infantry map reading handbook
DESCRIPTION
The best way of reading map is to use book to learn how to use terrain.TRANSCRIPT

7/17/2019 Infantry Map Reading Handbook
http://slidepdf.com/reader/full/infantry-map-reading-handbook 1/36
INFANTRY
BASIC MAP READING
HANDBOOK
Every Infantry soldier must understand and be able to apply the
principles of basic navigation. Recent conflicts in diverse theatres have
emphasised the importance of Map Reading as a core skill to the Infantry.
This handbook has been designed as an aide to revision and will
complement any instruction you have received to date. We must ensure
that practical Map Reading is common place to all soldiers across the
Infantry. I commend the Infantry Map Reading Handbook to you, and urgeyou to use it in order to sharpen the interest and knowledge in this vital
subject.
DIRECTOR OF INFANTRY
1
INDEX

7/17/2019 Infantry Map Reading Handbook
http://slidepdf.com/reader/full/infantry-map-reading-handbook 2/36
MAP READING AND LAND NAVIGATION
SECTION 1: MAPS AND INFORMATION1. MAPS AND THE GRID SYSTEM
2. GRID REFERENCES
3. SCALE
SECTION 2: HOW THE GROUND IS SHOWN ON A MAP4. ESTIMATING & MEASURING DISTANCES
5. HOW RELIEF IS SHOWN
6. THE SHAPE OF THE GROUND
SECTION 3: NAVIGATING EQUIPMENT AND SKILLS7. THE RA PROTRACTOR
8. ROMERS9. BEARINGS
10. SILVA LIGHTWEIGHT COMPASS
11. USING A LIGHTWEIGHT COMPASS
12. PRISMATIC COMPASS
13. DIRECTION WITHOUT A COMPASS
SECTION 4: WHERE AM I ON THE MAP?14. USING FEATURES TO SET A MAP AND FIND LOCATION
15. USING A COMPASS TO SET A MAP AND FIND LOCATION
16. THE GLOBAL POSITIONING SYSTEM
SECTION 5: ROUTE SELECTION17. PLANNING FACTORS FOR ROUTE SELECTION
18. LAND NAVIGATION ON FOOT ‘PACING’
19. PLANNING FACTORS
20. ROUTE CARDS
SECTION 6: FOLLOWING A ROUTE21. ROUTE FOLLOWING SKILLS
22. FOLLOWING A PLANNED ROUTE CHECKLIST
23. ROUTE FOLLOWING IN RESTRICTED VISIBILITY
24. WHAT TO DO IF ARE YOU LOST
SECTION 7: SUMMARY25. CONTINUATION TRAINING
26. EXAMPLE OF MAP READING TEST
27. CONVENTIONAL MAP SYMBOLS
SO3 TDT, HQ Inf
Mil Tel: 94381 2720
2

7/17/2019 Infantry Map Reading Handbook
http://slidepdf.com/reader/full/infantry-map-reading-handbook 3/36
SECTION 1: MAPS AND INFORMATION
MAPS AND THE GRID SYSTEM
The grid system on a map is based on lines of latitude and longitude, which are a series of
lines superimposed onto a map of the world. Lines of latitude are a series of concentric
rings, spreading north and south of the equator (see Fig 1). Lines of longitude run northand south intersecting at the geographic poles and measure the distance in mils or degrees
east and west from the meridian line which runs through Greenwich, London (see Fig 2).
The grid created by the lines of latitude and longitude allow us to determine an exact point
using the lines as co-ordinates, this is known as the grid system.
GRID REFERENCES
The UK National Grid system provides a means of giving a unique reference to any point
in the country. To read a grid reference always read first from left to right (eastings), then
bottom to top (northings) of your map.
"YOU GO ALONG THE PASSAGE AND UP THE STAIRS"
In other words....
eastings before northings.
The grid system is superimposed
on all maps, the only thing that
will differ is the scale of the map.
3
INDEX

7/17/2019 Infantry Map Reading Handbook
http://slidepdf.com/reader/full/infantry-map-reading-handbook 4/36
This is an example of a 4
figure grid reference.
On a normal 1:50000 map
each grid square is 1km in
width and length and so
can be divided into ten
100m intervals within the
square to give a more
accurate position.
Look at this example.
4
GRID
332
613
INDEX

7/17/2019 Infantry Map Reading Handbook
http://slidepdf.com/reader/full/infantry-map-reading-handbook 5/36
5
SECTION 1: MAPS AND INFORMATION
SCALE
Scale Explanation
As a navigator you must be able to understand and use map scales successfully to relate
distances on the map to distances on the ground..
For example;
A football pitch is 4 centimetres long on the map, but the football pitch is 100 metres long
on the ground. In other words 4 cm = 100 m on the ground.
We need to express this
statement as a ratio.
Change the ground distance
into centimetres
There are 100 cm in a metre.
(4 cm / 10,000 cm)
(on map / on ground)
However, a ratio always
relates to 1 so, in this case
divide each side by 4 (1 cm /2,500 cm).
Therefore 1 cm on the map = 2,500 cm on the ground. Which as a ratio is 1:2 500.
Map Scale
The map scale is usually located on the base of the map, this is a normal 1:50000 map
scale. It will give details in Kilometres, Statute Miles and Nautical Miles.
The scale of the map is
important, it will indicate
which Romer to use when
plotting grid bearings or the
distance between check-
points if you are measuring
distance.
INDEX

7/17/2019 Infantry Map Reading Handbook
http://slidepdf.com/reader/full/infantry-map-reading-handbook 6/36
6
SECTION 2: HOW THE GROUND IS SHOWN ON A MAP
ESTIMATING AND
MEASURING DISTANCES
Estimate distances by using the grid lines, all maps are gridded and scaled. With thisinformation estimating and measuring distances can be achieved in several ways.
Measurement Straight-line/Cross Country
Using the side of a lightweight
Compass, Romer or Protractor
which all have scaled rulers allows
simple straight-line distances to be
measured.
Grid squares are:
1 kilometre apart and approximately
1.5 kilometres across the grid square.
Look at the example; a straight-line distance is measured by a piece of card and the
distance between the two grids is marked off on the side of the card. Then the card is
measured using the map scale to give the straight-line distance.
Measurement Roads/Tracks
Place the straight side of a piece of
paper on the route to be measured
and mark off the distance travelled.
The side of the paper marked off
could be measured against the scale
of the map to produce an accuratedistance.
Examples of a straight-line
measurement between two points
on the map and measuring the
recorded distance against the scale
on the map.
INDEX

7/17/2019 Infantry Map Reading Handbook
http://slidepdf.com/reader/full/infantry-map-reading-handbook 7/36
Another example of
measuring a linear feature
(road) using a straight line,
this allows measurement of
bends and curves.
Marking off the distances
along the road onto thepiece of paper allows a
complete measurement of
the full length of the road.
SECTION 2: HOW THE GROUND IS SHOWN ON A MAP
HOW RELIEF IS SHOWN
Contours
These are lines drawn on a map connecting points of the same height above mean sea
level. The difference in height between two adjacent contours is called the contour
interval. The contour interval varies with different scale maps. Contour values always read
'uphill' see below.
Contours allow you to:
1. Calculate heights.
2. See the steepness of
the ground.
3. Picture the shape of
the ground.
7
INDEX

7/17/2019 Infantry Map Reading Handbook
http://slidepdf.com/reader/full/infantry-map-reading-handbook 8/36
Look below at the three diagrams, with the use of contour lines it enables us to use a two-
dimensional image to get three-dimensional information. The first picture shows how wide
the feature is, the second shows how high it is, the bottom picture, shows what the
contours would look like if this feature was on your map.
8
INDEX
7/17/2019 Infantry Map Reading Handbook
http://slidepdf.com/reader/full/infantry-map-reading-handbook 9/36
9
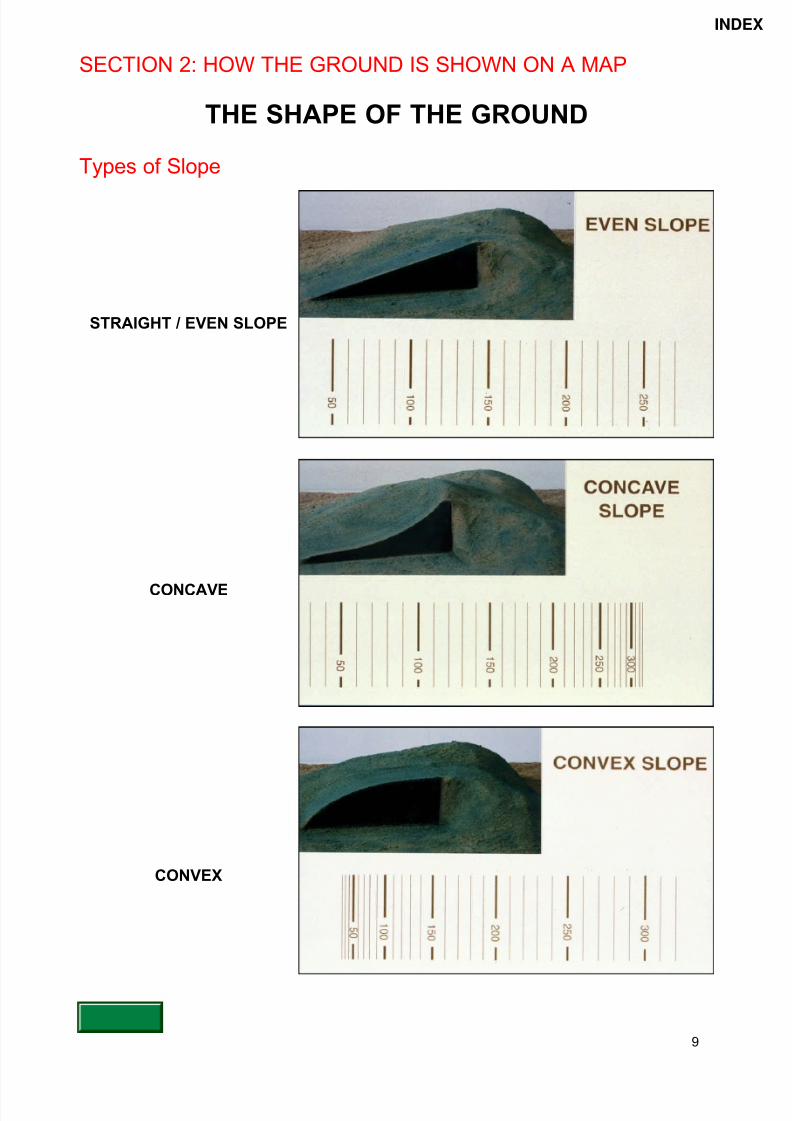
SECTION 2: HOW THE GROUND IS SHOWN ON A MAP
THE SHAPE OF THE GROUND
Types of Slope
STRAIGHT / EVEN SLOPE
CONCAVE
CONVEX
INDEX

7/17/2019 Infantry Map Reading Handbook
http://slidepdf.com/reader/full/infantry-map-reading-handbook 10/36
10
COMBINATION
The closer together the
contours, the steeper the
slope.
Types of Landforms (features)
There are many types of features, listed below are some of the most common types. Learn
to recognise them on the ground and on the map. A soldier should be able to recognise
the following landforms on a map and on the ground, and know their significance to
navigation: hills, valleys, escarpment, spur, re-entrant, saddle. Look below at the different
types of landforms and compare the shape of the feature and the contour lines.
V SHAPED VALLEY
U SHAPED VALLEY
INDEX

7/17/2019 Infantry Map Reading Handbook
http://slidepdf.com/reader/full/infantry-map-reading-handbook 11/36
11
RE-ENTRANT
SADDLE
RIDGE
SPUR
INDEX

7/17/2019 Infantry Map Reading Handbook
http://slidepdf.com/reader/full/infantry-map-reading-handbook 12/36
12
SECTION 3: NAVIGATING EQUIPMENT AND SKILLS
THE RA PROTRACTOR
Protractors are available in various sizes, semicircular or circular, usually made of
transparent plastic and graduated either in mils or degrees. The scales available are in milsand degrees. The Infantry only use mils in navigation.
Using the RA protractor.
1. The protractor shouldalways be used whenplotting grids and bearings.
2. Always check the scaleof the map and scale ofthe romer when plotting
grids.3. Tape up the yard scaleromer to avoid mistakes.
4. Use a line of fine cordfrom the centre pointwhen plotting bearings, a
plumb line.
5. Place the protractor over the map and align the northings and eastings with the zerolines and romer grids.
This is the issued protractor, the metres scale romers are on the left side, these are the
romers that you should use.
Metric Romers on the RA Protractor
Plotting a grid using the 1:50000 scale romer on the RA Protractor.
EXAMPLE A GR 628044 EXAMPLE B GR 627043
INDEX

7/17/2019 Infantry Map Reading Handbook
http://slidepdf.com/reader/full/infantry-map-reading-handbook 13/36
13
Plotting Bearings
Ensure the map is on a flat surface, align the base line with the vertical lines on the map,
the 0 should be in line with Grid North. All vertical and horizontal lines should be aligned
with those on the map, overlay the centre point over your location on the map (trig point).
Then draw a line or use a plumb line to draw a line from your location (trig point) to your
target (church with tower). Where the line crosses the outer scale it indicates the Grid
Bearing from your position (trig point) to your target (church with tower). The outer scale isused when plotting bearings East and inner scale for bearings West.
What is the Grid Bearing from the Trig Point to the Church?
Answer = 1300mils
To plot a backbearing from the church, turn the protractor to the left with the centre point
over the church. Read of the inner scale and plot a bearing of 4500 mils back to the trig
point.
Choose two points on a map and practice this procedure.
INDEX

7/17/2019 Infantry Map Reading Handbook
http://slidepdf.com/reader/full/infantry-map-reading-handbook 14/36
14
SECTION 3: NAVIGATING EQUIPMENT AND SKILLS
ROMERS
These provide a means of identifying the last digits of a grid reference. They are found on
the side of Silva compasses and on the inside face of protractors. Romers should not be
used to estimate an extra digit for a grid reference because the map is not designed to yield
the accuracy that the extra digits would imply.
Accuracy
This is the limit of accuracy you should expect from your romers:
1:25000 - 8 Figure grid reference is accurate to 10m.
1:50000 - 6 Figure grid reference is accurate to 100m.
EXAMPLE 1
GR 67851385 Church with tower.
GR 67551347 Trig Point.
GR 67151335 Church with spire.
EXAMPLE 2
GR 55300173 Church with spire.
GR 54900135 Trig Point.
GR 53820185 Radio Mast.
GR 53400130 Spot Height.
INDEX

7/17/2019 Infantry Map Reading Handbook
http://slidepdf.com/reader/full/infantry-map-reading-handbook 15/36
How to obtain a Grid Reference using a Romer on a Silva
Lightweight Compass
Ensure that the base mark of the romer (corner of the compass) is positioned on the map
and it overlays the centre of the target. Align the romer so that the vertical and horizontal
lines of the romer match that of the map, this will increase the accuracy of your grids.
REMEMBER; EASTINGS THEN NORTHINGS!
Look at the example above; note accuracy can be guaranteed to within 100 metres. An
8-fig grid reference can be obtained by dividing the grid into tenths, however this is not
guaranteed to be 100% accurate.
To improve accuracy when plotting grids a Romer will be a useful too l.
1348
6785
6754
6715
15
INDEX

7/17/2019 Infantry Map Reading Handbook
http://slidepdf.com/reader/full/infantry-map-reading-handbook 16/36
SECTION 3: NAVIGATING EQUIPMENT AND SKILLS
BEARINGS
You can give directions as:
The points of the compass, north, north-east, etc.Using the Mils system.
Which way is North? There are three norths.
Magnetic North. The compass needle always points to Magnetic North.
Grid North. The grid on a map is aligned to Grid North at the top of the map sheet.
True North. This is the actual direction to the North Pole.
Land navigators are only concerned with Magnetic and Grid North.
The difference between Magnetic and Grid North is called Magnetic Variation (MV) or the
Grid Magnetic Angle (GMA). This can always be found on the margin of your map with a
small diagram to assist you working out the magnetic variation.
To convert a magnetic bearing to a grid bearing, subtract the Magnetic Variation.
To convert a grid bearing to a magnetic bearing add the magnetic variation.
Remember:
This is an example of the grid magnetic variation which is
displayed on the margin of the map sheet. The magnetic
angle in 1998 is 70 mils. The year is now 2003 and theannual change is 2 mils East. This means that each year
the magnetic variation decreases by 2 mils.
Look at this example:
Change in angle from 1998 to 2003 = 5 x annual change
= 5 x 2 mils
= 10 mils East
The grid magnetic variation in 2003 = 60 mils
MAG TO GRID
GET RIDGRID TO MAG
ADD
16
INDEX

7/17/2019 Infantry Map Reading Handbook
http://slidepdf.com/reader/full/infantry-map-reading-handbook 17/36
17
SECTION 3: NAVIGATING EQUIPMENT AND SKILLS
SILVA LIGHTWEIGHT COMPASS
The compass is mounted on rectangular
clear plastic plate about 12.5 cm by 6 cm.
The compass body is cylindrical, liquid
filled and supports the compass needle on
a central pivot; it is graduated with an
outer circular scale at 50 mils interval and
inner scale at 2 degree intervals; a set of
four lines with an arrow is engraved
parallel to the zero axis of the circular
scales. The base is engraved with the
direction of travel arrow corresponding to
the lubber line of the compass. It also
incorporates a magnifying lens a shortscale of inches, a scale of millimetres and
Romers for 1: 25000,and 1: 50000 and
1: 63 360 scales.
Using the Silva Lightweight Compass
To take a grid bearing align the compass on the map, ensuring it is on a flat surface away
from Metallic (ferrous) objects such as weapons or vehicles. Place the compass with the
long side along the line of travel, in this case from the OP to the Church, then rotate the
compass dial so that the North Arrow and Parallel setting lines are parallel with theeastings. Where the line of travel cuts the compass dial is where the bearing can be
obtained. In our example this is 13 on the scale ring = a bearing of 1300mils.
INDEX

7/17/2019 Infantry Map Reading Handbook
http://slidepdf.com/reader/full/infantry-map-reading-handbook 18/36
18
BEFORE ATTEMPTING TO USE THIS BEARING IT MUST BECONVERTED FROM A GRID TO A MAGNETIC BEARING USING THEMAGNETIC VARIATION
To march to the target (church), set 1300mils as your bearing by turning the compass dial
to read 13 (1300mils), keep the compass needle on the magnetic north and follow the
direction line of the compass. This will allow you to move cross-country or in restricted
visibility on your required bearing.
Finding North
Set your compass to North;
rotate the compass body until
the compass needle points to
the "N" of magnetic North.
Once the compass needle
and direction line are aligned
the direction line will point to
Magnetic North. To find Grid
North subtract the magnetic
variation.
The Eastings are aligned with
the direction arrow of the
compass and when the map
and compass are rotated left
the compass needle will sit
between the two luminous
dots. This indicates the map
and compass are aligned to
the general direction of North.
NOTE THE COMPASS BODY
IS ALIGNED TO GRID NORTH,
HOWEVER THE COMPASS
NEEDLE IS NOT BETWEEN
THE TWO LUMINOUS DOTS
COMPASS BODY IS
ALIGNED AND THE
NEEDLE IS BETWEEN
TWO LUMINOUS DOTS
RED DIRECTIONLINE POINTS
TOWARDS NORTH
MAGNETIC NEEDLE MUST
LAY BETWEEN THE TWO
LUMINOUS DOTS.
THIS WILL KEEP THE
NEEDLE POINTING TO
MAGNETIC NORTH.
INDEX

7/17/2019 Infantry Map Reading Handbook
http://slidepdf.com/reader/full/infantry-map-reading-handbook 19/36
19
SECTION 3: NAVIGATING EQUIPMENT AND SKILLS
USING A SILVA LIGHTWEIGHT COMPASS
The compass needle always points to Magnetic North. Never stand near metal when using
a compass and always double check the bearing before setting off.
To take a bearing:1. Point the compass at the feature.
2. Turn the capsule until the north arrow is on top of the red hatched arrow.
3. Read off the bearing.
To plot a bearing:1. Convert the magnetic
bearing to a grid bearing.
2. Set the grid bearing on thecompass.
3. Place the edge of the
compass on your position
on the map.
4. Rotate the whole compass
until the lines in the
capsule are parallel with
the grid lines on the map.
5. Draw a line along the edge
of the compass and extendit to the church.
To plot a back bearing:
Having taken a magnetic bearing to a known position it is possible that you have got to
convert that bearing back, to your unknown location. This is called, plotting a back bearing.
If the bearing that you plot is less than 3200 mils then add 3200 from the original bearing.
Here is an example:
Bearing from your Location to Church with tower = 1300mils
As this is less than 3200, then add 3200 which gives you = 4500mils
The bearing from the church to your location is 4500mils. This is called a Back Bearing.
If the original bearing is greater than 3200mils then simply subtract 3200. This will give you
the back bearing. This can now be converted to a grid bearing and plotted on a map.
THIS BASIC PROCEDURE CAN BE PRACTICED ALMOST ANYWHERE. GO AND
PRACTICE IT TODAY, AND YOU WILL HAVE THE CONFIDENCE TO KNOW THAT YOU
WILL NEVER BE LOST.
COMPASS
BEARING
1300 mils
RED DIRECTION
ARROW POINTS
TOWARDS CHURCH
CHURCH
WITH TOWER
YOUR
LOCATION
RED NORTH IS
ALIGNED WITH
THE EASTINGS
INDEX
7/17/2019 Infantry Map Reading Handbook
http://slidepdf.com/reader/full/infantry-map-reading-handbook 20/36
20
SECTION 3: NAVIGATING EQUIPMENT AND SKILLS
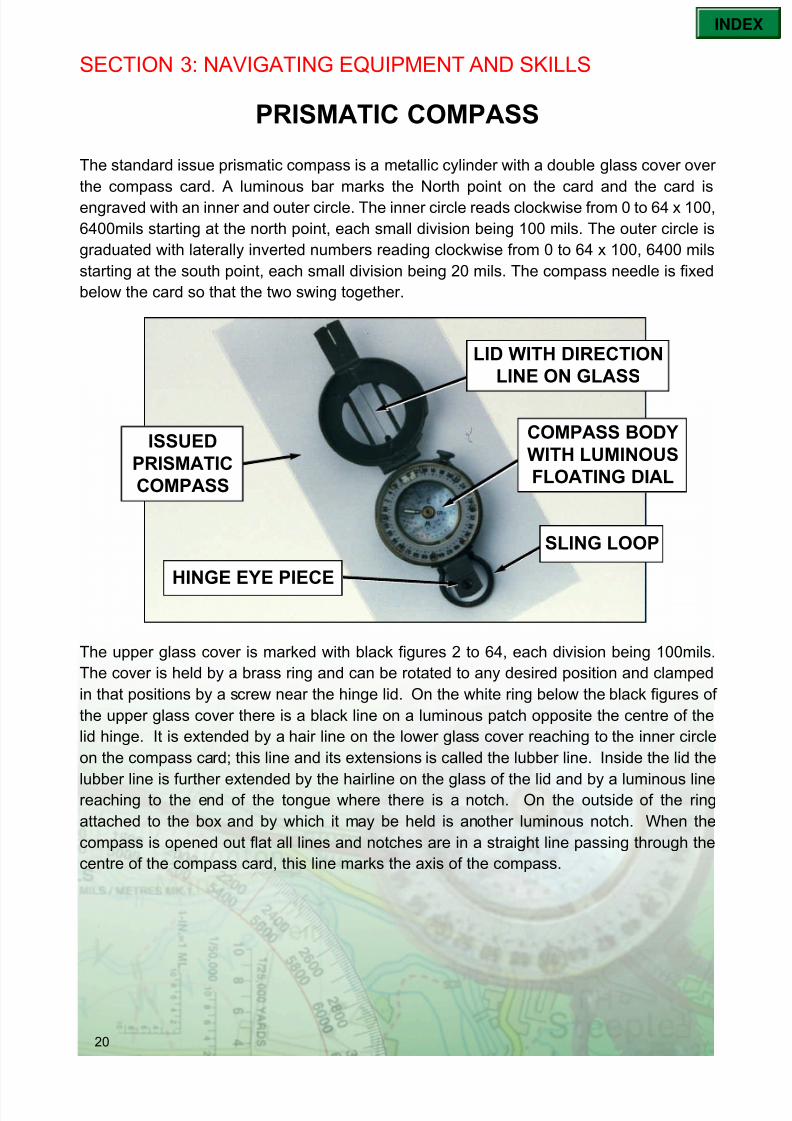
PRISMATIC COMPASS
The standard issue prismatic compass is a metallic cylinder with a double glass cover over
the compass card. A luminous bar marks the North point on the card and the card is
engraved with an inner and outer circle. The inner circle reads clockwise from 0 to 64 x 100,
6400mils starting at the north point, each small division being 100 mils. The outer circle is
graduated with laterally inverted numbers reading clockwise from 0 to 64 x 100, 6400 mils
starting at the south point, each small division being 20 mils. The compass needle is fixed
below the card so that the two swing together.
The upper glass cover is marked with black figures 2 to 64, each division being 100mils.
The cover is held by a brass ring and can be rotated to any desired position and clamped
in that positions by a screw near the hinge lid. On the white ring below the black figures of
the upper glass cover there is a black line on a luminous patch opposite the centre of the
lid hinge. It is extended by a hair line on the lower glass cover reaching to the inner circle
on the compass card; this line and its extensions is called the lubber line. Inside the lid the
lubber line is further extended by the hairline on the glass of the lid and by a luminous linereaching to the end of the tongue where there is a notch. On the outside of the ring
attached to the box and by which it may be held is another luminous notch. When the
compass is opened out flat all lines and notches are in a straight line passing through the
centre of the compass card, this line marks the axis of the compass.
SLING LOOP
HINGE EYE PIECE
LID WITH DIRECTION
LINE ON GLASS
COMPASS BODY
WITH LUMINOUS
FLOATING DIAL
ISSUED
PRISMATIC
COMPASS
INDEX

7/17/2019 Infantry Map Reading Handbook
http://slidepdf.com/reader/full/infantry-map-reading-handbook 21/36
21
Taking a bearing.
To take a bearing look through the sighting slit on
top of the prism and line up the
hairline on the lid with the object to which the
bearing is to be taken. At the same time observe
through the eyepiece the reading on the card.
When the card comes to rest, read the bearingagainst the hairline. A bearing to the nearest
20 mils can be read without difficulty; with practice
readings to within 10 mils could be expected.
Readings increase from right to left as seen
through the prism.
What are the magnetic compass bearings for A,B,C,D?
ANSWERS
A = 5800mils, B = 3720mils, C = 1660mils, D = 2880mils.
Individual Compass Error
This is not an excuse for poor navigation; every compass has a certain individual error and may
not point exactly to Magnetic North. Prismatic compasses have an accepted tolerance of
14 mils either way. All compasses should be checked against a known bearing or another
compass before it is used.
INDEX

7/17/2019 Infantry Map Reading Handbook
http://slidepdf.com/reader/full/infantry-map-reading-handbook 22/36
SECTION 3: NAVIGATING EQUIPMENT AND SKILLS
DIRECTION WITHOUT A COMPASS
Finding True North
Sun. The sun rises in the East, is
due South at midday in winter
(1 o'clock in summer) and sets in
the West. An extended hand-span
covers roughly 15 degrees or one
hour of sun movement. If you can
locate the direction of the sun
then using this method you will
know the approximate direction of
North.
North Stars. In the Northern Hemisphere you
can locate North by using the stars Ursa Major
(The Great Bear or Plough) will lead you to
Polaris (North Star) which is always North.
Look left at the diagram, Polaris is central to
the diagram, The Great Bear is very
prominent on a clear night, when located
extend an imaginary line from the end
"pointers" and this should enable you to locate
the pole star.
Watch Method. A watch cangive you an approximate
North-South line. Lay the
watch flat with the hour hand
pointing to the sun, or along
the shadow of a pencil or
similar object. In the Northern
Hemisphere, true south will
then be midway between the
hour hand and twelve o'clock
on the watch. In the SouthernHemisphere lay the watch with twelve o'clock pointing to the sun; true north then lies
midway between the hour hand and twelve o'clock.
22
INDEX

7/17/2019 Infantry Map Reading Handbook
http://slidepdf.com/reader/full/infantry-map-reading-handbook 23/36
SECTION 4: WHERE AM I ON THE MAP?
USING FEATURES TO SET A MAP
AND FIND LOCATION
Setting or orientating the map means turning the map until all the symbols on the map arein the same direction as the ground features is from the observer's location. A handy
mnemonic that you can use to remember how to do this is:
D The direction of features must always coincide
D The distance to a feature will help to identify it on the map
C Conventional symbols on the map to the features on the ground
R Relief may be the only recognisable feature in wild country
A The linear features will assist in confirming direction and identification
P A pattern is recognisable
P The proximity of features to each other will help to identify it on the map
S The shape of a feature will help to identify it on the map
Using the map, observe the ground and orientate yourself using visible land marks or
reference points.
23
INDEX

7/17/2019 Infantry Map Reading Handbook
http://slidepdf.com/reader/full/infantry-map-reading-handbook 24/36
SECTION 4: WHERE AM I ON THE MAP?
USING A COMPASS TO SET A MAPAND FIND LOCATION
To set a map using a compass:1. Hold the map horizontally in front of you and place the compass on it with the
lubber lines parallel with the eastings.
2. Turn your body until the compass needle is parallel with the North-South grid lines.
3. Look up and relate the symbols on the map to the features on the ground.
Note that the Magnetic Variation is too small to consider when setting the map.
To find your location on a line feature:
1. Identify a ground feature that you can pinpoint on the map.
2. Take a magnetic bearing to it with your compass.
3. Change the magnetic bearing to a back bearing as previously described.
Then plot it as a grid bearing onto your map.
4. Your position is where the compass edge, or a line extended from it crosses the
line symbol. This method can be applied to any line feature such as a stream,
track or edge of a wood
To find your position when not on a line feature, repeat the previous procedure for at least
two, but ideally, three points. Your position is within the area where the lines intersect,
i.e. a resection.
Intersection is applying a bearing from yours and known positions to an unknown object.Resection is applying a bearing from known positions to your unknown position.
PRACTICE MAKES PERFECT.
SECTION 4: WHERE AM I ON THE MAP?
THE GLOBAL POSITIONING SYSTEM
What is a Global Positioning System?
Global positioning systems (GPS) will give position to within 100 metres and altitude above
mean sea level for 95% of the time. Thick cloud cover or a jungle canopy can block the sig-
nal required by the GPS and render it useless. DON'T RELY ON THE GPS ALONE.
Before setting out ensure that you have been trained in the use of the system that
you are using and you have studied the user handbook. Not all systems have the
same menu options or capabilities.
Check the batteries and carry spares.
Before starting your route enter your initial position
24
INDEX

7/17/2019 Infantry Map Reading Handbook
http://slidepdf.com/reader/full/infantry-map-reading-handbook 25/36
To set the map using the GPS:
1. Place the map horizontally with the GPS on it, ensuring it is aligned with the
North-South grid lines.
2. Switch on the GPS and allow a few minutes to obtain a satellite 'fix' in Latitude
and Longitude
3. Turn your map until the North South grid lines match the GPS North arrow.
4. Look up and relate the symbols on the map to the features on the ground.
5. Convert the reading to a grid reference and note.
Note that magnetic variation is too small to consider when setting the map.
Remember: GPS is an aid to land navigation, it should not be regarded as a short cut to
accurate navigation.
SECTION 5: ROUTE SELECTION
PLANNING FACTORS FOR
ROUTE SELECTION
Factors Affecting Distance
Natural Obstacles Can the team physically cope with crossing any obstacles; this
could include rivers, lakes, cliffs or deserts. Natural obstacles
may force a detour.
Restricted Access There are man-made restrictions on access, this could be
Private Land, Out Of Bounds (minefield) or even Enemy Held
Ground.
Seasonal Access Even though there is a Right of Way, access may be restricted
at certain times of year. Will the weather close in during winter
or is there a possibility of avalanche or flooding?
Factors Affecting Time
Health/Fitness Your personal fitness will directly affect how fast and how far you
can safely walk. Always consider the weakest team member or
individuals that are injured.
Experience Are the team experienced enough to cover the distance or
capable of navigating the route in the climatic conditions.
Terrain Different terrain will allow progress at different rates. Can you
cope with the terrain? Have you got the correct clothing and
equipment for the terrain such as ropes or ice axes?
Going The condition of the ground, or the 'going', is a key factor in the
speed that you can walk across wild country. Will you cover the
route in the planned time frame?
Equipment The weights that people carry will determine the speed that the
terrain is covered.
25
INDEX

7/17/2019 Infantry Map Reading Handbook
http://slidepdf.com/reader/full/infantry-map-reading-handbook 26/36
26
SECTION 5: ROUTE SELECTION
LAND NAVIGATION ON FOOT ‘PACING’
The compass provides the means of maintaining direction, and distances travelled are
estimated by any of the following methods:
Speed and Elapsed Time.
The method is suitable for moves over relatively open or otherwise easy terrain. If
movement is on foot and v is the estimated speed over an elapsed time t , the distance
travelled, d is given at once by d = v x t
Example, if the average speed of 3.5 kph was maintained over six hours then;
Distance travelled = 3.5 x 6
= 21 Kms
Pacing.
Counting paces is a relatively more accurate method of measuring distances travelled
provided that the pacer has calibrated his step relative to the terrain and that the terrain is
firm and even. This is a basic guide to marching and pacing.
Remember the number of paces will increase if you are travelling up or down hill. Pacing is
very effective in close country such as the jungle.
INDEX

7/17/2019 Infantry Map Reading Handbook
http://slidepdf.com/reader/full/infantry-map-reading-handbook 27/36
27
SECTION 5: ROUTE SELECTION
PLANNING FACTORS
General
Information Always plan a route on a map before you start, use all available up todate information. This includes local knowledge as well as tactical
intelligence such as old patrol reports and even weather reports.
Factors Consider all the factors when selecting a route, time, distance,
altitude, equipment, food, water, radio ranges and enemy activity.
Distance Break it down into legs that can be managed easily with checkpoints.
With practice you will know if the steep but direct route or the long but
gentle route is best for you.
Legs A leg should be on the same path or bearing and end at a checkpoint
ideally a reference point.
Checkpoints These should be permanent, easily identifiable and capable of
confirmation on the ground both day and night.
Foul Weather In wild country, also plan alternative and escape routes for use in
foul weather. If the weather closes in or you have a casualty you must
have a plan to extract them to a RV for extraction.
Command When a route has been selected and approved do not deviate from
the route unless essential for safety reasons. If you do change routes
then inform someone by whatever means. Any rescue or casualty
extraction will be worked out using your planned route.
INDEX

7/17/2019 Infantry Map Reading Handbook
http://slidepdf.com/reader/full/infantry-map-reading-handbook 28/36
28
SECTION 5: ROUTE SELECTION
ROUTE CARDS
A route card is a document containing the key details of your intended route. For a simple
lowland route by day, marking your route on a map may suffice. When walking in wild
country it is necessary to produce a proper route card for each day of a route.
The Benefits of Making a Route Card are:1. It concentrates your mind on the route and aids sensible planning.
2. It is a safety requirement that you leave your intentions with somebody.
3. It acts as a log and provides useful data during and after the journey.
4. Tactically it allows other patrols to know your location and duration of your patrol.
Developing a Route Card.
Calculate legs using reference
points and calculate the
distances in between.
Calculate bearing from leg to leg,
both grid and magnetic bearings.
Estimate time to travel the route
considering terrain, distance and
prevailing weather.
INDEX

7/17/2019 Infantry Map Reading Handbook
http://slidepdf.com/reader/full/infantry-map-reading-handbook 29/36
SECTION 6: FOLLOWING A ROUTE
ROUTE FOLLOWING SKILLS
To march efficiently you need to:
1. Be constantly aware of your surroundings.
2. Continually relate map to ground to know your position on the map.
3. Know how to estimate distances by eye.
4. Know how to calculate distances travelled and still to be marched.
5. Develop a "Sense of Direction".
6. Competently use a compass to march on a bearing, check position and direction.
7. Trust your compass.
Estimating speed and distance travelled.
Using this formula allows you to calculate an approximate time it would take to move across
country uphill carrying a load.
FOLLOWING A PLANNED ROUTE CHECKLIST
Here is a checklist to use at the start of each leg
l Set / orientate map
l Locate position on map
l Read route card
l Identify route on map
l Identify start direction on groundl Note direction of travel
l Set the compass
l Pick markers
l Bound ground
l Note start time on route card
l Estimate checkpoint ETA
l Is everyone OK?
l Left any equipment?
l Always nominate a check navigator where possible and confirm direction and location.
29
5 kph plus 1 minute
per contour climbed
4 kph plus 1½ minutes
per contour climbed
INDEX

7/17/2019 Infantry Map Reading Handbook
http://slidepdf.com/reader/full/infantry-map-reading-handbook 30/36
SECTION 6: FOLLOWING A ROUTE
ROUTE FOLLOWING IN RESTRICTED VISIBILITY
Practice and experience will give you confidence when travelling in restricted visibility.
Before entering restricted visibility:1. Think: "Do I need to enter?"
2. Confirm location and take bearings whilst you still can.
3. Move to a safer route if possible (but be aware of time and distance changes).
4. Have the confidence to follow your compass.
5. Carefully monitor distance and direction travelled.
6. Increase awareness and precision of route following.
7. Remember: mountains make their own weather.
8. At night retain your night vision and make full use of any lights and the stars for direction.
9. The leading marker method may help when walking on a bearing in very restricted
visibility. This is for extreme weather conditions where you rope each other together and
the lead man is guided by the navigator on a set bearing. Send a soldier out to the limit
of visibility and aligned with the compass bearing. March to him and continue to repeat
this method. Don't forget to pace your route, as this will help you estimate your position.
WHAT TO DO IF YOU ARE LOST
At some point everyone will become navigationally challenged (lost). As a navigator you will
have an idea of where you are by simple navigational reference points. There will usuallybe a reference point not too far away, buildings, roads or natural feature such as hills or
rivers. There will be something around you to allow you to orientate yourself, use all
available assistance and equipment to help you.
Don't panic: Remember STOP! Note the time. Maintain morale and confidence.
Confirm that you are lost. If confirmed, ask yourself:
1. "How did I get lost? Wrong path, wrong valley? ...?"
2. "When was I last certain of my location?"
3. "What general direction have I been moving in?
4. "Where is the sun ...?"5. "How long have I been travelling since then?"
6. "How far could I have come?"
Scrutinise map and ground again. If still lost ...
Select the safest option from:
Retrace your steps.
Head on a bearing towards a 'known feature' such as one of your 'bounds'.
When you have moved to a safe reference point then re-plot your route and check your navigation as often as required.
Do not charge off or attempt to guess, you will often increase the error in your navigation
and make the situation worse.
30
INDEX

7/17/2019 Infantry Map Reading Handbook
http://slidepdf.com/reader/full/infantry-map-reading-handbook 31/36
SECTION 7: SUMMARY
CONTINUATION TRAINING
Military Map ReadingThe possibility of having to navigate over rough terrain in all weather conditions is part of life in the
Infantry. Theory lessons can be conducted by map reading instructors in barracks as part of anormal training programme. Map reading is a knowledge based skill that requires constant practice.
Most soldiers conduct map reading as part of a normal unit training programme. You can also helpyourself by using this handbook, visiting your local library and signing out map reading books as
well as going on the internet. A unit NAVEX by day or night is a great way to sharpen your skills.This is usually moving across a set piece of terrain or along a designated route carrying all personalfighting equipment. Every time you find yourself outdoors, whether going for a run, walk, or on
exercise, always carry and refer to your map. This will help avoid skill fade in this vital subject.
Adventure TrainingThe Army also recognises the importance of adventure training, in particular trekking, climbing andmountaineering as they all involve map reading. These are activities that promote map reading as askill and also practice navigating under testing conditions. All adventure training requires detailed
planning and resources. These activities must always be conducted by competent and qualifiedinstructors.
OrienteeringOrienteering is a sport that involves individuals or groups competing against each other by navigatinga set course using checkpoints, basic navigation and physical fitness. The sport combines navigation
and cross-country running. Both are demanding activities that will improve individuals map reading and
physical fitness. Most military training areas have permanent orienteering courses however a simplecourse takes a small amount of planning.
Permanent Orienteering Courses are established at the following garrison and camp areas;
Ballykinler Catterick Sennybridge Bulford Bramley
Borden Heath Deepcut RMAS Bruggen Merworth
Orienteering maps exist or are planned for the following garrison and camp areas;
ATR Winchester RMAS Catterick Upavon
Blandford Camp Shrivenham Lisburn Worthy Down
10 Top Tips for setting up an orienteering courseListed below is a checklist for a simple orienteering course planned at unit level. The course
selected must suit the standard of the soldiers. Start with a simple course, then progress to more
demanding routes, by day and night.
1. Authorised Training Area. (May have to be booked).
2. Maps of the area .( Small-scale maps are ideal 1: 25000 or less)
3. Silva compasses (one per man or group).
4. Recognisable check/control point markers (improvised will do)
5. Score card (improvised will do).
6. Safety is important so medical facilities must be considered.
7. Comprehensive safety brief for competitors and staff to include cut off times and what to do if injured.
8. Check weather conditions
9. Suitable clothing for rough ground and wet/cold weather.
10. Make it fun. Have a coy competition with a prize.
Details for local clubs and events and general information can be found at the following Websites;
Military: www.baoc.org.uk Civilian: www.britishorienteering.org.uk
31
INDEX

7/17/2019 Infantry Map Reading Handbook
http://slidepdf.com/reader/full/infantry-map-reading-handbook 32/36
32
SECTION 7: SUMMARY
EXAMPLE OF A MAP READING TEST
References:
A. Manual of Map Reading and Land Navigation.
B. Series M726 1:50,000 Scale UK maps.
All questions refer to map sheet
Serial
(a)Performance
(b)
Test Conditions
(c)Standards
(d)
1.
2.
3.
4.
What is the straight-line distance
from ………… to …………?
What is the indirect distance by
road/track from ………… to
…………?
Identify the conventional signs
marked on the map. (Clearly mark
the map.)
a. g.
b. h.
c. i.
d. j.
e. k.
f. l.
Give an 8 figure grid reference of
the conventional signs in question 3.
a. g.
b. h.
c. i.
d. j.
e. k.
f. l.
a. Written.
a. Written.
a. Written.
b. Without reference to the map
legend.
c. Given an M726 Map with 12
conventional signs.
a. Written.
b. Given a Romer.
a. 2 Points.
a. 2 Points.
a. Eight out of twelve to
be correct.
a. Eight out of twelve
grid references to an
accuracy of + 10 metres.
INDEX

7/17/2019 Infantry Map Reading Handbook
http://slidepdf.com/reader/full/infantry-map-reading-handbook 33/36
Serial
(a)Performance
(b)
Test Conditions
(c)Standards
(d)
5.
6.
7.
8.
9.
10.
Identify the relief features marked
on the map. (Clearly mark on themap.)
m. p.
n. q.
o. r.
What is the grid bearing from GR
………… to the GR …………?
If the grid bearing is …… mils andthe GMA is…… mils west, what is
the magnetic bearing?
If the magnetic bearing is …… mils
and the GMA is ……mils west, what
is the grid bearing?
What bearings would you set your
compass on if you were to march in
the following directions?
a. South
b. South Westc. North East
d. West
Your unit has 3 OP's the Grids are
as follows:
OP1 ________________
OP2 ________________
OP3 ________________
An enemy patrol is seen from the
above OP's on the following mag-
netic bearings.
OP1 ________________
OP2 ________________
OP3 ________________
Give a 6 figure Grid of the patrol.
a. Written.
a. Written.
b. Given a lightweight compass.
a. Written.
a. Written.
a. Written.
b. Given a lightweight compass.
a. Written.
b. Given a lightweight compass.
a. 6 Points.
a. 2 Points.
a. 2 Points.
a. 2 Points.
a. 4 Points.
a. 3 Points.
b. Accuracy to + 100m
33
INDEX

7/17/2019 Infantry Map Reading Handbook
http://slidepdf.com/reader/full/infantry-map-reading-handbook 34/36
34
Serial
(a)Performance
(b)
Test Conditions
(c)Standards
(d)
11.
12.
13.
14.
15.
You are unsure of your location, you
can see the following features and
take magnetic bearings to them.
Location and Grid Magnetic Bearing
a. ___________ ___________
b. ___________ ___________
c. ___________ ___________
Give a 6 figure Grid of your location.
Orient a Series M726 Map by
inspection, identify own location and
two other specified locations.
Demonstrate the ability to take a
magnetic bearing to a known
feature and apply it to the map as
a grid bearing.
Navigate a given route.
Navigate a given route by night.
a. Written.
b. Given a lightweight compass.
a. Outdoors by day in an area
away from barracks at a position
that overlooks the Countryside.
There must be three identifiable
features visible.
b. Given a Series M726 Map of
the local area and a lightweight
compass.c. Given position to within 4km
squared.
d. Time allowed 4 minutes.
e. Oral, practical.
a. Outdoors by day
b. Given a Series M726 Map of
the local area and a lightweight
compass.
c. Oral ,practical.
a. Outdoors by day.b. Individually on foot.
c. Along roads, paths, tracks
and cross-country for a distance
of not less than 5km.
d. Away from barracks.
e. Using a Series M726 map,
and lightweight compass.
f. Report to two control points.
g. Time allowed 1hr per 4 km
h. Correctly briefed on safety
and the country code.
a. Outdoors by night.b. In pairs, on foot.
c. Along roads, paths, tracks
and cross-country for a distance
not less than 5km.
d. Away from barracks.
e. Using a Series M726 map,
and a lightweight compass.
f. Report to two control points.
g. Time allowed 1 hr per 4km.
h. Correctly briefed on Safety
and the Country Code.
a. 3 Points.
b. Accuracy to + 100m
a. Must identify the 3
locations within the time.
b. Accuracy to + 100m
a. Set the grid bearing
onto the map using the
lightweight compass.
a. Complete the routewithout assistance.
b. If control points are
used then they must be
visited in the correct
order.
c. Within the given time
limit.
a. Complete the routewithout assistance.
b. If control points are
used then they must be
visited in the correct
order.
c. Within the given time
limit.
INDEX

7/17/2019 Infantry Map Reading Handbook
http://slidepdf.com/reader/full/infantry-map-reading-handbook 35/36
35
SECTION 7: SUMMARY
CONVENTIONAL MAP SYMBOLS
On maps various symbols will give you accurate information about the relief on the ground.
Trig points, spot heights, visible earthworks and cliff symbols provide relief information.There are several examples of conventional symbols below.
INDEX

7/17/2019 Infantry Map Reading Handbook
http://slidepdf.com/reader/full/infantry-map-reading-handbook 36/36
INDEX