inflammation - dual credit biology and biotechnology...
TRANSCRIPT

Copyright © Texas Education Agency 2011. All rights reserved.
DNA ExtractionEngaging Students and Industry Spotlight
Course Advanced Biotechnology
Unit DNA Structure and Function
Essential Question How can I extract DNAfrom a cell and why is it important in biotechnology?
TEKS130.364 1A,1C, 1G, 1H,2E, 2F, 2G, 2J,9A, 9B, 9C, 9F
TAKSObj 1 1A, 2A,2B, 2C, 2D
Prior StudentLearning An understanding of DNA structure and the use of micropipettes
Estimated time60 minutes-140 minutes(extension optional)
RationaleThe ability to extract and isolate DNA from cells and tissues has allowed for huge advances in biotechnology, including the ability to identify crime suspectsand the ability to sequence the entire human genome. With a small sample ofDNA you can test a newborn for many genetic diseases, analyze forensicevidence, or study genes involved in cancer. DNA extraction is also used in paternity cases. Modern genetics and genomics (the study of the entire DNA sequenceof an organism) is allowing scientists to understand how multiple genes contribute to disease or protect against carcinogens, identify genetic markers for diseases, tailor treatments to the genetic makeup of individuals (genomic medicine) and develop crops that tolerate drought or resist insects.
ObjectivesStudent will be able to:
• Isolate DNA from various types of cells.• Understand the roll of each step in the process of DNA extraction.• Understand science as a process.• Be able to identify sources of error, and propose areas
for improvement.• Be able to write a Standard Operating procedure
Engage
View: King Tut Unwrapped
View: The st o r y o f Ot z i t h e Ic e m an
1. Ask students why else would a technician want to sample and analyze DNA?
2. Where is DNA found?3. What is DNA?4. How does a technician isolate DNA?
Key Points• H o w to ex t r a c t DNA f r o m a n y t h i n g • F A Q a bo u t E x t r ac t i o n : T r o u b l e s h oot i n g
Activity1. Students complete pre lab activity on their own before coming to class
to perform the lab exercise OR complete it as a class.2. Students perform DNA Extraction of Wheat Germ*. This lab is straight
forward and always yields visible DNA. In future labs, students will be extracting DNA from other sources, including cheek cells, so this is a good introduction to the basic methods used.
3. See "Experiment Tricks of the Trade" for further information.4. Optional Extension*: Students create their own protocol for DNA
extraction after comparing to industry protocols. Students also perform several trials to determine the technique that yields the highest amount of DNA. Yield can be determined by weight, volume, or using a UV spectrophotometer.
*Adapted from Austin CC BioTechEd Project, Donald Bell, OCCC Project
Assessment
•Completion of pre-lab activity•Completion of "DNA Extraction of Wheat Germ" and post lab questions Successful Isolation of DNA•Extension Activity Rubric
Materials• Pre-Lab: DNA Extraction• DNA Extraction of Wheat Germ Handout• DNA Extraction Extension Handout• Extension Rubric• Experiment Tricks of the Trade
Accommodations for Learning Differences
National and State Education Standards
Texas Career and College Readiness StandardsI. Nature of Science: Scientific Ways of Learning and Thinking
A. Cognitive skills in science4. Rely on reproducible observations of empirical evidence when constructing, analyzing, andevaluating explanations of natural events and processes.
B. Scientific Inquiry1. Design and conduct scientific investigations in which hypotheses are formulated and tested.
C. Collaborative and safe working practices1. Collaborate on joint project2. Understand and apply safe procedures in the laboratory and filed including chemical, electrical and fire safety in safe handling of live or preserved organisms.3. Demonstrate skill in the safe use of a wide variety of apparatuses, equipment, techniques, and procedures.
D. Current Scientific Technology1. Demonstrate literacy in computer use.2. Use computer models, applications, and simulations.3. Demonstrate appropriate use of a wide variety of apparatuses, equipment, techniques, and procedures for collecting quantitative and qualitative data.
E. Effective communication of Scientific information1. Use several modes of expression to describe or characterize natural patterns and phenomena. These modes of expression include narrative, numerical, graphical, pictorial, symbolic, andkinesthetic.2. Use essential vocabulary of the discipline being studied.
III. Foundation Skills: Scientific Applications of CommunicationA. Scientific Writing
1. Use correct applications of writing practices in Scientific communication
B. Scientific Reading

2. Set up apparatuses, carry out procedures, and collect specific data from a given appropriate instructions.3. Recognize scientific vocabulary in the field of study and use this vocabulary to enhance clarity of communication.
C. Presentation of Scientific technical information1. Prepare and present scientific/technical information in
appropriate formats for various audiences.
Pre-Lab: DNA Extraction
Go to ht t p: / /l earn. geneti cs. ut ah. edu/ cont ent /l abs/ ext ract i on/
Answer the questions below using the Virtual Lab
1. Why would a scientist need to extract DNA from a cell? List 3 reasons:
2. Where is DNA found?
3. Where is the suspect's DNA sample taken from in the animation?
a. Why here?
4. List the materials you will need to perform DNA Extraction:
5. This solution is added to burst the cells open and means “to separate”:
6. The lysis solution contains two important ingredients:
a. Explain their function:
7. NaCl causes the proteins to
8. Why were two tubes added to the microcentrifuge?
9. After the first centrifugation, the is found is the supernatant while the
_ is found as a solid pellet at the bottom of the tube
10. To isolate the concentrated DNA is added. Because DNA is not soluble
in the solution, the DNA will
11. Following the second round of centrifugation, the is now found in the
pellet at the bottom of the tube.
You are now ready to perform your own DNA Extraction!

DNA Extraction of Wheat GermAdapted from Austin CC BioTechEd project; Donald Bell, OCCC project
A complete copy of DNA is found in every cell, except red blood cells in any organism. In order to release the DNA for analysis, scientists must break open the cells and remove structural proteins and enzymes that interfere with the DNAstructure. This simplified procedure releases a great deal of DNA so that you can see it. It allows observation of DNA’s physical and chemicalproperties. It does not, however, purify the sample enough for the strictstandards of a research or forensics lab.
You will have these materials to use:• Raw wheat germ (premeasured)• Non-iodized table salt (premeasured)• Dishwashing detergent (premeasured)• 6% papain solution (meat tenderizer) (premeasured)• 10 ml ice-cold ethanol in a test tube (keep it on ice)• Warm tap water (not boiling)• Ice• 2 small plastic cups• 1 plastic cup to hold ice• 1 small plastic cup for disposal of materials• 1 dropper (for stirrer and to dispense solution)
Laboratory1. In one of the small cups, mix about 50 ml of hot distilled water (or tap water) with the vial of dishwashing soap and salt. Stir easy to limit the bubbles. (Soap and salt are used to disrupt the cell walls and membranes to release the DNA. Heat also helps “lyse” the cells and speeds up the reaction. The salt will also help later to precipitate the DNA so that it becomes visible and can be separated.)
In the left column: Draw a strand of DNA, label its components and indicate where it is found in the cell. Why was hot water used?
[Pick the
Page
2. Place the raw wheat germ in the second small plastic cup. (Wheat germ is the embryo of a kernel of wheat – purchased at the grocery ,W is usually toasted which destroys the DNA VR LQVWHDG ZH XVH UDZ ZKHDW JHUP
In the left column: Draw and label the parts of the wheat germ that you learned about from the pre-lab. Why is the germ part used?
3. Add enough of the soap and salt solution to the wheat germ to fill it about1/3 full. The wheat germ will absorb the water and swell so you may need to add more soap solution so there is clear liquid on top for step 7. If youadd too much solution, the DNA will be diluted and you won’t see as muchin the last step.
In the left column: Draw how the soap and salt are acting on thecell membrane and/or DNA. Indicate which is the solvent and solute
4. Add the vial of meat tenderizer solution that contains the papain. (Meat tenderizers work by breaking down proteins to make the meat softer. There are proteins associated with DNA that will make it harder to spool and less likely to clump together and precipitate unless they are removed. Papain can also break down DNAase, an enzyme that breaks down DNA.)
In the left column: Draw what your solution looks like in the cup. Indicate where the DNA is located

Page
[Pick the
5. To give the soap and salt time to work, stir the solution slowly for 5 minutes using the blunt end of the pipette. Stirring helps the reactions but don’t stir too fast or you will get bubbles from the soap that traps the DNA.
6. Allow the solution to settle for about 2 minutes (or centrifuge for 30 seconds).
In the left column: Draw what the contents of your cup or tubelook like and indicate where the DNA and left over organelles are located
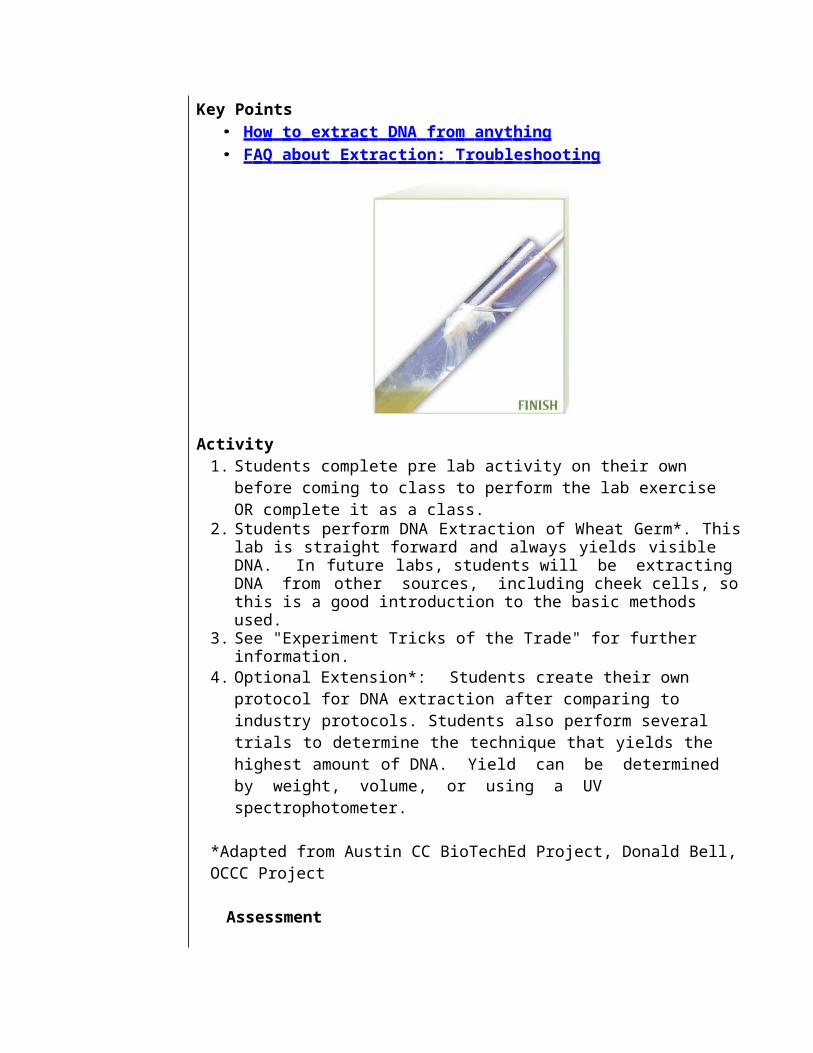
7. Use the pipette to withdraw 1 dropper full (about 1 ml) of the clearer fluid near the top of the solution.
8. Slowly add the fluid to the test tube containing 10 ml of ice-cold ethanol. DNA is soluble in water, but not in ethanol. The colder the ethanol, the less soluble the DNA is. The DNA may not appear immediately but will slowly appear over the course of about 3 minutes.
In the left column: Draw what you observe after addition of theethanol. Identify the substances
9. Use the pointed end of the pipette to try and spool the DNA. Stir the solution slowly and try to wrap the DNA around it enough that itwon’t slide off when you pull the pipette out of the solution out of the solution.
Page
[Pick the
Post Lab Questions/Analysis
1. We can’t really see a DNA molecule under the microscope unless it is tightly coiled into a chromosome. Why can you see the DNA after you put it into the ethanol?
2. If you were able to spool the DNA, you saw that it is stringy and has the consistency of thick syrup or mucus. Based on what you know about the molecule, why do you think it has this consistency?
3. Why can’t you use cooked food for your sample of DNA?
4. What part of the cell would the detergent work on?
5. Decide as a class how you will characterize your DNA:a. Dry DNA on paper towel and weigh to determine yield.
(It helps if they weigh the starting material first.)b. Record color of productc. Determine volume of the DNA obtainedd. Read O.D. 260 in a spectrophotometer and determine yield.
This method requires a spectrophotometer that measures ultraviolet light absorption and expensive quartz cuvettes thatallow UV light to pass through.
6. Record your characterization results here:
7. Observe other group results and list some ways you could increase your DNA yield based on speaking to other groups.

DNA Extraction Extension: An Industry PerspectiveAdapted from Austin CC BioTechEd project; Donald Bell, OCCC project
I. Comparison to an S.O.P. (Standard Operating Procedure)
1. Compare extraction protocol to at least one professional protocol such as the “Extraction of DNA from Mouse Tail”. Additional DNA extraction procedures can be found at company websites such as Stratagene ( www . s t r a t a g e n e . c o m) or Ambion ( www . a m b i o n . c o m). Using the keywords “DNA extraction techniques” on a search engine such as Google ( www . g o o g l e . c o m ) will bring up other protocols.
2. Have the students determine the differences between their lab and the professional protocol by completing the table below
Wheat Germ DNA Extraction Professional Protocol for In one of the small cups, mix about 50 ml of hot
distilled water (or tap water) with the vial of dishwashing soap and salt. Stir easy to limit the bubbles
Add enough of the soap and salt solution to the wheatgerm to fill it about 1/3 full.
the vial of meat tenderizer solution that contains thepapain
stir the solution slowly for 5 minutes using the bluntend of the pipette.
Allow the solution to settle for about 2 minutes
Slowly add the fluid to the test tube containing 10 mlof ice-cold ethanol. Use the pointed end of the pipette to try and spool the DNA

Page
II. Developing an S.O.P
The Problem: You are working at a company that makes DNA for sale to other scientists and research institutions. Since your company wants to stay in business, the DNA it sells must be of good quality and each extraction must give the highest possible yields. The basic protocol has been established for extracting DNA from wheat germ.
The Brainstorming Session: The lab supervisor (teacher) calls a meeting of all the biotechnicians to brainstorm ways to improve yield by modifying the protocol.
1. Write down biotechnicians suggestions for changing the protocol such as changing the amounts and brands of wheat germ, meat tenderizer, detergent and water, typeand temperature of water, and percent and temperature of ethanol. Other considerations may be stir mechanics (i.e. vigorous versus easy stirring or shakingversus stirring)
a. Experiment with other DNA sources. Which source gives the most DNA?How can you compare?
b. Experiment with different soaps and detergents: powdered v. liquid, shampoo?
c. Experiment with leaving out or changing steps. See if that makes a difference in your DNA yield.
d. Some protocols use a buffer to maintain a proper pH, although this protocoldid not. Here is a simple buffer recipe: 50g sugar, 3g Epsom salts, one buffered aspirin, add water to 500 mL. See if using a buffer instead of water improves your results.
e. When you change various parts of the protocols, be sure to write about howthese changes affected your results and why you think the change happened.
2. Each group of biotechnicians chooses a variable to explore and designsexperiments to test the hypothesis that each variable change addresses. Each set ofexperiments will require approvals from the lab supervisor.
The Research and Modification: The groups perform their experiments and write up their results and conclusions. These are presented to the entire company (class) and decisions are made regarding the inclusion of each tested variable and its resultant conclusion.
Tips for a Controlled ExperimentYou would use graduated cylinders to record volumes and a balance to record weightsYou would record how much time you allowed for each step for mixing and blending and incubation You would want to “control other variables.” That is, do every step exactly the same except for the one variable you are testing. For example, you might compare papaya juice versus meat tenderizer as the enzyme source. In this case you would keep all amounts and time identical and only change theenzyme source. You would record each step of your procedure fully and carefully so that someone else could read your record and exactly duplicate your experiment. Duplication of results is crucial to

Page
scientific investigations.
Page
III. YOUR TEAM TASK DELIVERABLES
1. Generate an S.O.P. (sample found on page 4).The right column is to record observations or any changes you made to the protocol.
2. Record results in the table on page 7
3. Type a brief conclusion to your experiment. Address areas of improvement that could be made for future experimentation
4. Present to classmates

Page
IV. SAMPLE S.O.P
Austin Community College Biotechnology Program SOP
SOP SOL-001 LABELING SOLUTIONS
Updated April 26, 2006
Title : Labe ling Prepared Solutions
1.0 SCOPE AND APPLICATION:
This SOP outlines the policy and procedure for labeling solutions prepared by students, faculty and staff.
2.0 SUMMARY OF METHOD
COMMENTS
1. Obtain a solution prep form from the instructor or from the folder next to the back door of the prep room.
2. Complete any calculations and enter them at the bottom of the solution prep form (or reference a page in your lab protocol).
3. Obtain all chemicals, glassware, and equipment needed to prepare the solution and assemble so they are all within reach.
4. Make a label for the vessel in which you will prepare the solution; usewhatever name you would usually call the solution (for example, “1X TAE buffer”). Leave plenty of room for information that will be added later. Affix the label to the vessel before

adding any chemical.5. Think of a unique ID number
(control number) for the solution. The format of control numbers in our labs must follow the following example:TAE-EG-041106
The first three letters are an abbreviation of the common name of the solution (in this example, Tris- Acetate-E DTA buffer). The second two letters are the initials of the person (or one of the people) who prepared the solution (Evelyn Goss). The last six digits are the date (always MMDDYY; in this example, April 11, 2006).
6. Fill out all sections of the solution prep form (see Appendix A for an example). If a field contains information that is not applicable, enter “N/A” in that field. Enter all information (except the amount of each chemical used)before preparing the solution. Enter the amounts used after weighing and delivering the chemical(s) to the preparation vessel.
7. After preparing the solution and
transferring solution and label to the storage vessel (if necessary), complete the label by including the following information:Solution prep control number
Any special instructions, such as expiration date or storage conditions
Safety warnings if the solution contains hazardous materials
Course number and semester (if applicable)
8. File the solution prep form alphabetically in the top drawer of the black file cabinet. If you are a student

Federal law mandates that any solution or chemical must be labeled with its identity if it is removed from its primary container (i.e. the stock bottle).
The purpose of control numbers is for any person working in the lab to discriminate between any two solutions, regardless of how similar they are, by the control number.
In the unusual case that one individual makes the same solution more than once in one day, simply insert numbers after the first three letters to indicate the order in which they were made.
For example, the second batch of TAEbuffer that Evelyn Goss made on April 11,2006 would have the control
number: TAE-2-EG-
041106.

taking a course, hand into your instructor, who will make copies as needed and give the original back to you for your lab report. The instructor should always keep a copy on file in the lab.
Never enter the amount of a chemicalused until you have actually measured and added the quantity. Do not enter the calculated mass or volume; only enter the actual, measured quantity.

V. Table of Results
TABLE Title :
Trial 1 Trial 2 Trial 3 Trial 4
Sampleamount
Water/buffervolume
Salt mass
Detergentvolume and source
Mix time
Filter/spin time
Enzymeamount and source
Alcohol amountand source
DNA Result(Characterize)
VI. Conclusion: Type as a Team
Data Data has inaccuracies in Data is presented Data presented isthe data presentations in correct format, accurate and
however there are organization of some inaccuracies table makes it in the data easier to presentations understand the
date
RUBRIC
Poor 1 – 2 pts Good 3 – 4 pts Excellent 5 – 6 pts
Components of task More than one is missing
One element is missing
All required elements are present
S.O.P. format It does not appear that the sample S.O.P was used to generate this S.O.P
Materials More than two materials missing or non scientific vocabulary used
Sample S.O.P was partially used. A few statements are not specific enough.
One or two materials not listed or scientific vocabulary not used for all materials
Sample S.O.P template was used and protocol is clear. Other students will be able to use this protocol toproduce the same resultsAll materials listed and identified using scientific vocabulary
Procedure Procedures do not accurately list the steps of the experiment. Specific language is not used
Procedures are listed in a logical order, but steps are not numbered and/or are not in complete sentences. Specific language is used most of the time
Procedures are listed in clear steps. Each step is numbered and is a complete sentence.Specific language is used
Conclusion Conclusion is unrelated to data
Conclusion is related to data and is accurate based on the data from the experiment.Possible sources of error are included. However, yourconclusion is not a full explanation of the experiment
Conclusion is related to the data, and is accurate based on the data from the experiment. Possible sources of error are included.
Experiment Tricks of the TradeRaw wheat germ
• can be purchased at a health food store or some large supermarket (toasted wheat germ does not work)
1 small plastic cup or beaker• 3 oz. bathroom cups. Paper cups tend to soften due to the hot water
and detergent which remove the wax coating.
1 small (100 or 150 mL) beaker or cup• to make initial mix of detergent, salt and water
Non-iodized table salt• sea salt or pickling salt; if none is available, the iodine shouldn’t interfere
with the reaction
Hot but not boiling distilled water or tap water• approximately 20 ml per student• 50-60 degrees C–do not use water hotter than indicated as it will damage the DNA.• Test your tap water—it may be hot enough right from the tap.• The water will become cooler during the extraction procedure, but this does not matter.
Dishwashing detergent• The following liquid soap products have been tested and work well: LemonFresh Joy, Woolite, Ivory, Shaper, Arm & Hammer, Herbal Essence shower gel by Clariol, Tide, Dish Drops, Kool Wash, Cheer, Sunlight Dish Soap, Dawn, Delicate, All, and Ultra Dawn.• Liquid products that do not work well are Life Tree, Shout, Shaklee, SunlightDishwasher, and LOC. Powdered detergents do not work in this protocol.
About 1 mL meat tenderizer containing papain - 6 % solution• Papain is the enzyme that will break down the structural proteins and
other enzyme.• Check the ingredient list. Not all meat tenderizers contain papain.
Glass stirring rod or other stirrer• you may substitute anything that can be used to stir- spoons, skewers,
popsicle sticks, etc.• Eyedropper or pasteur pipette and bulb

10 mL ice cold ethanol in a test tube on ice.• The colder the alcohol, the more likely the DNA will precipitate. You can add salt
to the ice to make it even colder or keep it in the freezer until right before you use it.
• It is better to use 95% ethanol or Everclear grain alcohol but 70% ethanol or 70-90% isopropyl alcohol will work too.
Large paper clip hook• used to spool the DNA• A glass stirring rod is usually recommended because the charge on the
glass attracts the DNA but it tends to slide off as it is pulled out of the alcohol.
• A glass pasteur pipette with the end curved into a hook over a bunsen burner may work even better.
• Paper clips are easily available but a thinner wire, if it is available, is easier to bend (small paper clips are too short).
• The hook must be fairly narrow if you want students to store their DNA in a microcentrifuge tube (see lab extensions)
Sealable container (optional) such as a tube, vial or jar to store DNA.• to save DNA for restriction analysis experiments (see lab extentions) or to
teach students proper storage of DNA
Paper towels or filter paper –for drying DNA.• Paper towels can be considered sterile until touched by human hands. If
you choose to have students dry the DNA it is not necessary to spool it.