infoblox deployment guide - vnios deployment on kvm
TRANSCRIPT
Deployment Guide vNIOS deployment on KVM January 2019

Deployment Guide: vNIOS deployment on KVM – January 2019
2
TABLE OF CONTENTS Overview .............................................................................................................................................. 3
Introduction ........................................................................................................................................ 3
vNIOS for KVM ................................................................................................................................... 3
vNIOS deployment on KVM ................................................................................................................ 3
Preparing the environment ................................................................................................................. 3
Installing KVM and Bridge utilities ...................................................................................................... 3
Creating various types networks ........................................................................................................ 5
Downloading vNIOS QCOW2 image ................................................................................................. 8
Copying vNIOS qcow2 image .......................................................................................................... 10
Deploying vNIOS with Bridge Networking........................................................................................ 11
Deploying vNIOS through xml file with Bridge Networking .............................................................. 11
Deploying vNIOS instance using virt-manager (GUI based approach) with Bridge Networking ..... 15
Deploying vNIOS instance using virt-install utility with Bridge Networking ...................................... 24
Deploying vNIOS with Macvtap Networking .................................................................................... 24
Deploying vNIOS through xml file with Macvtap Networking ........................................................... 24
Deploying vNIOS instance using virt-manager (GUI based approach) with Macvtap networking... 28
Deploying vNIOS instance using virt-install utility with Macvtap Networking ................................... 31
vNIOS deployment on KVM with SR-IOV interfaces ...................................................................... 31
Enabling SR-IOV virtual functions in KVM ....................................................................................... 32
Enabling SR-IOV virtual function on KVM........................................................................................ 32
Deploying vNIOS with SR-IOV vfs ................................................................................................... 34
Deployment Guide: vNIOS deployment on KVM – January 2019
3
Overview
Introduction
KVM (for Kernel-based Virtual Machine) is a full virtualization solution for Linux on x86 hardware containing virtualization extensions (Intel VT or AMD-V). It consists of a loadable kernel module, kvm.ko, that provides the core virtualization infrastructure and a processor specific module, kvm-intel.ko or kvm-amd.ko.
Using KVM, one can run multiple virtual machines running unmodified Linux or Windows images. Each virtual machine has private virtualized hardware: a network card, disk, graphics adapter etc.
KVM is an open source software. The kernel component of KVM is included in mainline Linux, as of 2.6.20. The user space component of KVM is included in mainline QEMU, as of 1.3.
vNIOS for KVM
Infoblox provides vNIOS QCOW2 images which enables customers to deploy large, robust, manageable and cost effective Infoblox grids on KVM, that provide core network services.
Supported Operating Systems and versions vNIOS for KVM is supported and validated on following Operating Systems.
• Ubuntu 14.04, 16.04 Server and Desktop Operating System
• Red Hat Enterprise Linux(RHEL) 7.x
vNIOS deployment on KVM
Preparing the environment
Installing KVM and Bridge utilities
1. vNIOS is supported and validated on Ubuntu 14.04, 16.04 and Red Hat Enterprise Linux(RHEL) 7.x based KVM with atleast 2 NIC cards connected. Note: This deployment guide covers vNIOS deployment on Ubuntu16.04 Desktop OS based KVM
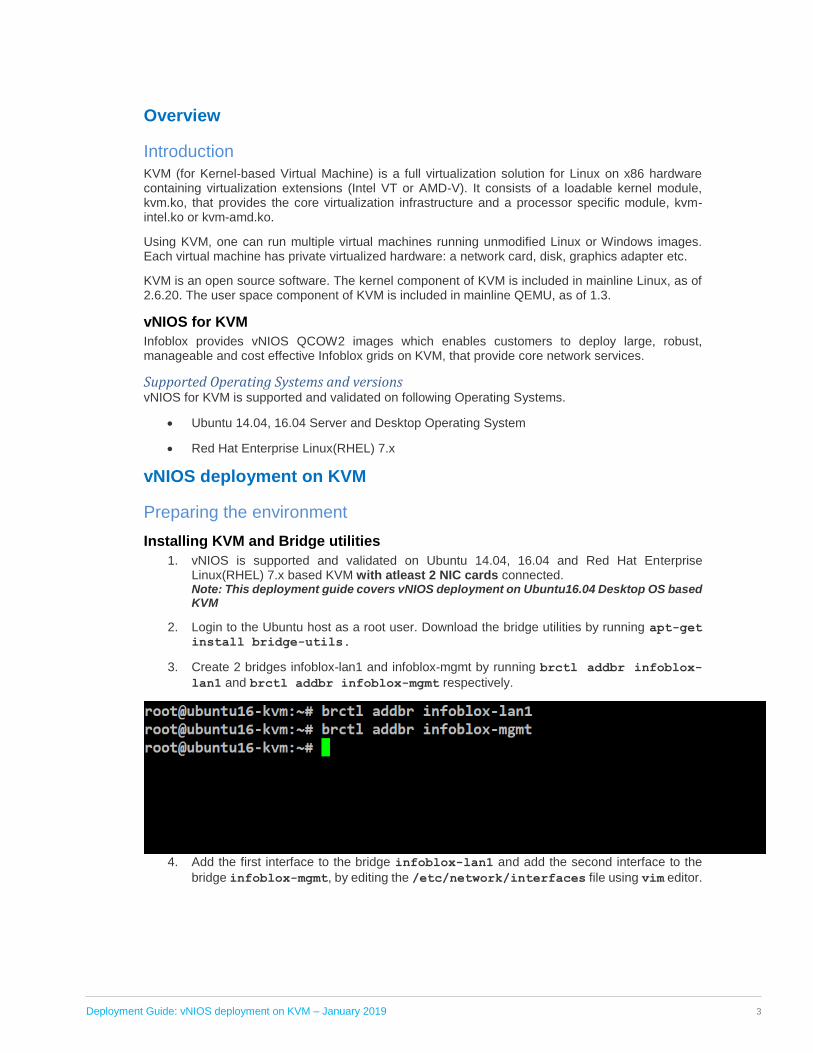
2. Login to the Ubuntu host as a root user. Download the bridge utilities by running apt-get install bridge-utils.
3. Create 2 bridges infoblox-lan1 and infoblox-mgmt by running brctl addbr infoblox-
lan1 and brctl addbr infoblox-mgmt respectively.
4. Add the first interface to the bridge infoblox-lan1 and add the second interface to the
bridge infoblox-mgmt, by editing the /etc/network/interfaces file using vim editor.

Deployment Guide: vNIOS deployment on KVM – January 2019
4
5. Verify that the bridges are created and associated with the respective interface by running
brctl show command
6. Restart the networking service by running /etc/init.d/networking command.
Note: Sometimes network fails to restart . In such scenario reboot the ubuntu machine to implement the changes.
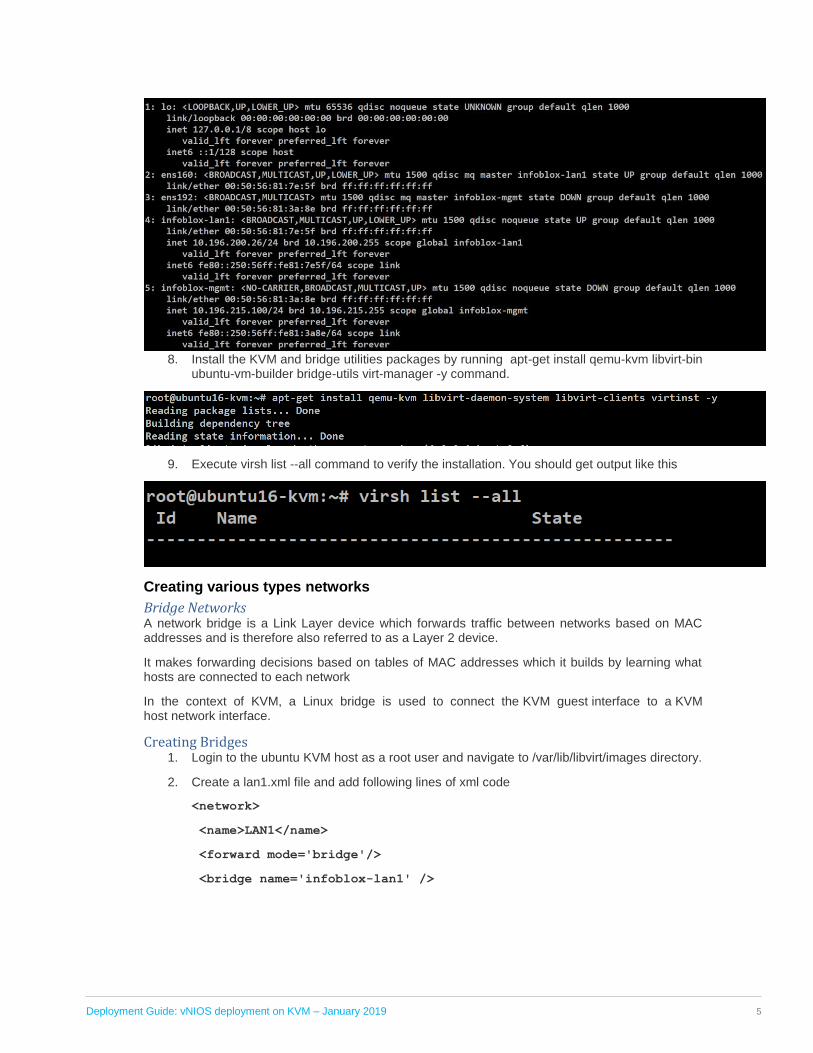
7. Run ip a command to verify that bridges are up.
Deployment Guide: vNIOS deployment on KVM – January 2019
5
8. Install the KVM and bridge utilities packages by running apt-get install qemu-kvm libvirt-bin
ubuntu-vm-builder bridge-utils virt-manager -y command.
9. Execute virsh list --all command to verify the installation. You should get output like this
Creating various types networks
Bridge Networks A network bridge is a Link Layer device which forwards traffic between networks based on MAC addresses and is therefore also referred to as a Layer 2 device.
It makes forwarding decisions based on tables of MAC addresses which it builds by learning what hosts are connected to each network
In the context of KVM, a Linux bridge is used to connect the KVM guest interface to a KVM host network interface.
Creating Bridges 1. Login to the ubuntu KVM host as a root user and navigate to /var/lib/libvirt/images directory.
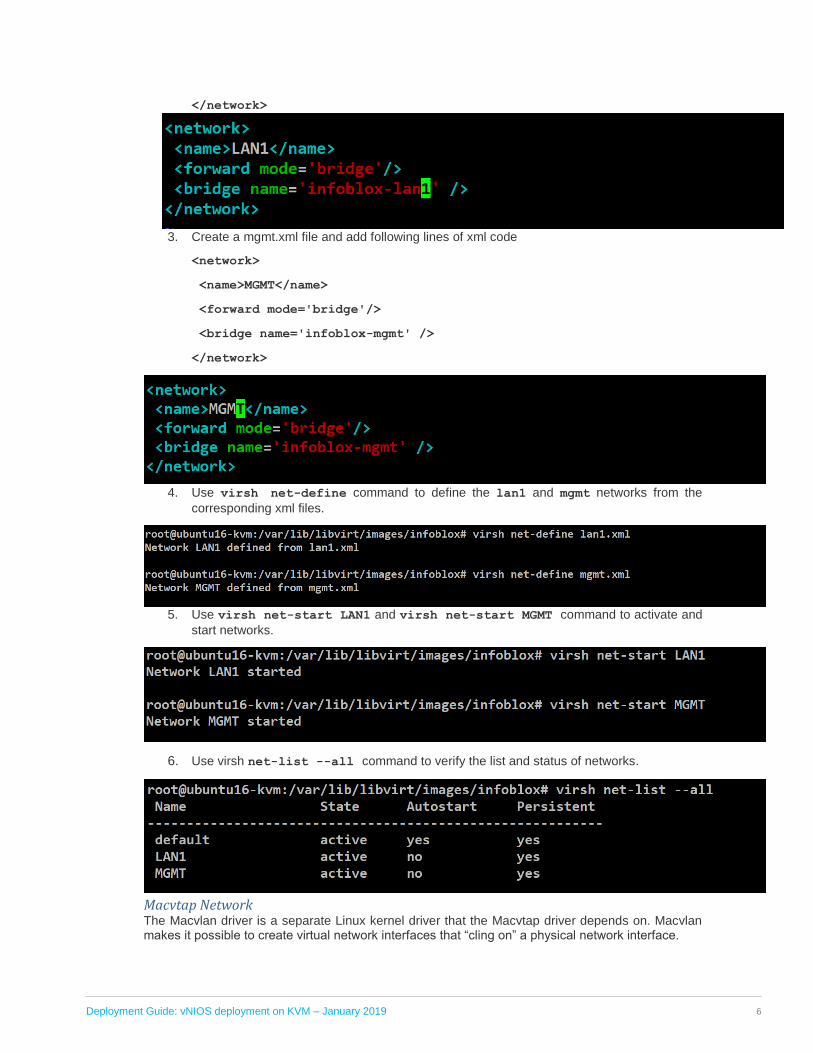
2. Create a lan1.xml file and add following lines of xml code
<network>
<name>LAN1</name>
<forward mode='bridge'/>
<bridge name='infoblox-lan1' />
Deployment Guide: vNIOS deployment on KVM – January 2019
6
</network>
3. Create a mgmt.xml file and add following lines of xml code
<network>
<name>MGMT</name>
<forward mode='bridge'/>
<bridge name='infoblox-mgmt' />
</network>
4. Use virsh net-define command to define the lan1 and mgmt networks from the
corresponding xml files.
5. Use virsh net-start LAN1 and virsh net-start MGMT command to activate and
start networks.
6. Use virsh net-list --all command to verify the list and status of networks.
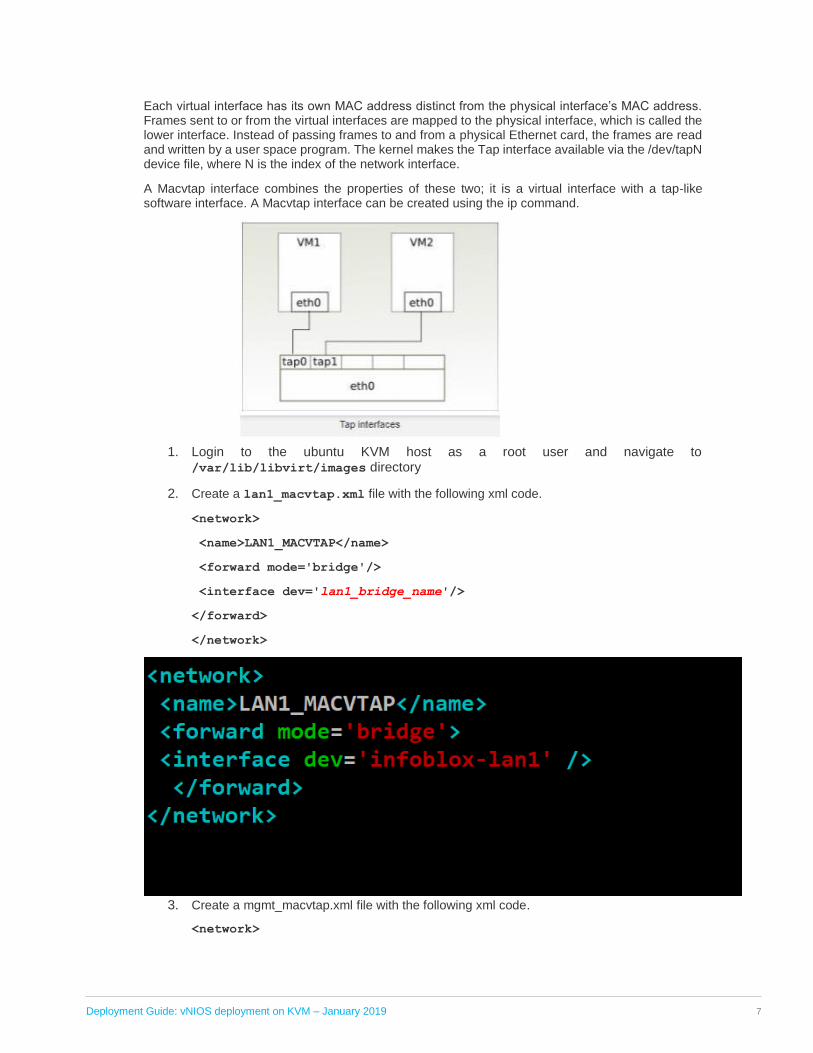
Macvtap Network The Macvlan driver is a separate Linux kernel driver that the Macvtap driver depends on. Macvlan makes it possible to create virtual network interfaces that “cling on” a physical network interface.
Deployment Guide: vNIOS deployment on KVM – January 2019
7
Each virtual interface has its own MAC address distinct from the physical interface’s MAC address. Frames sent to or from the virtual interfaces are mapped to the physical interface, which is called the lower interface. Instead of passing frames to and from a physical Ethernet card, the frames are read and written by a user space program. The kernel makes the Tap interface available via the /dev/tapN device file, where N is the index of the network interface.
A Macvtap interface combines the properties of these two; it is a virtual interface with a tap-like software interface. A Macvtap interface can be created using the ip command.
1. Login to the ubuntu KVM host as a root user and navigate to
/var/lib/libvirt/images directory
2. Create a lan1_macvtap.xml file with the following xml code.
<network>
<name>LAN1_MACVTAP</name>
<forward mode='bridge'/>
<interface dev='lan1_bridge_name'/>
</forward>
</network>
3. Create a mgmt_macvtap.xml file with the following xml code.
<network>
Deployment Guide: vNIOS deployment on KVM – January 2019
8
<name>MGMT_MACVTAP</name>
<forward mode='bridge'/>
<interface dev='mgmt_bridge_name'/>
</forward>
</network>
4. Use virsh net-define command to define the lan1 and mgmt macvtap networks from
the corresponding xml files.
5. Use virsh net-start LAN1_MACVTAP and virsh net-start MGMT_MACVTAP
command to activate and start macvtap networks.
6. Use virsh net-list --all command to verify the list and status of networks.
Downloading vNIOS QCOW2 image
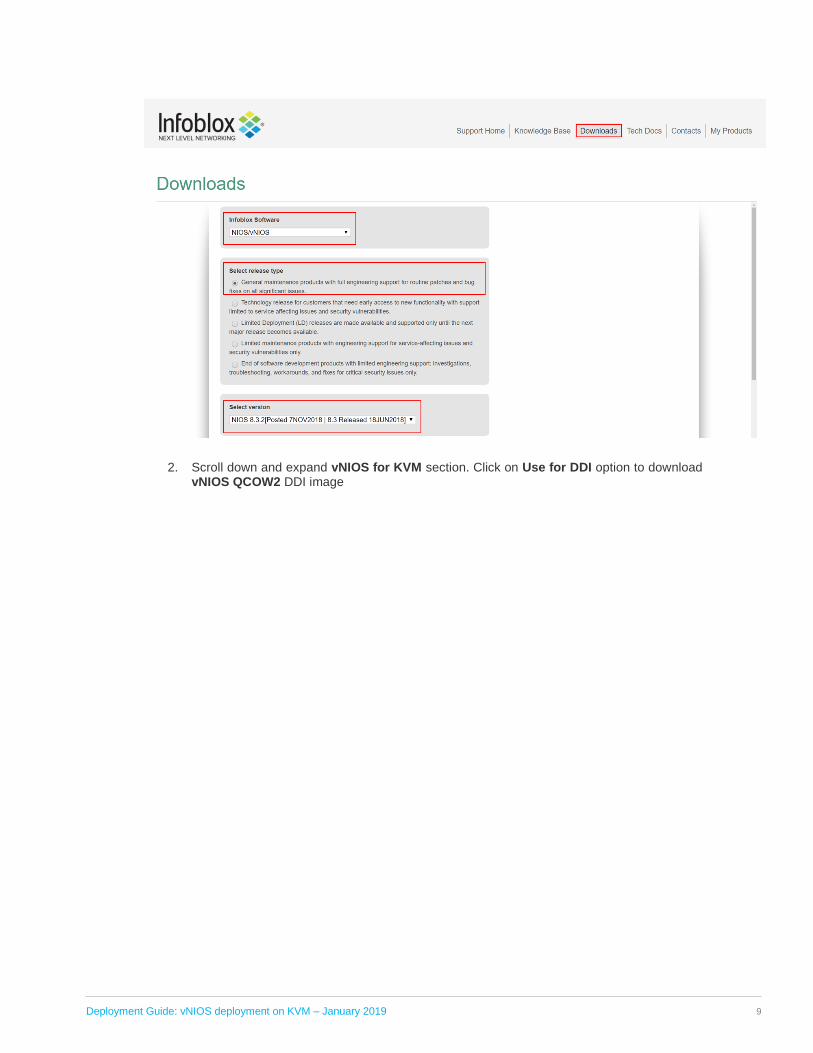
1. Login to the https://support.infoblox.com portal. Navigate to Downloads. In the Infoblox Software drop-down menu select NIOS/vNIOS. Under Select release type select the first option. In the Select version drop box select NIOS 8.3.2
Deployment Guide: vNIOS deployment on KVM – January 2019
9
2. Scroll down and expand vNIOS for KVM section. Click on Use for DDI option to download vNIOS QCOW2 DDI image
Deployment Guide: vNIOS deployment on KVM – January 2019
10
Copying vNIOS qcow2 image
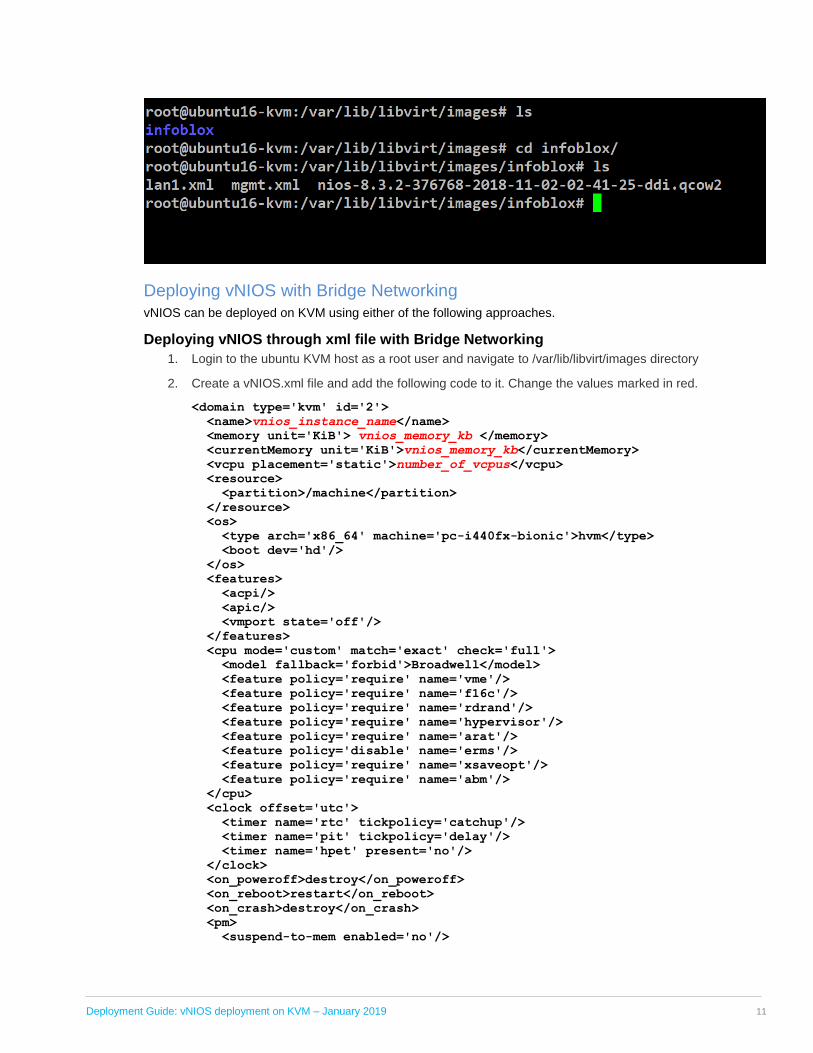
1. Create a directory → infoblox under /var/lib/libvirt/images location and copy
vNIOS qcow2 image to this location.
Deployment Guide: vNIOS deployment on KVM – January 2019
11
Deploying vNIOS with Bridge Networking
vNIOS can be deployed on KVM using either of the following approaches.
Deploying vNIOS through xml file with Bridge Networking
1. Login to the ubuntu KVM host as a root user and navigate to /var/lib/libvirt/images directory
2. Create a vNIOS.xml file and add the following code to it. Change the values marked in red.
<domain type='kvm' id='2'>
<name>vnios_instance_name</name>
<memory unit='KiB'> vnios_memory_kb </memory>
<currentMemory unit='KiB'>vnios_memory_kb</currentMemory>
<vcpu placement='static'>number_of_vcpus</vcpu>
<resource>
<partition>/machine</partition>
</resource>
<os>
<type arch='x86_64' machine='pc-i440fx-bionic'>hvm</type>
<boot dev='hd'/>
</os>
<features>
<acpi/>
<apic/>
<vmport state='off'/>
</features>
<cpu mode='custom' match='exact' check='full'>
<model fallback='forbid'>Broadwell</model>
<feature policy='require' name='vme'/>
<feature policy='require' name='f16c'/>
<feature policy='require' name='rdrand'/>
<feature policy='require' name='hypervisor'/>
<feature policy='require' name='arat'/>
<feature policy='disable' name='erms'/>
<feature policy='require' name='xsaveopt'/>
<feature policy='require' name='abm'/>
</cpu>
<clock offset='utc'>
<timer name='rtc' tickpolicy='catchup'/>
<timer name='pit' tickpolicy='delay'/>
<timer name='hpet' present='no'/>
</clock>
<on_poweroff>destroy</on_poweroff>
<on_reboot>restart</on_reboot>
<on_crash>destroy</on_crash>
<pm>
<suspend-to-mem enabled='no'/>
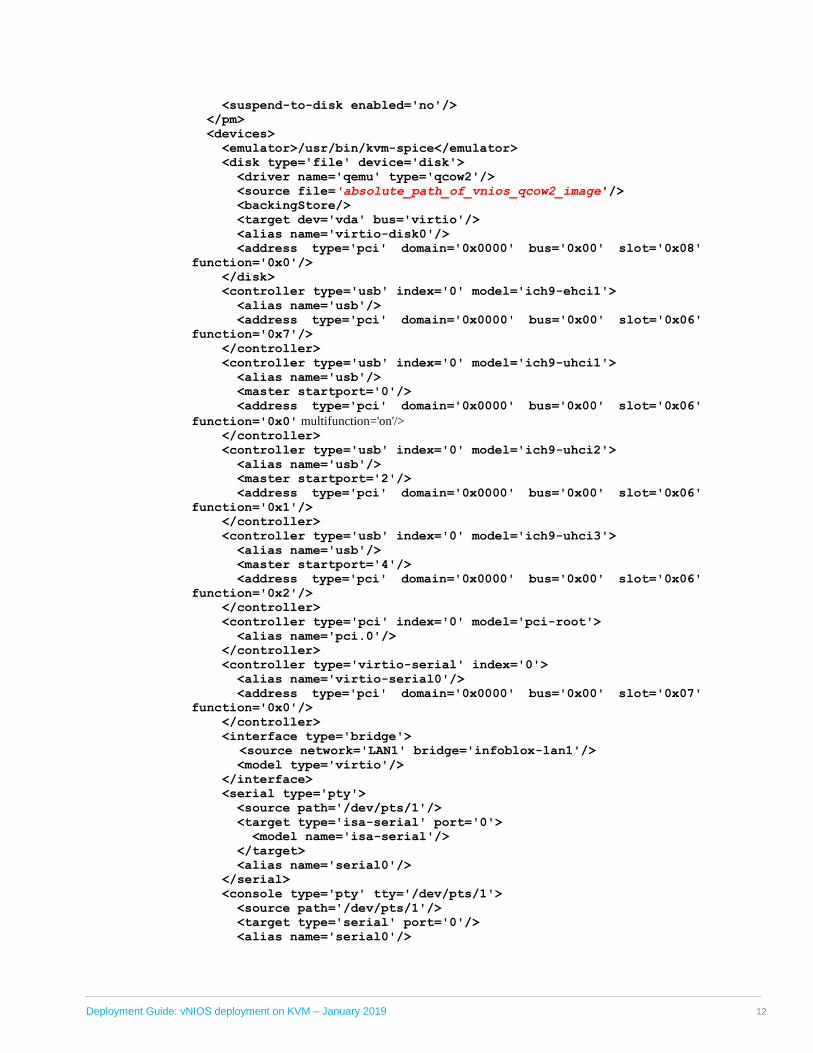
Deployment Guide: vNIOS deployment on KVM – January 2019
12
<suspend-to-disk enabled='no'/>
</pm>
<devices>
<emulator>/usr/bin/kvm-spice</emulator>
<disk type='file' device='disk'>
<driver name='qemu' type='qcow2'/>
<source file='absolute_path_of_vnios_qcow2_image'/>
<backingStore/>
<target dev='vda' bus='virtio'/>
<alias name='virtio-disk0'/>
<address type='pci' domain='0x0000' bus='0x00' slot='0x08'
function='0x0'/>
</disk>
<controller type='usb' index='0' model='ich9-ehci1'>
<alias name='usb'/>
<address type='pci' domain='0x0000' bus='0x00' slot='0x06'
function='0x7'/>
</controller>
<controller type='usb' index='0' model='ich9-uhci1'>
<alias name='usb'/>
<master startport='0'/>
<address type='pci' domain='0x0000' bus='0x00' slot='0x06'
function='0x0' multifunction='on'/> </controller>
<controller type='usb' index='0' model='ich9-uhci2'>
<alias name='usb'/>
<master startport='2'/>
<address type='pci' domain='0x0000' bus='0x00' slot='0x06'
function='0x1'/>
</controller>
<controller type='usb' index='0' model='ich9-uhci3'>
<alias name='usb'/>
<master startport='4'/>
<address type='pci' domain='0x0000' bus='0x00' slot='0x06'
function='0x2'/>
</controller>
<controller type='pci' index='0' model='pci-root'>
<alias name='pci.0'/>
</controller>
<controller type='virtio-serial' index='0'>
<alias name='virtio-serial0'/>
<address type='pci' domain='0x0000' bus='0x00' slot='0x07'
function='0x0'/>
</controller>
<interface type='bridge'>
<source network='LAN1' bridge='infoblox-lan1'/>
<model type='virtio'/>
</interface>
<serial type='pty'>
<source path='/dev/pts/1'/>
<target type='isa-serial' port='0'>
<model name='isa-serial'/>
</target>
<alias name='serial0'/>
</serial>
<console type='pty' tty='/dev/pts/1'>
<source path='/dev/pts/1'/>
<target type='serial' port='0'/>
<alias name='serial0'/>
Deployment Guide: vNIOS deployment on KVM – January 2019
13
</console>
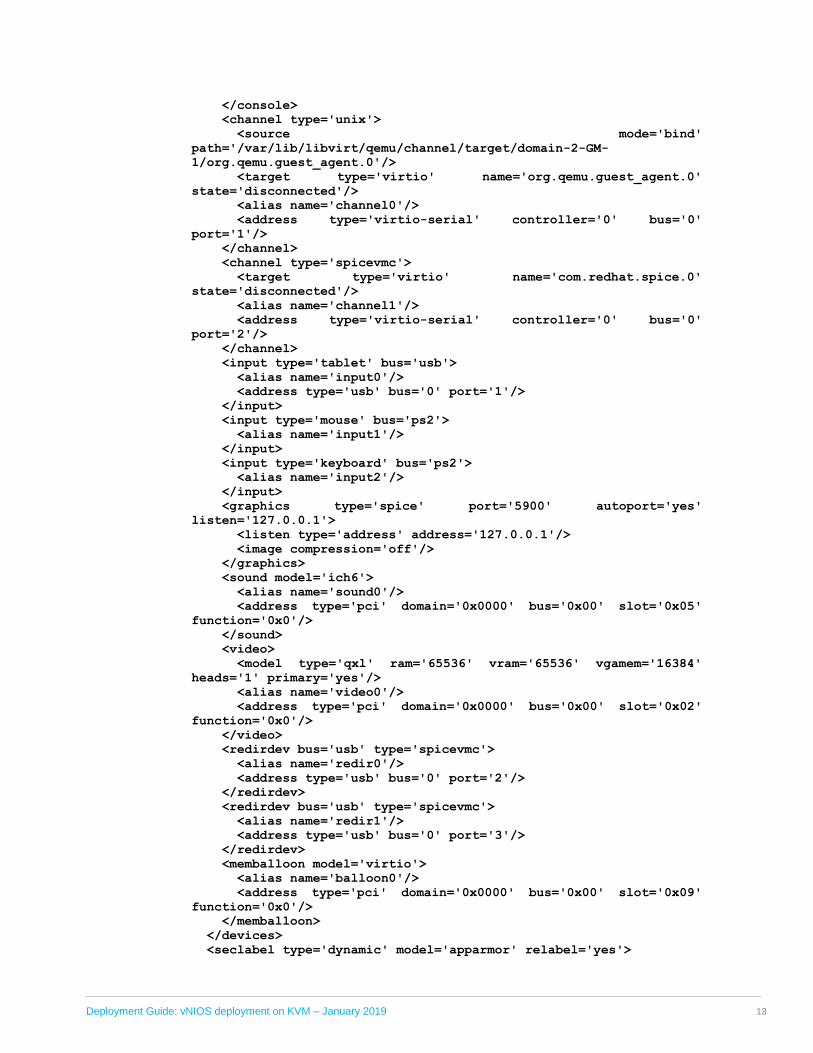
<channel type='unix'>
<source mode='bind'
path='/var/lib/libvirt/qemu/channel/target/domain-2-GM-
1/org.qemu.guest_agent.0'/>
<target type='virtio' name='org.qemu.guest_agent.0'
state='disconnected'/>
<alias name='channel0'/>
<address type='virtio-serial' controller='0' bus='0'
port='1'/>
</channel>
<channel type='spicevmc'>
<target type='virtio' name='com.redhat.spice.0'
state='disconnected'/>
<alias name='channel1'/>
<address type='virtio-serial' controller='0' bus='0'
port='2'/>
</channel>
<input type='tablet' bus='usb'>
<alias name='input0'/>
<address type='usb' bus='0' port='1'/>
</input>
<input type='mouse' bus='ps2'>
<alias name='input1'/>
</input>
<input type='keyboard' bus='ps2'>
<alias name='input2'/>
</input>
<graphics type='spice' port='5900' autoport='yes'
listen='127.0.0.1'>
<listen type='address' address='127.0.0.1'/>
<image compression='off'/>
</graphics>
<sound model='ich6'>
<alias name='sound0'/>
<address type='pci' domain='0x0000' bus='0x00' slot='0x05'
function='0x0'/>
</sound>
<video>
<model type='qxl' ram='65536' vram='65536' vgamem='16384'
heads='1' primary='yes'/>
<alias name='video0'/>
<address type='pci' domain='0x0000' bus='0x00' slot='0x02'
function='0x0'/>
</video>
<redirdev bus='usb' type='spicevmc'>
<alias name='redir0'/>
<address type='usb' bus='0' port='2'/>
</redirdev>
<redirdev bus='usb' type='spicevmc'>
<alias name='redir1'/>
<address type='usb' bus='0' port='3'/>
</redirdev>
<memballoon model='virtio'>
<alias name='balloon0'/>
<address type='pci' domain='0x0000' bus='0x00' slot='0x09'
function='0x0'/>
</memballoon>
</devices>
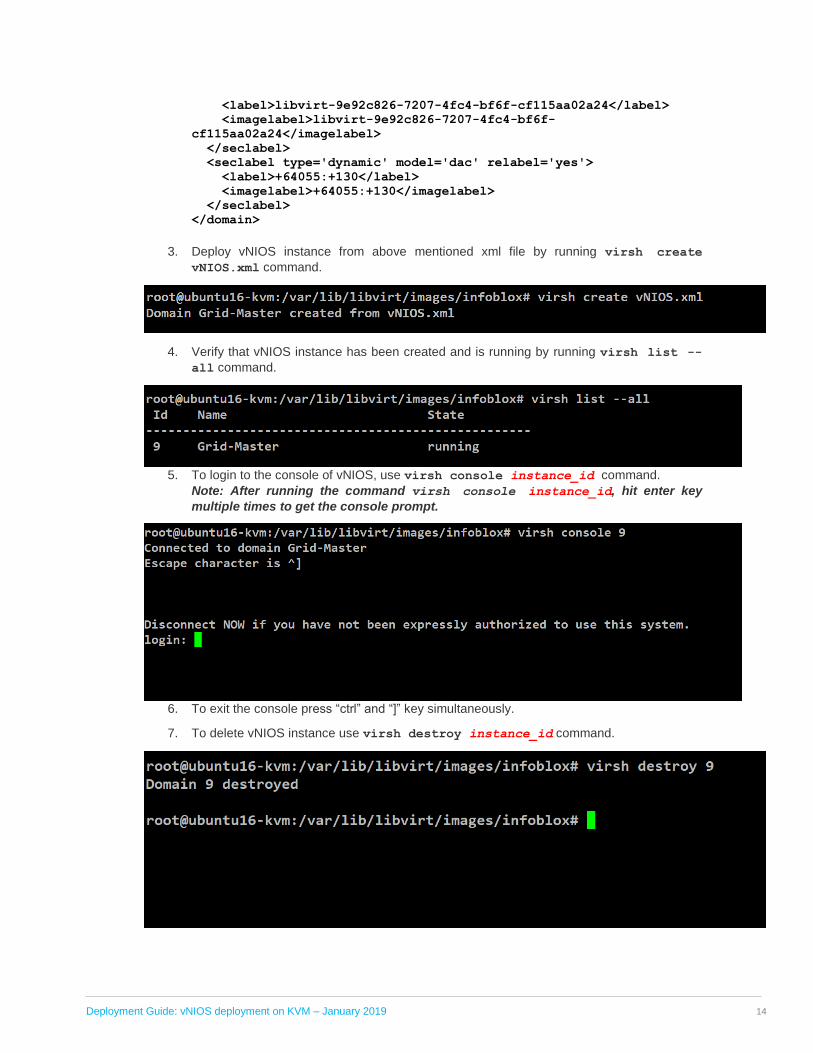
<seclabel type='dynamic' model='apparmor' relabel='yes'>
Deployment Guide: vNIOS deployment on KVM – January 2019
14
<label>libvirt-9e92c826-7207-4fc4-bf6f-cf115aa02a24</label>
<imagelabel>libvirt-9e92c826-7207-4fc4-bf6f-
cf115aa02a24</imagelabel>
</seclabel>
<seclabel type='dynamic' model='dac' relabel='yes'>
<label>+64055:+130</label>
<imagelabel>+64055:+130</imagelabel>
</seclabel>
</domain>
3. Deploy vNIOS instance from above mentioned xml file by running virsh create
vNIOS.xml command.
4. Verify that vNIOS instance has been created and is running by running virsh list --
all command.
5. To login to the console of vNIOS, use virsh console instance_id command.
Note: After running the command virsh console instance_id, hit enter key
multiple times to get the console prompt.
6. To exit the console press “ctrl” and “]” key simultaneously.
7. To delete vNIOS instance use virsh destroy instance_id command.
Deployment Guide: vNIOS deployment on KVM – January 2019
15
Deploying vNIOS instance using virt-manager (GUI based approach) with Bridge Networking
The virt-manager application is a desktop user interface for managing virtual machines through libvirt. It primarily targets KVM VMs, but also manages Xen and LXC (linux containers).
It presents a summary view of running domains, their live performance & resource utilization statistics. Wizards enable the creation of new domains, and configuration & adjustment of a domain’s resource allocation & virtual hardware.
An embedded VNC and SPICE client viewer presents a full graphical console to the guest domain.
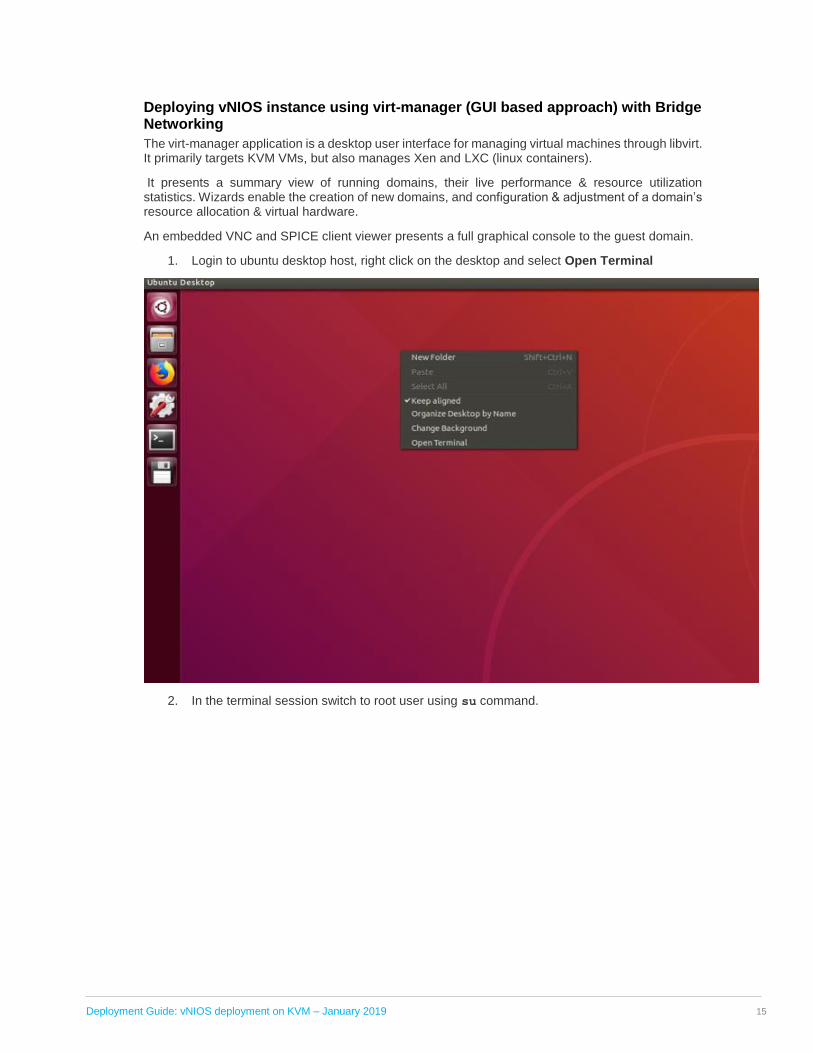
1. Login to ubuntu desktop host, right click on the desktop and select Open Terminal
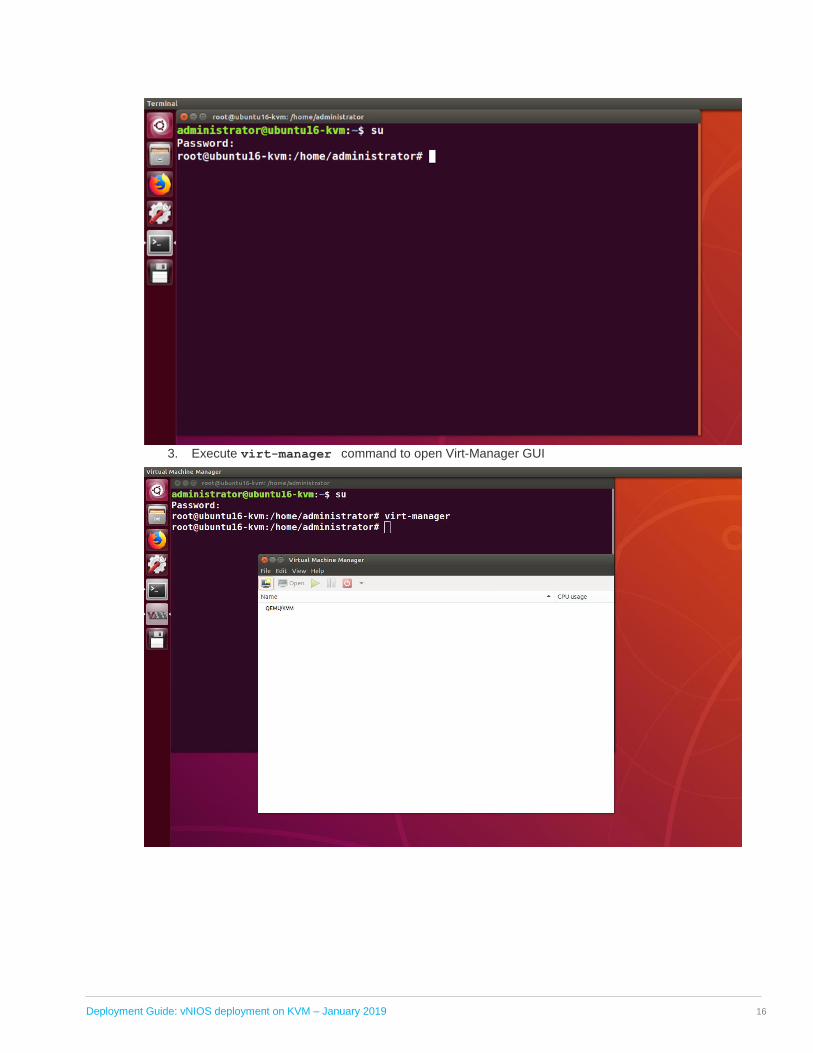
2. In the terminal session switch to root user using su command.
Deployment Guide: vNIOS deployment on KVM – January 2019
16
3. Execute virt-manager command to open Virt-Manager GUI
Deployment Guide: vNIOS deployment on KVM – January 2019
17
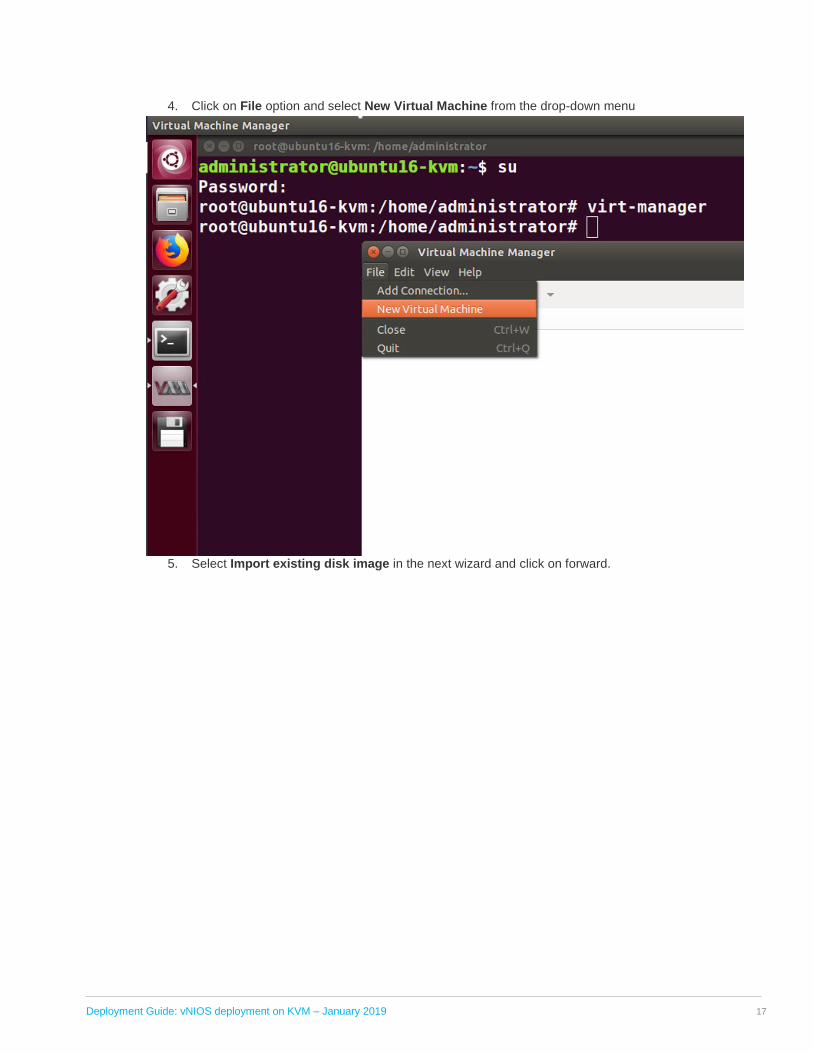
4. Click on File option and select New Virtual Machine from the drop-down menu
5. Select Import existing disk image in the next wizard and click on forward.

Deployment Guide: vNIOS deployment on KVM – January 2019
18
6. Click on Browse to select the vNIOS qcow2 image. Select Linux from the OS type drop-down box and Fedora from the Version drop-down box. Click on forward.

Deployment Guide: vNIOS deployment on KVM – January 2019
19
7. Enter the memory and vCPU details in the next wizard and click on forward.

Deployment Guide: vNIOS deployment on KVM – January 2019
20
8. Enter the name of vNIOS instance and check the Customize configuration before install option. Click on Finish
Deployment Guide: vNIOS deployment on KVM – January 2019
21
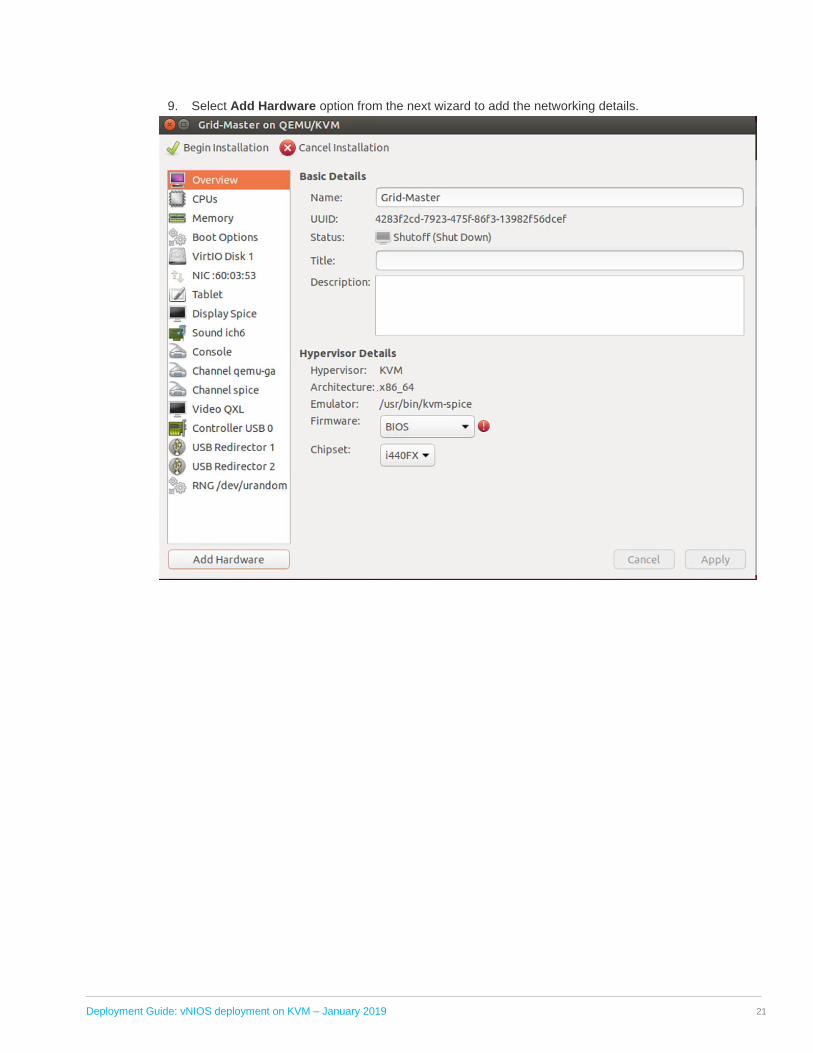
9. Select Add Hardware option from the next wizard to add the networking details.
Deployment Guide: vNIOS deployment on KVM – January 2019
22
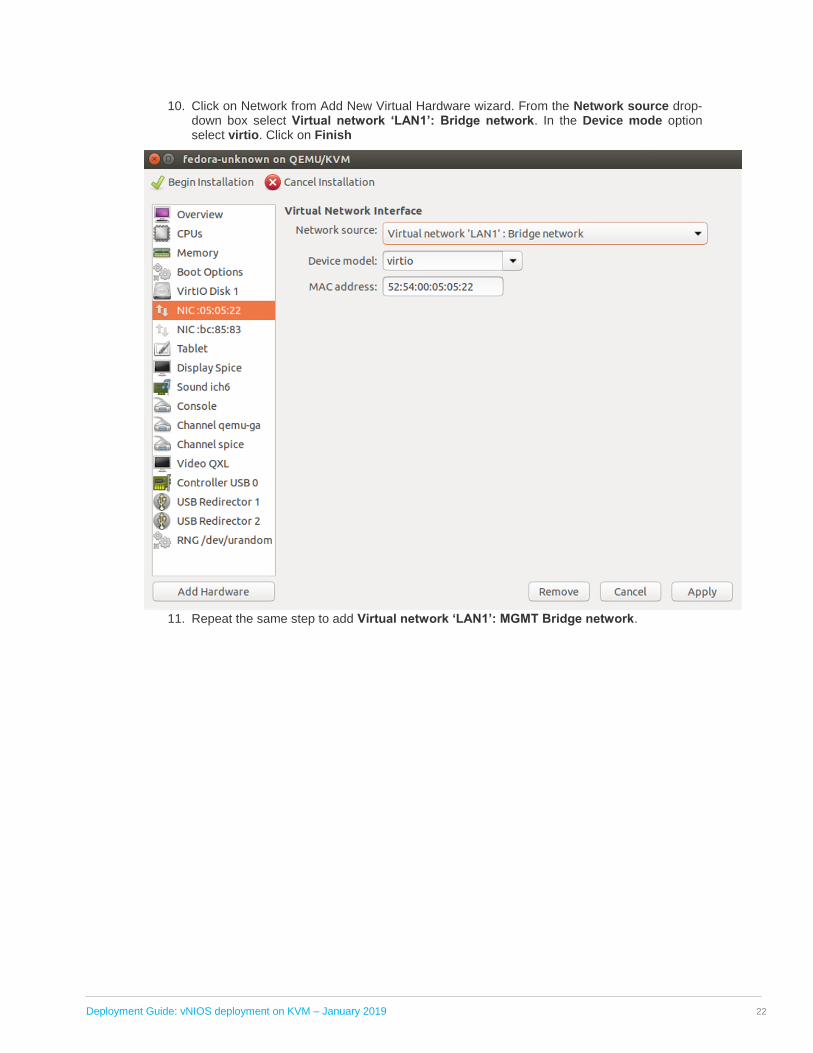
10. Click on Network from Add New Virtual Hardware wizard. From the Network source drop-down box select Virtual network ‘LAN1’: Bridge network. In the Device mode option select virtio. Click on Finish
11. Repeat the same step to add Virtual network ‘LAN1’: MGMT Bridge network.
Deployment Guide: vNIOS deployment on KVM – January 2019
23
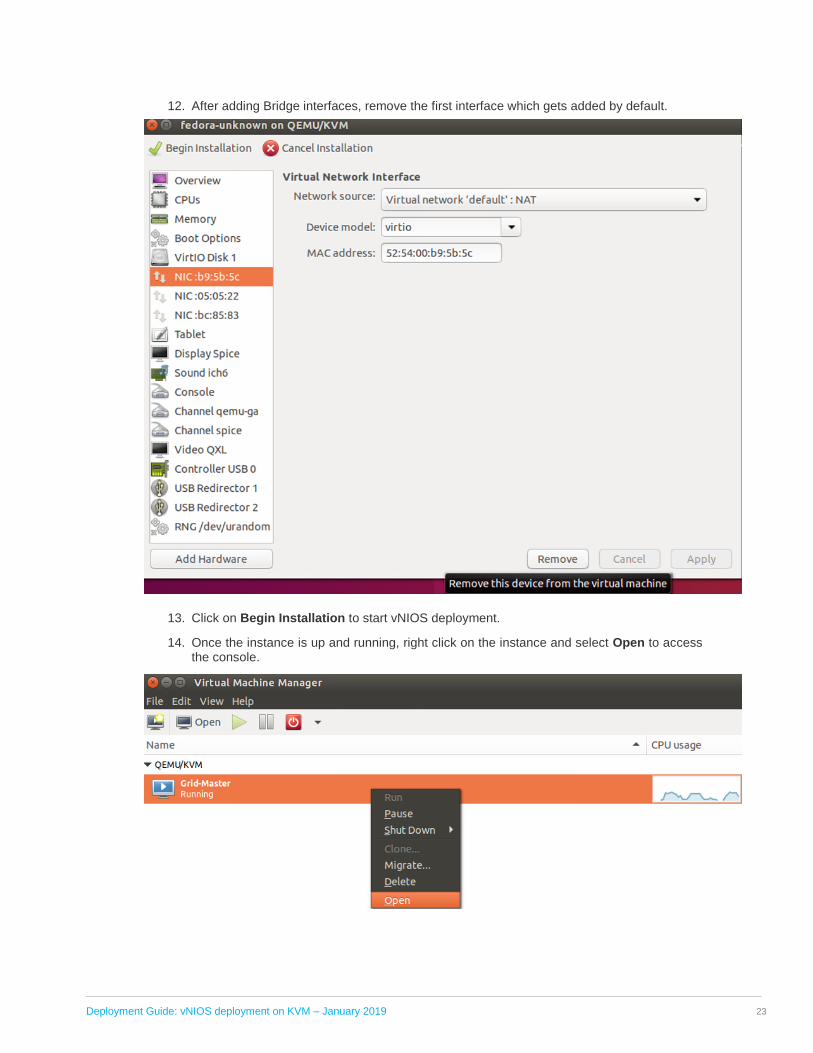
12. After adding Bridge interfaces, remove the first interface which gets added by default.
13. Click on Begin Installation to start vNIOS deployment.
14. Once the instance is up and running, right click on the instance and select Open to access the console.
Deployment Guide: vNIOS deployment on KVM – January 2019
24
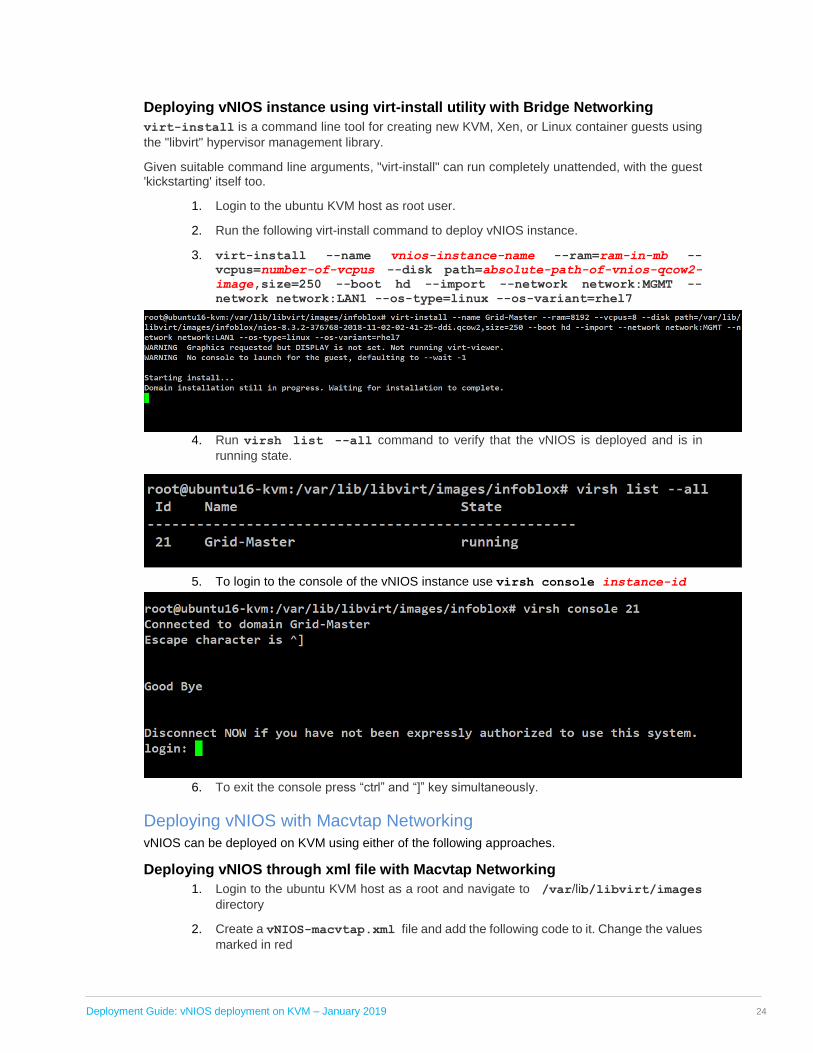
Deploying vNIOS instance using virt-install utility with Bridge Networking
virt-install is a command line tool for creating new KVM, Xen, or Linux container guests using
the "libvirt" hypervisor management library.
Given suitable command line arguments, "virt-install" can run completely unattended, with the guest 'kickstarting' itself too.
1. Login to the ubuntu KVM host as root user.
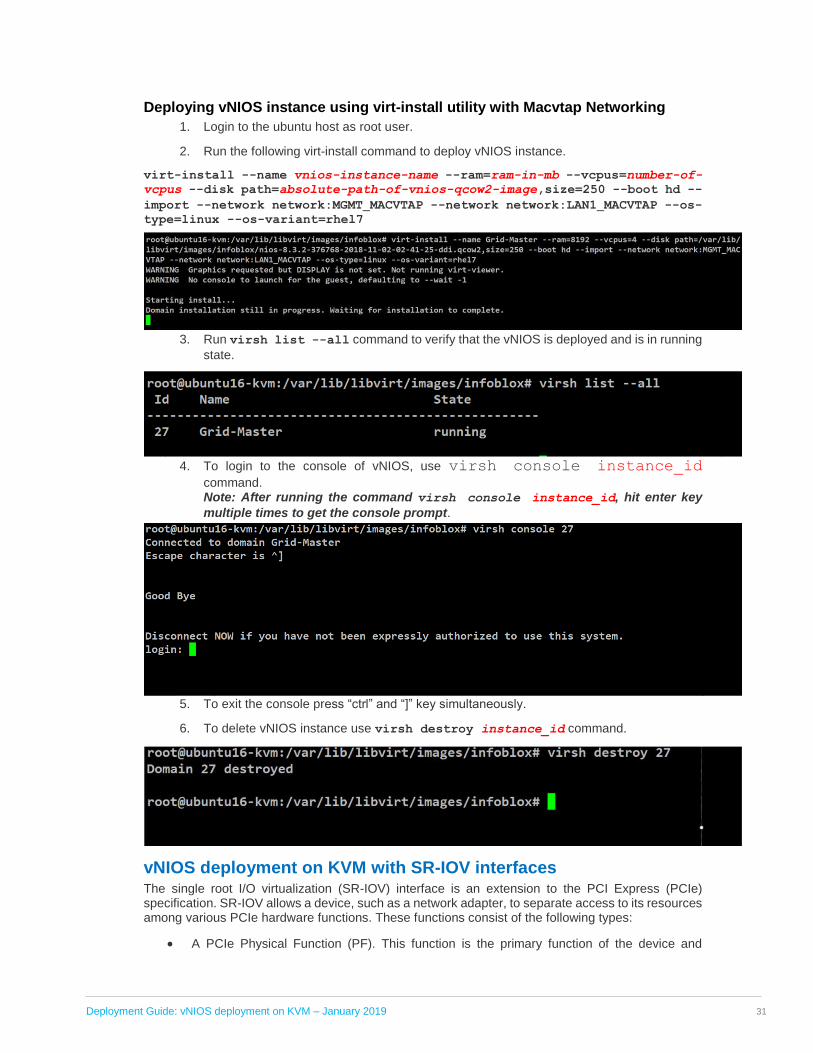
2. Run the following virt-install command to deploy vNIOS instance.
3. virt-install --name vnios-instance-name --ram=ram-in-mb --
vcpus=number-of-vcpus --disk path=absolute-path-of-vnios-qcow2-
image,size=250 --boot hd --import --network network:MGMT --
network network:LAN1 --os-type=linux --os-variant=rhel7
4. Run virsh list --all command to verify that the vNIOS is deployed and is in
running state.
5. To login to the console of the vNIOS instance use virsh console instance-id
6. To exit the console press “ctrl” and “]” key simultaneously.
Deploying vNIOS with Macvtap Networking
vNIOS can be deployed on KVM using either of the following approaches.
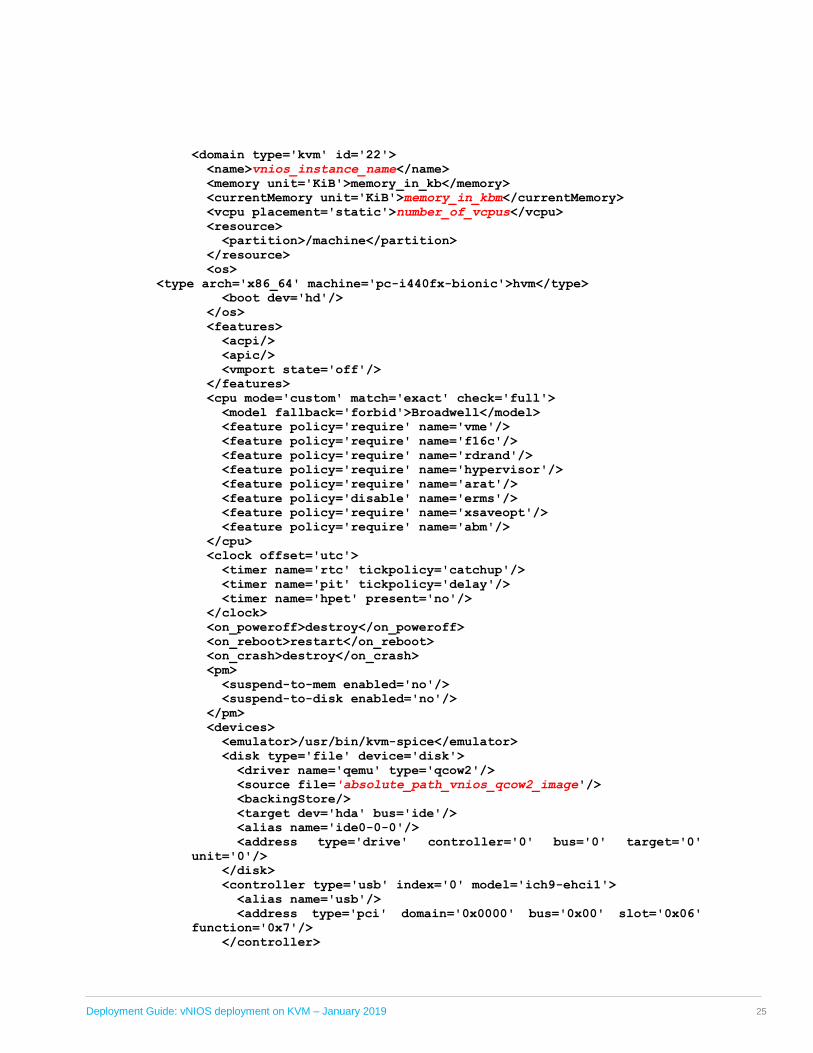
Deploying vNIOS through xml file with Macvtap Networking
1. Login to the ubuntu KVM host as a root and navigate to /var/lib/libvirt/images
directory
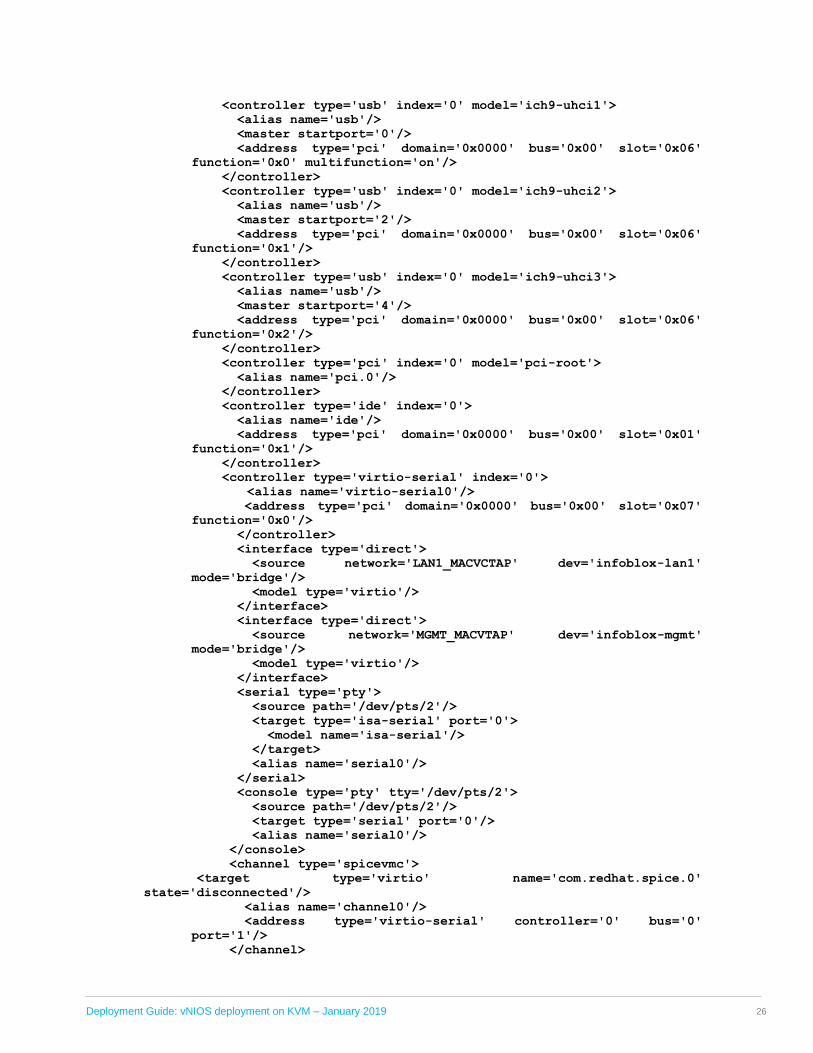
2. Create a vNIOS-macvtap.xml file and add the following code to it. Change the values
marked in red
Deployment Guide: vNIOS deployment on KVM – January 2019
25
<domain type='kvm' id='22'>
<name>vnios_instance_name</name>
<memory unit='KiB'>memory_in_kb</memory>
<currentMemory unit='KiB'>memory_in_kbm</currentMemory>
<vcpu placement='static'>number_of_vcpus</vcpu>
<resource>
<partition>/machine</partition>
</resource>
<os>
<type arch='x86_64' machine='pc-i440fx-bionic'>hvm</type> <boot dev='hd'/>
</os>
<features>
<acpi/>
<apic/>
<vmport state='off'/>
</features>
<cpu mode='custom' match='exact' check='full'>
<model fallback='forbid'>Broadwell</model>
<feature policy='require' name='vme'/>
<feature policy='require' name='f16c'/>
<feature policy='require' name='rdrand'/>
<feature policy='require' name='hypervisor'/>
<feature policy='require' name='arat'/>
<feature policy='disable' name='erms'/>
<feature policy='require' name='xsaveopt'/>
<feature policy='require' name='abm'/>
</cpu>
<clock offset='utc'>
<timer name='rtc' tickpolicy='catchup'/>
<timer name='pit' tickpolicy='delay'/>
<timer name='hpet' present='no'/>
</clock>
<on_poweroff>destroy</on_poweroff>
<on_reboot>restart</on_reboot>
<on_crash>destroy</on_crash>
<pm>
<suspend-to-mem enabled='no'/>
<suspend-to-disk enabled='no'/>
</pm>
<devices>
<emulator>/usr/bin/kvm-spice</emulator>
<disk type='file' device='disk'>
<driver name='qemu' type='qcow2'/>
<source file='absolute_path_vnios_qcow2_image'/>
<backingStore/>
<target dev='hda' bus='ide'/>
<alias name='ide0-0-0'/>
<address type='drive' controller='0' bus='0' target='0'
unit='0'/>
</disk>
<controller type='usb' index='0' model='ich9-ehci1'>
<alias name='usb'/>
<address type='pci' domain='0x0000' bus='0x00' slot='0x06'
function='0x7'/>
</controller>
Deployment Guide: vNIOS deployment on KVM – January 2019
26
<controller type='usb' index='0' model='ich9-uhci1'>
<alias name='usb'/>
<master startport='0'/>
<address type='pci' domain='0x0000' bus='0x00' slot='0x06'
function='0x0' multifunction='on'/>
</controller>
<controller type='usb' index='0' model='ich9-uhci2'>
<alias name='usb'/>
<master startport='2'/>
<address type='pci' domain='0x0000' bus='0x00' slot='0x06'
function='0x1'/>
</controller>
<controller type='usb' index='0' model='ich9-uhci3'>
<alias name='usb'/>
<master startport='4'/>
<address type='pci' domain='0x0000' bus='0x00' slot='0x06'
function='0x2'/>
</controller>
<controller type='pci' index='0' model='pci-root'>
<alias name='pci.0'/>
</controller>
<controller type='ide' index='0'>
<alias name='ide'/>
<address type='pci' domain='0x0000' bus='0x00' slot='0x01'
function='0x1'/>
</controller>
<controller type='virtio-serial' index='0'>
<alias name='virtio-serial0'/>
<address type='pci' domain='0x0000' bus='0x00' slot='0x07'
function='0x0'/>
</controller>
<interface type='direct'>
<source network='LAN1_MACVCTAP' dev='infoblox-lan1'
mode='bridge'/>
<model type='virtio'/>
</interface>
<interface type='direct'>
<source network='MGMT_MACVTAP' dev='infoblox-mgmt'
mode='bridge'/>
<model type='virtio'/>
</interface>
<serial type='pty'>
<source path='/dev/pts/2'/>
<target type='isa-serial' port='0'>
<model name='isa-serial'/>
</target>
<alias name='serial0'/>
</serial>
<console type='pty' tty='/dev/pts/2'>
<source path='/dev/pts/2'/>
<target type='serial' port='0'/>
<alias name='serial0'/>
</console>
<channel type='spicevmc'>
<target type='virtio' name='com.redhat.spice.0'
state='disconnected'/>
<alias name='channel0'/>
<address type='virtio-serial' controller='0' bus='0'
port='1'/>
</channel>
Deployment Guide: vNIOS deployment on KVM – January 2019
27
<input type='mouse' bus='ps2'>
<alias name='input0'/>
</input>
<input type='keyboard' bus='ps2'>
<alias name='input1'/>
</input>
<graphics type='spice' port='5900' autoport='yes'
listen='127.0.0.1'>
<listen type='address' address='127.0.0.1'/>
<image compression='off'/>
</graphics>
<sound model='ich6'>
<alias name='sound0'/>
<address type='pci' domain='0x0000' bus='0x00' slot='0x05'
function='0x0'/>
</sound>
<video>
<model type='qxl' ram='65536' vram='65536' vgamem='16384'
heads='1' primary='yes'/>
<alias name='video0'/>
<address type='pci' domain='0x0000' bus='0x00' slot='0x02'
function='0x0'/>
</video>
<redirdev bus='usb' type='spicevmc'>
<alias name='redir0'/>
<address type='usb' bus='0' port='1'/>
</redirdev>
<redirdev bus='usb' type='spicevmc'>
<alias name='redir1'/>
<address type='usb' bus='0' port='2'/>
</redirdev>
<memballoon model='virtio'>
<alias name='balloon0'/>
<address type='pci' domain='0x0000' bus='0x00' slot='0x08'
function='0x0'/>
</memballoon>
</devices>
<seclabel type='dynamic' model='apparmor' relabel='yes'>
<label>libvirt-588c6acb-3fcd-49a3-ad84-a59905c55f7d</label>
<imagelabel>libvirt-588c6acb-3fcd-49a3-ad84-
a59905c55f7d</imagelabel>
</seclabel>
<seclabel type='dynamic' model='dac' relabel='yes'>
<label>+64055:+130</label>
<imagelabel>+64055:+130</imagelabel>
</seclabel>
</domain>
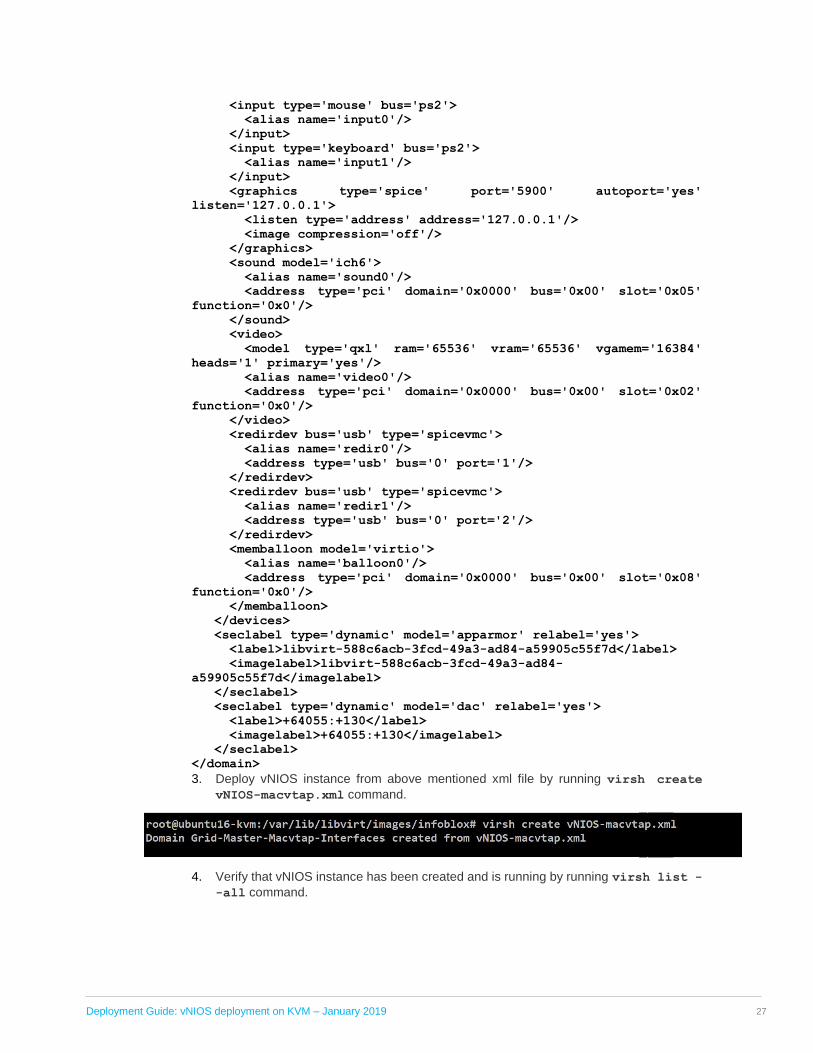
3. Deploy vNIOS instance from above mentioned xml file by running virsh create
vNIOS-macvtap.xml command.
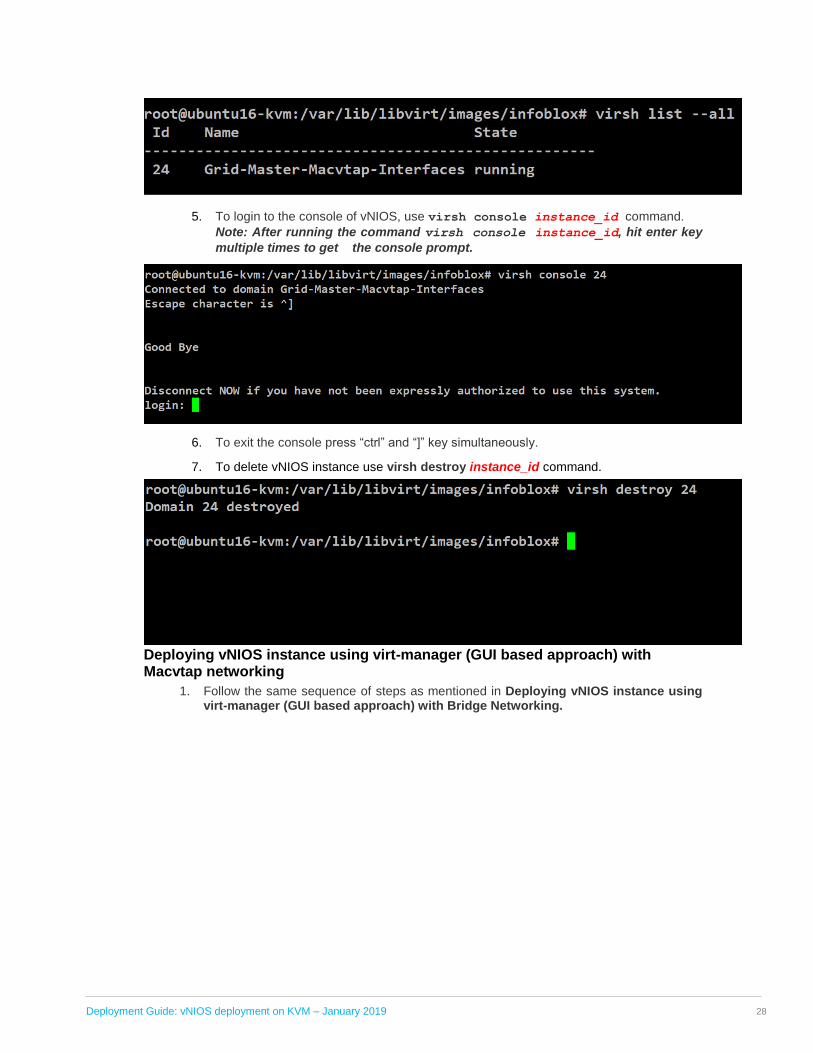
4. Verify that vNIOS instance has been created and is running by running virsh list -
-all command.
Deployment Guide: vNIOS deployment on KVM – January 2019
28
5. To login to the console of vNIOS, use virsh console instance_id command.
Note: After running the command virsh console instance_id, hit enter key
multiple times to get the console prompt.
6. To exit the console press “ctrl” and “]” key simultaneously.
7. To delete vNIOS instance use virsh destroy instance_id command.
Deploying vNIOS instance using virt-manager (GUI based approach) with Macvtap networking
1. Follow the same sequence of steps as mentioned in Deploying vNIOS instance using virt-manager (GUI based approach) with Bridge Networking.
Deployment Guide: vNIOS deployment on KVM – January 2019
29
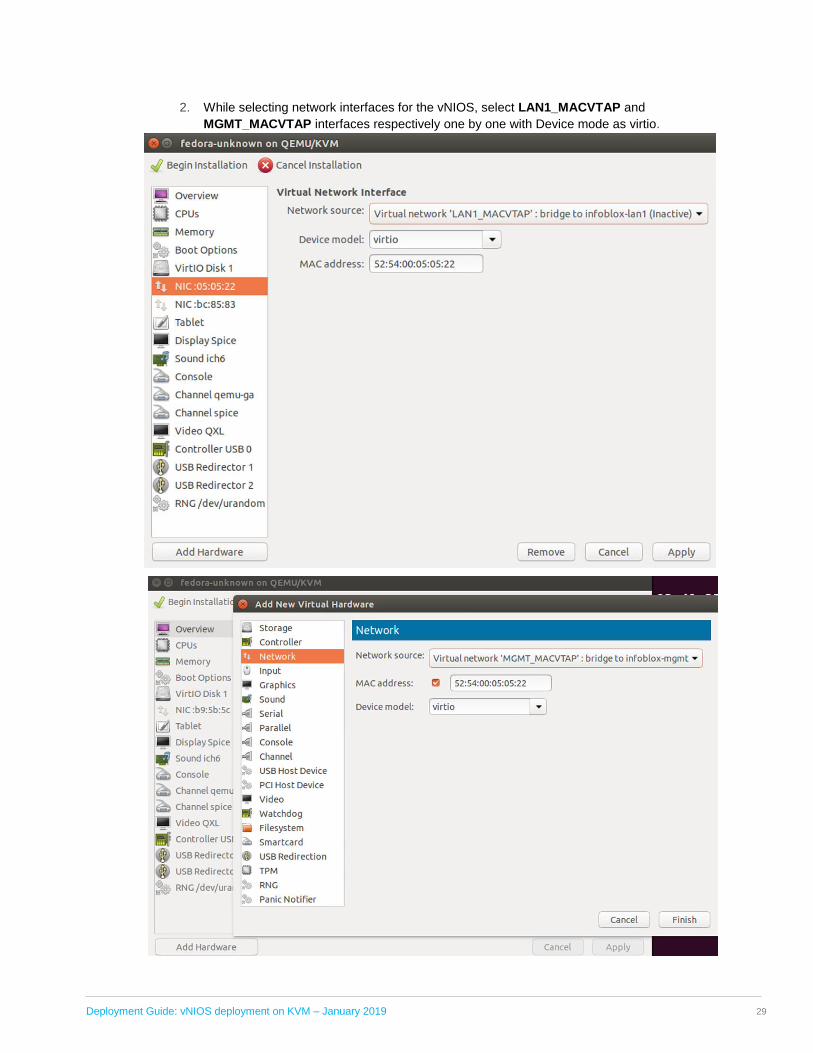
2. While selecting network interfaces for the vNIOS, select LAN1_MACVTAP and
MGMT_MACVTAP interfaces respectively one by one with Device mode as virtio.
Deployment Guide: vNIOS deployment on KVM – January 2019
30
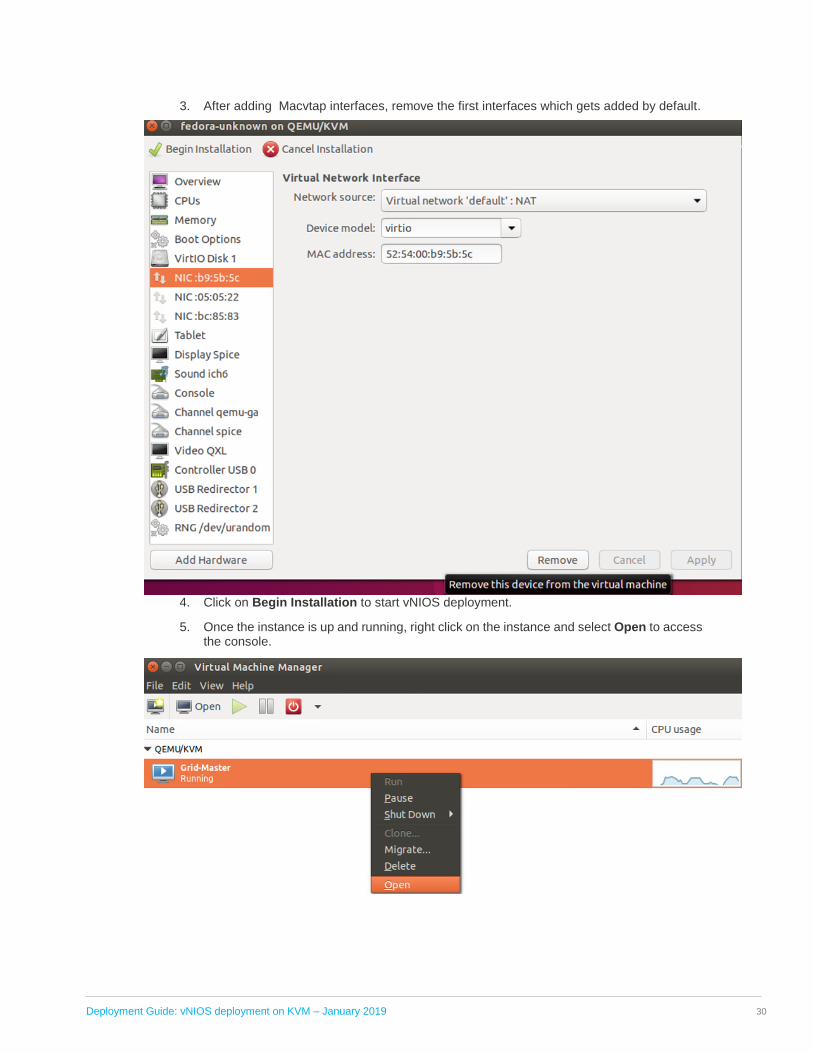
3. After adding Macvtap interfaces, remove the first interfaces which gets added by default.
4. Click on Begin Installation to start vNIOS deployment.
5. Once the instance is up and running, right click on the instance and select Open to access the console.
Deployment Guide: vNIOS deployment on KVM – January 2019
31
Deploying vNIOS instance using virt-install utility with Macvtap Networking
1. Login to the ubuntu host as root user.
2. Run the following virt-install command to deploy vNIOS instance.
virt-install --name vnios-instance-name --ram=ram-in-mb --vcpus=number-of-
vcpus --disk path=absolute-path-of-vnios-qcow2-image,size=250 --boot hd --
import --network network:MGMT_MACVTAP --network network:LAN1_MACVTAP --os-type=linux --os-variant=rhel7
3. Run virsh list --all command to verify that the vNIOS is deployed and is in running
state.
4. To login to the console of vNIOS, use virsh console instance_id
command. Note: After running the command virsh console instance_id, hit enter key
multiple times to get the console prompt.
5. To exit the console press “ctrl” and “]” key simultaneously.
6. To delete vNIOS instance use virsh destroy instance_id command.
vNIOS deployment on KVM with SR-IOV interfaces The single root I/O virtualization (SR-IOV) interface is an extension to the PCI Express (PCIe) specification. SR-IOV allows a device, such as a network adapter, to separate access to its resources among various PCIe hardware functions. These functions consist of the following types:
• A PCIe Physical Function (PF). This function is the primary function of the device and
Deployment Guide: vNIOS deployment on KVM – January 2019
32
advertises the device's SR-IOV capabilities.
• One or more PCIe Virtual Functions (VFs). Each VF is associated with the device's PF. A VF shares one or more physical resources of the device, such as a memory and a network port, with the PF and other VFs on the device. Each VF is associated with a KVM instance in a virtualized environment.
Each PF and VF is assigned a unique PCI Express Requester ID (RID) that allows an I/O memory management unit (IOMMU) to differentiate between different traffic streams and apply memory and interrupt translations between the PF and VFs. This allows traffic streams to be delivered directly to the appropriate KVM instance. As a result, nonprivileged data traffic flows from the PF to VF without affecting other VFs.
SR-IOV enables network traffic to bypass the software switch layer of the KVM virtualization stack. Because the VF is assigned to an instance, the network traffic flows directly between the VF and instance. As a result, the I/O overhead in the software emulation layer is diminished and achieves network performance that is nearly the same performance as in nonvirtualized environments.
Enabling SR-IOV virtual functions in KVM
Enabling SR-IOV virtual function on KVM
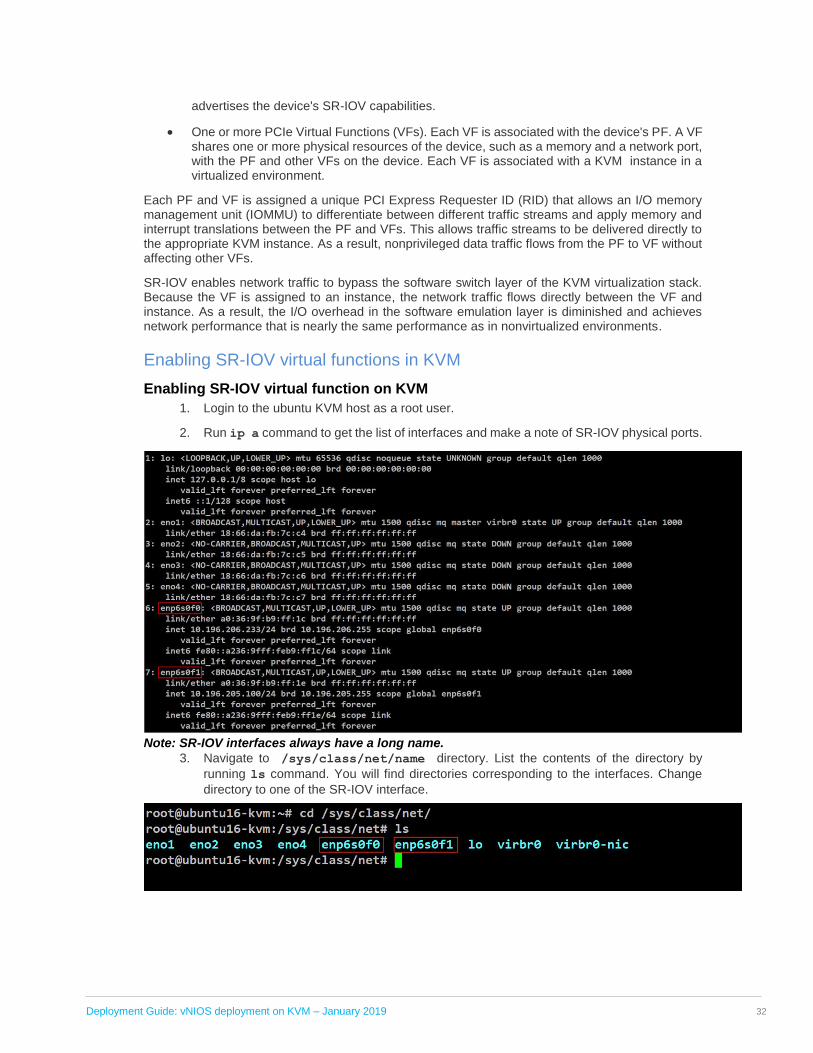
1. Login to the ubuntu KVM host as a root user.
2. Run ip a command to get the list of interfaces and make a note of SR-IOV physical ports.
Note: SR-IOV interfaces always have a long name.
3. Navigate to /sys/class/net/name directory. List the contents of the directory by
running ls command. You will find directories corresponding to the interfaces. Change
directory to one of the SR-IOV interface.
Deployment Guide: vNIOS deployment on KVM – January 2019
33
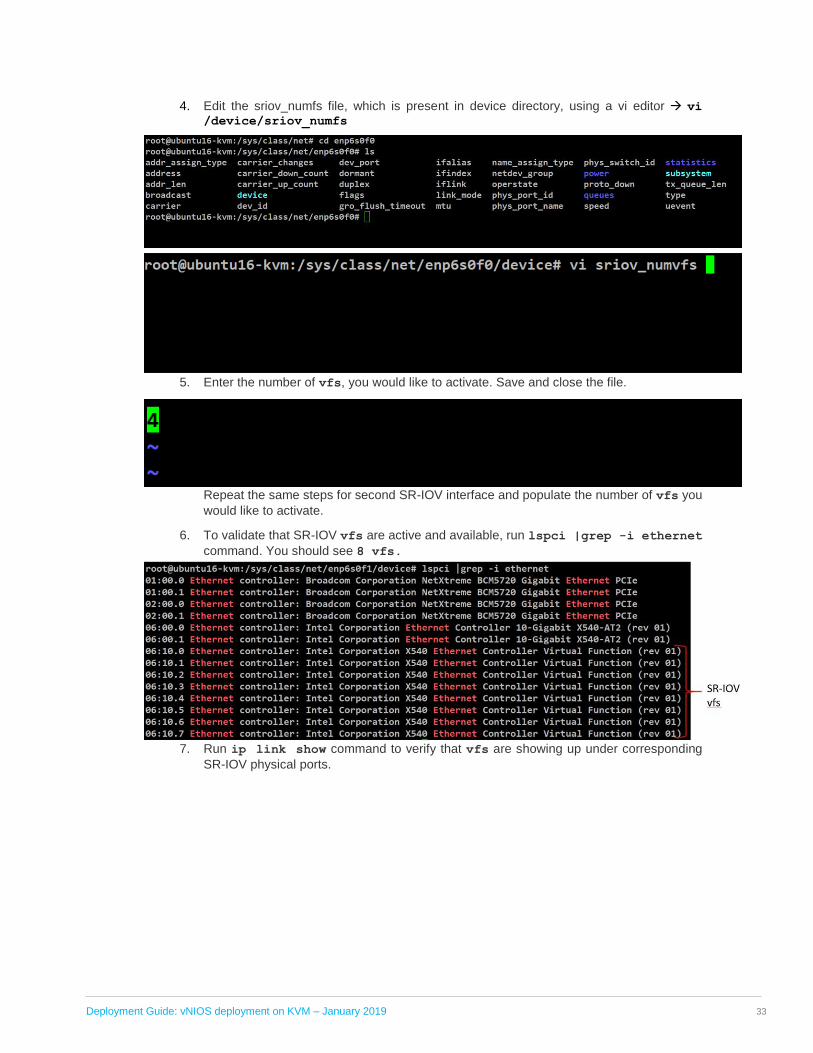
4. Edit the sriov_numfs file, which is present in device directory, using a vi editor → vi
/device/sriov_numfs
5. Enter the number of vfs, you would like to activate. Save and close the file.
Repeat the same steps for second SR-IOV interface and populate the number of vfs you
would like to activate.
6. To validate that SR-IOV vfs are active and available, run lspci |grep -i ethernet
command. You should see 8 vfs.
7. Run ip link show command to verify that vfs are showing up under corresponding
SR-IOV physical ports.
Deployment Guide: vNIOS deployment on KVM – January 2019
34
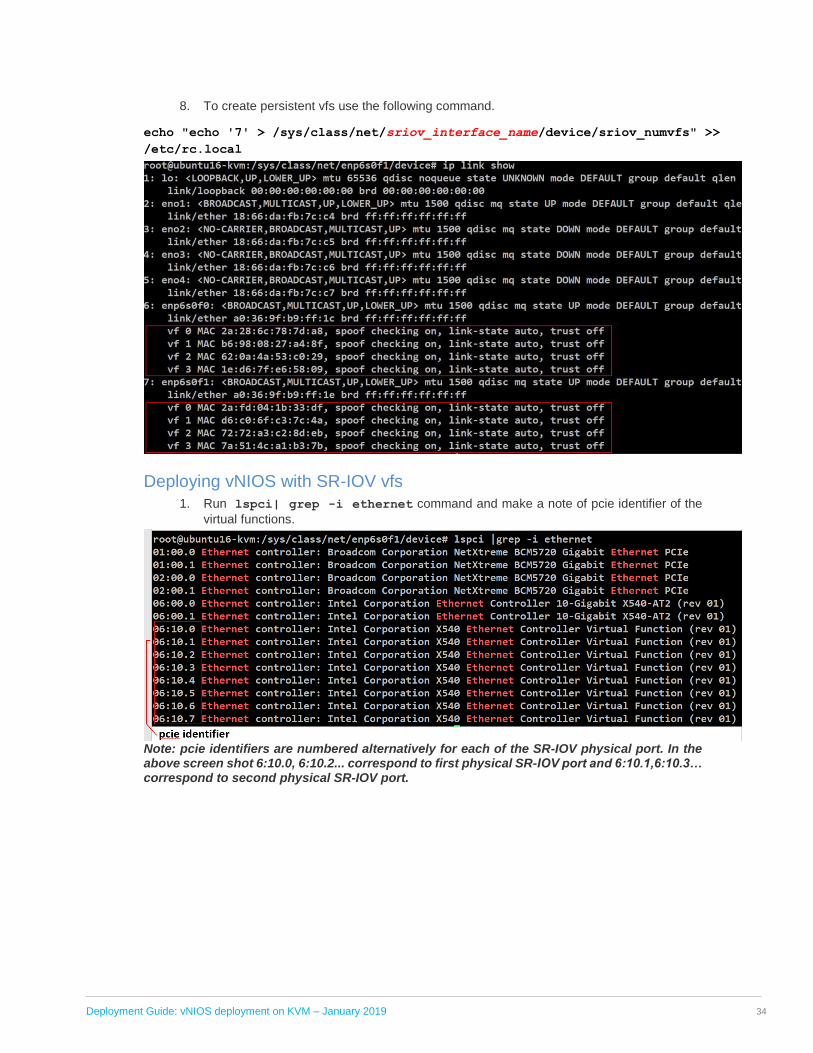
8. To create persistent vfs use the following command.
echo "echo '7' > /sys/class/net/sriov_interface_name/device/sriov_numvfs" >>
/etc/rc.local
Deploying vNIOS with SR-IOV vfs
1. Run lspci| grep -i ethernet command and make a note of pcie identifier of the
virtual functions.
Note: pcie identifiers are numbered alternatively for each of the SR-IOV physical port. In the above screen shot 6:10.0, 6:10.2... correspond to first physical SR-IOV port and 6:10.1,6:10.3… correspond to second physical SR-IOV port.
Deployment Guide: vNIOS deployment on KVM – January 2019
35
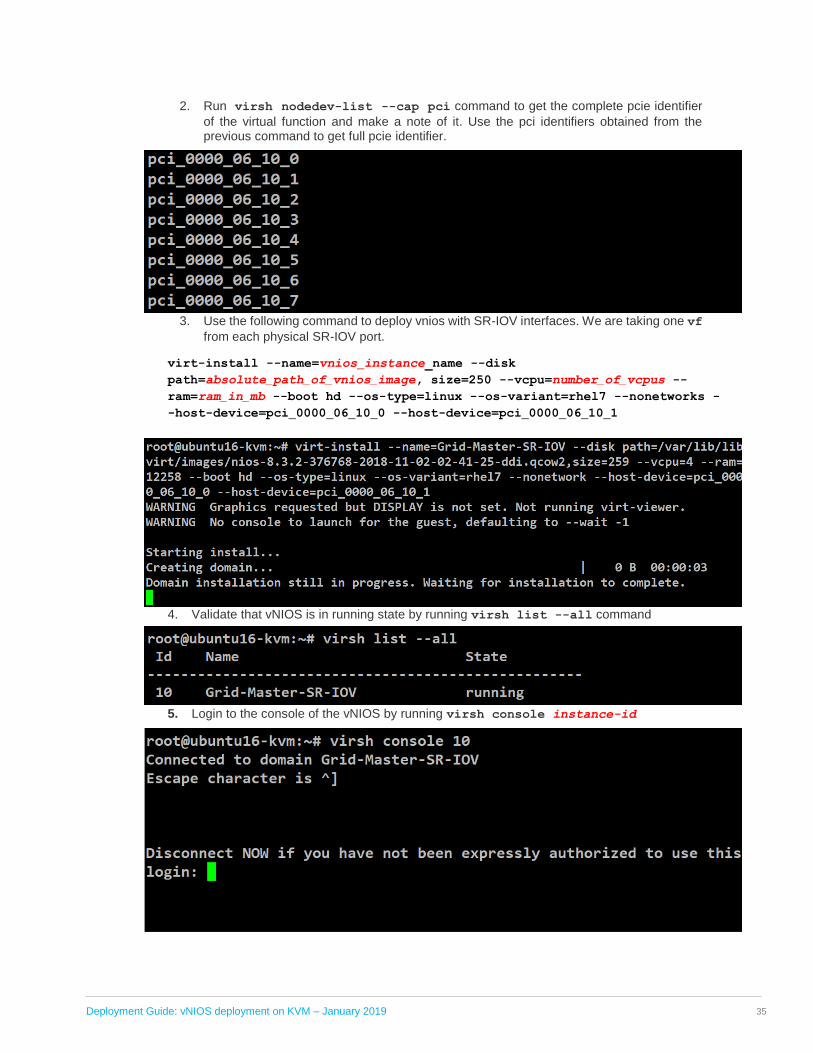
2. Run virsh nodedev-list --cap pci command to get the complete pcie identifier
of the virtual function and make a note of it. Use the pci identifiers obtained from the previous command to get full pcie identifier.
3. Use the following command to deploy vnios with SR-IOV interfaces. We are taking one vf
from each physical SR-IOV port.
virt-install --name=vnios_instance_name --disk
path=absolute_path_of_vnios_image, size=250 --vcpu=number_of_vcpus --
ram=ram_in_mb --boot hd --os-type=linux --os-variant=rhel7 --nonetworks -
-host-device=pci_0000_06_10_0 --host-device=pci_0000_06_10_1
4. Validate that vNIOS is in running state by running virsh list --all command
5. Login to the console of the vNIOS by running virsh console instance-id
Deployment Guide: vNIOS deployment on KVM – January 2019
36
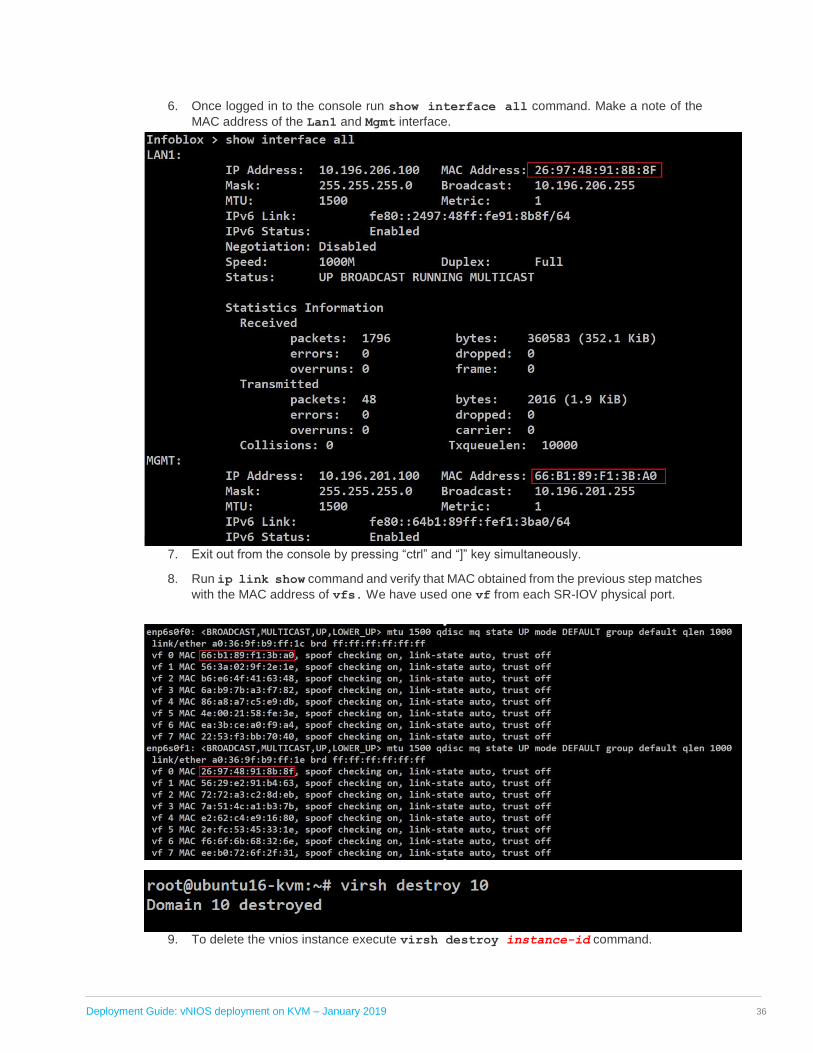
6. Once logged in to the console run show interface all command. Make a note of the
MAC address of the Lan1 and Mgmt interface.
7. Exit out from the console by pressing “ctrl” and “]” key simultaneously.
8. Run ip link show command and verify that MAC obtained from the previous step matches
with the MAC address of vfs. We have used one vf from each SR-IOV physical port.
9. To delete the vnios instance execute virsh destroy instance-id command.
Deployment Guide: vNIOS deployment on KVM – January 2019
37
Some Useful information
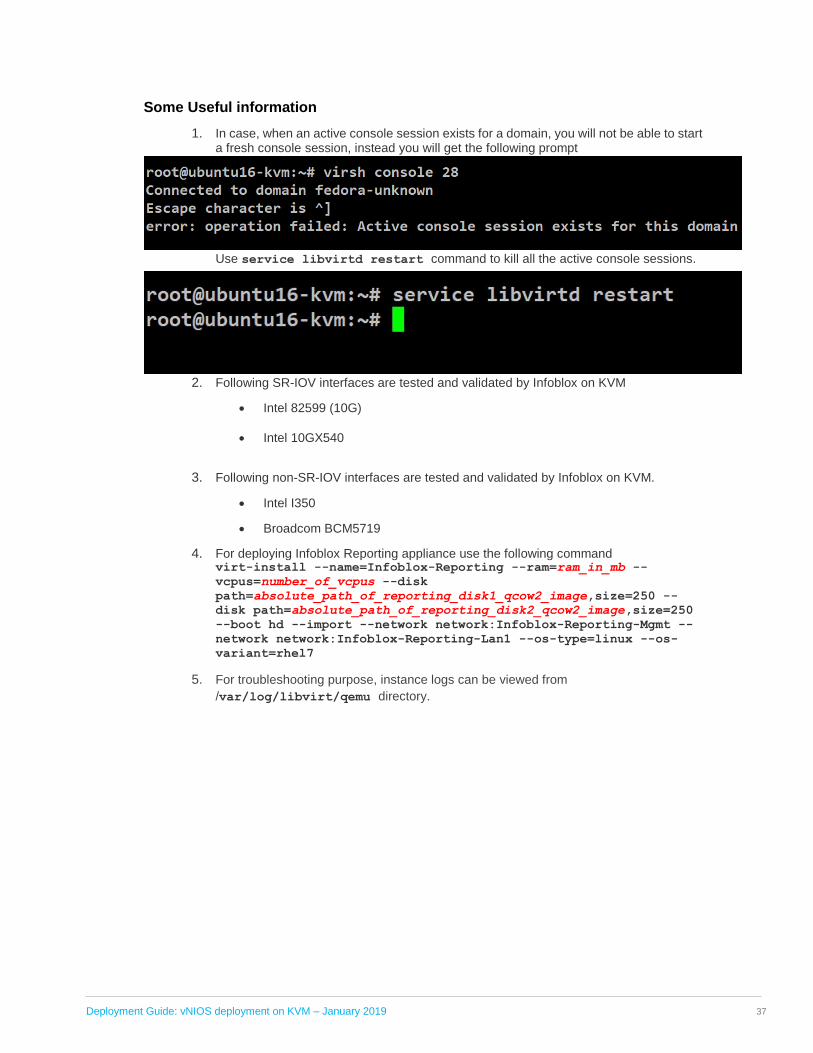
1. In case, when an active console session exists for a domain, you will not be able to start a fresh console session, instead you will get the following prompt
Use service libvirtd restart command to kill all the active console sessions.
2. Following SR-IOV interfaces are tested and validated by Infoblox on KVM
• Intel 82599 (10G)
• Intel 10GX540
3. Following non-SR-IOV interfaces are tested and validated by Infoblox on KVM.
• Intel I350
• Broadcom BCM5719
4. For deploying Infoblox Reporting appliance use the following command virt-install --name=Infoblox-Reporting --ram=ram_in_mb --
vcpus=number_of_vcpus --disk
path=absolute_path_of_reporting_disk1_qcow2_image,size=250 --
disk path=absolute_path_of_reporting_disk2_qcow2_image,size=250
--boot hd --import --network network:Infoblox-Reporting-Mgmt --
network network:Infoblox-Reporting-Lan1 --os-type=linux --os-
variant=rhel7
5. For troubleshooting purpose, instance logs can be viewed from
/var/log/libvirt/qemu directory.

Infoblox is leading the way to next-level DDI with its Secure Cloud-Managed Network Services. Infoblox brings next-level security,
reliability and automation to on-premises, cloud and hybrid networks, setting customers on a path to a single pane of glass for network
management. Infoblox is a recognized leader with 50 percent market share comprised of 8,000 customers, including 350 of the
Fortune 500.
Corporate Headquarters | 3111 Coronado Dr. | Santa Clara, CA | 95054
+1.408.986.4000 | 1.866.463.6256 (toll-free, U.S. and Canada) | [email protected] | www.infoblox.com
© 2018 Infoblox, Inc. All rights reserved. Infoblox logo, and other marks appearing herein are property of Infoblox, Inc. All other marks are the
property of their respective owner(s).