infor system21 inventory management
TRANSCRIPT

Infor System21 Inventory Management
Product Guide

Copyright © 2013 Infor
Important Notices The material contained in this publication (including any supplementary information) constitutes and contains confidential and proprietary information of Infor. By gaining access to the attached, you acknowledge and agree that the material (including any modification, translation or adaptation of the material) and all copyright, trade secrets and all other right, title and interest therein, are the sole property of Infor and that you shall not gain right, title or interest in the material (including any modification, translation or adaptation of the material) by virtue of your review thereof other than the non-exclusive right to use the material solely in connection with and the furtherance of your license and use of software made available to your company from Infor pursuant to a separate agreement, the terms of which separate agreement shall govern your use of this material and all supplemental related materials ("Purpose"). In addition, by accessing the enclosed material, you acknowledge and agree that you are required to maintain such material in strict confidence and that your use of such material is limited to the Purpose described above. Although Infor has taken due care to ensure that the material included in this publication is accurate and complete, Infor cannot warrant that the information contained in this publication is complete, does not contain typographical or other errors, or will meet your specific requirements. As such, Infor does not assume and hereby disclaims all liability, consequential or otherwise, for any loss or damage to any person or entity which is caused by or relates to errors or omissions in this publication (including any supplementary information), whether such errors or omissions result from negligence, accident or any other cause. Without limitation, U.S. export control laws and other applicable export and import laws govern your use of this material and you will neither export or re-export, directly or indirectly, this material nor any related materials or supplemental information in violation of such laws, or use such materials for any purpose prohibited by such laws. Trademark Acknowledgements The word and design marks set forth herein are trademarks and/or registered trademarks of Infor and/or related affiliates and subsidiaries. All rights reserved. All other company, product, trade or service names referenced may be registered trademarks or trademarks of their respective owners. Publication Information Release: Infor System21 3.0 Publication date: February 26, 2013 Document code: IN

Contents
About this guide .............................................................................................................................. 29
Intended audience....................................................................................................................... 29
Related documents ..................................................................................................................... 29
Contacting Infor ........................................................................................................................... 29
Chapter 1 Overview ..................................................................................................................... 31
Introduction ................................................................................................................................. 31
Relationships to Other Applications ............................................................................................ 31
Application Configuration ............................................................................................................ 32
Application Set Up Data .............................................................................................................. 33 Standard Codes and Descriptions ........................................................................................ 33 Item Data .............................................................................................................................. 33 Units of Measure ................................................................................................................... 35 Stockroom Balance ............................................................................................................... 35 Location Control .................................................................................................................... 35 Batch Control/Lot Traceability ............................................................................................... 36 Warehousing ......................................................................................................................... 36 Alternative Items ................................................................................................................... 36 Kit Lists ................................................................................................................................. 36 Containers............................................................................................................................. 36 Calendar Control ................................................................................................................... 37 Transaction Control and Item Supersession ......................................................................... 37 Global Item Maintenance ...................................................................................................... 37
Application Processing ................................................................................................................ 38 Movement Transactions ........................................................................................................ 38 Processing within a Location-controlled Stockroom .............................................................. 40 Stock Counting ...................................................................................................................... 40 Stock Management ............................................................................................................... 41
Average Usage ............................................................................................................... 41
Infor System21 Inventory Management | 3

Contents
Re-order Point and Maximum Stock ............................................................................... 42 Re-ordering Rules ........................................................................................................... 43 Available/Expected Stock ............................................................................................... 44 Periodic Processing ........................................................................................................ 44 Lot, Grade and Potency .................................................................................................. 44 Enquiries ......................................................................................................................... 44
Item Transformation .................................................................................................................... 45 Unit of Measure Conversions .......................................................................................... 46
Bar Code - Standard Validation .................................................................................................. 47
Returnable Containers ................................................................................................................ 48 Container Tracking ................................................................................................................ 49 The Business Process .......................................................................................................... 49
Manufacturers ................................................................................................................. 50 Wholesalers .................................................................................................................... 51
Reports ....................................................................................................................................... 52
Implementation Considerations ................................................................................................... 52 Associated Applications ........................................................................................................ 52
Inventory Management Companies ................................................................................ 53 Basic Data Set Up .......................................................................................................... 54 Company Profile ............................................................................................................. 55 Stockrooms and Stock Weeks Matrices .......................................................................... 55 Usage Profiles ................................................................................................................ 55 Descriptions .................................................................................................................... 55 Items ............................................................................................................................... 55 Stockroom Details ........................................................................................................... 56 Alternative Products ........................................................................................................ 56 Calendars ....................................................................................................................... 56 Initial Stock Balance Take On ......................................................................................... 56
Chapter 2 Inventory Maintenance .............................................................................................. 59
Inventory Maintenance Introduction ............................................................................................ 59 Associated Applications ........................................................................................................ 59 Implementation Considerations ............................................................................................. 59 Basic Data Set Up ................................................................................................................. 60
Descriptions Maintenance [1/INM, 6/INUM, 1/INV, 3/SAM] ......................................................... 61 Descriptions File Maintenance Selection Window ................................................................. 61 Descriptions File Maintenance Window ................................................................................ 62
4 | Infor System21 Inventory Management

Contents
Descriptions File Maintenance Detail Window ...................................................................... 63 Descriptions File Maintenance Code Details Window ........................................................... 63 Descriptions File Maintenance Selected Details Window ..................................................... 64
Items [2/INM, 1/MDM, 1/SAM, 10/INM] ....................................................................................... 66 Create/Maintain Inventory Item Selection Window ................................................................ 66 Item Master Scan Pop-up ..................................................................................................... 67 Maintain Inventory Item Descriptive Data Window ................................................................ 68 Maintain Inventory Item Units of Measure Window ............................................................... 72 Maintain Inventory Item Analysis Codes Window ................................................................. 76 Maintain Inventory Item Price and Costing Information Window ........................................... 78 Maintain Inventory Item Inventory Control Information Window ............................................ 80 Maintain Inventory Item Default Ordering Information Window ............................................. 83 Maintain Inventory Item Supplementary Data Window ......................................................... 86 Maintain Inventory Item Container Information 1 Window ..................................................... 88 Maintain Inventory Item Container Information 2 Window ..................................................... 91 Inventory Item Search Words Pop-up ................................................................................... 93 Group Valuation Criteria Pop-up ........................................................................................... 94 Item Supersession Maintenance Window ............................................................................. 95 Supersession Detail Maintenance Pop-up ............................................................................ 95 Transaction Control Effectivity Window ................................................................................. 97 Item Alias Maintenance Window ........................................................................................... 98 Item Search Characteristics Window .................................................................................. 100 Item Pricing Groups Pop-up ................................................................................................ 100 Lot Header Parameters Maintenance Pop-up ..................................................................... 101 Maintain Text Pop-up .......................................................................................................... 104 Item Text Pop-up ................................................................................................................ 106 Item Purchase Text Pop-up ................................................................................................ 106 Multi-lingual Descriptions Maintenance Pop-up .................................................................. 107
Alternative Item Maintenance [3/INM] ....................................................................................... 109 Alternative Items Maintenance Selection Window .............................................................. 109 Alternative Items Maintenance Detail Window .................................................................... 109
Kit Lists [4/INM] ......................................................................................................................... 111 Kit Lists Maintenance Selection Window ............................................................................ 111 Kit List Maintenance Detail Window .................................................................................... 112
Stockroom Details [5/INM, 2/MDM] ........................................................................................... 113 Stockroom Details Maintenance Selection Window ............................................................ 114 Stockroom Details Maintenance Window ............................................................................ 115 Landed Costs Entry Window ............................................................................................... 120
Infor System21 Inventory Management | 5

Contents
Item/Stockroom Location Control Details Pop-up ............................................................... 121
FIFO Costs [6/INM] ................................................................................................................... 124 Maintain FIFO Costs Selection Window .............................................................................. 124 Maintain FIFO Costs Window ............................................................................................. 125
Item/Container Profile Maintenance [7/INM] ............................................................................. 126 Container Profile Definition Selection Window .................................................................... 127 Container Profile Definition Detail Window ......................................................................... 128
Account Container Tracking Maintenance [8/INM] .................................................................... 131 Account Container Tracking Selection Window .................................................................. 131 Account Container Tracking Maintenance Summary Window ............................................ 132 Set Last Agreed Audit Date Pop-up .................................................................................... 133 Account Container Tracking Delivery/Return Details Window ............................................ 134 Asset/Container Tracking Audit Details Pop-up .................................................................. 135
Linked Item Maintenance [10/INM]............................................................................................ 137 Linked Item Maintenance Window ...................................................................................... 137 Global Item Maintenance Browse Item Catalogue Window ................................................ 138 Accept/Reject Global Item Definition Pop-up ...................................................................... 140 Item Enquiry (Owning Company) - Profile Selection Pop-up .............................................. 141 Profile Selection Pop-up ..................................................................................................... 142 GIM (Publish Item Definition) - Select Copy-to Companies Window ................................... 144
Copy Based on Item Creation [11/INM] ..................................................................................... 146 Copy Based on Item Selection Window .............................................................................. 146 Profile Options Window ....................................................................................................... 147
Tax Kit Maintenance [12/INM] ................................................................................................... 147 Tax Kit Maintenance Selection Window .............................................................................. 147 Tax Kit Maintenance Detail Window ................................................................................... 148
GIM Publication Details [20/INM] .............................................................................................. 151 GIM Copy-to Company Maintenance - Select Item Window ............................................... 151 GIM Copy to Company Selection Window .......................................................................... 152 GIM Change Item Ownership Window ................................................................................ 153
GIM (Pending Transfers) [21/INM] ............................................................................................ 155 GIM Pending Transfers Out (Confirm/Amend Selection) Window ....................................... 155
Global Item Attribute [1/L1M] .................................................................................................... 157 Global Item Attribute Maintenance Selection Window ........................................................ 157 Item Attribute Profile Maintenance Pop-up ......................................................................... 158 Item Attribute Profile Maintenance Window ........................................................................ 158
6 | Infor System21 Inventory Management

Contents
Chapter 3 Inventory Processing .............................................................................................. 161
Introducing Inventory Processing .............................................................................................. 161 Processing within a Location-controlled Stockroom ............................................................ 161 Processing with Negative Stock in a Location-controlled Stockroom .................................. 162 Processing Logic within Inventory ....................................................................................... 162 Processing within a Location-controlled Stockroom Using Catchweight ............................. 162 Processing within a Bonded Warehouse controlled stockroom ........................................... 163
Receipts, Issues and Adjustments ............................................................................................ 164
Record Purchase Order [1/INP] ................................................................................................ 165 Record Purchase Order Selection Window ......................................................................... 165 Record Purchase Order Detail Window .............................................................................. 166
Purchase Order Receipt [2/INP] ................................................................................................ 168 Record Purchase Receipt Selection Window ...................................................................... 168 Record Purchase Receipt Detail Window ........................................................................... 169
Miscellaneous Receipt [3/INP] .................................................................................................. 172 Record Miscellaneous Receipt Selection Window .............................................................. 172 Record Miscellaneous Receipt Detail Window .................................................................... 173 Enter Location Balances Pop-up ......................................................................................... 176 Enter Secondary Balances Pop-up ..................................................................................... 180 Secondary Value Details Pop-up ........................................................................................ 181
Customer Order Issue [11/INP] ................................................................................................. 182 Record Customer Order Issue Selection Window ............................................................... 182 Record Customer Order Issue Detail Window .................................................................... 183
Miscellaneous Issues ................................................................................................................ 185
Issue Physical Stock [12/INP] ................................................................................................... 187 Record Miscellaneous Issue (Physical) Selection Window ................................................. 187 Record Miscellaneous Issue (Physical) Details Window ..................................................... 188
Issue Available Stock [13/INP] .................................................................................................. 190 Record Miscellaneous Issue (Available) Selection Window ................................................ 190 Record Miscellaneous Issue (Available) Detail Window ..................................................... 191
Issue Frozen Stock [21/INP] ..................................................................................................... 193 Record Miscellaneous Frozen Issue Selection Window ...................................................... 193 Record Miscellaneous Frozen Issue Detail Window ........................................................... 194
Item Transformation [26/INP] .................................................................................................... 196 Record Item Transformation Selection Window .................................................................. 196 Review Item Transformation Details Window ...................................................................... 197
Infor System21 Inventory Management | 7
Contents
Review Item Transformation Details (Expanded View) Window ......................................... 199 Record One-to-One Item Transformation Details Window .................................................. 201 Record Many-to-One Item Transformation Details Window ................................................ 204 Record One-to-Many Item Transformation Details Window ................................................ 208
Physical Stock Adjustment [31/INP] .......................................................................................... 212 Record Stock Adjustment (Physical) Selection Window ..................................................... 212 Record Stock Adjustment (Physical) Detail Window ........................................................... 214
Allocated Stock Adjustment [32/INP] ......................................................................................... 216 Record Allocated Adjustment Selection Window ................................................................ 216 Record Allocated Adjustment Details Window .................................................................... 217
Frozen Stock Adjustment [33/INP] ............................................................................................ 219 Record Frozen Adjustment Selection Window .................................................................... 219 Record Frozen Adjustment Details Window ........................................................................ 220
Stock Transfers ......................................................................................................................... 222
Record Transfer Out [41/INP, 6/DRP, 11/WTD] ........................................................................ 224 Record Transfer Out Selection Window .............................................................................. 224 Record Transfer Out Detail Window ................................................................................... 225 Enter Rotation Balances Pop-up ......................................................................................... 228 Add Rotation Date Balance Pop-up .................................................................................... 230 Record Transfer Out Despatch Details Pop-up ................................................................... 230
Confirm Shipment Receipt [42/INP, 7/DRP, 12/WTD] ............................................................... 233 Confirm Shipment Receipt Selection Window ..................................................................... 233 Confirm Shipments Receipt Items in Transit Window ......................................................... 234
Single-step Stock Transfers ...................................................................................................... 237
Available Stock Transfer [43/INP] ............................................................................................. 238 Record Stock Transfer Selection Window ........................................................................... 238 Record Stock Transfer Detail Window ................................................................................ 239
Frozen Stock Transfer [51/INP] ................................................................................................. 242 Record Frozen Stock Transfer Selection Window ............................................................... 242 Record Frozen Stock Transfer Detail Window .................................................................... 243
Chapter 4 Stock Counting ........................................................................................................ 247
Stock Counting Introduction ...................................................................................................... 247 Stock Counting Steps ......................................................................................................... 248
Maintain Count Profile [1/INS, 1/WHS] ...................................................................................... 248 Count Profile Maintenance Stockroom Selection Window .................................................. 249 Count Profile Maintenance Details Window ........................................................................ 249
8 | Infor System21 Inventory Management

Contents
Count Profile Maintenance ABC Details Window ................................................................ 252
Enquire on Count Profile [2/INS, 2/WHS] .................................................................................. 253 Count Profile Enquiry Selection Window ............................................................................. 253 Count Profile Enquiry Details Window ................................................................................ 253 Count Profile Enquiry ABC Details Window ........................................................................ 253
Regenerate ABC Classifications [11/INS, 11/WHS] .................................................................. 254 Regenerate ABC Classifications Window ........................................................................... 254
Create Count by ABC Classification [21/INS, 21/WHS] ............................................................ 255 Create Count by Class/Date Selection Window .................................................................. 256 Create Count by Class/Date Control Window ..................................................................... 256
Create Count by Manual Range [22/INS, 22/WHS] .................................................................. 259 Create Count by Manual Range Detail Window .................................................................. 259
Create Count by Location Range [23/INS] ................................................................................ 263 Create Count by Location Selection Window ...................................................................... 263
Create Count for Warehouse Location [23/WHS] ..................................................................... 265 Create Count by Warehouse Location Area Selection Window .......................................... 265 Create Count by Warehouse Location Detail Window ........................................................ 266
Maintain Recommended Count [31/INS, 31/WHS].................................................................... 269 Maintain Count Selection Window ...................................................................................... 269 Maintain Count Details Window .......................................................................................... 270 Addition Pop-up .................................................................................................................. 271 Location-based Maintain Count Detail Window ................................................................... 272 Count Size Warning Pop-up ............................................................................................... 273
Enter Count Details [32/INS, 32/WHS] ...................................................................................... 274 Enter Count Selection Window ........................................................................................... 274 Enter Count Details Window ............................................................................................... 275 Enter Count Amendment Pop-up ........................................................................................ 277 Enter Count Addition Pop-up .............................................................................................. 279 Enter Counted Quantity Pop-up .......................................................................................... 281 Update Confirmation Pop-up............................................................................................... 282
Complete Count Lists [33/INS, 33/WHS] ................................................................................... 283 Complete Count Lists Count Selection Window .................................................................. 283 Complete Count Lists List Selection Window ...................................................................... 283
Print Count Sheets [ 41/INS, 41/WHS] ...................................................................................... 284 Print Count Sheets Count Selection Window ...................................................................... 285
Reprint Count Sheets [42/INS, 42/WHS] ................................................................................... 287
Infor System21 Inventory Management | 9
Contents
Reprint Count Sheets Count Selection Window .................................................................. 287
Count Reconciliation ................................................................................................................. 288
Count Reconciliation without Update [51/INS, 51/WHS] ........................................................... 294 Request Count Reconciliation (without Update) Selection Window .................................... 294 Request Count Reconciliation (without Update) Details Window ........................................ 295
Count Reconciliation with Update [52/INS, 52/WHS] ................................................................ 297 Request Count Reconciliation (with Update) Selection Window ......................................... 297 Request Count Reconciliation (with Update) Details Window ............................................. 297 Reconciliation History Updates ........................................................................................... 300
Enquire on Recommended Counts [61/INS, 61/WHS] .............................................................. 301 Count Enquiry Selection Window ........................................................................................ 301 Count Enquiry Details Window ............................................................................................ 301
Enquire on Outstanding Counts [62/INS, 62/WHS] ................................................................... 303 Count Enquiry Selection Window ........................................................................................ 303 Count Enquiry Detail Window ............................................................................................. 304
Enquire on Item Count Summary [63/INS, 63/WHS] ................................................................. 305 Item Count Summary Enquiry Selection Window ................................................................ 305 Item Count Summary Enquiry Details Window ................................................................... 305 Item Count Summary Enquiry Item Details Window ........................................................... 306
Enquire on Count History [64/INS, 64/WHS] ............................................................................. 307 Count History Enquiry Selection Window ............................................................................ 307 Count History Enquiry Summary Window ........................................................................... 308 Count History Enquiry Stockroom Detail window ................................................................ 308
Chapter 5 Inventory Updates ................................................................................................... 309
Inventory Updates Introduction ................................................................................................. 309 Inventory Decisions ............................................................................................................. 310
Week End Update [1/INC] ......................................................................................................... 314 Week End Update Confirmation Window ............................................................................ 314
Month End Update [2/INC] ........................................................................................................ 315 Month End Update Record Report Selection Criteria Window ............................................ 316 Month End Update Confirmation Window ........................................................................... 317
Year End Update [3/INC] .......................................................................................................... 319 Maintain Calendar File Window .......................................................................................... 320
Calculate ROP, Max Stock, and EOQ [4/INC] ........................................................................... 320
GIM (Item Update)[11/INC] ....................................................................................................... 322
10 | Infor System21 Inventory Management

Contents
Global Item Maintenance Submit Transfers (Confirm/Amend Selections) Window ............. 322
Global Duty Amendment [20/INC] ............................................................................................. 324 Global Duty Amendment Window ....................................................................................... 324
Standard Cost Change List [25/INC] ......................................................................................... 326 Standard Cost Change Maintenance Selection Window ..................................................... 327 Create/Amend List Pop-up .................................................................................................. 329 Standard Cost Change Cost Maintenance Window ............................................................ 330 Standard Cost Change Add Items Window ......................................................................... 332 Standard Cost Change Add Items by Range Window ........................................................ 333 Landed Cost Entry Window................................................................................................. 334
Month End Average Cost Revaluation [30/INC] ........................................................................ 335 Month End Average Costing Inventory Revaluation Window .............................................. 335
Chapter 6 Lot/Grade/Potency ................................................................................................... 337
Lot/Grade/Potency Introduction ................................................................................................ 337 Shelf Life, Grade and Potency ............................................................................................ 338
Maintain Lot Header [1/INL, 2/AOM] ......................................................................................... 340 Lot Header Maintenance Selection Window ....................................................................... 342 Lot Header Maintenance Details Window ........................................................................... 342 Adjust Active Ingredient Window ......................................................................................... 348 Maintain C-of-C Reference Pop-up ..................................................................................... 349
Maintain Grade [2/INL] .............................................................................................................. 350 Grade Maintenance Selection Window ............................................................................... 350 Grade Maintenance Detail Window ..................................................................................... 350 Maintain Grade Pop-up ....................................................................................................... 351
Stock Status Re-calculation [11/INL] ......................................................................................... 352 Stock Balance Re-calculation Window ................................................................................ 352
Lot Transformation [12/INL] ...................................................................................................... 353 Record Lot Transformation Selection Window .................................................................... 353 Record Lot Transformation Details Window ........................................................................ 354 Lot Header Details Pop-up .................................................................................................. 355
Enquire on Grade [21/INL] ........................................................................................................ 359 Grade Enquiry Selection Window ....................................................................................... 359 Grade Enquiry Details Window ........................................................................................... 359
Enquire on Grade History [22/INL] ............................................................................................ 360 Grade History Enquiry Selection Window ........................................................................... 360 Grade History Enquiry Details Window ............................................................................... 360
Infor System21 Inventory Management | 11

Contents
Enquire on Stock Status [23/INL] .............................................................................................. 362 Stock Status Enquiry Window ............................................................................................. 362 Stock Status Enquiry Available and Frozen Lots Window ................................................... 363
Enquire on Stock Status History [24/INL] .................................................................................. 365 Stock Status History Enquiry Selection Window ................................................................. 365 Stock Status History Enquiry Details Window ..................................................................... 365
Enquire on Potency [25/INL] ..................................................................................................... 367 Potency Enquiry Selection Window .................................................................................... 367 Potency Enquiry Details Window ........................................................................................ 367 Potency History Enquiry Pop-up ......................................................................................... 369
Enquire on Lot Trace [26/INL] ................................................................................................... 370 Lot Trace Enquiry Selection Window .................................................................................. 370 Lot Trace Enquiry Details Window ...................................................................................... 371 Forward/Backward Trace Pop-up ....................................................................................... 373
Lot Header Defaults Audit [31/INL]............................................................................................ 374
Report by Shelf Life [32/INL] ..................................................................................................... 375 Shelf Life Report Selection Window .................................................................................... 375
Chapter 7 Packaging Requirements ........................................................................................ 377
Introduction to Packaging Requirements .................................................................................. 377
Maintain Country Details [1/INK] ............................................................................................... 378 Maintain Packaging Reporting Countries Selection Window .............................................. 378 Maintain Packaging Reporting Country Detail Window ....................................................... 379 Maintain Responsibilities Pop-up ........................................................................................ 381 Packaging Codes Details Window ...................................................................................... 382 Add/Amend Packaging Details Pop-up ............................................................................... 383 Average Packaging Details per Despatch Window ............................................................. 384 Add Average Packaging Details Pop-up ............................................................................. 384 Maintain Packaging Categories Pop-up .............................................................................. 385 Add/Amend Packaging Category Pop-up ........................................................................... 386
Maintain Item Details [2/INK] ..................................................................................................... 387 Country Item Packing Details Selection Window ................................................................ 387 Link to Item Pop-up ............................................................................................................. 388 Country Item Packaging Codes Details Window ................................................................. 389 Enter Item Packaging Details Pop-up ................................................................................. 390 Select Additional Packaging Quantity Breaks Pop-up ......................................................... 391 Override Responsibilities Pop-up ........................................................................................ 392
12 | Infor System21 Inventory Management

Contents
Packaging Reporting Country Selection Pop-up ................................................................. 392 Select Route Pop-up ........................................................................................................... 393
Customer/Item Overrides [3/INK] .............................................................................................. 395 Customer/Item Responsibility Overrides Country Selection Window .................................. 395 Customer/Item Responsibility Overrides Selection Window ............................................... 395 Selection of Customer to be Maintained Window ................................................................ 396 Customer/Item Responsibility Overrides Window ............................................................... 396
Sales Channel Overrides [4/INK] .............................................................................................. 398 Sales Channel Responsibility Overrides Window ............................................................... 398 Override Responsibilities (Sales Channels) Pop-up ........................................................... 399
Maintain Calendar [5/INK] ......................................................................................................... 400 Inventory Calendar/Year Maintenance Selection Window .................................................. 400 Inventory Calendar/Year Maintenance Detail Window ........................................................ 401 Inventory Calendar/Year Maintenance (Standard Week) Window ...................................... 402 Inventory Calendar/Year Maintenance (Cyclic Week) Window ........................................... 403 Inventory Calendar/Year Maintenance (Period) Window .................................................... 404 Inventory Calendar/Year Maintenance Holiday Detail Window ........................................... 405
Extract Data from Inventory [11/INK] ......................................................................................... 406 Data Extract Selection Window ........................................................................................... 406
Update Period/Quarter [12/INK] ................................................................................................ 407 Update Quarter/Year Window ............................................................................................. 407 Update Quarter/Year Window ............................................................................................. 407
Corrections and Adjustments [13/INK] ...................................................................................... 408 Corrections and Adjustments Selection Window ................................................................. 408 Corrections and Adjustments Detail Window ...................................................................... 408 Corrections and Adjustments Window ................................................................................ 409
Enquire on Country Details [21/INK] ......................................................................................... 411 Packaging Reporting Countries Enquiry Selection Window ................................................ 411 Packaging Reporting Country Enquiry Details Window ...................................................... 411 Responsibilities Enquiry Pop-up ......................................................................................... 412 Packaging Details Enquiry Window .................................................................................... 412 Average Packaging Details per Despatch Enquiry Window ................................................ 413 Packaging Categories Enquiry Pop-up ............................................................................... 413
Enquire on Item Details [22/INK] ............................................................................................... 414 Country Item Packaging Details Enquiry Selection Window ............................................... 414 Country Item Packaging Details Enquiry Window ............................................................... 414
Packaging Payments [31/INK] .................................................................................................. 416
Infor System21 Inventory Management | 13

Contents
Packaging Payments Report Selection Window ................................................................. 416
Packaging Adjustments [32/INK] ............................................................................................... 417 Packaging Adjustment Report Selection Window ............................................................... 417
Packaging Usage [33/INK] ........................................................................................................ 418 Packaging Report Selection Window .................................................................................. 418
Delete Historical Data [42/INK] ................................................................................................. 419 Delete Historical Data Window ............................................................................................ 419
Create Historical Data [43/INK] ................................................................................................. 420 Create Historical Data Window ........................................................................................... 420
Chapter 8 Inventory Valuation ................................................................................................. 421
Inventory Valuation Introduction ................................................................................................ 421
Maintain Descriptions [1/INV] .................................................................................................... 422
Costing Analysis [2/INV] ............................................................................................................ 422 Costing Analysis Maintenance Selection Window ............................................................... 422 Costing Analysis Maintenance Detail Window .................................................................... 423
Stockroom Fiscal Close, Trial [11/INV] ...................................................................................... 424 Stockroom Fiscal Close Trial Selection Window ................................................................. 424 Stockroom Fiscal Close Window (Stockroom Range) ......................................................... 426 Stockroom Fiscal Close Window (Stockroom List) .............................................................. 426
Stockroom Fiscal Close, Update [12/INV] ................................................................................. 428
LIFO Re-valuation ..................................................................................................................... 428
LIFO Re-valuation, Trial [13/INV] .............................................................................................. 429 LIFO Re-valuation Trial Window ......................................................................................... 429 LIFO Re-valuation Window (Stockroom Range) ................................................................. 430 LIFO Re-valuation Window (Stockroom List) ...................................................................... 431
LIFO Re-valuation, Update [14/INV] .......................................................................................... 431 LIFO Re-valuation Update Window ..................................................................................... 431 LIFO Re-valuation Update Stockroom Range Window ....................................................... 433 LIFO Re-valuation Update Stockroom List Window ............................................................ 435
Report by Stock Movements [21/INV] ....................................................................................... 436 Stock Movements Print Selection Window .......................................................................... 436 Stock Movements Print Confirmation Window .................................................................... 438
Derive Opening Balances [31/INV]............................................................................................ 439 Cost Analysis Derive Opening Balances Window ............................................................... 439
Costing Analysis Maintenance [32/INV] .................................................................................... 440
14 | Infor System21 Inventory Management

Contents
Costing Analysis Setup Maintenance Selection Window .................................................... 440 Costing Analysis Setup Maintenance Item Selection Window ............................................ 441 Costing Analysis Setup Maintenance Opening Values Window.......................................... 441 Costing Analysis Setup Maintenance Previous Values Window ......................................... 442
Costing Analysis Setup Update [33/INV] ................................................................................... 444 Costing Analysis Setup Update Window ............................................................................. 444
LIFO Define Opening Balances [41/INV] ................................................................................... 445 LIFO Analysis Setup Selection Window .............................................................................. 445 LIFO Analysis Setup Detail Window ................................................................................... 445
Month End Average Revaluation Report [50/INV] ..................................................................... 446 Rerun Revaluation Report Window ..................................................................................... 446
Chapter 9 Enquiries .................................................................................................................. 449
Inventory Enquiries Introduction ................................................................................................ 449
Kit List Item Where Used Enquiry [1/INE] ................................................................................. 449 Kit List Item Where Used Selection Window ....................................................................... 449 Kit List Item Where Used Window ....................................................................................... 450
Descriptions Enquiry [2/INE] ..................................................................................................... 450 Descriptions File Enquiry Selection Window ....................................................................... 450 Descriptions File Enquiry Window ....................................................................................... 451 Descriptions File Enquiry Details Window ........................................................................... 451 Description File Enquiry Minor Type Details Window .......................................................... 452 Multi-lingual Descriptions Enquiry Pop-up .......................................................................... 452
Item/Stockroom Enquiry [3/INE] ................................................................................................ 452 Item/Stockroom Enquiry Selection Window ........................................................................ 452 Item/Stockroom Enquiry Window ........................................................................................ 453 Maintain Inventory Item Descriptive Data Window .............................................................. 453 Maintain Inventory Item Units of Measure Window ............................................................. 454 Maintain Inventory Item Analysis Codes Window ............................................................... 454 Maintain Inventory Item Price and Costing Window ............................................................ 455 Maintain Inventory Item Inventory Control Window ............................................................. 455 Maintain Inventory Item Default Ordering Window .............................................................. 456 Maintain Inventory Item Supplementary Data Window ....................................................... 456 Maintain Inventory Item Containers 1 Window .................................................................... 457 Maintain Inventory Item Containers 2 Window .................................................................... 457 Group Valuation Criteria Pop-up ......................................................................................... 457 Country Item Packaging Details Enquiry Window ............................................................... 458
Infor System21 Inventory Management | 15

Contents
Item Supersession Enquiry Window ................................................................................... 458 Supersession Detail Enquiry Pop-up .................................................................................. 458 Transaction Code Effectivity Enquiry Window ..................................................................... 458 Transaction Control Enquiry Header Selection Window ..................................................... 459 Transaction Control Enquiry Window .................................................................................. 459 Item Pricing Groups Enquiry Pop-up ................................................................................... 459 Lot Header Parameters Enquiry Pop-up ............................................................................. 460 Maintain Text Pop-up .......................................................................................................... 460 Item Text Window ............................................................................................................... 460 Purchase Text Enquiry Pop-up ........................................................................................... 460 Item/Stockroom Stock Summary Enquiry Window .............................................................. 461 Item/Stockroom Enquiry Stockroom Details Window .......................................................... 462 Item/Stockroom Lot Details Window ................................................................................... 465 Item/Stockroom Receipts Cost Enquiry Window ................................................................. 468 Lot Header Details Pop-up .................................................................................................. 469 Lot Trace Enquiry Window .................................................................................................. 472 Allocations Enquiry Pop-up ................................................................................................. 473 Item/Stockroom Lot by Date Details Window ...................................................................... 474 Locations Enquiry Window .................................................................................................. 475 Rotation Date Balances Window ......................................................................................... 476 Purchase/Issue Unit Selection Pop-up ................................................................................ 476 Item/Stockroom Enquiry FIFO Cost Details Window ........................................................... 477 Movements Analysis Pop-up............................................................................................... 478 Cost Analysis Pop-up .......................................................................................................... 479
Stock Movements [4/INE, 11/DRE] ........................................................................................... 481 Inventory Movements Enquiry Window ............................................................................... 481 Inventory Movements Summary Window ............................................................................ 482 Inventory Movements Details Window ................................................................................ 483
All Stockrooms for an Item [5/INE] ............................................................................................ 484 All Stockrooms for an Item Enquiry Selection Window ....................................................... 484 All Stockrooms for an Item Enquiry Enterprise Wide Window ............................................. 485 All Stockrooms for an Item Enquiry Window ....................................................................... 486
Stock History [6/INE] ................................................................................................................. 487 Stock History Enquiry Selection Window ............................................................................ 487 Stock History Enquiry Window ............................................................................................ 487
Stock In-transit [7/INE] .............................................................................................................. 488 Shipments In-transit Enquiry Selection Window .................................................................. 488 Shipments In-transit Enquiry Window ................................................................................. 488
16 | Infor System21 Inventory Management
Contents
Alternative Items [8/INE] ........................................................................................................... 491 Alternative Items Enquiry Selection Window ....................................................................... 491 Alternative Items Enquiry Details Window .......................................................................... 491
Deleted Items [9/INE] ................................................................................................................ 493 Deleted Items Enquiry Selection Window ........................................................................... 493 Deleted Items Enquiry Details Window ............................................................................... 494
Transaction Control Codes [10/INE].......................................................................................... 495 Transaction Control Enquiry Selection Window .................................................................. 495
Kit List [11/INE] ......................................................................................................................... 495 Kit List Enquiry Selection Window ....................................................................................... 495 Kit List Enquiry Detail Window ............................................................................................ 496
Account Container Tracking [12/INE] ........................................................................................ 497 Account Container Tracking Enquiry Selection Window ..................................................... 497 Account Container Tracking Enquiry Summary Window ..................................................... 498 Account Container Tracking Enquiry Detail Window ........................................................... 498 Asset/Container Tracking Audit Details Pop-up .................................................................. 499
Item Container Profile Enquiry [13/INE] .................................................................................... 500 Item Container Profile Enquiry Selection Window ............................................................... 500 Item Container Profile Enquiry Customer Selection Window .............................................. 501 All Version by Item/Customer Window ................................................................................ 501 Item Container Profile Enquiry Detail Window .................................................................... 502
Enquire on Item Transformation [14/INE] .................................................................................. 502 Item Transformation Enquiry Selection Window ................................................................. 503 Item Transformation Enquiry Details Window ..................................................................... 503 Forward/Backward Trace Pop-up ....................................................................................... 505
Items in a Location Enquiry [15/INE] ......................................................................................... 506 Items in a Location Selection Window ................................................................................ 506 Items in a Location Window ................................................................................................ 506 More Details Pop-up ........................................................................................................... 507
Chapter 10 Reports ..................................................................................................................... 509
Item/Stockroom [1/INR] ............................................................................................................. 509 Item/Stockroom Report Selection Window .......................................................................... 509
Descriptions File [2/INR] ........................................................................................................... 510
Item Supersessions [3/INR] ...................................................................................................... 512 Item Supersession Report Selection Criteria Window ......................................................... 512
Account Container Tracking Report [4/INR] .............................................................................. 513
Infor System21 Inventory Management | 17

Contents
Account Container Tracking Selection Window .................................................................. 513
Item Audit [11/INR] .................................................................................................................... 514
Stockroom Audit [12/INR] .......................................................................................................... 515
Stock Movements Valuation Report [21/INR] ............................................................................ 516 Stock Movements Valuation Record Report Selection Criteria Window ............................. 516
Stock Valuation [22/INR] ........................................................................................................... 518 Stock Valuation Record Report Selection Criteria Window ................................................. 518 Stock Valuation Report Sequence Selection Window ......................................................... 519
Movements Audit Report [31/INR]............................................................................................. 521
Movements Processed by AFI [32/INR] .................................................................................... 522 Request Movements Processed by AFI Report Selection Window ..................................... 522
Stock Movements [33/INR] ....................................................................................................... 523 Request Stock Movements Report Selection Window ........................................................ 523
Negative Stock Report [34/INR] ................................................................................................ 524 Negative Stock Report Selection Window ........................................................................... 525
Negative Stock Periodic Parameters [35/INR] .......................................................................... 525 Negative Stock Report Periodic Parameter Maintenance Window ..................................... 526
Non-moving Items [36/INR] ....................................................................................................... 527 Report on Non-moving Items Selection Window ................................................................. 527 Report on Non-moving Items by Stockroom Range Window .............................................. 528 Report on Non-moving Items by Item Range Window ........................................................ 529 Report on Non-moving Items by Site Window ..................................................................... 530
Negative Locations [37/INR] ..................................................................................................... 531 Request Negative Locations Report Selection Window ...................................................... 531
Re-order/Overstock [41/INR] ..................................................................................................... 532 Re-order/Overstock Report Window ................................................................................... 532
Stock Availability [42/INR] ......................................................................................................... 534 Stock Availability Report Window ........................................................................................ 534
Supply/Demand Exceptions [43/INR, 1/AOR] ........................................................................... 536 Exception Report Prompt Window ...................................................................................... 536
Rotation Factors [44/INR] .......................................................................................................... 538 Stock Rotation Factor Report Selection Window ................................................................ 538 Stock Rotation Factor Report by Stockroom Window ......................................................... 539 Stock Rotation Factor Report by Item Window ................................................................... 539 Stock Rotation Factor Report by Stockroom and Item List Window .................................... 540
18 | Infor System21 Inventory Management

Contents
Stock Rotation Factor Report by Stockroom List and Item List Window ............................. 541 Stock Rotation Factor Report by Site and Item Range Window .......................................... 541 Stock Rotation Factor Report by Site and Item List Window ............................................... 542
Items in a Location [45/INR] ...................................................................................................... 543 Items in a Location Selection Window ................................................................................ 543
Chapter 11 Utilities ...................................................................................................................... 545
Introduction to Location Control ................................................................................................ 545
Inventory Company Profile [1/INUM] ......................................................................................... 550 Maintain Company Profile Selection Window...................................................................... 550 Maintain Company Profile Aspect Selection Window .......................................................... 550 Maintain Company Profile Window ..................................................................................... 551 All Serial/Lot/Batch Header Parameters Maintenance Pop-up............................................ 556 Secondary UOM Pop-up ..................................................................................................... 559 Extended Options Pop-up ................................................................................................... 560 Reference Number Entry Pop-up ........................................................................................ 561 Presentation Details Pop-up ............................................................................................... 562 Maintain Company Stockroom Profile Window ................................................................... 563 Advanced Allocations Options Window ............................................................................... 567 Maintain Company Profile Stock Weeks Matrix Window ..................................................... 568 Maintain Location Control Stockroom Profile Window ........................................................ 570 Maintain Location Map Window .......................................................................................... 572 Location Control Number of Locations Pop-up ................................................................... 573 Maintain Location Map Locations Window .......................................................................... 574 Select Usage Code Pop-up ................................................................................................ 575 Usage Profile Window ......................................................................................................... 575
Stockroom Site [2/INUM] ........................................................................................................... 576 Stockroom Site Maintenance Selection Window ................................................................. 576 Stockroom Site Maintenance Window ................................................................................ 577 Reference Number Entry Pop-up ........................................................................................ 578
Reference Numbers [3/INUM] ................................................................................................... 579 Maintain Reference Numbers Selection Window ................................................................ 579 Maintain Reference Numbers Window ................................................................................ 579
Document Text Profiles [4/INUM] .............................................................................................. 581 Document Text Profile Maintenance Selection Window ...................................................... 581 Document Text Profile Maintenance Details Window ......................................................... 581
Default Text Types [5/INUM] ..................................................................................................... 583
Infor System21 Inventory Management | 19

Contents
Default Text Maintenance Window ..................................................................................... 583
Calendar [7/INUM, 3/INC] ......................................................................................................... 584 Maintain Calendar File Window .......................................................................................... 584
Period/Week End Control [8/INUM] ........................................................................................... 586 Inventory Period End Control Maintenance Selection Window ........................................... 586 Year Total Control Pop-up .................................................................................................. 586 Inventory Period End Control Maintenance window ............................................................ 587
Secondary UoMs [9/INUM] ....................................................................................................... 588 Maintain Unit of Measure Selection Window ....................................................................... 588 Maintain Unit of Measure Details Window .......................................................................... 588 Maintain Unit of Measure Selected Details Window ............................................................ 589
Sourcing Rules Access [10/INUM] ............................................................................................ 591 Maintain Sourcing Policy Access Criteria Selection Window .............................................. 591 Maintain Sourcing Policy Access Window .......................................................................... 591 Confirm/Delete Sourcing Policy Access for Sales Order Window ....................................... 593
Sourcing Rules [11/INUM, 4/MPS, 5/MRP] ............................................................................... 594 Maintain Sourcing Rules Window ....................................................................................... 594
Transaction Control Codes [12/INUM] ...................................................................................... 595 Transaction Control Maintenance Selection Window .......................................................... 595 Transaction Header Selection Window ............................................................................... 596 Transaction Control Maintenance Window ......................................................................... 597
Transaction Control Dates [13/INUM] ....................................................................................... 598 Transaction Control Effectivity Selection Window ............................................................... 598 Transaction Control Effectivity Maintenance Window ......................................................... 599
Processing Profiles [14/INUM] .................................................................................................. 601 Inventory Processing Profile Maintenance Window ............................................................ 601 Inventory Processing Profile Maintenance Window ............................................................ 601 Inventory Processing Profile Maintenance Detail Window .................................................. 602
Authorise Users to Stockroom [16/INUM] ................................................................................. 606 Maintain Authorised Stockrooms User Window .................................................................. 606 Maintain Authorised Stockrooms window ........................................................................... 606
Inventory Company Relationships [30/INUM] ........................................................................... 606 Maintain Inventory Company Relationships Selection Window........................................... 607 Add/Amend Company Relationship Pop-up ........................................................................ 607
Copy Company [1/INUD] ........................................................................................................... 612 Copy a Company ................................................................................................................ 612
20 | Infor System21 Inventory Management

Contents
Rebuild Item Search [2/INUD] ................................................................................................... 613 Request an Item Search Rebuild ........................................................................................ 613
Renumber Item Search Words [3/INUD] ................................................................................... 614 Request Item Search Words Renumbering ........................................................................ 614
Re-calculate Nominal Sec Values [4/INUD] .............................................................................. 615 Request the Recalculation of Nominal Sec Values ............................................................. 615
Location Balance Data Take-on [5/INUD] ................................................................................. 616 Considerations before Using this Activity to Create Location Control Item/Stockroom Profiles616 Location Detail Data Take-on Window ................................................................................ 617
Purge Audit Files Maintenance [11/INUD] ................................................................................. 618 Audit File Purge Maintenance Selection Window ................................................................ 618 Audit File Purge Maintenance Details Window ................................................................... 619
Purge Audit Files Submit Purge [12/INUD] ............................................................................... 620 Audit File Purge Selection Window ..................................................................................... 620
Purge Audit Files Machine Manager Parameters [13/INUD] ..................................................... 621 Audit File Purge Control - Machine Manager Parameters Window ..................................... 621
Company Deletion [21/INUD] .................................................................................................... 622 Company Deletion Window ................................................................................................. 622
Delete History and Movements [22/INUD] ................................................................................ 623 Delete History and Movements Window ............................................................................. 623
Delete FIFO/Lot Details [23/INUD] ............................................................................................ 624 Delete FIFO/Lot Details Window ......................................................................................... 624
Purge Stock Counts [24/INUD] ................................................................................................. 625 Purge Stock Counts Window .............................................................................................. 625
Purge Count Details/Action Lists [25/INUD] .............................................................................. 626 Count Details and Action List Purge Window ...................................................................... 626
Delete Shipment Receipts [26/INUD] ........................................................................................ 627
Set Balance Quantities to Zero [27/INUD] ................................................................................. 627
Purge Location Allocation Details [30/INUD] ............................................................................. 628
Item Deletion Overview ............................................................................................................. 629
Maintain Lists and Validate Items [31/INUD] ............................................................................. 630 Create List Pop-up .............................................................................................................. 631 Item Deletion List Maintenance Selection Window ............................................................. 632 Item Deletion List Maintenance by List Window .................................................................. 633 Item Deletion List Maintenance by Range Window ............................................................. 633
Infor System21 Inventory Management | 21

Contents
Item Deletion List Maintenance Window ............................................................................. 634
Delete Items [32/INUD] ............................................................................................................. 636 Item Deletion List Selection Window ................................................................................... 636
Reuse Deleted Items [33/INUD] ................................................................................................ 638
Database Integrity [1/INUI] ........................................................................................................ 639 Inventory Integrity Menu Window ........................................................................................ 639
Reconciling Demand ................................................................................................................. 641
Allocation Reconciliation [2/INUI] .............................................................................................. 642 Allocation Reconciliation Window ....................................................................................... 642
Location Map [15/INUM] ........................................................................................................... 642 Location Map Window ......................................................................................................... 642
On Order Reconciliation [3/INUI] ............................................................................................... 644 On Order Reconciliation Window ........................................................................................ 644
Audit Negative FIFO [4/INUI] .................................................................................................... 645
Rebuild Balances from Locations [5/INUI] ................................................................................. 646 Rebuild Balances from Locations Window .......................................................................... 646
Adjust Rotation Date Balances [6/INUI] .................................................................................... 648 Adjust Rotation Date Balances Selection Window .............................................................. 648 Adjust Rotation Date Balances Details Window .................................................................. 649 Amend Rotation Date Balances Pop-up ............................................................................. 649
Install Link to AFI for Stock Extract [1/INUA] ............................................................................. 651 AFI Data Dictionary ............................................................................................................. 651 Activating the Link ............................................................................................................... 654
Stock Extract - Test Mode [2/INUA] .......................................................................................... 655 Prompt for Inventory Trial Extract and Update Window ...................................................... 655
Stock Extract - Live Mode [3/INUA] ........................................................................................... 657 AFI Pop-up .......................................................................................................................... 657
Install Link to AFI for Container Extract ..................................................................................... 658 AFI Data Dictionary ............................................................................................................. 658
Container Extract - Test Mode [12/INUA] .................................................................................. 660 Container Movements - Trial Extract Window ..................................................................... 660
Container Extract - Live Mode [13/INUA] .................................................................................. 662 Container Extract Pop-up .................................................................................................... 662
Chapter 12 Application Interface ............................................................................................... 663
22 | Infor System21 Inventory Management

Contents
Receive Product Activity Data [1/INAI] ...................................................................................... 663 Receive Product Activity Data Window ............................................................................... 663
Maintain Product Activity Data [11/INAI] ................................................................................... 664 Inbound Product Activity Data Error Window ...................................................................... 664 Error Inbound Product Activity Header Selection Window .................................................. 665 Inbound Product Activity Header Maintenance - Error Recovery Window .......................... 665 Untitled Line Selection Pop-up ............................................................................................ 666 Inbound Product Activity Line Selection - Error Recovery Window ..................................... 666 Inbound Product Activity Line Detail Maintenance - Error Recovery Window ..................... 667 Inbound Product Activity SDQ Details Maintenance - Error Recovery Window .................. 668 Inbound Product Activity PO Numbers Maintenance - Error Recovery Window ................. 668
Appendix A Glossary ................................................................................................................ 671
Appendix B Inventory Descriptions ......................................................................................... 679
Descriptions File Major Type Codes ......................................................................................... 679 ACDF - Customer Schedule Definitions ........................................................................ 679 ADFM - Address Format ............................................................................................... 679 AEDI - Automatic Update from EDI ............................................................................... 679 ALTT - Alternative Item Type ........................................................................................ 679 AN - Agent, Sub-agent .................................................................................................. 679 ARPM - Arrears Processing Method ............................................................................. 679 ASAD - AS Address Type Codes .................................................................................. 680 ASNC - ASN Consignment Types ................................................................................ 680 ASNP - ASN Company Prefix ....................................................................................... 680 ASTA - Article Status Code ........................................................................................... 680 AUMD - Authorisation Method ...................................................................................... 680 AUTA - Purchase Authorisation Tables ........................................................................ 680 BCFM - Bank Code Format .......................................................................................... 680 BUDG- Budget Types ................................................................................................... 681 CALT - Calendar ........................................................................................................... 681 CARR - Carriers ............................................................................................................ 681 CCCC - Customer Class ............................................................................................... 681 CCON - Promotion Constraint Type ............................................................................. 681 CCRQ - Certificate of Conformance Required .............................................................. 682 CDSC - Cash Settlement Discount ............................................................................... 682 CHST - Character Set ................................................................................................... 682 CONI – Consolidated Invoice Types ............................................................................. 682 CRDC - Credit Checking Methods ................................................................................ 683
Infor System21 Inventory Management | 23

Contents
CRLV - Credit Check by Value ..................................................................................... 683 CRLD - Credit Check by Days ...................................................................................... 683 CRV4 - CR Conditioning ............................................................................................... 684 CTTP - Container Type ................................................................................................. 684 DCLS - Discount Class ................................................................................................. 684 DEPT - Departments..................................................................................................... 684 DFLT - Defaults ............................................................................................................ 684
• 2 - Cancelled and Open .......................................................................................................... 689
• 3- Cancelled, Complete and Open orders ............................................................................. 689 DIRE - Direction to Move in Warehousing .................................................................... 689 DIVN - Inventory Production Division ............................................................................ 689 DMND - Demand Reference Codes ............................................................................. 689 DN - Customer Division ................................................................................................ 689 DNTF - Picking Note Print Time Fence ......................................................................... 689 DOCT - Print Function in Order Entry ........................................................................... 690 DTAR - Duty Tariff Code ............................................................................................... 690 DUTS - Duty Status Flag .............................................................................................. 690 EDI - EDI Application Interface ..................................................................................... 690 EGLR - Extended General Ledger codes for Purchase Management .......................... 691 FORM – Formula .......................................................................................................... 691 FRTP - Freeloader Type ............................................................................................... 691 GDAR - Packaging Adjustment Reasons ...................................................................... 691 GDRC - Packaging Responsibility Codes ..................................................................... 692 GDFT - Packaging Report Format ................................................................................ 692 GDSC - Packaging Sales Channels ............................................................................. 692 HLCO - Hierarchy Level Codes .................................................................................... 692 IN - IN Default Values ................................................................................................... 693 INSC - Inventory Source ............................................................................................... 693 INVP - Invoice Print Sequence ..................................................................................... 693 LCNV – US Gallons to Liters Conversion ..................................................................... 694 LGCD - Language Format ............................................................................................ 694 LPRT - Print Code ........................................................................................................ 694 LTYP – License Type.................................................................................................... 695 MISC - Miscellaneous Company Level Descriptions .................................................... 695 MODE - Despatch Method ............................................................................................ 695 MOVR - Movement Reason Codes .............................................................................. 696 MUEF - Multiple Unit Entry Flag ................................................................................... 696 MVTP - Movement Types ............................................................................................. 696
24 | Infor System21 Inventory Management

Contents
NOTN - Nature of Transaction ...................................................................................... 697 OMAT – OM Task Codes .............................................................................................. 698 ORDM - Ordering Methods ........................................................................................... 700 ORST - User Order Type .............................................................................................. 700 ORTP - Order Type....................................................................................................... 700 PCLS - Item Class ........................................................................................................ 700 PGMJ - Item Group Major ............................................................................................. 700 PGMN - Item Group Minor ............................................................................................ 701 PGR - Discount Group .................................................................................................. 701 PLDL - Place of Delivery ............................................................................................... 701 PORT - Ports ................................................................................................................ 701 PQGP - Promotion Qualification Group ........................................................................ 701 PREM - Preminos User File Definitions Limit ................................................................ 702 PRTP - Pricing Functions .............................................................................................. 702 PTYP - Item Type ......................................................................................................... 702 QTNO - Quote Types .................................................................................................... 702 RCTY - Rule Comparison Type .................................................................................... 703 REOP - Inventory Re-order Policies ............................................................................. 703 RFCR - Invoice/Credit Note Reason Codes .................................................................. 704 RFTP - Reference Type ................................................................................................ 704 RGME - Regime ........................................................................................................... 704 RGNO - Region ............................................................................................................ 704 RSNC - Reason Code ................................................................................................... 704 RUEL - Rule Element Type ........................................................................................... 704 SCRC - Scrap/Reject Reason Codes ........................................................................... 705 SDIV - Item Sub-division ............................................................................................... 705 SHLU - Shelf Life Units ................................................................................................. 706 SN - Customer Region .................................................................................................. 706 SPRC - Short Pick Reason Code ................................................................................. 706 SPRS - Stockrooms No Short Pick ............................................................................... 706 SPXV - SPEX version ................................................................................................... 706 SRCE - Source/Supply Types ....................................................................................... 707 ST - Customer State ..................................................................................................... 707 STKF - Non-stock Item Type ........................................................................................ 707 STKS - Stock Status Codes .......................................................................................... 707 STKU - Stockroom Usage Code ................................................................................... 707 STRM - Inventory Storage Method ............................................................................... 708 STXG - State Tax Group ............................................................................................... 708
Infor System21 Inventory Management | 25

Contents
SUBT - Substitution Type ............................................................................................. 708 SUNC - Miscellaneous Order Charge Code ................................................................. 708 SUNI - Sales Unit Indicator Flag ................................................................................... 708 SUPI – Supersession Items .......................................................................................... 709 SUPR – Supersession Reasons ................................................................................... 709 SUSP - Order Suspend Codes ..................................................................................... 709 SV - Customer Sub-division .......................................................................................... 710 TAR - Tariff ................................................................................................................... 710 TDEL - Terms of Delivery ............................................................................................. 710 TMTH - Transport Method ............................................................................................ 711 TN - Salesman .............................................................................................................. 711 TPAR - Adjustment Reasons ........................................................................................ 711 TPBL - Bill of Lading Format ......................................................................................... 711 TPCC - Commodity Code ............................................................................................. 711 TPCT - Carrier Type ..................................................................................................... 712 TPCY - County .............................................................................................................. 712 TPDC - Default Capacity Type ...................................................................................... 712 TPIC - Creation of Requirements .................................................................................. 712 TPLS - Load Status ...................................................................................................... 712 TPPM - Payment Method .............................................................................................. 713 TPRM - Rating Method ................................................................................................. 713 TPSE - Serious Errors .................................................................................................. 713 TR - Customer Territory ................................................................................................ 714 TRAN - Movement Reference Type .............................................................................. 714 TTYP - Text Type ......................................................................................................... 714 UNIT - Unit of Measure ................................................................................................. 715 UOM - Units of Measure Codes .................................................................................... 715 USCY - Usage Cycle .................................................................................................... 715 USGC - Text Usage Codes ........................................................................................... 715 UTYP - Unit of Measure Type ....................................................................................... 716 VAT - Tax Codes .......................................................................................................... 716 VTXT - Zero/Exempt Tax Supplies Text ....................................................................... 716 WHCS - Warehousing Commit List Sequence .............................................................. 716 WHIS - Warehousing Item Sequence ........................................................................... 717 WHLS - Warehouse/List Type ...................................................................................... 717 WHML - Move List by Sequence .................................................................................. 717 WHMS - Move List Sequence ....................................................................................... 717 WHMT - Warehousing Movement Type ........................................................................ 718
26 | Infor System21 Inventory Management

Contents
WHMV - Warehouse Movement Trans ......................................................................... 718 WHNL - Number of Locations to be Created ................................................................ 718 WHPS - Warehousing Pick List Sequence ................................................................... 718 WHRS - Warehousing Reason Code ............................................................................ 719 WHSE - Warehouse Miscellaneous Parameters .......................................................... 719
Infor System21 Inventory Management | 27


About this guide
The purpose of this document is to describe the functions that can be used within the Inventory Management Module.
Intended audience The guide is intended for any users of the IN Inventory Management business module.
Related documents You can find the documents in the product documentation section of the Infor Xtreme Support portal, as described in the "Contacting Infor" section.
Contacting Infor If you have questions about Infor products, go to the Infor Xtreme Support portal at www.infor.com/inforxtreme.
If we update this document after the product release, we will post the new version on this Web site. We recommend that you check this Web site periodically for updated documentation.
If you have comments about Infor documentation, contact [email protected].
Infor System21 Inventory Management | 29


Chapter 1 Overview 1
Introduction A system to keep proper control of Inventory is a prerequisite for buying decisions, answering customer questions and deciding the production program. Different organisations require different levels of detail and support for Inventory Management decisions, and indeed this might vary within the same organisation. However, the basics of defining items, recording movement, even calculating balances and providing valuations will be common to all such companies.
The Inventory Management application provides a wide spectrum of facilities for the recording, valuation and management of Inventory. These facilities are the bedrock on which the interface to the product is built. The application may be installed in a simple organisation which views its Inventory as a single logical unit or with equal ease in a multi-warehousing organisation with separate raw material, finished goods and component stores. Multiple stockrooms or stores may be created, with the ability to maintain different stock investment policies in each. This is achieved without data redundancy as the same definition is used throughout.
Relationships to Other Applications The Inventory Management application is a fully standardised application and as such operates under the control of System Manager.
There are no prerequisite applications for this module (apart from the System Manager); moreover this application is a prerequisite for all the interfaced applications.
Although the application is designed to operate as a fully integrated application, it can be operated in a very simple fashion as a stand-alone system, including facilities to record sales and purchase activity as well as providing Inventory recording and control.
When the Bonded Warehousing application is installed it enforces a number of constraints upon the Inventory Management function; constraints that ensure the legal and fiscal requirements of a bonded warehouse are upheld. Refer to the Bonded Warehousing product guide for a full description of these constraints.
Infor System21 Inventory Management | 31

850BOverview
Application Configuration As with all applications, Inventory Management can be operated for a number of companies, the characteristics of each being maintained in a control file. The application is controlled by setting up data for the company and then for each stockroom within the company. Stockrooms may be added after the initial implementation of the application.
Certain policies may be set up as a default at the company level. These are:
• Costing Method • General Ledger codes • Period for usage calculation (week or month) • Stock Management Policy factors:
• Method of calculation • Re-order quantity factor • Stock carrying rate • Supply order placement cost
These policies and parameters will be used throughout the operation of the application unless overridden at the level of the item or at the time of the transaction.
It is necessary to define each of the stockrooms where stock will be held. Three important policies can be set at this level:
1 The stockroom may be excluded from valuation, e.g. for consignment stocks.
2 Certain transactions may be excluded from use in the stockroom.
3 A value usage matrix can be created to manage the stock investment policy of the stockroom. Nine value/usage bands may be created and target minimum and maximum weeks of stock defined.
Note: When the Bonded Warehousing application is installed a stockroom can be defined as a Bonded Warehouse. This condition automatically excludes a number of transactions for use in the stockroom.
In order to calculate average usage, two factors must be defined:
1 The time interval in weeks or months
2 The periods to be taken into account in the calculation of average usage
The time interval is set on the company record and a number of profiles may be maintained detailing which of the previous sixty time periods (weeks or months) will be included in the calculation.
32 | Infor System21 Inventory Management

850BOverview
Application Set Up Data The maintenance functions of the Inventory Management application enable the creation and amendment of master files and data files which are fundamental to its operation. The application will then build the necessary transaction and movement histories as work progresses.
There are a number of common features in the way in which data is maintained, these are:
• The standard product and description search routines • A standard method of selecting codes from a displayed list
The following data can be maintained:
• Standard Codes and Descriptions • Product Master Details • Alternative Products • Stockroom or Balance Details • Calendar
Standard Codes and Descriptions A Descriptions or Parameters file is used in most applications for a number of purposes. Primarily, it enables codes to be set up with standard descriptions. This provides for validation at the time of data entry and also the display of descriptions on both windows and reports. In some specific instances a rate is also stored, for example, in the case of the Tax Table. The application has a small number of standard parameters that must be present for its successful operation. The Inventory Management Application Descriptions file is the one used by standard applications. The standard parameters held on this file, therefore, include those required by all Logistics and Customer Services applications. Purchase Management also has its own parameter codes.
Item Data Inventory Management is designed to have a flexible data structure, but without incurring data redundancy. In order to achieve this there is an Item Master record which identifies the item to the application and indeed to all applications. On this is held the static descriptive and classification data. If more data is required in Inventory or any other application then a record of that information is set up and maintained in the originating application.
The following are examples of the additional data:
Inventory Management
• Stockroom balance records • Lot or batch records • Catchweight details
Infor System21 Inventory Management | 33

850BOverview
• Extended internal and external text • Language descriptions • Alternatives • Alias details • Search family codes • Sales Order Processing • Pricing group details • Costing details • Default size distribution • Transaction control details
Purchase Order Management
• Item/Supplier profiles
Production Applications
• Production profile
Forecasting
• Item/Forecast profile
DRP
• Item/DRP profile
In this way it can be seen that the application requires the entry and maintenance of only that data necessary to run the operational applications in any company's system.
The primary Item Master detail includes:
• Description • Six various analysis codes • Multiple units of measure • Catchweight • Tax codes • Costing method, costs and default General Ledger codes • Supersession details • Search families
34 | Infor System21 Inventory Management

850BOverview
Units of Measure Items can be defined as:
• Standard, i.e. non-multiple unit format/non-catchweight item • Catchweight item • Multiple unit format item
Standard is where units are used in a consistent way although different units can be used for purchasing, stocking and issuing. These can also vary by stockroom.
Catchweight is where two units of measure are used simultaneously and both need to be recorded. A simple example would be fish or meat where you record both the number of pieces and the weight.
Multiple unit format allows transaction quantities to be recorded in a combination of a products units of measure rather than as a decimal fraction.
Note: This only applies in certain exception transactions e.g. Proof of Delivery, Record Stock Count etc.
Stockroom Balance For any item one or more stockrooms may be defined. A stockroom is a discrete area within a company where stock is recorded and controlled separately from other company stocks. Depending upon the type of company a stockroom may be used to define divisions, depots, warehouses, stores, an area within a store or even van stock. If such distinctions are not required a single stockroom is created to record the total company stock of the item.
The static warehouse information is concerned with:
• Units of measure at the stockroom • Inventory Management policy and control • Balance data • Costs • Preferred suppliers
The warehouse selection allows the user to select more than one warehouse where the product may be stored, etc.
Location Control A stockroom may be designated as a Location Control stockroom. Location Control details are required for all items that will have stock balances held in this stockroom. A default location may be defined for each item, which is then the suggested location for receipts and unplanned issues. Items may be defined as using single or multiple locations.
Infor System21 Inventory Management | 35

850BOverview
Each location may be up to 12 characters long and may be created in ranges. Each location can be defined with a status of being either in use or suspended.
Batch Control/Lot Traceability The ability to track items at batch or lot number is available. An additional level of control is available for items that are lot, batch, or serial controlled. This is known as Lot Header Control, where Lot-specific information is maintained for each Lot individually. Examples of information that can vary by Lot include Availability Dates, Grade, and Potency (active ingredient strength/concentration) among others.
Warehousing If warehouse control is required, the Warehousing application should be installed.
Alternative Items For any item, one or more alternatives may be nominated. When the relationship is created it is possible to state whether or not the relationship is reversed. This facility is used by the Sales Order Processing functions to offer customers alternatives if an item is not currently available.
Kit Lists A kit of items may be set up for use within Sales Order Processing. This is a single level kit with a single parent and any number of components.
Where kits are sold, updates to Sales Analysis need to be considered.
Note: You can pass details of the whole kit, parent only or components.
Containers Container profiles are used to identify the numbers of containers associated with each unit of a base product. The container profile for a base product consists of a list of container item codes, each of which has an associated conversion factor that determines how many of those containers are required per issue unit of the base product. Products may optionally have a different container profile for each customer to whom they are shipped.
36 | Infor System21 Inventory Management

850BOverview
A version number is included for both the item container profile and the customer item container profile. An older version number cannot be selected once a new version has been created.
Calendar Control The Inventory Management application must concern itself with dates, week endings and period endings, in order to perform reconciliation, usage calculations and the analysis of information. Both week end dates and period end dates can be maintained for all operational years. These should be set up before processing begins.
Transaction Control and Item Supersession Transaction control and item supersession are two separate functions that can be used together, independently or not at all. Transaction control enables the user to allow or prohibit selected items from using a transaction. Item supersession enables the user to specify when an item should be superseded by another.
When used, they enable a limited form of 'product life-cycle' control, i.e. transaction control can prevent a new item from being ordered before all the relevant details have been set up and both can be used to handle item obsolescence or temporary withdrawal/substitution.
Global Item Maintenance This provides the ability to define an item in an inventory company (deemed the owning company of that item) and replicate that item's definition into other inventory companies. The attributes of an item can be specified as either globally or locally maintained.
Globally maintained attributes should only be maintained within the owning company of an item. Although globally maintained attributes are also available for maintenance within non-owning companies for an item, their values are automatically re-set to those values specified in the owning company should their values be changed.
Two types of organisational model are supported for the replication of item definitions.
1 Centralised type organisations that typically have a unified coding system where the responsibility for the definition of an item and control over which other companies within the organisation receive its definition are both handled centrally.
2 Decentralised organisations in which item definitions are passed between companies on a publication and subscription basis.
Infor System21 Inventory Management | 37

850BOverview
Each company that receives notification of a published item definition has control over the decision whether to subscribe to that items definition or not and whether they wish to review their local definition upon importing the published definition.
Application Processing There are four main processing functions involved in the operation of the Inventory Management application. These are as follows:
• Movement Transactions • Stock Counting • Stock Management • Periodic Processing
The first two functions are concerned with the performance of the stock recording aspects of Inventory; the third is concerned with deciding what stock should be where, and the fourth with building the database to aid management decisions. As the movement transactions are applied to the balances interactively, the displayed balance reflects the latest information in the system. Therefore, supply and despatch decisions can be made in greater confidence. The Inventory application can be installed in isolation. However, if Purchasing, Manufacturing and Sales Systems are installed, most of the movements will be performed in these operational systems. The Inventory application will concern itself exclusively with counting, housekeeping and stock management decisions.
Movement Transactions The primary purpose of an Inventory movement is to record an action within the application and to calculate its effect on the stock balance. In its simplest form, a miscellaneous receipt booking straight into Inventory increases the physical stock. However, a Customer Order Issue will not only reduce the physical stock but will also reduce the balance of the stock allocated to orders.
The following movement types are available:
• Customer Order Issue • Miscellaneous Issue • Purchase Order Receipt • Miscellaneous Receipt • Adjustment to Physical Stock • Adjustment to Allocated Stock • Adjustment to Frozen Stock • Transfer Out to Another Stockroom • Transfer In from Another Stockroom
38 | Infor System21 Inventory Management

850BOverview
• Record Purchase Order • Transfer In and Out (a move from one stockroom to another on a single transaction)
Each movement updates the appropriate balance field on the product stockroom balance. If the product is defined as being batch-controlled, lot-controlled or serial-controlled, the additional control number must be entered. A sub-set of the balances is maintained for the lower level record.
Costs may be entered with the movement and depending upon the movement type and the costing method the database will be updated appropriately.
There are five ways of valuing stock movements. These are:
Average Cost - The average cost of stock in the stockroom is recalculated every time a receipt is made. This average cost is used to value issues. (Receipts are valued at receipt cost.)
Standard Cost - The standard cost for the part is either rolled over from the manufacturing application or directly maintained. This cost is used to value all movements, both receipts and issues.
FIFO Cost - This is the acronym for First In First Out. Each receipt for the product is maintained as a separate balance and as an issue is made the product is consumed. The first receipt to arrive is the first receipt balance to be used for issues. The cost of the issue is taken from the receipt balance. The FIFO sequence is maintained by time as well as date. If the part is lot-controlled, the FIFO operates within lot.
LIFO Cost - This is the acronym for Last In First Out. Refer to the Inventory Valuation section for further details.
Latest Cost - This is when the latest cost of a receipt is used to value issue movements.
The default or preferred costing method is set in the company control record. However, you can control at the level of the product when it is defined and set a different costing method for that particular item. All costs are kept in up to five decimal places of base currency. The latest cost of the entire product is recorded and the average cost calculated whatever the costing method. If, for example, the valuation method is FIFO, this can be simply compared with the average and latest cost on an enquiry window.
For each inventory movement a record is written to a transaction file. This provides a full audit trail of movements. The information held includes:
• Movement type • Supplier or customer • Quantity moved • Value of the movement • Resulting stockroom balance • Batch/Lot number • Date and time of movement • Person responsible • Terminal used
The movement week and period details are determined from the calendar and period files, and set to either the current or next week/period.
Infor System21 Inventory Management | 39

850BOverview
The movement history may be held on the system as long as necessary but not less than one month. This is because it is used to prove the closing balance at the end of the period. It is available for both enquiry and reporting to assist investigations into stock inaccuracies and provide the basis of activity analysis.
Processing within a Location-controlled Stockroom If a stockroom is location-controlled, Location Control data is required for all Inventory transactions, with the exception of the Record Purchase Order Receipt and Adjust Allocated Stock transactions.
For all other transactions, the following principles apply:
• There is no need to capture location balances for items that are defined to single locations; in this case, the balance is updated automatically with the transaction balance of the movement.
• If items are defined to more than one location, then the location balances are captured after specifying the item and transaction quantity (and optionally the lot reference). The total of the location balances must match the transaction quantity before completing the movement.
• In both cases, location balance records are recorded for each movement that is processed, and the location balances are updated immediately after the Inventory balance is updated.
When stock of a non-lot controlled item is moved between locations the rotation date/time associated with the stock moved is carried forward to the target location of the movement.
Stock Counting The application provides a simple to use stock counting procedure which incorporates cycle counting. This enables the automatic creation of count recommendations. The following steps are involved:
• Count creation This is done manually by item ranges, or automatically on a time-based cycle.
• Review and maintain count recommendations • Request for printing of Stock Count sheets • Entry of counted stock figures • Reconcilation of Stock Count • Posting of adjustments if applicable
Products are selected for stock take by any of the following options:
• Product Number • Product Type • Product Class • Product Group Major • Product Group Minor
40 | Infor System21 Inventory Management
850BOverview
• Stockroom
The application records the stock level of the selected item(s) at the start of the count. This enables everyday processing of movements to continue while stock is being counted and reconciliation to take place on completion of the count. Stock take count sheets are then produced to the required detail, i.e. all levels of inventory records are exploded for the selected items. These may be used as input documents to the following processes.
The total quantity of physical stock of each product counted is entered from the stock take sheets. This data is validated and a report produced.
Until the stock take is deemed complete, a reconciliation report of physical stock versus computer stock count is available. This would normally be selected by the same parameters as used when requesting the original stock count sheets. The report highlights the differences between physical and computer figures with actual quantities and value variance. This is to help assess the importance of any discrepancy. On completion of the stock take the application offers the option to generate automatic adjustment of any unresolved discrepancies. Any variances outside the tolerances defined on the stockroom count profile are designated as count errors.
Note: Once the count sheets have been requested, no stock movements should take place for the selected products until after the physical counts have been entered and reconciled.
To assist in the reconciliation of any discrepancies, a report is available giving summary or detail information of stock movements.
Stock Management The system offers a number of stock management techniques including Material Requirements Planning and Distribution Requirements Planning. The Inventory Management application, even in isolation, can be used to operate an order point stock management policy. The main factors in this policy are:
• Average usage • Re-order point and maximum stock • Re-ordering rules
Average Usage The usage of an item is held on the stock history file and is maintained either weekly or monthly according to the usage cycle specified on the company profile record. Average usage is re-calculated during week or month end processing as appropriate.
The usage profile defines which of the preceding weeks' or months' usage are to be included in the calculation of average usage. The product stockroom balance record holds the code for the usage profile which will be used in the calculation of average usage.
Typically usage profiles will be set up to represent:
• Three months moving average
Infor System21 Inventory Management | 41

850BOverview
• Twelve months moving average • Seasonal moving average (this would be achieved by taking the previous month and the next
month last year)
Note: Care is taken to ensure that the average is only calculated from the start of the products life even though the profile indicated that previous data should be included. This is to ensure that the average is not distorted by the absence of history data.
Re-order Point and Maximum Stock The parameters of maximum stock, re-order point, re-order quantity and economic order quantity may be maintained for each product in each stockroom. Alternatively, by using the historical usage information, maintained as a result of all movements, the application can calculate these figures. These calculations are based upon grouping products into the categories defined on the stock weeks matrix:
Nine categories are used:
Value Usage
1 Low value Low usage
2 Low value Medium usage
3 Low value High usage
4 Medium value Low usage
5 Medium value Medium usage
6 Medium value High usage
7 High value Low usage
8 High value Medium usage
9 High value High usage
The definition of these groups is held on the stock weeks code matrix which is updated as part of the company profile maintenance procedure.
Limits are set to define the boundaries for high, medium and low usage and value. Minimum and maximum stock holdings, expressed as weeks at average usage, are assigned to each of the nine categories. The minimum stockholding in weeks is the number of weeks stock that will be left after the lead time has expired, and therefore, represents a safety stockholding. Safety stock is a measure of how likely the lead time and average usage are going to increase.
When the procedure to calculate re-order point, maximum stock, etc., is run, the application reads the stockroom records and re-assesses, for allowed products, what the re-order point and maximum stock quantities should be.
The application assesses where the product falls on the value axis of the stock weeks matrix based on its cost. It then determines where it falls on the usage axis based on its average usage.
42 | Infor System21 Inventory Management

850BOverview
Having assessed which of the nine categories this product falls into, the minimum and maximum stockholding (in weeks) are taken from the matrix and the following calculations performed:
Re-order Point = (Lead Time + Minimum Stockholding) * Average Usage
(Lead time and minimum stockholding are expressed in weeks.)
Maximum Stock = (Lead Time + Maximum Stockholding) * Average Usage
(Lead time and maximum stockholding are expressed in weeks.)
Re-order point and maximum stock are held on the product stockroom balance record.
Note: Since average usage is used in the calculation procedure, it is best run after the week end or month end processing procedure in which average usage is re-calculated.
The application is also able to calculate an Economic Order Quantity as follows:
EOQ = square root of [(2 x AUY x OPC) / ((IC x SCR) / 100) ]
where:-
Code
EOQ = Economic Order Quantity
AUY = Average Usage Per Year
OPC = Order Placement Cost
IC = Item Cost
SCR = Stock Carrying Rate %
Re-ordering Rules The application supports five different re-ordering policies:
Up to MAX - When expected stock drops below the re-order point, the system suggests that an order be placed of sufficient size to take the stock level up to the maximum.
Re-order Quantity - When expected stock drops below the re-order point, the application suggests that the re-order quantity be ordered. This quantity is either set by the user or determined by the application. A Re-order Quantity Factor can be held at stockroom level and a default is held in the company profile. If the re-order quantity factor is 30%, the application will recommend action to re-order enough stock to last through 30% of the lead time. If the factor is 200% the application will recommend action to re-order enough stock to last through twice the lead time.
Up To ROP - When expected stock drops below the re-order point, the application suggests that enough stock should be ordered to take the level up to the re-order point again. For example, if the re-order point is set to zero, this rule will ensure that goods are only re-ordered when there is demand for them in the form of a customer or manufacturing order.
Up To Min - When expected stock drops below the re-order point, the system suggests that an order be placed of sufficient size to take the stock held up to the minimum level.
Infor System21 Inventory Management | 43

850BOverview
EOQ - When expected stock drops below the re-order point, the system suggests that an order be placed for the calculated or maintained economic order quantity.
Available/Expected Stock These are calculated as follows:
Available Stock = Physical Stock - Frozen Stock - Allocated Stock - Picked Stock
Expected Stock = Available Stock + Stock In Transit + Stock On Supply Order - Stock on Back Order - Stock Reserved
Periodic Processing Although the Inventory Management application is a transaction-based system which records events as they happen, many of the decisions concerning stock levels and raising and amending orders are based upon the performance of a product over time. In order to make these decisions it is necessary to be able to view previous periods' activity. This is achieved by maintaining history files, not only of the transactions, but also summarised by type of transaction. These are maintained by running weekly, monthly and year end procedures.
Lot, Grade and Potency The application enables the recording and maintenance of a range of lots, batches or serial-controlled lots and their associated grade, potency, status and availability dates and times. This information is detailed on a lot header which applies to a whole lot irrespective of the lot’s location.
• The grade, potency and stock status can be maintained and any modified information is held on file so that history enquiries and audits are possible.
• The location of the lot can be traced and issues, receipts and stock movements details displayed.
Enquiries The enquiries in the Inventory Management application allow a multi-layer view of a product. These layers are:
• Company stock summarised by stockroom • Full details of the current balance, usage, and cost at a stockroom • The breakdown of a stockroom balance into the locations in which they are held • The breakdown of a stockroom balance into the batches or lots that comprise the stock holding • The movements that gave rise to the present balance • The summary of activity for previous periods
In addition, the reference files are supported by a full range of enquiries.
44 | Infor System21 Inventory Management

850BOverview
Item Transformation This provides the ability to transform a given quantity of stocked inventory items into one or more other stocked inventory items. The following types of transformation are supported:
Infor System21 Inventory Management | 45

850BOverview
All of the following standard inventory features are considered:
• Lot, batch and serial control (including their extended features, where appropriate) • Catchweight • Location Control • Warehousing • Negative Stock Control
Transformation operates within a single stockroom or warehouse; however any container items involved in a transformation are always taken from or received into the appropriate inbound and outbound container stockroom.
Supported transformations:
• One-to-one • One-to-many (equivalent to unpacking) • Many-to-one (equivalent to packing)
• Quantity conversions between different units of measure are possible if you establish these relationships in the Secondary UoMs maintenance task.
• Unit of measure codes are considered to be unique and are more than just descriptive in nature. For example, a unit of measure of BX (Box) assigned to two items, Item A and Item B, implies a one-to-one relationship between boxes of the two items; i.e. 1BX of Item A is the equivalent of 1BX of Item B. See below for further details.
• The costs associated with the transformed From items are not carried forward to the To items; you will be asked to key receipt costs for these items when the target item uses one of the actual costing methods, i.e. average, latest or FIFO.
• Pre-configuration of item transformation relationships is not supported. • Transformation requests cannot be based on any previous requests that may have been entered
for that item. • Item transformation is intended as an after the event transaction; therefore there is no allocation
of transformed From item quantities as you enter a transaction. Upon requesting update, entered transactions are processed as normal.
• Once entered, a transformation request cannot be converted to another format, e.g. a one-to-one transformation request cannot be converted to a one-to-many transformation request or vice versa.
• Non-stocked items are excluded from the transformation process. • Kit parents are excluded from the transformation process.
Unit of Measure Conversions Where possible, item transformation attempts to perform sanity checks against the transformed From and To item quantities to highlight possible transformation keying errors. Suspected transformation errors result in the issue of a suitable warning message; however the user takes the ultimate decision whether to accept the transformation request as entered.
46 | Infor System21 Inventory Management

850BOverview
To achieve this, you must establish relationships between your different units of measure codes using the Secondary UoMs maintenance task. Refer to the Secondary UoMs section for further details.
For example, the following unit of measure conversion relationships could be established:
UoM From UoM To Conversion Factor Multiply/Divide
01 (Singles) 10 (Tens) 10 Divide
01 (Singles) 12 (Dozens) 12 Divide
01 (Singles) 24 (Two Dozens) 24 Divide
01 (Singles) 48 (Four Dozens) 48 Divide
With the above units of measure relationships in place, a transformation is requested of 48 Singles of Item A into 5 Dozens of Item B. As the standard conversion expects 48 Singles to equate to 4 Dozens, the user is warned of the possible error in his request and asked to verify whether the transaction should be completed as entered or corrected by the user.
Caution: Without the existence of any relationship between the From and To quantity units of measure on a transformation request, the system assumes that any quantities that you enter are always correct and no sanity check is ever performed against the quantities involved in transformation request.
Bar Code - Standard Validation The barcode entered by the user is validated using the standard Modulus 10 check digit validation as documented in the Global Standards (GS1) Bar Code Implementation guide which can be viewed using the following link.
Global Standards (GS1) Bar Code Implementation guide
The formula, detailed below, can be found in section 3.A.1, Appendix 1 (page 93).
Bar codes can be tested using the following online calculator:
Bar codes calculator
The basic calculation is as follows:
Note: The algorithm is identical for all fixed length numeric GS1 data structures that require a check digit.
How to Calculate a Check Digit
Infor System21 Inventory Management | 47

850BOverview
The following table gives an example is an example to illustrate how a check digit is calculated:
Returnable Containers Containers are defined as inventory items.
• Containers can be monitored or tracked against customers or the carriers used for their transportation.
• Containers may contain mixed products. • Charges may be added to supply and demand orders for the containers associated with the
ordered items.
Products are associated with the containers required for their shipment.
• Multiple levels of container can be associated with a product.
48 | Infor System21 Inventory Management

850BOverview
• The number of each container required to ship a single issue unit of the base product is identified.
Inventory balances are maintained for empty container items.
• Empty container items may be returned to an organisation's suppliers for re-use. • Empty container items may be returned by an organisation's customers and booked into
inventory. • Empty container items can be defined as inputs on a manufacturing route.
Details of the container items required to ship product (i.e. quantities and values) are associated with a sales order throughout the fulfilment cycle.
• The container items associated with the ordered products are added to the order during Order Capture.
• The container items associated with products ordered by the customer are visible throughout all stages of the order fulfilment cycle.
• The deposit values of any containers associated with the products on an order are included in credit checks performed throughout its life cycle.
• Details of the number and types of container associated with the products on an order are printed on any documentation produced for that order (i.e. order acknowledgements, pick notes, consignment despatch notes, delivery notes, invoices etc.).
• Labels may be printed for the containers associated with the products on order. • Details of the number and types of container items associated with the products on an order are
visible within Transport Planning to assist the operator in load planning. • Adjustments made to the quantities of shipped product at both confirmation of despatch and
proof of delivery are reflected in the numbers of container items used for each despatch and ultimately charged for on the generated invoice.
Container Tracking Containers may be tracked against the customer(s) to whom they are shipped or the carriers used for their transportation. From the container tracking information held on the system it is possible to:
• View/report on the details of when and how many container items have been shipped to or returned by the customer
• Highlight situations where a customer holds an exceptional balance of a container item so that steps may be taken to recover some of these containers
The Business Process Container items (which may have a significant value to an organisation) are used/returned and re-used when shipping products throughout a supply chain. The fewer the number of container items held by an organisation the better, in terms of the cost of these items to an organisation.
Infor System21 Inventory Management | 49

850BOverview
Therefore, because of their nature, it is very important that the organisation has an accurate view as to where their containers currently reside in the supply chain.
The business process for processing and tracking containers throughout the supply chain differs depending on the type of business involved, i.e. manufacturer or wholesaler.
Manufacturers Orders are raised to purchase empty containers for use in manufacturing processes. These purchase orders are authorised and sent to the supplier.
Suppliers ship the ordered empty container items and, upon the recording of their receipt into stores, inventory balances are updated with the received empty container quantities. Purchase invoices received from the supplier for the empty containers are matched against receipts in Purchase Management and payment is made via the Accounts Payable system.
Manufacturing orders and schedules, e.g. for the bottling of vodka, are raised to cover the requirements for finished products. These orders and production schedules consume empty containers. The containers used in each process are defined as the inputs on a bill of materials. Each container may be formally issued or automatically consumed by the system (as a result of performing a production booking).
For example, to make a case of twelve 1.75 litre bottles of vodka requires twelve 1.75 litre bottles and a case.
As items are issued to a works order or production schedule, or as bookings are made against a works order or production schedule, the inventory balances of the empty container items used in the process are reduced in the appropriate stockroom and the inventory balances of the finished products are increased. By their definition, finished products have one or more container items associated with them, e.g. a case of vodka implies the existence of twelve 1.75 litre bottles and a case. When the container items are issued to the works order or production schedule, there is no visibility of the empty container within the inventory system.
Customers place sales orders for finished products, e.g. customers order a number of cases of vodka. The system automatically determines the container quantities expected to be used to ship finished products.
Charges can be generated on an order to cover any deposit charge related to the use of a particular container.
Stock is allocated to each sales order and a pick note generated. Each pick note contains a summary of the number of outer containers required for shipment. This container summary is used as a quick manual guide by the picker to ensure the correct number of containers has been picked for a particular sales order. Labels may be produced for outer containers at this time.
Picked items may require further packing requirements, e.g. be loaded onto other packs and/or pallets which form a consignment to be despatched to the customer.
Goods are then despatched to the customer.
50 | Infor System21 Inventory Management
850BOverview
Once goods have been delivered, and if an organisation supports it, proof of delivery is used to record any amendments made to a delivery. The appropriate invoice is generated, including any relevant charges required for the container items used in the shipping process.
Whenever a delivery is confirmed, the system keeps a track of the number of container items sent to each customer on each delivery. This gives an organisation visibility of those customers holding balances of their container items.
Once finished products have been consumed, customers return empty container items to their supplier and receive a credit that matches the deposit they were originally charged for the container when it was delivered. The recording of the return of empty containers is done as part of the Proof of Delivery function (when recording a subsequent delivery to a customer) or within Customer Returns.
As empty container returns are recorded, the system updates the container tracking information held against each customer and books the empty containers back into inventory. These containers may then be re-used in subsequent production processes.
Wholesalers Orders are raised to purchase finished products from a supplier. These purchase orders are authorised and sent to the supplier.
Suppliers ship the ordered products and, when recording their receipt, the system automatically calculates the number of container items received from the supplier, based on the definition of the product, and generates additional transactions on the purchase order for each container receipt. Purchase invoices, received from the supplier, cover the charges made for both the finished products received and deposits for any containers received. These supplier invoices are matched against receipts in Purchase Management and payment is made to the supplier via the Accounts Payable system.
Note: Inventory balances for container items are not increased when recording the receipt of finished products. Purchase transactions are generated for the container items to enable correct matching of purchase receipts against the supplier's invoice (which may contain deposit charges for containers associated with each finished product).
As within a manufacturing environment, wholesalers receive orders from their customers for finished products. The container processing and tracking requirements for these orders are identical to those described above.
Empty containers are then returned to the appropriate supplier. The recording of these returns is done within the Purchase Order Receipt process.
Credits are received from the supplier for the containers returned and these are matched against the appropriate return transactions within Purchase Invoice Matching.
Infor System21 Inventory Management | 51

850BOverview
Reports The reports produced by Inventory Management can be classified as:
• Status • Audit • Valuation • Movement Analysis • Action
Status reports are provided on the master files and particularly on the Item Master file. Audits with before and after images are printed on request. These include all changes since the previous print.
Most of the reports are supported by both selection and sequence parameters. This helps to minimise the processing time and the amount of paper required.
Caution: None of the standard reports apply the quantity formatting rules.
Caution: None of the standard reports show quantities in the default inventory or sales units for the item.
Implementation Considerations This section describes the recommended procedures to help you achieve a successful implementation of your new application. This is only intended as a guide to the procedures. When you have read this section and decided on the way in which you are going to set up your application, you should refer to the relevant sections which follow for more detailed information.
It is of vital importance to the success of any software implementation that some fundamental issues of the implementation are considered before any detailed steps are undertaken. In the case of Inventory Management these issues are as follows:
• How do you wish to use Inventory Management and other applications? • How many Inventory Management companies do you intend to set up?
These issues are usually closely linked, and this section deals with each issue in turn.
Associated Applications The fundamental point to consider here is, what functions do you intend Inventory Management to fulfil? Are you intending to use Inventory Management on a stand-alone basis, and to record all stock movements through its own procedures? If this is the case, this obviously simplifies the implementation, as you only need to be concerned with the set up requirements for Inventory Management.
52 | Infor System21 Inventory Management

850BOverview
If, however, you are installing other applications, your Inventory Management implementation needs to take into account the requirements of those applications. As Inventory Management is a prerequisite for all the Customer Service, Logistics and Production applications of the system, you can appreciate the need to consider its use in relation to the other applications.
Where Inventory Management is installed with other applications it provides:
• The basic database definition of parts, stockrooms and code descriptions • The central repository for information on stock holding, whether at stockroom or lot level • The central audit of stock movements and history • The source of costing information for the valuation of movements and stock holding
Other applications, therefore, use Inventory Management as shown in the following examples:
• Purchase Management uses the Inventory item definition, holds on-order information as a stockroom balance quantity and posts movement transactions to Inventory Management for receipts and returns.
• Sales Order Processing uses the Inventory item definitions, makes use of parameters defined in the Descriptions file; holds back order and allocation quantities as stockroom balance fields and posts movement transactions to Inventory Management for customer issues and returns.
• The Production applications use the Inventory basic item definitions, hold on-order and allocation quantities as stockroom balance files and post movement transactions to Inventory Management for production order issues and receipts.
In a full implementation, Inventory Management provides both basic data definitions and a transaction repository for a number of other applications. This is, of course, in addition to the functions which are only available within Inventory (i.e. the Stock Management and Stock Taking facilities, and the Stock Adjustment Transactions).
When planning your implementation it is important that you consider:
• Which other applications do you plan to install? • What requirements, in terms of data, will these applications look to Inventory Management to
fulfil? • How will the various stock movement requirements of the business be satisfied: by Inventory
Management, or by one of the other applications? • Will any non-standard/vertical applications require an interface to Inventory Management?
It is important that these sorts of questions are addressed at the planning stage. Inventory Management has a central role in any implementation, and subsequent changes are, therefore, difficult to make without disrupting the operation of other applications. It is worthwhile spending time early in the implementation to plan your use of Inventory Management and its relationship with other applications.
Inventory Management Companies Inventory Management, like all other applications, allows the simultaneous operation of discrete companies. Multiple companies are used for many reasons, but the major uses are either organisational, or for testing purposes.
Infor System21 Inventory Management | 53

850BOverview
A decision to set up multiple Inventory companies for organisational reasons may very well be taken because you require separate inventories. It is more likely, however, that multiple Inventory companies are required because you have separate operational organisations.
For example, you may require separate selling organisations to be reflected in separate companies in the Sales Order Processing and Invoicing application. In a standard installation, this requires separate Inventory Management companies to be created. Inventory Management companies interface on a one-to-one basis with companies in Purchase Management, Requisitioning, Sales Order Processing and Invoicing, Sales Analysis, Telesales, Distribution Requirements Planning and the Production applications.
It can, therefore, be seen that any decision about the use of companies in Inventory Management needs to be taken in terms of the broader implementation.
Basic Data Set Up Having decided on how you will use Inventory Management in conjunction with other applications and the companies you will use, you need to plan and implement the setting up of the basic data required for the application's operation. The main elements you will need to create are:
• Company profiles • Stockrooms • Stock weeks matrices • Usage profiles • Descriptions • Stockroom details • Alternatives • Calendars
The maintenance of these elements is covered in detail in the Application Set Up Data section. It is sufficient here to highlight particular issues to bear in mind when planning the implementation.
Two points which may ease the actual setting up of the data are:
1 You can use the Copy Company utility, which is the function which can be used to set up new companies within Inventory Management. The essential description codes are set up automatically as part of this routine, if a company is created from the company shipped with the application.
2 You may choose to convert some of the volume elements, such as item and stockroom details, from an existing system. If you have high volumes, this is particularly useful and will obviously save a significant amount of data entry time.
54 | Infor System21 Inventory Management

850BOverview
Company Profile The issues you should address prior to setting up company profiles are:
• Which costing method do you intend to adopt as a company standard? (Standard, Latest, Average and FIFO are available).
• How do you intend to make use of the user-defined specifications? • Do you want average usage calculated on a weekly or monthly basis? • What is to be your default re-order policy?
Stockrooms and Stock Weeks Matrices You will need to decide how many stockrooms you require. Remember that these may be physical stockrooms or they may be logical stockrooms, for example Quarantine or Written-off Stock. For each stockroom you will need to define:
• Whether the stockroom is to be included in stock valuation • Which transactions are allowed • If the stock management facilities of the application are to be used, you will need to define the
stock weeks matrix for the stockroom. Therefore, you will define the parameters of value and usage for the nine item categories, along with the preferred stock levels for each category.
Usage Profiles The application will automatically calculate average usage based on user-defined profiles. You will need to decide how many of these profiles you need to reflect the different patterns of demand in your business.
Descriptions The Inventory Management application holds a file of parameter codes and descriptions which is used by itself and other applications. These codes cover such elements as product groups, product types, units of measure, reason codes, etc. The major codes, i.e. the subject headings, are set up automatically if you use the Copy Company utility to create your company data initially. Before any further data set up can take place, you need to decide on the codes which you will require for each of these major headings.
Items There are a number of issues to resolve prior to setting up your basic item definitions:
• Prior to setting up items, stockrooms must be set up. • How are the items to be coded? It is generally recommended that the item number should
merely be a unique code to identify the item and not a meaningful or structured code.
Infor System21 Inventory Management | 55

850BOverview
• How will you use the major analysis codes which can be associated with an item: product major group, product minor group, product type and product class? These codes are important, as many reports allow selection and sequencing by them.
• What are the valid units of measure that you will require? • Will any parts be subject to a costing method which is not the company standard? • Which General Ledger accounts do you wish to associate with the item for General Ledger
updates? • What level of control do you wish to exercise over individual items? Do you require lot/batch
control, or is part/stockroom the lowest level you require?
Stockroom Details You must set up a stockroom details definition for each item you wish to hold in a stockroom. The issues to be decided here are:
• What units do you wish the stock balances and unit costs to be expressed in? • What are the rules regarding the preferred stock level of this item in this stockroom? Are they to
be set automatically, or manually? Which re-order policy and usage profile are to be used? • What is the standard cost? • Who is your preferred supplier?
Alternative Products Alternative products are used within the Sales Order Processing and Invoicing application, but are set up and maintained in Inventory Management.
Note: If you do set up alternatives, it is important to decide whether a relationship is reversible.
Calendars Immediately prior to processing, you will need to set up the current year, period and week details via the Calendars maintenance task. You must also ensure that week and period end dates have been set up for the current year.
Note: It should be noted that before processing begins for a new year you need to ensure that the end dates are set up.
Initial Stock Balance Take On Once all the basic data has been set up, you are then ready to appoint the initial stock balances prior to processing. This task may be undertaken as part of a conversion from another system, but, where this is not the case, the following inventory movements can be used.
• Physical Stock - use the Miscellaneous Receipt task to set the initial shelf stock,
56 | Infor System21 Inventory Management

850BOverview
• Allocated Stock - use the Allocated Stock Adjustment task to set any existing allocated stock level,
• Frozen Stock - use the Frozen Stock Adjustment task if you currently have stock which is unavailable for issue,
• Purchase Order - use the Record Purchase Order task to reflect the current supply situation,
It is worthwhile entering these movements all with a narrative indicating INITIAL SET UP, so that they can be readily identified in future. Making use of a standard procedure for this exercise means that a full audit is maintained in terms of movement records.
Infor System21 Inventory Management | 57


Chapter 2 Inventory Maintenance 2
Inventory Maintenance Introduction You use Inventory’s maintenance tasks to create and amend the master files and parameters that are fundamental to its operation.
Note: Use file maintenance, particularly the Inventory Descriptions file maintenance, with extreme care, since errors have far reaching effects. Introduce a proper procedure of authorisation and post maintenance checking.
Note: Use file maintenance, particularly the Inventory Descriptions file maintenance, with extreme care, since errors have far reaching effects. Introduce a proper procedure of authorisation and post maintenance checking.
You can use the master file enquiries to view the information you have specified in the maintenance tasks, and these are not separately described.
Associated Applications Inventory Management is a pre-requisite for all Customer Service, Logistic and Production applications. In a full implementation Inventory Management provides both basic data definition and transaction control for these applications.
Implementation Considerations Before you start to use Inventory, you need to consider the following questions:
• Which other applications do you plan to install?• How many companies do you need to set up within Inventory?• How do you want Inventory to fulfil the information requirements for these applications?• Will you use Inventory, or the other applications, to control the various stock movement
transactions?• Do you plan to interface non-standard or vertical applications with Inventory?
Infor System21 Inventory Management | 59

851BInventory Maintenance
Basic Data Set Up Once you have decided how you want to use Inventory, you need to set up:
• Company profiles for each company you want to use within Inventory • Stockrooms and stock weeks matrices • Locations and location maps for location-controlled stockrooms • Usage profiles • Descriptions • Items • Stockroom details • Calendars • Alternative items (if applicable) • Item supersession • Kit lists (a group of items normally sold as individual finished goods, but on occasions sold
together as a unit) • Transaction control
60 | Infor System21 Inventory Management

851BInventory Maintenance
Descriptions Maintenance [1/INM, 6/INUM, 1/INV, 3/SAM] Inventory Management, as well as many other Customer Services and Logistics applications, uses the Inventory Descriptions file to determine parameter values for the application.
Parameter files serve a number of purposes; for example, at data entry time it can save entry of long repetitive data.
Once set up and checked, parameter files help to make sure that data input is both accurate and valid.
An example of the use of the Inventory Descriptions file is for the usage cycle. When you set up an Inventory company profile, you must set up a usage cycle code; this field determines whether the stock history records should be summarised at a weekly or monthly level.
Use this task to enter and use parameters; codes that relate to a single function are grouped together. The identifier for a group of codes is called the major type. The members of any group are the descriptions codes.
See the Appendices section for detail about many of the standard Descriptions File entries and values.
Descriptions File Maintenance Selection Window To display this window, select the Maintain Descriptions task.
Use this window to add or maintain definitions of major types.
Fields
Major Type
Enter a major type to add or maintain.
Description Code
You can optionally enter a description code to add or maintain.
Position to
Enter a full or partial descriptions entry to position to that point in the list.
Leaving all fields blank and pressing enter will reposition the list at the top.
Functions
Description Code Details (F15)
If you have entered only a major type, use this to maintain description code details for that type. The Descriptions File Maintenance Detail window is displayed.
Infor System21 Inventory Management | 61

851BInventory Maintenance
If you have entered a major type and description code, use this to maintain description code details for that description code. The Descriptions File Maintenance Code Details window is displayed.
Note: Use Page Up and Page Down to display subsequent windows when appropriate.
To display details about a specific major type, enter the major type and then press Enter.
Note: Please refer to the Inventory Description chapter of this Product Guide for more details of the Description File Major Type Codes
Descriptions File Maintenance Window To display this window, enter a major type and press Enter on the Descriptions File Maintenance Selection window.
Fields
Major Type
This field displays your selected major type.
Description
You can enter or amend the description of the major type.
Description Limit
Enter up to seven numeric characters. This field is for information purposes only within Inventory Management.
P/V
Select one of the following:
Not applicable - If the rate does not apply
P - Where the rate is a percentage basis
V - Where the rate is a value basis
Note: You can define major types to act as search family characteristic codes, which are used in search family codes/certificates of conformance. If you want to use a major type in this way, enter V in the P/V field.
The description codes set up for each major type are the permitted values defined to the characteristic.
For example, you could have a major type (characteristic code) of COLR and descriptions (characteristic values) of Red, Pink and Blue.
Functions
Description Code Details (F15)
Use this to display the Descriptions File Maintenance Detail window.
62 | Infor System21 Inventory Management

851BInventory Maintenance
Language Descriptions (F23)
Use this to enter or amend a language code and its description. You can add these defined language codes to a customer's profile, in Sales Order Processing, to print any text entered in the specified language in the Maintain Text window on external documentation for that customer.
Note: You do not need to select language codes to print text in the native language.
Press Enter to update the major type details.
Descriptions File Maintenance Detail Window To display this window enter a major type and select Description Code Details (F15) on the Descriptions File Maintenance Selection window. Alternatively, select Description Code Details (F15) on the Descriptions File Maintenance window.
Use this window to enter the details for the selected major type.
Fields
Description Code
Enter a minor description code to add it to the list.
Position to
Enter a full or partial descriptions entry to position to that point in the list.
Leaving this field blank and pressing enter will reposition the list at the top.
Options
Select
Use this to view the selected minor type code. This displays the Inventory Descriptions File Maintenance Selected Details window for your selected minor type code.
Language Descriptions
Use this to view the Multi-lingual Descriptions Maintenance pop-up for your selected minor type code.
Press Enter to update the minor type.
Descriptions File Maintenance Code Details Window To display this window, enter a valid major type and description code and then select Description Code Details (F15) on the Descriptions File Maintenance Selection window.
Use this window to enter or amend details for the selected description code. Any existing details are displayed.
Infor System21 Inventory Management | 63

851BInventory Maintenance
Note: The window is the same as the Descriptions File Maintenance Selected Details window, except that it does not display the list of codes for the major type.
Fields
Description
Enter up to 30 alphanumeric characters to describe the code.
Note: The value entered in the Description Limit field is the recommended length for the description.
Parameter Limit
Enter up to two numeric characters to specify the length of the description associated with this description code, up to a maximum value of 30.
Rate
Enter a rate using up to five numeric characters, including two decimals. Use the rate for certain description types, such as extra charges, to define a rate associated with the major type. You define the nature of the rate by the percentage/value flag specified for this major type.
P/V
Select one of the following:
Not applicable - If the rate does not apply
P - Where the rate is percentage based
V - Where the rate is value based
Note: If you are defining a minor type for use in something such as a Certificate of Conformance code, enter V in this field.
Tax Code
Enter the Tax code, using one character. You can use this to define Tax codes associated with extra charges.
Select Previous to return to the Descriptions File Maintenance Selection window.
Descriptions File Maintenance Selected Details Window To display this window, select a minor type code on the Inventory Descriptions File Maintenance Detail window.
Use this window to enter or amend details for the selected minor type. Any existing details are displayed.
Note: The window is the same as the Descriptions File Maintenance Detail window, except that it also displays the Description, Parameter Limit, Rate, P/V and Tax code fields that relate to your selected minor type code.
64 | Infor System21 Inventory Management

851BInventory Maintenance
Fields
Description
Enter up to 30 alphanumeric characters to describe the minor type.
Note: The value entered in the Description Limit field is the recommended length for the description.
Parameter Limit
Enter up to two numeric characters to specify the length of the description associated with this minor type up to a maximum value of 30.
Rate
Enter a rate using up to five numeric characters, including two decimals. Use the rate for certain description types, such as extra charges, to define a rate associated with the major type. You define the nature of the rate by the percentage/value flag specified for this major type.
P/V
Select one of the following:
Not applicable - If the rate does not apply
P - Where the rate is percentage based
V - Where the rate is value based
Note: If you are defining a minor type for use in something such as a Certificate of Conformance code, enter V in this field.
Tax Code
Enter the Tax code, using one character. You can use this to define Tax codes associated with extra charges.
Functions
Delete (F11)
Use this to delete the description code. No confirmation is required.
Language Descriptions (F23)
Use this to display the Multi-lingual Descriptions Maintenance pop-up.
Note: You do not need to select language codes to print text in the native language.
Press Enter to update the minor type details and re-display the Inventory Descriptions File Maintenance Detail window.
Infor System21 Inventory Management | 65

851BInventory Maintenance
Items [2/INM, 1/MDM, 1/SAM, 10/INM] Use this to create or amend the primary Item Master information. This information is primarily concerned with classifying and describing an item. The characteristics of these items are defined by the analysis codes. The use of these codes varies depending upon the needs of the company. You should note the following points:
• You use minor product group as the main level of aggregation for the entry and maintenance of forecast data in MPS, MRP, DRP and FC.
• You can request reports and stock counts in Inventory Management by part type, product class, major product group or minor product group.
Create/Maintain Inventory Item Selection Window To display this window, select the Items task.
Use this window to specify the item code you want to create or amend.
Fields
Item
Enter the code of an existing item or enter a new code (using up to 15 alphanumeric characters) to add an item to the file.
You can use the prompt facility to select from the Item Master Scan pop-up.
A warning window is displayed when an item, subject to Global Item Maintenance, that has a "published" definition owned by another company, is selected for maintenance in any company other than its owning company. This lists the global attributes of the item (i.e. those that are the responsibility of the owning company to maintain) and informs you that any changes made to such an attribute's value will be automatically discarded and its value re-set to the corresponding value held on the item's definition in the owning company.
Furthermore, upon completion of the maintenance of the item, a window is displayed if a discrepancy exists between a global attribute's values in the current company and those held in the owning company for that item.
Note: These same windows are displayed when Item Maintenance is accessed from Linked Item Maintenance.
Press Enter to display the Maintain Inventory Item window.
66 | Infor System21 Inventory Management

851BInventory Maintenance
Item Master Scan Pop-up To display this pop-up, use the prompt facility on the Item field on the Create/Maintain Inventory Item Selection window.
This pop-up is used throughout Inventory Management to assist in identifying an item. You can also use the same item search function in all applications that use an item number.
Fields
Search Type
Select one of the following:
Item Reference (1)
Inventory Description (2)
If you are using Purchase Management, you can use the following search type:
Purchasing Description (3)
If you are using Advanced Order Entry you can use following search types:
Alias (4) - Alternative Reference
Search Characteristics (5)
Base item (9)
Prompt (?)
Select this and then press Enter to display another pop-up you can use to search on up to six words that appear in the item description. The default search type is defined in the Default Item Search Option field in the Inventory company profile.
Search Criteria
The content here depends on the Search Type field.
Item Reference
This displays all the items, in item number sequence, beginning with the search criterion entered. This can either be an item or the beginning characters of an item.
Inventory Description
Make a selection based on the Inventory search words, which currently exist for the item. These are generated at item maintenance time based on the first 20 words from the item description and the first three lines of the external text for the item. When either the item description or external text is modified you have the opportunity to rebuild the item search index. You can add words to the search index manually.
Purchasing Description
Make a selection based on the description. This can be either a whole word or the initial letters of a word appearing in the description.
Infor System21 Inventory Management | 67

851BInventory Maintenance
Alternative Reference
Make a selection based on the alternative item reference. This alternative item description may be used by a manufacturer or wholesaler and is maintained by selecting Alias (F17) on the Maintain Inventory Item window. The search criterion can be either a whole word or the initial letters of a word present in the alternative item reference. This search displays a list of all items, with the external reference and item reference that match the criterion.
Search Characteristics
Make a selection based on a single or a range of characteristics specified against a search family code. The search criterion is a search family code. You maintain this code within Advanced Order Entry.
Base Item
This displays all the base items in number sequence beginning with the entry made. You can only use this if you are using Production and Configurator.
Prompt
If you select this in the Search Type field, an extra pop-up is displayed.
You can position the display to a nominated point in the list. However, if only one reference meets the search criterion, the application returns to the maintenance window and inserts the item reference code automatically.
Select the item you want to use.
Maintain Inventory Item Descriptive Data Window Ref: IN12C02
To display this window, select an item and then press Enter on the Create/Maintain Inventory Item window.
Use this window to view and maintain data relating to the item. The current data for the item is displayed.
Note: If you make an error and existing data is inadvertently overwritten, select Previous (F12) before selecting Update (F8), so as not to save this data.
Fields
Description
Enter up to 36 alphanumeric characters, to describe the item. You use the description to identify the item on enquiries and reports, and to build the alpha search words for the item.
Effectivity Start
For a new item, enter or select the date from which the item can be sold, or added to the software. This field is useful if you want to find out how long the item has been used by the company.
68 | Infor System21 Inventory Management

851BInventory Maintenance
Last Changed
This is a system-maintained field holding the date on which you last changed the item details.
Deletion Requested By
This field displays the user who has selected the item for deletion in instances where the item is on the Deleted Items file.
Tax Code
Enter a Tax code
Alternatively, use the prompt facility to select from the Tax Code Selection pop-up.
The rate field is used to hold the appropriate Tax percentage. If you are using Sales Order Processing and Purchase Management or both, this information is used to calculate the tax payable on this item. If General Ledger is attached, confirmation of the Tax code is via the General Ledger Tax code definitions.
Note: If you are using US Sales Tax, this field is not displayed and the Tax Charge Type field is displayed in its place.
Duty Percentage
This is retrieved from the Inventory Descriptions file, if you enter an EEC tariff.
Tax Charge Type
If you use US Sales Tax, select one of the following to determine how sales tax is applied to your selected item:
Sales Tax Exempt (0) - Not to apply sales tax
Sales Tax Applicable (1) - To apply sales tax
Sales Tax Override (2) - To apply sales tax, depending upon the specified override rate
Note: These are defined in the Inventory Descriptions file under major type PSTC.
Container Item
Use this checkbox as follows:
Unchecked (default) - If the item is not a container item and the container information tabs are not displayed
Checked - If the item is a container item and the container information tabs are displayed (see below)
Caution: Do not set up a container item as non-stocked, lot-controlled, batch-controlled or serial- controlled, a catchweight item or average/latest/FIFO costed. The functionality associated with those attributes is not supported for container items.
Packaging Reporting Item
This will only be displayed if packaging reporting is switched on in the Inventory company profile.
Select one of the following:
Infor System21 Inventory Management | 69

851BInventory Maintenance
No (0) - To exclude the item from the packaging reporting
Yes (1) - To include the item in packaging reporting
Select Yes to enable Item Packing (F13) for entry of the item’s packaging parameters. This function is described fully in the Packaging Requirements chapter of this product guide.
User-defined Values
These are the three user-defined item specification fields. Their use in the Inventory Management company is defined in the Specification N Description fields on the Maintain Company Profile Initial Selection window. The fields are eleven numeric characters with four decimal places.
ANA Inner Code
Enter up to 14 alphanumeric characters to specify the ANA inner code for this item. This is the barcode that represents the lowest (consumer) unit of the item. If the Inventory Management company profile is set to validate this barcode, the code entered is validated.
Bar Code
Enter up to 14 alphanumeric characters to specify the barcode for this item. If the Inventory Management company profile is set to validate this barcode, the code entered is validated. If the barcode has been used on another item, a warning is displayed, detailing the item and description.
Note: If validation is on and you enter an ANA inner code or barcode with a length other than 8, 12, 13 or 14, an error message will be displayed.
EEC Tariff Code
Enter an EEC tariff code
Alternatively, use the prompt facility to select from the TAR EEC Tariff Code pop-up.
If you enter a tariff code, duty % is retrieved from the Inventory Descriptions file entry for the tariff code. Ten characters are available for definition of the EEC tariff code.
Note: Only eight-character tariff codes are permitted in companies defined within the World Trade application. This ensures that the tariff code definition within Inventory Management remains compatible with the definition of the first portion of an item's commodity code within the World Trade application (which is still restricted to eight characters).
Reference
Enter up to 15 alphanumeric characters to specify the reference number of the document confirming the EEC tariff classification.
Date
Enter or select the date for the tariff classification agreement, in the format DD/MM/YY.
Functions
Update (F8)
Use this to update the item details with any changes made.
70 | Infor System21 Inventory Management

851BInventory Maintenance
Valuation Group (F10)
Use this to define the group valuation criteria using the Group Valuation Criteria pop-up. This information is used for Inventory valuation or LIFO re-valuation purposes.
Item Packing (F13)
Use this to display the Country Item Packing Details Selection window for your selected item.
Note: This is only available if you have specified that this item is part of packaging reporting. For further information, see the Packaging Requirements chapter of this product guide.
Supersession (F14)
Use this to display the Item Supersession Maintenance window in order to maintain supersession details relating to the item.
Restart (F15)
Use this to re-start if you make an error and existing data is inadvertently overwritten. Use this before selecting Update (F8), so as not to save this data.
Transaction Control (F16)
Use this to display the Transaction Control Effectivity Maintenance window in order to maintain transaction control effectivity dates relating to the item.
Alias (F17)
Use this to create and maintain alternative item references used for item search, using the Item Alias Maintenance window. You can maintain any number of alternative references for an item. These may be customer specific item numbers or the original equipment manufacturer’s code. Dealer Aliases can also be maintained using this function.
Item Search (F18)
Use this to create and maintain item search details, using the Item Search Characteristics window.
Pricing Groups (F19)
Use this to maintain pricing groups, using the Item Pricing Groups pop-up.
Lot Details (F20)
Use this to create or amend information on lot controlled items, using the Lot Header Parameters Maintenance pop-up.
Enter Text (F21)
Use this to display the Maintain Text pop-up. Select a Usage Code and a Language Code for multi-lingual text entry. Press Enter to display the Item Text pop-up. Enter text in the selected language to be displayed or printed on external documentation, for example despatch notes, according to the usage code selected.
Note: You specify your customer's default language in the Maintain Customers task in Sales Order Processing. You can enter a different language to override this default language when the Additional Overrides (F16) function is available.
Note: You do not need to select language codes to print text in the native language.
Infor System21 Inventory Management | 71

851BInventory Maintenance
Purchase Text (F22)
Use this to display the Item Text pop-up.
Note: This is only available if Purchasing is switched on in the Inventory Company Profile.
Language Descriptions (F23)
Use this to display the Multi-lingual Descriptions Maintenance pop-up, where you can enter or amend a language code and its description. You can add these defined language codes to a customer's profile in Sales Order Processing so that any text entered in the specified language in the Maintain Text pop-up will be printed on external documentation for that customer.
Note: You do not need to select language codes to print text in the native language.
Press Enter to display the Maintain Inventory Item Units of Measure window.
Alternatively, select Update (F8) to save any changes made to the current item definition and return to the Create/Maintain Inventory Item Selection window.
Maintain Inventory Item Units of Measure Window To display this window, press Enter from the Create/Maintain Inventory Item - Descriptive Data window
Use this window to view and maintain data relating to unit of measure. The current data for the item is displayed.
Note: If you make an error and existing data is inadvertently overwritten, select Previous (F12) before selecting Update (F8), so as not to save this data.
Fields
Purchase Unit
Enter a unit
Alternatively, use the prompt facility to select from the inventory description UNIT Unit Descriptions pop-up.
The purchase unit defined here provides the default purchase ordering unit at the item stockroom level.
Stock -> Purchase Conversion
Enter up to nine numeric characters, including five decimals, to specify the relationship between the stock and purchase units. If stock and purchase units are the same, this should be 1. If, for example, stock units are Each and purchase units are Tens, this conversion factor should be 10.
Note: This must be an integer value if Multiple Unit Entry is set to Purchase, Stock & Issue Units (2).
72 | Infor System21 Inventory Management

851BInventory Maintenance
Stock Unit
If you only enter the stock unit, Inventory automatically enters the same unit of measure for issue and purchase units and enters 1 for the conversion factors.
You can use the prompt facility to select from the UNIT Unit Description pop-up.
Issue -> Stock Conversion
Enter up to nine numeric characters, including five decimals, to specify the relationship between the issue and stock units. If issue and stock units are the same, this conversion factor should be 1. If, for example, the issue unit is Each and the stock unit is Tens, this conversion factor should be 10.
Note: This must be an integer value if Multiple Unit Entry is set to Stock & Issue Units (1) or Purchase, Stock & Issue Units (2).
Note: If the issue unit and the purchase unit are the same, the following condition must apply: the product of the Stock to Purchase and the Issue to Stock factors must be exactly equal to 1.
Issue Unit
The issue unit displayed here provides the default issue unit at item stockroom level, and is the default ordering unit for this item in Purchase Management. For example, if you raise a purchase order in crates, boxes and bottles for a single item, and the issue unit is bottles, all orders are expressed in the application in bottles only.
Note: Once you have defined the issue unit of measure for an item, you cannot change it.
Note: The units of measure you specify in the above fields are the only valid units of measure to be used when ordering, moving, stocking and selling this Inventory item.
Purchase Pack
Enter up to six alphanumeric characters to define the purchase pack for this item.
Catchweight Item Type
Select the Catchweight Type for the item, which is 1, 2 or 3, or leave the field blank, if the item is not subject to Catchweight. The three types are as follows:
Type 1 – (Catchweight) transactions always prompt for the actual secondary unit value, and the secondary unit is used to calculate the purchase, sales and inventory cost values.
Type 2 – (Guaranteed Nett Weight) as type 1, except that sales invoice values are always calculated using the nominal secondary value.
Type 3 – (Standard weight) the nominal secondary value is always used. Costs are in the issuing Unit of Measure and value is by the Primary unit.
Note: Production items can only be defined as Catchweight items 1 or 2.
Note: This is only displayed when Catchweight is switched on at Inventory Company Profile level.
Secondary UOM
If you are using Catchweight, this and the Secondary Value field are displayed instead of the Weight per Selling Unit field. This defaults to the unit of measure selected in Company Profile Maintenance.
Infor System21 Inventory Management | 73

851BInventory Maintenance
You can use the prompt facility to select from the UNIT Unit Description pop-up.
You can then use the secondary UOM for advanced pricing and discounting of sales orders of the item and the secondary values are passed to Sales Analysis.
If the item is a Catchweight item, the stockroom costs are also expressed in this unit of measure.
Note: Both the Secondary Value and Secondary UOM fields must either be empty or have entries, otherwise an error message is displayed
Secondary Value
If Catchweight is being used, this and the Secondary UOM field are displayed instead of the Weight per Selling Unit field. The secondary value is the conversion between the item's issue unit and the item's secondary unit. If the item's issue unit is BOX and each box is 5Kg, the secondary value and the unit of measure would equal 5.0 and KG respectively.
Note: You can use Catchweight both with standard Production items and with Production items that are attached to a Warehouse.
Tolerance Percentage
When you capture an item's secondary value during a relevant transaction, you can enter a percentage in this field to set the default plus or minus degree of deviation from the expected nominal value. If you exceed this percentage tolerance a warning message is displayed. For example, if you enter 5 in this field, any transaction that exceeds the expected nominal value by plus or minus 5% will cause the warning message to display.
Tolerance Value
When you capture an item's secondary value during a transaction, you can enter an absolute value in this field to set the default plus or minus degree of deviation from the expected nominal. If you exceed this fixed value tolerance a warning message is displayed. For example, if you enter 5 in this field, any transaction that exceeds the expected nominal value by plus or minus 5kg (if the UOM is kilos) will cause the warning message to display.
Note: You can enter a number in either the Tolerance Percentage field or in the Tolerance Value field; you cannot enter a number in both.
Note: If both the Tolerance Percentage and Tolerance Value fields are empty, there is no tolerance and a warning is displayed for anything other than the default.
Weight per Selling Unit
Enter up to eleven numeric characters, including four decimals, to specify the weight of a single selling unit. If you use Transport Planning, the weight assigned to each item must be in the same unit of measure, for example, kilograms. If this company is using Catchweight, the Secondary Value and Secondary UOM fields replace this field.
Note: This field is displayed only if the Catchweight application is not used.
Multiple Unit Entry
This determines the way that item quantities may be entered.
Enter one of the following:
74 | Infor System21 Inventory Management

851BInventory Maintenance
0 - Decimal format
1 - Stock and issue units
2 - Purchase, stock and issue units
Alternatively, use the prompt facility to select from the MUEF Multiple Entry Unit Flag pop-up.
In some exception type transactions, such as Proof of Delivery, Sundry Invoicing, etc., some of these possible values may not be sensible for the item, depending on the definition of the units of measure. If, for example, the purchase, stock, and issue units are identical, values 1 and 2 are not allowed.
Note: This field is only displayed when the Quantity Formatting Details Display flag is switched on at Inventory Company Profile level.
Note: All items are automatically set to decimal format is Quantity Formatting Details Display is suppressed for the current company.
Unitary Item
This field displays the number of decimal places allowed for quantity fields.
Note: This field is only displayed when the Quantity Formatting Details Display flag is switched on at Inventory Company Profile level.
Sales Unit Indicator
Use this field to specify whether the item can be sold in issue units.
Enter one of the following:
0 - If the item cannot be sold in issue units
1 - If the item can be sold in issue units
Alternatively, use the prompt facility to select from the SUNI Sales Unit Indicator pop-up.
Note: This field is only displayed when the Quantity Formatting Details Display flag is switched on at Inventory Company Profile level.
For example, if you wish to hold inventory levels, costs and prices in bottles but restrict the taking of sales orders to cases, this field should be set to 0.
Note: All items are automatically set to allow their sale in issue units if Quantity Formatting Details Display is suppressed for the current company.
Default Inventory Unit
This unit is the default unit used when using Inventory application options.
Note: This field is only displayed when the Quantity Formatting Details Display flag is switched on at Inventory Company Profile level. When it is not displayed, the value defaults to the issue unit specified for the item.
Default Sales Unit
This unit is the default unit used when using Sales Order Processing application options.
Infor System21 Inventory Management | 75

851BInventory Maintenance
Note: This field is only displayed when the Quantity Formatting Details Display flag is switched on at Inventory Company Profile level. When it is not displayed, the value defaults to the issue unit specified for the item.
Equivalent Unit/Factor
This is a mechanism for linking the stock unit of an item to another unit, not the issue unit. It can be used in industry sectors that have the concept of a standard unit for converting stock quantities of this item to a standard unit quantity. For example, within the Beverage industry a standard case is made up of twelve 75cl bottles (9 litres of liquid), therefore any item packaging configuration can be expressed in terms of its number of standard (equivalent) cases.
Note: This is a similar concept to secondary unit of measure, although no additional balances are held on the system in equivalent units.
Optimum Unit/Factor
This can be used to express the optimum quantity to be sold, for example a full pallet. It can then be used within Advanced Pricing to give volume discounts.
Note: Both Equivalent Unit and Optimum Unit are used in certain forms of Pricing/Discounts.
Press Enter to display the Maintain Inventory Item Analysis Codes window.
Alternatively, select Update (F8) to save any changes made to the current item definition and return to the Create/Maintain Inventory Item Selection window.
Maintain Inventory Item Analysis Codes Window To display this window, press Enter from the Create/Maintain Inventory Item Units of Measure window
Use this window to view and maintain data relating to analysis codes. The current data for the item is displayed.
Note: If you make an error and existing data is inadvertently overwritten, select Previous (F12) before selecting Update (F8), so as not to save this data.
Fields
Item
Item Type
Enter an item type
Alternatively, use the prompt facility to select from the PTYP Item Type pop-up.
Item Class
Enter an item class
Alternatively, use the prompt facility to select from the PCLS Item Class pop-up.
76 | Infor System21 Inventory Management

851BInventory Maintenance
Item Group Major
Enter a major item group
Alternatively, use the prompt facility to select from the PGMJ Item Group - Major pop-up.
Item Group Minor
Enter a minor item group
Alternatively, use the prompt facility to select from the PGMN Item Group - Minor pop-up.
Note: Use the above codes to select items to be included in stock counts.
Note: Use the above codes to classify similar items for reporting purposes and select items for the valuation of stock movements.
Note: Use the minor item group as a level of aggregation for the entry and maintenance of forecast data in MPS, MRP and DRP. Within Production, they are used to group items into product families. These product families may subsequently be used as a selection parameter on a selective MRP run.
Caution: You should use the Item Group Minor code with the full knowledge of the implications to linked applications: Sales Analysis, Production and Forecasting.
Caution: You will not be able to alter the Item Group Minor code for an item if its Item Supersession In Use flag is set.
Division
Enter a division
Alternatively, use the prompt facility to select from the DIVN Inventory Product Division pop-up.
Sub-Division
Enter a sub-division
Alternatively, use the prompt facility to select from the SDIV Inventory Item Sub-Division pop-up.
Note: Use the above codes to define which division of the company has responsibility for this item.
Note: If you use the Advanced Financial Integrator to maintain stock and sales values in the General Ledger, you should consider the definition of items. Appropriate coding makes the mapping to the Chart of Accounts easier.
Inventory Source
You can group together items that you want to update onto a price list.
Enter an Inventory source code using a one-character code to indicate the pricing group to which this item belongs
Alternatively, use the prompt facility to select from the INSC Inventory Source pop-up.
Use Price List Updates to convert to a different currency, or when a percentage change in the price occurs. For more information see the Create New Price List Window section in the Order Entry product guide.
Infor System21 Inventory Management | 77

851BInventory Maintenance
If you use Configurator, you need to define a specific and unique value for each of the following categories:
• Model items • Base items • Pre-configured items • Order configured items • Generic components
In this case, we recommend that you use the M, B, P, O and G codes respectively. However, if any of these codes are already used in major type INSC, you must use different codes.
Sales Analysis Flag
Enter one of the following to define Sales Analysis tasks for kit items. These are set up under major type SAUI.
Note: If you are creating a new item, the value in this field defaults to that specified in the Inventory company profile.
0 - If you do not want to update Sales Analysis for this item
1 - If this is a non-kit item and should update Sales Analysis normally or if this is the parent of a kit for which only the parent details should update Sales Analysis
2 - If this is the parent of a kit for which only component details should update Sales Analysis
Note: The Sales Analysis update for a kit is controlled by the flag on the parent. The flag on the kit component merely specifies the Sales Analysis update on which you sell the component as an item in its own right. (For more information refer to the Kit Lists section.)
Press Enter to display the Maintain Inventory Item Price and Costing Information window.
Alternatively, select Update (F8) to save any changes made to the current item definition and return to the Create/Maintain Inventory Item Selection window.
Maintain Inventory Item Price and Costing Information Window To display this window, press Enter from the Create/Maintain Inventory Item Analysis Code window
Use this window to view and maintain data relating to price and cost. The current data for the item is displayed.
Note: If you make an error and existing data is inadvertently overwritten, select Previous (F12) before selecting Update (F8), so as not to save this data.
Fields
78 | Infor System21 Inventory Management

851BInventory Maintenance
Costing
Costing Method
This indicates the method used to cost the item when it is received into Inventory. Although the costing method for the item remains the same in all stockrooms, each stockroom holds its own unique cost record, which may therefore vary.
Note: Production does not use these default codes, but those associated with a specific stockroom.
Select one of the following costing methods for this item:
Standard (S) - To enter the standard cost in the Standard Cost field on the second Stockroom Details Maintenance window
Latest (L) - To enter the cost of receipt in Miscellaneous Receipts and use the latest cost
Average (A) - To enter the cost of receipt in Miscellaneous Receipts and use the average cost
FIFO (F) - To enter the cost of receipt in Miscellaneous Receipts and use FIFO costing
Note: You only need to enter this field if you do not want the item costing method to be the same as the default costing method set up on the company profile.
Note: You can enter information for any, or all, of the three following fields depending on the information that you want to hold for costing non-stock items.
Standard Cost
You use these costs as references for non-stock items.
Latest Cost
You use these costs as references for non-stock items.
Average Cost
You use these costs as references for non-stock items.
Price
Base List Price
You can enter a value to be used in valuation of forecasts in Distribution Requirements Planning. You can use this price in Sales Analysis for kit components.
Price Regulator Code
Enter a code of up to two alphanumeric characters
Alternatively, use the prompt facility to select from the PRC Price Regulator Codes pop-up.
Price List Seq Code
Enter a code of up to five alphanumeric characters.
Discount Group
You can group together items that have the same discounts on a discount list.
Infor System21 Inventory Management | 79

851BInventory Maintenance
Enter a discount group, using up to three alphanumeric characters
Alternatively, use the prompt facility to select from the PGR Item Discount Group pop-up.
Standard Pricing uses discount groups; these are referred to in discount lists configured in Sales Order Processing.
Note: If Advanced Pricing is in use, this becomes a memo field.
Accounts
Purchases
Enter an account number of up to 12 characters.
If you are using Purchase Management, this is the account number to which the purchase invoices are posted. This defaults to the account number in the General Ledger Account field on the Maintain Company Profile window
Cost of Sales Account
Enter an account number of up to 12 characters.
If you are using Sales Order Processing, this is the account number to which cost of sales transaction values are posted. This field defaults to the account number in the Cost of Sales GL Account field on the Maintain Company Profile window.
Sales Account
Enter an account number of up to 12 characters.
This is the account number to which stock transaction values are posted. This field defaults to the account number in the Sales GL Account field on the Maintain Company Profile window.
Price Variance Account
Enter an account number of up to 12 characters.
If you are using Purchase Management, this is the account number to which accruals are posted. This field defaults to the account number in the Price Variance GL Account field on the Maintain Company Profile window.
Note: None of the above entries is validated against the existing GL account structure.
Press Enter to display the Maintain Inventory Item Inventory Control window.
Alternatively, select Update (F8) to save any changes made to the current item definition and return to the Create/Maintain Inventory Item Selection window.
Maintain Inventory Item Inventory Control Information Window To display this window, press Enter from the Create/Maintain Inventory Item Pricing and Costing window
80 | Infor System21 Inventory Management

851BInventory Maintenance
Use this window to view and maintain data relating to inventory control. The current data for the item is displayed.
Note: If you make an error and existing data is inadvertently overwritten, select Previous (F12) before selecting Update (F8), so as not to save this data.
Fields
Batch/Lot/Serial Control
Set the control flag in Extended Lot Details within Inventory Management's company profile to determine the use of this facility. If it is not enabled for a type, you cannot select the option.
Select one of the following to specify the type of lot control for this item:
Batch (B) - To control stock by manufacturing batch number
Lot (L) - To control stock by manufacturing lot number
Serial (S) - To control stock by item serial number
Normal (N) - To control stock by total quantity recorded only
Lot control methods Lot (L), Batch (B) and Serial (S) require the entry of the appropriate control number when making a stock movement.
There is little functional difference between Lot (L) and Batch (B) control, other than Extended Lot Control can be activated separately for the two.
Note: Item cannot be serial controlled if the Bonded Warehousing application is installed and Item Variant definitions exist for the item.
Shelf Life Unit
For Items defined as Batch controlled, Lot controlled, or Serial controlled, and where the control type is further managed using Lot Headers, a Shelf Life Unit code is required. The available Shelf Life Units are:
1 – Days
2 – Weeks
3 – Months
4 – Years
5 – Indefinite
6 – Hours
7 – Minutes
Alternatively, use the prompt facility to select from the SHLU Shelf Life Unit pop-up.
Note: Options 6 for Shelf Life in Hours and 7 for Shelf Life in Minutes are available primarily to help manage Items that have batches of product with shelf life availability of less than a day.
Infor System21 Inventory Management | 81

851BInventory Maintenance
Shelf Life
Enter up to three numeric characters. This is the shelf life of the item expressed in the item shelf life units, and is the actual life of the product. Once the Shelf Life is passed, the Lot will be deemed to have expired, with the only expected action being that it should be disposed of.
To establish a batch/lot/serial number to expire the same day as received in Inventory, for the item establish a Shelf life unit of days, a Shelf life of 1 day and a Customer shelf life of 1 day.
Note: To enable shelf life and customer shelf life to be both 1 day, the Inventory Description major type DFLT and minor type ONEDAYLOTS parameter limit must be set to 1.
Customer Shelf Life
This is the portion of the total shelf life after the beginning of which some action might be expected to be taken, for example a price reduction. This value is subtracted from the Expiry Date of a Lot to give its Last Available Date.
For Items that have batches of product that come into being and become unavailable on the same day, both the Shelf Life and the Customer Shelf Life may be set to 1 day. This is only available for Items with the Shelf Life Unit set to 1 (days).
Note: The result of setting both the Shelf life and the Customer Shelf Life to one day is that the Creation Date, First Available Date, and Last Available Date are all the same date, with the Expiry Date being the following day.
Supersession in Use
This indicates whether item supersession is in operation for this item.
Use this checkbox as follows:
Unchecked - item supersession is not active
Checked - item supersession is active
Note: Existing item supersession data is retained when this function is de-activated at item level.
Transaction Control in Use
This indicates whether transaction control is in operation for this item
Use this checkbox as follows:
Unchecked - transaction control is not active
Checked - transaction control is active
Note: Existing transaction control data for this item is retained when this function is de-activated at item level.
Caution: Transactions could be restricted for any item because of codes associated with the item group minor of that item.
82 | Infor System21 Inventory Management

851BInventory Maintenance
Warranty Type
Enter a warranty type code.
Alternatively, use the prompt facility to select from the WTYP Warranty Type pop-up.
Storage Method
Enter a storage method code.
Alternatively, use the prompt facility to select from the STRM Inventory Storage Method pop-up.
Inspection Required
Use this checkbox as follows:
Unchecked - this item does not require inspection on receipt.
Checked - this item requires inspection on receipt.
Note: If you are using Purchase Management, any item flagged as requiring inspection upon receipt has a warning displayed when it is received directly into goods inwards or stores.
Subcontract Item
If Inventory Management is linked to Purchase Management, you can enter up to 15 alphanumeric characters to determine whether to book the item into stock under another item. If you specify a subcontract item, any purchase receipts against the maintained item are booked into stock against the subcontract item.
You can use the prompt facility to select from the Item Master Scan pop-up.
Press Enter to display the Maintain Inventory Item Default Ordering Information window.
Alternatively, select Update (F8) to save any changes made to the current item definition and return to the Create/Maintain Inventory Item Selection window.
Maintain Inventory Item Default Ordering Information Window To display this window, press Enter from the Create/Maintain Inventory Item - Inventory Control window
Use this window to view and maintain data relating to default ordering codes. The current data for the item is displayed.
Note: If you make an error and existing data is inadvertently overwritten, select Previous (F12) before selecting Update (F8), so as not to save this data.
Fields
Purchasing Officer
Enter a purchasing officer as defined in Purchase Management.
Alternatively, use the prompt facility to select from the Select Purchasing Officer pop-up.
Infor System21 Inventory Management | 83
851BInventory Maintenance
Preferred Supplier
If you want to use Advanced Order Entry to process back-to-back ordering of non-stock items, you must nominate an existing supplier from Accounts Payable. You can also use this in Production as a selection parameter on a selective MRP run.
You can use the prompt facility to select from the Supplier Search pop-up.
Note: The preferred supplier for back-to-back ordering for stock items is taken from the Stockroom Details file.
Search Family Code
This code, defined in Advanced Order Entry, defines up to 10 attributes of the item which are maintained using Item Search Chars (F18). These attributes can then be used in the Item Search facility.
You can use the prompt facility to select from the Search Family Code Selection pop-up.
Configurator also uses these codes:
• To link a model product with associated base products • To link a generic component with its actual components • To search for a matching component based on the specific characteristics
C-of-C Code
This code defines the structure of the certificate of conformance that you want to attach to any batches of your selected Item. You must already have set up this code, using the Certificate of Conformance Code Maintenance task within Advanced Order Entry. These codes determine the characteristics that will appear on the Certificate of Conformance for your selected Item. This field is only displayed if you have activated Advanced Order Entry on the Inventory company profile.
You can use the prompt facility to select from the Certificate of Conformance Selection pop-up.
Required
If you have specified a Certificate of Conformance in the C-of-C Code field, enter one of the following:
0 - If a certificate of conformance cannot be issued.
1 - If a certificate of conformance may be issued
2 - If you must have a certificate of conformance from the supplier upon receipt of the item
These codes are set up in the Inventory Descriptions file, under major type CCRQ.
Non-stock Item Type
Leave this field blank to define an item as stocked.
Set this field to a non-blank value to define the item as non-stocked.
Alternatively, use the prompt facility to select from the STKF Stock Flag pop-up.
A non-stock item is a purchasable and saleable and item that does not exist in a stockroom, for example, time charges, or items delivered directly from a supplier to a customer.
84 | Infor System21 Inventory Management

851BInventory Maintenance
Note: You can change an item's non-stock item type up to the point where a movement is recorded for an item.
Ordering Method
Enter one of the following:
0 (default) - Normal
1 - Made to Order
2 - Purchase to Order
Use this if you are using Advanced Order Entry to initiate a back-to-back requisition order at the time of order entry.
3 - Direct Delivery
Use this if you are using Advanced Order Entry to initiate a back-to-back requisition order at the time of order entry.
4 - Reservation
You can reserve stock for this sales order against outstanding purchase orders.
5 - Configure to Order
If you are using Configurator, this creates a production order.
6 - Enterprise Direct Delivery
Use this if you are using Enterprise to initiate a back-to-back order at the time of order entry.
You can use the prompt facility to select from the ORDM Ordering Method pop-up.
Note: You define order methods on the Inventory Descriptions file against the major type ORDM.
Press Enter to display the Maintain Inventory Item Supplementary Data window.
Alternatively, select Update (F8) to save any changes made to the current item definition and return to the Create/Maintain Inventory Item Selection window.
Infor System21 Inventory Management | 85

851BInventory Maintenance
Maintain Inventory Item Supplementary Data Window To display this window, press Enter from the Create/Maintain Inventory Item Default Ordering window
Note: For this window to be displayed, Supplementary Information Display must be checked on the Presentation Details pop-up in Company Profile Maintenance.
Use this window to view and maintain additional item data. The current data for the item is displayed.
Note: If you make an error and existing data is inadvertently overwritten, select Previous (F12) before selecting Update (F8), so as not to save this data.
Fields
Currently many of these fields are memo fields. However, they provide a way of collecting information which can be used for possible future development.
For example, the Literage/Gallonage/Barrelage fields provide an enabling mechanism for expressing stock/sales quantities in liquid measures rather than unit quantities. Similarly, there are a number of fields which are necessary for duty calculations.
Bottles per Case
This is derived from the issue and stock units.
Size Code
You can optionally enter the size code.
This is usually the volume of the issue unit of the item. For example, for alcoholic beverages it could be 75cl or 1L. This is a memo field.
Vintage
You can optionally enter the item's vintage. This is a memo field.
Volume per Stock Unit
You can optionally enter the volume in each stock unit of this item, i.e. volume per case.
Qualify the unit in which the volume has been entered by specifying an appropriate unit of measure, selected from the list of units defined on the Inventory Descriptions file under major type UNIT. This is a memo field.
Alcohol by Volume
You can optionally enter the alcohol by volume (strength) of the item.
Note: This value must be entered to use the Global Duty Increase task.
Literage
This is the volume, in litres, of a stock unit of the item. Enter the factor used to convert the stock unit to litres. This field is mandatory when duty information is entered.
86 | Infor System21 Inventory Management

851BInventory Maintenance
Gallonage
You can optionally enter the volume, in gallons (imperial or US), in each stock unit of this item. This is a memo field.
Barrelage
You can optionally enter the conversion factor for changing issue volumes to a percentage of a barrels volume. This is a memo field.
DSI Code
You can optionally enter up to twelve alphanumeric characters. This is a memo field.
DSI Factor
You can optionally enter nine numeric characters, with four decimal places. This is a memo field.
License Type
Enter a valid license type, as defined on the Inventory Description file (Parameter Type: LTYP).
Alternatively, use the prompt facility to select the license type from the LTYP License Type pop-up.
The license type of an item is used to determine whether a customer can buy or sell this product.
Note: The field is only shown if Customer Licensing in Use is set on the sales order processing company profile.
Duty Status
You can optionally enter one of the following:
1 - To indicate that an item may be sold to both duty suspended and duty paid customers
2 - To indicate that an item may only be sold to duty suspended customers
3 - To indicate that an item may only be sold to duty paid customers
Alternatively, use the prompt facility to select from the DUTS Duty Status pop-up.
These status codes are set up in the Inventory Descriptions file under major type DUTS.
Note: This status is not currently used.
Tariff
Enter a tariff code.
Alternatively, use the prompt facility to select from the DTAR Duty Tariff Code pop-up.
You set up tariff codes in the Inventory Descriptions file, under major type DTAR. The Parameter Limit indicates whether the rate is for spirits or not.
On entering a new Duty Tariff code the current rate is displayed in Duty Rate.
Rate (Base)
This shows the duty tariff rate in the base currency for the duty tariff code.
This rate on the item would normally be changed automatically when a global duty rate change is made. However, it can also be changed manually for the item.
Infor System21 Inventory Management | 87

851BInventory Maintenance
For spirits, this is rate per litre of alcohol.
For non-sprits, this is the rate per hectolitre of liquid.
Note: Any rate entered manually will be overridden by the next Global Duty Rate change.
Value (Base)
The duty value will change each time a global duty uplift is run. The duty value is determined by the duty tariff and the duty rate, but will only be due for change on the effectivity date.
Press Enter to display the Maintain Inventory Item Container Information 1 window if this is a container item.
Alternatively, select Update (F8) to save any changes made to the current item definition and return to the Create/Maintain Inventory Item Selection window.
Maintain Inventory Item Container Information 1 Window To display this window, press Enter from the Create/Maintain Inventory Item Default Order Information window.
Use this window to view and maintain container data. The current data for the item is displayed.
Note: The Container tabs 1 and 2 are only available when the item is designated as being a container. Refer to the Maintain Inventory Item - Descriptive Data tab.
Fields
Container Type
Enter a container type to identify the classification of the container, such as keg, carton, CHEP pallet.
Alternatively, use the prompt facility to select from the CTTP Container Type pop-up.
Valid container types are defined on the Inventory Descriptions file under major type CTTP.
Note: The container type is used in the Transport Planning Build Loads task when building the extended container summary for a transport requirement or load, to decide in which column quantities of the container item are to be placed.
Tracked
Use this to specify whether a container is to be tracked in inbound and outbound logistics processing.
Use this checkbox as follows:
Unchecked (default) - the container is not to be tracked
Checked - the container is to be tracked
88 | Infor System21 Inventory Management

851BInventory Maintenance
Tracked Against
Use this to indicate whether movements of a container are tracked against the customer to whom they are delivered or the carrier who makes the delivery.
Select one of the following:
Customer (Blank) (default) - To track the container against the customer delivery point at invoice generation
Haulier (1) - To track the container against the carrier used for shipment when confirming despatch of an order
Note: Third party pallets, such as CHEP pallets, should be tracked against the carrier used for transportation rather than the customer to whom deliveries are made.
Container Exception %
Enter the percentage of a container's average delivery quantity, above which a customer would be flagged as holding an excess balance of this container item.
Mixed Product
Use this to specify whether mixed products can be shipped in this container.
Use this checkbox as follows:
Unchecked (default) - mixed products cannot be shipped in this container
Checked - mixed products can be shipped in this container
Note: This field should be checked for containers such as a carton (i.e. a cardboard box with separators) where individual bottles of different products can be shipped in the same carton, or a pallet where the products ordered are placed onto the same pallet for shipment.
When container quantities for an order/delivery are calculated, this determines whether the system rounds quantities up to the nearest integer at line or order level.
The quantity shipped of a container that can contain mixed product may be overridden at despatch to record the actual numbers of these containers used for shipment.
Example:
A carton can hold a total of 6 bottles. An order is placed for 4 bottles of product #1 and 1 bottle of product #2, both of which can be shipped in the same carton.
Based on these quantities, the system calculates that a one carton is required for shipment. However, when the order is picked, the 4 bottles of product #1 are put into one carton and the 1 bottle of product #2 is put into a second carton.
Hence you can override the carton quantity from 1 to 2 when confirming despatch of the order.
Outbound Logistics
Use this to specify whether a container is optional for outbound logistics purposes.
For example, a pallet may be required where products are ordered in sufficient quantities to merit its use, but the pallet is not an integral part of the stocked item's definition.
Infor System21 Inventory Management | 89

851BInventory Maintenance
Enter one of the following:
Not optional (default) - If the container is not optional
Optional - If the container is optional
A non-optional container is one that is implied in a product's definition. For example, where the stocked item is described as a case of twelve 75cl bottles of vodka, the case and the bottles within that case are an integral part of that stocked item; therefore both of these container items should be described as non-optional in the configuration of that product.
An optional container is one that is added during the shipment process. For example, when shipping cases of vodka we might decide to put the cases onto a pallet (along with other items) but would expect to get an empty pallet from somewhere; therefore the pallet should be described as optional in the configuration of that product.
Note: Optional containers are consumed from inventory and generate stock movements at their point of use, i.e. Confirmation of Despatch.
Non-optional containers are not consumed from inventory and do not generate stock movements. The inventory consumption and stock movements for these containers is assumed to have happened prior to the receipt of the finished item i.e. as a component issue in a manufacturing process.
No. of Labels/Container
Use this to specify the number of labels to be printed for each container used for the shipment of goods.
Enter any valid numeric value between 0 and 999.
Note: Enter 0 (zero) if no labels are to be printed for this container item.
Maximum No. of Labels
Use this to specify the maximum number of non-SSCC bar-coded labels to be printed for a container.
Returns Template Sequence
Enter any valid numeric value.
The value entered determines the sequence of container items on the Container Returns pop-up within Proof of Delivery.
Note: A value of 0 (zero) indicates that this container item will not automatically appear on the Container Returns pop-up presented during Proof of Delivery; therefore, those containers that are not tracked should not have a value entered in this field.
Maximum Returns Quantity
Enter any valid numeric value.
The value entered is compared to any return quantity keyed in during Proof of Delivery. If the return quantity entered exceeds this value, a suitable warning message is issued.
Press Enter to display the Maintain Inventory Item Container Information 2 window.
90 | Infor System21 Inventory Management

851BInventory Maintenance
Alternatively, select Update (F8) to save any changes made to the current item definition and return to the Create/Maintain Inventory Item Selection window.
Maintain Inventory Item Container Information 2 Window To display this window, press Enter from the Create/Maintain Inventory Item Container Information 1 window.
Use this window to view and maintain container data. The current data for the item is displayed.
Note: The Container tabs 1 and 2 are only available when the item is designated as being a container. Refer to the Maintain Inventory Item - Descriptive Data tab.
Fields
RFID Tagged Container
Use this to specify whether containers are identified with an RFID tag.
Use this checkbox as follows:
Unchecked - the container is not RFID tagged
Checked - the container is RFID tagged
This can only be checked if the GRAI Required field is also checked.
Note: This field is currently for memo purposes only.
GRAI Required
Use this to specify whether a container is to be assigned a Global Returnable Asset Identifier.
Use this checkbox as follows:
Unchecked (default) - If the container is not to be assigned a GRAI
Checked - If the container is to be assigned a GRAI
Global Returnable Asset Identifiers are used to identify the owner of a container and, in conjunction with a serial number, can be used to identify containers uniquely for tracking purposes.
Note: This field is currently for memo purposes only.
GRAI Serial Numbered
Use this to specify whether a container requiring a Global Returnable Asset Identifier also requires a serial number in order to identify each container uniquely for tracking purposes.
To track containers accurately, the serial numbers of the containers shipped must be recorded on the system.
Use this checkbox as follows:
Infor System21 Inventory Management | 91

851BInventory Maintenance
Unchecked (default) - If a GRAI serial number is not required
Checked - If a GRAI serial number is required
This field can only be checked if the GRAI Required field is also checked.
Note: This field is currently for memo purposes only.
GRAI Bar-coded Label
Use this to specify whether a bar-coded label (where the bar-code represents the GRAI number of the container) is printed for a container.
Use this checkbox as follows:
Unchecked (default) - a bar-coded label is not to be printed
Checked - a bar-coded label is to be printed
This field can only be checked if the GRAI Required field is also checked.
Bar-coded GRAI labels could be scanned at the point of delivery and return. If these containers were also serial number controlled, the system would be able to identify the location within the supply chain of a particular instance (i.e. serial number) of a returnable container.
Note: This field is currently for memo purposes only.
SSCC Bar-coded Label
Use this to specify whether an SSCC bar-coded label is required for a container. If an SSCC bar-coded label is required, the Build Container task in Sales Order Processing must be used to identify the contents of each container and print the SSCC bar-coded label.
Use this checkbox as follows:
Unchecked (default) - If an SSCC bar-coded label is not required
Checked - If an SSCC bar-coded label is required
Note: If an SSCC bar-coded label is not required but a value has been entered in the Number of Labels/Container field, simple labels are printed for the container in the Pick Lists task.
Charge Raised
On Outbound Invoice
Use this to specify whether charges are added to sales invoices for the containers shipped to the customer.
Select one of the following:
No (0) (default) - no charges are added
Deposit (1) - there is a deposit charge
Rental (2) - there is a rental charge (where the customer is charge a daily rental for each container)
92 | Infor System21 Inventory Management

851BInventory Maintenance
On Inbound Invoice
Use this to specify whether a supplier adds separate deposit-based charges to their invoices for the containers associated with the products they ship.
Select one of the following values:
No (0) (default) - the supplier does not charge separately for their containers
Deposit (1) - the supplier charges a separate deposit for their containers
Select Update (F8) to save any changes made to the current item definition and return to the Create/Maintain Inventory Item Selection window.
Inventory Item Search Words Pop-up This pop-up is displayed automatically if you have amended the item description, external text or created an item on the Maintain Inventory Item window.
Use this to add or amend words relevant to the item. You can use this for item searching.
This will be in enquiry only mode if the following conditions are true.
• The current company does not own the item definition being maintained. • Maintenance of item search keys is deemed to be responsibility of the owning company.
Fields
Enter up to 20 key words used in a search on Inventory’s item description.
For New Items:
The pop-up displays, as separate key words, each part of the item description, and as many parts of the external text as possible.
For Existing Items:
The pop-up displays the previous versions of the keywords
To see the latest version, select Rebuild (F13).
Functions
Rebuild (F13)
Use this to rebuild the search engine, effectively adding new details to the search. As this is a toggle, you can select this to cancel these additions and select the old index, or existing search engine.
Press Enter to update and return to the Maintain Inventory Item window.
Infor System21 Inventory Management | 93

851BInventory Maintenance
Group Valuation Criteria Pop-up To display this pop-up, select Valuation Group (F10) on the Create/Maintain Inventory Item Price and Costing Information window
Use this pop-up to define the group valuation criteria for the selected item. You use this information for Inventory Valuation or LIFO Revaluation purposes.
Fields
Item Valuation by Group
Use this checkbox as follows:
Unchecked - Not to assign this item to a valuation group
Checked - To assign this item to a valuation group
Entry in this field is not permitted if the following conditions are true:
• The current company does not own the item definition being maintained. • Maintenance of this item attribute is deemed to be the responsibility of the owning company.
Valuation Group
Select a valuation group to which you want to assign this item.
Alternatively, use the prompt facility to select from the PGMN Item Group - Minor pop-up.
The group does not have to be the same as the minor item group previously assigned. It does have to have a UoM code in the Tax field, as this is the valuation group's UoM.
Entry in this field is not permitted if the following conditions are true:
• The current company does not own the item definition being maintained. • Maintenance of this item attribute is deemed to be responsibility of the owning company.
Conversion Factor (Issue to Group Unit)
Enter a conversion factor using up to nine numeric characters, including five decimals, to convert the item issue unit of measure to the assigned group unit of measure.
Entry in this field is not permitted if the following conditions are true:
• The current company does not own the item definition being maintained. • Maintenance of this item attribute is deemed to be responsibility of the owning company. Note: The above is also true when Item Maintenance has been accessed from Linked Item Maintenance.
Group Unit of Measure
When you select a valuation group for the item, this group unit of measure information is automatically displayed.
Caution: As all items in a group are updated with the same cost using LIFO revaluation, you MUST take care when you define item groups.
94 | Infor System21 Inventory Management

851BInventory Maintenance
Select Update (F8) to process the details and return to the Maintain Inventory Item window.
Item Supersession Maintenance Window To display this window, select Supersession (F14) on the Maintain Inventory Item Inventory control Information window
Use this window to maintain supersession details relating to the item.
Note: Item supersession data can be maintained for an item even when this function has been de-activated at either company or item level, thus permitting the necessary data to be set up prior to its use.
This will be in enquiry-only mode if the following conditions are true:
• The current company does not own the item definition being maintained. • Maintenance of Item Supersession Details is deemed to be responsibility of the owning
company.
Note: The above is also true when Item Maintenance has been accessed from Linked Item Maintenance.
Options
Amend
Use this to display the selected supersession item details in a pop-up to allow the necessary changes to the data set up to be made.
Delete
Use this to remove the selected superseding item from the displayed list. You will be asked to confirm the request. Press Enter on the confirmation pop-up and then select Delete (F11).
Note: Although the selected supersession item is removed from the displayed list immediately, you must update all other item information for the superseding item to be removed from the database.
Functions
Add (F10)
Use this to add a new supersession item.
Select Amend against an item or select Add (F10) to display the Supersession Detail Maintenance pop-up.
Supersession Detail Maintenance Pop-up To display this pop-up, select Supersession (F14) on the Maintain Inventory Item window , then select Amend against an item or select Add (F10) on the Item Supersession Maintenance window.
Infor System21 Inventory Management | 95

851BInventory Maintenance
Use this pop-up to maintain the supersession details for a particular supersession item.
You will be prompted for a supersession reason code when you enter supersession details.
Fields
Item
Enter the code of the superseding item, which can be any valid stocked, non-stocked or kit parent item.
Alternatively, use the prompt facility to select from the Item Master Scan pop-up.
A suitable warning message is displayed should any of the following attributes of the selected item differ from those of the item being superseded by this item.
• Purchase, stock and issue units of measure and their associated conversion factors • Item group (minor) • Tax code • Batch control status • Stocked item status
The assumption is that the above attributes would normally be the same for most supersessions.
Caution: For Item Supersession processing to function correctly within the Forecasting module, the Item Group (Minor) codes associated with both the superseded and superseding items must be the same.
A suitable warning message is also displayed if the selected item is either a kit parent or kit component item.
Caution: For the system to operate correctly, it is assumed that the superseding item is stored in the same stockrooms/warehouses as the item it supersedes. Should this not be the case, problems may be encountered during the entry of transactions.
Effective Date From
Enter or select the date upon which this supersession is to become active. Overlapping supersessions are not permitted.
A suitable warning is issued if the date entered is in the past.
Note: This date will default to a value one day greater than the end of any previous supersession defined or to the current system date.
Effective Date To
Enter or select the date upon which this supersession is to cease being effective.
A suitable warning is issued if the date entered is in the past.
Note: This date will default to a value of 99/99/99, signifying an indefinite supersession. When you are adding a new supersession to a chain that includes an indefinite supersession, the end date of the pre-existing indefinite supersession is re-calculated to become the day before the Effective From Date of the new supersession being added.
96 | Infor System21 Inventory Management

851BInventory Maintenance
Supersession Type
This indicates the type of supersession processing to be performed.
Select one of the following:
Forced (1) - If the user is forced to accept the superseding item OR quit the transaction line
Preferred (2) (default) - If the user is permitted to accept either the superseded or the superseding item
Stock Run Out (3) - If the user is permitted to accept either the superseded or the superseding item
In this case, for any stock reducing transaction the superseded item may only be accepted where there is sufficient stock on-hand to satisfy the required quantity. The on-hand quantity is calculated as the available balance minus any back ordered quantity in the chosen stockroom.
Reason Code
Enter a valid reason code.
Alternatively, use the prompt facility to select from the inventory description SUPR reason code pop-up.
The reason code entered dictates whether any item may be specified or if a specific item must be entered. See the inventory description for SUPR for more details.
If the limit against the SUP-DESC entry is set to 1 then the item description of the superseded item has the last 2 characters replaced with the supersession reason.
Superseded Scaling Factor
This is a percentage value, used by the Forecasting application, if present.
Forecasting transfers this percentage of the superseded item’s forecast to the superseding item.
Superseding Scaling Factor
This is a percentage value, used by the Forecasting application, if present.
Forecasting reduces the forecast of the superseding item to this percentage.
Caution: The two percentages specified must add up to 100.
Functions
Update (F8)
Use this to update the supersession details and return to the Item Supersession Maintenance window.
Transaction Control Effectivity Window To display this window, select Transaction Control (F16) on the Maintain Inventory Item Inventory Control Information window.
Infor System21 Inventory Management | 97

851BInventory Maintenance
Use this window to maintain transaction control effectivity dates relating to the item.
Note: Item transaction control data can be maintained for an item even when this function has been de-activated at either company or item level, thus permitting the necessary data to be set up prior to its use.
This will be in enquiry-only mode if the following conditions are true:
• The current company does not own the item definition being maintained. • Maintenance of item transaction control details is deemed to be responsibility of the owning
company. Note: The above is also true when Item Maintenance has been accessed from Linked Item Maintenance.
Fields
Line
Enter the line number of the code to be changed or deleted.
Transaction Code
Enter the pre-defined transaction control code to be added or edited.
Alternatively, use the prompt facility to select from the Select Transaction Code pop-up.
Date From
Enter or select the calendar date from which the entered transaction control code is to become effective.
Date To
Enter or select the calendar date up to and including which the entered transaction control code will be effective.
Note: The date ranges associated with different control codes cannot overlap.
Functions
Update (F8)
This is not displayed until changes have been made. Use this to confirm the changes.
Select Update (F8) to update the information and return to the Maintain Inventory Item window.
Item Alias Maintenance Window To display this window, select Alias (F17) on the Maintain Inventory Item Inventory Control Information window.
You use this window to specify any other references (or names) that you use for the selected item. You can create and maintain any number of alternative item references for an item, to be used for
98 | Infor System21 Inventory Management

851BInventory Maintenance
item search. These could be customer-specific item numbers or the original equipment manufacturer’s code.
This will be in enquiry-only mode if the following conditions are true.
• The current company does not own the item definition being maintained. • Maintenance of alternative item references is deemed to be responsibility of the owning
company. Note: The above is also true when Item Maintenance has been accessed from Linked Item Maintenance.
Note: Duplicate item references are allowed, as long as they are unique within Alternate Type / External Agency Code
Fields
Line
If there are any existing references for your selected item, enter the line number of the reference that you want to amend and then press Enter to display the existing details in the line entry fields at the bottom section of the window. Press Enter again to re-display those details in the middle section of the window.
Alias
Enter up to 36 alphanumeric characters to describe the item.
An items alias must be unique within Alias Type / External Agency, thus allowing the same item alias to be assigned to, for example, different customers.
External Agency
Enter up to eight alphanumeric characters to indicate the external agency, possibly the manufacturer or a customer, with which this alternative reference is associated.
Alias Type
Enter an alternative item type.
Alternatively, use the prompt facility to select from the ALTT Alternative Item Type pop-up.
This could be the type of external agency, for example, a wholesaler.
To create a Dealer Alias for an Inventory Item, enter the dealer alias item reference in the Alias field, enter D in the Alias Type field. In this case External Agency must be left blank.
Select Update (F8) to update the information. The alternative reference you have just defined is displayed in the middle section of the window.
Infor System21 Inventory Management | 99

851BInventory Maintenance
Item Search Characteristics Window To display this window, select Item Search (F18) on the Maintain Inventory Item Default Ordering Information window
You can use this window to maintain the search characteristics for this item that are associated with the family search code specified on the Default Ordering tab. The item reference and search family code are displayed with their respective descriptions, followed by all the characteristics associated with this family code.
This will be in enquiry-only mode if the following conditions are true.
• The current company does not own the item definition being maintained. • Maintenance of item search characteristics is deemed to be responsibility of the owning
company. Note: The above is also true when Item Maintenance has been accessed from Linked Item Maintenance.
Fields
Code
Enter or select a code for the characteristics.
Note: The number of decimals entered must conform to the specification made for the characteristic in the Search Families maintenance task in Advanced Order Entry.
Functions
Update/Aliases (F17)
Use this to create or update alternative item references. This displays the Item Alias Maintenance window for your selected item.
Select Update (F8) to update the details and return to the Maintain Inventory Item window.
Item Pricing Groups Pop-up To display this pop-up, select Pricing Groups (F19) on the Maintain Inventory Item Pricing and costing Information window
Use this pop-up to view, amend or delete item pricing group information.
Note: This pop-up is only available when Advanced Pricing is in use.
Fields
100 | Infor System21 Inventory Management

851BInventory Maintenance
Sequence
Enter the sequence in which the function is searched to determine whether it applies a particular line.
Type
Enter the pricing type.
Alternatively, use the prompt facility to select from the Pricing Type Select pop-up.
Group
Enter the item pricing group for which the selected pricing type is effective.
Alternatively, use the prompt facility to select from the ITMG Item Price Groups pop-up.
Note: The description of the item pricing group is displayed next to it.
Options
Amend
Use this to amend the pricing group.
Delete
Use this to delete the pricing group.
If you have entered or amended a line, press Enter to display that line in the middle section of the window. Select Update (F8) to update the details and return to the Maintain Inventory Item window.
Lot Header Parameters Maintenance Pop-up To display this pop-up, select Lot Details (F20) for a lot-controlled item on the Maintain Inventory Item Inventory Control Information window
Use this window to maintain the lot header details that are required for the item. Existing information is displayed.
Fields
Potency Required
Use this checkbox as follows:
Unchecked - potency is not a required attribute of the item’s lots
Checked - potency is required for each lot of this item received into Inventory
Standard Potency
If you have checked the Potency Required field, you must enter a default potency value. The value entered here is used to set the Potency for new batches of this item, unless a different actual lot potency is entered when the lot is first created. A lot’s recorded potency can be adjusted at any time during the lifetime of the lot to reflect the changing nature of the lot’s contents, or simply to correct the value for a lot that has the wrong potency recorded against it.
Infor System21 Inventory Management | 101

851BInventory Maintenance
Note: Potency is expressed as a percentage. The potency you specify here is the actual number of parts of active ingredient as a percentage of the number of parts of active ingredient that would be deemed to be 100% potent.
Grade Required
Use this checkbox as follows:
Unchecked – grade is not a required attribute for the item.
Checked – a grade value is required for each new lot of this item as its creation is recorded..
Default Grade
If you have checked the Grade Required field, you must enter a default grade value. The value entered is used to set the grade for new lots of the item, unless a different actual grade is entered when the creation of a lot is first recorded.
A prompt facility is available to select a GRAD parameter value from the Select Grade pop-up.
Default Stock Status
Enter a stock status code.
Alternatively, use the prompt facility to select from the STKS Stock Status pop-up.
This stock status code defaults into the Stock Status field every time you receive a new lot of this item into Inventory, unless a different Stock Status is selected when the creation of a lot is first recorded. Stock status codes are designated as either available or unavailable and, when applied to a lot, make the full quantity of that lot frozen or unfrozen. This overrides the separate frozen balance that is held on the lot, which will still be in force when the lot as a whole is released (changed to an ‘unfrozen’ stock status).
A blank stock status implies that a lot is available.
Note: The seven-digit limit field of the inventory description codes defined against STKS indicates the availability of an item. If the seventh digit of this field is 1, the stock status code indicates an unavailable item. Any other value renders the stock status code an available code.
Release Lead Time Units
Enter one of the following to specify the release time unit used when calculating the first available date of a lot:
1 - Days
2 - Weeks
3 - Months
4 - Years
Alternatively, use the prompt facility to select from the RLTU Release Lead Time Units pop-up.
Leave this field blank if you do not want to enter the release lead time. In this case, when the lot dates are calculated the first available date equals the production date. This always applies if the Item’s Shelf Life Unit is Hours or Minutes.
Note: For example, Production Date + Release Time = First Available Date.
102 | Infor System21 Inventory Management

851BInventory Maintenance
Release Lead Time
You must enter this if you specify a release lead time unit. Enter up to three numeric characters. The release time is used in the following calculation:
For example, Production Date + Release Time = First Available Date
If you leave this field blank when the lot dates are calculated, the first available date equals the production date.
Lot Dates To
Enter one of the following to specify the method used to position lot dates once they are calculated:
1 - To use actual lot dates
2 - To position to first day of the period
3 - To position to last day of the period
Alternatively, use the prompt facility to select from the CBDT Calculate Batch Dates To pop-up.
Note: These are defined on the Inventory Descriptions file under major type CBDT.
All lot dates are either entered or calculated using shelf life and release times. Once calculated, you can re-position the dates to the start or end of a period depending on the business requirements.
Display Lot Times
Use this checkbox as follows:
Unchecked – Lot Times are disabled for the Item and cannot be entered nor displayed.
Checked – Lot Times are enabled for the Item and are displayed for all lots.
Note: The value in this field defaults to the value held on the Company Profile.
Note: Time information is only applicable for Shelf Life Units of Hours or Minutes. For any other Shelf Life Units setting, time is displayed as zero (no time) and if anything is entered it is stored as memorandum-only. Because time is implied in the Hours and Minutes Shelf Life Units then time is always displayed irrespective of the setting of Display Lot time.
Note: Entry into these fields is not permitted if the following conditions are true:
• The current company does not own the item definition being maintained. • Maintenance of this item attribute is deemed to be responsibility of the owning company.
Note: The above is also true when Item Maintenance has been accessed from Linked Item Maintenance.
Freeze Tolerance
Enter a time, in HH:MM format, between 00:00 and 23:59
The value entered is used to ‘delay’ the freezing of stock for an Item whose Shelf Life is defined in either Hours or Minutes.
Infor System21 Inventory Management | 103

851BInventory Maintenance
For those Items with a Shelf Life Unit of Days, Weeks, Months or Years the Stock Status Monitor freezes stock once its last available date is passed.
For those Items with a Shelf Life Unit of Hours or Minutes the Stock Status Monitor freezes stock once the last available date/time plus any Freeze Tolerance defined for the Item is passed.
The Freeze Tolerance defined here (in HH: MM) is added to the Last Available Date/Time (or Expiry Date/Time) of a Lot to create a notional date/time that is checked when deciding whether to freeze stock.
This notional date/time is calculated within the Stock Status Monitor and Stock Status Recalculation processes and is not stored against a Lot.
Default Booking Time
Enter a valid time, in HH:MM format, in the range 00:00 to 23:59. The time defaults to 99:99 meaning no default time (required so as not to conflict with the definition of 00:00, as this indicates a default time of midnight). The value entered here is used as the booking time for any Lot created for the purposes of calculating the Expiry Time, regardless of the actual time of entry of the Lot creation.
The entered time will be used as the default Production Time for each new Lot created when receiving goods, in preference to the current time.
The Last Available and Expiry Dates/Times for a Lot will be calculated using this time as a base.
Note: This value is only relevant when Display Lot Times is set on.
Note: The Production Time is still maintainable for each received Lot, at the time of its creation, if this is required.
Freeze on Expiry
Use this checkbox to specify whether stock should be frozen once the Last Available Date/Time or the Expiry Date/Time of a Lot has been passed.
Set this field as follows:
Unchecked – Stock will be frozen by the Stock Status Monitor once the Last Available Date/Time (plus any Freeze Tolerance, if specified) of a Lot has been passed.
Checked – Stock will be frozen by the Stock Status Monitor once the Expiry Date/Time (plus any Freeze Tolerance, if specified) of a Lot has been passed.
Press Enter on each pop-up until the item is completely updated and the Maintain Inventory Item window is re-displayed.
Maintain Text Pop-up To display this pop-up, select Enter Text (F21) on the Maintain Inventory Item Descriptive Data window.
Note: This is a standard pop-up, and is displayed in a number of different areas and applications.
104 | Infor System21 Inventory Management

851BInventory Maintenance
Use this pop-up to select a usage code and a language code, or both, to specify where to print or display text, and in what language.
Note: You specify your customer's default language in the Maintain Customers task in Sales Order Processing. You can enter a different language to override this default language when the Additional Overrides (F16) function is available.
This will be in enquiry-only mode if the following conditions are true:
• The current company does not own the item definition being maintained. • Maintenance of item text is deemed to be responsibility of the owning company.
Note: The above is true for the maintenance of both internal and external text. Note: The above is also true when Item Maintenance has been accessed from Linked Item Maintenance.
Fields
Text Type
You can define up to ten combinations of default text. On this pop-up, you are maintaining the item text.
Text Reference
This is the reference number given to a text type, which retrieves default text when no text exists for the selected usage or language code.
Usage Code
Enter a usage code to specify where to display or print text.
Alternatively, use the prompt facility to select from the USGC Text Usage Codes pop-up.
Note: There are some standard text usage codes supplied with the Inventory application. You can define other usage codes in the Inventory Descriptions file under major type USGC to suit your company’s requirements.
Note: To enter text in multiple languages, enter a valid language code as well as a usage code.
Language Code
Enter a valid language code, in addition to the usage code, if you want to enter multi-lingual text.
Alternatively, use the prompt facility to select from the Select Language pop-up.
The Item Text pop-up is displayed so that you can enter text in the language specified. Leave this field blank if you do not use multi-lingual text entry.
Note: You do not need to select language codes to print text in the native language.
Functions
Infor System21 Inventory Management | 105

851BInventory Maintenance
Select Existing Text (F13)
Use this to list all currently defined usage and language code combinations for the entered text type and text reference. You can select the combination you want to use for entering multi-lingual text.
Press Enter to display the Item Text pop-up.
Item Text Pop-up To display this pop-up, enter a valid usage code (and optionally a language code) and then press Enter or select Select Existing Text (F13) on the Maintain Text pop-up.
Use this pop-up to enter, amend or delete text. Use the fields at the bottom of the window to move the text around and add or delete lines.
Fields
Position To
Enter the number of the first line of text to appear at the top of the pop-up.
Insert _ After_
Enter the number of lines you want to insert in the text as well as the number of the line after which they should appear.
Delete _ From_
Enter the number of lines you want to delete from the text as well as the first line number of the text to be deleted.
Functions
Change Usage/Language (F13)
Use this to re-display the Maintain Text pop-up to enter or select another usage code (and optionally a language code for entering multi-lingual text).
Select Update (F8) to update the text and return to the Maintain Inventory Item window.
Item Purchase Text Pop-up To display this pop-up, select Purchase Text (F22) on the Maintain Inventory Item Descriptive Data window.
You can use purchase text as an alternative description for this item in Purchase Management.
106 | Infor System21 Inventory Management

851BInventory Maintenance
You can review text entered against the item at order entry time within the Purchase Management application. This text entry function is only available if Purchase Management is installed and is linked to this Inventory company.
This will be in enquiry-only mode if the following conditions are true:
• The current company does not own the item definition being maintained. • Maintenance of purchasing item text is deemed to be responsibility of the owning company.
Note: The above is also true when Item Maintenance has been accessed from Linked Item Maintenance.
Fields
Position To
Enter the number of the first line of text to appear at the top of the pop-up.
Insert _ After_
Enter the number of lines you want to insert in the text as well as the number of the line after which they should appear.
Delete _ From_
Enter the number of lines you want to delete from the text as well as the first line number of the text to be deleted.
Select Update (F8) to save new or amended details to file.
Multi-lingual Descriptions Maintenance Pop-up To display this pop-up, select Language Descriptions (F23) on the Maintain Inventory Item Descriptive Data window.
You can enter or amend a language code and its description. You add these defined language codes to a customer's profile in Sales Order Processing, so that any text entered in the specified language in the Maintain Text pop-up will print on external documentation, for example despatch notes, for that customer.
Note: You do not need to select language to print text in the native language.
A pop-up will inform you that any changes made to language descriptions will be discarded and settings will revert to those defined in the owning company for the selected item if the following are all true:
• The current company does not own the item definition being maintained. • Maintenance of language descriptions is deemed to be the responsibility of the owning company. • Changes are made to any of the language descriptions associated with an item.
Infor System21 Inventory Management | 107

851BInventory Maintenance
Fields
Language
Enter a two-character language code, to represent a language you want to use.
Alternatively, use the prompt facility to select from the Select Language pop-up.
Description
Enter the language name corresponding with the entered language code
Note: To delete a line, remove the language code.
Select Update (F8) to update the file.
108 | Infor System21 Inventory Management

851BInventory Maintenance
Alternative Item Maintenance [3/INM] Use this task to define which alternative items you want to use if an item is not available or if it is currently out of stock.
Note: This task is used for Sales Order Processing.
Alternative Items Maintenance Selection Window To display this window, select the Alternative Item Maintenance task.
Use this window to select the item for which you want to maintain alternatives.
This will be in enquiry-only mode if the following conditions are true:
• The current company does not own the item definition being maintained. • Maintenance of alternative items is deemed to be responsibility of the owning company.
Fields
Item
Enter the reference code of the item that you want to maintain.
Alternatively, use the prompt facility to select from the Item Master Scan pop-up.
Select an item or enter an item and press Enter to display the Alternative Items Maintenance Detail window.
Alternative Items Maintenance Detail Window To display this window, select an item or enter an item and then press Enter on the Alternative Items Maintenance Selection window.
Use this window to select or maintain alternative items for the selected item.
Fields
Alternative Item
Enter the reference code of the item that you want to use as an alternative to the item displayed in the Item field.
Alternatively, use the prompt facility to select from the Item Master Scan pop-up.
You can define up to 14 alternatives.
Infor System21 Inventory Management | 109

851BInventory Maintenance
Description
This field displays the text description of the alternative item.
Reverse
Select one of the following:
Blank (0) (default) - Not to use the item as an alternative for the alternative item
Reverse (1) - To use the item as an alternative for the alternative item
Note: If the units of measurement for the items are different, an error message is displayed. In this case, Accept UOM Mismatch (F14) is displayed on the window. You can either select Accept UOM Mismatch (F14) or select Previous (F12).
When you have finished entering data in the fields, press Enter to check the details. This also defines the alternative items and re-displays the Alternative Items Maintenance Selection window.
110 | Infor System21 Inventory Management

851BInventory Maintenance
Kit Lists [4/INM] A kit list is a group of items normally sold as individual finished goods, but on occasions sold together as a unit.
The kit is known as the parent, the individual items as components.
In some industries, it is more appropriate to sell a kit of items, rather than regarding the kit as a single indivisible item. You can achieve a greater level of product flexibility with a smaller investment in Inventory. Use this task to create and maintain kits. When you add a component item to a kit, Inventory Management checks that there is an existing stockroom balance record in all the stockrooms that hold the parent of the kit.
Note: Stock is only held at component level.
Sales Order Processing uses this feature, where orders are raised against the kit parent as defined here in Inventory. In this case, the parent price is charged and the components' prices are ignored. However, you can use Sales Analysis to analyse the component prices.
You can call kit parent details from Advanced Order Entry and amend them during order entry, or you can define kits on line, without reference to this file.
Note: Kit components are individual items that are picked, packed and shipped. If they are items to be assembled to make a finished product, this is a Production process and not a kit list.
Kit Lists Maintenance Selection Window To display this window, select the Kit Lists task.
Use this window to select the item that you want to use as the parent item in a new kit list, or to select the parent item of an existing kit whose list of component items you want to amend.
This will be in enquiry-only mode if the following conditions are true:
• The current company does not own the item definition being maintained. • Maintenance of kit list details is deemed to be responsibility of the owning company.
Note: If you use Catchweight, a Catchweight item cannot be the parent of a kit list. In this case, an error message is displayed. In addition, if a non-Catchweight item is the parent of a kit list, you can add Catchweight type three items as components. In addition, you can add non-Catchweight items with or without a secondary UOM as components.
If either the kit parent or a component of the kit is subject to supersession, a suitable warning message will be issued.
Note: Supersession logic is only performed for kit parent items.
Fields
Infor System21 Inventory Management | 111

851BInventory Maintenance
Item
Enter the item reference number for the item that you want to use as a parent item in a new kit list. Alternatively, enter the item reference number of the parent item whose existing kit list you want to maintain.
Note: When Advanced Order Entry is in use, the kit parent item may be a non-stock item.
Press Enter to display the Kit List Maintenance Detail window.
Kit List Maintenance Detail Window To display this window, press Enter on the Kit List Maintenance Selection window.
Use this window to add or maintain the list of items that are defined to a kit list. Any current details of the kit are displayed, including component item numbers, descriptions and the quantity of each item you need to complete the kit.
Fields
Component Item
Enter the item number of the component item using up to 15 alphanumeric characters. The item must exist on the Item Master file.
Alternatively, use the prompt facility to select from the Item Master Scan pop-up.
Qty Off
Enter the quantity of the kit component that makes up the kit, using up to five numeric characters including two decimals.
Note: Component items cannot themselves be parent items of another kit. When the parent is a stocked item, you must define component items to all the stockrooms to which the parent item is defined.
You can delete a component from the kit by removing the item reference from the kit list.
Press Enter to display the item descriptions of any items that have been entered. Press Enter again to update the file and re-display the Kit List Maintenance Selection window.
112 | Infor System21 Inventory Management

851BInventory Maintenance
Stockroom Details [5/INM, 2/MDM] A stockroom is a discrete area of a company where stock is recorded and controlled separately from other company stock. Some companies only need one stockroom, whilst others, perhaps with a number of distribution points, need more. The key issue is that if there is a continuous requirement to record movements in and out and know the current balance of a particular area, you should use a stockroom.
There are three stages that you need to complete:
1 Define each stockroom in the company profile
2 Define all the items for the company in the item file
3 Associate each item with one or more of the stockrooms
Note: If you are using Order Capture or Advanced Order Entry, you can process an item that does not have a stockroom record (a non-stock item).
You can create more detailed definitions for items and stockrooms if, for example, you are using Warehousing, Production and DRP.
Use this task to create and maintain details related to the stocking of an item in a stockroom.
The stock management policies make sure that the levels of stock in each stockroom are correct. You can specify the parameters defining the implementation of these policies here.
Note: For a consignment stockroom (non-AS), the replenishment parameters from here will be taken as defaults when adding a new record in the Customer/Item Maintenance task.
An item must have the same method of costing throughout a company, be it average, standard, FIFO, or latest, but you can independently maintain the actual cost of the item at each stockroom.
Any changes to standard or landed costs via this task create an inventory movement if there is any physical stock, to provide a stock value adjustment which can be analysed via AFI. The value of this adjustment is the difference in cost between the original cost value for the current physical stock level (physical stock x cost price) and the revised cost value for the current physical stock level (physical stock x new input cost).
Location Control
If you have created a Location Control stockroom profile for this stockroom, you can also use this task to create Location Control details for the item. To create a Location Control stockroom profile for the stockroom use the Location Control Stockroom Profile window in the Inventory Company Profile task.
You need to create details for all items that will have stock balances held in a location-controlled stockroom. You can create these details before you activate Location Control for the stockroom. If you do not create these details, an error message is displayed during transaction processing and you will have to create them before you can complete the transaction.
Infor System21 Inventory Management | 113

851BInventory Maintenance
Stockroom Details Maintenance Selection Window To display this window, select the Stockroom Details task.
Use this window to specify the item and stockroom details you want to maintain or create.
Fields
Item
Enter the item you want to add to the stockroom, or for which you want to amend stockroom details.
Alternatively, use the prompt facility to select from the Item Master Scan pop-up.
Stockroom
Enter the stockroom code to identify the stockroom details you want to maintain.
Alternatively, use the prompt facility to select from the Stockroom Selection pop-up.
Note: You must define the stockroom to Inventory through the company profile before you maintain the stockroom details.
Note: You must configure stockroom details for each item, unless the item is being added as a non-stock item.
Note: Catchweight items cannot be stored in a bonded warehouse.
Standard Cost Changes - Movement Detail
The following fields are only required if standard cost changes are to be made.
Note: If you have entered this information previously in this session, it becomes the default for all cost changes.
Reference
Enter the reference number for the movement, using up to 14 alphanumeric characters. You can link this with the reference type.
Reference Date
Enter or select a date to be used as the reference date. This field defaults to the current system date. The reference date is cross-referenced with the table of period and week end dates, to decide the week and period numbers for ageing the stock movement and history records.
Reference Type
Enter the reference type, using up to 3 alphanumeric characters.
Alternatively, use the prompt facility to select from the TRAN Movement Reference Type pop-up.
You can use this field to enter a mnemonic to describe the reference number. For example, you can use REQ to indicate that the reference number is a stores requisition note number.
114 | Infor System21 Inventory Management

851BInventory Maintenance
Narrative
Enter the narrative or description for the movement, using up to 20 alphanumeric characters.
Movement Reason
Enter a reason code.
Alternatively, use the prompt facility to select from the MOVR Movement Reason Code pop-up.
Press Enter to display the Stockroom Details Maintenance window.
Stockroom Details Maintenance Window To display this window, enter an item number and stockroom code and then press Enter on the Stockroom Details Maintenance Selection window.
Use this window to maintain the item part of the stockroom details. Any existing information is displayed. Within this task, it is possible to enter a value that represents the amount by which the available stock is allowed to go negative during the allocation process.
Fields
Purchase Unit
Enter a purchase unit chosen from the units of measure defined on the Inventory Descriptions file under major type UNIT. This defaults to the purchase unit defined for the item in the Item Master file. This unit is assumed as the default ordering unit in Inventory Management and Purchase Management if you are using it.
You can use the prompt facility to select from the Purchase/Issue Unit Selection pop-up.
Note: All units specified on this window must be one of the three valid units defined for the item.
Note: Quantities on the database are recorded in the issue unit of the appropriate stockroom. The Inventory Unit is used as the default unit when recording inventory movements.
Inventory Unit
Enter the default inventory unit for this item in this stockroom. The value must be one of the three valid units of measure for the item. This defaults to the default unit of measure specified against the item.
Note: The default inventory unit for an item should be set to the stockroom issue unit if you wish inventory movements to be recorded as per the current system configuration.
Note: This field is only displayed if Quantity Formatting Details Display is requested in the Inventory company profile and the item allows multiple unit entry.
Note: This defaults to the specified Issue Unit when it is not displayed
Infor System21 Inventory Management | 115

851BInventory Maintenance
Issue Unit
Enter an issue unit chosen from the units of measure defined in the Inventory Descriptions file under major type UNIT. This defaults to the issue unit defined for the item in the Item Master file. All stock balances and costs for this item in this stockroom are expressed in this unit. If this item is flagged as a multiple unit entry item, the issue unit in all stockrooms in which that item is held must be the same as the issue unit defined for the item.
In Production, when you define a route header, you use this as the default UoM.
Note: You can only change the issue unit of measure for an existing item if there is no stock balance or outstanding orders recorded against the item.
If you do change the UoM, the costs and value based landed costs associated with the item are re-calculated.
Note: If you are using Catchweight, and the unit of measure is a secondary UoM, this field is displayed for your information only and cannot be amended.
Default Sales Unit
Enter the unit of measure to be used as the default sales unit for this item. The value entered must be one of the three valid units of measure for the item. It defaults to the default unit of measure specified for the item.
Note: This is only shown if Quantity Formatting Details Display is requested in the Inventory company profile and the item allows multiple unit entry.
Note: This defaults to the specified Issue Unit when it is not displayed
Reorder Policy
Enter one of the following to specify the item’s normal re-order policy for this stockroom:
1 - Up to MAX
2 - ROQ
3 - Up to MIN
4 - Up to ROP
5 - EOQ
Alternatively, use the prompt facility to select from the REOP Reorder Policy Codes pop-up.
The code defaults to that defined in the company profile but can be changed.
Vendor Scheduling Item
Use this checkbox as follows:
Unchecked - If Requisitioning controls the item purchasing
Checked - To indicate that you control item purchasing through Vendor Scheduling
This field is for purchased items only.
Note: If you change this field from checked to unchecked, any Vendor Scheduling purchase orders remain in place.
116 | Infor System21 Inventory Management

851BInventory Maintenance
Profile Code
Enter the usage profile, using up to two alphanumeric characters. This is defined in the company profile and is used in calculating the average usage for the item in this stockroom.
Alternatively, use the prompt facility to select from the Select Usage Code pop-up.
Lead Time
Enter the lead time in weeks, using up to five characters including two decimals. This is used for stock availability calculations. Lead time is only used to calculate due dates for purchase orders if an item or supplier profile is not available in Purchase Management.
The software calculates the available date by adding the lead time to the current date.
Reorder Point
Enter the re-order quantity, in issue units, using up to 13 numeric characters including three decimals, to determine at what quantity you should re-order stock.
Do this if you do not want the software to calculate this value automatically.
Production uses this to determine the safety stock figure for the item in this stockroom when you run MRP for cellular planning.
Maximum Stock
Enter the maximum stock, using up to 13 numeric characters including three decimals, if you do not want the software to calculate this value automatically.
Note: If the ROP is higher than the maximum stock, a warning is given.
Reorder Qty
Specify the re-order quantity, using up to 13 numeric characters including three decimals. If you leave this value as zero, the software calculates a re-order quantity based on re-order factor %. This only applies if you specify re-order policy 2 (ROP/ROQ). Otherwise, for policies 1-4, enter a figure to control the re-order level manually.
EOQ (Economic Order Quantity)
Enter up to 13 numeric characters including two decimals, to specify the economic order quantity, in issue units. Use this if you do not want the software to calculate this value automatically.
Calculate EOQ etc.
Use this checkbox as follows:
Unchecked - To enter these figures manually
Checked - If the application should calculate economic order quantity, re-order point and maximum stock
Note: If the Re-order Policy is 3 (Up to MIN), leave this field unchecked.
Infor System21 Inventory Management | 117

851BInventory Maintenance
Reorder Factor %
Specify the re-order factor %, using up to three numeric characters. This defaults to the percentage defined in the company profile. This percentage is the number of lead times worth of average usage to be re-ordered. This only applies if you specify the re-order policy as 2 (ROP/ROQ).
Suppliers
Enter up to four eight-character supplier codes to specify the suppliers of this item for this stockroom. Requisitioning uses the first supplier as the preferred supplier when generating recommended purchase orders.
You can use the prompt facility on these fields to select from the Supplier Search pop-up.
Material Cost
You can only enter material cost for standard cost items. For standard costed items, you enter the material cost, and any standard landed costs are applied to calculate the total standard cost. If no landed costs are defined, the standard cost equals the material cost. If it is amended when there is stock on hand in the stockroom, a stock value adjustment movement record is created.
Caution: For items stored in a bonded warehouse the duty suspended cost of the item should be entered here.
Note: A warning is issued if a stock value adjustment record will be created and no cost movement detail was entered on the previous window.
Note: The cost unit is displayed to the right of this field. This is useful if you are using Catchweight, as the cost UoM is the item's secondary UoM and not the stockroom issue UoM.
Note: If you are using Catchweight, the landed costs are added to the material cost to give a total standard cost per secondary UoM. In this case, a value based landed cost relates to the secondary UoM. The item/supplier profile and actual landed costs in Purchase Management are all based on the primary transaction quantity and never on the secondary transaction value.
Standard Cost
If the item is not standard costed, the field can be entered for memo purposes. Enter up to 15 numeric characters, including five decimals, to specify the standard cost of one issue unit of the item.
For standard costed items, this field is protected. It is calculated based on Material Cost with landed costs applied.
Caution: For items stored in a bonded warehouse the duty suspended cost of the item should be entered here.
Note: The default costing method is maintained on the Maintain Company Profile Initial Selection window and may be overridden for the item on the Price and Costing window of Maintain Inventory Item.
Production updates the material cost of an item, costed at standard, in order that landed costs may be added to it.
118 | Infor System21 Inventory Management

851BInventory Maintenance
Note: The cost unit is displayed to the right of this field. This is useful if you are using Catchweight, as the cost UoM is the item's secondary UoM and not the stockroom issue UoM.
Latest Cost
Note: You only use this field when the item is first added, so that it has a value in Inventory.
If you use latest costing, all stock valuation reflects the latest cost. The default costing method is defined in the Costing Method field on the Maintain Company Profile Stock Weeks Matrix window, and on the Price and Costing window of Maintain Inventory Item.
Enter up to 15 numeric characters, including five decimals, to specify the latest cost. The application maintains the latest cost as the unit cost associated with the last stock receipt recorded for an item. You specify it when the item stockroom is first set up, but is overridden during the next receipt.
Caution: For items stored in a bonded warehouse the duty suspended cost of the item should be entered here.
Note: The cost unit is displayed to the right of this field. This is useful if you are using Catchweight, as the cost UoM is the item's secondary UoM and not the stockroom issue UoM.
Base List Price
Enter up to 15 numeric characters, including five decimals. Use this data in the valuation of forecasts in MPS, DRP and MRP. It is also used by Sales Analysis to calculate sales values for kit components.
ABC Class Override
The ABC classification matrix is defined for each stockroom on the company profile. The categorisation is based on the value and usage of an item, either A, B or C with associated recommended minimum and maximum stockholding levels.
Leave this field blank if you to use the default class for the item configured on the Maintain Company Profile Stock Weeks Matrix window.
Enter A, B or C to associate the item with a different class, so that when stock counting is requested, the item is counted more or less frequently than the default.
Enter Z to exclude the item from a stock count generated by ABC Classification. Stock counts for items with this class can be generated by manual range.
Over Confirm
This percentage is used in Sales Order Processing when you confirm despatch an order or order line. This defines the maximum variance allowed between the despatch quantity and the recorded pick quantity.
It is defaulted from the Inventory Descriptions file, under major type MISC and description code DSTL.
Negativity
Enter a value, in issue units, that represents the amount by which the available stock is allowed to go negative during the allocation process.
Infor System21 Inventory Management | 119

851BInventory Maintenance
Note: This value notionally represents a single day’s production for users of non-System21 manufacturing systems.
Note: This negativity functionality is only supported via Order Capture and not via any of the other order entry methods.
Bins
Enter the bins in which you store this item in the stockroom using up to two sets of six alphanumeric characters. If you require full location management, you should install Location Control or Warehousing.
Note: Bin numbers are used to control the sequence in which items are printed on SOP pick lists
Date Changed
This is a system-maintained field indicating when you last changed this record.
Functions
Delete (F11)
Use this to delete a stockroom. To do this, select Delete (F11) twice, provided that the following conditions are satisfied:
• The physical stock balance must be zero. • No movements must exist in the current month. • No outstanding orders (sales, production, or purchase) must exist. • The item must not exist on any outstanding contracts (if Automotive is installed). • The item must not be specified on a production bill of material (if Manufacturing is installed.)
Landed Costs (F14)
Use this to define landed costs for the item. You can only use this if the item is standard costed.
Transaction Control (F16)
Use this to display the Transaction Control Effectivity Maintenance window. This is only available if the item is subject to transaction control.
Press Enter to check all details and return to the Stockroom Detail Maintenance Selection window.
If you are using Location Control, press Enter twice to display the Item/Stockroom Location Control Details pop-up.
Landed Costs Entry Window To display this window, select Landed Costs (F14) on the Stockroom Maintenance Detail window.
Use this window to enter and maintain landed costs for an item.
Note: If landed costs are amended when there is stock on hand in the stockroom, a stock value adjustment movement record is created.
120 | Infor System21 Inventory Management

851BInventory Maintenance
Note: You can only define landed costs for a standard costed item.
Fields
Cost Code
Enter an existing cost code.
Alternatively, use the prompt facility to select from the LAND Landed Cost Codes pop-up.
Landed cost codes are set up in Purchase Management.
Description
The description for your chosen cost code is automatically displayed.
Standard Landed Cost
Enter a figure for the cost code, using up to nine numeric characters including five decimals.
%/Value
Select one of the following:
Percentage (1) - For this landed cost to be percentage based
Value (0) - For this landed cost to be value based
Note: Landed costs are added to or subtracted from the material cost specified for an item/stockroom to derive the standard cost. The resulting total material cost and standard cost must not be negative.
Caution: Where landed costs are changed and updated, the Stockroom Details Maintenance window is re-displayed. If at this stage you select Exit (F3) or Previous (F12), all landed cost updates will be lost. A warning message is displayed to this effect.
Select Update (F8) to update the information you have added and return to the Stockroom Maintenance Details window, where landed costs will be added to or subtracted from the material cost to derive the standard cost.
Item/Stockroom Location Control Details Pop-up To display this pop-up, press Enter twice on the Stockroom Details Maintenance window.
Note: This pop-up is only displayed if there is a Location Control Stockroom Profile for this stockroom and it is not a consignment stockroom. To set one up, use Stockroom Profile Maintenance in the Inventory Company Profile task.
Note: This pop-up is not displayed if the stockroom is a consignment stockroom. The details normally set here will be set using the Customer/Item Maintenance task.
Use this pop-up to add Location Control defaults for your selected item and stockroom combination.
Fields
Infor System21 Inventory Management | 121

851BInventory Maintenance
Status
This field displays the Location Control status for your selected stockroom.
Default Location
This field displays the default location for your stockroom.
Default Location
Enter the single location in which you want to stock this item.
Alternatively, use the prompt facility to select from the Select Location pop-up.
This location is then the suggested location for receipts and unplanned issues.
Multiple Locations
Use this checkbox as follows:
Unchecked - To stock this item only in the single default location
You can only select to store stock in a single location if there is no stock balance or if all the stock is in the default location.
Checked - To stock this item in more than one location
Rotate Stock
Use this checkbox as follows:
Unchecked - Not to use stock rotation
Checked - To use stock rotation
This is automatically checked, thus forcing stock rotation by receipt date/time for items that are not subject to batch, lot or serial control.
Collect Secondary Balances
Note: This field is only displayed if you select a Catchweight item.
You only need to enter secondary balances at the lowest level required, since there is no need to enter higher-level transaction totals as there is for the primary balance.
Use this checkbox as follows:
Unchecked - Not to hold secondary balances by location
Checked - To hold location level secondary balances
Check this field if you want to stock items in multiple locations and therefore need to record secondary balances by separate location.
Note: If you de-activate this option, all location secondary balances are cleared when you press Enter.
Note: If you choose to stock an item in a single location, you cannot use this field because the location balance would be a duplicate of the item or lot balance.
122 | Infor System21 Inventory Management

851BInventory Maintenance
Functions
Refresh (F5)
Use this to restore any previous values for these fields.
Select Update (F8) to save and update your data, and return to the Stockroom Details Maintenance Selection window. Select Exit (F3) on that window to leave the task.
Infor System21 Inventory Management | 123

851BInventory Maintenance
FIFO Costs [6/INM] FIFO (first in, first out) determines that the costs of the oldest receipted stock items are used first, and that the cost of the units when issued is the same cost that they were received at.The system automatically issues at the oldest cost of stock first and keeps detailed cost tracking.
The application generates FIFO records when you set the costing method of a product to FIFO and you receive goods into stock. If at any point FIFO cost records are found to be in error, this facility can be used to amend the detail within a FIFO record. To audit any cost changes made, a movement is written to the Transaction file. This has a zero quantity and a value equal to that of the adjustment. An audit report is printed to help track the changes that have been made.
Note: If Catchweight is in use, the average cost of Catchweight items for physical and in-transit FIFO items is calculated using the secondary values.
Maintain FIFO Costs Selection Window To display this window, select the FIFO Costs task.
Use this window to select the item and stockroom combination for which you want to amend FIFO costs.
Fields
Item Number
Enter the item code. This must be an item defined to Inventory, which uses the FIFO costing method.
Alternatively, use the prompt facility to select from the Item Master Scan pop-up.
Stockroom Code
Enter the stockroom that stores your selected FIFO costed item.
Alternatively, use the prompt facility to select from the Stockroom Selection pop-up.
Reference
Enter the reference number of the movement, using up to 14 alphanumeric characters. You can link this with the reference type specified.
Reference Date
Enter or select a date to be used as the reference date. This field defaults to the current system date. The reference date is cross-referenced with the table of period and week end dates, to decide the week and period numbers for ageing the stock movement and history records.
Reference Type
Enter the reference type, using up to 3 alphanumeric characters.
Alternatively, use the prompt facility to select from the TRAN Movement Reference Type pop-up.
124 | Infor System21 Inventory Management

851BInventory Maintenance
You can use this field to enter a mnemonic to describe the reference number.
Narrative
Enter the narrative or description for the movement, using up to 20 alphanumeric characters.
Reason Code
Enter a reason code.
Alternatively, use the prompt facility to select from the MOVR Movement Reason Code pop-up.
Note: This information is written to the movement history. To help you recognise and analyse the movements, you can view and report on it.
Press Enter to display the Maintain FIFO Costs window.
Maintain FIFO Costs Window To display this window, press Enter on the Maintain FIFO Costs Selection window.
Use this window to maintain the unit cost of a FIFO record.
Note: The cost change only affects the balance remaining with that record. Inventory Management does not track items already issued to amend their cost. If part of the receipt has been issued, you must spread the total value of the adjustment over the remaining items in the receipt. This can lead to unusual short-term costs.
The upper part of the window identifies the product and stockroom for which the amendment has been requested. The lower part lists the open FIFO records for the product/stockroom.
Fields
Cost Per Unit
Enter or amend the cost for the FIFO record.
Note: Although the value of stock can have changed, this process does not update the General Ledger.
Note: Use AFI to extract information from FIFO cost re-valuation movements to update the General Ledger with any cost changes made.
Press Enter to change the value of the FIFO record. The value of the change is written to the Movements file, as an audit of the change.
If Period End Average Costing function is active, additional processing occurs when an Inventory FIFO Cost Amend is processed:
• Capture of additional movement details for the purposes of Period End Average Costing. • Update of Period Inventory Cost Balances for the purposes of Period End Average Costing.
Infor System21 Inventory Management | 125

851BInventory Maintenance
Item/Container Profile Maintenance [7/INM] Container profiles are used to identify the numbers of containers associated with each issue unit of a base product; for example, vodka is supplied in 1.75 litre bottles, twelve 1.75 litre bottles are shipped in a crate and 40 crates are loaded onto a wooden pallet.
The container profile for a base product consists of a list of container item codes, each of which has an associated conversion factor that determines how many of those containers are required per transaction unit of the base product.
Containers may be integral to the product definition or optional. Containers that are integral to a product's definition (such as a bottle) will have been either supplied with the product when purchased or consumed in the manufacturing process. Optional containers are consumed during outbound logistics processing.
Products may optionally have a different container profile for each customer to whom they are shipped, to account for situations where pallet sizes differ between customers.
Version numbers are automatically incremented by the system for both item and customer/item container profiles as they are maintained. By default, tasks select and store the latest version number, unless the task is related to a previous task, which already had an assigned version number (e.g. a credit note based on an invoice or an adjustment on a customer return). In such a case, that previously assigned version number will be used. An older version number cannot be selected once a new version has been created. The version number will be held on order, invoice and despatch note lines for ‘contained’ items.
The following tables give some examples of expected configurations for the container profiles of items:
Table 1: The stocked item is 12*75cl bottles pre-packed in a case. No additional containers are required when shipping this product.
Sequence Container Item Number Off
Include in Container Summary Optional
10 75cl bottle 1 (Multiply) No No
20 Case for twelve bottles 12 (Divide) Yes No
Table 2: The stocked item is 12*75cl bottles pre-packed in a case. These may be loaded onto a pallet for shipment to the customer. Each pallet can hold up to 20 cases (240 bottles) of the item. Inventory control is required for the use of pallets.
Sequence Container Item Number Off
Include in Container Summary Optional
10 75cl bottle 1 (Multiply) No No
20 Case for twelve bottles 12 (Divide) Yes No
30 Pallet 240 (Divide) No Yes
126 | Infor System21 Inventory Management

851BInventory Maintenance
Table 3: The stocked item is a 75cl bottle that is not pre-packed. Bottles will be put into cartons (a cardboard box with separators), which may be loaded onto a pallet for shipment. Each carton can hold up to 12 bottles and each pallet can hold up to 20 cartons (240 bottles) of the item. Inventory control is required for the use of pallets but not cartons.
Sequence Container Item Number Off
Include in Container Summary Optional
10 75cl bottle 1 (Multiply) No No
20 Carton for twelve bottles 12 (Divide) Yes No
30 Pallet 240 (Divide) No Yes
Note: The sequence number assigned to each container item in the profile is used to imply the container structure, with the lowest number representing the inner container and the highest the outermost container. When containers are added to an order, those defined with the lowest sequence number will be added to the order with the lowest assigned line number.
Container Profile Definition Selection Window To display this window, select the Item/Container Profile task.
Alternatively, select maintenance of the item/container profile of an item within the Linked Item Maintenance task.
Use this window to select the item (and optionally the customer) for which a container profile is to be defined.
Fields
Base Product
Enter the item code against which you wish to establish a container profile.
Note: The selected item code may not itself be a container item.
Customer
If the container profile of a product is different for a specific customer, enter a valid customer account code and delivery sequence.
Container profiles can be established at the following account levels:
• For a specific delivery address • For all delivery addresses for a customer, by specifying a delivery address code of 000
When adding a container profile for a specific customer the profile initially defaults to that defined for the product for all customers.
Infor System21 Inventory Management | 127

851BInventory Maintenance
Note: Container profiles for a specific customer cannot be added without first defining the default container profile for the product.
Enter an item code and press Enter to display the Container Profile Definition Detail window.
Container Profile Definition Detail Window To display this window, press Enter on the Container Profile Definition Selection window.
Use this window to maintain the container profile definition for an item. The latest version of the profile will be available for amendment. If these amendments are updated, a new version number is applied and this becomes the active version of the profile.
Note: There is no limit to the number of levels of associated container that can be established against a base product.
Note: There is no assumption that the issue unit of a product is the smallest unit for that item (although this will be the recommended set-up). Therefore it will be possible to establish a container profile where more than one container is used per unit of a base product.
Note: Once a container profile is defined against an item, its existence is flagged on the appropriate item definition. This ensures that Order Capture considers the containers associated with the item when raising orders.
Fields
Base Product
This field displays the item code and description of the base product entered on the Item/Container Profile Definition Selection window.
Customer
This field displays the customer code, delivery sequence code and name of the customer entered on the Item/Container Profile Definition Selection window.
Note: This is only displayed when you are maintaining the item/container profile definition for a specific customer.
Issue/Stock Conversion
This field displays the issue to stock conversion factor of the base product entered on the Item/Container Profile Definition Selection window.
This is followed by the issue unit of measure code and its description.
Stock/Purchase Conversion Factor
This field displays the stock to purchase conversion factor of the base product entered on the Item/Container Profile Definition Selection window.
128 | Infor System21 Inventory Management

851BInventory Maintenance
Note: The unit of measure conversion factors for the base product are displayed as a prompt, as the expectation is that conversion factors regarding the number of containers required would be based on these conversion factors.
A list of container items associated with the selected base product is then displayed.
Sequence (Seq)
Enter the sequence number that will dictate the order in which the container items in the container profile will be displayed.
Duplicate sequence numbers are not allowed.
This defaults to the Returns Template Sequence Number specified for the container item.
Container Item
Enter the item code of the container item.
Alternatively, use the prompt facility to select from the Item Master Scan pop-up.
The description of the container item will be displayed when you press Enter.
Any container item may only appear once in an item's container profile.
Number Off
Enter the number of the container item required when shipping a single unit of the base product.
Only positive integer values may be entered.
Multiply/Divide
Select one of the following:
Multiply (1)
Divide (2) (default)
The ordered quantity of the base product, in issue units, is either multiplied or divided by the Number Off value to derive the number of this container item required for shipping.
Optional
This is automatically set to the Outbound Logistics setting of the container entered in Item maintenance.
Note: Optional container item balances are consumed from the appropriate inventory stockroom at Confirmation of Despatch, based on the number of containers used in the despatching process (as recorded by the user). Inventory movements are also generated for these containers.
Caution: Warning: A container item must be flagged as optional within Item Maintenance for that container item to be consumed from inventory at despatch time.
Show in Container Summary
Use this to specify whether the container is included in the container summary on the following printed documents:
Infor System21 Inventory Management | 129

851BInventory Maintenance
• SOP Pick Note • SOP Clean Despatch Note (Delivery Note) • ASN Despatch Note • DY Delivery Note (Unpriced)
Use this checkbox as follows:
Unchecked (default) - If the container item will not appear in the container summary listed on the identified documents
Checked - If the container item will appear in the container summary listed on the identified documents
Note: A container might be specified to appear for one product item, but not for another.
If this is the case, the full total of the container will be shown and not just that quantity for the product where it is specified to be shown.
Note: System21 Drinks listed the outer containers associated with each product on documentation. Therefore the expectation would be that only one of the container items associated with a product would be flagged to show on documentation, although there is nothing to stop you from flagging more than one item to show on documentation.
Note: Only those containers which attract a deposit charge are shown on invoices and priced delivery notes. These are defined in Inventory Item Maintenance Container Information 2 window by setting the On Outbound Invoice field to Deposit.
Options
Amend
Use this to bring the details of the selected line to the bottom of the window for amendment.
Delete
Use this to delete the item from the container profile of an item.
Functions
Resequence (F5)
Use this to re-sequence the container items automatically, starting from 10, in increments of 10.
Delete (F11)
Use this to remove the container profile definition of an item from the system. You will be asked to confirm your request in a pop-up. All versions of the profile will be deleted.
Note: Delete (F11) will not be available if any version of the profile is in use on a sales order.
Note: All customer specific container profiles for an item must have been removed before the item container profile can be removed.
Note: The container profile for an item cannot be removed when there are outstanding orders on the system for the selected base product.
Select Update (F8) to save the entered information and return to the Container Profile Definition Selection window.
130 | Infor System21 Inventory Management

851BInventory Maintenance
Account Container Tracking Maintenance [8/INM] This task is used to maintain details of the container balances recorded against an account; that is, the system's view of the number of containers shipped to an account that have not yet been returned.
Note: Outbound carrier-tracked containers are tracked by supplier or carrier at Confirm Despatch/POD.
Note: Inbound and outbound containers are tracked by supplier at Goods Receiving and Returns and Adjustments.
Account Container Tracking Selection Window To display this window, select the Account Container Tracking Maintenance task.
Use this window either:
• To establish initial container balances against accounts where there is a need to record container balances for shipments made prior to installation of System21
• To make manual corrections to pre-existing container balances where it is found that the system view disagrees with container balances reported by the customer
Fields
Account Code
Enter a valid account code and delivery sequence code.
Alternatively, use the prompt facility to select from the Customer Scan pop-up.
Alternatively, enter a valid carrier code to maintain the container tracking information generated at confirm despatch for those containers which are tracked against the carrier used for shipment.
Alternatively, enter a valid Accounts Payable Supplier code.
Account Type
Select one of the following:
Customer (Blank) (default) - To maintain container-tracking information for a customer account
Carrier (1) - To maintain container-tracking information for a carrier code
Supplier (2) - To maintain container-tracking information for a supplier code
Note: If you specify Supplier, if the delivery sequence code is blank, this will be taken as 000.
Enter a valid account and press Enter to display the Account Container Tracking Maintenance Summary window.
Infor System21 Inventory Management | 131

851BInventory Maintenance
Account Container Tracking Maintenance Summary Window To display this window, enter a valid account code and then press Enter on the Account Container Tracking Selection window.
A list of all container balances held by the selected account is displayed.
Any of the containers listed may be selected and adjustments made to the balance quantity. Alternatively, balances may be added for containers not already in the list.
Fields
Account Code
This field displays the account code, delivery sequence code, name, address and postcode of the account selected on the Account Container Tracking Selection window.
Alternatively, it will display the name of the carrier selected on the Account Container Tracking Selection window.
Last Agreed Audit Date
This is the last date on which an agreement was made with the account regarding the number of containers held.
A list of existing container items tracked against the selected account is then displayed.
The following details are shown for each container item tracked against an account:
• The current container balance held by the account • The last agreed container balance held by the account as at the Last Agreed Audit Date
Options are available to:
• Record balances for other container items not currently listed (by entering the relevant details at the foot of the panel)
• Select the container balance of an existing container item for amendment • View a detailed list of when container deliveries and returns occurred against the selected
account
Container
Enter a valid container item code.
Alternatively, use the prompt facility to select from the Item Master Scan pop-up.
This field is protected when a pre-existing container balance has been selected for amendment.
The description of the entered container item code is retrieved from the Item Master file.
Current Balance
Enter the quantity of the container item held by the selected account.
132 | Infor System21 Inventory Management

851BInventory Maintenance
When adjustments are made to the container balance held by a customer, the transaction details are recorded in the Container Tracking (Detail) file. The quantity recorded on the generated transaction is the difference between the original and adjusted container balance.
Reason Code
Enter a valid reason for recording a new container balance or an adjustment to an existing container balance.
Alternatively, use the prompt facility to select from the MOVR Movement Reason Code pop-up.
An appropriate reason code must be entered on each adjustment transaction entered.
Options
Tracking Details
Use this to view the details of when deliveries/returns of the selected container item were recorded against the selected customer/carrier account.
Amend
Use this to select an existing container balance for amendment, bringing the details of the selected line to the foot of the window.
Functions
Set Last Agreed Audit Date (F14)
Use this to set the last agreed audit date for the selected account. The Set Last Agreed Audit Date pop-up is displayed.
Press Enter after each line entry to save the entered information. Use Previous (F12) to return to the Account Container Tracking Selection window.
Set Last Agreed Audit Date Pop-up To display this pop-up, select Set Last Agreed Audit Date (F14) on the Account Container Tracking Maintenance Summary window.
Use this pop-up to record an audit point for the container balances held by an account.
Fields
Agreed Audit Date
The current date is displayed to show that an audit agreement has been reached on this date.
Reason Code
Enter a valid reason code
Alternatively, use the prompt facility to select from the MOVR Movement Reason Code pop-up.
Infor System21 Inventory Management | 133

851BInventory Maintenance
Functions
Update (F8)
Use this to set the last agreed audit date and container balance for an account on the Container Tracking (Header) file.
Audit transactions are generated on the Container Tracking (Detail) file for each container item tracked against the customer.
Note: Transactions are generated with the Source Document set to indicate that they are agreed audit points.
Select Update (F8) to set the last agreed audit date and container balance and return to the Account Container Tracking Maintenance Summary window.
Account Container Tracking Delivery/Return Details Window To display this window, select Tracking Details against a pre-existing container balance summary on the Account Container Tracking Maintenance Summary window.
This window lists all delivery, return and adjustment transactions recorded for the selected container item against the selected account in reverse chronological order.
The following information is displayed from each Container Tracking (Detail) record:
• The date of the container movement • The order number on which the movement was recorded • The despatch note number on which the movement was recorded • The container movement quantity • The resulting container balance at the account • The container movement value • The source of the container movement, i.e. the transaction that resulted in its creation, such as
delivery of goods, return of empty, manual adjustment, etc.
Fields
Position To
Enter or select a valid calendar date to start displaying container-tracking transactions recorded on or before that date.
Options
134 | Infor System21 Inventory Management

851BInventory Maintenance
Audit Details
Use this against any of the listed transactions to view audit information related to that transaction on the Container Tracking Audit Details pop-up.
Select Previous (F12) to return to the Account Container Tracking Maintenance Summary window.
Asset/Container Tracking Audit Details Pop-up To display this pop-up, select Audit Details against a transaction on the Account Container Tracking Delivery/Return Details window.
Use this pop-up to view the audit details for the selected transaction.
Fields
Container Item/Description
The item code and the description of the container item are displayed.
Movement Source
One of the following values is displayed:
Delivery (1)
Return (2)
Customer Returns (3)
Manual adjustment (4) i.e. recorded using this task
Agreed audit point (5)
Order/Return Number
This field displays the order number or return number against which the container delivery or return was recorded.
It is not displayed for manual adjustments or audit points.
Despatch Note No.
This displays the despatch note number against which the container delivery/return was recorded.
It is not displayed for manual adjustments, audit points and customer returns.
Quantity
This shows the number of container items delivered or returned.
Note: The Quantity field is negative for returns.
Infor System21 Inventory Management | 135

851BInventory Maintenance
Resulting Balance
This is the balance of container items held by the account as a result of this movement.
Value
This is the value of the container movement.
Note: Container movement values are calculated by multiplying the movement quantity by the standard cost of the container item at the appropriate stockroom, the appropriate stockroom being the outbound container stockroom associated with the stockroom against which the stock movement is recorded.
Reason Code
The code and the description of the reason code recorded on the container movement are displayed.
These are not displayed for container deliveries.
Recorded Date
This field displays the date on which the container delivery or return was recorded.
Recorded Time
This field displays the time at which the container delivery or return was recorded.
User
This field displays the ID of the user who recorded the container delivery or return.
Workstation
This field displays the ID of the workstation upon which the container delivery or return was recorded.
Program ID
This field displays the ID of the program by which the container delivery or return was recorded.
Select Previous (F12) to return to the Account Container Tracking Delivery/Returns Details window.
136 | Infor System21 Inventory Management

851BInventory Maintenance
Linked Item Maintenance [10/INM] Use this task to maintain item-related profiles and details across applications. You first select an item and then amend any number of profiles such as item stockroom, item/supplier, DRP item profile, without having to locate the individual maintenance tasks on different menus.
Note: When a container profile is copied, its version header is included.
Note: If you are using Catchweight, the Catchweight-specific functions for each of the applications work as normal.
Linked Item Maintenance Window To display this window, select the Linked Item Maintenance task.
Use this window to enter an item number.
Fields
Item
Enter reference code of the item for which you want to maintain certain item related profiles or details.
Alternatively, use the prompt facility to select from the Item Master Scan pop-up.
Functions
Pending Transfer In (F17)
Use this to display the Global Item Maintenance - Pending Transfers In (Confirm/Amend Selections) window, which shows a list of the items published by other companies that have yet to be reviewed in the current company.
You can decide the appropriate action to be taken for each item in the displayed list. Refer to the GIM (Pending Transfers) section for further details.
Note: This function is only available where there is at least one item pending transfer to the current company and the company is permitted to decide whether to subscribe to published item definitions.
Upon return from the Pending Item Transfer window, any selections made are processed.
Item Catalogue In (F19)
Use this to display the Item Catalogue Enquiry window, which shows a list of all items published by other companies.
You can decide whether to subscribe to an item by taking the appropriate action against an item in the displayed list. Refer to the Item Catalogue Enquiry Window section for further details.
Note: This function will only be available where the current company has a relationship with another company that can publish item definitions.
Infor System21 Inventory Management | 137

851BInventory Maintenance
Upon return from the Item Catalogue Enquiry window, any selections made are processed.
If the selected item code has been published by another company and is pending review within the current company, control is passed to the Accept/Reject Global Definition pop-up. Otherwise, the Item Profile Selection window is displayed.
Global Item Maintenance Browse Item Catalogue Window To display this window, select Item Catalogue In (F19) on the Linked Item Maintenance window.
Use this window to view a list of the item definitions published by other companies so that the subscription criteria for a particular item can be revised in the current company.
Note: The task should be invoked in a partner company that is permitted to pull item definitions from other companies.
This is very similar to Pending Transfers, except that all items published on the catalogue are displayed, as opposed to those currently awaiting update in the partner company.
Note: A company relationship must exist, signifying that the current company pulls definition of items from the owning company, in order for an item to be valid for selection.
Fields
Position To
Enter any fifteen-character code.
The value entered is used to re-position the displayed list of pending transfer details.
Select (Sel)
Select one of the following:
Blank - To defer subscription to this item in the partner company
Accept (without review) (1) - To accept the definition (without review)
Enter this value where either of the following is true:
• The owning company pushes definitions of an item to the partner company. • The partner company has decided it will accept a published definition from another company
without having to review the definition before its version of the definition is updated.
Accept (with review) (2) - To accept the definition (with review)
Enter this value where the partner company wishes to review the definitions of items published by other companies before deciding to subscribe to the said definitions.
Item enquiry (owning company) (3) - To invoke the Linked Item Enquiry task for the chosen item
Note: The item details displayed will be related to the definition of the item within the owning company.
138 | Infor System21 Inventory Management

851BInventory Maintenance
Reject definition (9) - To reject the definition
Enter this value to signify that the partner company has decided not to subscribe to the published definition of the chosen item.
Note: Reject Definition (9) is only available when this task is invoked by a partner company by requesting Pending Transfer In (F17) within the Linked Item Maintenance task.
Functions
Update (F8)
Use this to update the Publication and Published Item Details files with any changes made to the subscription criteria.
Note: Records are removed from the Published Item Details file where the partner company decides to reject an items definition.
The following actions are also performed:
• The Item Update task is invoked for all items to be accepted in the partner company (with or without having to review the definition in that company).
• A record is written to the Pending Transfers Review file for each item whose definition is to be reviewed in the partner company. These records are processed upon returning to the Linked Item Maintenance task.
Upon return from the Pending Item Transfer window, any selections made are processed.
SeIect/Deselect All (F13)
Use this to toggle the selection values between Accept (without review), Accept (with review) and blank.
More Options (F23)
Use this to see more option text values.
Select Update (F8) to update the Publication and Published Item Details files with any changes made to the subscription criteria. The Linked Item Maintenance window will then be displayed.
Infor System21 Inventory Management | 139

851BInventory Maintenance
Accept/Reject Global Item Definition Pop-up To display this pop-up, select an item code in Linked Item Maintenance, where the item has been published by another company and is pending review within the current company.
Use this pop-up to accept the definition of the selected item from the owning company into the current company.
Note: Where a definition of the selected item already exists in the current company, the wording on the above window will read, "A global definition of this item has been re-published by company XX".
Fields
Accept/Reject Global Definition (Untitled)
The value selected dictates whether the definition of the selected item in the current company is updated from the definition in the owning company.
Select one of the following:
Accept Global Definition (without review) (1) - To accept the global definition of the item without reviewing the item's definition in the current company
Item Transfer will synchronise the chosen item to any attribute values (defined as global, global (fixed) or local (with default)) on the item definition in the current company with those specified for the item in its owning company.
Where the specified item does not yet exist in the current company, a skeleton definition will be generated based, on the settings of all global, global (fixed) and local (with default) attributes from the owning company.
Where the specified item already exists in the current company, only those attributes specified as global or global (fixed) will be updated with the corresponding settings from the owning company.
Upon completion of the required updates, you are returned to the Linked Item Maintenance Item Selection window.
Accept Global Definition (with review) (2) - To accept the global definition of the item and then review the item's definition in the current company.
Item Transfer will synchronise the chosen item to any attribute values (defined as global, global (fixed) or local (with default)) on the item definition in the current company with those specified for the item in its owning company.
Where the specified item does not yet exist in the current company, a skeleton definition will be generated based on the settings of all global, global (fixed) and local (with default) attributes from the owning company.
Where the specified item already exists in the current company, only those attributes specified as global or global (fixed) will be updated with the corresponding settings from the owning company.
140 | Infor System21 Inventory Management

851BInventory Maintenance
Upon completion of the required updates, you will be presented with the Linked Item Maintenance Item Profile Selection window for the specified item, thus giving you the chance to review and revise the imported item definition in your company. Only those attributes specified as either local or local (with default) may change value in the current company.
Reject Global Definition (9) - For the current company to maintain its own definition of this item.
This will invoke Item Transfer, which updates the Publication Details file for the specified item to reflect that the definition has been rejected by the current company. Once an item has been rejected by a company, subsequent changes to that item's definition in the owning company will not be published to that company.
Upon completion of the required updates, you are returned to the Linked Item Maintenance Item Selection window.
Functions
Item Enquiry (Owning Company) (F19)
Use this to review the definition of the item within the owning company and thus make an informed decision on whether to subscribe to the published definition of the item.
Select Update (F8) to perform the updates appropriate for the Accept/Reject Global Item Definition option previously selected.
Item Enquiry (Owning Company) - Profile Selection Pop-up To display this pop-up select Item Enquiry (Owning Company) (F19), on the Accept/Reject Global Item Definition pop-up.
Alternatively, select Item Enquiry (Owing Company) against an item on the Global Item Maintenance Browse Item Catalogue window.
The item code and description are displayed at the top of the pop-up.
You can maintain the following profiles or details for the item:
• Inventory Item Master • Kit List Details • Alternative Items • World Trade Item Master • Production Item Master
Fields
Inventory Item Details
Enter any valid number between 1 and 5.
Infor System21 Inventory Management | 141

851BInventory Maintenance
If this is selected, the Item/Stockroom enquiry task is invoked for the selected item in its owning company, thus permitting the partner company to review the item's definition prior to deciding whether to accept it.
Kit List Details
Enter any valid number between 1 and 5.
If this is selected, the Kit List enquiry task is invoked for the selected item in its owning company, thus permitting the partner company to review the kit definition prior to deciding whether to accept the item.
Alternative Item Details
Enter any valid number between 1 and 5.
If this is selected, the Alternative Items enquiry task is invoked for the selected item in its owning company, thus permitting the partner company to review the alternative items defined for an item prior to deciding whether to accept the item.
World Trade Details
Enter any valid number between 1 and 5.
Note: This is only displayed when World Trade is active.
If this is selected, the World Trade Item enquiry task is invoked for the selected item in its owning company, thus permitting the partner company to review the item's World Trade definition prior to deciding whether to accept the item.
Production Item Master Details
Enter any valid number between 1 and 5.
If this is selected, the Production Enquire on Item task is invoked for the selected item in its owning company, thus permitting the partner company to review the item's Production definition prior to deciding whether to accept the item.
Note: The value entered in the various selection fields determines the order in which the selected item enquiry tasks are invoked. Duplicate sequence numbers cannot be entered.
Once you have selected the profiles you wish to display, press Enter to page through them until you return to this pop-up.
Profile Selection Pop-up The Profile Selection pop-up is displayed, whether the item selected on the Linked Item Maintenance window exists or not.
The item code and description are displayed at the top of the pop-up.
You can maintain the following profiles or details for the item:
• Inventory Item Master • Item Stockroom Profile
142 | Infor System21 Inventory Management

851BInventory Maintenance
• Item Supplier Profile (Purchase Management) • Production Item Master (Production Definition Management) • Item Warehouse Profile (Warehousing) • World Trade Item Master (World Trade) • DRP Item Profile (Distribution Requirements Planning) • Transport Planning Item Master • Forecasting Item Profile (Forecasting) • Kit List Maintenance • Alternative Items • Item Container Profiles • Call.Connect Sales Details • Publish Item Details • ASN Item Details
Fields
Sequence (Untitled)
The sequence column is blank for all profiles, unless you are creating a new item.
To maintain a profile, enter 1 against the first profile you want to maintain, 2 against the second, 3 against the next and so on.
Note: If you enter an item code that does not exist, this pop-up is displayed with Inventory Item Master and Item Stockroom Profile already selected for modification.
Exist (Untitled)
If at least one profile combination has been defined, 1 is displayed. Otherwise, 0 is displayed.
For example, if you have defined an item to the stockroom and to the supplier, 1 is displayed in this field against Inventory Item Master Item Stockroom Profile and Item Supplier Profile and 0 is displayed against all other profiles.
Note: The only difference when comparing those maintenance tasks accessed from the Linked Item Maintenance task with those accessed directly from the menus is the extra function, F15, which displays the Select Profiles pop-up.
Caution: For maintenance functions requiring the selection of a second parameter, that is item stockroom details, item/supplier, you must select Exit (F3) from that function’s selection pop-up to progress to the next profile chosen for amendment.
Press Enter to display the first window selected. Select the required function on each window to page through other selections until you return to the Profile Selection pop-up.
Infor System21 Inventory Management | 143

851BInventory Maintenance
GIM (Publish Item Definition) - Select Copy-to Companies Window To display this window, select the Publish Item Details profile within Linked Item Maintenance.
Use this to publish an item's definition to the list of partner companies defined on the GIM (Publication Details) file. This is invoked within the company that is either:
• The owner of the item's definition
Or
• A company permitted to send items it has received to other companies with which it has a relationship Note: Publication of item details is performed on an item-by-item basis. The ability to perform a mass publication of items is not provided.
The list of companies to which details of the selected item are to be published is displayed. This information is established using Publication Details Maintenance.
Fields
Position to Company
Enter a company code to display the list from that code.
Select (Sel)
Use this checkbox as follows:
Unchecked - For each of the listed companies to which the publication of the specified item definition is to not occur
Checked - For each of the listed companies to which the publication of the specified item definition is to occur
Co
This field displays the company code of each company to which the selected item's details are to be published.
Company Name
This field displays the company name.
Exists
This field indicates whether a definition of the specified item already exists in the partner company.
Push/Pull
This displays the type of relationship (push or pull) between the owner and partner companies.
Note: The displayed list of companies excludes any that have already rejected the global definition of the specified item.
144 | Infor System21 Inventory Management

851BInventory Maintenance
Functions
Publish (F8)
Use this to remove any existing pending transfer records for the specified item from the Published Item Definitions file and add new records based upon the selections made by the user.
Note: The Item Catalogues entry for the specified item is updated at this juncture to reflect that the item's definition has been published by the owner.
In a Work Management environment, the publication of an item's definition generates an event for each partner company to identify the existence of a published/re-published item definition.
This event is processed within a new Global Item Maintenance business process, which generates an appropriate e-mail message to prompt you to review the item definition in the partner company.
Select/Deselect All (F13)
Use this to toggle the Select field against all listed companies between unchecked and checked.
Select Publish (F8) to remove any existing pending transfer records for the specified item from the Published Item Definitions file and add new records based upon the selections made.
Infor System21 Inventory Management | 145

851BInventory Maintenance
Copy Based on Item Creation [11/INM] Use this task to create a new item from an existing item profile. You can copy some or all of the item’s attributes, depending on the setting of flags on the Profile Options window. This can be particularly useful when entering the details of re-designed items to replace existing stock, or when defining numerous similar items to Inventory, where only minimal changes are necessary for each item's profile, thus reducing duplicate data entry.
Note: If you are using Catchweight, all the Catchweight-specific information is also copied, for example, secondary UOM value, tolerance values, Catchweight item type.
Copy Based on Item Selection Window To display this window, select the Copy Based on Item Creation task.
Use this window to select the established item from which you want to copy details and enter the item code of the new item. The latest version of the item container profile is used for the based on item container details.
When you are creating a new item by basing its definition on another item already defined in the current company, the Publication Details Maintenance and Publish Item Details tasks are both invoked to permit the current company to become the owner of the new item's definition and to allow you to decide which other companies are to receive a copy of the definition when it is eventually published.
Fields
Item
Enter a new and unique item code using up to 15 alphanumeric characters.
Note: If you enter an existing item, a message is displayed and you should enter another item code.
Description (Untitled)
Enter the description, using up to 36 alphanumeric characters, for this item code.
Based On
Enter the code of an existing item on which you would like to base this new item.
Note: When you press Enter, the description for this existing item is displayed.
Functions
Profile Options (F13)
Use this to select profiles before you submit the job. The Profile Options window will be displayed.
Select Submit (F8) to process the job.
146 | Infor System21 Inventory Management

851BInventory Maintenance
Profile Options Window To display this window, specify a new item code and the existing item on which you want to base this new item and then select Profile Options (F13) on the Copy Based on Item Selection window.
Note: Base item data (including item attributes, units of measure, lot, batch or serial control details and costing) is always copied to the new item. In addition, any of the following data may also be copied.
Use this window to select the options you want to copy for the item.
Fields
Item Details
Use these checkboxes as follows:
Unchecked - If you do not want to copy this information for the new item
Checked - To duplicate the information held here for the new item
Note: This will happen even if you have not defined that data for the existing item.
Note: The profile options displayed are subject to the individual functions being active.
Note: You can use Linked Item Maintenance to amend this information.
Select Submit (F8) to submit the job to create the item.
Tax Kit Maintenance [12/INM] Caution: This option should only be used in a US Drinks environment.
A single saleable product may be made up of components liable to different rates of excise tax, for example, a case of mixed wines or a box of spirit miniatures. Items with different tax classifications need to be identified and their excise taxes calculated separately.
This new task defines kits for tax calculation purposes only. They are not used as a kit when despatching or delivering product.
The tax kit parent is processed through Inventory Management and Sales Order Processing, but state and city excise taxes are calculated for the kit components.
Tax Kit Maintenance Selection Window To display this window, select the Tax Kit Maintenance task.
Use this window to select the item and variant for which a tax kit is to be maintained.
Infor System21 Inventory Management | 147

851BInventory Maintenance
Fields
Item
Enter a valid item code. This is the saleable item stocked within Inventory Management.
Alternatively, use the prompt facility to select the item code.
Variant
Enter a valid variant of the selected item.
Alternatively, use the prompt facility to select the variant code from the list of variants already defined for the item within Bonded Warehousing.
Note: Variant is only displayed when Bonded Warehousing is active in a US environment.
Press Enter to display the Tax Kit Maintenance Detail window.
Tax Kit Maintenance Detail Window To display this window, enter a valid Item and Variant and press Enter on the Tax Kit Maintenance Selection window.
Use this window to define the taxable components of the saleable item to be used when calculating any state and city excise taxes payable when the item is shipped or the duties payable when the item is removed from a bonded warehouse.
The description of the saleable item is displayed at the top of the window.
All current components of the kit (if any) are displayed.
To alter the kit definition, overtype the existing component list.
Fields
Kit item
Enter a valid item code.
Alternatively, use the prompt facility to select an item from the standard Item Master Scan popup.
Quantity off per kit
Enter the quantity of each kit component.
The total quantity of items in the kit would usually equate to the Stock to Issue Conversion Factor for the saleable item that defines the number of bottles in a case.
Variant
Enter a valid variant code for the component item.
Alternatively, use the prompt facility to select a variant from a list of variants already defined for the item within Bonded Warehousing.
148 | Infor System21 Inventory Management

851BInventory Maintenance
Note: Variant is only displayed when Bonded Warehousing is active in a US environment.
Press Enter to validate and save the entered information.
Infor System21 Inventory Management | 149


GIM Publication Details [20/INM] Use this task to establish the owner of an item's definition along with the list of other companies to which the items definition will be published.
Note: The owner of an item's definition does not have to publish its definition to all companies with which it has a relationship.
The actual publication of new item definitions and changes to already published item definitions are not performed here. Publication is the responsibility of Publish Item Definition, thus permitting the definition of an item to be finalised within the owning company prior to its worldwide publication.
The current owner of an item's definition can transfer the ownership to another company. This may be required should an incorrect company be assigned as the owner of an item's definition.
The container profile definition is an attribute of an item that can be the responsibility of the company that owns the item definition to maintain.
When copying the definition of an item from one company to another, the container profile definition for that item is copied if the owning company is deemed to be responsible for the container profile definition.
When copying the container profile definition for an item, the system forces the replication of any container items that are not already defined in the partner company.
GIM Copy-to Company Maintenance - Select Item Window To display this window, select the GIM Publication Details task.
Use this window to establish the owner of an item's definition along with the list of other companies to which the item's definition will be published.
Note: This window is bypassed when you are defining a new item definition within Linked Item Maintenance.
Fields
Item
Enter a valid item code that is already defined on the Item Master file.
Alternatively, use the prompt facility to select from the Item Master Scan pop-up.
Note: If an entry for the selected item already exists and the current company is not the owner of the item's definition, an appropriate message is displayed.
Enter a valid item code and then press Enter to display the Global Item Maintenance - Copy to Company Selection window.
Infor System21 Inventory Management | 151

851BInventory Maintenance
GIM Copy to Company Selection Window To display this window, enter a valid item code and then press Enter on the GIM - Copy-to Company Maintenance - Select Item window.
This window displays a list of all companies with an active entry on the Company Relationships file with the current operating company as the owning company and the chosen item attribute profile code, thus ensuring that the definition of the chosen item can only be sent to companies that have a valid relationship with the current operating company. Against each company listed, an indication of whether the item already exists in the partner company is given.
Fields
Attribute Profile
The Item Attribute Profile Code is a ten-character code assigned to an item that could be used to distinguish between different item types such as Finished Goods and Raw Materials. The code dictates which attributes of the item are the responsibility of the owning company to define.
Each item whose definition is to be published to other companies must be assigned an item attribute profile code. Only one item attribute profile can be associated with an item.
A value of blanks is permitted.
You can use the prompt facility to select from the IAPC Item Attribute Profile Code pop-up.
Valid item attribute codes are defined in Global Item Attributes Maintenance.
Note: The item attribute profile code will restrict the list of companies to which an item can be published. Changing this code will change the list of companies displayed.
Position to Company
Enter a company code to display the list from that code.
Select (Sel)
Select one of the following:
Blank - If publication of the item to the partner company has been deferred
Accept (without review) (1) - If the partner company accepts the definition of the item without reviewing its content
This option is automatically selected where the owning company pushes its item definitions into the partner company.
Accept (with Review) (2) - If the partner company is given the opportunity of reviewing and either accepting or rejecting the definition of an item published by this company
Upon accepting the item's definition in the partner company (via Linked Item Maintenance), you are forced to review the definition of the item via the appropriate maintenance tasks. This option is automatically selected where the partner company pulls the definition of published items from other owning companies.
152 | Infor System21 Inventory Management

851BInventory Maintenance
Functions
Update (F8)
Use this to commit the changes made to the publication details of an item to the Publication Details file and add an entry for the specified item to the Item Catalogue thus making the current company the owning company for that item.
Note: An item is flagged as not published upon the initial creation of its entry in the Item Catalogue.
Sel/Defer All (F13)
Use this to toggle the option against each partner company in the displayed list between Accept (without review) and blank.
Change Ownership (F24)
Use this to permit the current owner of an item's definition to pass ownership to another company.
Note: Ownership may only be passed to a company with an active relationship with the current owner.
Note: Changing ownership will not be permitted when there are transfers pending to other companies for the selected item.
Select Change Ownership (F24) to display the GIM Change Item Ownership window.
Alternatively, select Update (F8) to commit the changes and return to the GIM Copy-to Company Maintenance - Select Item window.
GIM Change Item Ownership Window To display this window, select Change Ownership (F24) on the GIM Copy to Company Selection window.
Use this to allow the current owner of an item's definition to pass ownership to another company.
Note: Ownership of an item can only pass to a company that already has a definition of the item. Therefore the list of companies is restricted to those that already contain the specified item.
Fields
Position to Company
Enter a company code to display the list from that code.
Select (Sel)
Only one of the listed companies can be selected and will become the new owner of the specified item.
Select one of the following:
Infor System21 Inventory Management | 153

851BInventory Maintenance
Blank - If publication of the item to the partner company has been deferred
Accept (without review) (1) - If the partner company accepts the definition of the item without reviewing its content
Accept (with Review) (2) - If the partner company is given the opportunity of reviewing and either accepting or rejecting the definition of an item published by this company
Functions
Update (F8)
Use this to update the Publication Details and Item Catalogue entries for the specified item with the chosen owning company.
It loops through all records on the Publication Details file for the selected item and where the partner company has a company relationship established with the new owning company, it changes the owning company to the new owning company.
Note: Where the Publication Detail is for the relationship between the old and new owners of the item definition, the partner company is also updated to become the old owner.
Select Update (F8) to commit the changes and return to the GIM Copy-to Company Maintenance - Select Item window.
154 | Infor System21 Inventory Management

851BInventory Maintenance
GIM (Pending Transfers) [21/INM] Use this task to display a list of items published by the current company that have not yet been processed in the partner companies so that adjustments can be made to the publication details.
Note: This can also be accessed by selecting Pending Transfer In (F17) within Linked Item Maintenance. When accessed in this manner, the list of items displayed is restricted to those pending update in the current company and the window title changes to read "Global Item Maintenance - Pending Transfers In (Confirm/Amend Selections)".
GIM Pending Transfers Out (Confirm/Amend Selection) Window To display this window, select the GIM (Pending Transfers) task.
Use this window to make adjustments to the publication details.
Fields
Position to Item
Enter any fifteen-character code to re-position the displayed list of pending transfer details.
Select (Sel)
Select one of the following:
Defer update (Blank) - To defer the update of an item's definition in the partner company
Previous update failed (0) - If the previous item update failed
Note: This status is achieved if an item is being updated by another user when the Item Update attempts to update a partner company's definition of a published item.
Accept definition (w/o review) (1) - If either of the following is true:
• The owning company pushes definitions of an item to the partner company • The partner company has decided it will accept a published definition from another company
without having to review the definition before its version of the definition is updated.
Accept definition (with review) (2) - If the partner company wishes to review the definitions of items published by other companies before deciding to subscribe to the said definitions
Delete (4) - To remove a pending transfer request
Note: This option is only available when this task is accessed by an owning company.
Reject definition (9) - To signify that the partner company has decided not to subscribe to the published definition of the item
Note: This option is only available when this task is invoked by a partner company by selecting Pending Transfer In (F17) within Linked Item Maintenance.
Infor System21 Inventory Management | 155

851BInventory Maintenance
Functions
Confirm Selections (F8)
Use this to update the Publication and Published Item Details with any changes made.
Note: Records are removed from the Published Item Details file where the partner company decides to reject an item's definition.
When this is invoked from within Linked Item Maintenance, the following actions are also performed:
• The Item Update is invoked for all items to be accepted in the partner company (with or without having to review the definition in that company).
• A record is written to the Pending Transfers Review file for each item whose definition is to be reviewed in the partner company. These records are processed upon returning to Linked Item Maintenance.
Select/Deselect All (F13)
Use this to toggle the selection values between Accept definition (with review) and Defer update.
Select Confirm Selections (F8) to update the Publication and Published Item Details with any changes made.
156 | Infor System21 Inventory Management

851BInventory Maintenance
Global Item Attribute [1/L1M] This Generic Systems File Maintenance task is used to establish the profile(s) of those attributes of an item that are to be considered global, i.e. those whose value should be the same in all companies in which a definition of an item can be found.
Any number of attribute profiles can be established for an environment. A unique ten-character item attribute profile code identifies each attribute profile.
An item attribute can be flagged as Global (fixed), Global, Local or Local (with default).
A global attribute value can only be maintained in the company deemed to be the owner of the item. Should the value of a global attribute be maintained in any other company, its value will be automatically re-set to the value defined for that attribute in the owning company.
A global (fixed) attribute is the same as a global attribute, except that it will not be possible to change such an attribute to be local or local (with default). Examples of such attributes are Item Description, Purchase Unit of Measure, Stock Unit of Measure, Issue Unit of Measure, Stock to Purchase Conversion Factor, Issue to Stock Conversion Factor, etc
A local attribute value is available for maintenance in all companies in which a definition of an item resides. Upon initial creation of an item in a partner company from its published definition, such an attribute will take a default value as per the normal rules for determining an item attribute's default value.
A local (with default) attribute value is also available for maintenance in all companies in which a definition of an item resides. However, upon initial creation of an item in a partner company from its published definition, such an attribute will take its default value from the publishing company.
Note: An attribute of an item might be a single field (i.e. item type, item class etc.) or a complete set of information associated with an item (i.e. item text, item supersession details etc.).
Any number of different item attribute profiles can be established.
This allows the definition of the global attributes of items to differ by item attribute profile code. For example, the global definition of a finished goods item might require different attributes of the item to be synchronised across companies from that of a raw material type item.
Global Item Attribute Maintenance Selection Window To display this window, select the Global Item Attribute task.
Use this window to select the profile for which you wish to maintain item attributes.
Fields
Item Attribute Profile Code
Enter a ten-character code that can be used to assign different item attribute profiles to different types of item if required, e.g. Finished Goods and Raw Materials.
Infor System21 Inventory Management | 157

851BInventory Maintenance
Alternatively, use the prompt facility to select from the IAPC Item Attribute Profile Code pop-up.
A value of *BLANKS is permitted.
Functions
Maintain Profiles (F10)
Use this to display the Item Attribute Profile Maintenance pop-up. This permits the creation/amendment of permissible item attribute profile codes.
Select Maintain Profiles (F10) display the Item Attribute Profile Maintenance pop-up or press Enter to display the Item Attribute Profile Maintenance window.
Item Attribute Profile Maintenance Pop-up To display this pop-up, select Maintain Profiles (F10) on the Global Item Attribute Maintenance Selection window.
Fields
Profile
Enter a ten-character alphanumeric code to identify a new item attribute profile code.
Description
Enter up to a thirty alphanumeric character description to be associated with the profile code.
Options
Amend
Use this to amend the description associated with the selected code.
Delete
Use this to delete the selected code.
Note: Confirmation is requested before the code is physically removed from the database.
Select a valid item attribute profile code and then press Enter to display the Item Attribute Profile Maintenance window.
Item Attribute Profile Maintenance Window To display this window, enter or elect a valid item attribute profile code and then press Enter on the Global Item Attribute Maintenance Selection window.
158 | Infor System21 Inventory Management

851BInventory Maintenance
Use this window to establish the item attributes that make up the profile definition by which an item will be considered global, i.e. whose value should be the same in all companies in which a definition of an item can be found.
A list of Item Attributes will be displayed. Use Page Up and Page Down to navigate through the list.
Fields
Select (Sel)
Select one of the following:
Blank - To denote an item attribute as local
Each company is permitted to change the value of such an attribute without affecting its value in any other company. The default value for a local attribute is derived based on the rules applied within Item Maintenance.
Global (1) - To denote a global attribute
Only the company deemed the owner of an item's definition is permitted to change the value of such an attribute.
Note: Both Item Maintenance and World Trade Item Maintenance permit you to change the value of a global attribute within a company that is not the owner of the item. Should the value of such an attribute be changed, the attribute value is automatically re-set to the value assigned by the item's owner.
Global (fixed) (2) - To denote a global attribute
It is imperative that certain attributes of an item are synchronised across all companies to ensure the correct operation of the system (e.g. item code, units of measure, conversion factors etc.). The item attributes to which this applies are assigned this state upon shipment and it will not be possible for you to change their assigned value.
Local (with default) (3) - To denote a local attribute
Each company is permitted to change the value of such an attribute without affecting its value in any other company. The default value for a local (with default) attribute is taken from the company deemed to be the owner of the item.
Functions
Update (F8)
Use this to validate the entries made and update the Attributes Definition file with valid changes.
Maintain Attribute Descriptions (F13)
Use this to toggle the Item Attribute field between input capable and input inhibited, thus enabling particular organisations to tailor the attribute descriptions to match the usage within their own organisation
Enter the required option against each line and then select Update (F8) to validate and update the entries. The Global Item Attribute Maintenance Selection window will be re-displayed.
Infor System21 Inventory Management | 159

851BInventory Maintenance
160 | Infor System21 Inventory Management

Chapter 3 Inventory Processing 3
Introducing Inventory Processing Inventory Processing is also commonly known as Stock Movement Transfer.
The primary functions of Inventory Management are to record stock movements and determine, at any moment, the current stock levels. To achieve this, there are a number of different types of stock movements.
Whilst you can record these transactions within Inventory Management, it forms part of an integrated business system, and other applications can perform many transactions more easily. For example, Purchase Management handles the receipt of goods, and Sales Order Processing the despatch. The main transactions within Inventory Management are stock counting and housekeeping.
When you process transactions, the format of the window is very similar for all transactions. To simplify the process, you enter common data on the first window. The second window records the detail of the movement.
Processing within a Location-controlled Stockroom If your stockroom is location-controlled, you need to enter Location Control data for all Inventory transactions, with the exception of the Record Purchase Order Receipt and Adjust Allocated Stock transactions.
For all other transactions, the following principles apply:
• You do not need to capture location balances for items that are defined to single locations; in thiscase, the balance is updated automatically with the transaction balance of the movement.
• If items are defined to more than one location, you can capture the location balances after youhave specified the item and transaction quantity (and optionally the lot reference). The total ofthe location balances must match the transaction quantity before you can complete themovement.
• In both cases, location balance records are recorded for each movement that is processed, andthe location balances are updated immediately after the Inventory balance is updated.
When stock of a non-lot-controlled item is moved between locations, the rotation date/time associated with the stock moved is carried forward to the target location of the movement.
Infor System21 Inventory Management | 161

852BInventory Processing
Processing with Negative Stock in a Location-controlled Stockroom For each Inventory stockroom, you can specify whether negative stock is allowed. You can still process Location Control stock transactions if negative stock is allowed.
If you are using Catchweight, when you update the location data during the stock transactions, the software will check that stock will not go negative for primary and secondary stock balances. A warning message will appear, but if negative stock is allowed in the stockroom, you can override this warning.
Processing Logic within Inventory Because Inventory is such a powerful application, and is the main prerequisite for the other system applications, there is a certain logic to the way in which it deals with processing transactions. When you press Enter on any of the Detail windows Inventory will check the following:
1 If the stockroom is controlled by Inventory and you are not using Catchweight (or the item is not an item that requires secondary balance details), processing continues as normal and will re-display the required Detail window for confirmation of the transaction.
2 If the stockroom is controlled by Inventory and you are using Catchweight, the Secondary Value Details pop-up is displayed so that you can specify the required Catchweight details before re-displaying the Detail window for confirmation of the transaction.
3 If the stockroom is controlled by Warehousing and you are not using Catchweight (or the item is not an item that requires secondary balance details), the Warehouse Pack Types window is displayed. Use this to confirm the pack details before re-displaying the required Detail window for confirmation of the transaction.
4 If the stockroom is controlled by Warehousing and you are using a Catchweight type 1 or 2 item (or the item is not an item that requires secondary balance details), the Secondary Value Details pop-up is displayed. Then the Warehouse Pack Types window is displayed before the required Detail window is re-displayed for confirmation of the transaction.
5 If the stockroom is location-controlled and you are processing a location-controlled item (with or without Catchweight), the Enter Location Balances pop-up is displayed so that you can specify location balance details before re-displaying the required Detail window so that you can confirm the transaction.
Processing within a Location-controlled Stockroom Using Catchweight If you are using both Location Control and Catchweight, the Secondary Balance Entry pop-up is not used. There are three factors that determine how secondary balances and location balances are processed:
162 | Infor System21 Inventory Management

852BInventory Processing
1 Is the secondary balance captured or calculated?
2 Is the item stocked in single or multiple locations?
3 Are secondary balances collected at the location level?
These three factors give the following combinations:
Are secondary balances captured or calculated?
Do items have single, default, locations or multiple locations?
Are secondary balances collected by location?
Categorisation for fields displayed in the window
Calculated (or no secondary balance required)
Multiple Yes or not applicable
Case 1
Calculated (or no secondary balance required)
Single No, or not applicable Case 2 (no window is displayed, normal processing occurs)
Captured Multiple No Case 3
Captured Multiple Yes Case 4
Processing within a Bonded Warehouse controlled stockroom If you use Bonded Warehousing application, the following operations within Inventory Management are not available for bonded stockrooms:
• Customer Order Issue • Miscellaneous Issue (Physical) • Miscellaneous Issue (Available) • Miscellaneous Issue Frozen • Adjust Physical Stock • Adjust Allocated Stock • Record Transfer Out • Single Step Transfer • Single Step Transfer Frozen • Item Transformation
The Transaction Allowed indicators on the Company Stockroom will be forced to be off for these transactions.
Another significant aspect is the enforced Lot Control processing of items in a Bonded Warehouse. A unique Rotation number is allocated to each receipt which is treated as a Lot in Inventory. If the item is not already defined as a Lot or Batch controlled item then the item is deemed to be Lot controlled and Lot processing takes place whenever the item’s stock is being referenced.
You cannot operate a serial controlled item in a Bonded Warehouse.
Infor System21 Inventory Management | 163

852BInventory Processing
Receipts, Issues and Adjustments You can categorise the main processes concerned with Inventory as receipts, issues or adjustments of stock.
164 | Infor System21 Inventory Management

852BInventory Processing
Record Purchase Order [1/INP] Use this task to maintain details of the supply position held in the on order balance. Once you have recorded a purchase order using this task, you can then use the Purchase Order Receipt task to receive those goods into Inventory.
Caution: You normally record purchase orders within Purchase Management. The following applies to those companies without Purchase Management.
Record Purchase Order Selection Window To display this window, select the Record Purchase Order task.
Use this window to select the stockroom that this transaction affects, and the date, reference information and reason code for the transaction.
Caution: If user stockroom authorisation is active you cannot perform this transaction if you are not authorised to the stockroom.
.
Fields
Stockroom
Enter the stockroom that this transaction affects, using up to 2 alphanumeric characters. This stockroom must exist on the company profile.
Alternatively, use the prompt facility to select from the Stockroom Selection pop-up.
Note: If the stockroom is a bonded warehouse the user must be authorised to the stockroom in order to record a transaction.
Reference
Enter the reference number for the movement, using up to 14 alphanumeric characters. You can link this with the reference type.
Note: Entry of a reference for each transaction is mandatory if the stockroom is a bonded warehouse.
Reference Date
Enter or select a date to be used as the reference date. This field defaults to the current system date. The reference date is cross-referenced with the table of period and week end dates, to decide the week and period numbers for ageing the stock movement and history records.
Note: If stockroom is a bonded warehouse then the reference date of a transaction cannot be prior to a specified number of days before today’s date.
Reference Type
Enter the reference type, using up to 3 alphanumeric characters.
Alternatively, use the prompt facility to select from the TRAN Movement Reference Type pop-up.
Infor System21 Inventory Management | 165

852BInventory Processing
You can use the Reference Type field to enter a mnemonic to describe the reference number. For example, you could use REQ to indicate that the reference number is a stores requisition note number.
Narrative
Enter the narrative or description for the movement, using up to 20 alphanumeric characters.
Reason Code
Enter a reason code.
Alternatively, use the prompt facility to select from the MOVR Movement Reason Code pop-up.
Note: If the stockroom is a bonded warehouse the reason code must be a valid bond receipt type as well as a valid inventory movement reason code. See the Bonded Warehousing Product Guide for further information regarding Receipt Types.
Press Enter confirm the details and then press Enter again to display the Record Purchase Order Detail window.
Record Purchase Order Detail Window To display this window, press Enter twice on the Record Purchase Order Selection window.
Use this window to record the details of the purchase order.
Note: The fields at the bottom of the window default from the information you specified on the Record Purchase Order Selection window.
Fields
Stockroom
This stockroom code defaults from the selection window, but you can change it.
Supplier
Define the source of supply, using up to 11 alphanumeric characters.
Caution: These supplier details are not confirmed against supplier profiles in Purchase Management.
Item
Enter the item code. The software displays the description.
Alternatively, use the prompt facility to select from the Item Master Scan pop-up.
Variant No.
Enter a valid variant for the selected item.
Alternatively, use the prompt facility to select a valid variant from the Variant Selection pop-up.
166 | Infor System21 Inventory Management

852BInventory Processing
Note: This field is only displayed if the stockroom is a bonded warehouse.
Movement Qty
Enter the quantity of the item.
Note: If the stockroom is a bonded warehouse the movement quantity must be a multiple of the stocking unit of the item.
Lot
You do not need to supply a lot number when you record a purchase order.
Note: This field is protected if the stockroom is a bonded warehouse. Its value is displayed upon returning from the Bonded Warehousing Receipt Details window,
Note: Lot control is enforced for all items in a bonded warehouse irrespective of the item setting. There is a one-to-one relationship between inventory lot numbers and rotations within the bonded warehouse.
Quantity Units
Enter one of the three units of measure defined in the Item Master file.
Alternatively, use the prompt facility to select from the Purchase/Issue Unit Selection pop-up.
The default is the default inventory unit.
This transaction processes the following update for each purchase order recorded:
• It includes the quantity in the on order balance.
Rotation Number
The rotation number assigned within a bonded warehouse to a receipt.
Note: This field is only displayed if the stockroom is a bonded warehouse.
Press Enter to check the data. Press Enter again to carry out the update.
Note: If you are using Catchweight, when you press Enter, Inventory calculates the cost of the movement and the movement balance from the nominal secondary balance for all Catchweight item types.
Infor System21 Inventory Management | 167

852BInventory Processing
Purchase Order Receipt [2/INP] Use this task to receive stock supplied as a result of a purchase order generated outside the Purchase Management application.
Note: If you are using Location Control or Location Control and Catchweight, please see the Processing within a Location-controlled Stockroom section for more information.
Caution: You normally record purchase orders within Purchase Management. The following applies to those companies without Purchase Management.
Record Purchase Receipt Selection Window To display this window, select the Purchase Order Receipt task.
Use this window to select the stockroom that this transaction affects, and the date, reference information and reason code for the transaction.
Caution: If user stockroom authorisation is active you cannot perform this transaction if you are not authorised to the stockroom.
Fields
Stockroom
Enter the stockroom code that this transaction affects, using up to 2 alphanumeric characters. This stockroom must exist on the company profile.
Alternatively, use the prompt facility to select from the Stockroom Selection pop-up.
Note: If the stockroom is a bonded warehouse the user must be authorised to the stockroom in order to record a transaction.
Reference
Enter the reference number of the movement, using up to 14 alphanumeric characters. You can link this with the reference type.
Note: Entry of a reference for each transaction is mandatory if the stockroom is a bonded warehouse.
Reference Date
Enter or select a date to be used as the reference date. This field defaults to the current system date. The reference date is cross-referenced with the table of period and week end dates, to decide the week and period numbers for ageing the stock movement and history records.
Note: If the stockroom is a bonded warehouse then the reference date of a transaction cannot be prior to a specified number of days before today’s date.
Reference Type
Enter the reference type using up to 3 alphanumeric characters.
Alternatively, use the prompt facility to select from the TRAN Movement Reference Type pop-up.
168 | Infor System21 Inventory Management

852BInventory Processing
You can use the reference type field to enter a mnemonic to describe the reference number.
Narrative
Enter the narrative or description for the movement, using up to 20 alphanumeric characters.
Reason Code
Enter a reason code.
Alternatively, use the prompt facility to select from the MOVR Movement Reason Code pop-up.
Note: If the stockroom is a bonded warehouse, the reason code must be a valid bond Receipt Type as well as a valid Inventory Movement Reason. See the Bonded Warehousing Product Guide for further information.
Press Enter to confirm the details. Then press Enter again to display the Record Purchase Receipt Detail window.
Record Purchase Receipt Detail Window To display this window, press Enter twice on the Record Purchase Receipt Selection window.
Use this window to record details for a receipt.
Note: The fields at the bottom of the window default from the information you specified on the Record Purchase Receipt Selection window.
Fields
Stockroom
This stockroom code defaults from the selection window, but you can change it.
Note: Stockroom code may not be changed if a bonded stockroom was selected on the Record Miscellaneous Receipt Selection window.
Note: If the stockroom selected on the Miscellaneous Receipt Selection window is not a bonded warehouse then a bonded warehouse cannot be entered here.
Supplier
Define the source of supply, using up to 11 alphanumeric characters.
Caution: The supplier details are not confirmed against supplier profiles in Purchase Management.
Item
Enter the item code. The description is automatically generated.
Alternatively, use the prompt facility to select from the Item Master Scan pop-up.
Infor System21 Inventory Management | 169

852BInventory Processing
Variant
Enter a valid variant for the selected item.
Alternatively, use the prompt facility to select a valid variant from the Variant Selection pop-up.
Note: This field is only shown if the stockroom is a bonded warehouse.
Movement Qty
Enter the quantity of the item, using up to 11 alphanumeric characters.
Note: If the stockroom is a bonded warehouse the movement quantity for an item must be an exact multiple of the stocking unit of the item.
Lot
Enter a lot number for the item you want to receive, using up to 15 alphanumeric characters.
Alternatively, use the prompt facility to select from the Select Lot Reference pop-up.
Note: To receive stock to a new lot number, enter the reference and then press Enter to display the Lot Header Details window to define your new lot reference. This window is only displayed when extended control is active.
Note: This field is replaced with the Rotation Number if processing a stock movement in a bonded warehouse.
Lot control is enforced for items in a bonded warehouse that are not flagged as lot/batch control. There will be a one-to-one relationship between inventory lot numbers and rotations within the bonded warehouse.
Note: The Lot Header Details pop-up is not displayed for items where lot control is forced when processing a stock movement in a bonded warehouse.
Rotation Number
This is the rotation number assigned to a receipt recorded against a bonded warehouse. It is only displayed if processing a stock movement in a bonded warehouse.
Note: Each receipt into a bonded warehouse is assigned a unique rotation number.
Quantity Units
Enter the unit of measure code.
Alternatively, use the prompt facility to select from the Purchase/Issue Unit Selection pop-up.
This defines the unit of measure in which the movement quantity is expressed. The unit of measure defaults to that defined as the default inventory unit for this item and stockroom combination but you can change this.
Press Enter to check the details for each item and to prompt for the next item number.
Note: You cannot receive more than is on order. If you do, the following message is displayed: ‘You cannot make a receipt for more than has been ordered’. You must return to Record Purchase Order and enter a new order before you try to receive stock.
170 | Infor System21 Inventory Management

852BInventory Processing
If you receive a negative stock quantity, the software will display a warning. You can continue with the transaction if you have decided to accept a negative stock balance in this stockroom. This is set up in the stockroom record of the Inventory company profile. In this case, select Continue (F8) to override the warning message.
Note: If you are using Location Control, press Enter to display the Enter Location Balances pop-up, if these balances are required for this item/stockroom combination. The window that is displayed depends on whether you need to capture details about location balances, and (if you are using Catchweight) the levels of secondary balance details required.
Note: If you are using Warehousing, press Enter to display the Warehousing Details pop-up if these details are required for the item/stockroom combination.
Note: If you are using Catchweight without Location Control, for items that are Catchweight category 1 or 2, when you first press Enter the Secondary Value Details pop-up is displayed. The title of this pop-up varies, as it is formed from the short description of the item's secondary UoM, plus the literal "Details", for example Kilos Details pop-up. For more information, see the Secondary Value Details Pop-up section.
This transaction processes the following updates:
• The movement quantity is added to the physical stock for the item stockroom combination. • The movement quantity is subtracted from on order balance. • The available stock is re-calculated. • The costs are re-calculated (average, latest, and the creation of a FIFO record, depending on
costing method). • The date of last receipt is updated. • Note: As costs are re-calculated, if you use any form of actual costing, you must enter a cost. If
the item is lot-controlled and a lot of the stated number does not exist, the software creates a new one.
If Period End Average Costing function is active, then two additional processes occur:
• Capture of additional movement details for the purposes of Period-end Average Costing. This captures the full actual costs of each receipt made, regardless of the Costing Method that is used to calculate and record the cost of the Inventory movement and to value the resulting Inventory balance. The full actual cost includes any Landed Costs which are defined for the Item/Supplier.
• Update of Period Inventory Balances for the purposes of Period End Average Costing. For each receipt that occurs, the quantity and cost of the receipt are added to the Period total quantity received and Period total cost of receipts. These totals accumulate for each Item over the opening balance quantity at the beginning of the Period and the cost of that balance valued using the previous period’s Period-end Average unit cost. This allows the calculation and storing of a Period-so far average cost, which becomes the Period-end Average Cost once all receipts in the Period have been completed.
Note: Landed costs are automatically included in the cost of an Inventory Purchase Order Receipt only for Standard Cost Items. Landed Costs cannot be added for Items with the other Cost Methods.
Press Enter to process the receipt and return to the Record Purchase Receipt Selection window.
Infor System21 Inventory Management | 171

852BInventory Processing
Miscellaneous Receipt [3/INP] Use this task to record the receipt of goods not covered by other tasks or applications.
Note: If you are using Location Control or Location Control and Catchweight, please see the Processing within a Location-controlled Stockroom section for more information.
Note: If you are using Catchweight, the movement cost of Catchweight items is based on the secondary value entered. When you enter a cost, it is in the item's secondary UoM.
Record Miscellaneous Receipt Selection Window To display this window, select the Miscellaneous Receipt task.
Use this window to select the stockroom that this transaction affects, and the date, reference information and reason code for the transaction.
Caution: If user stockroom authorisation is active you cannot perform this transaction if you are not authorised to the stockroom.
Fields
Stockroom
Enter the stockroom code that this transaction affects, using up to 2 alphanumeric characters. This stockroom must exist on the company profile.
Alternatively, use the prompt facility to select from the Stockroom Selection pop-up.
Note: If the stockroom is a bonded warehouse the user must be authorised to the stockroom in order to record a transaction.
Reference
Enter the reference number of the movement, using up to 14 alphanumeric characters; you can link this with the reference type specified.
Note: Entry of a reference for each transaction is mandatory if the stockroom is a bonded warehouse.
Reference Date
Enter or select a date to be used as the reference date. This field defaults to the current system date. The reference date is cross-referenced with the table of period and week end dates, to decide the week and period numbers for ageing the stock movement and history records.
Note: If stockroom is a bonded warehouse then the reference date of a transaction cannot be prior to a specified number of days before today’s date.
Reference Type
Enter the reference type, using up to 3 alphanumeric characters.
Alternatively, use the prompt facility to select from the TRAN Movement Reference Type pop-up.
172 | Infor System21 Inventory Management

852BInventory Processing
You can use the reference type field to enter a mnemonic to describe the reference number.
Narrative
Enter the narrative or description for the movement, using up to 20 alphanumeric characters.
Reason Code
Enter a reason code.
Alternatively, use the prompt facility to select from the MOVR Movement Reason Code pop-up.
Note: If the stockroom is a bonded warehouse the reason code must be a valid bond Receipt Type as well as a valid inventory Movement Reason. See the Bonded Warehousing Product Guide for further information.
Note: This information is written to the Movement History file. To help you recognise and analyse the movements, you can view and report on it.
Press Enter to confirm the details. Press Enter again to display the Record Miscellaneous Receipt Detail window.
Record Miscellaneous Receipt Detail Window To display this window, press Enter twice on the Record Miscellaneous Receipt Selection window.
Use this window to enter individual stock movements.
Note: The fields at the bottom of the window default from the information you specified on the Record Miscellaneous Receipt Selection window.
Fields
Stockroom
This stockroom code defaults from the selection window, but you can change it.
Note: Stockroom code may not be changed if a bonded stockroom was selected on the Record Miscellaneous Receipt Selection window.
Note: If the stockroom selected on the Miscellaneous Receipt Selection window is not a bonded warehouse then a bonded warehouse cannot be entered here.
Received From
This is a free-format field in which you can enter up to 10 alphanumeric characters to describe the person/place from whom/which you received this item.
Item
Enter the item, using up to 15 alphanumeric characters. You must link existing items to the stockroom through Inventory Maintenance.
Alternatively, use the prompt facility to select from the Item Master Scan pop-up.
Infor System21 Inventory Management | 173

852BInventory Processing
Variant
Enter a valid variant for the selected item.
Alternatively, use the prompt facility to select a valid variant from the Variant Selection pop-up.
Note: This field is only shown if the stockroom is a bonded warehouse
Movement Qty
Enter the quantity you want to receive, using up to 11 characters including three decimal places.
Note: If the stockroom is a bonded warehouse the movement quantity for an item must be an exact multiple of the stocking unit of the item
Lot
Enter a new lot number for the item, using up to 15 alphanumeric characters, or enter an existing lot number.
Alternatively, use the prompt facility to select from the Select Lot Reference pop-up.
Note: To receive stock to a new lot number, enter the reference and then press Enter to display the Lot Header Details window to define your new lot reference. This window is only displayed when extended control is active.
Note: This field is replaced with the Rotation Number if processing a stock movement in a bonded warehouse.
Lot control is enforced for items in a bonded warehouse that are not flagged as lot/batch control. There will be a one-to-one relationship between inventory lot numbers and rotations within the bonded warehouse.
Note: The Lot Header Details pop-up is not displayed for items where lot control is forced when processing a stock movement in a bonded warehouse.
Rotation Number
This is the rotation number assigned to a receipt recorded against a bonded warehouse. It is only displayed if processing a stock movement in a bonded warehouse.
Note: Each receipt into a bonded warehouse is assigned a unique rotation number.
Quantity Units
Enter the unit of measure code.
Alternatively, use the prompt facility to select from the Purchase/Issue Unit Selection pop-up.
This defines the unit of measure in which the movement quantity is expressed. The unit of measure defaults to that defined as the default inventory unit for this item and stockroom combination but you can change this.
Press Enter to display the three units of measure for the item. The first unit of measure, equal to the issue units of the item at this particular stockroom, is the default unit. You can still amend the window details at this stage.
174 | Infor System21 Inventory Management

852BInventory Processing
Cost/Unit
Enter the cost per unit, using up to 15 numeric characters including five decimal places.
If the movement is a goods receipt transaction and latest, average or FIFO costing is in use, the software values the movement at the entered cost.
Note: If you leave the Cost/Unit field blank for a goods receipt transaction, the message ‘Zero unit cost has been entered’ is displayed. You may still amend the cost at this stage in the procedure.
Note: Cost per unit is not entered for issue transaction. The appropriate cost is derived based on the costing method defined for the item and the appropriate cost and costing method are displayed.
Note: Only the costing method is displayed for FIFO costed items.
Note: With standard costing and no batch, lot or serial control, you only need to specify the item and movement quantity.
Enter the appropriate duty suspended cost if the receiving stockroom is a bonded warehouse.
If the receiving stockroom is a bonded warehouse the Rotation Receipt Detail window is displayed when you first press Enter. It is within this window that you record additional receipt information required for the receipt within the Bonded Warehousing application.
If you are using Location Control, press Enter to display the Enter Location Balances pop-up, if balances are required for this item/stockroom combination. The window that is displayed depends on whether you need to capture details about location balances, and (if you are using Catchweight) the levels of secondary balance details required.
If you are using Warehousing, press Enter to display the Warehousing Details pop-up, if these details are required for the item/stockroom combination.
If you are using Catchweight without Location Control, for items that are Catchweight category 1 or 2, when you first press Enter, the Secondary Value Details pop-up is displayed. The title of this pop-up varies, as it is formed from the short description of the item's secondary UoM, plus the literal "Details", for example Kilos Details pop-up. For more information, see the Secondary Value Details Pop-up section.
Note: If you specify a lot number that does not yet exist, Inventory displays the Lot Reference Maintenance pop-up.
Note: The detail pop-up for the transaction that you are processing will re-display until you do not need to make any more changes, in which case, press Enter to process the movement and prompt for the next item number.
When you have entered the entire batch of movements and processed the last movement, select Previous (F12) to return to the previous window.
This transaction processes the following updates:
• The movement quantity is added to physical stock for this item and stockroom combination. • The available stock is re-calculated.
Infor System21 Inventory Management | 175

852BInventory Processing
• Costs are re-calculated (average, latest) and a FIFO record is created, depending on costing method.
• The date of last receipt is updated.
As costs are re-calculated, if you use any form of actual costing, you must enter a cost. If the item is lot-controlled and a lot of the stated number does not exist, Inventory creates a new one.
If Period End Average Costing function is active, then two additional processes occur:
• Capture of additional movement details for the purposes of Period-end Average Costing. This captures the full actual costs of each receipt made, regardless of the Costing Method that is used to calculate and record the cost of the Inventory movement and to value the resulting Inventory balance. The full actual cost includes any Landed Costs which are defined for the Item/Supplier.
• Update of Period Inventory Balances for the purposes of Period End Average Costing. For each receipt that occurs, the quantity and cost of the receipt are added to the Period total quantity received and Period total cost of receipts. These totals accumulate for each Item over the opening balance quantity at the beginning of the Period and the cost of that balance valued using the previous period’s Period-end Average unit cost. This allows the calculation and storing of a Period-so far average cost, which becomes the Period-end Average Cost once all receipts in the Period have been completed.
Note: Landed costs are automatically included in the cost of an Inventory Purchase Order Receipt only for Standard Cost Items. Landed Costs cannot be added for Items with the other Cost Methods.
Press Enter again to carry out the update.
Enter Location Balances Pop-up To display this pop-up, press Enter during any stock transaction processing task, if you are using Location Control.
Note: This pop-up is not displayed if you are using the Record Purchase Order or Adjust Allocated Stock transactions to process Inventory movements.
Use this pop-up to record the balances and quantities affected by this transaction.
The top of the pop-up displays the item and stockroom information. If you are processing a receipt or adjustment of stock, it displays the legend Target Location. If you are processing an issue of stock, it displays the legend From Location in the top right hand corner of the pop-up for your information.
The fields and their descriptions define those displayed if you are processing using Case 1, that is, a Catchweight item with a single, or default, location and you do not need to capture the secondary balance by location. Any variations on this window are detailed under the relevant case section.
176 | Infor System21 Inventory Management

852BInventory Processing
Fields
Header Section
Item
This field displays your selected item code; its description is displayed below the code.
Stockroom
This field displays the stockroom from which you are processing this transaction.
Order
This field displays the sales, production, works or purchase order to which this transaction is attached, if this is applicable.
Line
This field displays the associated order line for this item. If there is no sales, production, works or purchase order attached to the transaction, this field displays four zeros.
Location
This field displays the item’s default location.
Total
This field displays the transaction quantity and the unit of measure that you specified during the transaction.
Cumulative
This field displays the current total of the location balances and is displayed in the same unit of measure as the transaction quantity.
Batch-controlled, Lot-controlled or Serial-controlled Items and Location Control
If you are processing an item that is batch-controlled, lot-controlled or serial-controlled, the following fields are displayed:
Lot (Batch or Serial Number)
This field displays the batch, lot or serial number reference for your selected item in the top section of the window.
Middle Section
Location
This field displays the locations you have selected for use for this transaction. During Sales Order Processing Interactive Confirmation of Despatch, the window will be pre-filled with the locations and balances printed on the pick note.
Quantity
This field displays the entered location balance.
UoM (Unit of Measure)
This field displays the entered transaction’s unit of measure.
Infor System21 Inventory Management | 177

852BInventory Processing
Footer Section
Location
This field is where you enter the location you want to use for this balance. It is initially pre-filled with the suggested, or default, location for your selected item in all circumstances except during Confirmation of Despatch, when it is blank.
You can use the prompt facility to select from the Location Prompt pop-up, which displays all active locations for your item.
If you are processing a receipt or an adjustment, the pop-up displays all locations that currently stock the item at the top of the list followed by all other locations within the stockroom. If you are processing an issue of stock, the Location Prompt pop-up will only display locations with stock of the selected item. Suspended locations are always excluded.
Note: If you attempt to use a location that is suspended, the system displays an error message.
Quantity
This field displays the amount of location balance you want to process. This initially defaults to the full transaction amount in all circumstances except during Confirmation of Despatch, but you can change it if required.
Note: For more information, see the Processing within a Location-controlled Stockroom section.
UoM (Unit of Measure)
This field displays the default unit of measure for the transaction quantity.
You can use the prompt facility to view the item’s other units of measure on the Purchase/Issue Unit Selection pop-up.
Note: For more information, see the Processing within a Location-controlled Stockroom section.
Case 3
If you are processing a Catchweight item with multiple locations and you do not need to capture secondary balances by location, the following fields are displayed on the Enter Location Balances pop-up:
Header Section
Secondary Balance
Note: The name of this field depends on the name of the secondary balance unit of measure.
This field is displayed to the right of the Total and Cumulative fields. Enter the total secondary balance value in this field for all locations that are included in the transaction.
Case 4
If you are processing a Catchweight item with multiple locations and you need to capture secondary balances by location, the following fields are displayed on the Enter Location Balances pop-up:
178 | Infor System21 Inventory Management

852BInventory Processing
Header Section
Secondary Balance
Note: The name of this field depends on the name of the secondary balance unit of measure.
This field is displayed to the right of the Total and Cumulative fields. This field displays the cumulative secondary balance value for all locations that are included in the transaction.
Middle Section
Secondary Balance
This field displays the secondary balance value for each existing location.
UoM
This field displays the unit of measure attached to the secondary balance.
Footer Section
Secondary Balance
Enter the secondary balance value for the selected item that you want to process. This initially defaults to the nominal secondary balance for the transaction quantity but you can change it if required.
UoM
This field displays the default unit of measure for the secondary balance value you have entered. You can change this to any valid secondary unit of measure attached to the item if required.
Case 5
If you are processing a Catchweight item with a single, default location a different pop-up is displayed. This pop-up performs the same function as the Secondary Value Details pop-up, although it displays more information about the transaction and the location that will be processed. For more information, see the Enter Secondary Balances Pop-up section.
Options
Amend
Use this against an existing line to re-display those details in the line entry fields at the bottom of the window to amend them.
Delete
Use this against a line to delete it.
Press Enter to select the location/quantity. This will be then displayed in the middle of the window.
Where it is an item that is not batch-controlled, lot-controlled or serial-controlled, for a stock movement transaction between locations in the same location-controlled stockroom, or from one location-controlled stockroom to another, the Enter Rotation Balances pop-up will be displayed first.
Select Update (F8) to update the location control balances and re-display the main processing window for your transaction. You can only select this if your location balance quantities match the transaction quantity.
Infor System21 Inventory Management | 179

852BInventory Processing
Enter Secondary Balances Pop-up To display this pop-up, press Enter during any stock transaction processing task if you are using Location Control and you are processing a Catchweight item with a single, default location.
Use this pop-up to confirm or amend your item’s secondary balance and location details.
This pop-up is only displayed if you are using Location Control. It mirrors the functionality of the Secondary Value Details pop-up. The tolerance check is performed against the transaction total.
Fields
Target Location
This is displayed in the top right-hand corner of the pop-up. For receipts and adjustment transactions, it displays the title Target Location. For issues, it displays the title From Location.
Item
This field displays the code of the item you are processing. The item description is displayed below the item code.
Stockroom
This field displays the stockroom for which you are processing.
Order
This field displays the sales, production, works or purchase order to which this transaction is attached, if this is applicable.
Location
This field displays the item’s default location.
Line
This field displays the associated order line for this item. If there is no sales, production, works or purchase order attached to the transaction, this field displays four zeros.
Batch, Lot or Serial-controlled Items and Location Control
If you are processing an item that is batch, lot, or serial-controlled, the following fields are displayed:
Lot (Batch or Serial Number)
This field displays the batch, lot or serial number reference for your selected item in the top section of the pop-up.
Total
This field displays the transaction quantity and the unit of measure that you specified during the transaction.
180 | Infor System21 Inventory Management

852BInventory Processing
Secondary Balance
This field displays the secondary balance for this transaction; it defaults to the nominal secondary balance for the transaction quantity.
UoM
This field displays the unit of measure of the location balance. It defaults to the item’s default unit of measure. You can use the prompt facility to display any valid codes for this item.
Press Enter to confirm the details and continue to process the transaction.
Secondary Value Details Pop-up To display this pop-up, press Enter during any stock processing transaction where you are not using Location Control, you are using Catchweight, and your item is defined as Catchweight category 1 or 2.
Use this pop-up to confirm or amend your item’s secondary unit of measure and the quantity you want to process.
Note: The title of this pop-up will vary as it is formed from the short description of the item’s secondary unit of measure and the word Details. For example if your item’s secondary unit of measure were to be Kg, the pop-up’s title would be Kilos Details Entry pop-up.
Fields
Untitled 1
This field displays the item code.
Untitled 2
This field displays the primary quantity that you have just entered.
Untitled 3
This field displays the unit of measure you have just entered, or the item’s default stockroom issue unit of measure.
Movement Value
This field displays the movement quantity in the item’s secondary unit of measure. You can override this value. If you enter a value that exceeds the configured tolerance, a warning message will be displayed.
Note: The title of this field changes to display the literal for the secondary unit of measure, for example, Movement Kilos, or Movement Ounces.
Unit of Measure
This field displays the item’s secondary unit of measure. You can change this if required.
Infor System21 Inventory Management | 181

852BInventory Processing
Press Enter to confirm the details and re-display the relevant processing window to process the transaction.
Customer Order Issue [11/INP] Use this task to issue stock to a customer order if you are not linked to the Sales Order Processing application.
You can only issue previously allocated stock. To do this, use Adjust Allocated Stock in Inventory Processing. There is no link with allocating stock to a customer order in the Sales Order Processing application.
Note: If you are using Location Control or Location Control and Catchweight, please see the Processing within a Location-controlled Stockroom section for more information.
Caution: You normally process sales orders through Sales Order Processing. The following applies to companies without Sales Order Processing.
Record Customer Order Issue Selection Window To display this window, select the Customer Order Issue task.
Use this window to select the stockroom that this transaction affects, and the date, reference information and reason code for the transaction.
Caution: If user stockroom authorisation is active you cannot perform this transaction if you are not authorised to the stockroom.
Fields
Stockroom
Enter the stockroom code that this transaction affects, using up to 2 alphanumeric characters. This stockroom must exist on the company profile.
Alternatively, use the prompt facility to select from the Stockroom Selection pop-up.
Note: In order to perform a customer order issue issues must be permitted in the selected stockroom. Issue transactions are not permitted from a bonded warehouse, therefore customer order issues are not permitted in these types of warehouses
Reference
You can enter the reference number of the movement, using up to 14 alphanumeric characters; you can link this with the reference type specified.
182 | Infor System21 Inventory Management

852BInventory Processing
Reference Date
Enter or select a date to be used as the reference date. This field defaults to the current system date. The reference date is cross-referenced with the table of period and week end dates, to decide the week and period numbers for ageing the stock movement and history records.
Reference Type
You must enter the reference type, using up to 3 alphanumeric characters.
Alternatively, use the prompt facility to select from the TRAN Movement Reference Type pop-up.
You can use the reference type field to enter a mnemonic to describe the reference number; for example, you could use SAL to indicate a sale made to a customer.
Narrative
Enter the narrative or description for the movement, using up to 20 alphanumeric characters.
Reason Code
You must enter a reason code.
Alternatively, use the prompt facility to select from the MOVR Movement Reason Code pop-up.
Note: This information is written to the Movement History file. To help you recognise and analyse the movements, you can view and report on it.
Press Enter to confirm the details. Press Enter again to display the Record Customer Order Issue Detail window.
Record Customer Order Issue Detail Window To display this window, press Enter twice on the Record Customer Order Issue Selection window.
Use this window to record the details of the customer’s order issue.
Note: The fields at the bottom of the window default from the information you specified on the Record Customer Order Issue Selection window.
Fields
Stockroom
This stockroom code defaults from the selection window, but you can change it.
Customer
Enter the customer, using up to 11 alphanumeric characters. Customer details are not checked against customer profiles in Sales Order Processing.
Item
Enter the item, using up to 15 alphanumeric characters. You must link existing items to the stockroom through Inventory Maintenance.
Infor System21 Inventory Management | 183

852BInventory Processing
Alternatively, use the prompt facility to select from the Item Master Scan pop-up.
Movement Qty
Enter the quantity you want to issue, using up to 11 characters including three decimal places.
Note: When this quantity will result in stock being negative, a pop-up will be displayed. For stockrooms where negative stock is allowed, this will display a warning message and you can use Update (F8) to accept the transaction. For stockrooms that do not allow negative stock, the pop-up will display an error message and the transaction cannot be processed.
Lot
Enter the existing lot reference number that is affected by this movement.
Alternatively, use the prompt facility to select from the Select Lot Reference pop-up.
Quantity Units
Enter the unit of measure code
Alternatively, use the prompt facility to select from the Purchase/Issue Unit Selection pop-up.
This field defines the unit of measure in which the movement quantity is expressed. The unit of measure defaults to the default inventory unit for this item and stockroom combination, but you can change this.
Cost/Unit
The appropriate cost and costing method is displayed for items using standard, average and latest costing.
If the movement is a goods receipt transaction and latest, average or FIFO costing is in use the software values the movement at the entered cost.
Note: If you leave the Cost/Unit field blank for a goods receipt transaction, the message "Zero unit cost has been entered" is displayed. You may still amend the cost at this stage in the procedure
Note: Cost per unit is not entered for issue transaction. The appropriate cost is derived based on the costing method defined for the item and the appropriate cost and costing method are displayed.
Note: Only the costing method is displayed for FIFO costed items.
Note: With standard costing and no batch, lot or serial control, you only need to specify the item and movement quantity.
Press Enter to display the three units of measure for the item. The first unit of measure, equal to the issue units of the item at this particular stockroom, is the default unit. You can still change the window at this point.
If Inventory displays the error message "You cannot issue more than has been allocated", with a negative number next to "Allocated Stock" in the middle of the window, and you want to continue with an issue, you must:
• Leave the Customer Order Issue task and select the Adjust Allocated Stock task.
184 | Infor System21 Inventory Management

852BInventory Processing
• Enter a number of items equal to or greater than the negative allocated stock figure displayed at the same time as the error message.
• Return to the Customer Order Issue task and continue as before.
If Inventory displays the error message "Standard unit cost has not been defined in stockroom" and you want to continue with an issue you must:
• Leave the Customer Order Issue task. • Select the Stockroom Details task. • Enter a standard cost for the item in the issuing stockroom. • Return to the Customer Order Issue task and continue as before. Note: If you are using Location Control, press Enter to display the Enter Location Balances pop-up, if balances are required for this item/stockroom combination. The window that is displayed depends on whether you need to capture details about location balances, and (if you are using Catchweight) the levels of secondary balance details required.
If you are using Warehousing, press Enter to display the Warehousing Details pop-up, if these details are required for the item/stockroom combination.
If you are using Catchweight without Location Control, for items that are Catchweight category 1 or 2, when you first press Enter, the Secondary Value Details pop-up is displayed. The title of this pop-up varies, as it is formed from the short description of the item's secondary UoM, plus the literal "Details", for example Kilos Details pop-up. For more information, see the Secondary Value Details Pop-up section.
This transaction processes the following updates:
• The movement quantity is subtracted from the physical stock and allocated stock for the item and stockroom combination.
• Available stock for the item and stockroom combination is calculated. • Usage figures for the item and stockroom combination are updated. • The last issue date for the item and stockroom combination is updated.
Press Enter again to carry out the update.
Miscellaneous Issues If you are issuing both available and frozen stock, you will need greater control on stock levels. In both cases, you can only issue more than the actual quantity of frozen or available stock held in stockrooms where negative stock is allowed.
Note: When any transaction would result in stock being negative, a pop-up will be displayed. For stockrooms where negative stock is allowed, this displays a warning message and you can select Update (F8) to accept the transaction. For stockrooms that do not allow negative stock, the pop-up will display an error message and the transaction cannot be processed.
Infor System21 Inventory Management | 185

852BInventory Processing
Caution: Changing the set-up of processing profiles should only be done by persons familiar with the impact of the change being made and is not normally recommended.
186 | Infor System21 Inventory Management

852BInventory Processing
Issue Physical Stock [12/INP] You can use this task to issue stock, regardless of how much is available. If the stockroom allows you to process negative stock, you can use this task to issue more stock that you currently have in the stockroom after a warning message.
Note: If you are using Location Control or Location Control and Catchweight, please see the Processing within a Location-controlled Stockroom section for more information.
Caution: Use this task carefully, to avoid problems with the stock levels.
Record Miscellaneous Issue (Physical) Selection Window To display this window, select the Issue Physical Stock task.
Use this window to select the stockroom that this transaction affects, and the date, reference information and reason code for the transaction.
Caution: If user stockroom authorisation is active you cannot perform this transaction if you are not authorised to the stockroom.
Fields
Stockroom
Enter the stockroom code that this transaction affects, using up to 2 alphanumeric characters. This stockroom must exist on the company profile.
Alternatively, use the prompt facility to select from the Stockroom Selection pop-up.
Note: In order to perform a physical stock issue, issues must be permitted in the selected stockroom. Issue transactions are not permitted from a bonded warehouse, therefore physical stock issues are not permitted in these types of warehouses
Reference
Enter the reference number of the movement using, up to 14 alphanumeric characters; you can link this with the reference type specified.
Reference Date
Enter or select a date to be used as the reference date. This field defaults to the current system date. The reference date is cross-referenced with the table of period and week end dates, to decide the week and period numbers for ageing the stock movement and history records.
Reference Type
Enter the reference type, using up to 3 alphanumeric characters.
Alternatively, use the prompt facility to select from the TRAN Movement Reference Type pop-up.
You can use the reference type field to enter a mnemonic to describe the reference number.
Infor System21 Inventory Management | 187

852BInventory Processing
Narrative
Enter the narrative or description for the movement, using up to 20 alphanumeric characters.
Or Job/Sub-job/Task
You can optionally enter a job, sub-job and task for the issue.
You can use the prompt facility on the first field to select from the Select Job Detail pop-up.
Reason Code
Enter a reason code.
Alternatively, use the prompt facility to select from the MOVR Movement Reason Code pop-up.
Note: This information is written to the Movement History file. To help you recognise and analyse the movements, you can view and report on it.
Press Enter to confirm the details. Press Enter again to display the Record Miscellaneous Issue (Physical) Detail window.
Record Miscellaneous Issue (Physical) Details Window To display this window, press Enter twice on the Miscellaneous Issue (Physical) Selection window.
Use this window to record the details of the miscellaneous stock issue.
Note: The fields at the bottom of the window default from the information you specified on the Record Miscellaneous Issue (Physical) Selection window.
Fields
Stockroom
This stockroom code defaults from the selection window; but you can change it.
Issued To
Enter a name or reference, using up to 11 alphanumeric characters.
Item
Enter the item, using up to 15 alphanumeric characters. You must link existing items to the stockroom through Inventory Maintenance.
Alternatively, use the prompt facility to select from the Item Master Scan pop-up.
Movement Qty
Enter the issue quantity, using up to 11 characters including three decimal places.
Note: When this quantity will result in stock being negative, a pop-up will be displayed. For stockrooms where negative stock is allowed, this displays a warning message and you can
188 | Infor System21 Inventory Management

852BInventory Processing
select Update (F8) to accept the transaction. For stockrooms that do not allow negative stock, the pop-up will display an error message and the transaction cannot be processed.
Lot
Enter the existing lot reference number that is affected by this movement.
Alternatively, use the prompt facility to select from the Select Lot Reference pop-up.
Quantity Units
Enter the unit of measure code
Alternatively, use the prompt facility to select from the Purchase/Issue Unit Selection pop-up.
This field defines the unit of measure in which the movement quantity is expressed. The unit of measure defaults to the default inventory unit for this item and stockroom combination, but you can change this.
Cost/Unit
This field is not used for issues.
If the movement is a goods receipt transaction and latest, average or FIFO costing is in use the software values the movement at the entered cost.
Note: If you leave the Cost/Unit field blank for a goods receipt transaction, the message "Zero unit cost has been entered" is displayed. You may still amend the cost at this stage in the procedure
Cost per unit is not entered for issue transaction. The appropriate cost is derived based on the costing method defined for the item and the appropriate cost and costing method are displayed.
Note: Only the costing method is displayed for FIFO costed items.
Press Enter to check these details. This task does not check to see if the stock is available, so a negative available stock figure could result.
If you receive a negative stock quantity, the software will display a warning. You can continue with the transaction if you have decided to accept a negative stock balance in this stockroom. This is set on the stockroom record of the Inventory company profile. In this case, select Continue (F8) to override the warning message.
Note: If you are using Location Control, press Enter to display the Enter Location Balances pop-up, if balances are required for this item/stockroom combination. The window that is displayed depends on whether you need to capture details about location balances, and (if you are using Catchweight) the levels of secondary balance details required.
If you are using Warehousing, press Enter to display the Warehousing Details pop-up, if these details are required for the item/stockroom combination.
If you are using Catchweight without Location Control, for items that are Catchweight category 1 or 2, when you first press Enter, the Secondary Value Details window is displayed. The title of this pop-up varies, as it is formed from the short description of the item's secondary UoM, plus the literal "Details", for example Kilos Details pop-up. For more information, see the Secondary Value Details pop-up section.
Infor System21 Inventory Management | 189

852BInventory Processing
This transaction processes the following updates:
• It subtracts from the physical balance. • It re-calculates the available stock balance. • It includes the transaction quantity in the usage details. • It updates the date last issued.
Press Enter again to carry out the update.
Issue Available Stock [13/INP] You can enter details of an issue of available stock. You can amend the updates associated with this transaction type in the Inventory processing profile, to reflect the updates you need when available stock is issued.
Note: If you are using Location Control or Location Control and Catchweight, please see the Processing within a Location-controlled Stockroom section for more information.
Record Miscellaneous Issue (Available) Selection Window To display this window, select the Issue Available Stock task.
Use this window to select the stockroom that this transaction affects, and the date, reference information and reason code for the transaction.
Caution: If user stockroom authorisation is active you cannot perform this transaction if you are not authorised to the stockroom.
Fields
Stockroom
Enter the stockroom code that this transaction affects, using up to 2 alphanumeric characters. This stockroom must exist on the company profile.
Alternatively, use the prompt facility to select from the Stockroom Selection pop-up.
Note: In order to perform an available stock issue, issues must be permitted in the selected stockroom. Issue transactions are not permitted from a bonded warehouse, therefore available stock issues are not permitted in these types of warehouses
Reference
Enter the reference number of the movement, using up to 14 alphanumeric characters; you can link this with the reference type specified.
190 | Infor System21 Inventory Management

852BInventory Processing
Reference Date
Enter or select a date to be used as the reference date. This field defaults to the current system date. The reference date is cross-referenced with the table of period and week end dates, to decide the week and period numbers for ageing the stock movement and history records.
Reference Type
Enter the reference type, using up to 3 alphanumeric characters.
Alternatively, use the prompt facility to select from the TRAN Movement Reference Type pop-up.
You can use the reference type field to enter a mnemonic to describe the reference number.
Narrative
Enter the narrative or description for the movement using up to 20 alphanumeric characters.
Reason Code
Enter a reason code.
Alternatively, use the prompt facility to select from the MOVR Movement Reason Code pop-up.
Note: This information is written to the Movement History file. To help you recognise and analyse the movements, you can view and report on it.
Press Enter to confirm the details. Press Enter again to display the Record Miscellaneous Issue (Available) Details window.
Record Miscellaneous Issue (Available) Detail Window To display this window, press Enter twice on the Record Miscellaneous Issue (Available) Selection window.
Use this window to record the details of the miscellaneous (available) stock issue.
Note: The fields at the bottom of the window default from the information you specified on the Record Miscellaneous Issue (Available) Selection window.
Fields
Stockroom
This field displays the stockroom code you specified on the selection window.
Item
Enter the item, using up to 15 alphanumeric characters. You must link existing items to the stockroom through Inventory Maintenance.
Alternatively, use the prompt facility to select from the Item Master Scan pop-up.
Infor System21 Inventory Management | 191

852BInventory Processing
Movement Qty
Enter the issue quantity, using up to 11 characters including three decimal places.
Note: When this quantity will result in stock being negative, a pop-up will be displayed. For stockrooms where negative stock is allowed, this displays a warning message and you can select Update (F8) to accept the transaction. For stockrooms that do not allow negative stock, the pop-up will display an error message and the transaction cannot be processed.
Lot
Enter the existing lot reference number that is affected by this movement.
Alternatively, use the prompt facility to select from the Select Lot Reference pop-up.
Quantity Units
Enter the unit of measure code
Alternatively, use the prompt facility to select from the Purchase/Issue Unit Selection pop-up.
This field defines the unit of measure in which the movement quantity is expressed. The unit of measure defaults to the default inventory unit for this item and stockroom combination, but you can change this.
Cost/Unit
Cost per unit is not used for issues.
If the movement is a goods receipt transaction and latest, average or FIFO costing is in use the software values the movement at the entered cost.
Note: If you leave the Cost/Unit field blank for a goods receipt transaction, the message "Zero unit cost has been entered" is displayed. You may still amend the cost at this stage in the procedure.
Cost per unit is not entered for issue transaction. The appropriate cost is derived based on the costing method defined for the item and the appropriate cost and costing method are displayed.
Note: Only the costing method is displayed for FIFO costed items.
Press Enter to check the details displayed.
Note: If you are using Location Control, press Enter to display the Enter Location Balances pop-up, if balances are required for this item/stockroom combination. The window that is displayed depends on whether you need to capture details about location balances, and (if you are using Catchweight) the levels of secondary balance details required.
If you are using Warehousing, press Enter to display the Warehousing Details pop-up, if these details are required for the item/stockroom combination.
If you are using Catchweight without Location Control, for items that are Catchweight category 1 or 2, when you first press Enter, the Secondary Value Details pop-up is displayed. The title of this pop-up varies, as it is formed from the short description of the item's secondary UoM, plus the literal "Details", for example Kilos Details pop-up. For more information, see the Secondary Value Details Pop-up section.
This transaction type:
192 | Infor System21 Inventory Management

852BInventory Processing
• Subtracts from the physical stock balance • Re-calculates the available stock balance • Includes this movement quantity in usage records for this item • Updates the date last issued for this item
If you attempt to issue stock that is not available, the message "Not enough stock available at this location" is displayed. To continue with the issue, use the Purchase Receipt or Miscellaneous Receipt tasks.
Note: If the issue item uses average or FIFO costing, Inventory suggests an issue cost per item.
Select Update (F8) to carry out the update.
Issue Frozen Stock [21/INP] You can enter details of an issue for stock from an item or a lot that has been frozen. You cannot issue more than is frozen. You can amend the updates associated with this transaction type in the Inventory processing profile, to reflect the updates you require when frozen stock is issued. Enter data as for other issues.
Note: If you are using Location Control or Location Control and Catchweight, please see the Processing within a Location-controlled Stockroom section for more information.
Record Miscellaneous Frozen Issue Selection Window To display this window, select the Issue Frozen Stock task.
Use this window to select the stockroom that this transaction affects, and the date, reference information and reason code for the transaction.
Caution: If user stockroom authorisation is active you cannot perform this transaction if you are not authorised to the stockroom.
Fields
Stockroom
Enter the stockroom code that this transaction affects, using up to two alphanumeric characters. This stockroom must exist on the company profile.
Alternatively, use the prompt facility to select from the Stockroom Selection pop-up.
Note: In order to perform a frozen stock issue, issues must be permitted in the selected stockroom. Issue transactions are not permitted from a bonded warehouse, therefore frozen stock issues are not permitted in these types of warehouses
Infor System21 Inventory Management | 193

852BInventory Processing
Reference
Enter the reference number of the movement, using up to 14 alphanumeric characters. You can link this with the reference type specified.
Reference Date
Enter or select a date to be used as the reference date. This field defaults to the current system date. The reference date is cross-referenced with the table of period and week end dates, to decide the week and period numbers for ageing the stock movement and history records.
Reference Type
Enter the reference type, using up to 3 alphanumeric characters.
Alternatively, use the prompt facility to select from the TRAN Movement Reference Type pop-up.
You can use the reference type field to enter a mnemonic to describe the reference number; for example.
Narrative
Enter the narrative or description for the movement, using up to 20 alphanumeric characters.
Reason Code
Enter a reason code
Alternatively, use the prompt facility to select from the MOVR Movement Reason Code pop-up.
Note: This information is written to the Movement History file. To help you recognise and analyse the movements, you can view and report on it.
Press Enter to confirm the details. Press Enter again to display the Record Miscellaneous Frozen Issue Detail window.
Record Miscellaneous Frozen Issue Detail Window To display this window, press Enter twice on the Record Miscellaneous Frozen Issue Selection window.
Use this window to record details of the miscellaneous issue of frozen stock transaction.
Note: The fields at the bottom of the window default from the information you specified on the Record Miscellaneous Frozen Issue Selection window.
Fields
Stockroom
This field displays the stockroom code from the selection window.
194 | Infor System21 Inventory Management

852BInventory Processing
Item
Enter the item, using up to 15 alphanumeric characters. You must link existing items to the stockroom through Inventory Maintenance.
Alternatively, use the prompt facility to select from the Item Master Scan pop-up.
Movement Qty
Enter the issue quantity, using up to 11 characters including three decimal places.
Lot
Enter the existing lot reference number that is affected by this movement.
Alternatively, use the prompt facility to select from the Select Lot Reference pop-up.
Quantity Units
Enter the unit of measure code
Alternatively, use the prompt facility to select from the Purchase/Issue Unit Selection pop-up.
This field defines the unit of measure in which the movement quantity is expressed. The unit of measure defaults to the issue unit for this item and stockroom combination, but you can change this.
Cost/Unit
If the movement is a goods receipt transaction and latest, average or FIFO costing is in use the software values the movement at the entered cost.
Note: If you leave the Cost/Unit field blank for a goods receipt transaction, the message "Zero unit cost has been entered" is displayed. You may still amend the cost at this stage in the procedure
Cost per unit is not entered for issue transaction. The appropriate cost is derived based on the costing method defined for the item and the appropriate cost and costing method are displayed.
Note: Only the costing method is displayed for FIFO costed items.
Press Enter to check the details you have entered.
Note: If you are using Location Control, press Enter to display the Enter Location Balances pop-up, if balances are required for this item/stockroom combination. The window that is displayed depends on whether you need to capture details about location balances, and (if you are using Catchweight) the levels of secondary balance details required.
If you are using Warehousing, press Enter to display the Warehousing Details pop-up, if these details are required for the item/stockroom combination.
If you are using Catchweight, for items that are Catchweight category 1 or 2, when you first press Enter, the Secondary Value Details pop-up is displayed. The title of this pop-up varies, as it is formed from the short description of the item's secondary UoM, plus the literal "Details", for example Kilos Details pop-up. For more information, see the Secondary Value Details Pop-up section.
This transaction:
• Subtracts from the physical stock balances
Infor System21 Inventory Management | 195

852BInventory Processing
• Subtracts from the frozen balances • Re-calculates the available stock balances • Includes this movement quantity in usage records for this item • Updates the date last issued for this item
Frozen stock includes:
• Items that have been frozen using the Adjust Frozen Stock task • Items where the stock status has been set to unavailable • Items that have not yet reached the first available date, or have passed the last available date,
as indicated on the lot header, and do not have the stock status code set to Released Note: If stock that has not yet reached the first available date and has a blank stock status code is included in the available stock, check that the stock monitor is running in the subsystem.
If Inventory displays a warning that there is insufficient frozen stock in the stockroom for the transfer to take place, but you want to continue with the transaction, you must:
• Adjust the frozen stock using the Record Frozen Adjustment task. • Return to this task and continue as before.
Select Update (F8) to carry out the update.
Item Transformation [26/INP] This activity is enabled for Work Management and can be run as part of a Business Process built in @ctive Modeler. Refer to the Work Management chapters in the Application Manager product guide for further information.
This task provides the ability to transform a given quantity of a stocked inventory item into one or more other stocked inventory items.
Transformation requests can be batched together or entered in single item batches, all transformation requests within a batch being assigned the same reference number.
Record Item Transformation Selection Window To display this window, select the Item Transformation task.
Use this window to select and enter a stockroom, date, reference and reason code for transforming items.
Caution: If user stockroom authorisation is active you cannot perform this transaction if you are not authorised to the stockroom.
Fields
196 | Infor System21 Inventory Management

852BInventory Processing
Stockroom
Enter the code of an existing stockroom.
Alternatively, use the prompt facility to select from the Stockroom Selection pop-up.
Note: In order to perform an item transformation both receipt and issue transactions must be permitted in the selected stockroom. Issue transactions are not permitted from a bonded warehouse, therefore item transformations are also not permitted in these types of warehouses
Reference Type
Enter the transformation type, using up to three alphanumeric characters.
These are defined in the Inventory Descriptions file under major type TRAN.
You can use the prompt facility on this field to select from the TRAN Movement Reference Type pop-up.
Narrative
Enter the narrative, or description, using up to twenty alphanumeric characters, associated with this item transformation.
Reason Code
Enter a reason code, using up to two alphanumeric characters.
These are defined in the Inventory Descriptions file under major type MOVR.
The reason code you specify determines whether the target quantity of the To item is automatically frozen by the system.
You can use the prompt facility on this field to select from the MOVR Movement Reason Code pop-up.
Note: If the Parameter Limit for the specified reason code is set to 1, the system automatically freezes the target quantity of the To item(s).
Reference Date
Enter or select the date of the item transformation.
Press Enter to confirm the details and then press Enter again to display the Review Item Transformation Details window.
Review Item Transformation Details Window To display this window, enter your required selection criteria and then press Enter twice on the Record Item Transformation Selection window.
Use this window to review details of items you want to transform.
• The window lists details of transformation requests you have already entered in this session. The list includes:
• Item
Infor System21 Inventory Management | 197

852BInventory Processing
• Lot Number • Movement Quantity • Quantity Units • Cost/Unit
And optionally:
• Item Description • Quantity Units Description • Stockroom
Fields
Generated Reference
The transformation reference is automatically generated by the system and will apply to all transformations within a batch.
Options
Amend
Use this to select a transformation request for amendment.
One of the following windows is displayed, depending on the make-up of the transformation request selected for amendment:
• Record One-to-One Item Transformation Details window • Record Many-to-One Item Transformation Details window • Record One-to-Many Item Transformation Details window
Functions
Update (F8)
Use this to process the batch of transformation requests you have entered.
The update:
• Subtracts the movement quantity from the physical balance of each From item • Adds the target quantity to the physical balance of each To item • Freezes the target quantity of each To item if the selected reason code indicates this as a
requirement of the transformation • Re-calculates the available balances of each From item and To item • Updates the usage and date of issue of each From item • Updates the date of receipt of each To item • Updates inventory costs • Updates the stock history for each From item and To item • Generates inventory movements that reflect the change in stock position for each From item
and To item
198 | Infor System21 Inventory Management

852BInventory Processing
Delete (F11)
Use this to delete the entire batch of transformation requests you have entered.
Confirmation of the deletion will be requested.
Expand (F13)
Use this to expand the window to show the item code and unit of measure code descriptions and stockroom code for each entered transformation detail line. The Review Item Transformation Details (Expanded View) window is displayed.
Transform One-to-One (F14)
Use this to add a one-to-one transformation request to the current batch of transformation requests. The Record One-to-One Item Transformation Details window is displayed.
Transform Many-to-One (F16)
Use this to add a many-to-one transformation request to the current batch of transformation requests. The Record Many-to-One Item Transformation Details window is displayed.
Transform One-to-Many (F18)
Use this to add a one-to-many transformation request to the current batch of transformation requests. The Record One-to-Many Item Transformation Details window is displayed.
Select Update (F8) to process the batch of transformation requests you have entered.
Review Item Transformation Details (Expanded View) Window To display this window, select Expand (F13) on the Review Item Transformation Details window.
Use this window to review details of items you want to transform.
The window lists details of transformation requests you have already entered in this session. The list includes:
• Item • Lot Number • Movement Quantity • Quantity Units • Cost/Unit
And optionally:
• Item Description • Quantity Units Description • Stockroom
Options
Infor System21 Inventory Management | 199

852BInventory Processing
Amend
Use this to select a transformation request for amendment.
One of the following windows is displayed, depending on the make-up of the transformation request selected for amendment:
• Record One-to-One Item Transformation Details window • Record Many-to-One Item Transformation Details window • Record One-to-Many Item Transformation Details window
Functions
Update (F8)
Use this to process the batch of transformation requests you have entered.
The update:
• Subtracts the movement quantity from the physical balance of each From item • Adds the target quantity to the physical balance of each To item • Freezes the target quantity of each To item if the selected reason code indicates this as a
requirement of the transformation • Re-calculates the available balances of each From item and To item • Updates the usage and date of issue of each From item • Updates the date of receipt of each To item • Updates inventory costs • Updates the stock history for each From item and To item • Generates inventory movements that reflect the change in stock position for each From item
and To item
Delete (F11)
Use this to delete the entire batch of transformation requests you have entered.
Confirmation of the deletion will be requested.
Contract (F13)
Use this to contract the window, suppressing the display of the item code and unit of measure code descriptions and stockroom code for each entered transformation detail line. The Review Item Transformation Details window is displayed.
Transform One-to-One (F14)
Use this to add a one-to-one transformation request to the current batch of transformation requests. The Record One-to-One Item Transformation Details window is displayed.
Transform Many-to-One (F16)
Use this to add a many-to-one transformation request to the current batch of transformation requests. The Record Many-to-One Item Transformation Details window is displayed.
200 | Infor System21 Inventory Management

852BInventory Processing
Transform One-to-Many (F18)
Use this to add a one-to-many transformation request to the current batch of transformation requests. The Record One-to-Many Item Transformation Details window is displayed.
Select Update (F8) to process the batch of transformation requests you have entered.
Record One-to-One Item Transformation Details Window To display this window, select Transform One-to-One (F14) on the Review Item Transformation Details window or the Review Item Transformation Details (Expanded View) window.
Use this window to enter details of the items you want to transform.
Fields
Source Item
From Item
Enter a valid item code.
Alternatively, use the prompt facility to select from the Item Master Scan pop-up.
Movement Quantity
Enter the quantity of the item to be transformed.
Note: Standard Negative Stock Processing is invoked for each transformation From item, thus ensuring there is sufficient stock of the chosen item available to continue with your transformation request.
Quantity Units (Untitled)
Enter a valid unit of measure code for the specified item. These are defined in the Item Master file.
This is the unit of measure in which the movement quantity (and cost) is expressed.
If you do not enter a unit of measure, this field defaults to the default inventory unit defined for the selected item and stockroom combination.
You can use the prompt facility on this field to select from the Units of Measure pop-up.
From Lot
Enter the originating lot, using up to fifteen alphanumeric characters. This lot must exist in the selected stockroom.
Alternatively, use the prompt facility to select from the Select Lot Reference pop-up.
Note: Multiple lots cannot be specified.
Infor System21 Inventory Management | 201

852BInventory Processing
Cost
The appropriate unit cost is displayed for items using standard average and latest costing.
The costing method associated with the chosen item is also displayed.
Note: Only the costing method is displayed for FIFO costed items, the cost being derived from the consumption of existing FIFO cost details.
Target Item
To Item
Enter a valid item code.
Alternatively, use the prompt facility to select from the Item Master Scan pop-up.
This cannot be the same as the From item.
Target Quantity
Enter the quantity of the target item to be received.
If this field is left blank, the value is calculated automatically from the relationship between the quantity units of the movement and target quantities, should such a relationship exist.
Note: You will be forced to enter a target quantity if no relationship exists between the quantity units of this and the movement quantity.
If you enter a quantity in this field and the quantity does not match the expected target quantity, as calculated from the relationship between the units of measure of this and the movement quantity, a warning is issued.
Caution: You may continue the transformation request at this stage without amending the target quantity; however you should only do this if you are sure of the implications of your actions
Quantity Units (Untitled)
Enter a valid unit of measure code for the selected item. These are defined in the Inventory Descriptions file under major type UNIT.
This is the unit of measure in which the target quantity is expressed.
If you do not enter a unit of measure, this field defaults to the same unit of measure as the movement quantity, if this unit is a valid unit of measure for the target item, or to the default inventory unit defined for the selected item and stockroom combination.
You can use the prompt facility on this field to select from the Units of Measure pop-up.
To Lot
Enter the target lot, using up to fifteen alphanumeric characters. This can be an existing lot or a new lot.
Alternatively, use the prompt facility to select from the Select Lot Reference pop-up.
In the case of an existing lot, the target quantity is added to the total physical quantity of that lot and its frozen or available balance, depending on the reason code you selected for the transformation request.
202 | Infor System21 Inventory Management

852BInventory Processing
If you do not enter a lot number for a lot-controlled item, it will default to the From lot number you have entered.
Note: Multiple target lots cannot be specified.
Cost
Enter the cost per unit, using up to fifteen numeric characters with five decimal places.
Note: The standard cost associated with the target item/stockroom combination is displayed automatically when you press Enter, if the item's costing method is set to standard.
You must enter a cost/unit for the target item if that item has a costing method of average, latest or FIFO. The costs associated with the transformed From items are not carried forward.
Note: If you leave the cost/unit blank, the message "Zero unit cost has been entered" is displayed. You can still amend the cost at this stage in the process.
Reference Type
Enter the transformation type, using up to three alphanumeric characters. These are defined in the Inventory Descriptions file under major type TRAN.
This field defaults to the value you specified on the Record Item Transformation Selection window but can be changed for each transformation request.
You can use the prompt facility on this field to select from the TRAN Movement Reference Type pop-up.
Reference Date
Enter or select the date of the item transformation.
This field defaults to the date you specified on the Record Item Transformation Selection window but can be changed for each transformation request.
Narrative
Enter the narrative, or description, using up to twenty alphanumeric characters, associated with this item transformation.
This field defaults to the value you specified on the Record Item Transformation Selection window but can be changed for each transformation request.
Reason Code
Enter a reason code, using up to two alphanumeric characters. These are defined in the Inventory Descriptions file under major type MOVR.
This field defaults to the value you specified on the Record Item Transformation Selection window but can be changed for each transformation request.
You can use the prompt facility on this field to select from the MOVR Movement Reason Code pop-up.
The reason code you specify determines whether the target item quantity is automatically frozen by the system. The text literal "FROZEN" is displayed when appropriate.
Infor System21 Inventory Management | 203

852BInventory Processing
Caution: If you are using extended batch/lot/serial control and the Stock Status Manager asynchronous background process is active, frozen stock generated by this task may be unfrozen by the system due to the settings held for a particular lot number on its lot header.
Functions
Delete (F11)
This function is displayed when you are amending a previously entered request.
Use this to delete the selected one-to-one transformation request from the batch of requests you are entering.
From Lot (F17)
Use this to display the Lot Header Details window for the From lot number you have specified.
To Lot (F19)
Use this to display the Lot Header Details window for the To lot number you have specified.
Note: The Lot Header Details window for the To lot is also displayed automatically when you press Enter, when you are recording a new transformation request.
Once you have entered the transformation details, press Enter to validate your selection and then select Update (F8) to add the entered details to the current batch and return to the Review Item Transformation Details window.
Note: If the To item is subject to lot, batch or serial control, press Enter to display the Lot Header Details pop-up, on which you are able to maintain the target item's lot attributes.
If you are using Location Control, press Enter to display the Enter Location Balances pop-up, if these are required for the From item/stockroom or To item/stockroom combination. The pop-up that is displayed depends on whether you are required to capture location balances and (if you are using catchweight) the level of secondary balance details required.
If you are using Warehousing, press Enter to display the Warehousing Details pop-up, if these details are required for the From item/stockroom or To item/stockroom combination.
If you are using Catchweight without Location Control, press Enter to display the [Secondary Value] Entry pop-up for the From item or To item with a Catchweight category of 1 or 2.
Record Many-to-One Item Transformation Details Window To display this window, select Transform Many-to-One (F16) on the Review Item Transformation Details window or the Review Item Transformation Details (Expanded View) window.
Use this window to record the detail of the items, lots and quantities to be transformed.
Fields
204 | Infor System21 Inventory Management

852BInventory Processing
Table of Source Items
From Item
Enter a valid item code. This cannot be the same as the To item.
The item must be stocked in the selected stockroom.
You can use the prompt facility on this field to select from the Item Master Scan pop-up.
Quantity
Enter the quantity of the From item to be issued from the selected stockroom.
Unit of Measure (UoM)
Enter a valid unit of measure code for the selected item. These are defined in the Inventory Descriptions file under major type UNIT.
This is the unit of measure in which the quantity is entered.
If you do not enter a unit of measure, it defaults to the default inventory unit defined for the selected item and stockroom combination.
You can use the prompt facility on this field to select from the Units of Measure pop-up.
From Lot
Enter a valid lot number for the selected item, using up to fifteen alphanumeric characters. This must be an existing lot for the selected item.
Alternatively, use the prompt facility to select from the Select Lot Reference pop-up.
Cost/Unit
This field displays the appropriate unit cost for items using standard average and latest costing.
Note: The costing method is displayed for FIFO costed items instead of the cost, the cost being derived from the consumption of existing FIFO cost details.
Lot
Use this checkbox as follows:
Unchecked - Not to maintain lot details
Checked - To maintain the header details for the selected lot number
Stockroom (SR)
This field displays the stockroom from which stock of the entered item will be taken. It is shown here for reference only.
This will default to the stockroom you specified on the Record Item Transformation Selection window, unless the item you select is a container item, in which case it will default to the Outbound Container Stockroom associated with the stockroom you specified on the Record Item Transformation Selection window.
Infor System21 Inventory Management | 205

852BInventory Processing
Target Item
To Item
Enter a valid item code. This must be a different item code from any of the From item codes you have entered above.
The item must be stocked in the selected stockroom.
You can use the prompt facility on this field to select from the Item Master Scan pop-up.
Target Quantity
Enter the quantity of the target item to be received.
If you leave this field blank, the value is calculated automatically from the relationship between the quantity units of the movement and target quantities, should such a relationship exist.
Note: Where multiple items are being transformed into a single item, the target quantity is calculated from the movement quantity of the first from item code specified. It is assumed that the first item is the base item for any transformation request that you enter.
Note: You will be forced to enter a target quantity if no relationship exists between the quantity units of this and the movement quantity.
If you enter a quantity in this field and the quantity does not match the expected target quantity, as calculated from the relationship between the units of measure of this and the movement quantity, a warning is issued.
Caution: You may continue the transformation request at this stage without amending the target quantity; however you should only do this if you are sure of the implications of your actions.
Unit of Measure (Untitled)
Enter a valid unit of measure code for the selected item. These are defined in the Inventory Descriptions file under major type UNIT.
This is the unit of measure in which the target quantity is expressed.
If you do not enter a unit of measure, it defaults to the same unit as the movement quantity, if that unit of measure is a valid unit of measure for this item, or to the default inventory unit defined for the selected item and stockroom combination.
You can use the prompt facility on this field to select from the Units of Measure pop-up.
To Lot
Enter the target lot, using up to fifteen alphanumeric characters. This can be an existing lot or a new lot.
Alternatively, use the prompt facility to select from the Select Lot Reference pop-up.
In the case of an existing lot, the target quantity is added to the total physical quantity of that lot and its frozen or available balance, depending on the reason code you specify on this window.
Cost
Enter the cost per unit using up to fifteen numeric characters with five decimal places.
206 | Infor System21 Inventory Management

852BInventory Processing
Note: The standard cost associated with the target item/stockroom combination is displayed automatically when you press Enter, if the item's costing method is set to standard.
You must enter a cost per unit for the target item if that item has a costing method of average, latest or FIFO. The costs associated with the transformed From items are not carried forward.
Note: If you leave the cost blank, the message "Zero unit cost has been entered" is displayed. Reference Type
Enter the transformation type, using up to three alphanumeric characters. These are defined in the Inventory Descriptions file under major type TRAN.
This field defaults to the value you specified on the Record Item Transformation Selection window.
You can use the prompt facility on this field to select from the TRAN Movement Reference Type pop-up.
Reference Date
Enter or select the date of the item transformation.
This field defaults to the date you entered on the Record Item Transformation Selection window.
Narrative
Enter the narrative, or description, using up to twenty alphanumeric characters, associated with this item transformation.
This field defaults to the value you specified on the Record Item Transformation Selection window.
Reason Code
Enter a reason code, using up to two alphanumeric characters. These are defined in the Inventory Descriptions file under major type MOVR.
This field defaults to the value you specified on the Record Item Transformation Selection window.
You can use the prompt facility on this field to select from the MOVR Movement Reason Code pop-up.
The reason code you specify determines whether the target item quantity is automatically frozen by the system. The text literal "FROZEN" is displayed when appropriate.
Caution: If you are using extended batch/lot/serial control and the Stock Status Manager asynchronous background process is active, frozen stock generated by this task may be unfrozen by the system due to the settings held for a particular lot number on its lot header.
Functions
Delete (F11)
Use this to delete a transformation request from the current batch of transactions. When you select this function, the Confirm Deletion pop-up is displayed, on which you will be asked to confirm or cancel your deletion request.
Infor System21 Inventory Management | 207

852BInventory Processing
Lot (F19)
Use this to display the Lot Header Details window for the To lot number you have selected.
Note: The Lot Header Details window for the To lot is also displayed automatically if you press Enter, when you are recording a new transformation request.
Once you have entered the transformation details press Enter to validate your selection, and then select Update (F8) to accept all of the entries have made and return to the Review Item Transformation Details window, where the details of the transformation request you have just recorded are displayed.
Note: If you are using Location Control, press Enter to display the Enter Location Balances pop-up, if these are required for any of the From item/stockroom or To item/stockroom combinations you have selected. The pop-up that is displayed depends on whether you are required to capture location balances and (if you are using Catchweight) the level of secondary balance details required.
If you are using Warehousing, press Enter to display the Warehousing Details pop-up, if these details are required for any of the From item/stockroom or To item/stockroom combinations you have selected.
If you are using Catchweight without Location Control, press Enter to display the [Secondary Value] Entry pop-up, if these details are required for any of the From item/stockroom or To item/stockroom combinations you have selected. This pop-up should only be displayed for those items with a Catchweight category of 1 or 2.
Record One-to-Many Item Transformation Details Window To display this window, select Transform One-to-Many (F18) on the Review Item Transformation Details window or the Review Item Transformation Details (Expanded View) window.
Use this window to record the detail of the items, lots and quantities to be transformed.
Fields
Source Items
From Item
Enter a valid item code.
This item must be stocked in the selected stockroom.
Alternatively, use the prompt facility to select from the Item Master Scan pop-up.
Note: The description of the item is automatically displayed when you press Enter.
Movement Quantity
Enter the quantity of the item to be transformed (issued from the selected stockroom).
208 | Infor System21 Inventory Management

852BInventory Processing
Unit of Measure (Untitled)
Enter a valid unit of measure code for the selected item. These are defined in the Inventory Descriptions file under major type UNIT.
This is the unit of measure in which the movement quantity is entered.
You can use the prompt facility on this field to select from the Units of Measure pop-up.
If you do not enter a unit of measure, it defaults to the default inventory unit defined for the selected item and stockroom combination.
From Lot
Enter a valid lot number for the selected item, using up to fifteen alphanumeric characters. This must be an existing lot for the selected item.
Alternatively, use the prompt facility to select from the Select Lot Reference pop-up.
Cost
The appropriate unit cost is displayed for items using standard average and latest costing.
The costing method associated with the chosen item is also displayed.
Note: Only the costing method is displayed for FIFO costed items, the cost being derived from the consumption of existing FIFO cost details
Reference Type
Enter the transformation type, using up to three alphanumeric characters. These are defined in the Inventory Descriptions file under major type TRAN.
This field defaults to the value you specified on the Record Item Transformation Selection window.
You can use the prompt facility on this field to select from the TRAN Movement Reference Type pop-up.
Reference Date
Enter or select the date of the item transformation.
This field defaults to the value you specified on the Record Item Transformation Selection window.
Narrative
Enter the narrative, or description, using up to twenty alphanumeric characters, associated with this item transformation.
This field defaults to the value you specified on the Record Item Transformation Selection window.
Reason Code
Enter a reason code, using up to two alphanumeric characters. These are defined in the Inventory Descriptions file under major type MOVR.
Infor System21 Inventory Management | 209

852BInventory Processing
This field defaults to the value you specified on the Record Item Transformation Selection window.
You can use the prompt facility on this field to select from the MOVR Movement Reason Code pop-up.
The reason code you specify determines whether the target item quantity is automatically frozen by the system. The text literal "FROZEN" is displayed when appropriate.
Caution: If you are using extended batch/lot/serial control and the Stock Status Manager asynchronous background process is active, frozen stock generated by this task may be unfrozen by the system due to the settings held for a particular lot number on its lot header.
Target Items Table
To Item
Enter a valid item code. This cannot be the same code as the From Item code you have entered.
The item must be stored in the selected stockroom.
You can use the prompt facility on this field to select from the Item Master Scan pop-up.
Quantity
Enter the quantity of the target item to be received.
If you leave this field blank, it is calculated automatically from the relationship between the quantity units of the movement and target quantities, should such a relationship exist.
Note: Automatic calculation of the target quantity is only performed for the first To item specified for any transformation request.
Note: You will be forced to enter a target quantity if no relationship exists between the quantity units of this and the movement quantity or the item you entered is a container.
If you enter a quantity in this field and the quantity does not match the expected target quantity, calculated from the relationship between the units of measure of this and the movement quantity, a warning is issued.
Caution: You may continue the transformation request at this stage without amending the target quantity; however you should only do this if you are sure of the implications of your actions.
Unit of Measure (UoM)
Enter a valid unit of measure code for the selected item. These are defined in the Inventory Descriptions file under major type UNIT.
This is the unit of measure in which the target quantity is expressed.
If you do not enter a unit of measure, it defaults to the default inventory unit defined for the selected item and stockroom combination.
You can use the prompt facility on this field to select from the Units of Measure pop-up.
210 | Infor System21 Inventory Management

852BInventory Processing
To Lot
Enter the target lot, using up to fifteen alphanumeric characters. This can be an existing lot or a new lot.
Alternatively, use the prompt facility to select from the Select Lot Reference pop-up.
In the case of an existing lot, the target quantity is added to the total physical quantity of that lot and the frozen or available balance as appropriate.
Cost/Unit
Enter the cost per unit for each target item, using up to fifteen numeric characters with five decimal places.
Note: The standard cost associated with the target item/stockroom combination is displayed automatically when you press Enter, if the item's costing method is set to standard.
Note: You must enter a cost per unit for each target item if that item has a costing method of average, latest or FIFO. The cost associated with the transformed from item is not carried forward.
Note: If you leave the Cost/Unit field blank for any item, the message "Zero unit cost has been entered" is displayed. You can still amend the appropriate cost at this stage in the process.
Lot
Use this checkbox as follows:
Unchecked - Not to maintain lot details
Checked - To maintain lot header details for the selected lot number
Note: The Lot Header Details pop-up is also displayed automatically when you press Enter for each item that is subject to lot, batch or serial control when you are recording a new item transformation request.
Stockroom (SR)
This field displays the stockroom into which stock of the entered item will be received. It is shown here for reference only.
This will default to the stockroom you specified on the Record Item Transformation Selection window, unless the item you select is a container item, in which case it will default to the Inbound Container Stockroom associated with the stockroom you specified on the Record Item Transformation Selection window.
Functions
Delete (F11)
Use this to delete a transformation request from the current batch of transactions. When you select this function, the Confirm Deletion pop-up is displayed, on which you will be asked to confirm or cancel your deletion request.
Lot (F17)
Use this to display the Lot Header Details window for the From lot number you have selected.
Infor System21 Inventory Management | 211

852BInventory Processing
Once you have entered the transformation details for each item, press Enter to validate your selection, and then select Confirm (F8) to accept all of the entries you have made and return to the Review Item Transformation Details window, where the details of the transformation request you have recorded are displayed.
Note: If you are using Location Control, press Enter to display the Enter Location Balances pop-up, if these are required for any of the From item/stockroom or To item/stockroom combinations you have selected. The pop-up that is displayed depends on whether you are required to capture location balances and (if you are using Catchweight) the level of secondary balance details required.
Note: If you are using Warehousing, press Enter to display the Warehousing Details pop-up, if these details are required for any of the From item/stockroom or To item/stockroom combinations you have selected.
Note: If you are using Catchweight without Location Control, press Enter to display the [Secondary Value] Entry pop-up, if these details are required for any of the From item/stockroom or To item/stockroom combinations you have selected. This pop-up should only be displayed for those items with a Catchweight category of 1 or 2.
Physical Stock Adjustment [31/INP] You can use this task to adjust physical stock levels without altering any other stock levels. All windows are the same as those for the Miscellaneous Receipt task, omitting any Customer/Received From fields.
This is one transaction where it would be common to have a negative movement quantity.
Note: If you are using Location Control or Location Control and Catchweight, please see the Processing within a Location-controlled Stockroom section for more information.
Record Stock Adjustment (Physical) Selection Window To display this window, select the Physical Stock Adjustment task.
Use this window to select the stockroom that this transaction affects, and the date, reference information and reason code for the transaction.
Caution: If user stockroom authorisation is active you cannot perform this transaction if you are not authorised to the stockroom.
Secondary Balance Validation and Adjusting Secondary Balances by Location
The validation rules that apply to the secondary balance value normally follow those that apply to the primary balance for all transactions with the exception of the Adjust Physical Stock task. The normal rule is that the value must not be zero and takes the sign of the transaction quantity by default (you cannot enter a sign).
212 | Infor System21 Inventory Management

852BInventory Processing
If you use this task, the transaction quantity can be zero (which is how you can adjust the secondary balances of an item without having to move stock). In this case, the secondary balance must still not be zero, but you can now specify the sign of each balance. If you are processing an item with multiple locations, you can use a mix of positive and negative signs to process the adjustment.
Fields
Stockroom
Enter the stockroom code that this transaction affects, using up to 2 alphanumeric characters. This stockroom must exist on the company profile.
Alternatively, use the prompt facility to select from the Stockroom Selection pop-up.
Note: In order to perform a physical stock adjustment, adjustments must be permitted in the selected stockroom. However, only frozen adjustment transactions are permitted for a bonded warehouse, therefore physical stock adjustments are not permitted in these types of warehouses.
Reference
Enter the reference number of the movement, using up to 14 alphanumeric characters; you can link this with the reference type specified.
Reference Date
Enter or select a date to be used as the reference date. This field defaults to the current system date. The reference date is cross-referenced with the table of period and week end dates, to decide the week and period numbers for ageing the stock movement and history records.
Reference Type
Enter the reference type, using up to 3 alphanumeric characters.
Alternatively, use the prompt facility to select from the TRAN Movement Reference Type pop-up.
You can use the reference type field to enter a mnemonic to describe the reference number.
Narrative
Enter the narrative or description for the movement, using up to 20 alphanumeric characters.
Reason Code
Enter a reason code.
Alternatively, use the prompt facility to select from the MOVR Movement Reason Code pop-up.
Note: This information is written to the Movement History file. To help you recognise and analyse the movements, you can view and report on it.
Press Enter to confirm the details. Press Enter again to display the Record Stock Adjustment (Physical) Detail window.
Infor System21 Inventory Management | 213

852BInventory Processing
Record Stock Adjustment (Physical) Detail Window To display this window, press Enter twice on the Record Stock Adjustment (Physical) Selection window.
Use this window to record the details of the physical stock adjustment.
Note: The fields at the bottom of the window default from the information you specified on the Record Stock Adjustment (Physical) Selection window.
Fields
Stockroom
This stockroom code defaults from the selection window, but you can change it.
Item
Enter the item, using up to 15 alphanumeric characters. You must link existing items to the stockroom through Inventory Maintenance.
Alternatively, use the prompt facility to select from the Item Master Scan pop-up.
Movement Qty
Enter the quantity you want to adjust, using up to 11 characters including three decimal places.
Note: When this quantity will result in stock being negative, a pop-up will be displayed. For stockrooms where negative stock is allowed, this displays a warning message and you can select Update (F8) to accept the transaction. For stockrooms that do not allow negative stock, the pop-up will display an error message and the transaction cannot be processed.
Lot
Enter the existing lot reference number that is affected by this movement.
Alternatively, use the prompt facility to select from the Select Lot Reference pop-up.
Quantity Units
Enter the unit of measure code
Alternatively, use the prompt facility to select from the Purchase/Issue Unit Selection pop-up.
This field defines the unit of measure in which the movement quantity is expressed. The unit of measure defaults to the default inventory unit for this item and stockroom combination, but you can change this.
Cost/Unit
Enter the cost per unit, using up to 15 numeric characters including five decimal places. Cost per unit is not used for issues or negative adjustments.
If the movement is a goods receipt transaction and latest, average or FIFO costing is in use the software values the movement at the entered cost.
214 | Infor System21 Inventory Management
852BInventory Processing
Note: If you leave the Cost/Unit field blank for a goods receipt transaction, the message "Zero unit cost has been entered" is displayed. You may still amend the cost at this stage in the procedure
Cost per unit is not entered for issue transaction. The appropriate cost is derived based on the costing method defined for the item and the appropriate cost and costing method are displayed.
Note: Only the costing method is displayed for FIFO costed items.
Press Enter to display the three units of measure for the item. The first unit of measure, equal to the issue units of the item at this particular stockroom, is the default unit. You can still change the window at this point.
If you receive a negative stock quantity, the software will display a warning. You can continue with the transaction if you have decided to accept a negative stock balance in this stockroom. This is set on the stockroom record of the Inventory company profile. In this case, select Continue (F8) to override the warning message.
Note: If you are using Location Control, press Enter to display the Enter Location Balances pop-up, if balances are required for this item/stockroom combination. The window that is displayed depends on whether you need to capture details about location balances, and (if you are using Catchweight) the levels of secondary balance details required.
If you are using Warehousing, press Enter to display the Warehousing Details pop-up, if these details are required for the item/stockroom combination.
If you are using Catchweight without Location Control, for items that are Catchweight category 1 or 2, when you first press Enter, the Secondary Value Details pop-up is displayed. The title of this pop-up varies, as it is formed from the short description of the item's secondary UoM, plus the literal "Details", for example Kilos Details pop-up. For more information, see the Secondary Value Details Pop-up section.
For non-Catchweight items, if you enter zero, an error message is displayed. However, for Catchweight items, a zero primary value and a positive or negative secondary value can be entered and processed properly. This allows you to adjust the secondary balance without affecting the primary balance.
This transaction:
• Adjusts the physical stock balance • Re-calculates the balances for both available and frozen stock • Costs are re-calculated (average, latest) and a FIFO record is created, depending on costing
method. • The date of last receipt is updated.
As costs are re-calculated, if you use any form of actual costing, you must enter a cost. If the item is lot-controlled and a lot of the stated number does not exist, Inventory creates a new one.
If Period End Average Costing function is active, then two additional processes occur:
• Capture of additional movement details for the purposes of Period-end Average Costing. This captures the full actual costs of each receipt made, regardless of the Costing Method that is used to calculate and record the cost of the Inventory movement and to value the resulting
Infor System21 Inventory Management | 215

852BInventory Processing
Inventory balance. The full actual cost includes any Landed Costs which are defined for the Item/Supplier.
• Update of Period Inventory Balances for the purposes of Period End Average Costing. For each receipt that occurs, the quantity and cost of the receipt are added to the Period total quantity received and Period total cost of receipts. These totals accumulate for each Item over the opening balance quantity at the beginning of the Period and the cost of that balance valued using the previous period’s Period-end Average unit cost. This allows the calculation and storing of a Period-so far average cost, which becomes the Period-end Average Cost once all receipts in the Period have been completed.
Note: Landed costs are automatically included in the cost of an Inventory Purchase Order Receipt only for Standard Cost Items. Landed Costs cannot be added for Items with the other Cost Methods.
When Inventory adjusts the physical stock balance, it updates the available or frozen stock balances, as appropriate, by the same amount.
You can use this procedure to adjust lots, if the item is lot-controlled, batch-controlled or serial-controlled.
Press Enter again to carry out the update.
Allocated Stock Adjustment [32/INP] Use this task to adjust the balance between the allocated and available stock levels, without changing the physical stock level.
Caution: Using this task where Production and/or Sales Order Processing is/are in use can have serious implications.
Record Allocated Adjustment Selection Window To display this window, select the Allocated Stock Adjustment task
Use this window to select the stockroom that this transaction affects, and the date, reference information and reason code for the transaction.
Caution: If user stockroom authorisation is active you cannot perform this transaction if you are not authorised to the stockroom.
Fields
Stockroom
Enter the stockroom code that this transaction affects, using up to 2 alphanumeric characters. This stockroom must exist in the company profile.
Alternatively, use the prompt facility to select from the Stockroom Selection pop-up.
216 | Infor System21 Inventory Management

852BInventory Processing
Note: In order to perform an allocated stock adjustment, adjustments must be permitted in the selected stockroom. However, only frozen adjustment transactions are permitted for a bonded warehouse, therefore allocated stock adjustments are not permitted in these types of warehouses.
Reference
Enter the reference number of the movement, using up to 14 alphanumeric characters; you can link this with the reference type specified.
Reference Date
Enter or select a date to be used as the reference date. This field defaults to the current system date. The reference date is cross-referenced with the table of period and week end dates, to decide the week and period numbers for ageing the stock movement and history records.
Reference Type
Enter the reference type, using up to 3 alphanumeric characters.
Alternatively, use the prompt facility to select from the TRAN Movement Reference Type pop-up.
You can use the reference type field to enter a mnemonic to describe the reference number.
Narrative
Enter the narrative or description for the movement, using up to 20 alphanumeric characters.
Reason Code
Enter a reason code.
Alternatively, use the prompt facility to select from the MOVR Movement Reason Code pop-up.
Note: This information is written to the Movement History file. To help you recognise and analyse the movements, you can view and report on it.
Press Enter to confirm the details. Press Enter again to display the Record Allocated Adjustment Details window.
Record Allocated Adjustment Details Window To display this window, press Enter twice on the Record Allocated Adjustment Selection window.
Use this window to record the details of the allocated adjustment.
Note: The fields at the bottom of the window default from the information you specified on the Record Allocated Adjustment Selection window.
Fields
Stockroom
This stockroom code defaults from the selection window, but you can change it.
Infor System21 Inventory Management | 217

852BInventory Processing
Customer
Enter the customer, using up to 11 alphanumeric characters.
Item
Enter the item, using up to 15 alphanumeric characters. You must link existing items to the stockroom through Inventory Maintenance.
Alternatively, use the prompt facility to select from the Item Master Scan pop-up.
Movement Qty
Enter the quantity you want to adjust, using up to 11 characters including three decimal places.
Lot
Enter a new lot number for the item, using up to 15 alphanumeric characters, or enter an existing lot number.
Alternatively, use the prompt facility to select from the Select Lot Reference pop-up.
Quantity Units
Enter the unit of measure code
Alternatively, use the prompt facility to select from the Purchase/Issue Unit Selection pop-up.
This field defines the unit of measure in which the movement quantity is expressed. The unit of measure defaults to the default inventory unit for this item and stockroom combination, but you can change this.
Cost/Unit
You do not need to enter a cost per unit for this transaction.
If the movement is a goods receipt transaction and latest, average or FIFO costing is in use the software values the movement at the entered cost.
Note: If you leave the Cost/Unit field blank for a goods receipt transaction, the message "Zero unit cost has been entered" is displayed. You may still amend the cost at this stage in the procedure.
Cost per unit is not entered for issue transaction. The appropriate cost is derived based on the costing method defined for the item and the appropriate cost and costing method are displayed.
Note: Only the costing method is displayed for FIFO costed items.
This transaction:
• Adjusts the allocated stock balance • Re-calculates the available stock balances
If the item is frozen or there is insufficient available stock for allocation, Inventory displays the message "You are trying to allocate more stock than you have".
You should process a receipt before continuing with the stock allocation.
218 | Infor System21 Inventory Management

852BInventory Processing
If the item is lot-controlled, you can display the physical and available stock balances by using the prompt facility on the Lot field. You can then continue the allocation against a lot that has sufficient available stock.
Press Enter to carry out the update.
Frozen Stock Adjustment [33/INP] Use this task to alter the balance between the frozen and available stock levels, without changing the physical stock level.
You can enter details of stock that cannot be allocated or issued. You can do this as a quality assurance freeze or to reserve a lot for a particular customer. You should only use this task to adjust frozen stock for items that are not under extended lot, batch or serial control, as specified on the company profile.
The principle behind extended details is that the whole balance of a lot, batch or serial item is either frozen or unfrozen. A partially frozen balance is illogical. To freeze or unfreeze part of a lot, use the Lot Transformation task to split the original lot into its frozen and unfrozen balances.
When extended details are active, you should have the Stock Status Monitor running and use the Stock Status Re-calculation task daily for items, via Machine Manager.
Therefore, adjusting the frozen balance of an item that is under extended details control is not advisable because the Stock Status Monitor will immediately reverse the adjustment.
Note: Available Stock = Physical - Frozen – Allocated
Note: Any stock that has not been allocated must be either available or frozen.
Note: If you are using Location Control or Location Control and Catchweight, please see the Processing within a Location-controlled Stockroom section for more information.
Record Frozen Adjustment Selection Window To display this window, select the Frozen Stock Adjustment task.
Use this window to select the stockroom that this transaction affects, and the date, reference information and reason code for the transaction.
Caution: If user stockroom authorisation is active you cannot perform this transaction if you are not authorised to the stockroom.
Fields
Stockroom
Enter the stockroom code that this transaction affects, using up to 2 alphanumeric characters.
Alternatively, use the prompt facility to select from the Stockroom Selection pop-up.
Infor System21 Inventory Management | 219

852BInventory Processing
Note: In order to perform a frozen stock adjustment, adjustments must be permitted in the selected stockroom. Only frozen adjustment transactions are permitted in a bonded warehouse.
Reference
You must enter the reference number of the movement, using up to 14 alphanumeric characters. You can link this with the reference type specified.
Reference Date
Enter or select a date to be used as the reference date. This field defaults to the current system date. The reference date is cross-referenced with the table of period and week end dates, to decide the week and period numbers for ageing the stock movement and history records.
Reference Type
You must enter the reference type, using up to 3 alphanumeric characters.
Alternatively, use the prompt facility to select from the TRAN Movement Reference Type pop-up.
You can use the reference type field to enter a mnemonic to describe the reference number; for example.
Narrative
Enter the narrative or description for the movement, using up to 20 alphanumeric characters.
Reason Code
You must enter a reason code.
Alternatively, use the prompt facility to select from the MOVR Movement Reason Code pop-up.
Note: This information is written to the Movement History file. To help you recognise and analyse the movements, you can view and report on it.
Press Enter to confirm the details. Press Enter again to display the Record Frozen Adjustment Details window.
Record Frozen Adjustment Details Window To display this window, press Enter twice on the Record Frozen Adjustment Selection window.
Use this window to record details of the adjustment of frozen stock transaction.
Note: The fields at the bottom of the window default from the information you specified on the Record Frozen Adjustment Selection window.
Fields
Stockroom
This stockroom code defaults from the selection window, but you can change it.
220 | Infor System21 Inventory Management

852BInventory Processing
Item
Enter the item, using up to 15 alphanumeric characters. You must link existing items to the stockroom through Inventory Maintenance.
Alternatively, use the prompt facility to select from the Item Master Scan pop-up.
Movement Qty
Enter the quantity you want to adjust, using up to 11 characters including three decimal places. Negative quantities are allowed.
Lot
Enter the existing lot reference number that is affected by this movement.
Alternatively, use the prompt facility to select from the Select Lot Reference pop-up.
Quantity Units
Enter the unit of measure code
Alternatively, use the prompt facility to select from the Purchase/Issue Unit Selection pop-up.
This field defines the unit of measure in which the movement quantity is expressed. The unit of measure defaults to the default inventory unit for this item and stockroom combination, but you can change it.
Cost/Unit
Enter the cost per unit, using up to 15 numeric characters including five decimal places.
If the movement is a goods receipt transaction and latest, average or FIFO costing is in use the software values the movement at the entered cost.
Note: If you leave the Cost/Unit field blank for a goods receipt transaction, the message "Zero unit cost has been entered" is displayed. You may still amend the cost at this stage in the procedure.
Cost per unit is not entered for issue transaction. The appropriate cost is derived based on the costing method defined for the item and the appropriate cost and costing method are displayed.
Note: Only the costing method is displayed for FIFO costed items.
Note: With standard costing and no batch/lot/serial control, you only need to specify the item and movement quantity.
The value of the transaction will be based upon the costing method and the inventory costs at the time of the movement. Therefore, for items where the costs fluctuate, it may well be that frozen movements and similar unfrozen movements will attract different values, even if the quantities are complementary.
Cost per unit is not used for issues.
Note: With standard costing and no batch/lot/serial control, you only need to specify the item and movement quantity.
Infor System21 Inventory Management | 221

852BInventory Processing
Press Enter to display the three units of measure for the item. The first unit of measure, equal to the issue units of the item at this particular stockroom, is the default unit. You can still change the window at this point.
Note: If you are using Location Control, press Enter to display the Enter Location Balances pop-up, if balances are required for this item/stockroom combination. The window that is displayed depends on whether you need to capture details about location balances, and (if you are using Catchweight) the levels of secondary balance details required.
If you are using Warehousing, press Enter to display the Warehousing Details pop-up, if these details are required for the item/stockroom combination.
If you are using Catchweight, when you press Enter, Inventory calculates the cost of the movement and the movement balance from the nominal secondary balance for all Catchweight item types.
Note: If this transaction will result in stock being negative, a pop-up will be displayed. For stockrooms where negative stock is allowed, this displays a warning message and you can select Update (F8) to accept the transaction. For stockrooms that do not allow negative stock, the pop-up will display an error message and the transaction cannot be processed.
This transaction:
• Adjust the frozen stock balance • Re-calculates the available stock balance
Press Enter again to carry out the update.
Alternatively, if you are using Location Control, press Enter to display the Enter Location Balances pop-up.
Stock Transfers When a transfer takes place between two stockrooms, there is often not only a physical change in location, but also a change in responsibility. There are two movements to record these actions, one to transfer goods out of a stockroom and the second to transfer goods into a different stockroom.
Four tasks are used that relate to transferring items between stockrooms. You use:
• Record Transfer Out and Confirm Shipment Receipt together to perform the two halves of a stock transfer
• Available Stock Transfer to transfer available stock between two stockrooms, immediately (there is no change to the in transit stock balance)
• Frozen Stock Transfer to transfer frozen stock between two stockrooms immediately, in a single operation
• DRP Transfer (refer to the DRP product guide for details) Note: You can only transfer quantities of an item that is defined to both the transferring and receiving stockrooms.
Insufficient Frozen or Physical Stock
222 | Infor System21 Inventory Management

852BInventory Processing
If Inventory displays a message indicating that there is insufficient frozen or physical stock in the stockroom for the desired transfer to take place and you want to continue with the transaction, you must:
• Exit the transfer task. • Select the Item/Stockroom task to view each stock balance for the item and stockroom
combination. • Select the appropriate stock adjustment task (physical, available or frozen) to increase that stock
balance. • Return to the stock transfer task and continue as before. • If the item is lot-controlled, Inventory Management automatically creates a lot with the same lot
header details as the lot in the From stockroom. Until stock is transferred into this lot, both the physical and available balances are set to zero.
Costing the Transfer
The costing of your transfer depends on the costing method you specified in the Item Master file. One of the following will apply:
• Average Costing The movement is valued at the average cost of the From stockroom, causing a re-calculation of average cost at the To stockroom.
• Standard Costing The movement out is valued at the standard cost of the From stockroom. The movement in is valued at the standard cost of the To stockroom.
• Latest Cost The movement out is valued at the latest cost of the From stockroom. The movement in is valued at this new latest cost at the To stockroom.
• FIFO The movement out is valued at FIFO cost. The movement in creates a new FIFO record for the same value.
Note: If you are using Location Control or Location Control and Catchweight, please see the Processing within a Location-controlled Stockroom section for more information.
Infor System21 Inventory Management | 223

852BInventory Processing
Record Transfer Out [41/INP, 6/DRP, 11/WTD] This task is enabled for Work Management and can be run as part of a Business Process built in @ctive Modeler.
For further information, refer to the Work Management chapter in the Application Manager product guide.
Use this task to record the first part of a two-part transfer transaction. This task records the details related to the transfer of stock out of one stockroom before it is recorded as received in the other stockroom using the Confirm Shipment Receipt task. You would use these two tasks if a stock transfer were over a physical distance, for example, if you were moving stock from one area of the country to another.
The physical stock at the source stockroom will be reduced, and the in-transit stock at the destination stockroom will be increased. Once stock is transferred using this task, it will be valued as part of the stock of the destination stockroom. Cost updates at the destination stockroom will be performed once receipt is confirmed.
Note: This should not be used for intra EC movements.
Record Transfer Out Selection Window To display this window, select the Record Transfer Out task.
Use this window to select the stockroom that this transaction affects, and the date, reference information and reason code for the transaction.
Caution: If user stockroom authorisation is active you cannot perform this transaction if you are not authorised to the stockroom.
Caution: To stockroom validation is not performed
Fields
From Stockroom
Enter the transferring stockroom for the item. This stockroom must exist on the company profile.
Alternatively, use the prompt facility to select from the Stockroom Selection pop-up.
Note: In order to perform a transfer out, transfers must be permitted in the selected stockroom. Inventory Transfer transactions are not permitted from a bonded warehouse, therefore a transfer out is not permitted in these types of warehouses.
To Stockroom
Enter the receiving stockroom for the item. This stockroom must exist on the company profile.
Alternatively, use the prompt facility to select from the Stockroom Selection pop-up.
224 | Infor System21 Inventory Management

852BInventory Processing
Internal Customer
Enter the name and code of an existing customer in this field. This field depends on whether you use DRP. The customer defaults from the stockroom record held within DRP.
You can use the prompt facility to select from the Select Customer pop-up.
Reference Date
Enter or select a date to be used as the reference date. This field defaults to the current system date. The reference date is cross-referenced with the table of period and week end dates, to decide the week and period numbers for ageing the stock movement and history records.
Reference Type
Enter the reference type using up to three alphanumeric characters.
Alternatively, use the prompt facility to select from the TRAN Movement Reference Type pop-up.
Note: This information is written to the Movement History file. To help you recognise and analyse the movements, you can view and report on it.
Narrative
Enter the narrative or description associated with the movement, using up to 20 alphanumeric characters.
Reason Code
Enter a reason code
Alternatively, use the prompt facility to select from the MOVR Movement Reason Code pop-up.
Use this code to indicate why the stock status code has changed.
Note: : The next two fields are only displayed when you have confirmed the movement and have re-displayed this window.
No. of Movements in Last Batch
This details the number of movements you have processed during this transaction. It is for information only.
Last Item Processed
This field displays the last item that was processed during the transaction and it is for information only.
Press Enter to confirm the details. Press Enter again to display the Record Transfer Out Detail window.
Record Transfer Out Detail Window To display this window, press Enter twice on the Record Transfer Out Selection window.
Use this window to record the details of the stock transfer between the selected stockrooms.
Infor System21 Inventory Management | 225

852BInventory Processing
Note: The fields at the bottom of the window default from the information you specified on the Record Transfer Out Selection window.
Fields
From Stockroom
This field displays the code of the transferring stockroom for the item.
To Stockroom
This field displays the code of the receiving stockroom for the item.
Generated Reference
This field displays a unique code number automatically generated by the software to identify this transfer.
Item
Enter the item, using up to 15 alphanumeric characters. You must define the item to the items file and link it to both stockrooms through Inventory Maintenance. You can amend the item number displayed in this field.
You can use the prompt facility to select from the Item Master Scan pop-up.
Movement Qty
Enter the quantity you want to transfer, using up to 11 characters including three decimal places.
Note: If you transfer a quantity that results in a negative stock balance, Inventory will display a warning. You can continue with the transaction if you have decided to accept a negative stock balance in this stockroom. This is set on the stockroom record of the Inventory company profile. In this case, select Continue (F8) to override the warning message.
Lot
Enter the existing lot reference number that is affected by this movement.
Alternatively, use the prompt facility to select from the Select Lot Reference pop-up.
Quantity Units
Enter the unit of measure code
Alternatively, use the prompt facility to select from the Purchase/Issue Unit Selection pop-up.
This field defines the unit of measure in which the movement quantity is expressed. Only those units defined for the item are allowed. The unit of measure defaults to that defined as the default inventory unit for this item and stockroom combination, but you can change it here.
Cost
This field displays the cost per unit for this movement, using up to 15 numeric characters including five decimal places.
If the movement is a goods receipt transaction and latest, average or FIFO costing is in use the software values the movement at the entered cost.
226 | Infor System21 Inventory Management

852BInventory Processing
Cost per unit is not entered for issue transactions. The appropriate cost is derived based on the costing method defined for the item and the appropriate cost and costing method are displayed.
Note: Only the costing method is displayed for FIFO costed items.
Date
This field displays the movement date that you specified on the selection window. You can change this for each item if required.
Reference Type
This field displays the reference type code that you specified on the selection window. You can change this for each item if required.
Narrative
You can override the existing narrative.
Reason Code
Enter the reason code for this movement.
Note: If you are using Location Control, press Enter to display the Enter Location Balances pop-up, if balances are required for this item/stockroom combination. The window that is displayed depends on whether you need to capture details about location balances, and (if you are using Catchweight) the levels of secondary balance details required.
If you are using Catchweight, for items that are Catchweight category 1 or 2, when you first press Enter, the Secondary Value Details window is displayed. The title of this pop-up varies, as it is formed from the short description of the item's secondary UoM, plus the literal "Details", for example Kilos Details pop-up. For more information, see the Secondary Value Details Pop-up section.
This transaction type:
• Subtracts from the physical stock in the From stockroom • Re-calculates the available stock in the From stockroom • Add to in transit stock in the To stockroom • Updates the usage at the From stockroom • The date of issue is updated at the From stockroom
Options
Amend
Use this against a line you want to amend. The details are then displayed in the input fields in the lower part of the window for modification.
Functions
Despatch Details (F18)
If you are using Centralised Document Processing, use this to record additional despatch information associated with the movement of goods.
Infor System21 Inventory Management | 227
852BInventory Processing
Once all the details for this issue are correct, press Enter. Press Enter again to display the movement details.
Enter Rotation Balances Pop-up To display this pop-up, press Enter during any stock movement transaction between locations in the same location-controlled stockroom, or from one location-controlled stockroom to another, and you are moving an item that is not batch-controlled, lot-controlled or serial-controlled.
Use this pop-up to confirm the actual rotation dates picked.
Fields
Item
These fields display the non-lot-controlled item selected for transfer and its associated description.
Stockroom
This field displays the stockroom selected as the From stockroom on the transfer request.
Order
When you are recording the despatch of a DRP order, this field displays the appropriate SOP order number.
When you are recording a transfer out, using task 41/INP, this field displays the system-generated reference number assigned to the transfer request.
When you are recording an available stock transfer, using task 43/INP, the order number will be blank.
Location
This field displays the location selected by you from which stock is to be transferred.
Line
When you are recording the despatch of a DRP order, the appropriate SOP order line number is displayed.
When you are recording a transfer out, using task 41/INP, the order line number will be zero.
When you are recording an available stock transfer, using task 43/INP, the order line number will be zero.
Sequence
When you are recording the despatch of a DRP order the appropriate SOP despatch note number is displayed.
When you are recording a transfer out, using task 41/INP, the system-generated line number is displayed.
228 | Infor System21 Inventory Management

852BInventory Processing
When you are recording an available stock transfer, using task 43/INP, the system-generated line number is displayed.
Total
These fields display the quantity and associated unit of measure selected for transfer from a location, as entered on the Enter Location Balances pop-up.
Cumulative
This field displays the sum of the allocated quantities entered against the rotations listed on in this window.
Select (Untitled)
Enter one of the following:
1 - To allocate the entered action quantity to the listed rotation
2 - To de-allocate the entered action quantity from the listed rotation
Action Qty
This field displays the quantity of the listed rotation to be allocated/de-allocated.
The system initially assumes that the transfer request should result in the movement the oldest stock out of the requested location. It does this by automatically planning the transfer of rotations in the chosen location in FIFO sequence until the quantity requested for transfer from a location has been satisfied.
Note: Quantity entries at this level are recorded in the same unit of measure as that used to record the quantity at location level.
Note: The quantity available for transfer from a location takes no account of any quantity either frozen or already suggested for issue on the LC Event Allocations file.
Note: You are permitted to allocate more than the physical quantity recorded against a rotation at the specified location. Normal negative stock rules are applied at rotation level whenever such a request is made i.e. a suitable warning or error message is issued should the requested movement result in the creation of a negative balance for the selected rotation.
Functions
Update (F8)
Add (F10)
Use this to display the Add Rotation Date Balance pop-up. This allows you to request the transfer of a rotation that currently cannot be found in the requested location.
Press Enter to perform the appropriate action (allocate/de-allocate) based upon the selection made.
Select Update (F8) to confirm and return to the Enter Location Balances pop-up and continue to process the transaction. This is only permitted when the cumulative quantity matches the total to transfer. The allocated quantity entered against each rotation is used to reduce that rotations physical balance.
Infor System21 Inventory Management | 229

852BInventory Processing
Add Rotation Date Balance Pop-up To display this pop-up, select Add (F10) on the Enter Rotation Balances pop-up.
Use this pop-up to request the transfer of a rotation that currently cannot be found in the requested location.
Fields
Date
Enter or select a valid calendar date whose value is less than or equal to the current system date.
Time
Enter a valid time, in twenty-four hour format.
Note: A Rotation balance for the requested date/time combination cannot already exist in the specified location.
Select Update (F8) to confirm the chosen date and return to the Enter Rotation Balances pop-up.
This generates a record on the LC Rotation Date Balances file for the chosen date and time. The added LC rotation balance is shown in the displayed list of LC rotation balances, thus allowing you to select the required quantity of that rotation for transfer.
Record Transfer Out Despatch Details Pop-up To display this pop-up, select Despatch Details (F18) on Record Transfer Out Detail window.
Use this pop-up to detail the document processing you want for the transfer out transaction.
Fields
Document Processing
Online Print of Despatch Notes
Use this checkbox as follows:
Unchecked - To print as part of a batch
Checked - To print immediately
Priced Despatch Note
Use this checkbox as follows:
Unchecked - Not to show prices on despatch notes
Checked - To show prices on despatch notes
230 | Infor System21 Inventory Management

852BInventory Processing
Despatch Note Language
Use this to specify the language of the text that you want to print on the despatch note.
Inventory checks your chosen code against those defined in Application Manager.
Alternatively, use the prompt facility to select from the Select Language pop-up.
Despatch Information
Despatch Method
Enter the default despatch method.
Alternatively, use the prompt facility to select from the MODE Despatch Method pop-up.
Transport Method
Enter the default transport method.
Alternatively, use the prompt facility to select from the TMTH Transport Method pop-up.
Reason for Despatch
Enter a reason for despatch.
Alternatively, use the prompt facility to select from the MOVR Movement Reason Code pop-up.
Terms of Delivery
Enter the default terms of delivery.
Alternatively, use the prompt facility to select from the TDEL Terms of Delivery pop-up.
Note: If you use World Trade, this field defaults to the value held on the Customer Maintenance - Trade Details window in Sales Order Processing.
Carrier
Enter the default carrier.
Alternatively, use the prompt facility to select from the Select Carrier pop-up.
The confirmation of this field depends on interfaced applications. The software performs the following checks in the order specified:
• If you use Advanced Shipping, and the processing company is active with Sales Order Processing, the carrier defaults to that defined in the Shipping Customer Defaults task. If you enter a new code, it is checked against the Shipping Names and Address file from Shipping Customer Defaults Maintenance.
• If you use Transport Planning, and the processing company is active in Sales Order Processing, the carrier defaults to the carrier defined to the Transport Planning delivery profile. If you enter a new code, it is checked against the Transport Planning Carrier file.
• You define a Sales Order Processing company to a Transport Planning company via a Sales Order Processing company/stockroom combination.
Shipping Marks
This is a free format field for shipping marks.
Infor System21 Inventory Management | 231

852BInventory Processing
Number of Packs
Enter a packaging code along with a quantity and unit of measure.
The confirmation depends on interfaced applications, but by default the code is checked against the Inventory Descriptions file, major type TPPK.
Note: If you use Advanced Shipping, the code entered is validated against the Pack Types file.
Weight
Enter a weight and a UoM code. The latter is checked against the Inventory Descriptions file, major type UoM.
Volume
Enter a volume and a UoM code. The latter is checked against the Inventory Descriptions file, major type UoM.
Select Update (F8) to update details.
232 | Infor System21 Inventory Management

852BInventory Processing
Confirm Shipment Receipt [42/INP, 7/DRP, 12/WTD] This task is enabled for Work Management and can be run as part of a Business Process built in @ctive Modeler.
For further information, refer to the Work Management chapter in the Application Manager product guide.
Use this task to confirm the receipt of shipment. This maintains the in transit balances and updates the stock and costs at the receiving stockroom. The acquisition movement is written at the point of internal receipt.
The transfer may have been by a transfer order or distribution order, or by an Inventory transfer out transaction. If the receiving stockroom is defined to the Warehousing module, you must enter the appropriate details within this task to include items in the put-away processing within Warehousing.
Note: If you are using Location Control or Location Control and Catchweight, please see the Processing within a Location-controlled Stockroom section for more information.
Note: Once confirmed, the received stock is allocated to the related sales order, if one exists.
Confirm Shipment Receipt Selection Window To display this window, select the Confirm Shipment Receipt task.
Use this window to confirm the receipt at a stockroom of stock in transit from another stockroom within the company. Inventory updates the records for the receiving stockroom. If you have defined this stockroom to Warehousing, you can use this task to enter details to include the items in the put-away processing of Warehousing.
Caution: If user stockroom authorisation is active you cannot perform this transaction if you are not authorised to the stockroom.
Caution: To stockroom validation is not performed
Caution: To stockroom validation is not performed
Fields
From Stockroom
Enter the transferring stockroom for the item. This stockroom must exist on the company profile.
Alternatively, use the prompt facility to select from the Stockroom Selection pop-up.
To Stockroom
Enter the receiving stockroom for the item. This stockroom must exist on the company profile.
Alternatively, use the prompt facility to select from the Stockroom Selection pop-up.
Infor System21 Inventory Management | 233

852BInventory Processing
Note: If you enter a specific order or consignment number, you do not need to specify From and To stockroom codes.
Distribution Order Number/Despatch Note Number
To restrict the information displayed on the receipt screen, you can optionally enter the distribution order number and also optionally enter the despatch note number.
If no despatch note number is entered, the details will be restricted to the distribution order number regardless of the despatch note.
If no order information is entered at all, all details for all orders in the entered stockroom range are displayed.
Consignment Number
Enter an Advanced Shipping consignment number, to display all the orders associated with this consignment.
Caution: You cannot enter both an Advanced Shipping consignment number and a distribution order number.
Receipt Date
Enter the date when the goods are received at the receiving stockroom.
Note: This field is only displayed if bond is active for the current company
Note: If the receiving stockroom is a bonded warehouse, the receipt date cannot be before the earliest permissible transaction date for that warehouse.
Last Rotation Number
The last rotation number assigned to a batch of received items is displayed here, upon returning to this window from the Confirm Shipment Receipt Items in Transit Window.
Note: This field is only displayed if bond is active for the current company
Note: If you use DRP, and no items are found in the Inventory Management In Transit file for the specified selection criteria, an error message is displayed.
Press Enter to confirm the details and display the Confirm Shipment Receipt Items in Transit window.
Confirm Shipments Receipt Items in Transit Window To display this window, press Enter on the Confirm Shipment Receipt Selection window.
Use this window to select the items within the received shipment from the list of displayed items in transit. The items are added to this in transit list when a distribution order is confirmed as despatched from a stockroom in DRP, Sales Order Processing or Warehousing.
You must confirm the whole of the quantity despatched as received before it is removed from the in transit list. You can do this across more than one shipment receipt.
234 | Infor System21 Inventory Management

852BInventory Processing
Note: As a result of the selection made, an individual order line might appear on several despatch notes. It will then appear several times in the display.
Fields
The fields at the top of the window display the selection made.
The From Stockroom and To Stockroom are always displayed.
In addition, the Distribution Order Number is displayed, if one was selected, as well as the Despatch Note Number, if one was selected.
Bonded Receipt Type
Enter a valid receipt type for receipts into a bonded warehouse.
Alternatively, use the prompt facility to select a type from the Receipt Type Selection pop-up.
If no entry is made the default receipt type “From Other Bonds” is assigned automatically.
Note: This field is only displayed if bond is active for the current company
Select All Lines to Update
Use this checkbox as follows:
Unchecked - Not to update all lines
Checked - To update all lines
Select (Sel)
Select one of the following:
Select order line for receipt - To select a line to be received or to amend receipt details
Maintain Lot Header Details - To maintain lot header details (if the item is lot-controlled, batch-controlled or serial-controlled) on the Lot Header Maintenance window
Date
This field displays the date of despatch from the From Stockroom. This will cross-reference the calendar to derive period/week numbers.
Order
This field displays the distribution order number allocated to the transaction.
Lin
This field displays the distribution order line number.
Item
This field displays the item reference code for the item that is in transit.
Infor System21 Inventory Management | 235

852BInventory Processing
SR
This field displays the receiving stockroom for the item. The receiving stockroom defaults to the To stockroom as entered on the distribution order. You can override this with any valid stockroom for the item.
If the receiving stockroom is a bonded warehouse, you can only override to another stockroom with the same bond status and bond reference as the original target stockroom for the transfer e.g. if the original target stockroom is a customs bonded warehouse then any override stockroom must be another customs bonded warehouse with the same bond reference.
Note: WT restricts overrides to stockrooms that are in the same country.
Quantity
You can specify the actual quantity received. This must not exceed the quantity despatched.
Note: If the received quantity is less than the quantity despatched, the received quantity will be booked into stock but the balances will remain in transit. The assumption is that the remainder of the item will be confirmed, via this window, once it is received.
If there are any discrepancies, you must use an Inventory stock adjustment (with an appropriate reason code) after the quantity has been fully received at the receiving stockroom.
Note: You cannot perform partial receipts of the in-transit quantity if the ‘from’ stockroom is a bonded warehouse.
UoM
This field displays the unit of measure for the item that is in transit.
If you are using Catchweight, the Secondary Value and UoM fields are also displayed. The way that these fields are displayed can be explained as follows:
• If there are no details held under either column for your item, there is no secondary value for the order line.
• If the columns display both a secondary value and a secondary unit of measure, but they are not underlined, the secondary value of the order line is for information only.
• If the columns display both values, and they are underlined, these values have been calculated by Catchweight and can be amended.
Note: You must confirm receipt of the entire despatch quantity before it is removed from the in transit list. You can do this across more than one shipment receipt.
Note: If you use Warehousing, you must enter the appropriate location details before you can complete the receipt.
Variant Code (Var)
If the receiving stockroom is a bonded warehouse with a different bond reference than the ‘from’ stockroom, enter a valid variant code against each item flagged for receipt.
Note: This field is only displayed if bond is active for the current company
236 | Infor System21 Inventory Management

852BInventory Processing
Lot Number
If the item is lot-controlled, batch-controlled or serial-controlled, the lot reference number is displayed.
The physical and available stock balances are updated by the received quantity and the in transit quantity reduced accordingly. This also updates the batch and FIFO cost records if appropriate.
These receipts are also updated in the Stock History and Stock Movement files as transfer in quantities. These should match with the corresponding transfer out details added at confirmation of despatch of the distribution order and the centre.
Note: If the ‘from’ stockroom and receiving stockrooms are bonded warehouses with the same bond reference the lot (rotation) despatched from the ‘from’ stockroom is displayed if the item is not flagged as batch-controlled, lot-controlled or serial-controlled.
Select Update (F8) to save any details. This submits the batch program to update selected lines. If you are using Location Control, the Enter Location Balances pop-up will be displayed. If you are using Warehousing, the Warehousing details are displayed. A Shipments Received report is produced as part of the batch job, to provide printed proof of shipments receipts.
Single-step Stock Transfers You can record the transfer of stock from one stockroom to another as a single process.
The tasks are:
• Available Stock Transfer • Frozen Stock Transfer
Use these tasks to transfer between stockrooms held within the same physical location, for example, between goods inwards and your stockroom.
Infor System21 Inventory Management | 237

852BInventory Processing
Available Stock Transfer [43/INP] This task is enabled for Work Management and can be run as part of a Business Process built in @ctive Modeler.
For further information, refer to the Work Management chapter in the Application Manager product guide.
Use this task to record a simultaneous transfer out of one stockroom and receipt into another. The updates that result from this transaction depend on the Inventory processing profile.
Note: If you are using Location Control or Location Control and Catchweight, please see the Processing within a Location-controlled Stockroom section for more information.
Note: If you use Location Control, the Enter Location Balances pop-up is displayed twice, once to record details at the From Stockroom, and a second time to record details at the Target Stockroom.
Record Stock Transfer Selection Window To display this window, select the Available Stock Transfer task
Use this window to specify the stockroom that this transaction affects, and the date, reference information and reason code for the transaction.
Caution: If user stockroom authorisation is active you cannot perform this transaction if you are not authorised to both the From and To stockrooms.
Fields
From Stockroom
Enter the transferring stockroom for the item. This stockroom must exist on the company profile.
Alternatively, use the prompt facility to select from the Stockroom Selection pop-up.
Note: In order to perform a single step transfer, transfers must be permitted in the selected stockroom. Inventory Transfer transactions are not permitted from a bonded warehouse, therefore a single step transfer is not permitted in these types of warehouses.
To Stockroom
Enter the receiving stockroom for the item. This stockroom must exist on the company profile.
Alternatively, use the prompt facility to select from the Stockroom Selection pop-up.
Note: If you are using Location Control, you can enter the same stockroom in both the From Stockroom and To Stockroom fields so that you can record a move from one location to another within the same stockroom.
Note: These values that you enter in the next three fields will be used for subsequent movements. If you use Document Processing, the reference is generated automatically.
238 | Infor System21 Inventory Management

852BInventory Processing
Note: In order to perform a single step transfer, transfers must be permitted in the selected stockroom.
Inventory Transfer transactions are not permitted from a bonded warehouse, therefore a single step transfer is not permitted in these types of warehouses.
Reference
Enter the reference number for the movement.
Reference Date
This date defaults to today's date, but you can change it if required. This will cross-refer to calendar to derive period/week numbers.
Reference Type
Enter the reference type code for the movement.
Alternatively, use the prompt facility to select from the TRAN Movement Reference Type pop-up.
Narrative
You can enter text to be used as the default for the subsequent movement.
Reason Code
Enter a reason code to explain the move.
Alternatively, use the prompt facility to select from the MOVR Movement Reason Code pop-up.
Press Enter to confirm the details. Press Enter again to display the Record Stock Transfer Detail window.
Record Stock Transfer Detail Window To display this window, press Enter twice on the Record Stock Transfer Selection window.
Use this window to record the details of the stock transfer.
Note: The fields at the bottom of the window default from the information you specified on the Record Stock Transfer Selection window.
Fields
From Stockroom
These fields display the code and name of the transferring stockroom for the item.
To Stockroom
These fields display the code and name of the receiving stockroom for the item.
Infor System21 Inventory Management | 239

852BInventory Processing
Item
Enter the item, using up to 15 alphanumeric characters. You must link the item to both stockrooms through Inventory Maintenance. You can amend the item number displayed in this field.
Alternatively, use the prompt facility to select from the Item Master Scan pop-up.
Note: You can enter an item that is defined as a kit parent as long as that item is also defined as a stock item and both the kit parent and any corresponding component items are defined to both stockrooms. In this case, the processing logic explodes the kit a component at a time. Because the quantity of each component is defined to the kit parent, the Movement Qty field is protected, but you can enter lot and any location details if required.
Movement Qty
Enter the quantity you want to transfer, using up to 11 characters including three decimal places.
Lot
Enter the existing lot reference number that is affected by this movement.
Alternatively, use the prompt facility to select from the Select Lot Reference pop-up.
Quantity Units
Enter the unit of measure code.
Alternatively, use the prompt facility to select from the Purchase/Issue Unit Selection pop-up.
This field defines the unit of measure in which the movement quantity is expressed. Only those units defined for the item are allowed. Unless you change it, this unit of measure defaults to that defined as the default inventory unit for this item and stockroom combination.
Cost
This field displays the cost per unit for this movement, using up to 15 numeric characters including five decimal places.
If the movement is a goods receipt transaction and latest, average or FIFO costing is in use the software values the movement at the entered cost.
Note: If you leave the Cost/Unit field blank for a goods receipt transaction, the message "Zero unit cost has been entered" is displayed. You may still amend the cost at this stage in the procedure
Cost per unit is not entered for issue transaction. The appropriate cost is derived based on the costing method defined for the item and the appropriate cost and costing method are displayed.
Note: Only the costing method is displayed for FIFO costed items.
Reference
This field displays the reference number that you specified on the selection window. You can change this for each item if required.
240 | Infor System21 Inventory Management

852BInventory Processing
Date
This field displays the movement date that you specified on the selection window. You can change this for each item if required.
Reference Type
This field displays the reference type code that you specified on the selection window. You can change this for each item if required.
Narrative
You can override the existing narrative.
Reason Code
You can override the reason code for this movement.
Note: If you are using Location Control, press Enter to display the Enter Location Balances pop-up if balances are required for this item/stockroom combination. The window that is displayed depends on whether you need to capture details about location balances, and (if you are using Catchweight) the levels of secondary balance details required.
If you are using Catchweight, for items that are Catchweight category 1 or 2, when you first press Enter, the Secondary Value Details pop-up is displayed. The title of this pop-up varies, as it is formed from the short description of the item's secondary UoM, plus the literal "Details", for example Kilos Details pop-up. For more information, see the Secondary Value Details Pop-up section.
Note: If you transfer a quantity that results in a negative stock balance Inventory will display a warning. You can continue with the transaction if you have decided to accept a negative stock balance in this stockroom. This is set on the stockroom record of the Inventory company profile. In this case, select Continue (F8) to override the warning message.
Options
Amend
Use this against a line to amend it. The details are then displayed in the lower part of the window for modification.
This transaction:
• Subtracts from the physical balance in the From stockroom • Re-calculates the available stock in both the From and To stockrooms • Adds to the physical balance in the To stockroom • Updates the usage and date of issue at the From stockroom • Updates the date of receipt in the To stockroom • Updates the item costs in the To stockroom
See Transfer Out for an explanation of the costing methods for transfers.
Press Enter to validate your entries. Press Enter again to transfer the movement details to the middle of the window. Select Update (F8) to carry out the update.
Infor System21 Inventory Management | 241

852BInventory Processing
Frozen Stock Transfer [51/INP] This task is enabled for Work Management and can be run as part of a Business Process built in @ctive Modeler.
For further information, refer to the Work Management chapter in the Application Manager product guide.
Use this task to transfer already-frozen stock from one stockroom to another, preserving the frozen status.
You cannot choose to transfer a greater quantity than the actual amount of frozen stock held in the From stockroom.
Note: If you are using Location Control or Location Control and Catchweight, please see the Processing within a Location-controlled Stockroom section for more information.
Note: If you use Location Control, the Enter Location Balances pop-up is displayed twice, once to record details at the From Stockroom, and a second time to record details at the Target Stockroom.
Record Frozen Stock Transfer Selection Window To display this window, select the Frozen Stock Transfer task.
Use this window to specify the stockroom that this transaction affects, and the date, reference information and reason code for the transaction.
Caution: If user stockroom authorisation is active you cannot perform this transaction if you are not authorised to both the From and To stockrooms.
Fields
From Stockroom
Enter the transferring stockroom for the items. This stockroom must exist on the company profile.
Alternatively, use the prompt facility to select from the Stockroom Selection pop-up.
Note: In order to perform a single step transfer, transfers must be permitted in the selected stockroom. Inventory Transfer transactions are not permitted from a bonded warehouse, therefore a single step transfer is not permitted in these types of warehouses.
To Stockroom
Enter the receiving stockroom for the items. This stockroom must exist on the company profile.
Alternatively, use the prompt facility to select from the Stockroom Selection pop-up.
Note: If you are using Location Control, you can enter the same stockroom in both the From Stockroom and To Stockroom fields so that you can record a move from one location to another within the same stockroom.
242 | Infor System21 Inventory Management

852BInventory Processing
Note: These values that you enter in the next three fields will be used for subsequent movements. If you use Document Processing, the reference is generated automatically.
Note: In order to perform a single step transfer, transfers must be permitted in the selected stockroom.
Inventory Transfer transactions are not permitted from a bonded warehouse, therefore a single step transfer is not permitted in these types of warehouses.
Reference
Enter the reference number for the movement.
Reference Date
This date defaults to today's date, but you can change it if required.
Reference Type
Enter the reference type code for the movement.
Alternatively, use the prompt facility to select from the TRAN Movement Reference Type pop-up.
Narrative
You can enter text to be used as the default for the subsequent movement.
Reason Code
Enter a reason code to explain the move.
Alternatively, use the prompt facility to select from the MOVR Movement Reason Code pop-up.
Press Enter to confirm the details. Press Enter again to display the Record Frozen Stock Transfer Detail window.
Record Frozen Stock Transfer Detail Window To display this window, press Enter twice on the Record Frozen Stock Transfer Selection window.
Use this window to record the details of the frozen stock transfer.
Note: The fields at the bottom of the window default from the information you specified on the Record Frozen Stock Transfer Selection window.
Fields
From Stockroom
These fields display the code and name of the transferring stockroom for the item.
To Stockroom
These fields display the code and name of the receiving stockroom for the item.
Infor System21 Inventory Management | 243

852BInventory Processing
Item
Enter the item, using up to 15 alphanumeric characters. You must link the item to the stockroom through Inventory Maintenance. You can amend the item number displayed in this field.
Alternatively, use the prompt facility to select from the Item Master Scan pop-up.
Note: You can enter an item that is defined as a kit parent as long as that item is also defined as a stock item and both the kit parent and any corresponding component items are defined to both stockrooms. In this case, the processing logic explodes the kit a component at a time. Because the quantity of each component is defined to the kit parent, the Movement Qty field is protected, but you can enter lot and any location details if required.
Movement Qty
Enter the quantity you want to transfer, using up to 11 characters including three decimal places.
Lot
Enter the existing lot reference number that is affected by this movement.
Alternatively, use the prompt facility to select from the Select Lot Reference pop-up.
Quantity Units
Enter the unit of measure code
Alternatively, use the prompt facility to select from the Purchase/Issue Unit Selection pop-up.
This field defines the unit of measure in which the movement quantity is expressed. Only those units defined for the item are allowed. Unless you change it, this unit of measure defaults to that defined as the default inventory unit for this item and stockroom combination.
Cost/Unit
This field displays the cost per unit for this movement, using up to 15 numeric characters, including five decimal places.
If the movement is a goods receipt transaction and latest, average or FIFO costing is in use the software values the movement at the entered cost.
Cost per unit is not entered for issue transactions. The appropriate cost is derived based on the costing method defined for the item and the appropriate cost and costing method are displayed.
Note: Only the costing method is displayed for FIFO costed items.
Reference
This field displays the reference number that you specified on the selection window. You can change this for each item if required.
Date
This field displays the movement date that you specified on the selection window. You can change this for each item if required.
244 | Infor System21 Inventory Management

852BInventory Processing
Reference Type
This field displays the reference type code that you specified on the selection window. You can change this for each item if required.
Narrative
You can override the existing narrative.
Reason Code
You can override the reason code for this movement.
Note: If you are using Location Control, press Enter to display the Enter Location Balances pop-up, if balances are required for this item/stockroom combination. The window that is displayed depends on whether you need to capture details about location balances, and (if you are using Catchweight) the levels of secondary balance details required.
If you are using Catchweight, for items that are Catchweight category 1 or 2, when you first press Enter, the Secondary Value Details pop-up is displayed. The title of this pop-up varies, as it is formed from the short description of the item's secondary UoM, plus the literal "Details", for example Kilos Details pop-up. For more information, see the Secondary Value Details Pop-up section.
Options
Amend
Use this against a line to amend it. The details are then displayed at the bottom of the window for modification.
This transaction:
• Subtracts from the physical balance in the From Stockroom • Re-calculates the frozen balance in both the From and To Stockrooms • Adds to the physical balance in the To Stockroom • Updates the usage and date of issue at the From Stockroom • Updates the date of receipt in the To Stockroom • Updates the item costs in the To Stockroom
See the Record Transfer Out section for an explanation of the costing methods for transfers.
Press Enter to validate your entries. Press Enter again to transfer the movement details to the middle of the window. Select Update (F8) to carry out the update.
Infor System21 Inventory Management | 245


Chapter 4 Stock Counting 4
Stock Counting Introduction You can use Inventory Management for counting physical stocks or free and frozen stocks. You can produce counts that are:
• Time based• Manually requested
Time Based
Use this for cycle counting or perpetual inventory. The software uses item classification to suggest WHAT to count and WHEN. Items are classified using the Maintain Company Profile Stock Weeks Matrix window as follows:
• A - High value and high usage or both• B - Medium value and medium usage or both• C - Low value and low usage both• Z - Ignore these items in a class/date control count
Stockrooms have a count objective per year, per ABC classification. With the definition of a number of working days, the software calculates time intervals so that you can meet the count objectives.
Manual Request
You can use group ranges to select items for counting at any time (for example Major, Minor, and so on).
Warehousing Stock Counting
The primary options of Warehousing are to record item locations and quantities and item movements. This incorporates a stock counting task that provides assistance with the control, documentation, reconciliation and adjustment of stock counting.
The Warehousing stock counting tasks apply to the default warehouse only. You can use the Authorise Users to Warehouse task to change a user’s default warehouse.
Physical Warehouse Areas/Locations
You can request stock counts by a range of locations within a given area. In addition, you can select specific location types with the omission of void locations.
Stock Taking and Location Control
Infor System21 Inventory Management | 247

853BStock Counting
Location-controlled stockrooms can also be counted by a range of locations. This will correct the location balances within the selected range of locations, but you will have to verify discrepancies by looking at the item’s other location balances before you make an adjustment.
Stock Counting Steps Count Creation
You can use ABC classification or manual range to create a count. For either method, the software provides a series of recommendations of what to count, but does not record details (lot/batch/serial). You can print count sheets at this stage but this will bypass the review stage and the count has an immediate status of outstanding. For warehouse-controlled and location-controlled stockrooms it is also possible to generate counts by range of location
Review Recommendations
If you have created a stock count, you can review those recommendations.
Maintain the Count
Once you have created a count, you can add items to or delete items from the count list.
Print Count Sheets
The software records the computer physical and frozen figures. The count is now of outstanding status. The produced count sheets can cover a number of action lists. You can also use the Re-print Count Sheets task to re-print the count sheets. Where the count is for LC stockrooms, count by location range is available.
Enter Count Details
You can record actual physical stock figures or free and frozen stock figures.
Reconciliation With or Without Update
Without Update - You can compare your actual counted physical figures or free and frozen figures with the recorded computer stock figures. If you use this task, you can report any variances by quantity and value. If these variances fall outside your defined tolerance limits they are designated as errors.
With Update - You can automatically adjust the computer physical and frozen stock figures.
Note: If you use either DRP or MRP, these tasks write net change triggers.
Maintain Count Profile [1/INS, 1/WHS] Use this task to set up profiles that control the range of items you want to count, and when.
248 | Infor System21 Inventory Management

853BStock Counting
For more information, see the Maintain Company Profile Stock Weeks Matrix Window section and in the Inventory Management Utilities chapter of this product guide to see how to define the ABC classifications.
Count Profile Maintenance Stockroom Selection Window To display this window, select the Maintain Count Profile task.
Use this window to enter the selection criteria for count profile maintenance.
Fields
Stockroom
Enter a stockroom code using up to two alphanumeric characters. You must define the stockroom to the Inventory company profile.
Alternatively, use the prompt facility to select from the Stockroom Selection pop-up.
Note: User must have been granted access rights to maintain the count profile for a bonded warehouse.
Press Enter to display the Count Profile Maintenance Details window
Count Profile Maintenance Details Window To display this window, select a stockroom and then press Enter on the Count Profile Maintenance Selection window.
Use this window to enter counting criteria for the stockroom or warehouse.
Fields
Last Count Number
This field displays the last count number used within the stockroom or warehouse. This is automatically assigned during count creation.
Overdue Days
Enter the number of days you want after the due date of a count before the software will consider it overdue. When the count becomes overdue, the count initialisation date on the Recommended Count Selection window is highlighted in red rather than yellow.
Time Fence Days
Enter the number of days of ABC cycle counting from which you want to produce counts. When you set the time fence days to zero, the count will only include items that are due to be counted
Infor System21 Inventory Management | 249

853BStock Counting
on or before that day. When you set it to greater than zero, the software creates extra counts, one for each day into the future. These counts only include items that are due to be counted on that day.
View Quantity on Count
Use this to specify whether recorded or computer stock figures are visible to the user after printing of count sheets.
Select one of the following:
No (0) - If the user cannot view the computer stock figures at all
Print (1) - If the user can view computer stocks on count sheets only
Panel (2) - If the user can view computer stocks on count entry windows only
Both (3) - If the user can view computer stocks on both count sheets and windows
Count Frozen Stock
Use this field to define the default setting for this stockroom.
Use this checkbox as follows:
Unchecked - If you cannot view and maintain free and frozen stock quantities on count sheets and windows
Checked - If you can view and maintain free and frozen stock quantities on count sheets and windows
This default setting can be overridden at count level within the count generation and count sheet printing tasks.
Count by Class
Use this to define whether you can count by class for the stockroom.
Use this checkbox as follows:
Unchecked - Not to count by class
Checked - To activate count by class
You must define tolerances for each class, that is A, B and C.
If you have outstanding counts for your stockroom, you cannot de-activate Count by Class.
Tolerances
Only shortfalls or excesses greater than the figures specified here are considered as count errors.
Percentage (-ve)
Enter the acceptable maximum percentage tolerance for stock shortage. During reconciliation, any shortfall between your actual count and the computer recorded count that is greater than this tolerance is a count error.
The software calculates percentage errors as follows:
250 | Infor System21 Inventory Management

853BStock Counting
(Counted Quantity - Computer Quantity X 100) / Computer Quantity
Percentage (+ve)
Enter the acceptable maximum percentage tolerance for stock excess. During reconciliation, any excess between your actual count and the computer recorded count that is greater than this tolerance is a count error.
The software calculates percentage error as follows:
(Counted Quantity - Computer Quantity X 100) / Computer Quantity
Value (-ve)
Enter the acceptable maximum value tolerance for stock shortage. During reconciliation, any shortfall between your actual count and the computer recorded count that is greater than this tolerance is a count error.
The software calculates value errors according to the costing method of the item as follows:
(Counted Quantity - Computer Quantity) X COST
where COST = Standard or Latest or Average, according to costing method of item.
The software uses the latest cost to value any discrepancies for FIFO costing items.
Value (+ve)
Enter the acceptable maximum value tolerance for stock excess. During reconciliation, any excess between your actual count and the computer recorded count that is greater than this tolerance is a count error.
The software calculates value errors according to the costing method of the item as follows:
(Counted Quantity - Computer Quantity) X COST
where COST = Standard or Latest or Average, according to costing method of item.
Discrepancies for FIFO costing items are valued at latest cost.
Press Enter to refresh the window and display the Count Profile Maintenance ABC Details window.
Infor System21 Inventory Management | 251

853BStock Counting
Count Profile Maintenance ABC Details Window To display this window, check the Count by Class field and then press Enter on the Count Profile Maintenance Details window.
Use this window to view the details for the count profile maintenance selection criteria previously specified.
Note: This window is the same as the Count Profile Maintenance Details window, except that it displays information for counts by item class.
Fields
Number of Days/Year
You use the number of days per year together with the count objective per class to calculate the next due count date for each item within the stockroom (based on the class of the item and the last counted date).
For example, if working days per year is 200 and the count objective for A class items is 20 (each item needs a stock check 20 times per working year), you should count each A class item every 200/20 (10) working days.
Number of Counts/Year
Enter the total number of counts that you want to perform for A, B and C class items during a working year.
Maximum Items Count
Use this to indicate the maximum number of A, B and C class items you want to include on an individual count sheet.
Select Update (F8) to update the details.
252 | Infor System21 Inventory Management
853BStock Counting
Enquire on Count Profile [2/INS, 2/WHS] Use this task to view the stockroom count profile.
Count Profile Enquiry Selection Window To display this window, select the Enquire on Count Profile task.
Use this window to select the stockroom for which you want to view the count profile.
Fields
Stockroom
Enter the stockroom code of the stockroom for which you want to view details.
Press Enter to display the Count Profile Enquiry Details window.
Count Profile Enquiry Details Window To display this window, press Enter on the Count Profile Enquiry Selection window.
This window displays the same information as that specified on the Count Profile Maintenance Details window. You cannot change anything at this point.
Select Exit (F3) to leave the enquiry.
Count Profile Enquiry ABC Details Window To display this window, press Enter on the Count Profile Enquiry Selection window.
This window displays the same information as that specified on the Count Profile ABC Maintenance Details window. You cannot change anything at this point.
Note: This window is the same as the Count Profile Enquiry Details window, except that it displays information for counts by item class.
Select Exit (F3) to leave the enquiry.
Infor System21 Inventory Management | 253

853BStock Counting
Regenerate ABC Classifications [11/INS, 11/WHS] Use this task to re-classify items within a stockroom, based on their average usage and cost in relation to the stockroom cost/usage matrix.
Note: It is not possible to regenerate ABC classifications if the stockroom selected is a consignment stockroom.
Once they are re-classified, the software re-calculates the next count date for each item in the stockroom, based on the last count date and the criteria defined for the stockroom count profile.
Depending on the usage cycle specified for company, this task is prompted at Week/Period End processing within Inventory, when average usage for item/stockroom profiles is re-calculated.
You can, however, use this task at any time to re-assign classifications and next count dates to items. You will need to do this if you have changed a stockroom matrix or stockroom count profile.
You can view the ABC classification of items in the Item/Stockroom enquiry task.
Regenerate ABC Classifications Window To display this window, select the Regenerate ABC Classifications task.
Use this window to select the stockroom for which you want to re-classify items.
Fields
Stockroom
Enter the code of the stockroom for which you want to re-classify items. The stockroom cannot be a consignment stockroom
Note: If you are using Warehousing, you do not need to enter a stockroom code. The software assumes that you want to process within your default warehouse.
Note: User must have been granted access rights to a bonded warehouse to be able to regenerate ABC classifications in that warehouse.
Press Enter to confirm your selection and then select Submit (F8) to start the process. Alternatively, If you use Warehousing, just select Submit (F8). The software assumes that you want to process within your default warehouse.
254 | Infor System21 Inventory Management

853BStock Counting
Create Count by ABC Classification [21/INS, 21/WHS] Use this task to create counts based on the next due for count date defined for each item within the stockroom or warehouse.
You can choose whether to count physical stock quantities only or free and frozen stock quantities.
If the stockroom selected is a consignment stockroom, it is not possible to perform this task.
The software produces counts for all items due for count before or on the count recommendation date specified on the window.
You can choose to produce additional counts for each day after the specified date up to the number of time fence days specified. These counts contain items that are due for count on those days only and provide a forward-looking view of future workloads.
The software also selects items based on the maximum number of items to count per class. You can specify this on the stockroom count profile.
You can print count sheets immediately; as a result they go straight to a status of outstanding. You can also choose include a review stage.
The count sheet contains a list of items, the number of items and the type. The type can be as follows:
• Type 1 - Class/Date Control For more information, see the Create Count by Class/Date Control Window section.
• Type 2 - Manual Range For more information, see the Create Count by Manual Range section.
• Type 3 - Warehouse Location For more information, see the Create Count by Location section.
• Type 4 - Catchweight This is only generated when catchweight is in use. This means the item has a zero primary value and a non-zero secondary value. You investigate this item to find out if any stock of this item is still available. As you can receive more of the item between printing of the count sheet and completing the stock take, it is strongly recommended that you investigate and correct these type 4 items first. Note: Before you create an ABC count, you should use the Regenerate ABC Classifications task.
Infor System21 Inventory Management | 255

853BStock Counting
Create Count by Class/Date Selection Window To display this window, select the Create Count by ABC Classification task.
Note: If you are using Warehousing, this window is not displayed.
Use this window to specify the stockroom for which you want to create a count.
Fields
Stockroom
Enter a stockroom code.
The stockroom cannot be a consignment stockroom.
Alternatively, use the prompt facility to select from the Stockroom Selection pop-up.
Note: User must have been granted access rights to a bonded warehouse to be able to create a count for that warehouse.
Press Enter to display the Create Count by Class/Date Control window.
Create Count by Class/Date Control Window To display this window, select a stockroom and then press Enter on the Create Count by Class/Date Selection window.
Note: If you are using Warehousing, this is the first window displayed when you select this task.
Fields
Time Fence Days
Enter the number of days after the date of recommendation (displayed as the From date), to be reviewed separately for count creation. Where possible, the software produces a daily count detailing the items that are due for count on the specific day, thus giving a view of future counts and workloads.
From
Enter the start date from which count creation begins. The default is today’s date.
Print Count Sheets
Use this checkbox as follows:
Unchecked - To review recommendations using the Maintain Recommended Count task before printing
Checked - To print immediately after generating the recommendations
256 | Infor System21 Inventory Management

853BStock Counting
Note: If you checked this field, the count is outstanding immediately. This action bypasses the option to review before printing.
No of Instructions/List
Enter the maximum number of items or location you want to print on an action list. If you use Warehousing, the value defaults to the value defined for the Warehouse list profile for count lists. If you enter zero, all instructions for the count appear on one list only.
Include Zero Balances
Use this checkbox as follows:
Unchecked - If items with zero physical and frozen stock are not to be included in the stock count
This is the default setting.
Checked - If you wish to include zero physical and frozen balance items
Count Frozen Stock
Use this field to specify whether physical stock quantities or free and frozen stock quantities are to be counted.
Use this checkbox as follows:
Unchecked - If you can view and maintain physical quantities on count sheets and windows
Checked - If you can view and maintain free and frozen quantities on count sheets and windows
The default setting of this field is retrieved from the count profile.
Note: This field is used in conjunction with the View Quantity on Count field in the count profile to control what is displayed on count sheets and windows.
Note: This field is used in conjunction with the Include Zero Balances field to control what items are excluded from a count.
Note: If you use Warehousing, the next two fields are displayed.
Organise Count By
Select one of the following:
Warehouse (1) (default) - As the count only relates to your default warehouse, to create a new list when the number of location or item details exceeds the value set for No of Instructions/List
Area (2) - To create a separate count list for each change of area code within the warehouse
In this case, the software creates a new list for each change in area code. There may be several lists per area if the number of location or item details to be checked exceeds the value set for Number of Instructions/List.
Access to Dimension 1 (3) - To create a separate count list for each change of access to dimension 1
In this case, if, for example, you set up Aisle to be the first dimension in the warehouse, the software produces one action list per aisle.
Infor System21 Inventory Management | 257

853BStock Counting
Sequence Count By
Note: If you are using Location Control, this field is displayed when you press Enter.
Select one of the following:
Item (1) (default) - To order the actions on the list by item
Location (2) - To order the actions on the list by location code
There are two reasons why the software does not produce a count after you have run the Create Count by ABC Classification task:
1 If you have set the Number of Counts per Year to count items relatively infrequently and you have recently counted all items, no items may be due to be counted, and hence no count recommendations are produced on the Count Profile.
2 The software cannot include items that are currently being counted on other count lists, whether active or recommended. Therefore, any items that appear on manually requested counts lists, at either a summary or detail level, do not appear on a count list created by ABC classification.
Select Submit (F8) to submit the job to perform the count creation.
258 | Infor System21 Inventory Management

853BStock Counting
Create Count by Manual Range [22/INS, 22/WHS] You can select items for counting at any time. These are flagged as unplanned counts.
If the stockroom is a consignment stockroom, it is not possible to perform this task.
You can choose whether to count physical stock quantities only or free and frozen stock quantities.
You can create counts for one or more stockrooms based on item range selection or item attribute selection.
You can enter a single stockroom or range of stockrooms in addition to a single selection or range of one of the following item attributes:
• Item number • Item group (major and minor) • Item type • Item class • Count class (A, B, C or Z)
You can print counts immediately, or review them before printing.
Create Count by Manual Range Detail Window To display this window, select the Create Count by Manual Range task.
Use this window to select the items you want to count. You can use some or all the selection criteria.
For each search criterion, if you only enter a value in the From field, or if both the From and the To fields are the same, entries must exist on the relevant master file. However if you define a range, the From and To entries need not exist on the Item Master file. If you only enter the From value and leave the To value blank, the To field defaults to the value in the From field.
Fields
Range From/Range To
Stockroom
Enter the stockroom code for which you want to create a count.
If you enter a single stockroom, it must exist as a stockroom defined to the company. If, however, you enter a range, the From and To stockrooms you use to define the range need not exist on the Stockroom Master file, except when they are the same value.
Selection of a consignment stockroom it is not allowed. Any consignment stockrooms within a selected range are bypassed.
You can use the prompt facility on these fields to select from the Stockroom Selection pop-up.
If you are creating a stock count for Warehousing, these fields are not displayed.
Infor System21 Inventory Management | 259

853BStock Counting
Note: User must have been granted access rights to all bonded warehouses within the range of stockrooms in order to generate counts for those warehouses
Item
Enter the item reference code of the item, or items, that you want to include on your stock count.
If you enter a single item, it must exist on the Item Master file. If, however, you enter a range, the From and To items you use to define the range need not exist on the Item Master file, except when they are the same value.
You can use the prompt facility on these fields to select from the Item Master Scan pop-up.
Item Group Major
Enter an item major group.
Alternatively, use the prompt facility to select from the PGMJ Item Group - Major pop-up.
If you enter a single major or minor combination, it must exist on the Item Master file. However, if you enter a range, the From and To major or minor groups you use to define the range need not exist on the Item Master file, except when they are the same value.
Item Group Minor
Enter the item group minor.
Alternatively, use the prompt facility to select from the PGMN Item Group - Minor pop-up.
If you enter a single major or minor combination, it must exist on the Item Master file.
However, if you enter a range, the From and To major or minor groups you use to define the range need not exist on the Item Master file, except when they are the same value.
Item Type
Enter the item type.
Alternatively, use the prompt facility to select from the PTYP Item Type pop-up.
If you enter a single item type, it must exist on the Item Master file. However, if you enter a range, the From and To item types you use to define the range need not exist on the Item Master file, except when they are the same value.
Item Class
Enter the item class.
Alternatively, use the prompt facility to select from the PCLS Item Class pop-up.
If you enter a single item class, it must exist on the Item Master file. However, if you enter a range, the From and To item classes you use to define the range need not exist on the Item Master file, except when they are the same value.
Count Class
Enter the item classification code for this stockroom. The software categorises items into classes A, B and C. Items with a classification of A normally have the highest usage and value, and so on.
260 | Infor System21 Inventory Management

853BStock Counting
Valid classes are A, B, C and Z. The Z class excludes items from count requests by ABC classification.
Count Date
Enter or select the date on which you want to process the count. This defaults to today’s date.
Print Count Sheets
Use this checkbox as follows:
Unchecked - To review recommendations via the Maintain Recommended Count task before printing
Checked - To print immediately after generating recommendations
Note: If you checked this field, the count is outstanding immediately. This action bypasses the option to review before printing.
No of Instructions/List
Use this to determine the maximum number of item or location details you want to print on an action list.
If you use Warehousing then the value defaults to the value defined for the Warehouse List Profile for count lists.
If you enter zero, all instructions for the count appear on one list only.
Include Zero Balances
Use this checkbox as follows:
Unchecked - If items with zero physical and frozen stock will not be included in the stock count
This is the default setting.
Checked - If you wish to include items with zero physical and frozen balances
Count Frozen Stock
Use this field to specify whether frozen stock quantities are to be counted.
Select one of the following:
Default from profile (default) - If the setting of the Count Frozen Stock field on each generated count is to be inherited from the appropriate count profile definition
No - If you can view and maintain physical quantities on count sheets and windows
Yes - If you can view and maintain free and frozen quantities on count sheets and windows
Note: Setting this field to No or Yes overrides the setting of this flag to the specified value on every count header generated based on the selection criteria you have entered.
Note: This field is used in conjunction with the View Quantity on Count field in the count profile to control what is displayed on count sheets and windows.
Note: This field is used in conjunction with the Include Zero Balances field to control what items are excluded from a count.
Infor System21 Inventory Management | 261

853BStock Counting
Note: This field is only relevant if you choose to print count sheets immediately.
Note: If you use Warehousing, the next two fields are displayed.
Organise Count By
Select one of the following:
Warehouse (1) (default) - As the count only relates to your default warehouse, to create a new list when the number of location or item details exceeds the value set for No of Instructions/List
Area (2) - To create a separate count list for each change of area code within the warehouse
In this case, the software creates a new list for each change in area code. There may be several lists per area if the number of location or item details to be checked exceeds the value set for Number of Instructions/List.
Access to Dimension 1 (3) - To create a separate count list for each change of access to dimension 1
In this case, if, for example, you set up Aisle to be the first dimension in the warehouse, the software produces one action list per aisle.
Sequence Count By
Note: This field is only displayed if you are using Location Control and you press Enter.
Select one of the following:
Item (1) (default) - To order the actions on the list by item
Location (2) - To order the actions on the list by location code
Note: A blank range selection for stockrooms defaults to all stockrooms.
Note: If you do not specify other selection criteria, the software selects all items within the specified stockroom range.
The count follows exactly the same steps as the class/date count.
Select Submit (F8) to submit the batch job to create the count.
262 | Infor System21 Inventory Management

853BStock Counting
Create Count by Location Range [23/INS] Note: You can only use this task if you use Location Control or consignment stockrooms.
You can create count for a stockroom by location. You can choose whether to print count sheets immediately, specify the number of instructions that you want to include on a count list and whether to sequence the count by item or location.
You can choose whether to count physical stock quantities only or free and frozen stock quantities.
For a consignment stockroom, you can select a single customer/delivery sequence only (as the location).
Create Count by Location Selection Window To display this window, select the Create Count by Location Range task.
Use this window to select the stockroom and locations for which you want to produce a stock count.
Fields
Stockroom
Enter the stockroom in which you want to produce a count.
Alternatively, use the prompt facility to select from the Stockroom Selection pop-up.
Note: User must have been granted access rights to a bonded warehouse to be able to generate a count for that warehouse.
Location Range From
Enter the start of the range of locations you want to include on the count.
Alternatively, use the prompt facility to select from the Location Prompt pop-up.
For a consignment stockroom, this must be a customer/delivery sequence that is defined for that stockroom. Its format is CCCCCCCC/DDD, where CCCCCCCC is the customer and DDD is the delivery sequence.
Location Range To
Enter the end of the range of locations you want to include on the count.
If not entered, this will default to the same value as the Location From.
Alternatively, use the prompt facility to select from the Location Prompt pop-up.
For a consignment stockroom, if entered this must be the same customer/delivery sequence as the Location From.
Note: To include a single location, enter that code in the Location From only. For a consignment stockroom, enter the customer and delivery sequence, separated by /.
Infor System21 Inventory Management | 263

853BStock Counting
Count Date
This defaults to today’s date, but can be changed if required.
Print Count Sheets
Use this checkbox as follows:
Unchecked - Not to print the count sheets immediately
In this case, you can produce the count sheets after reviewing their contents using the Maintain Recommended Count task.
Checked - To print count sheets immediately
In this case, you cannot review the results and the count is considered to be recommended.
No of Instructions/List
Enter the number of instructions that you want to print on each count list.
If you checked the Print Count Sheets field, use this to determine the maximum number of item or location details you want to print on an action list.
Sequence Count By
Select one of the following:
Item (1) - To order the actions on the list by item
Location (2) (default) - To order the actions on the list by location code
Count Frozen Stock
Use this field to specify whether frozen stock quantities are to be counted.
Use this checkbox as follows:
Unchecked - If you can view and maintain physical quantities on count sheets and windows
Checked - If you can view and maintain free and frozen quantities on count sheets and windows
The default setting of this field is retrieved from the count profile.
Note: This field is used in conjunction with the View Quantity on Count field in the count profile to control what is displayed on count sheets and windows.
Note: This field is only relevant if you choose to print count sheets immediately.
Select Submit (F8) to submit the batch job to process the count request.
264 | Infor System21 Inventory Management

853BStock Counting
Create Count for Warehouse Location [23/WHS] Note: You can only use this task if you use Warehousing.
You can create count for the default warehouse by location within a defined area.
You can choose whether to count physical stock quantities only or free and frozen stock quantities.
You can choose to use a range of criteria to select the locations within the area:
• By range selected by dimension • By status, so that you only count within active locations or all locations • By location type
You can select a maximum number of locations, so that count lists do not become too large.
You can print counts or create recommended counts to review before printing them.
Create Count by Warehouse Location Area Selection Window To display this window, select the Create Count for Warehouse Location task.
Use this window to select the area containing the locations you want to count, and specify the date associated with the count.
Fields
Area
Enter the area within your warehouse that you want to target for the count.
Alternatively, use the prompt facility to select from the Select Area pop-up.
Count Date
Enter or select the date associated with the count recommendation.
Press Enter to display the Create Count by Warehouse Location Detail window.
Infor System21 Inventory Management | 265

853BStock Counting
Create Count by Warehouse Location Detail Window To display this window, select an area and count date and then press Enter on the Create Count by Warehouse Location Selection window.
Use this window to select the locations within the chosen area for stock counting.
Fields
Location Ranges
You can leave both the From and To fields blank to select the entire range of dimension codes for the particular dimension.
Note: Warehouse dimensions are flexible and those illustrated here are simply one example.
Aisle
Enter the target range of dimension codes for count creation within the area.
Alternatively, use the prompt facility to select from the Select Dimension Values pop-up.
Bay
Enter the target range of dimension codes for count creation within the area.
Alternatively, use the prompt facility to select from the Select Dimension Values pop-up.
Row
Enter the target range of dimension codes for count creation within the area.
Alternatively, use the prompt facility to select from the Select Dimension Values pop-up.
Location Status
Select one of the following:
All (0) (default) - To select all locations defined by the dimension range.
Active Only (1) - To ignore void locations (generated via the warehouse map) and select those locations defined as active from the dimension range
Location Type
You can restrict the target locations for count by type. You must have defined the location type you enter within Warehousing.
If this field is left blank, the software selects all location types found for the dimension range.
Maximum Number of Locns
This is the maximum number of target locations for the count.
This defaults to the entry held in the Inventory Descriptions file, under major type WHNL, code description MAX.
It is strongly recommended that you maintain this value, so that you can guard against the entry of dimension ranges that targets a large number of locations.
266 | Infor System21 Inventory Management

853BStock Counting
Print Count Sheets
Use this checkbox as follows:
Unchecked - To review recommendations through the Maintain Recommended Count task before printing
Checked - To print immediately after generating recommendations
Note: If you check this field, the count is outstanding immediately. This action bypasses the option to review before printing.
No of Instructions/List
If you checked the Print Count Sheets field, use this to determine the maximum number of item or location details you want to print on an action list. This value defaults to the value defined in the Warehouse list profile for count lists.
Enter 0 to indicate that a new list should not be initiated based the number of item or location details. New lists can however be initiated by using the Organise Count By field.
Organise Count By
Select one of the following:
Warehouse (1) (default) - As the count only relates to your default warehouse, to create a new list when the number of location or item details exceeds the value set for No of Instructions/List
Area (2) - To create a separate count list for each change of area code within the warehouse
In this case, the software creates a new list for each change in area code. There may be several lists per area if the number of location or item details to be checked exceeds the value set for Number of Instructions/List.
Access to Dimension 1 (3) - To create a separate count list for each change of access to dimension 1
In this case, if, for example, you set up Aisle to be the first dimension in the warehouse, the software produces one action list per aisle.
Sequence Count By
Select one of the following:
Item (1) - To order the actions on the list by item
Location (2) (default) - To order the actions on the list by location code
Count Frozen Stock
Use this field to define whether frozen stock quantities are to be counted.
Use this checkbox as follows:
Unchecked - If you can view and maintain physical quantities on count sheets and windows
Checked - If you can view and maintain free and frozen quantities on count sheets and windows
The default setting of this field is retrieved from the count profile.
Infor System21 Inventory Management | 267

853BStock Counting
Note: This field is used in conjunction with the View Quantity on Count field in the count profile to control what is displayed on count sheets and windows.
Note: This field is only relevant if you choose to print count sheets immediately.
Functions
No. of Locns. (F16)
Use this to review the number of locations targeted for count based on the specified dimension range.
Note: We recommend that you use No of Locations (F16) to guard against producing counts over a large number of locations.
Select Submit (F8) to submit the count request.
268 | Infor System21 Inventory Management

853BStock Counting
Maintain Recommended Count [31/INS, 31/WHS] You can review recommended counts before you print them, if you did not choose to print count sheets when you requested the count.
Item-based Counts
You can add or delete summary recommendations, that is, a request to count all balances for an item. In addition, you can request detail recommendations, that is, specific lots, batches or serial numbers for count. You can delete counts entirely and have all associated items taken off count.
If you add any items to the count, the software considers them unplanned requests, and you must enter a reason code for these.
Location-based Counts in a Location-controlled Stockroom
You can add active locations if they are not already on another count.
You can delete locations from the count.
You can delete the entire count and un-set the Stocktake in Progress flag for all locations.
Maintain Count Selection Window To display this window, select the Maintain Recommended Count task.
Use this window to select the stockroom and stock count that you want to maintain.
Fields
Stockroom Code
Enter the stockroom code.
Alternatively, use the prompt facility to select from the Stockroom Selection pop-up.
Note: If you use Warehousing, this field is not displayed.
Note: User must have been granted access rights to a bonded warehouse to be able to maintain a count for that warehouse.
Count Number
Enter the count number.
Alternatively, use the prompt facility to select from the Recommended Count Select pop-up.
Press Enter to display the Maintain Count Details window. Alternatively, if you use Warehousing, press Enter to display the Location-based Maintain Count Details window.
Infor System21 Inventory Management | 269

853BStock Counting
Maintain Count Details Window To display this window, select a stockroom and count and then press Enter on the Maintain Count Selection window.
Use this window to add or delete summary or detail item recommendations.
Note: Summary recommendations are recommendations at item level. Detail recommendations are recommendations at lot, batch or serial number level. You cannot add a lot for an item that is already on the count, but you can add a single lot for an item that is not already on the count.
The stockroom, count number and the number of items or lots to count are displayed at the top of the window. Detail recommendations are a request to count specific lot, batch or serial numbers. You can only review recommended counts.
Note: If you use Location Control, the Location field is also displayed on this window.
Fields
Select (Untitled)
Select one of the following:
Delete (4) - To delete the count recommendation for a particular line
When you select Update (F8), the count recommendation is not included in the count and you immediately return to the Maintain Count Selection window.
Position to Item
If the list of recommendations extends over a single window, you can use this to enter the item reference number, or the first few characters of that reference, to view the count recommendation for that item.
Functions
Add (F9)
Use this to add new items to the count.
Select Update (F8) to save any changes.
270 | Infor System21 Inventory Management

853BStock Counting
Addition Pop-up To display this pop-up, select Add (F9) on the Maintain Count Details window.
Use this pop-up to add a new item to your selected count.
Fields
Item
Enter the reference code for the item you want to add. The item must exist on the Item Master file.
Alternatively, use the prompt facility to select from the Item Master Scan pop-up.
Location
This is only displayed if you want to process a Warehouse stock count. The location must exist within the current warehouse.
You can use the prompt facility to select from the Location Prompt pop-up.
Note: You only need to enter the location (and any other detail for the item balance) if you want to request the count of a specific warehouse balance for that item.
Lot
Enter the lot, batch or serial number associated with a lot-controlled item.
Alternatively, use the prompt facility to select from the Select Lot Reference pop-up.
Note: Lot numbers can be entered for any item that is being counted in a bonded warehouse, as lot control is forced for all items within a bonded warehouse.
Rotation
This is only displayed for a Warehouse stock count. Enter or select the rotation date associated with a balance for a date-controlled item.
Pack
This is only displayed for a Warehouse stock count. Enter the pack type associated with an item.
Label
This is only displayed for a Warehouse stock count. Enter the label number associated with a label-controlled pack type.
Reason Code
Enter the reason for adding this item to the count list. You must define the reason code in the Inventory Descriptions file, under major type CTRE and it must be of an unplanned nature
Note: You cannot use the reserved code of #1 representing a Planned request for an item originating from an initial count request.
To delete the entire count, select Delete (F11) twice.
Infor System21 Inventory Management | 271

853BStock Counting
Caution: You must delete summary recommendations before you can add a detail recommendation for an item.
Caution: Warning: Lot-controlled items are only shown at summary level. You can specify individual lots by pressing Add (F9).
Select Update (F8) to update all item additions and deletions.
Location-based Maintain Count Detail Window To display this window, select a stockroom and count on the Maintain Count Selection window and then press Enter, when the count is by location.
Note: You can only use this if you are processing a Location or Warehousing stock count.
Use this window to add location summary or detail recommendations to the count.
Fields
Position to Location
Enter the first few characters of a location code to position the details to the point you want to view.
Note: You must delete summary recommendations before you can add detailed recommendations for a location.
Options
Delete
Use this to delete a location recommendation.
This takes effect when you select Update (F8).
Functions
Add (F9)
Use this to add recommendations.
Labels (F15)
Use this to display label numbers for label-controlled pack types.
Select Update (F8) to update the data.
272 | Infor System21 Inventory Management

853BStock Counting
Count Size Warning Pop-up This pop-up is automatically displayed when the number of items specified for any of the classifications exceeds the maximum number of items per count sheet that you specified on the stockroom count profile when you choose to update a count request by ABC classification.
This situation can arise where you have added unplanned counts to the count list.
Select Previous (F12) to amend the current count. Alternatively, press Enter to accept the count with the excess items.
Infor System21 Inventory Management | 273

853BStock Counting
Enter Count Details [32/INS, 32/WHS] You can enter counted details on a list-by-list basis. You can amend those details until you record the list as complete. You can delete lists entirely and take all associated items off count (unless item details span a number of lists). You can only add item details if the item already exists as on count in this particular count. The software considers any additions to be override details, so you must enter an appropriate reason code.
We recommend that you do not complete the list until you have reviewed the reconciled details, as you cannot maintain a completed list.
If you are using Location Control, you can use this task to:
• Display stocked item/lot/location combinations with physical and frozen balances that are not equal to zero, that is, any physical or frozen balances with a value greater or less than zero (if you have specified that your stockroom can have negative balances)
• Add an item or lot in any active location provided that the combination is not included on another count, and the item is not restricted to a different single location
• Remove individual entries from the count • Delete the entire count
However:
• You cannot enter a balance at a location that is not a single location item’s default location. • You cannot view inactive locations when you use the Location Prompt facility. • You cannot select or add inactive or duplicate locations.
Enter Count Selection Window To display this window, select the Enter Count Details task.
Use this window to select the stockroom, count number and list number for which you want to enter the count details.
Fields
Stockroom
Enter the stockroom code. This field is not displayed if you are using Warehousing.
Alternatively, use the prompt facility to select from the Stockroom Selection pop-up.
Note: User must have been granted access rights to a bonded warehouse to be able to enter count details for that warehouse.
Count Number
Enter the count number.
Alternatively, use the prompt facility to select from the Outstanding Count Selection pop-up.
274 | Infor System21 Inventory Management

853BStock Counting
List Number
Enter the list number.
Alternatively, use the prompt facility to select from the Select List Number pop-up.
Press Enter to display the Enter Count Details window.
Enter Count Details Window To display this window, select a stockroom, stock count and list and then press Enter on the Maintain Count Selection window.
Use this window to enter the item quantities you have counted.
If the Count Frozen Stock field has been checked in the count header, enter pairs of free and frozen counted quantities for each item on the count; the system will calculate the physical quantity counted as the sum of the two quantities entered against each item.
If the Count Frozen Stock field was left unchecked in the count header, enter the physical quantity you have counted.
Note: If you are using Location Control, the Location field is also displayed on this window.
Fields
Select (Untitled)
Select one of the following
Select (1) - To enter or amend detail item count quantities
Press Enter to display the Enter Count Amendment pop-up and view current information available for amendment.
Lot Header (2) - To display the Lot Header window for a detail count line that is displayed on this window
Delete (4) - To delete selected items from the count
Pressing Enter will update the Item Summaries Cancelled total.
Note: The items selected will not be removed until Update (F8) is taken. They will be shown in the Item Summaries Cancelled total.
Note: Lot header details can only be maintained for items that are set to Lot Control in a bonded warehouse i.e. they do not exist for those items for which lot control is forced within a bonded warehouse.
Entered Quantity
If frozen stock quantities are being counted, enter the free quantity you have counted in this field. The frozen quantity is added to this quantity to give the counted physical quantity.
Infor System21 Inventory Management | 275

853BStock Counting
If frozen stock quantities are not being counted, enter the physical quantity you have counted in this field.
The quantity fields are qualified by unit of measure.
Entered Quantity Unit of Measure (UoM)
Enter the unit of measure that qualifies the entered quantity.
This should be the unit of measure in which the counted quantity is expressed.
Alternatively, use the prompt facility to enter the quantity via the Enter Quantity pop-up for a multiple unit entry item.
Alternatively, use the prompt facility to select the unit of measure from the Select UoM pop-up for a decimal item.
The prompt facility may be used to select an appropriate unit of measure from those defined for the selected item. Using the prompt facility will display either the Unit of Measure pop-up (if the selected item does not permit multiple unit entry or does permit multiple unit entry and a quantity has been entered) or the Enter Counted Quantity pop-up (if the selected item permits multiple unit entry and no quantity has been entered).
Note: The entered unit of measure must be one of the three units of measure specified for the item.
Note: If you do not enter a unit of measure then the Inventory Management item and stockroom issue unit of measure will be used.
Note: If you do not enter a unit of measure then the Inventory Management item and stockroom issue unit of measure will be used for a multiple unit format item.
Entered Frozen Quantity
If frozen stock quantities are being counted, enter the frozen quantity you have counted in this field. The entered quantity is added to this quantity to give the counted physical quantity.
Entered Frozen Unit of Measure (UoM)
Enter the unit of measure that qualifies the entered quantity.
If you do not enter a unit of measure for the frozen quantity, it will default to the same unit of measure as that used for the Entered Qty field.
You can use the prompt facility on this field to select from the displayed pop-up. Either the Unit of Measure Prompt pop-up or the Enter Multiple Unit Quantity pop-up will be displayed, depending upon whether the selected item permits multiple unit entry or not.
Alternatively, use the prompt facility to enter the quantity via the Enter Quantity pop-up for a multiple unit entry item.
Alternatively, use the prompt facility to select the unit of measure from the Select UoM pop-up for a decimal item.
Note: The entered unit of measure must be one of the three units of measure specified for the item.
276 | Infor System21 Inventory Management

853BStock Counting
Note: If you do not enter a unit of measure then the Inventory Management item and stockroom default inventory unit of measure will be used for a multiple unit format item.
Note: If you do not enter a unit of measure then the Inventory Management item and stockroom issue unit of measure will be used for a multiple unit format item.
Note: These fields are only displayed if the Count Frozen Stock field has been checked in the count header.
Position to Item
Enter the item code you want to display at the top of the list.
Functions
Update (F8)
Use this to confirm a completed list.
Add (F9)
Use this to add item details. You can only do this if the item already exists on this particular count. You can use this if you have discovered different lots of an item that were not recorded on the original count sheets. If the item is lot-controlled, the Lot Reference Maintenance window is automatically displayed for completion.
Delete (F11)
Use this to delete the complete list.
Include Zero Balances/Exclude Zero Balances (F13)
Use this to toggle between including and excluding items with zero balances, whether from the original stock count or added later.
If the Count Frozen Stock field has been left unchecked, the physical balance of an item must be zero for it to be included/excluded. Otherwise, both the free and frozen balances of an item must be zero.
Select an option and then press Enter.
Enter Count Amendment Pop-up The quantity fields are qualified by unit of measure.
To display this pop-up, enter 1 to select an item and then press Enter on the Enter Count Details window.
Use this pop-up to amend current information for your selected item.
Note: You can also enter the counted free quantity and counted frozen quantity directly into the fields provided beside the appropriate item count line.
Fields
Infor System21 Inventory Management | 277

853BStock Counting
Item
This field displays the item code.
Location
This field displays the location for the item. This is only displayed if your stockroom is location-controlled.
Lot
This field displays the associated lot number.
Reason
This field displays a reason code for the amendment.
Recorded Qty
This field is for display only and cannot be changed.
Recorded Frz
This field is for display only and cannot be changed.
Entered Quantity
If frozen stock quantities are being counted, enter the free quantity you have counted. The system will calculate the counted physical quantity by adding this to the entered frozen quantity.
If frozen stock quantities are not being counted, enter the physical quantity you have counted.
You can use the prompt facility on the UoM field to select from the displayed pop-up. Either the Unit of Measure Prompt pop-up or the Enter Multiple Unit Quantity pop-up will be displayed, depending upon whether the selected item permits multiple unit entry or not.
Note: The entered quantity is converted to stockroom issue units for storage on the database.
Entered quantity Unit of Measure (UoM)
Enter the unit of measure that qualifies the entered quantity.
If not specified, the unit of measure defaults to the default inventory unit specified for the item/stockroom combination.
Alternatively, use the prompt facility to enter the quantity via the Enter Quantity pop-up for a multiple unit entry item.
Alternatively, use the prompt facility to select the unit of measure from the Select UoM pop-up for a decimal item.
Note: The entered unit of measure must be one of the three units of measure specified for the item.
Note: If you do not enter a unit of measure then the Inventory Management item and stockroom default inventory unit of measure will be used for a multiple unit format item.
Note: If you do not enter a unit of measure then the Inventory Management item and stockroom issue unit of measure will be used for a decimal item.
278 | Infor System21 Inventory Management

853BStock Counting
Entered Frozen Quantity
Enter the counted frozen quantity as qualified by the unit of measure.
You can use the prompt facility on the UoM field to select from the displayed pop-up. Either the Unit of Measure Prompt pop-up or the Enter Multiple Unit Quantity pop-up will be displayed, depending upon whether the selected item permits multiple unit entry or not.
The entered quantity is added to this quantity to give the counted physical quantity.
Enter the required details and then press Enter to return to the Enter Count Details window.
Note: These fields are only displayed if the Count Frozen Stock field is checked in the count header.
Entered frozen Unit of Measure (UoM)
Enter the unit of measure that qualifies the entered quantity.
If not specified, the unit of measure defaults to the same unit of measure specified against the entered quantity.
Alternatively, use the prompt facility to enter the quantity via the Enter Quantity pop-up for a multiple unit entry item.
Alternatively, use the prompt facility to select the unit of measure from the Select UoM pop-up for a decimal item.
Note: The entered unit of measure must be one of the three units of measure specified for the item.
Note: If you do not enter a unit of measure then the Inventory Management item and stockroom default inventory unit of measure will be used for a multiple unit format item.
Note: If you do not enter a unit of measure then the Inventory Management item and stockroom issue unit of measure will be used for a decimal item.
Enter Count Addition Pop-up The quantity fields are qualified by unit of measure.
To display this pop-up, select Add (F9) on the Enter Count Details window.
Use this pop-up to add an item to the count.
Fields
Item
Enter an item number. This must be already on count in this count.
Infor System21 Inventory Management | 279

853BStock Counting
Alternatively, use the prompt facility to select from the Item Master Scan pop-up.
Location
This field is only displayed if you are using Warehousing. Enter the location where you counted the additional stock.
Alternatively, use the prompt facility to select from the Select Location Prompt pop-up.
Lot
Enter a lot, batch or serial number.
Alternatively, use the prompt facility to select from the Select Lot Reference pop-up.
A lot (rotation) number must be entered for all items in a bonded warehouse.
Rotation
This field is only displayed if you are using Warehousing. If the stock counted is rotation date-controlled, enter or select the appropriate rotation date.
Pack
This is only displayed if you are using Warehousing. Enter the pack type associated with the stock counted.
Label
This is only displayed if you are using Warehousing. If the pack type associated with the stock is label-controlled, enter the appropriate label number.
Reason Code
Enter the reason for adding this item to the count list. You must define the reason code in the Inventory Descriptions file, under major type CTRE, and it must be of an override nature.
You can use the prompt facility to select from the CTRE Count Reason pop-up.
Note: You cannot select the reserved code of #1 for a planned request for an item originating from an initial count request.
Entered Quantity
If frozen stock quantities are being counted, enter the free quantity you have counted in this field. The frozen quantity is added to this quantity to give the counted physical quantity.
If frozen stock quantities are not being counted, enter the physical quantity you have counted in this field.
You can use the prompt facility on the UoM field to select from the displayed pop-up. Either the Unit of Measure Prompt pop-up or the Enter Multiple Unit Quantity pop-up will be displayed, depending upon whether the selected item permits multiple unit entry or not.
Note: The entered quantity is converted to stockroom issue units for storage on the database.
Entered quantity Unit of Measure (UoM)
Enter the unit of measure that qualifies the entered quantity.
280 | Infor System21 Inventory Management

853BStock Counting
Alternatively, use the prompt facility to select an appropriate unit of measure from the Select Purchase / Issue Unit pop-up for a decimal item or enter the quantity via the Enter Quantity pop-up for a multiple unit entry item.
Note: The entered unit of measure must be one of the three units of measure specified for the item.
Note: If you do not enter a unit of measure then the Inventory Management item and stockroom default inventory unit of measure will be used for a multiple unit format item.
Note: If you do not enter a unit of measure then the Inventory Management item and stockroom issue unit of measure will be used for a decimal item.
Entered Frozen Quantity
Enter the counted frozen quantity as qualified by the unit of measure.
You can use the prompt facility on the UoM field to select from the displayed pop-up. Either the Unit of Measure Prompt pop-up or the Enter Multiple Unit Quantity pop-up will be displayed, depending upon whether the selected item permits multiple unit entry or not.
Note: These fields are only displayed if the View Frozen Quantity field is checked in the count profile.
Entered frozen Unit of Measure (UoM)
Enter the unit of measure that qualifies the entered quantity.
If not specified the unit of measure defaults to the same unit of measure specified against the entered quantity.
Alternatively, use the prompt facility to select an appropriate unit of measure from the Select Purchase / Issue Unit pop-up for a decimal item or enter the quantity via the Enter Quantity pop-up for a multiple unit entry item.
Note: The entered unit of measure must be one of the three units of measure specified for the item.
Note: If you do not enter a unit of measure then the Inventory Management item and stockroom default inventory unit of measure will be used for a multiple unit format item.
Note: If you do not enter a unit of measure then the Inventory Management item and stockroom issue unit of measure will be used for a decimal item.
Enter the required details and then press Enter to return to the Enter Count Details window.
Enter Counted Quantity Pop-up To display this pop-up, use the prompt facility on the unit of measure code on either the Enter Count Amendment pop-up or the Add Item to a Count pop-up.
Infor System21 Inventory Management | 281

853BStock Counting
Use this pop-up to enter a counted quantity in multiple unit form for an item that permits entry in this format. The item code and description of the item being counted are displayed in the upper portion of the window.
Fields
Quantity (Untitled)
Enter the counted quantity for the appropriate units of measure. Multiple units are available.
UoM (Untitled)
A description of each of the available units of measure is displayed.
Note: If only one quantity is entered in the Enter Counted Quantity pop-up, the appropriate unit is written as the entered unit onto the event detail. Otherwise, the entered unit defaults to the default inventory unit of the item.
Note: Entered quantities are converted to the appropriate issue unit for storage on the database.
Press Enter to accept the entered counted quantity and return to the Enter Count Details window.
Update Confirmation Pop-up To display this pop-up, select Update (F8) to update the specified quantities.
Use this pop-up to confirm a completed list. You must complete all lists associated with a count before you can process a reconciliation with update.
Fields
Complete List
Use this checkbox as follows:
Unchecked (default) - Not to complete the list
Checked - To complete the list
Note: Once you have completed a list, you cannot maintain it.
Note: It is recommended that you do not complete a list until after reconciliation, as a completed list can no longer be maintained.
Press Enter to complete the list.
282 | Infor System21 Inventory Management

853BStock Counting
Complete Count Lists [33/INS, 33/WHS] You can use this task to complete all lists associated with a count en masse, after you have specified details, reviewed the results of reconciliation, and before the final update.
You cannot complete lists if they contain detail records with lots referring to the special case of * Lot Error *. These are generated during the printing of count sheets if no lots exist for a batch-controlled, lot-controlled or serial-controlled item.
Complete Count Lists Count Selection Window To display this window, select the Complete Count Lists task.
Use this window to select the count number you want to complete.
Fields
Stockroom
Enter the required stockroom.
Alternatively, use the prompt facility to select from the Stockroom Selection pop-up.
Note: User must have been granted access rights to a bonded warehouse to be able to complete count lists for that warehouse.
Count Number
Enter the count number you want to complete. This count must be of an outstanding status, that is, the count has been printed and maintained.
Alternatively, use the prompt facility to select from the Outstanding Count Selection pop-up.
Press Enter to display the Complete Count Lists List Selection window.
Complete Count Lists List Selection Window To display this window, select a stockroom and count number and then press Enter on the Complete Count Lists Count Selection window.
Use this window to select an action list associated with a chosen count for completion.
Fields
Select (S)
Use Select (1) to select a list number associated with this count.
Select Update (F8) to perform the update.
Infor System21 Inventory Management | 283

853BStock Counting
Print Count Sheets [ 41/INS, 41/WHS] Use this task to produce a hard copy of your count, showing the summary recommendations made for your count. These are expanded to include lot/batch/serial level detail where appropriate.
You use the count sheets to record actual counted quantities for your items.
If you have chosen to count frozen stock, you enter pairs of free and frozen balances against each item on the count sheet. The system calculates the counted physical quantity as the sum of these two quantities.
If you have not chosen to count frozen stock, you enter the counted physical quantity against each item on the count sheet.
Note: If you are using Location Control, for counts that are in location sequence, the sort sequence is lot within item within location, and the column sequence (from left to right on the count sheet) is location, item and lot. For counts by item sequence, the sort sequence is lot within location within item and the column sequence is item, location and lot.
If a lot-controlled item has no recorded lots or each lot is empty, the software writes a record with the reference Lot Error. You must delete this reference during count entry and count and add the actual lots of the item (if they exist), or you can delete the item from the count.
In addition, when you print, you can split the workload for the count across a number of lists based on the number of instructions on the count and the number of instructions you want per list.
When you print the count sheet, it contains a list of items, the quantity of the items and the type. These can be as follows:
• Type 1 - Class/Date Control For more information, see the Create Count by Class/Date Control Window section.
• Type 2 - Manual Range For more information, see the Create Count by Manual Range section.
• Type 3 - Warehouse Location For more information, see the Create Count by Location section.
• Type 4 - Catchweight In this case, the item has a zero primary value and a non-zero secondary value. You need to investigate this item to find out if any stock of this item is still available. As you can receive more of the item between printing off the count sheet and completing the stock take, it is strongly recommended that you investigate and correct these type 4 items first.
If you are using Location Control, you can select a single stockroom, a range of counts and a sequence (item or location, whichever is the default) for which to produce the count sheets.
Note: Lot control is forced for all items in bonded warehouses.
284 | Infor System21 Inventory Management

853BStock Counting
Print Count Sheets Count Selection Window To display this window, select the Print Count Sheets task.
Use this window to enter the selection criteria for printing count sheets.
Fields
Stockroom
This field is not displayed if you are using Warehousing.
Enter the stockroom code.
Alternatively, use the prompt facility to select from the Stockroom Selection pop-up.
Note: User must have been granted access rights to a bonded warehouse to be able to print count sheets for that warehouse.
Count Number From/To
If you enter a single count, it must be outstanding. You can enter a range, to act as limiters. If you leave these fields blank, the software includes all recommendations.
No of Instructions/List
Enter a number to create multiple lists. If you enter zero, all counts appear on one list.
Count Frozen Stock
Use this field to specify whether frozen stock quantities are to be counted.
Select one of the following:
From Count Header (default) - If the decision as to whether you can view and maintain free and frozen quantities on count sheets and windows on each printed count is inherited from the appropriate count header
No - If you cannot view and maintain free and frozen quantities on count sheets and windows
Yes - If you can view and maintain free and frozen quantities on count sheets and windows
Note: If you use Warehousing, the next two fields are displayed.
Organise Count By
Select one of the following:
Warehouse (1) (default) - As the count only relates to your default warehouse, to create a new list when the number of location or item details exceeds the value set for No of Instructions/List
Area (2) - To create a separate count list for each change of area code within the warehouse
In this case, the software creates a new list for each change in area code. There may be several lists per area if the number of location or item details to be checked exceeds the value set for Number of Instructions/List.
Infor System21 Inventory Management | 285

853BStock Counting
Access to Dimension 1 (3) - To create a separate count list for each change of access to dimension 1
In this case, if, for example, you set up Aisle to be the first dimension in the warehouse, the software produces one action list per aisle.
Sequence Count By
Note: This field is also displayed if you are using Location Control when you press Enter.
Select one of the following:
Item (1) (default) - If the actions on the list are to be ordered by item
Location (2) - If the actions on the list are to be ordered by location code
Select Submit (F8) to submit the job to print the count sheets.
286 | Infor System21 Inventory Management

853BStock Counting
Reprint Count Sheets [42/INS, 42/WHS] Use this task to select count sheets you want to re-print.
If the Count Frozen Stock field is left unchecked, the recorded physical quantity is printed on the count sheet, if the View Quantity on Count field is set to Print or Both in the count profile.
If the Count Frozen Stock field is checked, the recorded free quantity is printed on the count sheet in place of the recorded physical quantity, if the View Quantity on Count field is set to Print or Both in the count profile. The recorded free quantity is calculated by subtracting the recorded frozen quantity from the recorded physical quantity.
The following additional information is printed for each item on the count sheet (if the View Quantity on Count field is set to Print or Both in the count profile):
• Recorded frozen quantity Note: The recorded frozen quantity is offset two-characters to the right of the corresponding free quantity of an item.
The following additional information is printed for each item on the count sheet:
• A box to enable entry of the counted frozen quantity of each item on the count Note: If you are using Location Control, for counts that are in location sequence, the sort sequence is lot within item within location, and the column sequence (from left to right) is location, item and lot. For counts by item sequence, the sort sequence is lot within location within item and the column sequence is item, location and lot.
Reprint Count Sheets Count Selection Window To display this window, select the Reprint Count Sheets task.
Use this window to re-print count sheets. You can print all lists or selected lists for a count.
Fields
Stockroom
Enter the stockroom code. This field is not displayed if you use Warehousing.
Alternatively, use the prompt facility to select from the Stockroom Selection pop-up.
Note: User must have been granted access rights to a bonded warehouse to be able to print count sheets for that warehouse.
Count Number From/Count Number To
If you enter a single count, it must be outstanding. You can enter a range, to act as limiters. If you leave these fields blank, the software includes all recommendations.
You can use the prompt facility on these fields to select from the Outstanding Count Selection pop-up.
Infor System21 Inventory Management | 287

853BStock Counting
List Number From/List Number To
If you enter a single list number, it must incomplete or outstanding. You can enter a range, to act as limiters. If you leave these fields blank, the software includes all recommendations.
You can use the prompt facility on these fields to select from the Select List Number pop-up.
Select Submit (F8) to submit the batch job to re-print your selected sheets.
Count Reconciliation You use reconciliation to compare counted stock values with the corresponding recorded computer stock values and assess stock count errors.
The software assesses stock errors for the counted values on both a percentage quantity and a value variance basis. If you have chosen to count frozen stock, count errors are assessed against the free, frozen and optionally the physical counted values independently and adjustments made accordingly. If you have not chosen to count frozen stock, count errors are assessed against physical counted values only.
If you have defined count profiles as count by classification, the software uses classification tolerances for each item detail record, that is, A, B or C.
If you have not specified count by classification for the stockroom, the software uses the single default set of quantity percentage and value tolerance figures to assess count errors.
You can restrict reconciliation (without update) to completed lists within the count, or to additionally include open lists that are still available for modification. You can also restrict the report content so that it only includes items with quantity/value variances.
You can print full detail or summary information by item with selection by item range.
The software highlights detail or item summaries with physical count errors with errors with * at the right-hand side of the report.
If an item summary if found with a physical count error but no physical count errors have occurred for the detail lines, the summary is highlighted with **. This situation normally arises due to a number of small positive (or negative) errors at detail level that in total constitute an error.
A similar situation happens in reconciliation with update where detail lines exist with a physical count error; however the summary is not flagged with a physical count error. This normally happens when you have a number of positive and negative physical count errors at detail level that cancel each other out. If this happens the software assesses whether the item summary is placed in error or the adjusted detail lines are ignored for the summary totals. If they are in error, the software processes forced adjustments for all detail variances regardless of the extent of the variance, and the summary is highlighted with **.
The software highlights detail or item summaries with free and frozen count errors with errors with # at the right-hand side of the report.
288 | Infor System21 Inventory Management

853BStock Counting
If an item summary if found with a free or frozen count error but no free or frozen count errors have occurred for the detail lines, the summary is highlighted with ##. This situation normally arises due to a number of small positive (or negative) errors at detail level that in total constitute an error.
If you want to assess whether variances are true count errors, you can print inventory movements that have occurred since the count sheets were printed, (and the computer stocks recorded), for those items that are in error.
You can use reconciliation with update to make adjustments involving the update of stockroom balances according to the tolerances specified. Full movement audit and history updates are reflected in Inventory for any adjustments that take place.
Additionally, item count summaries are updated to reflect the type of count carried out for the item, together with the last count date and a re-calculated next due count date. The stockroom period count history is updated to reflect the number and type of counts carried out for the stockroom.
If you use DRP and Production Planning, or both, the software writes net change triggers for any adjusted items. The software uses net change triggers to replace the items.
If you use Catchweight, the following occurs when reconciliation takes place.
For Catchweight items or non-Catchweight items with secondary units of measure, if the primary value is zero, the secondary value is also set to zero. If the primary value is adjusted, the secondary value is automatically adjusted. The nominal secondary value of the quantity is also adjusted.
The following examples serve to illustrate the decision making process carried out to decide whether to make and what adjustments to make.
In all of the following examples it has been assumed that the positive and negative percentage tolerances for the count are both set at 10%.
Example #1
Physical (a + b)
Free (a)
Frozen (b)
Recorded figures 100 80 20
Counted figures 100 75 25
% Variance 0% - 6.25% 25%
Here, the variance between the recorded and counted figures for the frozen quantity lies outside the acceptable tolerance level but the variances between the recorded and counted figures for both the physical and the free quantity lie within the acceptable tolerance level.
Movement Physical Free Frozen
Frozen adjustment 5 100 75 25
Note: Here, the frozen adjustment corrects the frozen quantity and alters the free quantity because of this frozen adjustment.
Infor System21 Inventory Management | 289
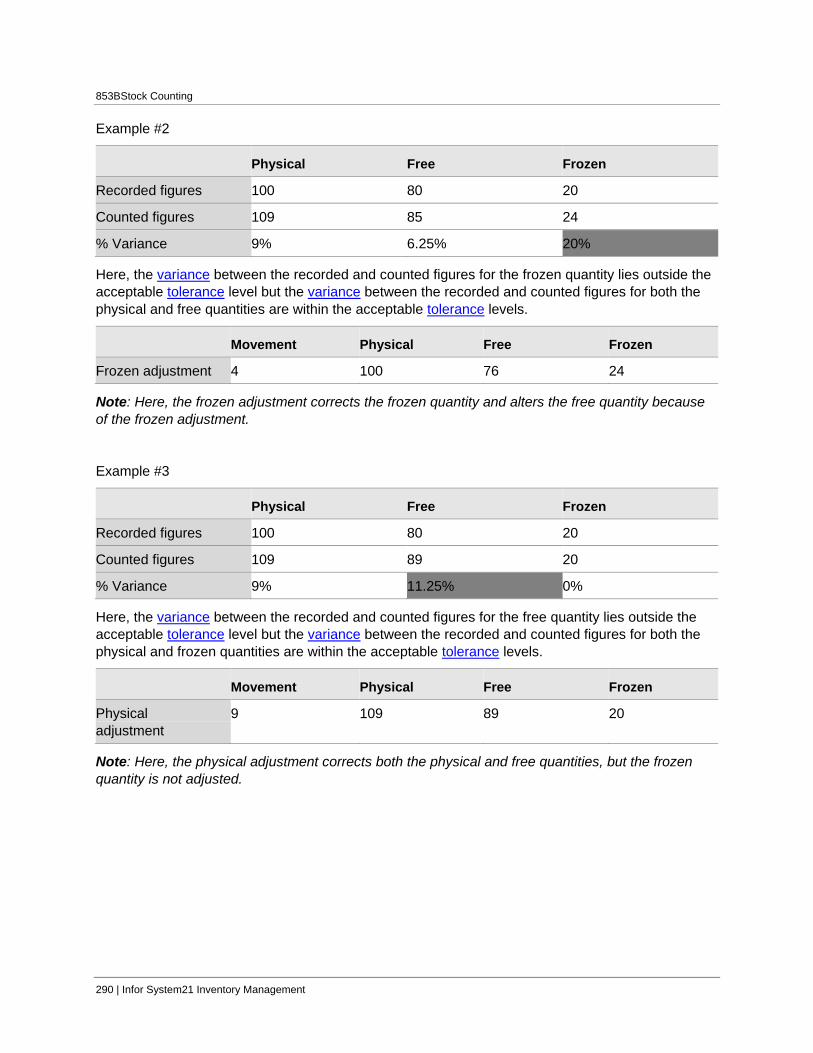
853BStock Counting
Example #2
Physical Free Frozen
Recorded figures 100 80 20
Counted figures 109 85 24
% Variance 9% 6.25% 20%
Here, the variance between the recorded and counted figures for the frozen quantity lies outside the acceptable tolerance level but the variance between the recorded and counted figures for both the physical and free quantities are within the acceptable tolerance levels.
Movement Physical Free Frozen
Frozen adjustment 4 100 76 24
Note: Here, the frozen adjustment corrects the frozen quantity and alters the free quantity because of the frozen adjustment.
Example #3
Physical Free Frozen
Recorded figures 100 80 20
Counted figures 109 89 20
% Variance 9% 11.25% 0%
Here, the variance between the recorded and counted figures for the free quantity lies outside the acceptable tolerance level but the variance between the recorded and counted figures for both the physical and frozen quantities are within the acceptable tolerance levels.
Movement Physical Free Frozen
Physical adjustment
9 109 89 20
Note: Here, the physical adjustment corrects both the physical and free quantities, but the frozen quantity is not adjusted.
290 | Infor System21 Inventory Management

853BStock Counting
Example #4
Physical Free Frozen
Recorded figures 100 80 20
Counted figures 106 89 17
% Variance 6% 11.25% 15%
Here, the variance between the recorded and counted figures for both the free and frozen quantities lie outside the acceptable tolerance level but the variance between the recorded and counted figures for the physical quantity is within the acceptable tolerance levels.
Movement Physical Free Frozen
Stock adjustment 6 106 86 20
Frozen adjustment -3 106 89 17
Note: Here the variance in the counted physical quantity is adjusted, even though it is within the accepted tolerance levels.
The free quantity is adjusted by both the physical and frozen adjustments.
The frozen quantity is adjusted by the frozen adjustment.
Note: Even though it was the variance in the free quantity which generated the physical stock adjustment, the adjustment quantity is equal to the change in the counted physical quantity and not the change in the counted free quantity.
Example #5
Physical Free Frozen
Recorded figures 100 80 20
Counted figures 108 87 21
% Variance 8% 8.75% 5%
Here, none of the variances lie outside accepted tolerance levels, so no adjustments are made.
Movement Physical Free Frozen
- 100 80 20
Infor System21 Inventory Management | 291

853BStock Counting
Example #6
Physical (a + b)
Free (a)
Frozen (b)
Recorded figures 100 80 20
Counted figures 111 85 26
% Variance 11% 6.25% 30%
Here, the variance between the recorded and counted figures for both the physical and frozen quantities lie outside the acceptable tolerance level but the variance between the recorded and counted figures for the free quantity is within the acceptable tolerance.
Movement Physical Free Frozen
Physical adjustment
11 111 91 20
Frozen adjustment 6 111 85 26
Note: Here the variance in the counted physical quantity is adjusted by the physical adjustment.
The free quantity is adjusted by both the physical and frozen adjustments.
The frozen quantity is adjusted by the frozen adjustment.
Example #7
Physical (a + b)
Free (a)
Frozen (b)
Recorded figures 100 80 20
Counted figures 116 90 26
% Variance 16% 12.5% 30%
Here, the variances between the recorded and counted figures for all quantities lie outside accepted tolerance levels.
Movement Physical Free Frozen
Physical adjustment
16 116 96 20
Frozen adjustment 6 116 90 26
Note: Here the variance in the counted physical quantity is adjusted by the physical adjustment.
The free quantity is adjusted by both the physical and frozen adjustments.
The frozen quantity is adjusted by the frozen adjustment.
292 | Infor System21 Inventory Management

853BStock Counting
Example #8
Physical (a + b)
Free (a)
Frozen (b)
Recorded figures 100 80 20
Counted figures 111 90 21
% Variance 11% 12.5% 5%
Here, the variance between the recorded and counted figures for both the physical and free quantities lie outside the acceptable tolerance level but the variance between the recorded and counted figures for the frozen quantity is within the acceptable tolerance.
Movement Physical Free Frozen
Physical adjustment
11 111 91 20
Frozen adjustment 1 111 90 21
Note: Here the variance in the counted physical quantity is adjusted by the physical adjustment.
The free quantity is adjusted by both the physical and frozen adjustments.
The frozen quantity is adjusted by the frozen adjustment.
If you use DRP or Production Planning, the software writes net change triggers for any adjusted items. Both frozen and physical adjustments generate these triggers.
Infor System21 Inventory Management | 293

853BStock Counting
Count Reconciliation without Update [51/INS, 51/WHS] Use this task to process reconciliation between system recorded stock figures and your manually entered count figures, without updating the system.
The following stock figures are reconciled:
• Physical stock • Free stock, if the Count Frozen Stock field is checked in the count header • Frozen stock, if the Count Frozen Stock field is checked in the count header
Request Count Reconciliation (without Update) Selection Window To display this window, select the Count Reconciliation without Update task.
Use this window to select the stockroom and count number that you want to use.
Note: If you use Warehousing, you only need to enter a count number as the software assumes that you want to process within your default warehouse.
Note: Lot-control is forced for items in a bonded warehouse that are not flagged as batch-controlled, lot-controlled or serial-controlled.
Fields
Stockroom
Enter the code of the stockroom that you want to use.
Alternatively, use the prompt facility to select from the Stockroom Selection pop-up.
Note: User must have access to a bonded warehouse to be able to request reconciliation of any count within the warehouse.
Count Number
Enter the count number for which you want to try to process a reconciliation.
Alternatively, use the prompt facility to select from the Outstanding Count Selection pop-up.
Press Enter to display the Request Count Reconciliation (without Update) Details window.
294 | Infor System21 Inventory Management

853BStock Counting
Request Count Reconciliation (without Update) Details Window To display this window, press Enter on the Request Count Reconciliation (without Update) Selection window.
Use this window to specify the details you want to reconcile.
Note: Generation of adjustments to account for count variances in a bonded warehouse is not allowed.
Fields
Count Lists
Select one of the following:
Completed (1) - To include completed lists in the report
All (2) (default) - To include both open and completed lists in the report
Report Content
Select one of the following:
Detail (1) (default) - To include item detail (that is, lots, batches and serial numbers) in the report
Summary (2) - To include item totals in the report
Note: If you are using Location Control, the detailed report content includes location details. The summary report content includes item level balances in item sequence or location level balances in location sequence.
Print Movements
Use this checkbox as follows:
Unchecked - To exclude movements
Checked - To print the movements (counted quantity, value of the count and recorded quantity of items)
The items printed in the report depend on the entry in the Items to be Included field.
Items to be Included
Select one of the following:
None (0) - Not to include details in the report
Variance (1) - To include those details with either a quantity or value variance in the report
All (2) (default) - To include all detail regardless of variance in the report
Note: If you select All, items with a variance in any one of the following quantities will be included on the reconciliation report.
• Physical quantity • Free quantity (if the Count Frozen Stock field is checked in the count header)
Infor System21 Inventory Management | 295

853BStock Counting
• Frozen quantity (if the Count Frozen Stock field is checked in the count header
Range of Items
From/To
Enter valid item reference number.
Alternatively, use the prompt facility to select from the Item Master Scan pop-up.
If you enter a single item it must exist on the Item Master file. If you enter a range, the From and To items used to define the range need not exist on the Item Master file except when they are the same value. If you leave the To item blank, it defaults to the From item. You can use range restriction to investigate specific item discrepancies.
Note: If you are using Location Control, the name of this section changes to Range of Locations and you can define the range of locations that you want to use.
Note: If you are using Location Control, this task sequences item-based counts by item, whereas location-based counts are always sequenced by location, regardless of the sequence in which they were create
Note: A blank range selection for items defaults to all items on the count.
Select Submit (F8) to submit the batch job.
296 | Infor System21 Inventory Management

853BStock Counting
Count Reconciliation with Update [52/INS, 52/WHS] Use this task to process a reconciliation between system-recorded and manually-counted stock figures. If you use this task, you can update the Inventory stockroom balances, according to the variances specified on the count profile.
Request Count Reconciliation (with Update) Selection Window To display this window, select the Count Reconciliation with Update task.
Use this window to select the stockroom and count number that you want to use.
Note: If you use Warehousing, you only need to enter a count number as the software assumes that you want to process within your default warehouse.
Caution: If user stockroom authorisation is active you cannot perform this transaction if you are not authorised to the stockroom.
Fields
Stockroom
Enter the code of the stockroom that you want to use.
Alternatively, use the prompt facility to select from the Stockroom Selection pop-up.
Note: User must have access to a bonded warehouse to be able to request reconciliation of any count within the warehouse.
Count Number
Enter the count number for which you want to try to process a reconciliation.
Alternatively, use the prompt facility to select from the Outstanding Count Selection pop-up.
Press Enter to display the Request Count Reconciliation (with Update) Details window.
Request Count Reconciliation (with Update) Details Window To display this window, press Enter on the Request Count Reconciliation (with Update) Selection window.
Use this window to specify the details that you want to reconcile.
Note: Generation of adjustments to account for count variances in a bonded warehouse is not allowed.
Fields
Infor System21 Inventory Management | 297

853BStock Counting
Report Content
Select one of the following:
Detail (1) - To include item detail (that is, lots, batches and serial numbers) in the report
Summary (2) - To include item totals in the report
Print Movements
Use this checkbox as follows:
Unchecked - Not to print movements
Checked - To print movements for all items that are in error
Note: If you are using Warehousing, in place of the checkbox you have four choices, as described below.
Select one of the following:
No (0) - Not to print movements
Inventory (1) (default) - To print movements for all items that are in error
Warehouse (2) - To print Warehousing movements for all items that are in error
Both (3) - To print both Inventory and Warehousing movements for all items that are in error
Items to be Included
Select one of the following:
None (0) - Not to include details are in the report
Variance (1) - To include details with either a quantity or value variance in the report
All (2) (default) - To include all detail regardless of variance in the report
Generate Adjustments
Select one of the following:
No (0) - Not to make stock adjustments
All (1) - To adjust all quantity variances regardless of size within inventory
Outside Tolerances (2) - To adjust those variances which are flagged as errors (with * or #) within Inventory
There is no default value.
If you set this field to All, the system corrects all variances in your stock figures irrespective of their size.
If you set this field to Outside Tolerances, the tables below serve to illustrate the adjustments that will be made to your stock levels by the system:
Generate Adjustments set to Outside Tolerances with no physical count error
298 | Infor System21 Inventory Management

853BStock Counting
Free stock count variance outside specified tolerances?
Frozen stock count variance within specified tolerance
Frozen stock count variance outside specified tolerance
No No adjustments Example #5
Frozen adjustment ONLY Examples #1 #2
Yes Physical Adjustment ONLY Example #3
Physical & frozen adjustments Example #4
Generate Adjustments set to Outside Tolerances with physical count error
Free stock count variance outside specified tolerances?
Frozen stock count variance within specified tolerance
Frozen stock count variance outside specified tolerance
No Physical & frozen adjustments Example #6
Yes Physical & frozen adjustments Example #8
Physical & frozen adjustments Example #7
Note: Physical count errors force the generation of frozen adjustments if the variance in the frozen quantity is not zero.
Note: To ensure that the physical, free and frozen quantities are all adjusted to match counted figures, you should set the Generate Adjustments field to All.
Note: Generate Adjustments must be set to No for counts in a bonded warehouse.
Reason Code
If you need to make adjustments, you must enter a movement reason.
Alternatively, use the prompt facility to select from the MOVR Movement Reason Code pop-up.
Select Update (F8) to submit the batch job.
Infor System21 Inventory Management | 299

853BStock Counting
Reconciliation History Updates If you request count reconciliation with update, the software performs the following count history updates:
Item Count History
• Count by Class If the item was a planned summary recommendation, the number of recommended counts is incremented. Similarly, if the item was part of an unplanned recommendation, that is, originating from an addition via recommendations maintenance, the number of unplanned counts is incremented.
• Count by Manual Range The number of unplanned counts is incremented.
Stockroom Count History
• Count by Class The software increments all numbers of A, B and C items counted for all planned item counts. In addition, the software increments the numbers of A, B and C items in error for planned summary recommendations.
• Count by Manual Range The software increments the number of other counts. In addition, the software increments the numbers of other counts in error.
Note: If you use Warehousing and you choose to count by Warehouse location, the software performs other updates associated with these counts.
300 | Infor System21 Inventory Management

853BStock Counting
Enquire on Recommended Counts [61/INS, 61/WHS] Use this task to view the details of recommended counts. You cannot maintain details using this task.
Count Enquiry Selection Window To display this window, select the Enquire on Recommended Counts task.
Use this window to select the stockroom and count number for your enquiry.
Fields
Stockroom
Enter a stockroom code, using up to 2 characters.
Alternatively, use the prompt facility to select from the Stockroom Selection pop-up.
Count Number
Enter a count number associated with the stockroom you have chosen.
Alternatively, use the prompt facility to select from the Recommended Count Selection pop-up.
Press Enter to display the Count Enquiry Details window.
Count Enquiry Details Window To display this window, select a stockroom and count list and then press Enter on the Count Enquiry Selection window.
This window displays the count details for your previously selected stockroom and count list combination. This includes the stockroom, the selected count number and list, the date (and time) on which the list was created, and the item count details. The middle of the window displays the information about the items included on the count, including the lot reference, if applicable, any reason codes for amendments to the count quantities, and both of those count quantities. Frozen quantities are also displayed when they have been included in the count.
Note: In 62/WHS the literal ‘Frozen’ is not displayed against each item, as there is insufficient space on the line.
Note: If you are using Location Control, the Location field is displayed on this window.
Fields
Infor System21 Inventory Management | 301

853BStock Counting
Position to Item
To position the display starting at a specific item, enter the item reference number in this field and then press Enter.
Select Exit (F3) to leave the enquiry.
302 | Infor System21 Inventory Management

853BStock Counting
Enquire on Outstanding Counts [62/INS, 62/WHS] Use this task to enquire on outstanding counts for a stockroom. You can review open or complete lists for a count.
Count Enquiry Selection Window To display this window, select the Enquire on Outstanding Counts task.
Use this window to select the count details on which you wish to enquire.
Fields
Stockroom
Enter a stockroom code.
Alternatively, use the prompt facility to select from the Stockroom Selection pop-up.
Count Number
Enter a count number.
Alternatively, use the prompt facility to select from the Outstanding Count Selection pop-up.
List Number
Enter a list number.
Alternatively, use the prompt facility to select from the Select Count List Number pop-up.
Press Enter to display the Count Enquiry Detail window.
Infor System21 Inventory Management | 303

853BStock Counting
Count Enquiry Detail Window To display this window, select a count and then press Enter on the Count Enquiry Selection window.
Use this window to view the details of the count that you have selected. The top of the window displays the stockroom and count number details, together with the item count information and the creation date.
The middle of the window displays all items associated with this count, any lot reference numbers if applicable, and the reason why the item is associated with the count.
Note: If you are using Location Control, the Location field is displayed on this window.
Fields
Position to Item
Enter an item code to start the display.
Note: If you are using Location Control, the following field is displayed instead of the Position to Item field:
Position to Location
Enter the location code to start the display.
Select Exit (F3) to leave the enquiry.
304 | Infor System21 Inventory Management

853BStock Counting
Enquire on Item Count Summary [63/INS, 63/WHS] Use this task to view yearly summary count information by item, that is, the number and type of counts carried out to date, with dates of the last count and the next count due.
Item Count Summary Enquiry Selection Window To display this window, select the Enquire on Item Count Summary task.
Use this window to select the stockroom and item for the count summary information that you want to view.
Fields
Stockroom
Enter a stockroom code.
Alternatively, use the prompt facility to select from the Stockroom Selection pop-up.
Item
Enter an item code to display count details for a single item.
Alternatively, use the prompt facility to select from the Item Master Scan pop-up.
Leave this field blank to display all item summaries associated with the specified stockroom.
Note: If you enter a stockroom and leave the Item field blank, the software displays summary count information for all items in the specified stockroom.
Press Enter to display the Item Count Summary Enquiry Details window.
Item Count Summary Enquiry Details Window To display this window, select a stockroom and then press Enter on the Item Count Summary Enquiry Details window.
Use this window to view the count summary information for the selected stockroom and to select the item that you want to view in more detail.
The top of the window displays your selected stockroom. The middle of the window displays a list of items held in the stockroom, the year and the number of recommended counts and unplanned counts that have been performed for each item. You can also view the date and the time of the last count and next count for each item.
Fields
Infor System21 Inventory Management | 305

853BStock Counting
Position to Item
If the list extends over a single window, enter the item reference number or the first few characters of an item to re-position the count list.
Options
Select
Use this to display count details for this item. This displays the Item Count Summary Enquiry Item Details window.
Select an item to view the Item Count Summary Enquiry Item Details window.
Item Count Summary Enquiry Item Details Window To display this window, select an item on the Item Count Summary Enquiry Details window.
Use this window to view summary information for the selected item and stockroom. The top of the window displays the stockroom and item you have selected. The middle of the window displays the year, the date and time of the last and next count for your selected item.
Fields
Recommended Counts
This field displays the number of recommended counts carried out this year.
Unplanned Counts
This field displays the number of unplanned, or manually requested, counts carried out this year.
Negative Stock Counts
This field displays the number of counts that have occurred with a negative balance for this year.
Note: The Low Stock Counts, Zero Stock Counts, Transaction Frequency Counts fields are provided for recommending counts in the future.
Select Exit (F3) to leave the enquiry.
306 | Infor System21 Inventory Management

853BStock Counting
Enquire on Count History [64/INS, 64/WHS] Use this task to view stockroom summary count information by period. You can only view counts for which you have run a reconciliation with update, even if no stock adjustments were actually generated.
At summary level the total number of counts is displayed, with information on the number of each ABC classified item counted with the number of items in error.
The number of other counts (those where you manually select the range) and other counts in error are displayed only at a detail level on an individual period basis.
Count History Enquiry Selection Window To display this window, select the Enquire on Count History task.
Use this window to select the stockroom and period for the count history information that you wish to view.
Fields
Stockroom
Enter the stockroom code.
Alternatively, use the prompt facility to select from the Stockroom Selection pop-up.
Week/Period
Enter the week or period you want to review. Leave this field blank to display all summaries associated with stockroom. These are displayed in descending period sequence by year.
If you want to view a specific period, you must use the following format:
YYMM for a Monthly usage cycle
YYWW for a Weekly usage cycle
where YY is the current year, MM is the current period and WW is the current week.
Note: You define the usage cycle in the Inventory company profile.
Press Enter to display the Count History Enquiry Summary window.
Infor System21 Inventory Management | 307

853BStock Counting
Count History Enquiry Summary Window To display this window, select a stockroom and period and then press Enter on the Count History Enquiry Selection window.
Use this window to view the count history information for the selected stockroom and period combination. The top of the window displays your selected stockroom. The middle of the window displays the periods in which a count occurred for this stockroom, the total number of counts, the number of A, B and C class counts carried out, and the number of errors that occurred.
Fields
Position To
If the summary count history extends over more than a single window, enter the period you want to view in this field.
Options
Select
Use this to display a more detailed count history. This displays the Count History Enquiry Stockroom Detail window.
Select a period to display the Count History Enquiry Stockroom Detail window.
Count History Enquiry Stockroom Detail window To display this window, select a period on the Count History Enquiry Summary window.
Use this window to view the summary period information for the stockroom, including the number of ABC classified items counted and the number of items with errors.
Select Exit (F3) to leave the enquiry.
308 | Infor System21 Inventory Management

Chapter 5 Inventory Updates 5
Inventory Updates Introduction The investment in Inventory typically represents one of the largest single areas of investment in a business, often as high as 25% of total assets. It is vital that you plan and control its acquisition and disposition.
There are a number of techniques to help with this control. In the sphere of a Production operation where demand is dependent on an agreed production schedule, the most common forms of control are Material Requirements Planning (MRP), or Just in Time (JIT).
However, there are a number of factors, independent of company decisions, which influence the demand for end-product items. These external factors include a certain amount of random variation in the demand for such items. As a result, forecasts of demand for these items are typically projections of historical demand patterns to determine average usage.
You must consider the concepts of independent and dependent demand when you select the appropriate Inventory Management techniques.
There are two types of Inventory: Movement and Organisational.
Inventory Holding
• Work In Progress - in a Production organisation• Stock In Transit - in a Distribution environment• Cycle Stock is a result of buying or making more than is needed immediately.• To determine the Economic Order Quantity, you must set the one-time costs of raising an order
and perhaps the cost of setting machines or transport against the costs of holding stock.• You would hold anticipation stock to deal with times when demand exceeds the rate of economic
supply for an item. Seasonal products, for example lawn mowers, are a good example of whereit is sensible to have a fairly steady rate of production throughout the year. You could build highlevels of stock over the winter so that the depletion rate of stock plus the production rate equalsdemand during high summer.
Infor System21 Inventory Management | 309

854BInventory Updates
Inventory Decisions You need to make two types of routine decisions when managing inventories - how much and when to order. Four main factors influence these decisions:
• Forecast demand • Replenishment lead time • Inventory-related cost • Management policies
There are two important parameters to assist inventory controllers in making these decisions:
• Economic Order Quantity - EOQ • Economic Time Between Orders - ETBO
Standard Calculation of EOQs:
EOQ = square root of [ (2 x CP x AU) / CH ]
where:
CP = Cost of order placement
AU = Average usage per annum
CH = Inventory holding cost per annum
CH = Item Cost * Carrying Rate/100
Once the software has calculated the EOQ, then:
ETBO = EOQ/WU
where WU = Weekly Usage.
The resulting Economic Time between Orders (ETBO) is in weeks.
Note: You specify the cost of order placement and carrying rate in the Inventory company profile.
Demand Management
Inventory Management has a range of facilities to help you manage independent demand items, traditionally controlled by re-order point techniques.
• You can use the value/usage matrix to help you implement a stock investment policy at each stockroom.
• You can use usage profiles to provide a range of calculations for forecast usage. • The software calculates the EOQ. You can use this as the basis of re-order quantity and time
between orders. • You can factor lead time within the re-order calculation to modify order review periods.
You can use Inventory Management to make re-order level calculations.
You can use many different criteria within the calculations to reflect differing item usages, values and stock control requirements.
310 | Infor System21 Inventory Management

854BInventory Updates
The culmination of the process is the production of the Re-order/Overstock report that details all recommendations.
Included in the set up before this are:
• The calculation of an average usage figure • The calculation of Re-order Point (ROP), Maximum Stock and Economic Order Quantity (EOQ) • The selection of one of 5 re-order policies appropriate to each item
Selection of the Re-order Policy
The software uses the following data for each of the re-order recommendations:
Physical/Available = 0
Expected = -90
Max. Weeks = 8 Average Usage = 10
Min. Weeks = 6 Lead Time = 4 weeks
Re-order Factor = 200%
ROP = (Min. Weeks) 6 + (LT) 4 * (Av. Usage) 10 = 100
Maximum stock = (Max. Weeks) 8 * (Av. Usage) 10 = 80
The maximum stock level is below the ROP because the lead time (4) is greater than the difference between maximum (8) and minimum (6) weeks, in other words 2.
Re-order Policy 1 (Up to Max)
ROQ = Maximum Stock - Expected + (Average Usage * Lead Time)
If you do not specify maximum stock on the item/stockroom record, the software obtains the appropriate value from the stock weeks grid. This is expressed in weeks and is multiplied by average usage to give a maximum stock value.
Example:
80 - - 90 + 40 = 210
Maximum Stock - Expected + (Av. Usage * LT)
Re-order Policy 2 (ROQ)
ROQ = Average Usage * Lead Time * FACTOR Percentage
Example:
10 * 4 * 200% = 80
Av. Usage * (LT) * Factor
Re-order Policy 3 (Up to Min)
To use this you must set the Calculate EOQ, etc. field to 0.
You can manually enter a ROP.
Infor System21 Inventory Management | 311

854BInventory Updates
ROQ = ROP - Expected
Example:
0 - - 90 = 90
Re-order Point - Expected
As you have set Calculate EOQ, etc. field to 0 for this policy, the software does not calculate ROP; it remains as 0 on the item/stockroom record.
Re-order Policy 4 (Up To ROP)
ROQ = ROP - Expected + (Average Usage * Lead Time)
Example:
100 - -90 + 40 = 230
Re-order Point - Expected + (LT)
Re-order Policy 5 (EOQ)
ROQ = EOQ
If you use policies 1 to 4, you can manually enter a re-order quantity. You can use policy 3 if you want to re-order to demand. The software reviews the stock position as follows for all items:
1 You can calculate available stock as:
Physical - Frozen - Allocated = Available
2 You can calculate expected stock as:
Available + Order + In Transit - Back Order - Reserved = Expected
3 If expected stock is greater than maximum stock, the item is reported as in excess.
4 If expected stock is less than re-order point, the item is reported for order action.
5 If you need an order action, you can manually specify the re-order quantity. If you do not, the software determines the re-order quantity for each policy as follows:
• If the policy is Up to Max, the software will recommend re-order up to the maximum stock holding.
• If the policy is ROP, the software calculates a re-order quantity based on the re-order quantity factor, the average usage and the lead time or the difference between expected and ROP if greater.
• If the policy is Up to Min, the software will recommend re-order up to the minimum stock holding. • If the policy is Up to ROP the software will recommend that you order enough to bring expected
back to ROP. • If the policy is EOQ, the software will recommend re-order of the calculated or maintained
economic order quantity.
312 | Infor System21 Inventory Management

854BInventory Updates
Example:
If the maximum stock is:
Maximum Stock Weeks * Average Usage
The re-order point is:
(Minimum Stock Weeks + Lead Time (in weeks)) * Average Usage
The expected stock is:
Available + On Order + In Transit - Back Orders - Reserved
The EOQ depends on cost of order placement, average usage per annum and inventory holding cost per year.
Regular Updates
To improve the speed and quality of information displayed within Inventory, a series of weekly and periodic balances are maintained. These balances need to be updated at week, month and year end.
At month end, you should run both the week end and month end updates consecutively. The month end run normally includes a valuation of stock movements and this, therefore, is prompted.
At year end, you should run the week end, month end and year end consecutively.
Infor System21 Inventory Management | 313

854BInventory Updates
Week End Update [1/INC] This batch task performs the following:
• If you have set the usage cycle in the company profile to W (weekly), the software re-calculates the average weekly usage for each product/stockroom.
• Both the physical and in transit stock at the end of the week are stored in a separate field (Stock at Start of Week) for each product/stockroom.
• The software re-sets the usage this week to zero for each product/stockroom. • The current week number on the calendar file is incremented by 1. If you are updating the last
week of the year, week number is set to 1.
If you are processing the last week of the year, you should follow this update immediately by month and year end processing since the year number on the Calendar file is only incremented by the year end update.
Note: If you use Catchweight, for items with a secondary unit of measure, the secondary stock at the start of the week is updated. The stock at the start of the week is equal to the total physical stock and the stock in transit, minus all movements in future weeks.
If an item does not have a secondary unit of measure, the secondary stock at the start of the week is zero.
Week End Update Confirmation Window To display this window, select the Week End Update task.
Use this window to confirm the Inventory week end.
Fields
Week Number
The current year/week number as recorded on the Inventory Calendar (i.e. the week being closed) is displayed, enabling verification that the correct week is being closed.
If the end date of the week being closed is greater than or equal to the system date then a warning message is also displayed.
Regenerate ABC Classifications
Enter one of the following:
0 - Not to regenerate automatically the ABC classifications of your items during the week end processing
1 - To regenerate automatically the ABC classifications of your items during the week end processing
Note: Regenerate ABC Classifications is only shown when the usage cycle is Monthly.
314 | Infor System21 Inventory Management

854BInventory Updates
Note: It is not possible to submit more than one Inventory Week End Update request at any one time. As soon as a user requests this task, other users will be locked out of the task until the original request has completed successfully. An error message is displayed when a user requests this task whilst a previous request is pending/in progress.
Select Submit (F8) to submit the update.
Month End Update [2/INC] This batch task performs the following tasks for each product/stockroom.
• If you have set the usage cycle on the company profile to monthly, Inventory re-calculates the average monthly usage.
• The usage this period is set to zero. • The number of sales orders this period is set to zero. • The number of substitutions this period is set to zero. • Current physical stock is stored in a separate field - Stock at Start of Period. • Inventory calculates the stock value using the appropriate costing method and stores the value
in a field called Stock Value at Start of Period.
The task also:
• Increments the current period number by 1
Note: The current period number is set to 1 when the end of the year is reached.
• Produces a Stock Movements Valuation report if you have requested this as part of the submission process
This report is produced based on parameters specified at that time.
Caution: Run Inventory Month End before you run any updates within the Accounts module. Inventory's Calendar dictates the posting of invoices to Accounts Receivable. You must use Close Inventory Period to post to a future period; otherwise, postings will continue for the previous period and be incorrect.
Note: This may be submitted via Machine Manager so that it can be scheduled to run out-of-hours on a regular basis. To do this you will need to create Machine Manager Group Schedules to hold these dates and use these instead of the weekly mask in the auto-day start or auto-day end entry.
Note: If Catchweight is in use, for items with a secondary unit of measure, the secondary stock at the start of the period is updated. The stock at the start of the period is equal to the total physical stock and the stock in transit minus all movements in future periods. If an item does not have a secondary unit of measure, the secondary stock at the start of the period is zero.
Infor System21 Inventory Management | 315

854BInventory Updates
Month End Update Record Report Selection Criteria Window To display this window, select the Month End Update task.
Use this window to specify the criteria that you want to use to produce the month end update report and process your month end update.
• To action the month end update and print a report, enter a range of parameters and then press Enter.
• To action the month end update without printing a report, leave all fields blank and then press Enter.
Fields
Include Kits
Select one of the following:
Components (1) (default) - To include kit components in the report
Headers (2) - To include kit headers in the report
Both (3) - To include both kit components and headers in the report
From/To
Stockroom Code
Enter a single stockroom code, or range of stockrooms, for which you want to produce the month end report.
You can use the prompt facility on these fields to select from the Stockroom Selection pop-up.
Item
Enter a single item, or range of items, for which you want to produce the month end report.
You can use the prompt facility on these fields to select from the Item Master Scan pop-up.
Item Group Major/Minor
Enter a single item group, or range of item groups, for which you want to produce the month end report.
You can use the prompt facility on these fields to select from the PGMJ Item Group - Major and PGMN Item Group - Minor pop-ups.
Item Type
Enter a single item type, or range of item types, for which you want to produce the month end report.
You can use the prompt facility on this field to select from the PTYP Item Type pop-up.
Item Class
Enter a single item class, or range of item classes, for which you want to produce the month end report.
316 | Infor System21 Inventory Management

854BInventory Updates
You can use the prompt facility on this field to select from the PCLS Item Class pop-up.
Press Enter to display the Month End Update Confirmation window.
Month End Update Confirmation Window To display this window, press Enter on the Month End Update Record Report Selection Criteria window.
Use this window to specify whether ABC classifications are regenerated and to specify the report sequences.
Fields
Month Number
This displays the current year/period number as specified on the Inventory Calendar (i.e. the period number which is being closed), enabling verification that the correct period is being closed.
If the end date of the period being closed is greater than or equal to the system date, a suitable warning is also displayed.
Regenerate ABC Classifications
Enter one of the following:
0 - Not to generate ABC classifications
1 - To generate ABC classifications
Note: This field is only shown when the usage cycle of the company is set to monthly.
Stockroom Fiscal Close
Use the next three fields to determine how you want to process a stockroom fiscal close for your selected stockroom.
Note: These fields are only displayed if you have set the Stockroom Fiscal Close field to 1 in the Inventory company profile so that you can automatically produce a stockroom fiscal close at month end.
Note: Use the Primary Sequence and Secondary Sequence codes to control the fiscal close. For example, if you specify that your primary sequence is by item and your secondary sequence is by movement date, the system will close the fiscal period by item and movement date order.
Primary Sequence
Select the primary sequence that you want to use to process a fiscal close.
These codes are set up in the Inventory Descriptions file under major type SJSQ.
Infor System21 Inventory Management | 317

854BInventory Updates
Secondary Sequence
Select the secondary sequence that you want to use to process a fiscal close.
These codes are set up in the Inventory Descriptions file under major type SJSQ.
Report Content
Enter one of the following:
0 - Not to produce a report of the fiscal close
1 - To produce a detailed report of the fiscal close
2 - To produce a summarised report of the fiscal close
3 - To produce both a detailed and summarised report of the fiscal close
Note: It is not possible to submit more than one Inventory Period End Update request at any one time. As soon as a user requests this task other users will be locked out of the task until the first request has either completed successfully or been cancelled. An error message is displayed when a user requests this task whilst a previous request is pending or in progress.
Select Submit (F8) to perform the update and print a report, if you have specified that you wish to do so.
If Period End Average Costing is active, then the following additional processing occurs when the Inventory Month End Update function takes place:
For each Item/Stockroom combination that is processed within the Month End Update, the following calculations and updates occur:
1. The Period End Average Cost is calculated for the Period that is being closed.
2. A Period End History record is written for the Period that has been closed.
3. The Period End Average Cost and Period End Stock Balance are updated with the new Period End Average Cost and new opening balances taken from the Stock Balance record.
4. A Period End Average Cost record is written.
5. Each movement within the Period is re-valued using the Period End Average Cost. A cost adjustment record is written for the difference between the cost recorded at the time of the receipt and the cost calculated using the Period End Average Cost.
The detailed calculations for each of the processes described above are as follows:
1. Period End Average Cost is calculated for the Period that is being closed.
The new Period End Average Cost is calculated by dividing the total cost of receipts in the Period by the total quantity received in the Period. Both these values are cumulative over the opening Period values. This gives a unit cost, which is the Period End Average Cost. This unit cost is then applied to the current balance of the Item in the Stockroom, to give a valuation of the current balance at the foregoing Period’s average cost. This provides the opening balance and value for the next Period’s calculation.
In practice, a Period Stock Balance is maintained, which keeps a running total of the current Period’s average cost so far. This is made up of the total receipts and their costs in the month so far,
318 | Infor System21 Inventory Management

854BInventory Updates
accumulated with the opening balance and value. Thus the on-going Period Average Cost is maintained, as well as the totals used to calculate it, and in turn this becomes the Period End Average Cost at the end of the Period.
2. A Period End History record is written for the Period that has been closed.
Once the new Period End Average Cost has been calculated, a Period End Stock History record is written for the Item/Stockroom. This holds all the details from the Period start, the Period total receipts, and the Period end. These will always be available to allow reconciliation with the actual movements from which the totals were derived, and to be available to provide historical information regarding the rates that were used to re-value the stock movements in the Period.
3. The Period End Stock Balance is updated with the new Period End Average Cost.
As described above, the Period End Stock Balance is updated with the current stock balance once the Period End History updates have been recorded. The current physical balance is used to reset the next Period’s Opening Stock Balance. This is then factored by the newly calculated Period End Average Cost from the previous month to give the Period Opening Value.
4. A Period End Average Cost record is written.
A Period End Average Cost record is also written. This record is identical to the History record, but is maintained separately, so that it is possible to retain a certain number of Periods on the ‘live’ database for enquiry purposes, when the history records may have been archived or removed elsewhere to satisfy legal requirements.
5. Each movement within the Period is re-valued.
Once the Period End Average Cost for an Item has been determined, all of the transactions for the Item within the Period are re-valued using that cost. Instead of updating the movement transactions themselves, a new cost adjustment transaction is generated for each of them (transaction type ‘Z’), which accounts for the difference between the original cost of the movement, and the ‘correct’ Period average cost. Each of these adjustments retains the Serial Number of the original transaction to which it relates. This allows the original transaction and the adjustment movement to be considered together, to give the full movement data including the Period End Average Cost.
Year End Update [3/INC] Use this task to:
• Update the number of weeks this year and last year specified on the calendar • Change the number of periods specified on the calendar • Set any yearly accumulators to zero • Increment the year number by one • Produce a Stock Valuation report as part of the submission process
Note: This task is the same as the Calendar Maintenance and Year End Update task.
Infor System21 Inventory Management | 319

854BInventory Updates
Maintain Calendar File Window To display this window, select the Year End Update task.
Use this window to specify the current date information for Inventory.
Fields
Current Year
You cannot change this value as it is updated automatically.
Current Week
Enter the current week, using up to two numeric characters.
Current Period
Enter the current period, using up to two numeric characters.
No. of Weeks This Year
Enter the number of weeks this year, using up to two numeric characters. The value must be less than or equal to 53.
No. of Weeks Last Year
Enter the number of weeks last year, using up to two numeric characters. The value must be less than or equal to 53.
No. of Periods This Year
Enter the number of periods this year, using up to two numeric characters. The value must be less than or equal to 13.
Note: This information is linked to the Sales Analysis company profile and Forecasting's company profile periods/backups details.
Press Enter to submit a batch job to perform the year end update.
Calculate ROP, Max Stock, and EOQ [4/INC] You can use this task to calculate the ROP, Maximum Stock and EOQ. These calculations are performed during the Ad-Hoc Update for all items that have 1 in the Calculate EOQ, etc. field on the second Stockroom Details Maintenance window.
Note: Run this task after the week/month end update to pick up the latest average usage figures.
You can see information about the basis of these calculations on the Maintain Company Profile window and on the Stockroom Details Maintenance window.
There are no selection criteria for this task. Select Confirm Submit (F8) to process the batch job.
320 | Infor System21 Inventory Management

854BInventory Updates
Infor System21 Inventory Management | 321
854BInventory Updates
GIM (Item Update)[11/INC] You use this task to synchronise the attribute values of item(s) in each designated partner company with the corresponding attribute values defined for the item(s) in their owning company.
It can be invoked from an owning company to process all published item definitions for that company that are flagged to be accepted by a partner company without further review or from a partner company to process just the published item definition for the received company code and item number.
The process followed for each selected item is described below:
The Item Catalogue is accessed to determine the Item Attribute Profile Code applicable for the item. The Item Attribute Profile Code of a published item establishes which attributes of that item are to be replicated from the owning company to each partner company.
The Item Attributes Definition file is accessed in Table Name sequence. Each field on each table processed will be updated according to the flag setting for that attribute in the Item Attributes Definition file.
For attributes defined as global, the attribute value in the partner company will be updated with the corresponding value from the owning company.
For attributes defined as local (with default), the attribute value in the partner company will be defaulted to the corresponding value from the owning company only if a new item definition is being generated in the partner company.
For attributes defined as local, the attribute value in the partner company will be defaulted based on the normal rules for defaulting items attributes within the partner company, but only where a new item definition is being generated in the partner company.
Once all of the attributes of an item have been updated, the Item Update Flag in the Published Item Definitions file for the processed item is set to indicate that the partner company item definition has been updated with the appropriate global attribute value settings.
This process produces a series of audit reports that list, for each partner company, details of which item definitions have been added and changed.
Note: A partner company’s definition of an item will not be updated if anther user is updating it.
Global Item Maintenance Submit Transfers (Confirm/Amend Selections) Window To display this window, select the GIM (Item Update) task.
Use this window to synchronise the attribute values of item(s) in each designated partner company with the corresponding attribute values defined for the item(s) in their owning company.
Fields
322 | Infor System21 Inventory Management

854BInventory Updates
Select (Sel)
Select one of the following:
Defer Update (Blank) - To defer the update of an item's definition in the partner company
Previous item update failed (0)
Note: This status is achieved if an item is being updated by another user when the Item Update attempts to update a partner company's definition of a published item.
Accept Definition (w/o review) (1) - Where either:
• The owning company pushes definitions of an item to the partner company. • The partner company has decided it will accept a published definition from another company
without having to review the definition before its version of the definition is updated.
Accept Definition (with review) (2) - Where the partner company wishes to review the definitions of items published by other companies before deciding to subscribe to said definitions
Delete (4) - To remove a pending transfer request
Note: This option is only available when this is accessed by an owning company.
Reject Definition (9) - To signify that the partner company has decided not to subscribe to the published definition of the item
Position to Item
Enter any fifteen-character code.
The value entered is used to re-position the displayed list of pending transfer details.
Functions
Select/Deselect All (F13)
Use this to toggle the selection values between Accept Definition (w/o review), Accept Definition (with review) and Defer Update.
More Options (F23)
Use this to toggle the option text values.
Select Submit Transfer (F8) to process the selected transfers.
Infor System21 Inventory Management | 323

854BInventory Updates
Global Duty Amendment [20/INC] Whenever a duty tariff changes, you need to incorporate this change in the price list for all of the affected products. Use this activity to alter the price lists. The procedure checks the product type and updates item prices within a group by a specified rate. If the price list is effective, all new orders will include these changes.
This batch job updates the duty rate on the Descriptions file, and the duty value on all items with the tariff code.
Each item identified for a change is also added to the Mass Item Price Uplift work file ready to update all appropriate price lists. Refer to the Advanced Pricing - Mass Item Price Uplift section in the Sales Order Processing Product Guide.
Global Duty Amendment Window To display this window, select the Global Duty Amendment task.
Use this window to select the tariff codes you want to update. The window displayed shows the existing tariff codes and their current tariff rates.
Fields
New Rate
Enter the new rate, which must be a monetary value in base currency.
For spirits, this is rate per litre of alcohol.
For non-spirits, this is the rate per hectolitre of liquid.
Options
Delete
Use this to delete a tariff. This tariff is not included in the price uplift. Select Delete on the confirmation pop-up and then press Enter to confirm the deletion. It is not mandatory for a tariff to be deleted in order to prevent a price uplift. The default value of the New Rate field is .00 and the Current Rate is not affected if the value is left as that.
Functions
Reset (F5)
Use this to cancel any changes you have made before submitting the job.
Press Enter to validate the new rates and then select Submit (F8) to update the rates and duty values in the Item Master file. The item price changes are also prepared ready for a Mass Item Price Uplift. The change in duty value is added to the existing duty value. The change in the duty value is added to the existing base list price in the Item Master file. If the base list price in the Item Master file is blank, the change in duty value is not written to it.
324 | Infor System21 Inventory Management
854BInventory Updates
Infor System21 Inventory Management | 325

854BInventory Updates
Standard Cost Change List [25/INC] Use this task to create a list of standard cost changes. This list of changes can then be applied when these new costs need to become effective. This can either be done immediately or by the use of a scheduled job in Machine Manager.
You can group items for change into lists. You can create as many lists as you need. The list of items can be built using a variety of selection criteria.
Once the list is built, existing costs can be viewed and new costs can be input.
The list of cost changes can then be applied and optional stock value cost adjustment movements can be created for the current stock on hand, which can then be posted via AFI.
Only the user who created the list can maintain or process it interactively. Other users can only view or print a list.
The following actions can be performed via this task:
• Create a list. • Add items to the list, item by item or by using ranges of item and item attribute codes. In both
cases, items can be immediately excluded when: • The cost is not zero • The Inventory stock balance is zero (this is optional) • They appear on a deletion request list
• Enter a new standard cost for the item. • Remove items from the list. • Delete the list. • Enquire on an item’s stockroom details via the All Stockrooms for an Item enquiry. • Print the list. This gives cost variance and adjustment detail. • Process the list immediately. • Release the list for batch processing.
Lists are processed via the job queue when a list is selected for processing immediately on the Standard Cost Change Maintenance Selection window. The status of the list will change to Submitted. Alternatively, a list may be processed by Machine Manager, in which case the status is changed to Released. The Machine Manager task will need to be set up by the user. When the task is invoked by Machine Manager, it will check for an effective date which is equal or before the current date and process any lists with a status of Released.
Note: Task 1910 should be set up in Machine Manager Auto Day End or Auto Day Start to schedule the update of lists with a status of Released. See the Machine Manager product guide for further guidance on how to set up a scheduled application task.
All items on the list are processed and the material and total costs are changed in the Inventory Stockroom and Landed Cost files. All changes are audited and reported. If no stockroom has been specified for the item, all stockrooms are changed. The report shows a single line with no stockroom detail and the previous cost is set to ** on the report.
326 | Infor System21 Inventory Management

854BInventory Updates
If the user has requested a cost adjustment movement, detail of all cost changes is also written to the inventory movement files if the physical stock quantity is not equal to 0. The value is the difference in cost between the original cost value for the current physical stock level (physical stock x cost price) and the revised cost value for the current physical stock level (physical stock x new input cost). A quantity of zero is always written to a cost adjustment movement. The movement reason is set to whatever the user has requested. This information can then be posted to the General Ledger via AFI if required.
Note: Cost adjustment movements are not generated for items with zero physical stock quantity or where there is no change to the cost.
Once a list is processed, it is deleted and no longer available on the list for selection.
Standard Cost Change Maintenance Selection Window To display this window, select the Standard Costs Change List task. If you have no existing lists, it will be necessary to use the Add (F6) function before maintaining the list details.
Use this window to select and maintain existing lists. Alternatively, existing lists may be processed, deleted or printed.
Fields
List
This field displays the list reference.
Created
This field displays the date on which the list was created.
Effective
This field displays the date on which the list becomes effective (for updating of the costs).
Status
This field displays the status for the list.
One of the following is displayed:
Created - Newly created, with no costs entered
Zero Costs - Created and having some zero cost values
Submitted - List submitted for immediate processing
Released - Available for update by machine manager scheduled update
WIP - List with costs partially applied
User ID
This field displays the user who created the list.
Infor System21 Inventory Management | 327

854BInventory Updates
Options
Amend Header
Use this to amend the list header on the Create/Amend List pop-up.
Amend Costs
Use this to amend the items and their costs within the list on the Standard Cost Change Cost Maintenance window.
Delete
Use this to delete the list.
Use this to print the list.
Process
Use this to process the list immediately.
Release
Use this to release the list for a Machine Manager scheduled update. Previously submitted lists cannot be re-submitted.
If you select Process to process the list immediately, it cannot be selected for any other activity. Scheduled updates can be selected for immediate update or other activity. Immediate submissions are validated to ensure that the effectivity date has been reached. If the validation is passed, a job is submitted to perform the changes. Scheduled updates can be released, but when processed, will only process lists where the effectivity date has been reached.
Created lists can only be selected for maintenance or deletion.
The list status changes to Submitted or Released if Process or Release is selected.
Functions
Add (F6)
Use this to add a new list. The Create/Amend List pop-up will be displayed.
Include All Users/Exclude All User (F13)
Use this to toggle between including and excluding other users' lists. You can only print lists belonging to other users.
Press Enter to process any selected options.
328 | Infor System21 Inventory Management

854BInventory Updates
Create/Amend List Pop-up To display this pop-up, select Add (F6) on the Standard Cost Change Maintenance Selection window. Alternatively, select Amend Header against an existing list.
Use this pop-up to create or amend a list for use during Mass Standard Cost Change processing.
Fields
List
Enter a list reference. When you are adding an item, this field will display the list to which you are adding.
Effective Date
Enter or select a date on which the list of cost changes is effective. This defaults to the current date.
This date is validated in conjunction with the reference date.
Include Items
With Zero Cost Only
Select one of the following, to determine whether to restrict to zero cost items:
All Items (0) (default)
Items with no standard cost (1)
With Physical Stock Only
Select one of the following, to determine whether to restrict to items having physical stock:
All Items (0) (default)
Items with physical stock (1)
Awaiting Deletion
Select one of the following, to determine whether to restrict to items that are not selected for deletion:
All items (0)
Items not on a deletion list (1) (default)
Note: For further information on item deletion lists, see the Maintain Lists and Validate Items section in the Inventory Management Utilities chapter of this product guide.
Movement Detail
Create Cost Adjustments
Use this checkbox as follows:
Unchecked - To suppress cost adjustments for existing stock
Infor System21 Inventory Management | 329

854BInventory Updates
Checked (default) - To create cost adjustments for existing stock
Reference
Enter the reference number for the movement, using up to 14 alphanumeric characters. You can link this with the reference type.
Reference Date
Enter or select a date to be used as the reference date. This field defaults to the current system date. The reference date is cross-referenced with the table of period and week end dates, to decide the week and period numbers for ageing the stock movement and history records.
If the effective date is changed, an error message is displayed, forcing you to amend the reference date as well. This date cannot be before the effective date.
Reference Type
Enter the reference type, using up to 3 alphanumeric characters.
Alternatively, use the prompt facility to select from the TRAN Movement Reference Type pop-up.
You can use the Reference Type field to enter a mnemonic to describe the reference number. For example, you can use REQ to indicate that the reference number is a stores requisition note number.
Narrative
Enter the narrative or description for the movements, using up to 20 alphanumeric characters. The default is Standard cost amend.
Reason Code
Enter a reason code.
Alternatively, use the prompt facility to select from the MOVR Movement Reason Code pop-up.
Functions
Add Items (F6)
Use this to update the list header of a new list and add items to the list.
Select Update (F8) to save the changes you have made to the list.
Standard Cost Change Cost Maintenance Window To display this window, select Amend Costs against a list on the Standard Cost Change Maintenance Selection window.
Use this window to select, remove, amend or enquire on an Item on the list, or to add new item costs.
Fields
330 | Infor System21 Inventory Management

854BInventory Updates
Position To
Enter an item to re-display the window starting at the item selected. You can enter part of a code (leading characters).
You can use the prompt facility on this field to select from the Item Master Scan pop-up.
Select
Enter one of the following:
1 - To maintain the landed costs
4 - To remove the item from the list
5 - To enquire on the item
Item
This field displays the item code.
Description
This field displays the item description (and may be truncated).
Store
This field displays the item stockroom.
** in this field means that the item was added to the list with no stockroom selected. Existing costs are not shown and entered costs are applied to all stockrooms for the item.
UoM
This field displays the cost unit of measure (UoM). This is useful if you are using Catchweight, as the cost UoM is the item’s secondary UoM and not the stockroom issue UoM.
Material Costs/Standard Costs
These fields display the current material and standard cost. You can enter a new material cost and this will be reflected in the standard cost. The standard cost is calculated from the material cost with any standard landed costs applied to it. If no landed costs are defined, the standard cost equals the material cost.
Functions
Add Items (F6)
Use this to add further items. The Standard Cost Change Add Items window is displayed.
Press Enter to process the selected options and re-calculate the standard costs.
Select Update (F8) to save your changes and return to the Standard Cost Change Maintenance Selection window
Infor System21 Inventory Management | 331

854BInventory Updates
Standard Cost Change Add Items Window To display this window, select Add Items (F6) on the Standard Cost Change Cost Maintenance window.
Use this window to add items to a standard cost change list.
Fields
Item
Enter an item to add it to the list.
Alternatively, use the prompt facility to select from the Item Master Scan pop-up.
Only standard costed items can be added to the list.
Stockroom
Enter a valid stockroom, or use the following field.
You can use the prompt facility on this field to select from the Stockroom Selection pop-up.
Or
Select one of the following:
All (1) - To select all stockrooms where the item exists
Single (2) - To select the item only, irrespective of stockroom
In this case, no existing stockroom cost detail is extracted. This is useful where a single cost is to be applied to all stockrooms.
(The default for this field is blank, meaning that a stockroom must be entered.)
Items Table
Select
Enter one of the following:
4 - To remove the item from the list
5 - To enquire on the item
A list of the new items is displayed, as they are added, showing Item, Description, Stockroom (Store) and Errors.
Functions
Add By Range (F7)
Use this to add further items on the Standard Cost Change Add Items by Range pop-up.
Select Update (F8) to update the items on the list and return to the Standard Cost Change Cost Maintenance window.
332 | Infor System21 Inventory Management

854BInventory Updates
Standard Cost Change Add Items by Range Window To display this window, select Add by Range (F7) on the Standard Cost Change Add Items window.
Use this window to select ranges of items to be added to a standard cost change list.
Fields
Item From/To/Or
You must enter an item range for addition to the list or select All Items in the Or field.
You can use the prompt facility on the From/To fields to select from the Item Master Scan pop-up.
Item Type From/To
You can optionally enter an item type range for addition to the list.
You can use the prompt facility on these fields to select from the PTYP Item Type pop-up.
Item Class From/To
You can optionally enter an item class range for addition to the list.
You can use the prompt facility on these fields to select from the PCLS Item Class pop-up.
Major Group From/To
You can optionally enter a major group range for addition to the list.
You can use the prompt facility on these fields to select from the PGMJ Item Group - Major pop-up.
Minor Group From/To
You can optionally enter a minor group range for addition to the list.
You can use the prompt facility on these fields to select from the PGMN Item Group - Minor pop-up.
Division From/To
You can optionally enter a division range for addition to the list.
You can use the prompt facility on these fields to select from the DIVN Inventory Product Division pop-up.
Sub Division From/To
You can optionally enter a sub division range for addition to the list.
You can use the prompt facility on these fields to select from the SDIV Inventory Item Sub-division pop-up.
Stockroom From/To
You must enter either a stockroom range for addition to the list or select one of the following in the Or field:
Infor System21 Inventory Management | 333

854BInventory Updates
All (1) - To select all stockrooms where the items exist
Single Cost (2) - Select items only, irrespective of stockroom
In this case, no existing stockroom cost detail is extracted. This is useful where a single cost is to be applied to all stockrooms.
You can use the prompt facility on the From/To fields to select from the Stockroom Selection pop-up.
Select Update (F8) to add the items to the list and return to the Standard Cost Change Add Items window. All standard costed items which meet all of the selection criteria are added to the list. If any are duplicated, or appear on another list, an error or warning will be displayed on the Standard Cost Change Add Items window.
Landed Cost Entry Window To display this window, select 1 (Landed Costs) against a line on the Standard Cost Change Cost Maintenance window.
Use this window to enter and maintain landed costs for an item.
Where a stockroom has not been selected for the item, this will not show any existing landed costs. Any landed costs entered here will be applied to all stockrooms. All existing landed costs will be replaced.
Fields
Cost Code
Enter a valid cost code.
Standard Landed Cost
Enter a figure for the cost code, using up to nine numeric characters, including five decimals.
Percent/Value
Select one of the following:
Value (0) - For this landed cost to be value-based
Percent (1) - For this landed cost to be percentage-based
Note: Landed costs are added to or subtracted from the material cost specified for an item/stockroom to derive the standard cost.
Select Update (F8) to update the information you have added and return to the Standard Cost Change Cost Maintenance window, where landed costs will be added to or subtracted from the material cost to derive the standard cost. The resultant total material cost and standard cost must not be negative.
334 | Infor System21 Inventory Management

854BInventory Updates
Month End Average Cost Revaluation [30/INC] This function carries out the revaluation of Inventory movements using Period End Average Costs. This is only available if Period End Average Costing is enabled (Inventory Descriptions Type DFLT – Limit value for code PEAC set to 1).
This function repeats the Period End processing for Period End Average Costing, generating any missing Period End Average Cost movements that are required.
Month End Average Costing Inventory Revaluation Window Field
Period Select
Enter the current or a prior period.
Current Period
The current Period is displayed for information.
Select Submit (F8) to revalue the inventory movements using period end average costs.
Infor System21 Inventory Management | 335


Chapter 6 Lot/Grade/Potency 6
Lot/Grade/Potency Introduction You can use batch or lot control on items that need more detailed identification of the stock, for example, drugs, wallpaper, wool, or date-controlled items. It is the same item, but you can manufacture quantities of the item at different times, or the item could be of varying colour/shade or need greater traceability through the supply chain.
Serial control is much more specific. This is where each individual item (i.e. each quantity of 1) carries a unique number, for example, a PC, a television, and so on.
You indicate in the Item Master file whether the item is to be batch-controlled, lot-controlled or serial-controlled. However, you must first indicate on the company profile whether you need to use extended lot details.
Are Extended Lot Details Required?
If you do not need to use extended lot details, Inventory functions as follows:
1 When you receive these items you must enter a lot number.
2 Inventory holds stock balances at lot number level.
3 You must also specify a valid lot number when you issue these items.
4 All Inventory enquiries will include lot number information.
If you do require extended lot details, Inventory supplies support for the Production application but also provides extra controls:
• Stock status• Dates• Shelf life• Potency• Grade• Lot traceability
Lot Movements
You can trace the location of a lot over both time and locations. For example, you can trace lots back to Production - to both component and parent items - and to both Sales Order Processing and Purchase Management Order enquiries. You can hold a single lot of an item in a number of
Infor System21 Inventory Management | 337

855BLot/Grade/Potency
stockrooms, where all parts of it retain the same lot header details. However, you can transform a lot and amend the lot details for each part.
You can enquire on all these aspects of lot control.
Note: You can hold a single lot of an item in more than one stockroom.
Stock Status
This is one of the functions that you can use to control stock availability. It covers the requirement to classify stock as being unavailable for processing, for example, for allocation, picking and despatch. For example, you can use stock status to cater for quarantine stock, stock within inspection or QA, stock for internal sales or for key customers.
If you leave the stock status blank, dates will control availability.
If you specify a stock status, this code will determine availability.
If you use a stock status code with 1 in the seventh digit of the Limit field of a description code recorded against STKS in the Inventory Descriptions file, you will make sure that all receipts of that item are automatically frozen.
The stock status applies to a complete lot, regardless of how many holding stockrooms there are for that lot. You can specify a default stock status in the Item Master file. Any changes made to the stock status are written to an audit file.
Shelf Life, Grade and Potency All lots have four dates associated with them, used by Production and Sales Order Processing Order Entry to control release and allocation of stock.
You can maintain a shelf life for all lot-controlled items and, in conjunction with the production or receiving dates, the stock status monitor can calculate the availability of the lot. A status flag, also on the lot header, provides extra function for lot control. You can use this to override the availability dates for the whole lot.
You can maintain the grade and potency level of the lot; you can make these details mandatory for certain items. Production uses lot potency to process actual potent units of a product where the strength of an active ingredient is important, rather than physical units.
Dates
You need to maintain Shelf Life Units (for example, days), and possibly numbers for shelf life and customer shelf life.
You also need to maintain release lead time units and numbers, if you require an inspection or QA period.
Production Date = Current Date (if finished goods received from Production or Purchasing)
Expiry Date = Production Date + Shelf Life
First Available Date = Production Date + Release Lead Time
338 | Infor System21 Inventory Management

855BLot/Grade/Potency
Last Available Date = Expiry Date - Customer Shelf Life
An Inventory Stock Status Monitor constantly reviews all controlled items with extended details and automatically freezes/unfreezes stock according to stock status codes or availability dates if there is a transaction involving the batch, lot or serial reference number.
If you define a customer-specific shelf life in the customer/item profile, that shelf life will be used to derive an availability date for that customer and used to allocate lots. However, this does not affect the default last available date and therefore the automatic freezing of lots by the Stock Status Monitor.
If you are using Order Capture, lots will be allocated automatically when a customer-specific shelf life is defined.
Similarly, Manual Allocation will automatically allocate lots when a customer-specific shelf life is defined.
If you are using Warehousing, the commit routine will ignore frozen stock beyond last available date.
Caution: We recommend that you run the Stock Status Re-calculation task regularly, to ensure that any controlled item balances are frozen when they are past their last available date. Otherwise, the Warehousing commit routine will use this stock, regardless of the date because it would still consider it to be available for use.
If you are using Advanced Order Entry, allocation against batches will give a warning message if stock is beyond its last available date or expiry date.
If you are using Sales Order Processing/Warehousing, the software warns you during confirm pick/despatch if the lot is beyond its last available date.
Grade
You use this for products that have a wide range of quality specifications and require multiple grades, for example, eggs.
You can use this to control allocation and issues, with only specific grades being issued to production, received into stock or issued to customers.
You can also use this if you need to downgrade or upgrade stock.
Potency
Again, you use this to hold potency details at lot level. You can update lot potency if mixtures or blending of potency occur.
Lot Traceability
You use this to provide full forward/backward traceability for all lots.
Forward = Customer Orders, Production Orders, Transfer Orders
Backward = Purchase Orders, Production Orders, Transfer Orders
Infor System21 Inventory Management | 339

855BLot/Grade/Potency
Maintain Lot Header [1/INL, 2/AOM] This task is enabled for Work Management and can be run as part of a Business Process built in @ctive Modeler.
Refer to the Work Management chapter in the Application Manager product guide.
Use this task to record basic information about a product lot, independently of the holding stockrooms for this lot within Inventory Management.
You normally enter this information when you receive a batch-controlled, lot-controlled or serial-controlled item into Inventory Management by any route. These routes include Inventory Receipts, Purchase Management Receipts, Production Finished Goods Receipts, and so on. However, you can maintain the lot header directly.
Note: You can also access these windows using the Maintain Lot Header task in Advanced Order Entry.
Stock Status
This stock status is different from other fields on the Lot Header, in that it is a significant change of state of the lot which can have considerable impact on inventory control. In particular, the changing of the status from Frozen to Unfrozen makes that stock immediately available for use or sale, so you may require greater control on who can make such a change.
Where this change of stock status (or perhaps a change to certain statuses) needs to be limited to particular authorised individuals, there is a facility available to configure user security control. When this security control is activated, individuals will not be able to change the stock status unless they have the appropriate authority.
For instance, any number of users may be allowed to freeze a lot, but only one authorised individual may be allowed to release a lot from its frozen state. In this case:
• The authorised user would have all stock status codes defined. • The other users would have a set of codes which excluded the Released status.
Note: The stock status codes are those in the Inventory Descriptions file under major type STKS.
Field Level Security is used to establish user authority and control which users can establish or make changes to the Stock Status, and what status values are allowed.
In the Maintain Security Objects [11/GLW], task add an STKS entry to activate security control.
Note: When no security object entry is present or the entry is Inactive, any user will be able to set or change the stock status.
340 | Infor System21 Inventory Management

855BLot/Grade/Potency
Field Value Notes
Security Object STKS
Description Lot Stock Status
Object Type 0 Alphanumeric
Object Length 2
Object Decimals Not applicable
Object Active 1 Active
In the Maintain User Security Objects [12/GLW] task, add an entry for each user that is allowed to change the stock status.
Note: When no user security entry is present for a user, that user will be not able to set or change the stock status.
Field Value Notes
User (The System21 user ID)
Application ID IN xxx A2 Where xxx is the System21 environment
Company (The System21 company code) Can be left blank if applicable to all companies
Security Object STKS
Security Activate 1 1 = Active 0 = Inactive This de-activates security control for the user, thus allowing the status to be changed to any value.
Security Group (Any code to represent a group of users)
e.g. LOTOWNER
In the Maintain Authorised Values [13/GLW] task, add an entry for each security group.
Note: When no authorised value entries are present for a user that is Active, that user will be not able to set or change the stock status.
Infor System21 Inventory Management | 341

855BLot/Grade/Potency
Field Value Notes
Security Group (The nominated user group code) e.g. LOTOWNER
Security Object STKS
Condition Choose an appropriate condition and set of stock status codes that are allowed for this user.
e.g. Range
Values e.g. from AA to ZZ would allow any status change
Note: If there are different sets of users who control different status settings, establish different groups with their own sets of values.
Lot Header Maintenance Selection Window To display this window, select the Maintain Lot Header task.
Use this window to select the item and lot reference whose header details you want to maintain.
Fields
Item
You must enter the item reference number of the item you want to amend; or enter a unique number to create a new lot reference for that item.
Alternatively, use the prompt facility to select from the Item Master Scan pop-up.
Lot Reference
Enter a lot reference. This can be a new reference number or an existing one.
Alternatively, use the prompt facility to select from the Select Lot Reference pop-up.
Note: You must enter the item number to use the prompt facility on associated lot reference numbers.
Press Enter to display the Lot Header Maintenance Detail window.
Lot Header Maintenance Details Window To display this window, select an item and lot number and then press Enter on the Lot Header Maintenance Selection window.
Use this window to maintain the header details for the requested lot. The lot header details are valid for all items included in the lot, regardless of the physical location of parts of that lot.
342 | Infor System21 Inventory Management

855BLot/Grade/Potency
For information on modifying the details for a subset of the lot, see the Lot Transformation section.
Note: In some circumstances, other external flags or applications control the visibility and maintenance of some of these fields. (This is particularly relevant if you use Production.)
Inventory holds the lot header information until the lot number itself is purged when you use the Delete FIFO/Lot Details task.
The upper part of the window identifies the item and lot number that you want to maintain. The lower part lists the lot header details specifically detailed for this item.
The window displays any current data for the lot.
Fields
Production Date
This is the date of manufacture, or receipt, for this lot. The field will default to the current date but can be any previous date. If you do not enter this date, Inventory calculates it back from the expiry date using the shelf life of the item.
If you receive the lot into either Purchase Management or Production, you must enter either a production date or an expiry date. If you receive the lot into Inventory, the fields are not mandatory.
This only applies when you receive the item lot for the first time. Once the lot exists you cannot maintain either the production or expiry date.
Production Time
If receiving a Lot for the first time and a default booking time has been set against the Item it is shown here as the Production time. Otherwise the current time is shown.
Note: This field is only displayed if you have checked the Display Lot Times field on the Lot Header Parameters Maintenance pop-up in the Items maintenance task.
Once you have created the lot, you cannot change this information.
Expiry Date
Enter or select a date not less than the current date.
This is the date on which the Shelf Life of the Lot comes to an end. The Lot is deemed not to be available on this date.
If you do not enter a date, it is calculated by adding the Shelf Life to the production date. If you receive the Lot in Purchase Management or Production, you must enter either a production or expiry date. If you receive via Inventory, the fields are not mandatory.
Once the Lot exists, you may amend its Expiry Date. A new Last Available Date is automatically re-calculated from the new Expiry Date. The production date is not maintainable.
If you enter an Expiry Date, the production date can be calculated from it by subtracting the Shelf Life.
Infor System21 Inventory Management | 343

855BLot/Grade/Potency
Expiry Time
This is the time at which the Shelf Life of the Lot comes to an end, after which the Lot should be unavailable.
The Expiry Time is calculated from the entered Production Date/Time and the Shelf Life of the Lot as long as the Shelf Life Unit of the Item is Hours or Minutes or Display Lot Time has been checked for the Item. Otherwise the Expiry Time is defaulted to 00:00 on the calculated Expiry Date.
If the Expiry Date is calculated from the entered Production Date, and the Shelf Life Unit of the Item is Hours or Minutes, or Display Lot Time has been checked for the Item then the Expiry Time is calculated by adding the Shelf Life to the Production Date and Production Time.
For example, if the Shelf Life is 10 Hours and the Production Date & Time is 07/03/2012 – 15:30 then the Expiry Date & Time will be 08/03/2012 – 01:30.
Note: This field is only displayed if the Display Lot Times field is switched on in the Lot Header Parameters Maintenance pop-up in the Items maintenance task or if the Shelf Life Unit is hours or minutes.
First Available Date
Enter or select a date, which must be greater than or equal to the Production Date.
If the Shelf Life Unit is not Hours or Minutes Inventory will normally freeze all Lots with a First Available Date greater than the current date.
If you do not enter or select a date, it may be calculated by adding the Release Time specified for the Item to the Production Date.
First Available Time
Enter a valid time. If the Production Date is equal to the First Available Date, the First Available Time must be greater than or equal to the Production Time.
If the Shelf Life Unit is Hours or Minutes the First Available Time may be calculated by adding the Release Time to the Production Date and Time.
If the Shelf Life Unit is Hours or Minutes, Inventory will normally freeze all lots with the First Available Date and Time greater than the current date and time.
If the Shelf Life Unit is not Hours or Minutes then the First Available Time is for memo purposes only.
Note: This field is only displayed if you have checked the Display Lot Times field on the Lot Header Parameters Maintenance pop-up in the Items maintenance task, or if the Shelf Life Unit is Hours or Minutes.
Last Available Date
Enter or select a date, which must be greater than or equal to the First Available Date but less than or equal to the Expiry Date.
If the Shelf Life Unit is not Hours or Minutes, Inventory will normally freeze all lots with a Last Available Date less than the current date if the Stock Status does not override this.
344 | Infor System21 Inventory Management

855BLot/Grade/Potency
If the Shelf Life Unit is Hours or Minutes, Inventory will normally freeze all lots with a Last Available Date and Time (or Expiry Date and Time if ‘Freeze On Expiry’ is on) less than the current date and time plus any Freeze Tolerance specified against the item, if the Stock Status does not override this.
The Last Available Date may be calculated by subtracting the Customer Shelf Life from the Expiry Date.
Note: For more information, see the Lot/Grade/Potency Introduction section.
Last Available Time
Enter a time, at which the Lot will become unavailable.
If the Expiry Date is equal to the Last Available Date, the Last Available Time must be less than or equal to Expiry Time.
If the Shelf Life Unit is Hours or Minutes the Last Available Time is calculated by subtracting the Customer Shelf Life from the Expiry Date & Time.
Note: This field is only displayed if you have checked the Display Lot Times field on the Lot Header Parameters Maintenance pop-up in the Items maintenance task, or if the shelf life units are hours or minutes.
Note: the Production Time may now default to the Default Booking Time specified for the item rather than the Current Time.
Note: The calculation of the Production, Expiry, First Available and Last Available Dates include time calculations if the Shelf Life Units are 6 (Hours) or 7 (Minutes).
If the item’s Shelf Life Unit is either of these, then calculations result in the setting of Lot Times as well as Dates by adding or subtracting the appropriate number of hours or minutes from the appropriate dates & times.
The rules for calculating any dates/times that are not entered are as follows:
Production Date & Time = Expiry Date & Time – Shelf Life
For example;
Expiry Date & Time: 09/03/2012 @ 02:05 Shelf Life: 10 Hours Production Date & Time = 08/03/2012 @ 16:05
Expiry Date & Time = Production Date & Time + Shelf Life
For example;
Production Date & Time: 08/03/2012 @ 18:05 Shelf Life: 8 Hours Expiry Date = 09/03/12 @ 02:05
First Available Date & Time = Production Date & Time + Release Lead Time
For example,
Infor System21 Inventory Management | 345

855BLot/Grade/Potency
Production Date & Time: 08/03/2012 @ 13:00 Release Lead Time: 1 Day First Available Date & Time = 09/03/2012 @ 13:00
Note: Release Lead Times in Hours or Minutes is not supported. However, if a Release Lead Time is specified for an item with a Shelf Life of Hours or Minutes.
Last Available Date & Time = Expiry Date & Time – Customer Shelf Life
For example,
Expiry Date & Time: 09/03/2012 @ 13:00 Customer Shelf Life: 23 hours Last Available Date & Time = 08/03/2012 @ 14:00 Stock Status
Enter a stock status code.
Alternatively, use the prompt facility to select from the STKS Stock Status pop-up.
The status can only set or changed if you have the appropriate level of authority; established using Field Level Security. Refer to the Field Level Security section in the General Ledger product guide for further information.
The stock status code is used as an override to the availability dates to determine if a lot quantity is available or classed as frozen stock.
If you leave the stock status blank, the availability dates are used to move stock in and out of the frozen state.
You can divide stock statuses into available or unavailable using the seven-digit Limit field held against the stock status description codes in the Inventory Descriptions file. If you set the seventh digit to 1, the stock status indicates that the lot is unavailable. If this last digit is set to any other value, the lot is available.
Reason Code
Enter a reason code.
Alternatively, use the prompt facility to select from the MOVR Movement Reason Code pop-up.
You must select a code if you change the stock status code, or if it is blank initially, to indicate why you have changed the status of the lot.
Potency
This field displays the potency of the whole lot, irrespective of the stockroom in which the lot is located.
Note: This field is displayed if the Potency Required field for the item is checked on the Lot Header Parameters Maintenance pop-up.
Note: Potency is a percentage, so the potency you specify here is the number of parts of active ingredient per hundred parts.
346 | Infor System21 Inventory Management

855BLot/Grade/Potency
Grade
Enter a grade code.
Alternatively, use the prompt facility to select from the GRAD Grade pop-up.
This is the grade of the whole lot, irrespective of the stockroom in which the lot is located.
Note: This field is displayed if the Grade Required field for the item is checked on the Lot Header Parameters Maintenance pop-up.
C-of-C Reference
Enter a Certificate of Conformance reference, associated with a C-of-C defined in Advanced Order Entry, to be assigned to this lot. You enter the values for this C-of-C when you first receive the lot into Inventory.
Note: If you are using Advanced Order Entry, and you have specified on the Default Ordering window in Maintain Inventory Item that this item requires a Certificate of Conformance, Inventory displays a Certificates of Conformance field on the Lot Header Details pop-up. (See the Advanced Order Entry product guide for an explanation of Certificates of Conformance.)
Supplier’s Lot Ref
Enter up to 36 alphanumeric characters to specify the lot reference allocated by the supplier.
Functions
Grades (F13)
Use this to display the Grade History Enquiry Details window for this lot.
Status (F14)
Use this to display the Stock Status History Enquiry Details window for an existing lot.
Potency (F15)
Use this to display the Potency History Enquiry pop-up for this lot.
Adjust Active Ingredient (F16)
Use this to display the Adjust Active Ingredient window.
Cert of Conformance (F17)
Use this to display the Maintain C-of-C Reference pop-up.
Text (F21)
Use this to display the Maintain Text pop-up to enter or select a Usage Code and a Language Code for multi-lingual text entry. Press Enter to display the Lot Reference Text pop-up. Use this window to enter text in your selected language. This text is displayed or printed on external documentation, for example, despatch notes, according to the usage code selected.
Note: You specify your customer's default language in Customer Details Maintenance in Sales Order Processing. You can override this default language by entering a different language code when Additional Overrides (F16) is available.
Note: Language codes do not need to be selected in order to print text in the native language.
Infor System21 Inventory Management | 347

855BLot/Grade/Potency
Press Enter to validate your entries and select a function to continue. Alternatively, press Enter again to re-display the Lot Header Maintenance Selection window.
Adjust Active Ingredient Window To display this window, select Adjust Active Ingredient (F16) on the Lot Header Maintenance Details window.
Use this window to modify the current potency level for a lot of the selected item. This change applies to the whole lot, irrespective of its location.
The top of the window displays the item number, item description and lot number of the selected lot.
Fields
Potency
This field displays the current potency of the lot.
Quantity
This field displays the current quantity of items attached to your selected lot, displayed in the item's issue unit.
Total Potent Units
This field displays the total potent units for your selected lot. Inventory calculates this as:
Quantity x Current Potency % = Total Potent Unit
New Potency
Specify the new potency using up to nine numeric characters, including five decimal places. Negative values are not allowed.
Note: Potency is a percentage, so the potency you specify here is the number of parts of active ingredient per hundred parts.
Reason Code
Enter a two-character alphanumeric reason code.
Alternatively, use the prompt facility to select from the PRSC Potency Reason Code pop-up.
Note: When you press Enter, Inventory will calculate and display the following information:
New Potent Units
This field displays the total potent unit for your selected lot using the new potency level in the Quantity x Potency % calculation.
Potency Change
This field displays the difference between the original total potent units and the new potent units. It can be positive or negative.
348 | Infor System21 Inventory Management

855BLot/Grade/Potency
Select Update (F8) to update the lot header details and potency history.
Maintain C-of-C Reference Pop-up To display this pop-up, enter a new Certificate of Conformance and then select Cert of Conformance (F17) on the Lot Header Maintenance Details window.
Use this pop-up to complete the Certificate of Conformance criteria before the lot is received into Inventory.
See the Advanced Order Entry product guide for details on creating Certificates of Conformance.
Fields
Code
Enter a relevant code for the criteria you need for this Certificate of Conformance.
Alternatively, use the prompt facility to select from the Characteristic Values pop-up.
Functions
Text (F21)
Use this to display the Maintain Text pop-up where you enter or select a Usage Code and a Language Code for multi-lingual text entry. For more information, see the Maintain Text Pop-up section in the Maintenance chapter of this product guide.
Select Update (F8) to save these details and re-display the Lot Header Maintenance Details pop-up.
Infor System21 Inventory Management | 349

855BLot/Grade/Potency
Maintain Grade [2/INL] Note: You can use this task if you have specified that your item requires grade details recorded against it.
Use this task to alter the grade of a lot. The change in grade applies to the whole lot, irrespective of where the lot is located.
Grade Maintenance Selection Window To display this window, select the Maintain Grade task.
Use this window to select the item whose current grade details you want to maintain.
Fields
Item
Enter an item code. This item must have grading requirements defined to it when you set the item up using the Items maintenance task.
Alternatively, use the prompt facility to select from the Item Master Scan pop-up.
Note: The item must be lot-controlled, batch-controlled or serial-controlled.
Press Enter to display the Grade Maintenance Detail window.
Grade Maintenance Detail Window To display this window, enter an item code and then press Enter on the Grade Maintenance Selection window.
Use this window to view a list of all the lots associated with the selected item.
Options
Maintain Grade
Use this to change the grade for this lot.
Grade History
Use this to display the Grade History Enquiry Details window for the selected lot.
Lot Header
Use this to display the Lot Header Details pop-up for the selected lot.
350 | Infor System21 Inventory Management
855BLot/Grade/Potency
Lot Trace Enquiry
Use this to display the Lot Trace Enquiry Details window for the selected item.
Select an option to display the next window. Alternatively, select Exit (F3) to leave the task.
Maintain Grade Pop-up To display this pop-up, select Maintain Grade against the lot you want to maintain on the Grade Maintenance Detail window.
Use this pop-up to maintain the grade for the selected lot. Existing information is displayed.
Fields
Grade
Enter a grade.
Alternatively, use the prompt facility to select from the GRAD Grade pop-up.
Reason Code
Enter a code describing why the grade is amended.
Alternatively, use the prompt facility to select from the RSCD Grade Reason Codes pop-up.
Press Enter to update the details and return to the Grade Maintenance Detail window.
Infor System21 Inventory Management | 351

855BLot/Grade/Potency
Stock Status Re-calculation [11/INL] Use this task to process all lots currently with physical stock. It uses the current date and the first and last available dates of each lot to determine whether the lot quantity should be available or frozen. This task checks all lots regardless of status. Any change in stock status applies to the whole lot across all stockrooms.
This task affects two stock balance values: available and frozen. The actual quantity of the lot does not change and the equation is not affected by this procedure: Physical = Available + Allocated + Frozen. The procedure reviews dates and stock status if the stock monitor is not running.
Note: The Stock Status recalculation takes into account the Freeze Tolerance and the Freeze on Expiry attribute of an attribute when deciding whether to freeze or unfreeze a Lot.
Note: It is recommended that you include this task as part of your Day Start procedure. For more information, contact your System Manager.
Stock Balance Re-calculation Window To display this window, select the Stock Status Re-calculation task.
Use this window to select the stock balance you want to re-calculate.
Fields
Item
Enter an item number.
Alternatively, use the prompt facility to select from the Item Master Scan pop-up.
Lot
Enter a lot reference.
Alternatively, use the prompt facility to select from the Select Lot Reference pop-up.
Stockroom
Enter a stockroom code.
Alternatively, use the prompt facility to select from the Stockroom Selection pop-up.
Note: You can leave each of these fields blank to re-calculate all lots of all items in all stockrooms that have a blank status code.
Press Enter to confirm your selection and then select Submit (F8) to submit the re-calculation.
352 | Infor System21 Inventory Management

855BLot/Grade/Potency
Lot Transformation [12/INL] Use this to enter the details of lots to be split or transformed. The status of each original lot remains constant while you maintain target lot header details.
You can use this if part of a lot has failed QA and you need to freeze it, whilst the remainder of the lot is of a good quality and should remain in an available status.
For Catchweight items, you can also transfer the secondary values. There are three different processes:
• When the entire balance is transformed and the entire secondary is also assigned to the new lot, batch or serial number, it does not need to be specified.
• For partial transformations of Catchweight type 1 and 2 items, the actual secondary value must be captured.
• For Catchweight type 3 items and items with a secondary unit of measure, the nominal secondary value is always calculated for partial and full transformations.
Record Lot Transformation Selection Window To display this window, select the Lot Transformation task.
Use this window to select the stockroom that this transaction affects and the date, reference information and reason for the transaction.
Caution: If user stockroom authorisation is active you cannot perform this transaction if you are not authorised to the stockroom.
Fields
Stockroom
You must enter the code of an existing stockroom.
Alternatively, use the prompt facility to select from the Stockroom Selection pop-up.
Note: In order to perform a lot transformation both receipt and issue transactions must be permitted in the selected stockroom. Issue transactions are not permitted from a bonded warehouse, therefore lot transformations are also not permitted in these types of warehouses
Reference Type
Enter the transformation type, using up to three alphanumeric characters.
Alternatively, use the prompt facility to select from the TRAN Movement Reference Type pop-up.
Date
Enter or select the date of the lot transformation. This defaults to today's date.
Infor System21 Inventory Management | 353
855BLot/Grade/Potency
Narrative
Enter the narrative, or description, associated with this lot transformation, using up to twenty alphanumeric characters.
Reason Code
Enter a reason code.
Alternatively, use the prompt facility to select from the MOVR Movement Reason Code pop-up.
Record Lot Transformation Details Window To display this window, enter your selection criteria and then press Enter twice on the Record Lot Transformation Selection window.
Use this window to enter details of multiple lots you want to split or transform. The status of the original lots will remain constant, while you maintain the target lot header details.
Fields
Item
Enter the required item.
Alternatively, use the prompt facility to select from the Item Master Scan pop-up.
Movement Qty
Specify the quantity you want to subtract from the first lot and transfer to the second lot, using up to eleven characters, including three decimals.
From Lot
Enter the originating lot, using up to fifteen alphanumeric characters. This lot must exist in your selected stockroom.
Alternatively, use the prompt facility to select from the Select Lot Reference pop-up.
Quantity Units
Enter the unit of measure for the quantity.
Alternatively, use the prompt facility to select from the Purchase/Issue Unit Selection pop-up.
To Lot
Enter the lot to receive the transferred items, using up to fifteen alphanumeric characters. This can be an existing lot or a new lot. In the case of an existing lot, the items are added to the total physical stock for that lot and the frozen or available balance as appropriate.
Alternatively, use the prompt facility to select from the Select Lot Reference pop-up.
354 | Infor System21 Inventory Management

855BLot/Grade/Potency
Narrative
You can amend the text, if necessary.
Reference Type
You can amend the reference type, if necessary.
You can use the prompt facility to select from the TRAN Movement Reference Type pop-up.
Date
You can enter or select a different date, if necessary.
Reason Code
You can amend the reference type, if necessary.
You can use the prompt facility to select from the MOVR Movement Reason Code pop-up.
Press Enter to display the Lot Header Details pop-up.
Note: If you use Catchweight, for items which are Catchweight category 1 or 2, when you first press Enter the Secondary Value Entry pop-up is displayed.
Options
Amend
Use this to bring the details down to the entry fields at the base of the window
Modify any details as necessary and then press Enter to accept the changes.
Lot Header Details
Use this to display the Lot Header Details pop-up for the lot displayed in the From Lot/To Lot field.
Functions
From Lot Details/To Lot Details (F13)
Use this to toggle between displaying the From Lot field and the To Lot field.
Once you have completed the lot header details for this transaction, press Enter to validate your entries and then select Update (F8) to process the transformation.
Lot Header Details Pop-up To display this pop-up, press Enter on the Record Lot Transformation Details window.
Use this pop-up to view any current or default lot header details for the To Lot, so that you can amend them. The values specified here are valid for the whole lot, even if parts of the lot are located in different stockrooms.
You must complete these details to process the lot transformation.
Fields
Infor System21 Inventory Management | 355

855BLot/Grade/Potency
Production Date
This is the date of manufacture, or receipt, for this lot. The field will default to the current date but can be any previous date. If you do not enter this date, Inventory calculates it back from the expiry date using the shelf life of the item.
If you receive the lot into either Purchase Management or Production, you must enter either a production data or expiry date. If you receive the lot into Inventory, the fields are not mandatory.
This only applies when you receive the item lot for the first time. Once the lot exists, you cannot maintain either the production or expiry date.
Production Time
Note: This field is only displayed if you have checked the Display Lot Times field on the Lot Header Parameters Maintenance pop-up in the Items maintenance task.
Once you have created the lot, you cannot change this information.
Expiry Date
This is the date on which the shelf life of the item expires.
If you do not enter this information, the software calculates this date by adding the shelf life to the production date. If you receive the lot in Purchase Management or Production, you must enter either a production or expiry date. If you receive via Inventory, the fields are not mandatory.
Once the lot exists, the production and expiry dates are not maintainable.
Expiry Time
Note: This field is only displayed if you have checked the Display Lot Times field on the Lot Header Parameters Maintenance pop-up in the Items maintenance task.
This is the time at which the shelf life of the item expires.
First Available Date
Enter or select a date, which must be greater than or equal to the production date.
Inventory will normally freeze all lots with the first available date greater than the current date. If you do not enter or select a date, Inventory generates it by adding the release time to the production date.
First Available Time
Note: This field is only displayed if you have checked the Display Lot Times field on the Lot Header Parameters Maintenance pop-up in the Items maintenance task.
Enter a time for memo purposes only. If the production date is equal to the first available date, the first available time must be greater than or equal to the production time.
Last Available Date
Enter or select a date, which must be greater than the first available date but less than or equal to the expiry date.
The IN Stock Status Monitor will normally freeze all lots with a last available date less than the current date if there is no stock status. Inventory will generate the date if you do not enter one.
356 | Infor System21 Inventory Management

855BLot/Grade/Potency
Note: For more information, see the Lot/Grade/Potency Introduction section.
Last Available Time
Note: This field is only displayed if you have checked the Display Lot Times field on the Lot Header Parameters Maintenance pop-up in the Items maintenance task.
Enter a time. If the expiry date is equal to the last available date, the last available time must be less than or equal to the expiry time.
Status Code
Enter a stock status code.
Alternatively, use the prompt facility to select from the STKS Stock Status pop-up.
The stock status code is used as an override to the availability dates to determine if a lot quantity is available or classed as frozen stock.
If you leave the stock status blank, the availability dates are used to move stock in and out of the frozen state.
You can divide stock statuses into available or unavailable using the seven-digit Limit field held against the stock status description codes in the Inventory Descriptions file. If you set the seventh digit to 1, the stock status indicates that the lot is unavailable. If this last digit is set to any other value, the lot is available.
Reason Code
Enter a reason code.
Alternatively, use the prompt facility to select from the MOVR Movement Reason Code pop-up.
You must select a code if you change the stock status code, or if it is blank initially, to indicate why you have changed the status of the lot.
Potency
This is the potency of the whole lot, irrespective of the stockroom in which the lot is located.
Note: This field is displayed if the Potency Required field for the item is checked on the Lot Header Parameters Maintenance pop-up.
Note: Potency is a percentage, so the potency you specify here is the number of parts of active ingredient per hundred parts.
Grade
Enter a grade code.
Alternatively, use the prompt facility to select from the GRAD Grade pop-up.
This is the grade of the whole lot, irrespective of the stockroom in which the lot is located.
Note: This field is displayed if the Grade Required field for the item is checked on the Lot Header Parameters Maintenance pop-up.
Infor System21 Inventory Management | 357

855BLot/Grade/Potency
C-of-C Reference
Enter a Certificate of Conformance reference, associated with a C-of-C defined in Advanced Order Entry, to be assigned to this lot. You enter the values for this C-of-C when you first receive the lot into Inventory.
Note: This field is only displayed if you are using Advanced Order Entry, and you have specified that this item requires a Certificate of Conformance on the Default Ordering window in Maintain Inventory Item. (See the Advanced Order Entry product guide for an explanation of Certificates of Conformance.)
Supplier’s Lot Ref
Enter up to 36 alphanumeric characters to specify the lot reference allocated by the supplier.
Functions
Grades (F13)
Use this to display the Grade History Enquiry Details window for this lot.
Status (F14)
Use this to display the Stock Status History Enquiry Details window for an existing lot.
Potency (F15)
Use this to display the Potency History Enquiry pop-up for this lot.
Adjust Active Ingredients (F16)
Use this to display the Adjust Active Ingredient window.
Cert of Conformance (F17)
Use this to display the Maintain C-of-C Reference pop-up.
Text (F21)
Use this to view any existing item text. For more information, see the Item Text Pop-up section in the Maintenance chapter of this product guide.
Note: When you press Enter to confirm these details, the Record Lot Transformation Details window is re-displayed, with the new line displayed in the top part of the window. The quantity units and cost per unit default from the From lot. To toggle between the From lot and the To lot, select From Lot Details/To Lot Details (F13).
Press Enter to confirm these details and re-display the Record Lot Transformation Details window.
358 | Infor System21 Inventory Management

855BLot/Grade/Potency
Enquire on Grade [21/INL] Use this task to view the grades defined to a particular item.
Grade Enquiry Selection Window To display this window, select the Enquire on Grade task.
Use this window to select the item.
Fields
Item
Enter the item reference code of the item whose grade details you want to view.
Alternatively, use the prompt facility to select from the Item Master Scan pop-up.
Press Enter to display the Grade Enquiry Details window
Grade Enquiry Details Window To display this window, specify an item and then press Enter on the Grade Enquiry Selection window.
Use this window to view the selected item number and item description and a list of valid lots, with associated grades and grade descriptions.
Options
Grade History
Use this to display the Grade History Enquiry Details window for this lot.
Lot Header
Use this to display the Lot Header Details pop-up for this lot.
Lot Trace Enquiry
Use this to display the Lot Trace Enquiry Details window for this lot.
Select the option to view the enquiry you require or select Exit (F3) to leave the enquiry.
Infor System21 Inventory Management | 359

855BLot/Grade/Potency
Enquire on Grade History [22/INL] Use this task to view any changes to the grade details recorded against a lot, batch or serial reference for an item.
Grade History Enquiry Selection Window To display this window, select the Enquire on Grade History task.
Use this window to select the item and lot reference numbers for which you want to view grade history details.
Fields
Item
Enter the item reference number for the item whose grade details you want to view.
Alternatively, use the prompt facility to select from the Item Master Scan pop-up.
Lot Number
Enter the specific lot, batch or serial reference number of the item.
Alternatively, use the prompt facility to select from the Select Lot Reference pop-up.
Press Enter to display the Grade History Enquiry Details window.
Grade History Enquiry Details Window To display this window, select an item code and lot number and then press Enter on the Grade History Enquiry Selection window.
Use this window to view the grade history of the lot, in date order. To modify the grade associated with this lot, use the Maintain Grade task.
Fields
Grade
This field displays all valid grades that have been recorded against your particular item and lot reference number combinations. These codes are set up under major type GRAD in the Inventory Descriptions file.
Description
This field displays the description of the grade codes.
360 | Infor System21 Inventory Management

855BLot/Grade/Potency
Date Changed
This field displays the date on which the grade change took place.
User
This field displays the user name of the person who last updated the lot grade.
Reason
This field displays the reason code attached to the grade change.
Functions
Lot Header (F13)
Use this to display the Lot Header Details pop-up.
Lot Trace (F14)
Use this to display the Lot Trace Enquiry Details window.
Select Exit (F3) to leave the enquiry.
Infor System21 Inventory Management | 361

855BLot/Grade/Potency
Enquire on Stock Status [23/INL] Use this enquiry to view the status of all lots associated with a particular item or stockroom. You can to select frozen or available lots, or all lots with a specific stock status code.
Stock Status Enquiry Window To display this window, select the Enquire on Stock Status task.
Use this window to select all lots associated with an item, stockroom or subset of items.
Fields
Date
The date defaults to today's date.
Enter Any One of the Following Mandatory Fields
Available
Use this checkbox as follows:
Unchecked - Not to select this criterion
Checked - To view stock balances and current stock status only for available stock
Frozen
Use this checkbox as follows:
Unchecked - Not to select this criterion
Checked - To view stock balances and current stock status only for frozen stock
All
Use this checkbox as follows:
Unchecked - Not to select this criterion
Checked - To view stock balances and current stock status of all lot-controlled stock
Stock Status
Enter a stock status code, using up to two alphanumeric characters, to view stock balances for stock that has that stock status code.
You can use the prompt facility to select from the STKS Stock Status pop-up.
The Following Are Optional
Note: You can select any of these fields to restrict the scope of the enquiry.
362 | Infor System21 Inventory Management

855BLot/Grade/Potency
Item
Enter a lot-controlled item reference number to restrict the enquiry to this item only.
Alternatively, use the prompt facility to select from the Item Master Scan pop-up.
Lot
Enter a lot number associated with the specified item. You cannot specify a lot number without first specifying the item.
Alternatively, use the prompt facility to select from the Select Lot Reference pop-up.
Stockroom
Enter the stockroom to which you wish to restrict the enquiry, using a two-character alphanumeric code. If this field is left blank, all stockrooms will be included in the enquiry.
Alternatively, use the prompt facility to select from the Stockroom Selection pop-up.
Item From
Enter an item, using up to fifteen alphanumeric characters. This will be the start of the range of items. If you leave the Item To field blank, the application will select all lot-controlled items ordered alphanumerically after this item.
You can use the prompt facility to select from the Item Master Scan pop-up.
Item To
Enter an item, using up to fifteen alphanumeric characters. This will specify the last item in the range.
If you specify a stockroom and a range of items, the enquiry will be restricted to those items within the range in that stockroom. If you leave the stockroom blank, all stockrooms will be checked for items within the range.
You can use the prompt facility to select from the Item Master Scan pop-up.
Press Enter to display the Stock Status Enquiry Available and Frozen Lots window.
Stock Status Enquiry Available and Frozen Lots Window To display this window, select your enquiry criteria and then press Enter on the Stock Status Enquiry window.
Use this window to view the available and frozen stock balances and stock status codes for all lots that fulfil the selections made on the previous window.
Options
Lot Header Details
Use this to display the Lot Header Details pop-up.
Infor System21 Inventory Management | 363

855BLot/Grade/Potency
Lot Trace Details
Use this to display the Lot Trace Enquiry Details window.
Allocations
Use this to display any allocations made against the selected lot on the Allocations Enquiry pop-up.
This option is only available if you are using Advanced Order Entry. Frozen lots with existing allocations are marked with an * for lot header, to view the lot header details.
Note: The lot quantity will display in reverse image if its status is not derived from the availability date range for the lot. This can occur when the stock status is manually adjusted.
Select an option. Alternatively, select Exit (F3) to leave the enquiry.
364 | Infor System21 Inventory Management

855BLot/Grade/Potency
Enquire on Stock Status History [24/INL] Use this task to view the past status of stock for a specific item and lot reference number combination.
Stock Status History Enquiry Selection Window To display this window, select the Enquire on Stock Status History task.
Use this window to select the item and lot number combination on which you want to enquire.
Fields
Item
Enter the item code for the item on which you want to enquire.
Alternatively, use the prompt facility to select from the Item Master Scan pop-up.
Lot Number
Enter the specific lot, batch or serial reference number on which you want to enquire.
Alternatively, use the prompt facility to select from the Select Lot Reference pop-up.
Press Enter to display the Stock Status History Enquiry Details window.
Stock Status History Enquiry Details Window To display this window, enter the item and lot number and then press Enter on the Stock Status History Enquiry Selection window.
The item reference number, item description and lot number specified on the previous window are displayed at the top of this window. When you enter the stock status enquiry, summary information is displayed. This includes:
• Stock status and description • Stockroom where the lot is located • Stock balances that are affected by changes in the stock status • Available stock, frozen stock and the net change in the two balances
Functions
Detail/Summary (F13)
Use this to toggle between detail and summary information.
Infor System21 Inventory Management | 365

855BLot/Grade/Potency
Lot Detail (F14)
Use this to display the Lot Header Details pop-up for this lot.
Lot Trace (F15)
Use this to display the Lot Trace Enquiry Details window for this lot.
Select Exit (F3) to leave the enquiry.
366 | Infor System21 Inventory Management

855BLot/Grade/Potency
Enquire on Potency [25/INL] Use this task to view any potency details recorded against a specific item and stockroom combination.
Potency Enquiry Selection Window To display this window, select the Enquire on Potency task.
Use this window to select the criteria for your enquiry.
Fields
Item
Enter the item code for the item on which you want to enquire.
Alternatively, use the prompt facility to select from the Item Master Scan pop-up.
Stockroom
Enter the stockroom that stocks the item on which you want to enquire.
Alternatively, use the prompt facility to select from the Stockroom Selection pop-up.
Press Enter to display the Potency Enquiry Details window
Potency Enquiry Details Window To display this window, enter an item and stockroom and then press Enter on the Potency Enquiry Selection window.
Use this window to view the actual and previous level of potency for the selected lot. Both the item and lot number are displayed at the top of the window, with the associated information displayed in date order, by stockroom, underneath.
Fields
Lot Number
This field displays the lot number references associated with your selected item.
Potency %
This field displays the current potency of the lot.
Quantity
This field displays the quantity of the item in the lot.
Infor System21 Inventory Management | 367

855BLot/Grade/Potency
Total Potent Units
This field displays the total potent units for your selected lot. Inventory calculates this as:
Quantity x Current Potency % = Total Potent Units
Note: Potency is a percentage, so the potency displayed here is the number of parts of active ingredient per hundred parts.
Options
Potency History
Use this to display the Potency History Enquiry pop-up for this lot.
Lot Header Details
Use this to display the Lot Header Details pop-up for the selected lot.
Lot Trace Enquiry
Use this to display the Lot Trace Enquiry Details window for the selected lot.
Select your enquiry criteria and then press Enter to continue.
368 | Infor System21 Inventory Management
855BLot/Grade/Potency
Potency History Enquiry Pop-up To display this pop-up, select Potency History against a lot on the Potency Enquiry window.
The item reference number, item description and lot number are displayed at the top of the pop-up, with the following information in date order:
• The date of the change in the level of potency for the batch • The new potency • The quantity affected by the change in potency • The resulting potent units (Quantity Affected x Potency %= Resulting Potent Units) • The reason code for the change in potency (as defined in the Inventory Descriptions file under
major type MOVR)
If you want to amend the potency of part of a batch, select Lot Transformation.
Select Previous (F12) to re-display the previous window.
Infor System21 Inventory Management | 369

855BLot/Grade/Potency
Enquire on Lot Trace [26/INL] Use this task to follow the receipt and issue of items associated with a particular lot, as well as identifying where a lot has been moved between stockrooms.
Lot Trace Enquiry Selection Window To display this window, select the Enquire on Lot Trace task.
Use this window to select the item and lot you want to trace.
Fields
Item
Enter the item whose lot you want to trace, using up to fifteen alphanumeric characters.
Alternatively, use the prompt facility to select from the Item Master Scan pop-up.
Lot
Enter the lot number for the item, using up to fifteen alphanumeric characters.
Alternatively, use the prompt facility to select from the Select Lot Reference pop-up.
Stockroom
Enter the stockroom you want to view, using up to two alphanumeric characters.
Alternatively, use the prompt facility to select from the Stockroom Selection pop-up.
From Date/To Date
Enter or select a range of dates to restrict the display of movements.
Note: If you specify a date range, the From date must be less than the To date. If you do not specify a To date, it will default to the From date.
Movement Type
Enter a single-character alphanumeric code.
Alternatively, use the prompt facility to select from the MVTP Movement Type Description pop-up.
Press Enter to display the Lot Trace Enquiry Details window.
370 | Infor System21 Inventory Management

855BLot/Grade/Potency
Lot Trace Enquiry Details Window To display this window, select an item, lot and movement combination and then press Enter on the Lot Trace Enquiry Selection window.
Alternatively, select Lot Trace Enquiry on any other enquiry window.
Use this window to view the receipts and issues of the selected item and lot combination. The item and lot details are displayed at the top of the window.
Fields
Date
This field displays the date of the receipt or issue for each lot.
Type
This field displays the type of transaction carried out for this item.
Order/Reference
This field displays the reference recorded for a transaction.
Sub-Reference
This field displays the sub-reference recorded for a transaction.
Note: You can use up to 33 characters to create the reference for works order-less production transactions (codes M, N and W). In this case the reference is made up as follows:
I = Item reference of up to 15 characters
R = Route code of 1 character (with a space either side)
F = Work-in-Progress Lot Number of up to 15 characters
Customer Supplier
This field displays the customer or supplier associated with the transaction. This information is taken from the Sales Order for a customer and the Purchase Order for a supplier.
Issue Units [Unit Name]
The field displays the amount of items associated with this lot/transaction, in the primary unit of measure.
If you are using Catchweight, select Quantity (or Short Description) (F9) to display the amount of items in either the primary unit of measure or the secondary unit of measure.
Options
Movement Details
Use this to display the Inventory Movements Summary window.
(For more information, see the Inventory Movements Summary Window section in the Inventory Enquiries chapter of this product guide.)
Infor System21 Inventory Management | 371

855BLot/Grade/Potency
Order Enquiry
Use this to display the Production Order Enquiry window.
Forward/Backward
Use this to display the Forward/Backward Trace pop-up.
Functions
Quantity/(Short Description) (F9)
This is a toggle that is only displayed when Catchweight is used for this company.
Select Quantity (F9) to display the quantity of the item in the Quantity fields in the primary unit of measure.
Select (Short Description) (F9), where (Short Description) is the 9-character description of the secondary unit of measure, to display the quantity of the item in the (Short Description) secondary unit of measure.
Lot Header Details (F13)
Use this to display the Lot Header Details pop-up.
Potency History (F15)
Use this to display the Potency History Enquiry pop-up.
Select one of the options against an item to view further details for your chosen item.
372 | Infor System21 Inventory Management

855BLot/Grade/Potency
Forward/Backward Trace Pop-up To display this pop-up, select Forward/Backward against an item on the Lot Trace Enquiry Details window.
Use this pop-up to display production orders and receipts for your chosen item. Use Issues/Receipts F13 to toggle between them. Use the Backwards trace to display component issues associated with a works order receipt and the Forwards trace to display finished goods receipts associated with a works order issue.
Options
Select
Use this to select the receipt or order you want to view.
Functions
Issues/Receipts (F13)
Use this to toggle between issues and receipts recorded for this item.
Select Exit (F3) to leave the enquiry.
Infor System21 Inventory Management | 373

855BLot/Grade/Potency
Lot Header Defaults Audit [31/INL] Select the Lot Header Defaults Audit task.
** Magic File Error XA **: IN06-XA00007
This report provides a print of the header defaults for each lot-controlled inventory item.
The information printed is the current default header details for each item, with additional entries of any changes made to the header details since this audit report was last run.
There are no selection criteria involved in this task. Select Confirm Submit (F8) to submit the report.
374 | Infor System21 Inventory Management

855BLot/Grade/Potency
Report by Shelf Life [32/INL] Use this report to print details of lots in a stockroom that are frozen or available on a specified date.
Shelf Life Report Selection Window To display this window, select the Report by Shelf Life task.
Fields
Date
This field defaults to today's date.
Enter Any One of the Following Mandatory Fields
Available
Use this checkbox as follows:
Unchecked - Not to select this criterion
Checked - To print stock balances and current stock status only for available stock
Frozen
Use this checkbox as follows:
Unchecked - Not to select this criterion
Checked - To print stock balances and current stock status only for frozen stock
All
Use this checkbox as follows:
Unchecked - Not to select this criterion
Checked - To print stock balances and current stock status of all lot-controlled stock
Include Zero Lots
Use this checkbox as follows:
Unchecked - Not to select this criterion
Checked - To print zero lot balances
Note: This may be chosen together with any one of the other four fields but not by itself.
Stock Status
Enter a two-character alphanumeric code if you want to print stock balances for stock that has the particular stock status code specified.
Alternatively, use the prompt facility to select from the STKS Stock Status pop-up.
Infor System21 Inventory Management | 375

855BLot/Grade/Potency
The Following Are Optional
You can select some of these additional fields to restrict the scope of the report.
Item
Enter a lot-controlled item reference number to restrict the report to this item only.
Alternatively, use the prompt facility to select from the Item Master Scan pop-up.
Lot
Enter a lot number associated with the item specified above. This field cannot be specified independently of the Item field. An entry in this field will restrict the enquiry to that lot only.
Alternatively, you can use some of the following fields:
Stockroom
You can optionally enter the stockroom to which you wish to restrict the report, using up to two alphanumeric characters. If this field is left blank, all stockrooms will be included in the report.
You can use the prompt facility to select from the Stockroom Selection pop-up.
Item From
You can optionally enter an item, using up to fifteen alphanumeric characters. This will be the item from which items will be selected. If no To item is specified, the application will select all lot-controlled items ordered alphanumerically after this item.
You can use the prompt facility to select from the Item Master Scan pop-up.
Item To
You can optionally enter an item, using up to fifteen alphanumeric characters, to specify the last lot-controlled item in the range.
If a stockroom is specified and a range of items is specified, the report will be restricted to those items within the range in that stockroom. If the stockroom is left blank, all stockrooms will be checked for items within the range.
You can use the prompt facility to select from the Item Master Scan pop-up.
Select Submit (F8) to submit the batch job to print the report.
376 | Infor System21 Inventory Management

Chapter 7 Packaging Requirements 7
Introduction to Packaging Requirements You can use Packaging Requirements both to analyse and report on packaging information. This information will help you to produce the packaging statistics that you need to submit to the appropriate authority. You can use the information produced to complete the standard documentation provided by these authorities.
You use Packaging Requirements to enter information about the quantity of each type of packaging that you use when you ship a product to a domestic customer over a specific period.
Setting up Packaging Requirements
Before you can track the packaging used you need to set up the following:
For each Item Inventory Company you must:
• Check the Packaging Reporting field on the Maintain Company Profile window• Set up the Packaging Reporting Country• Select Yes in the Packaging Reporting field for each item for which you need to track the
packaging details
For each Packaging Reporting Country you must create:
• Packaging categories• Packaging codes• Average packaging details per despatch• Default responsibilities
You also need to set up the packaging details for each item that you want to track.
Infor System21 Inventory Management | 377

856BPackaging Requirements
Maintain Country Details [1/INK] Use this task to maintain the data and reporting parameters for each country which needs to submit a packaging report. The information you can enter includes:
• Packaging Responsibilities
To apportion the responsibility for each member of the supply chain
• Default Responsibilities
To define percentage responsibilities when you are tracking responsibilities
Note: You can define default responsibilities, but they do not become effective until you switch on Track Responsibilities Processing.
• Packaging Categories
To define summary groups for the packaging used so that you can provide totals by surface area, weight, volume or any other classification
• Packaging Codes
These could relate to packaging materials, for example, glass, cardboard, wood, or to individual packaging, for example, glass bottle (25cl), glass bottle (33cl).
Note: Before you set up any of the reporting parameters, you must check the Packing Reporting field on the Maintain Company Profile window.
Maintain Packaging Reporting Countries Selection Window To display this window, select the Maintain Country Details task.
Use this window to select the Packaging Reporting country you want to maintain.
Options
Amend
Use this to alter the details for the reporting country.
Delete
Use this to delete the details for the country.
Functions
Add Country (F10)
Use this to define a new reporting country for the current Inventory company.
Position to (F19)
Use this to position the window display to the country selected.
Select a country or select Add Country (F10) to display the Maintain Packaging Reporting Country Detail window.
378 | Infor System21 Inventory Management

856BPackaging Requirements
Maintain Packaging Reporting Country Detail Window To display this window, select Amend against a country on the Maintain Packaging Reporting Countries Selection window.
Alternatively, select Add Country (F10) on the Maintain Packaging Reporting Countries Selection window.
Use this window to enter new details and change existing details for the selected packaging reporting country.
Fields
Country
Enter the country code.
If you are amending existing country details, this field is for information only and you cannot change it.
Note: You can only set up one set of packaging reporting details for each country.
Reporting Frequency
Select one of the following to define how often you need to produce the report:
Monthly (1) (default)
Quarterly (2)
If you are amending existing country details, this field is for information only and you cannot change it.
Reporting Format
Enter a valid report format or leave this field blank to use the standard report format.
You can use the prompt facility to select from the GDFT Packaging Reporting Format pop-up.
Note: You can define a report format using the Inventory Descriptions file code GDFT.
Track Responsibilities
Use this checkbox as follows:
Unchecked - If you have total responsibility for the packaging
Checked - To track responsibilities throughout the supply chain
Note: If you are using the German Duales report format, you must leave this field unchecked.
Calendar Code
Enter the code for the calendar used by this reporting country.
Alternatively, use the prompt facility to select from the Calendar Selection pop-up.
Infor System21 Inventory Management | 379

856BPackaging Requirements
Current Year
Enter the current year. This defaults to the current year for the Inventory company.
When you amend existing country details, this field is for information only.
Current Period
Enter the current period. This defaults to the first period of the current year.
When you amend existing country details, this field is for information only.
Reporting Currency
You must enter a reporting currency that is valid within General Ledger.
Alternatively, use the prompt facility to select from the Select Currency pop-up.
If you use World Trade, this field defaults to the reporting currency specified for this country.
Reporting Tax Code
You must enter a valid Tax Code.
Alternatively, use the prompt facility to select from the Tax Code Selection pop-up.
Reporting Address
You must enter the address where you need to submit your packaging data.
Target Recovery/Target Recycling
Enter the required percentages for target recovery and target recycling.
You use these fields when tracking responsibilities to compound with the derived responsibility. For example, if the amount of packaging you must recover is 25Kg, and you have set Target Recovery to 40% with Target Recycling set to 8%, you must recover 10Kg of packaging and recycle 2Kg of packaging during this period.
Functions
Responsibilities (F13)
Use this to maintain the packaging responsibilities incurred by the members of the supply chain.
Note: Responsibilities are only effective if you have checked the Track Responsibilities field.
Packaging Codes (F14)
Use this to define the packaging codes applicable in this country.
Average Packaging (F15)
Use this to maintain the average packaging details to be included on each despatch line.
Packaging Categories (F16)
Use this to maintain the packaging categories used by the countries to which you need to submit the report.
Note: If all the functions are not available, select Update (F8) to save the information. The rest of the functions will then be available.
380 | Infor System21 Inventory Management
856BPackaging Requirements
Select Update (F8) to validate and save the information entered. Then select Previous (F12) to return to the Maintain Packaging Reporting Country Selection window.
Maintain Responsibilities Pop-up To display this pop-up, select Responsibilities (F13) on the Maintain Packaging Reporting Country Detail window.
Use this pop-up to change the packaging responsibilities for the members of the supply chain. You can do this if you have selected to track responsibilities through the supply chain on the Maintain Packaging Reporting Country Detail window.
Fields
Resp
Enter a responsibility code.
Alternatively, use the prompt facility to select from the GDRC Packaging Responsibility Codes pop-up.
Resp %
Enter the percentage responsibility for each member of the supply chain.
The total responsibility for the supply chain cannot exceed 100% for either recycling or recovery.
Note: If the total responsibility does not equal 100%, you get a warning message when you select Update (F8). Clear the message and then select Update (F8) again to validate and save the changes.
Dft
Enter one of the following:
0 - To exclude this responsibility code from calculations
1 - To include this responsibility code in calculations
Dir
This is only displayed when the Enhanced Features option is on.
In order to stop imports that are subsequently supplied against the same item code from being counted twice, this facility will link a responsibility to the 'direction' of the transaction. The directions are simply outbound (0) and inbound (1). Inventory Description entries are allocated with the type SYDI to retrieve the titles.
Note: The direction field is INPCH in the Country Responsibilities file.
Enter one of the following:
0 - Outbound
Infor System21 Inventory Management | 381

856BPackaging Requirements
1 - Inbound
Note: The extract logic uses the inbound responsibilities for purchases and the outbound responsibilities for sales. Purchases pick up the rolled-up responsibility of previous tasks. For example, for a factored item, the import responsibilities are manufacture, conversion and filling. The outbound responsibilities are selling. For an item you consume, the inbound responsibilities are manufacture, conversion and filling, and there are no outbound responsibilities.
Options
Select
Use this to select the item.
The item details transfer to the fields at the bottom of the window so you can change the responsibility % and default.
Delete
Use this to remove the current item.
You cannot delete the item if you have set responsibility overrides.
Select Update (F8) to validate and save the information. Then select Previous (F12) to return to the Maintain Packaging Reporting Country Detail window.
Packaging Codes Details Window To display this window, select Packaging Codes (F14) on the Maintain Packaging Reporting Country Detail window.
Use this window to define the packaging codes used for the current country. Use Page Up and Page Down to see additional Category Codes when appropriate.
Note: If the Enhanced Features option is active, the Packaging Category Unit of Measure (UoM) validation is against the secondary UoMs. The use of the secondary UoMs and their related conversion factors makes the entry of item-related details easier.
Options
Amend
Use this to alter the packaging code definition on the Amend Packaging Details pop-up.
Delete
Use this to remove the packaging code definition.
Functions
Add (F6)
Use this to add new packaging code definitions.
382 | Infor System21 Inventory Management

856BPackaging Requirements
Select Amend against a definition or select Add (F6) to display the Add/Amend Packaging Details pop-up.
Add/Amend Packaging Details Pop-up To display this pop-up, select Amend against a line on the Packaging Codes Details window.
Alternatively, select Add (F6) on the Packaging Codes Details window.
Use this pop-up to add or alter the packaging details.
Note: If you are amending an existing packaging definition, the title of the pop-up is Amend Packaging Details. If you are adding a packaging definition, the title of the pop-up is Add Packaging Details.
Fields
Packaging Code
Enter a packaging code that is unique within this country. Enter a description for the packaging code.
Note: If you are amending the packaging code definition, you cannot change the packaging code but you can change the description
Category
Enter the category of the packaging. The categories can be user-defined (see the Maintain Packaging Categories Pop-up section for more information).
You can use the prompt facility to select from the Packaging Category Selection pop-up.
Tax Code
Enter the Tax Code for the packaging. You only need to do this in Germany.
You can use the prompt facility to select from the Tax Code Selection pop-up.
Fee
Enter the fee for the packaging. You only need to do this in Germany.
Press Enter and then select Update (F8) to validate and save the information. Then select Previous (F12) to return to the Packaging Codes Details window.
Infor System21 Inventory Management | 383

856BPackaging Requirements
Average Packaging Details per Despatch Window To display this window, select Average Packaging (F15) on the Maintain Packaging Reporting Country Detail window.
Use this window to select average packaging details per despatch.
Note: You can use this window to represent packaging used in small quantities on every despatch, for example, shrink-wrap.
Options
Amend
Use this to alter the average packaging details for the packaging code.
Delete
Use this to delete the average packaging details for the packaging code.
Functions
Add (F6)
Use this to add average despatch packaging details.
Select Amend against a packaging code or select Add (F6) to display the Add Average Packaging Details pop-up. Alternatively, select Previous (F12) to return to the Maintain Packaging Reporting Country Detail window.
Add Average Packaging Details Pop-up To display this pop-up, select Amend against a packaging code on the Average Packaging Details per Despatch window.
Alternatively, select Add (F6) on the Add Average Packaging Details per Despatch window.
Use this pop-up to add or amend packaging details per despatch.
Fields
Packaging Code
Enter the packaging code.
Alternatively, use the prompt facility to select from the Packaging Code Selection pop-up.
Units per Despatch
Enter the average number of units of packaging that you use for each despatch.
384 | Infor System21 Inventory Management

856BPackaging Requirements
Multiply or Divide
Select one of the following:
Multiply (0) - To multiply the despatch quantity by the units per despatch in order to calculate the total units used
Divide (1) - To divide the despatch quantity by the units per despatch in order to calculate the total units used
Press Enter to validate the information and then select Update (F8) to save. Select Previous (F12) to display the Packaging Codes Details window.
Maintain Packaging Categories Pop-up To display this pop-up, select Packaging Categories (F16) on the Maintain Packaging Reporting Country Detail window.
Use this pop-up to maintain the packaging categories for the selected packaging reporting country.
Options
Select
Use this to select the packaging category.
The Add/Amend Packaging Category pop-up is displayed.
Delete
Use this to remove the packaging category.
Functions
Add (F6)
Use this to add a new packaging category.
The Add/Amend Packaging Category pop-up is displayed.
Select a packaging category or select Add (F6) to display the Add/Amend Packaging Category pop-up. Alternatively, select Previous (F12) to display the Maintain Packaging Country Detail window.
Infor System21 Inventory Management | 385

856BPackaging Requirements
Add/Amend Packaging Category Pop-up To display this pop-up, select a packaging category on the Maintain Packaging Categories pop-up.
Alternatively, select Add (F6) on the Maintain Packaging Categories pop-up.
Use this pop-up to add or alter the packaging category.
Note: If you are amending an existing packaging category, the title of the pop-up is Amend Packaging Category. If you are adding a packaging category, the title of the pop-up is Add Packaging Category.
Fields
Category Code
Enter a category code that is unique within this country.
Description
Enter a description for the packaging category.
Note: If you are amending the packaging category, you cannot change the category code but you can change the description.
Unit
Enter the unit for the category.
You can use the prompt facility to select from the Units of Measure pop-up.
Press Enter to update the information and return to the Maintain Packaging Categories pop-up.
386 | Infor System21 Inventory Management

856BPackaging Requirements
Maintain Item Details [2/INK] Use this task to define country-specific information about the packaging that you need for each item. You can condition the packaging definition for an item dependent on the quantity despatched.
For example:
Beer:
Per litre = 50 grams aluminium
Per 10 litres = 500 grams aluminium + 2 grams plastic + 4 grams cardboard
Per 100 litres = 5000 grams aluminium + 20 grams plastic + 40 grams cardboard + 1 kg wood pallet
Note: Before you can define the packaging information, you need to select Yes in the Packaging Reporting Item field on the Maintain Inventory Item window.
Country Item Packing Details Selection Window To display this window, select the Maintain Item Details task.
Use this window to select the item for which you want to maintain packing details.
Fields
Item
Enter the item code.
Alternatively, use the prompt facility to select from the Item Master Scan pop-up.
Country
Enter the country for which you are defining the packaging.
Alternatively, use the prompt facility to select from the Packaging Reporting Country Selection pop-up.
Note: If you leave this field blank and then press Enter, the software displays a list of all the available packaging countries. Select the country you require.
Base On
This is useful for similar items. It allows packaging details to be based on another item. This is irrelevant when you are using Link to Item (F16). It is also irrelevant when you are amending existing packaging details.
You can use the prompt facility to select from the Item Master Scan pop-up.
When you are adding packaging details for the first time, the Base On item chosen must either have packaging details or be linked to an item that has packaging details. These details are populated into the new item.
Infor System21 Inventory Management | 387

856BPackaging Requirements
Functions
Link to Item (F6)
Use this to display the Link to Item pop-up. Many items will have the same packaging details. This function reduces the data-entry effort by enabling an item's packaging details to be linked to that of an equivalent item.
Note: If you have not defined packaging details, select Add (F6) to display the Enter Item Packaging Details pop-up and then select the country. For more information, see the Enter Item Packaging Details Pop-up section.
Enter an item code and a country code and then press Enter to display the Country Item Packaging Codes Details window.
If the item selected has a linked item, you will be reminded to use the function to see the linked item.
Link to Item Pop-up To display this pop-up, enter an item and/or a country and then select Link to Item (F6) on the Country Item Packing Details Selection window.
Use this pop-up to link to an item whose packing details you want to use for your selected item.
Fields
Item
Enter a link item code. Packaging details must exist for this link item and country.
Alternatively, use the prompt facility to select from the Item Master Scan pop-up.
Functions
Update (F8)
This is only available when the item entered has been successfully validated.
Once validation of the item is successful, select Update (F8) to perform the update and display the Country Item Packaging Codes Details window.
388 | Infor System21 Inventory Management

856BPackaging Requirements
Country Item Packaging Codes Details Window To display this window, enter an item code and country code and then press Enter on the Country Item Packaging Details Selection window.
Use this window to enter or amend the item packaging details.
Options
Amend
Use this to alter the packaging details.
Delete
Use this to delete the packaging details.
Changes to packaging information are not permitted if the following conditions are true:
• The current company does not "own" the item definition being maintained. • Maintenance of this item attribute is deemed to be responsibility of the "owning" company.
Functions
Add (F6)
Use this to add new packaging details. The Enter Item Packaging Details pop-up is displayed.
Quantity Breaks (F16)
Use this to add new despatch quantity breaks. The Select Additional Packaging Quantity Breaks pop-up is displayed.
Note: If this function is not available, select Issue Units (F21) to return to the Issue Units display.
Responsibilities (F17)
Use this to define the recycling and recovery responsibilities of each member of the supply chain. The Override Responsibilities pop-up is displayed.
Select Country (F18)
Use this to select a new country to define packaging information for this item. The Packaging Reporting Country Selection pop-up is displayed.
Issue Units (F21)
Use this to display the Packaging Details per Issue Unit. You can only use this when the packaging details per quantity breaks are displayed.
Include BOM Packaging (F22)
This is useful for manufactured items, providing the ability to derive the packaging details from the packaging material items in the route's Bill of Material.
This will retrieve the packaging details for each packaging material in the BOM and produce a composite packaging detail stored in this finished goods item packaging details.
Infor System21 Inventory Management | 389

856BPackaging Requirements
Although this still results in duplication (a summarisation) of packaging details, it overcomes the necessity for you to calculate this manually. (For performance reasons it is also better than calculating from the BOM dynamically for each finished item despatch transaction.)
On selecting this function you will be prompted for a route code.
Select Update (F8) to validate the information. Then select Previous (F12) to display the Country Item Packaging Details Selection window.
Enter Item Packaging Details Pop-up To display this pop-up, select Add (F6) on the Country Item Packaging Codes Details window.
Alternatively, select Add (F6) on the Select Additional Packaging Quantity Breaks pop-up, and enter the quantity break in the New Break field.
Use this pop-up to add and amend the packaging details for the selected item.
Fields
Packaging Code
Enter the item packaging code.
Alternatively, use the prompt facility to select from the Packaging Code Selection pop-up.
Note: You can only enter packaging details once for each packaging code.
Units per Issue Unit
Enter the number of packaging units per specified number of issue units.
This is per single issue unit unless you are defining packaging details for a quantity break, when it is per quantity specified.
Packaging Unit of Measure
This enables, for ease of use, the packaging unit to be expressed in something other than tonnes, such as kilograms, cases, or metres.
It defaults to the Category UoM, but it is validated against the Secondary UoMs.
You can use the prompt facility to select from the Units of Measure pop-up.
Note: If it is preferable to express the Packaging Category Units and Secondary Units in kilograms for ease of use; the volumes can be converted to tonnes in the reports.
It is assumed that this Secondary Unit weight will be in the same units as the Packaging Category, so that all weights output to the Period Summary file are consistent and the subsequent reporting works with just one weight UoM. (This could be kilograms or tonnes, depending on how you want to operate.)
390 | Infor System21 Inventory Management

856BPackaging Requirements
Multiply or Divide
Enter one of the following:
0 - To multiply the packaging units by issue units
1 - To divide the packaging units by issue units
Packaging Level
Primary, secondary and tertiary packaging levels are identified by a single character packaging level.
You can use the prompt facility to select from the SYLV System Setting - Packaging Level pop-up.
Allowable values are 1, 2 and 3 with initial titles defined in the Inventory Descriptions file under major type SYLV. These can be changed as required.
Functions
Include BOM Packaging (F22)
This is useful for manufactured items, providing the ability to derive the packaging details from the packaging material items in the route's Bill of Material.
This will retrieve the packaging details for each packaging material in the BOM and produce a composite packaging detail stored in this finished goods item packaging details.
Although this still results in duplication (a summarisation) of packaging details, it overcomes the necessity for you to calculate this manually. (For performance reasons it is also better than calculating from the BOM dynamically for each finished item despatch transaction.)
On selecting this function you will be prompted for a route code.
Press Enter to validate the data. Then press Enter to display the Country Items Packaging Codes Details window.
Select Additional Packaging Quantity Breaks Pop-up To display this pop-up, select Quantity Breaks (F16) on the Country Item Packaging Codes Details window.
Use this pop-up to select quantity breaks for which you want to display the packaging details. You can also:
• Add packaging details for a new quantity break • Display the packaging details for existing quantity breaks
For example, you may have defined the issue unit for a bottled beer as cases, but the item can also be packaged in cardboard cases, with twelve bottles per case. It can also be stocked in pallets with ten cases per pallet, shrink-wrapped in polythene.
In this instance, you would need to create packaging quantity breaks for:
Infor System21 Inventory Management | 391

856BPackaging Requirements
• One issue unit, in this example, one case The packaging details would be twelve bottles and one case.
• Ten issue units or one pallet The packaging details would be ten cases, one pallet and one unit of polythene shrink-wrap.
Options
Select
Use this to select the quantity break for which you want to display the item packaging details. The Country Item Packaging Codes Details window is displayed, showing the packaging details for the specified quantity break.
Note: Select Issue Units (F21) to display the Country Item Packaging Codes Details window for the Issue Unit.
Functions
Add (F6)
Use this to add the packaging details for a new quantity break.
Select Add (F6) and then enter a quantity break figure in the New Break field and press Enter to display the Enter Item Packaging Details pop-up.
Override Responsibilities Pop-up To display this pop-up, select Responsibilities (F17) on the Country Item Packaging Codes Details window.
Use this pop-up to override the country default packaging responsibilities at the item level.
Fields
Responsibility
Enter one of the following:
0 - To exclude the item from the responsibility calculations
1 - To include the item in the responsibility calculations
Select Update (F8) to display the Country Item Packaging Codes Details window.
Packaging Reporting Country Selection Pop-up To display this pop-up, select Select Country (F18) on the Country Item Packaging Codes Details window.
392 | Infor System21 Inventory Management

856BPackaging Requirements
Use this pop-up to select a new packaging reporting country.
Options
Select
Use this to select the country you want to define.
Note: If you have no item packaging details set up for the country selected, the Enter Item Packaging Details pop-up is displayed.
Select the appropriate country to display the Country Item Packaging Codes Details window.
Select Route Pop-up To display this pop-up, select Include BOM Packaging (F22) on the Country Item Packaging Codes Details window.
Use this pop-up to select a route code.
Fields
Route
This defaults to the Primary Planning Route. An error is shown if a route does not exist for the selected route code. The summarised pack details are calculated as described below and the Item Pack subfile refreshed. You can then change or add additional details.
You can use the prompt facility to select from the Select Route pop-up.
Processing summary:
• The approach to drilling down the BOM is based on the Production Indented Enquiry. • It is only interested in component items that are packaging items; that is, with a material type
of 1. All other items are ignored. • It calculates how many packaging items are needed to make one unit of the manufactured
item, giving consideration to lot size, route UoM, and co-product outputs. It then calculates then how many of each pack code are present in one unit of the manufactured item. As you go down the BOM, the number of material items is calculated according to the normal quantity-off rules.
• For each material item, the packaging details are retrieved. If this material item has a linked item, the packaging details for the linked item are retrieved. If quantity breaks exist, the appropriate break is found for the material quantity required at this point in the BOM. The quantity required for each pack is retained in a holding file.
• As further packaging material items are encountered, they may utilise the same pack codes. The requirement for this new material item is accumulated into the holding file.
Infor System21 Inventory Management | 393

856BPackaging Requirements
• On completing the BOM extract, the totals from the holding file are then shown in the maintenance sub-file. As this is the packaging required to make one finished item, the only quantity break is 1. If you need additional breaks they will have to be added manually.
Select Update (F8) to complete the update and return to the Country Item Packaging Codes Details window.
394 | Infor System21 Inventory Management

856BPackaging Requirements
Customer/Item Overrides [3/INK] Use this task to override responsibilities for packaging on the customer item. You should use this if a specific customer varies from the norm for the sales channel to which it belongs.
You can specify the delivery sequence to which the responsibility override relates. If you do not specify the delivery sequence, the responsibility override is applied to all delivery points for the customer.
Note: Inventory uses customer item responsibility overrides, regardless of the responsibility settings for Sales Channels, Country and Item.
Customer/Item Responsibility Overrides Country Selection Window To display this window select the Customer/Item Overrides task.
Use this window to select the country for which you want to enter packaging overrides.
Fields
Country
Enter the code for the country.
Alternatively, use the prompt facility to select from the Packaging Reporting Country Selection pop-up.
Enter a country and then press Enter to display the Customer/Item Responsibility Overrides Selection window.
Customer/Item Responsibility Overrides Selection Window To display this window, enter a country and then press Enter on the Customer/Item Responsibility Overrides Country Selection window.
Use this window to select the customer and item for which you want to enter packaging overrides.
Fields
Country
This field displays the selected country.
Item
Enter the item code.
Alternatively, use the prompt facility to select from the Item Master Scan pop-up.
Infor System21 Inventory Management | 395

856BPackaging Requirements
Customer
Enter the customer code and delivery sequence.
You can use the prompt facility on the first field to select from the Customer Scan pop-up.
Functions
Customer Scan by Item (F6)
Use this to display a list of all the customers and delivery sequences that apply to the item.
To display the Override Responsibilities window, enter a country, item, customer code and delivery sequence and then press Enter.
Selection of Customer to be Maintained Window To display this window, select Customer Scan by Item (F6) on the Customer/Item Responsibility Overrides Selection window.
Use this window to select the customer overrides you want to maintain.
Fields
Position To
Use this to position the display starting at the value entered in these fields.
Options
Select
Use this to select the customer and delivery sequence for which you want to enter responsibility overrides.
Select a customer to be maintained to display the Customer/Item Responsibility Overrides window.
Customer/Item Responsibility Overrides Window To display this window, enter an item, customer code and delivery sequence and then press Enter on the Customer/Item Responsibility Overrides Selection window.
Alternatively, select a customer on the Selection of Customer to be Maintained window.
Use this window to enter packaging responsibilities for the customer and item. These responsibilities override the default responsibilities set up for the packaging country.
Note: Only Outbound responsibilities can be selected if the Enhanced Features option is on.
Fields
396 | Infor System21 Inventory Management

856BPackaging Requirements
Responsibility
Use this checkbox as follows:
Unchecked - To exclude this item from the responsibility calculations
Checked - To include this item in the responsibility calculations
Select Update (F8) to validate the data and display the Customer/Item Responsibilities Override Selection window.
Infor System21 Inventory Management | 397

856BPackaging Requirements
Sales Channel Overrides [4/INK] Use this task to define packaging responsibilities for a sales channel when they vary from the default for a particular country.
Note: Inventory uses Sales Channel responsibility overrides, regardless of the responsibility settings for country and item, but these are overridden by any responsibility overrides defined for the customer.
Sales Channel Responsibility Overrides Window To display this window, select the Sales Channel Overrides task.
Use this window to select the sales channel for which you want to enter responsibility overrides.
Note: If the company does not have sales channels defined, you cannot define Sales Channel Responsibilities overrides.
Note: Only Outbound responsibilities can be selected if the Enhanced Features option is on.
Fields
Sales Channel
Enter the code for the sales channel.
Alternatively, use the prompt facility to select from the DN Customer Division pop-up.
Country
Enter the country.
Alternatively, use the prompt facility to select from the Packaging Reporting Country Selection pop-up.
Complete the Sales Channel and Country fields and then press Enter to display the Override Responsibilities (Sales Channels) pop-up.
398 | Infor System21 Inventory Management

856BPackaging Requirements
Override Responsibilities (Sales Channels) Pop-up To display this pop-up, complete the Sales Channel and Country fields and then press Enter on the Sales Channel Responsibility Overrides window.
Use this pop-up to enter the packaging responsibilities for the selected sales channel.
Fields
Responsibility
Use this checkbox as follows:
Unchecked - To exclude this item from the responsibility calculations
Checked - To include this item in the responsibility calculations
Select Update (F8) to validate the data and display the Sales Channel Responsibility Overrides window.
Infor System21 Inventory Management | 399

856BPackaging Requirements
Maintain Calendar [5/INK] Use this task to define and update the calendar profiles used by Packaging Requirements.
Inventory Calendar/Year Maintenance Selection Window To display this window, select the Maintain Calendar task.
Use this window to select the calendar you want to maintain or to enter the code for a new calendar profile.
Fields
Enter Calendar Code
Enter a code for a new calendar profile.
Year
Enter the year for the new calendar profile.
Based on Calendar Profile
You can enter the code and year of the calendar profile upon which you want to base the new profile.
Options
Select
Use this to select the calendar profile that you want to change.
Use this to print the calendar profile.
Enter a calendar code and year and optionally the profile and year upon which the new calendar should be based, to display the Inventory Calendar/Year Maintenance Detail window so that you can add a new calendar profile.
Alternatively, select an existing calendar for amendment. This also displays the Inventory Calendar/Year Maintenance Detail window.
400 | Infor System21 Inventory Management

856BPackaging Requirements
Inventory Calendar/Year Maintenance Detail Window To display this window in Amend mode, select an existing calendar on the Inventory Calendar/Year Maintenance Selection window.
Alternatively, to display this window in Add mode, enter a calendar code and year on the Inventory Calendar/Year Maintenance Selection window.
Use this window to enter details for the calendar profile you are maintaining or creating.
Fields
Calendar Code/Year
These fields display the chosen calendar code and year.
Description (Untitled)
Enter a description for the calendar profile.
Number of Periods per Year
Enter the number of periods in the year (either 12 or 13 periods).
Normal Start Day of Week
Select one of the following:
Monday (1)
Tuesday (2)
Wednesday (3)
Thursday (4)
Friday (5)
Saturday (6)
Sunday (7)
Start Date of the Year
Enter or select the date on which the calendar year starts.
Period Names
Enter the name of each period.
Days
Enter the number of days there are in each period.
Note: This includes working and non-working days.
Template Type to Use
Select one of the following:
Infor System21 Inventory Management | 401

856BPackaging Requirements
Standard Week (1) (default) - Where you have the same working days each week
Cyclic Week (2) - Where the working days changes over a number of weeks cycle (you can have up to a five-week cycle)
Period (3) – Period
Note: The next window varies depending upon the template type you have selected.
Functions
Delete (F11)
Use this to delete the selected calendar profile.
Press Enter to display the next Inventory Calendar/Year Maintenance window. The window that is displayed depends on the template type you specify here.
Inventory Calendar/Year Maintenance (Standard Week) Window To display this window, set the Template Type to Standard Week and then press Enter on the Inventory Calendar/Year Maintenance Detail window.
Use this window to enter the working days in a standard week.
Fields
Standard Weekly Template
Enter one of the following to set up the standard weeks for one or more weeks:
0 - Non-working day
1 - Working day
Note: Use the fields at the bottom of the window to define five alternative weekly templates if required.
Press Enter to validate the data you have specified and then press Enter again to display the Inventory Calendar/Year Maintenance Holiday Detail window.
402 | Infor System21 Inventory Management

856BPackaging Requirements
Inventory Calendar/Year Maintenance (Cyclic Week) Window To display this window, set the Template Type to Cyclic Week and then press Enter on the Inventory Calendar/Year Maintenance Detail window
Use this window to enter the working and non-working days when the pattern varies over more than one week.
Fields
Cyclic Weeks Templates
You can set up cyclic week templates for one or more weeks.
Use this checkbox as follows:
Unchecked - Non-working day
Checked - Working day
Number of Weeks
Enter a value between one and five to determine the number of weeks that are in your cycle.
Press Enter to validate the data you have specified and then press Enter again to display the Inventory Calendar/Year Maintenance Holiday Detail window.
Infor System21 Inventory Management | 403

856BPackaging Requirements
Inventory Calendar/Year Maintenance (Period) Window To display this window, set the Template Type to Period and then press Enter on the Inventory Calendar/Year Maintenance Detail window.
Use this window to enter the working and non-working days for either the 12 or 13 periods you have specified for this calendar year.
Fields
Period Template for Period
Set up the working day pattern for the specified period.
Use this checkbox as follows:
Unchecked - Non-working day
Checked - Working day
Functions
Skip to Holidays (F8)
Use this to display the Inventory Calendar/Year Maintenance Holiday Detail window without having to enter the working day pattern for the period.
Press Enter to validate the data you have specified. Press Enter again to display the Inventory Calendar/Year Maintenance Holiday Detail window.
404 | Infor System21 Inventory Management

856BPackaging Requirements
Inventory Calendar/Year Maintenance Holiday Detail Window To display this window select Skip to Holidays (F8) on the Inventory Calendar/Year Maintenance (Standard Week) window, Inventory Calendar/Year Maintenance (Cyclic Week) window, or Inventory Calendar/Year Maintenance (Period) window without maintaining the details.
Alternatively, press Enter to validate the data you have specified on the Inventory Calendar/Year Maintenance (Standard Week) window, Inventory Calendar/Year Maintenance (Cyclic Week) window, or Inventory Calendar/Year Maintenance (Period) window and then press Enter again.
Use this window to define the dates of any works holidays.
Fields
Holidays
From
Enter the start date of the holiday.
To
Enter the end date of the holiday.
Select Update (F8) to save the information and display the Inventory Calendar/Year Maintenance window.
Infor System21 Inventory Management | 405

856BPackaging Requirements
Extract Data from Inventory [11/INK] Use this task to extract the details of all issues for the selected period from the Inventory Movements file. The information is saved to the Packaging Extract file and then used to create the Packaging Usage report.
Note: You cannot extract data from closed packaging reporting periods.
Data Extract Selection Window To display this window, select the Extract Data from Inventory task.
Use this window to select the country and period whose packaging data you want to extract.
Fields
Country for Extract
Enter the country for which you want to extract the packaging data.
Alternatively, use the prompt facility to select from the Packaging Reporting Country Selection pop-up.
Note: Country means:
The country from which sales have been despatched, to both domestic and export customers
The country to which purchases have been received, from both domestic and import suppliers
Period/Quarter to be Extracted
Enter the period/quarter for which you want to extract the packaging data.
Note: you can only extract data for the current or future periods or quarters.
Select Submit (F8) to start the extraction process.
406 | Infor System21 Inventory Management

856BPackaging Requirements
Update Period/Quarter [12/INK] Use this to change the current packaging reporting period or quarter and year.
Note: You should perform data extract for the current period before you change the reporting period.
Update Quarter/Year Window To display this window, select the Update Period/Quarter task.
Use this window to select the country you want to update.
Fields
Country
Enter the country whose details you want to update.
Alternatively, use the prompt facility to select from the Packaging Reporting Country Selection pop-up.
Enter a country and then press Enter to display the Update Quarter/Year window.
Update Quarter/Year Window To display this window, select the country whose details you want to update and then press Enter on the Update Quarter/Year Country Selection window.
Use this window to select the quarter, period and year that you want to update.
Fields
Country
This field displays the selected country.
Current Quarter/Period
Enter the quarter/period you want to update. This defaults to the current reporting quarter/period.
Current Year
Enter the year. This defaults to the current reporting year.
Select Update (F8) to update the quarter or period.
Infor System21 Inventory Management | 407

856BPackaging Requirements
Corrections and Adjustments [13/INK] Use this task to enter adjustments related to the periods contained in the packaging report summary. These adjustments are shown on the German Duales report as period 13 figures.
Corrections and Adjustments Selection Window To display this window, select the Corrections and Adjustments task.
Use this window to select the country and period for which you want to enter packaging adjustments.
Fields
Country
Enter the packaging reporting country for which there are adjustments.
Alternatively, use the prompt facility to select from the Packaging Reporting Country Selection pop-up.
Period
Enter the period for the adjustments.
Enter a country and period and then press Enter to display the Corrections and Adjustments Detail window.
Corrections and Adjustments Detail Window To display this window, enter a country and period and then press Enter on the Corrections and Adjustments Selection window.
Use this window to select the adjustment details you want to amend or add.
Options
Amend
Use this to select the correction you want to amend.
Delete
Use this to remove the correction.
Functions
408 | Infor System21 Inventory Management

856BPackaging Requirements
Add (F6)
Use this to add a new correction or adjustment.
Select Add (F6) to display the Corrections and Adjustments window in Add mode. Alternatively, select Amend against a correction to display the Corrections and Adjustments window in Amend mode.
Corrections and Adjustments Window To display this window in Add mode, select Add (F6) on the Corrections and Adjustments Detail window. Alternatively, to display this window in Amend mode, select Amend against a correction on the Corrections and Adjustments Detail window.
Use this window to enter the adjustment details.
Fields
Packaging Code
Enter the packaging code for the adjustment.
Alternatively, use the prompt facility to select from the Packaging Code Selection pop-up.
If you are amending the adjustment, this field is for information only.
Responsibility
Enter the person who has responsibility for the adjustment.
Alternatively, use the prompt facility to select from the Packaging Responsibility Selection pop-up.
If you are amending the adjustment, this field is for information only.
Quantity
Enter the quantity of packaging to which this adjustment applies, using either a positive or negative value.
Adjustment Reason
Enter the reason for the adjustment.
Alternatively, use the prompt facility to select from the GDAR Packaging Adjustment Reasons pop-up.
Domestic or Foreign
Enter a valid code.
Alternatively, use the prompt facility to select from the SYDF System Setting - Domestic pop-up.
Infor System21 Inventory Management | 409

856BPackaging Requirements
Packaging Level
Enter a valid packaging level.
Alternatively, use the prompt facility to select from the SYLV System Setting - Packaging Level pop-up.
Account
You can optionally enter an account code.
Branch
You can optionally enter a branch code.
Press Enter to add or update the details and return to the Corrections and Adjustments Detail window.
410 | Infor System21 Inventory Management

856BPackaging Requirements
Enquire on Country Details [21/INK] Use this task to view the details for the packaging reporting countries.
Packaging Reporting Countries Enquiry Selection Window To display this window, select the Enquire on Country Details task.
Use this window to select the packaging reporting country whose details you want to display.
Fields
Position To
Enter the country you want to display and select Position To (F19) in order to position the cursor to that line.
Options
Select
Use this to select the country whose packaging reporting details you want to view.
Functions
Position To (F19)
Use this to position the cursor at the country code you have specified.
Select the country code on which you want to enquire to display the Packaging Reporting Country Enquiry Details window.
Packaging Reporting Country Enquiry Details Window To display this window, select the country on which you wish to enquire and then press Enter on the Packaging Reporting Countries Enquiry Selection window.
Use this window to view the details for the packaging reporting country. The fields on this window are the same as those on the Maintain Packaging Reporting Country Detail window.
Infor System21 Inventory Management | 411

856BPackaging Requirements
Functions
Responsibilities (F13)
Use this to display the packaging responsibilities for each section of the supply chain on the Responsibilities Enquiry pop-up.
Packaging Codes (F14)
Use this to display the defined packaging codes on the Packaging Details Enquiry window.
Average Packaging (F15)
Use this to display the average packaging used per despatch on the Average Packaging Details per Despatch Enquiry window.
Packaging Categories (F16)
Use this to display the defined packaging categories on the Packaging Categories Enquiry pop-up.
Select an option or select Exit (F3) to leave the enquiry.
Responsibilities Enquiry Pop-up To view this pop-up, select Responsibilities (F13) on the Packaging Reporting Enquiry Details window.
Use this pop-up to view the responsibilities set up for this packaging reporting country.
Select Previous (F12) to return to the previous window.
Packaging Details Enquiry Window To display this window, select Packaging Codes (F14) on the Packaging Reporting Enquiry Details window.
Use this window to view the packaging codes set up for this packaging reporting country.
Select Exit (F3) to leave the enquiry.
412 | Infor System21 Inventory Management

856BPackaging Requirements
Average Packaging Details per Despatch Enquiry Window To display this window, select Average Packaging (F15) on the Packaging Reporting Enquiry Details window.
Use this window to view the responsibilities set up for this packaging reporting country.
Select Exit (F3) to leave the enquiry.
Packaging Categories Enquiry Pop-up To display this pop-up, select Packaging Categories (F16) on the Packaging Reporting Enquiry Details window.
Use this pop-up to view the packaging categories set up for this packaging reporting country.
Select Exit (F3) to leave the enquiry.
Infor System21 Inventory Management | 413

856BPackaging Requirements
Enquire on Item Details [22/INK] Use this task to look at the packaging details for the item.
Country Item Packaging Details Enquiry Selection Window To display this window, select the Enquire on Item Details task.
Use this window to select the item and country for which you want to view details.
Fields
Item
Enter the item for which you want to view packaging details.
Alternatively, use the prompt facility to select from the Item Master Scan pop-up.
Country
Enter the code for the country.
Alternatively, use the prompt facility to select from the Packaging Reporting Country Selection pop-up.
Press Enter to display the Country Item Packaging Details Enquiry window.
Country Item Packaging Details Enquiry Window To display this window, specify the item and packaging reporting country and then press Enter on the Country Item Packaging Details Enquiry Selection window.
Use this window to view the packaging details for the item displayed. You can view the details for one issue unit or for the defined quantity breaks.
A highlighted message is displayed if the selected item has a Linked to Item. The details from that linked item are then shown.
Functions
Quantity Breaks (F16)
Use this to display the packaging quantity breaks.
Select Country (F18)
Use this to display the packaging details for a different packaging reporting country.
Select the function you require or select Exit (F3) to leave the enquiry.
414 | Infor System21 Inventory Management

856BPackaging Requirements
Infor System21 Inventory Management | 415

856BPackaging Requirements
Packaging Payments [31/INK] Use this report task to detail the recommended packaging payments totalled by period, quarter or year. There are also sub-totals for each category and each responsibility.
Packaging Payments Report Selection Window To display this window, select the Packaging Payments task.
Use this window to specify the country and period range for which you want to produce this report.
Note: This task is only available for companies with Extended Packaging Features switched off.
Fields
Reporting Country
Enter the country for the payment report.
Alternatively, use the prompt facility to select from the Packaging Reporting Country Selection pop-up.
From
Enter the starting period or quarter for the payment report.
To
Enter the finishing period or quarter for the payment report.
Select Submit (F8) to submit the job to print the report.
416 | Infor System21 Inventory Management

856BPackaging Requirements
Packaging Adjustments [32/INK] Use this report task to show all the packaging adjustments made for the specified period or quarter.
Packaging Adjustment Report Selection Window To display this window, select the Packaging Adjustments task.
Use this window to specify the country and period for which you want to produce the report.
Fields
Reporting Country
Enter the country for which you require the adjustment report.
Alternatively, use the prompt facility to select from the Packaging Reporting Country Selection pop-up.
Period/Quarter
Enter the period or quarter for which you require the adjustment report.
Select Submit (F8) to submit the job to print the report.
Infor System21 Inventory Management | 417

856BPackaging Requirements
Packaging Usage [33/INK] Use this report task to print the Packaging Extract file. For more information, see the Extract Data from Inventory section. You can produce the Packaging Usage report for a period, quarter or year.
Packaging Report Selection Window To display this window, select the Packaging Usage task.
Use this window to select the country and periods that are to be the subject of your report.
Note: This task is only available for companies with Extended Packaging Features switched off.
Fields
Reporting Country
Enter the packaging reporting country.
Alternatively, use the prompt facility to select from the Packaging Reporting Country Selection pop-up.
Current Period
This field displays the current period.
Advance Period
Use this checkbox as follows:
Unchecked - To keep the current period open
Checked - To close the current period and open a new period
Yearly Report Required
Enter one of the following:
1 - To produce the yearly report
2 - Not to produce the yearly report
Note: If you are producing the yearly report and you set the Advance Period flag, the year is also advanced, as long as an Inventory Data Extract has been run for every period of the year.
Select Submit Job (F8) to run the report and, where relevant, advance the period.
418 | Infor System21 Inventory Management

856BPackaging Requirements
Delete Historical Data [42/INK] Use this task to delete the historical data from the Packaging Extract file. The Packaging Extract file is produced when you run Extract Data from Inventory. For more information, see the Extract Data from Inventory section.
Delete Historical Data Window To display this window, select the Delete Historical Data task.
Use this window to select the country and period of the data you are deleting.
Fields
Country
Enter the packaging reporting country.
Alternatively, use the prompt facility to select from the Packaging Reporting Country Selection pop-up.
Last Period's/Quarter's Data to be Erased
Enter the last period or quarter for which you want to erase the data.
Period End Date
Enter the end date of the last period you want to erase.
Press Enter to remove the historical data.
Infor System21 Inventory Management | 419

856BPackaging Requirements
Create Historical Data [43/INK] Use this to create historical data for the specified country and quarter or period.
Create Historical Data Window To display this window, select the Create Historical Data task.
Use this window to specify the packaging country and period or quarter of the data you are creating.
Fields
Country
Enter the packaging reporting country for which you want to create data.
Alternatively, use the prompt facility to select from the Packaging Reporting Country Selection pop-up.
Last Period's/Quarter's Data to be Created
Enter the last period or quarter for which you want to create data.
Period End Date
Enter the end date of the last period or quarter.
Press Enter to create the data.
420 | Infor System21 Inventory Management

Chapter 8 Inventory Valuation 8
Inventory Valuation Introduction There are three main features in the Inventory Valuation. These are:
• Stockroom Fiscal CloseUse this to close a stockroom period and open the next. You can then process all movementswithin a stockroom period together.
• Stock Journal ReportUse this to produce a report for each stockroom at each inventory period end. You can chooseto produce the report automatically as part of the Stockroom Fiscal Close.
• LIFO Re-valuationUse this to re-value stock on a Last In First Out (LIFO) basis. You would normally only run this atthe year end.
You can activate Inventory Valuation company by company.
You can also enter an override cost for selected items or item groups. These costs will override all other costs for that item and group.
Infor System21 Inventory Management | 421

857BInventory Valuation
Maintain Descriptions [1/INV] Use this task to create and maintain description codes for Inventory Management valuation. For more information, see the Maintenance chapter of this product guide.
Costing Analysis [2/INV] Use this task to enter an override cost manually for selected items or item groups. The latest or average cost to be overridden is displayed, as are the start and close dates for the period or the year to date.
You can override the costs for a selected period or for the year to date, for both stockroom items and stockroom valuation groups.
Costing Analysis Maintenance Selection Window To display this window, select the Costing Analysis task.
Use this window to select the stockroom, item or valuation group and period for which you want to enter an override cost.
Fields
Stockroom
Enter the code of the stockroom where the item or item group is situated.
Alternatively, use the prompt facility to select from the Stockroom Selection pop-up.
Note: You must enter a stockroom in combination with either an item or an item group.
Item Valuation Group
Enter the item valuation group.
Alternatively, use the prompt facility to select from the PGMN Item Group - Minor pop-up.
Leave this field blank if you enter an item code.
Note: You can set up item valuation groups in Item Maintenance by selecting Maintain Pricing Groups (F19).
Item
Enter the item code.
Alternatively, use the prompt facility to select from the Item Master Scan pop-up.
422 | Infor System21 Inventory Management
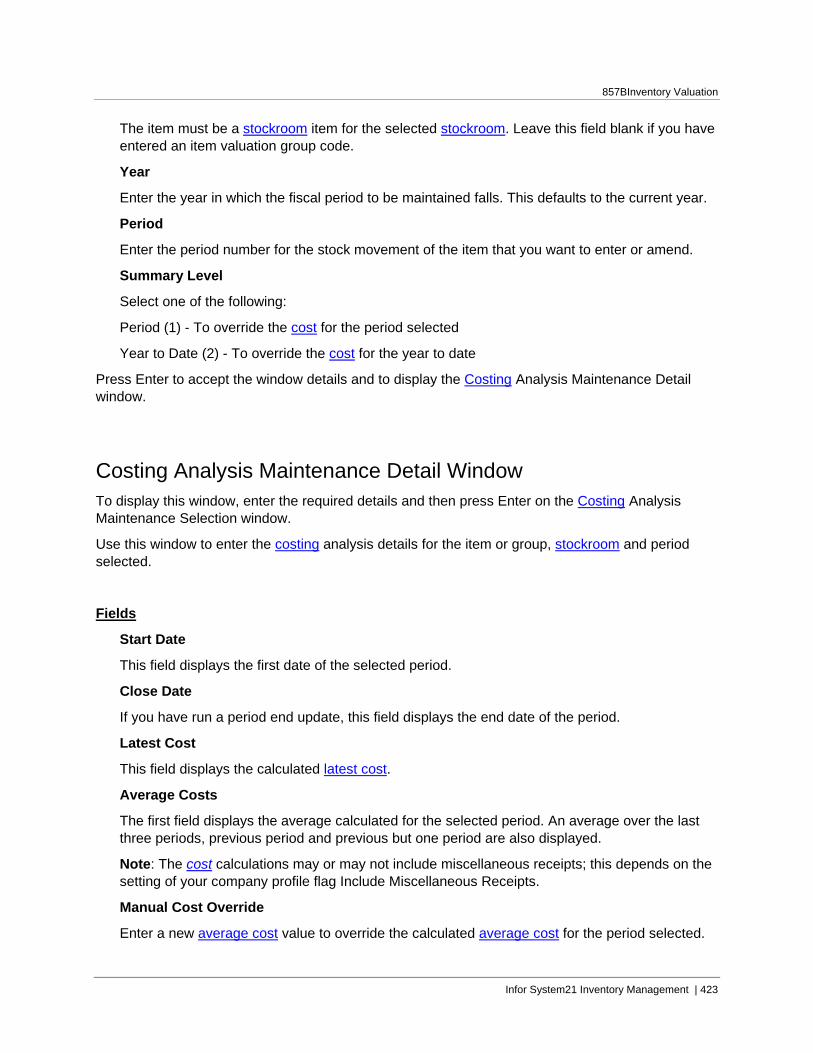
857BInventory Valuation
The item must be a stockroom item for the selected stockroom. Leave this field blank if you have entered an item valuation group code.
Year
Enter the year in which the fiscal period to be maintained falls. This defaults to the current year.
Period
Enter the period number for the stock movement of the item that you want to enter or amend.
Summary Level
Select one of the following:
Period (1) - To override the cost for the period selected
Year to Date (2) - To override the cost for the year to date
Press Enter to accept the window details and to display the Costing Analysis Maintenance Detail window.
Costing Analysis Maintenance Detail Window To display this window, enter the required details and then press Enter on the Costing Analysis Maintenance Selection window.
Use this window to enter the costing analysis details for the item or group, stockroom and period selected.
Fields
Start Date
This field displays the first date of the selected period.
Close Date
If you have run a period end update, this field displays the end date of the period.
Latest Cost
This field displays the calculated latest cost.
Average Costs
The first field displays the average calculated for the selected period. An average over the last three periods, previous period and previous but one period are also displayed.
Note: The cost calculations may or may not include miscellaneous receipts; this depends on the setting of your company profile flag Include Miscellaneous Receipts.
Manual Cost Override
Enter a new average cost value to override the calculated average cost for the period selected.
Infor System21 Inventory Management | 423

857BInventory Valuation
Note: This is the value used when you select Manual Cost as the valuation method on the LIFO Re-valuation windows.
Press Enter to accept the new cost. This updates the manual cost and re-displays the selection window.
Stockroom Fiscal Close, Trial [11/INV] You can run the stockroom fiscal close either manually or automatically. When you are running the fiscal close in manual mode you can run either a trial or an update close.
Note: You cannot select either Stockroom Fiscal Close task unless you have defined your Inventory Company Method of Close as Manual.
The two stockroom fiscal close tasks operate in the same way. The difference between the two is:
• Trial Use this task to accumulate values, up to the cut-off date selected, for analysis purposes, before the final update close. This also produces a report of items selected for the trial close. You can select the level of detail of the report and the sorting order for the details.
• Update Use this task to close either a site or selected stockrooms at the existing stock levels. The final summary stock movements are accumulated up to the entered cut-off date and the period is closed. You can choose to produce a report of the closed stock movements. Note: You must close all stockrooms associated with the site for the previous period.
Stockroom Fiscal Close Trial Selection Window To display this window, select the Stockroom Fiscal Close - Trial task.
Use this to accumulate values, up to the cut-off date selected, before the final update close. This also produces a report of items selected for the trial close. You can select the level of detail of the report and the sorting order for the details.
Fields
Year
Enter the year in which the fiscal period to be closed falls. This defaults to the current year.
Period
Enter the period number for the stockroom period being closed. This defaults to the current period.
424 | Infor System21 Inventory Management

857BInventory Valuation
Cut-off Date
Enter or select the last date for the collection of the data. This defaults to the current date.
Note: The summary movement details are accumulated from the last time a stockroom fiscal close was run (trial or update) to the specified Cut-Off Date.
Site
If you want to include all the stockrooms in a site, enter a site code.
Alternatively, use the prompt facility to select from the Stockroom Site Selection pop-up.
Leave this field blank if you want to produce the report for a list or range of stockrooms.
Stockroom
Select one of the following:
Range (1) - If you want to close a range of stockrooms
List (2) - If you want to close a list of stockrooms
Leave this field blank if you have entered a site.
Note: If you want to close a range of stockrooms, you must perform a fiscal close for every stockroom in the range for the previous period.
Primary Sequence
Select the primary sequence by entering one of the following:
1 (default) - Item (1)
2 - Movement date
3 - Movement type
Alternatively, use the prompt facility to select from the SJSQ Stock Journal Sequence pop-up.
Secondary Sequence
Select the secondary sequence by entering one of the following:
1 - Item
2 (default) - Movement date
3 - Movement type
Alternatively, use the prompt facility to select from the SJSQ Stock Journal Sequence pop-up.
Report Content
Select one of the following:
Detail (1) - To produce a report with stock movement transaction details
Summary (2) - To produce a summary report giving transaction quantities and values posted for the period
Both (3) (default) - To produce both reports
Infor System21 Inventory Management | 425

857BInventory Valuation
If you selected a site, the batch processes are submitted and the report produced.
If you selected Range in the Stockroom field, the Stockroom Fiscal Close window (Stockroom Range) is displayed.
If you selected List (2) in the Stockroom field, the Stockroom Fiscal Close window (Stockroom List) is displayed.
Press Enter to validate your entries and then select Submit (F8).
Stockroom Fiscal Close Window (Stockroom Range) To display this window, select Range in the Stockroom field and then enter the rest of the required information. Press Enter to validate your entries and then select Submit (F8) on the Stockroom Fiscal Close Trial Selection window.
Use this window to enter the range of stockrooms on which you want to run a fiscal close.
Fields
Stockroom
Enter a range of stockroom codes.
You can use the prompt facility on these fields to select from the Stockroom Selection pop-up.
Note: You must close all the stockrooms in the range for the previous period.
Press Enter to validate your entries. Then select Submit (F8) to submit the batch process and produce the report.
Stockroom Fiscal Close Window (Stockroom List) To display this window, select List in the Stockroom field and then enter the rest of the required information. Press Enter to validate your entries and then select Submit (F8) on the Stockroom Fiscal Close Trial Selection window.
Use this window to enter the list of stockrooms on which you want to run a fiscal close.
Fields
Stockroom
Enter the code for each stockroom you want to include in the report.
You can use the prompt facility on these fields to select from the Stockroom Selection pop-up.
Note: You must close the selected stockrooms for the previous period.
Press Enter to validate your entries. Then select Submit (F8) to submit the batch process and produce the report.
426 | Infor System21 Inventory Management

857BInventory Valuation
Infor System21 Inventory Management | 427

857BInventory Valuation
Stockroom Fiscal Close, Update [12/INV] Use this task to close either a site or selected stockrooms at the existing stock levels. The final summary stock movements are accumulated up to the entered cut-off date and the period is closed.
The Stockroom Fiscal Close - Update window is the same as the Stockroom Fiscal Close - Trial window. For more information, see the Stockroom Fiscal Close - Trial Selection Window [11/INV] section.
LIFO Re-valuation You can run Last in/First out (LIFO) re-valuation as a trial or as a live update task. Stock is re-valued on your selected average costs of either:
• Average annual receipt unit cost • Average cost of receipt over the last three periods • Documented (manually entered) unit cost
You normally run the re-valuation at the year-end. You can run re-valuation for a selected site or stockroom for a specified period. You can only perform a LIFO re-valuation on stockrooms that are under fiscal control.
Note: You can run the trial LIFO Re-valuation at any time.
The re-valuation can be accumulative. The net gain at the year end is re-calculated and includes previous years' closing stock values. The result can be a levelling out of current stock values affecting overall profit levels. The closing stock value is defined by the cost of any net gains plus the accumulated value of any remaining stock, based on a last in first out view of the remaining cost summaries from previous years.
Generated adjustments and LIFO cost summaries are generated at item or stockroom level. A report is produced giving the new closing stock value.
If you run a trial LIFO re-valuation, a report is printed but the Inventory data is not adjusted. If you run an update LIFO re-valuation, the Inventory data is adjusted. You can also purge LIFO balances and print the report.
Note: During a LIFO re-valuation, all items in a group are updated with the same cost. Therefore, when you define an item group, make sure you only include items of the same or similar values.
428 | Infor System21 Inventory Management

857BInventory Valuation
LIFO Re-valuation, Trial [13/INV] Use this task to submit a re-valuation on the basis of last in first out stock, for a selected site or stockrooms for a chosen period. You can include the previous year's LIFO re-valued stock in the trial re-valuation.
You select the valuation method for calculating the average cost for the period. You can generate a trial re-valuation at any time.
LIFO Re-valuation Trial Window To display this window, select the LIFO Re-valuation Trial (Processing) task.
Use this window to enter the details for the trial LIFO re-valuation.
Fields
Year
Enter the year in which the fiscal period to be re-valued falls. This defaults to the current year.
Period
Enter the period number for the stockroom period being closed. This defaults to the current period.
Site
Enter a site for the LIFO re-valuation.
Alternatively, use the prompt facility to select from the Stockroom Site Selection pop-up.
Leave this field blank if you want to re-value by stockroom.
Stockroom
Select one of the following:
Range (1) - If you want to re-value the stock for a range of stockrooms
List (2) - If you want to re-value the stock for a list of stockrooms
Leave this field blank if you have entered a site.
Note: The stockrooms you select for trial re-valuation must be either open for the current period or closed for the previous period.
Valuation Method
Select one of the following re-valuation methods for the closing stock:
Annual Average (1) (default) - To re-value any net gain in stock on the average cost of receipts over the year to date
Last 3 Months Average (2) - To re-value any net gain in stock on the average cost of receipts over the previous three months
Infor System21 Inventory Management | 429

857BInventory Valuation
Manual Cost (3) - To re-value any net gain in stock, using the manual override entered on the Costing Analysis Maintenance Detail window
Note: If you want to do a LIFO re-valuation by Manual Cost, all of the items in all of the stockrooms selected must have a manual cost override. If only a few items need a manual cost, transfer all the stock to a temporary stockroom, update the manual costs, define the opening balances, fiscally close the stockroom, re-value the stock and then transfer the stock back to the original stockroom.
When there is a net reduction in stock, the stock is re-valued at an earlier year’s costs and the LIFO stock balances for the previous years’ are reduced.
Purge Existing LIFO records
Use this checkbox as follows:
Unchecked - To keep all previous LIFO summary records
Checked - To remove all previous LIFO summary records
Note: If the LIFO re-valuation produces a higher stock valuation, the costs, in general, are falling. In this situation, purging the previous years’ LIFO summary balances produces a lower stock valuation.
Press Enter to validate your entries. Then select Submit (F8).
If you selected a site, the batch processes are submitted and the report is printed.
If you selected Range in the Stockroom field, the LIFO Re-valuation window (Stockroom Range) is displayed.
If you selected List in the Stockroom field, the LIFO Re-valuation window (Stockroom List) is displayed.
LIFO Re-valuation Window (Stockroom Range) To display this window, select Range in the Stockroom field and then enter the rest of the required information. Press Enter to validate your entries and then select Submit (F8) on the LIFO Re-valuation Trial window.
Use this window to enter the range of stockrooms for which you want to do a LIFO re-valuation.
Fields
Stockroom
Enter a range of stockroom codes you want to select for the period close. The selected stockrooms must be open for the current period or closed for the previous period.
You can use the prompt facility on these fields to select from the Stockroom Selection pop-up.
Press Enter to validate your entries. Then select Submit (F8) to start the batch processes and print the report.
430 | Infor System21 Inventory Management

857BInventory Valuation
LIFO Re-valuation Window (Stockroom List) To display this window, select List in the Stockroom field and then enter the rest of the required information. Press Enter to validate your entries and then select Submit (F8) on the LIFO Re-valuation Trial window.
Use this window to enter the list of stockrooms for which you want to do a LIFO re-valuation.
Fields
Stockroom
Enter the list of stockrooms you want to be re-valued. The selected stockrooms must be open for the current period or closed for the previous period.
You can use the prompt facility on these fields to select from the Stockroom Selection pop-up.
Press Enter to validate your entries. Then select Submit (F8) to start the batch processes and print the report.
LIFO Re-valuation, Update [14/INV] Use this task to submit a re-valuation on the basis of last in first out stock, for a selected site or stockrooms for a chosen period. You can include the previous years' LIFO re-valued stock in the trial re-valuation.
You select the valuation method for calculating the average cost for the period. You can also specify whether a report is printed and previous LIFO records are purged.
The LIFO Re-valuation Update task adjusts the inventory LIFO summary data. You can also choose to use this task to update the costs and generates value-only stock movements whereas the LIFO Re-valuation Trial task only produces a report.
LIFO Re-valuation Update Window To display this window, select the LIFO Re-valuation Update task.
Use this window to enter the details for the LIFO Re-valuation.
Fields
Year
This defaults to the current year. Enter the year in which the fiscal period you want to enter falls.
Infor System21 Inventory Management | 431

857BInventory Valuation
Period
Enter the period number for the stockroom period being closed.
Site
Enter a site for the re-valuation update.
Alternatively, use the prompt facility to select from the Stockroom Site Selection pop-up.
Leave this field blank if one or more stockrooms are to be selected.
Stockroom
Select one of the following:
Range (1) - If you want to re-value the stock for a range of stockrooms
List (2) - If you want to re-value the stock for a list of stockrooms
Leave this field blank if you have entered a site.
Note: The stockrooms you select for re-valuation must be fiscally closed.
Valuation Method
Select one of the following re-valuation methods for the closing stock:
Annual Average (1) - To re-value any net gain in stock on the average cost of receipts over the year to date
Last 3 Months Average (2) - To re-value any net gain in stock on the average cost of receipts over the previous three months
Manual Cost (3) - To re-value any net gain in stock using the manual override entered on the Costing Analysis Maintenance Detail window
Note: If you want to do a LIFO re-valuation by manual cost, all of the items in all of the stockrooms selected must have a manual cost override. If only a few items need a manual cost, transfer all the stock to a temporary stockroom, update the manual costs, define the opening balances, fiscally close the stockroom, re-value the stock and then transfer the stock back to the original stockroom.
Print Valuation Report
Use this checkbox as follows:
Unchecked - Not to print a valuation report
Checked - To produce a valuation report listing summary records for the period or year to date
The report includes opening quantities and values, receipts, issues and the average unit costs for your selected valuation method. It also includes LIFO valuation details for remaining quantity, unit cost, extended value and closing stock quantities, unit costs and values for the year whether for a net gain or net loss.
Generate Inventory Adjustments
Use this checkbox as follows:
432 | Infor System21 Inventory Management

857BInventory Valuation
Unchecked - Not to adjust inventory item costs with re-valued costs
Checked - To update unit costs and generate value-only stock movements as specified on the Inventory Adjustment Criteria section of the LIFO Re-valuation Update Stockroom Range or List window
Purge Existing LIFO records
Use this checkbox as follows:
Unchecked - To keep all previous LIFO summary records
Checked - To remove all previous LIFO summary records
Press Enter to validate your entries. Then select Submit (F8).
If you selected a site and are not updating costs, the batch processes are submitted and the report is printed.
If you selected a site and are updating the costs, or selected a stockroom list or range, the LIFO Re-valuation Update Stockroom Range or List window is displayed.
LIFO Re-valuation Update Stockroom Range Window To display this window, select Range in the Stockroom field and then select Submit (F8) on the LIFO Re-valuation Update window.
Use this window to select the range of stockrooms that you want to include in the re-valuation update, or to enter the Inventory adjustment criteria if you have specified that you want to update the costs.
Fields
Year
This field displays the current year and cannot be changed.
Period
This field displays the current period and cannot be changed.
Note: The information held in the next four fields defaults from the values entered on the LIFO Re-valuation Update window.
Stockroom
Enter a range of stockrooms that you want to update. You can enter a single stockroom, or leave these fields blank to include all stockrooms.
You can use the prompt facility to select from the Stockroom Selection pop-up.
These fields are not displayed if you entered a site code on the LIFO Re-valuation Update window.
Infor System21 Inventory Management | 433

857BInventory Valuation
Inventory Adjustment Criteria
Note: The inventory adjustment criteria are only displayed if you checked the General Inventory Adjustments field on the LIFO Re-valuation Update window.
Standard Costed Items
Select one of the following:
Update Standard Cost (1) (default) - To update the standard costs with the re-valued unit costs
Update All Costs (2) - To update the standard, latest and average costs with re-valued unit costs
Actual Costed Items (L/A/F)
Select one of the following:
Update Actual Costs (1) (default) - To update the actual costs (latest, average and FIFO) with the re-valued costs
Update All Costs (2) - To update the standard and actual costs with the re-valued unit costs
Ref. No. Date & Type
In the first field, enter a reference number for the adjustment transaction.
In the second field, enter or select a date. This defaults to the current date.
In the third field, enter a valid reference type to identify the re-valuation adjustment. Alternatively, use the prompt facility to select from the TRAN Movement Reference Type pop-up.
Narrative
Enter a brief note, using up to 20 alphanumeric characters, on the adjustment.
Reason Code
Enter a valid reason code to be reported with the cost adjustment item.
Alternatively, use the prompt facility to select from the MOVR Movement Reason Code pop-up.
Select Submit (F8) to process the re-valuation.
434 | Infor System21 Inventory Management

857BInventory Valuation
LIFO Re-valuation Update Stockroom List Window To display this window, select List in the Stockroom field and then enter the rest of the required information. Press Enter to validate your entries and then select Submit (F8) on the LIFO Re-valuation Update window.
Use this window to enter the list of stockrooms for which you want to do a LIFO re-valuation or to enter the Inventory adjustment criteria if you have specified that you want to update the costs.
Fields
Year
This field displays the current year and cannot be changed.
Period
This field displays the current period and cannot be changed.
Note: The information held in the next four fields defaults from the values entered on the LIFO Stockroom
Enter a list of stockroom codes.
You can use the prompt facility on these fields to select from the Stockroom Selection pop-up.
These fields are not displayed if you entered a site code on the LIFO Re-valuation Update window.
Note: You must close the selected stockrooms for the previous period.
Inventory Adjustment Criteria
Note: The inventory adjustment criteria are only displayed if you checked the General Inventory Adjustments field on the LIFO Re-valuation Update window.
Standard Costed Items
Select one of the following:
Update Standard Cost (1) (default) - To update the standard costs with the re-valued unit costs
Update All Costs (2) - To update the standard, latest and average costs with re-valued unit costs
Actual Costed Items (L/A/F)
Select one of the following:
Update Actual Costs (1) (default) - To update the actual costs (latest, average and FIFO) with the re-valued costs
Update All Costs (2) - To update the standard and actual costs with the re-valued unit costs
Ref. No. Date & Type
In the first field, enter a reference number for the adjustment transaction.
In the second field, enter or select a date. This defaults to the current date.
Infor System21 Inventory Management | 435

857BInventory Valuation
In the third field, enter a valid reference type to identify the re-valuation adjustment. Alternatively, use the prompt facility to select from the TRAN Movement Reference Type pop-up.
Narrative
Enter a brief note, using up to 20 alphanumeric characters, on the adjustment.
Reason Code
Enter a valid reason code to be reported with the cost adjustment item.
Alternatively, use the prompt facility to select from the MOVR Movement Reason Code pop-up.
Press Enter to validate your entries. Then select Submit (F8) to start the batch processes and print the report, if you have chosen to produce one.
Report by Stock Movements [21/INV] Use this task to print a stock valuation report. You can choose from a range of dates, from a site, a range of stockrooms or individual stockrooms. You can also select the order of the report and the level of detail. You can produce either a full list of stock journal movements for a selected period or an ad hoc selection. You can produce the ad hoc report for a list, or range, of items, movement types and dates.
Stock Movements Print Selection Window To display this window, select the Report by Stock Movements task.
Use this window to enter the selection criteria for the Stock Movements report.
Fields
Site
Enter the site if you want to report on all the stockrooms at a specific site.
Alternatively, use the prompt facility to select from the Stockroom Site Selection pop-up.
Leave this field blank if you want to report on a range or list of stockrooms.
Stockroom
Select one of the following:
Range (1) - If you want to report on the stock movements for a range of stockrooms
List (2) - If you want to report on the stock movements for a list of stockrooms
Leave this field blank if you have entered a site.
436 | Infor System21 Inventory Management
857BInventory Valuation
Report Type
Select one of the following:
Adhoc Movements (1) (default) - To produce a report for a list, or range, of items, movement types and dates specified on the following windows
Stock Journal Print (2) - To produce a full stock movements report from the last closed date, up to the cut off date specified on the following window
Primary Sequence
Select the primary sequence by entering one of the following:
1 (default) - Item
2 - Movement date
3 - Movement type
Alternatively, use the prompt facility to select from the SJSQ Stock Journal Sequence pop-up.
Primary Selection
Select one of the following to determine which primary items are displayed:
Range (1) (default) - If you want to report on the stock movements for a range of the specified primary sequence
List (2) - If you want to report on the stock movements for a list of the specified primary sequence
Note: If you are producing the Stock Journal report, you must select Range for the primary selection.
Secondary Sequence
Select the secondary sequence by entering one of the following:
1 (default) - Item
2 - Movement date
3 - Movement type
Alternatively, use the prompt facility to select from the SJSQ Stock Journal Sequence pop-up.
Note: The Primary Sequence and Secondary Sequence fields cannot be the same.
Report Content
Select one of the following:
Detail (1) (default) - To report on stock movement transaction details
Summary (2) - To produce a summary report giving transaction quantities and values posted for the period
Both (3) - To produce a report combining stock movement transaction details, transaction quantities and values posted for the period
Infor System21 Inventory Management | 437

857BInventory Valuation
Note: The exact format of the next window depends upon the information you have specified on this window.
Press Enter to validate your entries and display the Stock Movements Print Confirmation window.
Stock Movements Print Confirmation Window To display this window, complete the required fields and then press Enter on the Stock Movements Print Selection window.
Use this window to enter the selection criteria for the Stock Movements report.
Note: The format of the Stock Movements Print Confirmation window depends upon the information you have specified on the Stock Movements Print Selection window.
Fields
Year
Enter the year in which the fiscal period selected falls.
This field is only displayed if you selected Stock Journal Print in the Report Type field on the Stock Movements Print Selection window.
Period
Enter the period for the opening balance figures to take effect.
This field is only displayed if you selected Stock Journal Print in the Report Type field on the Stock Movements Print Selection window.
Cut-off Date
Enter or select the last date for which to include stock movements.
This field is only displayed if you selected Stock Journal Print in the Report Type field on the Stock Movements Print Selection window.
Stockroom
Enter either a range of stockroom codes or a list of stockroom codes.
These fields are not displayed if you entered a site code on the Stock Movements Print Selection window.
You can use the prompt facility on these fields to select from the Stockroom Selection pop-up.
Note: You should close selected stockrooms for previous periods.
Movement Date
Enter or select either a range of dates or a list of dates from which to select movement transactions.
438 | Infor System21 Inventory Management
857BInventory Valuation
This field is only displayed if you selected Movement Date in the Primary Sequence field on the Stock Movements Print Selection window.
Item
Enter either a range of item codes or a list of item codes.
These fields are only displayed if you selected Item in the Primary Sequence field on the Stock Movements Print Selection window. They are not displayed if you have selected Stock Journal Print in the Report Type field.
You can use the prompt facility on these fields to select from the Item Master Scan pop-up.
Movement Type
Enter either a range of movement types or a list of movement types.
These fields are only displayed if you selected Movement Type in the Primary Sequence field on the Stock Movements Print Selection window.
You can use the prompt facility on these fields to select from the MVTP Movement Type Description pop-up.
Press Enter to validate your selection and then select Submit (F8) to submit the print.
Derive Opening Balances [31/INV] Use this task to set the opening balances for a specified starting period. You need to specify the year and period for which you want to derive the opening balances.
You only need to run this task once, when you are setting up the inventory valuation.
Note: When you run a Stockroom Fiscal Close, the software assumes that the opening balances have already been defined during the previous period close. This is one method of defining the initial opening balances. You cannot use this with the other; Cost Analysis Setup Maintenance task combined with the Cost Analysis Setup Update.
Cost Analysis Derive Opening Balances Window To display this window, select the Derive Opening Balances task.
Use this window to select the period, year and stockroom for which you want to derive the opening balances.
Fields
Year
Enter the year for which you want to create the opening stock balances. This defaults to the current year.
Infor System21 Inventory Management | 439

857BInventory Valuation
Period
Enter the period for which you want to create the opening stock balances. This defaults to the current period.
Note: If the year and period selected are prior to the current year, stock movements must exist from this point onwards. Once the opening balances have been derived, perform a series of manual fiscal closes for each of the intervening periods until the previous period is closed. From this point onwards you can perform fiscal closes automatically.
Stockroom
Enter the stockroom for which you want to derive the current balances.
Alternatively, use the prompt facility to select from the Stockroom Selection pop-up.
Note: The period and stockroom combination cannot be closed or open.
Start Date
Enter or select the date from which you want to start the opening balances.
Enter the year, period, start date and stockroom and then select Update (F8) to create the Opening Balances.
Costing Analysis Maintenance [32/INV] Use this task to define initial opening balances before you run a Stockroom Close Function. Use this task combined with the Cost Analysis Setup Update task to set up the inventory historical data.
Note: When you run a Stockroom Fiscal Close, the software assumes that the opening balances have already been defined during the previous period close. This is one method of defining the initial opening balances. You cannot use this with the other, Derive Opening Balances.
You can define item period summaries so you can then manually close the stockroom. Once you have manually closed the first period, the initial details are available for the following period so that you can use the normal close function.
If you have purged stock movements, you can use this task to define the movement details for the purged periods until an appropriate position has been reached and you can use the manual close function again.
Note: Once the opening balances have been derived for the purged periods, perform a series of manual fiscal closes for each of the intervening periods until the previous period is closed. From this point onwards you can perform fiscal closes automatically.
Costing Analysis Setup Maintenance Selection Window To display this window, select the Costing Analysis Maintenance task.
440 | Infor System21 Inventory Management

857BInventory Valuation
Use this window to enter the year, period, stockroom and start date for which you want to enter initial opening balances.
Fields
Year
Enter the year in which the fiscal period to be entered falls. This defaults to the current year.
Period
Enter the period number.
Stockroom
Enter the stockroom code where the item is situated.
Alternatively, use the prompt facility to select from the Stockroom Selection pop-up.
Start Date
Enter or select the date on which the costing analysis is to take place. This must be within the period selected. If you leave this field blank, it defaults to the first day of the period selected.
Press Enter to accept the period control details and to display the Costing Analysis Setup Maintenance Item Selection window.
Costing Analysis Setup Maintenance Item Selection Window To display this window, press Enter on the Costing Analysis Setup Maintenance Selection window.
Use this window to enter the item for which you want to enter initial opening balances.
Fields
Item
Enter the item code. The item must already exist on the Item Master file and must have been entered as a stockroom item for the selected stockroom.
You can use the prompt facility on this field to select from the Item Master Scan pop-up.
Press Enter to accept the item and to display the Costing Analysis Setup Maintenance Opening Values window.
Costing Analysis Setup Maintenance Opening Values Window To display this window, press Enter on the Costing Analysis Setup Maintenance Item Selection window.
Infor System21 Inventory Management | 441

857BInventory Valuation
Use this window to enter the opening quantity and value of stock, the receipts, issues, adjustments and transfers of stock in the selected period.
Fields
Opening
Enter or amend the opening quantity and value for the period to date.
Receipts (All)
Enter or amend the quantity and value for all receipts for the period to date.
Receipts (Excluding Misc.)
Enter or amend the quantity and value for all receipts posted as miscellaneous for the period to date.
Note: Data is only displayed in this field if you have set your company profile flag to Include Miscellaneous Receipts.
Issues
Enter or amend the quantity and value for all issues for the period to date.
Adjustments (Net)
Enter or amend the quantity and value for all adjustments for the period to date.
Transfers (Net)
Enter or amend the quantity and value for all transfers for the period to date.
Press Enter. The software calculates the closing balances for the period. Then press Enter again to display the Costing Analysis Setup Maintenance Previous Values window.
Costing Analysis Setup Maintenance Previous Values Window To display this window press Enter twice on the Costing Analysis Setup Maintenance Opening Values window.
Use this window to enter the previous two periods’ receipts and costs.
Fields
Receipts (All) (Period-1)
Enter the quantity and value of receipts for the previous period.
Receipts (All) (Period-2)
Enter the quantity and value of receipts for the period before last.
442 | Infor System21 Inventory Management

857BInventory Valuation
Receipts (Excluding Misc.) (Period-1)
Enter the quantity and value of receipts, excluding miscellaneous receipts in the previous period.
Receipts (Excluding Misc.) (Period-2)
Enter the quantity and value of receipts, excluding miscellaneous receipts in the period before last.
Latest Cost (All)
Enter the latest cost of all stock.
Enter or select a date to show when the latest cost was entered.
Latest Cost (Excluding Misc.)
Enter the latest cost of all stock excluding the miscellaneous receipts.
Enter or select a date to show when the latest cost was entered.
Note: The latest and average cost calculations only include miscellaneous receipts if you have set your company profile flag to Include Miscellaneous Receipts.
Select Update (F8) to perform the cost update. The Costing Analysis Setup Maintenance Selection window is re-displayed.
Infor System21 Inventory Management | 443

857BInventory Valuation
Costing Analysis Setup Update [33/INV] Use this task to close stockrooms manually. This task differs from the Maintenance task in that it closes the stockroom at the existing stock levels. You cannot change any stock quantities or values.
You use this task combined with the Cost Analysis Setup Maintenance task to set up the Inventory historical data.
Note: When you are doing the initial set up of the Inventory data, you either use the Cost Analysis Setup Derive Opening Balances task or use the Cost Analysis Setup Maintenance task combined with the Cost Analysis Setup Update task to create historical data.
Costing Analysis Setup Update Window To display this window, select the Costing Analysis Setup Update task.
Use this window to enter the details of the stockroom and period on which you want to perform a manual close.
Fields
Year
Enter the year in which the fiscal period to be entered falls. This defaults to the current year.
Period
Enter the period number for the stockroom period being closed.
Stockroom
Enter the code of the stockroom you want to close.
Alternatively, use the prompt facility to select from the Stockroom Selection pop-up.
Cut-off Date
Enter or select the last date on which posting will be allowed to the stockroom.
Selecting Submit (F8) to submit the job to close the stockroom.
444 | Infor System21 Inventory Management
857BInventory Valuation
LIFO Define Opening Balances [41/INV] Use this task when you begin to use LIFO re-valuation for the first time, or if an item is to be included in LIFO re-valuation for the first time.
For each stockroom item, you need to enter the original quantity, current quantity and the unit cost.
Once you have created the historical LIFO Summary records, you can maintain them using the Derive Opening Balances task.
Note: The amendment function is achieved by deleting and re-writing the LIFO summary balance records. No indication is given that an existing LIFO summary record is about to be overwritten.
LIFO Analysis Setup Selection Window To display this window, select the LIFO Define Opening Balances task.
Use this window to enter the year and stockroom for which you wish to enter opening stock balances.
Fields
Year
Enter the year for which you want to create stock details.
Stockroom
Enter the code of the stockroom that you are setting up with the opening balance.
Alternatively, use the prompt facility to select from the Stockroom Selection pop-up.
Press Enter to validate the data and display the LIFO Analysis Setup Detail window.
LIFO Analysis Setup Detail Window To display this window, enter the stockroom and year and then press Enter on the LIFO Analysis Setup Selection window.
Use this window to enter the item details for the stockroom and year displayed.
Infor System21 Inventory Management | 445

857BInventory Valuation
Fields
Item
Enter the item code for which you want to create opening details.
Alternatively, use the prompt facility to select from the Item Master Scan pop-up.
Unit of Measure
This field displays the unit of measure.
Original Quantity
Enter the original quantity of stock.
Current Quantity
Enter the current quantity of stock.
Note: The current quantity must be either the same as or smaller than the original quantity. When there have been net stock losses in subsequent years, the original quantity is reduced to the current quantity by the amount of the stock losses.
Unit Cost
Enter the cost per unit item of stock.
Press Enter to validate the data and then select Update (F8). The LIFO Analysis Setup Selection window is re-displayed.
Month End Average Revaluation Report [50/INV] This function produces the revaluation report, listing the revaluations that were carried out for the selected Period. This is only available if Period End Average Costing is enabled (Inventory Descriptions Type DFLT – Limit value for code PEAC set to 1).
Rerun Revaluation Report Window Fields
Period Select
Enter the Year and Period that the report will cover.
Current Period
The current Period is displayed for information.
Item Select from
Enter the first item in the range to be covered by the report. Leave blank for all items.
446 | Infor System21 Inventory Management

857BInventory Valuation
Item Select to
Enter the last item in the range to be covered by the report. Leave blank for all items.
Select Update (F8) to submit the Month End Revaluation Report.
Infor System21 Inventory Management | 447


Chapter 9 Enquiries 9
Inventory Enquiries Introduction The enquiries included in Inventory Management are designed to help you achieve a layered approach to the review of an item. This includes:
• Balances, usage and cost at stockrooms• Movements• History• Descriptions and codes from the Inventory Descriptions file
Kit List Item Where Used Enquiry [1/INE] Use this task to view the parent items of the selected kit component.
Kit List Item Where Used Selection Window To display this window, select the Kit List Item Where Used task.
Use this window to select the item code of the kit component for your enquiry.
Fields
Item
Enter the item code of the kit component for which you want to view details.
Alternatively, use the prompt facility to select from the Item Master Scan pop-up.
Press Enter to display the Kit List Item Where Used window.
Infor System21 Inventory Management | 449

858BEnquiries
Kit List Item Where Used Window To display this window, enter the item code of a kit component and then press Enter on the Kit List Item Where Used Selection window.
This window displays the selected component item, the kit parent that it is used in, the description of the kit and the quantity of the component item used to make up the kit.
Select Exit (F3) to leave the task.
Descriptions Enquiry [2/INE] Use this task to view entries in the Inventory Descriptions file. The windows are the same as those used for maintenance, but you cannot amend any fields.
Descriptions File Enquiry Selection Window To display this window, select the Descriptions (Enquiries) task.
Use this window to specify the major or minor description codes for your enquiry.
Fields
Major Type
Enter the major type for your enquiry. Press Enter to display the Descriptions File Enquiry window.
Description Code
This field is for future development.
Functions
Description Code Details (F15)
Use this to display the Descriptions File Enquiry Details window for your selected major type.
Position to
Enter a full or partial descriptions entry to position the start point of the list.
Leaving all fields blank and pressing enter will reposition the list at the top.
450 | Infor System21 Inventory Management

858BEnquiries
Descriptions File Enquiry Window To display this window, enter a major type code and then press Enter on the Descriptions File Enquiry Selection window.
Use this window to view records in the Inventory Descriptions file.
Functions
Description Code Details (F15)
Use this to display the Descriptions File Enquiry Details window.
Language Descriptions (F23)
Use this to display the Multi-Lingual Descriptions Enquiry pop-up.
To display all description codes for a major type, enter the major type and select one of the functions to continue.
Descriptions File Enquiry Details Window To display this window, select Description Code Details (F15) on the Descriptions File Enquiry window.
Alternatively, select Description Code Details (F15) on the Descriptions File Enquiry Selection window.
You can view all the descriptions and the associated codes and rates, if appropriate.
Options
Select
Use this to display the Description File Enquiry Minor Type Details window for your selected minor type code.
Language Descriptions
Use this to display the Multi-Lingual Descriptions Enquiry window for your selected minor type code.
Position to
Enter a full or partial descriptions entry to position the start point of the list.
Leaving this field blank and pressing enter will reposition the list at the top.
Press Enter to continue or select Exit (F3) to leave the enquiry.
Infor System21 Inventory Management | 451

858BEnquiries
Description File Enquiry Minor Type Details Window To display this window, select a minor type and then press Enter on the Descriptions File Enquiry Details window.
This window displays the description, parameter limit, rate, percentage or value and Tax codes assigned to your selected minor type code.
Select Previous (F12) to re-display the Descriptions File Code Details Enquiry window.
Multi-lingual Descriptions Enquiry Pop-up To display this pop-up select Language Descriptions (F23) on the Descriptions File Enquiry window.
Alternatively, select Language Descriptions against a code on the Descriptions File Enquiry Details window.
You can view all of the different languages and their descriptions associated with your selected code.
Select Previous (F12) to re-display the previous window.
Alternatively, select Exit (F3) to leave the enquiry.
Item/Stockroom Enquiry [3/INE] Use this task to view all of the data from the Item Master file and the stockroom balance.
You can view static data for the item, a summary of the company stock position for the item, or the individual stockroom balances. You can also view batch, lot or serial details, FIFO costs and location details for stockrooms where this level of detail is available.
Stock levels are initially displayed in the default inventory unit defined for the item/stockroom combination and toggles are available to view them in any of the other valid unit of measure of an item.
Note: The functions you can use to view aspects of your Item/Stockroom enquiry depend on how you have set up your item in Item Maintenance.
Item/Stockroom Enquiry Selection Window To display this window, select the Item/Stockroom Enquiry task.
Use this window to select the item and the level of information you want to view.
452 | Infor System21 Inventory Management

858BEnquiries
Fields
Item
To view the static information associated with the item, enter the item number only and then press Enter.
Alternatively, use the prompt facility to select from the Item Master Scan pop-up.
Stockroom
Enter a stockroom code.
Alternatively, use the prompt facility to select from the Stockroom Selection pop-up.
Functions
Stock Summary (F13)
Use this to display the Item/Stockroom Stock Summary Enquiry window.
Select an item and then press Enter to display Item/Stockroom Enquiry window.
To view the stockholding of an item in a single stockroom, enter the item and stockroom code and then press Enter. This displays the Item/Stockroom Enquiry Stockroom Details window.
Item/Stockroom Enquiry Window To display this window, specify an item and then press Enter on the Item/Stockroom Enquiry Selection window.
Alternatively, this window can be displayed from within the Linked Item Maintenance task.
Use this window to view the data for the item. The fields on this window are the same as the fields in the Maintain Inventory Item window. For more information about the fields on this window, see the Maintain Inventory Item Window [2/INM] section in the Maintenance chapter of this product guide.
Press Enter to display the Inventory Item/Stockroom– descriptive data window.
Maintain Inventory Item Descriptive Data Window To display this window, select an item and then press Enter on the Item/Stockroom Enquiry window.
Use this window to view data relating to the item. The current data for the item is displayed.
Functions
Restart (F15)
Use this to return to the Item/Stockroom Enquiry Selection window.
Infor System21 Inventory Management | 453

858BEnquiries
Item Packaging (F13)
Use this to display the Country Item Packaging Details Enquiry window, if you are using Packaging Requirements. You can only use this function if your selected item has been set up for packaging reporting.
Alias (F17)
Use this to view any item Alias details that are set up.
Text (F21)
Use this to view the Maintain Text pop-up where you have previously specified a usage code and a language code for multi-lingual text entry. Press Enter to display the Item Text window. This is where you can view text in the selected language to be displayed or printed on external documentation, for example, despatch notes, according to the usage code selected.
Note: You specify your customer's default language in Customer Details Maintenance in Sales Order Processing. You can override this default language by entering a different language code when Additional Overrides (F16) is available.
Note: You do not need to select language codes to print text in the native language.
Purchase Text (F22)
Use this to view the Item Text Enquiry pop-up.
Press Enter to display the Inventory Item Units of Measure window.
Maintain Inventory Item Units of Measure Window To display this window, press Enter on the Inventory Item Descriptive Data window.
Use this window to view data relating to the item. The current data for the item is displayed.
Functions
Restart (F15)
Use this to return to the Item/Stockroom Enquiry Selection window.
Press Enter to display the Inventory Item Analysis Codes window.
Maintain Inventory Item Analysis Codes Window To display this window, press Enter on the Inventory Item/Stockroom – units of measure window
Use this window to view data relating to the item. The current data for the item is displayed.
Functions
454 | Infor System21 Inventory Management

858BEnquiries
Restart (F15)
Use this to return to the Item/Stockroom Enquiry Selection window.
Press Enter to display the Inventory Item Price and Costing window.
Maintain Inventory Item Price and Costing Window To display this window, press Enter on the Inventory Item/Stockroom Analysis Codes window.
Use this window to view data relating to the item. The current data for the item is displayed.
Note: When you are enquiring on an owning company's definition of an item from a partner company, the following item attributes are not displayed:
• Standard Cost per Stock Unit • Average Cost per Stock Unit • Latest Cost per Stock Unit • Base List Price
This is done to prevent partner companies from viewing potentially sensitive costing information
Functions
Restart (F15)
Use this to return to the Item/Stockroom Enquiry Selection window.
Valuation Group (F10)
Use this to enquire on the group valuation criteria for the selected item, using the Group Valuation Criteria pop-up. This information is used for Inventory valuation or LIFO re-valuation purposes.
Pricing Groups (F19)
Use this to view the item pricing groups for the selected item using the Item Pricing Groups pop-up.
Press Enter to display the Inventory Item Inventory Control window.
Maintain Inventory Item Inventory Control Window To display this window, press Enter on the Inventory Item Price and Costing window.
Use this window to view data relating to the item. The current data for the item is displayed.
Infor System21 Inventory Management | 455

858BEnquiries
Functions
Restart (F15)
Use this to return to the Item/Stockroom Enquiry Selection window.
Supersession (F14)
Use this to display the Item Supersession Enquiry window. This is only available when the appropriate flags are activated for the item.
Restart (F15)
Use this to return to the Item/Stockroom Enquiry Selection window.
Transaction Control (F16)
Use this to display the Transaction Code Effectivity Enquiry window. This is only available when the appropriate flags are activated for the item.
Lot (F20)
Use this to display the Lot Header Parameters Enquiry pop-up for the selected item, if it is subject to lot, batch or serial control.
Press Enter to display the Inventory Item Default Ordering window.
Maintain Inventory Item Default Ordering Window To display this window, press Enter on the Inventory Item Inventory Control window.
Use this window to view data relating to the item. The current data for the item is displayed.
Functions
Restart (F15)
Use this to return to the Item/Stockroom Enquiry Selection window.
Press Enter to display the Inventory Item Supplementary Data window.
Maintain Inventory Item Supplementary Data Window To display this window, press Enter on the Inventory Item Default Ordering window.
Use this window to view data relating to the item. The current data for the item is displayed.
Note: The Supplementary Data is only available when Supplementary Information Display is active in the Inventory company profile.
456 | Infor System21 Inventory Management
858BEnquiries
Functions
Restart (F15)
Use this to return to the Item/Stockroom Enquiry Selection window.
Press Enter to display the Inventory Item Containers 1 window if this is a container item, otherwise display the Item/Stockroom Stock Summary Enquiry window.
Maintain Inventory Item Containers 1 Window To display this window, press Enter on the Inventory Item/Stockroom – supplementary data window.
Use this window to view data relating to the item. The current data for the item is displayed.
Note: This window is only displayed for those items which have been defined as container items.
Functions
Restart (F15)
Use this to return to the Item/Stockroom Enquiry Selection window.
Press Enter to display the Inventory Item Containers 2 window.
Maintain Inventory Item Containers 2 Window To display this window, press Enter on the Inventory Item/Stockroom – containers 1 window.
Use this window to view data relating to the item. The current data for the item is displayed.
Note: This window is only displayed for those items which have been defined as container items.
Functions
Restart (F15)
Use this to return to the Item/Stockroom Enquiry Selection window.
Press Enter to display the Item/Stockroom Stock Summary Enquiry window.
Group Valuation Criteria Pop-up To display this pop-up, select Valuation Group (F10) on the Item/Stockroom Enquiry window.
Use this pop-up to view the group valuation criteria for the selected item. This information is used for Inventory valuation or LIFO re-valuation purposes.
Infor System21 Inventory Management | 457

858BEnquiries
Select Previous (F12) to return to the Item/Stockroom Enquiry window.
Country Item Packaging Details Enquiry Window To display this pop-up, select Item Packaging (F13) on the Item/Stockroom Enquiry window.
Use this pop-up to view the country item packaging details for the selected item.
Select Previous (F12) to return to the Item/Stockroom Enquiry window.
Item Supersession Enquiry Window To display this window, select Supersession (F14) on the Item/Stockroom Enquiry window.
Use this window to view the supersession chain associated with an item.
Options
Detail
Use this against an item to display the Supersession Detail Enquiry pop-up, which shows additional supersession attributes.
Select Previous (F12) to re-display the Item/Stockroom Enquiry window.
Alternatively, select Detail against a line to display the Supersession Detail Enquiry pop-up.
Supersession Detail Enquiry Pop-up To display this pop-up, select Detail against a line on the Item Supersession Enquiry window.
Use this pop-up to view the additional supersession attributes.
Select Previous (F12) to re-display the Item Supersession Enquiry window.
Transaction Code Effectivity Enquiry Window To display this window, select Transaction Control (F16) on the Item/Stockroom Enquiry window.
Use this window to display a list of all the transaction codes associated with an item. The amount of information displayed is dependent upon the route through which the enquiry is accessed.
When accessed from the Item/Stockroom Enquiry window, all transaction codes associated with the item (or its associated item group minor) in all stockrooms are displayed.
458 | Infor System21 Inventory Management

858BEnquiries
Note: Each level at which transaction codes can be associated with an item is displayed. Each level being separated from the next by a list of hyphens. The sequence of the displayed levels is:
• Item/Stockroom • Item Group Minor/Stockroom • Item • Item Group Minor
Options
View Transaction Code Enquiry
Use this to display the Transaction Control Enquiry Header Selection window for the transaction code recorded against the selected line.
Select Previous (F12) to re-display the Item/Stockroom Enquiry window.
Transaction Control Enquiry Header Selection Window To display this window, select View Transaction Code Enquiry against a transaction code on the Transaction Code Effectivity Enquiry window.
Use this window to select the transaction header that you want to view.
Options
Select
Use this to display the Transaction Control Enquiry window for the transaction code recorded against the selected line.
Select Previous (F12) to re-display the Item/Stockroom Enquiry window.
Transaction Control Enquiry Window To display this window, select a transaction header on the Transaction Control Enquiry Header Selection window.
Use this window to view the transactions allowed for the Transaction Control code, where 1 indicates allowed and 2 not allowed.
Select Previous (F12) to re-display the Transaction Control Enquiry Header Selection window.
Item Pricing Groups Enquiry Pop-up To display this pop-up, select Pricing Groups (F19) on the Item/Stockroom Enquiry window.
Infor System21 Inventory Management | 459

858BEnquiries
Use this pop-up to view the item pricing group information, if any exists.
Select Previous (F12) to return to the Item/Stockroom Enquiry window.
Lot Header Parameters Enquiry Pop-up To display this pop-up, select Lot (F20) on the Item/Stockroom Enquiry window.
Use this pop-up to view the lot header details for your selected batch-controlled, lot-controlled or serial-controlled item. The fields displayed on this pop-up are for information only.
Select Previous (F12) to re-display the Item/Stockroom Enquiry window.
Maintain Text Pop-up To display this pop-up, select Text (F21) on the Item/Stockroom Enquiry window.
Use this pop-up to specify a usage code.
Fields
Usage Code
Enter a usage code.
Alternatively, use the prompt facility to select from the USCG Text Usage Codes pop-up.
Press Enter to display the Item Text window.
Item Text Window To display this window, press Enter on the Maintain Text pop-up.
This window displays text for the selected item.
Select Previous (F12) to re-display the Item/Stockroom Enquiry window
Purchase Text Enquiry Pop-up To display this pop-up, select Purchase Text (F22) on the Item/Stockroom Enquiry window.
Use this pop-up to view the text for the selected item.
Select Previous (F12) to re-display the Item/Stockroom Enquiry window.
460 | Infor System21 Inventory Management

858BEnquiries
Item/Stockroom Stock Summary Enquiry Window To display this window, press Enter on the Item/Stockroom Enquiry window.
Note: If you enter an item on Item/Stockroom Enquiry Selection window and select Stock Summary (F13), you can view this information for each item/stockroom combination.
Use this window to view simple control figures for the total company stock of the item.
The relevant conversion factors for an item are displayed.
Note: When you are enquiring on an owning company’s definition of an item from a partner company it will not be possible to view stock information.
Fields
Issue to Stock
This field displays the issue to stock conversion factor of the item.
Stock to Purchase
This field displays the stock to purchase conversion factor of the item.
Usage This Week/Usage This Period/Usage This Year
These fields display the usage figures for the company, in issue units of measure.
Total Stock
This field displays the physical stock figure for the company, in issue units of measure.
Note: If you are using Catchweight for this company and the item has a secondary value, select Quantity/[Short Description] (F9) to display the quantity of the item in this field in either primary or secondary units of measure.
Unit of Measure (Untitled)
These fields display the issue unit of measure and its description.
Functions
Quantity/[Short Description] (F9)
You can only use this toggle when you use Catchweight for this company and the item has a secondary value.
When Quantity (F9) is displayed at the bottom of the window, select it to display the quantity of the item in the Total Stock field in the primary unit of measure.
When [Short Description] (F9) is displayed at the bottom of the window, where [Short Description] is the nine-character description of the secondary unit of measure, select it to display the quantity of the item in the Total Stock field in the secondary unit of measure. The abbreviation of the secondary unit of measure is displayed on the window by the appropriate fields.
Press Enter to display Item/Stockroom Enquiry Stockroom Details window.
Infor System21 Inventory Management | 461

858BEnquiries
Item/Stockroom Enquiry Stockroom Details Window To display this window, press Enter on the Item/Stockroom Stock Summary Enquiry window.
Alternatively, enter both the item code and stockroom code and then press Enter on Item/Stockroom Enquiry Selection window.
Note: If you stock the selected item in more than one stockroom, the stock balances will be displayed sequentially. Press Enter to display the details for the next stockroom.
This window displays stockroom information for your selected item.
The item and stockroom codes, with their associated descriptions, are displayed at the top of the window.
All balances displayed are in the default inventory unit defined for the item/stockroom combination. These balances may also be viewed in any of the valid units defined for the item.
The usage profile associated with an item/stockroom combination is displayed.
Fields
Issue to Stock
This field displays the Issue to Stock Conversion factor of an item.
Stock to Purchase
This field displays the Stock to Purchase Conversion factor of an item.
Stock Balances (XX)
Note: (XX) indicates the unit in which the stock balances are displayed. For example, values could be in Bottles, Cases, Pallets, Boxes, Eaches, and so on.
This section of the window displays the following:
• The physical stock held at this stockroom • The stock currently on purchase and works (production) orders • The stock currently allocated to demand orders • Stock currently frozen, that is, unavailable for allocation to demand orders • Stock currently in transit between stockrooms • Stock currently available for movement, allocation • Back Order, which is the stock on sales back order • POD, which is the stock currently awaiting POD (Proof of Delivery)
Note: If you are using Catchweight, the secondary balance for your selected Catchweight item is also displayed in this section.
462 | Infor System21 Inventory Management
858BEnquiries
Usage/Reorder Data (XX)
Note: (XX) indicates the unit in which the stock balances are displayed. For example, values could be in Bottles, Cases, Pallets, Boxes, Eaches, and so on.
This section displays the following:
• The amount of this item that has been issued from this stockroom over a weekly, monthly and annual basis
• The average usage for this item, which is calculated by Inventory • The ROP (re-order point) for this item stockroom combination • The maximum holding stock level for this stockroom, used by Inventory for the re-order
policy Up to Max • The EOQ (Economic Order Quantity) for this item/stockroom combination • The quantity you need to re-order • The re-order factor for your selected item (this is the number of lead times worth of average
usage that you should re-order) Note: Inventory only uses the information held within the Reorder and Reorder Factor fields if you have selected to use Re-order Policy 2 (ROP/ROQ).
• The lead time in weeks (the time in weeks between placing an order for a particular item and receiving it at the stockroom)
• The number of months’ stock cover for this item held in this stockroom
Costs (XX)
Note: (XX) indicates the unit in which the stock balances are displayed. For example, values could be in Bottles, Cases, Pallets, Boxes, Eaches, and so on.
This section of the window displays the following:
• The Standard, Latest and Average cost recorded for this item/stockroom combination. • The value of the stock • The most recent item cost according to the method of costing displayed next to the heading
Cost At. Note: If there is a base list price for the item, this will be displayed under the costing method in the Price field. Note: If you are using Proof of Delivery (POD), the value awaiting POD is included in the Value field. The value includes the value of the physical stock at the current costing method, the value of the stock in-transit and the value of stock awaiting POD.
Dates
This section displays the date on which you last changed this item/stockroom combination. It also displays the most recent receipt and issue of this item from this stockroom and the dates of the last and next stock count.
Infor System21 Inventory Management | 463

858BEnquiries
Miscellaneous
This section displays the following:
• Whether there is a stock take in progress for your selected item/stockroom combination • Whether your selected item is defined to Packaging Reporting • The percentage of over-confirmation • The unit of measure that is used to purchase this item from this stockroom • The stockroom bins where this item is located, if these are defined
Stock Check
This section displays the following:
• The dates of the last and next stock checks • The stock count profile code of the item • The number of weeks' stock figures (maximum and minimum) • The ABC classification of the item and any override in place
Suppliers
This final section displays the preferred suppliers for this item. It displays four supplier references, but only the supplier reference displayed first is used in processing.
Functions
Lot Details (F13)
If the selected item is batch-controlled, lot-controlled, serial-controlled or the stockroom for which details are being displayed is a bonded warehouse, use this to view a further breakdown of stock balances by batch number. This displays the Item/Stockroom Enquiry Lot Details window. For more information, see the Item/Stockroom Lot Details Window section.
The quantities displayed in this window will be shown in the same unit as the quantities shown in the current window.
Lot by Date (F14)
If the selected item is batch-controlled, lot-controlled, serial-controlled or the stockroom for which details are being displayed is a bonded warehouse, use this to view a further breakdown of stock balances by batch number. This displays the Item/Stockroom Enquiry Lot Details window. For more information, see the Item/Stockroom Lot by Date Details Window section.
The quantities displayed in this window will be shown in the same unit as the quantities shown in the current window.
Locations (F15)
If the selected stockroom is subject to location control, use this to display the Locations Enquiry window. For more information, see the Locations Enquiry Window section.
The quantities displayed in this enquiry will be shown in the same unit as the quantities shown in the current window.
464 | Infor System21 Inventory Management

858BEnquiries
Transaction Control (F16)
Use this to display the Transaction Code Effectivity Enquiry window. This is only available when the appropriate flags are activated for the item.
Change Units (F17)
Use this to display the balances in any of the available units of measure (purchase unit, issue unit or stock unit).
Stock Availability (F18)
Use this to display the Stock Availability Enquiry Details window within Sales Order Processing.
The quantities displayed in this enquiry will be shown in the same unit as the quantities shown in the current window.
FIFO Cost Details (F19)
Use this to display the Item/Stockroom Enquiry Receipt Costs window for the selected item (if applicable).
The quantities displayed in this window will be shown in the same unit as the quantities shown in the current window.
Movement and Cost Analysis (F20)
Use this to display the Movement Analysis pop-up for the selected item/stockroom combination. See the Movement Analysis Pop-up section for more details.
Note: Movement and Cost Analysis information is displayed in stockroom issue units.
Note: When you are enquiring on an owning company’s definition of an item from a partner company it will not be possible to request a Movement and Cost Analysis for an item.
Text (F21)
Use this to display the Maintain Text pop-up, where you have previously selected a usage code and a language code for multi-lingual text entry. Press Enter to display the Item Text window. This is where you can view text in the selected language to be displayed or printed on external documentation (for example, despatch notes), according to the usage code selected.
Potency (F22)
Use this to view potency details for items that are subject to lot, serial or batch control. This displays the Potency Enquiry for your selected item.
Press Enter to view a series of similar windows for each stockroom that stocks this item, in stockroom code order.
Item/Stockroom Lot Details Window To display this window, select Lot Details (F13) on Item/Stockroom Enquiry Stockroom Details window, if the item is batch-controlled, lot-controlled or serial-controlled.
Infor System21 Inventory Management | 465

858BEnquiries
Use this window to view a breakdown of stock balances at batch level. A list is displayed showing balance information.
The following quantities are displayed in the same unit as the quantities shown on the Item/Stockroom Enquiry Stockroom Details window:
• Physical • Allocated • Frozen • On-order • Available
Fields
Item
This field displays the reference code of the item.
Stockroom
This field displays the reference code of the stockroom.
Issue Units
This field displays the code for the primary unit of measure.
Note: If this company uses Catchweight, and the item has a secondary value, when you select [Short Description] (F9), the Issue Units field is not displayed.
Lot
This field displays the reference code of each lot balance.
Physical
If you use Catchweight in this company, and you select [Short Description] (F9), this field is displayed. For each lot balance, the physical quantity of the item is displayed in the secondary unit of measure.
Allocated
This field displays the allocated quantity of the item for each lot balance.
Available
This field displays the available quantity of the item for each lot balance.
Frozen
This field displays the frozen quantity of the item for each lot balance.
Note: If this company uses Catchweight and the item has a secondary value, when you select [Short Description] (F9), this field is removed from the window.
On Order
This field displays the quantity of the item on order for each lot balance.
466 | Infor System21 Inventory Management

858BEnquiries
Secondary UOM
If you use Catchweight in this company and the item has a secondary value, when you select [Short Description] (F9), this field displays the abbreviation of the secondary unit of measure.
Note: The above windows display quantities in whatever unit of measure is being displayed in the Item/Stockroom Enquiry Lot Details window.
Options
Note: The options available depend on whether you have made changes to the grade or potency profile of the lot, or both.
Receipt Costs
Use this to display the Item/Stockroom Receipts Costs Enquiry window.
Lot Header
Use this to display the Lot Header Details pop-up.
Lot Trace
Use this to display the Lot Trace Enquiry window.
Potency History
Use this to display the Potency History Enquiry window.
Grade History
Use this to display the Grade History Enquiry window.
Allocations
Use this to display the Allocations Enquiry window.
Functions
Quantity/[Short Description] (F9)
This is a toggle which is only available when you use Catchweight and the item has a secondary value.
When Quantity (F9) is displayed at the bottom of the window, select it to remove the Secondary UOM field from the window and to display the Issue Units field. Also, the Physical is quantity of the item in the primary unit of measure.
When [Short Description] (F9) is displayed at the bottom of the window, where [Short Description] is the nine-character description of the secondary unit of measure, select it to remove the Issue Units field from the window and display the Secondary UOM field. Also, the physical balance displayed is the quantity of the item in the secondary unit of measure.
Include Zero Lots (F13)
Use this to include zero lots for this item and to return to the original details.
Infor System21 Inventory Management | 467

858BEnquiries
Change Units (F17)
Use this to display the balances in any of the available units of measure (purchase unit, issue unit or stock unit).
Specify an option or select a function to continue. Alternatively, select Previous (F12) to re-display the Item/Stockroom Enquiry Stockroom Details window.
Item/Stockroom Receipts Cost Enquiry Window To display this window, select Receipt Costs against a lot on the Item/Stockroom Lot Details window.
Use this window to view receipt or transfer cost history for your selected item, lot and stockroom combination.
Fields
Item
This field displays the item.
Stockroom
This field displays the stockroom.
Issue Units
This field displays the primary unit of measure.
Note: If you use Catchweight and the item has a secondary value, when you select [Short Description] (F9), the Issue Units field is not displayed.
Secondary UOM
If you use Catchweight and the item has a secondary value, when you select [Short Description] (F9) this field is displayed instead of the Issue Units field containing the abbreviation of the secondary unit of measure.
Lot
This field displays your selected lot reference for this item.
Date Received/Time Received
These fields display the receipt date and time for each lot balance.
Original Quantity
This field displays the quantity of the item received, expressed in the primary unit of measure for each lot balance.
Note: If you use Catchweight and the item has a secondary value, when you select [Short Description] (F9), this field is replaced by the Original [Short Description] field.
468 | Infor System21 Inventory Management

858BEnquiries
Original [Short Description]
This field is displayed if you are using Catchweight and you select [Short Description] (F9). For each lot balance, the quantity of the item received, expressed in the secondary unit of measure, is displayed in this field.
From Supplier/Stockroom
This field displays the reference of the supplier or stockroom for each lot balance.
Cost Per
This field displays the cost per unit for each lot balance.
Balance
This field displays the total balance of each lot balance.
Functions
Quantity/[Short Description] (F9)
This is a toggle which is only available when you use Catchweight and the item has a secondary value.
When Quantity (F9) is displayed at the bottom of the window, select it to display the quantity of the item in the Original Quantity field in the primary unit of measure.
When [Short Description] (F9) is displayed at the bottom of the window, where [Short Description] is the nine character description of the secondary unit of measure, select it to display the quantity of the item in the Original [Short Description] field in the secondary unit of measure.
Change Units (F17)
Use this to display the balances in any of the available units of measure (purchase unit, issue unit or stock unit).
When you have finished displaying the receipt costs, select Previous (F12) to display the Item/Stockroom Enquiry Stockroom Details window.
Lot Header Details Pop-up To display this pop-up, select Lot Header against the required lot on the Item/Stockroom Lot Details window.
Use this pop-up to review the header information for the selected item and batch number combination.
The following quantities are displayed in the same unit as the quantities displayed on the Item/Stockroom Enquiry Lot Details window.
• Physical (Primary Units) • Allocated
Infor System21 Inventory Management | 469

858BEnquiries
• Available • Frozen
Fields
Item
This field displays the selected item.
Lot
This field displays your selected lot reference.
Stockroom
This field displays the selected stockroom.
Receipt Date
This field displays the receipt date for the item.
First Avail Date
This field displays the first date that the items are available to leave the stockroom.
Last Avail Date
This field displays the last date that the items are available to leave the stockroom.
Expiry Date
This field displays the expiry date of the items.
Physical
This field displays the physical stock balance for items with your selected lot reference in your selected stockroom.
If Catchweight is used for this company and the item has a secondary value, the number of items can be displayed in either the primary unit of measure by selecting Quantity (F9), or the secondary unit of measure by selecting [Short Description] (F9).
Allocated
This field displays the allocated stock balance for items with your selected lot reference in your selected stockroom.
If you use Catchweight, and you select [Short Description] (F9), this field is replaced by the Available field.
Available
This field displays the available stock balance for items with your selected lot reference in your selected stockroom.
If you use Catchweight and the item has a secondary value, when you select [Short Description] (F9) this field is removed from the window.
470 | Infor System21 Inventory Management

858BEnquiries
Frozen
This field displays the frozen stock balance for items with your selected lot reference in your selected stockroom.
Issue Units
This field displays the issue unit of measure for this item.
Note: If you use Catchweight and the item has a secondary value, when you select [Short Description] (F9), this field is removed from the window.
Secondary UOM
If you use Catchweight and the item has a secondary value, when you select [Short Description] (F9) this field is displayed instead of the Issue Units field, containing the abbreviation of the secondary unit of measure.
Stock Status
This field displays the current status of the items in the stockroom.
Grade
This field displays the current grade for lots of this item in the stockroom.
Actual Potency
This field displays the current potency of the lots of this item.
Potent Units
This field displays the total potent units for your selected lot. Inventory calculates this as:
Quantity x Current Potency % = Total Potent Unit
Supplier Lot Ref
This field displays a specific reference name that is usually provided by your supplier.
Functions
Quantity/[Short Description] (F9)
This toggle is available only when you use Catchweight and the item has a secondary value.
When Quantity (F9) is displayed at the bottom of the window, select it to remove the Physical and Secondary UOM fields for the secondary unit of measure, and display the Physical, Allocated, Available and Issue Units fields for the primary unit of measure.
When [Short Description] (F9) is displayed at the bottom of the window, where [Short Description] is the nine character description of the secondary unit of measure, you can select it to remove the Physical, Allocated, Available and Issue Units fields for the primary unit of measure. This will re-display the Physical and Secondary UOM fields for the secondary unit of measure.
C-of-C Reference (F17)
Use this to display the Enquire: C-of-C Reference window. This window displays all the valid certificate of conformance details attached to your selected item.
Infor System21 Inventory Management | 471

858BEnquiries
Text (F21)
Use this to display the Maintain Text pop-up.
Press Previous (F12) to return to the Item/Stockroom Lot Details window.
Lot Trace Enquiry Window To display this window, select Lot Trace against the required lot on the Item/Stockroom Lot Details window.
Use this pop-up to display transactions for the selected lot.
Fields
Date
This field displays the date of the receipt or issue for each lot.
Type
This field displays the type of transaction carried out for this item.
Order/Reference
This field displays the reference recorded for a transaction.
Sub-Reference
This field displays the sub-reference recorded for a transaction.
Note: You can use up to 33 characters to create the reference for works order-less production transactions (codes M, N and W). In this case the reference is made up as follows:
I = Item reference of up to 15 characters
R = Route code of 1 character (with a space either side)
F = Work-in-Progress Lot Number of up to 15 characters
Customer Supplier
This field displays the customer or supplier associated with the transaction. This information is taken from the Sales Order for a customer and the Purchase Order for a supplier.
Issue Units [Unit Name]
The field displays the amount of items associated with this lot/transaction, in the primary unit of measure.
If you are using Catchweight, select Quantity (or Short Description) (F9) to display the amount of items in either the primary unit of measure or the secondary unit of measure.
Options
472 | Infor System21 Inventory Management

858BEnquiries
Movement Details
Use this to display the Inventory Movements - Detail Enquiry window.
Order Enquiry
Use this to display the appropriate Order Enquiry (Sales or Purchase) when applicable.
Forward/Backward
Use this to display the Forward/Backward Trace pop-up when applicable.
Functions
Lot Header Details (F13)
Use this to display the Lot Header Details pop-up.
Potency History (F15)
Use this to display the Potency History Enquiry pop-up.
Select Previous (F12) to re-display the Item/Stockroom Lot Details window.
Allocations Enquiry Pop-up To display this pop-up, select Allocations against a line on the Item/Stockroom Lot Details window.
Use this pop-up to display any allocated orders linked to this item/stockroom combination.
Fields
Reference
This field displays the order reference number, including the order line number on which this item appears.
Type
This code indicates the type of demand order to which this item is allocated. These are set up in the Inventory Descriptions file under major type ORTP.
Desp. Date
This field displays the date that the allocated stock is due to be despatched.
Allocated
This field displays the quantity of this item, held in this stockroom that is allocated to this demand order.
UoM
This field displays the unit of measure in which the quantity is expressed.
Options
Infor System21 Inventory Management | 473

858BEnquiries
Select
Use this to display details of the demand order linked to this item/stockroom combination.
Select Previous (F12) to re-display the Item/Stockroom Lot Details window.
Item/Stockroom Lot by Date Details Window To display this window, select Lot by Date (F14) on the Item/Stockroom Enquiry Stockroom Details window, if the item is batch-controlled, lot-controlled or serial-controlled.
Use this window to view a further break down of stock balances by date. A list of lots is displayed showing lot balance information. The information this window displays is very similar to that shown on the Item/Stockroom Lot Details window.
Options
Receipt Costs
Use this to display the Item/Stockroom Receipts Costs Enquiry window.
Lot Header
Use this to display the Lot Header Details pop-up.
Lot Trace
Use this to display the Lot Trace Enquiry window.
Potency History
Use this to display the Potency History Enquiry window.
Grade History
Use this to display the Grade History Enquiry window.
Allocations
Use this to display the Allocations Enquiry window.
Functions
Include Zero Lots (F13)
Use this toggle to view any lots defined to this item in this stockroom that do not have stock balances. If you have selected Include Zero Lots (F13) to display the lots without stock balances, the name of the function changes to Exclude Zero Lots (F13). If you use this, the zero lots are removed.
Change Date Sequence (F15)
This is only available when the current sequence is ascending order of creation date (oldest first).
474 | Infor System21 Inventory Management

858BEnquiries
Use this to change the view of the lots shown. If they are currently displayed in ascending order of creation date (oldest first) they will be reversed to descending order of creation date (most recent first).
Every time you select Change Date Sequence (F15), the sequence will be reversed.
Change Units (F17)
Use this to display the balances in any of the available units of measure (purchase unit, issue unit or stock unit).
Select Previous (F12) to re-display the Item/Stockroom Enquiry Stockroom Details window
Locations Enquiry Window To display this window, select Locations (F15) on the Item/Stockroom Enquiry Stockroom Details window, if the item is defined to a location-controlled stockroom.
Use this window to view a breakdown of stockroom balances at location level.
The top of the window displays the item and its description, the selected stockroom, the default location allocated to this item, whether the item has multiple locations associated against it and whether you have chosen stock rotation for your selected item.
The middle of the window displays the current location, or locations, of the item and any stock balances (in issue units of measure) held against it.
The following quantities on this window are displayed in the same units as the quantities on the Item/Stockroom Enquiry Stockroom Details window.
• Physical (XX) • Frozen (XX) • Allocated (XX)
Note: (XX) indicates the units in which the stock balances are displayed. For example, stock balances could be in Bottles, Cases, Pallets, Boxes etc.
Options
Rotation Date Balances
Use this to view a breakdown of the location balance by rotation date. The Rotation Balance Enquiry window is displayed.
Note: This option is only available for items that are not subject to batch, lot or serial control.
Functions
Quantity (F9)/[Secondary Value]
Use this to view the location level secondary balances if they exist.
Note: You can only use this function if your company is set up as a Catchweight company.
Infor System21 Inventory Management | 475

858BEnquiries
Include Zero Locations (F13)
Use this toggle to view any locations defined to this item in this stockroom that do not have stock balances. If you have selected Include Zero Locations (F13) to display the locations without stock balances, the name of the function changes to Exclude Zero Locations (F13). If you use this, the zero locations are removed.
Select Previous (F12) to return to the Item/Stockroom Enquiry Stockroom Details window.
Rotation Date Balances Window To display this window, select Rotation Date Balances against an item’s location on the Locations Enquiry window
Use this window to view stock balances at rotation date level within a selected location.
Note: This window can only be invoked for an item that is not subject to batch, lot or serial control.
The top of the window displays details of the selected item code and description, the stockroom and location, and the affected balance in issue units. It displays the location balance from the Locations Enquiry window and the sum of the rotation date balances. These two balances should be the same. If they are not, you can use the Rebuild Balances from Location task or the Adjust Rotation Date Balances task to reconcile them.
The middle of the window displays the receipt (or creation) date and the time of that transaction along with the unique reference allocated to that transaction, and the quantity affected by that transaction.
The following quantities on this window are displayed in the same units as the quantities on the Item/Stockroom Enquiry Stockroom Details window.
• Balance (XX) • Cumulative • Rotation balance quantity
Note: (XX) indicates the units in which the stock balances are displayed. For example, stock balances could be in Bottles, Cases, Pallets, Boxes etc.
Select Previous (F12) to return to the Locations Enquiry window.
Purchase/Issue Unit Selection Pop-up To display this pop-up, select Change Units (F17) on the Item/Stockroom Enquiry Stockroom Details window.
Use this window to select the unit of measure in which you wish to view stock levels.
The purchase, stock and issue units for an item are listed. Any of these valid units may be chosen.
476 | Infor System21 Inventory Management

858BEnquiries
Options
Select
Use this against the unit you wish to use for viewing stock levels.
Select the unit in which you wish to view stock levels. Upon return to the Item/Stockroom Enquiry Stockroom Details window, the stock levels displayed will be in the chosen unit.
Item/Stockroom Enquiry FIFO Cost Details Window To display this window select FIFO Cost Details (F19) on Item/Stockroom Enquiry Stockroom Details window, if the item is FIFO costed.
Alternatively, select Receipt Costs against a lot on the Item/Stockroom Enquiry Lot Details Window.
Use this window to view the receipt costs of the selected item or item and lot combination.
This window displays the opening and current position of the unused FIFO batches for an item/stockroom. You can view both date and time details. The list of batches is displayed.
The following quantities are displayed in the same unit as the quantities shown on the Item/Stockroom Enquiry Stockroom Details window:
• Original quantity • Balance
The item cost is also expressed in these same units.
You can view the quantity received from another stockroom or supplier, and the balance of this batch remaining in the stockroom, with the associated cost per unit.
Note: To adjust FIFO records, use the FIFO Costs task.
If the chosen item is batch-controlled, lot-controlled or serial-controlled, you can select FIFO Details (F19) on the Item/Stockroom Enquiry Stockroom Details window to view this window, even if the item is not FIFO costed. You can then view the received costs, calculated according to the costing method specified on the Item Maintenance Costing Details window.
You can use this window for lot, batch, and serial-controlled items. To do this, select Receipt Costs against a lot on the Item/Stockroom Enquiry Lot Details window. In this case, the costs displayed will refer only to the selected lot.
Functions
Change Units (F17)
Use this to display the balances in any of the available units of measure (purchase unit, issue unit or stock unit).
Press Enter or select Previous (F12) to return to either the Item/Stockroom Enquiry Stockroom Details window or the Item/Stockroom Enquiry Lot Details window.
Infor System21 Inventory Management | 477

858BEnquiries
Movements Analysis Pop-up To display this pop-up, select Movement and Cost Analysis (F20) on Item/Stockroom Enquiry Stockroom Details window.
Use this pop-up to view movement and cost analysis information for your selected item in both year and period to date formats.
Fields
Period
This field displays the current period.
Start Date
This field displays the start date for this period.
Close Date
This field displays the end date for this period, for the purposes of this enquiry.
Stockroom
This field displays the stockroom for your selected item.
Item
This field displays your selected item.
Issue Unit
This field displays the issue unit for your selected item, as defined in the Items maintenance task.
Note: The following fields display both the quantity and value for the item for this period.
Opening
This field displays the stock balance for this item/stockroom combination and the associated value at the start of the period.
Receipts
This field displays the total stock of this item you have received and the associated value for those receipts for this period.
Issues
This field displays the total stock of this item you have issued and the associated value for those issues for this period.
Adjustments
This field displays the total stock of this item you have adjusted and the associated value for those adjustments for this period.
478 | Infor System21 Inventory Management

858BEnquiries
Transfers
This field displays the total stock of this item you have transferred and the associated value for those transfers for this period.
Closing
This field displays the stock balance for this item/stockroom combination and the associated value at the end of the period
Latest Receipt
This field displays the date of the latest receipt of this item in this stockroom.
Latest Issue
This field displays the date of the latest issue of this item in this stockroom.
Functions
Year to Date Details (F13)
Use this to toggle between period and year to date details for this item/stockroom combination.
Cost Analysis (F14)
Use this to toggle between the cost or movement analysis details.
Previous Period (F15)
Use this to view the details recorded against the previous period, where applicable.
Next Period (F16)
Use this to view the details recorded against the next period, where applicable.
Item Group (F17)
Use this to view the details recorded against an item group, if your item is part of an item group.
Select Previous (F12) to re-display the Item/Stockroom Enquiry Stockroom Details window.
Cost Analysis Pop-up To display this pop-up, select Cost Analysis (F14) on the Movements Analysis pop-up.
Use this pop-up to view cost analysis details for your selected item in both period and year to date format. The software displays the reference number and description, issue unit and current period details for your selected item.
Fields
Start Date/Close Date
This field displays the date range for the current period, for the purposes of this enquiry.
Infor System21 Inventory Management | 479

858BEnquiries
Latest Cost
These fields display the latest cost for this item and the date upon which the cost was calculated.
Average Cost
These fields display the average cost of the item for this period and the year to date.
Average Cost (Last 3 Periods)
This field displays the average cost of the item for the period three months ago.
Average Cost (Period-1)
This field displays the average cost of the item for the previous period.
Average Cost (Period-2)
This field displays the average cost of the item for the period two months ago.
Manual Cost Override
These fields display the value of any manual cost overrides you have performed for the current period and the year to date.
Functions
Movement Analysis (F14)
Use this to toggle between this window and the details held on the Movement Analysis window.
Select Previous (F12) to re-display the Item/Stockroom Enquiry Stockroom Details window.
480 | Infor System21 Inventory Management

858BEnquiries
Stock Movements [4/INE, 11/DRE] Use this task to view stock movements for an item in either summary or detail form.
Selection criteria are available to limit the number of stock movements displayed.
When you are viewing the details of a stock movement for an item, the format of any quantities displayed is dependent upon the following factors:
• Whether the item is a multiple unit format or decimal item • Whether the item is a Catchweight item or not
Inventory Movements Enquiry Window To display this window, select the Stock Movements task.
Use the top section of the window to enter selection criteria and the lower section to choose from a list of permitted movement types.
Note: Use Page Up and Page Down to view more valid movement type codes.
Fields
Item
Enter the item on which you want to enquire.
Alternatively, use the prompt facility to select from the Item Master Scan pop-up.
Leave this field blank to display all items.
You can then use any of the following selection criteria to reduce the scope of the subsequent display:
Stockroom
Enter a stockroom.
Alternatively, use the prompt facility to select from the Stockroom Selection pop-up.
Leave this field blank to include all stockrooms in the enquiry.
Lot
Enter a lot or leave this field blank for all lots.
From Date/To Date
Specify a range of dates or leave these fields blank for all dates.
Infor System21 Inventory Management | 481

858BEnquiries
Movement Type
Specify a particular movement type or leave this field blank for all types. You can select a movement type code from the list displayed in the lower half of the window. Use Page Up and Page Down to display more valid movement types.
Summary/Detail
Select one of the following:
Summary (1) (default) - To display a summary list with many movements on one window
Detail (2) - To display a detailed enquiry with one movement per window
Note: Selection of Detail requires an item number to be entered.
Press Enter to confirm the selections and display the window selected in the Summary/Detail field.
Inventory Movements Summary Window To display this window, select Summary in the Summary/Detail field on the Inventory Movements Enquiry window.
Use this window to view a summarised list of inventory movements that match the selection criteria entered on the Inventory Movements Enquiry window. The most recent movement is displayed first. Use Page Up and Page Down to display more movements. Where no item code is selected, only five movements are displayed per window (rather than the fifteen) as the item code and item description for each stock movement are also displayed.
The quantity shown against each movement for an item flagged as multiple unit format will be expressed in the default inventory unit of that item in the appropriate stockroom. For non-multiple unit format items the quantity shown against each movement will be expressed in the unit in which the movement was entered as/when it was recorded on the system
Options
Select
Use this to select the movement you want to view.
Functions
Quantity/[Short Description] (F9)
This is a toggle, which is available only when you use Catchweight, and the item has a secondary value.
When Quantity (F9) is displayed at the bottom of the window, select F9 to remove the [Short Description] field for the secondary unit of measure, and display the Quantity field for the primary unit of measure.
When [Short Description] (F9) is displayed at the bottom of the window (where [Short Description] is the nine-character description of the secondary unit of measure), you can select
482 | Infor System21 Inventory Management

858BEnquiries
F9 to remove the Quantity field for the primary unit of measure and display the [Short Description] field for the secondary unit of measure.
Expand/Contract (F22)
This is a toggle and is only displayed when all items are selected. It will contract the initial window by omitting the second line of the display.
Select the required inventory movement to display the Inventory Movements Details window. The window displayed depends upon the attributes of the item selected.
Inventory Movements Details Window To display this window, select Detail in the Summary/Detail field on the Inventory Movements Enquiry window. Alternatively, select the required movement on the Inventory Movements Summary window.
Use this window to view all the details of the selected inventory movement. The fields displayed will depend upon whether the item is:
• Non-multiple unit format/non-Catchweight item • Non-multiple unit format/Catchweight item • Multiple unit format item
There are three groups of data:
• Identification of the movement Item, stockroom, references and date
• Movement quantity This is the movement quantity expressed in the units in which the inventory movement was entered. The resulting stock balance, after the movement, is displayed in the issue unit of the item/stockroom combination. The movement value is also displayed.
• Further control information Lot number, third party (supplier, customer, etc.), date, time, terminal, user and the full display of production and lot transformation references, and so on
Note: Use Page Up and Page Down to view other movements.
Fields
Movement Quantity
This field displays the movement quantity expressed in the units in which the inventory movement was entered. For multiple unit entry items this is displayed in terms of the valid units (purchase, stock and issue or stock and issue).
Note: The unit in which the movement was recorded is also highlighted.
Infor System21 Inventory Management | 483

858BEnquiries
Movement Weight
This field displays the weight recorded against the selected inventory movement, expressed in the secondary unit of the selected item. This is only displayed for a Catchweight item.
Resulting Balance
This field displays the resulting stock balance, after the movement, displayed in the issue unit of the item/stockroom combination. For multiple unit entry items this is displayed in each of the valid item units (purchase, stock and issue or stock and issue).
Note: The default inventory unit of the item/stockroom combination is highlighted.
Resulting Weight
This field displays the resulting weight, after the inventory movement, expressed in the secondary unit of the selected item. This is only displayed for a Catchweight item.
Narrative
This varies according to the source of the transaction.
For example, if you are processing a Physical Stock Adjustment, you can use the narrative to add key narrative text to the transaction. Other system-generated transactions (for example, Production Issues) use the narrative to store additional information relating to the transaction. Therefore, production movements relating to works orders would include the works order, operation, route and work in progress lot number. For repetitive production movements, the narrative would contain the parent item operation, route and work in progress lot number. If the transaction is not related to the works order, it splits into the item and route.
Select Previous (F12) to return to the Inventory Movements Summary window.
All Stockrooms for an Item [5/INE] Use this task to view the stock of an item throughout the company at summary level, and then access the standard stockroom enquiry.
All Stockrooms for an Item Enquiry Selection Window To display this window, select the All Stockrooms for an Item task.
Use this window to specify the item for which you want to view details.
Fields
Item
Enter the item code of the item for which you want to view details.
484 | Infor System21 Inventory Management

858BEnquiries
Alternatively, use the prompt facility to select from the Item Master Scan pop-up.
Functions
Enterprise (F14)
This is only displayed if you are using Enterprise Orders. You can use this to view the stock position for your selected item over all companies that are defined to your Enterprise.
Enter an item and then press Enter to display the All Stockrooms for an Item Enquiry window.
All Stockrooms for an Item Enquiry Enterprise Wide Window To display this window, enter an item and then select Enterprise (F14) on the All Stockrooms for an Item Enquiry Selection window.
Use this window to view the stock position of your selected item over all companies.
Fields
Company/Stockroom
These fields display the Enterprise company and stockroom.
Frozen
This displays the quantity of stock that is frozen.
On Order
This displays the quantity of stock that is on order.
Physical/Available
This displays the quantity of stock that is physically stocked or available, or both, in the stock unit displayed in the Company/Stockroom/Units column.
Options
Select
Use this to display the Item/Stockroom Enquiry Stockroom Details window for your selected company and stockroom combination.
Stock Availability
Use this to display the Stock Availability Enquiry window for your selected company and stockroom combination.
Select the item, company and stockroom combination on which you want to enquire and then press Enter to display the Item/Stockroom Enquiry Stockroom Details window.
Alternatively, select Previous (F12) to re-display the All Stockrooms for an Item Enquiry Selection window.
Infor System21 Inventory Management | 485

858BEnquiries
All Stockrooms for an Item Enquiry Window To display this window, select an item and then press Enter on the All Stockrooms for an Item Enquiry Selection window.
Use this window to view the summary balance data for each stockroom where the item is stocked. It includes frozen, allocated, on order, in transit, physical and available stock balances.
Options
Select
Use this against the stockroom to display the Item/Stockroom Enquiry Stockroom Details window for your selected item/stockroom combination.
Locations
Use this against the stockroom to display the Location Enquiry window for stockrooms with location control.
Functions
Quantity/[Short Description] (F9)
This is a toggle, which is available only when you use Catchweight, and the item has a secondary value.
When Quantity (F9) is displayed at the bottom of the window, select F9 to remove the Physical/In Transit fields for the secondary unit of measure, and display the Frozen/Allocated, On Order/In Transit and Physical/Available fields for the primary unit of measure.
When [Short Description] (F9) is displayed at the bottom of the window, where [Short Description] is the nine-character description of the secondary unit of measure, select F9 to remove the Frozen/Allocated, On Order/In Transit and Physical/Available fields for the primary unit of measure, and display the Physical/In Transit fields for the secondary unit of measure.
Select Exit (F3) to leave the enquiry.
486 | Infor System21 Inventory Management

858BEnquiries
Stock History [6/INE] Use this task to view stock movement summaries (stock history) by week or period, depending on the usage cycle specified in the Inventory company profile.
Stock history is displayed in the default inventory units defined for an item/stockroom combination
Stock History Enquiry Selection Window To display this window, select the Stock History task.
Use this window to select the item/stockroom combination that you want to view.
Fields
Item
Enter the item reference number on which you want to enquire.
Alternatively, use the prompt facility to select from the Item Master Scan pop-up.
Stockroom
Enter a two-character code of the stockroom where the item is located.
Alternatively, use the prompt facility to select from the Stockroom Selection pop-up.
Press Enter to display the Stock History Enquiry window.
Stock History Enquiry Window To display this window, select an item and stockroom and then press Enter on the Stock History Enquiry Selection window.
The top of the window displays the average usage of the item in this stockroom.
This is followed by a list of the movements of the item for each week or period that has a movement recorded against it.
Note: All quantities are shown in the default inventory units defined for the item/stockroom combination.
Note: Use Page Up and Page Down to view more movements.
Press Enter to return to the Stock History Enquiry Selection window.
Infor System21 Inventory Management | 487

858BEnquiries
Stock In-transit [7/INE] Use this task to carry out enquiries on Distribution order lines in-transit between a selected centre and DC.
These items have been confirmed as despatched from the centre (via Sales Order Processing or Warehousing).
Shipments In-transit Enquiry Selection Window To display this window, select the Stock In-transit task.
Use this window to select all the Distribution order lines in-transit between a supply centre and a selected DC, or to display details of lines for one specific order in-transit.
You can select a list of all DCs and a list of all centres.
Fields
From Stockroom
Enter a DC code. You must define this to at least one network within DRP.
Alternatively, use the prompt facility to select from the Stockroom Selection pop-up.
To Stockroom
Enter a centre code. You must define this to at least one network within DRP.
Alternatively, use the prompt facility to select from the Stockroom Selection pop-up.
Distribution Order Number
Enter a valid distribution order, in other words, one confirmed as despatched at the centre and not yet confirmed as fully received at the DC.
Note: You can select an order without specifying its relevant centre or DC.
Enter a valid DC/centre combination or order number, or both, to display the Shipments In-transit Enquiry window.
Shipments In-transit Enquiry Window To display this window, enter a valid DC/centre combination or order number, or both, on the Shipments In-transit Enquiry Selection window.
The window displays the Distribution order line details.
Fields
488 | Infor System21 Inventory Management

858BEnquiries
From Stockroom/To Stockroom
These fields display the values from the previous window.
Date
This field displays the date of despatch from centre.
Order
This field displays the Distribution order number.
Lin
This field displays the Distribution order line number.
Item
This field displays the code for the item within Inventory Management.
SR
This field displays the local stockroom for the item at the DC.
Quantity
This field displays the amount of the item in-transit between the selected stockrooms. This amount is expressed using the primary unit of measure.
Secondary Val
This field displays the amount of the item in-transit between the selected stockrooms. This amount is expressed using the secondary unit of measure.
If you use Catchweight and the item has a secondary value, you can select Quantity/[Short Description] (F9) to remove the Quantity field and display the Secondary Val field.
UoM
This field displays the unit of measure. If you use Catchweight and the item has a secondary value, you can select Quantity/[Short Description] (F9) to toggle between the primary and secondary unit of measure.
Lot Number
This field displays the lot, batch or serial number for a batch-controlled, lot-controlled or serial-controlled item.
You can amend the stockroom, pack, lot number and rotation date when you confirm receipt of the shipment (via the DRP processing task) where appropriate.
Use Page Up and Page Down to view any further pages of lines meeting the selection criteria.
Functions
Infor System21 Inventory Management | 489

858BEnquiries
Quantity/[Short Description] (F9)
This is a toggle, which is available only when you use Catchweight, and the item has a secondary value.
When Quantity (F9) is displayed at the bottom of the window, select F9 to remove the Secondary Val field for the secondary unit of measure, and display the Quantity field for the primary unit of measure.
When [Short Description] (F9) is displayed at the bottom of the window, where [Short Description] is the nine-character description of the secondary unit of measure, select F9 to remove the Quantity field for the primary unit of measure, and display the Secondary Val field for the secondary unit of measure.
Select Exit (F3) to leave the enquiry.
490 | Infor System21 Inventory Management

858BEnquiries
Alternative Items [8/INE] Use this task to view any alternative items that you have set up.
Note: Although you can create alternative items within Inventory Management, they are used during Order Entry.
Alternative Items Enquiry Selection Window To display this window, select the Alternative Items task.
Use this window to specify the item for which you want to view the alternative items.
Fields
Item
Enter the item for which you want to view the alternative items.
Alternatively, use the prompt facility to select from the Select pop-up.
Press Enter to display the Alternative Items Enquiry Details window.
Alternative Items Enquiry Details Window
To display this window, select an item and then press Enter on the Alternative Items Enquiry Selection window.
Alternatively, this window can be displayed from within the Linked Item Maintenance task.
Use this window to view details of any alternative items attached to your selected item.
Fields
Item
These fields display your selected item and its description code.
Alternative Item
This field displays the item that you can use as an alternative item during order processing if there is insufficient stock of your selected item.
Description
This field displays the alternative item’s description.
Infor System21 Inventory Management | 491

858BEnquiries
Reverse
If this field displays Reverse, you can reverse the relationship between your selected item and its alternative item. For example, if you wanted to sell your alternative item, but there was insufficient stock, you could use your base item as an alternative.
If this field is blank, you cannot reverse the relationship.
Select Exit (F3) to leave the enquiry.
492 | Infor System21 Inventory Management

858BEnquiries
Deleted Items [9/INE] Use this task to view the items on the Deleted Items file.
Note: The Deleted Items file only holds the fields needed to make the sales invoice re-print and sales analysis work. It is not a copy of the deleted item master.
Deleted Items Enquiry Selection Window To display this window, select the Deleted Items task.
Use this window to select the item whose deleted item record you want to view.
Fields
Position To
Enter an item to re-display the window starting at the item selected. Part of a code may be entered.
Item
This field displays the item.
Description
This field displays the description of the item.
Deleted
This displays the date on which the item was deleted.
Options
Select
Use this against an item to view the deleted file record. The Deleted Items Detail Enquiry window is displayed.
Press Enter to re-display this window using the Position To field. Alternatively, select an item to display the Deleted Items Enquiry Details window.
Infor System21 Inventory Management | 493

858BEnquiries
Deleted Items Enquiry Details Window To display this window, select an item on the Deleted Items Enquiry Selection window.
Use this window to view details of any item on the Deleted Items file. The fields on this window are all from the Maintain Inventory Item window. For more information about the fields on this window, please refer to the Maintain Inventory Item Window section in the Maintenance chapter of this product guide.
Select Exit (F3) to leave the enquiry.
494 | Infor System21 Inventory Management

858BEnquiries
Transaction Control Codes [10/INE] Use this task to view the set-up of pre-existing transaction codes. This task follows the same format as the corresponding maintenance task.
Transaction Control Enquiry Selection Window To display this window, select the Transaction Control Codes task.
Fields
Transaction Control Code
Enter an existing transaction control code.
Alternatively, use the prompt facility to select from the Select Transaction Code pop-up.
Enter or select a code and then press Enter to display the Transaction Control Enquiry Header Selection window.
Note: This window can also be accessed from the Item/Stockroom Enquiry window. For further details, see the Transaction Control Enquiry Header Selection Window section.
Kit List [11/INE] Use this task to view the component breakdown of a kit parent item.
Note: A kit list is a group of items sold together as a unit.
The kit is known as the parent, the individual items as the components.
Kit List Enquiry Selection Window To display this window, select the Kit List task.
Fields
Item
Enter the item code of an existing kit parent item.
Alternatively, use the prompt facility to select from the Item Master Scan pop-up.
Infor System21 Inventory Management | 495

858BEnquiries
Note: If Catchweight is used in this company, a Catchweight item cannot be the parent of a kit list.
Also, if a non-Catchweight item is the parent of a kit list, only Catchweight type 3 or non-Catchweight items can be components of the kit list.
Press Enter to display the Kit List Enquiry Detail window, if a valid parent item code has been entered.
Kit List Enquiry Detail Window To display this window, select an item on the Kit List Enquiry Selection window.
Alternatively, this window can be displayed from within the Linked Item Maintenance task.
Use this window to view the components of the selected parent kit item.
Select Exit (F3) to leave the enquiry.
496 | Infor System21 Inventory Management

858BEnquiries
Account Container Tracking [12/INE] Use this task to view the details held for a customer or carrier in the Container Tracking (Header) and Container Tracking (Detail) files.
This task is an enquiry-only version of Account Container Tracking Maintenance. Refer to that section in the Maintenance chapter of this product guide for further details.
Account Container Tracking Enquiry Selection Window To display this window, select the Account Container Tracking task.
Use this window to select an account for the enquiry.
Fields
Account Code
Enter the account code and delivery sequence or address code.
If the account type is Customer, you can use the prompt facility on the first field to select from the Customer Scan pop-up.
If the account type is Carrier, you can use the prompt facility on the first field to select from the Select Carrier pop-up.
If the account type is Supplier, you can use the prompt facility on the first field to select from the Supplier Search pop-up.
Account Type
Select one of the following:
Customer (Blank) (default) - To indicate that the entered account is a customer
Carrier (1) - To indicate that the entered account is a carrier
Supplier (2) - To indicate that the entered account is a supplier
TP Company
Note: This field is only displayed if the Account Type field is set to Carrier.
Enter a transport company.
Alternatively, use the prompt facility to select from the Transport Company Selection pop-up.
TP Centre
Enter a transport centre.
Alternatively, use the prompt facility to select from the Select Transport Centre pop-up.
Note: For an account type of Supplier, if the delivery sequence is blank this will be taken as address code 000.
Infor System21 Inventory Management | 497

858BEnquiries
Press Enter to display the Account Container Tracking Enquiry Summary window.
Account Container Tracking Enquiry Summary Window To display this window, select an account, carrier or supplier on the Account Container Tracking Enquiry Selection window.
Use this window to view a summary of the containers for the selected account.
Options
Tracking Details
Use this to display Account Container Tracking Enquiry Detail window for the selected container.
Select Tracking Details against a container to display the Account Container Tracking Enquiry Detail window.
Account Container Tracking Enquiry Detail Window To display this window, select Tracking Details against a container on the Account Container Tracking Enquiry Summary window.
Use this window to view the movements for the selected container.
Options
Audit Details
Use this to display the Asset/Container Tracking Audit Details pop-up for the selected container movement.
Select Audit Details against a container movement to display the Asset/Container Tracking Audit Details pop-up.
498 | Infor System21 Inventory Management

858BEnquiries
Asset/Container Tracking Audit Details Pop-up To display this pop-up, select Audit Details against a container on the Account Container Tracking Enquiry Detail window.
Use this pop-up to view the movement details for the selected container movement.
Select Previous (F12) to return to the Account Container Tracking Enquiry Detail window.
Infor System21 Inventory Management | 499

858BEnquiries
Item Container Profile Enquiry [13/INE] Use this task to view the product item (and optionally the customer) details for which a container profile has been defined.
Item Container Profile Enquiry Selection Window To display this window, select the Item Container Profile Enquiry task.
Use this window to select a product item, and optionally the customer, on which you wish to enquire.
Fields
Base Product
Enter the product item number for which you wish to view a container profile.
Alternatively, use the prompt facility to select from the Item Master Scan pop-up.
Note: The selected item may not itself be a container item.
Customer
You can optionally enter a customer if you want to see the details specifically created for the item/customer combination.
Alternatively, use the prompt facility to select from the Customer Scan pop-up.
Container profiles may be established for the following account levels:
• For a specific delivery address • For all delivery addresses for a customer, by specifying a delivery address code of 000
Note: Customer/item container details take precedence over any Item details.
Version
Enter a version number.
You can use the prompt facility on this field to select from all available versions of item container profiles for the entered item on the All Version by Item/Customer pop-up.
If no entry is made, zero is assumed.
Caution: If an enquiry is needed in a situation where the customer is known (e.g. an order or invoice), it is better to enter the item and customer, since there may be some special customer-specific details set up, and these would be missed if only the item number were to be entered.
Functions
500 | Infor System21 Inventory Management

858BEnquiries
Show All Customer (F10)
Use this to show all the customers who have special details set up for the product item on the Item Container Profile Enquiry Customer Selection window. You can then use Select to display the details for that customer/item combination.
Press Enter to display the Item Container Profile Enquiry Detail window.
Item Container Profile Enquiry Customer Selection Window To display this window, select Show All Customer (F10) on the Item Container Profile Enquiry Selection window.
Use this window to view all the customer specific profiles for an Item.
Options
Select
Use this against a customer code to select it for further enquiry.
Select a customer to display the Item Container Profile Enquiry Detail window.
All Version by Item/Customer Window To display this window, use the prompt facility on the Version field on the Item Container Profile Enquiry Selection window.
Use this window to view all the versions of profiles for an item. Customer and sequence are left blank for base product versions.
Options
Select
Use this against a version to select it for further enquiry.
Select a line to return to the Item Container Profile Enquiry Selection window.
Infor System21 Inventory Management | 501
858BEnquiries
Item Container Profile Enquiry Detail Window To display this window, select a base product and optionally a customer and then press Enter on the Item Container Profile Enquiry Selection window.
Alternatively, select a customer on the Item Container Profile Enquiry Customer Selection window.
Use this window to view the container item details for the product or for a specific item/customer combination. Version number and version dates are displayed.
Fields
Base Product
This field displays the product selected, together with its description.
Customer
If a customer has been selected, it will be displayed; otherwise this line is shown as blanks. If a customer has been selected as well as an item, and there are no specific details for that customer, a literal will be shown:
"NO CUSTOMER SPECIFIC DETAILS"
In this case, the item details are shown, as they would be if only an item had been selected.
Sequence (Seq)
This field displays the sequence number of the container item.
Container Item/Description
These fields display the item number and description.
Number Off/M D
The product item sales quantity in its issue units is multiplied (1) or divided (2) by the value in the Number Off field to arrive at the container quantity required.
Optional (Opt)
This specifies whether the container is mandatory (1) or optional (0). It is displayed from the container's Item Master file record and cannot be amended.
Show in Summary
This specifies whether the container is to be printed on container summaries, which are shown on certain documents.
Select Previous (F12) to return to the Item Container Profile Enquiry Selection window.
Enquire on Item Transformation [14/INE] Use this task to enquire on transformations of one item to another.
502 | Infor System21 Inventory Management

858BEnquiries
Item Transformation Enquiry Selection Window To display this window, select the Enquire on Item Transformation task.
Use this window to select the item and lot you wish to trace.
Fields
Item
Enter the transformed item on which you wish to enquire, using up to fifteen alphanumeric characters.
Alternatively, use the prompt facility to select from the Item Master Scan pop-up.
Lot
Enter the specific lot number you have transformed into other items, using up to fifteen alphanumeric characters.
Alternatively, use the prompt facility to select from the Select Lot Reference pop-up.
You may leave this field blank, in which case all transformations for all lots of your selected item are displayed.
Stockroom
You can optionally enter the stockroom code you want to view, using up to two alphanumeric characters.
Alternatively, use the prompt facility to select from the Stockroom Selection pop-up.
From Date/To Date
Enter or select a date range to restrict the display of transformation movements.
Movement Type
This field is automatically set to the value J, signifying that only transformation movements matching the other selection criteria you enter are to be displayed.
Reference Number
Enter the first seven characters of the reference number assigned to a batch of transformation requests to restrict the display of transformation movements to those recorded in the specified batch.
Press Enter to display the Item Transformation Enquiry Details window.
Item Transformation Enquiry Details Window To display this window, enter your selection criteria and then press Enter on the Item Transformation Enquiry Selection window.
Infor System21 Inventory Management | 503

858BEnquiries
Use this window to view item transformation details for your selected item.
Fields
Sel
Select one of the following:
Movement details (1) - To display the Inventory Movements Detail window
For more information, see the Inventory Movements Detail Window section.
Forward/Backward (3) - To display the Forward/Backward Item Trace pop-up
Date
This field displays the date on which the item transformation was recorded.
Type
This field displays the type of transaction carried out on the selected item.
This will always show the value Trans. to indicate that transformation transactions are displayed.
Reference
This field displays the system-generated reference for the recorded transaction.
Sub-Reference
This field displays the original or resulting item for a transformation transaction.
Note: If more than one item resulted from a transformation request, the literal MULTIPLE ITEMS is displayed.
Quantity
This field displays the quantity of the item transformed in the primary unit of measure of that item.
If you are using Catchweight, select Quantity/Short Description (F9) to toggle the display of the transformed quantity between the primary and secondary units of measure of the selected item.
Functions
Quantity/Short Description (F9)
This is a toggle that is only displayed when you are using Catchweight.
Select Quantity (F9) to display the transformation quantity for each transaction in the primary unit of measure.
Select Short Description (F9), where 'Short Description’ is the nine-character description of the item's secondary unit of measure, to display the transformation quantity of each transaction in the secondary unit of measure.
Lot Header Details (F13)
Use this to display the Lot Header Details pop-up for the selected lot.
504 | Infor System21 Inventory Management

858BEnquiries
Note: This function is only available where the selected item is subject to batch/lot/serial control.
Select any transaction with Movement Details or Forward/Backward to enquire on further details for that transaction and then press Enter to action your request.
Forward/Backward Trace Pop-up To display this pop-up, select Forward/Backward against a transformation transaction and then press Enter on the Item Transformation Enquiry Details window.
Use this window to display the details of the items generated or consumed by your selected transformation transaction.
Options
Select
Use this to return to the Item Transformation Enquiry Details window and view transformation transactions for the selected item.
Functions
Transformations From/To (F13)
Use this to toggle between the From and To transformation details for your selected transaction.
Select Previous (F12) to return to the Item Transformation Enquiry Details window.
Infor System21 Inventory Management | 505

858BEnquiries
Items in a Location Enquiry [15/INE] Use this task to enquire on the items present in a location.
Items in a Location Selection Window To display this window, select the Items in a Location task.
Use this task to enquire on the items present in a location.
Fields
Stockroom
Enter a valid location-controlled stockroom.
Alternatively, use the prompt facility to select from the Stockroom Selection pop-up.
Where a stockroom is selected, the description is shown against it.
Location
Enter a valid location for the stockroom.
Alternatively, use the prompt facility to select from the Location prompt pop-up.
A stockroom must be specified before a location can be selected.
Press Enter to display the Items in a Location window.
Items in a Location Window To display this window, press Enter on the Items in a Location Selection window.
Use this window to view the items present in a location.
Fields
Item Table
For each item with a record at the selected location, the total physical stock across all lots is shown in the issue unit of measure.
Options
More Details
Use this to view the More Details pop-up, showing lot numbers (if applicable), physical, frozen and allocated stock. This is the default selection.
Rotation Date Balances
506 | Infor System21 Inventory Management

858BEnquiries
Use this to view the standard Rotation Date Balances Enquiry window.
Functions
Include Zero Items (F13)
Use this to toggle the display between inclusion and exclusion of zero items, i.e. items with zero physical quantities.
Select More Details against a line to display the More details pop-up.
More Details Pop-up To display this pop-up, select More Details against a line on the Items in a Location window.
Use this window to view the items present in a location.
If catchweight applies to this item, the secondary unit of measure details are shown instead of the allocated quantity. These details consist of the physical weight/quantity expressed in the secondary units.
Functions
Include Zero Items (F13)
Use this to toggle the display between inclusion and exclusion of zero items, i.e. items with zero physical quantities.
Select Previous (F12) to return to the Items in a Location window
Infor System21 Inventory Management | 507


Chapter 10 Reports 10
Item/Stockroom [1/INR] Use this task to produce a hard copy listing of item definitions and their associated item/stockroom balances. You can select ranges of items, item types, classes or groups to tailor the report. The following specifications are appropriate for this report:
• Frequency - On request• Stationery - Standard listing paper• Print Positions - 132• New Page - Overflow• Totals – None
Note: If you use Catchweight, the secondary value, unit of measure, Catchweight type and tolerances are displayed for each item. In addition, the secondary unit of measure and description, physical and in-transit stock values and descriptions for each stockroom are displayed.
Item/Stockroom Report Selection Window To display this window, select the Item/Stockroom task.
Fields
Include Kits
Select one of the following:
Components (1) (default) - To display kit components on the report
Headers (2) - To display kit headers on the report
Both (3) - To display both kit components and headers on this report
Note: This final setting may produce misleading results on the report, due to the duplicate representation of each kit in the stockroom.
Infor System21 Inventory Management | 509

859BReports
Item Summary/Detail
Select one of the following:
Summary (1) (default) - To produce a summary listing by items on your specific report
Detail (2) - To produce a detailed listing by items on your specific report
Stockroom Summary/Detail
Select one of the following:
Summary (1) (default) - To produce a summary listing by stockrooms on your specific report
Detail (2) - To produce a detailed listing by stockrooms on your specific report
From/To
You can use one of the following ranges to tailor your report or leave these fields blank to report on all criteria.
Stockroom
Enter a stockroom or a range of stockrooms for inclusion in this report.
You can use the prompt facility on these fields to select from the Stockroom Selection pop-up.
Item
Enter an item or item range for inclusion in this report.
You can use the prompt facility on these fields to select from the Item Master Scan pop-up.
Item Group Major/Minor
Enter the item group or range of item groups for inclusion in this report.
You can use the prompt facility on these fields to select from the PGMJ Product Group - Major and PGMN Product Group - Minor pop-ups.
Item Type
Enter the item type or range of item types for inclusion in this report.
You can use the prompt facility on these fields to select from the PTYP Item Type pop-up.
Item Class
Enter the item class or range of item classes for inclusion in this report.
You can use the prompt facility on these fields to select from the PCLS Item Class pop-up.
Press Enter to produce the report.
Descriptions File [2/INR] Select the Descriptions File task.
510 | Infor System21 Inventory Management

859BReports
This report lists the details included in the Inventory Descriptions file. The following specifications are appropriate for this report:
• Frequency - On request • Stationery - Standard listing paper • Print Positions - 132 • New Page - Overflow • Totals – None
There are no selection criteria needed to produce this report. Select Confirm Submit (F8) to print the report.
Infor System21 Inventory Management | 511

859BReports
Item Supersessions [3/INR] This report lists supersession details that match the selection criteria entered.
• Frequency - On request • Stationery - Standard listing paper • Print Positions - 132 • New Page - Overflow • Totals - None
Item Supersession Report Selection Criteria Window To display this window, select the Item Supersessions task.
Use this window to select the criteria you want to use to produce the item supersession report.
Fields
Item From/Item To
Enter a range of items, or leave these fields blank to include all items.
You can use the prompt facility on these fields to select from the Item Master Scan pop-up.
Effective Date From/Effective Date To
Enter or select a range of dates, or leave these fields blank to select all dates.
Supersession Type
Select one of the following:
Forced (1)
Preferred (2)
Stock Run Out (3)
All (4) (default)
Press Enter and then select Submit (F8) to send the report to print.
512 | Infor System21 Inventory Management

859BReports
Account Container Tracking Report [4/INR] This report lists container balances and the movements of containers to and from each account that matches the selection criteria entered.
• Frequency - On request • Stationery - Standard listing paper • Print Positions - 132 • New Page - Overflow • Totals - None
Account Container Tracking Selection Window To display this window, select the Account Container Tracking Report task.
The Account Container Tracking report allows you to list details of the container balances recorded against an account (or range of accounts) and the movements of containers to and from each account.
Fields
Account Type
Select one of the following:
Customer (Blank) (default) - To list containers tracked against a customer account
Carrier (1) - To list containers tracked against a carrier account
Supplier (2) - To list containers tracked against a supplier account
Note: For an account type of Supplier, if the delivery sequence is blank this will be taken as Address Code 000.
Account Code Range
Enter either a single account code or a range of account codes.
If the Account Type field is set to Customer, you can use the prompt facility on the first field to select from the Customer Scan pop-up.
If the Account Type field is set to Carrier, you can use the prompt facility on the first field to select from the Select Carrier pop-up.
If the Account Type field is set to Supplier, you can use the prompt facility on the first field to select from the Supplier Search pop-up.
Minimum Quantity
You can optionally enter a value, so that only those accounts holding a container balance greater than this value are listed.
Infor System21 Inventory Management | 513
859BReports
Detail/Summary
Select one of the following:
Detail (2) - To produce a detailed listing, showing both current container balances and the movements of each container to and from the account
Summary (1) - To produce a summary listing, only showing container balances for each account
There is no default value.
Show Movements Between/And
Enter or select a valid calendar date range to constrain the list of container movements listed on the report.
Press Enter to validate the selection criteria entered and to submit the report.
Item Audit [11/INR] Select the Item Audit task.
This task prints out of all the changes made to the Item Master file since the task was last run. The following specifications are appropriate for this report:
• Frequency - On request (typically, as part of a day or weekend run) • Stationery - Standard listing paper • Print Positions - 132 • New Page - Change of part number • Totals – None
Note: If you use Catchweight, the secondary value, unit of measure, Catchweight type and tolerances are displayed for each item. In addition, the secondary unit of measure and description, physical and in-transit stock values and descriptions for each stockroom are displayed.
There are no selection criteria needed to produce this report. Select Confirm Submit (F8) to print the report.
514 | Infor System21 Inventory Management

859BReports
Stockroom Audit [12/INR] Select the Stockroom Audit task.
This task prints out of all the changes made to the Stockroom file since the task was last run. The following specifications are appropriate for this report:
• Frequency - On request (typically, as part of a day or weekend run) • Stationery - Standard listing paper • Print Positions - 132 • New Page - Overflow • Totals – None
There are no selection criteria needed to produce this report. Select Confirm Submit (F8) to print the report.
Infor System21 Inventory Management | 515

859BReports
Stock Movements Valuation Report [21/INR] This report lists the stock movements of an item, or range of items, over a period of time, taking into account both demand and supply orders.
Proof of Delivery
If you are using Proof of Delivery (POD), the Inventory value includes the value of the physical stock, in-transit stock and that stock awaiting POD (even though the last two balances are not physically present in the stockroom).
When you request a Period End Update, the software prompts you to run this report.
The following quantities are shown in the appropriate default inventory unit of each item:
• Opening quantity • Receipts • Issues • Adjustments • Transfers • Closing quantity • Computer recorded quantity
The description of the appropriate inventory unit is shown for assistance.
Stock Movements Valuation Record Report Selection Criteria Window To display this window, select the Stock Movements Valuation task.
Use this window to select the criteria you want to use to produce the Stock Movements Valuation report.
Fields
Include Kits
Select one of the following:
Components (1) (default) - To display kit components on the report
Headers (2) - To display kit headers on the report
Both (3) - To display both kit components and headers on this report
Items with Zero Balances
Select one of the following:
Exclude (0) - To exclude items with zero balances from the report
516 | Infor System21 Inventory Management

859BReports
Include (1) - To include items with zero balances in the report
Stockroom From/To
Enter a range of stockrooms, or leave these fields blank to include all stockrooms.
You can use the prompt facility on these fields to select from the Stockroom Selection pop-up.
Item From/To
Enter a range of items, or leave these fields blank to select all items.
You can use the prompt facility on these fields to select from the Item Master Scan pop-up.
Item Group Major/Minor
Enter a range of major or minor item codes, or leave these fields blank to include all major or minor item codes.
You can use the prompt facility on these fields to select from the PGMJ Product Group - Major and PGMN Product Group - Minor pop-ups.
Item Type
Enter a range of item type codes, or leave these fields blank to include all item type codes.
You can use the prompt facility on these fields to select from the PTYP Item Type pop-up.
Item Class
Enter a range of item class codes, or leave these fields blank to include all item class codes.
You can use the prompt facility on these fields to select from the PCLS Item Class pop-up.
Note: If you use Catchweight, the secondary values and unit of measure are displayed.
Press Enter to submit the report.
Infor System21 Inventory Management | 517

859BReports
Stock Valuation [22/INR] Use this report task to value the physical stock of the requested items or stockrooms. The following specifications are appropriate for this report:
• Frequency - On request (typically, as part of the month-end processing for stocktaking problems)
• Stationery - Standard listing paper • Print Positions - 132 • New Page - Change of part number • Totals - At change of stockroom and at the end of the report, the report prints a total stock value.
The following quantities are shown in the appropriate default inventory unit of each item:
• Physical • In-transit • Awaiting POD • On-order • Allocated • Frozen • Available • Usage (year to date) • Usage (average) • Re-order point • Maximum stock
Stock Valuation Record Report Selection Criteria Window To display this window, select the Stock Valuation task.
Use this window to specify the selection criteria you want to use to produce the Stock Valuation report.
Fields
Include Kits
Select one of the following:
Components (1) (default) - To display kit components on the report
Headers (2) - To display kit headers on the report
Both (3) - To display both kit components and headers on this report
518 | Infor System21 Inventory Management

859BReports
Items with Zero Balances
Select one of the following:
Exclude (0) (default) - To exclude items with zero balances from the report
Include (1) - To include items with zero balances in the report
Note: You can choose to include kit components, headers or both on the report.
Stockroom Code From/To
Enter a range of stockrooms, or leave these fields blank to include all stockrooms.
You can use the prompt facility on these fields to select from the Stockroom Selection pop-up.
Item From/To
Enter a range of items, or leave these fields blank to select all items.
You can use the prompt facility on these fields to select from the Item Master Scan pop-up.
Item Group Major/Minor
Enter a range of major or minor item codes, or leave these fields blank to include all major or minor item codes.
You can use the prompt facility on these fields to select from the PGMJ Product Group - Major and PGMN Product Group - Minor pop-ups.
Item Type
Enter a range of item type codes, or leave these fields blank to include all item type codes.
You can use the prompt facility on these fields to select from the PTYP Item Type pop-up.
Item Class
Enter a range of item class codes, or leave these fields blank to include all item class codes.
You can use the prompt facility on these fields to select from the PCLS Item Class pop-up.
Note: If you use Catchweight, the secondary values and unit of measure are displayed.
Press Enter to display the Stock Valuation Report Sequence Selection window.
Stock Valuation Report Sequence Selection Window To display this window, enter your criteria and then press Enter on the Stock Valuation Record Report Selection Criteria window.
This window allows you to specify the primary and secondary print sequences. The primary sequence defaults to stockroom and the secondary sequence to item.
The report shows the selected primary sequence at the top of the page and has a page break at the change of the primary sequence.
Default values for the report sequence are derived from the entries made on the previous window.
Infor System21 Inventory Management | 519

859BReports
Fields
Major Sequence
Enter one of the following for the major (primary) sequence for the report:
1 - Stockroom
2 - Item
3 - Item group major/minor
4 - Item type
5 - Item class
Minor Sequence
Enter one of the following for the minor (secondary) sequence for the report:
1 - Stockroom
2 - Item
3 - Item group major/minor
4 - Item type
5 - Item class
Note: One of the sequences specified must be Stockroom.
Select Submit (F8) to submit the report for processing.
520 | Infor System21 Inventory Management

859BReports
Movements Audit Report [31/INR] Select the Movements Audit Report task.
Note: As this report details all movements since the report was last run, it is important to run this report at regular intervals, regardless of whether you print it or not.
Use this report task to detail all movements of all items since the report was last run. The software then purges the file. The report includes the totals for the following movement types; direct deliveries, frozen transfers, frozen issues, lot transformations, back-to-back, POD delivery adjustments and despatches awaiting POD. This must be run to generate data for the Negative FIFO report. The following specifications are appropriate for this report:
• Frequency - As required, but you should normally run it as part of a day or weekend run • Stationery - Standard listing paper • Print Positions - 132 • New Page - Change of part number • Totals - Movement value by transaction type, for each stockroom
Note: If you use Catchweight, the secondary values and unit of measure are displayed.
There are no selection criteria needed to produce this report. Select Confirm Submit (F8) to print the report.
Infor System21 Inventory Management | 521

859BReports
Movements Processed by AFI [32/INR] Use this task to provide a hard copy print of a selection of stock movements processed via the Advanced Financial Integrator (AFI) in a number of different sequences.
Request Movements Processed by AFI Report Selection Window To display this window, select the Movements Processed by AFI task.
Fields
Stockroom
Enter the code of the stockroom for which you want to produce the report.
Alternatively, use the prompt facility to select from the Stockroom Selection pop-up.
Leave this field blank to print details for all stockrooms.
Item Number
Enter the code of the item you want to include on the report, using up to fifteen alphanumeric characters.
Alternatively, use the prompt facility to select from the Item Master Scan pop-up.
Leave this field blank to print details for all items.
Item Group Major
Enter the major item group for which you want to produce the report.
Alternatively, use the prompt facility to select from the PGMJ Product Group - Major pop-up.
For a report of movements for all major item groups, leave this field blank.
Item Group Minor
Enter the minor item group for which you want to produce the report.
Alternatively, use the prompt facility to select from the PGMN Product Group - Minor pop-up.
For a report of movements for all minor item groups, leave this field blank.
Reference Date
To print a report of movements for particular reference dates, enter or select a single date or a range of dates. Leave these fields blank to print a report for all reference dates.
Movement Date
Enter or select a date or range of dates to specify the movements you want to include. To print movements for a particular day, enter just one date. Leave both fields blank to print all movements.
522 | Infor System21 Inventory Management

859BReports
Movement Type
Enter a movement type to print on the report, using a one-character code.
Alternatively, use the prompt facility to select from the MVTP Movement Type Description pop-up.
Leave this field blank to print all movement types.
Week Number
Enter the week number of the movements you want to print, using four numeric characters in the format WWYY. If this field is left blank, the report will detail all movements that satisfy previous selection criteria, regardless of week number.
Period Number
Enter the period number of the movements you want to print, using four numeric characters in the format PPYY. If this field is left blank, the report will detail all movements that satisfy any of the above selection criteria, regardless of period number.
Press Enter and then select Submit (F8) to send the report to print.
Stock Movements [33/INR] Use this task to produce a hard copy of a selection of stock movements in a number of different sequences.
Request Stock Movements Report Selection Window To display this window, select the Stock Movements task.
Use this window to specify the stock movement criteria as the basis for your report.
Fields
Stockroom
Enter the code of the stockroom for which you want to produce the report.
Alternatively, use the prompt facility to select from the Stockroom Selection pop-up.
Leave this field blank to print details for all stockrooms.
Item Number
Enter the code of the item you want to include on the report, using up to fifteen alphanumeric characters.
Alternatively, use the prompt facility to select from the Item Master Scan pop-up.
Infor System21 Inventory Management | 523

859BReports
Leave this field blank to print details for all items.
Item Group Major
Enter the major item group for which you want to produce the report.
Alternatively, use the prompt facility to select from the PGMJ Product Group - Major pop-up.
For a report of movements for all major item groups, leave this field blank.
Item Group Minor
Enter the minor item group for which you want to produce the report.
Alternatively, use the prompt facility to select from the PGMN Product Group - Minor pop-up.
For a report of movements for all minor item groups, leave this field blank.
Reference Date
To print a report of movements for particular reference dates, enter or select a single date or a range of dates. Leave these fields blank to print a report for all reference dates.
Movement Date
Enter or select a date or range of dates to specify the movements you want to include. To print movements for a particular day, enter just one date. Leave both fields blank to print all movements.
Movement Type
Enter a movement type to print on the report, using a one-character code.
Alternatively, use the prompt facility to select from the MVTP Movement Type Description pop-up.
Leave this field blank to print all movement types.
Week Number
Enter the week number of the movements you want to print, using four numeric characters in the format WWYY. If this field is left blank, the report will detail all movements that satisfy previous selection criteria, regardless of week number.
Period Number
Enter the period number of the movements you want to print, using four numeric characters in the format PPYY. If this field is left blank, the report will detail all movements that satisfy any of the above selection criteria, regardless of period number.
Press Enter and then select Submit (F8) to send the report to print.
Negative Stock Report [34/INR] Use this task to list any stock that has become negative as a result of an inventory transaction.
524 | Infor System21 Inventory Management

859BReports
Negative Stock Report Selection Window To display this window, select the Negative Stock task.
Use this task to highlight stock that has been allowed to go negative for any transaction that reduces stock levels.
Fields
Stockroom
Enter a valid stockroom code.
Alternatively, use the prompt facility to select from the Stockroom Selection pop-up.
Item
Enter the item code for which you want to produce the report.
Alternatively, use the prompt facility to select from the Item Master Scan pop-up.
From Date/To Date
Enter or select the range of dates for which you want to produce the report.
Control Flag
Select one of the following:
Report Only (0) (default) - Only to produce a report (this writes the record to the negative stock data file)
Report & Delete (1) - To produce a report and delete any negative stock movements that have been previously written to the Negative Stock Data file
Delete Only (2) - To delete the negative stock movement data only
Report, Delete & Adjust FIFO Items (3) - To produce a report, delete the stock movements and adjust negative FIFO records produced by value only adjustments
Note: It is recommended that you use this task to produce the report first and then use the task again to process any deletions and so on.
Select Submit (F8) to send the report to print.
Negative Stock Periodic Parameters [35/INR] Use this to set the parameters when you run the Negative Stock report automatically using Machine Manager.
Infor System21 Inventory Management | 525

859BReports
Negative Stock Report Periodic Parameter Maintenance Window To display this window, select the Negative Stock Periodic Parameters task
You use this window to amend the periodic parameters.
Fields
Stockroom
Enter a valid stockroom code.
Alternatively, use the prompt facility to select from the Stockroom Selection pop-up.
Item
Enter the item code for which you want to produce the report.
Alternatively, use the prompt facility to select from the Item Master Scan pop-up.
Control Flag
Select one of the following:
Report Only (0) (default) - Only to produce the report
Report & Delete (1) - To produce the report and delete the item(s)
Delete Only (2) - To delete the item(s) only
Report, Delete and Adjust FIFI Items (3) - To produce a report, delete and adjust FIFO items
Select Update (F8) to submit the job to update the parameters.
526 | Infor System21 Inventory Management

859BReports
Non-moving Items [36/INR] This report lists the last movements of both items that have no movements recorded against them since the selected last movement date, and items that have no movements at all.
You should run this report as part of the period end routines.
The report excludes the following:
• New items, whether they have movements in the current period or not • This is because the software does not create a Movement Analysis record for the current
period unless the stockroom had undergone a trial fiscal close. • All items in stockrooms not under fiscal open and close control
The report includes the following:
• Slow-moving items that have moved during the current period, but whose previous movement was before the selected last movement date Again, the items' inclusion in the report is due to the Movement Analysis record for the current period not being created.
You can also include Miscellaneous Receipts within this report, depending on the way in which you have set up your Inventory Management company profile.
Movement Analysis records hold two dates of last receipt; one includes miscellaneous receipts and the other does not, so this report can include items that have a recent miscellaneous receipt.
Report on Non-moving Items Selection Window To display this window, select the Non-Moving Items task.
Use this window to select report criteria.
Fields
Report Criteria
Select one of the following:
By Stockroom (1) (default) - To produce the report by stockroom
By Item (2) - To produce the report by item
Item
Select one of the following:
Range (1) (default) - To produce the report for a range of items
List (2) - To produce the report for a list of items
Infor System21 Inventory Management | 527

859BReports
Movement Type
Select one of the following:
Issues (1) - To report on issues
Receipts (2) - To report on receipts
Both (3) (default) - To report on both
Last Movement Date
Enter or select the date of the last movement on which to base the report. The format for the date is DDMMYY.
Note: If you choose to produce the report by stockroom, you must either enter a site for which to produce the report, or choose to produce the report on a range or list of stockrooms
Site
Enter the site for which to produce the report.
Alternatively, use the prompt facility to select from the Stockroom Site Selection pop-up.
Stockrooms
Alternatively, choose to produce the report for one of the following:
Range (1) - A range of stockrooms
List (2) - A list of stockrooms
There is no default value.
Note: The criteria selected on this window will determine the appearance of the next window.
Press Enter to display the Report on Non-moving Items by Stockroom/Item Range/List window.
Report on Non-moving Items by Stockroom Range Window To display this window, select By Stockroom in the Report Criteria field, select Range in both the Item and Stockroom fields, select your other report requirements and then press Enter on the Report on Non-moving Items Selection window.
Use this window to determine the item/stockroom ranges for which you want to process the report.
Note: If you selected List in the Stockroom field, you can use this window to select a list of stockrooms rather than a range. In this case, the title of the window changes to Report on Non-moving Items by Stockroom List window.
Fields
528 | Infor System21 Inventory Management

859BReports
Movement Type
This field displays the movement type for which you have chosen to produce the report.
Last Movement Date
This field displays the last movement date for which you have chosen to produce the report.
Item From/To
Enter the range of items for which you want to produce the report.
You can use the prompt facility on these fields to select from the Item Master Scan pop-up.
Stockroom From/To
Enter the range of stockroom codes for which you want to produce the report.
You can use the prompt facility on these fields to select from the Stockroom Selection pop-up.
Note: If you chose to produce a report for a list of stockrooms, there will be a number of entry fields on this window so that you can specify the exact stockrooms for which you want to produce the report.
Select Submit (F8) to submit a batch job to produce the report.
Report on Non-moving Items by Item Range Window To display this window, select By Item in the Report Criteria field, select Range in the Item field, leave the Site and Stockroom fields blank, select your other report requirements and then press Enter on the Report on Non-moving Items Selection window.
Use this window to determine the item range within which you want to process the report.
Note: If you selected List in the Item field, you can use this window to select a list of items rather than a range. In this case, the title of the window changes to Report on Non-moving Items by Item List window.
Fields
Movement Type
This field displays the movement type for which you have chosen to produce the report.
Last Movement Date
This field displays the last movement date for which you have chosen to produce the report.
Item From/To
Enter the range of items for which you want to produce the report.
You can use the prompt facility on these fields to select from the Item Master Scan pop-up.
Infor System21 Inventory Management | 529

859BReports
Note: If you chose to produce a report for a list of items, there will be a number of entry fields on this window so that you can specify the exact items for which you want to produce the report.
Select Submit (F8) to submit the job to print the report.
Report on Non-moving Items by Site Window To display this window, select By Stockroom in the Report Criteria field, select Range in the Item field, enter a site code in the Site field, select your other report requirements and then press Enter on the Report on Non-moving Items Selection window.
Use this window to determine the item range for which you want to process the report.
Note: If you selected List in the Item field, you can use this window to select a list of items rather than a range. In this case, the title of the window changes to Report on Non-moving Items by Item List window.
Fields
Movement Type
This field displays the movement type for which you have chosen to produce the report.
Last Movement Date
This field displays the last movement date for which you have chosen to produce the report.
Site
These fields display your selected site code and its associated description.
Item From/To
Enter the range of items for which you want to produce the report.
You can use the prompt facility on these fields to select from the Item Master Scan pop-up.
Note: If you chose to produce a report for a list of items, there will be a number of entry fields on this window so that you can specify the exact items for which you want to produce the report.
Select Submit (F8) to submit the job to print the report.
530 | Infor System21 Inventory Management

859BReports
Negative Locations [37/INR] Use this report task to list locations where the physical balance is negative, the frozen balance is negative or the physical balance is less than the frozen balance. You can select to produce the report on one or all location-controlled stockrooms, and a range of locations within those stockrooms.
Note: If you use Catchweight, this report will also include any locations where the secondary balance is negative.
Request Negative Locations Report Selection Window To display this window, select the Negative Locations task.
Use this window to determine the selection criteria for which you want to produce the report.
Fields
Stockroom
Enter the stockroom code for the stockroom for which you want to produce this report. This must be a location-controlled stockroom.
Alternatively, use the prompt facility to select from the Stockroom Selection pop-up.
Leave this field blank to produce a report on all location-controlled stockrooms.
Location Range From
Enter the starting value of the range of locations that you want to include in this report.
Alternatively, use the prompt facility to select from the Location Prompt pop-up.
To
Enter the closing value of the range of locations that you want to include in this report.
Alternatively, use the prompt facility to select from the Location Prompt pop-up.
Note: If you have not specified a stockroom code in the Stockroom field, the range of location codes specified in these fields will apply over all location-controlled stockrooms.
Select Submit Job (F8) to produce the report.
Infor System21 Inventory Management | 531

859BReports
Re-order/Overstock [41/INR] Use this task to produce a report on stock levels compared to maximum stock levels and re-ordering points. This also reports on the recommended order quantity or if there is stock excess.
You can choose to produce the report either by item within stockroom or by stockroom within item. You can choose to have all items in the report, or only those with movements since the report was last run.
The report can be produced for a single stockroom, a range of stockrooms or all inventory stockrooms in a company.
The following quantities are shown in the appropriate default inventory unit of each item:
• Physical balance • Frozen balance • Allocated balance • Available balance • Forward order balance • On-order balance • Reserved balance • In-transit balance • Back order balance • Expected balance • Re-order point • Maximum stock level • Average usage quantity • Suggested re-order quantity • Stock excess quantity
The description of the appropriate inventory unit is shown for assistance.
Re-order/Overstock Report Window To display this window, select the Re-order/Overstock task.
Use this window to select the report you want to produce, in either item within stockroom, or stockroom within item sequence.
Fields
From Stockroom/To Stockroom
Enter the range of stockrooms for which you want to produce the report.
532 | Infor System21 Inventory Management

859BReports
Alternatively, use the prompt facility on these fields to select from the Stockroom Selection pop-up.
Leave these fields blank to produce the report for all stockrooms.
Sequence
Select one of the following:
Item/Stockroom (1) - To produce a report in item and stockroom sequence
Stockroom/Item (2) (default) - To produce a report in stockroom and item sequence
All Items
Select one of the following:
All Items (1) - To report on all items
Moved, Not Yet Reported (2) (default) - To report on just those items that have moved and not yet been reported
If you use Requisitioning, you can use a similar task to produce additional reports. Furthermore, you can subdivide this report by Requisition, Purchasing Officer and Supplier.
Press Enter to process the report.
Infor System21 Inventory Management | 533
859BReports
Stock Availability [42/INR] Use this task to provide information on stock levels, current customer orders and other demands for all the selected items.
The following quantities are shown in the appropriate default inventory unit of each item:
• Physical balance • Frozen balance • Allocated balance • Available balance • In-transit balance • On-order balance • Back order balance • Outstanding order quantity • Reserved quantity • Available quantity • Expected quantity • Allocated quantity • On-pick quantity
The description of the appropriate inventory unit is shown for assistance.
Stock Availability Report Window To display this window, select the Stock Availability task.
Fields
Item From/Item To
Enter a range of item codes, or leave these fields blank to produce a report on all items.
You can use the prompt facility on these fields to select from the Item Master Scan pop-up.
Stockroom From/Stockroom To
Enter a range of stockroom codes, or leave these fields blank to produce a report on all stockrooms.
You can use the prompt facility on these fields to select from the Stockroom Selection pop-up.
Note: Leave the Item and Stockroom fields blank to produce a report for all items in all stockrooms.
Do You Require Allocations to be Printed?
Use this checkbox as follows:
534 | Infor System21 Inventory Management

859BReports
Unchecked - Not to print current stock allocations
Checked - To print current stock allocations
Do You Require Reservations to be Printed?
Use this checkbox as follows:
Unchecked - Not to print current stock reservations
Checked - To print current stock reservations
Report Only on Superseded Items
Use this checkbox as follows:
Unchecked - To print items whether or not they are currently subject to supersession
Checked - To only print those items that are currently subject to supersession
Report Only on Transaction Control Code
You can optionally enter a valid transaction control code.
Alternatively, use the prompt facility to select from the Select Transaction Code pop-up.
If you select a value, the submitted report will only print those items currently linked to the selected transaction code, either directly or indirectly (by their associated item group minor).
The following additional information is also printed on the report:
• Transaction code and description • Effective dates (from and to)
Press Enter to run the report.
Infor System21 Inventory Management | 535

859BReports
Supply/Demand Exceptions [43/INR, 1/AOR] Use this task to detail any changes affecting sales orders reserved against supply orders, for example purchase to order, make to order or direct delivery orders created in Advanced Order Entry.
The report shows the following sales order details, you can also report on the supply order details, for each purchase to order and direct delivery order where changes have occurred. It shows all incidents since the report was last run.
• Supply order type • Demand order type • Supply reference number • Demand reference number, supplier code and name • Customer code and name • Item code and description • Stockroom code and description • Original quantity • Action quantity • Order due date
You can also view the reason for the amendment. Reasons may include:
• Sales order amended • Production items master missing • Standard planning route not found • Sales order suspended, cancelled or a quotation • Production order quantity too small • Production order completion too late • Production order excess quantity
Exception Report Prompt Window To display this window, select the Supply/Demand Exceptions task.
Fields
Report to be Sequenced By
Select one of the following to determine the order sequence for your report:
Purchasing sequence (1)
Note: If you select this option, you must check the Include Purchase Orders field.
Sales order sequence (2)
536 | Infor System21 Inventory Management

859BReports
Both (3)
Include Purchase Orders
Use this checkbox as follows:
Unchecked - Not to include details of the supply orders corresponding to the sales orders included in the report
Checked - To include details of the supply orders corresponding to the sales orders included in the report
Note: If you have chosen to sequence your report by purchase orders, you must check this field.
Include Works Orders
Use this checkbox as follows:
Unchecked - Not to include details of the works orders corresponding to the sales orders included in the report
Checked - To include details of the works orders corresponding to the sales orders included in the report
Select Submit (F8) to submit the job to produce the report.
Infor System21 Inventory Management | 537

859BReports
Rotation Factors [44/INR] Inventory calculates stock rotation factors for items based on their recent usage. The factor is defined as the total usage across a selected number of periods (which you select), divided by the average stock level.
You can calculate an item’s average stock level as the sum of the closing balances divided by the number of periods.
Inventory processes this calculation each time you run the report. The latest rotation factor and the number of periods used in the calculation are held on the file. You can view them using the Movement Analysis Enquiry. Inventory excludes details for the current period, as the period is incomplete.
Note: The software calculates rotation factors from the Movement Analysis records; these are created for items in stockrooms with fiscal control.
Stock Rotation Factor Report Selection Window To display this window, select the Rotation Factors task.
Use this window to select report criteria.
Fields
Report Criteria
Select one of the following:
By Stockroom (1) - To produce the report by stockroom
By Item (2) - To produce the report by item
Item
Select one of the following:
All (Blank) (default) - To produce a report for all items
Range (1) - To produce a report for a range of items
List (2) - To produce a list of items
No. of Periods
Enter the number of periods' usage on which to base the calculations.
Note: You can produce the report by stockroom and enter either a site or a range or list of stockrooms on which to produce the report.
Site
Enter a site for which to produce the report.
538 | Infor System21 Inventory Management

859BReports
Alternatively, use the prompt facility to select from the Stockroom Site Selection pop-up.
Stockrooms
Alternatively, select one of the following:
All (Blank) (default) - To report on all stockrooms
Range (1) - To report on a range of stockrooms
List (2) - To report on a list of stockrooms
Note: The criteria you select on this window will determine the appearance of the next window.
Press Enter to display the Stock Rotation Factor Report by Stockroom window.
Stock Rotation Factor Report by Stockroom Window To display this window, select By Stockroom in the Report Criteria field, select Range in both the Item and Stockroom fields and then press Enter on the Stock Rotation Factor Report Selection window.
Use this window to determine the item/stockroom ranges for which you want to process the report.
Fields
No. of Periods
This field displays the number of periods for which you have chosen to produce the report calculations.
Item From/To
Enter the range of items for which you want to produce the report.
You can use the prompt facility on these fields to select from the Item Master Scan pop-up.
Stockroom From/To
Enter the range of stockrooms for which you want to produce the report.
You can use the prompt facility on these fields to select from the Stockroom Selection pop-up.
Select Submit (F8) to submit the batch job to process the report.
Stock Rotation Factor Report by Item Window To display this window, select By Item in the Report Criteria field and select Range in the Item field and then press Enter on the Stock Rotation Factor Report Selection window.
Use this window to determine the item range for which you want to process the report.
Infor System21 Inventory Management | 539

859BReports
Fields
No. of Periods
This field displays the number of periods for which you have chosen to produce the report calculations.
Item From/To
Enter the range of items for which you want to produce the report.
You can use the prompt facility on these fields to select from the Item Master Scan pop-up.
Select Submit (F8) to submit the batch job to process the report.
Stock Rotation Factor Report by Stockroom and Item List Window To display this window, select By Stockroom in the Report Criteria field, select List in the Item field, select Range in the Stockroom field and then press Enter on the Stock Rotation Factor Report Selection window
Use this window to specify the items for which you want to process the report.
Fields
No. of Periods
This field displays the number of periods for which you have chosen to produce the report calculations.
Item
Enter the items for which you want to produce the report.
You can use the prompt facility on these fields to select from the Item Master Scan pop-up.
Stockroom From/To
Enter a range of the stockrooms for which you want to produce the report.
You can use the prompt facility on these fields to select from the Stockroom Selection pop-up.
Select Submit (F8) to submit the batch job to process the report.
540 | Infor System21 Inventory Management

859BReports
Stock Rotation Factor Report by Stockroom List and Item List Window To display this window, select By Stockroom in the Report Criteria field, select List in both the Item field and Stockroom field and then press Enter on the Stock Rotation Factor Report Selection window.
Use this window to list the items and stockrooms for which you want to process the report.
Fields
No. of Periods
This field displays the number of periods for which you have chosen to produce the report calculations.
Item
Enter the items for which you want to produce the report.
You can use the prompt facility on these fields to select from the Item Master Scan pop-up.
Stockroom
Enter the stockrooms for which you want to produce the report.
You can use the prompt facility on these fields to select from the Stockroom Selection pop-up.
Select Submit (F8) to submit the batch job to process the report.
Stock Rotation Factor Report by Site and Item Range Window To display this window, select By Stockroom in the Report Criteria field, select Range in the Item field, enter a site code and then press Enter on the Stock Rotation Factor Report Selection window.
Use this window to specify the item range for which you want to process the report.
Fields
No. of Periods
This field displays the number of periods for which you have chosen to produce the report calculations.
Site
This field displays the site that you entered or selected on the Stock Rotation Factor Report Selection window.
Item From/To
Enter a range of the items for which you want to produce the report.
Infor System21 Inventory Management | 541

859BReports
You can use the prompt facility on these fields to select from the Item Master Scan pop-up.
Select Submit (F8) to submit the batch job to process the report.
Stock Rotation Factor Report by Site and Item List Window To display this window, select By Stockroom in the Report Criteria field, select List in the Item field, enter a site code and then press Enter on the Stock Rotation Factor Report Selection window.
Use this window to list the items for which you want to process the report.
Fields
No. of Periods
This field displays the number of periods for which you have chosen to produce the report calculations.
Site
This field displays the site that you entered or selected on the Stock Rotation Factor Report Selection window.
Item
Enter the items for which you want to produce the report.
You can use the prompt facility on these fields to select from the Item Master Scan pop-up.
Select Submit (F8) to submit the batch job to process the report.
542 | Infor System21 Inventory Management

859BReports
Items in a Location [45/INR] This report lists the details of items held within stockroom locations.
Items in a Location Selection Window To display this window, select the Items in Location task.
Fields
Stockroom From/To
Enter either a valid location controlled stockroom or range of stockrooms.
You can use the prompt facility on these fields to select from the Stockroom Selection pop-up.
Where a stockroom is selected, the description is shown against it.
Location From/To
The location range entry and selection are only valid if a single stockroom is entered.
You can use the prompt facility on these fields to select from the Location Prompt pop-up.
Zero Locations
Select one of the following:
Exclude (0) - To suppress zero balance locations (default)
Include (1) - To include zero balance locations
Rotation Details
Select one of the following:
Exclude (0) - To suppress rotation details (default)
Include (1) - To include rotation details
Select Update (F8) to submit a batch job to print the report.
Infor System21 Inventory Management | 543


Chapter 11 Utilities 11
Introduction to Location Control You use Location Control as an alternative to Warehousing, as it provides location control without the full disciplines required within Warehousing. Location Control also delivers more stock control features than Inventory Management.
Another name for Location Control is Stock Locator.
Before you can install and activate Location Control, you must install Inventory Management. Although Location Control is a separate application, it does not have software of its own; it is integrated throughout the system to process stock movements. The applications most affected by Location Control are:
• Inventory Management• Catchweight• Order Entry• Purchase Management• Customer Returns• Production• Advanced Customer Scheduling• Advanced Shipping• Advanced Receiving
Implementing Location Control
Before you can start to use Location Control, you must:
• Create the Location Control application in Application Manager and apply the authorisationcodes. For more information, see your Systems Manager.
• Set up the Stockroom profile in Inventory Company Maintenance.• Create the Location Control Stockroom profile details.• Create the Location Control Location Map.• Create as many of the Location Control item/stockroom profiles as required. The Location
Balance Take-on task will create any missing Location Control item/stockroom profiles from thestockroom’s default values.
• Complete or cancel as many outstanding pick notes and pull lists as possible.
Infor System21 Inventory Management | 545

860BUtilities
• Activate Location Control for the stockroom. • Use the Location Data Take-on task to populate the item’s default location. • Perform a stock take, or location-to-location transfers, to make sure that you distribute the stock
correctly across the locations. Note: Although the location-to-location transfer is a simple operation, it is recommended that you process a full stock take, as you can use it to test your implementation. Inaccurate location balances substantially reduce the benefits of Location Control.
• If you are going to use Location Control within Production, you must create Location Control details within Routes/Structures Maintenance, Text Type and Additional Text Maintenance.
Location Control - Key Points
Although Location Control is integrated with existing applications, you must create the Location Control application so that you can apply an authorisation code to it, and so activate it. If you do not activate Location Control, Inventory Management, Order Entry, Purchase Management, Customer Returns and the Production applications are not affected.
The main features of Location Control are:
• Stockroom Specific • Location Control is applied at stockroom level. You can also set Location Control defaults at
item/stockroom level. • You can use Location Control in a company which has stockrooms that are controlled by
both Inventory and Warehousing. Stockrooms can be controlled by Inventory, Warehousing or Location Control.
• You can set up all details required by Location Control before you activate it. • You can use a new data take-on task to convert an existing stockroom to a location-
controlled stockroom. • Locations
• Each stockroom in which Location Control is stockroom has two subdivisions, which are called In Use and Suspended. These subdivisions have no capacity or proximity limitations.
• You can create locations in ranges to make the creation process quicker. • Location Balances
• Physical and frozen balances are maintained by location. • If you activate both Location Control and Catchweight, you can choose to maintain
secondary balances by location. • Stock Rotation
Stock rotation is an important requirement for many organisations. You can choose to record stock rotation for lot-controlled, batch-controlled and serial-controlled items and non-lot-controlled items. If you use either form of stock rotation, you do not need to enter or select stock by rotation date. • For non-lot-controlled items, the stock rotation date is the date on which the stock was
received into the location. The system maintains a set of rotation date balances for each item by location. Receipts create new balances and receipt reversals consume these balances in LIFO sequence. Other transactions (issues, transfers and adjustments) consume the
546 | Infor System21 Inventory Management

860BUtilities
balances in FIFO sequence when the transaction reduces the stock balance, and increases the stock of the oldest balance when the transaction increases the stock balance.
• For lot-controlled items, the stock rotation date is the lot’s last available date. The date is calculated and maintained by the existing extended lot header options within the system.
• If you do currently use extended lot header details, you can use a new task to activate them for existing lots, batches or serial-controlled items. For more information, see the Advanced Allocations Options Window section.
• Event Allocation • This is the batch process that selects which location balances are to be used on a picking note
or pull list. It also allocates the lot balances. • Planned Issues
• When you produce picking notes for sales orders and shop documentation for production issues, they will list the lots or the locations, or both, from which to pick.
• These details are displayed during confirmation so that you can confirm the despatch or issue without any other data entry, apart from any overrides that are necessary. You can therefore, confirm sales orders in batch.
• The picking logic takes into account any stock that is committed to outstanding issues when selecting the lot or location balances, or both, from which Inventory can pick stock. You can now automatically allocate lot balances in Production.
• If lot balances are manually allocated, these are honoured. • Other Stock Movements
• Each item has a default location in a location-controlled stockroom. If you process an unplanned transaction, the default location is presented as the suggested location for the item.
• You can spread a single transaction over several locations. • You can use the Single Step Transfer task to transfer stock from location to location.
• Single Location Items • You can restrict an item to its default location. This means that you do not need to capture
the location balances during transactions. • Location Prompts
• When you process a receipt, the locations where the item is currently stocked are displayed at the top of the list, with their current balances.
• When you process an issue, only locations with stock for the item are displayed, with their current balances.
• Processing Stocktaking When you activate Location Control, you can process stock takes by: • Range of locations • Range of items • ABC classification
• Enquiries and Reports
Infor System21 Inventory Management | 547

860BUtilities
• You can use the Item/Stockroom enquiry task and the Stock enquiry task in Sales Order Processing to view the location balances by item. You can also use the same enquiry to view item balances by rotation date.
• You can produce a report to list negative location balances.
Constraints
• Integrated Applications Location-controlled stockrooms can be used by all stock balance affecting applications, with the following exceptions: • Service Management
Caution: These applications do not recognise location-controlled stockrooms and so do not issue a warning if you are about to use one. This means that the location balances are not updated. The Rebuild Balances from Location task's Reconciliation report will identify the stock imbalance, but there is no easy method of rectifying the discrepancy as it works from location balances upwards. Some tasks may terminate abnormally if they attempt to update the location balances with missing Location Control data.
• Stock Rotation For lot-controlled, batch-controlled and serial-controlled items, the prerequisites are extended lot, batch and serial header details. This is because the Location Control program uses the last available date on the lot header as the stock rotation date.
• Automatic Lower Level Allocation This is mandatory for location-controlled stockrooms. This means that the Sales Order Processing picking program can allocate lots, batches and serial numbers.
• Manual Allocation of stock by locations is not supported. Location balances are only committed with the pick note or production pull list is raised.
• Locations cannot be assigned to customers, suppliers, vans and so on. They cannot be designated as consignment stock, inspection, quarantine or marshalling locations. A location is simply a sub-division of a stockroom.
• Missing Location Control item/stockroom profiles cannot be created during a transaction. You must end the transaction and create the required profiles before you can complete the transaction. As these are now created by the Location Balance Data Take-on task or the Rebuild Balances for Locations task, this situation should not arise. Once a stockroom has been activated as location-controlled, you cannot add a new item/stockroom profile without also adding the corresponding Location Control item/stockroom profile.
• The Negative Stock window is displayed after the location balances have been entered. This is because the negative stock processing also checks for the Catchweight balances and these are captured at the same time as the location balances. You will only view this window if negative stock is allowed for a stockroom, as the negative location stock error will have already occurred when negative stock is not allowed. When negative stock is allowed, warning messages are displayed at location level and another warning is displayed at stockroom level.
• Location Balance Movement records are written for each movement, but they are audit records, so you cannot enquire or report on them.
• Kit parents are best defined for non-stock items for a variety of reasons. If then have been defined as stocked items, the system will expect a Location Control item/stockroom profile to
548 | Infor System21 Inventory Management

860BUtilities
exist for each parent. When you raise a picking note, the location will be Unspecified because there is no stock of a kit parent, but the subsequent confirmation will ignore this.
• In the Available Stock Transfer task you can select a line for amendment. If you do this, the previously entered location details for this item are lost.
Caution: Warehousing and Location Control are mutually exclusive for the same stockroom. You cannot place an active location-controlled stockroom under warehouse control. Warehousing and Location Control profiles can exist for the same stockroom as long as one or neither is active.
To convert a warehousing-controlled stockroom to a location-controlled stockroom you must:
1 Set up Location Control.
2 De-activate Warehousing for your selected stockroom. To do this, select Activate/Deactivate (F14) in the Warehouse Profile maintenance task.
3 Activate Location Control for your selected stockroom and process a data take-on or a stock count as required.
Infor System21 Inventory Management | 549

860BUtilities
Inventory Company Profile [1/INUM] You use this task to:
• Maintain company details and defaults for the Inventory Management application • (If you use Advanced Order Entry, you need to maintain these parameters within Inventory
Management as well.) • Create and maintain stockrooms for a company • Create and maintain usage profiles for a company
Caution: It is recommended that you use the Copy Company task to create a new company. You can use the Copy Company task to copy existing parameters and miscellaneous codes to your new company. You can then amend these details using your maintenance and utility tasks.
Maintain Company Profile Selection Window To display this window, select the Inventory Company Profile task.
Use this window to select the company that you want to maintain.
Options
Select
Use this to select the company you want to maintain.
Select a company to display the Maintain Company Profile Aspect Selection window.
Maintain Company Profile Aspect Selection Window To display this window, select the company you want to maintain on the Maintain Company Profile Selection window.
Use this window to select the aspect of the company profile you want to maintain.
Fields
Stockroom Code
If you want to create or maintain a company/stockroom profile, enter an existing stockroom code for amendment or a new code for addition.
Alternatively, use the prompt facility to select from the Stockroom Selection pop-up.
550 | Infor System21 Inventory Management

860BUtilities
Press Enter to display the Maintain Company Profile Stockroom Profile window and maintain the stockroom profile.
Usage Profile Code
If you want to maintain or create a usage profile, enter the code of the usage profile you want to maintain, or enter a new code for addition.
Alternatively, use the prompt facility to select from the Select Usage Code pop-up.
Press Enter to display the Usage Profile window to maintain the usage profile.
Inventory Management uses the usage profile to nominate historical data (by week or month) that is used to calculate average usage. Inventory Management uses this code to make re-order recommendations. You can define different usage profiles to reflect different usage trends.
Leave the stockroom and usage profile codes blank and then press Enter to display the Maintain Company Profile window.
Maintain Company Profile Window To display this window, leave the stockroom and usage profile codes blank and then press Enter on the Maintain Company Profile Selection window.
Use this window to maintain the default company parameters. Any current information is displayed. The company name is displayed. You cannot change this within Inventory Management.
Fields
Costing Method
Select one of the following to specify your company’s default costing method:
Standard - Standard costing
Latest - Latest costing
Average - Average costing
FIFO - FIFO costing
You can change the costing method for each individual product. For more information, see the Price and Costing Window description in the Maintain Inventory Item Window section in the Inventory Maintenance chapter of this product guide.
Specification N Description (where N is 1 to 3)
You can define three numeric specifications for each product, using up to 15 characters.
The description for each specification appears alongside the specification on the Maintain Inventory Item window. You use these specifications to define some dimension of a product not provided in the standard data. Standard processing makes no use of the specifications.
Infor System21 Inventory Management | 551

860BUtilities
General Ledger Account
Enter the default account number in the General Ledger to which purchase invoices are posted, if you use Purchase Management.
Sales GL Account
Enter the default account number in the General Ledger to which stock transaction values are posted.
Cost of Sales GL Account
Enter the default account number in the General Ledger to which cost of sales transaction values are posted, if you use Sales Order Processing.
Price Variance GL Account
Enter the default account number in the General Ledger to which accruals are posted, if you use Purchase Management.
Usage Cycle
Select one of the following to define the basis for Inventory Management to calculate average usage:
Monthly (M) - To maintain usage figures by month, and to express average usage as average usage/month
Weekly (W) - To maintain usage figures by week, and to express average usage as average usage/week
The software automatically records usage of all items at stockroom and company level.
Note: The usage figure is based on all types of Issue movements and Transfers Out. Four of the Re-order Policies use an average usage figure. To set the software to calculate this, you need to define usage profile codes.
Default Reorder Policy
Enter one of the following to specify the company’s normal re-order policy:
1 (Up to Max) - If, when expected stock drops below the re-order point, the software suggests that an order be placed of sufficient size to take the stock level up to the maximum
2 (ROQ) - If, when expected stock drops below the re-order point, the application suggests that the re-order quantity be ordered
You can set this quantity yourself, or the software can determine it for you. You can hold a Re-order Quantity Factor at stockroom level or as a default on the company profile.
Note: In other words, if you have set the re-order quantity factor to 30%, Inventory recommends that you re-order enough stock to last through 30% of the lead time. If you set the factor at 200%, Inventory recommends that you re-order enough stock to last through twice the lead time.
3 (Up to Min) - If, when expected stock drops below the re-order point, the application suggests that you order enough to take the level up to the re-order point again
552 | Infor System21 Inventory Management

860BUtilities
For example, if you set the re-order point to zero, this rule will re-order goods when there is demand for them, for example, from a customer or manufacturing order.
4 (Up to ROP) - If, when expected stock drops below the re-order point, the software suggests that you order enough stock to take the balance back up to the minimum level
5 (EOQ) - If, when expected stock drops below the re-order point, the software suggests that you place an order for the calculated or maintained economic order quantity
This re-order policy is then the default for all products in all stockrooms. You can change it for a particular product or stockroom if required.
Reorder Quantity Factor %
Define, as a percentage, the number of lead times' worth of average usage you want to re-order. For example, 100% is 1 lead time's worth, 150% is 1.5 lead times' worth.
Inventory Management uses this factor to calculate the re-order quantity for those item/stockroom combinations that use the re-order policy ROP but you have not specified a re-order quantity.
Stock Carrying Rate %
Enter the percentage cost of carrying a stock item for a year, using up to five numeric characters with two decimals. This is the cost as a percentage of the item cost. Inventory Management uses this in the economic order quantity calculations.
Order Placement Cost
Enter the cost in base currency of placing and processing a purchase order, using up to five numeric characters with two decimals. Inventory Management uses this in economic order quantity calculations.
Purchasing in Use
Use this checkbox as follows:
Unchecked - If Purchase Management is not in use
Checked - If Purchase Management is in use
SOP in Use
Select one of the following:
No (0) - If Sales Order Processing is not in use
SOP Attached (1) - If Sales Order Processing is in use
AOE Attached (2) - If Advanced Order Entry is in use
Extended Lot Details
Use the following to activate or de-activate extended detail control for lot-controlled, batch-controlled and serial-controlled items:
Batch Controlled
Use this checkbox as follows:
Infor System21 Inventory Management | 553

860BUtilities
Unchecked - To de-activate extended details for batch-controlled items
Checked - To activate extended details for batch-controlled items
Lot Controlled
Use this checkbox as follows:
Unchecked - To de-activate extended details for lot-controlled items
Checked - To activate extended details for lot-controlled items
Serial Controlled
Use this checkbox as follows:
Unchecked - To de-activate extended details for serial-controlled items
Checked - To activate extended details for serial-controlled items
If you check these fields to activate extended details, the Header Parameters Maintenance window is displayed for the appropriate area, for example, for lot-controlled, batch-controlled or serial-controlled items, or a combination of these if appropriate.
You would normally activate, or de-activate, these options during system implementation. If you de-activate these options after implementation, all of the functionality that used this information is disabled.
If you activate these options after implementation, you will be prompted to enter the missing information for all lot-controlled, batch-controlled and serial-controlled items that do not have extended details and shelf life parameters.
Note: If your have activated Location Control for your company, you need to make sure that you have activated lower level allocation details for all lot-controlled, batch-controlled and serial-controlled items. This is because Location Control cannot commit location balances to a pick note for these items unless the lots, batches or serial numbers are already allocated.
Packaging Reporting
You use this field to determine whether you want to use Packaging Reporting for your company. If you use Packaging Reporting, the software compiles packaging statistics for submission to the appropriate authority.
Use this checkbox as follows:
Unchecked - To de-activate Packaging Reporting for your company
Checked - To activate Packaging Reporting for this company
Note: The next three fields appear if you have chosen to activate Packaging Reporting for your company. For more information about these fields, see the Packaging Reporting section.
Default Country
Enter the default reporting country for packaging reporting.
Alternatively, use the prompt facility to select from the Packaging Reporting Country Selection pop-up.
554 | Infor System21 Inventory Management

860BUtilities
Sales Channel
Enter the sales channel you want to use for packaging reporting.
Alternatively, use the prompt facility to select from the GDSC Packaging Sales Channels pop-up.
Extended Features
Use this checkbox as follows:
Unchecked - To de-activate the extended features option for this company
Checked (default) - To activate the extended features option for this company
Checking this field will later cause the new UK 1997 Legislative extract program to run, rather than the original UK/German extract and report.
Sales Analysis
Default Flag
Use this field to determine how you want to update Sales Analysis for this company.
Enter a valid code.
Alternatively, use the prompt facility to select from the SAUI Sales Analysis Update pop-up.
These codes are defined in the Inventory Descriptions file, under major type SAUI.
Functions
Sec. UOM (F9)
Use this to display the Secondary UOM pop-up.
Note: This function is displayed if you use Catchweight. To use Catchweight, you must have a valid authorisation code.
Extras (F10)
Use this to display the Extended Options pop-up.
Reference Numbers (F15)
Use this to display the Reference Number Entry pop-up.
Presentation Details (F19)
Use this to display the Presentation Details pop-up.
Packaging Countries (F20)
This is displayed if you have checked the Packaging Reporting flag. Use this to access the windows used to set up the packaging reporting information. For more information see the Maintain Country Details section in the Packaging Requirements chapter of this product guide.
Once you have made the required amendments, press Enter twice to update the company profile.
If you have chosen to activate extended details for lot-controlled, batch-controlled or serial-controlled items, or all three, the All Serial/Lot/Batch Header Parameters Maintenance pop-up is displayed. The title of the pop-up changes to reflect the items whose extended details you have chosen to activate.
Infor System21 Inventory Management | 555

860BUtilities
All Serial/Lot/Batch Header Parameters Maintenance Pop-up To display this pop-up, check the Serial Controlled field, Lot Controlled field or Batch Controlled field, or any combination of the three, and then press Enter on the Maintain Company Profile window.
Note: The title of the pop-up changes to reflect the items whose extended details you have chosen to activate. For example, if you have chosen to activate extended details for batch-controlled items, the title of the window is All Batch Header Parameters Maintenance pop-up and so on. If you have chosen to activate more than one area of extended details, this pop-up is displayed for each of your selected areas in turn.
There are three conditions when this option is used:
• If you have not yet defined items with the selected type of control; that is batch, lot or serial In this case, any values entered on this pop-up will have no effect but they still need to be entered for future use.
• If you have defined items with the selected type of control, but they have no stock balances recorded against them In this case, the shelf life parameters are used to update any item that does not have shelf life details recorded against it. Items with existing shelf life parameters are not affected.
• If your controlled items have stock balances In this case, those with missing shelf life parameters are updated and any extended batch, lot or serial header details are created.
These missing values are either entered using this pop-up, derived from existing data, calculated or set to a default value.
The derived values are the item, lot reference and production date. The production date is calculated from the earliest remaining receipt in any stockroom.
The calculated values are the first available date, the last available date and the expiry date.
The default values are the potency and grade details, as these are set as being not required.
When you use this pop-up, only missing values are created; existing values are retained. If you use Advanced Order Entry, the supplier’s reference is retained for batch-controlled items.
Once you have created these details, you can amend them using Item Lot Header Maintenance.
556 | Infor System21 Inventory Management

860BUtilities
Fields
Note: You can use the Items maintenance task to define the details held in the next three fields for individual items. For more information, see the Maintain Inventory Item Window section in the Inventory Maintenance chapter of this product guide.
Shelf Life Unit
Enter a shelf life unit code to specify the default (from those defined in the Inventory Descriptions file, under major type SHLU).
Alternatively, use the prompt facility to select from the SHLU Shelf Life Unit pop-up.
Shelf Life
Enter up to three numeric characters to specify the default shelf life of the item expressed in the shelf life units. This is the actual life of the product.
For example, if you entered 1 (Days) in the Shelf Life Units field and enter 7 in this field, the total shelf life is 7 days.
Customer Shelf Life
For lot-controlled, batch-controlled and serial-controlled items, this value is subtracted from the expiry date to give the last available date. The Stock Status Re-calculation task will freeze the stock in all stockrooms when a lot-controlled, batch-controlled or serial-controlled item has passed its last available date. This task should be run regularly.
For example, if you enter 5 in this field, having entered a total shelf life of 7 days, 2 days are stock shelf life days and 5 are customer shelf life days.
Note: You can use the Item Maintenance task to define the details held in the next three fields for individual items. For more information, see the All Serial/Lot/Batch Header Parameters Maintenance Pop-up section. You can also use this task to define potency and grade details for individual items if they are required.
Default Stock Status
Enter a stock status code chosen from those defined in the Inventory Descriptions file under major type STKS. This stock status code defaults into the Stock Status field every time you receive a new lot of this item into Inventory. Stock status codes are designated as either available or unavailable, and then applied to a lot to make the quantity of that lot frozen or unfrozen. Receipts are frozen by the stock status monitor.
You can use the prompt facility on this field to select from the STKS Stock Status pop-up.
You can leave this field blank if you want to specify the lot as available.
Note: The seven-digit Limit field of the description codes defined against STKS indicates the availability of an item. If the seventh digit of this field is 1, the stock status code indicates an unavailable item. Any other value renders the stock status code an available code.
Release Lead Time Units
Enter the release time unit used when calculating the first available date of a lot.
Alternatively, use the prompt facility to select from the RLTU Release Lead Time Units pop-up.
Infor System21 Inventory Management | 557

860BUtilities
Leave this field blank if you do not want to enter the release lead time. In this case, when the lot dates are calculated, the first available date equals the production date.
Note: Production Date + Release Lead Time = First Available Date. The Stock Status Monitor will freeze receipts, and the Stock Status Re-calculation task will unfreeze them once the release date has passed.
Release Lead Time
You must enter this if you specified a release lead time unit. Enter up to three numeric characters. The release time is used in the following calculation:
Production Date + Release Lead Time = First Available Date.
If you leave this field blank, when the lot dates are calculated, the first available date equals the production date.
Lot Dates To
Enter one of the following alphanumeric characters to specify the method used to position lot dates once they are calculated:
1 - To use actual lot dates
2 - To position to the first day of the period
3 - To position to the last day of the period
You can use the prompt facility to select from the CBDT Calculate Batch Dates To pop-up.
All lot dates are either entered or calculated using shelf life and release times. Once calculated, this field can re-position the first available, last available and expiry dates to the start or end of a week depending on the business requirements. The first available date is set to the production date when the start of week date precedes the production date. In this case, the last, available and expiry dates are still calculated from this start of week date.
Display Lot Time
Use this checkbox as follows:
Checked - Not to display lot times when you receive a new lot of this item into Inventory.
Unchecked - To display lot times as well as lot dates
In this case, you need to enter a time, as well as a date, upon receipt of a lot.
Note: If you select Previous (F12), these details are not saved, and the Extended Details field is set back to unchecked.
Note: When you press Enter, the item and extended details are updated interactively.
Press Enter to save these details and re-display the Maintain Company Profile window.
558 | Infor System21 Inventory Management

860BUtilities
Secondary UOM Pop-up To display this pop-up, select Sec. UOM (F9) on the Company Profile Maintenance Initial Selection window.
Note: This function is displayed if you use Catchweight. To use Catchweight, you must have a valid authorisation code.
Use this pop-up to define the default secondary unit of measure, and the default percentage tolerance and tolerance value limits for your company. You use these tolerance limits during any transactions that involve a change to an item’s stockroom balance.
Fields
Secondary UOM
Enter an existing unit of measure.
Alternatively, use the prompt facility to select from the Units of Measure pop-up.
You can use the Secondary UoMs task to create these.
Tolerance %
When an item's secondary value is captured during a relevant transaction, entering a percentage number in this field can set the default plus or minus degree of deviation from the expected nominal value. If you exceed this percentage tolerance during a transaction, Inventory Management displays a warning message. For example, if you enter 5 in this field, any transaction that exceeds the expected nominal value by plus or minus 5% will cause the warning message to display.
Tolerance Value
When an item's secondary value is captured during a relevant transaction, entering an absolute value in this field can set the default plus or minus degree of deviation from the expected nominal value. If you exceed this fixed value tolerance during a transaction, Inventory Management displays a warning message. For example, if you enter 5 in this field, any transaction that exceeds the expected nominal value by plus or minus 5kg (if the UOM is kilos) will cause the warning message to display.
Note: Tolerance percentages or values are defined only for Catchweight item types 1 and 2. You can display and amend default values during Catchweight item creation.
Note: If both the Tolerance Percentage or Tolerance Value fields are empty, there is no tolerance and a warning is displayed for anything other than the default.
Note: You can enter a number in either the Tolerance Percentage field or the Tolerance Value field, but not both.
Select Update (F8) to save the selected entries in the Secondary UOM pop-up and re-display the Maintain Company Profile window.
Infor System21 Inventory Management | 559

860BUtilities
Extended Options Pop-up To display this pop-up, select Extras (F10) on the Maintain Company Profile window.
Use this pop-up to define the centralised processing of delivery documentation and designation of the default item search. If you are using Advanced Order Entry you can determine whether you can enter decimal quantities on orders.
Fields
Stockroom Fiscal Close
This is used in Inventory Re-valuation and determines how you want to perform your stockroom fiscal close process. For more information see the Stockroom Fiscal Close sections in the Inventory Valuation chapter of this product guide.
Select one of the following:
No (0) - Not to perform a stockroom fiscal close
Month End (1) - To perform a stockroom fiscal close as part of Inventory Management's Period End process
Manual (2) - To perform stockroom fiscal close manually
Latest and Average Cost Calculation
This is used in Inventory Re-valuation.
Select one of the following:
Exclusive of Misc. Rec. (0) - To exclude miscellaneous receipts of stock from latest and average cost calculations
Inclusive of Misc. Rec. (0) - To include miscellaneous receipts of stock from latest and average cost calculations
Centralised Delivery Documents
Select one of the following:
No (0) - To generate separate despatch/delivery documentation by each function
Optional (1) - To generate centralised delivery documentation where additional details have been specifically entered for the transaction
Mandatory (2) - To generate centralised delivery documentation for all movement of goods
Default Item Search Option
Select one of the following to specify the search criteria on the item search facility:
Item Reference (1)
Inventory Description (2)
Purchasing Description (3)
560 | Infor System21 Inventory Management

860BUtilities
Alias (4) - Alternative reference (only available if you are using Advanced Order Entry)
Search Characteristics (5) - Search characteristics (only available if you are using Advanced Order Entry)
Configurator (9) - Search by base item (only available if you are using Production and Configurator)
Integer Quantities
Use this checkbox as follows:
Unchecked - If you do not want integer quantities
Checked - If you want integer quantities
Supersession in Use
This indicates whether item Supersession is in operation in this company.
Use this checkbox as follows:
Unchecked - If Item Supersession is not active
Checked - If Item Supersession is active
Note: Existing control data is retained when this function is de-activated at company level.
Note: All items are automatically updated for Item Supersession when this function is activated at company level.
Transaction Control in Use
This indicates whether Transaction Control is in operation in this company.
Use this checkbox as follows:
Unchecked - If Transaction Control is not active
Checked - If Transaction Control is active
Note: Existing control data is retained when this function is de-activated at company level.
Note: All items are automatically updated for Transaction Control when this function is activated at company level.
Select Previous (F12) to re-display the Maintain Company Profile window.
Reference Number Entry Pop-up To display this pop-up, select Reference Numbers (F15) on the Maintain Company Profile window.
Use this pop-up to enter document processing reference numbers.
Infor System21 Inventory Management | 561

860BUtilities
Fields
Code
This field displays the company profile code and cannot be changed.
Description
This field displays the company description and cannot be changed.
Reference Type
This field displays the document processing option.
Reference Code
You can enter a new reference number.
Alternatively, use the prompt facility to select an existing reference from the RFCD Reference Code pop-up.
Last Number Used
This field displays the reference number last used for the document processing option currently selected.
Select Update (F8) to save any changes and re-display the Maintain Company Profile window.
Presentation Details Pop-up To display this pop-up, select Presentation Details (F19) on the Maintain Company Profile window.
Use this pop-up to define default presentation details for the Inventory company.
Fields
Quantity Formatting Details Display
Use this checkbox as follows:
Unchecked - To display quantity formatting parameters when defining an item
Checked - To suppress the display of quantity formatting parameters when defining an item
Supplementary Information Display
Use this checkbox as follows:
Unchecked - To suppress the display of the Supplementary Data when defining an item
Checked - To display the Supplementary Data when defining an item
Bar Code Validation
Use this field to specify whether barcode validation is required or not.
Use this checkbox as follows:
562 | Infor System21 Inventory Management

860BUtilities
Unchecked - If validation is not required
Checked - If validation is required
Select Update (F8) to save any changes and re-display the Maintain Company Profile window.
Maintain Company Stockroom Profile Window To display this window, select the stockroom profile you want to maintain and then press Enter on the Maintain Company Profile Selection window.
Use this window to create and maintain stockroom profiles.
It is necessary to designate a stockroom as a consignment stockroom.
Fields
Stockroom
This field displays the stockroom name. You can add or amend the description.
Include In Valuation
You can use this field to decide whether you want to include this stockroom in Inventory Management valuation or not.
Use this checkbox as follows:
Unchecked - To exclude the stockroom from valuation
Checked - To include the stockroom in valuation
Stockroom Usage Code
Enter the usage code associated with this stockroom. Inventory Management uses this code for information only. You can define stockroom usage codes in the Inventory Descriptions file, under major type STKU. For more information, see the Descriptions File Maintenance Selection Window section in the Inventory Maintenance chapter of this product guide.
You can use the prompt facility on this field to select from the STKU Stockroom Usage Code pop-up.
Department
Enter a department code associated with this stockroom. Inventory Management uses this data for information only. You can define department codes in the Inventory Descriptions file, under major type DEPT. For more information, see the Descriptions File Maintenance Selection Window section in the Inventory Maintenance chapter of this product guide.
You can use the prompt facility on this field to select from the DEPT Departments pop-up.
If you use Production's MRP Cellular Planning function, you must enter a three-character cell code to indicate the cell manager responsible for the supply and demand requirements of this
Infor System21 Inventory Management | 563

860BUtilities
stockroom. For each cell code defined, you should define an equivalent department code on the Production Parameters file.
Stockroom Site
Enter a site for this stockroom.
Alternatively, use the prompt facility to select from the Stockroom Site Selection pop-up.
Container Stockroom (Inbound)
Each stockroom is associated with another stockroom that will hold the empty containers for the items on inbound (purchase) transactions recorded against that stockroom.
Specify any valid stockroom as the container stockroom for inbound transactions.
Alternatively, use the prompt facility to select from the Stockroom Selection pop-up.
You must make an entry in this field if container profiles are active within Order Capture.
Note: The empty containers held by an organisation are usually held in a different area/stockroom from that used for finished goods items.
Note: Returns of empty containers from customers are sent to the appropriate area, where they can be examined and have processes performed upon them (such as cleaning) prior to their use in manufacturing processes or return to the supplier.
Note: For each stockroom, identify additional areas/stockrooms against which the balances/movements of empty containers can be recorded when recording inbound and outbound transactions.
Container Stockroom (Outbound)
Each stockroom is associated with another stockroom that will hold the empty containers for the items on outbound (sales) transactions recorded against that stockroom.
Specify any valid stockroom as the container stockroom for outbound transactions.
Alternatively, use the prompt facility to select from the Stockroom Selection pop-up.
You must make an entry in this field if container profiles are active within Order Capture.
Transaction Allowed
Use the following fields to determine the miscellaneous inventory transactions you want to process within this stockroom.
Receipts
Use this checkbox as follows:
Unchecked - To exclude the stockroom from goods receiving tasks
Checked - To receive goods at this stockroom
Issues
Use this checkbox as follows:
Unchecked - To exclude the stockroom from goods issuing tasks
564 | Infor System21 Inventory Management

860BUtilities
Checked - To issue goods from this stockroom
Note: This field must be Unchecked if the stockroom is a bonded warehouse.
Adjustments
Use this checkbox as follows:
Unchecked - To disallow stock adjustment transactions for the stockroom
Checked - To allow stock adjustment transactions for the stockroom
Note: If this field is checked for a bonded warehouse only frozen adjustment transactions are permitted. Stock and allocation adjustments are prohibited in a bonded warehouse.
Consignment Stock Consumption
Use this checkbox as follows:
Unchecked - To allow consignment stock consumption in this stockroom
Checked - Not to allow consignment stock consumption in this stockroom
Note: This field must be Unchecked if the stockroom is a bonded warehouse.
Consignment Stock – EDI Updates
Use the following fields to control EDI stock updates for a stockroom in which consignment stock consumption is allowed.
Receipts
Use this checkbox as follows:
Unchecked – If receipt stock updates via EDI are not allowed
Checked – If receipt stock updates via EDI are allowed
Note: This field must be Unchecked if the stockroom is a bonded warehouse.
Issues
Use this checkbox as follows:
Unchecked – If issue stock updates via EDI are not allowed
Checked – If issue stock updates via EDI are allowed
Note: This field must be Unchecked if the stockroom is a bonded warehouse.
Adjustments
Use this checkbox as follows:
Unchecked – If adjustment stock updates via EDI are not allowed
Checked – If adjustment stock updates via EDI are allowed
Note: This field must be Unchecked if the stockroom is a bonded warehouse.
Consignment Stock Consumption
Use this checkbox as follows:
Infor System21 Inventory Management | 565

860BUtilities
Unchecked – If consignment stock updates via EDI are not allowed
Checked – If consignment stock updates via EDI are allowed
Note: This field must be Unchecked if the stockroom is a bonded warehouse.
Inventory Balance Updates
Use this checkbox as follows:
Unchecked – If balance stock updates via EDI are not allowed
Checked – If balance stock updates via EDI are allowed
Note: This field must be Unchecked if the stockroom is a bonded warehouse.
Inventory Balance Updates
Transfers
Use this checkbox as follows:
Unchecked - Not to initiate transfers from this stockroom
Checked - To initiate transfers from this stockroom
Note: This field must be Unchecked if the stockroom is a bonded warehouse.
Supplier Orders
Use this checkbox as follows:
Unchecked - Not to initiate supplier orders from this stockroom
Checked - To initiate supplier orders from this stockroom
Note: This field must be Unchecked if the stockroom is a bonded warehouse.
Sales Orders
Use this checkbox as follows:
Unchecked - Not to take sales orders against this stockroom
Checked - To take sales orders against this stockroom
Note: This field must be Unchecked if the stockroom is a bonded warehouse.
Negative Stock Allowed
Use this checkbox as follows:
Unchecked - If transactions that produce negative item balances for this stockroom are not allowed
Checked - To process transactions that produce negative item balances for this stockroom
Consignment Stockroom
Use this checkbox as follows:
Unchecked - If the stockroom is not a consignment stockroom
566 | Infor System21 Inventory Management

860BUtilities
Checked - If the stockroom will be a consignment stockroom
If the stockroom is a designated consignment stockroom, the Inventory movement flags should all be set to unchecked
Caution: For AS (Automotive Advance Shipping), consignment stockrooms must not be flagged here; they are configured within AS Customer/Contract Maintenance.
Note: This field must be Unchecked if the stockroom is a bonded warehouse.
Press Enter to update the stockroom profile and display the Advanced Allocations Options window.
Advanced Allocations Options Window To display this window, press Enter on the Maintain Company Stockroom Profile window.
Use this window to enter the advanced allocation options for your selected company and stockroom.
Fields
Automatic Lower Level Allocation
Use this checkbox as follows:
Unchecked - If automatic lower level allocation is not required
Checked - To allocate orders automatically against specific lots, batches and/or serial numbers
Where a customer-specific shelf life is defined for an item, this automatic allocation will occur in Order Capture, Batch Sourcing, Manual Allocation, and at Picking.
Where an item has no customer-specific shelf life, this automatic allocation only occurs at Picking.
Manual Lower Level Allocation
Use this checkbox as follows:
Unchecked - If manual lower level allocation is not required
Checked - To allocate against specific lots, batches or serial numbers at the time of order entry or when you amend an order
The ability to allocate against lot numbers depends on the settings of the Allocate At flags described below.
Note: If you checked either the Automatic Lower Level Allocation field or the Manual Lower Level Allocation field, you must also check at least one of the next three Allocation At fields.
If you have left both of these fields unchecked, you must make sure that the next three Allocation At fields are also left unchecked.
The next three fields activate each type of lower level allocation:
Note: If you want to define a location-controlled stockroom, you must set the Automatic Lower Level Allocation field to checked, and you must set one of the next three fields to checked.
Infor System21 Inventory Management | 567

860BUtilities
You cannot activate Location Control without activating Automatic Lower Level Allocation.
Note: It is recommended that you check each of the Allocation At fields if Location Control is active.
Allocation at Batch Level
Use this checkbox as follows:
Unchecked - If allocation at batch level is not required
Checked - If you want lower level allocations to be valid for batches
Allocation at Serial Level
Use this checkbox as follows:
Unchecked - If allocation at serial level is not required
Checked - If you want lower level allocations to be valid for items controlled at serial number level
Allocation at Lot Level
Use this checkbox as follows:
Unchecked - If allocation at lot level is not required
Checked - If you want lower level allocations to be valid for lot-controlled items
Alternative Kit Allocation
Use this checkbox as follows:
Unchecked - To allocate component items only if you can allocate the whole kit
Checked - To allocate component items whether you can allocate the whole kit, or not
Press Enter to display the Maintain Company Profile Stock Weeks Matrix window.
Maintain Company Profile Stock Weeks Matrix Window To display this window, press Enter on the Advanced Allocations Options window.
Use this window to determine the parameters that govern stock usage.
During the update routines (weekly or monthly) you can run the re-generate ABC classification, which reviews and re-classifies items and calculates next count dates.
A three-by-three matrix is displayed. The Y-axis, labelled Value, is the unit cost of the item held in the selected stockroom. The X-axis, labelled Usage, is the most recently calculated average usage for any item in the stockroom. This means each square relates to a value/usage category.
By specifying low/medium and medium/high boundaries you can define nine cells that represent the value/usage categories for items in this stockroom.
The minimum and maximum stock holdings for each category are expressed in number of weeks of average usage. The date the matrix was last changed is displayed.
568 | Infor System21 Inventory Management

860BUtilities
Fields
Enter the following details for each cell:
Class
Select A, B or C to assign a classification to all items within this value/usage category. Historically, A class items are high value/high usage, whereas C class items are low value/low usage. You can select Z to exclude a value and usage combination from the matrix.
You can stock count by ABC classification and define a profile so that you count higher value items more frequently than lower value items.
To exclude single items from your stock counting mechanisms, select Z in the item classification field during Item Maintenance.
Min
Enter three numeric characters, including one decimal, to specify the minimum weeks' stock to hold for the category.
Max
Enter three numeric characters, including one decimal, to specify the maximum weeks' stock to hold for the category.
Value 1
Enter fifteen numeric characters, including five decimals, to specify the first value delimiter. Any items with a unit cost less than or equal to this value are in categories 1, 2 or 3.
Value 2
Enter fifteen numeric characters, including five decimals, to specify the second value delimiter. Any item with a unit cost between this value and value 1 are in category 4, 5 or 6. Items with a unit cost over this value are in category 7, 8 or 9.
Usage Qty 1
Enter eleven numeric characters, including three decimals, to specify the first usage delimiter. Items with an average usage up to this quantity are in category 1, 4 or 7.
Usage Qty 2
Enter eleven numeric characters, including three decimals, to specify the second usage delimiter. Items with an average usage between quantity 1 and this quantity are in category 2, 5 or 8. Items with an average usage over this quantity are in category 3, 6 or 9.
During the Ad hoc Update, for each included item, the software reviews the item’s cost and average usage, thus identifying an appropriate square and then selecting the number of minimum and maximum weeks.
The software then calculates:
Reorder Point = (Minimum Stock weeks + Lead Time in Weeks ) x Average Usage
Maximum Stock = Minimum Stock Weeks x Average Usage
Infor System21 Inventory Management | 569

860BUtilities
Economic Order Quantity = Square root of [(2 x order placement cost x Annual Usage) / inventory holding cost per year]
Note: Any records found without an associated item master or stockroom detail record are written to an exception report.
The Stockroom Details record would now include the calculated figures.
Press Enter to update the stockroom weeks matrix and display the Maintain Location Control Stockroom Profile window.
Alternatively, select Update Complete (F8) to update the stockroom weeks matrix and display the Maintain Company Profile Aspect Selection window, bypassing the set up of a Location Control profile for an Inventory stockroom.
Maintain Location Control Stockroom Profile Window To display this window, press Enter on the Maintain Company Profile Stock Weeks Matrix window.
Use this window to create or maintain the Location Control stockroom profile details.
Fields
Stockroom
This field displays your selected stockroom.
Note: The details that you specify in the Default Location, Multiple Locations, Rotate Stock and Collect Secondary Balances fields are defaults. They are used when you create the Location Control item/stockroom profile. They are also used to create missing item/stockroom profiles during the Data Take-On and Reconciliation programmes.
Default Location
You can enter a default location if required.
Alternatively, use the prompt facility to select from the Location Prompt pop-up.
Note: If you enter a default location and then press Enter or select Update (F8) to save these details, the location is created and is recorded on the Location Map.
Multiple Locations
Use this checkbox as follows:
Unchecked - If you want some or all of your stock to have single location references within your selected stockroom at item/stockroom level
This is a default value and can be changed in the item/stockroom profile if required.
Checked - If you want some or all of your stock to have multiple location references within your selected stockroom at item/stockroom level
This is a default value and can be changed in the item/stockroom profile if required.
570 | Infor System21 Inventory Management

860BUtilities
Rotate Stock
Use this checkbox as follows:
Unchecked - To de-activate stock rotation for this stockroom at item/stockroom level
This is a default value and can be changed in the item/stockroom profile if required.
Checked - To activate stock rotation for this stockroom at item/stockroom level
This is a default value and can be changed in the item/stockroom profile if required.
Collect Secondary Balances
Use this checkbox as follows:
Unchecked - Not to hold secondary balances by location for this stockroom at item/stockroom level
This is a default value and can be changed in the item/stockroom profile if required.
Checked - To hold location level secondary balances at item/stockroom level
This is a default value and can be changed in the item/stockroom profile if required.
Note: This field is only available if you are using Catchweight.
Location Control Status
Select one of the following:
Inactive (0) - To de-activate Location Control within your selected stockroom
Active (0) - To activate Location Control within your selected stockroom
Note: If you make a location-controlled stockroom inactive, the action clears the location balances and rotation balances and any outstanding event balances.
You cannot make a stockroom active if it is an active warehouse, or if you have not activated lower level allocation.
Caution: It is recommended that you do not de-activate an active location-controlled stockroom.
Warehouse Control Status
This field indicates whether or not Warehousing is active for your selected stockroom.
Note: You cannot use Warehousing and Location Control for the same stockroom, as they are mutually exclusive.
Functions
Update Complete (F8)
Use this to update the profile without maintaining the Location Map for your selected stockroom.
Delete (F11)
Use this to delete Location Control details for your selected stockroom.
Infor System21 Inventory Management | 571

860BUtilities
Note: This deletes Location Control data; the location balances, event allocations, Location Control data within the item/stockroom profile, the location map and Location Control stockroom profile for your selected stockroom.
Press Enter to display the Maintain Location Map window. Alternatively, select Update Complete (F8) to display the Maintain Company Profile Aspect Selection window.
Maintain Location Map Window To display this window, press Enter on the Maintain Location Control Stockroom Profile window. Alternatively, select the Location Map task.
Use this window to create location codes for a location-controlled stockroom, or to maintain location codes for an existing location-controlled stockroom.
You can also use this window to define the range of location codes that you want to create for your selected stockroom.
Note: You must make sure that your selected stockroom is defined to Inventory Management.
Fields
Stockroom
Select the stockroom whose location map you want to create or amend. This stockroom must be defined to Inventory.
Note: If you access this window from the Inventory Company Profile task, this field displays your selected stockroom.
Start Display At
Enter the location code that you want to display at the top of the window.
Alternatively, use the prompt facility to select from the Location Prompt pop-up.
You can only use this if you want to view existing locations. If you enter information in this field, you cannot use the next two fields. Press Enter to re-display the next window with the correct location code at the top of the window.
Enter Location Range to Create From
Enter the first code in the range of locations that you want to create. This code can be up to 12 alphanumeric characters long.
Alternatively, use the prompt facility to select from the Location Prompt pop-up.
To
Enter the last code in the range of locations that you want to create.
Alternatively, use the prompt facility to select from the Location Prompt pop-up.
Enter a single location code here, if required.
572 | Infor System21 Inventory Management

860BUtilities
Note: When you select Create Range (F8), Inventory checks each character position in turn and searches for the same type of character in each position. It also checks that the To location code is not less than the From location code.
If you enter the range A01 to A99, Inventory will create 99 locations. If you enter A01 to C50, Inventory will create 250 locations, that is, 99 A locations, 100 B locations and 51 C locations.
Note: It is recommended that you carefully consider the naming convention you use to create your location codes so that the resulting codes best reflect the layout of the stockroom.
Status
Select one of the following:
Active (0) - To activate the location
Suspended (1) - To de-activate the location
Restrict Number of Locations Created To
If you have entered a range of locations for creation, enter the maximum number of locations that you want to create.
The default is 9,999, which is the maximum value you can enter.
Functions
Create Range (F8)
Use this to create the locations you have defined in the Enter Location Range to Create fields. Any location codes within that range that have already been created are not duplicated. The creation process stops once the number of locations to be created has been exceeded or once the range if complete.
Number of Locations (F16)
Use this to check that your specified range will produce the number of locations that you are expecting. This displays the Location Control Number of Locations pop-up.
Press Enter to display the Maintain Location Map Locations window.
Location Control Number of Locations Pop-up To display this pop-up, select Number of Locations (F16) on the Maintain Location Map window.
Use this pop-up to check the number of locations that you are going to create from your selected range.
Fields
Number of Locations
This field displays the number of locations that you are planning to create using your specified range.
Infor System21 Inventory Management | 573

860BUtilities
Press Enter to return to the Maintain Location Map window.
Maintain Location Map Locations Window To display this window, press Enter on the Maintain Location Map window.
Use this window to view or amend any existing location codes for your selected stockroom. The stockroom and its description are displayed at the top if the window. There are up to three columns of location information displayed in the middle of the window, up to a maximum of 39 locations.
Fields
Stockroom
This field displays your selected stockroom.
Line Number (Untitled)
This field displays the line number that you can use to select a line for amendment or deletion. The numbers are always between 1 and 39.
Location
This field displays the location code.
Status
This field displays the current status of the location code.
Note: Use Page Up and Page Down to display more location codes if required.
Line
Enter the number of the line that corresponds to the location code you want to amend. The location details are displayed in the entry fields when you press Enter.
Location
This field displays your selected location code.
Note: You can enter a location code to select a location for amendment or deletion rather than entering a line number.
Action
Select one of the following:
Activate (0) - To activate the location code
You can activate a suspended location at any time.
Suspend (1) - To suspend a location code
You can only suspend an active location if it is empty and not defined as the default location for an item, or for the stockroom.
574 | Infor System21 Inventory Management

860BUtilities
Delete (4) - To delete a location code
You can only delete a location if it is empty and it is not a default location for an item or stockroom.
Note: If you delete location codes by mistake, you can re-define them.
Position To
Enter the location code that you want to display at the top of the window. Press Enter to display your selected location code.
Press Enter to confirm the changes that you have made.
Then select Exit (F3) to leave the Location Map and re-display the Maintain Location Control Stockroom Profile window. Select Update Complete (F8) to save the changes and re-display the Maintain Company Profile Aspect Selection window.
Select Usage Code Pop-up To display this pop-up, use the prompt facility on the Usage Profile Code field on the Maintain Company Profile Aspect Selection window.
Use this pop-up to select the usage code you require.
Options
Select Usage Code
Use this to select the usage profile code that you want to view or amend.
Select the usage profile code you require and then press Enter to display the Usage Profile window.
Usage Profile Window To display this window, select the usage profile code you require and then press Enter on the Select Usage Code pop-up.
Note: This window is displayed if you choose to amend an existing usage profile code or create a new one.
Use this window to add to or edit a set of profiles that define the historical periods used in the calculation of average weekly or monthly usage. You can use these for items with significant seasonal variations in sales.
Select the profile to display the weekly or monthly periods, depending on the usage cycle defined in the Inventory Management company profile. You can define the usage pattern for the current and
Infor System21 Inventory Management | 575

860BUtilities
previous 59 periods, so that, depending on the period definition, the history can go back one and a quarter or five years.
The calculations in the following example are based on the last 3 weeks'/months' usage figures.
An appropriate usage profile code is then assigned to each item in the Stockroom Details file.
Fields
Usage Profile Code
This field displays the usage profile code that you selected on the Select Usage Code pop-up or entered on the Maintain Company Profile Aspect Selection window.
Usage Cycle
This field displays the usage cycle for the company (either Week or Period).
Weeks/Periods
Note: These fields will be titled Weeks or Periods depending on the value in the Usage Cycle field.
Use this checkbox as follows:
Unchecked - To omit the period from the calculation
Checked - To include the period in the average usage calculation
Date Last Changed
This field displays the date on which an existing usage profile was last changed.
Press Enter to save any changes and re-display the Maintain Company Profile Aspect Selection window.
Stockroom Site [2/INUM] Use this task to maintain stockroom sites. Inventory Management uses this to define the output queue appropriate to the printing of delivery documentation.
Stockroom Site Maintenance Selection Window To display this window, select the Stockroom Site task.
Use this window to select the stockroom that you want to maintain.
576 | Infor System21 Inventory Management

860BUtilities
Fields
Stockroom Site
Enter a stockroom site to create or maintain. You can enter a maximum of 10 characters.
Alternatively, use the prompt facility to select from the Stockroom Site Selection pop-up.
Press Enter to display the Stockroom Site Maintenance window.
Stockroom Site Maintenance Window To display this window, enter a stockroom site and then press Enter on the Stockroom Site Maintenance Selection window.
Use this window to maintain the stockroom site details. Inventory Management displays any information for an existing stockroom site for amendment.
Note: Once you have defined sites, you must assign them to Inventory Management stockrooms if you want to use centralised document processing.
Fields
Site Name
Enter a description or name for the stockroom site.
Delivery Notes
Enter a valid output queue and library for delivery notes, to determine where you want delivery notes to print.
Combined Delivery Note/Invoice
Enter a valid output queue and library for combined delivery notes/invoices, to determine where you want combined delivery notes/invoices to print. If they are left blank, these fields default to the queue and library defined for delivery notes when you press Enter.
DRP Invoice
Enter a valid output queue and library for DRP invoices.
The idea is that these documents are required as part of the despatch process and are routed to the despatching site in order that they can, if required, accompany the physical delivery of the goods (as is the case in Italy).
Note: You cannot update a stockroom site until you have defined reference numbers for it. For further details see the Document Processing product guide.
Functions
Infor System21 Inventory Management | 577

860BUtilities
Reference Numbers (F15)
Use this to define reference codes for the stockroom site.
Select Update (F8) to save the details you have entered.
Reference Number Entry Pop-up To display this pop-up, select Reference Numbers (F15) on the Stockroom Site Maintenance window.
Use this pop-up to view reference numbers for amendment/information purposes. You can also view the type of documentation to which the reference number refers. For more information, see the Reference Numbers section.
Fields
Reference Code
Enter a defined reference code. You can define these in the Inventory Descriptions file, under major type RFCD. Reference codes are linked to reference types, which are defined under major type RFTP. For more information, see the Descriptions File Maintenance Selection Window section.
You can use the prompt facility on this field to select from the RFCD Reference Code pop-up.
Last Number Used
This field displays the last number the software has recorded against each reference type displayed.
Select Update (F8) to save any changes.
578 | Infor System21 Inventory Management

860BUtilities
Reference Numbers [3/INUM] Use this task to maintain reference numbers. You use reference numbers to define separate sequences of despatch note references for each stockroom site.
Maintain Reference Numbers Selection Window To display this window, select the Reference Numbers task.
Use this window to select the reference type and reference code that you want to maintain.
Fields
Reference Type
Enter a reference type.
Alternatively, use the prompt facility to select from the RFTP Reference Type pop-up.
This is defined in the Inventory Descriptions file as a minor type (for example CREDITNOTE), under major type RFTP. For more information, see the Descriptions File Maintenance Selection Window section.
Reference Code
Enter a reference code.
Alternatively, use the prompt facility to select from the RFCD Reference Code pop-up.
This is a major type code, as defined in the Inventory Descriptions file (RFCD). For more information, see the Descriptions File Maintenance Selection Window section.
Enter the details and then press Enter to display the Maintain Reference Numbers window.
Maintain Reference Numbers Window To display this window, enter the details and then press Enter on the Maintain Reference Numbers Selection window.
Use this window to maintain the reference number information for amendment.
Note: You can choose to prefix numbers with a single alphanumeric character, leaving up to seven numeric characters free.
Note: If you want to prefix the reference number to an alphanumeric character, the leftmost numeric character must be zero.
Infor System21 Inventory Management | 579

860BUtilities
Fields
Last Number Used
This is the number used for the last transaction for the displayed type of documentation.
Next Number to Use
This is the next sequential number.
From Reference
You can define a start number range for your sequence.
To Reference
You can also define an end number range for your sequence.
Select Update (F8) to save any details you have entered.
580 | Infor System21 Inventory Management

860BUtilities
Document Text Profiles [4/INUM] Use this task to maintain document text profiles. These are used to help you specify the type of text you want to use and how you want to use that text. These are defined in the Default Text Types task. Use this task to specify where you want the text types to display in your documentation. For example, you could specify which text appears in the header, line and footer areas of your invoice, order acknowledgement, pick notes and so on.
Document Text Profile Maintenance Selection Window To display this window, select the Document Text Profiles task.
Use this window to select the text profile you want to maintain.
Fields
Document Class
You can maintain:
• Acknowledgements • Pick notes • Delivery notes • Invoices
Options
Select
Use this to choose the type of documentation you want to define.
Select a documentation type to display the Document Text Profile Maintenance Details window.
Document Text Profile Maintenance Details Window To display this window, select a document type on the Document Text Profile Maintenance Selection window.
Use this window to enter the text details for your selected document type.
Infor System21 Inventory Management | 581

860BUtilities
Fields
Text Type
Enter the type of text you want to use on the documentation, for example, Order Header.
Alternatively, use the prompt facility to select from the Select Text Type pop-up.
Text Usage
Enter the code to define where you can use this text. You can define these codes in the Inventory Descriptions file under major type USGC. For more information, see the Descriptions File Maintenance Selection Window section.
You can use the prompt facility on this field to select from the USGC Text Usage Codes pop-up.
Position
Select one of the following to define the position of the text on the document:
Header (1)
Detail (2)
Trailer (3)
Sequence
Use this to determine where you want to print the text on the documentation.
Options
Select
Use this to select a type for amendment.
Delete
Use this to select a type for deletion.
Press Enter to save any details.
582 | Infor System21 Inventory Management

860BUtilities
Default Text Types [5/INUM] Use this to link the primary text type/usage code and the default or secondary text type/usage code. These text types are used in the Document Text Profiles task to define how you want to display information on your documentation.
Default Text Maintenance Window To display this window, select the Default Text Types task.
Use this window to view or amend default text.
Fields
Text Type
Select the type of text you want to use on the documentation, for example, Order Header.
Alternatively, use the prompt facility to select from the Select Text Types pop-up.
Text Usage
Select the code to use this field as a memo field available for user-defined records.
You can use the prompt facility on this field to select from the USGC Text Usage Codes pop-up.
Default Text Type
Select the type of text you want to use as the default.
Alternatively, use the prompt facility to select from the Select Text Types pop-up.
Default Text Usage
Select the usage code to use as the default.
You can use the prompt facility on this field to select from the USGC Text Usage Codes pop-up.
Options
Select
Use this to amend a text type.
Delete
Use this to delete a text type.
Note: When you choose Select, the current details are displayed in the fields at the bottom of the window.
Press Enter to save any details you have entered.
Infor System21 Inventory Management | 583

860BUtilities
Calendar [7/INUM, 3/INC] Use this task to maintain the current week, period and year number for the Inventory company. You normally use this task once, when you first set up Inventory codes for the calendar details. After this, the current calendar position is maintained automatically by the week, period, and year end batch update jobs.
You should never manually change these details during the course of the year, except under exceptional circumstances when you need to re-run the week, month, or year end update.
The Year-end Update task accesses the same details and submits a batch job which:
• Updates the number of weeks this year and last year specified on the calendar • Changes the number of periods specified on the calendar • Sets any yearly accumulators to zero • Increments the year number by one • Produces a Stock Valuation report as part of the submission process • Produces a Re-order report as part of the submission process
Maintain Calendar File Window To display this window, select the Calendar task.
Use this window to specify the current date information for Inventory.
Fields
Current Year
Enter the current year, using up to two numeric characters. This field is protected when this window is invoked as part of the Year End Update task.
Current Week
Enter the current week, using up to two numeric characters. This field is protected when this window is invoked as part of the Year End Update task.
Current Period
Enter the current period, using up to two numeric characters. This field is protected when this window is invoked as part of the Year End Update task.
No of Weeks This Year
Enter the number of weeks this year, using up to two numeric characters. The value must be less than or equal to 53. If this task is invoked as part of the Year End Update task, the default for this field will be the value specified in the Period/Week Control File for Year for the new year (if such a record is found).
584 | Infor System21 Inventory Management

860BUtilities
No of Weeks Last Year
Enter the number of weeks last year, using up to two numeric characters. The value must be less than or equal to 53. If this task is invoked as part of the Year End Update task, the default for this field will be the number of weeks this year for the year being closed.
No of Periods This Year
Enter the number of periods this year, using up to two numeric characters. The value must be less than or equal to 13. If this task is invoked as part of the Year End Update task, the default for this field will be the value specified in the Period/Week Control File for Year for the new year (if such a record is found).
Note: This information is linked to the Sales Analysis company profile and Forecasting's Company Profile Periods/Backups details.
Press Enter to update the calendar with the changes.
Alternatively, to process a Year End Update, press Enter to submit a batch job to perform the year end update.
Infor System21 Inventory Management | 585

860BUtilities
Period/Week End Control [8/INUM] Use this task to maintain period and week end dates. These are used within Inventory to stamp movements and update history records with the correct year, period and week number. You normally use the procedure when you initially set up the software, and to create dates for future years.
Note: You can define the term Period in a variety of ways, but it normally refers to a month.
Inventory Period End Control Maintenance Selection Window To display this window, select the Period/Week End Control task.
Use this window to select the year number and period type for which end-dates are to be maintained.
Fields
Year
Enter the year number of the year for which end dates are to be maintained.
Type
Select one of the following:
Weekly (1) - To maintain week end dates
Monthly (2) - To maintain month end dates
Press Enter to display the Year Total Control pop-up.
Year Total Control Pop-up To display this pop-up, press Enter on the Inventory Period End Control Maintenance Selection window.
Use this pop-up to confirm the total number of periods or weeks for your specified year.
Fields
586 | Infor System21 Inventory Management

860BUtilities
Untitled
Enter the number of weeks, or periods, that you want to maintain for your selected year.
You can enter up to 53 weeks or 13 periods.
Press Enter to display the Inventory Period End Control Maintenance window.
Inventory Period End Control Maintenance window To display this window, press Enter on the Year Control Total pop-up.
You can maintain end dates for a selected year and period type (week or month).
Caution: Take care when changing dates for a currently active year, as this may cause unpredictable results.
Fields
End Date
Enter or select dates for the week or period end dates.
Note: Where this is the initial set up of end dates for a particular year, only enter the first date. Press Enter and Inventory Management will automatically generate the rest of the dates for the year.
Press Enter to check any entries and then select Update (F8) to update the database.
Infor System21 Inventory Management | 587

860BUtilities
Secondary UoMs [9/INUM] Use this task to add recently created units of measure to the software. For each unit of measure, you can configure its relationship with other units of measurement by adding a conversion table. You can also associate a unit of measure with a larger unit of measure. For example, you can associate ounces with pounds.
Maintain Unit of Measure Selection Window To display this window, select the Secondary UoMs task.
Use this window to select the UoM you want to maintain.
Fields
Unit of Measure
Enter the unit of measure you want to configure, using a two-character code
Alternatively, use the prompt facility to select from the Units of Measure pop-up.
Note: Codes must exist for new units of measure in the Inventory Descriptions file under major type UOMC or GUMC before you can maintain their relationship to other units of measure.
Press Enter to display the Maintain Unit of Measure Details window.
Maintain Unit of Measure Details Window To display this window, select a UoM and then press Enter on the Maintain Unit of Measure Selection pop-up.
Use this window to maintain part of the selected UoM. Existing information is displayed.
Fields
Long Description
Enter a description of the unit of measure, using up to 30 characters.
Short Description
Enter a description of the unit of measure, using up to 9 characters. This is used elsewhere in the software to represent the unit of measure.
588 | Infor System21 Inventory Management

860BUtilities
Abbreviation
Enter a text description of the unit of measure, using up to 3 characters. This is used elsewhere in the software to represent the unit of measure.
Larger UOM
You can associate a unit of measure with a larger unit of measure. For example, you can associate ounces with pounds. The abbreviation and text description for the larger unit of measure are displayed in this field.
UOM Type
Enter one of the following:
1 - Weight
2 - Volume/Fluid Capacity
3 - Length
4 - Area
Alternatively, use the prompt facility to select from the UTYP UoM Type pop-up.
These UoM Types are held in the Inventory Descriptions file, under major type UTYP.
Select Update (F8) to save the details and display the Maintain Unit of Measure Selected Details window.
Maintain Unit of Measure Selected Details Window To display this window, select Update (F8) on the Maintain Unit of Measure Details window.
Use this window to configure the conversion factors between different units of measure.
Fields
Select (Sel)
Use this checkbox as follows:
Unchecked - If the conversion unit of measure is not to be edited
Checked - To edit the conversion unit of measure
To UOM
Enter the abbreviation of the conversion unit of measure.
Alternatively, use the prompt facility to select from the Units of Measure pop-up.
Infor System21 Inventory Management | 589

860BUtilities
Conv Factor
Enter the value, to four decimal places, by which the unit of measure must be either multiplied or divided to result in the conversion unit of measure.
M/D
Select one of the following to determine whether the unit of measure is multiplied or divided to result in the conversion unit of measure:
Multiply (M)
Divide (D)
Larger UOM
Use this checkbox as follows:
Unchecked - If it is not a larger unit of measure
Checked - If the conversion unit of measure is a larger unit of measure
Select Update (F8) to save any changes.
590 | Infor System21 Inventory Management

860BUtilities
Sourcing Rules Access [10/INUM] Use this task to create sourcing rules for Production orders to determine the path that the software will use to supply that demand. For example, you can create sourcing rules for Master Production Schedule runs that control the supply policy for items.
You can set up any number of sourcing rules so that the sourcing program reads the rules until it finds one that can satisfy the due date for that demand line.
Note: Previous releases of System21 used these rules for sourcing sales orders in an Enterprise environment. This is no longer applicable, as not all sales order sourcing is managed by Order Capture. Please refer to the Order Capture product guide for further information.
Note: There are also sourcing rules used in Vendor Scheduling to determine appropriate vendors to source a supply. These too are defined via their own maintenance tasks. Please refer to the Vendor Scheduling product guide for further information.
Caution: This task requires exclusive use of the system.
Maintain Sourcing Policy Access Criteria Selection Window To display this window, select the Sourcing Rules Access task.
Options
Select
Use this to select the area of demand for which you want to create sourcing rules.
Note: Although System21 no longer uses these rules for Sales Demand, it might be appropriate to utilise these rules for a bespoke development.
Select an area to display the Maintain Sourcing Policy Access window. The exact appearance of the window that is displayed depends on the demand area that you select.
Maintain Sourcing Policy Access Window This window is displayed automatically when you select a demand area on the Maintain Sourcing Policy Access Criteria Selection window.
Use this window to define the sourcing rule access for your selected demand area.
Caution: It is recommended that you carefully consider the access levels you want to use: once they are defined they cannot be changed.
Note: If you opt to maintain sourcing policy access for another type of demand, the title and input fields change accordingly.
Infor System21 Inventory Management | 591

860BUtilities
Fields
Activity Access Level
Select one of the following to determine what will prompt the source rules:
All (0) - To apply sourcing rules to all tasks
Activity Group (1) - To apply sourcing rules to a certain group of tasks
This is currently not in use.
Activity (2) - To apply sourcing rules by task
Demand Point Access
Select one of the following, to determine the demand point access:
All Demand Points (0) - If you want to define sourcing rules for all demand points
If you use Production, this would be your normal entry.
Warehouse/Plant (1) - If you want to define sourcing rules for a specific warehouse or Production plant
You can only use this if you want to define sourcing rules for Production demand.
Stockroom (2) - If you want to define sourcing rules for a specific stockroom
You can only use this if you want to define sourcing rules for Enterprise sales order demand.
Item Access Level
Select one of the following to determine what will prompt the system to access the source rule:
All Items (0) - To apply sourcing rules to all items
Item Attribute (1) - To apply sourcing rules to certain items with the same attribute
Item (2) - To apply rules to a certain item
Item Attribute Type
If you selected Item Attribute in the Item Access Level field, you must enter an item attribute type.
Alternatively, use the prompt facility to select from the ITAT Item Attributes pop-up.
Note: The codes defined in ITAT list the major type codes PGMJ and PGMN; that is, they are item major and minor codes. For more information about these codes, see the Inventory Descriptions section.
Note: The next two fields are not displayed if you are creating sourcing rule access details for Production.
Customer Access Level
Select one of the following to determine what customer level will prompt the system to access the source rule:
592 | Infor System21 Inventory Management

860BUtilities
All Customers (0) - To apply a rule to all customers
Customer Attribute (1) - To apply a rule to certain customers with the same attribute
Customer (2) - To apply a rule to a certain customer
Customer Attribute Type
If you selected Customer Attribute in the Customer Access Level field, you must enter a customer attribute type. These are defined under major type CUAT in the Inventory Descriptions file.
Note: The codes defined in CUAT are major types used in other areas of customer definition. For example, the code SN, defined to CUAT, is also the major type code for Sales Analysis Regions; code TN is the major type code for Salesman. For more information about these codes, see the Descriptions Maintenance section in the Inventory Maintenance chapter of this product guide.
Press Enter to confirm your entries and display the Confirm/Delete Sourcing Policy Access for Sales Order window.
Confirm/Delete Sourcing Policy Access for Sales Order Window To display this window, press Enter on the Maintain Sourcing Policy Access window.
Use this window to confirm the sourcing access details for your selected demand area, or to delete the current sourcing access details.
Note: If you opt to maintain sourcing policy access for another type of demand, the title and fields change accordingly.
Functions
Delete (F11)
Use this to delete the current sourcing rule access details. This displays the Confirm Access Deletion pop-up. Select Delete (F11) again to delete the current details and re-display the Maintain Sourcing Policy Access Criteria Selection window.
Press Enter to confirm the current details and re-display the Maintain Sourcing Policy Access Criteria Selection window.
Infor System21 Inventory Management | 593

860BUtilities
Sourcing Rules [11/INUM, 4/MPS, 5/MRP] Use this task to apply sourcing rules to the sourcing policy access details that you defined using the Sourcing Policy Access task. Sourcing rules define the processing that the software follows for each demand point at the specified access level.
Maintain Sourcing Rules Window To display this window, select the Sourcing Rules task.
A list of sourcing rule policies is displayed
Note: Previous releases of System21 used these rules for sourcing sales orders in an Enterprise environment. This is no longer applicable, as not all sales order sourcing is managed by the Order Capture. Please refer to the Order Capture product guide.
As the only rules applicable are for MPS and MRP Demand, please refer to the Production Planning product guide for a full description of this maintenance task.
594 | Infor System21 Inventory Management

860BUtilities
Transaction Control Codes [12/INUM] Use this task to create a list of transaction control codes. Each code is simply a definition of those transactions that are allowed and those that are prohibited.
Any number of transaction control codes can be created, either from scratch or by basing the definition upon an existing code.
Transaction Control Maintenance Selection Window To display this window, select the Transaction Control Codes task.
Use this window to specify the transaction control code that you want to process.
Fields
Transaction Control Code
Enter any valid three-character code.
Alternatively, use the prompt facility to select from the Select Transaction Code pop-up.
Transaction Control Code Description
Enter the description of the transaction control code.
A description need only be entered when you are defining a new transaction control code. If a value is entered when you are maintaining an existing transaction control code, the entered value replaces the description previously recorded against that code.
Based On
Enter any valid pre-existing transaction control code value.
Alternatively, use the prompt facility to select from the Select Transaction Code pop-up.
When you are creating a new transaction control code, the new profiles values will be initially defaulted to those associated with this pre-existing transaction control code definition.
No entry is permitted in this field when you are maintaining an existing transaction control code.
Enter a transaction control code and then press Enter to display the Transaction Header Selection window.
Infor System21 Inventory Management | 595

860BUtilities
Transaction Header Selection Window To display this window, select a code and then press Enter on the Transaction Control Maintenance Selection window.
Use this window to select the transaction header that you want to maintain.
Options
Select
Use this against the required transaction header type.
Functions
Update (F8)
You must use this on this window to commit the changes made on the following windows to the database.
Select a transaction header type. The window displayed depends upon which transaction header is selected. The processing options associated with each window are identical.
596 | Infor System21 Inventory Management

860BUtilities
Transaction Control Maintenance Window To display this window, select a transaction header type on the Transaction Header Selection window.
Use this window to specify the transactions allowed for the transaction control code.
Fields
Select (Untitled)
Select one of the following:
Transaction allowed (1) - For a transaction type to be allowed against this transaction control code
Transaction prohibited (2) - For a transaction type to be prohibited against this transaction control code
Functions
All Allowed (F14)
Use this to set all transaction types to Transaction Allowed.
All Prohibited (F15)
Use this to set all transaction types to Transaction Prohibited.
Press Enter to return to the previous window, retaining the selections made on this window.
Infor System21 Inventory Management | 597

860BUtilities
Transaction Control Dates [13/INUM] Use this task to link items to pre-defined transaction control codes.
Items can be linked to a transaction control code at four levels:
1 Item/Stockroom
2 Item Group Minor/Stockroom
3 Item (All Stockrooms)
4 Item Group Minor (All Stockrooms)
Note: It is possible to access this task from both the Item and Stockroom Balance tasks (via F16). An appropriate warning message will be issued in these tasks should the request be made when Transaction Control is inactive for the item/company. The initial selection window is bypassed when the task accessed from either of these tasks.
An effective date range must be entered for each association.
Note: If an item is linked to several different transaction codes at different levels, the code association at the lowest level takes precedence during the application of transaction control logic.
Transaction Control Effectivity Selection Window To display this window, select the Transaction Control Dates task.
Use this window to select the items and stockrooms for which you wish to maintain Transaction Control effectivity dates.
Fields
Item
Enter a valid item code.
Alternatively, use the prompt facility to select from the Item Master Scan pop-up.
Item Group Minor
Enter a valid item group minor code.
Alternatively, use the prompt facility to select from the PGMN Product Group - Minor pop-up.
Note: Entries in the Item and Item Group Minor fields are mutually exclusive.
Stockroom
Enter a valid inventory stockroom code.
Alternatively, use the prompt facility to select from the Stockroom Selection pop-up.
598 | Infor System21 Inventory Management

860BUtilities
Enter valid selection criteria and press Enter to display the Transaction Control Effectivity Maintenance window.
Transaction Control Effectivity Maintenance Window To display this window, enter valid selection criteria and then press Enter on the Transaction Control Effectivity Selection window.
Use this window to maintain Transaction Control effectivity dates for the item or items and stockroom you selected.
Fields
Line
Enter the line number of the code to be changed or deleted.
Trans Code
Enter a transaction control code to be added or edited.
Alternatively, use the prompt facility to select from the Select Transaction Code pop-up.
Date From
Enter or select the calendar date from which the entered transaction control code is to become effective.
Date To
Enter or select the calendar date up to and including which the entered transaction control code will be effective.
Note: The date ranges associated with different control codes cannot overlap.
Note: There are two distinctly different approaches to implementing transaction control.
1 Assign a code to a group of items and change the profile of allowed and prohibited transactions for that code to match the stage in the life cycle of the items. This type of approach is not recommended, as it makes no use of the effectivity dates and would require many different control codes.
2 Create a small range of codes to reflect the different stages of a product life cycle and assign items to the appropriate code by date range based upon their current status. This is the recommended approach, as it permits changes in product status to be planned and the appropriate data to be established in advance.
Functions
Infor System21 Inventory Management | 599

860BUtilities
Update (F8)
Use this to process and update any changes. This is not displayed until changes have been made.
Delete (F11)
Use this to delete the selected line. This is not displayed until a line has been selected.
Enter the Transaction Control code and effectivity dates and press Enter. Alternatively, enter the line number you wish to maintain. Finally, select Update (F8) to save any changes.
600 | Infor System21 Inventory Management

860BUtilities
Processing Profiles [14/INUM] Use this task to provide profile information for the Inventory Management interface program. These profiles provide user-defined Inventory Management updates as well as standard updates dictated via other Distribution products.
For more information about this task, see the Maintain Location Map Window section within the Inventory Company Profile task.
Note: For more information about how POD works, see the Introduction to Proof of Delivery in the Utilities chapter of the Sales Order Processing product guide.
Inventory Processing Profile Maintenance Window To display this window, select the Processing Profiles task.
Use this window to select the profile to be maintained.
Fields
Profile Code
Enter a profile code.
Alternatively, use the prompt facility to select from the Inventory Processing Profile Prompt pop-up.
Enter a profile code and then press Enter to display the Inventory Processing Profile Maintenance Detail window.
Inventory Processing Profile Maintenance Window To display this window, enter a profile code that defines an instruction set and then press Enter on the Inventory Processing Profile Maintenance Selection window.
Use this window to view existing sequences within the profile, showing movement type and description.
Fields
Profile Code
The field displays the profile code. You can enter or amend the description in the untitled field to the right of the code.
Sequence
This field displays the sequence number allocated to be used in the profile.
Infor System21 Inventory Management | 601

860BUtilities
Type
This field displays the movement type that you want to generate for a given item.
Description
This field displays a description of the movement type.
Options
Select
Use this to select the sequence you want to maintain.
Functions
Addition (F8)
Use this to add a new sequence.
Delete (F11)
Use this to delete a sequence.
Select a sequence to maintain and then press Enter to display the Inventory Processing Profile Maintenance Detail window.
Inventory Processing Profile Maintenance Detail Window To display this window, select a sequence and then press Enter or select Addition (F8) on the Inventory Processing Profile Maintenance window.
Use this window to maintain part of the profile code you have selected.
Fields
Sequence
This field displays the sequence of Inventory Management updates within the profile.
Movement Type
This field displays the movement type that you want to generate for a given item.
You can use the prompt facility to select from the MVTP Movement Type Description pop-up.
Stockroom
Select one of the following:
From (1) - To use the From stockroom
To (2) - To use the To stockroom, when two stockrooms are affected by the instruction set in this profile
602 | Infor System21 Inventory Management

860BUtilities
Sign of Quantity
Select one of the following:
Plus (+) - To specify that the sign in which the quantity would normally be expressed on the movement record is positive
Minus (-) - To specify that the sign in which the quantity would normally be expressed on the movement record is negative
Cost Value Calc
Any entry made is validated against the Inventory Descriptions file, major type CVLR.
You can use the prompt facility on this field to select from the CVLR Cost Value Rule pop-up.
Update for Balance Fields
This specifies which of the balance fields are to be updated as a result of this transaction. The fields are:
• Physical • On order • Allocated • On back order • Frozen • Bonded • In-transit • Forward • Reserved
Enter one of the following for each field:
0 - If an update is not required
1 - To add the actual quantity
2 - To subtract the actual quantity
3 - To add the planned quantity
4 - To subtract the planned quantity
You can use the prompt facility on these fields to select from the Balance Update Prompt pop-up.
Other Updates
FIFO Balances
Use this checkbox as follows:
Unchecked - If FIFO cost/lot trace balances are not to be updated
Checked - If FIFO cost/lot trace balances are to be updated
Infor System21 Inventory Management | 603

860BUtilities
Note: Although the valid values on-window are unchecked (No Update) and checked (Update), the database holds these values the other way around and IN070 suppresses the update when this field on the processing profile is checked (RS0109).
Costs
Use this checkbox as follows:
Unchecked - If Latest, Average and FIFO costs are not to be updated
Checked - If Latest, Average and FIFO costs are to be updated
Usage
Enter one of the following:
0 - If no update is required
1 - To add the actual quantity
2 - To subtract the actual quantity
3 - To add the planned quantity
4 - To subtract the planned quantity
Alternatively, use the prompt facility to select from the Usage Update Prompt pop-up.
Available
Use this checkbox as follows:
Unchecked - If available stock is not to be re-calculated
Checked - If available stock to be re-calculated
Date of Issue
Use this checkbox as follows:
Unchecked - If the date of last issue is not to be updated
Checked - If the date of last issue is to be updated
Date of Receipt
Use this checkbox as follows:
Unchecked - If the date of last receipt is not to be updated
Checked - If the date of last receipt is to be updated
Update History
Enter one of the following to specify the balance to be updated for stock history:
0 - If no update is required
1 - Receipt
2 - Issue
3 - Adjustment
604 | Infor System21 Inventory Management

860BUtilities
4 - Transfer out
5 - Supplier orders
6 - Transfer in
Alternatively, use the prompt facility to select from the History Update Prompt pop-up.
Additional Movement Details
Reference Type
Enter an additional movement type code for this item. These are defined in the Inventory Descriptions file, under major type TRAN.
You can use the prompt facility on this field to select from the TRAN Movement Reference Type pop-up.
Reason Code
Enter a reason code for the movement. These are defined in the Inventory Descriptions file, under major type MOVR.
You can use the prompt facility on this field to select from the MOVR Movement Reason Code pop-up.
Select Update (F8) to save any changes.
Infor System21 Inventory Management | 605

860BUtilities
Authorise Users to Stockroom [16/INUM] Use this task to authorise each user to a stockroom.
Maintain Authorised Stockrooms User Window To display this window, select the Authorise Users to Stockroom task.
Use this window to select the user and a company for which you want to maintain authorisation.
Fields
User
Enter the User ID of the user you want to authorise
Company Code
Enter the company for the stockroom you want to authorise
Press Enter to confirm the selection and display the Maintain Authorised Stockrooms window.
Maintain Authorised Stockrooms window To display this window, enter a user and company and then press Enter on the Maintain Authorised Stockrooms User window.
Use this window to define the stockrooms the selected user can access.
Fields
Auth
Use this checkbox as follows:
Unchecked - If the User does not have authority to this stockroom
Checked - If the user is authorised to this stockroom
Press Enter to save the information and then select Exit (F3) to leave the task.
Inventory Company Relationships [30/INUM] Use this task to establish the relationships between companies that permit item definitions to be passed between them.
Note: Without first establishing such relationships, it will not be possible to transmit item definitions between companies.
606 | Infor System21 Inventory Management

860BUtilities
Note: When implemented in centralised organisations that typically have a unified item coding system, where the responsibility for the definition of an item and control over which other companies within the organisation receive its definition are both handled centrally (i.e. organisations that push item definitions into other companies from a central definition point) the task should be used to establish push type relationships from the central company to all other companies that are to receive item definitions.
When implemented in organisations where each company is given the option to subscribe to item definitions that have been published by other companies, this task should be used to establish these pull type relationships in the different subscribing companies.
Note: The user does not have to be signed into any specific Inventory company to be able to use this task. Company authorisation checking is performed whilst maintaining relationships.
Maintain Inventory Company Relationships Selection Window To display this window, select the Inventory Company Relationships task.
Use this window to select the company for which you wish to maintain relationships.
A list of existing company relationships is displayed upon initial entry into this window.
Existing relationships are presented in owning company, item attribute profile code, and partner company sequence. For each company that will own item definitions a list of those companies to which those global definitions are sent is shown immediately after identification of the owning company.
Options
Amend
Use this to select the line you wish to maintain.
This displays the Amend Company Relationship window.
Functions
Add (F10)
Use this to display the Add Company Relationship pop-up.
Select Amend against a line or select Add (F10) to display the Add/Amend Company Relationship pop-up.
Add/Amend Company Relationship Pop-up To display this pop-up, select Amend against a line or select Add (F10) on the Maintain Inventory Company Relationships Selection window. The title of the pop-up varies accordingly.
Use this pop-up to add a new relationship between companies.
Infor System21 Inventory Management | 607

860BUtilities
Fields
Owning Company
You cannot maintain this field if you are amending an existing line.
Enter the two-character code that identifies an Inventory company that will publish its item definitions to other partner companies with which it has a trading relationship.
Alternatively, use the prompt facility to select from the Company Selection pop-up.
The value entered is validated against the Inventory Company Profile definition.
To be able to push item definitions to other System21 companies, the current user must be authorised to the company number entered.
Note: The combination of owning company, partner company and item attribute profile code must be unique.
Attributes associated with the owning company can dictate which attributes of an item can be entered when defining an item. The following attributes of the owning company will be compared with their corresponding values in the partner company and a suitable warning message issued if a difference is detected:
• SOP in Use This parameter indicates the forms of order entry permissible in this company. Certain attributes of an item can only be entered in companies in which Advanced Order Entry is permissible. Ideally the same forms of order capture should be in use in the owning and partner companies.
• Secondary Unit of Measure An entry in this parameter indicates a catchweight company. The owning and partner companies should have the same default secondary unit of measure.
• Packaging Reporting This parameter indicates whether packaging items can be associated with items and reported on the Packaging Waste tasks.
• Extended Packaging Features This parameter indicates whether extended features are available when associating packaging information with items. The level of control required should be the same in both the owning company and the partner company.
• Extended Lot Details Extended information may optionally be required for lot-controlled, batch-controlled or serial-controlled items. The level of control required should be the same in both the owning company and the partner company.
Partner Company
You cannot maintain this field if you are amending an existing line.
Enter the two-character code that identifies an Inventory company that will receive item definitions published by the owning company.
608 | Infor System21 Inventory Management

860BUtilities
Alternatively, use the prompt facility to select from the Company Selection pop-up.
The value entered is validated against the Inventory company profile definition.
To be able to pull item definitions from another company, the current user must be authorised to the company number entered.
Item Attribute Profile Code
You cannot maintain this field if you are amending an existing line.
This constrains the type of items that use the company relationship when transferring item definitions between the owning company and the partner company.
Possible values are limited to those defined in the Inventory Descriptions file under major type IAPC.
You can use the prompt facility to select from the IAPC Item Attribute Profile Code pop-up.
Note: All Item Attribute Profile Code definitions are recorded in the Inventory Descriptions file against the company code &&.
Items to be Published
This signifies whether the owning company is allowed to send the definition of items it has imported from other companies as well as those that it owns.
Select one of the following:
All (1) (default)
Owned Only (2)
Push/Pull
This signifies whether the owning company pushes item definitions into the partner company or the partner company can decide which published global item definitions it wants to subscribe to.
The possible values are:
Push (1) (default)
Pull (2)
Create Stockroom Balances
This signifies whether stockroom balances are to be generated in the partner company upon the initial import of an item definition from another company.
The possible values are:
None (0) - If no stockroom balances will be generated in the partner company when an item's definition is initially imported into that company
Create All (1) (default) - If a skeleton stockroom balance definition will be generated in each stockroom defined in the partner company when an item's definition is initially imported into that company
Infor System21 Inventory Management | 609

860BUtilities
Supplier Code
Enter the eight-character supplier code that will represent the owning company within the partner company.
The value entered becomes the default supplier code for any items and stockroom balances replicated into the partner company if the appropriate global attribute values are set. The entry made must be a valid supplier within the partner company.
Note: The appropriate GL company code is taken from either the partner company Purchase Management company profile (Purchasing in Use) or the partner company Accounts Receivable company profile (Purchasing not in use but SOP in use). If neither purchasing nor SOP is in use in the partner company then *BLANKS must be entered in this field.
You can use the prompt facility on this field to select from the Supplier Search pop-up.
Customer Code
Enter the eight-character customer code that will represent the partner company within the owning company.
The entry made must be a valid customer within the owning company.
Note: A delivery sequence of 000 is used when validating the customer code.
You can use the prompt facility on this field to select from the Customer Scan pop-up.
Currency Code
Enter the three-character currency code that will be used when trading occurs between the owning company and the partner company.
The entry made must be a valid currency within the General Ledger attached to both the owning company and the partner company.
A suitable warning message is issued if the value entered does not match the default trading currency for the supplier code and customer code entered.
You can use the prompt facility on this field to select from the Select Currency pop-up.
Note: To validate the currency code in the owning company, the appropriate GL company code is taken from either the owning company Purchase Management company profile (Purchasing in use) or the owning company Accounts Receivable company profile (Purchasing not in use but SOP in use). If neither purchasing nor SOP is in use in the owning company, you cannot enter a value in this field.
Note: To validate the currency code in the partner company, the appropriate GL company code is taking from either the partner company Purchase Management company profile (Purchasing in use) or the partner company Accounts Receivable company profile (Purchasing not in use but SOP in use). If neither purchasing nor SOP is in use in the partner company, you cannot enter a value in this field.
Active
This field indicates the status of the link between the owning company and the partner company.
The possible values are:
610 | Infor System21 Inventory Management

860BUtilities
Inactive (0) - If item definitions will not be passed between the owning and the partner company
Active (1) - If item definitions will be transferred between the owning company and the partner company
Note: De-activating a link between an owning and partner company is not permitted when there are transfers pending between the two companies.
Select Update (F8) to update the entered data and display the Maintain Inventory Company Relationships Selection window.
Infor System21 Inventory Management | 611

860BUtilities
Copy Company [1/INUD] Use this to create a new company within Inventory Management. The task copies the company profile and the Inventory Descriptions file. You can then complete the new company information using the Inventory Company Profile task.
Copy a Company To display this window, select the Copy Company task.
Fields
From Company
Enter the company code of the company from which you want to copy data.
Alternatively, use the prompt facility to select from the Company Selection pop-up.
To Company
Enter the new company code of the company to which you want data copied.
Note: The new company code should not exist already within the application.
Press Enter to copy the company details.
612 | Infor System21 Inventory Management

860BUtilities
Rebuild Item Search [2/INUD] Use this task to refresh the Item Master Scan pop-up.
You should run this task if:
• You have converted files from another system and therefore need the scan to be re-defined. • You have made changes to the item description and/or text and need to re-build the text.
Request an Item Search Rebuild To display this window, select the Rebuild Item Search task.
Select Submit (F8) to rebuild the item search words.
Infor System21 Inventory Management | 613

860BUtilities
Renumber Item Search Words [3/INUD]
Request Item Search Words Renumbering Select the Renumber Item Search Words task.
Use this task to re-number the search words associated with each item.
There are no selection criteria for this task. Select Confirm Submit (F8) to process the batch job.
614 | Infor System21 Inventory Management
860BUtilities
Re-calculate Nominal Sec Values [4/INUD]
Request the Recalculation of Nominal Sec Values To display this window, select the Re-calculate Nominal Sec Values task.
Use this task to re-calculate the nominal secondary stock levels for non-Catchweight items, or for Catchweight type 3 items that have a secondary value when transactions have occurred. You can use it to re-set existing values, but it is intended to create secondary stock levels for non-Catchweight items that have just had a secondary value assigned to them.
Note: If you are using Location Control, this task is also run as part of the Rebuild Balances from Locations task.
If no transactions have occurred, the secondary values are zero.
The software calculates the secondary stock balance from the primary stock balance for the stockroom, lot, FIFO or lot trace, or both and location balances held within Inventory.
Note: If you hold a lot of Catchweight type 3 items it is recommended that you run a stock valuation before and after you use this task.
Caution: This task does not produce stock movements or an audit trail.
There are no selection criteria for this task. Select Confirm Submit (F8) to process the batch job.
Infor System21 Inventory Management | 615

860BUtilities
Location Balance Data Take-on [5/INUD] Use this task when you implement Location Control. You use this task to add the item’s (or item and lot’s) current Inventory balance to its default location.
You must run this task for each active location-controlled stockroom.
If the item’s location control item/stockroom profile has not been created, this task will create it, based on the stockroom’s defaults, and the location balance, if placed in the stockroom’s default location.
This task produces a report of all of the balances transferred and any profiles that have been created. There should be no need to re-run this task for a stockroom. If you do re-run this task, it can only update those items with no location balances, and these should not exist. All items and item/lot combinations that have an existing location balance are not updated; these will appear on the report with the Already Transferred error text.
You need to process a stock take for all items that use multiple locations, so that you correctly populate the location balances before you start to use Location Control.
Considerations before Using this Activity to Create Location Control Item/Stockroom Profiles If you are going to use this task to create the Location Control item/stockroom profiles, you need to consider the following issues:
• Whether you set the stockroom profile value to single or multiple locations: It is recommended that you use the multiple locations setting. If you do not select this, you will have to re-set this value for each item that uses a different location from the stockroom’s default location before you can start to perform a stock take and re-distribute the stock around the stockroom.
• Items that only require a single location that differs from the stockroom’s default location: If the item/stockroom profile is created before you use this task, the take-on will place the stock into the correct location. If the profile is created as part of this task, the single location status will have to be set after the stock take has been processed.
616 | Infor System21 Inventory Management

860BUtilities
Location Detail Data Take-on Window To display this window, select the Location Detail Data Take-on task.
Use this window when you implement Location Control. You use this task to add the item’s (or item and lot’s) current Inventory balance to its default location.
Fields
Stockroom
Enter the stockroom for which you want to take on location balance details. This must be a stockroom for which Location Control is activated.
Alternatively, use the prompt facility to select from the Stockroom Selection pop-up.
Run Reconciliation Report
Use this checkbox as follows:
Unchecked - To run the take-on without producing a report
Checked - To produce a report of all balances transferred and any profiles created
Select Submit Job (F8) to process the data take-on and produce the required report if selected.
Infor System21 Inventory Management | 617
860BUtilities
Purge Audit Files Maintenance [11/INUD] Use this housekeeping task to select audit files you want to include in the purge routine in order to free unnecessarily occupied space on your system.
Audit File Purge Maintenance Selection Window To display this window, select the Purge Audit Files Maintenance task.
Use this window to select the application to purge.
Fields
Application
You can select audit files to submit to the purge routine in two ways:
• Enter a specific application code to display only audit files for the required application. • Leave the Application field blank to display all audit files corresponding with all applications.
You can use the prompt facility on this field to select from the Select Application pop-up.
Press Enter to display the Audit File Purge Maintenance Details window.
618 | Infor System21 Inventory Management

860BUtilities
Audit File Purge Maintenance Details Window To display this window, press Enter on the Audit File Purge Maintenance Selection window.
Use this window to select the audit files you want to submit to the purge routine. The files are displayed in alphanumeric order. For each file, the audit file number, description and date of the last purge are displayed.
Fields
Include (0/1)
Use this checkbox as follows:
Unchecked - To exclude an audit file in the next purge routine
Checked - To include an audit file in the next purge routine
Number of Days
Enter the number of days prior to the run date for which you want to keep audit file records. You can enter a maximum of 999 days.
Functions
Refresh (F5)
Use this to re-set the selection back to the state before any changes.
Select All (F13)
Use this to select all files.
Select Update (F8) to update any changes and create the appropriate records. To run the purge routine, run the Purge Audit Files Submit Purge task.
Infor System21 Inventory Management | 619

860BUtilities
Purge Audit Files Submit Purge [12/INUD] Before you use this task, select the audit files you want to include in the purge routine using the Audit File Purge Maintenance task.
Use this housekeeping task to start the audit file purge routine.
Note: This task also purges Location Control audit files if you are using Location Control.
Note: You should run this task regularly, using Machine Manager.
Audit File Purge Selection Window To display this window, select the Purge Audit Files Submit Purge task.
Use this window to select the application you require.
Fields
Application
Enter an application code to submit the selected audit files for one application or leave this field blank to submit all audit files selected in the Audit File Purge Maintenance task.
Alternatively, use the prompt facility to select from the Select Application pop-up.
The software calculates the purge date for each audit file by subtracting the entered number of days from the current system date. It purges any audit records created on or before the calculated purge date.
Note: After the routine is complete, the submitted audit files remain checked. This is so that you can keep a fixed number of days' records and run the purge routine without using the Audit File Purge Maintenance task.
Select Submit (F8) to process the purge.
620 | Infor System21 Inventory Management

860BUtilities
Purge Audit Files Machine Manager Parameters [13/INUD] Use this task to select applications whose audit files you wish to include in the purge routine when it is run through Machine Manager.
Note: This task also purges Location Control audit files if you are using Location Control.
Note: You should run this task regularly, using Machine Manager.
Use this task to:
• Remove items from the Deleted Items file when there is no sales invoice or sales analysis data. • Print a list of items that can be re-used. • Delete 'orphaned' item details.
Caution: This task processes all of the items on the Deleted Items file within a company. The job’s duration depends on the number of items it has to process.
Note: It should be run periodically if you wish to re-use item codes.
Audit File Purge Control - Machine Manager Parameters Window To display this window, select the Purge Audit Files Machine Manager Parameters task.
Use this window to select the applications you require.
Fields
Application
Enter or select one or more applications in which you require audit files to be purged regularly.
Alternatively, use the prompt facility to select from the Select Application pop-up.
Purge Selection
Enter one of the following:
Every Run (0) - To purge selected audit files for this application in every run
Next Run Only (1) - To purge selected audit files for this application in the next run only
Select Update (F8) to update the appropriate records. This purge itself is run from an entry in Machine Manager.
Infor System21 Inventory Management | 621

860BUtilities
Company Deletion [21/INUD] Use this task to delete all the data for specified companies. You would normally use this task in a test environment. The purpose of this task is to remove all data from Inventory Management for one or more selected companies. This occurs in three steps:
1 Copy to a temporary library the data for the companies that you want to retain.
2 Clear the physical files in the live library.
3 Copy back the data from the temporary library to the live library.
Enter the libraries that contain the relevant data for the deletion. If bespoke libraries are present, you should run this task separately for each library.
When you delete a company, the definitions of all item records for that company are also removed from the following files:
• Item Catalogue • Publication Details • Published Item Details
All records for the selected company as either the Published By company or Published To company are removed from the database.
Company Deletion Window To display this window, select the Company Deletion task.
Use this window to select the company that you want to delete.
Caution: This utility will delete records within all inventory files for a company.
Fields
Enter the code for company you want to delete and then press Enter. The company you are currently using is the default.
Press Enter to confirm the deletion and submit a batch job to delete the requested companies.
622 | Infor System21 Inventory Management

860BUtilities
Delete History and Movements [22/INUD] Use this task to purge data from the Stock Movement and Stock History files. Inventory deletes a record from the appropriate file when its week number is before the current week being processed, modified by the number of weeks entered as a parameter.
Caution: Take care to control history deletion, as the Stock History Records are used to determine average usage.
Delete History and Movements Window To display this window, select the Delete History and Movements task.
Use this window to select the information that you want to retain after the purge has occurred.
Fields
No of Weeks Movement to Retain
Enter up to three numeric characters to specify the number of weeks of stock movements you want to retain. The default is 60 weeks. Enter 999 to retain all movements.
No of Weeks History to Retain
Enter up to three numeric characters to specify the number of weeks of stock history records you want to retain. The default is 60 weeks. Enter 999 to retain all history records.
Press Enter to confirm the input parameters, and submit the job to remove movement and history records.
Infor System21 Inventory Management | 623

860BUtilities
Delete FIFO/Lot Details [23/INUD] Use this task to purge data from the FIFO Details file (INP83). You can also purge details from the Batch/Lot file (INP80).
This deletes any FIFO records with zero balances, and batch/lot records with zero balances and no stock movements.
Delete FIFO/Lot Details Window To display this window, select the Delete FIFO/Lot Details task.
Use this window to specify the selection criteria upon which to base your purge.
Fields
Cut-off Date
Enter or select the cut-off date for the FIFO details deletion. You can only delete records up to and including the cut-off dates.
Location
Use this checkbox as follows:
Unchecked - To retain batch/lot details
Checked - To delete batch/lot details
Cut-Off Date for Location
Enter the cut-off date for the batch/lot details deletion. Again, you can only delete records up to and including the cut-off dates.
Press Enter to confirm the selection criteria and submit the job to remove FIFO details and batch/lot records.
624 | Infor System21 Inventory Management

860BUtilities
Purge Stock Counts [24/INUD] Use this task to purge completed counts by individual count or by a count range basis.
The count headers and their associated count recommendations are deleted with full auditing to system standards. In addition, the associated count lists and their details are deleted.
You can choose to purge incomplete outstanding counts, so associated items are taken off count (for item-based counts) and associated locations are taken off count (for location-based counts).
Purge Stock Counts Window To display this window, select the Purge Stock Counts task.
Use this window to specify the selection criteria upon which to base your purge.
Fields
Stockroom
Enter the stockroom for which at least one count has been requested.
Alternatively, use the prompt facility to select from the Stockroom Selection pop-up.
Count Number From/To
You can optionally enter a single count number or a range of count numbers.
You can use the prompt facility to select from the Select Purge Count Number pop-up.
If you define a range, the From and To count numbers need not exist.
If you leave the To count number blank, it defaults to the From count number.
If you select a single count number, it must exist, it must be complete (reconciled) and the Purge Incomplete Counts field should be left unchecked.
Note: You must check the Purge Incomplete Counts field if you want to purge incomplete counts.
Purge Incomplete Counts
Use this checkbox as follows:
Unchecked - Not to purge incomplete counts as well as reconciled counts
Checked - To purge incomplete outstanding counts as well as reconciled counts
Select Submit (F8) to submit the batch job to carry out the purge.
Infor System21 Inventory Management | 625

860BUtilities
Purge Count Details/Action Lists [25/INUD] Use this task to purge completed count list details, by date.
The count lists and all associated details are deleted when their date of creation is less than or equal to the date entered.
Count Details and Action List Purge Window To display this window, select the Purge Count Details/Action Lists task.
Use this window to select the stockroom for which you want to process the purge, and the cut off date for the purge itself.
Note: The date entered defaults to the period end date for the current period minus two.
Fields
Stockroom
Enter the stockroom code for which purge has been requested.
Alternatively, use the prompt facility to select from the Stockroom Selection pop-up.
Purge Up To
Enter or select the date up to which you want to delete completed details.
Select Submit (F8) to submit the job to carry out the purge.
626 | Infor System21 Inventory Management

860BUtilities
Delete Shipment Receipts [26/INUD] Select the Delete Shipment Receipts task
Use this task to delete all confirmed shipment reports from the database.
Note: This requires exclusive use of the application.
There are no selection criteria. Select Confirm Submit (F8) to process the batch job.
Set Balance Quantities to Zero [27/INUD] This task sets the Inventory primary and secondary balances for the stockroom, lot, FIFO and location to zero.
This task does not zeroise the corresponding warehouse location balances.
Caution: It is recommended that you use this task within a test environment, as it does not generate any adjustment records
There are no selection criteria for this task. Select Confirm Submit (F8) to process the batch job.
Infor System21 Inventory Management | 627

860BUtilities
Purge Location Allocation Details [30/INUD] Select the Purge Location Allocation Details task.
Use this task to delete completed event allocation details.
Note: You should run this task regularly, using Machine Manager.
There are no selection criteria for this task. Select Confirm Submit (F8) to process the purge.
628 | Infor System21 Inventory Management

860BUtilities
Item Deletion Overview The basic processing sequence is:
• Create a list. • Add items to it. • Validate some or all of these items. • Delete the items. • Remove items from the Deleted Items file.
You can group items for deletion into lists. You can create as many lists as you need. A list can be in one of four states:
• 1 - Incomplete The list contains undeleted items and you can select the list for maintenance, validation or deletion.
• 2 - Validation or Deletion Pending You have selected the list for processing and the job is now waiting on a batch job-queue. You control when the job runs via the usual Application Manager methods. This status prevents the list from being selected for further processing.
• 3 - In Use The Validation or Deletion routine is in progress. This status prevents the list from being selected for further processing.
• 9 - Complete All items on the list have been deleted. You can view, print or delete these lists. Completed lists can be retained for audit purposes as they are ignored by the Item Deletion routine.
Only the user who created the list can maintain or process it. Other users can only view or print a list. Having created a list, you then add the items you want to delete to it. An item can only be active on one list at a time. Items on a list can be in one of six active states and one inactive state:
Active states:
0 - Awaiting Validation
1 - Validation Requested
2 - In Stock
3 - Validated
7 - Validation Error
8 - Deletion Error
Inactive state:
9 - Deleted
Infor System21 Inventory Management | 629

860BUtilities
Maintain Lists and Validate Items [31/INUD] Use this task to perform the following processes:
• Create a list. • Add items to the list, item by item or by using ranges of item and item attribute codes. In both
cases, items can be immediately excluded when they have: • Inventory stock balances (this is optional) • Receipts since a user-defined date • Issues since a user-defined date
Note: You could use the range facility to find items that are potential candidates for deletion. • Items are added to the list with a status of Awaiting Validation when they pass the three tests
above. When items with stock can be added, such items are added to the list with status of In Stock when they have inventory stock balances.
• Remove items from the list. You can do this regardless of their status. • Validate some or all of the items on the list. You do this by setting the item’s status to Validation
Requested. • This allows a large list to be processed in small sections. • It prints a report of ineligible items with the first occurrence of each validation rule’s error for
each item. For example, an item that appears on three sales orders and seven production bills of material will produce two errors.
• Delete the list. • Enquire on an item’s stockroom details via the All Stockrooms for an Item enquiry. • Print the list.
An item owned by the current company that is pending transfer to other companies cannot be deleted.
When the definition of an item is deleted, records for that item are also removed from the following files:
• Item Catalogue • Publication Details • Published Item Details • All records for the item with the selected company as either the Published By company or
Published To company are removed from the database.
630 | Infor System21 Inventory Management

860BUtilities
Create List Pop-up To display this pop-up, select Add (F6) on the Item Deletion List Maintenance Selection window.
This pop-up will also be displayed when the user has no current list to maintain and the Maintain Lists and Validate Items task is selected.
Use this pop-up to create a list for use during item deletion processing.
Fields
List
Enter a list reference. When an item is being added, this will display the list to which it is being added.
Add Items By
Select one of the following to choose how items are to be selected:
List (1)
Range (2)
Exclude Items with Stock
Select one of the following to choose whether to include items with physical stock:
Include (items with physical stock) (0)
Exclude items with physical stock (1) (default)
Issued After
Enter or select a date to exclude items issued after this date.
Received After
Enter or select a date to exclude items received after this date.
Press Enter to proceed with the selected choices.
Infor System21 Inventory Management | 631

860BUtilities
Item Deletion List Maintenance Selection Window To display this window, select the Maintain Lists and Validate Items task. This window will be displayed if you already have a list to display. Otherwise, the Create List pop-up will be displayed.
Use this window to select and maintain item deletion lists.
Fields
List
This field displays the list reference.
Created
This field displays the date on which the list was created.
Status
This field displays the deletion status for the list.
User ID
This field displays the ID of the user who created the list.
Options
Select List
Use this to select the list for maintenance.
Delete List
Use this to delete the list.
Print List
Use this to print the list.
Functions
Add (F6)
Use this to add a further list. The Create List pop-up will be displayed.
Include Other Users (F13)
Use this to include lists created by other users. These may only be viewed or printed. This will toggle between including and excluding other users' lists.
Select a list to add further items.
Alternatively, select Add (F6) to create more lists.
632 | Infor System21 Inventory Management

860BUtilities
Item Deletion List Maintenance by List Window To display this window, select List in the Add Items By field on the Create Lists pop-up.
Use this window to add items to an item deletion list.
Fields
Item
Enter an item to add it to the deletion list.
Alternatively, use the prompt facility to select from the Item Master Scan pop-up.
Options
Remove
Use this to remove an item from the list.
Select Update (F8) to update the items on the list and return to the Item Deletion List Maintenance Selection window.
Item Deletion List Maintenance by Range Window To display this window, select Range in the Add Items By field on the Create Lists pop-up.
Use this window to select ranges of items to be added to an item deletion list.
Fields
List
This field displays the selected list reference.
Select All (0/1)
Enter one of the following for each of the selection criteria listed:
0 - Not to select any
This is the default value for the Item field.
1 - To select all in the entered range
This is the default for all other fields.
From/To
Item
You can optionally enter an item range for addition to the list.
Infor System21 Inventory Management | 633

860BUtilities
Item Type
You can optionally enter an item type range for addition to the list.
Item Class From/To
You can optionally enter an item class range for addition to the list.
Major Group From/To
You can optionally enter a major group range for addition to the list.
Minor Group From/To
You can optionally enter a minor group range for addition to the list.
Division From/To
You can optionally enter a division range for addition to the list.
Sub Division From/To
You can optionally enter a sub division range for addition to the list.
Note: Items already awaiting deletion are automatically excluded.
Press Enter to update the items on the list and return to the Item Deletion List Maintenance Selection window.
Item Deletion List Maintenance Window To display this window, select a list on the Item Deletion List Maintenance Selection window.
Use this window to add, remove, validate and enquire on items in an item deletion list.
Fields
Position To
Enter an item to re-display the window starting at the item selected. Part of a code may be entered.
Select (Sel)
Select one of the following:
Request validation (2)
Remove from list (4)
Item enquiry (5)
Item
This field displays the item.
634 | Infor System21 Inventory Management

860BUtilities
Description
This field displays the item description.
List Status
This field displays the item's deletion status.
Functions
Add (F6)
Use this to add a further item.
Submit Validation (F8)
Use this to validate all items selected.
Validate All (F9)
Use this to validate all the items on the list.
Infor System21 Inventory Management | 635

860BUtilities
Delete Items [32/INUD] Use this task to select one or more of your own lists for deletion processing.
When production details are deleted, all costing data is deleted also.
This routine:
• Ignores items that are Awaiting Validation or Deleted but processes all others on the list • Re-validates each item again in case the situation has changed • Transfers the item’s details to the Deleted Items file • Deletes the data for each eligible item, one item at a time • Prints a status report for each item processed • Deletes the item from the Deleted Items file when there is no sales invoice or sales analysis data
This allows the item code to be re-used.
An item owned by the current company that is pending transfer to other companies cannot be deleted.
When the definition of an item is deleted, records for that item are also removed from the following files:
• Item Catalogue • Publication Details • Published Item Details
All records for the item with the selected company as either the Published By company or Published To company are removed from the database.
Item Deletion List Selection Window To display this window, select the Delete Items task.
Use this window to select one or more of your own lists for deletion processing.
Fields
List
This field displays the list reference.
Created
This field displays the date on which the list was created.
Status
This field displays the deletion status for the list.
636 | Infor System21 Inventory Management

860BUtilities
User ID
This field displays the user who created the list.
Options
Select List
Use this to select a list for processing.
Select Submit (F8) to process the selected lists.
Infor System21 Inventory Management | 637

860BUtilities
Reuse Deleted Items [33/INUD] Select the Reuse Deleted Items task.
Use this task to:
• Remove items from the Deleted Items file when there is no sales invoice or sales analysis data. • Print a list of items that can be re-used. • Delete 'orphaned' item details.
Caution: This task processes all of the items on the Deleted Items file within a company. The job’s duration depends on the number of items it has to process.
Note: This task should be run periodically if you wish to re-use item codes.
There are no selection criteria for this task. Select Confirm Submit (F8) to submit the batch job to carry out the process.
638 | Infor System21 Inventory Management

860BUtilities
Database Integrity [1/INUI] Use this task to check the integrity of the item data across several files. These are:
• Item Master - INP35 • Stockroom Balance - INP60 • Stockroom Profile - INP20 • Stock Location - INP80 • FIFO Costs - INP83
This task does not make any automatic adjustments, but produces a report highlighting any errors for manual amendment.
Note: You should run this on a weekly basis initially, run monthly, quarterly, and finally on an ad hoc basis. It is suggested that you run this task in the Bottom-Up Validation format.
Note: This may be submitted via Machine Manager so that it can be scheduled to run out-of-hours on a regular basis. To do this, you will need to create Machine Manager Group Schedules to hold these dates and use these instead of the weekly mask in the auto-day start or auto-day end entry.
Inventory Integrity Menu Window To display this window select the Database Integrity task.
Fields
Company Code
Enter the company code of the company for which you want to perform integrity processing.
Enter Option
Select one of the following:
Top-down validation (1) (default)
Bottom-up validation (2)
Message Type
Select one of the following:
Warning and serious messages will print (1)
Serious messages only will print (2) (default)
Processing
The routine processes as follows:
Top-down Validation
This reads the Item Master Records and performs the following integrity checks:
Infor System21 Inventory Management | 639

860BUtilities
1 That each item has at least one item stockroom record associated with it
2 A warning message is printed if this is not the case.
3 That a stockroom profile record exists for each stockroom defined on a stockroom balance record
4 A serious error message is printed if this is not the case.
5 That at least one FIFO cost record exists for stockroom balances associated with items for which FIFO costing is specified
6 A warning message is printed if this is not the case.
7 That, for FIFO costed items, the sum of the FIFO balance quantities is equal to the stockroom balance physical stock
8 A serious error message is printed if this is not the case.
9 The presence of FIFO records for items that are not FIFO costed
10 If any such records are found, a serious error message is printed.
11 That, for lot-controlled items, the sum of the balance is equal to the stockroom balance physical stock
12 A serious error message is printed if this is not the case.
13 The presence of lot records for items that are not defined as lot-controlled
14 If any such records are found, a serious error message is printed.
Bottom-up Validation
This is processed as above, but in reverse, and a similar report is produced.
Functions
Messages (F6)
Use this to display messages.
Press Enter to start the validation process.
640 | Infor System21 Inventory Management

860BUtilities
Reconciling Demand You can use two tasks to reconcile demand.
• Allocation Reconciliation, which reconciles stockroom balance record allocation totals to Sales, Transfer and Production orders
• On Order Reconciliation, which reconciles stockroom balance record on order totals to Purchase and Production orders
Note: You should run these on a weekly basis initially, run monthly, quarterly, and finally on an ad hoc basis.
Infor System21 Inventory Management | 641

860BUtilities
Allocation Reconciliation [2/INUI] Use this task to update the Stockroom Balance file (INP60).
The allocated quantities recorded against sales order lines for container items (i.e. those with an order line type of 4) are excluded from this process.
Container lines written to an order as a result of their association with the ordered products are not allocated against a stockroom.
Allocation Reconciliation can be performed for a single item or for all items.
Allocation Reconciliation Window To display this window, select the Reconcile Allocated Stock task.
Fields
Stockroom
Enter a valid stockroom code to limit the reconciliation process to a specific stockroom.
Alternatively, use the prompt facility to select from the Stockroom Selection pop-up.
If this field is left blank, reconciliation of the allocated balance is performed for all stockrooms within the company.
Item
Enter a valid Item code to limit the reconciliation process to a specific item.
Alternatively, use the prompt facility to select from the Item selection pop-up.
Location Map [15/INUM] If you are using Location Control, you can use this task to define the locations within a stockroom. Each location may be up to 12 characters long and locations may be created in ranges. You can also define the status of each location as being either in use or suspended.
There are two ways of accessing this task. You can access the Location Map as part of the Inventory Company Profile task, or you can use this task to access it.
Location Map Window To display this window, select the Location Map task.
642 | Infor System21 Inventory Management

860BUtilities
Fields
Stockroom
Enter a valid stockroom code to limit the reconciliation process to a specific stockroom.
Alternatively, use the prompt facility to select from the Stockroom Selection pop-up.
If this field is left blank, reconciliation of the allocated balance is performed for all stockrooms within the company.
Do You Wish the Reconciled Quantity Allocated to be Updated?
Use this checkbox as follows:
Unchecked - To report the differences with no update to the stockroom balance
Checked - To use the software-calculated allocated quantity to update the stockroom balance record where differences are found
Press Enter to confirm your selection and submit the job.
Infor System21 Inventory Management | 643

860BUtilities
On Order Reconciliation [3/INUI] Use this task to update the Stockroom Balance record (INP60).
On Order Reconciliation Window To display this window, select the On Order Reconciliation task.
Fields
Stockroom
Enter a valid stockroom code to limit the reconciliation process to a specific stockroom.
Alternatively, use the prompt facility to select from the Stockroom Selection pop-up.
If this field is left blank, reconciliation of the on order balance is performed for all stockrooms in the company.
Do You Wish the Reconciled Quantity on Order to be Updated?
Use this checkbox as follows:
Unchecked - To report on the differences without updating the stockroom balances
Checked - To use the software-calculated order quantity to update the stockroom balance record where differences are found
Press Enter to confirm your selection and submit the job.
644 | Infor System21 Inventory Management

860BUtilities
Audit Negative FIFO [4/INUI] Select the Audit Negative FIFO task.
If you process an issue before making the appropriate receipt, this can result in a negative figure in the FIFO record. Use this task to print a list of any records that have been created with negative costs.
Functions
Confirm Submit (F8)
Select Confirm Submit (F8) to submit a batch job
There are no selection criteria for this task. Select Confirm Submit (F8) to process the batch job.
Infor System21 Inventory Management | 645

860BUtilities
Rebuild Balances from Locations [5/INUI] If you are using Location Control, you can use this task to re-align Inventory balances and rotation balances with the location balances if they do not match.
You can run this task in report only mode or report and update mode for one or all location-controlled stockrooms. There are two stages to the rebuild balances process:
• Rebuild from the location balances: • This compares the location balance to the sum of the rotation date balances (for non-lot-
controlled items). If the sum of the rotation date balances exceeds the location balance, it consumes the rotation date balances in FIFO (First In First Out) sequence. If the sum of the rotation date balances is less than the location balance, it adds the difference to the oldest balance or writes a new balance record with the current system date.
• This compares the lot or item balances to the sum of the location balances. If the sum of location balances differs from the lot or item balance, it adjusts the lot or item balance accordingly.
• This deletes any empty location balance records. An empty location balance has zero physical and frozen stock.
• Create missing location and rotation balances: • The rebuild stage relies on the presence of a location balance. This creation stage caters for
situations where there is an Inventory balance without a corresponding location balance. This situation should not occur after the initial data take-on process. This stage uses the same logic as the Location Balances Data Take-on task and will create any missing item/stockroom profiles if required.
Each stage will produce a report. If you run this task in report mode only then no balances are updated or deleted.
Caution: This task does not check that the sum of the lot balances matches the item's stockroom balance. To do this, use the Data Integrity task. This task does not detect items or lot balances with no corresponding location balance, as this situation should not occur
Rebuild Balances from Locations Window To display this window, select the Rebuild from Locations task.
This window is the same as that used in the Location Balance Data Take-on task
Fields
Stockroom
Enter the stockroom whose location balances you want to rebuild. Leave this field blank to rebuild location balances for all location-controlled stockrooms within your company.
Alternatively, use the prompt facility to select from the Stockroom Selection pop-up.
646 | Infor System21 Inventory Management

860BUtilities
Update
Select one of the following:
Report (0) - To produce a report but not to update the location balances
Report and Update (1) - To produce the report and update the location balances
Functions
Submit (F8)
Select Submit (F8) to submit a batch job
Select Submit (F8) to process the report and, optionally, update the balances.
Infor System21 Inventory Management | 647

860BUtilities
Adjust Rotation Date Balances [6/INUI] You can only use this task if your company is using Location Control.
Use this task to adjust the rotation balances so that they match the actual stock balances’ rotation dates in a location.
There are a number of reasons why these two balances might not match:
• The picker does not pick the oldest stock every time he is requested to issue stock. • The newest stock is not returned when a receipt is returned. • Stock has been transferred between locations or stockrooms. • Stock has been returned from a customer.
Note: These kinds of discrepancies are normal if you use this form of stock rotation to control your stockroom balances. It is recommended that you use this task whenever you consider the discrepancies are beginning to affect the quality of the stock rotation you are achieving.
Adjust Rotation Date Balances Selection Window To display this window, select the Adjust Rotation Date Balances task.
Use this window to select the item, stockroom and location whose rotation date balances you want to adjust.
Fields
Item
Enter the item code for the item you want to maintain. This item must be stocked in a location-controlled stockroom, it must not be lot-controlled, and must not be a kit parent item.
Alternatively, use the prompt facility to select from the Item Master Scan pop-up.
Stockroom
Enter the stockroom code for the stockroom you want to maintain. This stockroom must be location-controlled.
Alternatively, use the prompt facility to select from the Stockroom Selection pop-up.
Location
Enter the location that you want to maintain.
Alternatively, use the prompt facility to select from the Location Prompt pop-up.
Note: If your item has only a single, default location defined against it, you do not need to enter the location code.
Press Enter to display the Adjust Rotation Date Balances Details window.
648 | Infor System21 Inventory Management

860BUtilities
Adjust Rotation Date Balances Details Window To display this window, press Enter on the Adjust Rotation Date Balances Selection window.
Use this window to add, amend or delete rotation date balances for your selected item/stockroom/location combination.
Note: Whether you add, amend or delete a rotation balance, the same pop-up is displayed, but the title of that pop-up reflects the action that you have chosen.
The top of the window displays details of the selected item code and description, the stockroom and location, and the location balance in issue units, and the sum of the rotation date balances.
The middle of the window displays the receipt (or creation) date and the time of that transaction, along with the unique reference allocated to that transaction, and the quantity affected by that transaction.
Options
Amend
Use this to select the balance for which you want to amend details.
Delete
Use this to select the balance you want to delete.
Functions
Add (F6)
Use this to create a new rotation data balance.
Note: If the balance and the cumulative balance do not match, you cannot use Exit (F3) or Previous (F12) to leave the window.
Select a line with Amend or Delete or select Add (F6) to display the Amend Rotation Date Balances pop-up.
Amend Rotation Date Balances Pop-up To display this pop-up, select Amend against to the balance that you want to amend on the Adjust Rotation Date Balances Details window.
Alternatively, select Delete against to the balance that you want to delete on the Adjust Rotation Date Balances Details window.
Alternatively, select Add (F6) on the Adjust Rotation Date Balances Details window.
Use this pop-up to amend your selected rotation date balance.
Note: The title of the pop-up reflects the action that you have chosen.
Infor System21 Inventory Management | 649

860BUtilities
Fields
Date
This field displays the date of the selected rotation date balance. You can change it to any date up to the current system date, if necessary.
If you are adding a new rotation date balance, this field defaults to the current system date.
If you are deleting a balance, you cannot change this information.
Time
This field displays the time associated with the transaction. You cannot enter or select a date and time combination that is in the future.
If you are adding a new rotation date balance, this field defaults to the current system time.
If you are deleting a balance, you cannot change this information.
Quantity
This field displays the rotation date balance.
If you are entering a new rotation date balance, this value must be greater than zero.
If you are deleting a balance, you cannot change this information.
Functions
Delete (F11)
This is only displayed if you have chosen to delete a rotation date balance. Use this to confirm your intention to delete the selected balance.
Press Enter to add or amend the rotation date as required and re-display the Adjust Rotation Date Balances Details window.
650 | Infor System21 Inventory Management

860BUtilities
Install Link to AFI for Stock Extract [1/INUA] Select the Install Link to AFI for Stock Extract task.
Where you have linked AFI to Inventory Management, the software extracts inventory movements when you run this task. AFI creates transactions for the Inventory movement types as defined on the journal conditions set up for Inventory Management. When you select the AFI to General Ledger Update task, these are posted to the General Ledger as journals.
There is no facility to automatically extract transactions and post to the General Ledger without operator intervention within Inventory Management, unlike Sales Invoicing. It is more appropriate to control the extract of Inventory movement transactions on a manual basis, because of the wide range of Inventory movement types, and the likely number of transactions.
If you have not linked AFI to Inventory Management, purchase receipts made within Purchase Management update General Ledger stock accounts when supplier invoices are matched to goods received notes and the logged invoices are confirmed in the Accounts Payable application.
Note: When you receive goods into Inventory Management AFI automatically posts details to the General Ledger Goods Purchased Account.
As well as the AFI link status being set to active, there must also be one or more live journals. The facility to set up a journal as live is part of the Journal Conditions Maintenance facility.
Note: You must set the Journal Condition field to test for a valid value when you want to read date from the source application. For example, you must set up the Journal Condition field to test for a specific Inventory movement type or range of types.
Select Confirm Submit (F8) to process the link.
AFI Data Dictionary The following files, and their associated fields, are available for defining how selection and consolidation or both are to take place.
Item Master
• Company Number • Item Code • Item Type • Item Class • Division • Sub-Division • Item Group Major • Item Group Minor • Tax Code • Discount Group • Stock Source
Infor System21 Inventory Management | 651
860BUtilities
• General Ledger Stock Account • General Ledger Cost of Sales Account • General Ledger Sales Account • General Ledger Price Variance Account • Warranty Type • Storage Method • Costing Method • Sub-Contracted Item • Resource Code
Inventory Movement
• Company Number • Item Code • Stockroom Code • Transaction Type • Reference Number • Movement Type • Movement Reason Code • Movement Source • To/From
Stock Balance
• Item Type • Item Class • ABC Override • ABC Class
Stockroom
• Stockroom Usage Code • Department Code
The following fields are defined as quantities that are available to post, (refer to Quantity field to post within posting definitions).
• Daily Movements • Movement Quantity (Movement UOM) • Movement Quantity (Item Master Issue UOM)
The following fields are available on the Inventory Movement file for posting as a value to the General Ledger.
• Total Movement Cost (Good Cost plus Landed Cost) • Secondary Cost (Landed Cost) • Net Cost (Good Cost)
652 | Infor System21 Inventory Management

860BUtilities
Customer Order Issue has an Inventory Movement Type of C. You can use it to perform a negative adjustment.
Sundry Issue has an Inventory Movement Type of S. You can use it to perform a negative adjustment.
Purchase Order Receipt has an Inventory Movement Type of P. You can use it to perform a positive adjustment.
Sundry Receipt has an Inventory Movement Type of R. You can use it to perform a positive adjustment.
Adjust Physical Stock has an Inventory Movement Type of A. You can use it to perform both a positive and negative adjustment.
Adjust Allocated Stock has an Inventory Movement Type of L. You can use it to perform either a positive or a negative adjustment.
Adjust Frozen Stock has an Inventory Movement Type of F. You can use it to perform either a positive or a negative adjustment.
Transfer Out has an Inventory Movement Type of O. You can use it to perform a negative adjustment.
Transfer In has an Inventory Movement Type of I. You can use it to perform a positive adjustment.
Purchase Order has an Inventory Movement Type of U. You can use it to perform a positive adjustment.
Production Issue has an Inventory Movement Type of M. You can use it to perform a negative adjustment.
Production Receipt has an Inventory Movement Type of N. You can use it to perform a positive adjustment.
Production Adjustment has an Inventory Movement Type of W. You can use it to perform either a positive or a negative adjustment.
Adjust In-Transit has an Inventory Movement Type of T. If you process a Transfer Out this is a positive adjustment, but if you process a Transfer In this is a negative adjustment.
Direct Delivery has an Inventory Movement Type of D. You can use it to perform a negative adjustment.
Frozen Transfer Out has an Inventory Movement Type of G. You can use it to perform a negative adjustment.
Frozen Transfer In has an Inventory Movement Type of H. You can use it to perform a positive adjustment.
Transformation has an Inventory Movement Type of J. You can use it to perform either a positive or a negative adjustment.
Frozen Issue has an Inventory Movement Type of K. You can use it to perform a negative adjustment.
Infor System21 Inventory Management | 653

860BUtilities
Back-to-back has an Inventory Movement Type of Q. You can use it to perform a positive adjustment.
Activating the Link It is recommended that you set Journal Conditions to test, and use the AFI Test task to prove them before you activate AFI and set Journal Conditions to Live.
Inventory movements are not posted to the General Ledger until you activate AFI. When AFI is active, postings to the General Ledger are made each time Inventory movements are extracted.
You must take the following steps to activate AFI:
1 Use the Maintain Journal Condition task from AFI Maintenance to change the status of your journal conditions from Inactive (0) or Under Test (1) to a status of Live (2). You do not need to do this for all journal conditions - only those which you are ready to activate.
2 Use the Maintain Application task from AFI Utilities to change the status of the AFI link from Inactive to Active using F8. At the same time check the validity of your consolidation settings on this display.
You can now use AFI to process Inventory movements to create General Ledger journals, according to your rules and definitions, from the point when you next create movements within the Inventory Management application and extract them.
654 | Infor System21 Inventory Management

860BUtilities
Stock Extract - Test Mode [2/INUA] Use this task to run test extracts of data from Inventory Management and create a General Ledger journal.
Note: No actual updating of data takes place, either within Inventory Management or General Ledger. This is simply a simulation of the effect of creating the specified journals for the nominated company.
You can generate three reports:
• General Ledger Postings - a list of the postings generated • Exceptions Report - displaying, for example, any balancing postings automatically created for
an unbalanced journal • Error Report - displayed error conditions encountered
Prompt for Inventory Trial Extract and Update Window To display this window, select the Stock Extract - Test Mode task.
Use this window to select the source company and type of extract you want to process.
Fields
Source Company
Enter the source company whose data you want to use for this trial extraction.
Alternatively, use the prompt facility to select from the Select Company pop-up.
Work with Inventory Movements Not Yet Processed
Use this checkbox as follows:
Unchecked - To specify a range of transaction numbers on which you want to base the trial
Checked - To use data that has not been extracted in live operation mode by AFI
Work with Inventory Movements From/To
This is only relevant if the previous field is unchecked. Specify here the range of transaction dates in the source application you want to use in this trial. If you want to use only the Inventory movements that occurred on a single day, specify the same date in the From and To entries.
Transactions within the source application that can be used for this trial are displayed in a pop up.
Type of Journal Definition to Use
Select one of the following:
Under Test (1) - To use journal definitions that are specified as being under test
Infor System21 Inventory Management | 655

860BUtilities
LIVE (2) - To use journal definitions that are specified as being live
Both (3) - To use both test and live journal definitions
Consolidate Postings
Use this checkbox as follows:
Unchecked - For no consolidation to take place, even though you may have postings defined as consolidatable
Checked - For consolidation to take place on those postings defined as consolidatable
Press Enter to validate the entries and then select Proceed (F8) to process the trial extraction.
656 | Infor System21 Inventory Management

860BUtilities
Stock Extract - Live Mode [3/INUA] Use this task to initiate the extract of Inventory Management transactions from the Inventory Movements file, for processing by AFI to create General Ledger journals.
AFI Pop-up To display this pop-up, select the Stock Extract - Live Mode task.
Note: If you have not activated the link between Inventory Management and Advanced Financial Integrator, a warning message is displayed.
Use this window to select the company whose transactions you want to extract.
Fields
Company
Enter the company code of the company for which you want Inventory Management transactions extracted.
Alternatively, use the prompt facility to select from the Select Company pop-up.
Transactions are extracted according to the selection criteria set up on your journal condition.
Select Proceed (F8) to continue with the extraction.
Infor System21 Inventory Management | 657

860BUtilities
Install Link to AFI for Container Extract Select the Install Link to AFI for Container Extract task.
You can choose whether you wish to analyse movements of containers to/from customers within the General Ledger, thus giving you a view of the value (and quantity) of your organisation's containers that currently reside on customer site.
The Install AFI Link for Container Extract task is the initial action to install the Container AFI application. It creates the AFI data dictionary for the fields available for this application (application code is IC (Inventory Containers)).
The next step is to create at least one live Journal for the IC application using task 1/FIM.
This is then followed by task 1/FIU (Maintain Application) where the IC application status is set to a status of Live.
Once this initialisation process has been carried out, the container movements can be extracted whenever you wish to update the General Ledger via AFI.
When you select the extract option (described in a later section), AFI creates transactions for the container movement types as defined on the journal conditions set up for Inventory Container Movements. When you select the AFI to General Ledger Update task, these are posted to the General Ledger as journals.
There is no facility to extract container movement transactions automatically and post to the General Ledger without operator intervention within Inventory Management, unlike Sales Invoicing. It is more appropriate to control the extract of container movement transactions on a manual basis, because of the different container movement types and the likely number of transactions.
AFI Data Dictionary The following files, and their associated fields, are available for defining how selection and consolidation or both are to take place:
Item Master
• Company Code • Costing Method • Container Type • Default Cost of Sales Account • Default GL Account • Item Discount Group • Division • Default Price Variance Account • Default Sales GL Account • Item Class • Item Group Major
658 | Infor System21 Inventory Management

860BUtilities
• Item Group Minor • Item Number • Item Type • Resource Code • Sub-contract Part • Sub-division • Stock Source • Storage Method • Tax Code • Warranty Type
Container Tracking Detail
• Account Type • Account Number • Delivery Sequence • Source Document • Container Item
The following fields are defined as quantities that are available to post (refer to the Quantity Field to Post within Posting Definitions):
Container Tracking Detail
• Container Quantity
The following fields on the Container Tracking Detail file to post as a value to the General Ledger:
• Value
Activating the AFI Container Movements Link
It is recommended that you set Journal Conditions to test and use the supplied AFI Test utility to prove them before setting them to live.
Container movements are not posted to the General Ledger until you activate the link. When the Container Movements Link has been activated, postings are made to the General Ledger each time the Container Extract - Live Mode task is requested.
Use the Maintain Journal Condition task from the AFI Maintenance menu to change the status of your journal conditions from Inactive (0) or Under Test (1) to a status of Live (2). You do not need to do this for all journal conditions, just those you are ready to activate.
Use the Maintain Application task from the AFI Utilities menu to change the status of the Container Movements Link form Inactive to Active using Activate Link (F8). At the same time, check the validity of your consolidation settings on the screen. The process of activating the link automatically sets all existing container movements to a status of Posted, thus ensuring that duplicate postings of container movements are never made.
Infor System21 Inventory Management | 659

860BUtilities
You can now use AFI to process Container Movements to create General Ledger journals, according to your rules and definitions, from the point when you create new container movements and extract them.
Select Confirm Submit (F8) to process the link.
Container Extract - Test Mode [12/INUA] AFI journals may be established to generate General Ledger journals from the information held on the Container Tracking (Detail) file.
Use this task to take a trial extract of container tracking data from Inventory Management and create a General Ledger journal.
Note: No actual updating of data takes place within either Inventory Management or General Ledger.
This is simply a simulation of the effect of creating the specified journals in the nominated company.
You can generate three reports:
• General Ledger Postings - a list of the postings generated • Exceptions Report - showing, for example, any balancing transactions automatically created for
an unbalanced journal • Error Report - showing error conditions encountered.
Container Movements - Trial Extract Window To display this window, select the Container Extract - Test Mode task.
Use this window to select the source company and range of container movements you wish to process.
Fields
Source Company
Enter the inventory company from which container-tracking data is to be extracted.
Alternatively, use the prompt facility to select from the Select Company pop-up.
Work with Inventory Movements Not Yet Processed
Use this checkbox as follows:
Unchecked - To specify a range of dates on which you want to base the trial
660 | Infor System21 Inventory Management

860BUtilities
Checked - To extract data that has not been extracted in live operation mode by AFI
Work with Container Movements Between
It is only possible to use this field when the previous field is unchecked.
Specify a range of transaction dates between which container movements in the source company are extracted for this trial. If you wish to consider the container movements that occurred on a single day then specify the same date in the From and To fields.
Type of Journal Definition to Use
Enter one of the following:
Under Test (1) - To use journals that are specified as being under test
LIVE (2) - To use journal definitions that are specified as being live
Both (3) - To use both test and live definitions
Consolidate Postings
Use this checkbox as follows:
Unchecked - For no consolidation to take place, even though there may be journal postings defined as consolidatable
Checked - For consolidation to take place on those journal postings defined as consolidatable
Press Enter to validate the entries and then select Proceed (F8) to process the trial extraction.
Infor System21 Inventory Management | 661

860BUtilities
Container Extract - Live Mode [13/INUA] AFI journals may be established to generate General Ledger journals from the information held on the Container Tracking (Detail) file.
Use this task to initiate the extract of container movement transactions from the Container Tracking (Detail) file for processing by AFI to create General Ledger journals.
Container Extract Pop-up To display this pop-up, select the Container Extract - Live Mode task.
Use this pop-up to select the company from which you wish to extract container movements to generate General Ledger journals.
Fields
Company
Enter the company from which you want container movements extracted.
Alternatively, use the prompt facility to select from the Select Company pop-up.
Container movements are extracted according to the selection criteria specified on each journal definition.
Select Proceed (F8) to continue with the live extraction.
662 | Infor System21 Inventory Management

Chapter 12 Application Interface 12
Receive Product Activity Data [1/INAI] Use this task to process inbound product task data transactions, for example stock movements from a remote site, typically your customer's, via EDI.
If state profile is active, the state reference code of the item may be received on the Product Activity Detail File, rather than an internal item code or a customer item reference.
Receive Product Activity Data Window To display this window select the Receive Product Activity Data task.
Fields
Print Product Activity Control List
Use this to determine the information you want to print.
Select one of the following:
All Activity (1) - To print all tasks
Exceptions Only (2) - To print exceptions only
Select Submit (F8) to print the control list.
Infor System21 Inventory Management | 663

861BApplication Interface
Maintain Product Activity Data [11/INAI] Use this task to recover inbound product task data errors. Product activity provides information on customers' sales task and inventory status.
Inbound Product Activity Data Error Window To display this window, select the Maintain Product Activity Data task.
Use this window to select a customer for the data recovery.
Fields
Customer
You must enter the customer whose data you want to recover.
Alternatively, use the prompt facility on the first field to select from the Customer Scan pop-up.
Note: Enter or select a customer and then press Enter to display the Error Inbound Product Activity Header Selection window.
Mailbox ID
You can also enter the mailbox ID. Each translator has a special identification address, called the mailbox ID. You can view this on the exception report.
Include
Use this to decide the level of information you want to display.
Select one of the following:
Errors Not Updated (1) - To include information about product task transmissions that have failed
All Errors (2) - To include information for failed transmissions and those that have already been maintained after failing validation
Maintain
Select one of the following:
Header (1) - To display the Inbound Product Activity Header Maintenance - Error Recovery window
Lines (2) - To display the Untitled Line Selection window
PO Numbers (3) - To display the Inbound Product Activity PO Numbers Maintenance - Error Recovery window
Press Enter. The window next displayed depends on what you enter on this window.
664 | Infor System21 Inventory Management

861BApplication Interface
Error Inbound Product Activity Header Selection Window To display this window, select a customer and then press Enter on the Inbound Product Activity Data Error window.
Use this window to select the required customer details. If more than one record has failed validation, the window displays a list of them for you to choose from.
Options
Header
Use this to display the Inbound Product Activity Header Maintenance - Error Recovery window.
Line
Use this to display the Untitled Line Selection pop-up.
PO Number
Use this to display the Inbound Product Activity PO Numbers Maintenance - Error Recovery window.
Functions
Toggle Name (F13)
Use this to toggle between displaying customer names and customer reference codes.
The window that is displayed next depends on what you select on this window.
Inbound Product Activity Header Maintenance - Error Recovery Window To display this window, select Header against a line on the Error Inbound Product Activity Header Selection window. Alternatively, select Header in the Maintain field and then press Enter on the Inbound Product Activity Data Error window.
Use this window to view and maintain details before you re-submit them to batch validation.
Fields
Location
Enter the location details for the customer.
Functions
Infor System21 Inventory Management | 665

861BApplication Interface
Line Sel (F14)
Use this to display the Untitled Line Selection pop-up.
PO Numbers Sel (F15)
Use this to display the Inbound Product Activity PO Numbers Maintenance - Error Recovery window.
Untitled Line Selection Pop-up To display this pop-up, select Line against a line on the Error Inbound Product Activity Header Selection window.
Alternatively, select Lines in the Maintain field and then press Enter on the Inbound Product Activity Data Error window.
Alternatively, select Line Sel (F14) on the Inbound Product Activity Header Maintenance - Error Recovery window.
Use this pop-up to select the line number you wish to maintain.
Fields
Enter Line Number
Enter the line number you want to maintain. Leave this field blank to display all lines that need maintenance.
Press Enter to display the Inbound Product Activity Line Selection - Error Recovery window.
Inbound Product Activity Line Selection - Error Recovery Window To display this window, leave the Enter Line Number field blank and then press Enter on the Untitled Line Selection pop-up.
Use this window to view and maintain all the lines for a record.
Options
Select Line Details
Use this to display the Inbound Product Activity Line Detail Maintenance - Error Recovery window.
Select SDQ Details
666 | Infor System21 Inventory Management
861BApplication Interface
Use this to display the Inbound Product Activity SDQ Details Maintenance - Error Recovery window.
Note: An asterisk indicates that you have already updated details for a line.
Select an option. The window that is displayed next depends on what you enter on this window.
Inbound Product Activity Line Detail Maintenance - Error Recovery Window To display this window, select Select Line Details against a line on the Inbound Product Activity Line Selection - Error Recovery window.
Use this window to maintain order line details for your selected customer before re-submission to the validation process.
Fields
Barcode
Enter up to 14 alphanumeric characters to specify the barcode for this item. If the Inventory Management company profile is set to validate this barcode, the code entered is validated.
Note: No checks for duplicates are performed here, as the same item may appear in several catalogues with the same barcode.
Note: If validation is on and you enter a barcode with a length other than 8, 12, 13 or 14, an error message will be displayed.
Functions
SDQ Details (F16)
Use this to display the Inbound Product Activity SDQ Details Maintenance - Error Recovery window.
Infor System21 Inventory Management | 667

861BApplication Interface
Inbound Product Activity SDQ Details Maintenance - Error Recovery Window To display this window, select Select SDQ Details against a line on the Inbound Product Activity Line Selection - Error Recovery window.
Alternatively, select SDQ Details (F16) on the Inbound Product Activity Line Detail Maintenance - Error Recovery window.
Use this window to view the SDQ details for the record you have selected.
Options
Select
Use this to select a line for amendment.
Delete
Use this to delete a line.
Functions
Add (F10)
Use this to add a line to the product task data recovery.
Select Update (F8) to return to the Inbound Product Activity Line Detail Maintenance - Error Recovery window.
Inbound Product Activity PO Numbers Maintenance - Error Recovery Window To display this window, select PO Number against a line on the Error Inbound Product Activity Header Selection window.
Alternatively, select PO Numbers in the Maintain field on the Inbound Product Activity Data Error window.
Alternatively, select PO Numbers Sel (F15) on the Inbound Product Activity Header Maintenance - Error Recovery window.
Use this window to select the purchase order number you wish to maintain for your selected customer.
Fields
668 | Infor System21 Inventory Management
861BApplication Interface
Select (1)
Enter 1 against a customer to select the purchase order.
Customer Location
This field displays the customer location code.
Starting/Ending Order Number
These fields display the range of purchase orders for your selected customer and customer location.
Status
This field displays the status of the selected customer purchase order range.
Functions
Add (F10)
Use this to add customer purchase order numbers to the product task data recovery.
Select Update (F8) to return to the Inbound Product Activity Line Detail Maintenance - Error Recovery window.
Infor System21 Inventory Management | 669


Appendix A Glossary A
Access Point This is normally used in Warehousing to define a point of reference in the dimension of a key element. For example, there is an access point between aisles A and B.
Action List A list of instructions to perform a number of warehouse moves including picks, putaways and transfers
Allocated Stock This is the quantity of a part which has been allocated to customer or works orders. It is usually expressed as a balance at part/stockroom level.
Alternative Part A part which can be used as an alternative to another
Area This is the part of a warehouse, the definition of which corresponds to the Location code. The area has a two-character code.
Area Dimension A Location code is made up of four elements. Each element is called an area dimension. For example you could interpret the area A01C as located at aisle A, bay 01, Row C.
Area Rules See Rules.
Available Stock This is the quantity of a part which is available for issue. It is usually expressed as a balance at part/stockroom level.
Average Cost This is the average cost of a part in a stockroom. This is recalculated every time a receipt is made.
Average Usage This is the average usage per week/period of a part in a stockroom. The weeks or periods which are included in this calculation are defined by the usage profile.
Back Order This is the quantity of a part which is required for customer orders which cannot currently be satisfied from stock. It is usually expressed as a balance at part/stockroom level.
Back to Back Order This is a purchase order raised to meet the requirements of a sales order.
Infor System21 Inventory Management | 671

861BApplication Interface
Balance This may be used either to signify a database record holding summary information, such as a stockroom balance, or a single summary quantity field on such a record, such as allocated stock.
Batch Control This is a level of stock control at a more detailed level than part/stockroom. See also lot control.
Batch/Lot Traceability Where stock control is specified at batch or lot level, this refers to the ability to trace the movement of stock at this detailed level.
Carton This is an item code which describes a collection of piece items. The stock can be moved (in other words, purchased, stocked, issued) as a carton or as individual pieces.
Catch weight For most businesses, items are bought, stocked, ordered, discounted, picked, priced and sold by the quantity of the item. The unit of measure in which the quantity of the item is expressed is known as the primary unit of measure and this type of processing is available to all types of business. However, some businesses price and/or sell by another unit of measure for example, a weight. This is known as the secondary unit of measure. A company which uses catch weight will typically use both primary and secondary units of measure, counting in the primary unit of measure, and pricing in the secondary unit of measure.
Check Digits Check digits or return codes can be used within the application to make sure that warehouse staff have visited the defined location. Check Digits consist of a pair of characters, displayed on the location, which must be entered to confirm an action. Check Digits are user defined.
Committing The Sales Order Processing, Invoicing and Production Control applications allocate stock against the four wall inventory for the warehouse. When the picking decisions have been made, the inventory at a location is then committed.
Cost This is a value associated with a part in a stockroom, or a movement. It is usually a value related to a single part (a unit cost), but may refer to a quantity of parts (a movement cost or value).
Costing Method This refers to the method used to establish a cost for movements or stock balances. The methods available are latest, average, standard and FIFO.
Count Error This is an error condition when one or more of the items associated with a count are found to be in error. In other words, there is a discrepancy between the recorded computer stock figure and the actual physical stock figure as specified by the allowed tolerances for the stockroom.
672 | Infor System21 Inventory Management

861BApplication Interface
Count Objective This is associated with stockrooms defined for counting by class/date control. A count objective is specified for each class A, B and C and defines the number of times per working year that each item (defined to the appropriate class) should be counted.
Count Reconciliation This is the comparison of counted stock quantities in order to assess a stock error or discrepancy, as defined by the tolerance criteria specified for a stockroom.
Cycle Counting This is the term given to the methodology associated with performing physical stock checks on an automated time based, or cyclic process defined by the class of each item and the number of times each class should be counted per working year.
Descriptions File This is a file maintained within Inventory Management which defines a number of parameter codes and their descriptions.
Detail Recommendation This is a manual request to count a specific lot, batch or serial number. Detail recommendations are entered via count recommendations maintenance after the count has been generated and may be a modified summary recommendation or may be a request to count an item or location that was not originally requested on the count.
Depot A depot is a stockroom which has been set up in Inventory Management and authorised for making despatches for sales orders.
Economic Order Quantity This is an optimum quantity of a part to be ordered on a single occasion. Its calculation is based on the usage of the part, the cost of order placement and the cost of carrying the part in stock.
Expected Stock This is the quantity of a part which is expected will be available for issues on a given date. This is usually expressed as a quantity for a part/stockroom.
Fast Batch This is the name given to the data entry style of confirmation of despatch. Data is entered in a batch and submitted to a batch queue for subsequent processing. This is to limit operator window time.
FIFO This is an acronym for First In First Out - one of the costing methods available in the Inventory Management application. By this method, each stock receipt is valued at actual cost, and issues are valued using these receipt batch costs on a First In First Out basis.
First Available Date The system calculates the first available date as being the lot production date plus the first release lead time. The first release lead time is the time the lot is held in Inventory before being released. This may be used for produce which is kept for maturing - for example, wines and spirits, cheese, and so on.
Infor System21 Inventory Management | 673

861BApplication Interface
First Available Time If the production date is equal to the first available date then this time must be equal to or greater than the production time. The time is only displayed if the Display Time field on the lot header parameters file is set to 1.
Frozen Stock This is the quantity of a part which is not available for issue (and not allocated). It is usually expressed as a balance quantity at part/stockroom level.
In Transit This is the quantity of a part which is currently in transit between two stockrooms. It is usually expressed as a balance quantity at the target part/stockroom.
Item Characteristics The attributes relating to an item (for example, shape grade, length, section and so on)
Item Class, Item Group, Item Type These are the main analysis categories in which you can group items together. Selection and sequencing on many reports is provided by these categories.
Item Stockroom This is the main level at which costs and balances are held within the application. The item stockroom record also defines stock management rules for an item within a particular stockroom.
Latest Cost This is the last cost at which a part was received into a stockroom. One of the costs maintained at part/stockroom level.
Last Available Date The system calculates the last available date as being the expiry date minus the customer shelf life. All lots with a last available date less than the current date will be frozen if there is no stock status code entered.
Last Available Time Enter the latest time that this lot will be available on the last available date. If the last available date equals the expiry date then the last available time must be equal to or less than the expiry time.
Lead Time The standard amount of time, in weeks, from a decision to order a part for a stockroom, to the part being received in the stockroom
LIFO Revaluation This is the revaluing of stock on a Last In First Out Basis. When stock levels are falling, LIFO revaluation consumes the most recent stock first leaving the remaining balance to be valued at the earlier year's cost. When stock levels are rising, only the net gain in stock is valued at the current cost, the remaining balance is valued at the previous year’s values.
Lot Control This refers to a level of stock control lower than part/stockroom. It may also be known as batch control.
674 | Infor System21 Inventory Management

861BApplication Interface
Lot Error This is a special lot reference generated for an Inventory stock count, when a summary request for a lot, batch, or serial controlled item is printed and no lot balances exist for the item.
Maximum Stock This is the maximum quantity of a part in a stockroom preferred by the user. It may be set manually, or automatically calculated by the system.
Movement Type This refers to the classification of movements by type of transaction, in other words, miscellaneous receipts, customer order issues.
On Order This is the quantity of a part for which outstanding purchase or work orders exist. It is usually expressed as a balance quantity at part/stockroom level.
Order Placement Cost This is the cost in base currency of placing and processing a purchase order. This is used in the calculation of economic order quantity.
Overdue Days This represents the number of days at which counts become overdue for printing, based on the date of count recommendation as entered at count request time.
Physical (Stock) This is the total quantity of a part in a stockroom. It is usually expressed as a balance quantity at part/stockroom level.
Pick List This contains a number of lists, one per order/schedule. Within all the lists are all the warehouse controlled components required, their quantities, locations within the warehouse and if appropriate the lot details.
Planned Request Items that are targeted for count in summary form (in other words, count all item balances), via the initial count creation, are considered planned requests.
Item summary and/or detail requests that are entered via count
Potency The potent value of the entire lot is displayed irrespective of which stockroom it is held in.
Reason Code This is entered whenever the stock status of a lot is changed. Valid codes are held on the descriptions file against major type SSRC.
Reorder Point This is the quantity of a part in a stockroom which, when reached, should trigger a reorder action. It may be set manually or calculated by the application.
Infor System21 Inventory Management | 675

861BApplication Interface
Reorder Policy This is the policy adopted to control the reorder of parts. It can be ROP/MAX, ROP/ROQ, or Up to ROP.
Reorder Quantity The quantity of a part recommended for reorder when reorder point is reached for the part in a stockroom
Reorder Quantity Factor % The number of lead times worth of average usage to be reordered, expressed as a percentage
Rotation Date This is the date the stock should be rotated. Stock may be rotated using the expiry date, the date of receipt to the warehouse or to the location.
Serial Number Control A form of batch or lot control, but exercised at a single, unique element level
Standard Cost This is the unit cost of a part in a stockroom, specified as a standard by the user for a defined period. Standard costing is one of the available costing methods within the application.
Stock Carrying Rate % This is the percentage cost of carrying a stock part for a year. This rate is used in Economic Order Quantity calculations.
Stock Count A periodic verification of the accuracy of computer-held stock figures by a physical count of stock
Stock History A summarised view of stock movements per week or period
Stock Management/Stock Movement This is a movement of a quantity of an item into or out of a stockroom. This refers more particularly to the recording of such a movement in the application, and the transaction record created as a result.
Stockroom A discrete area of a company where stock is recorded and controlled separately from other company stocks
Stockroom Balance See balance and part/stockroom.
Summary Recommendation This is a request to count an item or location in its entirety (in other words, all lots, balances or serial numbers for a lot controlled item in an inventory stockroom, or all low level warehouse balances for an item or location as defined within a warehouse). All item or location recommendations that are targeted via the initial count creation are summary recommendations by default.
676 | Infor System21 Inventory Management

861BApplication Interface
Suppliers Lot Reference This is the specific lot reference allocated by the supplier.
Time Fence You can define a time fence to control the date on which stock processing happens, for example stock allocation and printing acknowledgements. To do this, you specify the number of days that you want the system to add to the current date to calculate a date in the future that the system will use control stock processing.
Tolerance Tolerances are defined against the stockroom and define the upper and lower variances (by quantity percentage and value), that will be allowed for stock discrepancies for items counted within the stockroom. Percentage variances for a balance are defined as follows:
Value variances are defined by valuing the quantity variance according to the unit cost of the associated item:
(Counted Quantity - Computer Quantity) x Cost
Cost=costing method applied to the item.
Discrepancies for FIFO costed items are valued at latest cost.
Transaction Type This identifies whether the document is either an invoice or a credit note.
Type (Stock Availability Enquiry) Type of Order for example, purchase order or sales order
Unit of Measure, UOM The unit in which a quantity or unit cost is expressed
Usage The quantity of an item issued from a stockroom in a given period
Usage Profile A user defined profile which specifies the pattern of periods to be included in the calculation of average usage
Variance This is the calculated quantity % or value discrepancy between the counted stock balances and the associated computer stock balance for an item. Variances outside the defined tolerances for a stockroom are considered to be a count error for the item.
Tax Code This refers to the Tax rate that should be used to calculate the Tax charge for a specific order.
Warehouse This is a stockroom that has been set up and authorised for location recording in the Warehousing applications. It may also be authorised as a depot (see Depot).
Infor System21 Inventory Management | 677


Appendix B Inventory Descriptions B
Descriptions File Major Type Codes
ACDF - Customer Schedule Definitions You can create Customer Schedule Definitions using up to four characters.
ADFM - Address Format You can create address formats using up to two characters for use in World Trade.
AEDI - Automatic Update from EDI You can create automatic update from EDI Definitions using one character.
ALTT - Alternative Item Type You can create single character item reference types. These are used in Advanced Order Entry.
A code of ‘D’ must be added to enable the maintenance and use of dealer aliases
AN - Agent, Sub-agent This has a 5-character maximum length. You can use the agents and sub-agent codes that you set up here within Sales Order Processing Commissioning processes.
ARPM - Arrears Processing Method
01 Normal Arrears
02 Assumed arrears
Infor System21 Inventory Management | 679

861BApplication Interface
03 Re-stated arrears
ASAD - AS Address Type Codes You can create Address Type Codes using up to four characters.
ASNC - ASN Consignment Types
01 Delivery Point/Depot
02 Hub or Internal Consolidator
03 External Consolidator
04 For Future Development
ASNP - ASN Company Prefix You can create ASN Company prefixes using up to seven characters.
ASTA - Article Status Code You can create Article Status Codes using up to two characters.
AUMD - Authorisation Method
01 Authorisation Code
02 Date Horizons
03 Cumulative Quantity
04 Fixed Horizon in Calendar Days
AUTA - Purchase Authorisation Tables You can create Purchase Authorisation Tables using up to ten characters. This defines the identification code of the table of users which defines their spend limits.
BCFM - Bank Code Format You can create bank code formats for World Trade, using up to two characters.
680 | Infor System21 Inventory Management

861BApplication Interface
BUDG- Budget Types
B Budget
E Estimates
F Forecasts
T Targets
CALT - Calendar You can create calendar codes for World Trade, using up to three characters. As a minimum, you must have the following codes:
001 Intrastat
002 ESL
CARR - Carriers These are sales and purchase order carrier codes.
CCCC - Customer Class This is a two-character field displayed on the Customer Sales Details window within Customer Maintenance. It is normally selected as one of the six customer attributes when defining the Sales Analysis database.
CCON - Promotion Constraint Type If you are using Promotions this code identifies the type of customer constraint that is used to decide who is eligible for a promotion:
10 Customer Delivery Point
100 Territory
110 Division
120 Sub-division
20 All Customer Delivery Points
30 Customer Class
40 Trade Price Type
Infor System21 Inventory Management | 681

861BApplication Interface
50 Promotion Discount Type
60 Corporation
70 Branch
80 Region
90 State
CCRQ - Certificate of Conformance Required If you are using Advanced Order Entry you can decide whether to use Certificate of Conformance. To do this, you must select one of the following on the Item Maintenance window:
0 Certificate cannot be entered
1 Certificate can be entered
2 Certificate must be issued
CDSC - Cash Settlement Discount This is a two-character code to identify the cash settlement discount given to a customer. Enter the code on the Customer Sales Details window in Sales Order Processing. At order entry, the code will default to the order header, but can be overridden. The percentage rate assigned to the code is included with the invoice details when posting to Accounts Receivable.
CHST - Character Set These are two-character character sets for use in World Trade.
CONI – Consolidated Invoice Types
Major Type Code Description Limit Rate P/V
Tax Code
CONI Consolidated Invoice Types
0 No Consolidation
1 Daily by customer
2 Weekly by customer
3 Period by customer
4 Daily by customer order reference
682 | Infor System21 Inventory Management

861BApplication Interface
5 Weekly by customer order reference
6 Period by customer order reference
7 Daily by order
8 Weekly by order
9 Periods by order
A By order
CRDC - Credit Checking Methods Enter one of the following:
0 - For existing credit checking only in Sales Order Processing and Advanced Order Entry
1 - To choose additional SOP and AO credit checking methods by a credit check value and credit check by days or both (see CRLV and CRLD)
CRLV - Credit Check by Value Enter one of the following:
0 - If your customers are not credit checked on a value entered in the Customer Master file
1 - To perform a credit limit value check
You can then enter a value against the Credit Limit field in the Customers maintenance task.
CRLD - Credit Check by Days Enter one of the following:
0 - Not to perform credit checking by number of days for your customers
1 - If the total debtor days should not exceed the credit limit days set up for the customer
2 - If the total days outstanding should not exceed the credit limit days set up for the customer
3 - If the average days to pay should not exceed the credit limit days set up for the customer
4 - If the average days slow should not exceed the credit limit days set up for the customer
5 - If the number of days overdue of the oldest outstanding invoice should not exceed the credit limit days set up for the customer
Note: You can only apply this policy to level 1 and level 3 accounts in customer hierarchies.
Infor System21 Inventory Management | 683

861BApplication Interface
Note: CRLD options 1, 3 and 4 are calculated by the A/R debtor ratio routines. For more information see the Trend Parameters section in the Accounts Receivable product guide.
CRV4 - CR Conditioning For the current system date to display, you should set up CRV4 with a Description Code of 01, and Description CR Conditioning.
CTTP - Container Type This is a five-character field on the Item Maintenance Containers (1) window within the Item Maintenance task. It is used to distinguish between different types of container when constructing the container summary for an item within the Transport Planning Build Loads task.
DCLS - Discount Class This is a three-character code used in Advanced Pricing to control the application of discounts to an order line.
Note: Refer to the Advanced Pricing overview section in the Order Entry product guide for further information re: the set-up and use of discount classes.
DEPT - Departments In Production, if you want MRP to balance item supply and demand by stockroom rather than organisational model, you must provide a range of Production cell codes. Codes are linked to individual stockrooms via Inventory Management, Maintain Company and Stockroom Code.
The equivalent codes must exist on the Production Parameters file.
DFLT - Defaults This major type is used to define certain system defaults, which can be set by the user.
Where the Parameter Limit field is used, the value required should be placed in the last character of the field.
AUTHSTRC User Stockroom Authorisation
Use this code to control whether stockroom authorisation needs to be checked prior to the stockroom transaction being accepted.
Select one of the following:
Off (0) - no authorisation required. This is the default setting.
684 | Infor System21 Inventory Management

861BApplication Interface
On (1) - authorisation required. When active, the user that is processing movements must be authorised to the stockroom. This is done via the task Authorise Users to Stockroom [16/INUM].
AUTOALCRIN Auto Allocate Credits to Invoices
Use this code to control whether credits should be auto allocated to invoices. When the Limit field is set to 0, no allocation occurs. When it is set to 1, auto allocation of credits to invoices occurs.
BULKPICK Bulk picking in use
Use this code to control whether the bulk pick parameters are to be displayed on the Transport Planning Request Pick Note Select Window and bulk picking is run for bulk pick items.
CINVBYDD Consolidate invoice by despatch date
Use this code to control whether consolidated invoices should be created for forward and back despatch dates.
Set limit to 1 is active
CNTCOST Zero Cost Non-chargeable Containers Use this code to control the zero cost value of non-chargeable and rental container invoice detail lines. Set the Limit field to 1 to activate the setting to zero of the invoice detail lines.
CUSCOL Customer Collections
Use this code to hold the default value for customer collection pick notes. It applies at company level and if it is absent or to 0, the default is that 'normal' pick notes are required. To set this so that the default is to produce collection order pick notes, set the Limit value to 1.
CUSITEMACK Customer Item Acknowledgement
To control whether the Customer Item number is to be printed on the Customer Item Acknowledgement document the following description entry is defined. The Limit field is shipped set to 0 --- which means the Customer Item number will not print. Setting the limit to 1 will result in the customer Item number being printed on the external document.
Major Type Code Description Limit Tax P/V Rate
DFLT CUSTITEMACK Customer Item Acknowledgement
0
CUSITEMDES Customer Item Despatch Note
To control whether the Customer Item number is to be printed on the Customer Item Despatch Note document the following description entry is defined. The Limit field is shipped set to 0 --- which means the Customer Item number will not print. Setting the limit to 1 will result in the Customer Item Number being printed on the external document.
Major Type Code Description Limit Tax P/V Rate
DFLT CUSTITEMDES Customer Item Despatch Note 0
Infor System21 Inventory Management | 685

861BApplication Interface
CUSITEMINV Customer Item Invoice
To control whether the Customer Item number is to be printed on the Customer Item Invoice document the following description entry is defined. The Limit field is shipped set to 0 --- which means the Customer Item number will not print. Setting the limit to 1 will result in the Customer Item Number being printed on the external document.
Major Type Code Description Limit Tax P/V Rate
DFLT CUSTITEMINV Customer Item Invoice 0
CUSW Customer Warnings
Use this code to control whether warnings are active for Customers. The text usage code for the warning pop-up must be established in the Tax field. A blank Tax field signifies that warnings are inactive (default).
Set Tax field to W to activate warnings.
Note: Any established customer text usage code must be a valid code as established by the Inventory Description text usage codes USGC.
DATEBCKD Tax point/Despatch back days
This parameter signifies if the back days processing is active for invoice/despatch dating.
Set limit to 1 and Rate to the number of days prior to today’s date that can be used as the despatch date.
DATEFWDD Tax point/Despatch forward days
This parameter signifies if the forward days processing is active for invoice/despatch dating.
Set limit to 1 and Rate to the number of days forward of today’s date that can be used as the despatch date.
DESPPERD Despatch Period Derivation
This parameter signifies if the Sundry Invoice/Credit option will have the period derived from the tax point date and protected or not, when backward/forward dating invoices/despatches.
Set limit to 1 is active
EXSCCPSTIM External System Credit Card Posting Immediate
Use this code to specify how you wish to post credit card postings from external systems (e.g. WorldPay). When the Limit field is set to 1, credit card postings are processed immediately. When it is set to 0, credit card postings are processed as a batch as part of end of day procedures.
FIACCCTL AFI Control Account Definition
The OE invoicing AFI extract is configurable to take the control account from the Statement account or Invoice account, rather than the ordering account, if required.
686 | Infor System21 Inventory Management

861BApplication Interface
Major Type Code Description Limit Tax P/V Rate
DFLT FIACCCTL AFI Control Account Definition 0
Limit
Enter one of the following values:
0 (default) - the ordering customer is used
1 - the Statement Account is used
2 - the Invoice Account is used
Note: For other limits, or if the Description entry is missing, the ordering customer is used.
INVALTCUR Invoice Alternate Currency
Use this code to control whether alternate currency invoicing is enabled. Set the Limit field to 1 to switch this function on.
INVPST Post Invoices Automatically
Use this code to control whether invoices should be automatically posted and whether the user can or cannot change this value on the screen.
Enter one of the following values:
• 0-0 - No automatic posting, the user cannot change the value on the screen
• 1-0 - Post automatically, the user cannot change the value on the screen
• 0-1 - No automatic posting, the user can change the value on the screen
• 1-1 - Post automatically, the user can change the value on the screen
Note: The Descriptions file entry is delivered with the Tax code default set to 1-1.
ITMW Item Warnings
Use this code to control whether warnings are active for Items. The text usage code for the warning pop-up must be established in the Tax field. A blank Tax field signifies that warnings are inactive (default).
Set Tax field to W to activate warnings.
Note: Any established item text usage code must be a valid code as established by the Inventory Description text usage codes USGC.
LABELS Print Labels
Use this code to establish a default for the Print Labels field when requesting SOP pick notes. It applies at Company level and if it is absent or its Limit field is set to 0, container labels will not be printed. If it is set to 1, they will be printed.
NONCHGCNT Invoice Non-chargeable Containers
Infor System21 Inventory Management | 687

861BApplication Interface
Use this code to control the inclusion of non-chargeable and rental containers on invoices. Set the Limit field to 1 to activate the inclusion of containers on invoice detail lines.
ONEDAYLOTS Allow Lots of 1 Day Shelf Life
Use this code to control whether Lots can be created that are only available for one day, with the First and Last Available dates being the same day. Set the Limit field to 1 to allow Lots with single day availability, as below:
To allow both Shelf Life and Customer Shelf Life to be set to 1 day, the following description entry must be defined. This allows for a batch/lot/serial number to expire the same day as received in Inventory:
Major Type Code Description Limit Tax P/V Rate
DFLT ONEDAYLOTS Allow same day expiry 1
PEAC Period End Average Costing
Use this code to control whether Period/Month End Average Costs should be calculated and maintained. Set the Limit field to 1 to activate the Period End Average Costs function.
PICKSTOP Print Pick Notes for On Stop
Use this code to decide whether the pick notes should be produced for customers/orders that are on stop. When its Limit field is set to 0, pick notes will not be produced and a line will be printed on the audit report. When it is set to 1, the pick note will be produced and a line will not be printed on the audit report.
QTNO Quotation Type
Use this code to hold the default Quotation Type code as the first character of the description of this code. Use this to produce quotations as the default order mode.
SPDP Std Pricing Default Price List
Use this code to establish a default price list for the company regardless of currency. Set the Vat code to the required price list.
SPRR Short Pick Reason Required
Use this code to specify the circumstances under which a short pick code is required. Set the Limit field on this parameter as follows:
• 0 - No short pick reason required (this is the default) • 1 - Short pick reason required for under delivery only • 2 - Short pick reason required for both under and over deliveries
SUP-DESC Update Item Descriptions
Use this code to control whether the descriptions of superseded items are updated with the supersession reason code. If the Limit field is set to 1, then the item descriptions of superseded
688 | Infor System21 Inventory Management
861BApplication Interface
items will have the last 2 characters replaced with the supersession reason. If it is set to 0 then item descriptions will not be amended.
TEXTALLOW Sales Order Text Maintenance
Use this code to control the status of Sales Orders for which standalone text can be maintained. If text is allowed, set the Limit field with the desired value from the list below:
• 0 (default) – Only Open orders can have the text amended
• 1 - Complete and Open
• 2 - Cancelled and Open
• 3- Cancelled, Complete and Open orders
DIRE - Direction to Move in Warehousing If you are using item location rules, you must use one of two one-character codes 1 (ascending) and 2 (descending) on the Maintain Location Rules - Item window in Warehousing.
DIVN - Inventory Production Division This is a two-character code on the Item Maintenance window. This is normally selected as one of the six item attributes when defining the Sales Analysis database.
DMND - Demand Reference Codes These codes are used in Advanced Order Entry
You must set up the following codes:
1 - Sales order
2 - Purchase order
DN - Customer Division This is a two-character field on the Customer Sales Details window within the Customers maintenance task. This is normally selected as one of the six customer attributes when defining the Sales Analysis database.
DNTF - Picking Note Print Time Fence This provides the default Lead Time field value on the Request Picking Notes window within Sales Order Processing. You must create the code T: enter the number of days lead time you want to use in the Rate field.
Infor System21 Inventory Management | 689

861BApplication Interface
DOCT - Print Function in Order Entry This is used for Forms Lengths Overrides for despatch notes and picking notes to override the default settings for the printing areas (10 characters maximum).
DTAR - Duty Tariff Code This is a two-character field on the Item Maintenance Supplementary Data window within the Item Maintenance task. It is used to assign the appropriate duty tariff rate to an item.
DUTS - Duty Status Flag You use these codes in Inventory Management to signify the type of customer to whom an item may be sold.
Note: At present, the settings are used for memo purposes only.
The following codes should already exist in the Inventory Descriptions file (no other values are supported):
1 No limitation
2 Duty free only
3 Duty paid only
EDI - EDI Application Interface
ADEPOT This is the default stockroom used in the batch allocation run
ALLOCATE Select 1 to run batch allocation from Receive Inbound prompt, after receive order processing has completed
CATLREPT This is used on the Print Electronic Catalogues prompt. Select 0 for the report to include sent records. Select 1 for the report to include all records
PRICETPCNT, PRICETVALU
Pricing Tolerance percentage and values allow comparison of prices sent through EDI and in System21 database
QUANTTPCNT, QUANTTVALU
When quantity changes occur through a purchase order, these tolerance limits define the extent of the change. If it is outside these limits, it will not accept the change and will print an error message
TRANSLEAD You decide whether the display for lead time offset is in calendar days or weekdays.
690 | Infor System21 Inventory Management

861BApplication Interface
EGLR - Extended General Ledger codes for Purchase Management When you enter Inventory items on purchase orders, this retrieves extension codes to the GL account codes. Set up the following sub-codes:
01 - AFI rule for stock extended GL codes
02 - AFI rule for price variance extended GL codes
FORM – Formula This description defines the method of excise calculation for each reporting category. It is intended for use in US Drinks environments.
Major Type Code Description Limit Rate P/V
Tax Code
FORM 1 Per Wine Gallon
2 Per Litre
3 Per Barrel
4 Per Size
FRTP - Freeloader Type Use this two-character code to classify the type of freeloader promotions within Order Management.
Note: The Parameter Limit should be set to 1, if tax is payable on freeloader promotion award items.
Note: The P/V Indicator Flag should be set to P, if the freeloader promotion type represents a loyalty scheme.
The following codes should already exist in the Inventory Descriptions file (but you may add others if you wish):
A Non-taxable freeloader
B Taxable freeloader
P Loyalty Scheme
GDAR - Packaging Adjustment Reasons You can create Packaging Adjustment Reasons using up to two characters.
Infor System21 Inventory Management | 691

861BApplication Interface
GDRC - Packaging Responsibility Codes
01 Extractor
02 Manufacturer
03 Filler
04 Retailer
GDFT - Packaging Report Format These should include:
GER - German Duales Format
Positions 6 and 7 of the parameter limit for the above descriptions have special uses:
• Set position 6 to 1 to print a yearly report, which should only be used for the German format. • Set position 7 to 1 to de-activate track responsibilities. In this case you can enter responsibilities
after the no tracking message, but the overrides would not be effective unless you set this parameter back to 0.
GDSC - Packaging Sales Channels You must have the following codes:
00 No Sales Channel
01 Division
02 Sub-division
03 Region
04 State
05 Territory
06 Salesman
07 Customer Class
08 Corporation
09 Branch
HLCO - Hierarchy Level Codes You use these codes in Advanced Shipping to define the order in which details are printed on Advanced Shipping Notes.
692 | Infor System21 Inventory Management

861BApplication Interface
I Item
O Order
P Pack
S Shipment
T Tare
IN - IN Default Values EQVU - Equivalent Unit of Measure
Set the Tax Code to the two-character Unit of Measure code that you want to be used as the default Equivalent Unit of Measure code within the Item Maintenance task.
MUEF - Multiple Unit Entry Format Flag
Use this code to set the default setting for the Multiple Unit Entry Flag within Item Maintenance. Set the Parameter Limit to one of the following:
0 - Decimal
1 - Stock & Issue
2 - Purchase, Stock & Issue
OPTU - Optimum Unit
Set the Tax Code to the two-character Unit of Measure code that you want to be used as the default Optimum Unit of Measure code within Item Maintenance
SUNI - Sales Unit Indicator Flag
Use this code to set the default setting for the Sales Unit Indicator Flag within Item Maintenance. Set the Parameter Limit to one of the following:
0 - Cannot be sold in issue units
1 - Can be sold in issue units
INSC - Inventory Source If you are using Configurator, you must enter a one-character code to define the item's Inventory source on the Item Maintenance window.
INVP - Invoice Print Sequence Code SEQ
Enter one of the following in the Tax code fields:
Infor System21 Inventory Management | 693
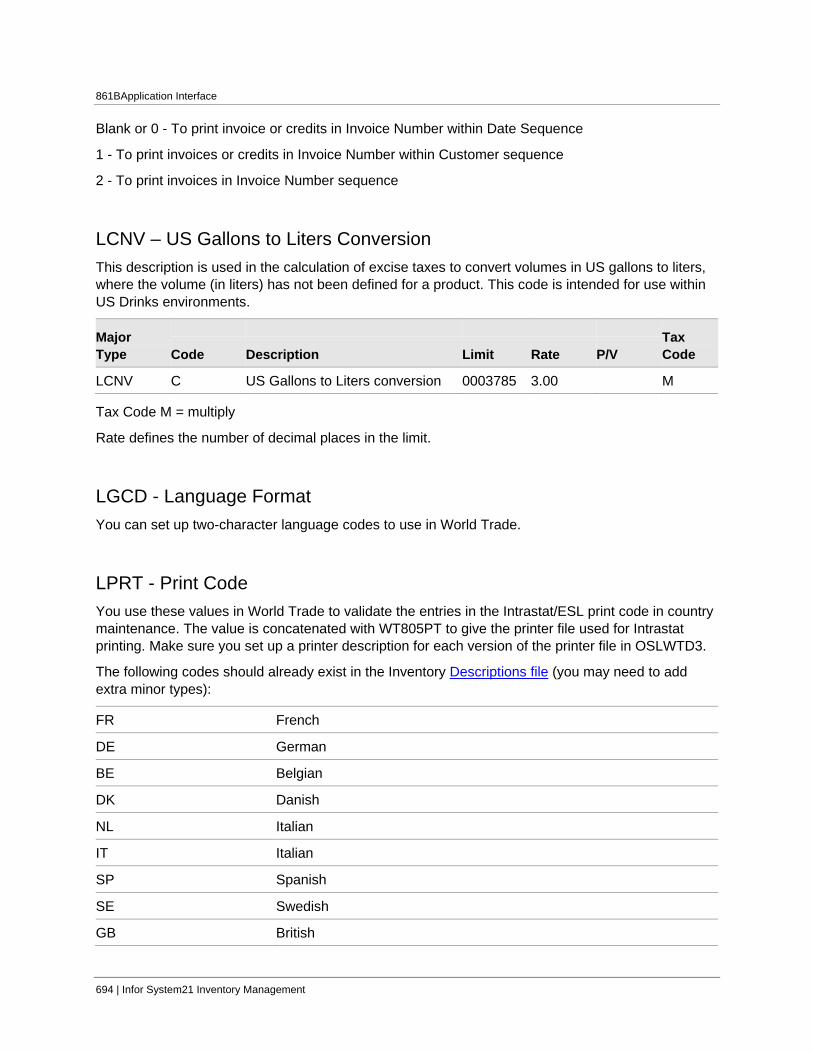
861BApplication Interface
Blank or 0 - To print invoice or credits in Invoice Number within Date Sequence
1 - To print invoices or credits in Invoice Number within Customer sequence
2 - To print invoices in Invoice Number sequence
LCNV – US Gallons to Liters Conversion This description is used in the calculation of excise taxes to convert volumes in US gallons to liters, where the volume (in liters) has not been defined for a product. This code is intended for use within US Drinks environments.
Major Type Code Description Limit Rate P/V
Tax Code
LCNV C US Gallons to Liters conversion 0003785 3.00 M
Tax Code M = multiply
Rate defines the number of decimal places in the limit.
LGCD - Language Format You can set up two-character language codes to use in World Trade.
LPRT - Print Code You use these values in World Trade to validate the entries in the Intrastat/ESL print code in country maintenance. The value is concatenated with WT805PT to give the printer file used for Intrastat printing. Make sure you set up a printer description for each version of the printer file in OSLWTD3.
The following codes should already exist in the Inventory Descriptions file (you may need to add extra minor types):
FR French
DE German
BE Belgian
DK Danish
NL Italian
IT Italian
SP Spanish
SE Swedish
GB British
694 | Infor System21 Inventory Management

861BApplication Interface
LTYP – License Type Use this to define the License Types for US Drinks installations. The License Types can be defined for wholesale customers to indicate which classifications of products they are licensed to purchase.
MISC - Miscellaneous Company Level Descriptions CNFQ - Confirm Despatch Quantity Default used in Advanced Shipping
Set the limit to one of the following:
1 - To default to the quantity you need
2 - To default to the available quantity
3 - To default to zero quantity, or any other value
DSTL - used in Advanced Order Entry and Sales Order Processing
Despatch over tolerance is held as the rate against this description code.
IDMP - used in Inventory Management
Add the Item Deletion Movement Period Ago for the Item/Stockroom Deletion routines. The Rate field should state the number of periods back from the current period, during which time item stockroom deletion is not allowed if any stock movements exist. If IDMP is not defined, all items flagged for deletion are deleted during the Item Deletion Routine.
PRCD - used in Advanced Shipping
Set the first character of the description to one of the following:
0 - To select the invoice price from the contract
1 - To select the invoice price from the standard price list
MODE - Despatch Method Create a single character code. You must configure Sales and Purchase Order despatch methods.
You must define the following modes of transport for World Trade:
1 - Sea
2 - Rail
3 - Road
4 - Air
5 - Post
7 - Fixed installations
9 - Own propulsion
Note: Take care that other Minor Types are not reported on an Intrastat.
Infor System21 Inventory Management | 695

861BApplication Interface
MOVR - Movement Reason Codes This is an optional two-character field on most stock movement transactions within Inventory Management, to track why a transaction is being processed. This is mandatory for stock count reconciliation where adjustments are generated.
Within Production, the following tasks prompt for reason codes: scrap, hold, hold WIP, release held WIP, scrap held WIP, transfer WIP, allocate WIP, de-allocate WIP, adjust WIP, unexpected (unplanned) output and work station status.
You require codes when booking scrap and held quantity during item, order and operator booking. You can allocate the total quantity to more than one code during a session.
You can enter a default scrap order on the Production software organisational model definition.
MUEF - Multiple Unit Entry Flag You use these codes in Inventory Management to signify whether an item expects quantities to be entered in multiple unit format or not.
The following codes should already exist in the Inventory Descriptions file (no other values are supported):
0 Decimal format
1 Stock & Issue
2 Purchase, Stock & Issue
MVTP - Movement Types Single character codes must exist because all Inventory transactions are created with one of the following codes and descriptions for movement types:
A - Stock adjustment
C - Customer order issue
D - Direct delivery
F - Frozen adjustment
G - Frozen transfer out
H - Frozen transfer in
I - Transfer in
J - Transformation
696 | Infor System21 Inventory Management

861BApplication Interface
K - Frozen issue
L - Allocated adjustment
M - Manufacturing issue
N - Manufacturing receipt
O - Transfer out
P - Purchase receipt
Q - Back to back
R - Miscellaneous receipt
S - Miscellaneous issue
T - In-transit adjustment
U - Purchase order
W - Manufacturing adjustment
X - LIFO revaluation adjustment
0 - No movement to be generated
For movement types used in Inventory Management, you can set the limit field to control whether movement reference, reason code and movement reference codes are mandatory.
You can set the limit field as follows:
Limit
Field
Reference
Mandatory
Reason Code
Mandatory
Reference Type
Mandatory
00 No No No
01 Yes No No
10 No Yes No
11 Yes Yes No
20 No No Yes
21 Yes No Yes
30 No Yes Yes
31 Yes Yes Yes
NOTN - Nature of Transaction You should set up the following two-character codes, for Intrastat reporting in World Trade:
10 - Standard transaction
Infor System21 Inventory Management | 697

861BApplication Interface
16 - Credit
17 - Credit, with no goods movement
20 - Replacement
30 - No consideration
40 - Movement before process/repair
50 - Movement after process/repair
58 - Process element
60 - No change of ownership
70 - Joint defence or government
80 - General construction
90 - Other
You should set up additional codes for Intrastat and ESL reporting as follows:
• France, Germany, Spain or Denmark - Codes 11, 21, 31, 41, 42, 51, 52 and code 61 • France, Germany or Spain - Codes 12-15, 22, 23, 32, 33, 43, 53, and code 62 • France or Denmark - Codes 70 and 80 • France - Code 90 • Germany - Codes 71, 72, 81, and 91 • Spain - Codes 7-9 and code 34 • Italy, Belgium, Holland and Sweden - Codes 1-9
OMAT – OM Task Codes This code is used to identify the menus and options for Order Capture menu and option security.
Once security is enabled, Order Capture will establish if the user or role is authorised in Application Manager to the Order Capture task code defined in the Limit field.
Where the Limit field is empty, no task code is assigned for the menu or option and ALL users and roles are NOT authorised.
The standard tasks codes for which menu and option security can be enabled are as defined in the table.
Major Type Code Description Limit Rate P/V
Tax Code
OMAT 4000 Edit Menu 4000
4005 Change Contact 4005
4010 Change Customer 4010
698 | Infor System21 Inventory Management
861BApplication Interface
4015 Delivery and Ship 4015
4020 Header Overrides 4020
4025 Price 4025
4030 Currency 4030
4035 Sales Details 4035
4040 Document Processing 4040
4045 Despatch Information 4045
4050 Invoice Information 4050
4055 Customer Attributes 4055
4060 Payment Terms 4060
4065 Order Text 4065
4070 Suspend Codes 4070
4075 Charges 4075
4080 Re Source 4080
4085 View Menu 4085
4090 Refresh Buying Lists 4090
4095 Refresh Call Lists 4095
4100 Tools Menu 4100
4105 System 4105
4110 Customise 4110
4115 Remove Item 4115
4120 Reinstate Item 4120
4125 Remove Item 4125
4130 Edit Line Text 4130
4135 Price Override 4135
4140 Select Supply 4140
4145 Amend Quotation 4145
4150 Amend Order 4150
Infor System21 Inventory Management | 699

861BApplication Interface
ORDM - Ordering Methods These are used within Advanced Order Entry, with or without Configurator. You must use the following codes, specified in the Item Master. You can override these codes during order entry:
0 - Normal Stocked Item
1 - Make to Order
2 - Purchase to Order
3 - Deliver Direct
4 - Reserve
5 - Configure to Order
ORST - User Order Type If you are using the Advanced Pricing module you can use this two-character code, which you can assign to a sales order, to control what pricing types are to be considered when pricing an order.
Note: Refer to the Advanced Pricing overview section in the Order Entry product guide for further information regarding the pricing by order type.
ORTP - Order Type If you are using Warehousing module you must use the following codes:
1 - Sales Order
2 - Production Order
PCLS - Item Class This is an optional two-character field on the Item Master Maintenance window to classify Inventory items. You can request stock take count sheets by a range of item classes. In addition, this field is normally selected as one of six item attributes when defining the Sales Analysis database.
PGMJ - Item Group Major This is an optional three-character field on the Item Master Maintenance window to classify Inventory items. You can request stock take count sheets and various reports by a combination of major and minor group codes. In addition, this field is normally selected as one of the six item attributes when defining the Sales Analysis database.
700 | Infor System21 Inventory Management

861BApplication Interface
PGMN - Item Group Minor This is an optional three-character field on the Item Master Maintenance window to classify Inventory items. You can request stock take count sheets and various reports by a combination of major and minor group codes. In addition, this field is normally selected as one of the six item attributes when defining the Sales Analysis database.
Note: It is important to configure the codes appropriately for use within Production. These codes are used to group similar items into product families for use by MPS and MRP forecasting. They are used similarly in Forecasting and in DRP.
PGR - Discount Group This is a maximum of three characters. It is used to group items that earn the same discounts on a discount list when standard pricing is in use.
PLDL - Place of Delivery You can set up five-character place of delivery codes for use in World Trade.
PORT - Ports You can set up five-character port codes for World Trade use.
PQGP - Promotion Qualification Group If you are using Promotions this code identifies the type of item attribute that is used to determine which items qualify for a promotion:
00 Item
10 Item Type
20 Item Class
30 Item Group Major
40 Item Group Minor
50 Division
60 Sub-division
70 Discount Group
Infor System21 Inventory Management | 701

861BApplication Interface
PREM - Preminos User File Definitions Limit This is used in EDI to define user files.
You can enter a list of document IDs and related text descriptions. This relates to the Document ID field in the Maintain Document IDs window.
PRTP - Pricing Functions These price function codes are used in combination with pricing type codes in Advanced Pricing to set up pricing type profiles.
1 Discount
2 Price
5 Whole order discount
6 Retrospective discount
7 Special allowance discount
PTYP - Item Type This is an optional one-character field on the Item Master Maintenance window to classify Inventory items. You can request stock take count sheets by a range of item types. In addition, this field is normally selected as one of the six item attributes when defining the Sales Analysis database.
You would normally define four codes used by Service Management to determine contract charging. These, typically, are:
• Major Spares • Minor Spares • Consumables • Supply Items
See the System Parameters Maintenance Window section in the Service Management product guide for details on how to use these codes.
QTNO - Quote Types This is used in Advanced Order Entry to record Quotation type codes. Set up single-character quotation type to identify the type of quote (such as 30 days, 60 days, and so on). You use this code to identify an order as a quotation in order entry. The rate is a value, added to current date, to calculate expiry date for quotations. If 1 or 2 is in the Tax field, order lines will be allocated.
702 | Infor System21 Inventory Management

861BApplication Interface
RCTY - Rule Comparison Type This is used in Advanced Customer Scheduling
1 - New release/previous release, latest revision
For example, the customer sends a new release, internal reference 3 revision 0; we compare it to the current release, internal reference 2 revision 10.
2 - New release/previous release, revision 000
For example, we compare the new release, internal reference 2 revision 0 to historical release, internal reference 1 revision 0.
3 - New revision/previous revision
For example, the customer sends a new revision of a schedule, internal reference 2 revision 2; we compare it to current schedule, internal reference 2 revision 1.
4 - New revision/revision 000
For example, we compare the new schedule internal reference 2 revision 2 to historical schedule internal reference 2 revision 0.
5 - New DCI/RAN issue/latest revision
For example, we compare the new issue internal reference 3 revision 0 to historical schedule internal reference 2 revision 10.
6 - New DCI/RAN issue/revision 000
For example, we compare the new issue internal reference 2 revision 0 to historical schedule internal reference 1 revision 0.
7 - New DCI revision/latest revision
For example, we compare the new revision internal reference 2 revision 2 to historical schedule internal reference 2 revision 1.
8 - New DCI Revision/revision 000
For example, we compare the new revision internal reference 2 revision 2 to historical schedule internal reference 2 revision 0.
REOP - Inventory Re-order Policies Enter one of the following five codes on the Item/Stockroom Maintenance window if you want to use re-order points within Inventory Management.
1 Up to MAX
2 ROQ
3 Up to MIN
4 Up to ROP
Infor System21 Inventory Management | 703

861BApplication Interface
5 EOQ
RFCR - Invoice/Credit Note Reason Codes The code identifies why you are raising an invoice or credit note and is found on the Misc. Invoice or Credit Note Header window.
Set the limit field within the code to 0 if you want the invoice/credit note to update Sales Analysis with quantity, sales value and cost. Set the limit field to 1 if you do not want the invoice/credit note to update Sales Analysis with sales value and cost only.
Caution: The reason code 0 must exist; otherwise the Invoice Print program will not work.
RFTP - Reference Type You can create Reference Types using up to ten characters.
RGME - Regime Assign Regimes (World Trade) to Movement Transport Information and included on Intrastat and ESL reporting. Set up codes for French and Italian reporting:
• France - Codes 11, 19, 21, 22, 25, 26, 27 and 29 • Italy - Codes 1-6
RGNO - Region You can set up three-character regions of origin for use in World Trade. Regions are assigned to EC Movements and included on Intrastate and ESL reporting.
Examples:
CA - Catalina
NE - Northern England
NI - Northern Italy
RSNC - Reason Code You can create Reason Codes using up to two characters.
RUEL - Rule Element Type This is used in Advanced Customer Scheduling.
704 | Infor System21 Inventory Management

861BApplication Interface
1 - Quantity within period
You associate this element type with a range of days, which are relative to the schedule issue date. For example, range 0-10 means look at the amount (quantity or percentage or sales value) in the first 10 days of the new schedule and compare it to the amount in the corresponding 10 days of the comparison schedule.
2 - Cumulative at authorisation period end (new date)
You associate this element type with an authorisation period (1-5). This looks at the amount at the period end date for the new schedule and compares it to the amount on the comparison schedule at the same date.
3 - Cumulative at authorisation period end (new/current date)
This is like element 2, but compares the amount at the new end date of the relevant period on the new schedule to the value at current end date of the corresponding period on the comparison schedule.
4 - Cumulative at high water mark
You associate this element type with an authorisation period (1-5). This looks at the amount at the high water mark on the new schedule and compares it to the amount at the high water mark on the comparison schedule.
5 - Cumulative mismatch
This is a special element which has no date range or authorisation period associated with it. In addition, it does not compare new schedule data to a base schedule. Instead, it calculates the customer’s implied goods in transit in two different ways and evaluates the size of any difference to determine whether this is an exception.
6 - Quantity within period excluding arrears
You associate this element type with a range of days, which are relative to the schedule issue date. For example, range 0-10 means look at the amount (quantity or sales value) in the first 10 days of the new schedule and compare it to the amount in the corresponding 10 days of the comparison schedule.
SCRC - Scrap/Reject Reason Codes This is a two-character field on the Returns/Scrap/Adjustment Enquiry window within Customer Returns; it identifies why you are scrapping a returned product.
Enter 1 in the Tax field against a reason code to not generate a credit for the goods scrapped/rejected.
SDIV - Item Sub-division This is a two-character field on the Item Maintenance window. It is normally selected as one of the six item attributes when defining the Sales Analysis database.
Infor System21 Inventory Management | 705

861BApplication Interface
SHLU - Shelf Life Units If you are using extended lot, batch or serial control, you must use this code. It is found on the Item/Stockroom Maintenance window. You can select one of the following codes to identify how to measure shelf life:
1 Days
2 Weeks
3 Months
4 Years
5 Indefinite
6 Hours
7 Minutes
SN - Customer Region This is a two-character field on the Customer Sales Details window within the Customer maintenance task. It is normally selected as one of the six customer attributes when defining the Sales Analysis database.
SPRC - Short Pick Reason Code This is a two-character code on a pick/despatch line that identifies the reason for any short shipment of the ordered quantity.
SPRS - Stockrooms No Short Pick Use this parameter to identify any stockrooms that do not require a reason code to be entered when making a short shipment.
SPXV - SPEX version This is used to determine the installed version of SPEX.
00 Default SPEX version
01 SPEX/400 EU version
02 SPEX for windows installed
706 | Infor System21 Inventory Management

861BApplication Interface
SRCE - Source/Supply Types This is used in Advanced Order. The following codes must exist:
1 Batch
2 Sales order
3 Purchase order
4 Requisitions
ST - Customer State This is a two-character field on the Customer Sales Details window within Customer Maintenance. It is normally selected as one of the six customer attributes when defining the Sales Analysis database.
STKF - Non-stock Item Type If you are using Advanced Order Entry, this is a one-character field on the Item Master Maintenance window that identifies the type of non-stock item.
STKS - Stock Status Codes This is used in Inventory to define stock status codes for items with lot, batch or serial control with shelf life.
These are two-character codes, used when stock is frozen or unfrozen from the Lot Maintenance tasks, or by the Stock Status Monitor.
You must set the Limit to 1 if you want to freeze stock and blank or zero for codes to unfreeze stock.
FZ Frozen
F2 Frozen
RL Released
UN Unfrozen
STKU - Stockroom Usage Code This is a two-character field on the Stockroom Maintenance window within the Inventory Management company profile.
Infor System21 Inventory Management | 707

861BApplication Interface
STRM - Inventory Storage Method This is a one-character field on the Item Master Maintenance window.
STXG - State Tax Group State tax groups can be created for use in excise tax. Customers are assigned to a State tax group and then State profiles define which groups payments are to be made for.
Note: This Description code is intended for use within US Drinks environments.
SUBT - Substitution Type This is a two-character code that signifies the type of item substitution that has occurred to result in a particular item being placed on a demand order.
The following codes should already exist in the Inventory Descriptions file (no other values are supported):
PI Promotion Accepted
S1 Supersession (Forced)
S2 Supersession (Preferred)
S3 Supersession (Stock Run-Out)
SUNC - Miscellaneous Order Charge Code This is a two-digit field to identify a miscellaneous charge that you can add to the Order Trailer window during order entry, order amend or confirmation of despatch. You can only define the charge code as a value in base currency with mandatory domestic rate Tax code (or tax code in US.) Currency conversion to prime values and change of Tax code occur automatically when codes are applied to prime currency orders.
SUNI - Sales Unit Indicator Flag You use these codes in Inventory Management to signify whether an item must be sold in multiples of its stocking unit when placing orders within Order Capture.
The following codes should already exist in the Inventory Descriptions file (no other values are supported):
0 Cannot be sold in issue units
1 Can be sold in issue units
708 | Infor System21 Inventory Management

861BApplication Interface
SUPI – Supersession Items No minor codes are shipped with this entry.
Enter the items that must be specified when a specific reason code is used.
Fields
Description ID
Enter the corresponding reason code on the SUPR description.
Description
Enter the only item code that can be used with the reason.
SUPR – Supersession Reasons No minor codes are shipped with this entry.
Enter the reason codes to be used when superseding one item with another in Item Maintenance [2/INM].
Fields
Limit
1 – any item can be used as the new item, except for those defined on the SUPI description.
0 – a specific item must be used. This is defined on the SUPI description.
SUSP - Order Suspend Codes This is a two-character field on the order header to identify why an order is suspended, together with the use of the Tax field to prevent auto de-allocation. You must define at least eleven codes, for example:
AD Card Authorisation Declined
BI Booking In Control
CA Awaiting Card Authorisation
CH Hierarchy credit limit exceeded
CL Credit limit exceeded
CP Customer suspended
CS Customer on credit stop
CT Customer on litigation stop
CW Cash With Order
FP Fixed price item
Infor System21 Inventory Management | 709

861BApplication Interface
NP Item not priced
PF Proforma Invoice
SV State Violation
You can define additional codes; however, you must manually enter these against an order.
If you set the Tax field to 1, you can suspend a fixed price line in Advanced Order Entry but still allocate allocated to that line. This does not affect Conversational Order Entry.
If an order is suspended:
• You cannot raise a picking note • You cannot adjust the allocation using Manual Allocation • You cannot adjust the allocation using Manual Allocation by Item • You can use Advanced Order Entry's Order Amendment to de-allocate or force allocate
If you set the Tax field to 2, you can create order lines in Advanced Order Entry with back-to-back requisitions or reserved against purchase orders.
If you set the Rate field to 1, you cannot use the code to suspend orders; for example, you could set code FP so that fixed price orders are not suspended. This only applies to the following default codes: NP, NV, FP and to user-defined codes.
SV - Customer Sub-division This is a two-character field on the Customer Sales Details window within Customer Maintenance. It is normally selected as one of the six customer attributes when defining the Sales Analysis database.
TAR - Tariff Any eight-digit commodity codes should be set up for use in World Trade. Ten-digit codes can be used when World Trade is not in use. This satisfies US legal requirements to enable reporting of item movements by tariff codes of ten characters.
TDEL - Terms of Delivery Set up three-character terms of delivery for World Trade as follows:
EXW Ex Works
FOB Free on Board
CIF Carriage, Insurance and Freight
DDU Delivered Duty Unpaid
710 | Infor System21 Inventory Management

861BApplication Interface
DDP Delivered Duty Paid
XXX Other
TMTH - Transport Method You can create Transport Methods using up to xx characters.
TN - Salesman This is a required five-character field on the Customer Sales Details window within Customer Maintenance. It is normally selected as one of the six customer attributes when defining the Sales Analysis database. You can use the salesman codes that you set up here within Sales Order Processing Commissioning processes.
TPAR - Adjustment Reasons This is used in Transport Planning
You must use these if you use carrier rating and there is a variance when authorising carrier payments.
01 Mistake in Manual Rating
02 Old Rate Codes Used
03 One
TPBL - Bill of Lading Format This is used in Transport Planning
You must define four codes if you want to use bills of lading when you maintain transport routes. The codes are:
01 One document per load
02 Document per drop/delivery point
03 One document with drop details
04 One document details by area
TPCC - Commodity Code This is used in Transport Planning
Infor System21 Inventory Management | 711

861BApplication Interface
This has a maximum of eight characters. You can use these when you define a transport centre.
TPCT - Carrier Type This is used in Transport Planning
This has a maximum of four characters. You can define these to categorise carriers.
TPCY - County This is used in Transport Planning
This has a maximum of four characters maximum. You can define these for use when you set up nodes.
TPDC - Default Capacity Type This is used in Transport Planning
Three codes must exist.
1 Weight
2 Volume
3 Containers
TPIC - Creation of Requirements This is used in Transport Planning
The following codes must exist:
1 Order creation
2 Allocation
3 Pick note creation
4 Commit (not used)
5 Confirm pick (not used)
6 Confirmation of despatch
TPLS - Load Status This is used in Transport Planning
712 | Infor System21 Inventory Management

861BApplication Interface
The following codes must exist:
10 Pending
20 A'printing (Awaiting printing)
30 Allocated (not used)
40 On pick (not used)
50 Picked (not used)
60 A'rating (Awaiting rating)
70 A'COD (Awaiting confirmation of load despatch)
80 A'auth. pay (Awaiting payment authorisation)
90 A'ledg. post (Awaiting posting of payment to the General Ledger)
95 A'hist (Awaiting drop to history)
99 Cancelled
Codes 30, 40 and 50 may exist but are not currently used.
TPPM - Payment Method This is used in Transport Planning
This is a maximum of two characters. You must define codes if you want to use carrier rating and therefore payment.
TPRM - Rating Method This is used in Transport Planning
You should create four codes if you want to use rating of loads:
01 Load and rate table
02 Drop and rate table
03 Area
04 Area and rate table
TPSE - Serious Errors This is used in Transport Planning
The following codes must exist:
Infor System21 Inventory Management | 713

861BApplication Interface
01 Sales order not found
02 Pick note header not found
03 Item record not found
04 Stockroom balance not found
05 Route specified not found
06 Time out for requirements update
07 Details changed after AFI post
08 Details changed after override
09 Global route change warning
10 Possible capacity problems
11 Item transport prof. not found
TR - Customer Territory This is a two-character field on the Customer Sales Details window within Customer Maintenance. It is normally selected as one of the six customer attributes when defining the Sales Analysis database.
TRAN - Movement Reference Type This is a two-character field used on all Inventory transaction windows within Inventory Management. Use these codes to identify the type of source document used.
Production routines that involve Inventory movements prompt for transaction type codes.
TTYP - Text Type This will determine the type of text entered and where on the documentation text will appear. Set up the following codes:
B Batch reference text
C Customer text
D Certificate of Conformance text
I Invoice header text
K Carrier
L Order line text
714 | Infor System21 Inventory Management

861BApplication Interface
O Order header text
P Item text
T Transport load text
X Promotion text
UNIT - Unit of Measure This is a two-character field on the Item Master window. Unit of measure could be a purchasing UoM, stocking UoM or issuing UoM.
UOM - Units of Measure Codes These codes are used for Catchweight
These are two-character codes. Unit of Measure could be a purchasing, stocking or issuing UoM.
Note: You must define all secondary units of measure in both the major types UNIT and UOM.
USCY - Usage Cycle This is a one-character field on the Inventory Management Company Profile Maintenance window. Two codes must exist:
M - Average per Month
W - Average per Week
USGC - Text Usage Codes These determine where the text will appear within documentation. The codes include:
B Batch reference text
C Certificate of Conformance text
E External text
I Internal text
P Planner
Infor System21 Inventory Management | 715

861BApplication Interface
UTYP - Unit of Measure Type This is a single character code that identifies the type of unit represented by a Unit of Measure code. The following codes should be shipped with the product (no other values are supported):
1 Weight
2 Volume
3 Length
4 Area
5 Unitary
VAT - Tax Codes Use this if the company is not linked to the General Ledger: it is redundant if the General Ledger is linked.
Set up any new Tax codes created in the General Ledger for World Trade under major type VAT.
BATCH - Batch lock request
You should set the limit to five attempts to access a locked record; set the rate to 20 seconds to wait.
INTER - Interactive lock request
You should set the limit to five attempts to access a locked record; set the rate to two seconds to wait.
Note: You can use these codes to control how long a job waits for the release of a temporary record lock and how many times to try to achieve a lock for updates.
VTXT - Zero/Exempt Tax Supplies Text This is used to hold text to print on invoices where the Tax value is zero because the line is zero-rated or exempt either due to the nature of the goods or by virtue of it being an intra-EU sale. It is used by OE/SS/JC invoice prints.
The sub-code length is 3 to hold a Tax code, for example:
000 - Zero-rate supply
ZER - EU 6th Directive exempt supply
WHCS - Warehousing Commit List Sequence If you are using Warehousing, the following codes must exist:
1 Order Sequence
716 | Infor System21 Inventory Management

861BApplication Interface
2 Customer Sequence
3 Journey Sequence
4 Despatch Sequence
6 Consignment Sequence
WHIS - Warehousing Item Sequence If you are using Warehousing, the following codes must exist:
1 Item Sequence
2 Alternative Location
3 Location Sequence
WHLS - Warehouse/List Type If you are using Warehousing, the following codes must exist:
01 Put
02 Pick List
03 Move List
04 Count List
WHML - Move List by Sequence If you are using Warehousing, the following codes must exist:
1 Warehouse
2 Area
3 Access Point for Dimension 1
WHMS - Move List Sequence If you are using Warehousing, the following codes must exist:
1 Item
2 Arrival Time
Infor System21 Inventory Management | 717

861BApplication Interface
WHMT - Warehousing Movement Type If you are using Warehousing, the following codes must exist:
1 Put
2 Pick
3 Sundry Movement Planned
4 Sundry Movement not Planned
5 Commitment Amendment
6 Count Reconciliation
7 Sundry Frozen Movement
WHMV - Warehouse Movement Trans If you are using Warehousing, the following codes must exist:
AF Frozen Stock Adjustment
AP Physical Stock Adjustment
CI Customer Order Issue
PR Purchase Receipt
SI Sundry Issue
SR Sundry Receipt
IT Transfer In
T0 Transfer Out
001 Internal Warehouse Movement
WHNL - Number of Locations to be Created A code of MAX with a value in the limit field must exist. The entered value will default to the maximum Number of Locations to be Created field within Maintain Warehouse Map when creating new location codes.
WHPS - Warehousing Pick List Sequence If you are using Warehousing, the following codes must exist:
1 Warehouse Sequence
718 | Infor System21 Inventory Management

861BApplication Interface
2 Area Sequence
3 Dimension 1 Sequence
WHRS - Warehousing Reason Code If you are using Warehousing, the following codes must exist:
#1 Put
#2 Commit Override
#3 Replenishment Override
#4 Instruction Overridden
#5 Item/Pack Profile Missing
#6 Item/WHSE Profile Missing
#7 Planned Movement
#8 Short Despatch Leave Frozen
#9 Count Reconciliation
99 Short Despatch Leave Committed
Note: Set the Limit field for code 99 to 1 to leave stock committed.
WHSE - Warehouse Miscellaneous Parameters
CDID Confirm Despatch Session with a Rate/Value of 1 (this is system-generated)
DTAQ Data Queue Wait Time in Seconds, where the limit field sets the data queue polling delay in seconds
EOFD End of File Delay in Seconds, where the limit field sets the data queue polling delay in seconds
ASPN Produce Advanced Shipping Pick Notes, where 1 in the Limit field means Yes
Infor System21 Inventory Management | 719