information in this documentation is subject to change...
TRANSCRIPT

Information in this documentation is subject to change without notice. The companies, names and information used within are fictional unless otherwise noted. No part of this documentation may be reproduced in any form, for any purpose, without the express written permission of Timeware, Inc.
© 2017 Timeware, Inc. All rights reserved.
Printed in the U.S.A.
Timeware, Inc. 9329 Ravenna Road, Suite D (800) 356-7640 Twinsburg, OH 44087 (866) 936-2420 (fax)

TABLE OF CONTENTS
CHAPTER 1: INTRODUCTION TO THE ADMINISTRATION MODULE .................................................................... 1
1.1: INTRODUCTION TO TIMEWARE PRIMETIME.............................................................................................................. 1 1.2: LAUNCHING TIMEWARE PRIMETIME....................................................................................................................... 2 1.3: ABOUT THE ADMINISTRATION MODULE ................................................................................................................. 3 1.4: NAVIGATING THE ADMINISTRATION MODULE .......................................................................................................... 4
CHAPTER 2: THE BUSINESS UNIT ..................................................................................................................... 8
2.1: ABOUT THE BUSINESS SECTION ............................................................................................................................. 8 2.2: ADDING NEW BUSINESS UNIT ............................................................................................................................... 9 2.3: CLONING NEW BUSINESS UNIT ........................................................................................................................... 10 2.4: DELETING EXISTING BUSINESS UNIT ..................................................................................................................... 10 2.5: BUSINESS UNIT (COMPANY) SETUP...................................................................................................................... 10
CHAPTER 3: THE JOB .................................................................................................................................... 11
3.1: ABOUT THE JOB ............................................................................................................................................... 11 3.2: ADDING NEW JOB ............................................................................................................................................ 12 3.3: CLONING NEW JOB ........................................................................................................................................... 12 3.4: DELETING EXISTING JOB ..................................................................................................................................... 12 3.5: JOB SETUP ...................................................................................................................................................... 12 3.6: JOB ATTENDANCE SETUP ................................................................................................................................... 14 3.7: JOB CONTROLS SETUP ....................................................................................................................................... 18 3.8: JOB PAYROLL CODES ......................................................................................................................................... 22 3.9: JOB SHIFTS ...................................................................................................................................................... 23 3.10: ASSIGNING EMPLOYEES ................................................................................................................................... 25 3.11: ASSIGNING GROUPS ........................................................................................................................................ 27
CHAPTER 4: THE EMPLOYEE GROUP .............................................................................................................. 29
4.1: ABOUT THE EMPLOYEE GROUP ........................................................................................................................... 29 4.2: GROUP SETUP ................................................................................................................................................. 30 4.3: ASSIGNING EMPLOYEES ..................................................................................................................................... 30
CHAPTER 5: THE EMPLOYEE .......................................................................................................................... 33
5.1: ABOUT THE EMPLOYEE ...................................................................................................................................... 33 5.2: ADDING NEW EMPLOYEE ................................................................................................................................... 33 5.3: CLONING NEW EMPLOYEE ................................................................................................................................. 34 5.4: DELETING EXISTING EMPLOYEE ........................................................................................................................... 34 5.5: EMPLOYEE PROFILE ........................................................................................................................................... 34 5.6: EMPLOYEE ID’S ................................................................................................................................................ 35 5.7: EMPLOYEE STATUS ........................................................................................................................................... 38 4.5: EMPLOYEE ADDRESS ......................................................................................................................................... 41 5.9: EMPLOYEE SHIFTS............................................................................................................................................. 43 5.10: ASSIGN POLICY .............................................................................................................................................. 46 5.11: ASSIGN JOBS ................................................................................................................................................. 48 5.12: ASSIGN JOB NUMBERS .................................................................................................................................... 49 5.13: BULLETIN SETUP ............................................................................................................................................. 50

CHAPTER 6: THE BIOSCREEN ......................................................................................................................... 52
6.1: ABOUT THE BIOSCREEN ..................................................................................................................................... 52 6.2: ADDING NEW BIOSCREEN .................................................................................................................................. 52 6.3: CLONING NEW BIOSCREEN ................................................................................................................................. 52 6.4: DELETING EXISTING BIOSCREEN........................................................................................................................... 53 6.5: BIOSCREEN SETUP ............................................................................................................................................ 53 6.6: BIOSCREEN OPERATION ..................................................................................................................................... 55 6.7: BIOSCREEN FUNCTION SETUP ............................................................................................................................. 58 6.8: BIOSCREEN EXECUTE FUNCTION .......................................................................................................................... 60
CHAPTER 7: ADMINISTRATION REPORTS....................................................................................................... 62
7.1: ABOUT THE ADMINISTRATION REPORTS ................................................................................................................ 62 7.2: RUNNING ADMINISTRATION REPORTS .................................................................................................................. 63
CHAPTER 8: GLOSSARY ................................................................................................................................. 64
8.1: INTRODUCTION ................................................................................................................................................ 64 8.2: GLOSSARY ....................................................................................................................................................... 64

Timeware Primetime User Guide – Administration Module 1
Chapt e r
Introduction to the Administration Module 1.1: Introduction to Timeware Primetime
Timeware Primetime™ is an ERP class workforce management system. Designed to help organizations of all types to manage their employee work activity including time & attendance, leave management, payroll management, accrued benefits, and scheduling. Timeware Primetime™ provides comprehensive management of all these activities starting at the time clock and ending in the payroll system. Thus, Timeware Primetime™ can be described as the system that manages everything from punch to payroll.
Timeware Primetime™ was designed with a unique object based architecture. What I mean by this, is that the Timeware Primetime™ entities and nomenclature are defined in an easy way and everything that is relevant to workforce management is called as it is. For instance, we use entities like Employee, Job, Company, Business Unit, Employee Group, Department, Time Clock. One exception to this rule, is that we call our time clock the Bioscreen™. The reason for this is that the Bioscreen™ was the first machine ever created with biometric fingerprint identification and a touch screen interface. To fully understand the Timeware Primetime™ system, the user must understand the relationships between the various major entities that he system is built around. The graph below shows these entities and the relationships among them in a graphical way.
Figure 1.1: The Timeware Primetime™ basic entities relationship diagram. As shown, the Business Unit (BU) is the top entity. The employee Group (home department) is associated with the BU on 1 to 1 basis. In other words, each Group can be associated with one BU. The Job is associated with the BU on 1 to 1 basis. The Employee is associated with the Group on 1 to 1 basis. In other words, each Employee can belong to one Group only. The Employee is associated with the Job on 1 to many basis. In other words, each Employee can have any number of jobs. The Bioscreen™ is associated with the BU on 1 to 1 basis.
1

1.2: Launching Timeware Primetime
Timeware Primetime is a Web based software application that can run on multiple platforms including: Windows, Mac OS and Linux. To make it possible to run this software, Timeware provides each client with a common link that can be saved to the user workstation desktop. By running this link, the Timeware Primetime software will run. The first screen the user will see is the logon dialog shown in Figure 1.1. below.
Figure 1.1. Logon Dialog Figure 1.2 Server Connection Dialog Figure 1.3 Change Password Dialog
If the software is being run for the first time, then the user must make sure the server connection link is entered as required. In Figure 1.2 above, we see that the server link is set to 192.168.1.124. This link can be entered as an IP address, URL or server name. Timeware will provide this information to the client upon system implementation. Upon successful login the system will remember this link for the future. Keep in mind however, if the machine is reimaged or a new machine is installed, this link needs to be entered again.
With the server connection link being setup correctly, to launch the Timeware Primetime software, the user must enter his/her assigned user name and password in the fields shown in Figure 1.1. above. If the correct user name and password are entered, the software will be launched, and the Timeware Primetime software will appear as shown in Figure 1.4 below.
The dashboard shown is made up of 4 parts as indicated.
Item#1, the Main Menu. Here the user can access both the File and Help menus.
Item#2, the Module Navigator. Here the user can choose to launch any of the listed software modules.
Item#3, the Module Navigator. Here the user can choose to launch any of the listed software modules.

Timeware Primetime User Guide – Administration Module 3
Item #4, the notification board. Here the use is informed of pending messages, leave request approvals, time charge approvals and time charge edits. By pressing any of the associated link, the appropriate module screens are automatically loaded.
To launch the Administration Module, simply press the Administration icon button in either navigator (item#2 or item #3 in Figure 1.4 below).
Figure 1.4. Timeware Primetime Dashboard
1.3: About the Administration Module
The Administration Module is primarily a setup module and will be used to manage five types of Timeware Primetime data elements: Business Units, Jobs, Employees, Groups and Bioscreen devices. The module is intended to be used by personnel who either maintain (i.e. adding and/or editing existing data) or have access to view data.
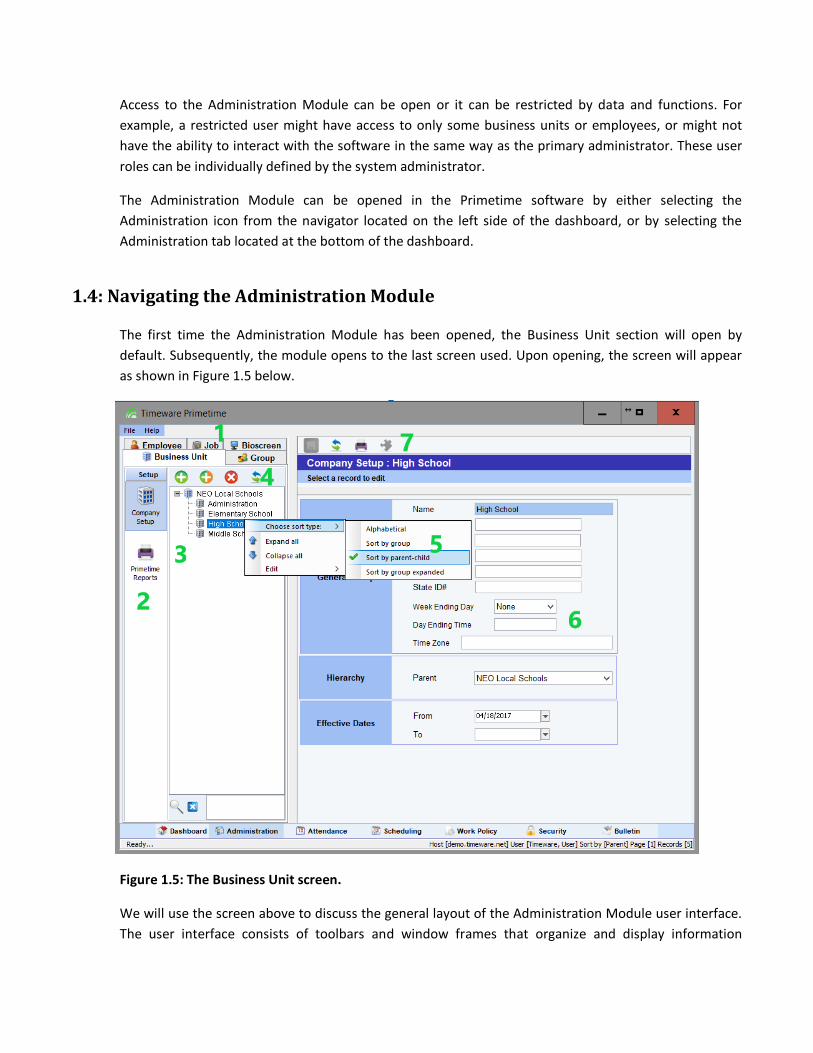
Access to the Administration Module can be open or it can be restricted by data and functions. For example, a restricted user might have access to only some business units or employees, or might not have the ability to interact with the software in the same way as the primary administrator. These user roles can be individually defined by the system administrator.
The Administration Module can be opened in the Primetime software by either selecting the Administration icon from the navigator located on the left side of the dashboard, or by selecting the Administration tab located at the bottom of the dashboard.
1.4: Navigating the Administration Module
The first time the Administration Module has been opened, the Business Unit section will open by default. Subsequently, the module opens to the last screen used. Upon opening, the screen will appear as shown in Figure 1.5 below.
Figure 1.5: The Business Unit screen.
We will use the screen above to discuss the general layout of the Administration Module user interface. The user interface consists of toolbars and window frames that organize and display information

Timeware Primetime User Guide – Administration Module 5
relevant to the data element selected. As mentioned above, these data elements are grouped by navigator tabs at the top left side of the screen (Fig. 1.5 #1). The Business Unit, Employee, Group, Job and Bioscreen tabs can be accessed, by a mouse click, to load the relevant user interface for each element.
Once a data element is selected, then the entire screen data and layout changes as follows:
The relevant functions of the selected element are displayed in the navigator (Fig. 1.5 #2). For example: the screen above, where the selected data element is the Business Unit, two functions are available: Company Setup and Company Reports. The navigator contains function buttons for all the various data configuration options. Depending on the type of data element selected, these options may be grouped into separate categories (e.g. Setup, Assign and Access categories for the Employees section). All administrative tasks will have an associated button in the navigator. When a navigator button is selected, the Details Window (Fig. 1.5 #6) will refresh with relevant information. For example: Figure 1.5 above shows the company setup details where the company selected is called “High School”.
The data records of the selected element are displayed in the navigator data tree (Fig. 1.5 #3). For example: in the screen above, where the selected data element is the Business Unit, the available business units are shown in the data tree.
Above the navigator data tree, a toolbar is also displayed (Fig. 1.5 #3). This tool bar can be used to add, clone or delete data records. In addition, a refresh icon can be used to refresh and reload the data tree. A detailed description of this toolbar functions is explained in Table 1.5 below.
Each data tree is associated with its own menu that can be displayed by right clicking the mouse over it (Fig. 1.5 #5). This menu can be different between data elements and it is mainly used for functions such as: collapsing the tree, expanding the tree, choosing the tree sort type or choosing whether to display active, inactive or all existing data records.
At the bottom of the navigator tree a search box is also displayed. It can be used to search for a specific record by name. Additional search options are also available depending on the data type selected. By hovering the mouse over the search box, a tool tip is displayed to inform the user of the available search options.
The window on the right side of the screen is the edits and detail window that can be used for viewing/editing the record details (Fig. 1.5 #6). Editing is granted to those users with a permission to edit the selected record. Other users may have read only access and can only view the data. This is the largest portion of the screen and will usually display editable fields. Additionally, there is a details screen toolbar (Fig. 1.5 #7) above the window with tools to add, edit and delete individual records displayed in the detail window. This toolbar applies only to the record currently being displayed. Further details on the actions of this toolbar are described in Table 1.2 below.

Table 1.1 – Tree Toolbar Icon Name Description
Add
This button enables the user to add a new data record. Once a new record is created, it will be added to the data tree and sorted as appropriate. This record can be further edited by making changes to the selection in the detail window (Fig. 1.5 #6).
Clone
This button enables the user to clone a new record from the tree selected record. Once a new record is created, it will be added to the data tree and sorted as appropriate. The cloned record will be copied directly from the one currently selected within the tree.
Delete
This button enables the user to delete the tree selected record. In cases where the record is currently in use, the deletion will fail, and an exception message will appear.
Refresh Pressing this button will reload the data tree records.
Table 1.2 – Details Toolbar Icon Name Description
Add
Press this button to add a new record to the detail window. This button will be enabled only if the context permits adding a new record within the detail window. For example, adding a new Job Shift from the Job section would be appropriate. After changes are made, the Save button must be used otherwise the data may be lost.
Clone
Press this button to clone a new record. The cloned record will be copied from the one currently selected in the detail window. This button will be enabled only if the context permits cloning a new record within the detail window. After changes are made, the Save button must be used otherwise the data may be lost.
Delete
Press this button to delete the currently selected record from the detail window. In cases where the record is currently in use, the deletion will fail, and an exception message will appear.
Refresh Press this button to refresh the records list presented.
Save
Pressing the save button will post any changes that have been made to the selected record. This button will be enabled only upon making new record changes.

Timeware Primetime User Guide – Administration Module 7
The print button allows the user to print out reports. Timeware Primetime loads reports by context. For example, if the Employee section is open, the print button will then load options to run employee reports.

Chapt e r
The Business Unit 2.1: About the Business Unit
The Business Unit (or Company) function can be accessed by selecting the Business Unit tab from the navigator. Upon selection, the Business Unit navigator functions, data records tree, detail section and associated toolbars will be loaded as shown in Figure 1.5 above.
The Business Unit data element is used to organize companies, locations or business units. The Timeware Primetime database designer can determine how best to break down an organization into multiple business units. The objective is to divide up the organization in a logical way that helps manage the system and apply business rules in the most effective manner. In the current example, the business units are broken down based on location. One ‘parent’ business is defined to represent the company as a whole, and all of the other units are referred to as ‘children’ of it. In this structure, any business rules that apply to the parent business unit will also apply to all its children.
This break down provides the following advantages to the Primetime user:
• The Bioscreen machines that are deployed at any given location can be associated with that location. Hence, the association of work location to a cost center can be easily tracked.
• Employees within any location can be easily accessed and managed by the location administrator by giving the administrator access to that specific business unit.
• If there is a specific set of business rules that apply to any location, then these rules can be applied to the associated business unit.
2.2: Adding New Business Unit
To add a new Business Unit record, press the green plus icon button above the navigator tree. Once done, a new business unit will be created, added to the tree and selected as to make it ready for editing.
Now you may continue the business unit setup by navigating the various setup tabs and filling in the relevant information as described in section 2.5 below. Keep in mind that the editing will be done in the details window and you must press the save button when finished.
2

Timeware Primetime User Guide – Administration Module 9
2.3: Cloning New Business Unit
Cloning a new business unit may save few steps in the creation process. That’s because, upon cloning an existing business unit record, some information is copied into the new record, thus, saving some time. To clone a new business unit, first select the existing business unit record that you want to clone, then press the green/orange plus icon button above the navigator tree. Once done, a new business unit will be created, added to the tree and selected as to make it ready for editing.
Now you may continue the business unit setup by navigating the various setup tabs and filling in the relevant information as described in section 2.5 below. Keep in mind that the editing will be done in the details window and you must press the save button when finished.
2.4: Deleting Existing Business Unit
You may delete a business unit from the system only if that business unit has no attendance records associated with it either by the job relationship or the group/employee relationship. In such cases and upon attempting to delete a business unit record, the system will generate an exception and the delete fails. If the business unit is no longer needed, then we recommend making the business unit inactive by specifying an effective ending date (for more details see section 2.5 Company Setup below).
To delete a business unit record, select the business unit from the records tree, then press the red X icon button above the records tree. Once done, a prompt will appear to validate your action, upon confirmation, the business unit record is deleted from the system and the business unit tree is refreshed.
2.5. Business Unit (Company) Setup
As shown in Figure 1.5 above, the ‘High School’ has been selected. Consequently, the detail window of the software is filled with the data available on this business unit. The screen is only partially filled because only the minimal amount of required data is entered. Note that only the fields with a blue background are required to be filled to successfully save the data record.
Within the details section, various data can be entered about the business unit. Each individual field will now be described.
Name The name identifier of the business unit.
Location Code This is a designator to tell the payroll system where work was performed. For example, if one or

more Bioscreen machines are associated with the selected business unit, then all punches from these machines would have the same location code as the one defined here.
Locality This is tracked in the same manner as the location code, and is used for tax computation purposes.
SIC This is tracked in the same manner as the location code and is used if required by the payroll system.
Federal ID# This is tracked in the same manner as the location code and is used if required by the payroll system.
Week Ending Day This can be selected if various locations of the company use different defined work weeks.
Day Ending Time This can be selected if various locations of the company use different ending times for their workdays.
Time Zone This can be selected if various locations of the company are located in different time zones
Hierarchy This is used to assign the business unit to a parent unit.
Effective Dates A business unit can be enabled or disabled by setting the dates. By leaving the ‘to’ field empty, a business unit will remain enabled as of the date entered in the ‘from’ field.
The Save button at the top of the detail window must be pressed after changes have been made. Failure to do so, before closing the software or navigating to another business unit or module, will result in changes being lost.

Timeware Primetime User Guide – Administration Module 11
Chapt e r
The Job 3.1: About the Job
The Job function can be accessed by selecting the Job tab from the navigator. Upon selection, the Job navigator functions, data records tree, detail section and associated toolbars will be loaded as shown in Figure 3.1 below.
Jobs within the Timeware Primetime software are used to represent a payroll cost center where labor cost needs to be tracked. Because of this broad definition, we can create many type of jobs, including those under the following categories:
Attendance or regular work jobs (e.g. school custodian) Substitute jobs (e.g. substitute teacher) Supplemental or extra work jobs (e.g. field trip or snow removal) Extra duty jobs (e.g. high school extra morning monitoring) Overhead or leave jobs (e.g. vacation, sick time)
In addition, we can organize jobs under parent job types. With this capability, jobs can be more readily organized together for easy access and maintenance. The Timeware database architects will advise as to the best possible strategies for creating and setting up jobs.
In general, jobs are created and setup in a way that is consistent with their purpose. Then, every job is assigned to one or more employee or employee groups. The, attendance data, whether initiated at the time clock, manually entered, or entered from other sources, will then be associated with the correct job. For example, we may create and setup a job called ‘High School Custodian.’ Then, we will assign all the high school custodians to it as individuals or simply assign the High School Custodians group to it. By doing so, every high school custodian can punch in on the clock and choose this as their work activity or job. The system will then compute work hours from clock punches and provide those hours to the payroll system for payment.
3

3.2: Adding New Job
The Job Setup process begins within the navigator Job Setup button selected as shown in Figure 3.1 below. To add a new Job record, press the green plus icon button located above the navigator tree. Once done, a new job will be created, added to the job records tree and selected as to make it ready for editing.
3.3: Cloning New Job
Cloning a new job may save few steps in the creation process. That’s because, upon cloning an existing job record, some information is copied into the new record, thus, saving some time. To clone a new job, from the data tree, select an existing job record you want to clone, then press the green/orange plus icon button above the navigator tree. Once done, a new job will be created, added to the tree and selected as to make it ready for editing. Now you may continue the job setup by navigating the various setup tabs and filling in the relevant information as described in the subsequent sections below.
3.4: Deleting Existing Job
You may delete a job from the system only if that job has no attendance records associated with it. In such cases and upon attempting to delete the job record, the system will generate an exception and the delete fails. In such case, if the job is no longer needed, then we recommend making the job inactive by specifying an effective ending date (for more details see section 3.5 Job Setup below).
To delete a job record, select the job from the records tree, then press the red X icon button above the records tree. Once done, a prompt will appear to validate your action, upon confirmation, the job record is deleted from the system and the jobs tree is refreshed.
3.5: Job Setup
In Timeware Primetime, setting up jobs is one of the most important processes. The process begins at the Job Setup screen. To open the Job Setup screen, simply select the Setup tab then the Job Setup icon from the navigator as shown in Figure 3.1 below.

Timeware Primetime User Guide – Administration Module 13
Figure 3.1: The Job Setup screen.
The Job Setup screen allows us to edit the basic portion of a job data record including:
Name This is the name identifier for the specific job
Description The description is used to further describe the job. Note that if a job description is entered, the Bioscreen device will show the job description instead of the job name.
Code/Number A code designator can be used, if needed, as a job identifier in order to assist the payroll system. In addition, the job code can be used to identify jobs when building master schedules.
Local Code This is a code that can be used to identify jobs in order to assist payroll with local tax computation information.
Parent This is used to select a parent job category for the job. If you are creating a category, this section is optional.

Business Unit This is used to associate the job with a company or location. Note that associating a job with a business unit here will associate the time worked at that job with the selected business unit, unless a global option is set to associate the time worked with a given Bioscreen machine.
Manager This can be used to select a job manager if appropriate.
Effective Dates A job can be enabled or disabled by setting restrictive job dates. By leaving the ‘to’ date field empty, a job will remain enabled as of the ‘from’ date specified.
As with any changes made within the detail window, any edits made to an existing job or any additional information about a new job must be saved by clicking the save icon at the top of the screen. If you navigate away from the selected job unit before saving, then any changes made will be lost.
3.6: Job Attendance Setup
Timeware Primetime allows the user to set up job attendance parameters that may be needed to control how the job is used in attendance relevant matters. To access the job attendance setup screen, the Job Attendance icon must be selected from the navigator. Once selected, the job attendance window will open as shown in Figure 3.2 below, with the screen data fields filled by the job selected from the navigator tree. Please note that in none of the job attendance fields are actually required in order for the job to function properly. They are used to further control how a job to be used and on an as-needed basis.
Figure 3.2: The Job Attendance information screen.

Timeware Primetime User Guide – Administration Module 15
Now we will explain the purpose of each Job Attendance data field.
Charge limit options
First off, the term ‘charge’ is used here to represent a clock attendance punch or a manually entered attendance record. As you can see in Figure 3.2 there are currently seven charge limit options. These options are mutually exclusive, meaning that only one option can be chosen per job, including a ‘none’ option if necessary. These options are as follows:
Apply in even increments If this option is chosen, then any time charge hours will be computed as an even increment of whatever value is entered in the adjacent Amount field. Furthermore, the computed value will have either Hour or Day as a unit of measure, depending on whatever is selected in the adjacent drop down menu. This option is usually used as part of overhead or leave type jobs. For example: suppose we are setting up a "Sick Time" job and the business rules dictate that we apply it in even increments of 0.25 days. Then, we need to select this option and enter 0.25 in the Amount field and select "Day" from the Unit drop down.
Fixed charge unit If this option is chosen, then any time charge hours will be computed as a fixed value which equals the value entered in the adjacent Amount field. The unit of measure is determined by whatever is selected in the adjacent drop down menu. For example: suppose we are setting up an "Alarm Drop" call-in job and the business rules dictate that the employee gets a fixed 3 hours of pay per occurrence. Then, we select this option, enter 3 in the Amount field and select "Hour" from the Unit drop down.
Fixed standard hours charge If this option is chosen, then any time charge hours will be computed as a fixed value which equals the value daily standard hours of the employee. Daily standard hours can be entered as work calendar parameter, fixed value or computed from employee assigned shifts.
Minimum charge If this option is chosen, then any time charge hours will be computed with a minimum value which equals the value entered in the adjacent Amount field. The unit of measure is determined by whatever is selected in the adjacent drop down menu. For example: suppose we are setting up a "Call In" job and the business rules dictate that the employee gets a minimum 2 hours of pay per occurrence. Then, we select this option, enter 2 in the Amount field and select "Hour" from the Unit drop down.
Minimum shift charge If this option is chosen, then any time charge hours will be computed with a minimum value which equals the hours defined by the shift worked. For example: We would select this option if we are setting up a "Bus Route" job and the business rules dictate that the employee gets paid for a minimum number of hours equal to the shift worked hours.
Minimum charge by work rule If this option is chosen, then any time charge hours will be computed with a minimum value which equals the hours computed by a work policy work rule.

Minimum charge by daily standard hours If this option is chosen, then any time charge hours will be computed with a minimum value which equals the employee daily standard hours.
Fixed shift charge If this option is chosen, then any time charge hours will be computed with as a fixed value which equals the hours defined by the shift worked. For example: We would select this option if we are setting up a "Bus Route" job, and the business rules dictate that the employee gets paid for a fixed number of hours equal to the shift worked hours.
Maximum charge If this option is chosen, then any time charge hours will be computed with a maximum value which equals the value entered in the adjacent Amount field. The unit of measure is determined by whatever is selected in the adjacent drop down menu. For example: If we are setting up a "Call In" job and the business rules dictate that the employee gets a maximum 2 hours of pay per occurrence. Then, we select this option, enter 2 in the Amount field and select "Hour" from the Unit drop down menu.
None Use this option in cases where no limits apply.
Job usage options
These options allow usage rules of the specified job to be applied. Unlike in the charge limit option, more than one of these options can be selected for any individual job. The job usage options are as follows:
Inhibit break deduction If this option is chosen, the system will not deduct any time for a lunch break even if the employee work policy requires it.
Available during calendar days only Selecting this option makes this job unavailable on the Bioscreen during non-working days.
Not Available on Bioscreen If this option is selected, the job is offered as a selectable option on the Bioscreen machine. For example, should the late start option be selected and the employee sign in late, then a leave job with this option will not be offered as a late start reason.
Allow shift splitting Selecting this option forces time worked across multiple shifts to be split into multiple time charges where the shifts boundary determine the split time.
Require authorization If this is selected then any hours worked on this specific job require further authorization before they can be sent to payroll.

Timeware Primetime User Guide – Administration Module 17
Differential and Premium
This option is used when the job pays any additional differential and/or premium pay for hours worked between certain hours of the day. The start time of the differential or premium pay is entered in the ‘from’ field, while the ending time is entered in the ‘to’ field. The differential amount is entered as a per hour number within the ‘diff’ field, while the weekend premium amount is entered as a per hour number within the ‘prem’ field. Please note that premium pay is only given during the weekend.
Bioscreen settings
Timeware Primetime has the unique ability of controlling overtime and splitting work time between the employee’s scheduled job and other supplemental or overhead type jobs. This capability can be defined at the job level by turning on the given controls in this screen, which are as follows:
Early-in overtime prompt If Yes is selected and minutes are specified, this option will enable the Bioscreen to prompt the employee whether he/she is approved to begin work earlier than the employee shift or scheduled time. If the sign in time is before the shift start time by the number of minutes specified, then the Bioscreen will ask the employee if he/she is approved for overtime. If the employee chooses yes, then the sign in time will be marked. If the employee chooses no, the start time will be adjusted to the employee’s shift start or scheduled start time.
Late-out overtime prompt If Yes is selected and minutes are specified, this option will enable the Bioscreen to prompt the employee whether he/she is approved to end work past the employee shift or scheduled time. If the sign out time is after the shift end time by the number of minutes specified, then the Bioscreen will ask the employee if he/she is approved for overtime. If the employee chooses yes, then the sign out time will be marked. If the employee chooses no, the end time will be adjusted to the employee’s shift end or scheduled end time.
Early-in supplemental prompt If Yes is selected and minutes are specified, this option will enable the Bioscreen to prompt the employee to choose a supplemental job to which all extra early start time will be charged. If the sign in time is before the shift start time by the number of minutes specified, then the Bioscreen will ask the employee to choose a supplemental job. If the employee chooses yes, then the time between sign in and start of shift will be charged to the supplemental job.
Late-out supplemental prompt If Yes is selected and minutes are specified, this option will enable the Bioscreen to prompt the employee to choose a supplemental job to which all extra end time will be charged. If the sign out time is after the shift end time by the number of minutes specified, then the Bioscreen will ask the employee to choose a supplemental job. If the employee chooses yes, then the time between shift end and sign out will be charged to the supplemental job.
Late-in PTO prompt If Yes is selected and minutes are specified, this option will enable the Bioscreen to prompt the employee to choose a PTO (paid time off or leave job) job if the sign in time is after the shift

start time by the number of minutes specified or more. If the employee chooses yes, then the time between start of shift and sign in will be charged to the PTO job.
Early-out PTO prompt If Yes is selected and minutes are specified, this option will enable the Bioscreen to prompt the employee to choose a PTO (paid time off or leave job) job if the sign out time is before the shift end time by the number of minutes specified or more. If the employee chooses yes, then the time between sign out and shift end will be charged to the PTO job.
Short Day PTO prompt If Yes is selected and minutes are specified, this option will enable the Bioscreen to prompt the employee to choose a PTO (paid time off or leave job) job if the difference between the time worked and the scheduled shift is equal or less than the specified minutes.
Prevent Early Sign In If Yes is selected, the Bioscreen will not allow any employee to sign in early for this job within the specified number of minutes.
Prevent Late Sign In If Yes is selected, the Bioscreen will not allow any employee to sign in early for this job any later than the specified number of minutes.
3.7: Job Controls Setup
After setting up the job attendance rules, job controls can be set to solidify the rules of the selected job. In order to do this, the Job Controls Setup icon must be selected. Once selected, the Detail Window will fill with a list of information that can be specified for the selected job. This screen is very important in job setup process since it determines:
The job types.
Whether the job allows ORH (over regular time) or not.
Whether the job allows overtime or not.
Whether the job allows call-in premium or not.
Whether hours worked on the job will be eligible for payroll or not.
Whether the job worked hours should be itemized on the attendance screen and some reports.
Whether the job can be statically assigned, meaning the assignment cannot be altered by an external import or source.
Whether the job is automatically assigned to all employees or not.
Whether the job worked hours can be split with another job on the Bioscreen.

Timeware Primetime User Guide – Administration Module 19
Figure 3.3: The Job Controls Setup screen.
As we can see from figure 3.3 above, there are nine different options within the Job Controls Setup screen which can be adjusted:
Type
This allows us to select the specific type of job. These options are mutually exclusive, meaning that only one option can be chosen per job. The options that are available are listed below.
Overhead This allows the job to be treated as overhead or a leave type job. An employee can choose such a job on the Bioscreen when requesting leave. Furthermore, when the employee signs in late or sign out early, these type of jobs, if assigned and a late or early PTO prompt is activated, will be presented to the employee to choose from as a supplement.
Attendance This causes the job to be treated as a regular work type job. An employee can sign in/out using such a job on the Bioscreen.
Supplemental If this option is chosen, then the job will be treated as a supplemental job. An employee can sign in/out using such a job on the Bioscreen. Furthermore, when the employee signs in early or late,

these type of jobs, if assigned and an early or late overtime prompt is activated, will be presented to the employee to choose from as a reason for starting early or signing out late.
Substitute This allows the job to be treated as a substitute type job. An employee can sign in/out using such a job on the Bioscreen. Furthermore, when the employee signs out this type of job, and if the job subbing for selection is activated, the employee will be presented with a list of regular jobs he or she is subbing for.
Title If this option is chosen, the job will be treated as a title type job to be used for organizational purposes only.
Extra Duty This causes the job to be treated as an extra duty type job. An employee can sign in/out using such a job on the Bioscreen. Furthermore, when the employees signs in/out using their regular job, and if the extra duty selection option is activated, the employee can pick one or more from a list of these extra duty jobs for extra pay.
Allow Over Regular Hours
This option is used to control whether the job hours will be counted towards the employee daily and weekly contracted hours. Selecting yes allows the hours worked to count as contract hours and contribute to ORH, while selecting no prohibits the hours from being both counted as contract and contributing to ORH. Selecting the automatic option forces all job hours to be categorized as ORH (over regular hours).
Allow Overtime
This option determines whether the worked hours of the specific job will be counted towards various types of overtime. Selecting the yes button allows hours to be counted towards any of the four types of overtime listed here, while selecting no prohibits overtime. Please note that one or many of these options can be selected.
All Time If selected, then the amount of worked hours will contribute to all levels of overtime.
Daily OT If chosen, the worked hours will contribute to daily overtime.
Holiday OT If chosen, the worked hours will contribute to holiday overtime.
Period OT If chosen, the worked hours will contribute to period overtime (weekly or pay period).
Allow Call in
This option is used to control whether the job worked hours should be treated as call in hours. If yes is chosen, then the options will be treated as call in hours, while no will prevent them from being treated

Timeware Primetime User Guide – Administration Module 21
as call in hours. Furthermore, an overtime rule can be added to the employee work policy that treats call in time as overtime
For Payroll
If yes is selected here, the amount of worked hours within any of four categories can be exported to the payroll system. Selecting multiple options will allow for several different types of hours to be exported at once. Please note that one or many of these options can be selected.
All Time If this is selected, all the worked hours on this job will be exported to payroll.
Regular If this is selected, the regular work hours will be exported for payroll.
OT If this is selected, the overtime work hours will be exported for payroll.
ORH If this is selected, the ORH work hours will be exported for payroll.
Accrual If this is selected, the accrued leave hours will be exported for payroll.
Itemize Attendance
Selecting yes for this option allows the hours worked in this job to be itemized in the attendance module calendar and within certain reports. A short code string must also be entered so that the itemized hours will be listed under a certain title.
Static Assignment
This option is used to control whether the job assignment can be modified by a third party system. For example, Timeware Primetime provides the means for interfacing with many third party Payroll, HR or ERP systems. Some of these interfaces are capable of exporting to Timeware Primetime, along with HR information, employee job assignment information. If this option is selected then this job will remain assigned no matter what the interface is programmed to do.
Allow All Employee Access
This option is used to control whether all employees can use the job or if it is to be used by assignment only.
Substitute for Job
This option is available for substitute type jobs only. It is used to select which work jobs the selected job can substitute for. For example, if the selected job is a "Sub Bus Driver" job, all the possible Bus Driver jobs that can be substituted for should be selected. If this option is setup, then when the user chooses this job at the Bioscreen, he/she will then be prompted to choose which job he/she is subbing for.
Splits with
This option is used to select which work jobs the selected job can split with. For example, let’s assume that the selected job is a "Field Trip" job, and during a field trip a bus driver spends some time driving and some time sitting. Now let’s assume we want to split the overall field trip time between field trip driving time and field trip sitting time. In this case, we would choose to split the selected "Field Trip" job with another job "Field Trip Sitting.”
3.8: Job Payroll Codes
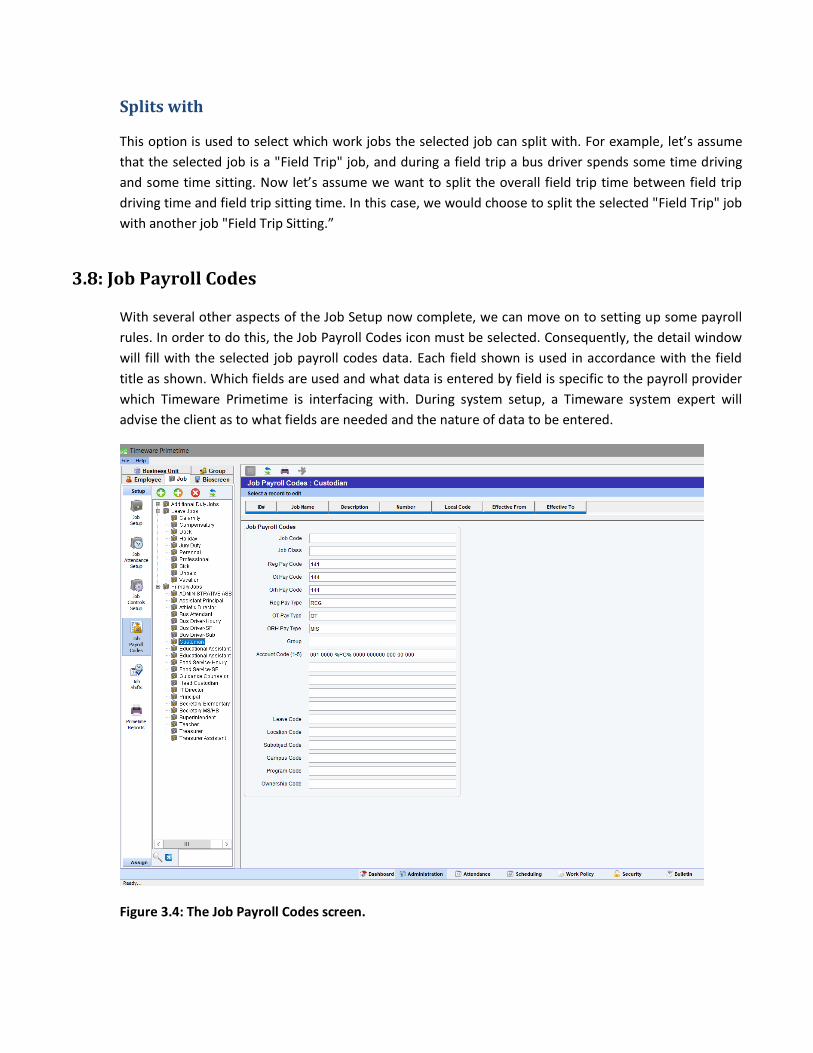
With several other aspects of the Job Setup now complete, we can move on to setting up some payroll rules. In order to do this, the Job Payroll Codes icon must be selected. Consequently, the detail window will fill with the selected job payroll codes data. Each field shown is used in accordance with the field title as shown. Which fields are used and what data is entered by field is specific to the payroll provider which Timeware Primetime is interfacing with. During system setup, a Timeware system expert will advise the client as to what fields are needed and the nature of data to be entered.
Figure 3.4: The Job Payroll Codes screen.

Timeware Primetime User Guide – Administration Module 23
3.9: Job Shifts
Before we proceed with Job Shifts, please note that shifts can also be setup the same way but at the employee level. There are certain advantages and disadvantages for defining shifts for the Job or for the Employee. We recommend consulting with a Timeware product expert prior to system setup. That ensures that the system is setup the best way possible.
The next step of the job process involves setting up shifts. In order to do this, the Job Shifts icon must be selected. Consequently, the detail window will fill with job shifts data. One notable difference between this screen and prior screens we have seen, that is the detail window is split between a table section and a detail section for editing. The purpose of the table section is to display all the job shifts since a job may have multiple shifts. In this case, the detail section below the table is used to display the selected shift data from the table above. Also notice that the tool bar above the detail section has the Add and Clone icon buttons enabled. That’s because one or more shifts can be added to each job. Here the administrator user can add, clone, edit and delete job shifts.
Figure 3.5: The Job Shifts setup screen.
Shift are essential in Timeware Primetime since they are used in various ways including:
Employee scheduling
Bioscreen prompts determination including: early sign in prompt, late sign out prompt, early sign in supplemental prompt, late out supplemental prompt, employee daily standard hours etc.
Various system calculations including: rounding and shift differential.
Many parameters can be edited for a job shift as follows.
Shift Setup
Shift Identifier The name identifier for the shift in question.
Shift Code This is used to identify the shift by a special code. This code may be used for payroll export or scheduling.
Start Time This is the scheduled start time for the shift.
End Time This is the scheduled end time for the shift.
Minimum Hours This is the minimum number of hours that the shift will credit an employee. This option should be used if the employee contract calls for a minimum hour guarantee. A good usage example of this option is school transportation route setup. If the shift guarantees certain number of hours, no matter when the route ends, then this option should be filled.
Calculated Hours This non-editable field displays the computed hours based upon the start and end times entered.
Employee This can be used to select a single employee to work this shift. This will make the shift solely available to the selected employee an no one else. A good usage example of this option is school transportation route setup. If the job is a school transportation route, then the route driver should be selected for all the route shifts.
Work Scope This allows the shift to be used during all times, standard work times, or non-standard work times only. Timeware primetime allows for designating any time-period to be non-standard time. Thus, remaining time will be standard time. If used, the shift can be designated to apply during either period. A good usage example of this option is public schools. Where, summer time is non-standard and other time is standard. In such a case, the summer shifts if different from standard time shifts, can be differentiated with this option. And the system will apply the right shift depending on the date of usage.

Timeware Primetime User Guide – Administration Module 25
Apply During This can be used to choose whether the shift can be used during all times, during the work week, or during the weekend.
Allow Breaks Choosing no for this option prohibits lunch break deductions to be automatically removed during this shift.
Effective From/To A shift can be enabled and disabled by setting the restrictive dates here. By leaving the ‘to’ field empty, a shift will remain enabled as long as the ‘from’ field is not in the future or empty.
Shift Differential and Premium
Diff. Amount This is used to specify the shift differential (currency) amount given for each hour of work during the entire week.
Weekend Premium Amount This is used to specify the shift differential (currency) amount given for each hour of work only during the weekend.
Non-standard Differential This is used to specify the hourly pay amount of the shift differential which is applied during non-standard time only.
Differential Code This is used to specify a code for payroll export.
Application Time This can be used to control how shift differential is computed. The differential can be computed over all time, can be limited by the shift start and end time, or can be limited to times before and after a shift.
Applicable Days
This control is used to specify which days the selected shifts is available on. If one or more days are selected here, then the system will adopt this selection instead of the option chosen in the ‘apply during’ field under Shift Setup.
3.10: Assigning Employees
Now that jobs and shifts have been successfully set up, employees need to be assigned to them either as individuals or as groups. To navigate to the assignment screen, first select the navigator Assign button, then select the navigator Assign Employees icon. Now, the job employee assignment screen should be displayed as shown in Figure 3.6 below. Please note, this assignment screen is typical of all Timeware Primetime assignment screens.
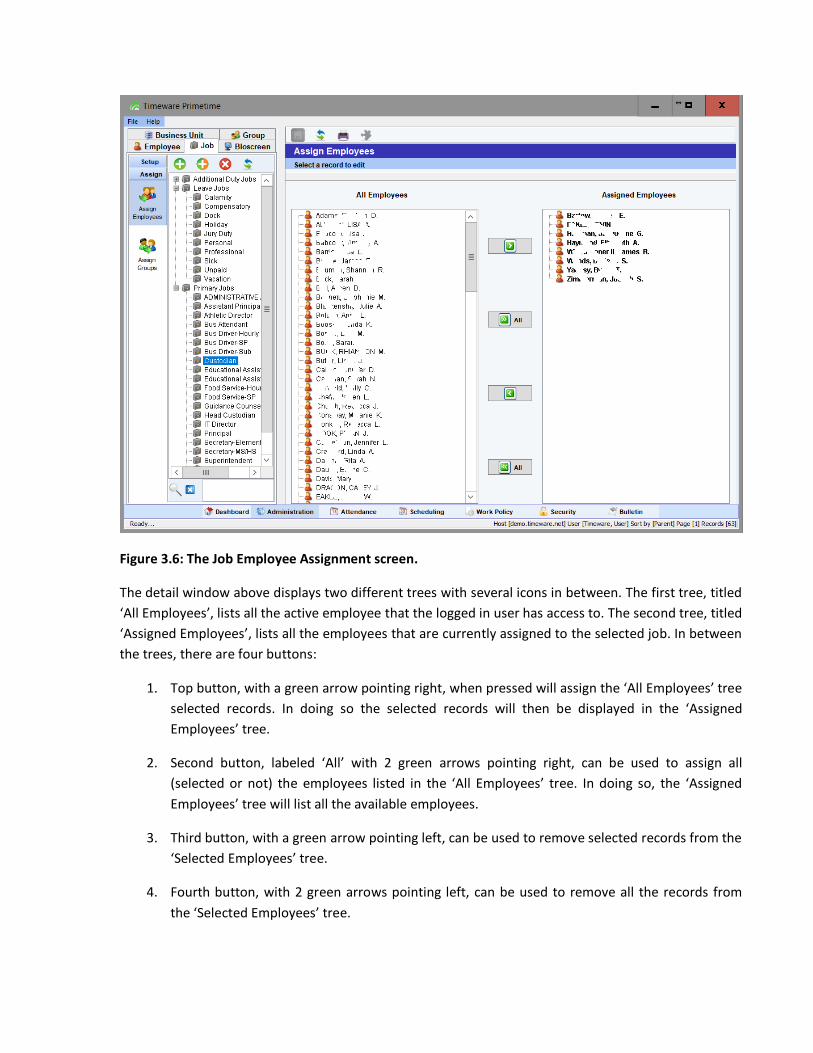
Figure 3.6: The Job Employee Assignment screen.
The detail window above displays two different trees with several icons in between. The first tree, titled ‘All Employees’, lists all the active employee that the logged in user has access to. The second tree, titled ‘Assigned Employees’, lists all the employees that are currently assigned to the selected job. In between the trees, there are four buttons:
1. Top button, with a green arrow pointing right, when pressed will assign the ‘All Employees’ tree selected records. In doing so the selected records will then be displayed in the ‘Assigned Employees’ tree.
2. Second button, labeled ‘All’ with 2 green arrows pointing right, can be used to assign all (selected or not) the employees listed in the ‘All Employees’ tree. In doing so, the ‘Assigned Employees’ tree will list all the available employees.
3. Third button, with a green arrow pointing left, can be used to remove selected records from the ‘Selected Employees’ tree.
4. Fourth button, with 2 green arrows pointing left, can be used to remove all the records from the ‘Selected Employees’ tree.

Timeware Primetime User Guide – Administration Module 27
When employee assignment is changed, the user must press the Save button located above the assignment window. This is needed to post and save the changes made.
In some cases, it is essential that the system records the primary position of the employee. That can be done here as follows: upon assigning an employee to a job, the user can designate the job as the employee primary position. To do so,
1. Select the employee from the ‘Assigned Employees’ tree.
2. Right click the mouse over the selected name.
3. Choose the ‘Choose Default Job’ option.
The same menu can be also used to specify a primary (default) shift if needed. Resetting this selection can be also accomplished using this method.
3.11: Assigning Groups
Now that jobs and shifts have been successfully set up, employees need to be assigned to them either as individuals or as groups. To navigate to the assignment screen, the Assign bar on the left side of the screen must be selected, then the Assign Groups icon must be selected to bring up the job group assignment data. This job group assignment screen is typical of all Timeware Primetime assignment screens.

Figure 3.7: The Assigning Groups screen.
The job group assignment window shown above works the same way as the job employee assignment window described in the previous section. To assign one or more groups, just select the groups from the ‘All Groups’ tree, assign them then save.

Timeware Primetime User Guide – Administration Module 29
Chapt e r
The Employee Group 4.1: About the Employee Group
The Employee Group is used to organize employees into their home groups or departments. It is part of the Timeware Primetime Administration Module and can be opened by selecting the Group tab in Figure 4.1 below. Once opened it will appear as shown in Figure 4.1.
Figure 4.1: The Employee Group Setup screen.
4

A group is used to organize employees by home groups or departments. The Timeware Primetime database designer can assist in determining how best to group employees together. Dividing up an organization in a logical way will help manage the system and apply business rules in the most effective manner. In the example shown, the employees are broken down based on location and job category. A building location serves as a ‘parent’ group, and all categories of employees working there are referred to as ‘children’ of it. This allows for easy management of all employees at that location or all employees working a certain type of job.
4.2. Group Setup
In the Group window, detailed properties of a group can be viewed by selecting a group from the navigator tree, then clicking the Group Setup icon from the navigation. As shown in Figure 4.1 above, the ‘BELLEF’ group has been selected. The Detail Window displays the properties of this group. This data is referred to as the group setup data. Each individual data field is described:
Name The name identifier of the group can be entered here.
Description The description is used to further describe the group’s members or purpose.
Number A number can be used, if needed, as an extra group identifier.
Parent Group This is used to select a parent for the group. If you are creating a parent group, this section is optional.
Manager This can be used to select a group manager if appropriate.
Parent Company This is used to associate the group with a company or location.
Effective Dates A group can be enabled or disabled by setting restrictive dates. By leaving the ‘to’ date field empty, a group will remain enabled as of the ‘from’ date specified.
The Save button at the top of the screen must be pressed after any changes have been made. Failure to do so before closing the software or navigating to another business unit or module will result in changes being lost.
4.3: Assigning Employees
Once a group has been created, employees can then be assigned to the it. The employee assignment window can be opened by selecting a group from the navigator tree, then clicking the Group Setup icon from the navigation. The employee assignment screen will appear as shown in Fig 4.1 below.

Timeware Primetime User Guide – Administration Module 31
Figure 4.2: The Group Assign Employees screen.
The detail window above displays two different trees with several icons in between. The first tree, titled ‘All Employees’, lists all the active employee that the logged in user has access to. The second tree, titled ‘Assigned Employees’, lists all the employees that are currently assigned to the selected group. In between the trees, there are four buttons:
5. Top button, with a green arrow pointing right, when pressed will assign the ‘All Employees’ tree selected records. In doing so the selected records will then be displayed in the ‘Assigned Employees’ tree.
6. Second button, labeled ‘All’ with 2 green arrows pointing right, can be used to assign all (selected or not) the employees listed in the ‘All Employees’ tree. In doing so, the ‘Assigned Employees’ tree will list all the available employees.
7. Third button, with a green arrow pointing left, can be used to remove selected records from the ‘Selected Employees’ tree.
8. Fourth button, with 2 green arrows pointing left, can be used to remove all the records from the ‘Selected Employees’ tree.

When employee assignment is changed, the user must press the Save button located above the assignment window. This is needed to post and save the changes made.

Timeware Primetime User Guide – Administration Module 33
Chapt e r
The Employee 5.1: About the Employee
Employee management is part of the Timeware Primetime Administration Module and can be opened by selecting the Employee tab as shown in Figure 5.1 below.
Here the system administrator can add, edit and delete employee information as needed. Employees within the Primetime software are used to represent the following:
Contract hourly employees who worked hours that need to be tracked for payroll purposes. Non-contract hourly employees who worked hours that need to be tracked for payroll purposes. Substitute hourly employees who worked hours that need to be tracked for payroll purposes. Semi-professional hourly employees who worked hours that need to be tracked for comp time
tracking purposes. Salaried employees who worked hours that need to be tracked for comp time tracking purposes. Any employee who needs to be tracked for accrual tracking purposes. Any employee that is an administrative user of the Primetime software.
Within the Primetime software, employees such as those listed above, are organized into groups. The Timeware database architects will advise as to the best possible grouping strategies for individual organizations.
5.2: Adding New Employee
The Employee Setup process begins within the navigator Setup button as demonstrated in Figure 5.1. Here we can see a list of employee groups within the records tree, and we can see that the ‘Custodian-HS” group has been expanded to list its individual employees.
To add an employee, press the green plus icon button above the records tree. Once done, a new employee will be created, added to the employee records tree and selected as to make it ready for
5

34 Timeware Primetime User Guide – Administration Module
editing. Now you may continue the employee setup by navigating the various employee setup tabs and filling in the relevant information.
5.3: Cloning New Employee
Cloning a new employee may save few steps in the employee record creation process. That’s because, upon cloning an existing employee record, some information is copied into the new employee record, thus, saving some time. For example: cloning an employee from the ‘Custodian-HS’ group will add a new employee (clone) to this group.
To clone a new employee, select an existing employee record you want to clone, then press the green/orange plus icon button above the records tree. Once done, a new employee will be created, added to the employee records tree within the same group as that of the cloned employee and selected as to make it ready for editing. Now you may continue the employee setup by navigating the various employee setup tabs and filling in the relevant information as described below.
5.4: Deleting Existing Employee
You may delete an employee from the system only if that employee has no attendance records. If the employee has attendance records, then the system will generate an exception and the delete fails. If the employee is no longer active within the organization, then we recommend making the employee inactive at the appropriate date (for more details see section 5.7 Employee Status below).
To delete an employee record, either in this window or in any other employee setup window, select the employee from the records tree, then press the red X icon button above the records tree. Once done, a prompt will appear to validate your action, upon confirmation, the employee record is deleted from the system and the employee tree is refreshed.
5.5: Employee Profile
The Employee Setup process begins within the navigator Setup button as demonstrated in Figure 5.1. Here we can see a list of employee groups within the records tree, and we can see that the ‘Custodian-HS” group has been expanded to list its individual employees.
To add an employee, either in this window or in any other employee setup window, press the green plus icon button above the records tree. Once done, a new employee will be created, added to the employee records tree and selected as to make it ready for editing.
Timeware Primetime User Guide – Administration Module 35
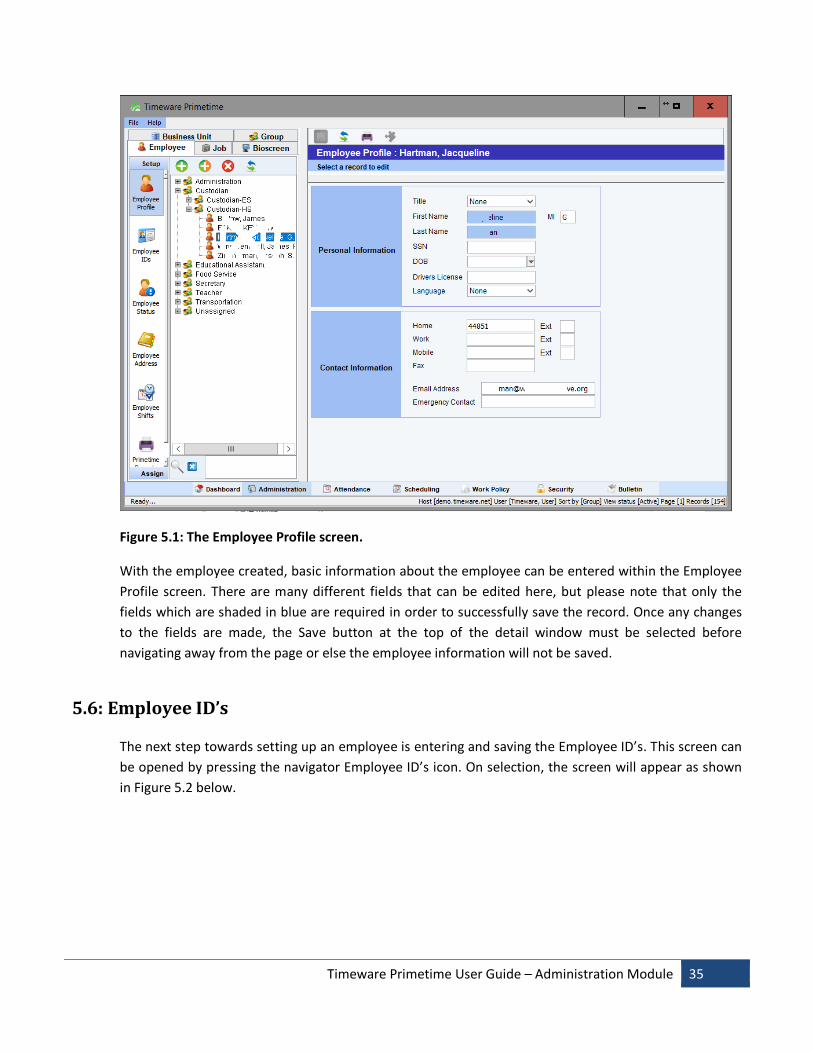
Figure 5.1: The Employee Profile screen.
With the employee created, basic information about the employee can be entered within the Employee Profile screen. There are many different fields that can be edited here, but please note that only the fields which are shaded in blue are required in order to successfully save the record. Once any changes to the fields are made, the Save button at the top of the detail window must be selected before navigating away from the page or else the employee information will not be saved.
5.6: Employee ID’s
The next step towards setting up an employee is entering and saving the Employee ID’s. This screen can be opened by pressing the navigator Employee ID’s icon. On selection, the screen will appear as shown in Figure 5.2 below.

36 Timeware Primetime User Guide – Administration Module
Figure 5.2: The Employee ID setup screen.
At this time, the following fields can be edited. Note once again that only the fields highlighted in blue are required.
Login Information
User Name The user name to be used if the employee is to be given access to the Primetime software.
Password The password to be used if the employee is to be given access to the Primetime software.
Password/Repeat Password The password to be used repeated, to make sure what is entered in the previous field is correct. This is only necessary if the employee is to be given access to the Primetime software.
ID Numbers
Payroll Number This is the employee identifier to the payroll system. The payroll system is expected to have this

Timeware Primetime User Guide – Administration Module 37
same number as the primary employee identification. In this way, attendance exported for payroll will match the employee record between both systems.
Badge/PIN Number This is the number that will be used as the employee identifier when using the Bioscreen or time clock.
Card/Prox. Number The identifier to be used if a proximity card to be used at the Bioscreen or time clock.
External ID A third party system ID. This ID would be system generated and may not be manually entered.
Bioscreen and Clock
Two fields are used to set up the access level and biometric threshold level of the selected employee. The second field is used to select the biometric threshold of the employee.
o Access Level The access level is used to define if the employee is a regular user or an administrator/registrar type of Bioscreen user. This drop down has only two options: ‘User’ and ‘Registrar & Administrator’. While most employees will get the default setting of a ‘User’, anyone with the responsibility of registering fingerprints or performing administrative tasks on the Bioscreen should be given the ‘Registrar & Administrator’ access.
o Biometric Threshold While most users need this setting to remain at the default level, few employees may need this setting changed especially if they have poor fingerprint quality. By lowering the threshold, the employee chances of passing the biometric test at the Bioscreen are much greater. In recognition of this biometric deficiency, Timeware Primetime offers multiple levels of biometric threshold to accommodate all users no matter what quality of fingerprints they have. For this purpose, the Biometric Threshold drop down offers the following selection:
o Default Level – this is the normal system level and it should be given to most users. o Low Biometric Threshold – if given to an employee, this level will allow the employee
biometric pass with a low score. o Low – Low Biometric Threshold – if given to an employee, this level will allow the
employee biometric pass with a lower score yet. o Any Fingerprint - if given to an employee, this level will allow the employee to pass the
biometric authentication by scanning any fingerprint. o Badge Number Only - if given to an employee, this level will allow the employee to be
authenticated at the Bioscreen, without biometric test, only by just entering his/her badge number.

38 Timeware Primetime User Guide – Administration Module
Authentication Policy
The Timeware Bioscreen can be configured with its own authentication policy. This policy should govern what authentication options are used. In this regard, consulting with a Timeware product expert during implementation is highly recommended. The Bioscreen authentication policy should govern this area for most employees. However, there will be exceptions where certain employees may require an individual policy. An example of this would be an employee with poor fingerprints. In such a case using biometric authentication is problematic, so the system administrator may decode to use the combination of badge number entry and taking a photo.
Timeware primetime offers up to 4 different authentication policies that can be defined for an employee. These policies work individually to provide full authentication. In other words, if any one policy is satisfied at the Bioscreen then the employee authentication is granted. Each authentication policy offers multiple options, where, all selected options must be satisfied to authenticate the employee at the Bioscreen. Each authentication policy can be made of one or more of the following options:
o Badge Number If selected, this option will require a badge number entry at the Bioscreen for authentication.
o Fingerprint If selected, this option will require a fingerprint biometric scan at the Bioscreen for authentication. Please note that the biometric score required will be set to default level unless another level is chosen above.
o RFID If selected, this option will require a RFID proximity card scan at the Bioscreen for authentication.
o Photo If selected, this option will require a photo to be taken at the Bioscreen for authentication.
o Mobiid If selected, this option will require a mobile smart phone authentication at the Bioscreen for authentication.
As an example, an employee can be setup with the combination of Badge# and Fingerprint for authentication. In the meantime, the Biometric Threshold level (see above) can be setup to ‘low-low biometric threshold’. These settings will override the default Bioscreen settings and allow the assigned employee biometric access with low score.
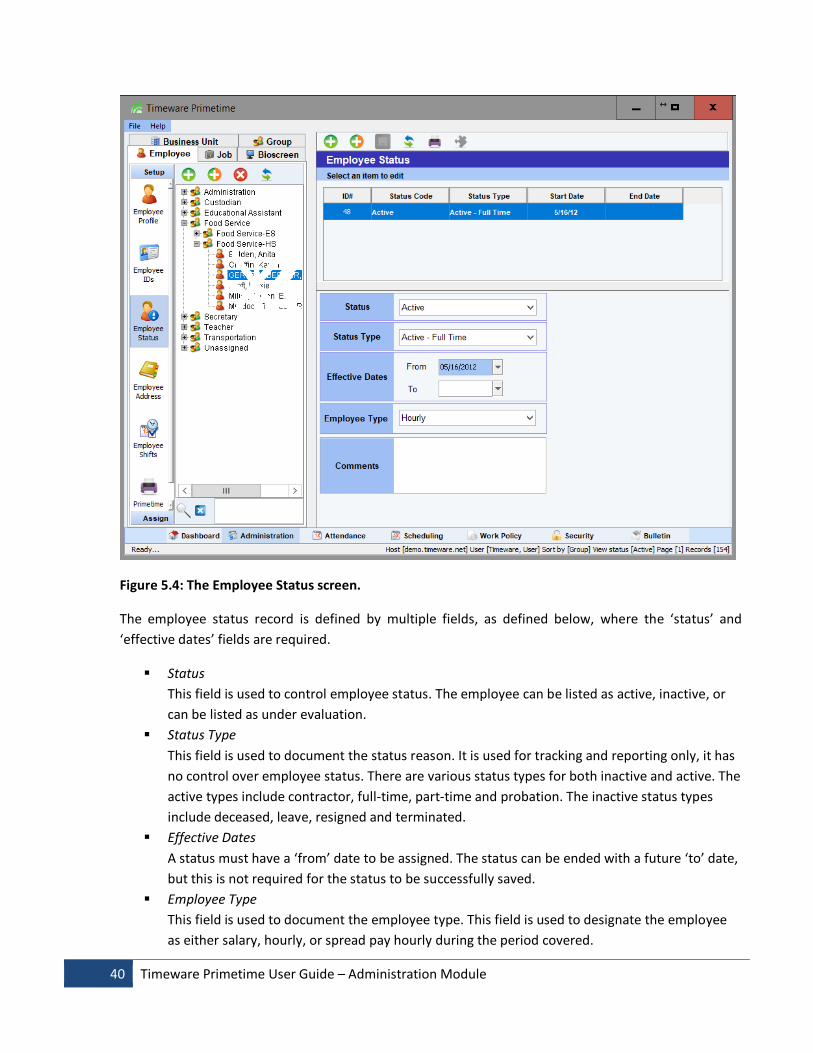
5.7: Employee Status
The employee status is very important and is primarily used to designate an employee as active or inactive. An active employee can use the system, while inactive employee cannot. The employee status

Timeware Primetime User Guide – Administration Module 39
screen can be accessed by pressing Employee Status navigator icon. Once populated, this detail window is split horizontally, with the upper section capable of showing a table of one or more employee status records. The bottom section will show details about the selected record from the table. The employee status window is shown in Figure 5.4 below.
Since an employee status may change, thus, the need for more than one status record. For this reason, Timeware Primetime provides the ability to add multiple status records. Consequently, deleting a status record becomes necessary as well.
Add Status Record
To add a new employee status, press the green plus icon button located above the record detail window. Once done, a new employee status will be created, added to the employee status records table and selected as to make it ready for editing. Now you may continue the employee status setup by editing the various employee status fields with relevant information. Once your changes are complete, you must press the Save button, located above the record detail window, to post and save the changes made. Please note that adding a new status record is only needed when the employee has a change of status from inactive to active. In such a case, the currently active record effective end date must be filled with the date immediately before the new status start date (see Activating Inactive Employee section below).
Clone Status Record
Cloning a status record gives the same results as adding one. Except by cloning an existing record, a new one is added with some information copied from the cloned record, thus, saving few steps in the process. To clone an employee status, press the green/orange plus icon button located above the record detail window. Once done, a new employee status will be created, added to the employee status records table and selected as to make it ready for editing. Now you may continue the employee status setup by editing the various employee status fields with relevant information. Once your changes are complete, you must press the Save button, located above the record detail window, to post and save the changes made. Please note that cloning a new status record is only needed when the employee has a change of status from inactive to active. In such a case, the currently active record effective end date must be filled with the date immediately before the new status start date (see Activating Inactive Employee section below).
Delete Status Record
To delete an employee status record, press the delete icon button located above the record detail window. Once done, the selected employee status will be deleted, and the employee status table is updated.
40 Timeware Primetime User Guide – Administration Module
Figure 5.4: The Employee Status screen.
The employee status record is defined by multiple fields, as defined below, where the ‘status’ and ‘effective dates’ fields are required.
Status This field is used to control employee status. The employee can be listed as active, inactive, or can be listed as under evaluation.
Status Type This field is used to document the status reason. It is used for tracking and reporting only, it has no control over employee status. There are various status types for both inactive and active. The active types include contractor, full-time, part-time and probation. The inactive status types include deceased, leave, resigned and terminated.
Effective Dates A status must have a ‘from’ date to be assigned. The status can be ended with a future ‘to’ date, but this is not required for the status to be successfully saved.
Employee Type This field is used to document the employee type. This field is used to designate the employee as either salary, hourly, or spread pay hourly during the period covered.

Timeware Primetime User Guide – Administration Module 41
Comments This field can be used to add comments about the employee status.
Inactivating an Active Employee
To inactivate an active employee simply fill the effective to date with the date of the employee last employment date. Once your changes are complete, you must press the Save button, located above the record detail window, to post and save the changes made. This, ends the employee active period, thus, from the date that follows forward the employee has no status which is equivalent to being inactive. You may also add another status that begins on the date immediately after the active status ends and with the status set to inactive.
Activating an Inactive Employee
To activate an inactive employee simply fill the effective to date with the date that is immediately prior to the employee new active status start. Once your changes are complete, you must press the Save button, located above the record detail window, to post and save the changes made. This, ends the employee inactive period. Now add a new status record, set the status to active and fill the effective from date. Once your changes are complete, you must press the Save button, located above the record detail window, to post and save the changes made.
5.8: Employee Address
One further basic piece of information that can be added about the employee is the employee’s address. The employee address record is not required and is used for tracking and reporting only. It has no control usage within the Timeware Primetime software. To access the employee address screen, press the navigator Employee Address icon. Once populated, this detail window is split horizontally, with the upper section capable of showing a table of one or more employee address records. The bottom section will show details about the selected record from the table. The employee status window is shown in Figure 5.4 below.
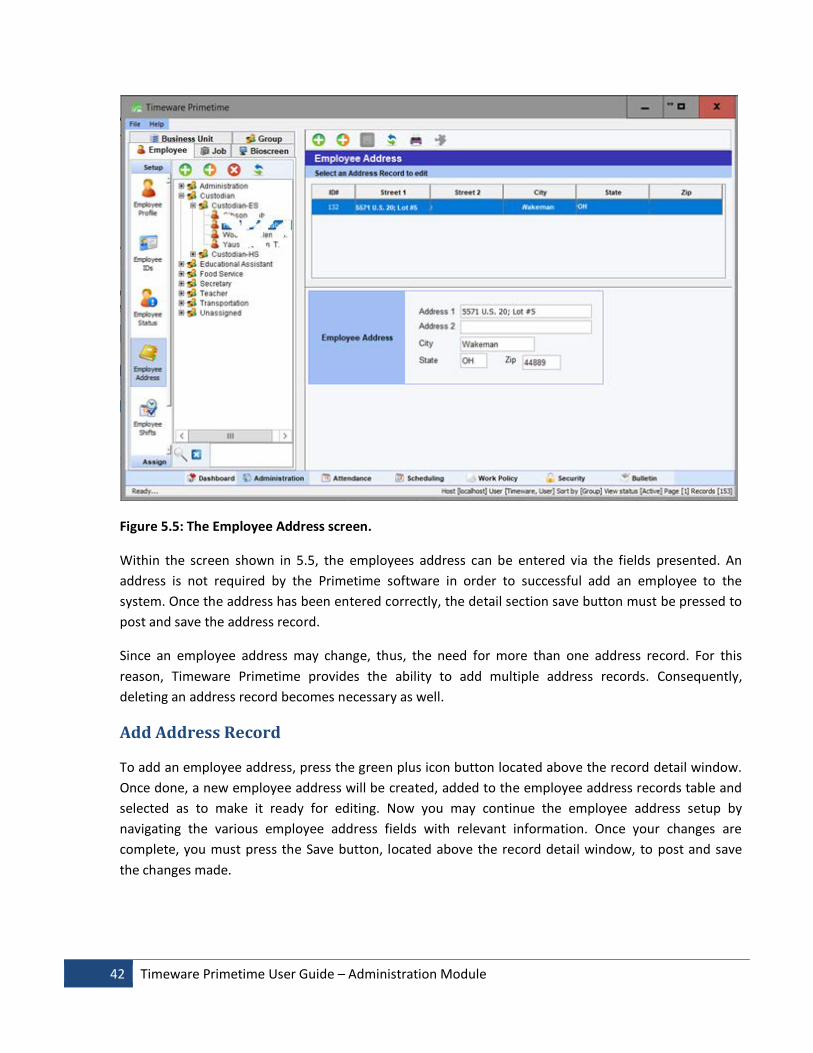
42 Timeware Primetime User Guide – Administration Module
Figure 5.5: The Employee Address screen.
Within the screen shown in 5.5, the employees address can be entered via the fields presented. An address is not required by the Primetime software in order to successful add an employee to the system. Once the address has been entered correctly, the detail section save button must be pressed to post and save the address record.
Since an employee address may change, thus, the need for more than one address record. For this reason, Timeware Primetime provides the ability to add multiple address records. Consequently, deleting an address record becomes necessary as well.
Add Address Record
To add an employee address, press the green plus icon button located above the record detail window. Once done, a new employee address will be created, added to the employee address records table and selected as to make it ready for editing. Now you may continue the employee address setup by navigating the various employee address fields with relevant information. Once your changes are complete, you must press the Save button, located above the record detail window, to post and save the changes made.

Timeware Primetime User Guide – Administration Module 43
Clone Address Record
Cloning an address record gives the same results as adding one. Except by cloning an existing record is added with some information copied from the cloned record, thus, saving few steps I the process. To clone an employee address, press the green/orange plus icon button located above the record detail window. Once done, a new employee address will be created, added to the employee address records table and selected as to make it ready for editing. Now you may continue the employee address setup by navigating the various employee address fields with relevant information. Once your changes are complete, you must press the Save button, located above the record detail window, to post and save the changes made.
Delete Address Record
To delete an employee address record, press the delete icon button located above the record detail window. Once done, the selected employee address will be deleted, and the employee address table is updated.
5.9: Employee Shifts
Before we proceed with Employee Shifts, please note that shifts can also be setup the same way but at the Job level. There are certain advantages and disadvantages for defining shifts for the Job or for the Employee. We recommend consulting with a Timeware product expert prior to system setup. That ensures that the system is setup the best way possible.
The next step of the employee setup process involves setting up shifts. To do this, the navigator Employee Shifts icon must be selected. Consequently, the detail window will fill with employee shifts data. One notable difference between this screen and prior screens we have seen, that is the detail window is split between a table section and a detail section for editing. The purpose of the table section is to display all the employee shifts since an employee may have multiple shifts. In this case, the detail section below the table is used to display the selected shift data from the table above. Also notice that the tool bar above the detail section has the Add, Clone and Delete icon buttons enabled. That’s because one or more shifts can be added to each employee. Here the administrator user can add, clone, edit and delete employee shifts.

44 Timeware Primetime User Guide – Administration Module
Figure 5.6: The Employee Shifts setup screen.
Shift are essential in Timeware Primetime since they are used in various ways including:
Employee scheduling
Bioscreen prompts determination including: early sign in prompt, late sign out prompt, early sign in supplemental prompt, late out supplemental prompt, employee daily standard hours etc.
Various system calculations including: rounding and shift differential.
Many parameters can be edited for a n employee shift as follows.
Shift Setup
Shift Identifier The name identifier for the shift in question.
Shift Code This is used to identify the shift by a special code. This code may be used for payroll export or scheduling.

Timeware Primetime User Guide – Administration Module 45
Start Time This is the scheduled start time for the shift.
End Time This is the scheduled end time for the shift.
Minimum Hours This is the minimum number of hours that the shift will credit an employee. This option should be used if the employee contract calls for a minimum hour guarantee. A good usage example of this option is school transportation route setup. If the shift guarantees certain number of hours, no matter when the route ends, then this option should be filled.
Calculated Hours This non-editable field displays the computed hours based upon the start and end times entered.
Employee This can be used to select a single employee that job shift can apply to. This will make the shift solely available to the selected job and selected employee. A good usage example of this option is a school food transportation route. Since each route is driven by one single driver, the rote shift should then be associated with the driver. Please note, for the driver to be listed here, he/she must also be assigned to the job we are setting up shifts for.
Work Scope This allows the shift to be used during all times, standard work times, or non-standard work times only. Timeware primetime allows for designating any time-period to be non-standard time. Thus, remaining time will be standard time. If used, the shift can be designated to apply during either period. A good usage example of this option is public schools. Where, summer time is non-standard and other time is standard. In such a case, the summer shifts if different from standard time shifts, can be differentiated with this option. And the system will apply the right shift depending on the date of usage.
Apply During This can be used to choose whether the shift can be used during all times, during the work week, or during the weekend.
Allow Breaks Choosing no for this option prohibits lunch break deductions to be automatically removed during this shift.
Effective From/To A shift can be enabled and disabled by setting the restrictive dates here. By leaving the ‘to’ field empty, a shift will remain enabled as0 long as the ‘from’ field is not in the future or empty.
Shift Differential and Premium
Diff. Amount This is used to specify the shift differential (currency) amount given for each hour of work during the entire week.

46 Timeware Primetime User Guide – Administration Module
Weekend Premium Amount This is used to specify the shift differential (currency) amount given for each hour of work only during the weekend.
Non-standard Differential This is used to specify the hourly pay amount of the shift differential which is applied during non-standard time only.
Differential Code This is used to specify a code for payroll export.
Application Time This can be used to control how shift differential is computed. The differential can be computed over all time, can be limited by the shift start and end time, or can be limited to times before and after a shift.
Applicable Days
This control is used to specify which days the selected shifts is available on. If one or more days are selected here, then the system will adopt this selection instead of the option chosen in the ‘apply during’ field under Shift Setup.
5.10: Assign Policy
The Employee Assign Policy screen is designed to help the administrator user quickly assign an employee to a supervisor od add an employee to a Group. It can also be used to define the employee daily standard hours. Furthermore, this screen presents the user with a summary of the applicable work policies and rules that apply to this employee. This may be helpful when reviewing the employee applicable work policy.
To access the Assign Policy screen, the user must first select the Assign navigator tab then select the Assign Policy navigator icon button. On selection, the Employee Assign Policy screen is shown as in Figure 5.7 below.

Timeware Primetime User Guide – Administration Module 47
Figure 5.7: The Employee Assign Policy screen.
Assign Policy Screen Elements
The information that can be assigned to an individual employee within this screen are as follows:
Supervisor A list of supervisors will be provided in the dropdown menu. This option helps display employees when sorted by supervisor (i.e. in an organizational chart). It also can be used for notification purposes.
Group A list of employee groups are provided here in the dropdown menu. In order to save an employee properly, a selection must be made within this drop down menu. In addition to helping with the display of employees by group, it also can be used to assign a work group policy.
Daily Standard Hours The amount of daily standard hours that the employee will work are specified here. This should only be filled out if the standard hours are not defined by a work calendar or if they are not being calculated based on an employee shift.

48 Timeware Primetime User Guide – Administration Module
Use Employee Shift Hours Selecting this option will cause the system to calculate the employee standard hours from the employee’s assigned shifts.
Assigned Policy This is an informational box that shows various work rules and policies that apply to the selected employee. The rules here are set up in various other sections and modules of the Primetime software.
May be assigned as a supervisor or time approver This box can be selected if there is a desire to assign this employee as a supervisor, or if the employee will be approving attendance or schedule times.
Allow Bioscreen Auto Shift Completion This box can be selected to have the Bioscreen prompt employee to use automatic shift completion if the employee were to miss a punch on the clock.
5.11: Assign Jobs
Employees can also be assigned to various jobs of all types: regular jobs, leave jobs, supplemental jobs, substitute jobs, etc. To access the Assign Job screen, the user must first select the job from the navigator tree, select the Assign navigator tab then select the Assign Employee navigator icon button. On selection, the Job employee assignment screen will appear shown as in Figure 5.9 below.
Figure 5.9 below displays two different trees with several icons in between. The first tree, titled ‘All Jobs’, lists all the active jobs that the logged in user has access to. The second tree, titled ‘Assigned Jobs’, lists all the jobs that are currently assigned to the selected employee. In between the trees, there are four buttons:
1. Top button, with a green arrow pointing right, when pressed will assign the ‘All Jobs’ tree selected records. In doing so the selected records will then be displayed in the ‘Assigned Jobs’ tree.
2. Second button, labeled ‘All’ with 2 green arrows pointing right, can be used to assign all (selected or not) the jobs listed in the ‘All Jobs’ tree. In doing so, the ‘Assigned Jobs’ tree will list all the available jobs.
3. Third button, with a green arrow pointing left, can be used to remove selected records from the ‘Selected Jobs’ tree.
4. Fourth button, with 2 green arrows pointing left, can be used to remove all the records from the ‘Selected Jobs’ tree.
When employee job assignment is changed, the user must press the Save button located above the assignment window. This is needed to post and save the changes made.

Timeware Primetime User Guide – Administration Module 49
Figure 5.8: The Employee Assign Jobs screen.
5.12: Assign Job Numbers
In some cases, the payroll system may require a special code, or number, for a specific employee activity or job. In such cases, this screen can be used to enter the code or number needed.
To access the Assign Job Numbers screen, the user must first select the employee record from the navigator employee tree, select the Assign navigator tab then select the Assign Job Numbers navigator icon button. On selection, the Employee Assign Job Numbers screen will open as shown as in Figure 5.9 below.
To setup corresponding job numbers, use that table and simply click the mouse over the Job Number cell of a job. Then enter the number or code as needed. When employee job numbers are changed, the user must press the Save button located above the detail window. This is needed to post and save the changes made.

50 Timeware Primetime User Guide – Administration Module
Figure 5.9: The Assign Job Numbers screen.
5.13: Bulletin Setup
The Timeware Primetime software allows the administrator the ability to send individualized messages, or bulletins, to employees. These messages can be viewed and acknowledged on the Bioscreen machines, or through e-mail. These messages are called ‘bulletins’ and can be composed within the Bulletin Setup screen.
To access the Bulletin Setup screen, the user must first select the employee record from the navigator employee tree, select the Assign navigator tab then select the Bulletin Setup navigator icon button. On selection, the Employee Bulletin Setup screen will open as shown as in Figure 5.10 below. As shown, this screen is set up with a horizontal split, with the top half showing the employee bulletins list, and the bottom half showing the details of the selected bulletin.
Timeware Primetime User Guide – Administration Module 51
Figure 5.10: The Bulletin Setup screen.
To create a new bulletin for an employee, simply press the green plus icon above the Bulletin Setup detail window and an empty new bulletin will appear. The following options can now be edited:
• Name The title of the bulletin that will be displayed can be entered here.
• Priority This controls the viewing options of the bulletin for the employee.
• Effective Dates The dates during which the bulletin is viewable can be edited here.
• Distributed By The differing methods of distribution are listed here. Note that multiple means can be selected to send the bulletin.
• Message The body of the bulletin that will be seen by the employee can be entered here.
When employee bulletin is changed, the user must press the Save button located above the detail window. This is needed to post and save the changes made.

52 Timeware Primetime User Guide – Administration Module
Chapt e r
The Bioscreen 6.1: About the Bioscreen
The Bioscreen function can be accessed by selecting the Bioscreen tab from the navigator. Upon selection, the Bioscreen navigator functions, data records tree, detail section and associated toolbars will be loaded as shown in Figure 6.1 below.
The Bioscreen data element is used to represent the Timeware Bioscreen time clock and HR kiosk machine. Furthermore, the Bioscreen is used to represent any time clock that is integrated with the Timeware Primetime system. This distinction is done by a configuration choice of the Bioscreen model type. When the Bioscreen hardware is commissioned, the Bioscreen records created here are presented for user selection. So, every record created here can be associated with a Bioscreen hardware machine.
6.2: Adding New Bioscreen
To add a new Bioscreen record, press the green plus icon button above the navigator tree. Once done, a new Bioscreen record will be created, added to the tree and selected as to make it ready for editing.
Now you may continue the Bioscreen setup by navigating the various setup tabs and filling in the relevant information as described in section 6.5 below. Keep in mind that the editing will be done in the details window and you must press the save button when finished.
6.3: Cloning New Bioscreen
Cloning a new Bioscreen may save few steps in the creation process. That’s because, upon cloning an existing Bioscreen record, some information is copied into the new record, thus, saving some time. To clone a new Bioscreen, first select the existing Bioscreen record that you want to clone, then press the green/orange plus icon button above the navigator tree. Once done, a new Bioscreen record will be created, added to the tree and selected as to make it ready for editing.
6

Timeware Primetime User Guide – Administration Module 53
Now you may continue the Bioscreen setup by navigating the various setup tabs and filling in the relevant information as described in section 7.5 below. Keep in mind that the editing will be done in the details window and you must press the save button when finished.
6.4: Deleting Existing Bioscreen
You may delete a Bioscreen from the system only if that Bioscreen has no attendance records associated with it. In such cases and upon attempting to delete a Bioscreen record, the system will generate an exception and the delete fails.
To delete a Bioscreen record, select the Bioscreen from the records tree, then press the delete icon
button located above the records tree. Once done, a prompt will appear to validate your action, upon confirmation, the Bioscreen record is deleted from the system and the Bioscreen tree is refreshed.
6.5. Bioscreen Setup
As shown in Figure 6.1 below, the ‘Elementary School-1’ Bioscreen has been selected. Consequently, the detail window of the software is filled with the selected Bioscreen basic setup information. The screen is only partially filled because only the minimal amount of required data is entered. Note that only the fields with a blue background are required to be filled to successfully save the data record.
Within the details section, various data can be entered about the Bioscreen. Each individual field will now be described.
Name The name identifier of the Bioscreen.
Description The description is used to further describe the Bioscreen.
Serial Number This field can be entered for 3rd party time clock devices. But for the Bioscreen, this field is populated by the Bioscreen itself.
Business Unit This field is needed to Associate the Bioscreen machine with a location or company business unit. Now when attendance punches, or other Bioscreen transactions, are collected, those punches location/business unit will be marked based on this selection.
Model Type This selection determines the Bioscreen model type. But more importantly, it dictates how the associated machine operates. This is essential in telling the Timeware Primetime system how to treat the associated hardware. Many types are currently available including:
o Bioscreen 1040 – this is a legacy Bioscreen model. It includes all Bioscreen types up to Bioscreen Model 5, or otherwise known as ‘Bioscreen 5’.

54 Timeware Primetime User Guide – Administration Module
o Bioscreen 7t – this is our most current Bioscreen model. It can be used with our most recent releases of the Bioscreen 6t and Bioscreen 7t platforms. When choosing this type, the Timeware Primetime system enables all the current Bioscreen functions. Care should be taken when choosing this type, it should only be picked only if the associated hardware machine is a Bioscreen 6t or 7t.
o Biopilot 1000 Series – This type represents a legacy 3rd party time clock. This series time clock is capable of handling user identification by biometric fingerprint recognition and RFID.
o Biopilot 100 Series – This type represents a legacy 3rd party time clock. This series time clock is capable of handling user identification only by RFID.
o Biopilot 1000PP Series RFID – This type represents a current party time clock. This series time clock is capable of handling user identification only by RFID.
o Biopilot 1000PP Series Fingerprint – This type represents a current party time clock. This series time clock is capable of handling user identification only by fingerprint identification.
o Bioscreen PC – this is a pure software based time clock. The client furnishes the hardware where the Bioscreen 7t software is installed.
o Bioscreen Web – this is a pure software based time clock. Timeware furnishes the cloud server where the Bioscreen 7t software is installed.
o Registration Station – this is a pure software based time clock. The client furnishes the hardware where the Bioscreen 7t software is installed. In this case, the Bioscreen software is modified to support biometric registration only.
Time Zone In cases where the client physical locations are spread across multiple time zones, then this option becomes necessary. It will help the machine interpret the transactions time properly. To select a time zone simply click on the field associated and select the appropriate one.
Lat Active Date This field is populated by the Bioscreen itself. the Bioscreen informs the server that it is active every few minutes. This field displays the last time the server has been informed that the Bioscreen is active.
Software Version This field is populated by the Bioscreen itself. the Bioscreen informs the server what version of the Bioscreen software it is running. This field displays the received version.
IP Address For third party time clocks, this field is used for recording the IP address of the clock. But for the Bioscreen, this field is populated by the Bioscreen itself. the Bioscreen informs the server what IP address it has. This field displays the received IP.
The Save button at the top of the detail window must be pressed after changes have been made. Failure to do so, before closing the software or navigating to another business unit or module, will result in changes being lost.

Timeware Primetime User Guide – Administration Module 55
Figure 6.1: The Bioscreen Setup screen.
6.6. Bioscreen Operation
As shown in Figure 6.2 below, the ‘Elementary School-1’ Bioscreen has been selected. Consequently, the detail window of the software is filled with the selected Bioscreen operations parameters. The screen is only partially filled because only the minimal amount of required data is entered. Note that only the fields with a blue background are required to be filled to successfully save the data record.
Within the details section, various data can be entered about the Bioscreen. Each individual field will now be described.
Threshold Level - Identification Identification is a biometric term that means user validation by fingerprint scanning only. The value entered here is used by the Bioscreen to determine biometric pass or fail when the user simply scans the fingerprint (i.e. not in combination with a badge entry). In other words, if the user just scans his/her registered finger, then for the user to pass, the Bioscreen biometric

56 Timeware Primetime User Guide – Administration Module
engine must obtain a score equal or higher than the value entered here. The advantage of the biometric identification method is speed since it limits the authentication process to one step.
Threshold Level - Verification Verification is a biometric term that means user validation by the combination of badge number entry and scanning of the fingerprint. The value entered here is used by the Bioscreen to determine biometric pass or fail for the already identified user via the badge number entry. In other words, if the user enters his/her badge number then scans his/her registered finger, then for the user to pass, the Bioscreen biometric engine must obtain a score equal or higher than the value entered here. The advantage of the biometric verification method is consistency and better performance since authentication requires a smaller biometric score.
User Action Timeout The Bioscreen operates as an unattended device. For this reason, it includes a timeout feature where if the user does not interact with the device for so long then the device resets to its normal screen thus allowing other users to use the device. The value entered here defines how long the machine will wait, with no activity on the screen, before it resets its interface.
Multi User Timeout As you know the Bioscreen machine is used to record attendance punches. In case multiple users are lined up taking turns then the punch time for all them will be the same as long as the duration between punches does not exceed the parameter entered here.
Server Connection Timeout The value entered here determines when the machine resets its connection with the server while the machine is not active.
RFID Operating Mode The Bioscreen supports multiple RFID technologies. If the RFID option is used, then the appropriate option must be selected here. For this selection Many options are currently available including:
o HID iClass – choose this selection if your organization is using the HID iClass type of RFID cards.
o HID Prox II choose this selection if your organization is using the HID Prox II type of RFID cards.
o IR OEM100 – choose this selection if your organization is using the IR OEM100 type of RFID cards.
Default Screen Since the Bioscreen user interface include many screens and functions, here you can choose a screen the machine will show by default. In most cases the ATTENDANCE screen is chosen here.
Host Operating Mode In addition to its basic functionality, the Bioscreen machine can be configured as a mobile device server. Choose the ‘Mobi Server Operation’ if you plan on using the Bioscreen as a mobile device server, otherwise select the ‘Default Operation’ option.
Allow All Business Unit Access This selection can be used to allow the user to choose a business unit to associate the clock punch with. It is mostly used in cases where the Bioscreen is used as a Web Clock.

Timeware Primetime User Guide – Administration Module 57
Allow Transactions Without an Assigned Job Part of the Bioscreen attendance process is choosing a job the user is signing in/out for. This option allows the sign in/out process to proceed if the user has not been assigned any jobs yet.
Figure 6.2: The Bioscreen Operation Parameters Setup screen.
Authentication Policy
The Timeware Bioscreen can be configured with its own authentication policy. This policy should govern what authentication options are used. In this regard, consulting with a Timeware product expert during implementation is highly recommended.
Timeware primetime offers up to 4 different authentication policies that can be defined for a Bioscreen. These policies work individually to provide full authentication. In other words, if any one policy is satisfied at the Bioscreen then the employee authentication is granted. Each authentication policy offers multiple options, where, all selected options must be satisfied to authenticate the employee at the Bioscreen. Each authentication policy can be made of one or more of the following options:

58 Timeware Primetime User Guide – Administration Module
o Badge Number If selected, this option will require a badge number entry at the Bioscreen for authentication.
o Fingerprint If selected, this option will require a fingerprint biometric scan at the Bioscreen for authentication. Please note that the biometric score required will be set to default level unless another level is chosen for the individual user.
o RFID If selected, this option will require a RFID proximity card scan at the Bioscreen for authentication.
o Photo If selected, this option will require a photo to be taken at the Bioscreen for authentication.
o Mobiid If selected, this option will require a mobile smart phone authentication at the Bioscreen for authentication.
Please note that the user may have his/her own authentication policy (see Employee section above). In such case the Bioscreen will use the user defined policy.
Reset Command
This option is used to send a reset command to the Bioscreen. The Bioscreen resets by restarting itself. The command can be scheduled to be sent on a certain date or it can be sent as an immediate command.
The Save button at the top of the detail window must be pressed after changes have been made. Failure to do so, before closing the software or navigating to another business unit or module, will result in changes being lost.
6.7. Bioscreen Function Setup
As shown in Figure 6.3 below, the ‘Elementary School-1’ Bioscreen has been selected. Consequently, the detail window of the software is filled with the selected Bioscreen function setup records. There the table lists all the additional functions the Bioscreen is configured to have.
The next step of the Bioscreen setup process involves setting up additional functions. To do this, the navigator Function Setup icon must be selected. Consequently, the detail window will fill with Bioscreen functions data. One notable difference between this screen and prior screens we have seen, that is the detail window is split between a table section and a detail section for editing. The purpose of the table section is to display all the Bioscreen functions since a Bioscreen may have multiple additional functions. In this case, the detail section below the table is used to display the selected function data from the table above. Also notice that the tool bar above the detail section has the Add, Clone and Delete icon
Timeware Primetime User Guide – Administration Module 59
buttons enabled. That’s because one or more functions can be added to each Bioscreen. Here the administrator user can add, clone, edit and delete Bioscreen functions.
Within the details section, various data can be entered about the Bioscreen function. Each individual field will now be described.
Button Location The Bioscreen currently supports up to 9 functions where each function position can be between 1 and 9. Positions 1 and 9 are reserved for Attendance and Administration respectively. The additional 7 functions can be configured here where each function button position can be chosen here. For example, button position 2 is chosen for the HR Inquiry function in Figure 6.3. below.
Function Currently the Bioscreen supports 8 auxiliary functions. Up to 7 of these functions can be added to the Bioscreen machine dashboard. The additional auxiliary functions include:
o HR Inquiry – This function provides the Bioscreen users the ability to view and report: current time card data, previous pay period time card data, current schedule data and current accrued balances.
o HR Request - This function provides the Bioscreen users the ability to request leave from the Bioscreen.
o Schedule Complete – This function provides the Bioscreen users the ability to chose leave time for recently missed schedules.
o Bulletin – This function provides the Bioscreen users the ability to view current and previous bulletins and messages.
o Time Sheet – This function provides the Bioscreen users the ability to fill out their attendance time sheet.
o Partial Day Absence – This function provides the Bioscreen users the ability to leave for a partial day absence.
o Shift Complete - This function provides the Bioscreen users the ability to complete previous shifts that he/she were not able to sign in or out on.
o Web Link - This function provides the Bioscreen users the ability to load any web page based on the command parameter specified. This can be useful for companies with portals or web sites developed for their employees use.
Command Parameter This field is used to enter specific command parameter for certain functions. For example, the Web Link function requires a URL tat can be entered here.
Function Timeout This field is used to specify the amount of time od no activity before the Bioscreen exits the function screen and returns to the main dashboard.
Block Out Time In some cases it may be desirable to prevent users from occupying the Bioscreen machine while browsing through a specific auxiliary function. For example, during certain time the machine will

60 Timeware Primetime User Guide – Administration Module
be very busy with users signing in to work. During this time, it may be desirable to block access to the auxiliary functions. To accomplish this, up to 4 time-ranges can be specified.
Figure 6.3: The Bioscreen Function Setup screen.
The Save button at the top of the detail window must be pressed after changes have been made. Failure to do so, before closing the software or navigating to another business unit or module, will result in changes being lost.
6.8. Bioscreen Execute Function
As shown in Figure 6.4 below, the ‘Elementary School-1’ Bioscreen has been selected. Consequently, the detail window of the software is filled with the Bioscreen functions available for execution. These are maintenance functions within the Timeware Primetime system. To execute a function, select it from the list then press the Execute button. The currently available functions include: Choose Bioscreen Remote Access Application – Since the Bioscreen user interface can be
accessed by remote access tools like Ultra VNC, this function allows the user to locate the Ultra VNC client on their workstation. Once execute, this function brings up a file chooser dialog where the user can browse for the VNC client that is already installed on their machine.

Timeware Primetime User Guide – Administration Module 61
Bioscreen Remote Access – Choose this function then press the Execute button to launch the remote access program chosen in the previous function. Please note that the Timeware Primetime software will execute the chosen VNC program in conjunction with the Bioscreen IP address as reported by the Bioscreen machine itself.
Bioscreen Load Update – Choose this function to load a new software update to the selected Bioscreen or to all Bioscreen machines. Please note that this function is only available where the Timeware Primetime software is running on the server machine itself.
Figure 6.4: The Bioscreen Execute Function screen.

62 Timeware Primetime User Guide – Administration Module
Chapt e r
Administrator Reports 7.1: About the Administrator Reports
To access Administrator Reports simply select the navigator icon labeled Primetime Reports or the printer icon from the detail screen tool bar. On selection, the Administrator Reports screen will appear as shown in Figure 7.1 below. Keep in mind that reporting in Timeware Primetime is context sensitive. In other words, each module reports are confined to it and can be run from within the module only. Furthermore, depending on which navigator tab is selected, the reporting screen loads only the reports associated with the object selected. In Figure 7.1 below, the reporting screen shows the employee reports since the Employee tab is selected.
Figure 7.1: The Administrator Reporting Screen
7

Timeware Primetime User Guide – Administration Module 63
7.2: Running Administrator Reports
To run a report, simply select the report from the list, if necessary modify any available options, then press the Get Report button. This will load the report you’ve selected as shown in Figure 7.2 below.
Figure 7.2: The Administrator Employee List report screen
At the top of the reporting screen, a tool bar is provided that allows you to: save the report in various formats or send the report to a printer. Additional options are also available for zooming and navigating the report pages.

64 Timeware Primetime User Guide – Administration Module
Chapt e r
Glossary 8.1: Introduction
In this chapter, we present a glossary of terms related to the Primetime software. Since terminology may vary from one organization to another, we hope this resource will help remove any ambiguity from the terms referenced in this guide.
8.2: Glossary
Term Description
Access Security Module The software part of Timeware Primetime that manages the Access security policy. It is used only by administrators.
Access Security Policy It consists of a group of settings that dictate the level of access a user has in the Timeware Primetime software. Access can be customized down to the individual function for each software module.
Accrual Module The software part of Timeware Primetime that manages the Accrual policy. It is mostly used by administrators and managers.
Accrual Policy It encapsulates one or more accrual rules. These rules dictate how accrued hours are computed and consumed.
Administration Module The software part of Timeware Primetime that manages the main data objects like: Business Unit, Job, Employee Group, Employee and Bioscreen. It is mostly used by administrators and managers.
Attendance Module The software part of Timeware Primetime that deals with attendance data. It is used mostly by time keepers, managers and payroll staff.
Bioscreen An advanced hardware timeclock that serves as a user interface for the system. Most Bioscreen settings can be configured via Primetime.
Bulletin One-way messages sent from the administration to employees via the Primetime software, by email or Bioscreen notification.
Bulletin Module The software part of Timeware Primetime that manages the bulletin and internal messaging. It is mostly used by administrators and managers.
Business Unit An organizational element that is usually comprised of a set of jobs and employee groups. Physical location is frequently used as the common link between members of a business unit.
8

Timeware Primetime User Guide – Administration Module 65
Job A cost center or work job. While the regular attendance work job is used most often, other types are also used including overhead, supplemental, and extra duty jobs.
Employee A person or entity that has a record in the Timeware system. An employee is usually given access to Primetime, the Bioscreen, or both.
Payroll Policy A group of settings that determines how payroll is calculated and exported. This mainly involves the organization and maintenance of pay grades.
Schedule Calendar A calendar of work days, work jobs, and shifts that defines a schedule.
Time Charge A time charge is an object that encapsulate all the characteristics of a time and attendance data record.
Work Calendar A calendar of work days and/or work hours needed to define a schedule.
Work Policy
A group of settings that govern the way business processes are handled in the Timeware system. This includes break, overtime, bonus, attendance, and rounding rules. It encapsulates one or more work policy rules. These rules dictate how attendance hours are computed.
Work Policy Module The software part of Timeware Primetime that manages the Work Policy. It is mostly used by administrators and managers.