informationnow summer 2014 release notes v6.5.12 sti... · sti_0718141205 informationnow summer...
TRANSCRIPT

InformationNOW Summer 2014 Release Notes v6.5.12.15767
After the update has been completed, the version number should read v6.5.12.15767 in the lower left corner of the main InformationNOW screen. All changes affect all states except where noted.
Note: This update also includes changes that have been released as Service Builds since the winter 2014 update.
Enhancements The enhancements listed below have been implemented in the v6.5.12.15767 release of InformationNOW. It is strongly recommended that users review the InformationNOW –Summer 2014 Release Preview document from the STI support site for details regarding the following enhancements. To access the document, log in to http://support.sti-k12.com. Click Documentation. Select Quick Reference Guides and then InformationNOW Web-based SIS.
Classroom • Under Classroom | Grade Book, teachers have the ability to Copy Grade Books from one class to
another. Prior to the summer update, when a user selected to Copy Grade Books if the user had not set up options in the sending Grade Book the program would assign default options to the receiving class. Options are set up under Classroom | Grade Book. Select to View the class and click the Options link under the Manage menu on the left. After the summer update is applied, when the user selects to copy a Grade Book where options have not yet been set up, the program will assign the school default settings for the following:
o Averaging Method
o Standards Calculate Weight Maximum Value
o Standards Calculate Rule
o Standards Scale
o Standards Calculate Method
Grading • A new error message has been added that warns users who change the Average Setup on a graded item.
When the user makes a change and clicks OK, the following message will display: Changing the averaging method for the selected graded item will remove all previous average methods assigned by all users.
People • Historical Tracking
o Contacts: Historical tracking has been added to contacts for students and staff. When a contact is added or the relationship data is changed, a historical record will be created of the change.
o Addresses: Historical tracking has been added to addresses for the following: Contacts, Staff, Staff Contacts and People.
STI_0718141205 InformationNOW Summer 2014 Release Notes 1

Reports • Grade Label: Added new 3 ¾ x 2 7/8 label size to accommodate up to seven graded items and 13 sections
per label.
• Transcript: Extra white space has been removed from the Transcript Landscape report.
• Health Plan Read Receipts: Read receipts are being added to student Health Plans. This change requires not only the summer 2014 update of InformationNOW but also the summer update of the InformationNOW Health module, which is currently scheduled for late summer 2014.
Students • A new option has been added which allow users to set required fields for student records. The option has
been added to three locations:
o Student Main tab: Go to Students | Student Maintenance. Search for and select to View the student.
o Student Enrollment Main tab: Go to Students | Enrollment. Search for and select to View the student.
o Student Registration Main tab: Go to Students | Registration. Search for and select to View the student.
• Student Forms: There have been two changes to student forms:
o A Notes field has been added.
o Users may now attach documents to student Form records.
• Add Student Permission: A new permission has been added under System Preferences | Permission Maintenance for Add Student. When the update is applied, users who already have Maintain Student permission will be granted Add Student permission by default, as this is the functionality prior to the summer update. Once the update is applied a user with only Maintain Student permission will no longer be able to add a student. User must have both Maintain Student and Add Student permission to add a student. The permission affects the ability to add a student from the following menus:
o Students | Student Maintenance | Add
o Students | Enrollment | Search for Student | Add
o Students | Registration | Search for Student | Add
o Students | District-wide Students | Add
• Adding Sections To Student Schedule: If a user is adding sections to a student schedule, and the student was enrolled in school after the start of term, when the user goes to add sections to the schedule, the Start of Term field will default to the student’s enrollment date rather than today’s date.
• Schedule Conflict Checking: Student schedule conflict checking has been modified to include period variations.
• Dual Enrollment – Importing Grades: The ability to import report card grades, comments and notes from one school to another in the same district has been added. The most common application of this option is for a Reporting School to import (sync) grades students have earned at a Serving School, such as a vocational or other type of Serving School. The Reporting School will then be able to print grades on report cards and other grade reports.
System Preferences • Custom Fields: The ability to add custom fields has been added to busses.
STI_0718141205 v6.5.12.15767 2

Utilities • Standardized Test Import: The Standardized Test Import has been modified. A Requirements
Minimum setting has been added to the component level. This was an issue for some districts whose test results were both numeric- and text-based.
State-Specific Changes – Alabama The following state-specific changes are included in this release:
• Allow for exception schools to bypass AL state enrollment (enrollment action that the district performs will not be updated in the locator). An exception school (one whose school number is alpha-numeric) is needed for dual enrollment – grades to allow a student to be dually enrolled.
• Locator will exclude schools with alpha numeric school numbers from the locator build.
• Direct Certification additional code functionality & Direct Certification expanded coding for extended eligibility:
o Added code functionality for DC children (2 new codes – 21, 22).
o Expanded coding and updated business rules for Extended Eligibility Students.
• Ability to manually set a registered student to E98:
o Permits the E98 of registered students with blank SSIDs which:
Eliminates the need for support to have to turn off state enrollment to mass enroll students who were registered via 3rd party online registration.
Eliminates the need for iStateQA to create E98 hot fixes for registered students.
Eliminates the need to change locator business rules to accommodate the root problem.
Allows users to continue to register students while state is off.
o Enabled on an ‘as-needed’ basis via a script to set System Setting.
• Federal Programs student tab has changed:
o Changed HOMELESS STATUS to HOMELESS RESIDENCY STATUS.
o Corrected drop-down menu under SERVED BY: to include new options. Mapped current data for Title IA to Title I and for McKinney Vento completive Sub grant to McKinney-Vento Grant.
o Changed layout / mapping for Federal Program tab:
Added three new headings and new layout.
Added fields defined in other locations.
Removed category and all custom fields referenced in that category.
o Even Start:
Local Funds
Migrant Program
Office of School Readiness
Private School or Day Care
Special Education
Title I
• A valid SSN is no longer required on the student record.
o Allows blank/null in SSN field on extracts, but ensures that if an SSN is entered it will comply with
STI_0718141205 v6.5.12.15767 3

current format requirements.
o An empty SSN will not cause an extract to have a soft or hard error.
o A tooltip is added to the SSN field indicating SSN Not Required.
• Teacher Schedule Report: Removed highly qualified flag. Also removed column HQ from the Teacher Schedule Report.
• Removed race code “Not Specified” and business rules associated with it.
• Updated Direct Certification Expanded Coding for Extended Eligibility.
• Added Additional Student Custom Fields “Four Year Plan” and “CCRS”.
• Removed obsolete Withdrawal, Exit Type and Dropout Codes.
Other Items of Interest • Fee post/unpost routines – performance/table lock updates. For large districts, posting fees during the
school day resulted in performance issues. Performance has been improved in the routine so schools may post or unpost during school hours.
• Added support for Internet Explorer 11.
Security Changes This section contains a list of any changes to Permission Maintenance that correspond to new or changed functionality. This is to provide a quick overview for any users who manage Permission Maintenance in the school/district to determine what, if any, new functionalities need to be modified/added for current InformationNOW users. Changes to permissions are performed under System Preferences | Permission Maintenance.
New Permissions Added • System | Maintain Required Field
• Person | View Historical Contacts
• Person | View Historical Addresses
• Student | Add Student: Once the update is applied, any user who had permission to Maintain Student will automatically be granted permission to Add Student.
Changes To Existing Permissions • Maintain Student no longer allows the user to add a student.
• Maintain/View Forms permission has been updated to allow the user to also Maintain/View Attachments.
• Maintain Academic Session, Maintain Closed Academic Session, or View Academic Session now allows the user to maintain or view the list of serving schools on the Academic Session Edit page for the reporting school.
• Maintain Section allows the user to update the serving section from the Section Edit page for the reporting school.
• Maintain Grading allows the user to sync grades from the Management Console.
• A user who may currently create custom fields in other areas of the program will be able to add custom fields on buses.
STI_0718141205 v6.5.12.15767 4

• A user who is able to maintain buses can add custom field data.
Modifications The modifications listed below have been implemented in the v6.5.12.15767 release of InformationNOW.
Discipline • When multiple dispositions were entered, users could not delete them.
Grading • Users received stack trace errors when attempting to remove a valid grade from the grading scale.
• Users received errors when attempting to modify grading scale.
Query • Google Chrome: Could not export query results to csv, xml or txt.
Reports • Grade Book Report:
o Did not print in student average order when selected.
o Was blank if user changed the start date or end date.
o The Activity Value was not included when selecting detail regardless of the options selected.
• Standardized Test Report: When generating the report, results were not limited to the selected date range.
Scheduling • User received error Enroll date must be in first scheduled term when copying a schedule from another
student.
• Valid Course Inactive checkbox was not saving for some users.
• On the student’s Schedule screen, under the View History link, when the user clicked to Save Notes, it changed every transaction for a schedule change.
• When applying models en masse or individually, and entering an enrollment date, the model would not apply.
• Required Scheduling Rules were not being taken into consideration when using the Master Schedule Builder.
STI_0718141205 v6.5.12.15767 5
InformationNOW – Basics
Overview This Quick Reference Guide provides an overview of basic functionality of InformationNOW.
Access • Open the Internet browser (Internet Explorer, Firefox, Netscape, etc.).
• Enter the URL used to access InformationNOW. Example: http://123.stiinformationnow.com/informationnow. Press the Enter key on the keyboard or click Go on the Web browser.
• The permissions assigned to the user will determine whether he/she will be able to view and access information on a district level pertaining to all schools created within the district. The permissions assigned also determine what may be seen at the School level, and will depend on the school(s) to which the user is assigned. Permissions are assigned under System Preferences | Permission Maintenance.
• Once the Web site is accessed, the login prompt will appear. Enter the Login and Password assigned via the Access tab under Staff | Staff Maintenance.
o Forgot Password? Click and follow the instructions to retrieve a password.
o Click to access STI Events or STI Products.
o Click to access the web page RSS feed.
o Click to access STI on Twitter.
• After an initial login has been established, the next time the user logs into InformationNOW, the system will retain the last user name used to access InformationNOW from that workstation. Passwords are always required.
• Choose a school from the drop-down list and the desired academic session. Click Login. The schools assigned to the user via the Access tab under Staff | Staff Maintenance will determine the school(s) the user may access. The system will retain the last selected school and academic session for the next login.
Quick Reference Guide STI_0630140948 InformationNOW – Basics • 1

InformationNOW School Home Page The school home page background color is white by default. Another color may be selected to serve as the background color for the main menu at the left side of every screen. Additionally, the user may create a school logo which will display at the top of the home page and on every menu screen in the application.
Note: To modify the school color and logo, go to School/District | School. Search for the school and click to View. Click the Customization tab. For more details, refer to the InformationNOW - School-District Options Quick Reference Guide.
The school’s home page displays current district announcements as well as school-specific announcements. Each announcement shows the date on which the announcement was published, and may contain links to more information, such as online education-related articles. School-specific announcements are created under School/District | School on the Announcements tab. District-wide announcements are created under School/District | District on the Announcements tab. See the InformationNOW - School-District Options Quick Reference Guide for more details.
• Name: If the user has a preferred name, it will display in the upper right hand corner. If there is no preferred name, the user’s first name will display. Click the name to Change Password or Logout.
• Click to View Help, Documentation, Knowledgebase, STI Events, STI Products or About.
Quick Reference Guide STI_0630140948 InformationNOW – Basics • 2

Navigation At the left side of the home page, and on every screen in InformationNOW, is the main menu. From the main menu, users may select from the following menus to view the sub-menus for each selected topic:
Home For more details, refer to the InformationNOW – School-District Options Quick Reference Guide.
• Home Page: Click to view the announcements for the school and/or district based on the group assigned to the user’s login.
• School Events: Click to view a calendar of events.
Students For more details regarding most topics, refer to the InformationNOW – Student Quick Reference Guide.
• Student Maintenance: Search for, Add, View and Delete student records.
• Enrollment: Enroll individual students.
• Mass Enrollment: Enroll a group of students.
• Registration: Register or unregister individual students or a group of students.
• Quick Entry Edit: Modify select data elements for a group of students. For detailed instructions, refer to the InformationNOW – Quick Entry Edit Quick Reference Guide.
• Student Filter: Create a filter of students. Filters may be used to select a set of students to view under Student Maintenance, to modify data elements under Quick Entry Edit or to print reports for a selected group of students. For detailed instructions, refer to the InformationNOW – Filters Quick Reference Guide.
• District-wide Students: With the appropriate permissions granted, view students from all schools within the district.
• Medical: Access the student’s immunization, health conditions, screenings and fitness test results. For detailed instructions, refer to the InformationNOW – Medical Quick Reference Guide.
Quick Reference Guide STI_0630140948 InformationNOW – Basics • 3

Note: This option is disabled if the InformationNOW Health module is installed. Contact your sales representative for details regarding the health module.
• Mass Manage: Assign district services, fitness tests, school programs, standardized tests or student goals/career plans to a group of students.
• No Shows: Mark students as no shows, for students who did not attend one minute in the current academic session. Refer to State Guidelines to determine if there are specific rules to be followed for no show students.
• Reports: Generate student-based reports such as Birthday Listing, Student Profile or Mailing Labels.
• Setup: Access the student-based lookups. For more details, refer to the InformationNOW – Lookups Quick Reference Guide.
Fees For more details, refer to the InformationNOW – Fees Quick Reference Guide.
• Mass Assign Fees: Used to assign general fees to a group of students.
• Mass Change Fees: Change the amount of a general fee that has already been applied to students.
• Mass Delete Fees: Delete a specific general fee from either all students or by the date the fee was applied to students.
• Account: Create general fees (such as locker or registration fees) to be assigned to students.
• Reports: Generate fee-based reports such as receipts or fee statement.
• Setup: Access the fee-based lookups. For more details, refer to the InformationNOW – Lookups Quick Reference Guide.
Attendance For more details, refer to the InformationNOW – Attendance Quick Reference Guide.
• By Date: Enter attendance records for a group of students for a selected date, level (All-day, Half-day, Tardy) and reason.
• Check In/Out: Enter student check-in or check-out records for a selected date and reason.
• Reconcile Attendance: If changes are made to the overall attendance setup, existing records may be reconciled (recalculated) based on the new setup. Users should contact STI Support before reconciling attendance.
Quick Reference Guide STI_0630140948 InformationNOW – Basics • 4

• Reports: Generate attendance-based reports such as Daily Absence Listing and ADA/ADM.
• Setup: Access the attendance-based lookups. For more details, refer to the InformationNOW – Lookups Quick Reference Guide.
Discipline For more details, refer to the InformationNOW – Discipline Quick Reference Guide.
• Incidents: View, Edit and Delete student incident records. Incidents are generally used to track the more severe or state-reported discipline records.
• Reports: Generate discipline-based reports, such as Discipline Letters.
• Setup: Access the discipline-based lookups. For more details, refer to the InformationNOW – Lookups Quick Reference Guide.
Scheduling For more details, refer to the InformationNOW – Scheduling Quick Reference Guide.
• Master Schedule: Add, View, Edit or Delete sections from the Master Schedule for the selected academic session.
• Build Master Schedule: Use the Master Schedule Builder to create a Master Schedule based on staffing and course criteria as well as student requests.
• Master Schedule Staff: Enter staff criteria such as periods, day types, terms and rooms to be considered when staffing a built master schedule.
• Mass Assign Sections: Assign a group of students to a specific section of a course.
• Mass Assign Requests: Assign requests to a group of students.
• Schedule Requests: Schedule a group of students based on their requests.
• Approve Requests: Approve requests that have been submitted via the home portal.
Quick Reference Guide STI_0630140948 InformationNOW – Basics • 5

• Mass Apply Models: Assign schedule or request models to a group of students.
• Homerooms: Add, View, Edit or Delete homerooms.
• Homerooms Builder: Assign homerooms to a group of students. Includes options to balance based on Primary Ethnicity, Gender and Lunch.
• Homerooms Assignment: Assign a group of students to a homeroom.
• Valid Courses: Add, View, Edit or delete courses for the current academic session.
• Reports: Generate schedule-based reports such as Course Rosters and Student Schedules.
• Setup: Access the scheduling-based lookups. For more details, refer to the InformationNOW – Lookups Quick Reference Guide.
Grades For more details, refer to the InformationNOW – Grading Quick Reference Guide.
• Grade Entry: View, Edit or Delete the graded items by section.
• Reports: Generate grade-based reports such as Honor Roll, Class Rank and Report Cards.
• Setup: Access the grade-based lookups. For more details, refer to the InformationNOW – Lookups Quick Reference Guide.
Staff For more details, refer to the InformationNOW – Staff Quick Reference Guide.
• Staff Maintenance: Search for, Add, View and Delete staff records.
• Staff Filter: Create a filter of staff members. Filters may be used to select a set of staff to view under Staff Maintenance or to print reports for a select group of staff. For detailed instructions, refer to the InformationNOW – Filters Quick Reference Guide.
• Reports: Generate staff-based reports such as Staff Listing.
• Setup: Access the staff-based lookups. For more details, refer to the InformationNOW – Lookups Quick Reference Guide.
Quick Reference Guide STI_0630140948 InformationNOW – Basics • 6
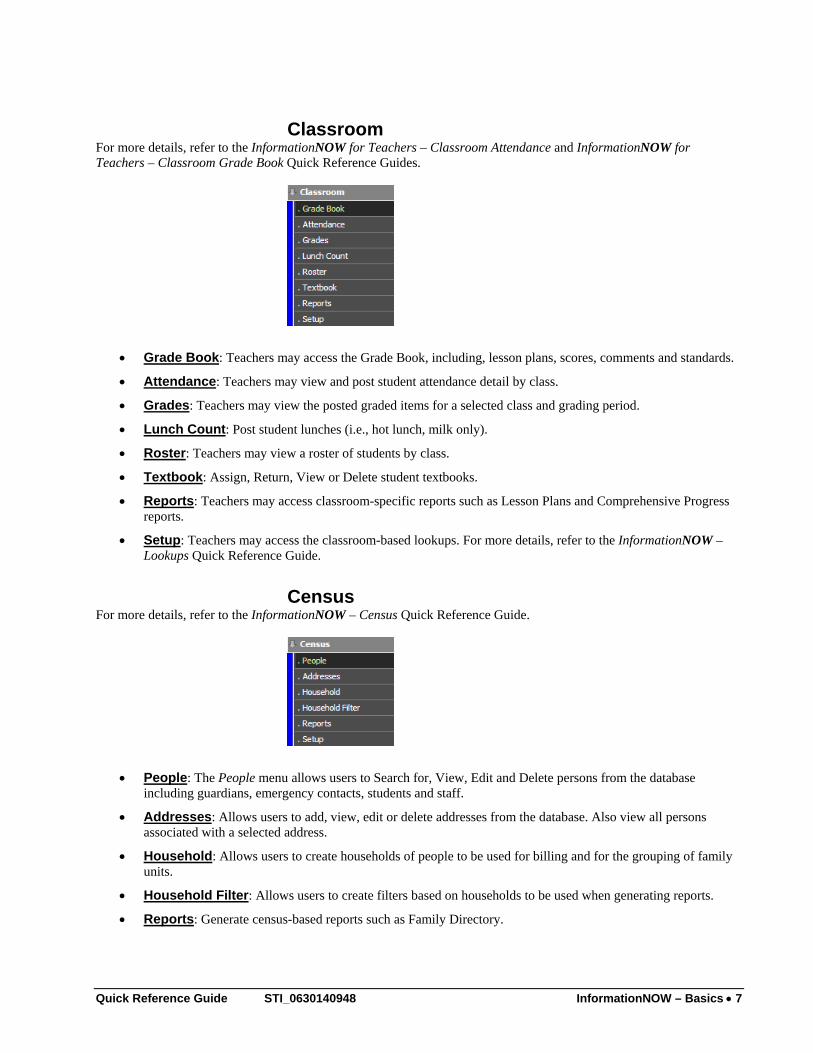
Classroom For more details, refer to the InformationNOW for Teachers – Classroom Attendance and InformationNOW for Teachers – Classroom Grade Book Quick Reference Guides.
• Grade Book: Teachers may access the Grade Book, including, lesson plans, scores, comments and standards.
• Attendance: Teachers may view and post student attendance detail by class.
• Grades: Teachers may view the posted graded items for a selected class and grading period.
• Lunch Count: Post student lunches (i.e., hot lunch, milk only).
• Roster: Teachers may view a roster of students by class.
• Textbook: Assign, Return, View or Delete student textbooks.
• Reports: Teachers may access classroom-specific reports such as Lesson Plans and Comprehensive Progress reports.
• Setup: Teachers may access the classroom-based lookups. For more details, refer to the InformationNOW – Lookups Quick Reference Guide.
Census For more details, refer to the InformationNOW – Census Quick Reference Guide.
• People: The People menu allows users to Search for, View, Edit and Delete persons from the database including guardians, emergency contacts, students and staff.
• Addresses: Allows users to add, view, edit or delete addresses from the database. Also view all persons associated with a selected address.
• Household: Allows users to create households of people to be used for billing and for the grouping of family units.
• Household Filter: Allows users to create filters based on households to be used when generating reports.
• Reports: Generate census-based reports such as Family Directory.
Quick Reference Guide STI_0630140948 InformationNOW – Basics • 7

• Setup: Access the census-based lookups. For more details, refer to the InformationNOW – Lookups Quick Reference Guide.
School/District For more details, refer to the InformationNOW – School-District Options Quick Reference Guide.
• School: Add, view, edit and delete schools from the database.
• District: View and edit existing district properties.
• Lockers: Create lockers and assign them to a group of students.
• Textbook: Add, Assign, Return, View, Delete or Locate student textbooks.
• Setup: Access the school/district-based lookups. For more details, refer to the InformationNOW – Lookups Quick Reference Guide.
Billing Used to track student billing.
• Charges: Assign charges to students.
• Payments: Process student payments.
• Report: Generate reports based on student charges and payments.
• Schedules: Set up recurring student charges.
• Setup: Access the billing-specific lookups. For more details, refer to the InformationNOW – Billing Setup Quick Reference Guide.
• Utilities: Access utilities specific to the billing module.
Quick Reference Guide STI_0630140948 InformationNOW – Basics • 8

Health Used to track student health information beyond the data entered under the student’s medical screen under Students | Student Maintenance.
• Daily Log: Track student’s General Medical, Medications, Office Visits, Screenings, Immunizations, Health
Conditions/Medical Equipment and Forms.
• Student Health: Access student’s general health records.
• Mass Manage: Use this option to mass manage screenings, fitness screenings and results.
• Reports: Generate reports based on student health data.
• Utilities: Use this option to synchronize medication schedules with the school calendar.
• Setup: Access the health-specific lookups. For more details, refer to the InformationNOW – Health Basics Quick Reference Guide.
Management Console
Alerts Used to manage e-mail alerts to guardians who have elected to Go Green.
Console • Grading Period: View unposted attendance or unposted grades.
• Term: Post/Unpost grades to transcripts or reconcile term GPA and rank.
• Gradebook: Select to reconcile grade books for all teachers.
• School: Select to share school setup.
• Academic Session: Create new, close a session, clear a session so that it may be deleted. Promote/unpromote students up or down a grade level. Also withdraw students en masse.
• Fee: Post/Unpost Course Fees or Reconcile Course Fees.
• Staff Leave: Select to reset staff leave based on the settings of each leave type.
Event Log Click to view a log of users who have attempted to log in to InformationNOW, both successfully and unsuccessfully.
Quick Reference Guide STI_0630140948 InformationNOW – Basics • 9

Reports Generate District-wide, School-based or State-mandated reports/exports. If installed, users may also access the INFocus reporting tool. District and School reports are also available under a corresponding sub-menu. For example, the Birthday Listing report is available under the Reports menu and also under Students | Reports.
3rd Party Integration Generate exports for the following vendors:
• AlertNow Export
• Comalex Café
• ConnectEdu
• Edline
• Infosnap
• Learning Earnings
• Chalkable
• Lunch Box
• Phone Master
• School Messenger
• MCS Meral Lunch
• STILunch
• XAP Transcript
• Career Cruising
Quick Reference Guide STI_0630140948 InformationNOW – Basics • 10

Utilities For more details, refer to the various applicable InformationNOW Quick Reference Guides for each topic. For instructions regarding the State Reports menu, refer to the appropriate State Guidelines.
• Assign Home Passwords: Assign one or more passwords for Home access.
• Email: Manage emails.
• File Imports: Import state-assigned Student ID number or Standardized Test electronic result files.
• Pictures: Generate a picture file to be given to a vendor and match pictures from a vendor to students and staff.
• Query: Create XML, HTML, TXT, or CSV export files containing various data elements from InformationNOW. Options include data concerning students, staff, student daily attendance, student discipline, student grading, student period attendance and student schedules.
• STI Integration: Set the parameters for integration with STISETS and/or STIAssessment.
System Preferences For more details, refer to the InformationNOW – System Preferences and the InformationNOW – Lookups Quick
Reference Guides.
• Group Maintenance: Add, View and Delete the various software user groups which enable permissions to be granted to a group of users.
• Mass Assign Group: Assign individual users to user groups in a single process.
• Mass Assign Schools: Assign individual users to schools in a single process.
• Permission Maintenance: Modify the task, field and report permissions for a group of users.
• Security: Set various permission-based parameters including password expiration and system access restriction times.
• Setup: Access all lookups for all modules and menus. For more details, refer to the InformationNOW – Lookups Quick Reference Guide.
Quick Reference Guide STI_0630140948 InformationNOW – Basics • 11

Preferences
• Change Context: Access a different school or academic session.
• Change Password: Change the password of the user currently logged in.
District Information District information is established and maintained by selecting School/District | District. The term district describes the local administrative level of the educational system. A district administers all schools in the same educational system within a geographic region. InformationNOW provides for exactly one district and this district, once installed, cannot be removed from the system. Additional districts cannot be created. The required district information is either pre-installed or entered during installation. Information may only be edited by a user with the appropriate permissions. For more details concerning use of the District module, see the InformationNOW – School-District Options Quick Reference Guide.
School Information School information is established and maintained by selecting School/District | School. InformationNOW supports any number of schools to be associated with a district. In the School module, a user with appropriate access privileges may search for schools, view summary details of schools that match search criteria, add new schools to the system, view and edit information elements associated with a school, inactivate a school and delete a school. For more details concerning use of the School module, see the InformationNOW - School-District Options Quick Reference Guide.
Student Information Student information is established and maintained by selecting Students in the main menu. A student enters the system by being enrolled into a school and leaves the system by being withdrawn from all schools. In the Students module, a user with appropriate access privileges may search for students during enrollment, view summary details of students that match the search criteria during enrollment, search for students while performing student information maintenance, view summary details of students that match the search criteria while performing student information maintenance, add new students to the system, view and edit information elements associated with a student, delete a student, enroll students into a school and withdraw students from schools. For more details concerning use of the Students module, see the InformationNOW – Students Quick Reference Guide.
Staff Information Staff information is established and maintained by selecting Staff in the main menu. In the Staff module, a user with appropriate access privileges may search for staff, view summary details of staff that match the search criteria, add new staff to the system, view and edit information elements associated with a staff member and delete staff members. For more details concerning use of the Staff module, see the InformationNOW – Staff Quick Reference Guide.
Quick Reference Guide STI_0630140948 InformationNOW – Basics • 12

InformationNOW – Homerooms
About This Guide This Quick Reference Guide provides an overview of the Homeroom options in InformationNOW.
Creating Homerooms To add a homeroom, perform the following steps:
• Go to Scheduling | Homerooms. Existing homerooms will display.
• Click Add.
• The academic session will display.
Note: To change academic sessions, click Cancel and then select Preferences. Change the academic session and/or school as desired and click OK. This option is only available for users with the appropriate privileges.
• Required fields are denoted onscreen with an asterisk (*).
o Name: Required. Enter the name of the homeroom. Ex.: 6a, 6b, 6c.
Quick Reference Guide STI_0701141517 InformationNOW – Homerooms • 1
o Description: Enter the long description. Ex.: 6th Grade Homeroom A.
o Room No.: Select the room number from the drop-down list. Rooms are entered under School/District | School | Rooms tab.
o Staff No.: Click the Find link to search the teacher list to select the appropriate homeroom teacher.
o Teacher Name: This field will be auto-populated, based on the teacher selected through the Find link as described above.
• Click Create to save.
Note: Once students are assigned to the homeroom, the user may return to this screen to view the Breakdown by Status and Gender section at the bottom of the screen.
Assigning Students to Homerooms Homerooms may be entered by a group of students or by individual students.
Homeroom Builder To assign a group of students to homerooms, including options to balance by Primary Ethnicity, Gender or Lunch Code, perform the following steps:
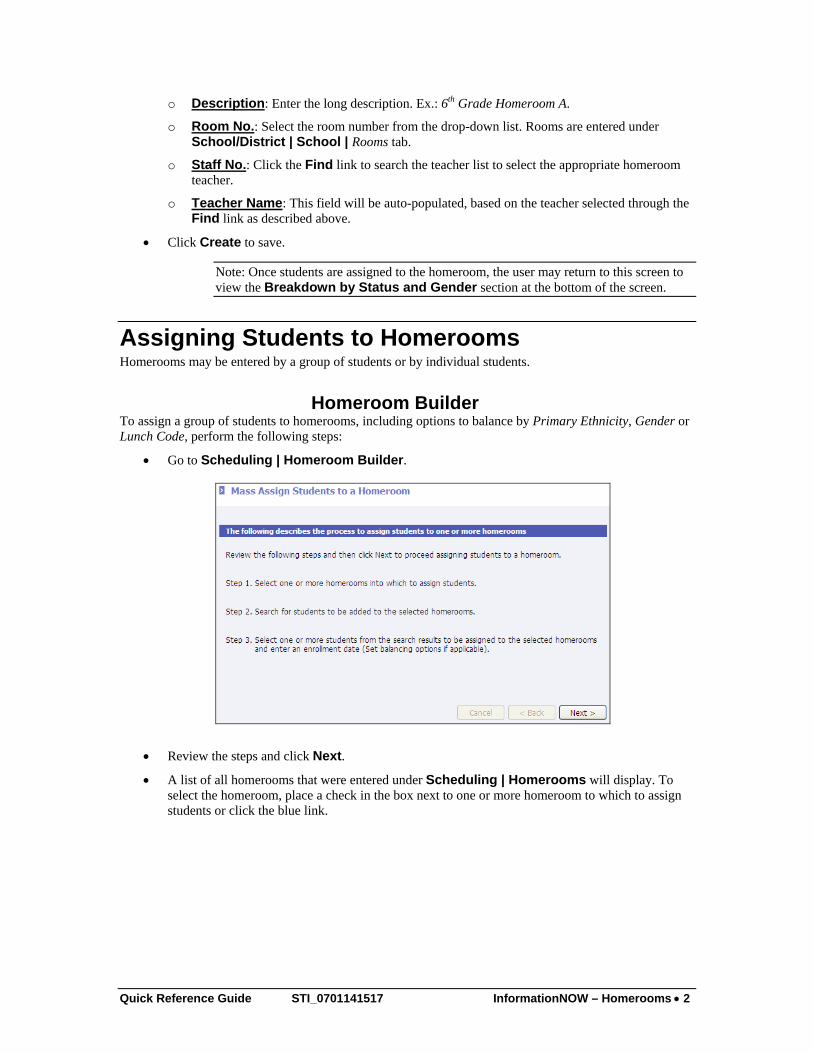
• Go to Scheduling | Homeroom Builder.
• Review the steps and click Next.
• A list of all homerooms that were entered under Scheduling | Homerooms will display. To select the homeroom, place a check in the box next to one or more homeroom to which to assign students or click the blue link.
Quick Reference Guide STI_0701141517 InformationNOW – Homerooms • 2

• Click Next.
• Select the search criteria to determine the students to add. For example, Grade 11. Click Next.
• Enter the search criteria to filter the list of students and click Next.
• A list of students who meet the criteria will display in the Student List box on the left side of the screen. Move the students from the Student List box to the Selected Students box on the right to add those students to the selected homeroom.
Note: Students who are already in the selected homeroom will display in the box on the right with an asterisk (*) following their name.
o Use one of the following methods:
Highlight one student and click Add.
Select multiple students by using Ctrl+click or Shift+click options and click Add.
Move all students listed by clicking Add All. o Use the Remove or Remove All buttons to move students from the Selected Students box
back to the Student List box. Students listed in the Student List box will not be assigned to the selected homeroom.
Quick Reference Guide STI_0701141517 InformationNOW – Homerooms • 3

• If appropriate, check to Overwrite Current Homeroom Assignment. Student current homerooms will be overwritten with the new homeroom assignment.
• Enter the Date on which this student is to be enrolled in this homeroom.
• If a maximum capacity exists for the homerooms, enter the Maximum Student Capacity. If entered, the maximum number entered will not be exceeded for any homeroom.
• If Fill To Capacity is selected, each homeroom will be filled in order to capacity by grade level and then by name alphabetically. If not checked, each homeroom will be balanced by size and then by other selected factors (Primary Race, Gender, Lunch).
• Select the factors by which the homerooms should be balanced including Primary Race, Gender and/or Lunch (Free, Reduced, etc.).
Note: Students already assigned to the homeroom will display on the right side of the screen with an * next to their name.
• Click Assign.
By Period To assign a group of students to a homeroom based on a specific period of day, perform the following steps:
• Go to Scheduling | Homeroom Assignment.
Quick Reference Guide STI_0701141517 InformationNOW – Homerooms • 4

• Select the Period of day that determines the homeroom to which the student is to be assigned.
• Select the Day that determines the homeroom to which the student is to be assigned.
• If the student is to be enrolled in the homeroom other than today’s date, enter the beginning date in the Effective Date field.
• Click Assign.
By Student Students may be individually assigned to a homeroom or re-assigned to a different homeroom by performing the following steps:
• Go to Students | Student Maintenance | School tab. Click the Hist link to the right of the Homeroom field.
• Click Add.
• Select the homeroom from the drop-list that appears onscreen. Enter the start date and any note under Reason, if desired.
• Click Create.
Quick Reference Guide STI_0701141517 InformationNOW – Homerooms • 5

Modifying, Adding or Deleting Student’s Homeroom To alter a student’s homeroom, perform the following steps:
• Go to Students | Student Maintenance | School tab.
• Click the Hist link to the right of the Homeroom field.
Modify (View) Existing Homeroom Record Modify a student’s existing homeroom if the student was enrolled in the incorrect homeroom or if the homeroom needs to be changed and a record of the previous homeroom is not required.
• Either place a check next to the record and click View; or
• Click the blue link indicating the Start Date.
• Change the Homeroom, Start Date and/or Reason as applicable.
Quick Reference Guide STI_0701141517 InformationNOW – Homerooms • 6

• Click OK to save the changes.
Change (Add) Student’s Homeroom If a student was previously enrolled in a homeroom and now needs to be entered into a new homeroom, and if a record of the student’s previous homeroom needs to be retained, click the Add button in the student’s Homeroom change screen and perform the steps below.
• Select the new homeroom.
• Enter the date on which the student moved to the new homeroom.
• If desired, enter the reason the changes was made.
• Click Create.
Remove (Delete) Student’s Homeroom To delete a student from a homeroom, perform the following steps:
• Go to Students | Student Maintenance | School tab.
• Click the Hist link to the right of the Homeroom field.
• Place a check next to the record to be deleted.
• Click Delete.
Quick Reference Guide STI_0701141517 InformationNOW – Homerooms • 7

Deleting Homeroom To delete a homeroom from the database, perform the following steps:
• Go to Scheduling | Homerooms and place a check next to the homeroom to be deleted.
• Click Delete.
• A message will display prompting the user to confirm deletion. Click OK to proceed or click Cancel to cancel the deletion.
Note: A homeroom may not be deleted if students are assigned to it.
Homeroom Roster Maintenance Users may add or delete students from a specific homeroom from the Homeroom Roster screen. To view this change, go to Scheduling | Homerooms. Click to View a homeroom. Click to View Roster under the Tasks menu on the left. Use the Add, View and Delete buttons to make changes to the homeroom roster.
Quick Reference Guide STI_0701141517 InformationNOW – Homerooms • 8

• To add a student to the homeroom click Add. Search for and select the student. Select the date they are to be enrolled in the homeroom and reason.
• To view students, place a check next to their Student Number and click View.
• To remove the student from the homeroom, place a check next to their Student Number and click Delete.
Homeroom Report To generate a homeroom roster listing students by homeroom, perform the following steps:
• Go to Students | Reports, then click Student Listing.
• If desired, select a filter.
• Click the Group by drop-list and select Homeroom.
• Check any other options desired.
• Click Preview.
Quick Reference Guide STI_0701141517 InformationNOW – Homerooms • 9

InformationNOW – Elementary Scheduling
About Elementary Scheduling Elementary scheduling is used in those schools where groups of students remain together all day. For information regarding scheduling students using the Requests method, see the InformationNOW – Scheduling Quick Reference Guide.
Scheduling Setup
Academic Session A new academic session will need to be created prior to scheduling. Schools new to InformationNOW will create the academic sessions under the appropriate school(s). For details, see the InformationNOW – Creating An Academic Session Quick Reference Guide. Once the new academic session is created, switch to the academic session under Preferences | Change Context.
Lookups The lookups (code banks) listed below will need to be verified prior to scheduling. Go to Scheduling | Lookups and select from the drop-list. Then click Refresh. All lookups are district-wide codes, with the exception of Terms and Periods.
Note: Do not delete any codes that are attached to the current academic session.
• Bell Schedules
• Blocks
• Classification of Instructional Program (CIP)
• Course Type
• Difficulty Level
• Funding Method
• Instructional Setting
• Models
Quick Reference Guide STI_0702140903 InformationNOW – Elementary Scheduling • 1

• Periods
• Teaching Method
• Terms
Rooms To set up rooms, go to Schools/District | School | Rooms tab and do the following:
• Add new rooms, entering the information below for each.
o *Room number
o Max Capacity
o *Room Description
o Location
• View rooms to update existing information as needed.
• Delete any rooms no longer used.
Teachers Teacher/staff information should be set up under Staff | Staff Maintenance. For details entering staff information, please refer to the InformationNOW – Staff Quick Reference Guide.
• Add new staff as necessary.
• View existing staff records to update applicable information.
• Delete any staff members who have left the district and will not return.
Valid Courses To set up valid courses, go to Scheduling | Valid Courses | Add (to create new records) or Search (to locate and verify existing records). Required fields are indicated with an asterisk (*).
Note: To copy changes from the valid course file to existing sections in the master schedule, perform the following steps, check the Apply Changes to Sections box before selecting to View a course.
• Go to the Main tab and enter/check information as follows:
o *Course Number: May be alpha and/or numeric.
o Alternate Course Number: May be alpha and/or numeric.
o State Course Number: May be alpha and/or numeric.
o *Short Name: Prints on report cards, labels, and student schedules.
o *Long Name: Prints on standard report cards, transcripts and other scheduling reports o *Course Type: Used in relation to goals sought and prerequisites. Required in some states.
Refer to state guidelines for more details.
o CIP Code: Used for Vocational reporting.
o GPA Credit: Total amount of GPA credit for the course.
o Difficulty Level: Required in some states. Refer to state guidelines for more details. May also be used for goals sought.
o Honor Roll: Check to flag this class as an honor roll class.
Quick Reference Guide STI_0702140903 InformationNOW – Elementary Scheduling • 2

o Graduation Credit: Total amount of graduation credit for the course.
o *Allowable Gender: Check Male, Female or both.
o *Starting Grade: Earliest allowable grade level to request or take this course.
o *Ending Grade: Latest allowable grade level to request or take this course.
o Max Capacity: Enter the maximum number of students allowed per section.
o Course is Instructional: Check if applicable.
o Is State Reported: Check if applicable.
o Display On Report Card: Check if grades for this course are to be displayed on the report card.
o Is Required: Check if this course is to be considered required. When requests are entered for students, they will be marked as required if the course is marked as required. However, it may be un-checked on the student’s request. Courses marked as required will be scheduled with a higher priority during the automated scheduler.
o Active: Check if this course is considered active. Inactive courses will not display on Course Request Entry, Master Schedule Builder or Course Listing Report (unless selected to include). If models exist with inactive courses, the inactive courses will not be added when the model is applied to students. If requests were entered via the home portal prior to the course being set as inactive, the requests can still be approved vial the request approval process. Requests for an inactive course are not automatically deleted. Once a course is marked as inactive, it will not display from the request entry screen via the home portal. Course requests can be approved even if the course is not active. Sections will schedule for inactive courses if requests exist during schedule requests process.
o Instructional Setting: Select the setting for this course.
o Teaching Method: Select the teaching method for this course.
o Funding Method: Select the funding method for this course.
o Click Create if adding a course, or click OK if editing a previously added course.
• Standards tab:
o Click Add.
o Select a search criterion such as Standard Subject.
o Click Search.
o Place a check next to each Standard that applies.
o Click OK.
Note: Contact STI regarding importing state standards where available.
• Custom tab: Enter custom data. Custom fields are created under System Preferences | Setup.
• Summary tab: Lists by School, by Academic Session, by Term, the sections of the selected Valid Course.
• Tasks menu:
o Print Screen option.
o Help option.
Quick Reference Guide STI_0702140903 InformationNOW – Elementary Scheduling • 3

• Manage menu:
o Create Sections from Course: See the section “Master Schedule” below for more information on Master Schedule sections.
o Prerequisites
• Rules (And) section: All rules set here are required.
• Course Requirements (Or) section: Multiple items entered are either/or requirements.
• Course Type Requirements (Or) section: Multiple items entered are either/or requirements.
o Course Fees: Click +Add to add course fees to each course.
o Course Request Roster: Click to view the list of students who have requested this course. Requests may be added, viewed or deleted.
• Reports menu:
o Standards Bank: Allows standards for the selected course or all standard to be printed.
Master Schedule The Master Schedule contains information on when a course will be taught, where it will be taught and who will teach the course. Some information will pull from the Valid Courses file. In some instances, this information may be edited on each section. In other cases, the information may not be edited. Go to Scheduling | Master Schedule. Click Search for a list of current sections. To insert a new section, click Add. To modify an existing record, select the record and click View. Information should be entered as follows:
• Course Information: This information pulls from the Valid Course fie and cannot be edited.
o Course Number o Alt Course Number o State Course Number o CIP Code o Active: Will be unchecked if the valid course has been unchecked as Active.
• Section Details o *Section Number: Enter a section number. May be alpha/numeric.
o *Short Name: Prints on report cards, labels, and student schedules.
o *Long Name: Prints on standard report cards, transcripts and other scheduling reports.
o *Allowable Gender: Check male and/or female as needed.
o *Course Type: Select from the drop-list.
o Difficulty Level: Select from the drop-list.
o Display On Report Card Checkbox: Check if grades for this section are to print on report cards.
o Honor Roll: Check if this course counts toward honor roll.
o Teacher: Click the Teacher link and then click Add to add teachers to course.
Quick Reference Guide STI_0702140903 InformationNOW – Elementary Scheduling • 4

o Room: Select from the drop-list.
o *Starting Grade: Enter the lowest grade level which may be scheduled into the class.
o *Ending Grade: Enter the highest grade level which may be scheduled into the class.
o Grading Scale: Select a grading scale if this course uses a scale different from the scale attached to grade levels.
o GPA Credit: Enter the amount of credit a student earns toward GPA each time credit is awarded.
o Graduation Credit: Enter the amount of credit a student earns toward graduation each time credit is awarded.
o Serving Section: When editing sections in the master schedule at a Reporting School, the user may link this section to a section in a Serving School which allows the user to import report card grades, comments and notes from the Serving School to the Reporting School. For more details regarding dual enrolled students refer to the InformationNOW – Grading quick reference guide.
o *Periods/Blocks: Check the period(s)/block(s) during which the class will meet.
o Period Variations: If using period variations, select the variation that is followed by this section. This option only needs to be selected for courses that meet during the period in which a variation has been set up (i.e., Period 4 is lunch but there are lunch waves A, B and C within that period and the class the student is in period 4 determine which lunch they take.)
o *Meets On: If available, select the appropriate day type(s) on which the class will meet.
o Terms: Check the terms during which the class will meet.
o Capacity: Enter the maximum number of students that may be scheduled into this class. If students are currently enrolled they will display in gray in the Enrolled column to the right.
o A. Credit: Check if credit is awarded at the end of the term.
o GPA Method: Enter the GPA settings to be considered for the grade a student receives in this class. For example, to add 1 quality point to the student for the grade they received in this course, enter a 1 in the W. Add field. To add the grade that the student receives for this course twice in the student’s GPA calculation, enter a 2 in the Weight Mult. field. To keep the grade received for this class from calculating towards a student’s weighted GPA, uncheck the Inc. Weighted GPA box. To keep the grade received for this class from calculating towards a student’s unweighted GPA, uncheck the Inc. Unweighted GPA box.
• Additional Info o Course is Instructional: Check if this is an instructional course. Used for some state
reporting.
o Is State Reported: Check if course is reported to the state.
o Instructional Setting: Select from drop-list. Used for some state reporting.
o Teaching Method: Select from drop-list. Used for some state reporting.
o Funding Method: Select from drop-list. Used for some stare reporting.
• Manage – Roster: Under the Manage menu on the left, click to manage the Roster for this section.
Models Models may be set up as either Scheduling models, which include specific sections of courses; or as models based on Requests only. For details regarding Request models, please refer to the InformationNOW – Scheduling Quick Reference Guide as that is not a typical elementary school application.
Quick Reference Guide STI_0702140903 InformationNOW – Elementary Scheduling • 5

The steps for creating scheduling models are as follows:
• Go to Scheduling | Setup.
• Select Models from the drop-list and click Refresh.
• Click Add to create a new model.
o Select *Type of scheduling.
o Enter a *Name for the model. Examples might include 4-A (homeroom), Mrs Smith, etc.
o Enter a Description if desired. For example, if the name of the model is 4-A, the description may be the teacher name for that homeroom.
o Click Create.
o Click Add.
o Enter search criteria, such as a teacher name, and click Search.
o Checkmark the course(s) to be added to the model and click OK. If multiple pages exist, add the courses on one page then navigate to the next page to continue adding.
o On the model Add screen, click OK once all courses have been added.
o Continue until all scheduling (homeroom) models have been created.
Scheduling Students Models may be applied to groups of students or to individual students by following the steps below.
Applying Models to a Group A wizard will guide the user through this process. The steps are as follows:
• Go to Scheduling | Mass Apply Models.
• The first screen explains the steps taken during the scheduling process. Click Next.
• Step 1: In the drop-list, select the type of model with which to work (Schedule).
• Click Refresh.
• Bullet the model with which to work and click Next (or alternately, click on the link for the model).
• Step 2: Enter the search criteria to build a list of students (for example, Find a homeroom) and click Next.
• Step 3: Select the students to schedule using this model. Click on individual names or press and hold the Ctrl key to multi-select students. Click Add> (the user may also click Add All>> to add every student to the Selected Students dialog box). If multiple pages of students exist, add students from first page and then navigate to next page and continue adding. Repeat until all pages have been used. Click Next.
• Verify that all students in the list should have this model. If incorrect, click Back and add or delete students as necessary. When correct, click Apply.
• The program will apply the model and return to Step 2. If additional students need to be added to this group, continue. To work with a new model, click Back.
• Repeat process until all students have been scheduled.
Quick Reference Guide STI_0702140903 InformationNOW – Elementary Scheduling • 6

Applying a Model to a Single Student To apply a model for a single student, select Students | Student Maintenance. Search for and select to View a student. Under the Manage menu on the left, select Schedule.
• Under the Tasks menu, select Apply Model.
• Select the model and click OK (or alternately, click on the link for the model).
• Verify that all courses are correct for student. If changes need to be made, checkmark the course and click Delete to remove a course; or click Add to add an additional course. When schedule is complete and correct, click Close.
Reports • Course Listing: Generates a listing of all courses for which sections have been created.
• Course Roster: Generates a listing of all students in each course.
• Free Room: Generates a listing of all rooms that are free during a specific period/day type.
• Free Teacher: Generates a listing of all teachers who are free during a specific period/day type.
• Incomplete Student Schedules: Generates a listing of student schedules that are incomplete based on a specific number of periods/day types. Also can generate a listing of all students with no schedules.
• Master Schedule List: Generates a listing of all courses currently scheduled, including teacher name, period of day, terms met, day type, room and number of students scheduled.
• Master Schedule Summary: Generates a summary of students scheduled into each class, broken down by grade, ethnic code and gender.
• Room-Teacher Utilization: Generates a matrix view of rooms or teachers and the period of day they are utilized.
• Student Schedule List: Generates a schedule for each student.
• Student Schedule Matrix: Generates a matrix view of each student’s schedule.
Quick Reference Guide STI_0702140903 InformationNOW – Elementary Scheduling • 7

Quick Reference Guide STI_0702141149 InformationNOW for Teachers – Classroom Attendance • 1
InformationNOW for Teachers – Classroom Attendance
Taking Attendance in InformationNOW Teachers should first log in to InformationNOW and select the appropriate school. Then perform the following steps:
• From the menu tree at left, select Classroom | Attendance.
• Select the correct Active Date (the date for which attendance is to be entered) and Grading Period. The current date and period will appear by default, but the user may change these values if necessary. Click Refresh.
Note: When the Grading Period is changed, only dates within that grading period may be selected.
• Choose the course for which attendance is to be taken by clicking on the Course Number that appears as a blue link or by clicking to bullet the circle to the left of the course number and then clicking View.

• The Attendance screen will appear displaying a list of currently enrolled students.
• There are four attendance statuses for students for the selected day and period:
Present
Absent
Missing
Tardy
Note: A calendar icon indicates that the student was not present on the last day that the class met.
• Students will be marked Present as indicated by the icon to the left of their name. However, if a student has been marked as absent for the day (this could happen, for instance, if the office marked the student absent), the student will
appear with an Absent icon to the left of his/her name, as indicated by student John Cummings in the view above.
Quick Reference Guide STI_0702141149 InformationNOW for Teachers – Classroom Attendance • 2
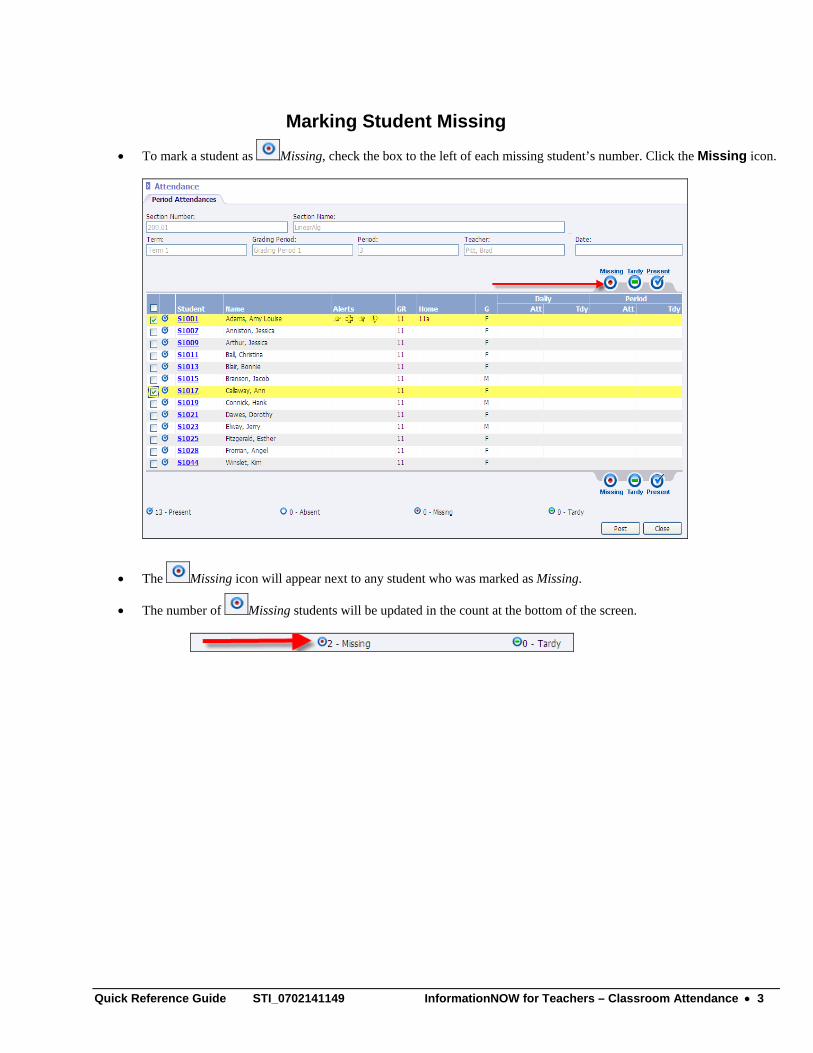
Marking Student Missing
• To mark a student as Missing, check the box to the left of each missing student’s number. Click the Missing icon.
• The Missing icon will appear next to any student who was marked as Missing.
• The number of Missing students will be updated in the count at the bottom of the screen.
Quick Reference Guide STI_0702141149 InformationNOW for Teachers – Classroom Attendance • 3

Marking Student Tardy
• To mark a student as Tardy, check the box to the left of each applicable student number. Click the Tardy icon.
• The Tardy icon will appear next to any student who was marked as Tardy.
• The number of Tardy students will be updated in the count at the bottom of the screen.
Posting Attendance Once all students in the course have been marked as Missing or Tardy, click Post to complete the attendance process.
Note: Once a teacher has posted attendance, all deletions must be performed in the office.
Editing Absence Reasons With the appropriate permissions, teachers may edit absence reasons once attendance has been posted. To edit a student’s absence reason, click to view the attendance screen by either:
• Clicking the course number that appears as a blue link; or,
• Clicking to bullet the course number and then clicking View.
Note: The Post button will be inactive because attendance has already been posted for the selected date and period.
Quick Reference Guide STI_0702141149 InformationNOW for Teachers – Classroom Attendance • 4

• To edit one student, place a check next to the left of the student’s name and click the Absence Reasons link under the Manage menu on the left. If no student is checked, the Edit Attendance screen will display for all students who were marked absent for the selected date/period.
• The Edit Attendance screen will appear. Note: If no student was selected in the previous screen, the Edit Attendance screen will appear for the first student who was marked absent on the list. Use the navigation buttons at the bottom of the screen to move to the first, previous, next or last student who was marked absent.
o Level: Select the level the student was absent.
o Note: Enter any applicable notes for the student’s absence.
o Reason: Based on the Level selected above, a list of available Reasons will display. Bullet the reason that applies to this student’s absence record. Click OK to save changes or use the buttons to navigate to the next record. Changes will be saved when moving to the next record.
Quick Reference Guide STI_0702141149 InformationNOW for Teachers – Classroom Attendance • 5
Attendance Reports
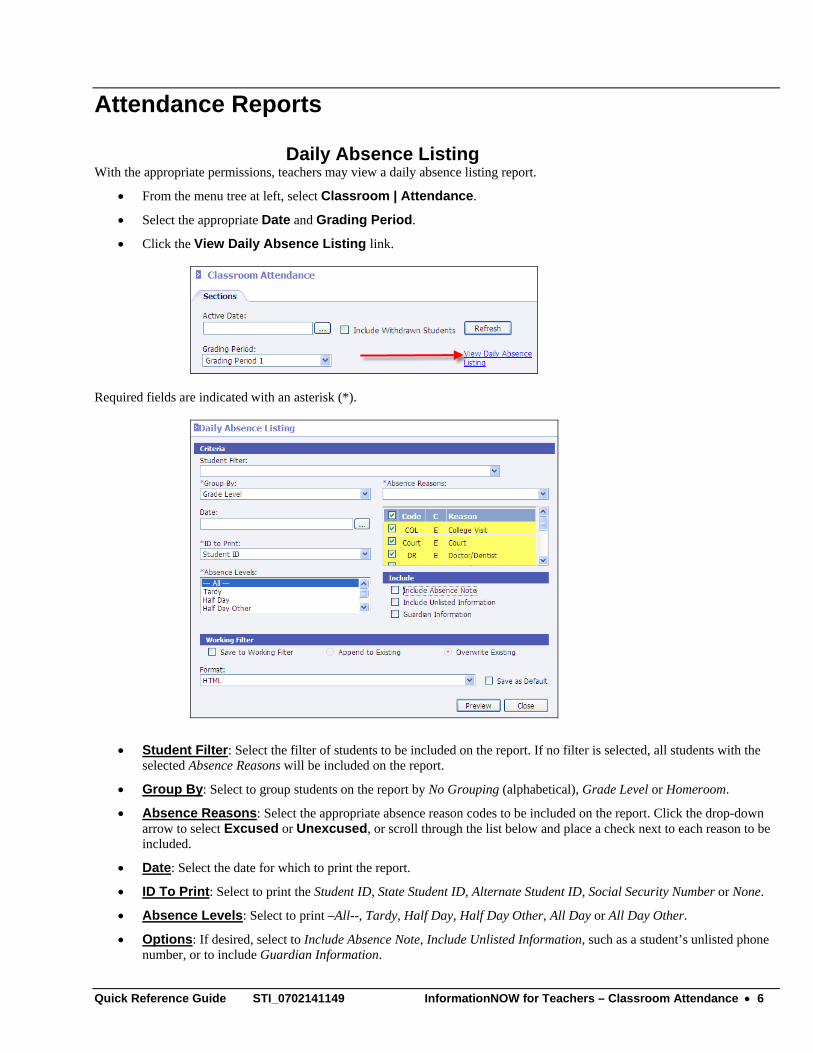
Daily Absence Listing With the appropriate permissions, teachers may view a daily absence listing report.
• From the menu tree at left, select Classroom | Attendance.
• Select the appropriate Date and Grading Period.
• Click the View Daily Absence Listing link.
Required fields are indicated with an asterisk (*).
• Student Filter: Select the filter of students to be included on the report. If no filter is selected, all students with the selected Absence Reasons will be included on the report.
• Group By: Select to group students on the report by No Grouping (alphabetical), Grade Level or Homeroom.
• Absence Reasons: Select the appropriate absence reason codes to be included on the report. Click the drop-down arrow to select Excused or Unexcused, or scroll through the list below and place a check next to each reason to be included.
• Date: Select the date for which to print the report.
• ID To Print: Select to print the Student ID, State Student ID, Alternate Student ID, Social Security Number or None.
• Absence Levels: Select to print –All--, Tardy, Half Day, Half Day Other, All Day or All Day Other.
• Options: If desired, select to Include Absence Note, Include Unlisted Information, such as a student’s unlisted phone number, or to include Guardian Information.
Quick Reference Guide STI_0702141149 InformationNOW for Teachers – Classroom Attendance • 6

Attendance Profile The Attendance Profile is a one-per-student report including the student’s daily absences. Options include the ability to print period attendance, include totals by absence reason, include check in/out detail, unlisted information (phone number or address which has been marked as unlisted) and notes. After selecting Classroom | Attendance, select to View a class by either bulleting the class and clicking View or by clicking the class number that appears as a blue link. Under the Reports menu on the left, select Attendance Profile.
• Student Filter: To generate the report for a select group of students, select the filter from the available list.
• *Group By: Select whether to group by Grade Level, Homeroom, or no group, which will print in alphabetical order.
• *ID To Print: Select the student ID (Student ID, State ID Number, Alternate Student Number, Social Security Number or None) to print on the report when printing detail.
• Start/End Date: Enter the range of dates to be included on the report.
• Period Absences: Check to include the individual period absence detail for the student.
• Reason Totals: Check to include the totals by absence reason and by student on the report.
• Check In/Out: Check to include the check in or out detail for the student.
• Unlisted Information: Check to include the phone or address information of the student even if it has been marked as unlisted.
• Notes: Check to include any notes that have been entered on the student’s daily absence record.
• Withdrawn Students: Select to include currently withdrawn students.
• *Absences Reasons: Select Excused to automatically select all the excused reason codes from the list below. Select Unexcused to only select all of the unexcused reasons from the list below. Alternately, the user may individually check the absence reason codes to include in the absence reason list.
Quick Reference Guide STI_0702141149 InformationNOW for Teachers – Classroom Attendance • 7

• *Terms: Select ---All--- to print attendance detail for the entire academic session or select the term. Use Ctrl+click or Shift+click to select multiple terms.
• Working Filter: For details concerning the Working Filter option, please refer to the InformationNOW – Filters Quick Reference Guide, available from the STI Support Web site at http://support.sti-k12.com.
• Format: Select the desired format for the report – Acrobat (PDF) file, CSV (comma delimited), Excel, HTML, TIFF file, XML file with report data. To save this as the default report option for this user, check the Save As Default box.
Attendance Register The Attendance Register report lists students in a grid-style display. The report includes daily absences as well as tardies for students. A summary also includes a break-down by number and percentage by day and race code.
• Student Identification: Select the ID to include on the report (Student Number, State ID Number, Alt Student Number or SSN).
• Absence Reasons: Select Excused, Unexcused or place a check next to the absence reasons to be included in the absence totals on the report.
• Reporting Period: Select the reporting period for which to print.
• Report Type: Select Detail, Summary or Both.
• Show Local Reason Code: The report will print the absence reason state code. If Show Local Reason code is selected, the absence reason code will display instead of the absence reason state code.
• Include Tardies: Check to include tardies in the display and calculations.
Quick Reference Guide STI_0702141149 InformationNOW for Teachers – Classroom Attendance • 8

InformationNOW for Teachers – Classroom Grade Book
Overview The following is an overview of the options available to teachers under the Classroom | Grade Book menu.
Note: Users may also wish to print the InformationNOW for Teachers – Tri-Fold Quick Guide for returning teachers who need only a brief overview of Grade Book steps. The document is available at http://support.sti-k12.com.
Table of Contents InformationNOW for Teachers – Classroom Grade Book 1
Overview ................................................................................................................................... 1 Table of Contents....................................................................................................................... 1 Setting Up Activity Attributes ................................................................................................... 2 Grade Book................................................................................................................................ 3
Accessing Grade Book ................................................................................................ 3 Display Flags............................................................................................................... 4 Options and Categories ............................................................................................... 5 Adding Activities to the Lesson Plan .......................................................................... 9 Copy Grade Books .................................................................................................... 12 Change Activity Dates............................................................................................... 13 Copy Scores .............................................................................................................. 13 Average Setup ........................................................................................................... 16 Posting Standards ...................................................................................................... 20 Posting Grades........................................................................................................... 21 Alternative Scores ..................................................................................................... 21
Student Scores ......................................................................................................................... 24 Quick Entry of Student Scores in an Activity ........................................................... 24 Fill ............................................................................................................................. 25 Student Score Screen................................................................................................. 25 Alpha Grades............................................................................................................. 26 Entering Comments for Students............................................................................... 28 Computing Semester (Final) Averages Where a Semester Exam Is Given ......................................................................................................................... 29 Entering Standard Marks........................................................................................... 33
Quick Ref Guide STI_0706141453 InformationNOW for Teachers – Classroom Grade Book • 1

Learning Earning Credits......................................................................................................... 33 Grade Book Reports ................................................................................................................ 34
Grade Book ............................................................................................................... 34 Report Cards.............................................................................................................. 36 Progress Reports........................................................................................................ 37 Comprehensive Progress Report ............................................................................... 39 Birthday Listing......................................................................................................... 41 Lesson Plan ............................................................................................................... 41 Standards Report Card............................................................................................... 43 Worksheet Report...................................................................................................... 45 Missing Assignments Report..................................................................................... 46 Student Listing .......................................................................................................... 48 Standardized Test ...................................................................................................... 49 Portrait Style Report Card ......................................................................................... 50 Two Column Report Card ......................................................................................... 52 Seating Chart ............................................................................................................. 54
Additional Reports................................................................................................................... 54 Lunch Counts ............................................................................................................ 54 Unposted Grades ....................................................................................................... 54
Other Tips................................................................................................................................ 54
Setting Up Activity Attributes Activity Attributes are various options that appear within the teacher Lesson Plan. Attributes may be assigned to activities within the teacher Grade Book. Teachers may mark attributes as Private or Public. Public attributes are visible by Home Portal users such as parents or students. To modify the activity attributes, perform the following steps:
• From the menu tree at left, select Classroom | Setup.
• From the Lookup box, select Activity Attributes and click Refresh.
Adding an Attribute To add an attribute, click on the blue Add icon ( ).
Note: Only certain staff members will be able to add attributes, due to the security setup for different groups of staff members.
Quick Ref Guide STI_0706141453 InformationNOW for Teachers – Classroom Grade Book • 2

Enter information in the following fields (items indicated by an asterisk* are required):
• *Name: Name this attribute.
• Description: Enter a more detailed description of the attribute, if desired.
• *Code: Enter a unique code for the attribute.
• State Code: If a state code is required, enter it here.
• SIF Code: If using SIF, enter the SIF code here.
• NCES Number: Enter the NCES Number here if desired.
Click OK to save this attribute. The screen will refresh, and a blank Add Activity Attributes screen will appear. Click Cancel in a blank screen after all attributes have been added.
Grade Book
Accessing Grade Book To access the Grade Book, click Classroom | Grade Book.
• Select the correct Grading Period and click Refresh. When the Grading Period is selected, the Active Date will default to the last date in the selected grading period. It is
Quick Ref Guide STI_0706141453 InformationNOW for Teachers – Classroom Grade Book • 3

not necessary to modify the date unless selecting to View Daily Absence Listing.
• To view the daily attendance for the selected date, click View Daily Absence Listing.
• To choose a course, select it by clicking on the course number that appears as a blue link or bullet the circle to the left of the course number and click the View icon
. The list of students enrolled in the course will display.
Note: To include withdrawn students in the selected course roster, check Include Withdrawn Students before selecting the course.
Display Flags
• A red score means the student’s score exceeds the total points possible for the activity.
• A blue box around a student score indicates that the student was marked as absent on the date of that activity.
• If an assignment is marked as Late, a red-orange triangle is placed in the score box.
• If an assignment is marked as Dropped, the grade will appear as gray with a strikethrough.
• If an assignment is marked as Incomplete, the grade will appear with a blue triangle and an underscore.
Quick Ref Guide STI_0706141453 InformationNOW for Teachers – Classroom Grade Book • 4

• For an Exempt grade, the score box must be empty. Also, the activity itself must be set to allow exemptions (i.e., a final exam). An exempt activity will display as EXT.
Options and Categories Before the Grade Book may be used, Options and Categories must be created.
Options Setup The Grade Book options listed below are provided to allow teachers to customize features available in the Grade Book. To access click Options in the Manage section at left.
Available options are:
• View By Date Descending: This will provide a view of the activities (such as daily grades and test) by date in descending order. Note that the manual Grade Book used by teachers displays items in ascending order. Using descending order allows the activity to be displayed closer to the student’s name. The teacher would then not need to scroll to locate the activity.
Quick Ref Guide STI_0706141453 InformationNOW for Teachers – Classroom Grade Book • 5
• Round Displayed Averages: When selected, the average will be displayed in whole numbers.
• Group by Category: When this option is selected, the activities shown on the Grade Book screen will be grouped by categories. Example: All Homework activities would be displayed next to each other, and all Tests would be displayed next to each other.
• Hide Student Names: This option will hide student names from printed grading listings. For example: If grades are to be printed and posted in the classroom for students to view, the student names will not show; instead, students will be identified by Student Number.
• Include Withdrawn Students: Check this box to show students who were in class for only part of the selected grading period.
• Display Total Points: Check this box to display the total number of points accumulated by students. This is not available if either Category Points or Category Average is selected as the Averaging Method.
• Display Student Averages: This option will allow an average to display on the Scores tab of the Grade Book. The average that is displayed is controlled by the graded item that is marked with GPA Points in the Grading Period Setup.
• Display Letter Grades: Check this box to display a column that shows the current Letter Grade for the Average.
Note: This may differ from what is actually posted to a student’s grade file due to rounding. The grade posted is not rounded, whereas the average on the Score tab is rounded to 2 decimal places. Also, if no letter grade is displayed, confirm that the numeric value is defined within a valid alpha grade on the scale.
• Display Maximum Score: Check to display the total points possible for each activity as part of the activity column heading.
• Averaging Method choices include:
Note: The school has the option to set the averaging method for all classes. If the user is unable to select an averaging method, check with the program administrator to see if this option has been locked by the school.
o Points: When averaging by the Points method, the average is calculated by dividing the total amount of points the student has earned by the total points possible. Example: 932/1000 = 93.2.
o Average: When averaging by the Average method, each individual activity is averaged, and then all the activities are averaged together to obtain a single value. Example: 91/100=91.0, 48/50=96.0, and 23/25=92.0. The Average is then calculated by averaging all activities; 91.0, 96.0, and 92.0 = 93.0.
o Category Points: When averaging by the Category Points method, the average for each category is calculated as with the Points method, and then a percentage is applied to the
Quick Ref Guide STI_0706141453 InformationNOW for Teachers – Classroom Grade Book • 6

categories to determine the average. Example: A category named Test will represent 60% of the students’ grades and a category named Homework will represent 40% of the students’ grades. Determine the Test average via the Points method from above, using ONLY the Test category for the total points earned and possible (All Tests = 273/300 = 91.0). Determine the Homework average by the same method (All Homework = 659/700 = 94.1). To apply the percentage, multiply 60% times 91.0 = 54.6, and 40% times 94.1 = 37.64; then add the products together (54.6 + 37.64 = 92.24). 92.24 is the average for this example.
o Category Average: This average method is calculated the same as the Category Point method. Example: Average the Test category (91.0 + 96.0 = 93.5) and average the Homework category (92.0 + 93.0 = 92.5). Apply the percentage 60% times 93.5 (56.1) and 40% times 92.5 (37.0). The average would be the sum (56.1 + 37.0) = 93.1.
• Student Sort by: Selecting one of these options will reorder the students on the Grade Book screen. Generally, sorting by Student Display Name is used. Options include:
o Custom Order: Allows teacher to arrange students in a custom order. Most often used to move new students to the bottom of the Grade Book. From the Grade Book Comments tab, click to View a comment for a student and enter a unique number in the Custom Order field. It is not necessary to add a Custom Order to every student. It is only necessary to add a Custom Order to new students. Then, when selecting to sort students by Custom Order, students with a unique identifier will drop to the bottom of the Grade Book list.
o Random Order: Helpful when displaying the Grade Book to students with the Hide Student Name option selected.
o Score For Selected Activity: Students will display in highest to lowest order for the selected activity.
o Student Average: Students will display in high-low order for the running Grade Book average for the selected course and grading period.
o Student Display Name: Students will display alphabetically by last name, first name.
o Student First Name: Students will display alphabetically by first name.
o Student Number: Students will display in order by student number which is auto-generated.
• Standards: This section is used to determine how averages are given to standards that are attached to the selected course.
o Standard Calculate Weight Maximum Value: Check this box if the maximum weight will be calculated for the standard’s grade.
o Standards Calculate Rule options include the following:
Current Grading Period: Select this rule if the student’s grade for a standard will only include the current grading period activities.
Running Section: Select this rule if the student’s grade for a standard will include the activities for the section of the current course in which the student is enrolled. A section may last all year.
Running Term: Select this rule if the student’s grade for a standard will include all activities for the term. A term may have more than one grading period but may not last all year.
o Standard Scale: Select the grading scale used to determine the standard’s grade.
o Standards Calculate Method:
Quick Ref Guide STI_0706141453 InformationNOW for Teachers – Classroom Grade Book • 7

o Averaging: Select this method if each individual activity is an average. The standard’s grade is calculated by averaging all the activities.
o Points: Select this method if each individual activity is based on points (example: 90/100). The standard’s grade is calculated by dividing the total points earned by the total points possible.
• Print Screen: Click to send a copy of the screen to the printer.
• Copy Options: Click to copy the options that have been set on a different course to this course.
• Click OK when all selections are complete.
Categories Setup From the Manage section, select Categories. Examples of Categories are Test, Homework, Project, Quizzes, etc.
Note: If no Categories have been created for the Grade Book, click the Copy Categories option under the Tasks menu on the left to select to copy Categories from an existing course to this course. Search for and select the view the Categories for an existing course. Select the Categories to be copied to this course.
Also, the school has an option to create categories for all users. Categories created by the school will display with a lock icon and may not be edited.
To add a category click on the blue Add icon ( ). The Add Category screen will appear.
Enter information in the following fields (an asterisk* indicates a required field):
• *Name: Name the type of category for activities to be graded.
Quick Ref Guide STI_0706141453 InformationNOW for Teachers – Classroom Grade Book • 8

• Description: Enter a more detailed description of this category, if desired.
• High Score to Drop: If this category will be allowed to drop a score, enter the highest score to drop, if any. Leaving the value at 0 (zero) would allow all scores to drop.
• Low Score to Drop: If this category will be allowed to drop a score, enter the lowest score to drop, if any. Leaving the value at 0 (zero) would allow all scores to drop.
• Percentage: A percentage must be entered if using the Category Points or the Category Average method of averaging grades. Using a Percentage is the same as weighting a category.
o Example A: A teacher might want her Test category to be 60% (enter 60 for the Percentage value) and the Homework category to be 40% (enter 40 for the Percentage value) of the grading period average. To compute the average, all the test activities are averaged together and all the homework activities are averaged together. The percentages would then be applied for each category, with the grading period average being the sum of these products.
o Example B: A student has a 90 average on all his tests and a 95 average on all his homework. Apply the percentages (90 times 60% = 54 and 95 times 40% = 38) and add the products (54+38); the grading period average is 92.
Click OK to save the record. The screen will refresh to allow the user to enter to enter another category. When finished, click Cancel. This example displays the scenario described above. Click Close.
Adding Activities to the Lesson Plan To add an activity,
• Click the icon from the Scores tab; or
• Click the Plan tab and click the icon.
• Enter the date. To select the date from a popup calendar, click the ellipsis button ( ). Always click the Refresh button after changing the date.
Note: To display all existing activities regardless of date, clear the Date field and click Refresh.
• Click the blue Add icon ( ).
Quick Ref Guide STI_0706141453 InformationNOW for Teachers – Classroom Grade Book • 9

• Enter information into the following fields (an asterisk* indicates a required field):
o *Date: Enter the correct date for this activity, or click the ellipsis button to select the date from the popup calendar.
o Day: The day of the week is automatically generated by the program.
o Unit: Name the unit that this activity is covering, if desired.
o *Category: Select a category from the drop-list.
o *Activity Name: Assign this activity a unique name. No two activities may have same name.
o Assessment: Check this box if this assignment is an assessment given online via STIAssessment.
Note: If checked, the user will be given the opportunity to select the Assessment to tie to this activity. Once the assessment is assigned, the user will not be able to edit student scores for this activity from the InformationNOW Grade Book. Scores will need to be changed in STIAssessment. If this box is checked and a user edits the activity and unchecks the box the user will be able to edit scores. However, any scores that are changed in STIAssessment will no longer be reflected in InformationNOW.
o Visible In Home Portal: Check this box if this activity is to display in the Home Portal for users such as students and guardians.
o Graded: Check this box if this activity will receive a grade. IMPORTANT: This must be checked in order for students to receive grades.
o Can drop student score: Check this box if a score may be dropped for this activity.
o Is entire activity dropped: Check this box to drop all the scores for this activity.
Note: Be aware that selecting this option will drop all the scores for this activity from all students’ running average.
o *Total: Enter the total of points possible for this activity.
Quick Ref Guide STI_0706141453 InformationNOW for Teachers – Classroom Grade Book • 10

o *Weight Multiplier: For this activity to be part of the grading period average, a number greater than 0 must be entered. 1 is the default value. By default, the weight multiplier will apply to the student’s score only. For example, an activity worth 100 points is weighted 2.0 times. If a student earns 100 out of 100, the system will compute this as 200 out of 100. To weight the total possible points, the average method will need to be set correctly. See “Average Setup” on page 16 for further details. The weighted score will not display under the Scores tab of the Grade Book.
o *Weight Addition: Enter a number here if points are to be added to each student’s grade for this activity. This option behaves similar to Weight Multiplier. For example, an activity worth 20 points is weighted 2.0 points. If a student earns 10 out of 20 points, InformationNOW will consider this as 12 out of 20 points. See “Average Setup” on page 16 for further details. The weighted score will not display under the Scores tab of the Grade Book.
The tabs at the bottom of the screen are not available until the activity has been created. Click Create. The Edit Activity screen for the activity that was just created will display. The tabs at the bottom will become active.
Standards To add a standard to the Lesson Plan, while on the Standards tab, click the blue Add icon ( ).
Note: Standards will only be available if they have been attached to the course under Scheduling | Valid Courses | on the Standards tab. For more details regarding standards, please refer to the InformationNOW – Standard-Based Reporting quick reference guide which is available from the STI website at http://www.sti-k12.com.
Click the standard name or put a check in the box next to the name and click OK. A screen will appear showing the standard on the lesson plan with standards attached.
Attributes Tab The Attributes tab contains Activity Attributes that are created under System Preferences | Setup. To enter information on these tabs, click the desired tab. Type any desired information regarding the selected activity.
• Select the Type. Types are created under System Preferences | Setup for Activity Attributes.
• If the attribute is to be visible from users of the Home Portal, such as guardians or students, check the Visible in Home Portal box.
• Enter any applicable Notes. If the item is marked as Visible in Home Portal, notes may be viewed by
Quick Ref Guide STI_0706141453 InformationNOW for Teachers – Classroom Grade Book • 11
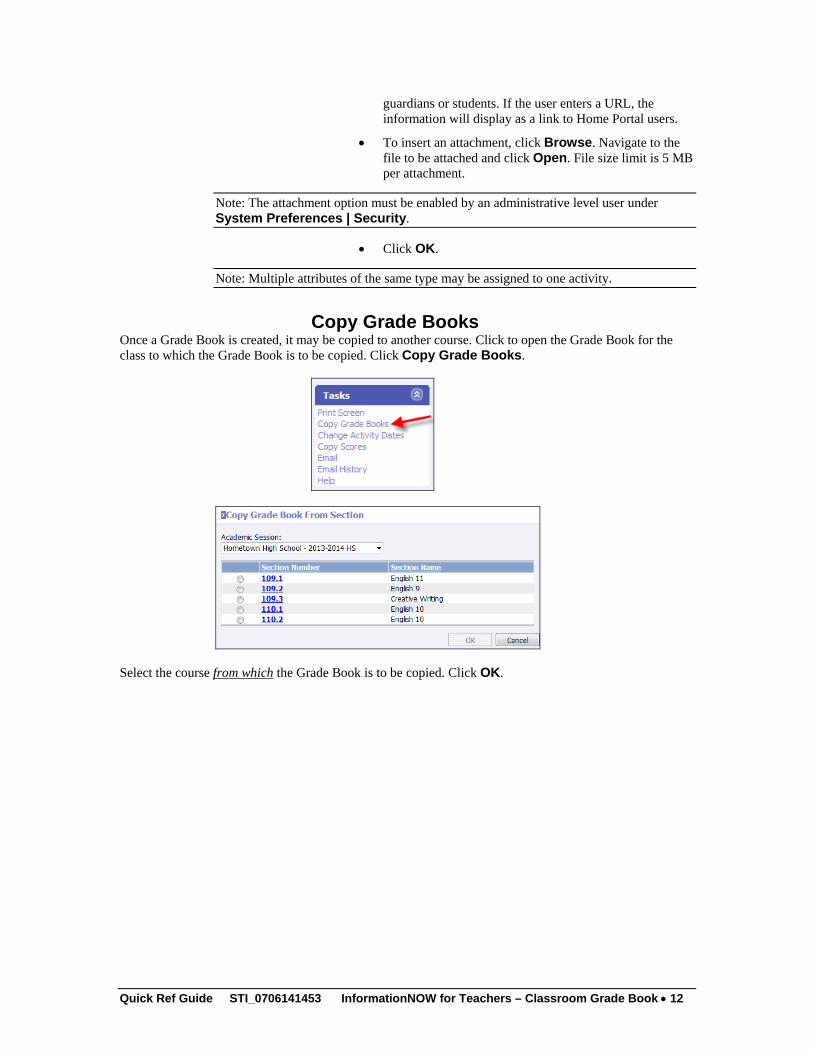
guardians or students. If the user enters a URL, the information will display as a link to Home Portal users.
• To insert an attachment, click Browse. Navigate to the file to be attached and click Open. File size limit is 5 MB per attachment.
Note: The attachment option must be enabled by an administrative level user under System Preferences | Security.
• Click OK.
Note: Multiple attributes of the same type may be assigned to one activity.
Copy Grade Books Once a Grade Book is created, it may be copied to another course. Click to open the Grade Book for the class to which the Grade Book is to be copied. Click Copy Grade Books.
Select the course from which the Grade Book is to be copied. Click OK.
Quick Ref Guide STI_0706141453 InformationNOW for Teachers – Classroom Grade Book • 12
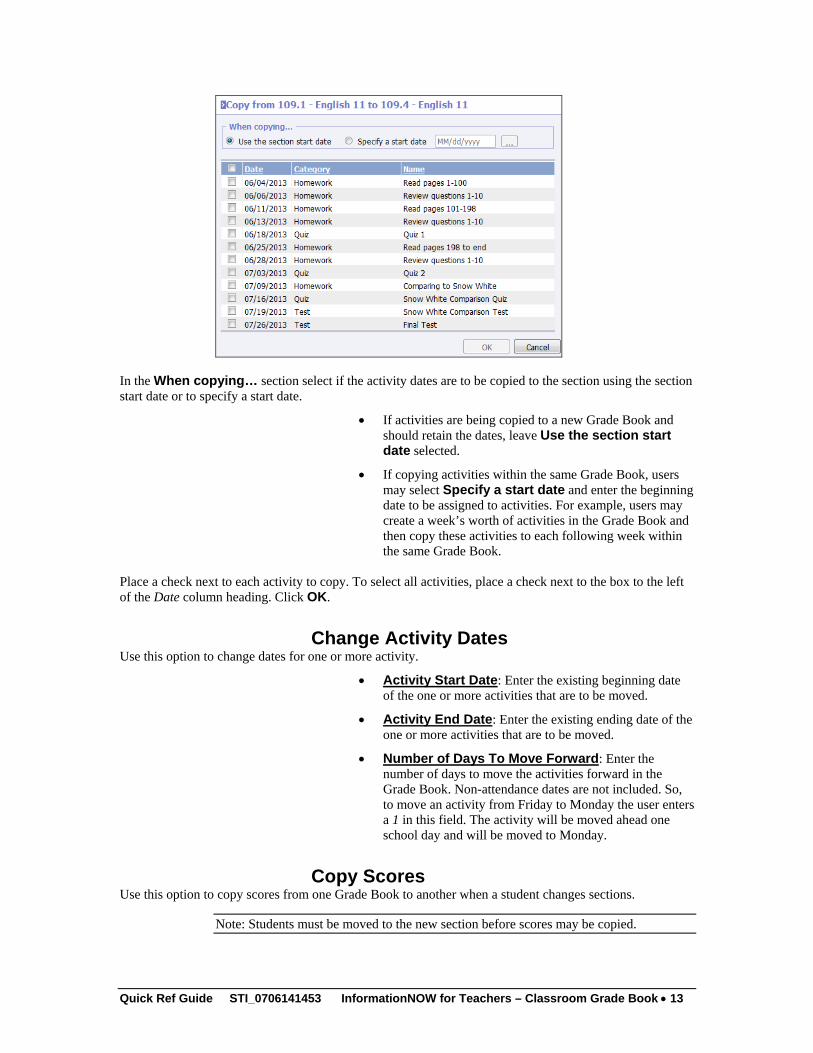
In the When copying… section select if the activity dates are to be copied to the section using the section start date or to specify a start date.
• If activities are being copied to a new Grade Book and should retain the dates, leave Use the section start date selected.
• If copying activities within the same Grade Book, users may select Specify a start date and enter the beginning date to be assigned to activities. For example, users may create a week’s worth of activities in the Grade Book and then copy these activities to each following week within the same Grade Book.
Place a check next to each activity to copy. To select all activities, place a check next to the box to the left of the Date column heading. Click OK.
Change Activity Dates Use this option to change dates for one or more activity.
• Activity Start Date: Enter the existing beginning date of the one or more activities that are to be moved.
• Activity End Date: Enter the existing ending date of the one or more activities that are to be moved.
• Number of Days To Move Forward: Enter the number of days to move the activities forward in the Grade Book. Non-attendance dates are not included. So, to move an activity from Friday to Monday the user enters a 1 in this field. The activity will be moved ahead one school day and will be moved to Monday.
Copy Scores Use this option to copy scores from one Grade Book to another when a student changes sections.
Note: Students must be moved to the new section before scores may be copied.
Quick Ref Guide STI_0706141453 InformationNOW for Teachers – Classroom Grade Book • 13

• Open the Grade Book for the section to which the student was transferred.
• Place checks next to the student(s) for which grades are to be copied.
• Click the Copy Scores link.
• The following Wizard screen will display:
• Review the steps and click Next.
Note: If more than one class is available (i.e., the student has withdrawn from this class more than once), multiple records will display and will be sorted by withdrawal date, most recent first.
• Select the course from which to copy the scores and click Next.
Quick Ref Guide STI_0706141453 InformationNOW for Teachers – Classroom Grade Book • 14

• Activity scores are selected from the activities in the left column and copied into the activity listed in the right column. When activity scores are copied, they disappear from the left side of the screen.
o Auto-Copy will copy all scores from the left side which match on category, date and activity name to activities on the right side. All matched activities will be removed from the list on the left.
o Alternately, users may bullet an activity on the left and then select the activity on the right to which to copy the score and click Copy.
• Once the Copy or Auto-Copy option is selected, the Score will display in the column on the right side of the screen.
• To undo the copy to an activity, bullet the activity on the right and click Clear. Scores will not be copied to that activity. The matching activity will then display again on the left side of the screen.
• Users must click Finish to copy the activity scores.
o Scores may only be copied for sections with the same course number.
o Scores may be copied from one teacher to another as long as the course number is the same.
o If the total points possible of the activities are not the same, the score will not be copied.
Quick Ref Guide STI_0706141453 InformationNOW for Teachers – Classroom Grade Book • 15

o The Copy Scores From grid will only show activities for which the student has a score (alpha or numeric) or an alternate score value; or those that have been marked late or incomplete.
o When a score is copied, all associate score fields such as Is Dropped, Is Incomplete or Is Late are also copied.
o Scores are not removed from the initial Grade Book.
o There is no “saved link” between the scores of one Grade Book to another. If scores are copied and then the score is changed in one Grade Book, the change will not be reflected in the other Grade Book.
o If the student already has a score in the receiving Grade Book, a new score may not be copied to overwrite it.
Setup Before comments may be added to a student record, the comments must first be set up. While in the teacher Grade Book, on the left of the screen under Manage, click Comment Setup.
Note: If no comments have been created for the Grade Book, click the Copy Comments option under the Tasks menu on the left to select to copy comments from an existing course to this course. Search for and select the view the comments for an existing course. Select the comments to be copied to this course.
• To add a comment, click on the blue Add icon ( ).
• Type in the comment and click OK. The Add Comment screen will appear. Continue to add comments as necessary. When finished, click Cancel.
Note: The school has the ability to set up a comment bank to share with all users. Comments entered by the school cannot be edited.
• When finished Adding, Viewing or Deleting comments, click Close.
Average Setup The Average Setup controls how grades are calculated to a running average for the selected grading period and graded items (ex. Grading Period Grade, Semester Exam, Semester Average, Yearly Average). Graded items may be set up differently. Average Methods that are associated with report card graded items are created by the system when the grading periods are set up by the Administrator.
Quick Ref Guide STI_0706141453 InformationNOW for Teachers – Classroom Grade Book • 16

To access the averaging method, click Average Setup under the Manage menu on the left bar of the Grade Book.
All graded items are listed, including the Name, Description, Weight Added, Type and Weighted Score. To edit an item, click the name of the item or place a check next to it and click View. The Section Number/Name, Periods and Days of the Week display.
Quick Ref Guide STI_0706141453 InformationNOW for Teachers – Classroom Grade Book • 17
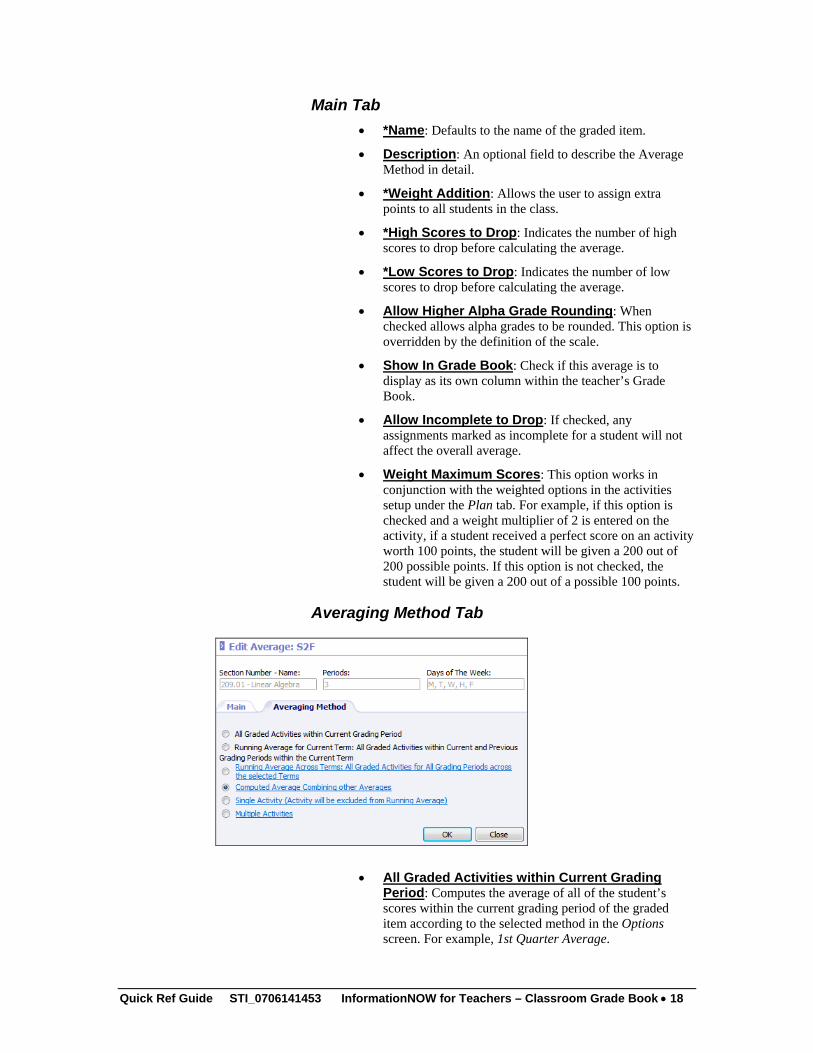
Main Tab • *Name: Defaults to the name of the graded item.
• Description: An optional field to describe the Average Method in detail.
• *Weight Addition: Allows the user to assign extra points to all students in the class.
• *High Scores to Drop: Indicates the number of high scores to drop before calculating the average.
• *Low Scores to Drop: Indicates the number of low scores to drop before calculating the average.
• Allow Higher Alpha Grade Rounding: When checked allows alpha grades to be rounded. This option is overridden by the definition of the scale.
• Show In Grade Book: Check if this average is to display as its own column within the teacher’s Grade Book.
• Allow Incomplete to Drop: If checked, any assignments marked as incomplete for a student will not affect the overall average.
• Weight Maximum Scores: This option works in conjunction with the weighted options in the activities setup under the Plan tab. For example, if this option is checked and a weight multiplier of 2 is entered on the activity, if a student received a perfect score on an activity worth 100 points, the student will be given a 200 out of 200 possible points. If this option is not checked, the student will be given a 200 out of a possible 100 points.
Averaging Method Tab
• All Graded Activities within Current Grading Period: Computes the average of all of the student’s scores within the current grading period of the graded item according to the selected method in the Options screen. For example, 1st Quarter Average.
Quick Ref Guide STI_0706141453 InformationNOW for Teachers – Classroom Grade Book • 18

• Running Average For Current Term: Computes the average of all of the student’s scores within a term according to the selected method in the Options screen. For example, school policy states that the 2nd quarter grade is an accumulation of work from the 1st and 2nd quarter. This works only if both grading periods are setup in the same term.
• Running Average Across Terms: Selecting this option will average activities in the current grading period along with activities from any previous grading period(s) in the current term and prior terms. It will not take into account activities in future grading periods. Any activities used in a Single Activity Average will be omitted from the calculation. If selected, click the blue link to select the starting term.
Quick Ref Guide STI_0706141453 InformationNOW for Teachers – Classroom Grade Book • 19

• Computed Average Combining other Averages: Computes the average based on other Report Card Graded Items. For example, the 1st or 2nd Semester Average for upper grade levels or a Final Average for the lower grade levels. See “Computing Semester (Final) Averages” on page 29 for more information.
• Single Activity (Activity will be excluded from Running Average): Calculates the average by getting the score from a single activity. The selected activity will no longer affect the Current or Running Average. For example, Semester Exam.
• Multiple Activities allows for a custom averaging method to be created. This allows the user to select specific activities to average together. For example, select all of the activities within the first half of the grading period to compare with the student’s current average. Something similar to a progress report.
The possibilities for custom averaging methods are limitless. For example, a 4-week Average Method can be created to average all of the assignments for the first 4 weeks of a grading period so there is a quick point of reference for comparison to how the student is doing the rest of the grading period. The custom Average Methods are available in each grading period. That means instead of creating new ones for each grading period, the same method may be adjusted for each grading period. Custom Averages will not post to the report card.
Posting Standards At the end of each grading period, standard marks are to be posted from the Grade Book to the student’s grade file. Standards will always print on standard based report cards. However, they must be posted in order for users to be able to view standard marks from the student maintenance screen. They must also be posted in order to print on report cards and two-column report cards. To post standard marks for the selected grading period, go to Post Standards under the Manage menu at left.
Quick Ref Guide STI_0706141453 InformationNOW for Teachers – Classroom Grade Book • 20

Verify that the correct course and grading period are selected. Click OK.
Posting Grades At the end of each grading period, grades must be posted from the Grade Book to the student’s grade file for report card printing.
Note: Posting grades must be enabled. To enable posting, go to Grades | Setup. Select Grading Periods from the lookup list and select the appropriate term. Click to view the grading period and check Allow Posting.
Before posting, press the Recalculate button on the Scores tab to ensure that the students’ averages are up to date. To post the grades for the selected grading period, go to Post Grades under the Manage menu at left.
The screen will display the information that is to be posted for the selected term and grading period. Click OK to post the information to the student’s grade record to be printed on report cards. Click Close to cancel the process.
Alternative Scores Alternative Scores may be assigned to students for an activity grade (ex. Unexcused Absence, Homework Coupon).
• Alternative Scores are created under Classroom | Setup | Alternate Score Translation or System Preferences | Setup | Alternate Score Translation.
• Alternate Scores may not be EXT or the same as a Valid Alphabetic Grade. They may contain numbers but must
Quick Ref Guide STI_0706141453 InformationNOW for Teachers – Classroom Grade Book • 21

begin with an alpha character. Alternate Scores may not be numeric.
• In the example above, a homework coupon may be given to a student as a reward. When HC is entered into the Grade Book as the score for an activity, the system will use 100% of the maximum score when calculating averages. For example, if an HC is given to a student for an activity that is worth 50 points, the student will receive 100% of the activity maximum score, or, 50 points.
Student Grading Scales With the appropriate permission, teachers may view the scale that has been assigned to an individual student. If the teacher has permission, they will be able to update the scale at the student/section level. Go to Classroom | Grade Book. Click to View a section. A new Student Grading Scales option has been added to the Manage menu on the left.
Quick Ref Guide STI_0706141453 InformationNOW for Teachers – Classroom Grade Book • 22

When selected the Student Grading Scales screen will display. It lists all students in the class along with the hierarchy of grading scales.
The hierarchy for grading scales is as follows:
• Student Section; if no scale is assigned it looks at…
• Student School; if no scale is assigned it looks at…
• Section; if no scale is assigned it looks at…
• Grade Level. In the above example, the Regular scale has been assigned to the student’s grade level as noted in the Grade Level column. The same scale has also been assigned to this section of the class as noted in the Section column. However, Robert Aaron has been assigned a scale of Weighted Scale. Scales that are selected in the Student School column have precedence over scales selected in the Grade Level or Section columns. Therefore, when calculating Robert’s running average, InformationNOW will refer to the Weighted Scale. Since Patrick Alpha does not have a scale assigned to him, the program will use the regular scale when calculating the student’s running average. If the teacher has permission, they can assign a different grading scale to the student by selecting a scale under the Student Section drop list. Select the scale from the available list and click OK to save the changes. InformationNOW will then use the selected scale to determine the student’s overall running average in the teacher’s Grade Book for this class.
Setting a grading scale will affect all grading periods that the student is scheduled in the section.
Quick Ref Guide STI_0706141453 InformationNOW for Teachers – Classroom Grade Book • 23

Student Scores
Quick Entry of Student Scores in an Activity
There is more than one way to enter scores for activities. Select the Scores tab.
Column Entry The first option is to enter scores down the Activity column. This is the quickest. To enter student scores in an activity, select the Scores tab. Click in the blue area to the right of the students name and under the correct activity.
Enter a score for the selected student and press the down arrow key on the keyboard. Enter the next student’s score and press either the Enter key or the down arrow key to continue to move from student to student.
Note: The grade entered may be a numeric value or an alpha grade. The alpha grade MUST be defined in a grading scale. InformationNOW will use the Averaging Equivalent from the grading scale when averaging the alpha activity grade into the student’s running average for the selected grading period.
Quick Ref Guide STI_0706141453 InformationNOW for Teachers – Classroom Grade Book • 24

Fill While on the Score tab, enter a grade for a student for a selected activity. Right-click on the grade and select Fill. Any students below the selected student on the list will be given the same grade as the selected student for the selected activity.
Drop While on the Score tab, enter a grade for a student for a selected activity. Right-click on the grade and select Drop. The grade will not be calculated into the student’s running average for the grading period. The grade will display in strikethrough font (ex. 52) on the Scores tab.
Note: Grades may only be dropped if, when the activity was created on the Plan tab, the option was checked for Can drop student score.
Student Score Screen Another option to enter or modify a score is to double-click on a cell across from the student and in the column of the activity for which the grade is to be entered.
Quick Ref Guide STI_0706141453 InformationNOW for Teachers – Classroom Grade Book • 25

• New Score: Enter a new score or edit the current score.
• Comment List: Select a comment from list created under the Comments tab of the Grade Book.
• All Activities in Category Dropped: This option informs the user the score was dropped when Is Entire Activity Dropped is checked on the Activity page under the Plan tab.
• User Dropped: If allowed via the Activity setup, the score can be dropped as to not affect the student’s average. This option will not be available if, when the activity was created on the Plan tab, the Can drop student score box is not checked.
• System Dropped: Indicates that, when the activity was created on the Plan tab, the box Is entire activity dropped is checked. Scores received for a dropped activity will not affect the running average for the student.
• Comment: A custom comment may be entered here which will show up on the progress reports.
• Is Incomplete: Checking this box will mark the cell with a blue triangle in the top left corner. Any score that is marked as Is Incomplete will not be included in the student’s overall running Grade Book average.
• Is Exempt: Check this box if the student is exempt from this activity (for instance, the activity might be a semester final exam).
Note: A student may only be exempt from an activity if the activity is tied to a graded item that allows exemptions. Refer to the InformationNOW – Grading Quick Reference Guide for details regarding graded items.
• Is Late: Check if the student turned the assignment in late. Assignments that are marked as late will appear with a bright orange triangle next to the score on the Grade Book screen.
Click OK to save changes to the student grade record. User should click the Recalculate button to update averages for each student.
Alpha Grades Alpha characters may be added to activities. If the alpha character(s) are from an assigned scale, the averaging equivalent will be used in any averaging formulas, but the alpha character will still be displayed in the Grade Book. If the alpha character(s) entered are from the Alternative Score Translation lookup bank, the settings in the lookup will determine how an averaging formula is affected. See “Alternative Scores” on page 21.
Quick Ref Guide STI_0706141453 InformationNOW for Teachers – Classroom Grade Book • 26

Note: When a user hovers the mouse over an alpha score in the Grade Book, a tool tip will show the numeric grade that will be used in any calculation.
Quick Ref Guide STI_0706141453 InformationNOW for Teachers – Classroom Grade Book • 27

Entering Comments for Students To add a comment on a student, click the Comments tab.
• Select the student for whom a comment is to be added by clicking the student’s ID number link (the S- number to the left of the student’s name).
Quick Ref Guide STI_0706141453 InformationNOW for Teachers – Classroom Grade Book • 28

• Users may enter both Progress Report comments and Report Card Comments from the same screen. Choose a comment from the Comment List drop-list or type a new comment directly in the Comment text box.
• Click OK when finished.
Computing Semester (Final) Averages Where a Semester Exam Is Given
To compute Semester (Final) Averages, perform the following steps:
• Step 1: Create Semester Exam activity.
• Step 2: Modify Semester Exam Average Setup.
• Step 3: Modify the Semester (Final) Average Setup.
Note: Steps 1 and 2 are only required if the Semester Exam is used to compute a Semester Average and/or is posted on the report card. If not using semester exam, go directly to “Step 3: Modify the Semester (Final) Average Setup” on page 31.
Step 1: Create Semester Exam Activity
Note: As of the winter 2013 update, this step is no longer required. Users may enter exam grades, including exempt status, directly from the Student Averages screen.
Create an activity with an Activity Name that indicates it is a Semester Final Exam.
Quick Ref Guide STI_0706141453 InformationNOW for Teachers – Classroom Grade Book • 29

Enter data here as desired, but include the following:
• Graded: Check this box under the Grading Properties section.
• Total: Enter the total number of points possible for the exam.
• Weight Multiplier: Weight multiplier must be 1.00 Click the Create button and then click OK.
Step 2: Setup Semester Exam Average Setup • From the Manage menu at left, select Average Setup.
Quick Ref Guide STI_0706141453 InformationNOW for Teachers – Classroom Grade Book • 30

o If a Semester Exam average does not exist, click Add. Enter the criteria as desired on the Main tab.
o If the Semester Exam average exists, select it from the list to View.
• Click the Averaging Method tab.
• Select Single Activity (activity will be excluded from the running average).
• Select the semester exam activity by clicking the radio button to the left of the date of the activity.
• Click OK to close this screen and Close again to close the Semester Exam Edit Average screen.
Step 3: Modify the Semester (Final) Average Setup The steps below may be followed to set up the Semester Average with or without an exam. The same steps may be followed for creating a year end final average, substituting Final for Semester.
• Under the Manage menu at left, select Average Setup.
• Click the line that indicates the semester average to be calculated. (ex. Sem 1 Average).
Quick Ref Guide STI_0706141453 InformationNOW for Teachers – Classroom Grade Book • 31

• Click the Averaging Method tab.
• Click Computed Average Combining other Averages.
• The Averaging Method: Percentage screen will display.
• Enter the percentage for each graded item to be calculated into the semester average. For example, if each grading
Quick Ref Guide STI_0706141453 InformationNOW for Teachers – Classroom Grade Book • 32

period grade is to count 40% of the semester average, enter a 40 next to each grading period graded item. If the exam is to count as 20% of the student’s overall semester average, enter a 20 next to the semester exam graded item.
• In the exempt column, enter the percentage for each graded item to be calculated if the student is exempt from a graded item such as semester final exam. For example, if each grading period grade is to count 50% of the semester final average for students who are exempt from the semester final, enter a 50 next to each grading period item.
Note: Users may not be able to access the percentages depending on privileges assigned by the program or network administrator. Also, graded items may vary depending on the semester/term selected and length of the course (i.e., year-long course vs. a semester long course).
• Click OK to save.
Entering Standard Marks If standards have been assigned to the course, standard marks may be given. For details regarding standard marks, please refer to the InformationNOW – Standard-Based Reporting Quick Reference Guide, which is available from the STI support site at http://support.sti-k12.com.
Learning Earning Credits For districts where InformationNOW is integrated with Learning Earnings, an additional icon will display at the top of the grade book Scores tab.
• To award credits to students from the Grade Book, place a check next to the student(s) name and click Award LE Credits.
• Credits: If all students are to receive the same number of credits, enter the number of credits in the Credits field at
Quick Ref Guide STI_0706141453 InformationNOW for Teachers – Classroom Grade Book • 33

the top of the screen. The students will be assigned the number of credits. Users may edit credits for individual students as desired on the list of students below.
• Category: If desired, select the credit Category. Select the category at the top of the screen to have the selected category assigned to each student on the list. Users may then edit categories on the individual students on the list below.
• Click Send These Credits.
Grade Book Reports Reports are available on the Grade Book screen under the Reports menu at left.
Grade Book The Grade Book report may be accessed from the Classroom | Reports menu or from Classroom | Grade Book after selecting to View a course. Any user who has teacher privileges or access to Classroom | Grade Book may print the report.
• When generating the report from Classroom | Reports, the report will be generated for the selected grading period and section. The report will only be generated for the current grading period. The current date will be used to determine the current grading period. User must have teacher privileges and be assigned to the section to generate. When report is generated from this
Quick Ref Guide STI_0706141453 InformationNOW for Teachers – Classroom Grade Book • 34

location the report will include all sections to which the teacher is assigned for the current grading period.
• When generating the report from Classroom | Grade Book, users must first place a check next to student(s) to be included on the report and then click Grade Book to generate the report for the selected students. The report will print for the selected course only. Users may enter the date range for which to print.
• *Start Date: Includes activities on or after Grading Period Start date. Defaults to current grading period start date.
• *End Date: Includes activities on or before Grading Period End date. Defaults to current grading period end date.
• Order By: Select to order report by:
o Student Display Name: Order students by display name (Alpha ascending).
o Student ID: Order students by value selected in ID to Print (Alpha then numeric, ascending).
o Section Average: Order students by section average (Numeric descending).
• ID to Print: Select to print Alternate Student Number, Social Security Number, State ID Number or Student Number.
• Report Type: Select Detail or Summary.
• Display Letter Grade: Check to print the letter grade in addition to the numeric grade.
• Display Total Points: Check to include a total of points earned and points possible.
• Display Student Average: Check to include the student’s average.
Quick Ref Guide STI_0706141453 InformationNOW for Teachers – Classroom Grade Book • 35

• Suppress Student Name: Check to hide student names on printed report.
• Withdrawn Students: Select to include students who are currently withdrawn from the section regardless of their current enrollment status.
• Non-Graded Activities: Check to include activities that are not marked as graded in the report.
Note: When printing a summary report and activities reach the right margin, a new page will be started containing the remaining activities to allow the user to view the entire report by laying the pages side-by-side.
Report Cards Prints the posted grades for the selected grading period and student(s).
• *Grading Period: Select the grading period for which to print.
• *ID To Print: Select to include the Student Number, State ID Number, Alternate Student Number, Social Security Number or None.
• *Order By: Select to order the report cards by Grade Level, Postal (Zip) Code, Student Homeroom, Student Name or Student Number.
• Show Grades: Select to Show Grades Across the Page (i.e., one row for each course) or Show Grades Down the Page (i.e., one row for each grade).
Quick Ref Guide STI_0706141453 InformationNOW for Teachers – Classroom Grade Book • 36

• *Address Report To: Select to print report cards for Students, those contacts marked as Is Custodians or All Contacts.
• *Form: Select to print an 8 ½ x 11 report or using a form purchased from the STI forms department (with or without school address).
• Go Green: Select this option to not print a hard copy of the report card for any student/guardian (contact) who has elected to Go Green. An alert will be created instead which can be used to generate an email to the student/contact to let them know the report is available for viewing via the Home Portal.
• Letterhead: Check if printing on pre-printed school letterhead. The school name/address will be omitted from the report and the information will print starting further down the page, allowing for the school letterhead information that is already printed on the paper at the top.
• Absence Reasons: If selecting to include attendance information, select the absence reason codes to be included in the absence totals.
• Heading: Enter a heading that will print directly above the student name/address.
• PTD Daily Att: Includes cumulative absences as well as absences for the selected grading period.
• Period Att: Include attendance for each period.
• Print Credit: Prints the earned credit.
• Picture: Check to print the student’s picture if it is on file.
• Notes: Check to print notes assigned to the student.
• Display YTD Info: This will include any previous graded items that are set to print on an all-year report card.
• Parent Signature: Adds a line for the parent to sign the report cards.
• Promotion Status: Check to print the student’s current promotion status. Generally used at the end of the school year to display whether the student is promoted or retained.
• Withdrawn Students; Check to print report cards for currently withdrawn students.
Progress Reports Progress Reports prints the current average for the selected student(s).
Quick Ref Guide STI_0706141453 InformationNOW for Teachers – Classroom Grade Book • 37

• Absence Reasons: Select absence reasons to be included in selected daily attendance counts.
• Attendance: Prints Year-To-Date and Grading Period daily attendance. Period Attendance may be included as well.
• Section Comment: Enter a comment to be printed for each section.
• ID To Print: Select the ID to print on the report card (None, Student Number, State ID Number, Alternate Student Number and Social Security Number).
• Min/Max Student Average: If a value is entered, only the students who have averages between the Min/Max parameters will be displayed in the report. It is not necessary to enter both a Minimum and a Maximum.
• Go Green: Select this option to not print a hard copy of the report for any student/guardian (contact) who has elected to Go Green. An alert will be created instead which can be used to generate an email to the student/contact to let them know the report is available for viewing via the Home Portal.
• Class Average: Includes the overall class average for each activity.
• Period Attendance: Check to include period attendance counts on the report card.
• Total Points: Displays the total points earned for the student for the grading period.
• Signature Line: Prints a parent/guardian signature line.
• Additional Mailings: Check to print extra reports for contacts marked to receive mailings.
Quick Ref Guide STI_0706141453 InformationNOW for Teachers – Classroom Grade Book • 38

• Category Averages: Provides a breakdown on the student is doing in each category.
• Min/Max Category Averages: To include only students with an overall category average in a given range, check the Category Averages box and enter the numeric range in the fields provided.
• Letter Grade: Prints the letter grade equivalent of the current running average for the student directly below the running average.
• Student Comment: Includes comments entered on the activity grade under Scores.
• Student Mailing Address: Prints the student mailing address on the report for mailing.
Comprehensive Progress Report The Comprehensive Progress Report is a one-per-student report of posted grades along with activity grades for a selected grading period and/or date range. If generating the report from the Grade Book, place a check next to the student(s) for which to print and then click Comprehensive Progress Report option. The report is also available Classroom | Reports. When generating from the Classroom | Reports menu, the report will print for all students the user teachers for all classes.
• Student Filter: Disabled if printing from the Grade Book. If printing from Classroom | Reports, select the filter of students to be included on the report. If not filter
Quick Ref Guide STI_0706141453 InformationNOW for Teachers – Classroom Grade Book • 39

is selected, all students that the teacher teaches will be included.
• *Grading Period: Select the grading period for which to print. This option is disabled when printing from the Grade Book as the grading period was already selected before accessing the Grade Book screen.
• Start/End Date: Select to print for a date range of activities. Dates must be within the grading period selected.
• Absence Reasons: If including attendance on the report, place a check next to each absence reason to be included on the report. Alternately, click the drop-list and select Excused or Unexcused and all applicable reasons will be selected by default.
• *Display Daily Attendance: Select to include None, Grading Period, Year To Date or Both.
• Min./Max. Student Average: Select to print a report for only those students who have at least one section average between the minimum and maximum range entered here.
• Go Green: Select this option to not print a hard copy of the report for any student/guardian (contact) who has elected to Go Green. An alert will be created instead which may be used to generate an e-mail to the student/contact to let them know the report is available for viewing via the Home Portal.
• Window Envelope: Check to print the report in a format that will fit in a #10 window envelope.
• Include:
o Student Mailing Address
o Student Comment
o Signature Line
o Student Photo
o Total Points
o Category Averages
o Period Attendance
o Additional Mailings
o Class Average Only
o Class Average
o Withdrawn Students
• ID To Print: Select to print None, Alternate Student Number, State ID or Student Number.
• Order By: Select to order the report by Student Display Name, ID Selected (if printing ID), Grade Level,
Quick Ref Guide STI_0706141453 InformationNOW for Teachers – Classroom Grade Book • 40

Homeroom, Postal Code or Distribution Period (not available if printing from the Grade Book).
Birthday Listing The Birthday Listing generates a listing of students and their birthday based on a calendar date range or monthly range.
• Student Filter: Select the filter of students to be included on the report. If not filter is selected, all students will be included.
• Date or Range Of Dates: Enter the range of dates of birthdays to include. For example, to print all birthdays for the year 1999, enter 1/1/1999 to 12/31/1999.
• Month or Range of Months: Select the start and end month. For example, to print tall February birthdays regardless of the year the student was born, select February for both the start and end months.
• *Group By: Select to group the report by No Grouping (Alphabetic), Date of Birth, Grade Level or Homeroom.
• Include Withdrawn Students: Select to include currently withdrawn students on the report.
• Include Student Photograph: Check to include the student’s photo if on file.
Lesson Plan The Lesson Plans Report prints the lesson plans based on a selected date range. The report may be used a summary count or a detailed list.
Quick Ref Guide STI_0706141453 InformationNOW for Teachers – Classroom Grade Book • 41

• Staff Filter: Select the filter of staff for which to print. This option is disabled when printing from the Grade Book reports menu.
• *Start/End Date: Select the range of dates of the activities to be included.
• Include Activities: Check to include information from the activity tabs.
• Include Standards: Check to include standard marks for the selected activities and date range.
• Activity Attribute Text: Select to include Public, Private or Public and Private.
• Activity Attributes: Select the activity tabs to be included.
• Minimum Number of Days With Plans: Enter the minimum number of days with lesson plans to be included.
• Activity Categories: Select the activity categories (i.e., Homework, Quizzes) to be included.
• Sort Activities: Select to sort activities by Date/Category or Category/Date.
• Sort Section: Select to sort the various sections by Teacher/Section, Teacher/Course, Teacher/Period or Section.
Quick Ref Guide STI_0706141453 InformationNOW for Teachers – Classroom Grade Book • 42

Standards Report Card The Standards Report Card allows the one-per-student reporting of standards.
• Student Filter: Select the filter of students to include. If no filter is selected, all students will be included.
• *Grading Period: Select the grading period for which to print.
• Absence Reasons: Select the absence reasons to be included in the absence counts on the report card.
• Message: Enter the message to display on all students’ report cards.
• Grading Scale. Enter the grading scale to print on the report card.
• Go Green: Select this option to not print a hard copy of the report for any student/guardian (contact) who has elected to Go Green. An alert will be created instead which may be used to generate an e-mail to the student/contact to let them know the report is available for viewing via the Home Portal.
Quick Ref Guide STI_0706141453 InformationNOW for Teachers – Classroom Grade Book • 43

• Letterhead: Check if printing on pre-printed school letterhead. The school name/address will be omitted from the report and the information will print starting further down the page, allowing for the school letterhead information that is already printed on the paper at the top.
• *Address Report To: Select to print report cards for Students, those contacts marked as Is Custodians or All Contacts.
• Go Green: Select this option to not print a hard copy of the report card for any student/guardian (contact) who has elected to Go Green. An alert will be created instead which can be used to generate an email to the student/contact to let them know the report is available for viewing via the Home Portal.
• Parent Signature: Adds a line for the parent to sign the report cards.
• Report Card Grades: Check to include posted report card grades on the standards report card.
• Report Card Comments: Only available if including Report Card grades. Check to include the comments that are attached to report card grades.
• Announcement: Check to include the school announcement that is assigned to the grading period under Grading | Setup | Grading Periods lookup.
• Student Picture: Check to print the student’s picture if it is on file.
• Student Address: Check to include the student’s address on the report card.
• Promotion Status: Check to print the student’s current promotion status. Generally used at the end of the school year to display if the student is promoted or retained.
• Withdrawn Students; Check to print report cards for currently withdrawn students.
• Standards With Marks Only: Check to print only the skills for which students have received a mark (score).
• Standards Comments: Check to include the comments that were attached to the standard marks.
• *Attendance Details: Select to include None, Yearly, Grading Period or Both Year/Grading Period attendance totals.
• *ID To Print: Select to include the student’s Alternate Student Number, None, Social Security Number, State ID Number or Student Number.
• *Order By: Select to order the report cards by Display Name, Distribution Period, Grade Level, Homeroom, Student Number or Postal (Zip) Code.
Quick Ref Guide STI_0706141453 InformationNOW for Teachers – Classroom Grade Book • 44

Worksheet Report The Worksheet Report allows a teacher, or an administrator with appropriate rights, to print a worksheet for a specific date range, with specific activities, with or without grades/scores. It also allows the teacher to print either the student names or student numbers (for example, to print grades on a particular activity). Blank columns may also be added.
• *Start/End Date: Enter the date range for activities to include.
• *ID To Print: Select to include Student Number, State ID Number, Alternate Student Number, Social Security Number or None.
• Activities: Place a check next to the activities to be included on the worksheet.
• Blank Columns: Select to include up to five (5) blank columns on the report. After placing a check next to a row, users may enter a title for the column in the field provided to the right.
• Include:
o Scores: Check to include the student scores for all included activities.
o Average: Check to include the student’s running average.
o Letter Grade: Check to include the letter grade equivalent of the grade.
o Student Name: Check to include the student name on the report. Uncheck this option if, for example, scores are to be posted to a bulletin board.
Quick Ref Guide STI_0706141453 InformationNOW for Teachers – Classroom Grade Book • 45

Missing Assignments Report The Missing Assignments report prints a list of students who have a blank grade for any activities in the specified date range.
• *Start Date: Includes activities on or after this date. Defaults to current grading period start date.
• *End Date: Includes activities on or before this date. Defaults to current grading period end date.
• Order By: Select to order by Student or Section.
o Student: Lists each student with each section (ascending by time slot) then each activity (ascending by date) for the sections where scores are missing.
o Section: Groups by full Section Number ascending, then lists activities ascending by date, then students (ascending by display name) who are missing activity scores.
• ID to Print: Select to print Alternate Student Number, Social Security Number, State ID Number or Student Number.
• Count Zeros as Missing: Will include activities for which a student received a 0 grade.
• One Per Page: If checked, a page break will be inserted based on the Order selected.
• Suppress Student Name: Check to hide student names on the printed report.
• Alternate Scores Only: Will only print activities for which Alternate Scores have been assigned.
• Alternate Scores: Select the Alternate Scores to include on the report or select --- All ---.
Quick Ref Guide STI_0706141453 InformationNOW for Teachers – Classroom Grade Book • 46

• Withdrawn Students: Check to include students who have withdrawn from the section.
Quick Ref Guide STI_0706141453 InformationNOW for Teachers – Classroom Grade Book • 47

Student Listing A report listing all students in the selected class.
• *Report Type: Select to print a Summary or Detail report.
• *Order By: Select to order students on the report by Student Name, Student ID Number, Grade Level, Homeroom or Postal (Zip) Code.
• Report Subtitle: Enter a heading to print at the top of the report.
• *Student Identifier: Select to print Student ID, State Student ID, Alternate Student ID, Social Security Number or None.
• *Address: Select to include Mailing Address, Physical Address, Both Mailing and Physical or None.
• *Contacts:
o Primary Family Only: Any contact who is flagged as Is Family Member and whose physical address is the same as the student’s.
o Primary Family and Extended: Any contact who is checked as Is Family Member.
o Emergency Contact Only
o Can Pick Up Student Only
o None
• Include:
o Race
Quick Ref Guide STI_0706141453 InformationNOW for Teachers – Classroom Grade Book • 48

o Lunch Code
o Student Photograph
o Student Status
o Unlisted Information
o Withdrawn Students
Standardized Test A report of student’s Standardized Test results.
• *Start/End Date: To only include tests with a specific date, enter the date range in the Start and End fields.
• Test: To print for only a select test(s), select it from the list or select to print for All.
• Components: To print for only a select component(s), select it from the list of select to print for All.
• *Meets Requirements: Select to include students who have met the requirements (Yes), have not met requirements (No) or all (Both).
• *ID To Print: Select to include Alternate Student Number, Social Security Number, State Student ID or Student Number.
• *Group By: Select to group students by Display Name, Grade Level, Homeroom, ID Selected, Test or Date (Ascending).
• Include:
Quick Ref Guide STI_0706141453 InformationNOW for Teachers – Classroom Grade Book • 49
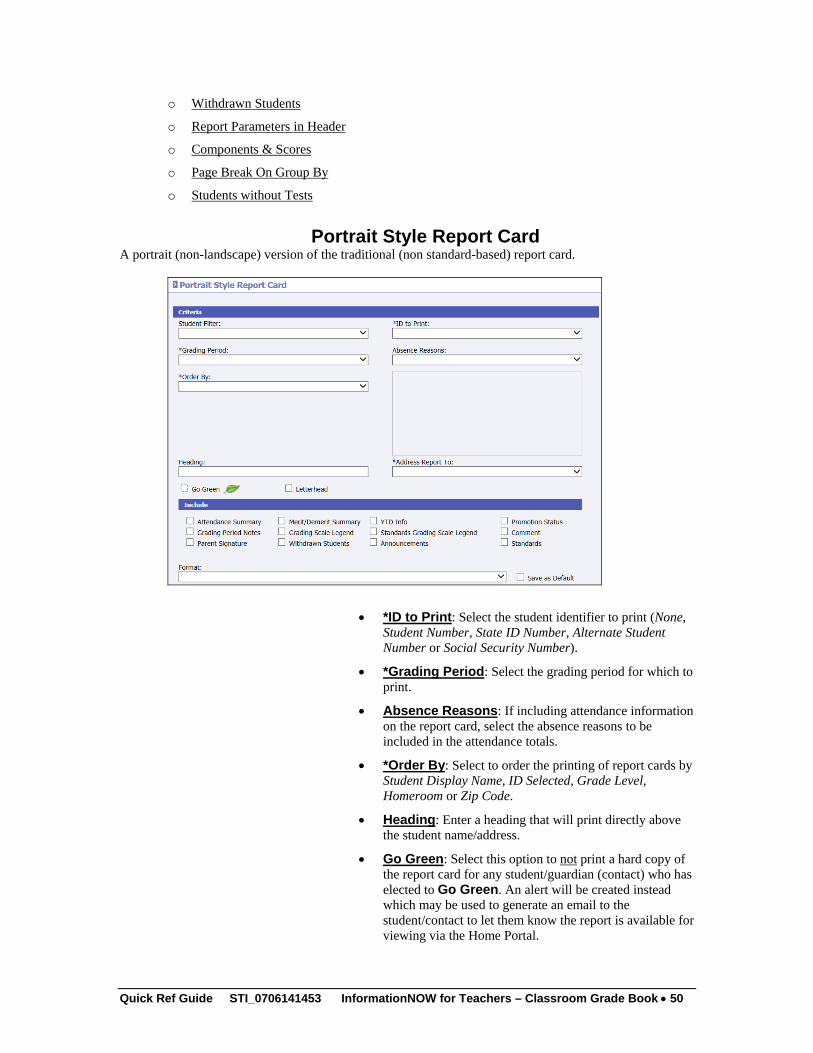
o Withdrawn Students
o Report Parameters in Header
o Components & Scores
o Page Break On Group By
o Students without Tests
Portrait Style Report Card A portrait (non-landscape) version of the traditional (non standard-based) report card.
• *ID to Print: Select the student identifier to print (None, Student Number, State ID Number, Alternate Student Number or Social Security Number).
• *Grading Period: Select the grading period for which to print.
• Absence Reasons: If including attendance information on the report card, select the absence reasons to be included in the attendance totals.
• *Order By: Select to order the printing of report cards by Student Display Name, ID Selected, Grade Level, Homeroom or Zip Code.
• Heading: Enter a heading that will print directly above the student name/address.
• Go Green: Select this option to not print a hard copy of the report card for any student/guardian (contact) who has elected to Go Green. An alert will be created instead which may be used to generate an email to the student/contact to let them know the report is available for viewing via the Home Portal.
Quick Ref Guide STI_0706141453 InformationNOW for Teachers – Classroom Grade Book • 50

• *Address Report To: Select to print report cards for Students, those contacts marked as Is Custodians or All Contacts.
• Attendance Summary: Check to include an attendance summary. Attendance will be included for the selected absence reasons. The attendance section will include the following based on the absence reason codes selected:
o Total Days Enrolled
o Total Days Present
o Days Absent
o Excused Days Absent
o Unexcused Days Absent
o Times Tardy
o Excused Tardies
o Unexcused Tardies
• Grading Period Notes: Check to include the notes entered on the student posted grades. Only notes for the selected grading period will print.
• Parent Signature: Check to include a parent signature line on the report card.
• Merit/Demerit Summary: Select to include a summary of the student’s merits and demerits based on the student’s discipline and commendation views.
• Grading Scale Legend: Check to include the grading scale legend based on grading scales assigned to the course. Student’s schedule may contain sections with different grading scales. The report will print all grading scales for the student in the Grading Scale Legend in descending order by max score/range value.
• Withdrawn Students: Check to include currently withdrawn students when printing.
• YTD Info: Check to include previous grading period grades along with the selected grading period. The report will display up to the last four grading periods due to space availability.
• Standards Grading Scale Legend: Check to include a legend for the standard grading scale if selecting to print Standards. Student’s schedule may contain sections with different standard grading scales The report will print all standard grading scales for the student in the Standards Grading Scale Legend in descending order by max score/range value.
• Announcements: Check to include the announcements entered on the selected grading period.
• Promotion Status: Check to include the student’s current promotion status.
Quick Ref Guide STI_0706141453 InformationNOW for Teachers – Classroom Grade Book • 51

• Comment: Check to include the comment entered on the student.
• Standards: Check to include standard marks on the report card.
Two Column Report Card A two-column traditional report card (i.e., non standard-based report cards).
• *ID to Print: Select the student identifier to print (None, Student Number, State ID Number, Alternate Student Number or Social Security Number).
• *Grading Period: Select the grading period for which to print.
• Absence Reasons: If including attendance information on the report card, select the absence reasons to be included in the attendance totals.
• *Order By: Select to order the printing of report cards by Student Display Name, ID Selected, Grade Level, Homeroom or Zip Code.
• *Address Report To: Select to print report cards for Students, those contacts marked as Is Custodians or All Contacts.
• Go Green: Select this option to not print a hard copy of the report card for any student/guardian (contact) who has elected to Go Green. An alert will be created instead which may be used to generate an email to the student/contact to let them know the report is available for viewing via the Home Portal.
Quick Ref Guide STI_0706141453 InformationNOW for Teachers – Classroom Grade Book • 52
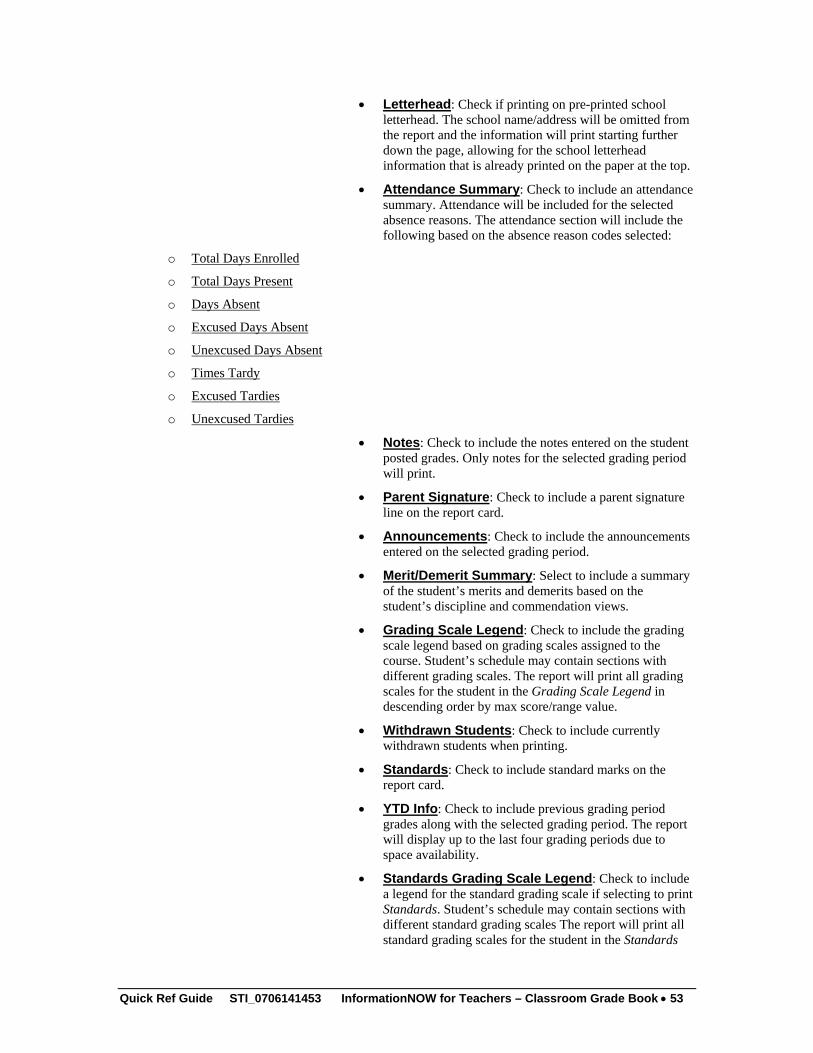
• Letterhead: Check if printing on pre-printed school letterhead. The school name/address will be omitted from the report and the information will print starting further down the page, allowing for the school letterhead information that is already printed on the paper at the top.
• Attendance Summary: Check to include an attendance summary. Attendance will be included for the selected absence reasons. The attendance section will include the following based on the absence reason codes selected:
o Total Days Enrolled
o Total Days Present
o Days Absent
o Excused Days Absent
o Unexcused Days Absent
o Times Tardy
o Excused Tardies
o Unexcused Tardies
• Notes: Check to include the notes entered on the student posted grades. Only notes for the selected grading period will print.
• Parent Signature: Check to include a parent signature line on the report card.
• Announcements: Check to include the announcements entered on the selected grading period.
• Merit/Demerit Summary: Select to include a summary of the student’s merits and demerits based on the student’s discipline and commendation views.
• Grading Scale Legend: Check to include the grading scale legend based on grading scales assigned to the course. Student’s schedule may contain sections with different grading scales. The report will print all grading scales for the student in the Grading Scale Legend in descending order by max score/range value.
• Withdrawn Students: Check to include currently withdrawn students when printing.
• Standards: Check to include standard marks on the report card.
• YTD Info: Check to include previous grading period grades along with the selected grading period. The report will display up to the last four grading periods due to space availability.
• Standards Grading Scale Legend: Check to include a legend for the standard grading scale if selecting to print Standards. Student’s schedule may contain sections with different standard grading scales The report will print all standard grading scales for the student in the Standards
Quick Ref Guide STI_0706141453 InformationNOW for Teachers – Classroom Grade Book • 53

Grading Scale Legend in descending order by max score/range value.
• Promotion Status: Check to include the student’s current promotion status.
• Comment Legend: Check to include a legend of descriptions for the comments assigned to the student grade records.
• Photograph: Check to include the student’s photo if on file.
Seating Chart To print the seating chart, go to Classroom | Grade Book. Select to View a class. Click the Seating Chart option under the Reports menu on the left.
Additional Reports Depending on the privileges assigned to the user, additional reports may be accessed under the Classroom | Reports menu. Reports that are accessible from the Reports menu that are not accessible from the Grade Book include the following:
Lunch Counts A listing of posted student, staff or guest lunches for a selected date range.
Unposted Grades A report of sections for which grades have not yet been posted for a selected grading period.
Other Tips What is the blue box?
What is the blue box surrounding student’s scores for Activities?
The blue box indicates the student was marked absent for that period and for the day of the activity.
Can student demographic information be accessed from the Grade Book?
Yes. Click on the student’s name and the student’s maintenance screen will open.
Quick Ref Guide STI_0706141453 InformationNOW for Teachers – Classroom Grade Book • 54

Note: The ability to access student information is based on privileges assigned to the user.
What do the symbols mean in the Alerts column? If permission is granted to users to view alerts, these alerts may be viewed under the Alerts column within the Grade Book. The icons pertain to the particular student.
Note: Alerts will only display if data is entered for the student. For example, if a student has not been given rights to access the Internet, the Internet access icon will not appear for the student.
• Explorer Icon: The student has been marked as having permission for Internet access.
• Cross: The student has been marked as having a medical alert. Click this icon to view the student’s alert.
• Graduation Cap: The student has been marked as Active for their Special Education Status.
• Balloon: The student has been marked with a special alert. Double-click on the icon to view the special alert.
• T: The student has met the truancy threshold as established by the district.
Quick Ref Guide STI_0706141453 InformationNOW for Teachers – Classroom Grade Book • 55

Setting Up Options 1. Before using the Grade Book, options must be set. 2. Click Classroom. Grade Book will be selected. 3. Make sure the correct Grading Period is selected and
click the Section Number that appears as a blue link. 4. Click Options on the left. 5. Check the appropriate options including the student
sort for this class and grading period. 6. Click OK. 7. To copy these options to another class, open the
other class and click Options. Click Copy Options. Select the class from which to copy the options and then click OK.
Creating Categories 1. Categories must be created before the user may
create Activities. 2. Click Classroom. Grade Book will be selected. 3. Make sure the correct Grading Period is selected
and click the Section Number that appears as a blue link.
4. Click Categories on the left. 5. Click Add. Required fields are indicated with an
asterisk (*). 6. Enter the appropriate information. If averaging by
Category Points or by Category Averages, be sure to enter the percentage that this category will count towards the student’s overall average.
7. Click OK. 8. Continue adding categories as needed. Be sure the
percentage totals 100% for all categories. 9. When finished entering categories, click Close. 10. To copy these same categories to another class,
open the other class and click Categories. Click Copy Categories. Select the class from which to copy the categories and then click OK.
Creating Activities 1. Click Classroom. Grade Book will be selected. 2. Make sure the correct Grading Period is selected
and click the Section Number that appears as a blue link.
3. The user may click the Add Activity button or click the Plan tab, select the grading period to view all existing activities and then click Add. Required fields are indicated with an asterisk (*).
4. Enter the details for the activity. Type the date or click to select it from a calendar. • Check Graded if students receive a grade for
this activity. • Check if the activity, and the score, is to be
Visible in Home Portal. 8. Click Create. 9. To copy these activities to another class or another
section of the same class, open the other class and click Copy Activities. Select the class from which to copy the activities. Click OK.
Average Setup Use the average setup option to indicate the method by which the Grade Book average is to be calculated. 1. Click Classroom. Grade Book will be selected. 2. Make sure the correct Grading Period is selected
and click the Section Number that appears as a blue link.
3. Click Average Setup on the left. 4. Select the grade that is to be averaged (ex. Quarter
1) and click View. 5. Click the Averaging Method tab. 6. Select the appropriate option for how the Grade
Book is to be calculated for the selected score. For example, for the Quarter 1 average, the Averaging Method may be All Graded Activities within Current Grading Period.
Entering Activity Grades 1. Click Classroom. Grade Book will be selected. 2. Make sure the correct Grading Period is selected
and click the Section Number that appears as a blue link.
3. Click the Scores tab. 4. Either double-click in the Activity column across
from the student’s name or click one time in the column to enter the score in the appropriate column across from the student’s name. • Press Enter key to save the record and stay on
the same student. • Press down arrow to save the record and
move down to the next student on the list for the same activity.
• Press right arrow to move to the next activity for the same student.
• To enter a comment for the score, double-click in the Activity column across from the student’s name.
• Right-click across from a student’s name in an Activity column to mark a grade as Dropped, Late, Incomplete or Exempt, or to use the Fill option to fill in the same grade for all students for the activity.
5. Click Recalculate to update the average. Learning Earnings To issue credits click to View a class. From the Scores tab place a check next to each student who is to be awarded credit. Click Award LE Credit. If all students are to receive the same number of credits and category, enter the number of Credits to give each student, select a Category if desired and click Send These Credits. Alternately users may assign a specific number of Credits and/or Category to each student listed below.
Manually Entering Grading Period Grades 1. If the user is NOT using the Grade Book to
enter individual activities and needs to manually enter grading period grades, click Classroom. Grade Book will be selected.
2. Make sure the correct Grading Period is selected and click the Section Number that appears as a blue link.
3. Click Student Averages on the left. 4. Double-click in the direct entry column cell for
the grade to enter. User must have permission to enter a direct average.
5. Enter information and click OK. User will still need to post grades. See Posting Grading Period Grades section immediately below.
NOTE: Manual grade entry may also be done from Classroom | Grades if the user has permission. However, if a teacher enters grades on the Grades menu and then posts grades from the Grade Book, the grades will be overwritten.

Posting Grading Period Grades 1. Click Classroom. Grade Book will be selected. 2. Make sure the correct Grading Period is selected
and click the Section Number that appears as a blue link.
3. Click Post Grades on the left. 4. Make sure the correct grading period is displayed
and click OK. Manually Entering Grading Period Grades If Not Posting From the Grade Book WARNING! This option is not recommended. Users should either use the Grade Book to maintain a running average or manually enter grading period grades under the Student Averages menu option. This option is ONLY to be used if the teacher is NOT posting grades from Grade Book. If grades are entered here and then grades are posted from the Grade Book, these grades will be overwritten. Use this option ONLY if NOT posting grades from the Grade Book.
1. Click Classroom | Grades. 2. Make sure the correct Grading Period is
selected and click the Section Number that appears as a blue link.
3. Place check next to student(s). Click View. 4. Enter information and click OK. Printing the Grade Book 1. Click Classroom. Grade Book will be selected. 2. Make sure correct Grading Period is selected
and click the Section Number that appears as a blue link.
3. Place a check next to each student to be included on the report.
4. Click Grade Book under Reports on the left. 5. Select the desired options and click Preview. 6. The Grade Book will display in .PDF format.
Click Print. Taking Attendance 1. Click Classroom and then click Attendance. 2. Enter the date for which attendance is to be entered
or click to select it from a calendar. 3. Click the Section Number that appears as a blue
link. 4. Place a check next to all students who are missing
and click Missing. 5. Place a check next to all students who were tardy to
class and click Tardy. Then click Post.
Taking Lunch Count 1. Click Classroom and then click Lunch Count. 2. If the date needs to be changed, either enter the date
for which lunch is to be entered or click to select it from a calendar.
3. Click the Section Number blue link. • To enter lunch for each individual person,
next to each student/staff name, enter the number of items requested in the appropriate column.
• To enter a total for the entire class instead of for each individual person, either next to the teacher name or in the Guest row on the bottom of the screen, enter the total number of items requested for the entire class.
Emailing Students/Guardians 1. Click Classroom. Grade Book will be selected. 2. Make sure the correct Grading Period is selected
and click the Section Number that appears as a blue link.
3. Place a check next to each student to e-mail. 4. Click Email on the left. 5. Enter the Subject in the space provided. 6. All e-mail addresses for the selected students and
their guardians will display below. Place a check next to each e-mail address to which to send the e-mail and click MailTo.
7. The local e-mail program will open. All the selected e-mail addresses will be displayed in the BCC line to protect e-mail privacy. Do not copy these to the TO line.
8. Enter the body of the e-mail and click Send as normal.
Teacher Quick
Guide
This document contains a brief overview of options available to teachers in InformationNOW. For complete details regarding each of these options, please refer to the InformationNOW for Teachers Quick Reference
Guides, which are available at http://support.sti-k12.com.
STI_0706141456

InformationNOW – Grading Checklist
About this Document This document is intended to provide a brief overview of the steps a district or school might take at the end of a grading period or term. This checklist is intended only as a guide. There may be additional steps users may need to take based on state-reporting requirements as well as district policies. This document references several other Quick Reference Guides that are available from the STI support Web site. To access these documents, go to http://support.sti-k12.com. Enter the user name and password and Login. Select Documentation | Quick Reference Guides | InformationNOW Web-based SIS.
Setup: Beginning Of Academic Session Only The following is a list of steps that should be performed at the beginning of the academic session for each school.
Item Grades | Setup | Valid Alphabetic Grades: Verify all grades needed have been entered.
Grades | Setup | Grading Scale: Add new scales or select View to edit existing scales.
Scheduling | Setup | Terms: Add new terms or select View to edit existing terms.
Grades | Setup | Grading Periods: Select Term and click Refresh. Add new grading periods or select View to edit exiting grading periods. Review the graded items, including all checkboxes and the Percentage link where appropriate.
Grades | Setup | Grade Comments: Add new, Delete old or select View to edit exiting comments.
Scheduling | Master Schedule: Add new sections or select View to edit existing sections. Verify Grading Scale, A.Credit checkboxes, GPA Credit, Grad Credit and GPA Method checkboxes.
Students | Student Maintenance | Contacts: Review contacts to verify that Receives Mailings is checked for those who are to receive report cards.
If Syncing Grades From Serving School: • Add Serving Schools: Go to School/District | School. Search for and View the school to which grades will be
imported. Click the Serving School tab. Add the Serving School from which grades are to be imported. Also link Graded Items from the Reporting School to the Serving School graded items.
• Schedule students into sections of the same course number at both the Reporting School and the Serving School. • Link Sections: At the Reporting School go to Scheduling | Master Schedule. Search for and View sections that
contain students who are issued grades at the serving school. Under the Serving Section drop list, select the section of the class that is to be lynched to the section in the Reporting School.
Quick Reference Guide STI_0630141542 InformationNOW – Grading Checklist • 1

Checklists The following contains examples of steps schools will take based on the number of terms and grading periods. The checklist contains a step that is to be taken followed by columns for each grading period/term. If the column to the right is blacked out, it indicates that the step is not performed during that grading period/term. For example, in the Four 9-Week Grading Periods/Two Terms checklist, the item below the second step is to turn on Allow Posting To Transcripts. The box is blacked out in the 9W1 and 9W3 columns to the right, indicating that this step is not done during those grading periods.
Four 9-Week Grading Periods/Two Terms The following checklist is for schools that have four 9-week grading periods and two terms (semesters).
Setup 9W1 9W2
End of Term 1
9W3 9W4 End of Term 2
Turn on Posting: Grades | Setup | Grading Periods. Check Allow Posting.
Allow Posting to Transcripts: Grades | Setup | Grading Periods. Check Post to Transcript.
Turn Off View In Home Portal: To temporarily turn off Home Portal while grades are being finalized, go to School/District | District | Home Portal. Under Grades, uncheck Enabled. Alternately, this may be done individually for each school.
Enter Grades: The recommended method is for teachers to post grades and/or skills from the Grade Book. Alternately, teachers may manually enter grades via Classroom | Grade Entry or the office may enter grades via Grades | Grade Entry. Users may also sync grades from Serving Schools. Go to Mgmt Console | Console. Select Synchronize Grades under the Serving Schools option.
Print Preliminary Reports 9W1 9W2
End of Term 1
9W3 9W4 End of Term 2
Classroom | Reports | Unposted Grades Report
Grades | Reports | Missing Grades Report
Grades | Reports | Grade Verification
Finalize Grades 9W1 9W2
End of Term 1
9W3 9W4 End of Term 2
Correct Missing/Invalid Grades: Best method is to have teachers repost after making corrections.
If desired, re-run the Grade Verification Report.
Grades | Setup | Grading Periods: Uncheck Allow Posting.
Mgmt Console | Console | Post Grades to Transcripts
Quick Reference Guide STI_0630141542 InformationNOW – Grading Checklist • 2

Print Final Reports 9W1 9W2
End of Term 1
9W3 9W4 End of Term 2
Grades | Reports | Honor Roll
Grades | Reports: Run the report card of choice: Report Card, Two-Column Report Card, Portrait Report Card or Standards Report Card.
Print Grade or Permanent Record Labels if desired.
Grades | Reports | Rank Report
Reports | Transcript Report or Landscape Transcript
Four 9-Week Terms The following checklist is for schools that have four 9-week terms (semesters).
Setup T1 T2 T3 T4 Turn on Posting: Grades | Setup | Grading Periods. Check Allow Posting. Allow Posting to Transcripts: Grades | Setup | Grading Periods. Check Post to Transcript.
Turn Off View In Home Portal: To temporarily turn off Home Portal while grades are being finalized, go to School/District | District | Home Portal. Under Grades, uncheck Enabled. Alternately, this may be done individually for each school.
Enter Grades: The recommended method is for teachers to post grades and/or skills from the Grade Book. Alternately, teachers may manually enter grades via Classroom | Grade Entry or the office may enter grades via Grades | Grade Entry. Users may also sync grades from Serving Schools. Go to Mgmt Console | Console. Select Synchronize Grades under the Serving Schools option.
Print Preliminary Reports T1 T2 T3 T4 Classroom | Reports | Unposted Grades Report
Grades | Reports | Missing Grades Report
Grades | Reports | Grade Verification
Finalize Grades T1 T2 T3 T4 Correct Missing/Invalid Grades: Best method is to have teachers repost after making corrections.
If desired, re-run the Grade Verification Report.
Grades | Setup | Grading Periods: Uncheck Allow Posting.
Mgmt Console | Console | Post Grades to Transcripts
Print Final Reports T1 T2 T3 T4 Grades | Reports | Honor Roll
Grades | Reports: Run the report card of choice: Report Card, Two-Column Report Card, Portrait Report Card or Standards Report Card.
Print Grade or Permanent Record Labels if desired.
Grades | Reports | Rank Report
Reports | Transcript Report or Landscape Transcript
Quick Reference Guide STI_0630141542 InformationNOW – Grading Checklist • 3

Six 6-Week Grading Periods/Two Terms
Setup
6W1 6W2 6W3 End of Term 1
6W4 6W5 6W6 End of Term 2
Turn on Posting: Grades | Setup | Grading Periods. Check Allow Posting.
Allow Posting to Transcripts: Grades | Setup | Grading Periods. Check Post to Transcript.
Turn Off View In Home Portal: To temporarily turn off Home Portal while grades are being finalized, go to School/District | District | Home Portal. Under Grades, uncheck Enabled. Alternately, this may be done individually for each school.
Enter Grades: The recommended method is for teachers to post grades and/or skills from the Grade Book. Alternately, teachers may manually enter grades via Classroom | Grade Entry or the office may enter grades via Grades | Grade Entry. Users may also sync grades from Serving Schools. Go to Mgmt Console | Console. Select Synchronize Grades under the Serving Schools option.
Print Preliminary Reports
6W1 6W2 6W3 End of Term 1
6W4 6W5 6W6 End of Term 2
Classroom | Reports | Unposted Grades Report
Grades | Reports | Missing Grades Report
Grades | Reports | Grade Verification
Finalize Grades
6W1 6W2 6W3 End of Term 1
6W4 6W5 6W6 End of Term 2
Correct Missing/Invalid Grades: Best method is to have teachers repost after making corrections.
If desired, re-run the Grade Verification Report.
Grades | Setup | Grading Periods: Uncheck Allow Posting.
Mgmt Console | Console | Post Grades to Transcripts
Quick Reference Guide STI_0630141542 InformationNOW – Grading Checklist • 4

Print Final Reports
6W1 6W2 6W3 End of Term 1
6W4 6W5 6W6 End of Term 2
Grades | Reports | Honor Roll
Grades | Reports: Run the report card of choice: Report Card, Two-Column Report Card, Portrait Report Card or Standards Report Card.
Print Grade or Permanent Record Labels if desired.
Grades | Reports | Rank Report
Reports | Transcript Report or Landscape Transcript.
Quick Reference Guide STI_0630141542 InformationNOW – Grading Checklist • 5

InformationNOW – Grading
About this Guide This Quick Reference Guide provides an overview of the traditional grading options available in InformationNOW. For details regarding skill-based reporting, please refer to the InformationNOW – Standard-Based Reporting Quick Reference Guide. For details regarding the teacher’s options for Grade Book grading, please refer to the InformationNOW for Teachers – Classroom Grade Book Quick Reference Guide. Grades are based on the courses or subjects in which a student is enrolled for a given academic session. Prior to entering grades:
• Academic Sessions and Terms must be created. See the InformationNOW – Creating an Academic Session Quick Reference Guide for further details.
• Students must be enrolled in the selected school for the selected academic session. See the InformationNOW – Student Module Quick Reference Guide for further details.
• Students must be enrolled in courses/subjects for the selected academic session. See the InformationNOW – Scheduling Quick Reference Guide for further details.
Table Of Contents InformationNOW – Grading 1
About this Guide........................................................................................................................1 Table Of Contents......................................................................................................................1 Setup ..........................................................................................................................................2
Lookups.......................................................................................................................2 Additional Setups ......................................................................................................15
Importing Grades From A Serving School ..............................................................................18 Reporting School Setup.............................................................................................18
Grade Entry..............................................................................................................................23 By Student .................................................................................................................23 By Group ...................................................................................................................25 Synchronizing Grades From Serving School ............................................................27
Reports.....................................................................................................................................28 Class Rank.................................................................................................................29 Failure Listing ...........................................................................................................30 Grade Distribution .....................................................................................................32 Grade Label ...............................................................................................................33 Grade Verification Report .........................................................................................34 Honor Roll.................................................................................................................36
InformationNOW - Grading STI_0702140926 InformationNOW – Grading • 1

Missing Grades..........................................................................................................37 Portrait Style Report Card .........................................................................................38 Report Card ...............................................................................................................39 Two Column Report Card .........................................................................................41
Setup
Lookups The following Lookups are created under Grades | Setup or under System Preferences | Setup. These Lookups pertain to grading and must be created before scores may be recorded for graded items. For complete details regarding adding, viewing and deleting Lookups, please refer to the InformationNOW – Lookups Quick Reference Guide. Required fields are indicated with an asterisk (*).
GPA Method The GPA Method determines the type of grade point averaging that is to be calculated for students (Ex. Numeric, Standard). Once GPA Methods are defined, they may be attached to grading scales and then to sections in the Master Schedule. To insert a new record, select GPA Method from the drop-list and click Refresh. A list of existing GPA Methods will display. Click Add.
• *Name: Enter the name for this GPA method. Example: Numeric.
• Description: Enter a description of this GPA method here (not required). Example: Percentage Based GPA.
• *Code: Enter a unique code for this GPA Method. Example: Num.
• State Code: Enter the state code if applicable. Refer to State Guidelines to determine if this is required.
• SIF Code: Enter the SIF code if applicable. Refer to State Guidelines to determine if this is required.
• NCES Number: Enter the NCES number if applicable. Refer to State Guidelines to determine if this is required.
• Use Numeric Grade: If the GPA calculation is based on number grades and not letter (Alpha) grades, this box must be checked. If Use Numeric Grade is not checked, the GPA Method will use letter/alpha grades to compute the GPA.
• Active: Check if this is an active GPA method. Inactive GPA methods will not display in drop-lists or on sections in the Master Schedule as an option.
InformationNOW - Grading STI_0702140926 InformationNOW – Grading • 2

Click Create. The record will be saved and a new GPA Method screen will appear. Continue adding all GPA Methods. Click Cancel when finished.
Grading Comments Grading Comments are typically the observations to be reported at the end of a grading or progress period on the report card (ex. Works Well With Others, Does Not Turn In Homework On Time). To insert a new record, select Grading Comments from the drop-list and click Refresh. A list of existing comments will display. Click Add.
• Code: Enter a unique identifier for this grading comment.
• Comment: Enter the observation (limit 30 characters). Click Create. The record will be saved and a new Grading Comment screen will appear. Continue adding all Grading Comments. Click Cancel when finished.
Grading Periods Grading Periods are used to mark the span of school days in the academic calendar for which report cards are given to students. Report cards typically include grades and/or comments for subjects in which students are enrolled during the Grading Period. Before Grading Periods may be created, terms must be established. See the InformationNOW – Attendance Quick Reference Guide for instructions regarding terms. To insert a new record, select Grading Periods from the drop-list. Select the appropriate term and click Refresh. A list of existing grading periods for the selected term will display. Click Add.
InformationNOW - Grading STI_0702140926 InformationNOW – Grading • 3

• *Name: Enter a unique name for the grading period. Example: 3rd Quarter. The name of the grading period will print on the student’s report card.
• *Code: Enter a code for this grading period. Example: 3Q.
• *Start Date: Enter the date on which this grading period beings in
mm/dd/yyyy format, or choose the date by clicking the button and browsing the popup calendar. Click on the date in the calendar and it will populate the Start Date field.
• *End Date: Enter the date on which this grading period ends in
mm/dd/yyyy format, or choose the date by clicking the button and browsing the popup calendar.
• Description: Give the grading period a description, if desired (optional).
• Allow Posting?: Check this box when the grades from the Teacher’s Grade Book are ready to post to the student’s grade screen to be printed on report cards.
Note: Once grades have been posted by teachers, it is recommended that the user uncheck this box so that grades cannot be modified or re-posted while grades are being verified and report cards are being printed.
• School Announcement: Enter a message to be printed on each student’s report card for the selected grading period.
Click Create. Once the Grading Period is defined, the graded items to be collected for that grading period must be added.
Graded Items While on the Grading Period view screen, click Add.
Note: To modify the Sequence of graded items, which controls the order in which graded items print on the report card, place a check next to the graded item and use the Up or Down arrows to move the item up or down in the list.
InformationNOW - Grading STI_0702140926 InformationNOW – Grading • 4

The Add Graded Item screen will display.
• *Name: Enter the name of the Graded Item. The name will appear on the Report Card. It is recommended that this information be different for each grading period. Example: 3rd Quarter Grade.
• Percentage: Can only be accessed once the graded item has been saved.
• Description: A description of the graded item may be entered here (not required).
• Grade Level(s): Can only be used once a graded item has been saved. If this graded item applies only to one grade level, select that grade level from the available list. All grade levels are selected by default.
• This Graded Item is used to determine:
o GPA Points: Check this box if this graded item is to be used in the GPA calculation. For example, in some schools, the 3rd Grading Period grade is not included in GPA calculations. However, the 4th Grading Period will have a graded item for which GPA is calculated for these schools. Generally, this option does not apply to elementary schools.
o Graduation Credit: Check this box if this graded item is to be used to determine if graduation credit is to be issued for the student for a given course. For example, in a 2-term/4-quarter school, if graduation credit is based on the final grade for the year, this box would only be checked for the 4th Quarter Final graded item. This option also does not generally apply to elementary schools.
• Allow Exemptions: Check to allow students to be exempt from the graded item (i.e., a semester final exam grade). After selecting this option, click the Percentage link to set overriding percentages. In the following example, for the semester two final average grade, each quarter grade will be worth 40% and the semester exam will be worth 20%. However, if a student is exempt from the semester exam, each quarter grade will be worth 50% of the semester average. For exemptions by grade level, select the Grade Level from the available list. Set the Percentage and Exemption % for the selected grade level.
InformationNOW - Grading STI_0702140926 InformationNOW – Grading • 5

Note: If no graded item is set to allow exemptions, the Exemption% column will be disabled.
• Display as Avg in Gradebook: Determines the grade item that will be displayed in the Average column within the Grade Book instead of the grade that is marked as the grade for GPA Points. Only one item may be set as the Grade Book average. If no graded item is selected, the program will assume the grade that is marked as the GPA Points grade for the grading period is to display as the average in the Grade Book.
• Include on Yearly Report Card: This option is checked by default. Uncheck if this graded item (ex. Comments) is not to be printed on a report card for subsequent grading periods. For example, if creating a comment for Quarter 1, check this box and this comment will not print on report cards for Quarter 2, 3 or 4.
• Post to Transcript: Allows the graded item to be posted to the transcript regardless of graduation credit. Previously the program would post the item that is marked for Grad Credit to the transcript. This option allows for one additional grade to be posted to the transcript.
• Post Rounded Average: Indicates that the rounded average should be posted from the Grade Book. For example, if this option is selected and a student has a Grade Book average of 69.67, a 70 will be posted to the student’s grade record.
• Report as Alpha Grade (from Scale): Check this box if only an alphabetic (letter) grade is to appear on the report card even if the graded item is a numeric grade. The corresponding letter grade that is assigned to the numeric value in the grading scale will print on the report card. If the graded item is set to Report as Alpha Grade and the user has manually entered an alpha score (instead of posting the grade from the grade book), when grades are posted to the transcript the following will take place:
o The alpha grade entered on the manual grade entry screen will be displayed as the alpha grade on the student’s transcript.
o The Averaging Equivalent of the alpha grade will display as the numeric value on the student’s transcript. To determine the averaging equivalent, go to System Preferences | Setup. Select Grading Scales and click Refresh. Click to View the grading scale. The number that appears in the Avg Equivalent column will be the numeric grade that is posted to the student’s transcript.
Click Create. Continue adding necessary graded items for the selected grading period.
Graded Item Grade Level Exceptions Once a graded item has been saved, exceptions may be set up for four of the options based on various grade levels. Click to View a graded item. The grade level All will be selected by default. To set an exception for a different grade level, select that grade level from the list.
InformationNOW - Grading STI_0702140926 InformationNOW – Grading • 6

The following four options may be changed for the selected grade level: • Determines GPA Points
• Determines Graduation Credits
• Include on Yearly Report Card: The following options have been updated to only include graded items that are marked as Include on Yearly Report Card for the grade level of the student:
o Report Card o Standard Report Card o Student Profile o Two Column Report Card o Portrait Style Report Card o Bahamas Report Card
• Post to Transcript: The post transcript option has been modified to only post graded items that are marked as post to transcript for the grade level of the student.
Comments Comments may also be added to a graded item. For example, during quarter one the school may collect two comments. These comments should be added to the graded item. For example, after clicking Create to add the Quarter 1 Grade item, click to view the graded item. The Comments section is now activated. Click Add to insert a comment to be attached to the quarter 1 grade.
Enter a Name (example: Com1) and a Description. Click Create. The following is an example of a Grading Period 2 with graded items of a period grade, a semester exam grade and a semester final average grade. In this example, the GPA points and graduation credit are determined from the semester final grade.
InformationNOW - Grading STI_0702140926 InformationNOW – Grading • 7

The following is an example of a Grading Period 4 with graded items of a period grade, a semester exam grade, a semester final average grade and a year-end final grade. In this example, the GPA points and graduation credit are determined from the semester final grade, not the year end average.
Percentages (Averaging Formulas) To compute a semester or year end average for students, an averaging formula must be created to determine which grades are to be averaged. Example 1: To set up an averaging formula for the end of Semester 1 in which Quarter 1, Quarter 2 and the Semester Exam are averaged together, perform the following steps:
• Go to Grades | Setup. Select to view Grading Periods. Select Term 1. Click Refresh. Select the grading period to edit. Click to view the graded item to which grades are to be averaged (ex. Semester Final).
InformationNOW - Grading STI_0702140926 InformationNOW – Grading • 8

• Click the Percentage link to set up the averaging formula for this
item.
• Each graded item for the selected term will display. Enter the number
representing the percentage that the grade will weight in the final calculated grade. In the following example, when setting up an averaging method for the Semester 1 Final Grade, the 1st 9 weeks grade and 2nd 9 weeks grade each count 40% of the semester final grade. The final exam is worth 20% of the semester final grade.
The criteria entered will apply to all grade levels. To create an exception, select the Grade Level from the list and enter a unique percentage for that grade level. This field refers to the Starting Grade Level on the master schedule section and NOT the student’s grade level.
Note: Grade Book must be reconciled in order to apply changes made on this screen. To reconcile the Grade Book, go to Management Console | Reconcile Grade Book.
InformationNOW - Grading STI_0702140926 InformationNOW – Grading • 9

Example 2: To set up an averaging formula for the end of year final grade where semester 1 final and semester 2 are averaged together, perform the following steps:
• Go to Grades | Setup. Select to view Grading Periods. Select Term 2. Click Refresh. Select the grading period to be edited. Click to view the graded item to which grades are to be averaged (ex. Year End Average).
• Click the Percentage link to set up the averaging formula for this
item.
• Each graded item for the selected term will display. Enter the number representing the percentage that the grade will weight in the final calculated grade. In the following example, the semester 1 final average grade and the semester 2 final average grade would each be worth 50% of the Year End Final Average grade.
InformationNOW - Grading STI_0702140926 InformationNOW – Grading • 10

Note: The Grade Book must be reconciled in order to apply changes made on this screen. To reconcile the Grade Book, go to Management Console | Reconcile Grade Book.
Averaging Formulas By Course Averaging formulas may also be assigned to a specific course. If an averaging formula is assigned to a course, it will override the averaging formula assigned to the graded item/grading period. To assign a formula to a course go to Scheduling | Valid Courses. Search for and select to View a course. Click the Average Setup tab. Select a Grading Period in which a formula has been created (ex. Quarter 2). Place a check next to the graded item to be modified (ex. Sem 1 Final Average) and click View. Edit the Percentages for this specific course.
Hierarchy of Averaging Formulas When considering average percentages, InformationNOW will use the following hierarchy (highest to lowest).
1. Grade Level – Changes to the grade level graded item percentage will overwrite any existing course graded item percentages and will also overwrite existing classroom average percentages.
2. Course – Any changes to the course graded item percentage will overwrite any existing classroom average percentages for sections of the course in the academic session of context.
3. Classroom Average Percentage – This is the percentage used by grading calculation. The grade level and course graded item percentage screens are a way to mass edit this percentage, but teacher will still be able to overwrite those percentages if they have the Maintain Classroom permission.
Valid Alphabetic Grades All letter grades which may be assigned to a graded item must be entered as a valid alphabetic grade. Users may enter any value in the name field including alpha, numeric or characters. Go to Grades | Setup or System Preferences | Setup. Select Valid Alphabetic Grades and click Refresh. All existing Valid Alphabetic Grades will display.
InformationNOW - Grading STI_0702140926 InformationNOW – Grading • 11

To insert a record, click Add.
• *Name: Enter the letter grade. Example: X.
• State Code: If applicable, enter the state code to be reported for this alphabetic grade. Check state guidelines to determine if this is required.
• Description: Enter a description of the grade. Example: X is the grade entered for Semester Exam when the student is exempt.
• Honor Roll Equivalent: Select the grade to be considered the equivalent to this grade when calculating honor roll. If, for example, an A+ is considered the same as an A for honor roll calculation purposes, edit the A+ valid alphabetic grade record and select an A from the Honor Roll Equivalent drop-list.
Note: Once a valid alpha grade has an honor roll equivalent, the original grade is no longer visible on the Honor Roll Report parameter screen. In the following example, the valid grades of A+ and A- have honor roll equivalents, so they no longer show in the grid. B+ and B- do not have honor roll equivalents, so both still show.
• Click Create.
Grading Scales Grading Scales are used to denote numeric and alphabetical grades along with the corresponding numeric values for GPA calculations. Prior to entering Grading Scales, Valid Alphabetic Grades must be created (see “Valid Alphabetic Grades” on page 11). Also, it is recommended that users create the GPA Method (see “GPA Method” on page 2).
InformationNOW - Grading STI_0702140926 InformationNOW – Grading • 12

To create grading scales, perform the following steps:
• Go to Grades | Setup or System Preferences | Setup.
• Select Grading Scales from the list and click Refresh. All existing grading scales will display.
• Click Add.
• *Name: Enter a unique name for this grading scale (Ex. Numeric, Standard).
• Description: Enter a brief description for this grading scale.
• Alpha: Bullet to display only the alpha grade of the score within the InformationNOW Home Portal.
• Numeric: Bullet to display only the numeric grade of the score within the InformationNOW Home Portal.
• Both: Bullet to display both the alpha and numeric values of the score within the InformationNOW Home Portal. After the update is applied the default will be set to Both for all grading scales which are the current functionality.
• Click Create.
• Uncheck the Hide Excluded box. All Valid Alphabetic Grades will display.
• Place a check next to the items to be edited (or place a check to the right of the Incl heading to select all).
• Click View.
InformationNOW - Grading STI_0702140926 InformationNOW – Grading • 13
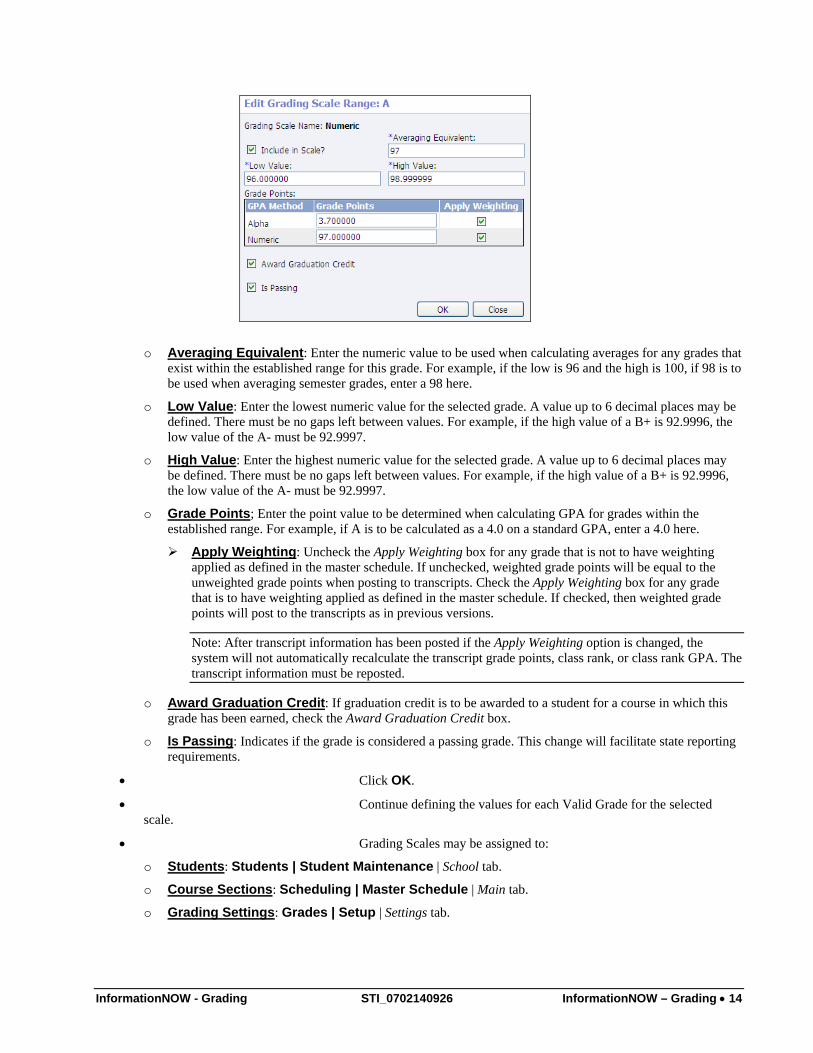
o Averaging Equivalent: Enter the numeric value to be used when calculating averages for any grades that exist within the established range for this grade. For example, if the low is 96 and the high is 100, if 98 is to be used when averaging semester grades, enter a 98 here.
o Low Value: Enter the lowest numeric value for the selected grade. A value up to 6 decimal places may be defined. There must be no gaps left between values. For example, if the high value of a B+ is 92.9996, the low value of the A- must be 92.9997.
o High Value: Enter the highest numeric value for the selected grade. A value up to 6 decimal places may be defined. There must be no gaps left between values. For example, if the high value of a B+ is 92.9996, the low value of the A- must be 92.9997.
o Grade Points; Enter the point value to be determined when calculating GPA for grades within the established range. For example, if A is to be calculated as a 4.0 on a standard GPA, enter a 4.0 here.
Apply Weighting: Uncheck the Apply Weighting box for any grade that is not to have weighting applied as defined in the master schedule. If unchecked, weighted grade points will be equal to the unweighted grade points when posting to transcripts. Check the Apply Weighting box for any grade that is to have weighting applied as defined in the master schedule. If checked, then weighted grade points will post to the transcripts as in previous versions.
Note: After transcript information has been posted if the Apply Weighting option is changed, the system will not automatically recalculate the transcript grade points, class rank, or class rank GPA. The transcript information must be reposted.
o Award Graduation Credit: If graduation credit is to be awarded to a student for a course in which this grade has been earned, check the Award Graduation Credit box.
o Is Passing: Indicates if the grade is considered a passing grade. This change will facilitate state reporting requirements.
• Click OK.
• Continue defining the values for each Valid Grade for the selected scale.
• Grading Scales may be assigned to:
o Students: Students | Student Maintenance | School tab.
o Course Sections: Scheduling | Master Schedule | Main tab.
o Grading Settings: Grades | Setup | Settings tab.
InformationNOW - Grading STI_0702140926 InformationNOW – Grading • 14

o School Grade Level: School/District | School | Main tab. Select Grade Scales under the Manage menu at left to assign grading scales to grade levels.
Additional Setups
Master Schedule Additional items pertaining to grading should be set up in the Master Schedule. Go to Scheduling | Master Schedule. Search for and select to view a course section.
• Display on Report Card: Check this box if this section of the course should display on report cards.
• Honor Roll: Check if the grades received for this section of the course should be considered when calculating Honor Roll.
• Grading Scale: Select a grading scale if this course uses a scale different from the scale attached to grade levels.
InformationNOW - Grading STI_0702140926 InformationNOW – Grading • 15

• GPA Credit: Enter the amount of credit a student will earn toward GPA for the entire course.
• Graduation Credit: Enter the amount of credit a student will earn toward graduation for the successful completion of the entire course.
• Serving Section: When editing sections in the master schedule at a Reporting School, the user may link this section to a section in a Serving School which allows the user to import report card grades, comments and notes from the Serving School to the Reporting School. For more details regarding dual enrolled students refer to the Importing Grades From A Serving School section starting on page 18.
• A. Credit: Check if attempted (GPA) credit is awarded at the end of the term. The number of check marks here will be divided into the GPA credit and Graduation credit values entered for the section.
• GPA Method:
o Weight Add: Enter the weight added value for the various GPA methods. GPA Methods are created under either Grades | Setup or System Preferences | Setup.
o Weight Mult.: Enter the weight multiplier for the various GPA methods. GPA Methods are created under either Grades | Setup or System Preferences | Setup.
Grades Settings Tab To set up additional criteria for grading, go to Grades | Setup. Select the Settings tab.
InformationNOW - Grading STI_0702140926 InformationNOW – Grading • 16

• Min Grade Level for Rank & GPA: Select the minimum grade level for the school.
Note: The grade level is unique to the selected school. However, the grade level selected will apply to all academic sessions for the selected school.
• GPA Decimal Position: Enter the number of decimal places to be used when calculating GPA’s.
• Transcript History:
o Grading Scale: Select the grading scale to be applied to transcript history.
o Transcript GPA Method: Select the GPA method to be used on transcripts.
o Display Non-credit Bearing Classes: Check to display all grades on student transcripts, regardless of graduation credit earned.
• Class Rank Calculations: o Sequencing: Select the sequencing to be used if a tie exists when calculating student class rank.
Sequential: Example, if three students tie for 2nd in class ranking, the students will all be ranked 2nd and the next student on the list will be ranked 3rd.
Logical: Example, if three students tie for 2nd in class ranking, the students will all be ranked 2nd and the next student on the list will be ranked 5th.
o Weighting: Select whether weighted or un-weighted grade points are to be used when calculating class rank
o Rank GPA Method: Select the method to be used when calculating the GPA to determine class ranking (alpha or numeric).
o Decimal Precision: Enter the number of decimal places to be used when calculating GPA’s to determine class rank.
o Rank by Comparing Total Grade Points Only: Check if class rank is to be determined by adding total grade points earned only. If selected, credit received will not be a determining factor when calculating class rank.
o Weight Transcript GPA: Check if a transcript GPA is to be weighted.
• Report Card GPA:
o GPA Type: Select the GPA to print on the report card. Select a specific GPA Method, All methods or None. If selecting None, all other GPA options are disabled.
o GPA Weighted Type: Indicates whether to print Weighted, Unweighted or Both.
o Grading Period GPA: Determines whether to print a grading period GPA for the Current Grading Period Only, All Grading Periods (cumulative), or None.
o Display Cumulative GPA: Check to display cumulative “career” GPA.
o Include on Report Card: Check to include the GPA on the traditional report card.
o Include on Standards Report Card: Check to include the GPA on the Standards (skills based) Report Card.
• Reports And Grade Labels:
o Numeric Grade Decimal Precision: Enter the number of digits to display for a grade after the decimal point. For example, if a 2 is entered and a student received an 85.4129 grade, an 85.41 would display because the Numeric Grade Decimal Precision was set to display 2 points after the decimal period on grade reports and labels.
InformationNOW - Grading STI_0702140926 InformationNOW – Grading • 17

o Include Withdrawn Sections On Reports: Check to include sections from which students have withdrawn on grading reports.
Depending on the GPA parameters selected, a table will be generated on the report card similar to below.
• Use Averaging Equivalent: Use the averaging equivalent rather than the actual numeric average calculated
in the Grade Book. For example, the user wishes to use the numeric grade from classroom for the 9 weeks grades, but calculate the semester average on a different point scale. When this option is selected, the program will reference the applicable grading scale to find the averaging equivalent when calculating an average. If not selected, the application will use the actual numeric value of the Grade Book activities.
• Transcript Grade Display: Select to display Alpha, Numeric or Both grades on the individual student’s transcript screen.
• Thresholds for Posting: Enter the number of instructional days for which the student can be withdrawn from the section or from school and still receive a grade.
Importing Grades From A Serving School The ability to import report card grades, comments and notes from one school to another in the same district is available. The most common application of this option is for a Reporting School to import (sync) grades that students have earned at a Serving School such as a vocational or other type of Serving School. The Reporting School will then be able to print grades on report cards and other grade reports.
Note: For the remainder of this section, the school where grades have been entered by the teacher such as a vocational school will be referred to as the “Serving School”. The school where grades are to be imported to print on report cards, etc. will be referred to as the “Reporting School”.
In order for the import to be successful, the following must take place:
• Reporting and Serving Schools: Students must be enrolled in class sections with the same course number at both the Reporting School and the Serving School.
• Serving School: Report card grades must be entered/posted.
• Reporting School:
• Serving School(s) must be created.
• Graded items must be linked to items in the Serving School.
• Sections in Reporting School master schedule must be linked to sections in the Serving School.
• Grades must be synced (see Synchronizing Grades From Serving School section beginning on page 27).
Reporting School Setup The following setup must be performed at the Reporting School (the school that is to receive grades to print on report cards and other grade reports).
InformationNOW - Grading STI_0702140926 InformationNOW – Grading • 18

Note: Setup is school and academic session and must be performed each academic session.
Step 1: Add Serving Schools Go to School/District | School. Search for and select to View an existing reporting school. Click the Acad Sessions tab. Click to View the academic session in which grades are to be imported.
Click the new Serving Schools tab.
Click Add to insert a record for each serving school where students are currently served and, therefore, from which the Reporting School wishes to import grades.
InformationNOW - Grading STI_0702140926 InformationNOW – Grading • 19

A screen will display with the Reporting School on the left along with a list of every graded item for the Reporting School for the selected academic session.
To the right the user may click the Serving School drop list at the top of the column and select the Serving School from which grades are to be received. In the drop down list:
• Only active academic sessions will display.
• Only non-archived academic sessions will display.
• Only academic sessions in the same academic year as the reporting academic session will display.
• Academic sessions that already have mapped graded items with this academic session will not display.
• The user must have permission to View Academic Session in order to view the list of schools.
Note: The Serving School must be a school within the district and must exist under School/District | School.
Once the school is selected, the drop lists in the right column will be populated with every graded item for the selected Serving School and academic session.
InformationNOW - Grading STI_0702140926 InformationNOW – Grading • 20

For each graded item that is to be imported to the Reporting School, select the corresponding graded item from the Serving School list across from the graded item in the Reporting School. In the above example, under Reporting School the 1st item in the list is the Term 1, Quarter 1, Q1 (1st 9 week) grade. It corresponds to the T1 (Term 1), Q1 (quarter 1), 9Wk1 item in the Serving School. The following is an example of a completed screen where all graded items at the Reporting School have been mapped to corresponding graded items in the Serving School. Only the grades that are to be imported need to be mapped. So, if the Serving School has a grade that is NOT to be imported into the Reporting school (ex. Serving school is tracking a year end average that is not tracked in the Reporting School), no mapping is required.
When finished selecting all of the graded items that are to be imported from the Serving School, click Create.
InformationNOW - Grading STI_0702140926 InformationNOW – Grading • 21

The Serving School record will display with the School name and Academic Session. Continue adding a record for every Serving School from which grades are to be imported (synched). Special Instructions:
• This setup is unique to the academic session and school. Therefore, it must be set up for each academic session and school from which grades are to be imported.
• To delete a serving school record the user must have permission to Maintain Academic Session. If the academic session is closed, the user must have permission to Maintain Closed Academic Session.
• An error message will display if the user attempts to map a single graded item in the Serving School to multiple graded items in the Reporting School.
• If a graded item in the Reporting School or the Serving School is later deleted, all mappings for the graded item will be deleted.
Step 2: Linking Sections Once the Serving School is added on the Serving School tab under the Academic Session, the user must link class sections in the Reporting School to sections in the Serving School. In the Reporting School go to Scheduling | Master Schedule. Search for and select to View a section that needs to be linked to a section in the Serving School.
InformationNOW - Grading STI_0702140926 InformationNOW – Grading • 22

Click the drop down list and select the section in the Serving School that contains the student(s) who attend the Serving School. The drop list will show the academic session name, school name and section number.
Note: Students must be enrolled in the class section in the Reporting School and also in a section with the same course number in the Serving School.
• The Serving School must first be added to School/District | School | Acad Session tab | Serving School tab to populate the Serving Section drop list on the class section screen.
• Only sections that have the same course number as the reporting section will be displayed.
• If the serving section is later deleted at the Serving School it will be unlinked from the section at the Reporting School.
Grade Entry Warning! Grades should only be entered using the By Student or By Group methods outlined below if teachers do not use the InformationNOW Grade Book. If teachers use Grade Book, grades should be entered via Grade Book and then posted to the individual student grade records. Grades should not be entered using the By Student or By Group method as described in the following section when Grade Book is in use because, should a teacher make a change in the Grade Book, that change will not be made on the individual student record unless the grade is posted. If the grade is posted, it will overwrite the grade that was entered using the method described in this section.
By Student To enter grading period grades by student, perform the following steps:
• Go to Students | Student Maintenance.
• Search for and select to View a student.
• Click the Grades link under the Manage menu at left.
InformationNOW - Grading STI_0702140926 InformationNOW – Grading • 23

• The grading period closest to the current date on the server will display automatically. If desired, click the Grading Period drop-list, select a different grading period, and click Refresh.
• All existing courses from the student’s schedule for the selected grading period will display along with any grades that were manually entered or posted from the teacher’s Grade Book (See the InformationNOW for Teachers – Classroom Quick Reference Guide).
• To edit a record, place a check next to the course number and click View.
• Student Number, Name, Homeroom, Grade Level and Gender may not be edited. Section Number, Section Name, Term, Grading Period, Period and Teacher may not be edited.
• All graded item options for the selected grading period selected will display. Enter all criteria in the fields provided.
InformationNOW - Grading STI_0702140926 InformationNOW – Grading • 24

Note: Comments may be created under Grades | Setup. See “Grading Comments” on page 3 for more details.
• Display On Transcript: Check if this grade information for the selected course and grading period is to print on transcript report regardless of whether it is posted to transcripts.
• Repeating Course: If the student previous failed the class and the grade record being entered is to repeat the course.
• Note: Enter any notes pertaining to this grade record. Notes may be displayed on student report cards.
• Display Attendance: Check to view the student’s current attendance totals.
Click OK to save the record.
Note: An individual student report card may be generated from the student’s grade screen. Click the Print Report Card option under the Reports menu at left.
By Group To enter grades for a group of students by course, go to Grades | Grade Entry.
• Enter the search criteria to select the course for which to enter grades.
• Click Search.
• A list of courses matching the search criteria will display. To select a course either place a check next to the Course Section and click View or click the course section number, which appears as a blue link.
InformationNOW - Grading STI_0702140926 InformationNOW – Grading • 25

• All students scheduled into the selected course for the grading period
will display, along with any grades that were manually entered or posted from the teacher’s Grade Book (See the InformationNOW for Teachers – Classroom Grade Book Quick Reference Guide).
• To modify a student’s grade, either place a check next to the student number and click View or click the student number, which appears as a blue link.
InformationNOW - Grading STI_0702140926 InformationNOW – Grading • 26

Student Number, Name, Homeroom, Grade Level and Gender may not be edited. Section Number, Section Name, Term, Grading Period, Period, and Teacher may not be edited.
• All graded item options for the selected grading period selected will display. Enter all criteria in the fields provided.
Note: Comments may be created under Grades | Setup. See “Grading Comments” on page 3 for more details.
• Display On Transcript: Check if this grade information for the selected course and grading period is to print on transcript report regardless of whether it is posted to transcripts.
• Repeating Course: Check this box if the student previously failed the class and the grade record being entered is for the student’s repeat of the course.
• Note: Enter any notes pertaining to this grade record. Notes may be displayed on student report cards.
• Display Attendance: Check to view the student’s current attendance totals.
• Click OK to save the record.
Synchronizing Grades From Serving School Once grades have been entered for the students at the Serving School(s) they may be synced (imported) at the Reporting School. Go to Mgmt Console | Console. Select the Synchronize Grades option under the Serving Schools section.
Select the grading period for which grades are to synced (imported) into the Reporting School.
InformationNOW - Grading STI_0702140926 InformationNOW – Grading • 27

• Click Show Errors to view potential errors without importing grades.
• Click any blue hyperlinks to view details regarding the error(s).
• Click the Sync button to synchronize grades from the Serving School to the Reporting School.
• The total number of sections that are linked to a Serving School will be displayed at the top of the page.
• The total number of synchronized grades and comments will be displayed at the top of the page. Only affected records will be counted. A record that was previously synchronized will not be counted.
• The user must have permission to Maintain Grading to synchronize grades.
Reports All reports pertaining to grades may be generated under the Grades | Reports menu or under the main Reports menu. Required fields are indicated with an asterisk (*).
Note: An option is available to the Grades | Setup | Settings tab which allows users to select to Include Withdrawn Sections on Reports. Sections from which a student has been withdrawn will print with an asterisk (*). A key will print on the report indicating that an * = Withdrawn. If selected, sections from which students have been withdrawn will print on the following reports. This is a per school setting.
InformationNOW - Grading STI_0702140926 InformationNOW – Grading • 28

Class Rank To calculate GPA’s and generate a list of student’s by class ranking based on this GPA, go to Grades | Reports | Class Rank.
• Student Filter: To generate the report for a select group of students, select the filter. For more details regarding filters, please refer to the InformationNOW – Filters Quick Reference Guide.
• *GPA Method: Select the GPA method to be used when calculating class rank.
• *Decimal Precision. Enter the number of decimal places to be considered when calculating GPA’s for the purpose of class rank.
• *ID To Print: Select the Student ID to be printed on the report (Student Number, State ID Number, Alt. Student Number, Soc. Sec. Num., None).
• *Order By: Select the order in which the display the students - Student Display Name or Rank.
• GPA Range: Enter the High and Low GPA Range to be included in class rank. For example, to print a standard based GPA report for students of GPA’s from 3.5 to 4.0, enter a 4.0 in the high field and a 3.5 in the low field. All students with a GPA of 3.5 to 4.0 will be included in the class rank report.
• Ranking Type: Logical/Sequential: o Logical: Example: If three students tie for 2nd in class ranking, the students will all be ranked 2nd and the
next student on the list will be ranked 5th.
InformationNOW - Grading STI_0702140926 InformationNOW – Grading • 29

o Sequential: Example: If three students tie for 2nd in class ranking, the students will all be ranked 2nd and the next student on the list will be ranked 3rd.
• Academic Session: Select the academic session(s) for which rank is to be calculated. Use Ctrl+click or Shift+click to select more than one academic session.
• Classes To Include: Select whether to include All classes, all terms or All classes in terms that award credit.
• Min Grade Level: Select the minimum grade level to be included in the calculation of class rank.
• Add Unearned Grade Points: Check if seeking a cumulative GPA and the current term has not yet been posted to transcripts, but all grades are to be included in the cumulative GPA calculation/rank.
• Other Options:
o Use Weighted GPA: Check if student’s weighted GPA is to be used instead of the un-weighted GPA.
o Use Total Grade Points Only: Check if the GPA to determine class rank is to be based on the number of classes taken regardless of the credit issue for each course. Students will be ranked based on the total number of quality points only. Credit will not be considered.
o GPA Information: Check to display the student’s GPA that was used to calculate class rank in addition to the student name on the report.
o Withdrawn Students: Check if students who are currently withdrawn are to be included in the ranking.
o Graduation Credits: Select to include the student’s current graduation credit total.
• Format: Select the format of the report from the available list (Acrobat (PDF file), CSV (comma delimited), Excel, HTML, TIFF file or XML file with report data).
Failure Listing To generate a list of students with one or more failing grade, go to Grades | Reports | Failure Listing.
InformationNOW - Grading STI_0702140926 InformationNOW – Grading • 30

• Start Section/End Section: To generate a listing of students for a range of course section(s), click the Find link to search for the beginning section number. Next, click the Find link to search for the ending section number.
• Start Section Short Name/End Section Short Name: To generate a listing of students for a range of course names (ex. English 9 to English 10), enter the first section short name in the start field (ex. English 9). Enter the ending section short name in the field provided.
• Teacher Filter: To generate the report for a select group or individual teacher, select the filter from the available list. For more details regarding teacher filters, refer to the InformationNOW – Filters Quick Reference Guide.
• Student Filter: To generate the report for a select group or individual student, select the filter from the available list. For more details regarding student filters, refer to the InformationNOW – Filters Quick Reference Guide.
• *Group By: Select to group students on the report by Primary Teacher Display Name, Course Section, Student Display Name, Student Grade Level, Student Homeroom or Course Name.
• Minimum Occurrences: Enter the minimum occurrences of the grade that the student must have in order to be included on the report. For example, to obtain a list of students who have 1 or more failing grades, enter a 1.
• Heading: Enter a unique heading to print at the top of the report (ex. More than 2 F’s – 3rd Quarter).
• *Grades To Include: Select one failing grade or use Ctrl+click or Shift+click options to select more than one grade to be considered as failing grades.
• *Grading Period: Select the grading period for which to check for failing grades. Use Ctrl+click or Shift+click to select multiple grading periods.
InformationNOW - Grading STI_0702140926 InformationNOW – Grading • 31

• *Graded Items: Select the graded items to be checked for failing grades. Use Ctrl+click or Shift+click to select multiple graded items.
• Required Courses Only: Select to only check the grades for courses that are marked as required to determine whether a student qualifies for a failing grade.
• Withdrawn Student: Check to include currently withdrawn students on the report.
• *Course Types: Select the course type(s) to be included when determining if the student has a failing grade.
• *ID To Print: Select Student ID, State Student ID, Alternate Student ID, Social Security Number or None.
• Format: Select the format of the report from the available list (Acrobat (PDF file), CSV (comma delimited), Excel, HTML, TIFF file or XML file with report data).
Grade Distribution To print a report showing the distribution of grades (ex. how many A’s were issues, how many B’s, etc.) go to Grades | Reports | Grade Distribution.
• Student Filter: To generate the report for a select group or individual student, select the filter from the available list. For more details regarding student filters, refer to the InformationNOW – Filters Quick Reference Guide.
• Teacher Filter; To generate the report for a select group or individual teacher, select the filter from the available list. For more details regarding teacher filters, refer to the InformationNOW – Filters Quick Reference Guide.
• Start Section/End Section: To generate a listing of students for a range of course section(s), click the Find link to search for the beginning section number. Next, click the Find link to search for the ending section number.
• *Course Types: Select the type(s) to be included.
InformationNOW - Grading STI_0702140926 InformationNOW – Grading • 32

• *Grading Periods: Select the grading period for which to print from the available list.
• Graded Items: Select the item(s) to be included.
• Start Section Name/End Section Name: To generate a listing of students for a range of course names (ex. English 9 to English 10), enter the first section short name in the start field (ex. English 9). Enter the ending section short name in the field provided.
• *Report Type: Select to print summary or detail.
• *Group By: Select the grouping of No Group (alphabetical), Course Type or Teacher.
• Withdrawn Students: Check to include currently withdrawn students even if the selected filter is not set up to include withdrawn.
• Additional Teachers: Select to include additional teacher information on the report.
• Percentages: Select to include student percentages on the report.
• Breakdowns: Select to include additional grade distribution breakdown by student’s Gender, Economic status (lunch code), Racial code (race) and/or Grade Level.
• Format: Select the format of the report from the available list (Acrobat (PDF file), CSV (comma delimited), Excel, HTML, TIFF file or XML file with report data).
Grade Label To print a grade label, go to Reports | School or to Grades | Reports.
InformationNOW - Grading STI_0702140926 InformationNOW – Grading • 33
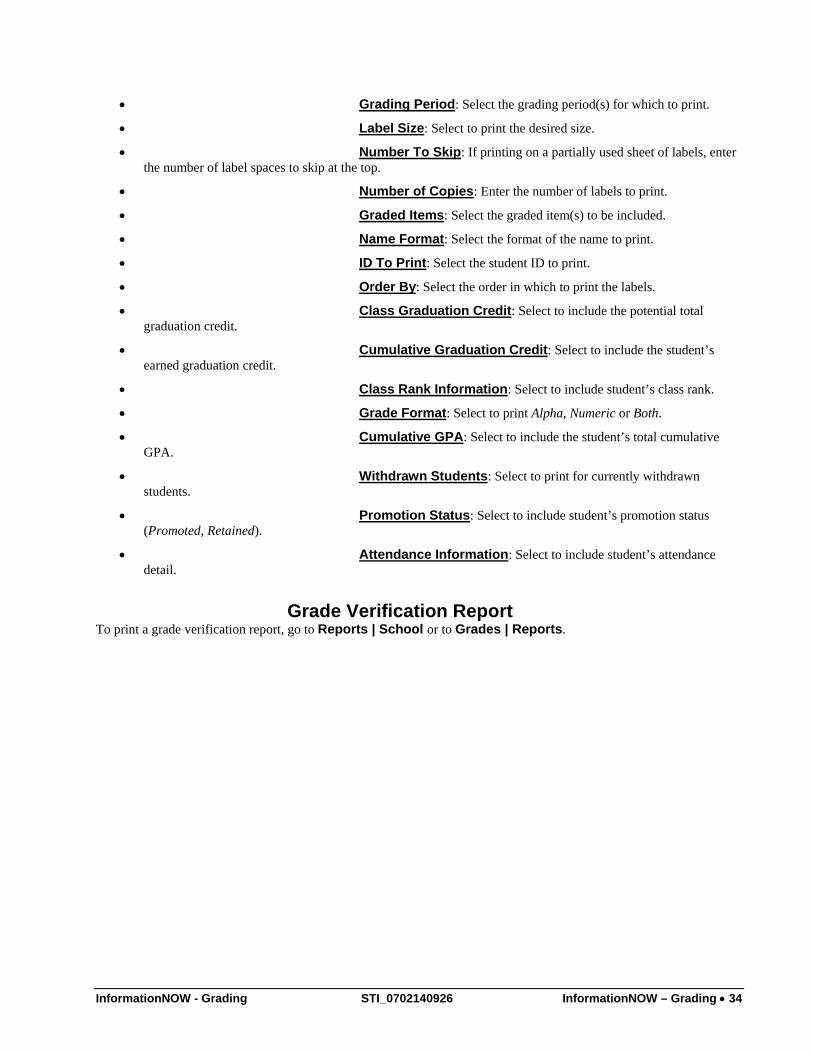
• Grading Period: Select the grading period(s) for which to print.
• Label Size: Select to print the desired size.
• Number To Skip: If printing on a partially used sheet of labels, enter the number of label spaces to skip at the top.
• Number of Copies: Enter the number of labels to print.
• Graded Items: Select the graded item(s) to be included.
• Name Format: Select the format of the name to print.
• ID To Print: Select the student ID to print.
• Order By: Select the order in which to print the labels.
• Class Graduation Credit: Select to include the potential total graduation credit.
• Cumulative Graduation Credit: Select to include the student’s earned graduation credit.
• Class Rank Information: Select to include student’s class rank.
• Grade Format: Select to print Alpha, Numeric or Both.
• Cumulative GPA: Select to include the student’s total cumulative GPA.
• Withdrawn Students: Select to print for currently withdrawn students.
• Promotion Status: Select to include student’s promotion status (Promoted, Retained).
• Attendance Information: Select to include student’s attendance detail.
Grade Verification Report To print a grade verification report, go to Reports | School or to Grades | Reports.
InformationNOW - Grading STI_0702140926 InformationNOW – Grading • 34

• Start Section: Click Find to select the starting section number. If no number is selected, all sections will be included.
• End Section: Click Find to select the ending section number. If no number is selected, all sections will be included.
• Start Section Name: Enter a beginning short name to be included on the report. For example, type eng to print for all courses that have a Short Name beginning with the letters eng.
• End Section Name: Enter an ending short name to be included on the report.
• Grading Period: Select the grading period(s) to include on the report or ---All---.
• Graded Item: Select the graded item(s) to include on the report or ---All---. Note: After a grading period has been selected, this list will be filtered to the graded items for the selected grading period. If the user selects to print all grading periods, all graded items will display.
• Teacher: To print for one teacher, click Find. Search for and select the teacher for which to print. If no teacher is selected, the report will print for all teachers.
• Staff Filter: To print for a select group of teachers, click to bullet Staff Filter and then select the filter from the available list. If blank, the report will print for all teachers.
• Section Order: Select to order sections by:
o Section No.: Sort ascending by full section number.
o Period/Section No.: Sort ascending by period; then full section number.
o Period/Teacher: Sort ascending by period; then teacher Last Name, First Name.
o Teacher/Section No.: Sort ascending by teacher Last Name, First Name, then full Section Number.
o Teacher/Period: Sort ascending by teacher Last Name, First Name, then Period.
• Student Order: Select to order students by Display Name, Grade Level or the selected ID To Print.
InformationNOW - Grading STI_0702140926 InformationNOW – Grading • 35

• Grade Type: Select to print grade types of Alpha, Numeric or Both.
• ID to Print: Select to print Alternate Student Number, Social Security Number, State ID Number or Student Number.
• Include: Check to include:
o Comments/Legend: If selected, graded item comments will print along with a comment legend at the bottom of the document. If printing for multiple grading periods, only the comments from the latest grading period will print.
o Notes: If selected, student grading period note will print.
o Signature: If selected, a signature line will print.
o Withdrawn: If selected, currently withdrawn students will be included. Withdrawn students will be indicated with an asterisk (*) at the end of the student name.
Honor Roll To generate an Honor Roll based on the number of grades earned for a selected grading period, go to Grades | Reports | Honor Roll.
• Student Filter: To generate the report for a select group or individual student, select the filter from the available list. For more details regarding student filters, refer to the InformationNOW – Filters Quick Reference Guide.
• *Grading Period: Select the grading period for which to determine the Honor Roll.
• Maximum Allowed Absences: If attendance is to be considered when determining if a student makes the Honor Roll, enter the maximum number of allowable absences.
o *Minimum For Alpha Grade: For each graded item, enter the minimum number of grades the student may have for each alpha grade. For example, if generating a high honor report and a student may have one A- and still make the Honor Roll, enter a 1 in the A- field. Students with more than one A- will not make the Honor Roll. Enter a zero to indicate that the number of a specific grade that a student has should not affect the report. Leaving a field blank indicates that they student may not have ANY of the specific grade to be included on the report. For example, for an A/B honor roll, enter 0’s in the A/B fields to indicate that
InformationNOW - Grading STI_0702140926 InformationNOW – Grading • 36

the students can have any number of A’s and B’s to be included on the report, and leave the rest of the fields blank to indicate that the student may not have any of the other grades to be included.
• *Order By: Select the order in which to print the students - Grade Level, Homeroom or Student Display Name.
• Include:
o Grades Earned: Check to print the student along with all grades earned for the selected grading period.
o Student Names Only: Check to print only the student’s name, excluding Student Number, Homeroom, Grade Level, Phone and Guardian names.
o Honor Roll Classes Only: In the Master Schedule, courses may be marked as counting towards Honor Roll. When generating the Honor Roll report, check this box to only consider these courses marked as Honor Roll courses. When calculating if a student should be on the Honor Roll, grades they have received for classes that are not marked as Honor Roll will not be taken into consideration.
o Unlisted Information: Check to include the student’s phone number even if it is marked as unlisted.
o Header: Enter a unique heading that will print at the top of the report (Ex. High Honor Roll, Honor Roll, Honorable Mention).
• Format: Select the format of the report from the available list (Acrobat (PDF file), CSV (comma delimited), Excel, HTML, TIFF file or XML file with report data).
Missing Grades To generate a list of students and courses for which a grade has not yet been entered, go to Grades | Reports | Missing Grades.
Note: The report will only print for sections that have been checked to Display On Report Card. Go to Scheduling | Master Schedule. Search for and click to View a section. If Display On Report Card is checked, then any students with a missing score for this section will be included in the Missing Grades report.
• Student Filter: To generate the report for a select group or individual student, select the filter from the available list. For more details regarding student filters, refer to the InformationNOW – Filters Quick Reference Guide.
InformationNOW - Grading STI_0702140926 InformationNOW – Grading • 37

• Report Type: Select to print a summary report listing only a count of missing grades or select detailed to receive a report of the classes for which grades are missing.
• *Order By: Select to order by Grade Level, Section Short Name, Student Name or Teacher.
• *Grading Period: Select the grading period for which to check for missing grades. Use Ctrl+click or Shift+click to select multiple grading periods.
• *Graded Items: Select the graded items to be checked for missing grades. Use Ctrl+click or Shift+click to select multiple graded items.
• Format: Select the format of the report from the available list (Acrobat (PDF file), CSV (comma delimited), Excel, HTML, TIFF file or XML file with report data).
Portrait Style Report Card To print a portrait style report card, go to Grades | Reports | Portrait Report Card.
• Grading Period: Select the grading period for which to print.
• Order By: Select the order to print. If printing by distribution period, select the Distribution Period of the day and Distribution Date to use to determine order of printing.
• Heading: Enter the custom header to print at the top of the report.
• Go Green: Select this option to not print a hard copy of the report card for any student/guardian (contact) who has elected to Go Green. An alert will be created instead which can be used to generate an e-mail to the student/contact to let them know the report is available for viewing via the home portal.
• Letterhead: Check to move the printing down on the report card to allow for printing on letterhead.
• ID To Print: Select which ID to include on the report.
InformationNOW - Grading STI_0702140926 InformationNOW – Grading • 38

• Absence Reasons: Select the code(s) to be included if printing attendance information on the report.
• Address Report To: Select the group for which to print.
• Attendance Summary: Select to include the attendance information on the report.
• Grading Period Notes: Select to include the notes that were entered on the grading period on the report.
• Parent Signature: Select to include a parent signature line.
• Merit/Demerit Summary: Select to include student’s merit and demerit totals.
• Grading Scale Legend: Select to include the grading scale.
• Withdrawn Students: Select to include currently withdrawn students when printing.
• YTD Info: Select to include student’s year-to-date GPA details.
• Standards Grading Scale Legend: Select to include the standards based grading scale.
• Announcements: Select to include the grading period announcement.
• Promotion Status: Check to include the student’s current promotion status.
• Comment: Select to include the comment entered on the grading period grade.
• Standards: Select to include the student’s standard marks.
Report Card To generate traditional report cards (i.e., non skill-based report cards), go to Grades | Reports | Report Card.
InformationNOW - Grading STI_0702140926 InformationNOW – Grading • 39

• Student Filter: To generate the report for a select group or individual student, select the filter from the available list. For more details regarding student filters, refer to the InformationNOW – Filters Quick Reference Guide.
• *Grading Period: Select the grading period for which to print report cards.
• Order By: Select to order the printing of report cards by Distribution Period, Grade Level, Postal Code, Student Homeroom, Student Name or Student Number. If selecting Distribution Period, select the period of day and enter the date for which to print. Student report cards will be grouped together by course for the selected period and date. When printing from either the Students | Reports location, the student Maintenance screen or from the Grade Book, users do not have the option to print in Distribution Period order.
• ID to Print: Select the student identifier to print (Student Number, State ID Number, Alternate Student Number, Social Security Number or None).
• Show Grades Across The Page: Select to print all grades received for a course in one row.
• Show Grades Down The Page: Select to print all grades together for each grading period.
• Absence Reasons: If including attendance information on the report card, select the absence reasons to be included in the attendance totals.
• Address Report To: Select to print for students, custodians or all contacts.
• Form: To print on preprinted form purchased from STI, select the form from the available list.
• Go Green: Select this option to not print a hard copy of the report card for any student/guardian (contact) who has elected to Go Green. An alert will be created instead which can be used to generate an e-mail to the student/contact to let them know the report is available for viewing via the home portal.
InformationNOW - Grading STI_0702140926 InformationNOW – Grading • 40
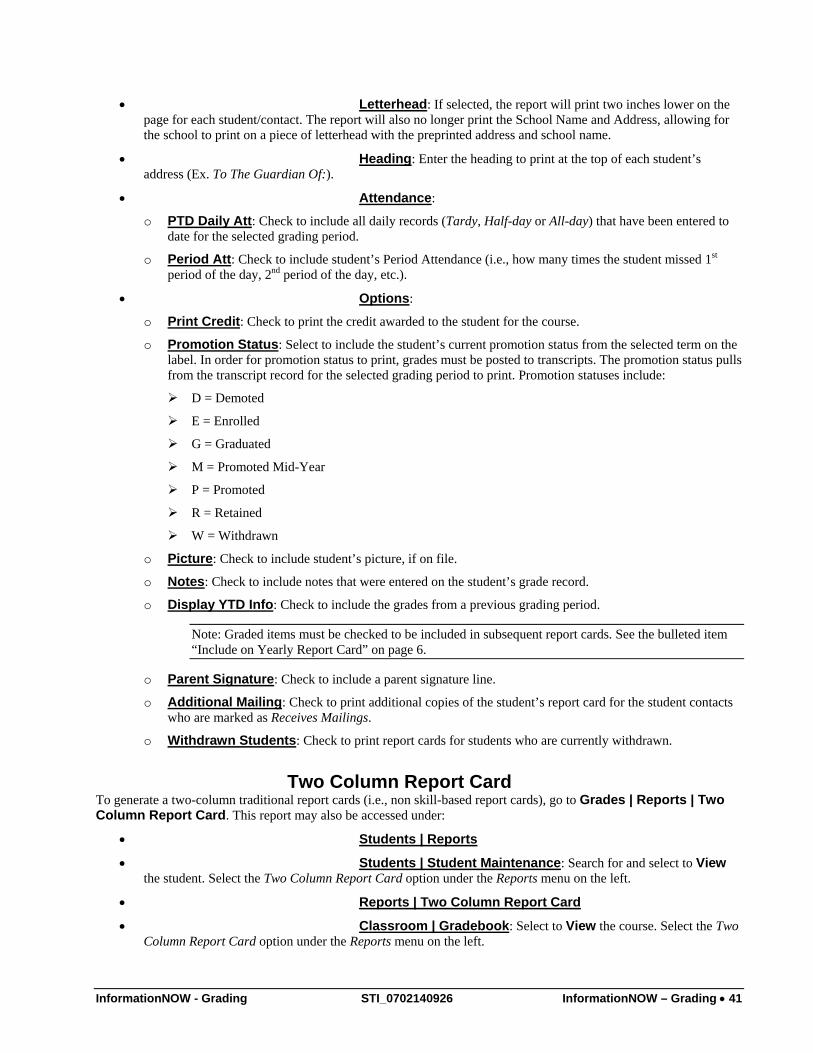
• Letterhead: If selected, the report will print two inches lower on the page for each student/contact. The report will also no longer print the School Name and Address, allowing for the school to print on a piece of letterhead with the preprinted address and school name.
• Heading: Enter the heading to print at the top of each student’s address (Ex. To The Guardian Of:).
• Attendance:
o PTD Daily Att: Check to include all daily records (Tardy, Half-day or All-day) that have been entered to date for the selected grading period.
o Period Att: Check to include student’s Period Attendance (i.e., how many times the student missed 1st period of the day, 2nd period of the day, etc.).
• Options:
o Print Credit: Check to print the credit awarded to the student for the course.
o Promotion Status: Select to include the student’s current promotion status from the selected term on the label. In order for promotion status to print, grades must be posted to transcripts. The promotion status pulls from the transcript record for the selected grading period to print. Promotion statuses include:
D = Demoted
E = Enrolled
G = Graduated
M = Promoted Mid-Year
P = Promoted
R = Retained
W = Withdrawn
o Picture: Check to include student’s picture, if on file.
o Notes: Check to include notes that were entered on the student’s grade record.
o Display YTD Info: Check to include the grades from a previous grading period.
Note: Graded items must be checked to be included in subsequent report cards. See the bulleted item “Include on Yearly Report Card” on page 6.
o Parent Signature: Check to include a parent signature line.
o Additional Mailing: Check to print additional copies of the student’s report card for the student contacts who are marked as Receives Mailings.
o Withdrawn Students: Check to print report cards for students who are currently withdrawn.
Two Column Report Card To generate a two-column traditional report cards (i.e., non skill-based report cards), go to Grades | Reports | Two Column Report Card. This report may also be accessed under:
• Students | Reports
• Students | Student Maintenance: Search for and select to View the student. Select the Two Column Report Card option under the Reports menu on the left.
• Reports | Two Column Report Card
• Classroom | Gradebook: Select to View the course. Select the Two Column Report Card option under the Reports menu on the left.
InformationNOW - Grading STI_0702140926 InformationNOW – Grading • 41

Required fields are indicated with an asterisk (*).
Note: A Spanish version of the report will automatically be used when the browser is set to the Spanish language. If the language set in the user’s Internet Explorer or Firefox browser is set to Spanish, then the Two Column Report Card will automatically print in Spanish. If it is set to any other language it will continue to print in English.
• Student Filter: Select the filter of students for which to print. If no filter is selected, all currently enrolled students will print. When printing from the teacher Grade Book, only students for the selected course will print.
• *ID to Print: Select the student identifier to print (None, Student Number, State ID Number, Alternate Student Number or Social Security Number).
• *Grading Period: Select the grading period for which to print.
• Absence Reasons: If including attendance information on the report card, select the absence reasons to be included in the attendance totals.
• *Order By: Select to order the printing of report cards by Student Display Name, ID Selected, Grade Level, Homeroom, Zip Code, or Distribution Period. If selecting Distribution Period, select the period of day and enter the date for which to print. Student report cards will be grouped together by course for the selected period and date. When printing from either the Students | Reports location, the student Maintenance screen or from the Grade Book, users do not have the option to print in Distribution Period order.
• Address Report To: Select to print for students, custodians or all contacts.
• Go Green: Select this option to not print a hard copy of the report card for any student/guardian (contact) who has elected to Go Green. An alert will be created instead which can be used to generate an e-mail to the student/contact to let them know the report is available for viewing via the home portal.
• Letterhead: If selected, the report will print two inches lower on the page for each student/contact. The report will also no longer print the School Name and Address, allowing for the school to print on a piece of letterhead with the preprinted address and school name.
InformationNOW - Grading STI_0702140926 InformationNOW – Grading • 42

• Attendance Summary: Check to include an attendance summary. Attendance will be included for the selected absence reasons. The attendance section will include the following based on the absence reason codes selected:
o Total Days Enrolled
o Total Days Present
o Days Absent
o Excused Days Absent
o Unexcused Days Absent
o Times Tardy
o Excused Tardies
o Unexcused Tardies
• Notes: Check to include the notes entered on the student posted grades. Only notes for the selected grading period will print.
• Parent Signature: Check to include a parent signature line on the report card.
• Announcements: Check to include the announcements entered on the selected grading period.
• Merit/Demerit Summary: Select to include a summary of the student’s merits and demerits based on the student’s discipline and commendation views.
• Grading Scale Legend: Check to include the grading scale legend based on grading scales assigned to the course. Student’s schedule may contain sections with different grading scales. The report will print all grading scales for the student in the Grading Scale Legend in descending order by max score/range value.
• Withdrawn Students: Check to include currently withdrawn students when printing.
• Standards: Check to include standard marks on the report card.
• YTD Info: Check to include previous grading period grades along with the selected grading period. The report will display up to the last four grading periods due to space availability.
• Standards Grading Scale Legend: Check to include a legend for the standard grading scale if selecting to print Standards. Student’s schedule may contain sections with different standard grading scales The report will print all standard grading scales for the student in the Standards Grading Scale Legend in descending order by max score/range value.
• Withdrawn Sections: Check to include marks for course sections from which the student has previously withdrawn during the selected academic session. An asterisk (*) will appear next to the student name.
• Promotion Status: Check to include the student’s current promotion status.
• Comment Legend: Check to include a legend of descriptions for the comments assigned to the student grade records.
• Photograph: Check to include the student’s photo if on file.
InformationNOW - Grading STI_0702140926 InformationNOW – Grading • 43

InformationNOW – Scheduling
About This Guide This guide provides an overview of the scheduling options available in InformationNOW.
Contents InformationNOW – Scheduling 1
About This Guide ...................................................................................................................... 1 Contents..................................................................................................................................... 1 Checklist .................................................................................................................................... 2
Prepare To Schedule in the Next Academic Session................................................... 2 To Schedule in Next Academic Session...................................................................... 3
Data Preparation ........................................................................................................................ 3 Served Grade Levels ................................................................................................... 3 Set Complete Schedule Option.................................................................................... 4 Create New Academic Session.................................................................................... 4 Switch Academic Sessions.......................................................................................... 4 Lookups....................................................................................................................... 4 Update Rooms............................................................................................................. 5 Update Teacher Information ....................................................................................... 6 Valid Courses .............................................................................................................. 6 Master Schedule ........................................................................................................ 12
Enter Student Requests ............................................................................................................ 15 Mass Assign Course Requests................................................................................... 15 Mass Apply Models .................................................................................................. 18 Apply Models to an Individual Student..................................................................... 19 Posting Requests from Career Plans.......................................................................... 19 Enter Requests Individually ...................................................................................... 23 Processing Home Portal Requests ............................................................................. 23
Request Reports....................................................................................................................... 24 Build Master Schedule............................................................................................................. 28 Schedule Requests ................................................................................................................... 28
For a Group of Students ............................................................................................ 28 For a Single Student .................................................................................................. 32
Mass-Assign Sections.............................................................................................................. 32 Manually Resolving Student Conflicts .................................................................................... 35
Quick Reference Guide STI_0702140935 InformationNOW – Scheduling • 1

Schedule Reports ..................................................................................................................... 35 Individual Student Schedule View .......................................................................................... 36
Override..................................................................................................................... 36 Term .......................................................................................................................... 37 Include Withdrawn Classes ....................................................................................... 37 Reassign .................................................................................................................... 37 Withdraw................................................................................................................... 39 Add............................................................................................................................ 39 View .......................................................................................................................... 40 Delete ........................................................................................................................ 40 Other Sections ........................................................................................................... 40 Requests .................................................................................................................... 41 Tasks Menu ............................................................................................................... 41 Manage...................................................................................................................... 41 Reports ...................................................................................................................... 41
Student Schedule Matrix View................................................................................................ 42 Layout ....................................................................................................................... 44 Overrides ................................................................................................................... 45 Tasks ......................................................................................................................... 45 Reports ...................................................................................................................... 45 Saving Changes ......................................................................................................... 45 Dates.......................................................................................................................... 46
Block Scheduling..................................................................................................................... 46 Create Academic Session .......................................................................................... 46 Setup.......................................................................................................................... 47 Master Schedule ........................................................................................................ 48 Master Schedule Builder ........................................................................................... 49 Student Schedule ....................................................................................................... 49
Checklist This checklist is provided to facilitate the process of scheduling students into classes. Detailed information about the listed steps is included in the document.
Prepare To Schedule in the Next Academic Session
� School Next Year: Students | Student Maintenance | Main tab or Students | Quick Entry Edit.
� Confirm School Grade Levels: School/District | School | Grade Levels under Manage menu at left.
� Set Complete Schedule Options: School/District | School | Setup tab on the individual school record.
� Verify Custom Fields: System Preferences | Setup | Custom Fields. Confirm fields that are to be retained during Rollover are checked as Retain Data During Rollover.
� Valid Courses: Scheduling | Valid Courses
� Master Schedule: Scheduling | Master Schedule
Quick Reference Guide STI_0702140935 InformationNOW – Scheduling • 2

To Schedule in Next Academic Session � Create New Year Academic Session: Management Console | Create New Academic
Session or School/District | School | Acad. Sessions tab.
� Switch to New Academic Session: Preferences | Change Context
� Verify Periods: Scheduling | Setup | Periods
� Verify Day Types:
� Verify Rooms
� Verify Staff: Staff | Staff Maintenance.
� Create Request Models: Scheduling | Setup | Models.
� Enroll individual students who were not enrolled during the creation of the new academic session.
� Enter Student Requests: By model or individually.
� Set Staff Criteria: Scheduling | Master Schedule Staff.
� Set Course Criteria: Scheduling | Build Master Schedule.
• Select Course Number.
Terms
Periods or Blocks, depending on the Scheduling Type/Model selected
Day Type
Teacher
o Course Schedule Settings Screen
Recommended Sections
Sections Actual
# Created Sections
Search Sections
Copy Settings
Clear Sections
Create Sections
Build Schedule
� Schedule Students against Master Schedule: Scheduling | Schedule Requests.
� Modify Individual Student Schedules: Students | Student Maintenance.
Data Preparation
Served Grade Levels • Go to Schools/District | School. Search for and select to View the school.
• Under the Manage menu list, select Grading Levels.
• Confirm that all grades serviced by the school are selected. Also, check the grade specified as the incoming grade level. For example, if Hometown High School is to receive 8th graders from
Quick Reference Guide STI_0702140935 InformationNOW – Scheduling • 3

Hometown Jr. High, on the Hometown High School Grading Levels screen, 8th Grade must be selected as a valid grade level for this school.
Set Complete Schedule Option • Go to Schools/District | School. Search for and select to View the school.
• Click the Setup tab.
• Select the Scheduling option to indicate a student has a complete schedule when…
o All periods have been scheduled for every day in every term.
o All requests have been scheduled. Based on the option selected, a student with a complete schedule will not display on the automated scheduler error report with an incomplete schedule.
Create New Academic Session For details regarding creating a new academic session, please refer to the InformationNOW – Creating an Academic Session Quick Reference Guide.
Switch Academic Sessions To schedule in the new academic session, switch to that session by going to Preferences | Change Context. Select the appropriate academic session.
Note: It is critical that users be aware of the Academic Session in which they are working. Use the task bar at the very top of the screen to confirm.
Lookups
Scheduling To access scheduling lookups, go to either Scheduling | Setup or System Preferences | Setup. Confirm the following are established for the selected academic session.
• Bell Schedules
• Blocks
• Classification of Instructional Programs
• Course Type
• Custom Fields – Course
• Custom Fields – Student Schedule
• Difficulty Level
• Funding Method
• Instructional Setting
• Models
Click +Add to add a new Request Model.
*Type: Choose Request. *Model: Name Request Model.
Quick Reference Guide STI_0702140935 InformationNOW – Scheduling • 4

Click Create.
Click +Add to add Valid Courses to Model.
Click Search to access Valid Course File.
Place a check beside each class from page 1 and click OK.
Click +Add and navigate to each additional page in Valid Course File.
Place a check beside each class from each additional page(s) until all classes are listed for the Request Model.
Click OK to finish creating Model.
Repeat for each Request Model desired; click Cancel to exit when finished.
• Periods
• Teaching Methods
• Terms
Grading To access scheduling-related lookups that also pertain to grading, go to either Grades | Setup or to System Preferences | Setup. Confirm the following are established for the selected academic session.
• GPA Methods
• Grading Periods
• Grading Scale
• Standards Subjects
• Standards
Update Rooms To update rooms, go to Schools/District | School. Search for and select the school. Select the Rooms tab.
Note: Changes made to rooms will affect all academic sessions. Rooms should not be deleted until all of the classes tied to that room in the Master Schedule are complete.
Add Click Add to insert new rooms. Required fields are indicated with an asterisk (*).
Quick Reference Guide STI_0702140935 InformationNOW – Scheduling • 5

• *Room: Enter a unique alpha/numeric room identifier.
• Max Capacity: Enter the maximum number of seats available in the room.
• *Room Description: Enter a unique brief description of the room.
• Location: Select a location for the room. Locations are created under System Preferences | Setup. Select School Locations and click Refresh to add, view or delete locations.
• Click to Create the record.
• Add: Click to add the primary teacher to the room. If the teacher is assigned to the room, when the teacher is assigned to a section in the Master Schedule, the room will automatically be populated (but may be changed if necessary).
View To view or edit a room, either click the room blue link or place a check next to the room and click View.
Delete To delete a room, place a check next to the room and click Delete. Warning! Rooms are not unique to the academic session. When a room is created, it may be viewed in any academic session. Therefore, rooms must not be deleted until all classes tied to the room in the Master Schedule have been completed and the academic session has been closed.
Update Teacher Information To update staff information, go to Staff | Staff Maintenance.
• Add any new teachers
• Select and view existing teachers to make any necessary changes.
Note: Changes made will affect staff records regardless of the academic session. It is not recommended to delete outgoing teachers until after the current academic session has been closed.
Valid Courses To update valid courses go to Scheduling | Valid Courses.
Add Click Add to insert new courses for the selected academic session. Required fields are indicated with an asterisk (*).
Note: Depending on the user’s state, some fields may be hidden.
Quick Reference Guide STI_0702140935 InformationNOW – Scheduling • 6

• *Course Number: Enter a unique course identifier. May be alpha and/or numeric.
• Alt Course Number: Enter an alternative course number. May be alpha and/or numeric.
• State Course Number: Enter the state-specific number for this course to be used in state reporting. Check the State Guidelines to determine if this is required. State Course Number may be alpha and/or numeric.
• *Short Name: Enter a short name for this course. The short name will print on the standards bank report, course request verification report, course request roster report, course request matrix report, course listing report and will display on the student’s request screen.
• *Long Name: Enter a long description for the course.
• *Course Type: Used in relation to transcript graduation requirements and prerequisites. Required for VOC (Vocational Courses) in Mississippi.
• CIP Code: Enter the unique CIP code for this course. Consult your State Guidelines to determine if this is required. The CIP code is used in vocational reporting.
• GPA Credit: Enter the total number of GPA credit to be issued to students enrolled in this course.
• Difficulty Level: Assign the difficulty level for this course. Difficulty level may be used in tracking graduation requirements. Consult your State Guidelines to determine if this is required.
• Graduation Credit: Enter the total number of Graduation credit to be issued to students who successfully complete the entire course.
• Max Capacity: Enter the maximum number of students allowed per section of this course. When sections are created under the Build Master Schedule option, capacity will automatically be set to 25 for sections in which a capacity is not specified.
Quick Reference Guide STI_0702140935 InformationNOW – Scheduling • 7

• *Starting Grade/Ending Grade: Select the starting and ending grade levels for students who may request or take this course. Earliest allowable grade level to request or take this course. Remember that the students will be in their current grade level until promotion has taken place. So, for example at the High School, the earliest grade level for freshman classes may need to be 8 rather than 9.
Note: If starting and ending grade levels are set here, then only courses with the grade levels identified for the school will be pulled into the Master Builder screen. See “Build Master Schedule” on page 28 for more details.
• *Allowable Gender: Check the applicable genders for this course.
• Honor Roll: Check if the grades received in this course should be considered when calculating the honor roll.
• *School Category: Select the school(s) in which this course is taught.
o GPA Method: Options in this section of the screen control the GPA Method criteria for all sections of this course. As a new section is added, these data elements will be copied to the section. Users with appropriate permissions will be able to modify the settings for the individual section. However, if a user checks the Apply Changes To Section option and edits a course and makes changes to the GPA Method section. All changes will be copied to each existing section of the course. Users should take care when selecting the Apply Changes To Section option and editing a course.
Weight Add: Enter the weight added value for the various GPA methods. GPA Methods are created under either Grades | Setup or System Preferences | Setup.
Weight Mult.: Enter the weight multiplier for the various GPA methods. GPA Methods are created under either Grades | Setup or System Preferences | Setup.
Inc. Weighted GPA: Check if scores received for this course are to be included in a student’s weighted GPA.
Inc. Unweighted GPA: Check if scores received for this course are to be included in a student’s non-weighted GPA.
• Course is Instructional: Check if this course is considered instructional. Consult your State Guidelines to determine if this is required.
• Is State Reported: Check if this course is to be included in state reports. Consult your State Guidelines to determine if this is required.
• Display on Report Card: Check if the grades for this class are to be printed on report cards.
• Is Required: Check to indicate that this course is required. If checked, when requests are entered for students, the course will be marked as required automatically. Any course may be unchecked as desired.
• Is Active: Uncheck to make this course inactive. Inactive courses will not display on Course Request Entry, Master Schedule Builder, or Course Listing Report (unless selected to include). When searching for a course, if Active Only is selected, inactive courses will not display on the search results screen.
• Instructional Setting: Select the instructional setting for this course. Consult your State Guidelines to determine if this is required.
• Teaching Method: Select the teaching method for this course. Consult your State Guidelines to determine if this is required.
• Funding Method: Choose the funding method for this course. Consult your State Guidelines to determine if this is required.
Quick Reference Guide STI_0702140935 InformationNOW – Scheduling • 8

Click Create to save the course. After saving the record, the following tabs may be accessed.
Summary Tab The Summary tab displays the course number and short description. Also lists the school, academic session and sections available by term.
Standards Tab Allows user to view, add or delete standards from the selected course. To insert a standard, perform the following steps:
• Click Add.
• Enter or select at least one search criteria (Name, Standard Subject, Low Grade or High Grade) and click Search.
• The list of matching criteria will display.
• Place a check next to the standard to be applied to this course.
• Click OK.
Custom Tab Custom fields may be assigned to the Valid Course File. Refer to State Guidelines to determine if this is required. Custom fields are created under System Preferences | Setup. Select Custom Fields and Course and then click Refresh to add, view, delete or re-prioritize custom fields.
Textbook Tab Textbooks may be assigned to the Valid Course File. Refer to the InformationNOW – Textbook Quick Reference guide for details regarding textbooks.
Scheduling Rules Tab The ability to assign Scheduling Rules to the courses in the Valid Course file has been added. Scheduling rules allow users to assign specific scenarios to be followed when using the Master Schedule Builder or the Schedule Request options. To create a new rule, click Add. Required fields are indicated with an asterisk (*).
In the following example, a rule is being assigned to a course called Biology I.
• *Course Name: Click Find to locate the course for which the rule is to be created that will be tied to the selected course. In this example, Algebra I is selected.
• Is Required: Check if this rule Is Required. Selecting this option will override any Priority selected. When the Master Schedule Builder or schedule request options are selected, this rule will be followed absolutely. If selected, the Priority field will be inactive.
• *Priority: Select the Priority in which this rule is to be followed as it relates to other rules that have been assigned to this course. Assigning a priority of 1 indicates that this rule is to be followed before any other rules with a high priority (i.e., 2, 3, 4, etc.).
Quick Reference Guide STI_0702140935 InformationNOW – Scheduling • 9

• Term: Select if this course is to take place during a Different term than the selected course, during the Same term, during a term that takes place Before the selected course or during a term that takes place After the selected course. In the above example, Algebra I and Biology I are to be placed in Different terms when either the Master Schedule Builder or the schedule requests options are selected.
• Period/Block/Day Type: Select if this course is to take place in a Different Period/Block/Day Type than the selected course, the Same Period/Block/Day Type, a Period/Block/Day Type that occurs Before the selected class or a Period/Block/Day Type that occurs After the selected course. In the above example, Algebra I and Biology I are to be placed in the Same Period/Block/Day Type as Biology I when either the Master Schedule Builder or the schedule requests options are selected.
• Teacher: Select if this course is to be assigned to a Different Teacher than the selected course or the Same Teacher. In the above example, Algebra I and Biology I, no preference has been assigned.
Averaging Setup Tab Click to modify the averaging setup for this course for all teachers of the course. Once criteria is set here, if a teacher does not have permission to modify his or her averaging setup, that teacher will not be able to modify the average setup for individual classes.
Tasks Menu Click to perform one of the following tasks:
• Print Screen
• Help
Manage Menu Click to access one of the following menu options:
• Create Sections from Course: Allows the user to create and/or add to section(s) of an existing Valid Course.
• Prerequisites: Prerequisites allow for the creation of requirements that students must meet in order to enroll in the selected course.
Example 1 – “AND” Requirement: To enroll in a Creative Writing course, a student must have earned at least two credits within the course type of English AND at least one of the credits must have been in English 9. For this example, on the pre-requisites screen for the Creative Writing course, perform the following steps:
• First create a rule for the requirement that states a student must have received 1.0 credit in English 9.
Under the Rules (And) section, click Add.
Enter a name for the rule (ex.: English 9)
Under the Course Requirements (OR) section, click Add.
Click Find to locate the English 9 course.
Enter a credit of 1.0 indicating the student must have received a full credit in the English 9 course.
Click Create.
• Next, create a rule for the requirement that states a student must have completed two credits within the English course type. Since this is an “AND” requirement, meaning in
Quick Reference Guide STI_0702140935 InformationNOW – Scheduling • 10

addition to the English 9 requirement, a new rule on the left side of the screen must be added.
Under the Rules (AND) section, click Add.
Enter a name for the rule (ex.: 2 English Credits).
Under the Course Type Requirements (OR) section, click Add.
Select the course type of English.
Enter the credit of 2.0.
Click Create.
Example 2 – “OR” Requirement: To enroll in a Creative Writing course, a student must have earned at least two credits within the course type of English OR at least one credit of English 9. For this example, on the pre-requisites screen for the Creating Writing course, perform the following steps:
• Create a rule for the pre-requisite. Since this is an OR requirement, only one rule needs to be created on the left-hand side of the screen.
Under the Rules (AND) section, click Add.
Enter a name for the rule (ex.: Creative Writing).
Under the Course Requirements (OR) section, click Add. Find the English 9 course. Enter a credit of 1.0 and click Create.
Under the Course Type Requirements (OR) section, click Add. Select the English course type. Enter a credit of 2.0 and click Create.
Click Close to save the pre-requisite.
• Course Fees: Click Add to insert a fee for this course. Required fields are indicated with an asterisk (*).
*Name: Enter a name for the fee (ex.: Workbook).
*Category: Select the category for the fee. Categories are created under either Fees | Setup or System Preferences | Setup.
*Amount: Enter the entire fee amount in decimal format (ex.: 20.00)
Description: Enter a brief description for the course fee.
• Course Request Roster: Click to view student requests for this course.
Add: Click to add requests for additional students.
View: Place a check next to existing request(s) and click to edit.
Delete: Place a check next to existing request(s) and click to delete.
Prerequisites: Click to view prerequisites for this course.
Copy Students: Click to copy students who are currently requesting this course to another course.
Move Students: Click to move students who are currently requesting this course to a different course.
Course Request Roster: Click to print a report of the student requests.
Quick Reference Guide STI_0702140935 InformationNOW – Scheduling • 11

Reports Menu Click to access the following report:
• Standards Bank: Allows Standards for the Selected Course or all Standards to be printed.
Master Schedule To update valid courses, go to Scheduling | Master Schedule.
Note: The Master Schedule may be copied from a different school or Academic Session. To copy the Master Schedule, including customer fields, from one school to another, go to Mgmt Console | Console. Click Share School Setup. Select the School/Academic Session FROM WHICH to copy and check the Master Schedule box. Click OK.
The Master Schedule contains information detailing when a course will be taught; where it will be taught; and who will teach the course. Some information will pull from the Valid Courses File. In some instances, this information may be edited on each section. Some fields must be edited on the valid course and may not be edited on the Master Schedule.
Note: If the Master Schedule was copied into the New Academic Session, it can be edited to change information for the new academic session. If user is only editing the Master Schedule for the new academic session, the Build Master Schedule function option would not be used.
Add To insert a new section, click Add.
Note: Sections may also be added from the Valid Course file. Go to Scheduling | Valid Courses. Search for and view the desired course. Click to Create Section From Course under the Manage menu at left.
Enter the course search criteria (ex.: English) and click Search. Bullet the course from the resulting list and click OK or click the course number that appears as a blue link. Required fields are indicated with an asterisk (*).
Quick Reference Guide STI_0702140935 InformationNOW – Scheduling • 12

• Course Information: Course Number, Alt Course Number, State Course Number and CIP Code pull from the Valid Course File and cannot be edited.
• Section Details:
*Section Number: Enter a unique section number. This field may be alpha and/or numeric.
*Short Name: Enter a short name for this section. The short name will print on most grading reports (including report cards), transcript reports, student schedule reports, Master Schedule reports, discipline reports as well as the student’s schedule screen.
*Long Name: Enter a long name for this section. The long name will print on the Room-Teacher utilization report and will display on most of the teacher’s classroom screens.
*Allowable Gender: Check Male and/or Female as needed.
*Course Type: Select the appropriate course type from the drop-list. Used in relation to transcript graduation requirements and prerequisites. Consult your State Guidelines to determine if this is required.
Difficulty Level: Assign the difficulty level for this section. Difficulty level may be used in tracking graduation requirements. Consult your State Guidelines to determine if this is required.
Display on Report Card: Check this box if this section of the course should display on report cards.
Honor Roll: Check if the grades received for this section of the course should be considered when calculating honor roll.
Quick Reference Guide STI_0702140935 InformationNOW – Scheduling • 13

Teacher: Click the Teacher link to add the main teacher or add additional teacher(s).
Room: Select from the drop-list. Rooms are created under School/District | School. Search for and view the school. Click the Rooms tab.
*Starting/Ending Grade: Enter the lowest and highest grade level to be scheduled into the class. Remember that the students will be in their current grade level until promotion has taken place so, for example, at the High School the earliest grade level for freshman classes may need to be 8 rather than 9.
Grading Scale: Select a grading scale if this course uses a scale different from the scale attached to grade levels.
GPA Credit: Enter the amount of credit a student will earn toward GPA for the entire course. Amount must be entered in the format of x.xxx (i.e. 1.000).
Graduation Credit: Enter the amount of credit a student will earn toward graduation for the successful completion of the entire course. Amount must be entered in the format of x.xxx (i.e. 1.000).
Serving Section: When editing sections in the master schedule at a Reporting School, the user may link this section to a section in a Serving School which allows the user to import report card grades, comments and notes from the Serving School to the Reporting School. For more details regarding dual enrolled students refer to the InformationNOW – Grading quick reference guide.
*Periods: Check the period(s) during which this section will meet.
Period Variation: Only available if period variations have been attached to bell schedules. For example, if the student lunch wave is determined by the class the students attend during 3rd period, each Period 3 course would be assigned a period variation indicating the time that students go to lunch vs. class. Please refer to the InformationNOW – Attendance Quick Reference Guide for more details regarding period variations.
*Meets On: Available only for specific scheduling types which are selected when the academic session is created. If available, select the appropriate day type(s) on which the class will meet.
Terms: Check the terms during which the class will meet.
Capacity: Enter the maximum number of students that may be scheduled into this class. When sections are created under the Build Master Schedule option, capacity will automatically be set to 25 for sections where a capacity is not specified.
Enrolled: The number of currently enrolled students for the term will display.
A. Credit: Check if attempted (GPA) credit is awarded at the end of the term. The number of check marks here will be divided into the GPA credit and Graduation credit values entered for the section.
GPA Method:
Weight Add: Enter the weight added value for the various GPA methods. GPA Methods are created under either Grades | Setup or System Preferences | Setup.
Weight Mult.: Enter the weight multiplier for the various GPA methods. GPA Methods are created under either Grades | Setup or System Preferences | Setup.
• Additional Info: Course is Instructional: Check if this section is considered instructional. Consult your
State Guidelines to determine if this is required.
Is State Reported: Check if section is to be included in state-mandated extracts. Consult your State Guidelines to determine if this is required.
Quick Reference Guide STI_0702140935 InformationNOW – Scheduling • 14

Instructional Setting: Select the instructional setting for this section. Consult your State Guidelines to determine if this is required.
Teaching Method: Select the teaching method for this section. Consult your State Guidelines to determine if this is required.
Funding Method: Select the funding method for this section. Consult your State Guidelines to determine if this is required.
Edit To modify an existing section, go to Scheduling | Master Schedule. Search for and view the section to be modified. After making the changes, click OK to save.
Note: On the search result list, users may click the number of students currently enrolled in the class that appears as a blue link.
A list of currently enrolled students will display. Users with appropriate rights may then click a student number that appears as a blue link to access that student’s demographic information.
Delete To delete an existing section, go to Scheduling | Master Schedule. Search for the section to be deleted. Place a check next to the section number and click Delete.
Enter Student Requests
Mass Assign Course Requests Course requests may be added to a group of student by going to Scheduling | Mass Assign Requests. Review the steps and click Next.
Quick Reference Guide STI_0702140935 InformationNOW – Scheduling • 15

1. Allows the user to build a list of students to which to assign requests. Enter the search criteria and click Next.
2. A list will display on the left showing students who meet the search criteria. Use the Add >, Add All >>, < Remove and << Remove All buttons to move students who are to be assigned the requests to the right side of the screen. Click Next.
3. Enter the search criteria for the course(s) to be requested for the selected students. Click Next. 4. The resulting list of courses will display. Place a check next to the course(s) to be added as
requests for the student(s) selected in step 2. Click Next.
Quick Reference Guide STI_0702140935 InformationNOW – Scheduling • 16

5. A window will display that allows the user to set specific parameters for the selected course request. The name of the course will display at the top of the screen in gray. Options that are selected on this screen will be applied to all requests for the selected course.
o Required: Select if the course is required for the student.
o Alternative Course: Alternative course requests may not be assigned in mass. This option is disabled.
o Section: If a specific section is to be assigned to the students, select the section from the list.
Prescribed: Indicates that this is the section students are to be scheduled into when the automated scheduler is run (i.e., pre-scheduling student).
Proscribe: Indicates that this is the section students are NOT to be scheduled into when the automated scheduler is run. Most often this is used to indicate sections reserved for special circumstances, such as advanced placement or special education.
o Teacher: If a specific teacher is to be assigned to the students, click Find to select the teacher.
Prescribed: Indicates that this is the teacher to which students are to be assigned when the automated scheduler is run (i.e., pre-scheduling teacher).
Proscribe: Indicates that this is the teacher students are NOT to be scheduled with when the automated scheduler is run. Most often this is used to indicate teachers reserved for special circumstances such as special education.
o Start Term: If students are to be scheduled into a section that begins in a certain term, select the term from the available list. Otherwise, select --- Any ---.
o Periods: If students are to be assigned a section that meets in a specific period, enter the period in the field provided.
o Meets On: If students are to be assigned a section that meets on a specific day, enter that day in the field provided.
o Number Of Terms: Indicates if the students are to be scheduled into only a certain number of terms for the selected course.
Quick Reference Guide STI_0702140935 InformationNOW – Scheduling • 17

6. Once parameters have been selected, click Assign.
7. The course request will be assigned to the selected students and a resulting list will display.
8. If multiple courses were selected in Step 4, use the navigation arrows to move to the next course. Set the appropriate parameters and click Assign.
9. Continue until all selected courses have been assigned to the selected students.
Mass Apply Models Go to Scheduling | Mass Apply Models and follow the Wizard. Models should first be created under Scheduling | Setup or under System Preferences | Setup.
Note: At any time, click Cancel to exit the process. Click Back to return to the previous screen. Click Next to continue.
Quick Reference Guide STI_0702140935 InformationNOW – Scheduling • 18

Step 1: Select a model from the list of models displayed for a selected model type
• For Type, choose Requests and click Refresh.
• Bullet a model and click Next.
Step 2: Enter criteria to build a list of students • Select criteria using any field (usually a grade level).
• Click Next.
Step 3: Select student or subset of students from the resulting set of students to be applied to a model
• Select students and move from left list to right list.
• Click Next.
Step 4: List of students that would be applied to a model
• Check any Override options that apply. See “Override” on page 36 for more details.
• Confirm list of students is correct.
• Click Apply.
Apply Models to an Individual Student Go to Students | Maintenance.
• Find a student.
• Under the Manage menu, click Requests.
• Under the Manage menu, click Apply Model.
Posting Requests from Career Plans Note: When creating requests from a career plan, any existing requests for the student will not be overwritten.
Quick Reference Guide STI_0702140935 InformationNOW – Scheduling • 19

Assigning By Group Go to Scheduling | Mass Assign Requests. Click the From Career Plan tab.
• Review the steps and click Next.
• Enter criteria and click Search.
Quick Reference Guide STI_0702140935 InformationNOW – Scheduling • 20

• The resulting list of students will display. The list will only include students who have career plans.
• Use the Add> or Add All>> buttons to move students for whom requests are to be assigned to the right hand side of the screen.
• Click Assign. A status screen will display any resulting errors.
• Click the Run Course Request Errors Report link to generate the standard course request error report.
• If the academic session in which the user is logged in is a current academic session (i.e., neither past not future), course requests will be assigned from the student’s career plan where the career plan course grade level is equal to the student’s current grade level. For example, if the user is logged into an academic session where the student’s grade level is 9, then the course requests from the student’s career plan that have a grade level of 9 assigned to them will be added to the student’s requests.
• If the user is logged into a future academic session, the program will check to see if the students have been promoted:
o If students are promoted, the program will use career plans that match the student’s current grade level in the academic session of context.
Quick Reference Guide STI_0702140935 InformationNOW – Scheduling • 21

o If students are not promoted, the program will use career plans that match the student’s current grade level + 1 in the academic session of context.
Assigning To Individual Student Course requests may also be assigned from the career plan on an individual student. To view this change, go to Students | Student Maintenance. Search for and select to View the student. Click Goals Sought under the Manage menu on the left. Click to Assign Course Requests based on the goal that has been assigned to the student that contains a plan.
When selected, the program will assign requests to the student based on the career plan where the grade level is equal to the student’s current grade level in which the user is logged in. A message will display indicating the requests that were successfully assigned to the student.
• The Assign Course Requests link is not available for past academic sessions.
• The link is not available for students without career plans.
• In a current academic session, the program will assign course requests from the student’s career plan where the career plan course grade level is equal to the student’s current grade level.
• In a future academic session, the program will assign course requests from the student’s career plan where the career plan course grade level is equal to the next sequential grade level above the student’s current grade level in the academic session of context.
• If any errors occur during the process, a message will display in red indicating the course number and any related error.
Note: Duplicate requests are not considered errors, since students may be required to request the same course multiple times.
Quick Reference Guide STI_0702140935 InformationNOW – Scheduling • 22

Enter Requests Individually Go to Students | Student Maintenance.
• Find a student.
• Under the Manage menu, click Requests.
• Under the Manage menu, click Add to multiple-select courses to add as requests.
• Click the +Add button to add one request at a time.
Prescribe: User is marking a course/section/teacher to which the student will be scheduled when the automated scheduler is run. (Pre-scheduling student)
Proscribe: User is marking a course/section/teacher that a student is NOT to be scheduled into.
Processing Home Portal Requests Requests may be entered by students or parents via the home portal of InformationNOW. These requests must then be approved or rejected. Go to Scheduling | Approve Requests.
• Status: Select to filter the screen to view requests that are Pending, Approved, Rejected or All requests (blank).
• Counselor: By default, pending requests will display for the logged in user for students who are assigned to them as a Counselor. To view the requests for a different counselor, click Find and search for the counselor. To remove the counselor filter click Clear.
• Columns:
File No: The student’s id number. If the user has the rights, click the hyper link to access the student’s demographic record.
Name: Displays the student’s name.
Course Name Number: The name of the course and the course ID that is being requested.
Terms: If the user requested a specific number of terms, it will display here. Note: The specific number of terms may not be entered on a request that is submitted via the Home Portal.
Quick Reference Guide STI_0702140935 InformationNOW – Scheduling • 23

Start: If the user requested a specific starting term, it will display here. Note: The specific starting term may not be entered on a request that is submitted via the Home Portal.
Required: If this request has been marked as a required course for the student, a Yes will display in the Required column. Note: Required may not be checked on a request that is submitted via the Home Portal.
Type: Indicates if this request is a primary request or if the request is an alternative request. Primary requests will be scheduled first if possible. If the primary course is unable to be scheduled due to conflicts, the alternative course will be scheduled instead. Note: Alternates may not be assigned for requests that are submitted via the Home Portal.
Status: Once a request is added through the parent portal, school staff must review the request. Until the request is approved by the school, the request will display in a P (Pending) status. Once the school has accepted the request, the status will display as A (Accepted).
• Approve: To approve the request, place a check next to the request(s) and click Approve. The request will display in the Home Portal as accepted and will be processed when the student is scheduled. Once approved, the request will display on the student’s screen under Students | Student Maintenance.
• Reject: To reject the request, place a check next to the request(s) and click Reject. The request will display in the Home Portal as rejected.
• Delete: To remove the request from the student, place a check next to the request(s) and click Delete. The request will no longer display on the student request screen in Home Portal or from the student’s record under Student Maintenance.
Request Reports • Course Request Analyzer: A report comparison of students who have requested multiple
courses to determine which courses should not be placed in the same period of the day as other courses.
o Order By: Select to order the students on the report by Display Name, Grade Level or Homeroom.
Quick Reference Guide STI_0702140935 InformationNOW – Scheduling • 24

o Student ID to Print: Select to include Student Number, State ID Number, Alternate Student Number, Social Security Number or None.
o Student requested All selected courses: Click the drop-list below to select the courses to include in the report. Any student who has requested ALL of the selected courses will be included on the report.
o Student requested ONE of the selected courses: Click the drop-list below to select the courses to include in the report. Any student who has at least ONE of the selected courses will be included on the report.
Note: Use the Remove From List button to remove any courses from the ALL or ONE sections that do not belong on the report.
• Course Request Errors: A report of student request errors.
Errors include:
1 - No Requests: An error will display for each term and for each student that has no requests entered for the selected term(s). A 1 – No Requests error will also display if the student has no requests entered for Any term(s).
2 - Too Many Requests: An error will display for each student whose sum of the requests is greater than the number of periods * the number of terms. For example, if the student has 9 course requests for all year courses and there are only 8 periods in the day, an error will display for this student indicating 2 - Too Many Requests.
3 - Not Enough Requests: An error will display for each student and for each term if the sum of the requests is less than the number of terms * the number of periods. For example, if the student has 5 course requests for all year courses and there are 8 periods in the day, an error will display for the student indicating Not Enough Requests for (Term Name). Also, if the student 7 requests entered for single-term courses and there are 8
Quick Reference Guide STI_0702140935 InformationNOW – Scheduling • 25

terms in the year, a message will display indicating 3 - Not Enough Requests for (Term Name).
4 - Invalid Section: An error will display for each student and for each course where the gender of the student does not match the allowable gender for the course. For example, if PE110 – Girls Basketball is set up as a course for only females and a male has requested the course, the error message 4 - Invalid Section will display for the male student.
5 - Credits Already Received: An error will display for the student and course if the student’s transcript history contains more than a 0 graduation credit for the selected course. For example, if the student is requesting Eng101 and the student has already received graduation credit for Eng101 in his or her transcript history, an error message 5 - Credits already received for Eng101 will display.
6 - Prerequisites: An error will display for the student and course if the student has not met the prerequisites which were established for the selected course. For example, if the Valid Course File for Creative Writing includes a prerequisite for Eng101 and the student’s transcript history does not include graduation credit for Eng101, an error will display indicating 6 - Prerequisites required for Creative Writing.
7 - Invalid Grade Level: An error will display for the student and course if the student’s grade level is less than or greater than the allowable grade level for the course. For example, if an 8th grade student has requested English 11 which has been marked in the Valid Course File as a course only available for 11th and 12th graders, an error message will display indicating 7 - Invalid Grade Level English 11.
• Course Request Matrix: A matrix or list report of the count of requests by course.
• Course Request Roster: A list report by course of student requests.
Quick Reference Guide STI_0702140935 InformationNOW – Scheduling • 26

• Course Request Tally: A count by course of student requests listed by grade level and ethnicity. Also available from the individual student’s request screen.
• Course Request Verification: A list report by student of requests. Also available from the individual student’s request screen.
Request details include:
T: The number of terms requested if specified.
S: The semester requested or A for Any.
L: Is the course Linked? This is currently not available in InformationNOW but is to be added.
R: Request marked as required.
P: Request priority. This is currently not available in InformationNOW but is to be added.
I: The number of instances requested. For example, if a senior must take PE twice to graduate, enter an instance of 2 on the request for the student to be scheduled into two sections of PE. This is currently not available in InformationNOW but is to be added.
Prescribed Section or Teacher: Proscribed teacher/section does not display on the Course Request Verification report.
Prescribe indicates that students should only be scheduled with the selected teacher/section.
Proscribe indicates that students should be scheduled with any teacher/section except for the selected teacher/section.
Quick Reference Guide STI_0702140935 InformationNOW – Scheduling • 27

Grad Credit: The graduation credit to be earned by the student upon the successful completion of the course.
Build Master Schedule Through the Build Master Schedule option, InformationNOW will construct a Master Schedule based on the constraints entered for Staff and Course information as well as student Course Requests. Refer to the InformationNOW – Master Schedule Builder quick reference guide for details.
Schedule Requests
For a Group of Students Schedules students into course sections based on requests and availability. Go to Scheduling | Schedule Requests.
Note: At any time, click Cancel to exit the process. Click Back to return to the previous screen. Click Next to continue.
Note: The date and time the scheduler was last run will display as shown above.
Step 1: Enter criteria to build a list of students
Quick Reference Guide STI_0702140935 InformationNOW – Scheduling • 28
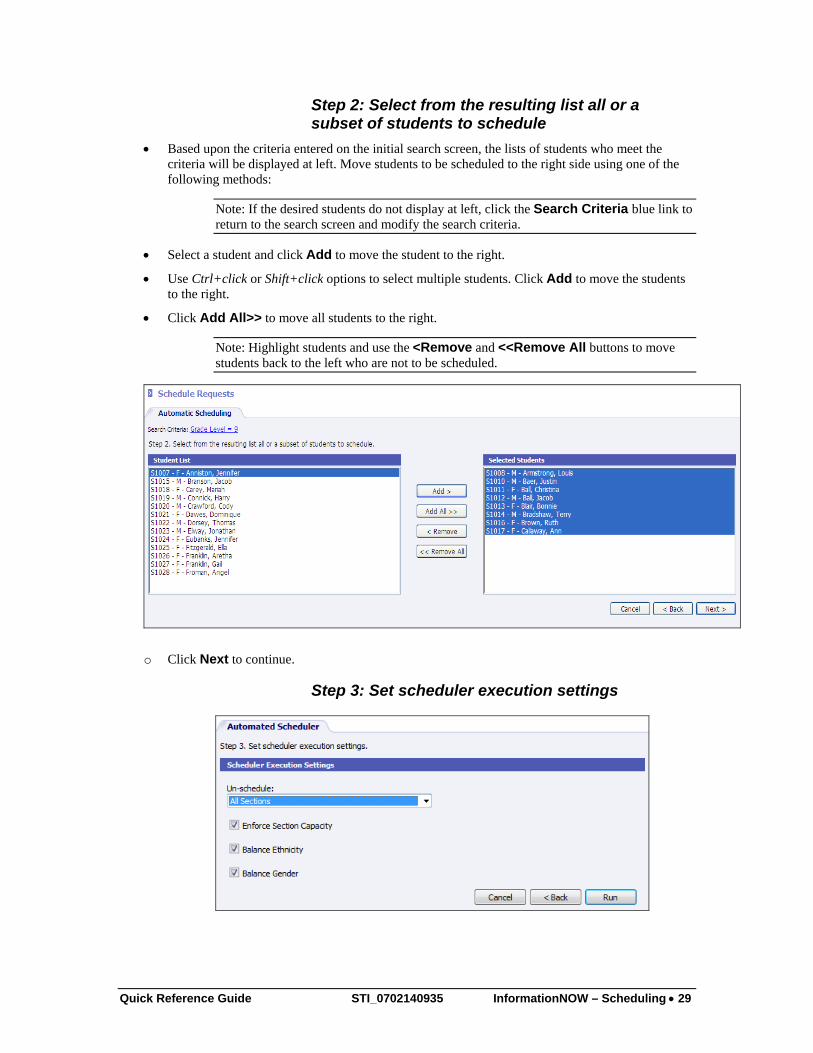
Step 2: Select from the resulting list all or a subset of students to schedule
• Based upon the criteria entered on the initial search screen, the lists of students who meet the criteria will be displayed at left. Move students to be scheduled to the right side using one of the following methods:
Note: If the desired students do not display at left, click the Search Criteria blue link to return to the search screen and modify the search criteria.
• Select a student and click Add to move the student to the right.
• Use Ctrl+click or Shift+click options to select multiple students. Click Add to move the students to the right.
• Click Add All>> to move all students to the right.
Note: Highlight students and use the <Remove and <<Remove All buttons to move students back to the left who are not to be scheduled.
o Click Next to continue.
Step 3: Set scheduler execution settings
Quick Reference Guide STI_0702140935 InformationNOW – Scheduling • 29

• Un-Schedule before Scheduling: All Sections: Un-schedules all students before scheduling.
Requested Courses: Will only schedule those courses for which a request exists on the student request screen. Will not affect the manually scheduled courses/student combinations for which no request exists.
None: Will not un-schedule any students.
• Enforce Section Capacity: When selected, the scheduler will not exceed the seating capacity allowed in each term of a section.
• Balance Ethnicity: Attempts to balance each section by the students’ ethnicities.
• Balance Gender: Attempts to balance each section by the student gender. Click Invoke to begin the scheduling process.
Step 4: Review scheduler’s summary output
Warning! If a user stops the automated scheduler, any changes that were made by the scheduler will not be undone when the scheduler is stopped. Students who have been un-scheduled will remain unscheduled. Requests that have been scheduled will remain scheduled.
• Success Rate: A percentage representing the number of successfully scheduled requests divided by the total number of requests being scheduled.
Quick Reference Guide STI_0702140935 InformationNOW – Scheduling • 30

• Required Success Rate: A percentage representing the success rate for required courses only. The number of successfully scheduled required requests divided by the total number of required requests being scheduled.
• Alternate Request Rate: A percentage representing the number of requests that were successfully scheduled using an alternate request divided by the total number of requests that were successfully scheduled.
• Potentially Scheduled Requests: An estimate of the highest number of requests that may be scheduled. The estimate may be high, but it will never be low.
• Duration: The amount of time, in seconds, that the scheduler took to schedule the requests.
• Potential Success Rate: A percentage representing the number of requests that could potentially be scheduled divided by the total number of requests being scheduled. The potential success rate may be high, but it will never be low.
• Number of Successfully Scheduled Requests: The number of requests that were successfully scheduled.
• Adjusted Success Rate: A percentage representing the number of requests that were successfully scheduled divided by the number of requests that could potentially be scheduled. The adjusted success rate may be high, but it will never be low.
Error Descriptions The following is a break down of the errors that a user might receive on the automated scheduler results screen along with a brief description. Error Description Included in
Scheduling Error Report
Included in Automated Scheduler’s Error Count
All Sections Full All sections of the requested course are full. This error is only counted by the automated scheduler if the option to enforce capacity is enabled.
Yes Yes
Gender Not Allowed
The requested course does not have any sections that allow the student’s gender.
Yes Yes
Invalid Prescribed Teacher
The requested course does not have any sections taught by the prescribed teacher.
Yes Yes
No Requests The student does not have any course requests. Yes Yes
No Sections There are no sections of the requested course. Yes Yes
Not Enough Requests
The student does not have enough course requests to make a complete schedule. The report assumes the student would be scheduled in the longest section of each requested course. This error is only included if the school defines a complete schedule as having all periods scheduled. This error is not included if the school defines a complete schedule as having all requests scheduled.
Yes Yes
Too Many Requests
The student has more course requests than can be scheduled. The report assumes the student would be scheduled in the shortest section of each requested course.
Yes Yes
Unscheduled Request
The student has an unscheduled course request. Yes No
Quick Reference Guide STI_0702140935 InformationNOW – Scheduling • 31

Click OK to accept the scheduler results.
For a Single Student Go to Students | Student Maintenance.
• Search for and select to View the student.
• Under the Manage menu, click Request.
• Under the Manage menu, click Schedule Student.
Mass-Assign Sections To mass-assign sections to a group of students, go to Scheduling | Mass Assign Sections.
Note: At any time, click Cancel to exit the process. Click Back to return to the previous screen. Click Next to continue.
Step 1: Enter criteria to build a list of sections
• Enter the course/section search criteria, then click Next.
Quick Reference Guide STI_0702140935 InformationNOW – Scheduling • 32

Step 2: Optionally, select one or more sections into which to add the selected students
• Place a check next to each course into which the students are to be scheduled.
• Click Next.
• A list will display showing the selected courses along with the section number, section name, teacher and the number of currently enrolled students in the section. To proceed, click Next. Click Back to return to the previous screen and modify the sections selected.
Quick Reference Guide STI_0702140935 InformationNOW – Scheduling • 33

Step 3: Enter criteria to build a list of students
• Select criteria using any field (usually a grade level) to filter the students who may be selected to add to the sections.
• Click Next.
Step 4: Select from the resulting list all or a subset of students to add to sections
• Based upon the criteria entered on the initial search screen, the lists of students who meet the criteria are displayed at left. Use one of the methods listed below to move students to the right to be scheduled:
Note: If the desired students do not display at left, click the Search Criteria blue link to return to the search screen and modify the search criteria.
Quick Reference Guide STI_0702140935 InformationNOW – Scheduling • 34

Select a student and click Add to move the student to the right.
Use Ctrl+click or Shift+click options to select multiple students. Click Add to move the students to the right.
Click Add All>> to move all students to the right.
Note: Highlight students and use the <Remove and <<Remove All buttons to move students back to the left who are not to be scheduled.
Click Next to proceed.
Step 5: Click the Enroll button to complete the process
• Click Enroll to add selected students to the chosen sections. Duplicate students will not be added.
A list of failed students will display.
Manually Resolving Student Conflicts To manually resolve individual student’s conflicts, go to Student | Student Maintenance. Search for and select to view the student.
• Click Schedule under the Manage menu at left.
• Modify the schedule as needed.
Schedule Reports The following reports concerning schedules are available from either the Reports menu or by going to Scheduling | Reports.
• Course Roster
• Course Request Analyzer
• Course Request Errors
• Course Request Matrix
• Course Request Roster
• Course Request Tally
• Course Request Verification
• Course Roster
• Free Room
• Free Teacher
• Incomplete Student Schedules
• Master Schedule Error Report
Quick Reference Guide STI_0702140935 InformationNOW – Scheduling • 35

• Master Schedule List
• Master Schedule Matrix
• Master Schedule Summary
• Room-Teacher Utilization
• Student Schedule List
• Student Schedule Matrix
Individual Student Schedule View To access an individual student’s schedule:
• Go to Students | Student Maintenance.
• Search for and select to View a student.
• Click the Schedule link under the Manage menu at left.
Override When copying a schedule, applying a model or adding a section to the student schedule, courses will not be available to add to the student schedule if parameters of capacity, gender and grade level have been assigned to the course section. For example: If a Boy’s PE class has been created with a gender restriction of Male only, when adding a PE class to a girl’s schedule, the course may not be added because of the gender restriction. Using an override allows sections to be added to the student’s schedule regardless of capacity, gender or grade level restrictions that have been assigned to the course section.
• Seating Capacity: Checking this option will allow the section to be assigned to the student even when the student will exceed the section’s seating capacity. The user will not receive the Cannot enroll student. Exceeding seating capacity is not allowed. error when adding students to sections.
Quick Reference Guide STI_0702140935 InformationNOW – Scheduling • 36

• Gender Restriction: Checking this option will allow the section to be assigned to the student even when the student is not the gender type required by the section. The user will not receive the Cannot enroll student. Gender is not allowed. error when adding students to sections.
• Grade Level Restriction: Checking this option will allow the section to be assigned to the student even when the student is not in the grade level required by the section. The user will not receive the Cannot enroll student. Grade Level is not allowed. error when adding students to sections.
Note: The same override options are also available under Scheduling | Mass Assign Sections and Scheduling | Mass Apply Models.
The user may select one or more options. Once selected, these settings are saved for this user and will remain selected as long as the user is logged in to InformationNOW. The next time the user logs in, the options will be unchecked.
Term When accessing the student schedule screen, the entire schedule for the selected student and academic session will display. To filter the displayed schedule to just one term, select that term from the available list and click Refresh.
Include Withdrawn Classes When accessing the student schedule screen, only the classes in which the student is currently enrolled will display. To view classes from which the student has withdrawn, check the Include Withdrawn Classes box and click Refresh.
Reassign Users may reassign students from one section of a course to another section of the same course or to a section of a new course.
• To activate the option, place a check next to the existing course/section to be changed.
• Once a course is selected, the Reassign option becomes active.
• Select to Reassign. Select to Delete the course from the student schedule or Withdraw the student. If deleting, all history pertaining to this student for the course will be deleted. Typically delete is only selected during the start of the year or a term when a student has not attended the course. If withdrawing, enter the Withdraw Date and any applicable notes. Click OK.
Quick Reference Guide STI_0702140935 InformationNOW – Scheduling • 37

• The Search Sections screen will display.
Note: If an override is selected on the student schedule screen (Seating Capacity, Gender Restriction, Grade Level Restriction), when using the Reassign option, the override(s) will be considered when displaying courses in the Search Sections option.
• Enter the search criteria.
Fit Only • When the Fit Only option is selected and the user clicks Next, the Section Result list will display
sections considering:
Sections of courses that are not already scheduled;
Periods that are not already scheduled;
Grade level allowances (unless Override/Grade Level is selected);
Gender allowances (unless Override/Gender is selected);
Section seat capacity (unless Override/Capacity is selected);
and Course pre-requisites (unless Override/‘Pre-requisites’ is selected).
• Click Next. The sections list will appear.
• Place a check next to the courses to be added/reassigned to the student.
Note: In the Terms column, the current number of students enroll will display with the capacity for the course separated by a /. Click the link to access a roster for the selected course and term.
Quick Reference Guide STI_0702140935 InformationNOW – Scheduling • 38

• Click OK.
• If desired, select the grading scale for this student for this course. Also assign an Inclusion Section and specify the Term(s) during which the student will attend the class.
• Click Insert.
Withdraw • To withdraw a student from a course, select the course from the student’s schedule screen and
click Withdraw.
• Enter the Withdraw Date and any applicable Notes if desired.
• Click OK.
Add • To add a course to a student schedule, click Add.
• Enter the search criteria and click Next.
Note: If Fit Only is checked, only the courses that fit into existing open spaces in the student’s schedule will display when user selects Next.
Also, if an Override is selected before the user clicks Add, the Overrides will apply when the list of available courses displays
• Place a check next to the course(s) to be added to the schedule and click Next.
• Make any necessary changes:
Enroll Start of Term: Check if the student is to be enrolled in the course as of the beginning of the selected term. Uncheck the box and enter the Effect Date of Course Enrollment if the student was to have enrolled in the course after the start of the term.
Grading Scale: Select a grading scale only if the selected student is to use a grading scale when calculating grades than the rest of the students enrolled in the course.
Inclusion Section: If this is an inclusion section, click Find to locate that section.
Terms: Check the boxes that represent the terms that the selected student is to be enrolled for the selected course.
• Click Insert.
Quick Reference Guide STI_0702140935 InformationNOW – Scheduling • 39

View To view a specific course for the selected student, place a check next to the course and click View. Users may also click the blue Section Number link to access the View screen.
Custom Fields When selecting to edit a record for a student’s class, if custom fields have been created, users may click the Custom tab to edit the specific information for this student’s class.
Withdraw From the View screen, a student may be withdrawn from the selected course. Click Withdraw, then enter the Withdraw Date and any applicable notes.
Delete To delete a student from a course, place a check next to the course and click Delete.
Note: If Delete is selected, all history pertaining to this student for the course will be deleted. Typically, Delete is only selected during the start of the year or a term when a student has not attended the course.
Other Sections When viewing a student’s schedule, to view other sections of a specific course, place a check next to the course and click Other Sections.
A list of sections will display for the same course. The terms column also contains a hyperlink of the current enrollment for the course/capacity. Click the link to view the roster for the selected course and term. To reassign a student to a new section, bullet the section to move the student to and click Reassign. Select to Delete or Withdraw the student from the previous section. If selecting to withdraw, enter the withdraw date and any appropriate notes. Click OK.
Quick Reference Guide STI_0702140935 InformationNOW – Scheduling • 40

Enter enrollment details for the new section including terms and click Insert.
Note: Users may not enroll the student in a class in a period of the day if the student is already enrolled in a class that period.
Requests To view requests from the student’s schedule screen, click the Unscheduled Requests link.
Tasks Menu • Print Screen: Select to send a copy of the current screen to the printer.
• Copy A Schedule: Click to copy a schedule from one student to this student. Only available if the student currently has no schedule.
• Apply Model: Select to apply an existing scheduling model to this student.
• View History: Click to view a history of the changes made to this student’s schedule.
• Help: Select to access online help.
Manage • Transcript: Click to access the transcript screen for the selected student.
Reports • Student Schedule: Select to print a schedule for the selected student.
Quick Reference Guide STI_0702140935 InformationNOW – Scheduling • 41

Student Schedule Matrix View An option is available to view and modify a student’s schedule from a matrix view. This allows for a graphical working view of the students schedule and requests.
Note: The matrix screen may be disabled in the application configuration file for all users. Contact a customer care representative for assistance.
The Schedule Matrix is also available from the student search screen in the Manage drop-list. Go to Students | Student Maintenance. Enter criteria and click Search. Click the Manage drop-list on the right and select Schedule Matrix. Place a check next to one or more students and click View. The user will be directed to the schedule matrix screen.
To view this option go to Students | Student Maintenance. Search for and select to View a student. Click the Schedule Matrix link under the Manage menu on the left. When selected, the following view will display.
Note: The view will change depending on the schedule model.
• All course requests are listed down the left margin (ordered by the name of the course).
Quick Reference Guide STI_0702140935 InformationNOW – Scheduling • 42

• Any course request that is scheduled will be in the column on the left in grey and will also show in the Day Type/Period/Block grid.
o For scheduled sections, the section displays in the grid with the Seats Taken/Seats Available (ex. 13/20), Course/Section Number, Course Short Name, Teacher and Room Number. Click directly on the Seats Taken/Seats Available blue link to view the list of students who are enrolled in the section.
o Users may click the X in the upper right hand corner of the course box to remove it from the student’s schedule.
o Any course request that is not currently scheduled will show in white on the list.
o A section that meets in contiguous blocks, day types, period or terms, will be displayed as a single square in the grid.
o A section that meets in non-contiguous blocks, day types, period or terms, will be displayed as a multiple squares in the grid.
• The Day Type/Period/Block grid shows any currently scheduled section. This area may be used to manage requests as well as Master Schedule options.
• Withdrawn sections are not displayed on the grid. As course requests are selected from the left margin, the available/matching sections will show in yellow in the grid. Only sections that match the course request will be displayed. If the course request has an alternate request, then sections for that request are also displayed.
Note: An ellipsis button (…) will display if multiple sections are available for the selected course during the same period. Click the ellipsis button (…) to view all of the available sections for the period/block.
To select one of the sections and add it to the student's schedule, simply click on the desired yellow section in the grid.
Quick Reference Guide STI_0702140935 InformationNOW – Scheduling • 43

In the following example, the user clicked section Alg 2.1 during 1st period. After the section is added to the student’s schedule, it will appear in grey.
If a section causes a conflict, it will show in red outline. If the section is selected, the conflicted section is automatically unscheduled.
The controls at the top of the screen allow the user to change the display, print reports, set overrides and view history.
Layout Choose whether to organize a student’s schedule by Day Type or by Term.
• Day Type: The screen will display a separate schedule table for each day type.
• Term: The screen will display a separate schedule table for each term. The Layout button will only be displayed when the scheduling model is Normal, Day Met, or Cycle.
Quick Reference Guide STI_0702140935 InformationNOW – Scheduling • 44

When the scheduling model is Normal, the page will use the Day Type layout by default. When the scheduling model is Day Met or Cycle, the page will use the Term layout by default. When the scheduling model is Period, the page will display a single schedule table. The name of the day type will not be displayed. When the scheduling model is Block, the page will display a single schedule table. Blocks will be displayed down the vertical axis in place of periods. Terms will be displayed across the horizontal axis. Day types and periods will not be displayed.
Overrides Select the validation rules that will be enforced or overridden.
• Validation rules with a checkbox next to them will not be enforced.
• Zero, one, or more of the validation rules may be checked.
• When you click an option, the checkbox next to that option will be toggled.
• The options that were previously selected by the user will be restored when the user re-opens the page.
• The Override button will only be displayed when the user has permission to Allow Override of Section Checks.
Tasks The Tasks button provides a list of links to other pages for this student. When the View History link is clicked, a popup will display showing the student’s full schedule history.
Note: The history screen will only display schedule changes that were made AFTER the summer release was applied. Changes to schedules that were performed prior to the installation of the summer update will not be included.
Reports The Reports button provides a list links to reports for this student. When the Student Schedule link is clicked, a popup will display showing the options page for the Student Schedule Report.
Saving Changes Click OK to save all changes. Changes are not saved until the OK button is clicked. If the user clicks Close, the screen will close without saving changes. Click Reset to re-load the screen without saving changes.
Note: When the user attempts to save changes, an error will be displayed if any changes have been made to the student’s schedule outside of this page since the page was accessed (i.e., if another user access the same student’s screen). When a validation error occurs, the system will attempt to save changes to other sections. When a more serious error occurs, the system will roll back all changes. In either case, all errors are displayed to the user.
Quick Reference Guide STI_0702140935 InformationNOW – Scheduling • 45

Dates • Course Enrollment Dates: When a student is enrolled in a section under Students | Student
Maintenance | Schedule link, InformationNOW typically allows the user to select the scheduled terms and enroll date for the section. The Schedule Matrix page does not allow the user to select the scheduled terms or an enroll date. Instead, these options are determined for the user.
o When a student is enrolled in a section before the section has started, the student will be scheduled in all terms that the section meets. The enroll date will be null.
o When a student is enrolled in a section after the term has started, the student will be scheduled in the current term and all future terms that the section meets. The enroll date will be today’s date.
o When a student is enrolled in a section on a date that occurs between two terms, the student will be scheduled in all future terms that the section meets. The enroll date will be the first day of the next term.
o The page will not allow a student to be enrolled in a section that has ended.
o An un-scheduled section that has ended will not be displayed when the user selects a request, a section, or the More Sections dialog.
• Deletes or Withdrawals: When a student is withdrawn from a section via the Students | Student Maintenance | Schedule link, InformationNOW typically allows the user to choose whether to delete or withdraw a student from a section. If withdrawn is selected, the user enters a withdrawn date. The Schedule Matrix page does not allow the user to choose whether to delete or withdraw a student and does not allow the user to enter a withdrawn date. Instead, these options are determined for the user.
o When a student is removed from a section before the section has started, the student will be deleted from the section.
o When a student is removed from a section during a term, the student will be withdrawn from the section. The withdraw date will be yesterday’s date.
o When a student is removed from a section on a date that occurs between two terms, the student will be withdrawn from the section. The withdraw date will be the last day of the previous term.
o The page will not allow a student to be removed from a section after the section has ended.
The X icon will not be displayed for a scheduled section that has ended.
The ellipsis icon will not be displayed for a scheduled section that has ended.
An un-scheduled section will not be displayed if it has a scheduling conflict with a section that has ended.
Block Scheduling Block scheduling is the most complex and capable scheduling model. Each section is assigned to a block, which is then assigned to a day type and time slot. The calendar specifies the day type and bell schedule for each school day. Block scheduling is ideal for schools that use mosaic or block scheduling.
Create Academic Session Note: The following assumes user is creating a new academic session under the School/District menu from the school’s Acad Session tab and not through the Create New Academic Session option under Mgmt Console.
Quick Reference Guide STI_0702140935 InformationNOW – Scheduling • 46

The Block scheduling model must be selected when creating the new academic session. To create a new academic session, go to School/District | School | Acad. Sessions | Add | Schedule Type | Scheduling Model. Select Each Section Declares Blocks Which it Meets, Each Block Declares Day Type and Period. Refer to the InformationNOW – Creating An Academic Session Quick Reference Guide.
Setup Code banks for blocks, periods, and bell schedules should be set prior to setting day types.
Blocks To create blocks, go to Scheduling | Setup. Select Blocks from the list of lookups and click Refresh.
Click Add to insert a new block of instructional time that occurs in a typical day.
Periods To create periods, go to Scheduling | Setup. Select Periods from the list of lookups and click Refresh. Click Add to insert periods of the day representing the instructional blocks of time.
Bell Schedule To create bell schedules, go to Scheduling | Setup. Select Bell Schedules from the list of lookups and click Refresh.
Set Day Types To create day types, go to School/District | School. Search for and select to view the school. Click the Acad. Session tab. Select to view the academic session and click the Day Types tab. Click Add to insert Day Types or select the existing and click View.
Quick Reference Guide STI_0702140935 InformationNOW – Scheduling • 47

For each new Day Type, set the period (TimeSlot) and the block with which to associate it.
Note: The Add Row button is used to add additional block pairs (if more than eight pairs are needed).
The Remove Row button may be used to remove unused block pairs.
Master Schedule For block scheduling, the Master Schedule will allow for block assignment:
Each block may specify zero, one, or more sections that meet in that block. Each section may meet in zero, one, or more blocks.
Quick Reference Guide STI_0702140935 InformationNOW – Scheduling • 48

Master Schedule Builder Where Period was formerly displayed, it will be replaced by the term Block. For example, go to Scheduling | Build Master Schedule. Select a course. Instead of defining the periods available, select the blocks available.
Student Schedule The student schedule will display blocks instead of periods of the day.
Quick Reference Guide STI_0702140935 InformationNOW – Scheduling • 49

InformationNOW – Transcripts
About this Guide This document provides instructions on setting up and utilizing the Transcripts feature in InformationNOW.
Setup The setup steps in this section must be completed prior to using Transcripts.
Grading Settings To set up transcripts, go to Grades | Setup. Select the Settings tab and enter data as described below. Required fields are indicated with an asterisk (*).
Quick Reference Guide STI_0704141137 InformationNOW – Transcripts • 1

• Grade Settings:
o *Min Grade Level for Rank & GPA: Select the earliest grade level to be included in class rank and GPA calculations.
o *GPA Decimal Precision: Enter the number of decimal places to be included in GPA calculation.
• Transcript History:
o *Grading Scale: Select the type of grading scale to be printed on transcripts if included.
o *Transcript GPA Method: Select the type of GPA to display on the students' printed transcript reports.
o Display Non-Credit Bearing Classes: Check to include all grades on the printed student transcript report, regardless of credit issued.
• Class Rank Calculations:
o Sequencing: Select the preference for Class Rank sequence in case of ties during the ranking process.
Sequential: If a three-way tie occurs for 3rd place in the class ranking, the students will be ranked, 1, 2 and 3, 3, 3, 4.
Logical: If a three-way tie occurs for 3rd place in the class ranking, the students will be ranked 1, 2, 3, 3, 3, 6.
o Weighting: Select whether the GPA used to determine class ranking is an unweighted GPA or a weighted GPA.
o *Rank GPA Method: Select the GPA Method that is being used to determine the ranks of the students.
o *Decimal Precision: Enter the number of decimal places to be used when calculating class rank GPA.
o Rank by Comparing Total Grade Points: Rank the students on total grade points earned and not credit attempted (GPA). For example, a student with 4 A’s will receive 4 quality points for each A, for a total of 16 quality points. Another student earns 4 A’s and a B, which will earn a total of 19 quality points. The second student will be ranked ahead of the first student in this example.
o Weight Transcript GPA: Print the weighted GPA on the students’ transcripts.
• Report Card GPA: Choose the appropriate settings for items to print on the report card.
o GPA Type: Select to print No GPA (None), Alpha, Numeric or All.
o GPA Weighted Type: Select to print Weighted, Unweighted or Both for GPA’s on the report card.
o Grading Period GPA: Select to print a GPA for the Current Grading Period Only, All Grading Periods or No grading period GPA (None).
o Display Cumulative GPA: Check to include the student’s cumulative GPA on the report card.
o Include On Report Card: Check to include all of the selected items on the traditional report card.
o Include On Standards Report Card: Check to include all of the selected items on the standards report card.
• Reports And Grade Labels:
o Numeric Grade Decimal Positions: Enter the number of decimal places to print on grading reports and labels.
o Include Withdrawn Sections on Reports: Check to include sections from which a student is currently withdrawn on grading reports and labels.
• Averaging: Check to use the averaging equivalent of a graded item when averaging grades.
• Transcript Grade Display: Select to view Alpha, Numeric or Both grades on the individual student’s transcript screen.
Quick Reference Guide STI_0704141137 InformationNOW – Transcripts • 2

• Thresholds For Posting: Enter the number of instructional days for which the student can be withdrawn from the section or from school and still receive a grade. If the date on which a student withdraws from a section (or from school) is less that the grading period end date minus the number of in-school/instructional days from the school calendar entered for the posting threshold, then the student will not have grades posted for the section for the grading period. For example, if students who withdraw five days before the ending of the grading period should still receive a posted grade from the teacher’s Grade Book, enter a 5 in this field.
Click OK to save the changes.
GPA Method GPA Methods are the various formulas used for calculating a student's GPA. Those formulas may include a standard-based GPA, such as a 4- or 12-point scale, or a numeric- (percentage-) based GPA. For specific instructions regarding GPA Method, please refer to the InformationNOW - Grading Quick Reference Guide. To modify the GPA method, go to either Grades | Setup or to System Preferences | Setup. Select the GPA Method lookup and click Refresh.
Grading Scales Grading Scales are used for multiple purposes other than assigning letter grades to students for earning specific numeric grades. The parts of the transcript controlled by the scale include credit awarded and the amount of quality points awarded. For specific instructions regarding Grading Scales, please refer to the InformationNOW - Grading Quick Reference Guide. To modify the Grading Scales, go to either Grades | Setup or to System Preferences | Setup. Select the Grading Scales lookup and click Refresh. For transcript setup, remember the following for each alpha mark or numeric grade range:
• For a graduation credit to be awarded, Award Graduation Credit must be checked.
• For quality points to be awarded, the GPA Method field must have a value.
• If a student earns zero quality points at a specific grade point, then a 0 must be entered into the GPA Method field.
• If the GPA method uses numeric grades, the value entered for the GPA Method will be overridden. When posting to the transcript, InformationNOW will use the student’s numeric grade.
Grade Levels Users may exclude terms from Transcript GPA & Rank by term and by grade level. This will exclude any grade information from the class size, rank, and GPA calculations after a certain term. This setting is by grade level. For example, a school may want to “lock” GPA & Rank for all seniors on December 31st after the first term is completed for scholarship and ranking purposes for graduation. To change the setting, go to System Preferences | Setup. Select Grade Level from the list and click Refresh. Click to View a grade level. In the lookup bank for grade level, an option is available for each grade level. Exclude transcript terms with a sequence greater than xx. The field is blank by default, meaning that all transcript terms will be considered when calculating rank and GPA.
Quick Reference Guide STI_0704141137 InformationNOW – Transcripts • 3

The sequence number referred to here is the sequence number on the transcript term record under System Preferences | Setup.
When posting and reconciling transcripts, the calculations for class size, class rank, and GPA will exclude student transcript term data that is received in a transcript term after the selected term sequence where the student transcript term grade level matches the grade level containing the setting.
Terms Terms are used to indicate how often credit can be awarded. Terms are also used to indicate the shortest length of time a class lasts, as well as the name of the term printed on the transcripts. For specific instructions regarding Terms, please refer to the InformationNOW – Attendance Quick Reference guide. To modify the Terms, go to either Scheduling | Setup or to System Preferences | Setup. Select the Terms lookup and click Refresh. If the necessary term does not exist, click Add to insert a new term.
Note regarding ConnectEdu Term: If using ConnectEdu, select the corresponding credit bearing graded item.
Grading Periods Grading Periods are the timeframes for which graded items may be collected and reported.
Note: Terms must be created before Grading Periods can be added.
Quick Reference Guide STI_0704141137 InformationNOW – Transcripts • 4

To modify the Grading Periods, go to either Grades | Setup or to System Preferences | Setup. Select the Grading Periods lookup. Select the appropriate Term and click Refresh. For details regarding grading periods, refer to the InformationNOW – Grading Quick Reference Guide.
Academic Session Name Academic Sessions are created for the various time segments during an academic year. For example, one academic session may be created for the regular school year that would run from August to May, and another academic session may be created for the summer school that runs from June to July. For specific instructions regarding Academic Sessions, please refer to the InformationNOW – Creating An Academic Session Quick Reference Guide.
Note: The name of the academic session will print on the student transcript.
Valid Course The Valid Course area is used to set a default for GPA Credits and Graduation Credit when sections are created in the Master Schedule. For specific instructions regarding Valid Courses, please refer to the InformationNOW – Scheduling Quick Reference Guide. To modify courses, go to Scheduling | Valid Courses.
Master Schedule The Master Schedule contains the following settings which affect GPA and credit calculations for transcripts.
• Course Type: The general grouping to which the section belongs.
• Difficulty Level: The level of difficulty of the section.
• Grading Scale: A scale should only be selected if the section uses a scale other than the default scale assigned to each grade level in the School Maintenance form, located under School/District | School.
• GPA Credit: The number of credits attempted for the course. If section does not affect GPA, leave blank.
Note: If left blank, no grade points will be awarded even if Include Unweighted and Weighted are checked.
• Grad Credit: The number of credits earned for completing the coursework.
• A. Credit: o This area controls the terms for which credit is awarded. If a term is checked, credit will be attempted
and/or awarded for that term.
o Along with GPA and Grad Credit, A.Credit determines how much credit is actually attempted and/or earned. This might be used in cases in which a year-round class is considered 1.00 credit attempted and/or earned and .50 is awarded for each semester. A. Credit would be checked for 2 terms, with 1.00 credit divided by 2 terms checked = 0.50 credit for each term checked.
o If A. Credit is checked AND GPA Credit and Grad Credit are left blank, the term grade will post to the transcript without affecting GPA and awarding graduation credit. Possibly used at middle school where no credits are awarded or when a student is auditing courses at the high school.
• Weight Added: Award additional quality points when computing weighted GPA.
Quick Reference Guide STI_0704141137 InformationNOW – Transcripts • 5

Note: If course is not weighted, leave at 0.00.
• Weight Multiplier: Award additional quality points by multiplying the quality points by this factor.
Note: If course is not weighted, leave at 1.00.
• Unweighted and Weighted GPA checkboxes: If checked, the course will be included into the GPA Method. If not checked, the course will be excluded from the GPA Method.
Note: If there is no GPA value, the inclusion checkbox does not have to unchecked. NO grade points will be awarded if there is no GPA credit awarded.
Note 2: Generally, these checkboxes should remain checked unless the user wishes to set exclusion from a specialized GPA Method (for example, Core Classes GPA).
Now that the transcript setup has been completed, the grades should be ready to be posted to the transcripts.
Posting Grades to Transcripts Once the grades have been entered and validated for the students, the grades can be posted to the transcripts. This process copies the grades from the current academic session into the transcript file.
Note: If grade comments have been entered on the student’s grades screen, those comments will also be posted to the student’s transcript grade record.
To copy the grades from the students' grade files to the transcripts, the grades must be posted to the transcripts. To complete the task do the following:
• Go to Grades | Setup. Select the Grading Periods lookup and click Refresh.
• Confirm that the correct graded item has GPA Points and Grad Credit checked.
• Go to Mgmt Console | Console.
• Click Post Grades to Transcript.
Select either current term to post or repost a previous term.
Quick Reference Guide STI_0704141137 InformationNOW – Transcripts • 6

Note: Once the current term has been posted, previous terms may not be reposted unless the user first unposts the current term. For example, if term 2 has been posted and changes are required for term 1, users must unpost term 2 and then unpost term 1. Make changes to term 1 grades and then repost term 1 and then repost term 2. It is always suggested to spot-check student transcripts to confirm the accuracy after posting. To unpost transcripts, go to Mgmt Console | Console. Select to Unpost Grades to Transcript.
If changes are made to grade-related items such as student grades, Master Schedule or grading scales, grades must be posted again to the student transcript.
Note: A warning will display if there are no graded items marked to post to transcript for the selected term.
If an Academic Session is closed, any changes within that Academic Session will need to be made directly on the student’s transcript.
Reconcile Term GPA and Rank Users may also update GPA/Rank without re-posting to transcripts. This provides the user the ability for manually entered transcript information to be included in transcript class size, rank and GPA calculation.
A screen will display where the user may select the Term to be reconciled. Only those terms that have already been posted to transcript in the academic session will display.
When the user clicks Reconcile, the program will recalculate GPA and RANK for the term selected based upon changes to transcript settings and manual student transcript edits.
Quick Reference Guide STI_0704141137 InformationNOW – Transcripts • 7

To determine which students to include, the system considers the following:
• Which students have transcript records posted for the selected term.
• If the student checked as Exclude from class rank.
• If the cumulative GPA for the student through the selected term not blank.
Viewing Student Transcripts Once grades have been posted to transcripts, they may be viewed through the student’s Transcript screen. Go to Students | Student Maintenance. Search for and select the student. Click the Transcript option under the manage menu at left. To access the new user interface, go to Students | Student Maintenance. Search for and select to View a student. Click the Transcript option under the Manage menu on the left. The following screen will display:
Quick Reference Guide STI_0704141137 InformationNOW – Transcripts • 8

• Cumulative GPA: The student’s cumulative Grade Point Average. The GPA displayed here is controlled by the Transcript GPA Method drop-list under Grades | Setup | Settings tab. If the weighted GPA is desired, check the Weight Transcript GPA option.
• Total Graduation Credits: The Total Graduation Credits includes the total number of graduation credits for all terms. This will only include credits that are currently posted to transcripts. Any credits that are in progress will not be included in the total.
• Terms: Each transcript term displays in individual box. Terms are ordered by Sequence as defined on the Transcript Term. They will display in ascending sequence order, since the system is displaying the most recent Transcript Term appears in the top left, with each subsequent sequenced area appearing after it. The structure of each Transcript Term will display as follows:
Quick Reference Guide STI_0704141137 InformationNOW – Transcripts • 9

Region Description
A Hyperlink that displays the Academic Session name entered into the Transcript Term. Clicking on the hyperlink will display the Transcript Term edit screen.
B The grade level of the student at the end of the posted term.
C The red X in the upper right corner of the term allows the user to delete an entire term. When the user clicks the red X, he or she will be prompted with a dialog asking Are you sure you wish to delete this term?
D
Each section that has been added for the Transcript Term will display in this grid. The Course column will contain the course's full name and will be hyperlinked. Clicking the hyperlink will open the Transcript Section edit screen in a pop-up for the user.
E
The Grade column will contain the numeric grade for the course. In the event a numeric grade is not present, the alpha grade will display. Note: To determine if the screen should display alpha or numeric grades, go to Grades | Setup | Settings tab. In the Transcript Grade Display option, select to display Numeric, Alpha or Both.
F The Cred column will display the graduation credits for the course.
G
The last column will contain a red X that will allow the user to delete a line entry from the list of courses. When a user clicks the red X, he or she will be prompted with a dialog asking Are you sure you wish to delete this section?
H
This text area will contain the following information: SN: The school number of the school that relates to the term GPA: The student's GPA for the term Status: The student's promotion status code for the term Enr: The number of days the student was on roll during the term. Abs: The number of days the student was absent during the term. Tdy: The number of days the student was tardy during the term. Rank ## out of ##: The student's class rank and the class size for the term. Rank GPA: The student's rank GPA for the term
Quick Reference Guide STI_0704141137 InformationNOW – Transcripts • 10

Region Description
i The Add Section button will allow users to add additional sections to a particular Transcript Term for the student. Clicking this button will cause the Transcript Section add screen to display.
• Transcript Report: To print a transcript for this student, click Transcript Report under the Reports menu at left.
• Transcript Landscape: To print a landscape transcript report, click Transcript – Landscape under the Reports menu at left.
Adding a Transcript Term To add a new transcript term, click the button in the upper right hand corner. Required fields are indicated with an asterisk (*).
• *Sequence: The sequence determines the order in which terms will display on the student’s individual transcript screen. Transcript terms display on the student screen in sequence ascending order. When inserting a new term, the Sequence will default to 1 but may be changed to reorder the terms for the selected student.
• *School: Click Find to select the school from a list. If the school does not exist in the list, click Add to insert a new school.
• Academic Year: This field will populate when the Transcript Term is selected. If posted, pulls from the Session Name field, located on the Acad. Sessions tab of the School Maintenance screen.
Note: If the year is listed more than once with different Academic Session names (for example, 2014 and 2013-2014), the Academic Session name was modified between posting terms to the transcript.
• *Transcript Term: The term within the Academic Session for which the courses were completed. If posted, pulls from the Name field of the Terms which were created under Scheduling | Setup or System Preferences | Setup and under the Terms lookup. Click Find to select the term from a list of existing available terms.
Quick Reference Guide STI_0704141137 InformationNOW – Transcripts • 11
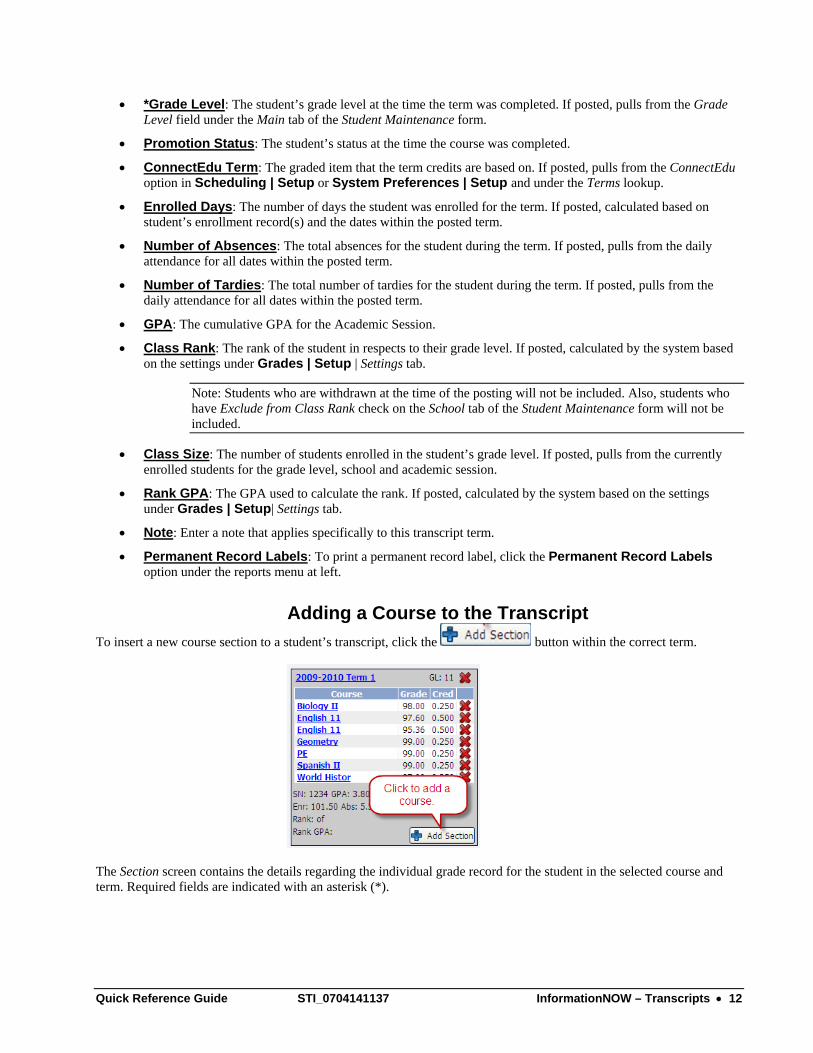
• *Grade Level: The student’s grade level at the time the term was completed. If posted, pulls from the Grade Level field under the Main tab of the Student Maintenance form.
• Promotion Status: The student’s status at the time the course was completed.
• ConnectEdu Term: The graded item that the term credits are based on. If posted, pulls from the ConnectEdu option in Scheduling | Setup or System Preferences | Setup and under the Terms lookup.
• Enrolled Days: The number of days the student was enrolled for the term. If posted, calculated based on student’s enrollment record(s) and the dates within the posted term.
• Number of Absences: The total absences for the student during the term. If posted, pulls from the daily attendance for all dates within the posted term.
• Number of Tardies: The total number of tardies for the student during the term. If posted, pulls from the daily attendance for all dates within the posted term.
• GPA: The cumulative GPA for the Academic Session.
• Class Rank: The rank of the student in respects to their grade level. If posted, calculated by the system based on the settings under Grades | Setup | Settings tab.
Note: Students who are withdrawn at the time of the posting will not be included. Also, students who have Exclude from Class Rank check on the School tab of the Student Maintenance form will not be included.
• Class Size: The number of students enrolled in the student’s grade level. If posted, pulls from the currently enrolled students for the grade level, school and academic session.
• Rank GPA: The GPA used to calculate the rank. If posted, calculated by the system based on the settings under Grades | Setup| Settings tab.
• Note: Enter a note that applies specifically to this transcript term.
• Permanent Record Labels: To print a permanent record label, click the Permanent Record Labels option under the reports menu at left.
Adding a Course to the Transcript To insert a new course section to a student’s transcript, click the button within the correct term.
The Section screen contains the details regarding the individual grade record for the student in the selected course and term. Required fields are indicated with an asterisk (*).
Quick Reference Guide STI_0704141137 InformationNOW – Transcripts • 12

Section Details • *Full Section Number: The course and section number of the completed course. If manually entering the
grade, either enter the section number or click Find to search for the course in the existing Valid Course file. If selecting a section, the teacher assigned to the section will display in the Primary Teacher field.
Note: When selecting to Find the course from the Valid Course file, the Full Section Number, Section Short Name, Course Type, Difficulty Level, GPA Credit, Grad Credit and the Include check boxes for Unweighted GPA will be populated automatically based on what is set for the selected course in the Valid Course File. All fields may be edited except for Section Short Name, Course Type or Difficulty Level.
WARNING! If tracking Graduation Credits or Goals Sought to monitor progress towards a specific graduation goal, users must click Find to select a course from the Valid Course file. Scores that are added to the student transcript by hand-typing the course and not using the Find button will not be considered when determining if a student has met a specific goal.
• *Section Short Name: The name of the completed course. If posted, pulls from the Master Schedule Section screen under Scheduling | Master Schedule. If the Find option was used to search for the course, this field will be disabled.
• Course Type: The category of the course (ex.: Math, English, Science). This field is used for Graduation Requirements. If posted, pulls from the Master Schedule section screen under Scheduling | Master Schedule. If the Find option was used to search for the course, this field will be disabled.
• Difficulty Level: The level of difficulty of the course. This field is used for Graduation Requirements. If posted, pulls from the Master Schedule section screen under Scheduling | Master Schedule. If the Find option was used to search for the course, this field will be disabled.
• Repeated Course: Check box that denotes a course that is repeated by student.
• Primary Teacher: Automatically populated if the user clicks Find to select a course from the existing master schedule.
Student Grade Details • Alpha Grade: The alphabetic grade the student earned.
• Numeric Grade: The numeric grade the student earned.
Quick Reference Guide STI_0704141137 InformationNOW – Transcripts • 13

Note: If selecting to Find a course from the Valid Course File, when the numeric grade is entered, the program will populate the Alpha Grade and the Points for the Unweighted GPA’s based on the course and assigned grading scale. Users may edit the letter grade if necessary for the grade record. If the letter grade change affects the points earned, the Points for the GPA Methods may need to be edited manually.
• GPA Credits: The number of credits attempted. This field must either be blank or show a value of 0.01 or greater. It cannot contain the value of 0.00. If blank, the grade will not have an effect on the GPA. If posted, pulls from the Master Schedule.
• Grad Credits: The number of credits the student earned for completing the course work. If posted, pulls from the Master Schedule (if the student’s grade is checked for Graduation Credit within the Grading Scale).
• Include on Transcript Regardless of Credit: Check here if this course is to be included on the printed transcript if no credit is earned. If Display Non-Credit Bearing Grades under Grades | Setup and on the Settings tab is not checked, this option overrides that setting.
Grade Points • Unweighted Include: Check this box if the section is considered part of the GPA Method. If posted, pulls
from the Master Schedule.
• Unweighted Points: The number of quality points the student earned. If posted, calculated by comparing students’ grade to grading scale. If Use Numeric Grade is checked in the GPA Method form, the students’ actual numeric grade will be used.
• Weighted Include: Check this box if the section is considered part of the GPA Method. If posted, pulls from the Master Schedule.
• Weighted Points: The number of weighted quality points the student earned. If posted, calculated by comparing student’s grade to the grading scale and adding weight based on the weight multiplier; and/or added in the Master Schedule form. If Use Numeric Grade is checked in the GPA Method form, the student’s actual numeric grade plus weight multiplier and/or weight added will be entered.
o If a course is not weighted, the GPA points are usually the same in the Unweighted Points and Weighted Points fields.
o If a course is weighted, the GPA points in the Unweighted Points field will be equal to an unweighted course and the Weighted Points will be unweighted points plus additional points.
Note: Generally, courses are included in both weighted and unweighted GPA methods. There may be customized GPA Methods that allow a section to be included in the weighted GPA, but not in the unweighted GPA.
• Note: Enter a note that may be included on the printed transcript.
Quick Reference Guide STI_0704141137 InformationNOW – Transcripts • 14

Editing a Term To edit a transcript term, click the Term which appears as a blue link at the top of the term box.
Deleting a Term To delete a term, click the red X that appears in the upper right hand corner of the term box. When the user clicks the red X, he or she will be prompted with a dialog asking Are you sure you wish to delete this term?
Editing a Course To edit a course, click the name of the course that appears as a blue link.
Quick Reference Guide STI_0704141137 InformationNOW – Transcripts • 15

Deleting a Course To delete a course from the term, click the red X next to the course. When a user clicks the red X, he or she will be prompted with a dialog asking Are you sure you wish to delete this section?
Transcript Reports
Permanent Record Header Labels This report allows users to print a label to affix to the student’s permanent record folder. The report is available from the Students | Reports menu and the Reports | All Reports menu.
Select from the following options. Required fields are indicated with an asterisk (*).
• Filter: Select the filter of students for which to print.
• *ID To Print: Select to include the Student Number, Social Security Number, Alt. Student Number, State ID Number, or None.
• *2nd ID to Print: To print an additional ID on the label, select it from the available list.
Quick Reference Guide STI_0704141137 InformationNOW – Transcripts • 16
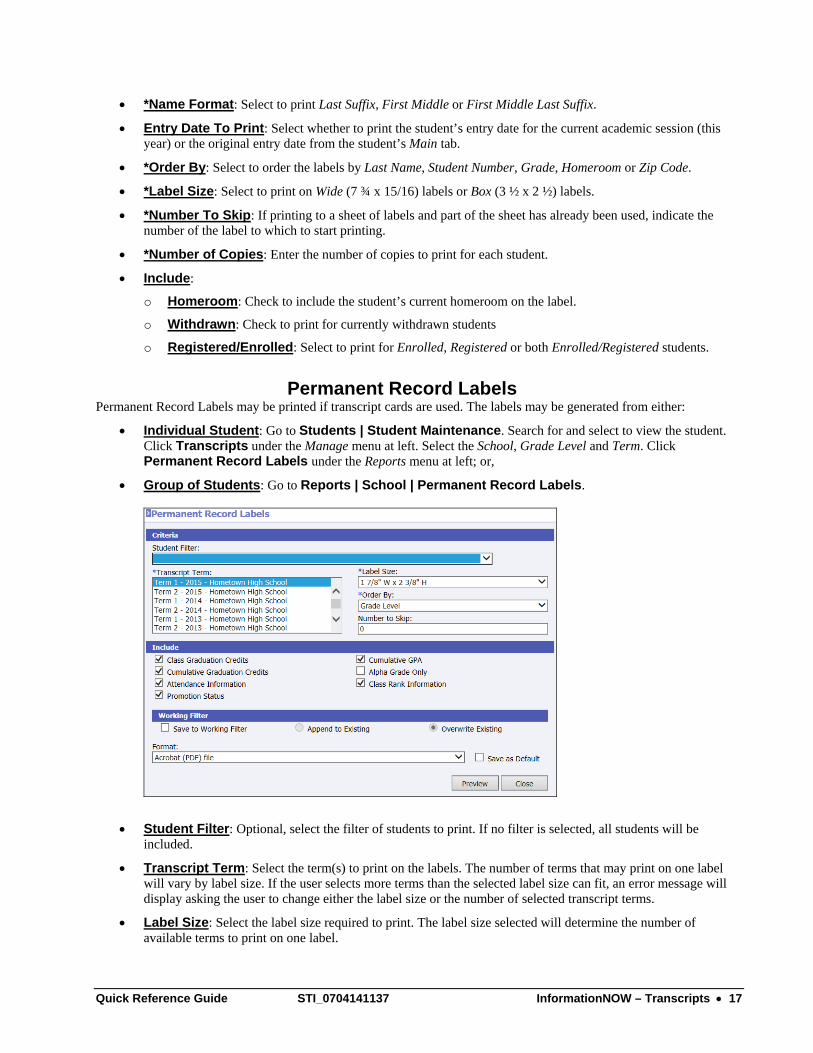
• *Name Format: Select to print Last Suffix, First Middle or First Middle Last Suffix.
• Entry Date To Print: Select whether to print the student’s entry date for the current academic session (this year) or the original entry date from the student’s Main tab.
• *Order By: Select to order the labels by Last Name, Student Number, Grade, Homeroom or Zip Code.
• *Label Size: Select to print on Wide (7 ¾ x 15/16) labels or Box (3 ½ x 2 ½) labels.
• *Number To Skip: If printing to a sheet of labels and part of the sheet has already been used, indicate the number of the label to which to start printing.
• *Number of Copies: Enter the number of copies to print for each student.
• Include:
o Homeroom: Check to include the student’s current homeroom on the label.
o Withdrawn: Check to print for currently withdrawn students
o Registered/Enrolled: Select to print for Enrolled, Registered or both Enrolled/Registered students.
Permanent Record Labels Permanent Record Labels may be printed if transcript cards are used. The labels may be generated from either:
• Individual Student: Go to Students | Student Maintenance. Search for and select to view the student. Click Transcripts under the Manage menu at left. Select the School, Grade Level and Term. Click Permanent Record Labels under the Reports menu at left; or,
• Group of Students: Go to Reports | School | Permanent Record Labels.
• Student Filter: Optional, select the filter of students to print. If no filter is selected, all students will be included.
• Transcript Term: Select the term(s) to print on the labels. The number of terms that may print on one label will vary by label size. If the user selects more terms than the selected label size can fit, an error message will display asking the user to change either the label size or the number of selected transcript terms.
• Label Size: Select the label size required to print. The label size selected will determine the number of available terms to print on one label.
Quick Reference Guide STI_0704141137 InformationNOW – Transcripts • 17

Note: Please contact the STI Forms department to purchase labels.
• Order by: If printing for multiple students, select the order in which the students are to be printed. The options are Grade Level, Homeroom or Student Display Name.
• Number To Skip: If printing on a partially used sheet of labels, enter the number of the label on the page across/down on which to begin printing.
• Class Graduation Credits: Print the graduation credits earned for the term.
• Cumulative Graduation Credits: Print the total graduation credits the students have earned.
• Attendance Information: Print the number of membership days, absences and tardies.
• Promotion Status: Select to include the student’s current promotion status from the selected term on the label. Options include:
o D = Demoted
o E = Enrolled
o G = Graduated
o M = Promoted Mid-Year
o P = Promoted
o R = Retained
o W = Withdrawn
• Cumulative GPA: Print the overall GPA for the students.
• Alpha Grade Only: By default, this option is selected. If not checked, the numeric grade only will be printed.
• Class Rank Information: Print the students’ ranks and rank GPA’s.
Transcript Report The transcript report may be generated from either:
• Individual Student: Go to Students | Student Maintenance. Search for and select to view the student. Click Transcripts under the Manage menu at left and click Transcript Report under the Reports menu at left; or,
• Group of Students: Go to Reports | Transcript Report. Required fields are indicated with an asterisk (*).
Quick Reference Guide STI_0704141137 InformationNOW – Transcripts • 18

• Student Filter: (Optional) Select the filter of students to print. If no filter is selected, all students will be included.
Note: It is not necessary to select a filter when printing a transcript from the student’s Transcript screen.
• Report Layout: Select the layout of Term Oriented, Year Oriented or Grouped By Course Type.
• Signature Label Text: Defaults to Registrar. If the person approving the transcript is in a different position, the position may be entered here. This label will print next to the signature line.
• *Order By: If printing transcripts for multiple students, transcripts may be printed in order by Student Display Name, Grade Level or Homeroom.
• ID To Print: Select the student ID to print on the report (None/blank, Student Number, Alt Student Number, Social Security Number or State ID Number.
• Go Green: Select this option to not print a hard copy of the transcript report for any student/guardian (contact) who has elected to Go Green. An alert will be created instead which can be used to generate an email to the student/contact to let them know the report is available for viewing via the home portal.
• Grade Levels: Select the grade levels of the students to be included in the transcript. For example, to print a transcript of student’s grades from 8th through 12th grade, select 8, 9, 10, 11 and 12.
• *Grade Type: Select the grade type to print (Numeric, Alpha or Both).
• Grading Scale to Display: Select a scale to display on the transcript.
• Grading Scale Text: Users may either select a grading scale from the existing list or enter grading scale detail in the Grading Scale Text box. If selecting a grading scale from the existing list, users may edit that grading scale in the Grading Scale Text box below.
Quick Reference Guide STI_0704141137 InformationNOW – Transcripts • 19
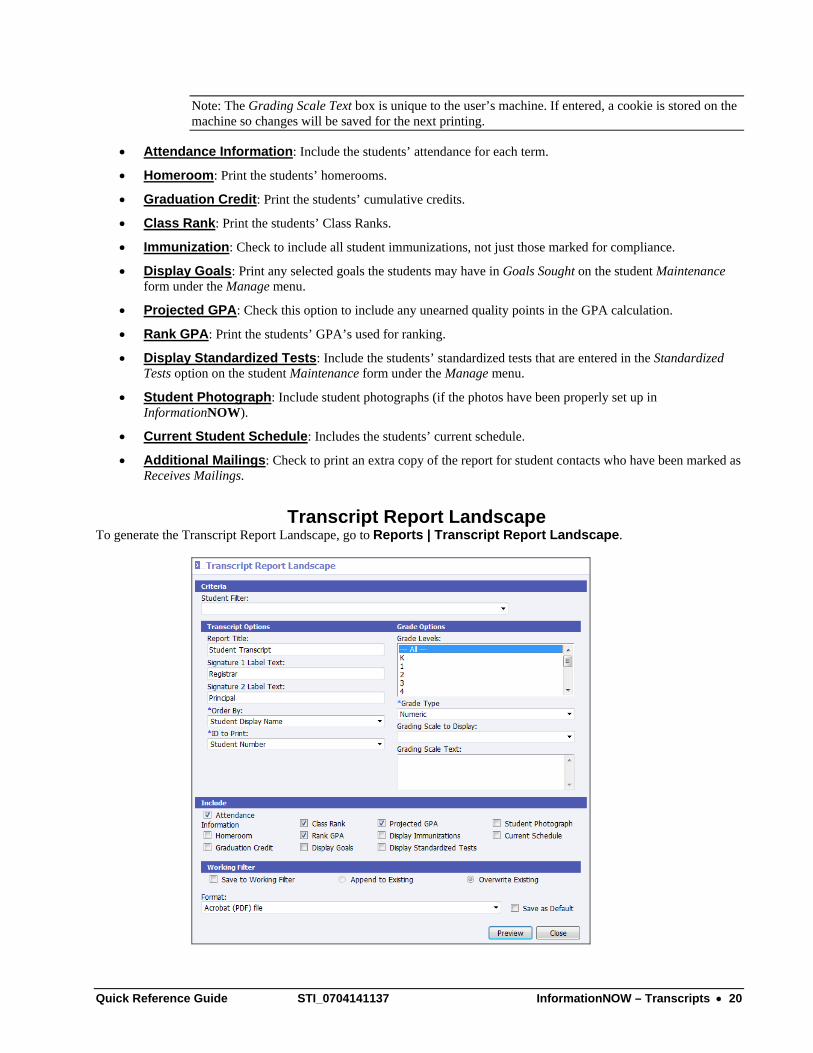
Note: The Grading Scale Text box is unique to the user’s machine. If entered, a cookie is stored on the machine so changes will be saved for the next printing.
• Attendance Information: Include the students’ attendance for each term.
• Homeroom: Print the students’ homerooms.
• Graduation Credit: Print the students’ cumulative credits.
• Class Rank: Print the students’ Class Ranks.
• Immunization: Check to include all student immunizations, not just those marked for compliance.
• Display Goals: Print any selected goals the students may have in Goals Sought on the student Maintenance form under the Manage menu.
• Projected GPA: Check this option to include any unearned quality points in the GPA calculation.
• Rank GPA: Print the students’ GPA’s used for ranking.
• Display Standardized Tests: Include the students’ standardized tests that are entered in the Standardized Tests option on the student Maintenance form under the Manage menu.
• Student Photograph: Include student photographs (if the photos have been properly set up in InformationNOW).
• Current Student Schedule: Includes the students’ current schedule.
• Additional Mailings: Check to print an extra copy of the report for student contacts who have been marked as Receives Mailings.
Transcript Report Landscape To generate the Transcript Report Landscape, go to Reports | Transcript Report Landscape.
Quick Reference Guide STI_0704141137 InformationNOW – Transcripts • 20

• Student Filter: (Optional) Select the filter of students to print. If no filter is selected, all students will be included.
• Report Title: Enter the text to be printed below the District Name (Default is Student Transcript).
• Signature Label 1 Text: Enter the text to be printed for the first signature line.
• Signature Label 2 Text: Enter the text to be printed for the second signature line.
• Order By: Select to order by Student Display Name, Grade Level (then display name) or Homeroom.
• ID to Print: Select to print Student Number, Alternate Student Number, Social Security Number or State ID Number.
• Grade Levels: Select the grade levels to be printed on the report. For example, to print a transcript for grades assigned to a student from 8th grade through 12th grade, select 8 to 12. This does not indicate the students to print on the report. It determines the range of grades to be included on the report
• Grade Type: Select which type of grade to print on the report – Alpha, Numeric or Both.
• Grading Scale To Display: Users may either select a grading scale from the existing list or enter grading scale detail in the Grading Scale Text box. If selecting a grading scale from the existing list, users may edit that grading scale in the Grading Scale Text box below.
Note: The Grading Scale Text box is unique to the user’s machine. If entered, a cookie is stored on the machine so changes will be saved for the next printing.
• Attendance Information: Check to include attendance detail in the bottom right corner of the report.
• Homeroom: Check to display the name and teacher of the student’s homeroom.
• Graduation Credit: Check to print course listing with credits required/received in the top right corner of the report.
• Class Rank: Check to include class rank and size.
• Rank GPA: Check to include the GPA that was used to calculate the student’s class ranking.
• Display Goals: Check to print student goals.
• Projected GPA: Check to print student’s projected GPA based on current grades.
• Display Immunizations: Check to include all student immunizations, not just those checked for compliance.
• Display Standardized Tests: Check to display a summary of the student’s standardized test(s).
• Student Photograph: Check to include picture if on file.
• Current Schedule: Select to include the student’s current schedule on the transcript.
Quick Reference Guide STI_0704141137 InformationNOW – Transcripts • 21