ingres 2006 r2 for windows quick start guide - huihoo
TRANSCRIPT

Ingres® 2006 Release 2 for Windows
Quick Start Guide
February 2007

This documentation and related computer software program (hereinafter referred to as the "Documentation") is for the end user's informational purposes only and is subject to change or withdrawal by Ingres Corporation ("Ingres") at any time.
This Documentation may not be copied, transferred, reproduced, disclosed or duplicated, in whole or in part, without the prior written consent of Ingres. This Documentation is proprietary information of Ingres and protected by the copyright laws of the United States and international treaties.
Notwithstanding the foregoing, licensed users may print a reasonable number of copies of this Documentation for their own internal use, provided that all Ingres copyright notices and legends are affixed to each reproduced copy. Only authorized employees, consultants, or agents of the user who are bound by the confidentiality provisions of the license for the software are permitted to have access to such copies.
This right to print copies is limited to the period during which the license for the product remains in full force and effect. The user consents to Ingres obtaining injunctive relief precluding any unauthorized use of the Documentation. Should the license terminate for any reason, it shall be the user's responsibility to return to Ingres the reproduced copies or to certify to Ingres that same have been destroyed.
To the extent permitted by applicable law, INGRES PROVIDES THIS DOCUMENTATION "AS IS" WITHOUT WARRANTY OF ANY KIND, INCLUDING WITHOUT LIMITATION, ANY IMPLIED WARRANTIES OF MERCHANTABILITY, FITNESS FOR A PARTICULAR PURPOSE OR NONINFRINGEMENT. IN NO EVENT WILL INGRES BE LIABLE TO THE END USER OR ANY THIRD PARTY FOR ANY LOSS OR DAMAGE, DIRECT OR INDIRECT, FROM THE USER OF THIS DOCUMENTATION, INCLUDING WITHOUT LIMITATION, LOST PROFITS, BUSINESS INTERRUPTION, GOODWILL, OR LOST DATA, EVEN IF INGRES IS EXPRESSLY ADVISED OF SUCH LOSS OR DAMAGE.
The use of any product referenced in this Documentation and this Documentation is governed by the end user's applicable license agreement.
The manufacturer of this Documentation is Ingres Corporation.
For government users, the Documentation is delivered with "Restricted Rights" as set forth in 48 C.F.R. Section 12.212, 48 C.F.R. Sections 52.227-19(c)(1) and (2) or DFARS Section 252.227-7013 or applicable successor provisions.
Copyright © 2007 Ingres Corporation. All Rights Reserved.
Ingres, OpenROAD, and EDBC are registered trademarks of Ingres Corporation. All other trademarks, trade names, service marks, and logos referenced herein belong to their respective companies.

Contents
Chapter 1: Installing Ingres 5 Install Ingres for Windows...................................................................................................... 5
Separately Installed Components....................................................................................... 5 Advanced Component Selection ......................................................................................... 6
Startup and Shutdown on Windows ......................................................................................... 6 Start and Stop Ingres with Ingres Visual Manager ................................................................ 7 Start and Stop Ingres with the Ingres Service Manager ......................................................... 8
Chapter 2: Creating a Database 9 How You Create a Database.................................................................................................... 9 How You Create a Database Using Visual Tools.......................................................................... 9
Connect to Ingres Using Visual DBA ................................................................................. 10 Create a Database Using Visual DBA................................................................................. 11 Create a Table Using Visual DBA ...................................................................................... 12 Populate a Table Using the Import Assistant ...................................................................... 14
Chapter 3: Using the Ingres Demonstration Application 17 Ingres Demonstration Application.......................................................................................... 17 What You Should Know........................................................................................................ 17 Start the Ingres Demonstration Application............................................................................. 18 Get Help on the Demonstration Application ............................................................................. 18
Chapter 4: Connecting to Ingres from .NET 19 Required Software............................................................................................................... 19 Install the Data Provider into the Toolbox ............................................................................... 20 Start the Ingres Data Adapter Configuration Wizard ................................................................. 21 Configure a Connection........................................................................................................ 23 Design a Query................................................................................................................... 25
Chapter 5: Connecting to Ingres from Eclipse 27 Required Software............................................................................................................... 27 Install Plug-ins ................................................................................................................... 27 How You Connect to Ingres from Eclipse................................................................................. 28 Create a Connection Profile................................................................................................... 29 Define an Ingres Driver........................................................................................................ 31
Contents iii

Create a New Database Connection ....................................................................................... 34 Connect to a Database......................................................................................................... 35 Create an SQL Scratch File ................................................................................................... 36
Chapter 6: Connecting to Ingres from Python 39 Requirements ..................................................................................................................... 39 Ingres Python DBI Driver and the Ingres ODBC Driver.............................................................. 39 Create a Connection to Ingres............................................................................................... 40 Example—Connect to Ingres and Select from a Table ............................................................... 40
Chapter 7: Connecting to Ingres from PHP 41 Requirements ..................................................................................................................... 41 Download the PECL Extension ............................................................................................... 41
Download the Windows CVS Client ................................................................................... 42 Install the Extension on Windows..................................................................................... 42
ingres_connect() Function—Connect to Ingres......................................................................... 45 Code Examples ................................................................................................................... 46
Chapter 8: Connecting to Ingres from Perl 49 Requirements ..................................................................................................................... 49 Ingres Perl DBI Extension..................................................................................................... 50 How You Can Build and Install the Ingres Perl DBI Extension..................................................... 50 Build the DBD::Ingres Extension ........................................................................................... 51 Test and Install the DBD::Ingres Extension............................................................................. 51 How You Can Use the DBD::Ingres Extension.......................................................................... 52 Example—Connect to Ingres and Select from a Table ............................................................... 52
Index 53
iv Quick Start Guide

Chapter 1: Installing Ingres
This section contains the following topics:
Install Ingres for Windows (see page 5) Startup and Shutdown on Windows (see page 6)
Install Ingres for Windows The installation process on Windows uses an easy to follow installation wizard.
To start the installation wizard
1. Log on to your Windows machine and execute the file setup.exe located in the root directory of the Ingres distribution.
Note: To install Ingres, you must be logged on as a user with administrative privileges.
The first page of the Ingres Installation Wizard is displayed.
2. Respond to the Installation Wizard dialogs.
If you need more information about a specific item, click the item's
information button .
After you provide the required information in the Installation Wizard dialogs, the installation program installs Ingres.
Note: Installation considerations are described in detail in the Installation Guide.
Separately Installed Components
The Ingres .NET Data Provider and Ingres Documentation are provided as separately installable components. They are displayed as installable components in the installation wizard only if their packages are detected in the installation image you downloaded. When a full Ingres image (Ingres, Ingres .NET Data Provider, and Ingres Documentation) is installed, these three components are listed as separate programs in the Add/Remove Programs feature of the Control Panel in Windows.
Note: If you download the Ingres .NET Data Provider and Ingres Documentation packages to the same directory as the Ingres download, they will appear as installable components.
Installing Ingres 5

Startup and Shutdown on Windows
Advanced Component Selection
The Component Selection page of the installation wizard lets you select a Custom installation.
When Custom is selected, the checkbox "Select advanced customization of components" appears. This option lets you select individual components (rather than default packages) for installation. For example, Vision and network protocols other than TCP/IP are not installed by default, so you can select these individually using the advanced Custom Setup.
This option is recommended for advanced users only.
Startup and Shutdown on Windows You can start up and shut down your Ingres instance on Windows in the following ways:
Automatically
Using Ingres Visual Manager
Using Ingres Service Manager
Using the Services Window in Windows
Using the ingstart and ingstop commands
Note: Due to tightened security on the Microsoft Windows Vista platforms, we must impose the following restriction when using Ingres on Windows Vista: All Ingres tools and applications must be started from the Ingres Command Prompt, which is located in the Ingres Program Group under the Vista Start menu. In addition, to secure the appropriate privileges to execute a server process on Vista, you must always start Ingres as a service.
6 Quick Start Guide
Startup and Shutdown on Windows
Start and Stop Ingres with Ingres Visual Manager
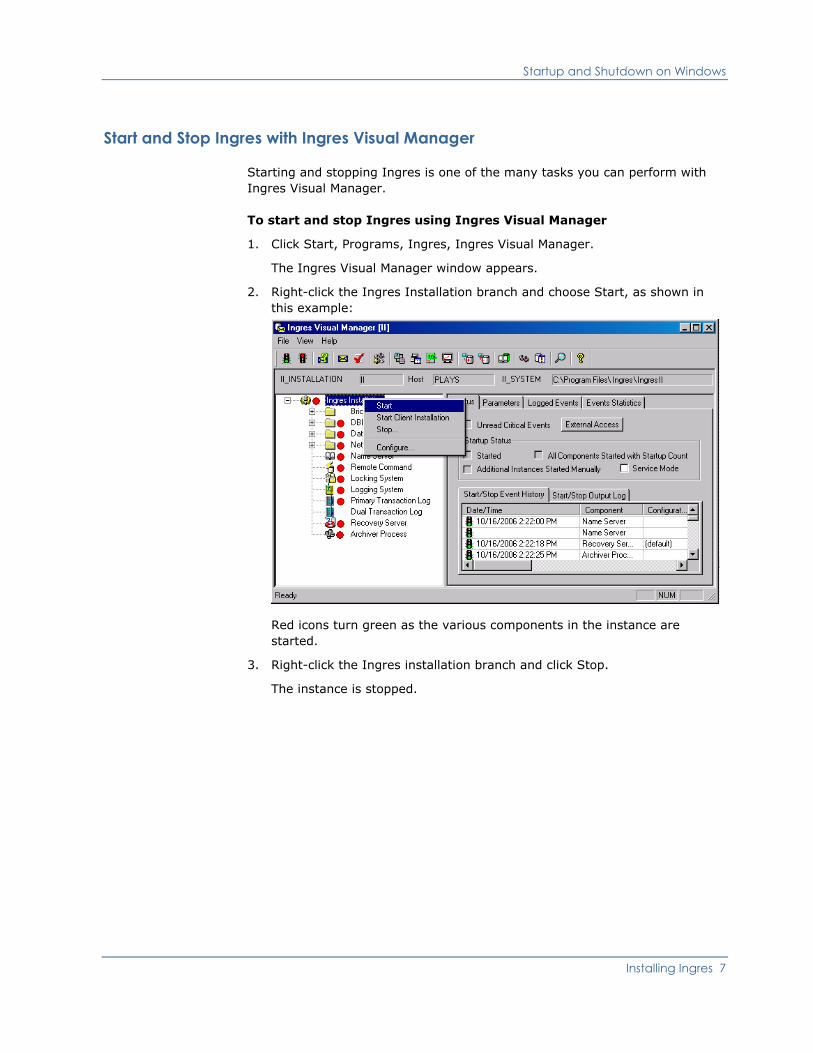
Starting and stopping Ingres is one of the many tasks you can perform with Ingres Visual Manager.
To start and stop Ingres using Ingres Visual Manager
1. Click Start, Programs, Ingres, Ingres Visual Manager.
The Ingres Visual Manager window appears.
2. Right-click the Ingres Installation branch and choose Start, as shown in this example:
Red icons turn green as the various components in the instance are started.
3. Right-click the Ingres installation branch and click Stop.
The instance is stopped.
Installing Ingres 7
Startup and Shutdown on Windows
Start and Stop Ingres with the Ingres Service Manager
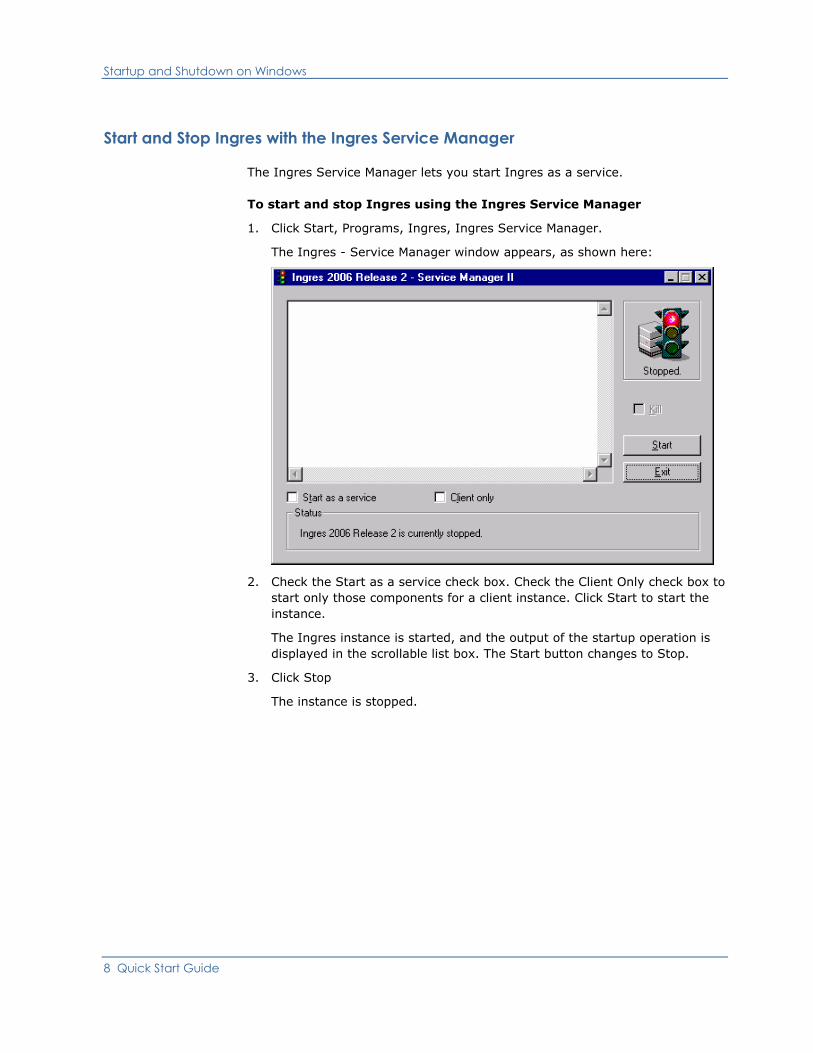
The Ingres Service Manager lets you start Ingres as a service.
To start and stop Ingres using the Ingres Service Manager
1. Click Start, Programs, Ingres, Ingres Service Manager.
The Ingres - Service Manager window appears, as shown here:
2. Check the Start as a service check box. Check the Client Only check box to start only those components for a client instance. Click Start to start the instance.
The Ingres instance is started, and the output of the startup operation is displayed in the scrollable list box. The Start button changes to Stop.
3. Click Stop
The instance is stopped.
8 Quick Start Guide

Chapter 2: Creating a Database
This section contains the following topics:
How You Create a Database (see page 9) How You Create a Database Using Visual Tools (see page 9)
How You Create a Database A database can be created using Visual DBA, if available in your environment, or by using Ingres commands and SQL statements.
The process for creating a database is as follows:
1. Create a database.
2. Create base tables for the database.
3. Populate the tables with data.
Note: Examples used in this guide are from the Ingres demonstration database, demodb.
How You Create a Database Using Visual Tools The Ingres Visual DBA suite of tools is available on Windows.
The process for creating a database using the Ingres visual tools is as follows:
1. Connect to Ingres using Visual DBA
2. Create a database using the Create Database dialog in Visual DBA.
3. Create a table using the Create Table dialog in Visual DBA
4. Load data into the table using the Import Assistant.
Creating a Database 9
How You Create a Database Using Visual Tools
Connect to Ingres Using Visual DBA
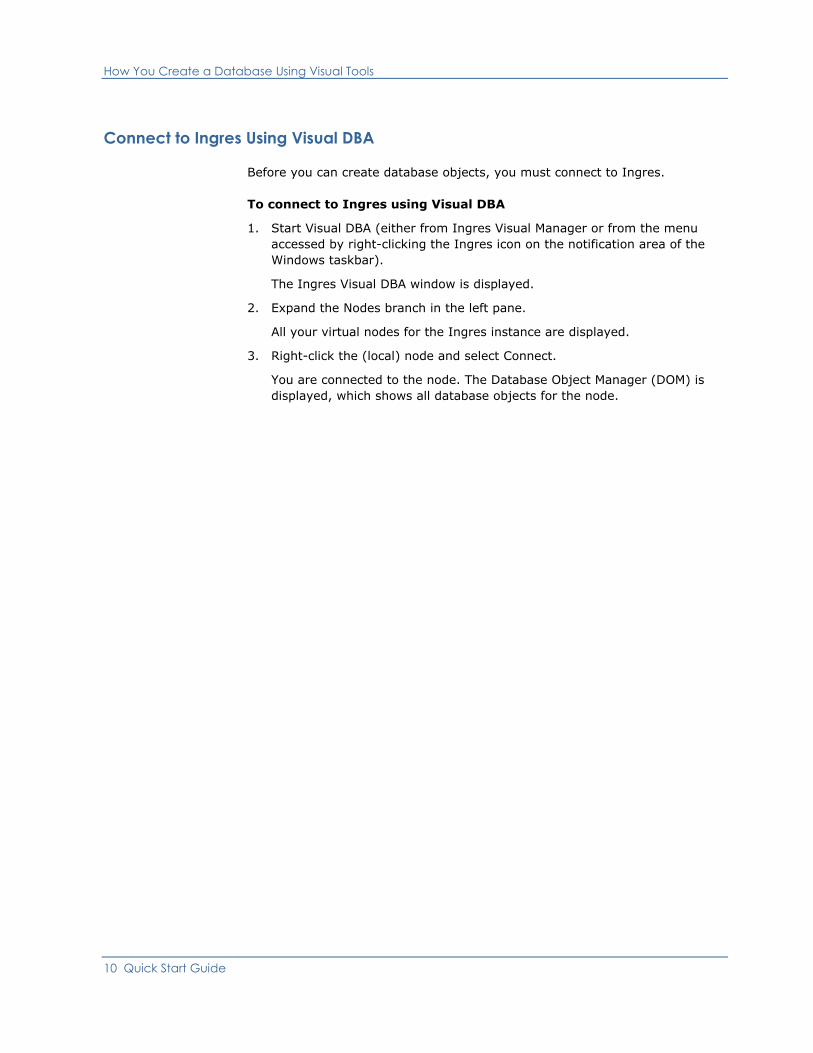
Before you can create database objects, you must connect to Ingres.
To connect to Ingres using Visual DBA
1. Start Visual DBA (either from Ingres Visual Manager or from the menu accessed by right-clicking the Ingres icon on the notification area of the Windows taskbar).
The Ingres Visual DBA window is displayed.
2. Expand the Nodes branch in the left pane.
All your virtual nodes for the Ingres instance are displayed.
3. Right-click the (local) node and select Connect.
You are connected to the node. The Database Object Manager (DOM) is displayed, which shows all database objects for the node.
10 Quick Start Guide

How You Create a Database Using Visual Tools
Create a Database Using Visual DBA
To create a database using Visual DBA, use the Create Database dialog.
To create a database
1. Select the Databases object category branch in the Database Object
Manager window, and then click the Add Object toolbar button .
The Create Database dialog appears.
The fields in this sample dialog are filled in as if creating the demodb database.
2. Fill in the necessary information (for details, see the online help), and click OK.
You are notified that the database has been created successfully.
Creating a Database 11

How You Create a Database Using Visual Tools
Create a Table Using Visual DBA
After you create a database, you can create its tables, indexes, and other database objects.
To create a base table
1. Expand the Databases object category branch in the Database Object Manager window, and then expand the branch of the database in which the table will be created.
2. Select the Tables object category branch and click the Add Object toolbar
button .
The Create Table dialog appears.
3. Enter a unique, valid name for the table in the Table Name field.
In the sample dialog below, the airport table in the demodb database is being created.
Note: You can create a table from another table by selecting the Create Table As Select check box. For detailed information about each option, see the Visual DBA online help.
4. Enter a column name in the Name edit control in the column layout box (for example, ap_id) and click Add.
A column is added to the column layout box.
12 Quick Start Guide
How You Create a Database Using Visual Tools
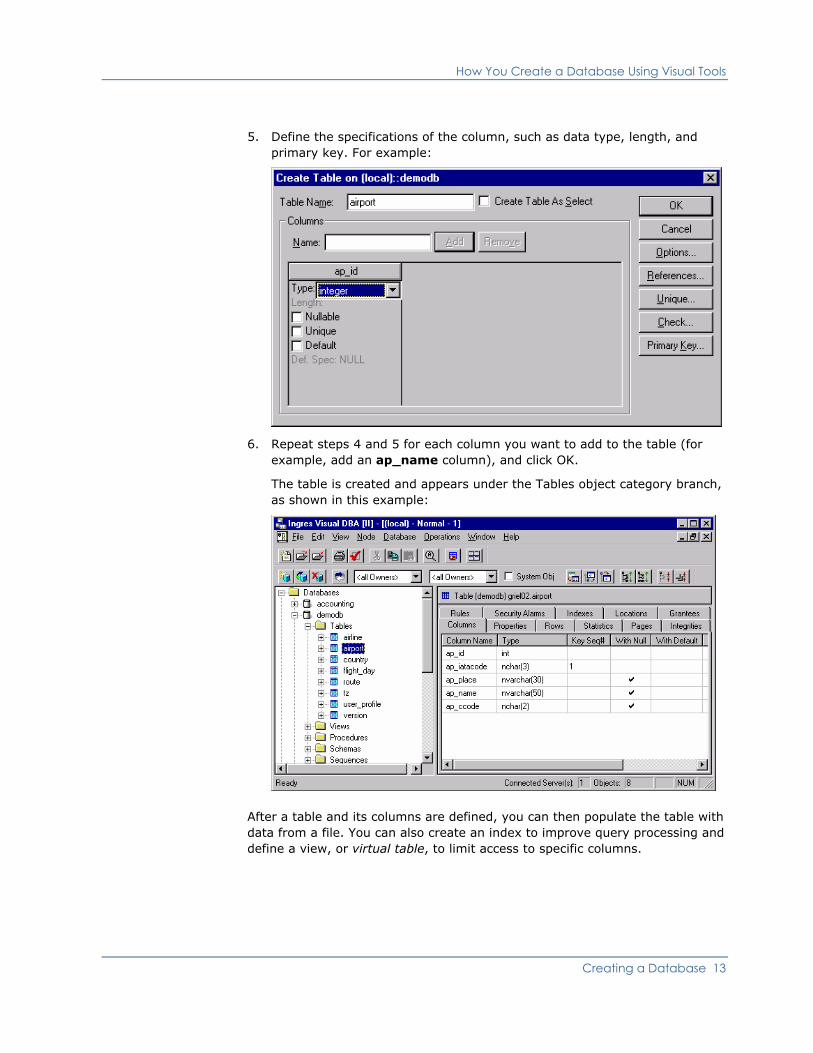
5. Define the specifications of the column, such as data type, length, and primary key. For example:
6. Repeat steps 4 and 5 for each column you want to add to the table (for example, add an ap_name column), and click OK.
The table is created and appears under the Tables object category branch, as shown in this example:
After a table and its columns are defined, you can then populate the table with data from a file. You can also create an index to improve query processing and define a view, or virtual table, to limit access to specific columns.
Creating a Database 13

How You Create a Database Using Visual Tools
Populate a Table Using the Import Assistant
You can populate a table with data by importing the data from a file. The Ingres Import Assistant can import data from various file types.
In this example, we use a CSV file located in %II_SYSTEM%\ingres\demo\data\airport.csv.
Note: The airport table in the demodb is already populated. This sample procedure creates a new table called temp, which you can delete (drop) after this exercise.
To import data from a file using the Import Assistant
1. Click the Ingres Import Assistant button on the toolbar in Visual Manager.
Step 1 of 4 of the Import Assistant is displayed.
2. Use the browse button in the File to be imported control to locate the file.
3. Expand the (local) node in the Into Ingres Table control, and then expand the demodb database. Select the <new table> option and enter temp into the Ingres Table to be Created field. Press Next.
Step 2 of 3 of the Import Assistant (File Format Identification) is displayed.
The Import Assistant displays each of its interpretations of the data as a tab.
4. Select the Csv1 tab, which shows that there are five columns of data.
Check the Tab corresponds to expected results box and press Next.
Step 3 of 4 of the Import Assistant (Column Properties) is displayed.
The utility assigns default values to column properties.
14 Quick Start Guide

How You Create a Database Using Visual Tools
5. Double-click the "with null" field in the first column and select "not null" from the drop-down list.
Change the properties of the other columns, as needed.
Note: When importing into Unicode columns, use the data type char or varchar. Ingres will coerce the values to Unicode using the appropriate Unicode mapping, indicated by the value of the Ingres environment variable II_CHARSET.
Press Next.
Step 4 of 4 of the Import Assistant (Import Preview) is displayed.
Note: If the file was large, you could commit every 1000 rows to avoid filling the transaction log file.
6. Press the Finish Button
The new table is populated.
You are asked if you want to import another file.
7. Press No.
The Import Assistant closes.
Creating a Database 15

Chapter 3: Using the Ingres Demonstration Application
This section contains the following topics:
Ingres Demonstration Application (see page 17) What You Should Know (see page 17) Start the Ingres Demonstration Application (see page 18) Get Help on the Demonstration Application (see page 18)
Ingres Demonstration Application Ingres provides a sample transactional based application that demonstrates common programming tasks required to develop an application using Ingres.
The application shows how information is retrieved from Ingres and presented in a user interface control. Novice users can "borrow" code from the application to use in their own application development.
The demonstration application provides a working example of the main tasks required to insert, update, and retrieve data from an Ingres database, including:
SELECT queries that require parameters
Execution of a row producing procedure
INSERT, UPDATE, and DELETE queries
Transaction commit and rollback
Use of Unicode character types
Handling of binary large objects (BLOBs)
What You Should Know The application developer should be familiar with the development language and environment, and somewhat familiar with SQL.
Using the Ingres Demonstration Application 17
Start the Ingres Demonstration Application
Start the Ingres Demonstration Application You can access the demonstration application if you opted to create and populate a demonstration database during the installation process.
When the application is started, it automatically connects to the database, demodb, on the local Ingres instance.
To start the demonstration application
Run IngresDemoApp.exe, located in the following directory:
%II_SYSTEM%\ingres\demo\xxxxxx\travel\app
where xxxxxx is the language, IDE, or software framework that the application is developed in. For example:
C# application: %II_SYSTEM%\ingres\demo\csharp\travel\app.
Eclipse Java application: %II_SYSTEM%\ingres\demo\Eclipse\travel\app.
Note: The source code for the application resides in: %II_SYSTEM%\ingres\demo\xxxxxx\travel\solution.
Get Help on the Demonstration Application Each user interface control that displays data retrieved from an Ingres database has contextual help that includes instructions, source code, and query excerpts.
To display contextual help
The procedure for displaying contextual help depends on the application. For example:
C# Application: Press the help button in the upper right corner of the window, and then select a user interface control.
Eclipse Java Application: Press the help tab in the results part of the window, or press F1.
18 Quick Start Guide
Chapter 4: Connecting to Ingres from .NET
This section contains the following topics:
Required Software (see page 19) Install the Data Provider into the Toolbox (see page 20) Start the Ingres Data Adapter Configuration Wizard (see page 21) Configure a Connection (see page 23) Design a Query (see page 25)
Required Software The following software is required to connect to Ingres from .NET:
Microsoft .NET 2.0 Framework
Ingres .NET Data Provider 2.0
(Optional) An interactive development environment such as Microsoft Visual Studio 2005
Note: The procedure in this guide shows how to connect using Visual Studio.
Connecting to Ingres from .NET 19

Install the Data Provider into the Toolbox
Install the Data Provider into the Toolbox The Ingres .NET Data Provider is integrated with Visual Studio 2005. Such integration allows a programmer to drag-and-drop the data provider design component onto a control, and to easily develop applications using wizards and editors.
The Ingres .NET Data Provider must be installed into the Visual Studio 2005 Toolbox before using it for the first time.
To install the data provider components into the Toolbox
1. Create an empty Windows Form (Winform) application.
2. Right-click the Data tab of the toolbox, and select Customize Toolbox.
The Customize Toolbox dialog is displayed.
3. Select the IngresCommand, IngresConnection, and IngresDataAdapter components on the .NET Framework Components tab, and then click OK.
The Ingres .NET Data Provider components are installed in the Toolbox, as shown in this example:
20 Quick Start Guide

Start the Ingres Data Adapter Configuration Wizard
If the IngresCommand, IngresConnection, and IngresDataAdaper components do not appear in the Customize Toolbox dialog, you can add them.
To add the Ingres .NET Data Provider components to the Customize Toolbox dialog
1. Click Browse on the Customize Toolbox dialog and browse to the directory C:\Program Files\Ingres\dotnet\assembly\v2.0.
2. Open the Ingres.Client dll.
The components are added.
Start the Ingres Data Adapter Configuration Wizard The Toolbox's Data tab lists the .NET data provider components that are available during the application's design.
To start the Ingres Data Adapter Configuration Wizard
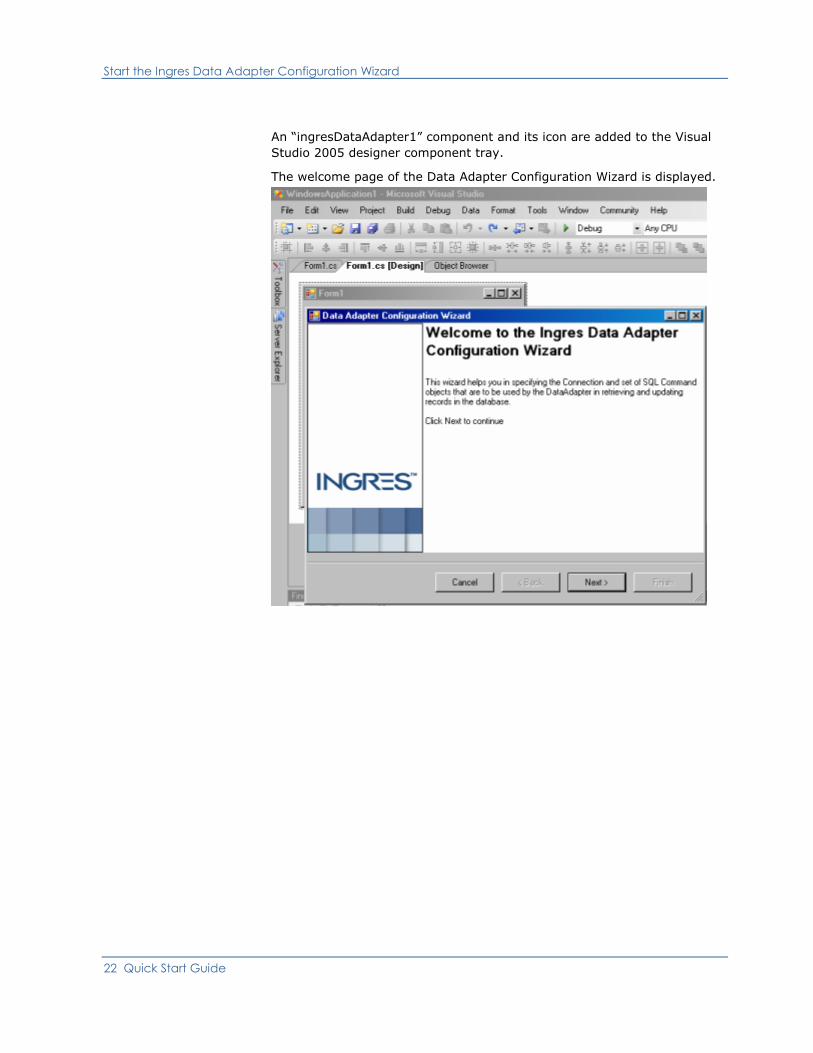
1. Drag the IngresDataAdapter component from the list on the Toolbox's Data tab onto the Windows Form design surface (“Form1”).
Connecting to Ingres from .NET 21
Start the Ingres Data Adapter Configuration Wizard
An “ingresDataAdapter1” component and its icon are added to the Visual Studio 2005 designer component tray.
The welcome page of the Data Adapter Configuration Wizard is displayed.
22 Quick Start Guide
Configure a Connection
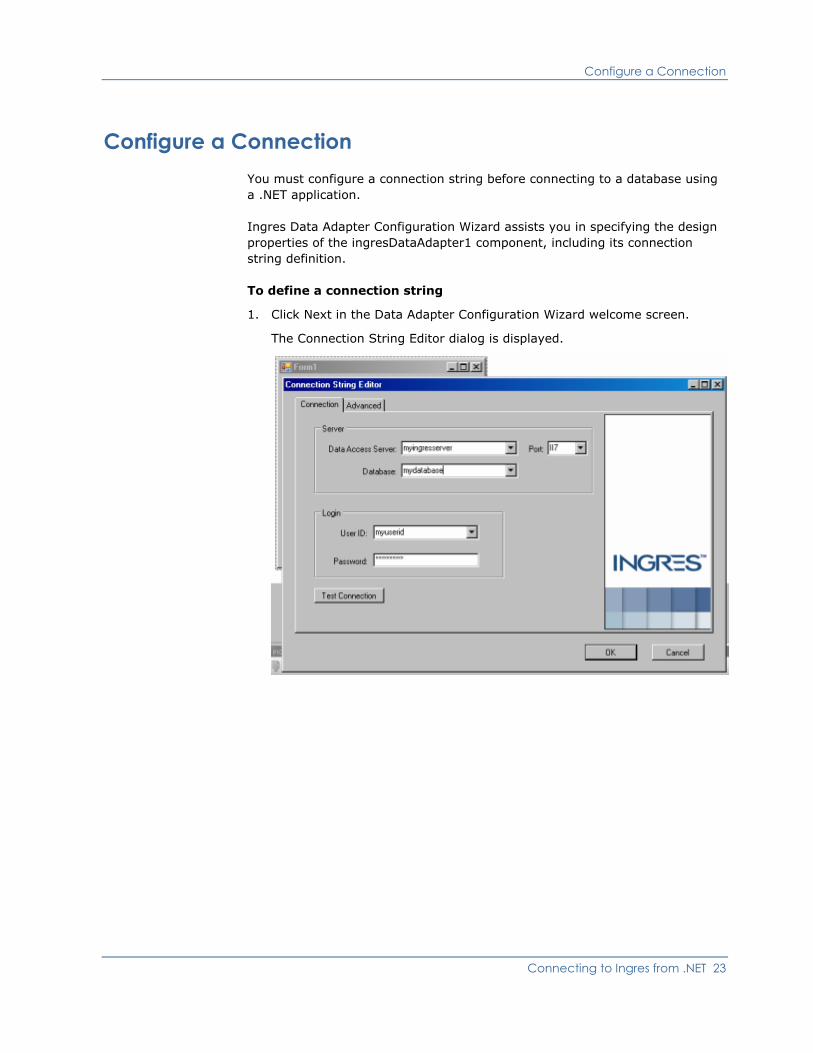
Configure a Connection You must configure a connection string before connecting to a database using a .NET application.
Ingres Data Adapter Configuration Wizard assists you in specifying the design properties of the ingresDataAdapter1 component, including its connection string definition.
To define a connection string
1. Click Next in the Data Adapter Configuration Wizard welcome screen.
The Connection String Editor dialog is displayed.
Connecting to Ingres from .NET 23

Configure a Connection
2. Enter the connection information on the Connection tab:
Data Access Server
Specifies the name of the Data Access Server (DAS) that services .NET application requests for the target DBMS Server.
In this example, we use the local node, which uses the reserved name "(local)".
Port
Identifies the port number on the host server machine that the Data Access Server is listening to.
The port is typically specified as abn where ab is the instance ID (set during installation and found in the Ingres system variable II_INSTALLATION) and n is 7 for the DAS.
(To display the instance ID, use the command ingprenv II_INSTALLATION.)
Default: II7
Database
Specifies the name of the target database that the application will connect to by default.
User ID
Specifies the name of the authorized user that is connecting to the DBMS Server.
Note: User ID and password are optional when connecting to a local Data Access Server and the current operating system logged-in user is also a valid Ingres user.
Password
Specifies the password associated with the specified User ID for connecting to the DBMS Server.
Click Ok.
The wizard generates a connection string using the information you supplied. For example:
Host=(local);Port=II7;Database=demodb
24 Quick Start Guide

Design a Query
Design a Query In the Data Adapter Configuration Wizard, you can enter your SQL command or use the Query Builder tool to generate the SELECT statement.
To design a query using the Query Builder
1. Click Query Builder to develop your SELECT statement.
The Add Table dialog opens.
2. Click User Tables or All Tables.
A list of available tables is displayed.
3. Choose your table from the list, and then click Add, Close.
Ingres Query Designer opens.
Connecting to Ingres from .NET 25

Design a Query
The Ingres Query Designer has three horizontal panels:
The top panel
Consists of tab pages, one for each table reference in the FROM clause of the query. Each tab page contains a list of check boxes for each column defined in the table. The columns are listed as they are written in the table's catalog definition.
Check or uncheck each column to add or remove the column reference from the SELECT statement.
The middle panel
Is a grid that lists the column names and or expressions in the SELECT statement's column reference list. It provides a convenient tabular format for entering the column references.
The bottom panel
Displays the query text as it is being built. The query text can be directly edited and is automatically formatted for readability.
4. Enter column references you want to add to your query into any one of the three panels.
The other two panels are automatically updated.
5. Click OK.
The query builder returns to the Ingres Data Adapter Wizard and displays the generated SELECT statement.
6. Click Finish.
The Ingres Data Adapter Wizard is closed.
26 Quick Start Guide

Chapter 5: Connecting to Ingres from Eclipse
This section contains the following topics:
Required Software (see page 27) Install Plug-ins (see page 27) How You Connect to Ingres from Eclipse (see page 28) Create a Connection Profile (see page 29) Define an Ingres Driver (see page 31) Create a New Database Connection (see page 34) Connect to a Database (see page 35) Create an SQL Scratch File (see page 36)
Required Software To connect to Ingres from the Eclipse SDK, you must download and install the following software and necessary plug-ins, which you can obtain from the Eclipse Data Tools Project page at http://www.eclipse.org/datatools/ (http://www.eclipse.org/datatools/).
Eclipse Software Development Kit (SDK)
Eclipse Modeling Framework (EMF)
Graphical Editing Framework (GEF)
Data Tools Platform (DTP)
Ingres DTP plug-in
The required versions are described in the Ingres readme.
Install Plug-ins You can check which plug-ins your copy of Eclipse has by accessing the Eclipse Help menu. If your copy of Eclipse does not have the required versions, you must download and install them.
To install a plug-in
1. Extract the downloaded plug-in into your Eclipse plug-in area.
2. Re-start Eclipse to load the plug-ins.
Connecting to Ingres from Eclipse 27

How You Connect to Ingres from Eclipse
How You Connect to Ingres from Eclipse The process for connecting to Ingres from the Eclipse SDK is as follows:
1. Create a Connection Profile.
2. Define an Ingres driver.
3. Create a new database connection.
4. Connect to a database.
5. Create an SQL scratch file.
Note: Before you connect to Ingres, ensure that your Ingres instance is running.
28 Quick Start Guide
Create a Connection Profile
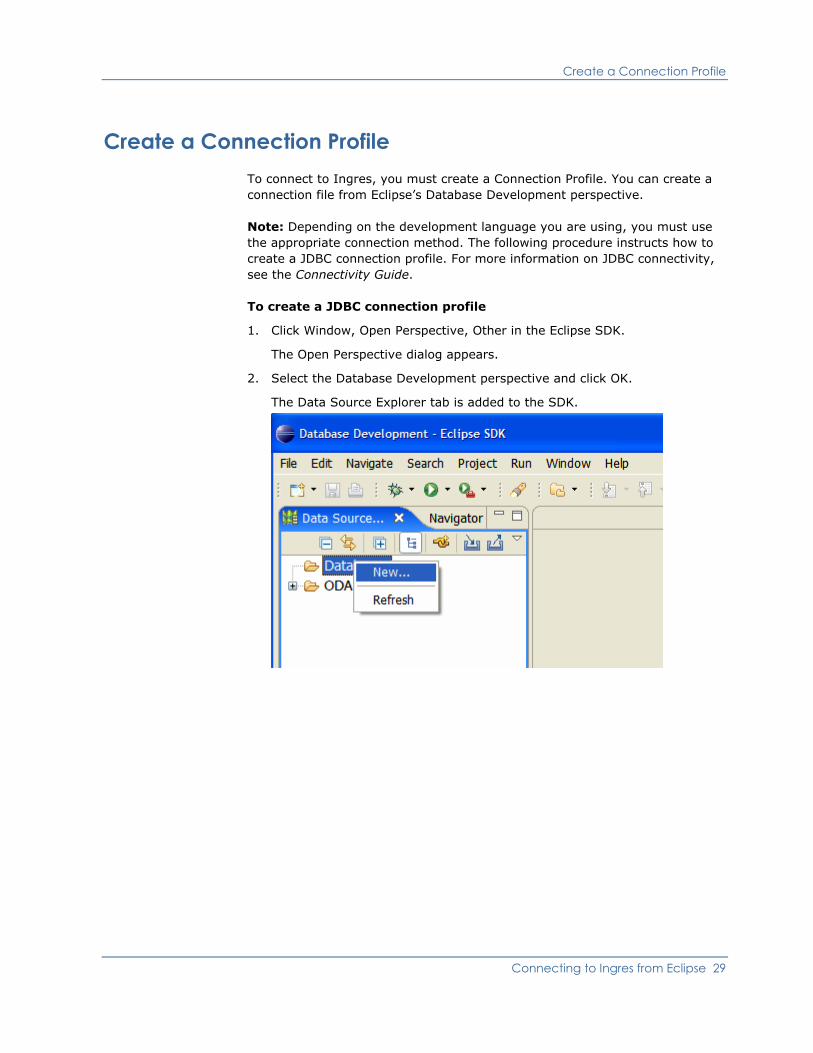
Create a Connection Profile To connect to Ingres, you must create a Connection Profile. You can create a connection file from Eclipse’s Database Development perspective.
Note: Depending on the development language you are using, you must use the appropriate connection method. The following procedure instructs how to create a JDBC connection profile. For more information on JDBC connectivity, see the Connectivity Guide.
To create a JDBC connection profile
1. Click Window, Open Perspective, Other in the Eclipse SDK.
The Open Perspective dialog appears.
2. Select the Database Development perspective and click OK.
The Data Source Explorer tab is added to the SDK.
Connecting to Ingres from Eclipse 29

Create a Connection Profile
3. In the Data Source Explorer, right-click the Database folder and select New from the context menu.
The New Connection Profile dialog appears.
4. Select the “Ingres JDBC Connection” wizard and click Next.
The Create connection profile panel is displayed.
5. Enter a name and description for your connection.
For example:
Click Next.
The Specify a Driver and Connection Details panel is displayed.
If you have already defined an Ingres driver, proceed to Create a New Database Connection. If you need to define a driver, continue with Define an Ingres Driver.
30 Quick Start Guide

Define an Ingres Driver
Define an Ingres Driver Note: If you have not defined an Ingres Driver, you must define one. If you have already defined an Ingres driver, skip to Create a New Database Connection.
To define an Ingres driver
1. On the Specify a Driver and Connection Details panel of the wizard, click the Browse button next to the Select a driver drop-down menu.
The Driver Definitions dialog appears.
Connecting to Ingres from Eclipse 31

Define an Ingres Driver
2. If no driver is listed in the Ingres 2006 branch, select the Ingres branch and click Add.
The New Driver Entry dialog appears.
3. In the Available Driver Templates list, select Ingres JDBC Driver.
The Driver Name field will contain: Ingres JDBC Driver.
4. Ensure that the Edit New Driver Instance Immediately option is selected, and then click OK.
The Edit Driver Entry dialog appears.
Note: In most cases Eclipse will be unable to locate the driver file.
5. Select the Driver File iijdbc.jar and click Edit Jar/Zip. Browse to your Ingres Instance system area (defined in the Ingres system variable II_SYSTEM) then to the subdirectories: ingres, lib to locate and select the driver file.
32 Quick Start Guide

Define an Ingres Driver
6. Ensure that the other driver details, including the Driver Class (com.ingres.jdbc.IngresDriver) and the instance ID (for example, II) are correct. For example:
Note: You can specify User credentials at connect time, rather than on the generic driver form.
Click OK.
7. In the Driver Definitions dialog, select the Ingres JDBC Driver from the list.
Connecting to Ingres from Eclipse 33
Create a New Database Connection
Click OK.
Continue with Create a New Database Connection.
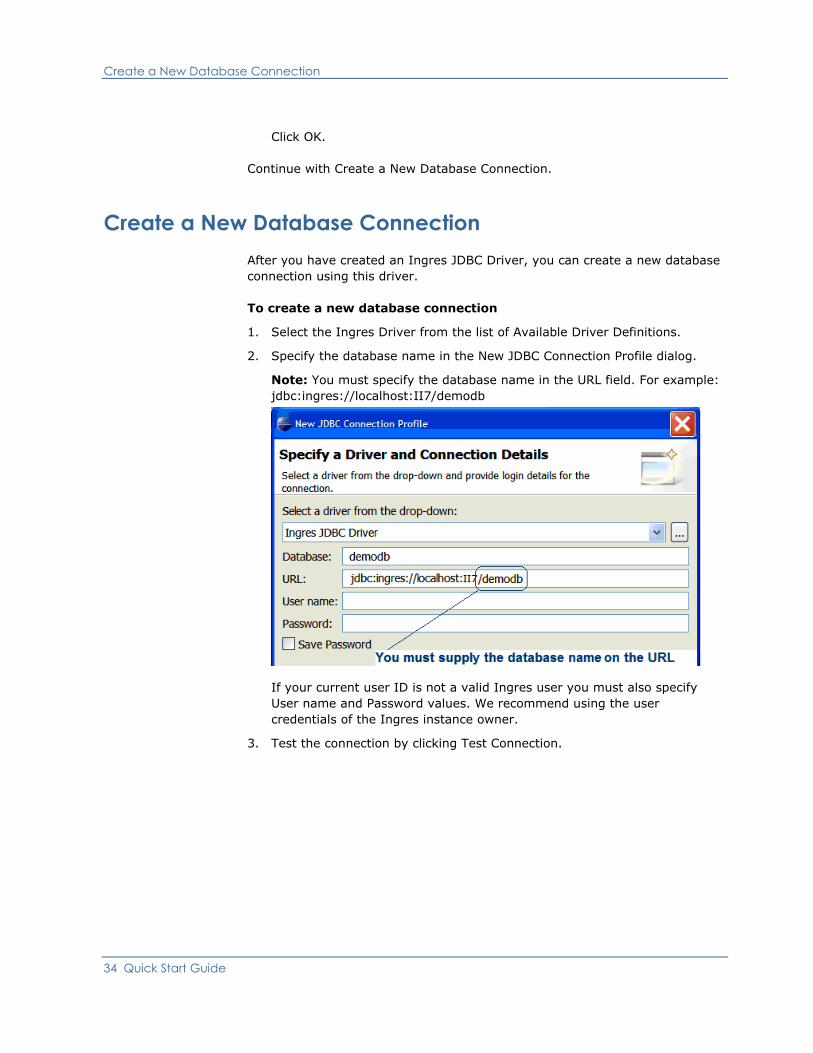
Create a New Database Connection After you have created an Ingres JDBC Driver, you can create a new database connection using this driver.
To create a new database connection
1. Select the Ingres Driver from the list of Available Driver Definitions.
2. Specify the database name in the New JDBC Connection Profile dialog.
Note: You must specify the database name in the URL field. For example: jdbc:ingres://localhost:II7/demodb
If your current user ID is not a valid Ingres user you must also specify User name and Password values. We recommend using the user credentials of the Ingres instance owner.
3. Test the connection by clicking Test Connection.
34 Quick Start Guide

Connect to a Database
4. Click Finish to close the profile wizard.
An Ingres database is listed in the Data Source Explorer. For example:
Connect to a Database After you have created a database connection profile, you can connect to the database from the Data Source Explorer.
To connect to a database
1. Open the Databases root folder in the Data Source Explorer.
Available databases are listed.
2. Right-click on the Ingres database and select Connect from the context menu.
The connection is established. For example:
Connecting to Ingres from Eclipse 35

Create an SQL Scratch File
You can now explore the objects in your database.
Create an SQL Scratch File An SQL scratch file is required to work with the database, and the file must belong to an Eclipse Project. If you have not created an Eclipse project, you must create one by clicking File, New, General Project. You can then create an SQL scratch file in the Eclipse SDK and connect it to a database.
To create an SQL scratch file
1. Click File, New, Other.
The New dialog appears.
2. Open the SQL Development folder and select the SQL File wizard.
For example:
Click Next.
The SQL File wizard appears.
36 Quick Start Guide

Create an SQL Scratch File
3. Select the parent folder.
The folder name is the same as the project name.
4. Enter a file name.
For example, “IngresDemoSqlFile”:
Connecting to Ingres from Eclipse 37

Create an SQL Scratch File
5. Set the connection details as shown, and then click Finish.
The Eclipse editor opens the new SQL file you created.
The SQL scratch file is connected to the database.
You can now issue SQL requests. Use the context menu or shortcut keys to execute your request. For example:
38 Quick Start Guide

Chapter 6: Connecting to Ingres from Python
This section contains the following topics:
Requirements (see page 39) Ingres Python DBI Driver and the Ingres ODBC Driver (see page 39) Create a Connection to Ingres (see page 40) Example—Connect to Ingres and Select from a Table (see page 40)
Requirements To connect to Ingres from Python, you must meet the following prerequisites:
Have Python installed in your development environment
Build or download the Ingres Python DBI driver
Create a connection from Python to Ingres
You can download the latest version of Python from http://www.python.org/ (http://www.python.org/).
Ingres Python DBI Driver and the Ingres ODBC Driver To connect to Ingres from Python using the Ingres Python DBI driver, you can use pre-built binaries, which you can download from http://www.ingres.com/downloads/prod-download-drivers.php (http://www.ingres.com/downloads/prod-download-drivers.php). The version of the binary driver depends on the version of Python installed. For more information on version compatibility, see the Ingres Python DBI Driver readme.
The Ingres Python DBI driver requires that you have installed Ingres and the Ingres ODBC driver. For more information about the Ingres ODBC driver, see the chapter “Understanding ODBC Connectivity” in the Connectivity Guide. The Ingres ODBC driver is located in the following Ingres directory: ingres\bin (DLL).
Connecting to Ingres from Python 39

Create a Connection to Ingres
Create a Connection to Ingres To connect to Ingres, you must instantiate an instance of the Connection class using the ingresdbi.connect() function.
If you have created a DSN, you could use the following code:
conn = ingresdbi.connect(dsn="myDSN")
Or you could connect directly to an Ingres database:
conn = ingresdbi.connect(database="myDB")
The ingresdbi.connect() function has other keywords that you can specify. For complete information, see the Ingres Python DBI Driver readme.
Example—Connect to Ingres and Select from a Table The following is a simple segment of code that connects to the Ingres database iidbdb and selects from iitables.
import ingresdbi
conn = ingresdbi.connect(database='iidbdb') curs = conn.cursor() curs.execute('select table_owner, table_name from iitables') for x in curs: print x curs.close() conn.close()
40 Quick Start Guide

Chapter 7: Connecting to Ingres from PHP
This section contains the following topics:
Requirements (see page 41) Download the PECL Extension (see page 41) ingres_connect() Function—Connect to Ingres (see page 45) Code Examples (see page 46)
Requirements To connect to Ingres from PHP, you need to download or build the PECL extension and install it. (PECL stands for PHP Extension Community Library, which is a repository for PHP extensions.)
Download the PECL Extension Download the PECL extension for Windows.
Select the appropriate DLL for the PHP version you are using from the following page:
http://pecl4win.php.net/ext.php/php_ingres.dll (http://pecl4win.php.net/ext.php/php_ingres.dll)
Connecting to Ingres from PHP 41

Download the PECL Extension
Download the Windows CVS Client
The PHP project provides anonymous access to the CVS server to enable users to download the code as needed. Windows users can download a compatible CVS client from http://www.cvsnt.org (http://www.cvsnt.org).
To download the Windows CVS client
1. Log in to the CVS server as follows:
cvs -d :pserver:[email protected]/repository login
When prompted for a password, enter phpfi.
2. Fetch the code for the PECL Ingres library with the following command:
cvs -d :pserver:[email protected]/repository co pecl/ingres
This creates two directories, pecl and a subdirectory of ingres. The library code is located in the ingres folder.
Note: If you want to download the source code for PHP, go to http://php.net/anoncvs.php (http://php.net/anoncvs.php).
Install the Extension on Windows
After downloading the appropriate extension for your environment, you must install it.
To install the extension on Windows
1. Copy php_ingres.dll to your extensions directory.
2. Edit the php.ini file to define the directory that PHP will use, adding the following line for the extension parameter:
extension=php_ingres.dll
42 Quick Start Guide

Download the PECL Extension
3. Ensure that the II_SYSTEM directory is defined as a system environment variable:
a. Click Start, Control Panel, and then double-click the System icon.
b. The System Properties dialog appears.
c. Click Environment Variables to view the user and system level environment variables:
d. If there is no II_SYSTEM variable defined in the System variables list, click New and enter II_SYSTEM as the new Variable name and the path to Ingres on your system as the Variable value:
Click OK when you are finished.
Connecting to Ingres from PHP 43

Download the PECL Extension
4. Ensure that the web server process owner is a valid Ingres user:
For IIS 5.x
IUSR_YourPCName
For Apache
SYSTEM or whatever user the service runs as
5. Restart the web server for the changes to take effect
6. To verify that you have the Ingres extension enabled create the following PHP script in a directory that your web server can access:
<!-- file : php_setup_info.php --> <?php phpinfo(); ?>
7. Using a web browser, open the script php_setup_info.php. Scroll down the page to locate the section titled “ingres” (similar to the following image, although the extension version and revision number may differ for your installation).
This will confirm that the extension has been set up and is active. For example:
44 Quick Start Guide
ingres_connect() Function—Connect to Ingres
ingres_connect() Function—Connect to Ingres You connect to Ingres using the ingres_connect() function and disconnect using ingres_close(). ingres_connect() returns an Ingres II link resource on success, or FALSE on failure.
This function has the following syntax:
resource = ingres_connect([database[,username[,password]]])
database
Specifies a database with the following syntax:
[vnode_id::]dbname[/svr_class]
vnode_id
Specifies the virtual node name used to connect to a remote machine
dbname
Specifies the database name
svr_class
Specifies the Ingres server class, which defaults to INGRES if not specified. It is used when connecting to different server classes.
username
Specifies an Ingres user name to use for the connection
password
Specifies the password for the user name
Note: If any parameters are missing, ingres_connect() uses the values in php.ini for ingres.default_database, ingres.default_user, and ingres.default_password.
Example: ingres_connect()
<?php $link = ingres_connect(“mydb”, “username”, “password”); or die(“Could not connect”); echo “Connected successfully”; ingres_close($link); ?>
Note: You can use ingres_pconnect() function to create a persistent connection.
Connecting to Ingres from PHP 45
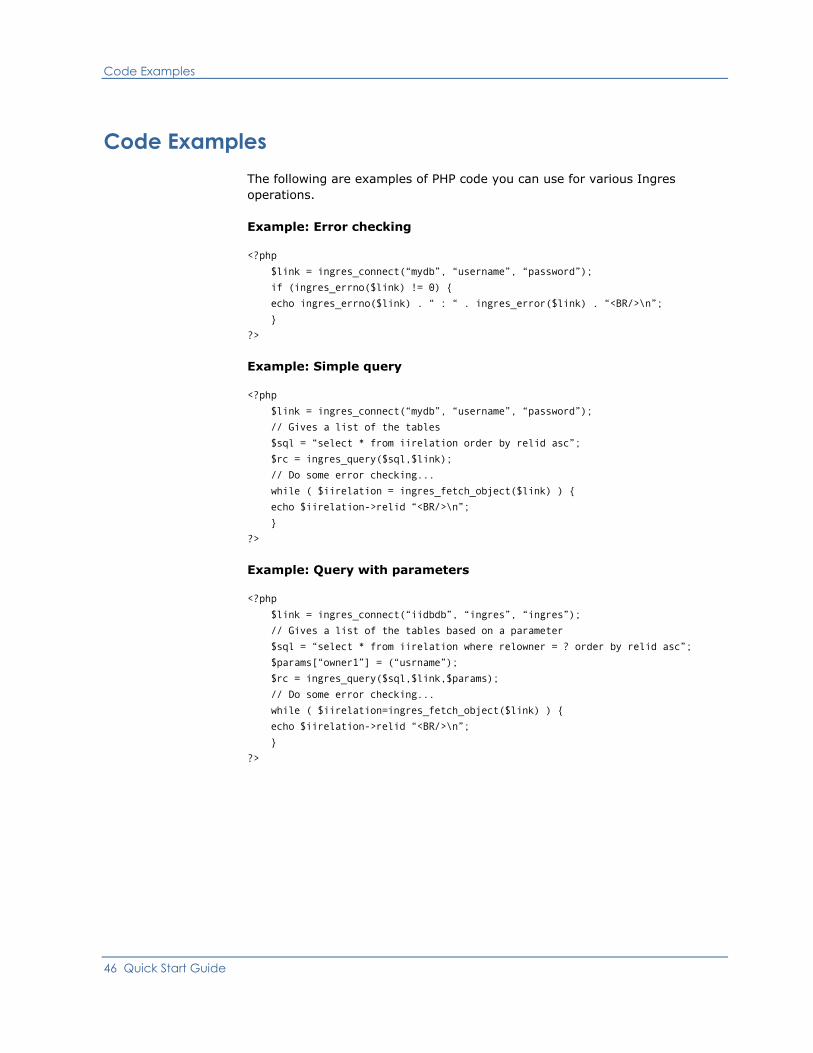
Code Examples
Code Examples The following are examples of PHP code you can use for various Ingres operations.
Example: Error checking
<?php $link = ingres_connect(“mydb”, “username”, “password”); if (ingres_errno($link) != 0) { echo ingres_errno($link) . “ : “ . ingres_error($link) . “<BR/>\n”; } ?>
Example: Simple query
<?php $link = ingres_connect(“mydb”, “username”, “password”); // Gives a list of the tables $sql = “select * from iirelation order by relid asc”; $rc = ingres_query($sql,$link); // Do some error checking... while ( $iirelation = ingres_fetch_object($link) ) { echo $iirelation->relid “<BR/>\n”; } ?>
Example: Query with parameters
<?php $link = ingres_connect(“iidbdb”, “ingres”, “ingres”); // Gives a list of the tables based on a parameter $sql = “select * from iirelation where relowner = ? order by relid asc”; $params[“owner1”] = (“usrname”); $rc = ingres_query($sql,$link,$params); // Do some error checking... while ( $iirelation=ingres_fetch_object($link) ) { echo $iirelation->relid “<BR/>\n”; } ?>
46 Quick Start Guide

Code Examples
Example: Loading a BLOB
<?php // Fetch the image to be inserted $handle = fopen (“usrname.png”,”r”); $login_image = stream_get_contents($handle); fclose($handle); // Set up the query $sql = “insert into login_images values (?,?)”; // Type the parameters being passed $types = “vB”; // varchar, BLOB // Set up the parameter values $params[“login”] = “usrname”; $params[“image”] = $login_image; // Execute $rc = ingres_query($sql,$link,$params,$types); ?>
Connecting to Ingres from PHP 47


Chapter 8: Connecting to Ingres from Perl
This section contains the following topics:
Requirements (see page 49) Ingres Perl DBI Extension (see page 50) How You Can Build and Install the Ingres Perl DBI Extension (see page 50) Build the DBD::Ingres Extension (see page 51) Test and Install the DBD::Ingres Extension (see page 51) How You Can Use the DBD::Ingres Extension (see page 52) Example—Connect to Ingres and Select from a Table (see page 52)
Requirements To connect to Ingres from Perl, you must meet the following prerequisites:
Install and test Perl in your development environment
Build and test the Ingres Perl DBI (database interface) driver
Create a connection from Perl to Ingres
You can download the latest version of Perl from http://www.perl.org/ (http://www.perl.org/).
System requirements and other installation information are contained in the Ingres Perl DBI Extension readme, available from http://www.ingres.com/downloads/prod-download-drivers.php (http://www.ingres.com/downloads/prod-download-drivers.php).
Connecting to Ingres from Perl 49

Ingres Perl DBI Extension
Ingres Perl DBI Extension The Ingres Perl DBI is a database extension for the Perl DBI system that enables access to Ingres databases. It is built on top of the standard Perl DBI extension. The driver supports database access to Ingres 2006 and prior versions of Ingres.
The source code is available for download from the Comprehensive Perl Archive Network (CPAN) repository for Perl extensions at http://search.cpan.org/dist/DBD-Ingres/ (http://search.cpan.org/dist/dbd-ingres/).
For more information, see the Ingres Perl DBI Driver readme, available from http://search.cpan.org/~htoug/DBD-Ingres-0.51/Ingres.pm (http://search.cpan.org/~htoug/DBD-Ingres-0.51/Ingres.pm).
How You Can Build and Install the Ingres Perl DBI Extension Before you can use the Ingres Perl extension, DBD::Ingres, you must first build and install it. Building the extension requires a C development environment and Ingres ESQL/C. The steps required to build the extension are common to all platforms except for a slight difference between the commands used.
Note: To build the extension on Windows, Microsoft's Visual Studio .NET compiler and Platform SDK are required.
50 Quick Start Guide

Build the DBD::Ingres Extension
Build the DBD::Ingres Extension Perform the following procedure to download and build the DBD::Ingres extension.
To download and build the extension
1. Download the latest version of the DBD::Ingres extension from http://search.cpan.org/dist/DBD-Ingres/ (http://search.cpan.org/dist/dbd-ingres/).
2. Use a suitable tool to extract the downloaded files.
Among other tools for Windows, you could use WinZip.
3. Open a command prompt or shell and change the directory to the location of the extracted files.
4. Ensure the Ingres environment is properly set up.
Ensure that II_SYSTEM and platform-specific paths have LIB and INCLUDE defined.
5. Enter the following command to generate the Makefile needed to build the extension:
perl Makefile.PL
6. Build the extension:
nmake
Test and Install the DBD::Ingres Extension Perform the following procedure to test and install the DBD::Ingres extension.
To test and install the extension
1. Set the environment variable DBI_DSN to the name of a valid Ingres database, for example, perldb:
set DBI_DSN=perldb
2. Run the tests using the following command:
nmake test
If everything is set up correctly, the message “All tests successful” is displayed.
3. Install the extension using the following command:
nmake install
Connecting to Ingres from Perl 51

How You Can Use the DBD::Ingres Extension
How You Can Use the DBD::Ingres Extension To use the Ingres Perl module, the Perl DBI module must be included using the use statement. The data source name supplied to the DBI->connect() method is used determine the correct DBD module to load to make the database connection.
Example—Connect to Ingres and Select from a Table The following is a simple segment of code that connects to the Ingres database iidbdb and selects from iitables.
use DBI;
# Define the database to used $dbname = "dbi:Ingres:iidbdb";
# Connect to the database my $dbh = DBI->connect($dbname, "", "");
# Prepare a statement $cursor = $dbh->prepare("SELECT table_name, table_owner FROM iitables order by table_name asc");
# Execute the cursor $cursor->execute;
# Fetch the results while ($row = $cursor->fetchrow_arrayref) { print(DBI::neat_list($row), "\n"); }
# Close the cursor $cursor->finish;
52 Quick Start Guide
Index
.
.NET Data Provider • 5, 19
C C# • 18 connect to Ingres • 10, 19, 27, 39, 41, 49
D databases
creating • 9, 11 demonstration application • 17, 18
C# • 18 documentation • 5
E Eclipse • 27
I Import Assistant • 14 installing Ingres
on Windows • 5
P Perl • 49 PHP • 41 Python • 39
S Service Manager (Windows) • 8 start Ingres • 6, 7, 8
T table
create • 12 populate • 14
V Vision • 6 Visual DBA
connect to Ingres with • 10 create a database with • 9
Visual Manager • 7
Index 53