insert elementsweb.tools4revit.com/insert-elements/insert elements... · 2014-01-06 · insert...
TRANSCRIPT
Insert Elements
The Fastest Way to Quickly & Easily
Insert Revit® Families to the Different Project Places
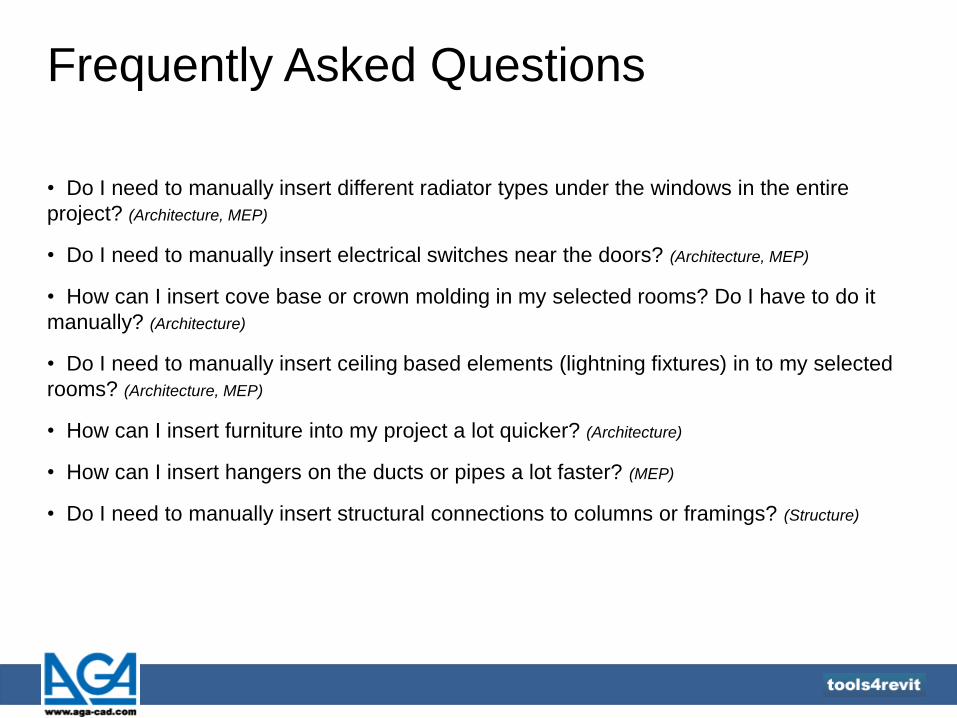
Frequently Asked Questions
• Do I need to manually insert different radiator types under the windows in the entire
project? (Architecture, MEP)
• Do I need to manually insert electrical switches near the doors? (Architecture, MEP)
• How can I insert cove base or crown molding in my selected rooms? Do I have to do it
manually? (Architecture)
• Do I need to manually insert ceiling based elements (lightning fixtures) in to my selected
rooms? (Architecture, MEP)
• How can I insert furniture into my project a lot quicker? (Architecture)
• How can I insert hangers on the ducts or pipes a lot faster? (MEP)
• Do I need to manually insert structural connections to columns or framings? (Structure)
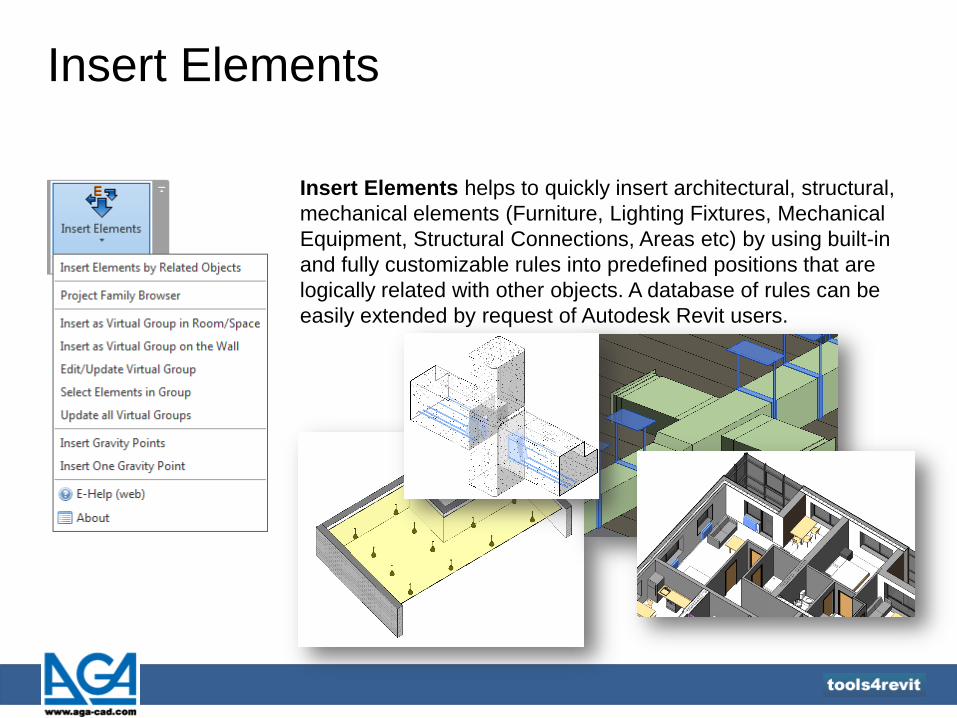
Insert Elements
Insert Elements helps to quickly insert architectural, structural,
mechanical elements (Furniture, Lighting Fixtures, Mechanical
Equipment, Structural Connections, Areas etc) by using built-in
and fully customizable rules into predefined positions that are
logically related with other objects. A database of rules can be
easily extended by request of Autodesk Revit users.
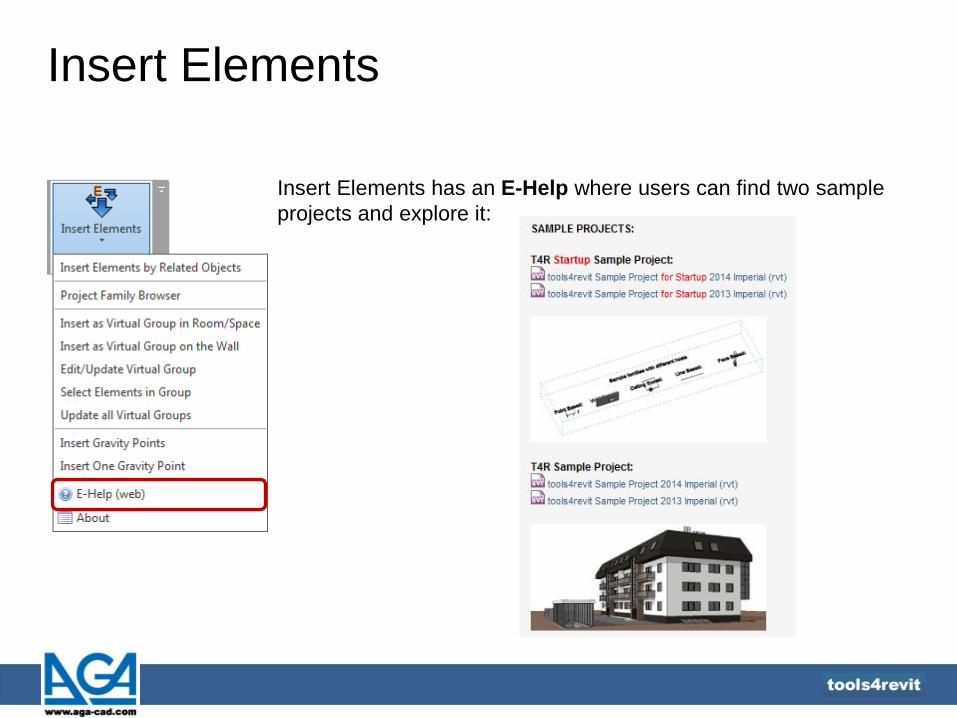
Insert Elements
Insert Elements has an E-Help where users can find two sample
projects and explore it:
Insert Elements by Related Objects
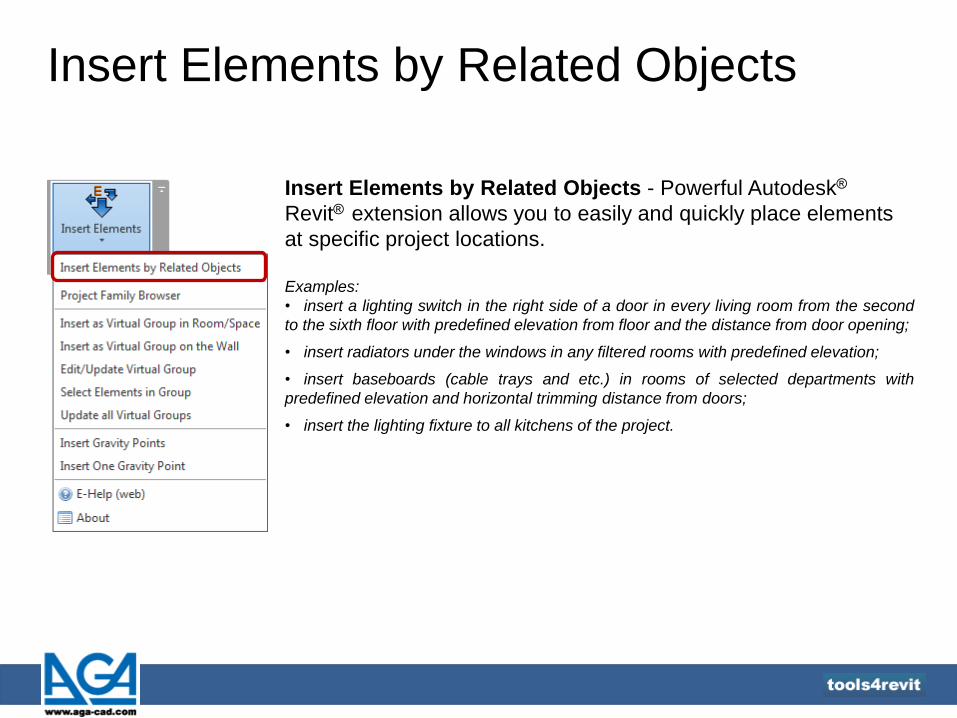
Insert Elements by Related Objects - Powerful Autodesk®
Revit® extension allows you to easily and quickly place elements
at specific project locations.
Examples:
• insert a lighting switch in the right side of a door in every living room from the second
to the sixth floor with predefined elevation from floor and the distance from door opening;
• insert radiators under the windows in any filtered rooms with predefined elevation;
• insert baseboards (cable trays and etc.) in rooms of selected departments with
predefined elevation and horizontal trimming distance from doors;
• insert the lighting fixture to all kitchens of the project.
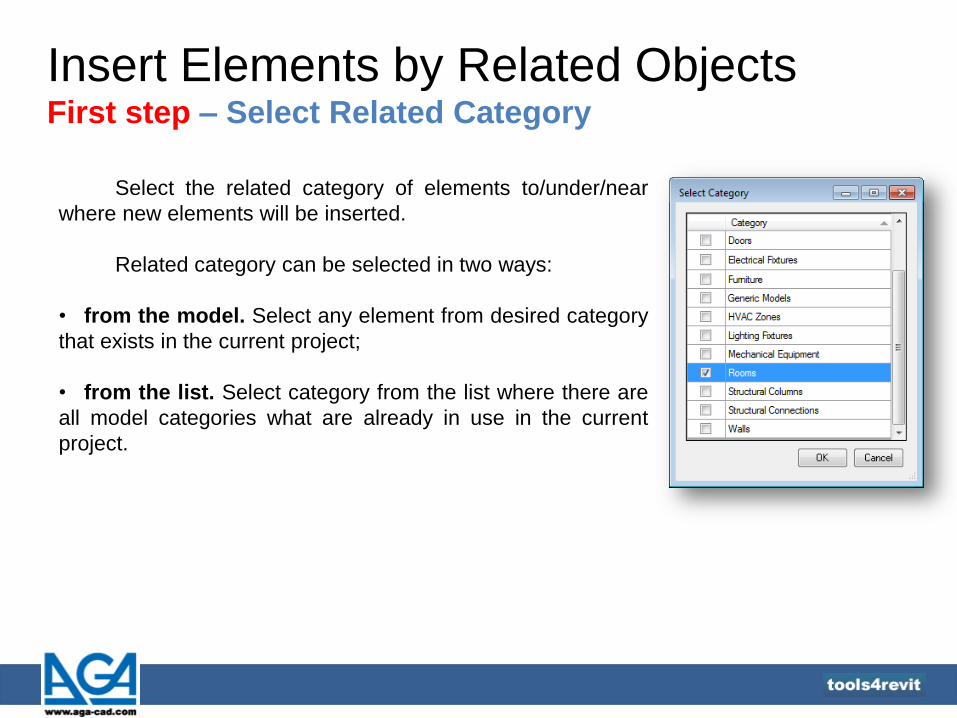
Insert Elements by Related Objects First step – Select Related Category
Select the related category of elements to/under/near
where new elements will be inserted.
Related category can be selected in two ways:
• from the model. Select any element from desired category
that exists in the current project;
• from the list. Select category from the list where there are
all model categories what are already in use in the current
project.
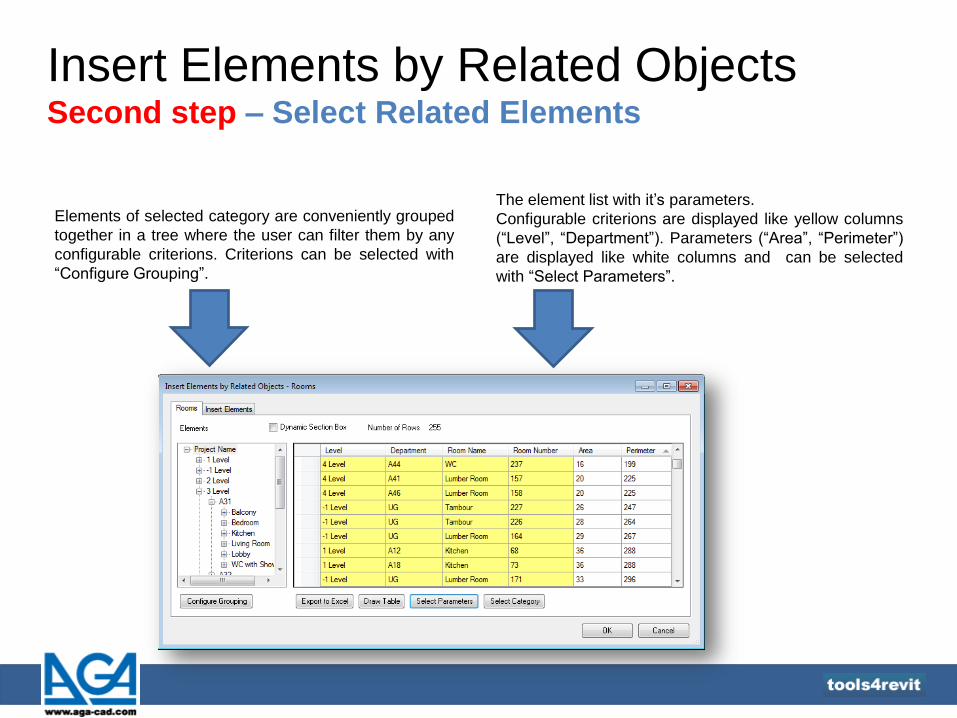
Insert Elements by Related Objects Second step – Select Related Elements
Elements of selected category are conveniently grouped
together in a tree where the user can filter them by any
configurable criterions. Criterions can be selected with
“Configure Grouping”.
The element list with it’s parameters.
Configurable criterions are displayed like yellow columns
(“Level”, “Department”). Parameters (“Area”, “Perimeter”)
are displayed like white columns and can be selected
with “Select Parameters”.
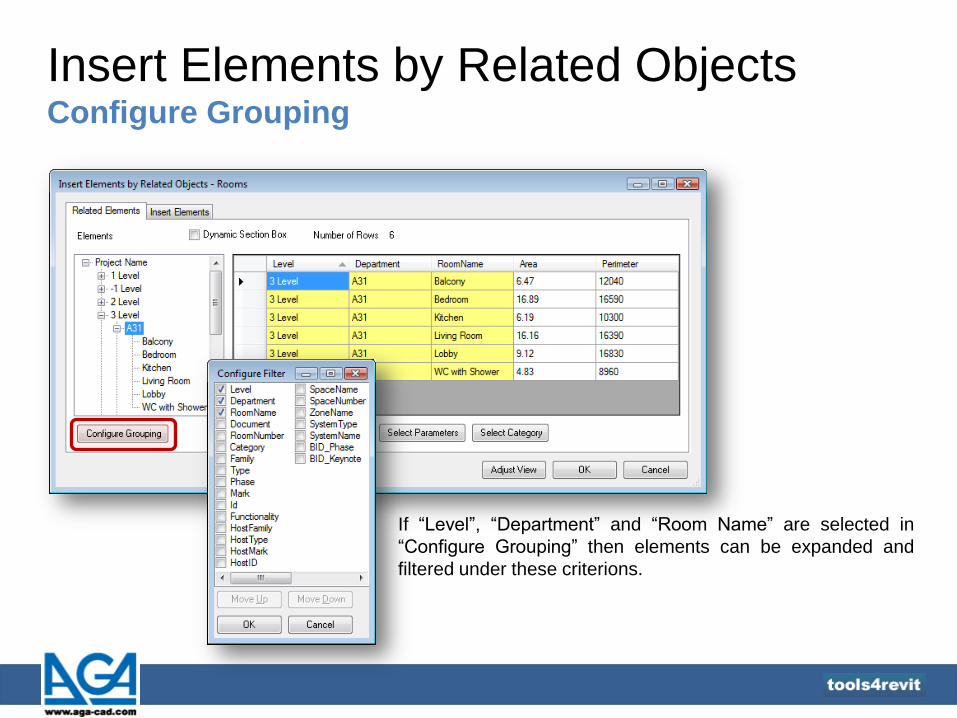
Insert Elements by Related Objects Configure Grouping
If “Level”, “Department” and “Room Name” are selected in
“Configure Grouping” then elements can be expanded and
filtered under these criterions.

Insert Elements by Related Objects Select Parameters
Select Parameters - select
parameters that will be used at
“Insert Elements” form columns.
At the left side there are all
available parameters from
selected category. Adding new or
removing parameters are
available with the commands
“Add” and “Remove”.
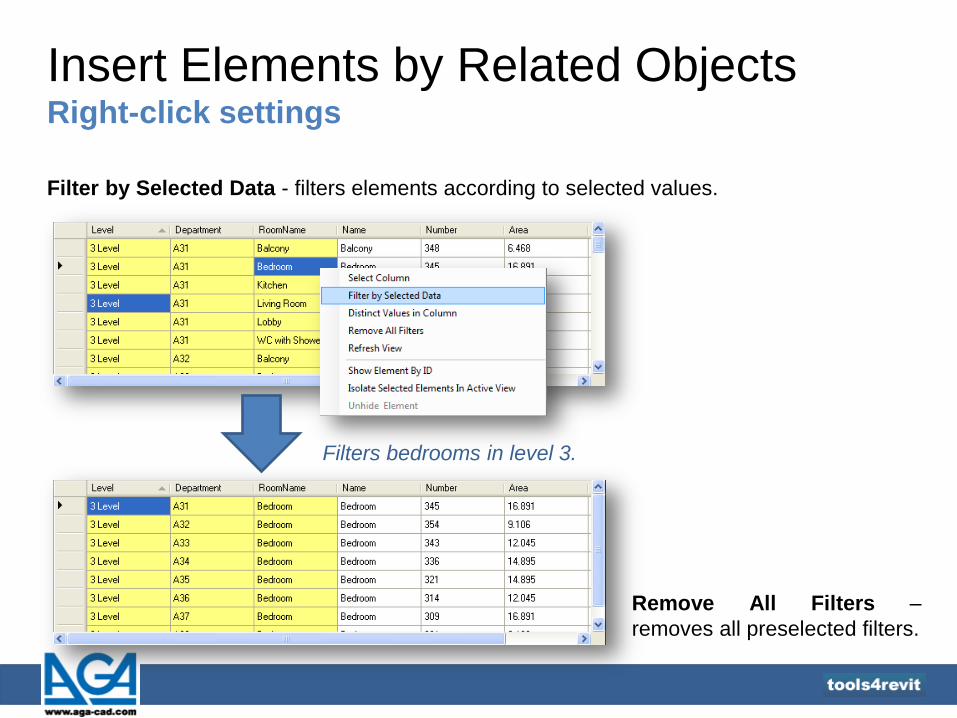
Insert Elements by Related Objects Right-click settings
Filter by Selected Data - filters elements according to selected values.
Filters bedrooms in level 3.
Remove All Filters –
removes all preselected filters.
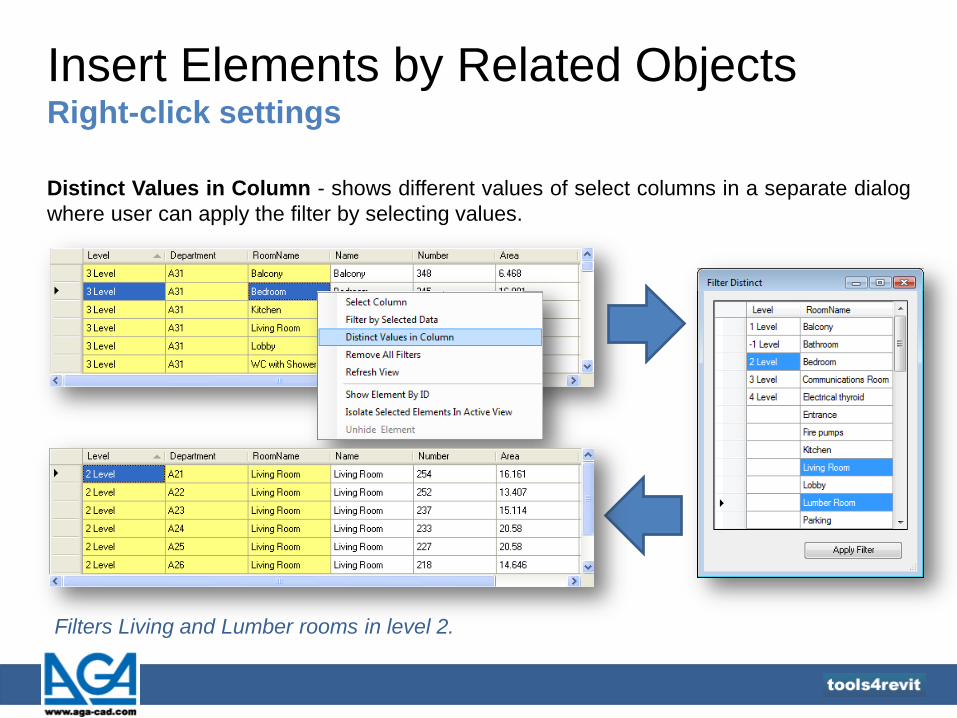
Insert Elements by Related Objects Right-click settings
Distinct Values in Column - shows different values of select columns in a separate dialog
where user can apply the filter by selecting values.
Filters Living and Lumber rooms in level 2.

Insert Elements by Related Objects Right-click settings
In the selection process user can see selected elements in the active view. In case if
elements are not visible press Refresh View.
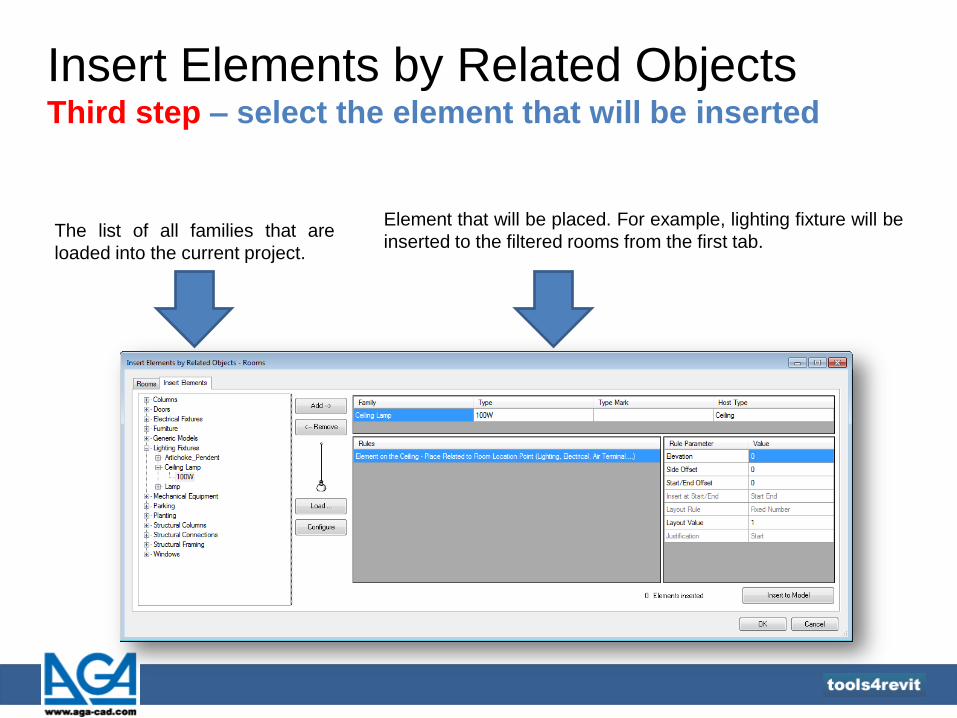
Insert Elements by Related Objects Third step – select the element that will be inserted
The list of all families that are
loaded into the current project.
Element that will be placed. For example, lighting fixture will be
inserted to the filtered rooms from the first tab.
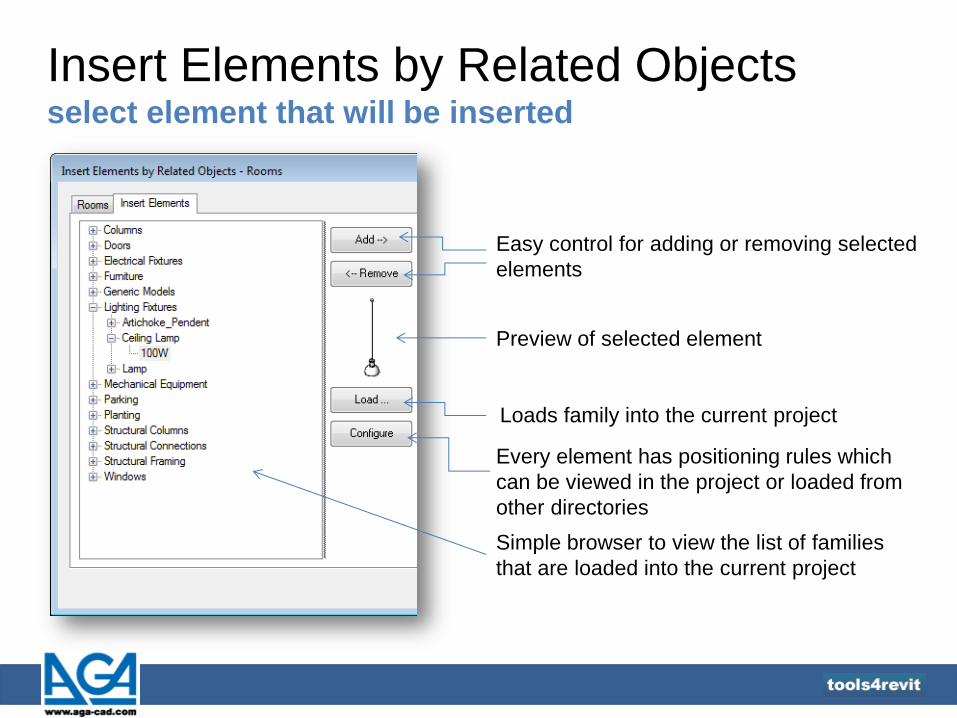
Insert Elements by Related Objects select element that will be inserted
Easy control for adding or removing selected
elements
Preview of selected element
Every element has positioning rules which
can be viewed in the project or loaded from
other directories
Simple browser to view the list of families
that are loaded into the current project
Loads family into the current project
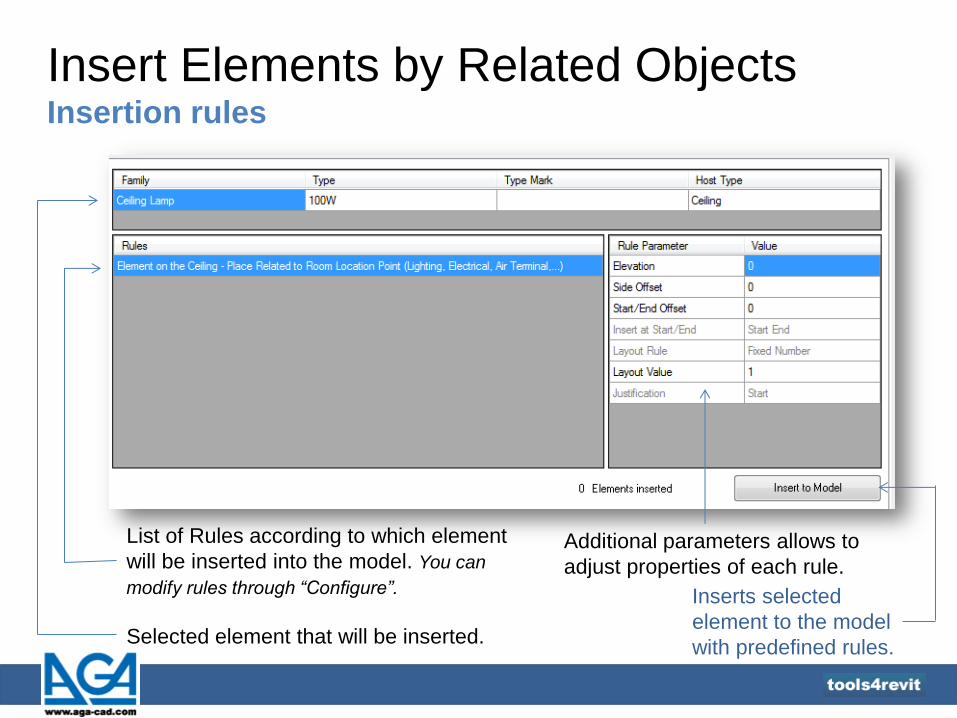
Insert Elements by Related Objects Insertion rules
List of Rules according to which element
will be inserted into the model. You can
modify rules through “Configure”.
Selected element that will be inserted.
Additional parameters allows to
adjust properties of each rule.
Inserts selected
element to the model
with predefined rules.
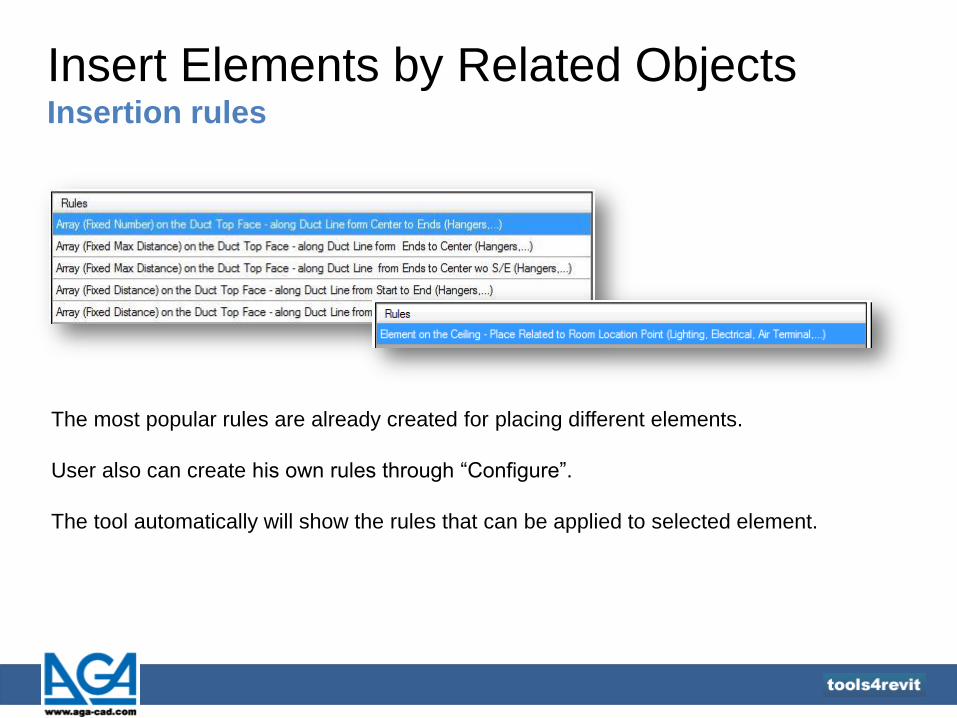
Insert Elements by Related Objects Insertion rules
The most popular rules are already created for placing different elements.
User also can create his own rules through “Configure”.
The tool automatically will show the rules that can be applied to selected element.
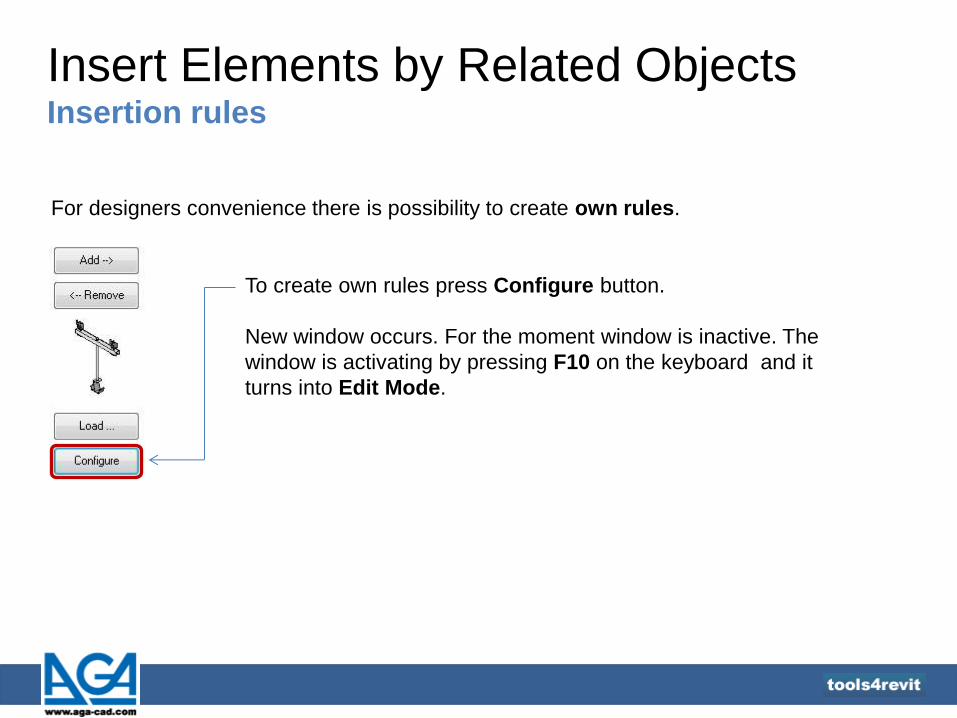
Insert Elements by Related Objects Insertion rules
For designers convenience there is possibility to create own rules.
To create own rules press Configure button.
New window occurs. For the moment window is inactive. The
window is activating by pressing F10 on the keyboard and it
turns into Edit Mode.
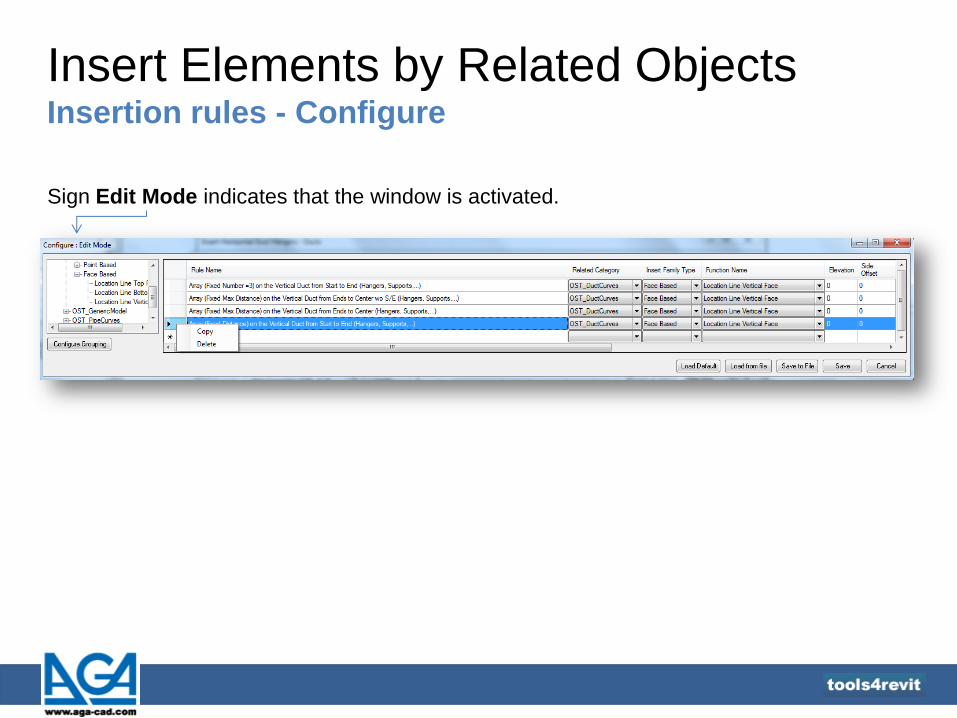
Insert Elements by Related Objects Insertion rules - Configure
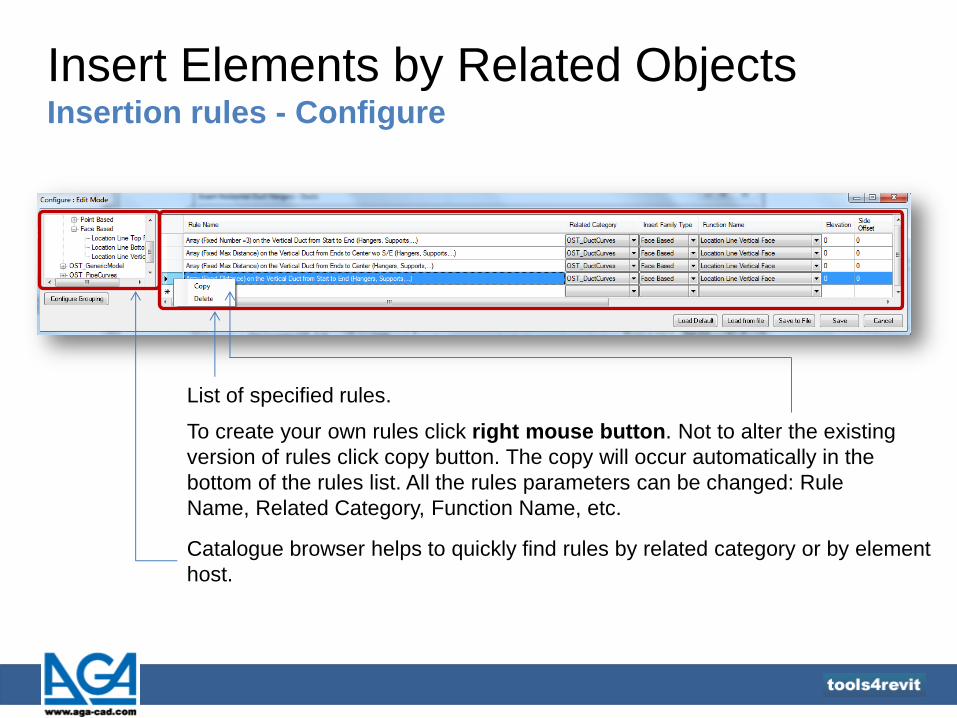
Sign Edit Mode indicates that the window is activated.
Insert Elements by Related Objects Insertion rules - Configure
To create your own rules click right mouse button. Not to alter the existing
version of rules click copy button. The copy will occur automatically in the
bottom of the rules list. All the rules parameters can be changed: Rule
Name, Related Category, Function Name, etc.
List of specified rules.
Catalogue browser helps to quickly find rules by related category or by element
host.
Insert Elements by Related Objects Insertion rules - Configure
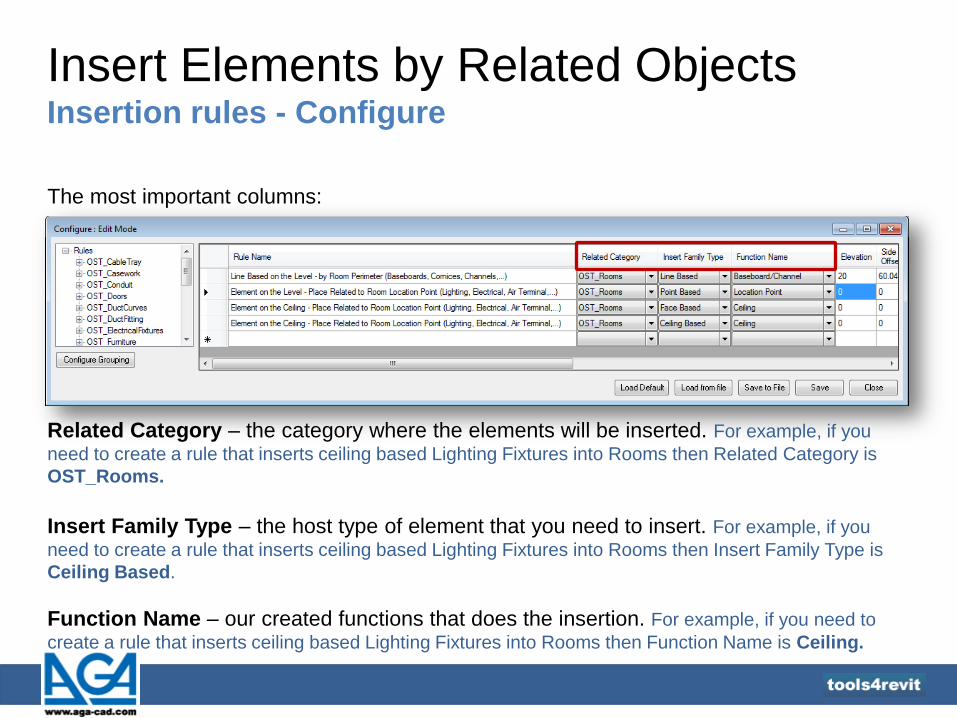
The most important columns:
Related Category – the category where the elements will be inserted. For example, if you
need to create a rule that inserts ceiling based Lighting Fixtures into Rooms then Related Category is
OST_Rooms.
Insert Family Type – the host type of element that you need to insert. For example, if you
need to create a rule that inserts ceiling based Lighting Fixtures into Rooms then Insert Family Type is
Ceiling Based.
Function Name – our created functions that does the insertion. For example, if you need to
create a rule that inserts ceiling based Lighting Fixtures into Rooms then Function Name is Ceiling.
Insert Elements by Related Objects Insertion rules - Configure
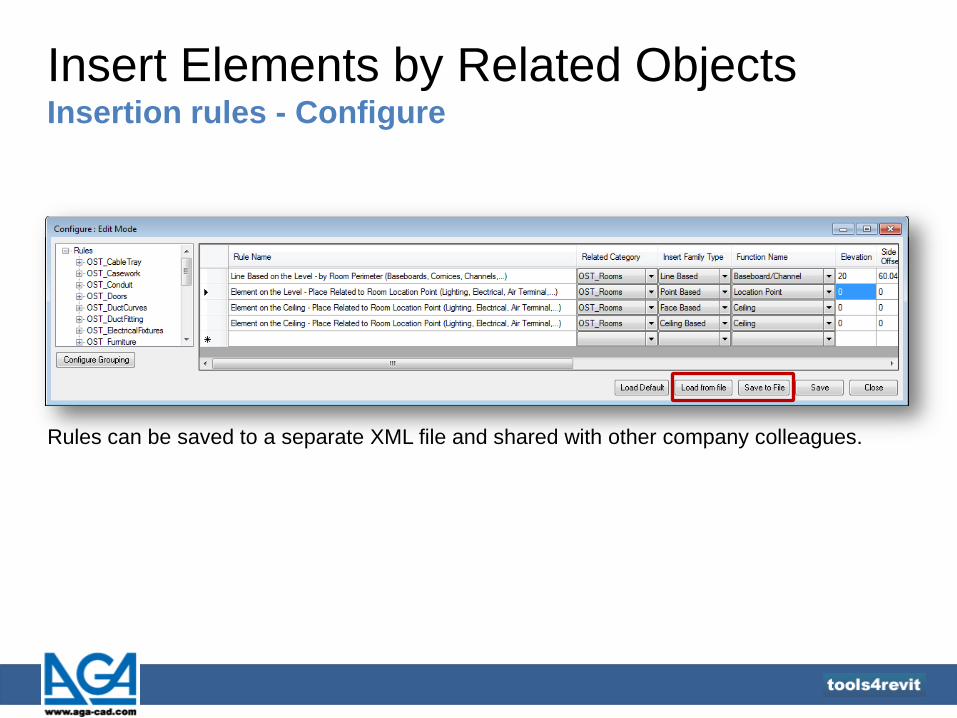
Rules can be saved to a separate XML file and shared with other company colleagues.
Insert Elements by Related Objects Rule Parameters
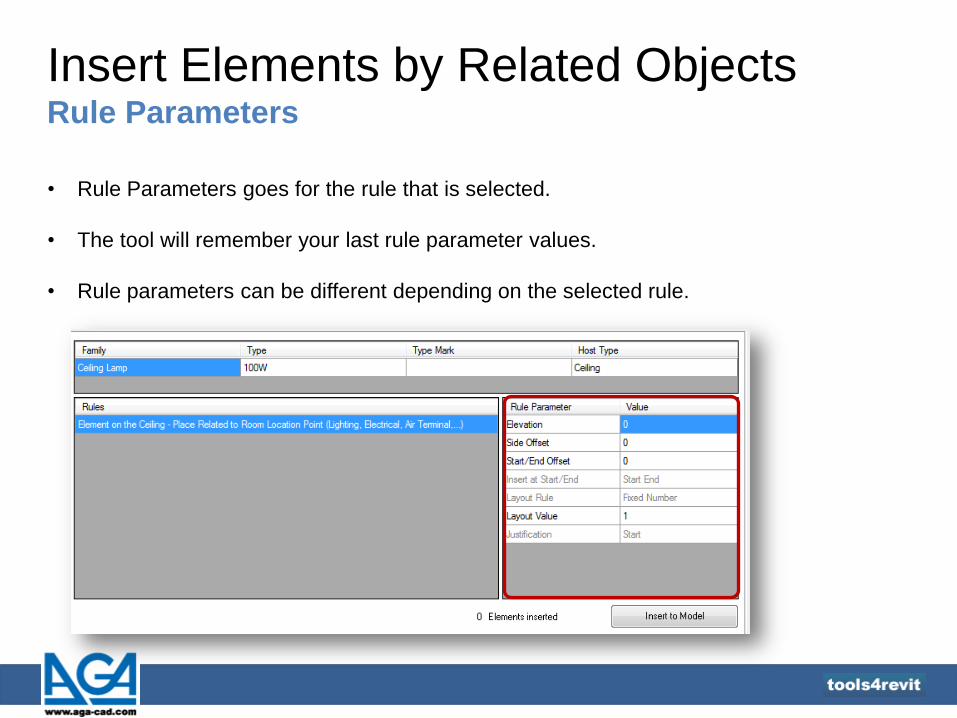
• Rule Parameters goes for the rule that is selected.
• The tool will remember your last rule parameter values.
• Rule parameters can be different depending on the selected rule.
Insert Elements by Related Objects Rule Parameters
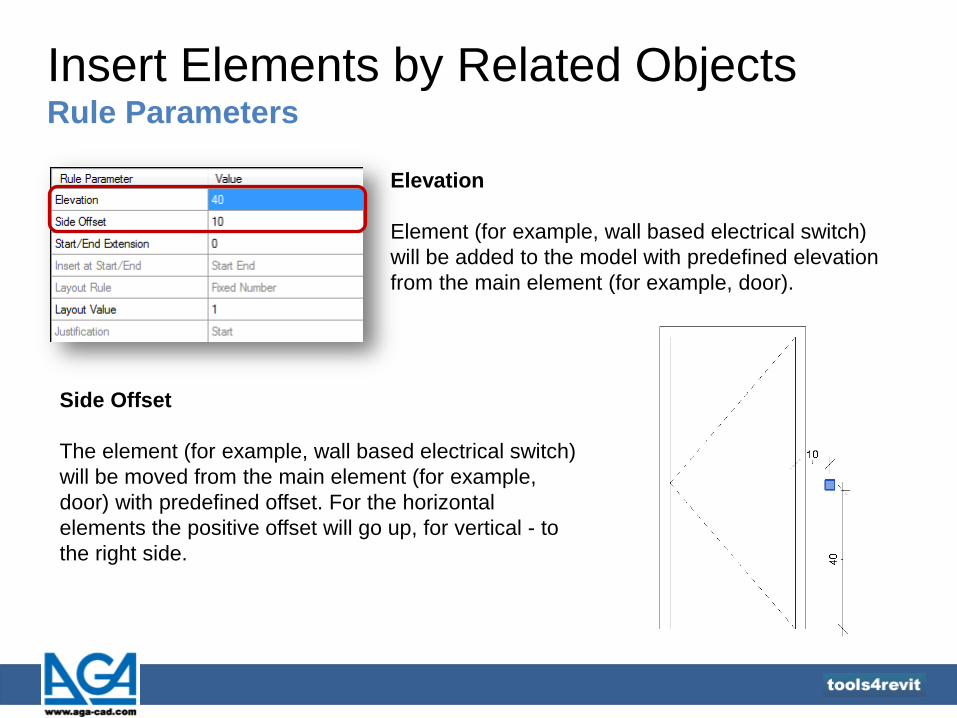
Elevation
Element (for example, wall based electrical switch)
will be added to the model with predefined elevation
from the main element (for example, door).
Side Offset
The element (for example, wall based electrical switch)
will be moved from the main element (for example,
door) with predefined offset. For the horizontal
elements the positive offset will go up, for vertical - to
the right side.
Insert Elements by Related Objects Rule Parameters
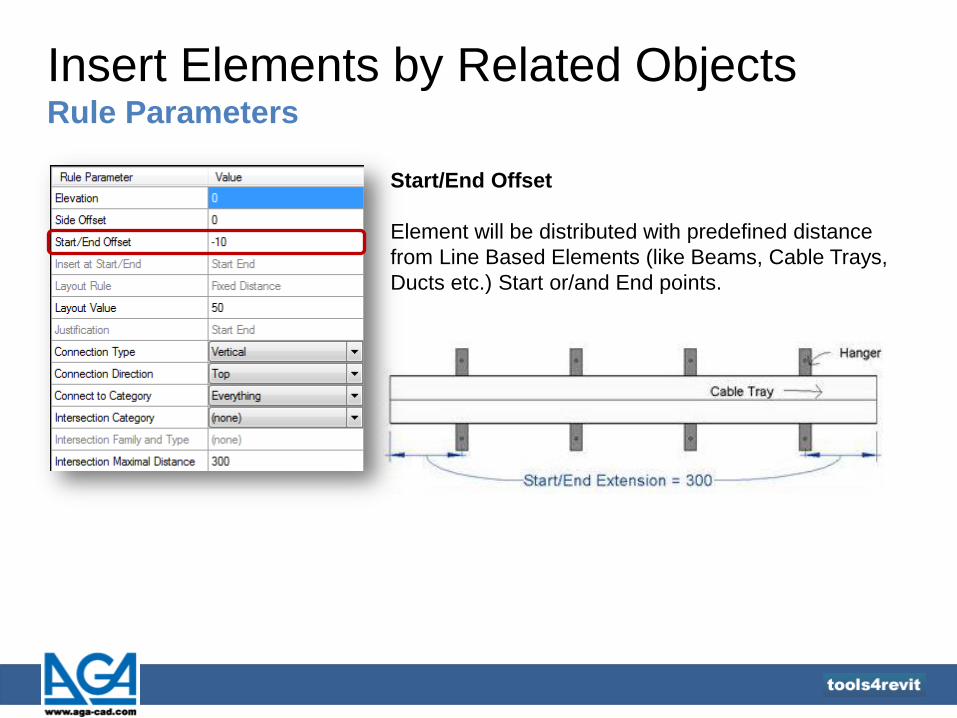
Start/End Offset
Element will be distributed with predefined distance
from Line Based Elements (like Beams, Cable Trays,
Ducts etc.) Start or/and End points.
Insert Elements by Related Objects Rule Parameters
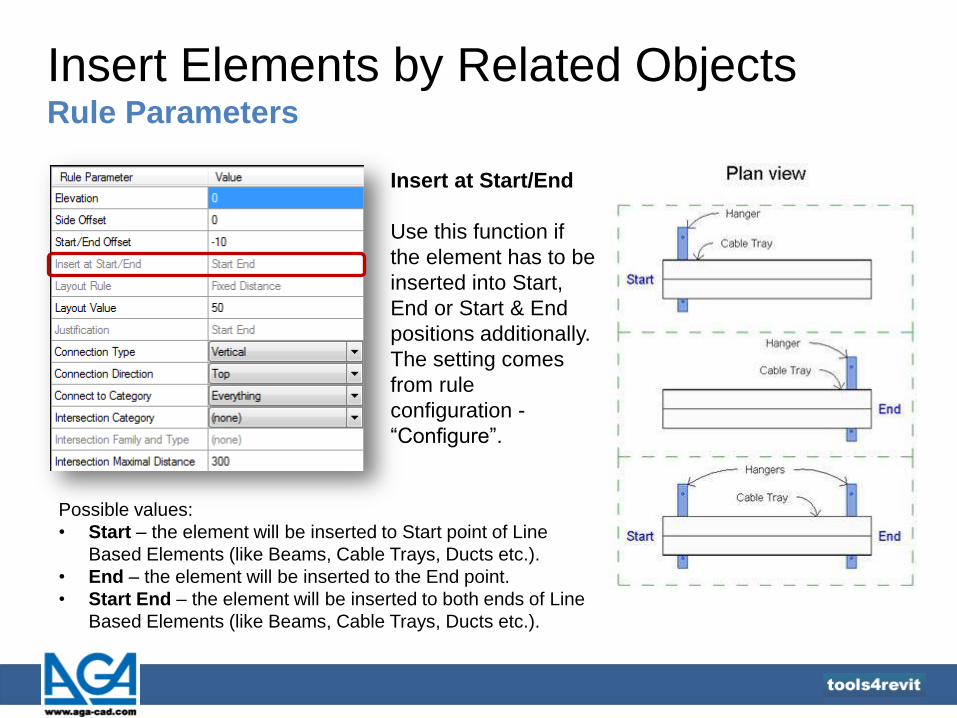
Insert at Start/End
Use this function if
the element has to be
inserted into Start,
End or Start & End
positions additionally.
The setting comes
from rule
configuration -
“Configure”.
Possible values:
• Start – the element will be inserted to Start point of Line
Based Elements (like Beams, Cable Trays, Ducts etc.).
• End – the element will be inserted to the End point.
• Start End – the element will be inserted to both ends of Line
Based Elements (like Beams, Cable Trays, Ducts etc.).
Insert Elements by Related Objects Rule Parameters
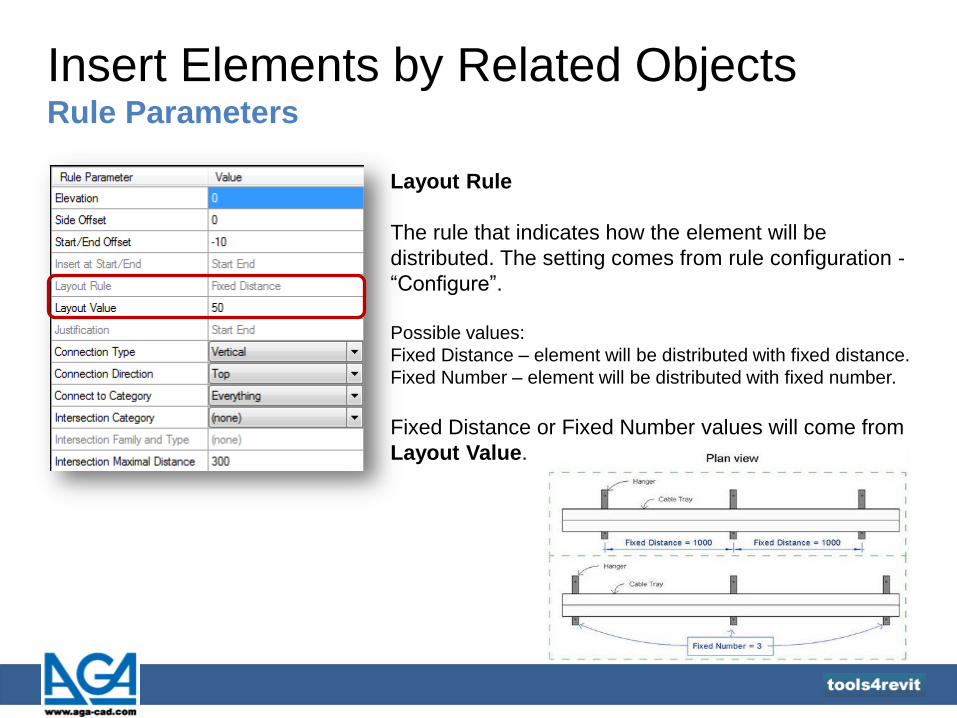
Layout Rule
The rule that indicates how the element will be
distributed. The setting comes from rule configuration -
“Configure”.
Possible values:
Fixed Distance – element will be distributed with fixed distance.
Fixed Number – element will be distributed with fixed number.
Fixed Distance or Fixed Number values will come from
Layout Value.
Insert Elements by Related Objects Rule Parameters
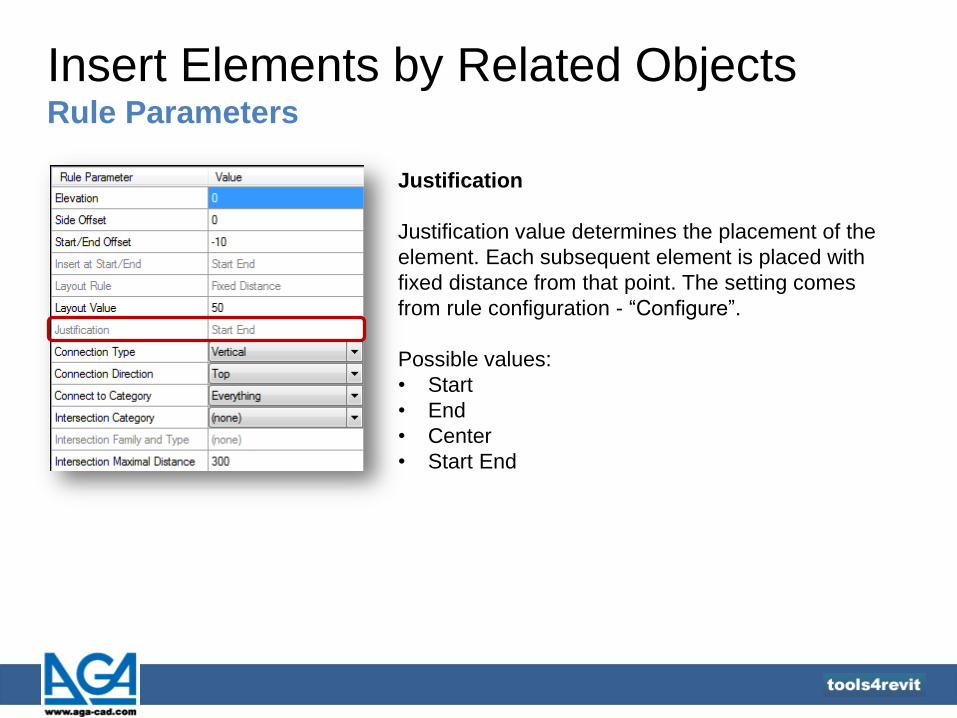
Justification
Justification value determines the placement of the
element. Each subsequent element is placed with
fixed distance from that point. The setting comes
from rule configuration - “Configure”.
Possible values:
• Start
• End
• Center
• Start End
Insert Elements by Related Objects Rule Parameters
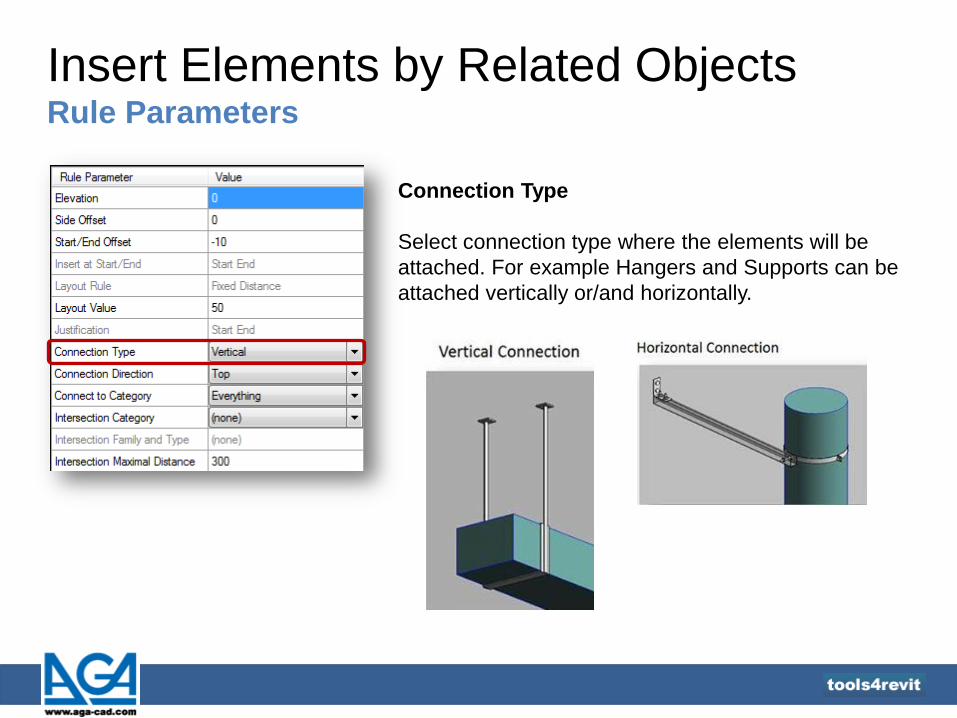
Connection Type
Select connection type where the elements will be
attached. For example Hangers and Supports can be
attached vertically or/and horizontally.
Insert Elements by Related Objects Rule Parameters
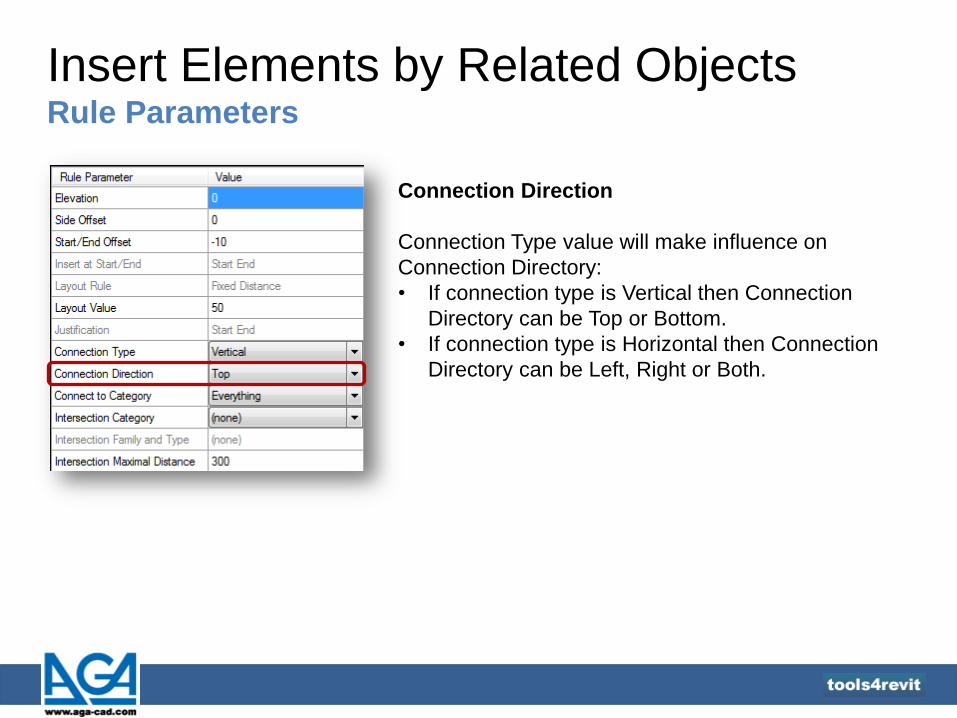
Connection Direction
Connection Type value will make influence on
Connection Directory:
• If connection type is Vertical then Connection
Directory can be Top or Bottom.
• If connection type is Horizontal then Connection
Directory can be Left, Right or Both.

Insert Elements by Related Objects Rule Parameters
Connect to Category
Select the category where the element (for example,
hanger or support) will be attached.
Possible categories for the Vertical connection: • Everything (Roofs, Floors, Structural Foundations, Structural
Framings or Reference Planes)
• Roofs
• Floors
• Structural Foundations
• Structural Framings
• Reference Planes
Possible categories for the Horizontal connection: • Everything (Walls, Structural Columns, Structural Framings
or Reference Planes)
• Walls
• Structural Columns
• Structural Framings
• Reference Planes
Insert Elements by Related Objects Rule Parameters
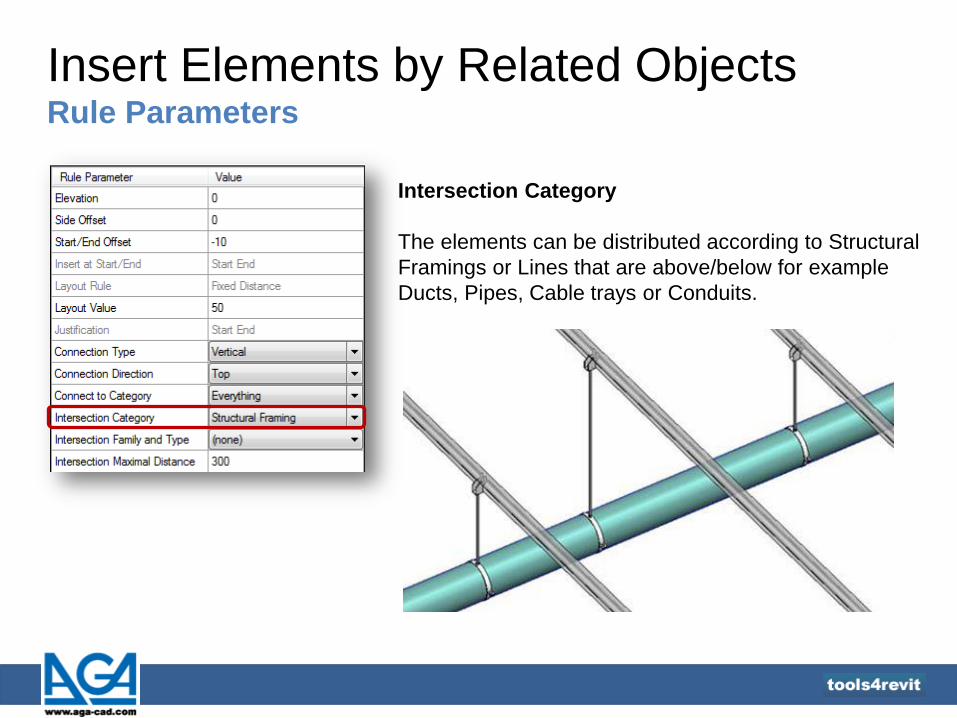
Intersection Category
The elements can be distributed according to Structural
Framings or Lines that are above/below for example
Ducts, Pipes, Cable trays or Conduits.

Insert Elements by Related Objects Rule Parameters
Intersection Family and Type
Select Family and Type name or Line Type where the
elements will be attached.
Intersection Maximal Distance
Add Maximal Distance in all directions where the
elements will attach Roofs, Floors, Structural
Foundations, Structural Framings, Walls, Reference
planes and Lines.
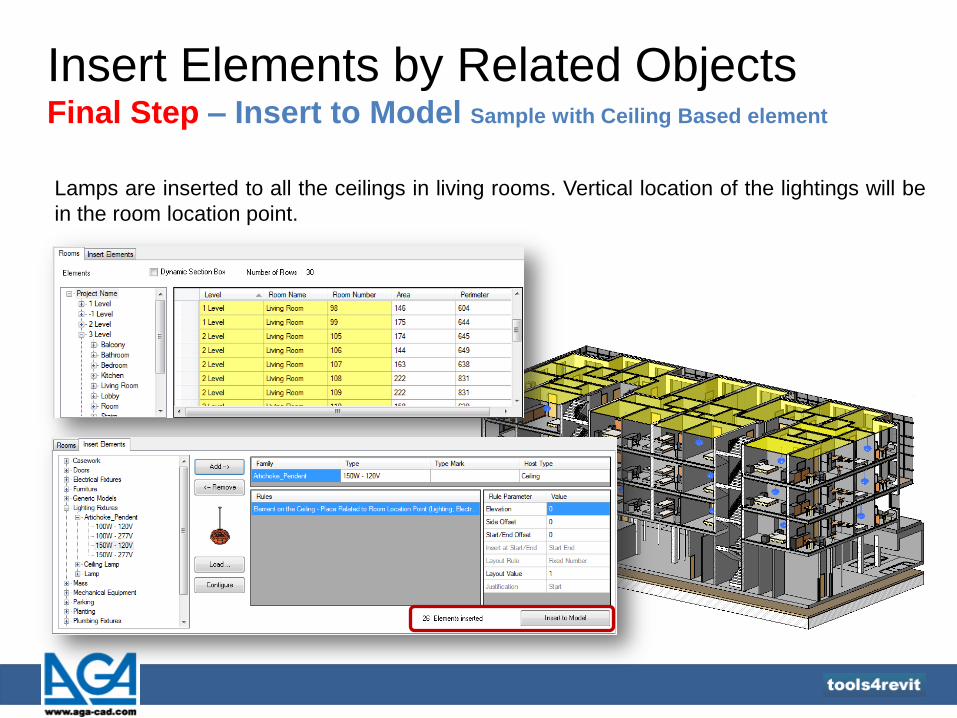
Insert Elements by Related Objects Final Step – Insert to Model Sample with Ceiling Based element
Lamps are inserted to all the ceilings in living rooms. Vertical location of the lightings will be
in the room location point.
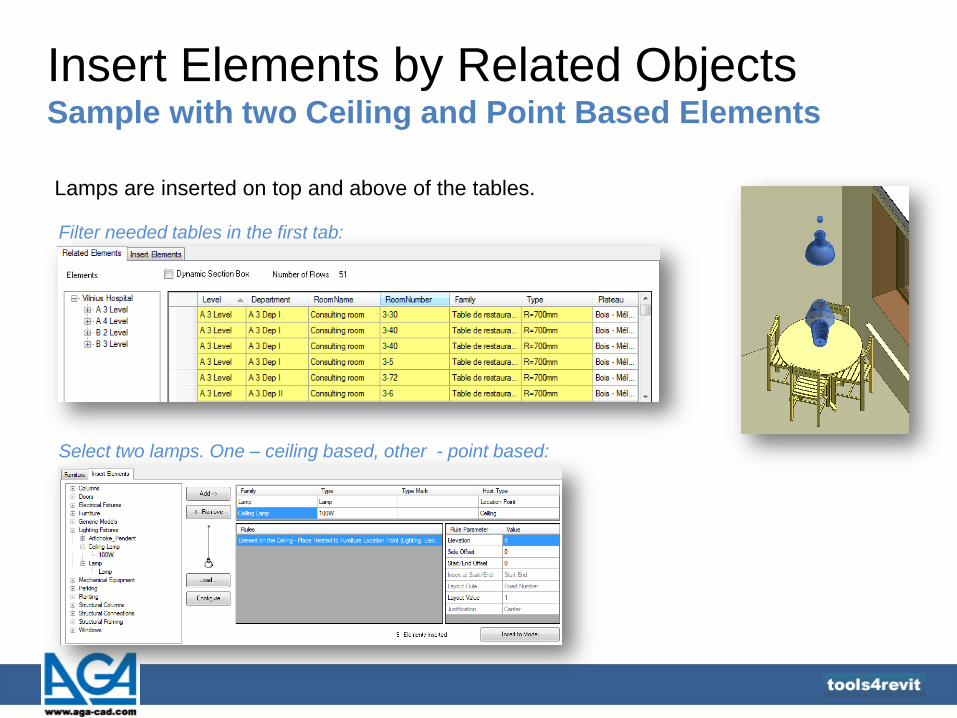
Insert Elements by Related Objects Sample with two Ceiling and Point Based Elements
Lamps are inserted on top and above of the tables.
Filter needed tables in the first tab:
Select two lamps. One – ceiling based, other - point based:
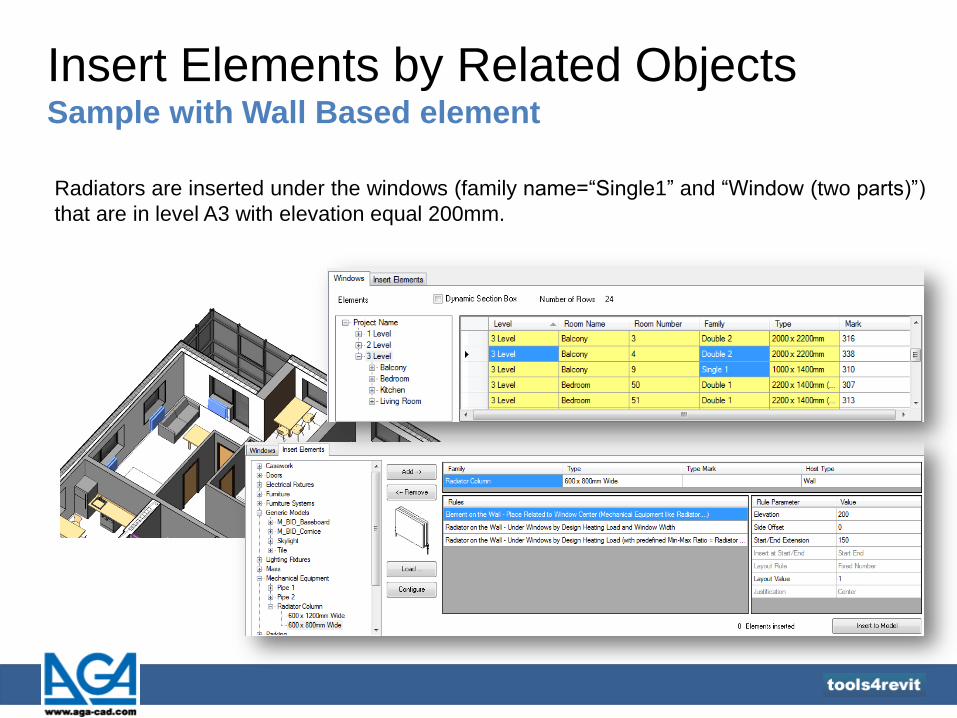
Insert Elements by Related Objects Sample with Wall Based element
Radiators are inserted under the windows (family name=“Single1” and “Window (two parts)”)
that are in level A3 with elevation equal 200mm.
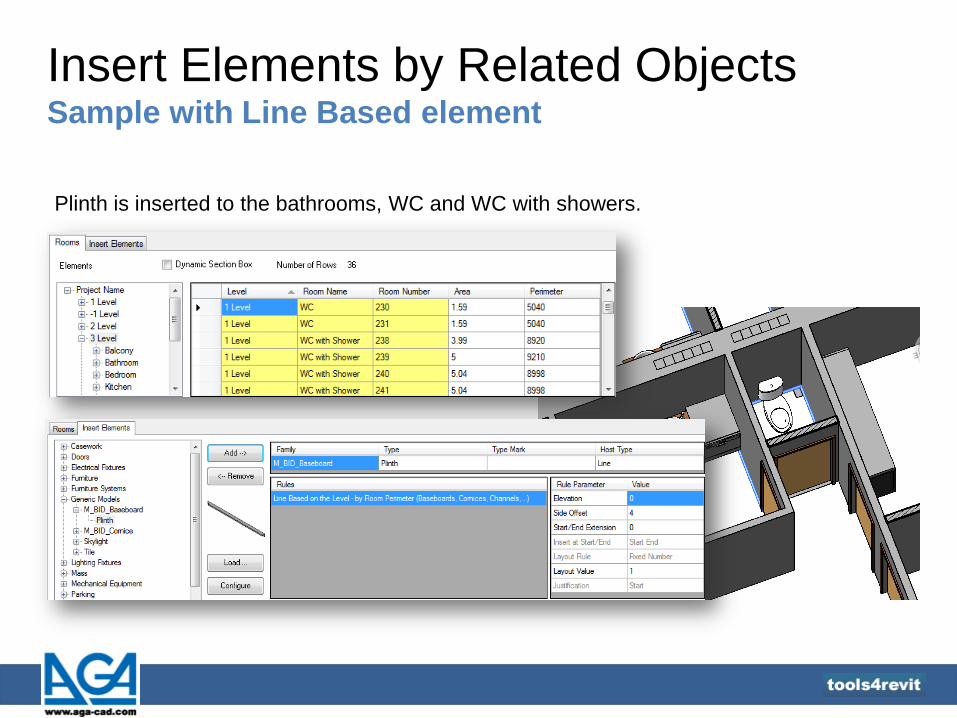
Insert Elements by Related Objects Sample with Line Based element
Plinth is inserted to the bathrooms, WC and WC with showers.
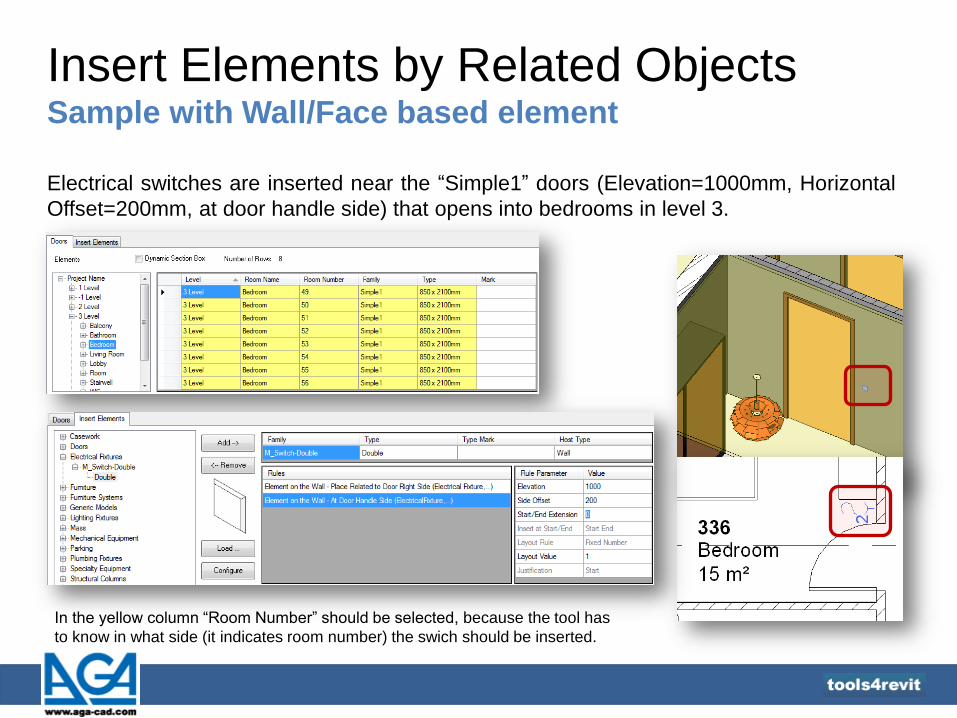
Insert Elements by Related Objects Sample with Wall/Face based element
Electrical switches are inserted near the “Simple1” doors (Elevation=1000mm, Horizontal
Offset=200mm, at door handle side) that opens into bedrooms in level 3.
In the yellow column “Room Number” should be selected, because the tool has
to know in what side (it indicates room number) the swich should be inserted.
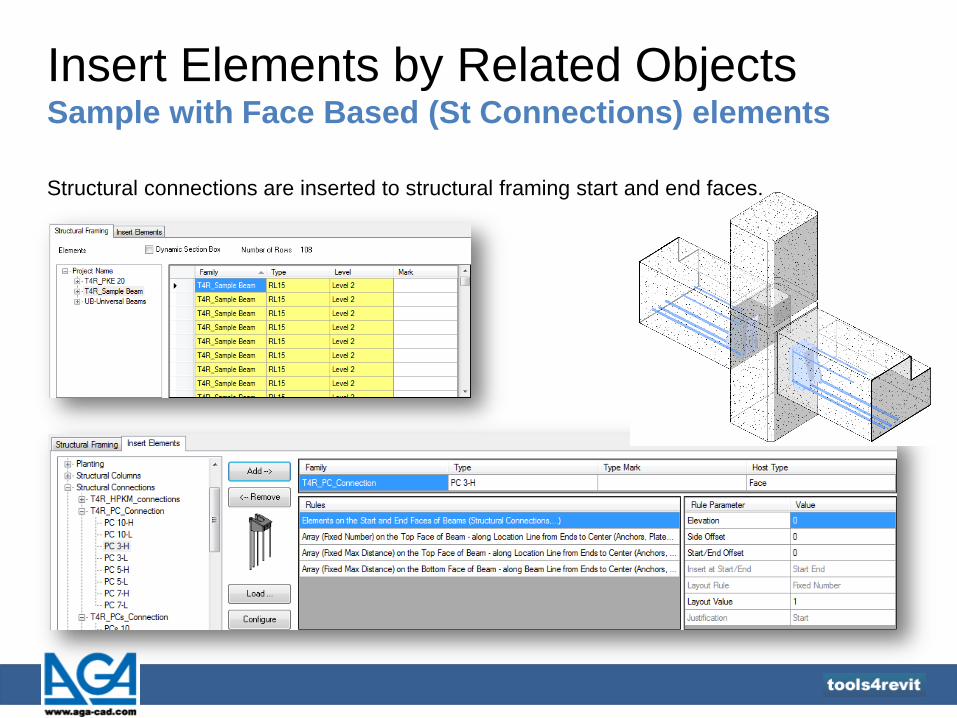
Insert Elements by Related Objects Sample with Face Based (St Connections) elements
Structural connections are inserted to structural framing start and end faces.
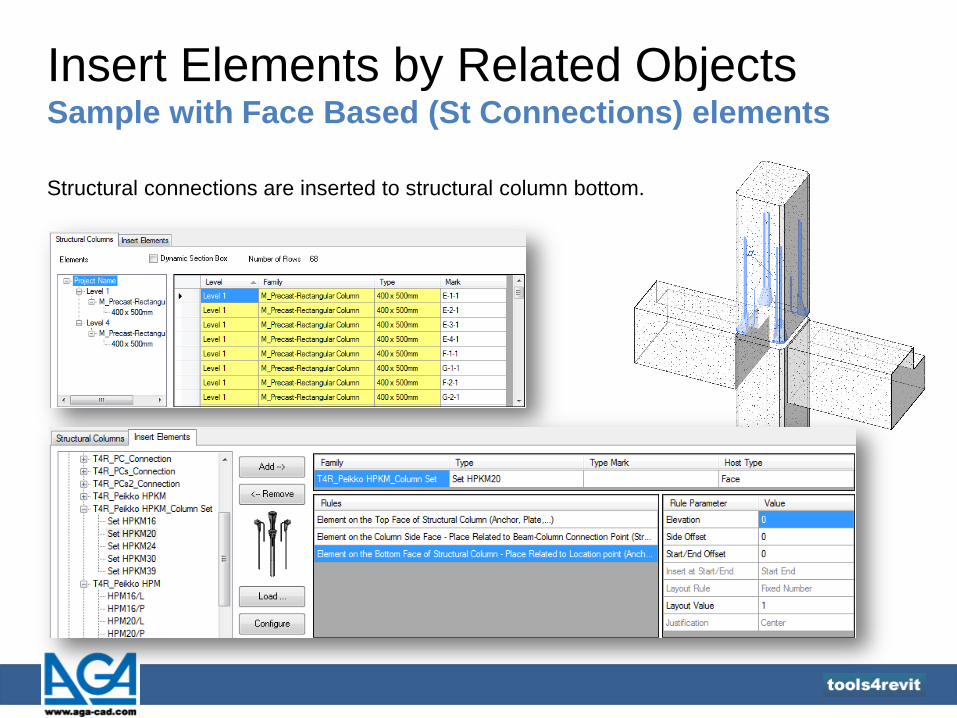
Insert Elements by Related Objects Sample with Face Based (St Connections) elements
Structural connections are inserted to structural column bottom.

Insert Elements by Related Objects Sample with Face Based (Hangers, Supports) elements
Hangers are inserted to Ducts top face.
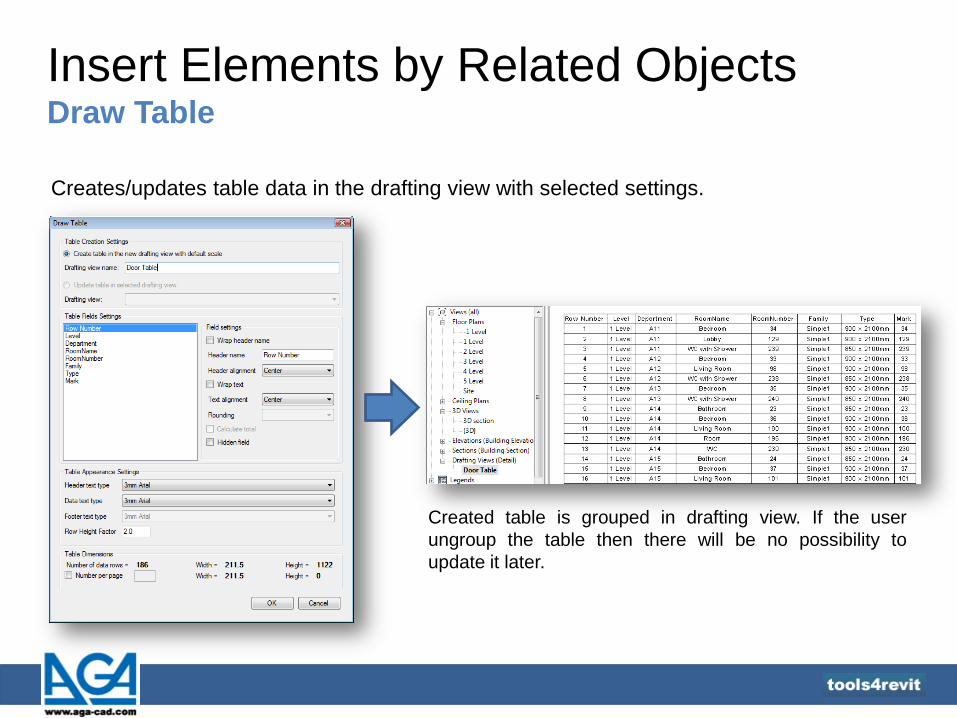
Insert Elements by Related Objects Draw Table
Creates/updates table data in the drafting view with selected settings.
Created table is grouped in drafting view. If the user
ungroup the table then there will be no possibility to
update it later.
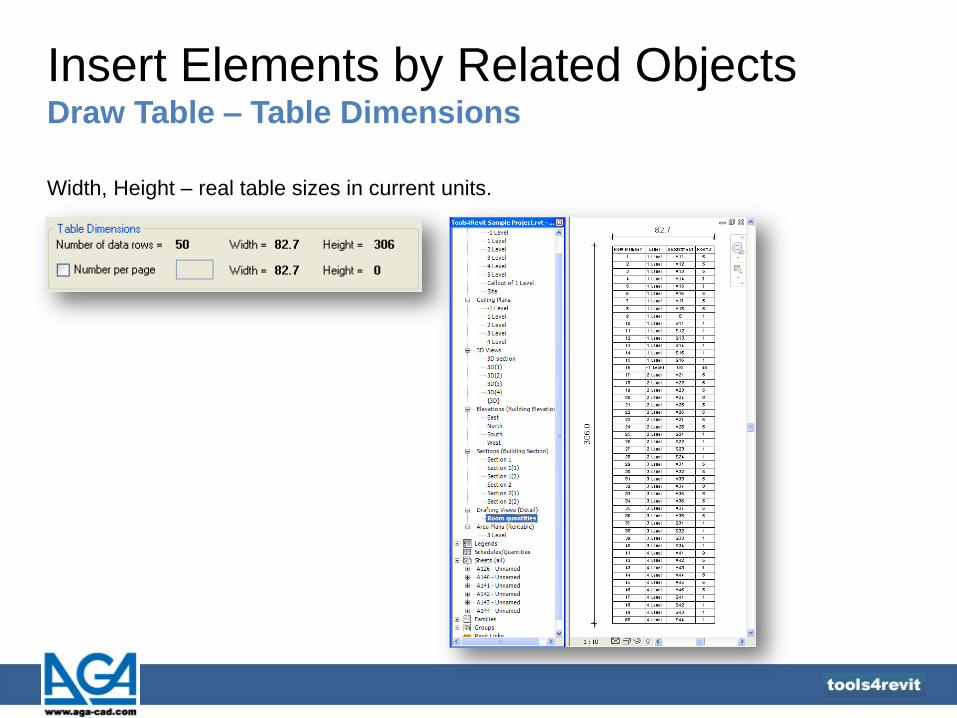
Insert Elements by Related Objects Draw Table – Table Dimensions
Width, Height – real table sizes in current units.
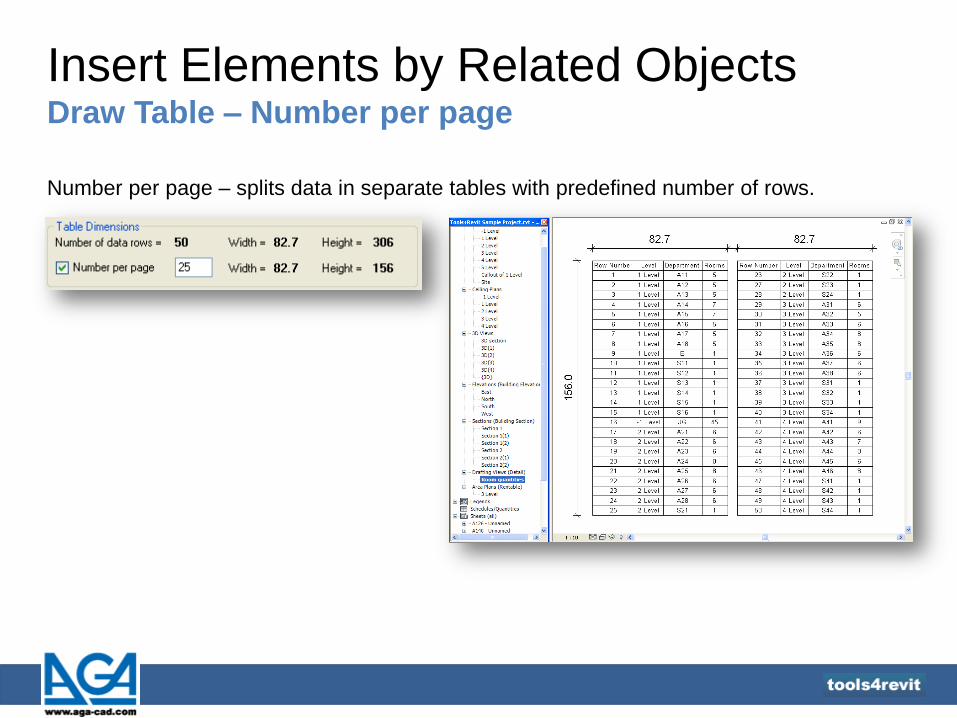
Insert Elements by Related Objects Draw Table – Number per page
Number per page – splits data in separate tables with predefined number of rows.
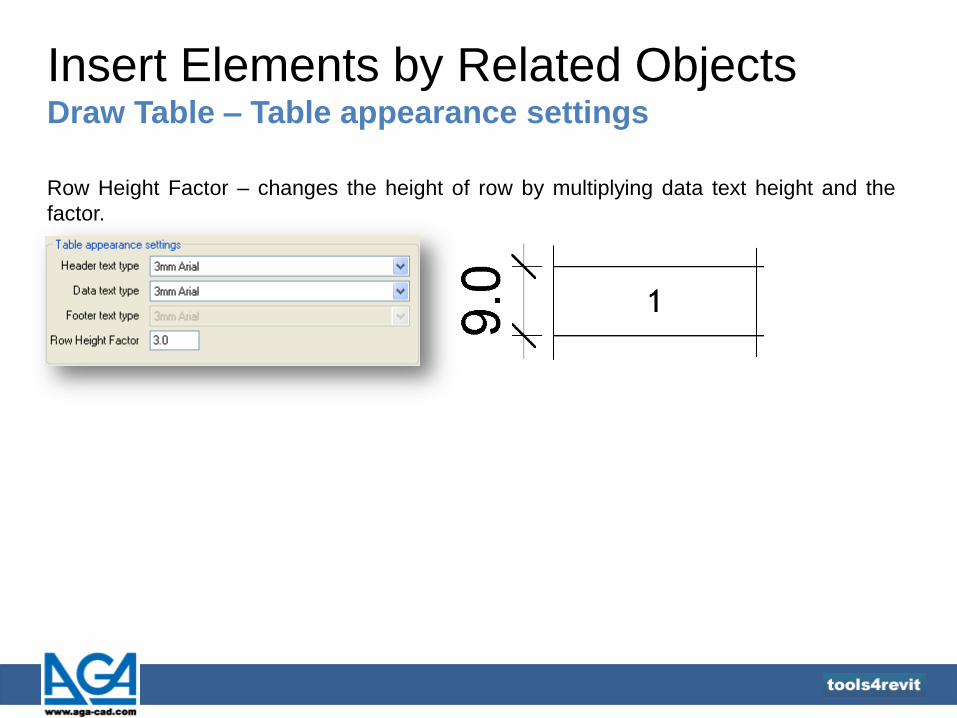
Insert Elements by Related Objects Draw Table – Table appearance settings
Row Height Factor – changes the height of row by multiplying data text height and the
factor.
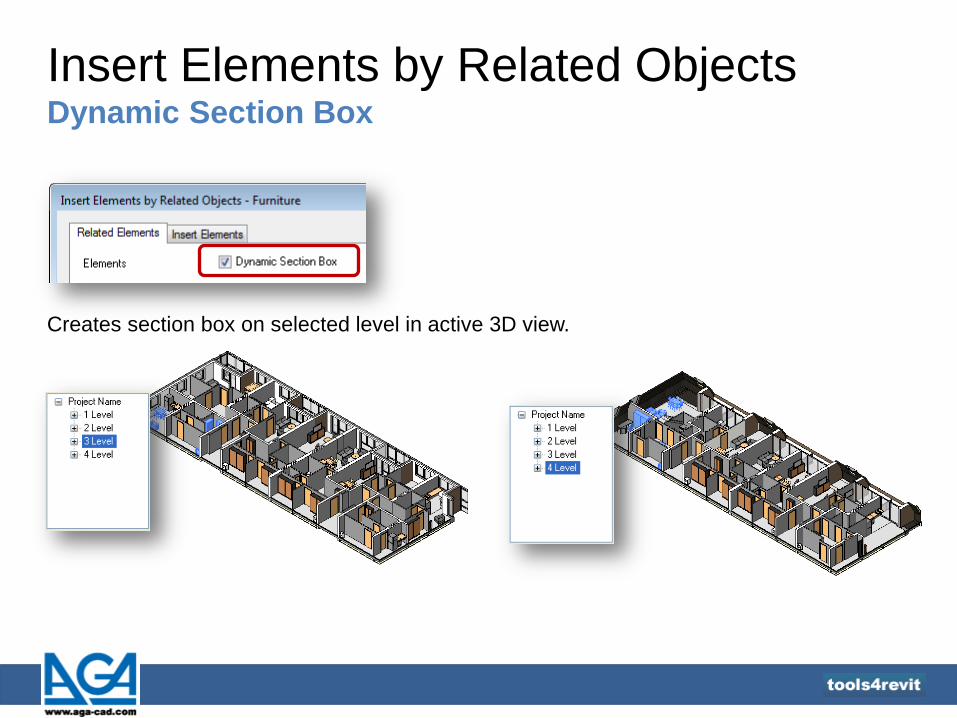
Insert Elements by Related Objects Dynamic Section Box
Creates section box on selected level in active 3D view.
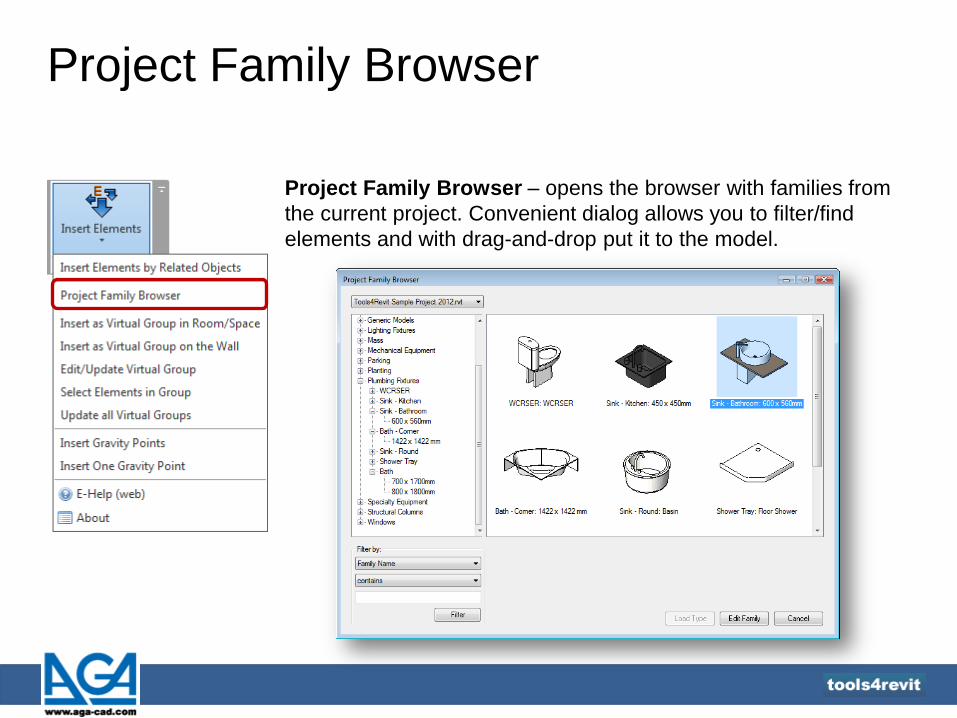
Project Family Browser
Project Family Browser – opens the browser with families from
the current project. Convenient dialog allows you to filter/find
elements and with drag-and-drop put it to the model.
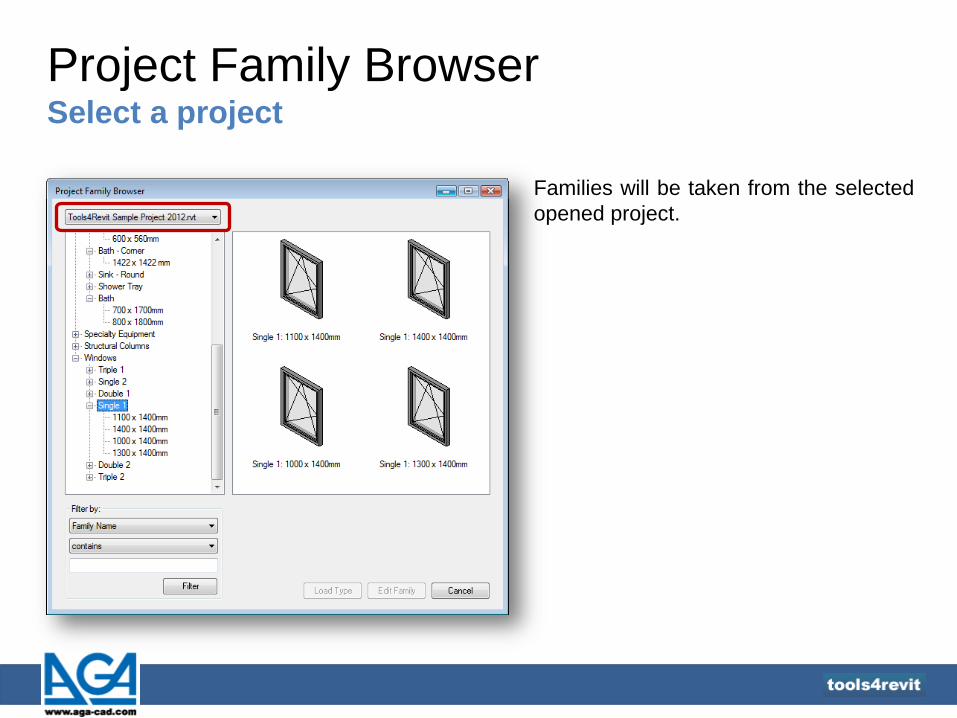
Project Family Browser Select a project
Families will be taken from the selected
opened project.
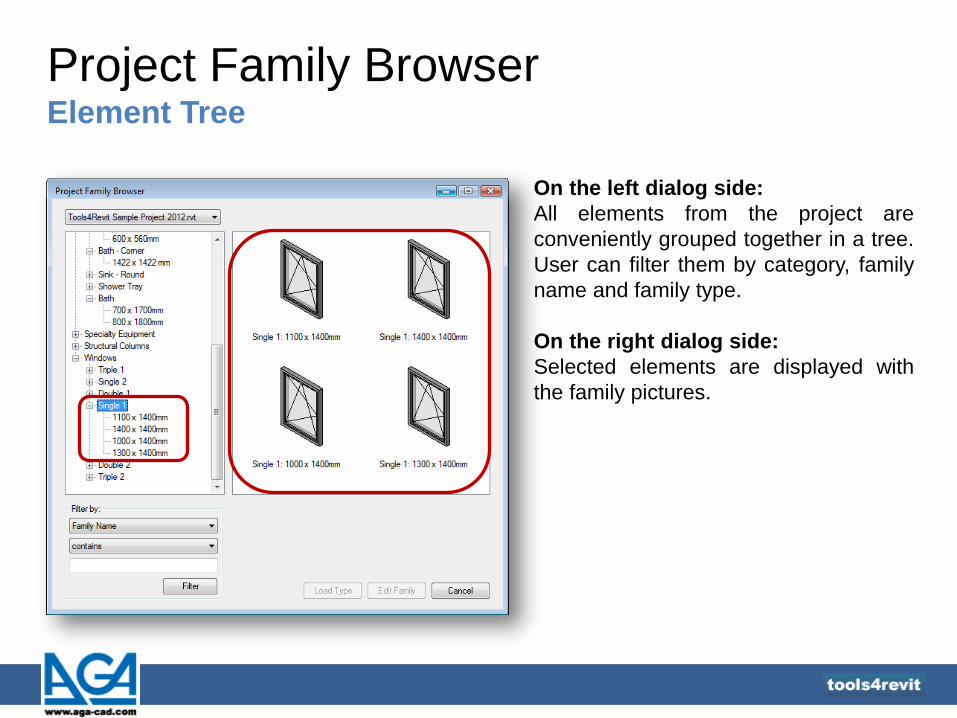
Project Family Browser Element Tree
On the left dialog side:
All elements from the project are
conveniently grouped together in a tree.
User can filter them by category, family
name and family type.
On the right dialog side:
Selected elements are displayed with
the family pictures.
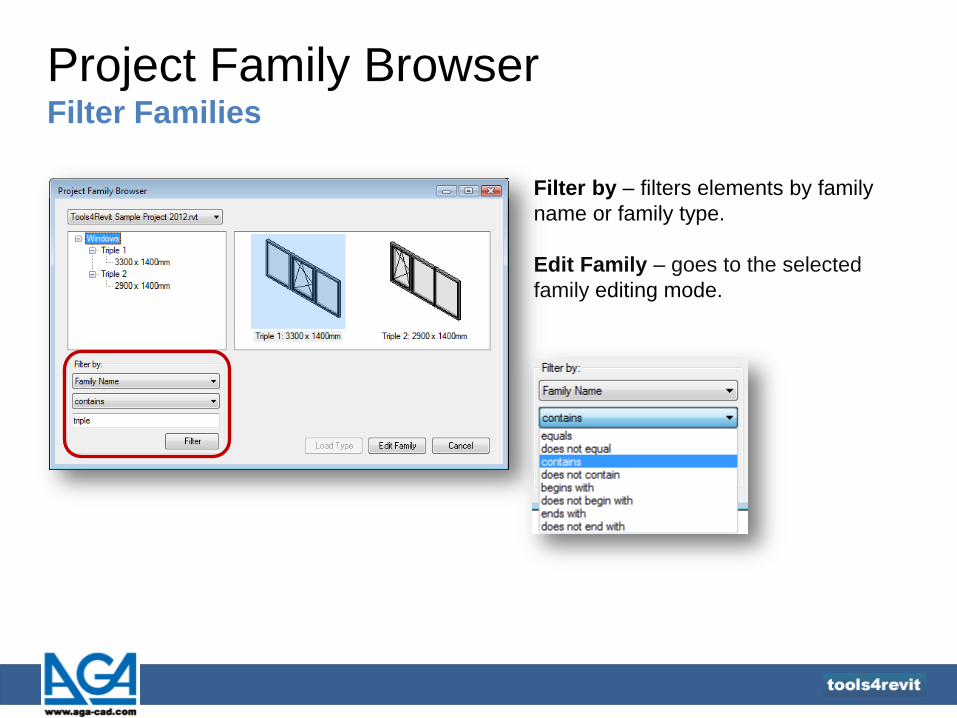
Project Family Browser Filter Families
Filter by – filters elements by family
name or family type.
Edit Family – goes to the selected
family editing mode.
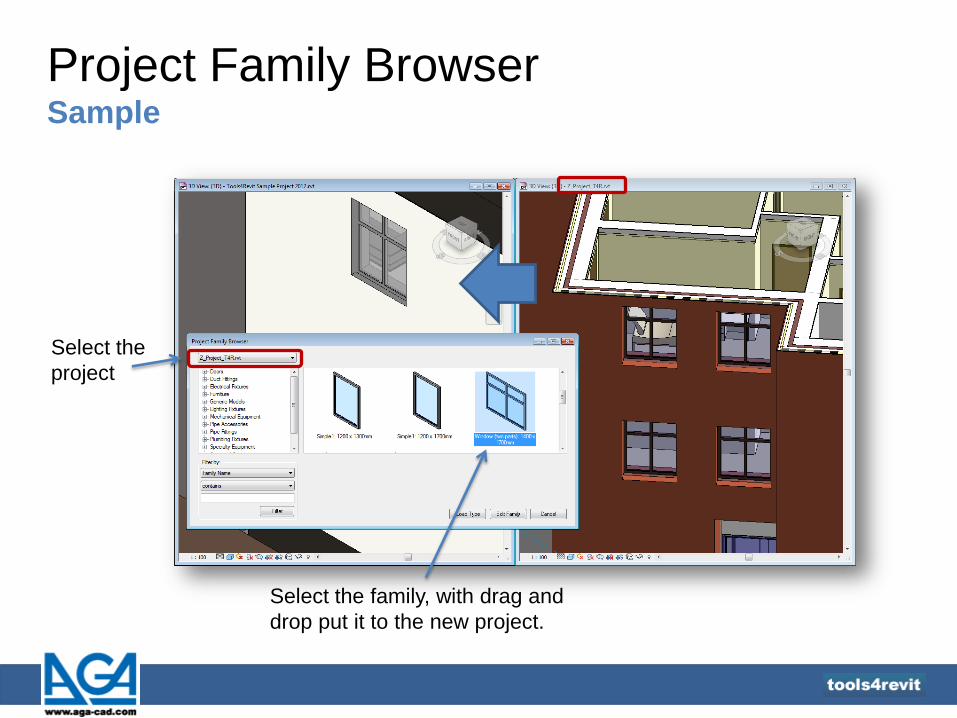
Project Family Browser Sample
Select the
project
Select the family, with drag and
drop put it to the new project.
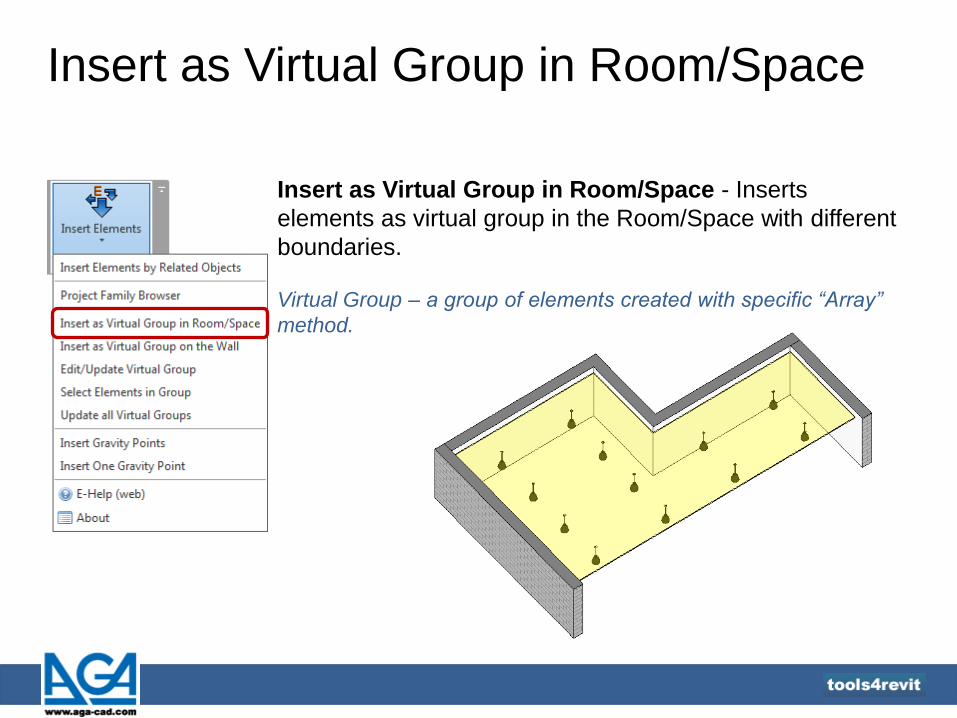
Insert as Virtual Group in Room/Space
Insert as Virtual Group in Room/Space - Inserts
elements as virtual group in the Room/Space with different
boundaries.
Virtual Group – a group of elements created with specific “Array”
method.
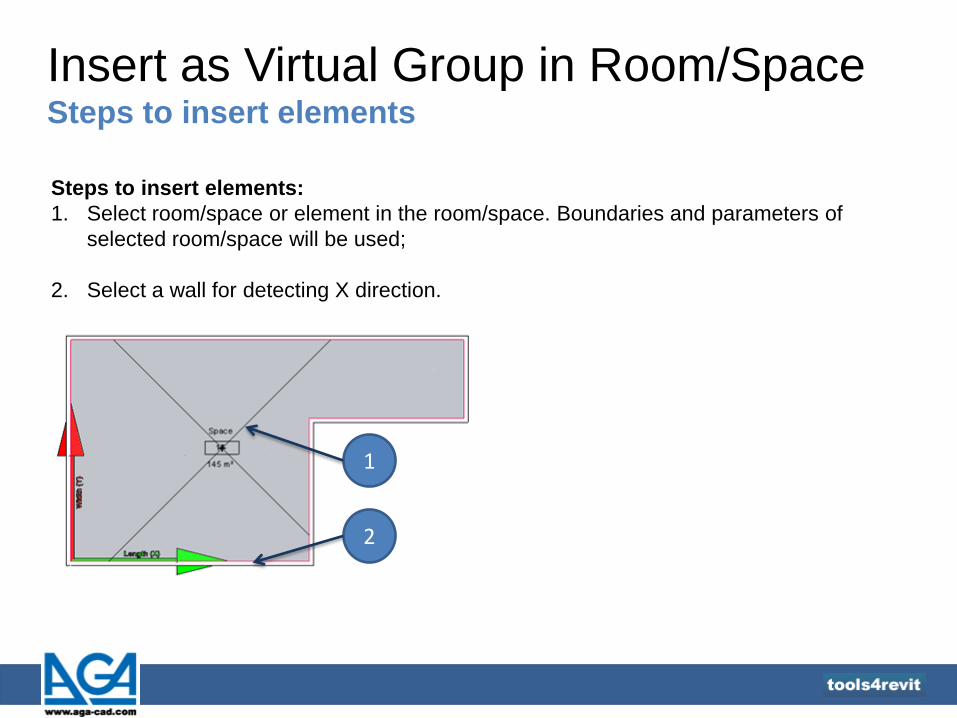
Insert as Virtual Group in Room/Space Steps to insert elements
Steps to insert elements:
1. Select room/space or element in the room/space. Boundaries and parameters of
selected room/space will be used;
2. Select a wall for detecting X direction.
1
2
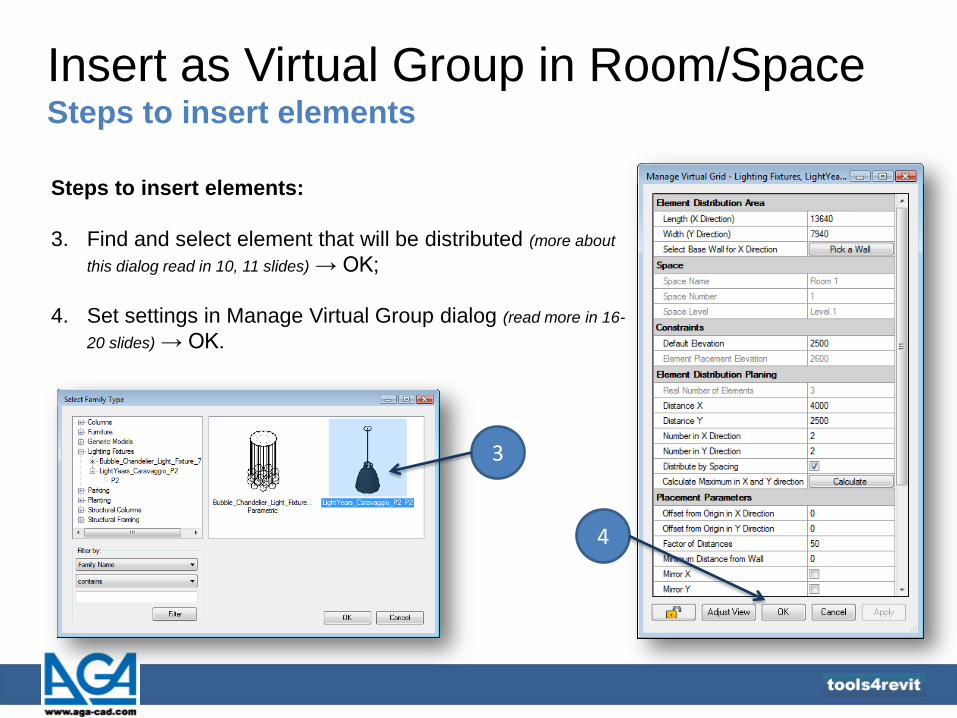
Insert as Virtual Group in Room/Space Steps to insert elements
Steps to insert elements:
3. Find and select element that will be distributed (more about
this dialog read in 10, 11 slides) → OK;
4. Set settings in Manage Virtual Group dialog (read more in 16-
20 slides) → OK.
3
4
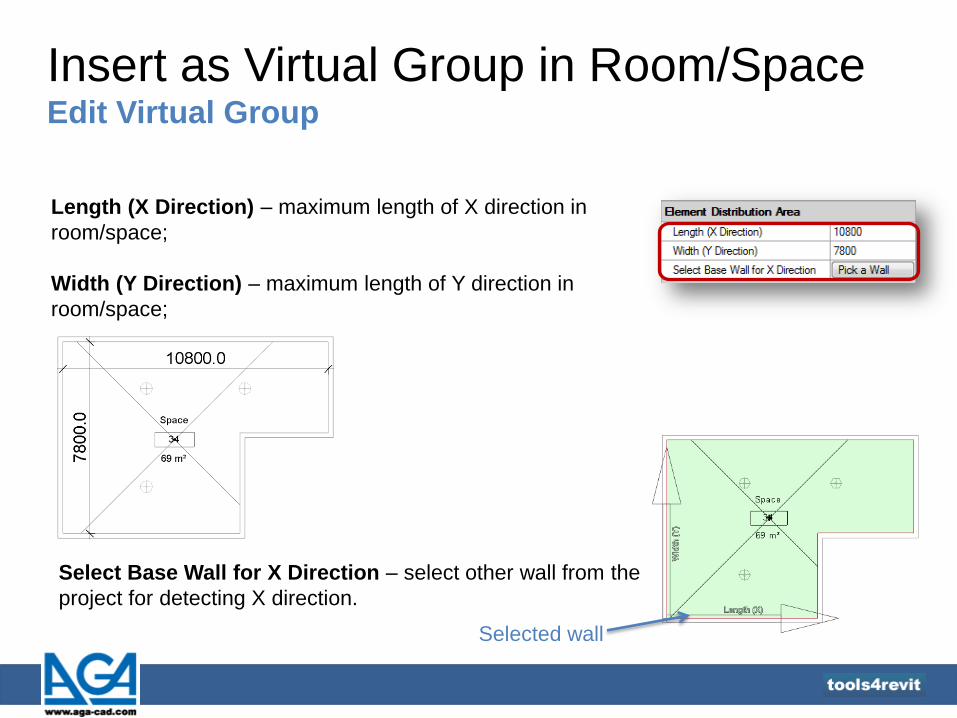
Insert as Virtual Group in Room/Space Edit Virtual Group
Length (X Direction) – maximum length of X direction in
room/space;
Width (Y Direction) – maximum length of Y direction in
room/space;
Select Base Wall for X Direction – select other wall from the
project for detecting X direction.
Selected wall
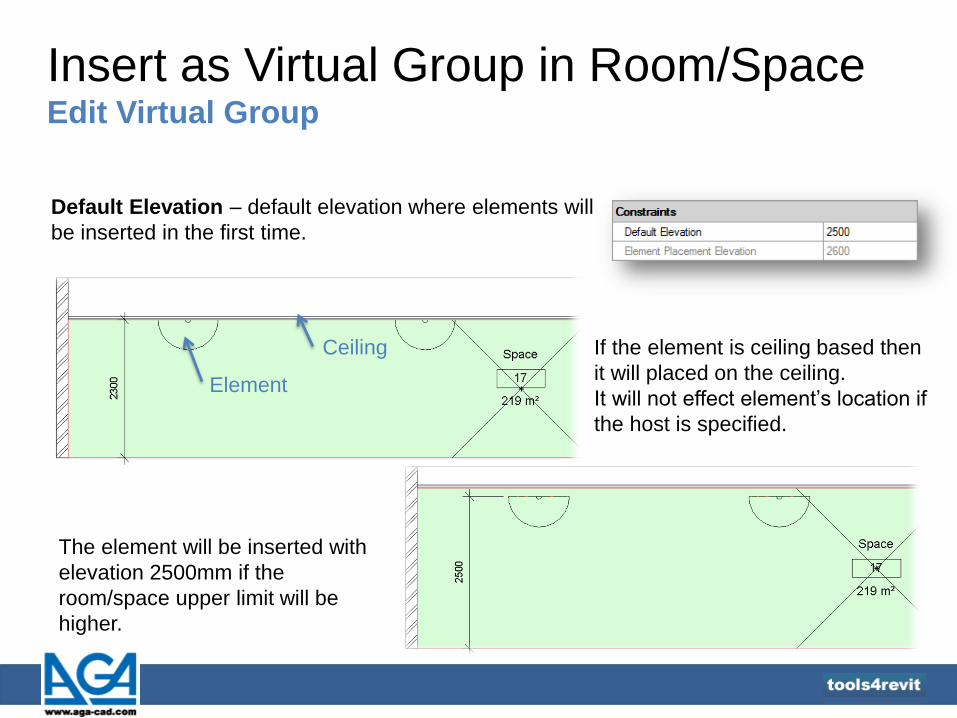
Default Elevation – default elevation where elements will
be inserted in the first time.
Ceiling
Element
The element will be inserted with
elevation 2500mm if the
room/space upper limit will be
higher.
If the element is ceiling based then
it will placed on the ceiling.
It will not effect element’s location if
the host is specified.
Insert as Virtual Group in Room/Space Edit Virtual Group
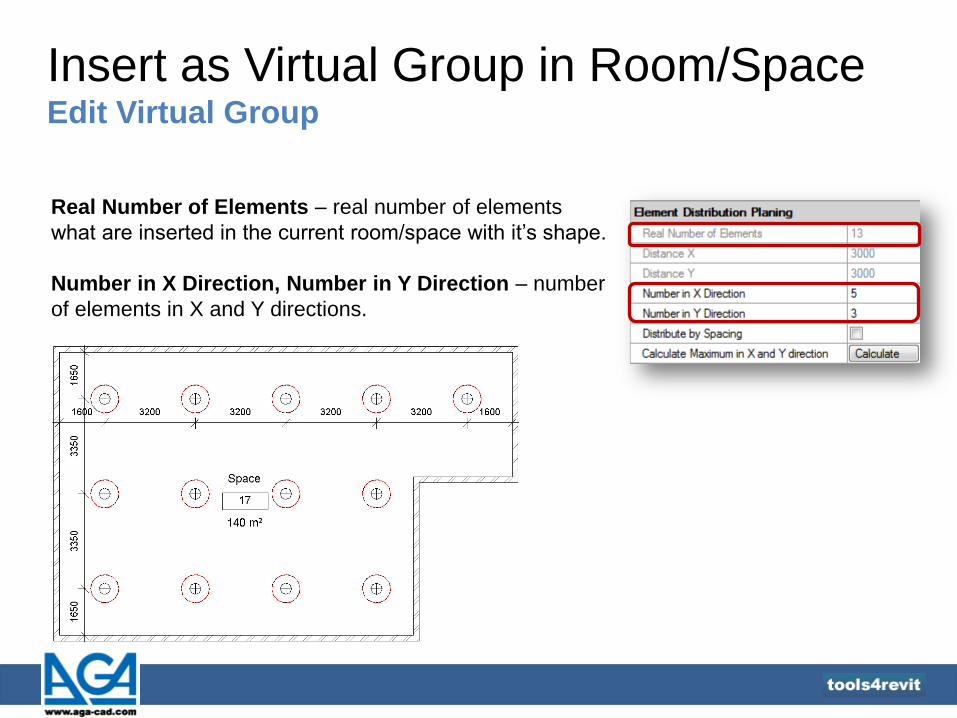
Real Number of Elements – real number of elements
what are inserted in the current room/space with it’s shape.
Number in X Direction, Number in Y Direction – number
of elements in X and Y directions.
Insert as Virtual Group in Room/Space Edit Virtual Group
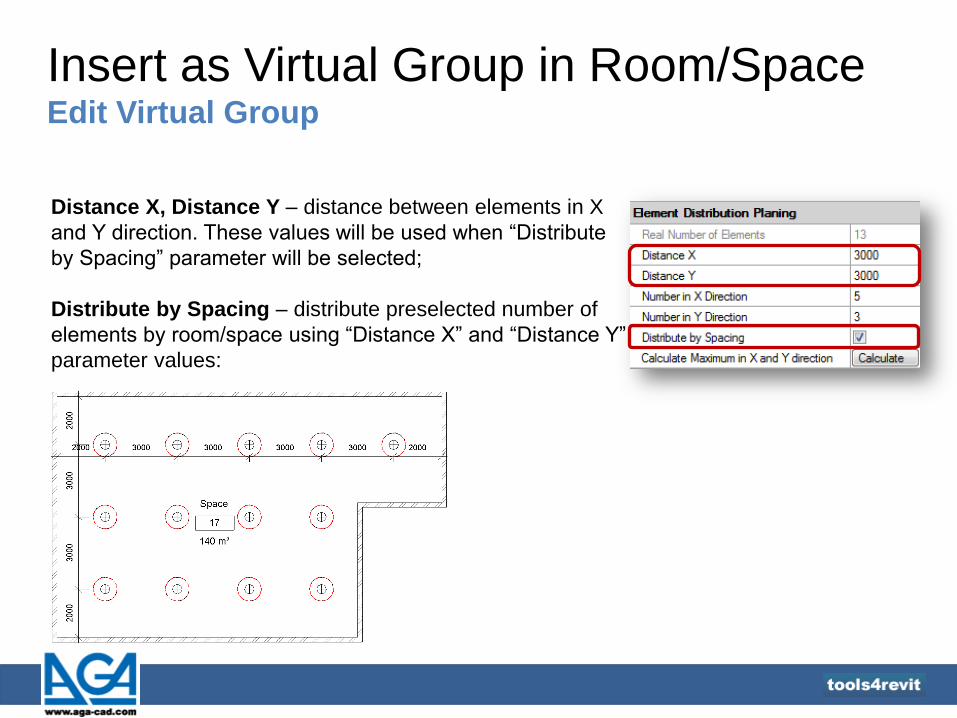
Distance X, Distance Y – distance between elements in X
and Y direction. These values will be used when “Distribute
by Spacing” parameter will be selected;
Distribute by Spacing – distribute preselected number of
elements by room/space using “Distance X” and “Distance Y”
parameter values:
Insert as Virtual Group in Room/Space Edit Virtual Group
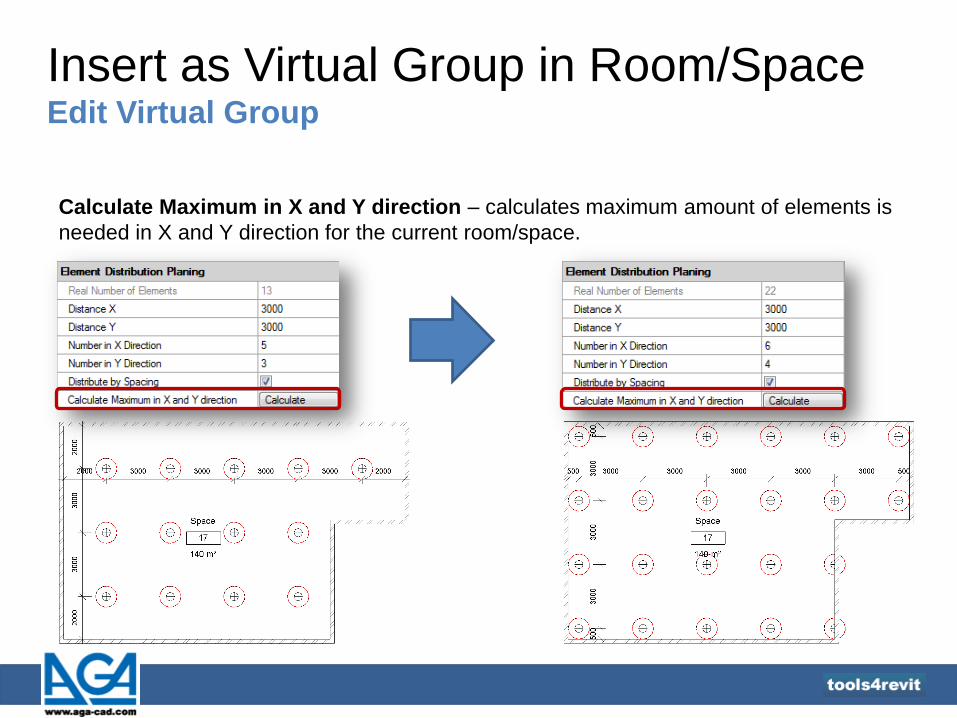
Calculate Maximum in X and Y direction – calculates maximum amount of elements is
needed in X and Y direction for the current room/space.
Insert as Virtual Group in Room/Space Edit Virtual Group
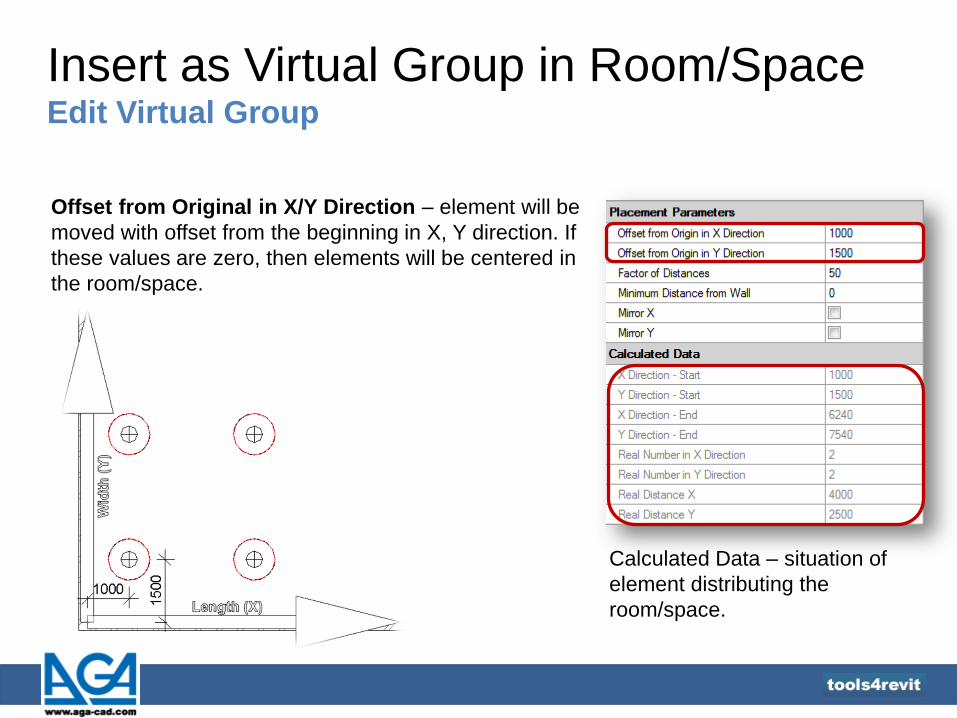
Offset from Original in X/Y Direction – element will be
moved with offset from the beginning in X, Y direction. If
these values are zero, then elements will be centered in
the room/space.
Calculated Data – situation of
element distributing the
room/space.
Insert as Virtual Group in Room/Space Edit Virtual Group
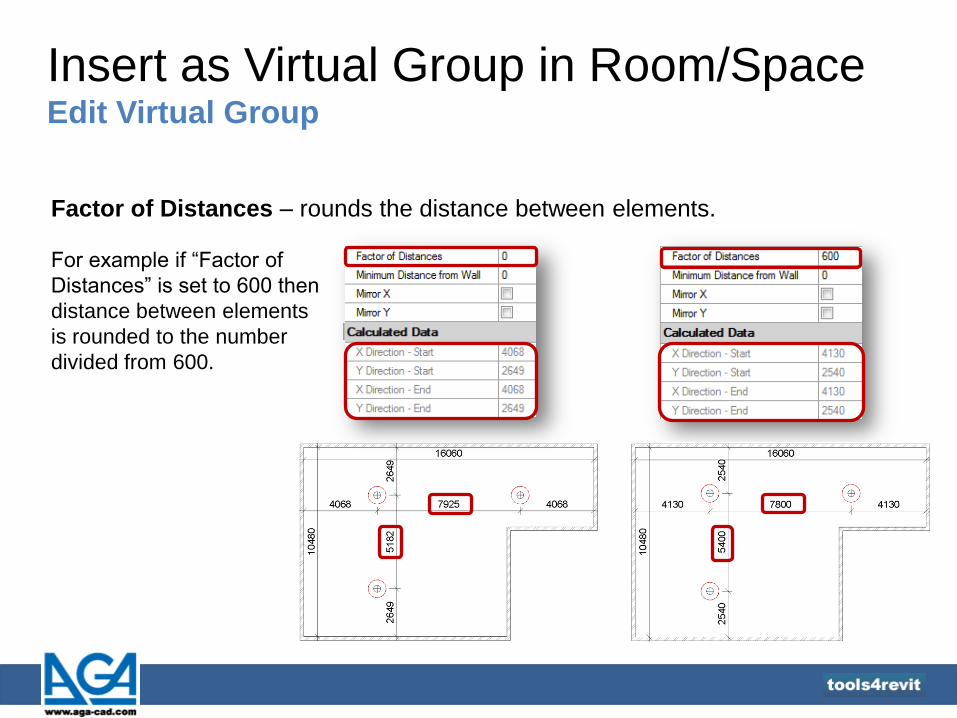
For example if “Factor of
Distances” is set to 600 then
distance between elements
is rounded to the number
divided from 600.
Factor of Distances – rounds the distance between elements.
Insert as Virtual Group in Room/Space Edit Virtual Group
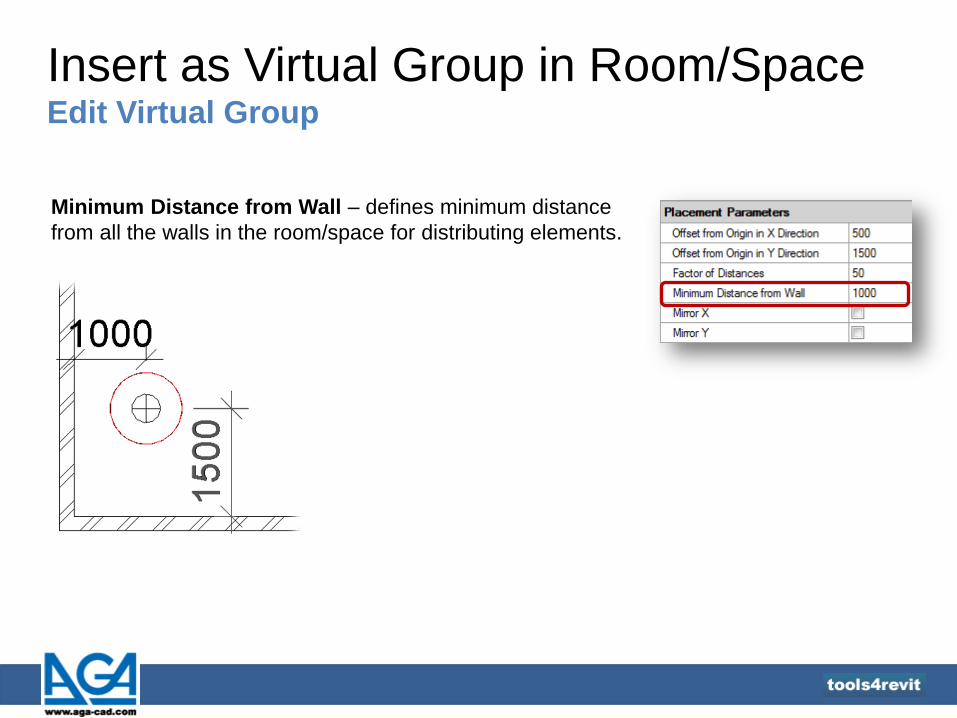
Minimum Distance from Wall – defines minimum distance
from all the walls in the room/space for distributing elements.
Insert as Virtual Group in Room/Space Edit Virtual Group
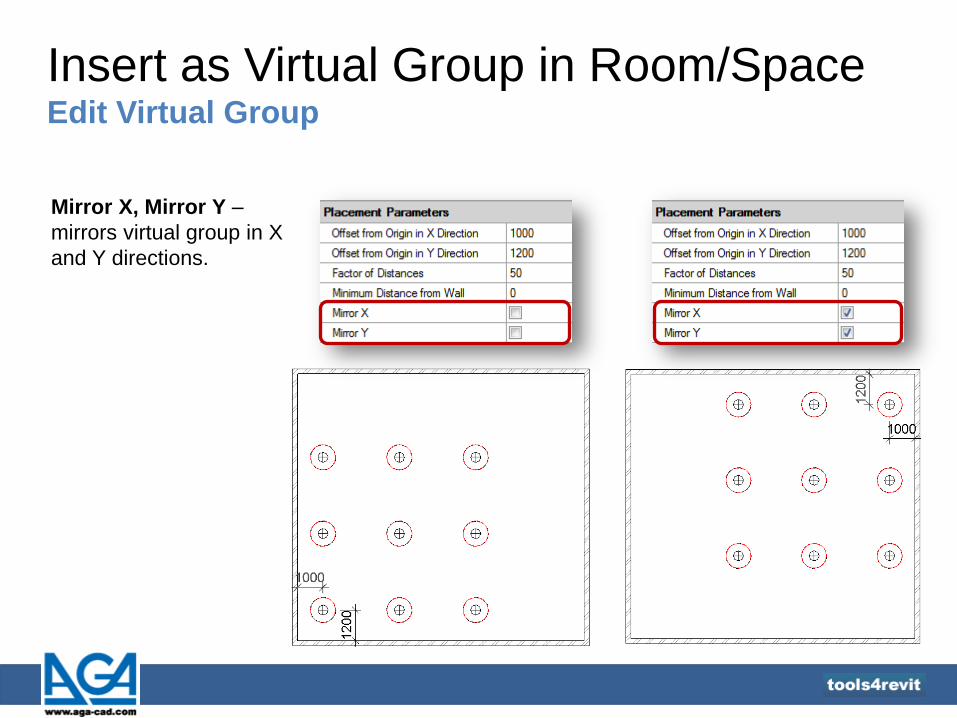
Mirror X, Mirror Y –
mirrors virtual group in X
and Y directions.
Insert as Virtual Group in Room/Space Edit Virtual Group

Insert as Virtual Group in Room/Space Edit Virtual Group
Placement parameters
can be locked.
Note: Virtual Group can’t be
copied or mirrored!
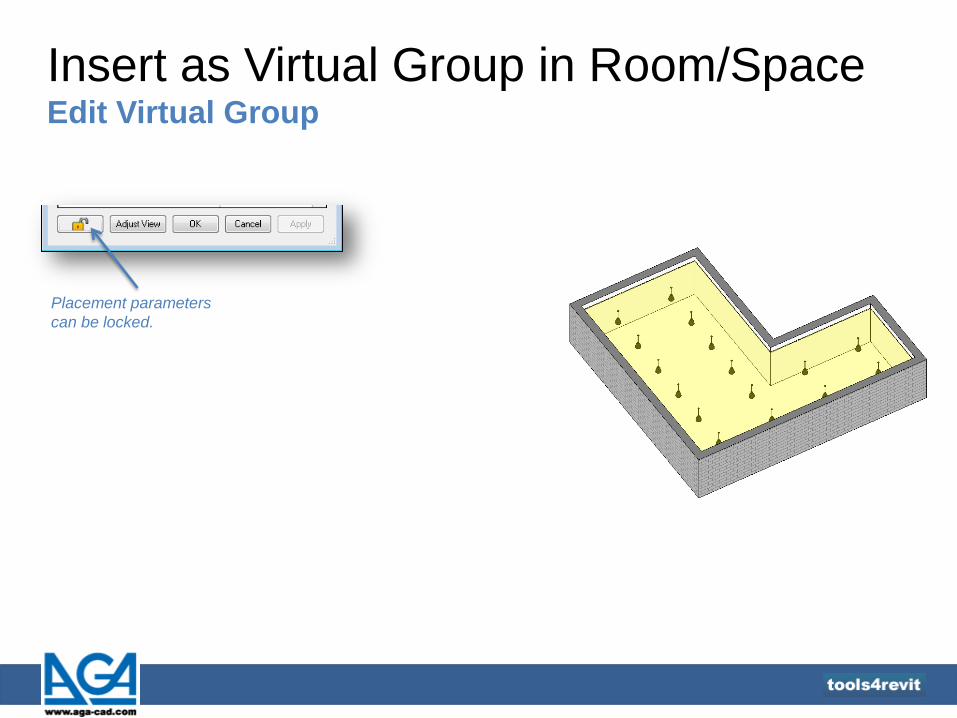
Insert as Virtual Group in Room/Space Edit Virtual Group
Placement parameters
can be locked.

Insert as Virtual Group on the Wall
Inserts face based elements on the selected wall. Function works
the same as “Insert as Virtual Group in Room/Space”.
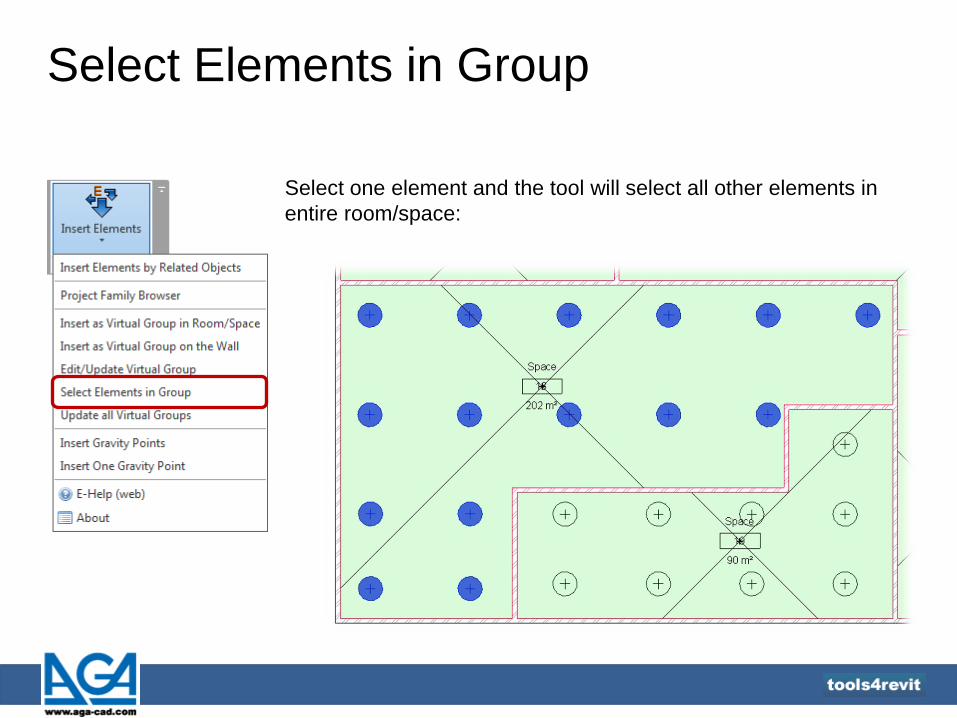
Select Elements in Group
Select one element and the tool will select all other elements in
entire room/space:
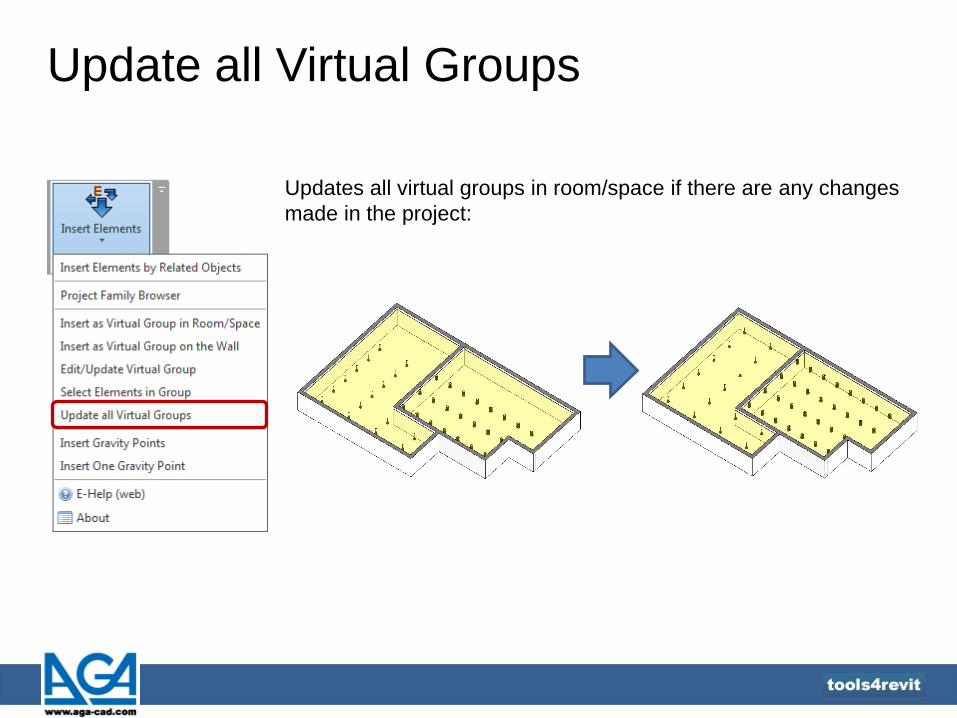
Update all Virtual Groups
Updates all virtual groups in room/space if there are any changes
made in the project:

Insert Gravity Points
Adds user created element (generic models category) to
selected elements that shows gravity center.
Insert Elements Benefits
• Speed – Enables you to instantly insert hundreds of elements into your Revit model.
• Error Prevention and Easy Control Process
• Increased Productivity and Cost Savings – Revit users will save hundreds hours per
project using Insert Elements automation of routine functions and through early
identification of design errors.

Copyright © 2012 AGA CAD Ltd.
TOOLS4REVIT© is developed by AGA CAD Ltd., Autodesk Authorised Developer
to
ols4
revit
AGA-CAD is the supplier of computer-aided design software and data management solution, operating since 1991. Company’s activities consist of TOOLS4REVIT development, Revit® families creation, programming services for working with BIM projects faster and easier. With resellers in a number of countries AGA CAD Ltd. implements BIM solutions for architects, structural and MEP engineers, constructors and building contractors.
If you have any ideas or problems and you would like to make your work with BIM projects faster and easier we can design a tool or a program especially for you. Write your ideas directly to [email protected].