insight360 userguide 3_0
TRANSCRIPT

Insight 360User Guide3.0

Insight 360 2
© 2015 Turning Technologies, LLC. All rights reserved.
Portions Responsive Innovations, LLC, Microsoft Corporation
No part of this document may be reproduced or transmitted in any form or by any means, electronic or mechanical, for any purpose,without the express written permission of Turning Technologies, LLC. All rights reserved.
Turning Technologies, LLC, 255West Federal Street, Youngstown, OH 44503 USA.
TurningPoint® is a registered trademark of Turning Technologies, LLC. Other trademarked product names mentioned in this manualare owned by their respective companies.
The following regulatory statements apply to radio frequency and infrared transmitters and receivers mentioned in this manual,including the ResponseCard RF, ResponseCard RF LCD, ResponseCard IR, ResponseCard XR, ResponseCard NXT, QT Device,CPS IR, CPS Pulse, CPS Spark, Gen 2, PRS RF, PRS IR, DualBoard, Touch Board, Touch Board Plus, MeetingBoard, SchoolBoard,iPannel, Mobi, MobiView, MobiKWIK, Mobi Learner, Mobi 360 and their respective receivers.
FCC Statement
This device complies with part 15 of the FCC Rules. Operation is subject to the following two conditions: (1) This device may notcause harmful interference, and (2) this device must accept any interference received, including interference that may causeundesired operation.
Changes or modifications not expressly approved by the party responsible for compliance could void the user’s authority to operatethe equipment.
IC Statement
This device complies with Industry Canada licence-exempt RSS standard(s). Operation is subject to the following two conditions: (1)this device may not cause interference, and (2) this device must accept any interference, including interference that may causeundesired operation of the device.
Le présent appareil est conforme aux CNR d'Industrie Canada applicables aux appareils radio exempts de licence. L'exploitation estautorisée aux deux conditions suivantes : (1) l'appareil ne doit pas produire de brouillage, et (2) l'utilisateur de l'appareil doit acceptertout brouillage radioélectrique subi, même si le brouillage est susceptible d'en compromettre le fonctionnement.
turningtechnologies.com/user-guides
Insight 360 3
Table of ContentsTABLE OF CONTENTS 3
ABOUT INSIGHT 360 CLOUD™ 6How Insight 360 CloudWorks 7Technical Requirements 8Getting Started 9Creating a Turning Account 9Downloading Software 9Setting Up theMobi 360 and Clickers 10Setting Up the Insight 360 Teacher and Student Apps 11Generating a Session Code 11Setting Up Insight 360 CloudWeb Access 12Upgrading Devices to Insight 360 Cloud 12
The Insight 360 Cloud Home Tab 14Removing aMessage from theMessage Center 14
CueTag™Creator 16Tagging Questions with the CueTag Creator 16
MY CLASSES 17Classes 18Creating a New Class 19Adding/Removing Students from aClass 19Copying a Class 20Deleting a Class 21Editing Class Details 21Combining Classes 22
Students 23Adding a Student Manually 23Importing Students 24Viewing the Student Import Exception Log 26Editing a Student in the Exception Log 26Editing Student Details 27Enrolling a Student in a Class 27Removing a Student from aClass 27Removing a Student from the Database 28Inactivating a Student 28
MY FAVORITES 30Setting Up Favorites 31Creating a Favorite by Browsing for or Using a Path 31Creating a Favorite Using Drag and Drop 32
Organizing Favorites 32Changing a Favorite Page Name 33Deleting a Favorite 33Editing a Favorite 33
turningtechnologies.com/user-guides

Insight 360 4
Viewing a Favorite from Insight 360 Cloud 34Accessing Favorites During Instruction 34
MY TESTS 35Answer Key Tests 35Creating an Answer Key Test 35Adding aQuestion to an Answer Key Test 36Attaching a Test File Document 37Editing an Answer Key Test 38Copying an Answer Key Test 39Importing an Answer Key Test 39Exporting an Answer Key Test 39Deleting an Answer Key Test 40Question Types 40CreatingMultiple Choice Questions 40CreatingMultiple Answer Questions 41Creating Numeric Questions 41Creating Short Answer Questions 42Creating True/False Questions 43Creating Yes/NoQuestions 43Creating Poll Questions 44
ExamView Tests 45Opening ExamView Test Generator 45
The Test Player 46Starting a Self-Paced Test 46Using the Timer for Self-Paced Tests 47Displaying the Student ResponseGrid During a Test 47Ending a Self-Paced Test 48Viewing Results of a Self-Paced Test 48
MY STANDARDS 50Adding Standards to the Quick Select List 51Adding a Standard to a Test Question 51
MY RESULTS 52Configuring Reports 53Generating a Report 54Setting a Report Date Range 54Changing the Proficiency Setting for a Report 55Switching the Report View 55Saving, Printing and Exporting Reports 55
Class Reports 57Generating a Performance Analysis Report 57Generating a Standards Analysis Report 58Generating aMultiple Standard Analysis Report 59
Session Reports 60Generating a Performance Analysis Report 61Generating aQuestion Analysis Report 61
turningtechnologies.com/user-guides

Insight 360 5
Generating a Session Content Report 62Generating a Response Summary Report 63Generating a Student Summary Report 63Generating a ResponseGrid Report 64
Student Reports 66Generating a Performance Summary Report 67Generating a Session Results Report 67Generating a Standards Analysis Report 68Generating aMultiple Standard Analysis Report 68
Viewing and Editing Scores 70Viewing Scores for a Class Session 70Editing Student Results 71Assigning Scores to an Anonymous Student 71Editing Question Results 72Exporting Constructed Response Images and Scratchpad Drawings 73
MY SETTINGS 75DeviceManagement 75Preferences 75
Student Devices Join Configuration 76Student Device Settings 76
Mobile Devices 76Manage Plugins 77Activating the Plugin 77Importing a Class from a Third-Party Testing System 77Viewing and Editing an Imported Class 78Using a Test from a Third-party Testing System 78Viewing Test Results from an Imported Test 78
Backup/Restore 79Upgrade Devices to Insight 360 Cloud 79About 80
TROUBLESHOOTING INSIGHT 360 CLOUD 81
USING INSIGHT 360 CLOUD WITH A PROGRAMMED QT DEVICE 87
CONTACT US 88
turningtechnologies.com/user-guides

Insight 360 6
About Insight 360 Cloud™
The Insight 360 Cloud software performs four main functions:
l Set up of class rosters, students, Favorites and testsl Administration of self-paced testsl Storage and reporting of class session datal Presentationmode for formative assessment
Minimal setup is required before the Insight 360 Cloud system can be used for the first time. To utilize all of the benefits of theInsight 360 Cloud system, the following should be set up:
l Preferencesl Classesl Studentsl Favoritesl Tests
Most of these require a one-time setup and do not require editing until your classes or students change.
NOTEYouwill use theMobi 360mobile interactive whiteboard or the Insight 360 Teacher app to teachclass.
Administration of Self-paced Tests
During class, the only time you will need to open the Insight 360 Cloud software is to administer a self-paced test. A self-pacedtest presents a list of questions to the participant. Students answer each question at their own pace using their own Pulse 360or ResponseCard NXT clickers, QT Device, the Insight 360 Student app orWeb Access. Answer Key and ExamView® self-paced tests are administered from theMy Tests tab.
Storage and Reporting of Class Session Data
Insight 360 Cloud stores several types of class session data while a session is running on theMobi 360. When a class sessionis over, Insight 360 Cloudmakes the class session data available for viewing, editing and reporting purposes. Class sessiondata includes test and question scores, screenshots and reports. Class session data is available from theMy Results tab.
This chapter covers the following sections:
How Insight 360 Cloud WorksTechnical RequirementsGetting StartedThe Insight 360 Cloud Home TabCueTag™ Creator
turningtechnologies.com/user-guides

Insight 360 7
How Insight 360 Cloud WorksTheMobi 360 or Insight 360 Teacher app allows you to control the Insight 360 Cloud software from amobile platform. Theteacher device itself does not retain any data, settings or other information. It presents data gathered from Insight 360 Cloud. Italso allows you to control the lesson content and setup, and administer and view formative assessments while walking aroundthe classroom. You can view anything that is collected from the student response devices at any time on theMobi 360 or theInsight 360 Teacher app.
Communicating with Student Devices
Insight 360 Cloud communicates with the following clickersand their corresponding receivers:
l Pulse 360l ResponseCard NXTl QT Device
Insight 360 Cloud can also communicate viaWi-Fi or theschool’s LAN when using the Insight 360 Student app orInsight 360 CloudWeb Access service. When questions areinitiated from either theMobi 360, Insight 360 Teacher app orInsight 360 Cloud (in the case of a self-paced test), the Insight360 Cloud software collects data from the student responsesystem. Self-paced tests can be sent to tablets via the Insight360 Cloud software.
NOTETo use the constructed response feature, the instructor must use the Insight 360 Teacher app.
turningtechnologies.com/user-guides
Insight 360 8
Technical RequirementsWindows
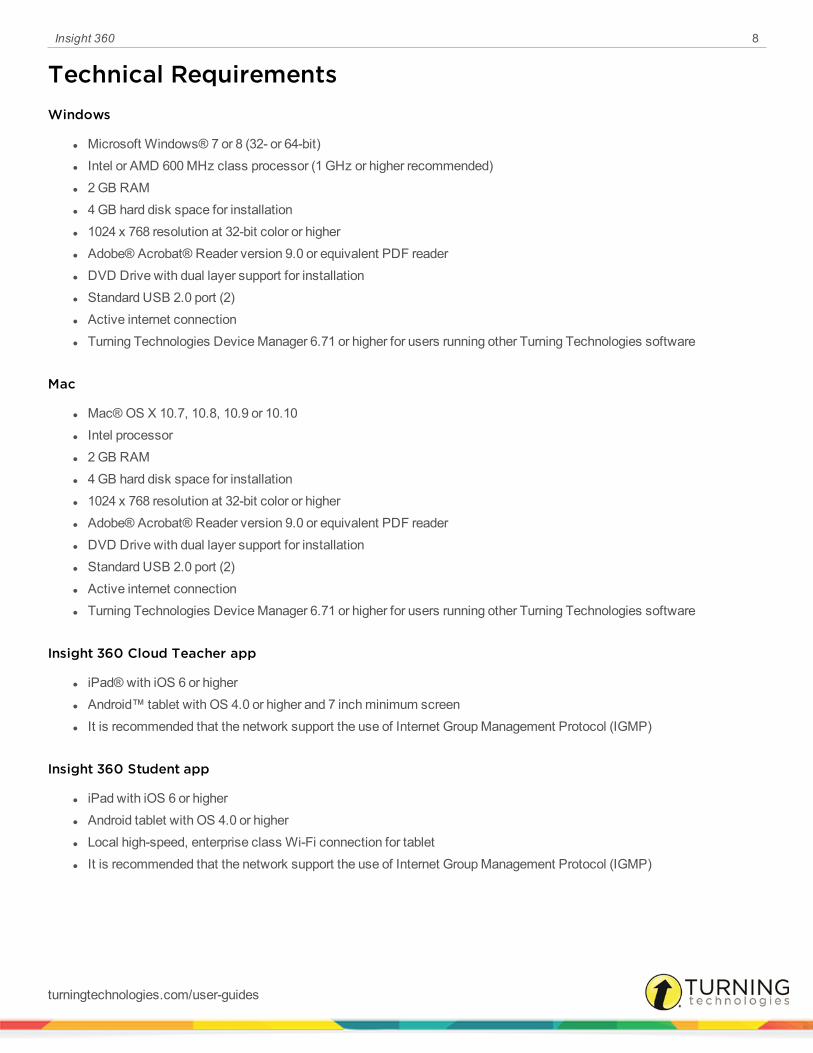
l Microsoft Windows® 7 or 8 (32- or 64-bit)l Intel or AMD 600MHz class processor (1 GHz or higher recommended)l 2GB RAMl 4GB hard disk space for installationl 1024 x 768 resolution at 32-bit color or higherl Adobe® Acrobat® Reader version 9.0 or equivalent PDF readerl DVD Drive with dual layer support for installationl Standard USB 2.0 port (2)l Active internet connectionl Turning Technologies DeviceManager 6.71 or higher for users running other Turning Technologies software
Mac
l Mac® OS X 10.7, 10.8, 10.9 or 10.10l Intel processorl 2GB RAMl 4GB hard disk space for installationl 1024 x 768 resolution at 32-bit color or higherl Adobe® Acrobat® Reader version 9.0 or equivalent PDF readerl DVD Drive with dual layer support for installationl Standard USB 2.0 port (2)l Active internet connectionl Turning Technologies DeviceManager 6.71 or higher for users running other Turning Technologies software
Insight 360 Cloud Teacher app
l iPad® with iOS 6 or higherl Android™ tablet with OS 4.0 or higher and 7 inchminimum screenl It is recommended that the network support the use of Internet GroupManagement Protocol (IGMP)
Insight 360 Student app
l iPad with iOS 6 or higherl Android tablet with OS 4.0 or higherl Local high-speed, enterprise class Wi-Fi connection for tabletl It is recommended that the network support the use of Internet GroupManagement Protocol (IGMP)
turningtechnologies.com/user-guides
Insight 360 9
Getting StartedThese steps will get you started using Insight 360 Cloud quickly.
This section covers the following topics:
Creating a Turning AccountDownloading SoftwareSetting Up the Mobi 360 and ClickersSetting Up the Insight 360 Teacher and Student AppsGenerating a Session CodeSetting Up Insight 360 Cloud Web AccessUpgrading Devices to Insight 360 Cloud
Creating a Turning AccountA Turning Account is a unique identifier that is used to tie together all software accounts and response devices. A TurningAccount is required for use with Turning Technologies products.
1 Go to https://account.turningtechnologies.com/.2 Click Create Account.
TheSign Up page is displayed.3 Enter your email address and click Next.
A verification email will be sent to the email address you provide.4 Check your email and click the link to verify your Turning Account.
NOTEIf you did not receive the verification email, click theResend Verification button in TurningAccount.
5 Enter all required fields as noted by the asterisks.6 From theRole drop-downmenu, select Instructor.7 Enter and confirm your password in the fields provided.
NOTEThe passwordmust be at least eight characters long and contain one lowercase letter, oneuppercase letter and one number.
8 Select the box labeled I accept the Terms of Use and click Create account.The Dashboard is displayed.
Downloading Software
Prerequisites
Youmust have Administrative privileges on your computer to download the Install version of the software.
turningtechnologies.com/user-guides
Insight 360 10
IMPORTANTPrior to downloading, verify with your institution which version of the software is supported.
1 Sign in to your Turning Account.2 Select Downloads from the left menu.3 Select the appropriate program.4 Save the file to a specified location.5 Open the file and follow the on-screen instructions.
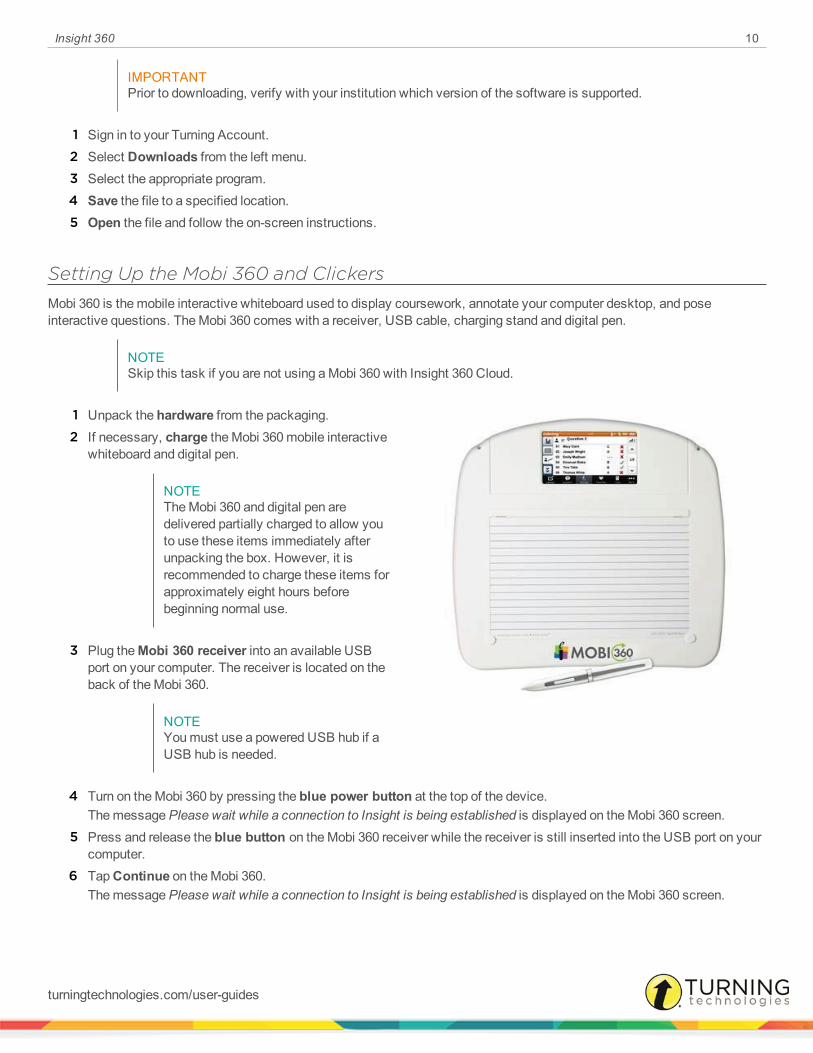
Setting Up the Mobi 360 and ClickersMobi 360 is themobile interactive whiteboard used to display coursework, annotate your computer desktop, and poseinteractive questions. TheMobi 360 comes with a receiver, USB cable, charging stand and digital pen.
NOTESkip this task if you are not using aMobi 360 with Insight 360 Cloud.
1 Unpack the hardware from the packaging.2 If necessary, charge theMobi 360mobile interactive
whiteboard and digital pen.
NOTETheMobi 360 and digital pen aredelivered partially charged to allow youto use these items immediately afterunpacking the box. However, it isrecommended to charge these items forapproximately eight hours beforebeginning normal use.
3 Plug theMobi 360 receiver into an available USBport on your computer. The receiver is located on theback of theMobi 360.
NOTEYoumust use a powered USB hub if aUSB hub is needed.
4 Turn on theMobi 360 by pressing the blue power button at the top of the device.ThemessagePlease wait while a connection to Insight is being established is displayed on theMobi 360 screen.
5 Press and release the blue button on theMobi 360 receiver while the receiver is still inserted into the USB port on yourcomputer.
6 TapContinue on theMobi 360.ThemessagePlease wait while a connection to Insight is being established is displayed on theMobi 360 screen.
turningtechnologies.com/user-guides

Insight 360 11
7 To set up and connect clickers, plug in the clicker receiver.When you start a class the join code (JC)/channel is displayed at the top of theMobi 360 screen. Students may need tomanually enter the join code/channel into the clickers.
Setting Up the Insight 360 Teacher and Student AppsIf using a tablet for the teacher device instead of theMobi 360 or if students are using tablets instead of clickers, follow theinstructions below.
1 Download and install the Insight 360 Teacher and Student apps from the appropriate app store.
2 Open the Insight 360 Cloud desktopsoftware, sign in with your Turning
Account, click and select MobileDevices from the left menu.
3 Select the box labeledEnable Insight360 Teacher app.
4 Enter the computer name (alias) andpassword in the boxes provided.
NOTEThe computer namemustbe unique. This is thename the students willuse to find your computerwhen connecting with theInsight 360 Student app.
5 Optionally, select Preferences from the left menu and select the box labeledPrompt teacher to confirm studentreconnect.This setting generates a prompt whenever a student attempts to rejoin a class session using the Insight 360 Studentapp.
6 On the tablet, open the Insight 360 Teacher app.7 Tap the computer name entered in step 4.8 Enter the password in the box provided.9 TapOK.
The Teach a Class screen appears.
Generating a Session CodeWhen using the Insight 360 Teacher app, you can generate a Session Code to prevent unauthorized tablets from joining asession as student devices. Students enter the generated code into their tablets when they attempt to join the class session.
IMPORTANTSession Codes are required when using Insight 360 CloudWeb Access, but are optional whenusing the Insight 360 Student app.
turningtechnologies.com/user-guides
Insight 360 12
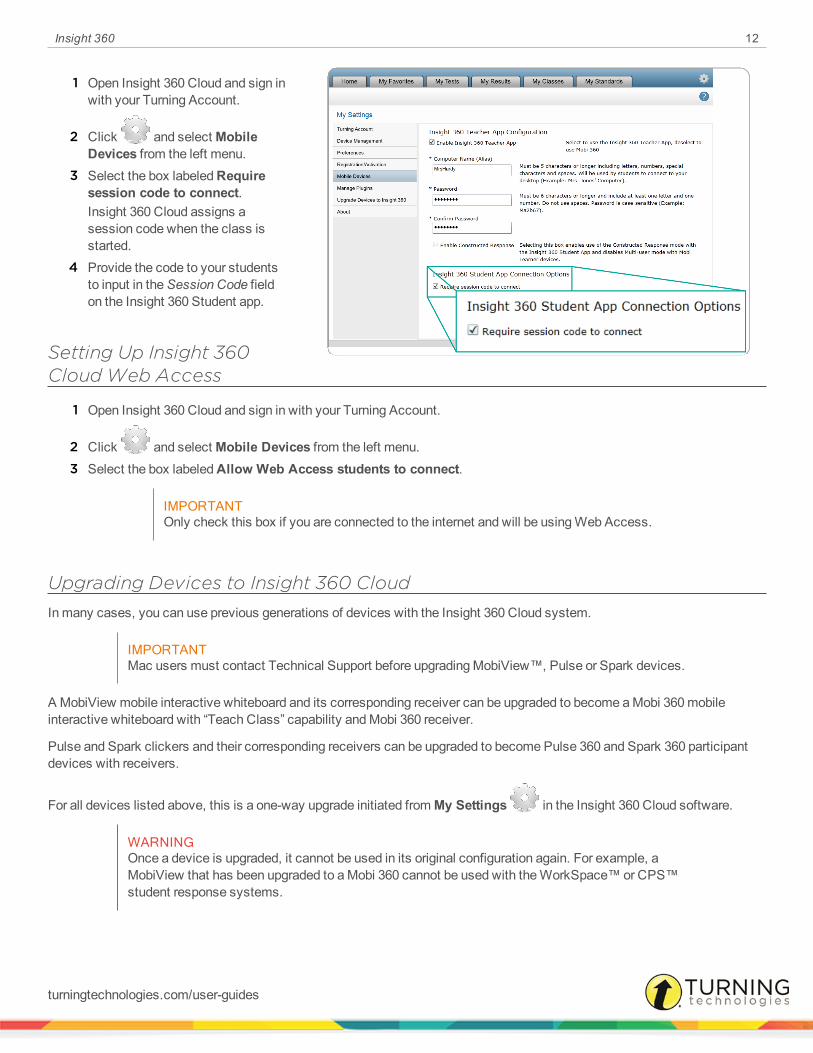
1 Open Insight 360 Cloud and sign inwith your Turning Account.
2 Click and select MobileDevices from the left menu.
3 Select the box labeledRequiresession code to connect.Insight 360 Cloud assigns asession code when the class isstarted.
4 Provide the code to your studentsto input in theSession Code fieldon the Insight 360 Student app.
Setting Up Insight 360Cloud Web Access
1 Open Insight 360 Cloud and sign in with your Turning Account.
2 Click and select Mobile Devices from the left menu.3 Select the box labeledAllow Web Access students to connect.
IMPORTANTOnly check this box if you are connected to the internet and will be usingWeb Access.
Upgrading Devices to Insight 360 CloudIn many cases, you can use previous generations of devices with the Insight 360 Cloud system.
IMPORTANTMac users must contact Technical Support before upgradingMobiView™, Pulse or Spark devices.
A MobiView mobile interactive whiteboard and its corresponding receiver can be upgraded to become aMobi 360mobileinteractive whiteboard with “Teach Class” capability andMobi 360 receiver.
Pulse and Spark clickers and their corresponding receivers can be upgraded to become Pulse 360 and Spark 360 participantdevices with receivers.
For all devices listed above, this is a one-way upgrade initiated from My Settings in the Insight 360 Cloud software.
WARNINGOnce a device is upgraded, it cannot be used in its original configuration again. For example, aMobiView that has been upgraded to aMobi 360 cannot be used with theWorkSpace™ or CPS™student response systems.
turningtechnologies.com/user-guides

Insight 360 13
Mobi KWIK™andMobi Learner™mobile interactive whiteboards can be used with Insight 360 Cloud following a firmwareupdate as learner devices in multi-user mode. These devices do not need to be upgraded and can continue to function withCPS, Response™ andWorkSpace through DeviceManager.
1 Insert theMobi RF receiver into an available USB port on the computer with the Insight 360 Cloud software.2 Use a USB cable to connect theMobiView to the same computer as in step 1.
3 Click in Insight 360 Cloud.4 Select Upgrade Devices to Insight 360 Cloud from the left menu.5 Select theUpgrade your MobiView and Mobi RF receiver to Insight 360 Cloud radio button.6 Click Start Upgrade.
A dialog box notifies you that the upgrade cannot be undone.7 Click OK to upgrade your devices.8 Click Start Upgrade.
Progress bars display the status of the upgrade.
WARNINGDoNOT disconnect theMobiView orMobi RF receiver while the upgrade is in process.
If you are attempting to upgrade using aMac, amessage will appear. Please contactTechnical Support to assist you before continuing.
9 When the upgrade is complete, click Finish.
TheMobiView is now upgraded to aMobi 360, and theMobi RF receiver is now upgraded to aMobi 360 receiver. Youcan now disconnect theMobi 360 from the computer.
turningtechnologies.com/user-guides

Insight 360 14
The Insight 360 Cloud Home TabTheHome tab in the Insight 360 Cloud software contains threemain sections:
l Learn About Insight 360 Cloud - Contains links to training videos and to the Help Centerl Quick Links - Contains links to often-used functions within Insight 360 Cloud including starting a self-paced test,tagging, Favorites and ExamView®
l Message Center - Shows important notifications andmessages
Two additional links are also available in the Insight 360 Cloud software:
Opens My Settings
Opens the Insight 360 Cloud Help Center
Using Quick Links
TheQuick Links section of the Insight 360 Cloud Home tab provides links to often-used functions within the Insight 360 Cloudsoftware.
Start a self-paced test - Opens Test Player from theMy Tests tab, allowing you to run an Answer Keyor ExamView® test.
Start Tagging - Opens the CueTag Creator, allowing you to use existing coursematerials with Insight360 Cloud.
Modify My Favorites pages - Opens My Favorites, where you can set up links to files and websites tobe accessed during instruction from theMobi 360 or the Insight 360 Teacher app.
Launch ExamView® Test Generator - Opens the ExamView Test Generator, allowing you to create ormodify an ExamView test.
Removing a Message from the Message CenterTheMessage Center on the Insight 360 CloudHome tab displays important messages and notifications. Most messagesrequire an action to remove the notification.
EXAMPLEReminder to register Insight 360 Cloud
Device Conflict error
Firmware update available
turningtechnologies.com/user-guides
Insight 360 15
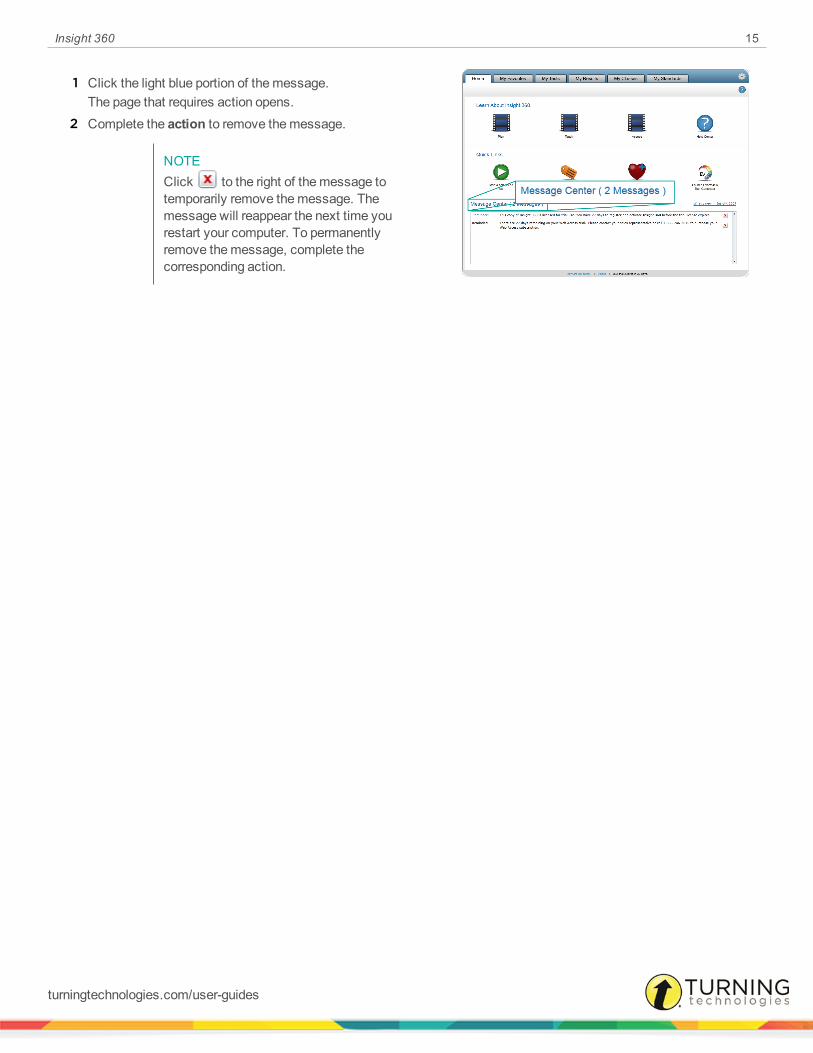
1 Click the light blue portion of themessage.The page that requires action opens.
2 Complete the action to remove themessage.
NOTE
Click to the right of themessage totemporarily remove themessage. Themessage will reappear the next time yourestart your computer. To permanentlyremove themessage, complete thecorresponding action.
turningtechnologies.com/user-guides

Insight 360 16
CueTag™ CreatorA CueTag™ is a small barcode generated by Insight 360 Cloud. A CueTag can be placed on a software document, such as aMicrosoft PowerPoint presentation or text document. The CueTag contains question information read by the Insight 360 Cloudsoftware and sent to theMobi 360 or Insight 360 Teacher app.
Tagging Questions with the CueTag CreatorPlacing a CueTag on a page enables you to use the Insight 360Cloud system to ask and record participant responses toquestions that you have already created in existing coursematerials.
1 On the Insight 360 CloudHome tab, click .TheCueTag Creatorwindow opens.
2 Select the type of question to be tagged from theQuestion drop-downmenu.
3 Select the question format and click the button thatrepresents the correct answer.A thin barcode is generated in theCueTag Preview box.
4 Enter a short description in the box provided ifnecessary.The short description is displayed on theMobi 360 or theInsight 360 Teacher app. The short description is alsodisplayed in the reports.
5 If an educational standard should be associated with thisquestion, click Standard and select the applicablestandard.
NOTEYou can only assign one standard perCueTag.
6 Drag and drop or copy and paste the CueTag into the inthe appropriate place in the document.
NOTEDONOT change the size and DONOT “hide”the CueTag from the screen. The CueTagmust be visible to be recognized.
turningtechnologies.com/user-guides
Insight 360 17
My Classes
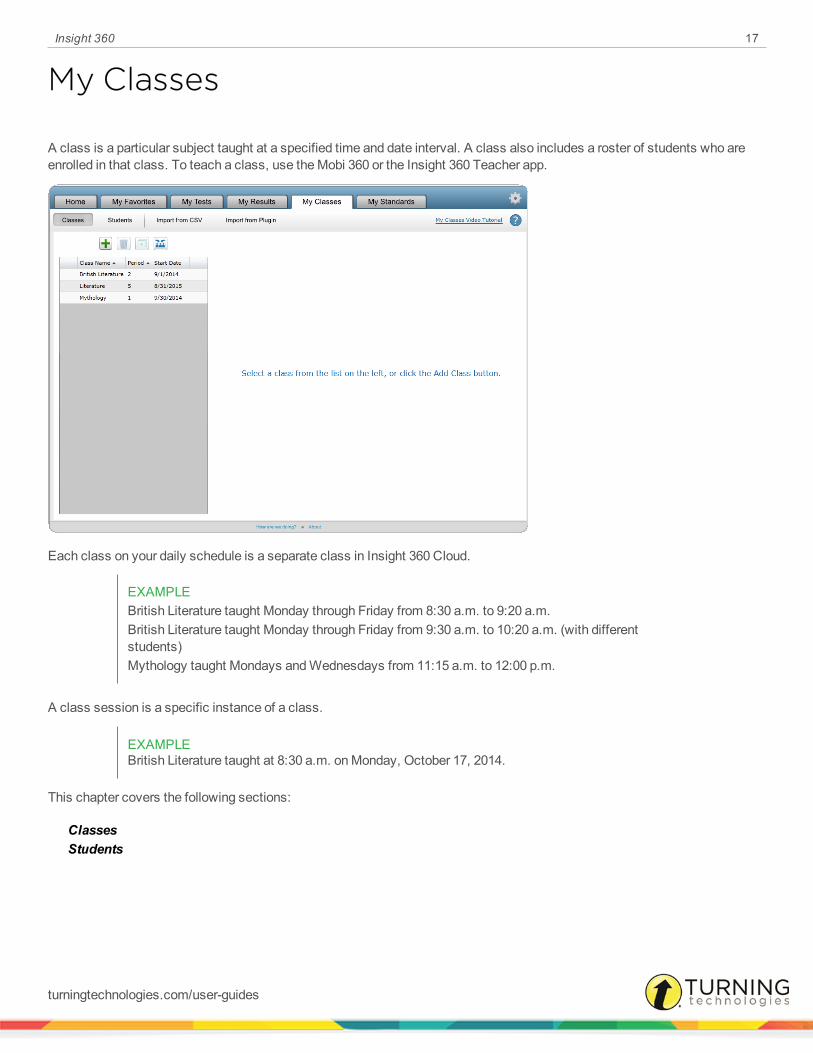
A class is a particular subject taught at a specified time and date interval. A class also includes a roster of students who areenrolled in that class. To teach a class, use theMobi 360 or the Insight 360 Teacher app.
Each class on your daily schedule is a separate class in Insight 360 Cloud.
EXAMPLEBritish Literature taught Monday through Friday from 8:30 a.m. to 9:20 a.m.British Literature taught Monday through Friday from 9:30 a.m. to 10:20 a.m. (with differentstudents)Mythology taught Mondays andWednesdays from 11:15 a.m. to 12:00 p.m.
A class session is a specific instance of a class.
EXAMPLEBritish Literature taught at 8:30 a.m. onMonday, October 17, 2014.
This chapter covers the following sections:
ClassesStudents
turningtechnologies.com/user-guides

Insight 360 18
ClassesSetting up a class in Insight 360 Cloud allows the software to:
l Associate screenshots, tests, quiz questions and responses with a class sessionl Save student data associated with the class sessionl Provide access to class session and student data after the session has ended
You can start an anonymous class without setting up a class in Insight 360 Cloud. However, the data from an anonymousclass cannot be associated with specific students.
An Insight 360 Cloud class consists of the following basic data:
l Class Namel Course ID (computer generated or use your own)l Class Period (Optional)l Section (Optional)l Start and End Dates (school semester or year dates)l Start and End Timesl Days of theWeek that the class is taughtl Students enrolled in the class
NOTEStudents must be added to the Insight 360 Cloud database before they can be added to classes.
This section covers the following topics:
Creating a New ClassAdding/Removing Students from a ClassCopying a ClassDeleting a ClassEditing Class DetailsCombining Classes
turningtechnologies.com/user-guides

Insight 360 19
Creating a New Class
1 Select theMy Classes tab and clickClasses.
2 Click .3 In theClass Name field, enter the
name of the new class.4 In theCourse ID field, use the
assigned course identificationnumber or enter a new Course ID.
5 Optionally, in thePeriod field, enter thecode for the time slot the class is tobe taught.This is usually a digit between 0 (zero)and 10, but any alphanumericcharacters can be used.
6 Optionally, in theSection field,enter thealphanumeric code representing theclass section.
7 In theStart Date field, enter the course start date in format MM/DD/YYYY, or click to select the course start date.8 Repeat step 7 in theEndDate field.
9 In theStart Time field, enter the course start time, or click to select the time from a drop-down box.
NOTEThe arrow buttons change time elements based on the cursor position within the time field.For example, click AM and then click either arrow button to change AM to PM.
10 Repeat step 9 in theEnd Time field.11 Select the boxes for each day the class is to be taught.12 Click Add/Remove Students to add students to the class.
NOTEStudents must be added to the Insight 360 Cloud database before they can be added toclasses. SeeStudents on page 23 for more information.
Adding/Removing Students from a ClassUse the Add/Remove Students button to add or remove a student from a class. Students must be added to the Insight 360Cloud database before they can be added to classes.
turningtechnologies.com/user-guides
Insight 360 20
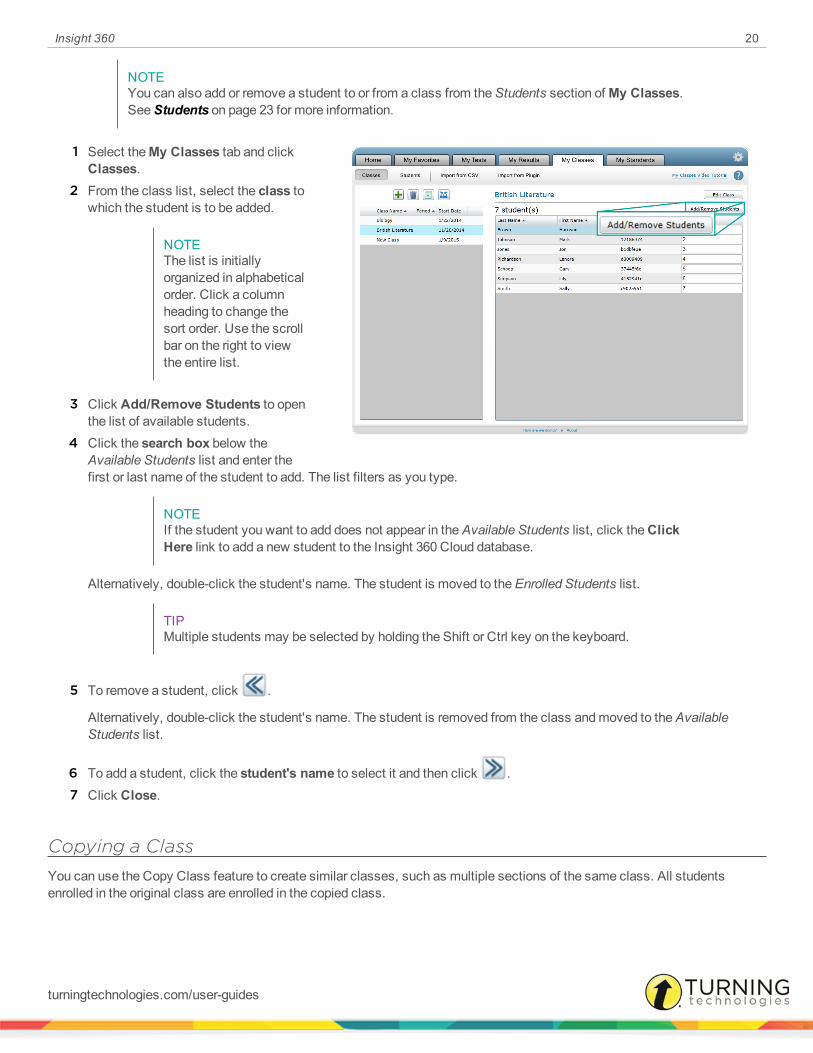
NOTEYou can also add or remove a student to or from a class from theStudents section of My Classes.SeeStudents on page 23 for more information.
1 Select theMy Classes tab and clickClasses.
2 From the class list, select the class towhich the student is to be added.
NOTEThe list is initiallyorganized in alphabeticalorder. Click a columnheading to change thesort order. Use the scrollbar on the right to viewthe entire list.
3 Click Add/Remove Students to openthe list of available students.
4 Click the search box below theAvailable Students list and enter thefirst or last name of the student to add. The list filters as you type.
NOTEIf the student you want to add does not appear in theAvailable Students list, click theClickHere link to add a new student to the Insight 360 Cloud database.
Alternatively, double-click the student's name. The student is moved to theEnrolled Students list.
TIPMultiple students may be selected by holding the Shift or Ctrl key on the keyboard.
5 To remove a student, click .
Alternatively, double-click the student's name. The student is removed from the class andmoved to theAvailableStudents list.
6 To add a student, click the student's name to select it and then click .7 Click Close.
Copying a ClassYou can use the Copy Class feature to create similar classes, such as multiple sections of the same class. All studentsenrolled in the original class are enrolled in the copied class.
turningtechnologies.com/user-guides

Insight 360 21
1 Select theMy Classes tab and click Classes.2 Select the class you want to copy from the class list.
TIPThe list is initially organized in alphabetical order. Click a column heading to change the sortorder. Use the scroll bar on the right to view the entire list.
3 Click .A copy of the class appears in the class list.
4 From the class list, select the copied class.The copied class opens to the right of the class list.
5 Edit the class details to reflect the new information.6 Click Add/Remove Students to modify student enrollment. For more information onmodifying students, see
Adding/Removing Students from a Class on page 19
Deleting a ClassUse the Delete Class feature to remove unwanted classes from the Insight 360 Cloud database.
WARNINGOnce the class is deleted from the Insight 360 Cloud database, all of the session data associatedwith the class including test scores, screenshots and reports will also be deleted. Studentsenrolled in the class will not be deleted from the database, but student results relating to thedeleted class will be deleted.
1 Select theMy Classes tab and click Classes.2 Select the class to delete from the class list.
TIPThe list is initially organized in alphabetical order. Click a column heading to change the sortorder. Use the scroll bar on the right to view the entire list.
3 Click .A warning appears.
4 Verify that the class is the correct class to delete and click Yes.
Editing Class DetailsEditing class details can be particularly useful if you created a new class by copying a similar class.
turningtechnologies.com/user-guides

Insight 360 22
1 Select theMy Classes tab and click Classes.
2 Select the class to edit from the classlist.
TIPThe list is initiallyorganized in alphabeticalorder. Click a columnheading to change thesort order. Use the scrollbar on the right to view theentire list.
3 Click Edit Class.4 Edit any of the class details as shown.
Combining ClassesThe Combine Classes feature is designed for certain integration platforms and allows you to create a combined class usingimported classes from the integration platform.
1 Select theMy Classes tab and click Classes.
2 Click .3 Edit the class details to reflect the new combined class information.4 Click Add/Remove Classes.
5 Select one or more classes form theEligible Classes column and click .
NOTEOnly classes imported from a certain integration platform will be listed in theEligible Classescolumn.
6 Click Close.
turningtechnologies.com/user-guides
Insight 360 23
StudentsStudents must be added to your Insight 360 Cloud database before they can be enrolled in classes.
NOTEAll favorites, classes, student data and other Insight 360 information resides on the computer usedto set up this data. This data is not accessible if you take theMobi 360 or the Insight 360 Teacherapp to another classroom, even if that classroom computer is running Insight 360. Youmust alsoset up that computer with the same classes, students, favorites and other data.
This section covers the following topics:
Adding a Student ManuallyImporting StudentsViewing the Student Import Exception LogEditing a Student in the Exception LogEditing Student DetailsEnrolling a Student in a ClassRemoving a Student from a ClassRemoving a Student from the DatabaseInactivating a Student
Adding a Student Manually
Prerequisites
Before you can add a student to a class, the student must be entered into the Insight 360 Cloud database.
turningtechnologies.com/user-guides
Insight 360 24
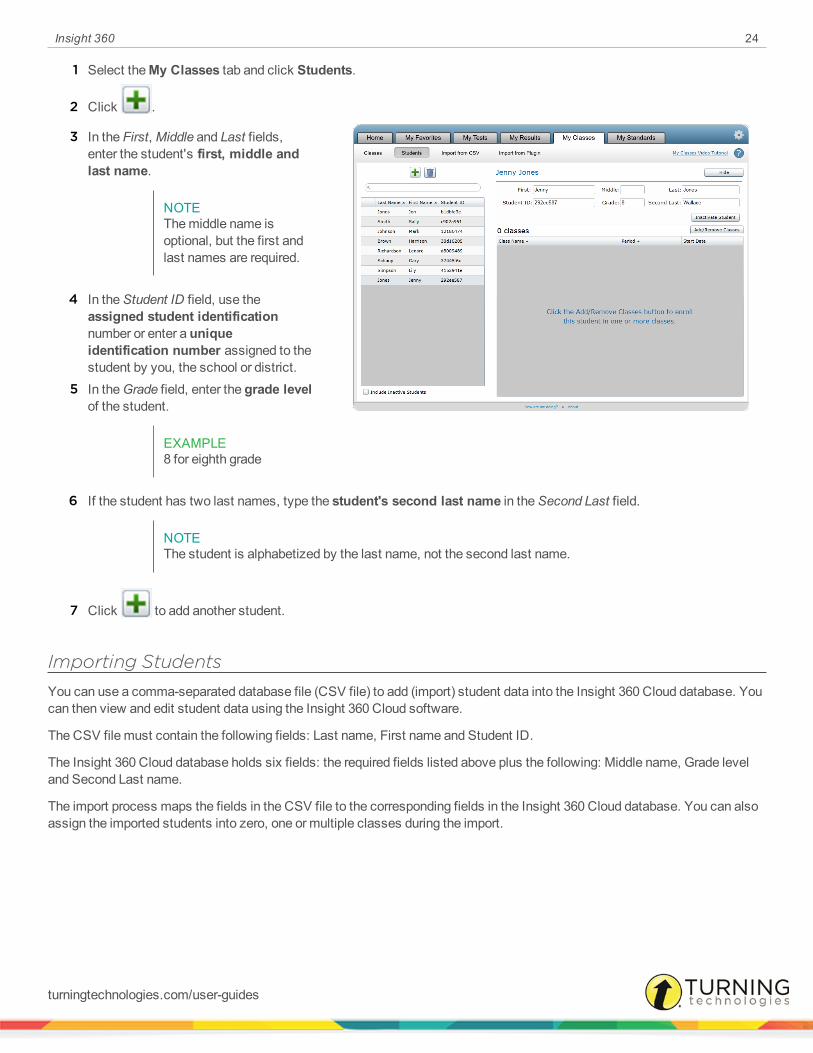
1 Select theMy Classes tab and click Students.
2 Click .
3 In the First,Middle and Last fields,enter the student's first, middle andlast name.
NOTEThemiddle name isoptional, but the first andlast names are required.
4 In theStudent ID field, use theassigned student identificationnumber or enter a uniqueidentification number assigned to thestudent by you, the school or district.
5 In theGrade field, enter the grade levelof the student.
EXAMPLE8 for eighth grade
6 If the student has two last names, type the student's second last name in theSecond Last field.
NOTEThe student is alphabetized by the last name, not the second last name.
7 Click to add another student.
Importing StudentsYou can use a comma-separated database file (CSV file) to add (import) student data into the Insight 360 Cloud database. Youcan then view and edit student data using the Insight 360 Cloud software.
The CSV file must contain the following fields: Last name, First name and Student ID.
The Insight 360 Cloud database holds six fields: the required fields listed above plus the following: Middle name, Grade leveland Second Last name.
The import process maps the fields in the CSV file to the corresponding fields in the Insight 360 Cloud database. You can alsoassign the imported students into zero, one or multiple classes during the import.
turningtechnologies.com/user-guides

Insight 360 25
NOTEA student can only be imported once. If you attempt to import a student with the same Student IDas an existing student in your Insight 360 Cloud database, the import process will not import theduplicate student, but will move the duplicate student into the Student Import Exception Log. Formore information, seeEditing a Student in the Exception Log on page 26.
1 Select theMy Classes tab and click Import from CSV.2 Click Start Import.
TheStudent Import screen is displayed.3 Select the box(es) corresponding to the class(es) into which the students will be imported and click Next.
TIPThe class list is initially sorted by start date. Change the sort order by clickingPeriod orStartDate.
4 Click and navigate to theCSV file containing the student roster.5 Select the desired file and click Open.
NOTEIf you have previously imported students from a database file and want to use the same fieldmappings, select your saved mapping entry from theUse PredefinedMapping drop-downmenu.
6 On theMap Fields screen, click the arrow next to the number zero to indicate the number of header rows to ignore in thisfile.
NOTEIf you do not specify the number of header rows to ignore, students named “First NameMiddle Name Last Name”may result. Delete those students from the class or from thedatabase.
7 For each column on theMap Fields screen, click theNot Used drop-down and select the corresponding Insight 360Cloud database field.
EXAMPLEIf the column contains student first names, select First Name.
If the column does not match an Insight 360 Cloud field, leave the selection as Not Used.
8 Click Nextwhenmapping is complete.9 Review the student data to be imported and click Finish Import.10 On the Import Successful screen, do one of the following:
l Click View Exception Log if errors were found during the import process.l Click Save Mapping to saveMap Fields settings (step 6) for use during the next import.l Click Import More Students to import another CSV file.
turningtechnologies.com/user-guides
Insight 360 26
NOTEIf there are errors in the import process, the student with the error will not be imported.Instead, the affected student will be placed in theStudent Import Error Log. For moreinformation, seeEditing a Student in the Exception Log on page 26.
Viewing the Student Import Exception LogIf there are errors in the import process, the student or students containing errors (also called exceptions) will not be imported.Instead, the affected student or students are placed in the Student Import Exception Log. You can view and edit students in theException Log.
1 Select theMy Classes tab and click Import from CSV.2 Click View Exceptions.
NOTEIf the student import did not generate any errors, you will not see theView Exceptionsoption.
Editing a Student in the Exception LogIf there are errors during the student import process, the affected students aremoved to the Student Import Exception Log. TheError column provides a brief explanation of the error.
NOTEThemost common exception is a duplicate Student ID.
If a student has not been imported into the Insight 360 Cloud database, theStudent Imported column displays No. Studentinformation, such as the Student ID, can be edited.
If a student has been imported into the Insight 360 Cloud database theStudent Imported column displays Yes. Studentinformation cannot be edited.
1 To edit students in the exception log:a In the exception log, double-click the item to be edited.b Enter the new information and press Enter.
2 To import edited students into the Insight 360 Cloud database:a Select the box or boxes that correspond to the student.b Click Import Selected Students.
WARNINGThis action occurs immediately and cannot be undone.
3 To remove students from the exception log:a Select the box or boxes that correspond to the student.b Click Remove Selected Exceptions.
turningtechnologies.com/user-guides

Insight 360 27
WARNINGThis action occurs immediately and cannot be undone.
Editing Student DetailsOnce a student has been added to the Insight 360 Cloud database, you can edit the student's name, ID, grade level andclasses. A student can also be enrolled or removed from a class.
1 Select theMy Classes tab and click Students.2 In theSearch box, enter the first or last name of the student to modify.
The student list filters as you type.Alternatively, select the student to modify from the student list.
3 Select the student's name.4 Click Edit Student.5 Enter the changes in each field as applicable.
NOTEInsight 360 Cloud saves changes to each field automatically when you click away from theedited field.
Enrolling a Student in a ClassA student can be enrolled in more than one class.
NOTEYou can also add a student to a class from theClasses section of My Classes.
1 Select theMy Classes tab and click Students.2 In theSearch box, enter the first or last name of the student to modify.
The student list filters as you type.Alternatively, select the student to modify from the student list.
3 Select the student's name.4 Click Add/Remove Classes.5 Below Available Classes, select the appropriate class.
6 Click .Alternatively, double-click the class name.The class is moved to theEnrolled Classes list.
7 Click Close.
Removing a Student from a ClassTheStudents section of My Classes allows you to view all classes that have been added to a student's profile.
turningtechnologies.com/user-guides
Insight 360 28
NOTEYou can also remove a student from a class using theClasses section of My Classes.
1 Select theMy Classes tab and click Students.2 In theSearch box, enter the first or last name of the student to modify.
The student list filters as you type.Alternatively, select the student to modify from the student list.
3 Select the student's name.4 Click Add/Remove Classes.5 Below Enrolled Classes, select the class.
6 Click .Alternatively, double-click the class name.The class will be removed from theEnrolled Classes list.
7 Click Close.
Removing a Student from the DatabaseDeleting a student immediately and permanently removes the student and all class session records pertaining to that studentfrom the Insight 360 Cloud database.
WARNINGThere is no undo option or method for retrieving deleted student information from the database.
1 Select theMy Classes tab and click Students.2 In theSearch box, type the first or last name of the student to delete.
The student list filters as you type.Alternatively, select the student to delete from the student list.
3 Select the student's name..
4 Click .A warning appears.
5 Verify that you really want to delete the student and click Yes.
Inactivating a StudentWhen a student is inactivated, he or she is removed from all classes. However, all student information and class sessionrecords are retained in the Insight 360 Cloud database. Inactivating a student prevents the student from appearing in thestudent list unless you select the Include Inactive Students box.
1 Select theMy Classes tab and click Students.2 In theSearch box, enter the first or last name of the student to delete.
The student list filters as you type.Alternatively, select the student to delete from the student list.
turningtechnologies.com/user-guides

Insight 360 29
3 Select the student's name.4 Click Edit Student.5 Click Inactivate Student.
A warning appears.6 Verify that you really want to inactivate the student and click Yes.
turningtechnologies.com/user-guides
Insight 360 30
My Favorites
A Favorite is a link to a file or website. The file can be located on your classroom computer or on your network. Favorites canbe accessed from theMobi 360 or Insight 360 Teacher app during classroom instruction.
TheMy Favorites tab on Insight 360 Cloud allows you to create a Favorite, organize Favorites into pages and delete Favorites.
Insight 360 Cloud automatically assigns an icon corresponding to the Favorite's file type. Icons cannot be changed.
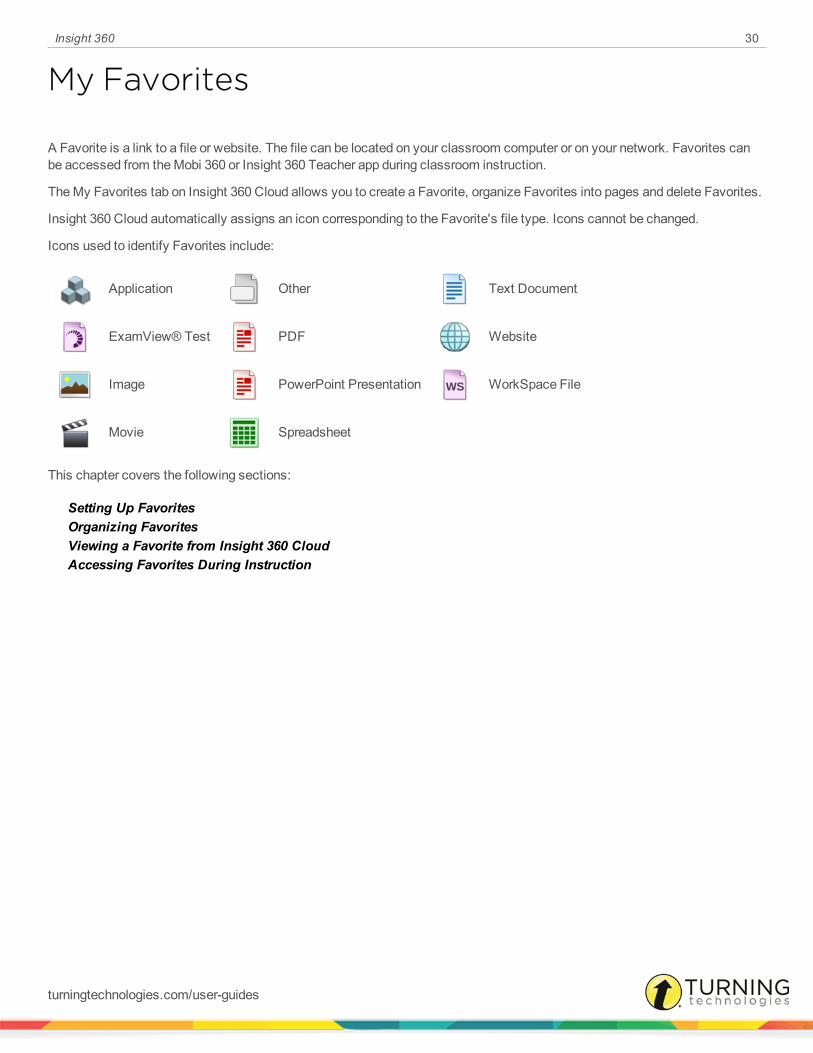
Icons used to identify Favorites include:
Application Other Text Document
ExamView® Test PDF Website
Image PowerPoint Presentation WorkSpace File
Movie Spreadsheet
This chapter covers the following sections:
Setting Up FavoritesOrganizing FavoritesViewing a Favorite from Insight 360 CloudAccessing Favorites During Instruction
turningtechnologies.com/user-guides

Insight 360 31
Setting Up FavoritesMy Favorites is organized into four pages with eight favorites to a page for a total of 32 favorites. TheMy Favorites left menushows the names of the pages and how many favorites have been added to each page (indicated by green circles). Themainportion of theMy Favorites tab allows you to add favorites to the selected page.
NOTEAll favorites, classes, student data and other Insight 360 information resides on the computer usedto set up this data. This data is not accessible if you take theMobi 360 or the Insight 360 Teacherapp to another classroom, even if that classroom computer is running Insight 360. Youmust alsoset up that computer with the same classes, students, favorites and other data.
This section covers the following topics:
Creating a Favorite by Browsing for or Using a PathCreating a Favorite Using Drag and Drop
Creating a Favorite by Browsing for or Using a Path
1 Select theMy Favorites tab.2 Below Favorites Pages, select a page to add the favorite.
NOTEA green circle indicates that a file or link is assigned to the favorite slot.
3 Click an available rectangle.4 In theName field, enter a descriptive name for the favorite.
5 In the File field, enter the path or internet address (URL)
of the favorite or click and navigate to the file on yourcomputer.
turningtechnologies.com/user-guides
Insight 360 32
6 Click to ensure the path is correct.
NOTEIf you click into an empty favorites rectangle but do not intend to add a favorite in that spot,click outside of the rectangle.
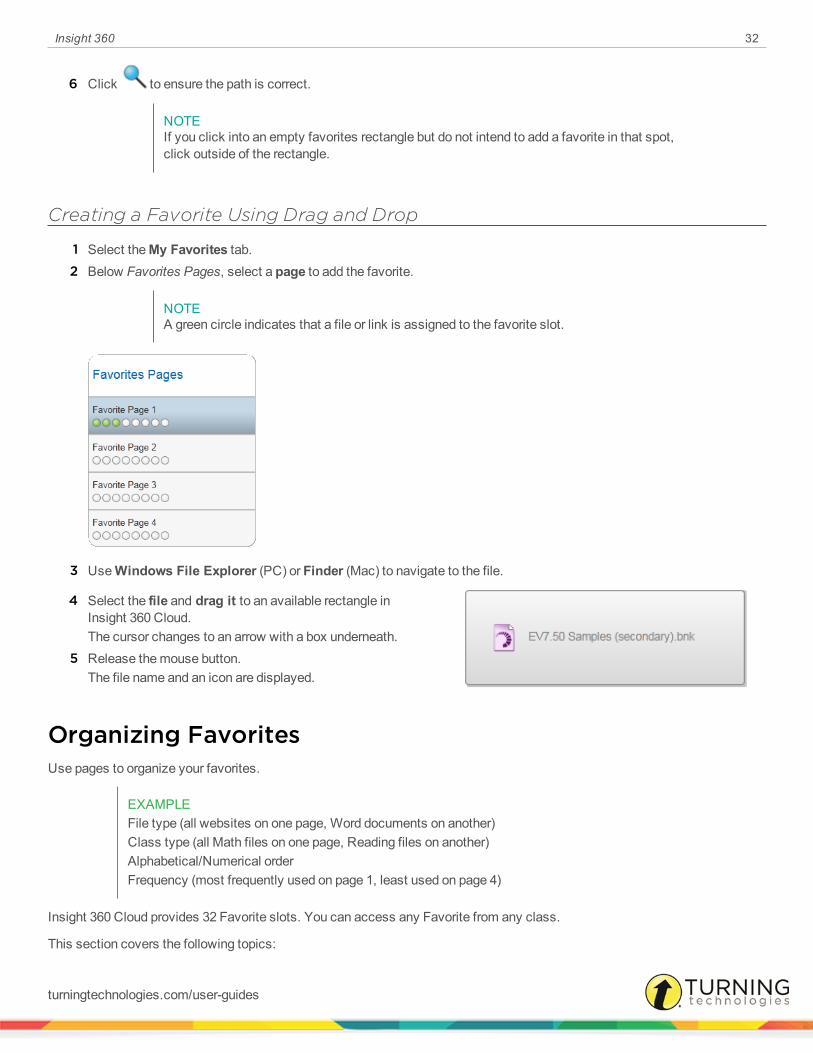
Creating a Favorite Using Drag and Drop
1 Select theMy Favorites tab.2 Below Favorites Pages, select a page to add the favorite.
NOTEA green circle indicates that a file or link is assigned to the favorite slot.
3 UseWindows File Explorer (PC) or Finder (Mac) to navigate to the file.
4 Select the file and drag it to an available rectangle inInsight 360 Cloud.The cursor changes to an arrow with a box underneath.
5 Release themouse button.The file name and an icon are displayed.
Organizing FavoritesUse pages to organize your favorites.
EXAMPLEFile type (all websites on one page, Word documents on another)Class type (all Math files on one page, Reading files on another)Alphabetical/Numerical orderFrequency (most frequently used on page 1, least used on page 4)
Insight 360 Cloud provides 32 Favorite slots. You can access any Favorite from any class.
This section covers the following topics:
turningtechnologies.com/user-guides

Insight 360 33
Changing a Favorite Page NameDeleting a FavoriteEditing a Favorite
Changing a Favorite Page NameOrganize your favorites by assigning descriptive page names from theMy Favorites tab. By default, the Favorites Pages aresimply numbered one through four.
1 Select theMy Favorites tab.2 Below Favorites Pages, select the page to rename.
3 In thePage Name field, enter the new name of the page.
Deleting a Favorite
1 Select theMy Favorites tab.2 Below Favorites Pages, select the page that contains the favorite to delete.3 Click the favorite to delete.
4 Click .5 Verify this is the favorite you want to delete and click Yes.
Editing a Favorite
1 Select theMy Favorites tab.2 Below Favorites Pages, select the page that contains the favorite to edit.3 Click the favorite to edit.4 Edit the name or file path as necessary.5 Click out of the rectangle to save the changes.
turningtechnologies.com/user-guides

Insight 360 34
Viewing a Favorite from Insight 360 Cloud
1 Select theMy Favorites tab.2 Below Favorites Pages, select the page that contains the favorite to be viewed.3 Click the favorite to view.
4 Click .The file opens in a new window.
NOTEIf the file does not open, verify that the path and file name are correct.
Accessing Favorites During InstructionFavorites set up in Insight 360 Cloud can be accessed from theMobi 360 or the Insight 360 Teacher app during instruction. Aclass must be started to access favorites.
NOTEAll favorites, classes, student data and other Insight 360 information resides on the computer usedto set up this data. This data is not accessible if you take theMobi 360 or the Insight 360 Teacherapp to another classroom, even if that classroom computer is running Insight 360. Youmust alsoset up that computer with the same classes, students, favorites and other data.
1 Tap .2 Tap the favorite to display.
The favorite opens on your computer desktop.3 To access favorites on other pages:
a Tap the down arrow to scroll to the next favorites page.
NOTEOn the Insight 360 Teacher app, swipe from right to left to access additional favoritespages.
b Tap the up arrow to scroll to the previous favorites page.
turningtechnologies.com/user-guides
Insight 360 35
My Tests
TheMy Tests tab on the Insight 360 Cloud software allows you to create and edit Answer Key Tests, set up ExamView®Tests and administer self-paced Answer Key and ExamView® Tests.
This chapter covers the following sections:
Answer Key TestsExamView TestsThe Test Player
Answer Key TestsAnswer Key tests are set up and administered through theMy Tests tab in Insight 360 Cloud.
This section covers the following topics:
Creating an Answer Key TestAdding a Question to an Answer Key TestAttaching a Test File DocumentEditing an Answer Key TestCopying an Answer Key TestImporting an Answer Key TestExporting an Answer Key TestDeleting an Answer Key TestQuestion Types
Creating an Answer Key TestAnswer Key tests consist of a set of answers created and stored in Insight 360 Cloud. The actual questions are not stored inInsight 360 Cloud. An optional test file document containing the test questions may be attached to the Answer Key test inInsight 360 Cloud. For more information, seeAttaching a Test File Document on page 37.
turningtechnologies.com/user-guides

Insight 360 36
If students are using the Insight 360 Studentapp, the attached test file document with thetest questions displays on joined deviceswhile the test is in progress.
1 Open Insight 360 Cloud.2 Select theMy Tests tab and click
Answer Key Tests.
3 Click .TheNew Answer Key Test paneopens.
4 In the Test Name field, enter adescriptive name for the answer key.
5 To attach a test file click , navigateto the desired file and click Open.
6 In theQuestions area, click .TheQuestion 1 pane is displayed.
7 Complete the question details as required.
8 If another question is required for the answer key, click .
NOTEThe Answer Key test, and all of its questions, are automatically created when you click thecorresponding Add button. Changes are automatically saved when you navigate away fromthe field you are editing.
Adding a Question to an Answer Key TestAnswer Key tests only contain answer text for the question, NOT the question text.
The following types of questions can be added to an Answer Key test:
l Multiple Choice (one correct answer, up to six options)l Multiple Answer (more than one correct answer, up to six options)l Numericl Short Answerl True/Falsel Yes/No
1 Select theMy Tests tab and click Answer Key Tests.2 Select the answer key test to edit.
turningtechnologies.com/user-guides
Insight 360 37
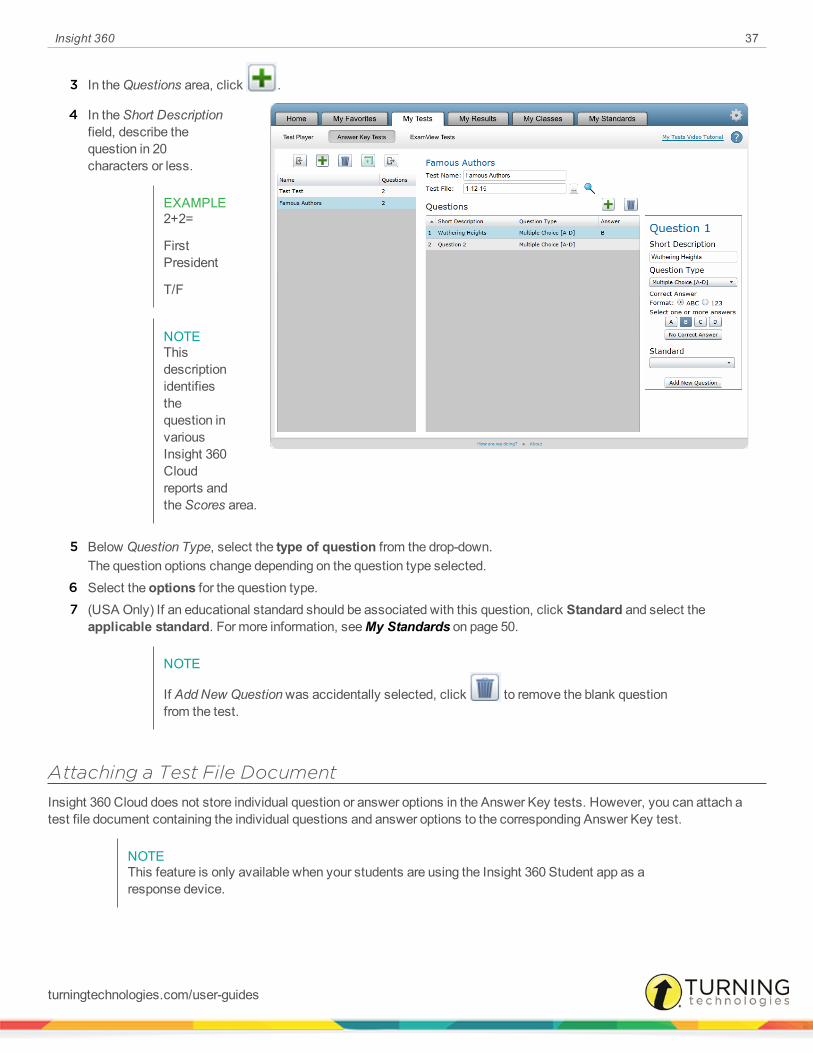
3 In theQuestions area, click .
4 In theShort Descriptionfield, describe thequestion in 20characters or less.
EXAMPLE2+2=
FirstPresident
T/F
NOTEThisdescriptionidentifiesthequestion invariousInsight 360Cloudreports andtheScores area.
5 Below Question Type, select the type of question from the drop-down.The question options change depending on the question type selected.
6 Select the options for the question type.7 (USA Only) If an educational standard should be associated with this question, click Standard and select the
applicable standard. For more information, seeMy Standards on page 50.
NOTE
If AddNew Questionwas accidentally selected, click to remove the blank questionfrom the test.
Attaching a Test File DocumentInsight 360 Cloud does not store individual question or answer options in the Answer Key tests. However, you can attach atest file document containing the individual questions and answer options to the corresponding Answer Key test.
NOTEThis feature is only available when your students are using the Insight 360 Student app as aresponse device.
turningtechnologies.com/user-guides
Insight 360 38
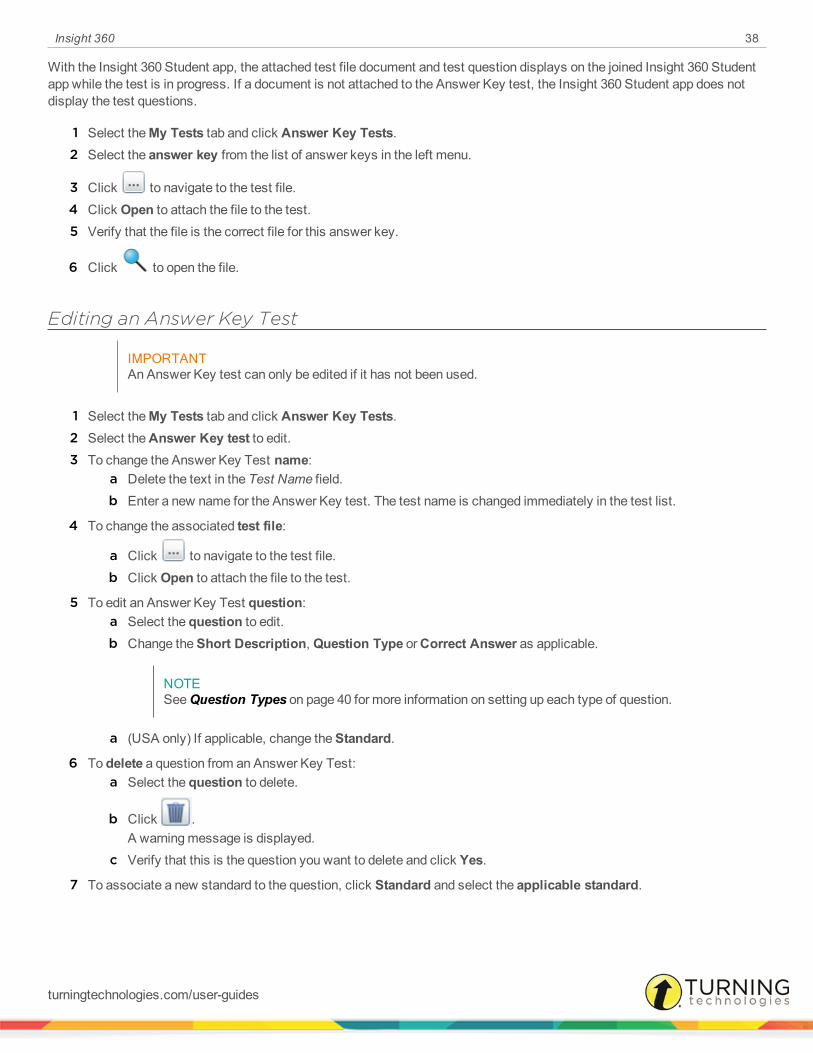
With the Insight 360 Student app, the attached test file document and test question displays on the joined Insight 360 Studentapp while the test is in progress. If a document is not attached to the Answer Key test, the Insight 360 Student app does notdisplay the test questions.
1 Select theMy Tests tab and click Answer Key Tests.2 Select the answer key from the list of answer keys in the left menu.
3 Click to navigate to the test file.4 Click Open to attach the file to the test.5 Verify that the file is the correct file for this answer key.
6 Click to open the file.
Editing an Answer Key Test
IMPORTANTAn Answer Key test can only be edited if it has not been used.
1 Select theMy Tests tab and click Answer Key Tests.2 Select theAnswer Key test to edit.3 To change the Answer Key Test name:
a Delete the text in the Test Name field.b Enter a new name for the Answer Key test. The test name is changed immediately in the test list.
4 To change the associated test file:
a Click to navigate to the test file.b Click Open to attach the file to the test.
5 To edit an Answer Key Test question:a Select the question to edit.b Change theShort Description, Question Type orCorrect Answer as applicable.
NOTESeeQuestion Types on page 40 for more information on setting up each type of question.
a (USA only) If applicable, change theStandard.
6 To delete a question from an Answer Key Test:a Select the question to delete.
b Click .A warningmessage is displayed.
c Verify that this is the question you want to delete and click Yes.
7 To associate a new standard to the question, click Standard and select the applicable standard.
turningtechnologies.com/user-guides

Insight 360 39
Copying an Answer Key TestTo use the same Answer Key test across multiple classes, youmust copy the original Answer Key.
1 Select theMy Tests tab and click Answer Key Tests.2 Select theAnswer Key test to copy.
3 Click .The new test appears at the bottom of the Answer Key Test list.
4 In the Test Name field, enter a new name for the copy.5 Make changes to the new Answer Key Test as necessary.
Importing an Answer Key Test
1 Select theMy Tests tab and click Answer Key Tests.
2 Click .3 Browse to the location of the Answer Key Test file.4 Select the test and click Open.
The Answer Key Test is imported into Insight 360 Cloud.
Exporting an Answer Key Test
1 Select theMy Tests tab and click Answer Key Tests.2 Select theAnswer Key Test to be exported.
3 Click .4 Name theAnswer Key Test and click Save.
NOTEThe default save location is:
PC - C:\Program Files (x86)\eInstruction\ExamView\Tests
Mac - Applications > eInstruction > ExamView > Test
Next Steps
The Answer Key Test is exported as an XML file. You can now save this file to a flash drive and import the XML version of theAnswer Key Test on another computer that has Insight 360 Cloud installed. For more information, see Importing an AnswerKey Test on page 39.
turningtechnologies.com/user-guides

Insight 360 40
Deleting an Answer Key Test
1 Select theMy Tests tab and click Answer Key Tests.2 Select theAnswer Key test to delete.
IMPORTANTYou cannot delete an Answer Key test that has already been administered and containsstudent data unless the session data has been deleted from theScores section of theMyResults tab.
3 Click .A warningmessage is displayed.
4 Verify that this is the Answer Key test you want to delete and click Yes.
Question TypesInsight 360 Cloud allows you to create the following types of questions:
l Multiple Choice (one correct answer, up to six options)l Multiple Answer (more than one correct answer, up to six options)l Numericl Short Answerl True/Falsel Yes/No
Responses can be scored as correct or incorrect, providing statistical feedback on individual and class progress.
Creating Multiple Choice Questions
A multiple choice question has one correct answer from a number of options.
1 Create an Answer Key or Tagged question.2 From theQuestion Type drop-downmenu, select theMultiple Choice type
matching the number of answer options to present to the student.
EXAMPLEMultiple Choice A-C has three options: A, B, and C
Multiple Choice A-F has six options: A, B, C, D, E, and F
3 To present numeric answer options, select 123.4 Below Select one or more answers, click the letter or number representing the
correct answer. If the question is a poll with no correct answer, click No CorrectAnswer.
5 If an educational standard should be associated with this question, clickStandard and select the applicable standard.
turningtechnologies.com/user-guides

Insight 360 41
Creating Multiple Answer Questions
A multiple answer question has two or more correct answers among a number of options. Students must enter all of the correctanswers (and none of the incorrect answers) for their response to bemarked as “correct.”
1 Create an Answer Key or Tagged question.2 From theQuestion Type drop-downmenu, select theMultiple Choice type
matching the number of answer options to present to the student.
EXAMPLEMultiple Choice A-C has three options: A, B, and C
Multiple Choice A-F has six options: A, B, C, D, E and F
3 To present numeric answer options, select 123.4 Below Select one or more answers, click the letters or numbers representing the
correct answers.5 If an educational standard should be associated with this question, click Standard
and select the applicable standard.
Creating Numeric Questions
A numeric question requires the student to type in a number as the answer. The numbermay contain decimal places and canbe graded on its format. A range of values can be set as the correct answer or answers.
1 Create an Answer Key or Tagged question.2 From theQuestion Type drop-downmenu, select Numeric.3 In theCorrect Answer field, enter the answer in its correct format. If the question
is a poll with no correct answer, click No Correct Answer.4 If the answermust be exact to a certain number of decimal places, select the box
labeledGrade Format.
turningtechnologies.com/user-guides
Insight 360 42
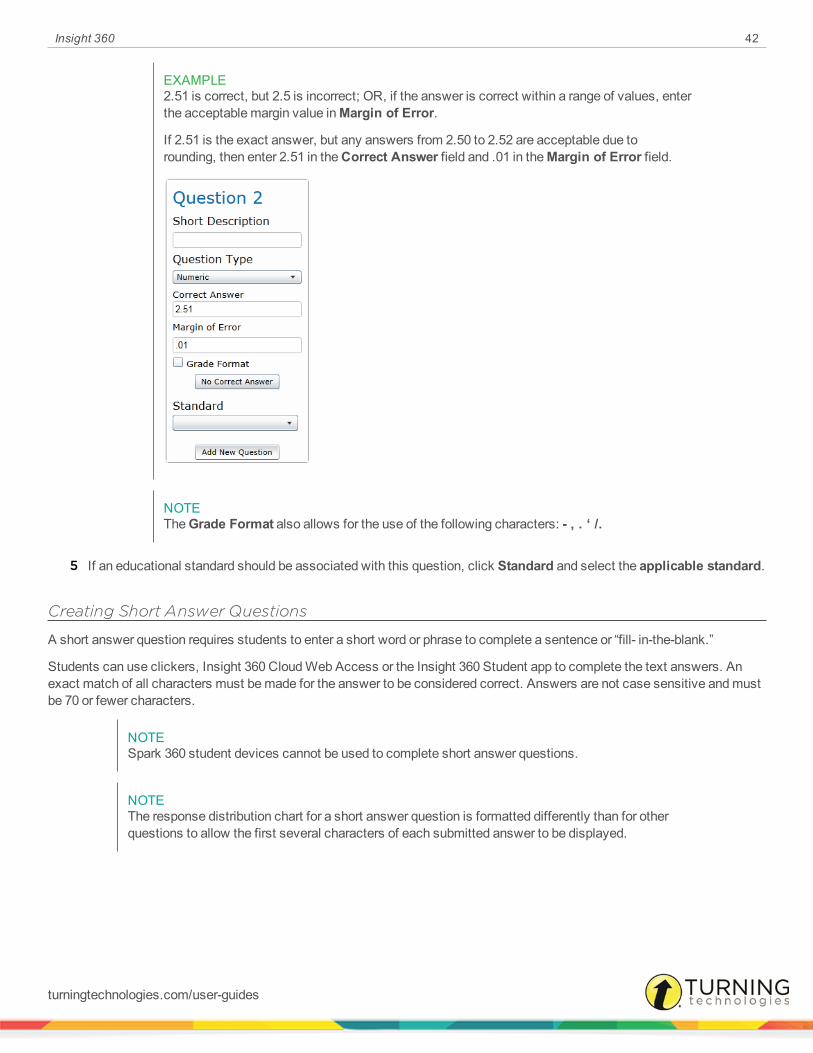
EXAMPLE2.51 is correct, but 2.5 is incorrect; OR, if the answer is correct within a range of values, enterthe acceptable margin value inMargin of Error.
If 2.51 is the exact answer, but any answers from 2.50 to 2.52 are acceptable due torounding, then enter 2.51 in theCorrect Answer field and .01 in theMargin of Error field.
NOTETheGrade Format also allows for the use of the following characters: - , . ‘ /.
5 If an educational standard should be associated with this question, click Standard and select the applicable standard.
Creating Short Answer Questions
A short answer question requires students to enter a short word or phrase to complete a sentence or “fill- in-the-blank.”
Students can use clickers, Insight 360 CloudWeb Access or the Insight 360 Student app to complete the text answers. Anexact match of all characters must bemade for the answer to be considered correct. Answers are not case sensitive andmustbe 70 or fewer characters.
NOTESpark 360 student devices cannot be used to complete short answer questions.
NOTEThe response distribution chart for a short answer question is formatted differently than for otherquestions to allow the first several characters of each submitted answer to be displayed.
turningtechnologies.com/user-guides
Insight 360 43
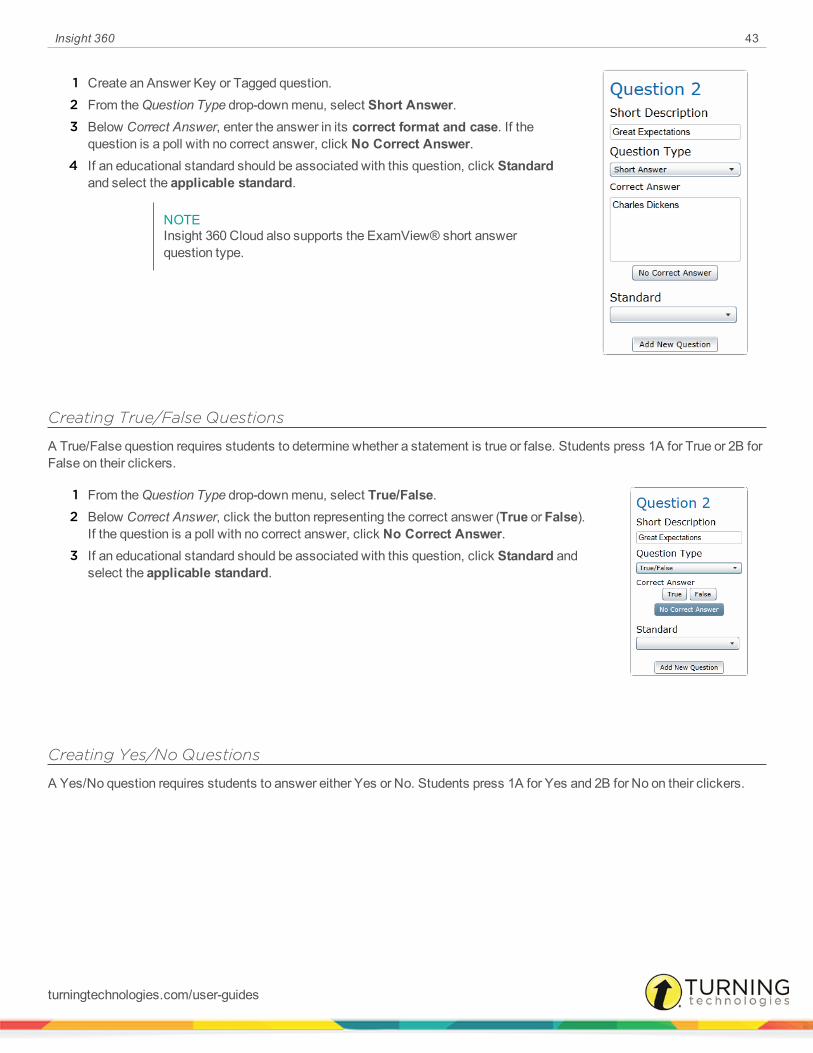
1 Create an Answer Key or Tagged question.2 From theQuestion Type drop-downmenu, select Short Answer.3 Below Correct Answer, enter the answer in its correct format and case. If the
question is a poll with no correct answer, click No Correct Answer.4 If an educational standard should be associated with this question, click Standard
and select the applicable standard.
NOTEInsight 360 Cloud also supports the ExamView® short answerquestion type.
Creating True/False Questions
A True/False question requires students to determine whether a statement is true or false. Students press 1A for True or 2B forFalse on their clickers.
1 From theQuestion Type drop-downmenu, select True/False.2 Below Correct Answer, click the button representing the correct answer (True or False).
If the question is a poll with no correct answer, click No Correct Answer.3 If an educational standard should be associated with this question, click Standard and
select the applicable standard.
Creating Yes/No Questions
A Yes/No question requires students to answer either Yes or No. Students press 1A for Yes and 2B for No on their clickers.
turningtechnologies.com/user-guides
Insight 360 44
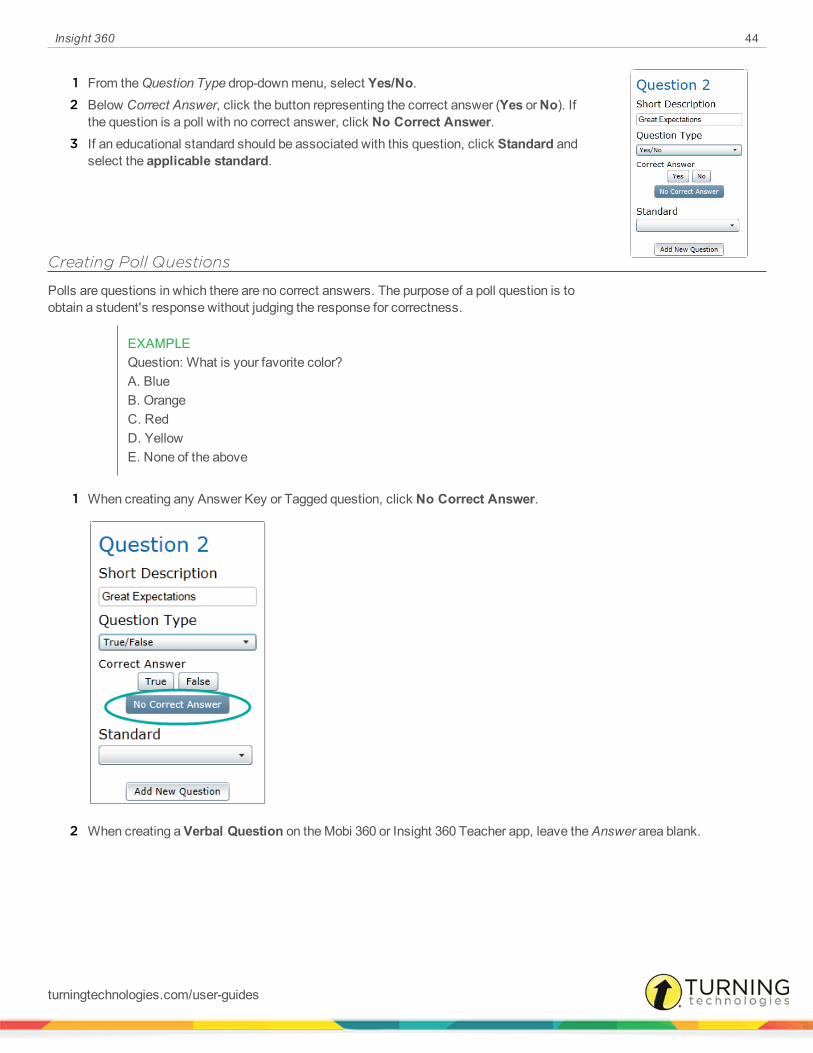
1 From theQuestion Type drop-downmenu, select Yes/No.2 Below Correct Answer, click the button representing the correct answer (Yes orNo). If
the question is a poll with no correct answer, click No Correct Answer.3 If an educational standard should be associated with this question, click Standard and
select the applicable standard.
Creating Poll Questions
Polls are questions in which there are no correct answers. The purpose of a poll question is toobtain a student's response without judging the response for correctness.
EXAMPLEQuestion: What is your favorite color?A. BlueB. OrangeC. RedD. YellowE. None of the above
1 When creating any Answer Key or Tagged question, click No Correct Answer.
2 When creating aVerbal Question on theMobi 360 or Insight 360 Teacher app, leave theAnswer area blank.
turningtechnologies.com/user-guides

Insight 360 45
ExamView TestsYou can use ExamView to quickly create printed or online tests that can be answered with various student devices.
With ExamView, you can create several different question types, including:
l True/False andModified True/Falsel Numeric Responsel Multiple Choicel Multiple Answerl Short Answerl Bimodal (can be displayed as either multiple choice or short answer)l Yes/No
NOTENot all of these question types work with the Spark 360 student response system.
Use the Test Player on the Insight 360 Cloud software to administer the ExamView tests and collect answers from the studentdevices.
NOTEFormore information on the ExamView Test Generator and other ExamView products, refer to theExamView user guides at http://www.turningtechnologies.com/user-guides.
Opening ExamView Test GeneratorYou can open ExamView Test Generator directly from the Insight 360 CloudHome tab or theMy Tests tab. ExamView TestGenerator opens in a new window.
All favorites, classes, student data and other Insight 360 information resides on the computer used to set up this data. Thisdata is not accessible if you take theMobi 360 or the Insight 360 Teacher app to another classroom, even if that classroomcomputer is running Insight 360. Youmust also set up that computer with the same classes, students, favorites and other data.
1 From the Insight 360 CloudHome tab, click Launch ExamView Test Generator.Alternatively, from theMy Tests tab, click ExamView Tests and click Open ExamView.
turningtechnologies.com/user-guides
Insight 360 46
The Test PlayerThe Test Player runs self-paced Answer Key or ExamView tests during a class session. During a self-paced test, studentsanswer a list of test questions at their own pace using their own individual student devices.
The Test Player can be accessed from the Insight 360 Cloud Home tab or theMy Tests tab.
This section covers the following topics:
Starting a Self-Paced TestUsing the Timer for Self-Paced TestsDisplaying the Student Response Grid During a TestEnding a Self-Paced TestViewing Results of a Self-Paced Test
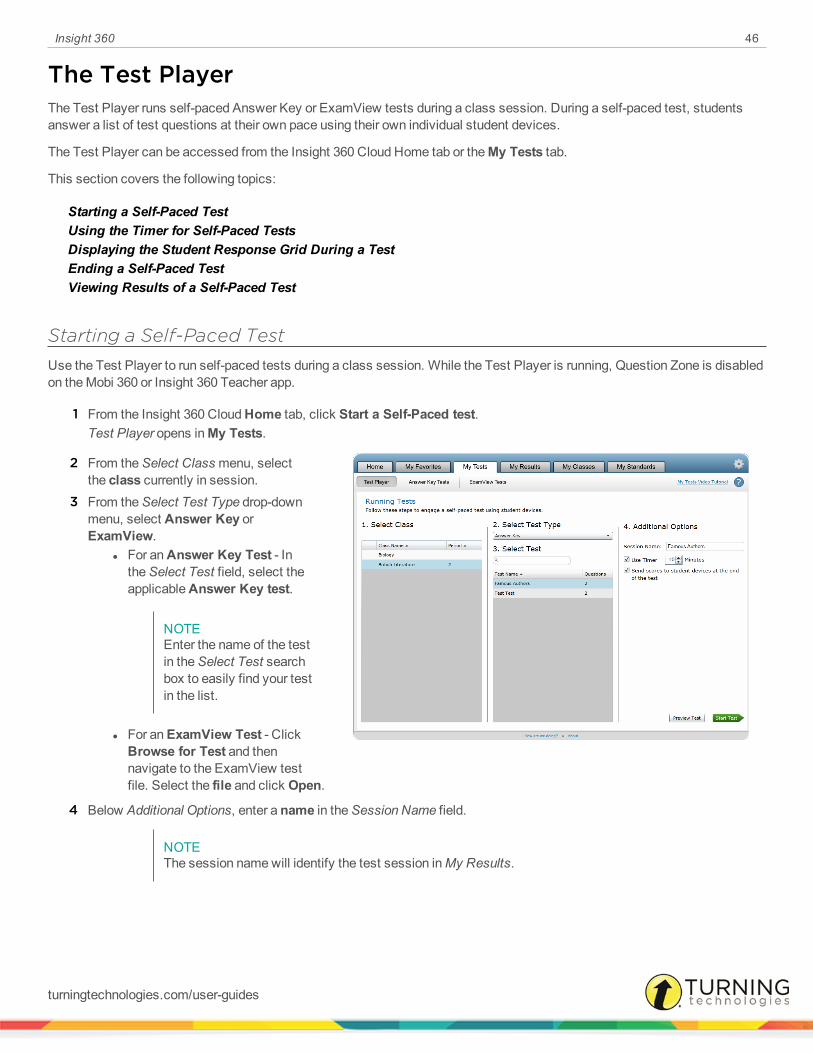
Starting a Self-Paced TestUse the Test Player to run self-paced tests during a class session. While the Test Player is running, Question Zone is disabledon theMobi 360 or Insight 360 Teacher app.
1 From the Insight 360 CloudHome tab, click Start a Self-Paced test.Test Player opens inMy Tests.
2 From theSelect Class menu, selectthe class currently in session.
3 From theSelect Test Type drop-downmenu, select Answer Key orExamView.
l For anAnswer Key Test - IntheSelect Test field, select theapplicableAnswer Key test.
NOTEEnter the name of the testin theSelect Test searchbox to easily find your testin the list.
l For anExamView Test - ClickBrowse for Test and thennavigate to the ExamView testfile. Select the file and click Open.
4 Below Additional Options, enter a name in theSession Name field.
NOTEThe session namewill identify the test session inMy Results.
turningtechnologies.com/user-guides
Insight 360 47
5 Optionally, time the test by selecting the box labeledUse Timer. Enter the number of minutes in theMinutes box.6 Optionally, select the box labeledSend scores to students at the end of the test if you want each student to see his
or her score on the individual student device.7 Click Preview Test to view the Answer Key prior to the start of the test.
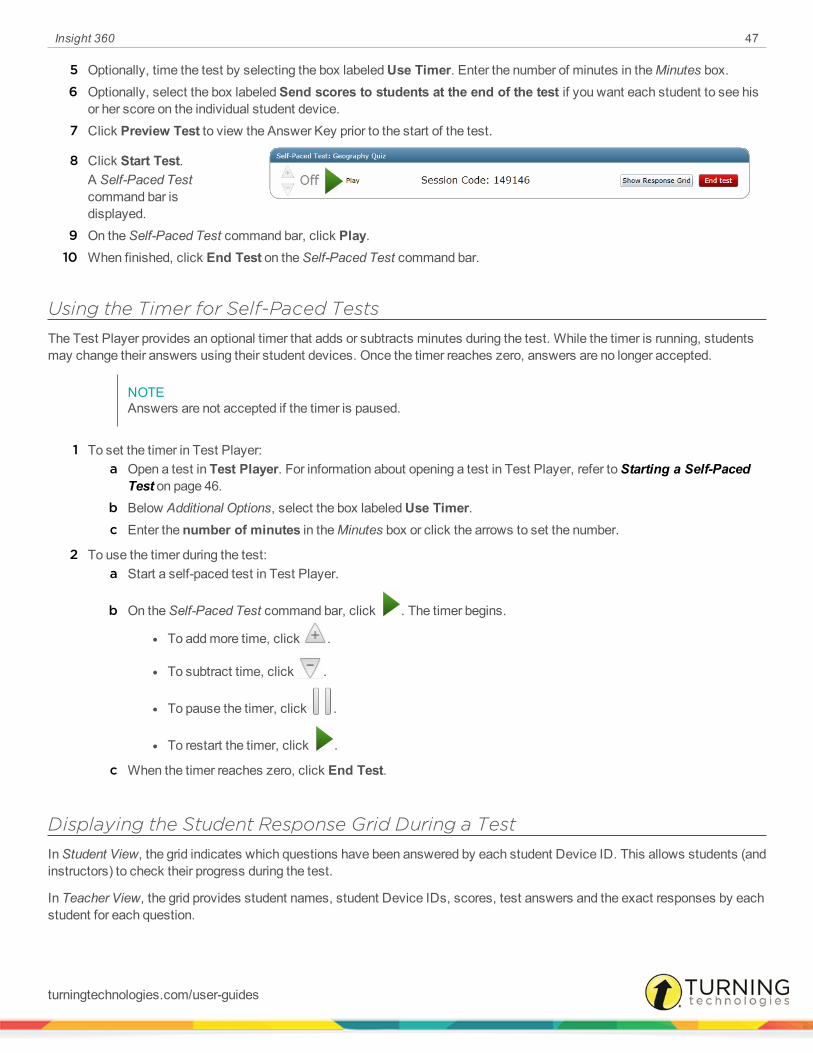
8 Click Start Test.A Self-Paced Testcommand bar isdisplayed.
9 On theSelf-Paced Test command bar, click Play.10 When finished, click End Test on theSelf-Paced Test command bar.
Using the Timer for Self-Paced TestsThe Test Player provides an optional timer that adds or subtracts minutes during the test. While the timer is running, studentsmay change their answers using their student devices. Once the timer reaches zero, answers are no longer accepted.
NOTEAnswers are not accepted if the timer is paused.
1 To set the timer in Test Player:a Open a test in Test Player. For information about opening a test in Test Player, refer toStarting a Self-Paced
Test on page 46.b Below Additional Options, select the box labeledUse Timer.c Enter the number of minutes in theMinutes box or click the arrows to set the number.
2 To use the timer during the test:a Start a self-paced test in Test Player.
b On theSelf-Paced Test command bar, click . The timer begins.
l To addmore time, click .
l To subtract time, click .
l To pause the timer, click .
l To restart the timer, click .
c When the timer reaches zero, click End Test.
Displaying the Student Response Grid During a TestInStudent View, the grid indicates which questions have been answered by each student Device ID. This allows students (andinstructors) to check their progress during the test.
In Teacher View, the grid provides student names, student Device IDs, scores, test answers and the exact responses by eachstudent for each question.
turningtechnologies.com/user-guides

Insight 360 48
1 Start a self-paced test in Test Player from the Insight 360 CloudHome tab.Test Player opens inMy Tests.
2 From theSelect Class menu, select the class currently in session.3 From theSelect Test Type drop-downmenu, select Answer Key orExamView.
l For anAnswer Key Test - In theSelect Test field, select the applicableAnswer Key test.l For anExamView Test - Click Browse for Test and then navigate to the ExamView test file. Select the file andclick Open.
4 Enter additional information, including session name, in theAdditional Options area.5 Click Start Test.
A Self-Paced Test command bar is displayed.
6 On theSelf-Paced Testcommand bar, clickShow Response Grid.By default, the griddisplays inStudentView. Use the Teacher View andStudent View buttons to toggle between these views.
TIPThe projector should be off when displaying Teacher View.
Ending a Self-Paced TestTheSelf-Paced Test command bar is visible on the classroom computer screen when a self-paced test (such as an AnswerKey or ExamView test) has been started from Insight 360 Cloud.
1 Click End Test on theSelf-Paced Test command bar.The Test Endedwindow opens.
2 Select one of the following options:l Return to Test - Closes the Test Endedwindow and returns to theSelf-Paced Test command bar in its mostrecent configuration.
l Close - Closes the Test Endedwindow and theSelf-Paced Test command bar.l Close and View Results - Closes the Test Endedwindow and theSelf-Paced Test command bar; displays thetest results on theMy Results tab in Insight 360 Cloud.
Viewing Results of a Self-Paced TestWhen a self-paced test ends, the Insight 360 Cloud software records the student scores and other information about the test.You can view the results immediately following the test, or later from theMy Results tab in the Insight 360 Cloud software.Youcan also send results of a self-paced test to student devices running the Insight 360 Student app, but youmust decide to dothis in the Test Player prior to starting the test.
turningtechnologies.com/user-guides
Insight 360 49
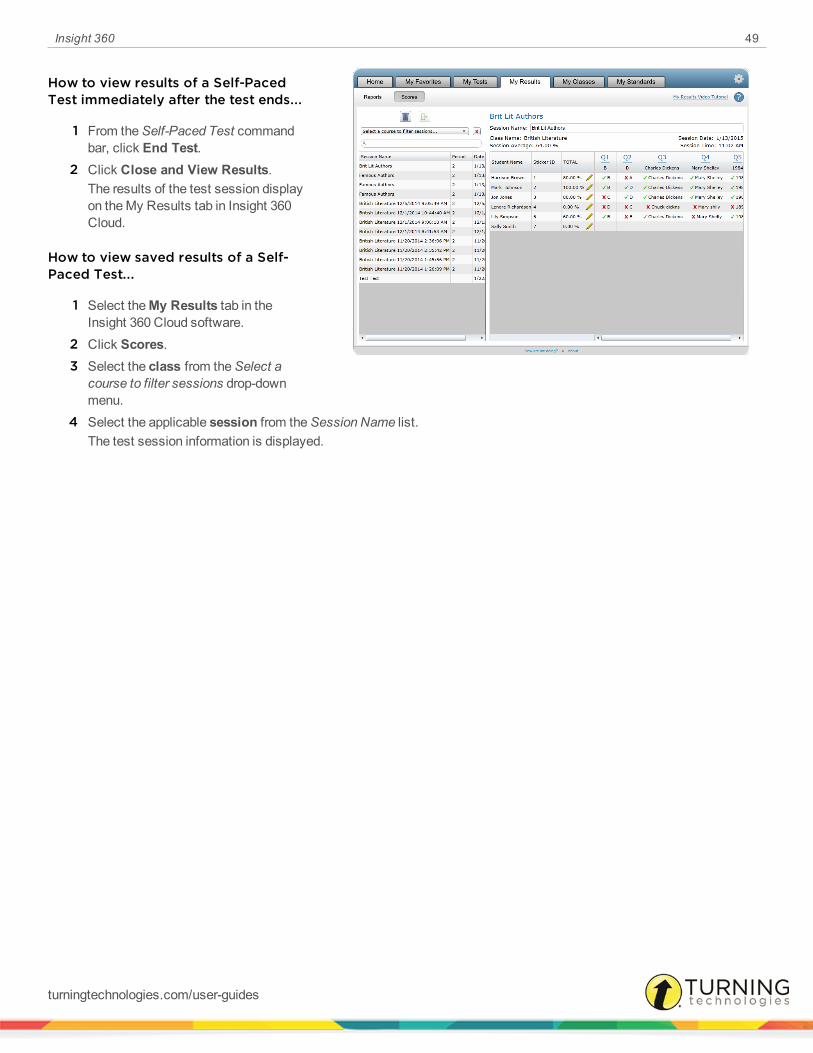
How to view results of a Self-PacedTest immediately after the test ends...
1 From theSelf-Paced Test commandbar, click End Test.
2 Click Close and View Results.The results of the test session displayon theMy Results tab in Insight 360Cloud.
How to view saved results of a Self-Paced Test...
1 Select theMy Results tab in theInsight 360 Cloud software.
2 Click Scores.3 Select the class from theSelect a
course to filter sessions drop-downmenu.
4 Select the applicable session from theSession Name list.The test session information is displayed.
turningtechnologies.com/user-guides
Insight 360 50
My Standards
You can use Insight 360 Cloud to associate individual Answer Key and CueTag questions with US educational standards.Answer Key and ExamView tests can contain questions associated with both CommonCore and US state standards.Individual questions tagged with CueTag barcodes can also be associated with CommonCore and US state standards.Selected standards populate a "quick select" list available for future questions. You can generate Standards Analysis andMultiple Analysis reports at the class and student levels to view student proficiency.
Insight 360 Cloud uses CommonCore and US educational standards from Academic Benchmarks. Academic Benchmarkscollects andmaintains content, assessment and performance standards used by many education professionals in the UnitedStates. CommonCore standards are available for K-12 English Language Arts and K-12Mathematics.
CommonCore standards are automatically installed when you install Insight 360 Cloud. If you include a US state when youregister your copy of the Insight 360 Cloud software, the standards for that state will install when you activate the Insight 360Cloud software.
This chapter covers the following sections:
Adding Standards to the Quick Select ListAdding a Standard to a Test Question
turningtechnologies.com/user-guides

Insight 360 51
Adding Standards to the Quick Select List
IMPORTANTWhen the Insight 360 Cloud software is first installed, theStandard drop-downmenu is notpopulated. Before you can assign a standard to a question, youmust find and select the applicablestandard. After you have selected a standard, it is added to theStandard drop-downmenu forfuture use.
You can select CommonCore standards or, if you registered your Insight 360 Cloud software with a US state address, you canselect standards applicable to your state.
1 Select theMy Standards tab.2 Select the standards category from the list.
The select standard category appears on the right side ofthe screen.
3 Expand the arrow next to the standard category to expandthe list. Continue expanding your selections until youreach the desired standard.
NOTECommonCore standards are divided intostrands, standards and anchor standards.State standards may be divided into strands,concepts and performance objectives. Youcan select any of these levels, but it may bemore effective to choose themost specific level applicable to the question.
4 Select the box next to the desired standard.The selected standard now appears in your quick select list when creating answer keys and using the CueTag Creator.
Adding a Standard to a Test Question
1 Select theMy Tests tab and click Answer Key Tests.2 Select anAnswer Key test.3 Select a question.
TheQuestion Details pane is displayed.4 From theStandard drop-downmenu, select the standard applicable to the question.
NOTEOnly one standardmay be associated to a question.
turningtechnologies.com/user-guides

Insight 360 52
My Results
TheMy Results tab in the Insight 360 Cloud software allows you to view classroom data.
NOTEIf you are using Insight 360 Cloud on aMac, youmust be connected to the internet to generatereports.
From the My Results tab, you can:
l View class performance and standards reports.l View class session reports, including session content screenshots and individual student scores.l View student performance and standards reports.l Save reports in PDF or CSV file formats.
NOTENot all reports can be saved in all formats.
Results Zone versus My Results
When you ask a Verbal, Tagged or ExamView question using theMobi 360 or Insight 360 Teacher app, you can view studentresponses to the question in real-time from the Results Zone. After the class session has ended, student responses and otherclass session data are no longer available on theMobi 360 or the Insight 360 Teacher app. All class session information issaved in the Insight 360 Cloud database for viewing through theMy Results tab in the Insight 360 Cloud software.
My Results consists of two sections:
l Reports - Thirteen formatted reports provide statistics, graphs, student scores and other data in exportable formats.Reports can be generated for the class, individual class sessions and individual students. Reports can be exported to acomma-separated value (CSV) file and edited.
l Scores - An editable grid of student scores for a specific class session. You can change individual student responses tospecific questions or change a question’s responses to apply to all students. Data can be changed inScores andexported to a ResponseGrid Report.
NOTETo export scores for a specific class session, use theResponse Grid report.
This chapter covers the following sections:
Configuring ReportsClass ReportsSession ReportsStudent ReportsViewing and Editing Scores
turningtechnologies.com/user-guides
Insight 360 53
Configuring ReportsThere are three groups of reports available in My Reports:
l Class- Performance and Standards Analysis reports combine data for all sessions of a specific class. These reportsprovide summary information on class proficiency and can be filtered according to US state educational standards.
l Session- These reports provide data for a specific class session, including summary performance data for the session,statistics on responses to individual questions, screenshots and individual student scores.
l Student- Performance and Standards Analysis reports display an individual student compared to the rest of the class.
Depending on the data being presented, reports may be configured by:
l Class namel Class sessionl Student namel US state standardl Date rangel Proficiencyl Type
IMPORTANTOnly options that apply to the selected specific report are displayed at the top of the reportconfiguration page. Class name, class session, student name and standard are provided as drop-down options when applicable.
This section covers the following topics:
Generating a ReportSetting a Report Date RangeChanging the Proficiency Setting for a ReportSwitching the Report ViewSaving, Printing and Exporting Reports
turningtechnologies.com/user-guides

Insight 360 54
Generating a Report
1 Select theMy Results tab and clickReports.
2 Select the desired report from the leftmenu.
3 From theSelect a class drop-downmenu, select the class for which youwant to see the report.
4 If applicable, select the class sessionfrom theSelect a session drop-downmenu.
5 If applicable, select the student namefrom theSelect a student drop-downmenu.
6 If applicable, select the standard fromtheSelect a standard drop-downmenu.
7 Click Generate Report.The report displays as a PDF in grid orchart format.
NOTEWhen youmake a change to a report, such as selecting a new class session or student, youmust click Generate Report to view the new data.
8 Depending on the type of report, you can export to a CSV. Click Export to CSV. You also have the option to select thebox next toShow Advanced Export Options to filter column data.
Setting a Report Date RangeThe following reports allow you to filter the data to a specific date range:
l Class Performance Analysisl Class Standards Analysisl Class Multiple Standard Analysisl Student Performance Summaryl Student Standards Analysisl Student Multiple Standard Analysis
After you have set the date range, youmust generate (or regenerate) the report to see the newly filtered data.
1 Select the desired report from the left menu.2 Enter all necessary information in the fields provided.
3 In theDate Range field, enter the beginning date in MM/DD/YYYY format, or click to select the date.4 In the To field, repeat step 3 to enter the end date.5 Click Generate Report.
turningtechnologies.com/user-guides
Insight 360 55
Changing the Proficiency Setting for a ReportMany reports track the proficiency of a class or student. The proficiency is theminimum score that must be obtained todemonstrate that the student has achieved a base level of skill or knowledge in the subject. Insight 360 Cloud sets theproficiency to 65% by default, however you can change this setting for each individual report. Insight 360 Cloud remembers thechanged proficiency setting for all future reports.
1 Select the desired report.2 In theProficiency field, enter the new minimum proficiency score.3 Click Generate Report.
Switching the Report ViewAll Performance Analysis and Standards Analysis reports can be viewed as either a grid or as a bar chart.
1 Select the desired report from the left menu.2 Enter all necessary information in the fields provided.3 Select theChart radio button to view the report as a bar chart.4 Select theGrid radio button to view the report as a grid.5 Click Generate Report.
Saving, Printing and Exporting ReportsReports can be saved to and printed from a portable document format (PDF). Additionally, you can export most reports to aCSV file.
IMPORTANTA PDF reader is required to view compiled files. Please ensure a PDF reader is installed on yourcomputer.
TIPExporting to a CSV file is the primary method for importing class data into third-party programssuch as grade books, learningmanagement systems and parent portals.
1 Select the desired report from the left menu.2 Enter all necessary information in the fields provided and click Generate PDF.
l The report opens in your PDF reader.l The file is automatically named and saved in a Temp folder. To save it with a different name and path from AdobeAcrobat or Acrobat Reader, click File from themenu bar, mouse overSave As and select PDF.
turningtechnologies.com/user-guides

Insight 360 56
l To print the file from Adobe Acrobat or Acrobat Reader, click Print.
3 To export a report to a CSV File:a Select the box labeledShow Advanced
Export Options.b Select the data that you want to appear in each column
of the CSV export file.
TIPTo save a custom export scheme for theResponseGrid report, make your changesand select Default from theExportScheme drop-downmenu.You will then be prompted to save yourscheme and can select the saved schemethe next time you generate a ResponseGrid report.
c Click Export to CSV.A dialog box prompts you for a file name.
d In the File name field, enter a name for the report.e Click Save.
NOTETo view or print a CSV file, youmust import it into a third-party program such asMicrosoft Excel. Refer to the documentation for your third-party program for help.
turningtechnologies.com/user-guides

Insight 360 57
Class ReportsClass reports provide summary information on class progress towards meeting educational objectives. Insight 360 Cloudprovides three types of class reports:
l Performance Analysis - The Performance Analysis report provides a summary view of the class’s performance overmultiple class sessions.
l Options include choosing a date range and changing the proficiency settingl Available in grid or chart viewsl Each class session is listed on a separate line (Grid view) or bar (Chart view)l Lists number of students above and below proficiency level in each sessionl Lists highest, lowest and class average scores for each sessionl Can be exported to CSV file format
l Standards Analysis - The Standards Analysis report provides an overview of class performance toward a single USstate educational standard.
l Options include choosing the standard, setting a date range and changing the proficiency settingl Displays only the sessions with test or question results aligned with the selected standardl Available in grid or chart viewsl Each class session is listed on a separate line (Grid view) or bar (Chart view)l Lists number of students above and below proficiency level for that standard in each sessionl Can be exported to CSV file format
l Multiple Standard Analysis - TheMultiple Standards Analysis report provides the proficiency percentage of eachstudent answering test questions that align with multiple US educational standards.
l Options include setting a date range and changing the proficiency settingl Displays only the sessions with test or question results aligned with standardsl Lists percentage of students above and below proficiency level for each standard in each sessionl Can be exported to CSV file format
This section covers the following topics:
Generating a Performance Analysis ReportGenerating a Standards Analysis ReportGenerating a Multiple Standard Analysis Report
Generating a Performance Analysis ReportA Performance Analysis report allows you to determine the overall proficiency of the class (number of students who passed thetest) for each test session.
The Performance Analysis report can be displayed in grid or chart format. The chart provides the following information for theselected class and test session:
l Average score for each test sessionl Number of students who scored above the proficiency (passing) level
turningtechnologies.com/user-guides

Insight 360 58
l Number of students who scored below the proficiency levell Number of questions presented during the test session
In addition to the information displayed on the chart, the grid version of this report provides the following information:
l Test session date and timel Highest score in classl Lowest score in class
1 Select theMy Results tab and click Reports.2 ExpandClass from the left menu and select Performance Analysis.3 From theSelect a class drop-downmenu, select the class for which you want to generate the report.4 Set the beginning and end dates to broaden or narrow the number of test sessions included in the report in theDate
Range fields.5 In theProficiency field, enter a percentage correct score at which students have demonstrated proficiency.6 To view more options, select the box labeledShow Advanced Export Options.7 To view the report in grid format, select theGrid radio button.8 Click Generate Report.
TIPClick Export to CSV to export the report to a CSV file.
Generating a Standards Analysis ReportA Standards Analysis report allows you to determine the overall proficiency of the class in answering test questions that alignwith a US educational standard. This report is essentially the same as the Class Performance Analysis report, but allows youto filter the results for specific educational standards.
The Class Standards Analysis report can be shown in chart or grid format. The chart provides the following information for theselected class and test session:
l Average score for each test session for the selected standardl Number of students who scored above the proficiency level on questions pertaining to the selected standardl Number of students who scored below the proficiency level on questions pertaining to the selected standardl Number of questions answered during the test session that pertained to the selected standard
NOTEIn addition to the information shown on the chart format, the grid version of this report provides thetest session date and time.
1 Select theMy Results tab and click Reports.2 ExpandClass from the left menu and select Standards Analysis.3 From theSelect a class drop-downmenu, select the class for which you want to generate the report.4 From theSelect a standard drop-downmenu, select the applicable standard.
turningtechnologies.com/user-guides

Insight 360 59
5 Set the beginning and end dates to broaden or narrow the number of test sessions included in the report in theDateRange fields.
6 In theProficiency field, enter a percentage correct score at which students have demonstrated proficiency.7 To view more options, select the box labeledShow Advanced Export Options.8 To view the report in grid format, select theGrid radio button.9 Click Generate Report.
TIPClick Export to CSV to export the report to a CSV file.
Generating a Multiple Standard Analysis ReportA Multiple Standard Analysis report allows you to determine the proficiency of each student answering test questions that alignwith multiple US educational standards.
The Class Multiple Standard Analysis provides the following information (per question):
l Class averagel Highest proficiency percentagel Lowest proficiency percentagel Standard and standard description
1 Select theMy Results tab and click Reports.2 ExpandClass from the left menu and select Multiple Standard Analysis.3 From theSelect a class drop-downmenu, select the class for which you want to generate the report.4 Set the beginning and end dates to broaden or narrow the number of test sessions included in the report in theDate
Range fields.5 In theProficiency field, enter a percentage correct score at which students have demonstrated proficiency.6 To view more options, select the box labeledShow Advanced Export Options.7 Click Generate Report.
TIPClick Export to CSV to export the report to a CSV file.
turningtechnologies.com/user-guides

Insight 360 60
Session ReportsSession reports provide specific information regarding results and content for each class session. Insight 360 Cloud providessix types of Session reports:
l Performance Analysis - The Session Performance Analysis report provides a summary view of how each studentperformed during a single class session.
l Options include choosing a session and changing the proficiency settingl Available in grid or chart viewsl Each student is listed on a separate line (grid view) or bar (chart view) along with score and proficiency rating(yes/no on grid; above/below on chart)
l Can be exported to CSV file
l Question Analysis - The Session Question Analysis report provides specific information regarding each questionassessed in a single class session.
l Each question is presented on its own “page” with navigation buttons to access more questionsl Displays the question name, question type, responses, number and percentage of students who answered witheach response
l Session Content - The Session Content report provides all screenshots captured in a single class session.l Options allow you to filter the screenshots by type (manual, Verbal question, Tagged question, ExamViewquestion and Constructed Response)
l Each screenshot is presented on its own “page” with navigation buttons to access more screenshotsl Clicking the image displays the screenshot in full-screenmode. Press the ESC key to return the screen tonormal.
l Response Summary - The Session Response Summary report provides proficiency data based on the percentage ofcorrect answers.
l Options include changing the proficiency settingl Displays the question number, correct answer, percentage correct, number of students who did not respond andother responses
l Scores are color coded green for students above the proficiency setting and yellow for students below theproficiency setting
l Can be exported to CSV file
l Student Summary - The Session Student Summary report provides proficiency data based on each individual student.l Options include changing the proficiency settingl Displays the student name, Student ID, number of questions presented, number of questions answeredcorrectly, number of questions answered incorrectly, number of questions not responded to, and the overallscore
l Scores are color coded green for students above the proficiency setting and yellow for students below theproficiency setting
l Can be exported to CSV file
l Response Grid - The Session ResponseGrid report provides all student responses for all questions assessed during asingle class session. This report is similar to the information provided inScores, but the data can only be exported fromthe ResponseGrid report.
turningtechnologies.com/user-guides
Insight 360 61
l Options include changing the proficiency settingl Each student is listed on a separate line along with overall score for session and individual responses for eachquestion
l Scores are color coded green for students above the proficiency setting and yellow for students below theproficiency setting
l Can be exported to CSV file
This section covers the following topics:
Generating a Performance Analysis ReportGenerating a Question Analysis ReportGenerating a Session Content ReportGenerating a Response Summary ReportGenerating a Student Summary ReportGenerating a Response Grid Report
Generating a Performance Analysis ReportA Performance Analysis report allows you to determine each student’s proficiency for a specific test session.
The Performance Analysis report can be shown in chart or grid format. The chart provides the following information for theselected test session:
l Class average scorel Number of questionsl Each student’s individual score color-coded in green (at or above proficiency level) or yellow (below proficiency level)
In addition to the information displayed on the chart format, the grid version of this report provides the Student ID and eachstudent’s exact score.
1 Select theMy Results tab and click Reports.2 ExpandSession from the left menu and click Performance Analysis.3 From theSelect a class drop-downmenu, select the class for which you want to generate the report.4 From theSelect a session drop-downmenu, select the desired class session.5 In theProficiency field, enter a percentage correct score at which students have demonstrated proficiency.6 To view more options, select the box labeledShow Advanced Export Options.7 To view the report in grid format, select theGrid radio button.8 Click Generate Report.
TIPClick Export to CSV to export the report to a CSV file.
Generating a Question Analysis ReportA Question Analysis report allows you to view class responses to specific questions presented during a test session. For eachquestion, you can view the number and percentage of students who selected each option. If none of the students selected an
turningtechnologies.com/user-guides

Insight 360 62
option, the option does not show on the report.
TheQuestion Analysis report is divided into individual pages based on the number of questions presented during the selectedtest session. Each page provides the following information for the selected test question:
l All responses to the test question selected by at least one studentl Green (correct) and red (incorrect) color-coded bars indicating the number of students who selected each responsel Actual number of students who selected each responsel Percentage of students who selected each responsel A screenshot of the classroom computer desktop taken when the question started (Verbal and Tagged questions only)
1 Click theMy Results tab and click Reports.2 ExpandSession from the left menu and click Question Analysis.3 From theSelect a class drop-downmenu, select the class for which you want to generate the report.4 From theSelect a session drop-downmenu, select the desired class session.5 ForReport Type, select theChart orGrid radio button.6 Click Generate Report.
The report displays the data for the first question in the test session.7 Click Next to view data for the next question in the test session.
Generating a Session Content ReportA Session Content report allows you to view screenshots taken during an entire class session.
The Session Content report is divided into individual pages based on the number of screenshots taken during the selectedclass session. Each page displays one screenshot. The screenshots are presented in the order they were taken during thesession.
The following screenshots can be viewed:
l Manual - Taken by the instructor using the Screenshot button on theMobi 360 or Insight 360 Teacher app.l Verbal - Taken by Insight 360 Cloud when a Verbal question is started.l Tagged - Taken by Insight 360 Cloud when a Tagged question is started.l ExamView - Taken by Insight 360 Cloud when an ExamView question is started.l Constructed Response - Taken by Insight 360 Cloud when a Constructed Response question is started.
NOTEMulti-user screenshots are also saved here.
By default, all types of screenshots are included. To exclude any screenshots, select the box next to that particular type ofscreenshot (to deselect the type) inMore Options.
1 Select theMy Results tab and click Reports.2 ExpandSession from the left menu and select Session Content.3 From theSelect a class drop-downmenu, select the class for which you want to generate the report.4 From theSelect a session drop-downmenu, select the desired class session.
turningtechnologies.com/user-guides

Insight 360 63
5 To exclude any screenshots, select the box next to that type (to deselect the type).6 Click Generate Report.
The report displays as a PDF.
Generating a Response Summary ReportA Response Summary report allows you to view proficiency data based on the percentage of correct answers.
The Response Summary report is divided into four columns consisting of:
l Questionl Correct answerl Percentage correctl Number of students who did not respondl Other responses
1 Select theMy Results tab and click Reports.2 ExpandSession from the left menu and click Response Summary.3 From theSelect a class drop-downmenu, select the class for which you want to generate the report.4 From theSelect a session drop-downmenu, select the desired class session.5 In theProficiency field, enter a percentage correct score at which students have demonstrated proficiency.6 To view more options, select the box labeledShow Advanced Export Options.7 Click Generate Report.
TIPClick Export to CSV to export the report to a CSV file.
Generating a Student Summary ReportA Student Summary report allows you to view proficiency data based on each individual student.
The Student Summary report is divided into seven columns consisting of:
l Student namel Student IDl Number of questions answeredl Number of questions answered correctlyl Number of questions answered incorrectlyl Number of questions not responded tol Score
1 Select theMy Results tab and click Reports.2 ExpandSession from the left menu and click Response Summary.3 From theSelect a class drop-downmenu, select the class for which you want to generate the report.
turningtechnologies.com/user-guides

Insight 360 64
4 From theSelect a session drop-downmenu, select the desired class session.5 In theProficiency field, enter a percentage correct score at which students have demonstrated proficiency.6 To view more options, select the box labeledShow Advanced Export Options.7 Click Generate Report.
TIPClick Export to CSV to export the report to a CSV file.
Generating a Response Grid ReportA ResponseGrid report allows you to view every student’s response to every test question presented during a specific testsession. This report is similar to theScores section of My Results, except that the ResponseGrid report provides sessionsummary information and results cannot be changed.
NOTETo change any scores on the ResponseGrid report, youmust go to theScores section in MyResults.
The ResponseGrid report provides the following information:
l Student namel Student IDl Each student’s overall score for the selected test session, color-coded green (at or above proficiency level) or yellow(below proficiency level)
l The number of test questions left unanswered by each student during the test sessionl Each student’s response for each test question presented during the test session, color-coded with a green checkmark(correct) or red “x” (incorrect)
l Cumulative class scores for every question, color-coded green (at or above proficiency level) or yellow (belowproficiency level)
1 Select theMy Results tab and click Reports.2 ExpandSession from the left menu and select Response Grid.3 From theSelect a class drop-downmenu, select the class for which you want to generate the report.4 From theSelect a session drop-downmenu, select the desired class session.
TIPTo save a custom export scheme for the ResponseGrid report, make your changes andselect Default from theExport Scheme drop-downmenu. You will then be prompted to saveyour scheme and can select the saved scheme the next time you generate a ResponseGridreport.
5 In theProficiency field, enter a percentage correct score at which students have demonstrated proficiency.6 To view more options, select the box labeledShow Advanced Export Options.
turningtechnologies.com/user-guides

Insight 360 65
7 Click Generate Report to view a PDF version of the report.8 Optionally, click Export to CSV to export the report information for import into an LMS.
turningtechnologies.com/user-guides
Insight 360 66
Student ReportsStudent reports provide summary information on a student’s progress towards meeting educational objectives. Insight 360Cloud provides four types of Student reports:
l Performance Summary - The Performance Summary report provides student proficiency data as compared to theclass average over multiple class sessions.
l Options include choosing a student, setting a date range and changing the proficiency settingl Available in grid or chart viewsl Each class session is listed on a separate line (grid view) or bar (chart view)l Compares the student’s score to the class average and proficiency settingl On chart view only – designates Answer Key tests with Keyl Can be exported to CSV file format
l Session Results - The Session Results report provides an overview of a selected student's proficiency for a particularclass session.
l Options include selecting the student and displaying only incorrect answersl Provides the Class Average Score and Student Scorel Can be exported to CSV file format
l Standards Analysis - The Standards Analysis report provides an overview of student’s proficiency toward a single USstate educational standard.
l Options include choosing the student and standard, setting a date range and changing the proficiency settingl Displays only the sessions with test or question results aligned with the selected standardl Available in grid or chart viewsl Each class session is listed on a separate line (grid view) or bar (chart view)l Shows the student’s proficiency on questions linked to the selected standard in each sessionl On chart view only – designates Answer Key tests with Keyl Can be exported to CSV file format
l Multiple Standard Analysis - TheMultiple Standards Analysis report provides the proficiency percentage of eachstudent answering test questions that align with multiple US educational standards.
l Options include selecting a student, setting a date range and changing the proficiency settingl Displays only the sessions with test or question results aligned with standardsl Lists percentage of students above and below proficiency level for each standard in each sessionl Can be exported to CSV file format
This section covers the following topics:
Generating a Performance Summary ReportGenerating a Session Results ReportGenerating a Standards Analysis ReportGenerating a Multiple Standard Analysis Report
turningtechnologies.com/user-guides

Insight 360 67
Generating a Performance Summary ReportA Performance Summary report allows you to determine a specific student’s proficiency across multiple test sessions for aselected class. Additionally, the Performance Summary report compares a student’s actual score to the class performance foreach test given during a specific class.
The Performance Summary report can be shown in grid or chart format. The chart provides the following information:
l Range of class scores for each test session as depicted by a gray barl Lowest and highest class scores labeled at each end of the range barl The selected student’s individual score for each test session color-coded in green (at or above proficiency level) oryellow (below proficiency level)
In addition to the information shown on the chart format, the grid version provides the following information:
l Class section and periodl Session date and timel Class average scorel Number of questions in each test session
1 Select theMy Results tab and click Reports.2 ExpandStudent from the left menu and select Performance Summary.3 From theSelect a class drop-downmenu, select the class for which you want to generate the report.4 From theSelect a student drop-downmenu, select the appropriate student.5 Set the beginning and end dates to broaden or narrow the number of test sessions included in the report in theDate
Range fields.6 In theProficiency field, enter a percentage correct score at which students have demonstrated proficiency.7 To view more options, select the box labeledShow Advanced Export Options.8 To view the report in grid format, select theGrid radio button.9 Click Generate Report.
TIPClick Export to CSV to export the report to a CSV file.
Generating a Session Results ReportThe Session Results report provides information on the question, correct answer and student's answer.
The Session Results report is divided into individual pages based on the number of questions asked during the selected classsession. Each page displays the student's name, the class average score and the student's score. The students are listedalphabetically.
1 Select theMy Results tab and click Reports.2 ExpandStudent from the left menu and select Session Results.3 From theSelect a class drop-downmenu, select the class for which you want to generate the report.4 From theSelect a student drop-downmenu, select the appropriate student.
turningtechnologies.com/user-guides

Insight 360 68
5 From theSelect a session drop-downmenu, select the desired class session.6 By default, thePrint only incorrect box is selected. To include all questions and answers, uncheck the box.7 To view more options, select the box labeledShow Advanced Export Options.8 Click Generate Report.
TIPClick Export to CSV to export the report to a CSV file.
Generating a Standards Analysis ReportA Standards Analysis report allows you to determine the proficiency of a specific student in answering questions that align witha selected US educational standard.
The Standards Analysis report can be shown in chart or grid format. The chart provides the following information for the selec-ted class, test session and standard:
l Student score on test questions pertaining to the selected standard, color-coded green (at or above proficiency) oryellow (below proficiency)
l Number of questions answered during the test session that pertained to the selected standard
In addition to the information shown on the chart format, the grid version provides the test session date and time.
1 Select theMy Results tab and click Reports.2 ExpandStudent from the left menu and select Standards Analysis.3 From theSelect a class drop-downmenu, select the class for which you want to generate the report.4 From theSelect a student drop-downmenu, select the appropriate student.5 From theSelect a standard drop-downmenu, select the appropriate US educational standard.6 Set the beginning and end dates to broaden or narrow the number of test sessions included in the report in theDate
Range fields.7 In theProficiency field, enter a percentage correct score at which students have demonstrated proficiency.8 To view more options, select the box labeledShow Advanced Export Options.9 To view the report in grid format, select theGrid radio button.10 Click Generate Report.
TIPClick Export to CSV to export the report to a CSV file.
Generating a Multiple Standard Analysis ReportA Multiple Standard Analysis report allows you to determine the proficiency of each student answering test questions that alignwith multiple US educational standards.
TheMultiple Standard Analysis provides the following information (per standard):
l Proficiency level
turningtechnologies.com/user-guides

Insight 360 69
l Student scorel Class averagel Highest scorel Lowest scorel Number of questionsl Number correctl Number incorrectl Questions not responded to
1 Select theMy Results tab and click Reports.2 ExpandStudent from the left menu and select Multiple Standard Analysis.3 From theSelect a class drop-downmenu, select the class for which you want to generate the report.4 From theSelect a student drop-downmenu, select the appropriate student.5 Set the beginning and end dates to broaden or narrow the number of test sessions included in the report in theDate
Range fields.6 In theProficiency field, enter a percentage correct score at which students have demonstrated proficiency.7 To view more options, select the box labeledShow Advanced Export Options.8 To view the report in grid format, select theGrid radio button.9 Click Generate Report.
TIPClick Export to CSV to export the report to a CSV file.
turningtechnologies.com/user-guides
Insight 360 70
Viewing and Editing ScoresTheScores section of theMy Results tab allows you to access and edit student scores and question responses.
InScores you can:
l View scores from a specific session.l Edit a student’s responses to individual questions.l Adjust a question’s impact on scores.l Change a question’s correct answer.l View the screenshot associated with a Verbal, Tagged, ExamView, or constructed response question.
This section covers the following topics:
Viewing Scores for a Class SessionEditing Student ResultsAssigning Scores to an Anonymous StudentEditing Question ResultsExporting Constructed Response Images and Scratchpad Drawings
Viewing Scores for a Class SessionTo view class session scores after the class has ended, select theMy Results tab in Insight 360 Cloud.
You can view scores for a class session from theSession ResponseGrid report or from theScores section of theMy Resultstab.
The Session ResponseGrid report is not editable, but allows you to export the session data so it can be printed or used in third-party software.
NOTEPoll and Constructed Response questions are indicated by a blue and white icon at the top of aquestion column. These questions are not counted in student scores or class average, but arecounted as unanswered.
1 Select theMy Results tab and click Scores.2 InSelect a course to filter sessions click the class for which you want to view scores.3 In theSearch box, type the name of a class session or test name.
TheSession Name list filters as you type.
NOTEWhen you administer a self-paced test such as an Answer Key or ExamView test, Insight360 Cloud saves that test as its own session with the test name, date and time as thesession name.
4 In theSession Name list, click the session for which you want to see scores.The data appears to the right of theSession Name list.
turningtechnologies.com/user-guides

Insight 360 71
Youmay need to use the horizontal scroll bar to view all questions and the vertical scroll bar to see all students.
NOTE
If appears instead of a student’s name, the student response device was not assigned toa student in your class roster. For more information, seeAssigning Scores to anAnonymous Student on page 71.
Editing Student ResultsYou can change a student’s results for a test session by editing his or her responses to individual questions.
Editing student results might be required if:
l Students used response devices not assigned to their Student IDs (such as if they exchanged devices) and youmustchange scores attributed to the wrong students.
l A student misunderstood a question and you want to give the student credit for the question.l A student cheated on one or more questions and you want to remove credit for the questions.
1 Select theMy Results tab and click Scores.
NOTEPoll and Constructed Response questions are indicated by a blue and white icon at the top ofa question column. These questions are not counted in student scores or class average, butare counted as unanswered.
2 Access the scores for the class session you need to edit.
NOTE
If appears instead of a student’s name, the student response device was not assigned toa student in your class roster. For more information, seeAssigning Scores to anAnonymous Student on page 71.
3 Click next to the score of the applicable student.TheScoreswindow opens for that student with each question and response listed.
4 In theStudent’s Response column, edit the student’s response by:l Clicking the buttons corresponding to the new response.l Typing a new answer in the text box (for numeric questions).
5 Click Close.
Assigning Scores to an Anonymous StudentOccasionally youmay have a student in class who is not assigned to the Insight 360 Cloud class roster. If that studentanswers questions with a student response device, Insight 360 Cloud will assign responses from that device as anonymous.
turningtechnologies.com/user-guides
Insight 360 72
l Anonymous students appear with blank student names inMy Resultsl You can assign anonymous results to actual students in theScores section of My Resultsl Before you can assign a student to the anonymous scores, the student must be added to the class roster
1 Select theMy Results tab and click Scores.
2 Click next to the device for which you want to assign the scores.TheAssign Anonymous Student box opens.
NOTEIf theAssign Anonymous Student box is empty, youmust add the student to the class roster.
3 Click the student name to assign to the device.4 Click Accept.
NOTEAssigning the student to the Device ID for this session does not affect past or future DeviceID assignments. To permanently change future Device ID assignments, change the ID inMyClasses. For more information, seeEditing Student Details on page 27.
Editing Question ResultsThe results of any Verbal, Tagged, ExamView or Self-paced test question can be edited from theMy Results tab.
Youmay want to edit the results of a question if:
l The correct answer initially assigned to the question was incorrect.l The question wording or options caused themajority of the class to select the wrong answer.l Youwant to expand the list of acceptable answers.l Youwant to give all students credit for answering the question.
NOTEPoll and Constructed Response questions are indicated by a blue and white icon at the top of aquestion column. These questions are not counted in student scores or class average, but arecounted as unanswered.
1 Select theMy Results tab and click Scores.2 Click the question number for the question you want to edit.3 Click the applicable editing option.
You can edit question results in five ways:
l Omit question from results - Student responses remain intact, but the question is not used in student scores orclass averages.
l Mark all responses correct - All student responses are changed to the correct answer. Student scores andclass averages are adjusted accordingly.
turningtechnologies.com/user-guides
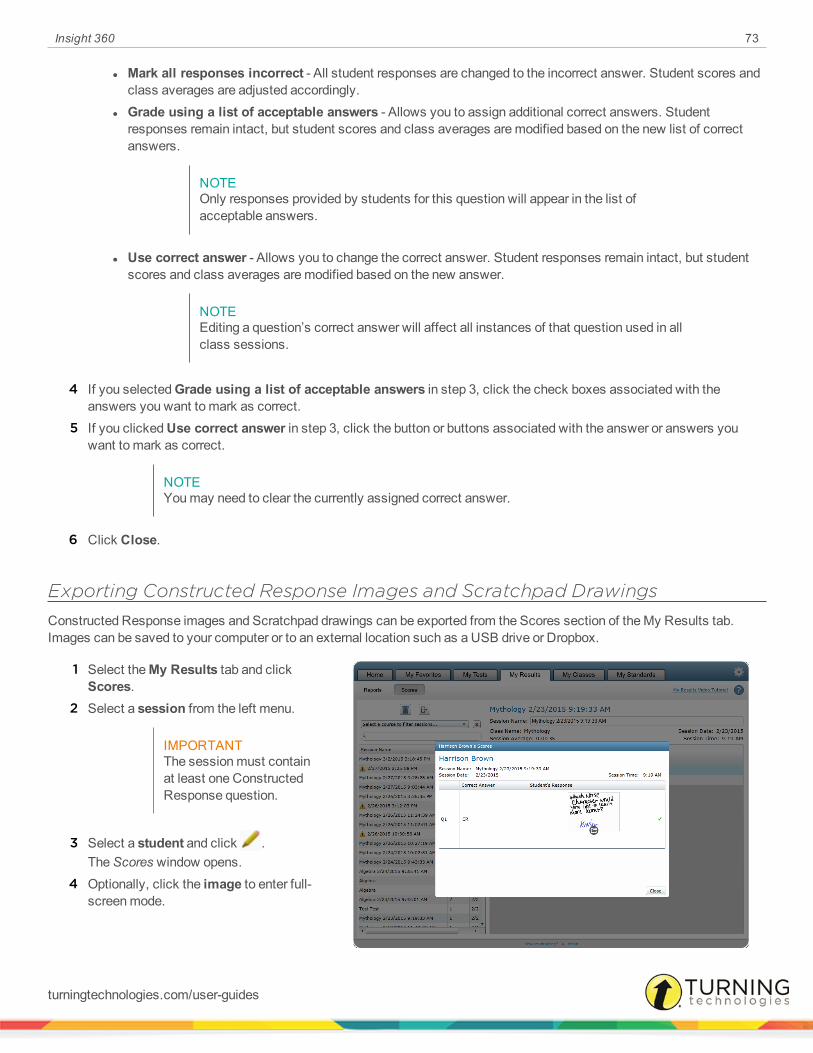
Insight 360 73
l Mark all responses incorrect - All student responses are changed to the incorrect answer. Student scores andclass averages are adjusted accordingly.
l Grade using a list of acceptable answers - Allows you to assign additional correct answers. Studentresponses remain intact, but student scores and class averages aremodified based on the new list of correctanswers.
NOTEOnly responses provided by students for this question will appear in the list ofacceptable answers.
l Use correct answer - Allows you to change the correct answer. Student responses remain intact, but studentscores and class averages aremodified based on the new answer.
NOTEEditing a question’s correct answer will affect all instances of that question used in allclass sessions.
4 If you selectedGrade using a list of acceptable answers in step 3, click the check boxes associated with theanswers you want to mark as correct.
5 If you clickedUse correct answer in step 3, click the button or buttons associated with the answer or answers youwant to mark as correct.
NOTEYoumay need to clear the currently assigned correct answer.
6 Click Close.
Exporting Constructed Response Images and Scratchpad DrawingsConstructed Response images and Scratchpad drawings can be exported from the Scores section of theMy Results tab.Images can be saved to your computer or to an external location such as a USB drive or Dropbox.
1 Select theMy Results tab and clickScores.
2 Select a session from the left menu.
IMPORTANTThe sessionmust containat least one ConstructedResponse question.
3 Select a student and click .TheScores window opens.
4 Optionally, click the image to enter full-screenmode.
turningtechnologies.com/user-guides

Insight 360 74
5 Click to export the image.TheExport Constructed Responsewindow opens.
6 Browse to the desired save location and click Save.
turningtechnologies.com/user-guides

Insight 360 75
My Settings
TheMy Settings page is accessed by clicking in the upper-right corner of the Insight 360 Cloud software.
My Settings is divided into eight categories:
Device ManagementPreferencesMobile DevicesManage PluginsBackup/RestoreUpgrade Devices to Insight 360 CloudAbout
Device ManagementThe DeviceManagement category lists information for every device that has connected to your computer through Insight 360Cloud.
1 From theSelect Device Type drop-downmenu, select the device type.2 The following information is displayed:
l Device Typel Connectionl Firmwarel Join Codel Last Used
3 Optionally, select the box labeledOnly show devices that have updates available to be notified of new devicefirmware.
PreferencesThe Preferences category allows you to determine the Student Devices Join Configuration and the Student Device Settings.
turningtechnologies.com/user-guides
Insight 360 76
Student Devices Join Configuration
Assign students to student devices using Sticker ID - Select this option if each student has been assigned a Sticker ID inthe class roster. Use the Starting Sticker ID menu to determine the starting ID number.
Student will input ID into their student devices - Select this option to require each student to input his or her unique Insight360 Cloud ID prior to joining the session.
Student Device Settings
Select the box labeledSend correct/incorrect feedback to student devices at the end of each teacher led question tosend feedback to student devices after the polling question has ended.
Select the box labeledPrompt teacher to confirm student reconnect if you want to confirm dropped connections.
Mobile DevicesWithin theMobile Devices category, you can enable the Insight 360 Teacher and Student apps. For more information on how toset up the applications, seeSetting Up the Insight 360 Teacher and Student Apps on page 11.
turningtechnologies.com/user-guides

Insight 360 77
Manage PluginsTo import a roster from a third-party system or application using an approved plugin, select theManage Plugins category.
This section covers the following topics:
Activating the PluginImporting a Class from a Third-Party Testing SystemViewing and Editing an Imported ClassUsing a Test from a Third-party Testing SystemViewing Test Results from an Imported Test
Activating the PluginBefore you can import rosters and other associated data, youmust activate the plugin.
1 Click .2 Select Manage Plugins from the left menu.3 Select the box next to the desired plugin.4 Enter your username and password. Youmay also have to enter additional information if it is requested.5 Click Apply.
Insight 360 Cloud connects with the third-party system or application and confirms that the information you entered iscorrect. A status bar appears and a confirmationmessage appears on the screen once the connection is made.
Importing a Class from a Third-Party Testing System
1 Select theMy Classes tab.2 Click Import from Plugin.3 Click Start Import next to the plugin that you want to use.
If your plugin is not listed, go back toActivating the Plugin on page 77.
NOTEYoumay need to select additional information to complete the import.
4 Click Import.A progress status bar is displayed and a confirmationmessage appears when there is a successful import.
5 Click OK.
turningtechnologies.com/user-guides

Insight 360 78
Viewing and Editing an Imported Class
1 To view your classes, select theMy Classes tab and click Classes.l All of your classes are listed, including any that have been created within Insight 360 Cloud.l An icon of the third-party testing system appears next to each imported class.l If you click a class, the students’ names appear.
2 To edit a class, select the class and click Edit Class.
NOTEFields that contain gray text cannot be edited.
Using a Test from a Third-party Testing SystemWhen you administer an imported test, the results automatically upload to the third-party testing system once the test ends. Ifyou choose to give an ExamView or Answer Key test, the results must bemanually uploaded to the third-party testing system.
1 Select theMy Tests tab.2 Select a class from the class list.3 From theSelect Test Type drop-downmenu, select the third-party testing system's test.4 Below Select Test,select the criteria needed from the drop-downmenus.5 Below Additional Options, you can:
l Enter theSession Namel Select the box labeledUse Timer to set a timerl Send individual scores to student devices at the end of the test. Select the box labeledSend scores to student
device at the end of test.
6 Click Start Test.
NOTEPreview testwill not function for imported tests.
NOTEAn imported test can be linked to a test file (containing the questions) by usingAttachContent File.
Viewing Test Results from an Imported TestInsight 360 Cloud sends the test results to the third-party testing system once the test ends. Results can also be viewed fromtheMy Results tab.
1 Select theMy Results tab.2 ClickScores.3 Select the test from the left menu.
turningtechnologies.com/user-guides
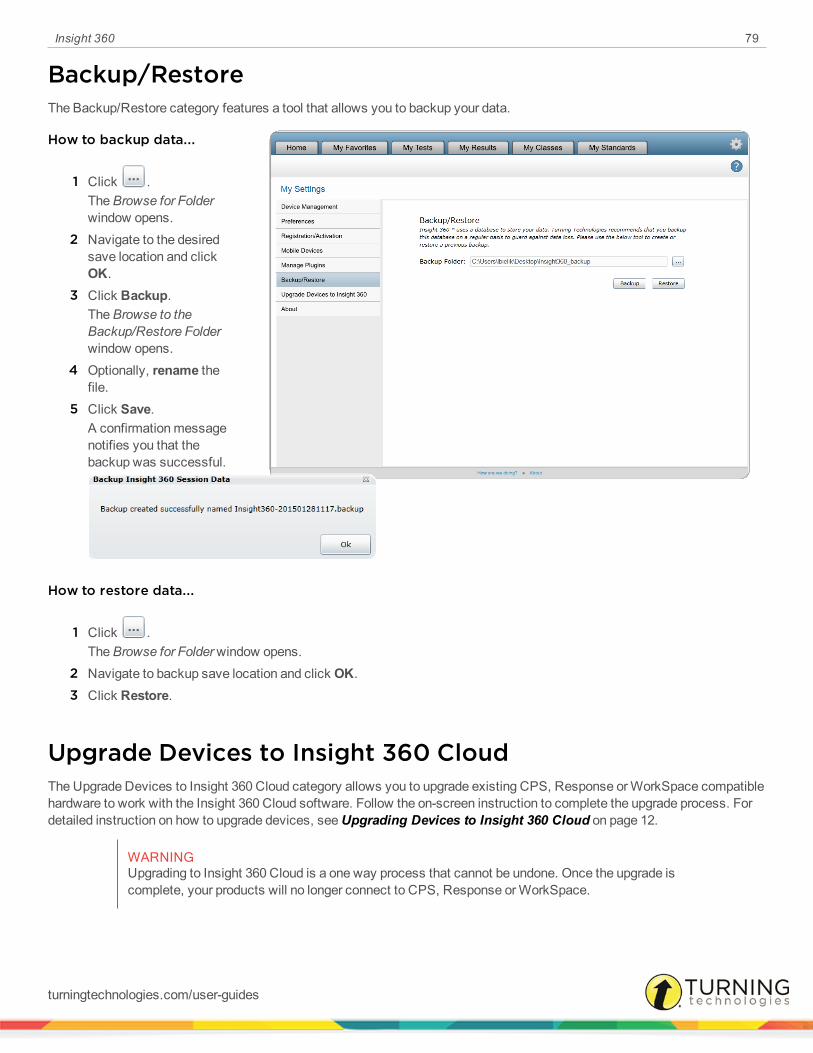
Insight 360 79
Backup/RestoreThe Backup/Restore category features a tool that allows you to backup your data.
How to backup data...
1 Click .TheBrowse for Folderwindow opens.
2 Navigate to the desiredsave location and clickOK.
3 Click Backup.TheBrowse to theBackup/Restore Folderwindow opens.
4 Optionally, rename thefile.
5 Click Save.A confirmationmessagenotifies you that thebackup was successful.
How to restore data...
1 Click .TheBrowse for Folderwindow opens.
2 Navigate to backup save location and click OK.3 Click Restore.
Upgrade Devices to Insight 360 CloudThe Upgrade Devices to Insight 360 Cloud category allows you to upgrade existing CPS, Response orWorkSpace compatiblehardware to work with the Insight 360 Cloud software. Follow the on-screen instruction to complete the upgrade process. Fordetailed instruction on how to upgrade devices, seeUpgrading Devices to Insight 360 Cloud on page 12.
WARNINGUpgrading to Insight 360 Cloud is a one way process that cannot be undone. Once the upgrade iscomplete, your products will no longer connect to CPS, Response orWorkSpace.
turningtechnologies.com/user-guides

Insight 360 80
AboutThe About category provides you with information regarding your Insight 360 Cloud software that may be necessary whencontacting Technical Support.
turningtechnologies.com/user-guides

Insight 360 81
Troubleshooting Insight 360 Cloud
Insight 360 Cloud Does not Open
If the Insight 360 Cloud software does not open, check the following:
l Double-click the Insight 360 Cloud icon on the classroom computer desktop.l Is another instance of Insight 360 Cloud already open, but hidden behind other windows on your computer?l If there is no icon on the desktop, was the software installed correctly or were there any errors? Contact your ITAdministrator if you experienced errors during installation.
l Did you have Admin (administrative) rights on your computer when you installed Insight 360 Cloud? Contact your ITAdministrator if you are unsure.
l Is Insight 360 Cloud listed as an installed program on your Start menu (Windows) or in your Applications folder (Mac)?l Does your computer have an anti-virus or firewall software that would prevent you from installing new software? Be sureyou disabled any anti-virus software on your system before installing Insight 360 Cloud. Contact your IT Administrator ifyou are not sure whether your system has anti-virus or firewall software.
Possible Solutions
l Uninstall and reinstall the Insight 360 Cloud software.Temporarily shut down your anti-virus software before installingInsight 360 Cloud. Contact your IT Administrator about firewalls and security permission required to install newsoftware.
Instructor Device Does not Connect
If your instructor device (such as a tablet) does not connect to the Insight 360 Cloud system, check the following:
l You are using the Insight 360 Teacher app downloaded from the appropriate app store.l TheEnable Insight 360 Teacher app check box is selected in My Settings > Mobile Devices.l The computer running Insight 360 Cloud is shown in the Pair Computer (iOS) Pair Computer and Tablet (Android) list.l An Insight 360 Teacher app is not already connected. Only one Insight 360 Teacher app can be connected to Insight 360Cloud at a time.
l The password used to pair the computer and device is the same as the password typed intoMy Settings > MobileDevices.
Possible Solutions
l Download and install the Insight 360 Teacher app from the appropriate app store.l Enable the device in Insight 360 Cloud.l Pair the device with the computer running Insight 360 Cloud. Create a new password if necessary.l Manually connect the device with the IP address. Contact your IT Administrator if you are not sure how to do this.
Student Application Does not Connect
If an Insight 360 Student app does not connect to the Insight 360 Cloud system, check the following:
turningtechnologies.com/user-guides
Insight 360 82
l The classroom computer is running Insight 360 CloudMobile Edition.l The instructor’s Insight 360 Teacher app has been correctly set up.l The student device has downloaded and installed the Insight 360 Student app from the appropriate app store.l The session code, Student ID or Sticker ID used to connect to the session is correct.l If instructor started an anonymous class, the student selected Join as Guest User (may have to tap Back and then Joinas Guest User).
l The number of allowable connected student devices (100 as of Release 2.0) has not been exceeded.l The student was not denied upon attempting to rejoin the class.
Possible Solutions
l Click About in the Insight 360 Cloud software on the classroom computer to determine which edition of the software isinstalled. If Edition shows anything other thanMobile, contact your sales representative to purchaseMobile Edition oran Insight 360 CloudMobile USB Stick, which provides Mobile functionality while the USB stick is inserted into acomputer with Insight 360 Cloud.
l Download the Insight 360 Student app from the appropriate app store.l Disconnect any non-essential student devices from the session (power off or use the Insight 360 Teacher app todisconnect Student applications).
l In the Session Running dialog box displayed on the classroom computer, deselect and reselect theRequire SessionCode to Join box. Ensure the correct Session Code is entered in the Session Code box when the student is attemptingto join.
l Restart the class.
Mobi 360 Does not Connect
If theMobi 360 does not connect, check the following:
l TheMobi 360 is turnedON using the blue power button on the top edge of the device.l TheMobi 360 receiver is inserted into a working USB port on the computer running the Insight 360 Cloud software.l TheMobi 360 battery icon shows at least one bar or charging. If the battery icon shows red, charge theMobi 360.l Does your computer have an anti-virus or firewall software that would prevent communication between theMobi 360and the Insight 360 Cloud software? Check with your IT Administrator if you are unsure.
l If you are running other Turning Technologies devices, make sure theMobi 360 andMobi 360 receiver do NOT show upin DeviceManager.
NOTEThe DeviceManager is a separate program that is NOT used in Insight 360 Cloud but is similar toInsight 360 Cloud’s DeviceManagement section in My Settings.
Possible Solutions
turningtechnologies.com/user-guides

Insight 360 83
l Charge theMobi 360 using the charging stand. You can use theMobi 360 while it is charging.
NOTEDoNOT plug the charging stand into a computer to charge theMobi 360. Either plug theMobi360 into the computer using the USB cable or plug the charging stand into a standard walloutlet.
l Update firmware on theMobi 360 and/or theMobi 360 receiver.l Close DeviceManager (right-click on the DeviceManager icon and select Exit).
Mobi 360 Unable to Connect Error Message
If you see themessage “Mobi 360 is unable to connect…” check the following:
l TheMobi 360 receiver is inserted into a working USB port on the computer.
NOTEMany USB receivers look the same. Ensure that you have theMobi 360 receiver and not areceiver from another Turning Technologies product.
l The computer is the same computer on which the Insight 360 Cloud software is installed.l The computer is turnedON.l Both theMobi 360 Receiver and theMobi 360 are listed as Connected in DeviceManagement.
Student Clicker Does not Connect
Student clickers cannot connect to Insight 360 Cloud unless a class has been started with theMobi 360 or Insight 360 Teacherapp. If a class has been started, clickers with the same Join Code as entered in DeviceManagement should automaticallyconnect to the class session.
Multiple Clickers Unable to Connect
If none of the clickers in your classroom can connect to Insight 360 Cloud, check the following:
l The appropriate receiver is inserted into a working USB port on the classroom computer that is running the Insight 360Cloud software.
NOTEWhen you are running Insight 360 Cloud with aMobi 360 and the clickers, TWO receiversmust be inserted into USB ports on the same computer: theMobi 360 receiver and the clickerreceiver.
l The Join Code as entered in DeviceManagement is the same as the Join Code entered on the individual clickers.l The clickers are Pulse 360, ResponseCard NXT or QT Device clickers, or have been upgraded to work with the Insight360 Cloud system.
turningtechnologies.com/user-guides

Insight 360 84
NOTEIf a clicker receiver was recently upgraded, the firmware on the individual clickers must beupdated. The update process starts in DeviceManagement andmust be completed for eachclicker. Clickers will not connect until the firmware update is finished.
Single Clicker Unable to Connect
If only one or two clickers are unable to connect, but others are able to connect, check the following:
l The clicker is turnedON.l The battery level indicator shows at least one bar. If the battery indicator is empty or the device cannot turn ON, replacethe batteries.
l The Join Code entered on the clicker is the same as configured in DeviceManagement.l The Sticker ID shown in the clicker’s menu is the same as the number on the sticker, and is also the same as theSticker ID configured for the student on theMy Classes tab.
l If joining by Student ID, ensure the Student ID entered is the same as the Student ID configured for the student on theMy Classes tab.
l The clicker has the latest firmware and does not need updating. If there is a triangular icon in the device’s row in DeviceManagement, the clicker requires a firmware update.
NOTEThe update process must be completed for each clicker. Clickers will not connect until thefirmware update is finished.
Pulse/Spark 360 Receiver Not Found Error
The "Pulse/Spark 360 Receiver not found" error message displays on theMobi 360 if Insight 360 Cloud cannot communicatewith the Pulse/Spark 360 receiver when you start a self-paced test or Verbal or Tagged question. Check the following:
l The Pulse/Spark 360 receiver is inserted into a working USB port on the classroom computer.
NOTEMany USB receivers look the same. Verify that you have the Pulse/Spark 360 receiver andnot a receiver from another Turning Technologies product. When running Insight 360 Cloudwith the optional student response system, you should have TWO receivers inserted intoUSB ports on your computer: theMobi 360 receiver and the Pulse/Spark 360 receiver.
l The computer is the same computer on which the Insight 360 Cloud software is installed.l The computer, clickers andMobi 360 are all turnedON.l Both the Pulse/Spark 360 receiver and one or more clickers are listed as "Connected" in DeviceManagement.l Pulse/Spark 360 receiver has themost current firmware update.
Firmware Update is Available Message
Periodically you will see themessage "One or more of your devices has a firmware update available."
turningtechnologies.com/user-guides

Insight 360 85
This message indicates that updates are available for download to your Insight 360 Cloud system. The update could be for yourMobi 360, Mobi 360 receiver, clickers or clicker receiver. Youmay continue using the Insight 360 Cloud system now andupdate the firmware at a later time.
How Do I Know if the Receiver is Working?
A blue light on the receiver glows when it is fully inserted and turnedON. On theMobi 360 receiver, the blue light is in themiddle of the receiver. On the Pulse/Spark 360 receiver, the blue light is at the end closest to the USB port.
Insight 360 Cloud Does Not Show My Classes or Students
If you cannot see any classes or students that you had previously configured in the Insight 360 Cloud software, check thefollowing:
l The Insight 360 Cloud database is installed on the local machine rather than on a network.l You did not move theMobi 360 to another classroom.
NOTEAll favorites, classes, student data and other Insight 360 information resides on the computerused to set up this data. This data is not accessible if you take theMobi 360 or the Insight360 Teacher app to another classroom, even if that classroom computer is running Insight360. Youmust also set up that computer with the same classes, students, favorites andother data.
l Ensure the database was not moved and that permissions were not changed.l Your Insight 360 Cloud software is activated and has been recently updated.
Contact your IT Administrator for more guidance on these topics.
My Pen Does Not Work
If your Mobi 360 digital pen does not work, check the following:
l The red protective tape has been completely removed from the battery section of the digital pen. The thin plastic tapekeeps the battery from discharging during storage and shipment. It must be completely removed upon hardware set up.Occasionally a small piece of tape remains behind. To determine whether any tape is stuck between the pen sections,gently press the tab on the back of the pen, slide the two sections apart, and check around the battery for remnants ofred tape.
l The digital pen proximity indicator shows on theMobi 360 when the pen tip nears theMobi 360 writing surface. If thisindicator is red, the digital pen needs recharging. Place the digital pen in theMobi 360 holder, ensuring it clicks intoplace. The pen icon on theMobi 360 shows charging when the pen is correctly situated. You can use theMobi 360 whilecharging the pen, but should place theMobi 360 on its charging stand when it is not in use to charge both theMobi 360and its digital pen. The digital pen requires eight hours to fully charge a drained battery.
l If the digital pen proximity indicator does not show at all, the pen battery may need to be replaced.
Student Clickers Do Not Receive Feedback
There are two ways to send feedback to clickers:
l To always send feedback at the end of Verbal, Tagged, or ExamView questions, select theSend correct/incorrectfeedback to student devices at the end of each question checkbox in Preferences.
turningtechnologies.com/user-guides

Insight 360 86
l To send scores at the end of self-paced tests, select theSend scores to response pads at the end of the testoption when starting the self paced test in My Tests.
If these options are selected and clickers do not show feedback during these occasions, check the following:
l Ensure the Pulse/Spark 360 receiver is plugged into a USB port on the computer running the Insight 360 Cloudsoftware.
l Clickers and Pulse/Spark 360 receiver firmware is current and does not need to be updated. If the firmware needsupdated, there will be amessage on theMobi 360 and in theMessage Center on the Insight 360 Cloud Home page.
l If only one clicker does not receive feedback, ensure the student entered the proper Join Code and Sticker ID or StudentID (if required). If these are correct, you will be able to see the student’s response on the Student Performance Table inthe Results Zone on theMobi 360 for Verbal or Tagged questions. For self-paced tests, you can look up the student’sscore on the Session ResponseGrid report in My Results in the Insight 360 Cloud software.
Computer Does Not Meet Minimum Requirements Error
When you turn ON theMobi 360mobile interactive whiteboard for the first time, it connects to the Insight 360 Cloud software toconfirm system specifications. If Insight 360 Cloud detects that your computer does not meet minimum requirements, amessage will appear on theMobi 360 screen.
Tap the error message on theMobi 360 screen to view system deficiencies. Contact your IT Administrator for assistance incorrecting system deficiencies.
Tutorials
Several training tutorials have been created to assist you in performing certain tasks. You can find these and additional videoson the Insight 360 Cloud Training Tutorials page.
turningtechnologies.com/user-guides

Insight 360 87
Using Insight 360 Cloud with a ProgrammedQT Device
Setting Preferences
1 Click and select thePreferences tab.2 Select Student will input ID into their student devices.
Adding a Student Manually
1 Select theMy Classes tab and click Students.
2 Click .3 In the First,Middle and Last fields, enter the student's first, middle and last name.
NOTEThemiddle name is not required, but the first and last names must be entered in theirrespective fields.
4 In theStudent ID field, enter the sticker number on the back of the QT Device.5 In theGrade field, enter the grade level of the student (e.g., 8 for eighth grade).6 If the student has two last names, type the student's second last name in theSecond Last field.
NOTEThe student will be alphabetized by the last name, not the second last name.
7 Click to add another student.
Using the QT Device in Class
1 Start the class.2 Instruct the students to press any button on theQT Device to "wake up" the clicker.3 The students are prompted for their ID when the first question is asked.4 Instruct the students to enter the sticker number on the back of the QT Device.
turningtechnologies.com/user-guides
Insight 360 88
Contact Us
For additional help, contact Turning Technologies Technical Support.
Technical Support is available from 7 a.m. - 9 p.m. EST.
From within the contiguous United States, you can reach Technical Support toll-free by calling 866.746.3015. If you are callingfrom outside of the United States, please call +1 330.746.3015.
Technical Support may also be reached via e-mail at [email protected] or [email protected], a brandof Turning Technologies.
Wewant to hear from you! To submit a product enhancement request, visit us athttp://www.turningtechnologies.com/product-enhancement-request-form.
Office Locations
Ohio
255West Federal StreetYoungstown, Ohio 44503Toll-Free: 866.746.3015Direct: 330.746.3015International: +1 330.746.3015
Belfast
19 Colvin HouseInspire Business ParkCarrowreagh RoadBelfast BT16 1QTUnited KingdomDirect: +44 (0)28 9048 7898
Paris
26/36 rue Alfred Nobel93600 Aulnay-sous-BoisFranceDirect/Support: +33 (0)1 58 31 10 60
Amsterdam
Keizersgracht 75, Garden1015 CE, AmsterdamTheNetherlandsDirect: +31 (0)85 4011 040
turningtechnologies.com/user-guides