install ise on a vmware virtual machine · ovatemplate memory cpu 4gbram(noreservation)...
TRANSCRIPT

Install ISE on a VMware Virtual Machine
• Supported VMware Versions, on page 1• Support for VMware vMotion, on page 1• Support for Open Virtualization Format, on page 2• Virtual Machine Requirements, on page 3• Virtual Machine Resource and Performance Checks, on page 9• Obtain the Cisco ISE Evaluation Software, on page 11• Install Cisco ISE on Virtual Machines, on page 12• Migrate Cisco ISE VM from Evaluation to Production, on page 24
Supported VMware VersionsCisco ISE supports the following VMware servers and clients:
• VMware version 8 (default) for ESXi 5.x
• VMware version 11 (default) for ESXi 6.x
Support for VMware vMotionCisco ISE supports the cold VMware vMotion feature that allows you to migrate virtual machine (VM)instances (running any persona) between hosts. For the VMware vMotion feature to be functional, the followingcondition must be met:
• Cisco ISE must be shutdown and powered off—Cisco ISE does not allow to stop or pause the databaseoperations during vMotion. This might lead to data corruption issues. Hence, ensure that Cisco ISE isnot running and active during the migration.
Cisco ISE VM does not support Hot vMotion.Note
Refer to your VMware documentation for more information on VMotion requirements.
Install ISE on a VMware Virtual Machine1
If the Snapshot feature is enabled on the VM, it might corrupt the VM configuration. If this issue occurs, youmight have to reimage the VM and disable VM snapshot.
Caution
Cisco ISE does not support VMware snapshots for backing up ISE data because a VMware snapshot savesthe status of a VM at a given point in time. In a multi-node Cisco ISE deployment, data in all the nodes arecontinuously synchronized with current database information. Restoring a snapshot might cause databasereplication and synchronization issues. We recommend that you use the backup functionality included inCisco ISE for archival and restoration of data. Using VMware snapshots to back up ISE data results in stoppingCisco ISE services. A reboot is required to bring up the ISE node.
Note
Support for Open Virtualization FormatCisco ISE supports the Open Virtualization Format (OVF) and offers OVA templates that you can use toinstall and deploy Cisco ISE on virtual machines (VMs). The following OVA templates are available:
If you need to customize the disk size, CPU, or memory allocation, you can manually deploy Cisco ISE usingthe standard .iso image. However, it is important that you ensure the minimum requirements and resourcereservations specified in this document are met. The OVA templates simplify ISE virtual appliance deploymentby automatically applying the minimum resources required for each platform.
• ISE-2.0.1.xxx.xxx-eval.ova—Use this template if you are evaluating Cisco ISE and the evaluation licensewould support up to 100 endpoints.
• ISE-2.0.1.xxx.xxx-virtual-SNS3415.ova—Use this template if your VMware appliance specification iscomparable with an SNS-3415 appliance.
• ISE-2.0.1.xxx.xxx-virtual-SNS3495.ova—Use this template if your VMware appliance specification iscomparable with an SNS-3495 appliance.
• ISE-2.0.1.xxx.xxx-virtual-SNS3515.ova—Use this template if your VMware appliance specification iscomparable with an SNS-3515 appliance.
• ISE-2.0.1.xxx.xxx-virtual-SNS3595.ova—Use this template if your VMware appliance specification iscomparable with an SNS-3595 appliance.
The following table provides OVA template reservations.
Install ISE on a VMware Virtual Machine2
Install ISE on a VMware Virtual MachineSupport for Open Virtualization Format

CPUMemoryOVA Template
2300 MHz (no reservation)4 GB RAM (no reservation)
For evaluating guestaccess and basic accesspolicy flows, aminimumof 4GBRAMis required. Forevaluating advancedfeatures such as pxGrid,internal CA, SXP,Device Administration,and Passive IdentityServices, we suggestthat you configure yourVM to have 16 GBRAM after deployingthe Eval OVA.
Note
Virtual Eval OVA
8000 MHz16 GB RAMVirtual SNS-3415 OVA
16000 MHz32 GB RAMVirtual SNS-3495 OVA
12000 MHz16 GB RAMVirtual SNS-3515 OVA
16000 MHz64 GB RAMVirtual SNS-3595 OVA
Virtual Machine RequirementsTo achieve performance and scalability comparable to the Cisco ISE hardware appliance, the VMware virtualmachine should be allocated system resources equivalent to the Cisco SNS 3515 and 3595 appliances.
Install ISE on a VMware Virtual Machine3
Install ISE on a VMware Virtual MachineVirtual Machine Requirements
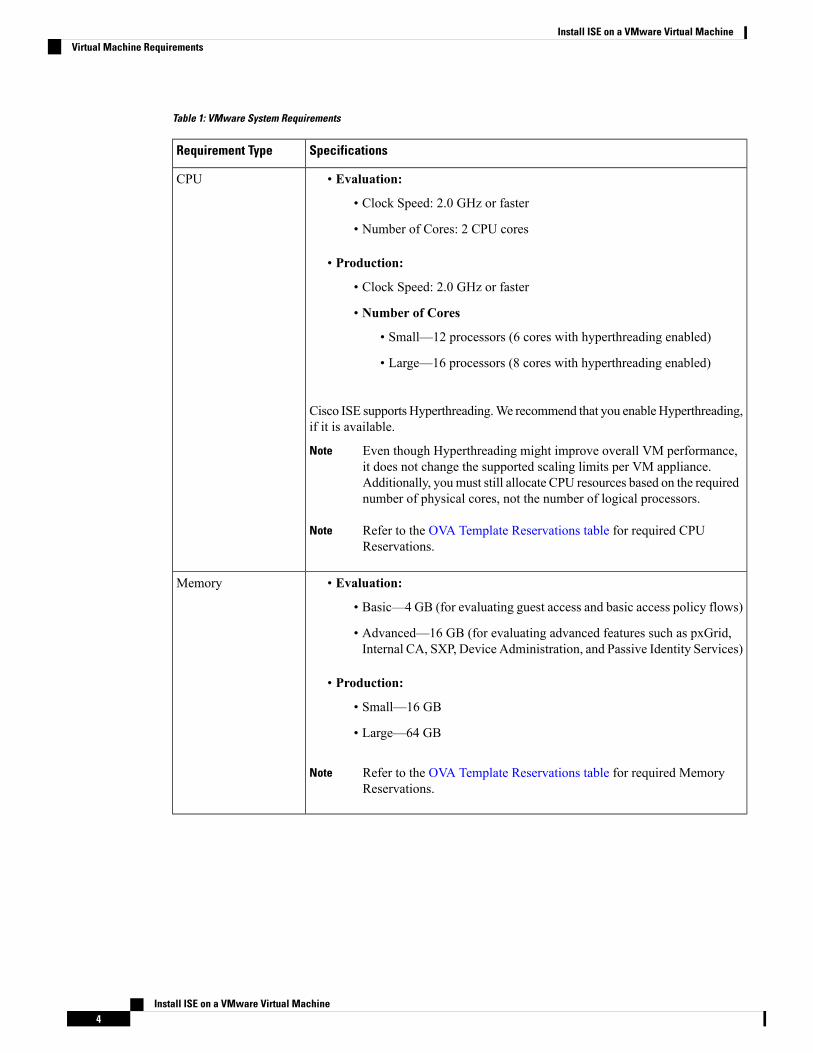
Table 1: VMware System Requirements
SpecificationsRequirement Type
• Evaluation:
• Clock Speed: 2.0 GHz or faster
• Number of Cores: 2 CPU cores
• Production:
• Clock Speed: 2.0 GHz or faster
• Number of Cores
• Small—12 processors (6 cores with hyperthreading enabled)
• Large—16 processors (8 cores with hyperthreading enabled)
Cisco ISE supports Hyperthreading.We recommend that you enableHyperthreading,if it is available.
Even though Hyperthreading might improve overall VM performance,it does not change the supported scaling limits per VM appliance.Additionally, youmust still allocate CPU resources based on the requirednumber of physical cores, not the number of logical processors.
Note
Refer to the OVA Template Reservations table for required CPUReservations.
Note
CPU
• Evaluation:
• Basic—4 GB (for evaluating guest access and basic access policy flows)
• Advanced—16 GB (for evaluating advanced features such as pxGrid,Internal CA, SXP, Device Administration, and Passive Identity Services)
• Production:
• Small—16 GB
• Large—64 GB
Refer to the OVA Template Reservations table for required MemoryReservations.
Note
Memory
Install ISE on a VMware Virtual Machine4
Install ISE on a VMware Virtual MachineVirtual Machine Requirements

SpecificationsRequirement Type
• Evaluation:
• Minimum (only for lab testing; supports about 20 endpoints)—100 GB
• Recommended—200 GB
• Production:
200 GB to 1.999 TB of disk storage (size depends on deployment and tasks).
We recommend that your VM host server use hard disks with a minimumspeed of 10,000 RPM.
When you create the Virtual Machine for Cisco ISE, use a singlevirtual disk that meets the storage requirement. If you use morethan one virtual disk to meet the disk space requirement, theinstaller may not recognize all the disk space.
Note
Refer to the recommended disk space for VMs in the followinglink: Disk Space Requirements, on page 7.
Note
Hard Disks
The storage system for the Cisco ISE virtual appliance requires a minimum writeperformance of 50 MB per second and a read performance of 300 MB per second.Deploy a storage system that meets these performance criteria and is supported byVMware server.
Cisco ISE provides a number of methods to verify if your storage system meetsthese minimum requirements before, during, and after Cisco ISE installation. SeeVirtual Machine Resource and Performance Checks, on page 9 for moreinformation.
We recommend the VMFS file system because it is most extensively tested, butother file systems, transports, and media can also be deployed provided they meetthe above requirements.
Storage and File System
Paravirtual (default for RHEL 7 64-bit) or LSI Logic Parallel
For best performance and redundancy, a caching RAID controller is recommended.Controller options such as RAID 10 (also known as 1+0) can offer higher overallwrite performance and redundancy than RAID 5, for example. Additionally,battery-backed controller cache can significantly improve write operations.
Disk Controller
1 GB NIC interface required (two or more NICs are recommended; six NICs aresupported). Cisco ISE supports E1000 and VMXNET3 adapters.
We recommend that you select E1000 to ensure correct adapter orderby default. If you choose VMXNET3, youmight have to remap the ESXiadapter to synchronize it with the ISE adapter order.
Note
NIC
VMware Virtual Machine Hardware Version 8 or higher on ESXi 5.x and 6.x.VMware VirtualHardwareVersion/Hypervisor
Install ISE on a VMware Virtual Machine5
Install ISE on a VMware Virtual MachineVirtual Machine Requirements
Virtual Machine Appliance Size RecommendationsCisco ISE 2.4 introduces a large VM for Monitoring nodes. Deploying a Monitoring persona on a large VMoffers the following advantages:
• Improves performance in terms of faster response to live log queries and report completion.
• Will be able to support the deployments that can handle more than 500, 000 sessions when the supportis provided in future ISE releases.
This form factor is available only as a VM in Release 2.4 and later, and requires a large VM license.Note
When sizing the Cisco ISE deployment, see the Deployment Size and Scaling Recommendations section fordetails on the number and size of appliances that are required for your deployment. The virtual machine (VM)appliance specifications should be comparable with physical appliances run in a production environment. Thefollowing table provides the minimum resources required to size your virtual appliance comparable to that ofan SNS 3515 or SNS 3595 physical appliance.
Keep the following guidelines in mind when allocating resources for the appliance:
• Failure to allocate the specified resources might result in performance degradation or service failure. Wehighly recommend that you deploy dedicated VM resources and not share or oversubscribe resourcesacross multiple guest VMs. Deploying Cisco ISE virtual appliances using the OVF templates ensuresthat adequate resources are assigned to each VM. If you do not use OVF templates, then ensure that youassign the equivalent resource reservations when you manually install Cisco ISE using the ISO image.
If you choose to deploy Cisco ISE manually without the recommendedreservations, you must assume the responsibility to closely monitor yourappliance’s resource utilization and increase resources, as needed, to ensure properhealth and functioning of the Cisco ISE deployment.
Note
OVF templates are not applicable for Linux KVM. OVF templates are availableonly for VMware virtual machines.
Note
• If you are using the OVA templates for installation, check the following settings after the installation iscomplete:
• Ensure that the CPU usage in the CPU Limit field (under the Virtual Hardware tab in the EditSettings window) is set to Unlimited. Setting a limit for CPU usage (for example, setting the CPUusage limit as 12000 MHz) will impact the system performance. If limit has been set, you mustshutdown the VM client, remove the limit, and the restart the VM client.
• Ensure that the memory usage in theMemory Limit field (under the Virtual Hardware tab in theEdit Settings window) is set to Unlimited. Setting a limit for memory usage (for example, settingthe limit as 12000 MB) will impact the system performance.
Install ISE on a VMware Virtual Machine6
Install ISE on a VMware Virtual MachineVirtual Machine Appliance Size Recommendations

• Policy Service nodes on VMs can be deployed with less disk space than Administration or Monitoringnodes. The minimum disk space for any production Cisco ISE node is 200 GB. See Disk SpaceRequirements, on page 7 for details on the disk space required for various Cisco ISE nodes and personas.
• VMs can be configured with 1 to 6 NICs. The recommendation is to allow for 2 or more NICs. Additionalinterfaces can be used to support various services such as profiling, guest services, or RADIUS.
Table 2: Minimum VM Appliance Specifications for a Production Environment
Large VM Appliance (based onSNS-3595)
Small VM Appliance (based onSNS-3515)
Platform
8 total cores (at 1.8 GHz or above).
You must enablehyperthreading andassign the resultingnumber of logicalprocessors (16) to eachserver.
Note
6 total cores (at 1.8 GHz or above).
You must enablehyperthreading andassign the resultingnumber of logicalprocessors (12) to eachserver.
Note
Processor
64 GB16 GBMemory
200 GB—1.999 TB. See DiskSpace Requirements, on page 7for more information.
200 GB—1.999 TB. See DiskSpace Requirements, on page 7for more information.
Total Disk Space
Up to 6 Gigabit Ethernet NICsUp to 6 Gigabit Ethernet NICsEthernet NICs
Related TopicsCisco ISE Ports Reference
Disk Space RequirementsThe following table lists the Cisco ISE disk-space allocation recommended for running a virtual machine ina production deployment.
Disk size of 2 TB or greater is currently not supported. Ensure that the maximum disk size is less than 2 TB.Note
Table 3: Recommended Disk Space for Virtual Machines
Maximum DiskSpace
Recommended DiskSpace for Production
Minimum DiskSpace forProduction
Minimum DiskSpace forEvaluation
ISE Persona
1.999 TB600 GB to 1.999 TB600 GB200 GBStandalone ISE
1.999 TB250 to 300 GB250 GB200 GBDistributedISE—Administration only
Install ISE on a VMware Virtual Machine7
Install ISE on a VMware Virtual MachineDisk Space Requirements

Maximum DiskSpace
Recommended DiskSpace for Production
Minimum DiskSpace forProduction
Minimum DiskSpace forEvaluation
ISE Persona
1.999 TB600 GB to 1.999 TB600 GB200 GBDistributed ISE—Monitoringonly
1.999 TB200 GB200 GB200 GBDistributed ISE—PolicyService only
1.999 TB200 GB200 GB200 GBDistributed ISE—pxGrid only
1.999 TB600 GB to 1.999 TB600 GB200 GBDistributedISE—Administration andMonitoring (and optionallypxGrid)
1.999 TB600 GB to 1.999 TB600 GB200 GBDistributedISE—Administration,Monitoring, and Policy Service(and optionally pxGrid)
Additional disk space is required to store local debug logs, staging files, and to handle log data during upgrade,when the Primary Administration Node temporarily becomes a Monitoring node.
Note
Disk Space GuidelinesKeep the following guidelines in mind when deciding the disk space for Cisco ISE:
• You can allocate only up to 1.999 TB of disk space for a Cisco ISE VM.
• Cisco ISE must be installed on a single disk in virtual machine.
• Disk allocation varies based on logging retention requirements. On any node that has the Monitoringpersona enabled, 30 percent of the VM disk space is allocated for log storage. A deployment with 25,000endpoints generates approximately 1 GB of logs per day.
For example, if you have a Monitoring node with 600-GB VM disk space, 180 GB is allocated for logstorage. If 100,000 endpoints connect to this network every day, it generates approximately 4 GB of logsper day. In this case, you can store 38 days of logs in the Monitoring node, after which you must transferthe old data to a repository and purge it from the Monitoring database.
For extra log storage, you can increase the VM disk space. For every 100 GB of disk space that you add, youget 30 GB more for log storage. Depending on your requirements, you can increase the VM disk size up to amaximum of 1.999 TB of log storage.
If you increase the disk size of your virtual machine after initial installation, then you must perform a freshinstallation of Cisco ISE on your virtual machine to properly detect and utilize the full disk allocation.
Install ISE on a VMware Virtual Machine8
Install ISE on a VMware Virtual MachineDisk Space Guidelines

The following table lists the number of days that logs can be retained on your Monitoring node based on theallocated disk space and the number of endpoints that connect to your network. The numbers are based onhaving log suppression and anomalous client detection enabled.
Table 4: Days that Logs can be Stored in a Monitoring Node
2048 GB1024 GB600 GB200 GBNo. of Endpoints
1,28964537812610,000
6453231896320,000
4302151264230,000
323162953240,000
258129762650,000
129653813100,000
8643269150,000
6533197200,000
5226166250,000
Increasing Disk Size
If you find that context and visibility is slow, or you are running out of room for logs, you need to allocatemore disk space.
To plan for additional log storage, for every 100 GB of disk space that you add, 60 GB is available for logstorage. The maximum VM disk size is 1.999 TB .
In order for ISE to detect and utilize the new disk allocation, you must deregister the node, update the VMsettings, and reinstall ISE. One way to do this is to install ISE on a new larger node, and add that node to thedeployment as high availability. After the nodes have synchronized, make the new VM the primary andderegister the original VM.
Virtual Machine Resource and Performance ChecksBefore installing Cisco ISE on a virtual machine, the installer performs hardware integrity checks by comparingthe available hardware resources on the virtual machine with the recommended specifications.
During a VM resource check, the installer checks for the hard disk space, number of CPU cores allocated tothe VM, CPU clock speed, and RAM allocated to the VM. If the VM resources do not meet the basic evaluationspecifications, the installation aborts. This resource check is applicable only for ISO-based installations.
When you run the Setup program, a VM performance check is done, where the installer checks for disk I/Operformance. If the disk I/O performance does not meet the recommended specifications, a warning appearson screen, but it allows you to continue with the installation. This performance verification check is applicablefor both ISO-based and OVA (VMware) installations.
Install ISE on a VMware Virtual Machine9
Install ISE on a VMware Virtual MachineVirtual Machine Resource and Performance Checks

The VM performance check is done periodically (every hour) and the results are averaged for a day. If thedisk I/O performance does not meet the recommended specification, an alarm is generated.
The VM performance check can also be done on demand from the Cisco ISE CLI using the show tech-supportcommand.
The VM resource and performance checks can be run independent of Cisco ISE installation. You can performthis test from the Cisco ISE boot menu.
On-Demand Virtual Machine Performance Check Using the show tech-supportCommand
You can run the show tech-support command from the CLI to check the VM performance at any point oftime. The output of this command will be similar to the following:ise-vm123/admin# show tech | begin "disk IO perf"Measuring disk IO performance*****************************************Average I/O bandwidth writing to disk device: 48 MB/secondAverage I/O bandwidth reading from disk device: 193 MB/secondWARNING: VM I/O PERFORMANCE TESTS FAILED!WARNING: The bandwidth writing to disk must be at least 50 MB/second,WARNING: and bandwidth reading from disk must be at least 300 MB/second.WARNING: This VM should not be used for production use until diskWARNING: performance issue is addressed.Disk I/O bandwidth filesystem test, writing 300 MB to /opt:314572800 bytes (315 MB) copied, 7.81502 s, 40.3 MB/sDisk I/O bandwidth filesystem read test, reading 300 MB from /opt:314572800 bytes (315 MB) copied, 0.416897 s, 755 MB/s
Virtual Machine Resource Check from the Cisco ISE Boot MenuYou can check for virtual machine resources independent of Cisco ISE installation from the boot menu.
The CLI transcript appears as follows:
Cisco ISE Installation (Serial Console)Cisco ISE Installation (Keyboard/Monitor)System Utilities (Serial Console)System Utilities (Keyboard/Monitor)
Use the arrow keys to select System Utilities (Serial Console) or System Utilities (Keyboard/Monitor) andpress Enter. The following screen appears:
Available System Utilities:
[1] Recover administrator password[2] Virtual Machine Resource Check[3] Perform System Erase[q] Quit and reload
Enter option [1 - 3] q to Quit
Enter 2 to check for VM resources. The output will be similar to the following:
Install ISE on a VMware Virtual Machine10
Install ISE on a VMware Virtual MachineOn-Demand Virtual Machine Performance Check Using the show tech-support Command

********** Virtual Machine host detected…***** Hard disk(s) total size detected: 322 Gigabyte***** Physical RAM size detected: 40443664 Kbytes***** Number of network interfaces detected: 1***** Number of CPU cores: 2***** CPU Mhz: 2300.00***** Verifying CPU requirement…***** Verifying RAM requirement…***** Writing disk partition table…
You can check for virtual machine resources independent of Cisco ISE installation from the boot menu.
The CLI transcript appears as follows:Welcome to the Cisco Identity Services Engine Installer
Cisco ISE Version: 2.0.0.205
Available boot options:
[1] Cisco ISE Installation (Keyboard/Monitor)[2] Cisco ISE Installation (Serial Console)[3] System Utilities (Keyboard/Monitor)[4] System Utilities (Serial Console)<Enter> Boot existing OS from hard disk.
Enter boot option and press <Enter>.
From the CLI boot menu, enter 3 or 4 to go to the System Utilities menu.Cisco ISE System Utilities Menu
Available System Utilities:
[1] Recover administrator password[2] Virtual Machine Resource Check[3] System Erase[4] Install Media Check[q] Exit and reload
Enter option and press <Enter>
Enter 2 to check for VM resources. The output will be similar to the following:********** Virtual Machine host detected…***** Hard disk(s) total size detected: 322 Gigabyte***** Physical RAM size detected: 40443664 Kbytes***** Number of network interfaces detected: 1***** Number of CPU cores: 2***** CPU Mhz: 2300.00***** Verifying CPU requirement…***** Verifying RAM requirement…***** Writing disk partition table…
Obtain the Cisco ISE Evaluation SoftwareTo obtain the Cisco ISE evaluation software (R-ISE-EVAL-K9=), contact your Cisco Account Team or yourAuthorized Cisco Channel Partner.
To migrate a Cisco ISE configuration from an evaluation system to a fully licensed production system, youneed to complete the following tasks:
Install ISE on a VMware Virtual Machine11
Install ISE on a VMware Virtual MachineObtain the Cisco ISE Evaluation Software

• Back up the configuration of the evaluation version.
• Ensure that your production VM has the required amount of disk space. See Deployment Size and ScalingRecommendations for details.
• Install a production deployment license.
• Restore the configuration to the production system.
For evaluation, the minimum allocation requirements for a hard disk on a VM is 200 GB. When you movethe VM to a production environment that supports a larger number of users, be sure to reconfigure the CiscoISE installation to the recommended minimum disk size or higher (up to the allowed maximum of 1.999 TB).
Note
Before you begin
For evaluation purposes, Cisco ISE can be installed on any supported VMs that complies with the VMrequirements. When evaluating Cisco ISE, you can configure less disk space in the VM, but you must allocatea minimum disk space of 200 GB.
Step 1 Go to http://www.cisco.com/go/ise. You must already have valid Cisco.com login credentials to access this link.Step 2 Click Download Software for this Product.
The software image comes with a 90-days evaluation license already installed, so you can begin evaluating all Cisco ISEservices when the installation and initial configuration are complete.
Install Cisco ISE on Virtual MachinesYou can install Cisco ISE on VMs in any one of the following ways. We recommend that you download anddeploy Cisco ISE OVA templates.
• Deploy Cisco ISE on Virtual Machines Using OVA Templates , on page 12
• Install Cisco ISE on Virtual Machines Using the ISO File, on page 13
• Clone a Cisco ISE Virtual Machine, on page 19
Deploy Cisco ISE on Virtual Machines Using OVA TemplatesYou can use OVA templates to install and deploy Cisco ISE software on a virtual machine. Download theOVA template from Cisco.com.
Install ISE on a VMware Virtual Machine12
Install ISE on a VMware Virtual MachineInstall Cisco ISE on Virtual Machines

Before you begin
The ISE OVA templates are not compatible with VMware web client for vCenter 6.5. As a workaround, usethe VMware OVF tool to import the OVA templates.
You must reimage Cisco ISE from ISO if the virtual hard disk is resized after importing the OVA, as CiscoISE does not support resizing hard disk and file systems after installation.
Note
When deploying Cisco ISE OVA files, we recommend that you remove or disconnect the unrequired networkadapters after you complete the import, but before you run the setup for Cisco ISE. If you are using 4 or morenetwork adapters, retain network adapter type E1000 to avoid interface reordering. If you are using up to 3network adapters, you can delete all your E1000 network adapters and replace them with VMXNET3 ones.
Note
Step 1 Open VMware vSphere client.Step 2 Log in to VMware host.Step 3 Choose File > Deploy OVF Template from the VMware vSphere Client.Step 4 Click Browse to select the OVA template, and click Next.Step 5 Confirm the details in the OVF Template Details page, and click Next.Step 6 Enter a name for the virtual machine in the Name and Location page to uniquely identify it, and click Next.Step 7 Choose a data store to host the OVA.Step 8 Click the Thick Provision radio button in the Disk Format page, and click Next.
Cisco ISE supports both thick and thin provisioning. However, we recommend that you choose thick provisioning forbetter performance, especially for Monitoring nodes. If you choose thin provisioning, operations such as upgrade,backup and restore, and debug logging that require more disk space might be impacted during initial disk expansion.
Step 9 Verify the information in the Ready to Complete page. Check the Power on after deployment check box.Step 10 Click Finish.
Install Cisco ISE on Virtual Machines Using the ISO FileTo install Cisco ISE on a VM using the ISO file:
Before you begin
• Ensure that you read and allocate VM resources according to the requirements specified in this chapter.
• Ensure that you have read the Prerequisites for Configuring a VMware ESXi Server, on page 14 section.
• Download the Cisco ISE ISO image from Cisco.com.
Step 1 Configure a VMware server. See Configure a VMware Server, on page 16.
Install ISE on a VMware Virtual Machine13
Install ISE on a VMware Virtual MachineInstall Cisco ISE on Virtual Machines Using the ISO File
Step 2 Configure a VMware system to boot from a software DVD. See Configure a VMware System to Boot From a Cisco ISESoftware DVD, on page 18.
Prerequisites for Configuring a VMware ESXi ServerReview the following configuration prerequisites listed in this section before you attempt to configure aVMWare ESXi server:
• Remember to log in to the ESXi server as a user with administrative privileges (root user).
• Cisco ISE is a 64-bit system. Before you install a 64-bit system, ensure that Virtualization Technology(VT) is enabled on the ESXi server. You must also ensure that your guest operating system type is setto Red Hat Enterprise Linux 7 (64-bit).
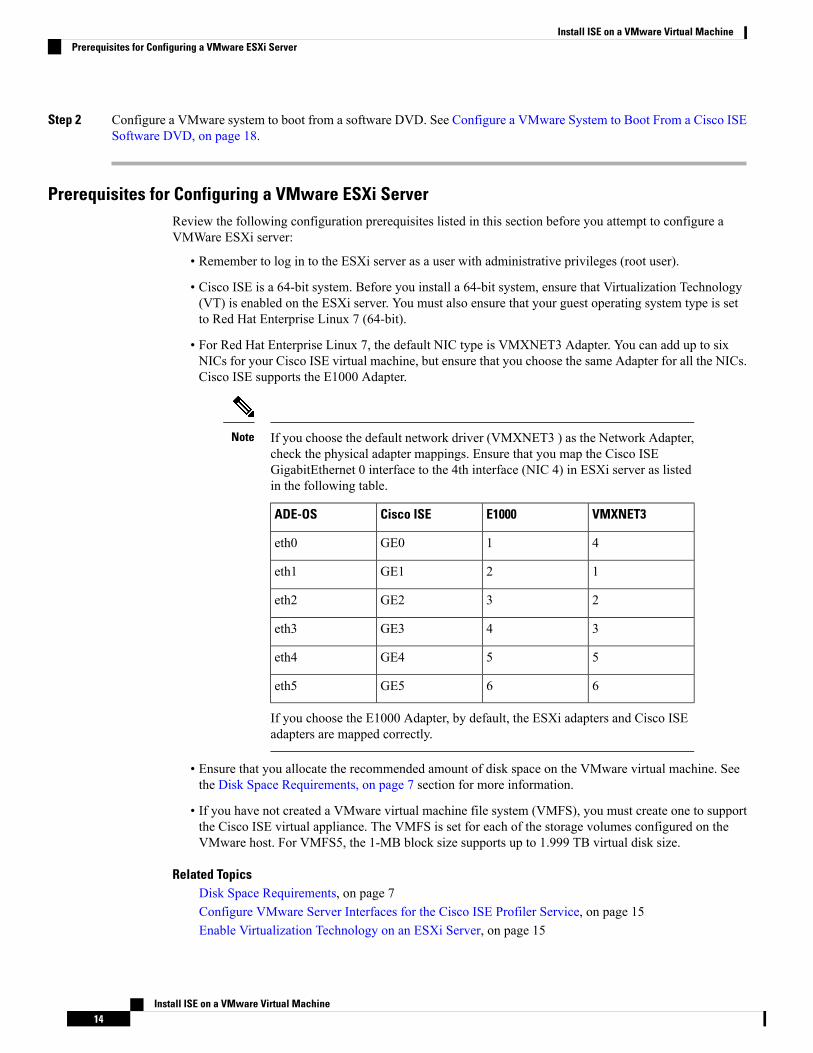
• For Red Hat Enterprise Linux 7, the default NIC type is VMXNET3 Adapter. You can add up to sixNICs for your Cisco ISE virtual machine, but ensure that you choose the same Adapter for all the NICs.Cisco ISE supports the E1000 Adapter.
If you choose the default network driver (VMXNET3 ) as the Network Adapter,check the physical adapter mappings. Ensure that you map the Cisco ISEGigabitEthernet 0 interface to the 4th interface (NIC 4) in ESXi server as listedin the following table.
VMXNET3E1000Cisco ISEADE-OS
41GE0eth0
12GE1eth1
23GE2eth2
34GE3eth3
55GE4eth4
66GE5eth5
If you choose the E1000 Adapter, by default, the ESXi adapters and Cisco ISEadapters are mapped correctly.
Note
• Ensure that you allocate the recommended amount of disk space on the VMware virtual machine. Seethe Disk Space Requirements, on page 7 section for more information.
• If you have not created a VMware virtual machine file system (VMFS), you must create one to supportthe Cisco ISE virtual appliance. The VMFS is set for each of the storage volumes configured on theVMware host. For VMFS5, the 1-MB block size supports up to 1.999 TB virtual disk size.
Related TopicsDisk Space Requirements, on page 7Configure VMware Server Interfaces for the Cisco ISE Profiler Service, on page 15Enable Virtualization Technology on an ESXi Server, on page 15
Install ISE on a VMware Virtual Machine14
Install ISE on a VMware Virtual MachinePrerequisites for Configuring a VMware ESXi Server

Virtualization Technology Check
If you have an ESXi server installed already, you can check if VT is enabled on it without rebooting themachine. To do this, use the esxcfg-info command. Here is an example:
~ # esxcfg-info |grep "HV Support"|----HV Support............................................3|----World Command Line.................................grep HV Support
If HV Support has a value of 3, then VT is enabled on the ESXi server and you can proceed with the installation.
If HV Support has a value of 2, then VT is supported, but not enabled on the ESXi server. You must edit theBIOS settings and enable VT on the server.
Enable Virtualization Technology on an ESXi Server
You can reuse the same hardware that you used for hosting a previous version of Cisco ISE virtual machine.However, before you install the latest release, you must enable Virtualization Technology (VT) on the ESXiserver.
Step 1 Reboot the appliance.Step 2 Press F2 to enter setup.Step 3 Choose Advanced > Processor Configuration.Step 4 Select Intel(R) VT and enable it.Step 5 Press F10 to save your changes and exit.
Configure VMware Server Interfaces for the Cisco ISE Profiler Service
Configure VMware server interfaces to support the collection of Switch Port Analyzer (SPAN) or mirroredtraffic to a dedicated probe interface for the Cisco ISE Profiler Service.
Step 1 Choose Configuration > Networking > Properties > VMNetwork (the name of your VMware serverinstance)VMswitch0 (one of your VMware ESXi server interfaces) Properties Security.
Step 2 In the Policy Exceptions pane on the Security tab, check the Promiscuous Mode check box.Step 3 In the Promiscuous Mode drop-down list, choose Accept and click OK.
Repeat the same steps on the other VMware ESXi server interface used for profiler data collection of SPAN or mirroredtraffic.
Connect to the VMware Server Using the Serial Console
Step 1 Power down the particular VMware server (for example ISE-120).Step 2 Right-click the VMware server and choose Edit.Step 3 Click Add on the Hardware tab.Step 4 Choose Serial Port and click Next.
Install ISE on a VMware Virtual Machine15
Install ISE on a VMware Virtual MachineVirtualization Technology Check

Step 5 In the Serial Port Output area, click the Use physical serial port on the host or the Connect via Network radio buttonand click Next.
• If you choose the Connect via Network option, you must open the firewall ports over the ESXi server.
• If you select the Use physical serial port on the host, choose the port. You may choose one of the following twooptions:
• /dev/ttyS0 (In the DOS or Windows operating system, this will appear as COM1).
• /dev/ttyS1 (In the DOS or Windows operating system, this will appear as COM2).
Step 6 Click Next.Step 7 In the Device Status area, check the appropriate check box. The default is Connected.Step 8 Click OK to connect to the VMware server.
Configure a VMware Server
Before you begin
Ensure that you have read the details in the Prerequisites for Configuring a VMware ESXi Server, on page14 section.
Step 1 Log in to the ESXi server.Step 2 In the VMware vSphere Client, in the left pane, right-click your host container and choose New Virtual Machine.Step 3 In the Configuration dialog box, choose Custom for the VMware configuration and click Next.Step 4 Enter a name for the VMware system and click Next.
Tip Use the hostname that you want to use for your VMware host.Tip
Step 5 Choose a datastore that has the recommended amount of space available and click Next.Step 6 (Optional) If your VM host or cluster supports more than one VMware virtual machine version, choose a Virtual
Machine version such as Virtual Machine Version 7, and click Next.Step 7 Choose Linux and Red Hat Enterprise Linux 7 from the Version drop-down list.Step 8 Choose 2 from the Number of virtual sockets and the Number of cores per virtual socket drop-down list. Total number
of cores should be 4.
(Optional; appears in some versions of ESXi server. If you see only the Number of virtual processors, choose 4).
Step 9 Choose the amount of memory and click Next.Step 10 Choose the E1000 NIC driver from the Adapter drop-down list and click Next.
We recommend that you select E1000 to ensure correct adapter order by default. If you choose VMXNET3,you might have to remap the ESXi adapter to synchronize it with the ISE adapter order.
Note
Step 11 Choose Paravirtual as the SCSI controller and click Next.Step 12 Choose Create a new virtual disk and click Next.Step 13 In the Disk Provisioning dialog box, click Thick Provision radio button, and click Next to continue.
Install ISE on a VMware Virtual Machine16
Install ISE on a VMware Virtual MachineConfigure a VMware Server

Cisco ISE supports both thick and thin provisioning. However, we recommend that you choose thick provisioning forbetter performance, especially for Monitoring nodes. If you choose thin provisioning, operations such as upgrade,backup and restore, and debug logging that require more disk space might be impacted during initial disk expansion.
Step 14 Uncheck the Support clustering features such as Fault Tolerance check box.Step 15 Choose the advanced options, and click Next.Step 16 Verify the configuration details, such as Name, Guest OS, CPUs, Memory, and Disk Size of the newly created VMware
system. You must see the following values:
• Guest OS—Red Hat Enterprise Linux 7
• Logical CPUs—12
• Memory—16 GB or 16384 MB
• Disk Size—200 GB to 1.999 TB based on the recommendations for VMware disk space
For the Cisco ISE installation to be successful on a virtual machine, ensure that you adhere to the recommendationsgiven in this document.
Step 17 Click Finish.
The VMware system is now installed.
What to do next
To activate the newly created VMware system, right-click VM in the left pane of your VMware client userinterface and choose Power > Power On.
Related TopicsVirtual Machine Appliance Size Recommendations, on page 6Disk Space Requirements, on page 7
Increase Virtual Machine Power-On Boot Delay ConfigurationOn a VMware virtual machine, the boot delay by default is set to 0. You can change this boot delay to helpyou choose the boot options (while resetting the Administrator password, for example).
Step 1 From the VSphere client, right click the VM and choose Edit Settings.Step 2 Click the Options tab.Step 3 Choose Advanced > Boot Options.Step 4 From the Power on Boot Delay area, select the time in milliseconds to delay the boot operation.Step 5 Check the check box in the Force BIOS Setup area to enter into the BIOS setup screen when the VM boots the next
time.Step 6 Click OK to save your changes.
Install ISE on a VMware Virtual Machine17
Install ISE on a VMware Virtual MachineIncrease Virtual Machine Power-On Boot Delay Configuration

Configure a VMware System to Boot From a Cisco ISE Software DVDAfter configuring the VMware system, you are ready to install the Cisco ISE software. To install the CiscoISE software from a DVD, you need to configure the VMware system to boot from it. This requires theVMware system to be configured with a virtual DVD drive.
Before you begin
You must download the Cisco ISE ISO, burn the ISO image on a DVD, and use it to install Cisco ISE on thevirtual machine.
Step 1 In the VMware client, highlight the newly created VMware system and choose Edit Virtual Machine Settings.Step 2 In the Virtual Machine Properties dialog box, choose CD/DVD Drive 1.Step 3 Click the Host Device radio button and choose the DVD host device from the drop-down list.Step 4 Choose the Connect at Power On option and click OK to save your settings.
You can now use the DVD drive of the VMware ESXi server to install the Cisco ISE software.
What to do next
After you complete this task, click theConsole tab in the VMware client user interface, right-click VM in theleft pane, choose Power, and choose Reset to restart the VMware system.
Install Cisco ISE Software on a VMware System
Before you begin
• After installation, if you do not install a permanent license, Cisco ISE automatically installs a 90-dayevaluation license that supports a maximum of 100 endpoints.
• Download the Cisco ISE software from the Cisco Software Download Site athttp://www.cisco.com/en/US/products/ps11640/index.html and burn it on a DVD. You will be requiredto provide your Cisco.com credentials.
Step 1 Log in to the VMware client.Step 2 For the virtual machine to enter the BIOS setup mode, right click the VM and click Edit Settings.Step 3 Click the Options tab.Step 4 Select Boot Options and configure the following option:
a) In the Force BIOS Setup area, check the check box to enter the BIOS setup screen when the virtual machine boots.
Step 5 Click OK.Step 6 Ensure that the Coordinated Universal Time (UTC) and the correct boot order is set in BIOS:
a) If the virtual machine is turned on, turn the system off.b) Turn on the virtual machine.
The system enters the BIOS setup mode.
Install ISE on a VMware Virtual Machine18
Install ISE on a VMware Virtual MachineConfigure a VMware System to Boot From a Cisco ISE Software DVD

c) In the Main BIOS menu, using the arrow keys, navigate to the Date and Time field and press Enter.d) Enter the UTC/Greenwich Mean Time (GMT) time zone.
This time zone setting ensures that the reports, logs, and posture-agent log files from the various nodes in yourdeployment are always synchronized with regard to the time stamps.
e) Using the arrow keys, navigate to the Boot menu and press Enter.f) Using the arrow keys, select CD-ROM Drive and press + to move the CD-ROM drive up the order.g) Using the arrow keys, navigate to the Exit menu and choose Exit Saving Changes.h) Choose Yes to save the changes and exit.
Step 7 Insert the Cisco ISE software DVD into the VMware ESXi host CD/DVD drive and turn on the virtual machine.
When the DVD boots, the console displays:
Cisco ISE Installation (Serial Console)Cisco ISE Installation (Keyboard/Monitor)System Utilities (Serial Console)System Utilities (Keyboard/Monitor)
Step 8 Use the arrow keys to select Cisco ISE Installation (Serial Console) or Cisco ISE Installation (Keyboard/Monitor)and press Enter. If you choose the serial console option, you should have a serial console set up on your virtual machine.See the VMware vSphere Documentation for information on how to create a console.The installer starts the installation of the Cisco ISE software on the VMware system. Allow 20minutes for the installationprocess to complete. When the installation process finishes, the virtual machine reboots automatically. When the VMreboots, the console displays:Type 'setup' to configure your appliancelocalhost:
Step 9 At the system prompt, type setup and press Enter.The Setup Wizard appears and guides you through the initial configuration.
Related TopicsCisco ISE Setup Program Parameters
Cisco ISE ISO Installation on Virtual Machine FailsIf a fresh installation of Cisco ISE on a virtual machine fails, and you have the default network driver(VMXNET3 ) chosen as the Network Adapter, check the physical adapter mappings. Ensure that you mapthe Cisco ISE GigabitEthernet 0 interface to the 6th interface (NIC 6) in ESXi. The workaround is to use theE1000 driver as the Network Adapter.
Clone a Cisco ISE Virtual MachineYou can clone a Cisco ISE VMware virtual machine (VM) to create an exact replica of a Cisco ISE node. Forexample, in a distributed deployment with multiple Policy Service nodes (PSNs), VM cloning helps youdeploy the PSNs quickly and effectively. You do not have to install and configure the PSNs individually.
You can also clone a Cisco ISE VM using a template.
For cloning, you need VMware vCenter. Cloning must be done before you run the Setup program.Note
Install ISE on a VMware Virtual Machine19
Install ISE on a VMware Virtual MachineCisco ISE ISO Installation on Virtual Machine Fails

Before you begin
• Ensure that you shut down the Cisco ISE VM that you are going to clone. In the vSphere client, right-clickthe Cisco ISE VM that you are about to clone and choose Power > Shut Down Guest.
• Ensure that you change the IP Address and Hostname of the cloned machine before you power it on andconnect it to the network.
Step 1 Log in to the ESXi server as a user with administrative privileges (root user).
VMware vCenter is required to perform this step.
Step 2 Right-click the Cisco ISE VM you want to clone, and click Clone.Step 3 Enter a name for the new machine that you are creating in the Name and Location dialog box and click Next.
This is not the hostname of the new Cisco ISE VM that you are creating, but a descriptive name for your reference.
Step 4 Select a Host or Cluster on which you want to run the new Cisco ISE VM and click Next.Step 5 Select a datastore for the new Cisco ISE VM that you are creating and click Next.
This datastore could be the local datastore on the ESXi server or a remote storage. Ensure that the datastore has enoughdisk space.
Step 6 Click the Same format as source radio button in the Disk Format dialog box and click Next.
This option copies the same format that is used in the Cisco ISE VM that you are cloning this new machine from.
Step 7 Click the Do not customize radio button in the Guest Customization dialog box and click Next.Step 8 Click Finish.
What to do next
• Change the IP Address and Hostname of a Cloned Virtual Machine
• Connect a Cloned Cisco Virtual Machine to the Network
Related TopicsClone a Cisco ISE Virtual Machine Using a Template, on page 20Disk Space Requirements, on page 7
Clone a Cisco ISE Virtual Machine Using a TemplateIf you are using vCenter, then you can use a VMware template to clone a Cisco ISE virtual machine (VM).You can clone the Cisco ISE node to a template and use that template to create multiple new Cisco ISE nodes.Cloning a virtual machine using a template is a two-step process:
Before you begin
For cloning, you need VMware vCenter. Cloning must be done before you run the Setup program.Note
Install ISE on a VMware Virtual Machine20
Install ISE on a VMware Virtual MachineClone a Cisco ISE Virtual Machine Using a Template
Step 1 Create a Virtual Machine Template, on page 21Step 2 Deploy a Virtual Machine Template, on page 21
Create a Virtual Machine Template
Before you begin
• Ensure that you shut down the Cisco ISE VM that you are going to clone. In the vSphere client, right-clickthe Cisco ISE VM that you are about to clone and choose Power > Shut Down Guest.
• We recommend that you create a template from a Cisco ISE VM that you have just installed and not runthe setup program on. You can then run the setup program on each of the individual Cisco ISE nodesthat you have created and configure IP address and hostnames individually.
Step 1 Log in to the ESXi server as a user with administrative privileges (root user).
VMware vCenter is required to perform this step.
Step 2 Right-click the Cisco ISE VM that you want to clone and choose Clone > Clone to Template.Step 3 Enter a name for the template, choose a location to save the template in the Name and Location dialog box, and click
Next.Step 4 Choose the ESXi host that you want to store the template on and click Next.Step 5 Choose the datastore that you want to use to store the template and click Next.
Ensure that this datastore has the required amount of disk space.
Step 6 Click the Same format as source radio button in the Disk Format dialog box and click Next.
The Ready to Complete dialog box appears.
Step 7 Click Finish.
Deploy a Virtual Machine Template
After you create a virtual machine template, you can deploy it on other virtual machines (VMs).
Step 1 Right-click the Cisco ISE VM template that you have created and choose Deploy Virtual Machine from this template.Step 2 Enter a name for the new Cisco ISE node, choose a location for the node in the Name and Location dialog box, and click
Next.Step 3 Choose the ESXi host where you want to store the new Cisco ISE node and click Next.Step 4 Choose the datastore that you want to use for the new Cisco ISE node and click Next.
Ensure that this datastore has the required amount of disk space.
Step 5 Click the Same format as source radio button in the Disk Format dialog box and click Next.Step 6 Click the Do not customize radio button in the Guest Customization dialog box.
Install ISE on a VMware Virtual Machine21
Install ISE on a VMware Virtual MachineCreate a Virtual Machine Template
The Ready to Complete dialog box appears.
Step 7 Check the Edit Virtual Hardware check box and click Continue.
The Virtual Machine Properties page appears.
Step 8 Choose Network adapter, uncheck the Connected and Connect at power on check boxes, and click OK.Step 9 Click Finish.
You can now power on this Cisco ISE node, configure the IP address and hostname, and connect it to the network.
What to do next
• Change the IP Address and Hostname of a Cloned Virtual Machine
• Connect a Cloned Cisco Virtual Machine to the Network
Related TopicsClone a Cisco ISE Virtual Machine Using a Template, on page 20Disk Space Requirements, on page 7
Change the IP Address and Hostname of a Cloned Virtual MachineAfter you clone a Cisco ISE virtual machine (VM), you have to power it on and change the IP address andhostname.
Before you begin
• Ensure that the Cisco ISE node is in the standalone state.
• Ensure that the network adapter on the newly cloned Cisco ISE VM is not connected when you poweron the machine. Uncheck theConnected andConnect at power on check boxes. Otherwise, if this nodecomes up, it will have the same IP address as the source machine from which it was cloned.
Install ISE on a VMware Virtual Machine22
Install ISE on a VMware Virtual MachineChange the IP Address and Hostname of a Cloned Virtual Machine

Figure 1: Disconnecting the Network Adapter
• Ensure that you have the IP address and hostname that you are going to configure for the newly clonedVM as soon as you power on the machine. This IP address and hostname entry should be in the DNSserver. You cannot use "localhost" as the hostname for a node.
• Ensure that you have certificates for the Cisco ISE nodes based on the new IP address or hostname.
Procedure
Step 1 Right-click the newly cloned Cisco ISE VM and choose Power > Power On.Step 2 Select the newly cloned Cisco ISE VM and click the Console tab.Step 3 Enter the following commands on the Cisco ISE CLI:
configure terminalhostname hostname
The hostname is the new hostname that you are going to configure. The Cisco ISE services are restarted.
Step 4 Enter the following commands:interface gigabit 0ip address ip_address netmask
The ip_address is the address that corresponds to the hostname that you entered in step 3 and netmask is the subnet maskof the ip_address. The system will prompt you to restart the Cisco ISE services. See the Cisco Identity Services EngineCLI Reference Guide, for the ip address and hostname commands.
Step 5 Enter Y to restart Cisco ISE services.
Install ISE on a VMware Virtual Machine23
Install ISE on a VMware Virtual MachineChange the IP Address and Hostname of a Cloned Virtual Machine

Connect a Cloned Cisco Virtual Machine to the NetworkAfter you power on and change the ip address and hostname, you must connect the Cisco ISE node to thenetwork.
Step 1 Right-click the newly cloned Cisco ISE virtual machine (VM) and click Edit Settings.Step 2 Click Network adapter in the Virtual Machine Properties dialog box.Step 3 In the Device Status area, check the Connected and Connect at power on check boxes.Step 4 Click OK.
Migrate Cisco ISE VM from Evaluation to ProductionAfter evaluating the Cisco ISE release, you can migrate the from an evaluation system to a fully licensedproduction system.
Before you begin
• When you move the VMware server to a production environment that supports a larger number of users,be sure to reconfigure the Cisco ISE installation to the recommended minimum disk size or higher (upto the allowed maximum of 1.999 TB).
• Please not that you cannot migrate data to a production VM from a VM created with less than 200 GBof disk space. You can only migrate data from VMs created with 200 GB or more disk space to aproduction environment.
Step 1 Back up the configuration of the evaluation version.Step 2 Ensure that your production VM has the required amount of disk space.Step 3 Install a production deployment license.Step 4 Restore the configuration to the production system.
Related TopicsDeployment Size and Scaling Recommendations
Install ISE on a VMware Virtual Machine24
Install ISE on a VMware Virtual MachineConnect a Cloned Cisco Virtual Machine to the Network