installation and administration guide - oracle · oracle® database installation and administration...
TRANSCRIPT
Oracle® DatabaseInstallation and Administration Guide
12c Release 1 (12.1) for Fujitsu BS2000/OSD
E67706-02
January 2017

Oracle Database Installation and Administration Guide, 12c Release 1 (12.1) for Fujitsu BS2000/OSD
E67706-02
Copyright © 2007, 2017, Oracle and/or its affiliates. All rights reserved.
Primary Author: Bharathi Jayathirtha
Contributing Authors: Janelle Simmons
This software and related documentation are provided under a license agreement containing restrictions onuse and disclosure and are protected by intellectual property laws. Except as expressly permitted in yourlicense agreement or allowed by law, you may not use, copy, reproduce, translate, broadcast, modify, license,transmit, distribute, exhibit, perform, publish, or display any part, in any form, or by any means. Reverseengineering, disassembly, or decompilation of this software, unless required by law for interoperability, isprohibited.
The information contained herein is subject to change without notice and is not warranted to be error-free. Ifyou find any errors, please report them to us in writing.
If this is software or related documentation that is delivered to the U.S. Government or anyone licensing it onbehalf of the U.S. Government, then the following notice is applicable:
U.S. GOVERNMENT END USERS: Oracle programs, including any operating system, integrated software,any programs installed on the hardware, and/or documentation, delivered to U.S. Government end users are"commercial computer software" pursuant to the applicable Federal Acquisition Regulation and agency-specific supplemental regulations. As such, use, duplication, disclosure, modification, and adaptation of theprograms, including any operating system, integrated software, any programs installed on the hardware,and/or documentation, shall be subject to license terms and license restrictions applicable to the programs.No other rights are granted to the U.S. Government.
This software or hardware is developed for general use in a variety of information management applications.It is not developed or intended for use in any inherently dangerous applications, including applications thatmay create a risk of personal injury. If you use this software or hardware in dangerous applications, then youshall be responsible to take all appropriate fail-safe, backup, redundancy, and other measures to ensure itssafe use. Oracle Corporation and its affiliates disclaim any liability for any damages caused by use of thissoftware or hardware in dangerous applications.
Oracle and Java are registered trademarks of Oracle and/or its affiliates. Other names may be trademarks oftheir respective owners.
Intel and Intel Xeon are trademarks or registered trademarks of Intel Corporation. All SPARC trademarks areused under license and are trademarks or registered trademarks of SPARC International, Inc. AMD, Opteron,the AMD logo, and the AMD Opteron logo are trademarks or registered trademarks of Advanced MicroDevices. UNIX is a registered trademark of The Open Group.
This software or hardware and documentation may provide access to or information about content, products,and services from third parties. Oracle Corporation and its affiliates are not responsible for and expresslydisclaim all warranties of any kind with respect to third-party content, products, and services unlessotherwise set forth in an applicable agreement between you and Oracle. Oracle Corporation and its affiliateswill not be responsible for any loss, costs, or damages incurred due to your access to or use of third-partycontent, products, or services, except as set forth in an applicable agreement between you and Oracle.
Contents
Preface ................................................................................................................................................................ xi
Audience ....................................................................................................................................................... xi
Documentation Accessibility .................................................................................................................... xii
Using Oracle Database Documentation .................................................................................................. xii
Related Documents..................................................................................................................................... xii
Conventions Used in this Manual ............................................................................................................ xii
Part I Concepts
1 Concepts and Architecture
1.1 About the BS2000 Operating System ............................................................................................. 1-1
1.2 About File Systems ........................................................................................................................... 1-1
1.3 About Processes ................................................................................................................................ 1-2
1.4 Memory Architecture....................................................................................................................... 1-2
1.5 BS2000 User Ids ................................................................................................................................. 1-4
1.5.1 Installation User ID for Fujitsu BS2000/OSD Systems .................................................... 1-4
1.5.2 DBA User ID for Fujitsu BS2000/OSD Systems ............................................................... 1-5
1.5.3 Client User IDs for Fujitsu BS2000/OSD Systems............................................................ 1-5
1.6 Oracle Database Programs .............................................................................................................. 1-5
1.6.1 Program Libraries.................................................................................................................. 1-5
1.6.2 Program Environment .......................................................................................................... 1-6
1.7 Physical Storage Structures ............................................................................................................. 1-9
1.7.1 Files of an Oracle Database .................................................................................................. 1-9
1.7.2 Oracle Managed Files ......................................................................................................... 1-10
1.7.3 Files of a Bigfile Tablespace ............................................................................................... 1-11
1.8 Parameter Files................................................................................................................................ 1-11
Part II Installation and Database Creation
2 Oracle Database Installation and Deinstallation
2.1 Overview of Oracle Database Installation .................................................................................... 2-1
2.2 Planning the Installation.................................................................................................................. 2-2
iii
2.3 Oracle Database Preinstallation Requirements ............................................................................ 2-2
2.3.1 Checking Hardware Requirements .................................................................................... 2-2
2.3.2 Checking Software Requirements....................................................................................... 2-5
2.3.3 Checking Network Setup ..................................................................................................... 2-8
2.3.4 Creating Required Operating System Users and Groups ............................................... 2-9
2.3.5 Identify Required Directories in POSIX........................................................................... 2-13
2.3.6 Identifying or Creating Oracle Base Directory in POSIX .............................................. 2-15
2.4 Installing Oracle Database............................................................................................................. 2-17
2.5 Oracle Database Postinstallation Tasks ....................................................................................... 2-19
2.6 About Installing Multiple Oracle Databases............................................................................... 2-20
2.7 About Removing Oracle Database Software .............................................................................. 2-20
3 About Creating a Database
3.1 Prerequisites for Database Creation............................................................................................... 3-1
3.2 About Creating a Non-CDB ............................................................................................................ 3-1
3.2.1 Creating a Database Automatically .................................................................................... 3-2
3.2.2 Creating a Database Manually ............................................................................................ 3-4
3.3 About Creating a Multitenant Container Database..................................................................... 3-7
3.3.1 Creating Parameter Files for a CDB.................................................................................... 3-8
3.3.2 About Creating a CDB.......................................................................................................... 3-9
4 About Upgrading a Database
4.1 Performing Preupgrade Procedures .............................................................................................. 4-1
4.2 Performing Upgrade Procedures ................................................................................................... 4-3
4.3 Performing Postupgrade Procedures............................................................................................. 4-5
Part III Database Administration
5 Administering Oracle Database
5.1 Using the SQL*Plus Utility.............................................................................................................. 5-1
5.2 Startup and Parameter Files ............................................................................................................ 5-1
5.2.1 The Environment Definition File ORAENV...................................................................... 5-2
5.2.2 The Initialization File INIT.ORA......................................................................................... 5-2
5.2.3 The Server Parameter File SPFILE ...................................................................................... 5-2
5.2.4 About Using the Initialization File...................................................................................... 5-3
5.3 Preparing a Remote Startup of a Database Instance Using SQL*Plus ...................................... 5-3
5.4 Automatic Diagnostic Repository .................................................................................................. 5-4
5.4.1 Automatic Diagnostic Repository Directories and Files.................................................. 5-5
5.4.2 ADR Command Interpreter Utility..................................................................................... 5-5
6 Oracle Database Utilities
6.1 Basics of Oracle Database Utilities ................................................................................................. 6-1
6.1.1 The Oracle Database Environment-Definition File .......................................................... 6-2
iv

6.1.2 The ORALOAD Library ....................................................................................................... 6-3
6.1.3 Starting Oracle Utilities in the BS2000 Program Environment....................................... 6-3
6.1.4 Starting Oracle Utilities in the POSIX Program Environment........................................ 6-4
6.1.5 Connecting to an Oracle Database Instance ...................................................................... 6-6
6.1.6 Using BS2000 Files for Input and Output .......................................................................... 6-7
6.2 SQL*Plus ........................................................................................................................................... 6-8
6.2.1 Using SQL*Plus in the BS2000 Environment .................................................................... 6-9
6.2.2 Using SQL*Plus in the POSIX environment.................................................................... 6-13
6.2.3 SQL*Plus User Profiles ....................................................................................................... 6-15
6.2.4 Using SQL*Plus Symbols ................................................................................................... 6-16
6.2.5 Sample Schemas and SQL*Plus......................................................................................... 6-16
6.2.6 SQL*Plus Limits................................................................................................................... 6-17
6.3 The SQL*Loader ............................................................................................................................. 6-17
6.3.1 Starting the SQL*Loader Utility ........................................................................................ 6-17
6.3.2 Using the SQL*Loader Demonstration Files ................................................................... 6-18
6.4 The Export Utility ........................................................................................................................... 6-18
6.4.1 Starting the Export Utility .................................................................................................. 6-18
6.4.2 Exporting to Foreign Systems............................................................................................ 6-19
6.5 The Import Utility........................................................................................................................... 6-20
6.5.1 Starting the Import Utility.................................................................................................. 6-20
6.5.2 Importing from Foreign Systems ...................................................................................... 6-20
6.6 The Data Pump Export Utility ...................................................................................................... 6-21
6.6.1 Starting the Data Pump Export Utility............................................................................ 6-21
6.7 The Data Pump Import Utility...................................................................................................... 6-22
6.7.1 Starting the Data Pump Import Utility ............................................................................ 6-22
6.8 Recovery Manager on BS2000....................................................................................................... 6-22
6.9 Checking the Integrity of the Physical Data Structure .............................................................. 6-23
6.10 Workload Replay Client .............................................................................................................. 6-23
6.10.1 About Running Workload Replay Client ...................................................................... 6-23
6.10.2 About Troubleshooting Workload Replay Client ........................................................ 6-24
6.11 The Oracle Text Loader................................................................................................................ 6-25
7 Backing Up and Recovering a Database
7.1 Backing Up an Oracle Database ..................................................................................................... 7-1
7.1.1 Using BS2000 Utilities to Back Up an Oracle Database ................................................... 7-1
7.1.2 Performing Online Backup .................................................................................................. 7-2
7.2 Restoring an Oracle Database ......................................................................................................... 7-3
7.3 About Using the Recovery Manager.............................................................................................. 7-3
8 About Unified Auditing
8.1 Enabling Unified Auditing.............................................................................................................. 8-1
8.2 Disabling Unified Auditing............................................................................................................. 8-2
v
9 Java in the Database
9.1 Installation of a Java Enabled Database ........................................................................................ 9-1
9.2 Database character sets and Java Encodings ................................................................................ 9-2
9.3 Java Demonstration Files ................................................................................................................. 9-3
10 Oracle Text
10.1 Installing Oracle Text ................................................................................................................... 10-1
10.2 Restrictions of Oracle Text on BS2000........................................................................................ 10-1
11 XML
11.1 About XDK Installation ............................................................................................................... 11-1
11.2 Features and Restrictions of XML Features on BS2000 Systems............................................ 11-1
12 Oracle Net Services
12.1 Introducing Oracle Net Services................................................................................................. 12-1
12.1.1 About Bequeath Protocol ................................................................................................. 12-2
12.1.2 About IPC Protocol Support ............................................................................................ 12-3
12.1.3 About TCP/IP Protocol Support..................................................................................... 12-4
12.1.4 About TCP/IP with SSL Protocol ................................................................................... 12-5
12.1.5 About Oracle Advanced Security ................................................................................... 12-5
12.2 Shared Server Architecture ......................................................................................................... 12-7
12.3 Configuring the Network ............................................................................................................ 12-8
12.3.1 About Using Easy Connect Naming Method................................................................ 12-8
12.3.2 About Using the Local Naming Method........................................................................ 12-9
12.3.3 About Using the Directory Naming Method ................................................................ 12-9
12.3.4 Customizing Oracle Net Listener Configuration.......................................................... 12-9
12.3.5 Configuration on the Client ........................................................................................... 12-11
12.3.6 Testing the Configuration on the Client ...................................................................... 12-11
12.4 Troubleshooting Oracle Net Services ...................................................................................... 12-11
Part IV Application Development
13 Database Applications
13.1 Overview of Database Applications .......................................................................................... 13-1
13.1.1 Architecture of the Programmatic Interfaces ................................................................ 13-2
13.1.2 PL/SQL Support................................................................................................................ 13-2
13.1.3 Building and Running a Programmatic Interface Application................................... 13-2
13.2 Precompiler Applications ............................................................................................................ 13-4
13.2.1 About Using Precompilers............................................................................................... 13-4
13.2.2 Precompiler Pro*C/C++................................................................................................... 13-6
13.2.3 Precompiler Pro*COBOL.................................................................................................. 13-7
13.3 Oracle Call Interface Applications ............................................................................................. 13-9
vi
13.3.1 Linking OCI Applications .............................................................................................. 13-10
13.4 The Object Type Translator ....................................................................................................... 13-10
13.4.1 Starting Object Type Translator .................................................................................... 13-11
13.4.2 OTT System Configuration File..................................................................................... 13-11
13.5 Oracle Database Applications in POSIX Program Environment......................................... 13-11
13.6 openUTM Database Applications ............................................................................................ 13-12
13.6.1 Operation of Oracle Database Using openUTM Programs....................................... 13-12
13.6.2 Distributed openUTM Files ........................................................................................... 13-12
13.6.3 DBA Responsibilities ...................................................................................................... 13-13
13.6.4 Developing an Oracle Database/openUTM Application.......................................... 13-13
13.6.5 Troubleshooting............................................................................................................... 13-22
14 External Procedures
14.1 Loading External Procedures...................................................................................................... 14-1
15 Globalization Support
15.1 Language, Territory, and Character Set .................................................................................... 15-1
15.1.1 Oracle Database ................................................................................................................. 15-2
15.1.2 Other Oracle Database Products ..................................................................................... 15-2
15.2 Supported Language Conventions ............................................................................................ 15-2
15.3 Supported Territories ................................................................................................................... 15-3
15.4 Supported Character Sets ............................................................................................................ 15-3
15.5 Location of Message Files ............................................................................................................ 15-5
15.6 Linguistic Definitions ................................................................................................................... 15-5
Part V Appendices
A Oracle Error Messages for BS2000
B Oracle Environment Variables
B.1 ORAENV Rules ................................................................................................................................ B-1
B.2 Built-in Variables .............................................................................................................................. B-2
B.3 General Variables ............................................................................................................................. B-3
B.4 DBA Startup Variables .................................................................................................................... B-6
B.5 Oracle Net Services Variables....................................................................................................... B-10
C Initialization Parameters and the Parameter File
C.1 Example Parameter File .................................................................................................................. C-1
C.2 Unsupported Parameters................................................................................................................ C-1
C.3 Additional Notes on Initialization Parameters............................................................................ C-1
D Troubleshooting
D.1 Problems Creating Oracle Database 12c....................................................................................... D-1
vii
D.2 Problems Starting an Oracle Database Instance.......................................................................... D-1
D.3 Problems When Starting the Background Tasks......................................................................... D-2
D.4 Problems Accessing Database and Log Files............................................................................... D-2
D.5 Oracle Database Trace Files............................................................................................................ D-3
E File Types and Names Used by Oracle
Index
viii

List of Figures
1-1 Placement of Data Areas in Background, Server and Utility Tasks..................................... 1-313-1 Usage of Program Libraries by Programmatic Interfaces................................................... 13-3
ix

x

Preface
Starting from Oracle Database 12c Release 1 (12.1.0.2), the content of Oracle DatabaseUser's Guide for Fujitsu BS2000/OSD is merged into this manual.
This manual provides information about installing, administering, maintenance, andusage of Oracle Database and related products. It also provides information forBS2000/OSD end users of Oracle products. Certain topics in this manual apply to bothusers and database administrators. This manual describes the following:
• How Oracle Database operates under BS2000/OSD
• How to install Oracle Database
• How to create or upgrade an Oracle Database
• How to administer an Oracle Database
• How to use Oracle Database utilities
• How to build and run Oracle Database applications
This section contains the following topics:
• Audience (page xi)
• Documentation Accessibility (page xii)
• Using Oracle Database Documentation (page xii)
• Related Documents (page xii)
• Conventions Used in this Manual (page xii)
AudienceThis manual is intended for:
• Database Administrators (DBAs)
• Users of Oracle Database
• Oracle Database Support
The reader is assumed to have a fundamental knowledge of BS2000/OSD. No attemptis made to document features of BS2000/OSD, except as they affect or are affected byOracle Database.
xi
Documentation AccessibilityFor information about Oracle's commitment to accessibility, visit the OracleAccessibility Program website at http://www.oracle.com/pls/topic/lookup?ctx=acc&id=docacc.
Access to Oracle Support
Oracle customers that have purchased support have access to electronic supportthrough My Oracle Support. For information, visit http://www.oracle.com/pls/topic/lookup?ctx=acc&id=info or visit http://www.oracle.com/pls/topic/lookup?ctx=acc&id=trs if you are hearing impaired.
Using Oracle Database DocumentationOracle Database products that run on BS2000/OSD principally offer the samefunctionality as Oracle Database products on other operating systems. However,because of the diversity of operating systems, the use of applications may differslightly between different operating systems. As a result of this, Oracle provides twotypes of documentation:
Type Meaning/Usage
Generic This is the primary Oracle Database documentation, which describeshow the product works and how it is used. Use this type ofdocumentation to learn about product functions and how to use anyOracle Database product or utility.
System Specific This documentation provides the information required to use theproduct on a specific operating system. Use this type ofdocumentation to determine whether there are any system-specificdeviations from the generic documentation.
This manual is written for users of Oracle Database for BS2000/OSD, providing themwith BS2000/OSD-specific information about using Oracle Database products. It doesnot describe how to use a product unless its use is different than that is described inthe generic documentation.
Related DocumentsFor more information, refer to the Fujitsu documentation at:
http://manuals.ts.fujitsu.com/index.php?id=1
All Oracle documentation is available at the following URL:
http://docs.oracle.com/en/
Conventions Used in this ManualThe following conventions are used in this manual:
Typographic Conventions
The following text conventions are used in this manual:
xii

Convention Meaning
boldface Boldface type indicates graphical user interface elements associatedwith an action, or terms defined in text or the glossary.
italic Italic type indicates book titles, emphasis, or placeholder variables forwhich you supply particular values.
monospace Monospace type indicates commands within a paragraph, URLs, codein examples, text that appears on the screen, or text that you enter.
Command Syntax
Item Syntax
Commands This font identifies text that must be entered exactly as shown:
set echo off
Variables Variables appear in italics. Substitute an appropriate value, forexample:
arg1
Required Items Required items are enclosed in braces { }. You must choose one of thealternatives.
DEFINE { macro1 | macro2 }
Optional Items Optional items are enclosed in square brackets [].
[options] formname [userid/password]
Repetitive Items An ellipsis, ... represents an arbitrary number of similar items.
CHKVAL fieldname value1 value2... valueN
Punctuation
The following symbols should always be entered as they appear in the commandformat:
Name Symbol
ampersand &
backslash \
colon :
comma ,
double quotationmark
"
equal sign =
hyphen -
xiii

Name Symbol
number sign #
parentheses ()
period .
semicolon ;
single quotationmark
'
xiv

Part IConcepts
This part provides the basic concepts and architecture of Oracle Database on FujitsuBS2000/OSD systems. It contains the following chapter:
• Concepts and Architecture (page 1-1)


1Concepts and Architecture
The platform independent concepts and the architecture of Oracle Database aredescribed in Oracle Database Concepts.
This chapter describes the basic concepts of Oracle Database specific to FujitsuBS2000/OSD systems. It includes the following topics:
• About the BS2000 Operating System (page 1-1)
• About File Systems (page 1-1)
• About Processes (page 1-2)
• Memory Architecture (page 1-2)
• BS2000 User Ids (page 1-4)
• Oracle Database Programs (page 1-5)
• Physical Storage Structures (page 1-9)
• Parameter Files (page 1-11)
1.1 About the BS2000 Operating SystemOracle Database 12c Release 1 for Fujitsu BS000/OSD runs on the BS2000 operatingsystem. Oracle Database uses both native BS2000 interface and the POSIX interface.
The sections in this chapter describe in detail how Oracle Database uses the programenvironments, native BS2000 and POSIX.
1.2 About File SystemsOracle Database 12c Release 1 operates on the following file systems:
• BS2000 Data Management System (DMS), which is a flat file system.
• POSIX file system, which is hierarchically structured and consists of directories andfiles.
The default file system for an Oracle Database program depends on the programenvironment in which the program is started. For example, if you start an OracleDatabase utility in the BS2000 program environment, then a flat file is located in theBS2000 DMS. If you start the same Oracle Database utility in the POSIX shell, then aflat file is located in the POSIX file system.
A file system can be directly addressed independent of the program environment. Theprefix /BS2/ addresses the BS2000 DMS file system. A file name that starts with avalid POSIX path, such as /home/oracle addresses the POSIX file system.
Concepts and Architecture 1-1
As in earlier releases, database files always reside in the BS2000 DMS file system. Forexample, data files, control files, online redo log files, and archive redo log files.
Starting with Oracle Database 12c Release 1, most of the Oracle supplied SQL scriptsare installed in the POSIX file system. To run a SQL script from the ORACLE_HOMEdirectory in the BS2000 program environment, you must enter the fully qualified filename.
Automatic Diagnostic Repository (ADR) requires a hierarchical file system to create afile-based repository for database diagnostic data. So, the directories and files of ADRreside in the POSIX file system.
During Oracle Database installation, executables, libraries, and other files are installedin both the BS2000 DMS and in the POSIX file system. You must provide access to thePOSIX file system.
See Also:
“Oracle Database Installation and Deinstallation” (page 2-1) for informationabout access to the POSIX file system
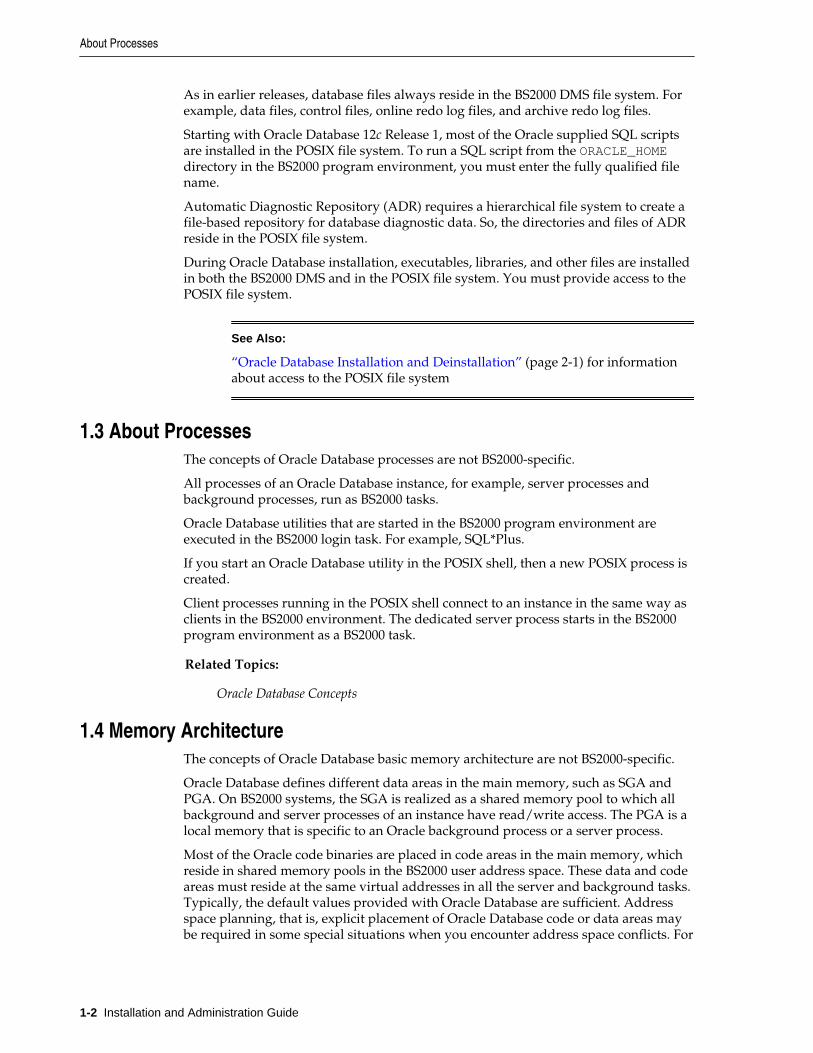
1.3 About ProcessesThe concepts of Oracle Database processes are not BS2000-specific.
All processes of an Oracle Database instance, for example, server processes andbackground processes, run as BS2000 tasks.
Oracle Database utilities that are started in the BS2000 program environment areexecuted in the BS2000 login task. For example, SQL*Plus.
If you start an Oracle Database utility in the POSIX shell, then a new POSIX process iscreated.
Client processes running in the POSIX shell connect to an instance in the same way asclients in the BS2000 environment. The dedicated server process starts in the BS2000program environment as a BS2000 task.
Related Topics:
Oracle Database Concepts
1.4 Memory ArchitectureThe concepts of Oracle Database basic memory architecture are not BS2000-specific.
Oracle Database defines different data areas in the main memory, such as SGA andPGA. On BS2000 systems, the SGA is realized as a shared memory pool to which allbackground and server processes of an instance have read/write access. The PGA is alocal memory that is specific to an Oracle background process or a server process.
Most of the Oracle code binaries are placed in code areas in the main memory, whichreside in shared memory pools in the BS2000 user address space. These data and codeareas must reside at the same virtual addresses in all the server and background tasks.Typically, the default values provided with Oracle Database are sufficient. Addressspace planning, that is, explicit placement of Oracle Database code or data areas maybe required in some special situations when you encounter address space conflicts. For
About Processes
1-2 Installation and Administration Guide

example, dynamic subsystems may occupy the default address ranges, which mayrequire you to relocate Oracle Database areas.
The following Oracle environment variables control explicit placement of OracleDatabase code and data areas:
• COM_BASE
• KNL_BASE
• PGA_BASE
• SGA_BASE
The order of the areas in the address space is not significant. The xxx_BASE variable isevaluated only during startup processing.
The first process which realizes that a shared pool does not exist creates this sharedpool. All other processes of an Oracle Database instance and server processes attach tothe existing shared memory.
The following figure is an example of the placement of data areas:
Figure 1-1 Placement of Data Areas in Background, Server and Utility Tasks
ORABGR
PGA1
COM_BASE
KNL_BASE
PGA_BASE
SGA_BASE
Task 1
OracleServer
PGA1
Task 2
Oracle Tools(e.g. sqlplus)
Task 3
Shared code Core/NLS/Oracle Net Services/Oracle Client
Shared code Kernel
SGA
The xxx_BASE values must be compatible with the BS2000 value SYSBASE (definedby BS2000 generation and delimiting the user address space).
Database application programs use a separate shared code pool for common servicessuch as Core, Globalization Support, and Net Services. The name of this pool isClient Common Pool and its placement can be controlled by the ORAENVenvironment variable CLN_BASE. The default value for the CLN_BASE is set to 200MB.
CLN_BASE=200MB
In general, Oracle Database administrators must be aware of conflicts between Oraclepool placements and other pool placements in the system.
Related Topics:
Oracle Database Concepts
Memory Architecture
Concepts and Architecture 1-3

1.5 BS2000 User IdsThe following BS2000 user IDs are required for Oracle Database:
• Installation User ID for Fujitsu BS2000/OSD Systems (page 1-4)
• DBA User ID for Fujitsu BS2000/OSD Systems (page 1-5)
• Client User IDs for Fujitsu BS2000/OSD Systems (page 1-5)
1.5.1 Installation User ID for Fujitsu BS2000/OSD SystemsThe installation user ID is required for installing Oracle Database. The POSIX user,which corresponds to the BS2000 installation user ID must be initialized with a uniqueuser number, group number, and a valid home directory.
A separate installation user ID is required for every Oracle Database release. However,multiple databases using the same release must refer to the same installation user ID.
Oracle Database software uses $ORACINST as a placeholder for the installation userID. During installation, ORACINST is replaced by the name of the installation user ID.In this guide, $ORACINST is used as a proxy for the installation user ID.
The installation procedure installs Oracle Database in the BS2000 file system (DMS)and in the POSIX file system. The BS2000 file system (DMS) contains:
• Executable programs, such as SQL*Plus.
• Load libraries, in particular, ORALOAD.LIB, from which modules are loaded forexecution.
• Files and system configuration files specifying default precompiler options.
• Object libraries required to link precompiler applications, such as PRO.LIB.
• Platform-specific installation utilities, for example BS2000 command procedures.
• Default configuration files, such as the default ORAENV file.
• Files for demo schemas and demo applications.
The POSIX file system contains:
• Oracle supplied SQL scripts.
• Binaries to run Oracle programs, such as SQL*Plus, in the POSIX shell.
• Shared objects, such as libclntsh.so.
• JAVA tools like loadjava or owm.
• Files for application development.
Note: Starting from Oracle Database 12c Release 1, most of the Oraclesupplied SQL scripts reside in the POSIX file system. In earlier OracleDatabase releases these scripts resided in the BS2000 DMS file system.
BS2000 User Ids
1-4 Installation and Administration Guide

1.5.2 DBA User ID for Fujitsu BS2000/OSD SystemsThe DBA user ID is used as the owner of one or more Oracle databases. This user IDowns all the files for a specific Oracle database. The corresponding POSIX user mustbe initialized with a unique user number, group number, and a valid home directory.
All BS2000 tasks of an Oracle Database instance are executed under the DBA user ID.These tasks refer to the executable programs and libraries, which are available underthe installation user ID. These programs and libraries must not be copied into the DBAuser ID. You can use the installation user ID as a DBA user ID. However, Oraclerecommends that you use separate user IDs.
Multiple databases can be created under the same or different DBA user IDs. If thedatabases are created under different BS2000 user IDs, then the databases areseparated and protected from each other by the BS2000 protection mechanisms.
1.5.3 Client User IDs for Fujitsu BS2000/OSD SystemsThe Client user ID allows a normal non-DBA user to access and use the databasethrough Oracle Database utilities, such as SQL*Plus, and through applicationprograms.
These client programs can run in the BS2000 user IDs, which are different from theDBA user ID. They can connect to Oracle Database through Oracle Net Servicesfacilities.
Oracle recommends to initialize the corresponding POSIX user with a unique usernumber, group number, and a valid home directory.
1.6 Oracle Database ProgramsOracle Database programs are stored in program libraries, known as BS2000 LMSlibraries.
The programs are loaded from these libraries for execution. They require a specificprogram environment, which must be defined before execution.
The following topics are discussed:
• Program Libraries (page 1-5)
• Program Environment (page 1-6)
1.6.1 Program LibrariesThe program libraries are required to run Oracle Database programs.
Oracle Database for Fujitsu BS2000/OSD requires the following program libraries:
• The ORALOAD Library (page 1-5)
• The ORAMESG Library (page 1-6)
The ORALOAD Library
All Oracle Database 12c Release 1 programs require the ORALOAD library, which is$ORACINST.ORALOAD.LIB by default. Oracle Database uses this library to loadexecutables and subroutines dynamically. The BS2000 link name ORALOAD mustidentify the ORALOAD library before calling any Oracle Database program. If the link
Oracle Database Programs
Concepts and Architecture 1-5

name is missing, then you get an error message from the BS2000 loader. This linkname is set when running the ORAENV procedure in the BS2000 program environment.
BS2000 file links are not visible in the POSIX program environment. Oracle Databaseprograms running in the POSIX shell use an internal mechanism to locate theORALOAD library.
The ORAMESG library
The ORAMESG library, $ORACINST.ORAMESG.LIB, is required for dynamicallyloading the binaries for the Oracle Database messages by an Oracle Database programwhen required. The BS2000 link name ORAMESG must identify the ORAMESG librarybefore calling any Oracle Database program. If the link name is missing, then you getan error message from the BS2000 loader. This link name is set when running theORAENV procedure.
BS2000 file links are not visible in the POSIX program environment. Oracle Databaseprograms running in the POSIX shell use an internal mechanism to locate theORAMESG library.
1.6.2 Program EnvironmentThe program environment for Oracle Database can either be the native BS2000environment or the POSIX Shell.
The default program environment for server and background tasks is the BS2000environment. Regardless of the program environment, Oracle Database always requirea running POSIX subsystem.
This section contains the following topics:
• Oracle Environment Variables (page 1-6)
• Setting Variables in the BS2000 Program Environment (page 1-6)
• Setting Variables in the POSIX Program Environment (page 1-7)
1.6.2.1 Oracle Environment Variables
All Oracle Database programs and database applications require environmentvariables.
Oracle Environment Variables (page B-1) contains a list of Oracle Databaseenvironment variables that the database administrator can use. The non-DBA usersmust set a few of these variables. Any DBA-specific variables that are placed in a non-DBA user’s environment are ignored.
1.6.2.2 Setting Variables in the BS2000 Program EnvironmentOracle Database utilities and application programs running in the BS2000 programenvironment use the Oracle Database environment definition file, ORAENV for settingup the program environment.
This file is divided into two parts, an executable part to set required BS2000 file links,and a static part for the definition of the environment variables. During programinitialization, the environment variables are read from the ORAENV file.
The procedure $ORACINST.INSTALL.P.DBA automatically creates a template for theORAENV file with the name sid.P.ORAENV, where sid is the instance identifier. Thegenerated file provides a default configuration for an Oracle Database instance. You
Oracle Database Programs
1-6 Installation and Administration Guide

can edit this file to adapt it to your needs. Non-DBA users can also generate anORAENV file specific to their own environment.
To make the environment variables accessible, run a CALL-PROCEDURE command onthe ORAENV file for the instance that you want to use. For example, to specify theenvironment variables for the instance DEMO, run the following BS2000 SDF command:
/CALL-PROCEDURE DEMO.P.ORAENV
Note:
• The database administrator must not modify the ORAENV file while anOracle Database is running.
• Non-DBA users may modify their ORAENV file at any time.
You can run several Oracle Database instances simultaneously on your BS2000 system,even within the same DBA user ID. A unique system identifier provides a globallyunique name for the instance so that a user can select a particular instance byassigning the instance identifier sid to the ORACLE_SID environment variable. This isachieved by calling the corresponding ORAENV file sid.P.ORAENV.
Alternatively the structured BS2000 SDF-P system variable SYSPOSIX can be used todefine the Oracle Database environment variables. The variable SYSPOSIX can bedeclared in the SYS.SDF.LOGON.USERINCL file so that it is accessible for allprograms and procedures started in the BS2000 login task. Use the followingcommand to declare the variable:
/DECLARE-VARIABLESYSPOSIX,TYPE=*STRUCTURE(DEFINITION=*DYNAMIC),SCOPE=*TASK(STATE=*ANY)
If you want to set an environment variable with an underscore in its name, then youmust substitute the underscore with a hyphen. For example, to set ORACLE_HOMEusing the SYSPOSIX system variable, use the following command:
/SET-VARIABLE SYSPOSIX.ORACLE-HOME=’/u01/app/oracle/product/12.1.0/dbhome_1’
See Also:
• C Library Functions V2.5A for POSIX Applications (BS2000/OSD) for moreinformation about the BS2000 SDF-P system variable SYSPOSIX
• “Generating The Environment-Definition File” (page 6-2) for moreinformation
1.6.2.3 Setting Variables in the POSIX Program EnvironmentOracle Database utilities and application programs running in the POSIX shell get theenvironment variables from the POSIX environment.
All Oracle Database and BS2000 specific variables can be set in the POSIXenvironment. The Oracle Database environment variable ORACLE_HOME must be set.To run a utility for a particular instance, you must also set the Oracle Databaseenvironment variable ORACLE_SID. The operating system environment variable PATH
Oracle Database Programs
Concepts and Architecture 1-7

must be extended by the path to the Oracle binaries $ORACLE_HOME/bin. If you donot set any other Oracle variable in the POSIX program environment, then OracleDatabase utilities uses the default values.
The installation procedure creates a profile in the oracle_home_path directorywhich can be executed to set and export the most important environment variableslike ORACLE_HOME, PATH , or LD_LIBRARY_PATH. You can execute this profile withthe following POSIX shell command:
oracle_home_path/.profile.oracle
Note:
The Oracle Database environment variable BGJPAR is marked as a commentafter the first installation. So, this variable will not be set when youexecute .profile.oracle command. If you do not set this variable, then thefollowing default value is used:
BGJPAR=START=IMME,CPU-LIMIT=NO,LOGGING=*NO
You can change the default value of a variable by setting this variable in the POSIXenvironment. For example:
$ NLS_LANG=German_Germany.WE8BS2000$ export NLS_LANG
You can also use the ORAENV file that you created in the BS2000 file system DMS.Create a file with the name oraenvsid in the $ORACLE_HOME/dbs directorydescribing the location and name of the ORAENV file.
For example, to use the ORAENV file, $ORADATA.ORCL.P.ORAENV, you must create afile with the name oraenvORCL in the $ORACLE_HOME/dbs directory that containsthe name of the BS2000 ORAENV file as follows:
$ ORACLE_HOME=/u01/app/oracle/product/12.1.0/dbhome_1$ export ORACLE_HOME$ echo '$ORADATA.ORCL.P.ORAENV' > $ORACLE_HOME/dbs/oraenvORCL
Set the Oracle Database environment variable ORACLE_SID and call the utility:
$ ORACLE_SID=ORCL$ export ORACLE_SID$ $ORACLE_HOME/bin/sqlplus /nolog
Oracle Database utilities running in the POSIX shell handle the variables of the BS2000ORAENV file as lower-ranking variables. If a variable is set in the POSIX environmentand the same variable is defined in the ORAENV file, then the POSIX variable is notoverwritten by the ORAENV variable. For example, if the variable, NLS_LANG is set toGerman_Germany.WE8BS2000 in the POSIX environment and toAmerican_America.WE8BS2000 in the BS2000 ORAENV file, then the variable keepsthe value German_Germany.WE8BS2000 in the environment of the Oracle Databaseutility running in the POSIX shell.
Consider the following:
• You must set the ORACLE_HOME variable.
• You must set the ORACLE_SID variable to specify a particular instance.
Oracle Database Programs
1-8 Installation and Administration Guide
• To access a BS2000 ORAENV file, you must create a file, oraenvsid in the$ORACLE_HOME/dbs directory that contains the fully qualified name of yourBS2000 ORAENV file.
• If a ORAENV file in the BS2000 file system is assigned to the specified ORACLE_SID,then ensure that this file is accessible for the utility.
• In the POSIX environment, the variables of the BS2000 ORAENV file are handled assubordinate variables.
• The SID in the file name oraenvsid is case sensitive and must match the SIDspecified in the Oracle Database environment variable ORACLE_SID.
1.7 Physical Storage StructuresThis section describes some features of physical storage structures, which are specificfor Fujitsu BS2000/OSD. It includes the following topics:
• Files of an Oracle Database (page 1-9)
• Oracle Managed Files (page 1-10)
• File of a Bigfile Tablespace (page 1-11)
Related Topics:
Oracle Database Concepts
1.7.1 Files of an Oracle DatabaseAn Oracle database is a set of operating system files that store data in persistent diskstorage.
There are different types of database files:
• data files
• temp files
• control files
• online redo log files
• archive redo log files
The database files always reside in the BS2000 DMS and have the file attribute, FILE-STRUC=PAM. Database files cannot reside in the POSIX file system.
Both the BS2000 operating system and Oracle Database perform input and outputefficiently in units called blocks. A block is the basic unit of data storage. An OracleDatabase block can have the following size depending on the format of the BS2000DMS pubset:
• 2K, 4K, 6K, 8K, 16K, 32K when using BS2000 2K pubset format
• 4K, 8K, 16K, 32K when using BS2000 4K pubset format
Physical Storage Structures
Concepts and Architecture 1-9

1.7.2 Oracle Managed FilesOracle Managed Files (OMF) is a file naming strategy that enables you to specifyoperations in terms of database objects rather than file names.
For example, you can create a tablespace without specifying the names of its data files.In this way, Oracle Managed Files eliminates the need for administrators to directlymange the operating system files in a database.
The following is a list of INIT.ORA parameters for Oracle Managed Files:
• DB_CREATE_FILE_DEST for data files, temp files, and block change tracking files.
• DB_CREATE_ONLINE_LOG_DEST_n for redo log files and control files.
• DB_RECOVERY_FILE_DEST for backups, archive log files, and flashback log files.
On BS2000, these parameters are used as a prefix for file names.
Oracle tablespace names can be up to 30 characters long. To associate an OMF createdfile name with its tablespace, you must use tablespace names that are distinct in thefirst eight characters. Oracle allows underscore (_) in tablespace names. Anyunderscore (_) that is present is changed to hyphen (-) for use in the generated filename.
File names for Oracle Managed Files have the following format on BS2000:
File type Format
control files destOMC.tttttttt
log files destOMLlll.tttttttt
permanent tablespace files, data file copies destOMD.tsn.tttttttt
temporary tablespace files destOMT.tsn.tttttttt
archive log files destOMA.Tnnn.Snnnnnn.tttttttt
data file or archivelog backup piece destOMB.Lnnn.tttttttt
rman autobackup piece destOMX.xnnnnnnn.tttttttt
block change tracking files destOMR.tttttttt
flashback log files destOMF.tttttttt
where:
• dest is the destination string (_DEST) in the OMF parameter
• tttttttt is the encoded timestamp (which looks like a random mix of letters andnumerals)
• lll is a three-digit log-group number
• tsn is up to eight characters for the tablespace name
• Tnnn is the letter "T" followed by a three-digit thread number
Physical Storage Structures
1-10 Installation and Administration Guide

• Snnnnnn is the letter "S" followed by a six-digit sequence number
• Lnnn is the letter "L" followed by a three-digit incremental level
• x is the letter P, if the database has an SPFILE, or the letter T if the database doesnot have an SPFILE
• nnnnnnn is a seven-byte timestamp
The maximum length of a BS2000 DMS file name is 54 characters. This maximumlength includes the BS2000 DMS catid and the userid, which can have a maximumlength of 16 characters in total. As a consequence, the preceding OMF file nameformats impose a limit of 39 characters on DB_CREATE_ONLINE_LOG_DEST_n andDB_CREATE_FILE_DEST, and 29 characters on DB_RECOVERY_FILE_DEST.
See Also:
Oracle Database Administrator's Guide for more information about file nameformats
1.7.3 Files of a Bigfile TablespaceA bigfile tablespace contains a single large data file or a temp file.
This single data file or temp file must reside on a BS2000 DMS pubset with thefollowing attributes:
LARGE_VOLUMES=*ALLOWED and LARGE_FILES=*ALLOWED
See Also: Files and Volumes Larger than 32 GB for more information abouthandling large objects on BS2000/OSD
1.8 Parameter FilesThe database parameter file INIT.ORA is used to define startup parameters for thedatabase and the instance.
By default, this file resides in the BS2000 DMS in the DBA user ID. It is also possible toplace this file in the POSIX file system.
In addition to the INIT.ORA file, a binary server-side initialization file SPFILE can becreated by using the CREATE SPFILE statement. This file must be created in theBS2000 DMS in the DBA user ID.
Related Topics:
Oracle Database Reference
Oracle Database Administrator’s Guide
Parameter Files
Concepts and Architecture 1-11

Parameter Files
1-12 Installation and Administration Guide
Part IIInstallation and Database Creation
This part of the document discusses the following topics:
• Oracle Database Installation and Deinstallation (page 2-1)
• About Creating a Database (page 3-1)
• About Upgrading a Database (page 4-1)


2Oracle Database Installation and
Deinstallation
The preinstallation requirements, postinstallation tasks, installation and deinstallationof Oracle Database 12c Release 1 on BS2000 are discussed in the following topics:
• Overview of Oracle Database Installation (page 2-1)
• Planning the Installation (page 2-2)
• Oracle Database Preinstallation Requirements (page 2-2)
• Installing Oracle Database (page 2-17)
• Oracle Database Postinstallation Tasks (page 2-19)
• About Installing Multiple Oracle Databases (page 2-20)
• About Removing Oracle Database Software (page 2-20)
2.1 Overview of Oracle Database InstallationYou can download Oracle Database software from Oracle Software Delivery Cloud at https://edelivery.oracle.com. The installation files are included in a LibraryMaintenance System (LMS) library called staging library, which is delivered in a zipfile.
Download the zip file and extract it to a temporary location on a Windows or UNIXsystem. Then upload the staging library to the BS2000 system using File TransferProtocol (FTP). The following sections describe the installation process for OracleDatabase on the Fujitsu BS2000/OSD Servers. The name of the staging library reflectsthe releases of Oracle Database or Oracle Database Patch Set, and the supportedhardware architecture:
• oraxxxxx.arch.lib
Where xxxxx is the release number and arch is the supported hardwarearchitecture. For example:
ora12102.s390.lib
Note:
ora12102.s390.lib is the name of the staging library for the base release ofOracle Database 12c Release 1 (12.1.0.2).
Oracle Database Installation and Deinstallation 2-1

2.2 Planning the InstallationThe Oracle Database installation process consists of the following steps:
1. Read the release notes: Refer to Oracle Database Release Notes for FujitsuBS2000/OSD before you begin the installation.
2. Review the licensing information: Although the installation media in the mediapack contain many Oracle components, you are permitted to use only thosecomponents for which you have purchased licenses. Oracle Support Services doesnot provide support for components for which licenses have not been purchased.
See Also:
Oracle Database Licensing Information for more licensing information
3. Complete preinstallation tasks: "Oracle Database Preinstallation Requirements(page 2-2)" describes preinstallation tasks that you must complete beforeinstalling the product.
4. Install the software: "Installing Oracle Database (page 2-17)" describes how to usethe installation procedure for BS2000 to install Oracle Database 12c Release 1.
5. Complete postinstallation tasks: "Oracle Database Postinstallation Tasks(page 2-19)" describes recommended and required postinstallation tasks.
6. Multiple software installations: "About Installing Multiple Oracle Databases(page 2-20)" provides information about multiple installations of Oracle software.
7. Remove Oracle Database software: "About Removing Oracle Database Software(page 2-20)" describes how to remove Oracle Database software from your system.
2.3 Oracle Database Preinstallation RequirementsYou must complete the following tasks before you install Oracle Database 12c Release1 for Fujitsu BS2000/OSD:
• Checking Hardware Requirements (page 2-2)
• Checking Software Requirements (page 2-5)
• Checking Network Setup (page 2-8)
• Creating Required Operating System Users and Groups (page 2-9)
• Identify Required Directories in POSIX (page 2-13)
• Identifying or Creating Oracle Base Directory in POSIX (page 2-15)
2.3.1 Checking Hardware RequirementsThe system must meet the following hardware requirements:
• Fujitsu BS2000 Server Lines (page 2-3)
• Memory Requirements (page 2-3)
Planning the Installation
2-2 Installation and Administration Guide

• Disk Space Requirements (page 2-3)
• Display Requirements (page 2-4)
2.3.1.1 Fujitsu BS2000 Server Lines
Oracle Database 12c Release 1 for Fujitsu BS2000/OSD (S Series) is based on the /390instruction set and supports the following Fujitsu BS2000 server lines:
• S Servers
• SE Servers
• SQ Servers
This release runs on all Fujitsu BS2000 processors, in particular on the S servers and /390-based system units of SE servers. It runs in the /390 compatibility mode onprocessors that are based on Intel x86 architecture. This applies for x86-based serverunits of the SE servers (SU x86).
See Also:
“Oracle Database Variants for Fujitsu BS2000/OSD” for details about whichvariant can run on the various Fujitsu BS2000 server lines and hardwarearchitectures
Note: The release of a special variant of Oracle Database 12c Release 1 basedon the x86 instruction set is not planned.
2.3.1.2 Memory Requirements
Oracle Database requires at least 2 GB main memory.
The address space limit for the installation user ID should be 512 MB or higher. For theDBA user IDs, it should be at least 1024 MB.
• To determine the memory size, enter the following command:
/SHOW-SYSTEM-INFORMATION INFORMATION=*MEMORY-SIZE
• To determine the user address space limit, log in to the desired user ID and enterthe following command:
/SHOW-USER-ATTRIBUTES
If the user address space is less than the required size, then ask your BS2000 systemadministrator to increase the address space limit by using the command:
/MODIFY-USER-ATTRIBUTES USER-IDENTIFICATION=user-id,ADRESS-SPACE-LIMIT={512|1024}
2.3.1.3 Disk Space Requirements
Oracle Database 12c Release 1 requires an installation in the BS2000 file system (DMS)and in the POSIX file system. Oracle recommends using a separate POSIX file systemfor the Oracle Database software installation.
Oracle Database Preinstallation Requirements
Oracle Database Installation and Deinstallation 2-3

See Also:
Fujitsu guide for BS2000/OSD mainframes POSIX Basics for Users and SystemAdministrators for more information about creating an additional POSIX filesystem:
http://manuals.ts.fujitsu.com/file/11125/posix_g.pdf
When the POSIX administrator or BS2000 system administrator creates a new POSIXfile system by using the START-POSIX-INSTALLATION command, a new POSIXcontainer file similar to a UNIX disk partition is allocated in the BS2000 file system.The POSIX file system is created in this container file. If the desired mount point, forexample, /u01, is not available in the root system, then the mount point is created andthe file system is mounted.
Oracle Database 12c Release 1 software for Fujitsu BS2000/OSD requires the followingdisk space:
• BS2000 file system:
Item Free Disk Space
Software 1.200.000 PAM pages
Staging library 1.000.000 PAM pages
Recommended (in total) 2.500.000 PAM pages
• POSIX file system:
Requirement Free Disk Space
Minimum 4 GB
Recommended 7 GB
Note:
The diagnostic data of the Automatic Diagnostic Repository (ADR) reside inthe POSIX file system. The disk space required for the ADR depends on thenumber of Oracle database instances and the amount of diagnostic datacreated for incidents. Therefore, you may need significantly more disk spacein the POSIX file system than recommended.
The extracted files occupy about 1.200.000 PAM pages in the BS2000 file system. Thefiles installed in the POSIX file system occupy about 600 MB.
The staging library does not have to reside in your installation user ID.
2.3.1.4 Display Requirements
Oracle Database supports 9750 compatible terminals. In addition, Oracle Databasesupports X-terminals in the POSIX environment when you log in to POSIX usingrlogin or ssh.
Oracle Database Preinstallation Requirements
2-4 Installation and Administration Guide
The minimum resolution for Java based tools with a graphical user interface (GUI)shipped with Oracle Database 12c Release 1 is 1024 x 768 or higher.
2.3.2 Checking Software RequirementsBefore installing Oracle Database, Oracle recommends that you check if your systemmeets the following software requirements:
• Operating System and Communication System Requirements (page 2-5)
• POSIX Parameters (page 2-6)
• Package Requirements (page 2-6)
• Additional BS2000 Software Components (page 2-7)
• Compiler and CRTE Requirements for Oracle Database Applications (page 2-8)
• Additional Software Requirements (page 2-8)
2.3.2.1 Operating System and Communication System Requirements
Oracle Database 12c Release 1 requires the following operating system andcommunication system versions or higher:
• BS2000/OSD-BC V9.0, BS2000 OSD/BC V10.0, and higher.
• openNet Server V3.5
This includes BCAM V22.0 and Sockets V2.6.
Oracle recommends that you regularly install the most current correction packages foryour BS2000 system.
Check the version of your BS2000 system with the following command:
/SHOW-SYSTEM-INFORMATION INFORMATION=*BS2000-ID
Note:
The correction level of the POSIX subsystem must be A43 or higher. You cancheck the POSIX correction level with the following command:
/EXECUTE-POSIX-CMD CMD='uname -v'
You can check the version of your openNet Server software by checking the version ofthe software component BCAM with the following command:
/SHOW-INSTALLATION-PATH INSTALLATION-UNIT=BCAM,LOGICAL-IDENTIFIER=*NONE
You can also ask your BS2000 system administrator to check the BCAM version withthe command:
/BCSHOW SHOW=BCAM
Note:
The BCAM version must be V22 or higher.
Oracle Database Preinstallation Requirements
Oracle Database Installation and Deinstallation 2-5

2.3.2.2 POSIX Parameters
Check the following POSIX parameters for the recommended values for OracleDatabase 12c Release 1:
Parameter Name Description Recommended Value
HDSTNI Number of hard disk servertasks
4
NPBUF Number of physical I/Obuffers
20
NPROC Maximum number ofprocesses
1000
NBUF Number of I/O buffers 200
MAXUP Maximum number ofprocesses per user
300
NOTTY Maximum number of ttys 512
NOPTY Maximum number of ptys 512
NOSTTY Maximum number of sttys 512
DBLSTATE Initial state of POSIX loader 1
DBLPOOL Size of pool in MB for POSIXloader
30
The POSIX administrator or the BS2000 system administrator can check the values inthe file $TSOS.SYSSSI.POSIX-BC.version, for example, version = 090|100. Thevalues can also be checked by using the usp POSIX command :
# usp -s nproc
The POSIX administrator or the BS2000 administrator can update the value with thefollowing command:
# usp -P parameter -v value
Note:
• If you edit the parameters in the $TSOS.SYSSSI.POSIX-BC.versionfile, then you must restart the POSIX subsystem.
• The parameter values depend on the overall load of the BS2000 system andmust be adjusted to this load. The values listed previously are minimalrecommendations.
2.3.2.3 Package Requirements
Oracle Database 12c Release 1 requires the following POSIX packages with thespecified versions or higher:
Oracle Database Preinstallation Requirements
2-6 Installation and Administration Guide

• POSIX-SH V8.0
• JENV V6.0
• APACHE V2.2, including correction package 2/2015
• PERL V5.8, including correction package 2/2015
• BCAM V22.0
Use the following POSIX command to check the installed packages:
$ pkginfo package name
Note:
Ensure that all the specified packages are installed before installing OracleDatabase.
2.3.2.4 Additional BS2000 Software Components
Oracle Database 12c Release 1 requires the following additional software with thespecified versions or higher:
• CRTE-BASYS V1.9A or CRTE-BASYS V10.0A
• SDF V4.7
• SDF-P V2.5
• SDF-A V4.1
• EDT V17.0A
• LMS V3.4
• openSM2 V9.0
• PTHREADS V1.4 including correction package 1/2016
• ORACLE-TOOLS V1.0
The Oracle Database utility ADRCI requires the zip utility in the POSIXenvironment for creating ADR incident packages, that can be uploaded to OracleSupport.
Currently, the zip utility is not included in the supply unit of POSIX of FujitsuBS2000. You must download it separately from the download section on the FujitsuSupport website:
http://support.ts.fujitsu.com/Download
Download the software package called ORACLE-TOOLS. This software packagecontains the utilities zip and unzip. You can find this software package by enteringthe package name ORACLE-TOOLS into the search box of the download section.Install the software package ORACLE-TOOLS as described in the readme file.
Oracle Database Preinstallation Requirements
Oracle Database Installation and Deinstallation 2-7

Note:
• The subsystem CRTEBASY must be loaded.
• SDF-A is optional. SDF-A is only required to update the SDF user syntaxfile for Oracle. If SDF-A is not available, then the SDF user syntax fileupdate for Oracle is skipped. If you do not update the SDF syntax file forOracle, then you cannot start Oracle Database utilities with BS2000 SDFcommands in UNIX-style.
• The software component PTHREAD is required by the replay client utility,wrc.
2.3.2.5 Compiler and CRTE Requirements for Oracle Database Applications
If high-level languages, such as C or COBOL, are used to interface with the OracleDatabase, then the following versions or higher are supported:
• COBOL85 V2.3
• COBOL2000 V1.5
• CPP V3.2
• CRTE V2.9
• CRTE V10.0
2.3.2.6 Additional Software Requirements
openUTM V6.1 or higher is required if you want to use Oracle Database inconfigurations with the transaction monitor openUTM.
2.3.3 Checking Network SetupTypically, the computer on which you want to install Oracle Database is connected tothe network as a member of a network domain. Besides the BCAM host name, the hostmust have a fully qualified name (hostname.domain) that can be resolved by a DNS.You must perform the following important checks on a BS2000 computer:
• About Checking Sockets Subsystem (page 2-8)
• About Checking BCAM Timer (page 2-9)
• About Checking LWRESD (page 2-9)
• About Checking Loopback Address (page 2-9)
• About Checking the Configuration Files in the POSIX File System (page 2-9)
2.3.3.1 About Checking Sockets Subsystem
The sockets subsystem SOC6 must be created and running. You can check the status ofthe sockets subsystems with the following command:
/SHOW-SUBSYSTEM-STATUS SOC6
Oracle Database Preinstallation Requirements
2-8 Installation and Administration Guide

2.3.3.2 About Checking BCAM Timer
Oracle recommends to check the BCAM connection and letter timer. Your BS2000system administrator can display the timer values with the following command:
/SHOW-BCAM-TIMER[TIMER=*STD]
The value for the connection timer, also called CONN in the output of the STD sectionmust be set to a minimum of 600 seconds. The value for the letter timer, also known asLETT in the STD section must be set to a large value. The value 0 in the outputindicates an infinite letter time.
2.3.3.3 About Checking LWRESD
Oracle recommends to use the Light Weight Resolver (LWRESD) for host nameresolution operations. You require BS2000 system administrator privilege for checkingand administering LWRESD. Ask your BS2000 system administrator to check ifLWRESD is running, by using the following command:
/SHOW-LWRESD-PARAMETERS
For example, the following output shows the parameter file in use:
RESOLV-FILE : :PVS1:$TSOS.SYSDAT.LWRESD.012.RESOLV.CONF
This parameter file must contain valid name server IP-addresses and a domain or asearch list of domain names.
2.3.3.4 About Checking Loopback Address
Check if the $TSOS.SYSDAT.BCAM.ETC.HOSTS file contains an entry for theloopback address. For example:
127.0.0.1 localhost loopback # local address
2.3.3.5 About Checking the Configuration Files in the POSIX File System
Check the network configuration files, /etc/hosts and /etc/resolv.conf.These files must be identical to the corresponding files in the BS2000 administratoruser ID TSOS. If the files are not identical, then consult your BS2000 systemadministrator to synchronize the files.
2.3.4 Creating Required Operating System Users and GroupsIf you are installing Oracle software on your computer for the first time, then you mayhave to create several BS2000 user IDs, POSIX users, and groups. The BS2000 user IDfor the Oracle Database 12c Release 1 software is called the installation user ID. Theuser ID where an Oracle database is stored is called the Oracle DatabaseAdministration (DBA) user ID.
The name of the groups can be:
• oracle or oinstall for the Oracle Database installation user.
• dba for the Oracle Database Administration (DBA) user.
On BS2000, you can use only one group for both Oracle Database installation andadministration. Oracle recommends that you use the installation user ID group,oracle, as the primary group for users who require administrative privileges forOracle Database administration. However, if you want to use a separate group for theDBA user ID, for example, dba, then you must ensure that dba is the primary group,
Oracle Database Preinstallation Requirements
Oracle Database Installation and Deinstallation 2-9

and the installation user ID group is assigned to the DBA user ID as a subsidiarygroup.
This section includes the following topics:
• About Creating the BS2000 Installation User ID (page 2-10)
• About Creating the POSIX System Group (page 2-10)
• About Initializing the POSIX User (page 2-11)
• About Creating Users and Groups for Oracle Databases (page 2-11)
2.3.4.1 About Creating the BS2000 Installation User ID
The BS2000 system administrator must create an user ID under which you want theOracle Database 12c Release 1 software to reside. This user ID is called the Oracleinstallation user ID or Oracle software owner. Throughout this guide, ORACINST isused as a proxy name for the real installation user ID. This user ID does not requireany special BS2000 privileges:
• You must not use the BS2000 system administrator user ID TSOS as an OracleDatabase installation user ID.
• The user address space limit must be set to at least 512 MB.
• During installation, all files are created with the following file attributes:
USER-ACC=ALL-USERS,ACCESS=READ
• You do not need to define write access for any file after installation.
When the BS2000 system administrator creates the installation user ID with thefollowing command, the corresponding POSIX user is also created:
/ADD-USER ORACINST,…
The POSIX user attributes, namely, user number, group number, login directory andprogram, are assigned default values.
2.3.4.2 About Creating the POSIX System Group
For installation under POSIX, the POSIX administrator or the BS2000 systemadministrator must create system groups in POSIX. Oracle recommends to use theoracle group for the Oracle software owner. If you want to use the dba group for theOracle database user, then you must add the group of the software owner, that is,oracle as a supplementary group for the DBA user.
• If this is not the first Oracle Database installation under POSIX, then you candetermine the group name by using the following POSIX command:
$ more /var/opt/oracle/oraInst.loc
If the oraInst.loc file exists, then the output of this command is similar to thefollowing:
inventory_loc=/u01/app/oraInventoryinst_group=oracle
The inst_group parameter shows the group name of your former OracleDatabase installation. In the above example, it is oracle.
Oracle Database Preinstallation Requirements
2-10 Installation and Administration Guide

• To determine if this group is defined with a unique group ID, enter the followingcommand:
$ grep 'oracle' /etc/group
If the output shows the group name and the group ID is greater than 100, then thegroup exists.
If the group ID is 100, then you must change the ID to a distinct value greater than100, for example, 104.
If the group cannot be found in /etc/group, then ask your POSIX administratoror BS2000 system administrator to add the group name and a unique groupnumber to the /etc/group file. The administrator must use a text editor, such asedt or vi to add a new line with the following specifications:
groupname::groupnumber:user-id[,user-id,...]
The following example shows a line in the /etc/group file for the oracle group:
oracle::104:ORACINST,ORACDBA
Add further installation user IDs and all DBA user IDs to the line with the Oraclegroup ID.
2.3.4.3 About Initializing the POSIX User
Before using the installation user ID as a POSIX user, the POSIX administrator or theBS2000 system administrator must initialize the POSIX user with the followingcommand:
/ADD-POSIX-USER USER-NAME=installation-user-id,USER-NUMBER=nnn,GROUP-NUMBER=oracle-group-number,HOME-DIRECTORY=path[,RLOGIN-ACCOUNT=account]
Consider the following requirements:
• The USER-NAME is the installation user ID.
• The USER-NUMBER must be unique and greater than 100.
• The GROUP-NUMBER must be the number of the Oracle installation group andgreater than 100.
• The HOME-DIRECTORY must be a valid path. Do not use a path which resides inthe root or var file system. Oracle strictly recommends to create a separate filesystem for the POSIX users. An example for a valid HOME-DIRECTORY is /home/oracinst where /home is the mount point of a POSIX file system.
• The RLOGIN-ACCOUNT can be specified if you allow the remote access by usingrlogin or ssh.
2.3.4.4 About Creating Users and Groups for Oracle Databases
An Oracle database in BS2000 resides in BS2000 user IDs. This user ID is called theDBA user ID and is different from the Oracle database installation user ID. The BS2000system administrator must ensure that the DBA user ID has the following attributesand privileges to create or modify the DBA user ID:
• Set the user’s address space limit to at least the following value:
ADDRESS-SPACE-LIMIT=1024
Oracle Database Preinstallation Requirements
Oracle Database Installation and Deinstallation 2-11

• Set the following parameters for ACCOUNT-ATTRIBUTES:
MAX-ALLOWED-CATEGORY=TP NO-CPU-LIMIT=YESSTART-IMMEDIATE=YES
Note: You must not use the BS2000 system administrator user ID TSOS as anOracle Database DBA user ID under any circumstances.
Oracle recommends that the BS2000 system administrator defines a separate job classfor the background and server tasks.
This job class must have the following characteristics:
TP-ALLOWED=YESNO-CPU-LIMIT=YESJOB-TYPE=BATCHSTART=IMMEDIATELY
The POSIX user for the DBA user ID must be initialized with a unique user numberand group number. The group number can be the same as used for the OracleDatabase software owner or can be a separate dba group number.
If you create a new DBA user ID for a new Oracle database, then you must alsoinitialize the POSIX user in the same way as described in "About Initializing the POSIXUser (page 2-11)." If you want to upgrade an existing Oracle database, then you mustcheck if the POSIX user is initialized for the DBA user ID using the following BS2000command:
/SHOW-POSIX-USER-ATTRIBUTES
If the output shows default values and the directory is /home/gast, then initializethe POSIX user using the following BS2000 command:
/ADD-POSIX-USER USER-NAME=dba-user-id,USER-NUMBER=nnn,GROUP-NUMBER=dba-group-number,HOME-DIRECTORY=path[,RLOGIN-ACCOUNT=account]
You can modify the POSIX user attributes of an initialized POSIX user using thefollowing BS2000 command:
/MODIFY-POSIX-USER-ATTRIBUTES USER-ID=dba-user-id,USER-NUMBER=nnn,GROUP-NUMBER=dba-group-number,DIRECTORY=path
Add the new DBA user ID to the DBA group in the /etc/group file. If the DBAgroup is not present, then you must create a new entry for the DBA group inthe /etc/group file as described in “About Creating the POSIX System Group”(page 2-10). Finally, add the DBA user ID to the group of the Oracle Database softwareowner.
The following example shows the entries for the oracle and dba groups in the etc/group file:
oracle::504:ORAINST,ORADATAdba::505:ORADATA
Oracle Database Preinstallation Requirements
2-12 Installation and Administration Guide

Note:
• Ensure that the home directory does not reside in the root or var filesystem.
• The USER-NUMBER must be unique and greater than 100.
• The GROUP-NUMBER must be unique and greater than 100. It can be thesame as the Oracle installation group.
2.3.5 Identify Required Directories in POSIXThe following sections describe about the directories that you must identify or createin the POSIX file system for Oracle Database:
• About Oracle Base Directory (page 2-13)
• About Oracle Inventory Directory (page 2-14)
• About Oracle Home Directory (page 2-14)
2.3.5.1 About Oracle Base Directory
Oracle base directory is a top-level directory for Oracle software installations. Oraclerecommends to use only one Oracle base directory for all software installations with apath similar to the following:
/mount_point/app/oracbase
In this example:
• mount_point is the mount point directory for the file system that contains theOracle software. The examples in this guide use /u01 for the mount pointdirectory.
• oracbase is used as an example for a significant subdirectory name to show thatthis is the Oracle base for the software insallations.
• If you want to use different Oracle base directories, then you can use the operatingsystem user name of the Oracle software owner as the last subdirectory name.
The components /mount_point/app represent the operating system part of thepath. Before you install Oracle Database 12c Release 1, you must create the operatingsystem part of the path.
Note:
• The installation user ID and the installation group must have read, write,and execute permissions to the subdirectory app.
• During Oracle Database software installation, you are prompted for a validOracle base directory. You can accept the default value or enter a new path.The installation procedure creates the Oracle base directory if possible.
Oracle Database Preinstallation Requirements
Oracle Database Installation and Deinstallation 2-13

Although multiple Oracle installations require separate installation user IDs in BS2000and separate Oracle home directories, you can always use the same Oracle basedirectory. For example:
/u01/app/oracbase
See Also:
"Expanding a File System for the Oracle Base Directory (page 2-16)" for moreinformation about the POSIX file system
2.3.5.2 About Oracle Inventory Directory
The Oracle Inventory directory (oraInventory) stores the inventory of all softwareinstalled on the system. It is required and shared by all Oracle software installationson a single computer. If you have an existing Oracle Inventory path, then the Oracleinstallation procedure uses that Oracle Inventory.
The Oracle installation procedure derives the path for the Oracle Inventory directoryfrom the /var/opt/oracle/oraInst.loc file. If this file does not exist, then itderives the inventory path from ORACLE_BASE and creates the Oracle Inventorydirectory in the following path: ORACLE_BASE/../oraInventory. For example, ifORACLE_BASE is set to /u01/app/oracbase, then the Oracle Inventory directory iscreated in the path /u01/app/oraInventory.
The Oracle installation procedure creates the Oracle subdirectories that you specifyand sets the correct owner, group, and permissions for it. The operating system part ofthe path, for example, /u01/app must exist and you must have read, write, andexecute permissions in the app directory.
Note:
• All Oracle software installations rely on the Oracle Inventory directory.Ensure that you back it up regularly.
• Do not delete this directory unless you have completely removed all Oraclesoftware from the system.
• By default, the Oracle Inventory directory is not installed under the Oraclebase directory. This is because all Oracle software installations share acommon Oracle Inventory, so there is only one Oracle Inventory for allsoftware owners.
2.3.5.3 About Oracle Home Directory
The Oracle home directory is the directory where you install the software for aparticular Oracle product. When you run the Oracle installation procedure, it promptsyou to specify the path of this directory. You can accept the recommended path orenter a new path. The directory that you specify must be a subdirectory of the Oraclebase directory. Oracle recommends that you specify a path similar to the following forthe Oracle home directory:
oracle_base_path/product/12.1.0/dbhome_1
Oracle Database Preinstallation Requirements
2-14 Installation and Administration Guide

The Oracle installation procedure creates the directory path that you specify. It alsosets the correct owner, group, and permissions. You do not have to create thisdirectory manually.
Note:
During the installation, you must not specify an existing directory that haspredefined permissions applied to it as the Oracle home directory. If you do,then you may experience installation failure due to file and group ownershippermission errors.
2.3.6 Identifying or Creating Oracle Base Directory in POSIXBefore you start the installation, you must either identify the operating system part ofan existing Oracle base directory or if required, create one. This section containsinformation about the following topics:
• About Identifying an Existing Oracle Base Directory in POSIX (page 2-15)
• Expanding a File System for the Oracle Base Directory (page 2-16)
• Creating a File System for the Oracle Base Directory (page 2-16)
Note:
You can create an Oracle base directory, even if other Oracle base directoriesexist on the system.
2.3.6.1 About Identifying an Existing Oracle Base Directory in POSIX
You can identify the existing Oracle base directories as follows:
• Identifying an existing Oracle Inventory directory.
Search for the string 'inventory_loc' in the file /var/opt/oracle/oraInst.loc:
$ grep 'inventory_loc' /var/opt/oracle/oraInst.loc
If oraInst.loc exists, then the output is similar to the following:
inventory_loc=/u01/app/oraInventory
• Deriving an Oracle base directory from an existing Oracle home directory.
Enter the following command to display the contents of the /var/opt/oracle/oratab file:
$ more /var/opt/oratab
If the oratab file exists, then it may contain lines similar to the following:
*:/u01/app/orac1020/product/10g:N*:/u01/app/orac1120/product/dbhome:N
The directory paths specified on each line identify Oracle home directories. In thepreceding examples, Oracle base directories contain the user name of the Oraclesoftware owner, /u01/app/orac1020 and /u01/app/orac1120 respectively.
Oracle Database Preinstallation Requirements
Oracle Database Installation and Deinstallation 2-15
Oracle recommends to use a single base directory for all Oracle Databaseinstallations. For example:
/u01/app/oracbase
Ensure that the Oracle base directory:
• Is not on the same file system as the operating system (root or var).
• Has sufficient free disk space.
To determine the free disk space on the file system where the Oracle base directory islocated, enter the following command:
$ df -k oracle_base_path
Note:
The installation procedure looks for an Oracle base directory and prompts youto accept the suggested path or to enter a new path.
2.3.6.2 Expanding a File System for the Oracle Base Directory
If you want to install Oracle Database into an existing file system with existing Oraclesoftware installations, but the POSIX file system has insufficient space, then the POSIXadministrator or the BS2000 system administrator can expand the file system with theOracle base directory using the POSIX installer. Complete the following steps toexpand the file system using the POSIX installer:
1. Start the POSIX Installer using the following command:
/START-POSIX-INSTALLATION
2. Choose Administrate POSIX filesystems.
3. Mark the desired file system and choose expand.
4. Enter the number of PAM pages by which the file system should be expanded.
2.3.6.3 Creating a File System for the Oracle Base Directory
If you want the Oracle base directory to reside in a new POSIX files system, then thePOSIX administrator or the BS2000 system administrator must create a POSIX filesystem using the POSIX installer. Complete the following steps to create a POSIX filesystem using the POSIX installer:
1. Start the POSIX installer using the following command:
/START-POSIX-INSTALLATION
2. Choose Administrate POSIX filesystems and then, choose append.
3. Enter the BS2000 file name for the container of the file system.
4. Enter the number of PAM pages of the container.
The POSIX installer allocates a new POSIX container file in the BS2000 file system andcreates the POSIX file system inside the container. The POSIX installer also promptsfor a mount point for the new file system. If the mount point does not exist, then it iscreated in the root system and the new file system is mounted. By default, the owner
Oracle Database Preinstallation Requirements
2-16 Installation and Administration Guide

of the new file system is SYSROOT. The administrator must at least create theoperating system part of the Oracle base directory and specify the correct owner,group, and permissions for it with the following specifications:
# /mkdir -p /mount_point/app/ # chownoracle_sw_owner:oracle_installation_group/mount_point/app/ #chmod 775 /mount_point/app/
For example:
# mkdir -p /u01/app/# chown oracinst:oracle /u01/app/# chmod 775 /u01/app/
2.4 Installing Oracle DatabaseOracle Database 12c Release 1 (12.1) software is available in a zipped LMS library.Complete the following steps to install Oracle Database:
1. Copy the software to a temporary location on a Windows or UNIX system that hasFTP access to the BS2000 system where you want to install the software.
Download the installation files from Oracle Software Delivery Cloud, https://edelivery.oracle.com/, and move the zip file to this Windows or UNIXsystem.
2. Unzip the zip file with a zip utility, such as WinZip, to create the staging libraryoraxxxxx.s390.lib.
3. Transfer the staging library with the FTP binary into a user ID on the BS2000system. This can either be the Oracle installation user ID or any other user ID.Before the transfer, if you are using BS2000 FTP, preallocate the file by using theFTP file command as shown in the example:
file oraxxxxx.s390.lib,fcbtype=pam,blkctrl=no,blksize=(std,2),space=1000000
Use the following command if you are using FTP on the platform where you hadunzipped the file:
quote fileoraxxxxx.s390.lib,fcbtype=pam,blkctrl=no,blksize=(std,2),space=1000000
4. If you have transferred the staging library to a user ID that is not equal to theOracle installation user ID, then you must grant access to the staging library for allusers. Use the following command:
/MODIFY-FILE-ATTRIBUTES ORAxxxxx.S390.LIB,USER-ACCESS=*ALL-USERS
5. Log in to the installation user ID.
6. If the staging library resides in the installation user ID, then call the Oracleinstallation procedure as follows:
/CALL-PROCEDURE (ORAxxxxx.S390.LIB,ORAINST.PRC)
If you have stored the staging library in a different BS2000 user ID, then call theOracle installation procedure as follows:
Installing Oracle Database
Oracle Database Installation and Deinstallation 2-17

/CALL-PROCEDURE(staging_userid.ORAxxxxx.S390.LIB,ORAINST.PRC),(STAGING-UID=staging_userid)
For example:
/CALL-PROCEDURE ($FOO.ORAxxxxx.S390.LIB,ORAINST.PRC),(STAGING-UID=$FOO)
Oracle Database installation procedure performs the following actions:
• Checks hardware and software requirements.
• Checks the available disk space for the BS2000 files and the POSIX files.
• Extracts the files from the staging library.
• Installs Oracle software in the installation user ID.
• Updates the SDF syntax files, if SDF-A is available.
• Installs Oracle Database software in the POSIX file system.
• Registers the software in the Oracle Inventory file.
The following is the complete syntax of the installation procedure:
/CALL-PROCEDURE ([staging_userid.]ORAxxxxx.S390.LIB,ORAINST.PRC)[,
([CMD={INSTALL|UNINSTALL}]
[,INSTALLATION-TYPE={DATABASE|CLIENT}]]
[,STAGING-UID={''|staging_userid}]
[,ORACLE-BASE={*PROMPT|oracle_base_path}]
[,ORACLE-HOME={*PROMPT|oracle_home_path}]
[,DEBUG={Y|N}])
The following table lists the parameters, their corresponding values, and theirdescription that are used during Oracle Database installation:
Parameter Value Description
CMD INSTALL|UNINSTALL
default: INSTALL
Install or uninstall OracleDatabase.
INSTALLATION-TYPE DATABASE|CLIENT
default:DATABASE
Types of installation.
STAGING-UID ' '|user ID of staging library
default: ''
BS2000 user ID where thestaging library is located.
Installing Oracle Database
2-18 Installation and Administration Guide

Parameter Value Description
ORACLE-BASE *PROMPT|
oracle_base_path
default: *PROMPT
The Oracle base directory isrequired for installing OracleDatabase 12c Release 1 in thePOSIX file system. Thedefault value *PROMPT,indicates the prompting foran Oracle base directory.
ORACLE-HOME *PROMPT|
oracle_home_path
default: *PROMPT
The Oracle home directory isrequired for installing OracleDatabase 12c Release 1 in thePOSIX file system. Thedefault value *PROMPTindicates the prompting foran Oracle home directory.
DEBUG Y|N
default: N
Debug the installationprocedures.
The installation procedure also provides the opportunity to run the installation as abackground task. In this case, you must specify the parameters ORACLE-BASE andORACLE-HOME, otherwise the installation is aborted. Since the installation takes about250 CPU seconds, Oracle recommends that you set the CPU-LIMIT to at least 300seconds. You can start the installation as follows:
/ENTER-PROCEDURE (ORAxxxxx.S390.LIB,ORAINST.PRC),(ORACLE-BASE='/u01/app/oracbase',ORACLE-HOME='/u01/app/oracbase/product/12.1.0/dbhome_1'),CPU-LIMIT=300
When you run the installation as a background task, the installation process is loggedto the file INSTALL.ORAINST.LST.
Installing Oracle Database in the POSIX file system requires an ORACLE_BASE andORACLE_HOME path. During installation you are prompted for these paths, if theinstallation runs in the dialog mode and if you have not specified the parameters inthe procedure call. You can accept the suggested paths or enter new paths.
2.5 Oracle Database Postinstallation TasksTo complete the installation, the POSIX administrator or the BS2000 systemadministrator must run the oracle_home_path/root.sh script as follows:
• In the BS2000 environment, use the following command:
/EXECUTE-POSIX-CMD CMD='oracle_home_path/root.sh'
For example,
/EXECUTE-POSIX-CMD CMD='/u01/app/oracbase/product/12.1.0/dbhome_1/root.sh'
• In the POSIX environment (shell), use the following command:
# sh oracle_home_path/root.sh
Oracle Database Postinstallation Tasks
Oracle Database Installation and Deinstallation 2-19
For example:
# sh /u01/app/oracbase/product/12.1.0/dbhome_1/root.sh
If this is the first Oracle Database installation on the BS2000 server, then the root.shscript completes the following actions:
• Creates the path, /var/opt/oracle
• Creates the file, /var/opt/oracle/oraInst.loc
• Creates an empty file, /var/opt/oracle/oratab
2.6 About Installing Multiple Oracle DatabasesYou can install multiple Oracle databases, based on different releases of Oraclesoftware. In this case, different releases of the software must be installed underdifferent installation user IDs and different Oracle home directories.
2.7 About Removing Oracle Database SoftwareTo remove Oracle Database software from your computer, log in to the Oracleinstallation user ID and use the installation procedure as follows:
/CALL-PROCEDURE INSTALL.P.ORAINST,(CMD=UNINSTALL)
This procedure completes the following actions:
• Removes the Oracle Database software from the POSIX file system.
• Updates the Oracle inventory.
• Removes the Oracle Database software from the BS2000 file system.
Note:
Only the files installed by the Oracle installation procedure, namely,ORAINST.PRC are removed from the system. Files created by a user or by anOracle instance are retained in the Oracle home directory and the installationuser ID.
About Installing Multiple Oracle Databases
2-20 Installation and Administration Guide
3About Creating a Database
Starting with Oracle Database 12c Release 1, you can use the Oracle Multitenant optionto configure and manage a multitenant environment. The multitenant architectureenables an Oracle Database to function as a multitenant container database (CDB) thatincludes zero, one, or many customer-created pluggable databases (PDBs). A PDB is aportable collection of schemas, schema objects, and nonschema objects.
This chapter describes the following:
• Prerequisites for Database Creation (page 3-1)
• About Creating a Non-CDB (page 3-1)
• About Creating a Multitenant Container Database (page 3-7)
3.1 Prerequisites for Database CreationBefore you can create a database, the following prerequisites must be met:
1. Oracle Database 12c Release 1 must be installed under the installation user ID.
2. The BS2000 system administrator must create a DBA user ID with the attributes.
See Also:
• “Oracle Database Installation and Deinstallation” (page 2-1) for details onhow to install Oracle Database
• “About Creating Users and Groups for Oracle Databases” (page 2-11) fordetails about the attributes
3.2 About Creating a Non-CDBA non-CDB is the traditional type of an Oracle database, which was supported inOracle Database releases before 12c.
A non-CDB still exists in Oracle Database 12c Release 1.
You can create a non-CDB either automatically or manually. Oracle recommends thatyou use the automatic creation procedure outlined in the “Creating a DatabaseAutomatically” (page 3-2) section. Instructions on how to create a traditionaldatabase manually are given in the “Creating a Database Manually” (page 3-4)section.
This section describes the following topics:
• Creating a Database Automatically (page 3-2)
About Creating a Database 3-1

• Creating a Database Manually (page 3-4)
3.2.1 Creating a Database AutomaticallyComplete the following steps to create a database automatically:
1. Log in to the DBA user ID.
2. To start the automatic creation procedure, INSTALL.P.SUPER, enter the followingcommand:
/CALL-PROCEDURE $ORACINST.INSTALL.P.SUPER
When you run the INSTALL.P.SUPER procedure, you must specify the value ofthe following keyword parameters (the default values are used if you choose not tomodify the values):
Parameter Value
BATCH Enter YES to run the procedure in the batch mode. The default is set toYES. So, by default the procedure is run in the batch mode.
CPULIMIT Sets the time limit for batch jobs. The default is 2000.
PLSQL Enter NO to suppress automatic installation of the basic PL/SQLpackage. The default is YES.
VIEWS Enter NO to suppress automatic installation of the basic views (catalog,import/export, and so on). The default is YES.
3. Answer the prompts for the following information. If you do not enter any value,then the default values shown on the screen are used:
Parameter Value
DBASID Enter the 1 - 4 character system ID of the database you are installing.This is a mandatory parameter.
JOBCLASS Enter the jobclass to be used for Oracle Database 12c Release 1background jobs. This is mandatory.
UPDATE Enter YES if you have existing files for this SID and if you want toupdate them.
SYSPW Enter the desired password for the Oracle Database user SYS.
Note: By default the SYS user has the password CHANGE_ON_INSTALL.For security reasons, Oracle recommends that you change thispassword immediately after installation.
SYSTEMPW Enter the desired password for the Oracle Database user SYSTEM.
Note: By default the SYSTEM user has the password MANAGER. Forsecurity reasons, Oracle recommends that you change this passwordimmediately after installation.
JAVA Enter NO if you do not need a Java enabled database (thus savingmemory, CPU, and disk space resources). For more information refer to “Java in the Database” (page 9-1) section.
About Creating a Non-CDB
3-2 Installation and Administration Guide

Parameter Value
DBSIZE Enter the size of the system tablespace files in bytes, kilobytes, ormegabytes. The value you enter can have one of the following forms:
• 44M for 44 megabytes• 44000K for 44000 kilobytes• 10000000 for 10000000 bytesThe default is 400 MB.
AUXSIZE Enter the size of the sysaux tablespace file in bytes, kilobytes, ormegabytes. The value you enter can have one of the following forms:
• 44M for 44megabytes• 44000K for 44000 kilobytes• 10000000 for 10000000 bytesThe default is 300 MB.
LOGSIZE Enter the size of the log files in bytes, kilobytes, or megabytes. Thevalue you enter can have one of the following forms:
• 1M for 1 megabytes• 1000K for 1000 kilobytes• 100000 for 100000 bytesThe default is 20000 KB.
UNDOSIZE Enter the size of the undo tablespace file in bytes, kilobytes, ormegabytes. The value you enter can have one of the following forms:
• 44M for 44 megabytes• 44000K for 44000 kilobytes• 10000000 for 10000000 bytesThe default is 100 MB.
LOCAL Enter NO if you do not require a locally managed system tablespace.The default is YES. If you choose a locally managed system tablespace,then Oracle automatically creates a default temporary tablespace.
DEFTS Enter NO if you do not want to create a default permanent tablespace.The default is YES.
TEMPTS This prompt only appears if you do not want a locally managed systemtablespace. Enter NO if you do not want a default temporarytablespace. The default is YES.
CHARSET Enter the character set with which you want the database to be created(the default is WE8BS2000).
For more information refer to “Globalization Support” (page 15-1).
NCHARSET Enter the national character set used to store data in columnsspecifically defined as NCHAR, NCLOB, or NVARCHAR2. Valid values areAL16UTF16 and UTF8. The default is AL16UTF16.
Unless specified otherwise, $ORACINST.INSTALL.P.SUPER generates and enters abatch job which:
• Calls INSTALL.P.DBA.
• Creates the system and sysaux tablespace.
• Creates the default permanent tablespace, temporary tablespace, and undotablespace.
About Creating a Non-CDB
About Creating a Database 3-3

• Creates the log files.
• Initializes the database.
• Runs CATALOG.SQL.
• Runs CATPROC.SQL .
• Installs the tables for online help messages.
• Installs the DEMO tables.
• Changes the system passwords if necessary.
• Calls the verification procedure.
When $ORACINST.INSTALL.P.SUPER has completed, you should have aninitialized, ready-to-use database, and a running Oracle Database instance. The resultsof the job are listed in the file, L.sid.INSSUP.SYSOUT, where sid is the system IDof the database that you just installed.
3.2.2 Creating a Database ManuallyOracle recommends that you use the automatic creation procedure outlined in"Creating a Database Automatically (page 3-2)". The manual creation procedureperforms the same steps as the automatic creation procedure. However, when youcreate a database manually, you can perform the steps at your own pace, and alsochoose which of the optional steps to perform, omit, or perform later.
This section describes the following topics:
• Creating Parameter Files for a Non-CDB (page 3-4)
• Creating the Database (page 3-5)
• About Installing Data Dictionary Views (page 3-6)
• About Installing Online Help Messages (page 3-6)
• About Installing Demo Tables (page 3-7)
• About Installing Sample Schemas (page 3-7)
• About Verifying Database Creation (page 3-7)
• About Installing Oracle Text (page 3-7)
• About Installing Java (page 3-7)
3.2.2.1 Creating Parameter Files for a Non-CDB
Create the parameter files for the new database as follows:
1. Log in to the DBA user ID.
2. Call the BS2000 command procedure INSTALL.P.DBA. This procedure generatesparameter files for the database in the DBA user ID. When the procedure beginsyou are prompted to supply a 1 to 4 character system ID for the database you arecreating.
To install the DBA files, enter the following command:
About Creating a Non-CDB
3-4 Installation and Administration Guide

/CALL-PROCEDURE $ORACINST.INSTALL.P.DBA
This procedure prompts you for the following information:
Parameter Value
DBASID Enter the 1 - 4 character system ID of the database you are creating.
JOBCLASS Enter the BS2000 jobclass to be used for background and servertasks.
You can also modify the following keyword parameters when invoking thisprocedure:
Parameter Value
LOG Enter WRITE-TEXT (the BS2000 command name) if you want tohave install actions listed.
UPDATE Enter YES/NO to indicate whether existing files are to be updated.The default is NO.
The $ORACINST.INSTALL.P.DBA procedure generates the following files into theDBA user ID:
• sid.P.ORAENV: Oracle Database environment definition file
• sid.DBS.INIT.ORA: Oracle Database initialization file
where sid is the system ID for the database being created.
These files are generated by using the two corresponding files DEMO.P.ORAENVand DEMO.DBS.INIT.ORA in the installation user ID as templates.
3.2.2.2 Creating the Database
After generating the DBA files, you must create the database. This section describesthe procedure for creating the database:
• About Modifying the Initialization File for a Non-CDB (page 3-5)
• About Modifying the ORAENV File for a Non-CDB (page 3-6)
• About Using SQL*Plus to Create the Database (page 3-6)
3.2.2.2.1 About Modifying the Initialization File for a Non-CDB
Determine if you want to make any changes to parameters in the distributedinitialization file, sid.DBS.INIT.ORA (where sid is the system ID for the database).The SGA parameters may need to be adjusted to reflect memory limitations and themaximum number of users who can access the Oracle Database instance at one time.Use a BS2000 editor to make the modifications.
See Also:
Oracle Database Reference for more information about the initializationparameters
About Creating a Non-CDB
About Creating a Database 3-5

3.2.2.2.2 About Modifying the ORAENV File for a Non-CDB
Modify the environment definition file, sid.P.ORAENV, according to your specificrequirements. Remember that a number of variables are evaluated during startuponly. If you modify such a variable in the ORAENV file later on, then you may have towait for the next startup for the changes to take effect.
Do not explicitly set the environment variable NLS_LANG when you run Oraclesupplied SQL scripts.
The character set in the ORAENV variable NLS_LANG, however, must not be changedwhen you run some of the delivered SQL scripts.
3.2.2.2.3 About Using SQL*Plus to Create the Database
Remember that you must call the applicable sid.P.ORAENV procedure before callingSQL*Plus. To execute SQL*Plus, enter the following commands:
/START-EXECUTABLE (*LINK(ORALOAD),SQLPLUS)* /NOLOGSQL> CONNECT / AS SYSDBASQL> STARTUP NOMOUNT [PFILE=filename]
• /NOLOG omits being prompted for user name and password.
• CONNECT gives you a connection to an idle instance.
• The last statement starts the Oracle Database instance.
If you want to use your own copy of the initialization file (sid.DBS.INIT.ORA), thenuse the PFILE=filename option, as illustrated in the previous command.
The following statement creates database and log files:
SQL> CREATE DATABASE...;
Note:
If you get an error before the first SQL> prompt, then it may be caused byeither a missing ORAENV file (or ORASID not set in the ORAENV file), orsometimes by an address space conflict. For example, the address range youassigned to the kernel memory pool (KNL_BASE) could be occupied by asubsystem.
3.2.2.3 About Installing Data Dictionary Views
Run the scripts necessary to build data dictionary views, synonyms, and PL/SQLpackages. Run the following commands:
SQL> SPOOL filenameSQL> SET TERMOUT OFFSQL> $ORACLE_HOME/rdbms/admin/catalog.sqlSQL> $ORACLE_HOME/rdbms/admin/catproc.sql
3.2.2.4 About Installing Online Help Messages
To install the Online Help facility, enter the following command:
/CALL-PROCEDURE $ORACINST.INSTALL.P.HELP,(sid[,SYSTEMPW=systempw])
About Creating a Non-CDB
3-6 Installation and Administration Guide
3.2.2.5 About Installing Demo Tables
To install demo tables, enter the following:
/CALL-PROCEDURE $ORACINST.INSTALL.P.DEMO,(sid[,SYSTEMPW=systempw])
3.2.2.6 About Installing Sample Schemas
To install sample schemas, enter the following:
/CALL-PROCEDURE $ORACINST.INSTALL.P.SAMPLES,(sid[,SYSTEMPW=systempw] [,SYSPW=syspw])
The procedure INSTALL.P.SAMPLES installs the human resources (HR), order entry(OE), info exchange (IX), and sales history (SH) sample schemas with the defaultpasswords. Product media (PM) is not supported.
Note:
By default, the password for the SYSTEM user is MANAGER and the passwordfor the SYS user is CHANGE_ON_INSTALL. For security reasons, Oraclerecommends that you change these passwords and the sample schemapasswords immediately after installation.
3.2.2.7 About Verifying Database Creation
To verify if the demonstration database was correctly created, enter the following:
/CALL-PROCEDURE $ORACINST.INSTALL.P.VERIFY,(sid[,SYSTEMPW=systempw])
If the demonstration database was correctly created, then you see messages like thefollowing displayed on the screen:
*SCOTT'S TABLE EMP IS INSTALLED
3.2.2.8 About Installing Oracle Text
Installing Oracle Text is summarized in the "Oracle Text (page 10-1)" chapter of thisbook.
3.2.2.9 About Installing Java
Installing Java is summarized in the "Java in the Database (page 9-1)" chapter of thisbook.
3.3 About Creating a Multitenant Container DatabaseA multitenant container database (CDB) is a single physical database that containszero, one, or many user-created pluggable databases. A pluggable database (PDB) is aportable collection of schemas, schema objects, and nonschema objects that appears toan Oracle Net client as a non-CDB. A non-CDB is a traditional Oracle database thatcannot contain PDBs.
Starting with Oracle Database 12c Release 1, you can create a multitenant containerdatabase (CDB).
About Creating a Multitenant Container Database
About Creating a Database 3-7

The topics in this section describe how to create a CDB manually on Fujitsu BS2000/OSD. As creating a CDB involves Perl scripts, you must perform some steps in thePOSIX environment. Perl is supported only in the POSIX environment of BS2000.
The following topics are discussed:
• Creating Parameter Files for a CDB (page 3-8)
• About Creating a CDB (page 3-9)
See Also: Oracle Database Administrator’s Guide for more information aboutcreating a CDB
3.3.1 Creating Parameter Files for a CDBCreate the parameter files for the new database as follows:
1. Log in to the DBA user ID.
2. Call the BS2000 command procedure INSTALL.P.DBA. This procedure generatesparameter files for the database in the DBA user ID. When the procedure beginsyou are prompted to supply a 1 to 4 character system ID for the database you arecreating.
To install the DBA files, enter the following command:
/CALL-PROCEDURE $ORACINST.INSTALL.P.DBA
This procedure prompts you for the following information:
Parameter Value
DBASID Enter the 1 - 4 character system ID of the database you are creating.
JOBCLASS Enter the BS2000 jobclass to be used for background and servertasks.
You can also modify the following keyword parameters when invoking thisprocedure:
Parameter Value
LOG Enter WRITE-TEXT (the BS2000 command name) if you want tohave install actions listed.
UPDATE Enter YES/NO to indicate whether existing files are to be updated.The default is NO.
The $ORACINST.INSTALL.P.DBA procedure generates the following files into theDBA user ID:
• sid.P.ORAENV: Oracle Database environment definition file
• sid.DBS.INIT.ORA: Oracle Database initialization file
where sid is the system ID for the database being created.
About Creating a Multitenant Container Database
3-8 Installation and Administration Guide
These files are generated by using the two corresponding files DEMO.P.ORAENVand DEMO.DBS.INIT.ORA in the installation user ID as templates.
3.3.2 About Creating a CDBThe procedure to create a multitenant container database (CDB) is discussed in thefollowing topics:
• About Modifying the Initialization File for a CDB (page 3-9)
• About Modifying the ORAENV File for a Non-CDB (page 3-6)
• Using SQL*Plus to Create a CDB (page 3-9)
3.3.2.1 About Modifying the Initialization File for a CDB
Determine if you want to make any changes to the parameters in the distributedinitialization file, sid.DBS.INIT.ORA (where sid is the system ID for the database).The SGA parameters may need to be adjusted to reflect memory limitations and themaximum number of users who can access the Oracle Database instance at one time.Use a BS2000 editor to make the modifications.
To create a CDB, set the value for the ENABLE_PLUGGABLE_DATABASE initializationparameter in the sid.DBS.INIT.ORA file as follows:
ENABLE_PLUGGABLE_DATABASE=TRUE
See Also:
Oracle Database Reference for an explanation of initialization parameters
3.3.2.2 About Modifying the ORAENV File for a CDB
Modify the environment definition file, sid.P.ORAENV, according to your specificrequirements. Remember that a number of variables are evaluated during startuponly. If you modify such a variable in the ORAENV file later on, then you may have towait for the next startup for the changes to take effect.
Do not explicitly set the environment variable NLS_LANG when you run Oraclesupplied SQL scripts.
The character set in the ORAENV variable NLS_LANG, however, must not be changedwhen you run some of the delivered SQL scripts.
3.3.2.3 Using SQL*Plus to Create a CDB
Complete the following steps to create a CDB using the SQL*Plus utility:
1. In the DBA user ID, change to the POSIX shell by executing the BS2000 SDFcommand:
/START-POSIX-SHELL
2. Start SQL*Plus in the POSIX shell and start up the instance with the NOMOUNToption:
$ . oracle_home_path/.profile.oracle$ ORACLE_SID=sid$ export ORACLE_SID
About Creating a Multitenant Container Database
About Creating a Database 3-9

$ sqlplus /nologSQL> connect / as sysdbaSQL> startup nomount;
3. Execute a SQL statement similar to the following to create CDB$ROOT and PDB$SEED of the CDB. In the following example, a CDB with the name CDB1 iscreated:
SQL> CREATE DATABASE CDB1USER SYS IDENTIFIED BY sys_passwordUSER SYSTEM IDENTIFIED system_passwordLOGFILE 'CDB1.DBS.LOG1.DBF' SIZE 20M, 'CDB1.DBS.LOG2.DBF' SIZE 20MDATAFILE 'CDB1.DBS.DATABASE1.DBF' SIZE 400MSYSAUX DATAFILE 'CDB1.DBS.SYSAUX.DBF' SIZE 200MDEFAULT TABLESPACE USERSDATAFILE 'CDB1.DBS.USERS1.DBF' SIZE 10M AUTOEXTEND ONDEFAULT TEMPORARY TABLESPACE TEMPTEMPFILE 'CDB1.DBS.TEMP1.DBF' SIZE 10M AUTOEXTEND ONUNDO TABLESPACE UNDOTBS1DATAFILE 'CDB1.DBS.UNDO1.DBF' SIZE 100M AUTOEXTEND ONCHARACTER SET WE8BS2000NATIONAL CHARACTER SET AL16UTF16EXTENT MANAGEMENT LOCALENABLE PLUGGABLE DATABASESEED FILE_NAME_CONVERT = ('DBS','SEED');
4. The next statement installs all of the components required by a CDB. For example,it runs the SQL scripts catalog.sql and catproc.sql in CDB$ROOT and PDB$SEED of the CDB:
SQL> @$ORACLE_HOME/rdbms/admin/catcdb.sql
5. Exit SQL*Plus and check the spool files for error messages.
About Creating a Multitenant Container Database
3-10 Installation and Administration Guide
4About Upgrading a Database
The specific information about upgrading your existing Oracle database to OracleDatabase 12c Release 1 on Fujitsu BS2000/OSD systems is discussed in this chapter.
Before you perform an upgrade, you must be familiar about upgrade preparation,space and backup requirements, release differences, handling TIMESTAMP WITHTIME ZONE data type, and other database upgrade concepts.
It is assumed that you have correctly installed Oracle Database 12c Release 1 asexplained in “Oracle Database Installation and Deinstallation.” (page 2-1).This chapterdescribes upgrading a database from Oracle Database 11g Release 2 (11.2) to OracleDatabase 12c Release 1 (12.1). The upgrade is done both in the normal BS2000environment and in the POSIX shell. Oracle recommends that you be familiar withboth these environments.
This chapter includes the following topics:
• Performing Preupgrade Procedures (page 4-1)
• Performing Upgrade Procedures (page 4-3)
• Performing Postupgrade Procedures (page 4-5)
Related Topics:
Oracle Database Upgrade Guide
4.1 Performing Preupgrade ProceduresYou must analyze your database before upgrading it to the new release. To analyze,run the preupgrd.sql Pre-Upgrade Information Tool from the environment of thedatabase that you want to upgrade. Running the Pre-Upgrade Information Toolprovides information about any issues that needs to be fixed.
You must run the preupgrd.sql tool in the environment of the source database. Forexample in the Oracle Database 11g Release 2 environment. The database must be upand running. For running preupgrd.sql, you must start SQL*Plus in the POSIXshell.
The Pre-Upgrade Information Tool generates log files and fixup scripts that you canrun, to resolve issues that are flagged in the source database. These log files and fixupscripts are generated in the POSIX file system. If ORACLE_BASE is defined, then thegenerated scripts and log files are created in the $ORACLE_BASE/cfgtoollogsdirectory. If ORACLE_BASE is not defined, then the generated scripts and log files arecreated in the $ORACLE_HOME/cfgtoollogs directory.
Perform the following steps in the environment of the source database:
About Upgrading a Database 4-1
1. Log in to the DBA user ID of the source database.
2. To avoid being prompted for many overflow acknowledgements on your screen,enter:
/MODIFY-TERMINAL-OPTIONS OVERFLOW-CONTROL=*NO-CONTROL
3. Change to the POSIX shell:
/START-POSIX-SHELL
4. Copy preupgrd.sql and utluppkg.sql from the rdbms/admin directory ofthe new Oracle home where you installed Oracle Database 12c to a directory that isaccessible when you connect to your source database, which is the database to beupgraded. Use the following commands:
$ cp oracle_home_path_12c/rdbms/admin/preupgrd.sql preupgrd.sql$ cp oracle_home_path_12c/rdbms/admin/utluppkg.sql utluppkg.sql
5. Before you run SQL*Plus in the POSIX shell, set the Oracle environment variablesORACLE_HOME and ORACLE_BASE by executing the .profile.oracle file:
$ . oracle_home_path_11g/.profile.oracle
You must also set the ORACLE_SID environment variable to the sid of your OracleDatabase instance. Use the following commands:
$ ORACLE_SID=sid$ export ORACLE_SID
Note: You must remember that the variable BGJPAR might not be defined.Oracle recommends to set the variable BGJPAR according to the value youfind in the corresponding ORAENV file , sid.P.ORAENV.
6. Run the preupgrd.sql Pre-Upgrade Information Tool:
$ sqlplus /nologSQL> connect / as sysdbaSQL> @preupgrd.sql SQL> exit
7. View and read through the resulting generated fixup scripts and log file, which arelocated in:
• $ORACLE_BASE/cfgtoollogs/db_unique_name/preupgrade directory ifORACLE_BASE is defined.
• $ORACLE_HOME/cfgtoollogs/db_unique_name/preupgrade directory ifORACLE_BASE is not defined.
8. After you have reviewed the scripts, Oracle recommends that you executepreupgrade_fixups.sql on the source database. Thepreupgrade_fixups.sql script attempts to resolve issues reported by thepreupgrade process. You must manually resolve the issues that cannot be resolvedautomatically by a fixup script.
9. Shutdown the database and exit SQL*Plus. Use the following commands:
$ sqlplus /nologSQL> connect / as sysdba
Performing Preupgrade Procedures
4-2 Installation and Administration Guide

SQL> shutdown immediate;SQL> exit
10. Exit the POSIX shell:
$ exit
Note: Oracle recommends that you back up your Oracle database afterrunning the Pre-Upgrade Information Tool and shutting down the database.
4.2 Performing Upgrade ProceduresThis topic describes the new upgrade method using the catctl.pl Perl script. AsPerl is only supported on the POSIX environment, you must change to the POSIX shellfor some of the following steps.
All the steps in this phase must be performed in the new Oracle Database 12cenvironment. For some steps you have to change to the POSIX shell.
Note: Earlier releases of Oracle Database used the catupgrd.sql upgradeutility to process the upgrade. Oracle strongly recommends that starting withOracle Database 12c release, you use the catctl.pl parallel upgrade utility.This replaces the catupgrd.sql utility and provides both parallel processingmode and serial mode.
Perform the following upgrade steps:
1. Log in to the DBA user ID of the database to be upgraded.
2. To avoid being prompted for many overflow acknowledgements on your screen,enter:
/MODIFY-TERMINAL-OPTIONS OVERFLOW-CONTROL=*NO-CONTROL
3. Enter the following command to create an Oracle Database 12c Release 1INIT.ORA file and an Oracle Database 12c Release 1 ORAENV file. Save the originalfiles under the suffix .OLD. Use the following commands:
/CALL-PROCEDURE $ORACINST.INSTALL.P.DBA,(sid,jobclass,UPDATE=YES)
4. Modify the newly created files according to your requirements. For example,change the values of PROCESSES or DB_CACHE_SIZE in the INIT.ORA file.
5. Set the parameters in the INIT.ORA file as recommended by the Pre-UpgradeInformation Tool. Ensure that the COMPATIBLE initialization parameter isexplicitly set to 11.2.0 or higher.
6. Change to the POSIX shell. Use the following command:
/START-POSIX-SHELL
7. Before you run SQL*Plus in the POSIX shell you must set some environmentvariables. For example, ORACLE_HOME and ORACLE_BASE. To set these variables,run the .profile.oracle file that is located in the ORACLE_HOME directory ofthe Oracle Database 12c software installation:
Performing Upgrade Procedures
About Upgrading a Database 4-3

$ . oracle_home_path_12c/.profile.oracle
8. Set the ORACLE_SID environment variable to the sid of your Oracle Databaseinstance:
$ ORACLE_SID=sid$ export ORACLE_SID
Note: Ensure that you define the BGJPAR variable. Oracle recommends to setthe BGJPAR variable to the corresponding value in the ORAENV file,sid.P.ORAENV.
9. Start up the instance in upgrade mode as follows:
$ sqlplus /nologSQL> connect / as sysdbaSQL> startup upgradeSQL> exit
10. Run the Perl script for upgrade as follows:
$ cd $ORACLE_HOME/rdbms/admin$ perl catctl.pl -l $HOME/logs catupgrd.sql
The –l option allows you to specify the directory where you want to write theupgrade log files.
See Also: Oracle Database Upgrade Guide for other options of the Perl script,catctl.pl.
The upgraded database is shut down after running catctl.pl.
11. Restart the instance to reinitialize the system parameters for normal operation:
$ sqlplus /nologSQL> connect / as sysdbaSQL> startup
12. Run utlu121s.sql, the Post-Upgrade Status Tool to display a summary of theupgrade results:
SQL> @utlu121s.sql
If the utlu121s.sql script returns errors, or shows components that do notcontain the most recent release, or do not have the UPGRADED status, then refer to Oracle Database Upgrade Guide for troubleshooting.
Note: When the upgrade is complete without any errors, the status of thedatabase is set to UPGRADED. This behavior differs from earlier releases wherethe status of the database was set to VALID after upgrading. The UPGRADEDstatus indicates that the data dictionary has been loaded without any errors.
Running the utlrp.sql script in normal mode recompiles data dictionaryobjects and moves the data dictionary from an UPGRADED status to a VALIDstatus.
Performing Upgrade Procedures
4-4 Installation and Administration Guide

13. Run the catuppst.sql script located in the $ORACLE_HOME/rdbms/admindirectory, only if you notice any errors during the database upgrade:
SQL> @catuppst.sql
Note: Check the log file if catuppst.sql was run during the upgrade. Ifcatuppst.sql was not run, then you must manually run thecatuppst.sql script as shown in step 13 (page 4-5). Warning messages arealso displayed when running the catctl.pl script indicating that thecatuppst.sql script was not run during the upgrade.
14. Oracle recommends to gather fixed object statistics to minimize the time needed forrecompilation with utlrp.sql script. Execute the following SQL statement:
SQL> execute dbms_stats.gather_fixed_objects_stats;
15. Run the utlrp.sql script to recompile any remaining stored PL/SQL and Javacode. Use the following command:
SQL> @utlrp.sql
16. Verify that all expected packages and classes are valid. (This step assumes that youpreviously ran the preupgrd.sql script before starting the upgrade.) Use thefollowing command:
SQL> @utluiobj.sql
17. Run the utlu121s.sql script again to verify that all issues have been fixed. Referto step 12 (page 4-4). All components should now have the status VALID.
18. To query invalid objects, execute SQL queries similar to:
SQL> SELECT count(*) FROM dba_objects WHERE status='INVALID';SQL> SELECT distinct object_name FROM dba_objects WHERE status='INVALID';
Your database is now upgraded to Oracle Database 12c Release 1.
4.3 Performing Postupgrade ProceduresYou must complete the following tasks after upgrading to Oracle Database 12c Release1:
• Rebuilding Database Application Programs (page 4-5)
• Updating ORAENV Files (page 4-6)
• Migrating to Unified Auditing (page 4-6)
Rebuilding Database Application Programs
All database application programs with Embedded SQL must be precompiled usingthe new precompilers of Oracle Database 12c Release 1. Then they must be recompiledand relinked using the new Oracle Database libraries.
All database application programs with Oracle Call Interface (OCI) must berecompiled and relinked using the new Oracle Database libraries.
All openUTM database applications must be rebuilt. Refer to the chapters onopenUTM in this guide for more information.
Performing Postupgrade Procedures
About Upgrading a Database 4-5
Updating ORAENV Files
The ORAUID environment variable must refer to the correct Oracle Databaseinstallation user ID and the ORACLE_HOME environment variable must refer to thecorresponding Oracle home directory in the POSIX file system. Check your ORAENVfiles, and if necessary, update the value of the ORAUID, ORACLE_BASE, andORACLE_HOME environment variables. Also check other environment variables for anyadjustments.
Migrating to Unified Auditing
Oracle Database 12c Release 1 supports Unified Auditing. After upgrading to OracleDatabase 12c, the Unified Auditing option is not enabled.
See Also:
• “About Unified Auditing” (page 8-1) for more information aboutenabling Unified Auditing
• Oracle Database Upgrade Guide for more information about migrating toUnified Auditing
Performing Postupgrade Procedures
4-6 Installation and Administration Guide

Part IIIDatabase Administration
This part discusses the following topics related to Oracle Database administration:
• Administering Oracle Database (page 5-1)
• Oracle Database Utilities (page 6-1)
• Backing Up and Recovering a Database (page 7-1)
• About Unified Auditing (page 8-1)
• Java in the Database (page 9-1)
• Oracle Text (page 10-1)
• XML (page 11-1)
• Oracle Net Services (page 12-1)


5Administering Oracle Database
This chapter describes how to administer Oracle Database 12c Release 1 for BS2000/OSD.
Common administration tasks are described in the following sections:
• Using the SQL*Plus Utility (page 5-1)
• Startup and Parameter Files (page 5-1)
• Preparing a Remote Startup of a Database Instance Using SQL*Plus (page 5-3)
• Automatic Diagnostic Repository (page 5-4)
5.1 Using the SQL*Plus UtilitySQL*Plus is the primary command-line interface to administer your Oracle database.You can use SQL*Plus to start up and shut down the database, set databaseinitialization parameters, create and manage users, create and alter database objects,and so on.
See Also: “SQL*Plus” (page 6-8) for more information about how to useSQL*Plus on Fujitsu BS2000/OSD
5.2 Startup and Parameter FilesOracle uses the following parameter files when starting the database:
1. The environment definition file ORAENV, which contains BS2000-specificinformation. In the ORAENV file, identify the database that has to be started or shutdown. You can use this file to set the required environment variables.
2. The initialization file INIT.ORA or the server parameter file SPFILE, which existsin all Oracle Database implementations and contains database-specificparameters.
This section describes the following:
• The Environment Definition File ORAENV (page 5-2)
• The Initialization File INIT.ORA (page 5-2)
• The Server Parameter File SPFILE (page 5-2)
• About Using the Initialization File (page 5-3)
Administering Oracle Database 5-1
5.2.1 The Environment Definition File ORAENVThe ORAENV file is identified by sid.P.ORAENV, where SID is the system identifier.The same ORAENV file must be used by SQL*Plus in BS2000 and by all backgroundjobs.
If you use SQL*Plus in the POSIX shell, then you must specify the requested BS2000parameters that are set in the ORAENV file. You can set the variables in the POSIXenvironment or use the facility to access the BS2000 ORAENV file as described in “Setting Variable in the POSIX Program Environment.” (page 1-7)
Ensure that the value for sid in the POSIX file name oraenvsid matches the value ofthe environment variable ORACLE_SID. For example, if you created a POSIX fileoraenvsid with sid in uppercase, then you must set the environment variableORACLE_SID to exactly the same value.
$ echo '$ORADATA.ORCL.P.ORAENV' > $ORACLE_HOME/dbs/oraenvORCL$ ORACLE_SID=ORCL$ export ORACLE_SID$ sqlplus /nolog$ SQL> connect / as sysdba
See Also:
• “Oracle Environment Variables” (page B-1) for information aboutrequired and optional ORAENV variables
• “Starting Oracle Utilities in the POSIX Program Environment” (page 6-4)for more information about how to set POSIX environment variables
5.2.2 The Initialization File INIT.ORATo start up a database, you require the INIT.ORA parameter file. This file contains alist of specifications for the Oracle database. The platform independent parameters setup the instance and the database.
Related Topics:
Oracle Database Administrator’s Guide
Oracle Database Reference
5.2.3 The Server Parameter File SPFILEYou can choose to maintain initialization parameters in a binary server parameter file.A server parameter file is initially built from a traditional text initialization parameterfile using the CREATE SPFILE command. If you enter the following command:
CREATE SPFILE FROM PFILE;
where, neither SPFILE name nor PFILE name is specified, then Oracle looks for a textinitialization file sid.DBS.INIT.ORA and creates a server parameter filesid.DBS.SPFILE.ORA.
Startup and Parameter Files
5-2 Installation and Administration Guide
5.2.4 About Using the Initialization FileA default initialization file, called $ORACINST.DEMO.DBS.INIT.ORA, is distributedwith Oracle Database. During database creation, this file is copied to the DBA user IDand renamed to sid.DBS.INIT.ORA, where sid is the 1 to 4 character system ID youspecified at the beginning of the database creation procedure.
Oracle determines the value of sid by retrieving the ORASID environment variabledefined in the ORAENV file for the database. When you issue the STARTUP commandwithout specifying the PFILE, Oracle locates the initialization parameter file byexamining file names in the following order:
1. sid.DBS.SPFILE.ORA
2. DBS.SPFILE.ORA
3. sid.DBS.INIT.ORA
If you want to use a different initialization file, then use the argument PFILE. Forexample, to bring up a previously created database using an initialization file calledTEST.INIT.ORA, enter the following:
/START-EXECUTABLE (*LINK(ORALOAD),SQLPLUS)* /NOLOG
At the SQL*Plus prompt, enter:
SQL> CONNECT / AS SYSDBASQL> STARTUP PFILE=TEST.INIT.ORA
5.3 Preparing a Remote Startup of a Database Instance Using SQL*PlusThis section describes the preparations that are required to start up a database instanceremotely using SQL*Plus:
1. Usually, Oracle Database 12c Release 1 listener parameter file, LISTENER.ORAdoes not contain a static service registration section (SID_LIST) for a databaseservice. In case of a remote startup, you must define this section for the desireddatabase. For example:
SID_LIST_LISTENER = (SID_LIST = (SID_DESC = (SID_NAME = ORCL)))
The listener must be running on the computer where you want to start the instance.The listener must statically register the instance. If the listener does not run underthe same user ID as the instance that you want to start, then you must do one of thefollowing:
• Use the Oracle environment variables sid_USER, user_ACCOUNT, anduser_PASSWORD to specify the required LOGON authorization parameters in theORAENV file of the listener.
• Use SECOS, Fujitsu's Security Control System for BS2000/OSD.
See Also: "Configuring the Network (page 12-8)" for more information
Preparing a Remote Startup of a Database Instance Using SQL*Plus
Administering Oracle Database 5-3

2. Create a password file with the Oracle utility, ORAPWD under the user ID of theinstance that you want to administer. To run the ORAPWD utility on BS2000, use thefollowing command:
/START-EXECUTABLE (*LINK(ORALOAD),ORAPWD)*file=password_file password=my_password entries=10
See Also: Oracle Database Administrator’s Guide for more information abouthow to use the ORAPWD utility
3. The name of the password file is derived from the SSSIDPWF parameter. Ensurethat you add this parameter to the ORAENV file of the instance that you want tostart:
SSSIDPWF = password_file
4. The parameter REMOTE_LOGIN_PASSWORDFILE must be set to EXCLUSIVE in theinitialization file of the instance:
REMOTE_LOGIN_PASSWORDFILE = EXCLUSIVE
5. Execute SQL*Plus on the remote computer and connect as user sys to a server ofthe instance that you want to start. The following example shows the commandsfor SQL*Plus on a UNIX client. The net service name orcl_on_bs2000 is used toaddress the remote instance on the BS2000 computer:
sqlplus /nologSQL> connect sys@orcl_on_bs2000 as sysdbaEnter password:passwordConnectedSQL> startup...
5.4 Automatic Diagnostic RepositoryAutomatic Diagnostic Repository (ADR) is a file-based hierarchical data store fordepositing diagnostic information produced by diagnostic framework clients. Therepository contains data describing incidents, traces, dumps, alert logs, health checkrecords, SQL Trace information, and other information essential for problemdiagnosis.
See Also:
Oracle Database Administrator’s Guide for more information about AutomaticDiagnostic Repository
This section describes the following:
• Automatic Diagnostic Repository Directories and Files (page 5-5)
• ADR Command Interpreter Utility (page 5-5)
Automatic Diagnostic Repository
5-4 Installation and Administration Guide

5.4.1 Automatic Diagnostic Repository Directories and FilesAutomatic Diagnostic Repository (ADR) is a directory structure that is stored outsideof the database. It is therefore available for problem diagnosis when the database isdown.
The directories and files of the Automatic Diagnostic Repository are stored in thePOSIX file system.
See Also:
Oracle Database Administrator’s Guide for information about the directorystructure
The ADR root directory is known as ADR base. Its location is set by theDIAGNOSTIC_DEST initialization parameter. For example:
DIAGNOSTIC_DEST=/u01/app/oracbase/oradata/adr
If this parameter is omitted or left null, then the database sets the DIAGNOSTIC_DESTparameter upon startup as follows:
• If the environment variable ORACLE_BASE is set, then the DIAGNOSTIC_DESTparameter is set to the directory designated by ORACLE_BASE.
• If the environment variable ORACLE_BASE is not set, then the DIAGNOSTIC_DESTparameter is set to ORACLE_HOME/log.
Within ADR base, there can be multiple ADR homes, where each ADR home is theroot directory for all diagnostic data, such as, traces, dumps, alert log, and so on, fora particular instance of a particular Oracle product or component.
Oracle Net Services also stores diagnostic data in the ADR. The location for diagnosticinformation for Oracle Net Services is set by the ADR_BASE andADR_BASE_listener_name parameters. These are set in the sqlnet.ora andlistener.ora Oracle Net Services parameter files.
See Also:
Oracle Database Net Services Administrator's Guide for more information aboutdiagnostic information for Oracle Net Services
You can read the text files of the Automatic Diagnostic Repository with text editorssuch as vi or edtu, or with POSIX shell commands such as cat or more.
You can investigate ADR with the ADRCI utility.
5.4.2 ADR Command Interpreter UtilityADR Command Interpreter (ADRCI) utility enables you to investigate problems, viewhealth check reports, and package first-failure diagnostic data within a command-lineenvironment. You can then upload the package to Oracle Support. ADRCI also enablesyou to view the following:
• Names of the trace files in the ADR.
Automatic Diagnostic Repository
Administering Oracle Database 5-5
• Alert log with XML tags stripped, with and without content filtering.
You must execute the ADRCI command-line utility in the POSIX shell. Before youstart the ADRCI utility, you must set the ORACLE_HOME environment variable. Thesystem variable PATH must be extended by the path name of the Oracle bin directory,$ORACLE_HOME/bin. You can set the environment variables by executingthe .profile.oracle profile in the appropriate Oracle home directory. Additionalenvironment variables, such as ORACLE_SID, are not required.
See Also:
• Oracle Database Utilities for more information about ADRCI
• “Starting Oracle Utilities in the POSIX Program Environment” (page 6-4)for more information about Oracle Database utilities
After setting these environment variables, start the ADRCI utility in the POSIX shellby entering adrci after the POSIX shell command prompt.
Note:
You cannot start the ADRCI utility in the BS2000 program environment.ADRCI utility must be started in the POSIX shell.
Display the current ADR base with the ADRCI show base command. The currentADR home can be displayed with the show homes command.
Set ADR base with the set base command. You can set ADR home with the sethome command.
The show alert command shows the contents of the alert log in a text editor.
If you use a blockmode terminal, then the default editor for ADRCI on FujitsuBS2000/OSD is edtu. If you use an xterm terminal, after having logged in to POSIXthrough rlogin or ssh, then the default editor for ADRCI is vi.
You can either select the preferred text editor by setting the environment variableEDITOR before starting the ADRCI utility or specify your preferred text editor withinADRCI with the ADRCI set editor command.
Note:
The editor vi does not work on blockmode terminals and the editor edtudoes not work on xterm terminals.
With ADRCI, you can invoke Incident Packaging Service (IPS) to create packages forincidents with the following commands:
ips create packageips generate package
Upload the resulting zip file to Oracle Support.
Automatic Diagnostic Repository
5-6 Installation and Administration Guide
6Oracle Database Utilities
The different Oracle Database utilities and how to use them with Fujitsu BS2000/OSDare discussed in the following topics:
• Basics of Oracle Database Utilities (page 6-1)
• SQL*Plus (page 6-8)
• The SQL*Loader (page 6-17)
• The Export Utility (page 6-18)
• The Import Utility (page 6-20)
• The Data Pump Export Utility (page 6-21)
• The Data Pump Import Utility (page 6-22)
• Recovery Manager on BS2000 (page 6-22)
• Checking the Integrity of the Physical Data Structure (page 6-23)
• Workload Replay Client (page 6-23)
• The Oracle Text Loader (page 6-25)
See Also: Oracle Database Utilities
6.1 Basics of Oracle Database UtilitiesThe BS2000-specific information about Oracle Database utilities that you must usewith Oracle Database 12c Release 1 (12.1) for Fujitsu BS2000/OSD are discussed in thefollowing sections:
• The Oracle Database Environment-Definition File (page 6-2)
• The ORALOAD Library (page 6-3)
• Starting Oracle Utilities in the BS2000 Program Environment (page 6-3)
• Starting Oracle Utilities in the POSIX Program Environment (page 6-4)
• Connecting to an Oracle Database Instance (page 6-6)
• Using BS2000 Files for Input and Output (page 6-7)
Oracle Database Utilities 6-1

6.1.1 The Oracle Database Environment-Definition FileEvery Oracle Database utility and product under BS2000 uses an Oracle Databaseenvironment definition file, named ORAENV.
The ORAENV file is divided into the following parts:
• An executable part for BS2000 commands
• A static part for the definition of the environment variables
When processing the environment-definition file, a file link with the name ORAENV iscreated to the file itself. Oracle programs use the link name ORAENV to open this file.When reading this file, all lines with BS2000 commands (‘/’ in column one) andcomments (‘*’ in column one) will be ignored. Only the variable settings starting incolumn one will be accepted.
You must generate this file before you use the Oracle Database programs as it containsseveral Oracle Database environment variables. These Oracle Database environmentvariables describe the operating environment for the Oracle Database and utilities.
If you do not generate the ORAENV file, then the default values are used for allenvironment variables. In some cases, there are no default values for environmentvariables, such as for ORASID. If you start an Oracle Database program or utilitywithout generating the ORAENV file first, then you cannot connect to the OracleDatabase.
This section includes the following topics:
• Generating the Environment-Definition File (page 6-2)
• Calling the Environment Definition File (page 6-2)
• Specifying the Environment Variables (page 6-3)
See Also: "Generating the Environment-Definition File (page 6-2)" fordetails on how to create the ORAENV file
6.1.1.1 Generating the Environment-Definition File
To generate an ORAENV file, perform the following steps:
1. Call the INSTALL.P.USER procedure by entering the following command:
/CALL-PROCEDURE $ORACINST.INSTALL.P.USER
You are prompted to enter the database system identifier, SID.
2. Enter the SID. If you do not know the SID, then contact your databaseadministrator.
6.1.1.2 Calling the Environment Definition File
To call the ORAENV file (sid.P.ORAENV) for the database DEMO, enter the followingCALL-PROCEDURE command on the ORAENV file:
/CALL-PROCEDURE DEMO.P.ORAENV
Basics of Oracle Database Utilities
6-2 Installation and Administration Guide
6.1.1.3 Specifying the Environment Variables
To specify the environment variables, call the ORAENV file containing the environmentvariables for the database you want to use.
If required, you can change Oracle Database 12c Release 1 (12.1) working environmentby editing the user variables in the ORAENV file.
See Also: “Oracle Environment Variables” (page B-1) for a list of thevariables that you can specify in the ORAENV file
Note:
The values that you assign to user variables are specific to your task and thedatabase with which you work. The database administrator can also set othervariables that may affect the whole database instance. If you try to set valuesfor the DBA-specific variables in the ORAENV file, then they are ignored.
6.1.2 The ORALOAD LibraryThe ORALOAD library, $ORACINST.ORALOAD.LIB is required for executing OracleDatabase 12c Release 1 (12.1) programs. The ORALOAD library must be identified bythe link name ORALOAD before calling Oracle Database programs. If the link name ismissing, then a BLS (BS2000 loader) error message is displayed. The ORALOAD linkname is set when the ORAENV procedure is called.
The ORAMESG library, $ORACINST.ORAMESG.LIB is required for Oracle messages.This library is assigned the link name ORAMESG in the ORAENV procedure.
6.1.3 Starting Oracle Utilities in the BS2000 Program EnvironmentBefore you start Oracle Database programs, you must call the environment definitionfile.
See Also: "Calling the Environment Definition File (page 6-2)" for moreinformation
Use the SDF command START-EXECUTABLE-PROGRAM or the shorter form START-EXECUTABLE to start a program or a utility. Specify the options and operands as thefirst data input line when the data prompt (*) is displayed, as shown in the followingexample:
/START-EXECUTABLE (*LINK(ORALOAD),program_name)CCM0001 enter options:* [option_switch] [arguments]
where:
program_name is the name of the program or the utility that you want to start
option_switch is one or more of the program-dependent optional switches. If this isused, then the switch is preceded by a dash (-).
arguments are one or more operands of the program (or utility), or the user nameand password combination, or both.
Basics of Oracle Database Utilities
Oracle Database Utilities 6-3
As soon as the program is loaded, the CCM0001 prompt is displayed and enables youto enter the command line options. As shown in the preceding examples, you canenter the option_switch or arguments for the program. The prompt of theprogram is displayed. If the program is SQL*Plus, then the prompt is SQL>. You cannow enter one of the commands of the program. See the generic documentation for theproduct for a description of the valid commands.
For example, to start SQL*Plus, enter the following command:
/START-EXECUTABLE (*LINK(ORALOAD),SQLPLUS)* userid/password
To start a utility in UNIX-Style, the Oracle syntax file$ORACINST.SYSSDF.ORACLE.USER must be activated. This is done by the MOD-SDF(MODIFY-SDF-OPTIONS) command in the ORAENV file. Remove the commentmarker '&*' and call the sid.P.ORAENV file again. The following commands to startan Oracle utility are available:
/START-ORACLE-ADRCI or /ADRCI/START-ORACLE-CM-CONTROL or /CMCTL/START-ORACLE-CMMIGR or /CMMIGR/START-ORACLE-EXPORT or /OEXP/START-ORACLE-EXPDP or /EXPDP/START-ORACLE-IMPORT or /OIMP/START-ORACLE-IMPDP or /IMPDP/START-ORACLE-LISTENER-CONTROL or /LSNRCTL/START-ORACLE-ORAPWD or /ORAPWD/START-ORACLE-SQLLOADER or /SQLLDR/START-ORACLE-SQLPLUS or /SQLPLUS/START-ORACLE-TNSPING or /TNSPING/START-ORACLE-RECOVERY-MANAGER or /RMAN
Specify the parameters after the start command. Enclose the parameters within singlequotation marks, if they contain a white space or an equal sign (=) . The followingexamples show how to start an utility in UNIX Style in the BS2000 programenvironment:
/lsnrctl
/sqlplus /nolog
/oimp 'system/manager file=iea buffer=210000 ignore=y grants=yrows=y full=y commit=y'
6.1.4 Starting Oracle Utilities in the POSIX Program EnvironmentStarting from Oracle Database 12c Release 1 (12.1), you can run utilities like SQL*Plusboth in the normal BS2000 environment and the POSIX environment.
During Oracle Database installation, the utilities are installed within the POSIX filesystem in the oracle_home_path/bin directory.
To start Oracle utilities in the POSIX shell, you must set the ORACLE_HOMEenvironment variable and extend the PATH environment variable by the path name ofthe Oracle directory, oracle_home_path/bin as follows:
$ ORACLE_HOME=/u01/app/oracbase/product/12.1.0/dbhome_1$ export ORACLE_HOME$ PATH=$ORACLE_HOME/bin:$PATH$ export PATH
Basics of Oracle Database Utilities
6-4 Installation and Administration Guide

Alternatively, you can execute the oracle_home_path/.profile.oracle profile,which is created during Oracle Database installation under POSIX. This profile setsand expands the most important variables like ORACLE_HOME and PATH.
To execute the profile, enter the following command:
$ . /u01/app/oracbase/product/12.1.0/dbhome_1/.profile.oracle
Set the variable ORACLE_SID to start an Oracle utility for a specific Oracle Databaseinstance. Check the related ORAENV file in the BS2000 file system for instance specificenvironment variables. Set these variables in the POSIX shell before you start theutility.
Utilities running in the POSIX shell provide the opportunity to read instance-specificvariables from the ORAENV file in the BS2000 file system. To provide access to theBS2000 ORAENV file, you must create a file by name, oraenvsid in theoracle_home_path/dbs directory. This file contains the qualified BS2000 file nameof the BS2000 ORAENV file. It acts as a link to the ORAENV file in the BS2000 file system.
For example, to access the ORAENV file, $ORADATA.ORCL.P.ORAENV, you must createan oraenvORCL file in the oracle_home_path/dbs directory, as follows:
$ ORACLE_HOME=/u01/app/oracbase/product/12.1.0/dbhome_1$ export ORACLE_HOME$ echo '$ORADATA.ORCL.P.ORAENV' > $ORACLE_HOME/dbs/oraenvORCL$ chmod 664 $ORACLE_HOME/dbs/oraenvORCL
Note:
• Utilities running in the POSIX shell handle the variables of the BS2000ORAENV file as subordinate variables. Environment variables in the POSIXshell take precedence over settings in the BS2000 ORAENV file.
• The SID in the file name oraenvsid is case sensitive and must match theSID specified in ORACLE_SID.
• You must grant access to the user using the BS2000 ORAENV file, if thePOSIX user that runs the Oracle utility in the POSIX shell is different fromthe BS2000 user ID where the ORAENV file is located.
If an Oracle utility uses the BEQ protocol to connect to a database, then Oracle NetServices gets the job parameters to start a dedicated server in the BS2000 environmentfrom the BGJPAR variable. If you do not specify this variable, then Oracle Net Servicesuses default values.
Note:
The BGJPAR variable might not be set after theoracle_home_path/.profile.oracle profile is run.
While using the BEQ protocol, Oracle recommends that you define the particularBS2000 job parameters for BS2000 jobs that are started by Oracle Net Services. TheBGJPAR variable provides the option to define these parameters. You can define thisvariable either in the related BS2000 ORAENV file or by explicitly setting it in the POSIXenvironment to the appropriate value.
Basics of Oracle Database Utilities
Oracle Database Utilities 6-5

For example, to assign a bequeathed server task to a special JOB-CLASS, set theBGJPAR variable in the POSIX environment as follows:
$ ORACLE_SID=orcl$ export ORACLE_SID$ BGJPAR='START=SOON,CPU-LIMIT=NO,JOB-CLASS=JCBORA,LOGGING=*NO'$ export BGJPAR
You can start the utilities in a similar way as on other UNIX systems. For example, tostart SQL*Plus, use the following commands:
$ sqlplus /nolog$ SQL> connect / as sysdba
6.1.5 Connecting to an Oracle Database InstanceYou can connect to an Oracle Database instance using one of the following methods:
• Oracle Net Services with the Bequeath adapter.
• Oracle Net Services over TCP/IP or IPC.
See Also: " Oracle Net Services (page 12-1)"
Check with your database administrator if you can connect to the Oracle databaseusing the listed methods, as the possibilities available are dependent on how thesystem has been configured. Usually, you specify the way you connect to an OracleDatabase instance as part of the logon string appended to the userid/password, andseparated from it by an at sign (@), as described in the following sections:
• Default Connections (page 6-6)
• Accessing an Oracle Database Instance (page 6-6)
6.1.5.1 Default Connections
If you do not specify a connection string, then use the DEFAULT_CONNECTION orTWO_TASK environment variables to specify an Oracle Database Net Services connectdescriptor.
See Also: “Oracle Environment Variables” (page B-1) for more informationabout the ORAENV file, and the DEFAULT_CONNECTION and TWO_TASKenvironment variables.
6.1.5.2 Accessing an Oracle Database Instance
Use Oracle Net Services to access a local or a remote database instance. Use the OracleNet Services logon string to identify the following for accessing a local or a remotedatabase:
• Protocol to be used.
• Database that you want to access.
• Type of server (whether dedicated or shared) that you want to use.
The Oracle Net Services logon string has the following structure:
Basics of Oracle Database Utilities
6-6 Installation and Administration Guide
/START-EXECUTABLE (*LINK(ORALOAD),SQLPLUS)* userid/password@service_name
where:
service_name specifies a service name stored in the TNSNAMES.ORA file thatidentifies the TNS connect descriptor for the desired database. If you are not sure ofwhat you should enter, then contact your database administrator.
The following example shows a logon string to connect to a database defined in theTNSNAMES.ORA file as SERVERX:
HR/HR@SERVERX
See Also: “Oracle Net Services” (page 12-1) for information aboutconnecting to an Oracle Database using the Bequeath adapter
6.1.6 Using BS2000 Files for Input and OutputIn most cases, Oracle Database for BS2000/OSD programs use the functions of the C-BS2000 run-time system to access their input and output files. Oracle Databaseprograms can read and write SAM, ISAM, and PAM files.
This section includes the following topics:
• Text Files (page 6-7)
• Binary Files (page 6-7)
• Default File Name Extensions (page 6-7)
• Using Link Names (page 6-8)
• Fixed Link Names (page 6-8)
6.1.6.1 Text Files
SAM or ISAM files store textual data. Each record is considered as a single text line. Forexample, the SQL script files used by SQL*Plus and spool output files.
SQL*Loader input data is provided as SAM or ISAM files. These files may also containnon-printable data, such as packed decimal or binary integer values. For ISAM files,the key at the beginning of the record is generally ignored.
6.1.6.2 Binary Files
Binary data is usually stored in PAM files.
6.1.6.3 Default File Name Extensions
Under BS2000/OSD, the Oracle Database utilities add default extensions to file namesonly when the last component of the specified file name is longer than threecharacters, or when only one component is specified, as shown in the following table:
Original File Name Extended File Name
TEST.TEST TEST.TEST.EXT
TST TST.EXT
Basics of Oracle Database Utilities
Oracle Database Utilities 6-7
Original File Name Extended File Name
T.T T.T
TEST.TST TEST.TST
This is similar to the file naming conventions used with Oracle Database on a UNIXsystem.
6.1.6.4 Using Link Names
In special cases, instead of specifying a file name, you can also specify the link name ofa previously issued BS2000 /SET-FILE-LINK command. Use the syntaxlink=linkname in places where a file name is requested. In this way, you canoverride default file attributes, preallocate file space, and so on. There are a fewexceptions where you cannot use the link=linkname notation.
When using the link=linkname notation, the default file name extensions do notwork. As a result, file name defaults derived from such notation are not valid, and youmust provide explicit names in such cases.
For example, when working with SQL*Loader, if you specify link=linkname for theSQL*Loader control file, then you must provide explicit names for the BAD, LOG, andDISCARD file names.
Some programs may report a syntax error when the link=linkname notation is usedon the command (options) line. In such cases, omit the parameter on the commandline and specify it instead, when you are prompted for the missing parameter.
6.1.6.5 Fixed Link Names
Oracle Database 12c Release 1 (12.1) for BS2000/OSD uses fixed link names for specificfiles.
The most important link names are as follows:
Type Meaning/Usage
ORAENV Oracle Database environment definition file.
ORALOAD The link name is mandatory and specifies the load library from whichthe Oracle Database modules are loaded during processing.
ORAMESG The link name is mandatory and specifies the message library fromwhich Oracle message modules are loaded during execution.
Typically, you can set these link names by running the ORAENV procedure.
6.2 SQL*PlusSQL*Plus is an interactive and a batch query tool that is installed with every OracleDatabase installation. It has a command-line user interface. SQL*Plus has its owncommands and environment, and provides access to the Oracle Database. It enablesyou to enter and execute SQL, PL/SQL, SQL*Plus, and operating system commands toperform the following:
• Format, perform calculations on, store, and print from query results
SQL*Plus
6-8 Installation and Administration Guide
• Examine table and object definitions
• Develop and run batch scripts
• Perform database administration
This section describes how to use SQL*Plus in the BS2000 environment and in thePOSIX environment. It supplements the SQL*Plus User's Guide and Reference. Itcontains the following topics:
• Using SQL*Plus in the BS2000 Environment (page 6-9)
• Using SQL*Plus in the POSIX environment (page 6-13)
• SQL*Plus User Profiles (page 6-15)
• Using SQL*Plus Symbols (page 6-16)
• Sample Schemas and SQL*Plus (page 6-16)
• SQL*Plus Limits (page 6-17)
6.2.1 Using SQL*Plus in the BS2000 EnvironmentThis section describes how to use SQL*Plus in the BS2000 environment. It contains thefollowing topics:
• Starting SQL*Plus in the BS2000 Environment (page 6-9)
• Interrupting a SQL*Plus Command in the BS2000 Environment (page 6-10)
• Running BS2000 Commands from SQL*Plus (page 6-10)
• Starting the BS2000 Editor (page 6-11)
• Spooling SQL*Plus Output (page 6-11)
• Specifying the Search Path for SQL Scripts in the BS2000 Environment (page 6-12)
• Starting SQL*Plus in a BS2000 command procedure (page 6-12)
6.2.1.1 Starting SQL*Plus in the BS2000 Environment
1. To start SQL*Plus, enter:
/START-EXECUTABLE (*LINK(ORALOAD),SQLPLUS)
*username/password
Note:
If you omit user name and password, then you will be prompted to enterthese values.
If you enter the user name only, then you will be prompted for the password.
SQL*Plus displays the following command prompt:
SQL>
SQL*Plus
Oracle Database Utilities 6-9
The SQL*Plus command prompt indicates that SQL*Plus is ready to accept yourcommands.
2. To start SQL*Plus without connecting to a database, enter the following command:
/START-EXECUTABLE (*LINK(ORALOAD),SQLPLUS)*/NOLOG
3. After SQL*Plus has started, you can connect to the database with the CONNECTcommand as follows:
SQL> CONNECT username/password
6.2.1.2 Interrupting a SQL*Plus Command in the BS2000 Environment
Use the INTERRUPT key [K2] to interrupt the execution of a SQL*Plus statement inSQL*Plus. For example, you can interrupt SQL*Plus if you receive a long report thatyou do not want to be completely displayed on the screen. When you press theINTERRUPT key [K2], the display of the report is stopped and the SQL*Pluscommand prompt is displayed.
Note:
If you issue an INTERRUPT key when an input is requested, then you mustanswer this request before interrupting the process. However, this answer willbe ignored.
6.2.1.3 Running BS2000 Commands from SQL*Plus
The SQL*Plus HOST command and the $ command enables you to run a BS2000command without exiting from SQL*Plus.
Some examples of how you can use the HOST command:
• If you enter the HOST command without any BS2000 command, then it takes you tothe BS2000 command level:
SQL> HOST /SHOW-USER-STATUS
To return to SQL*Plus, use the BS2000 command RESUME .
• If you enter the HOST command with a BS2000 command, then the commandexecutes and the control returns to the SQL*Plus command level:
SQL> HOST SHOW-USER-STATUSSQL>
The following BS2000 commands, if used with the HOST or $ command, do not returnto SQL*Plus when they have finished running:
• START-EXECUTABLE-PROGRAM
• LOAD-EXECUTABLE-PROGRAM
• START-PROGRAM
• LOAD-PROGRAM
SQL*Plus
6-10 Installation and Administration Guide

• CALL-PROCEDURE
• HELP-SDF
• LOGOFF
6.2.1.4 Starting the BS2000 Editor
You can use the SQL*Plus EDIT command to start the BS2000 editor:
SQL> EDIT
This command:
• Writes the SQL buffer, which contains the current SQL statement, to a file calledSQLEDT.BUF in the current BS2000 user ID.
• Starts the editor EDT, which reads the SQLEDT.BUF file into the work area.
You can then edit and write to the file using the @write command. Use the @haltcommand to exit the editor and return to SQL*Plus. SQL*Plus then reads the currentcontents of SQLEDT.BUF back into its command buffer, from which you can executethe SQL statement by entering a forward slash (/) at the SQL*Plus command prompt.
Note:
If you use the SQL*Plus DEFINE _EDITOR command to define a name for theeditor, then SQL*Plus ignores it when running in the BS2000 environment. Italways starts the EDT editor.
You can also use the EDIT command to edit a SQL file by specifying the SQL file. Forexample, if you enter the following command, then the editor EDT is called to edit theLOGIN.SQL file:
SQL> EDIT LOGIN[.SQL]
Note that you can omit the default file name extension .SQL.
See Also: SQL*Plus User's Guide and Reference for more details about the EDITcommand
6.2.1.5 Spooling SQL*Plus Output
When you use the SQL*Plus SPOOL command, SQL*Plus uses the default output-filesuffix, .LST.
Note:
The output generated by BS2000/OSD operating system commands are notspooled.
When you issue a SPOOL OUT command, SQL*Plus executes the BS2000 /PRINTcommand:
/PRINT tempfile,ERASE
SQL*Plus
Oracle Database Utilities 6-11
where tempfile is a temporary copy of the spool file. This routes the file to thecentral printer. To specify any /PRINT command options, such as character sets, orrouting to a remote printer, add the following line to the ORAENV file:
PRINTPAR=options
where options is any sequence of /PRINT command options. Refer to the BS2000manual . SQL*Plus then executes a /PRINT command, which includes these options.
See Also: BS2000 manual User Commands (ISP Format) for more informationabout these options
6.2.1.6 Specifying the Search Path for SQL Scripts in the BS2000 Environment
You can run SQL script with SQL*Plus by using the START command or the @ (atsymbol).
If SQL*Plus is executed in the BS2000 environment, it searches the SQL script in thecurrent BS2000 user ID. If the script is not found, then SQL*Plus searches the pathsspecified by the SQLPATH environment variable. This variable is used to specify one ormore file name prefixes separated by a semicolon (;), which should be applied whensearching for the SQL script file.
For example, if SQLPATH is set as follows:
SQLPATH=PRIVATE;$GLOBAL;/guest/scripts/;
then, when you enter the following command:
SQL> @filename
SQL*Plus searches for the SQL script file in the following sequence, until a matchingfile name is found:
1. filename.SQL in the current BS2000 user ID in the BS2000 DMS.
2. PRIVATE.filename.SQL with the prefix PRIVATE in the current user ID in theBS2000 DMS.
3. $GLOBAL.filename.SQL in the BS2000 user ID $GLOBAL in the BS2000 DMS.
4. /guest/scripts/filename.sql in the directory /guest/scripts/ in thePOSIX file system.
See Also: "Basics of Oracle Database Utilities (page 6-1)" for moreinformation about default file name extensions
6.2.1.7 Starting SQL*Plus in a BS2000 command procedure
If you execute SQL*Plus within a BS2000 SDF command procedure, add the followingcommand to the procedure before the /START-EXECUTE command for SQL*Plus:
/ASSIGN-SYSDTA *SYSCMD
This forces SQL*Plus to read data from the procedure, instead of prompting at theterminal.
SQL*Plus
6-12 Installation and Administration Guide

6.2.2 Using SQL*Plus in the POSIX environmentYou can run SQL*Plus not only in the normal BS2000 environment, but also in thePOSIX environment.
This section describes the following:
• Starting SQL*Plus in the POSIX Environment (page 6-13)
• Interrupting a SQL*Plus Command in the POSIX Environment (page 6-13)
• Running Shell Commands From SQL*Plus (page 6-13)
• Using an Editor in SQL*Plus (page 6-14)
• Spooling SQL*Plus Output in the POSIX Environment (page 6-14)
• Specifying the Search Path for SQL Scripts in the POSIX Environment (page 6-15)
6.2.2.1 Starting SQL*Plus in the POSIX Environment
Set the required environment variables and run SQL*Plus as described in "StartingOracle Utilities in the POSIX Program Environment (page 6-4)." To connect to adatabase immediately, specify the user name and password as an argument as follows:
$ sqlplus username/password
If you do not want to connect to a database, then specify /nolog as an argument:
$ sqlplus /nolog
If you start SQL*Plus without any arguments, then you will be prompted for the username and password.
6.2.2.2 Interrupting a SQL*Plus Command in the POSIX Environment
Interrupting a SQL statement when you run SQL*Plus in the POSIX environmentdepends on the terminal connected with your POSIX session.
To interrupt a SQL statement in the POSIX environment:
• Enter @@c and then press the Enter key if the POSIX shell is started on ablockmode terminal.
• Press the Ctrl + C key combination if the POSIX shell is started by a remote X-clientthrough rlogin or ssh using an xterm terminal.
6.2.2.3 Running Shell Commands From SQL*Plus
The SQL*Plus HOST command and the $ command enables you to enter a POSIX shellcommand, without exiting SQL*Plus.
When using the HOST command, remember the following points:
• If you enter the HOST command without any shell command, then a POSIXsubshell is started and the POSIX command prompt is displayed. To return toSQL*Plus, you must use the exit command or the return command in the POSIXsubshell.
• If you enter the HOST command with a POSIX shell command, then the commandis executed in a subshell and then control returns to SQL*Plus.
SQL*Plus
Oracle Database Utilities 6-13
• Use the bs2cmd POSIX shell command to execute BS2000 commands.
6.2.2.4 Using an Editor in SQL*Plus
Start a text editor in SQL*Plus with the EDIT command, to edit an SQL statement.
The default editor depends on the terminal connected with your POSIX session:
• If the POSIX shell is started on a blockmode terminal, then edtu is set as thedefault editor in SQL*Plus.
• If the POSIX shell is started by a remote X-client through rlogin or ssh using anxterm terminal, then vi is set as the default editor in SQL*Plus.
SQL*Plus provides the opportunity to define a preferred text editor with the DEFINE_EDITOR command. In the POSIX environment you can define a preferred editor. Forexample, to define the editor used by the EDIT command to be the POSIX editoredtu, enter the following command in SQL*Plus:
DEFINE _EDITOR = edtu
Note:
• The editor vi does not work on blockmode terminals.
• The editor edtu does not work on xterm terminals.
The command EDIT:
• Writes the SQL buffer, which contains the current SQL statement to a file calledSQLEDT.BUF in the current working directory in the POSIX file system.
• Starts the editor, which reads the file SQLEDT.BUF into the work area.
You can then edit and write this file using @write with edtu editor and using :wwith vi editor.
To exit the editor and return to SQL*Plus, use the @halt command with edtu and :qwith vi. SQL*Plus then reads the current contents of SQLEDT.BUF back into itscommand buffer, from which the SQL statement can be run by entering slash “/” atthe SQL*Plus command prompt.
You can also use the EDIT command to edit a SQL file by specifying the name of theSQL file. For example, if you enter the following command, then the editor is called toedit the login.sql file:
SQL> EDIT login[.sql]
Note that you can omit the default file name extension, .sql.
6.2.2.5 Spooling SQL*Plus Output in the POSIX Environment
When using the SQL*Plus SPOOL command, SQL*Plus uses the default output-filesuffix, .lst .
The command SPOOL OUT is not supported, when you use SQL*Plus in the POSIXenvironment.
SQL*Plus
6-14 Installation and Administration Guide

6.2.2.6 Specifying the Search Path for SQL Scripts in the POSIX Environment
You can run a SQL script with SQL*Plus by using the START command or the @ (atsymbol).
If SQL*Plus is executed in the POSIX environment, it searches the SQL script in thecurrent working directory. If the script is not found, then SQL*Plus searches the pathsspecified by the SQLPATH environment variable. This variable specifies one or morefile name prefixes separated by a semicolon (;), which should be applied whensearching for the SQL script file.
For example, if SQLPATH is set as follows:
SQLPATH=’private;/BS2/$GLOBAL;/guest/scripts/;’export SQLPATH
then, when you enter the following command:
SQL> @filename
SQL*Plus searches for the SQL script file in the following sequence, until a matchingfile name is found:
1. filename.SQL in the current working directory in the POSIX file system.
2. private/filename.SQL in the subdirectoryprivate of the current workingdirectory in the POSIX file system.
3. /BS2/$GLOBAL.filename.SQL in the BS2000 user ID $GLOBAL in the BS2000DMS.
4. /guest/scripts/filename.sql in the directory /guest/scripts/ in thePOSIX file system.
See Also: "Basics of Oracle Database Utilities (page 6-1)" for moreinformation about default file name extensions
6.2.3 SQL*Plus User ProfilesYou can set up your SQL*Plus environment to use the same settings with each session.There are two operating system files to do this:
• The Site Profile file, glogin.sql for site wide settings.
• The User Profile file, login.sql for user specific settings.
When a user starts SQL*Plus, the glogin.sql file is executed first followed by theuser's login.sql file. These profiles are discussed in detail in the following topics:
• The glogin.sql Global Setup File (page 6-15)
• The login.sql User Setup File (page 6-16)
6.2.3.1 The glogin.sql Global Setup File
The Site Profile file, glogin.sql is executed when you start SQL*Plus. This filecontains SQL statements and SQL*Plus commands that must be run at the beginningof a SQL*Plus session. The glogin.sql file is located in the POSIX file system,
SQL*Plus
Oracle Database Utilities 6-15

$ORACLE_HOME/sqlplus/admin. The database administrator may customize theglogin.sql file if required.
6.2.3.2 The login.sql User Setup File
Every time you start SQL*Plus, the user profile script login.sql is executed after theglogin.sql script. Similar to glogin.sql, this file also contains SQL statementsand SQL*Plus commands that a user wants to run at the beginning of every SQL*Plussession.
When you start SQL*Plus in the BS2000 environment, SQL*Plus first searches forlogin.sql in the current BS2000 user ID. If the login.sql file is not found, thenSQL*Plus searches along the path that is specified by the SQLPATH environmentvariable. If there are more than one login.sql file, then SQL*Plus executes the firstlogin.sql file that is found. For a customized SQL*Plus environment, each BS2000user ID can have its own login.sql file.
When you start SQL*Plus in the POSIX environment, SQL*Plus first searches forlogin.sql in the current working directory in the POSIX file system. If thelogin.sql file is not found, then SQL*Plus searches along the path that is specifiedby the SQLPATH environment variable . If there are more than one login.sql file,then SQL*Plus executes the first login.sql file that is found. For a customizedSQL*Plus environment, each POSIX user can have its own login.sql file.
See Also:
• "Oracle Environment Variables (page B-1)" for a description of theSQLPATH environment variable
• SQL*Plus User's Guide and Reference for more information aboutlogin.sql
The following is a sample startup file:
set echo offset feedback 4set pause onset pause PLEASE ACKNOWLEDGE TO CONTINUEset echo on
6.2.4 Using SQL*Plus SymbolsThe SQL*Plus symbol used for concatenation is the vertical bar, "|" (X'4F'). For userswith German keyboards and using a 7–bit terminal character set, any key thattransmits a X'4F' (for example, "ö"), can be used.
6.2.5 Sample Schemas and SQL*PlusThe sample schemas provide a common platform for examples.
SQL*Plus
6-16 Installation and Administration Guide
See Also:
• SQL*Plus User's Guide and Reference for more information about the sampleschemas and SQL*Plus
• "Creating a Database (page 3-1)" for information about how to install thesample schemas
6.2.6 SQL*Plus LimitsThe limits of several SQL*Plus elements are specified in SQL*Plus User's Guide andReference. The following table defines BS2000 specific limits:
Item Limit
File name length 54 in the BS2000 DMS (including CATID and BS2000 user ID)
512 in the POSIX system
LINESIZE 32767
MAXDATA 32767
Maximum numberof nested commandfiles
12
6.3 The SQL*LoaderSQL*Loader is a tool used for moving data from an external file (or files) into thetables of an Oracle database. SQL*Loader can load data in several formats and caneven load several tables simultaneously. You can also use it to load only records thatmatch a particular data value.
This section includes the following topics:
• Starting the SQL*Loader Utility (page 6-17)
• Using the SQL*Loader Demonstration Files (page 6-18)
See Also: Oracle Database Utilities for a detailed description of SQL*Loaderand its demonstration files
6.3.1 Starting the SQL*Loader UtilityYou can start SQL*Loader either in the BS2000 environment or the POSIXenvironment.
Related Topics:
Starting Oracle Utilities in the BS2000 Program Environment (page 6-3)
Starting Oracle Utilities in the POSIX Program Environment (page 6-4)
The SQL*Loader
Oracle Database Utilities 6-17

6.3.2 Using the SQL*Loader Demonstration FilesThe demonstration files are shipped under:
$ORACINST.RDBMS.DEMO.ULCASE*.CTL$ORACINST.RDBMS.DEMO.ULCASE*.SQL$ORACINST.RDBMS.DEMO.ULCASE*.DAT
To run the ULCASE1 demo, perform the following steps:
1. Run SQL*Plus and set up the table to be used in the demonstration by entering thefollowing commands:
/START-EXECUTABLE (*LINK(ORALOAD),SQLPLUS)* SCOTT/passwordSQL> START $ORACINST.RDBMS.DEMO.ULCASE1
Note:
This example sets up the table for the user SCOTT to run the demonstrations.
2. Start SQL*Loader to run the demonstration by entering the following command:
/START-EXECUTABLE (*LINK(ORALOAD),SQLLDR)* SCOTT/password $ORACINST.RDBMS.DEMO.ULCASE1 ULCASE1 ULCASE1
6.4 The Export UtilityThe Export utility is used to write data from an Oracle database into the BS2000system files. Use this utility with the Import utility to back up your data and to movedata between Oracle databases.
This section includes the following topics:
• Starting the Export Utility (page 6-18)
• Exporting to Foreign Systems (page 6-19)
6.4.1 Starting the Export UtilityYou can start the Export utility exp either in the BS2000 environment or the POSIXenvironment.
See Also:
• Starting Oracle Utilities in the BS2000 Program Environment (page 6-3)
• Starting Oracle Utilities in the POSIX Program Environment (page 6-4)
Export dump files, which are created in the BS2000 DMS by EXP are usually of the SAMfile structure. You can override default output file specifications by running a SET-FILE-LINK command such as:
/SET-FILE-LINK LINK-NAME=explink,FILE-NAME=expfile,ACCESS-METHOD=*SAM,RECORD-FORMAT=*FIXED,RECORD-SIZE=2048,BUFFER-LENGTH=*STD(1)
The Export Utility
6-18 Installation and Administration Guide

Then, call the EXP utility by specifying the following in response to the output filename prompt:
LINK=explink
On a nonkey public volume set, you may need to adjust the BLKSIZE and RECSIZEvalues for efficient disk-space usage (note that RECSIZE must be 16 bytes less than theBLKSIZE on nonkey disks). Specify the RECSIZE value to match the export recordsize.
For example:
/SET-FILE-LINK LINK-NAME=explink,FILE-NAME=expfile,ACCESS-METHOD=*SAM,RECORD-FORMAT=*FIXED,RECORD-SIZE=2032,BUFFER-LENGTH=2048
Note:
Do not use variable record size with SAM files.
When using a block size (PAM) or record size (SAM) other than 2048, you mustalso specify a corresponding RECORDLENGTH parameter to EXP on the optionsline.
When exporting large volumes of data, the default disk-space allocation for the outputfile is inappropriate, and the program spends a significant amount of time allocatingsecondary extents of disk space. If the maximum number of extents exceeds thenumber that the catalog entry can hold, then an output-file error occurs.
You must always preallocate the EXP output file with the BS2000 /FILE command,before starting the Export utility. When allocating the file, you must use a realisticestimate for both the primary and secondary space allocations.
For example:
/CREATE-FILE LARGE.EXPORT.DMP,SPACE=(30000,30000)/ADD-FILE-LINK LINK-NAME=EXPOUT,FILE-NAME=LARGE.EXPORT.DMP/START-EXECUTABLE (*LINK(ORALOAD),EXP)* system/manager...Export file: EXPDAT.DMP >link=expout...
6.4.2 Exporting to Foreign SystemsYou can export to foreign systems using the following methods:
• Exporting Data to Tape (page 6-19)
• Transferring Data by File Transfer (page 6-20)
6.4.2.1 Exporting Data to Tape
To export directly to tape:
1. Create a catalog entry for a file using the CREATE-FILE command.
2. Create a link using the ADD-FILE-LINK command. For example:
The Export Utility
Oracle Database Utilities 6-19

/CREATE-FILE tapefile,SUPPORT=*TAPE(VOLUME=vsn,DEVICE-TYPE=device)/ADD-FILE-LINK LINK-NAME=tapelink,FILE-NAME=tapefile,ACCESS-METHOD=*SAM,RECORD-FORMAT=*FIXED,RECORD-SIZE=2048,BUFFER-LENGTH=*STD(1)
3. Set the environment variable EXP_CLIB_FILE_IO to FALSE.
4. Execute EXP by specifying the following value in response to the output file nameprompt:
LINK=tapelink
The export utility writes the output as SAM files, which simplifies export to an OracleDatabase on foreign systems.
6.4.2.2 Transferring Data by File Transfer
If you use FTP, then ensure that you specify binary mode. This is to avoid automaticEBCDIC-ASCII conversion.
6.5 The Import UtilityThe Import utility is used to write data from the files created by the Export utility to anOracle database.
This section includes the following topics:
• Starting the Import Utility (page 6-20)
• Importing from Foreign Systems (page 6-20)
See Also: “Known Problems, Restrictions and Workarounds” in OracleDatabase Release Notes for Fujitsu BS2000/OSD for restrictions when using theImport utility
6.5.1 Starting the Import UtilityYou can start the Import utility, imp either in the BS2000 environment or the POSIXenvironment.
See Also:
• Starting Oracle Utilities in the BS2000 Program Environment (page 6-3)
• Starting Oracle Utilities in the POSIX Program Environment (page 6-4)
6.5.2 Importing from Foreign SystemsThis section gives you few guidelines on importing data from non-BS2000 systems. Itincludes the following topics:
• Importing File with Non-Standard Block Size (page 6-21)
• Importing Data from Tape (page 6-21)
• Transferring Data by File Transfer (page 6-21)
The Import Utility
6-20 Installation and Administration Guide

6.5.2.1 Importing File with Non-Standard Block Size
If the import file on the BS2000/OSD operating system has a block size (BLKSIZE) notequal to 2 KB, then you must specify the block size during import with the Importparameter RECORDLENGTH.
6.5.2.2 Importing Data from Tape
The Import utility can read directly from tape, provided the file can be processed as aSAM file, which is usually the case even for EXP files created on foreign systems (forexample, as a sequence of fixed 2 KB blocks).
To read a foreign export file directly:
1. Create a catalog entry for a file using the IMPORT-FILE command.
2. Create a link using the ADD-FILE-LINK command. For example:
/IMPORT-FILE SUPPORT=*TAPE(VOLUME=vsn,DEVICE-TYPE=device,FILE-NAME=tapefile)/ADD-FILE-LINK LINK-NAME=tapelink,FILE-NAME=tapefile
3. Set the environment variable IMP_CLIB_FILE_IO to FALSE.
4. Execute IMP by specifying the following value in response to the input file nameprompt:
LINK=tapelink
6.5.2.3 Transferring Data by File Transfer
If you use FTP, then ensure that you specify binary mode. This is to avoid automaticASCII-EBCDIC conversion. The received file is stored as a PAM file by the BS2000 FTPutility and can immediately be used as an input file to IMP.
You must use FTP on BS2000 when you want to use an export file from BS2000 as animport file on an ASCII platform. To avoid new line (NL) insertion at blockboundaries, ensure that you provide the binary and the ftyp binary parameters.
6.6 The Data Pump Export UtilityThe Data Pump Export and Import are functionally similar to Export and Importdiscussed in the preceding sections. However, the I/O processing for dump files isdone in the Oracle database server rather than in the client utility session.
This utility is used to write data from an Oracle database into the BS2000 system files.Use this utility with the Data Pump Import utility to back up your data and to movedata between Oracle databases.
6.6.1 Starting the Data Pump Export UtilityYou can start the Data Pump Export utility, expdp either in the BS2000 environmentor the POSIX environment.
See Also:
• “Starting Oracle Utilities in the BS2000 Program Environment” (page 6-3)
• “Starting Oracle Utilities in the POSIX Program Environment” (page 6-4)
The Data Pump Export Utility
Oracle Database Utilities 6-21
The Data Pump Export dump files are always created in the BS2000 DMS as PAM fileswith BLKSIZE=(STD,2).
To use an export file from BS2000 as an import file on an ASCII platform, use FTP asthe transfer utility on BS2000 side and indicate the binary parameter .
Note:
If you start EXPDP in UNIX-style and use interactive-command mode [K2]key, then the parameters must be specified when you are prompted for them,and not on the command line.
Data Pump Export to tape is not supported.
6.7 The Data Pump Import UtilityThe Data Pump Import utility is used to write data from the files created by the DataPump Export utility to an Oracle database.
6.7.1 Starting the Data Pump Import UtilityYou can start the Data Pump Import utility impdp either in the BS2000 environment orthe POSIX environment.
See Also:
• "Starting Oracle Utilities in the BS2000 Program Environment (page 6-3)"
• "Starting Oracle Utilities in the POSIX Program Environment (page 6-4)"
The following example shows how to use the command-line mode of impdp in theBS2000 environment:
START-EXECUTABLE (*LINK(ORALOAD),IMPDP)* username/password [options]
If you use an export file from an ASCII platform as an import file on BS2000, then useFTP as the transfer utility on BS2000 side and indicate the binary parameter.
Before you get the file, issue the FTP command:
file dmp-file,fcbtype=pam,blksize=(std,2),blkctrl=no
Note:
If you start IMPDP in UNIX-style and use interactive-command mode [K2]key, then the parameters must be specified when you are prompted for them,and not on the command line.
Data Pump Import by tape is not supported.
6.8 Recovery Manager on BS2000On BS2000/OSD, Recovery Manager does not support tapes. Disks are the onlybackup media.
The Data Pump Import Utility
6-22 Installation and Administration Guide
As a workaround, use the Recovery Manager output as a first level storage to bemigrated by BS2000 subsystem HSMS (Hierarchical Storage Management System) totapes. However, it is the administrator's responsibility to ensure the cooperation of thetwo systems.
The following is an example of a Recovery Manager command in the BS2000environment:
/START-EXECUTABLE (*LINK(ORALOAD),RMAN)*target "dba1/dba1@i1" catalog "dba2/dba2@i2" cmdfile "b.dat" log "b.log"
6.9 Checking the Integrity of the Physical Data StructureTo check the data structure integrity of offline databases, use the DBVERIFYcommand-line utility. You can start the DBVERIFY utility dbv, either in the BS2000environment or the POSIX environment.
The following examples shows how to use dbv in the BS2000 environment:
/START-EXECUTABLE (*LINK(ORALOAD),DBV)file=orcl.dbs.database1.dbf blocksize=4096 feedback=100
The following example shows how to use dbv in the POSIX environment:
$ dbv file=orcl.dbs.database1.dbf blocksize=4096 feedback=100
See Also:
• "Starting Oracle Utilities in the BS2000 Program Environment (page 6-3)"
• "Starting Oracle Utilities in the POSIX Program Environment (page 6-4)"
• Oracle Database Utilities for more information about the DBVERIFYprogram
6.10 Workload Replay ClientThe Workload Replay Client (WRC) is a multithreaded program where each threadsubmits a workload from a captured session.
An executable program, wrc is located in the $ORACLE_HOME/bin directory. Thespecific characteristics of the Workload Replay Client (WRC) on BS2000 is discussed inthe following topics:
• About Running Workload Replay Client (page 6-23)
• About Troubleshooting Workload Replay Client (page 6-24)
Related Topics:
Oracle DatabaseTesting Guide
6.10.1 About Running Workload Replay ClientBefore you start the Workload Replay Client (WRC), you must copy theWRC.OPTFILE from the installation user ID to the client user ID. The WRC.OPTFILEmust reside in the BS2000 DMS. Use the following command:
/COPY-FILE $ORACINST.WRC.OPTFILE,WRC.OPTFILE,SAME
Checking the Integrity of the Physical Data Structure
Oracle Database Utilities 6-23

See Also: Oracle Database Testing Guide to run the Workload Replay Client
6.10.2 About Troubleshooting Workload Replay ClientYou must not modify the parameters of the WRC.OPTFILE except when there areproblems with the WRC application. The following table shows the parametersdefined in the WRC.OPTFILE. Modify the parameter values carefully:
Parameter Value Description
APPLL $ORACINST.ORALOAD.LIB Application Load Library
SCHPO *STD|FIFO|RR
Default: *STD
Defines the threadscheduling policy: Standard,First In First Out, or RoundRobin.
BUSYC Integer 1…2147483647
Default: 100
Number of retries to get alock.
MINRT Integer 0…59
Default: 1
Minimum number ofresource tasks.
MAXRT Integer 0…59
Default: 1
Maximum number ofresource tasks.
MINTH Integer 1…59
Default: 1
Minimum number of threadtasks.
MAXTH Integer 1…59
Default: 1
Maximum number of threadtasks.
MSESZ Integer 1…2147483647
Default: 262144
Number of bytes reserved forthe main stack.
ILCS7 Integer 1…2147483647
Default: 262144
Default size of a stack for athread.
SHAMS Integer 1…2147483647
Default: 131072
Number of memory pagesreserved for the applicationmemory pool.
To get information about the running WRC, call the procedure ITH-SHOW from theSYSPRC library of the PTHREADS installation:
/CALL-PROCEDURE $TSOS.SYSPRC.PTHREADS.014(ITH-SHOW)
This utility produces an output similar to the following:
/CALL-PROCEDURE $TSOS.SYSPRC.PTHREADS.014(ITH-SHOW)% BLS0523 ELEMENT 'ITHSHOW', VERSION 'V01.4A10', TYPE 'L' FROM LIBRARY':BUG2:$TSOS.SYSLNK.PTHREADS.014' IN PROCESS% BLS0524 LLM 'ITHSHOW', VERSION 'V01.4A10' OF '2013-11-30 03:17:44' LOADED% BLS0551 COPYRIGHT (C) 2013 Fujitsu Technology Solutions. ALL RIGHTS RESERVEDSTARTED AT 2016-04-20-145816 BY POSIX (running)LLM = WRC (prelinked)MAIN = IC@#MAIN
Workload Replay Client
6-24 Installation and Administration Guide

APPLL = :POR5:$ORA12102.ORALOAD.LIBRUNTL = :BUG2:$TSOS.SYSLNK.PTHREADS.014PTHvers = 01.4A21 2016-02-10 18:55:31FDs = 5 (3 ORIG FDs, 2 RESO FDs)Threads = 5 (1 user threads, 4 system threads)TYPE TSN PID JOB-TYPE PRI CPU-USED CPU-MAX ACCOUNT#ORIG 1D4U 2902 (X'0B56') 3 DIALOG *0 240 3.0365 32767 FSC waiting for new requestsRESO 1D48 2917 (X'0B65') 3 DIALOG *0 240 0.0450 32767 FSC executing requestTHRE 1D49 2918 (X'0B66') 3 DIALOG *0 240 0.2478 32767 FSC
Here you find the TSNs of the tasks involved in the WRC application. You can connectto the WRC application when you choose the TSN of the ORIG task as the input for theparameter TSN of the ITH-START procedure in the following format:
/CALL-PROCEDURE $TSOS.SYSPRC.PTHREADS.014(ITH-START),(TSN=1D4U)
When you see the double slash prompt you can type SHOW-PTHREADS-STATUS toshow the status of the running WRC application or CANCEL-THREADED-PROGRAM tocancel the application. If the ORIG task is already terminated, then you can terminateall other tasks of the WRC application. In the BS2000 environment, use the followingsystem command:
/CANCEL_JOB JOB-IDENTIFICATION=tsn
In the POSIX environment use the shell command kill to abort pending processes.You must use the signal SIGABRT (6) or SIGTERM (15) to notify the target process:
$ kill -6 pid
6.11 The Oracle Text LoaderThis utility imports and exports text data. .
You can start the Oracle Text Loader utility ctxldr either in the BS2000 environmentor the POSIX environment.
See Also:
• Oracle Text (page 10-1) for installing Oracle Text
• "Starting Oracle Utilities in the BS2000 Program Environment (page 6-3)"
• "Starting Oracle Utilities in the POSIX Program Environment (page 6-4)"
The following examples show how to use ctxldr in the BS2000 environment:
/START-EXECUTABLE (*LINK(ORALOAD),CTXLDR)*-USER username/password [options]
The following example shows how to use ctxldr in the POSIX environment:
$ ctxldr -USER username/password [options]
Related Topics:
Oracle Text Reference
The Oracle Text Loader
Oracle Database Utilities 6-25

The Oracle Text Loader
6-26 Installation and Administration Guide

7Backing Up and Recovering a Database
This chapter supplements the generic Oracle Database documentation set withinformation about backup and recovery. It includes the following topics:
• Backing Up an Oracle Database (page 7-1)
• Restoring an Oracle Database (page 7-3)
• About Using the Recovery Manager (page 7-3)
Refer to the following Oracle manuals for detailed information about database backupand recovery:
• Oracle Database Concepts
• Oracle Database Administrator’s Guide
• Oracle Database Backup and Recovery User’s Guide
You can choose among many methods and Oracle tools for backup and recovery. Youmay use the Import and Export Utilities for logical backup and recovery. For physicalbackup and recovery you may use Recovery Manager (RMAN) or operating systemutilities.
This chapter describes some BS2000 specific issues if you apply user-managed backupand recovery with SQL*Plus and BS2000 utilities.
See Also: "Performing Online Backup (page 7-2)" for information aboutRMAN on BS2000
7.1 Backing Up an Oracle DatabaseYou can use one of the following methods to back up an Oracle Database:
• Using BS2000 Utilities to Back Up an Oracle Database (page 7-1)
• Performing Online Backup (page 7-2)
7.1.1 Using BS2000 Utilities to Back Up an Oracle DatabaseYou can back up an Oracle database using BS2000 operating system utilities (forexample, ARCHIVE or the /COPY-FILE command).
Use the following steps to back up an Oracle database:
1. While the database is running, collect the names of all the files, which make upOracle Database. You can determine the names of the log and database files byentering the following commands:
Backing Up and Recovering a Database 7-1

/START-EXECUTABLE (*LINK(ORALOAD),SQLPLUS)* /NOLOGSQL> CONNECT / AS SYSDBASQL> SELECT * FROM V$DATAFILE;SQL> SELECT * FROM V$LOGFILE;
2. To ensure that all Oracle database files are synchronized at the time of the backup,shut down Oracle database using SQL*Plus.
3. Back up all the database files and log files using the BS2000 ARCHIVE utility or theBS2000 /COPY-FILE command. You should always back up all the files at thesame time.
4. Restart Oracle Database using SQL*Plus.
7.1.2 Performing Online BackupYou can perform an online backup of the database or individual tablespaces by usingeither:
• The BS2000 ARCHIVE utility together with Oracle Database INSTALL.C.OPNBACKutility.
• The BS2000 PERCON utility.
The ARCHIVE method is faster, and is described in this section.
Before you can perform an online (hot) backup of individual tablespaces, you mustensure that the ARCHIVE utility can back up open files.
The following BS2000 command ensures that ARCHIVE can back up all open files:
/START-EXECUTABLE $ORACINST.INSTALL.C.OPNBACK*filename
The INSTALL.C.OPNBACK utility calls the BS2000 macro CATAL, which sets theOPNBACK file attribute to YES. For the CATAL macro to work, the database must beshut down or the tablespace in question must be offline. You enter this command oncefor each file. For example, before adding it to a tablespace, not on the occasion of eachbackup.
You must never back up database files online without first setting the tablespace tobackup mode. If you do not follow this step, then the resulting backup files areinconsistent. To perform an online backup of individual tablespaces or data files, usethe following procedure:
1. Enter the following command:
SQL> ALTER TABLESPACE name BEGIN BACKUP;
2. Back up the files of the tablespace using the BS2000 ARCHIVE utility. Ensure thatthe OLS parameter of ARCHIVE is set to YES.
3. Enter the following command:
SQL> ALTER TABLESPACE name END BACKUP;
Backing Up an Oracle Database
7-2 Installation and Administration Guide

Note:
The preceding SQL*Plus commands operate on tablespaces, while theARCHIVE utility operates on data files.
7.2 Restoring an Oracle DatabaseAn Oracle Database can be restored offline from backups, using the following steps:
1. Copy all the database files and the log files from the backup. You may use theBS2000 ARCHIVE utility or the BS2000 /COPY-FILE command. Files must berestored with their original name.
To determine the name of all data files, query the V$DATAFILE table while theOracle database is running. Enter the following command when the SQL prompt isdisplayed:
SQL> SELECT FILE#,NAME FROM V$DATAFILE;
The following is an example of the result that is displayed:
FILE# NAME------ -------------------------1 :pvs:$dbauserid.sid.DBS.DATABASE1.DBF2 :pvs:$dbauserid.sid.DBS.DATABASE2.DBF 2 ROWS SELECTED.
You can determine the name of the log files in a similar way:
SQL> SELECT GROUP#,MEMBER FROM V$LOGFILE;
The following is an example of the result that is displayed:
GROUP# MEMBER------ -------------------------1 :pvs:$dbauserid.sid.DBS.LOG1.DBF2 :pvs:$dbauserid.sid.DBS.LOG2.DBF 2 ROWS SELECTED.
2. Under the DBA user ID, ensure that the ORASID environment variable identifiesthe Oracle Database, which is to be restored.
3. Use the SQL*Plus STARTUP command to start the Oracle database.
7.3 About Using the Recovery ManagerIn addition to the BS2000 utilities, you can also use Oracle Recovery Manager (RMAN)to back up and restore a database.
See Also: "Recovery Manager on BS2000 (page 6-22)" for more information
Restoring an Oracle Database
Backing Up and Recovering a Database 7-3

About Using the Recovery Manager
7-4 Installation and Administration Guide

8About Unified Auditing
Unified auditing enables you to capture audit records from a variety of sources.
Unified Auditing is a new auditing facility in Oracle Database 12c Release 1 (12.1).
The unified audit trail, which resides in a read-only table in the AUDSYS schema in theSYSAUX tablespace, makes this information available in an uniform format in theUNIFIED_AUDIT_TRAIL data dictionary view.
When the database is writable, audit records are written to the unified audit trail. Ifthe database is not writable, then audit records are written to new format operatingsystem files in the POSIX file system in the $ORACLE_BASE/audit/$ORACLE_SIDdirectory.
This chapter contains the following topics:
• Enabling Unified Auditing (page 8-1)
• Disabling Unified Auditing (page 8-2)
See Also: Oracle Database Security Guide for more details
8.1 Enabling Unified AuditingThe Unified Auditing option is not enabled after you intall Oracle Database. You canfind if your database has been migrated to unified auditing by querying the V$OPTION dynamic view. Query the VALUE column of the V$OPTION dynamic view asfollows with SQL*Plus:
SQL> SELECT VALUE FROM V$OPTION WHERE PARAMETER = 'UnifiedAuditing';
If the output for the VALUE column is TRUE, then pure unified auditing is alreadyenabled in your database. If unified auditing has not been enabled, then the output isFALSE.
To enable the Unified Auditing option, relink the ORAKNL binary in the ORALOADlibrary $ORACINST.ORALOAD.LIB. Relinking is done by calling a BS2000 commandprocedure.
After shutting down all databases and stopping all listeners, log in to the installationuser ID $ORACINST. Enter the following BS2000 command to enable UnifiedAuditing:
/CALL-PROCEDURE INSTALL.P.UNIAUD-ON
Restart the databases and listeners in your DBA user IDs. After restarting, all thedatabases run with Unified Auditing.
About Unified Auditing 8-1

8.2 Disabling Unified AuditingTo disable the Unified Auditing option, relink the ORAKNL binary in the ORALOADlibrary $ORACINST.ORALOAD.LIB. Relinking is done by calling a BS2000 commandprocedure.
After shutting down all databases and stopping all listeners, log in to the installationuser ID $ORACINST. Enter the following BS2000 command to disable UnifiedAuditing:
/CALL-PROCEDURE INSTALL.P.UNIAUD-OFF
Restart the databases and listeners in your DBA user IDs. After restarting, alldatabases run without the Unified Auditing option.
Disabling Unified Auditing
8-2 Installation and Administration Guide
9Java in the Database
This chapter describes BS2000-specific features for Java in the database. This chapterincludes:
• Installation of a Java Enabled Database (page 9-1)
• Database character sets and Java Encodings (page 9-2)
• Java Demonstration Files (page 9-3)
See Also: Oracle Java documentation set for more information
9.1 Installation of a Java Enabled DatabaseWhen you call $ORACINST.INSTALL.P.SUPER and set the JAVA parameter to YES,you get a database that meets the Java requirements.
When you enable Java in an existing Oracle database, you can use the Java relatedparts of this procedure as an example and modify it according to your needs. Forexample, you can increase dbsize, shared_pool_size, create a large rollbacksegment, run initjvm.sql, and so on.
See Also: Oracle Database Java Developer’s Guide for more information
Where can files related to Java reside and how should they be encoded?
It is not absolutely straightforward where files used by Java must be stored and howthey should be encoded. In general, files can reside either in the native BS2000 or in thePOSIX file system. However, there are exceptions.
The following table gives an overview of the file types, location, default encoding, andencoding modifications for APIs or statements:
Statement or API File type Place Defaultencoding
Encodingmodification
CREATE JAVA CLASSUSING BFILE
.class BS2000 PAMfile or POSIX
Binary Not applicable
CREATE JAVARESOURCE USINGBFILE
.properties BS2000 PAMfile or POSIX
ascii None, that is,there is nomeans to changethe defaultencoding.
Java in the Database 9-1
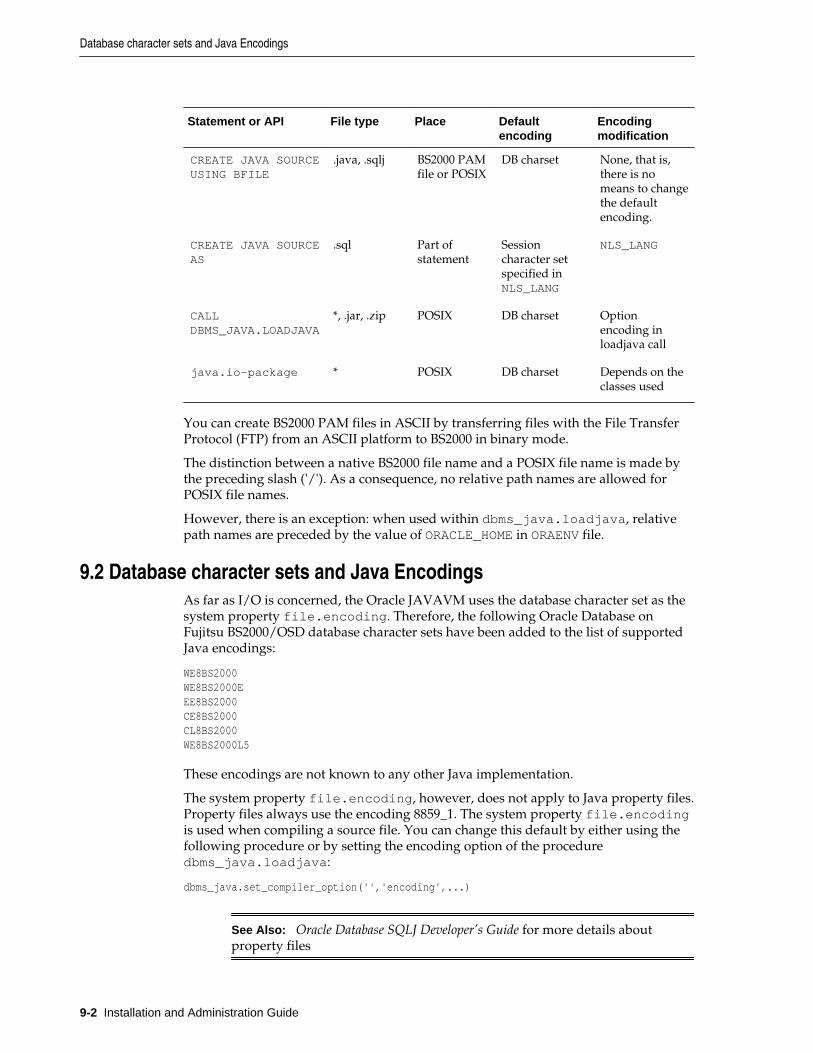
Statement or API File type Place Defaultencoding
Encodingmodification
CREATE JAVA SOURCEUSING BFILE
.java, .sqlj BS2000 PAMfile or POSIX
DB charset None, that is,there is nomeans to changethe defaultencoding.
CREATE JAVA SOURCEAS
.sql Part ofstatement
Sessioncharacter setspecified inNLS_LANG
NLS_LANG
CALLDBMS_JAVA.LOADJAVA
*, .jar, .zip POSIX DB charset Optionencoding inloadjava call
java.io-package * POSIX DB charset Depends on theclasses used
You can create BS2000 PAM files in ASCII by transferring files with the File TransferProtocol (FTP) from an ASCII platform to BS2000 in binary mode.
The distinction between a native BS2000 file name and a POSIX file name is made bythe preceding slash ('/'). As a consequence, no relative path names are allowed forPOSIX file names.
However, there is an exception: when used within dbms_java.loadjava, relativepath names are preceded by the value of ORACLE_HOME in ORAENV file.
9.2 Database character sets and Java EncodingsAs far as I/O is concerned, the Oracle JAVAVM uses the database character set as thesystem property file.encoding. Therefore, the following Oracle Database onFujitsu BS2000/OSD database character sets have been added to the list of supportedJava encodings:
WE8BS2000WE8BS2000EEE8BS2000CE8BS2000CL8BS2000WE8BS2000L5
These encodings are not known to any other Java implementation.
The system property file.encoding, however, does not apply to Java property files.Property files always use the encoding 8859_1. The system property file.encodingis used when compiling a source file. You can change this default by either using thefollowing procedure or by setting the encoding option of the proceduredbms_java.loadjava:
dbms_java.set_compiler_option('','encoding',...)
See Also: Oracle Database SQLJ Developer’s Guide for more details aboutproperty files
Database character sets and Java Encodings
9-2 Installation and Administration Guide

9.3 Java Demonstration FilesA simple Java demonstration program running in the server is shipped under:
$ORACINST.JAVAVM.DEMO.HELLO.SQL
An example with database connection using the server-side internal driver is shippedunder:
$ORACINST.JAVAVM.DEMO.EMPLOYEE.JAVA$ORACINST.JAVAVM.DEMO.CREATE.SQL$ORACINST.JAVAVM.DEMO.RUN.SQL
Java Demonstration Files
Java in the Database 9-3

Java Demonstration Files
9-4 Installation and Administration Guide

10Oracle Text
Oracle Text provides indexing, word and theme searching, and viewing capabilitiesfor text in query applications and document classification applications.
This chapter describes how to install and run Oracle Text and the restrictions of thisoption on BS2000. It includes the following topics:
• Installing Oracle Text (page 10-1)
• Restrictions of Oracle Text on BS2000 (page 10-1)
10.1 Installing Oracle TextOracle Text is not installed when you create a database. To install Oracle Text, youmust complete the following steps:
1. Start SQL*Plus. To avoid being prompted for many overflow acknowledgementson the screen, set OVERFLOW-CONTROL=*NO-CONTROL:
/MODIFY-TERMINAL-OPTIONS OVERFLOW-CONTROL=*NO-CONTROL/START-EXECUTABLE (*LINK(ORALOAD),SQLPLUS)* /nologconnect / as sysdbaspool catctx.log@$ORACLE_HOME/ctx/admin/catctx.sql CTXSYS SYSAUX TEMP NOLOCK;
where CTXSYS is the password for ctxsys, SYSAUX is the default tablespace forctxsys, TEMP is the temporary tablespace for ctxsys, and LOCK|NOLOCKspecifies whether the ctxsys user account is locked or not.
2. If you are working with US english texts, then install the appropriate language-specific default preferences:
connect CTXSYS/CTXSYS@$ORACLE_HOME/ctx/admin/defaults/drdefus.sql;
If you are not working with US english texts, then open the drdef*.sql scriptaccording to the preferred language, set the attribute, refer to "Restrictions ofOracle Text on BS2000 (page 10-1)," and run the script.
3. Type exit when finished.
10.2 Restrictions of Oracle Text on BS2000The following restrictions apply for Oracle Text on Fujitsu BS2000:
• Index themes are not supported.
• INSO filters, which are licensed on special platforms only, are not supported.
Oracle Text 10-1

• ctxkbtc, which is a knowledge base utility is not supported.
• URL_DATASTORE objects are not supported.
Note:
FILE_DATASTORE objects may reside on native BS2000 DMS as PAM files oron the POSIX file system.
Restrictions of Oracle Text on BS2000
10-2 Installation and Administration Guide

11XML
This chapter describes BS2000 specific topics of XML such as installation, features, andrestrictions. It contains the following topics:
• About XDK Installation (page 11-1)
• Features and Restrictions of XML Features on BS2000 Systems (page 11-1)
See Also:
• Oracle XML Developer's Kit Programmer's Guide
• Oracle XML DB Developer’s Guide
• Oracle Database XML C API Reference
• Oracle Database XML C++ API Reference
• Oracle Database XML Java API Reference
11.1 About XDK InstallationThe Oracle XML Developer's Kit (XDK) is not part of the Oracle Database product set.Oracle recommends downloading the latest version of XDK from the OracleTechnology Network (OTN) at
http://www.oracle.com/technetwork/topics/index.html
The Jar files for the XML SQL utility, xsu12.jar and xdb.jar, and the XML Parser,xmlparserv2.jar are already loaded in the database when you create a database asexplained in "About Creating a Database (page 3-1)."
11.2 Features and Restrictions of XML Features on BS2000 SystemsThe following table provides an overview of the XML features that are available forthe programming languages on BS2000:
An empty field means that the feature is not supported.
N/A means means that it is not applicable.
XML Feature Availability forJava
Availability forC
Availability forC++
Availability forPL/SQL
Parser Yes Yes
XSLT Processor Yes Yes
XML 11-1

XML Feature Availability forJava
Availability forC
Availability forC++
Availability forPL/SQL
Class Generator N/A N/A
XSQL N/A N/A N/A
TransviewerBeans
N/A N/A N/A
XML-SQLUtility
Yes N/A N/A Yes
SchemaProcessor
Yes N/A
When you use PL/SQL instead of Java, you must consider the following behavior:
• PL/SQL file input is only possible from POSIX and with ASCII data format.
• PL/SQL file output is written to POSIX with ASCII data format.
• For INSERT/UPDATE/DELETE operations the XML document must not contain <?xml ... encoding=WE8BS2000 ...>.
When using the JAVA-interfaces, you must ensure the right character set of the data.
If you have an ASCII platform with JDK, then you can also use XML components andoperate on the BS2000 Oracle database using a JDBC connection.
See Also: Java in the Database (page 9-1) for more information about theencoding considerations
Features and Restrictions of XML Features on BS2000 Systems
11-2 Installation and Administration Guide
12Oracle Net Services
This chapter describes Oracle Net Services and it's implementation in the BS2000 andPOSIX program environment. It supplements the Oracle Database Net ServicesAdministrator's Guide with BS2000-specific information about the following topics:
• Introducing Oracle Net Services (page 12-1)
• Shared Server Architecture (page 12-7)
• Configuring the Network (page 12-8)
• Troubleshooting Oracle Net Services (page 12-11)
12.1 Introducing Oracle Net ServicesOracle Net Services supports network communication between a client applicationand a remote or a local database running on a variety of operating systems.
Oracle Net Services allows the database servers and the client applications, or serversacting as clients, to run on separate systems and provides a means for moving databetween the nodes on a network. For example, a UNIX or Windows user can runapplications that access and manipulate data in a remote Oracle database running on aBS2000 system.
Oracle Net Services is also used for inter-process communication, if a client and therequested database service are running on the same machine.
As mentioned in the Concepts and Architecture (page 1-1) chapter, Oracle programscan run in both the BS2000 and the POSIX program environment. In the POSIXprogram environment, the BS2000 sockets are not supported. So, Oracle Net Servicesuses different sockets implementation depending on the program environment.
In the BS2000 program environment, Oracle Net Services uses the BS2000 sockets bydefault. The BS2000 sockets support the protocol families PF_ISO, PF_INET, andPF_INET6. Oracle Net Services uses the protocol family, PF_ISO for the following:
• Inter-process communication.
• Support of the hand off feature to move a accepted connection from the listenerprocess to a server process.
If the POSIX program environment is detected, then Oracle Net Services automaticallyswitches to the use of the POSIX sockets. The POSIX sockets support the protocolfamilies PF_UNIX, PF_INET, and PF_INET6. The protocol family PF_ISO is notsupported by the POSIX sockets and cannot be used for inter-process communication.Therefore, the TCP/IP protocol is used with a local host address when a client runningin the POSIX environment communicates with a server running in the BS2000environment.
Oracle Net Services 12-1
Starting with Oracle Database 12c Release 1 (12.1), you can use the POSIX sockets alsoin the BS2000 program environment. This feature provides the advantage of using theprotocol family PF_UNIX in both program environments. The protocol familyPF_UNIX provides a smarter handling of the hand off mechanism, which is requiredfor the support of the Database Resident Connection Pooling (DRCP) feature. Thevariable NT_IPC_PROTOCOL_UNIX is introduced to activate the POSIX sockets in theBS2000 environment:
NT_IPC_PROTOCOL_UNIX={TRUE|FALSE} Default: FALSE
Setting this variable to TRUE forces an Oracle program to use the POSIX sockets andthe protocol family PF_UNIX for inter-process communication. To ensure the use ofthe correct protocol family for inter-process communication, you must set the variableto the same value in both environments.
This section contains the following topics:
• About Bequeath Protocol (page 12-2)
• About IPC Protocol Support (page 12-3)
• About TCP/IP Protocol Support (page 12-4)
• About TCP/IP with SSL Protocol (page 12-5)
• About Oracle Advanced Security (page 12-5)
Note:
For inter-process communication, both the client and the server must use thesame sockets implementation.
12.1.1 About Bequeath ProtocolThe Bequeath technique enables clients to connect to a database without using thenetwork listener. Oracle's Bequeath protocol internally spawns a server process foreach client application. It does the same operation that a remote network listener doesfor the connection locally.
Starting with Oracle Database 12c Release 1 (12.1), you can also use the POSIX socketsin the BS2000 program environment. In this case Oracle Net Services uses the protocolPF_UNIX for local connections and for handing off a connection.
By default, Oracle Net Services uses the BS2000 sockets in the BS2000 programenvironment, which is, NT_IPC_PROTOCOL_UNIX=FALSE. If you configure OracleNet Services to use POSIX sockets in the BS2000 program environment, that is ifNT_IPC_PROTOCOL_UNIX=TRUE, then ensure that the environment variableNT_IPC_PROTOCOL_UNIX is set to the same value for both the client and the localserver.
12.1.1.1 Overview of the Bequeath Protocol
The Bequeath protocol:
• Does not use a network listener. Therefore, listener configuration is not required.
• Automatically spawns a dedicated server.
Introducing Oracle Net Services
12-2 Installation and Administration Guide
• Is used for local connections where an Oracle Database client application, such asSQL*Plus, communicates with an Oracle Database instance running on the samecomputer.
• Only works in the Dedicated Server mode. It cannot be used in the Shared Servermode.
Note:
If clients are running in a user ID that is different from the DBA user ID, thenOracle recommends using a net service name to connect through a listener tothe destination database.
12.1.2 About IPC Protocol SupportThis section introduces Oracle's Inter Process Communication (IPC) protocol supportfor inter-process calls. It is used to map the functionality of IPC to Oracle's NetFoundation Layer. Oracle Utilities and products running in the POSIX shell cannot usethe IPC protocol if the variable NT_IPC_PROTOCOL_UNIX is set to FALSE.
It includes the following topics:
• Overview of IPC (page 12-3)
• Using the IPC Protocol (page 12-3)
12.1.2.1 Overview of IPC
On BS2000 systems, the IPC protocol is used for local inter-process communication.The Oracle Protocol Support for IPC uses the ISO functionality of the BS2000 sockets ifNT_IPC_PROTOCOL_UNIX=FALSE. If POSIX sockets are also used in the BS2000program environment, that is, if NT_IPC_PROTOCOL_UNIX=TRUE, then the OracleProtocol Support for IPC uses the UNIX protocol family.
The client process initiates its IPC connection with the remote process by specifying aKEY that describes the listening process. Once the connection is established, the twocommunicating processes send and receive data through a continuous byte stream.
12.1.2.2 Using the IPC Protocol
The IPC protocol enables applications to integrate with the Inter ProcessCommunication method on a local host. The following is the syntax for using IPCprotocol:
(ADDRESS= (PROTOCOL=IPC) (KEY=alphanumeric))
where:
PROTOCOL specifies the supported protocol. For IPC, the value is IPC.
KEY specifies the listen endpoint. A string of at most 32 characters: [a...z], [A...Z],[0...9], '.', '-', '_', '$'
The following is an example of an IPC ADDRESS that specifies a server on a local host:
(ADDRESS= (PROTOCOL=IPC)
Introducing Oracle Net Services
Oracle Net Services 12-3

(KEY=ORCL) )
Note:
If the IPC protocol is specified by a utility or user application running in thePOSIX shell and if NT_IPC_PROTOCOL_UNIX=FALSE, then Oracle NetServices fails to use the IPC protocol. The following error message isdisplayed:
TNS-12557: TNS:protocol adapter not loadable
12.1.3 About TCP/IP Protocol SupportThis section introduces Oracle's TCP/IP protocol support, which is used to map thefunctionality within TCP/IP to Oracle's Net Foundation Layer. It includes thefollowing topics:
• Overview of TCP/IP (page 12-4)
• Using the TCP/IP Protocol (page 12-4)
12.1.3.1 Overview of TCP/IP
TCP/IP is a family of related protocols that derives its name from the two maincomponents:
• Transmission Control Protocol (TCP)
• Internet Protocol (IP)
The IP component dispatches information around the network, and the TCPcomponent assures reliable transfer of data from one point to another.
Application software positioned on top of the TCP/IP protocol views the network as areliable two-way data transmission medium. This medium provides inter-processcommunication in a connection-oriented manner between pairs of processes in hostcomputers attached to inter-connected computer networks.
The application or client process initiates its TCP/IP connection with the remote hostprocess by specifying an address pair:
• A host IP address
• A TCP port (or entry point) on the host
Once the connection is established, the pair of communicating processes sends andreceives data through a continuous byte stream. The TCP/IP protocol is supportedboth in the BS2000 and the POSIX program environment.
12.1.3.2 Using the TCP/IP Protocol
The TCP/IP protocol support implements a standard interface that is used to resolvethe equivalent communication functions between the TCP/IP protocol and Oracle'sNet Foundation Layer.
The specific TCP/IP connection parameters are part of the ADDRESS keyword-valuepair. The three TCP/IP–specific parameters can be entered in any order within theADDRESS construct. The syntax used by Oracle's TCP/IP protocol support is:
Introducing Oracle Net Services
12-4 Installation and Administration Guide

(ADDRESS= (PROTOCOL=TCP) (HOST=hostname) (PORT=port#))
where:
PROTOCOL specifies the supported protocol. For TCP/IP, the value is TCP.
HOST specifies the host name or the host's IP address.
PORT specifies the TCP/IP port number.
The following is an example of the TCP/IP ADDRESS specifying a client on thesales-server host:
(ADDRESS= (PROTOCOL=TCP) (HOST=sales-server) (PORT=1521))
12.1.4 About TCP/IP with SSL ProtocolThe TCP/IP with Secure Socket Layer (SSL) protocol is supported in this release. SSLprovides authentication, encryption, and data integrity using public key infrastructure(PKI). SSL stores authentication data, such as certificates and private keys, in an OracleWallet.
The connection parameters for TCP/IP with SSL protocol are the same as TCP/IPexcept for the protocol, which is TCPS:
(ADDRESS= (PROTOCOL=TCPS) (HOST=hostname) (PORT=port#) )
where:
• PROTOCOL specifies the supported protocol. For TCP/IP with SSL protocol, thevalue is TCPS.
• HOST specifies the host name or the host's IP address.
• PORT specifies the TCP/IP with SSL protocol port number.
The following is an example of the TCP/IP with SSL protocol ADDRESS specifying aclient on the sales-server host:
(ADDRESS= (PROTOCOL=TCPS) (HOST=sales-server) (PORT=2484) )
12.1.5 About Oracle Advanced SecurityThis section describes how to configure the data integrity and the cryptographicservices of Oracle Advanced Security for Fujitsu BS2000/OSD.
Introducing Oracle Net Services
Oracle Net Services 12-5

For using either the data integrity, or the cryptographic services, or both, you mustspecify the appropriate parameters in the SQLNET.ORA file.
Use the following parameters to specify whether a service (example: crypto-checksumming or encryption) should be active:
SQLNET.CRYPTO_CHECKSUM_CLIENTSQLNET.CRYPTO_CHECKSUM_SERVERSQLNET.ENCRYPTION_CLIENTSQLNET.ENCRYPTION_SERVER
Each of the preceding parameters defaults to REJECTED.
Each of the preceding parameters can have one of the following values:
Value Meaning
ACCEPTED The service is active if the other side of the connectionspecifies REQUESTED or REQUIRED and there is a compatiblealgorithm available on the other side. It is inactive otherwise.
REJECTED The service must not be active, and the connection fails if theother side specifies REQUIRED.
REQUESTED The service is active if the other side specifies ACCEPTED,REQUESTED, or REQUIRED and there is a compatiblealgorithm available on the other side. It is inactive otherwise.
REQUIRED The service must be active, and the connection fails if theother side specifies REJECTED or if there is no compatiblealgorithm on the other side.
Use the following parameters to control the algorithms that are made available foreach service on each end of a connection:
SQLNET.CRYPTO_CHECKSUM_TYPES_CLIENTSQLNET.CRYPTO_CHECKSUM_TYPES_SERVERSQLNET.ENCRYPTION_TYPES_CLIENTSQLNET.ENCRYPTION_TYPES_SERVER
The value of each of these parameters can be either a list of algorithm names inparenthesis separated by commas or a single algorithm name.
Type Values
Crypto checksum types MD5, SHA1,SHA256, SHA384, SHA512
Encryption types 3DES112, 3DES168, AES128, AES192, AES256, DES,DES40, RC4_40, RC4_56, RC4_128, RC4_256
Related Topics:
Oracle Database Net Services Administrator's Guide
Oracle Database Net Services Reference
Oracle Database Security Guide
Introducing Oracle Net Services
12-6 Installation and Administration Guide

12.2 Shared Server ArchitectureThe initialization parameters that control the shared server architecture are as follows:
• LOCAL_LISTENER
• DISPATCHERS
• MAX_DISPATCHERS
• SHARED_SERVERS
• MAX_SHARED_SERVERS
• SHARED_SERVER_SESSIONS
• CIRCUITS
The shared server architecture and the dedicated server architecture can workconcurrently in an instance. Provide information in the connect descriptor to indicatewhether a connecting application should use the shared server or the dedicated serverarchitecture. By default, the listener process uses the shared server architecture. If youwant the application to use the dedicated server architecture, then you must setUSE_DEDICATED_SERVER=ON in the SQLNET.ORA file or specify a net service namewith the parameter SERVER in the used naming method. The SQLNET.ORA parameterUSE_DEDICATED_SERVER=ON overwrites the SERVER parameter.
The following example shows how to reference a dedicated server in a shared serverconfiguration by using a specially defined net service name:
FINANCE_DED=(DESCRIPTION= (ADDRESS= (PROTOCOL=TCP) (HOST=sales-server) (PORT=1521)) (CONNECT_DATA= (SERVICE_NAME=sales.us.acme.com) (SERVER=dedicated)))
To choose between using the shared server and the dedicated server architecture, youmust consider the CPU overhead versus resource allocation, such as, tasks, memory,and so on. Use the shared server architecture if many clients work only occasionallywith an Oracle database. Use the dedicated server architecture if only a few clientswork intensively with an Oracle database. Before you decide, consider using theinformation in the following shared server dynamic tables:
• V$DISPATCHER
• V$QUEUE
• V$SHARED_SERVERS
• V$SHARED_SERVER_MONITOR
Shared Server Architecture
Oracle Net Services 12-7
See Also:
• Oracle Database Net Services Administrator's Guide and Oracle DatabaseAdministrator’s Guide for detailed information about the shared serverarchitecture
• Oracle Database Net Services Reference for more information on how toreference a dedicated server in a shared server configuration
• Oracle Database Administrator’s Guide for more information about sharedserver dynamic tables
12.3 Configuring the NetworkYou can either use the Easy Connect Naming Method to connect to the database or theLocal Naming Method. When you use the Local Naming Method, Oracle recommendsyou to configure clients for the use of service names that are easy to remember aliasesfor database addresses and match the address preconfigured in each system'sLISTENER.ORA file. The client uses these addresses to connect to the network listener,which routes the connection request to the required service. During a connection, aclient passes the service name to which it wants to connect.
The LISTENER.ORA file identifies and controls the behavior of the network listenerthat listens for services on the system. This file includes network listener descriptorsand addresses, services the listener it is listening for, and various control parameters.
Client configuration is accomplished by creating a list of net service names withaddresses of network destinations through the local naming parameter fileTNSNAMES.ORA or an LDAP compliant directory server.
• About Using Easy Connect Naming Method (page 12-8)
• About Using the Local Naming Method (page 12-9)
• About Using the Directory Naming Method (page 12-9)
• Customizing Oracle Net Listener Configuration (page 12-9)
• Configuration on the Client (page 12-11)
• Testing the Configuration on the Client (page 12-11)
12.3.1 About Using Easy Connect Naming MethodThe Easy Connect naming method, can be used to connect to a database without theneed to configure service names in the TNSNAMES.ORA configuration file. For usingthe Easy Connect naming method, ensure that EZCONNECT is listed in the client'sconfiguration file parameter for naming adaptors NAMES.DIRECTORY_PATH.
Easy Connect naming is suitable for small and simple environments.
See Also: Oracle Database Net Services Administrator's Guide for moreinformation about the Easy Connect naming method
Configuring the Network
12-8 Installation and Administration Guide

12.3.2 About Using the Local Naming MethodLocal naming refers to the method of resolving a service name to a network address byusing information configured on each individual client in a TNSNAMES.ORAconfiguration file. For using the local naming, ensure that TNSNAMES is listed in theclient's configuration file parameter for naming adaptors NAMES.DIRECTORY_PATH.
Local naming is most appropriate for simple distributed networks with a smallnumber of services that change infrequently.
12.3.3 About Using the Directory Naming MethodDirectory Naming refers to the method of resolving a service name to a networkaddress by using a directory server. For using a directory server, ensure that LDAP islisted in the client's configuration file parameter for naming adaptorsNAMES.DIRECTORY_PATH and that the target address of the directory server isconfigured in the LDAP.ORA parameter file. For example:
# LDAP.ORA Network Configuration File: network.admin.ldap.oraDEFAULT_ADMIN_CONTEXT = ""DIRECTORY_SERVERS= (oid_server:389:636)DIRECTORY_SERVER_TYPE = Your Internet Directory
.
See Also: Oracle Database Net Services Administrator's Guide and OracleDatabase Net Services Reference for more information
12.3.4 Customizing Oracle Net Listener ConfigurationBefore starting the listener, you must set up the configuration file LISTENER.ORA.This file includes the address of the listener and various control parameters used bythe listener. When a listener accepts a connection request of a client, it routes theconnection to a database server. In case of a dedicated server, the listener starts theserver using the bequeath protocol and inherits the connection. Therefore, the listenershould run in the DBA user ID of the Oracle database.
Usually the listener runs in the same DBA user ID as the Oracle database instance. Ifyou have Oracle database instances running in different DBA user IDs, then you canconfigure a single listener to support all database services. In this case the listenermust know the LOGON authorization parameters, USER-ID, ACCOUNT, andPASSWORD of the foreign DBA user ID where Oracle database server tasks must bestarted. Use the Oracle environment variables sid_USER, user_ACCOUNT, anduser_PASSWORD as described in the following table to specify the required LOGONauthorization parameters:
Parameter Meaning
BGJPAR Parameters for ENTER jobs
sid_BGJPAR Parameters for ENTER jobs identified by SID
sid_USER The user ID under which the job should run
user_ACCOUNT Account of the target user ID
Configuring the Network
Oracle Net Services 12-9

Parameter Meaning
user_PASSWORD Password of the target user ID
Note:
In order to avoid storing a password in the ORAENV file, you can use SECOS,which is Fujitsu's Security Control System for BS2000. SECOS supports thefacility to grant the listener’s user ID the right to start batch jobs in the DBAuser ID. Thus the environment variable sid_USER is the only variable thatmust be set.
The following example of an ORAENV file configured for a central listener processshows how the parameters work. The listener can share this ORAENV file with aninstance, which runs under the same user ID. For a better understanding, we assumethat the listener and the instances DEM0 and DEM1 are running under the user IDORACDEM1 while the instance DEM2 is running under the user ID ORACDEM2. Definethe following parameters:
BGJPAR=J-C=JCBORA,START=IMME,CPU-LIMIT=NO,LOGGING=*NODEM1_BGJPAR=J-C=JCBDEM1,START=IMME,CPU-LIMIT=NODEM2_USER=ORACDEM2ORACDEM2_ACCOUNT=01234ORACDEM2_PASSWORD=ORACLE
The listener always runs the same sequence to look up the parameters sid_BGJPARand sid_USER. If the value for sid_BGJPAR is not found, then the listener uses thevalue given by the parameter BGJPAR. If a user ID is given by sid_USER, then thelistener tries to get the processing admission from the parameters user_ACCOUNT anduser_PASSWORD. For the given ORAENV, you get the following scenarios for thelistener:
• The listener should start a server for the instance DEM0. Because the parametersDEM0_BGJPAR and DEM0_USER are not defined the listener starts the server for theinstance DEM0 under the user ID ORACDEM1 with the start parameters defined byBGJPAR.
• If a server for the instance DEM1 must be started, then the listener looks for theparameters DEM1_BGJPAR and DEM1_USER. In this case the parameterDEM1_BGJPAR can be evaluated, whereas, the evaluation of DEM1_USER failedbecause this parameter is not defined. Therefore, the listener adds the startparameters "J-C=JCBDEM1,START=IMME,CPU-LIMIT=NO" to the ENTER-PROCEDURE command and starts the job under the user ID ORACDEM1.
• Now a server for instance DEM2 must be started. The listener looks for theparameters DEM2_BGJPAR and DEM2_USER. The parameter DEM2_BGJPAR is notdefined so that the listener uses the start parameters defined by BGJPAR. On theother hand the parameter DEM2_USER can be evaluated successfully and returnsthe value ORACDEM2. Now the listener tries to get the processing admission byevaluating the parameters ORACDEM2_ACCOUNT and ORACDEM2_PASSWORD. Thelistener starts the server job under the user ID ORACDEM2 with the ENTER-PROCEDURE parameters "J-C=JCBORA, START=IMME,CPU-LIMIT=NO,LOGGING=*NO".
Configuring the Network
12-10 Installation and Administration Guide
Start the listener using the Listener Control Utility LSNRCTL:
/CALL-PROCEDURE sid.P.ORAENV/START-EXECUTABLE (*LINK(ORALOAD),LSNRCTL)
When the enter options prompt is displayed, press ENTER to get to the LSNRCTLprompt. Enter the following command to start the listener:
LSNRCTL> START listener-name
See Also: Oracle Database Net Services Administrator's Guide
12.3.5 Configuration on the ClientConfiguration of network clients involves adding or editing parameters in the clientconfiguration file SQLNET.ORA and, depending on the used naming method, in theconfiguration file LDAP.ORA or TNSNAMES.ORA.
See Also: Oracle Database Net Services Reference for more information aboutthe configuration parameters
12.3.6 Testing the Configuration on the ClientAfter you have verified the network connections, verify the connections to the desiredOracle Database systems using the TNSPING utility:
/CALL-PROCEDURE sid.P.ORAENV/START-EXECUTABLE (*LINK(ORALOAD),TNSPING)
When the enter options prompt displays, enter the net service name for thedatabase service that you have specified in the naming service. If everything worksfine, then a message similar to the following is returned:
TNS Ping Utility for BS2000: Version 12.1.0.2.0 - Production on 08-AUG-2016 12:03:19Used parameter files: network.admin.sqlnet.oraUsed TNSNAMES adapter to resolve the aliasAttempting to contact (DESCRIPTION = (ADDRESS_LIST = (ADDRESS = (PROTOCOL = TCP)(HOST = sales-server)(PORT = 3055)))(CONNECT_DATA = (SERVICE_NAME = sales.us.acme.com)))OK (30 msec)
Related Topics:
Oracle Database Net Services Administrator's Guide
12.4 Troubleshooting Oracle Net ServicesThe following is a list of error messages and steps to fix the errors:
1. Listener could not be started. LSNRCTL returns the following error message:
LSNRCTL> startStarting /BS2/$ORACINST.tnslsnr: please wait...
TNS-12547: TNS:lost contact
Troubleshooting Oracle Net Services
Oracle Net Services 12-11

TNS-12560: TNS:protocol adapter errorTNS-00517: Lost contactBS2000 Error: 145: Connection timed outLSNRCTL>
• Ensure that the subsystem POSIX is up and running.
• Ensure that the BCAM Light Weight Resolver LWRESD is properly configured andrunning.
2. Listener could not open the log file.
• Check if the listener log file, for example, NETWORK.LOG.LISTENER.LOG, isaccessible and readable.
• Verify the listener log file using the BS2000 SDF command REPAIR-DISK-FILES.
• If you are not able to fix the listener log file, then delete the file.
3. A client reports ORA-12545
• Check the naming service, if the host name returned by the listener is wellknown in the TCP/IP network.
• If you do not want to use the BCAM host name of the computer in the TCP/IPnetwork, then define a sockets-host-name as described in the BCAMdocumentation and register this name in the name service.
• Ensure that the BCAM Light Weight Resolver LWRESD is properly configured andrunning.
4. A client reports ORA-12535
• If you use the IPC protocol, then check the Connection Timeout parameter ofBCAM (use the BCSHOW command). This parameter should be set to at least 600seconds.
5. A client reports ORA-03113
• Check if the SQLNET.EXPIRE_TIME parameter is set for the server. If theparameter is set, then check the BCAM LETTER-TIMER using the BCSHOWcommand. If the LETTER-TIME is less than the SQLNET.EXPIRE_TIME, thenthe data that is sent by the server to see if the client is running may not be readduring their lifetime, which is limited by the LETTER-TIME. As a result, theclient logs a broken pipe in the SQLNET.LOG file:
ns main err code: 12547ns (2) err code: 12560nt main err code: 517nt (2) err code: 32nt OS err code: 0x0040002c
You can solve this problem by setting the LETTER-TIMER to infinite.
Troubleshooting Oracle Net Services
12-12 Installation and Administration Guide
Part IVApplication Development
This part summarizes topics for application developers:
• Database Applications (page 13-1)
• External Procedures (page 14-1)
• Globalization Support (page 15-1)


13Database Applications
This chapter contains the following topics:
• Overview of Database Applications (page 13-1)
• Precompiler Applications (page 13-4)
• Oracle Call Interface Applications (page 13-9)
• The Object Type Translator (page 13-10)
• Oracle Database Applications in POSIX (page 13-11)
• openUTM Database Applications (page 13-12)
13.1 Overview of Database ApplicationsOracle Programmatic Interfaces are tools for application designers who want to useSQL statements to access an Oracle Database from within high-level languageprograms. The following types of programmatic interfaces are available:
• The Precompiler Interface, which is a programming tool that enables you to embedSQL statements in high-level language source code.
• The Oracle Call Interface (OCI), that enables to create high-level languageapplications that use function calls to access an Oracle database and control allphases of SQL statement execution.
On BS2000/OSD, the Oracle Database precompilers support programs written in C, C++, and COBOL programming languages.
This section contains the following topics:
• Architecture of the Programmatic Interfaces (page 13-2)
• PL/SQL Support (page 13-2)
• Building and Running a Programmatic Interface Application (page 13-2)
See Also:
• Oracle Database Programmer's Guide to the Oracle Precompilers for detailedinformation about Oracle Precompilers
• Pro*C/C++ Programmer's Guide or Pro*COBOL Programmer's Guide
Database Applications 13-1

13.1.1 Architecture of the Programmatic InterfacesAll precompiler and Oracle Call Interface (OCI) applications are linked with a smallstub module. This stub module dynamically loads the SQL runtime system of theOracle Database precompilers from the ORALOAD library. Programs written in thefollowing languages can be combined:
• Pro*C/C++
• Pro*COBOL (COBOL85 and COBOL2000)
Note:
OCI C and OCI COBOL programs cannot be combined; any attempt to do soresults in execution errors. The entries into Oracle Database used by OCI Cand OCI COBOL (for example, OLOGON) have identical names but differentargument lists. For OCI COBOL, all arguments are by reference, that is, theparameter list contains all pointers. For OCI C, the numeric arguments are byvalue.
Oracle Database precompilers generate different SQLLIB function names for differentlanguages. The following names are used:
• SQ0XXX: COBOL
• sq2xxx: C
13.1.2 PL/SQL SupportThe precompilers support PL/SQL as described in the Oracle Database PL/SQLLanguage Reference. When using PL/SQL, you must specify SQLCHECK=FULL orSQLCHECK=SEMANTICS on the precompiler option line. The default isSQLCHECK=NONE. When requesting SQLCHECK, the precompiler must connect to adatabase. So, ensure that you provide the necessary connection information. (You mayalso want to set the DEFAULT_CONNECTION variable in the ORAENV file).
When SQLCHECK=SEMANTICS is specified, you must also specifyUSERID=username/password.
13.1.3 Building and Running a Programmatic Interface ApplicationTo build and run a programmatic interface application, perform the following steps:
1. Edit your source code, including embedded SQL, as outlined in the genericprecompiler documentation.
2. Precompile the source with the corresponding precompiler.
Overview of Database Applications
13-2 Installation and Administration Guide

Note:
You must use WE8BS2000 as client character set during precompilation (set inORAENV file). Any other character set might lead to problems with theconcatenation sign ("||").
You do not need to precompile if you build an OCI C or an OCI COBOLapplication.
3. Compile the application.
4. Link the application, including the stub module PROSTUB from the$ORACINST.PRO.LIB library.
5. Call the environment definition file. Refer to "Calling the Environment-DefinitionFile (page 6-2)" for details.
6. Run the application with the START-EXECUTABLE command. The supportingOracle Database module is dynamically loaded from the ORALOAD library.
7. You can find sample BS2000 procedures for precompiling, compiling, and linkingin the installation user ID: $ORACINST.P.PROC, $ORACINST.P.PROCOB, and$ORACINST.P.PROLNK.
Figure 13-1 (page 13-3) illustrates the sequence of events outlined in the precedingnumbered list and how the programmatic interfaces use the program libraries.
Figure 13-1 Usage of Program Libraries by Programmatic Interfaces
TCP/IPNetwork
DatabaseServer
Application(user precompiler / OCI program including language runtime and ILCS)
PROSTUB(Oracle Server stub module)
RDBMS
OracleNet
Client
ORAPRO module
ORACLN module(including OracleNet)
linked from $ORACINST.PRO.LIB
loaded from $ORACINST.ORALOAD.LIB
loaded from $ORACINST.ORALOAD.LIB
Overview of Database Applications
Database Applications 13-3
For more information, see the specific notes for the programmatic interfaces in thischapter.
13.2 Precompiler ApplicationsLearn about precompiler applications in this section. It includes the following topics:
• About Using Precompilers (page 13-4)
• Precompiler Pro*C/C++ (page 13-6)
• Precompiler Pro*COBOL (page 13-7)
13.2.1 About Using PrecompilersOracle Database precompilers on BS2000/OSD support LMS libraries for the filesmentioned in this section. This section includes the following topics:
• Include Files (page 13-4)
• User-Specific Configuration Files (page 13-5)
• Input, Output, and List-files (page 13-5)
• Additional Remarks (page 13-5)
This functionality helps saving disk resources and provides clarity by grouping files indifferent libraries.
All LMS library elements that you use must be of element type "S”. The precompilersgenerate elements of type "S" if libraries are used. When you use LMS libraryelements, the precompilers build temporary files with the prefix "#T.”, which aredeleted when the preprocessing completes successfully.
When you use LMS library elements, the element name that you specify must be thefull element name including the suffix. The precompilers do not append the suffix tothe element name.
13.2.1.1 Include Files
All standard include files are shipped in the LMS library,$ORACINST.PRO.INCLUDE.LIB. You must specify this LMS library or a user-defined include library for the EXEC SQL INCLUDE statements. Use the INCLUDEprecompiler option, as follows:
* INCLUDE=$ORACINST.PRO.INCLUDE.LIB \* INCLUDE=mylibrary
where mylibrary is the BS2000 file name of the user-defined library, such asPROC.INCLIB.
Note:
The order in which you specify the different INCLUDE options affects theperformance of precompilation. You should place the commonly used filesbefore the rarely used ones.
Precompiler Applications
13-4 Installation and Administration Guide

13.2.1.2 User-Specific Configuration Files
You can also specify a user-specific configuration file as an LMS-element using thefollowing syntax:
* CONFIG=my_config_lib[config_element]
where my_config_lib is the BS2000 file name of the configuration library andconfig_element is the full name of the element.
You must use brackets when specifying the configuration element, as shown in thefollowing example.
* CONFIG=CONFIG.LIB[PROCOB.CFG]
13.2.1.3 Input, Output, and List-files
Besides using BS2000 files, you can also use the LMS library elements for precompilerI/O using the INAME, ONAME, and LNAME options.
If you do not specify a library file name and an element, then the Oracle Databaseprecompilers generate BS2000 ISAM files by default. The only option that you mustenter is the INAME option. This can be either a BS2000 file name or a library file name,and the name of an element from the LMS library.
For example:
* INAME=my_input_lib[my_element] \* ONAME=my_output_lib[my_element] \* LNAME=my_list_lib[my_element] \
where my_input_lib is the BS2000 file name of the particular library andmy_element is the name of the element including the specific suffix.
Note:
You must use brackets when specifying the LMS library element.
In the following example, Pro*C generates an output file with the name SAMPLE.C asthe ONAME option has been omitted:
* INAME=INPUT.LIB[SAMPLE.PC] \ * LNAME=LIST.LIB[SAMPLE.LST]
13.2.1.4 Additional Remarks
The following are the additional remarks on this release of Oracle Database 12cRelease 1 (12.1) for Fujitsu BS2000/OSD:
• Only compilers and compiler versions supporting the ILCS Standard Linkage aresupported. If the Oracle Database detects a call from a user program not using theStandard Linkage conventions, then it terminates the task and displays the messagenumber 5002 or 5003.
• If ONAME is not specified when starting a precompiler, then the precompilergenerates a default name, which consists of the last part of INAME with the relevantsuffix. For example, if the name of the C program you want to compile isMYPROG.PERS.TEST.PC, and if ONAME is omitted, then Pro*C generates an outputfile with the name TEST.C.
Precompiler Applications
Database Applications 13-5
• If you work with float variables, then you may encounter rounding problems. Theworkaround is to declare the float variables as double variables instead.
13.2.2 Precompiler Pro*C/C++This section describes the procedure for using Pro*C/C++. It includes the followingtopics:
• Starting Pro*C (page 13-6)
• Pro*C Include, System Configuration and Demo Files (page 13-6)
• SQLLIB Calls (page 13-6)
• Linking Pro*C Programs (page 13-6)
• The Pro*C SQLCPR.H Header File (page 13-7)
• UTM Applications (page 13-7)
13.2.2.1 Starting Pro*C
To start the Pro*C precompiler, enter the following:
/START-EXECUTABLE (*LINK(ORALOAD),PROC)* INAME=myprog.PC ONAME=myprog.C [options]
where:
myprog is the name of the C program.
options specifies Pro*C options. For a list and description of the valid options, see Pro*C/C++ Programmer's Guide.
Note:
You must use a separate precompiler option INCLUDE for each path you wantto specify, unlike as described in Pro*C/C++ Programmer's Guide. A list asallowed for the option SYS_INCLUDE may cause the precompiler to loop.
13.2.2.2 Pro*C Include, System Configuration and Demo Files
The Pro*C include files, demo files, and system configuration files are shipped under:
$ORACINST.PRO.INCLUDE.LIB$ORACINST.C.DEMO.*.PC$ORACINST.UTM.DEMO.*.PC$ORACINST.CONFIG.PCSCFG.CFG
An example of a BS2000 procedure for precompilation and compilation is included inthe Oracle Database software under the name $ORACINST.P.PROC.
13.2.2.3 SQLLIB Calls
If you want to program explicit C calls to SQLLIB functions, then you must callsq2xxx instead of sqlxxx. For example, call sq2cex instead of sqlcex.
13.2.2.4 Linking Pro*C Programs
To link a Pro*C program, you need:
Precompiler Applications
13-6 Installation and Administration Guide
• The common runtime environment, CRTE.
• The Pro* library $ORACINST.PRO.LIB, which contains the stub module,PROSTUB.
Note:
You must use the BS2000 BINDER instead of TSOSLNK.
To link your program, you must create your user-specific link procedure. An exampleof such a link procedure is included in the Oracle Database software with the name,$ORACINST.P.PROLNK.
13.2.2.5 The Pro*C SQLCPR.H Header File
If you are making calls to Pro*C functions, such as sq2cls() or sq2glm(), then youcan include the SQLCPR.H file into the C programs to verify that the functions calls arecorrect.
In the Pro*C programs, add the following line:
EXEC SQL INCLUDE SQLCPR
as you would for SQLCA or SQLDA.
13.2.2.6 UTM Applications
You can use Pro*C to write UTM program units.
See Also: openUTM Database Applications (page 13-12)
13.2.3 Precompiler Pro*COBOLThis section describes the procedure for using Pro*COBOL: It includes the followingtopics:
• Starting Pro*COBOL (page 13-8)
• Pro*COBOL Include, System Configuration, and Demo Files (page 13-8)
• SQLLIB Calls (page 13-9)
• Linking Pro*COBOL Programs (page 13-9)
• openUTM Applications (page 13-9)
When using Pro*COBOL, be careful about the following constructions withparagraphs and EXEC statements, because the precompiler generates a paragraphheading for the code generated from these EXEC statements:
Before precompiling After precompiling
COB-LABEL1. COB-LABEL1
. .
. .
Precompiler Applications
Database Applications 13-7

Before precompiling After precompiling
EXEC SQL.... SQL-LABEL1.
. .
. .
COB-LABEL2. COB-LABEL2.
Before precompiling, the statement PERFORM COB-LABEL1 runs the code inparagraph COB-LABEL1 until the COB-LABEL2 heading is reached. However, theprecompiler generates a paragraph heading, SQL-LABEL1, for the code generatedfrom the EXEC SQL statement.
As a result, after precompiling, PERFORM COB-LABEL1 runs the code in theparagraph COB-LABEL1 until the SQL-LABEL1 heading is reached. The workaroundfor this problem is to use SECTIONS or to run PERFORM COB-LABEL1 THRU COB-LABEL2.
A COPY statement as the first statement in WORKING-STORAGE SECTION may resultin a wrong code generation if copied structures must be continued by non-copiedcode. This is because the precompiler generates its data definitions before the first datadefinition of the source program. To avoid this, insert a FILLER definition as the firstline in WORKING-STORAGE SECTION, as follows:
01 FILLER PIC X
13.2.3.1 Starting Pro*COBOL
To start the Pro*COBOL precompiler, enter the following commands:
/START-EXECUTABLE (*LINK(ORALOAD),PROCOB)* INAME=myprog.PCO ONAME=myprog.COB [options]
where:
myprog specifies the COBOL program.
options specifies the Pro*COBOL options.
Note:
The Pro*COBOL option MAXLITERAL defaults to 180, and not 256, as shownin the Pro*COBOL Programmer's Guide. The option FORMAT=TERMINAL is notsupported.
See Also: Pro*COBOL Programmer's Guide for PRO*COBOL options
13.2.3.2 Pro*COBOL Include, System Configuration, and Demo Files
The Pro*COBOL include files, demo files, and system configuration files are shippedunder:
$ORACINST.PRO.INCLUDE.LIB$ORACINST.COBOL.DEMO.*.PCO
Precompiler Applications
13-8 Installation and Administration Guide

$ORACINST.UTM.DEMO.*.PCO $ORACINST.CONFIG.PCBCFG.CFG
An example of a BS2000 procedure for precompilation and compilation is included inyour Oracle Database software under the name $ORACINST.P.PROCOB2000.
13.2.3.3 SQLLIB Calls
If you want to program explicit COBOL calls to SQLLIB functions, then call SQ0XXXinstead of SQLXXX. For example, call SQOADR instead of SQLADR.
13.2.3.4 Linking Pro*COBOL Programs
To link a Pro*COBOL program, you need:
• The common runtime environment, CRTE.
• The Pro* Library $ORACINST.PRO.LIB, which contains the stub module,PROSTUB.
• Unicode, which is only supported with COBOL2000. This might generate calls tothe BS2000-Macro NLSCNV. To resolve the GNLCNV entry, use the BS2000 XHCSlibrary.
See Also: Fujitsu BS2000 manual XHCS for more information about theGNLCNV entry
Note:
You must use the BS2000 BINDER instead of TSOSLNK.
To link your program, you must create your own user-specific link procedure. Anexample of such a link procedure is included in your Oracle Database software withthe name, $ORACINST.P.PROLNK.
13.2.3.5 openUTM Applications
You can use Pro*COBOL to write openUTM (Universal Transaction Monitor) programunits. Pro*C and Pro*COBOL program units can be combined in an openUTMapplication.
See Also: openUTM Database Applications (page 13-12) for moreinformation
13.3 Oracle Call Interface ApplicationsOn Fujitsu BS2000/OSD, the Oracle Call Interface (OCI) supports the programminglanguages, C and COBOL.
When you use the set of host language calls that comprise the Oracle Call Interface,you can access the data in an Oracle database by programs written in the C andCOBOL programming languages.
Oracle Call Interface Applications
Database Applications 13-9
Note:
The precompiler products from Oracle offer a higher level interface to theOracle Database. A single precompiler call is translated to several OCI calls.As the precompilers are easy to use, and in a few cases offer more or differentfunctionality than OCI, you may prefer to use the precompilers for someapplications.
See Also: Oracle Call Interface Programmer's Guide for more information aboutOCI calls
13.3.1 Linking OCI ApplicationsTo link OCI programs, you need:
• The common runtime environment, CRTE.
• The Pro* Library $ORACINST.PRO.LIB, which contains the stub modules OCI$COB and PROSTUB.
When linking OCI COBOL programs, OCI$COB must always be included beforePROSTUB.
Note:
You must use the BS2000 BINDER instead of TSOSLNK.
To link your program, you must create your own user-specific link procedure. Anexample of such a link procedure is included in your Oracle Database software withthe name $ORACINST.P.PROLNK.
For example, to link your program, call the BS2000 procedure as follows:
/CALL-PROCEDURE $ORACINST.P.PROLNK,dir,module,TYPE=OCIC
or:
/CALL-PROCEDURE $ORACINST.P.PROLNK,dir,module,TYPE=OCICOB
where, the module to be linked is stored in dir.LIB.
The OCI include files and demo files are shipped under:
$ORACINST.RDBMS.DEMO.OCI.LIB$ORACINST.RDBMS.DEMO.*.C $ORACINST.RDBMS.DEMO.*.COB
13.4 The Object Type TranslatorThis section describes how to use the Object Type Translator (OTT) on BS2000. Itincludes the following topics:
• Starting Object Type Translator (page 13-11)
• OTT System Configuration File (page 13-11)
The Object Type Translator
13-10 Installation and Administration Guide

13.4.1 Starting Object Type TranslatorThe Object Type Translator (OTT) is based on Java and can only be started in thePOSIX environment. You must use the JDBC thin driver to connect to the database.The connect string is specified in the url option, as follows:
url=jdbc:oracle:thin:@hostname:port:sid
In the following example, OTT will connect to the database with the service identifierorcl, on the host myhost, that has a TCP/IP listener on port 1521.
For example:
ott userid=scott/tiger url=jdbc:oracle:thin:@myhost:1521:orcl intype=demoin.typ outtype=demoout.typ code=c hfile=demo.h
See Also: Pro*C/C++ Programmer's Guide for more information about ObjectType Translator
13.4.2 OTT System Configuration FileThe OTT system configuration file is installed with the Oracle Database software, withthe following name:
$ORACLE_HOME/precomp/admin/ottcfg.cfg
13.5 Oracle Database Applications in POSIX Program EnvironmentYou can run application programs either in the BS2000 program environment or in thePOSIX program environment. This section describes how you can build Oracledatabase applications that can run in the POSIX program environment.
You must precompile and compile the Pro* application or OCI application asdescribed in the previous chapters.
When linking the application, you must include the stub module PROSTUBX instead ofPROSTUB and you must add the following lines in the BS2000 procedure for linking:
/SET-FILE-LINK BLSLIB01,$.SYSLNK.CRTE.POSIX/SET-FILE-LINK BLSLIB02,$.SYSLIB.POSIX-SOCKETS.version_number
Note:
These two libraries must be the first libraries in the search order for theresolution of unresolved external references.
To start an Oracle Database application in the POSIX environment by using BS2000SDF commands, set the BS2000 SDF-P variable SYSPOSIX.PROGRAM-ENVIRONMENTto SHELL.
You can set additional POSIX environment variables by using the BS2000 SDF-Pvariable SYSPOSIX.
The following example shows how to set the SDF-P variable SYSPOSIX to run anapplication in the POSIX environment:
Oracle Database Applications in POSIX Program Environment
Database Applications 13-11
/DECL-VAR SYSPOSIX,TYPE=*STRUCT(DEF=*DYN),SCOPE=*TASK(STATE=*ANY)/SET-VAR SYSPOSIX.PROGRAM-ENVIRONMENT='SHELL'/SET-VAR SYSPOSIX.ORACLE-HOME='oracle_home_path'/SET-VAR SYSPOSIX.ORACLE-SID='oracle_sid'
13.6 openUTM Database ApplicationsThis section describes how to use the BS2000 transaction monitor openUTM forcoordinated interoperation with Oracle Database 12c Release 1 (12.1). The followingtopics are covered:
• Operation of Oracle Database Using openUTM Programs (page 13-12)
• Distributed openUTM Files (page 13-12)
• DBA Responsibilities (page 13-13)
• Developing an Oracle Database/openUTM Application (page 13-13)
• Troubleshooting (page 13-22)
13.6.1 Operation of Oracle Database Using openUTM ProgramsUniversal Transaction Monitor (openUTM) controls the execution of user programsthat can be used from a large number of terminals at the same time.
An openUTM application consists of a structured sequence of processing stages thatare supplied with access rights for the specific user. These stages, in turn, consist ofopenUTM transactions that are carried out either in their entirety, or not at all.
If several users use openUTM at the same time, then simultaneous access to the shareddatabase is also usually required. The database/data communications system (DB/DCsystem), Oracle Database/openUTM, synchronizes access by openUTM applicationsto Oracle Database, and ensures that the database remains in a consistent state. In theevent of a system failure, the DB/DC system performs an automatic recovery, whichensures that the database remains in a consistent state that is synchronized withopenUTM.
Synchronization of Oracle Database and openUTM is done through the XA interface.The XA interface is an X/Open interface for the coordination between databasesystems and transaction monitors.
See Also: Oracle Database Development Guide for a description of the conceptsof the XA interface
13.6.2 Distributed openUTM FilesWhen you install Oracle Database, as described in Oracle Database Installation andDeinstallation (page 2-1), openUTM related software and files are installed in theinstallation user ID. The distributed openUTM files include:
• XAO.LIB
This file contains the connection module for the XA interface.
• The following files provide examples of procedures and programs:
UTM.DEMO.P.COMPILE.CUTM.DEMO.P.COMPILE.COBOL
openUTM Database Applications
13-12 Installation and Administration Guide
UTM.DEMO.P.KDCDEFUTM.DEMO.P.KDCROOTUTM.DEMO.P.PROBINDUTM.DEMO.P.PROSTRTUTM.DEMO.CSELEMP.PCUTM.DEMO.SELDEP.PCOUTM.DEMO.SELEMP.PCOUTM.DEMO.UPDEMP.PCOUTM.DEMO.ERRSQL.CUTM.DEMO.ERRTXT.C
13.6.3 DBA ResponsibilitiesThis section describes the responsibilities of the DBA or the administrator of theopenUTM application.
The administrator of the openUTM application must define the open string for the XAinterface with help from the application developer. This open string must be includedin the openUTM start parameters.
The DBA must ensure that the static data dictionary viewDBA_PENDING_TRANSACTIONS exists. The DBA must also grant the SELECTprivilege to the static data dictionary view for all Oracle users specified in the XA openstring. Use the following example to grant the SELECT privilege to user scott:
grant select on DBA_PENDING_TRANSACTIONS to scott;
The Oracle users are identified in the open string with the item Acc.
See Also: "Defining an Open String (page 13-15)" for more information
13.6.4 Developing an Oracle Database/openUTM ApplicationOracle Database 12c on BS2000 supports openUTM V6.1 or higher. openUTM supportsthe XA interface. Oracle Database 12c on BS2000 coordinates with openUTM throughthis XA interface.
This section includes the following topics:
• Defining an Open String (page 13-15)
• Using Precompilers with openUTM (page 13-18)
• SQL Operations (page 13-20)
• openUTM Operations (page 13-21)
The main steps involved in developing an Oracle Database application for coordinatedinter-operation with openUTM are as follows:
• Building the openUTM program units (page 13-14)
• Defining the configuration (page 13-14)
• Translating the KDCROOT table module and openUTM program units (page 13-15)
• Linking the openUTM application program (page 13-15)
• Starting the openUTM application (page 13-15)
openUTM Database Applications
Database Applications 13-13

In addition, this section also describes how to define the open string for the XAinterface and how to use precompilers with the Oracle XA library
Building the openUTM program units
Refer to the openUTM manual Programming Applications with KDCS for COBOL, C, andC++.
Defining the configuration
Refer to the following openUTM manuals:
• Generating Applications
• Administering Applications
An Oracle Database/openUTM application requires the following information forexecution:
• Information about the application
• Username/password with access protection
• Information about the terminal and communication partners
• Information about the transaction codes (TAC’s)
These properties collectively form the configuration, which is stored in the KDCFILEfile. The configuration definition is carried out by the KDCDEF utility.
This section gives the descriptions for openUTM KDCDEF control statements that areimportant for connecting to the Oracle database. They are:
• DATABASE
When the Oracle Database/openUTM application is generated, you must specifythat openUTM communicates with the Oracle Database. Enter the followingcommand to specify openUTM communication with the database:
DATABASE TYPE=XA,ENTRY=XAOSWD
where TYPE=XA specifies the use of the XA interface and ENTRY=XAOSWD specifiesthe name of the XA switch for the Oracle database (for dynamic registration).
• OPTION
If you specify the corresponding GEN operand in the OPTION command, then theKDCDEF utility also produces the source-code for the KDCROOT table module. Thesyntax of OPTION is as follows:
OPTION [DATA=filename][,GEN={KDCFILE|ROOTSRC|NO|ALL}][,ROOTSRC=filename][,SHARETAB=filename][,TEST={N[o]|Y[ES]}]
• MAX
Another important operand is APPLIMODE, which is specified in the MAXcommand. This determines the restart behavior after a system failure. The syntax ofMAX is as follows:
MAX APPLINAME=name[,APPLIMODE={S[ECURE]|F[AST]}][,ASYNTASKS=number][...]
openUTM Database Applications
13-14 Installation and Administration Guide
APPLIMODE=SECURE means that openUTM continues after an applicationmalfunction with a coordinated warm-start of the openUTM application and theOracle database.
If you specify APPLIMODE=FAST, then openUTM application restart is notexecuted, as openUTM does not store the restart information. In the event of anerror, the application starts from scratch. Transactions that are still open after anopenUTM-application malfunction are rolled back automatically.
See the UTM.DEMO.P.KDCDEF file for an example procedure for building theKDCFILE and the KDCROOT table module.
Translating the KDCROOT table module and openUTM program units
The source of the KDCROOT table module msut be compiled with the BS2000Assembler and the openUTM program units must be compiled with thecorresponding programming language compilers. See the example procedureUTM.DEMO.P.KDCROOT for the compilation of the KDCROOT table module.
Linking the openUTM application program
The openUTM application program is produced by linking the KDCROOT table modulewith the openUTM program units.
You must include the stub module XAOSTUB:
INC-MOD LIB=$ORACINST.XAO.LIB,ELEM=XAOSTUB
Note:
Instead of writing the linking procedure, you must use the example procedureUTM.DEMO.P.PROBIND and apply modifications as needed.
To write your own linking procedure, study the example carefully beforewriting.
Starting the openUTM application
An example procedure for starting the openUTM application is in theUTM.DEMO.P.PROSTRT file.
When starting the openUTM application, you must specify the start parameters forboth openUTM and Oracle Database.
The openUTM start parameters are described in the openUTM manual UsingopenUTM Applications on BS2000 Systems.
The start parameter for using the XA interface for coordinated inter-operation withOracle Database 12c is:
.RMXA RM="Oracle_XA",OS="<ORACLE open string>"
13.6.4.1 Defining an Open String
This section describes how to construct an open string and includes the followingtopics:
• Required Fields (page 13-16)
• Optional Fields (page 13-17)
openUTM Database Applications
Database Applications 13-15
• Examples (page 13-18)
The transaction monitor uses this string to connect to the database. The maximumnumber of characters in an open string is 256. Construct the string as follows:
Oracle_XA{+required_fields...}[+optional_fields...]
where the required_fields are:
• Acc=P/user/access_info
• SesTm=session_time_limit
and the optional_fields are:
• DB=db_name
• MaxCur=maximum_no_of_open_cursors
• SqlNet=connect_string
• DbgFl=value_from_1_to_15
Note:
• You can enter the required fields and optional fields in any order whenconstructing the open string.
• All field names are case-insensitive, although their values may or may notbe case-sensitive depending on the system.
• You cannot use the "+" character as part of the actual information string.
13.6.4.1.1 Required Fields
The required fields for the open string are:
Item Meaning
Acc Specifies user access information.
P Indicates that explicit user and password information is provided.
user Specifies the Oracle Database user name.
access_info Specifies the Oracle Database password.
For example, Acc=P/scott/tiger indicates that the user and password informationis provided. In this case, the user name is scott and the password is tiger.
Ensure that the user scott has the SELECT privilege on theDBA_PENDING_TRANSACTIONS table in the previous example.
openUTM Database Applications
13-16 Installation and Administration Guide

Note:
For security reasons, starting with version V6.3, openUTM supports theplaceholders *UTMUSER and *UTMPASS for user and access_info. Thevalues for these openUTM placeholders are specified through the openUTMKDCDEF generation. When the xa_open call is executed, openUTM replacesthese placeholders with the generated values. Using these placeholders isoptional in openUTM V6.3, but it is mandatory in openUTM V6.4
Item Meaning
SesTm Specifies the maximum amount of time a transaction can be inactivebefore it is automatically deleted by the system.
session_time_limit
Specifies the maximum time limit in seconds between the start of aglobal transaction and the commit or roll back of this transaction.
13.6.4.1.2 Optional Fields
Optional fields for the open string are described in the following table:
Item Meaning
DB Specifies the database name.
db_name Indicates the name used in Oracle Database precompilers to identifythe database.
Application programs that use only the default database for the OracleDatabase precompiler, that is, application programs that do not usethe AT clause in their SQL statements, must omit the DB=db_nameclause in the open string.
Note: This default database is specified in the ORAENV file by theenvironment variable ORASID.
Applications that use explicitly–named databases should indicate thatdatabase name in their DB=db_name field.
For example, DB=payroll indicates that the database name is payrolland that the application program uses that name in AT clauses.
For more information about precompilers, refer to the section "Using Precompilerswith openUTM (page 13-18)" later in this chapter.
Item Meaning
MaxCur Specifies the number of cursors to be allocated when thedatabase is opened. It serves the same purpose as theprecompiler option maxopencursors.
maximum_no_of_open_cursors
Specifies the number of open cursors.
For example, MaxCur=5 indicates that the process should try to keep five open cursorscached.
openUTM Database Applications
Database Applications 13-17

See Also: Oracle Database Programmer's Guide to the Oracle Precompilers formore information about maxopencursors
Item Meaning
SqlNet Specifies the SQL*Net connect string.
connect_string Specifies the string that is used to open a connection to the database.This can be any supported Oracle Net Services connect string.
For example:
SqlNet=MADRID_FINANCE indicates an entry in TNSNAMES.ORA referencing aprotocol, a host, and a port number. For more information, refer to Oracle Net Services(page 12-1) in this guide.
Item Meaning
DbgFl Specifies if debugging should be enabled (debug flag). For moreinformation refer to “About Debugging” (page 13-23) section in thischapter.
13.6.4.1.3 Examples
This section contains examples of open strings for the XA interface.
Note:
If the string is longer than one line, then refer to the openUTM documentationfor information about how to split the string information.
For the bequeath protocol of Oracle Net Services:
Oracle_XA+Acc=P/scott/tiger+SesTm=0+DbgFl=15
For other protocols of Oracle Net Services:
Oracle_XA+SqlNet=MADRID_FINANCE+Acc=P/scott/tiger+SesTm=0Oracle_XA+DB=finance+SqlNet=MADRID_FINANCE+Acc=P/scott/tiger+SesTM=0
The optional fields LogDir, Loose_Coupling, SesWT, and Threads are notsupported.
See Also: Oracle Database Development Guide for more information about thefields in the open string
13.6.4.2 Using Precompilers with openUTM
You can choose from the following options when interfacing with precompilers:
• Using Pro*C with the Default Database (page 13-19)
• Using Pro*C with a Named Database (page 13-19)
openUTM Database Applications
13-18 Installation and Administration Guide

Run all the precompiler programs with the option release_cursor set to no.Precompiler programs may be written in C or COBOL. The precompiler Pro*C is usedin the examples.
13.6.4.2.1 Using Pro*C with the Default Database
If Pro*C applications access the default database, then ensure that the DB=db_namefield used in the open string is not present. The absence of this field indicates thedefault connection as defined in the ORAENV file, and only one default connection isallowed for each process.
The following is an example of an open string identifying a default Pro*C connection:
Oracle_XA+SqlNet=MADRID_FINANCE+Acc=P/scott/tiger+SesTm=0
Here, DB=db_name is absent, indicating an empty database identifier string.
The following is the syntax of a select statement:
EXEC SQL SELECT ENAME FROM EMP;
13.6.4.2.2 Using Pro*C with a Named Database
If Pro*C applications access a named database, then include the DB=db_name field inthe open string. Any database you refer to must reference the same db_name specifiedin the corresponding open string.
An application may access the default database, as well as one or more nameddatabases, as shown in the following examples.
For example, if you want to update an employee's salary in one database, thedepartment number deptno in another, and the manager information in a thirddatabase, then you must configure the following open strings in the transactionmanager:
Oracle_XA+SqlNet=MADRID_FINANCE1+Acc=P/scott/tiger+SesTm=0
Oracle_XA+DB=MANAGERS+SqlNet=MADRID_FINANCE2+Acc=P/scott/tiger+SesTm=0
Oracle_XA+DB=PAYROLL+SqlNet=MADRID_FINANCE3+Acc=P/scott/tiger+SesTm=0
There is no DB=db_name field in the first open string.
In the application program, enter declarations such as:
EXEC SQL DECLARE PAYROLL DATABASE; EXEC SQL DECLARE MANAGERS DATABASE;
Again, the default connection corresponding to the first open string that does notcontain the db_name field, does not require a declaration.
When performing the update, enter statements similar to the following:
EXEC SQL AT PAYROLL update emp set sal=4500 where empno=7788;EXEC SQL AT MANAGERS update emp set mgr=7566 where empno=7788;EXEC SQL update emp set deptno=30 where empno=7788;
There is no AT clause in the last statement because it refers to the default database.
You can use a character host variable in the AT clause, as shown in the followingexample:
openUTM Database Applications
Database Applications 13-19
EXEC SQL BEGIN DECLARE SECTION;db_name1 CHARACTER(10);db_name2 CHARACTER(10)EXEC SQL END DECLARE SECTION;..set db_name1 = 'PAYROLL' set db_name2 = 'MANAGERS'..EXEC SQL AT :db_name1 UPDATE...EXEC SQL AT :db_name2 UPDATE...
See Also: Pro*COBOL Programmer's Guide and Pro*C/C++ Programmer's Guidethat discusses concurrent logons
Note:
• openUTM applications must not create Oracle database connections oftheir own. Therefore, an openUTM user is not allowed to issue CONNECTstatements within an openUTM program. Any work performed by themwould be outside the global transaction, and may confuse the connectioninformation given by openUTM.
• SQL calls must not occur in the openUTM start exit routine, however mayoccur in the conversation exit routine “Vorgangs-Exit”.
13.6.4.3 SQL Operations
UTM application program units must use embedded SQL. Calls to the Oracle CallInterface (OCI) are not allowed.
The following SQL operations are discussed:
• CONNECT (page 13-20)
• COMMIT (page 13-21)
• ROLLBACK (page 13-21)
• SAVEPOINT (page 13-21)
• Cursor Operations (page 13-21)
• Dynamic SQL (page 13-21)
• PL/SQL (page 13-21)
• Autocommit (page 13-21)
13.6.4.3.1 CONNECT
A connection is implicitly established when the UTM task is started. This connectionuses the data specified in the open string. Further, explicit CONNECT operations issuedby the program units are not allowed.
openUTM Database Applications
13-20 Installation and Administration Guide

13.6.4.3.2 COMMIT
An explicit COMMIT statement is not allowed in UTM program units. The openUTMautomatically issues a COMMIT statement at PEND RE, PEND FI, PEND SP, or PENDFC operation.
13.6.4.3.3 ROLLBACK
An explicit ROLLBACK statement is not allowed in UTM program units. The openUTMautomatically issues a ROLLBACK statement on encountering a PEND ER, PEND RS,PEND FR, or RSET operation.
13.6.4.3.4 SAVEPOINT
The SAVEPOINT statement is not allowed in UTM program units.
13.6.4.3.5 Cursor Operations
A cursor is valid only until a PEND is executed. Because of a possible task changeduring a PEND KP, PEND PA, or PEND PR, you cannot perform operations on apreviously filled cursor such as OPEN or FETCH after a PEND KP, PEND PA, or PENDPR.
However, you can open and fetch a new cursor after PEND KP. The alternative tousing PEND KP is to use the PGWT-call, which waits until it receives an input from theterminal, to assign the same TACCLASS to subsequent programs after a PEND PA orPR operation.
See Also: The openUTM manual, Programming Applications with KDCS forCOBOL, C and C++
13.6.4.3.6 Dynamic SQL
You may use dynamic SQL as described in Oracle Database Programmer's Guide to theOracle Precompilers.
13.6.4.3.7 PL/SQL
COMMIT, ROLLBACK, CONNECT, and SAVEPOINT statements are not allowed inPL/SQL programs running under UTM.
13.6.4.3.8 Autocommit
Avoid autocommit operations as they violate the synchronization between OracleDatabase and UTM transactions. Take precautions when using the DDL operations, asthese often contain implicit autocommits.
For example, DDL statements such as, CREATE TABLE, DROP TABLE, and CREATEINDEX are not allowed in a global transaction because they force the pending work tobe committed.
13.6.4.4 openUTM Operations
This section describes the Oracle Database-specific points that you must considerwhen using UTM operations. It describes the effect of the PEND (Program Unit End),and RSET (Reset) operations of openUTM. These operations represent the commonsynchronization points between openUTM and the Oracle Database.
The following openUTM operations are discussed:
openUTM Database Applications
Database Applications 13-21
• RSET and PEND RS (page 13-22)
• PEND ER and PEND FR (page 13-22)
• PEND KP, PEND PR, and PEND PA (page 13-22)
• PEND RE, PEND FI, PEND SP, and PEND FC (page 13-22)
When you issue a PEND call, UTM calls the Oracle Database internally through the XAinterface for synchronization. When the PEND takes place:
• The user dialog/transaction is detached from the executing task.
• Any resource that is still attached to the user is released.
13.6.4.4.1 RSET and PEND RS
Resetting a UTM transaction implies rolling back the Oracle Database transaction.
13.6.4.4.2 PEND ER and PEND FR
When using these calls to terminate a UTM transaction, the Oracle Databasetransaction is also rolled back.
13.6.4.4.3 PEND KP, PEND PR, and PEND PA
These operations only end a UTM dialog step without affecting the correspondingOracle Database transaction.
13.6.4.4.4 PEND RE, PEND FI, PEND SP, and PEND FC
These PEND calls cause an implicit COMMIT to be executed. All cursors that are notexplicitly closed, are closed.
13.6.5 TroubleshootingThis section discusses how to recover data if there are problems or a system failure.Both trace files and recovering pending transactions are discussed in the followingsections:
• Trace Files (page 13-22)
• About Debugging (page 13-23)
• In-Doubt or Pending Transactions (page 13-23)
• Oracle Database SYS Account Tables (page 13-24)
13.6.5.1 Trace Files
The Oracle XA library logs any error and tracing information to its trace file. Thisinformation is useful in supplementing the XA error codes. For example, it canindicate whether an open failure is caused by an incorrect open string, failure to findthe Oracle Database instance, or a login authorization failure. The trace file is createdin the BS2000 user ID, where the openUTM application runs. The name of the trace fileis:
ORAXALOG.pid-db_name-date.TRC
where
pid is the process identifier (TSN).
openUTM Database Applications
13-22 Installation and Administration Guide

db_name is the database name you specified in the open string field DB=db_name.
date is the date when the trace file is created.
13.6.5.1.1 Trace File Examples
Examples of trace files are discussed in this section.
The following example shows a trace file for an application's task with the TSN 1234that was opened on April 2nd 1999. The DB field for this application was not specifiedin the open string when the resource manager was opened
ORAXALOG.1234-NULL-990402.TRC
The following example shows a trace file that was created on December 15th 1998 bythe BS2000 task with the TSN 5678. The DB field was specified as FINANCE in the openstring when the resource manager was opened.
ORAXALOG.5678-FINANCE-981215.TRC
Each entry in the trace file contains information that looks similar to:
1032.2: xa_switch rtn ORA-22
where 1032 is the time when the information is logged, 2 is the resource manageridentifier, xa_switch is an internal identifier of the Oracle XA library, and ORA-22 isthe returned Oracle database information.
13.6.5.2 About Debugging
You can specify the DbgFl (debug flag) in the open string.
Depending on the debugging level (low:DbgFl=1, high:DbgFl=15), you can get moreor less debug entries in the trace file ORAXALOG.pid-db_name-date.TRC.
See Also: Oracle Database Development Guide for more information
13.6.5.3 In-Doubt or Pending Transactions
In-doubt or pending transactions are transactions that have been prepared but not yetcommitted in the database. Generally, openUTM resolves any in-doubt or pendingtransaction. However, the Database Administrator may have to override an in-doubttransaction when working with UTM-F, that is, APPLIMODE=FAST. For example,when the in-doubt transaction is:
• Locking data that is required by other transactions.
• Not resolved in a reasonable amount of time.
Note:
Overriding in-doubt transactions can cause inconsistency between openUTMand the database. For example, if the DB transaction is committed by theDatabase Administrator and the openUTM application rolls back thetransaction in the warm-start phase, then the Oracle Database cannot roll thiscommitted transaction back, therefore, causing an inconsistency.
openUTM Database Applications
Database Applications 13-23
13.6.5.4 Oracle Database SYS Account Tables
The tables under the Oracle Database SYS account that contain transactions generatedby regular Oracle Database applications and Oracle Database/openUTM applicationsare as follows:
• DBA_2PC_PENDING
• DBA_2PC_NEIGHBORS
• DBA_PENDING_TRANSACTIONS
• V$GLOBAL_TRANSACTION
See Also:
For detailed information about how to use these tables, refer to the sections inthe Oracle Database Administrator’s Guide that discuss failures during two-phase commit and manually overriding in-doubt transactions
For transactions generated by Oracle Database/openUTM applications, the followingcolumn information applies specifically to the DBA_2PC_NEIGHBORS table:
• The DBID column is always xa_orcl.
• The DBUSER_OWNER column is always db_namexa.oracle.com.
Remember that the db_name is always specified as DB=db_name in the open string. Ifyou do not specify this field in the open string, then the value of this column isNULLxa.oracle.com for transactions that are generated by Oracle Database/openUTM applications.
For example, use the following sample SQL statement to find out more informationabout in-doubt transactions that are generated by Oracle Database/openUTMapplications.
SELECT * FROM DBA_2PC_PENDING p, DBA_2PC_NEIGHBORS n WHERE p.LOCAL_TRAN_ID = n.LOCAL_TRAN_ID AND n.DBID = 'xa_orcl';
openUTM Database Applications
13-24 Installation and Administration Guide
14External Procedures
This chapter describes how to create an environment on BS2000, where externalprocedure calls can operate. It complements the chapter about External Procedures inthe Oracle Database Development Guide.
14.1 Loading External ProceduresThis section complements the corresponding part in Oracle Database Development Guide.
Perform the following steps to load external procedures:
1. Set up the environment.
An external procedure does not run in the same process and address space as thecaller. Oracle creates separate processes for them to operate in a safe and securemanner. Oracle Net Services features are used for this purpose. The user mustprovide appropriate Oracle Net Services parameter files. An example of how thisworks is documented in this section.
The listener.ora file must have the following entry:
(SID_DESC = (SID_NAME = ep_agt1) (ENVS = EXTPROC_DLLS=ANY) (ORACLE_SID = sid_of_your_database) (PROGRAM = EXTPROC))
The tnsnames.ora file must have the following entry:
extproc_connection_data = (DESCRIPTION =(ADDRESS =(PROTOCOL=ipc)(KEY = sid_of_your_database)(CONNECT_DATA =(PRESENTATION=RO)(SID = ep_agt1)))
Now, you can start a listener.
See Also:
• Oracle Database Development Guide
• Oracle Database Data Cartridge Developer's Guide
• Oracle Database Net Services documentation set
2. Identify the DLL.
A DLL in the BS2000 environment is a BS2000 LMS library containing the functionscalled as external procedures. When EXTPROC is loaded, these functions aredynamically linked to the program.
External Procedures 14-1
Use the following command to identify your library to Oracle:
CREATE LIBRARY my_c_library AS '$myuserid.my-modlib';
The external C routine must be compiled and the generated LLM must be stored inthe LMS library. If you set the MODULE-PROPERTIES option LOWER-CASE-NAMES=*NO, during compilation with the BS2000 C compiler CPP, then alllowercase letters in the entry names are converted to uppercase.
Also, if you set the MODULE-PROPERTIES option SPECIAL-CHARACTERS=*CONVERT-TO-DOLLAR, then all underscores (_) in the entry namesare converted to dollar signs ($), which must be considered when publishing theexternal procedure.
3. Publishing and running external procedures are similar to the description in OracleDatabase Development Guide. You can find the result messages about the executionof the external procedure in the L.sid.EXTP.SYSOUT.tsn file.
Loading External Procedures
14-2 Installation and Administration Guide

15Globalization Support
This chapter describes the globalization support available with Oracle Database 12cRelease 1 (12.1) for Fujitsu BS2000/OSD, with information about the following:
• Language, Territory, and Character Set (page 15-1)
• Supported Language Conventions (page 15-2)
• Supported Territories (page 15-3)
• Supported Character Sets (page 15-3)
• Location of Message Files (page 15-5)
• Linguistic Definitions (page 15-5)
Character set tables; and country and regional information, such as, date format,names of months, and so on, are dynamically loaded at run time. This reduces theactual storage requirements and allows new languages to be added in the futurewithout the need to relink all applications.
The files containing character set information are created in the current BS2000 userID. The names of these files have the following format:
O12NLS.LXnnnnn.NLB
These files are for internal use only. You should not make changes to them. If youneed a character set, language, or a territory code that is not present, then contactOracle Support Services to check for any updates.
Note:
User-defined character sets as documented in Oracle Database GlobalizationSupport Guide are not supported in this release.
15.1 Language, Territory, and Character SetTo choose a language, a territory, and a character set that you want to work with, youmust perform separate procedures for Oracle Database and the supported OracleDatabase utilities. This section includes the following topics:
• Oracle Database (page 15-2)
• Other Oracle Database Products (page 15-2)
Globalization Support 15-1

15.1.1 Oracle DatabaseFor Oracle Database, the database administrator sets the NLS_LANGUAGE andNLS_TERRITORY parameters in the initialization files.
See Also: Oracle Database Globalization Support Guide for more information
15.1.2 Other Oracle Database ProductsFor the supported Oracle Database products, you can choose a language, a territory,and a character set by setting the value of the NLS_LANG environment variable. Setthis environment variable in the ORAENV file or in the POSIX shell as follows:
NLS_LANG=language_territory.characterset
where:
language is any supported language.
territory is any supported territory.
characterset is the character set required by your terminal.
For example:
NLS_LANG=German_Germany.D8BS2000
15.2 Supported Language ConventionsOracle Database 12c Release 1 (12.1) for Fujitsu BS2000/OSD provides support forlanguage conventions, such as names of days and months, for the followinglanguages:
• American English: american (default)
• Czech: czech
• Danish: danish
• Dutch: dutch
• Finnish: finnish
• French: french
• German: german
• Hungarian: hungarian
• Italian: italian
• Norwegian: norwegian
• Polish: polish
• Portuguese: portuguese
• Slovak: slovak
Supported Language Conventions
15-2 Installation and Administration Guide

• Spanish: spanish
• Swedish: swedish
• Russian: russian
• Turkish: turkish
15.3 Supported TerritoriesOracle Database Globalization Support provides support for territory conventions,such as start day of the week, for the following territories:
• America: america (default)
• Czech Republic: czech republic
• Denmark: denmark
• Finland: finland
• France: france
• Germany: germany
• Hungary: hungary
• Italy: italy
• The Netherlands: the netherlands
• Norway: norway
• Poland: poland
• Portugal: portugal
• Spain: spain
• Sweden: sweden
• CIS: CIS
• Slovakia: slovakia
• Turkey: turkey
• United Kingdom: united kingdom
15.4 Supported Character SetsOracle Database 12c Release 1 (12.1) supports the following character sets for serversand clients under BS2000/OSD:
Name Description Usage
US8BS2000 Siemens 9750-62 EBCDIC 8-bit
American
Supported Territories
Globalization Support 15-3
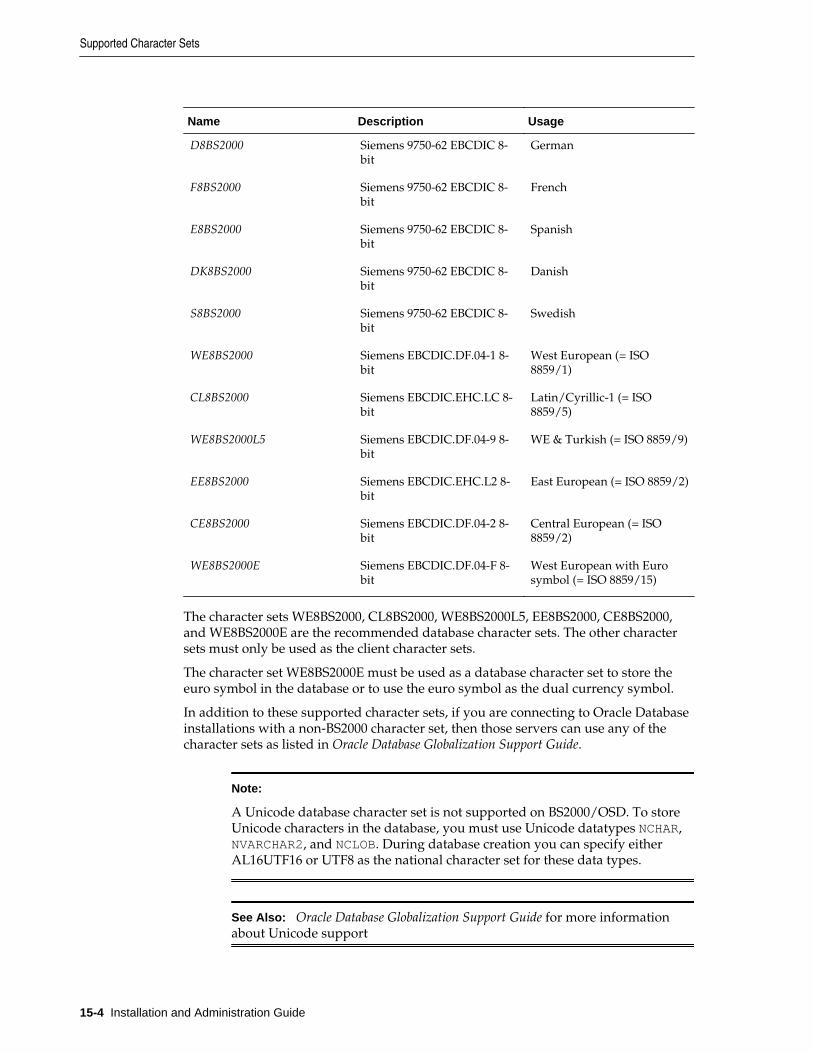
Name Description Usage
D8BS2000 Siemens 9750-62 EBCDIC 8-bit
German
F8BS2000 Siemens 9750-62 EBCDIC 8-bit
French
E8BS2000 Siemens 9750-62 EBCDIC 8-bit
Spanish
DK8BS2000 Siemens 9750-62 EBCDIC 8-bit
Danish
S8BS2000 Siemens 9750-62 EBCDIC 8-bit
Swedish
WE8BS2000 Siemens EBCDIC.DF.04-1 8-bit
West European (= ISO8859/1)
CL8BS2000 Siemens EBCDIC.EHC.LC 8-bit
Latin/Cyrillic-1 (= ISO8859/5)
WE8BS2000L5 Siemens EBCDIC.DF.04-9 8-bit
WE & Turkish (= ISO 8859/9)
EE8BS2000 Siemens EBCDIC.EHC.L2 8-bit
East European (= ISO 8859/2)
CE8BS2000 Siemens EBCDIC.DF.04-2 8-bit
Central European (= ISO8859/2)
WE8BS2000E Siemens EBCDIC.DF.04-F 8-bit
West European with Eurosymbol (= ISO 8859/15)
The character sets WE8BS2000, CL8BS2000, WE8BS2000L5, EE8BS2000, CE8BS2000,and WE8BS2000E are the recommended database character sets. The other charactersets must only be used as the client character sets.
The character set WE8BS2000E must be used as a database character set to store theeuro symbol in the database or to use the euro symbol as the dual currency symbol.
In addition to these supported character sets, if you are connecting to Oracle Databaseinstallations with a non-BS2000 character set, then those servers can use any of thecharacter sets as listed in Oracle Database Globalization Support Guide.
Note:
A Unicode database character set is not supported on BS2000/OSD. To storeUnicode characters in the database, you must use Unicode datatypes NCHAR,NVARCHAR2, and NCLOB. During database creation you can specify eitherAL16UTF16 or UTF8 as the national character set for these data types.
See Also: Oracle Database Globalization Support Guide for more informationabout Unicode support
Supported Character Sets
15-4 Installation and Administration Guide
15.5 Location of Message FilesAll message files are located in ORAMESG.LIB in the installation user ID.
15.6 Linguistic DefinitionsAll the linguistic definitions listed in Oracle Database Globalization Support Guide areavailable.
Location of Message Files
Globalization Support 15-5

Linguistic Definitions
15-6 Installation and Administration Guide
Part VAppendices
Appendices contain supplemental material for this document.
The following topics are discussed:
• Oracle Error Messages for BS2000 (page A-1)
• Oracle Environment Variables (page B-1)
• Initialization Parameters and the Parameter File (page C-1)
• Troubleshooting (page D-1)
• File Types and Names Used by Oracle (page E-1)


AOracle Error Messages for BS2000
This appendix lists error messages, causes, and corrective actions that are specific tooperation of Oracle Database for Fujitsu BS2000. The messages shown in this appendixmay be accompanied by additional text when displayed on screen. This text identifiesthe function that detected the problem, and can include internal status codes, BS2000SOSD error code, or both. These error codes can be helpful to the Oracle SupportServices Representative in determining the cause of a problem. The BS2000 SOSD errorcode indicates that the error originated in the operating system code. The error code isdisplayed in hexadecimal, and is structured as follows:
BS2000 SOSD error 0x8xxxyyyy from mmmmmmmm : text
Where:
• xxx identifies the function reporting the error.
• yyyy details the error. It is either an internal code of the function, or a compactedreturn code of a BS2000 system macro (see subsequent section).
• mmmmmmmm is the name of the function.
• text, if present, explains the error code. Often it says "RC FROM zzzzz MACRO".
A BS2000 system macro return code is condensed into the 2-byte value yyyy asfollows:
• For system macros that return a code bb0000aa, yyyy is bbaa
• For I/O calls, yyyy is the DMS error code
• In all other cases, yyyy contains the right halfword of the return code of the BS2000macro.
Sometimes, for example, in the early stages of initialization when the messagecomponents are not yet available, the Oracle Database cannot issue a regular Oraclemessage. If this occurs, then Oracle Database calls the ILCS task termination routine,or it issues a TERM macro directly, giving the message number as the user terminationcode. You can use this message number to find the explanation in this appendix.
ORA-05000: ORACLE termination routine calledCause: The termination routine of the Oracle Database run-time system has beencalled due to a fatal error.
Action: If you do not know why the Oracle Database program terminated, or how toresolve this problem, then contact the Oracle Support Services Representative.
A-1

ORA-05001: Unsupported BS2000 VersionCause: The active version of the BS2000 operating system is not supported by thisOracle Database release.
Action: Upgrade to a more recent BS2000 version.
ORA-05002: Fatal error: called from non-ILCS programCause: In a precompiler or OCI application, the Oracle Database is called from aprogram that does not run in an ILCS environment. The Oracle Database does notsupport non-ILCS programs
Action: Ensure that the application program runs in an ILCS mode. Someprogramming languages, for example, FOR1, PL/I, require specific options for ILCS.Refer to the Fujitsu documentation for further information.
ORA-05003: Fatal error: ILCS PCD cannot be verifiedCause: In a precompiler or OCI application, Oracle Database is called with a save areathat is marked as an ILCS save area but does not point to a proper PCD (ILCS globalarea). The problem is either that memory has been overwritten, or that OracleDatabase is called from a program that does not run in an ILCS environment. OracleDatabase does not support non-ILCS programs.
Action: Ensure that the application program runs in an ILCS mode. Someprogramming languages, for example, FOR1, PL/I, require specific options for ILCS.Refer to the Fujitsu documentation for further information.
ORA-05004: Fatal error: stack overflow, extension failedCause: A call to a function required an extension of the current call stack segment.This extension failed and the corresponding ILCS routine returned the error.
Action: Ensure that the address space limit of the BS2000 user ID is sufficient and thatthere is no temporary memory saturation. Then re-run the program. If you needfurther help, then contact the Oracle Support Services Representative.
ORA-05005: Error: IT0INITS called in PROLODCause: This is an internal error and should not occur.
Action: Contact the Oracle Support Services Representative.
ORA-05006: sltga already initializedCause: The initialization routine for the sltga is called more than once.
Action: Check if more than one stub modules (PROSTUB, XAOSTUB) are linked to theapplication.
ORA-05007: failed to load OSNTABCause: This message is usually preceded by a BS2000 BLS-nnnn message. The mostlikely reason is that the ORALOAD library cannot be found.
Action: Contact the Database Administrator about the ORALOAD library. If you cannotidentify the cause of the problem, then contact the Oracle Support ServicesRepresentative.
ORA-05008: failed to load requested network driverCause: This message is usually be preceded by a BS2000 BLS-nnnn message. Themost likely reason is that the ORALOAD library cannot be found.
A-2 Installation and Administration Guide

Action: Contact the Database Administrator about the ORALOAD library. If you cannotidentify the cause of the problem, then contact the Oracle Support ServicesRepresentative.
ORA-05010: bad filename lengthCause: Buffer overflow while building/translating a file name. This could be causedby specifying an excessively long file name in the ORAENV file.
Action: If you cannot identify the cause of the problem, then contact the OracleSupport Services Representative.
ORA-05011: bad file sizeCause: This is an internal error and should not normally occur.
Action: Contact the Oracle Support Services Representative.
ORA-05012: bad block sizeCause: This is an internal error and should not normally occur.
Action: Contact the Oracle Support Services Representative.
ORA-05013: bad filename parseCause: A file name being analyzed is not well-formed for Oracle Database purposes.
Action: Correct the file name and re-run the program.
ORA-05014: sfcopy: non-matching block sizeCause: In a partial database file copy, source and target file have different block sizes.This may indicate an internal error and should not normally occur.
Action: If you cannot identify the cause of the problem, then contact the OracleSupport Services Representative.
ORA-05015: text file open failedCause: An Oracle Database text or command file cannot be opened. One of thefollowing could cause this error: the file name is wrong, the file has not been properlyinitialized, or the file is not accessible.
Action: Correct the problem and restart the Oracle Database. If this occurs when youissued the STARTUP command, then check the initialization file for the correctspecification of the database files.
ORA-05016: text file close failedCause: Attempt to close an Oracle Database file has failed. This is an internal errorand should not normally occur.
Action: Contact your Oracle Support Services Representative.
ORA-05017: file open failedCause: An Oracle Database database file cannot be opened. Either the file name iswrong, the file has not been properly initialized, or the file is not accessible.
Action: Correct the problem and restart the Oracle Database. If this occurred whenyou issued the STARTUP command, then check the initialization file for the correctspecification of the database files.
A-3

ORA-05018: file seek failedCause: This is an internal error and should not normally occur.
Action: Contact the Oracle Support Services Representative.
ORA-05019: file write failedCause: An I/O error occurred while writing to an Oracle Database file.
Action: If the error cannot be identified as one caused by a disk malfunction, theneither contact the System Administrator, or contact the Oracle Support ServicesRepresentative.
ORA-05020: write block outside of fileCause: An attempt was made to write a block of an Oracle Database file that does notexist. For example, block number < 1 or > file size. This is an internal error andshould not normally occur.
Action: Contact the Oracle Support Services Representative.
ORA-05021: file read failedCause: An I/O error occurred while reading an Oracle Database file.
Action: If the error cannot be identified as one caused by a disk malfunction, theneither contact the System Administrator, or contact the Oracle Support ServicesRepresentative.
ORA-05022: read block outside of fileCause: An attempt was made to read a block of an Oracle Database file that does notexist. For example, block number < 1 or > file size. This is an internal error andshould not normally occur.
Action: Contact the Oracle Support Services Representative.
ORA-05023: file close failedCause: The attempt to close an Oracle Database file failed. This is an internal errorand should not normally occur.
Action: Contact the Oracle Support Services Representative.
ORA-05025: sfccf:file mismatch. Trying to reuse a file with different sizeCause: When trying to reuse a database file, the file size specified differs from theactual size of the existing file.
Action: Specify the correct file size (remember to subtract one logical block for theimplicit header block), or leave the size unspecified, or use a different file name if youwant to create a larger or smaller database file.
ORA-05026: file does not existCause: An attempt was made to access a database file, which no longer exists.
Action: Contact the Database Administrator who may know why this error hasoccurred. If the Database Administrator cannot find the cause of the problem, thencontact the Oracle Support Services Representative.
A-4 Installation and Administration Guide

ORA-05027: file does existCause: When attempting to create a new file, this error occurs if the file is found andis not empty.
Action: If the error occurred in a create database, then retry with the reuseoption. Otherwise use a different file name or check whether the file can be erased.
ORA-05028: file is not a dbfileCause: The database, or log, or control, file to be opened does not contain the properidentification for such a file.
Action: Check for wrong file specification.
ORA-05029: illegal use-optionCause: Internal error. Function sfccf was called with an illegal option.
Action: Contact the Oracle Support Services Representative.
ORA-05030: SID not definedCause: When the system id was required, typically, to substitute the "?" in names, forexample, in file names set by the initialization file, it was not yet defined. This couldbe caused by a missing ORAENV file or a missing ORASID in that file.
Action: Ensure that the ORAENV file definition is correct and re-run the program.
ORA-05031: SID translation failureCause: The system id is syntactically incorrect.
Action: Ensure that the ORASID definition is correct and re-run the program.
ORA-05032: bad name parseCause: The translation of a file name, or other name containing variable parts, failed.The error may be caused by a wrong specification in the ORAENV file.
Action: Ensure that the ORAENV variable assignments are correct. If you cannotidentify the cause of the problem, then contact the Oracle Support ServicesRepresentative.
ORA-05033: bad environment valuesCause: One or more of the values specified in the ORAENV file are invalid.
Action: Ensure that you specified legal values in the ORAENV file, refer to the OracleEnvironment Variables (page B-1) in this guide for further information.
ORA-05034: bad sealCause: Internal error. An internal file control structure is found to be corrupt.
Action: Contact the Oracle Support Services Representative.
ORA-05035: host command not executedCause: A BS2000 command, argument of a HOST or #HOST command, is invalid or toolong.
Action: Enter a valid HOST command.
A-5
ORA-05036: bad user id (length)Cause: Internal buffer overflow while building a file name from variable components.
Action: Ensure that the ORAUID value specified in the ORAENV file is correct. If youcannot identify the cause of the problem, then contact the Oracle Support ServicesRepresentative.
ORA-05037: /CANCEL command not executedCause: A background job could not be canceled. The background task may havealready been terminated.
Action: If you cannot identify the cause of the problem, then contact the OracleSupport Services Representative.
ORA-05038: SID has illegal lengthCause: The system identifier specified in either the ORAENV file or as part of a connectstring exceeds 4 characters in length.
Action: Specify a correct value.
ORA-05039: Recursive entry to ssodrvCause: Oracle Database kernel has been reentered at the top. This should not happen.
Action: Ensure that the user program does not incorrectly call Oracle Databasefunctions from within an interrupt handling routine (signal routine, contingency). Ifyou cannot identify the cause of the problem, then contact the Oracle SupportServices Representative.
ORA-05040: no more dynamic memoryCause: Request memory failed in file-management components. This is probablycaused by a user address space that is too small.
Action: Ensure that the address space limit of the BS2000 user ID is sufficient and thatthere is no temporary memory saturation. Then re-run the program. If you needfurther help, then contact the Oracle Support Services Representative.
ORA-05046: Archive control string errorCause: The archive file name or control parameters are incorrect.
Action: Correct the parameters.
ORA-05050: PGA (fixed part) could not be allocatedCause: Probable operating system error or internal error.
Action: Contact the Oracle Support Services Representative.
ORA-05051: cannot allocate var. PGACause: During creation of the PGA, required dynamic memory could not be allocated.
Action: Verify that the user address space is large enough and that if an applicationprogram produced the error, the program is not consuming excessive memory.Otherwise contact the Oracle Support Services Representative.
ORA-05052: error deleting var. PGACause: During deletion of the PGA, dynamic memory could not be released. This isan internal error and should not normally occur.
A-6 Installation and Administration Guide
Action: Contact the Oracle Support Services Representative.
ORA-05053: invalid or missing PGA_BASECause: An invalid value for the PGA_BASE parameter has been specified in theORAENV file.
Action: Use the default value for the PGA_SIZE environment variable. If this does notsolve the problem, then contact the Oracle Support Services Representative.
ORA-05054: invalid or missing PGA_SIZECause: An invalid value for the PGA_SIZE environment variable has been specified inthe ORAENV file. You should never need to change the default value for the PGA_SIZEenvironment variable.
Action: Use the default value for the PGA_SIZE environment variable. If this does notsolve the problem, then contact the Oracle Support Services Representative.
ORA-05055: address range for PGA (fixed part) is not freeCause: The address range described by the PGA_BASE and PGA_SIZE ORAENVvariables is not available for allocation. This may be due to overlapping PGA, SGA,and KERNEL areas, or to an application program, which has occupied memory in thisarea. If you did not specify a value for PGA_BASE, the default may be inappropriatefor the case.
Action: Refer to Memory Architecture (page 1-2) for further information.
ORA-05056: no more context spaceCause: During processing of a SQL statement, dynamic memory could not beallocated. This could happen when very complex requests are being processed andthere is not enough memory available.
Action: Verify that the user address space is large enough and that the applicationprogram, if the error occurred when you were using an application program, is notusing excessive memory. Otherwise, contact the Oracle Support ServicesRepresentative.
ORA-05058: assert failed: SGA not mappedCause: This is an internal error and should not normally occur.
Action: Contact the Oracle Support Services Representative.
ORA-05059: assert failed: not in kernelCause: This is an internal error and should not normally occur.
Action: Contact the Oracle Support Services Representative.
ORA-05060: SGA not createdCause: After you run the STARTUP command, the SGA shared memory pool couldnot be created.
Action: Verify that you are not trying to start the database while it is running and thatthe database system id is not being used for two different databases. Otherwise,contact the Oracle Support Services Representative.
A-7

ORA-05061: SGA attach failedCause: Connection to the SGA shared memory pool could not be established. Thismay have happened if you used the wrong system id, or if the database you expectedto be running is not running.
Action: Verify that it is not one of the preceding causes (check with the DatabaseAdministrator). Otherwise, contact the Oracle Support Services Representative.
ORA-05063: SGA base invalidCause: An invalid value has been specified for the SGA_BASE parameter in theORAENV file.
Action: This value is not normally needed. If specified, it must be a value giving thefull virtual address for the SGA memory pool. Correct the value and run theSTARTUP command.
ORA-05064: cannot allocate SGACause: After creating the memory pool, the REQMP to allocate the space failed. Thismight be an operating system error.
Action: If you cannot identify the cause of the problem, then contact the OracleSupport Services Representative.
ORA-05065: SGA not deletedCause: When attempting to detach from the SGA, the DISMP system macro returnedan error.
Action: If you cannot identify the cause of the problem, then contact the OracleSupport Services Representative.
ORA-05066: SGA address space conflictCause: The SGA cannot be placed at the requested address range, because the range isalready partly used. The SGA start address is defined by the ORAENV variable,SGA_BASE; its size is determined by various initialization file parameters such asprocesses, buffers, and so on.
Action: Refer to “Memory Architecture” (page 1-2) and adjust the relevantinitialization file and ORAENV variables. Check the address space limit of the DBAuser ID. Contact the System Administrator to find out about shared subsystems andtheir placement in the address space. Ensure that you do not overlap with the OracleDatabase kernel.
ORA-05067: SGA: address space saturationCause: When the SGA is being allocated, the operating system reported that thevirtual address space is saturated.
Action: Contact the System Administrator about paging area size and current overallsystem load.
ORA-05068 SGA still active, should not beCause: When the SGA is being created during startup, it is found that the SGAmemory pool is still in use, although the databases should be shut down. This may becaused by a hanging single-task, user task, or a network server task.
Action: Check for such hanging tasks. Cancel these tasks, and then restart thedatabase.
A-8 Installation and Administration Guide
ORA-05069: Unexpected SGA memory pool problemCause: The ENAMP macro returned an unexpected error code.
Action: Contact the Oracle Support Services Representative.
ORA-05070: cannot enable TPA ser.itemCause: Probable operating system error.
Action: Contact the Oracle Support Services Representative.
ORA-05071: cannot ENQ on TPA ser.itemCause: Probable operating system error.
Action: Contact the Oracle Support Services Representative.
ORA-05072: cannot enable post/wait itemCause: Probable operating system error.
Action: Contact the Oracle Support Services Representative.
ORA-05073: error in postCause: An inter-process communication operation failed.
Action: Check that the database and all required background tasks are runningcorrectly. If you cannot identify the cause of the problem, then contact the OracleSupport Services Representative.
ORA-05074: error in waitCause: An inter-process communication operation failed.
Action: Check that the database and all required background tasks are runningcorrectly. If you cannot identify the cause of the problem, then contact the OracleSupport Services Representative.
ORA-05075: error in task table managerCause: Internal error.
Action: Contact the Oracle Support Services Representative.
ORA-05076: error setting spidCause: Probable operating system error.
Action: Contact the Oracle Support Services Representative.
ORA-05077: cannot enable HIA eventCause: Probable operating system error. The HIA (Here I Am) event item is used tocheck the successful start of an Oracle Database process.
Action: Contact the Oracle Support Services Representative.
ORA-05078: create process failureCause: When you issued the STARTUP command, a background job could not bestarted successfully.
Action: Check for the job scheduling problems and that any BGJPAR entry in theORAENV file is correct. If you cannot identify the cause of the problem, then contactthe Oracle Support Services Representative.
A-9
ORA-05079: internal asynchronous IO errorCause: This is an internal error and should not normally occur.
Action: Contact the Oracle Support Services Representative.
ORA-05107: POSIX environment variable <variablename> not definedCause: The specified environment variable is not defined.
Action: Define and export the requested variable in your profile.
ORA-05108: failed to process BS2000 command <bs2-command>Cause: The BS2000 command processor cannot execute the command.
Action: Test the logged command in the POSIX shell using the POSIX command,bs2cmd.
ORA-05109: failed to initialize environment for POSIXCause: An application running under the POSIX shell cannot create links to requiredfiles in the BS2000 file system.
Action: Check if the environment variables required for Oracle Database applicationsunder POSIX are set properly.
ORA-05110: cannot attach to memory poolCause: Invalid pool ID parameter xxx_MPID or operating system error.
Action: Check the ORAENV parameter xxx_MPID, at most 4 characters of the set[A...Z],[0...9]), or contact the Oracle Support Services Representative.
ORA-05111: error attaching to memory poolCause: This error mostly occurs due to an address space conflict. The two lowsignificant bytes of the SOSD error show the return code of the ENAMP macro. Forexample, 1804.
Action: Refer to the manual Executive Macros of the Fujitsu BS2000 operating systemreleased on the Fujitsu manual server:
http://manuals.ts.fujitsu.com/
This manual contains a description of the SOSD error. This problem usually can beresolved by using a higher base address.
ORA-05112: error creating memory poolCause: This error mostly occurs due to an address space conflict. The two lowsignificant bytes of the SOSD error show the return code of the ENAMP macro. Forexample, 1804.
Action: Refer to the manual Executive Macros of the Fujitsu BS2000 operating systemreleased on the Fujitsu manual server:
http://manuals.ts.fujitsu.com/
This manual contains a description of the SOSD error. This problem usually can beresolved by using a higher base address
ORA-05114: bad pool baseCause: An invalid value for the base address parameter of the shared pool, that is,CLN_BASE, COM_BASE, and so on has been specified in the ORAENV file.
A-10 Installation and Administration Guide
Action: If this value is specified, it must be a value giving the full virtual address forthe base address of a memory pool. Correct the value and restart the database.
ORA-05116: cannot load shared code into poolCause: Shared code could not be loaded into the specified memory pool. The two lowsignificant bytes of the SOSD error show the main return code of the BIND macro, forexample, x'0198'.
Action: Refer to the manual Executive Macros of the Fujitsu BS2000 operating systemreleased on the Fujitsu manual server for a description of the SOSD error:
http://manuals.ts.fujitsu.com/
ORA-05117: cannot attach to socket subsystemCause: An application could not be bound to the sockets subsystem. Generally thismessage is preceded by a BLS-nnnn message from the operating system.
Action: Use the BS2000 command 'SHOW-SUBSYSTEM-STATUS SOC6' to verifythat the sockets subsystem SOC6 is created.
ORA-05118: ORACLE PCD slot not accessibleCause: The current task is trying to attach to the ORACLE PCD slot but cannot findthis slot.
This is an internal error and should not normally occur.
Action: Contact the Oracle Support Services Representative.
ORA-05119: module verification failedCause: The version of the shared loaded module does not match the version of theconnection module on the user side.
Action: Mostly this error occurs with user applications. In this case re-link theapplication with the Oracle Database release in use.
ORA-05120: waiting for shared module to be loaded timed outCause: This is an internal error and should not normally occur.
Action: Set the environment Variable OSDDBG=INI and re-start the program. Theerror and the involved memory pool name will be logged. Ask your BS2000 systemadministrator if the associated memory pool is locked by a foreign task or user.
ORA-05121: waiting for initialization of shared module timed outCause: This is an internal error and should not normally occur.
Action: Set the environment Variable OSDDBG=INI and re-start the program. Theerror and the involved memory pool name will be logged. Ask your BS2000 systemadministrator if the associated memory pool is locked by a foreign task or user.
ORA-05126: Missing IT0PCD addressCause: The ILCS run-time link-library is probably missing.
Action: Contact the System Administrator.
ORA-05161: TCP/IP can't perform asynchronous test on break socket.Cause: Select on break socket failed.
A-11
Action: Contact the System Administrator about TCP/IP networking problems. If theerror persists, contact the Oracle Support Services Representative.
ORA-05165: function not supportedCause: Either Oracle Database or BS2000 does not support this function.
Action: None.
ORA-05167: Defect in data bufferCause: This is an internal error and should not normally occur.
Action: Contact the Oracle Support Services Representative.
ORA-05170: SID not defined (ORAENV file missing?)Cause: The system identifier, data base name, is not defined when needed duringOracle Database program initialization. A missing ORAENV file or a missing ORASIDentry in that file could cause this error.
Action: Ensure that the ORAENV file definition is correct and re-run the program.
ORA-05173: bad kernel sizeCause: An invalid value for the KNL_SIZE parameter has been specified in theORAENV file.
Action: You should not normally need to specify this variable, as the default value iscorrect. Contact the Oracle Support Services Representative.
ORA-05174: bad kernel baseCause: An invalid value for the KNL_BASE parameter has been specified in theORAENV file.
Action: If this value is specified, then it must be a value giving the full virtual addressfor the kernel memory pool. Correct the value and restart the database.
ORA-05175: Kernel address space conflictCause: The Oracle Database kernel cannot be placed at the requested address range,because the range is already used. The kernel start address is defined by the ORAENVparameter, KNL_BASE.
Action: Refer to Memory Architecture (page 1-2) and adjust the relevant initializationfile and ORAENV parameters. Check the address space limit of the DBA user ID.Contact the System Administrator to learn about shared subsystems and theirplacement in the address space.
ORA-05176: Kernel: address space saturationCause: When the Oracle Database kernel memory pool was being allocated, theoperating system signalled that the virtual address space is currently saturated.
Action: Contact the System Administrator about paging area size and current overallsystem load.
ORA-05177: Unexpected Kernel memory pool problemCause: The ENAMP macro returned an unexpected error code.
Action: Refer to the ENAMP macro description in the BS2000 documentation forpossible reasons. If you cannot identify the cause of the problem, then contact theOracle Support Services Representative.
A-12 Installation and Administration Guide

ORA-05178: Kernel module not yet initializedCause: The current task is trying to attach to an Oracle Database kernel which is notyet completely initialized. This can only happen if you try to connect to a database,which is just being started.
Action: Retry after a while. Remember that it may take a few minutes until a databaseis fully running and ready for the users. If the error persists, then check this issue withthe Database Administrator.
ORA-05181: load/init problem with PRO/OCI interfaceCause: The user-side stub module could not load the PRO/OCI module. In this case,the message is usually preceded by a BS2000 BLS-nnnn message, or the loadedmodule is incompatible with the version of the stub module.
Action: Ensure that the ORALOAD link name exists and points to the current ORALOADlibrary. Re-link the application with the current link libraries.
ORA-05191: symbol translation error for kernel memory poolCause: The logical name translation for the kernel memory pool failed. Normally, thisindicates an invalid system id, ORASID in the ORAENV file.
Action: Ensure that the ORAENV file definition is correct. Otherwise, contact the OracleSupport Services Representative.
ORA-05192: cannot create/attach kernel memory poolCause: The memory pool for the Oracle Database kernel code could not be enabled. Ina user program, a possible cause is that the user program already allocates part of theaddress range needed for the memory pool.
Action: Ensure that the user program does not request storage excessively, and thatany SGA_BASE and KNL_BASE parameters in the ORAENV file are consistent. If youcannot identify the cause of the problem, then contact the Oracle Support ServicesRepresentative.
ORA-05193: Symbol translation error for kernel module or load libraryCause: The logical-name translation for the kernel module or load library failed. Thisis an internal error and should not normally occur.
Action: Contact the Oracle Support Services Representative.
ORA-05194: cannot load kernelCause: The kernel could not be loaded into the kernel memory pool. In most cases,this message is preceded by a BLS-nnn message from the operating system.
Action: Ensure that the ORALOAD link name identifies the correct ORALOAD library,and that the ORAENV variable, KNL_MODULE, names one of the possible kernels. Thenre-issue the STARTUP command. If you cannot identify the cause of the problem,then contact the Oracle Support Services Representative.
ORA-05195: bad or missing kernel connectorCause: The loaded kernel could not verify its user-side connector module. This canoccur if you use an incorrect kernel version.
Action: If you cannot identify the cause of the problem, then contact the OracleSupport Services Representative.
A-13
ORA-05198: associated internal OSD error code %dCause: This message precedes ORA-05199, if there is more information available. Thefirst 4 hexadecimal digits can often identify the module, and the last 4 hexadecimaldigits are usually a condensed version of an associated system macro code. This codecan be helpful in diagnosing the problem.
Action: If you cannot identify the cause of the problem, then contact the OracleSupport Services Representative.
ORA-05199: ORACLE ABNORMAL EXITCause: A fatal error occurred, which prevents continuation of execution. In manycases, a preceding message explains the error. The system causes the programexecution to stop (TERM ABNORMAL with DUMP is displayed).
Action: If you cannot identify the cause of the problem, then contact the OracleSupport Services Representative.
A-14 Installation and Administration Guide
BOracle Environment Variables
This appendix describes variables that can be specified in the ORAENV file, thestructured system variable SYSPOSIX, or the POSIX shell. Oracle parameters, such asORACLE_SID and NLS_LANG, may be specified in the ORAENV file, system variableSYSPOSIX, or POSIX shell. If you use a ORAENV file, then you must follow the ORAENVrules for specifying environment variables as described in the following sections. Ifyou use the system variable SYSPOSIX, then you must follow the rules to set a SDF-Pvariable. For example, if the variable name contains an underscore '_' , then you mustuse a hyphen '-' instead of the underscore. In the POSIX shell, you must follow theUNIX rules to set and export the environment variables.
This appendix contains the following topics:
• ORAENV Rules (page B-1)
• Built-in Variables (page B-2)
• General Variables (page B-3)
• DBA Startup Variables (page B-6)
• Oracle Net Services Variables (page B-10)
The following table describes the variables that are categorized into three classes:
Class Description
DBA These variables are for database administration purposes. Most DBAvariables are evaluated only during the database startup.
USER These variables can be specified by ordinary users as well as by theDBA. When these variables are specified in a particular user's ORAENVfile, they modify that user's environment only.
NET These variables apply to Oracle Net Services components.
The class (or classes) to which a variable belongs is noted in the variable descriptionsin this appendix.
Any DBA or NET variables specified in an ordinary user's ORAENV file are ignored.
See Also: "Oracle Envrionment Variables (page 1-6)" for more details
B.1 ORAENV RulesConsider the following general rules when you create or modify ORAENV files:
B-1
• All lines which begin with a slash or asterisk (/ or *) are ignored.
• All variable names must be written in uppercase.
• Spaces must not be included immediately before and after the equals sign (=).
• Do not enclose values in quotation marks unless you want the quotation marks tobe part of the value.
• Errors in variable names are not recognized. This means that the value of anyvariable whose name is typed incorrectly is not modified.
• There is only limited checking of variable assignments. An incorrect value maygenerate an error message, but may also be interpreted as a null value.
• When variable assignments refer to other variables, BS2000 command filesubstitution syntax applies. Substitution takes place when the variable is stored inthe local environment.
For example:
ORAUID=$ORACINSTSQLPATH=&ORAUID..RDBMS.ADMIN
assigns the value $ORACINST.RDBMS.ADMIN to the variable SQLPATH. If ORAUID ischanged, then SQLPATH automatically reflects the new value.
• The sequence of items in the ORAENV file is not generally significant. If an itemoccurs more than once, then the first occurrence is used.
• If a value is not specified for a variable, then the default value is used, if it exists.
B.2 Built-in VariablesThe following variables are always defined, and may be referenced in other variableassignments:
• LOGNAME (page B-2)
• ORAUID (page B-2)
• PGM (page B-3)
• TERM (page B-3)
• TSN (page B-3)
B.2.1 LOGNAME
The LOGNAME variable always contains the current BS2000 user ID. Do not alter thevalue of this variable by assigning a different value to it in the ORAENV file.
B.2.2 ORAUID
This variable specifies the BS2000 user ID where the Oracle Database programs,installation, and demonstration files are installed. The initial value is derived from theORALOAD link name (the user ID part of the ORALOAD library name). This value isusually correct, but if necessary, you can override it by assigning a different value to itin the ORAENV file.
Format: ORAUID=$userid or ORAUID=/BS2/$userid
B-2 Installation and Administration Guide
B.2.3 PGM
The PGM variable contains the program name specified in the BS2000 commandSTART-EXECUTABLE. You cannot alter the value of this variable by assigning adifferent value to it in the ORAENV file.
B.2.4 TERM
The TERM variable contains the terminal type. The default value is SNI9750. Thisdefault value is usually correct, but if necessary, you can override it by assigning adifferent value to it in the ORAENV file.
B.2.5 TSN
The TSN variable contains the task sequence number of the current task. You cannotalter the value of this variable by assigning a different value to it in the ORAENV file.
B.3 General VariablesThe following variables are for general use by Oracle DBAs and users:
• CLN_BASE (page B-3)
• CLN_MPID (page B-4)
• CLN_SCOPE (page B-4)
• EXP_CLIB_FILE_IO (page B-4)
• IMP_CLIB_FILE_IO (page B-5)
• NLS_LANG (page B-5)
• OPS_JID (page B-5)
• ORASID (page B-5)
• PRINTPAR (page B-5)
• SQLPATH (page B-6)
• SSSIDPWF (page B-6)
B.3.1 CLN_BASE
This variable specifies the address of the shared memory pool for the client-sideshared code of Oracle Database, which is used by customer written databaseapplications.
Format:
CLN_BASE=address
Classification:
USER, NET
Default:
200M
B-3

B.3.2 CLN_MPID
This variable specifies the identification of the shared memory pool for the client-sideshared code of Oracle Database, which is used by customer written databaseapplications.
Format:
CLN_MPID=sid
Classification:
USER, NET
Default:
CLN_MPID=&ORASID
B.3.3 CLN_SCOPE
This variable specifies the scope of the shared memory pool for the client-side sharedcode of Oracle Database, which is used by customer written database applications. Thevalid values are:
Value Description
T The use of the memory pool is limited to the calling task.
U All Oracle Database client tasks within the same BS2000 user ID as thecalling task are participants of the shared memory pool.
G All Oracle Database client tasks in the system are participants.
Format:
CLN_SCOPE={T|U|G}
Classification:
USER, NET
Default:
CLN_SCOPE=G
B.3.4 EXP_CLIB_FILE_IO
This variable should be set to FALSE when you use the Export utility to overcome aproblem with the C library functions, when an export file is written to tape.
Format: EXP_CLIB_FILE_IO=FALSE
Classification: USER
Default: EXP_CLIB_FILE_IO=TRUE
B-4 Installation and Administration Guide

B.3.5 IMP_CLIB_FILE_IO
This variable should be set to FALSE when you use the Import utility to overcome aproblem with the C library functions, when an import file is read from tape.
Format: IMP_CLIB_FILE_IO=FALSE
Classification: USER
Default: IMP_CLIB_FILE_IO=TRUE
B.3.6 NLS_LANG
This variable specifies the language, territory, and character set. For example:
NLS_LANG=GERMAN_GERMANY.D8BS2000
Format: NLS_LANG=language_territory.character-set
Classification: USER, DBA
Default: NLS_LANG=AMERICAN_AMERICA.WE8BS2000
B.3.7 OPS_JID
This variable is used for concatenation with the OS_AUTHENT_PREFIX, refer to theinitialization parameter. The default value concatenates the value of the parameterOS_AUTHENT_PREFIX with the BS2000 user ID. Using OPS_JID, you can specify thatthe BS2000 jobname is used instead. This is useful when many users are sharing asingle BS2000 user ID.
Format: OPS_JID=userid/jobname
Classification: DBA
Default: userid
B.3.8 ORASID
This variable defines the database that is used if no database identification is given atconnect time.This variable is a synonym of the ORACLE_SID variable.
Format: ORASID=sid (sid is a characterstring where 1 <= length <= 4)
Classification: USER, DBA
Note:
Oracle recommends that you use the ORACLE_SID variable.
B.3.9 PRINTPAR
This variable specifies optional variables for the /PRINT command internally issuedby the SPOOL OUT statement in SQL*Plus. Using this variable, the user can modify thespooled job, and, for example, route the job to a remote printer, add print options forlaser printers, and so on. The BS2000 /PRINT command for spool files is issued asfollows:
/PRINT temporary_spoolfile,&PRINTPAR
Format: PRINTPAR=print-options
B-5
Classification: USER
B.3.10 SQLPATH
This variable specifies a path where SQL*Plus looks for SQL scripts. Elements of thepath are separated by semicolons (;). For example:
SQLPATH=PRIVATE;$ORACINST
This assignment causes SQL*Plus to look for filename.SQL, then forPRIVATE.filename.SQL, and finally for $ORACINST.filename.SQL.
Format: SQLPATH=search-path
Classification: USER, DBA
Default: SQLPATH=&ORACLE_HOME/rdbms/admin;&ORAUID..RDBMS.DEMO
B.3.11 SSSIDPWF
This variable specifies the password file.
Format: SSSIDPWF=password-file
Classification: DBA
See Also: "Administering Oracle Database (page 5-1)" for more information
B.4 DBA Startup VariablesThe following variables are used during database and network startup. Theysupplement (and in some cases provide defaults for) variables contained in theinitialization file.
To ensure that the variables are consistent, Oracle recommends that database startupand shutdown, background tasks, and server tasks refer to the same ORAENV file.
Note:
The default values listed in the following sections are built-in defaults, someof them are overridden by settings in the shipped DEMO.P.ORAENV.
The following DBA startup variables include:
• Address and Size Specification (page B-7)
• BGJPAR (page B-7)
• BGJ_PROCEDURE (page B-7)
• BGJPRC_UID / BGJPRC_SID (page B-8)
• BGJ_LOG_JOBSTART (page B-8)
• sid_BGJPAR (page B-8)
• sid_USER (page B-8)
• user_ACCOUNT/ user_PASSWORD (page B-8)
B-6 Installation and Administration Guide

• COM_MPID (page B-9)
• COM_BASE (page B-9)
• JOBID (page B-9)
• KNL_BASE (page B-9)
• ORACLE_HOME (page B-9)
• PGA_BASE (page B-9)
• PGA_SIZE (page B-10)
• SF_PBLKSIZE (page B-10)
• SGA_BASE (page B-10)
B.4.1 Address and Size Specification
Several variables described in this section define memory addresses and sizes. Thenotations used to specify these items are as follows:
• A number with no modifiers is interpreted as a decimal number
• A number followed by K or M is interpreted as a decimal number multiplied by1024 or 1048576 (1024*1024) respectively
• A number enclosed in single quotation marks and preceded by the letter X isinterpreted as a hexadecimal number
For example, the following example sets the KNL_BASE variable to 8 MB:
KNL_BASE=8MKNL_BASE=8388608KNL_BASE=X'800000'
B.4.2 BGJPAR
This variable specifies the parameters for the BS2000 command ENTER-PROCEDURE,which is used for starting BS2000 jobs for the Oracle Database background and serverprocesses. You can specify most of the parameters that are allowed for the BS2000command ENTER-PROCEDURE in this variable. The ENTER-PROCEDURE command isused to submit jobs as follows:
.jobname ENTER-PROCEDURE jobfile,&BGJPAR
Format: BGJPAR=parameters
Classification: DBA
Note:
The BGJPAR variable is set up by the installation procedure.
B.4.3 BGJ_PROCEDURE
This variable specifies the fully qualified name of the ENTER-PROCEDURE commandfor starting background jobs.
Format: BGJ_PROCEDURE=filename
B-7

Classification: DBA, NET
Default: BGJ_PROCEDURE=(&ORAUID..ORALOAD.LIB,ENTER.PRC)
B.4.4 BGJPRC_UID / BGJPRC_SID
These variables specify the user ID and sid of the file for the background enter jobs. Ifyou want to use a special enter job file, then the parameters must be set to the desireduserid and sid.
Format:
BGJPRC_UID=$useridBGJPRC_SID=sid
Classification: DBA, NET
B.4.5 BGJ_LOG_JOBSTART
This variable specifies whether the operating system message that a new job wasaccepted should be logged on SYSOUT or not.
Format: BGJ_LOG_JOBSTART=Y/N
Classification: DBA,USER, NET
Default: BGJ_LOG_JOBSTART=N
B.4.6 sid_BGJPAR
This variable specifies the parameters, which are used by the ENTER-PROCEDUREcommand to start a server process for the instance specified by SID.
Format: sid_BGJPAR=parameters
Syntax: sid is a string of a maximum of 4 alphanumeric characters
parameters are the parameters for the ENTER-PROCEDURE command as describedin volume 3 of the BS2000 commands manual.
Classification: DBA,USER, NET
B.4.7 sid_USER
This variable specifies the BS2000 user ID where the instance identified by sidresides.
Format: sid_USER=userid
Syntax: sid is a string of a maximum of 4 alphanumeric characters
userid is a string of a maximum of 8 alphanumeric characters, which follows thenaming rules of a BS2000 user ID.
Classification: DBA,USER, NET
B.4.8 user_ACCOUNT/ user_PASSWORD
user_ACCOUNT or user_PASSWORD define credentials of a BS2000 user ID, which isused by the ENTER-PROCEDURE command to start a process.
Format: user_ACCOUNT=account
user_PASSWORD=password
B-8 Installation and Administration Guide

Syntax: user is a string of a maximum of 8 alphanumeric characters, which followsthe rules of a BS2000 user ID and must match a BS2000 user ID defined by theparameter sid_USER.
account is a string of a maximum of 8 alphanumeric characters, which follows thenaming rules for a BS2000 account number.
password is a string of a maximum of 8 alphanumeric characters, which follows thenaming rules for a BS2000 password.
Classification: DBA, NET
B.4.9 COM_MPID
This parameter specifies the identification of the shared code pool of the Oracledatabase instance for some common Oracle Database software components.
Format: COM_MPID=sid
Classification: DBA
Default: COM_MPID=&ORASID
B.4.10 COM_BASE
This parameter specifies the address of the shared code pool of the Oracle databaseinstance for some common Oracle Database software components.
Format: COM_BASE=address
Classification: DBA
Default: Release Dependent
B.4.11 JOBID
This variable is used internally in identifying the background tasks and generatingtask-specific names. You must never specify values for this variable.
Classification: DBA
B.4.12 KNL_BASE
This variable specifies the base address of the shared memory pool for the OracleDatabase kernel module. This must be an integral number of megabytes.
Format: KNL_BASE=address
Classification: DBA
Default: Release Dependent
B.4.13 ORACLE_HOME
The Oracle home directory is the directory in the POSIX file system, which containsthe installation of the software for a particular Oracle product.
Format: ORACLE_HOME=/path-name
Classification: DBA, USER
B.4.14 PGA_BASE
This variable specifies the base address of the fixed part of the PGA. The PGA is task-specific, but must be located at a fixed memory address so that the kernel can access it.The base address must lie on a 64 KB boundary.
B-9

Format: PGA_BASE=address
Classification: DBA
Default: Release Dependent
B.4.15 PGA_SIZE
This variable specifies the size of the fixed part of the PGA. This variable must not bechanged from its default value.
Format: PGA_SIZE=size
Classification: DBA
Default: Release Dependent
B.4.16 SF_PBLKSIZE
This variable specifies the physical blocksize of redo log files.
Format: SF_PBLKSIZE=2K|4K
Classification: DBA
Default: 2 KB
Note:
This variable cannot be changed after database creation.
B.4.17 SGA_BASE
This variable specifies the base address of the shared memory pool for the SGA of anOracle Database instance. The base address must lie on a megabyte boundary.
Format: SGA_BASE=address
Classification: DBA
Default: Release Dependent
Note:
There is no corresponding SGA_SIZE variable; the size of the SGA memorypool is calculated when the database is started.
B.5 Oracle Net Services VariablesThe following are the Oracle Net Services variables:
• DEFAULT_CONNECTION (page B-11)
• BREAK_HANDLING (page B-11)
• TNS_ADMIN (page B-11)
• TNS_BEQ_TIMEOUT (page B-12)
• TNS_UPDATE_IPNODE (page B-12)
B-10 Installation and Administration Guide
• TNS_DH_TIMEOUT (page B-12)
• NT_IPC_PROTOCOL_UNIX (page B-12)
B.5.1 DEFAULT_CONNECTION
This variable provides a default host string for connect requests where no host stringis specified. If you connect to the same database always, then it may be convenient tospecify this variable. This value must contain everything you would otherwise specifyafter the "@" character. This variable is a synonym of the TWO_TASK variable.
Format: DEFAULT_CONNECTION=host-string
Classification: USER, NET
Example:
DEFAULT_CONNECTION=TNS:(DESCRIPTION=(ADDRESS=(PROTOCOL=TCP)(HOST=MADRID)(PORT=1521))(CONNECT_DATA=(SERVICE_NAME=PROD)))
B.5.2 BREAK_HANDLING
This variable deactivates the signal routine for user interrupts, which sends a breakover the network. An interrupt can be released by pressing the [K2] key.
Format:
BREAK_HANDLING=ON|OFF
Classification:
DBA, USER, NET
Default:
BREAK_HANDLING=ON
B.5.3 TNS_ADMIN
This variable specifies the path to the Oracle Net Services configuration files, forexample, LISTENER.ORA, TNSNAMES.ORA, and SQLNET.ORA. The configuration filescan be stored in the BS2000 DMS or POSIX file system. Depending on the target filesystem, the path can be a BS2000 user ID or a POSIX directory.
If TNS_ADMIN is not defined, then the default search path is NETWORK.ADMIN, whenthe program runs in the BS2000 environment.
When the program runs in the POSIX program environment, the default search pathfor TNS_ADMIN is $ORACLE_HOME/network/admin.
Format: TNS_ADMIN=$userid|/posix_path
Classification: DBA, USER, NET
B-11

B.5.4 TNS_BEQ_TIMEOUT
This variable specifies the time a parent process waits until it establishes a connectionto a child process.
Format: TNS_BEQ_TIMEOUT=lifetime (in seconds)
Classification: NET
Default: TNS_BEQ_TIMEOUT=180
B.5.5 TNS_UPDATE_IPNODE
This variable forces the Oracle Net software to change the server's IP-Node name to anIP-Node address.
Format: TNS_UPDATE_IPNODE=TRUE/FALSE
Classification: NET
Default: TNS_UPDATE_IPNODE=FALSE
B.5.6 TNS_DH_TIMEOUT
If a listener has accepted a connection request which must be handed off to a server,then this variable specifies the time the listener waits for a response from the server.
Format: TNS_DH_TIMEOUT=sec
Classification: NET
Default: TNS_DH_TIMEOUT=10
B.5.7 NT_IPC_PROTOCOL_UNIX
Specifies whether to use the POSIX sockets protocol PF_UNIX for local IPCcommunication or the BS2000 sockets protocol PF_ISO.
Format: NT_IPC_PROTOCOL_UNIX={TRUE|FALSE}
Classification: NET
Default: NT_IPC_PROTOCOL_UNIX=FALSE
Note:
There are some differences in the BEQ adapter when using POSIX sockets. Aclient using BS2000 sockets with PF_ISO for IPC cannot connect through IPCor BEQ adapter to a server that uses the PF_UNIX protocol.
B-12 Installation and Administration Guide
CInitialization Parameters and the Parameter
File
Every time SQL*Plus starts an Oracle Database instance, it uses a set of parameterswhich specify the characteristics of the instance's operation. These parameters are keptin a file, typically named sid.DBS.INIT.ORA.This topic lists unsupported parameters,and lists other parameters that you may need to change to customize the OracleDatabase for the system.
This topic contains the following sections:
• Example Parameter File (page C-1)
• Unsupported Parameters (page C-1)
• Additional Notes on Initialization Parameters (page C-1)
See Also: Oracle Database Reference for general descriptions of the parameters
C.1 Example Parameter FileThe $ORACINST.DEMO.DBS.INIT.ORA parameter file is created during OracleDatabase installation. You can copy and edit this as a text file.
C.2 Unsupported ParametersThe following initialization file parameters, described in the generic documentationare not supported in Oracle Database 12c for Fujitsu BS2000/OSD.
• MAX_DUMP_FILE_SIZE
• OS_ROLES
• AUDIT_SYSLOG_LEVEL
• MEMORY_MAX_TARGET
• MEMORY_TARGET
Specifying these parameters in the initialization file results in an Oracle Database errorduring startup. The workaround is to remove such lines from the file.
C.3 Additional Notes on Initialization ParametersThis section contains additional information about the following initializationparameters:
• BACKGROUND_DUMP_DEST (page C-2)
C-1

• USER_DUMP_DEST (page C-2)
• AUDIT_FILE_DEST (page C-3)
• DB_BLOCK_SIZE (page C-3)
• DB_FILE_MULTIBLOCK_READ_COUNT (page C-3)
• DB_FILES (page C-3)
• LOCK_SGA (page C-3)
• SGA_MAX_SIZE (page C-3)
• LOG_ARCHIVE_DEST (page C-3)
C.3.1 BACKGROUND_DUMP_DEST
This parameter specifies the path name (directory or prefix), where debugging tracefiles for the background processes, such as, LGWR, DBWn, and so on are written duringOracle operations. Furthermore, it specifies the path name for the alert file. The defaultvalue for this parameter is the current BS2000 user ID of the Oracle backgroundprocesses. You can specify a prefix for the trace and alert files in the following format:
BACKGROUND_DUMP_DEST=BDD
You can also specify a POSIX directory for this parameter.
Note:
The BACKGROUND_DUMP_DEST parameter is deprecated in Oracle Database12c Release 1.
This parameter is ignored by the new diagnosability infrastructure introducedin Oracle Database 11g, which places trace and core files in a locationcontrolled by the DIAGNOSTIC_DEST initialization parameter.
C.3.2 USER_DUMP_DEST
This parameter specifies the path name (directory or prefix), where the server writesthe debugging trace files on behalf of a user process. The default value for thisparameter is the current BS2000 user ID of the Oracle Database processes.
You can specify a prefix for the trace files as follows:
USER_DUMP_DEST=UDD
You can also specify a POSIX directory for this parameter.
Note:
The USER_DUMP_DEST parameter is deprecated in Oracle Database 12cRelease 1.
This parameter is ignored by the new diagnosability infrastructure introducedin Oracle Database 11g, which places trace and core files in a locationcontrolled by the DIAGNOSTIC_DEST initialization parameter.
C-2 Installation and Administration Guide

C.3.3 AUDIT_FILE_DEST
This parameter specifies the operating system directory into which the audit trail iswritten when the AUDIT_TRAIL initialization parameter is set to os, xml, orxml,extended. You must specify a POSIX directory for this parameter. The firstdefault value for this parameter is ORACLE_BASE/admin/ORACLE_SID/adump. Thesecond default value, which is used if the first default value does not exist or isunusable, is ORACLE_HOME/rdbms/audit. Remember that regardless of whetherdatabase auditing is enabled, Oracle Database on Fujitsu BS2000/OSD always recordssome database-related actions into the operating system audit file, such as, instancestartup, shutdown, and connections with administrator privileges.
Note:
In an Oracle Database that has been migrated to unified auditing, the settingof this parameter has no effect.
C.3.4 DB_BLOCK_SIZE
This parameter can have one of the following values:
• 2K, 4K, 6K, 8K, 16K, 32K, if you use BS2000 2K pubset format.
• 4K, 8K, 16K, 32K, if you use BS2000 4K pubset format.
C.3.5 DB_FILE_MULTIBLOCK_READ_COUNT
The maximum value of this parameter is 128K/DB_BLOCK_SIZE, which in most casesis also the recommended value. Setting this parameter beyond this limit has no effect.
C.3.6 DB_FILES
The maximum value for this parameter is 65533 for BS2000.
C.3.7 LOCK_SGA
This parameter is ignored in Oracle Database 12c for Fujitsu BS2000/OSD. Buffers inthe SGA are page-fixed only during I/O operations. Otherwise, the SGA on BS2000 ispageable.
C.3.8 SGA_MAX_SIZE
This parameter should not be specified in Oracle Database 12c for Fujitsu BS2000/OSD. Because the SGA is not permanently page-fixed as it is on some other systems,there is little benefit in reserving SGA expansion space with the SGA_MAX_SIZEparameter. It defaults to the actual SGA size.
C.3.9 LOG_ARCHIVE_DEST
This parameter can indicate a pubset, such as LOG_ARCHIVE_DEST=:PUB1: to storeall the archived redo logs on a special media.
C-3

C-4 Installation and Administration Guide
DTroubleshooting
This topic describes problems that you may encounter when using Oracle Database12c Release 1 on BS2000, and provides you with information about how to diagnoseand overcome such problems.
To solve a problem, identify the type of the problem and locate the relevantinformation in this topic. Examine each of the listed points to find the cause of theproblem. Carry out the suggested solution, and try again. The event log file describedin this document may help you to diagnose the problem.
This appendix contains the following topics:
• Problems Creating Oracle Database 12c (page D-1)
• Problems Starting an Oracle Database Instance (page D-1)
• Problems When Starting the Background Tasks (page D-2)
• Problems Accessing Database and Log Files (page D-2)
• Oracle Database Trace Files (page D-3)
See Also: Oracle Error Messages for BS2000 (page A-1) in this guide and Oracle Database Error Messages Reference for information about specificmessages
D.1 Problems Creating Oracle Database 12cYou must always use the BS2000 procedure INSTALL.P.SUPER to create a newdatabase, because this is the easiest way to get a correct instance. If you encounterproblems during this process, then study the diagnostic output, correct, and run therespective part manually, or remove the partially created database, and rerun thewhole process.
Also, check the following:
• If the BS2000 user ID has sufficient PUBLIC-SPACE-LIMIT for the correspondingpubset.
• If enough disk space is available on the pubset that is used to create the databases.
• If the disk space fragmentation is too high.
D.2 Problems Starting an Oracle Database InstanceThis topic contains information related to problems that you may encounter whenstarting an Oracle Database instance.
D-1
• If you get an ORA-05032 error with no extra information, then check the following:
If you attempt to start an instance and the startup fails, you might get anORA-05032 message and not much information. This indicates that a problemoccurred in a very early stage of the startup, when Oracle Database error stack andbacktracking mechanism were not yet active. If this is the case, then you shouldcheck the following:
– If you called the ORAENV procedure prior to calling SQL*Plus.
– If you specified a correct and unique ORASID value in the ORAENV file
– If there potential address range conflicts:
The address ranges assigned to the kernel memory pool, the SGA, and the PGA,in each task, could be partially occupied by shared BS2000 subsystems also usedin the instance. Contact the System Administrator to find out how thesubsystems are arranged. Then change the corresponding xxx_BASEenvironment variables in the ORAENV file to relocate the Oracle Database areasto suitable address ranges.
– If the user address space is large enough:
A small address space limit may not leave enough space for Oracle Databaserequirements.
– If a previous startup attempt failed, leaving invalid background, server, or usertasks:
If the Oracle Database has not been shut down properly, then the oldbackground tasks or server tasks may hang and may still be connected to theSGA of the old instance. This inhibits the creation of a new SGA. You may get amessage indicating shutdown in progress.
Cancel the remaining background, server, and user tasks. Exit SQL*Plus, whichis required to release shared memory pools of the old instance and retry.
D.3 Problems When Starting the Background TasksIf you get a timeout message when starting the background tasks, then check thefollowing points:
• If the background tasks are blocked in the BS2000 job queue. This may occur due toa system overload or an insufficient task priority.
The background tasks must always be started with the IMMEDIATE option andpreferably in a reserved BS2000 jobclass. Check the BGJPAR environment variableand the user attributes of the BS2000 user ID. Cancel any background tasks thathave already started.
• If no background task can be found using the /SHOW-USER-STATUS command,then the jobs have probably been aborted. Check the job outputs.
D.4 Problems Accessing Database and Log FilesIf you have problems opening, closing, reading, or writing a database or log file, thencheck the following points:
• If the file exist.
D-2 Installation and Administration Guide

• If the file is accessible to the program that is trying to open it.
• If there is a hardware problem.
• If you specified the correct block size.
If you specified the ORAENV environment variable, SF_PBLKSIZE, at databasecreation, then you must continue to use the same specification whenever you run anALTER DATABASE statement.
D.5 Oracle Database Trace FilesWhenever an Oracle database encounters an exception, it writes a trace or a dump file.Verify this trace file for more detailed information about the issue. You may need tosend the trace file to the Oracle Support Services Representative, if you cannot resolvethe issue.
D-3

D-4 Installation and Administration Guide

EFile Types and Names Used by Oracle
The following is a list of file types and names used by Oracle Database on BS2000:
sid.DBS.xxx.DBF
Database files such as sid.DBS.CONTROL.DBF, sid.DBS.DATABASE1.DBF, orsid.DBS.LOG1.DBF contain the entire Oracle database including data dictionary, usertables, log files, and so on.
sid.DBS.INIT.ORA
Parameter file used when an instance is started.
sid.P.ORAENV
Environment definition file, which defines the program environment. You must runthis file before starting an instance or an application:
/CALL-PROCEDURE sid.P.ORAENV
S.E.tsn.YYYY-MM-DD.hh.mm.ss
Temporary ENTER-PROCEDURE file for starting the background processes.
S.OUT.tsn.YYYY-MM-DD.hhmmss.number
Temporary files of background processes containing the runtime information. After atask is successfully completed, these files are removed. These files can help indiagnosis.
L.sid.xxxx.SYSOUT.tsn
Run-time listing documenting the start of a background process. When a processfinishes, orderly listings are removed, except the SDF-P variable BGJOUT is set toKEEP in sid.P.ORAENV for diagnosis purposes. xxxx corresponds with the identifier ofOracle background jobs.
Oracle Net Services LOG files
All errors encountered in Oracle network products are appended to a log file.
See Also: Oracle Database Net Services Administrator's Guide for moreinformation about Oracle Net Services log files
E-1
T.sid.INSTALL.E.SUPER
Temporary file created by the BS2000 procedure INSTALL.P.SUPER. You can removethis file after a successful Oracle Database installation.
T.sid.INSTALL.E.SUPER.72
Temporary file created by the BS2000 procedure INSTALL.P.SUPER. You can removethis file after a successful Oracle Database installation.
L.sid.xxx.LOG
Log file created by the BS2000 procedure INSTALL.P.SUPER, for example,L.sid.CATALOG.LOG. You can remove this file after a successful Oracle Databaseinstallation.
ORAXALOG.tsn-NULL-YYMMDD.TRC
This file is used to trace errors when openUTM is used with Oracle Database. This fileis created only when an error occurs or when tracing is turned on. You can replaceNULL by a db_name when specified in the open string.
E-2 Installation and Administration Guide
Index
Aadministration utility
SQL*Plus, 5-1Architecture
Oracle Server, 1-1AUDIT_FILE_DEST, C-3
B
BACKGROUND_DUMP_DEST, C-2BCAM, 12-12Bequeath adapter, 12-2BGJ_LOG_JOBSTART, B-8BGJ_PROCEDURE, B-7BGJPAR, B-7Bigfile Tablespace, 1-11BS2000 Data Management System (DMS) file system,
1-1BS2000 editor
starting, 6-11
C
Call Interface, 13-9CDB, 3-7CDB creation, 3-9CE8BS2000, 9-2Character sets
supported, 15-3CIRCUITS, 12-7CL8BS2000, 9-2Client User ID, 1-5CLN_BASE, B-3CLN_MPID, B-4CLN_SCOPE, B-4COM_BASE, B-9Commands
DEFINE_EDITOR, 6-11EDIT, 6-11SPOOL, 6-11
Connecting to the Oracle Database, 6-6Creating a Database, 3-1
DData dictionary views
installing, 3-6Database
recovering, 7-3Database character sets
Java, 9-2DB_BLOCK_SIZE, C-3DB_FILE_MULTIBLOCK_READ_COUNT, C-3DB_FILES, C-3DEFAULT_CONNECTION, B-11DEFINE_EDITOR command, 6-11Demonstration files
SQL*Loader, 6-18Disabling Unified Auditing, 8-2
E
EDIT command, 6-11EE8BS2000, 9-2Enabling Unified Auditing, 8-1Environment variables
BGJPAR, B-7CLN_BASE, B-3CLN_MPID, B-4CLN_SCOPE, B-4DEFAULT_CONNECTION, B-11EXP_CLIB_FILE_IO, B-4IMP_CLIB_FILE_IO, B-5JOBID, B-9KNL_BASE, B-9LOGNAME, B-2NLS_LANG, B-5OPS_JID, B-5ORAUID, B-2PGA_BASE, B-9PGA_SIZE, B-10PGM, B-3PRINTPAR, B-5SF_PBLKSIZE, B-10SGA_BASE, B-10SQLPATH, B-6
Index-1

Environment variables (continued)SSSIDPWF, B-6TERM, B-3TNS_ADMIN, B-11TSN, B-3
Environment VariablesBGJ_PROCEDURE, B-7NT_IPC_PROTOCOL_UNIX, B-12TNS_DH_TIMEOUT, B-12
EXP_CLIB_FILE_IO, B-4Export utility, 6-18External procedure calls, 14-1
F
File Names, E-1File Systems
BS2000 Data Management System, 1-1POSIX, 1-1
File Types, E-1files
Java installation, 9-1Files
BS2000 input/output, 6-7INIT.ORA, C-1SQL*Loader demonstration, 6-18trace, 13-22
I
IMP, 6-20IMP_CLIB_FILE_IO, B-5Import utility, 6-20INIT.ORA
modifying, 3-5, 3-9Initialization parameters
CIRCUITS, 12-7DB_FILE_MULTIBLOCK_READ_COUNT, C-3DB_FILES, C-3INIT.ORA file, C-1LOCAL_LISTENER, 12-7MAX_DISPATCHERS, 12-7SHARED_SERVERS, 12-7
InstallationJava Enabled Database, 9-1
Installation User ID, 1-4Interrupting
SQL*Plus, 6-10Interrupting SQL*Plus Command in POSIX, 6-13
JJava
database character sets, 9-2JOBID, B-9
K
KNL_BASE, B-9
L
L.sid.xxx.LOG, E-1L.sid.xxxx.SYSOUT.tsn, E-1Languages
specifying, 15-1supported, 15-2
Linguistic definitions, 15-5Loading External Procedures, 14-1LOCAL_LISTENER, 12-7LOCK_SGA, C-3LOG_ARCHIVE_DEST, C-3LOGNAME, B-2
M
MAX_DISPATCHERS, 12-7MAX_SHARED_SERVERS, 12-7Messages, A-1Modifying INIT.ORA, 3-5, 3-9multitenant container database, 3-7
N
National language support, 15-1NLS_LANG, B-5NT_IPC_PROTOCOL_UNIX, B-12
OOCI
linking, 13-10OPS_JID, B-5Oracle
file types, E-1Oracle Advanced Security, 12-5Oracle Call Interface, 13-9Oracle Database
administering, 5-1architecture, 1-1precompilers, 13-1programmatic interfaces, 13-1utilities, 6-1
Oracle Managed Files, 1-10Oracle Net Services LOG files, E-1Oracle Text, 10-1ORACLE_HOME, B-9ORAENV, 3-6, 3-9ORAENV variables, 1-6ORALOAD, 6-3ORALOAD Library, 1-5ORAMESG Library, 1-5
Index-2

ORAUID, B-2ORAXALOG.tsn-NULL-YYMMDD.TRC, E-1
P
parameter files, 5-1Parameter Files, 1-11Parameters
initialization, C-1PGA, B-9PGA_BASE, B-9PGA_SIZE, B-10PGM, B-3POSIX file system, 1-1Post Upgrade Procedures, 4-5Precompilers
interfacing to the Oracle XA Library, 13-18Pro*C, 13-6Pro*COBOL, 13-7
Prerequisites, 3-1Printers, B-5PRINTPAR, B-5Pro*C/C++, 13-6Pro*COBOL, 13-7Program Environment
BS2000 Environment, 1-6POSIX Environment, 1-7
Program LibrariesORALOAD Library, 1-5ORAMESG Library, 1-5
Programmatic Interfaces, 13-1Protocol Adapters
TCP/IP, 12-4
R
Recovering Databases, 7-3Recovery Manager, 7-3Remote Startup
database instanceremote startup, 5-3
Running Workload Replay Client, 6-23
S
S.E.tsn.YYYY-MM-DD.hh.mm.ss, E-1S.OUT.tsn.YYYY-MM-DD.hhmmss, E-1Sample schemas and SQL*Plus, 6-16Server Parameter File, 5-2SF_PBLKSIZE, B-10SGA_BASE, B-10SGA_MAX_SIZE, C-3shared code pool, B-9SHARED_SERVERS, 12-7sid_BGJPAR, B-8SID_LIST_LISTENER, 5-3
sid_USER, B-8sid.DBS.INIT.ORA, E-1sid.DBS.xxx.DBF, E-1sid.P.ORAENV, E-1Specifying
languages, territories, character sets, 15-1SPFILE, 5-2SPOOL command, 6-11Spooling SQL*Plus Output, 6-11SQL*Loader, 6-17SQL*Plus
and INIT.ORA, 5-2database administration utility, 5-1
SQLPATH, B-6SSSIDPWF, B-6Starting
BS2000 editor, 6-11Export utility, 6-18Import utility, 6-20Pro*C, 13-6Pro*COBOL, 13-8SQL*Loader Utility, 6-17
Starting Oracle utilitieswith /START-PROGRAM, 6-3
Supportedcharacter sets, 15-3languages, 15-2territories, 15-3
T
T.sid.INSTALL.E.SUPER, E-1T.sid.INSTALL.E.SUPER.72, E-1TCP/IP adapter, 12-4TERM, B-3Territories
specifying, 15-1supported, 15-3
The Data Pump Import utility, 6-22timeout handling, D-2TNS_ADMIN, B-11TNS_DH_TIMEOUT, B-12TNS_UPDATE_IPNODE, B-12Trace Files, 13-22Troubleshooting
Workload Replay Client, 6-24TSN, B-3
U
Unified Auditing, 8-1User ID
DBA, 1-5user_ACCOUNT, B-8USER_DUMP_DEST, C-2user_PASSWORD, B-8
Index-3

UtilitiesExport, 6-18Import, 6-20SQL*Loader, 6-17
UTM, 13-12
Vvariables
ORAENV, 1-6
W
WE8BS2000, 9-2
WE8BS2000E, 9-2WE8BS2000L5, 9-2
X
XDK, 11-1XML, 11-1XML parser, 11-1XSLT Processor, 11-1
Index-4