installation and customization guide - ibm...defining security authorization for policy agent.....47...
TRANSCRIPT
Open Data Analytics for z/OSVersion 1 Release 1
Installation and Customization Guide
IBM
SC27-9033-00

Note
Before using this information and the product it supports, read the information in “Notices” on page189.
This edition applies to Version 1 Release 1 of IBM® Open Data Analytics for z/OS® (5655-OD1) and to all subsequentreleases and modifications until otherwise indicated in new editions.
Last updated: 2020-03-11© Copyright International Business Machines Corporation 2016, 2019.US Government Users Restricted Rights – Use, duplication or disclosure restricted by GSA ADP Schedule Contract withIBM Corp.© Rocket Software, Inc. 2016, 2019.
Contents
Figures................................................................................................................ vii
Tables.................................................................................................................. ix
About this information.......................................................................................... xi
How to send your comments to IBM.....................................................................xiiiIf you have a technical problem................................................................................................................xiii
Summary of changes for IBM Open Data Analytics for z/OS Installation andCustomization Guide........................................................................................ xv
Part 1. Introduction............................................................................................... 1
Chapter 1. Introduction to IBM Open Data Analytics for z/OS................................................................... 3
Chapter 2. Planning for installation............................................................................................................. 5Planning considerations......................................................................................................................... 5
Product overview.............................................................................................................................. 5Skill requirements.............................................................................................................................5Time requirements............................................................................................................................5
Preinstallation considerations............................................................................................................... 5Installation user ID........................................................................................................................... 5Requisite products............................................................................................................................6Required resources...........................................................................................................................6
Part 2. Installation................................................................................................ 9
Chapter 3. Installing IBM Open Data Analytics for z/OS.......................................................................... 11
Part 3. Customization.......................................................................................... 13
Chapter 4. Customizing your environment for z/OS Spark....................................................................... 15Using the Spark configuration workflow .............................................................................................16Upgrading Spark configuration workflows ..........................................................................................20
Assigning an owner to new or changed steps ...............................................................................22Verifying the Java and bash environments..........................................................................................26Verifying configuration requirements for z/OS UNIX System Services.............................................. 28Setting up a user ID for use with z/OS Spark.......................................................................................28Verifying the env command path........................................................................................................ 32Customizing the Apache Spark directory structure............................................................................ 32
Creating the Apache Spark configuration directory.......................................................................33Updating the Apache Spark configuration files..............................................................................34Creating the Apache Spark working directories............................................................................ 35
Configuring networking for Apache Spark........................................................................................... 37Configuring z/OS Spark client authentication......................................................................................41
Creating and configuring digital certificates and key rings............................................................43Configuring Policy Agent.................................................................................................................46
iii

Defining security authorization for Policy Agent............................................................................47Creating the Policy Agent configuration files................................................................................. 48Configuring PROFILE.TCPIP for AT-TLS.........................................................................................49Defining the AT-TLS policy rules.................................................................................................... 49Starting and stopping Policy Agent................................................................................................ 52Configuring additional authorities and permissions for the Spark cluster....................................53Restricting the ability to start or stop the Spark cluster................................................................55Starting the Spark cluster...............................................................................................................57
Configuring IBM Java........................................................................................................................... 57Creating jobs to start and stop Spark processes.................................................................................58Setting up started tasks to start and stop Spark processes .............................................................. 59
Procedures for each Spark cluster................................................................................................. 60Define the routing of the log output............................................................................................... 61Set and export common environment variables............................................................................62Define the RACF started profile for started tasks..........................................................................62WLM configuration.......................................................................................................................... 63Stopping the started tasks..............................................................................................................63Canceling the started tasks............................................................................................................ 64Automating the starting of tasks.................................................................................................... 64
Configuring memory and CPU options.................................................................................................65Configuring z/OS workload management for Apache Spark...............................................................72
Overview of Apache Spark Processes............................................................................................ 72Assigning job names to Spark processes.......................................................................................73Overview of WLM classification...................................................................................................... 75Defining WLM service classes for Spark.........................................................................................77Defining WLM report classes for Spark.......................................................................................... 80Defining WLM classification rules for Spark...................................................................................81Other Apache Spark attributes.......................................................................................................82
Chapter 5. Customizing the Data Service server.......................................................................................85Preparing to customize........................................................................................................................ 85Required naming conventions............................................................................................................. 86Creating server data sets..................................................................................................................... 86Defining security authorizations.......................................................................................................... 87Configuring Workload Manager (WLM)................................................................................................ 87APF-authorizing LOAD library data sets.............................................................................................. 88Copying target libraries........................................................................................................................ 88Configuring support for code pages and DBCS ...................................................................................88Creating the Global Registry log stream..............................................................................................89Customizing the server initialization member.....................................................................................89Configuring the started task JCL..........................................................................................................90Configuring the ISPF application......................................................................................................... 91Configuring generation data set retrieval............................................................................................ 91Configuring delimited data support..................................................................................................... 93
Chapter 6. Installing the Data Service Studio........................................................................................... 95Verifying the studio installation........................................................................................................... 96Installing the JDBC driver.................................................................................................................... 96Installing the Python dsdbc module....................................................................................................97
Chapter 7. Installing the JDBC Gateway...................................................................................................99Starting the JDBC Gateway server.................................................................................................... 101Launching the JDBC Gateway administrative console......................................................................102
Chapter 8. z/OS IzODA Livy Installation and Customization..................................................................103Customizing z/OS IzODA Livy ............................................................................................................104Customizing user access for z/OS IzODA Livy ..................................................................................106
iv

Chapter 9. Customizing Anaconda ......................................................................................................... 111
Part 4. Verification.............................................................................................113
Chapter 10. Verifying the IBM Open Data Analytics for z/OS customization.........................................115Using the IBM Open Data Analytics for z/OS Spark Configuration Checker ....................................116
Chapter 11. Verifying the Data Service server installation.....................................................................119
Chapter 12. Verifying the IBM Open Data Analytics for z/OS product...................................................121
Chapter 13. Verifying the z/OS IzODA Livy installation.......................................................................... 129
Part 5. Resource monitoring...............................................................................133
Chapter 14. Resource monitoring for Apache Spark..............................................................................135Spark web interfaces......................................................................................................................... 135Configuring Spark web interfaces......................................................................................................138Securing Spark web interfaces.......................................................................................................... 139Enabling the Spark history service.................................................................................................... 140Spark log files..................................................................................................................................... 141Using RMF to monitor Spark workload.............................................................................................. 142
Interactive performance reports with Monitor III.......................................................................142Long-term reporting with the Postprocessor...............................................................................146
Using z/OS and z/OS UNIX commands to monitor Spark workload................................................. 147Using IBM Health Checker for z/OS to monitor Spark workload...................................................... 149
Part 6. Troubleshooting..................................................................................... 151
Chapter 15. Troubleshooting issues with Apache Spark....................................................................... 153
Appendix A. Migrating to a new version of Apache Spark.................................... 157
Appendix B. Sample configuration and AT-TLS policy rules for z/OS Spark clientauthentication............................................................................................... 161
Appendix C. Sample z/OS IzODA Livy AT-TLS policy rules...................................167
Appendix D. Memory and CPU configuration options...........................................169
Appendix E. Spark properties specific to the z/OS environment.......................... 175
Appendix F. Data sets........................................................................................ 179
Appendix G. Restrictions................................................................................... 183
Appendix H. Apache Spark in a mixed-endian environment.................................185
Accessibility......................................................................................................187
Notices..............................................................................................................189Trademarks..............................................................................................................................................190
v

Index................................................................................................................ 191
vi

Figures
1. Example of components in a typical Spark cluster...................................................................................... 3
2. Network ports used in a typical Apache Spark environment.....................................................................38
3. Sample job to start the master and worker................................................................................................58
4. Sample job to stop the master and worker................................................................................................ 59
5. Sample Spark cluster in client deploy mode.............................................................................................. 68
6. Logical view of a sample WLM classification scenario............................................................................... 76
7. Livy/Spark key ring setup..........................................................................................................................106
8. The Apache Spark master web UI............................................................................................................ 136
9. The Apache Spark worker web UI............................................................................................................ 137
10. The Apache Spark application web UI................................................................................................... 138
11. The Spark history server web UI............................................................................................................ 141
12. Example of the RMF Storage Delays report........................................................................................... 143
13. Example of the RMF Common Storage report....................................................................................... 144
14. Example of the RMF Storage Frames report.......................................................................................... 144
15. Example of the RMF Storage Memory Objects report........................................................................... 145
16. Example of the RMF Processor Delays report........................................................................................145
17. Example of the RMF Processor Usage report........................................................................................ 145
18. Example of the RMF zFS File System report.......................................................................................... 146
19. Example of the RMF Workload Activity report for a Spark service class.............................................. 146
vii

viii
Tables
1. Planning checklist for a first-time installation..............................................................................................6
2. Scope of environment variables................................................................................................................. 29
3. Apache Spark working directories.............................................................................................................. 35
4. Network ports used by the Spark cluster................................................................................................... 38
5. Network ports used by the Spark driver.....................................................................................................39
6. Suggested initial memory sizing for a Spark cluster.................................................................................. 66
7. Customization checklist.............................................................................................................................. 85
8. Livy working directories............................................................................................................................ 104
9. Supported environments per deploy mode............................................................................................. 105
10. Spark UI configurations.......................................................................................................................... 138
11. Apache Spark log files............................................................................................................................ 141
12. Selected fields in the RMF Workload Activity report............................................................................. 146
13. z/OS system commands to monitor Spark workload............................................................................ 148
14. z/OS UNIX shell commands to monitor Spark workload.......................................................................148
15. Example network port configurations.................................................................................................... 161
16. Environment variables that control memory settings........................................................................... 169
17. Spark properties that control memory settings.....................................................................................169
18. Environment variables that control CPU settings.................................................................................. 170
19. Spark properties that control CPU settings........................................................................................... 170
20. Spark properties that affect application and cluster parallelism..........................................................171
21. IBM JVM runtime options that control resource usage.........................................................................172
22. IBM z/OS configuration parameters.......................................................................................................173
23. Spark properties specific to the z/OS environment............................................................................... 175
ix

24. Data sets created by INSTPAC............................................................................................................... 179
x

About this information
This information supports IBM Open Data Analytics for z/OS (5655-OD1).
Purpose of this information
This information describes how to prepare for installation, install, customize, and verify IBM Open DataAnalytics for z/OS in your environment.
Who should read this information
This information is intended for z/OS system programmers and system administrators who areresponsible for installing and customizing IBM Open Data Analytics for z/OS. The customizationinformation is also of interest to application developers who want to understand how variouscustomization and tuning actions might affect the performance of their applications.
For more information
For more information about IBM Open Data Analytics for z/OS, see the following publications:
• Open Data Analytics for z/OS Installation and Customization Guide• Open Data Analytics for z/OS User's Guide• Open Data Analytics for z/OS Administrator's Guide• Open Data Analytics for z/OS Solutions Guide• Open Data Analytics for z/OS System Messages
© Copyright IBM Corp. 2016, 2019 xi

xii Open Data Analytics for z/OS : IBM Open Data Analytics for z/OS V1.1.0 Installation and CustomizationGuide

How to send your comments to IBM
We invite you to submit comments about the z/OS product documentation. Your valuable feedback helpsto ensure accurate and high-quality information.
Important: If your comment regards a technical question or problem, see instead “If you have a technicalproblem” on page xiii.
Submit your feedback by using the appropriate method for your type of comment or question:Feedback on z/OS function
If your comment or question is about z/OS itself, submit a request through the IBM RFE Community(www.ibm.com/developerworks/rfe/).
Feedback on IBM Knowledge Center functionIf your comment or question is about the IBM Knowledge Center functionality, for example searchcapabilities or how to arrange the browser view, send a detailed email to IBM Knowledge CenterSupport at [email protected].
Feedback on the z/OS product documentation and contentIf your comment is about the information that is provided in the z/OS product documentation library,send a detailed email to [email protected]. We welcome any feedback that you have, includingcomments on the clarity, accuracy, or completeness of the information.
To help us better process your submission, include the following information:
• Your name, company/university/institution name, and email address• The following deliverable title and order number: Open Data Analytics for z/OS Installation and
Customization Guide, SC27-9033-00• The section title of the specific information to which your comment relates• The text of your comment.
When you send comments to IBM, you grant IBM a nonexclusive authority to use or distribute thecomments in any way appropriate without incurring any obligation to you.
IBM or any other organizations use the personal information that you supply to contact you only about theissues that you submit.
If you have a technical problemIf you have a technical problem or question, do not use the feedback methods that are provided forsending documentation comments. Instead, take one or more of the following actions:
• Go to the IBM Support Portal (support.ibm.com).• Contact your IBM service representative.• Call IBM technical support.
© Copyright IBM Corp. 2016, 2019 xiii

xiv Open Data Analytics for z/OS : IBM Open Data Analytics for z/OS V1.1.0 Installation and CustomizationGuide

Summary of changes for IBM Open Data Analytics for z/OSInstallation and Customization Guide
The following changes are made to Version 1 Release 1.
March 2020
• Changes throughout “Setting up started tasks to start and stop Spark processes ” on page 59 forHistory Server and Shuffle service support, including a new section, “Procedures for each Spark cluster”on page 60
November 2019
• Changes throughout the manual for Spark version 2.3.4, including changes to “Using the Sparkconfiguration workflow ” on page 16 and “Upgrading Spark configuration workflows ” on page 20.
September 2019
• The default value for the globalmax parameter is increased from 5000 to 50000.• The newest supported version of Bourne Again Shell (Bash) is 4.3.48.• A new section, “Configuring Spark web interfaces” on page 138.• A new section, “Restricting the ability to start or stop the Spark cluster” on page 55.• Updated descriptions for configuration workflows in “Using the Spark configuration workflow ” on page
16• Appendix B, “Sample configuration and AT-TLS policy rules for z/OS Spark client authentication,” on
page 161 and Appendix C, “Sample z/OS IzODA Livy AT-TLS policy rules,” on page 167 have extensivechanges. Note that this information has replaced Appendix C, "z/OS IzODA Livy Pagent policies."
June 2019
• A new chapter, Chapter 2, “Planning for installation,” on page 5, provides tips on planning theinstallation and deployment of IzODA.
• New information for z/OS IzODA Livy support:
– Introductory description of Livy in Chapter 1, “Introduction to IBM Open Data Analytics for z/OS,” onpage 3
– An additional migration note in Chapter 3, “Installing IBM Open Data Analytics for z/OS,” on page11
– Chapter 8, “z/OS IzODA Livy Installation and Customization,” on page 103– Chapter 13, “Verifying the z/OS IzODA Livy installation,” on page 129– z/OS IzODA Livy Pagent policies
• Added Spark worker fails with ICH408I message with NEWJOBNAME insert to Part 6,“Troubleshooting,” on page 151.
The default value for the globalmax parameter is increased from 5000 to 50000.
March 2019
• The system messages were moved from this guide to the new Open Data Analytics for z/OS SystemMessages.
• A new section, “Upgrading Spark configuration workflows ” on page 20, which includes “Assigning anowner to new or changed steps ” on page 22.
© Copyright IBM Corp. 2016, 2019 xv
• The JDBC Gateway is a Data Service distributed application server that allows direct connectivity toJDBC data sources. See Chapter 7, “Installing the JDBC Gateway,” on page 99.
December 2018
• New sample policy for when AT-TLS is used as the Spark client authentication method, in Appendix C,“Sample z/OS IzODA Livy AT-TLS policy rules,” on page 167
• A new table of Spark configuration options, Table 20 on page 171.• New entries in Table 23 on page 175.• The Spark REST server port is disabled. See the migration notes in Chapter 3, “Installing IBM Open Data
Analytics for z/OS,” on page 11 for more information.• New section, “Other Apache Spark attributes” on page 82, that describes increasing the parallelism of
your Spark applications and allowing multiple Spark applications to run simultaneously.
September 2018
• This version has received editorial updates.• A new section, “Using the Spark configuration workflow ” on page 16• New blog link locations in the What to Do Next part of Chapter 12, “Verifying the IBM Open Data
Analytics for z/OS product,” on page 121
June 2018
• “Verifying the env command path” on page 32 is updated to include a fixed APAR number.• “Updating the Apache Spark configuration files” on page 34 is updated to provide clarification about
Apache Derby configuration.• A note is updated in the task, “Creating the Apache Spark working directories” on page 35, to provide
guidance on temporary file system usage.• A new network port for the PySpark daemon is added to “Configuring networking for Apache Spark” on
page 37.• Step 3b in “Configuring memory and CPU options” on page 65 is updated to clarify the amount of
native memory that is required.• A new property, spark.python.daemon.port, is added to Appendix E, “Spark properties specific to
the z/OS environment,” on page 175.• An appendix is added for Data Service server messages and codes.
April 2018
• “Automating the starting of tasks” on page 64 is updated to provide clarification about the sampleprocedures that are included in IBM Open Data Analytics for z/OS.
• A new topic, “Define the routing of the log output” on page 61, is added for using started tasks.• The following enhancements are available when customizing the Data Service server:
– You can now manually create the Global registry log stream. See “Creating the Global Registry logstream” on page 89.
– Using a virtual table rule, you can read a subset of a generation data group. See “Configuringgeneration data set retrieval” on page 91.
– Delimited data can now be used with virtual tables. See “Configuring delimited data support” on page93.
March 2018
• The following topics are updated to introduce the environment verification function:
xvi Open Data Analytics for z/OS : IBM Open Data Analytics for z/OS V1.1.0 Installation and CustomizationGuide
– A new migration note is added to Chapter 3, “Installing IBM Open Data Analytics for z/OS,” on page11.
– The Spark property, spark.zos.environment.verify is added to Appendix E, “Spark propertiesspecific to the z/OS environment,” on page 175.
• A note is added to the table, Table 4 on page 38, for the SPARK_MASTER_PORT configurationproperty.
• Step 4, in “Creating and configuring digital certificates and key rings” on page 43, is updated to includean additional command.
• A note and a new step are added to the task, “Configuring additional authorities and permissions for theSpark cluster” on page 53.
• A note is added to “Creating jobs to start and stop Spark processes” on page 58 to provideclarification.
• The following topics introduce the task, “Setting up started tasks to start and stop Spark processes ” onpage 59:
– “Set and export common environment variables” on page 62– “Define the RACF started profile for started tasks” on page 62– “WLM configuration” on page 63– “Stopping the started tasks” on page 63– “Canceling the started tasks” on page 64– “Automating the starting of tasks” on page 64
• “Using the IBM Open Data Analytics for z/OS Spark Configuration Checker ” on page 116 is added tointroduce the Configuration Checker tool.
• Step 4, in “Securing Spark web interfaces” on page 139, is updated to include an additional option.• Chapter 15, “Troubleshooting issues with Apache Spark,” on page 153 includes new troubleshooting
information.• An appendix is added for IBM Open Data Analytics for z/OS system messages.
December 2017
• A note and performance considerations are added to Chapter 3, “Installing IBM Open Data Analytics forz/OS,” on page 11.
• “Verifying the env command path” on page 32 includes an updated task description.• An important note is added to “Creating jobs to start and stop Spark processes” on page 58.• The following topics introduce enhanced job name specification options:
– Chapter 3, “Installing IBM Open Data Analytics for z/OS,” on page 11– “Assigning job names to Spark processes” on page 73– “Using the spark.zos.executor.jobname.template” on page 73– “Using the spark.zos.driver.jobname.template” on page 74– Appendix E, “Spark properties specific to the z/OS environment,” on page 175
• The following topics introduce a new client authentication method, Trusted Partner:
– “Configuring z/OS Spark client authentication” on page 41– “Creating and configuring digital certificates and key rings” on page 43– “Defining the AT-TLS policy rules” on page 49– “Configuring additional authorities and permissions for the Spark cluster” on page 53– “Starting the Spark cluster” on page 57
Summary of changes for IBM Open Data Analytics for z/OS Installation and Customization Guide xvii

– The spark-defaults.conf configuration file option,spark.zos.master.authenticate.method is introduced. For more information, see Appendix E,“Spark properties specific to the z/OS environment,” on page 175.
• A checklist for customizing the Data Service server is added. See “Preparing to customize” on page 85.• “APF-authorizing LOAD library data sets” on page 88 contains updated information about required
APF authorizations.• “Configuring additional authorities and permissions for the Spark cluster” on page 53 and Chapter 12,
“Verifying the IBM Open Data Analytics for z/OS product,” on page 121 include updated content andcode samples.
• The task, “Securing Spark web interfaces” on page 139, is added.• Chapter 15, “Troubleshooting issues with Apache Spark,” on page 153 includes an updated error
message when Spark scripts fail.• Appendix A, “Migrating to a new version of Apache Spark,” on page 157 includes updated migration
actions.• Appendix C, “Sample z/OS IzODA Livy AT-TLS policy rules,” on page 167 is updated to include a new
sample policy.• All of the links to external Apache Spark websites are updated for Spark version 2.2.0.• All instances of WLM APAR OA50845 are updated to the latest WLM APAR OA52611.
September 2017
• “Creating and configuring digital certificates and key rings” on page 43 and “Defining securityauthorization for Policy Agent” on page 47 include updated code samples.
• “Configuring additional authorities and permissions for the Spark cluster” on page 53 provides furtherclarification on Spark permissions.
• The following topics include updated job names:
– “Using _BPX_JOBNAME to assign job names to Spark processes” on page 75– “Overview of WLM classification” on page 75– “Defining WLM service classes for Spark” on page 77– “Defining WLM report classes for Spark” on page 80– “Defining WLM classification rules for Spark” on page 81– “Interactive performance reports with Monitor III” on page 142– “Long-term reporting with the Postprocessor” on page 146
• Chapter 12, “Verifying the IBM Open Data Analytics for z/OS product,” on page 121 adds two newinstallation verification procedures to verify the IBM Open Data Analytics for z/OS product.
xviii Open Data Analytics for z/OS : IBM Open Data Analytics for z/OS V1.1.0 Installation and CustomizationGuide

Part 1. Introduction
© Copyright IBM Corp. 2016, 2019 1

2 Open Data Analytics for z/OS : IBM Open Data Analytics for z/OS V1.1.0 Installation and Customization Guide

Chapter 1. Introduction to IBM Open Data Analyticsfor z/OS
This topic provides a brief introduction to the product components and terminology in IBM Open DataAnalytics for z/OS (IzODA).
Product components
IBM Open Data Analytics for z/OS consists of the following components:z/OS IzODA Spark (FMID HSPK120)
z/OS IzODA Spark (z/OS Spark) is built on Apache Spark, a high-performance, general executionengine for large-scale data processing. One of its key features is the capability to perform in-memorycomputing. Unlike traditional large data processing technologies, Spark allows caching ofintermediate results in memory rather than writing them to disk, thereby dramatically improving theperformance of iterative processing.
z/OS IzODA Mainframe Data Service (FMID HMDS120)z/OS IzODA Mainframe Data Service (Data Service or MDS) provides integration facilities for both IBMZ data sources and other off-platform data sources. The Data Service provides your Apache Sparkapplication with optimized, virtualized, and parallelized access to a wide variety of data.
z/OS IzODA Anaconda (FMID HANA110)z/OS IzODA Anaconda includes Python and Anaconda Python packages for data science, whichprovide data scientists with a comprehensive solution for integrating computations to the data.
Figure 1 on page 3 illustrates the components in a typical Spark cluster.
Figure 1. Example of components in a typical Spark cluster
The components are described in “Terminology” on page 4.
© Copyright IBM Corp. 2016, 2019 3

z/OS IzODA Livy
z/OS IzODA Livy is built on Apache Livy. It is a REST service used in conjunction with Spark that enablesusers to submit Spark jobs without having the Spark client installed. This enables developers to harnessthe data analytics power that Spark is capable of providing from within a web or mobile application. Jobsare submitted to the Livy server through REST API that contains information about the Spark applicationto be run. An interactive Scala or Python session with Livy can also be started.
Terminology
The following terms and abbreviations appear throughout this documentation:Master
The Spark daemon that allocates resources across applications.Worker (slave)
The Spark daemon that monitors and reports resource availability and, when directed by the master,spawns executors. The worker also monitors the liveness and resource consumption of the executors.
ExecutorA process that the worker creates for an application. The executors perform the actual computationand data processing for an application. Each application has its own executors.
Driver programThe process that runs the main function of the application and creates the SparkContext.
SparkContextCoordinates all executors in the cluster and sends tasks for the executors to run.
Apache ToreeOpen source software that provides the foundation for interactive applications to connect to and usez/OS Spark.
Jupyter NotebookAn open source web application that provides an interactive application development environment fordata scientists.
Deploy modeDistinguishes where the driver process runs. In cluster deploy mode, the framework starts the driverinside the cluster. In client deploy mode, the submitter starts the driver from outside the cluster. Ifyou use Jupyter Notebook and Apache Toree to interact with Spark, you are likely using client deploymode. The default is client deploy mode.
Local modeA non-distributed, single-JVM deployment mode in which all of the Spark execution components—driver, master, worker, and executors—run in the same JVM.
Cluster modeNot to be confused with cluster deploy mode, Spark in cluster mode means that, unlike local mode,each Spark execution component—driver, master, worker, and executors—runs in a separate JVM. Anapplication can be submitted to a Spark cluster in both cluster deploy mode and client deploy mode.
Cluster managerThe software that manages resources for the Spark cluster. Apache Spark supports Standalone,Mesos, and YARN. Only the Standalone cluster manager is available for Open Data Analytics for z/OS.
TaskA unit of work that is sent to one executor.
4 Open Data Analytics for z/OS : IBM Open Data Analytics for z/OS V1.1.0 Installation and Customization Guide

Chapter 2. Planning for installation
Use the information in this chapter and the IBM Open Data Analytics for z/OS (IzODA) softwarerequirements to plan the installation and deployment of IzODA.
For a complete listing of the IzODA hardware and software requirements including prerequisites and co-requisites, see Program Directory for IBM Open Data Analytics for z/OS.
Planning considerations
Product overviewIBM Open Data Analytics for z/OS (IzODA) consists of three components: Spark, MDS, and Anaconda.
Skill requirementsSMPE skills are required for IBM Open Data Analytics for z/OS installation.
The configuration of IBM Open Data Analytics for z/OS requires more than the typical systemprogramming permissions and expertise. The installation and configuration span several roles that maybe performed by one or more individuals. Table 1 on page 6 lists the roles that may be needed for therequired and optional customization tasks.
Given the number of tasks and roles involved, close collaboration is key to successfully getting IBM OpenData Analytics for z/OS (IzODA) up and running. Use of this high-level roadmap will help coordinate,organize, and keep track of all installation and configuration tasks.
The amount of time that is required to install and configure IzODA components depends on such factorssuch as:
• The current z/OS UNIX and TCP/IP configuration• The availability of prerequisite software and maintenance• Whether OMVS segments are defined for IzODA users.
Time requirementsExperience has shown that the installation and configuration process of IzODA requires from one to fivedays to complete. This time requirement is for a clean installation performed by an experienced systemprogrammer. If problems are encountered, or if the required skills are not available, the setup will takelonger
Preinstallation considerationsFor detailed instructions on the SMP/E installation of the product, see Program Directory for IBM OpenData Analytics for z/OS (GI13-4348-00).
Installation user IDThe user ID that is used to install IzODA, or to install maintenance, must have the following attributes:
• UID(0) or READ access or higher to the BPX.SUPERUSER facility class• Be connected to a group that has a GID• Have READ access or higher to the following facility classes:
– BPX.FILEATTR.PROGCTL
© Copyright IBM Corp. 2016, 2019 5

– BPX.FILEATTR.APF– BPX.FILEATTR.SHARELIB
• Have WRITE access to the following paths:
– /usr/lpp/IBM/izoda/spark– /usr/lpp/IBM/izoda/anaconda
For a complete listing of the IzODA installation user ID requirements, see Program Directory for IBM OpenData Analytics for z/OS.
Requisite productsIzODA has a list of prerequisite software that must be installed and operational before the product willwork.
For a complete listing of the IzODA software requirements including prerequisites, see Program Directoryfor IBM Open Data Analytics for z/OS.
Plan ahead to have these requisite products available, as it might take some time, depending on thepolicies at your site. The key requisites for a basic setup are the following:
• z/OS V2R1 or higher• z/OS ICSF V2R1 or higher• IBM 64-bit SDK for z/OS Java Version 8, SR6 or higher.
Required resourcesThe configuration of IzODA requires more than the typical system programming permissions andexpertise; therefore, assistance from others might be needed. Table 1 on page 6 lists theadministrators who are needed for the required and optional customization tasks.
These are the book numbers referenced in Table 1 on page 6:
Table 1. Planning checklist for a first-time installation. Planning checklist
Complete? Task IT Role/Skills Publications
Installation
Planning installationoptions on z/OS
z/OS systemprogrammer
Program Directory forIBM Open Data Analyticsfor z/OS and PSPbuckets
Procuring, installing, andconfiguring prerequisiteproducts, except IzODA
z/OS systemprogrammer
Program Directory forIBM Open Data Analyticsfor z/OS and PSPbuckets
Installing IzODA z/OS systemprogrammer with UNIXskills
Program Directory forIBM Open Data Analyticsfor z/OS, Part 2,“Installation,” on page9, and PSP buckets
Configuring Spark
Verifying environmentand UNIX SystemServices configurationrequirements.
z/OS systemprogrammer, securityadministrator
Chapter 4, “Customizingyour environment forz/OS Spark,” on page15
6 Open Data Analytics for z/OS : IBM Open Data Analytics for z/OS V1.1.0 Installation and Customization Guide

Table 1. Planning checklist for a first-time installation. Planning checklist (continued)
Complete? Task IT Role/Skills Publications
Creating a user ID z/OS systemprogrammer, securityadministrator
Chapter 4, “Customizingyour environment forz/OS Spark,” on page15
Customizing ApacheSpark directorystructure
z/OS systemprogrammer, securityadministrator
Chapter 4, “Customizingyour environment forz/OS Spark,” on page15
Configuring network,ports, and firewalls
z/OS systemprogrammer, networkadministrator
Chapter 4, “Customizingyour environment forz/OS Spark,” on page15 and Chapter 5,“Customizing the DataService server,” on page85
Configuring clientauthentication forApache Spark
z/OS systemprogrammer, securityadministrator, networkadministrator
Chapter 4, “Customizingyour environment forz/OS Spark,” on page15
Configuring memory andCPU options
z/OS systemprogrammer, securityadministrator
Chapter 4, “Customizingyour environment forz/OS Spark,” on page15
Configuring WLM z/OS systemprogrammer, securityadministrator
Chapter 4, “Customizingyour environment forz/OS Spark,” on page15
Configuring MDS
Create required datasets and securityapplication to use withthe server.
z/OS systemprogrammer, securityadministrator
Chapter 5, “Customizingthe Data Service server,”on page 85
Configuring WLM z/OS systemprogrammer, securityadministrator
Chapter 5, “Customizingthe Data Service server,”on page 85
Setting up securityauthorizations and APF-authorize LOAD librarydata sets
z/OS systemprogrammer, securityadministrator
Chapter 5, “Customizingthe Data Service server,”on page 85
Configure MDS server toread optionally selectedz/OS data
IMS administrator, Db2administrator, CICSadministrator, securityadministrator
Open Data Analytics forz/OS Solutions Guide
Chapter 2. Planning for installation 7

Table 1. Planning checklist for a first-time installation. Planning checklist (continued)
Complete? Task IT Role/Skills Publications
Optionally configureMDS server to readdistributed data
Administrator ofdistributed server
Chapter 7, “Installingthe JDBC Gateway,” onpage 99 and Open DataAnalytics for z/OSSolutions Guide
Configuring Anaconda
Environmental setupand Post-SMP/Einstallation instructions
z/OS systemprogrammer with UNIXskills
Chapter 9, “CustomizingAnaconda ,” on page111
Verifying IzODA
Verifying IzODAcustomization
z/OS systemprogrammer with UNIXskills
Chapter 10, “Verifyingthe IBM Open DataAnalytics for z/OScustomization,” on page115
Verifying Data Serviceserver installation
z/OS systemprogrammer
Chapter 11, “Verifyingthe Data Service serverinstallation,” on page119
Verifying IzODA product z/OS systemprogrammer with UNIXskills
Chapter 12, “Verifyingthe IBM Open DataAnalytics for z/OSproduct,” on page 121
8 Open Data Analytics for z/OS : IBM Open Data Analytics for z/OS V1.1.0 Installation and Customization Guide

Part 2. Installation
© Copyright IBM Corp. 2016, 2019 9

10 Open Data Analytics for z/OS : IBM Open Data Analytics for z/OS V1.1.0 Installation and CustomizationGuide

Chapter 3. Installing IBM Open Data Analytics forz/OS
You can install IBM Open Data Analytics for z/OS (IzODA) by using CBPDO or, alternatively, SystemPac orServerPac.
Before you begin
Ensure that the following software requirements for Open Data Analytics for z/OS have been met:
• IBM z/OS V2.1 or later• The minimum required Java™ level is IBM 64-Bit SDK for z/OS Java Technology Edition V8, Service
Refresh 6. However, if the RELEASE file in the Spark installation directory indicates that the productwas built with a later Java level, IBM urges you to use that Java level.
• Bourne Again Shell (bash) version 4.2.53 or version 4.3.48.
For the latest list of requirements, see the information in the Preventive Service Planning (PSP) bucket.
Migration notes: If you already use IBM z/OS Platform for Apache Spark, note the following differences inOpen Data Analytics for z/OS:
• IzODA changes the level of Apache Spark. For more information, see Appendix A, “Migrating to a newversion of Apache Spark,” on page 157.
• IzODA changes the default z/OS Spark installation directory to /usr/lpp/IBM/izoda/spark/sparknnn (for instance, /usr/lpp/IBM/izoda/spark/spark23x).
• IzODA uses UTF-8 encoding. For details, see “Setting up a user ID for use with z/OS Spark” on page 28and “Network port configurations” on page 161.
• As of the December 2018 release, the Spark REST server port is disabled. You can enable connectionsto the REST port (such as when using cluster deploy mode) in your local spark-defaults.conf file, but theport will not function properly until you complete the setup to secure and enable the REST port.. Fordetails, see “Configuring networking for Apache Spark” on page 37.
• IzODA introduces client authentication, which is enabled by default and requires additional setup.Apache Spark will not function properly until you complete the setup for client authentication or disablethe client authentication function. For details, see “Configuring z/OS Spark client authentication” onpage 41.
• IzODA changes the way you assign job names to executor and driver processes. IzODA no longer honorsthe specification of spark.executorEnv._BPX_JOBNAME on the command line or in an application.For details, see “Assigning job names to Spark processes” on page 73.
• If the PTF for APAR PI93605 is installed, Spark master and worker daemons will perform environmentverification during initialization and will fail to start if the verification fails. The reason for terminationcan be found in the daemon's log. You can disable this feature by setting thespark.zos.environment.verify to false in spark-defaults.conf.
• z/OS IzODA Livy (Livy) is delivered through Anaconda (HANA11) and introduced in APAR (PH11339).The SMP/E APPLY process installs the Livy package into the Anaconda directory, but does not makethem available for use. See Chapter 8, “z/OS IzODA Livy Installation and Customization,” on page 103for instructions on how to get started with using the z/OS IzODA Livy package.
Additional migration note: If you are installing the PTF for APAR PI89136, note the following changesthat are introduced by the APAR:
• APAR PI89136 changes the level of Apache Spark to 2.2.0. For more information, see Appendix A,“Migrating to a new version of Apache Spark,” on page 157.
• If you specify an incorrect job name prefix, Spark worker daemon will fail rather than ignoring the error.For more information, see “Assigning job names to Spark processes” on page 73.
© Copyright IBM Corp. 2016, 2019 11
• If client authentication is enabled, and you submit an application to the Spark master port in cluster-deploy-mode, then the Spark driver will run under the ID of the user who did the submit.
Note: Open Data Analytics for z/OS currently has some restrictions on Apache Spark functionalities. For alist of restrictions, see Appendix G, “Restrictions,” on page 183.
Note: A new service (PTF) level for Open Data Analytics for z/OS (FMID HSPK120) might provide a newversion of Apache Spark. Before installing a new PTF, see Appendix A, “Migrating to a new version ofApache Spark,” on page 157.
About this task
Open Data Analytics for z/OS is supplied in a Custom-Built Product Delivery Offering (CBPDO, 5751-CS3).For installation instructions, see Program Directory for IBM Open Data Analytics for z/OS.
You can also install Open Data Analytics for z/OS with a SystemPac or ServerPac. For information aboutthe various z/OS product installation offerings, see z/OS Planning for Installation.
Service updates for Open Data Analytics for z/OS are provided as PTFs that perform a full replacement ofthe product. Therefore, you can use a PTF to update your existing installation or to perform a newinstallation.
IBM recommends that you mount your z/OS Spark file system from the same system on which the Sparkcluster will be run.
Procedure
Complete the following steps to install Open Data Analytics for z/OS on your system.1. Choose the most appropriate method for installing Open Data Analytics for z/OS.2. Use the information in Program Directory for IBM Open Data Analytics for z/OS to install Open Data
Analytics for z/OS on your system.
ResultsOpen Data Analytics for z/OS is installed on your z/OS system.
What to do nextBefore you use Open Data Analytics for z/OS for the first time, follow the customization instructions inPart 3, “Customization,” on page 13.
12 Open Data Analytics for z/OS : IBM Open Data Analytics for z/OS V1.1.0 Installation and CustomizationGuide

Part 3. CustomizationCustomize your z/OS environment for z/OS Spark and the Data Service, and install and configure the DataService Studio.
© Copyright IBM Corp. 2016, 2019 13

14 Open Data Analytics for z/OS : IBM Open Data Analytics for z/OS V1.1.0 Installation and CustomizationGuide

Chapter 4. Customizing your environment for z/OSSpark
Before you can use z/OS Spark, you must customize your environment for it and its dependent products.Complete this task after you install Open Data Analytics for z/OS but before your first use of it.
Before you begin
Follow the instructions in Chapter 3, “Installing IBM Open Data Analytics for z/OS,” on page 11 to installOpen Data Analytics for z/OS on your system.
About this task
The default program location for z/OS Spark is /usr/lpp/IBM/izoda/spark/.
Procedure
Complete the following tasks to customize your environment for z/OS Spark. You can use the z/OS Sparkconfiguration workflow as described in “Using the Spark configuration workflow ” on page 16 or you canfollow these individual steps. You will need access to a TSO session, an OMVS session (preferably througha Putty terminal):
__ a. “Verifying the Java and bash environments” on page 26__ b. “Verifying configuration requirements for z/OS UNIX System Services” on page 28__ c. “Setting up a user ID for use with z/OS Spark” on page 28__ d. “Verifying the env command path” on page 32__ e. “Customizing the Apache Spark directory structure” on page 32
__ 1) “Creating the Apache Spark configuration directory” on page 33__ 2) “Updating the Apache Spark configuration files” on page 34__ 3) “Creating the Apache Spark working directories” on page 35
__ f. “Configuring networking for Apache Spark” on page 37__ g. “Configuring z/OS Spark client authentication” on page 41__ h. “Configuring IBM Java” on page 57__ i. “Creating jobs to start and stop Spark processes” on page 58__ j. “Setting up started tasks to start and stop Spark processes ” on page 59
__ k. “Configuring memory and CPU options” on page 65__ l. “Configuring z/OS workload management for Apache Spark” on page 72
Results
You have customized your environment for z/OS Spark.
What to do next
Continue with Chapter 5, “Customizing the Data Service server,” on page 85.
© Copyright IBM Corp. 2016, 2019 15

Using the Spark configuration workflowUsing the Spark configuration workflow to configure Spark.
About this task
You can use the the Workflows task in IBM z/OS Management Facility (z/OSMF) to configure Spark (FMIDHSPK120). The information and commands are similar to those described in this manual.
The z/OSMF interface simplifies the configuration steps, collects input, discovers details about yourinstallation, helps you manage task assignments to members of your team, and runs configuration jobs.The parts of the configuration workflow are as follows:
workflow-spark-config.xmlThe workflow definition file. Specify the fully-qualified path to this file on the 'Create Workflow' dialogin the z/OSMF workflow task. The workflow definition and the other supporting files in this directorywill then load into z/OSMF
workflow-spark-config-*.rexxThese REXX programs support various workflow tasks. The programs are invoked by the z/OSMFworkflow. Do not run them manually unless directed by IBM Support.
workflow-spark-config-attls*.templateTemplate files for configuration of Application Transparent Transport Layer Security (AT-TLS) andclient authentication. These files are processed as input by the workflow code, but they can serve as amodel for manually configuring AT-TLS and client authentication.
These workflow files are located in the Spark installation directory under the zos-workflow directory forthe Spark releases supported by the workflow. The default installation directory is /usr/lpp/IBM/izoda/spark/sparknnn, where nnn is the current Spark version (for example, /usr/lpp/IBM/izoda/spark/spark23x for Spark 2.3.4). Note that for all Spark 2.3 releases, nnn is 23x. (forexample, /usr/lpp/IBM/izoda/spark/spark23x for Spark 2.3.0).
Procedure
1. Create and run the workflow using a UID 0 user.2. From the Workflows task on z/OSMF, locate the Workflows table.
16 Open Data Analytics for z/OS : IBM Open Data Analytics for z/OS V1.1.0 Installation and CustomizationGuide
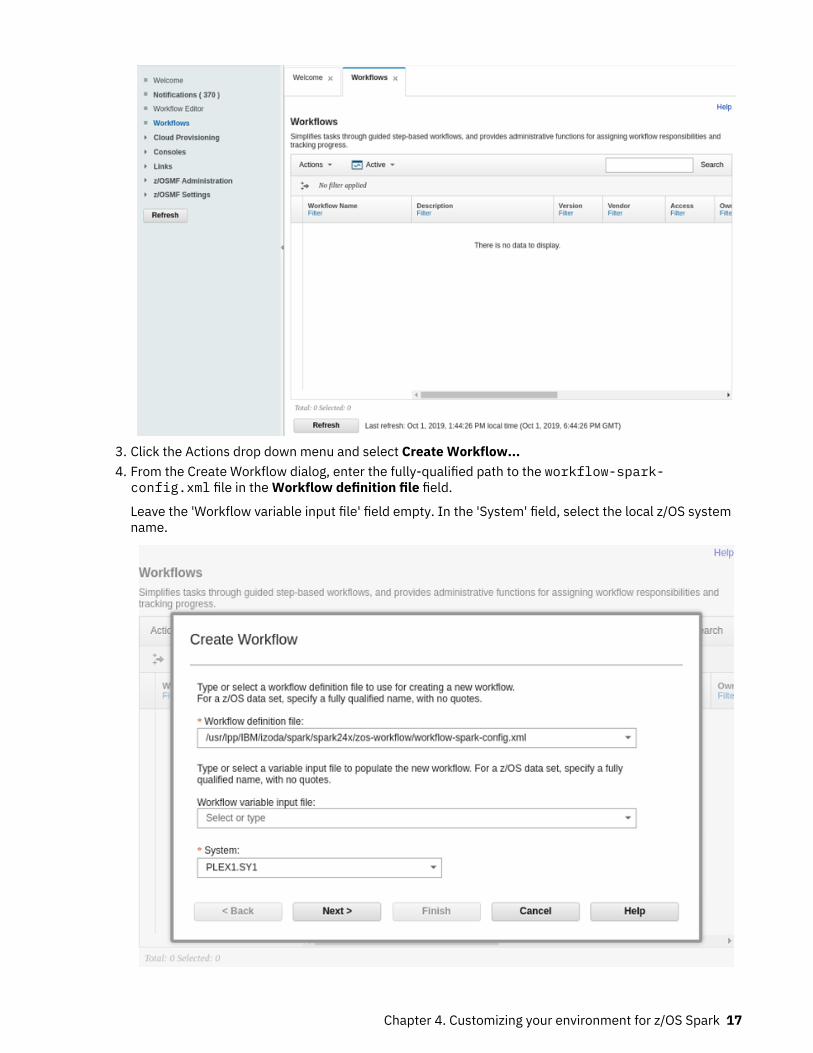
3. Click the Actions drop down menu and select Create Workflow...4. From the Create Workflow dialog, enter the fully-qualified path to the workflow-spark-config.xml file in the Workflow definition file field.
Leave the 'Workflow variable input file' field empty. In the 'System' field, select the local z/OS systemname.
Chapter 4. Customizing your environment for z/OS Spark 17
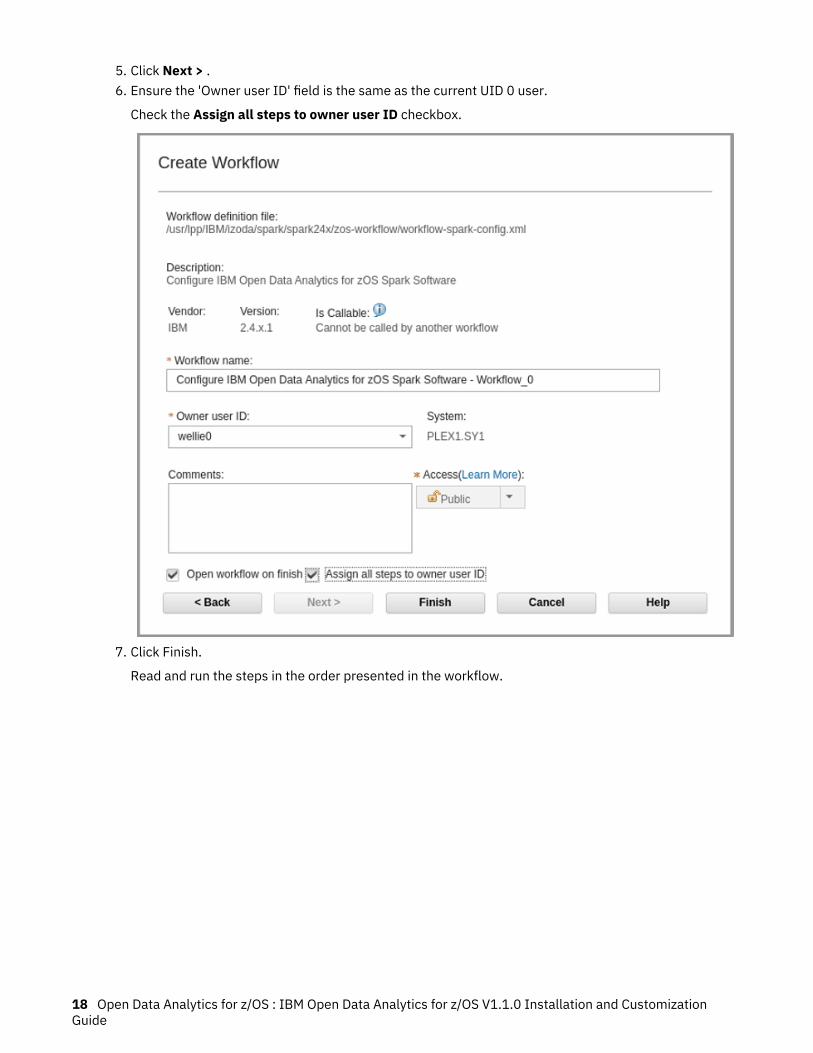
5. Click Next > .6. Ensure the 'Owner user ID' field is the same as the current UID 0 user.
Check the Assign all steps to owner user ID checkbox.
7. Click Finish.
Read and run the steps in the order presented in the workflow.
18 Open Data Analytics for z/OS : IBM Open Data Analytics for z/OS V1.1.0 Installation and CustomizationGuide

Note: The workflow can be used to copy and modify an existing Spark configuration to be a newconfiguration or to update an existing configuration. To use the workflow for these purposes, read andfollow the instructions in step 2 - How to use this workflow to copy or upgrade from a previous Sparkconfiguration.
What to do next
You may assign certain steps to other users who have other skills or authority such as your SecurityAdministrator or Network administrator depending on how your organization divides configuration work.IBM Open Data Analytics for z/OS also provides a workflow that provides step-by-step instructions fortuning and allocating resources. That workflow exists at the following location: https://github.com/IBM/IBM-Z-zOS/tree/master/zOS-Workflow/IzODA%20Workflows
Note that customization steps need to be done in sequential order.
For more information about the Workflows task in z/OSMF, see the following location: https://www.ibm.com/support/knowledgecenter/SSLTBW_2.3.0/com.ibm.zosmfworkflows.help.doc/izuWFhpWorkflowsTask.html
Chapter 4. Customizing your environment for z/OS Spark 19

Upgrading Spark configuration workflowsUpgrading Spark configuration workflows.
About this task
You may optionally upgrade your existing Spark configuration workflow in order to receive fixes or newfunction. You can then run any new or changed steps as needed. Note that you may also need to runsubsequent steps that have dependencies on any changes. Steps that need to be rerun will no longer bemarked as Complete. The Spark configuration workflow supports running all of the steps again; however,any changes you have made to the configuration manually might be overwritten.
Another option is to delete or archive the old instance of the Spark configuration workflow and create anew one using the new xml file. After creating a new instance, you will need to run all of the steps again.
Only one instance of a given workflow can be active at a time. Follow these steps to upgrade theworkflow:
Procedure
1. Select the previous instance of the Spark configuration workflow in the Workflows Task.2. From the Actions menu, select the 'Create New Based on Existing' action.
The Create New Based on Existing window is displayed.
3. Input the file name of the workflow (for example, /usr/lpp/IBM/izoda/spark/spark24x/zos-workflow/workflow-spark-config.xml) and select the appropriate system. Use the samesystem name used when you created the original workflow instance.
Click Next>.
The Create New Based on Existing - Replace Workflow window is displayed:
20 Open Data Analytics for z/OS : IBM Open Data Analytics for z/OS V1.1.0 Installation and CustomizationGuide

4. Ensure 'Copy variable values based on upgrade definition' is checked. Unchecking this means theupgrade will discard your previous data input for the workflow, such as SPARK_HOME and otherconfiguration values.
By default the workflow notes and workflow history are copied to the new workflow instance. You mayuncheck 'Copy workflow notes' or 'Copy workflow history' to omit them. Workflow notes are created byusers of the workflow. Workflow history is a z/OSMF-managed log of activity in the workflow, whichmight be useful to IBM support for certain workflow issues.
5. Make a choice under Step Attributes:Copy step attributes based on upgrade definition
(Default) This copies your previous input and retains the status of the steps and job output fromthe previous workflow. Steps that have changed, or were affected by changes in the new workflowversion may have their step status and job output discarded when the new instance is created.Steps affected by such changes and any new steps will also have their ownership changed to'Unassigned.' It is easy to locate the steps you need to run after the upgrade by looking at the stepstatus or by filtering on the State column. However, extra work is required as the workflow ownermust assign the owner to all of the affected steps.
See “Assigning an owner to new or changed steps ” on page 22 for instructions.
Note: With this option, if you run a step with a state of Complete again, z/OSMF does not updatethe step status if the step fails. It will also not change the status of steps that depend on the step.
Assign all steps to owner user IDAssigns all steps to you, the workflow owner. However, it will not copy step status or job outputfrom the previous workflow. It will be more difficult to locate steps that changed.
Chapter 4. Customizing your environment for z/OS Spark 21
No copy and assignDoes not copy step attributes and job output, nor will it assign steps. This option is notrecommended for the Spark configuration workflow.
6. Click Finish.
z/OSMF cancels the original workflow, creates the new instance of the workflow, and copies data asyou specified.
What to do next
Go to “Assigning an owner to new or changed steps ” on page 22.
Assigning an owner to new or changed stepsAssigning an owner to new or changed steps while upgrading Spark configuration workflows.
About this task
Any steps IBM added to the workflow, or changed in some important way, must now be assigned anowner. After you perform these actions, the Perform tab of the steps is enabled so that step actions canbe performed.
Procedure
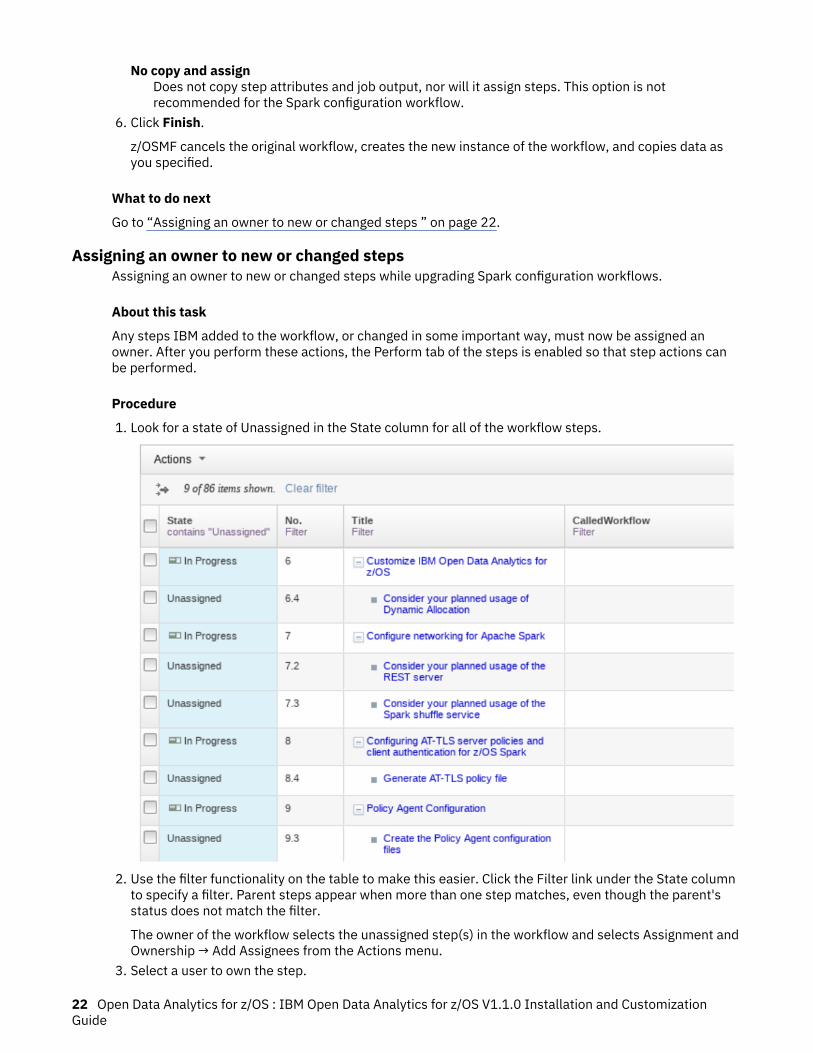
1. Look for a state of Unassigned in the State column for all of the workflow steps.
2. Use the filter functionality on the table to make this easier. Click the Filter link under the State columnto specify a filter. Parent steps appear when more than one step matches, even though the parent'sstatus does not match the filter.
The owner of the workflow selects the unassigned step(s) in the workflow and selects Assignment andOwnership → Add Assignees from the Actions menu.
3. Select a user to own the step.
22 Open Data Analytics for z/OS : IBM Open Data Analytics for z/OS V1.1.0 Installation and CustomizationGuide

The user that you want to assign could be the workflow owner or you.
4. The step status shows as Assigned. If you used the filter in the table, change it to show the rows withAssigned state.
Chapter 4. Customizing your environment for z/OS Spark 23
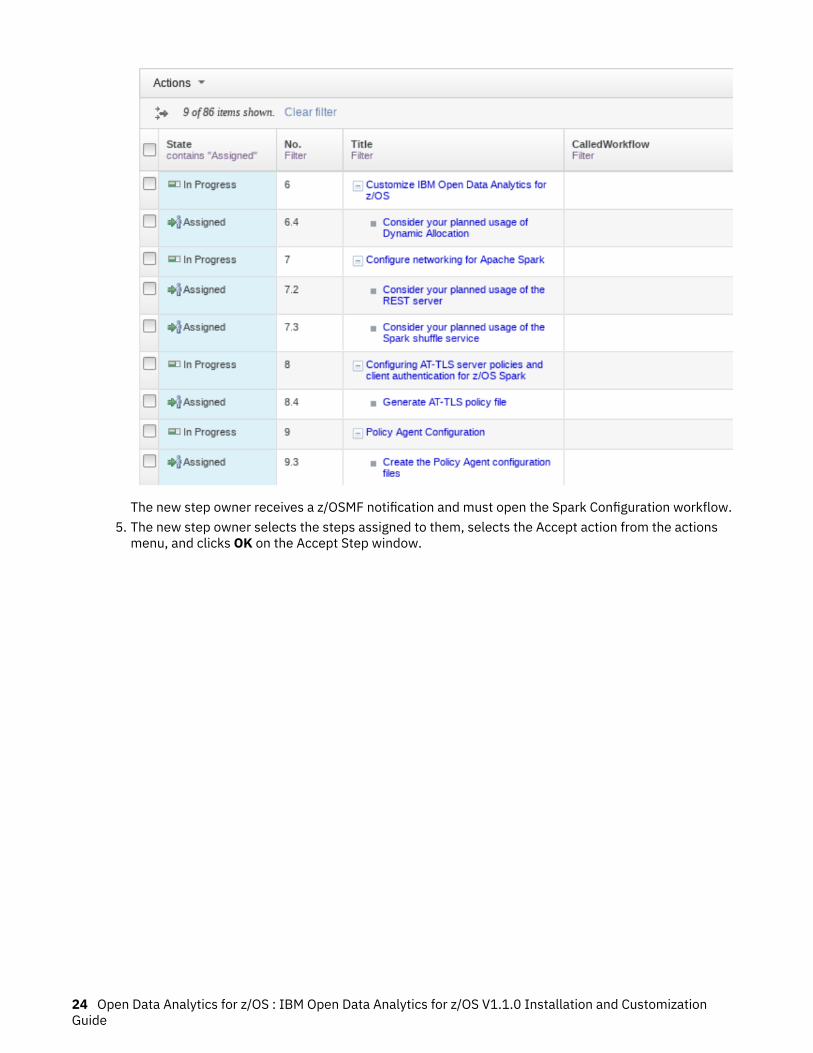
The new step owner receives a z/OSMF notification and must open the Spark Configuration workflow.5. The new step owner selects the steps assigned to them, selects the Accept action from the actions
menu, and clicks OK on the Accept Step window.
24 Open Data Analytics for z/OS : IBM Open Data Analytics for z/OS V1.1.0 Installation and CustomizationGuide

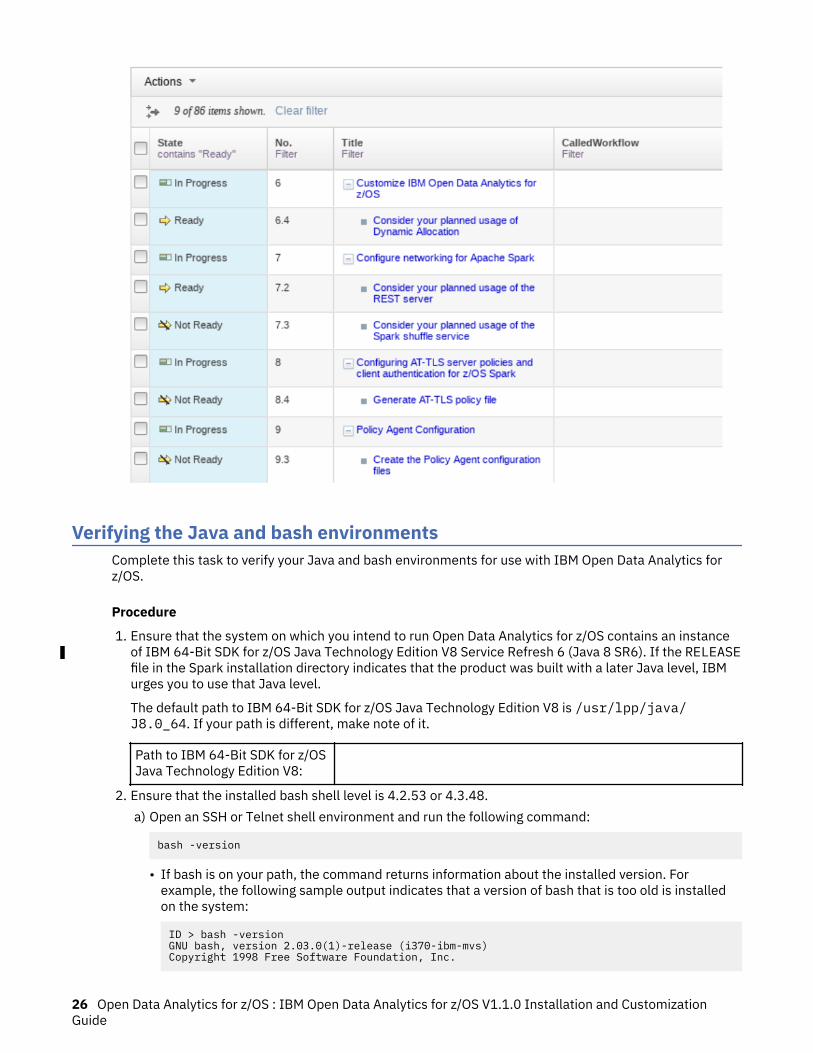
Note that until Accept Step is run, the Perform tab on the step remains disabled, and the step actionscannot be performed
What to do next
The step(s) will show as 'Ready.' Again, you will need to adjust the filter to see the group.
Chapter 4. Customizing your environment for z/OS Spark 25
Verifying the Java and bash environmentsComplete this task to verify your Java and bash environments for use with IBM Open Data Analytics forz/OS.
Procedure
1. Ensure that the system on which you intend to run Open Data Analytics for z/OS contains an instanceof IBM 64-Bit SDK for z/OS Java Technology Edition V8 Service Refresh 6 (Java 8 SR6). If the RELEASEfile in the Spark installation directory indicates that the product was built with a later Java level, IBMurges you to use that Java level.
The default path to IBM 64-Bit SDK for z/OS Java Technology Edition V8 is /usr/lpp/java/J8.0_64. If your path is different, make note of it.
Path to IBM 64-Bit SDK for z/OSJava Technology Edition V8:
2. Ensure that the installed bash shell level is 4.2.53 or 4.3.48.a) Open an SSH or Telnet shell environment and run the following command:
bash -version
• If bash is on your path, the command returns information about the installed version. Forexample, the following sample output indicates that a version of bash that is too old is installedon the system:
ID > bash -versionGNU bash, version 2.03.0(1)-release (i370-ibm-mvs)Copyright 1998 Free Software Foundation, Inc.
26 Open Data Analytics for z/OS : IBM Open Data Analytics for z/OS V1.1.0 Installation and CustomizationGuide
The following sample output indicates that the minimum required version of bash is alreadyinstalled on the system:
ID > bash -versionGNU bash, version 4.2.53(2)-release (i370-ibm-openedition)Copyright (C) 2011 Free Software Foundation, Inc.License GPLv3+: GNU GPL version 3 or later <http://gnu.org/licenses/gpl.html>
This is free software; you are free to change and redistribute it.There is NO WARRANTY, to the extent permitted by law.
• If bash is not on your path, search your system for bash. The default path to bash 4.2.x and 4.3.xare /usr/bin/bash-4.2 and /usr/bin/bash-4.3 respectively, though your system mightcontain more than one instance of bash. Go to all the directories where you find instances of bashand run ./bash -version to call the instance and check the version.
Tip: You can use the find command to search for bash. For instance, the following commandsearches for all files named bash from the root (/) directory:
find / -name "bash"
Note the following points about this command:
• This command traverses your whole system and will likely take some time to complete.• You will see access errors if you run the command from a user ID that does not have sufficient
authority to traverse and access all of the directories and files in your system.• You can narrow the search to directories that are likely candidates for product installations, such
as /usr/bin and /usr/lpp.b) If bash is not installed or a version other than 4.2.53 or 4.3.48 are installed, obtain and install the
4.2.53 or 4.3.48 level of bash. You can obtain the proper levels of bash from z/OS IzODA Anaconda(FMID HANA110), or download them from Rocket z/OS Open Source Community Downloads(www.rocketsoftware.com/ported-tools).Select to download bash and follow the instructions to register with Rocket. You can then downloadthe archive file and the "Getting Started" document.
Tip: The bash installation process involves the following actions:
1) Creating a mount point and file system on z/OS to hold the bash files2) Uploading in binary the archive file into your new file system3) Extracting the archive file with gzip –d filename.tar.gz4) Extracting the file with tar –xvfo filename.tar
When the correct version of bash is installed, a set of directories (/bin and /man) exists thatrepresents the bash shell code. Make note of the path to the bash /bin directory.
Path to the bash /bin directory:
What to do next
Continue with “Verifying configuration requirements for z/OS UNIX System Services” on page 28.
Chapter 4. Customizing your environment for z/OS Spark 27

Verifying configuration requirements for z/OS UNIX System ServicesSpark runs in a z/OS UNIX System Services (z/OS UNIX) environment. Complete this task to ensure thatthe configuration requirements for z/OS UNIX are met.
Procedure
1. If this is the first time you are running applications in z/OS UNIX, see z/OS UNIX System ServicesPlanning to ensure that your z/OS UNIX environment is properly configured and customized.
For instance, Spark should not be run as UID 0.
However, if you choose to run Spark as UID 0 in an environment where multiple users are mapped toUID 0, you might encounter problems with the wrong shell profile being read and the requiredenvironment variables not being set. For instance, $HOME/.profile might be read for user BOBmapped to UID 0, when you really wanted the shell profile for SPARKID (also mapped to UID 0) to beread.
For alternatives to setting multiple user IDs as UID 0, see "Superusers in z/OS UNIX" in z/OS UNIXSystem Services Planning.
2. Optional: Consider enabling health checks for z/OS UNIX and other z/OS system services. for moreinformation, see IBM Health Checker for z/OS User's Guide.
See “Using IBM Health Checker for z/OS to monitor Spark workload” on page 149 for a list of healthchecks that you might find helpful.
What to do next
Continue with “Setting up a user ID for use with z/OS Spark” on page 28.
Setting up a user ID for use with z/OS SparkComplete this task to set up a user ID for use with z/OS Spark.
About this task
For this task, you can either create a new user ID to use for z/OS Spark, or you can use an existing user ID.
Note: The user ID of the Spark worker daemon requires READ access to the BPX.JOBNAME profile in theFACILITY class to change the job names of the executors and drivers.
Procedure
1. Choose or create an appropriate user ID for use with z/OS Spark.
Specifically, this is the user ID under which the Spark cluster is started, known as the Spark ID in thisdocumentation. The Spark ID should have a non-zero UID (not a superuser) and should not haveaccess to any data beyond what it needs for running a Spark cluster. Ensure that the default shellprogram in the OMVS segment for the Spark ID is set to the bash shell. Also, ensure that the user IDhas, at a minimum, the authority to create directories and extract archived or compressed files.
Tip: If you need to change or create a user ID, work with your security administrator to do so.
Using an existing user IDIf you intend to use an existing user ID, you might need to first update the OMVS segment to setbash as the default shell program for the user ID. Complete the following steps to determinewhether the PROGRAM attribute of the OMVS segment is valid for the target user ID.
a. Use SSH to log on using the user ID.b. Run echo $SHELL and review the output.
28 Open Data Analytics for z/OS : IBM Open Data Analytics for z/OS V1.1.0 Installation and CustomizationGuide
If bash is still not listed as the default shell for the user ID, a potential reason is because /etc/profile is explicitly invoking a shell other than bash. If so, work with your system administratorto update /etc/profile to define the operative shell in the OMVS segment.
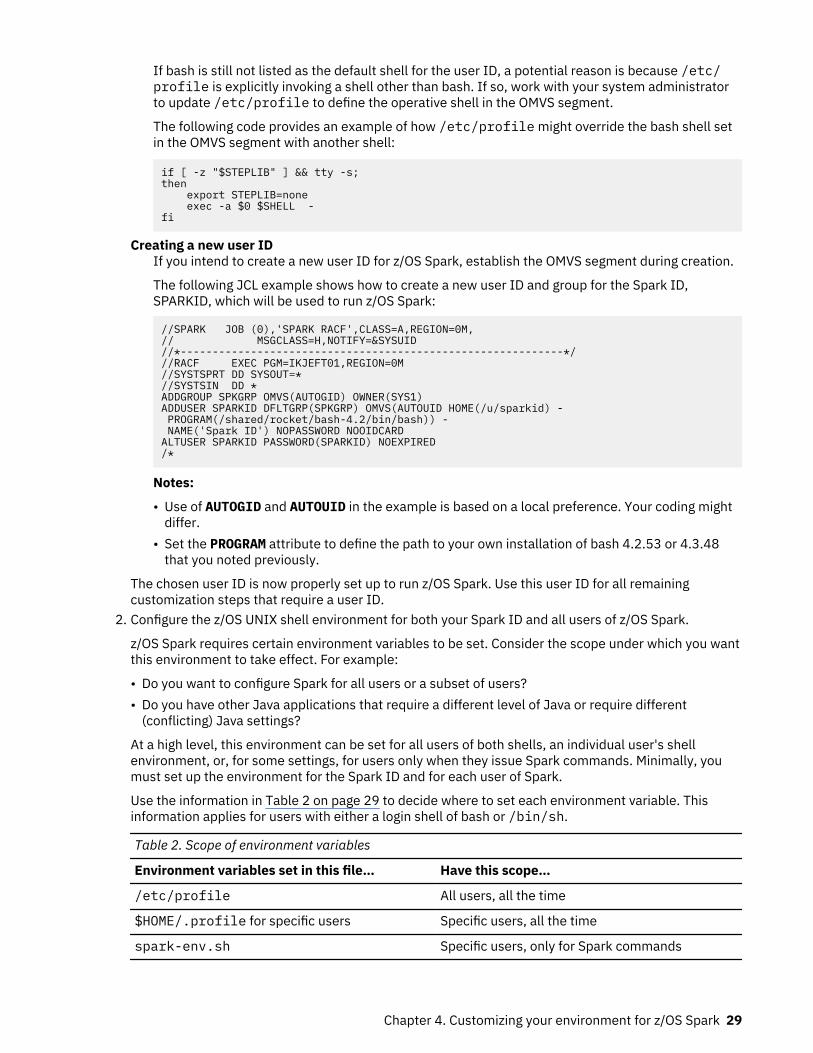
The following code provides an example of how /etc/profile might override the bash shell setin the OMVS segment with another shell:
if [ -z "$STEPLIB" ] && tty -s;then export STEPLIB=none exec -a $0 $SHELL -fi
Creating a new user IDIf you intend to create a new user ID for z/OS Spark, establish the OMVS segment during creation.
The following JCL example shows how to create a new user ID and group for the Spark ID,SPARKID, which will be used to run z/OS Spark:
//SPARK JOB (0),'SPARK RACF',CLASS=A,REGION=0M, // MSGCLASS=H,NOTIFY=&SYSUID //*------------------------------------------------------------*///RACF EXEC PGM=IKJEFT01,REGION=0M //SYSTSPRT DD SYSOUT=* //SYSTSIN DD * ADDGROUP SPKGRP OMVS(AUTOGID) OWNER(SYS1) ADDUSER SPARKID DFLTGRP(SPKGRP) OMVS(AUTOUID HOME(/u/sparkid) - PROGRAM(/shared/rocket/bash-4.2/bin/bash)) - NAME('Spark ID') NOPASSWORD NOOIDCARD ALTUSER SPARKID PASSWORD(SPARKID) NOEXPIRED /*
Notes:
• Use of AUTOGID and AUTOUID in the example is based on a local preference. Your coding mightdiffer.
• Set the PROGRAM attribute to define the path to your own installation of bash 4.2.53 or 4.3.48that you noted previously.
The chosen user ID is now properly set up to run z/OS Spark. Use this user ID for all remainingcustomization steps that require a user ID.
2. Configure the z/OS UNIX shell environment for both your Spark ID and all users of z/OS Spark.
z/OS Spark requires certain environment variables to be set. Consider the scope under which you wantthis environment to take effect. For example:
• Do you want to configure Spark for all users or a subset of users?• Do you have other Java applications that require a different level of Java or require different
(conflicting) Java settings?
At a high level, this environment can be set for all users of both shells, an individual user's shellenvironment, or, for some settings, for users only when they issue Spark commands. Minimally, youmust set up the environment for the Spark ID and for each user of Spark.
Use the information in Table 2 on page 29 to decide where to set each environment variable. Thisinformation applies for users with either a login shell of bash or /bin/sh.
Table 2. Scope of environment variables
Environment variables set in this file… Have this scope…
/etc/profile All users, all the time
$HOME/.profile for specific users Specific users, all the time
spark-env.sh Specific users, only for Spark commands
Chapter 4. Customizing your environment for z/OS Spark 29

Note: The spark-env.sh file is discussed in more detail in “Updating the Apache Spark configurationfiles” on page 34.
Values that you set for environment variables in the $HOME/.profile file override the values forthose variables in the /etc/profile system file. Values that you set in spark-env.sh override anyvalues previously set in either /etc/profile or $HOME/.profile.
Tip: If the Spark ID does not already have a $HOME/.profile file, create one now.
a) Determine which of the files listed in Table 2 on page 29 you want to update.(Creation and customization of the spark-env.sh file will be discussed later.)
b) For the files (listed in Table 2 on page 29) that you determined need to be updated, edit each to setthe environment variables, as follows:
• Set JAVA_HOME to point to the location of IBM 64-Bit SDK for z/OS Java Technology Edition V8.• Set PATH to include the /bin directory of IBM 64-Bit SDK for z/OS Java Technology Edition V8.
Tip: You can set this value by using $JAVA_HOME.• Set PATH to prioritize the path to the /bin directory of bash 4.2.53 or 4.3.48 higher than any
earlier version of bash that exists on your system.• Set IBM_JAVA_OPTIONS to provide file encoding to UTF-8.• Set _BPXK_AUTOCVT to ON to enable the automatic conversion of tagged files. APAR PH01619
adds this to spark-env.sh and spark-env.sh.template by default.• Include an export statement to make all the variables available to the z/OS UNIX shell
environment.
The following example illustrates how to code the .profile file for these environment variablesettings:
# Spark ID .profileJAVA_HOME=/shared/java/java_1.8_64PATH=$JAVA_HOME/bin:/shared/rocket/bash-4.2/bin:$PATH:$HOME:IBM_JAVA_OPTIONS="-Dfile.encoding=UTF8"_BPXK_AUTOCVT=ON
# This line sets the promptPS1='$LOGNAME':'$PWD':' >'
# This line exports the variable settingsexport JAVA_HOME PATH IBM_JAVA_OPTIONS _BPXK_AUTOCVT PS1
The same syntax applies for /etc/profile, $HOME/.profile, and spark-env.sh.c) If you set the environment variables in the profile (as in either of the first two rows in Table 2 on
page 29), skip to step “2.d” on page 30 now. Otherwise, if you set the environment variables onlyin spark-env.sh (as in the third row in Table 2 on page 29), issue the following command in anSSH or Telnet shell environment to source the spark-env.sh file:
source spark-env.sh
d) In an SSH or Telnet shell environment, run the following command to verify that the bash version isset properly.
bash -version
The command returns a version number of 4.2.53 or 4.3.48. If it does not, ensure that the PATHvalue in the file you updated in step “2.b” on page 30 lists the latest version of the bash /bindirectory before any other bash installations.
e) In an SSH or Telnet shell environment, run the following command to verify that the correct level ofbash is set as the default.
ps -p $$
30 Open Data Analytics for z/OS : IBM Open Data Analytics for z/OS V1.1.0 Installation and CustomizationGuide

The command returns the value of the process ID and indicates the shell program that is used, forexample:
SPARKID:/u/sparkid: >ps -p $$ PID TTY TIME CMD 16777299 ttyp0000 0:00 /shared/rocket/bash-4.2/bin/bash
This example output shows that the installation path is correctly set to the 4.2.53 installation ofbash as provided on the PROGRAM attribute of the user ID OMVS segment.
If the latest copy of bash is not listed, something in /etc/profile is overriding the shell. Ensurethat /etc/profile is correct.
f) In an SSH or Telnet shell environment, issue the following command to verify that JAVA_HOME isset to IBM 64-Bit SDK for z/OS Java Technology Edition V8.
java -version
You should see output similar to the following example:
java version "1.8.0_231"Java(TM) SE Runtime Environment (build 8.0.6.0 - pmz6480sr6 - 20191107_01(SR6))IBM J9 VM (build 2.9, JRE 1.8.0 z/OS s390x-64-Bit Compressed References 20191106_4321 (JIT enabled, AOT enabled)OpenJ9 - f0b6be7OMR - 18d8f94IBM - 233dfb5)JCL - 20191016_01 based on Oracle jdk8u231-b10
If the output is incorrect or Java is not found, issue the following command:
echo $JAVA_HOME
The command returns the path to IBM 64-Bit SDK for z/OS Java Technology Edition V8. If it doesnot, ensure that the JAVA_HOME value is set correctly in the file you updated in step “2.b” on page30.
g) In an SSH or Telnet shell environment, run the following command to verify the correct fileencoding.
echo $IBM_JAVA_OPTIONS
The command returns -Dfile.encoding=UTF8. If it does not, ensure that theIBM_JAVA_OPTIONS value is set correctly in the file you updated in step “2.b” on page 30.
h) In an SSH or Telnet shell environment, run the following command to verify the automaticconversion of tagged files.
echo $_BPXK_AUTOCVT
The command returns ON. If it does not, ensure that the _BPXK_AUTOCVT value is set correctly inthe file you updated in step “2.b” on page 30.
3. Permit the SPARKID to spawn USS address spaces with specific job names.The z/OS Spark worker spawns new address space using the job name specifications in the spark-defaults.conf file.Action required:
Permit the SPARKID to the BPX.JOBNAME profile in the security product. For RACF, this would bePERMIT BPX.JOBNAME CLASS(FACILITY) ID(SPARKID) ACCESS(READ)
Results
Your chosen user ID is now ready for use with z/OS Spark.
Chapter 4. Customizing your environment for z/OS Spark 31

What to do next
Continue with “Verifying the env command path” on page 32.
Verifying the env command pathComplete this task to verify the path for the env command.
About this task
Before Spark 2.2.0 (introduced by APAR PI89136), the shell scripts for IBM Open Data Analytics for z/OSSpark require /usr/bin/env. If your system doesn't have /usr/bin/env, complete this task to createa symbolic link for /usr/bin/env.
Spark 2.2.0 changes the shell scripts to use /bin/env, which is a more common set-up. If your systemdoesn't have /bin/env, use the steps that are outlined in this task as a guideline to create a symboliclink for /bin/env.
Procedure
1. Ensure that /usr/bin/env exists and provides a correct listing of the environment.In an SSH or Telnet shell environment, run the following command to verify the location and contentsof env:
/usr/bin/env
The command returns a list of name and value pairs for the environment in your shell.
If /usr/bin/env does not exist, complete the following steps to set it up:
a) Locate the env program on your system.A potential location is in /bin/env.
b) Create a symbolic link (symlink) so that /usr/bin/env resolves to the true location of env.For example:
ln -s /bin/env /usr/bin/env
c) In an SSH or Telnet shell environment, run the following command to verify that the symlink works.
/usr/bin/env
The command returns a list of name and value pairs for the environment in your shell.2. Verify that the symbolic link for the env command persists across system IPLs.
Depending on how /usr/bin/ is configured on your system, the symbolic link for /usr/bin/envmight not persist across an IPL without additional setup. Ensure that your IPL setup includes creationof this symbolic link, if necessary. For instance, you can update your /etc/rc file to include thecommand to create the symbolic link. The /etc/rc file is typically used to customize commands forz/OS UNIX application services.
What to do next
Continue with “Customizing the Apache Spark directory structure” on page 32.
Customizing the Apache Spark directory structureIBM Open Data Analytics for z/OS installs Apache Spark into a z/OS file system (zFS) or hierarchical filesystem (HFS) directory. This documentation refers to the installation directory as SPARK_HOME. The
32 Open Data Analytics for z/OS : IBM Open Data Analytics for z/OS V1.1.0 Installation and CustomizationGuide

default installation directory is /usr/lpp/IBM/izoda/spark/sparknnn, where nnn is the currentApache Spark version (for instance, /usr/lpp/IBM/izoda/spark/spark23x for Spark 2.3.4).
By default, Apache Spark runs from the installation directory, and most of its configuration files, log files,and working information are stored in the installation directory structure. On z/OS systems, however, theuse of the installation directory for all of these purposes is not ideal operating behavior. Therefore, bydefault, Open Data Analytics for z/OS installs Apache Spark in a read-only file system. The following tasksdescribe how to set up customized directories for the Apache Spark configuration files, log files, andtemporary work files. While you can customize the directory structure used by Apache Spark, theexamples here follow the Filesystem Hierarchy Standard.
Plan to work with your system programmer who has authority to update system directories.
Note: SPARK_HOME is an environment variable that is used by many Apache Spark scripts. This variablemust contain the path to the z/OS Spark installation directory. In step “2” on page 29 of “Setting up auser ID for use with z/OS Spark” on page 28, it was determined which files needed to be updated to setthez/OS UNIX shell environment. Update the files modified in that step to set and export theSPARK_HOME environment variable. For example:
export SPARK_HOME=/usr/lpp/IBM/izoda/spark/spark23x
Creating the Apache Spark configuration directoryComplete this task to create a customized directory for the Apache Spark configuration files.
About this task
The default Apache Spark configuration directory is $SPARK_HOME/conf. In accordance with theFilesystem Hierarchy Standard (FHS), this task creates a new configuration directory under /etc. Thistask also ensures that the user ID that will run Apache Spark programs has read/write access to the newdirectory and sets the SPARK_CONF_DIR environment variable to point to the new directory.
Procedure
1. Open an SSH or Telnet shell environment and create a new directory under /etc for the Apache Sparkconfiguration files.
For example, to create the /etc/spark/conf directory, enter the following command:
mkdir -p /etc/spark/conf
2. Provide read/write access to the new directory to the user ID that runs Open Data Analytics for z/OS.3. Ensure that the SPARK_CONF_DIR environment variable points to the new directory.
For example:
export SPARK_CONF_DIR=/etc/spark/conf
Note: The SPARK_CONF_DIR environment variable can be set and exported as in this example in the$HOME/.profile or the /etc/profile as determined in Step 2 in “Setting up a user ID for use withz/OS Spark” on page 28.
Results
You now have a customized directory to hold the Apache Spark configuration files.
What to do nextContinue with “Updating the Apache Spark configuration files” on page 34.
Chapter 4. Customizing your environment for z/OS Spark 33

Updating the Apache Spark configuration filesComplete this task to copy the Apache Spark configuration files to your new configuration directory andupdate them.
About this task
There are three main Apache Spark configuration files:spark-env.sh
A shell script that is sourced by most of the other scripts in the Apache Spark installation. You can useit to configure environment variables that set or alter the default values for various Apache Sparkconfiguration settings. For sample contents of this file, see Appendix B, “Sample configuration andAT-TLS policy rules for z/OS Spark client authentication,” on page 161.
spark-defaults.confA configuration file that sets default values for the Apache Spark runtime components. You canoverride these default values on the command line when you interact with Spark using shell scripts.For sample contents of this file, see Appendix B, “Sample configuration and AT-TLS policy rules forz/OS Spark client authentication,” on page 161.
log4j.propertiesContains the default configuration for log4j, the logging package that Apache Spark uses.
You can find templates of these configuration files and the default spark-defaults.conf and spark-env.sh files in the $SPARK_HOME/conf directory. Note that spark-defaults.conf andlog4j.properties files are ASCII files. If you have set _BPXK_AUTOCVT=ON as specified in “Setting upa user ID for use with z/OS Spark” on page 28, you can edit them without any explicit conversion.
The spark-shell and spark-sql interactive command line interfaces ($SPARK_HOME/bin/spark-shell and $SPARK_HOME/bin/spark-sql) have built-in support for the Apache Hive metastoreservice, which contains an embedded instance of the Apache Derby database. By default, theseinterfaces automatically create metastore_db and spark-warehouse directories and the derby.logfile in the directory from which they are invoked. Therefore, you must either invoke spark-shell orspark-sql from a writable directory or set up your configuration files to point to writable directories. Ifyou have multiple users running these interfaces, ensure that they use different writable directories sothat one user does not attempt to use another user's database.
To set the location of the metastore_db directory, configure thejavax.jdo.option.ConnectionURL property in the hive-site.xml file. You can find a samplehive-site.xml file in $SPARK_HOME/conf. For more information about Hive metastore configuration,see Hive Metastore Administration (https://cwiki.apache.org/confluence/display/Hive/AdminManual+MetastoreAdmin).
To set the location of the spark-warehouse directory, configure the spark.sql.warehouse.dirproperty in the spark-defaults.conf file, or use the --conf spark.sql.warehouse.dircommand-line option to specify the default location of the database in warehouse.
To set the location of the derby.log file, configure the following property in the spark-defaults.conf file or as a command-line option to point to the desired Derby log file location:
spark.driver.extraJavaOptions -Dderby.stream.error.file=derby_log_file_location
If you do not need separate directories for the metastore_db directory and the derby.log file, you canconfigure the Derby system directory by specifying the following property in the spark-defaults.conffile:
spark.driver.extraJavaOptions -Dderby.system.home=derby_sys_dir
By default, both the metastore_db directory and the derby.log file will be created in this Derbysystem directory.
For more information about Apache Derby configuration, see Tuning Derby (https://db.apache.org/derby/docs/10.2/tuning/).
34 Open Data Analytics for z/OS : IBM Open Data Analytics for z/OS V1.1.0 Installation and CustomizationGuide

For more information about Apache Spark support for Apache Hive, see http://spark.apache.org/docs/2.3.4/sql-programming-guide.html.
Procedure
1. Copy the template or default configuration files into your new configuration directory.For example:
cp $SPARK_HOME/conf/spark-env.sh.template $SPARK_CONF_DIR/spark-env.shcp $SPARK_HOME/conf/spark-defaults.conf.template $SPARK_CONF_DIR/spark-defaults.confcp $SPARK_HOME/conf/log4j.properties.template $SPARK_CONF_DIR/log4j.properties
2. Update the configuration files as necessary as you complete the rest of the customization proceduresfor Open Data Analytics for z/OS.
If necessary, remember to complete step “2.b” on page 30 now. Also, set and export theSPARK_CONF_DIR environment variable as described in step “3” on page 33 of “Creating the ApacheSpark configuration directory” on page 33.
What to do nextContinue with “Creating the Apache Spark working directories” on page 35.
Creating the Apache Spark working directoriesComplete this task to create the Apache Spark working directories.
About this task
Table 3 on page 35 lists some of the working directories that Apache Spark uses. The sizes of thesedirectories might need to be large depending on the type of work that is running; this is true particularlyfor the SPARK_LOCAL_DIRS directory.
Table 3. Apache Spark working directories
Directory contents Default location Environment variable Suggested newdirectory
Log files $SPARK_HOME/logs SPARK_LOG_DIR Under /var, suchas /var/spark/logs
Working data for theworker process
$SPARK_HOME/work SPARK_WORKER_DIR Under /var, suchas /var/spark/work
Shuffle and RDD data /tmp SPARK_LOCAL_DIRS Under /tmp, suchas /tmp/spark/scratch
PID files /tmp SPARK_PID_DIR Under /tmp, suchas /tmp/spark/pid
Procedure
1. As you did in “Creating the Apache Spark configuration directory” on page 33, follow your file systemconventions and create new working directories for Apache Spark.
Note: Consider mounting the $SPARK_WORKER_DIR and $SPARK_LOCAL_DIRS directories onseparate zFS file systems to avoid uncontrolled growth on the primary zFS where Spark is located. Thesizes of these zFS file systems depend on the activity level of your applications and whether auto-cleanup or rolling logs is enabled (see step “4” on page 36). If you are unsure about the sizes, 500MB is a good starting point. Then, monitor the growth of these file systems and adjust their sizesaccordingly. Avoid using temporary file systems (TFS) for these directories if you expect significantgrowth, as TFS can use a large amount of real memory.
Chapter 4. Customizing your environment for z/OS Spark 35
2. Give the following users read/write access to the newly created working directories:
• The user ID who runs z/OS Spark (SPARKID in these examples)• The end user IDs who will be using z/OS Spark.
Assuming those users belong to the same UNIX user group, you may issue:
chmod ug+rwx /var/spark/logschmod ug+rwx /var/spark/workchmod ug+rwx /tmp/spark/scratchchmod ug+rwx /tmp/spark/pid
3. Update the $SPARK_CONF_DIR/spark-env.sh script with the new environment variables pointingto the newly created working directories.For example:
export SPARK_WORKER_DIR=/var/spark/work
4. Configure these directories to be cleaned regularly.a) Configure Spark to perform cleanup.
By default, Spark does not regularly clean up worker directories, but you can configure it to do so.Change the following Spark properties in $SPARK_CONF_DIR/spark-defaults.conf to valuesthat support your planned activity, and monitor these settings over time:spark.worker.cleanup.enabled
Enables periodic cleanup of worker and application directories. This is disabled by default. Setto true to enable it.
spark.worker.cleanup.intervalThe frequency, in seconds, that the worker cleans up old application work directories. Thedefault is 30 minutes. Modify the value as you deem appropriate.
spark.worker.cleanup.appDataTtlControls how long, in seconds, to retain application work directories. The default is 7 days,which is generally inadequate if Spark jobs are run frequently. Modify the value as you deemappropriate.
For more information about these properties, see http://spark.apache.org/docs/2.3.4/spark-standalone.html.
b) Configure Spark to enable rolling log files.
Be default, Spark retains all of the executor log files. You can change the following Spark propertiesin $SPARK_CONF_DIR/spark-defaults.conf to enable rolling of executor logs:
spark.executor.logs.rolling.maxRetainedFilesSets the number of latest rolling log files that are going to be retained by the system. Older logfiles will be deleted. The default is to retain all log files.
spark.executor.logs.rolling.strategySets the strategy for rolling of executor logs. By default, it is disabled. The valid values are:time
Time-based rolling. Use spark.executor.logs.rolling.time.interval to set therolling time interval.
sizeSize-based rolling. Use spark.executor.logs.rolling.maxSize to set the maximumfile size for rolling.
spark.executor.logs.rolling.time.intervalSets the time interval by which the executor logs will be rolled over. Valid values are:
• daily• hourly• minutely
36 Open Data Analytics for z/OS : IBM Open Data Analytics for z/OS V1.1.0 Installation and CustomizationGuide

• Any number of seconds
spark.executor.logs.rolling.maxSizeSets the maximum file size, in bytes, by which the executor logs will be rolled over.
For more information about these properties, see http://spark.apache.org/docs/2.3.4/configuration.html.
c) Create jobs that clean up or archive the following directories listed in Table 3 on page 35:
$SPARK_LOG_DIR$SPARK_WORKER_DIR, if not configured to be cleaned by Spark properties$SPARK_LOCAL_DIRS
z/OS UNIX ships a sample script, skulker, that you can use as written or modify to suit yourneeds. The -R option can be useful, as Spark files are often nested in subdirectories. You canschedule skulker to run regularly from cron or other in-house automation tooling. You can find asample skulker script in the /samples directory. For more information about skulker, see"skulker - Remove old files from a directory" in z/OS UNIX System Services Command Reference.
5. Optional: Periodically check all file systems involved in Spark (such as $SPARK_HOME and any othersmounted under it or elsewhere).
• You can specify the FSFULL parameter for a file system to that it generates operator messages asthe file system reaches a user-specified threshold.
• Look for the number of extents, which can impact I/O performance for the disks involved. Performthese steps to reduce the number of extents:
a. Create and mount a new zFS.b. Use copytree, tar, or similar utilities to copy the key directories from the old file system to the
new one.c. Unmount the old file system and re-mount the new file system in its place.
For more information, see "Managing File System Size" in z/OS DFSMSdfp Advanced Services.
Note: Update the BPXPRMxx member of parmlib with the new file systems.
Results
You have completed the customization of your Apache Spark directory structure.
What to do next
Continue with “Configuring networking for Apache Spark” on page 37.
Configuring networking for Apache SparkComplete this task to configure the port access and other networking customization that Apache Sparkrequires.
About this task
Apache Spark makes heavy use of the network for communication between various processes, as shownin Figure 2 on page 38.
Chapter 4. Customizing your environment for z/OS Spark 37

Figure 2. Network ports used in a typical Apache Spark environment
These ports are further described in Table 4 on page 38 and Table 5 on page 39, which list the portsthat Spark uses, both on the cluster side and on the driver side.
Table 4. Network ports used by the Spark cluster
Port name Default portnumber
Configuration property* Notes
Master web UI 8080 spark.master.ui.port orSPARK_MASTER_WEBUI_PORT
The value set by thespark.master.ui.port propertytakes precedence.
Worker web UI 8081 spark.worker.ui.port orSPARK_WORKER_WEBUI_PORT
The value set by thespark.worker.ui.port takesprecedence.
History server webUI
18080 spark.history.ui.port Optional; only applies if you use thehistory server.
38 Open Data Analytics for z/OS : IBM Open Data Analytics for z/OS V1.1.0 Installation and CustomizationGuide

Table 4. Network ports used by the Spark cluster (continued)
Port name Default portnumber
Configuration property* Notes
Master port 7077 SPARK_MASTER_PORT SPARK_MASTER_PORT (or thedefault, 7077) is the starting point forconnection attempts and not theactual port that might be connected.In addition, the value can be 0, whichmeans it uses a random port number.Therefore, SPARK_MASTER_PORT (orthe default, 7077) might not be theport that is used for the master. Thisstatement is true for all methods ofstarting the master, includingBPXBATCH, the start*.sh scripts,and the started task procedure.
Note: You should not choose 0 forSPARK_MASTER_PORT if you intendto use client authentication.
Master REST port 6066 spark.master.rest.port Not needed if the REST service isdisabled. If you wish to use the RESTservice and are planning to useauthentication, you should configureAT-TLS port authentication for thisport. Note that as of APAR PH03469,it is disabled by default.
Worker port (random) SPARK_WORKER_PORT
Block manager port (random) spark.blockManager.port
External shuffleserver
7337 spark.shuffle.service.port
Optional; only applies if you use theexternal shuffle service.
PySpark daemon (random) spark.python.daemon.port Optional; only applies if you usePySpark. APAR PI98042 (for Spark2.2.0) is required to use this property.
Table 5. Network ports used by the Spark driver
Port name Default portnumber
Configuration property* Notes
Application web UI 4040 spark.ui.port
Driver port (random) spark.driver.port
Block manager port (random) spark.blockManager.port The value set by thespark.driver.blockManager.port property takes precedence
Driver blockmanager port
(Value ofspark.blockManager.port)
spark.driver.blockManager.port
Ifspark.driver.blockManager.port is not set, thespark.blockManager.portconfiguration is used.
Chapter 4. Customizing your environment for z/OS Spark 39

*The Spark properties in the Configuration property column can either be set in the spark-defaults.conf file (if listed in lower case) or in the spark-env.sh file (if listed in upper case).
Spark must be able to bind to all the required ports. If Spark cannot bind to a specific port, it tries againwith the next port number. (+1). The maximum number of retries is controlled by thespark.port.maxRetries property (default: 16) in the spark-defaults.conf file.
Note: The external shuffle server port does not support the port binding retries functionality.
The port binding retries functionality also implies a limit on the number of simultaneous instances ofthose ports across all Spark processes that use the same configuration. Assume thespark.port.maxRetries property is at default (16), here are a few examples:
• If the Spark application web UI is enabled, which it is by default, there can be no more than 17 Sparkapplications running at the same time, due to the 18th Spark driver process will fail to bind to anApplication UI port.
• When both spark.blockManager.port and spark.driver.blockManager.port are set, therecan be no more than 17 executor processes running at the same time, because the 18th executorprocess will fail to bind to a Block manager port.
• When spark.blockManager.port is set but spark.driver.blockManager.port is not set, thecombined total of executor and driver processes cannot exceed 17, as the 18th process will fail to bindto a Block manager port.
Careful consideration is needed and you may need to increase the spark.port.maxRetries value ifyou are going to run multiple Spark applications at the same time, and/or planning to utilize a highnumber of executors within the cluster simultaneously.
Procedure
1. For your planned deployment and ecosystem, consider any port access and firewall implications forthe ports listed in Table 4 on page 38 and Table 5 on page 39, and configure specific port settings, asneeded.For instance, if your application developers need to access the Spark application web UI from outsidethe firewall, the application web UI port must be open on the firewall.
Each time a Spark process is started, a number of listening ports are created that are specific to theintended function of that process. Depending on your site networking policies, limit access to all portsand permit access for specific users or applications.
On z/OS, you can use settings in z/OS Communications Server and RACF to enforce controls. Forinstance, you can specify PORT UNRSV DENY in your TCPIP.PROFILE to deny all applications accessto unreserved ports for TCP or UDP. You can also specify PORT UNRSV SAF to grant specific access tospecific users, such as the user ID that starts the Spark cluster and the Spark users. For moreinformation about the PORT statement, see z/OS Communications Server: IP Configuration Reference.
2. Consider your planned usage of the REST server.
The REST server interface, which listens on port 6066 by default, is currently disabled by default. As ofAPAR PH03469, the REST server supports TLS client authentication and Spark applications can besubmitted through this interface.
3. Configure Spark environment variables for common enterprise networking configurations.You can set each of the following environment variables in the spark-env.sh file:SPARK_PUBLIC_DNS
For environments that use network address translation (NAT), set SPARK_PUBLIC_DNS to theexternal host name to be used for the Spark web UIs. SPARK_PUBLIC_DNS sets the public DNSname of the Spark master and workers. This allows the Spark Master to present in the logs a URLwith the host name that is visible to the outside world.
SPARK_LOCAL_IPSet the SPARK_LOCAL_IP environment variable to configure Spark processes to bind to a specificand consistent IP address when creating listening ports.
40 Open Data Analytics for z/OS : IBM Open Data Analytics for z/OS V1.1.0 Installation and CustomizationGuide

SPARK_MASTER_HOSTOn systems with multiple network adaptors, Spark might attempt the default setting and give up ifit does not work. Set the SPARK_MASTER_HOST (known as SPARK_MASTER_IP prior to Spark 2.0)to avoid this.
What to do next
Continue with “Configuring z/OS Spark client authentication” on page 41.
Configuring z/OS Spark client authentication
Complete the following tasks to enable authentication for connections to the Spark master port.
z/OS Spark client authentication is enabled by default. Spark does not function properly until youcomplete the setup for client authentication or disable the client authentication function.
The z/OS UNIX System Services APAR OA57666 is required for z/OS Spark client authentication to workproperly.
If you want to defer the use of client authentication (for instance, for early testing in a secure testenvironment), you can disable this function by setting the following property in the spark-defaults.conf file.
spark.zos.master.authenticate false
Note: If client authentication is disabled and you start your Spark cluster and driver under different userIDs, then some functions, such as the spark-sql command line interface, might not work properly. Thisis because the directories that are created by the Spark cluster might not be permissible to the Sparkdriver.
If client authentication is enabled, you can specify one of the following client authentication methods:Application Transparent Transport Layer Security (AT-TLS)
This is the default Spark client authentication method that uses digital certificates along with AT-TLS.You need to set up digital certificates for the Spark cluster and its users, as well as an AT-TLS policy.
Trusted PartnerIf all connections to the master port are internal, then you can consider using the Trusted Partnerclient authentication method, which doesn't require client certificates. However, this methodcontinues to use AT-TLS for server authentication. A connection is internal if both endpoints belong inthe same sysplex, the data flowing through the connection is never exposed outside of the sysplex,and the link or interface that is used is one of the following types:
• CTC• HiperSockets interface (iQDIO)• MPCPTP (including XCF and IUTSAMEH)• OSA-Express QDIO with CHPID type OSX or OSM• Loopback• Both connection partners are owned by the same multihomed stack
Trusted Partner requires additional security configuration for the cluster and its users.
For more information about internal connections, see "Sysplex-specific connection routinginformation" in z/OS Communications Server: IP Programmer's Guide and Reference.
You can specify the wanted authentication method (ATTLS or TrustedPartner) in the spark-defaults.conf file. For example:
spark.zos.master.authenticate.method ATTLS
The APAR PI89136 is required to use Trusted Partner client authentication method.
Chapter 4. Customizing your environment for z/OS Spark 41

Note: The workers must have the same spark.zos.master.authenticate andspark.zos.master.authenticate.method options as the master in order for the worker to register.
Note: APAR PH01619 adds a restriction of registering workers with the master. In order to registerworkers with masters, they must contain the same authentication configurations,spark.zos.master.authenticate and spark.zos.master.authenticate.method; otherwise, they will berejected with one of the following messages (and it will appear in the worker log):
• Master's client authentication does not match Worker's• Master's client authentication method does not match Worker's
About Application Transparent Transport Layer Security (AT-TLS)
AT-TLS is a z/OS Communications Server feature that transparently implements the TLS protocol in theTCP layer of the stack. As defined by the TLS protocol, AT-TLS uses digital certificates to authenticate theserver and optionally the client, and encrypts the data that is flowing between the server and the client.
During client authentication, the Spark master acts as a server and accepts connections from the Sparkworker and Spark users, which act as clients. Once the Spark master validates the client’s digitalcertificate, a secure connection will be established and all subsequent data-flow between the server andthe client will be encrypted.
For more information about AT-TLS, see "Application Transparent Transport Layer Security dataprotection" in z/OS Communications Server: IP Configuration Guide.
Using AT-TLS as the client authentication method
You can use AT-TLS with level 2 client authentication to secure communications between the Sparkmaster and its clients. Specifically, you can create digital certificates for end users and use the certificatesto authenticate those users when they connect to the Spark master port. Each of the certificates mustmap to a valid z/OS user ID, as required by level 2 client authentication. When a client attempts toconnect to the Spark master port, the Spark master daemon queries AT-TLS to ensure that the followingconditions exist:
• Communication between the client and the server is encrypted.• A trusted relationship is established.• A client certificate is matched to a local z/OS user ID.
Using Trusted Partner as the client authentication method
Using AT-TLS as the client authentication method requires a digital certificate for each user that isconnecting to the Spark master port. If you know that all connections to the master port are internal, youcan consider using the Trusted Partner client authentication method instead, which doesn't require clientcertificates. However, this method continues to use AT-TLS for server authentication.
Complete the following tasks to configure client authentication for Spark on z/OS.
Note: These tasks show examples using RACF commands and configurations. If you use a differentsecurity product, use the equivalent SAF facilities for that product.
__ 1. “Creating and configuring digital certificates and key rings” on page 43__ 2. “Configuring Policy Agent” on page 46__ 3. “Defining security authorization for Policy Agent” on page 47__ 4. “Creating the Policy Agent configuration files” on page 48__ 5. “Configuring PROFILE.TCPIP for AT-TLS” on page 49__ 6. “Defining the AT-TLS policy rules” on page 49__ 7. “Starting and stopping Policy Agent” on page 52__ 8. “Configuring additional authorities and permissions for the Spark cluster” on page 53__ 9. “Starting the Spark cluster” on page 57
42 Open Data Analytics for z/OS : IBM Open Data Analytics for z/OS V1.1.0 Installation and CustomizationGuide

Creating and configuring digital certificates and key ringsComplete this task to create and configure digital certificates and key rings that are needed for z/OSSpark client authentication.
About this task
The TLS protocol relies on digital certificates that are signed by a trusted certificate authority (CA) toauthenticate the end points. The following configuration uses an internal CA. You might consider using aninternal CA when only users within your company or organization need access to Spark. If you havealready configured an internal CA for use with other products, you can reuse any existing end-usercertificates for Spark.
This configuration uses a one-to-one certificate-to-user ID association. That is, one certificate maps toone user.
Digital certificates can be managed through RACF, PKI Services, or other security products.
Tip: If you are using AT-TLS as the client authentication method and plan to have a large number of Sparkusers (50 or more), consider using PKI Services, which provides additional management functionality forlarger environments.
• For more information about digital certificates in RACF, see "Planning your certificate environment" and"Setting up your certificate environment" in z/OS Security Server RACF Security Administrator's Guide.
• For more information about PKI Services, see "Introducing PKI Services" in z/OS Cryptographic ServicesPKI Services Guide and Reference.
The following steps show examples using RACF commands, and subsequent configuration steps assumethe CA definitions (such as labels) that appear in these examples.
Procedure
1. If you do not already have an internal CA defined, use RACF as the CA to create a CA certificate.
• AT-TLS as the client authentication method:
RACDCERT GENCERT CERTAUTH SUBJECTSDN(OU('SPARK Local CA') O('IBM') C('US')) WITHLABEL('SPARK Local CA') NOTAFTER(DATE(2030/01/01)) SIZE(1024)
• Trusted partner as the client authentication method:
RACDCERT GENCERT CERTAUTH SUBJECTSDN(OU('SPARK Local CA TP') O('IBM') C('US')) WITHLABEL('SPARK Local CA TP') NOTAFTER(DATE(2030/01/01)) SIZE(1024)
For more information about the RACDCERT command, see z/OS Security Server RACF CommandLanguage Reference.
2. Create a server certificate and key ring for the user ID that will be used to start the Spark cluster(SPARKID in these examples).
• AT-TLS as the client authentication method:
a) Create a certificate for the Spark cluster that is signed by the CA.
RACDCERT GENCERT ID(SPARKID) SIGNWITH(CERTAUTH LABEL('SPARK Local CA'))KEYUSAGE(HANDSHAKE) WITHLABEL('Spark Server Cert') SUBJECTSDN(CN('SPARK TEST SERVER') O('IBM') L('Poughkeepsie') SP('New York') C('US')) NOTAFTER(DATE(2030/01/01))
b) Create an SSL keyring (SparkRing in these examples).
RACDCERT ADDRING(SparkRing) ID(SPARKID)
c) Connect the Spark server certificate to the SSL key ring.
Chapter 4. Customizing your environment for z/OS Spark 43
RACDCERT ID(SPARKID) CONNECT(ID(SPARKID) LABEL('Spark Server Cert') RING(SparkRing) USAGE(PERSONAL) DEFAULT)
d) Connect the CA certificate to the SSL key ring.
RACDCERT ID(SPARKID) CONNECT(CERTAUTH LABEL('SPARK Local CA') RING(SparkRing))
e) Allow the Spark cluster ID (SPARKID) to access its key ring.
PERMIT IRR.DIGTCERT.LISTRING CLASS(FACILITY) ID(SPARKID) ACCESS(READ)PERMIT IRR.DIGTCERT.LIST CLASS(FACILITY) ID(SPARKID) ACCESS(READ)
f) Refresh the RACF FACILITY class profiles.
SETROPTS RACLIST(FACILITY) REFRESH
You can issue the following command to verify your setup:
RACDCERT LISTRING(SparkRing) ID(SPARKID)
• Trusted partner as the client authentication method:
a) Create a server certificate that is signed by the CA.
RACDCERT GENCERT ID(SPARKID) SIGNWITH(CERTAUTH LABEL('SPARK Local CA TP')) KEYUSAGE(HANDSHAKE) WITHLABEL('Spark Server Cert TP') SUBJECTSDN(CN('SPARK TEST SERVER') O('IBM') L('Poughkeepsie') SP('New York') C('US')) NOTAFTER(DATE(2030/01/01))
b) Create an SSL keyring (SparkRingTP in these examples).
RACDCERT ADDRING(SparkRingTP) ID(SPARKID)
c) Connect the Spark server certificate to the SSL key ring.
RACDCERT ID(SPARKID) CONNECT(ID(SPARKID) LABEL('Spark Server Cert TP')RING(SparkRingTP) USAGE(PERSONAL) DEFAULT)
d) Connect the CA certificate to the SSL key ring.
RACDCERT ID(SPARKID) CONNECT(CERTAUTH LABEL('SPARK Local CA TP') RING(SparkRingTP))
e) Allow the Spark cluster ID (SPARKID) to access its key ring.
PERMIT IRR.DIGTCERT.LISTRING CLASS(FACILITY) ID(SPARKID) ACCESS(READ)PERMIT IRR.DIGTCERT.LIST CLASS(FACILITY) ID(SPARKID) ACCESS(READ)
f) Refresh the RACF FACILITY class profiles.
SETROPTS RACLIST(FACILITY) REFRESH
You can issue the following command to verify your setup:
RACDCERT LISTRING(SparkRingTP) ID(SPARKID)
3. Configure the Spark end users (SPARKUSR in these examples).
• AT-TLS as the client authentication method:
Create and connect a client certificate and a key ring for each Spark end user.
a) Create a client certificate that is signed by the CA.
44 Open Data Analytics for z/OS : IBM Open Data Analytics for z/OS V1.1.0 Installation and CustomizationGuide

RACDCERT GENCERT ID(SPARKUSR) SIGNWITH(CERTAUTH LABEL('SPARK Local CA')) KEYUSAGE(HANDSHAKE) WITHLABEL('Spark Client Cert') SUBJECTSDN(CN('SPARK TEST SERVER') O('IBM') L('Poughkeepsie') SP('New York') C('US')) NOTAFTER(DATE(2030/01/01))
Note: For end users who will be using off-platform Jupyter Notebook environments to connect toSpark on this z/OS system, export their certificates and send them to the system administrator ofthe system from which those clients will connect (for instance, a distributed system administratorfor JupyterHub or a z/OS system administrator using a different security database). The remotesystem administrator will need to set up these client certificates to be used when connecting to thisz/OS system. Specifically, to export the client certificate (public and private key) and CA certificate(public key) into a PKCS#12 (.p12) certificate package, issue the following RACF command:
RACDCERT EXPORT(LABEL('Spark Client Cert')) ID(SPARKUSR) DSN('SPARKADM.SPARKUSR.P12') FORMAT(PKCS12DER) PASSWORD('password')
In this example:SPARKADM
The system programmer who is configuring certificates.SPARKUSR
The end user.password
The password used to access the contents of the package.This creates a p12 package in the SPARKADM.SPARKUSR.P12 data set.
b) Create an SSL keyring. The same key ring name (SparkRing) is used here for setup simplicity.
RACDCERT ADDRING(SparkRing) ID(SPARKUSR)
c) Connect the client certificate to the end user's key ring.
RACDCERT ID(SPARKUSR) CONNECT(ID(SPARKUSR) LABEL('Spark Client Cert')RING(SparkRing) USAGE(PERSONAL) DEFAULT)
d) Connect the CA certificate to the end user's key ring.
RACDCERT ID(SPARKUSR) CONNECT(CERTAUTH LABEL('SPARK IBM Local CA') RING(SparkRing))
e) Allow the end user's user ID to access its key ring.
PERMIT IRR.DIGTCERT.LISTRING CLASS(FACILITY) ID(SPARKUSR) ACCESS(READ)PERMIT IRR.DIGTCERT.LIST CLASS(FACILITY) ID(SPARKUSR) ACCESS(READ)
f) Refresh the RACF FACILITY class profiles
SETROPTS RACLIST(RDATALIB) REFRESH
• Trusted partner as the client authentication method:
With Trusted Partner as the client authentication method, you do not need to setup client certificatefor each end user. Instead, you give the clients access to the CA's virtual key ring. The clients need tohave access to the CA's certificate on the key ring to validate the server's certificate. You canaccomplish this by administering a profile in either the FACILITY or the RDATALIB class. Using theFACILITY class provides global control of all rings, whereas using the RDATALIB class providesgranular control of a specific ring. The RDATALIB class profile takes precedence over the FACILITYclass profile if both are defined.
• When using the RDATALIB class:
RDEFINE RDATALIB CERTIFAUTH.IRR_VIRTUAL_KEYRING.LST UACC(NONE)PERMIT CERTIFAUTH.IRR_VIRTUAL_KEYRING.LST CLASS(RDATALIB) ID(SPARKUSR)
Chapter 4. Customizing your environment for z/OS Spark 45

ACCESS(READ)SETROPTS RACLIST(RDATALIB) REFRESH
Note: If the RDATALIB class is not already active, activate and RACLIST it first:
SETROPTS CLASSACT(RDATALIB) RACLIST(RDATALIB)SETROPTS RACLIST(RDATALIB) REFRESH
• When using the FACILITY class:
PERMIT IRR.DIGTCERT.LISTRING CLASS(FACILITY) ID(SPARKUSR) ACCESS(READ)SETROPTS RACLIST(FACILITY) REFRESH
For more information about virtual key rings, see "RACF and key rings" in z/OS Security Server RACFSecurity Administrator's Guide.
What to do next
Continue with “Configuring Policy Agent” on page 46.
Configuring Policy AgentComplete this task to configure Policy Agent to run as a z/OS started task. You can skip this task if a PolicyAgent started task is already configured on your system.
About this task
Policy Agent reads, parses, and installs AT-TLS policies in the TCP/IP stack. The policies containinformation that is necessary to negotiate secure connections.
Policy Agent runs as a z/OS UNIX process, so it can be started either from the z/OS UNIX shell or as az/OS started task. This task uses a z/OS started task procedure to start Policy Agent.
For more information about Policy Agent and running Policy Agent as a started task, see "Policy Agent andpolicy applications" in z/OS Communications Server: IP Configuration Reference.
Procedure
Create the following sample procedure to start Policy Agent as a z/OS started task.
//PAGENT PROC//PAGENT EXEC PGM=PAGENT,REGION=0K,TIME=NOLIMIT,// PARM=('ENVAR("_CEE_ENVFILE=DD:STDENV")/-l SYSLOGD')//*//* For information on the above environment variables, refer to the//* IP CONFIGURATION GUIDE. Other environment variables can also be//* specified via STDENV.//* //* UNIX file containing environment variables://STDENV DD PATH='/etc/pagent.env',PATHOPTS=(ORDONLY)//*//* Output written to stdout and stderr goes to the data set or//* file specified with SYSPRINT or SYSOUT, respectively. But//* normally, PAGENT doesn't write output to stdout or stderr.//* Instead, output is written to the log file, which is specified//* by the PAGENT_LOG_FILE environment variable, and defaults to//* /tmp/pagent.log. When the -d parameter is specified, however,//* output is also written to stdout.//*//SYSPRINT DD SYSOUT=*//SYSOUT DD SYSOUT=*//CEEDUMP DD SYSOUT=*,DCB=(RECFM=FB,LRECL=132,BLKSIZE=132)
In this example, /etc/pagent.env points to the Policy Agent environment file.
• For more information about starting Policy Agent as a z/OS started task, see "Starting Policy Agent as astarted task" in z/OS Communications Server: IP Configuration Reference.
• For more information about starting Policy Agent from the z/OS UNIX shell, see "Starting Policy Agentfrom the z/OS Shell" in z/OS Communications Server: IP Configuration Reference.
46 Open Data Analytics for z/OS : IBM Open Data Analytics for z/OS V1.1.0 Installation and CustomizationGuide

Tip: For information about the overall configuration of Policy Agent, see "Steps for configuring the PolicyAgent" in z/OS Communications Server: IP Configuration Guide.
What to do next
Before you can start Policy Agent, you must define the appropriate security authorizations.
Continue with “Defining security authorization for Policy Agent” on page 47.
Defining security authorization for Policy AgentComplete this task to define the appropriate security authorizations for Policy Agent.
About this task
The policies managed by Policy Agent can significantly affect system operation. Therefore, you mustrestrict the list of z/OS user IDs under which Policy Agent is allowed to run. To do this, you must definecertain resources and controls in your system’s security management product, such as RACF.
Procedure
Complete the following steps to set up security definitions for Policy Agent in RACF.1. Define the PAGENT user ID.
In this example, Policy Agent runs under the z/OS user ID named PAGENT and has a default group(DFLTGRP) of OMVSGRP and an OMVS segment with a UID of 0.
ADDUSER PAGENT DFLTGRP(OMVSGRP) OMVS(UID(0) HOME('/'))
2. Define the PAGENT started task to RACF.
In this example, Policy Agent runs as a z/OS started task named PAGENT. To define the Policy Agentstarted task to RACF, use the RDEFINE command to create the PAGENT.* profile in the STARTEDclass. (The SETROPTS commands are included for completeness. These commands have no effectwhen the STARTED class is already activated.)
SETROPTS CLASSACT(STARTED)SETROPTS RACLIST(STARTED)SETROPTS GENERIC(STARTED)RDEFINE STARTED PAGENT.* STDATA(USER(PAGENT)) SETROPTS RACLIST(STARTED) REFRESHSETROPTS GENERIC(STARTED) REFRESH
3. Grant Policy Agent the ability to make socket requests during TCP/IP stack initialization.
A TCP/IP stack initializes before Policy Agent installs policies into the stack. During the initializationwindow, only user IDs that are permitted to the EZB.INITSTACK.sysname.tcpname profile in theSERVAUTH class can make socket requests.
The following example shows the RACF commands to define a generic EZB.INITSTACK.** resourceprofile and grants READ access to the PAGENT user ID.
SETROPTS GENERIC(SERVAUTH)SETROPTS CLASSACT(SERVAUTH) RACLIST(SERVAUTH)RDEFINE SERVAUTH EZB.INITSTACK.** UACC(NONE)PERMIT EZB.INITSTACK.** CLASS(SERVAUTH) ACCESS(READ) ID(PAGENT)SETROPTS RACLIST(SERVAUTH) REFRESH
In addition to PAGENT, also grant READ access to the following applications:
• OMPROUTE• SNMP agent and subagents• NAMED• Other applications that do not require AT-TLS but that you want to start prior to general applications
Chapter 4. Customizing your environment for z/OS Spark 47

4. Grant access to authorized users to manage the PAGENT started task.
To restrict management access to the PAGENT started task, define a MVS.SERVMGR.PAGENT profile inthe OPERCMDS resource class and permit authorized users access to this profile, as in the followingexample:
SETROPTS CLASSACT(OPERCMDS)SETROPTS RACLIST (OPERCMDS)RDEFINE OPERCMDS (MVS.SERVMGR.PAGENT) UACC(NONE)PERMIT MVS.SERVMGR.PAGENT CLASS(OPERCMDS) ACCESS(CONTROL) ID(PAGENT)SETROPTS RACLIST(OPERCMDS) REFRESH
5. Consider restricting access to the pasearch command.
You can use the z/OS UNIX pasearch command to display policy definitions. The output from thiscommand indicates whether policy rules are active and shows the policy definition attributes.However, you might not want every user to be able to see the policy definitions. To restrict access tothe pasearch command, define an appropriate resource profile in the SERVAUTH resource class, asdescribed in step 1 of "Steps for configuring the Policy Agent" in z/OS Communications Server: IPConfiguration Guide.
What to do next
Continue with “Creating the Policy Agent configuration files” on page 48.
Creating the Policy Agent configuration filesComplete this task to create Policy Agent configuration files.
About this task
You can use the IBM Configuration Assistant for z/OS Communications Server to update the Policy Agentconfiguration files, or you can update them manually. For more information, see "Options for configuringAT-TLS security" in z/OS Communications Server: IP Configuration Guide.
Procedure
1. Create a file to contain the environment variable that points to the PAGENT configuration file.The default configuration file is /etc/pagent.env, but you can specify a different location in thePolicy Agent started task JCL that you created in “Configuring Policy Agent” on page 46.
In this example, the pagent.env file defines the following PAGENT environment variables:PAGENT_CONFIG_FILE
Points to the PAGENT configuration file (pagent.conf)PAGENT_LOG_FILE
Points to the PAGENT log file. In this example, Policy Agent logs messages to the syslog daemonand is the recommended practice. For information about setting up the syslog daemon, see"Configuring the syslog daemon" in z/OS Communications Server: IP Configuration Guide.
LIBPATHPolicy Agent needs access to one or more DLLs at run time. Set the LIBPATH environment variableto include the /usr/lib directory, which normally includes all of the required DLLs.
TZDefines the local time zone.
PAGENT_CONFIG_FILE=/etc/pagent.confPAGENT_LOG_FILE=SYSLOGDLIBPATH=/usr/libTZ=EST5EDT
2. Create the PAGENT configuration file (pagent.conf).
48 Open Data Analytics for z/OS : IBM Open Data Analytics for z/OS V1.1.0 Installation and CustomizationGuide

The following example shows the contents of the pagent.conf file:
# LOGLEVEL 511 turns on all trace levels for Policy AgentLOGLEVEL 511TcpImage TCPIP FLUSH PURGETTLSConfig /etc/pagent/TCPIP_TTLS.policy
The /etc/pagent/TCPIP_TTLS.policy file is the AT-TLS policy to be defined in “Defining the AT-TLS policy rules” on page 49.
What to do next
Continue with “Configuring PROFILE.TCPIP for AT-TLS” on page 49.
Configuring PROFILE.TCPIP for AT-TLSComplete this task to configure TCP/IP to enable AT-TLS support.
About this task
You must enable AT-TLS support in the TCP/IP profile data set (PROFILE.TCPIP).
Procedure
Add the following statement to the PROFILE.TCPIP data set to enable AT-TLS support:
TCPCONFIG TTLS
For more information about the TCPCONFIG TTLS statement, see z/OS Communications Server: IPConfiguration Reference.
Wait until you finish “Defining the AT-TLS policy rules” on page 49 before recycling TCP/IP or refreshingits profile.
What to do next
Continue with “Defining the AT-TLS policy rules” on page 49.
Defining the AT-TLS policy rulesComplete this task to define the AT-TLS policy rules in the policy configuration file.
About this task
An AT-TLS policy configuration file contains the AT-TLS rules that identify specific types of TCP traffic,along with the type of TLS/SSL to be applied to those connections. If a rule match is found, AT-TLStransparently provides TLS protocol control for the connection based on the security attributes that arespecified in the actions that are associated with the rule.
Procedure
1. Configure your AT-TLS policy rules.
The content of your AT-TLS policy depends on the Spark client authentication method that you choose.
Sample AT-TLS policies are provided in Appendix B, “Sample configuration and AT-TLS policy rules forz/OS Spark client authentication,” on page 161. For more information about AT-TLS policy file syntax,structure, and the like, see "AT-TLS policy configuration" in z/OS Communications Server: IPConfiguration Guide.
• AT-TLS as the client authentication method:
Chapter 4. Customizing your environment for z/OS Spark 49
a. Create the PortGroup and the associated PortRange statements. By default Spark uses port7077 as the master port, and supports port binding retries via the spark.port.maxRetriesconfiguration setting (default: 16) mentioned in the previous section. Hence, we include the initialvalue and the entire retry range in the PortRange statement.
PortGroup SparkClusterGrp_ATTLS{ PortRangeRef SparkMaster_ATTLS}PortRange SparkMaster_ATTLS{ Port 7077-7093}
You may optionally include the Master REST port (default: 6066, supports port binding retries)and the External shuffle server port (default: 7337) in the PortGroup by creating thecorresponding PortRange statements and reference to them:
PortGroup SparkClusterGrp_ATTLS{ PortRangeRef SparkMaster_ATTLS PortRangeRef SparkMasterRest_ATTLS PortRangeRef SparkExtShuffleServer_ATTLS}PortRange SparkMaster_ATTLS{ Port 7077-7093}PortRange SparkMasterRest_ATTLS{ Port 6066-6082}PortRange SparkExtShuffleServer_ATTLS{ Port 7337}
Note: If the Master REST port is protected by the AT-TLS policy rules then it will not be accessiblefrom outside of the sysplex (e.g., from a web browser) until you export the client certificates intoa, for example, PKCS#12 (.p12) certificate package. For instructions, see “Creating andconfiguring digital certificates and key rings” on page 43.
b. Define the Inbound and Outbound rules for the port group, and the associatedTTLSGroupAction(GroupAct_TTLS_On) andTTLSEnvironmentAction(EnvAct_SparkServer_ATTLS andEnvAct_SparkClient_ATTLS) when the rules are triggered.
TTLSRule SparkServer_ATTLS{ Direction Inbound LocalPortGroupRef SparkClusterGrp_ATTLS TTLSGroupActionRef GroupAct_TTLS_On TTLSEnvironmentActionRef EnvAct_SparkServer_ATTLS}TTLSRule SparkClient_ATTLS{ Direction Outbound RemotePortGroupRef SparkClusterGrp_ATTLS TTLSGroupActionRef GroupAct_TTLS_On TTLSEnvironmentActionRef EnvAct_SparkClient_ATTLS}
c. Create the TTLSGroupAction statement. This statement enables TLS security for the selectedconnections.
TTLSGroupAction GroupAct_TTLS_On{ TTLSEnabled On}
50 Open Data Analytics for z/OS : IBM Open Data Analytics for z/OS V1.1.0 Installation and CustomizationGuide

d. Create the corresponding TTLSEnvironmentAction statements for the Inbound and OutboundTTLSRules. The server side (Inbound) assumes the ServerWithClientAuth handshake roleand the client side (Outbound) assumes the Client role. For simplicity, both sides use the sameTTLSKeyRingParmsRef(KeyRing_ATTLS) andTTLSEnvironmentAdvancedParmsRef(EnvAdv_TLS).
TTLSEnvironmentAction EnvAct_SparkServer_ATTLS{ HandshakeRole ServerWithClientAuth EnvironmentUserInstance 0 TTLSKeyRingParmsRef KeyRing_ATTLS TTLSEnvironmentAdvancedParmsRef EnvAdv_TLS}TTLSEnvironmentAction EnvAct_SparkClient_ATTLS{ HandshakeRole Client EnvironmentUserInstance 0 TTLSKeyRingParmsRef KeyRing_ATTLS TTLSEnvironmentAdvancedParmsRef EnvAdv_TLS}
e. Create the TTLSKeyRingParm sand TTLSEnvironmentAdvancedParms statements. Use thesame SSL keyring name (SparkRing) as during the server/client certificate creation steps in theprevious section. ClientAuthType of SAFCheck is needed to enforce level 2 clientauthentication.
TTLSKeyRingParms KeyRing_ATTLS{ Keyring SparkRing} TTLSEnvironmentAdvancedParms EnvAdv_TLS{ ClientAuthType SAFCheck TLSv1 Off TLSv1.1 Off TLSv1.2 On}
• Trusted Partner as the client authentication method:
a. Create the PortGroup and the associated PortRange statements. By default Spark uses port7077 as the master port, and supports port binding retries via the spark.port.maxRetriesconfiguration setting (default: 16). Therefore, include the initial value and the entire retry range inthe PortRange statement.
PortGroup SparkClusterGrp_TP{ PortRangeRef SparkMaster_TP}PortRange SparkMaster_TP{ Port 7077-7093}
b. Define the Inbound and Outbound rules for the port group, and the associatedTTLSGroupAction(GroupAct_TTLS_On) andTTLSEnvironmentAction(EnvAct_SparkServer_TP and EnvAct_SparkClient_TP) whenthe rules are triggered.
TTLSRule SparkServer_TP{ Direction Inbound LocalPortGroupRef SparkClusterGrp_TP TTLSGroupActionRef GroupAct_TTLS_On TTLSEnvironmentActionRef EnvAct_SparkServer_TP}TTLSRule SparkClient_TP{ Direction Outbound RemotePortGroupRef SparkClusterGrp_TP TTLSGroupActionRef GroupAct_TTLS_On
Chapter 4. Customizing your environment for z/OS Spark 51

TTLSEnvironmentActionRef EnvAct_SparkClient_TP}
c. Create the TTLSGroupAction statement. This statement enables TLS security for the selectedconnections.
TTLSGroupAction GroupAct_TTLS_On{ TTLSEnabled On}
d. Create the corresponding TTLSEnvironmentAction statements for the Inbound and OutboundTTLSRules. The server side (Inbound) assumes the Server handshake role, and uses the SSLkeyring specified in the TTLSKeyRingParms statement (KeyRing_TP) that follows. The clientside (Outbound) assumes the Client role, and uses the CA's virtual key ring to access the CA'scertificate via the “Keyring *AUTH*/*” syntax. For simplicity, both sides use the sameTTLSEnvironmentAdvancedParmsRef(EnvAdv_TLS_TP).
TTLSEnvironmentAction EnvAct_SparkServer_TP{ HandshakeRole Server EnvironmentUserInstance 0 TTLSKeyRingParmsRef KeyRing_TP TTLSEnvironmentAdvancedParmsRef EnvAdv_TLS_TP}TTLSEnvironmentAction EnvAct_SparkClient_TP{ HandshakeRole Client EnvironmentUserInstance 0 TTLSKeyRingParms { Keyring *AUTH*/* } TTLSEnvironmentAdvancedParmsRef EnvAdv_TLS_TP}
e. Create the TTLSKeyRingParms and TTLSEnvironmentAdvancedParms statements. Use thesame SSL keyring name (SparkRingTP) as during the server/client certificate creation steps in theprevious section.
TTLSKeyRingParms KeyRing_TP{ Keyring SparkRingTP}TTLSEnvironmentAdvancedParms EnvAdv_TLS_TP{ TLSv1 Off TLSv1.1 Off TLSv1.2 On}
2. Recycle TCP/IP to pick up the profile changes that you made earlier, or issue the following MVS systemcommand to refresh its profile:
VARY TCPIP,,OBEYFILE,DSN=new_tcpip_profile
What to do next
Continue with “Starting and stopping Policy Agent” on page 52.
Starting and stopping Policy AgentThis task assumes that Policy Agent is running as a z/OS started task.
Procedure
• Issue the MVS START command to start Policy Agent as a started task.For example:
52 Open Data Analytics for z/OS : IBM Open Data Analytics for z/OS V1.1.0 Installation and CustomizationGuide

S PAGENT
• To perform a normal shutdown of Policy Agent, issue the MVS STOP command.For example:
P PAGENT
What to do next
Continue with “Configuring additional authorities and permissions for the Spark cluster” on page 53.
Configuring additional authorities and permissions for the Spark cluster
About this taskComplete this task to configure additional authorities and permissions that are needed within the Sparkcluster.
Note: If you change the authority of an active Spark process, you might need to restart the process for thechange to take effect.
Procedure
1. Ensure that Spark client authentication is enabled.
Spark client authentication is enabled by default. However, you might have disabled it in a controlledtest environment to simplify your initial setup and testing. Enable client authentication now (or verifythat it is still enabled) by setting the following property in the spark-defaults.conf file:
spark.zos.master.authenticate true
2. Specify the Spark client authentication method to use. There are 2 Spark client authenticationmethods - AT-TLS (ATTLS), which is the default, and Trusted Partner (TrustedPartner). Specifyspark.zos.master.authenticate.method to be either ATTLS or TrustedPartner in thespark-defaults.conf file.
• Use AT-TLS as the client authentication method:
spark.zos.master.authenticate.method ATTLS
• Use Trusted Partner as the client authentication method:
spark.zos.master.authenticate.method TrustedPartner
3. Configure the Spark cluster user ID (SPARKID in earlier examples) to have authority to change the userIDs of the Spark executors to those of the authenticated end user IDs. To do this, configure theSURROGAT class profile for the surrogate user ID.For example:a) Issue the following RACF commands to define a generic profile that allows SPARKID (a non-UID 0
user ID) to switch to any other z/OS user ID that has a defined z/OS UNIX segment:
SETROPTS CLASSACT(SURROGAT) RACLIST(SURROGAT) GENERIC(SURROGAT)RDEFINE SURROGAT BPX.SRV.** UACC(NONE)PERMIT BPX.SRV.** CLASS(SURROGAT) ACCESS(READ) ID(SPARKID)SETROPTS GENERIC(SURROGAT) RACLIST(SURROGAT) REFRESH
b) Issue the following command to verify that the profile setup is successful:
RLIST SURROGAT BPX.SRV.** AUTHUSER
4. Configure the z/OS system that hosts the Spark cluster to honor ACLs that will be set by the Spark IDthat is running the cluster.For example, issue the following RACF command:
Chapter 4. Customizing your environment for z/OS Spark 53

SETROPTS CLASSACT(FSSEC)
5. Change the permissions on the Spark working directory and Spark local directory so that bothSPARKID and the end users can write to them. This customization assumes that the end user and theSPARKID belong to the same UNIX group.Add the sticky bit so that users can only delete their own files. For example, issue the followingcommands from the z/OS UNIX shell:
chmod ug+rwx $SPARK_WORKER_DIRchmod +t $SPARK_WORKER_DIRchmod ug+rwx $SPARK_LOCAL_DIRSchmod +t $SPARK_LOCAL_DIRS
Note: If you enabled event logging (as described in “Enabling the Spark history service” on page 140),perform this step for the event log directory as well.
You can issue the following command to verify the proper settings:
ls -ld $SPARK_WORKER_DIR $SPARK_LOCAL_DIRS
The output should be similar to the following example:
drwxrwxr-t 2 SPARKID SYS1 8192 Aug 8 08:51 /var/spark/workdrwxrwxr-t 2 SPARKID SYS1 8192 Aug 8 08:51 /tmp/spark/scratch
Note: -t in the output can also appear as -T if your userid has a umask that does not set the executepermission for other users.
6. Grant the Spark cluster user ID READ access to the BPX.SERVER FACILITY class profile, so the Sparkmaster daemon can verify whether the client is authorized to connect to the master port.
RDEFINE FACILITY BPX.SERVER UACC(NONE)PERMIT BPX.SERVER CLASS(FACILITY) ID(SPARKID) ACCESS(READ)SETROPTS RACLIST(FACILITY) REFRESH
7. If you are using Trusted Partner as the Spark client authentication method, complete the following:a) Configure the Spark cluster user ID (SPARKID) to have authority to obtain its connection partner's
routing information and security credentials. To do this, grant the user ID READ access to thefollowing SERVAUTH class profile:
EZB.IOCTL.sysname.tcpprocname.PARTNERINFO
where:sysname
Specifies the system name that is defined in the sysplex.tcpprocname
Specifies the TCP/IP procedure name.
Tip: You can specify a wildcard on segments of the profile name.
RDEFINE SERVAUTH EZB.IOCTL.*.*.PARTNERINFO UACC(NONE)PERMIT EZB.IOCTL.*.*.PARTNERINFO CLASS(SERVAUTH) ID(SPARKID) ACCESS(READ)SETROPTS RACLIST(SERVAUTH) REFRESH
b) If the client (Spark driver and worker) is on a different TCP/IP stack than the master daemon,create a common security daemon name within your sysplex.
RDEFINE SERVAUTH EZBDOMAIN APPLDATA('security_domain_name')SETROPTS RACLIST(SERVAUTH) REFRESH
where:security_domain_name
Specifies the name of the security domain. The name is not case sensitive and is limited to 255characters.
54 Open Data Analytics for z/OS : IBM Open Data Analytics for z/OS V1.1.0 Installation and CustomizationGuide

You can display the defined EZBDOMAIN by issuing:
RLIST SERVAUTH EZBDOMAIN
c) Mark the file $SPARK_HOME/lib/zos-native/libspark_zos_ioctl.so as controlled(trusted), if it is not already.
To verify whether the file has the controlled attribute on, issue the following command:
ls -E $SPARK_HOME/lib/zos-native
The output should be similar to the following:
-rwxr-xr-x -ps- 1 SPARKID SPKGRP 81920 Oct 13 13:43 libspark_zos_ioctl.so
If the file does not have the p extended attribute, then it is not marked as controlled. To mark thefile as controlled, issue the following command from a user ID that has READ access to theBPX.FILEATTR.PROGCTL resource in the FACILITY profile:
extattr +p $SPARK_HOME/lib/zos-native/libspark_zos_ioctl.so
d) Grant the Spark cluster user ID (SPARKID) and every end user ID (SPARKUSR) READ access to theAZK.SPARK.MASTER.CONNECT XFACILIT class profile.
RDEFINE XFACILIT AZK.SPARK.MASTER.CONNECT UACC(NONE)PERMIT AZK.SPARK.MASTER.CONNECT CLASS(XFACILIT) ID(SPARKID) ACCESS(READ)PERMIT AZK.SPARK.MASTER.CONNECT CLASS(XFACILIT) ID(SPARKUSR) ACCESS(READ)SETROPTS RACLIST(XFACILIT) REFRESH
e) If you are using started tasks to start the master and worker, after you installed JZOS, you mustdefine a PROGRAM profile for the JZOS load module (JVMLDM86) and permit SPARKID read accessto the profile.
For example, issue the following RACF commands:
RDEFINE PROGRAM JVMLDM86 ADDMEM('datasetname'/volser/NOPADCHK)SETROPTS WHEN(PROGRAM) REFRESHPERMIT JVMLDM86 CLASS(PROGRAM) ID(SPARKID) ACCESS(READ)SETROPTS WHEN(PROGRAM) REFRESH
For more information about started tasks, see “Setting up started tasks to start and stop Sparkprocesses ” on page 59.
What to do next
• If you previously completed the overall configuration of z/OS Spark, continue with “Starting the Sparkcluster” on page 57.
• If you have not yet completed your initial configuration of z/OS Spark, continue with “Configuring IBMJava” on page 57.
Restricting the ability to start or stop the Spark clusterComplete this task to restrict the ability to start or stop the Spark cluster components (such as, Masterand Worker) via the shell scripts located in the $SPARK_HOME/sbin directory.
Note: For restricting the ability to start or stop the Spark cluster components via started tasks, see“Define the RACF started profile for started tasks” on page 62.
About this task
Apache Spark provides Bash shell scripts for starting the individual components, such as the Master, theWorker, or the History server. However, when carefully allocating resources for the Spark cluster via WLM,having extra cluster components can disrupt the expected port, storage and zIIP allocations.
Chapter 4. Customizing your environment for z/OS Spark 55
Setting the Spark “sbin” directory contents to be unreadable and unexecutable
By default, the contents of the $SPARK_HOME/sbin directory have permissions of “755”, or “rwxr-xr-x”.To restrict users from starting their own Spark cluster, the permissions of the directory and its contentscan be changed to “700” or “rwx------“. This would prevent users from using the scripts within thedirectory to start Spark cluster components, seeing the contents of the Spark “$SPARK_HOME/sbin”directory, and copying the scripts to their own directories (where they could set their own permissionsand bypass the execution restrictions). Alternately, you could use permission value “750” (or “rwxr-x---”)in the commands that follow to allow userids within the Spark group to start or stop the Spark clustercomponents (and potentially, start their own cluster, as they might do if they were testing a new spark-defaults.conf setting, for example).
Following are commands to alter permission of sbin:
Assume the zFS file system is SYS1.SPARK.ZFS for Spark and the mountpoint is /usr/lpp/IBM/izoda/spark/, from TSO OMVS or a Putty session, logged in as the owner of the SPARK_HOME directory:
tsocmd "mount filesystem('SYS1.SPARK.ZFS') type(zfs) mode(rdwr) mountpoint('/usr/lpp/IBM/izoda/spark')"
cd $SPARK_HOMEchmod -R 700 ./sbin
tsocmd "mount filesystem('SYS1.SPARK.ZFS') type(zfs) mode(read) mountpoint('/usr/lpp/IBM/izoda/spark')"
Similarly, to back out this change, return to the same OMVS or Putty shell and issue these commands:
tsocmd "mount filesystem('SYS1.SPARK.ZFS') type(zfs) mode(rdwr) mountpoint('/usr/lpp/IBM/izoda/spark')"
cd $SPARK_HOMEchmod -R 755 ./sbin
tsocmd "mount filesystem('SYS1.SPARK.ZFS') type(zfs) mode(read) mountpoint('/usr/lpp/IBM/izoda/spark')"
Finally, if you want to allow just one of the scripts (such as the Spark configuration checker) to be open toexecution by anyone, use these commands:
tsocmd "mount filesystem('SYS1.SPARK.ZFS') type(zfs) mode(rdwr) mountpoint('/usr/lpp/IBM/izoda/spark')"
cd $SPARK_HOMEchmod -R 700 ./sbin chmod 711 ./sbin/chmod 755 ./sbin/spark-configuration-checker.sh
tsocmd "mount filesystem('SYS1.SPARK.ZFS') type(zfs) mode(read) mountpoint('/usr/lpp/IBM/izoda/spark')"
Some of these commands use the -R command (recursive) flag; others do not. You can reuse the "755"form for any other shell scripts in that directory for which you want to allow execution. Note that somescripts invoke other scripts in the ./sbin directory, and will need to have their permissions changed aswell.
Note: The SMP/E install process will reinstall the scripts when PTFs are applied. Because of this, you willneed to re-do the chmod commands each time after applying service. You may want to consider creatinga post-install BPXBATCH job to execute the commands shown previously in this section.
Note: It is still possible for “motivated” users to acquire their own copy of the scripts via download fromthe open source world and use them to start the cluster component. The changes shown in this sectionprevent only inadvertent or unplanned usage by users.
Using standard z/OS MVS command authorization
Most installations will have tight controls over which operators are allowed to use START, STOP andCANCEL commands. If you have used the supplied SAZKSAMP examples to create Started Task JCL for
56 Open Data Analytics for z/OS : IBM Open Data Analytics for z/OS V1.1.0 Installation and CustomizationGuide

the Spark Master and Worker, you may want to update the RACF controls over the START and STOP ofthose started tasks to further secure the Spark cluster environment. Refer to “MVS Commands, RACFAccess Authorities, and Resource Names” in z/OS MVS System Commands. For example, you might needto define new resources like MVS.START.STC.AZKMSTR and MVS.STOP.STC.AZKMSTR to control theMaster. (Similar names would exist for the Worker; for example, MVS.START.STC.AZKWRKR.)
Starting the Spark cluster
About this task
If you have completed all of the tasks to enable client authentication for Apache Spark and you havepreviously completed all of the tasks in your overall configuration of z/OS Spark, you can start your Sparkcluster as usual.
However, if you have just configured client authentication as part of your initial overall configuration ofz/OS Spark, skip this procedure and do not start the Spark cluster until you have completed all of theremaining configuration tasks for z/OS Spark, as directed in "What to do next."
Procedure
After completing all of the tasks to enable client authentication and configure z/OS Spark, start the Sparkcluster and run your Spark applications as usual. If a worker or driver is unable to be authenticated, it failsto connect to the master port.
With z/OS Spark client authentication enabled, an application that is submitted to the master port has itsexecutors started under the user ID of that application. An application that is submitted to the REST port,which is the port for cluster deploy mode, is considered part of the Spark cluster and therefore has boththe driver and executors run under the user ID of the Spark cluster.
What to do next
If you have not yet completed your initial configuration of z/OS Spark, continue your configurationactivities with “Configuring IBM Java” on page 57.
Configuring IBM JavaSpark runs as several Java virtual machine (JVM) processes. Complete this task to ensure that IBM Javais properly configured.
Procedure
1. See Hints and Tips for Java on z/OS (www.ibm.com/systems/z/os/zos/tools/java/faq/javafaq.html) toensure that your Java configuration has the appropriate settings.Also see “IBM Java configuration options” on page 171 for additional settings.
2. Set _CEE_DMPTARG to store Java dumps on a separate mount point outside of $SPARK_HOME.For more information, see JVM environment settings (https://www.ibm.com/support/knowledgecenter/en/SSYKE2_8.0.0/com.ibm.java.zos.80.doc/diag/appendixes/env_var/env_jvm.html).
For information about the order in which Java applies dump settings, see Dump agent environmentvariables (https://www.ibm.com/support/knowledgecenter/en/SSYKE2_8.0.0/com.ibm.java.zos.80.doc/diag/tools/dumpagents_env.html).
3. Configure large page memory allocation for Java.For information about configuration and best practices for setting maximum java heap sizes, seeConfiguring large page memory allocation (https://www.ibm.com/support/knowledgecenter/SSYKE2_8.0.0/com.ibm.java.zos.80.doc/user/alloc_large_page.html).
4. If you have Java applications that use compression, ensure that zEDC is properly configured.
Chapter 4. Customizing your environment for z/OS Spark 57

For more information, see zEnterprise Data Compression (https://www.ibm.com/support/knowledgecenter/en/SSYKE2_8.0.0/com.ibm.java.zos.80.doc/user/zedc_compression.html).
What to do next
To use jobs to start and stop Spark processes, continue with “Creating jobs to start and stop Sparkprocesses” on page 58.
To use started tasks to start and stop Spark processes, continue with “Setting up started tasks to startand stop Spark processes ” on page 59.
Creating jobs to start and stop Spark processesYou can use BPXBATCH to start and stop Spark processes, such as the master and worker.
Note: We recommend that you use started tasks rather than BPXBATCH (see “Setting up started tasks tostart and stop Spark processes ” on page 59). However, if you prefer, you can use BPXBATCH, asdescribed in this section.
The examples of jobs are based on the following assumptions:
• The user ID that starts and stops the Spark cluster is SPARKID.• The default shell program for SPARKID is bash.• Spark is installed in /usr/lpp/IBM/izoda/spark/sparknnn, where nnn is the Spark version (for
instance, /usr/lpp/IBM/izoda/spark/spark23x for Spark 2.3.4).
Important: Be sure that all of the required environment variables, such as JAVA_HOME, are set in theenvironment that is started by BPXBATCH. You can accomplish this in one of the following ways:
• Export the environment variables in one of the bash startup files.
Invoke the bash command with the -l option in BPXBATCH. The -l option on the bash commandinstructs bash to run a login shell, in which bash first reads, and runs commands from the file /etc/profile, if the file exists. After reading that file, bash looks for ~/.bash_profile, ~/.bash_login,and ~/.profile in that order, reads and runs commands from the first one that exists and is readable.You can export your environment variables in ~/.bash_profile, for example, so they are added tothe environment.
• Use the STDENV DD statement to pass environment variables to BPXBATCH. You can specify a file thatdefines the environment variables or specify them directly in the JCL. For more information about usingthe STDENV statement, see "Passing environment variables to BPXBATCH" in z/OS UNIX SystemServices User's Guide.
Sample job to start the master and worker
Figure 3 on page 58 shows an example of a BPXBATCH job to start the master and worker.
The -l and -c options on the bash command instruct bash to run a login shell with the entire shellcommand sequence given between the single quotation marks ('). The semicolons (;) in the commandsequence separate different shell commands.
//SPARKMST JOB 'SPARK START',CLASS=K,MSGCLASS=A,// NOTIFY=&SYSUID,SYSTEM=HOST,USER=SPARKID //PRTDS EXEC PGM=BPXBATCH,REGION=0M //STDPARM DD * SH /bin/bash -l -c 'cd /usr/lpp/IBM/izoda/spark/spark23x/sbin;start-master.sh;sleep 5;start-slave.sh spark://hostname.yourcompany.com:7077' //SYSOUT DD SYSOUT=* //STDIN DD DUMMY //STDOUT DD SYSOUT=* //STDERR DD SYSOUT=* //
Figure 3. Sample job to start the master and worker
58 Open Data Analytics for z/OS : IBM Open Data Analytics for z/OS V1.1.0 Installation and CustomizationGuide
The bash command in the sample start job issues the following sequence of commands:
1. Change directories to the Spark installation directory where the administration commands are located.
cd /usr/lpp/IBM/izoda/spark/spark23x/sbin
2. Start the master.
start-master.sh
3. Sleep for 5 seconds to allow the master time to start.
sleep 5
4. Start the worker.
start-slave.sh spark://hostname.yourcompany.com:7077
where hostname.yourcompany.com is the name of the host where the master is listening on port 7077.
You can also issue these commands directly from the z/OS UNIX shell as a quick test of your Sparkconfiguration.
Sample job to stop the master and worker
Figure 4 on page 59 shows an example of a BPXBATCH job to stop the master and worker. Its logic issimilar to the start job, except that it first stops the worker and then stops the master.
//SPARKSTP JOB 'SPARK STOP',CLASS=K,MSGCLASS=A,// NOTIFY=&SYSUID,SYSTEM=HOST,USER=SPARKID //PRTDS EXEC PGM=BPXBATCH,REGION=0M //STDPARM DD * SH /bin/bash -l -c 'cd /usr/lpp/IBM/izoda/spark/spark23x/sbin;stop-slave.sh;sleep 5;stop-master.sh'//SYSOUT DD SYSOUT=* //STDIN DD DUMMY //STDOUT DD SYSOUT=* //STDERR DD SYSOUT=* //
Figure 4. Sample job to stop the master and worker
What to do next
Test your start and stop jobs to ensure that your setup is correct. Then, continue with “Configuringmemory and CPU options” on page 65.
Setting up started tasks to start and stop Spark processesComplete this task to set up started tasks to start and stop Spark processes.
About this taskThe following list provides the benefits of using this feature.
• Allows the Spark master, worker, history server, and shuffle service to run on z/OS consistent withrunning other MVS batch jobs, job steps, or started tasks.
– Handles START, STOP, and CANCEL command options and writes messages to the MVS console. Formore information about the messages that are issued, see Open Data Analytics for z/OS SystemMessages.
– Can be extended to take advantage of all of the capabilities that JZOS provides. These capabilitiesinclude the use of SYSOUT for output directories, MVS data sets, and DD statements.
• Maintains flexible configuration of the Java execution environment and the z/OS UNIX System Servicesenvironment that the Spark master and worker require.
Chapter 4. Customizing your environment for z/OS Spark 59

• Automation
– Allows the Spark master, worker, history server, and shuffle service to be managed through customerautomation products and policies.
– Allows automation products to start and stop the master and worker with no parameters, with theassurance that the worker is started using the master port for which the master is actually started.
– Allows the worker to retry starting for a period of time if the master is not yet started.– Allows enterprise automation management strategies to be applied to the Spark master and worker.
These strategies include the following:
- Started task dependencies such as staging the starting and stopping of Spark started tasks basedon the availability of other started tasks. These tasks can include but are not limited to OMVS, MDS,TCPIP, and Database Servers (Db2, IMS, and more).
- Failure recovery by restarting the Spark master and worker on any system under automationmanagement control.
The examples of started tasks are based on the following assumptions:
• JZOS Batch Launcher and Toolkit in IBM 64-Bit SDK for z/OS Java Technology Edition V8 is installedand operational. For installation and configuration instructions and information about messages andreturn codes from JZOS, see JZOS Batch Launcher and Toolkit: Installation and User's Guide.
• If you are using Trusted Partner authentication, ensure that a PROGRAM profile is defined for the loadmodule, JVMLDM86. For instructions, see Step 11 in “Configuring additional authorities andpermissions for the Spark cluster” on page 53.
• For each Spark cluster, the spark-env.sh contains a unique SPARK_IDENT_STRING. Do not specify$USER or allow it to default to $USER.
• The user ID that starts and stops the Spark cluster is the SPARKID that is previously created theSPKGRP is the group that is previously created.
• The default shell program for SPARKID is bash.• Spark is installed in /usr/lpp/IBM/izoda/spark/sparknnn, where nnn is the Spark version. For
example, /usr/lpp/IBM/izoda/spark/spark23x for Spark 2.3.4.• Spark is configured as described in this document and the required environment variables are set in the
following procedures. For more information, see “Set and export common environment variables” onpage 62.
• OMVS must be initialized before the master can start.• The directories that are specified by the following environment variables, or the defaults taken when
not specified, must exist and have the appropriate authorities. For more information, see “Creating theApache Spark working directories” on page 35.
– SPARK_HOME– SPARK_CONF_DIR– SPARK_LOG_DIR– SPARK_PID_DIR– SPARK_LOCAL_DIRS– SPARK_WORKER_DIR
Procedures for each Spark clusterTo create a procedure (master, worker, history server, shuffle service) for a Spark cluster, copy and editthe applicable sample procedure that is included in IBM Open Data Analytics for z/OS. The procedureneeds to be put in a data set in your PROCLIB concatenation, such as SYS1.PROCLIB.
There are four sample procedures. The high-level qualifier (hlq) depends on your installation. In thisdocument, the default high-level qualifier is AZK.
• hlq.SAZKSAMP(AZKMSTR) - Master
60 Open Data Analytics for z/OS : IBM Open Data Analytics for z/OS V1.1.0 Installation and CustomizationGuide

• hlq.SAZKSAMP(AZKWRKR) - Worker• hlq.SAZKSAMP(AZKHIST) - History Server• hlq.SAZKSAMP(AZKSHUF) - Shuffle service
Follow the instructions in the sample procedure. For example, SPARK_CONF_DIR must be set andexported in the procedure. It will not default to $SPARK_HOME/conf.
Note that there are instances where the procedure for the Shuffle service cannot be used. The Shuffleservice can be started in two ways:
• By invoking sbin/start-shuffle-service.sh or the new started task• Internally, by the worker when spark.shuffle.service.enabled=true configuration is set. By default, the
Spark Shuffle service starts and runs under the Spark Worker whenspark.shuffle.service.enabled=true.
Do not use the started task (or shell script) during the following:
1. When starting the Shuffle service inside the worker process with thespark.shuffle.service.enabled=true configuration (this is a prerequisite for dynamic allocation).
2. When enabling dynamic allocation with the spark.dynamicAllocation.enabled=true config.
If using one or both of these features, the worker or Shuffle service (started via the first service) will failwith a port binding error. The second service to be started will fail as both services bind the Shuffleservice port (spark.shuffle.service.port, default 7337).
Note: spark.shuffle.service.enabled has no effect on the Shuffle service when it is started via the shellscript or started task. It is a property used by the worker only.
When starting the Spark started tasks manually, you should ensure that the Master (and optional Historyand Shuffle servers) have initialized before starting the Worker. When starting via automation, they can bestarted in parallel, as the Worker will wait a limited amount of time for the Master to initialize. Spark usersmay encounter errors if Spark jobs are submitted before all started tasks have initialized.
Define the routing of the log outputWhen using started tasks to start and stop Spark processes, the routing of the log output is dependentupon a combination of settings in the $SPARK_CONF_DIR/log4j.properties file and the values forthe STDERR or STDOUT DD cards in the master and worker procedures.
For example, using the default values in the $SPARK_CONF_DIR/log4j.properties file, as shown inthe following sample, will route the log output to the value in the STDERR DD card:
log4j.rootCategory=INFO, consolelog4j.appender.console=org.apache.log4j.ConsoleAppenderlog4j.appender.console.target=System.err
Using the default values for both the $SPARK_CONF_DIR/log4j.properties file and the STDERR DDcard of //STDERR DD SYSOUT=&SOUT directs both the JZOS output and the Spark output to SYSOUT.
Changing the log4j.appender.console.target value to System.out will route the log output to thevalue in the STDOUT DD card.
Alternatively, to route the Spark log output to a USS file in the $SPARK_LOG_DIR directory, if you areusing the default values for the $SPARK_CONF_DIR/log4j.properties file, you must specify the fullpath for the log file by using the value that is set for $SPARK_LOG_DIR on the STDERR DD card. Thefollowing examples show the specifications for the master and the worker log files for a cluster that isdenoted as Cluster1 where the value of $SPARK_LOG_DIR is /var/spark/logs. You must specify aunique file name for the master and a unique file name for the worker. If you are starting more than onecluster, you must specify unique file names for each master and worker across all clusters.
The following example is for the master procedure.
//STDERR DD PATH='/var/spark/logs/azkmstrCluster1.err',// PATHOPTS=(OWRONLY,OCREAT,OTRUNC),PATHMODE=SIRWXU
Chapter 4. Customizing your environment for z/OS Spark 61

The following example is for the worker procedure.
//STDERR DD PATH='/var/spark/logs/azkwrkrCluster1.err',// PATHOPTS=(OWRONLY,OCREAT,OTRUNC),PATHMODE=SIRWXU
By default, the master and worker log files are created with PATHMODE=SIRWXU, which is equivalent toz/OS UNIX file access attributes of “700” (“rwx------“). As such, the user ID that starts/stops the Sparkcluster (SPARKID in these examples) has full access to the log files, and no access for anyone else. Youmay change this behavior by modifying the PATHMODE parameter value. For more information about thePATHMODE parameter, see "PATHMODE parameter" in z/OS MVS JCL Reference.
When using started tasks to start and stop Spark processes, the log files are not rotated as when usingother methods for starting the master and worker. It is recommended that you not specify OAPPEND forthe PATHOPTS to avoid file growth.
Set and export common environment variablesComplete this task to set and export common environment variables.
About this task
Environment variables are needed by both the AZKMSTR and AZKWRKR procedures. In addition, theenvironment variables that are needed by the JZOS launcher must be exported. However, the /etc/profile and .profile scripts are not run when the JZOS launcher is run.
Therefore, it is easiest to create a common script to set and export the environment variables. IBM OpenData Analytics for z/OS or IzODA provides a script template.
The template is installed in $SPARK_HOME/conf and is called spark-zos-started-tasks.sh.template. It needs to be copied and modified, and then put into the $SPARK_CONF_DIRwith your other scripts.
The template is modeled after the sample procedure (PROC) in JZOS Batch Launcher and Toolkit:Installation and User's Guide. The environment variables are loaded from this script, rather than setdirectly in the PROC as shown in the sample. In addition, this script loads the spark-env.sh script andsets up other environment variables as needed for the started tasks.
Procedure
1. Copy the template into your configuration directory. For example:
cp $SPARK_HOME/conf/spark-zos-started-tasks.sh.template $SPARK_CONF_DIR/spark-zos-started-tasks.sh
2. Update $SPARK_CONF_DIR/spark-zos-started-tasks.sh as necessary.
Define the RACF started profile for started tasksComplete this task to define the RACF started profile for started tasks.
About this task
From TSO, or from JCL that runs IKJEFT01, you must define the RACF profiles to the started tasks. Usethe names of the procedures for the started tasks for each cluster that you defined for your installation inplace of AZKMSTR, AZKWRKR, AZKHIST, and AZKSHUF in the following example procedure.
Procedure
1. Enter the following command to define the RACF started profile to the master started task:
RDEFINE STARTED AZKMSTR.* STDATA(USER(SPARKID) GROUP(SPKGRP))
2. Enter the following command to define the RACF started profile to the worker started task:
62 Open Data Analytics for z/OS : IBM Open Data Analytics for z/OS V1.1.0 Installation and CustomizationGuide

RDEFINE STARTED AZKWRKR.* STDATA(USER(SPARKID) GROUP(SPKGRP))
3. Enter the following command to define the RACF started profile to the history service:
RDEFINE STARTED AZKHIST.* STDATA(USER(SPARKID) GROUP(SPKGRP))
4. Enter the following command to define the RACF started profile to the shuffle service:
RDEFINE STARTED AZKSHUF.* STDATA(USER(SPARKID) GROUP(SPKGRP))
5. Enter the following command to set the RACF options previously specified:
SETROPTS RACLIST(STARTED) REFRESH
Results
After successfully completing the previous tasks, you should have a defined RACF started profile to themaster and worker started tasks, the history service, and the shuffle service.
Note: If you attempt to start AZKMSTR before you complete the steps in this task, you might be promptedwith the following messages:
SY1 s azkmstrSY1 IRR813I NO PROFILE WAS FOUND IN THE STARTED CLASS FOR AZKMSTR WITH JOBNAME AZKMSTR. RACF WILL USE ICHRIN03.SY1 $HASP100 AZKMSTR ON STCINRDRSY1 $HASP373 AZKMSTR STARTEDSY1 ICH408I JOB(AZKMSTR ) STEP(STARTING) CL(PROCESS ) OMVS SEGMENT NOT DEFINEDSY1 $HASP395 AZKMSTR ENDED
Note:
The master task and the worker task must be started with the same user unless the user used to start theworker task has UID(0).
Note:
If the master was started as a started task, the worker must be started as a started task.
WLM configurationConfigure the AZKMSTR and AZKWRKR started tasks to use the same service class that you previouslyspecified in the Spark master and worker daemons. For more information about WLM service classes forSpark, see “Defining WLM service classes for Spark” on page 77. For more information that describes aprocedure for defining a started task to a WLM service class, see Step 2 of “Configuring WorkloadManager (WLM)” on page 87.
You must define both the master and worker started task procedures to a WLM service class for everycluster for which started task procedures were created.
Stopping the started tasksThe started tasks are stopped by using the following stop commands with no parameters.
stop azkwrkrstop azkmstrstop azkhiststop azkshuf
If a worker is started for a master task, the worker task is stopped when the master task is stopped. Thesystem looks at the file that is created when the worker is started for this instance, which contains theprocess ID for the worker process. It does so by using the same naming convention that the shell scriptsuse (identified by SPARK_IDENT_STRING), and ensures that the worker is either a java process orJVMLDM86 (JZOS).
Chapter 4. Customizing your environment for z/OS Spark 63
When the worker is stopped due to the master being stopped, the worker process is ended immediately.This action results in a return code of 0143 in the HASP395 message on the console when the workerstops. This return code is normal and appears as seen in the following example.
stop azkmstr$HASP395 AZKWRKR ENDED - RC=0143$HASP395 AZKMSTR ENDED - RC=0000
Canceling the started tasksThe started tasks can be canceled by using the following cancel command:
cancel azkwrkrcancel azkmstrcancel azkhistcancel azkshuf
If a worker is started for a master task and the master task is canceled, the worker task is not ended andis left in a state with no master associated to it. The worker task is reattached upon the restart of themaster or can be manually ended by stopping or canceling it.
Automating the starting of tasksComplete this task if you want to automate the starting of tasks.
About this taskThe following one-time steps are optional, but allow the following benefits:
• Allows automation products to start and stop the master and worker with no parameters, with theassurance that the worker is started using the master port for which the master is actually started.
• Allows the worker to retry starting for a period of time if the master is not yet started.
Procedure
1. If you have modified the $SPARK_CONF_DIR/log4j.properties file, complete the following tasks.If you do not have a $SPARK_CONF_DIR/log4j.properties file, no action is required.a) Ensure that log4j.rootCategory is set to INFO, DEBUG, or ALL, and that the appender isconsole such as, log4j.rootCategory=INFO, console.
b) The log4j.appender.console.target parameter can be specified as either System.err orSystem.out if the procedure previously created for starting the master uses the correctcorresponding card (STDERR or STDOUT) as described in the next step.
For more information, see “Define the routing of the log output” on page 61.
Note: log4j.appender.console.target=System.err is the default and the followingexamples, which refer to the sample procedure hlq.SAZKSAMP(AZKMSTR), use STDERR. The high-level qualifier (hlq) depends on your installation. In this document, the default high-level qualifier isAZK.
2. Change the DD statement in the master procedures for each cluster to specify a unique z/OS UNIXSystem Services file in an existing directory. If you specifiedlog4j.appender.console.target=System.err in the previous step, change the DD statementto STDERR. If you specified log4j.appender.console.target=System.out in the previous step,change the DD statement to STDOUT. An example is provided in the sample procedure, AZKMSTR,which shows the STDERR that can be used for a cluster that is denoted as Cluster1.
Note: It is recommended, but not required, that you use the directory that you specified for the$SPARK_LOG_DIR environment variable in the spark-env.sh file. If you don't use the
64 Open Data Analytics for z/OS : IBM Open Data Analytics for z/OS V1.1.0 Installation and CustomizationGuide

$SPARK_LOG_DIR directory path, the path must exist and SPARKID must have authority to read andwrite to it.
//STDERR DD PATH='/var/spark/logs/azkmstrCluster1.err',// PATHOPTS=(OWRONLY,OCREAT,OTRUNC),PATHMODE=SIRWXU
3. Set and export the SPARK_ZOS_MASTER_LOG environment variable in the worker procedure for eachcluster, to the same z/OS UNIX System Services file that is specified in the corresponding masterprocedure. An example is provided in the sample procedure, AZKWRKR. The following example showsthe setting for the master for a cluster that is denoted as Cluster1.
export SPARK_ZOS_MASTER_LOG=/var/spark/logs/azkmstrCluster1.err
ResultsWhen the master is started with no parameters, values are either taken from the environment variables, ifset, or the defaults are used. SPARK_MASTER_HOST does not have a default, and therefore must be set inthe spark-env.sh file.
When the master is started by using the automation technique for started tasks, the INFO messages arewritten to the file that is specified in Step “2” on page 64. These messages include the port number towhich the master is bound, the master host, and the process ID for the master.
When the worker is started with no parameters, it reads the file that is specified inSPARK_ZOS_MASTER_LOG and finds the port number and any other values that are needed to ensure thatthe master is started. This is the same file that is written by the master when the cluster is started. If themaster is not started, it retries for a period of time to allow the master time to start.
Configuring memory and CPU optionsComplete this task to configure the memory and CPU options for Apache Spark.
About this task
Apache Spark is designed to consume a large amount of CPU and memory resources in order to achievehigh performance. Therefore, it is essential to carefully configure the Spark resource settings, especiallythose for CPU and memory consumption, so that Spark applications can achieve maximum performancewithout adversely impacting other workloads.
Setting the memory and CPU options for your Spark workload can be an ongoing task. It is good practiceto regularly monitor the actual resource consumption and identify potential bottlenecks by using thevariety of monitoring tools described in Chapter 14, “Resource monitoring for Apache Spark,” on page135. After obtaining performance measurements, you can fine tune your Spark workload.
For a quick reference to various Spark and z/OS system configuration options that you might wish toconsider when tuning your environment for Open Data Analytics for z/OS, see Appendix D, “Memory andCPU configuration options,” on page 169.
Procedure
1. Determine the system resources that Spark needs.
Before you modify the memory and CPU settings for your Spark cluster, determine an amount ofresources to give to your Spark workload. For a detailed discussion about sizing Spark workloads, seeResource Tuning Recommendations for IBM z/OS Platform for Apache Spark (https://www.ibm.com/support/techdocs/atsmastr.nsf/WebIndex/WP102684).
a) Determine the amount of memory and processor that your Spark cluster is allowed to use.
When assessing the amount of memory to allot for Apache Spark, consider the followingparameters:
Chapter 4. Customizing your environment for z/OS Spark 65
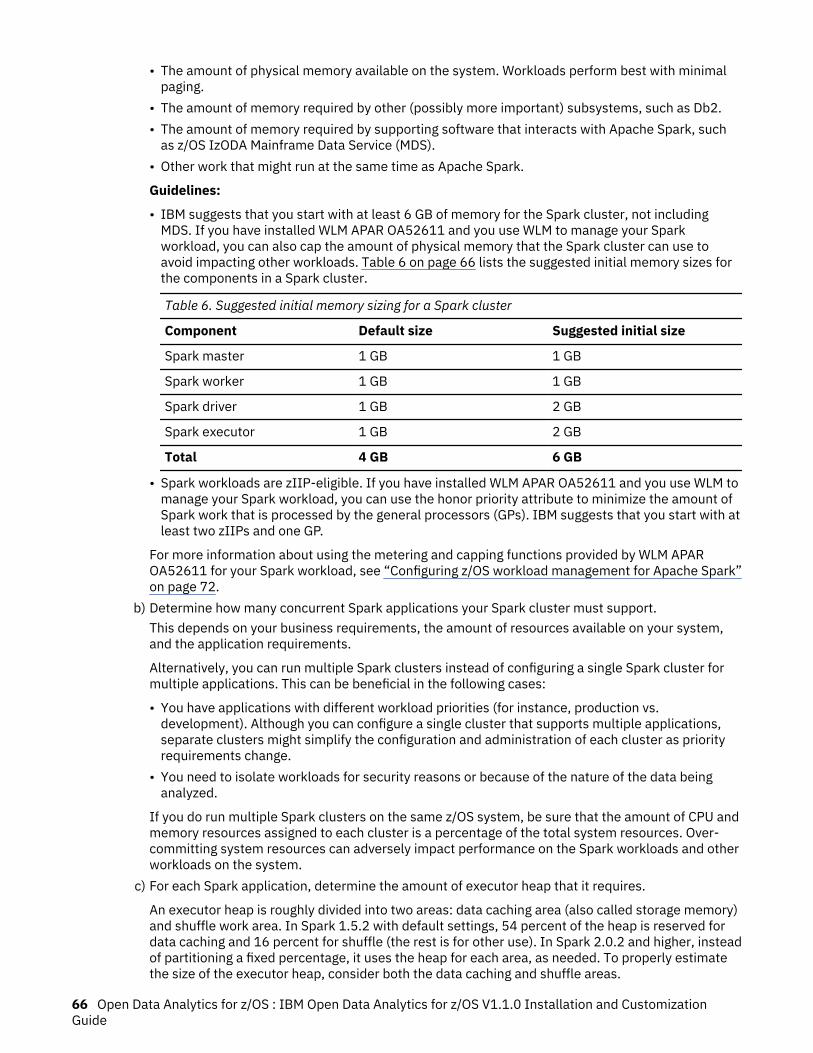
• The amount of physical memory available on the system. Workloads perform best with minimalpaging.
• The amount of memory required by other (possibly more important) subsystems, such as Db2.• The amount of memory required by supporting software that interacts with Apache Spark, such
as z/OS IzODA Mainframe Data Service (MDS).• Other work that might run at the same time as Apache Spark.
Guidelines:
• IBM suggests that you start with at least 6 GB of memory for the Spark cluster, not includingMDS. If you have installed WLM APAR OA52611 and you use WLM to manage your Sparkworkload, you can also cap the amount of physical memory that the Spark cluster can use toavoid impacting other workloads. Table 6 on page 66 lists the suggested initial memory sizes forthe components in a Spark cluster.
Table 6. Suggested initial memory sizing for a Spark cluster
Component Default size Suggested initial size
Spark master 1 GB 1 GB
Spark worker 1 GB 1 GB
Spark driver 1 GB 2 GB
Spark executor 1 GB 2 GB
Total 4 GB 6 GB
• Spark workloads are zIIP-eligible. If you have installed WLM APAR OA52611 and you use WLM tomanage your Spark workload, you can use the honor priority attribute to minimize the amount ofSpark work that is processed by the general processors (GPs). IBM suggests that you start with atleast two zIIPs and one GP.
For more information about using the metering and capping functions provided by WLM APAROA52611 for your Spark workload, see “Configuring z/OS workload management for Apache Spark”on page 72.
b) Determine how many concurrent Spark applications your Spark cluster must support.This depends on your business requirements, the amount of resources available on your system,and the application requirements.
Alternatively, you can run multiple Spark clusters instead of configuring a single Spark cluster formultiple applications. This can be beneficial in the following cases:
• You have applications with different workload priorities (for instance, production vs.development). Although you can configure a single cluster that supports multiple applications,separate clusters might simplify the configuration and administration of each cluster as priorityrequirements change.
• You need to isolate workloads for security reasons or because of the nature of the data beinganalyzed.
If you do run multiple Spark clusters on the same z/OS system, be sure that the amount of CPU andmemory resources assigned to each cluster is a percentage of the total system resources. Over-committing system resources can adversely impact performance on the Spark workloads and otherworkloads on the system.
c) For each Spark application, determine the amount of executor heap that it requires.
An executor heap is roughly divided into two areas: data caching area (also called storage memory)and shuffle work area. In Spark 1.5.2 with default settings, 54 percent of the heap is reserved fordata caching and 16 percent for shuffle (the rest is for other use). In Spark 2.0.2 and higher, insteadof partitioning a fixed percentage, it uses the heap for each area, as needed. To properly estimatethe size of the executor heap, consider both the data caching and shuffle areas.
66 Open Data Analytics for z/OS : IBM Open Data Analytics for z/OS V1.1.0 Installation and CustomizationGuide
To achieve optimal results, it is best to cache all of the data that Spark needs in memory to avoidcostly disk I/O. When raw data is encapsulated in a Java object, the object is often larger than thesize of the data that it holds. This expansion factor is a key element to consider when projectinghow large the data cache should be. Ideally, the expansion factor is measured by persisting sampledata to an RDD or DataFrame and using the Storage tab on the application web UI to find the in-memory size. When it is not possible to measure the actual expansion factor for a set of data,choosing a value from 2x to 5x of the raw data size for RDDs, and 1x to 2x of the raw data size forDataFrames should provide a reasonable estimate. Without considering the shuffle work area, youcan determine the preliminary heap size using the equations:
in-memory data size = raw data size × estimated or measured expansion factor
executor heap = in-memory data size ÷ fraction of heap reserved for cache
The amount of memory needed for the shuffle work area depends entirely on the application.Shuffling happens when the application issues operations like groupByKey that requires data to betransferred. When the amount of shuffle memory is not adequate for the required shuffleoperations, Spark spills the excess data to disk, which has a negative impact on performance. Youcan find occurrences and amounts of shuffle spills executor stderr log file, such as in the followingexample:
INFO ExternalSorter: Thread 106 spilling in-memory map of 824.3 MB to disk (1 time so far)INFO ExternalSorter: Thread 102 spilling in-memory map of 824.3 MB to disk (1 time so far)INFO ExternalSorter: Thread 116 spilling in-memory map of 824.3 MB to disk (1 time so far)
For more information about Spark 2.3.4 memory management settings, see "MemoryManagement" in http://spark.apache.org/docs/2.3.4/configuration.html.
d) Determine the number of executors for each application.To do this, consider the following points:
• There is some startup cost associated with initializing a new Java virtual machine. Each executorruns within its own JVM, so the total overhead associated with JVM startup increases with eachadditional executor.
• Garbage collection (GC) costs are generally higher for large heaps. IBM Java can typically runwith up to 100 GB heap with little GC overhead. If your application requires larger heap space,consider using multiple executors with smaller heaps. You can use the Spark application web UIto monitor the time spent in garbage collection.
• Efficient Spark applications are written to allow a high degree of parallelism. The use of multipleexecutors can help avoid the contention that can occur when too many threads execute inparallel within the same JVM.
• There is increased overhead when multiple executors need to transfer data to each other.e) For each Spark application, determine the size of the driver JVM heap. This only applies if your
driver runs on a z/OS system.
The driver heap should be large enough to hold the application results returned from the executors.Applications that use actions like collect or take to get back a sizable amount of data mayrequire large driver heaps. If the returned data exceeds the size of the driver heap, the driver JVMfails with an out-of-memory error. You can use the spark.driver.memory andspark.driver.maxResultSize Spark properties to tune the driver heap size and the maximumsize of the result set returned to the driver.
The driver process can either run on behalf of the user invoking the Spark application, inheriting theuser's z/OS resource limits (client deploy mode), or it can use the backend cluster resources(cluster deploy mode). Generally, application developers tend to use client deploy mode whilebuilding their applications (for instance, using Jupyter notebooks or interactive spark-shell).Then, production-ready applications are submitted in cluster deploy mode.
If the Spark driver runs in cluster deploy mode, the driver is considered part of the cluster;therefore, the resources it uses (such as spark.driver.memory) are taken from the total amountallotted for the Spark cluster.
Chapter 4. Customizing your environment for z/OS Spark 67
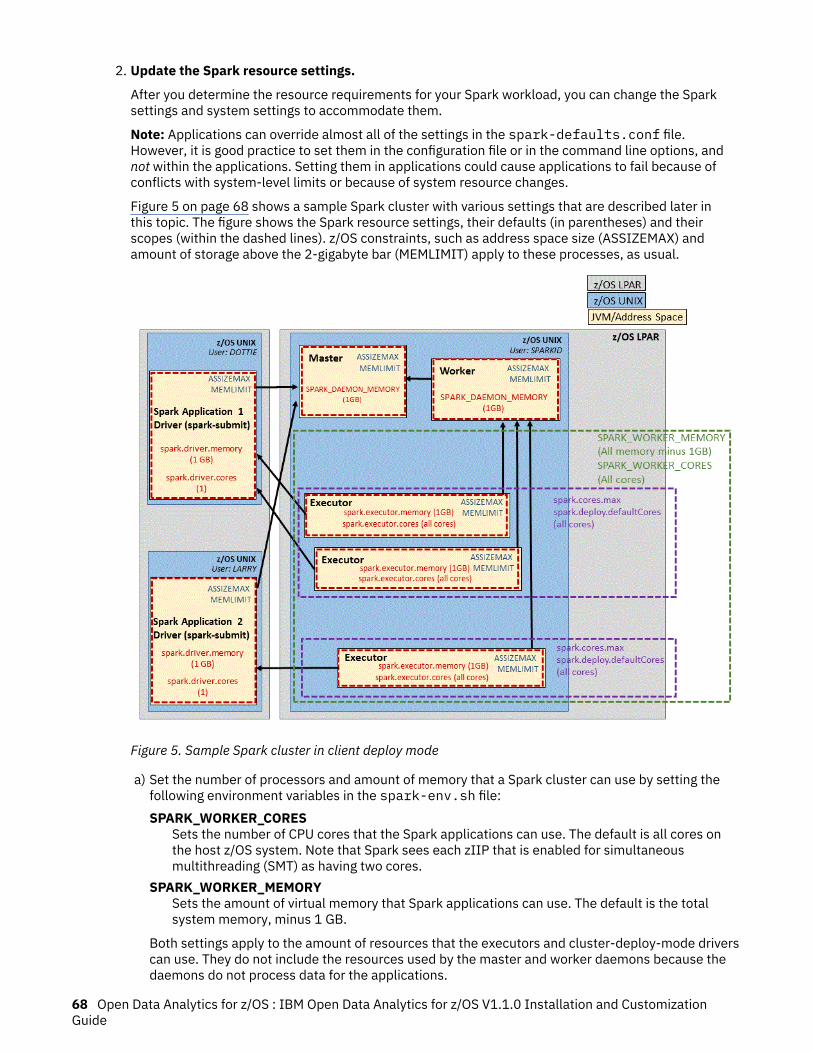
2. Update the Spark resource settings.
After you determine the resource requirements for your Spark workload, you can change the Sparksettings and system settings to accommodate them.
Note: Applications can override almost all of the settings in the spark-defaults.conf file.However, it is good practice to set them in the configuration file or in the command line options, andnot within the applications. Setting them in applications could cause applications to fail because ofconflicts with system-level limits or because of system resource changes.
Figure 5 on page 68 shows a sample Spark cluster with various settings that are described later inthis topic. The figure shows the Spark resource settings, their defaults (in parentheses) and theirscopes (within the dashed lines). z/OS constraints, such as address space size (ASSIZEMAX) andamount of storage above the 2-gigabyte bar (MEMLIMIT) apply to these processes, as usual.
Figure 5. Sample Spark cluster in client deploy mode
a) Set the number of processors and amount of memory that a Spark cluster can use by setting thefollowing environment variables in the spark-env.sh file:SPARK_WORKER_CORES
Sets the number of CPU cores that the Spark applications can use. The default is all cores onthe host z/OS system. Note that Spark sees each zIIP that is enabled for simultaneousmultithreading (SMT) as having two cores.
SPARK_WORKER_MEMORYSets the amount of virtual memory that Spark applications can use. The default is the totalsystem memory, minus 1 GB.
Both settings apply to the amount of resources that the executors and cluster-deploy-mode driverscan use. They do not include the resources used by the master and worker daemons because thedaemons do not process data for the applications.
68 Open Data Analytics for z/OS : IBM Open Data Analytics for z/OS V1.1.0 Installation and CustomizationGuide

b) Set the number of cores that a Spark application (including its executors and cluster-deploy-modedrivers) can use by setting the following properties in the spark-defaults.conf file:spark.deploy.defaultCores
Sets the default number of cores to give to an application if spark.cores.max is not set. Thedefault is all the cores on the system.
spark.cores.maxSets the maximum number of cores to give to an application. The default is to use thespark.deploy.defaultCores value.
c) Set the number of concurrent applications that a Spark cluster can support.
This number is controlled by the amount of resources allotted to the Spark cluster and how muchcan be used by each application.
Assuming there is enough memory, the number of concurrent applications that a Spark cluster cansupport is expressed by the following equation:
SPARK_WORKER_CORES ÷ spark.cores.max (or spark.deploy.defaultCores)
Example: If you set SPARK_WORKER_CORES=15 and spark.cores.max=5, the Spark cluster canallow up to 15 ÷ 5 = 3 applications to run concurrently, assuming there is enough memory for all ofthem.
There is no Spark setting that controls the amount of memory that each application can use. Toensure that the Spark cluster can support the desired number of concurrent applications, setSPARK_WORKER_MEMORY to an appropriate value. See step “2.g” on page 70 for moreinformation.
d) Set the amount of resources that each executor can use by setting the following properties in thespark-defaults.conf file:spark.executor.cores
Sets the number of cores that each executor can use. The default is all CPU cores on thesystem.
spark.executor.memorySets the amount of memory that each executor can use. The default is 1 GB.
e) Set the amount of resources that each driver can use by setting the following properties in thespark-defaults.conf file:spark.driver.cores
Sets the number of cores that each driver can use. The default is 1.spark.driver.memory
Sets the amount of memory that each driver can use. The default is 1 GB.spark.driver.maxResultSize
Sets a limit on the total size of serialized results of all partitions for each Spark action (such ascollect). Jobs will fail if the size of the results exceeds this limit; however, a high limit cancause out-of-memory errors in the driver. the default is 1 GB.
f) Set the number of executors for each Spark application.
This number depends on the amount of resources allotted to the application, and the resourcerequirements of the executor and driver (if running in cluster deploy mode).
As discussed earlier, you can use spark.cores.max (or spark.deploy.defaultCores) to setthe number of cores that an application can use. Assuming there is enough memory, the number ofexecutors that Spark will spawn for each application is expressed by the following equation:
(spark.cores.max (or spark.deploy.defaultCores) − spark.driver.cores (if in clusterdeploy mode)) ÷ spark.executor.cores
Example: If you set spark.cores.max=5, spark.driver.cores=1, andspark.executor.cores=2 and run in cluster deploy mode, the Spark worker spawns (5 − 1) ÷ 2= 2 executors.
Chapter 4. Customizing your environment for z/OS Spark 69
g) Use the following set of equations to determine a proper setting for SPARK_WORKER_MEMORY toensure that there is enough memory for all of the executors and drivers:
executor_per_app = (spark.cores.max (or spark.deploy.defaultCores) −spark.driver.cores (if in cluster deploy mode)) ÷ spark.executor.cores
app_per_cluster = SPARK_WORKER_CORES ÷ spark.cores.max (orspark.deploy.defaultCores)
SPARK_WORKER_MEMORY ≥ (spark.executor.memory × executor_per_app × app_per_cluster) +spark.driver.memory (if in cluster deploy mode)
h) Set the amount of memory to allocate to each daemon-like process—specifically, the master,worker, and the optional history server— by setting the SPARK_DAEMON_MEMORY environmentvariable in the spark-env.sh file.The default is 1 GB and is satisfactory for most workloads.
There is no corresponding processor setting for the Spark daemon processes.3. Update system resource settings.
In addition to the Spark settings, there are system-level settings that are required or recommended foryour Spark workload to function properly and efficiently.
Continue by determining and setting values for the system-level settings shown in Figure 5 on page68.
a) Set _BPX_SHAREAS=NO.
The worker process spawns the executor processes. If the _BPX_SHAREAS environment variable isset to YES, the new executor process runs in the same address space as its parent. If_BPX_SHAREAS is set to NO, the executor runs in its own address space. Because executorprocesses typically consume a large amount of system resources, IBM suggests that you set_BPX_SHAREAS=NO for easier resource management and isolation, and to increase availableresources for the executor.
b) Set the MEMLIMIT value.
z/OS uses the MEMLIMIT setting to control the amount of 64-bit virtual memory that an addressspace can use. For the user ID that starts the Spark cluster, the MEMLIMIT value must be set to thelargest JVM heap size (typically, spark.executor.memory) plus the amount of native memoryneeded. For the user ID that submits the application to the cluster, the MEMLIMIT must be set tospark.driver.memory plus the amount of native memory needed. The required amount ofnative memory varies by application. 1 GB is typically needed if the JVM heap size is less than 16GB and 2 GB is typically needed if the JVM heap size is greater than 16 GB.
Spark has the ability to use off-heap memory, which is configured through thespark.memory.offHeap.enabled Spark property and is disabled by default. If you enable off-heap memory, the MEMLIMIT value must also account for the amount of off-heap memory that youset through the spark.memory.offHeap.size property in the spark-defaults.conf file.
If you run Spark in local mode, the MEMLIMIT needs to be higher as all the components run in thesame JVM; 6 GB should be a sufficient minimum value for local mode.
You can set the MEMLIMIT value in any of the following ways:
• Recommended: Set the MEMLIMIT value in the OMVS segment of the security profile for the userID that you use to start Spark. For instance, you can use the RACF ALTUSER command to set theMEMLIMIT for a user ID. For more information about the ALTUSER command, see "ALTUSER(Alter user profile)" in z/OS Security Server RACF Command Language Reference.
• Specify the MEMLIMIT parameter on the JCL JOB or EXEC statement, which overrides theMEMLIMIT value in the user's security profile, if you start your Spark cluster from z/OS batch. Formore information, see "MEMLIMIT parameter" in z/OS MVS JCL Reference.
70 Open Data Analytics for z/OS : IBM Open Data Analytics for z/OS V1.1.0 Installation and CustomizationGuide

• Use the IEFUSI exit, which overrides all of the other MEMLIMIT settings. Therefore, if you use theIEFUSI exit, be sure to make exceptions for Spark jobs. For more information, see "IEFUSI - StepInitiation Exit" in z/OS MVS Installation Exits.
• Set the system default in the SMFPRMxx member of parmlib. The system default is used if noMEMLIMIT value has been set elsewhere. The default value is 2 GB. You can use theDISPLAY SMF,O operator command to display the current settings. For more information, see"SMFPRMxx (system management facilities (SMF) parameters)" in z/OS MVS Initialization andTuning Reference.
To check the MEMLIMIT setting for a specific user ID, you can issue the ulimit command in thez/OS UNIX shell while logged in with that user ID. The following example shows the commandresponse:
/bin/ulimit -a core file 8192bcpu time unlimited data size unlimited file size unlimited stack size unlimited file descriptors 1500 address space unlimited memory above bar 16384m
c) Ensure that the settings in your BPXPRMxx parmlib, especially the MAXASSIZE parameter, meetthe suggested minimums for Java.
For the suggested minimum values, see Working with BPXPRM settings (https://www.ibm.com/support/knowledgecenter/SSYKE2_8.0.0/com.ibm.java.zos.80.doc/user/zos_bpxprm.html) in IBMSDK, Java Technology Edition z/OS User Guide (www.ibm.com/support/knowledgecenter/SSYKE2_8.0.0/pdf/en/sdkandruntimeguide.zos.80_8.0.pdf). For more information about theBPXPRMxx member, see "BPXPRMxx (z/OS UNIX System Services parameters)" in z/OS MVSInitialization and Tuning Reference.
You can set some of these parameters at the user ID level, such as the maximum address spacesize (the ASSIZEMAX value in the OMVS segment of the security profile for the user ID), by usingthe RACF ALTUSER command. For more information about the ALTUSER command, see "ALTUSER(Alter user profile)" in z/OS Security Server RACF Command Language Reference.
d) Ensure that you have enough extended common service area (ECSA) and extended system queuearea (ESQA) memory configured on your system to account for Spark usage.
For instance, Spark memory-maps large files to improve performance. However, the use of memorymap services can consume a large amount of ESQA memory. For more information, see "Evaluatingvirtual memory needs" in z/OS UNIX System Services Planning.
You can use the RMF reports to monitor the ECSA and ESQA usage by your Spark cluster. For moreinformation, see Chapter 14, “Resource monitoring for Apache Spark,” on page 135.
e) Consider using z/OS workload management (WLM) to manage Spark workload. With WLM, youdefine performance goals and assign a business importance to each goal. The system then decideshow much resource, such as CPU or memory, to give to a workload to meet the goal. WLMconstantly monitors the system and adapts processing to meet the goals. You can also use WLM tocap the maximum amount of CPU time and physical memory used by Spark. For more information,see “Configuring z/OS workload management for Apache Spark” on page 72.
f) Consider using simultaneous multithreading (SMT) to improve throughput. Beginning with IBMz13®, you can enable SMT on zIIPs. Open Data Analytics for z/OS is zIIP-eligible and might benefitfrom SMT. When executing on a system configured with sufficient zIIP capacity, the benchmarksdemonstrated in Resource Tuning Recommendations for IBM z/OS Platform for Apache Spark(https://www.ibm.com/support/techdocs/atsmastr.nsf/WebIndex/WP102684) showed throughputimprovements of 15 to 20 percent when SMT was enabled.
g) Ensure that the system has enough large pages to accommodate all requests.
When available, 1M pageable large pages are the default size for the object heap and code cachefor Java on z/OS. Large pages provide performance improvements to applications such as Spark
Chapter 4. Customizing your environment for z/OS Spark 71

that allocate a large amount of memory. The use of 1M pageable large pages requires IBMzEnterprise EC12, or later, with the Flash Express feature (#0402).
When the system's supply of pageable 1M pages is depleted, available 1M pages from the LFAREAare used to back pageable 1M pages. Adjust your LFAREA to account for the Spark JVMs. You canset the size of the LFAREA in the IEASYSxx member of parmlib.
For more information about configuring large pages for Java, see Configuring large page memoryallocation (https://www.ibm.com/support/knowledgecenter/SSYKE2_8.0.0/com.ibm.java.zos.80.doc/user/alloc_large_page.html). For more information about the IEASYSxxparmlib member, see "IEASYSxx (system parameter list)" in z/OS MVS Initialization and TuningReference.
What to do next
When you have completed configuring memory and CPU options, continue with “Configuring z/OSworkload management for Apache Spark” on page 72.
Configuring z/OS workload management for Apache SparkOne of the strengths of the IBM Z platform and the z/OS operating system is the ability to run multipleworkloads at the same time within one z/OS image or across a Parallel Sysplex®. Workloads usually havedifferent, often competing, performance and resource requirements that must be balanced to make thebest use of an installation's resources, maintain the highest possible throughput, and achieve the bestpossible system responsiveness. The function that makes this possible is dynamic workloadmanagement, which is implemented in the workload management component of z/OS.
With z/OS workload management (WLM), you define performance goals and assign a business importanceto each goal. You define the goals for work in business terms, and the system decides how muchresource, such as CPU or memory, to assign so as to meet the goal. WLM constantly monitors the systemand adapts processing to meet the goals.
You can configure WLM to manage Open Data Analytics for z/OS workloads to optimize systemperformance.
Note: The following topics discuss some new functions in Open Data Analytics for z/OS, including thememory limit and honor priority attributes in WLM. The IBM.Function.MemoryCapping fix category andthe MEMCAP/K keyword in RETAIN identify the PTFs that enable these new functions.
Overview of Apache Spark ProcessesApache Spark uses a master/worker architecture. A Spark cluster typically has multiple processes, eachrunning in its own Java virtual machine (JVM).
The following list describes the most significant processes:
• The master daemon allocates resources across applications.• The worker daemon monitors and reports resource availability and, when directed by the master,
spawns executors. The worker also monitors the liveness and resource consumption of the executors.• The executor performs the actual computation and data processing for the application.• The driver program runs the main function of the application and creates a SparkContext.
The master and worker processes are generally lightweight. By contrast, the executors attempt to use allavailable system resources by default. You can use the spark-defaults.conf file, spark-env.sh file,and command line parameters to constrain the number of CPU cores and amount of memory that eachexecutor can consume. These parameters, however, are static and require that the Spark processes berestarted for changes to take effect. (For more information about the Apache Spark configuration options,see http://spark.apache.org/docs/2.3.4/configuration.html. For more information about tuning theApache Spark cluster, see http://spark.apache.org/docs/2.3.4/tuning.html.)
72 Open Data Analytics for z/OS : IBM Open Data Analytics for z/OS V1.1.0 Installation and CustomizationGuide
The worker process spawns the executor processes. If the _BPX_SHAREAS environment variable is set toYES, the new executor process will run in the same address space as its parent. If _BPX_SHAREAS is setto NO, the executor will run in its own address space. Because executor processes usually consume alarge amount of system resources, IBM suggests that you set _BPX_SHAREAS=NO for easier resourcemanagement and isolation, and to increase available resources for the executor.
WLM provides a more dynamic way to manage the performance of your Spark workloads.
Assigning job names to Spark processesAssigning unique job names to Spark processes helps to identify the purpose of each process, correlate aprocess to an application, and facilitate the grouping of processes into a WLM service class.
You can use Spark properties and the _BPX_JOBNAME environment variable to assign job names toexecutors, drivers, and other Spark processes.
Note: The user ID of the Spark worker daemon requires READ access to the BPX.JOBNAME profile in theFACILITY class to change the job names of the executors and drivers.
Note: A specification that yields a job name that is more than 8 characters, raises an exception.
Setting the job name of the executors
A system programmer can specify the spark.zos.executor.jobname.prefix or thespark.zos.executor.jobname.template property in the spark-defaults.conf configuration fileto define a job name.
The APAR PI89136 is required to use spark.zos.executor.jobname.template.
If spark.executorEnv._BPX_JOBNAME is specified in the spark-defaults.conf file, the_BPX_JOBNAME environment variable takes precedence. Only the executor job name or job name prefixspecified in the spark-defaults.conf file is honored; any such settings that are specified in anapplication or on the command line are ignored.
Using the spark.zos.executor.jobname.prefix
A system programmer can specify the spark.zos.executor.jobname.prefix property in thespark-defaults.conf configuration file to define a job name prefix which, when combined with someor all of an application instance number, forms the job name of the executors. An application instancenumber is the last four digits of an application ID and is unique to each application within a Spark cluster.Application IDs appear on both the master and application web UIs. The actual job names of theexecutors will consist of the defined prefix plus as many digits of the corresponding application instancenumber, starting from the last (right-most) digit, as can fit to form an 8-character job name.
For example, if you specify spark.zos.executor.jobname.prefix=SPARKX, the job name of theexecutors for application 0001 will be SPARKX01. Since z/OS job names are limited to eight characters,no special character is used to differentiate separate executor instances for the same application; that is,all executors for application 0001 will have the same job name.
The spark-defaults.conf file contains a default setting ofspark.zos.executor.jobname.prefix=ODASX. If no executor prefix is specified in the spark-defaults.conf file, the job names of the executors follow the z/OS UNIX default of a user ID with anumeric suffix. For details, see “Using _BPX_JOBNAME to assign job names to Spark processes” on page75.
Using the spark.zos.executor.jobname.template
A system programmer can specify a template for generating job names by using thespark.zos.executor.jobname.template property in the spark-defaults.conf configurationfile. The template property provides further customization when you are generating job names forexecutors. The template uses variables that can be substituted for several pieces of information about thework that the executor is running. These variables include cluster, application, and executor.cluster
Chapter 4. Customizing your environment for z/OS Spark 73

The number that is specified by spark.zos.cluster.instanceNumber.
Default length: 1
applicationThe application instance number.
Default length: 4
executorThe executor instance number.
Default length: 1
A number of digits can be specified for each, for example:<executor:2>
The least 2 significant digits of the executor instance number are used.
For example, ODA<cluster:1><application:2><executor:2> where cluster number is 2,application number is 0312, and executor is 0000, would yield ODA21200.
Note: The spark.zos.executor.jobname.template property supersedesspark.zos.executor.jobname.prefix options.
Setting the job name of the driver in cluster deploy mode
A system programmer can specify the spark.zos.driver.jobname.prefix orspark.zos.driver.jobname.template property in the spark-defaults.conf configuration file todefine a job name.
The APAR PI89136 is required to use spark.zos.driver.jobname.template.
Only the driver job name prefix or job name template setting that is specified in the spark-defaults.conf file is honored; any such settings that are specified in an application or on the commandline are ignored.
Using the spark.zos.driver.jobname.prefix
A system programmer can specify the spark.zos.driver.jobname.prefix property in the spark-defaults.conf configuration file to define a job name prefix which, when combined with some or all ofa driver instance number, forms the job name of the driver in cluster deploy mode. A driver instancenumber is the last four digits of a driver ID and is unique to each driver within a Spark cluster. The driverIDs of cluster deploy-mode applications appears on the master web UI. The actual job name of the driverwill consist of the defined prefix plus as many digits of the corresponding driver instance number, startingfrom the last (right-most) digit, as can fit to form an 8-character job name.
For example, if you specify spark.zos.driver.jobname.prefix=SPARKD, the job name of the driverwith driver instance number 0001 will be SPARKD01.
Note: The driver prefix does not apply to drivers in client deploy mode since client-deploy-mode driverprocesses are already up and running before the configuration file is read; thus, their job names cannot bechanged.
The spark-defaults.conf file contains a default setting ofspark.zos.driver.jobname.prefix=ODASD. If no driver prefix is specified in the spark-defaults.conf file, the job name of the driver in cluster deploy mode follows the z/OS UNIX default of auser ID with a numeric suffix.
Using the spark.zos.driver.jobname.template
A system programmer can specify a template for generating job names by using thespark.zos.driver.jobname.template property in the spark-defaults.conf configuration file.The template property provides further customization when you are generating job names for the driver.The template uses variables that can be substituted for several pieces of information about the work thatthe driver is running. These variables include cluster and driver.
74 Open Data Analytics for z/OS : IBM Open Data Analytics for z/OS V1.1.0 Installation and CustomizationGuide

clusterThe number that is specified by spark.zos.cluster.instanceNumber.
Default length: 1
driverThe driver instance number.
Default length: 4
For example, ODA<cluster:1><driver:2> where cluster number is 6 and driver number is 0312,would yield ODA612.
Note: The spark.zos.driver.jobname.template property supersedesspark.zos.driver.jobname.prefix options.
Using _BPX_JOBNAME to assign job names to Spark processes
When a new z/OS UNIX process is started, it runs in a z/OS UNIX initiator (a BPXAS address space). Bydefault, this address space has an assigned job name of userIDx, where userID is the user ID that startedthe process, and x is a decimal number. You can use the _BPX_JOBNAME environment variable to set thejob name of the new process. Assigning a unique job name to each Spark process helps to identify thepurpose of the process and makes it easier to group processes into a WLM service class.
The following example shows a portion of a script that assigns different job names for the master andworker processes before starting them:
_BPX_JOBNAME='ODASM1A' /usr/lpp/IBM/izoda/spark/spark23x/sbin/start-master.shsleep 5export _BPX_SHAREAS=NO_BPX_JOBNAME='ODASW1A' /usr/lpp/IBM/izoda/spark/spark23x/sbin/start-slave.sh spark://127.0.0.1:7077
A system programmer can set the job name of the executor address space by settingspark.executorEnv._BPX_JOBNAME in the spark-defaults.conf configuration file as in thefollowing example:
spark.executorEnv._BPX_JOBNAME ODASX1A
If the job name of the executor is set in this manner, all Spark executors will have the same job name.
Note: Only the spark.executorEnv._BPX_JOBNAME setting specified in the spark-defaults.conffile is honored. Any such settings that are specified in an application or on the command line are ignored.
Tip: If you use the Jupyter Kernel Gateway with Apache Toree to access Spark, it is good practice to usethe same naming convention for the Toree instances. For instance, if you set _BPX_JOBNAME=ODASD forthe Toree instances and set spark.zos.executor.jobname.prefix=ODASX for the executors andyou have client authentication enabled, you can then classify the driver and the executors for userElpida's application by using transaction name and user ID qualifiers, such as TN=ODAS* and UI=Elpida.
In addition to the master, worker, driver, and executors, your Spark environment may have additionalprocesses, such as the Spark history server. You can also use _BPX_JOBNAME to assign unique job namesto those processes.
Setting _BPX_JOBNAME requires appropriate privileges. For more information about _BPX environmentvariables, see z/OS UNIX System Services Planning.
Overview of WLM classificationYou specify goals for the WLM services for Open Data Analytics for z/OS work in the same manner as forother z/OS workloads, by associating the work with a service class. In the service class, you assign goalsto the work, along with the relative importance of each goal. You can also assign limits for CPU andmemory capacity to be available to a service class. To associate incoming work with a particular serviceclass, you must also define classification rules.
Chapter 4. Customizing your environment for z/OS Spark 75

Example of a WLM classification scenario
Figure 6 on page 76 shows a logical view of a the WLM configuration for a sample classification scenario.
Figure 6. Logical view of a sample WLM classification scenario
In Figure 6 on page 76, four service classes are defined: ODAS1SCH, ODAS2SCH, ODAS2SCL, andODAS2SCD.
• The ODAS2SCH and ODAS2SCL service classes are associated with the ODAS2RGH resource group,which allows 50 percent GP capacity and has no memory limit.
• The ODAS2SCD service class is associated with the ODAS2RGL resource group, which allows only 10percent GP capacity and has a memory limit of 20 GB.
Four classification rules are defined that classify work as follows:
• All processes in Spark cluster 1, whose names match the ODAS%1* pattern, are classified into theODAS1SCH service class. User Angie's executor receives its job name by using the _BPX_JOBNAMEenvironment variable.
• Master and worker processes in Spark cluster 2, whose names match the ODAS%2* pattern, areclassified into the ODAS2SCH service class.
• The executor for user Jill in Spark cluster 2 has a job name of ODASX002 and is classified into theODAS2SCL service class. The job name is generated by specifying thespark.zos.executor.jobname.prefix property.
• The executor for user Bob in Spark cluster 2 has a job name of ODASX003 and is classified into theODAS2SCD service class. The job name is generated by specifying thespark.zos.executor.jobname.prefix property.
76 Open Data Analytics for z/OS : IBM Open Data Analytics for z/OS V1.1.0 Installation and CustomizationGuide
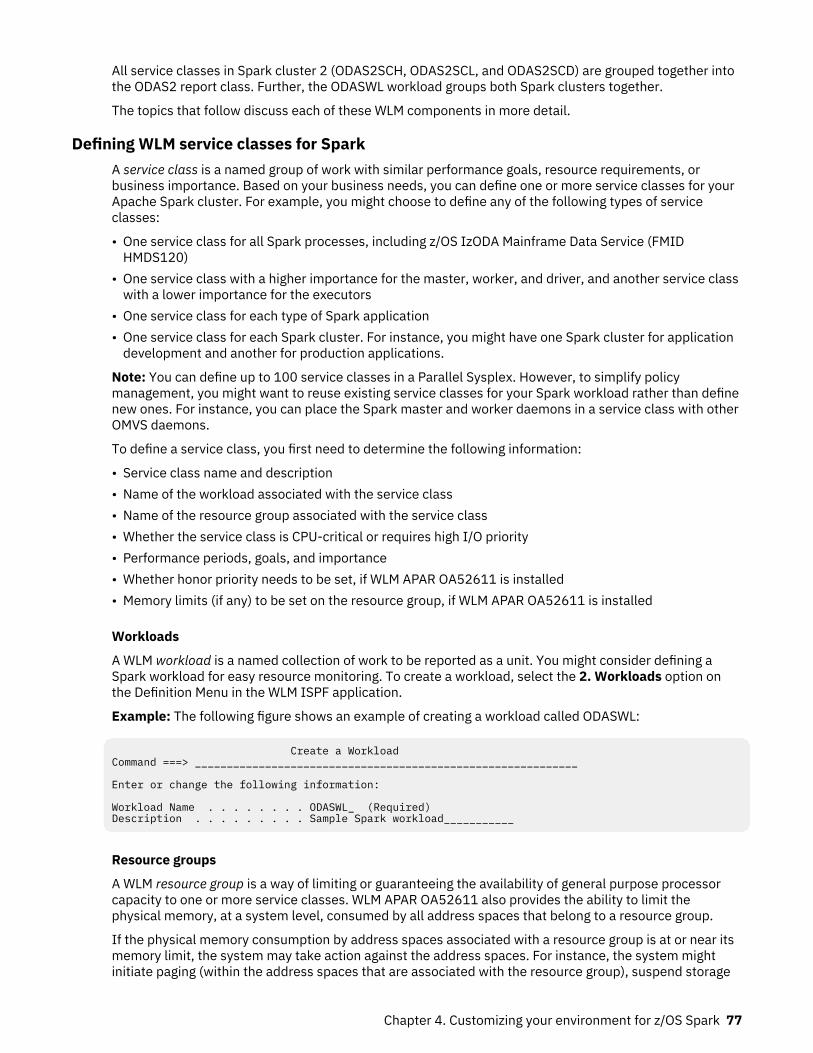
All service classes in Spark cluster 2 (ODAS2SCH, ODAS2SCL, and ODAS2SCD) are grouped together intothe ODAS2 report class. Further, the ODASWL workload groups both Spark clusters together.
The topics that follow discuss each of these WLM components in more detail.
Defining WLM service classes for SparkA service class is a named group of work with similar performance goals, resource requirements, orbusiness importance. Based on your business needs, you can define one or more service classes for yourApache Spark cluster. For example, you might choose to define any of the following types of serviceclasses:
• One service class for all Spark processes, including z/OS IzODA Mainframe Data Service (FMIDHMDS120)
• One service class with a higher importance for the master, worker, and driver, and another service classwith a lower importance for the executors
• One service class for each type of Spark application• One service class for each Spark cluster. For instance, you might have one Spark cluster for application
development and another for production applications.
Note: You can define up to 100 service classes in a Parallel Sysplex. However, to simplify policymanagement, you might want to reuse existing service classes for your Spark workload rather than definenew ones. For instance, you can place the Spark master and worker daemons in a service class with otherOMVS daemons.
To define a service class, you first need to determine the following information:
• Service class name and description• Name of the workload associated with the service class• Name of the resource group associated with the service class• Whether the service class is CPU-critical or requires high I/O priority• Performance periods, goals, and importance• Whether honor priority needs to be set, if WLM APAR OA52611 is installed• Memory limits (if any) to be set on the resource group, if WLM APAR OA52611 is installed
Workloads
A WLM workload is a named collection of work to be reported as a unit. You might consider defining aSpark workload for easy resource monitoring. To create a workload, select the 2. Workloads option onthe Definition Menu in the WLM ISPF application.
Example: The following figure shows an example of creating a workload called ODASWL:
Create a Workload Command ===> ____________________________________________________________ Enter or change the following information: Workload Name . . . . . . . . ODASWL_ (Required) Description . . . . . . . . . Sample Spark workload___________
Resource groups
A WLM resource group is a way of limiting or guaranteeing the availability of general purpose processorcapacity to one or more service classes. WLM APAR OA52611 also provides the ability to limit thephysical memory, at a system level, consumed by all address spaces that belong to a resource group.
If the physical memory consumption by address spaces associated with a resource group is at or near itsmemory limit, the system may take action against the address spaces. For instance, the system mightinitiate paging (within the address spaces that are associated with the resource group), suspend storage
Chapter 4. Customizing your environment for z/OS Spark 77

requesters, or, in certain situations, abnormally end (abend) entire address spaces. IBM suggests usingthe memory limit attribute as an upper limit so that, under normal conditions, resource consumption willoperate well below the limit.
Typically, Spark workloads are resource intensive, so you might wish to consider defining resource groupsto ensure that your Spark workload does not impact other workloads that, in business terms, are moreimportant. In addition, Spark executors are generally good candidates to have their physical memoryusage capped, since they typically consume a lot of memory. However, you might see performancedegradation or even termination of your Spark applications if they reach their memory limit. In the case oftermination, Spark applications usually observe an ABEND SEC6. Another situation that can occur is if anexecutor is not executing or responding for an extended period, such as in a heavy paging situation that isinitiated by approaching a resource group's memory limit, the executor might be declared lost by thedriver. This might prompt the spawning of a new replacement executor and it becomes possible to havetwo or more executors running in the same resource group, performing the same computation. In a highlycompetitive resource situation, the driver might declare that it cannot finish successfully and terminates.IBM suggests that you not place the Spark master and worker daemons in a memory-limited resourcegroup, so that the Spark cluster stays alive even if the system terminates executors.
IBM suggests that you consider your Spark configuration when using WLM to limit resources available toSpark processes. The SPARK_WORKER_CORES parameter should be set to a value less than or equal tothe number of processors available to the Spark executors after WLM-imposed limits. TheSPARK_WORKER_MEMORY parameter should also be set to a value less than or equal to the memory limitdefined for the executors' resource group. Setting appropriate values for these parameters helps Spark todispatch work within its limits and help reduce unintended consequences. (For more information aboutthe Apache Spark configuration options for standalone mode, see http://spark.apache.org/docs/2.3.4/spark-standalone.html.)
For more information about memory limits for resource groups, see "Storage Management Overview" inz/OS MVS Initialization and Tuning Guide and "Defining service classes and performance goals" in z/OSMVS Planning: Workload Management. For more information about monitoring resource consumption bySpark applications, see Chapter 14, “Resource monitoring for Apache Spark,” on page 135.
To create a resource group, select the 3. Resource Groups option on the Definition Menu in the WLM ISPFapplication. You can define up to 32 resource groups in a Parallel Sysplex; however, to simplify policymanagement, you might wish to reuse existing resource groups for your Spark workload rather thandefine new ones.
Example: The following figure shows an example of creating a resource group called ODASRG with amaximum capacity of 10 percent of the LPAR share in the general processor pool and a memory limit of20 GB:
Create a Resource Group Command ===> ____________________________________________________________ Enter or change the following information: Resource Group Name . . . . : ODASRG_ (required) Description . . . . . . . . . Sample Spark resource group Define Capacity: 2 1. In Service Units (Sysplex Scope) 2. As Percentage of the LPAR share (System Scope) 3. As a Number of CPs times 100 (System Scope) Minimum Capacity . . . . . . . ________ Maximum Capacity . . . . . . . 10______ Include Specialty Processor Consumption NO____(YES or NO) Memory Limit (System Scope) 20______ GB
Other service class attributes
You can define the rest of the service class attributes on the Create a Service Class panel. To create aservice class, select the 4. Service Class option on the Definition Menu in the WLM ISPF application.
78 Open Data Analytics for z/OS : IBM Open Data Analytics for z/OS V1.1.0 Installation and CustomizationGuide

CPU Critical and I/O Priority GroupYou can use the CPU Critical attribute and the I/O Priority Group attribute to give higher CPU and I/Opriorities to the work in the service class. Spark workloads do not typically require higher CPU or I/Opriorities.
Honor PriorityWLM APAR OA52611 also provides the ability to exclude a service class from the system-wide HonorPriority defaults. By setting the Honor Priority attribute to NO on a service class, work in that serviceclass that is eligible to run on specialty processors (such as zIIPs) does not overflow to general-purpose CPs (GPs) when there is insufficient capacity on the specialty processors. The default is touse the IFAHONORPRIORITY and IIPHONORPRIORITY parameters that are specified in the IEAOPTxxmember of parmlib.
You can set the Honor Priority attribute to NO if you want to minimize the amount of Spark workprocessed by the GPs. However, give careful consideration to setting Honor Priority attributes to NOon service classes, especially in the case of highly utilized specialty processors. For instance, a Sparkservice class restricted to zIIPs may consume much of the zIIP capacity and cause other zIIP-eligibleworkloads, such as IBM Db2, to overflow to GPs. In addition, Spark applications, by default, fall intothe default OMVS service class. If the default OMVS service class is restricted to specialty engines,other processes in the same service class, such as terminals or ssh sessions, might becomeunresponsive. Spark applications might also experience timeouts during driver and executorcommunication if they are waiting for CPU time for too long. Monitor these timeouts and adjust thetimeout values in the Spark configuration accordingly. For more information about monitoring Sparkresources, see Chapter 14, “Resource monitoring for Apache Spark,” on page 135.
Performance periodsPerformance periods are available for work that has variable resource requirements and for whichyour goals change as the work uses more resources. For each performance period, you specify a goal,and importance level, and an optional duration.
GoalsThere are three types of goals:
• Response time goals indicate how quickly you want your work to be processed. The response timerepresents the time that WLM is aware of the unit of work and it is measured differently for differentsubsystems. It is not an end-to-end response time. Response time goals are not appropriate for alltypes of work, such as long-running jobs or workloads that do not have frequent transactioncompletions. There are two types of response time goals:
– Average response time goals are typically used for transactions that have extremely homogenousresponse times.
– Percentile response time goals are used to set a response time target for a given percentage oftransactions (for instance, 80 percent of transactions within 3 seconds).
• Execution velocity goals define how fast work should run when ready, without being delayed forprocessor, storage, I/O access, and queue delay. Execution velocity goals are intended for work forwhich response time goals are not appropriate, such as started tasks or long-running work.
• Discretionary goals are for low-priority work for which you do not have any particular performancegoal. WLM processes the work using resources not required to meet the goals of other serviceclasses. Note that the honor priority option is insignificant for discretionary service classes becausework assigned to these service classes never gets help from GPs.
The type of goal that is best suited for your Spark workload depends on the workload itself.
• For long-running Spark applications, such as model training or streaming workloads, IBM suggestsusing velocity goals.
• For short-running Spark applications, such as machine learning model evaluations, a response timegoal might be more appropriate.
• For exploratory data science and experimental or new workloads, a discretionary goal might be abetter fit.
Chapter 4. Customizing your environment for z/OS Spark 79

When determining workload goals, also consider how honor priority has been set for the service class.For instance, if a Spark service class has high velocity goals and is set to use only zIIPs, these twosettings might interfere with each other under certain conditions and cause an undesired state for theSpark applications and their workload priorities.
DurationDuration is the length of the performance period, in service units. For a given period, if the work in thatperiod does not complete by the time the specified number of service units have been used, the workmoves into the next performance period and its associated goal. You do not specify a duration if thereis only one period or on the last period in a service class.
ImportanceImportance is the relative importance of the service class goal and is only used when work is notmeeting its goal. WLM uses the importance value to decide the order in which work should receiveresources when that work is not achieving its goal. Importance is expressed in five levels: 1 to 5, with1 being the highest importance.
Example: The following figure shows an example of creating a service class called ODASSC1 for theODASWL workload:
Create a Service Class Row 1 to 2Command ===> ____________________________________________________________ Service Class Name . . . . . . ODASSC1 (Required) Description . . . . . . . . . Sample Spark service class Workload Name . . . . . . . . ODASWL (name or ?) Base Resource Group . . . . . ODASRG (name or ?) Cpu Critical . . . . . . . . . NO (YES or NO) I/O Priority Group . . . . . . NORMAL (NORMAL or HIGH) Honor Priority . . . . . . . . NO (DEFAULT or NO) Specify BASE GOAL information. Action Codes: I=Insert new period, E=Edit period, D=Delete period. -- Period -- ------------------- Goal ------------------- Action # Duration Imp. Description __ _ _________ _ ________________________________________ __ 1 _________ 3 Execution velocity of 50
The following figure shows the definition of the velocity goal for period 1:
Execution velocity goal Enter an execution velocity for period 1 Velocity . . . 50 (1-99) Importance . . 3 (1=highest, 5=lowest) Duration . . . _________ (1-999,999,999, or none for last period) F1=Help F2=Split F5=KeysHelp F9=Swap F12=Cancel
Defining WLM report classes for SparkWLM allows you to specify report classes to report on a subset of work running in a single service classand to combine work running in different service classes within one report class. Although report classesare optional, they can be useful if you have multiple service classes defined for your Spark workload or ifyou commingle your Spark and non-Spark workloads in the same service classes. For instance, you mighthave separate service classes set up for Spark executor processes and non-executor processes. You canput both service classes in the same report class and monitor the resource usage as a whole. The RMFworkload activity report shows the performance metrics and resource utilization for work in each serviceclass and report class. For more information about the RMF workload activity report, see z/OS RMF ReportAnalysis.
To create a report class, select the 7. Report Classes option on the Definition Menu in the WLM ISPFapplication.
80 Open Data Analytics for z/OS : IBM Open Data Analytics for z/OS V1.1.0 Installation and CustomizationGuide
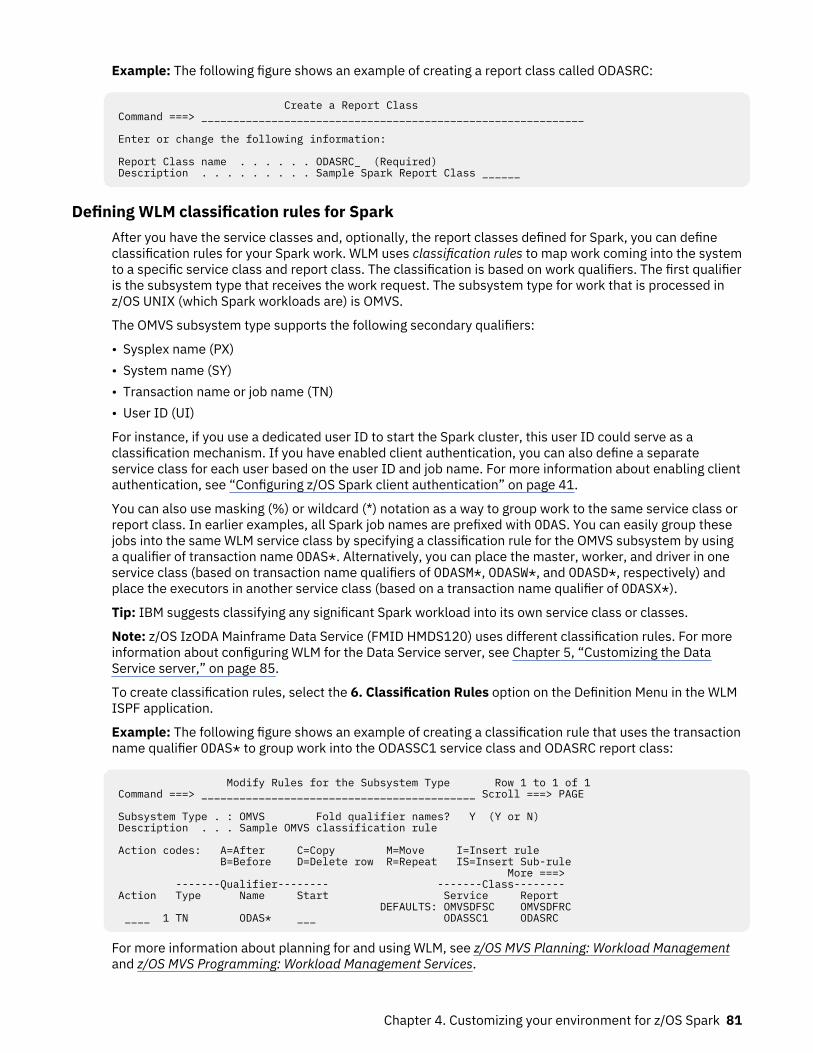
Example: The following figure shows an example of creating a report class called ODASRC:
Create a Report Class Command ===> ____________________________________________________________ Enter or change the following information: Report Class name . . . . . . ODASRC_ (Required) Description . . . . . . . . . Sample Spark Report Class ______
Defining WLM classification rules for SparkAfter you have the service classes and, optionally, the report classes defined for Spark, you can defineclassification rules for your Spark work. WLM uses classification rules to map work coming into the systemto a specific service class and report class. The classification is based on work qualifiers. The first qualifieris the subsystem type that receives the work request. The subsystem type for work that is processed inz/OS UNIX (which Spark workloads are) is OMVS.
The OMVS subsystem type supports the following secondary qualifiers:
• Sysplex name (PX)• System name (SY)• Transaction name or job name (TN)• User ID (UI)
For instance, if you use a dedicated user ID to start the Spark cluster, this user ID could serve as aclassification mechanism. If you have enabled client authentication, you can also define a separateservice class for each user based on the user ID and job name. For more information about enabling clientauthentication, see “Configuring z/OS Spark client authentication” on page 41.
You can also use masking (%) or wildcard (*) notation as a way to group work to the same service class orreport class. In earlier examples, all Spark job names are prefixed with ODAS. You can easily group thesejobs into the same WLM service class by specifying a classification rule for the OMVS subsystem by usinga qualifier of transaction name ODAS*. Alternatively, you can place the master, worker, and driver in oneservice class (based on transaction name qualifiers of ODASM*, ODASW*, and ODASD*, respectively) andplace the executors in another service class (based on a transaction name qualifier of ODASX*).
Tip: IBM suggests classifying any significant Spark workload into its own service class or classes.
Note: z/OS IzODA Mainframe Data Service (FMID HMDS120) uses different classification rules. For moreinformation about configuring WLM for the Data Service server, see Chapter 5, “Customizing the DataService server,” on page 85.
To create classification rules, select the 6. Classification Rules option on the Definition Menu in the WLMISPF application.
Example: The following figure shows an example of creating a classification rule that uses the transactionname qualifier ODAS* to group work into the ODASSC1 service class and ODASRC report class:
Modify Rules for the Subsystem Type Row 1 to 1 of 1 Command ===> ___________________________________________ Scroll ===> PAGE Subsystem Type . : OMVS Fold qualifier names? Y (Y or N) Description . . . Sample OMVS classification rule Action codes: A=After C=Copy M=Move I=Insert rule B=Before D=Delete row R=Repeat IS=Insert Sub-rule More ===> -------Qualifier-------- -------Class-------- Action Type Name Start Service Report DEFAULTS: OMVSDFSC OMVSDFRC ____ 1 TN ODAS* ___ ODASSC1 ODASRC
For more information about planning for and using WLM, see z/OS MVS Planning: Workload Managementand z/OS MVS Programming: Workload Management Services.
Chapter 4. Customizing your environment for z/OS Spark 81

Other Apache Spark attributesOnce you have secured your Apache Spark environment and defined it to WLM, you can further customizeyour environment. This section describes two ways in which to do that:
• Increasing the parallelism of your Spark applications• Allowing multiple Spark applications to run simultaneously.
Increasing parallelism attributes
Spark is well-known for its ability to parallelize the processing of data. Often, this involves careful tuningof the attributes within spark-defaults.conf. Even then, the Spark Master may decide to execute theprogram such that it is not consuming all the resources available to it. In such a case, you may want toconsider using dynamic allocation.
Dynamic Allocation (see Appendix D, “Memory and CPU configuration options,” on page 169) allows theSpark Master to start and stop executors as needed and as system resources allow. For example, if anapplication has partitioned its data appropriately, it may be possible for the Spark Master to request moreexecutors be added to the application, allowing the application to execute more efficiently and completeearlier.
When using Dynamic Allocation, it is more likely that data will be shuffled among the executors. Towardthat end, you must also enable the Spark Shuffle server (also described in Appendix D, “Memory and CPUconfiguration options,” on page 169).
This causes the executors to make their shuffle data accessible to other executors by storing it on theWorker. (This may increase the amount of storage needed by the worker.)
You can also read about the shuffle server and dynamic allocation on the Apache Spark website.
Scheduling multiple Apache Spark applications
Any Apache Spark cluster has the ability to run multiple applications. Generally, however, most Sparkinstallations are configured by default to run just one application, using all the resources availablememory and CPU. z/OS IzODA Spark has addressed this issue.
Starting with APAR PI03469, Spark 2.2.0.8 and higher includes a new setting(spark.zos.master.app.alwaysScheduleApps=true) that enables z/OS IzODA Spark to schedulemultiple applications to execute at the same time, even if it seems to use more memory or CPU than theSpark Master sees in the system. In this way, more applications can execute and Workload Manager canbetter manage resources.
By setting spark.zos.master.app.alwaysScheduleApps to true in spark-defaults.conf, eachapplication that registers with the master will be allowed to execute in a “virtual” cluster (subject tolimitations; more details later). New applications can get all resources on the cluster, independent of theresources already allocated to other applications. This gives z/OS Workload Manager a chance to managecores and memory on Spark's behalf instead of requiring Spark and the system programmer to tune theavailable resources for applications to run concurrently.
The number of concurrently running applications can be limited by settingspark.zos.maxApplications in spark-defaults.conf. The default is 5.spark.zos.maxApplications is valid only if spark.zos.master.app.alwaysScheduleApps istrue.
Note that there are still limits on the memory and cores an application can use. A single applicationcannot receive more cores than SPARK_WORKER_CORES or more memory than SPARK_WORKER_MEMORYspecifies across all its executors. However, be aware that multiple applications could each receiveSPARK_WORKER_CORES or SPARK_WORKER_MEMORY. Also be aware that the memory and cores allocatedto the driver do not introduce limits. Furthermore, the scheduler will still obey the “Memory and CPUconfiguration options” in Appendix D, “Memory and CPU configuration options,” on page 169. Resourcecontention could result if too many applications are concurrently running with too many resources, so it isimportant to adjust your configuration options accordingly and tailor your WLM policy to ensure properoperation within your system.
82 Open Data Analytics for z/OS : IBM Open Data Analytics for z/OS V1.1.0 Installation and CustomizationGuide

Therefore, if all settings other than spark.zos.maxApplications andspark.zos.master.app.alwaysScheduleApps are default, the total amount of memory the mastercould allocate is (spark.zos.maxApplications * (SPARK_WORKER_MEMORY +spark.driver.memory)) and the total for cores is (spark.zos.maxApplications *(SPARK_WORKER_CORES + spark.driver.cores)). It is important to adjust yourSPARK_WORKER_MEMORY and SPARK_WORKER_CORES accordingly.
Note: Spark Drivers only appear in the master Web UI if applications are submitted in cluster-deploymode. If an application is submitted via client-deploy mode, its driver does not contribute to the usedmemory and cores on the Web UI.
Note that on the master Web UI, you may observe more memory or cores in use than are available. This isnormal behavior in this “virtual cluster” environment.
Chapter 4. Customizing your environment for z/OS Spark 83

84 Open Data Analytics for z/OS : IBM Open Data Analytics for z/OS V1.1.0 Installation and CustomizationGuide

Chapter 5. Customizing the Data Service serverAfter you install Mainframe Data Service, customize the server for use.
Before you beginYou must install Data Service and apply all available maintenance before customizing the server. To applyserver maintenance, you should acquire available PTFs and apply them to the server so you will have themost current available code for your installation.
Preparing to customizeBefore you start to customize IBM Open Data Analytics for z/OS, familiarize yourself with thecustomization tasks.
The following table describes each significant customization task. Use this checklist to guide you throughthe customization process.
Table 7. Customization checklist
Step Task description For more information
1 Review the required naming conventions thatmust be followed when configuring the serversubsystem ID and the server initializationmember.
See “Required naming conventions” on page86.
2 Create the server data sets using thehlq.SAZKCNTL members AZKDFDIV,AZKGNMP1 and AZKEXSWI.
See “Creating server data sets” on page 86.
3 Set up the security application to use with theserver using one of the followinghlq.SAZKCNTL members: AZKRAVDB,AZKA2VDB, AZKTSVDB.
See “Defining security authorizations” on page87.
4 Configure Workload Manager (WLM) foroptimum performance of the server.
See “Configuring Workload Manager (WLM)”on page 87.
5 APF-authorize the product LOAD library datasets.
See “APF-authorizing LOAD library data sets”on page 88.
6 Create a copy of the product libraries(optional).
See “Copying target libraries” on page 88.
7 Configure the server to support DBCS(optional).
See “Configuring support for code pages andDBCS ” on page 88.
8 Create the Global Registry log stream(optional).
See “Creating the Global Registry log stream”on page 89.
9 Customize the server to access your datasources in hlq.SAZKEXEC(AZKSIN00).
See “Customizing the server initializationmember” on page 89. Then, see "Configuringaccess to data sources" in the Solutions Guidefor the specific types of data sources theserver should access.
10 Configure the started task JCL located inhlq.SAZKCNTL(AZK1PROC) before you canstart the server.
See “Configuring the started task JCL” onpage 90.
© Copyright IBM Corp. 2016, 2019 85

Table 7. Customization checklist (continued)
Step Task description For more information
11 Configure the CLIST that invokes the ISPFpanels by using hlq.SAZKEXEC(AZK).
See “Configuring the ISPF application” onpage 91.
12 Verify the installation by creating a virtualtable and accessing its underlying VSAM file(optional).
See Chapter 11, “Verifying the Data Serviceserver installation,” on page 119.
Required naming conventionsYou must follow the Data Service server naming conventions when configuring the server subsystem IDand the server initialization member.
The server subsystem name must follow the pattern xZKy, where x is any alphabetic character A - Z and yis any alphanumeric character A-Z or 0-9.
Depending on what you name the server subsystem, the server initialization member must follow thesame naming convention as the server subsystem name, for example, xZKyIN00.
Note: The default server naming conventions used throughout this guide are AZKS for the serversubsystem name and AZKSIN00 for the server initialization member.
Creating server data setsThe AZKDFDIV and AZKGNMP1 members of hlq.SAZKCNTL create data sets for the Trace Browse, theglobal variable checkpoint, and the data-mapping facility (DMF) that are used by the Data Service server.The AZKGNMP1 member also copies distributed data sets into user-modifiable data sets. The AZKEXSWImember builds the Web interface objects.
Procedure
1. Customize the AZKDFDIV member in hlq.SAZKCNTL to meet your requirements. The AZKDFDIVmember contains comments that describe how to customize the variables.
2. Submit the AZKDFDIV member.3. Customize the AZKGNMP1 member in hlq.SAZKCNTL to meet your requirements. The AZKGNMP1
member contains comments that describe how to customize the variables.4. Submit the AZKGNMP1 member.
Note: The map data set created in this step should be the first concatenated data set in the DDstatement AZKMAPP located in the server started task. See hlq.SAZKCNTL(AZK1PROC). The user andserver should have read and write permissions to this data set. The system-provided data set(hlq.SAZKSMAP) should be the last data set in the AZKMAPP concatenation. The user and servershould only have read access to the data set. The administrator will need read and write permissions.
5. Customize the AZKEXSWI member in hlq.SAZKCNTL to meet your requirements. The AZKEXSWImember contains comments that describe how to customize the variables.
Note: The data set named on the RECEIVE command in the AZKEXSWI member is later used in theserver initialization member AZKSIN00 for the SWICNTLDSN parameter definition, as follows:
swiobj = SHLQ2||".SAZKOBJ""MODIFY PARM NAME(SWICNTLDSN) VALUE("||swiobj||")"
6. Submit the AZKEXSWI member.
86 Open Data Analytics for z/OS : IBM Open Data Analytics for z/OS V1.1.0 Installation and CustomizationGuide

Defining security authorizationsTo use an external security product, such as RACF, ACF2, or Top Secret, define the started task name tothe security product and authorize the data set.
Procedure
To define the server and other required permissions for your security product, customize the appropriatesecurity option located in the hlq.SAZKCNTL library, and submit the job:
• AZKRAVDB is for IBM Resource Access Control Facility (RACF) security.• AZKA2VDB is for CA ACF2 (Access Control Facility) security.• AZKTSVDB is for CA Top Secret Security (TSS).
Results
Make sure that your z/OS Security Administrator reviews the security definitions. You might need tochange definitions to meet requirements at your site.
Configuring Workload Manager (WLM)To get optimum performance from the server, define the server to WLM. The Data Service server shouldbe prioritized slightly below the data provider in your WLM environment. It is not sufficient to simply addthe STC to a WLM service class as the server will create independent enclaves for each connection.
About this task
The server should be configured to use a medium to high performing WLM velocity goal as its defaultservice class.
Procedure
1. Create a WLM Classification rule.a) Go to the WLM ISPF application, and select option 6 (Classification Rules).b) Select option 1 to Create.c) Set the Subsystem Type to AZK, and provide an optional description.d) Under the Class/Service Column next to DEFAULTS, set the desired default service class name. If a
desired service class does not exist, then create one using option 4 (Service Classes) under thePrimary WLM menu. Press enter and PF3 to save.
2. Define the Data Service started task AZK1PROC to a WLM service class.a) Go to the WLM ISPF application, and select option 6 (Classification Rules).b) For the STC WLM-subsystem type, select Modify.c) Add an entry for AZK1PROC.d) Add an appropriate service class for the started task and define it relative to existing workload
resource management objectives.e) Add a unique Report class for the started task.
3. Activate the new WLM policy definition.
Chapter 5. Customizing the Data Service server 87
APF-authorizing LOAD library data setsYou must authorize for APF (Authorized Program Facility) all LOAD library data sets allocated to the DataService server.
About this task
All LOAD library data sets allocated to the Data Service server in the server started task JCL must be APF-authorized.
These LOAD library data sets are allocated to the following ddnames:
• STEPLIB
You must authorize the LOAD library AZK.SAZKLOAD.• AZKRPCLB
You must authorize the LOAD library AZK.SAZKRPC.
If any data sets allocated to these ddnames are not APF-authorized, the Data Service server will issue theerror message AZK0051S during startup identifying the ddname and data set name of each unauthorizedlibrary. Startup processing will discontinue and the server will shut down.
Procedure
The APF authorize should be done dynamically using the SETPROG APF command, and then madepermanent for the next IPL (initial program load) by updating the appropriate system PARMLIB member.
Copying target librariesIt is recommended that copies be made of the target libraries to preserve any prior customization, asapplying new maintenance often replaces existing PDS members.
Configuring support for code pages and DBCSYou can configure the server to support Japanese code pages and double-byte character sets (DBCS).
About this taskTo support different code pages and double-byte character sets, you must manually customize the serverinitialization member.
Procedure
1. Locate the server configuration member. The server initialization member is shipped in data setmember hlq.SAZKEXEC(AZKSIN00) and may have been copied to a new data set for customization inthe step “Copying target libraries” on page 88.
2. In the member, locate the DEFINE DATABASE statement for your subsystem, and verify that theCCSID value is set correctly for the subsystem.
3. Locate the comment Set CCSID for non-DB2 data, as shown in the following example:
/*-------------------------------------*//* Set CCSID for non-DB2 data *//*-------------------------------------*/
if DoThis then do "MODIFY PARM NAME(SQLENGDFLTCCSID) VALUE(1047)"
4. Change DontDoThis to DoThis to enable the parameters.
88 Open Data Analytics for z/OS : IBM Open Data Analytics for z/OS V1.1.0 Installation and CustomizationGuide

5. Update the following parameter:
Parameter Description Valid values
SQLENGDFLTCCSID Specifies the CCSID to use forSQL engine tables. All hosttables except for Db2 areassumed to be stored in thisCCSID. Where possible, thisCCSID should match the clientCCSID used when connecting.
CCSID value
Sample values:
• 1047 (LATIN OPEN SYS EB)• 931 (JAPAN MIX EBCDIC)• 1390 (JAPAN MIX EBCDIC)
Creating the Global Registry log streamYou can manually create the Global Registry log stream instead of having the server dynamically create it.
Before you beginConfirm the following prerequisites:
• The GLBLREGISTRYEHLQ parameter is not set to NOLOGSTREAMS in the server initialization fileAZKSIN00.
• The server is not running. This customization step should be performed before any instance of theserver is started unless the NOLOGSTREAMS parameter is specified.
About this taskTo manually create the Global Registry log stream, you must customize and run either the AZKLSGBL orAZKLSGBO customization job before the server is started.
Procedure
Customize and run one of the following jobs before the server is started:
• If a coupling facility is used, use batch job hlq.SAZKCNTL(AZKLSGBL).• If a coupling facility does not exist within your SYSPLEX environment, then create the DASD-only log
stream structure using the batch job hlq.SAZKCNTL(AZKLSGBO).
Customizing the server initialization memberThe server initialization member AZKSIN00 is a REXX program that you use to set product parametersand define links and databases. You must customize the server initialization member for your installationenvironment.
About this task
The server initialization member is shipped in data set member hlq.SAZKEXEC(AZKSIN00) and may havebeen copied to a new data set for customization in the step “Copying target libraries” on page 88.
As you go through the installation, you accept or set parameter values in the server initialization member.
If you are installing the server for the first time, it is recommended that all the default values be accepted.You can change the values as needed later.
If you are installing a new version of the server over a previous version, the previous server member mightcontain parameter values that you modified to meet specific requirements in your environment. In thiscase, you should review the initialization member for the previous version for any customizations thatneed to be made to the initialization member for the new version.
Chapter 5. Customizing the Data Service server 89

Procedure
1. Find the line that contains “SHLQ1” and provide your own high-level qualifier to define the ISPF datasets. For example: “SHLQ1=AZK”
2. If you created copies of your target libraries to preserve customizations, find the line that contains“SHLQ2” and provide your own high-level qualifier to define the Event Facility (SEF) data sets. Ensurethat the HLQ results in proper data set references for these features.For example: “SHLQ2=AZK.AZKS”. If you did not create copies of the target libraries, then "SHLQ2"should contain the same value as "SHLQ1".
3. Review the following default values for the TCP/IP parameters and change the values as necessary.The following example shows the section of the initialization member in which to make the changes:
“MODIFY PARM NAME(OEPORTNUMBER) VALUE(1200)” “MODIFY PARM NAME(WSOEPORT) VALUE(1201)” “MODIFY PARM NAME(TRACEOERW) VALUE(YES)” “MODIFY PARM NAME(OEKEEPALIVETIME) VALUE(30)” "MODIFY PARM NAME(PARALLELIO) VALUE(YES)" “MODIFY PARM NAME(OEPIOPORTNUMBER) VALUE(1204)”
Configuring the started task JCLTo configure the started task JCL, modify the AZK1PROC (subsystem default ID) member that is in thehlq.SAZKCNTL library.
About this task
The AZK1PROC member contains the JCL procedure that is required to run the main address space(started task).
Procedure
1. Add the HLQ name of the libraries to the hlq parameter.
This parameter sets the server data set allocations to the correct data set names.2. Confirm that the SYSEXEC DD statement allocates the correct data set name that contains the
customized server initialization member AZKSIN00. This data set was created in job AZKGNMP1previously in the step “Creating server data sets” on page 86. The default name ishlq.SAZKEXEC(AZKSIN00).
3. Ensure that the DD AZKMAPP concatenation points to the hlq.SAZKMAP data set created in theprevious installation job AZKGNMP1. This data set should be first in the concatenation and is used forstoring user-defined virtual table maps. The hlq.SAZKMAP data set, which contains the default virtualtable maps that are part of the product distribution, should be placed last.
4. The server runs as a z/OS started task. Under normal circumstances, the server starts at systemstartup and stops before the system shuts down. To start the server on demand, use the followingconsole command:
S AZKS
where AZKS is the subsystem name of the server instance you defined.
Note: If you use a procedure name other than the SSID provided in the example, then you issue thestart command using that procedure name.
5. If you use an automation package to start the system, associate the START command with the VTAMinitialization complete message (IST020I), the TCP/IP initialization complete message (EZB6473I), orboth messages.
6. To verify that the startup is successful, look for the following entries in the server Job Entry Subsystem(JES) log.
90 Open Data Analytics for z/OS : IBM Open Data Analytics for z/OS V1.1.0 Installation and CustomizationGuide
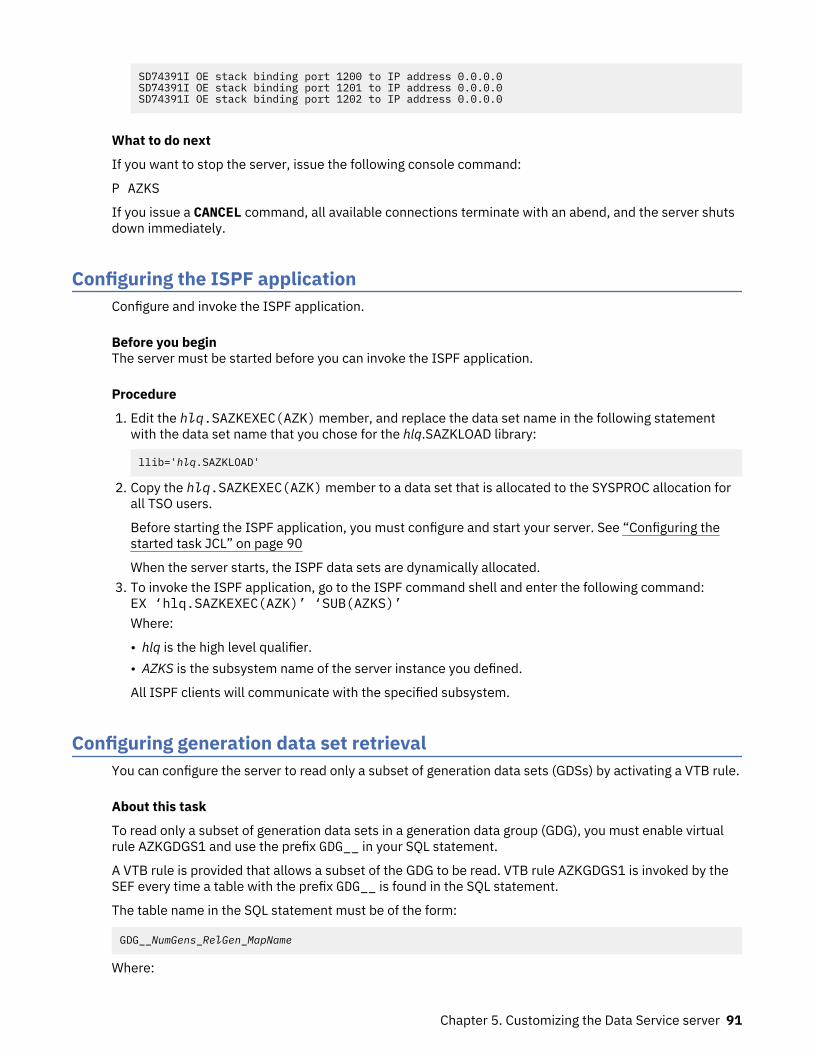
SD74391I OE stack binding port 1200 to IP address 0.0.0.0 SD74391I OE stack binding port 1201 to IP address 0.0.0.0SD74391I OE stack binding port 1202 to IP address 0.0.0.0
What to do next
If you want to stop the server, issue the following console command:
P AZKS
If you issue a CANCEL command, all available connections terminate with an abend, and the server shutsdown immediately.
Configuring the ISPF applicationConfigure and invoke the ISPF application.
Before you beginThe server must be started before you can invoke the ISPF application.
Procedure
1. Edit the hlq.SAZKEXEC(AZK) member, and replace the data set name in the following statementwith the data set name that you chose for the hlq.SAZKLOAD library:
llib='hlq.SAZKLOAD'
2. Copy the hlq.SAZKEXEC(AZK) member to a data set that is allocated to the SYSPROC allocation forall TSO users.
Before starting the ISPF application, you must configure and start your server. See “Configuring thestarted task JCL” on page 90
When the server starts, the ISPF data sets are dynamically allocated.3. To invoke the ISPF application, go to the ISPF command shell and enter the following command:EX ‘hlq.SAZKEXEC(AZK)’ ‘SUB(AZKS)’Where:
• hlq is the high level qualifier.• AZKS is the subsystem name of the server instance you defined.
All ISPF clients will communicate with the specified subsystem.
Configuring generation data set retrievalYou can configure the server to read only a subset of generation data sets (GDSs) by activating a VTB rule.
About this task
To read only a subset of generation data sets in a generation data group (GDG), you must enable virtualrule AZKGDGS1 and use the prefix GDG__ in your SQL statement.
A VTB rule is provided that allows a subset of the GDG to be read. VTB rule AZKGDGS1 is invoked by theSEF every time a table with the prefix GDG__ is found in the SQL statement.
The table name in the SQL statement must be of the form:
GDG__NumGens_RelGen_MapName
Where:
Chapter 5. Customizing the Data Service server 91

• GDG__ is a constant indicating a generation data set request.• NumGens is a required number 0 through 999 indicating the number of generations to read.• RelGen is an optional number 0 through 999 indicating the relative generation at which to start reading.
A value of 0 is equivalent to a suffix of (0) in a JCL allocation; a value of 1 is equivalent to (-1), and so on.• MapName is the table defined in the map data set.
For example, the following request will result in generations HLQ.GDG.STAFF(-3) throughHLQ.GDG.STAFF(-6) being retrieved:
SELECT * FROM GDG__4_3_STAFF
Where the STAFF table specifies a base data set name of HLQ.GDG.STAFF. In other words, with thisrequest, four generations will be read in descending generation order beginning with relative generation 3(that is, generations 3, 4, 5, and 6).
Use the procedure in this task to enable sample rule AZKGDGS1.
Additional details:
When a request is made to allocate a data set, it will first be determined if the data set name represents aGDG base name. If so, a CSI lookup call will be made to return the associated GDS data set names. If aVTB rule does not specify the number of generations to read and MapReduce is disabled, or if there is asingle generation, the GDG will be allocated using its base data set name, and normal systemconcatenation of generation data sets will occur. If MapReduce is enabled and there are multiple activegeneration data sets, a number of I/O processing tasks will be created. The number of I/O tasks isdetermined as follows:
1. If VPD is in use, the number of VPD I/O threads specified.2. If MRC is in use, the number of active Client threads defined in the MRC request.3. If neither VPD nor MRC is in use, the number of I/O threads will be equal to the lesser of the following:
• The number of active generation data sets in the GDG• The number of generations requested by a VTB rule• The number of MapReduce tasks specified in the ACIMAPREDUCETASKS configuration
When the number of I/O tasks is equal to or less than the number of generation data sets, each task willread one or more complete data sets. When the number of I/O tasks exceeds the number of generationdata sets, some tasks will be idle.
Procedure
1. Customize the server configuration member (AZKSIN00) to enable virtual table rule events byconfiguring the SEFVTBEVENTS parameter in the member, as follows:
"MODIFY PARM NAME(SEFVTBEVENTS) VALUE(YES)"
2. Access the VTB rules, as follows:a) In the IBM Open Data Analytics for z/OS - Primary Option Menu, specify option E, Rules Mgmt.b) Specify option 2, SEF Rule Management.c) Enter VTB for Display Only the Ruleset Named.
3. Enable the rule by specifying E next to AZKGDGS1 and pressing Enter.4. Set the rule to Auto-enable by specifying A next to AZKGDGS1 and pressing Enter.
Setting a rule to Auto-enable activates the rule automatically when the server is re-started.
92 Open Data Analytics for z/OS : IBM Open Data Analytics for z/OS V1.1.0 Installation and CustomizationGuide

Configuring delimited data supportTo be able to process delimited data using virtual tables, you must configure a virtual table rule toactivate delimited data processing and optionally define delimiter values.
About this task
Data Service provides the ability to process delimited data from files, MQ data, and log streams usingvirtual tables mapped to MQ or z/OS files. The most common form of delimited data is comma separatevalue files (.csv).
When delimited data processing is activated, processing occurs in column order, so the delimited datamust include a value for each column in the map in the correct order to prevent errors. Data conversionerrors will occur if the delimited data is not compatible with the host types of the columns. If conversionfails, diagnostic information related to the error is automatically logged for troubleshooting problems.
Delimited processing is supported through virtual table rules only. Using virtual table rule options, youcan enable delimited data processing, set column and string delimiter values, and control header recordprocessing.
A sample rule, AZKMDDLM, is provided that documents these settings. Use the following procedure toconfigure the sample rule.
Procedure
1. Customize the server configuration member (AZKSIN00) to enable virtual table rule events byconfiguring the SEFVTBEVENTS parameter in the member, as follows:
"MODIFY PARM NAME(SEFVTBEVENTS) VALUE(YES)"
2. Access the VTB rules, as follows:a) In the IBM Open Data Analytics for z/OS - Primary Option Menu, specify option E, Rules Mgmt.b) Specify option 2, SEF Rule Management.c) Enter VTB for Display Only the Ruleset Named.
3. Customize the AZKMDDLM rule, as follows:a) Specify S next to AZKMDDLM to edit the rule.b) Find the vtb.optbdlcv variable and set to 1 to activate delimited processing for a map.c) Update additional rule options as needed. The following table describes the VTB rule options that
support delimited data processing.
VTB variable Description
vtb.optbdlcv Set to 1 to activate delimited processing for a map.
vtb.optbdlco Set the column delimiter. The default value is the commacharacter (,). For example, if you use the colon character (:) asthe column delimiter, specify vtb.optbdlco = ':'.
vtb.optbdlch Set the character field or string delimiter. The default value isthe quotation mark character ("). For example, if you use thehash character (#) as the string delimiter, specifyvtb.optbdlch = '#'.
vtb.optbdlhr Set to 1 to identify and remove the header record containingcolumn names. If specified without a header prefix, the systemcompares the first token in each line to the first column name inthe table to recognize and discard the header. The default is noheader checking.
Chapter 5. Customizing the Data Service server 93
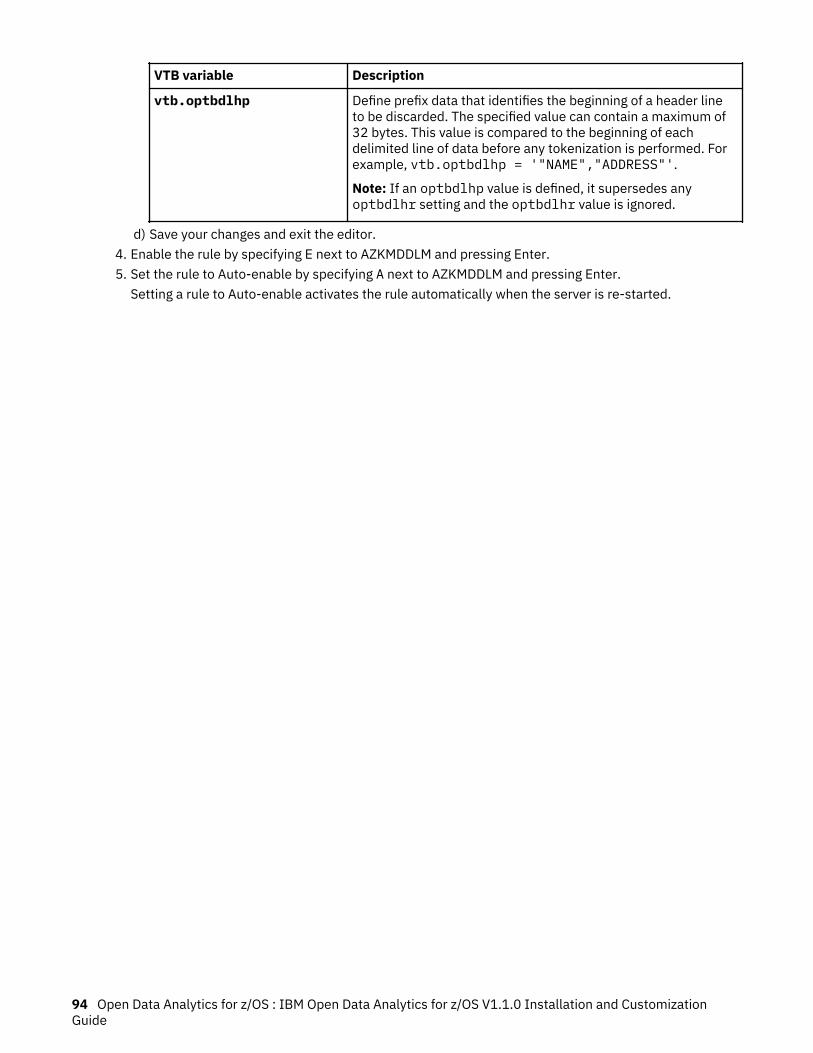
VTB variable Description
vtb.optbdlhp Define prefix data that identifies the beginning of a header lineto be discarded. The specified value can contain a maximum of32 bytes. This value is compared to the beginning of eachdelimited line of data before any tokenization is performed. Forexample, vtb.optbdlhp = '"NAME","ADDRESS"'.
Note: If an optbdlhp value is defined, it supersedes anyoptbdlhr setting and the optbdlhr value is ignored.
d) Save your changes and exit the editor.4. Enable the rule by specifying E next to AZKMDDLM and pressing Enter.5. Set the rule to Auto-enable by specifying A next to AZKMDDLM and pressing Enter.
Setting a rule to Auto-enable activates the rule automatically when the server is re-started.
94 Open Data Analytics for z/OS : IBM Open Data Analytics for z/OS V1.1.0 Installation and CustomizationGuide

Chapter 6. Installing the Data Service StudioThe Data Service Studio is an Eclipse-based user interface that allows you to create and managemetadata on the Data Service server that is required to provide access to your mainframe and non-mainframe data.
Before you beginBefore installing the Data Service Studio, verify that all installation prerequisites are met:
System component Requirement
Permissions You have appropriate user logon credentials and user privileges on yourclient system to install the Data Service Studio. For example, to install thestudio on Windows, you need administrator authority; ensure that your userprofile has the appropriate privileges to write to the target system location.
Supported operatingsystems
Windows 7, 8, 10
Linux – Red Hat Enterprise Linux 6.7 or higher; Ubuntu 16 or higher
macOS (Sierra)
System memory A minimum of 4 GB is recommended.
Hard disk space A minimum of 1 GB is recommended.
Software Installing the Data Service Studio as a plug-in to your existing Eclipseenvironment requires Eclipse Kepler 4.3 (or higher) and Java 1.7 or Java 1.8.
About this taskYou can choose to install the Data Service Studio software in a new Eclipse environment (a full install) oras a plug-in within an existing Eclipse environment (a plug-in install):Full install
A full install installs the Data Service Studio software in a new Eclipse environment on Windows. Thismethod includes the installation of Windows Eclipse (64-bit), JRE 1.7, and the Data Service plug-in.This installation method is recommended for Windows 64-bit users who are installing the studio forthe first time.
Plug-in installA plug-in install installs only the Data Service plug-in. This installation method is recommended forthe following users:
• Users on all supported platforms other than Windows 64-bit• Existing Eclipse users that want to reuse their own Java runtime and Eclipse installation• Users wanting to upgrade their existing Data Service Studio installation with a newer version of the
Data Service plug-in
Procedure
1. From the z/OS mainframe, transfer the installation member hlq.SAZKBIN(AZKBIN1) to a folder on yourworkstation using the File Transfer Protocol (FTP) in binary mode.
2. Rename the file to azk-studio.zip.3. Create a new installation folder for the Data Service Studio.4. Double-click the azk-studio.zip, and then extract the contents to the installation folder.
© Copyright IBM Corp. 2016, 2019 95

5. In the installation folder, navigate to the studio\install folder that was created, and then selectone of the following installation methods:
• To perform a full install, installing the Data Service Studio software in a new Eclipse environment,complete the following steps:
a. In the studio\install folder, run the setup.bat script.b. After the installation completes, launch the Data Service Studio using the shortcut created on
the desktop or in the Start menu.• To perform a plug-in install, installing the Data Service Studio software as a plug-in to an existing
Eclipse environment, complete the following steps:
a. From your Eclipse application, click Help > Install New Software, and then click Add.b. On the Add Repository dialog box, click Archive.c. Locate the mds.zip file in the studio\install folder, and then click Open.d. Enter the software file name, a name for the repository, and then click OK.e. Select the check box next to the file, and then click Next.f. Complete the remaining installation wizard steps, and then restart Eclipse when prompted.
6. To begin using Data Service Studio, open the Data Service perspective using the menu option Window> Open Perspective.
Verifying the studio installationVerify that you can connect from the Data Service Studio to the server and browse metadata on theserver.
Procedure
1. On the Server tab, click Set Server.
2. Provide information for the following fields and click OK:Field Description
Host The z/OS LPAR name on which the Data Service server is running.
Port The JDBC port number that the server is using. During customization, the portnumber is specified in the server configuration file; the parameter name isOEPORTNUMBER. To locate this number, use SDSF on the mainframe to browsethe server JOB output and search for OEPORTNUMBER.
Userid The user ID that the server will use to authenticate the connection.
User Password The password that corresponds to the user ID being used to connect to the server.
The Server tab displays the new server connection. You can now browse the server metadata andconfigure the interfaces for the solutions that you want to use.
Installing the JDBC driverJava-based applications and tools use the JDBC driver to access data that is made available through DataService.
About this task
The JDBC driver is a Type 4 driver that is written in Java and implements the network protocol for theData Service.
96 Open Data Analytics for z/OS : IBM Open Data Analytics for z/OS V1.1.0 Installation and CustomizationGuide

The JDBC driver requires Java 1.7 or higher and is supplied as a ZIP archive file that contains thefollowing components:
• dv-jdbc-[version #].jar (the driver core implementation file)• log4j-api-[version #].jar (logging framework API file)• log4j-core-[version #].jar (logging framework implementation file)• log4j2.xml (sample logging configuration file)
Procedure
1. From the mainframe, transfer the driver installation member hlq.SAZKBIN(AZKBIN2) to yourdevelopment workstation using the File Transfer Protocol (FTP) in binary mode.
2. Rename the file to JDBCdriver.zip.3. On your development workstation, create a directory, and then extract the contents of the
JDBCdriver.zip archive into that directory.4. To use the drivers with Data Service instead of the JDBC driver shipped with the studio, create a
directory on the mainframe and FTP the driver files in binary mode to that directory. For example:<mount_point>/DSDriver. The <mount_point>/DSDriver path is used with the spark-submitcommand.
What to do nextFor details about the JDBC driver, see the Solutions Guide.
Installing the Python dsdbc moduleYou can access z/OS data from Python applications using Mainframe Data Service and the IzODAAnaconda component.
Querying Data Service virtual tables from Python applications requires the IzODA Anaconda componentand use of the Python dsdbc module. The Python dsdbc module is an implementation of the Python DB2.0 API (https://www.python.org/dev/peps/pep-0249/) which enables Python developers on z/OS to usea simple, portable framework to access the Data Service. The dsdbc module is available with the IzODAAnaconda component.
Note: When using the IzODA Anaconda component, Python applications do not use the JDBC driver fordata access; the non-Java based Python dsdbc module is used for data access.
To install and configure IzODA Anaconda, see Chapter 9, “Customizing Anaconda ,” on page 111. Noadditional modifications to the Data Service server are required.
Chapter 6. Installing the Data Service Studio 97

98 Open Data Analytics for z/OS : IBM Open Data Analytics for z/OS V1.1.0 Installation and CustomizationGuide

Chapter 7. Installing the JDBC GatewayThe JDBC Gateway is a Data Service distributed application server that allows direct connectivity to JDBCdata sources. Install the JDBC Gateway to connect directly to JDBC data sources.
Before you beginBefore installing the JDBC Gateway, review the following points:
• For an overview of the JDBC Gateway solution, see "JDBC Gateway" in the Solutions Guide.• The following terminology is used in the installation procedure:
– JDBC Gateway server. The server is the backend component that allows communication with the DataService server.
– JDBC Gateway administrative console. The administrative console is the front-end web componentthat you use to configure your data sources. Only a single user (web client) can access the JDBCGateway administrative console at a time. When installing the JDBC Gateway, you must specify aspecific user ID for this purpose. This user ID is an internal application ID that allows access to theweb user interface.
– Port for the Web UI. This port will be used to access the Web-based administrative console and isspecified during the installation procedure.
Note: The JDBC Gateway also uses another port to listen for incoming DRDA requests. This DRDAlistener port is set later when configuring the JDBC Gateway.
• Before installing the JDBC Gateway, verify that all installation requirements are met, as follows:
System component Requirement
Permissions You have appropriate user logon credentials and user privileges on yourclient system to install the JDBC Gateway. For example, to install anddeploy the JDBC Gateway on Windows, you may need to run withadministrator privileges depending on the target location.
Supported platforms The JDBC Gateway is a pure Java application and therefore can bedeployed on any platform that supports Java 8 or higher.
System memory Minimum of 1 GB
Hard disk space Minimum of 500 MB
Software – Java 8 is required to install and deploy JDBC Gateway.– One of the following web browsers (with JavaScript support enabled)
must be used to access the JDBC Gateway administrative console:
- Google Chrome browser V50.0.2661.102 or later- Mozilla Firefox V47.0.1 or later- Microsoft Edge V25.10586.0.0 or later- Microsoft Internet Explorer V10 or later- Apple Safari browser V9.0.3 or later
– Database connectivity requires an appropriate JDBC driver for each typeof data source that is accessed.
About this taskUse the following procedure to install the JDBC Gateway. This installation installs the JDBC Gatewayserver and administrative console.
© Copyright IBM Corp. 2016, 2019 99

During the installation, you must specify a user ID to be used for the JDBC Gateway administrativeconsole. When using the JDBC Gateway administrative console, only a single user can access theadministrative console at a time.
As part of the installation, the following actions occur:
• The jgate.properties file is created, which contains the site-specific settings.• Start and stop scripts appropriate to the platform are created. The installer creates cmd scripts if you
are running on Windows and sh scripts if you are running on Unix or Linux.
Considerations for USS installation: For installation in USS, it is recommended that you define thefollowing environment variables:
export IBM_JAVA_OPTIONS="-Dfile.encoding=ISO8859-1"export _BPXK_AUTOCVT=ON
When the installer generates start and stop scripts, the following actions occur depending on thesevariables:
• If you have not set the recommended environment variables, the scripts will be generated in EBCDIC.You can run the gateway as normal for Unix using the following command: sh startServer.sh
• If you set the IBM_JAVA_OPTIONS variable, the scripts will be generated in ASCII, and you will need touse the following command: chtag -tc ISO8859-1 <file>. (Tagging in USS basically means_BPXK_AUTOCVT must be ON if you want to edit or execute the script in the shell.)
Files generated by the JDBC Gateway, such as log files and the jgate.properties file, will begenerated in ASCII regardless of the aforementioned environment variable settings (except forjetty.out, which is in EBCDIC). In order to browse these files natively in USS, you must use the chtagcommand and set _BPXK_AUTOCVT=ON.
Procedure
1. From the z/OS mainframe, transfer the installation member hlq.SAZKBIN(AZKBINJ) to yourworkstation using the File Transfer Protocol (FTP) in binary mode.
2. Rename the file to jdbc-gateway.zip.3. On your host machine, create a directory to host the JDBC Gateway, and then extract the contents of
the installation file into that directory.The extracted contents will include the JDBCGatewaySetup11.jar file.
Note: If your host machine does not have an unzip utility, extract the contents of the installation file ona Windows workstation and copy the JDBCGatewaySetup11.jar file to the host machine.
4. At a command prompt in the directory, run the following command:
java -jar JDBCGatewaySetup11.jar
The installer launches.5. Enter the following information at the prompts:
Prompt Description
You are about to install JDBCGateway. Do you want to proceed?(Y/n)
Enter Y to continue with the installation, or entern to cancel the installation.
Specify the installation directory(local directory\JDBCGateway):
Enter the path of the directory where to installthe application, or press Enter to use the defaultvalue as indicated.
Set login for JDBC Gateway admin Webpage (admin):
Enter the user ID to be used for the JDBCGateway administrative console, or press Enter touse the default value admin.
100 Open Data Analytics for z/OS : IBM Open Data Analytics for z/OS V1.1.0 Installation and CustomizationGuide
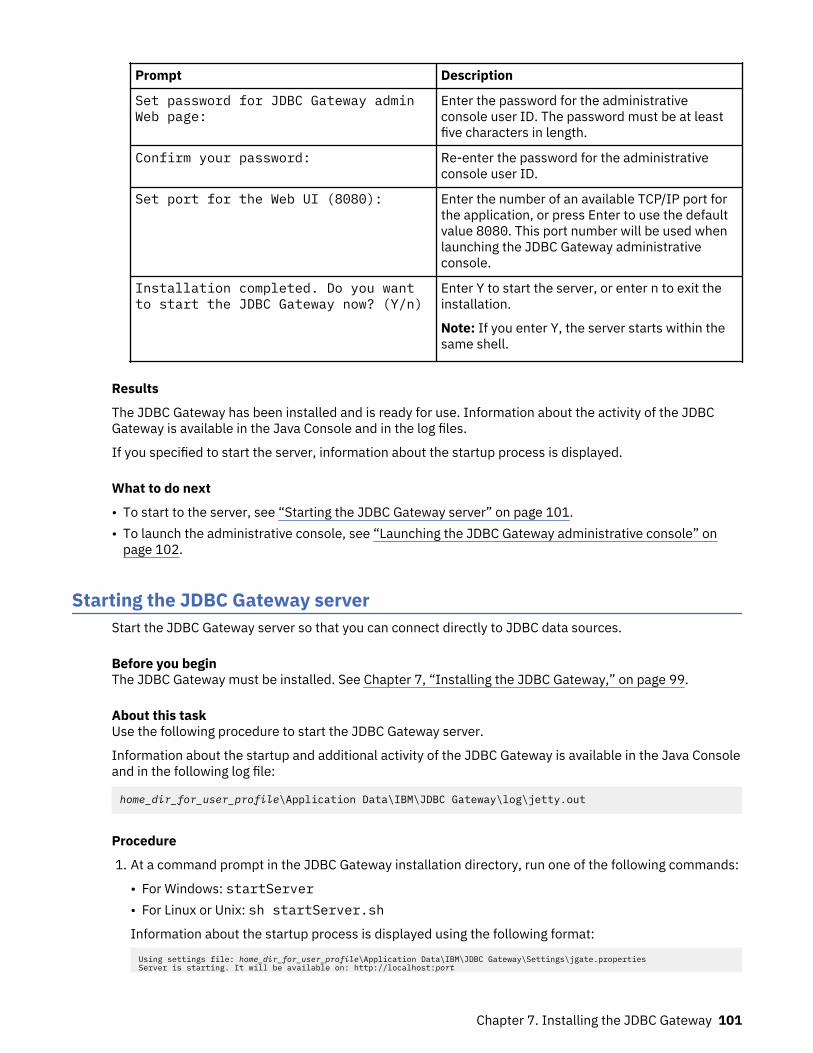
Prompt Description
Set password for JDBC Gateway adminWeb page:
Enter the password for the administrativeconsole user ID. The password must be at leastfive characters in length.
Confirm your password: Re-enter the password for the administrativeconsole user ID.
Set port for the Web UI (8080): Enter the number of an available TCP/IP port forthe application, or press Enter to use the defaultvalue 8080. This port number will be used whenlaunching the JDBC Gateway administrativeconsole.
Installation completed. Do you wantto start the JDBC Gateway now? (Y/n)
Enter Y to start the server, or enter n to exit theinstallation.
Note: If you enter Y, the server starts within thesame shell.
Results
The JDBC Gateway has been installed and is ready for use. Information about the activity of the JDBCGateway is available in the Java Console and in the log files.
If you specified to start the server, information about the startup process is displayed.
What to do next
• To start to the server, see “Starting the JDBC Gateway server” on page 101.• To launch the administrative console, see “Launching the JDBC Gateway administrative console” on
page 102.
Starting the JDBC Gateway serverStart the JDBC Gateway server so that you can connect directly to JDBC data sources.
Before you beginThe JDBC Gateway must be installed. See Chapter 7, “Installing the JDBC Gateway,” on page 99.
About this taskUse the following procedure to start the JDBC Gateway server.
Information about the startup and additional activity of the JDBC Gateway is available in the Java Consoleand in the following log file:
home_dir_for_user_profile\Application Data\IBM\JDBC Gateway\log\jetty.out
Procedure
1. At a command prompt in the JDBC Gateway installation directory, run one of the following commands:
• For Windows: startServer• For Linux or Unix: sh startServer.sh
Information about the startup process is displayed using the following format:
Using settings file: home_dir_for_user_profile\Application Data\IBM\JDBC Gateway\Settings\jgate.propertiesServer is starting. It will be available on: http://localhost:port
Chapter 7. Installing the JDBC Gateway 101

Server process ID: processIDSee home_dir_for_user_profile\Application Data\IBM\JDBC Gateway\log\jetty.out for server status information.
2. Wait for the JDBC Gateway server startup process to complete, which is indicated by the followingmessage in the jetty.out log file:
date time : JGATE Server started and ready to accept connections on port port_number
3. Optional: To stop the JDBC Gateway server, run the following command in the JDBC Gatewayinstallation directory:
• For Windows: stopServer• For Linux or Unix: sh stopServer.sh
ResultsThe JDBC Gateway server has been started and is ready for use. Information about the activity of theJDBC Gateway is available in the Java Console and in the log files.
What to do nextStart the JDBC Gateway administrative console. See “Launching the JDBC Gateway administrativeconsole” on page 102.
Launching the JDBC Gateway administrative consoleLaunch the JDBC Gateway administrative console so that you can configure connections to JDBC datasources.
Before you beginThe JDBC Gateway server must be installed and active. See Chapter 7, “Installing the JDBC Gateway,” onpage 99 and “Starting the JDBC Gateway server” on page 101.
About this taskUse the following procedure to start the JDBC Gateway administrative console.
Only a single user (web client) can access the JDBC Gateway administrative console at a time.
Note: The JDBC Gateway does not require an external web application server. It contains its own Jettyweb application server.
Procedure
1. In a web browser, launch the JDBC Gateway administrative console using the following URL:
http://server:port
where:
• server is the machine name or address where the JDBC Gateway server is running• port is the port specified during the installation
2. Enter the Username and Password specified during installation.
The JDBC Gateway administrative console launches.
ResultsThe JDBC Gateway administrative console is running and ready for use. Information about the activity ofthe JDBC Gateway is available in the Java Console and in the log files.
What to do nextConfigure access to data sources in the JDBC Gateway and the Data Service server. See "Configuringaccess to data sources using the JDBC Gateway" in the Solutions Guide.
102 Open Data Analytics for z/OS : IBM Open Data Analytics for z/OS V1.1.0 Installation and CustomizationGuide

Chapter 8. z/OS IzODA Livy Installation andCustomization
Before you can use z/OS IzODA Livy, you must customize your environment for it and its dependentproducts.
Before you begin
Follow the instructions in Chapter 3, “Installing IBM Open Data Analytics for z/OS,” on page 11 to installOpen Data Analytics for z/OS on your system.
About this task
Once installed, the default program location for z/OS IzODA Livy is /usr/lpp/IBM/izoda/anaconda/extras/apache-livy.
Complete the tasks in this topic to customize your environment for z/OS Livy. You will need access to aTSO session and an OMVS session (preferably through a Putty terminal).
About z/OS IzODA Livy
The Livy server is a REST service used in conjunction with Spark that allows users to submit Spark jobswithout having the Spark client installed. It provides two modes of job submission for the end users:
• Batch mode: For submitting Spark application files such as Scala JARs and Python .py files.Conceptually this is equivalent to users using spark-submit for application submission.
• Session mode: For submitting Scala or Python application code interactively. Conceptually this isequivalent to users using interactive shell such as spark-shell or pyspark shell.
After the Spark job is received, the Livy server submits the application to the Spark cluster on behalf ofthe user.
Installing z/OS IzODA Livy
Complete this task to install the z/OS IzODA Livy package onto your system using Anaconda. IBMrecommends the System Programmer to perform the install of Livy into the Anaconda base environment.
1. Determine the Anaconda environment that you will be using for the install. The System Programmerwill be using the base environment (already created).
• If you are not the System Programmer, IBM recommends first creating your own conda environmentfor the install. For example:
conda create -n myenv python
2. Activate your environment. The System Programmer will use the base environment.
conda activate myenv
3. Enter the following:
conda install apache-livy
Setting up a user ID for use with z/OS IzODA Livy
Complete this task to set up a user ID for use with z/OS IzODA Livy. For this task, you can either create anew user ID to use for z/OS IzODA Livy, or you can use an existing user ID.
© Copyright IBM Corp. 2016, 2019 103

Choose or create an appropriate user ID for use with z/OS IzODA Livy. Specifically, this is the user IDunder which the Livy server is started, known as the Livy server user ID in this documentation.
The Livy server will be submitting Spark application to the Spark cluster on behalf of the Livy end users.Therefore, the Livy server user ID must have the appropriate authorities for submitting Spark applicationto the Spark cluster as any other Spark end user. If z/OS Spark client authentication is enabled, refer to“Configuring z/OS Spark client authentication” on page 41 for details about setting up the Spark end userID with the appropriate authorities.
Before starting the Livy server, you must have the appropriate authorities to either access or create (ifthey do not already exist) the directories that are specified by the following environment variables, or thedefaults taken when not specified:
LIVY_CONF_DIRLIVY_LOG_DIRLIVY_PID_DIR
IBM also recommends you set the LIVY_HOME environment variable to the Livy installation directory.
Customizing z/OS IzODA LivyBefore you can use z/OS IzODA Livy, you must customize your environment for it and its dependentproducts.
Configuring the z/OS IzODA Livy working directories
Complete this task to configure z/OS IzODA Livy to run using your desired configurations. The followingtable lists some of the working directories that z/OS IzODA Livy uses:
Table 8. Livy working directories
Directory contents Default location Environment variable Suggested newdirectory
Log files $LIVY_HOME/logs $LIVY_LOG_DIR Under /var, such as /var/livy/logs
Configuration files $LIVY_HOME/conf $LIVY_CONF_DIR Under /var, such as /var/livy/conf
PID files /tmp $LIVY_PID_DIR Under /tmp, suchas /tmp/livy/pid
1. Follow your file system conventions and create new working directories for z/OS IzODA Livy.2. Ensure the Livy server user ID (created in Chapter 8, “z/OS IzODA Livy Installation and Customization,”
on page 103) has read/write access to the newly created working directories.3. Ensure that these directories, specifically $LIVY_LOG_DIR, get cleaned regularly.
Creating the Livy configuration files from template
This task creates the livy.conf, livy-env.sh and log4j.properties configuration files in the Livyserver user ID’s $LIVY_CONF_DIR directory.
Create the files by using the template files located in the $LIVY_HOME/conf directory. For example:
cp $LIVY_HOME/conf/livy-env.sh.template $LIVY_CONF_DIR/livy-env.shcp $LIVY_HOME/conf/livy.conf.template $LIVY_CONF_DIR/livy.confcp $LIVY_HOME/conf/log4j.properties.template $LIVY_CONF_DIR/log4j.properties
104 Open Data Analytics for z/OS : IBM Open Data Analytics for z/OS V1.1.0 Installation and CustomizationGuide

Updating the Livy configuration files from template
You will need to configure the Livy server by using the livy.conf and livy-env.sh configuration fileslocated in $LIVY_CONF_DIR directory.
1. The following parameters should be set in the livy.conf configuration file:
a. Set livy.spark.master to the Master URL of your Spark cluster. For example:
livy.spark.master = spark://master:7077
b. Set livy.spark.deploy-mode to the deploy mode that your Spark cluster accepts.
Note: When setting the livy.spark.deploy-mode to cluster, Livy session mode submissions areno longer available. In addition, batch job Livy submits with PySpark applications are notsupported. Both of these are available only if the livy.spark.deploy-mode configuration is setto client. See Table 9 on page 105 for more information.
Table 9. Supported environments per deploy mode
Client Cluster
Spark session (Scala) Supported Not supported
Sparky Session (Python) Supported Not supported
Spark batch job Supported Supported
Sparky batch job Supported Not supported
livy.spark.deploy-mode = client
c. Set livy.file.local-dir-whitelist to the directories that contain your Spark applicationfiles, separated by commas:
livy.file.local-dir-whitelist = /usr/lpp/IBM/izoda/spark/spark23x/examples/jars/, path/to/directory2containing/jar-files
d. You may also modify the host IP address and the Livy server port by setting livy.server.hostand livy.server.port:
livy.server.host = localhostlivy.server.port = 8998
If you have changed the SPARK_LOCAL_IP environment variable, you will likely have to change thelivy.server.host as well. By default, the Livy server uses port 8998.
e. You may also modify the session timeout value by setting the livy.server.session.timeoutconfiguration. We support the following suffixes: “us” (microseconds), “ms” (milliseconds), “s”(seconds), “m” or “min” (minutes), “h” (hours), and “d” (days):
livy.server.session.timeout-check = truelivy.server.session.timeout = 1h
If livy.server.session.timeout-check is set to false, livy.server.session.timeout will be ignored.2. Update the $LIVY_CONF_DIR/livy-env.sh with the environment variables pointing to the newly
created working directories during the “Configuring the z/OS IzODA Livy working directories” on page104 task.
For example:
LIVY_LOG_DIR=/var/livy/logsLIVY_PID_DIR=/tmp/livy/pid
Chapter 8. z/OS IzODA Livy Installation and Customization 105

Customizing user access for z/OS IzODA LivyComplete this task to configure user access for z/OS IzODA Livy.
About this task
Similar to Spark, z/OS IzODA Livy supports the use of AT-TLS authentication at the Livy server port forenhanced security. It can be achieved by configuring the necessary digital certificates and key ring for theLivy end users and creating the corresponding AT-TLS policy rules.
IBM recommends using AT-TLS authentication at the Livy server port along with AT-TLS as the z/OS Sparkclient authentication. You may defer setting up authentication on both Livy and Spark during, for instance,early testing in a secure test environment.
Creating and configuring digital certificates and key rings
Complete this task to create and configure digital certificates and key rings that are needed for z/OS Livyauthentication.
In these examples, a new set of internal CA, key ring and digital certificates are created for enabling AT-TLS authentication between the Livy end user and the Livy Server, that is separated from the Spark onesdiscussed in previous chapter. By doing so, the System Programmer can authorize access to the Livyserver and the Spark cluster independently. This configuration assumes one-to-one certificate-to-user IDassociation; that is, one certificate maps to one user.
When both Livy AT-TLS authentication and Spark client authentication are enabled, the certificate setup(as shown in Figure 7 on page 106) consists of:
• Livy server/client certificates, signed by the Livy internal CA (“LIVY Local CA” in these examples),connected to the Livy SSL key ring (“LivyRing” in these examples).
• Spark server/client certificates, signed by the Spark internal CA (“SPARK Local CA” as discussedpreviously), connected to the SparkSSL key ring (“SparkRing” as discussed previously).
Figure 7. Livy/Spark key ring setup
The Livy end user ID who will be submitting Spark jobs via Livy needs to own a Livy client certificate. Endusers who own both a Spark and a Livy client certificate can submit Spark jobs either via Livy or to thecluster directly, for example, via spark-submit.
106 Open Data Analytics for z/OS : IBM Open Data Analytics for z/OS V1.1.0 Installation and CustomizationGuide

Because the Livy server will be submitting applications to the Spark cluster on behalf of the Livy endusers, the Livy server user ID needs to own a Livy server certificate (connected to the Livy key ring) as wellas a Spark client certificate (connected to the Spark key ring).
Digital certificates can be managed through RACF, PKI Services, or other security products.
Procedure:
1. If you do not already have an internal Livy CA defined, use RACF as the CA to create a Livy CAcertificate. For example:
RACDCERT GENCERT CERTAUTH SUBJECTSDN(OU('LIVY Local CA') O('IBM') C('US')) WITHLABEL('LIVY Local CA') NOTAFTER(DATE(2030/01/01)) SIZE(1024)
For more information about the RACDCERT command, see z/OS Security Server RACF CommandLanguage Reference.
2. Create a certificate and key ring for the user ID that will be used to start the Livy server:
The following RACF commands assume that you have already created the Spark Client Certificate forSPARKUSR. If not, see “Creating and configuring digital certificates and key rings” in “Configuring z/OSSpark client authentication” on page 41
a. Create a Livy certificate that is signed by the Livy CA.
RACDCERT GENCERT ID(SPARKUSR) SIGNWITH(CERTAUTH LABEL('LIVY Local CA')) KEYUSAGE(HANDSHAKE) WITHLABEL('Livy Server Cert') SUBJECTSDN(CN('LIVY TEST SERVER') O('IBM') L('Poughkeepsie') SP('New York') C('US')) NOTAFTER(DATE(2030/01/01)) ALTNAME(DOMAIN('livyServer-host-addr') IP(xxx.xxx.xxx.xxx))
b. Create a Livy SSL key ring (Livy Ring in these examples).
RACDCERT ADDRING(LivyRing) ID(SPARKUSR)
c. Connect the Livy server certificate to the Livy key ring.
RACDCERT ID(SPARKUSR) CONNECT(ID(SPARKUSR) LABEL('Livy Server Cert') RING(LivyRing) USAGE(PERSONAL) DEFAULT)
d. Connect the Livy CA certificate to the Livy key ring.
RACDCERT ID(SPARKUSR) CONNECT(CERTAUTH LABEL('LIVY Local CA') RING(LivyRing))
e. Allow the Livy server user ID (SPARKUSR) to access the its key ring.
PERMIT IRR.DIGTCERT.LISTRING CLASS(FACILITY) ID(SPARKUSR) ACCESS(READ)
PERMIT IRR.DIGTCERT.LIST CLASS(FACILITY) ID(SPARKUSR) ACCESS(READ)
f. Refresh the RACF FACILITY class profiles:
SETROPTS RACLIST(FACILITY) REFRESH
3. Create and connect a certificate and a key ring for each Livy end user (LIVYUSR in these examples):
a. Create a client certificate that is signed by the Livy CA.
RACDCERT GENCERT ID(LIVYUSR) SIGNWITH(CERTAUTH LABEL('LIVY Local CA')) KEYUSAGE(HANDSHAKE) WITHLABEL('Livy Client Cert') SUBJECTSDN(CN('LIVY TEST SERVER') O('IBM') L('Poughkeepsie') SP('New York') C('US')) NOTAFTER(DATE(2030/01/01))
Note: In order to connect to the Livy server from off-platform Livy interfaces, this certificate willneed to be exported. Refer to “Exporting Livy user certificates” on page 108.
b. For users who will be connecting to the Livy server, create an SSL key ring for each user withthesame name as in step 2b.
Chapter 8. z/OS IzODA Livy Installation and Customization 107

RACDCERT ADDRING(LivyRing) ID(LIVYUSR)
c. Connect the client certificate to the end user’s key ring.
RACDCERT ID(LIVYUSR) CONNECT(ID(LIVYUSR) LABEL('Livy Client Cert') RING(LivyRing) USAGE(PERSONAL) DEFAULT)
d. Connect the Livy CA certificate to the end user’s key ring.
RACDCERT ID(LIVYUSR) CONNECT(CERTAUTH LABEL('LIVY Local CA') RING(LivyRing))
e. Allow the end user’s user ID to access its key ring.
PERMIT IRR.DIGTCERT.LISTRING CLASS(FACILITY) ID(LIVYUSR) ACCESS(READ)
PERMIT IRR.DIGTCERT.LIST CLASS(FACILITY) ID(LIVYUSR) ACCESS(READ)
f. Refresh the RACF FACILITY class profiles:
SETROPTS RACLIST(FACILITY) REFRESH
Exporting Livy user certificates
Complete this task to export the Livy user certificates for use by off-platform Livy interfaces.
Digital certificates can be exported through RACF PKI services or other security products. In the followingexample, RACF is used to extract the certificates into a PKCS#12 certificate package (.p12) and opensslto convert the .p12 into the PEM format. PEM is one of many formats available. Work with your securityadministrator if certificates are needed in other formats.
1. Create the .p12 package.
For example, from TSO, issue the following command to create a .p12 packages in the LIVYUSR’sdataset where ‘password’ is the password used to access the contents of the package:
RACDCERT EXPORT(LABEL('Livy Client Cert'))ID(LIVYUSR)DSN('LIVYUSR.P12')FORMAT(PKCS12DER)PASSWORD('password')
2. Transfer (for example, FTP) the .p12 package as binary to the remote system. Issue the opensslcommand on the remote system to display the contents of the package. You will be prompted twicefor the password used during the export. For example:
openssl pkcs12 -info -in LIVYUSR.P12 -passin pass:"password"
3. In PEM format, extract the client certificate, the CA certificate, and the private key from the .p12package to three separate files.
a. Extract the client certificate.
For example, to extract the client certificate into a pem-encoded file, issue the following:
openssl pkcs12 -in LIVYUSR.P12 -passin pass:"password" -out livyusr.orig.pem -clcerts -nokeys
This creates a file "livyusr.orig.pem". This file cannot be used until some informational linesare removed.
Specifically, lines outside the BEGIN and END lines should be removed. Here is an example of whatthese look may like:
Bag Attributes friendlyName: Livy Client Cert localKeyID: 00 00 00 01
108 Open Data Analytics for z/OS : IBM Open Data Analytics for z/OS V1.1.0 Installation and CustomizationGuide
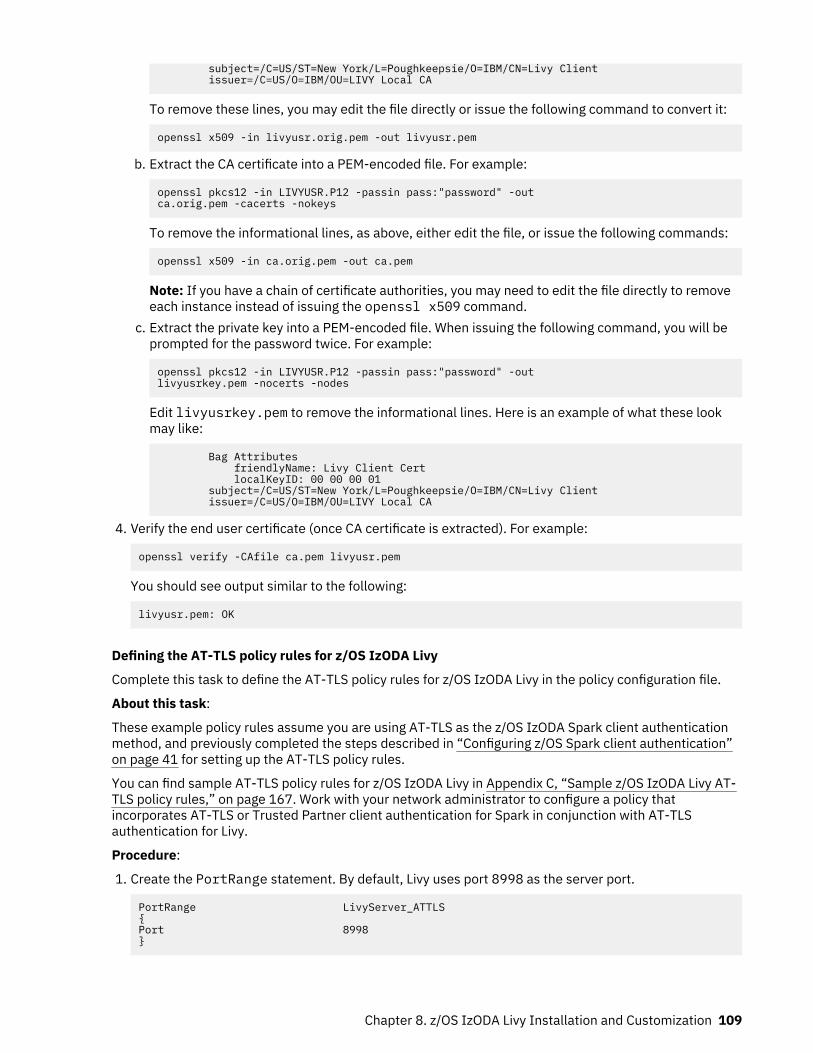
subject=/C=US/ST=New York/L=Poughkeepsie/O=IBM/CN=Livy Client issuer=/C=US/O=IBM/OU=LIVY Local CA
To remove these lines, you may edit the file directly or issue the following command to convert it:
openssl x509 -in livyusr.orig.pem -out livyusr.pem
b. Extract the CA certificate into a PEM-encoded file. For example:
openssl pkcs12 -in LIVYUSR.P12 -passin pass:"password" -out ca.orig.pem -cacerts -nokeys
To remove the informational lines, as above, either edit the file, or issue the following commands:
openssl x509 -in ca.orig.pem -out ca.pem
Note: If you have a chain of certificate authorities, you may need to edit the file directly to removeeach instance instead of issuing the openssl x509 command.
c. Extract the private key into a PEM-encoded file. When issuing the following command, you will beprompted for the password twice. For example:
openssl pkcs12 -in LIVYUSR.P12 -passin pass:"password" -out livyusrkey.pem -nocerts -nodes
Edit livyusrkey.pem to remove the informational lines. Here is an example of what these lookmay like:
Bag Attributes friendlyName: Livy Client Cert localKeyID: 00 00 00 01 subject=/C=US/ST=New York/L=Poughkeepsie/O=IBM/CN=Livy Client issuer=/C=US/O=IBM/OU=LIVY Local CA
4. Verify the end user certificate (once CA certificate is extracted). For example:
openssl verify -CAfile ca.pem livyusr.pem
You should see output similar to the following:
livyusr.pem: OK
Defining the AT-TLS policy rules for z/OS IzODA Livy
Complete this task to define the AT-TLS policy rules for z/OS IzODA Livy in the policy configuration file.
About this task:
These example policy rules assume you are using AT-TLS as the z/OS IzODA Spark client authenticationmethod, and previously completed the steps described in “Configuring z/OS Spark client authentication”on page 41 for setting up the AT-TLS policy rules.
You can find sample AT-TLS policy rules for z/OS IzODA Livy in Appendix C, “Sample z/OS IzODA Livy AT-TLS policy rules,” on page 167. Work with your network administrator to configure a policy thatincorporates AT-TLS or Trusted Partner client authentication for Spark in conjunction with AT-TLSauthentication for Livy.
Procedure:
1. Create the PortRange statement. By default, Livy uses port 8998 as the server port.
PortRange LivyServer_ATTLS{Port 8998}
Chapter 8. z/OS IzODA Livy Installation and Customization 109
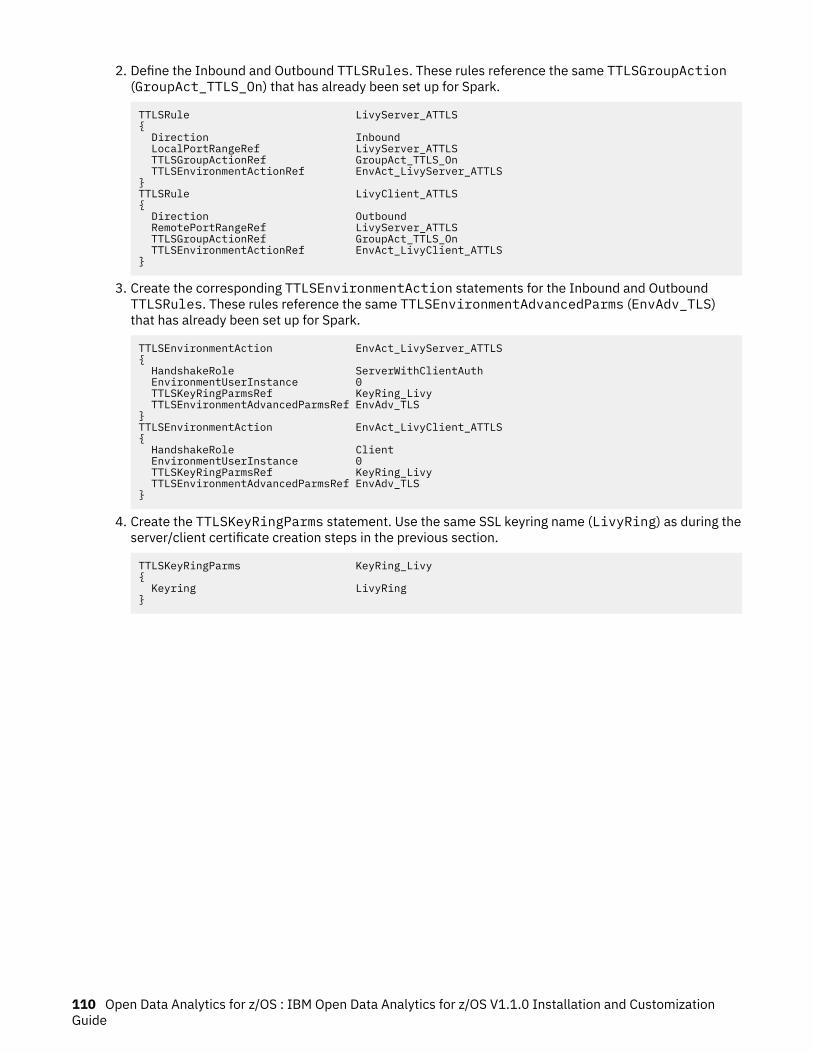
2. Define the Inbound and Outbound TTLSRules. These rules reference the same TTLSGroupAction(GroupAct_TTLS_On) that has already been set up for Spark.
TTLSRule LivyServer_ATTLS{ Direction Inbound LocalPortRangeRef LivyServer_ATTLS TTLSGroupActionRef GroupAct_TTLS_On TTLSEnvironmentActionRef EnvAct_LivyServer_ATTLS}TTLSRule LivyClient_ATTLS{ Direction Outbound RemotePortRangeRef LivyServer_ATTLS TTLSGroupActionRef GroupAct_TTLS_On TTLSEnvironmentActionRef EnvAct_LivyClient_ATTLS}
3. Create the corresponding TTLSEnvironmentAction statements for the Inbound and OutboundTTLSRules. These rules reference the same TTLSEnvironmentAdvancedParms (EnvAdv_TLS)that has already been set up for Spark.
TTLSEnvironmentAction EnvAct_LivyServer_ATTLS{ HandshakeRole ServerWithClientAuth EnvironmentUserInstance 0 TTLSKeyRingParmsRef KeyRing_Livy TTLSEnvironmentAdvancedParmsRef EnvAdv_TLS}TTLSEnvironmentAction EnvAct_LivyClient_ATTLS{ HandshakeRole Client EnvironmentUserInstance 0 TTLSKeyRingParmsRef KeyRing_Livy TTLSEnvironmentAdvancedParmsRef EnvAdv_TLS}
4. Create the TTLSKeyRingParms statement. Use the same SSL keyring name (LivyRing) as during theserver/client certificate creation steps in the previous section.
TTLSKeyRingParms KeyRing_Livy{ Keyring LivyRing}
110 Open Data Analytics for z/OS : IBM Open Data Analytics for z/OS V1.1.0 Installation and CustomizationGuide

Chapter 9. Customizing Anacondaz/OS IzODA Anaconda (FMID HANA110) contains the Anaconda data science ecosystem, which consistsof the Anaconda package manager and a library of packages that data scientists and applicationdevelopers can assemble into specific stacks of runtime capabilities to support particular data scienceapplications.
Anaconda is primarily a Python-based environment favored by data scientists who are familiar with theanalytics capabilities that have been built around the Python language. This environment complementsand overlaps some of the capabilities that are available in z/OS IzODA Spark (FMID HSPK120). Together,Anaconda and z/OS Spark provide a complete data science platform that can support a broad range ofanalytics applications.
A more complete description of the Anaconda environment is available at Anaconda (https://www.continuum.io/).
Note: Users of Spark 2.2.0 and earlier who are migrating to a newer level of Python should continue touse Python 3.6.
Anaconda package management
Anaconda package management is provided through the conda command line interface. This is used tomanage the root environment of installed packages. A base set of packages is provided with theAnaconda component, and a repository of additional packages is available through the IzODA channelhosted in the Anaconda Cloud. For a complete list of available packages, see Package Repository forIzODA (https://anaconda.org/IzODA/repo).
Anaconda repositories
Anaconda repositories are dynamic and flexible. The conda package manager can be used to install oruninstall any version of a package whenever it is published to a repository. This capability allowsAnaconda to be framework for managing all types of functional packages, and makes it ideal for handlingruntime environments based on open source.
Detailed information about all of the capabilities of the Anaconda ecosystem on z/OS, as well as theinstallation and configuration of the z/OS IzODA Anaconda component, is available on github at AnacondaOverview.
© Copyright IBM Corp. 2016, 2019 111

112 Open Data Analytics for z/OS : IBM Open Data Analytics for z/OS V1.1.0 Installation and CustomizationGuide

Part 4. Verification
© Copyright IBM Corp. 2016, 2019 113

114 Open Data Analytics for z/OS : IBM Open Data Analytics for z/OS V1.1.0 Installation and CustomizationGuide

Chapter 10. Verifying the IBM Open Data Analyticsfor z/OS customization
Some simple checks can verify that the basic installation and customization of IBM Open Data Analyticsfor z/OS was successful.
Before you beginFollow the instructions in Part 3, “Customization,” on page 13 to customize your environment and OpenData Analytics for z/OS.
About this task
Complete the following steps to verify the successful installation and customization of Open DataAnalytics for z/OS on your system.
Procedure
The spark-shell command attempts to create metastore_db in the current directory. If you do nothave the hive-site.xml file set up, and if your SPARK_HOME directory is read-only, you must invokespark-shell from a writable directory. For more information, see “Updating the Apache Sparkconfiguration files” on page 34.
The following steps assume that you are using a writable directory other than SPARK_HOME.1. Open an SSH or Telnet shell environment and navigate to a user-writable directory, such as your home
directory.2. Run the following command to open the Open Data Analytics for z/OS shell:
$SPARK_HOME/bin/spark-shell
where:SPARK_HOME
The environment variable that contains the path to the Open Data Analytics for z/OS installationdirectory.
After a series of messages, the Open Data Analytics for z/OS prompt appears:
scala>
3. From the Open Data Analytics for z/OS prompt, run the following command, which should return thevalue 1000:
sc.parallelize(1 to 1000).count()
4. From the Open Data Analytics for z/OS prompt, enter the following command to verify that the helpinformation is displaying properly:
:help
The returned help information resembles the following example:
All commands can be abbreviated, e.g. :he instead of :help.Those marked with a * have more detailed help, e.g. :help imports.
:help [command] print this summary or command-specific help:history [num] show the history (optional num is commands to show):h? <string> search the history:imports [name name ...] show import history, identifying sources of names:implicits [-v] show the implicits in scope:javap <path|class> disassemble a file or class name
© Copyright IBM Corp. 2016, 2019 115

:load <path> load and interpret a Scala file...
5. Enter the following command to exit the spark-shell:
:quit
6. From the z/OS UNIX prompt, run the following command to verify that Open Data Analytics for z/OScan generate an approximate value for Pi:
$SPARK_HOME/bin/run-example SparkPi
The returned information resembles the content in the following sample, with "Pi is roughly3.13742" within the content:
SPARKID:~ $ $SPARK_HOME/bin/run-example SparkPiUsing Spark's default log4j profile: org/apache/spark/log4j-defaults.properties18/08/21 16:33:15 INFO SparkContext: Running Spark version 2.2.018/08/21 16:33:16 WARN NativeCodeLoader: Unable to load native-hadoop library for your platform... using builtin-java classes where applicable18/08/21 16:33:16 INFO SparkContext: Submitted application: Spark Pi…18/08/21 16:33:20 INFO TaskSchedulerImpl: Removed TaskSet 0.0, whose tasks have all completed, from pool 18/08/21 16:33:20 INFO DAGScheduler: ResultStage 0 (reduce at SparkPi.scala:38) finished in 0.713 s18/08/21 16:33:20 INFO DAGScheduler: Job 0 finished: reduce at SparkPi.scala:38, took 1.057874 sPi is roughly 3.14057570287851418/08/21 16:33:20 INFO SparkUI: Stopped Spark web UI at http://……18/08/21 16:33:20 INFO ShutdownHookManager: Shutdown hook called18/08/21 16:33:20 INFO ShutdownHookManager: Deleting directory /tmp/spark/scratch/spark-3d5858dc-bb8b-4538-8f6a-7712e9151b12
ResultsYou have successfully verified the basic installation and customization of Open Data Analytics for z/OS onyour z/OS system. For information about verifying other aspects of the product, such as the master andworkers, see http://spark.apache.org/docs/2.3.4/.
Using the IBM Open Data Analytics for z/OS Spark Configuration Checker
About this task
The Configuration Checker tool, which is included in IBM Open Data Analytics for z/OS Spark starting fromIzODA Spark 2.2.0, verifies and displays some of your IzODA Spark settings.
Note: If you are using Spark 2.2.0, APAR PI93605 is required to use the checker.
Procedure
The IzODA Spark Configuration Checker must be invoked from the user ID under which the Spark clusteris started. In this documentation, it is referred to as the Spark ID. To run the IzODA Spark ConfigurationChecker, invoke the following command:
$SPARK_HOME/sbin/spark-configuration-checker.sh
Where:$SPARK_HOME
Specifies the IzODA Spark installation directory.
The tool also supports the following parameters:-v, --verbose
Provides lists of checks, configuration files, settings, and solutions for errors or warnings as output.-c, --color
Adds colors to the output.
116 Open Data Analytics for z/OS : IBM Open Data Analytics for z/OS V1.1.0 Installation and CustomizationGuide
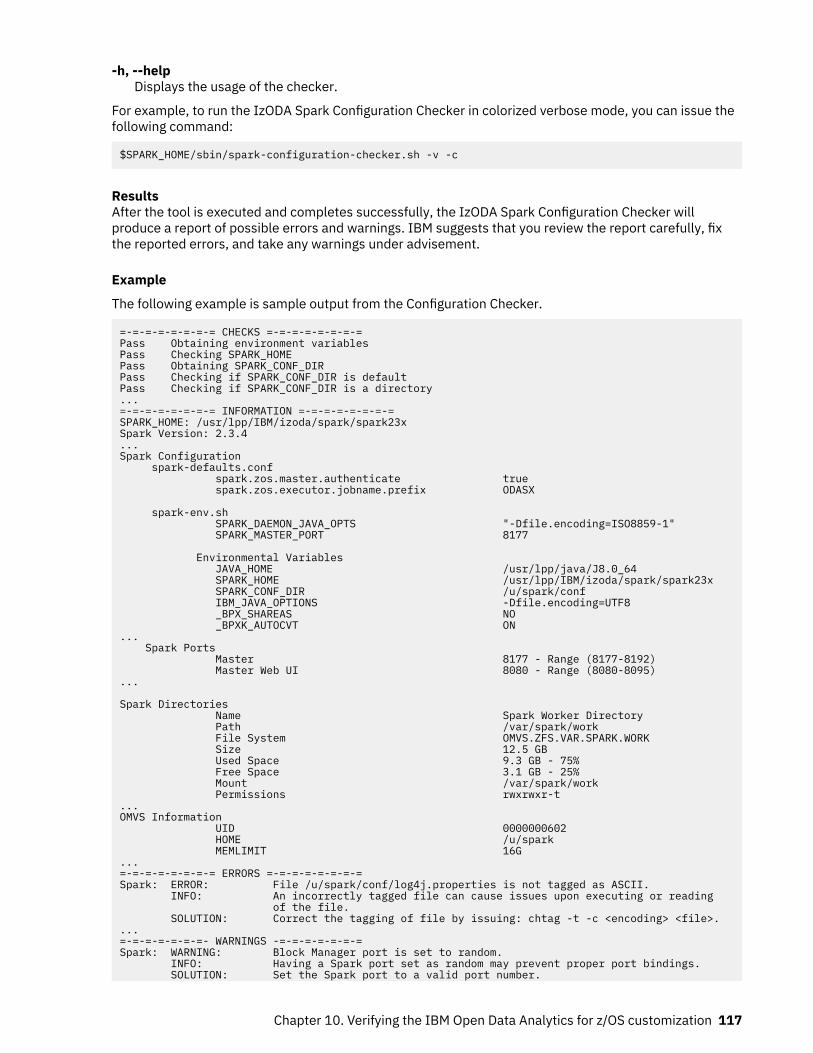
-h, --helpDisplays the usage of the checker.
For example, to run the IzODA Spark Configuration Checker in colorized verbose mode, you can issue thefollowing command:
$SPARK_HOME/sbin/spark-configuration-checker.sh -v -c
ResultsAfter the tool is executed and completes successfully, the IzODA Spark Configuration Checker willproduce a report of possible errors and warnings. IBM suggests that you review the report carefully, fixthe reported errors, and take any warnings under advisement.
Example
The following example is sample output from the Configuration Checker.
=-=-=-=-=-=-=-= CHECKS =-=-=-=-=-=-=-=Pass Obtaining environment variablesPass Checking SPARK_HOMEPass Obtaining SPARK_CONF_DIRPass Checking if SPARK_CONF_DIR is defaultPass Checking if SPARK_CONF_DIR is a directory...=-=-=-=-=-=-=-= INFORMATION =-=-=-=-=-=-=-=SPARK_HOME: /usr/lpp/IBM/izoda/spark/spark23xSpark Version: 2.3.4...Spark Configuration spark-defaults.conf spark.zos.master.authenticate true spark.zos.executor.jobname.prefix ODASX
spark-env.sh SPARK_DAEMON_JAVA_OPTS "-Dfile.encoding=ISO8859-1" SPARK_MASTER_PORT 8177
Environmental Variables JAVA_HOME /usr/lpp/java/J8.0_64 SPARK_HOME /usr/lpp/IBM/izoda/spark/spark23x SPARK_CONF_DIR /u/spark/conf IBM_JAVA_OPTIONS -Dfile.encoding=UTF8 _BPX_SHAREAS NO _BPXK_AUTOCVT ON... Spark Ports Master 8177 - Range (8177-8192) Master Web UI 8080 - Range (8080-8095)...
Spark Directories Name Spark Worker Directory Path /var/spark/work File System OMVS.ZFS.VAR.SPARK.WORK Size 12.5 GB Used Space 9.3 GB - 75% Free Space 3.1 GB - 25% Mount /var/spark/work Permissions rwxrwxr-t...OMVS Information UID 0000000602 HOME /u/spark MEMLIMIT 16G...=-=-=-=-=-=-=-= ERRORS =-=-=-=-=-=-=-=Spark: ERROR: File /u/spark/conf/log4j.properties is not tagged as ASCII. INFO: An incorrectly tagged file can cause issues upon executing or reading of the file. SOLUTION: Correct the tagging of file by issuing: chtag -t -c <encoding> <file>....=-=-=-=-=-=-=- WARNINGS -=-=-=-=-=-=-=Spark: WARNING: Block Manager port is set to random. INFO: Having a Spark port set as random may prevent proper port bindings. SOLUTION: Set the Spark port to a valid port number.
Chapter 10. Verifying the IBM Open Data Analytics for z/OS customization 117

...Please refer to the IzODA Installation and Customization Guide for more details.
118 Open Data Analytics for z/OS : IBM Open Data Analytics for z/OS V1.1.0 Installation and CustomizationGuide

Chapter 11. Verifying the Data Service serverinstallation
To verify the server installation, create a sample VSAM file and a virtual table, and then run a query thataccesses the VSAM data.
Procedure
1. Create the sample VSAM file on the mainframe that hosts the server. Run the AZKGNSTF member inthe hlq.SAZKCNTL data set to allocate and load the sample VSAM file.The job should complete with a condition code of 0.
2. Create the staffvs virtual table. Run the AZKIVVS1 member in the hlq.SAZKCNTL data set toperform a batch extract of the sample VSAM file listing and create a virtual table that formats theresult set that is returned from the VSAM file.This step runs a query against the sample VSAM file. The job should complete with a condition code of0.
© Copyright IBM Corp. 2016, 2019 119

120 Open Data Analytics for z/OS : IBM Open Data Analytics for z/OS V1.1.0 Installation and CustomizationGuide

Chapter 12. Verifying the IBM Open Data Analyticsfor z/OS product
After you verify the two individual FMIDs that are part of the IBM Open Data Analytics for z/OS product,verify that both components work together.
About this task
In the following procedure, the SPARK_HOME environment variable contains the path to the z/OS Sparkinstallation directory. By default, the configuration settings for your Spark cluster reside in the$SPARK_HOME/conf directory. These configuration settings may be kept in any directory and pointed toby the SPARK_CONF_DIR environment variable. This approach can be useful if you want to isolate yourcluster settings from a specific installation, such as for migration or for multi-cluster installationscenarios.
Complete the following steps to verify the operation of the Open Data Analytics for z/OS product on yoursystem.
Procedure
1. Start the Spark master daemon on your z/OS image.From a z/OS UNIX session, issue the following command:
$SPARK_HOME/sbin/start-master.sh -h host_IP_address -p sparkMaster-port
where:$SPARK_HOME
An environment variable that contains the installation path for z/OS Spark.host_IP_address
The IP address for this z/OS system. In this documentation, this value is shown as xxx.xxx.xxx.xxx.sparkMaster-port
The Spark master daemon port. The default is 7077.
The Spark master daemon attempts to define the port that you specify on the -p parameter. If thisport is not available, it increments the -p value by one and attempts to bind to the next available port.It is imperative to check the Spark master daemon log file (located in the $SPARK_LOG_DIR directory)to determine the port number on which the Spark master daemon is listening.
It is helpful to look at an example of an actual Spark master daemon log file for some pertinentinformation that you will need.
Example: The following output shows a portion of a valid Spark master daemon log file, spark-${USER}-org.apache.spark.deploy.master.Master-1-host.out, that was generated afterissuing the following command:
$SPARK_HOME/sbin/start-master.sh -h xxx.xxx.xxx.xxx -p 7077
If your Spark master daemon log does not look like this example, compare the contents of the SparkCommand: line in your log file to the one shown here and look for any differences. (You will not see theRegistering worker message in your log file until you start the Spark worker daemon in the nextstep.) Different versions of Apache Spark can also generate different log file contents. Spark Command: /usr/lpp/java/java800/J8.0_64/bin/java -cp /usr/lpp/IBM/Spark/sbin/../conf/:/usr/lpp/IBM/Spark/jars/* -Dfile.encoding=UTF8 -Xmx1g org.apache.spark.deploy.master.Master --host xxx.xxx.xxx.xxx --port 7077 --webui-port 8080 -h xxx.xxx.xxx.xxx -p 7077 ======================================== Using Spark's default log4j profile: org/apache/spark/log4j-defaults.properties 18/08/21 10:39:39 INFO Master: Started daemon with process name: 65639@hostname
© Copyright IBM Corp. 2016, 2019 121

18/08/21 10:39:39 WARN NativeCodeLoader: Unable to load native-hadoop library for your platform... using builtin-java classes where applicable 18/08/21 10:39:40 INFO SecurityManager: Changing view acls to: SPARKID 18/08/21 10:39:40 INFO SecurityManager: Changing modify acls to: SPARKID 18/08/21 10:39:40 INFO SecurityManager: Changing view acls groups to: … 18/08/21 10:39:40 INFO SecurityManager: Changing modify acls groups to: … A 18/08/21 10:39:40 INFO SecurityManager: z/OS client authentication is enabled, using method ATTLS. Make sure your environment is configured properly for this method. See IzODA Installation and Customization Guide for more information. 18/08/21 10:39:40 INFO SecurityManager: SecurityManager: authentication disabled; ui acls disabled; users with view permissions: Set(SPARKID); groups with view permissions: Set(); users with modify permissions: Set(SPARKID); groups with modify permissions: Set() 18/08/21 10:39:40 WARN NetUtil: Failed to find the loopback interface B 18/08/21 10:39:40 INFO Utils: Successfully started service 'sparkMaster' on port 7077. B 18/08/21 10:39:40 INFO Master: Starting Spark master at spark://xxx.xxx.xxx.xxx:7077 18/08/21 10:39:40 INFO Master: Running Spark version 2.2.0 18/08/21 10:39:40 INFO Master: Performing master environment verification C 118/08/21 10:39:40 INFO Utils: Successfully started service 'MasterUI' on port 8080. C 18/08/21 10:39:40 INFO MasterWebUI: Started MasterWebUI at http://xxx.xxx.xxx.xxx:8080 D 18/08/21 10:39:40 INFO Utils: Successfully started service on port 6066. D 18/08/21 10:39:40 INFO StandaloneRestServer: Started REST server for submitting applications on port 6066 18/08/21 10:39:40 INFO Master: I have been elected leader! New state: ALIVE 18/08/21 10:40:03 WARN ZosNativeUtil: TLS connection pending, will retry. TTLSi_Stat_Policy=4, TTLSi_Stat_Conn=1, TTLSi_Sec_Type=6 18/08/21 10:40:04 INFO Master: Registering worker xxx.xxx.xxx.xxx:1026 with 10 cores, 4.0 GB RAM, from user ID SPARKID
Note the following information from the log file:
• The messages that are prefixed by A identify the z/OS Client authentication options that wereselected. In this example, z/OS Client Authentication is enabled and using ATTLS as itsauthentication method.
• The messages that are prefixed by B identify the port number that is being used for the Sparkmaster daemon. In this example, the Spark master daemon successfully bound to and is using hostIP address xxx.xxx.xxx.xxx and port 7077.
• The messages that are prefixed by C identify the port number that the Spark master daemon isusing for the MasterUI port. In this example, the Spark master daemon successfully bound to and isusing port 8080 for the MasterUI port.
• The messages that are prefixed by D identify the port number that the Spark master daemon isusing for its REST port. Note that finding these message is optional for verifying the IzODA product.The REST server interface, which listens on port 6066, is disabled by default. As of APAR PH03469,IzODA supports TLS client authentication on the REST server port and applications can be securelysubmitted through this interface. For details, see “Configuring networking for Apache Spark” on page37. In this example, the Spark master daemon successfully bound to and is using port 6066 for theREST port. .
Write down each of these port numbers for your configuration; you will need them later in thisprocedure.
sparkMaster port:
MasterUI port:
REST port:
2. Start the Spark worker daemon on your z/OS image.From a z/OS UNIX session, issue the following commands:
$SPARK_HOME/sbin/start-slave.sh spark://host_IP_address:sparkMaster-port
where:$SPARK_HOME
An environment variable that contains the installation path for z/OS Spark.
122 Open Data Analytics for z/OS : IBM Open Data Analytics for z/OS V1.1.0 Installation and CustomizationGuide

host_IP_addressThe IP address (xxx.xxx.xxx.xxx) for this z/OS system.
sparkMaster-portThe Spark master daemon port. The default is 7077.
It is helpful to look at an example of an actual Spark worker daemon log file for some pertinentinformation that you will need.
Example: The following output shows a portion of a valid Spark worker daemon log file, spark--org.apache.spark.deploy.worker.Worker-1-host.out, that was generated after issuing thefollowing command:
$SPARK_HOME/sbin/start-slave.sh spark://xxx.xxx.xxx.xxx:7077
Spark Command: /usr/lpp/java/J8.0_64/bin/java -cp /usr/lpp/IBM/Spark/sbin/../conf/:/usr/lpp/IBM/Spark/jars/* -Dfile.encoding=UTF8 -Xmx1g org.apache.spark.deploy.worker.Worker --webui-port 8081 spark://xxx.xxx.xxx.xxx:7077 ======================================== Using Spark's default log4j profile: org/apache/spark/log4j-defaults.properties 18/08/21 10:42:48 INFO Worker: Started daemon with process name: 16842871@hostname 18/08/21 10:42:48 WARN NativeCodeLoader: Unable to load native-hadoop library for your platform... using builtin-java classes where applicable 18/08/21 10:42:48 INFO SecurityManager: Changing view acls to: SPARKID 18/08/21 10:42:48 INFO SecurityManager: Changing modify acls to: SPARKID 18/08/21 10:42:48 INFO SecurityManager: Changing view acls groups to: … 18/08/21 10:42:48 INFO SecurityManager: Changing modify acls groups to: … 18/08/21 10:42:48 INFO SecurityManager: SecurityManager: authentication disabled; ui acls disabled; users with view permissions: Set(SPARKID); groups with view permissions: Set(); users with modify permissions: Set(SPARKID); groups with modify permissions: Set() 18/08/21 10:42:48 WARN NetUtil: Failed to find the loopback interface E 18/08/21 10:42:48 INFO Utils: Successfully started service 'sparkWorker' on port 1028. E 18/08/21 10:42:49 INFO Worker: Starting Spark worker xxx.xxx.xxx.xxx:1028 with 10 cores, 4.0 GB RAM 18/08/21 10:42:49 INFO Worker: Running Spark version 2.2.0 18/08/21 10:42:49 INFO Worker: Spark home: /usr/lpp/IBM/Spark
18/08/21 10:42:49 INFO Worker: Performing worker environment verification 18/08/21 10:42:49 INFO ZosSafUtil: READ access to SAF BPX.SRV.* SURROGAT class profile permission check for SPARKID is successful F 18/08/21 10:42:49 INFO Utils: Successfully started service 'WorkerUI' on port 8081. F 18/08/21 10:42:49 INFO WorkerWebUI: Bound WorkerWebUI to 0.0.0.0, and started at http://xxx.xxx.xxx.xxx:8081 18/08/21 10:42:49 INFO Worker: Connecting to master xxx.xxx.xxx.xxx:7077... 18/08/21 10:42:49 INFO TransportClientFactory: Successfully created connection to xxx.xxx.xxx.xxx/9.57.2.76:7077 after 37 ms (0 ms spent in bootstraps) 18/08/21 10:42:50 INFO Worker: Successfully registered with master spark://xxx.xxx.xxx.xxx:7077
Note the following information from the log file:
• The messages that are prefixed by E identify the port number that is being used for the Sparkworker daemon. In this example, the Spark worker daemon successfully bound to and is using port1028.
• The messages that are prefixed by F identify the port number that the Spark worker daemon isusing for the WorkerUI port. In this example, the Spark worker daemon successfully bound to and isusing port 8081 for the WorkerUI port.
Write down each of these port numbers for your configuration; you will need them later in thisprocedure.
sparkWorker port:
WorkerUI port:
Now that you have successfully started the Spark master daemon and Spark worker daemonprocesses on the z/OS system, you can now use the spark-submit command to run the same
Chapter 12. Verifying the IBM Open Data Analytics for z/OS product 123

SparkPi sample that you ran via the interactive spark-shell command in Chapter 10, “Verifying theIBM Open Data Analytics for z/OS customization,” on page 115.
3. Issue the following command on a single line, to run the SparkPi sample in client-deploy mode:
• $SPARK_HOME/bin/spark-submit --class org.apache.spark.examples.SparkPi --master spark://host-IP-addr:sparkMaster-port $SPARK_HOME/examples/jars/spark-examples_2.11-sparkVersion.jar
where:$SPARK_HOME
An environment variable that contains the installation path for z/OS Spark.host_IP_address
The IP address (xxx.xxx.xxx.xxx) for this z/OS system.sparkMaster-port
The Spark Master port. The default is 7077.sparkVersion
z/OS Spark version number (2.3.4 or 2.4.4)
After you issue the spark-submit command, you should see the application’s driver log as stderrand an approximation of pi as stdout.
Example: The following output shows an example of the messages that result from the Spark submit.18/08/21 11:54:14 INFO DAGScheduler: Job 0 finished: reduce at SparkPi.scala:38, took 3.470622 s G Pi is roughly 3.14055570277851418/08/21 11:54:14 INFO SparkUI: Stopped Spark web UI at http://XXX.XXX.XXX.XXX:404018/08/21 11:54:14 INFO StandaloneSchedulerBackend: Shutting down all executors18/08/21 11:54:14 INFO CoarseGrainedSchedulerBackend$DriverEndpoint: Asking each executor to shut down18/08/21 11:54:14 INFO MapOutputTrackerMasterEndpoint: MapOutputTrackerMasterEndpoint stopped!18/08/21 11:54:14 INFO MemoryStore: MemoryStore cleared18/08/21 11:54:14 INFO BlockManager: BlockManager stopped18/08/21 11:54:14 INFO BlockManagerMaster: BlockManagerMaster stopped18/08/21 11:54:14 INFO OutputCommitCoordinator$OutputCommitCoordinatorEndpoint: OutputCommitCoordinator stopped!18/08/21 11:54:14 INFO SparkContext: Successfully stopped SparkContext18/08/21 11:54:14 INFO ShutdownHookManager: Shutdown hook called18/08/21 11:54:14 INFO ShutdownHookManager: Deleting directory /tmp/spark/scratch/spark-95ed4711-ec2d-41fd-9b64-ab5cd6a03ebc
The messages that are prefixed by G are stdout of the application. All other messages are stderr. Inthis example, the SparkPi application approximated Pi to be 3.140555702778514.
To determine whether the spark-submit command completed successfully, look for theapproximation of Pi. You can also use the Spark MasterUI port via a web browser to view the state ofthe completed application (step 5).
4. (Optional) Issue the following command on a single line, to run the SparkPi sample in cluster-deploymode:
• $SPARK_HOME/bin/spark-submit --class org.apache.spark.examples.SparkPi --master spark://host-IP-addr:sparkRest-port $SPARK_HOME/examples/jars/spark-examples_2.11-sparkVersion.jar
where:$SPARK_HOME
An environment variable that contains the installation path for z/OS Spark.host_IP_address
The IP address (xxx.xxx.xxx.xxx) for this z/OS system.sparkREST-port
The Spark Master REST port. The default is 6066.
124 Open Data Analytics for z/OS : IBM Open Data Analytics for z/OS V1.1.0 Installation and CustomizationGuide
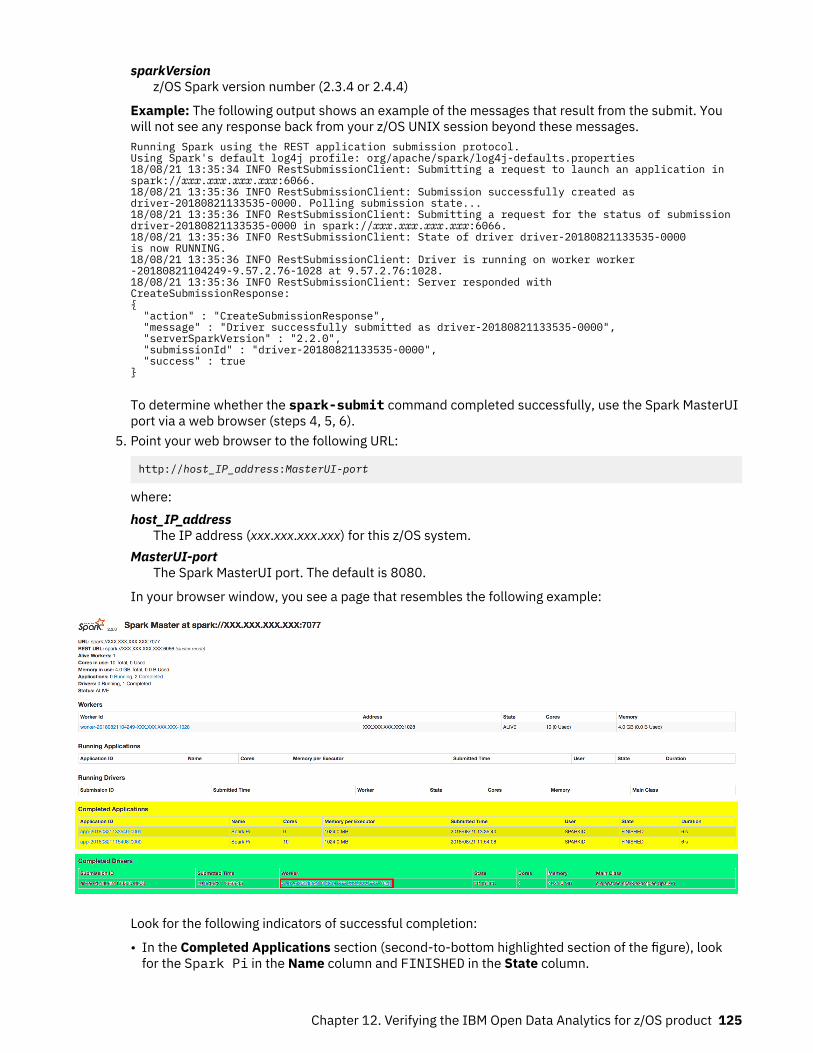
sparkVersionz/OS Spark version number (2.3.4 or 2.4.4)
Example: The following output shows an example of the messages that result from the submit. Youwill not see any response back from your z/OS UNIX session beyond these messages.Running Spark using the REST application submission protocol.Using Spark's default log4j profile: org/apache/spark/log4j-defaults.properties18/08/21 13:35:34 INFO RestSubmissionClient: Submitting a request to launch an application in spark://xxx.xxx.xxx.xxx:6066.18/08/21 13:35:36 INFO RestSubmissionClient: Submission successfully created as driver-20180821133535-0000. Polling submission state...18/08/21 13:35:36 INFO RestSubmissionClient: Submitting a request for the status of submission driver-20180821133535-0000 in spark://xxx.xxx.xxx.xxx:6066.18/08/21 13:35:36 INFO RestSubmissionClient: State of driver driver-20180821133535-0000 is now RUNNING.18/08/21 13:35:36 INFO RestSubmissionClient: Driver is running on worker worker-20180821104249-9.57.2.76-1028 at 9.57.2.76:1028.18/08/21 13:35:36 INFO RestSubmissionClient: Server responded with CreateSubmissionResponse:{ "action" : "CreateSubmissionResponse", "message" : "Driver successfully submitted as driver-20180821133535-0000", "serverSparkVersion" : "2.2.0", "submissionId" : "driver-20180821133535-0000", "success" : true}
To determine whether the spark-submit command completed successfully, use the Spark MasterUIport via a web browser (steps 4, 5, 6).
5. Point your web browser to the following URL:
http://host_IP_address:MasterUI-port
where:host_IP_address
The IP address (xxx.xxx.xxx.xxx) for this z/OS system.MasterUI-port
The Spark MasterUI port. The default is 8080.
In your browser window, you see a page that resembles the following example:
Look for the following indicators of successful completion:
• In the Completed Applications section (second-to-bottom highlighted section of the figure), lookfor the Spark Pi in the Name column and FINISHED in the State column.
Chapter 12. Verifying the IBM Open Data Analytics for z/OS product 125

• In the Completed Drivers section (bottom highlighted section of the figure), look fororg.apache.spark.examples.SparkPi in the Main Class column and FINISHED in the Statecolumn.
If you did not perform the optional cluster-deploy mode submission in step 4, skip to step 8.6. In the Completed Drivers section, click the link in the Worker column for the
org.apache.spark.examples.SparkPi main class.
The link has the format worker-yyyymmddttttttt-host_IP_address-WorkerPort. When youclick it, you see a page that resembles the following example:
7. In the Finished Drivers section, click the stdout link in the Logs column for theorg.apache.spark.examples.SparkPi main class to display the value of SparkPi.
8. Use the interactive spark-shell command to run a small program to access the STAFFVS VSAMdata set that was created and loaded in Chapter 11, “Verifying the Data Service server installation,” onpage 119.
a) Issue the following command to start the interactive spark-shell:
$SPARK_HOME/bin/spark-shell --jars path_to_DVDriver/dv-jdbc-version_number.jar
Result: The spark-shell provides an automatic, implied Spark context (sc) where you can run aScala program.
b) Enter the following Scala statements to access and display the STAFFVS VSAM data set by usingthe Rocket DV JDBC driver:
val dfReader = spark.read.format("jdbc").option("driver", "com.rs.jdbc.dv.DvDriver").option("url", "jdbc:rs:dv://host_IP_address:AZKSport;DSN=AZKS;DBTY=DVS").option("dbtable", "AZKSQL.STAFFVS").option("user", "userID").option("password", "password")val df = dfReader.load()df.show()
where:host_IP_address
The IP address for this z/OS system.AZKSport
The Rocket MDSS port. The default is 1200.userID
The z/OS user ID that has permission to read the STAFFVS data set.
126 Open Data Analytics for z/OS : IBM Open Data Analytics for z/OS V1.1.0 Installation and CustomizationGuide

passwordThe password for userID.
Result: You see the first 20 rows of the STAFFVS data set, as in the following example display:
scala> val dfReader = spark.readdfReader: org.apache.spark.sql.DataFrameReader = org.apache.spark.sql.DataFrameReader@53ef76cf
scala> .format("jdbc")res7: org.apache.spark.sql.DataFrameReader = org.apache.spark.sql.DataFrameReader@53ef76cf
scala> .option("driver", "com.rs.jdbc.dv.DvDriver")res8: org.apache.spark.sql.DataFrameReader = org.apache.spark.sql.DataFrameReader@53ef76cf
scala> .option("url", "jdbc:rs:dv://xxx.xxx.xxx.xxx:1200;DSN=AZKS;DBTY=DVS")res9: org.apache.spark.sql.DataFrameReader = org.apache.spark.sql.DataFrameReader@53ef76cf
scala> .option("dbtable", "AZKSQL.STAFFVS")res10: org.apache.spark.sql.DataFrameReader = org.apache.spark.sql.DataFrameReader@53ef76cf
scala> .option("user", "xxxxxxx")res11: org.apache.spark.sql.DataFrameReader = org.apache.spark.sql.DataFrameReader@53ef76cf
scala> .option("password", "xxxxxxxx").load()res12: org.apache.spark.sql.DataFrame = [STAFFVS_KEY_ID: int, STAFFVS_DATA_NAME_L: int ... 4 more fields]
scala> val df = dfReader.load()df: org.apache.spark.sql.DataFrame = [STAFFVS_KEY_ID: int, STAFFVS_DATA_NAME_L: int ... 4 more fields]
scala> df.show()+--------------+-------------------+-----------------+-----------------+----------------+----------------+|STAFFVS_KEY_ID|STAFFVS_DATA_NAME_L|STAFFVS_DATA_NAME|STAFFVS_DATA_DEPT|STAFFVS_DATA_JOB|STAFFVS_DATA_YRS|+--------------+-------------------+-----------------+-----------------+----------------+----------------+| 10| 7| SANDERS| 20| MGR| 7|| 20| 6| PERNAL| 20| SALES| 8|| 30| 8| MARENGHI| 38| MGR| 5|| 40| 7| O'BRIEN| 38| SALES| 6|| 50| 5| HANES| 15| MGR| 10|| 60| 7| QUIGLEY| 38| SALES| 0|| 70| 7| ROTHMAN| 15| SALES| 7|| 80| 5| JAMES| 20| CLERK| 0|| 90| 7| KOONITZ| 42| SALES| 6|| 100| 5| PLOTZ| 42| MGR| 7|| 110| 4| NGAN| 15| CLERK| 5|| 120| 8| NAUGHTON| 38| CLERK| 0|| 130| 9| YAMAGUCHI| 42| CLERK| 6|| 140| 5| FRAYE| 51| MGR| 6|| 150| 8| WILLIAMS| 51| SALES| 6|| 160| 8| MOLINARE| 10| MGR| 7|| 170| 8| KERMISCH| 15| CLERK| 4|| 180| 8| ABRAHAMS| 38| CLERK| 3|| 190| 7| SNEIDER| 20| CLERK| 8|| 200| 8| SCOUTTEN| 42| CLERK| 0|+--------------+-------------------+-----------------+-----------------+----------------+----------------+only showing top 20 rows
ResultsYou have now verified that the z/OS Spark and Mainframe Data Service components of Open DataAnalytics for z/OS successfully work together on your z/OS system.
What to do nextTo perform additional installation verification, run the following installation verification programs that areavailable on GitHub.Anaconda/ODL Installation Verification Program (IVP) with Jupyter Notebook (izoda.github.io/site/anaconda/ivp-jupyter-notebook/)
IBM provides this installation verification program (IVP) to get started with Anaconda and OptimizedData Layer (ODL) stacks of IzODA. By completing this IVP, you ensure that Anaconda and ODL areinstalled successfully and that you are able to run data visualizations and analysis on mainframe datasources.
IzODA Installation Verification Program (IVP) with PySpark (izoda.github.io/site/anaconda/ivp-pyspark/)
IBM provides this installation verification program (IVP) to get started with the Anaconda and PySparkstacks of IzODA. After completing this IVP, you ensure that Anaconda and PySpark are installed
Chapter 12. Verifying the IBM Open Data Analytics for z/OS product 127

successfully and that you are able to run simple data analysis on mainframe data sources by usingSpark dataframes.
128 Open Data Analytics for z/OS : IBM Open Data Analytics for z/OS V1.1.0 Installation and CustomizationGuide
Chapter 13. Verifying the z/OS IzODA Livyinstallation
z/OS IzODA Livy installation verification program.
Before you begin
Follow the instructions in Part 3, “Customization,” on page 13 to customize your environment and OpenData Analytics for z/OS.
About this task
Complete the following steps to verify the successful installation and customization of z/OS IzODA Livy onyour system.
Starting the Livy Server
1. If livy.spark.master is set to a Spark master URL in the livy.conf configuration file, start thecorresponding Spark cluster.
2. Start an OMVS session with the user ID chosen as the Livy server user ID, and start the Livy server byissuing the following:
$LIVY_HOME/bin/livy-server start
A message is issued that indicates the Livy server has started, displaying the location of the Livy serverlog file.
3. If livy.spark.master is set to a Spark master URL in the livy.conf configuration file, verify theLivy server user ID has been set up correctly for submitting Spark applications to the Spark cluster viaspark-submit. From the Livy server user ID OMVS session, issue the following:
$SPARK_HOME/bin/spark-submit --class org.apache.spark.examples.SparkPi --master spark://host-IP-addr:sparkMaster-port $SPARK_HOME/examples/jars/spark-examples_2.11-sparkVersion.jar
where:$SPARK_HOME
An environment variable that contains the installation path for z/OS Spark.host-IP-addr
The IP address (xxx.xxx.xxx.xxx) for this z/OS system.sparkMaster-port
The Spark Master port. The default is 7077.SparkVersion
The z/OS Spark version number (2.3.4 or 2.4.4).4. If the Livy server is protected by AT-TLS client authentication, import the PKCS#12 (.p12) certificate
package extracted during the "Exporting Livy user certificates" section of “Customizing z/OS IzODALivy ” on page 104 into a web browser. For instructions on importing PKCS#12 certificate package intothe web browser, consult the Web browser's documentation.
5. Connect to the Livy server UI by navigating to this web address with a web browser:
https://livyServer-host-IP-addr:livyServer-port/ui/ (or http:// if the Livy server is not protected byAT-TLS client authentication)
where:
© Copyright IBM Corp. 2016, 2019 129
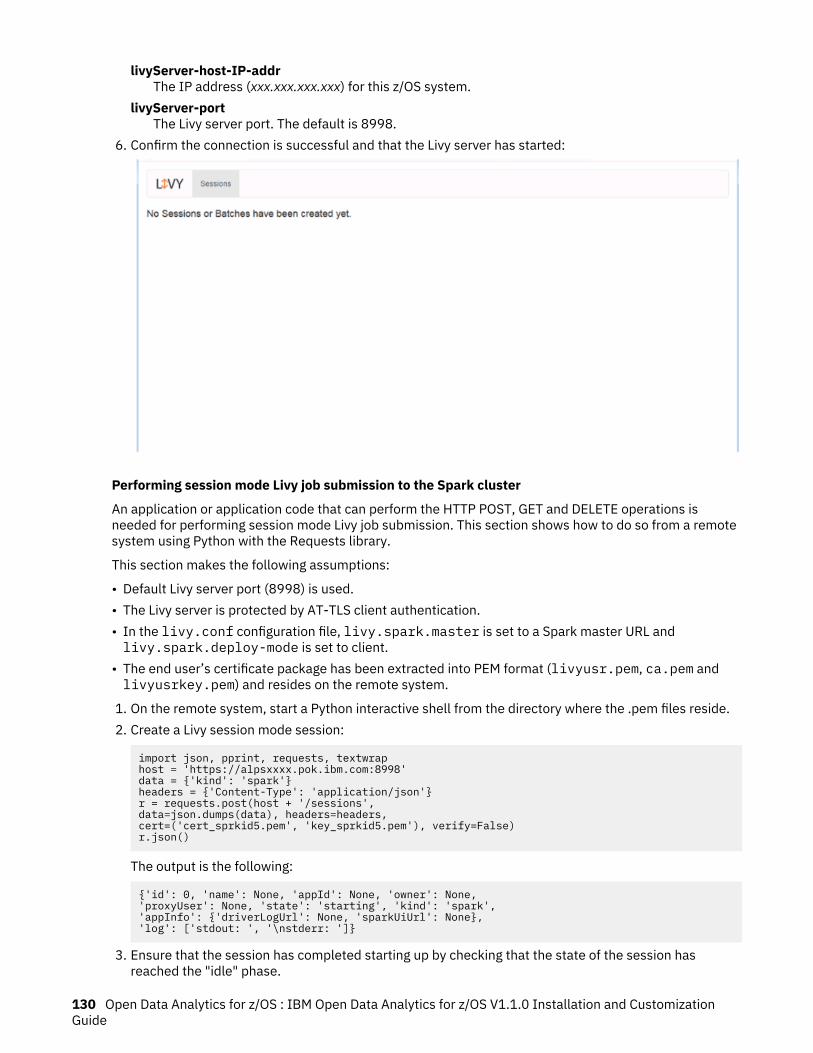
livyServer-host-IP-addrThe IP address (xxx.xxx.xxx.xxx) for this z/OS system.
livyServer-portThe Livy server port. The default is 8998.
6. Confirm the connection is successful and that the Livy server has started:
Performing session mode Livy job submission to the Spark cluster
An application or application code that can perform the HTTP POST, GET and DELETE operations isneeded for performing session mode Livy job submission. This section shows how to do so from a remotesystem using Python with the Requests library.
This section makes the following assumptions:
• Default Livy server port (8998) is used.• The Livy server is protected by AT-TLS client authentication.• In the livy.conf configuration file, livy.spark.master is set to a Spark master URL andlivy.spark.deploy-mode is set to client.
• The end user’s certificate package has been extracted into PEM format (livyusr.pem, ca.pem andlivyusrkey.pem) and resides on the remote system.
1. On the remote system, start a Python interactive shell from the directory where the .pem files reside.2. Create a Livy session mode session:
import json, pprint, requests, textwraphost = 'https://alpsxxxx.pok.ibm.com:8998'data = {'kind': 'spark'}headers = {'Content-Type': 'application/json'}r = requests.post(host + '/sessions', data=json.dumps(data), headers=headers, cert=('cert_sprkid5.pem', 'key_sprkid5.pem'), verify=False)r.json()
The output is the following:
{'id': 0, 'name': None, 'appId': None, 'owner': None, 'proxyUser': None, 'state': 'starting', 'kind': 'spark', 'appInfo': {'driverLogUrl': None, 'sparkUiUrl': None}, 'log': ['stdout: ', '\nstderr: ']}
3. Ensure that the session has completed starting up by checking that the state of the session hasreached the "idle" phase.
130 Open Data Analytics for z/OS : IBM Open Data Analytics for z/OS V1.1.0 Installation and CustomizationGuide

session_url = host + r.headers['location']r = requests.get(session_url, headers=headers)cert=('livyusr.pem', 'livyusrkey.pem'), verify=False)r.json()
The output is the following:
{'id': 0, 'name': None, 'appId': None, 'owner': None, 'proxyUser': None, 'state': 'idle', 'kind': 'spark', 'appInfo': {'driverLogUrl': None, 'sparkUiUrl': None}, 'log': ['19/05/16 15:41:41 INFO BlockManager: Using org.apache.spark.storage.RandomBlockReplicationPolicy for block replication policy', '19/05/16 15:41:41 INFO BlockManagerMaster: Registering BlockManager BlockManagerId(driver, localhost, 57060, None)', '19/05/16 15:41:41 INFO BlockManagerMasterEndpoint: Registering block manager localhost:57060 with 434.4 MB RAM, BlockManagerId(driver, localhost, 57060, None)', '19/05/16 15:41:41 INFO BlockManagerMaster: Registered BlockManager BlockManagerId(driver, localhost, 57060, None)', '19/05/16 15:41:41 INFO BlockManager: Initialized BlockManager: BlockManagerId(driver, localhost, 57060, None)', '19/05/16 15:41:42 INFO SparkEntries: Spark context finished initialization in 1842ms', "19/05/16 15:41:42 INFO SharedState: Setting hive.metastore.warehouse.dir ('null') to the value of spark.sql.warehouse.dir ('file:$LIVY_HOME/bin/spark-warehouse').", "19/05/16 15:41:42 INFO SharedState: Warehouse path is 'file:$LIVY_HOME/bin/spark-warehouse'.", '19/05/16 15:41:43 INFO StateStoreCoordinatorRef: Registered StateStoreCoordinator endpoint', '19/05/16 15:41:43 INFO SparkEntries: Created Spark session.']}
4. Pass in the Scala code via a Python dictionary data, with the key being code and the value being thecode that is to be run in the session. The output may display the state as either waiting or running.
statements_url = session_url + '/statements'data = {'code': '1 + 1'}r = requests.post(statements_url, data=json.dumps(data), headers=headers, cert=('livyusr.pem', 'livyusrkey.pem'), verify=False)r.json()
The output is the following:
{'id': 0, 'code': '1 + 1', 'state': 'waiting', 'output': None, 'progress': 0.0}
5. Obtain the results. Repeat this step if the session is still in ‘running’ state and has not reached the‘available’ state.
statement_url = host + r.headers['location']r = requests.get(statement_url, headers=headers)cert=('livyusr.pem', 'livyusrkey.pem'), verify=False)pprint.pprint(r.json())
The output is the following:
{'code': '1 + 1', 'id': 0, 'output': {'data': {'text/plain': 'res0: Int = 2\n'}, 'execution_count': 0, 'status': 'ok'}, 'progress': 1.0, 'state': 'available'}
6. Close the session.
requests.delete(session_url, headers=headers, cert=('livyusr.pem', 'livyusrkey.pem'), verify=False)
Chapter 13. Verifying the z/OS IzODA Livy installation 131

Performing batch mode Livy job submission to the Spark cluster
An application or application code that can perform the HTTP POST operation is needed for performingbatch mode Livy job submission. This section shows how to do so from a Unix-based remote system usingcURL (curl).
This section assumes the following:
• Default Livy server port (8998) is used.• The Livy server is protected by AT-TLS client authentication.• In the livy.conf configuration file, livy.spark.master is set to a Spark master URL andlivy.spark.deploy-mode is set to client.
• Using z/OS Spark version 2.3.4 at its default installation directory (/usr/lpp/IBM/izoda/spark/spark23x).
• The end user’s certificate package has been extracted into PEM format (livyusr.pem, ca.pem andlivyusrkey.pem) and residing on the Unix-based remote system.
• The end user’s certificate PKCS#12 package (.12) has been imported into a web browser.
1. On the Unix-based remote system, go to the directory where the .pem files reside.2. Submit the SparkPi sample to the Livy server by issuing the following:
curl -X POST --verbose -k --cert ./usera.pem --cacert ./ca.pem --key ./livyusrkey.pem --data '{"file": "/usr/lpp/IBM/izoda/spark/spark23x/examples/jars/spark-examples_2.11-2.3.4.jar", "className": "org.apache.spark.examples.SparkPi"}' -H "Content-Type: application/json" https://xxx.xxx.xxx.xxx:8998/batches
3. Connect to the Livy server web UI with a web browser. Verify a batch session has been created andhas reached the ‘success’ state eventually.
4. Click on ‘session’ link on the web UI and verify that the ‘stdout’ section of the log contains the “Pi isroughly” output message:
Stopping the Livy server
1. From the Livy server user ID OMVS session, issue the following:
$LIVY_HOME/bin/livy-server stop
132 Open Data Analytics for z/OS : IBM Open Data Analytics for z/OS V1.1.0 Installation and CustomizationGuide

Part 5. Resource monitoring
© Copyright IBM Corp. 2016, 2019 133

134 Open Data Analytics for z/OS : IBM Open Data Analytics for z/OS V1.1.0 Installation and CustomizationGuide

Chapter 14. Resource monitoring for Apache SparkWhether you use the Apache Spark configuration files or z/OS workload management (WLM) to manageyour Spark resources, it is good practice to monitor the actual resource usage over time and fine tuneyour setup accordingly.
Spark web interfacesApache Spark provides a suite of web user interfaces (UIs) that you can use to monitor the status andresource consumption of your Spark cluster.
Apache Spark provides the following UIs:
• Master web UI• Worker web UI• Application web UI
The application web UI is particularly useful to identify potential performance issues with your Sparkcluster.
Some sections of the web UIs only appear if relevant information is available. For instance, the masterweb UI omits the driver information section if a driver has not been running in the cluster.
You can access the Spark web UIs by pointing your web browser to:
http://host_IP:ui_port
where:host_IP
The IP address for the z/OS system on which Spark runsui_port
The Spark web UI port number
For more information about where to find the port numbers, see “Configuring networking for ApacheSpark” on page 37.
Note: The layout of the web UIs that are shown in the following examples are for Apache Spark 2.0.2. TheUIs might look different for other releases of Apache Spark.
Master web UI
The master web UI provides an overview of the Spark cluster and displays the following information:
• Master URL and REST URL• CPUs and memory available to the Spark cluster• Worker status and its allotted resources• Information about the active and completed applications, such as their status, allotted resources, and
duration• Information about the active and completed drivers, such as their status and allotted resources
You can use the master web UI to identify the amount of CPU and memory resources that are allotted tothe Spark cluster and to each application. Spark sees each SMT-enabled zIIP as having two cores.
The master web UI also provides an overview of the applications. For instance, if an application is in theWAITING state, it likely does not have sufficient resources to run.
Figure 8 on page 136 shows an example of the master web UI.
© Copyright IBM Corp. 2016, 2019 135

Figure 8. The Apache Spark master web UI
Worker web UI
The worker web UI provides an overview of the executors and drivers that are spawned by the workerprocess. It displays information about the allotted resources, status, and provides links to log files foreach of these child processes. You can use this web UI to see how many executors are currently runningand the amount of resources allotted to each.
Figure 9 on page 137 shows an example of the worker web UI.
136 Open Data Analytics for z/OS : IBM Open Data Analytics for z/OS V1.1.0 Installation and CustomizationGuide

Figure 9. The Apache Spark worker web UI
Application web UI
Each Spark application launches its own instance of the web UI. The application web UI provides a wealthof information about the Spark application and can be a useful tool to debug the application. This web UIhas the following tabs:
• The Jobs tab displays a summary page of all jobs in the Spark application and a detailed page for eachjob. The summary page shows high-level information, such as the status, duration, and progress of alljobs and the overall event timeline. When you click on a job on the summary page, you see the detailedpage for that job. The detailed page further shows the event timeline, DAG visualization, and all stagesof the job.
• The Stage tab displays a summary page that shows the current state of all stages of all jobs in the Sparkapplication, and, when you click on a stage, a detailed page for that stage. The details page shows theevent timeline, DAG visualization, and all tasks for the stage.
• If the application has persisted RDDs, the Storage tab displays information about the RDDs. Thesummary page shows the storage levels, sizes and partitions of all RDDs, and the detailed page showsthe sizes and using executors for all partitions in an RDD.
• The Environment tab displays the values for the different environment and configuration variables,including Java, Spark, and system properties.
• The Executors tab displays summary information about the executors that were created for theapplication, including memory and disk usage and task and shuffle information. The Storage Memorycolumn shows the amount of memory used and reserved for caching data.
• If the application executes Spark SQL queries, the SQL tab displays information, such as the duration,jobs, and physical and logical plans for the queries.
• The web UI includes a Streaming tab if the application uses Spark streaming. This tab displaysscheduling delay and processing time for each micro-batch in the data stream, which can be useful fortroubleshooting the streaming application.
From a resource monitoring perspective, the Executors tab provides information about the amount ofmemory, disk, and cores used by each executor for the application.
From a performance monitoring perspective, the Executors tab displays garbage collection (GC) time andshuffle information for each executor. The Storage tab displays the percentage of RDD data that can becached in memory.
Figure 10 on page 138 shows an example of the worker web UI.
Chapter 14. Resource monitoring for Apache Spark 137

Figure 10. The Apache Spark application web UI
Configuring Spark web interfacesComplete this task to configure and customize the Spark web interfaces.
About this task
The Apache Spark web interfaces can be configured and customized by a number of configurationproperties. For more information about Apache Spark web interfaces, see “Spark web interfaces” on page135.
Table 10. Spark UI configurations
Configuration name Default Configuration property Notes
Spark UI kill True spark.ui.killEnabled Allows jobs and stagesto be killed from theweb UI
Spark web interface kill button
By default, Spark provides the ability to kill applications, jobs, and stages through the web interface of theSpark master and Spark application. This ability is available to anyone that can access the web interfaceof the respective process. Depending on your required configuration, you may want to control if this isenabled within your Spark environment.
Depending on which Spark process web interface page you are viewing, the kill button appears indifferent locations. Within the Spark master web interface, the kill button appears on the Running
138 Open Data Analytics for z/OS : IBM Open Data Analytics for z/OS V1.1.0 Installation and CustomizationGuide
Applications table and the Running Drivers table. Within the Spark application web interface, the killbutton appears on the Active Jobs table, on the Jobs tab, and the Active Stages table, on the Stages tab.
This feature can be disabled by updating your spark-defaults.conf with the property,spark.ui.killEnabled and setting it to false. If set to false while starting the Spark master, the kill buttonwill not appear on the Spark master web interface and you will no longer be able to kill a runningapplication or running driver. If set to false while starting a Spark application, either through spark-submit or spark-shell, the kill button will not appear on the Spark application web interface and you willno longer be able to kill an active job or active stage.
Securing Spark web interfacesComplete this task to secure Spark web interfaces.
About this task
The Apache Spark web interfaces can be secured with https/SSL by way of Spark SSL settings. For moreinformation about Apache Spark web interfaces, see “Spark web interfaces” on page 135.
Procedure
1. Generate a public-private key pair. Then, wrap the public key in a digital certificate, and store theprivate key and the certificate in a keystore. The following example uses the Java keytool tool togenerate a self-signed certificate.
keytool -genkeypair -keystore /u/sparkid/.keystore \-keyalg RSA -alias selfsigned \-dname "CN=mysparkcert L=Poughkeepsie S=NY C=US" \-storepass examplestorepass -keypass examplekeypass
2. Export the generated certificate and import it into a Java truststore. The following example again usesthe Java keytool tool.
keytool -exportcert -keystore /u/sparkid/.keystore \-alias selfsigned -storepass example storepass -file test1.cer
keytool -importcert -keystore /u/sparkid/.truststore \-alias selfsigned \-storepass examplestorepass -file test1.cer -noprompt
3. Update the spark-defaults.conf file to enable SSL for Spark WebUI, by using the keystore andtruststore that is setup in the previous steps.
spark.ssl.enabled truespark.ssl.trustStore /u/sparkid/.truststorespark.ssl.trustStorePassword examplestorepassspark.ssl.keyStore /u/sparkid/.keystorespark.ssl.keyStorePassword examplestorepassspark.ssl.keyPassword examplekeypassspark.ssl.protocol TLSv1.2
4. Start your Spark cluster as normal. When you point your web browser to the Spark web interface, itautomatically redirects to the SSL port, which is typically the non-SSL port plus 400. For example,http://127.0.0.1:8080 would be directed to https://127.0.0.1:8480.
You can also use the spark.ssl.ui.port option to set the SSL port for the Spark web UI. Thespark.ssl.ui.port option can be specified in spark-defaults.conf.
Note: If you are using a self-signed certificate, like the one in the previous example, you might need toinstall the certificate in your web browser. Self-signed certificates are generally rejected by webbrowsers, since they are not signed by a known certificate authority and therefore not trusted.
Results
The specified Spark web interfaces are secure.
Chapter 14. Resource monitoring for Apache Spark 139
Enabling the Spark history serviceComplete this task to enable the Apache Spark history service to view information about completedapplications.
About this task
The information that the application web UI displays is, by default, only available when the application isactive. To view the information after an application completes, you must enable event logging beforestarting the application. The Spark history server can then use the event logs to reconstruct theapplication’s web UI.
Procedure
Complete the following steps to enable event logging and point the history server to the event logs.1. Add the following statements to your spark-defaults.conf file:
spark.eventLog.enabled truespark.eventLog.dir event-log-directoryspark.history.fs.logDirectory event-log-directory
where event-log-directory is the directory in which the event log files are to be stored, such asfile:///var/spark/events.
Important: Use the event log directory only for event logging. Unexpected errors can occur if Sparkfinds non-event log files in the event log directory.
2. To start the history server, issue the following command from bash:
$SPARK_HOME/sbin/start-history-server.sh
where SPARK_HOME is an environment variable that contains the installation path for z/OS Spark.After the history server is started, you can use your browser to access the event logs and reconstructedapplication web UI for completed applications.3. Point your web browser to the history server URL:
http://host_IP:history_server_port
where:host_IP
The IP address for the z/OS system on which Spark runs.history_server_port
The Spark history server UI port number. The default port number is 18080.
Figure 11 on page 141 shows an example of the history server web UI.
140 Open Data Analytics for z/OS : IBM Open Data Analytics for z/OS V1.1.0 Installation and CustomizationGuide

Figure 11. The Spark history server web UI4. Click an entry in the App ID column of the history server web UI to see the reconstructed application
web UI for that application.5. To stop the history server, issue the following command from bash:
$SPARK_HOME/sbin/stop-history-server.sh
Spark log filesApache Spark log files can be useful in identifying issues with your Spark processes.
Table 11 on page 141 lists the base log files that Spark generates.
Table 11. Apache Spark log files
Log file Location
Master logs $SPARK_LOG_DIR/spark-userID-org.apache.spark.deploy.master.Master-instance-host.out
Worker logs $SPARK_LOG_DIR/spark-userID-org.apache.spark.deploy.master.Worker-instance-host.out
Driver logs (client deploy mode) Printed on the command line by default
Driver logs (cluster deploy mode)
• stdout
• stderr
• $SPARK_WORKER_DIR/driverID/stdout
• $SPARK_WORKER_DIR/driverID/stderr
Executor logs
• stdout
• stderr
• $SPARK_WORKER_DIR/applID/executorID/stdout
• $SPARK_WORKER_DIR/applID/executorID/stderr
In the Location column:userID
The user ID that started the master or worker.instance
The master or worker instance number.host
The short name of the host on which the master or worker is starteddriverID
The ID of the driver. You can find this ID on the application web UI.executorID
The ID of the executor. You can find this ID on the application web UI.
Chapter 14. Resource monitoring for Apache Spark 141

You can customize the Spark directories shown in the table. For more information about the purpose ofthese directories and their suggested locations, see “Creating the Apache Spark working directories” onpage 35.
Tip: It is a good practice to periodically clean up or archive your Spark directories to avoid errors causedby low file system space. For instance, you can use the z/OS UNIX shell command, skulker, in aregularly scheduled tool to remove old files in a directory.
Using RMF to monitor Spark workloadThe z/OS Resource Measurement Facility (RMF) is a tool for z/OS performance measurement andmanagement. RMF collects performance data for z/OS and Parallel Sysplex environments and generatesreports that allow you to monitor and tune your systems according to your business needs.
RMF uses three monitors to gather data:
• Short-term data collection with Monitor III• Snapshot monitoring with Monitor II• Long-term data gathering with Monitor I and Monitor III
The system operator starts all monitors as background sessions with a variety of options that determinethe type of data to collect and where to store it. For more information about setting up the RMF monitors,see z/OS RMF User's Guide.
All three RMF monitors create reports, as does the Postprocessor. The following topics provide anoverview of the reports that are most relevant to monitoring a Spark workload. For complete informationabout RMF reports, see z/OS RMF Report Analysis.
Interactive performance reports with Monitor IIIThe interactive Monitor III reporter runs in a TSO/E session under ISPF and provides system or sysplexperformance reports in the following ways:
• Displays your current system status in real-time mode• Shows previously collected data that is still available in either in-memory buffers or pre-allocated VSAM
data sets
You can use Monitor III to quickly identify storage and processor delays for your active Spark workload.To start an interactive Monitor III session, enter the TSO/E command RMF and select Monitor III from theRMF - Performance Management panel. From the RMF III Primary Menu, you can select the specificperformance metrics that you want to see. To further filter the report by job class and service class, youcan issue the following command:
report_name job_class,service_class
where:report_name
The short name of the reportjob_class
One of the following job class names:
ALL (or A)ASCH (or AS)BATCH (or B)OMVS (or O)STC (or S)TSO (or T)
142 Open Data Analytics for z/OS : IBM Open Data Analytics for z/OS V1.1.0 Installation and CustomizationGuide
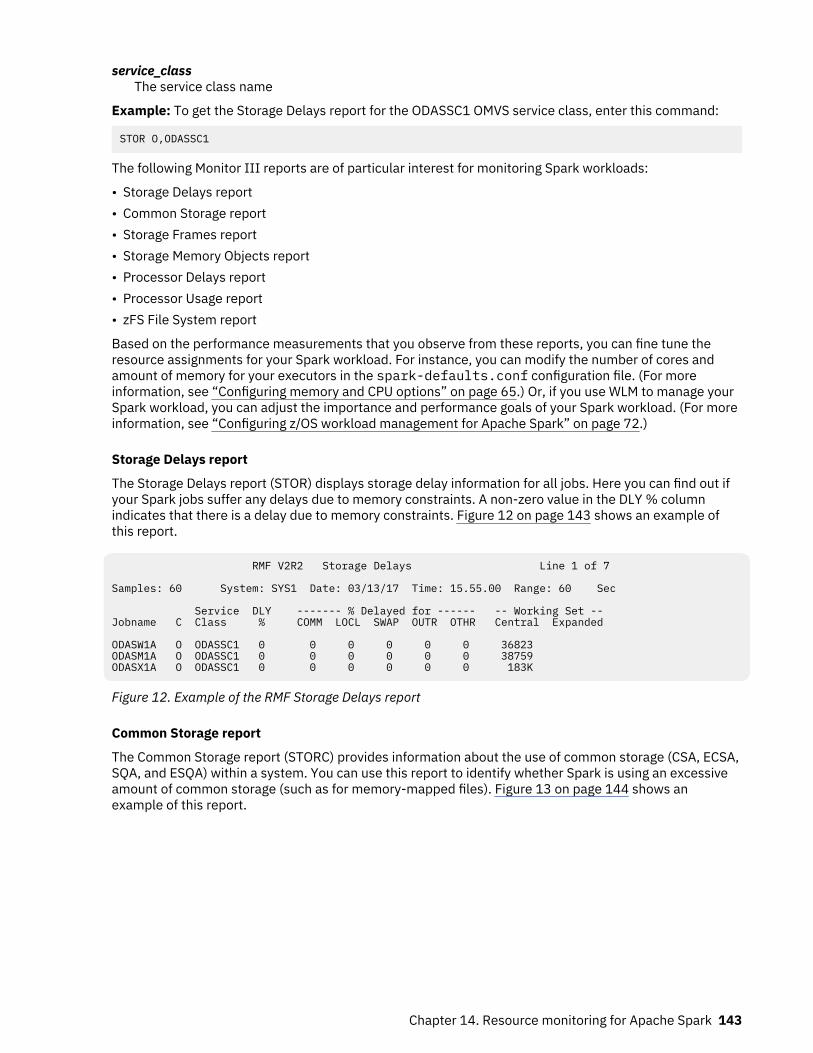
service_classThe service class name
Example: To get the Storage Delays report for the ODASSC1 OMVS service class, enter this command:
STOR O,ODASSC1
The following Monitor III reports are of particular interest for monitoring Spark workloads:
• Storage Delays report• Common Storage report• Storage Frames report• Storage Memory Objects report• Processor Delays report• Processor Usage report• zFS File System report
Based on the performance measurements that you observe from these reports, you can fine tune theresource assignments for your Spark workload. For instance, you can modify the number of cores andamount of memory for your executors in the spark-defaults.conf configuration file. (For moreinformation, see “Configuring memory and CPU options” on page 65.) Or, if you use WLM to manage yourSpark workload, you can adjust the importance and performance goals of your Spark workload. (For moreinformation, see “Configuring z/OS workload management for Apache Spark” on page 72.)
Storage Delays report
The Storage Delays report (STOR) displays storage delay information for all jobs. Here you can find out ifyour Spark jobs suffer any delays due to memory constraints. A non-zero value in the DLY % columnindicates that there is a delay due to memory constraints. Figure 12 on page 143 shows an example ofthis report.
RMF V2R2 Storage Delays Line 1 of 7 Samples: 60 System: SYS1 Date: 03/13/17 Time: 15.55.00 Range: 60 Sec Service DLY ------- % Delayed for ------ -- Working Set -- Jobname C Class % COMM LOCL SWAP OUTR OTHR Central Expanded ODASW1A O ODASSC1 0 0 0 0 0 0 36823 ODASM1A O ODASSC1 0 0 0 0 0 0 38759 ODASX1A O ODASSC1 0 0 0 0 0 0 183K
Figure 12. Example of the RMF Storage Delays report
Common Storage report
The Common Storage report (STORC) provides information about the use of common storage (CSA, ECSA,SQA, and ESQA) within a system. You can use this report to identify whether Spark is using an excessiveamount of common storage (such as for memory-mapped files). Figure 13 on page 144 shows anexample of this report.
Chapter 14. Resource monitoring for Apache Spark 143
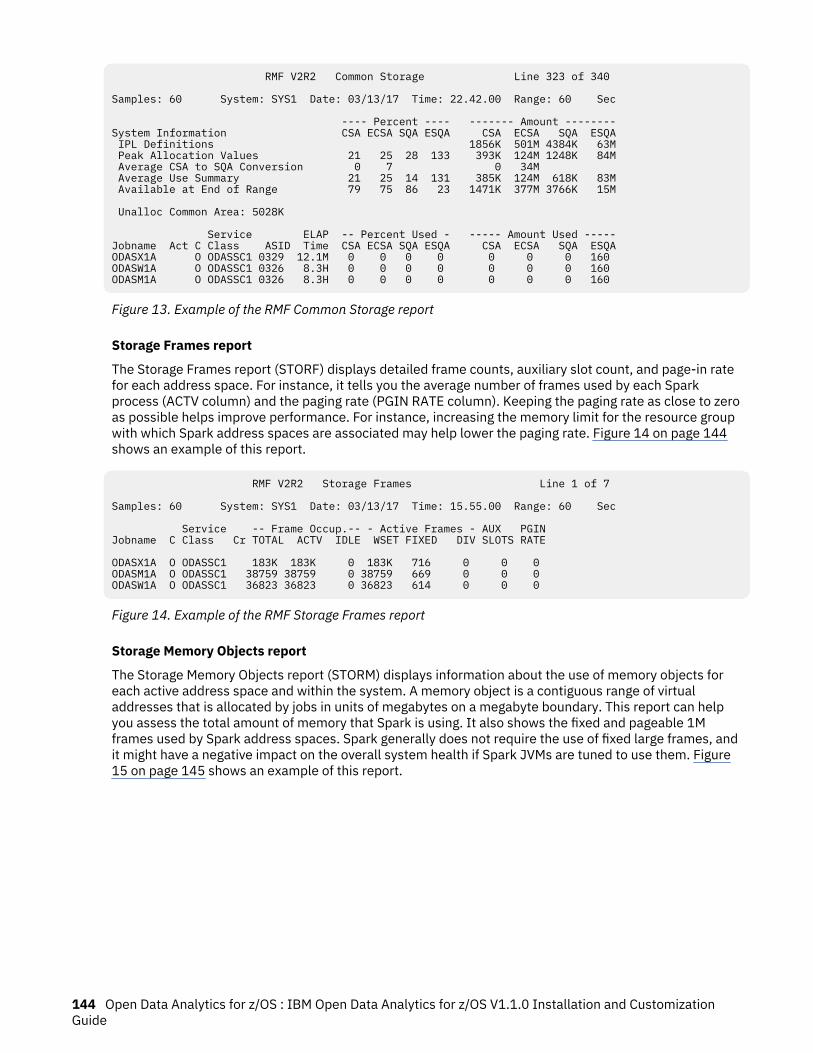
RMF V2R2 Common Storage Line 323 of 340 Samples: 60 System: SYS1 Date: 03/13/17 Time: 22.42.00 Range: 60 Sec ---- Percent ---- ------- Amount --------System Information CSA ECSA SQA ESQA CSA ECSA SQA ESQA IPL Definitions 1856K 501M 4384K 63M Peak Allocation Values 21 25 28 133 393K 124M 1248K 84M Average CSA to SQA Conversion 0 7 0 34M Average Use Summary 21 25 14 131 385K 124M 618K 83M Available at End of Range 79 75 86 23 1471K 377M 3766K 15M Unalloc Common Area: 5028K Service ELAP -- Percent Used - ----- Amount Used -----Jobname Act C Class ASID Time CSA ECSA SQA ESQA CSA ECSA SQA ESQAODASX1A O ODASSC1 0329 12.1M 0 0 0 0 0 0 0 160ODASW1A O ODASSC1 0326 8.3H 0 0 0 0 0 0 0 160ODASM1A O ODASSC1 0326 8.3H 0 0 0 0 0 0 0 160
Figure 13. Example of the RMF Common Storage report
Storage Frames report
The Storage Frames report (STORF) displays detailed frame counts, auxiliary slot count, and page-in ratefor each address space. For instance, it tells you the average number of frames used by each Sparkprocess (ACTV column) and the paging rate (PGIN RATE column). Keeping the paging rate as close to zeroas possible helps improve performance. For instance, increasing the memory limit for the resource groupwith which Spark address spaces are associated may help lower the paging rate. Figure 14 on page 144shows an example of this report.
RMF V2R2 Storage Frames Line 1 of 7 Samples: 60 System: SYS1 Date: 03/13/17 Time: 15.55.00 Range: 60 Sec Service -- Frame Occup.-- - Active Frames - AUX PGIN Jobname C Class Cr TOTAL ACTV IDLE WSET FIXED DIV SLOTS RATE ODASX1A O ODASSC1 183K 183K 0 183K 716 0 0 0 ODASM1A O ODASSC1 38759 38759 0 38759 669 0 0 0 ODASW1A O ODASSC1 36823 36823 0 36823 614 0 0 0
Figure 14. Example of the RMF Storage Frames report
Storage Memory Objects report
The Storage Memory Objects report (STORM) displays information about the use of memory objects foreach active address space and within the system. A memory object is a contiguous range of virtualaddresses that is allocated by jobs in units of megabytes on a megabyte boundary. This report can helpyou assess the total amount of memory that Spark is using. It also shows the fixed and pageable 1Mframes used by Spark address spaces. Spark generally does not require the use of fixed large frames, andit might have a negative impact on the overall system health if Spark JVMs are tuned to use them. Figure15 on page 145 shows an example of this report.
144 Open Data Analytics for z/OS : IBM Open Data Analytics for z/OS V1.1.0 Installation and CustomizationGuide

RMF V2R2 Storage Memory Objects Line 1 of 7 Samples: 60 System: SYS1 Date: 03/13/17 Time: 15.55.00 Range: 60 Sec ----MemObj---- ---Frames--- --1MB Fixed-- --2GB Fixed-- -1MB Pageable- Fixed 1M 10 Shared 424K Total 111K Total 12 Initial 22056 Fixed 2G 1 Common 280K Common 13 %Used 8.3 Dynamic 4109 Shared 28 %Used 39.2 %Used 3.9 %Used 100 Common 631 ------------------------------------------------------------------------------- Service --Memory Objects- --1M Frames- 2G-Fr ------Bytes------Jobname C Class ASID Total Comm Shr Fixed Pgable Fixed Total Comm Shr ODASM1A O ODASSC1 0618 351 0 0 0 69 0 13.7G 0 0ODASX1A O ODASSC1 0634 347 0 0 0 541 0 45.8G 0 0ODASW1A O ODASSC1 0345 334 0 0 0 65 0 13.1G 0 0
Figure 15. Example of the RMF Storage Memory Objects report
Processor Delays report
The Processor Delays report (PROC) displays all jobs that were waiting for or using the processor duringthe reporting interval. Here you can see if your Spark jobs suffer any delays due to processor constraints.Figure 16 on page 145 shows an example of this report.
RMF V2R2 Processor Delays Line 1 of 10 Samples: 60 System: SYS1 Date: 03/13/17 Time: 15.55.00 Range: 60 Sec Service CPU DLY USG EAppl ----------- Holding Job(s) -----------Jobname CX Class Type % % % % Name % Name % Name ODASX1A O ODASSC1 CP 3 2 0.360 IIP 0 23 24.30 ODASM1A O ODASSC1 CP 2 0 0.000 IIP 2 0 0.012 ODASW1A O ODASSC1 CP 2 0 0.000 IIP 0 0 0.023
Figure 16. Example of the RMF Processor Delays report
Processor Usage report
The Processor Usage report (PROCU) displays all jobs that were using a general-purpose or special-purpose processor during the reporting interval. You can use this report to understand the CPU usage ofyour Spark jobs. Combined with the Processor Delay report, you can assess whether you need to changethe performance goals or importance of your Spark workload. Figure 17 on page 145 shows an exampleof this report.
RMF V2R2 Processor Usage Line 1 of 5 Samples: 60 System: SYS1 Date: 03/13/17 Time: 15.55.00 Range: 60 Sec Service --- Time on CP % --- ----- EAppl % ----- Jobname CX Class Total AAP IIP CP AAP IIP ODASX1A O ODASSC1 0.360 0.000 0.218 0.360 24.30 ODASW1A O ODASSC1 0.000 0.000 0.000 0.000 0.023 ODASM1A O ODASSC1 0.000 0.000 0.000 0.000 0.012
Figure 17. Example of the RMF Processor Usage report
zFS File System report
The zFS File System report (ZFSFS) measures zFS activity on the basis of single file systems. With thisreport, you can monitor the I/O rates and response times associated with the file systems that Sparkuses. Figure 18 on page 146 shows an example of this report.
Chapter 14. Resource monitoring for Apache Spark 145

RMF V2R2 zFS File System - SVPLEX3 Line 23 of 46 Samples: 120 Systems: 4 Date: 03/09/17 Time: 15.07.00 Range: 120 Sec ------ File System Name -------------------- I/O Resp Read XCF System Owner Mode Size Usg% Rate Time % Rate OMVSSPA.SPARK.PLX3.ZFS *ALL D0 RO 1440M 60.5 0.000 0.000 0.0 0.000
Figure 18. Example of the RMF zFS File System report
Long-term reporting with the PostprocessorYou can use the RMF Postprocessor to generate long-term overview reports for your Spark workload.Unlike the interactive Monitor III sessions, Postprocessor reports allow you to analyze your Sparkworkload performance over the long term and fine tune its resource assignments. For more informationabout running the Postprocessor and other report options, see z/OS RMF User's Guide.
Workload Activity report
The Workload Activity report (WLMGL) presents a summarized view of a WLM-managed workload. Youcan select to view this report for a specific service class, report class, WLM workload, and various othertypes. For instance, if you place all of your Spark processes in a single service class, you can generate aWorkload Activity report that tells you the actual amount of memory and CPU consumed by thatworkload. Figure 19 on page 146 shows an example of the Workload Activity report for the ODASSC1service class.
W O R K L O A D A C T I V I T Y PAGE 48 z/OS V2R2 SYSPLEX ZPETPLX2 DATE 02/13/2017 INTERVAL 30.00.057 MODE = GOAL
RPT VERSION V2R2 RMF TIME 17.29.35 REPORT BY: POLICY=WLMPOL01 WORKLOAD=ODASWL SERVICE CLASS=ODASSC1 RESOURCE GROUP=ODASRG CRITICAL =NONE HONOR PRIORITY=NO DESCRIPTION =Sample Spark service class -TRANSACTIONS- TRANS-TIME HHH.MM.SS.TTT --DASD I/O-- ---SERVICE--- SERVICE TIME ---APPL %--- --PROMOTED-- ----STORAGE----AVG 4.19 ACTUAL 716 SSCHRT 5.5 IOC 202338 CPU 276.626 CP 0.57 BLK 0.000 AVG 167913.4MPL 4.19 EXECUTION 715 RESP 2.3 CPU 16393K SRB 2.816 AAPCP 0.00 ENQ 0.000 TOTAL 702887.3ENDED 441 QUEUED 1 CONN 2.2 MSO 1972M RCT 0.039 IIPCP 0.14 CRM 0.000 SHARED 0.00END/S 0.24 R/S AFFIN 0 DISC 0.0 SRB 166881 IIT 0.228 LCK 3.098 #SWAPS 135 INELIGIBLE 0 Q+PEND 0.1 TOT 1989M HST 0.000 AAP N/A SUP 0.000 -PAGE-IN RATES-EXCTD 0 CONVERSION 0 IOSQ 0.0 /SEC 1105K AAP N/A IIP 20.85 SINGLE 0.0AVG ENC 0.00 STD DEV 1.195 IIP 213.360 BLOCK 0.0REM ENC 0.00 ABSRPTN 264K SHARED 0.0MS ENC 0.00 TRX SERV 264K HSP 0.0 TRANSACTION APPL% : TOTAL : CP 0.55 AAP/IIP ON CP 0.14 AAP/IIP 20.85 MOBILE : CP 0.00 AAP/IIP ON CP 0.00 AAP/IIP 0.00
Figure 19. Example of the RMF Workload Activity report for a Spark service class
Table 12 on page 146 describes some of the fields in the Workload Activity report that are more relevantto Spark.
Table 12. Selected fields in the RMF Workload Activity report
Field heading Entries
SERVICE TIME CPUTime, in seconds, consumed on general-purpose and special-purpose processors.
IITI/O interrupt time, in seconds.
IIPzIIP service time, in seconds.
146 Open Data Analytics for z/OS : IBM Open Data Analytics for z/OS V1.1.0 Installation and CustomizationGuide

Table 12. Selected fields in the RMF Workload Activity report (continued)
Field heading Entries
APPL % CPPercentage of the processor time used by transactions running ongeneral-purpose processors.
IIPCPPercentage of the processor time used by zIIP-eligible transactionsrunning on general-purpose processors. This is a subset of the APPL% CP value.
IIPPercentage of the processor time used by transactions executed onzIIPs.
STORAGE AVGWeighted average number of central storage frames allocated toactive ASIDs.
TOTALTotal number of central storage frames allocated to resident ASIDs.
PAGE-IN RATES SINGLEAverage rate at which pages are read into central storage whiletransactions are resident in central storage.
BLOCKRate of demand page-ins from DASD for blocked pages.
Using z/OS and z/OS UNIX commands to monitor Spark workloadYou can use z/OS system commands and z/OS UNIX shell commands to monitor your Apache Sparkworkload, especially its usage of system resources.
You can incorporate the system commands or shell commands into automated tools as part of the regularsystem checkup, or you can issue the commands directly to diagnose a particular problem.
z/OS system commands to monitor Spark workload
Table 13 on page 148 lists some z/OS system commands that you can use to monitor Spark workload. Formore information about these commands, see z/OS MVS System Commands. For more information aboutthe response to the DISPLAY OMVS command, refer to the response message IDs in z/OS MVS SystemMessages, Vol 3 (ASB-BPX).
Chapter 14. Resource monitoring for Apache Spark 147

Table 13. z/OS system commands to monitor Spark workload
z/OS system command Description
DISPLAY OMVS,LIMITS[,PID=process_id] Displays information about current z/OS UNIXparmlib limits, their high-water marks, and currentsystem usage. When the PID parameter isspecified, LIMITS displays high-water marks andcurrent usage for an individual process.
Although you should monitor the usage of allsystem resources, Spark workload particularlyimpacts these limits:
• MAXMMAPAREA, the maximum number of dataspace pages that can be allocated for memorymapping of z/OS files
• MAXPROCSYS, the maximum number ofprocesses that can be active at the same time
• MAXPIPES, the maximum number of named orunnamed pipes that can be oped in the system atone time
DISPLAY OMVS,PIPES[,{ALL|UID=uid}] Displays summary information about the z/OSUNIX pipe usage. The default is to list the two UIDswith the highest pipe create count. If you specifyALL, all UIDs with a pipe create count aredisplayed.
DISPLAY OMVS,U=userid Displays process information for all processesassociated with the specified TSO/E user ID. If youhave a dedicated user ID under which all Sparkprocesses run, you can use this command todisplay information about all of those processes.
z/OS UNIX shell commands to monitor Spark workload
Table 14 on page 148 lists some z/OS UNIX shell commands that you can use to monitor Spark workload.For more information about these commands, see z/OS UNIX System Services Command Reference. Formore information about the zfsadm command suite, see z/OS File System Administration.
Table 14. z/OS UNIX shell commands to monitor Spark workload
z/OS UNIX shell command Description
df [-kPStv] [file ...] Displays the amount of free space left on a filesystem. You can use this command to monitor freespace left on file systems that Spark uses.
skulker [-iw] [-r|-R] [-l logfile]directory days_old
Finds and deletes old files in directory, based oncomparing the file's access time to the agespecified by days_old.
zfsadm fsinfo -exceptions Lists all file systems that are low on space or thathad applications fail due to low space errors.
zlsof -t [-p pid] [-u user] Shows a tally of all open files, sockets, and pipes,filtered by process ID (pid) or user, if specified. Youcan use this command to monitor different filetypes opened by Spark.
148 Open Data Analytics for z/OS : IBM Open Data Analytics for z/OS V1.1.0 Installation and CustomizationGuide

Table 14. z/OS UNIX shell commands to monitor Spark workload (continued)
z/OS UNIX shell command Description
ulimit -a Displays the resource limits on processes createdby the user. For instance, you can use thiscommand to display the file descriptor limit of yourSpark processes.
Using IBM Health Checker for z/OS to monitor Spark workloadIBM Health Checker for z/OS is an MVS component that identifies potential problems before they impactyour availability or cause outages.
Health Checker checks the current, active z/OS and sysplex settings and definitions for a system andcompares the values to those suggested by IBM or defined by you. It produces output in the form ofdetailed messages to inform you of potential problems and suggested actions.
Consider enabling the z/OS UNIX System Services health checks and other system-level checks thatmight be relevant to your Spark workload. The following health checks might be of particular interestwhen running Spark workload:
• RACF_UNIX_ID• RSM_MEMLIMIT• RSM_AFQ IEA_ASIDS• USS_AUTOMOUNT_DELAY• USS_FILESYS_CONFIG• USS_MAXSOCKETS_MAXFILEPROC• USS_CLIENT_MOUNTS• USS_KERNEL_PVTSTG_THRESHOLD• USS_KERNEL_STACKS_THRESHOLD• VSM_CSA_THRESHOLD• VSM_SQA_THRESHOLD
For more information about these health checks and about Health Checker in general, see IBM HealthChecker for z/OS User's Guide.
Chapter 14. Resource monitoring for Apache Spark 149

150 Open Data Analytics for z/OS : IBM Open Data Analytics for z/OS V1.1.0 Installation and CustomizationGuide

Part 6. Troubleshooting
© Copyright IBM Corp. 2016, 2019 151

152 Open Data Analytics for z/OS : IBM Open Data Analytics for z/OS V1.1.0 Installation and CustomizationGuide

Chapter 15. Troubleshooting issues with ApacheSpark
Use the following information to troubleshoot issues you might encounter with Apache Spark.
You can also use Apache Spark log files to help identify issues with your Spark processes. See “Spark logfiles” on page 141 for more information about where to find these log files.
Spark commands fail with an EDC5111I message, and ICH408I message appears on the z/OSconsole
Symptom: Spark worker daemon fails to create executors with the following error:
18/01/22 13:11:14 ERROR ExecutorRunner: Error running executorjava.io.IOException: Cannot run program "/usr/lpp/java/java800/J8.0_64/bin/java" (in directory"/u/usr1/work/app-20180122131112-0000/0"): EDC5111I Permission denied. at java.lang.ProcessBuilder.start(ProcessBuilder.java:1059) atorg.apache.spark.deploy.worker.ExecutorRunner.org$apache$spark$deploy$worker$ExecutorRunner$$fetchAndRunExecutor(ExecutorRunner.scala:167) at org.apache.spark.deploy.worker.ExecutorRunner$$anon$1.run (ExecutorRunner.scala:73)Caused by: java.io.IOException: EDC5111I Permission denied. at java.lang.UNIXProcess.<init>(UNIXProcess.java:189) at java.lang.ProcessImpl.start(ProcessImpl.java:167) at java.lang.ProcessBuilder.start(ProcessBuilder.java:1040) ... 2 more
The following message appears on the z/OS console:
SY1 ICH408I USER(USR1 ) GROUP(SYS1 ) NAME(####################) /u/usr1/work/app-20180122131112-0000/0 CL(DIRSRCH ) FID(E2D7D2F0F0F10002000000014BA847EA) INSUFFICIENT AUTHORITY TO CHDIR ACCESS INTENT(--X) ACCESS ALLOWED(GROUP ---) EFFECTIVE UID(0000000012) EFFECTIVE GID(0000000500)
Cause: When z/OS Spark client authentication is enabled, the Spark executor processes run under theuser ID of the driver. However, the z/OS system that hosts the Spark cluster is not configured to acceptACL's set by Spark, which is needed for the executors to access Spark directories.
Response: Configure the z/OS system that hosts the Spark cluster to accept ACL's. For example, issue thefollowing RACF command:
SETROPTS CLASSACT(FSSEC)
For more information, see “Configuring z/OS Spark client authentication” on page 41.
Spark scripts fail with FSUM6196 and EDC5129I messages
Symptom: Spark scripts fail with the following error message:
env: FSUM6196 bash: not executable: EDC5129I No such file or directory
Cause: Apache Spark expects to find the bash shell in the user's PATH environment variable, but bashcannot be found when the spark-script attempts to invoke bash.
Response: Ensure that the PATH environment variable includes the directory where the bash executableis installed. For example, if bash is located at /usr/bin/bash-4.2/bin/bash, ensure that PATHincludes /usr/bin/bash-4.2/bin.
© Copyright IBM Corp. 2016, 2019 153
Spark scripts fail with FSUM7332 message
Symptom: Spark scripts fail with the following error message:
failed to launch org.apache.spark.deploy.master.Master: /usr/lpp/IBM/izoda/spark/spark23x/bin/spark-class 76: FSUM7321 Unknown option "posix"
Cause: Apache Spark expects to find the env command in /usr/bin, but it cannot be found. Eitherthe /usr/bin/env symbolic link is missing or it is not pointing to /bin/env. It is possible that creationof this symbolic link was missed during Spark setup or that the symbolic link was lost after a system IPL.
Response: Ensure that /usr/bin/env exists and is a symbolic link to /bin/env, and that the symboliclink persists across system IPLs. For more information, see “Verifying the env command path” on page32.
An error occurs when starting the master, but the master starts correctly
Symptom: When starting the master, the following error occurs:
bash-4.2$ $SPARK_HOME/sbin/start-master.shstarting org.apache.spark.deploy.master.Master, logging to /u/user/Billy/logs/spark--org.apache.spark.deploy.master.Master-1-ALPS.outfailed to launch org.apache.spark.deploy.master.Master:full log in /u/user/Billy/logs/spark--org.apache.spark.deploy.master.Master-1-ALPS.out
Cause: Apache Spark polls for a number of seconds to repeatedly check to see if the master startedsuccessfully. If your system is under heavy load, this message might appear, but it generally means thatthe check finished polling for success before the master startup completed.
Response: Check the master log, or issue the ps command and look for the master process to definitivelysee whether or not the master started successfully.
Only one Spark executor is started
Symptom: You specified --num-executors 2 on a spark-submit, but only one executor was started.
Cause: The --num-executors parameter is only valid in YARN mode, which is not supported on z/OS.Instead, the number of executors is determined by your resource settings.
Response: For more information about resource settings, see “Configuring memory and CPU options” onpage 65.
Shell script displays unreadable characters
Symptom: When running a shell script, it displays unreadable characters on the screen, such as:
./start-master.sh: line 1: syntax error near unexpected token `$'\101\123\124\105\122^''
Cause: Incorrect file encoding or downlevel bash shell.
Response: Ensure that the file encoding is in EBCDIC, not ASCII, and is not tagged as ASCII. You cancheck the tagging of a file by issuing the ls -T shell command. Also, ensure that your bash shell level is4.2.53 or 4.3.48. You can check the bash level by issuing the bash -version command.
Spark-shell fails with java.lang.ExceptionInInitializerError error message
Symptom: Spark-shell fails with the following error message:
java.lang.ExceptionInInitializerError …. Scala signature package has wrong version expected: 5.0 found: 45.0 in scala.package
Cause: Your JVM is likely running with the wrong default encoding.
154 Open Data Analytics for z/OS : IBM Open Data Analytics for z/OS V1.1.0 Installation and CustomizationGuide

Response: Ensure that you have the following environment variable set:
IBM_JAVA_OPTIONS=-Dfile.encoding=UTF8
For more information about setting environment variables, see “Setting up a user ID for use with z/OSSpark” on page 28.
The Spark master fails with JVMJ9VM015W error
Symptom: The Spark master fails to start and gives the following error:
JVMJ9VM015W Initialization error for library j9gc28(2): Failed to instantiate compressed references metadata; 200M requestedError: Could not create the Java Virtual Machine.Error: A fatal exception has occurred. Program will exit.
Cause: The master JVM could not obtain enough memory to start. Memory is most likely constrained byyour ASSIZEMAX setting.
Response: For more information about setting the ASSIZEMAX parameter, see “Configuring memory andCPU options” on page 65.
A Spark application is not progressing and shows JVMJ9VM015W error in the log
Symptom: The Spark master and worker started successfully; however, the Spark application is notmaking any progress, and the following error appears in the executor log:
JVMJ9VM015W Initialization error for library j9gc28(2): Failed to instantiate heap; 20G requestedError: Could not create the Java Virtual Machine.Error: A fatal exception has occurred. Program will exit.
Cause: The executor JVM could not obtain enough memory to start. Memory is most likely constrained byyour MEMLIMIT setting or IEFUSI exit.
Response: For more information about setting the MEMLIMIT parameter or using the IEFUSI exit, see“Configuring memory and CPU options” on page 65. Also see "Displaying process limits" in z/OS UNIXSystem Services Planning.
Spark commands fail with an EDC5157 message, or BPXP015I and BPXP014I messages appear onthe z/OS console
Symptom: Spark commands fail with the following error message:
17/08/08 13:51:40 INFO StandaloneAppClient$ClientEndpoint: Executor updated: app-20170808135140-0000/0 is now FAILED (java.io.IOException: Cannot run program "/usr/lpp/java/java800/J8.0_64/bin/java" (in directory "/u/user1/work/app-20170808135140-0000/0"):EDC5157I An internal error has occurred.)
The following messages appear on the z/OS console:
BPXP015I HFS PROGRAM /bin/setfacl IS NOT MARKED PROGRAM CONTROLLED.BPXP014I ENVIRONMENT MUST BE CONTROLLED FOR SURROGATE (BPX.SRV.uuuuuuuu) PROCESSING.
Cause: Apache Spark 2.1.1 and later requires that the _BPX_SHAREAS environment variable be set to NOwhen starting the cluster, but it is currently set to YES.
Response: Under your Spark user ID (for instance, SPARKID), ensure that the $SPARK_CONF_DIR/spark-env.sh file contains _BPX_SHAREAS=NO, and that the master and worker processes werestarted using that spark-env.sh file. Verify that the SPARK_CONF_DIR and _BPX_SHAREASenvironment variable are set properly for any BPXBATCH jobs that run start-master.sh and start-slave.sh. Consider restarting the master and worker processes to ensure the proper setting is used.
Chapter 15. Troubleshooting issues with Apache Spark 155
Spark worker or driver cannot connect to the master and the log files show "java.io.IOException:Failed to connect" error messages
Symptom: The Spark master starts successfully, but the worker or the driver is unable to connect to it.The following error message is repeated several times in the worker or application log:
org.apache.spark.SparkException: Exception thrown in awaitResult...Caused by: java.io.IOException: Failed to connect to ip_address:port
Cause: The worker or driver is unable to connect to the master due to network errors.
Response: Check your network connectivity. If you have Spark client authentication enabled, verify thatyour AT-TLS policy is set up correctly and that the worker or driver has a valid digital certificate. For moreinformation about client authentication, see “Configuring z/OS Spark client authentication” on page 41.
Spark worker fails with ICH408I message with NEWJOBNAME insert
Symptom: Spark worker fails with the following error message:
ICH408I USER(SPARKID) GROUP(SPARKGRP) NAME(####################) CL(PROCESS ) INSUFFICIENT AUTHORITY TO NEWJOBNAME
Cause: The IzODA Apache Spark worker spawns drivers and executors using the jobname prefixes ortemplates specified in spark-defaults.conf. The SPARKID userid will not be authorized to create jobs withspecified jobnames unless authorized.
Response: Permit the SPARKID userid to the BPX.JOBNAME profile with READ access..
156 Open Data Analytics for z/OS : IBM Open Data Analytics for z/OS V1.1.0 Installation and CustomizationGuide

Appendix A. Migrating to a new version of ApacheSpark
IBM z/OS Platform for Apache Spark (FMID HSPK110) and IBM Open Data Analytics for z/OS (FMIDHSPK120) are built on Apache Spark. Different service (PTF) levels of these products might providedifferent versions of Apache Spark. Perform the following steps if you are migrating from one version ofApache Spark to another.
Before you begin
If you previously installed IBM z/OS Platform for Apache Spark, Version 1.1.0, or IBM Open Data Analyticsfor z/OS, Version 1.1.0, determine the Apache Spark version that is provided. You can find the ApacheSpark version in the RELEASE file in the Spark installation directory. The following sample outputindicates that a version of Apache Spark 2.2.0 is provided.
IBM Open Data Analytics for z/OS - Spark, Version 2.2.0 built for Hadoop 2.7.7Built with Java JRE 1.8.0 IBM ZOS build 8.0.5.17 - pmz6480sr5fp17-20180627_01(SR5 FP17)Built from Git zos_Spark_2.2.0.12 (revision bcb96e0f31e4e4e7f82d85c72ec31478419cbd39)Built via Jenkins job Spark/zos_Spark_2.2.0.12, Build#20Build flags: -Phive -Phive-thriftserver -Phadoop-2.7
Important: Mixing different Spark components, such as Spark master and worker, from different ApacheSpark versions could yield undesirable and unpredictable results. A Spark cluster, for example, might notfunction properly if the master daemon is started from Apache Spark 2.0.2 whereas the worker daemon isstarted from Apache Spark 2.2.0.
Important: IBM urges you to install and test the new version of Apache Spark on a test system before youinstall it on a production system. IBM also recommends that you back up any custom files, such asspark-defaults.conf and spark-env.sh, before installing the new version.
Before installing the new version of Apache Spark
Complete the following steps to understand the impact of migrating to a newer version of Apache Sparkon your applications and to update your level of Java.
1. Determine whether your Spark setup resides in a mixed-endian environment.
A mixed-endian environment exists if part of your Apache Spark setup, typically the worker, runs on anIBM Z platform, and another part, typically the driver, runs on a different platform. The Spark driver isthe process that hosts your Spark application, and it can run as an independent process or inside athird-party product, such as Scala Workbench (including Jupyter Notebook) or Spark Job Server.Apache Spark 2.x.x no longer supports mixed-endian environments in client deploy mode. If this is theenvironment that you use, see Appendix H, “Apache Spark in a mixed-endian environment,” on page185 for information about possible alternatives.
2. Review the new functionality in the new version of Apache Spark and the changes to the Spark APIs todetermine any changes that you might need to make to your applications before migration. Use theinformation at the following links to learn about the changes. Be sure to consider the changes for eachin between Apache Spark version. For example, if you are migrating from Apache Spark 2.0.2 to 2.2.0,you need to consider the changes for Apache Spark 2.1.0, 2.1.1, and 2.2.0.
• For high-level information about new features; changes, removals, and deprecations made to theApache Spark APIs; performance improvements and known issues, see the following links.
– If your previous Apache Spark version is 1.5.2, start here:
- Spark Release 1.6.0 (spark.apache.org/releases/spark-release-1-6-0.html)- Spark Release 1.6.1 (spark.apache.org/releases/spark-release-1-6-1.html)- Spark Release 1.6.2 (spark.apache.org/releases/spark-release-1-6-2.html)
© Copyright IBM Corp. 2016, 2019 157

- Spark Release 2.0.0 (spark.apache.org/releases/spark-release-2-0-0.html)- Spark Release 2.0.1 (spark.apache.org/releases/spark-release-2-0-1.html)- Spark Release 2.0.2 (spark.apache.org/releases/spark-release-2-0-2.html)
– If your previous Spark version is 2.0.2, you can start here:
- Spark Release 2.1.0 (spark.apache.org/releases/spark-release-2-1-0.html)- Spark Release 2.1.1 (spark.apache.org/releases/spark-release-2-1-1.html)
– If your previous Apache Spark version is 2.1.1, you can start here:
- Spark Release 2.1.2 (spark.apache.org/releases/spark-release-2-1.2.html)- Spark Release 2.1.3 (spark.apache.org/releases/spark-release-2-1-3.html)- Spark Release 2.2.0 (spark.apache.org/releases/spark-release-2-2-0.html)
– If your previous Apache Spark version is 2.2.0, you can start here:
- https://spark.apache.org/releases/spark-release-2-2-1.html- https://spark.apache.org/releases/spark-release-2-2-2.html- https://spark.apache.org/releases/spark-release-2-2-3.html- https://spark.apache.org/releases/spark-release-2-3-0.html- https://spark.apache.org/releases/spark-release-2-3-1.html- https://spark.apache.org/releases/spark-release-2-3-2.html- https://spark.apache.org/releases/spark-release-2-3-3.html
• If you are migrating from Apache Spark version 1.5.2, see Spark 2.0 deprecations and removals(https://issues.apache.org/jira/browse/SPARK-11806).
• The Spark SQL and Spark ML projects have additional migration changes for each version of ApacheSpark. See the following resources for details.
– http://spark.apache.org/docs/2.3.4/sql-programming-guide.html.– http://spark.apache.org/docs/2.3.4/ml-guide.html. Note that as of Apache Spark 2.0, the RDD-
based APIs in the spark.mllib package have entered maintenance mode; consider how thismight affect your applications.
– Spark MLlib Old Migration Guides (spark.apache.org/docs/2.0.2/ml-migration-guides.html).• The following Spark projects have no specific migration steps. However, they might document new
behaviors as of the Spark version.
– http://spark.apache.org/docs/2.3.4/streaming-programming-guide.html– http://spark.apache.org/docs/2.3.4/structured-streaming-programming-guide.html– http://spark.apache.org/docs/2.3.4/graphx-programming-guide.html
3. Based on your findings from the information in step “2” on page 157, update your applications asneeded to work with the new Spark version.
4. If you are using an older Java level than the one indicated in the RELEASE file, consider updating yourJava level.
5. Ensure that any other open source or third-party software in your environment that interacts withSpark supports the new version of Apache Spark. For example, some versions of Scala Workbench donot work with the new versions of Apache Spark.
Installing the new version of Apache Spark
Install IBM Open Data Analytics for z/OS Spark, FMID HSPK120 and its service updates (PTFs).
For installation guidelines, see Program Directory for IBM Open Data Analytics for z/OS.
158 Open Data Analytics for z/OS : IBM Open Data Analytics for z/OS V1.1.0 Installation and CustomizationGuide

After installing the new version of Apache Spark
1. Recompile applications that use any of the changed Spark APIs.2. Consider using the Spark workflow to configure the new release of Spark. If not using the workflow,
examine any new Apache Spark configuration options and make necessary changes to your spark-defaults.conf and spark-env.sh configuration files.
For the current list of configuration options, see http://spark.apache.org/docs/2.3.4/configuration.html. A new Apache Spark version might introduce new configuration options as well asdeprecate existing ones.
Note: For the contents of the spark-defaults.conf and spark-env.sh configuration files, youcan find IBM-supplied default values in spark-defaults.conf.template and spark-env.sh.template.
3. If you use the spark-submit or spark-sql command line interface, you must either invoke themfrom a writable directory or change your configuration files. For more information, see “Updating theApache Spark configuration files” on page 34.
Appendix A. Migrating to a new version of Apache Spark 159

160 Open Data Analytics for z/OS : IBM Open Data Analytics for z/OS V1.1.0 Installation and CustomizationGuide
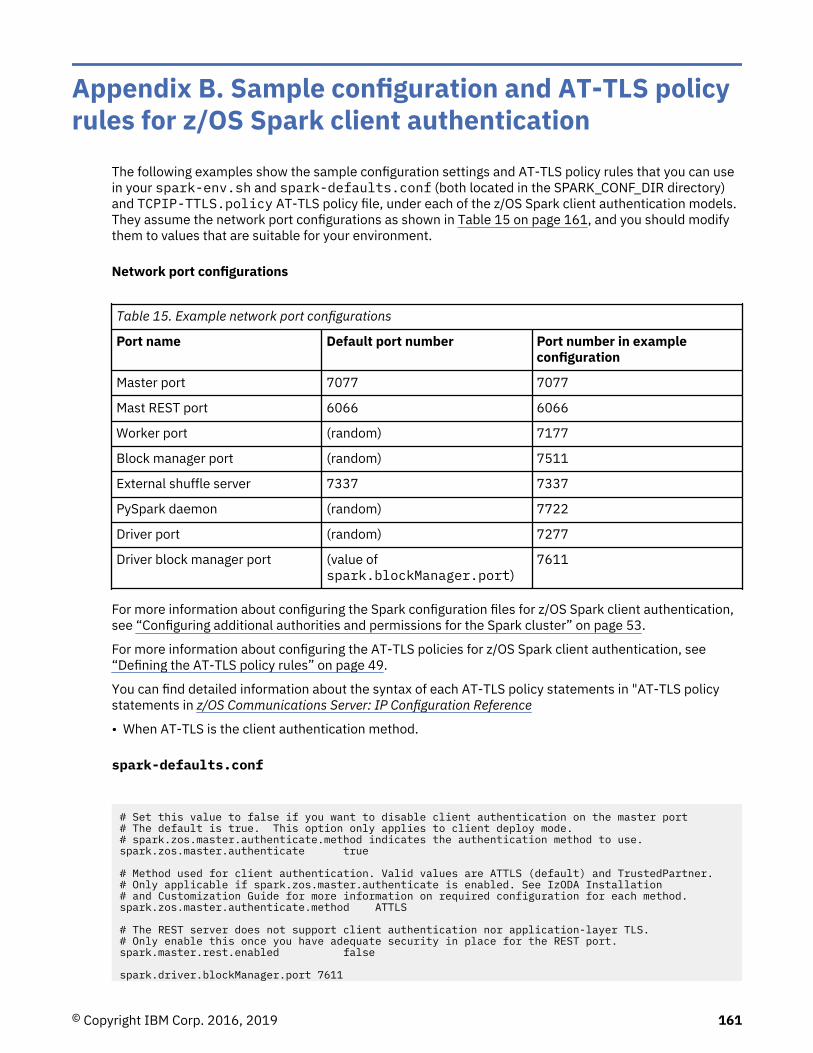
Appendix B. Sample configuration and AT-TLS policyrules for z/OS Spark client authentication
The following examples show the sample configuration settings and AT-TLS policy rules that you can usein your spark-env.sh and spark-defaults.conf (both located in the SPARK_CONF_DIR directory)and TCPIP-TTLS.policy AT-TLS policy file, under each of the z/OS Spark client authentication models.They assume the network port configurations as shown in Table 15 on page 161, and you should modifythem to values that are suitable for your environment.
Network port configurations
Table 15. Example network port configurations
Port name Default port number Port number in exampleconfiguration
Master port 7077 7077
Mast REST port 6066 6066
Worker port (random) 7177
Block manager port (random) 7511
External shuffle server 7337 7337
PySpark daemon (random) 7722
Driver port (random) 7277
Driver block manager port (value ofspark.blockManager.port)
7611
For more information about configuring the Spark configuration files for z/OS Spark client authentication,see “Configuring additional authorities and permissions for the Spark cluster” on page 53.
For more information about configuring the AT-TLS policies for z/OS Spark client authentication, see“Defining the AT-TLS policy rules” on page 49.
You can find detailed information about the syntax of each AT-TLS policy statements in "AT-TLS policystatements in z/OS Communications Server: IP Configuration Reference
• When AT-TLS is the client authentication method.
spark-defaults.conf
# Set this value to false if you want to disable client authentication on the master port# The default is true. This option only applies to client deploy mode. # spark.zos.master.authenticate.method indicates the authentication method to use.spark.zos.master.authenticate true
# Method used for client authentication. Valid values are ATTLS (default) and TrustedPartner.# Only applicable if spark.zos.master.authenticate is enabled. See IzODA Installation # and Customization Guide for more information on required configuration for each method. spark.zos.master.authenticate.method ATTLS
# The REST server does not support client authentication nor application-layer TLS.# Only enable this once you have adequate security in place for the REST port.spark.master.rest.enabled false
spark.driver.blockManager.port 7611
© Copyright IBM Corp. 2016, 2019 161
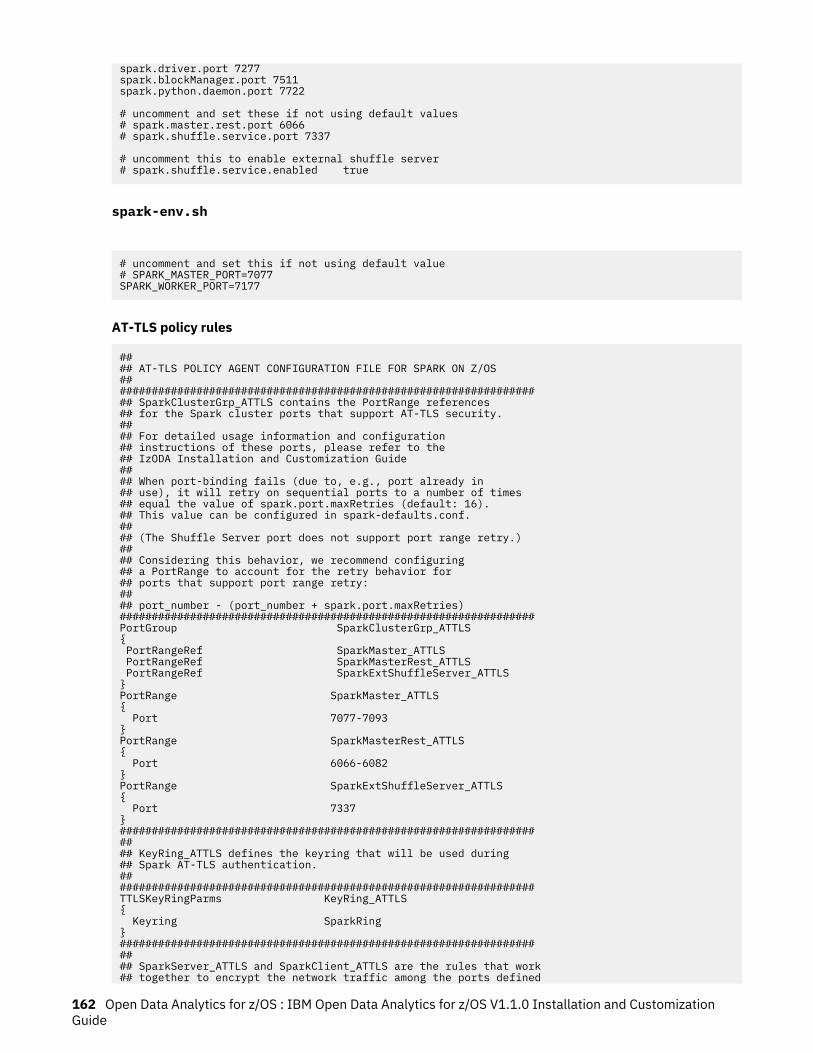
spark.driver.port 7277spark.blockManager.port 7511spark.python.daemon.port 7722
# uncomment and set these if not using default values# spark.master.rest.port 6066# spark.shuffle.service.port 7337
# uncomment this to enable external shuffle server# spark.shuffle.service.enabled true
spark-env.sh
# uncomment and set this if not using default value# SPARK_MASTER_PORT=7077SPARK_WORKER_PORT=7177
AT-TLS policy rules
#### AT-TLS POLICY AGENT CONFIGURATION FILE FOR SPARK ON Z/OS##################################################################### SparkClusterGrp_ATTLS contains the PortRange references## for the Spark cluster ports that support AT-TLS security.#### For detailed usage information and configuration ## instructions of these ports, please refer to the## IzODA Installation and Customization Guide#### When port-binding fails (due to, e.g., port already in## use), it will retry on sequential ports to a number of times## equal the value of spark.port.maxRetries (default: 16).## This value can be configured in spark-defaults.conf.#### (The Shuffle Server port does not support port range retry.)#### Considering this behavior, we recommend configuring## a PortRange to account for the retry behavior for## ports that support port range retry:#### port_number - (port_number + spark.port.maxRetries)#################################################################PortGroup SparkClusterGrp_ATTLS{ PortRangeRef SparkMaster_ATTLS PortRangeRef SparkMasterRest_ATTLS PortRangeRef SparkExtShuffleServer_ATTLS}PortRange SparkMaster_ATTLS{ Port 7077-7093}PortRange SparkMasterRest_ATTLS{ Port 6066-6082}PortRange SparkExtShuffleServer_ATTLS{ Port 7337}##################################################################### KeyRing_ATTLS defines the keyring that will be used during## Spark AT-TLS authentication.###################################################################TTLSKeyRingParms KeyRing_ATTLS{ Keyring SparkRing}##################################################################### SparkServer_ATTLS and SparkClient_ATTLS are the rules that work## together to encrypt the network traffic among the ports defined
162 Open Data Analytics for z/OS : IBM Open Data Analytics for z/OS V1.1.0 Installation and CustomizationGuide
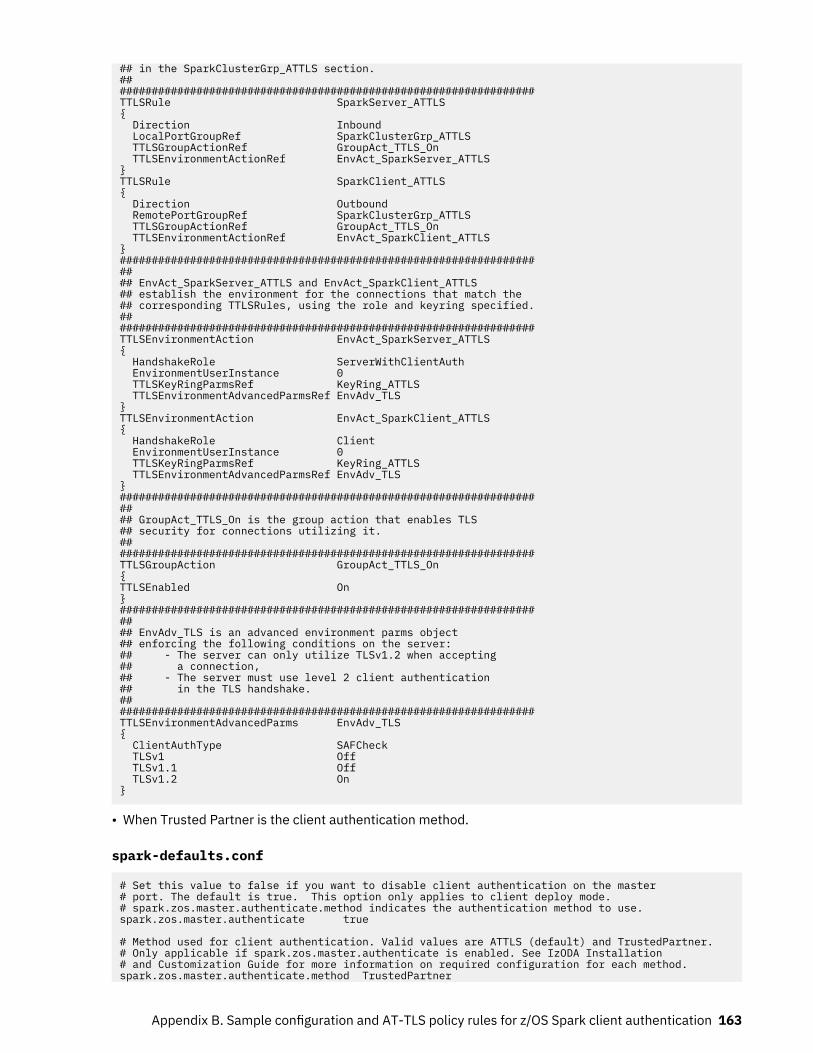
## in the SparkClusterGrp_ATTLS section.###################################################################TTLSRule SparkServer_ATTLS{ Direction Inbound LocalPortGroupRef SparkClusterGrp_ATTLS TTLSGroupActionRef GroupAct_TTLS_On TTLSEnvironmentActionRef EnvAct_SparkServer_ATTLS}TTLSRule SparkClient_ATTLS{ Direction Outbound RemotePortGroupRef SparkClusterGrp_ATTLS TTLSGroupActionRef GroupAct_TTLS_On TTLSEnvironmentActionRef EnvAct_SparkClient_ATTLS}##################################################################### EnvAct_SparkServer_ATTLS and EnvAct_SparkClient_ATTLS## establish the environment for the connections that match the ## corresponding TTLSRules, using the role and keyring specified.###################################################################TTLSEnvironmentAction EnvAct_SparkServer_ATTLS{ HandshakeRole ServerWithClientAuth EnvironmentUserInstance 0 TTLSKeyRingParmsRef KeyRing_ATTLS TTLSEnvironmentAdvancedParmsRef EnvAdv_TLS}TTLSEnvironmentAction EnvAct_SparkClient_ATTLS{ HandshakeRole Client EnvironmentUserInstance 0 TTLSKeyRingParmsRef KeyRing_ATTLS TTLSEnvironmentAdvancedParmsRef EnvAdv_TLS}##################################################################### GroupAct_TTLS_On is the group action that enables TLS## security for connections utilizing it.###################################################################TTLSGroupAction GroupAct_TTLS_On{TTLSEnabled On}##################################################################### EnvAdv_TLS is an advanced environment parms object## enforcing the following conditions on the server:## - The server can only utilize TLSv1.2 when accepting## a connection,## - The server must use level 2 client authentication## in the TLS handshake.###################################################################TTLSEnvironmentAdvancedParms EnvAdv_TLS{ ClientAuthType SAFCheck TLSv1 Off TLSv1.1 Off TLSv1.2 On}
• When Trusted Partner is the client authentication method.
spark-defaults.conf
# Set this value to false if you want to disable client authentication on the master # port. The default is true. This option only applies to client deploy mode. # spark.zos.master.authenticate.method indicates the authentication method to use.spark.zos.master.authenticate true
# Method used for client authentication. Valid values are ATTLS (default) and TrustedPartner.# Only applicable if spark.zos.master.authenticate is enabled. See IzODA Installation # and Customization Guide for more information on required configuration for each method.spark.zos.master.authenticate.method TrustedPartner
Appendix B. Sample configuration and AT-TLS policy rules for z/OS Spark client authentication 163

# The REST server does not support client authentication nor application-layer TLS.# Only enable this once you have adequate security in place for the REST port.spark.master.rest.enabled false
spark.driver.blockManager.port 7611spark.driver.port 7277spark.blockManager.port 7511spark.python.daemon.port 7722
# uncomment and set these if not using default values# spark.master.rest.port 6066# spark.shuffle.service.port 7337
# uncomment this to enable external shuffle server# spark.shuffle.service.enabled true
spark-env.sh
" uncomment and set this if not using default value" SPARK_MASTER_PORT=7077 SPARK_WORKER_PORT=7177
Trusted Partner policy rules
#### TRUSTED PARTNER POLICY AGENT CONFIGURATION FILE FOR SPARK ON Z/OS##################################################################### SparkClusterGrp_TP contains the PortRange references## for the Spark cluster ports that support Trusted Partner## security.#### For detailed usage information and configuration ## instructions of these ports, please refer to the## IzODA Installation and Customization Guide#### When port-binding fails (due to, e.g., port already in## use), it will retry on sequential ports to a number of times## equal the value of spark.port.maxRetries (default: 16).## This value can be configured in spark-defaults.conf.#### (The Shuffle Server port does not support port range retry.)#### Considering this behavior, we recommend configuring## a PortRange to account for the retry behavior for## ports that support port range retry:#### port_number - (port_number + spark.port.maxRetries)#################################################################PortGroup SparkClusterGrp_TP{ PortRangeRef SparkMaster_TP}PortRange SparkMaster_TP{ Port 7077-7093}##################################################################### KeyRing_TP defines the keyring that will be used during## Spark Trusted Partner authentication.###################################################################TTLSKeyRingParms KeyRing_TP{ Keyring SparkRingTP}##################################################################### SparkServer_TP and SparkClient_TP are the rules that work## together to encrypt the network traffic among the ports defined## in the SparkClusterGrp_TP section.###################################################################TTLSRule SparkServer_TP{
164 Open Data Analytics for z/OS : IBM Open Data Analytics for z/OS V1.1.0 Installation and CustomizationGuide

Direction Inbound LocalPortGroupRef SparkClusterGrp_TP TTLSGroupActionRef GroupAct_TTLS_On TTLSEnvironmentActionRef EnvAct_SparkServer_TP}TTLSRule SparkClient_TP{ Direction Outbound RemotePortGroupRef SparkClusterGrp_TP TTLSGroupActionRef GroupAct_TTLS_On TTLSEnvironmentActionRef EnvAct_SparkClient_TP}##################################################################### EnvAct_SparkServer_TP and EnvAct_SparkClient_TP## establish the environment for the connections that match the ## corresponding TTLSRules, using the role and keyring specified.###################################################################TTLSEnvironmentAction EnvAct_SparkServer_TP{ HandshakeRole Server EnvironmentUserInstance 0 TTLSKeyRingParmsRef KeyRing_TP TTLSEnvironmentAdvancedParmsRef EnvAdv_TLS_TP}TTLSEnvironmentAction EnvAct_SparkClient_TP{ HandshakeRole Client EnvironmentUserInstance 0 TTLSKeyRingParms { Keyring *AUTH*/* } TTLSEnvironmentAdvancedParmsRef EnvAdv_TLS_TP}##################################################################### GroupAct_TTLS_On is the group action that enables TLS## security for connections utilizing it.###################################################################TTLSGroupAction GroupAct_TTLS_On{ TTLSEnabled On}##################################################################### EnvAdv_TLS_TP is an advanced environment parms object## enforcing the following conditions on the server:## - The server can only utilize TLSv1.2 when accepting## a connection.###################################################################TTLSEnvironmentAdvancedParms EnvAdv_TLS_TP{ TLSv1 Off TLSv1.1 Off TLSv1.2 On}
Appendix B. Sample configuration and AT-TLS policy rules for z/OS Spark client authentication 165

166 Open Data Analytics for z/OS : IBM Open Data Analytics for z/OS V1.1.0 Installation and CustomizationGuide

Appendix C. Sample z/OS IzODA Livy AT-TLS policyrules
The following example shows the sample AT-TLS policies that you can use in you TCPIP_TTLS.policyAT-TLS policy file for z/OS IzODA Livy. This is meant to be used in conjunction with sample AT-TLSpolicies shown in Appendix B, “Sample configuration and AT-TLS policy rules for z/OS Spark clientauthentication,” on page 161 when AT-TLS is used as the Spark client authentication method..
For more information about AT-TLS policies, see Chapter 8, “z/OS IzODA Livy Installation andCustomization,” on page 103. You can find detailed information about the syntax of each AT-TLS policystatement in "AT-TLS policy statements" in z/OS Communications Server: IP Configuration Reference.
AT-TLS policies when AT-TLS is used as the Spark client authentication method
##################################################################### LivyServer_ATTLS is the port the Livy Server listens## on for connections from external clients. This port## supports AT-TLS security.#### The Livy Server port does not support port range retry.#### By default, livy-server binds to the port specified on## livy.server.port in $LIVY_CONF_DIR/livy.conf.###################################################################PortRange LivyServer_ATTLS{Port 8998}##################################################################### KeyRing_Livy defines the keyring that will be used during## Livy Server AT-TLS authentication.###################################################################TTLSKeyRingParms KeyRing_Livy{Keyring LivyRing}##################################################################### LivyServer_ATTLS and LivyClient_ATTLS are the rules that## encrypt network traffic going into and out of the Livy Server## port.#### The LivyClient_ATTLS rule is necessary only if you are going## to submit jobs to the Livy Server from either the same LPAR or## the same Sysplex. It is not needed if you will be only using ## external HTTP clients.###################################################################TTLSRule LivyServer_ATTLS{Direction InboundLocalPortRangeRef LivyServer_ATTLSTTLSGroupActionRef GroupAct_TTLS_OnTTLSEnvironmentActionRef EnvAct_LivyServer_ATTLS}TTLSRule LivyClient_ATTLS{Direction OutboundRemotePortRangeRef LivyServer_ATTLSTTLSGroupActionRef GroupAct_TTLS_OnTTLSEnvironmentActionRef EnvAct_LivyClient_ATTLS}##################################################################### EnvAct_LivyServer_ATTLS and EnvAct_LivyClient_ATTLS## establish the environment for the connections that match the ## corresponding TTLSRules, using the role and keyring specified.
© Copyright IBM Corp. 2016, 2019 167

#### Remove the EnvAct_LivyClient_ATTLS section if the corresponding ## TTLSRule is not present.###################################################################TTLSEnvironmentAction EnvAct_LivyServer_ATTLS{HandshakeRole ServerWithClientAuthEnvironmentUserInstance 0TTLSKeyRingParmsRef KeyRing_LivyTTLSEnvironmentAdvancedParmsRef EnvAdv_TLS}TTLSEnvironmentAction EnvAct_LivyClient_ATTLS{HandshakeRole ClientEnvironmentUserInstance 0TTLSKeyRingParmsRef KeyRing_LivyTTLSEnvironmentAdvancedParmsRef EnvAdv_TLS}
168 Open Data Analytics for z/OS : IBM Open Data Analytics for z/OS V1.1.0 Installation and CustomizationGuide
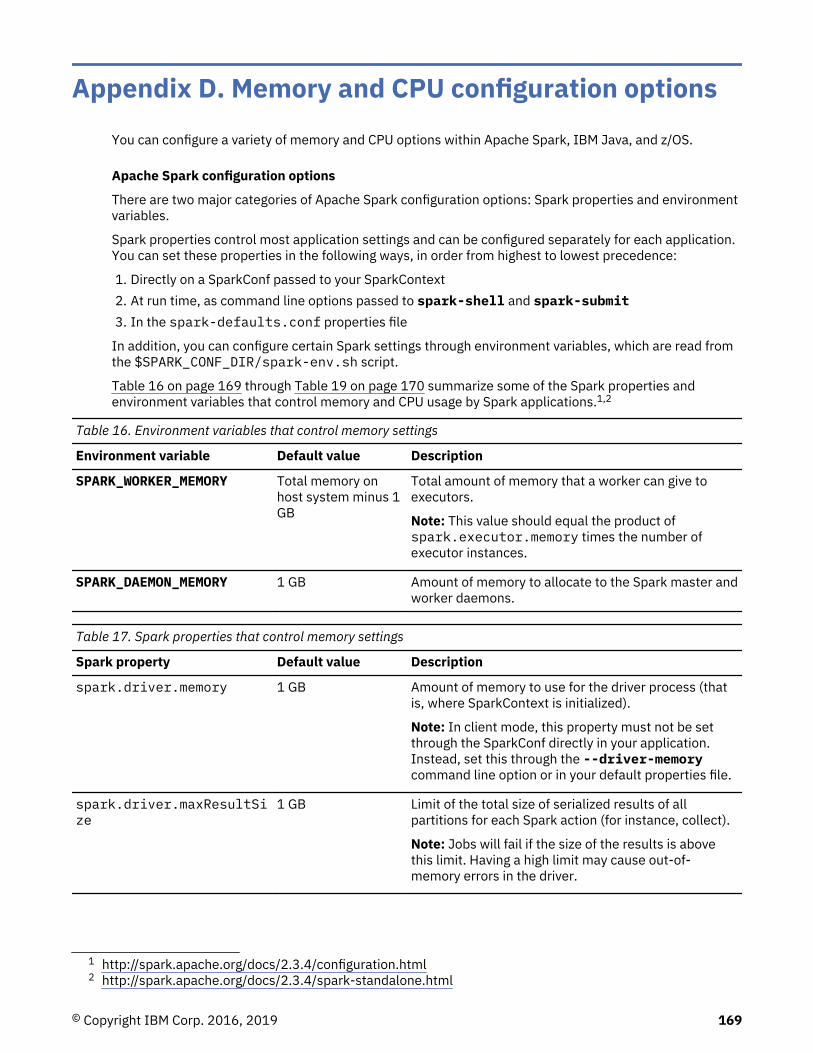
Appendix D. Memory and CPU configuration optionsYou can configure a variety of memory and CPU options within Apache Spark, IBM Java, and z/OS.
Apache Spark configuration options
There are two major categories of Apache Spark configuration options: Spark properties and environmentvariables.
Spark properties control most application settings and can be configured separately for each application.You can set these properties in the following ways, in order from highest to lowest precedence:
1. Directly on a SparkConf passed to your SparkContext2. At run time, as command line options passed to spark-shell and spark-submit3. In the spark-defaults.conf properties file
In addition, you can configure certain Spark settings through environment variables, which are read fromthe $SPARK_CONF_DIR/spark-env.sh script.
Table 16 on page 169 through Table 19 on page 170 summarize some of the Spark properties andenvironment variables that control memory and CPU usage by Spark applications.1,2
Table 16. Environment variables that control memory settings
Environment variable Default value Description
SPARK_WORKER_MEMORY Total memory onhost system minus 1GB
Total amount of memory that a worker can give toexecutors.
Note: This value should equal the product ofspark.executor.memory times the number ofexecutor instances.
SPARK_DAEMON_MEMORY 1 GB Amount of memory to allocate to the Spark master andworker daemons.
Table 17. Spark properties that control memory settings
Spark property Default value Description
spark.driver.memory 1 GB Amount of memory to use for the driver process (thatis, where SparkContext is initialized).
Note: In client mode, this property must not be setthrough the SparkConf directly in your application.Instead, set this through the --driver-memorycommand line option or in your default properties file.
spark.driver.maxResultSize
1 GB Limit of the total size of serialized results of allpartitions for each Spark action (for instance, collect).
Note: Jobs will fail if the size of the results is abovethis limit. Having a high limit may cause out-of-memory errors in the driver.
1 http://spark.apache.org/docs/2.3.4/configuration.html2 http://spark.apache.org/docs/2.3.4/spark-standalone.html
© Copyright IBM Corp. 2016, 2019 169
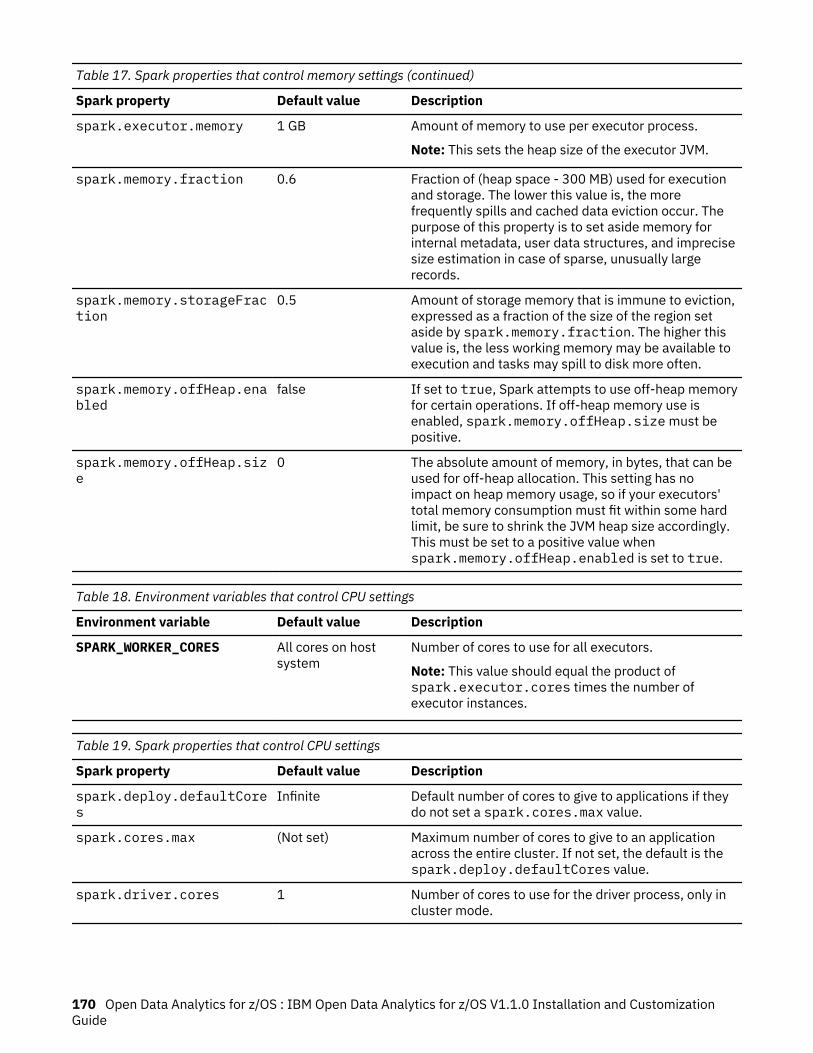
Table 17. Spark properties that control memory settings (continued)
Spark property Default value Description
spark.executor.memory 1 GB Amount of memory to use per executor process.
Note: This sets the heap size of the executor JVM.
spark.memory.fraction 0.6 Fraction of (heap space - 300 MB) used for executionand storage. The lower this value is, the morefrequently spills and cached data eviction occur. Thepurpose of this property is to set aside memory forinternal metadata, user data structures, and imprecisesize estimation in case of sparse, unusually largerecords.
spark.memory.storageFraction
0.5 Amount of storage memory that is immune to eviction,expressed as a fraction of the size of the region setaside by spark.memory.fraction. The higher thisvalue is, the less working memory may be available toexecution and tasks may spill to disk more often.
spark.memory.offHeap.enabled
false If set to true, Spark attempts to use off-heap memoryfor certain operations. If off-heap memory use isenabled, spark.memory.offHeap.size must bepositive.
spark.memory.offHeap.size
0 The absolute amount of memory, in bytes, that can beused for off-heap allocation. This setting has noimpact on heap memory usage, so if your executors'total memory consumption must fit within some hardlimit, be sure to shrink the JVM heap size accordingly.This must be set to a positive value whenspark.memory.offHeap.enabled is set to true.
Table 18. Environment variables that control CPU settings
Environment variable Default value Description
SPARK_WORKER_CORES All cores on hostsystem
Number of cores to use for all executors.
Note: This value should equal the product ofspark.executor.cores times the number ofexecutor instances.
Table 19. Spark properties that control CPU settings
Spark property Default value Description
spark.deploy.defaultCores
Infinite Default number of cores to give to applications if theydo not set a spark.cores.max value.
spark.cores.max (Not set) Maximum number of cores to give to an applicationacross the entire cluster. If not set, the default is thespark.deploy.defaultCores value.
spark.driver.cores 1 Number of cores to use for the driver process, only incluster mode.
170 Open Data Analytics for z/OS : IBM Open Data Analytics for z/OS V1.1.0 Installation and CustomizationGuide

Table 19. Spark properties that control CPU settings (continued)
Spark property Default value Description
spark.executor.cores All cores on hostsystem
Number of cores to use on each executor. Setting thisparameter allows an application to run multipleexecutors, provided that there are enough cores on theworker (SPARK_WORKER_CORES); otherwise, only oneexecutor per application runs on each worker.
Table 20. Spark properties that affect application and cluster parallelism
Spark property Default value Description
spark.zos.master.app.alwaysScheduleApps
false Use this property to enable the Spark Master to startapplications, even when the current applicationsappear to be using all the CPU and memory. Thisenables the system to start and then manage theresources across the applications, according to theWLM policy.
spark.zos.maxApplications
5 Whenspark.zos.master.app.alwaysScheduleApps isset to true, specifies the maximum number ofapplications that can be scheduled to runconcurrently. This value should be set based onresources available according to the current WLMpolicy.
spark.dynamicAllocation.enabled
false Specifies the Spark Master can request that the SparkWorker add or remove executors based on theworkload and available resources.
spark.shuffle.service.enabled
false Specifies that the worker should start the SparkShuffle service, which allows executors to transfer(shuffle) data across executors, as needed. This isrequired whenspark.dynamicAllocation.enabled is true.
For more information about the Apache Spark configuration options, see http://spark.apache.org/docs/2.3.4/configuration.html. For more information about tuning the Apache Spark cluster, see http://spark.apache.org/docs/2.3.4/tuning.html.
IBM Java configuration options
In addition to the Apache Spark settings, you can use IBM JVM runtime options to manage resourcesused by Apache Spark applications.
You can set the IBM JVM runtime options in the following places:IBM_JAVA_OPTIONS
Use this environment variable to set generic JVM options.SPARK_DAEMON_JAVA_OPTS
Use this environment variable to set additional JVM options for the Apache Spark master and workerdaemons.
spark.driver.extraJavaOptionsUse this Apache Spark property to set additional JVM options for the Apache Spark driver process.
spark.executor.extraJavaOptionsUse this Apache Spark property to set additional JVM options for the Apache Spark executor process.You cannot use this option to set Spark properties or heap sizes.
Appendix D. Memory and CPU configuration options 171
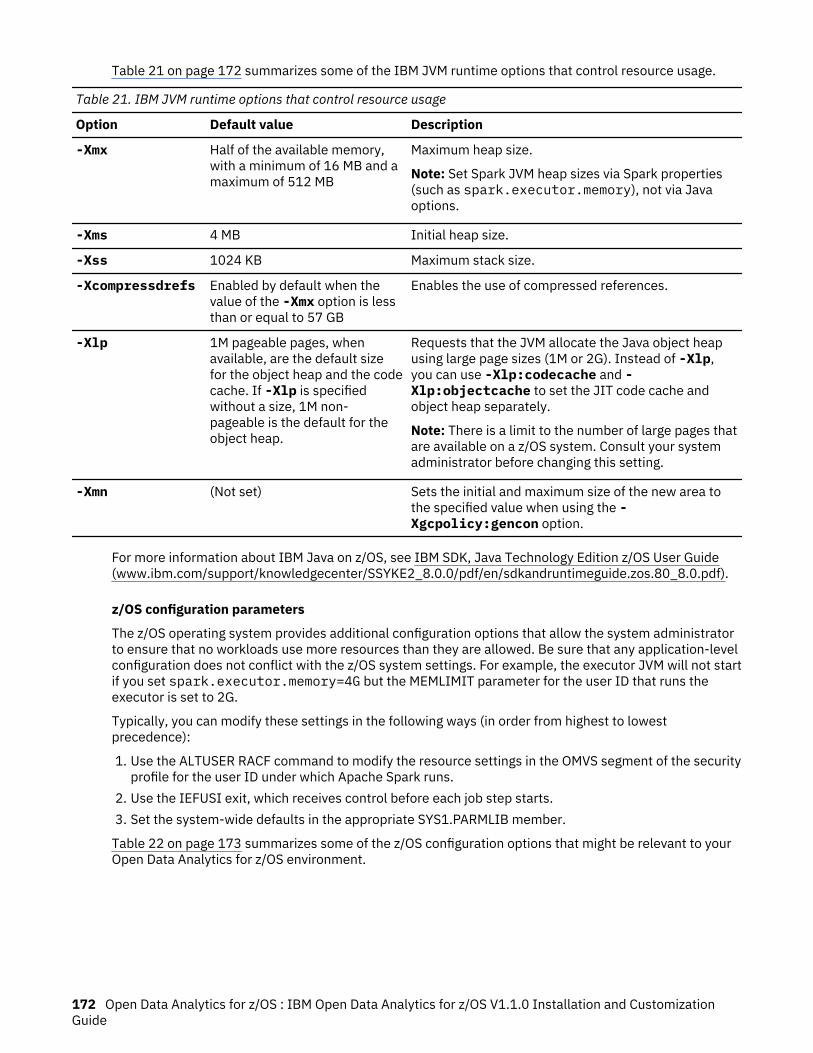
Table 21 on page 172 summarizes some of the IBM JVM runtime options that control resource usage.
Table 21. IBM JVM runtime options that control resource usage
Option Default value Description
-Xmx Half of the available memory,with a minimum of 16 MB and amaximum of 512 MB
Maximum heap size.
Note: Set Spark JVM heap sizes via Spark properties(such as spark.executor.memory), not via Javaoptions.
-Xms 4 MB Initial heap size.
-Xss 1024 KB Maximum stack size.
-Xcompressdrefs Enabled by default when thevalue of the -Xmx option is lessthan or equal to 57 GB
Enables the use of compressed references.
-Xlp 1M pageable pages, whenavailable, are the default sizefor the object heap and the codecache. If -Xlp is specifiedwithout a size, 1M non-pageable is the default for theobject heap.
Requests that the JVM allocate the Java object heapusing large page sizes (1M or 2G). Instead of -Xlp,you can use -Xlp:codecache and -Xlp:objectcache to set the JIT code cache andobject heap separately.
Note: There is a limit to the number of large pages thatare available on a z/OS system. Consult your systemadministrator before changing this setting.
-Xmn (Not set) Sets the initial and maximum size of the new area tothe specified value when using the -Xgcpolicy:gencon option.
For more information about IBM Java on z/OS, see IBM SDK, Java Technology Edition z/OS User Guide(www.ibm.com/support/knowledgecenter/SSYKE2_8.0.0/pdf/en/sdkandruntimeguide.zos.80_8.0.pdf).
z/OS configuration parameters
The z/OS operating system provides additional configuration options that allow the system administratorto ensure that no workloads use more resources than they are allowed. Be sure that any application-levelconfiguration does not conflict with the z/OS system settings. For example, the executor JVM will not startif you set spark.executor.memory=4G but the MEMLIMIT parameter for the user ID that runs theexecutor is set to 2G.
Typically, you can modify these settings in the following ways (in order from highest to lowestprecedence):
1. Use the ALTUSER RACF command to modify the resource settings in the OMVS segment of the securityprofile for the user ID under which Apache Spark runs.
2. Use the IEFUSI exit, which receives control before each job step starts.3. Set the system-wide defaults in the appropriate SYS1.PARMLIB member.
Table 22 on page 173 summarizes some of the z/OS configuration options that might be relevant to yourOpen Data Analytics for z/OS environment.
172 Open Data Analytics for z/OS : IBM Open Data Analytics for z/OS V1.1.0 Installation and CustomizationGuide

Table 22. IBM z/OS configuration parameters
Parameter Default value Description Where to set
MEMLIMIT 2 GB Amount of virtual storage above thebar that an address space is allowedto use.
Note: Set the MEMLIMIT for theSpark user ID to the largest JVM heapsize (executor memory size) plus theamount of native memory that Sparkprocessing might require (typically, atleast 2 GB).
• MEMLIMIT parameter in theSMFPRMxx parmlib member(sets the system-widedefault)
• MEMLIMIT parameter on JCLJOB or EXEC statements
• IEFUSI exit• MEMLIMIT variable in the
OMVS security profilesegment
MAXMMAPAREA 40960 Maximum amount of data spacestorage, in pages, that can beallocated for memory mapping ofz/OS UNIX files.
• MAXMMAPAREA parameter inthe BPXPRMxx parmlibmember (sets the system-wide default)
• MMAPAREAMAX variable inthe OMVS security profilesegment
MAXASSIZE 200 MB Maximum address space size for anew process.
Note: The JVM will fail to start if theMAXASSIZE for the Spark user ID istoo small. The recommendedminimum for Java is 2,147,483,647bytes.
• MAXASSIZE parameter in theBPXPRMxx parmlib member(sets the system-widedefault)
• IEFUSI exit• ASSIZEMAX variable in the
OMVS security profilesegment
MAXCPUTIME 1000 Maximum CPU time, in seconds, thata process can use.
• MAXCPUTIME parameter inthe BPXPRMxx parmlibmember (sets the system-wide default)
• CPUTIMEMAX variable in theOMVS security profilesegment
MAXPROCESSOR 25 Maximum number of concurrentlyactive processes for a single z/OSUNIX user ID.
• MAXPROCUSER parameter inthe BPXPRMxx parmlibmember (sets the system-wide default)
• PROCUSERMAX variable inthe OMVS security profilesegment
For more information about z/OS parmlib members, see z/OS MVS Initialization and Tuning Reference.
Appendix D. Memory and CPU configuration options 173

174 Open Data Analytics for z/OS : IBM Open Data Analytics for z/OS V1.1.0 Installation and CustomizationGuide

Appendix E. Spark properties specific to the z/OSenvironment
Table 23 on page 175 lists the Spark properties that are specific to Spark running on z/OS systems as partof IBM Open Data Analytics for z/OS.
You set these properties in the spark-defaults.conf file.
Table 23. Spark properties specific to the z/OS environment
Spark property Default value Description
spark.zos.master.authenticate
true Specifies whether Spark authenticates connections tothe Spark master port. The authentication method thatis used is indicated byspark.zos.master.authenticate.method.
spark.zos.master.authenticate.method
ATTLS Specifies the method that Spark is to use toauthenticate connections to the Spark master port.
The value, ATTLS, requires AT-TLS with clientauthentication. The value, TrustedPartner, requiresthat all connections are internal. This property isignored ifspark.zos.master.authenticate=false isspecified.
spark.zos.cluster.instanceNumber
Specifies the instance number of the Spark cluster.
spark.zos.driver.jobname.prefix
ODASD Specifies the job name prefix for drivers in clusterdeploy mode. The suffix will be as many digits of thecorresponding driver instance number as can fit toform an 8-character job name, starting from the last(rightmost) character of the driver instance number.
For example, if you specifyspark.zos.driver.jobname.prefix=SPARKD,the job name of the driver with a driver instancenumber of 0001 will be SPARKD01.
The spark-defaults.conf file contains a defaultsetting ofspark.zos.driver.jobname.prefix=ODASD.Note that this job name prefix applies only to drivers incluster deploy mode. For client deploy mode, you cancontinue to use the _BPX_JOBNAME environmentvariable to set the job name of the driver.
© Copyright IBM Corp. 2016, 2019 175
Table 23. Spark properties specific to the z/OS environment (continued)
Spark property Default value Description
spark.zos.driver.jobname.template
Specifies the job name template for drivers in clusterdeploy mode. The template property provides furthercustomization when you are generating job names forthe driver. The template uses variables that can besubstituted for several pieces of information about thework that the driver is running. These variables includecluster and driver.
For example, ODA<cluster:1><driver:2> wherecluster number is 6 and driver number is 0312, wouldyield ODA612.
spark.zos.executor.jobname.prefix
ODASX Specifies the job name prefix for executors. The suffixwill be as many digits of the corresponding applicationinstance number as can fit to form an 8-character jobname, starting from the last (rightmost) character ofthe application instance number. All executors for thesame application will have the same job name.
For example, if you specifyspark.zos.executor.jobname.prefix=SPARKX,the job names of the executors for application instancenumber 0001 will be SPARKX01.
The spark-defaults.conf file contains a defaultsetting ofspark.zos.executor.jobname.prefix=ODASX.If no executor prefix is specified in spark-defaults.conf, the executor job names follow thez/OS UNIX default (user ID with a numeric suffix).
spark.zos.executor.jobname.template
Specifies the job name template for executors. Thetemplate property provides further customizationwhen you are generating job names for executors. Thetemplate uses variables that can be substituted forseveral pieces of information about the work that theexecutor is running. These variables include cluster,application, and executor.
For example,ODA<cluster:1><application:2><executor:2>where cluster number is 2, application number is0312, and executor is 0000, would yield ODA21200.
176 Open Data Analytics for z/OS : IBM Open Data Analytics for z/OS V1.1.0 Installation and CustomizationGuide

Table 23. Spark properties specific to the z/OS environment (continued)
Spark property Default value Description
spark.zos.environment.verify true Specifies whether Spark should perform environmentverification during master and worker daemoninitialization. If enabled, Spark verifies that thedaemons have the proper authority to perform thenecessary functions. The daemons are terminated ifthey fail the verification. The results of the verificationcan be found in the daemon logs.
This property requires the Spark cluster user ID tohave READ access to the BPX.SERVER FACILITYclass profile, unless client authentication is notenabled (spark.zos.master.authenticate isfalse). The configuration instructions for clientauthentication describe this in detail.
spark.python.daemon.port Specifies the port for the PySpark daemon to listen on.This property is only applicable if you are usingPySpark. The value must be between 1024 - 65535(inclusive), or 0 to specify a random port. The numberof retries is determined byspark.port.maxRetries. For Spark 2.2.0, APARPI98042 is required to use this property.
spark.zos.master.app.alwaysScheduleApps
False Specifies whether Spark should start applicationswhen resources such as CPU and memory appear tobe all in use. This enables the system to manage theapplications according to the policies established byWLM.
spark.zos.maxApplications 5 Whenspark.zos.master.app.alwaysScheduleApps isset to true, specifies the maximum number ofapplications that can be scheduled to runconcurrently. This value should be set based onresources available according to the current WLMpolicy.
Appendix E. Spark properties specific to the z/OS environment 177

178 Open Data Analytics for z/OS : IBM Open Data Analytics for z/OS V1.1.0 Installation and CustomizationGuide

Appendix F. Data setsThe following table lists the data sets that installation member INSTPAC creates.
The installation data sets have the format hlq.data_set_name_suffix, where hlq is the high level qualifierand data_set_name_suffix is as listed in the table.
Any data set prefixed with the subsystem ID (SSID) is a data set created during post-installation to allowuser modification. These post-installation data sets have the format hlq.SSID.data_set_name_suffix.
Table 24. Data sets created by INSTPAC
Data set namesuffix
SMP/E datatype
SMP/E datadefinition
Data setorgani-zation
Recordformat
Logicalrecordlength
Blocksize
tracks
AAZKCNTL USER2 ASDBCNTL PO-E FB 80 32720 180
AAZKDBRM USER1 ASDBDBRM PO-E FB 80 32720 300
AAZKEXEC EXEC ASDBEXEC PO-E FB 80 32720 450
AAZKHTML TEXT ASDBHTML PO-E VB 32765 32760 15
AAZKHTX PRODXML ASDBHTX PO-E VB 19036 19040 15
AAZKJLOD PROGRAM ASDBJLOD PO-E U 0 6000 15
AAZKLIST UTOUT ASDBLIST PO-E FBA 133 32718 45
AAZKMAP DATA ASDBMAP PO-E FB 1024 31744 15
AAZKMLIB MSG ASDBMLIB PO-E FB 80 32720 15
AAZKMOD MOD ASDBMOD PO-E U 0 6144 1800
AAZKOBJ USER3 ASDBOBJ PO-E FB 80 32720 1275
AAZKPLIB PNL ASDBPLIB PO-E FB 80 32720 105
AAZKRPC PROGRAM ASDBRPC PO-E U 0 6000 750
AAZKSAMP SAMP ASDBSAMP PO-E FB 80 32720 270
AAZKSLIB SKL ASDBSLIB PO-E FB 80 32720 15
AAZKSWI DATA ASDBSWI PO-E FB 80 32720 30
AAZKTLIB TBL ASDBTLIB PO-E FB 80 32720 15
AAZKXATH EXEC ASDBXATH PO-E FB 80 32720 15
AAZKXCMD EXEC ASDBXCMD PO-E FB 80 32720 15
AAZKXEXC EXEC ASDBXEXC PO-E FB 80 32720 15
AAZKXGLV EXEC ASDBXGLV PO-E FB 80 32720 15
AAZKXPUB EXEC ASDBXPUB PO-E FB 80 32720 15
AAZKXRPC EXEC ASDBXRPC PO-E FB 80 32720 15
AAZKXSQL EXEC ASDBXSQL PO-E FB 80 32720 15
AAZKXTOD EXEC ASDBXTOD PO-E FB 80 32720 15
AAZKXVTB EXEC ADVSXVTB PO-E FB 80 32720 15
© Copyright IBM Corp. 2016, 2019 179
Table 24. Data sets created by INSTPAC (continued)
Data set namesuffix
SMP/E datatype
SMP/E datadefinition
Data setorgani-zation
Recordformat
Logicalrecordlength
Blocksize
tracks
SAZKXATH EXEC SSDBXATH PO-E FB 80 32720 15
SAZKCLOD MOD SSDBCLOD PO-E U 0 6000 270
SAZKXCMD EXEC SSDBXCMD PO-E FB 80 32720 15
SAZKCNTL USER2 SDBCNTL PO-E FB 80 32720 180
SAZKDBRM USER1 SSDBDBRMX PO-E FB 80 32720 15
SAZKEXEC EXEC SSDBXEXC PO-E FB 80 32720 15
SAZKEXEC EXEC SSDBEXEC PO-E FB 80 32720 450
SAZKXGLV EXEC SSDBXGLV PO-E FB 80 3 2720 15
SAZKHTML TEXT SSDBHTML PO-E VB 32756 32760 15
SAZKHTX PRODXML SSDBHTX PO-E VB 19036 19040 15
SAZKINST SMP/E does notmaintain thisdata set.
PO-E FB 80 32720 18
SAZKJLOD PROGRAM SSDBJLOD PO-E U 0 6000 15
SAZKLIST UTOUT SSDBLIST PO-E FBA 133 32718 45
SAZKLOAD MOD SSDBLOAD PO U 0 6000 4500
SAZKMAP DATA SSDBMAP PO-E FB 1024 31744 15
SAZKOBJ USER3 SSDBOBJ PO-E FB 80 32720 1125
SAZKXPUB EXEC SSDBXPUB PO-E FB 80 32720 15
SAZKXRPC EXEC SSDBXRPC PO-E FB 80 32720 15
SAZKRPC PROGRAM SSDBRPC PO-E U 0 6000 375
SAZKSAMP SAMP SSDBSAMP PO-E FB 80 32720 300
SAZKMDL1 SMP/E does notmaintain thisdata set.
SDBLMOD PO-E U 0 6000 18
SAZKMDL2 SMP/E does notmaintain thisdata set.
SDBLMOD2 PO-E U 0 6000 18
SAZKMENU MSG SHDWMLIB PO-E FB 80 32720 15
SAZKPENU PNL SHDWPLIB PO-E FB 80 32720 210
SAZKSLIB SKL SHDWSLIB PO-E FB 80 32720 15
SAZKTENU TBL SHDWTLIB PO-E FB 80 32720 15
SAZKXSQL EXEC SSDBXSQL PO-E FB 80 32720 15
SAZKXWWW DATA SSDBSWI PO-E FB 80 32720 30
180 Open Data Analytics for z/OS : IBM Open Data Analytics for z/OS V1.1.0 Installation and CustomizationGuide

Table 24. Data sets created by INSTPAC (continued)
Data set namesuffix
SMP/E datatype
SMP/E datadefinition
Data setorgani-zation
Recordformat
Logicalrecordlength
Blocksize
tracks
SWI.OBJ1 SMP/E does notmaintain thisdata set.
PO-E VB 4092 12288 30
SAZKXTOD EXEC SSDBXTOD PO-E FB 80 32720 15
Note: SMP/E does not maintain this data set.
Appendix F. Data sets 181

182 Open Data Analytics for z/OS : IBM Open Data Analytics for z/OS V1.1.0 Installation and CustomizationGuide

Appendix G. Restrictions
The following restrictions currently exist for IBM Open Data Analytics for z/OS Version 1.1.0:
• The R programming language is not supported.• Hive on Spark is not supported.• Running Spark on YARN or Mesos is not supported.• Apache Thrift server is not supported.• The use of multiple workers is not supported.• Mixed-endian environments in client deploy mode are not supported.
© Copyright IBM Corp. 2016, 2019 183

184 Open Data Analytics for z/OS : IBM Open Data Analytics for z/OS V1.1.0 Installation and CustomizationGuide

Appendix H. Apache Spark in a mixed-endianenvironment
IBM Open Data Analytics for z/OS uses Apache Spark 2.3.4 which does not support mixed-endianenvironments in client deploy mode.
A mixed-endian environment exists if part of your Apache Spark setup, typically the worker, runs on anIBM Z platform (big-endian), and another part, typically the driver, runs on a different platform (little-endian). The Spark driver is the process that hosts your Spark application, and it can run as anindependent process or inside a third-party product, such as Scala Workbench (including JupyterNotebook) or Spark Job Server. However, there are third-party solutions that address this problem andallow Spark applications to run in a mixed-endian environment. See the following alternatives for moredetails.
If you currently run Apache Spark in a mixed-endian environment and deploy the driver in client mode,consider using one of the following alternatives:
• Deploy the driver in cluster mode. A cluster-mode deployment launches the driver inside the Sparkcluster. The default for Apache Spark 2.3.4 is client mode, which launches the driver outside thecluster. Note that Scala Workbench does not support cluster-mode deployment.
For more information about cluster deploy mode, see http://spark.apache.org/docs/2.3.4/submitting-applications.html.
• Consider migrating to a solution that supports Spark in a mixed-endian environment. For instance,Jupyter Notebook Extension to Kernel Gateway (NB2KG) running on an x86 platform can connect toApache Spark on z/OS through the Jupyter Kernel Gateway to Apache Toree on z/OS (KG2ATz).
• If you use a third-party products to host your Spark driver and the product runs on the Linux platform,consider migrating it to a Linux on z Systems® platform.
• Start your application from a z/OS system, as follows:
1. Assemble application and package dependencies into a self-contained JAR file using a buildmanagement tool, such as SBT or Apache Maven. For more information about self-containedapplications, see Quick Start: Self-Contained Applications (spark.apache.org/docs/latest/quick-start.html#self-contained-applications).
2. Transfer the JAR file to the z/OS UNIX System Services (z/OS UNIX) environment on which yourApache Spark cluster resides, if it is not already there. For information about transferring files to thez/OS UNIX environment, see "File transfer directly to or from z/OS UNIX" in z/OS UNIX SystemServices User's Guide.
3. Perform spark-submit from the z/OS system on which your Apache Spark cluster resides in one ofthe following ways:
– Remotely connect to the z/OS UNIX environment and run the spark-submit script from a z/OSUNIX interface, such as the standard shell or the ISPF interface.
– Use FTP or Java to submit a batch job that invokes the spark-submit script.
- For information about submitting a job via FTP, see "Interfacing with JES" in z/OSCommunications Server: IP User's Guide and Commands.
- For information about submitting a job via Java, see Submit batch jobs from Java on z/OS(https://www.ibm.com/developerworks/systems/library/es-batch-zos.html).
© Copyright IBM Corp. 2016, 2019 185

186 Open Data Analytics for z/OS : IBM Open Data Analytics for z/OS V1.1.0 Installation and CustomizationGuide

Accessibility
The publications for IBM Open Data Analytics for z/OS are available in IBM Knowledge Center and AdobePortable Document Format (PDF) and comply with accessibility standards. If you experience difficultieswhen you use any of the information, notify IBM through one of the comment methods described in “Howto send your comments to IBM” on page xiii.
© Copyright IBM Corp. 2016, 2019 187

188 Open Data Analytics for z/OS : IBM Open Data Analytics for z/OS V1.1.0 Installation and CustomizationGuide

Notices
This information was developed for products and services offered in the U.S.A. or elsewhere.
IBM may not offer the products, services, or features discussed in this document in other countries.Consult your local IBM representative for information on the products and services currently available inyour area. Any reference to an IBM product, program, or service is not intended to state or imply that onlythat IBM product, program, or service may be used. Any functionally equivalent product, program, orservice that does not infringe any IBM intellectual property right may be used instead. However, it is theuser's responsibility to evaluate and verify the operation of any non-IBM product, program, or service.
IBM may have patents or pending patent applications covering subject matter described in thisdocument. The furnishing of this document does not give you any license to these patents. You can sendlicense inquiries, in writing, to:
IBM Director of LicensingIBM CorporationNorth Castle DriveArmonk, NY 10504-1785U.S.A
For license inquiries regarding double-byte character set (DBCS) information, contact the IBM IntellectualProperty Department in your country or send inquiries, in writing, to:
Intellectual Property LicensingLegal and Intellectual Property LawIBM Japan, Ltd.19-21, Nihonbashi-Hakozakicho, Chuo-kuTokyo 103-8510, Japan
The following paragraph does not apply to the United Kingdom or any other country where suchprovisions are inconsistent with local law: INTERNATIONAL BUSINESS MACHINES CORPORATIONPROVIDES THIS PUBLICATION "AS IS" WITHOUT WARRANTY OF ANY KIND, EITHER EXPRESS ORIMPLIED, INCLUDING, BUT NOT LIMITED TO, THE IMPLIED WARRANTIES OF NON-INFRINGEMENT,MERCHANTABILITY OR FITNESS FOR A PARTICULAR PURPOSE. Some states do not allow disclaimer ofexpress or implied warranties in certain transactions, therefore, this statement may not apply to you.
This information could include technical inaccuracies or typographical errors. Changes are periodicallymade to the information herein; these changes will be incorporated in new editions of the publication.IBM may make improvements and/or changes in the product(s) and/or the program(s) described in thispublication at any time without notice.
Any references in this information to non-IBM Web sites are provided for convenience only and do not inany manner serve as an endorsement of those Web sites. The materials at those Web sites are not part ofthe materials for this IBM product and use of those Web sites is at your own risk.
IBM may use or distribute any of the information you supply in any way it believes appropriate withoutincurring any obligation to you.
Licensees of this program who wish to have information about it for the purpose of enabling: (i) theexchange of information between independently created programs and other programs (including thisone) and (ii) the mutual use of the information which has been exchanged, should contact:
Site CounselIBM Corporation2455 South RoadPoughkeepsie, NY 12601-5400USA
© Copyright IBM Corp. 2016, 2019 189
Such information may be available, subject to appropriate terms and conditions, including in some cases,payment of a fee.
The licensed program described in this information and all licensed material available for it are providedby IBM under terms of the IBM Customer Agreement, IBM International Program License Agreement, orany equivalent agreement between us.
Information concerning non-IBM products was obtained from the suppliers of those products, theirpublished announcements or other publicly available sources. IBM has not tested those products andcannot confirm the accuracy of performance, compatibility or any other claims related to non-IBMproducts. Questions on the capabilities of non-IBM products should be addressed to the suppliers ofthose products.
All statements regarding IBM's future direction or intent are subject to change or withdrawal withoutnotice, and represent goals and objectives only.
If you are viewing this information softcopy, the photographs and color illustrations may not appear.
COPYRIGHT LICENSE:
This information might contain sample application programs in source language, which illustrateprogramming techniques on various operating platforms. You may copy, modify, and distribute thesesample programs in any form without payment to IBM, for the purposes of developing, using, marketingor distributing application programs conforming to the application programming interface for theoperating platform for which the sample programs are written. These examples have not been thoroughlytested under all conditions. IBM, therefore, cannot guarantee or imply reliability, serviceability, orfunction of these programs. The sample programs are provided "AS IS", without warranty of any kind. IBMshall not be liable for any damages arising out of your use of the sample programs.
TrademarksIBM, the IBM logo, and ibm.com® are trademarks or registered trademarks of International BusinessMachines Corp., registered in many jurisdictions worldwide. Other product and service names might betrademarks of IBM or other companies. A current list of IBM trademarks is available on the Web at"Copyright and trademark information" (www.ibm.com/legal/copytrade.shtml).
Rocket is a registered trademark of Rocket Software, Inc.
Java and all Java-based trademarks and logos are trademarks or registered trademarks of Oracle, itsaffiliates, or both.
UNIX is a registered trademark of The Open Group in the United States, other countries, or both.
Linux is a registered trademark of Linus Torvalds in the United States, other countries, or both.
Other company, product, or service names may be trademarks or service marks of others.
190 Open Data Analytics for z/OS : IBM Open Data Analytics for z/OS V1.1.0 Installation and CustomizationGuide

Index
Aaccessibility
contact IBM 187ACF2 87Anaconda 97Apache Spark
configuring directory structure for 32configuring memory and CPU options for 65configuring workload management (WLM) for 72in mixed-endian environments 185migrating to 157sample configuration files 161
APF (Authorized Program Facility)LOAD library 88
AT-TLS policysample for z/OS IzODA Livy 167
authentication, configuring 41automation
starting started tasks 64AZKDFDIV member 86AZKSIN00 member 89
Bbash, level 26
Ccertificates, configuring 43checklist, customization 85client authentication, configuring 41code page 88commands for monitoring workload 147configuration checker 116configuration files
samples for Apache Sparkspark-defaults.conf 161spark-env.sh 161, 162
configuration options, memory and CPU 169configuring
APF-authorizing 88ISPF client 91security authorizations 87server component 85server file 89Spark workflow 16started task JCL 90web interfaces 138Workload Manager (WLM) 87
copyingtarget libraries 88
CPU configuration options 169creating
SWIOBJ data set 86system data sets 86
customization
customization (continued)started tasks 59verification 115
customization checklist 85customizing
additional authorities and permissions 53, 55configuring Apache Spark directory structure
creating configuration directory 33creating working directories 35updating configuration files 34
configuring Apache Spark memory and CPU options 65configuring certificates and key rings 43configuring client authentication 41configuring Java 57configuring Policy Agent 46configuring TCP/IP for AT-TLS 49defining AT-TLS policy rules 49defining security for Policy Agent 47Policy Agent configuration files 48setting up a user ID 28starting Policy Agent 52stopping Policy Agent 52verifying env command path 32verifying Java and bash 26verifying z/OS UNIX 28
DData Service server
configuring 85naming conventions 86starting 90stopping 90
Data Service Studiodownload 95installing 95
data setscreated by installation 179
Data Studioverifying installation 96
DBCS 88default subsystem name 89delimited data, configuring 93digital certificates 43directory structure, configuring for Apache Spark 32double-byte character set 88Downloading
studio component 95
Ffeedback xiii
Ggeneration data set, configuring access 91
Index 191

Global Registry log stream, creating 89
Hhistory service 140
IIBM Health Checker for z/OS 149IBM Java, configuring 57installation
data sets 179installation user ID 5planning checklist 6planning for 5required resources 6required skills 5requisite products 6time requirements 5verification 115
installingJDBC Gateway 99studio component 95
ISPF client 91
JJava, level 26JDBC Gateway
installing 99starting the administrative console 102starting the server 101
Kkey rings 43
LLOAD library 88log files 141
Mmemory and CPU options, configuring for Apache Spark 65memory configuration options 169mixed-endian environments 185monitoring, resource, See resource monitoring
Nnaming conventions
Data Service server 86network ports 37, 62networking
configuration 37, 62Notices 189
Pperformance, system 72planning for installation
planning for installation (continued)checklist 6installation user ID 5product overview 5required resources 6required skills 5requisite products 6time requirements 5
Policy Agentstarting 52
Policy Agent, configuration files 48Policy Agent, configuring 46Policy Agent, security for 47ports, network 37, 62preparation
customizing 15product verification 121PTF level, considerations for updating 157Python 97
RRACF 87Resource Measurement Facility (RMF), z/OS 142resource monitoring
history service 140IBM Health Checker for z/OS 149Spark log files 141using z/OS RMF
Monitor III reports 142Postprocessor 146
web interfaces 135z/OS and z/OS UNIX commands 147
restrictions 183
Ssecuring
Spark web interfaces 139security
configuring client authentication 41security authorizations
ACF2 87RACF 87Top Secret Security 87
sending to IBMreader comments xiii
server event facility (SEF)configure delimited data 93configure GDG access 91
server file 89SMP/E 88Spark properties, z/OS-specific 175Spark workflow
upgrading 20, 22started task JCL 90started tasks
automation 64customization 59set and export environment variables 62
summary of changes for IBM Open Data Analytics for z/OSInstallation and Customization Guide xvsystem data sets
192 Open Data Analytics for z/OS : IBM Open Data Analytics for z/OS V1.1.0 Installation and CustomizationGuide
system data sets (continued)creating 86
system performance 72
Ttarget libraries 88TCP/IP, configuring for AT-TLS 49Top Secret Security 87
Uupdating to latest PTF level, considerations 157user interface (UI), web 135, 138using
configuration checker 116IzODA configuration checker 116
Vverification
configuration checker 116customization 115installation 115
verifying 119verifying installation
Data Studio 96
Wweb user interface (UI) 135, 138workload management (WLM), configuring for Apache Spark72Workload Manager (WLM)
configuring 87workloads 72
Zz/OS commands for workload monitoring 147z/OS IzODA Livy
sample AT-TLS policy 167z/OS UNIX requirements 28
Index 193

194 Open Data Analytics for z/OS : IBM Open Data Analytics for z/OS V1.1.0 Installation and CustomizationGuide


IBM®
SC27-9033-00