installation and operating manual - koi · installation and operating manual complete instructions...
TRANSCRIPT

INSTALLATION AND OPERATING MANUAL
Complete instructions for all models of evoUV
WARNING:
The evoUV is rated for use with pumps operating with up to 20 metres of head.
Evolution Aqua Ltd. - Evolution House - Kellet Close - Wigan - Lancashire - United Kingdom - WN5 0LPt +44 (0) 1942 216554 - f +44 (0) 1942 216562 - e [email protected] - w www.evolutionaqua.com
30
UKEnglish
EVO05042012MAN
• Ensure that the unit is switched off at the mains before you attempt to conduct any type of maintenance on the evoUV.
• Ensure that the gland nut / end cap is tight before running the unit.• Do not unscrew end cap while water is in the unit. • After replacing bulbs or before tightening the end cap, make sure that the
seals are in the correct position, and the bulb socket is dry.• Should the electrical connections get wet, please dry thoroughly before
switching power on.

WARNING: PLEASE READ THE FOLLOWING SAFETY INFORMATION FIRST.
IMPORTANT SAFETY INFORMATION
- Please Read Carefully- Never look directly at an illuminated UV bulb.- Do not run this unit dry. Do not cover this unit. - Please ensure that the unit is full of water before switching it on.- Always isolate the unit from mains electricity and turn off any water supply before
carrying out any maintenance.- Always disconnect all pond appliances from the mains supply before putting your
hands into the water.- Use in the area of the garden pond only if the installation complies with the
relevant wiring regulations.- Power must be supplied through a Residual Current Device (RCD) with a residual
operating current not exceeding 30mA.- This unit must be earthed. Never use a fuse larger than 3 amps on the power lead.- The unit must not be submerged in water.- If the quartz sleeve is cracked, replace it immediately.- The unit must be either fully frost protected or taken inside during Winter months.- Young children should always be supervised near water.
PRODUCT INFORMATION
- Rating: 220-240V, 50Hz. evo30 is 33-36 watt. evo55 is 40-50 watt. evo110 is 67-81 watt.
- Rating in USA only: 100-277V, 50/60Hz. evo55 is 44-52 watt. evo110 is 67-87 watt.
- All units are Class 1, IP64. All units are CE approved.
Disposal Of Your Old Product
Your product is designed and manufactured with high quality material and components, which can be recycled and reused. When this crossed-out wheeled bin symbol is attached to a product, it means the product is covered by the European Directive 2002/96/EC. Please contact your local authority about correct disposal for electrical and electronic equipment. Our WEE Registration Number is WEE/FE1471RR.
Please act according to your local rules and do not dispose of your old products with your normal household waste. The correct disposal of your old product will help prevent potential negative consequences for the environment and human health.

Congratulations on purchasing an Evolution Aqua evoUV. Our range of evoUV pond clarifiers have been manufactured using the latest technology and design techniques. evoUVs have been designed to clear green water which is caused by single celled green algae and prevent it from returning. evoUVs will work alongside many different filtration systems but when used alongside Evolution Aqua’s pond filtration systems, the evoUV will deliver crystal clear and healthy pond water.
Please read this instruction manual carefully from start to finish before attempting to install your evoUV.
CONTENTS
evoUV Diagrams PAGE 4
evoUV Parts List PAGE 5
Flow Rates PAGE 6
Installing Your evoUV PAGE 7
Positioning and Mounting the evoUV PAGE 7
Connection to Your Pipework PAGE 10
Connection to the Electricity Supply PAGE 11
Commissioning and Switching on the evoUV PAGE 12
UV Bulb Replacement PAGE 13
Replacing / Cleaning the Quartz Sleeve PAGE 14
In Built Protection PAGE 15
Trouble Shooting and Frequently Asked Questions PAGE 16
Guarantee PAGE 18
INTRODUCING EVOLUTION AQUA’S evoUV

(B)
(B)
(G)
(G)
(G)
(G)
(G)
(G)
(G)
(G)
(I)
(I)
(I)
(I)
(G)
(G)
(G)
(G)
(G)
(G)
(G)
(G)
INLET / OUTLET(C)
INLET / OUTLET
INLET / OUTLET(C)
INLET / OUTLET
(A)
(A)
(D)
(E)
(E)
(F)
(F)
(L)
(L)(M)
(M)
(J)
(J) (D)
(K)
(K)
30 evoUV DIAGRAMS
4
(H)
DIMENSIONS:evo30 and evo55 including factory fitted attachments:1000 x 185 x 115mm
DIMENSIONS:evo110 including factory fitted attachments:1000 x 260 x 115mm

Description evo30 evo55 evo110
Cover Plate A A A
Ballast & Integrated Fuse B B B
1½” Hosetail C C -----------------------------
End Cap D D D
UV Bulb E E E
Quartz Sleeve F F F
Cover Plate Screw G G G
Hosetail O-Ring H H -----------------------------
Ballast Screw I I I
Gland Nut J J J
Bulb Socket K K K
O-Ring (Quartz Sleeve) L L L
Gland Nut Sleeve M M M
evoUV COMPONENTS LIST
Cross reference the components listed below, with the diagrams on the previous page.
PLEASE NOTE:
1. Ensure that the gland nut is tight before letting water run through the unit.
2. Do not attempt to unscrew the end cap while the unit is full of water.
3. After replacing bulbs or before tightening the end cap, make sure that the seals are in the correct position, and the bulb socket is dry.
5
Gland Nut End Cap UV Bulb
Quartz Sleeve O-RingBulb SocketGland Nut Sleeve
Quartz Sleeve

FLOW RATES
Your evoUV will withstand operating pressures of 20 metres head. This means that evoUVs are able to operate with most of the circulating pumps commonly used.
Please note: For optimum performance we recommend that you pass the entire volume of your pond through the evoUV unit approximately once every two hours. Please also note that we recommend a minimum flow rate equivalent to passing the entire pond volume through the unit once every three hours.
It is important to note that there are factors that affect how you select the right size of evoUV for your pond.
Your evoUV will keep your pond clear of green water up to its maximum capacity as stated on the box for the evo30 and evo55. The evo110 is an effective unit and has multiple uses. It can be used on large ponds, retail installations, aquaculture and other commercial aquaria installations. Please see your local Evolution Aqua dealer for details.
evo30 evo55 evo110PONDS UP TO 30,000 litres 55,000 litres 75,000 litres
You will need to take into consideration such things as stocking levels, sunlight / shade, daily sunshine amounts etc. This is not always possible to calculate, and if this is the case, apply the rules of thumb below as a guide.
USA - Southern States / Mediterranean 3 Watts UV per 1,000 litresNorthern Europe including UK 2 Watts UV per 1,000 litresUSA - Northern States / Canada 1 Watts UV per 1,000 litres
It must be stressed however, that these are only guidelines, and you should take advice from your local Evolution Aqua dealer.
Description evo30 evo55 evo110
Maximum Flow Rate 15,000 litres/hour 27,500 litres/hour 36,500 litres/hour
Bulb life 9000 hours 9000 hours 9000 hours
Bulb – with EA code 1 x 30 Watt EVO30B 1 x 55 Watt EVO55B 2 x 55 Watt EVO55B
Inlet / Outlet 1½” BSP male thread 1½” BSP male thread 2” BSP male thread
Inlet / Outlet USA Models N/A 2” NPT male thread 2” NPT male thread
Evolution Aqua order codes for UK hardpipe fittings only
Adaptor– K82-23-55 Adaptor– K82-23-55 Adaptor– K82-23-66
Union – K82-78-55 Union – K82-78-55 Union – K82-78-66
6
or or or

INSTALLING YOUR evoUV
Before you do this, it is important that you familiarise yourself with the diagrams and parts list on pages 4 and 5.
The two universal hosetails supplied with the evo30 and evo55, should be screwed into the inlet / outlet at either end of the unit. Hosetails are not provided with the evo110. Hosetails should be tightened using hand pressure only. Ensure that the O-Rings are in position before assembling. Please note that there is no correct direction of flow through the unit, either end of the unit may be used as the inlet or outlet.
POSITIONING AND MOUNTING THE evoUV
evoUV units are splashproof but not waterproof. The unit can be positioned either on a horizontal or vertical surface, but never on its back. This is to prevent a build up of water on the cover plate face and to protect the circuit board.
Please note that when installing the evoUV horizontally, you must install it with the cover plate reading the correct way up (so the cover plate is user friendly). Although splashproof, your evoUV must not be submerged in water or placed in a position where water may collect around the unit.
Fix your evoUV into position using the stainless steel brackets attached to the evoUV. Screws and washers are not provided. On the evo30 and evo55 models a third bracket is attached to the rear serial number plate. This bracket is angled down during transit. Turn the bracket upright to install. There is no need to tighten up the screws.
When fixing to the wall please leave a 1 metre gap at one end of the evoUV to enable bulb / quartz sleeve removal and maintenance.
If installing the unit prior to or without a pond filter, we would recommend that the use of a pre-filter is used on the water pump to prevent excess solids from being pumped into the unit. The evoUV may be connected to the water flow on any pumped line, this could be, for instance, a skimmer line or any other additional pumped line. The two most common forms of set up are pump fed and gravity fed. These are illustrated on the following pages.
7

MOUNTED HORIZONTALLYDO NOT MOUNT UNIT ON ITS BACK
MOUNTEDVERTICALLY
POSITIONING AND MOUNTING THE evoUV
PLEASE NOTE:Always leave approximately 1 metre of free space at one end of the evoUV for UV bulb and Quartz Sleeve maintenance.
8
MOUNTED HORIZONTALLYDO NOT MOUNT UNIT ON ITS BACK
MOUNTEDVERTICALLY
MOUNTED HORIZONTALLYDO NOT MOUNT UNIT ON ITS BACK
MOUNTEDVERTICALLY
MOUNTED HORIZONTALLYDO NOT MOUNT UNIT ON ITS BACK
MOUNTEDVERTICALLY
IMPORTANT Never mount the evoUV flat on its back.

PONDFILTER
EVOUVPOND
WATERPUMP
PUMP
SYMBOL KEY:
DIRECTION OFWATER FLOW
POSITIONING AND MOUNTING THE evoUV
Gravity Fed Installation
Pump Fed Installation
PLEASE NOTE:
On Gravity Fed systems it is recommended to install a ball valve either side of the evoUV for maintenance.
POND
WATER LEVEL
PUMP
SYMBOL KEY:
DIRECTION OFWATER FLOW
BALL VALVE /SERVICE VALVE
EVOUV
PONDFILTER
WATERPUMP
9

Connection using rigid pipe (evo30, evo55 and evo110)The unit may also be rigid plumbed by the use of an adaptor (not supplied).See table on page 6 for relevant fittings. These fittings will screw directly into the evoUV and will enable you to connect to the relevant size pipework.
The table below shows the inlet and outlet sizes of the evoUV:
MODEL UK AND EUROPE USA AND CANADAevo30 1½” BSP N/Aevo55 1½” BSP 2” NPT
evo110 2” BSP 2” NPT
CUT AND REMOVEUNWANTED HOSETAILS
CUT
1½” 1¼” 1”
CUT
10
CONNECTION TO YOUR PIPEWORK
Connection with flexible hose (evo30 and evo55 only)The evo30 and evo55 is supplied with two universal hosetails to take 1”, 1¼”, and 1½” diameter flexible hose. If you are using one of the two larger sizes, the smaller sections of the hosetails must be cut off to ensure sufficient water flow and to prevent possible damage to the pump. We recommend that you use the largest diameter hose available. The hosetails should be trimmed away from the unit as shown in the diagram below. Once the hosetails have been trimmed, attach them to the unit as described on page 7. Secure the flexi-hose to the hosetail with a stainless steel hose clip (not provided).

CONNECTION TO THE ELECTRICITY SUPPLY
Electrical installations must be done by a qualified electrician.
The power supply must meet the specifications on the product. The cores in the supply cable are coloured in accordance with the following code:
Brown = Live. Blue = Neutral. Earth = Green/Yellow. Do not use the supply cable to lift the evoUV as this may cause damage.
WARNING - A Residual Current Device (RCD), also known as the Residual Current Circuit Breaker (RCCB), with a tripping current not exceeding 30mA must be installed in the supply circuit. A means of disconnection from the supply having a contact separation of at least 3mm in all poles must be incorporated in the wiring.
Caution: Use in the area of the garden pond only if the installation complies with the relevant wiring regulations. Please consult a qualified electrician.
Caution: Always disconnect all pond appliances from the mains supply before putting your hands into the water.
All electrical installations and wiring must be adequately protected to prevent any damage.
Enough electrical cable is supplied with the unit to connect to the mains electric. This unit must be connected to permanent wiring. A switch with 3mm contact separation must be provided in the fixed wiring to provide disconnection from the electricity supply.
11

COMMISSIONING & SWITCHING ON THE evoUV
Before you run your evoUV, you should first check that you have installed the unit and pipework correctly.
Check that the gland nuts and the end caps are tight.
Having taken a last look at your pipework to ensure that everything looks right, switch on the circulating pump, and check for any leaks.
Only after you have satisfied yourself that the evoUV is installed correctly should you switch on the electricity supply to the unit.
Your evoUV is now up and running.
12
13
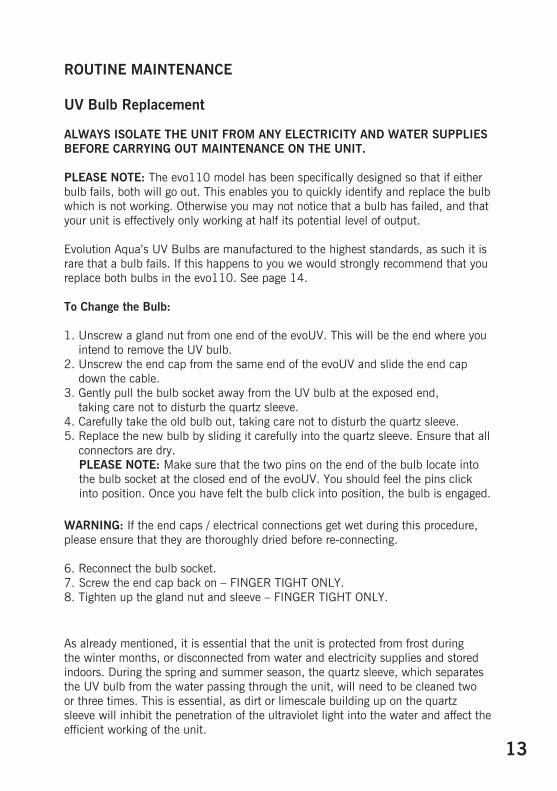
ROUTINE MAINTENANCE
UV Bulb Replacement
ALWAYS ISOLATE THE UNIT FROM ANY ELECTRICITY AND WATER SUPPLIES BEFORE CARRYING OUT MAINTENANCE ON THE UNIT.
PLEASE NOTE: The evo110 model has been specifically designed so that if either bulb fails, both will go out. This enables you to quickly identify and replace the bulb which is not working. Otherwise you may not notice that a bulb has failed, and that your unit is effectively only working at half its potential level of output.
Evolution Aqua’s UV Bulbs are manufactured to the highest standards, as such it is rare that a bulb fails. If this happens to you we would strongly recommend that you replace both bulbs in the evo110. See page 14.
To Change the Bulb:
1. Unscrew a gland nut from one end of the evoUV. This will be the end where you intend to remove the UV bulb.
2. Unscrew the end cap from the same end of the evoUV and slide the end cap down the cable.
3. Gently pull the bulb socket away from the UV bulb at the exposed end, taking care not to disturb the quartz sleeve.
4. Carefully take the old bulb out, taking care not to disturb the quartz sleeve.5. Replace the new bulb by sliding it carefully into the quartz sleeve. Ensure that all
connectors are dry. PLEASE NOTE: Make sure that the two pins on the end of the bulb locate into
the bulb socket at the closed end of the evoUV. You should feel the pins click into position. Once you have felt the bulb click into position, the bulb is engaged.
WARNING: If the end caps / electrical connections get wet during this procedure, please ensure that they are thoroughly dried before re-connecting.
6. Reconnect the bulb socket. 7. Screw the end cap back on – FINGER TIGHT ONLY.8. Tighten up the gland nut and sleeve – FINGER TIGHT ONLY.
As already mentioned, it is essential that the unit is protected from frost during the winter months, or disconnected from water and electricity supplies and stored indoors. During the spring and summer season, the quartz sleeve, which separates the UV bulb from the water passing through the unit, will need to be cleaned two or three times. This is essential, as dirt or limescale building up on the quartz sleeve will inhibit the penetration of the ultraviolet light into the water and affect the efficient working of the unit.

14
Replacing / Cleaning Quartz sleeve
ALWAYS ISOLATE THE UNIT FROM ANY ELECTRICITY AND WATER SUPPLIES BEFORE CARRYING OUT MAINTENANCE ON THE UNIT.
To Replace / Clean the Quartz Sleeve:
1. Unscrew a gland nut from one end of the evoUV. This will be the end where you want to remove the UV bulb / quartz Sleeve.
2. Unscrew the end cap from the same end of the evoUV and slide the end cap down the cable.
3. Gently pull the bulb socket away from the UV bulb at the exposed end, taking care not to disturb the quartz sleeve.
4. Carefully take the old bulb out, taking care not to disturb the quartz sleeve. 5. Now remove the gland nut from the other end of the evoUV.6. Unscrew the end cap containing the bulb socket from the same end
of the evoUV.7. Place the two end caps containing the bulb sockets out of the way on top of
the evoUV. 8. Carefully remove and keep safe the two O-Rings from quartz sleeve. There may
be some water that drains from the unit.9. Gently slide out the sleeve, taking care not to allow it to drop inside the
UV body.10. Clean the sleeve and polish with a soft cloth or paper towel.
If you live in a hard water area, you may get limescale on the quartz sleeve; this can be easily removed by using vinegar or a cold water descaler.
11. Replace the quartz sleeve by sliding it back into the evoUV, ensuring that an equal amount of the sleeve is showing at each end.
12. Slide the two O-Rings back into position on each end of the quartz sleeve.13. Now carefully slide the bulb back inside the quartz sleeve.
WARNING: If the end caps / electrical connections get wet during this procedure, please ensure that they are thoroughly dried before re-connecting.
14. Attach one bulb socket to one end of the bulb.15. On the same end screw on the end cap, but not the gland nut, finger tight only.16. Now install the bulb socket, end cap, sleeve and gland nut at the opposite end
of the bulb – FINGER TIGHT ONLY.17. Screw the gland nut on to the other end cap.

15
In Built Protection
The evoUV range of pond clarifiers have thermal overload and internal fuse protection.
Thermal Overload Protection - This will automatically switch off the unit should the temperature exceed the maximum operating temperature limits.
Internal Fuse - This protects the electrical components in the event of a power surge. PLEASE NOTE: This internal fuse cannot be replaced.
16
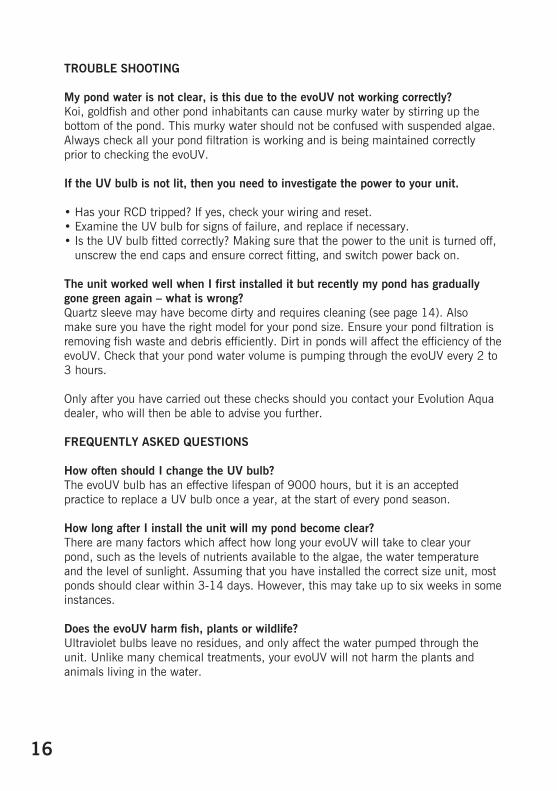
TROUBLE SHOOTING
My pond water is not clear, is this due to the evoUV not working correctly?Koi, goldfish and other pond inhabitants can cause murky water by stirring up the bottom of the pond. This murky water should not be confused with suspended algae. Always check all your pond filtration is working and is being maintained correctly prior to checking the evoUV.
If the UV bulb is not lit, then you need to investigate the power to your unit.
• Has your RCD tripped? If yes, check your wiring and reset.• Examine the UV bulb for signs of failure, and replace if necessary.• Is the UV bulb fitted correctly? Making sure that the power to the unit is turned off,
unscrew the end caps and ensure correct fitting, and switch power back on.
The unit worked well when I first installed it but recently my pond has gradually gone green again – what is wrong?Quartz sleeve may have become dirty and requires cleaning (see page 14). Also make sure you have the right model for your pond size. Ensure your pond filtration is removing fish waste and debris efficiently. Dirt in ponds will affect the efficiency of the evoUV. Check that your pond water volume is pumping through the evoUV every 2 to 3 hours.
Only after you have carried out these checks should you contact your Evolution Aqua dealer, who will then be able to advise you further.
FREQUENTLY ASKED QUESTIONS
How often should I change the UV bulb? The evoUV bulb has an effective lifespan of 9000 hours, but it is an accepted practice to replace a UV bulb once a year, at the start of every pond season.
How long after I install the unit will my pond become clear?There are many factors which affect how long your evoUV will take to clear your pond, such as the levels of nutrients available to the algae, the water temperature and the level of sunlight. Assuming that you have installed the correct size unit, most ponds should clear within 3-14 days. However, this may take up to six weeks in some instances.
Does the evoUV harm fish, plants or wildlife?Ultraviolet bulbs leave no residues, and only affect the water pumped through the unit. Unlike many chemical treatments, your evoUV will not harm the plants and animals living in the water.
17
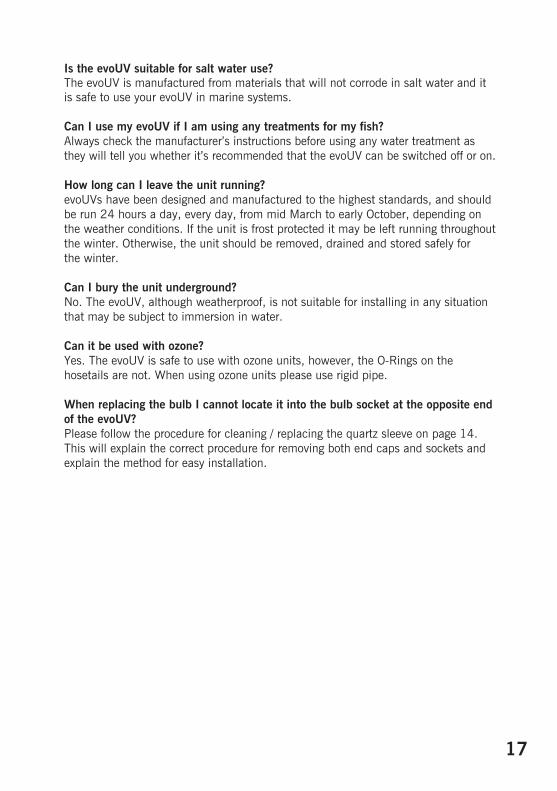
Is the evoUV suitable for salt water use?The evoUV is manufactured from materials that will not corrode in salt water and it is safe to use your evoUV in marine systems.
Can I use my evoUV if I am using any treatments for my fish?Always check the manufacturer’s instructions before using any water treatment as they will tell you whether it’s recommended that the evoUV can be switched off or on.
How long can I leave the unit running?evoUVs have been designed and manufactured to the highest standards, and should be run 24 hours a day, every day, from mid March to early October, depending on the weather conditions. If the unit is frost protected it may be left running throughout the winter. Otherwise, the unit should be removed, drained and stored safely for the winter.
Can I bury the unit underground?No. The evoUV, although weatherproof, is not suitable for installing in any situation that may be subject to immersion in water.
Can it be used with ozone?Yes. The evoUV is safe to use with ozone units, however, the O-Rings on the hosetails are not. When using ozone units please use rigid pipe.
When replacing the bulb I cannot locate it into the bulb socket at the opposite end of the evoUV? Please follow the procedure for cleaning / replacing the quartz sleeve on page 14. This will explain the correct procedure for removing both end caps and sockets and explain the method for easy installation.

OUR GUARANTEE
This product is guaranteed against defects in material and workmanship for 2 years from the date of purchase, under normal usage. The guarantee DOES NOT APPLY in case of improper use, negligence, lack of maintenance or accidental damage to the evoUV. If the evoUV fails due to a manufacturing fault within this period it will be either repaired or replaced free of charge. Liability is limited to replacement of the faulty product only; no other costs will be reimbursed. This guarantee is not transferable and does not affect your statutory rights. This guarantee does not confer any rights other than those expressly set out above. This guarantee does not cover the evoUV bulb or quartz sleeve.
The manufacturer or supplier shall not be responsible, or held liable for any damages caused by defective components or materials of this product; or for loss incurred by interruption of service; or any consequential/incidental damages and expenses arising from the production, sale use or misuse of this product.
Any warranty claim must be accompanied by a valid, dated proof of purchase.
Evolution Aqua and its dealers shall not be held liable for any loss of fish, plants or any other livestock as a result of any failure or defect of this product.
The evoUV has a serial number plate attached to the back of the unit. If this serial number plate has been removed or tampered with, this will void the warranty.
18

NOTES
19

Evolution Aqua LtdEvolution HouseKellet CloseWiganLancashireUnited KingdomWN5 0LP
t: +44 (0) 1942 216554f: +44 (0) 1942 216562e: [email protected]: www.evolutionaqua.com
Evolution Aqua are the award winning pond filtration manufacturer who put
innovation, research and development at the top of their agenda. With a proven
track record for delivering the latest technology to the aquatics and fish farming
markets - we are the first choice for everyone from the general hobbyist to the
serious fishkeeper. Find out more about the evoUV and all of our other innovative
products at www.evolutionaqua.com. The difference is clear.