installation and operation manual - bendpak · 2018-09-25 · bendpak 1645 lemonwood dr. santa...
TRANSCRIPT
1645 Lemonwood Dr. Santa Paula, CA, 93060 USA
Toll Free: 1 (800) 253-2363 Tel: 1 (805) 933-9970
bendpak.com
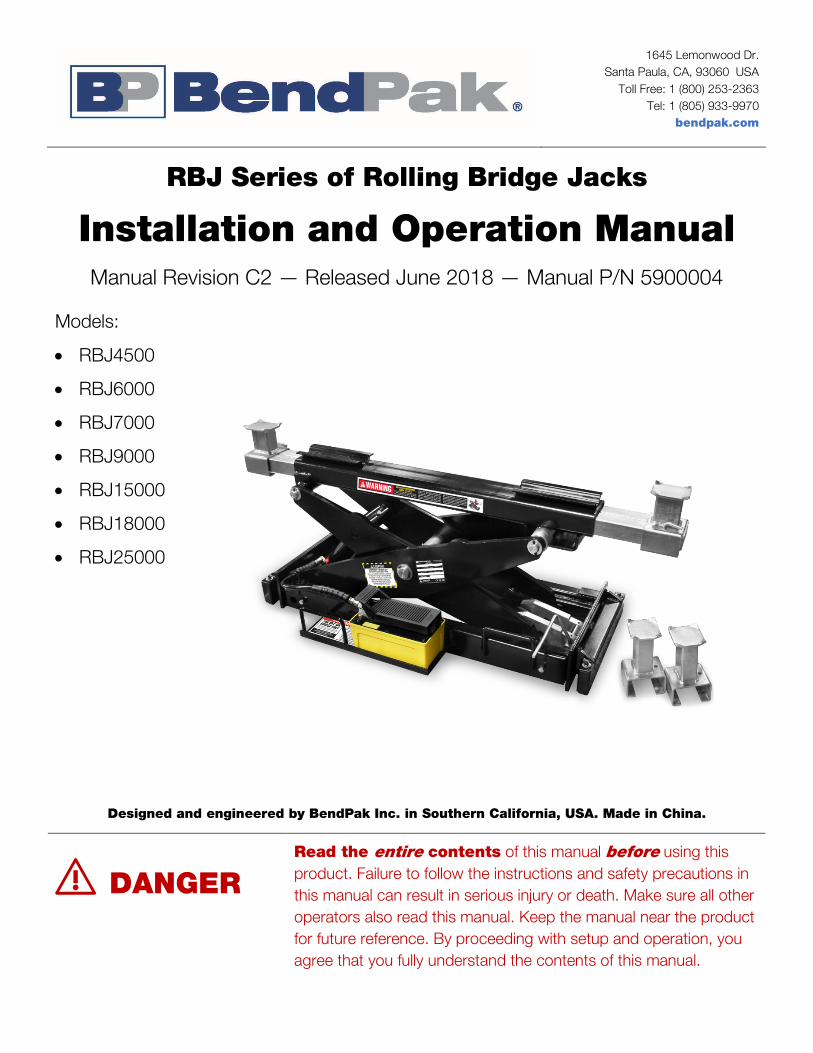
RBJ Series of Rolling Bridge Jacks
Installation and Operation Manual Manual Revision C2 — Released June 2018 — Manual P/N 5900004
Models:
• RBJ4500
• RBJ6000
• RBJ7000
• RBJ9000
• RBJ15000
• RBJ18000
• RBJ25000
Designed and engineered by BendPak Inc. in Southern California, USA. Made in China.
⚠ DANGER Read the entire contents of this manual before using this product. Failure to follow the instructions and safety precautions in this manual can result in serious injury or death. Make sure all other operators also read this manual. Keep the manual near the product for future reference. By proceeding with setup and operation, you agree that you fully understand the contents of this manual.
Manual. RBJ Series of Rolling Bridge Jacks, Installation and Operation Manual, Manual Part Number 5900004, Manual Revision C2, Released June 2018.
Copyright. Copyright © 2018 by BendPak Inc. All rights reserved. You may make copies of this document if you agree that: you will give full attribution to BendPak Inc., you will not make changes to the content, you do not gain any rights to this content, and you will not use the copies for commercial purposes.
Trademarks. BendPak and the BendPak logo are registered trademarks of BendPak Inc. All other company, product, and service names are used for identification only. All trademarks and registered trademarks mentioned in this manual are the property of their respective owners.
Limitations. Every effort has been made to ensure complete and accurate instructions are included in this manual. However, product updates, revisions, and/or changes may have occurred since this manual was published. BendPak reserves the right to change any information in this manual without incurring any obligation for equipment previously or subsequently sold. BendPak is not responsible for typographical errors in this manual. Feel free to contact BendPak at any time to get the latest information about any product: bendpak.com.
Warranty. The BendPak warranty is more than a commitment to you: it is also a commitment to the value of your new product. Contact your nearest BendPak dealer or visit www.bendpak.com/support/warranty for full warranty details. Go to bendpak.com/support/register-your-product/ and fill out the online form to register your product (be sure to click Submit).
Safety. Your new product was designed and manufactured with safety in mind. Your safety also depends on proper training and thoughtful operation. Do not set up, operate, maintain, or repair the unit without reading and understanding the safety information in this manual and the labels on the unit. Contact BendPak if you are unclear about any safety aspect of this product; do not use this product unless you can do so safely!
Owner Responsibility. In order to maintain your product properly and to ensure operator safety, it is the responsibility of the product owner to read and follow these instructions: • Follow all setup, operation, and maintenance instructions. • Make sure product setup conforms to all applicable local, state, and federal codes, rules, and regulations,
such as state and federal OSHA regulations and electrical codes. • Read and follow all safety instructions. Keep them readily available for operators. • Make sure all operators are properly trained, know how to safely operate the unit, and are properly supervised. • Do not operate the product until you are certain all parts are in place and operating correctly. • Carefully inspect the product on a regular basis and perform all maintenance as required. • Service and maintain the unit only with approved replacement parts. • Keep all instructions permanently with the product
and make sure all labels are clean and visible. • Only use this product if it can be used
safely!
Unit Information. Enter the Model Number, Serial Number, and the Manufactured On date from the label on your unit. This information is required for part or warranty issues. Model: Serial: Manufactured On:

RBJ Series of Rolling Bridge Jacks 3 P/N 5900004 — June 2018 — Rev. C2
Table of Contents Introduction 3 Operation 20 Shipping Information 4 Maintenance 24 Safety Considerations 4 Troubleshooting 25 Components 6 Accessories 26 FAQ 8 Labels 28 Specifications 9 Parts Sheets 30 Setup 10 Maintenance Log 54
Introduction This manual covers the RBJ Series of Rolling Bridge Jacks, which are used with four-post Lifts to raise two or four wheels off the Lift’s runway, making automotive service such as brake jobs and suspension work easier to accomplish.
This manual covers the following RBJ models:
• RBJ4500: Raises up to 4,500 lbs / 2,041 kg
• RBJ6000: Raises up to 6,000 lbs / 2,721 kg
• RBJ7000: Raises up to 7,000 lbs / 3,175 kg
• RBJ9000: Raises up to 9,000 lbs / 4,082 kg
• RBJ15000: Raises up to 15,000 lbs / 6,804 kg
• RBJ18000: Raises up to 18,000 lbs / 8,165 kg
• RBJ25000: Raises up to 25,000 lbs / 11,340 kg
The RBJ4500, RBJ6000, RBJ7000, and the RBJ9000 are ALI Certified accessories for many of the four-post Lifts with which they are used. The RBJ15000, RBJ18000, and RBJ25000 were not submitted for ALI certification.
ALI is the Automotive Lift Institute (www.autolift.org), an independent organization whose mission is to promote the safe design, construction, installation, inspection, and use of automotive Lifts.
This manual is mandatory reading for all users of Rolling Bridge Jacks, including anyone who installs, operates, maintains, or repairs them.
⚠ DANGER Be very careful when installing, operating, maintaining, or repairing your unit; failure to do so could result in property damage, product damage, injury, or (in very rare cases) death. Make sure only authorized personnel operate the unit. All repairs must be performed by an authorized technician. Do not make modifications to the unit; this voids the warranty and increases the chances of injury or property damage. Make sure to read and follow the instructions on the labels on the unit.

RBJ Series of Rolling Bridge Jacks 4 P/N 5900004 — June 2018 — Rev. C2
Keep this manual on or near the equipment so that anyone who uses or services it can read it.
If you are having issues, refer to the Troubleshooting section of this manual for assistance.
Technical support and service is available from your dealer, on the Web at bendpak.com/support, by email at [email protected], or by phone at (800) 253-2363, extension 196.
You may also contact BendPak for parts replacement information (please have the model and serial number of your unit available) at (800) 253-2363, extension 191.
Shipping Information Your unit was carefully checked before shipping. Nevertheless, you should thoroughly inspect the shipment before you sign to acknowledge that you received it.
When you sign the bill of lading, it tells the carrier that the items on the invoice were received in good condition. To protect yourself, do not sign the bill of lading until after you have inspected the shipment. If any of the items listed on the bill of lading are missing or are damaged, do not accept the shipment until the carrier makes a notation on the bill of lading that lists the missing and/or damaged goods.
If you discover missing or damaged goods after you receive the shipment and have signed the bill of lading, notify the carrier at once and request the carrier to make an inspection. If the carrier will not make an inspection, prepare a signed statement to the effect that you have notified the carrier (on a specific date) and that the carrier has failed to comply with your request.
It is difficult to collect for loss or damage after you have given the carrier a signed bill of lading. If this happens to you, file a claim with the carrier promptly. Support your claim with copies of the bill of lading, freight bill, invoice, and photographs, if available. Our willingness to assist in helping you process your claim does not make us responsible for collection of claims or replacement of lost or damaged materials.
Safety Considerations Read this manual carefully before using your new product. Do not set up or operate the product until you are familiar with all operating instructions and warnings. Do not allow anyone else to operate the product until they are also familiar with all operating instructions and warnings.
Rolling Bridge Jack Safety Information Please note the following:
• The product is a Rolling Bridge Jack. Use it only for its intended purpose. • The product should only be operated by authorized personnel. • When the product is in use, keep all body parts away from it. • Do not make any modifications to the product.
⚠ WARNING When the Rolling Bridge Jack is on a raised Lift, do not go under it! If you notice a Roller out of position, get everyone out from under the Lift, lower the Lift, reposition the Rollers back onto the Utility Rail, and then make sure the Safety Brackets and Adjustment Bolts are correctly installed and adjusted.

RBJ Series of Rolling Bridge Jacks 5 P/N 5900004 — June 2018 — Rev. C2
• Make sure all operators read and understand this Installation and Operation Manual. Keep the manual near the device at all times.
• Make a visual inspection of the product before using it every time. Check for missing or damaged parts. Do not use the product if you find any of these issues. Instead, take the Jack out of service, then contact an authorized repair facility, your distributor, or BendPak at (800) 253-2363.
• Make a thorough inspection of the product at least once a year. Replace any damaged or severely worn cables, hydraulic hoses, decals, or warning labels. Do not use the product until worn or damaged items have been replaced.
• Do not touch hot parts; you could be burned. • Take care locating cables and hoses; you do not want them driven over or stepped on. • Always wear steel-toed footwear and safety glasses when using the Jack. • Clear the area immediately if a vehicle is in danger of falling off the Rolling Bridge Jack. • Make sure the Rolling Bridge Jack is on a Safety Lock before starting work. • Operating temperature for a Rolling Bridge Jack is 41°F to 104°F (5°C to 40°C). • Make sure the weight of a vehicle being raised by a Rolling Bridge Jack does not exceed its
maximum lifting capacity.
Symbols Following are the symbols used in this manual:
⚠ DANGER Calls attention to an immediate hazard that will result in death or severe injury.
⚠ WARNING Calls attention to a hazard or unsafe practice that could result in death or severe personal injury.
⚠ CAUTION Calls attention to a hazard or unsafe practice that could result in minor personal injury, product, or property damage.
NOTICE Calls attention to a situation that, if not avoided, could result in product or property damage.
Liability Information BendPak assumes no liability for damages resulting from:
• Use of the equipment for purposes other than those described in this manual.
• Modifications to the equipment without prior, written permission from BendPak.
• Damage to the equipment from external influences.
• Incorrect operation of the equipment.

RBJ Series of Rolling Bridge Jacks 6 P/N 5900004 — June 2018 — Rev. C2
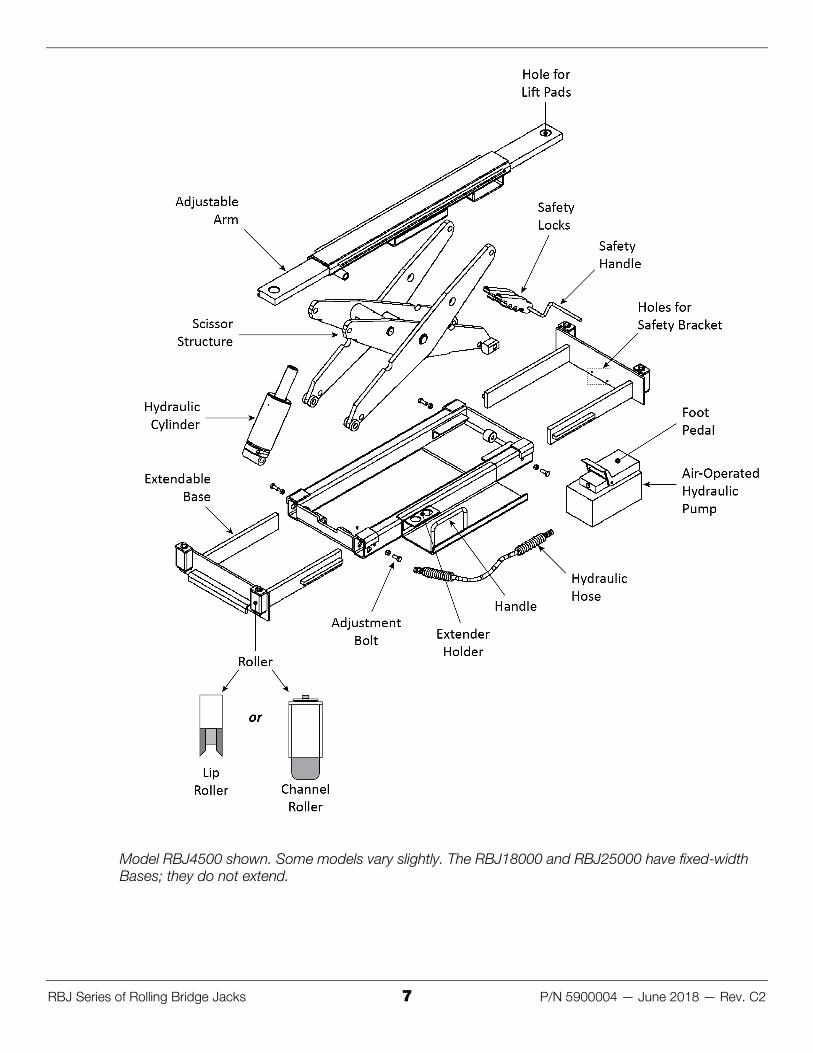
Components Rolling Bridge Jack components include:
• Scissor Structure. Rolling Bridge Jacks are scissor lifts that are powered by air pressure from the Air-Operated Hydraulic Pump.
• Air-Operated Hydraulic Pump. Provides power to the Rolling Bridge Jack. The Air-Operated Hydraulic Pump must be attached to an air supply: 20 cubic feet per minute (.57 cubic meters per minute) and 100 psi (7 bar).
• Foot Pedal. Raises and lowers the Rolling Bridge Jack. Despite its name, you can use the Foot Pedal with your hands or your feet.
• Hydraulic Hose. Connects the Air-Operated Hydraulic Pump to the Hydraulic Cylinder. • Hydraulic Cylinder. Moves the Scissor Structure up and down. • Safety Locks. Hold the Rolling Bridge Jack in place once raised to the desired height. Always
leave your Rolling Bridge Jack either fully lowered or on a Safety Lock; never leave a Rolling Bridge Jack in an unlocked position with a vehicle on it.
⚠ WARNING Before starting work on a vehicle, make sure the Rolling Bridge Jack is on a Safety Lock and that all Lift Pads are in contact with the lifting points on the underside of the vehicle.
• Safety Handle. Moves the Rolling Bridge Jack off its Safety Lock so it can be lowered. Not the same as the Handle you use to move the Rolling Bridge Jack.
• Adjustable Arms. Slide in and out so you can hit the lifting points of the vehicles you are lifting. • Lift Pads. Position them under the lifting points on the underside of the vehicle. Lift Pads fit into
the holes on the end of the Adjustable Arms.
Tip If you have an RBJ4500 and want more control over where the Rolling Bridge Jack contacts the lifting points on the underside of vehicles, the RBJ4500 Adapter Kit includes two sliding rubber contact pads and two sliding receivers. See RBJ4500 Adapter Kit for more information.
• Lift Pad Extenders. Allow you to raise the height of the Lift Pads to better hit the lifting points on vehicles. Two medium and two tall are included with the Rolling Bridge Jack.
• Extender Holder. Hold the Lift Pad Extenders when you are not using them. • Handle. Used to move the Rolling Bridge Jack. Note the same thing as the Safety Handle. • Extendable Bases. Move in and out to accommodate the distance between the Lift’s runways. • Rollers. Located on the ends of the Extendable Bases, the Lip Rollers or Channels Rollers
(depending on model) sit on or in the Utility Rail and let you move the Rolling Bridge Jack. Models RBJ4500, RBJ6000, and RBJ7000 have Lip Rollers. Models RBJ9000, RBJ15000, RBJ18000, and RBJ25000 have Channel Rollers.
• Safety Brackets. A safety feature, they hold the Rolling Bridge Jack in place on the Utility Rail. Installed after the Jack is moved into place. Installation is mandatory.
• Adjustment Bolts. Another safety feature, they hold the Extendable Base in place. Installed after the Jack is moved into place. Installation is mandatory.
RBJ Series of Rolling Bridge Jacks 7 P/N 5900004 — June 2018 — Rev. C2
Model RBJ4500 shown. Some models vary slightly. The RBJ18000 and RBJ25000 have fixed-width Bases; they do not extend.

RBJ Series of Rolling Bridge Jacks 8 P/N 5900004 — June 2018 — Rev. C2
Frequently Asked Questions Question: What kinds of vehicles can I raise on my Rolling Bridge Jack? Answer: A wide range of vehicles. There are multiple Rolling Bridge Jack models, each supporting different weight capacities, so a wide range of vehicles can be raised.
Q: If a vehicle is already on a Lift, why do I need a Rolling Bridge Jack? A: A Rolling Bridge Jack gives you the option of raising two or four wheels of the vehicle off the Runway of the Lift, which makes certain automotive services (brake jobs, suspension work, tire changes, and so on) much easier. To get four wheels off the Runway, you need two Rolling Bridge Jacks.
Q: What Rolling Bridge Jack goes with what BendPak Lift? A: Rolling Bridge Jack pairs are associated with specific BendPak lifts, based on their weight capacities. So if you have a BendPak HD-14 Lift, for example, which has a capacity of 14,000 lbs, you would need two RBJ7000 Rolling Lift Jacks.
Q: Can I use a Rolling Bridge Jack on an Alignment Lift? A: Yes. They work the same on an Alignment Lift.
Q: Are Rolling Bridge Jacks heavy? A: Yes. You need a shop crane or forklift to put them into position and you must not stand or walk under them. Your Rolling Bridge Jack was designed to stay in place, but you should always use extreme care when walking around under Lifts, raised vehicles, and Rolling Bridge Jacks.
Q: Why are the bases of a Rolling Bridge Jack extendable? A: To accommodate different widths between Runways on the four-post Lift. Note that the bases for the RBJ18000 and the RBJ25000 are not extendable.
Q: How is a Rolling Bridge Jack powered? A: Via air pressure (that you supply) that connects to the Air-Operated Hydraulic Pump. The optional AK-14 Integrated Rolling Bridge Air Line Kit makes this easy; visit the website page for more information.
Q: How many Safety Lock positions does my Rolling Bridge jack have? A: Three. This gives you three heights to which you can raise and hold your Rolling Bridge Jack.
Q: How long can I leave a vehicle raised on my Rolling Bridge Jack? A: For quite some time, as long as long as you leave it on a Safety Lock. Once a Safety Lock is engaged, gravity holds the vehicle up, so a loss of air pressure has no effect; your vehicle is going to stay where you left it. Always leave your Rolling Bridge Jack either fully lowered or on a Safety Lock.

RBJ Series of Rolling Bridge Jacks 9 P/N 5900004 — June 2018 — Rev. C2
Specifications
Model RBJ4500 RBJ6000 RBJ7000
Lifting capacity 4,500 lbs / 2,041 kg 6,000 lbs / 2,721 kg 7,000 lbs / 3,175 kg
Minimum arm reach 42" / 1,069 mm 41.8" / 1,062 mm 41.8" / 1,062 mm
Maximum arm reach 57" / 1,449 mm 56.1" / 1,426 mm 56.1" / 1,426 mm
Maximum operating hydraulic pressure
2,490 PSI 3,370 PSI 4,550 PSI
Shipping weight 305 lbs / 139 kg 305 lbs / 139 kg 305 lbs / 139 kg
Model RBJ9000 RBJ15000
Lifting capacity 9,000 lbs / 4,082 kg 15,000 lbs / 6,804 kg
Minimum arm reach 41.8" / 1,062 mm 39.4" / 1,003 mm
Maximum arm reach 56.1" / 1,426 mm 63.7" / 1,618 mm
Maximum operating hydraulic pressure
5,020 PSI 6,000 PSI
Shipping weight 305 lbs / 139 kg 570 lbs / 259 kg
Model RBJ18000 RBJ25000
Lifting capacity 18,000 lbs / 8,165 kg 25,000 lbs / 11,340 kg
Minimum arm reach 39.6" / 1,008 mm 39.6" / 1,008 mm
Maximum arm reach 63.4" / 1,612 mm 63.4" / 1,612 mm
Maximum operating hydraulic pressure
7,200 PSI 8,050 PSI
Shipping weight 788 lbs / 358 kg 802 lbs / 363 kg
Specifications are subject to change without notice.
About Vehicle Wheelbases A BendPak four-post Lift supports less weight than its rated capacity when the wheelbase of the vehicle on the Lift is shorter. This is because the wheels of these shorter wheelbase vehicles are closer to the middle of the Runways, where there is less strength. Consequently, the rated capacity of that Lift is less for these shorter wheelbase vehicles.
For example, if you want to raise a vehicle with a wheelbase of 100" on an HDS-14LSX Lift, the rated capacity of the Lift is reduced by 50% to 7,000 lbs (3,175 kg).
Rated capacity information is included in the Specifications section in the manual of all four-post Lifts. Refer to the manual for information for a specific Lift.
RBJ Series of Rolling Bridge Jacks 10 P/N 5900004 — June 2018 — Rev. C2
This reduced capacity based on vehicle wheelbase does not impact the rated capacity of the Rolling Bridge Jacks used on those Lifts. Nevertheless, make sure to always check the rated capacity of the Lift your Rolling Bridge Jacks are being used on to make sure it does not exceed the rated capacity of the Lift.
Setup This section describes how to set up your Rolling Bridge Jack.
Safety Rules When installing a Rolling Bridge Jack, your safety depends on proper training and thoughtful operation.
⚠ WARNING Do not install this equipment unless you have automotive lift installation training. Always use proper lifting tools, such as a forklift or shop crane, to lift heavy components. Do not install this equipment without reading and understanding this manual and the safety labels on the unit.
Only fully trained personnel should be involved in installing this equipment. Pay attention at all times. Use appropriate tools and lifting equipment. Stay clear of moving parts.
⚠ WARNING You must wear appropriate protective equipment during setup: leather gloves, steel-toed work boots, eye protection, back belts, and hearing protection.
Tools You may need some or all of the following tools:
• Hex key wrench set • Medium crescent wrench • Forklift, shop crane, or other heavy lifting device • Medium flat screwdriver • Tape measure, 25 feet or longer • Air fitting, to connect the Air-Operated Hydraulic Pump to air pressure
Preparing the Lift Rolling Bridge Jacks go into the open space between the two runways of the four-post Lift.
Keep the following in mind:
• The Lift must be installed properly and operating normally. Only use a Rolling Bridge Jack with a Lift that has been installed according to the manufacturer’s instructions and is operating normally per those instructions.
⚠ WARNING Do not set up or use a Rolling Bridge Jack if the Lift is not the model the Rolling Bridge Jack was designed for or the Lift was improperly installed. Instead, contact the manufacturer of the Lift or BendPak Customer Service at (800) 253-2363 for instructions.
RBJ Series of Rolling Bridge Jacks 11 P/N 5900004 — June 2018 — Rev. C2
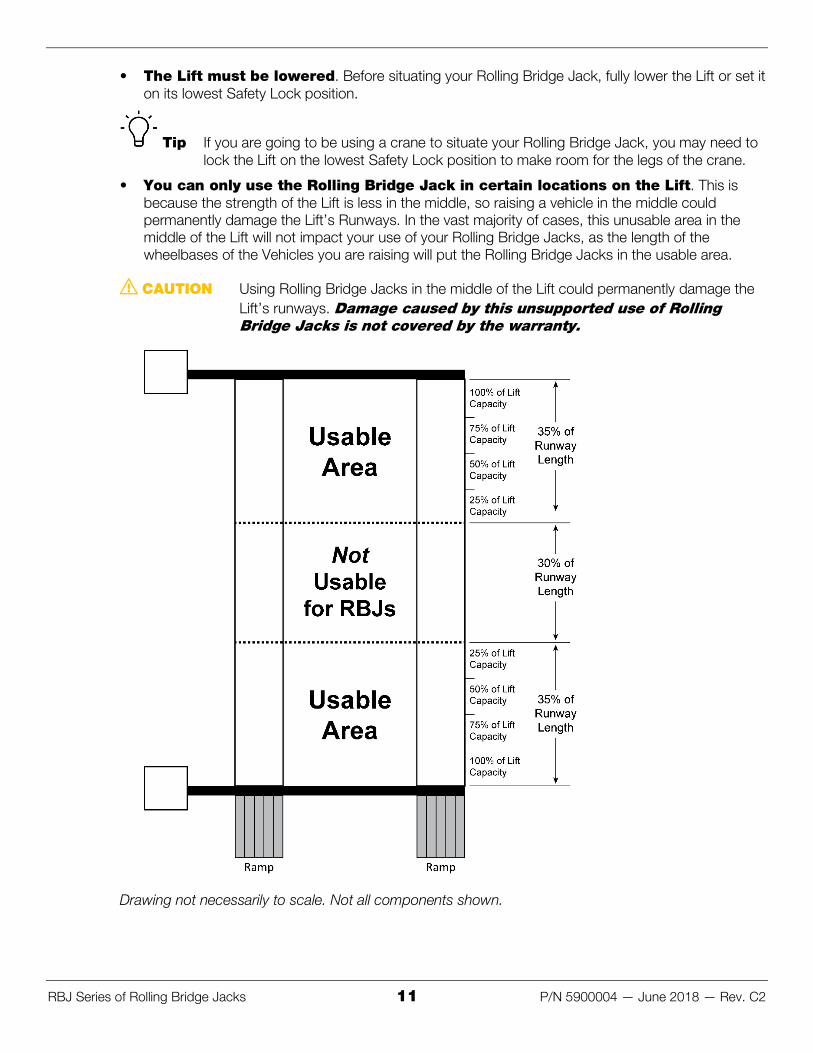
• The Lift must be lowered. Before situating your Rolling Bridge Jack, fully lower the Lift or set it on its lowest Safety Lock position.
Tip If you are going to be using a crane to situate your Rolling Bridge Jack, you may need to lock the Lift on the lowest Safety Lock position to make room for the legs of the crane.
• You can only use the Rolling Bridge Jack in certain locations on the Lift. This is because the strength of the Lift is less in the middle, so raising a vehicle in the middle could permanently damage the Lift’s Runways. In the vast majority of cases, this unusable area in the middle of the Lift will not impact your use of your Rolling Bridge Jacks, as the length of the wheelbases of the Vehicles you are raising will put the Rolling Bridge Jacks in the usable area.
⚠ CAUTION Using Rolling Bridge Jacks in the middle of the Lift could permanently damage the Lift’s runways. Damage caused by this unsupported use of Rolling Bridge Jacks is not covered by the warranty.
Drawing not necessarily to scale. Not all components shown.

RBJ Series of Rolling Bridge Jacks 12 P/N 5900004 — June 2018 — Rev. C2
So what does this information mean:
• If you are using one Rolling Bridge jack on your Lift, do not use it in the unusable area. • If you are using two Rolling Bridge Jacks on your Lift, center the Vehicle between the Front and
the Back of the Runways, over the area that is not usable for Rolling Bridge Jacks. This gives you the most room on the ends (the usable areas) for your Rolling Bridge Jacks.
• If you are using two Rolling Bridge Jacks, they must never be closer to each other than 30% of the length of the Runway of the Lift they are on, nor can either one be used in the unusable area.
Check the Specifications of your Lift for the length of the Runways and additional information.
• The Lift runways must be parallel. Make sure the Lift runways were installed parallel to each other. The distance between the Lift runways must be equal along the entire length of the Lift.
In the following drawing, the distance between the runways at Points A, B, and C must be the same. If they differ, moving the Rolling Bridge Jack will be more difficult.
⚠ WARNING If the Lift runways are not parallel, moving the Rolling Bridge Jack could force it off the Utility Rail, increasing the chances it could fall and be damaged or cause injury. If Lift runways are not parallel, take the Lift out of service and get it adjusted so that the Lift runways are parallel. Then can you use your Rolling Bridge Jack on the Lift.

RBJ Series of Rolling Bridge Jacks 13 P/N 5900004 — June 2018 — Rev. C2
Drawing not necessarily to scale. Not all components shown.
RBJ Series of Rolling Bridge Jacks 14 P/N 5900004 — June 2018 — Rev. C2
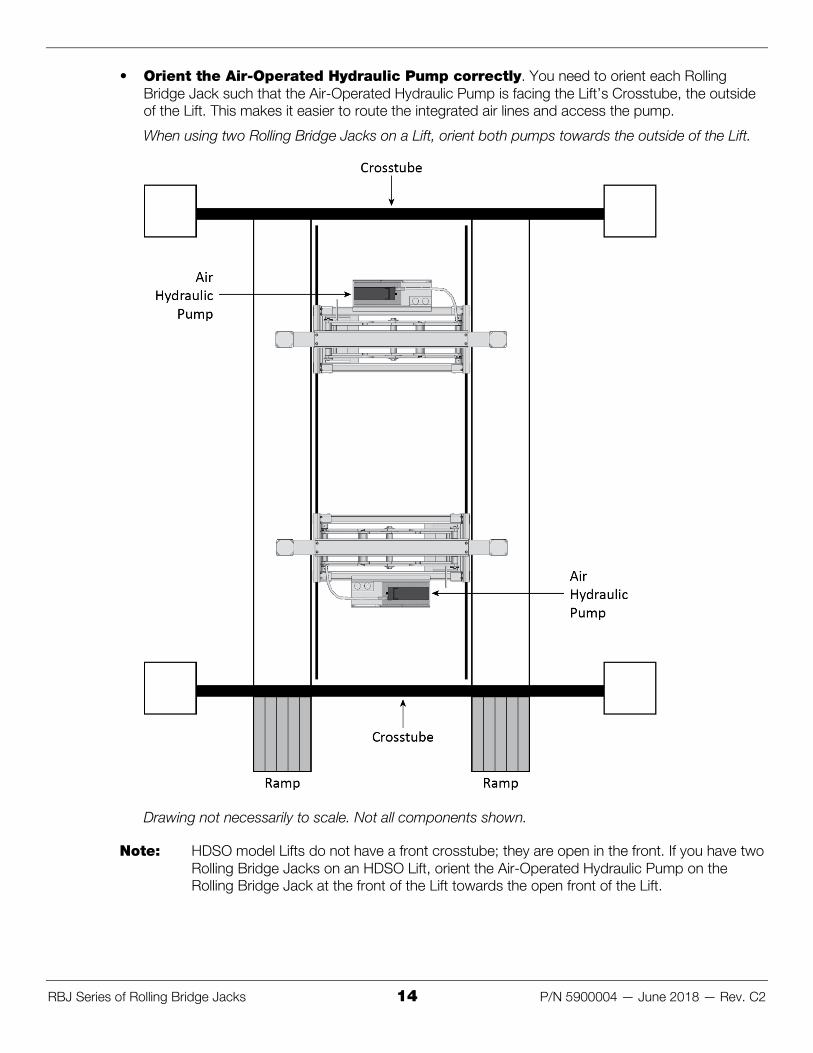
• Orient the Air-Operated Hydraulic Pump correctly. You need to orient each Rolling Bridge Jack such that the Air-Operated Hydraulic Pump is facing the Lift’s Crosstube, the outside of the Lift. This makes it easier to route the integrated air lines and access the pump.
When using two Rolling Bridge Jacks on a Lift, orient both pumps towards the outside of the Lift.
Drawing not necessarily to scale. Not all components shown.
Note: HDSO model Lifts do not have a front crosstube; they are open in the front. If you have two Rolling Bridge Jacks on an HDSO Lift, orient the Air-Operated Hydraulic Pump on the Rolling Bridge Jack at the front of the Lift towards the open front of the Lift.

RBJ Series of Rolling Bridge Jacks 15 P/N 5900004 — June 2018 — Rev. C2
Moving the Rolling Bridge Jack into Position Rolling Bridge Jacks need to be moved into position on the four-post Lift using a forklift, shop crane, or other device appropriate for lifting heavy loads.
⚠ WARNING Pay close attention when moving the Rolling Bridge Jack off its shipping pallet; it could shift and cause injury. Prior to removing the strapping or bolts, make sure the Rolling Bridge Jack is held securely by a forklift, shop crane, or other device appropriate for lifting heavy objects.
To move a Rolling Bridge Jack into position on a Lift:
1. Make sure the Lift is either fully lowered or on a Safety Lock.
2. If you are installing an RBJ18000 or RBJ25000, set the Runways to ~44 inches / 1130 mm apart.
For models with adjustable bases, set the Runways to the desired width apart.
3. Using a shop crane, forklift, or other lifting device, raise the Rolling Bridge Jack and orient it between the Lift’s two runways. Do not lower it onto the Utility Rail yet.
Remember to orient the Air-Operated Hydraulic Pump side appropriately: orient the Pump side of the Jack towards the Crosstubes of the Lift (not towards the inside).
4. Lower the Rolling Bridge Jack to just above the Utility Rails between the Lift’s runways. Do not lower it onto the Utility Rails yet.
5. For models with adjustable bases, adjust the bases to the correct width. For the RBJ18000 or RBJ25000, adjust the Offside Runway to the correct width.
The correct width is where the Lip Roller is directly over the Utility Rail Lip or the Channel Roller is directly over the Utility Rail Channel, depending on model.
This drawing shows the Channel Roller of a model with an adjustable base at the correct width, directly over the Utility Rail Channel.

RBJ Series of Rolling Bridge Jacks 16 P/N 5900004 — June 2018 — Rev. C2
6. Put in place (in the holes on the ends of the Extendable Bases) the bolts and washers that secure the Safety Brackets. See the drawing on the next page for more information.
The bolts and washers go on the outside edge of the Jack, the edge closest to the Lift.
If you do not put them into place now, it is much harder later.
7. Lower the Rolling Bridge Jack onto the Utility Rail Lip or into the Utility Rail Channel, depending on model.
The following drawing shows the Lip Roller on the Rolling Bridge Jack being lowered onto the Utility Rail Lip of the Lift. Models RBJ4500, RBJ6000, and RBJ7000 use Lip Rollers.
The following drawing shows the Channel Roller on the Rolling Bridge Jack being lowered into the Utility Rail Channel of the Lift. Models RBJ9000, RBJ15000, RBJ18000, and RBJ25000 use Channel Rollers.
RBJ18000 and RBJ25000 have fixed-width bases; they are not extendable.
8. Make sure the Utility Rail Channel is clear of all debris.
9. When the Rolling Bridge Jack is correctly situated on the Utility Rail Lip or in the Utility Rail Channel, securely tighten all four Adjustment Bolts.
⚠ WARNING You are required to fully tighten all four Adjustment Bolts. They help ensure the Jack stays in place on the Utility Rails.

RBJ Series of Rolling Bridge Jacks 17 P/N 5900004 — June 2018 — Rev. C2
10. Install Safety Brackets on both sides of the Rolling Bridge Jack.
This drawing shows the Safety Bracket being installed on one side of the Rolling Bridge Jack; make sure to install the Safety Bracket on both sides.
⚠ WARNING You are required to install Safety Brackets on each end of the Rolling Bridge Jack. They help ensure the Jack stays in place on the Utility Rails.
The two bolts and washers on the Utility Rail side were put into place earlier; the two nuts and washers are put on from the Jack side. If the bolts and washers were not put into place earlier, you will need to raise the Jack up in order to put them in.
11. If you are installing two Jacks on the Lift, install the Safety Brackets on the second Jack.
12. Raise the Lift (so that the Rolling Bridge Jack is off the ground) and put it on a Safety Lock.
If you put the Lift on a Safety Lock in Step 1, you can ignore this step.
⚠ WARNING Do not start using the Rolling Bridge Jack until you are certain the Lift is securely situated on a Safety Lock.
13. Check the clearance and movement of the Rolling Bridge Jack.
Make sure the Rollers are centered in the Utility Rail Channel or on the Utility Rail Lip at all points along the usable portion of the Utility Rail.
14. If necessary, make adjustments to ensure proper operation.
Do not use your Rolling Bridge Jack unless it is safe to do so!
RBJ Series of Rolling Bridge Jacks 18 P/N 5900004 — June 2018 — Rev. C2
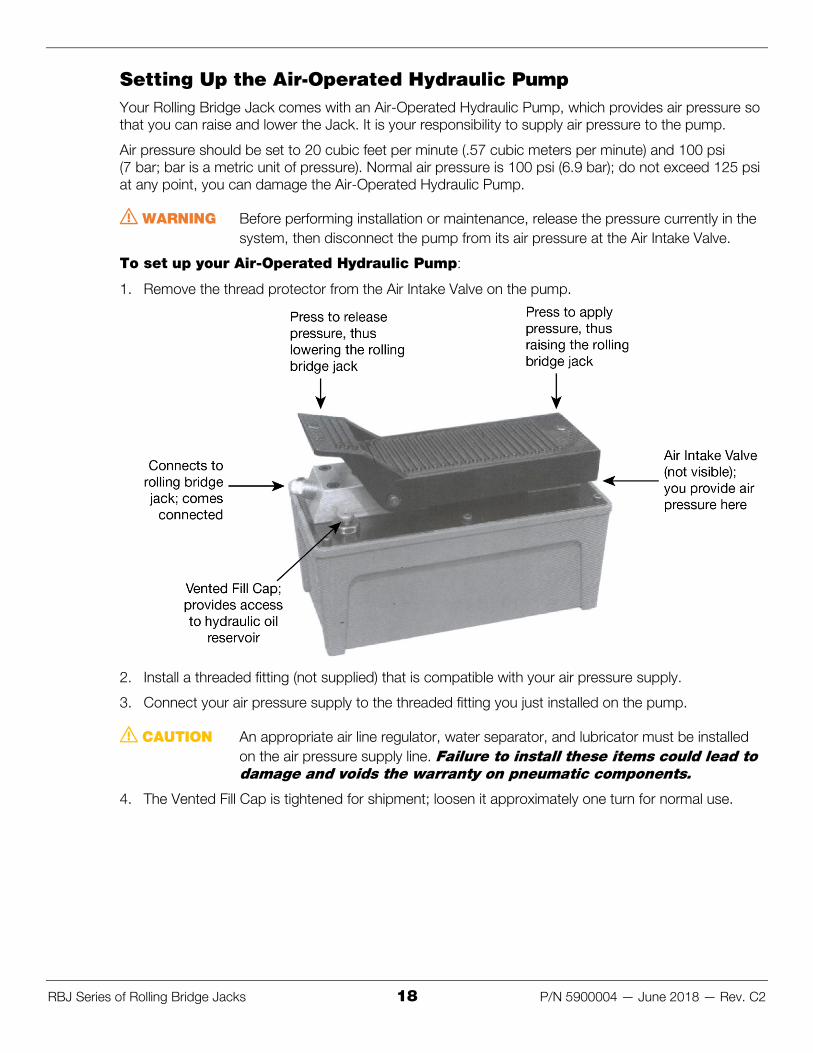
Setting Up the Air-Operated Hydraulic Pump Your Rolling Bridge Jack comes with an Air-Operated Hydraulic Pump, which provides air pressure so that you can raise and lower the Jack. It is your responsibility to supply air pressure to the pump.
Air pressure should be set to 20 cubic feet per minute (.57 cubic meters per minute) and 100 psi (7 bar; bar is a metric unit of pressure). Normal air pressure is 100 psi (6.9 bar); do not exceed 125 psi at any point, you can damage the Air-Operated Hydraulic Pump.
⚠ WARNING Before performing installation or maintenance, release the pressure currently in the system, then disconnect the pump from its air pressure at the Air Intake Valve.
To set up your Air-Operated Hydraulic Pump:
1. Remove the thread protector from the Air Intake Valve on the pump.
2. Install a threaded fitting (not supplied) that is compatible with your air pressure supply.
3. Connect your air pressure supply to the threaded fitting you just installed on the pump.
⚠ CAUTION An appropriate air line regulator, water separator, and lubricator must be installed on the air pressure supply line. Failure to install these items could lead to damage and voids the warranty on pneumatic components.
4. The Vented Fill Cap is tightened for shipment; loosen it approximately one turn for normal use.

RBJ Series of Rolling Bridge Jacks 19 P/N 5900004 — June 2018 — Rev. C2
Preparing for Operation To prepare the Rolling Bridge Jack for normal operation, you need to:
• Fill the fluid reservoir on the Air-Operated Hydraulic Pump; it comes empty. • Perform an operational test to make sure the Jack is working normally.
When you receive your Rolling Bridge Jack, the Hydraulic Fluid reservoir is empty. U.S. law and insurance rules prevent us from shipping products with Hydraulic Fluid included. You must fill the reservoir of the Air-Operated Hydraulic Pump with approved fluids before using your Jack.
⚠ CAUTION Do not run the Air-Operated Hydraulic Pump without fluid; you will damage it.
Approved fluids are any general purpose ISO-32, ISO-46, or ISO-68 Hydraulic Fluid or approved ATF fluids such as Dexron III, Dexron VI, Mercon V, Mercon LV, or any Synthetic Multi-Vehicle ATF.
To check the fluid reservoir of the Air-Operated Hydraulic Pump:
1. Remove the vented fill cap.
2. Insert a dipstick or piece of plastic into the tank until it hits the bottom.
3. Remove the dipstick or piece of plastic and measure the amount of fluid.
The fluid level should be from 3.35 to 3.5 inches deep.
4. If the current level is below 3.35 inches, add approved fluid until it is between 3.35 and 3.5 inches.
5. If the current level is already between 3.35 and 3.5 inches, no action needs to be taken.
6. Reinstall the vented fill cap.
You do not need a vehicle on the Jack to test it.
To test your Rolling Bridge Jack:
⚠ WARNING When raising or lowering your Jack, keep body parts, especially your hands, away from the Scissor Structure and the Adjustable Arms. You could be injured if you are not careful.
1. Press and hold the PUMP end of the pedal to begin raising the Rolling Bridge Jack.
If the Rolling Bridge Jack does not raise, refer to the Troubleshooting section.

RBJ Series of Rolling Bridge Jacks 20 P/N 5900004 — June 2018 — Rev. C2
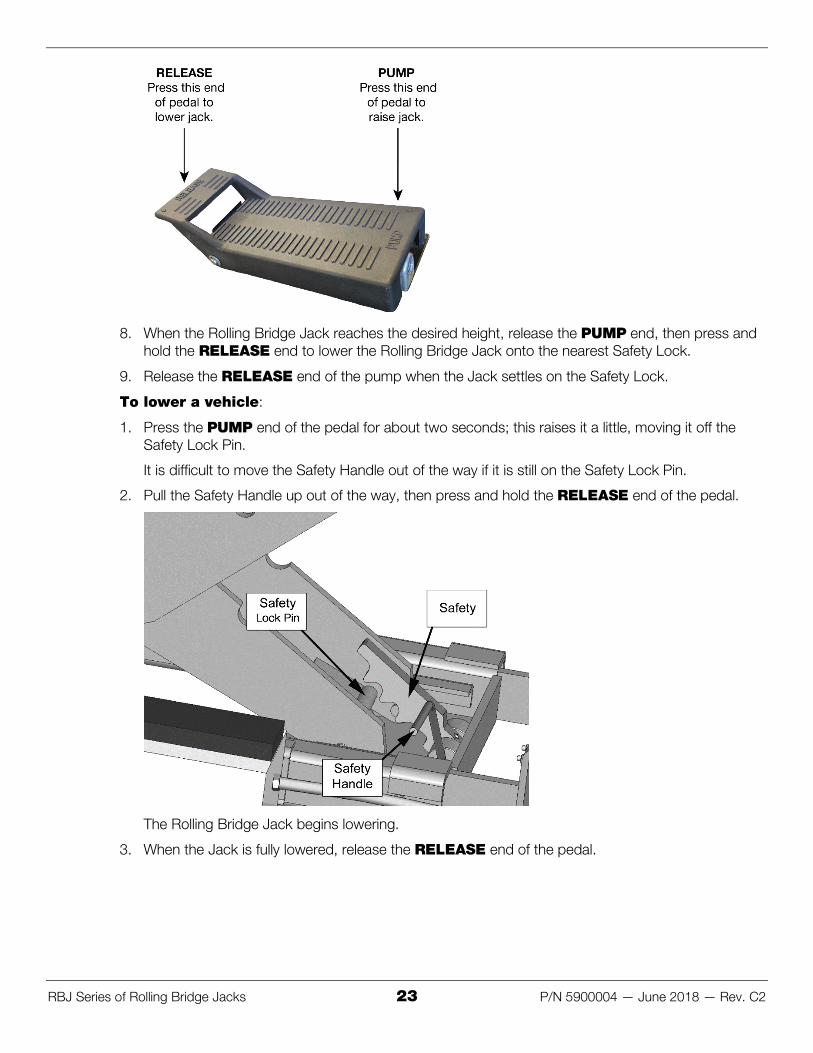
2. When the Rolling Bridge Jack reaches the desired height, release the PUMP end, then press and hold the RELEASE end to lower the Rolling Bridge Jack onto the closest Safety Lock.
3. Release the RELEASE end of the pump when the Jack settles on the Safety Lock.
This drawing shows the Jack on a Safety Lock; the Safety is help in place on the Safety Lock Pin by the weight of the Rolling Bridge Jack and the vehicle on it.
⚠ WARNING Only leave your Rolling Bridge Jack on a Safety Lock or fully lowered.
4. To lower the Rolling Bridge Jack from a Safety Lock: press the PUMP end of the pedal to get it off the Safety Lock Pin, pull the Safety Handle up to move it out of the way, then press and hold the RELEASE end of the pedal.
The Rolling Bridge Jack begins lowering.
5. When the Jack is fully lowered, release the RELEASE end of the pedal.
Assuming the test went fine, your Rolling Bridge Jack is ready for normal operation.
If there were issues, resolve the issues before beginning normal operation. You can refer to Troubleshooting for additional information.
RBJ Series of Rolling Bridge Jacks 21 P/N 5900004 — June 2018 — Rev. C2
Operation This section covers normal operation of your Rolling Bridge Jack.
Safety Rules Important: Your safety is dependent on reading, understanding, and implementing these Safety
Rules. Do not skip over them; read them carefully and follow them!
To use your Rolling Bridge Jack safely:
• Never stand under or walk under a Rolling Bridge Jack when the Lift is raised, whether there is a vehicle on the Jack or not. Safety first: walk around!
• Check daily to make sure all Rollers are sitting correctly either on the Utility Rail or in the Utility Channel, depending on model. If one or more Rollers come off the Utility Rail or out of the Utility Channel, it could fall.
⚠ DANGER If you ever see any of the Rollers off the Utility Rail, out of the Utility Channel, or moving strangely, immediately move all persons away from the Lift and the Rolling Bridge Jack. When everyone is out of the way, carefully lower the Lift to the ground (if it is raised) and drive the vehicle off (if there is a vehicle on the Lift), as long as these things can be done safely. When the Lift is fully lowered, put the Rollers back onto the Utility Rail or the Utility Channel, then make sure the Adjustment Bolts and the Safety Brackets are installed and operating correctly. Do not attempt to put the Rollers back onto the Utility Rail or the Utility Channel from underneath the Rolling Bridge Jack.
• After moving or using your Rolling Bridge Jack, check to make sure the Rollers are sitting correctly either on the Utility Rail or in the Utility Channel.
⚠ WARNING Use care when using your Rolling Bridge Jack. If it falls when the Lift is raised, it can damage the Jack, the ground underneath, or cause significant injury to anyone underneath it. BendPak strongly recommends no one, ever, walk underneath your Rolling Bridge Jack when the Lift is raised.
• Always keep the Utility Rail Channels clean. If there are liquid spills, wipe them up. If there is debris, clean it up. If anything other than your Rolling Bridge Jack is in the Utility Rail Channels, move those things out of the way.
• Before lowering the Lift, check underneath it to make sure there are no obstructions on the ground under the Rolling Bridge Jack. If there is something underneath the Rolling Bridge Jack, move it out of the way. The issue here is that if the Jack hits an obstruction on the ground, it could push the Jack out of position or off the Utility Rail, increasing the chances that it could fall in the future.
• Before driving a vehicle onto the Lift, make sure the Rolling Bridge Jack is fully lowered. • Before and after driving a vehicle onto the Lift, check to make sure the Rollers are sitting correctly
on the Utility Rail or in the Utility Channel, depending on model. • If a vehicle accidentally knocks the Rolling Bridge Jack when being driven either onto or off of the
Lift, the Jack may no longer be secure. Check to make sure the Rollers are sitting correctly on the Utility Rail or in the Utility Channel, the Adjustment Bolts and Safety Brackets and in place and operating normally, and the Rolling Bridge Jack is not damaged. If you find any of these situations, take the Jack out of service and fix the issues before resuming use of the Rolling Bridge Jack.

RBJ Series of Rolling Bridge Jacks 22 P/N 5900004 — June 2018 — Rev. C2
Raising and Lowering This section describes how to raise and lower your Rolling Bridge Jack.
To raise a vehicle on your Rolling Bridge Jack:
1. Drive the vehicle onto the Lift following the manufacturer’s instructions.
⚠ WARNING Make sure the arms of the Rolling Bridge Jack are fully lowered so they do not hit the underside of the vehicle when the vehicle is driven onto the Lift. If a vehicle does ever hit the Rolling Bridge Jack while being driven onto or off of the Lift, make sure the Rolling Bridge Jack has not been damaged and that all Rollers are correctly seated on or in the Utility Rail.
2. Position the tires of the vehicle in the center of each runway.
3. Set the parking brake on the vehicle and use a wheel chock to hold the vehicle in position.
4. Check the Utility Rail Channels to make sure nothing is in them that could obstruct the movement of the Rolling Bridge Jack.
5. Check the area to make sure everyone is clear of the Lift and the Rolling Bridge Jack; make sure there are no obstructions above the vehicle.
6. Position the Adjustable Arms of the Rolling Bridge Jack so the Lift Pads are under the vehicle’s lifting points, as specified by the vehicle manufacturer.
⚠ WARNING Make sure to lift the vehicle at the correct lifting points. Lifting at the wrong location could potentially damage the vehicle and/or the Rolling Bridge Jack.
7. Press and hold the PUMP end of the pedal to begin raising the Rolling Bridge Jack.
RBJ Series of Rolling Bridge Jacks 23 P/N 5900004 — June 2018 — Rev. C2
8. When the Rolling Bridge Jack reaches the desired height, release the PUMP end, then press and hold the RELEASE end to lower the Rolling Bridge Jack onto the nearest Safety Lock.
9. Release the RELEASE end of the pump when the Jack settles on the Safety Lock.
To lower a vehicle:
1. Press the PUMP end of the pedal for about two seconds; this raises it a little, moving it off the Safety Lock Pin.
It is difficult to move the Safety Handle out of the way if it is still on the Safety Lock Pin.
2. Pull the Safety Handle up out of the way, then press and hold the RELEASE end of the pedal.
The Rolling Bridge Jack begins lowering.
3. When the Jack is fully lowered, release the RELEASE end of the pedal.

RBJ Series of Rolling Bridge Jacks 24 P/N 5900004 — June 2018 — Rev. C2
Moving a Rolling Bridge Jack Tips for moving a Rolling Bridge Jack:
• Never try to move a Rolling Bridge Jack if it has a vehicle raised on it. • The easiest way to move a Rolling Bridge Jack is to use its Handle when the Lift is lowered and no
vehicle is on the Lift. • If you know what vehicle you are going to be raising on a Rolling Bridge Jack, move the Jack(s) to
where you think the lifting points will hit before driving the vehicle onto the Lift. • To move a Rolling Bridge Jack while the Lift is raised, use the Handle, but do not stand directly
under the Jack. • Before moving a Rolling Bridge Jack while the Lift is raised, check to make sure the Rollers are
sitting correctly on the Utility Rail or in the Utility Channel, depending on model. Also check to make sure the Adjustment Bolts and Safety Brackets are installed and working normally.
• While moving a Rolling Bridge Jack while the Lift is raised, watch the Rollers to make sure they are staying on or in the Utility Rail as the Jack moves. If they are coming off, move away immediately.
• Move out from under a raised Lift as soon as you have moved the Jack. Do not stand or work under a Rolling Bridge Jack on a raised Lift.
Additional Operating Information Keep the following in mind when operating your Rolling Bridge Jack:
• Check the weight of a vehicle before attempting to lift it. Do not guess. Never exceed the rated load capacity of the Rolling Bridge Jack.
• Lift Pads must always be used; make sure they are correctly positioned under the lifting points of the vehicle you are raising. Do not raise a load without the Lift Pads.
• Visually inspect your Rolling Bridge Jack before each use. Do not use it if you find damage or severe wear. Make sure the Rollers are on or in the Utility Rails.
• Do not rock the vehicle while it is raised or remove items that could cause excessive weight shift. • Keep the Utility Rail Channels and Lips clean and free from debris.
Hydraulic Power System Warnings
⚠ WARNING Failure to observe these precautions can result in serious personal injury, including, in rare cases, death.
• The Air-Operated Hydraulic Pump must be correctly connected to the Rolling Bridge Jack before raising a vehicle or applying pressure.
• Do not attempt to connect or disconnect hose couplers while a vehicle is raised or while the hydraulic system is under pressure.
• Use every precaution to guard against dirt getting into the Lift or the Air-Operated Hydraulic Pump. • Keep bare hands away from Hydraulic Fluids. • When dealing with Hydraulic Fluids, observe the safety instructions of the lubricant manufacturer. • Use protective equipment (like safety goggles, protective gloves, suitable working clothes, safety
boots, and so on) when dealing with the hydraulic system. • If Hydraulic Fluid comes into contact with the eyes, gets into the bloodstream, or is swallowed,
seek immediate medical attention.
RBJ Series of Rolling Bridge Jacks 25 P/N 5900004 — June 2018 — Rev. C2
Maintenance ⚠ WARNING: Before performing any maintenance, remove air pressure from the system, then
disconnect the air pressure supply from the Air-Operated Hydraulic Pump.
To maintain your Rolling Bridge Jack:
• Keep the Rolling Bridge Jack clean; wipe up any oil spills. Do not let dirt get into the hydraulic system.
• Daily: Make a visual inspection of all moving parts and check for damage or excessive wear. Replace any damaged or worn parts before equipment is put back into operation.
• Daily: Make sure Safety Locks are in good operating condition. Do not use your Rolling Bridge Jack if the Safety Locks are damaged or excessively worn.
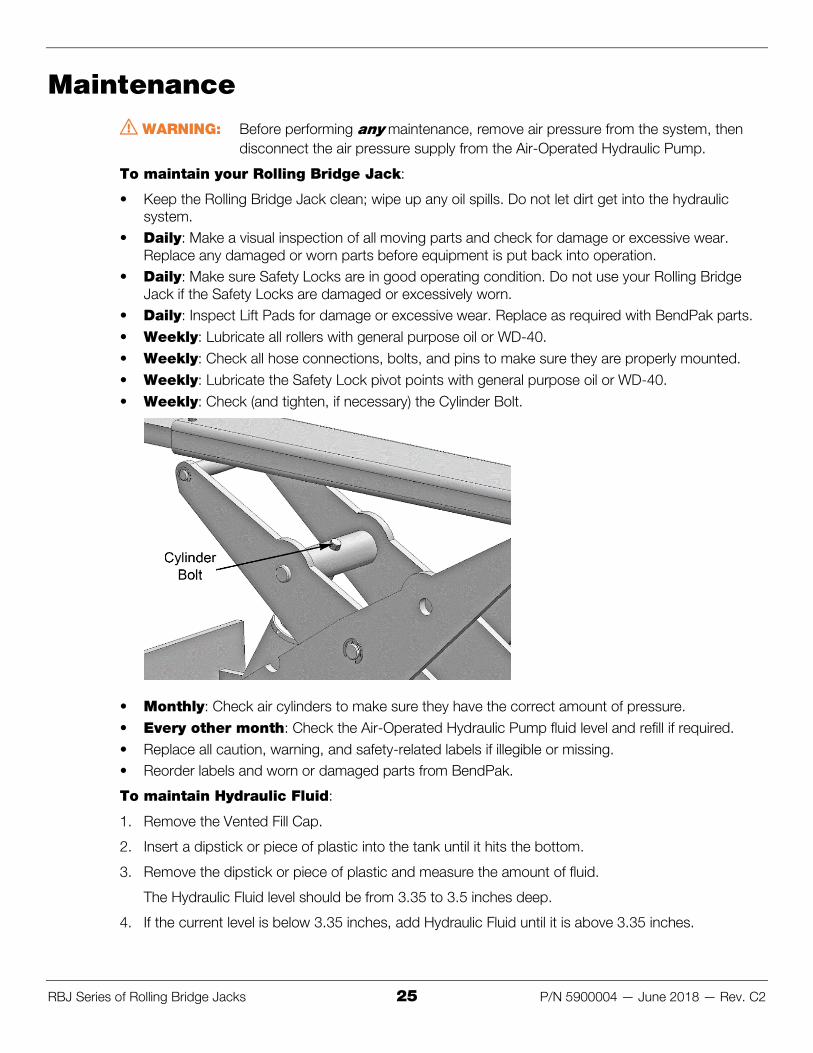
• Daily: Inspect Lift Pads for damage or excessive wear. Replace as required with BendPak parts. • Weekly: Lubricate all rollers with general purpose oil or WD-40. • Weekly: Check all hose connections, bolts, and pins to make sure they are properly mounted. • Weekly: Lubricate the Safety Lock pivot points with general purpose oil or WD-40. • Weekly: Check (and tighten, if necessary) the Cylinder Bolt.
• Monthly: Check air cylinders to make sure they have the correct amount of pressure. • Every other month: Check the Air-Operated Hydraulic Pump fluid level and refill if required. • Replace all caution, warning, and safety-related labels if illegible or missing. • Reorder labels and worn or damaged parts from BendPak.
To maintain Hydraulic Fluid:
1. Remove the Vented Fill Cap.
2. Insert a dipstick or piece of plastic into the tank until it hits the bottom.
3. Remove the dipstick or piece of plastic and measure the amount of fluid.
The Hydraulic Fluid level should be from 3.35 to 3.5 inches deep.
4. If the current level is below 3.35 inches, add Hydraulic Fluid until it is above 3.35 inches.

RBJ Series of Rolling Bridge Jacks 26 P/N 5900004 — June 2018 — Rev. C2
Disposing of Hydraulic Fluid Used Hydraulic Fluid cannot be thrown in the regular trash or dumped into the environment. This pollutes the environment and is illegal.
Instead, take it to a recycling center. Used/dirty Hydraulic Fluid can be cleaned and re-used.
Important: If your Hydraulic Fluid is contaminated (by being mixed with other fluids such as antifreeze, gasoline, or solvents), you must treat it like a hazardous waste and take it for disposal at an appropriate facility. Contaminated is different than used/dirty.
In summary:
• If you have dirty/used Hydraulic Fluid, take it to a fluid recycling center. • If you have contaminated Hydraulic Fluid, take it to a hazardous waste collection facility.
If you do not know how to find an appropriate facility, go to earth911.com or look for resources in your state or local area.
Troubleshooting This section describes how to troubleshoot your Jack.
Issue Action to Take
Jack does not lift load. Make sure load is not too heavy.
Make sure Rolling Bridge Jack is getting appropriate air pressure from the air supply.
Make sure the Air-Operated Hydraulic Pump has sufficient Hydraulic Fluid.
Make sure dirt has not gotten into the hydraulic system. If it has, replace the Hydraulic Fluid and clean the hydraulic system.
Jack does not move along Utility Rail.
Make sure the Utility Rail Channels and Lips are clear of obstructions.
Make sure Rolling Bridge Jack is correctly situated on Utility Rail Channel or Lip.
Check with BendPak to make sure the Rolling Bridge Jack is installed on an approved Lift.
Jack raises load but does not stay up.
Make sure you put the Rolling Bridge Jack onto a Safety Lock when the load is at the desired height. The Rolling Bridge Jack is meant to raise and lower loads; it is not designed to hold a load indefinitely unless the load is on a Safety Lock.
Make sure the Rolling Bridge Jack is not leaking Hydraulic Fluid.
If you continue to have an issue, contact your dealer or BendPak Customer Service at (800) 253-2363.

RBJ Series of Rolling Bridge Jacks 27 P/N 5900004 — June 2018 — Rev. C2
Accessories
Optional AK-14 Integrated Rolling Bridge Air Line Kit Mounts and secures your air line to your Lift's runways, creating a handy air line solution for your Rolling Bridge Jacks.
Visit the website page for the Air Line Kit for more information.

RBJ Series of Rolling Bridge Jacks 28 P/N 5900004 — June 2018 — Rev. C2
RBJ4500 Adapter Kit The RBJ4500 Adapter Kit is a four-piece kit that increases the capabilities of the RBJ4500 Rolling Bridge Jack by providing sliding adapters that mount on the main center tube.
Note: This Adapter Kit only works with the RBJ4500 Rolling Lift Jack; it cannot be used with other models.
The Adapter Kit includes:
• Two low-profile sliding rubber contact pads • Two sliding receivers that accommodate the standard RBJ4500 Lift Pads or stackable adapters
This image shows the short round Lift Pad on the left and the Lift Pad base on the right.
This image shows how to slide the adapters into place. You can adjust the positions of the adapters so that the Lift Pads make contact with the appropriate lifting points for the vehicle you are lifting.
Visit the website page for the Adapter Kit for more information.
RBJ Series of Rolling Bridge Jacks 29 P/N 5900004 — June 2018 — Rev. C2
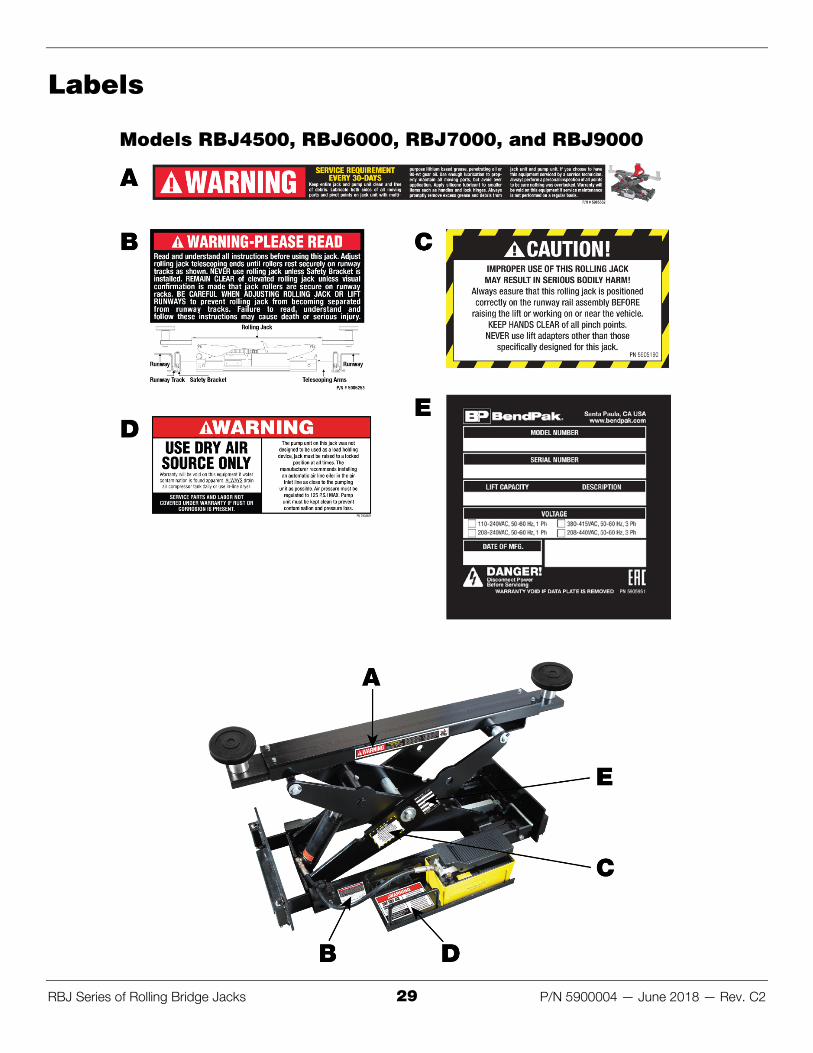
Labels
Models RBJ4500, RBJ6000, RBJ7000, and RBJ9000

RBJ Series of Rolling Bridge Jacks 30 P/N 5900004 — June 2018 — Rev. C2
Models RBJ15000, RBJ18000, and RBJ25000
RBJ Series of Rolling Bridge Jacks 31 P/N 5900004 — June 2018 — Rev. C2
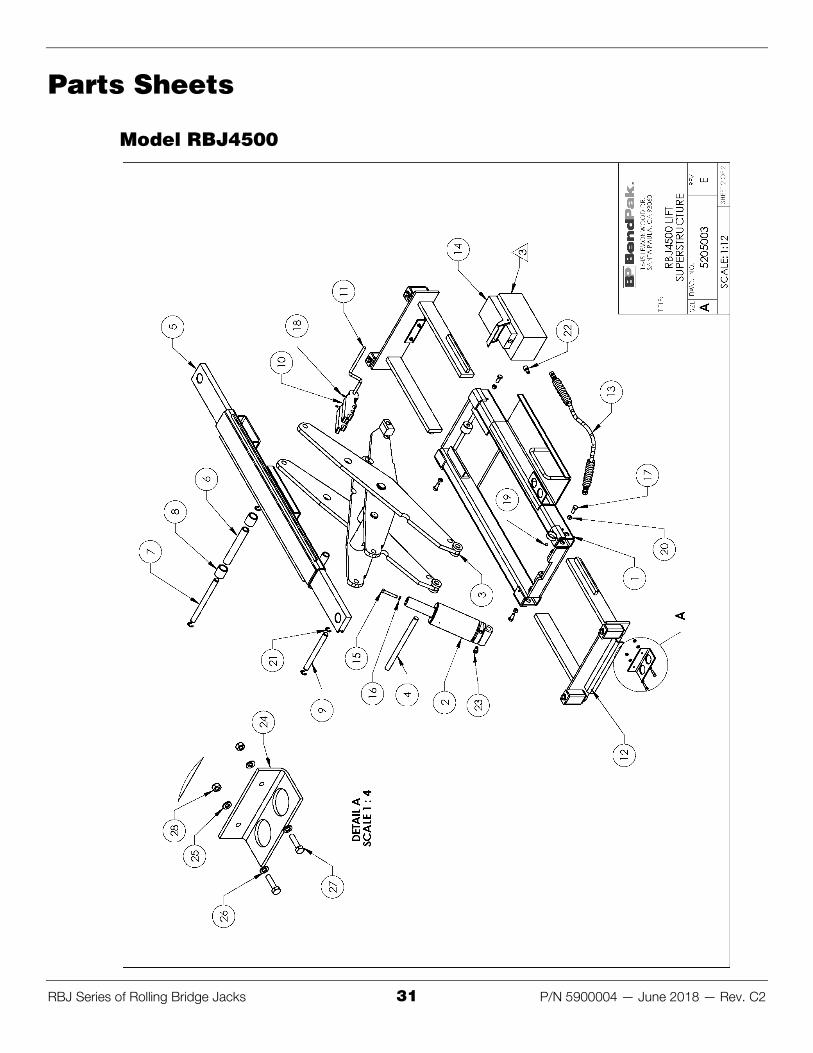
Parts Sheets
Model RBJ4500
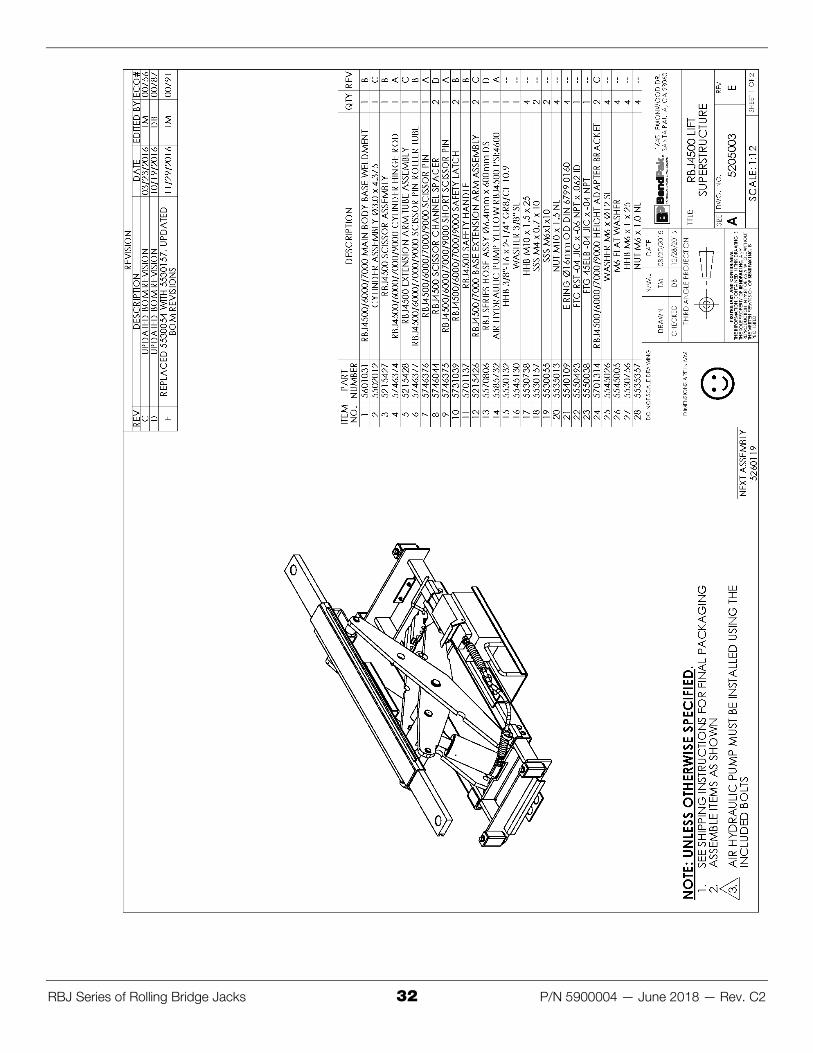
RBJ Series of Rolling Bridge Jacks 32 P/N 5900004 — June 2018 — Rev. C2

RBJ Series of Rolling Bridge Jacks 33 P/N 5900004 — June 2018 — Rev. C2

RBJ Series of Rolling Bridge Jacks 34 P/N 5900004 — June 2018 — Rev. C2

RBJ Series of Rolling Bridge Jacks 35 P/N 5900004 — June 2018 — Rev. C2
Model RBJ6000
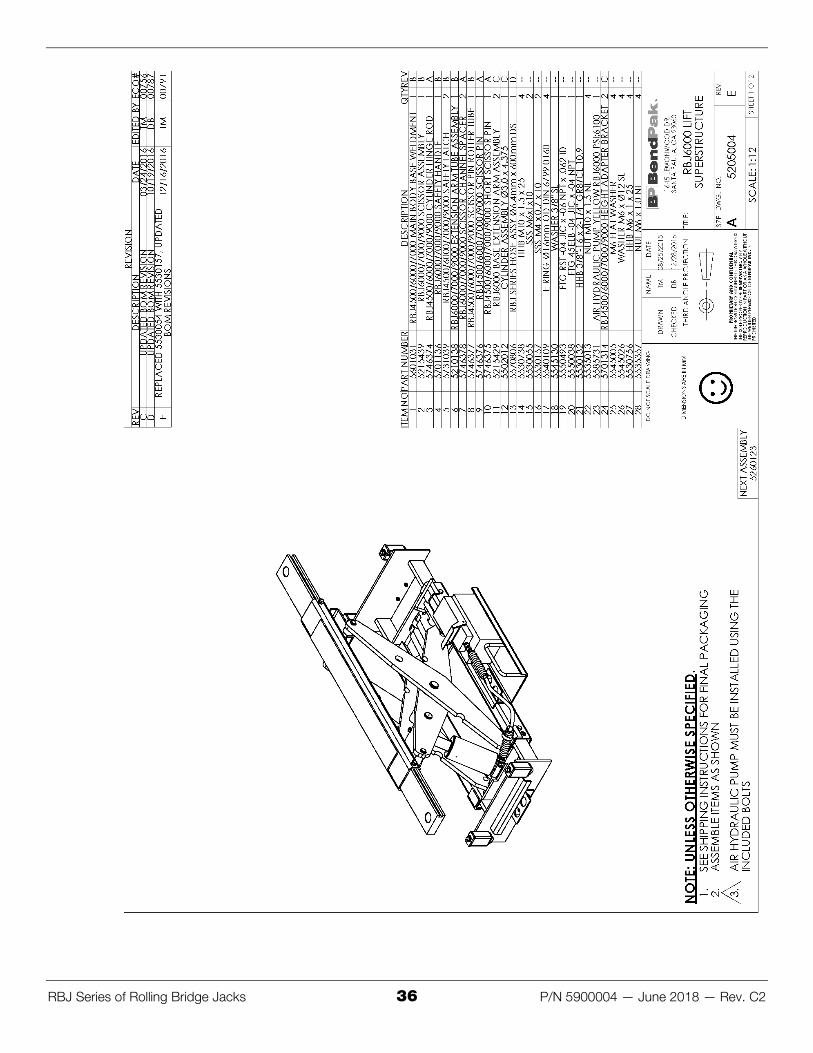
RBJ Series of Rolling Bridge Jacks 36 P/N 5900004 — June 2018 — Rev. C2
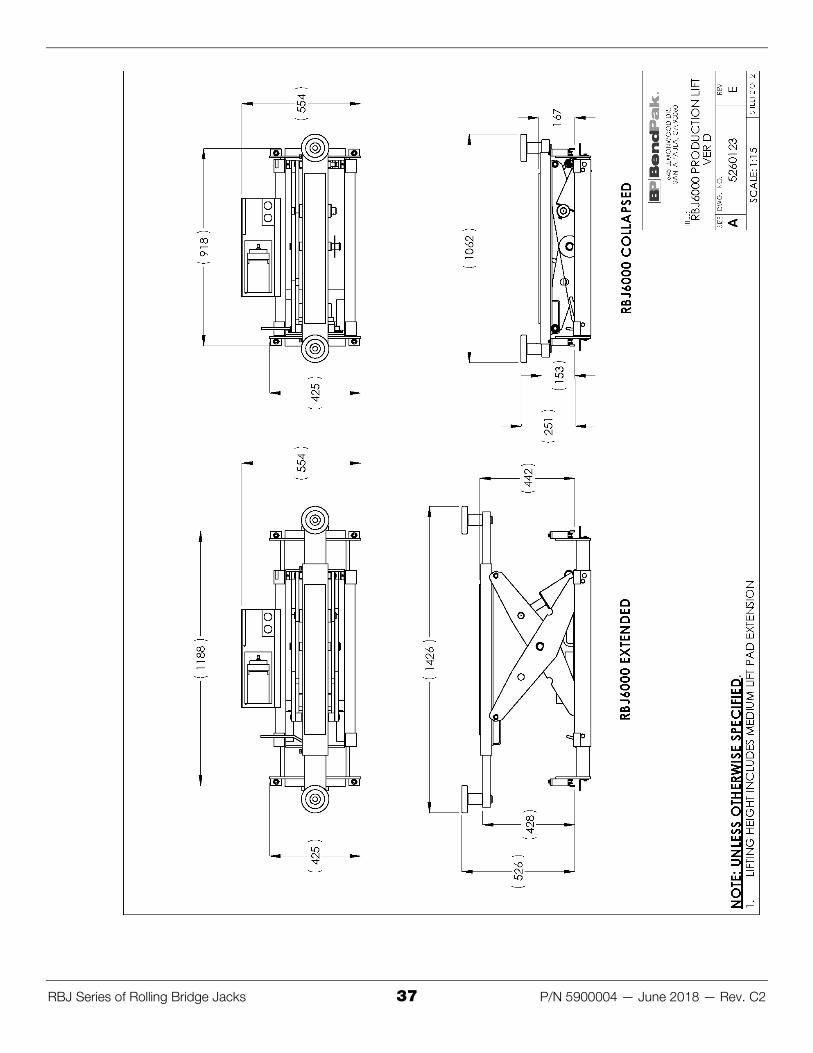
RBJ Series of Rolling Bridge Jacks 37 P/N 5900004 — June 2018 — Rev. C2
RBJ Series of Rolling Bridge Jacks 38 P/N 5900004 — June 2018 — Rev. C2
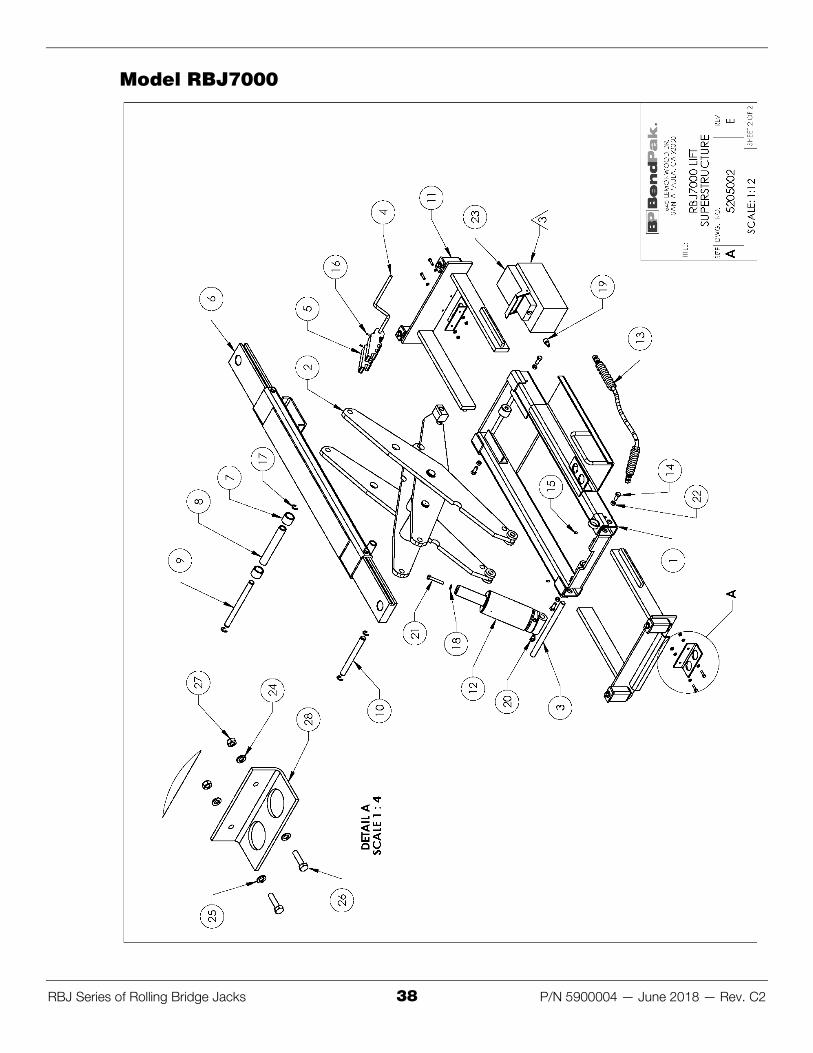
Model RBJ7000
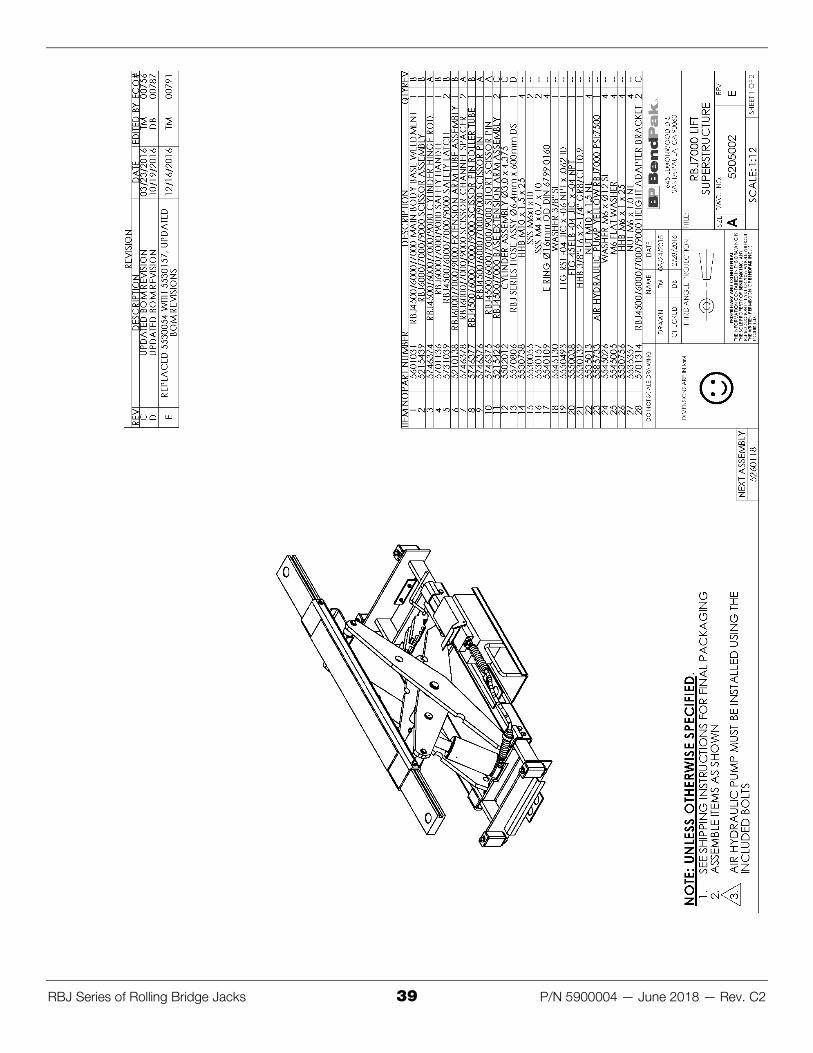
RBJ Series of Rolling Bridge Jacks 39 P/N 5900004 — June 2018 — Rev. C2

RBJ Series of Rolling Bridge Jacks 40 P/N 5900004 — June 2018 — Rev. C2
RBJ Series of Rolling Bridge Jacks 41 P/N 5900004 — June 2018 — Rev. C2
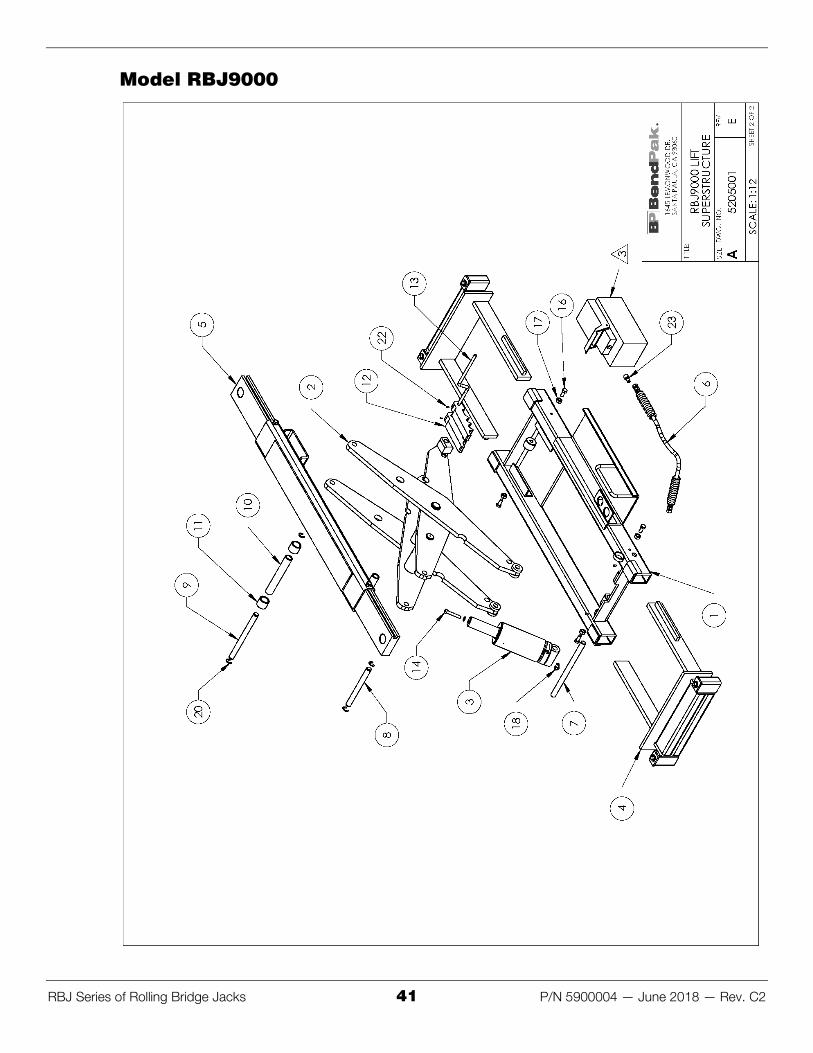
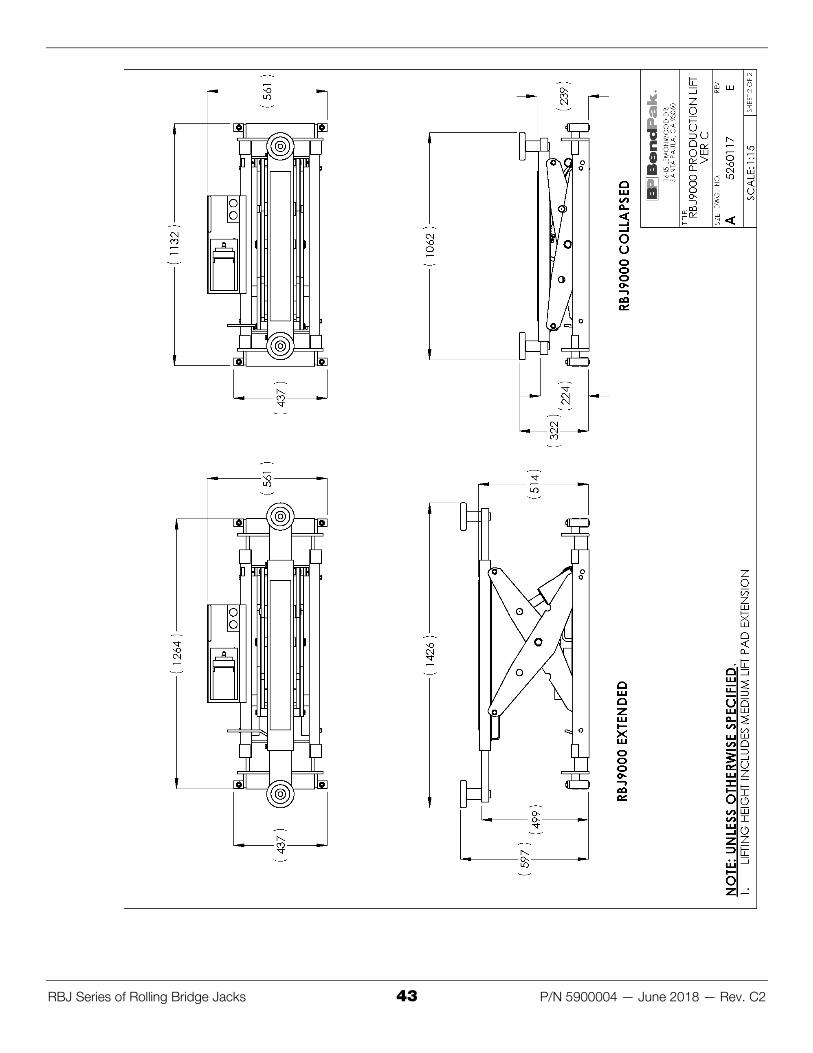
Model RBJ9000

RBJ Series of Rolling Bridge Jacks 42 P/N 5900004 — June 2018 — Rev. C2
RBJ Series of Rolling Bridge Jacks 43 P/N 5900004 — June 2018 — Rev. C2

RBJ Series of Rolling Bridge Jacks 44 P/N 5900004 — June 2018 — Rev. C2
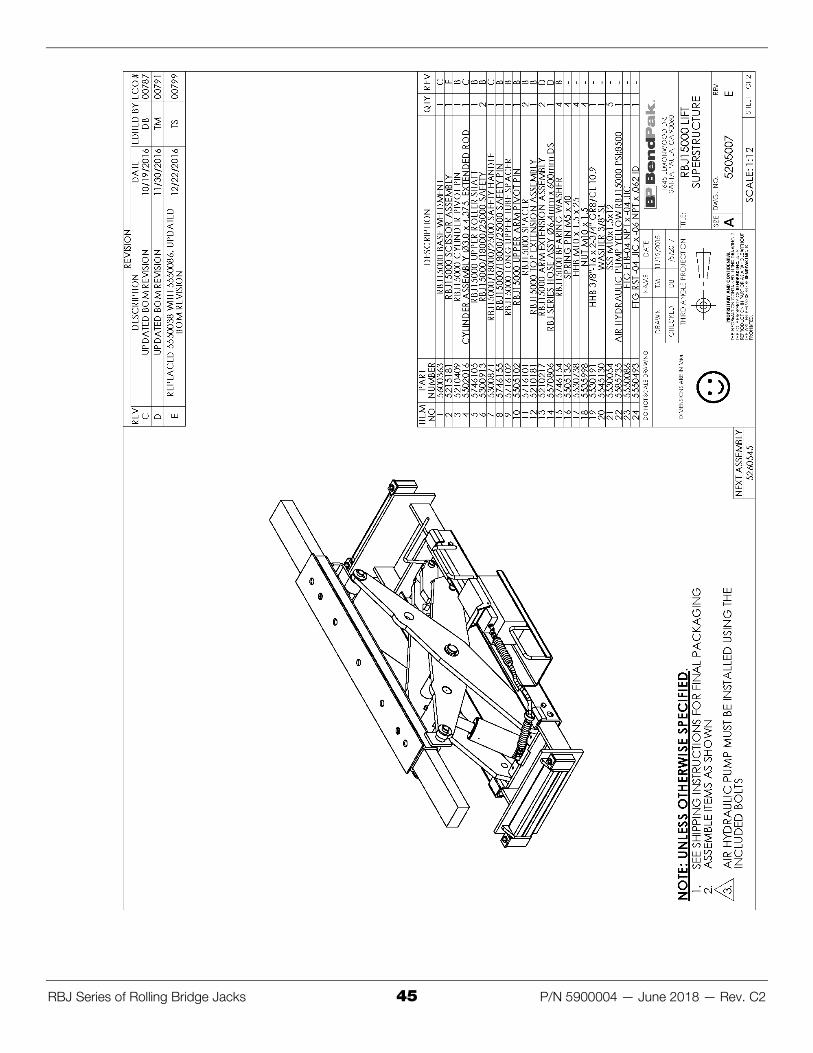
Model RBJ15000
RBJ Series of Rolling Bridge Jacks 45 P/N 5900004 — June 2018 — Rev. C2
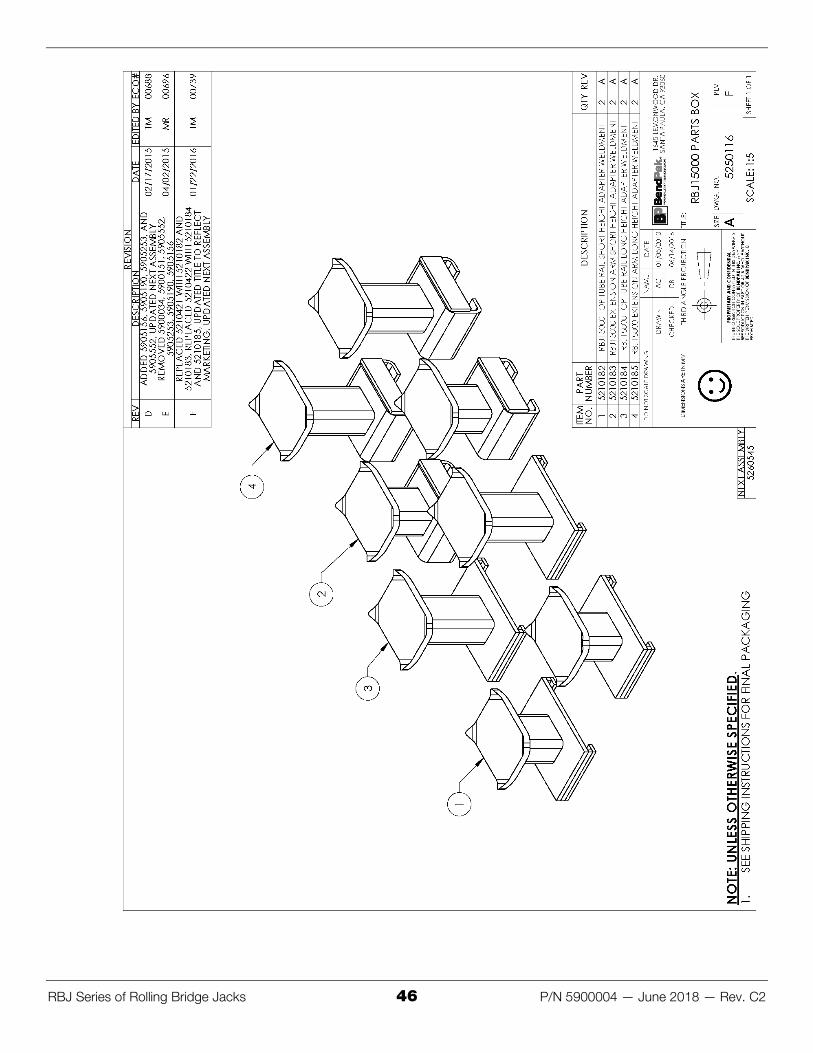
RBJ Series of Rolling Bridge Jacks 46 P/N 5900004 — June 2018 — Rev. C2

RBJ Series of Rolling Bridge Jacks 47 P/N 5900004 — June 2018 — Rev. C2
RBJ Series of Rolling Bridge Jacks 48 P/N 5900004 — June 2018 — Rev. C2
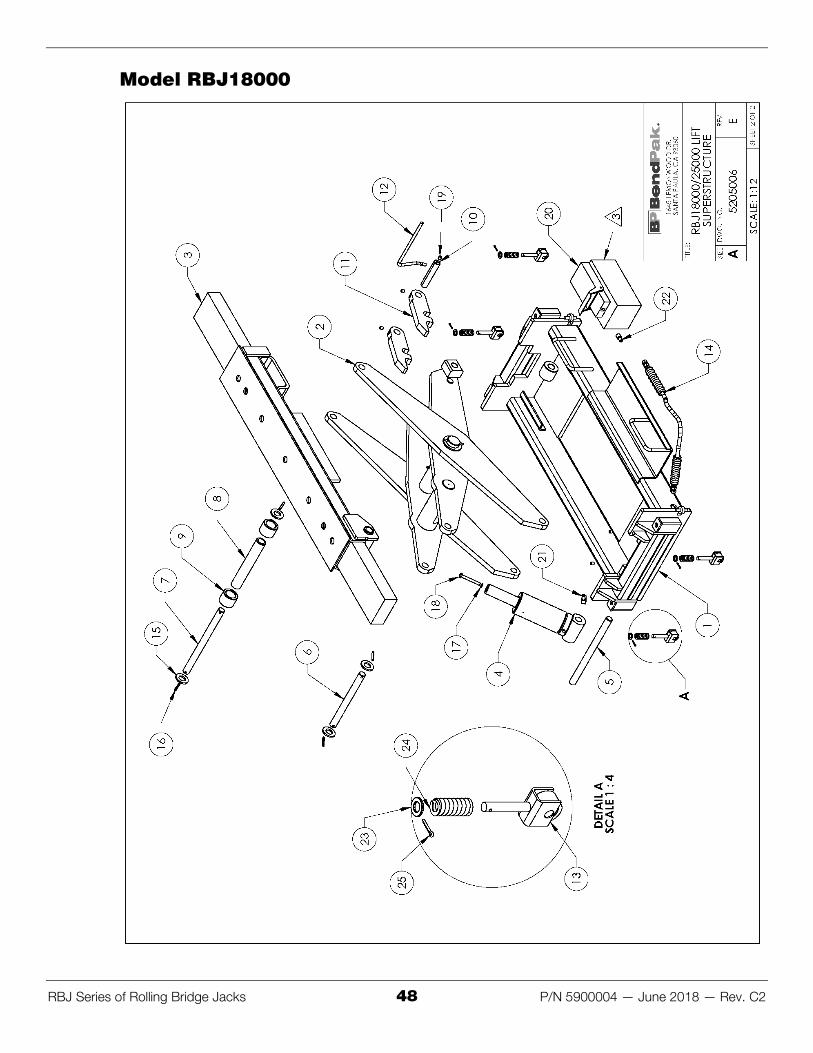
Model RBJ18000
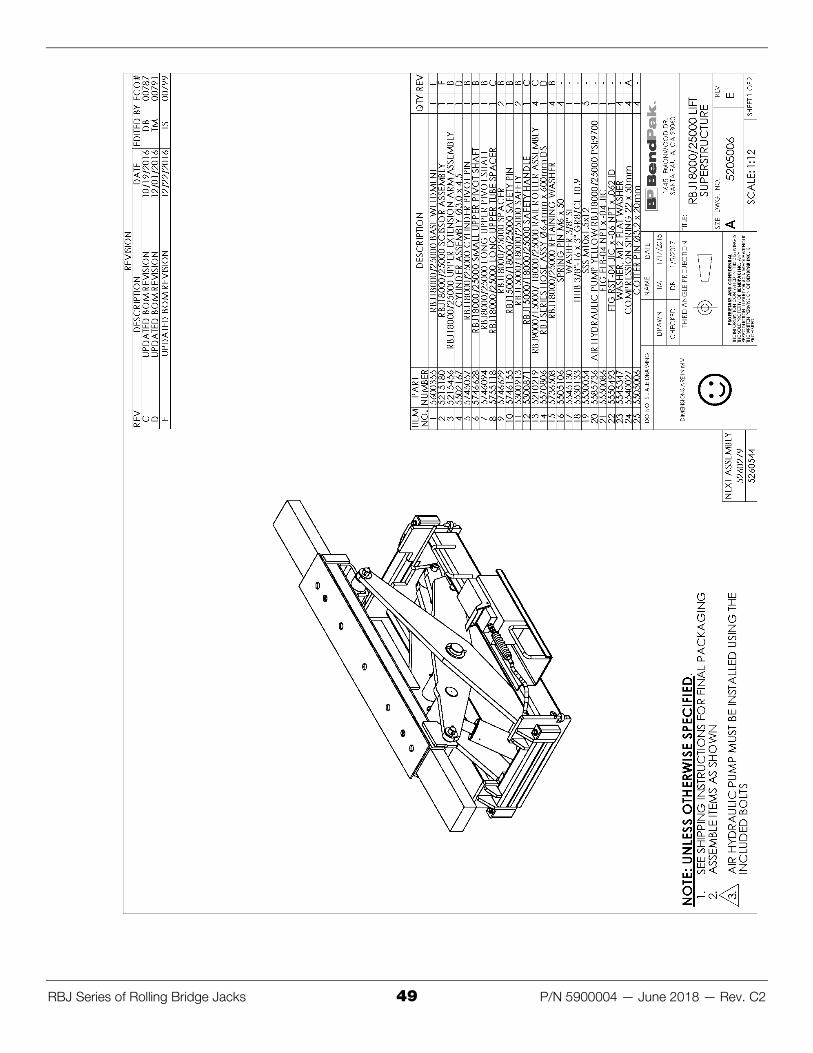
RBJ Series of Rolling Bridge Jacks 49 P/N 5900004 — June 2018 — Rev. C2

RBJ Series of Rolling Bridge Jacks 50 P/N 5900004 — June 2018 — Rev. C2

RBJ Series of Rolling Bridge Jacks 51 P/N 5900004 — June 2018 — Rev. C2

RBJ Series of Rolling Bridge Jacks 52 P/N 5900004 — June 2018 — Rev. C2
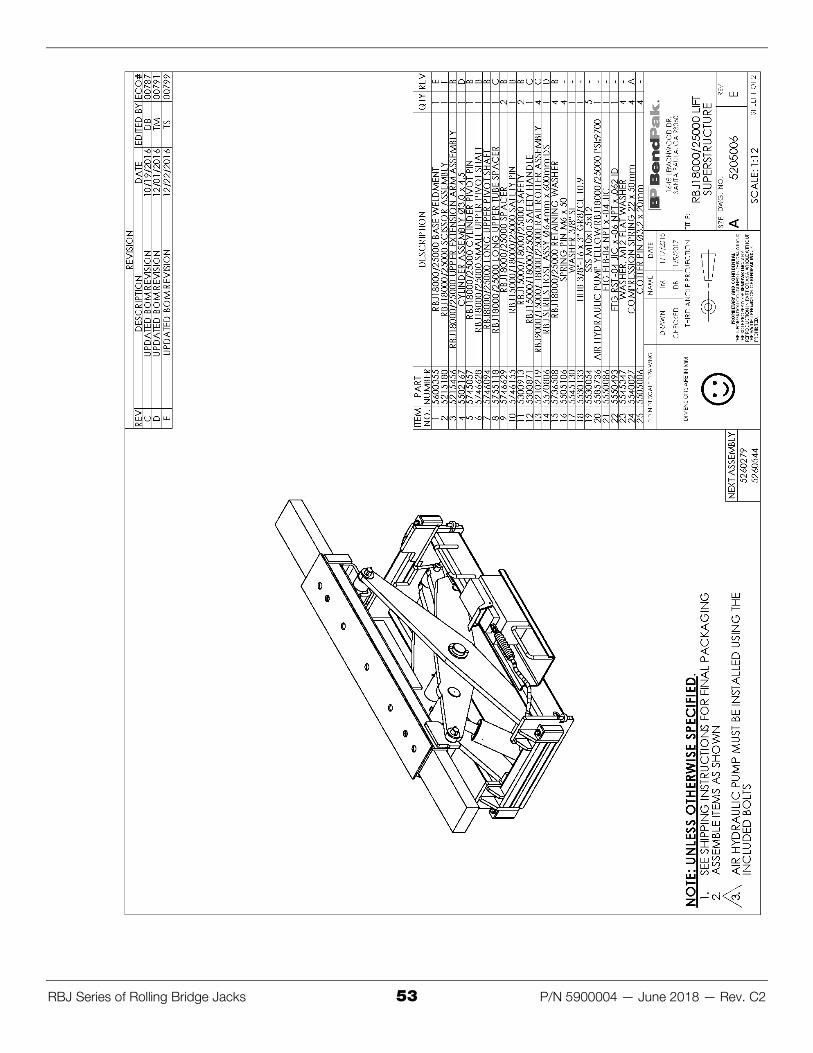
Model RBJ25000
RBJ Series of Rolling Bridge Jacks 53 P/N 5900004 — June 2018 — Rev. C2
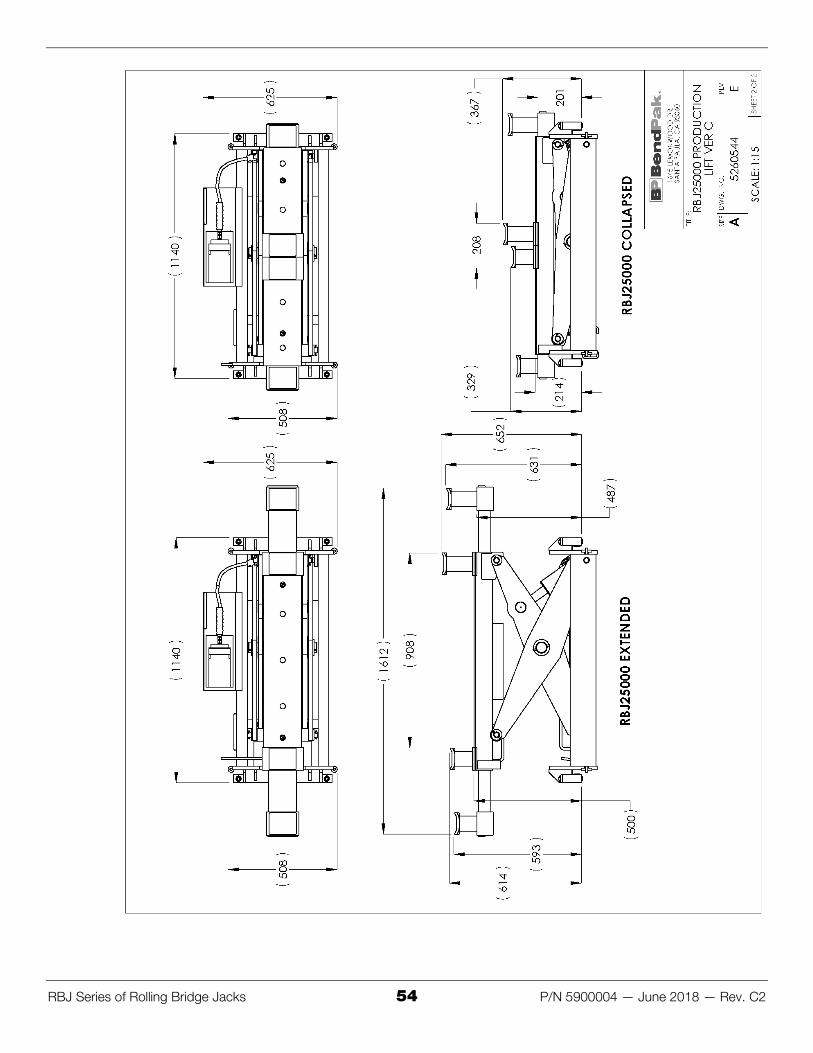
RBJ Series of Rolling Bridge Jacks 54 P/N 5900004 — June 2018 — Rev. C2

RBJ Series of Rolling Bridge Jacks 55 P/N 5900004 — June 2018 — Rev. C2
Maintenance Log
RBJ Series of Rolling Bridge Jacks 56 P/N 5900004 — June 2018 — Rev. C2
Maintenance Log

1645 Lemonwood Drive Santa Paula, CA, 93060 USA
© 2018 BendPak Inc. All rights reserved. bendpak.com