installation and operation - s&c electric company · do not assume the operating-handle...
TRANSCRIPT

Instruction Sheet 765-510
S&C Omni-Rupter® SwitchesOutdoor Distribution (14.4 kV and 25 kV)
Three-Pole Side-Break Integer Style Upright, Triangular, and Inverted Mounting Configurations—Rotating Operating Mechanism
© S&C Electric Company 2011-2016, all rights reservedNovember 21, 2016
Installation and Operation
Section Page Section Page
IntroductionQualified Persons . . . . . . . . . . . . . . . . . . . . . . . . . . . . . . 2 Operating Considerations . . . . . . . . . . . . . . . . . . . . . . . . 2Read this Instruction Sheet . . . . . . . . . . . . . . . . . . . . . . 3Retain this Instruction Sheet . . . . . . . . . . . . . . . . . . . . . . 3Proper Application . . . . . . . . . . . . . . . . . . . . . . . . . . . . . . 3Warranty . . . . . . . . . . . . . . . . . . . . . . . . . . . . . . . . . . . . . 3
Safety InformationUnderstanding Safety-Alert Messages . . . . . . . . . . . . . . 4Following Safety Instructions . . . . . . . . . . . . . . . . . . . . . 4Replacement Instructions and Labels . . . . . . . . . . . . . . . 4Location of Safety Labels . . . . . . . . . . . . . . . . . . . . . . . 5
Safety Precautions . . . . . . . . . . . . . . . . . . . . . . . . . . . . .6
Shipping and HandlingPacking . . . . . . . . . . . . . . . . . . . . . . . . . . . . . . . . . . . . . . 7Inspection . . . . . . . . . . . . . . . . . . . . . . . . . . . . . . . . . . . . 7Handling . . . . . . . . . . . . . . . . . . . . . . . . . . . . . . . . . . . . . 8
InstallationOperating Pipe Preparation . . . . . . . . . . . . . . . . . . . . . . 9Mounting to Wood . . . . . . . . . . . . . . . . . . . . . . . . . . . . . . 9Mounting the Switch Assembly . . . . . . . . . . . . . . . . . . . . 9Upright Mounting Configuration . . . . . . . . . . . . . . . . . . . 9Inverted Mounting Configuration . . . . . . . . . . . . . . . . . . 11Triangular Mounting Configuration . . . . . . . . . . . . . . . . 12Installing the Optional Pole Band . . . . . . . . . . . . . . . . . 13Installing the Vertical Operating Pipe . . . . . . . . . . . . . . 14Installing the Operating Handle . . . . . . . . . . . . . . . . . . 16Installing the Optional Phase-to-Ground Wildlife Protection . . . . . . . . . . . . . . . . . . . . . . . . . . . 18Installing the Base Covers . . . . . . . . . . . . . . . . . . . . . . 19Installing the Wildlife Disks . . . . . . . . . . . . . . . . . . . . . . 20Dead-Ending Conductors . . . . . . . . . . . . . . . . . . . . . . . 24Connecting High-Voltage Conductors . . . . . . . . . . . . . . 24Locking the Operating Handle . . . . . . . . . . . . . . . . . . . 26Checking Operation . . . . . . . . . . . . . . . . . . . . . . . . . . . 28
OperationTo Open . . . . . . . . . . . . . . . . . . . . . . . . . . . . . . . . . . . . 31To Close . . . . . . . . . . . . . . . . . . . . . . . . . . . . . . . . . . . . 31
Table of Contents
Upright Mounting Configuration
Triangular Mounting Configuration
Inverted Mounting Configuration

2 S&C Instruction Sheet 765-510
Introduction
Qualified Persons WARNINGThe equipment covered by this publication must be installed, operated, and maintained by qualified persons who are knowledgeable in the installation, operation, and maintenance of overhead electric power distribution equipment along with associated hazards . A qualified person is one who is trained and competent in:
• The skills and techniques necessary to distinguish exposed live parts from nonlive parts of electrical equipment
• The skills and techniques necessary to determine the proper approach distances corresponding to the voltage to which the qualified person will be exposed
• The proper use of the special precautionary techniques, personal protective equip-ment, insulating and shielding materials, and insulated tools for working on or near exposed energized parts of electrical equipment
These instructions are intended only for such qualified persons . They are not intended to be a substitute for adequate training and experience in safety procedures for this type of equipment .
Operating Considerations
Circuit making and breaking is involved in the normal operation of these interrupter switches and, as a result, precautionary “partway” opening or closing is undesirable. To operate manually, swing the operating handle through its full stroke without hesitation. Do not assume the operating-handle position necessarily indicates the Open or Closed position of the interrupter-switch blades. Upon completion of an opening or closing operation, visually check the position of the interrupter-switch blades to determine the intended position has been attained, then tag or padlock the operating handle in accordance with standard system operating procedures. In all cases make certain the operating handle is locked before “walking away.” Note: These interrupter switches are not intended for breaking fault currents.
If the switch is covered in ice or snow, do not “chop” the switch between the Open and Closed position to dislodge ice and snow. Omni-Rupter Switches in the upright and triangular configuration are capable of being opened and closed under ¾-inch (19-mm) ice formation. Switches in the inverted mounting configuration have a ¾-inch (19-mm) ice-break capability with ice shields.

S&C Instruction Sheet 765-510 3
Introduction
Read this Instruction Sheet
NOTICEThoroughly and carefully read this instruction sheet before installing or operating your S&C Omni-Rupter Switch . Familiarize yourself with Safety Information and Safety Precautions on pages 4 through 6 .
Retain this Instruction Sheet
This instruction sheet is a permanent part of your S&C Omni-Rupter Switch. Designate a location where you can easily retrieve and refer to this publication. The latest version is available online in PDF format at sandc.com/Support/Product-Literature.asp
Proper Application WARNINGThe equipment in this publication must be selected for a specific application . The application must be within the ratings furnished for the equipment . Refer to S&C Speci-fication Bulletin 765-31 for complete application information .
In most applications, these interrupter switches are capable of switching rated continuous load currents at full voltage. Consequently, no interlocking with secondary protective equipment is required.
Omni-Rupter Switches rated 14.4 kV and 25 kV can carry up to 1000 amperes on a continuous basis for ambient temperatures to 104°F (40°C) with a minimum wind velocity of 2 feet per second. Emergency interrupting performance may be expected for currents to 1000 amperes; refer to Specification Bulletin 765-31 for detailed information concern-ing interrupting ratings.
Warranty The warranty and/or obligations described in S&C’s standard conditions of sale, as set forth in Price Sheet 150, plus any special warranty provisions, as set forth in the applicable product-line specification bulletin, are exclusive. The remedies provided in the former for breach of these warranties shall constitute the immediate purchaser’s or end user’s exclusive remedy and a fulfillment of all seller’s liability. In no event shall the seller’s liability to the immediate purchaser or end user exceed the price of the specific product that gives rise to the immediate purchaser’s or end user’s claim. All other warranties, whether express or implied or arising by operation of law, course of dealing, usage of trade or otherwise, are excluded. The only warranties are those stated in Price Sheet 150, and THERE ARE NO EXPRESS OR IMPLIED WARRANTIES OF MERCHANTABILITY OR FITNESS FOR A PARTICULAR PURPOSE. ANY EXPRESS WARRANTY OR OTHER OBLIGATION PROVIDED IN PRICE SHEET 150 IS GRANTED ONLY TO THE IMMEDIATE PURCHASER AND END USER, AS DEFINED THEREIN. OTHER THAN AN END USER, NO REMOTE PURCHASER MAY RELY ON ANY AFFIRMATION OF FACT OR PROMISE THAT RELATES TO THE GOODS DESCRIBED HEREIN, ANY DESCRIPTION THAT RELATES TO THE GOODS, OR ANY REMEDIAL PROMISE INCLUDED IN PRICE SHEET 150.
The seller’s warranties do not apply if the switch is power operated using a switch operator of other than S&C manufacture.

4 S&C Instruction Sheet 765-510
Safety Information
Understanding Safety-Alert Messages
Several types of safety-alert messages may appear throughout this instruction sheet and on labels and tags attached to the Omni-Rupter Switch. Familiarize yourself with these types of messages and the importance of these various signal words:
DANGER“DANGER” identifies the most serious and immediate hazards that will likely result in serious personal injury or death if instructions, including recommended precautions, are not followed .
WARNING“WARNING” identifies hazards or unsafe practices that can result in serious personal injury or death if instructions, including recommended precautions, are not followed .
CAUTION“CAUTION” identifies hazards or unsafe practices that can result in minor personal injury if instructions, including recommended precautions, are not followed .
NOTICE“NOTICE” identifies important procedures or requirements that, if not followed, can result in product or property damage if instructions are not followed .
Following Safety Instructions
If you do not understand any portion of this instruction sheet and need assistance, contact your nearest S&C Sales Office or S&C Authorized Distributor. Their telephone numbers are listed on S&C’s website sandc.com, or call S&C Headquarters at (773) 338-1000; in Canada, call S&C Electric Canada Ltd. at (416) 249-9171.
NOTICE
Thoroughly and careful ly read this instruction sheet before operating your S&C Omni-Rupter Switch .
Replacement Instructions and Labels
If you need additional copies of this instruction sheet, contact your nearest S&C Sales Office, S&C Authorized Distributor; S&C Headquarters, or S&C Electric Canada Ltd.
It is important that any missing, damaged, or faded labels on the equipment be replaced immediately. Replacement labels are available by contacting your nearest S&C Sales Office, S&C Authorized Distributor, S&C Headquarters, or S&C Electric Canada Ltd.

S&C Instruction Sheet 765-510 5
Location of Safety Labels
Safety Information
REORDER INFORMATION FOR SAFETY LABELS
Location Safety Alert Message Description Number
A DANGERSwitches may be energized from either side and with blades in any position .
G-6580-2«
B WARNING Lifting Instructions G-9377p
C WARNING Lifting Instructions G-9379p
D NOTICE Instructions for Connecting Conductors to Terminal Pads G-9391p
E WARNING Lifting Instructions G-10218p
« This label is placed on both sides of switch base on opposite ends . p This part is a tag that is to be removed and discarded after the switch is installed and adjusted .
B
A
D
A
C
D
E
A
D

6 S&C Instruction Sheet 765-510
Safety Precautions
DANGER
Omni-Rupter Switches operate at high voltage. Failure to observe these precautions will result in serious personal injury or death.
Some of these precautions may differ from company operating procedures and rules . Where a discrepancy exists, users should follow their company’s operating procedures and rules .
1. QUALIFIED PERSONS. Access to switches and controls must be restricted only to qualified persons . See “Qualified Persons” on page 2 .
2. SAFETY PROCEDURES. Always follow safe operating procedures and rules .
3. PERSONAL PROTECTIVE EQUIPMENT. Always use suitable protective equipment such as rubber gloves, rubber mats, hard hats, safety glasses, and flash clothing in accordance with safe operating procedures and rules .
4. SAFETY LABELS AND TAGS. Do not remove or obscure any of the “DANGER,” “WARNING,” “CAUTION,” or “NOTICE” labels and tags . Remove tags ONLY if instructed to do so .
5. ENERGIZED COMPONENTS. Always consider all parts live until de-energized, tested, and grounded .
6. INTERRUPTER SWITCH POSITION. Always confirm the Open/Close position of interrupter switches by visually observing the position of the blades . Switches may be energized from either side and with the blades in any position .
7. MAINTAINING PROPER CLEARANCE. Always main-tain proper clearance from energized components .
8. OPERATION. Circuit making and breaking is involved in the normal operation of this interrupter switch and, as a result, “partway” opening or closing is undesirable . To operate, swing the operating handle through its full travel vigorously and without hesitation . See the Operation section on page 31 .

S&C Instruction Sheet 765-510 7
Shipping and Handling
Packing Study the erection drawing carefully and check the bill of materials to be sure all parts are at hand.
When a standard mounting arrangement is specified, the shipment will include:
• A three-pole interrupter switch, complete with interphase drive, factory assembled on a single base
• Four 6-feet 10-inch vertical-operating pipe sections, predrilled, where required, for attachment to the universal couplings
• Miscellaneous mounting hardware (less through-bolts) for securing the Omni-Rupter Switch to the pole
• The appropriate set of operating-mechanism components for the vertical operating pipe; e.g. handle, guide bearings, and couplings—each tagged and keyed to the bill of materials for ready identification
• If a Standard Minor Modification of a standard mounting arrangement is specified, the appropriate parts, as identified in the bill of materials under suffix “-M,” “-S1,” “-S2,” “-S6,” or “-S6L” will be included with the operating-mechanism components. Specifically, the modifications designated by these suffixes are:
-M Mounting provisions and modifications for power operation using the S&C 6801M Automatic Switch Operator
-S1 One 2 ⅝ -inch diameter tubular fiberglass insulating section in vertical operating shaft
-S2 One Cypoxy™ Insulator unit in vertical operating shaft
-S6 Key interlock—single lock for “locked open” application
-S6L Provisions only for key interlocks—mounting bracket for interlock
“-V1,” “-V2,” or “-V3”—adds (one, two, or three respectively) extra 6-foot 10-inch lengths of pipe and includes the appropriate number of extra couplings and guides
• A detailed erection drawing for the Omni-Rupter Switch will be found in a water-resistant envelope shipped with the switch (If a standard mounting arrangement is to be used, this erection drawing is a printed sheet. This same sheet is also furnished when a standard minor modification of a standard mounting arrangement is to be used. In the latter case, a copy of RD-7397 (Omni-Rupter Switch Standard Minor Modifica-tions for R4 Switches) is included.)
Drawings for standard mounting arrangements show only minimum or suggested locating dimensions for the vertical-operating-pipe guide bearings and the operating-handle assembly. Specific locations are to be determined either on the job or by the user’s engineering department.
Inspection Examine the shipment for external evidence of damage as soon after receipt as possible, preferably before removal from the carrier’s conveyance. Check the bill of lading to make sure shipping skids, crates, and containers listed thereon are present:
If there is visible loss and/or damage:
1. Notify the delivering carrier immediately.
2. Ask for a carrier inspection.
3. Note the condition of shipment on all copies of the delivery receipt.
4. File a claim with the carrier.
If concealed damage is discovered:
1. Notify the delivering carrier within 15 days of receipt of shipment.
2. Ask for a carrier inspection.
3. File a claim with the carrier.
Also notify S&C Electric Company in all instances of loss and/or damage.

8 S&C Instruction Sheet 765-510
Shipping and Handling
Handling WARNINGDO NOT use the lifting bracket to lift the crated switch from the truck or conveyance.
The lifting bracket will only hold the weight of the switch and will NOT hold the weight of the crated switch and associated packing materials .
Failure to uncrate the switch before lifting with the lifting bracket may cause damage to the switch or personal injury.
The crate is designed to be moved and lifted using a lift truck. Raised slots on the bottom of the crate are provided for the truck’s forks. See Figure 1.
For switches in the upright and inverted mounting configurations: Upright, upright with extra mounting pole clearance mounting configuration, and inverted mounting configuration switches are provided with a single-point lifting bracket that is permanently attached to the switch base. See Figure 2 on page 10 and Figure 3 on page 11.
Secure the lifting slings to the switch before unbolting the switch from its crate. Remove all packing materials before lifting the switch.
CAUTIONFor switches in the upright mounting configurations: to maintain proper electrical clearance, make sure the lifting bracket is placed in the retracted (lowered) position after installation .
Failure to do so may increase risk of flashover.
For switches in the triangular mounting configuration: Secure the lifting slings to the switch before unbolting the switch from its crate. Remove all packing materials before lifting the switch. DO NOT unbolt the switch from the crate before attaching the lifting slings.
Figure 1. Shipping crate.
CrateRaised slots for lift forks
S&C Instruction Sheet 765-510 9
Installation
Operating Pipe PreparationIf desired, the vertical operating pipe can be cut to length (if not precut at the factory) before proceeding to the job site. The standard lengths of pipe supplied measure 6 feet 10 inches (208.3 cm). Cutting dimensions are shown on the erection drawing.
Mounting to WoodWhen mounting the switch and its operating mechanism to a wood pole, it is recommended that suitably sized square washers be placed under the nuts. The use of spring-type washers between the square washers and nuts is also recommended to compensate for wood-pole shrinkage and thus maintain fastener tightness. Square and spring-type washers are not included with the switch.
Step 1Drill two 11∕16-inch-diameter holes in the utility pole at the desired height for mounting the switch. Refer to the erection drawing for details.
Step 2Insert two 5∕8-inch-diameter through-bolts (not furnished) in the holes drilled in Step 1 and secure loosely with the necessary square washers and nuts so the heads of the bolts project sufficiently from the face of the pole to engage the switch-base mounting bracket. Make sure that the flat washer for each bolt is between the bolt head and the switch-base pole-mounting bracket.
Mounting the Switch Assembly
Upright Mounting Configuration
Step 3
WARNINGLift the switch using the lifting bracket provided . Do not allow lifting slings to stress switch parts . Avoid allowing the switch to swing while lifting .
Lifting the switch by the live parts or pole-unit bases will damage the switch . Rough handling may cause damage to the blades and contacts .
Failure to lift the switch properly can result in switch damage, causing improper operation, arcing or electrical shock.

10 S&C Instruction Sheet 765-510
Step 3 Continued
Switches in the upright mounting configuration are provided with a retractable single-point lifting bracket permanently attached to the switch base. See Figure 2.
(a) Make sure that the switch is fully closed.
(b) Attach lifting slings ONLY to the single-point lifting bracket.
(c) Lift the switch as shown in Figure 2 until the lifting slings are just taut.
(d) Unbolt the switch base from the shipping skid.
(e) Slowly and carefully lift the switch to the proper mounting height.
(f) Guide the switch so the through-bolts projecting from the utility pole slip into the holes in the switch’s pole-mounting bracket. (The pole-mounting bracket is provided with a keyhole and an open slotted hole for ease of installation.)
(g) Lower the switch so the pole-mounting bracket bears down on the through-bolts.
(h) Securely tighten the through-bolts. Install the two 1∕2-inch diameter lag screws on the front of the mounting bracket, diagonally from each other. See Figure 2.
(i) Remove the lifting sling from the single-point lifting bracket. Lower the lifting bracket.
(j) If desired, a crossarm brace (user-furnished) may be attached to the base. Mounting brackets for crossarm braces must be specified separately. Contact your local S&C Sales Office for details.
CAUTIONTo maintain proper electrical clearance, make sure the lifting bracket is placed in the retracted (lowered) position after installation .
Failure to do so may increase risk of flashover.
Installation
Figure 2. Hoisting the upright mounting configuration Omni-Rupter Switch into position.
Keyhole
Lifting bracket
Slotted hole
Lag screw
Lag screw
S&C Instruction Sheet 765-510 11
Installation
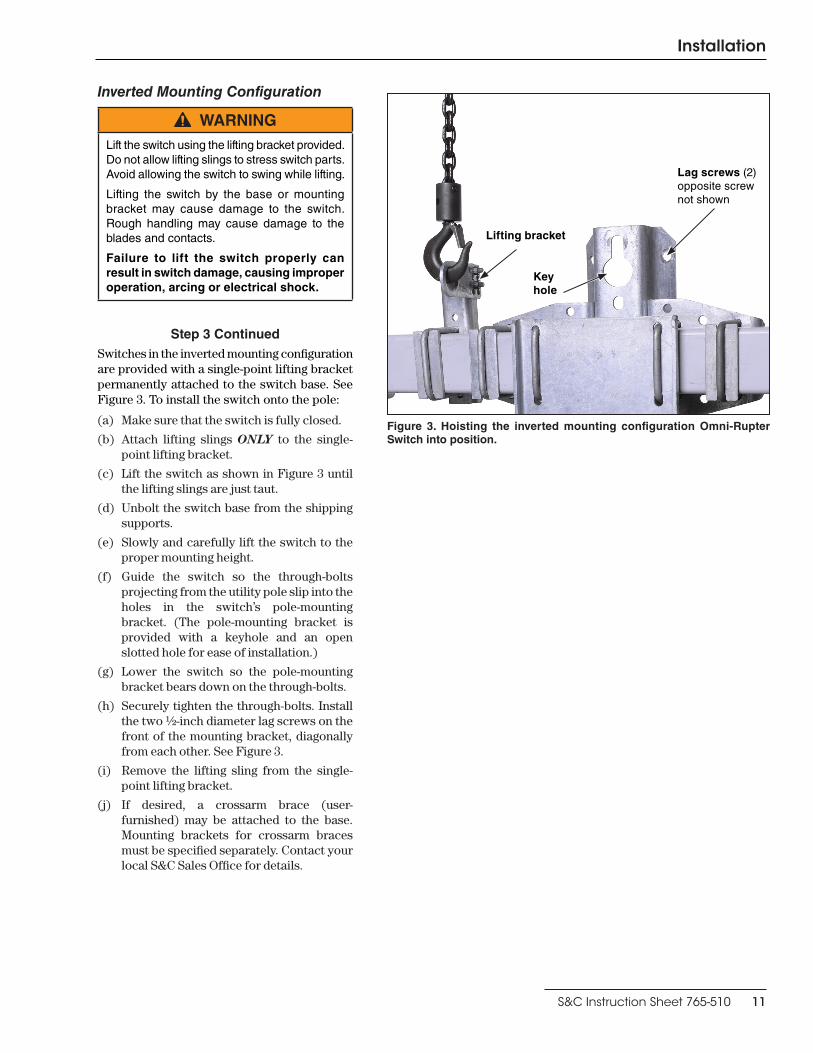
Figure 3. Hoisting the inverted mounting configuration Omni-Rupter Switch into position.
Lifting bracket
Inverted Mounting Configuration
WARNINGLift the switch using the lifting bracket provided . Do not allow lifting slings to stress switch parts . Avoid allowing the switch to swing while lifting .
Lifting the switch by the base or mounting bracket may cause damage to the switch . Rough handling may cause damage to the blades and contacts .
Failure to lift the switch properly can result in switch damage, causing improper operation, arcing or electrical shock.
Step 3 ContinuedSwitches in the inverted mounting configuration are provided with a single-point lifting bracket permanently attached to the switch base. See Figure 3. To install the switch onto the pole:
(a) Make sure that the switch is fully closed.
(b) Attach lifting slings ONLY to the single-point lifting bracket.
(c) Lift the switch as shown in Figure 3 until the lifting slings are just taut.
(d) Unbolt the switch base from the shipping supports.
(e) Slowly and carefully lift the switch to the proper mounting height.
(f) Guide the switch so the through-bolts projecting from the utility pole slip into the holes in the switch’s pole-mounting bracket. (The pole-mounting bracket is provided with a keyhole and an open slotted hole for ease of installation.)
(g) Lower the switch so the pole-mounting bracket bears down on the through-bolts.
(h) Securely tighten the through-bolts. Install the two 1∕2-inch diameter lag screws on the front of the mounting bracket, diagonally from each other. See Figure 3.
(i) Remove the lifting sling from the single-point lifting bracket.
(j) If desired, a crossarm brace (user-furnished) may be attached to the base. Mounting brackets for crossarm braces must be specified separately. Contact your local S&C Sales Office for details.
Keyhole
Lag screws (2) opposite screw not shown

12 S&C Instruction Sheet 765-510
Triangular Mounting Configuration
WARNINGLift the switch by the attaching lifting slings to the vertical switch support member by looping around the dead-ending bracket and the switch mounting weldment . Do not allow lifting slings to stress switch parts . Avoid allowing switch to swing while lifting .
Lifting the switch by the live parts or pole-unit bases will damage the switch . Rough handling may cause damage to the blades and contacts .
Failure to lift the switch properly can result in switch damage, causing improper operation, arcing, or electrical shock.
Step 3 Continued(a) Make sure that the switch is fully closed.
(b) Attach the lifting slings ONLY to the vertical switch support member by looping around the dead-ending bracket and the switch mounting weldment.
(c) Lift the switch as shown in Figure 4 until the lifting slings are just taut.
(d) Unbolt the switch from the shipping skid.
(e) Slowly and carefully lift the switch to the proper mounting height.
(f) Guide the switch so the through bolts projecting from the utility pole slip into the holes in the switch’s pole-mounting bracket. (The pole-mounting bracket is provided with a keyhole and an open slotted hole for ease of installation.)
(g) Securely tighten the through-bolts. Install the two 1∕2-inch diameter lag screws on the front of the mounting bracket, diagonally from each other. See Figure 5.
(h) Remove the lifting slings from the switch.
If desired, a crossarm brace (user-furnished) may be attached to the base for switches in the triangular mounting configuration. Mounting brackets for crossarm braces must be speci-fied separately. Consult your nearest S&C Sales Office for details.
Figure 5. Typical pole-band attachment detail (triangular mounting configuration illustrated).
« Install two lag screws on front of the mounting bracket .
½- inch lag screw«
Through-bolts (provided by customer)
Pole mounting bracket
Through-bolt
Installation
Figure 4. Hoisting the triangular mounting configuration Omni-Rupter Switch into position.
Lifting slings
Vertical support member

S&C Instruction Sheet 765-510 13
Installation
Figure 6. Typical pole-band attachment detail (vertical mounting configuration illustrated).
« Install four lag screws on the front of the mounting bracket . Install one lag screw to center of pole band .
½-inch lag screw«
Pole mounting bracket
Pole band
14 × 1 × 3-inchstiffening block
J-bolt
Installing the Optional Pole Band
Step 4Secure the pole-band (optional) to the mounting bracket on the switch, using the J-bolts provided. See Figure 6. Two ¼ × 1 × 3-inch stiffening blocks are furnished to be used behind the pole-band flanges and underneath the J-bolt nuts. Fasten the pole band to the back side of the pole through the hole in the center of the band using one of the five 1∕2-inch diameter lag screws provided. Then, fasten the mounting bracket to the pole using the four remaining 1∕2-inch lag screws as shown in Figure 6.
Through bolt

14 S&C Instruction Sheet 765-510
Figure 7. Attaching the uppermost vertical operating pipe to the switch for an upright mounting configuration.
Vertical operating pipe
Universal coupling
Installing the Vertical Operating PipeS&C recommends assembling each coupling as work progresses from the top down, starting with the universal coupling connecting the switch to the upper section of vertical operating pipe. Continue with the universal coupling between the upper section of vertical operating pipe and the first lower section, the splice couplings connecting the lower sections of pipe to each other, and end with the rotating operating handle or 6801M Automatic Switch Operator.
Variations in the surface and height of the wood pole and/or operating pipe are easier to adjust for when the switch is installed in this manner.
NOTICEInstalling Piercing Set ScrewThis equipment uses piercing set screws to couple the operating mechanism to the operating pipe and to provide stability to the couplings joining one or more lengths of pipe .
Before assembling a coupling, back the piercing set screw out of the coupling so the tip does not protrude into the body of the coupling . This ensures the coupling’s clamp screws can be fully tightened . After the operator assembly is in place, tighten the piercing set screw, piercing the pipe, and continue until resistance is felt . It is not necessary to fully tighten the piercing set screw .
Step 5Locate the universal coupling that is shipped in the carton of switch ED parts. Attach the universal coupling to the rotating shaft of the toggle mechanism using the ½-inch stainless-steel pin, flatwasher, and cotter pin provided. See Figure 7 or 8, as applicable. Install the uppermost section of the predrilled vertical operating pipe in the universal coupling as shown. Then, secure the vertical operating pipe to the universal coupling using the ½ × 13 × 2½-inch bolt, flatwasher, and nut provided. If only one vertical pipe section is used, omit Steps 6 through 9 and proceed to Step 10.
Installation
Figure 8. Attaching uppermost vertical operating pipe to the switch for triangular mounting configuration.
Universal coupling
Vertical operating pipe

S&C Instruction Sheet 765-510 15
Installation
Figure 9. The guide bearing assembly and universal coupling (upper position).
Uppermost pipe section
½ × 1 × 2½-inch bolts (2)
Universal coupling (splice couplings used below this group)
Guide bearing assembly
Alignment-adjusting slots
Gaining channel (used on round poles only)
Figure 10. The guide bearing assembly and splice coupling (intermediate positions).
Gaining channel (used on round poles only)
Splice coupling
Guide bearing assembly
Alignment-adjusting slots
Step 6Install a universal coupling on the lower end of the uppermost section of the vertical operating pipe in the fashion described above using the ½ × 13 × 2½-inch bolt and ½—13 nut provided. See Figure 9.
Step 7Position and install the guide bearing assembly on the pole in accordance with the dimension shown on the erection drawing.
Step 8Pass the next section of vertical operating pipe up through the guide bearing and attach it to the universal coupling on the lower end of the uppermost vertical-operating-pipe section. See Figure 9.
Step 9Repeat Step 7 if additional guide bearings are specified. Intermediate sections of pipe are held together using a splice coupling. See Figure 10. Insert the splice coupling inside the upper section of pipe and align the holes. Insert the ribbed neck carriage bolt through the pipe and coupling and fasten with the supplied nut and washer. Tighten the carriage bolt until the ribbed-neck engages with the holes in both the pipe and coupling. Then insert the lower section of the splice coupling into the next section of pipe. Align the holes and insert the second ribbed-neck carriage bolt through the pipe and coupling, and fasten in the same manner as the first bolt.

16 S&C Instruction Sheet 765-510
Installing the Operating Handle
NOTICEIf ordered with provisions for power operation with the S&C 6801M Automatic Switch Operator (Catalog Number Suffix “-M”), omit steps 10 through 13 and proceed with the installation steps described in the 6801M Operator Instal-lation Instructions (S&C Instruction Sheet 1045M-510) . Once the 6801M operator has been installed, proceed with step 14 of this instruction sheet .
Step 10«Install the operating-handle assembly on the lowest section of vertical operating pipe at the location indicated on the erection drawing. Make certain the cutting tip of the piercing set screw in the operating-handle assembly does not protrude through the clamp when installing the assembly on the vertical operating pipe. After the operating-handle assembly is in place, tighten the piercing set screw on the operating-handle assembly, piercing the pipe. Continue turning until a firm resistance is felt. See Figure 11.
Slide the foot bearing assembly onto the lowest vertical-operating-pipe section and bolt it to the pole at the position shown on the erec-tion drawing. At the same time, use one of the mounting bolts to attach one end of the ground-ing strap (the end with the grounding connector attached) to the foot bearing assembly.p
If necessary to compensate for the taper of the wood pole and to keep the vertical operating pipe aligned and plumb, shift the guide bearings toward or away from the pole. Alignment slots are provided for this purpose. See Figures 9 and 10 on page 15.
Step 11Fasten the free end of the grounding strap to the lowest vertical-operating-pipe section a few inches above the operating-handle assembly (or key interlock) with the U-bolt connector provided for this purpose. Then connect the lower end of the strap to a suitable earth ground, fastening the grounding connector provided at that end of the strap.p See Figure 11.
Figure 11. A foot bearing assembly and operating-handle assembly.
Vertical-operating-pipe section
Swing-away hasps for padlocking
Handle
Foot bearing support plate
Piercing set screw
Gaining channel (used on round poles only)
Grounding connector (for earth ground connection—see text)p
Grounding strap
Installation
« When a key interlock is furnished (Standard Minor Modification Suffix “-S6”), refer to Step 20 on page 26 at this point .
p The grounding recommendations described in this doc-ument may differ from the standard operating and safety procedures of certain electric utility companies . Where a discrepancy exists, the operating procedures of the electric utility apply .

S&C Instruction Sheet 765-510 17
Installation
Step 12Open and close the interrupter switch slowly to see that no operating difficulties are encountered caused by undetected damage in shipping. (This applies only when checking for alignment and complete closure; when in service, the interrupter switch should be opened or closed vigorously through its full travel without hesitation at any point.
Step 13
CAUTIONAdjust the stop plates to remove all excess play from the operating mechanism and to attain proper “windup” tension before energizing the switch .
Slack in the operating pipe may allow the vertical operating pipe to move or vibrate during high winds or inclement weather .
Failure to properly adjust the handle may cause contact overheating or arcing, damaging the blade contacts. Injury to operating personnel may result.
Loosen the bolts that secure the adjustable stop plates to the foot bearing support plate. See Figure 12. Place the switch in the fully open position and adjust the open-position stop plate so the handle, when lowered, fits into the open-position slot. Mark on the support plate the location of the open-position stop plate.
Fully close the switch and apply sufficient pressure to the handle in the closing direction to remove all play in the operating-pipe linkage. Now adjust the closed-position stop plate so the handle will require even greater pressure to force it into the closed-position slot. Mark on the support plate the location of the closed-position stop plate.
While holding both stop plates in the previ-ously marked positions, torque the bolts to secure the stop plates to the support plate. Move the handle to the Switch-Open position and verify the handle, when lowered, fits firmly into the open-position slot.
Move the handle to the Switch-Closed posi-tion. Verify that all play in the operating-pipe linkage has been taken up before the handle can be lowered into the closed-position slot and substantial pressure is required to force the handle into the closed-position slot.
Step 14Recheck to be sure that all clamp bolts and piercing set screws have been torqued to final tightness.
Figure 12. The foot bearing assembly and operating-handle assembly.
Foot bearing support plate
Adjustable stop plates

18 S&C Instruction Sheet 765-510
Installing the Optional Phase-to-Ground Wildlife Protection (Catalog Number Suffix “-W”)
DANGERDe-energize the switch and ground it at all six terminals before installing the wildlife protection option .
The wildlife protection option is not designed to be installed on energized equipment .
Failure to do so could lead to serious injury or death.
The phase-to-ground wildlife protection option helps prevent climbing and perching animals from making phase-to-grounded part contact. See Figures 13 and 14. A typical wildlife protection installation includes:
• Six wildlife disks
On switches in the upright mounting configuration:
• One fiberglass interphase operating rod, pre-installed
• One pole-mounting bracket cover
• Two base covers (three base covers on switches with extra mounting-pole clear-ance) (Base covers are not included on switches with insulated bases.)
NOTICES&C recommends installing the wildlife protection option after the switch is secured to the utility pole .
Damage to the wildlife option may occur if lifting slings strain the wildlife disks during handling .
Figures 13 and 14 illustrate a typical instal-lation of the wildlife protection option. The fiberglass operating rod will be pre-installed at the factory. Consult the RD drawing accom-panying the switch installation instructions for details specific to your switch that may differ from these instructions that begin on page 19. Following are instructions for a typical field installation of the wildlife protection option.
Installation
Figure 13. A 14.4-kV Omni-Rupter with optional wildlife protection (Catalog Number Suffix “-W”), upright mounting configuration.
Wildlife disks
Base cover
Wildlife disks
Fiberglass interphase operating rod
Figure 14. A 14.4-kV Omni-Rupter switch with optional wildlife protection (Catalog Number Suffix “-W”), inverted mounting configuration, single-phase shown.
Wildlife disks
Insulated operating rod

S&C Instruction Sheet 765-510 19
Installation
Installing the Base CoversBase covers are only used on switches in the upright mounting configuration. Skip to “Installing the Wildlife Disks” on page 20 for switches in the inverted mounting configuration.
Step 15With the switch in the closed position, place the base covers onto the steel base of the switch in the positions shown on the associated RD drawing. If optional surge arrester mounting provisions (Catalog Number Suffix “-A1” or “-A2”) have been specified for the switch, cutouts will be provided in the base covers to fit around the arrester mounting brackets.
Step 16Hook one end of the spring clip assembly into the lip on the edge of one side of the base cover. See Figure 15. Bring the spring clip underneath the switch base and stretch it until it can be hooked into the lip on the edge of the opposite side of the base cover. Make sure the spring clip is approximately one-half inch from the edge of the base cover. See Figure 16. Install the remaining spring clips on their respective base covers in accordance with the supplied RD drawing.
Figure 16. Make sure clips are installed approximately ½-inch (12.7 mm) from the edge of the cover.
½-inch from edge
Figure 15. Hook one end of spring clip into the base cover lip. Stretch underneath the base and hook the clip on the opposite side.
Base cover
Spring clip
Switch base

20 S&C Instruction Sheet 765-510
Installing the Wildlife DisksBefore installing the wildlife disks, determine the proper placement of the disks on the switch blade and contact insulators.
On Upright 14.4-kV Omni-Rupter Switches (Porcelain and Cypoxy™ Insulators)Install the wildlife disk to the bottom skirt root of the insulator on both the blade and contact ends of the switch. When the wildlife disks are properly installed, the disks will overlap slightly, as shown in Figure 17.
On Upright 25-kV Omni-Rupter Switches (Porcelain and Cypoxy™ Insulators)Blade-end of the switch: Install the wildlife disk on the bottom skirt root of the insulator.
Contact-end of the switch: Count up two skirts from the base and install the wildlife disk to the insulator on the blade-end. When the wild-life disks are installed properly, they will be at approximately the same height. See Figure 18.
Figure 18. Wildlife disk placement on 25-kV Omni-Rupter Switches upright mounting configuration.
Contact-end Blade-end
Disks at same height
Install two skirts from bottom skirt root
Insulator Insulator
Install disk on bottom skirt root
Figure 17. Wildlife disk placement on 14.4-kV Omni-Rupter Switches upright mounting configuration.
Contact-end Blade-end
Disks overlap blade-end over contact-end
InsulatorInsulator
Install disk on bottom skirt root
Install disk on bottom skirt root
Installation

S&C Instruction Sheet 765-510 21
Installation
On Inverted 14.4-kV Omni-Rupter Switches (Porcelain and Cypoxy™ Insulators)Install the wildlife disk to the lowest skirt of the insulator on both the blade and contact ends of the switch. When the wildlife disks are installed properly, the disks will slightly overlap, as shown in Figure 19.
On Inverted 25-kV Omni-Rupter Switches (Porcelain and Cypoxy™ Insulators)Contact end of the switch: Install the wildlife disk on the bottom skirt of the insulator.
Blade end of the switch: Count up three skirts from the live parts and install the wildlife disk to the insulator on the blade end. When the wildlife disks are installed properly, they will be at approximately the same height. See Figure 20.
First skirt root from bottom of insulator
Stationary insulator with contact
Figure 19. Wildlife disk placement on 14.4-kV Omni-Rupter Switch, inverted mounting configuration.
Figure 20. Wildlife disk placement on 25-kV Omni-Rupter Switch, inverted mounting configuration.
Rotating insulator with blade
First skirt root from bottom of insulator
Rotating insulator with blade
Stationary insulator with contact
First skirt root from bottom of insulator Third skirt root
from bottom of insulator

22 S&C Instruction Sheet 765-510
Installation
Step 17Upright mounting configuration shown, inverted mounting configuration similar.
(a) To assemble the disks, fit the disk around the insulator on the blade-end of the switch. See Figure 21. Then, insert the locking tabs of one-half of the disk into the open slot on the other half to create a secure overlapping fit. Repeat the procedure on the opposite side of the disk. When the halves are correctly assembled, the S&C logo will be on top of the disk on both sides. See Figure 22.
(b) Starting with the outside locking tabs first, squeeze the overlapping sides together until the tabs audibly snap into place. Snap tab into open slot
Upper locking tab
Lower locking tab
Slot
Figure 22. Snap the lower tab into open slot.
Figure 21. Fit the disk halves around the insulator.
InsulatorDisk halves

S&C Instruction Sheet 765-510 23
Figure 24. The pole-mounting bracket cover.
Mounting bracket cover
Snap rivets
(c) Push the two halves of the disk together in toward the insulator so the disk fits the insulator as close as possible. See Figure 23. Snap the upper locking tab firmly into place. Both tabs should protrude through the open slot, as shown in Figure 22 on page 22.
(d) Repeat (a) through (c) in this step to install the wildlife disks on the insulators on the contact-end of the switch.
For Omni-Rupter Switches in the upright mounting configuration:
(e) After installing the wildlife disks, install the pole-mounting bracket cover with the snap-rivets provided. See Figure 24.
Figure 23. Push the disk halves together. Snap the upper tab into place. The disk halves should fit as tight against the insulator as possible.
Push disk halves together
Installation
Step 17 Continued

24 S&C Instruction Sheet 765-510
Figure 25. The dead-ending brackets (triangular mounting configura-tion shown).
Extension link assemblies
Dead-end brackets
Jumper
Line conductor
Dead-Ending ConductorsDead-ending provisions are standard on Omni-Rupter Switches in the upright, upright with extra mounting pole clearance, triangular, or inverted mounting configurations. When dead-ending to these brackets, a pole band and extension-link assembliesu are required. See Figure 25.
Maximum dead-end loading for S&C dead-ending brackets with steel bases:
Where pull-off forces are applied to only one side of the switch
For switches in the upright and triangular mounting configurations
2000 pounds per conductor
For switches in the upright with extra pole-mounting clearance mounting configuration
1500 pounds per conductor
For switches in the inverted mounting configuration
1500 pounds for 14 .4-kV switches and 1000 pounds for 25-kV switches
Where pull-off forces are applied to both sides of the switch
For switches in all mount-ing configurations
8000 pounds per conductor
Maximum dead-end loading for S&C dead-ending brackets with insulated bases:
Where pull-off forces are applied to only one side of the switch
For switches in the upright, upright with extra pole-mounting clearance, and triangular mounting configurations
700 pounds for 14 .4-kV switches and 500 pounds for 25-kV switches
For switches in the inverted mounting configuration
500 pounds per conductor
Where pull-off forces are applied to both sides of the switch
For switches in all mount-ing configurations
8000 pounds per conductor
Connecting High-Voltage Conductors
DANGERConductors must be de-energized and grounded in accordance with standard system operating practice .
Failure to do so can result in serious injury or death.
Installation
u A pole band can be specified by adding suffix “-P1” to the catalog number . Extension-link assemblies can be provided by adding suffix “-D” to the catalog number of the switch or an equivalent user-furnished extension means may be used .

S&C Instruction Sheet 765-510 25
Installation
The Omni-Rupter Switch terminal pads are silver-plated and do not require abrasive cleaning as a part of their preparation. Wipe any dirt or grease from the surface and apply a thick coating of Penetrox® A (available from Burndy Corporation) or other appropriate conductor preparation compound.
CAUTIONDO NOT wire-brush the terminal pads . Wire brushing may scratch the plating .
Step 18When high-voltage conductors are to be connected using aluminum-alloy connectors the following procedures should be employed:
(a) Thoroughly wire-brush the current-transfer surfaces of each connector and immediately apply a liberal coating of conductor preparation compound to the brushed surfaces. DO NOT wire-brush the Omni-Rupter Switch terminal pads.
(b) Place the hinge-end articulating terminal pad in the center-neutral position. See Figure 26.
(c) Prepare the conductors using the manufacturer’s or utility’s standard procedures and clamp them in their respective connectors.
(d) Attach the connectors to the terminal pads. Allow the articulating terminal pad to “settle” naturally with the weight of the conductor.
For other types of connector, follow the manufacturer’s recommended preparation procedure before connecting to Omni-Rupter Switch terminal pads. See Figure 27.
NOTICETo avoid overloading the terminal pads, S&C recommends making the jumper connection to the line conductor before securing the jumper fasteners to the terminal pad .
Step 19Attach the jumper connectors to their respective terminal pads using flexible-conductor connections. See Figure 27.
Figure 26. Place the articulating terminal pad in the central neutral position.
Terminal pad (center-neutral position) Blade
Conductor
Figure 27. Attach the jumper connectors to the terminal pads. Do not overload the terminal pads. (Typical connector attachment.)
Articulating terminal pad
Jumper connector
“Mass anode” type connectors, such as the Catalog Number 5300 series offered by S&C, that have been des-ignated by the connector manufacturer as being suitable for direct attachment to copper alloy terminal pads .

26 S&C Instruction Sheet 765-510
Figure 28. Key-interlock group detail.
Interlock (with ⅜-inch bolt projection and ¾-inch bolt travel)
Vertical operating pipe
Locking disc
Interlock bracket
Gaining channel (used on round poles only)
Foot bearing assembly
Operating-handle assembly
⅜ inch (9 .5 mm)
Locking the Operating Handle
NOTICEIf ordered with provisions for power operation with the S&C 6801M Automatic Switch Operator (Catalog Number Suffix “-M”), omit Step 20 and proceed with the locking instructions described in the 6801M Operator Installation Instructions (S&C Instruction Sheet 1045M-510) . Once the 6801M operator locking instructions have been followed, proceed with Step 21 of this instruction sheet .
Step 20With padlock: The operating-handle assembly includes swing-away hasps for padlocking the interrupter switch in either the open or closed position.
With key interlock: The interlock group (see Figure 28) includes a Superior key interlock, Type B6003-1 Mk II single or multiple key (or equivalent), with ⅜-inch bolt projection and ¾-inch bolt travel, locking disc, and interlock bracket. If “provision only” for a key interlock is specified, the interlock will not be included. See Figure 28. Assemble with the operating-handle assembly as follows:
If necessary to compensate for the taper of the wood pole and to keep the vertical operating pipe aligned and plumb, shift the guide bearings toward or away from the pole. Alignment slots are provided for this purpose. See Figures 9 and 10 on page 15.
(a) Slide the interlock bracket, locking disc, operating-handle assembly, and foot bearing assembly onto the lowest vertical-operating-pipe section with the locking disc and the operating-handle assembly between the interlock bracket and the foot bearing assembly, as illustrated in Figure 28. Bolt the foot bearing assembly to the pole at the position shown on the erection drawing. At the same time, use one of the mounting bolts to attach one end of the grounding strap (the end with the grounding connector attached) to the foot bearing assembly.p
Installation
p The grounding recommendations described in this doc-ument may differ from the standard operating and safety procedures of certain electric utility companies . Where a discrepancy exists, the operating procedures of the electric utility apply .

S&C Instruction Sheet 765-510 27
Installation
Figure 30. Key-interlock group detail.
Locking disc
Interlock bracket
Figure 29. The foot bearing assembly and operating-handle assembly.
Handle
Piercing set screws
(b) Install the operating-handle assembly on the lowest section of vertical operating pipe at the location indicated in the erection drawing. Make certain the cutting tip of the piercing set screw in the operating-handle assembly does not protrude when installing the assembly on the vertical operating pipe. After the operating handle is in place, tighten the piercing set screw on the operating-handle assembly, piercing the pipe. Continue turning until a firm resistance is felt. See Figure 29.
(c) Attach the interlock bracket to the foot bearing assembly, using the ½–13 × 1 screws and lockwashers furnished.
(d) Attach the key interlock to the interlock bracket and extend the bolt.
(e) With the interrupter switch in the closed position, use the interlock bolt to position the locking disc so the bolt enters the closed-position slot in the disc (and will enter the open-position slot when the switch is in the open position). Hold the locking disc ⅜-inch below the interlock bracket (see Figure 30) and drill 7�16-inch holes through the vertical-operating-pipe section, using the holes in the locking-disc collar as pilots. Attach the locking disc to the pipe using the ⅜–16 × 3 bolt, nut, and lockwasher furnished.
(f) Block one of the two slots in the locking disc with the blocking screw provided. The slot to be blocked will be determined by whether a locked-open or locked-closed arrangement is required.
NOTICEKey interlocks are intended for proper sequencing of switching operations; they are not intended to provide security . The operating-handle assembly includes swing-away hasps for padlocking the interrupter switch in either the Open or Closed position .
Complete the operating-handle installation as directed in Steps 10 through l4 on pages 16 and 17. Proceed to page 28 for instructions on checking switch operation and adjustment.
⅜-inch (9.5 mm)

28 S&C Instruction Sheet 765-510
Figure 31. The blade and contact assembly in the fully closed position.
Blade
Guide fingers
Checking Operation
NOTICEIf furnished with provisions for power operation using the S&C 6801M Automatic Switch Operator (Catalog Number Suffix “-M”), perform Steps 21 and 22 using the installed 6801M operator and the instructions described in the "Adjusting the Tap Position on the Load Resistor" section of the 6801M Operator Instal-lation Instructions (S&C Instruction Sheet 1045M-510) .
Step 21Open and close the interrupter switch by swinging the handle slowly through its full travel. Check to be sure that the following conditions exist:
(a) With the operating handle as far as it will go in the closing direction, all main contacts of the interrupter switch are in the fully-closed position. See Figure 31.
(b) With the operating handle as far as it will go in the opening direction, the switch blades are 90 degrees from the closed position. (perpendicular to the switch mounting-weldment). See Figure 32.
Installation
Figure 32. The blade at the 90 degrees from switch mounting-weldment position.
Switch mounting-weldment
Blade

S&C Instruction Sheet 765-510 29
Installation
Step 22Check the following on each phase.
(a) Open and close the switch and examine the interrupter and blade alignment. The interrupter and interrupter shunt arm must be parallel to the sweep of the blade. See Figure 33.
(b) Slowly open the switch. The following conditions should be met:
• As the blades move toward the open position, the operating cam shunt contact should engage the interrupter shunt arm on the copper-bronze contact surface of the shunt contact. See Figure 34.
• When the blade reaches its full travel the interrupter shunt arm will be released and will quickly snap back to its closed position and reset for the next operation. See Figure 33.
(c) Slowly close the switch. The following conditions should be met:
• The interrupter shunt arm should be guided into position by the curved back of the shunt contact. See Figure 35.
Figure 33. Make sure the interrupter and interrupter shunt arm is parallel to the sweep of the blade.
Interrupter shunt arm (reset)
Blade
Interrupter
Figure 34. The shunt contact should engage the interrupter shunt arm on the copper-bronze contact surface of the shunt contact.
Interrupter shunt arm
Blade
Shunt contact
Figure 35. The shunt contact will guide the interrupter shunt arm into position.
Interrupter shunt arm
Shunt contact

30 S&C Instruction Sheet 765-510
Step 22 continued• The blade should move into the jaw
contact guide fingers on center. See Figure 36.
• When the interrupter is fully closed, the interrupter shunt arms are resting against or are no more than ⅛-inch away from the auxiliary return arm of the multipurpose operating cam. See Figure 37.
NOTICEIf any of the conditions described above cannot be achieved, the damage likely was sustained during shipping or storage . Contact the nearest S&C Sales Office for assistance .
NOTICEOmni-Rupter Switches specified with the optional harsh environment contacts (Catalog Number Suffix “-C”) have graphite-impregnated blades that are greaseless and self-lubricating . DO NOT apply grease to the blade contacts .
Installation
Figure 36. During closing, make sure the blade enters the guide fingers on center.
Guide fingers
Blade
Figure 37. The interrupter shunt arm should be resting against or be no more than ⅛-inch (9.5 mm) away from the auxiliary return arm.
Interrupter shunt arm Auxiliary
return arm

S&C Instruction Sheet 765-510 31
WARNINGDO NOT operate the Omni-Rupter Switch slowly or part way by using a “chopping” motion.
When in service, the Omni-Rupter Switch should always be opened or closed vigorously through its full travel without hesitation at any point .
NOTICEIf furnished with provisions for power operation using the S&C 6801M Automatic Switch Operator (Catalog Number Suffix “-M”), follow the operating instructions found in the 6801M Operator Operating Manual (S&C Instruction Sheet 1045M-540) .
To Open:Remove the padlock or retaining device from the padlock hasp. Swing the hasp clear of the closed stop plate. Make sure the padlock hasp of the open stop plate is clear of the stop plate opening.
Lift the handle out of the closed stop plate and swing it quickly toward the open direction. See Figure 38. Lower the handle into the open stop plate. Secure the handle with a padlock or retaining device according to standard system operating procedures and safety practices.
Check the switch to make sure all three pole-units are open and their blades are at an approximate 90 degrees from the closed posi-tion (perpendicular to the switch mounting-weldment). See Figure 32 on page 28.
To Close:Remove the padlock or retaining device from the padlock hasp. Swing the hasp clear of the open stop plate. Make sure the padlock hasp of the closed stop plate is clear of the stop plate opening.
Lift the handle out of the open stop plate and swing it quickly toward the closed direction. Lower the handle into the closed stop plate. Secure the handle with a padlock or retaining device according to standard system operating procedures and safety practices.
Check the switch blades to make sure all three phases are closed. See Figure 31 on page 28.
Figure 38. Swing the handle and secure it in the open or closed stop plate.
Operating handle
Hasp
Stop plates
Operation
