installation, configuration, and development guide1.7 deploying to apache tomcat 1-22 1.7.1 about...
TRANSCRIPT
Oracle® REST Data ServicesInstallation, Configuration, and DevelopmentGuide
Release 3.0.11E87809-03July 2017

Oracle REST Data Services Installation, Configuration, and Development Guide, Release 3.0.11
E87809-03
Copyright © 2011, 2017, Oracle and/or its affiliates. All rights reserved.
Primary Authors: Mamata Basapur, Chuck Murray
Contributors: Colm Divilly, Sharon Kennedy, Ganesh Pitchaiah, Kris Rice, Elizabeth Saunders, Jason Straub,Vladislav Uvarov
This software and related documentation are provided under a license agreement containing restrictions onuse and disclosure and are protected by intellectual property laws. Except as expressly permitted in yourlicense agreement or allowed by law, you may not use, copy, reproduce, translate, broadcast, modify,license, transmit, distribute, exhibit, perform, publish, or display any part, in any form, or by any means.Reverse engineering, disassembly, or decompilation of this software, unless required by law forinteroperability, is prohibited.
The information contained herein is subject to change without notice and is not warranted to be error-free. Ifyou find any errors, please report them to us in writing.
If this is software or related documentation that is delivered to the U.S. Government or anyone licensing it onbehalf of the U.S. Government, then the following notice is applicable:
U.S. GOVERNMENT END USERS: Oracle programs, including any operating system, integrated software,any programs installed on the hardware, and/or documentation, delivered to U.S. Government end users are"commercial computer software" pursuant to the applicable Federal Acquisition Regulation and agency-specific supplemental regulations. As such, use, duplication, disclosure, modification, and adaptation of theprograms, including any operating system, integrated software, any programs installed on the hardware,and/or documentation, shall be subject to license terms and license restrictions applicable to the programs.No other rights are granted to the U.S. Government.
This software or hardware is developed for general use in a variety of information management applications.It is not developed or intended for use in any inherently dangerous applications, including applications thatmay create a risk of personal injury. If you use this software or hardware in dangerous applications, then youshall be responsible to take all appropriate fail-safe, backup, redundancy, and other measures to ensure itssafe use. Oracle Corporation and its affiliates disclaim any liability for any damages caused by use of thissoftware or hardware in dangerous applications.
Oracle and Java are registered trademarks of Oracle and/or its affiliates. Other names may be trademarks oftheir respective owners.
Intel and Intel Xeon are trademarks or registered trademarks of Intel Corporation. All SPARC trademarks areused under license and are trademarks or registered trademarks of SPARC International, Inc. AMD, Opteron,the AMD logo, and the AMD Opteron logo are trademarks or registered trademarks of Advanced MicroDevices. UNIX is a registered trademark of The Open Group.
This software or hardware and documentation may provide access to or information about content, products,and services from third parties. Oracle Corporation and its affiliates are not responsible for and expresslydisclaim all warranties of any kind with respect to third-party content, products, and services unless otherwiseset forth in an applicable agreement between you and Oracle. Oracle Corporation and its affiliates will not beresponsible for any loss, costs, or damages incurred due to your access to or use of third-party content,products, or services, except as set forth in an applicable agreement between you and Oracle.
Contents
Preface
Audience xvii
Documentation Accessibility xvii
Related Documents xviii
Conventions xviii
Third-Party License Information xviii
1 Installing Oracle REST Data Services
1.1 About Oracle REST Data Services 1-1
1.2 Understanding the Installation Process 1-2
1.2.1 Supported Java EE Application Servers 1-2
1.2.2 System Requirements 1-2
1.2.3 About Installing Oracle REST Data Services 1-3
1.3 Configuring and Installing Oracle REST Data Services 1-3
1.3.1 About Using the Command-Line Interface 1-4
1.3.2 About the Database Users Used by Oracle REST Data Services 1-4
1.3.3 Privileges Granted by Oracle REST Data Services 1-5
1.3.4 Downloading, Configuring and Installing Oracle REST Data Services 1-6
1.3.4.1 Simple Installation Using a Parameters File 1-7
1.3.4.2 Advanced Installation Using Command-Line Prompts 1-8
1.3.4.3 Validating the Oracle REST Data Services Installation 1-9
1.3.4.4 If You Want to Reinstall or Uninstall (Remove) Oracle REST DataServices 1-10
1.3.5 Using SQL Developer Oracle REST Data Services Administration(Optional) 1-10
1.3.5.1 About SQL Developer Oracle REST Data Services Administration 1-11
1.3.5.2 Configuring an Administrator User 1-11
1.3.6 Using OAuth2 in Non-HTTPS Environments 1-11
1.4 Running in Standalone Mode 1-12
1.4.1 Starting in Standalone Mode 1-12
1.4.1.1 Converting a Private Key to DER (Linux and Unix) 1-13
1.4.2 Stopping the Server in Standalone Mode 1-14
iii
1.4.3 Configuring a Doc Root for Non-Application Express Static Resources 1-14
1.5 Deploying to Oracle WebLogic Server 1-15
1.5.1 About Oracle WebLogic Server 1-15
1.5.2 Downloading, Installing, and Configuring Oracle REST Data Services 1-15
1.5.3 Configuring Oracle Application Express Images 1-16
1.5.4 Launching the Administration Server Console 1-16
1.5.5 Installing the Oracle WebLogic Server Deployment 1-17
1.5.6 Configuring WebLogic to Handle HTTP Basic Challenges Correctly 1-18
1.5.7 Verifying the State and Health of ords and i 1-19
1.6 Deploying to GlassFish Server 1-19
1.6.1 About GlassFish Server 1-20
1.6.2 Downloading, Installing, and Configuring Oracle REST Data Services 1-20
1.6.3 Configuring Oracle Application Express Images 1-20
1.6.4 Launching the Administration Server Console 1-21
1.6.5 Installing the GlassFish Server Deployment 1-21
1.7 Deploying to Apache Tomcat 1-22
1.7.1 About Apache Tomcat 1-23
1.7.2 Downloading, Installing, and Configuring Oracle REST Data Services 1-23
1.7.3 Configuring Oracle Application Express Images 1-23
1.7.4 Installing the Apache Tomcat Deployment 1-24
1.8 Upgrading Oracle REST Data Services 1-24
1.9 Using a Bequeath Connection to Install, Upgrade, Validate, or UninstallOracle REST Data Services 1-25
2 Configuring Oracle REST Data Services (Advanced)
2.1 Configuring Multiple Databases 2-1
2.1.1 About the Request URL 2-1
2.1.2 Configuring Additional Databases 2-2
2.1.3 Routing Based on the Request Path Prefix 2-3
2.1.3.1 Example of Routing Based on the Request Path Prefix 2-3
2.1.4 Routing Based on the Request URL Prefix 2-4
2.1.4.1 Example of Routing Based on the Request URL Prefix 2-4
2.2 Support for RAC Fast Connection Failover 2-4
2.3 Configuring Security, Caching, Pre- and Post Processing, Environment, andExcel Settings 2-5
2.4 Developing RESTful Services for Use with Oracle REST Data Services 2-5
3 Developing Oracle REST Data Services Applications
3.1 Introduction to Relevant Software 3-2
3.1.1 About Oracle Application Express 3-2
iv
3.1.2 About RESTful Web Services 3-2
3.2 Getting Started with RESTful Services 3-2
3.2.1 RESTful Services Terminology 3-3
3.2.2 About Request Path Syntax Requirements 3-4
3.2.3 "Getting Started" Documents Included in Installation 3-4
3.2.4 About cURL and Testing RESTful Services 3-5
3.2.5 Automatic Enabling of Schema Objects for REST Access (AutoREST) 3-6
3.2.5.1 Examples: Accessing Objects Using RESTful Services 3-7
3.2.5.2 Filtering in Queries 3-18
3.2.5.3 Auto PL/SQL 3-26
3.2.6 Manually Creating RESTful Services Using SQL and PL/SQL 3-31
3.2.6.1 About Oracle REST Data Services Mechanisms for PassingParameters 3-31
3.2.6.2 Using SQL/JSON Database Functions with ORDS 3-42
3.2.7 About Working with Dates Using ORDS 3-50
3.2.7.1 About Datetime Handling with Oracle REST Data Services 3-51
3.2.7.2 About Setting the Time Zone that ORDS Uses 3-52
3.2.7.3 Exploring the Sample RESTful Services in Application Express(Tutorial) 3-53
3.3 Configuring Secure Access to RESTful Services 3-57
3.3.1 Authentication 3-58
3.3.1.1 First Party Cookie-Based Authentication 3-58
3.3.1.2 Third Party OAuth 2.0-Based Authentication 3-58
3.3.2 About Privileges for Accessing Resources 3-59
3.3.3 About Users and Roles for Accessing Resources 3-59
3.3.4 About the File-Based User Repository 3-60
3.3.5 Tutorial: Protecting and Accessing Resources 3-60
3.3.5.1 OAuth Flows and When to Use Each 3-61
3.3.5.2 Assumptions for This Tutorial 3-61
3.3.5.3 Steps for This Tutorial 3-62
3.4 About Oracle REST Data Services User Roles 3-72
3.4.1 About Oracle Application Express Users and Oracle REST DataServices Roles 3-73
3.4.1.1 Granting Application Express Users Oracle REST Data ServicesRoles 3-73
3.4.1.2 Automatically Granting Application Express Users Oracle RESTData Services Roles 3-73
3.4.2 Controlling RESTful Service Access with Roles 3-74
3.4.2.1 About Defining RESTful Service Roles 3-74
3.4.2.2 Associating Roles with RESTful Privileges 3-75
3.5 Authenticating Against WebLogic Server and GlassFish User Repositories 3-75
3.5.1 Authenticating Against WebLogic Server 3-75
v

3.5.1.1 Creating a WebLogic Server User 3-76
3.5.1.2 Verifying the WebLogic Server User 3-77
3.5.2 Authenticating Against GlassFish 3-77
3.5.2.1 Creating a GlassFish User 3-77
3.5.2.2 Verifying the GlassFish User 3-78
3.6 Integrating with Existing Group/Role Models 3-78
3.6.1 About role-mapping.xml 3-78
3.6.1.1 Parameterizing Mapping Rules 3-79
3.6.1.2 Dereferencing Parameters 3-79
3.6.1.3 Indirect Mappings 3-80
3.7 Using the Oracle REST Data Services PL/SQL API 3-80
3.7.1 Creating a RESTful Service Using the PL/SQL API 3-81
3.7.2 Testing the RESTful Service 3-81
4 NoSQL and Oracle REST Data Services
4.1 About NoSQL and Oracle REST Data Services 4-1
4.1.1 Technology Environment 4-1
4.1.2 Typical Oracle REST Data Services Input and Output 4-3
4.2 NoSQL Store Installation and Registration 4-4
4.3 Adding and Removing a NoSQL Store for Use with Oracle REST DataServices 4-5
4.4 NoSQL REST Services 4-6
4.4.1 Metadata Services 4-7
4.4.1.1 Read Metadata (GET) 4-7
4.4.2 Data Services 4-10
4.4.2.1 Read Data (GET) 4-10
4.4.2.2 Idempotent Write (PUT) 4-14
4.4.2.3 Write (POST) 4-15
4.4.2.4 Delete (DELETE) 4-15
4.4.3 DDL Services 4-15
4.4.3.1 Create/Update (POST) 4-16
4.4.3.2 Drop (POST) 4-16
4.4.3.3 Poll (GET) 4-17
4.4.4 Common Parameters 4-17
4.4.4.1 Parameters to Skip Results and Limit the Number of Results 4-17
4.4.4.2 Parameters to Specify Query Conditions 4-18
4.4.4.3 Parameters to Specify Direction (Order), and Consistency andDurability Guarantees 4-19
vi
5 ORDS PL/SQL Package Reference
5.1 ORDS.CREATE_ROLE 5-1
5.2 ORDS.CREATE_SERVICE 5-1
5.3 ORDS.DEFINE_HANDLER 5-4
5.4 ORDS.DEFINE_MODULE 5-6
5.5 ORDS.DEFINE_PARAMETER 5-7
5.6 ORDS.DEFINE_PRIVILEGE 5-9
5.7 ORDS.DEFINE_SERVICE 5-11
5.8 ORDS.DEFINE_TEMPLATE 5-14
5.9 ORDS.DELETE_MODULE 5-15
5.10 ORDS.DELETE_PRIVILEGE 5-16
5.11 ORDS.DELETE_ROLE 5-16
5.12 ORDS.DROP_REST_FOR_SCHEMA 5-17
5.13 ORDS.ENABLE_OBJECT 5-17
5.14 ORDS.ENABLE_SCHEMA 5-18
5.15 ORDS.PUBLISH_MODULE 5-19
5.16 ORDS.RENAME_MODULE 5-20
5.17 ORDS.RENAME_PRIVILEGE 5-21
5.18 ORDS.RENAME_ROLE 5-21
5.19 ORDS.SET_MODULE_ORIGINS_ALLOWED 5-22
5.20 ORDS.SET_URL_MAPPING 5-23
6 OAUTH PL/SQL Package Reference
6.1 OAUTH.CREATE_CLIENT 6-1
6.2 OAUTH.DELETE_CLIENT 6-2
6.3 OAUTH.GRANT_CLIENT_ROLE 6-3
6.4 OAUTH.RENAME_CLIENT 6-4
6.5 OAUTH.REVOKE_CLIENT_ROLE 6-4
6.6 OAUTH.UPDATE_CLIENT 6-5
A ORDS Database Type Mappings
A.1 Oracle Built-in Types A-1
A.2 Handling Structural Database Types A-3
A.3 Oracle Geospacial Encoding A-5
A.4 Enabling Database Mapping Support A-5
B About the Oracle REST Data Services Configuration Files
B.1 Locating Configuration Files B-1
vii
B.2 Setting the Location of the Configuration Files B-1
B.3 Understanding the Configuration Folder Structure B-1
B.4 Understanding the Configuration File Format B-2
B.4.1 Understanding the url-mapping.xml File Format B-2
B.5 Understanding Configurable Parameters B-3
C Troubleshooting Oracle REST Data Services
C.1 Enabling Debug Tracing C-1
C.2 Enabling Detailed Request Error Messages C-1
C.3 Configuring Application Express Static Resources with Oracle REST DataServices C-1
D Development Tutorial: Creating an Image Gallery
D.1 Before You Begin D-1
D.1.1 About URIs D-1
D.1.2 About Browser Support D-2
D.1.3 Creating an Application Express Workspace D-2
D.2 Creating the Gallery Database Table D-2
D.3 Creating the Gallery RESTful Service Module D-3
D.4 Trying Out the Gallery RESTful Service D-4
D.5 Creating the Gallery Application D-5
D.6 Trying Out the Gallery Application D-8
D.7 Securing the Gallery RESTful Services D-8
D.7.1 Protecting the RESTful Services D-8
D.7.2 Modifying the Application to Use First Party Authentication D-9
D.8 Accessing the RESTful Services from a Third Party Application D-11
D.8.1 Creating the Third Party Developer User D-12
D.8.2 Registering the Third Party Application D-12
D.8.3 Acquiring an Access Token D-12
D.8.4 Using an Access Token D-14
D.8.5 About Browser Origins D-15
D.8.6 Configuring a RESTful Service for Cross Origin Resource Sharing D-15
D.8.7 Acquiring a Token Using the Authorization Code Protocol Flow D-15
D.8.7.1 Registering the Client Application D-16
D.8.7.2 Acquiring an Authorization Code D-16
D.8.7.3 Exchanging an Authorization Code for an Access Token D-17
D.8.7.4 Extending OAuth 2.0 Session Duration D-18
D.8.8 About Securing the Access Token D-19
viii

E Using the Multitenant Architecture with Oracle REST Data Services
E.1 Understanding the Installation Choices E-1
E.2 Installing Oracle REST Data Services into a CDB E-2
E.3 Upgrading Oracle REST Data Services in a CDB Environment E-3
E.4 Making All PDBs Addressable by Oracle REST Data Services (PluggableMapping) E-3
E.5 Uninstalling Oracle REST Data Services in a CDB Environment E-5
F Getting Started with RESTful Services
F.1 REST-Enable a Database Table F-1
F.2 Create a RESTful Service from a SQL Query F-5
F.3 Protect Resources F-11
F.4 Creating a RESTful Service through the Connections Navigator F-12
F.4.1 Creating a Privilege under REST Data Services F-17
F.4.2 Creating a Role F-20
F.5 Register an OAuth Client Application F-20
Index
ix

x

List of Examples
3-1 Enabling the PL/SQL Function 3-27
3-2 Enabling the PL/SQL Procedure 3-27
3-3 Generating an Endpoint for the Stored Procedure 3-29
3-4 Package Procedure and Function Endpoints 3-30
3-5 Nested JSON Purchase Order with Nested LineItems 3-43
3-6 PL/SQL Handler Code Used for a POST Request 3-44
3-7 GET Handler Code using Oracle REST Data Services Query on Relational Tables for
Generating a Nested JSON object 3-47
3-8 ORDS PL/SQL API Call for Creating a New test/:id Template and GET Handler in the
demo Module 3-48
3-9 Setting the Duser.timezone Java Environment Variable in Standalone Mode 3-52
3-10 Setting the Duser.timezone Java Environment Variable in a Java Application Server 3-53
4-1 Getting Metadata from a NoSQL Database 4-3
6-1 Example to Add Multiple Privileges 6-6
xi

xii
List of Figures
3-1 Selecting the Enable REST Service Option 3-28
3-2 Auto Enabling the PL/SQL Package Object 3-29
3-3 Adding an Anonymous PL/SQL Block to the Handler for the PUT Method 3-33
3-4 Setting the Bind Parameter l_salarychange to Pass for the PUT Method 3-34
3-5 Obtaining the URL to Call from the Details Tab 3-34
3-6 Displaying the Results from a SQL Query to Confirm the Execution of the PUT Method 3-35
3-7 Creating a Template Definition to Include a Route Pattern for Some Parameters or
Bind Variables 3-37
3-8 Adding a SQL Query to the Handler 3-38
3-9 Using Browser to Show the Results of Using a Route Pattern to Send a GET Method
with Some Required Parameter Values 3-39
3-10 Using Browser to Show the Results of Using a Query String to Send a GET Method
with Some Parameter Name/Value Pairs 3-41
3-11 Generating Nested JSON Objects 3-50
4-1 Overview of Typical Environment 4-2
F-1 Enabling the Schema of the EMP Table for REST F-3
F-2 REST Enabling the EMP Table F-4
F-3 Testing the REST Enabled Table F-5
F-4 Entering Information for New RESTful Services Connection F-6
F-5 Entering Information on the Specify Module Page F-7
F-6 Entering Information on the Specify Template Page F-8
F-7 Entering Information on the Specify Handler Page: F-8
F-8 Testing the RESTful Service Created from a SQL Query F-10
F-9 Edit Privilege Dialog Box F-11
F-10 REST Data Services option under Connections Navigator F-13
F-11 Entering Information on the Specify Module Page F-14
F-12 Entering Information on the Specify Template Page F-15
F-13 Entering Information on Create Resource Handler Page: F-16
F-14 Create Privilege Dialog Box F-18
F-15 Entering the New Role Name F-20
xiii

xiv

List of Tables
3-1 Parameters for batchload 3-16
B-1 Oracle REST Data Services Configuration Files Parameters B-3
xv

xvi
Preface
Oracle REST Data Services Installation, Configuration, and Development Guideexplains how to install and configure Oracle REST Data Services. (Oracle REST DataServices was called Oracle Application Express Listener before Release 2.0.6.)
Note:
Effective with Release 3.0, the title of this book is Oracle REST Data ServicesInstallation, Configuration, and Development Guide. The addition of"Development" to the title reflects the fact that material from a previousseparate unofficial "Developer's Guide" has been included in this book in Developing Oracle REST Data Services Applications (page 3-1).
Topics:
• Audience (page xvii)
• Documentation Accessibility (page xvii)
• Related Documents (page xviii)
• Conventions (page xviii)
• Third-Party License Information (page xviii)
AudienceThis document is intended for system administrators or application developers who areinstalling and configuring Oracle REST Data Services. This guide assumes you arefamiliar with web technologies, especially REST (Representational State Transfer),and have a general understanding of Windows and UNIX platforms.
Documentation AccessibilityFor information about Oracle's commitment to accessibility, visit the OracleAccessibility Program website at http://www.oracle.com/pls/topic/lookup?ctx=acc&id=docacc.
Access to Oracle Support
Oracle customers that have purchased support have access to electronic supportthrough My Oracle Support. For information, visit http://www.oracle.com/pls/topic/lookup?ctx=acc&id=info or visit http://www.oracle.com/pls/topic/lookup?ctx=acc&id=trsif you are hearing impaired.
xvii
Related DocumentsFor more information and resources relating to Oracle REST Data Services, see thefollowing the Oracle Technology Network (OTN) site:
http://www.oracle.com/technetwork/developer-tools/rest-data-services/
ConventionsThe following text conventions are used in this document:
Convention Meaning
boldface Boldface type indicates graphical user interface elements associatedwith an action, or terms defined in text or the glossary.
italic Italic type indicates book titles, emphasis, or placeholder variables forwhich you supply particular values.
monospace Monospace type indicates commands within a paragraph, URLs, codein examples, text that is displayed on the screen, or text that you enter.
Third-Party License InformationOracle REST Data Services contains third-party code. See the Oracle DatabaseLicensing Information book for notices Oracle is required to provide.
Note, however, that the Oracle program license that accompanied this productdetermines your right to use the Oracle program, including the third-party software,and the terms contained in the following notices do not change those rights.
Preface
xviii

1Installing Oracle REST Data Services
This section describes how to install and deploy Oracle REST Data Services. (RESTstands for Representational State Transfer.)
Note:
Oracle REST Data Services was called Oracle Application Express Listenerbefore Release 2.0.6.
Topics:
• About Oracle REST Data Services (page 1-1)
• Understanding the Installation Process (page 1-2)
• Configuring and Installing Oracle REST Data Services (page 1-3)
• Running in Standalone Mode (page 1-12)
• Deploying to Oracle WebLogic Server (page 1-15)
• Deploying to GlassFish Server (page 1-19)
• Deploying to Apache Tomcat (page 1-22)
• Upgrading Oracle REST Data Services (page 1-24)
• Using a Bequeath Connection to Install, Upgrade, Validate, or Uninstall OracleREST Data Services (page 1-25)
1.1 About Oracle REST Data ServicesOracle REST Data Services is a Java EE-based alternative for Oracle HTTP Serverand mod_plsql. The Java EE implementation offers increased functionality including acommand line based configuration, enhanced security, file caching, and RESTful webservices. Oracle REST Data Services also provides increased flexibility by supportingdeployments using Oracle WebLogic Server, GlassFish Server, Apache Tomcat, and astandalone mode.
The Oracle Application Express architecture requires some form of web server toproxy requests between a web browser and the Oracle Application Express engine.Oracle REST Data Services satisfies this need but its use goes beyond that of OracleApplication Express configurations. Oracle REST Data Services simplifies thedeployment process because there is no Oracle home required, as connectivity isprovided using an embedded JDBC driver.
1-1

1.2 Understanding the Installation ProcessThis section offers an overview of Oracle REST Data Services and providesinformation about supported Java Platform, Enterprise Edition (Java EE) applicationservers and system requirements.
Topics:
• Supported Java EE Application Servers (page 1-2)
• System Requirements (page 1-2)
1.2.1 Supported Java EE Application ServersOracle REST Data Services supports the following Java EE application servers:
Application Server Supported Release
Oracle WebLogic Server 11g Release 1 (10.3.6) or later
GlassFish Server Release 3.1.2 or later
For 4.0 (but not 4.1), the global switch for cdi 1-1 must be used todisable the injection check, as follows:
asadmin set configs.config.server-config.cdi-service.enable-implicit-cdi=false
However, it is strongly recommend that you not use 4.0, becausesetting that global switch affects all subsequent deployments onthis web server, which may result in other deployments failing.
Apache Tomcat Release 7.0.56 or later
1.2.2 System RequirementsOracle REST Data Services system requirements are as follows:
• Oracle Database (Enterprise Edition, Standard Edition or Standard Edition One)release 11.1 or later, or Oracle Database 11g Release 2 Express Edition.
• Java JDK 1.7 or later.
• Java Servlet Specification 2.3 or later.
• Web browser requirements:
– Microsoft Internet Explorer 8.0 or later.
– Mozilla Firefox 3.0 or later.
– Google Chrome 2.0 or later.
Chapter 1Understanding the Installation Process
1-2

Note:
Oracle Application Express is not a prerequisite for using Oracle REST DataServices.
If Oracle Application Express is installed and if RESTful services have beenconfigured during the installation (see the step "Configure RESTful Services"in Oracle Application Express Installation Guide), then Oracle REST DataServices supports it, including executing the RESTful services defined inOracle Application Express.
1.2.3 About Installing Oracle REST Data ServicesTo install Oracle REST Data Services:
1. Download, install, and configure Oracle REST Data Services.
2. Deploy Oracle REST Data Services. Deployment options include:
• Standalone Mode.
• Oracle WebLogic Server.
• GlassFish Server.
• Apache Tomcat.
Related Topics:
• Running in Standalone Mode (page 1-12)
• Deploying to Oracle WebLogic Server (page 1-15)
• Deploying to GlassFish Server (page 1-19)
• Deploying to Apache Tomcat (page 1-22)
1.3 Configuring and Installing Oracle REST Data ServicesBefore you deploy Oracle REST Data Services, you must install and configure it usinga command-line interface.
Topics:
• About Using the Command-Line Interface (page 1-4)
• About the Database Users Used by Oracle REST Data Services (page 1-4)
• Privileges Granted by Oracle REST Data Services (page 1-5)
• Downloading, Configuring and Installing Oracle REST Data Services (page 1-6)
• Using SQL Developer Oracle REST Data Services Administration (Optional)(page 1-10)
• Using OAuth2 in Non-HTTPS Environments (page 1-11)
Chapter 1Configuring and Installing Oracle REST Data Services
1-3
See Also:
If you plan to use Oracle REST Data Services with a NoSQL Database store,refer to NoSQL Store Installation and Registration (page 4-4) for moreinformation.
To use the Oracle REST API for JSON Data Persistence, you must also installthe Oracle REST API. See "Oracle REST API Installation" in Oracle RESTData Services SODA for REST Developer's Guide.
1.3.1 About Using the Command-Line InterfaceOracle REST Data Services provides several command line commands. For example,you can configure the location where Oracle REST Data Services stores configurationfiles, configure the database Oracle REST Data Services uses, and start Oracle RESTData Services in standalone mode.
To display a full list of available commands, go to the directory or folder containing theords.war file and execute the following command:
java -jar ords.war help
A list of the available commands is displayed. To see instructions on how to use eachof these commands, enter help followed by the command name, for example:
java -jar ords.war help configdir
1.3.2 About the Database Users Used by Oracle REST Data ServicesOracle REST Data Services uses the following database users:
User Name Required Description
APEX_PUBLIC_USER Only if usingOracle REST DataServices withOracle ApplicationExpress
If you use Oracle REST Data Serviceswith Oracle Application Express, this isthe database user used when invokingPL/SQL Gateway operations, forexample, all Oracle Application Expressoperations.
For information on unlocking theAPEX_PUBLIC_USER, see "ConfigureAPEX_PUBLIC_USER Account" in Oracle Application Express InstallationGuide.
APEX_REST_PUBLIC_USER Only if usingRESTful Servicesdefined inApplicationExpress
The database user used when invokingOracle Application Express RESTfulServices if RESTful Services defined inApplication Express workspaces arebeing accessed
Chapter 1Configuring and Installing Oracle REST Data Services
1-4
User Name Required Description
APEX_LISTENER Only if usingRESTful Servicesdefined inApplicationExpress
The database user used to queryRESTful Services definitions stored inOracle Application Express if RESTfulServices defined in Application Expressworkspaces are being accessed
ORDS_METADATA Yes Owner of the PL/SQL packages used forimplementing many Oracle REST DataServices capabilities. ORDS_METADATAis where the metadata about OracleREST Data Services-enabled schemas isstored.
It is not accessed directly by OracleREST Data Services; the Oracle RESTData Services application never creates aconnection to the ORDS_METADATAschema. The schema password is set toa random string, connect privilege isrevoked, and the password is expired.
ORDS_PUBLIC_USER Yes User for invoking RESTful Services in theOracle REST Data Services-enabledschemas.
The APEX_<xxx> users are created during the Oracle Application Express installationprocess.
1.3.3 Privileges Granted by Oracle REST Data ServicesAs part of the Oracle REST Data Services installation, privileges are granted toseveral users:
• PUBLIC is granted SELECT on many ORDS_METADATA tables and views.
• PUBLIC is granted EXECUTE on PL/SQL packages that are available for users toinvoke.
• ORDS_METADATA is granted EXECUTE on the following:
– SYS.DBMS_ASSERT
– SYS.DBMS_CRYPTO
– SYS.DBMS_LOB
– SYS.DBMS_OUTPUT
– SYS.DBMS_REGISTRY
– SYS.DBMS_SESSION
– SYS.DBMS_UTILITY
– SYS.VALIDATE_ORDS
– SYS.HTF
– SYS.HTP
– SYS.OWA
Chapter 1Configuring and Installing Oracle REST Data Services
1-5

– SYS.WPG_DOCLOAD
• ORDS_METADATA is granted SELECT on the following:
– SYS.DBA_DIRECTORIES
– SYS.DBA_OBJECTS
• ORDS_METADATA is granted the following system privileges:
– ALTER USER
– CREATE TRIGGER
• ORDS_METADATA is granted the necessary object privileges to migrate ApplicationExpress REST data to ORDS_METADATA tables.
1.3.4 Downloading, Configuring and Installing Oracle REST DataServices
The procedures in this topic apply to installing Oracle REST Data Services in atraditional (non-CDB) database. If you want to install and use Oracle REST DataServices in a multitenant database environment, see Using the MultitenantArchitecture with Oracle REST Data Services section.
Note:
You must complete the configuration steps in this topic before deploying to anapplication server.
To install and configure Oracle REST Data Services:
1. Download the file ords.version.number.zip from the Oracle REST Data Servicesdownload page.
Note that the version.number in the file name reflects the current release number.
2. Unzip the downloaded zip file into a directory (or folder) of your choice:
• UNIX and Linux: unzip ords.version.number.zip
• Windows: Double-click the file ords.version.number.zip in Windows Explorer
3. Choose one of the following installation options:
• Simple Installation Using Parameters File.
• Advanced Installation Using Command-Line Prompts.
4. You can reinstall or uninstall Oracle REST Data Services if required.
Related Topics:
• Using the Multitenant Architecture with Oracle REST Data Services (page E-1)
• About the Database Users Used by Oracle REST Data Services (page 1-4)
• If You Want to Reinstall or Uninstall (Remove) Oracle REST Data Services(page 1-10)
Chapter 1Configuring and Installing Oracle REST Data Services
1-6
See Also:
http://www.oracle.com/technetwork/developer-tools/rest-data-services/
downloads/index.html
1.3.4.1 Simple Installation Using a Parameters FileYou can perform a simple installation using the parameters specified in the <path-to-params-file>/ords_params.properties file under the location where you installed OracleREST Data Services. You can edit that file beforehand to change default values toreflect your environment and preferences. If a parameter is missing in the file, you willbe prompted for it.
To perform a simple installation using the parameters file:
1. Optionally, if you want to use the database default and temporary tablespaces,you can remove the following tablespace-related entries in theords_params.properties file:
schema.tablespace.default=SYSAUXschema.tablespace.temp=TEMPuser.tablespace.default=USERSuser.tablespace.temp=TEMP
2. Make any desired values to default values to reflect your environment andpreferences. If you change any of the tablespace-related values, you must ensurethat the tablespaces you specify already exist in the database.
The default ords_params.properties file includes the following:
db.hostname=localhostdb.port=1521db.servicename=db.sid=db.username=APEX_PUBLIC_USERmigrate.apex.rest=falserest.services.apex.add=rest.services.ords.add=trueschema.tablespace.default=SYSAUXschema.tablespace.temp=TEMPstandalone.http.port=8080standalone.mode=truestandalone.static.images=user.tablespace.default=USERSuser.tablespace.temp=TEMP
Note:
On Microsoft Windows systems, if you specify an Application Express staticimages location for standalone.static.images, use the backslash (escapecharacter) before the colon, and use a forward slash as the folder separator.Example: standalone.static.images=d\:/test/apex426/apex/images/
3. Enter either of the following commands:
Chapter 1Configuring and Installing Oracle REST Data Services
1-7

java -jar ords.warjava -jar ords.war install simple
(You can omit install simple because the simple installation is the default.)
When you install Oracle REST Data Services for the first time, you are prompted forpasswords for these users: the PL/SQL gateway database user andORDS_PUBLIC_USER. The encrypted passwords are stored in the parameter file (forexample, user.public.password=@0585904F6C9B442532D5212962835D00C8).
If you later want to change the passwords, you must remove the encrypted passwordsfrom the parameter file. For security reasons, readable (non-encrypted) passwords arenot allowed in the parameter file.
1.3.4.2 Advanced Installation Using Command-Line PromptsYou can perform an advanced installation in which you are prompted for the necessaryparameter values, after which your choices are stored in the params/ords_params.properties file under the location where you installed Oracle REST DataServices.
To perform an advanced installation, enter the following command:
java -jar ords.war install advanced
During installation, Oracle REST Data Services checks if configuration files alreadyexist in your specified configuration folder:
• If configuration files do not exist in that folder, they are created (examples:defaults.xml, apex_pu.xml).
• If configuration files from an earlier release exist in that folder, Oracle REST DataServices checks if <name>_pu.xml is present; and if it is not, you are prompted forthe password for the ORDS_PUBLIC_USER account. If the configuration files<name>_al.xml and <name>_rt.xml from Release 2.0.n exist, they are preserved.(However, in Releases 2.0.n RESTful Services was optional, and therefore thefiles might not exist in the configuration folder.)
• If multiple configuration files exist from a previous release (examples: apex.xml,apex_al.xml, apex_rt.xml, sales.xml, sales_al.xml, sales_rt.xml, …), and if<name>_pu.xml does not exist, then you are prompted to select the databaseconfiguration so that the ORDS schema can be created in that database.
The following shows an example advanced installation. In this example, if youaccepted the default value of 1 for Enter 1 if you wish to start in standalone modeor 2 to exit [1], the remaining prompts are displayed; and if you will be using OracleApplication Express, you must specify the APEX static resources location.
d:\ords>java -jar ords.war install advancedThis Oracle REST Data Services instance has not yet been configured.Please complete the following promptsEnter the location to store configuration data:d:\path\to\config\Enter the name of the database server [localhost]:Enter the database listen port [1521]:Enter 1 to specify the database service name, or 2 to specify the database SID [1]:2Enter the database SID [xe]:Enter 1 if you want to verify/install Oracle REST Data Services schema or 2 to skip this step [1]:Enter the database password for ORDS_PUBLIC_USER:Confirm password:
Chapter 1Configuring and Installing Oracle REST Data Services
1-8
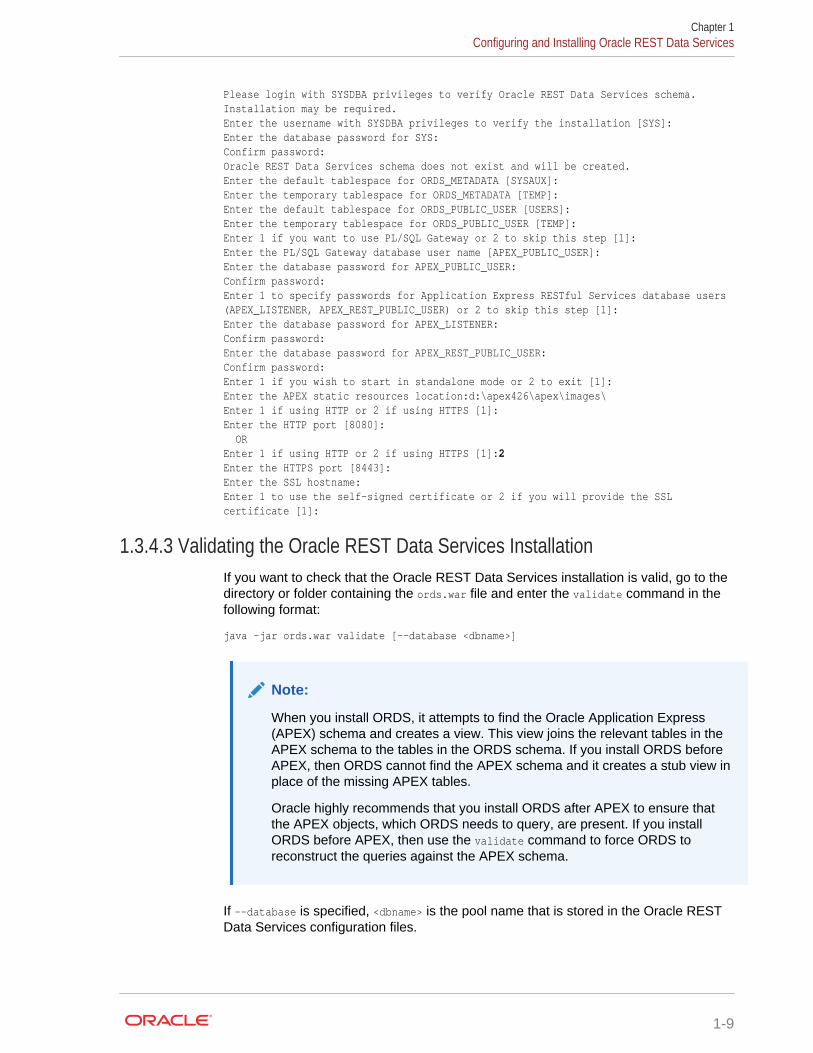
Please login with SYSDBA privileges to verify Oracle REST Data Services schema. Installation may be required.Enter the username with SYSDBA privileges to verify the installation [SYS]:Enter the database password for SYS:Confirm password:Oracle REST Data Services schema does not exist and will be created.Enter the default tablespace for ORDS_METADATA [SYSAUX]:Enter the temporary tablespace for ORDS_METADATA [TEMP]:Enter the default tablespace for ORDS_PUBLIC_USER [USERS]:Enter the temporary tablespace for ORDS_PUBLIC_USER [TEMP]:Enter 1 if you want to use PL/SQL Gateway or 2 to skip this step [1]:Enter the PL/SQL Gateway database user name [APEX_PUBLIC_USER]:Enter the database password for APEX_PUBLIC_USER:Confirm password:Enter 1 to specify passwords for Application Express RESTful Services database users (APEX_LISTENER, APEX_REST_PUBLIC_USER) or 2 to skip this step [1]:Enter the database password for APEX_LISTENER:Confirm password:Enter the database password for APEX_REST_PUBLIC_USER:Confirm password:Enter 1 if you wish to start in standalone mode or 2 to exit [1]:Enter the APEX static resources location:d:\apex426\apex\images\Enter 1 if using HTTP or 2 if using HTTPS [1]:Enter the HTTP port [8080]: OREnter 1 if using HTTP or 2 if using HTTPS [1]:2Enter the HTTPS port [8443]:Enter the SSL hostname:Enter 1 to use the self-signed certificate or 2 if you will provide the SSL certificate [1]:
1.3.4.3 Validating the Oracle REST Data Services InstallationIf you want to check that the Oracle REST Data Services installation is valid, go to thedirectory or folder containing the ords.war file and enter the validate command in thefollowing format:
java -jar ords.war validate [--database <dbname>]
Note:
When you install ORDS, it attempts to find the Oracle Application Express(APEX) schema and creates a view. This view joins the relevant tables in theAPEX schema to the tables in the ORDS schema. If you install ORDS beforeAPEX, then ORDS cannot find the APEX schema and it creates a stub view inplace of the missing APEX tables.
Oracle highly recommends that you install ORDS after APEX to ensure thatthe APEX objects, which ORDS needs to query, are present. If you installORDS before APEX, then use the validate command to force ORDS toreconstruct the queries against the APEX schema.
If --database is specified, <dbname> is the pool name that is stored in the Oracle RESTData Services configuration files.
Chapter 1Configuring and Installing Oracle REST Data Services
1-9

You are prompted for any necessary information that cannot be obtained from theconfiguration of pool name, such as host, port, SID or service name, and the nameand password of a user with SYSDBA privilege (such as SYS AS SYSDBA).
Note:
If the validate command is run against a CDB, then it will validate the CDB andall of its PDBs.
1.3.4.4 If You Want to Reinstall or Uninstall (Remove) Oracle REST DataServices
If you want to reinstall Oracle REST Data Services, you must first uninstall the existingOracle REST Data Services; and before you uninstall, ensure that Oracle REST DataServices is stopped.
Uninstalling Oracle REST Data Services removes the ORDS_METADATA schema,the ORDS_PUBLIC_USER user, and Oracle REST Data Services-related databaseobjects (including public synonyms) if they exist in the database. To uninstall (remove,or deinstall) Oracle REST Data Services, go to the directory or folder containing theords.war file and enter the uninstall command as follows:
java -jar ords.war uninstall
The uninstall command prompts you for some necessary information (host, port, SIDor service name, username, password).
See Also:
To uninstall Oracle REST Data Services from a CDB, see Using theMultitenant Architecture with Oracle REST Data Services (page E-1).
1.3.5 Using SQL Developer Oracle REST Data ServicesAdministration (Optional)
This section describes how to use Oracle SQL Developer to administer Oracle RESTData Services.
See Also:
"Oracle REST Data Services Administration" in Oracle SQL Developer User'sGuide
Topics:
• About SQL Developer Oracle REST Data Services Administration (page 1-11)
Chapter 1Configuring and Installing Oracle REST Data Services
1-10

• Configuring an Administrator User (page 1-11)
1.3.5.1 About SQL Developer Oracle REST Data Services AdministrationOracle SQL Developer enables you to administer Oracle REST Data Services using agraphical user interface. To take full advantage of these administration capabilities,you must use SQL Developer Release 4.1 or later. Using SQL Developer for OracleREST Data Services administration is optional.
Using this graphical user interface, you can update the database connections, JDBCsettings, URL mappings, RESTful connections, security (allowed procedures, blockedprocedures, validation function and virus scanning), Caching, Pre/Post ProcessingProcedures, Environment, and Excel Settings. Oracle SQL Developer also providesstatistical reporting, error reporting, and logging.
See Also:
"Oracle REST Data Services Administration" in Oracle SQL Developer User'sGuide
1.3.5.2 Configuring an Administrator UserIf you want to be able to administer Oracle REST Data Services using SQL Developer,then you must configure an administrator user as follows:
• Execute the following command:
java -jar ords.war user adminlistener "Listener Administrator"
• Enter a password for the adminlistener user.
• Confirm the password for the adminlistener user.
• If you are using Oracle REST Data Services without HTTPS, follow the steps listedunder the section,Using OAuth2 in Non-HTTPS Environments.
When using SQL Developer to retrieve and/or upload an Oracle REST Data Servicesconfiguration, when prompted, enter the credentials provided in the preceding list.
1.3.6 Using OAuth2 in Non-HTTPS EnvironmentsRESTful Services can be protected with the OAuth2 protocol to control access tononpublic data. To prevent data snooping, OAuth2 requires all requests involved in theOAuth2 authentication process to be transported using HTTPS. The default behaviorof Oracle REST Data Services is to verify that all OAuth2 related requests have beenreceived using HTTPS. It will refuse to service any such requests received over HTTP,returning an HTTP status code of 403 Forbidden.
This default behavior can be disabled in environments where HTTPS is not availableas follows:
1. Locate the folder where the Oracle REST Data Services configuration is stored.
2. Edit the file named defaults.xml.
3. Add the following setting to the end of this file just before the </properties> tag.
Chapter 1Configuring and Installing Oracle REST Data Services
1-11
<entry key="security.verifySSL">false</entry>
4. Save the file.
5. Restart Oracle REST Data Services if it is running.
Note that it is only appropriate to use this setting in development or test environments.It is never appropriate to use this setting in production environments because it willresult in user credentials being passed in clear text.
Note:
Oracle REST Data Services must be restarted after making configurationchanges. See your application server documentation for information on how torestart applications.
1.4 Running in Standalone ModeAlthough Oracle REST Data Services supports the Java EE application servers, youalso have the option of running in standalone mode. This section describes how to runOracle REST Data Services in standalone mode.
Standalone mode is suitable for development use and is supported in productiondeployments. Standalone mode, however, has minimal management capabilities whencompared to most Java EE application servers and may not have adequatemanagement capabilities for production use in some environments.
Topics:
• Starting in Standalone Mode (page 1-12)
• Stopping the Server in Standalone Mode (page 1-14)
• Configuring a Doc Root for Non-Application Express Static Resources(page 1-14)
Related Topics:
• Supported Java EE Application Servers (page 1-2)
1.4.1 Starting in Standalone ModeTo launch Oracle REST Data Services in standalone mode:
1. To start Standalone mode, execute the following command:
java -jar ords.war
If you have not yet completed configuration, you are prompted to do so.
Chapter 1Running in Standalone Mode
1-12

Tip:
To see help on standalone mode options, execute the following command:
java -jar ords.war help standalone
Note:
If you want to use RESTful services that require secure access, you shoulduse HTTPS.
2. When prompted, specify the location of the folder containing the Oracle ApplicationExpress static resources used by Oracle REST Data Services, or press Enter ifyou do not want to specify this location.
3. When prompted select if you want Oracle REST Data Services to generate a self-signed certificate automatically or if you want to provide your own certificate. If youwant to use your own certificate, provide the path for the Certificate and DERencoded related private key when prompted.
If the private key has not already been converted to DER, see section, Convertinga Private Key to DER (Linux and Unix) before you enter the values here.
You are only prompted for these values the first time you launch standalone mode.
Note:
Ensure that no other servers are listening on the port you choose. The defaultport 8080 is commonly used by HTTP or application servers, including theembedded PL/SQL gateway; the default secure port 8443 is commonly used byHTTPS.
Related Topics:
• Using OAuth2 in Non-HTTPS Environments (page 1-11)
• Converting a Private Key to DER (Linux and Unix) (page 1-13)
1.4.1.1 Converting a Private Key to DER (Linux and Unix)Usually, you would have created a private key and a Certificate Signing Requestbefore obtaining your signed certificate. The private key needs to be converted intoDER in order for Oracle REST Data Services to read it properly.
For example, assume that the original private key was created using the OpenSSL toolwith a command similar to either of the following:
openssl req -new -newkey rsa:2048 -nodes -keyout yourdomain.key -out yourdomain.csr
or
openssl genrsa -out private.em 2048
Chapter 1Running in Standalone Mode
1-13
In this case, you must run a command similar to the following to convert it and removethe encryption: openssl pkcs8 -topk8 -inform PEM -outform DER -in yourdomain.key -out yourdomain.der -nocrypt
openssl pkcs8 -topk8 -inform PEM -outform DER -in yourdomain.key -out yourdomain.der -nocrypt
After doing this, you can include the path to yourdomain.der when prompted by OracleREST Data Services, or you can modify the following entries in conf/ords/standalone/standalone.properties:
ssl.cert=<path to yourdomain.crt>ssl.cert.key=<path to yourdomain.der>ssl.host=yourdomain
Also, ensure that jetty.secure.port is set.
1.4.2 Stopping the Server in Standalone ModeTo stop the Oracle REST Data Services server in standalone mode, at a commandprompt press Ctrl+C.
1.4.3 Configuring a Doc Root for Non-Application Express StaticResources
You can configure a doc root for standalone mode to deploy static resources that areoutside the /i folder that is reserved for Application Express static resources.
To do so, specify the --doc-root parameter with the standalone mode command, as inthe following example:
java -jar ords.war standalone --doc-root /var/www/html
The preceding example makes any resource located within /var/www/html availableunder http://server:port/. For example, if the file /var/www/html/hello.txt exists, itwill be accessible at http://server:port/hello.txt.
The value specified for --doc-root is stored in ${config.dir}/ords/standalone/standalone.properties in the standalone.doc.root property. If a custom doc root is notspecified using --doc-root, then the default doc-root value of ${config.dir}/ords/standalone/doc_root is used. Any file placed within this folder will be available at theroot context.
This approach has the following features and considerations:
• HTML resources can be addressed without their file extension. For example, if afile named hello.html exists in the doc root, it can be accessed at the URI http://server:port/hello.
• Attempts to address a HTML resource with its file extension are redirected to thelocation without an extension. For example, if the URI http://server:port/hello.html is accessed, then the client is redirected to http://server:port/hello.
The usual practice is to serve HTML resources without their file extensions, so thisfeature facilitates that practice, while the redirect handles the case where theresource is addressed with its file extension.
Chapter 1Running in Standalone Mode
1-14

• Index pages for folders are supported. If a folder contains a file named index.htmlor index.htm, then that file is used as the index page for the folder. For example,if /var/www/html contains /abc/xyz/index.html, then accessing http://server:port/abc/xyz/ displays the contents of index.html.
• Addressing a folder without a trailing slash causes a redirect to the URI with atrailing slash. For example, if a client accesses http://server:port/abc/xyz, thenthe server issues a redirect to http://server:port/abc/xyz/.
• Resources are generated with weak etags based on the modification stamp of thefile and with a Cache Control header that causes the resources to be cached for 1hour.
1.5 Deploying to Oracle WebLogic ServerThis section describes how to deploy Oracle REST Data Services on Oracle WebLogicServer. It assumes that you have completed the installation process and are familiarwith Oracle WebLogic Server. If you are unfamiliar with domains, managed servers,deployment, security, users and roles, refer to your Oracle WebLogic Serverdocumentation.
Topics:
• About Oracle WebLogic Server (page 1-15)
• Downloading, Installing, and Configuring Oracle REST Data Services (page 1-15)
• Configuring Oracle Application Express Images (page 1-16)
• Launching the Administration Server Console (page 1-16)
• Installing the Oracle WebLogic Server Deployment (page 1-17)
• Configuring WebLogic to Handle HTTP Basic Challenges Correctly (page 1-18)
• Verifying the State and Health of ords and i (page 1-19)
1.5.1 About Oracle WebLogic ServerYou can download Oracle WebLogic Server from Oracle Technology Network.
To learn more about installing Oracle WebLogic Server, see Oracle FusionMiddleware Getting Started With Installation for Oracle WebLogic Server and OracleFusion Middleware Installation Guide for Oracle WebLogic Server.
See Also:
http://www.oracle.com/technetwork/middleware/weblogic/downloads/index.html
1.5.2 Downloading, Installing, and Configuring Oracle REST DataServices
You must complete this step before deploying Oracle REST Data Services onWebLogic.
Chapter 1Deploying to Oracle WebLogic Server
1-15

Related Topics:
• Configuring and Installing Oracle REST Data Services (page 1-3)
1.5.3 Configuring Oracle Application Express ImagesIf you are using Oracle Application Express, you must create a web archive toreference the Oracle Application Express, image files. However, if you are not usingOracle Application Express, you may skip the rest of this section about configuringOracle Application Express images.
Before you begin, you must create a web archive (WAR) file to reference the OracleApplication Express image files. Use the static command to create a web archive filenamed i.war:
java -jar ords.war static <apex directory>\images
Where:
• <apex directory> is the directory location of Oracle Application Express.
This command runs the static command contained in the ords.war file. It packagesthe Application Express static images into an archive file named i.war.
The created images WAR does not contain the static resources; instead, it referencesthe location where the static resources are stored. Therefore the static resources mustbe available at the specified path on the server where the WAR is deployed.
Tip:
Use java -jar ords.war help static to see the full range of options for thestatic command.
Use the i.war file to deploy to WebLogic in the following steps:
1. Launching the Administration Server Console
2. Installing the Oracle WebLogic Server Deployment
3. Configuring WebLogic to Handle HTTP Basic Challenges Correctly
1.5.4 Launching the Administration Server ConsoleTo launch the Administration Server console:
1. Start an Administration Server.
2. Launch the WebLogic Administration Console by typing the following URL in yourweb browser:
http://<host>:<port>/console
Where:
• <host> is the DNS name or IP address of the Administration Server.
• <port> is the port on which the Administration Server is listening for requests(port 7001 by default).
Chapter 1Deploying to Oracle WebLogic Server
1-16
3. Enter your WebLogic Administrator username and password.
4. If your domain is in Production mode, click the Lock & Edit button on the left-panebelow the submenu Change Center. If your domain is in Development mode, thisbutton does not appear.
1.5.5 Installing the Oracle WebLogic Server Deployment
Tip:
The Oracle REST Data Services files, ords.war and i.war, must be availablebefore you start this task.
To install the deployment:
1. Go to the WebLogic Server Home Page. Below Domain Configuration, selectDeployments.
The Summary of Deployments is displayed.
2. Click Install.
3. Specify the location of the ords.war file and click Next.
The ords.war file is located in the folder where you unzipped the Oracle RESTData Services ZIP file.
Tip:
WebLogic Server determines the context root from the file name of a WARarchive. If you need to keep backward compatibility, so that URLs are of theform http://server/apex/... rather than http://server/ords/..., then you mustrename ords.war to apex.war before the deployment.
The Install Application assistant is displayed.
4. Select Install this deployment as an application and click Next.
5. Select the servers and/or clusters to which you want to deploy the application ormodule and click Next.
Tip:
If you have not created additional Managed Servers or clusters, you do notsee this assistant page.
6. In the Optional Settings, specify the following:
a. Name - Enter:
ords
b. Security - Select the following:
Chapter 1Deploying to Oracle WebLogic Server
1-17

Custom Roles: Use roles that are defined in the Administration Console;use policies that are defined in the deployment descriptor
c. Source accessibility - Select:
Use the defaults defined by the deployment's targets
7. Click Next.
A summary page is displayed.
8. Under Additional configuration, select one of the following:
• Yes, take me to the deployment's configuration - Displays theConfiguration page.
• No I will review the configuration later - Returns you to the Summary ofDeployments page.
9. Review the summary of configuration settings that you have specified.
10. Click Finish.
11. Repeat the previous steps to deploy the i.war file.
In the optional settings, specify the following:
a. Name - Enter:
i
b. Security - Select:
Custom Roles: Use roles that are defined in the Administration Console;use policies that are defined in the deployment descriptor
c. Source Accessibility - Select:
Use the defaults defined by the deployment's targets
12. If your domain is in Production Mode, then on the Change Center click ActivateChanges.
Related Topics:
• Configuring and Installing Oracle REST Data Services (page 1-3)
• Configuring Oracle Application Express Images (page 1-16)
1.5.6 Configuring WebLogic to Handle HTTP Basic ChallengesCorrectly
By default WebLogic Server attempts to intercept all HTTP Basic Authenticationchallenges. This default behavior needs to be disabled for Oracle REST Data Servicesto function correctly. This is achieved by updating the enforce-valid-basic-auth-credentials flag. The WebLogic Server Administration Console does not display theenforce-valid-basic-auth-credentials setting. You can use WebLogic Scripting Tool(WLST) commands to check, and edit the value in a running server.
The following WLST commands display the domain settings:
connect('weblogic','weblogic','t3://localhost:7001')cd('SecurityConfiguration')cd('mydomain') ls()
Chapter 1Deploying to Oracle WebLogic Server
1-18

If the domain settings displayed, contains the following entry:
-r-- EnforceValidBasicAuthCredentials true
Then you must set this entry to false.
To set the entry to false, use the WLST commands as follows:
connect('weblogic', 'weblogic', 't3://localhost:7001')edit()startEdit()cd('SecurityConfiguration')cd('mydomain') set('EnforceValidBasicAuthCredentials','false')save()activate()disconnect()exit()
Note:
WebLogic Server must be restarted for the new settings to take effect.
In the preceding example:
• weblogic is the WebLogic user having administrative privileges
• weblogic is the password
• mydomain is the domain
• The AdminServer is running on the localhost and on port7001
Related Topics:
• WebLogic Server Command Reference
1.5.7 Verifying the State and Health of ords and iIn the Summary of Deployments, select the Control tab and verify that both the ordsand i State are Active and the Health status is OK.
If ords and/or i are not Active, then enable them. In the Deployments table, select thecheck box next to ords and/or i. Click Start and select Servicing all requests to makethem active.
1.6 Deploying to GlassFish ServerThis section describes how to deploy Oracle REST Data Services on GlassFishServer.
Topics:
• About GlassFish Server (page 1-20)
• Downloading, Installing, and Configuring Oracle REST Data Services (page 1-20)
• Configuring Oracle Application Express Images (page 1-20)
Chapter 1Deploying to GlassFish Server
1-19

• Launching the Administration Server Console (page 1-21)
• Installing the GlassFish Server Deployment (page 1-21)
Tip:
This section assumes that you have completed the installation process andare familiar with GlassFish Server. If you are unfamiliar with domains, servers,applications, security, users and roles, see your GlassFish Serverdocumentation.
1.6.1 About GlassFish ServerYou can install Oracle REST Data Services with GlassFish Server. GlassFish Serveris available for download from the Oracle Technology Network.
Related Topics:
• Downloading, Installing, and Configuring Oracle REST Data Services (page 1-20)
See Also:
http://www.oracle.com/us/products/middleware/application-server/oracle-
glassfish-server/index.html
1.6.2 Downloading, Installing, and Configuring Oracle REST DataServices
You must complete this step before deploying Oracle REST Data Services onGlassFish.
1.6.3 Configuring Oracle Application Express ImagesIf you are using Oracle Application Express, you must create a web archive toreference the Oracle Application Express, image files. However, if you are not usingOracle Application Express, you may skip the rest of this section about configuringOracle Application Express images.
Before you begin, you must create a web archive (WAR) file to reference the OracleApplication Express image files. Use the static command to create a web archive filenamed i.war:
java -jar ords.war static <apex directory>\images
Where:
• <apex directory> is the directory location of Oracle Application Express.
Chapter 1Deploying to GlassFish Server
1-20

The created images WAR does not contain the static resources; instead, it referencesthe location where the static resources are stored. Therefore the static resources mustbe available at the specified path on the server where the WAR is deployed.
Tip:
Use java -jar ords.war help static to see the full range of options for thestatic command.
Use the i.war file to deploy to GlassFish in the following steps:
1. Launching the Administration Server Console
2. Installing the GlassFish Server Deployment
1.6.4 Launching the Administration Server ConsoleAt least one GlassFish server domain must be started before you start theAdministration Console.
To launch the Administration Console:
1. Launch the Administration Console by typing the following URL in your webbrowser:
http://localhost:4848
2. If prompted, log in to the Administration Console.
Tip:
You are prompted to log in if you chose to require an administration passwordat the time GlassFish server was installed.
1.6.5 Installing the GlassFish Server Deployment
Tip:
The Oracle REST Data Services files, ords.war and i.war must be availablebefore you start this task.
To install the deployment:
1. On the navigation tree, click the Application node.
The Applications page is displayed.
2. Click the Deploy button.
The Deploy Applications or Modules page is displayed.
Chapter 1Deploying to GlassFish Server
1-21

3. Select Packaged File to be Uploaded to the Server and click Browse.
4. Navigate to the location of the ords.war file, select the file, and click Open.
The Deploy Applications or Modules page is displayed.
5. On the Deploy Applications or Modules page, specify the following:
a. Type: Web Application
b. Context Root: ords
Tip:
The Context Root value defaults to ords. However you can change it to apex ifyou need to keep backward compatibility, so that URLs are of the form http://server/apex/... rather than http://server/ords/....
c. Application Name: ords
d. Status: Enabled
e. Description: Oracle REST Data Services
f. Accept all other default settings and click OK.
6. Repeat the previous steps to deploy the i.war file. Clear the Context Root field sothat the context root set in the sun-web.xml is used.
The Applications page is displayed. A check mark should appear in the Enabled fieldfor ords
Tip:
If a check mark does not appear in the Enabled column for ords, then selectthe check box next to ords and click Enable.
Related Topics:
• Configuring and Installing Oracle REST Data Services (page 1-3)
• Configuring Oracle Application Express Images (page 1-20)
1.7 Deploying to Apache TomcatThis section describes how to deploy Oracle REST Data Services on Apache Tomcat.
Topics:
• About Apache Tomcat (page 1-23)
• Downloading, Installing, and Configuring Oracle REST Data Services (page 1-23)
• Configuring Oracle Application Express Images (page 1-23)
• Installing the Apache Tomcat Deployment (page 1-24)
Chapter 1Deploying to Apache Tomcat
1-22
1.7.1 About Apache Tomcat
Tip:
This section assumes that you have completed the installation process andare familiar with Apache Tomcat. If you are unfamiliar with domains, servers,applications, security, users and roles, see your Apache Tomcatdocumentation.
You can download Apache Tomcat from:
See Also:
http://tomcat.apache.org/download-70.cgi
1.7.2 Downloading, Installing, and Configuring Oracle REST DataServices
You must complete this step before deploying Oracle REST Data Services on ApacheTomcat.
Related Topics:
• Configuring and Installing Oracle REST Data Services (page 1-3)
1.7.3 Configuring Oracle Application Express ImagesIf you are using Oracle Application Express, you must create a web archive toreference the Oracle Application Express, image files. However, if you are not usingOracle Application Express, you may skip the rest of this section about configuringOracle Application Express images.
To configure Oracle Application Express Images on Apache Tomcat:
• Copy the contents of the <apex directory>/images folder to <Tomcat directory>/webapps/i/.
Where:
– <apex directory> is the directory location of the Oracle Application Expressdistribution.
– <Tomcat directory> is the folder where Apache Tomcat is installed.
Chapter 1Deploying to Apache Tomcat
1-23

1.7.4 Installing the Apache Tomcat Deployment
Tip:
The Oracle REST Data Services file ords.war must be available before youstart this task.
To install the Apache Tomcat deployment:
1. Move the ords.war file into the webapps folder where Apache Tomcat is installed.
Tip:
Apache Tomcat determines the context root from the file name of a WARarchive. If you need to keep backward compatibility, so that URLs are of theform http://server/apex/... rather than http://server/ords/..., then you mustrename ords.war to apex.war before moving it into to the webapps folder.
2. Access Oracle Application Express by typing the following URL in your webbrowser:
http://<hostname>:<port>/ords/
Where:
• <hostname> is the name of the server where Apache Tomcat is running.
• <port> is the port number configured for Apache Tomcat application server.
Related Topics:
• Configuring and Installing Oracle REST Data Services (page 1-3)
• Configuring Oracle Application Express Images (page 1-23)
1.8 Upgrading Oracle REST Data ServicesIf you want to upgrade to a new release of Oracle REST Data Services, you must dothe following:
1. Stop the Oracle REST Data Services instance.
• If you are running Oracle REST Data Services on your application server(such as Oracle WebLogic Server, GlassFish Server, or Apache Tomcat), stopOracle REST Data Services.
• If you are running Oracle REST Data Services in standalone mode, refer tosection, Stopping the Server in Standalone Mode.
2. Go to the folder where you unzipped the new Oracle REST Data Services releasedistribution.
3. Enter the following on the command line:
java -jar ords.war install advanced
Chapter 1Upgrading Oracle REST Data Services
1-24
or
java -jar ords.war
4. When prompted for the configuration folder, use the configuration folder where theOracle REST Data Services configuration files are stored. (The configurationlocation will be stored in the ords.war file.)
• If you specified an existing Oracle REST Data Services configuration folderthat contains the configuration files, Oracle REST Data Services will attempt toconnect to each database defined in the configuration folder and check theinstalled version.
• If you specified an Oracle REST Data Services configuration folder that doesnot exist, you will be prompted for the database connection information, theORDS_PUBLIC_USER credentials, and additional configuration information.Oracle REST Data Services will attempt to connect to this database and checkthe installed version.
When Oracle REST Data Services checks the installed version, it does the following,depending on whether an earlier 3.0.n version is already installed in the database.
• If the installed version is an earlier 3.0.n version of Oracle REST Data Services,you are prompted for the SYS credentials to enable Oracle REST Data Services toapply the in-place upgrade. The in-place upgrade will modify the existinginstallation to add the updated schema objects and packages. The existingmetadata stored in the ORDS schema will remain intact.
• If Oracle REST Data Services is not already installed in the database (or if you areupgrading from Release 2.0.n), you are prompted for the SYS credentials toenable Oracle REST Data Services to perform the installation, and you will also beprompted for the default and temporary tablespaces for the ORDS_METADATAschema and ORDS_PUBLIC_USER.
When the upgrade or installation completes, you can re-deploy the ords.war file to yourapplication server or start Oracle REST Data Services in standalone mode.
Related Topics:
• Troubleshooting Oracle REST Data Services (page C-1)
• Stopping the Server in Standalone Mode (page 1-14)
1.9 Using a Bequeath Connection to Install, Upgrade,Validate, or Uninstall Oracle REST Data Services
You can use the bequeath connection to install, upgrade, validate, or uninstall OracleREST Data Services. The installer will not prompt you for the SYS username andpassword for the operation
In the parameter file, add the property: bequeath.connect=true
Using a bequeath connection for installing, validating, or uninstalling Oracle RESTData Services is supported on Linux and Windows systems for Oracle DatabaseRelease 12, but only on Linux systems for Oracle Database Release 11.
The command used must be run by an operating system user that is a member of theDBA group. Example of installing Oracle REST Data Services:
java -jar ords.war
Chapter 1Using a Bequeath Connection to Install, Upgrade, Validate, or Uninstall Oracle REST Data Services
1-25

Bequeath Connection Using Linux
On a Linux system, you must set the following environment variables to use thebequeath connection:
• ORACLE_HOME
• ORACLE_SID
• LD_LIBRARY_PATH (to point to ORACLE_HOME/lib)
For Oracle Database Release 11 (but not for Release 12), you must specify the option-DuseOracleHome=true. Examples of installing Oracle REST Data Services on a Linuxsystem:
• For Oracle Database Release 11: java -DuseOracleHome=true -jar ords.war
• For Oracle Database Release 12: java -jar ords.war
Related Topics:
• Simple Installation Using a Parameters File (page 1-7)
Chapter 1Using a Bequeath Connection to Install, Upgrade, Validate, or Uninstall Oracle REST Data Services
1-26

2Configuring Oracle REST Data Services(Advanced)
This section explains how to configure Oracle REST Data Services for connecting tomultiple databases for routing requests, and it refers to other documentation sourcesfor other configuration information.
Note:
Oracle REST Data Services must be restarted after making configurationchanges. See your application server documentation for information on how torestart applications.
Topics:
• Configuring Multiple Databases (page 2-1)
• Support for RAC Fast Connection Failover (page 2-4)
• Configuring Security, Caching, Pre- and Post Processing, Environment, and ExcelSettings (page 2-5)
• Developing RESTful Services for Use with Oracle REST Data Services(page 2-5)
2.1 Configuring Multiple DatabasesOracle REST Data Services supports the ability to connect to more than onedatabase. This section describes different strategies for routing requests to theappropriate database.
Topics:
• About the Request URL (page 2-1)
• Configuring Additional Databases (page 2-2)
• Routing Based on the Request Path Prefix (page 2-3)
• Routing Based on the Request URL Prefix (page 2-4)
2.1.1 About the Request URLOracle REST Data Services supports a number of different strategies for routingrequests to the appropriate database. All of these strategies rely on examining therequest URL and choosing the database based on some kind of match against theURL. It is useful to recap the pertinent portions of a request URL. Consider thefollowing URL:
2-1

https://www.example.com/ords/sales/f?p=1:1
This URL consists of the following sections:
• Protocol: https
• Host Name: www.example.com
• Context Root: /ords
The context root is the location at which Oracle REST Data Services is deployedon the application server.
• Request Path: /sales/f?p=1.1
This is the portion of the request URL relative to the context root.
For different applications, it may be important to route requests based on certainprefixes in the request path or certain prefixes in the full request URL.
There are two steps to configuring multiple databases:
1. Configuring the database connection information
2. Configuring which requests are routed to which database
2.1.2 Configuring Additional DatabasesWhen you first configure Oracle REST Data Services, you configure a defaultdatabase connection named: apex. You can create additional database connectionsusing the setup command.
Tip:
To see full help for the setup command type:
java -jar ords.war help setup
To create a database connection type the following:
java -jar ords.war setup --database <database name>
Where:
• <database name> is the name you want to give the database connection.
You are prompted to enter the information required to configure the database. Afteryou have configured the additional databases, define the rules for how requests arerouted to the appropriate database.
Related Topics:
• Configuring and Installing Oracle REST Data Services (page 1-3)
• Routing Based on the Request Path Prefix (page 2-3)
• Routing Based on the Request URL Prefix (page 2-4)
Chapter 2Configuring Multiple Databases
2-2
2.1.3 Routing Based on the Request Path PrefixYou create request routing rules using the map-url command.
Tip:
To see full help for the map-url command type:
java -jar ords.war help map-url
If you want to route requests based just on matching a prefix in the request pathportion of the URL, use the map-url command as follows:
java -jar ords.war map-url --type base-path --workspace-id <workspace name> <path prefix> <database name>
Where:
• <workspace name> is the name of the Oracle Application Express workspace whereRESTful services for this connection are defined. This may be omitted if RESTfulServices are not being used.
• <path prefix> is the prefix that must occur at the start of the request path.
• <database name> is the name of the database connection configured in the previousstep.
Related Topics:
• Configuring Additional Databases (page 2-2)
2.1.3.1 Example of Routing Based on the Request Path PrefixAssuming Oracle REST Data Services is deployed on a system named example.com atthe context path /ords, then create the following rule:
java -jar ords.war map-url --type base-path --workspace-id sales_rest /sales sales_db
This rule means that any requests matching https://example.com/ords/sales/... arerouted to the sales_db database connection. The sales_rest workspace defined withinthe sales_db database is searched for RESTful Services definitions.
The previous rule matches all of the following requests:
https://example.com/ords/sales/f?p=1:1https://example.com/ords/sales/leads/https://www.example.com/ords/sales/forecasting.report?month=jan (If www.example.com resolves to the same system as example.com.)
The previous rule does not match of any of the following requests:
http://example.com/ords/sales/f?p=1:1 (The protocol is wrong.)https://example.com:8080/ords/sales/f?p=1:1 (The port is wrong: 443 is default for https, but don't specify if using default.)https://example.com/ords/f?p=1:1 (Missing the /sales prefix.)https://example.com/pls/sales/leads/ (The context path is wrong.)
Chapter 2Configuring Multiple Databases
2-3

2.1.4 Routing Based on the Request URL PrefixIf you want to route requests based on a match of the request URL prefix, use the map-url command as follows:
java -jar ords.war map-url --type base-url --workspace-id <workspace name> <url prefix> <database name>
Where:
• <workspace name> is the name of the Oracle Application Express workspace whereRESTful services for this connection are defined. This may be omitted if RESTfulServices are not being used.
• <url prefix> is the prefix with which the request URL must start.
• <database name> is the name of the database connection.
2.1.4.1 Example of Routing Based on the Request URL PrefixAssuming Oracle REST Data Services is deployed on a system named example.com atthe context path /ords, then create the following rule:
java -jar ords.war map-url --type base-url --workspace-id sales_rest https://example.com/ords/sales sales_db
This rule means that any requests matching https://example.com/ords/sales/... arerouted to the sales_db database connection. The sales_rest workspace defined withinthe sales_db database is searched for RESTful Services definitions.
The previous rule matches all of the following requests:
https://example.com/ords/sales/f?p=1:1https://example.com/ords/sales/leads/https://example.com/ords/sales/forecasting.report?month=jan
The previous rule does not match of any of the following requests:
http://example.com/ords/sales/f?p=1:1 (The protocol is wrong.)https://example.com:8080/ords/sales/f?p=1:1 (The port is wrong: 443 is default for https, but don't specify if using default.)https://example.com/ords/f?p=1:1 (Missing the /sales segment of the base URL.)https://example.com/pls/sales/leads/ (The context path is wrong.)https://www.example.com/ords/sales/forecasting.report?month=jan (The host name is wrong.)
2.2 Support for RAC Fast Connection FailoverOracle REST Data Service (ORDS) supports the Fast Connection Failover (FCF)feature of Oracle Real Application Clusters (Oracle RAC).Oracle REST Data Service runs with the Universal Connection Pool (UCP) in all theApplication Server environments that it supports, such as WebLogic, Tomcat,GlassFish. UCP in turn supports Fast Connection Failover . To enable FCF, OracleNotification Service (ONS) must to be enabled. To enable ONS, add entries to the listof properties in the Oracle REST Data Services defaults.xml configuration file asshown in the following code snippet:
Chapter 2Support for RAC Fast Connection Failover
2-4
<entry key="jdbc.enableONS">true</entry><entry key= "jdbc.ONSConfig">nodes=racnode1:4200,racnode2:4200\nwalletfile=/oracle11/onswalletfile</entry>
ONS is the messaging facility used to send the Fast Application Notification (FAN)events. When ONS is enabled, ORDS automatically enables FCF. To Enable specificFCF capabilities such as fail over or other advanced FCF capabilities such as loadbalancing, you need to add entries in the configuration file for the custom connectionas shown in the following code snippet:
<entry key="db.connectionType">customurl</entry><entry key="db.customURL">jdbc:oracle:thin:@(DESCRIPTION=(FAILOVER=ON)(ADDRESS_LIST= (LOAD_BALANCE=ON)(ADDRESS=(PROTOCOL=TCP)(HOST=prod_scan.example.com)(PORT=1521))) (CONNECT_DATA=(SERVICE_NAME=ISPRD)))|</entry>
After updating the defaults.xml configuration file, ORDS need to be restarted for thechanges to take effect.
UCP supports Fast Connection Failover. FCF listens and responds to FAN events todeal with the following two scenarios:
• Unplanned outages
: When RAC detects an instance failure, it generates a FAN Down event whichFCF picks up. FCF then terminates all connections to the failed instance anddirects all future requests to the surviving RAC instances.
• Planned outages
: For instance, when a Database Administrator (DBA) wants to gracefully shutdown a RAC instance for performing some maintenance activity. The instanceshutdown generates a FAN Planned Down event which FCF picks up. FCF thendirects all new requests to other RAC instances and drains or allows currentlyactive transactions to complete.
Note:
Long running transactions may need to be terminated forcefully.
2.3 Configuring Security, Caching, Pre- and PostProcessing, Environment, and Excel Settings
To configure security, caching, pre- and post- processing, environment, and Excelsettings, see Using SQL Developer Oracle REST Data Services Administration(Optional) (page 1-10).
2.4 Developing RESTful Services for Use with Oracle RESTData Services
For more information on how to develop RESTful Services for use with Oracle RESTData Services, see Developing Oracle REST Data Services Applications (page 3-1).
Chapter 2Configuring Security, Caching, Pre- and Post Processing, Environment, and Excel Settings
2-5

Chapter 2
Developing RESTful Services for Use with Oracle REST Data Services
2-6

3Developing Oracle REST Data ServicesApplications
This section explains how to develop applications that use Oracle REST DataServices. It includes guidance and examples.
Note:
If you want to get started quickly, you can try the tutorial in Getting Started withRESTful Services (page F-1) now. However, you should then return to thischapter to understand the main concepts and techniques.
Note:
Ensure that you have installed and configured both Oracle Application Express4.2 or later, and Oracle REST Data Services 3.0 or later, before attempting tofollow any of the tutorials and examples.
To use the Oracle REST API for JSON Data Persistence, you must first installthe Oracle REST API. See "Oracle REST API Installation" in Oracle RESTData Services SODA for REST Developer's Guide.
It is assumed that you are familiar with Oracle Application Express. If you arenew to Oracle Application Express, see the Oracle Application Expressdocumentation.
Topics:
• Introduction to Relevant Software (page 3-2)
• Getting Started with RESTful Services (page 3-2)
• Automatic Enabling of Schema Objects for REST Access (AutoREST)(page 3-6)
• Filtering in Queries (page 3-18)
• Configuring Secure Access to RESTful Services (page 3-57)
• About Oracle REST Data Services User Roles (page 3-72)
• Authenticating Against WebLogic Server and GlassFish User Repositories(page 3-75)
• Integrating with Existing Group/Role Models (page 3-78)
• Using the Oracle REST Data Services PL/SQL API (page 3-80)
3-1
You may also want to review Development Tutorial: Creating an Image Gallery(page D-1), a supplementary extended example that uses Oracle ApplicationExpress to build an application.
3.1 Introduction to Relevant SoftwareThis section explains some key relevant software for developing applications that useOracle REST Data Services.
Topics:
• About Oracle Application Express (page 3-2)
• About RESTful Web Services (page 3-2)
Related Topics:
• About Oracle REST Data Services (page 1-1)
3.1.1 About Oracle Application ExpressOracle Application Express is a declarative, rapid web application development tool forthe Oracle database. It is a fully supported, no cost option available with all editions ofthe Oracle database. Using only a web browser, you can develop and deployprofessional applications that are both fast and secure.
3.1.2 About RESTful Web ServicesRepresentational State Transfer (REST) is a style of software architecture fordistributed hypermedia systems such as the World Wide Web. An API is described asRESTful when it conforms to the tenets of REST. Although a full discussion of REST isoutside the scope of this document, a RESTful API has the following characteristics:
• Data is modelled as a set of resources. Resources are identified by URIs.
• A small, uniform set of operations are used to manipulate resources (for example,PUT, POST, GET, DELETE).
• A resource can have multiple representations (for example, a blog might have anHTML representation and an RSS representation).
• Services are stateless and since it is likely that the client will want to accessrelated resources, these should be identified in the representation returned,typically by providing hypertext links.
Release 4.2 of Oracle Application Express leverages the capabilities of Oracle RESTData Services to provide developers with an easy to use graphical user interface fordefining and testing RESTful Web Services.
3.2 Getting Started with RESTful ServicesThis section introduces RESTful Services, and provides guidelines and examples fordeveloping applications that use RESTful Services.
Topics:
• RESTful Services Terminology (page 3-3)
Chapter 3Introduction to Relevant Software
3-2
• About Request Path Syntax Requirements (page 3-4)
• "Getting Started" Documents Included in Installation (page 3-4)
• About cURL and Testing RESTful Services (page 3-5)
• Automatic Enabling of Schema Objects for REST Access (AutoREST)(page 3-6)
• Manually Creating RESTful Services Using SQL and PL/SQL (page 3-31)
• About Working with Dates Using ORDS (page 3-50)
Related Topics:
• Developing Oracle REST Data Services Applications (page 3-1)
3.2.1 RESTful Services TerminologyThis section introduces some common terms that are used throughout this document:
• RESTful service: An HTTP web service that conforms to the tenets of theRESTful architectural style.
• Resource module: An organizational unit that is used to group related resourcetemplates.
• Resource template: An individual RESTful service that is able to service requestsfor some set of URIs (Universal Resource Identifiers). The set of URIs is definedby the URI Pattern of the Resource Template
• URI pattern: A pattern for the resource template. Can be either a route pattern ora URI template, although you are encouraged to use route patterns.
• Route pattern: A pattern that focuses on decomposing the path portion of a URIinto its component parts. For example, a pattern of /:object/:id? willmatch /emp/101 (matches a request for the item in the emp resource with id of 101)and will also match /emp/ (matches a request for the emp resource, because the :idparameter is annotated with the ? modifier, which indicates that the id parameter isoptional).
For a detailed explanation of route patterns, see docs\javadoc\plugin-api\route-patterns.html, under <sqldeveloper-install>\ords and under the location (if any)where you manually installed Oracle REST Data Services.
• URI template: A simple grammar that defines the specific patterns of URIs that agiven resource template can handle. For example, the pattern employees/{id} willmatch any URI whose path begins with employees/, such as employees/2560.
• Resource handler: Provides the logic required to service a specific HTTP methodfor a specific resource template. For example, the logic of the GET HTTP methodfor the preceding resource template might be:
select empno, ename, dept from emp where empno = :id
• HTTP operation: HTTP (HyperText Transport Protocol) defines standard methodsthat can be performed on resources: GET (retrieve the resource contents), POST(store a new resource), PUT (update an existing resource), and DELETE (remove aresource).
Related Topics:
• About RESTful Web Services (page 3-2)
Chapter 3Getting Started with RESTful Services
3-3

3.2.2 About Request Path Syntax RequirementsTo prevent path-based attacks, Oracle REST Data Services performs a number ofvalidation checks on the syntax of the path element of each request URL.Each path must conform to the following rules:
• Is not empty or whitespace-only
• Does not contain any of the following characters: ?, #, ;, %
• Does not contain the null character (\u0000)
• Does not contain characters in the range: \u0001-\u0031
• Does not end with white space or a period (.)
• Does not contain double forward slash (//) or double back slash(\\)
• Does not contain two or more periods in sequence (.., ..., and so on)
• Total length is {@value #MAX_PATH_LENGTH} characters or less
• Does not match any of the following names (case insensitive), with or without fileextensions: CON, PRN, AUX, CLOCK$, NUL, COM0, COM1, COM2, COM3,COM4, COM5, COM6, COM7, COM8, COM9, LPT0, LPT1, LPT2, LPT3, LPT4,LPT5, LPT6, LPT7, LPT8, LPT9
If you intend to auto-REST enable objects, then avoid object names that do not complywith these requirements. For example, do not create a table named #EMPS. If you dowant to auto-REST enable objects that have non-compliant names, then you must usean alias that complies with the requirements.
These requirements are applied to the URL decoded form of the URL, to preventattempted circumvention of percent encodings.
3.2.3 "Getting Started" Documents Included in InstallationWhen you install Oracle REST Data Services, an examples folder is created withsubfolders and files that you may find helpful. The installation folder hierarchy includesthis:
ords conf docs examples soda getting-started getting-started-nosql ...
In this hierarchy:
• examples\soda: Contains sample JSON documents used in some examplesincluded in Oracle REST Data Services SODA for REST Developer's Guide.
• examples\getting-started: Double-click index.html for a short document about howto get started developing RESTful Services using Oracle REST Data Services.This document focuses on using SQL Developer to get started. (SQL Developer isthe primary tool for managing Oracle REST Data Services. For example, the ability
Chapter 3Getting Started with RESTful Services
3-4

to auto-enable REST support for schemas and tables is available only in SQLDeveloper.)
• examples\getting-started-nosql: Double-click index.html for a short documentabout how to get started accessing NoSQL stores using Oracle REST DataServices
3.2.4 About cURL and Testing RESTful ServicesOther sections show the testing of RESTful Services using a web browser. However,another useful way to test RESTful Services is using the command line tool namedcURL.
This powerful tool is available for most platforms, and enables you to see and controlwhat data is being sent to and received from a RESTful service.
curl -i https://server:port/ords/workspace/hr/employees/7369
This example produces a response like the following:
HTTP/1.1 200 OKServer: Oracle-REST-Data-Services/2.0.6.78.05.25ETag: "..." Content-Type: application/jsonTransfer-Encoding: chunkedDate: Thu, 28 Mar 2014 16:49:34 GMT
{ "empno":7369, "ename":"SMITH", "job":"CLERK", "mgr":7902, "hiredate":"1980-12-17T08:00:00Z", "sal":800, "deptno":20}
The -i option tells cURL to display the HTTP headers returned by the server.
Related Topics:
• Exploring the Sample RESTful Services in Application Express (Tutorial)(page 3-53)
See Also:
cURLThe example in this section uses cURL with the services mentioned in Exploring the Sample RESTful Services in Application Express (Tutorial)(page 3-53)
Chapter 3Getting Started with RESTful Services
3-5

3.2.5 Automatic Enabling of Schema Objects for REST Access(AutoREST)
If Oracle REST Data Services has been installed on the system associated with adatabase connection, you can use the AutoREST feature to conveniently enable ordisable Oracle REST Data Services access for specified tables and views in theschema associated with that database connection. Enabling REST access to a table,view or PL/SQL function, procedure or package allows it to be accessed throughRESTful services.
AutoREST is a quick and easy way to expose database tables as REST resources.You sacrifice some flexibility and customizability to gain ease of effort. AutoRest letsyou quickly expose data but (metaphorically) keeps you on a set of guide rails. Forexample, you cannot customize the output formats or the input formats, or do extravalidation.
On the other hand, manually created resource modules require you to specify the SQLand PL/SQL to support the REST resources. Using resource modules requires moreeffort, but offers more flexibility; for example, you can customize what fields areincluded, do joins across multiple tables, and validate the incoming data using PL/SQL.
So, as an application developer you must make a choice: use the "guide rails" ofAutoREST, or create a resource module to do exactly what you need. If you chooseAutoREST, you can just enable a table (or set of tables) within a schema.
Note that enabling a schema is not equivalent to enabling all tables and views in theschema. It just means making Oracle REST Data Services aware that the schemaexists and that it may have zero or more resources to expose to HTTP. Thoseresources may be AutoREST resources or resource module resources.
You can automatically enable Oracle REST Data Services queries to access individualdatabase schema objects (tables, views, and PL/SQL) by using a convenient wizard inOracle SQL Developer. (Note that this feature is only available for Oracle REST DataServices- enabled schemas, not for Oracle Application Express workspaces.)
To enable Oracle REST Data Services access to one or more specified tables orviews, you must do the following in SQL Developer:
1. Enable the schema (the one associated with the connection) for REST access.
Schema level: To enable Oracle REST Data Services access to selected objects(that you specify in the next step) in the schema associated with a connection,right-click its name in the Connections navigator and select REST Services, thenEnable REST Services.
(To drop support for Oracle REST Data Services access to objects in the schemaassociated with a connection, right-click its name in the Connections navigator andselect REST Services, then Drop REST Services.)
2. Individually enable REST access for the desired objects.
Table or view level: To enable Oracle REST Data Services access to a specifiedtable or view, right-click its name in the Connections navigator and select EnableREST Services.
For detailed usage information, click the Help button in the wizard or dialog box inSQL Developer.
Chapter 3Getting Started with RESTful Services
3-6

3.2.5.1 Examples: Accessing Objects Using RESTful ServicesThis section provides examples of using Oracle REST Data Services queries andother operations against tables and views after you have REST-enabled them.
You can automatically expose table and view objects as RESTful services using SQLDeveloper. This topic provides examples of accessing these RESTful services.
Tip:
Although these examples illustrate the URL patterns used to access theseresources, clients should avoid hard coding knowledge of the structure ofthese URLs; instead clients should follow the hyperlinks in the resources tonavigate between resources. The structure of the URL patterns may evolveand change in future releases.
This topic provides examples of accessing objects using RESTful Services.
• Get Schema Metadata (page 3-7)
• Get Object Metadata (page 3-8)
• Get Object Data (page 3-10)
• Get Table Data Using Paging (page 3-11)
• Get Table Data Using Query (page 3-12)
• Get Table Row Using Primary Key (page 3-13)
• Insert Table Row (page 3-14)
• Update/Insert Table Row (page 3-15)
• Delete Using Filter (page 3-16)
• Post by Batch Load (page 3-16)
3.2.5.1.1 Get Schema MetadataThis example retrieves a list of resources available through the specified schema alias.It shows RESTful services that are created by automatically enabling a table or view,along with RESTful Services that are created by resource modules.
This example retrieves a list of resources available through the specified schema alias.
Pattern: GET http://<HOST>:<PORT>/ords/<SchemaAlias>/metadata-catalog/
Example: GET http://localhost:8080/ords/ordstest/metadata-catalog/
Result:
{ "items": [ { "name": "EMP", "links": [ { "rel": "describes",
Chapter 3Getting Started with RESTful Services
3-7
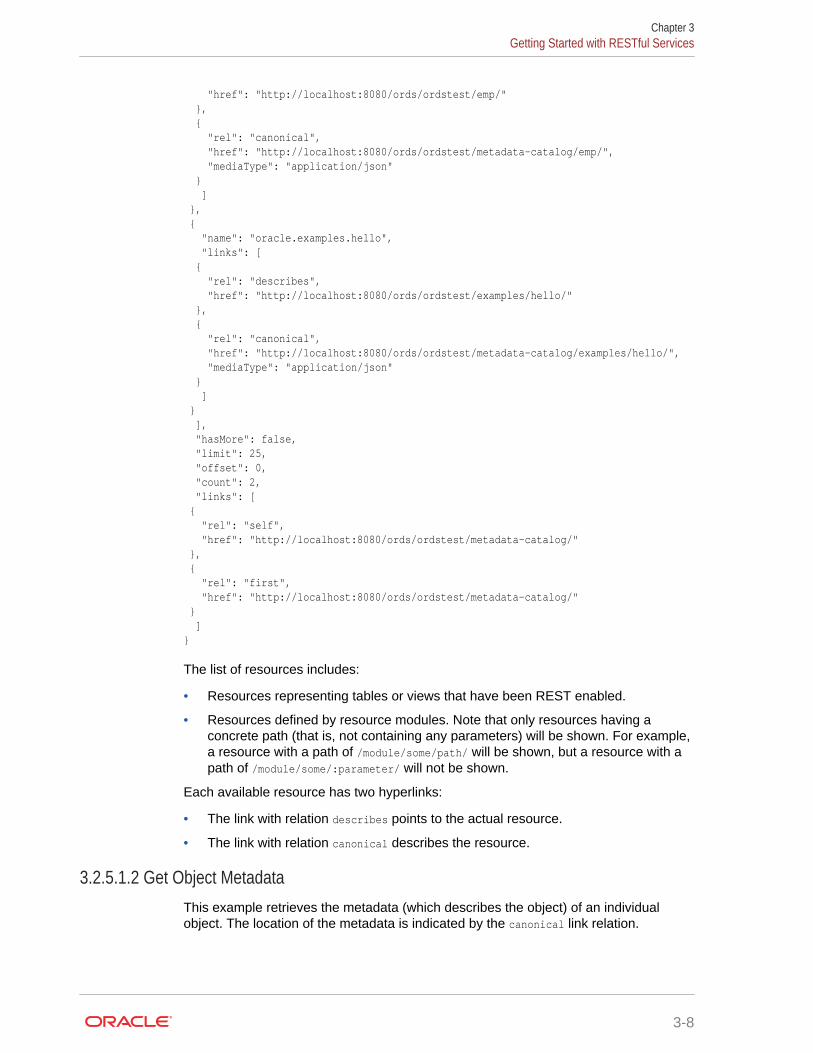
"href": "http://localhost:8080/ords/ordstest/emp/" }, { "rel": "canonical", "href": "http://localhost:8080/ords/ordstest/metadata-catalog/emp/", "mediaType": "application/json" } ] }, { "name": "oracle.examples.hello", "links": [ { "rel": "describes", "href": "http://localhost:8080/ords/ordstest/examples/hello/" }, { "rel": "canonical", "href": "http://localhost:8080/ords/ordstest/metadata-catalog/examples/hello/", "mediaType": "application/json" } ] } ], "hasMore": false, "limit": 25, "offset": 0, "count": 2, "links": [ { "rel": "self", "href": "http://localhost:8080/ords/ordstest/metadata-catalog/" }, { "rel": "first", "href": "http://localhost:8080/ords/ordstest/metadata-catalog/" } ]}
The list of resources includes:
• Resources representing tables or views that have been REST enabled.
• Resources defined by resource modules. Note that only resources having aconcrete path (that is, not containing any parameters) will be shown. For example,a resource with a path of /module/some/path/ will be shown, but a resource with apath of /module/some/:parameter/ will not be shown.
Each available resource has two hyperlinks:
• The link with relation describes points to the actual resource.
• The link with relation canonical describes the resource.
3.2.5.1.2 Get Object MetadataThis example retrieves the metadata (which describes the object) of an individualobject. The location of the metadata is indicated by the canonical link relation.
Chapter 3Getting Started with RESTful Services
3-8

Pattern: GET http://<HOST>:<PORT>/ords/<SchemaAlias>/metadata-catalog/<ObjectAlias>/
Example: GET http://localhost:8080/ords/ordstest/metadata-catalog/emp/
Result:
{ "name": "EMP", "primarykey": [ "empno" ], "members": [ { "name": "empno", "type": "NUMBER" }, { "name": "ename", "type": "VARCHAR2" }, { "name": "job", "type": "VARCHAR2" }, { "name": "mgr", "type": "NUMBER" }, { "name": "hiredate", "type": "DATE" }, { "name": "sal", "type": "NUMBER" }, { "name": "comm", "type": "NUMBER" }, { "name": "deptno", "type": "NUMBER" } ], "links": [ { "rel": "collection", "href": "http://localhost:8080/ords/ordstest/metadata-catalog/", "mediaType": "application/json" }, { "rel": "canonical", "href": "http://localhost:8080/ords/ordstest/metadata-catalog/emp/" }, { "rel": "describes", "href": "http://localhost:8080/ords/ordstest/emp/" }
Chapter 3Getting Started with RESTful Services
3-9
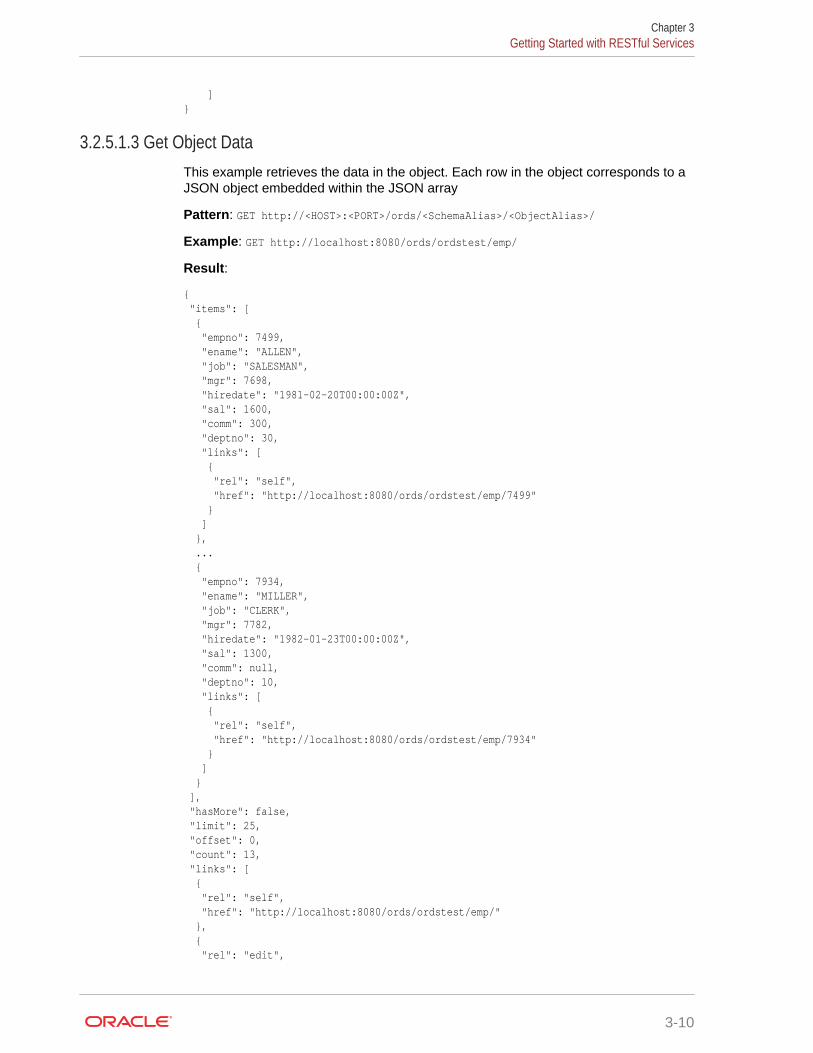
]}
3.2.5.1.3 Get Object DataThis example retrieves the data in the object. Each row in the object corresponds to aJSON object embedded within the JSON array
Pattern: GET http://<HOST>:<PORT>/ords/<SchemaAlias>/<ObjectAlias>/
Example: GET http://localhost:8080/ords/ordstest/emp/
Result:
{ "items": [ { "empno": 7499, "ename": "ALLEN", "job": "SALESMAN", "mgr": 7698, "hiredate": "1981-02-20T00:00:00Z", "sal": 1600, "comm": 300, "deptno": 30, "links": [ { "rel": "self", "href": "http://localhost:8080/ords/ordstest/emp/7499" } ] }, ... { "empno": 7934, "ename": "MILLER", "job": "CLERK", "mgr": 7782, "hiredate": "1982-01-23T00:00:00Z", "sal": 1300, "comm": null, "deptno": 10, "links": [ { "rel": "self", "href": "http://localhost:8080/ords/ordstest/emp/7934" } ] } ], "hasMore": false, "limit": 25, "offset": 0, "count": 13, "links": [ { "rel": "self", "href": "http://localhost:8080/ords/ordstest/emp/" }, { "rel": "edit",
Chapter 3Getting Started with RESTful Services
3-10

"href": "http://localhost:8080/ords/ordstest/emp/" }, { "rel": "describedby", "href": "http://localhost:8080/ords/ordstest/metadata-catalog/emp/" }, { "rel": "first", "href": "http://localhost:8080/ords/ordstest/emp/" } ]}
3.2.5.1.4 Get Table Data Using PagingThis example specifies the offset and limit parameters to control paging of resultdata.
Pattern: GET http://<HOST>:<PORT>/ords/<SchemaAlias>/<ObjectAlias>/?offset=<Offset>&limit=<Limit>
Example: GET http://localhost:8080/ords/ordstest/emp/?offset=10&limit=5
Result:
{ "items": [ { "empno": 7900, "ename": "JAMES", "job": "CLERK", "mgr": 7698, "hiredate": "1981-12-03T00:00:00Z", "sal": 950, "comm": null, "deptno": 30, "links": [ { "rel": "self", "href": "http://localhost:8080/ords/ordstest/emp/7900" } ] }, ... { "empno": 7934, "ename": "MILLER", "job": "CLERK", "mgr": 7782, "hiredate": "1982-01-23T00:00:00Z", "sal": 1300, "comm": null, "deptno": 10, "links": [ { "rel": "self", "href": "http://localhost:8080/ords/ordstest/emp/7934" } ] } ],
Chapter 3Getting Started with RESTful Services
3-11

"hasMore": false, "limit": 5, "offset": 10, "count": 3, "links": [ { "rel": "self", "href": "http://localhost:8080/ords/ordstest/emp/" }, { "rel": "edit", "href": "http://localhost:8080/ords/ordstest/emp/" }, { "rel": "describedby", "href": "http://localhost:8080/ords/ordstest/metadata-catalog/emp/" }, { "rel": "first", "href": "http://localhost:8080/ords/ordstest/emp/?limit=5" }, { "rel": "prev", "href": "http://localhost:8080/ords/ordstest/emp/?offset=5&limit=5" } ]}
3.2.5.1.5 Get Table Data Using QueryThis example specifies a filter clause to restrict objects returned.
Pattern: GET http://<HOST>:<PORT>/ords/<SchemaAlias>/<ObjectAlias>/?q=<FilterClause>
Example: GET http://localhost:8080/ords/ordstest/emp/?q={"deptno":{"$lte":20}}
Result:
{ "items": [ { "empno": 7566, "ename": "JONES", "job": "MANAGER", "mgr": 7839, "hiredate": "1981-04-01T23:00:00Z", "sal": 2975, "comm": null, "deptno": 20, "links": [ { "rel": "self", "href": "http://localhost:8080/ords/ordstest/emp/7566" } ] }, ... { "empno": 7934, "ename": "MILLER",
Chapter 3Getting Started with RESTful Services
3-12

"job": "CLERK", "mgr": 7782, "hiredate": "1982-01-23T00:00:00Z", "sal": 1300, "comm": null, "deptno": 10, "links": [ { "rel": "self", "href": "http://localhost:8080/ords/ordstest/emp/7934" } ] } ], "hasMore": false, "limit": 25, "offset": 0, "count": 7, "links": [ { "rel": "self", "href": "http://localhost:8080/ords/ordstest/emp/?q=%7B%22deptno%22:%7B%22%24lte%22:20%7D%7D" }, { "rel": "edit", "href": "http://localhost:8080/ords/ordstest/emp/?q=%7B%22deptno%22:%7B%22%24lte%22:20%7D%7D" }, { "rel": "describedby", "href": "http://localhost:8080/ords/ordstest/metadata-catalog/emp/" }, { "rel": "first", "href": "http://localhost:8080/ords/ordstest/emp/?q=%7B%22deptno%22:%7B%22%24lte%22:20%7D%7D" } ]}
3.2.5.1.6 Get Table Row Using Primary KeyThis example retrieves an object by specifying its identifying key values.
Pattern: GET http://<HOST>:<PORT>/ords/<SchemaAlias>/<ObjectAlias>/<KeyValues>
Where <KeyValues> is a comma-separated list of key values (in key order).
Example: GET http://localhost:8080/ords/ordstest/emp/7839
Result:
{ "empno": 7839, "ename": "KING", "job": "PRESIDENT", "mgr": null, "hiredate": "1981-11-17T00:00:00Z", "sal": 5000, "comm": null,
Chapter 3Getting Started with RESTful Services
3-13

"deptno": 10, "links": [ { "rel": "self", "href": "http://localhost:8080/ords/ordstest/emp/7839" }, { "rel": "edit", "href": "http://localhost:8080/ords/ordstest/emp/7839" }, { "rel": "describedby", "href": "http://localhost:8080/ords/ordstest/metadata-catalog/emp/item" }, { "rel": "collection", "href": "http://localhost:8080/ords/ordstest/emp/" } ]}
3.2.5.1.7 Insert Table RowThis example inserts data into the object. The body data supplied with the request is aJSON object containing the data to be inserted.
If the object has a primary key, then there must be an insert trigger on the object thatpopulates the primary key fields. If the table does not have a primary key, then theROWID of the row will be used as the item's identifier.
If the object lacks a trigger to assign primary key values, then the PUT operationdescribed in next section,Update/Insert Table Row should be used instead.
Pattern: POST http://<HOST>:<PORT>/ords/<SchemaAlias>/<ObjectAlias>/
Example:
curl -i -H "Content-Type: application/json" -X POST -d "{ \"empno\" :7, \"ename\": \"JBOND\", \"job\":\"SPY\", \"deptno\" :11 }" "http://localhost:8080/ords/ordstest/emp/Content-Type: application/json { "empno" :7, "ename": "JBOND", "job":"SPY", "deptno" :11 }
Result:
{ "empno": 7, "ename": "JBOND", "job": "SPY", "mgr": null, "hiredate": null, "sal": null, "comm": null, "deptno": 11, "links": [ { "rel": "self", "href": "http://localhost:8080/ords/ordstest/emp/7" }, {
Chapter 3Getting Started with RESTful Services
3-14
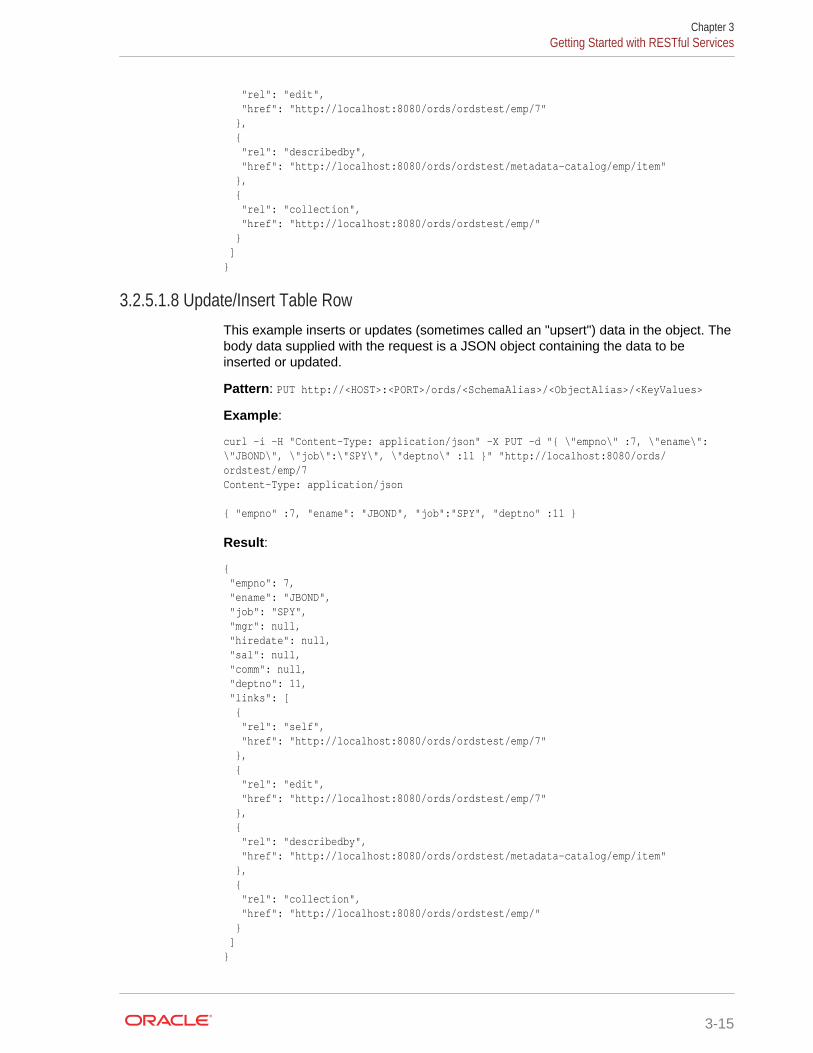
"rel": "edit", "href": "http://localhost:8080/ords/ordstest/emp/7" }, { "rel": "describedby", "href": "http://localhost:8080/ords/ordstest/metadata-catalog/emp/item" }, { "rel": "collection", "href": "http://localhost:8080/ords/ordstest/emp/" } ]}
3.2.5.1.8 Update/Insert Table RowThis example inserts or updates (sometimes called an "upsert") data in the object. Thebody data supplied with the request is a JSON object containing the data to beinserted or updated.
Pattern: PUT http://<HOST>:<PORT>/ords/<SchemaAlias>/<ObjectAlias>/<KeyValues>
Example:
curl -i -H "Content-Type: application/json" -X PUT -d "{ \"empno\" :7, \"ename\": \"JBOND\", \"job\":\"SPY\", \"deptno\" :11 }" "http://localhost:8080/ords/ordstest/emp/7Content-Type: application/json { "empno" :7, "ename": "JBOND", "job":"SPY", "deptno" :11 }
Result:
{ "empno": 7, "ename": "JBOND", "job": "SPY", "mgr": null, "hiredate": null, "sal": null, "comm": null, "deptno": 11, "links": [ { "rel": "self", "href": "http://localhost:8080/ords/ordstest/emp/7" }, { "rel": "edit", "href": "http://localhost:8080/ords/ordstest/emp/7" }, { "rel": "describedby", "href": "http://localhost:8080/ords/ordstest/metadata-catalog/emp/item" }, { "rel": "collection", "href": "http://localhost:8080/ords/ordstest/emp/" } ]}
Chapter 3Getting Started with RESTful Services
3-15

3.2.5.1.9 Delete Using FilterThis example deletes object data specified by a filter clause.
Pattern: DELETE http://<HOST>:<PORT>/ords/<SchemaAlias>/<ObjectAlias>/?q=<FilterClause>
Example: curl -i -X DELETE "http://localhost:8080/ords/ordstest/emp/?q={"deptno":11}"
Result:
{ "itemsDeleted": 1 }
3.2.5.1.10 Post by Batch LoadThis example inserts object data using the batch load feature. The body data suppliedwith the request is a CSV file. The behavior of the batch operation can be controlledusing the optional query parameters, which are described in Table 3-1 (page 3-16).
Pattern: POST http://<HOST>:<PORT>/ords/<SchemaAlias>/<ObjectAlias>/batchload?<Parameters>
Parameters:
Table 3-1 Parameters for batchload
Parameter Description
batchesPerCommit Sets the frequency for commits. Optional commit points can be setafter a batch is sent to the database. The default is every 10 batches.0 indicates commit deferred to the end of the load. Type: Integer.
batchRows Sets the number of rows in each batch to send to the database. Thedefault is 50 rows per batch. Type: Integer.
dateFormat Sets the format mask for the date data type. This format is used whenconverting input data to columns of type date. Type: String.
delimiter Sets the field delimiter for the fields in the file. The default is thecomma (,).
enclosures embeddedRightDouble
errors Sets the user option used to limit the number of errors. If the number oferrors exceeds the value specified for errorsMax (the service option)or by errors (the user option), then the load is terminated.
To permit no errors at all, specify 0. To indicate that all errors beallowed (up to errorsMax value), specify UNLIMITED (-1) .
Chapter 3Getting Started with RESTful Services
3-16

Table 3-1 (Cont.) Parameters for batchload
Parameter Description
errorsMax A service option used to limit the number of errors allowed by users. Itintended as an option for the service provider and not to be exposedas a user option. If the number of errors exceeds the value specifiedfor errorsMax (the service option) or by errors (the user option), thenthe load is terminated.
To permit no errors at all, specify 0. To indicate that all errors beallowed, specify UNLIMITED (-1).
lineEnd Sets the line end (terminator). If the file contains standard line endcharacters (\r. \r\n or \n), then lineEnd does not need to be specified.
lineMax Sets a maximum line length for identifying lines/rows in the datastream. A lineMax value will prevent reading an entire stream as asingle line when the incorrect lineEnd character is being used. Thedefault is unlimited.
locale Sets the locale.
responseEncoding Sets the encoding for the response stream.
responseFormat Sets the format for response stream. This format determines howmessages and bad data will be formatted. Valid values: RAW, SQL.
timestampFormat Sets the format mask for the time stamp data type. This format is usedwhen converting input data to columns of type time stamp.
timestampTZFormat Sets the format mask for the time stamp time zone data type. Thisformat is used when converting input data to columns of type timestamp time zone.
truncate Indicates if and/or how table data rows should be deleted before theload. False (the default) does not delete table data before the load;True causes table data to be deleted with the DELETE SQL statement;Truncate causes table data to be deleted with the TRUNCATE SQLstatement.
Example:
POST http://localhost:8080/ords/ordstest/emp/batchload?batchRows=25Content-Type: text/csv empno,ename,job,mgr,hiredate,sal,comm,deptno0,M,SPY MAST,,2005-05-01 11:00:01,4000,,117,J.BOND,SPY,0,2005-05-01 11:00:01,2000,,119,R.Cooper,SOFTWARE,0,2005-05-01 11:00:01,10000,,1126,Max,DENTIST,0,2005-05-01 11:00:01,5000,,11
Result:
#INFO Number of rows processed: 4#INFO Number of rows in error: 0#INFO Elapsed time: 00:00:03.939 - (3,939 ms) 0 - SUCCESS: Load processed without errors
Chapter 3Getting Started with RESTful Services
3-17
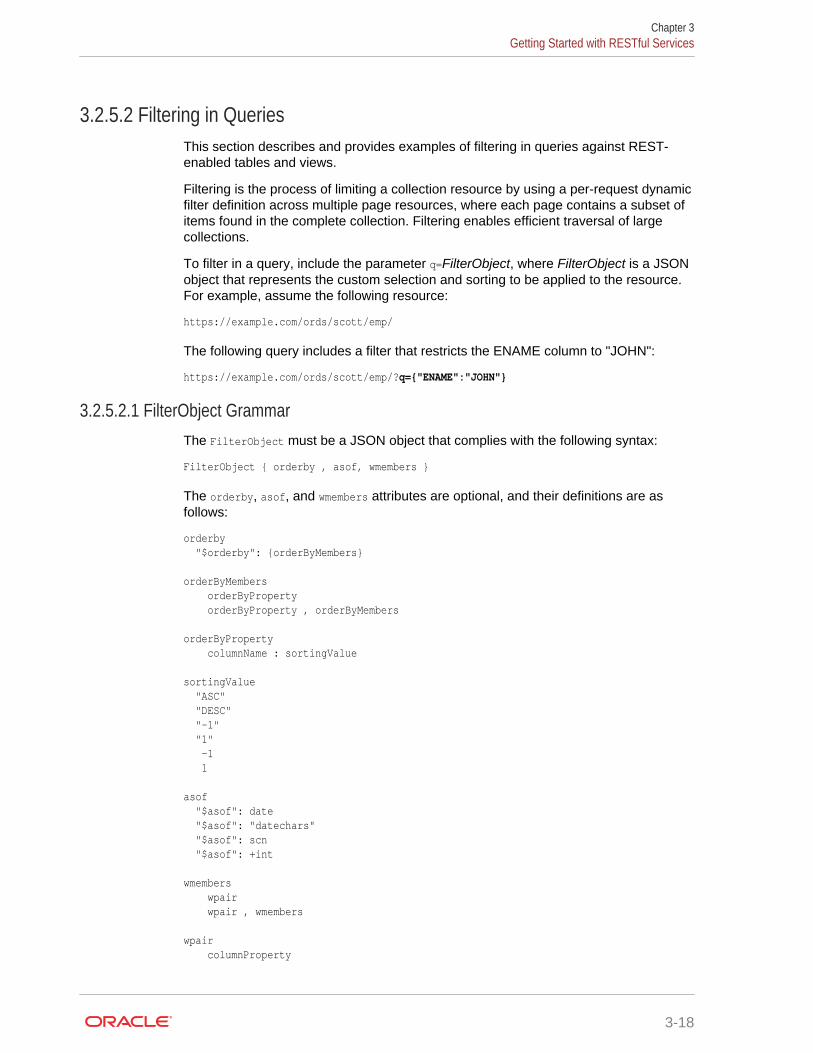
3.2.5.2 Filtering in QueriesThis section describes and provides examples of filtering in queries against REST-enabled tables and views.
Filtering is the process of limiting a collection resource by using a per-request dynamicfilter definition across multiple page resources, where each page contains a subset ofitems found in the complete collection. Filtering enables efficient traversal of largecollections.
To filter in a query, include the parameter q=FilterObject, where FilterObject is a JSONobject that represents the custom selection and sorting to be applied to the resource.For example, assume the following resource:
https://example.com/ords/scott/emp/
The following query includes a filter that restricts the ENAME column to "JOHN":
https://example.com/ords/scott/emp/?q={"ENAME":"JOHN"}
3.2.5.2.1 FilterObject GrammarThe FilterObject must be a JSON object that complies with the following syntax:
FilterObject { orderby , asof, wmembers }
The orderby, asof, and wmembers attributes are optional, and their definitions are asfollows:
orderby "$orderby": {orderByMembers} orderByMembers orderByProperty orderByProperty , orderByMembers orderByProperty columnName : sortingValue sortingValue "ASC" "DESC" "-1" "1" -1 1 asof "$asof": date "$asof": "datechars" "$asof": scn "$asof": +int wmembers wpair wpair , wmembers wpair columnProperty
Chapter 3Getting Started with RESTful Services
3-18

complexOperatorProperty columnProperty columnName : string columnName : number columnName : date columnName : simpleOperatorObjectcolumnName : complexOperatorObject columnName : [complexValues] columnName "\p{Alpha}[[\p{Alpha}]]([[\p{Alnum}]#$_])*$" complexOperatorProperty complexKey : [complexValues] complexKey : simpleOperatorObject complexKey "$and" "$or" complexValues complexValue , complexValues complexValue simpleOperatorObject complexOperatorObject columnObject columnObject {columnProperty} simpleOperatorObject {simpleOperatorProperty} complexOperatorObject {complexOperatorProperty} simpleOperatorProperty "$eq" : string | number | date "$ne" : string | number | date "$lt" : number | date "$lte" : number | date "$gt" : number | date "$gte" : number | date "$instr" : string "$ninstr" : string "$like" : string "$null" : null "$notnull" : null "$between" : betweenValue betweenValue [null , betweenNotNull] [betweenNotNull , null] [betweenRegular , betweenRegular] betweenNotNull number date
Chapter 3Getting Started with RESTful Services
3-19
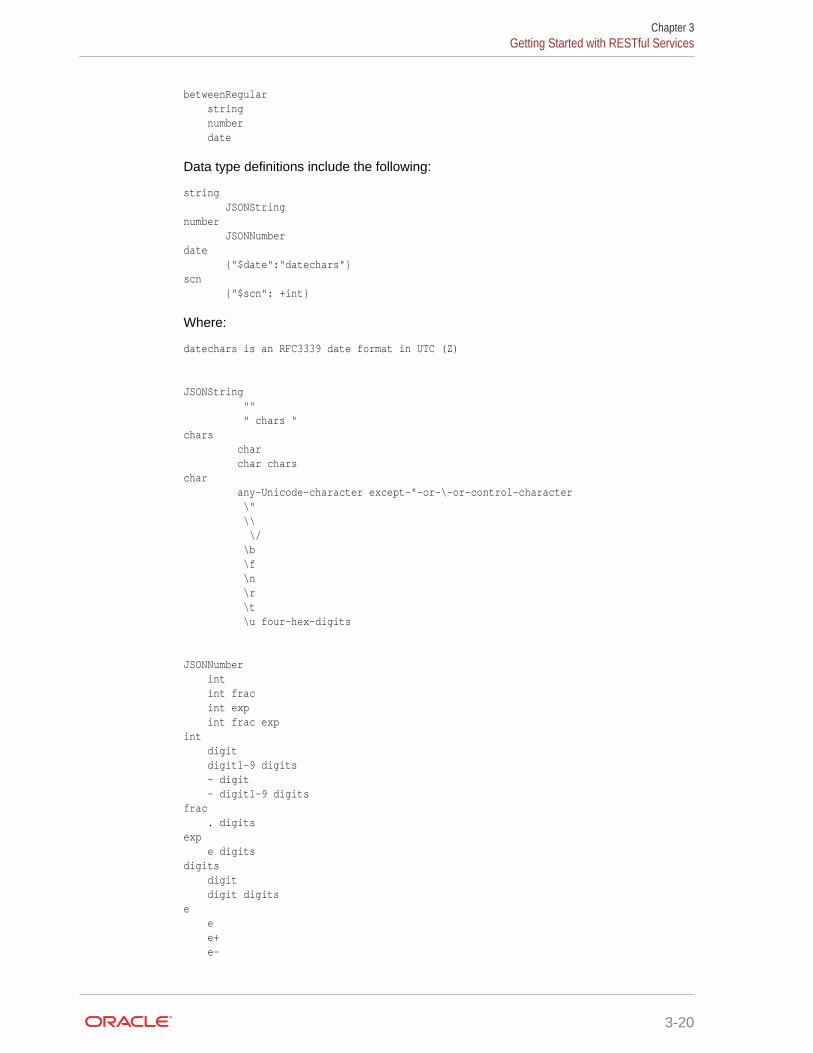
betweenRegular string number date
Data type definitions include the following:
string JSONStringnumber JSONNumberdate {"$date":"datechars"}scn {"$scn": +int}
Where:
datechars is an RFC3339 date format in UTC (Z) JSONString "" " chars "chars char char charschar any-Unicode-character except-"-or-\-or-control-character \" \\ \/ \b \f \n \r \t \u four-hex-digits JSONNumber int int frac int exp int frac expint digit digit1-9 digits - digit - digit1-9 digitsfrac . digitsexp e digitsdigits digit digit digitse e e+ e-
Chapter 3Getting Started with RESTful Services
3-20

E E+ E-
The FilterObject must be encoded according to Section 2.1 of RFC3986.
3.2.5.2.2 Examples: FilterObject SpecificationsThe following are examples of operators in FilterObject specifications.
ORDER BY property ($orderby)
Order by with literals { "$orderby": {"SALARY": "ASC","ENAME":"DESC"}} Order by with numbers { "$orderby": {"SALARY": -1,"ENAME": 1}}
ASOF property ($asof) With SCN (Implicit) { "$asof": 1273919} With SCN (Explicit) { "$asof": {"$scn": "1273919"}} With Date (Implicit) { "$asof": "2014-06-30T00:00:00Z"} With Date (Explicit) { "$asof": {"$date": "2014-06-30T00:00:00Z"}} EQUALS operator ($eq) (Implicit and explicit equality supported._ Implicit (Support String and Dates too) { "SALARY": 1000}
Chapter 3Getting Started with RESTful Services
3-21
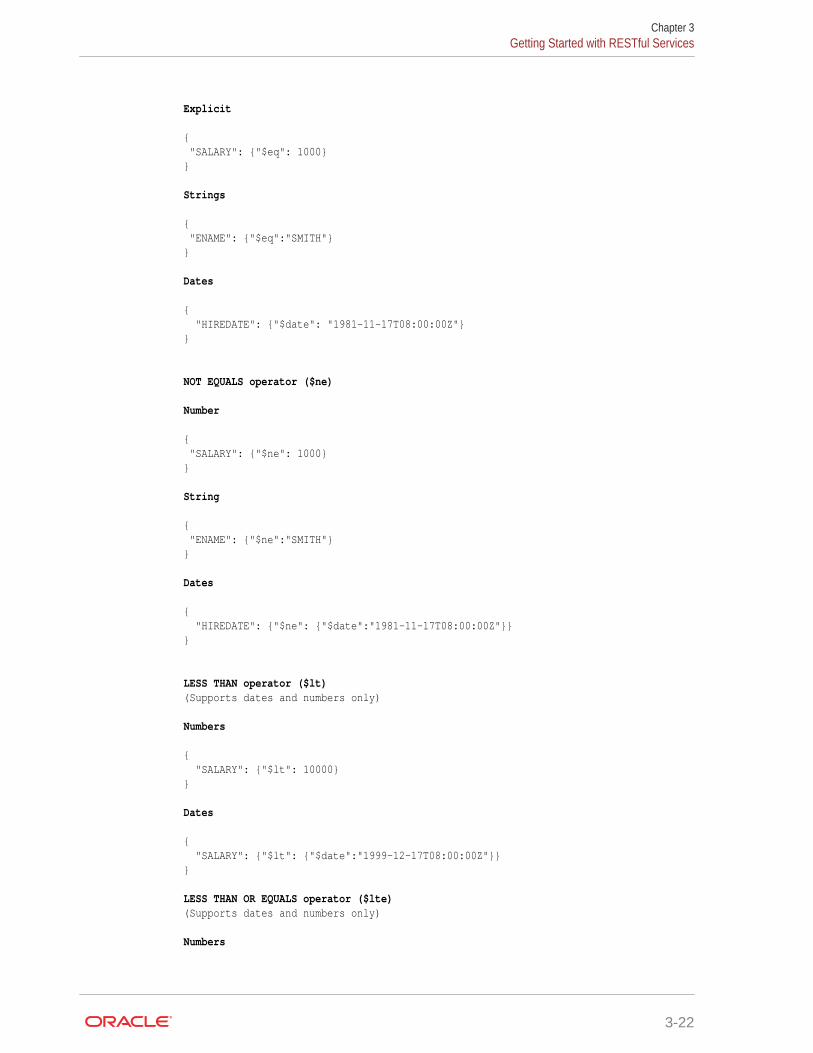
Explicit { "SALARY": {"$eq": 1000}} Strings { "ENAME": {"$eq":"SMITH"}} Dates { "HIREDATE": {"$date": "1981-11-17T08:00:00Z"}} NOT EQUALS operator ($ne) Number { "SALARY": {"$ne": 1000}} String { "ENAME": {"$ne":"SMITH"}} Dates { "HIREDATE": {"$ne": {"$date":"1981-11-17T08:00:00Z"}}} LESS THAN operator ($lt)(Supports dates and numbers only) Numbers { "SALARY": {"$lt": 10000}} Dates { "SALARY": {"$lt": {"$date":"1999-12-17T08:00:00Z"}}} LESS THAN OR EQUALS operator ($lte)(Supports dates and numbers only) Numbers
Chapter 3Getting Started with RESTful Services
3-22
{ "SALARY": {"$lte": 10000}} Dates { "HIREDATE": {"$lte": {"$date":"1999-12-17T08:00:00Z"}}} GREATER THAN operator ($gt)(Supports dates and numbers only) Numbers { "SALARY": {"$gt": 10000}} Dates { "SALARY": {"$gt": {"$date":"1999-12-17T08:00:00Z"}}} GREATER THAN OR EQUALS operator ($gte)(Supports dates and numbers only) Numbers { "SALARY": {"$gte": 10000}} Dates { "HIREDATE": {"$gte": {"$date":"1999-12-17T08:00:00Z"}}}
In string operator ($instr)(Supports strings only) { "ENAME": {"$instr":"MC"}} Not in string operator ($ninstr)(Supports strings only) { "ENAME": {"$ninstr":"MC"}} #### LIKE operator ($like)(Supports strings. Eescape character not supported to try to match expressions with _ or % characters.)
Chapter 3Getting Started with RESTful Services
3-23

{ "ENAME": {"$like":"AX%"}} #### BETWEEN operator ($between)(Supports string, dates, and numbers) Numbers { "SALARY": {"$between": [1000,2000]}} Dates { "SALARY": {"$between": [{"$date":"1989-12-17T08:00:00Z"},{"$date":"1999-12-17T08:00:00Z"}]}} Strings { "ENAME": {"$between": ["A","C"]}} Null Ranges ($lte equivalent) (Supported by numbers and dates only)
{ "SALARY": {"$between": [null,2000]}} Null Ranges ($gte equivalent)(Supported by numbers and dates only)
{ "SALARY": {"$between": [1000,null]}} #### NULL operator ($null) { "ENAME": {"$null": null}} #### NOT NULL operator ($notnull) { "ENAME": {"$notnull": null}} #### AND operator ($and)(Supports all operators, including $and and $or) Column context delegation(Operators inside $and will use the closest context defined in the JSON tree.)
Chapter 3Getting Started with RESTful Services
3-24

{ "SALARY": {"$and": [{"$gt": 1000},{"$lt":4000}]}} Column context override(Example: salary greater than 1000 and name like S%)
{ "SALARY": {"$and": [{"$gt": 1000},{"ENAME": {"$like":"S%"}} ] }} Implicit and in columns ```{ "SALARY": [{"$gt": 1000},{"$lt":4000}] }``` High order AND(All first columns and or high order operators -- $and and $ors -- defined at the first level of the JSON will be joined and an implicit AND)(Example: Salary greater than 1000 and name starts with S or T) { "SALARY": {"$gt": 1000}, "ENAME": {"$or": [{"$like":"S%"}, {"$like":"T%"}]} } Invalid expression (operators $lt and $gt lack column context) { "$and": [{"$lt": 5000},{"$gt": 1000}]} Valid alternatives for the previous invalid expression { "$and": [{"SALARY": {"$lt": 5000}}, {"SALARY": {"$gt": 1000}}]} { "SALARY": [{"$lt": 5000},{"$gt": 1000}]} { "SALARY": {"$and": [{"$lt": 5000},{"$gt": 1000}]}}
OR operator ($or)(Supports all operators including $and and $or) Column context delegation(Operators inside $or will use the closest context defined in the JSON tree)
{ "ENAME": {"$or": [{"$eq":"SMITH"},{"$eq":"KING"}]}}
Chapter 3Getting Started with RESTful Services
3-25
Column context override(Example: name starts with S or salary greater than 1000)
{ "SALARY": {"$or": [{"$gt": 1000},{"ENAME": {"$like":"S%"}} ] }}
3.2.5.3 Auto PL/SQLThis section explains how PL/SQL is made available through HTTP(S) for RemoteProcedure call (RPC).The auto PL/SQL feature uses a standard to provide consistent encoding and datatransfer in a stateless web service environment. Using this feature, you can enableOracle Database stored PL/SQL functions and procedures at package level throughORDS, similar to how you enable the views and tables.
Auto Enabling PL/SQL Subprograms
ORDS supports auto enabling of the following PL/SQL objects, based on their catalogobject identifier:
• PL/SQL Procedure
• PL/SQL Function
• PL/SQL Package
The functions, and procedures within the PL/SQL package cannot be individuallyenabled as they are named objects within a PL/SQL package object. Therefore, thegranularity level enables the objects at the package level. This granularity levelenables to expose all of its public functions and procedures.
If you want to only enable a subset of functions and procedures, then you must createa separate delegate package and enable it to expose only that subset of functions andprocedures.
Note:
Overloaded package functions and procedures are not supported.
3.2.5.3.1 Method and Content Type Supported for Auto Enabling PL/SQL ObjectsThis section discusses the method and content-type supported by this feature.The auto enabling of the PL/SQL Objects feature supports POST as the HTTPmethod. In POST method, input parameters are encoded in the payload and outputparameters are decoded from the response.
Note:
The standard data CRUD to HTTP method mappings are not applicable asthis feature provides an RPC-style interaction.
The content-type supported is application/json.
Chapter 3Getting Started with RESTful Services
3-26
3.2.5.3.2 Auto-Enabling the PL/SQL ObjectsThis section explains how to auto-enable the PL/SQL objects through ORDS.
You can enable the PL/SQL objects in one of the following ways:
• Auto-Enabling Using the ORDS PL/SQL API (page 3-27)
• Auto-Enabling the PL/SQL Objects Using SQL Developer (page 3-28)
3.2.5.3.2.1 Auto-Enabling Using the ORDS PL/SQL API
You can enable a PL/SQL object using the ORDS PL/SQL API.
To enable the PL/SQL package, use the ORDS PL/SQL API as shown in followingsample code snippet:
BEGIN ords.enable_object( p_enabled => TRUE, p_schema => 'MY_SCHEMA', p_object => 'MY_PKG', p_object_type => 'PACKAGE', p_object_alias => 'my_pkg', p_auto_rest_auth => FALSE); commit;END;/
Example 3-1 Enabling the PL/SQL Function
To enable the PL/SQL function, use the ORDS PL/SQL API as shown in followingsample code snippet:
BEGIN ords.enable_object( p_enabled => TRUE, p_schema => 'MY_SCHEMA', p_object => 'MY_FUNC', p_object_type => 'FUNCTION', p_object_alias => 'my_func', p_auto_rest_auth => FALSE);
commit;END;/
Example 3-2 Enabling the PL/SQL Procedure
To enable the PL/SQL procedure, use the ORDS PL/SQL API as shown in followingsample code snippet:
BEGIN ords.enable_object( p_enabled => TRUE, p_schema => 'MY_SCHEMA', p_object => 'MY_PROC', p_object_type => 'PROCEDURE', p_object_alias => 'my_proc', p_auto_rest_auth => FALSE);
Chapter 3Getting Started with RESTful Services
3-27
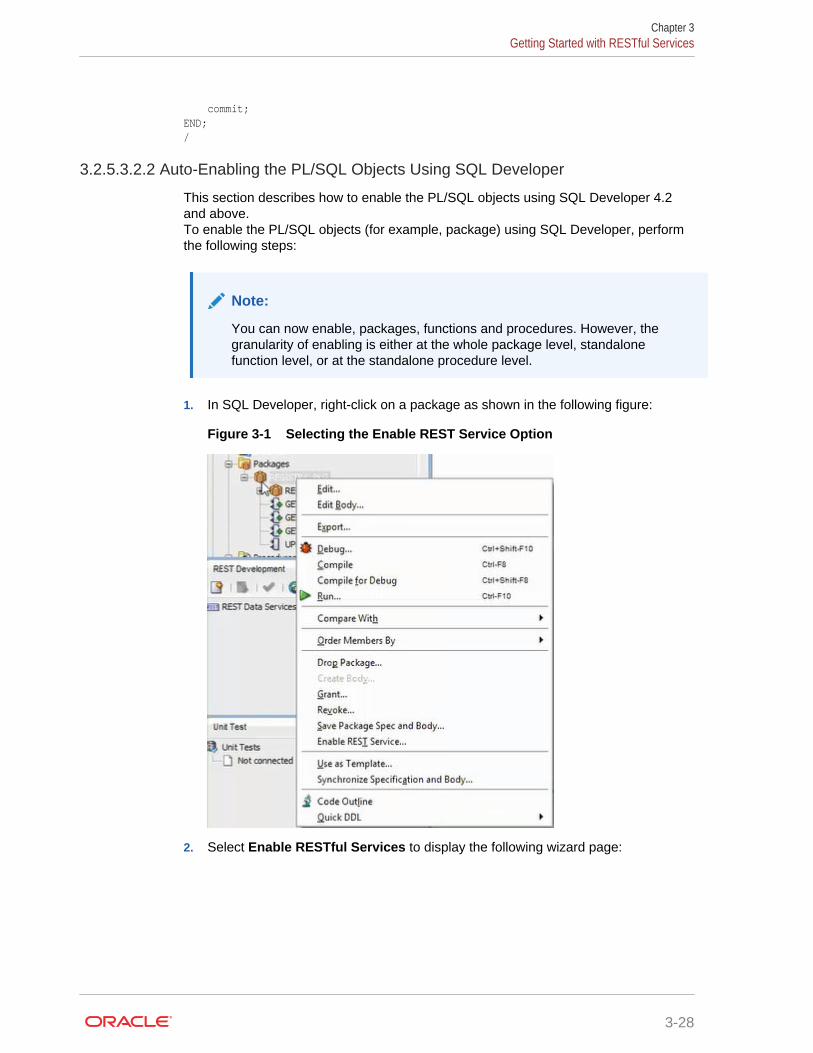
commit;END;/
3.2.5.3.2.2 Auto-Enabling the PL/SQL Objects Using SQL Developer
This section describes how to enable the PL/SQL objects using SQL Developer 4.2and above.To enable the PL/SQL objects (for example, package) using SQL Developer, performthe following steps:
Note:
You can now enable, packages, functions and procedures. However, thegranularity of enabling is either at the whole package level, standalonefunction level, or at the standalone procedure level.
1. In SQL Developer, right-click on a package as shown in the following figure:
Figure 3-1 Selecting the Enable REST Service Option
2. Select Enable RESTful Services to display the following wizard page:
Chapter 3Getting Started with RESTful Services
3-28
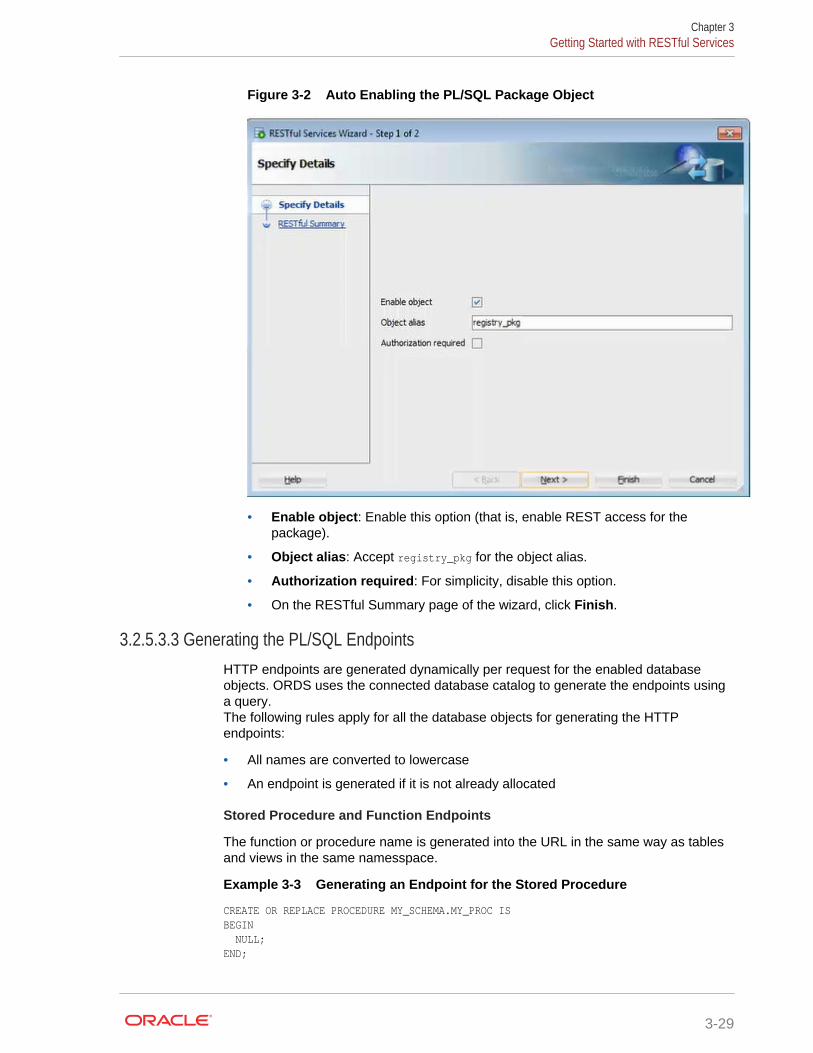
Figure 3-2 Auto Enabling the PL/SQL Package Object
• Enable object: Enable this option (that is, enable REST access for thepackage).
• Object alias: Accept registry_pkg for the object alias.
• Authorization required: For simplicity, disable this option.
• On the RESTful Summary page of the wizard, click Finish.
3.2.5.3.3 Generating the PL/SQL EndpointsHTTP endpoints are generated dynamically per request for the enabled databaseobjects. ORDS uses the connected database catalog to generate the endpoints usinga query.The following rules apply for all the database objects for generating the HTTPendpoints:
• All names are converted to lowercase
• An endpoint is generated if it is not already allocated
Stored Procedure and Function Endpoints
The function or procedure name is generated into the URL in the same way as tablesand views in the same namesspace.
Example 3-3 Generating an Endpoint for the Stored Procedure
CREATE OR REPLACE PROCEDURE MY_SCHEMA.MY_PROC ISBEGIN NULL;END;
Chapter 3Getting Started with RESTful Services
3-29

Following endpoint is generated:
http://localhost:8080/ords/my_schema/my_proc/
Example 3-4 Package Procedure and Function Endpoints
The package, function, and procedure endpoints are generated with package name asa parent. Endpoints for functions and procedures that are not overloaded or where thelowercase name is not already in use are generated.
If you have a package, MY_PKG as defined in the following code snippet:
CREATE OR REPLACE PACKAGE MY_SCHEMA.MY_PKG AS PROCEDURE MY_PROC; FUNCTION MY_FUNC RETURN VARCHAR2; PROCEDURE MY_PROC2; PROCEDURE "my_proc2"; PROCEDURE MY_PROC3(P1 IN VARCHAR); PROCEDURE MY_PROC3(P2 IN NUMBER);END MY_PKG;
Then the following endpoints are generated:
http://localhost:8080/ords/my_schema/my_pkg/MY_PROChttp://localhost:8080/ords/my_schema/my_pkg/MY_FUNC
Note:
Endpoints for the procedure my_proc2 is not generated because its name is notunique when the name is converted to lowercase, and endpoints for theprocedure my_proc3 is not generated because it is overloaded.
3.2.5.3.4 Resource Input PayloadThe input payload is a JSON document with values adhering to the REST standard.The payload should contain a name/value pair for each IN or IN OUT parameter asshown in the following code snippet:
{ "p1": "abc", "p2": 123, "p3": null}
Note:
Where there are no IN or IN OUT parameters, an empty JSON body isrequired as shown in the following code snippet:
{
}
ORDS uses the database catalog metadata to unmarshal the JSON payload intoOracle database types, which is ready to be passed to the database through JDBC.
Chapter 3Getting Started with RESTful Services
3-30

3.2.5.3.5 Resource Payload ResponseWhen the PL/SQL object is executed successfully, it returns a JSON body.The JSON body returned, contains all OUT and IN OUT output parameter values.ORDS uses the database catalog metadata to marshal the execution of the result backinto JSON as shown in the following code snippet:
{ "p3" : "abc123", "p4" : 1}
Where there are no OUT or IN OUT parameters, an empty JSON body is returned asshown in the following code snippet:
{
}
3.2.5.3.6 Function Return ValueThe return value of functions do not have an associated name.As the return value of functions do not have an associated name, the name "~ret" isused as shown in the following code snippet:
{ "~ret" : "abc123"}
3.2.6 Manually Creating RESTful Services Using SQL and PL/SQLThis section describes how to manually create RESTful Services using SQL andPL/SQL and shows how to use a JSON document to pass parameters to a storedprocedure in the body of a REST request.This section includes the following topics:
• About Oracle REST Data Services Mechanisms for Passing Parameters(page 3-31)
• Using SQL/JSON Database Functions with ORDS (page 3-42)
3.2.6.1 About Oracle REST Data Services Mechanisms for PassingParameters
This section describes the main mechanisms that Oracle REST Data Servicessupports for passing parameters using REST HTTP to handlers that are written by thedeveloper:
• Using JSON to Pass Parameters (page 3-32)
You can use JSON in the body of REST requests, such as the POST or PUT method,where each parameter is a JSON name/value pair.
• Using Route Patterns to Pass Parameters (page 3-36)
You can use route patterns for required parameters in the URI to specifyparameters for REST requests such as the GET method, which does not have abody, and in other special cases.
Chapter 3Getting Started with RESTful Services
3-31
• Using Query Strings for Optional Parameters (page 3-40)
You can use query strings for optional parameters in the URI to specifyparameters for REST requests, such as the GET method, which does not have abody, and in other special cases.
Prerequisite Setup Tasks To Be Completed Before Performing Tasks for PassingParameters
This prerequisite setup information assumes you have completed steps 1 and 2 inGetting Started with RESTful Services section, where you have REST-enabled theordstest schema and emp database table (Step 1) and created and tested the RESTfulservice from a SQL query (Step 2). You must complete these two steps beforeperforming the tasks about passing parameters described in the subsections thatfollow.
Related Topics:
• Getting Started with RESTful Services (page 3-2)
3.2.6.1.1 Using JSON to Pass Parameters
This section shows how to use a JSON document to pass parameters to a storedprocedure in the body of a REST request, such as POST or PUT method, where eachparameter is a name/value pair. This operation performs an update on a record, whichin turn returns the change to the record as an OUT parameter.
Perform the following steps:
1. Note:
The following stored procedure performs an update on an existing record inthe emp table to promote an employee by changing any or all of the following:job, salary, commission, department number, and manager. The storedprocedure returns the salary change as an OUT parameter.
create or replace procedure promote ( l_empno IN number, l_job IN varchar2, l_mgr IN number, l_sal IN number, l_comm IN number, l_deptno IN number, l_salarychange OUT number) is oldsalary number; begin select nvl(e.sal, 0)into oldsalary FROM emp e where e.empno = l_empno; update emp e set e.job = nvl(l_job, e.job), e.mgr = nvl(l_mgr, e.mgr), e.sal = nvl(l_sal, e.sal), e.comm = nvl(l_comm, e.comm), e.deptno = nvl(l_deptno, e.deptno) where e.empno = l_empno; l_salarychange := nvl(l_sal, oldsalary) - oldsalary; end;
As a privileged ordstest user, connect to the ordstest schema and create thepromote stored procedure.
Chapter 3Getting Started with RESTful Services
3-32

2. Perform the following steps to setup a handler for a PUT request on the emp resourceto pass parameters in the body of the PUT method in a JSON document to thepromote stored procedure.
a. Using Oracle SQL Developer, in the REST Development section, right click onthe emp template and select Add Handler for the PUT method.
b. In the Create Resource Handler dialog, click the green plus symbol to add theMIME type application/json and then click Apply to send it a JSON documentin the body of the PUT method.
c. Using the SQL Worksheet, add the following anonymous PL/SQL block: beginpromote
(:l_empno, :l_job, :l_mgr, :l_sal, :l_comm, :l_deptno, :l_salarychange);
end; as shown in the following figure.
Figure 3-3 Adding an Anonymous PL/SQL Block to the Handler for thePUT Method
d. Click the Parameters tab to set the Bind Parameter as l_salarychange , theAccess Method as an OUT parameter, the Source Type as RESPONSE, and DataType as INTEGER as shown in the following figure. This is the promoteprocedure’s output which is an integer value equal to the change in salary in aJSON name/value format.
Chapter 3Getting Started with RESTful Services
3-33
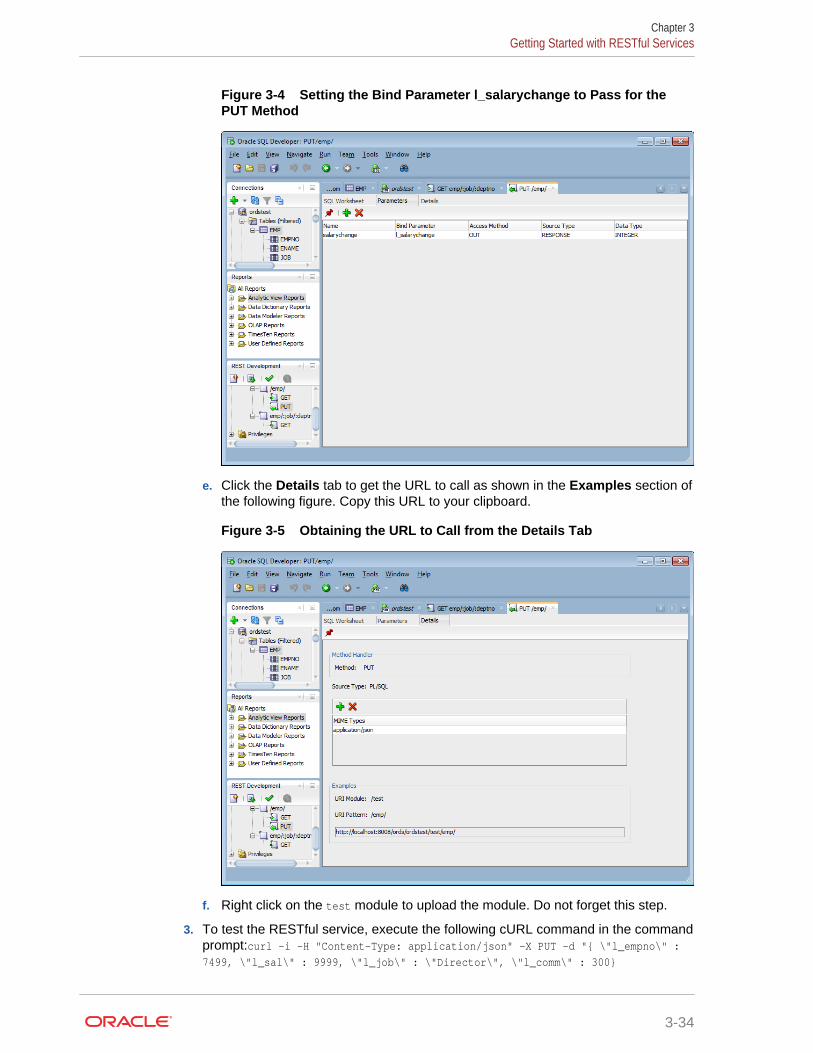
Figure 3-4 Setting the Bind Parameter l_salarychange to Pass for thePUT Method
e. Click the Details tab to get the URL to call as shown in the Examples section ofthe following figure. Copy this URL to your clipboard.
Figure 3-5 Obtaining the URL to Call from the Details Tab
f. Right click on the test module to upload the module. Do not forget this step.
3. To test the RESTful service, execute the following cURL command in the commandprompt:curl -i -H "Content-Type: application/json" -X PUT -d "{ \"l_empno\" :7499, \"l_sal\" : 9999, \"l_job\" : \"Director\", \"l_comm\" : 300}
Chapter 3Getting Started with RESTful Services
3-34

Note:
You can also use any REST client available to test the RESTful service.
The cURL command returns the following response:
HTTP/1.1 200 OK Content-Type: application/json Transfer-Encoding: chunked {"salarychange":8399}
4. In SQL Developer SQL Worksheet, perform the following SELECT statement on theemp table: SELECT * from emp to see that the PUT method was executed, then selectthe Data tab to display the records for the EMP table.
Figure 3-6 Displaying the Results from a SQL Query to Confirm theExecution of the PUT Method
Chapter 3Getting Started with RESTful Services
3-35

Note:
• All parameters are optional. If you leave out a name/value pair for aparameter in your JSON document, the parameter is set to NULL.
• The name/value pairs can be arranged in any order in the JSONdocument. JSON allows much flexibility in this regard in the JSONdocument.
• Only one level of JSON is supported. You can not have nested JSONobjects or arrays.
3.2.6.1.2 Using Route Patterns to Pass Parameters
This section describes how to use route patterns in the URI to specify parameters forREST requests, such as with the GET method, which does not have a body.
First create a GET method handler for a query on the emp table that has many bindvariables. These steps use a route pattern to specify the parameter values that arerequired.
Perform the following steps to use a route pattern to send a GET method with somerequired parameter values:
1. In SQL Developer, right click on the test module and select Add Template tocreate a new template that calls emp; however, in this case the template definitionincludes a route pattern for the parameters or bind variables that is included in theURI rather than in the body of the method. To define the required parameters, usea route pattern by specifying a /: before the job and deptno parameters. Forexample, for the URI pattern, enter: emp/:job/:deptno as shown in the followingfigure.
Chapter 3Getting Started with RESTful Services
3-36
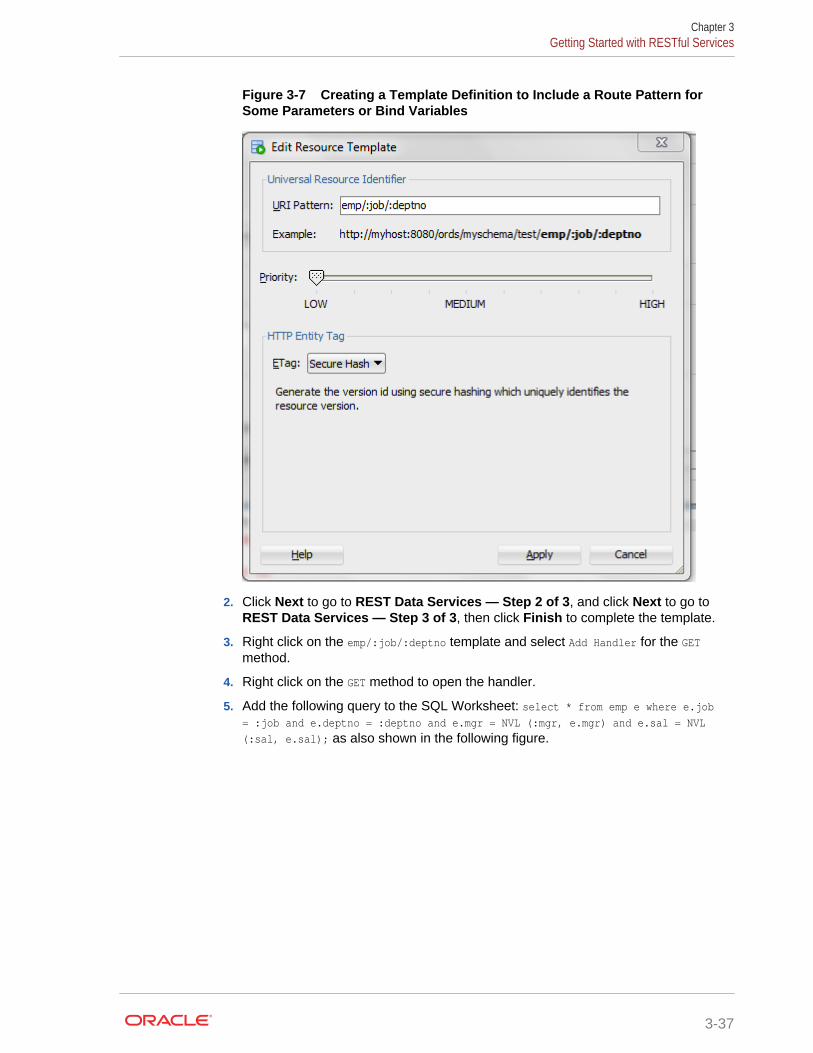
Figure 3-7 Creating a Template Definition to Include a Route Pattern forSome Parameters or Bind Variables
2. Click Next to go to REST Data Services — Step 2 of 3, and click Next to go toREST Data Services — Step 3 of 3, then click Finish to complete the template.
3. Right click on the emp/:job/:deptno template and select Add Handler for the GETmethod.
4. Right click on the GET method to open the handler.
5. Add the following query to the SQL Worksheet: select * from emp e where e.job= :job and e.deptno = :deptno and e.mgr = NVL (:mgr, e.mgr) and e.sal = NVL
(:sal, e.sal); as also shown in the following figure.
Chapter 3Getting Started with RESTful Services
3-37

Figure 3-8 Adding a SQL Query to the Handler
6. Click the Details tab to get the URL to call. Copy this URL to your clipboard.
7. Right click on the test module to upload the module. Do not forget this step.
8. Test the REST endpoint. In a web browser enter the URL:http://localhost:8080/ords/ordstest/test/emp/SALESMAN/30 as shown in the following figure.
Chapter 3Getting Started with RESTful Services
3-38
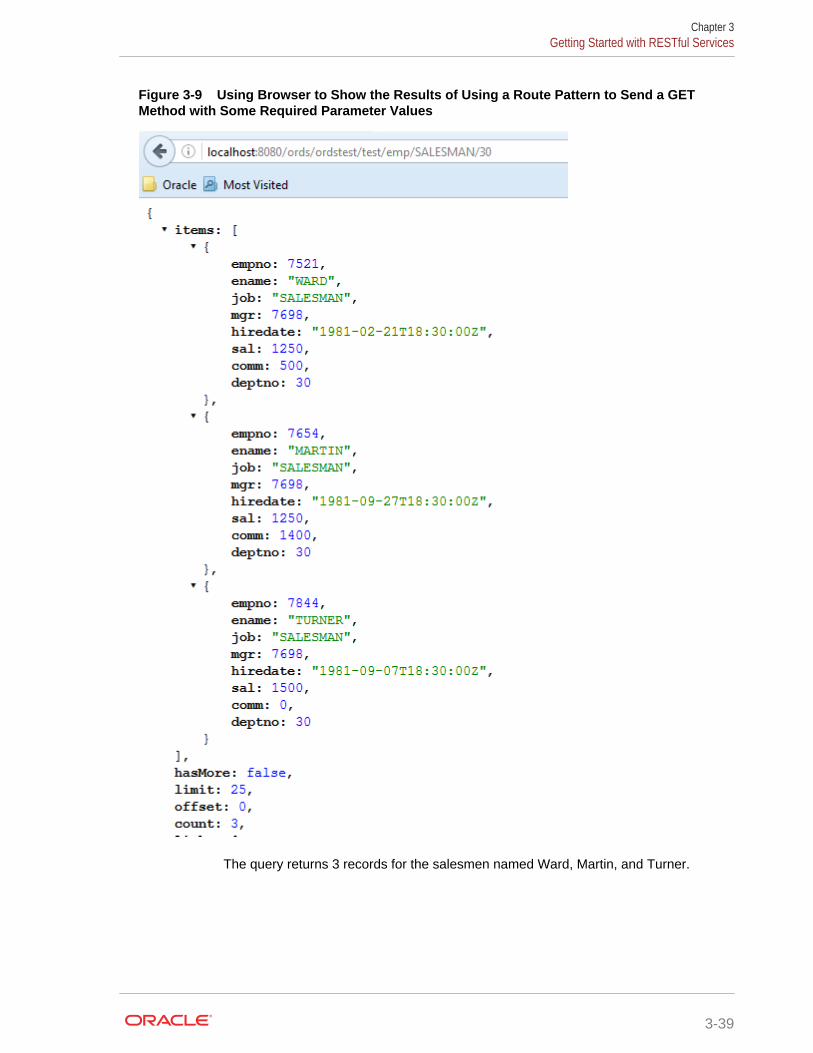
Figure 3-9 Using Browser to Show the Results of Using a Route Pattern to Send a GETMethod with Some Required Parameter Values
The query returns 3 records for the salesmen named Ward, Martin, and Turner.
Chapter 3Getting Started with RESTful Services
3-39
See Also:
To learn more about Route Patterns see this document in the ORDSdistribution at docs/javadoc/plugin-api/route-patterns.html and this document Oracle REST Data Services Route Patterns
3.2.6.1.3 Using Query Strings for Optional Parameters
This section describes how to use query strings in the URI to specify parameters forREST requests like the GET method, which does not have a body. You can use querystrings for any of the other optional bind variables in the query as you choose.
The syntax for using query strings is: ?parm1=value1&parm2=value2 … &parmN=valueN.
For example, to further filter the query: http://localhost:8080/ords/ordstest/test/emp/SALESMAN/30, to use a query string to send a GET method with some parameter name/value pairs, select employees whose mgr (manager) is 7698 and whose sal (salary) is1500 by appending the query string ?mgr=7698&sal=1500 to the URL as follows: http://localhost:8080/ords/ordstest/test/emp/SALESMAN/30?mgr=7698&sal=1500.
To test the endpoint, in a web browser enter the following URL: http://localhost:8080/ords/ordstest/test/emp/SALESMAN/30?mgr=7698&sal=1500 as shown in the followingfigure:
Chapter 3Getting Started with RESTful Services
3-40

Figure 3-10 Using Browser to Show the Results of Using a Query String toSend a GET Method with Some Parameter Name/Value Pairs
The query returns one record for the salesman named Turner in department 30 whohas a salary of 1500 and whose manager is 7698.
Note the following points:
• It is a good idea to URL encode your parameter values. This may not always berequired; however, it is the safe thing to do. This prevents the Internet fromtransforming something, for example, such as a special character in to some othercharacter that may cause a failure. Your REST client may provide this capability oryou can search the Internet for the phrase url encoder to find tools that can do thisfor you.
• Never put a backslash at the end of your parameter list in the URI; otherwise, youmay get a 404 Not Found error.
Chapter 3Getting Started with RESTful Services
3-41

See Also:
To gain more experience using JSON to pass parameter values, see Lab 4 ofthe ORDS Oracle By Example (OBE) and Database ApplicationDevelopment Virtual Image.
3.2.6.2 Using SQL/JSON Database Functions with ORDSThis section describes how to use the SQL/JSON database functions available inOracle Database 12c Release 2 (12.2) to map the nested JSON objects to and fromthe hierarchical relational tables.This section includes the following topics:
• Inserting Nested JSON Objects into Relational Tables (page 3-42)
• Generating Nested JSON Objects from Hierachical Relational Data (page 3-47)
3.2.6.2.1 Inserting Nested JSON Objects into Relational TablesThis section explains how to insert JSON objects with nested arrays into multiple,hierarchical relational tables.The two key technologies used to implement this functionality are as follows:
• The :body bind variable that ORDS provides to deliver JSON and other content inthe body of POST and other REST calls into PL/SQL REST handlers
• JSON_TABLE and other SQL/JSON operators provided in Oracle Database 12cRelease 2 (12.2)
Some of the advantages of using these technologies for inserting data into relationaltables are as follows:
• Requirements for implementing this functionality are very minimal. For example,installation of JSON parser software is not required
• You can use simple, declarative code that is easy to write and understand whenthe JSON to relational mapping is simple
• Powerful and sophisticated capabilities to handle more complex mappings. Thisincludes:
– Mechanisms for mapping NULLS and boolean values
– Sophisticated mechanisms for handling JSON. JSON evolves over time.Hence, the mapping code must be able to handle both the older and newerversions of the JSON documents.
For example, simple scalar values may evolve to become JSON objectscontaining multiple scalars or nested arrays of scalar values or objects. SQL/JSON operators that return the scalar value can continue to work even whenthe simple scalar is embedded within these more elaborate structures. Aspecial mechanism, called the Ordinality Column, can be used to determinethe structure from where the value was derived.
Chapter 3Getting Started with RESTful Services
3-42
See Also:
The following pages for more information on JSON_TABLE and other SQL/JSON operators and on Ordinality Column mechanism:
• https://blogs.oracle.com/jsondb/
• https://blogs.oracle.com/jsondb/entry/the_new_sql_json_query3
3.2.6.2.1.1 Usage of the :body Bind Variable
This section provides some useful tips for using the :body bind variable.Some of the useful tips for using the :body bind variable are as follows:
• The :body bind variable can be accessed, or de-referenced, onlyonce. Subsequent accesses return a NULL value. So, you must first assignthe :body bind variable to the local L_PO variable before using it in the twoJSON_Table operations.
• The :body bind variable is a BLOB datatype and you can assign it only to a BLOBvariable.
Note:
Since L_PO is a BLOB variable, you must use the FORMAT JSON phrase after theexpression in the JSON_TABLE function. section for more information.
The :body bind variable can be used with other types of data such as image data.
See Also:
• Development Tutorial: Creating an Image Gallery (page D-1) for aworking example of using :body bind variable with image data .
• Database SQL Language Reference
3.2.6.2.1.2 Example of JSON Purchase Order with Nested LineItems
This section shows an example that takes the JSON Purchase Order with NestedLineItems and inserts it into a row of the PurchaseOrder table and rows of theLineItem table.
Example 3-5 Nested JSON Purchase Order with Nested LineItems
{"PONumber" : 1608, "Requestor" : "Alexis Bull", "CostCenter" : "A50", "Address" : {"street" : "200 Sporting Green", "city" : "South San Francisco", "state" : "CA", "zipCode" : 99236, "country" : "United States of America"},
Chapter 3Getting Started with RESTful Services
3-43

"LineItems" : [ {"ItemNumber" : 1, "Part" : {"Description" : "One Magic Christmas", "UnitPrice" : 19.95, "UPCCode" : 1313109289}, "Quantity" : 9.0}, {"ItemNumber" : 2, "Part" : {"Description" : "Lethal Weapon", "UnitPrice" : 19.95, "UPCCode" : 8539162892}, "Quantity" : 5.0}]}'
3.2.6.2.1.3 Table Definitions for PurchaseOrder and LineItems Tables
This section provides definitions for the PurchaseOrder and LineItem tables.The definitions for the PurchaseOrder and the LineItems tables are as follows:
CREATE TABLE PurchaseOrder ( PONo NUMBER (5), Requestor VARCHAR2 (50), CostCenter VARCHAR2 (5), AddressStreet VARCHAR2 (50), AddressCity VARCHAR2 (50), AddressState VARCHAR2 (2), AddressZip VARCHAR2 (10), AddressCountry VARCHAR2 (50), PRIMARY KEY (PONo));
CREATE TABLE LineItem ( PONo NUMBER (5), ItemNumber NUMBER (10), PartDescription VARCHAR2 (50), PartUnitPrice NUMBER (10), PartUPCCODE NUMBER (10), Quantity NUMBER (10), PRIMARY KEY (PONo,ItemNumber));
3.2.6.2.1.4 PL/SQL Handler Code for a POST Request
This section gives an example PL/SQL handler code for a POST request. The handlercode is used to insert a purchase order into a row of the PurchaseOrder table androws of the LineItem table.
Example 3-6 PL/SQL Handler Code Used for a POST Request
Declare L_PO BLOB; Begin L_PO := :body; INSERT INTO PurchaseOrder SELECT * FROM json_table(L_PO FORMAT JSON, '$' COLUMNS ( PONo Number PATH '$.PONumber', Requestor VARCHAR2 PATH '$.Requestor', CostCenter VARCHAR2 PATH '$.CostCenter', AddressStreet VARCHAR2 PATH '$.Address.street', AddressCity VARCHAR2 PATH '$.Address.city', AddressState VARCHAR2 PATH '$.Address.state', AddressZip VARCHAR2 PATH '$.Address.zipCode', AddressCountry VARCHAR2 PATH '$.Address.country'));
Chapter 3Getting Started with RESTful Services
3-44
INSERT INTO LineItem SELECT * FROM json_table(L_PO FORMAT JSON, '$' COLUMNS ( PONo Number PATH '$.PONumber', NESTED PATH '$.LineItems[*]' COLUMNS ( ItemNumber Number PATH '$.ItemNumber', PartDescription VARCHAR2 PATH '$.Part.Description', PartUnitPrice Number PATH '$.Part.UnitPrice', PartUPCCode Number PATH '$.Part.UPCCode', Quantity Number PATH '$.Quantity')));commit;end;
3.2.6.2.1.5 Creating the REST API Service to Invoke the Handler
This section explains how to create the REST API service to invoke the handler, usingthe Oracle REST Data Services.To setup the REST API service, a URI is defined to identify the resource the RESTcalls will be operating on. The URI is also used by Oracle REST Data Services toroute the REST HTTP calls to specific handlers. The general format for the URI is asfollows:
<server>:<port>/ords/<schema>/<module>/<template>/<parameters>
Here, <server>:<port> is where the Oracle REST Data Service is installed. For testingpurposes, you can use demo and test in place of module and template respectivelyin the URI. Modules are used to group together related templates that define theresources the REST API will be operating upon.
To create the REST API service, use one of the following methods:
• Use the ORDS PL/SQL API to define the REST service and a handler for thePOST insert. Then connect to the jsontable schema on the database server thatcontains the PurchaseOrder and LineItem tables.
Note:
JSON_TABLE and other SQL/JSON operators use single quote so these mustbe escaped. For example, every single quote (’) must be replaced with doublequotes (“).
• Use the ORDS REST Development pane in SQL Developer to define the RESTservice.
3.2.6.2.1.6 Defining the REST Service and Handler using ORDS PL/SQL API
This section shows how to define the REST Service and Handler for the POST insertusing the Oracle REST Data Services (ORDS) PL/SQL API.You can alternatively use the ORDS REST development pane in SQL Developer tocreate the modules, templates and handlers.
BEGIN ORDS.ENABLE_SCHEMA( p_enabled => TRUE, p_schema => 'ORDSTEST',
Chapter 3Getting Started with RESTful Services
3-45

p_url_mapping_type => 'BASE_PATH', p_url_mapping_pattern => 'ordstest', p_auto_rest_auth => FALSE);
ORDS.DEFINE_MODULE( p_module_name => 'demo', p_base_path => '/demo/', p_items_per_page => 25, p_status => 'PUBLISHED', p_comments => NULL); ORDS.DEFINE_TEMPLATE( p_module_name => 'demo', p_pattern => 'test', p_priority => 0, p_etag_type => 'HASH', p_etag_query => NULL, p_comments => NULL); ORDS.DEFINE_HANDLER( p_module_name => 'demo', p_pattern => 'test', p_method => 'POST', p_source_type => 'plsql/block', p_items_per_page => 0, p_mimes_allowed => '', p_comments => NULL, p_source => ' declare L_PO BLOB := :body;begin
INSERT INTO PurchaseOrder SELECT * FROM json_table(L_PO FORMAT JSON, ''$'' COLUMNS ( PONo Number PATH ''$.PONumber'', Requestor VARCHAR2 PATH ''$.Requestor'', CostCenter VARCHAR2 PATH ''$.CostCenter'', AddressStreet VARCHAR2 PATH ''$.Address.street'', AddressCity VARCHAR2 PATH ''$.Address.city'', AddressState VARCHAR2 PATH ''$.Address.state'', AddressZip VARCHAR2 PATH ''$.Address.zipCode'', AddressCountry VARCHAR2 PATH ''$.Address.country''));
INSERT INTO LineItemSELECT * FROM json_table(L_PO FORMAT JSON, ''$'' COLUMNS ( PONo Number PATH ''$.PONumber'', NESTED PATH ''$.LineItems[*]'' COLUMNS ( ItemNumber Number PATH ''$.ItemNumber'', PartDescription VARCHAR2 PATH ''$.Part.Description'', PartUnitPrice Number PATH ''$.Part.UnitPrice'', PartUPCCode Number PATH ''$.Part.UPCCode'', Quantity Number PATH ''$.Quantity'')));
commit;end;' );
COMMIT; END;
Chapter 3Getting Started with RESTful Services
3-46

Related Topics:
• Using the Oracle REST Data Services PL/SQL API (page 3-80)
• About Oracle REST Data Services Mechanisms for Passing Parameters(page 3-31)
• ORDS PL/SQL Package Reference (page 5-1)
3.2.6.2.2 Generating Nested JSON Objects from Hierachical Relational DataThis section explains how to query the relational tables in hierarchical (parent/child)relationships and return the data in a nested JSON format using the Oracle RESTData Services.The two key technologies used to implement this functionality are as follows:
• The new SQL/JSON functions available with Oracle Database 12c Release 2(12.2). You can use json_objects for generating JSON objects from the relationaltables, and json_arrayagg, for generating nested JSON arrays from nested (child)relational tables.
• The ORDS media source type used for enabling the REST service handler toexecute a SQL query that in turn returns the following types of data:
– The HTTP Content-Type of the data, which in this case is application/json
– The JSON data returned by the json_object
Some of the advantages of using this approach are as follows:
• Requirements for implementing this functionality is very minimal. For example,installation of JSON parser software is not required.
• Simple, declarative coding which is easy to write and understand which makes theJSON objects to relational tables mapping simple.
• Powerful and sophisticated capabilities to handle more complex mappings. Thisincludes mechanisms for mapping NULLS and boolean values.
For example, a NULL in the Oracle Database can be converted to either theabsence of the JSON element or to a JSON NULL value. The Oracle Databasedoes not store Boolean types but the SQL/JSON functions allow string or numericvalues in the database to be mapped to Boolean TRUE or FALSE values.
3.2.6.2.2.1 Example to Generate Nested JSON Objects from the HierachicalRelational Tables
This section describes how to query or GET the data we inserted into thePurchaseOrder and LineItem relational tables in the form of nested JSON purchaseorder.
Example 3-7 GET Handler Code using Oracle REST Data Services Query onRelational Tables for Generating a Nested JSON object
SELECT 'application/json', json_object('PONumber' VALUE po.PONo, 'Requestor' VALUE po.Requestor, 'CostCenter' VALUE po.CostCenter, 'Address' VALUE json_object('street' VALUE po.AddressStreet, 'city' VALUE po.AddressCity, 'state' VALUE po.AddressState, 'zipCode' VALUE po.AddressZip,
Chapter 3Getting Started with RESTful Services
3-47

'country' VALUE po.AddressCountry), 'LineItems' VALUE (select json_arrayagg( json_object('ItemNumber' VALUE li.ItemNumber, 'Part' VALUE json_object('Description' VALUE li.PartDescription, 'UnitPrice' VALUE li.PartUnitPrice, 'UPCCode' VALUE li.PartUPCCODE), 'Quantity' VALUE li.Quantity)) FROM LineItem li WHERE po.PONo = li.PONo)) FROM PurchaseOrder po WHERE po.PONo = :id
3.2.6.2.2.2 ORDS PL/SQL API Calls for Defining Template and GET Handler
This section provides an example of ORDS PL/SQL API call for creating a newtemplate in the module created.
Example 3-8 ORDS PL/SQL API Call for Creating a New test/:id Template andGET Handler in the demo Module
Beginords.define_template( p_module_name => 'demo', p_pattern => 'test/:id'); ords.define_handler( p_module_name => 'demo', p_pattern => 'test/:id', p_method => 'GET', p_source_type => ords.source_type_media, p_source => ' SELECT ''application/json'', json_object(''PONumber'' VALUE po.PONo, ''Requestor'' VALUE po.Requestor, ''CostCenter'' VALUE po.CostCenter, ''Address'' VALUE json_object(''street'' VALUE po.AddressStreet, ''city'' VALUE po.AddressCity, ''state'' VALUE po.AddressState, ''zipCode'' VALUE po.AddressZip, ''country'' VALUE po.AddressCountry), ''LineItems'' VALUE (select json_arrayagg( json_object(''ItemNumber'' VALUE li.ItemNumber, ''Part'' VALUE json_object(''Description'' VALUE li.PartDescription, ''UnitPrice'' VALUE li.PartUnitPrice, ''UPCCode'' VALUE li.PartUPCCODE), ''Quantity'' VALUE li.Quantity)) FROM LineItem li WHERE po.PONo = li.PONo)) FROM PurchaseOrder po WHERE po.PONo = :id ' ); Commit;End;
3.2.6.2.3 Testing the RESTful ServicesThis section shows how to test the POST and GET RESTful Services to access theOracle database and get the results in a JSON format.This section includes the following topics:
Chapter 3Getting Started with RESTful Services
3-48
• Insertion of JSON Object into the Database (page 3-49)
• Generating JSON Object from the Database (page 3-49)
3.2.6.2.3.1 Insertion of JSON Object into the Database
This section shows how to test insertion of JSON purchase order into the database.URI Pattern: http://<HOST>:<PORT>/ords/<SchemaAlias>/<module>/<template>
Example:
Method: POST
URI Pattern: http://localhost:8080/ords/ordstest/demo/test/
To test the RESTful service, create a file such as po1.json with the following data forPONumber 1608 :
{"PONumber" : 1608, "Requestor" : "Alexis Bull", "CostCenter" : "A50", "Address" : {"street" : "200 Sporting Green", "city" : "South San Francisco", "state" : "CA", "zipCode" : 99236, "country" : "United States of America"}, "LineItems" : [ {"ItemNumber" : 1, "Part" : {"Description" : "One Magic Christmas", "UnitPrice" : 19.95, "UPCCode" : 1313109289}, "Quantity" : 9.0}, {"ItemNumber" : 2, "Part" : {"Description" : "Lethal Weapon", "UnitPrice" : 19.95, "UPCCode" : 8539162892}, "Quantity" : 5.0}]}'
Then, execute the following cURL command in the command prompt:
curl -i -H "Content-Type: application/json" -X POST -d @po1.json "http://localhost:8080/ords/ordstest/demo/test/"
The cURL command returns the following response:
HTTP/1.1 200 OK Transfer-Encoding: chunked
3.2.6.2.3.2 Generating JSON Object from the Database
This section shows the results of a GET method to fetch the JSON object from thedatabase..Method: GET
URI Pattern: http://<HOST>:<PORT>/ords/<SchemaAlias>/<module>/<template>/<parameters>
Example:
To test the RESTful service, in a web browser, enter the URL http://localhost:8080 /ords/ordstest/demo/test/1608 as shown in the following figure:
Chapter 3Getting Started with RESTful Services
3-49

Figure 3-11 Generating Nested JSON Objects
3.2.7 About Working with Dates Using ORDSORDS enables developers to create REST interfaces to Oracle Database, OracleDatabase 12c JSON Document Store, and Oracle NoSQL Database as quickly and
Chapter 3Getting Started with RESTful Services
3-50
easily as possible. When working with Oracle Database, developers can use theAutoREST feature for tables or write custom modules using SQL and PL/SQL routinesfor more complex operations.
ORDS uses the RFC3339 standard for encoding dates in strings. Typically, the dateformat used is dd-mmm-yyyy, for example, 15-Jan-2017. ORDS automaticallyconverts JSON strings in the specified format to Oracle date data types whenperforming operations such as inserting or updating values in Oracle Database. Whenconverting back to JSON strings, ORDS automatically converts Oracle date data typesto the string format.
Note:
Oracle Database supports a date data type while JSON does not support adate data type.
This section includes the following topics:
• About Datetime Handling with Oracle REST Data Services (page 3-51)
• About Setting the Time Zone that ORDS Uses (page 3-52)
See Also:
The following page for more information, including details on how time andtime zones are handled https://jsao.io/2016/10/working-with-dates-using-ords/
3.2.7.1 About Datetime Handling with Oracle REST Data ServicesAs data arrives from a REST request, Oracle REST Data Services (ORDS) may parseISO 8601 strings and convert them to the TIMESTAMP data type in Oracle Database. Thisoccurs with AutoREST (POST and PUT) as well as with bind variables in custommodules. Remember that TIMESTAMP does not support time zone related components,so the DATETIME value is set to the time zone ORDS uses during the conversionprocess.
When constructing responses to REST requests, ORDS converts DATETIME values inOracle Database to ISO 8601 strings in Zulu. This occurs with AutoREST (GET) and incustom modules that are mapped to SQL queries (GET). In the case of DATE andTIMESTAMP data types, which do not have time zone related components, the time zoneis assumed to be that in which ORDS is running and the conversion to Zulu is madefrom there.
Here are some general recommendations when working with ORDS for REST (that is,not APEX):
• Ensure that ORDS uses the appropriate time zone as per the data in the database(for example, the time zone you want dates going into the database).
• Do not alter NLS settings (that is, the time_zone) mid-stream.
Chapter 3Getting Started with RESTful Services
3-51

Note that while ISO 8601 strings are mentioned, ORDS actually supports strings.RFC3339 strings are a conformant subset of ISO 8601 strings. The default formatreturned by JSON.stringify(date) is supported.
WARNING:
It is important to keep the time zone that ORDS uses in sync with the sessiontime zone to prevent issues with implicit data conversion to TIMESTAMP WITHTIME ZONE or TIMESTAMP WITH LOCAL TIME ZONE. ORDS does this automatically bydefault but developers can change the session time zone with an ALTERSESSION statement.
See Aslo:
RFC3339
3.2.7.2 About Setting the Time Zone that ORDS UsesWhen Oracle REST Data Services (ORDS) is started, the JVM it runs in obtains andcaches the time zone ORDS uses for various time zone conversions. By default, thetime zone is obtained from the operating system (OS), so an easy way to change thetime zone ORDS uses is to change the time zone of the OS and then restart ORDS orthe application server on which it is running. Of course, the instructions for changingthe time zone vary by the operating system.
If for any reason you do not want to use the same time zone as the OS, it is possibleto override the default using the Java environment variable Duser.timezone. Exactlyhow that variable is set depends on whether you are running in standalone mode or ina Java application server. The following topics show some examples.
Standalone Mode
When running ORDS in standalone mode, it is possible to set Java environmentvariables by specifying them as command line options before the -jar option.
Example 3-9 Setting the Duser.timezone Java Environment Variable inStandalone Mode
The following code example shows how to set the timezone in standalone mode onthe command line.
$ java -Duser.timezone=America/New_York -jar ords.war standalone
Java Application Server — Tomcat 8
In a Java application server, Tomcat 8, and possibly earlier and later versions too, it ispossible to set the time zone using the environment variable CATALINA_OPTS. Therecommended way to do this is not to modify the CATALINA_BASE/bin/catalina.shdirectly, but instead to set environment variables by creating a script named setenv.shin CATALINA_BASE/bin.
Chapter 3Getting Started with RESTful Services
3-52

Example 3-10 Setting the Duser.timezone Java Environment Variable in a JavaApplication Server
The following code example shows the contents of the setenv.sh script for setting thetimezone in a Java Application server — Tomcat 8.
CATALINA_TIMEZONE="-Duser.timezone=America/New_York"CATALINA_OPTS="$CATALINA_OPTS $CATALINA_TIMEZONE
3.2.7.3 Exploring the Sample RESTful Services in Application Express(Tutorial)
Oracle highly recommends to develop ORDS application using SQL Developerbecause it supports the most recent ORDS releases, that is, 3.0.X. ApplicationExpress provides a tutorial that is useful for learning some basic concepts of RESTand ORDS. However, the tutorial uses the earlier ORDS releases, that is, 2.0.X.Following are some of the useful tips discussed on how to use the tutorial:
If your Application Express instance is configured to automatically add the sampleapplication and sample database objects to workspaces, then a sample resourcemodule named: oracle.example.hr will be visible in the list of Resource Modules. If thatresource module is not listed, then you can click the Reset Sample Data task on theright side of the RESTful Services Page to create the sample resource module.
1. Click on oracle.example.hr to view the Resource Templates and ResourceHandlers defined within the module. Note how the module has a URI prefix with thevalue: hr/. This means that all URIs serviced by this module will start with thecharacters hr/.
2. Click on the resource template named employees/{id}. Note how the template has aURI Template with the value: employees/{id}. This means that all URIs starting withhr/employees/ will be serviced by this Resource Template.
The HTTP methods supported by a resource template are listed under the resourcetemplate. In this case, the only supported method is the GET method.
3. Click on the GET Resource Handler for hr/employees/{id} to view its configuration.
The Source Type for this handler is Query One Row. This means that the resource isexpected to be mapped to a single row in the query result set. The Source for thishandler is:
select * from emp where empno = :id
Assuming that the empno column is unique, the query should only produce a singleresult (or no result at all if no match is found for :id). To try it out, press the Testbutton. The following error message should be displayed:
400 - Bad Request - Request path contains unbound parameters: id
If you look at the URI displayed in the browser, it will look something like this:
https://server:port/ords/workspace/hr/employees/{id}
where:
• server is the DNS name of the server where Oracle Application Express isdeployed
Chapter 3Getting Started with RESTful Services
3-53

• port is the port the server is listening on
• workspace is the name of the Oracle Application Express workspace you arelogged into
Note the final part of the URI: hr/employees/{id}. The error message says that thisis not a valid URI, the problem is that you did not substitute in a concrete value forthe parameter named {id}. To fix that, press the browser Back button, then clickSet Bind Variables.
4. For the bind variable named :id, enter the value 7369, and press Test.
A new browser window appears displaying the following JSON (JavaScript ObjectNotation):
{ "empno":7369, "ename":"SMITH", "job":"CLERK", "mgr":7902, "hiredate":"1980-12-17T08:00:00Z", "sal":800, "deptno":20}
Note also the URI displayed in the browser for this resource:
https://server:port/ords/workspace/hr/employees/7369
The {id} URI Template parameter is bound to the SQL :id bind variable, and inthis case it has been given the concrete value of 7369, so the query executed by theRESTful Service becomes:
select * from emp where empno = 7369
The results of this query are then rendered as JSON as shown above.
Tip:
Reading JSON can be difficult. To make it easier to read, install a browserextension that pretty prints the JSON. For example, Mozilla Firefox andGoogle Chrome both have extensions:
• JSONView for Firefox
• JSON Formatter (Chrome)
Now see what happens when you enter the URI of a resource that does not exist.
5. On the Set Bind Variables page, change the value of :id from 7369 to 1111, andpress Test.
As before, a new window pops up, but instead of displaying a JSON resource, itdisplays an error message reading:
404 - Not Found
Chapter 3Getting Started with RESTful Services
3-54
This is the expected behavior of this handler: when a value is bound to :id thatdoes not exist in the emp table, the query produces no results and consequently thestandard HTTP Status Code of 404 - Not Found is returned.
So, you have a service that will provide information about individual employees, ifyou know the ID of an employee, but how do you discover the set of valid employeeids?
6. Press Cancel to return to the previous page displaying the contents of theResource Module.
7. Click on the template named employees/.
The following steps look at the resource it generates, and later text will help youunderstand its logic.
8. Click on the GET handler beneath employees/, and click Test.
A resource similar to the following is displayed (If you haven't already done so, nowwould be a good time to install a JSON viewer extension in your browser to make iteasier to view the output):
{ "next": {"$ref": "https://server:port/ords/workspace/hr/employees/?page=1"}, "items": [ { "uri": {"$ref": "https://server:port/ords/workspace/hr/employees/7369"}, "empno": 7369, "ename": "SMITH" }, { "uri": {"$ref": "https://server:port/ords/workspace/hr/employees/7499"}, "empno": 7499, "ename": "ALLEN" }, ... { "uri": {"$ref": "https://server:port/ords/workspace/hr/employees/7782"}, "empno": 7782, "ename": "CLARK" } ]}
This JSON document contains a number of things worth noting:
• The first element in the document is named next and is a URI pointing to thenext page of results. (An explanation of how paginated results are supportedappears in later steps)
• The second element is named items and contains a number of child elements.Each child element corresponds to a row in the result set generated by thequery.
Chapter 3Getting Started with RESTful Services
3-55

• The first element of each child element is named uri and contains a URIpointing to the service that provides details of each employee. Note how thelatter part of the URI matches the URI Template: employees/{id}. In otherwords, if a client accesses any of these URIs, the request will be serviced bythe employees/{id} RESTful service previously discussed.
So, this service addresses the problem of identifying valid employee IDs bygenerating a resource that lists all valid employee resources. The key thing torealize here is that it does not do this by just listing the ID value by itself andexpecting the client to be able to take the ID and combine it with prior knowledge ofthe employees/{id} service to produce an employee URI; instead, it lists the URIs ofeach employee.
Because the list of valid employees may be large, the service also breaks the listinto smaller pages, and again uses a URI to tell the client where to find the nextpage in the results.
To see at how this service is implemented, continue with the next steps.
9. Press the Back button in your browser to return to the GET handler definition.
Note the Source Type is Query, this is the default Source Type, and indicates thatthe resource can contain zero or more results. The Pagination Size is 7, whichmeans that there will be seven items on each page of the results. Finally, theSource for the handler looks like this:
select empno "$uri", empno, ename from ( select emp.*, row_number() over (order by empno) rn from emp ) tmp where rn between :row_offset and :row_count
In this query:
• The first line states that you want to return three columns. The first column isthe employee id: empno, but aliased to a column name of $uri (to be explainedlater), the second column is again the employee ID, and the third column is theemployee name, ename.
• Columns in result sets whose first character is $ (dollar sign) are given specialtreatment. They are assumed to denote columns that must be transformed intoURIs, and these are called Hyperlink Columns. Thus, naming columns with aleading $ is a way to generate hyperlinks in resources.
When a Hyperlink Column is encountered, its value is prepended with the URIof the resource in which the column is being rendered, to produce a new URI.For example, recall that the URI of this service is https://server:port/ords/workspace/hr/employees/. If the value of empno in the first row produced by thethis service's query is 7369, then the value of $uri becomes: https://server:port/ords/workspace/hr/employees/7369.
• JSON does not have a URI data type, so a convention is needed to make itclear to clients that a particular value represents a URI. Oracle REST DataServices uses the JSON Reference proposal, which states that any JSONobject containing a member named $ref, and whose value is a string, is a URI.Thus, the column: $uri and its value: https://server:port/ords/workspace/hr/employees/7369 is transformed to the following JSON object:
Chapter 3Getting Started with RESTful Services
3-56

{"uri": {"$ref": "https://server:port/ords/workspace/hr/employees/7369" } }
• The inner query uses the row_number() analytical function to count the numberof rows in the result set, and the outer WHERE clause constrains the result setto only return rows falling within the desired page of results. Oracle REST DataServices defines two implicit bind parameters, :row_offset and :row_count, thatalways contain the indicies of the first and last rows that should be returned in agiven page's results.
For example, if the current page is the first page and the pagination size is 7,then the value of :row_offset will be 1 and the value of :row_count will be 7.
To see a simpler way to do both hyperlinks and paged results, continue with thefollowing steps.
10. Click on the GET handler of the employeesfeed/ resource template.
Note that the Source Type of this handler is Feed and Pagination Size is 25.
11. Change the pagination size to 7, and click Apply Changes.
The Source of the handler is just the following:
select empno, ename from emp order by deptno, ename
As you can see, the query is much simpler than the previous example; however, ifyou click Test, you will see a result that is very similar to the result produced by theprevious example.
• The Feed Source Type is an enhanced version of the Query Source Type thatautomatically assumes the first column in a result set should be turned into ahyperlink, eliminating the need to alias columns with a name starting with $. Inthis example, the empno column is automatically transformed into a hyperlink bythe Feed Source Type.
• This example demonstrates the ability of Oracle REST Data Services toautomatically paginate result sets if a Pagination Size of greater than zero isdefined, and the query does not explicitly dereference the :row_offsetor :row_count bind parameters. Because both these conditions hold true for thisexample, Oracle REST Data Services enhances the query, wrapping it inclauses to count and constrain the number and offset of rows returned. Notethat this ability to automatically paginate results also applies to the QuerySource Type.
See Also:
JSON Reference
3.3 Configuring Secure Access to RESTful ServicesThis section describes how to configure secure access to RESTful Services
Chapter 3Configuring Secure Access to RESTful Services
3-57
RESTful APIs consist of resources, each resource having a unique URI. A set ofresources can be protected by a privilege. A privilege defines the set of roles, at leastone of which an authenticated user must possess to access a resource protected by aprivilege.
Configuring a resource to be protected by a particular privilege requires creating aprivilege mapping. A privilege mapping defines a set of patterns that identifies theresources that a privilege protects.
Topics:
• Authentication (page 3-58)
• About Privileges for Accessing Resources (page 3-59)
• About Users and Roles for Accessing Resources (page 3-59)
• About the File-Based User Repository (page 3-60)
• Tutorial: Protecting and Accessing Resources (page 3-60)
3.3.1 AuthenticationUsers can be authenticated through first party cookie-based authentication or thirdparty OAuth 2.0-based authentication
Topics:
• First Party Cookie-Based Authentication (page 3-58)
• Third Party OAuth 2.0-Based Authentication (page 3-58)
3.3.1.1 First Party Cookie-Based AuthenticationA first party is the author of a RESTful API. A first party application is a web applicationdeployed on the same web origin as the RESTful API. A first party application is ableto authenticate and authorize itself to the RESTful API using the same cookie sessionthat the web application is using. The first party application has full access to theRESTful API.
3.3.1.2 Third Party OAuth 2.0-Based AuthenticationA third party is any party other than the author of a RESTful API. A third partyapplication cannot be trusted in the same way as a first party application; therefore,there must be a mediated means to selectively grant the third party application limitedaccess to the RESTful API.
The OAuth 2.0 protocol defines flows to provide conditional and limited access to aRESTful API. In short, the third party application must first be registered with the firstparty, and then the first party (or an end user of the first party RESTful service)approves the third party application for limited access to the RESTful API, by issuingthe third party application a short-lived access token.
See Also:
https://tools.ietf.org/html/rfc6749
Chapter 3Configuring Secure Access to RESTful Services
3-58

3.3.1.2.1 Two-Legged and Three-Legged OAuth FlowsSome flows in OAuth are defined as two-legged and others as three-legged.
Two-legged OAuth flows involve two parties: the party calling the RESTful API (thethird party application), and the party providing the RESTful API. Two-legged flows areused in server to server interactions where an end user does not need to approveaccess to the RESTful API. In OAuth 2.0 this flow is called the client credentials flow. Itis most typically used in business to business scenarios.
Three-legged OAuth flows involve three parties: the party calling the RESTful API,the party providing the RESTful API, and an end user party that owns or manages thedata to which the RESTful API provides access. Three-legged flows are used in clientto server interactions where an end user must approve access to the RESTful API. InOAuth 2.0 the authorization code flow and the implicit flow are three-legged flows.These flows are typically used in business to consumer scenarios.
For resources protected by three-legged flows, when an OAuth client is registeringwith a RESTful API, it can safely indicate the protected resources that it requiresaccess to, and the end user has the final approval decision about whether to grant theclient access. However for resources protected by two-legged flows, the owner of theRESTful API must approve which resources each client is authorized to access.
3.3.2 About Privileges for Accessing ResourcesA privilege for accessing resources consists of the following data:
• Name: The unique identifier for the Privilege. This value is required.
• Label: The name of the privilege presented to an end user when the user is beingasked to approve access to a privilege when using OAuth. This value is required ifthe privilege is used with a three-legged OAuth flow.
• Description: A description of the purpose of the privilege. It is also presented to theend user when the user is being asked to approve access to a privilege. This valueis required if the privilege is used with a three-legged OAuth flow.
• Roles: A set of role names associated with the privilege. An authenticated partymust have at least one of the specified roles in order to be authorised to accessresources protected by the privilege. A value is required, although it may be anempty set, which indicates that a user must be authenticated but that no specificrole is required to access the privilege.
For two-legged OAuth flows, the third party application (called a client in OAuthterminology) must possess at least one of the required roles.
For three-legged OAuth flows, the end user that approves the access request from thethird party application must possess at least one of the required roles.
Related Topics:
• Two-Legged and Three-Legged OAuth Flows (page 3-59)
3.3.3 About Users and Roles for Accessing ResourcesA privilege enumerates a set of roles, and users can possess roles. but where arethese Roles defined? What about the users that possess these roles? Where are theydefined?
Chapter 3Configuring Secure Access to RESTful Services
3-59
A privilege enumerates a set of roles, and users can possess roles. Oracle REST DataServices delegates the task of user management to the application server on whichOracle REST Data Services is deployed. Oracle REST Data Services is able toauthenticate users defined and managed by the application server and to identify theroles and groups to which the authenticated user belongs. It is the responsibility of theparty deploying Oracle REST Data Services on an application server to also configurethe user repository on the application server.
Because an application server can be configured in many ways to define a userrepository or integrate with an existing user repository, this document cannot describehow to configure a user repository in an application server. See the application serverdocumentation for detailed information.
3.3.4 About the File-Based User RepositoryOracle REST Data Services provides a a simple file-based user repositorymechanism. However, this user repository is only intended for the purposes ofdemonstration and testing, and is not supported for production use.
See the command-line help for the user command for more information on how tocreate a user in this repository:
java -jar ords.war help user
Format:
java -jar ords.war user <user> <roles>
Arguments:
• <user> is the user ID of the user.
• <roles> is the list of roles (zero or more) that the user has.
Related Topics:
• Tutorial: Protecting and Accessing Resources (page 3-60)
3.3.5 Tutorial: Protecting and Accessing ResourcesThis tutorial demonstrates creating a privilege to protect a set of resources, andaccessing the protected resource with the following OAuth features:
• Client credentials
• Authorization code
• Implicit flow
It also demonstrates access the resource using first-party cookie-based authentication.
Topics:
• OAuth Flows and When to Use Each (page 3-61)
• Assumptions for This Tutorial (page 3-61)
• Steps for This Tutorial (page 3-62)
Chapter 3Configuring Secure Access to RESTful Services
3-60
3.3.5.1 OAuth Flows and When to Use EachThis topic explains when to use various OAuth flow features.
Use first party cookie-based authentication when accessing a RESTful API from a webapplication hosted on the same origin as the RESTful API.
Use the authorization code flow when you need to permit third party web applicationsto access a RESTful API and the third party application has its own web server whereit can keep its client credentials secure. This is the typical situation for most webapplications, and it provides the most security and best user experience, because thethird party application can use refresh tokens to extend the life of a user sessionwithout having to prompt the user to reauthorize the application.
Use the implicit flow when the third party application does not have a web serverwhere it can keep its credentials secure. This flow is useful for third party single-page-based applications. Because refresh tokens cannot be issued in the Implicit flow, theuser will be prompted more frequently to authorize the application.
Native mobile or desktop applications should use the authorization code or implicitflows. They will need to display the sign in and authorization prompts in a web browserview, and capture the access token from the web browser view at the end of theauthorization process.
Use the client credentials flow when you need to give a third party application directaccess to a RESTful API without requiring a user to approve access to the datamanaged by the RESTful API. The third party application must be a server-basedapplication that can keep its credentials secret. The client credentials flow must not beused with a native application, because the client credentials can always bediscovered in the native executable.
3.3.5.2 Assumptions for This TutorialThis tutorial assumes the following:
• Oracle REST Data Services is deployed at the following URL: https://example.com/ords/
• A database schema named ORDSTEST has been enabled for use with OracleREST Data Services, and its RESTful APIs are exposed under: https://example.com/ords/ordstest/
• The ORDSTEST schema contains a database table named EMP, which wascreated as follows:
create table emp ( empno number(4,0), ename varchar2(10 byte), job varchar2(9 byte), mgr number(4,0), hiredate date, sal number(7,2), comm number(7,2), deptno number(2,0), constraint pk_emp primary key (empno) );
Chapter 3Configuring Secure Access to RESTful Services
3-61

• The resources to be protected are located under: https://example.com/ords/ordstest/examples/employees/
3.3.5.3 Steps for This TutorialFollow these steps to protect and access a set of resources.
1. Enable the schema. Connect to the ORDSTEST schema and execute thefollowing PL/SQL statements;
begin ords.enable_schema; commit;end;
2. Create a resource. Connect to the ORDSTEST schema and execute the followingPL/SQL statements:
beginords.create_service( p_module_name => 'examples.employees' , p_base_path => '/examples/employees/', p_pattern => '.' , p_items_per_page => 7, p_source => 'select * from emp order by empno desc');commit;end;
The preceding code creates the /examples/employees/ resource, which you willprotect with a privilege in a later step.
You can verify the resource by executing following cURL command:
curl -i https://example.com/ords/ordstest/examples/employees/
The result should be similar to the following (edited for readability):
Content-Type: application/jsonTransfer-Encoding: chunked { "items": [ {"empno":7934,"ename":"MILLER","job":"CLERK","mgr":7782,"hiredate":"1982-01-23T00:00:00Z","sal":1300,"comm":null,"deptno":10}, ... ], "hasMore":true, "limit":7, "offset":0, "count":7, "links": [ {"rel":"self","href":"https://example.com/ords/ordstest/examples/employees/"}, {"rel":"describedby","href":"https://example.com/ords/ordstest/metadata-catalog/examples/employees/"}, {"rel":"first","href":"https://example.com/ords/ordstest/examples/employees/"}, {"rel":"next","href":"https://example.com/ords/ordstest/examples/employees/?offset=7"}
Chapter 3Configuring Secure Access to RESTful Services
3-62

]}
3. Create a privilege. While connected to the ORDSTEST schema, execute thefollowing PL/SQL statements:
begin ords.create_role('HR Administrator'); ords.create_privilege( p_name => 'example.employees', p_role_name => 'HR Administrator', p_label => 'Employee Data', p_description => 'Provide access to employee HR data'); commit;end;
The preceding code creates a role and a privilege, which belong to theORDSTEST schema.
• The role name must be unique and must contain printable characters only.
• The privilege name must be unique and must conform to the syntax specifiedby the OAuth 2.0 specification, section 3.3 for scope names.
• Because you will want to use this privilege with the three-legged authorizationcode and implicit flows, you must provide a label and a description for theprivilege. The label and description are presented to the end user during theapproval phase of three-legged flows.
• The values should be plain text identifying the name and purpose of theprivilege.
You can verify that the privilege was created correctly by querying theUSER_ORDS_PRIVILEGES view.
select id,name from user_ords_privileges where name = 'example.employees';
The result should be similar to the following:
ID NAME ----- -----------------10260 example.employees
The ID value will vary from database to database, but the NAME value should beas shown.
4. Associate the privilege with resources. While connected to the ORDSTESTschema, execute the following PL/SQL statements:
begin ords.create_privilege_mapping( p_privilege_name => 'example.employees', p_pattern => '/examples/employees/*'); commit;end;
The preceding code associates the example.employees privilege with the resourcepattern /examples/employees/.
Chapter 3Configuring Secure Access to RESTful Services
3-63
You can verify that the privilege was created correctly by querying theUSER_ORDS_PRIVILEGE_MAPPINGS view.
select privilege_id, name, pattern from user_ords_privilege_mappings;
The result should be similar to the following:
PRIVILEGE_ID NAME PATTERN ------------ -------------------- ---------------------10260 example.employees /examples/employees/*
The PRIVILEGE_ID value will vary from database to database, but the NAME andPATTERN values should be as shown.
You can confirm that the /examples/employees/ resource is now protected by theexample.employees privilege by executing the following cURL command:
curl -i https://example.com/ords/ordstest/examples/employees/
The result should be similar to the following (reformatted for readability):
HTTP/1.1 401 UnauthorizedContent-Type: text/htmlTransfer-Encoding: chunked <!DOCTYPE html><html>...</html>
You can confirm that the protected resource can be accessed through first partyauthentication, as follows.
a. Create an end user. Create a test user with the HR Administrator role,required to access the examples.employees privilege using the file-based userrepository. Execute the following command at a command prompt
java -jar ords.war user "hr_admin" "HR Administrator"
When prompted for the password, enter and confirm it.
b. Sign in as the end user. Enter the following URL in a web browser:
https://example.com/ords/ordstest/examples/employees/
On the page indicating that access is denied, click the link to sign in.
Enter the credentials registered for the HR_ADMIN user, and click Sign In.
Confirm that the page redirects to https://example.com/ords/ordstest/examples/employees/ and that the JSON document is displayed.
5. Register the OAuth client. While connected to the ORDSTEST schema, executethe following PL/SQL statements:
begin oauth.create_client( p_name => 'Client Credentials Example', p_grant_type => 'client_credentials', p_privilege_names => 'example.employees', p_support_email => '[email protected]'); commit;end;
Chapter 3Configuring Secure Access to RESTful Services
3-64

The preceding code registers a client named Client Credentials Example, toaccess the examples.employees privilege using the client credentials OAuth flow.
You can verify that the client was registered and has requested access to theexamples.employees privilege by executing the following SQL statement:
select client_id,client_secret from user_ords_clients where name = 'Client Credentials Example';
The result should be similar to the following:
CLIENT_ID CLIENT_SECRET -------------------------------- ------------------------o_CZBVkEMN23tTB-IddQsQ.. 4BJXceufbmTki-vruYNLIg..
The CLIENT_ID and CLIENT_SECRET values represent the secret credentials forthe OAuth client. These values must be noted and kept secure. You can think ofthem as the userid and password for the client application.
6. Grant the OAuth client a required role. While connected to the ORDSTESTschema, execute the following PL/SQL statements:
begin oauth.grant_client_role( 'Client Credentials Example', 'HR Administrator'); commit;end;
The preceding code registers a client named Client Credentials Example, toaccess the examples.employees privilege using the client credentials OAuth flow.
You can verify that the client was granted the role by executing the following SQLstatement:
select * from user_ords_client_roles where client_name = 'Client Credentials Example';
The result should be similar to the following:
CLIENT_ID CLIENT_NAME ROLE_ID ROLE_NAME ---------- --------------------------- -------- ---------------------- 10286 Client Credentials Example 10222 HR Administrator
7. Obtain an OAuth access token using client credentials.
The OAuth protocol specifies the HTTP request that must be used to create anaccess token using the client credentials flow[rfc6749-4.4.].
The request must be made to a well known URL, called the token endpoint. ForOracle REST Data Services the path of the token endpoint is always oauth/token,relative to the root path of the schema being accessed. The token endpoint for thisexample is:
https://example.com/ords/ordstest/oauth/token
Execute the following cURL command:
curl -i --user clientId:clientSecret --data "grant_type=client_credentials" https://example.com/ords/ordstest/oauth/token
In the preceding command, replace clientId with the CLIENT_ID value inUSER_ORDS_CLIENTS for Client Credentials Example, and replace clientSecret
Chapter 3Configuring Secure Access to RESTful Services
3-65
with the CLIENT_SECRET value shown in USER_ORDS_CLIENTS for ClientCredentials Example. The output should be similar to the following:
HTTP/1.1 200 OKContent-Type: application/json { "access_token": "2YotnFZFEjr1zCsicMWpAA", "token_type": "bearer", "expires_in":3600}
In the preceding output, the access token is of type bearer, and the value isspecified by the access_token field. This value will be different for every request.The expires_in value indicates the number of seconds until the access tokenexpires; in this case the token will expire in one hour (3600 seconds).
8. Access a protected resource using the access token. Execute the followingcURL command:
curl -i -H"Authorization: Bearer accessToken" https://example.com/ords/ordstest/examples/employees/
In the preceding command, replace accessToken with the value of the access_tokenfield shown in the preceding step. The output should be similar to the following:
Content-Type: application/jsonTransfer-Encoding: chunked { "items": [ {"empno":7934,"ename":"MILLER","job":"CLERK","mgr":7782,"hiredate":"1982-01-23T00:00:00Z","sal":1300,"comm":null,"deptno":10}, ... ], "hasMore":true, "limit":7, "offset":0, "count":7, "links": [ {"rel":"self","href":"https://example.com/ords/ordstest/examples/employees/"}, {"rel":"describedby","href":"https://example.com/ords/ordstest/metadata-catalog/examples/employees/"}, {"rel":"first","href":"https://example.com/ords/ordstest/examples/employees/"}, {"rel":"next","href":"https://example.com/ords/ordstest/examples/employees/?offset=7"} ]}
9. Register the client for authorization code. While connected to the ORDSTESTschema, execute the following PL/SQL statements:
begin oauth.create_client( p_name => 'Authorization Code Example', p_grant_type => 'authorization_code', p_owner => 'Example Inc.', p_description => 'Sample for demonstrating Authorization Code Flow',
Chapter 3Configuring Secure Access to RESTful Services
3-66

p_redirect_uri => 'http://example.org/auth/code/example/', p_support_email => '[email protected]', p_support_uri => 'http://example.org/support', p_privilege_names => 'example.employees' ); commit;end;
The preceding code registers a client named Authorization Code Example, toaccess the examples.employees privilege using the authorization code OAuth flow.For an actual application, a URI must be provided to redirect back to with theauthorization code, and a valid support email address must be supplied; however,this example uses fictitious data and the sample example.org web service.
You can verify that the client is now registered and has requested access to theexamples.employees privilege by executing the following SQL statement:
select id, client_id, client_secret from user_ords_clients where name = 'Authorization Code Example';
The result should be similar to the following:
ID CLIENT_ID CLIENT_SECRET---------- -------------------------------- -------------------------------- 10060 IGHso4BRgrBC3Jwg0Vx_YQ.. GefAsWv8FJdMSB30Eg6lKw..
To grant access to the privilege, an end user must approve access. TheCLIENT_ID and CLIENT_SECRET values represent the secret credentials for theOAuth client. These values must be noted and kept secure. You can think of themas the userid and password for the client application.
10. Obtain an OAuth access token using an authorization code. This major stepinvolves several substeps. (You must have already created the HR_ADMIN enduser in a previous step.)
a. Obtain an OAuth authorization code.
The end user must be prompted (via a web page) to sign in and approveaccess to the third party application. The third party application initiates thisprocess by directing the user to the OAuth Authorization Endpoint. For OracleREST Data Services, the path of the authorization endpoint is always oauth/auth, relative to the root path of the schema being accessed. The tokenendpoint for this example is:
https://example.com/ords/ordstest/oauth/auth
The OAuth 2.0 protocol specifies that the Authorization request URI mustinclude certain parameters in the query string:
The response_type parameter must have a value of code.
The client_id parameter must contain the value of the applications clientidentifier. This is the client_id value determined in a previous step.
The state parameter must contain a unique unguessable value. This valueserves two purposes: it provides a way for the client application to uniquelyidentify each authorization request (and therefore associate any applicationspecific state with the value; think of the value as the application's ownsession identifier); and it provides a means for the client application to protectagainst Cross Site Request Forgery (CSRF) attacks. The state value will bereturned in the redirect URI at the end of the authorization process. The client
Chapter 3Configuring Secure Access to RESTful Services
3-67
must confirm that the value belongs to an authorization request initiated by theapplication. If the client cannot validate the state value, then it should assumethat the authorization request was initiated by an attacker and ignore theredirect.
To initiate the Authorization request enter the following URL in a web browser:
https://example.com/ords/ordstest/oauth/auth?response_type=code&client_id=cliendId&state=uniqueRandomValue
In the preceding URI, replace clientId with the value of the CLIENT_IDcolumn that was noted previously, and replace uniqueRandromValue with aunique unguessable value. The client application must remember this valueand verify it against the state parameter returned as part of the redirect at theend of the authorization flow.
If the client_id is recognized, then a sign in prompt is displayed. Enter thecredentials of the HR_ADMIN end user, and click Sign In; and on the nextpage click Approve to cause a redirect to redirect URI specified when theclient was registered. The redirect URI will include the authorization code inthe query string portion of the URI. It will also include the same stateparameter value that the client provided at the start of the flow. The redirectURI will look like the following:
http://example.org/auth/code/example/?code=D5doeTSIDgbxWiWkPl9UpA..&state=uniqueRandomValue
The client application must verify the value of the state parameter and thennote the value of the code parameter, which will be used in to obtain an accesstoken.
b. Obtain an OAuth access token.
After the third party application has an authorization code, it must exchange itfor an access token. The third party application's server must make a HTTPSrequest to the Token Endpoint. You can mimic the server making this requestby using a cURL command as in the following example:
curl --user clientId:clientSecret --data "grant_type=authorization_code&code=authorizationCode" https://example.com/ords/ordstest/oauth/token
In the preceding command, replace clientId with the value of the CLIENT_IDshown in USER_ORDS_CLIENTS for Authorization Code Example, replaceclientSecret with the value of the CLIENT_SECRET shown inUSER_ORDS_CLIENTS for Authorization Code Example, and replaceauthorizationCode with the value of the authorization code noted in a previousstep (the value of the code parameter).
The result should be similar to the following:
HTTP/1.1 200 OKContent-Type: application/json { "access_token": "psIGSSEXSBQyib0hozNEdw..", "token_type": "bearer", "expires_in":3600, "refresh_token": "aRMg7AdWPuDvnieHucfV3g.."}
Chapter 3Configuring Secure Access to RESTful Services
3-68
In the preceding result, the access token is specified by the access_token field,and a refresh token is specified by the refresh_token field. This refresh tokenvalue can be used to extend the user session without requiring the user toreauthorize the third party application.
c. Access a protected resource using the access token.
After the third party application has obtained an OAuth access token, it canuse that access token to access the protected /examples/employees/ resource:
curl -i -H"Authorization: Bearer accessToken" https://example.com/ords/ordstest/examples/employees/
In the preceding command, accessToken with the value of the access_token fieldshown in a previous step.
The result should be similar to the following:
Content-Type: application/jsonTransfer-Encoding: chunked { "items": [ {"empno":7934,"ename":"MILLER","job":"CLERK","mgr":7782,"hiredate":"1982-01-23T00:00:00Z","sal":1300,"comm":null,"deptno":10}, ... ], "hasMore":true, "limit":7, "offset":0, "count":7, "links": [ {"rel":"self","href":"https://example.com/ords/ordstest/examples/employees/"}, {"rel":"describedby","href":"https://example.com/ords/ordstest/metadata-catalog/examples/employees/"}, {"rel":"first","href":"https://example.com/ords/ordstest/examples/employees/"}, {"rel":"next","href":"https://example.com/ords/ordstest/examples/employees/?offset=7"} ]}
d. Extend the session using a refresh token.
At any time, the third party application can use the refresh token value togenerate a new access token with a new lifetime. This enables the third partyapplication to extend the user session at will. To do this, the third partyapplication's server must make an HTTPS request to the Token Endpoint. Youcan mimic the server making this request by using a cURL command as in thefollowing example:
curl --user clientId:clientSecret --data “grant_type=refresh_token&refresh_token=refreshToken" https://example.com/ords/ordstest/oauth/token
In the preceding command, replace clientId with the value of the CLIENT_IDshown in USER_ORDS_CLIENTS for Client Credentials Client, replaceclientSecret with the value of the CLIENT_SECRET shown in
Chapter 3Configuring Secure Access to RESTful Services
3-69

USER_ORDS_CLIENTS for Client Credentials Client, and replacerefreshToken with the value of refresh_token obtained in a previous step.
The result should be similar to the following:
HTTP/1.1 200 OKContent-Type: application/json { "access_token": "psIGSSEXSBQyib0hozNEdw..", "token_type": "bearer", "refresh_token": "aRMg7AdWPuDvnieHucfV3g..", "expires_in": 3600}
In the preceding result, the access token is specified by the access_token field,a new refresh token is specified by the refresh_token field. This refresh tokenvalue can be used to extend the user session without requiring the user toreauthorize the third party application. (Note that the previous access tokenand refresh token are now invalid; the new values must be used instead.)
11. Register the client for implicit flow. While connected to the ORDSTESTschema, execute the following PL/SQL statements:
begin oauth.create_client( p_name => 'Implicit Example', p_grant_type => 'implicit', p_owner => 'Example Inc.', p_description => 'Sample for demonstrating Implicit Flow', p_redirect_uri => 'http://example.org/implicit/example/', p_support_email => '[email protected]', p_support_uri => 'http://example.org/support', p_privilege_names => 'example.employees' ); commit;end;
The preceding code registers a client named Implicit Example to access theexamples.employees privilege using the implicit OAuth flow. For an actualapplication, a URI must be provided to redirect back to with the authorization code,and a valid support email address must be supplied; however, this example usesfictitious data and the sample example.org web service.
You can verify that the client is now registered and has requested access to theexamples.employees privilege by executing the following SQL statement:
select id, client_id, client_secret from user_ords_clients where name = 'Implicit Example';
The result should be similar to the following:
ID CLIENT_ID CLIENT_SECRET---------- -------------------------------- -------------------------------- 10062 7Qz--bNJpFpv8qsfNQpS1A..
To grant access to the privilege, an end user must approve access.
12. Obtain an OAuth access token using implicit flow. (You must have alreadycreated the HR_ADMIN end user in a previous step.)
Chapter 3Configuring Secure Access to RESTful Services
3-70
The end user must be prompted (via a web page) to sign in and approve access tothe third party application. The third party application initiates this process bydirecting the user to the OAuth Authorization Endpoint. For Oracle REST DataServices, the path of the authorization endpoint is always oauth/auth, relative tothe root path of the schema being accessed. The token endpoint for this exampleis:
https://example.com/ords/ordstest/oauth/auth
The OAuth 2.0 protocol specifies that the Authorization request URI must includecertain parameters in the query string:
The response_type parameter must have a value of token.
The client_id parameter must contain the value of the applications client identifier.This is the client_id value determined in a previous step.
The state parameter must contain a unique unguessable value. This value servestwo purposes: it provides a way for the client application to uniquely identify eachauthorization request (and therefore associate any application specific state withthe value; think of the value as the application's own session identifier); and itprovides a means for the client application to protect against Cross Site RequestForgery (CSRF) attacks. The state value will be returned in the redirect URI at theend of the authorization process. The client must confirm that the value belongs toan authorization request initiated by the application. If the client cannot validate thestate value, then it should assume that the authorization request was initiated byan attacker and ignore the redirect.
To initiate the Authorization request enter the following URL in a web browser:
https://example.com/ords/ordstest/oauth/auth?response_type=token&client_id=cliendId&state=uniqueRandomValue
In the preceding URI, replace clientId with the value of the CLIENT_ID columnthat was noted previously, and replace uniqueRandromValue with a uniqueunguessable value. The client application must remember this value and verify itagainst the state parameter returned as part of the redirect at the end of theauthorization flow.
If the client_id is recognized, then a sign in prompt is displayed. Enter thecredentials of the HR_ADMIN end user, and click Sign In; and on the next pageclick Approve to cause a redirect to redirect URI specified when the client wasregistered. The redirect URI will include the access token in the query stringportion of the URI. It will also include the same state parameter value that theclient provided at the start of the flow. The redirect URI will look like the following:
http://example.org/auth/code/example/#access_token=D5doeTSIDgbxWiWkPl9UpA..&type=bearer&expires_in=3600&state=uniqueRandomValue
The client application must verify the value of the state parameter and then notethe value of the access token.
13. Access a protected resource using an access token. Execute the followingcURL command:
curl -i -H "Authorization: Bearer accessToken" https://example.com/ords/ordstest/examples/employees/
In the preceding command, replace accessToken with the value of the access_tokenfield shown in the preceding step. The output should be similar to the following:
Chapter 3Configuring Secure Access to RESTful Services
3-71

Content-Type: application/jsonTransfer-Encoding: chunked { "items": [ {"empno":7934,"ename":"MILLER","job":"CLERK","mgr":7782,"hiredate":"1982-01-23T00:00:00Z","sal":1300,"comm":null,"deptno":10}, ... ], "hasMore":true, "limit":7, "offset":0, "count":7, "links": [ {"rel":"self","href":"https://example.com/ords/ordstest/examples/employees/"}, {"rel":"describedby","href":"https://example.com/ords/ordstest/metadata-catalog/examples/employees/"}, {"rel":"first","href":"https://example.com/ords/ordstest/examples/employees/"}, {"rel":"next","href":"https://example.com/ords/ordstest/examples/employees/?offset=7"} ]}
Related Topics:
• Using the Oracle REST Data Services PL/SQL API (page 3-80)
3.4 About Oracle REST Data Services User RolesOracle REST Data Services defines a small number of predefined user roles:
• RESTful Services - This is the default role associated with a protected RESTfulservice.
• OAuth2 Client Developer - Users who want to register OAuth 2.0 applications musthave this role.
• SQL Developer - Users who want to use Oracle SQL Developer to develop RESTfulservices must have this role.
• SODA Developer - This is the default role that is required to access the SODA RESTAPI. For more information about this role, see Oracle REST Data Services SODAfor REST Developer's Guide.
• Listener Administrator - Users who want to administrate an Oracle REST DataServices instance through Oracle SQL Developer must have this role. Typically,only users created through the java -jar ords.war user command will have thisrole.
Because the Listener Administrator role enables a user to configure an OracleREST Data Services instance, and therefore has the capability to affect allApplication Express workspaces served through that instance, Application Expressusers are not permitted to acquire the Listener Administrator role.
Chapter 3About Oracle REST Data Services User Roles
3-72
Topics:
• About Oracle Application Express Users and Oracle REST Data Services Roles(page 3-73)
• Controlling RESTful Service Access with Roles (page 3-74)
3.4.1 About Oracle Application Express Users and Oracle REST DataServices Roles
By default, Oracle Application Express users do not have any of the Oracle RESTData Services predefined user roles. This means that, by default, Application Expressusers cannot:
• Invoke protected RESTful Services
• Register OAuth 2.0 applications
• Use Oracle SQL Developer to develop RESTful services.
This applies to all Application Express users, including Application Express developersand administrators. It is therefore important to remember to follow the steps below toadd Application Express users to the appropriate user groups, so that they cansuccessfully perform the above actions.
Topics:
• Granting Application Express Users Oracle REST Data Services Roles(page 3-73)
• Automatically Granting Application Express Users Oracle REST Data ServicesRoles (page 3-73)
3.4.1.1 Granting Application Express Users Oracle REST Data Services RolesTo give an Application Express User any of the roles above, the user must be addedto the equivalent Application Express user group. For example, to give theRESTEASY_ADMIN user the RESTful Services role, follow these steps:
1. Log in to the RESTEASY workspace as a RESTEASY_ADMIN.
2. Navigate to Administration and then Manage Users and Groups.
3. Click the Edit icon to the left of the RESTEASY_ADMIN user.
4. For User Groups, select RESTful Services.
5. Click Apply Changes.
3.4.1.2 Automatically Granting Application Express Users Oracle REST DataServices Roles
Adding Application Express users to the appropriate user groups can be an easilyoverlooked step, or can become a repetitive task if there are many users to bemanaged.
Chapter 3About Oracle REST Data Services User Roles
3-73
To address these issues, you can configure Oracle REST Data Services toautomatically grant Application Express users a predefined set of RESTful Serviceroles by modifying the defaults.xml configuration file.
In that file, Oracle REST Data Services defines three property settings to configureroles:
• apex.security.user.roles - A comma separated list of roles to grant ordinaryusers, that is, users who are not developers or administrators.
• apex.security.developer.roles - A comma separated list of roles to grant userswho have the Developer account privilege. Developers also inherit any roles definedby the apex.security.user.roles setting.
• apex.security.administrator.roles - A comma separated list of roles to grantusers who have the Administrator account privilege. Administrators also inheritany roles defined by the apex.security.user.roles andapex.security.developer.roles settings.
For example, to automatically give all users the RESTful Services privilege and alldevelopers and administrators the OAuth2 Client Developer and SQL Developer roles,add the following to the defaults.xml configuration file:
<!-- Grant all Application Express Users the ability to invoke protected RESTful Services --><entry key="apex.security.user.roles">RESTful Services</entry> <!-- Grant Application Express Developers and Administrators the ability to register OAuth 2.0 applications and use Oracle SQL Developer to define RESTful Services --> <entry key="apex.security.developer.roles"> OAuth2 Client Developer, SQL Developer</entry>
Oracle REST Data Services must be restarted after you make any changes to thedefaults.xml configuration file.
3.4.2 Controlling RESTful Service Access with RolesThe built-in RESTful Service role is a useful default for identifying users permitted toaccess protected RESTful services.
However, it will often also be necessary to define finer-grained roles to limit the set ofusers who may access a specific RESTful service.
Topics:
• About Defining RESTful Service Roles (page 3-74)
• Associating Roles with RESTful Privileges (page 3-75)
3.4.2.1 About Defining RESTful Service RolesA RESTful Service role is an Application Express user group. To create a user groupto control access to the Gallery RESTful Service, follow these steps. (
1. Log in to the RESTEASY workspace as a workspace administrator.
2. Navigate to Administration and then Manage Users and Groups.
3. Click the Groups tab.
4. Click Create User Group.
Chapter 3About Oracle REST Data Services User Roles
3-74

5. For Name, enter Gallery Users.
6. Click Create Group.
3.4.2.2 Associating Roles with RESTful PrivilegesAfter a user group has been created, it can be associated with a RESTful privilege. Toassociate the Gallery Users role with the example.gallery privilege, follow these steps.
1. Navigate to SQL Workshop and then RESTful Services.
2. In the Tasks section, click RESTful Service Privileges.
3. Click Gallery Access.
4. For Assigned Groups, select Gallery Users.
5. Click Apply Changes.
With these changes, users must have the Gallery Users role to be able to access theGallery RESTful service.
See Also:
The steps here use the image gallery application in Development Tutorial:Creating an Image Gallery (page D-1) as an example.
3.5 Authenticating Against WebLogic Server and GlassFishUser Repositories
Oracle REST Data Services can use APIs provided by WebLogic Server andGlassFish to verify credentials (username and password) and to retrieve the set ofgroups and roles that the user is a member of.
This section walks through creating a user in the built-in user repositories provided byWebLogic Server and GlassFish, and verifying the ability to authenticate against thatuser.
This document does not describe how to integrate WebLogic Server and GlassFishwith the many popular user repository systems such as LDAP repositories, but OracleREST Data Services can authenticate against such repositories after WebLogic Serveror GlassFish has been correctly configured. See your application serverdocumentation for more information on what user repositories are supported by theapplication server and how to configure access to these repositories.
Topics:
• Authenticating Against WebLogic Server (page 3-75)
• Authenticating Against GlassFish (page 3-77)
3.5.1 Authenticating Against WebLogic ServerAuthenticating a user against WebLogic Server involves the following major steps:
Chapter 3Authenticating Against WebLogic Server and GlassFish User Repositories
3-75
1. Creating a WebLogic Server User (page 3-76)
2. Verifying the WebLogic Server User (page 3-77)
3.5.1.1 Creating a WebLogic Server UserTo create a sample WebLogic Server user, follow these steps:
1. Start WebLogic Server if it is not already running
2. Access the WebLogic Server Administration Console (typically http://server:7001/console), enter your credentials.
3. In the navigation tree on the left, click the Security Realms node
4. If a security realm already exists, go to the next step. If a security realm does notexist, create one as follows:
a. Click New.
b. For Name, enter Test-Realm, then click OK.
c. Click Test-Realm.
d. Click the Providers tab.
e. Click New, and enter the following information:
Name: test-authenticator
Type: DefaultAuthenticator
f. Restart WebLogic Server if you are warned that a restart is necessary.
g. Click Test-Realm.
5. Click the Users and Groups tab.
6. Click New, and enter the following information:
• Name: 3rdparty_dev2
• Password: Enter and confirm the desired password for this user.
7. Click OK.
8. Click the Groups tab.
9. Click New., and enter the following information:
• Name: OAuth2 Client Developer (case sensitive)
10. Click OK.
11. Click the Users tab.
12. Click the 3rdparty_dev2 user.
13. Click the Groups tab.
14. In the Chosen list, add OAuth2 Client Developer .
15. Click Save.
You have created a user named 3rdparty_dev2 and made it a member of a groupnamed OAuth2 Client Developer. This means the user will acquire the OAuth2 ClientDeveloper role, and therefore will be authorized to register OAuth 2.0 applications.
Now verify that the user can be successfully authenticated.
Chapter 3Authenticating Against WebLogic Server and GlassFish User Repositories
3-76
3.5.1.2 Verifying the WebLogic Server UserTo verify that the WebLogic Server user created can be successfully authenticated,follow these steps:
1. In your browser, go to a URI in the following format:
https://server:port/ords/resteasy/ui/oauth2/clients/
2. Enter the credentials of the 3rdparty_dev2 user, and click Sign In.
The OAuth 2.0 Client Registration page should be displayed, with no applicationslisted. If this page is displayed, you have verified that authentication against theWebLogic Server user repository is working.
However, if the sign-on prompt is displayed again with the message User is notauthorized to access resource, then you made mistake (probably misspelling theGroup List value).
3.5.2 Authenticating Against GlassFishAuthenticating a user against GlassFish involves the following major steps:
1. Creating a GlassFish User (page 3-77)
2. Verifying the GlassFish User (page 3-78)
3.5.2.1 Creating a GlassFish UserTo create a sample GlassFish user, follow these steps:
1. Start GlassFish if it is not already running
2. Access the GlassFish Administration Console (typically http://server:4848); and ifyou have configured a password, enter your credentials.
3. Navigate to the Security Configuration pages:
4. In the navigation tree on the left, expand the Configurations node, and thenexpand the following nodes: server-config, Security, Realms, file.
5. Click Manage Users.
6. Click New, and enter the following information:
• Name: 3rdparty_dev2
• Group List: OAuth2 Client Developer (case sensitive)
• Password: Enter and confirm the desired password for this user.
7. Click OK.
You have created a user named 3rdparty_dev2 and made it a member of a groupnamed OAuth2 Client Developer. This means the user will acquire the OAuth2 ClientDeveloper role, and therefore will be authorized to register OAuth 2.0 applications.
Now verify that the user can be successfully authenticated.
Chapter 3Authenticating Against WebLogic Server and GlassFish User Repositories
3-77
3.5.2.2 Verifying the GlassFish UserTo verify that the WebLogic Server user created in Creating a GlassFish User(page 3-77) can be successfully authenticated, follow these steps:
1. In your browser, go to a URI in the following format:
https://server:port/ords/resteasy/ui/oauth2/clients/
2. Enter the credentials of the 3rdparty_dev2 user, and click Sign In.
The OAuth 2.0 Client Registration page should be displayed, with no applicationslisted. If this page is displayed, you have verified that authentication against theWebLogic Server user repository is working.
However, if the sign-on prompt is displayed again with the message User is notauthorized to access resource, then you made mistake (probably misspelling theGroup List value).
3.6 Integrating with Existing Group/Role ModelsThe examples in other sections demonstrate configuring the built-in user repositoriesof WebLogic Server and GlassFish. In these situations you have full control over howuser groups are named. If a user is a member of a group with the exact same (casesensitive) name as a role, then the user is considered to have that role.
However, when integrating with existing user repositories, RESTful service developerswill often not have any control over the naming and organization of user groups in theuser repository. In these situations a mechanism is needed to map from existing"physical" user groups defined in the user repository to the "logical" roles defined byOracle REST Data Services and/or RESTful Services.
In Oracle REST Data Services, this group to role mapping is performed by configuringa configuration file named role-mapping.xml.
Topics:
• About role-mapping.xml (page 3-78)
3.6.1 About role-mapping.xmlrole-mapping.xml is a Java XML Properties file where each property key defines apattern that matches against a set of user groups, and each property value identifiesthe roles that the matched user group should be mapped to. It must be located in thesame folder as the defaults.xml configuration file. The file must be manually createdand edited.
Consider this example:
<?xml version="1.0" encoding="UTF-8"?><!DOCTYPE properties SYSTEM "http://java.sun.com/dtd/properties.dtd"><properties> <entry key="webdevs">RESTful Services</entry></properties>
Chapter 3Integrating with Existing Group/Role Models
3-78

This role mapping is straightforward, stating that any user who is a member of a groupnamed: webdevs is given the role RESTful Services, meaning that all members of thewebdevs group can invoke RESTful Services.
A mapping can apply more than one role to a group. For example:
<?xml version="1.0" encoding="UTF-8"?><!DOCTYPE properties SYSTEM "http://java.sun.com/dtd/properties.dtd"><properties> <entry key="webdevs">RESTful Services, SQL Developer</entry></properties>
This rule gives members of the webdevs group both the RESTful Services and SQLDeveloper roles.
Topics:
• Parameterizing Mapping Rules (page 3-79)
• Dereferencing Parameters (page 3-79)
• Indirect Mappings (page 3-80)
3.6.1.1 Parameterizing Mapping RulesHaving to explicitly map from each group to each role may not be scalable if thenumber of groups or roles is large. To address this concern, you can parameterizerules. Consider this example:
<?xml version="1.0" encoding="UTF-8"?><!DOCTYPE properties SYSTEM "http://java.sun.com/dtd/properties.dtd"> <properties> <entry key="{prefix}.webdevs">RESTful Services</entry></properties>
This example says that any group name that ends with .webdevs will be mapped to theRESTful Services role. For example, a group named: HQ.webdevs would match this rule,as would a group named: EAST.webdevs.
The syntax for specifying parameters in rules is the same as that used for URITemplates; the parameter name is delimited by curly braces ({}).
3.6.1.2 Dereferencing ParametersAny parameter defined in the group rule can also be dereferenced in the role rule.Consider this example:
<?xml version="1.0" encoding="UTF-8"?><!DOCTYPE properties SYSTEM "http://java.sun.com/dtd/properties.dtd"> <properties> <entry key="cn={userid},ou={group},dc=MyDomain,dc=com">{group}</entry></properties>
This example maps the organizational unit component of an LDAP distinguished nameto a role. It says that the organizational unit name maps directly to a role with samename. Note that it refers to a {userid} parameter but never actually uses it; in effect, ituses {userid} as a wildcard flag.
For example, the distinguished name cn=jsmith,ou=Developers,dc=MyDomain,dc=com willbe mapped to the logical role named Developers.
Chapter 3Integrating with Existing Group/Role Models
3-79

3.6.1.3 Indirect MappingsTo accomplish the desired role mapping, it may sometimes be necessary to applymultiple intermediate rules. Consider this example:
<?xml version="1.0" encoding="UTF-8"?><!DOCTYPE properties SYSTEM "http://java.sun.com/dtd/properties.dtd"><properties> <entry key="cn={userid},ou={group},dc=example,dc=com">{group}</entry> <entry key="{prefix},ou={group},dc=acquired,dc=com">{group}</entry> <entry key="Developers">RESTful Services, SQL Developer</entry></properties>
This example maps the organizational unit component of an LDAP distinguished nameto some roles. Complicating matters is the fact that users can come from two differentorganizations, resulting in differing distinguishing name patterns.
• Users from example.com always have a single common name (CN) identifying theiruser id, followed by the organizational unit (OU) and the domain name (DC). Forexample: cn=jsmith,ou=Developers,dc=example,dc=com.
• Users from acquired.com have varying numbers of common name (CN) prefixes,but the organizational unit is the field you are interested in. For example:cn=ProductDev,cn=abell,ou=Engineering,dc=acquired,dc=com.
• Both organizations identify software engineers with ou=Developers.
You want to map engineers in both organizations to the RESTful Services and SQLDeveloper roles.
• The first rule maps engineers in the example.com organization to the intermediateDevelopers role.
• The second rule maps engineers in the acquired.com organization to theintermediate Developers role.
• The final rule maps from the intermediate Developers role to the RESTful Servicesand SQL Developer roles.
3.7 Using the Oracle REST Data Services PL/SQL APIOracle REST Data Services has a PL/SQL API (application programming interface)that you can use as an alternative to the SQL Developer graphical interface for manyoperations. The available subprograms are included in the following PL/SQLpackages:
• ORDS, documented in ORDS PL/SQL Package Reference (page 5-1)
• OAUTH, documented in OAUTH PL/SQL Package Reference (page 6-1)
To use the Oracle REST Data Services PL/SQL API, you must first:
• Install Oracle REST Data Services in the database that you will use to developRESTful services.
• Enable one or more database schemas for REST access.
Topics:
• Creating a RESTful Service Using the PL/SQL API (page 3-81)
Chapter 3Using the Oracle REST Data Services PL/SQL API
3-80

• Testing the RESTful Service (page 3-81)
Related Topics:
• Automatic Enabling of Schema Objects for REST Access (AutoREST) (page 3-6)
3.7.1 Creating a RESTful Service Using the PL/SQL APIYou can create a RESTful service by connecting to a REST-enabled schema andusing the ORDS.CREATE_SERVICE procedure.
The following example creates a simple "Hello-World"-type service:
begin ords.create_service( p_module_name => 'examples.routes' , p_base_path => '/examples/routes/', p_pattern => 'greeting/:name', p_source => 'select ''Hello '' || :name || '' from '' || nvl(:whom,sys_context(''USERENV'',''CURRENT_USER'')) "greeting" from dual'); commit;end;/
The preceding example does the following:
• Creates a resource module named examples.routes.
• Sets the base path (also known as the URI prefix) of the module to /examples/routes/.
• Creates a resource template in the module, with the route pattern greeting/:name.
• Creates a GET handler and sets its source as a SQL query that forms a shortgreeting:
– GET is the default value for the p_method parameter, and it is used here becausethat parameter was omitted in this example.
– COLLECTION_FEED is the default value for the p_method parameter, and it is usedhere because that parameter was omitted in this example
• An optional parameter named whom is specified.
Related Topics:
• ORDS.CREATE_SERVICE (page 5-1)
3.7.2 Testing the RESTful ServiceTo test the RESTful service that you created, start Oracle REST Data Services if it isnot already started:
java -jar ords.war
Enter the URI of the service in a browser. The following example displays a "Hello"greeting to Joe, by default from the current user because no whom parameter isspecified.:
http://localhost:8080/ords/ordstest/examples/routes/greeting/Joe
In this example:
Chapter 3Using the Oracle REST Data Services PL/SQL API
3-81

• Oracle REST Data Services is running on localhost and listening on port 8080.
• Oracle REST Data Services is deployed at the context-path /ords.
• The RESTful service was created by a database schema named ordstest.
• Because the URL does not include the optional whom parameter, the :whom bindparameter is bound to the null value, which causes the query to use the value ofthe current database user (sys_context(''USERENV'',''CURRENT_USER'')) instead.
If you have a JSON viewing extension installed in your browser, you will see a resultlike the following:
{ "items": [ { "greeting": "Hello Joe from ORDSTEST" } ], "hasMore": false, "limit": 25, "offset": 0, "count": 1, "links": [ { "rel": "self", "href": "http://localhost:8080/ords/ordstest/examples/routes/greeting/" }, { "rel": "describedby", "href": "http://localhost:8080/ords/ordstest/metadata-catalog/examples/routes/greeting/" }, { "rel": "first", "href": "http://localhost:8080/ords/ordstest/examples/routes/greeting/Joe" } ]}
The next example is like the preceding one, except the optional parameter whom isspecified to indicate that the greeting is from Jane.
http://localhost:8080/ords/ordstest/examples/routes/greeting/Joe?whom=Jane
This time, the result will look like the following:
{ "items": [ { "greeting": "Hello Joe from Jane" } ], "hasMore": false, "limit": 25, "offset": 0, "count": 1, "links": [ { "rel": "self", "href": "http://localhost:8080/ords/ordstest/examples/routes/greeting/" },
Chapter 3Using the Oracle REST Data Services PL/SQL API
3-82
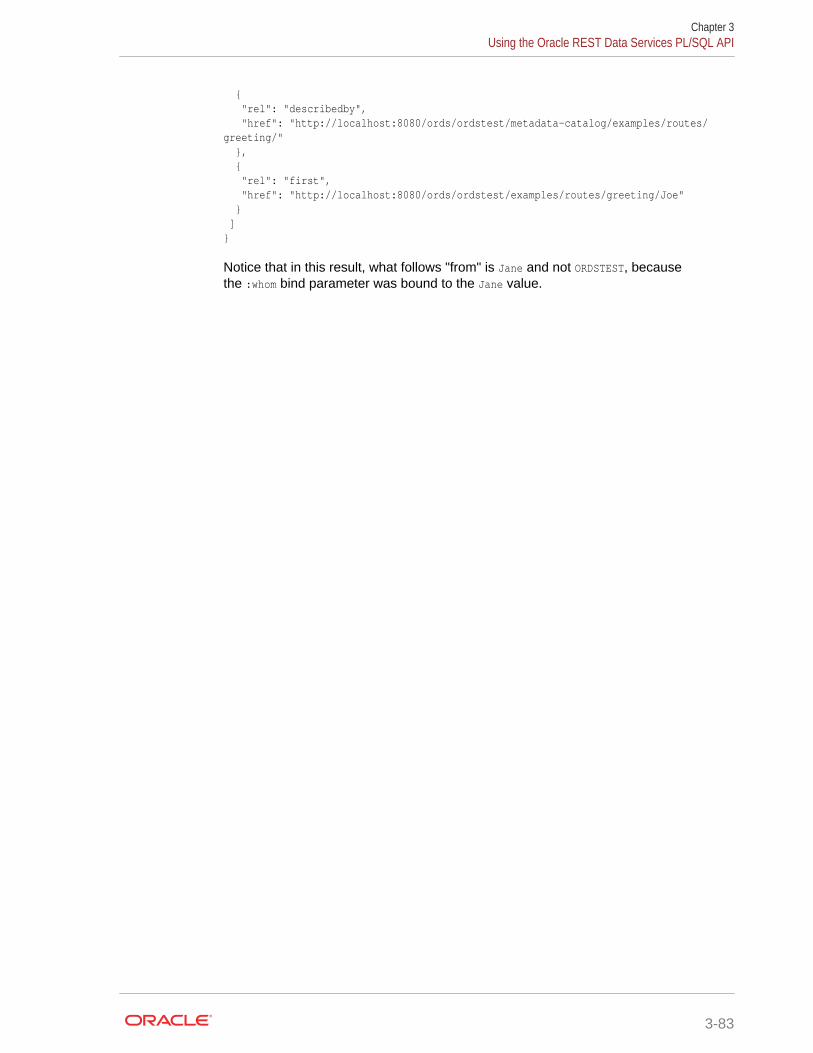
{ "rel": "describedby", "href": "http://localhost:8080/ords/ordstest/metadata-catalog/examples/routes/greeting/" }, { "rel": "first", "href": "http://localhost:8080/ords/ordstest/examples/routes/greeting/Joe" } ]}
Notice that in this result, what follows "from" is Jane and not ORDSTEST, becausethe :whom bind parameter was bound to the Jane value.
Chapter 3Using the Oracle REST Data Services PL/SQL API
3-83

Chapter 3
Using the Oracle REST Data Services PL/SQL API
3-84

4NoSQL and Oracle REST Data Services
This chapter explains how to use Oracle REST Data Services to provide HTTP-basedREST access to Oracle NoSQL Database (also referred to here as NoSQL) data andmetadata.See also some NoSQL example files included in the Oracle REST Data Servicesinstallation. For a short document about how to get started accessing NoSQL stores,double-click the file examples/getting-started-nosql/index.html under the locationwhere you installed Oracle REST Data Services.
Topics:
• About NoSQL and Oracle REST Data Services (page 4-1)
• NoSQL Store Installation and Registration (page 4-4)
• Adding and Removing a NoSQL Store for Use with Oracle REST Data Services(page 4-5)
• NoSQL REST Services (page 4-6)
4.1 About NoSQL and Oracle REST Data ServicesOracle REST Data Services can provide HTTP-based REST service access to OracleNoSQL Database, through operations on the NoSQL data and metadata.Data accessconsists of CRUD (create, read, update, delete) operations on NoSQL tables:
• Create: HTTP POST and PUT to provide services to create row data.
• Read: HTTP GET to provide key, partial key, and field range queries on row data,with directives for consistency and order.
• Update: HTTP PUT to provide services to update row data.
• Delete: HTTP DELETE to provide services to delete row data.
Metadata access consists of HTTP GET to provide services to read NoSQL metadata.
Topics:
• Technology Environment (page 4-1)
• Typical Oracle REST Data Services Input and Output (page 4-3)
4.1.1 Technology EnvironmentThe key pieces in the technology environment for using Oracle REST Data Serviceswith NoSQL are:
• REST services
Direct web service calls to Oracle NoSQL Database, and marshall data returnedinto JSON format.
Can be deployed using Oracle WebLogic Server, GlassFish, or Apache Tomcat.
4-1
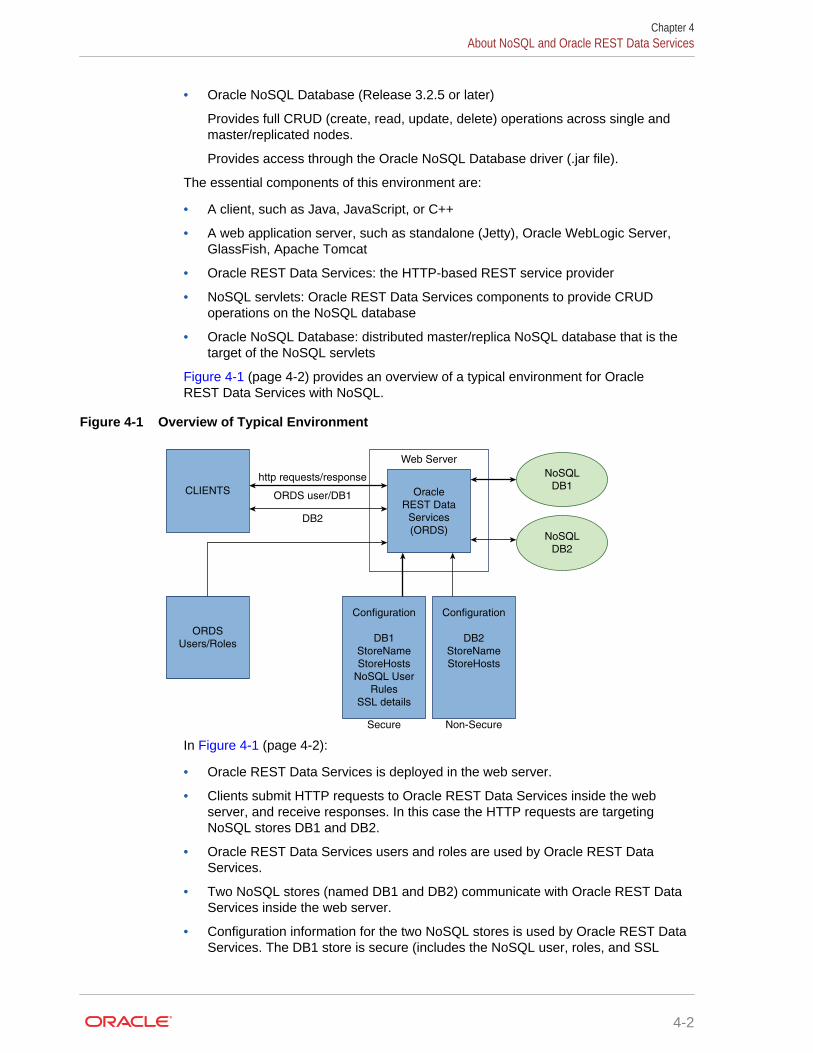
• Oracle NoSQL Database (Release 3.2.5 or later)
Provides full CRUD (create, read, update, delete) operations across single andmaster/replicated nodes.
Provides access through the Oracle NoSQL Database driver (.jar file).
The essential components of this environment are:
• A client, such as Java, JavaScript, or C++
• A web application server, such as standalone (Jetty), Oracle WebLogic Server,GlassFish, Apache Tomcat
• Oracle REST Data Services: the HTTP-based REST service provider
• NoSQL servlets: Oracle REST Data Services components to provide CRUDoperations on the NoSQL database
• Oracle NoSQL Database: distributed master/replica NoSQL database that is thetarget of the NoSQL servlets
Figure 4-1 (page 4-2) provides an overview of a typical environment for OracleREST Data Services with NoSQL.
Figure 4-1 Overview of Typical Environment
CLIENTS
ORDS
Users/Roles
Oracle
REST Data
Services
(ORDS)
Web Server
Configuration
DB1
StoreName
StoreHosts
NoSQL User
Rules
SSL details
Configuration
DB2
StoreName
StoreHosts
NoSQL
DB2
NoSQL
DB1
Secure Non-Secure
http requests/response
ORDS user/DB1
DB2
In Figure 4-1 (page 4-2):
• Oracle REST Data Services is deployed in the web server.
• Clients submit HTTP requests to Oracle REST Data Services inside the webserver, and receive responses. In this case the HTTP requests are targetingNoSQL stores DB1 and DB2.
• Oracle REST Data Services users and roles are used by Oracle REST DataServices.
• Two NoSQL stores (named DB1 and DB2) communicate with Oracle REST DataServices inside the web server.
• Configuration information for the two NoSQL stores is used by Oracle REST DataServices. The DB1 store is secure (includes the NoSQL user, roles, and SSL
Chapter 4About NoSQL and Oracle REST Data Services
4-2

details), and the DB2 store is non-secure. The configuration information wasspecified the stores were registered with Oracle REST Data Services.
4.1.2 Typical Oracle REST Data Services Input and OutputExample 4-1 (page 4-3) is a REST service request (input) to get metadata abouttables from a NoSQL database.
Example 4-1 Getting Metadata from a NoSQL Database
http://localhost:8080/ords/sales/metadata-catalog/
In Example 4-1 (page 4-3):
• http://localhost:8080/ords is the URL for accessing the Oracle REST DataServices web application from the web server running on localhost with port 8080.
• /sales is the NoSQL database identifier. This identifier will map to a NoSQLconfiguration.
• metadata-catalog/ is the component that services the metadata request.
Example 4-1 (page 4-3) might product output similar to the following in response:
{ "items": [ { "name": "complexUsers", "links": [ { "rel": "canonical", "href": "http://localhost:8080/ords/sales/metadata-catalog/tables/complexUsers/", "mediaType": "application/json" }, { "rel": "describes", "href": "http://localhost:8080/ords/sales/tables/complexUsers/" } ] }, { "name": "evolveUsers", "links": [ { "rel": "canonical", "href": "http://localhost:8080/ords/sales/metadata-catalog/tables/evolveUsers/", "mediaType": "application/json" }, { "rel": "describes", "href": "http://localhost:8080/ords/sales/tables/evolveUsers/" . . .
Chapter 4About NoSQL and Oracle REST Data Services
4-3

4.2 NoSQL Store Installation and RegistrationTo install and register a NoSQL store involves regarding the Oracle REST DataServices installation host as a NoSQL Client. Therefore, if the NoSQL store is secure,then the security properties file (client.security) and the SSL information file(client.trust) must be copied to the Oracle REST Data Services host's network.These files are generated when the NoSQL store is first established, as explained inthe NoSQL documentation.
If the NoSQL store is secure, it must be accessed by a NoSQL user. NoSQL provide aWallet (for Enterprise Editions) and a password file (for Community editions) to holdpassword information. The password file is not secure because it is plain text, soOracle REST Data Services provides an alternative storage of passwords. Creatingthe Wallet is also described in the NoSQL documentation; and if the Wallet is used, ittoo must be copied into the Oracle REST Data Services host's network.
Each Oracle REST Data Services installation has a configuration directory, whichincludes a nosql directory for NoSQL store configurations. The nosql directory will haveone directory for each NoSQL store, and each store-specific directory includes thefollowing files:
client.security (for Secure noSQL stores)client.trust (for Secure NoSQL stores)Wallet directory (Optional for NoSQL secure stores)nosql.properties
The nosql.properties file includes the following:
oracle.dbtools.kv.store.name=<storename>oracle.dbtools.kv.store.hosts=<comma separated set of HOSTS:PORTS>[And optionally the following:]oracle.dbtools.kv.store.pagelimit=<maximum number of items per page>oracle.dbtools.kv.store.security.properties=client.security (the name of the NoSQL client.security file)oracle.dbtools.kv.store.requiredRoles=<list of comma separated roles>
If oracle.dbtools.kv.store.requiredRoles property is not included in thenosql.properties file, then the REST service is authorized for anonymous users;otherwise access is granted to any user that has any of these roles.
The client.security file contains the SSL properties, and it also contains the following:
oracle.kv.auth.username=<NoSQL user used for ORDS to access the store>
The client.security file may also need to include the following:
• oracle.kv.auth.wallet.dir=<wallet directory> to specify the wallet directory, if awallet is used
• oracle.dbtools.kv.store.auth.pwd=<encrypted pwd> to specify the password for theNoSQL user, if a password option is used
Note all path names in the client.security file must be specified with the full path.
The following examples show:
• A store accessed by Oracle REST Data Services anonymous users on thelocalhost port 5000 with name kvstore (a typical KVLite store).
Chapter 4NoSQL Store Installation and Registration
4-4
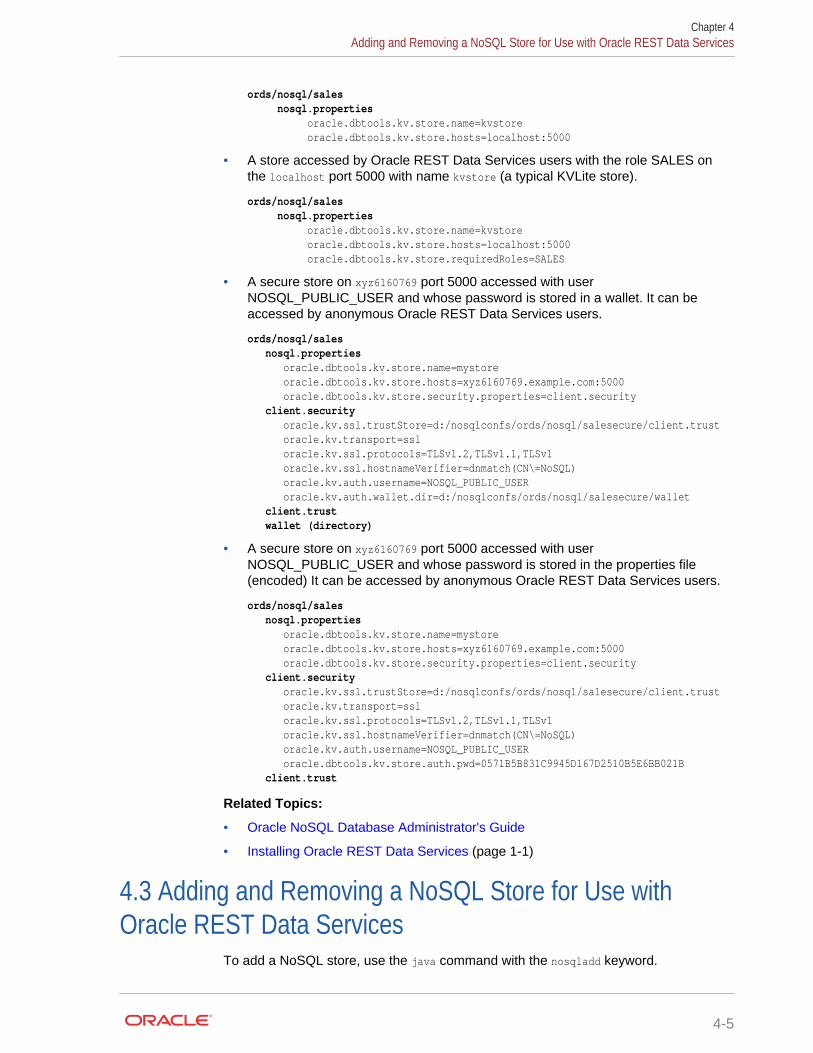
ords/nosql/sales nosql.properties oracle.dbtools.kv.store.name=kvstore oracle.dbtools.kv.store.hosts=localhost:5000
• A store accessed by Oracle REST Data Services users with the role SALES onthe localhost port 5000 with name kvstore (a typical KVLite store).
ords/nosql/sales nosql.properties oracle.dbtools.kv.store.name=kvstore oracle.dbtools.kv.store.hosts=localhost:5000 oracle.dbtools.kv.store.requiredRoles=SALES
• A secure store on xyz6160769 port 5000 accessed with userNOSQL_PUBLIC_USER and whose password is stored in a wallet. It can beaccessed by anonymous Oracle REST Data Services users.
ords/nosql/sales nosql.properties oracle.dbtools.kv.store.name=mystore oracle.dbtools.kv.store.hosts=xyz6160769.example.com:5000 oracle.dbtools.kv.store.security.properties=client.security client.security oracle.kv.ssl.trustStore=d:/nosqlconfs/ords/nosql/salesecure/client.trust oracle.kv.transport=ssl oracle.kv.ssl.protocols=TLSv1.2,TLSv1.1,TLSv1 oracle.kv.ssl.hostnameVerifier=dnmatch(CN\=NoSQL) oracle.kv.auth.username=NOSQL_PUBLIC_USER oracle.kv.auth.wallet.dir=d:/nosqlconfs/ords/nosql/salesecure/wallet client.trust wallet (directory)
• A secure store on xyz6160769 port 5000 accessed with userNOSQL_PUBLIC_USER and whose password is stored in the properties file(encoded) It can be accessed by anonymous Oracle REST Data Services users.
ords/nosql/sales nosql.properties oracle.dbtools.kv.store.name=mystore oracle.dbtools.kv.store.hosts=xyz6160769.example.com:5000 oracle.dbtools.kv.store.security.properties=client.security client.security oracle.kv.ssl.trustStore=d:/nosqlconfs/ords/nosql/salesecure/client.trust oracle.kv.transport=ssl oracle.kv.ssl.protocols=TLSv1.2,TLSv1.1,TLSv1 oracle.kv.ssl.hostnameVerifier=dnmatch(CN\=NoSQL) oracle.kv.auth.username=NOSQL_PUBLIC_USER oracle.dbtools.kv.store.auth.pwd=0571B5B831C9945D167D2510B5E6BB021B client.trust
Related Topics:
• Oracle NoSQL Database Administrator's Guide
• Installing Oracle REST Data Services (page 1-1)
4.3 Adding and Removing a NoSQL Store for Use withOracle REST Data Services
To add a NoSQL store, use the java command with the nosqladd keyword.
Chapter 4Adding and Removing a NoSQL Store for Use with Oracle REST Data Services
4-5
Usage:
java -jar ords.war nosqladd [--secure] [--clientTrustFile] [--clientSecurityFile] [--walletDir] [--password] [--user] [--pagelimit] <storeAlias> <storeName> <hostPorts> <roles>
Options:
• [--secure] Flag indicating that the store is secure.
• [--clientTrustFile] Location of the client.trust file, which will be copied from thislocation into the NoSQL configuration area).
• [--clientSecurityFile] Location of the client.security file, which will be copiedfrom this location, with potential updates, to the NoSQL configuration area.
• [--walletDir] Location of the wallet directory (folder), which will be copied fromthis location to the NoSQL configuration area.
• [--password] Password for the connection.
• [--user] User name for the connection.
• [-- pagelimit] Maximum number of items per page for this store.
Arguments:
• <storeAlias> Store alias.
• <storeName> Store name.
• <hostPorts> Host:Port values (comma-separated list).
• <roles> Roles (comma-separated list).
To remove (delete) a NoSQL store, use the java command with the nosqldel keyword.
Usage:
java -jar ords.war nosqldel <storeAlias>
Arguments:
• <storeAlias> Store alias.
4.4 NoSQL REST ServicesA NoSQL request has the following format:
host:port/ords/<nosqlalias>/<nosqlservice>
Where:
• <nosqlalias> is the alias for the NoSQL store.
• <nosqlservice> is an appropriate string for the metadata, data, or DDL servicebeing invoked.
Topics:
• Metadata Services (page 4-7)
• Data Services (page 4-10)
• DDL Services (page 4-15)
Chapter 4NoSQL REST Services
4-6

• Common Parameters (page 4-17)
4.4.1 Metadata ServicesGET (Read Metadata) is the only NoSQL service available.
Topics:
• Read Metadata (GET) (page 4-7)
4.4.1.1 Read Metadata (GET)The GET (Read Metadata) service has different <nosqlservice> formats and output,depending on whether the request is for metadata for all tables or a specified table.
• For all tables: <nosqlservice> = metadata-catalog/
The JSON output is of the following format, which has links to each table'smetadata and the first page of data. For example:
{ "items": [ { "name": "complexUsers", "links": [ { "rel": "canonical", "href": "http://localhost:8080/ords/sales/metadata-catalog/tables/complexUsers/", "mediaType": "application/json" }, { "rel": "describes", "href": "http://localhost:8080/ords/sales/tables/complexUsers/" } ] }, { "name": "shardUsers", "links": [ { "rel": "canonical", "href": "http://localhost:8080/ords/sales/metadata-catalog/tables/shardUsers/", "mediaType": "application/json" }, { "rel": "describes", "href": "http://localhost:8080/ords/sales/tables/shardUsers/" } ] }, { "name": "simpleUsers", "links": [ { "rel": "canonical", "href": "http://localhost:8080/ords/sales/metadata-catalog/tables/simpleUsers/",
Chapter 4NoSQL REST Services
4-7

"mediaType": "application/json" }, { "rel": "describes", "href": "http://localhost:8080/ords/sales/tables/simpleUsers/" } ] } ], "hasMore": false, "count": 3, "limit": 25, "offset": 0, "links": [ { "href": "http://localhost:8080/ords/sales/metadata-catalog/", "rel": "self" } ] }
• For a specified table: <nosqlservice> = metadata-catalog/tables/<name>/ where<name> is the name of the table
The JSON output is of the following format, with properties, keys, column details,child tables, and links. For example:
{ "type": "TABLE", "name": "simpleUsers", "fullname": "simpleUsers", "description": null, "primarykey": [ "userID" ], "shardkey": [ "userID" ], "members": [ { "name": "firstName", "type": "STRING", "description": null }, { "name": "lastName", "type": "STRING", "description": null }, { "name": "userID", "type": "INTEGER", "description": null } ], "indexes": [ { "name": "compoundIndex", "description": null, "indexfields": [ "lastName",
Chapter 4NoSQL REST Services
4-8

"firstName" ] }, { "name": "simpleIndex", "description": null, "indexfields": [ "firstName" ] } ], "childtables": [ ], "links": [ { "rel": "collection", "href": "http://localhost:8080/ords/sales/metadata-catalog/" }, { "rel": "canonical", "href": "http://localhost:8080/ords/sales/metadata-catalog/tables/simpleUsers/", "mediaType": "application/json" }, { "rel": "describes", "href": "http://localhost:8080/ords/sales/tables/simpleUsers/" } ]}
• For a specified table's items: <nosqlservice> = metadata-catalog/tables/<name>/item where <name> is the name of the table
The JSON output is of the following format, with properties, keys, column details,child tables, and links. For example:
{ "name": "simpleUsers", "fullname": "simpleUsers", "description": null, "primarykey": [ "userID" ], "members": [ { "name": "firstName", "type": "STRING", "description": null }, { "name": "lastName", "type": "STRING", "description": null }, { "name": "userID", "type": "INTEGER", "description": null } ], "links": [ { "rel": "collection", "href": "http://localhost:8080/ords/sales/metadata-catalog/"
Chapter 4NoSQL REST Services
4-9
}, { "rel": "canonical", "href": "http://localhost:8080/ords/sales/metadata-catalog/tables/simpleUsers/item", "mediaType": "application/json" } ]}
4.4.2 Data ServicesServices are available for reading, writing, and deleting NoSQL data.
Topics:
• Read Data (GET) (page 4-10)
• Idempotent Write (PUT) (page 4-14)
• Write (POST) (page 4-15)
• Delete (DELETE) (page 4-15)
4.4.2.1 Read Data (GET)The GET (Read Data) service has different <nosqlservice> formats and output,depending on whether the request is for all data in a table or a subset of the data in atable.
• For all data in a table: <nosqlservice> = tables/<name>/
The JSON output is of the following format. The data is returned in an unorderedsequence, and it includes property pair values and links from the collection toshow where it belongs and that it is editable. For example:
{ "items": [ { "$version": "rO0ABXcsAAQC5a2Fp3hHLajIZEw7k4elAAAAAAAAAQABAwAAAAEAAAABAAAAAAAEwTE.", "firstName": "Bob", "lastName": "Johnson", "userID": 109, "links": [ { "href": "http://localhost:8080/ords/sales/tables/simpleUsers/109", "rel": "self" }, { "href": "http://localhost:8080/ords/sales/metadata-catalog/tables/simpleUsers/item", "rel": "describedby" } ] }, { "$version": "rO0ABXcsAAQC5a2Fp3hHLajIZEw7k4elAAAAAAAAAKYBAwAAAAEAAAABAAAAAAAEZNg.", "firstName": "Alex", "lastName": "Robertson", "userID": 1, "links": [
Chapter 4NoSQL REST Services
4-10

{ "href": "http://localhost:8080/ords/sales/tables/simpleUsers/1", "rel": "self" }, { "href": "http://localhost:8080/ords/sales/metadata-catalog/tables/simpleUsers/item", "rel": "describedby" } ] },…….. "accepts": [ "application/json" ], "hasMore": false, "count": 6, "limit": 25, "offset": 0, "links": [ { "href": "http://localhost:8080/ords/sales/tables/simpleUsers/", "rel": "edit", "targetSchema": "application/json" }, { "href": "http://localhost:8080/ords/sales/metadata-catalog/tables/simpleUsers/", "rel": "describedby" }, { "href": "http://localhost:8080/ords/sales/tables/simpleUsers/", "rel": "self" } ] }
• For data in a table where keys are specified: <nosqlservice> = tables/<name>/<keys>
<name> is the name of the table, and <keys> is a set of comma-separated index keyvalues. The key values must be in the order of key definition. If not all key partsare specified, retrieval is based on partial keys. If the full key is specified, theoutput is a single item.
The JSON output includes property pair values and links from the collection toshow where it belongs. The following example shows JSON output when a full keyis specified (tables/shardUsers/Robertson,Alex).
{ "$version": "rO0ABXcsAAQC5a2Fp3hHLajIZEw7k4elAAAAAAAAAKYBAwAAAAEAAAABAAAAAAAEZNg.", "firstName": "Alex", "lastName": "Robertson", "userID": 1, "accepts": [ "application/json" ], "links": [ { "href": "http://localhost:8080/ords/sales/tables/simpleUsers/1", "rel": "self" }, { "href": "http://localhost:8080/ords/sales/metadata-catalog/tables/simpleUsers/item", "rel": "describedby"
Chapter 4NoSQL REST Services
4-11

}, { "href": "http://localhost:8080/ords/sales/tables/simpleUsers/1", "rel": "edit", "targetSchema": "application/json" }, { "href": "http://localhost:8080/ords/sales/tables/simpleUsers/", "rel": "collection" } ] }
The following example shows JSON output where a partial key is specified(tables/shardUsers/Robertson).
{ "items": [ { "$version": "rO0ABXcsAAQC5a2Fp3hHLajIZEw7k4elAAAAAAAAAMIBAwAAAAEAAAABAAAAAAAEbLw.", "firstName": "Alex", "lastName": "Robertson", "email": "[email protected]", "links": [ { "href": "http://localhost:8080/ords/sales/tables/shardUsers/Robertson,Alex", "rel": "self" }, { "href": "http://localhost:8080/ords/sales/metadata-catalog/tables/shardUsers/item", "rel": "describedby" } ] }, { "$version": "rO0ABXcsAAQC5a2Fp3hHLajIZEw7k4elAAAAAAAAAMQBAwAAAAEAAAABAAAAAAAEbSE.", "firstName": "Beatrix", "lastName": "Robertson", "email": "[email protected]", "links": [ { "href": "http://localhost:8080/ords/sales/tables/shardUsers/Robertson,Beatrix", "rel": "self" }, { "href": "http://localhost:8080/ords/sales/metadata-catalog/tables/shardUsers/item", "rel": "describedby" } ] } ], "accepts": [ "application/json" ], "hasMore": false, "count": 2, "limit": 25, "offset": 0, "links": [
Chapter 4NoSQL REST Services
4-12
{ "href": "http://localhost:8080/ords/sales/tables/shardUsers/", "rel": "edit", "targetSchema": "application/json" }, { "href": "http://localhost:8080/ords/sales/metadata-catalog/tables/shardUsers/", "rel": "describedby" }, { "href": "http://localhost:8080/ords/sales/tables/shardUsers/", "rel": "up" }, { "href": "http://localhost:8080/ords/sales/tables/shardUsers/Robertson", "rel": "self" } ] }
• For data in a table where an index and keys are specified: <nosqlservice> =tables/<name>/index/<indexname>/<keys>
<name> is the name of the table, <indexname> is the name of the index, and <keys> isa set of comma-separated index key values. The key values must be in the orderof key definition. If not all key parts are specified, retrieval is based on partial keys.If the full key is specified, the output is a single item.
The JSON output includes property pair values and links from the collection toshow where it belongs and that it is editable. For example:
{ "items": [ { "$version": "rO0ABXcsAAQC5a2Fp3hHLajIZEw7k4elAAAAAAAAALIBAwAAAAEAAAABAAAAAAAEaIk.", "firstName": "Joel", "lastName": "Robertson", "userID": 3, "links": [ { "href": "http://localhost:8080/ords/sales/tables/simpleUsers/3", "rel": "self" }, { "href": "http://localhost:8080/ords/sales/metadata-catalog/tables/simpleUsers/item", "rel": "describedby" } ] }, { "$version": "rO0ABXcsAAQC5a2Fp3hHLajIZEw7k4elAAAAAAAAAL4BAwAAAAEAAAABAAAAAAAEa4k.", "firstName": "Joel", "lastName": "Jones", "userID": 6, "links": [ { "href": "http://localhost:8080/ords/sales/tables/simpleUsers/6", "rel": "self" }, { "href": "http://localhost:8080/ords/sales/metadata-catalog/tables/simpleUsers/item",
Chapter 4NoSQL REST Services
4-13
"rel": "describedby" } ] } ], "hasMore": false, "count": 2, "limit": 25, "offset": 0, "links": [ { "href": "http://localhost:8080/ords/sales/metadata-catalog/tables/simpleUsers/", "rel": "describedby" }, { "href": "http://localhost:8080/ords/sales/tables/simpleUsers/index/simpleIndex/Joel", "rel": "self" }, { "href": "http://localhost:8080/ords/sales/tables/simpleUsers/", "rel": "collection" } ] }
4.4.2.2 Idempotent Write (PUT)The PUT (Idempotent Write) service has different <nosqlservice> formats and output,depending on whether the operation is upsert, put if present, or put if version. ("Put ifversion" means that the PUT operation will succeed only if the latest version in theNoSQL database is the stated version. This prevents a client from overwriting a newervalue with an older value.)
• For Upsert (update it present, create if not): <nosqlservice> = tables/<name>/
The body of the request is JSON format of the form returned by the Read Data(GET) (page 4-10) operations, but without links. For example:
{ "userID": 108, "firstName": "Bob", "lastName": "Johnson"}
• For Put if Present: <nosqlservice> = tables/<name>/<key>
<name> is the name of the table, and <key> is the primary key value of the newobject.
The body of the request is JSON format of the form returned by the Read Data(GET) (page 4-10) operations, but without links. For example:
{ "userID": 108, "firstName": "Bob", "lastName": "Johnson"}
If the row is not present, the status 404 (NOT_FOUND) is returned.
• For Put if Present for a specified version: <nosqlservice> = tables/<name>/<key>
<name> is the name of the table, <key> is the primary key value of the new object,and the header parameter If-Match specifies the value of the $version property onan item. If the version matches the one specified, then it is updated.
The body of the request is JSON format of the form returned by the Read Data(GET) (page 4-10) operations, but without links. For example:
{ "userID": 108, "firstName": "Bob", "lastName": "Johnson"}If-Match= rO0ABXcsAAQC5a2Fp3hHLajIZEw7k4elAAAAAAAAAL4BAwAAAAEAAAABAAAAAAAEa4k
Chapter 4NoSQL REST Services
4-14

If the row is not present, the status 404 (NOT_FOUND) is returned. If the row doesnot match the specified version, the status 412 (PRECONDITION_FAILED) isreturned.
Related Topics:
• Read Data (GET) (page 4-10)
4.4.2.3 Write (POST)The POST (Put if Absent) service has the following <nosqlservice> format:<nosqlservice> = tables/<name>/
<name> is the name of the table.
The body of the request is JSON format of the form returned by the Read Data (GET)(page 4-10) operations, but without links. For example:
{ "userID": 108, "firstName": "Bob", "lastName": "Johnson"}
If the row is present, the status 400 ((BAD_REQUEST) This row already exists) isreturned. If the row is absent, the status 201 (CREATED) is returned.
Related Topics:
• Read Data (GET) (page 4-10)
4.4.2.4 Delete (DELETE)The DELETE (Delete) service can have an optional version identifier specified.
• For Delete with no version specified: <nosqlservice> = tables/<name>/<keys>
<name> is the name of the table, and <keys> is the primary key value or set ofcomma--separated primary key values of the rows to be deleted. If not all keyparts are specified, deletion is based on partial keys.
If a specified row is present, the status 204 (NO_CONTENT) is returned. If aspecified row is absent, the status 404 (NOT_FOUND) is returned.
• For Delete if the version and keys must result in only one object being returned(that is, the object is fully specified): <nosqlservice> = tables/<name>/<keys>
<name> is the name of the table, <keys> is the primary key value or set of comma--separated primary key values of the rows to be deleted, and the header parameterIf-Match specifies the value of the $version property on an item. If the versionmatches the one specified, then it is deleted. For example:
If-Match= rO0ABXcsAAQC5a2Fp3hHLajIZEw7k4elAAAAAAAAAL4BAwAAAAEAAAABAAAAAAAEa4k
If a specified row-version combination is present, the status 204 (NO_CONTENT)is returned. If a specified row is present but not for the specified version, the status412 (PRECONDITION_FAILED) is returned. If a specified row is absent, the status404(NOT_FOUND) is returned.
4.4.3 DDL ServicesServices are available for manipulating NoSQL tables and indexes.
Chapter 4NoSQL REST Services
4-15

For table requests, the body of the request is a text format corresponding to thatspecified in Getting Started with Oracle NoSQL Database Tables, Appendix A ("TableData Definition Language Overview").
Topics:
• Create/Update (POST) (page 4-16)
• Drop (POST) (page 4-16)
• Poll (GET) (page 4-17)
Related Topics:
• Getting Started with Oracle NoSQL Database Tables
4.4.3.1 Create/Update (POST)For DDL create and update operations, the service has the following <nosqlservice>format: <nosqlservice> = ddl/
Example:
http://localhost:8080/ords/sales/ddl/
The body of the request contains the DDL to be executed on the NoSQL store.Examples of the body of the request:
CREATE TABLE IF NOT EXISTS myUsers (firstName STRING,lastName STRING,userID INTEGER,PRIMARY KEY (userID))
CREATE INDEX IF NOT EXISTS myUser_index ON myUsers(lastName, firstName)
ALTER TABLE myUsers(ADD newcolumn STRING)
If the operation succeeds, a status of OK is returned, along with a Location headervariable giving the location of the new resource. For example (creating an index):
Status: 200: OKHeaders: Location: http://localhost:8080/ords/sales/metadata-catalog/tables/myUsers/index/myUser_index
If the operation fails, an error code is returned.
If the operation does not complete within 1 second, a status of ACCEPTED isreturned, along with a task ID so that you can send requests to see if it has finished.For example (creating an index):
Status: 202: AcceptedHeaders: Location: http://localhost:8080/ords/sales/ddl/tasks/16
4.4.3.2 Drop (POST)For DDL drop operations, the service has the following <nosqlservice> format:<nosqlservice> = ddl/
Example:
http://localhost:8080/ords/sales/ddl/
Chapter 4NoSQL REST Services
4-16

The body of the request contains the DDL to be executed on the NoSQL store.Examples of the body of the request:
DROP INDEX IF EXISTS myUser_index ON myUsers
DROP TABLE IF EXISTS myUsers
If the operation succeeds, a status of NO_CONTENT is returned.
If the operation fails, an error code is returned.
If the operation does not complete within 1 second, a status of ACCEPTED isreturned, along with a task ID so that you can send requests to see if it has finished.For example (dropping a table):
Status: 202: AcceptedHeaders: Location: http://localhost:8080/ords/sales/ddl/tasks/17
4.4.3.3 Poll (GET)The Poll service has the following <nosqlservice> format: <nosqlservice> = ddl/tasks/<id>
Example:
http://localhost:8080/ords/sales/ddl/tasks/17
If the operation succeeds, a status of OK is returned, and the Location header canprovide additional information.
If the Location header is the same as the URL request (for example, http://localhost:8080/ords/sales/ddl/tasks/17), then the task is still ongoing.
If the Location header is blank or null, then the task has finished and this task was adrop operation, so there is no new location.
If the Location header is not blank and is not the same as the URL request, then it isthe location of the new or updated resource.
4.4.4 Common ParametersSeveral groups of parameters can be used for with multiple operations and for specificdesired results.
Topics:
• Parameters to Skip Results and Limit the Number of Results (page 4-17)
• Parameters to Specify Query Conditions (page 4-18)
• Parameters to Specify Direction (Order), and Consistency and DurabilityGuarantees (page 4-19)
4.4.4.1 Parameters to Skip Results and Limit the Number of ResultsIn GET operations, you can specify a limit and an offset by using ?limit={limit}&offset={offset}. For example:
<nosqlservice> = metadata-catalog/?limit=2&offset=1
Chapter 4NoSQL REST Services
4-17

The preceding example returns two objects per page, starting with the second object(that is, skipping the first one). The JSON output might be as follows:
{ "items": [ { "name": "evolveUsers", "links": [ { "rel": "canonical", "href": "http://localhost:8080/ords/sales/metadata-catalog/tables/evolveUsers/", "mediaType": "application/json" }, { "rel": "describes", "href": "http://localhost:8080/ords/sales/tables/evolveUsers/" } ] }, { "name": "shardUsers", "links": [ { "rel": "canonical", "href": "http://localhost:8080/ords/sales/metadata-catalog/tables/shardUsers/", "mediaType": "application/json" }, { "rel": "describes", "href": "http://localhost:8080/ords/sales/tables/shardUsers/" } ] } ], "hasMore": false, "count": 2, "limit": 2, "offset": 1, "links": [ { "href": "http://localhost:8080/ords/sales/metadata-catalog/", "rel": "self" }, { "href": "http://localhost:8080/ords/sales/metadata-catalog/?limit=2", "rel": "prev" }, { "href": "http://localhost:8080/ords/sales/metadata-catalog/?limit=2", "rel": "first" } ]
4.4.4.2 Parameters to Specify Query ConditionsYou can limit rows retrieved by using field ranges, and you can specify the order ofretrieval. The query structure for this is a simple list of ANDed pairs. For example:
?q={"firstName":{"$between":["A","C"]},"$direction":"reverse"}
Special characters must be escaped using URL encoding. For example:
Chapter 4NoSQL REST Services
4-18
http://localhost:8080/ords/sales/tables/simpleUsers/index/simpleIndex/?q={"firstName":{"$between":%5B"A","C"%5D}}
4.4.4.3 Parameters to Specify Direction (Order), and Consistency andDurability Guarantees
You can specify values for the direction (order), consistency guarantees, and durabilityguarantees, overriding any related default values in the store.
• For direction (order), specify the $direction property with one of the values asfollows:
$direction = "forward" | "reverse" | "unordered"
For direction (order), the default is "forward".
For primary key retrieval using a partial or empty key, only "unordered" is allowed,and any other value is ignored.
• For consistency guarantees, specify the $consistency property with appropriatevalues as follows (note that <LONG> means a long number):
$consistency = <Absolute> | <None> | <Replica> | <Time> | <Version> <Absolute> = "absolute"<None> = "none"<Replica> = "replica"<Time> = <Lag> "," <Timeout><Lag> = <LONG> "," <Units><Timeout> = <LONG> "," <Units><Units> = "nanoseconds" | "microseconds" | "milliseconds" | "seconds" | "minutes" | "hours" | "days"<version> = <version_id> "," <LONG> "," <Units><version_id> = <version id of item as returned in GET>
For example:
http://localhost:8080/ords/sales/tables/shardUsers/Robertson,Beatrix?q={"$consistency":"time(3,seconds,2,minutes)"}
• For durability guarantees, specify a header called NoSQL-Write-Option with a valuein the following format (note that <LONG> means a long number):
<WriteOption> = (<DurabilityPolicy> | <DurabilityGuarantees>) ";" <WriteTimeOut> <DurabilityPolicy> = "Durability" "=" <DurabilityValue><DurabilityValue> = "COMMIT_NO_SYNC" | "COMMIT_SYNC" | "COMMIT_WRITE_NO_SYNC"<DurabilityGuarantees> = <MasterSyncPolicy> ";" <ReplcaSyncPolicy> ";" <ReplicaAckPolicy><MasterSyncPolicy> = "MasterSync" "=" "NO_SYNC" | "SYNC" | "WRITE_NO_SYNC"<ReplicaSyncPolicy> = "ReplicaSync" "=" "NO_SYNC" | "SYNC" | "WRITE_NO_SYNC"<ReplicaAckPolicy> = "ReplicaAck" "=" "ALL" | "NONE" | "SIMPLE_MAJORITY"<WriteTimeOut> = "TimeOut" "=" <LONG> [ ; "Units" "=" <Units>]
For example, create a header NoSQL-Write-Option with the value:
Durability = COMMIT_NO_SYNC; TimeOut = 3; Units = seconds
Chapter 4NoSQL REST Services
4-19
Chapter 4
NoSQL REST Services
4-20
5ORDS PL/SQL Package Reference
The ORDS PL/SQL package contains subprograms (procedures and functions) fordeveloping RESTful services using Oracle REST Data Services.
Related Topics:
• Using the Oracle REST Data Services PL/SQL API (page 3-80)
5.1 ORDS.CREATE_ROLEFormat
ORDS.CREATE_ROLE( p_role_name IN sec_roles.name%type);
Description
CREATE_ROLE creates an Oracle REST Data Services role with the specified name.
Parameters
p_role_nameName of the role.
Usage Notes
After the role is created, it can be associated with any Oracle REST Data Servicesprivilege.
Examples
The following example creates a role.
EXECUTE ORDS.CREATE_ROLE(p_role_name=>'Tickets User');
5.2 ORDS.CREATE_SERVICE
Note:
ORDS.CREATE_SERVICE is deprecated. Use ORDS.DEFINE_SERVICE(page 5-11) instead.
Format
ORDS.CREATE_SERVICE( p_module_name IN ords_modules.name%type, p_base_path IN ords_modules.uri_prefix%type,
5-1

p_pattern IN ords_templates.uri_template%type, p_method IN ords_handlers.method%type DEFAULT 'GET', p_source_type IN ords_handlers.source_type%type DEFAULT ords.source_type_collection_feed, p_source IN ords_handlers.source%type, p_items_per_page IN ords_modules.items_per_page%type DEFAULT 25, p_status IN ords_modules.status%type DEFAULT 'PUBLISHED', p_etag_type IN ords_templates.etag_type%type DEFAULT 'HASH', p_etag_query IN ords_templates.etag_query%type DEFAULT NULL, p_mimes_allowed IN ords_handlers.mimes_allowed%type DEFAULT NULL, p_module_comments IN ords_modules.comments%type DEFAULT NULL, p_template_comments IN ords_modules.comments%type DEFAULT NULL, p_handler_comments IN ords_modules.comments%type DEFAULT NULL);
Description
Creates a new RESTful service.
Parameters
p_module_nameThe name of the RESTful service module. Case sensitive. Must be unique.
p_base_pathThe base of the URI that is used to access this RESTful service. Example: hr/ meansthat all URIs starting with hr/ will be serviced by this resource module.
p_patternA matching pattern for the resource template. For example, a pattern of /objects/:object/:id? will match /objects/emp/101 (matches a request for the item inthe emp resource with id of 101) and will also match /objects/emp/ (matches a requestfor the emp resource, because the :id parameter is annotated with the ? or questionmark modifier, which indicates that the id parameter is optional).
p_methodThe HTTP method to which this handler will respond. Valid values: GET (retrieves arepresentation of a resource), POST (creates a new resource or adds a resource to acollection), PUT (updates an existing resource), DELETE (deletes an existing resource).
p_source_typeThe HTTP request method for this handler. Valid values:
• source_type_collection_feed. Executes a SQL query and transforms the result setinto an ORDS Standard JSON representation. Available when the HTTP methodis GET. Result Format: JSON
• source_type_collection_item. Executes a SQL query returning one row of datainto a ORDS Standard JSON representation. Available when the HTTP method isGET. Result Format: JSON
• source_type_media. Executes a SQL query conforming to a specific format andturns the result set into a binary representation with an accompanying HTTPContent-Type header identifying the Internet media type of the representation.Result Format: Binary
• source_type_plsql. Executes an anonymous PL/SQL block and transforms anyOUT or IN/OUT parameters into a JSON representation. Available only when theHTTP method is DELETE, PUT, or POST. Result Format: JSON
Chapter 5ORDS.CREATE_SERVICE
5-2

• source_type_query || source_type_csv_query. Executes a SQL query andtransforms the result set into either an ORDS legacy JavaScript Object Notation(JSON) or CSV representation, depending on the format selected. Available whenthe HTTP method is GET. Result Format: JSON or CSV
• source_type_query_one_row. Executes a SQL query returning one row of data intoan ORDS legacy JSON representation. Available when the HTTP method is GET.Result Format: JSON
• source_type_feed. Executes a SQL query and transforms the results into a JSONFeed representation. Each item in the feed contains a summary of a resource anda hyperlink to a full representation of the resource. The first column in each row inthe result set must be a unique identifier for the row and is used to form ahyperlink of the form: path/to/feed/{id}, with the value of the first column beingused as the value for {id}. The other columns in the row are assumed tosummarize the resource and are included in the feed. A separate resourcetemplate for the full representation of the resource should also be defined. ResultFormat: JSON
p_sourceThe source implementation for the selected HTTP method.
p_items_per_pageThe default pagination for a resource handler HTTP operation GET method, that is,the number of rows to return on each page of a JSON format result set based on adatabase query. Default: NULL (defers to the resource module setting).
p_statusThe publication status. Valid values: 'PUBLISHED' (default) or 'NOT_PUBLISHED'.
p_etag_typeA type of entity tag to be used by the resource template. An entity tag is an HTTPHeader that acts as a version identifier for a resource. Use entity tag headers to avoidretrieving previously retrieved resources and to perform optimistic locking whenupdating resources. Valid values: 'HASH' or 'QUERY' or 'NONE'.
• HASH - Known as Secure HASH: The contents of the returned resourcerepresentation are hashed using a secure digest function to provide a uniquefingerprint for a given resource version.
• QUERY - Manually define a query that uniquely identifies a resource version. Amanually defined query can often generate an entity tag more efficiently thanhashing the entire resource representation.
• NONE - Do not generate an entity tag.
p_etag_queryA query that is used to generate the entity tag.
p_mimes_allowedA comma-separated list of MIME types that the handler will accept. Applies to PUTand POST only.
p_module_commentsComment text.
p_template_commentsComment text.
Chapter 5ORDS.CREATE_SERVICE
5-3
p_handler_commentsComment text.
Usage Notes
Creates a resource module, template, and handler in one call.
This procedure is deprecated. Use ORDS.DEFINE_SERVICE (page 5-11) instead.
Examples
The following example creates a simple service.
BEGIN ORDS.CREATE_SERVICE( p_module_name => 'my.tickets', p_base_path => '/my/tickets/', p_pattern => '.', p_source => 'select t.id "$.id", t.id, t.title from tickets t' || ' where t.owner = :current_user order by t.updated_on desc' );END;/
5.3 ORDS.DEFINE_HANDLERFormat
ORDS.DEFINE_HANDLER( p_module_name IN ords_modules.name%type, p_pattern IN ords_templates.uri_template%type, p_priority IN ords_templates.priority%type DEFAULT 0, p_etag_type IN ords_templates.etag_type%type DEFAULT 'HASH', p_etag_query IN ords_templates.etag_query%type DEFAULT NULL, p_comments IN ords_templates.comments%type DEFAULT NULL);
Description
DEFINE_HANDLER defines a module handler. If the handler already exists, then thehandler and any existing handlers will be replaced by this definition; otherwise, a newhandler is created.
Parameters
p_module_nameName of the owning RESTful service module. Case sensitive.
p_patternMatching pattern for the owning resource template.
p_methodThe HTTP method to which this handler will respond. Valid values: GET (retrieves arepresentation of a resource), POST (creates a new resource or adds a resource to acollection), PUT (updates an existing resource), DELETE (deletes an existing resource).
p_source_typeThe HTTP request method for this handler. Valid values:
Chapter 5ORDS.DEFINE_HANDLER
5-4

• source_type_collection_feed. Executes a SQL query and transforms the result setinto an ORDS Standard JSON representation. Available when the HTTP methodis GET. Result Format: JSON
• source_type_collection_item. Executes a SQL query returning one row of datainto a ORDS Standard JSON representation. Available when the HTTP method isGET. Result Format: JSON
• source_type_media. Executes a SQL query conforming to a specific format andturns the result set into a binary representation with an accompanying HTTPContent-Type header identifying the Internet media type of the representation.Result Format: Binary
• source_type_plsql. Executes an anonymous PL/SQL block and transforms anyOUT or IN/OUT parameters into a JSON representation. Available only when theHTTP method is DELETE, PUT, or POST. Result Format: JSON
• source_type_query || source_type_csv_query. Executes a SQL query andtransforms the result set into either an ORDS legacy JavaScript Object Notation(JSON) or CSV representation, depending on the format selected. Available whenthe HTTP method is GET. Result Format: JSON or CSV
• source_type_query_one_row. Executes a SQL query returning one row of data intoan ORDS legacy JSON representation. Available when the HTTP method is GET.Result Format: JSON
• source_type_feed. Executes a SQL query and transforms the results into a JSONFeed representation. Each item in the feed contains a summary of a resource anda hyperlink to a full representation of the resource. The first column in each row inthe result set must be a unique identifier for the row and is used to form ahyperlink of the form: path/to/feed/{id}, with the value of the first column beingused as the value for {id}. The other columns in the row are assumed tosummarize the resource and are included in the feed. A separate resourcetemplate for the full representation of the resource should also be defined. ResultFormat: JSON
p_sourceThe source implementation for the selected HTTP method.
p_items_per_pageThe default pagination for a resource handler HTTP operation GET method, that is,the number of rows to return on each page of a JSON format result set based on adatabase query. Default: NULL (defers to the resource module setting).
p_mimes_allowedComma-separated list of MIME types that the handler will accept. Applies to PUT andPOST only.
p_commentsComment text.
Usage Notes
Only one handler for each HTTP method (source type) is permitted.
Examples
The following example defines a POST handler to the /my/tickets/ resource to acceptnew tickets.
Chapter 5ORDS.DEFINE_HANDLER
5-5

BEGIN ORDS.DEFINE_HANDLER( p_module_name => 'my.tickets', p_pattern => '.', p_method => 'POST', p_mimes_allowed => 'application/json', p_source_type => ords.source_type_plsql, p_source => ' declare l_owner varchar2(255); l_payload blob; l_id number; begin l_payload := :body; l_owner := :owner; if ( l_owner is null ) then l_owner := :current_user; end if; l_id := ticket_api.create_ticket( p_json_entity => l_payload, p_author => l_owner ); :location := ''./'' || l_id; :status := 201; end; ' );END;/
5.4 ORDS.DEFINE_MODULEFormat
ORDS.DEFINE_MODULE( p_module_name IN ords_modules.name%type, p_base_path IN ords_modules.uri_prefix%type, p_items_per_page IN ords_modules.items_per_page%type DEFAULT 25, p_status IN ords_modules.status%type DEFAULT 'PUBLISHED', p_comments IN ords_modules.comments%type DEFAULT NULL);
Description
DEFINE_MODULE defines a resource module. If the module already exists, then themodule and any existing templates will be replaced by this definition; otherwise, a newmodule is created.
Parameters
p_module_nameName of the owning RESTful service module. Case sensitive.
p_base_pathThe base of the URI that is used to access this RESTful service. Example: hr/ meansthat all URIs starting with hr/ will be serviced by this resource module.
Chapter 5ORDS.DEFINE_MODULE
5-6

p_items_per_pageThe default pagination for a resource handler HTTP operation GET method, that is,the number of rows to return on each page of a JSON format result set based on adatabase query. Default: 25.
p_statusPublication status. Valid values: PUBLISHED (default) or NOT_PUBLISHED.
p_commentsComment text.
Usage Notes
(None.)
Examples
The following example creates a simple module.
BEGIN ORDS.DEFINE_MODULE( p_module_name => 'my.tickets', p_base_path => '/my/tickets/' );END;/
5.5 ORDS.DEFINE_PARAMETERFormat
ORDS.DEFINE_PARAMETER( p_module_name IN ords_modules.name%type, p_pattern IN ords_templates.uri_template%type, p_method IN ords_handlers.method%type, p_name IN ords_parameters.name%type , p_bind_variable_name IN ords_parameters.bind_variable_name%type DEFAULT NULL, p_source_type IN ords_parameters.source_type%type DEFAULT 'HEADER', p_param_type IN ords_parameters.param_type%type DEFAULT 'STRING', p_access_method IN ords_parameters.access_method%type DEFAULT 'IN', p_comments IN ords_parameters.comments%type DEFAULT NULL);
Description
DEFINE_PARAMETER defines a module handler parameter. If the parameter alreadyexists, then the parameter will be replaced by this definition; otherwise, a newparameter is created.
Parameters
p_module_nameName of the owning RESTful service module. Case sensitive.
p_patternMatching pattern for the owning resource template.
Chapter 5ORDS.DEFINE_PARAMETER
5-7
p_methodThe owning handler HTTP Method. Valid values: GET (retrieves a representation of aresource), POST (creates a new resource or adds a resource to a collection), PUT(updates an existing resource), DELETE (deletes an existing resource).
p_nameThe name of the parameter, as it is named in the URI Template or HTTP Header.Used to map names that are not valid SQL parameter names.
p_bind_variable_nameThe name of the parameter, as it will be referred to in the SQL. If NULL is specified,then the parameter is unbound.
p_source_typeThe type that is identified if the parameter originates in the URI Template or a HTTPHeader. Valid values: HEADER, RESPONSE, URI.
p_param_typeThe native type of the parameter. Valid values: STRING, INT, DOUBLE, BOOLEAN, LONG,TIMESTAMP.
p_access_methodThe parameter access method. Indicates if the parameter is an input value, outputvalue, or both. Valid values: IN, OUT, INOUT.
p_commentsComment text.
Usage Notes
All parameters must have unique names and variable names for the same handler.
Examples
The following example defines an outbound parameter on the POST handler to storethe location of the created ticket.
BEGIN ORDS.DEFINE_PARAMETER( p_module_name => 'my.tickets', p_pattern => '.', p_method => 'POST', p_name => 'X-APEX-FORWARD', p_bind_variable_name => 'location', p_source_type => 'HEADER', p_access_method => 'OUT' );END;/
The following example defines an outbound parameter on the POST handler to storethe HTTP status of the operation.
BEGIN ORDS.DEFINE_PARAMETER( p_module_name => 'my.tickets', p_pattern => '.', p_method => 'POST', p_name => 'X-APEX-STATUS-CODE',
Chapter 5ORDS.DEFINE_PARAMETER
5-8
p_bind_variable_name => 'status', p_source_type => 'HEADER', p_access_method => 'OUT' );END;/
5.6 ORDS.DEFINE_PRIVILEGEFormat
ORDS.DEFINE_PRIVILEGE( p_privilege_name IN sec_privileges.name%type, p_roles IN owa.vc_arr, p_patterns IN owa.vc_arr, p_modules IN owa.vc_arr, p_label IN sec_privileges.label%type DEFAULT NULL, p_description IN sec_privileges.description%type DEFAULT NULL, p_comments IN sec_privileges.comments%type DEFAULT NULL);orORDS.DEFINE_PRIVILEGE( p_privilege_name IN sec_privileges.name%type, p_roles IN owa.vc_arr, p_patterns IN owa.vc_arr, p_label IN sec_privileges.label%type DEFAULT NULL, p_description IN sec_privileges.description%type DEFAULT NULL, p_comments IN sec_privileges.comments%type DEFAULT NULL);orORDS.DEFINE_PRIVILEGE( p_privilege_name IN sec_privileges.name%type, p_roles IN owa.vc_arr, p_label IN sec_privileges.label%type DEFAULT NULL, p_description IN sec_privileges.description%type DEFAULT NULL, p_comments IN sec_privileges.comments%type DEFAULT NULL);
Description
DEFINE_PRIVILEGE defines an Oracle REST Data Services privilege. If the privilegealready exists, then the privilege and any existing patterns and any associations withmodules and roles will be replaced by this definition; otherwise, a new privilege iscreated.
Parameters
p_privilege_nameName of the privilege. No spaces allowed.
p_rolesThe names of the roles, at least one of which the privilege requires. May be empty, inwhich case the user must be authenticated but does not require any specific role;however, must not be null. Unauthenticated users will be denied access.
p_patternsA list of patterns.
p_modulesA list of module names referencing modules created for the current schema.
Chapter 5ORDS.DEFINE_PRIVILEGE
5-9

p_labelName of this security constraint as displayed to an end user. May be null.
p_descriptionA brief description of the purpose of the resources protected by this constraint.
p_commentsComment text.
Usage Notes
p_roles, p_patterns, and p_modules do not accept null values. If no value is to bepassed, then either choose the appropriate procedure specification or pass an emptyowa.vc_arr value.
Examples
The following example creates a privilege connected to roles, patterns, and modules:
DECLARE l_priv_roles owa.vc_arr; l_priv_patterns owa.vc_arr; l_priv_modules owa.vc_arr;BEGIN l_priv_roles(1) := 'Tickets User'; l_priv_patterns(1) := '/my/*'; l_priv_patterns(2) := '/comments/*'; l_priv_patterns(3) := '/tickets_feed/*'; l_priv_patterns(4) := '/tickets/*'; l_priv_patterns(5) := '/categories/*'; l_priv_patterns(6) := '/stats/*';
l_priv_modules(1) := 'my.tickets';
ords.create_role('Tickets User');
ords.define_privilege( p_privilege_name => 'tickets.privilege', p_roles => l_priv_roles, p_patterns => l_priv_patterns, P_modules => l_priv_modules, p_label => 'Task Ticketing Access', p_description => 'Provides the ability to create, ' || 'update and delete tickets ' || 'and post comments on tickets' );END;/
The following example creates a privilege connected to roles and patterns:
DECLARE l_priv_roles owa.vc_arr; l_priv_patterns owa.vc_arr;BEGIN l_priv_roles(1) := 'Tickets User'; l_priv_patterns(1) := '/my/*'; l_priv_patterns(2) := '/comments/*'; l_priv_patterns(3) := '/tickets_feed/*'; l_priv_patterns(4) := '/tickets/*'; l_priv_patterns(5) := '/categories/*';
Chapter 5ORDS.DEFINE_PRIVILEGE
5-10

l_priv_patterns(6) := '/stats/*';
ords.create_role('Tickets User');
ords.define_privilege( p_privilege_name => 'tickets.privilege', p_roles => l_priv_roles, p_patterns => l_priv_patterns, p_label => 'Task Ticketing Access', p_description => 'Provides the ability to create, ' || 'update and delete tickets ' || 'and post comments on tickets' );END;/
The following example creates a privilege connected to roles:
DECLARE l_priv_roles owa.vc_arr;BEGIN l_priv_roles(1) := 'Tickets User';
ords.create_role('Tickets User');
ords.define_privilege( p_privilege_name => 'tickets.privilege', p_roles => l_priv_roles, p_label => 'Task Ticketing Access', p_description => 'Provides the ability to create, ' || 'update and delete tickets ' || 'and post comments on tickets' );END;/
5.7 ORDS.DEFINE_SERVICEFormat
ORDS.DEFINE_SERVICE( p_module_name IN ords_modules.name%type, p_base_path IN ords_modules.uri_prefix%type, p_pattern IN ords_templates.uri_template%type, p_method IN ords_handlers.method%type DEFAULT 'GET', p_source_type IN ords_handlers.source_type%type DEFAULT ords.source_type_collection_feed, p_source IN ords_handlers.source%type, p_items_per_page IN ords_modules.items_per_page%type DEFAULT 25, p_status IN ords_modules.status%type DEFAULT 'PUBLISHED', p_etag_type IN ords_templates.etag_type%type DEFAULT 'HASH', p_etag_query IN ords_templates.etag_query%type DEFAULT NULL, p_mimes_allowed IN ords_handlers.mimes_allowed%type DEFAULT NULL, p_module_comments IN ords_modules.comments%type DEFAULT NULL, p_template_comments IN ords_modules.comments%type DEFAULT NULL, p_handler_comments IN ords_modules.comments%type DEFAULT NULL);
Chapter 5ORDS.DEFINE_SERVICE
5-11

Description
DEFINE_SERVICE defines a resource module, template, and handler in one call. Ifthe module already exists, then the module and any existing templates will be replacedby this definition; otherwise, a new module is created.
Parameters
p_module_nameName of the RESTful service module. Case sensitive. Must be unique.
p_base_pathThe base of the URI that is used to access this RESTful service. Example: hr/ meansthat all URIs starting with hr/ will be serviced by this resource module.
p_patternA matching pattern for the resource template. For example, a pattern of /objects/:object/:id? will match /objects/emp/101 (matches a request for the item inthe emp resource with id of 101) and will also match /objects/emp/. (Matches a requestfor the emp resource, because the :id parameter is annotated with the ? modifier,which indicates that the id parameter is optional.)
p_methodThe HTTP Method to which this handler will respond. Valid values: GET (retrieves arepresentation of a resource), POST (creates a new resource or adds a resource to acollection), PUT (updates an existing resource), DELETE (deletes an existing resource).
p_source_typeThe HTTP request method for this handler. Valid values:
• source_type_collection_feed. Executes a SQL query and transforms the result setinto an ORDS Standard JSON representation. Available when the HTTP methodis GET. Result Format: JSON
• source_type_collection_item. Executes a SQL query returning one row of datainto a ORDS Standard JSON representation. Available when the HTTP method isGET. Result Format: JSON
• source_type_media. Executes a SQL query conforming to a specific format andturns the result set into a binary representation with an accompanying HTTPContent-Type header identifying the Internet media type of the representation.Result Format: Binary
• source_type_plsql. Executes an anonymous PL/SQL block and transforms anyOUT or IN/OUT parameters into a JSON representation. Available only when theHTTP method is DELETE, PUT, or POST. Result Format: JSON
• source_type_query || source_type_csv_query. Executes a SQL query andtransforms the result set into either an ORDS legacy JavaScript Object Notation(JSON) or CSV representation, depending on the format selected. Available whenthe HTTP method is GET. Result Format: JSON or CSV
• source_type_query_one_row. Executes a SQL query returning one row of data intoan ORDS legacy JSON representation. Available when the HTTP method is GET.Result Format: JSON
Chapter 5ORDS.DEFINE_SERVICE
5-12

• source_type_feed. Executes a SQL query and transforms the results into a JSONFeed representation. Each item in the feed contains a summary of a resource anda hyperlink to a full representation of the resource. The first column in each row inthe result set must be a unique identifier for the row and is used to form ahyperlink of the form: path/to/feed/{id}, with the value of the first column beingused as the value for {id}. The other columns in the row are assumed tosummarize the resource and are included in the feed. A separate resourcetemplate for the full representation of the resource should also be defined. ResultFormat: JSON
p_sourceThe source implementation for the selected HTTP method.
p_items_per_pageThe default pagination for a resource handler HTTP operation GET method, that is,the number of rows to return on each page of a JSON format result set based on adatabase query. Default: NULL (defers to the resource module setting).
p_statusPublication status. Valid values: PUBLISHED (default) or NOT_PUBLISHED.
p_etag_typeA type of entity tag to be used by the resource template. An entity tag is an HTTPHeader that acts as a version identifier for a resource. Use entity tag headers to avoidretrieving previously retrieved resources and to perform optimistic locking whenupdating resources. Valid values are HASH, QUERY, NONE:
• HASH (known as Secure HASH): The contents of the returned resourcerepresentation are hashed using a secure digest function to provide a uniquefingerprint for a given resource version.
• QUERY: Manually define a query that uniquely identifies a resource version. Amanually defined query can often generate an entity tag more efficiently thanhashing the entire resource representation.
• NONE: Do not generate an entity tag.
p_etag_queryQuery that is used to generate the entity tag.
p_mimes_allowedComma-separated list of MIME types that the handler will accept. Applies to PUT andPOST only.
p_module_commentsComment text.
p_template_commentsComment text.
p_handler_commentsComment text.
Usage Notes
Creates a resource module, template, and handler in one call.
Use this procedure instead of the deprecated ORDS.CREATE_SERVICE procedure.
Chapter 5ORDS.DEFINE_SERVICE
5-13
Examples
The following example defines a REST service that retrieves the current user's tickets.
BEGIN ORDS.DEFINE_SERVICE( p_module_name => 'my.tickets', p_base_path => '/my/tickets/', p_pattern => '.', p_source => 'select t.id "$.id", t.id, t.title from tickets t' || ' where t.owner = :current_user order by t.updated_on desc' );END;/
The following example defines a REST service that retrieves tickets filtered bycategory.
BEGIN ORDS.DEFINE_SERVICE( p_module_name => 'by.category', p_base_path => '/by/category/', p_pattern => ':category_id', p_source => 'select ''../../my/tickets/'' || t.id "$.id", t.id, t.title' || ' from tickets t, categories c, ticket_categories tc' || ' where c.id = :category_id and c.id = tc.category_id and' || ' tc.ticket_id = t.id order by t.updated_on desc' );END;/
5.8 ORDS.DEFINE_TEMPLATEFormat
ORDS.DEFINE_TEMPLATE( p_module_name IN ords_modules.name%type, p_pattern IN ords_templates.uri_template%type, p_priority IN ords_templates.priority%type DEFAULT 0, p_etag_type IN ords_templates.etag_type%type DEFAULT 'HASH', p_etag_query IN ords_templates.etag_query%type DEFAULT NULL, p_comments IN ords_templates.comments%type DEFAULT NULL);
Description
DEFINE_TEMPLATE defines a resource template. If the template already exists, thenthe template and any existing handlers will be replaced by this definition; otherwise, anew template is created.
Parameters
p_module_nameName of the owning RESTful service module. Case sensitive.
Chapter 5ORDS.DEFINE_TEMPLATE
5-14

p_patternA matching pattern for the resource template. For example, a pattern of /objects/:object/:id? will match /objects/emp/101 (matches a request for the item inthe emp resource with id of 101) and will also match /objects/emp/. (Matches a requestfor the emp resource, because the :id parameter is annotated with the ? modifier,which indicates that the id parameter is optional.)
p_priorityThe priority for the order of how the resource template should be evaluated: 0 (lowpriority. the default) through 9 (high priority).
p_etag_typeA type of entity tag to be used by the resource template. An entity tag is an HTTPHeader that acts as a version identifier for a resource. Use entity tag headers to avoidretrieving previously retrieved resources and to perform optimistic locking whenupdating resources. Valid values are HASH, QUERY, NONE:
• HASH (known as Secure HASH): The contents of the returned resourcerepresentation are hashed using a secure digest function to provide a uniquefingerprint for a given resource version.
• QUERY: Manually define a query that uniquely identifies a resource version. Amanually defined query can often generate an entity tag more efficiently thanhashing the entire resource representation.
• NONE: Do not generate an entity tag.
p_etag_queryQuery that is used to generate the entity tag.
p_commentsComment text.
Usage Notes
he resource template pattern must be unique with a resource module.
Examples
The following example defines a resource for displaying ticket items.
BEGIN ORDS.DEFINE_TEMPLATE( p_module_name => 'my.tickets', p_pattern => '/:id' );END;/
5.9 ORDS.DELETE_MODULEFormat
ORDS.DELETE_MODULE( p_module_name IN ords_modules.name%type);
Description
DELETE_MODULE deletes a resource module.
Chapter 5ORDS.DELETE_MODULE
5-15

Parameters
p_module_nameName of the owning RESTful service module. Case sensitive.
Usage Notes
If the module does not already exist or is accessible to the current user, then noexception is raised.
Examples
The following example deletes a resource module.
EXECUTE ORDS.DELETE_MODULE(p_module_name=>'my.tickets');
5.10 ORDS.DELETE_PRIVILEGEFormat
ORDS.DELETE_PRIVILEGE( p_name IN sec_privileges.name%type);
Description
DELETE_PRIVILEGE deletes a provilege.
Parameters
p_nameName of the privilege.
Usage Notes
If the privilege does not already exist or is not accessible to the current user, then noexception is raised.
Examples
The following example deletes a privilege.
EXECUTE ORDS.DELETE_PRIVILEGE(p_name=>'tickets.privilege');
5.11 ORDS.DELETE_ROLEFormat
ORDS.DELETE_ROLE( p_role_name IN sec_roles.name%type);
Description
DELETE_ROLE deletes the named role.
Chapter 5ORDS.DELETE_PRIVILEGE
5-16
Parameters
p_nameName of the role.
Usage Notes
This will also delete any association between the role and any privileges that referencethe role.
No exception is produced if the role does not already exist.
Examples
The following example deletes a role.
EXECUTE ORDS.DELETE_ROLE(p_role_name=>'Tickets User');
5.12 ORDS.DROP_REST_FOR_SCHEMAFormat
ORDS.DROP_REST_FOR_SCHEMA( p_schema ords_schemas.parsing_schema%type DEFAULT NULL);
Description
DROP_REST_FOR_SCHEMA deletes all auto-REST Oracle REST Data Servicesmetadata for the associated schema.
Parameters
p_schemaName of the schema.
Usage Notes
This procedure effectively "undoes" the actions performed by the ORDS.Enable_Schemaprocedure.
Examples
The following example deletes all auto-REST Oracle REST Data Services metadatafor the TICKETS schema.
EXECUTE ORDS.DROP_REST_FOR_SCHEMA('tickets');
Related Topics:
• ORDS.ENABLE_SCHEMA (page 5-18)
5.13 ORDS.ENABLE_OBJECTFormat
ORDS.ENABLE_OBJECT( p_enabled IN boolean DEFAULT TRUE,
Chapter 5ORDS.DROP_REST_FOR_SCHEMA
5-17

p_schema IN ords_schemas.parsing_schema%type DEFAULT NULL, p_object IN ords_objects.parsing_object%type, p_object_type IN ords_objects.type%type DEFAULT 'TABLE', p_object_alias IN ords_objects.object_alias%type DEFAULT NULL, p_auto_rest_auth IN boolean DEFAULT NULL);
Description
ENABLE_OBJECT enables Oracle REST Data Services access to a specified table orview in a schema.
Parameters
p_enabledTRUE to enable access; FALSE to disable access.
p_schemaName of the schema for the table or view.
p_objectName of the table or view.
p_object_typeType of the object: TABLE (default) or VIEW.
p_object_aliasAlias of the object.
p_auto_rest_authControls whether Oracle REST Data Services should require user authorizationbefore allowing access to the Oracle REST Data Services metadata for this object.
Usage Notes
Only database users with the DBA role can enable/access to objects that they do nowown.
Examples
The following example enables a table named CATEGORIES.
EXECUTE ORDS.ENABLE_OBJECT(p_object=>'CATEGORIES');
The following example enables a view named TICKETS_FEED.
BEGIN ORDS.ENABLE_OBJECT( p_object => 'TICKETS_FEED', p_object_type => 'VIEW' );END;/
5.14 ORDS.ENABLE_SCHEMAFormat
ORDS.ENABLE_SCHEMA p_enabled IN boolean DEFAULT TRUE,
Chapter 5ORDS.ENABLE_SCHEMA
5-18

p_schema IN ords_schemas.parsing_schema%type DEFAULT NULL, p_url_mapping_type IN ords_url_mappings.type%type DEFAULT 'BASE_PATH', p_url_mapping_pattern IN ords_url_mappings.pattern%type DEFAULT NULL, p_auto_rest_auth IN boolean DEFAULT NULL);
Description
ENABLE_SCHEMA enables Oracle REST Data Services to access the namedschema.
Parameters
p_enabledTRUE to enable Oracle REST Data Services access; FALSE to disable Oracle RESTData Services access.
p_schemaName of the schema. If the p_schema parameter is omitted, then the current schema isenabled.
p_url_mapping_typeURL Mapping type: BASE_PATH or BASE_URL.
p_url_mapping_patternURL mapping pattern.
p_auto_rest_authFor a schema, controls whether Oracle REST Data Services should require userauthorization before allowing access to the Oracle REST Data Services metadatacatalog of this schema.
Usage Notes
Only database users with the DBA role can enable or disable a schema other thantheir own.
Examples
The following example enables the current schema.
EXECUTE ORDS.ENABLE_SCHEMA;
5.15 ORDS.PUBLISH_MODULEFormat
ORDS.PUBLISH_MODULE( p_module_name IN ords_modules.name%type, p_status IN ords_modules.status%type DEFAULT 'PUBLISHED');
Description
PUBLISH_MODULE changes the publication status of an Oracle REST Data Servicesresource module.
Chapter 5ORDS.PUBLISH_MODULE
5-19

Parameters
p_module_nameCurrent name of the RESTful service module. Case sensitive.
p_statusPublication status. Valid values: PUBLISHED (default) or NOT_PUBLISHED.
Usage Notes
(None.)
Examples
The following example publishes a previously defined module named my.tickets.
EXECUTE ORDS.PUBLISH_MODULE(p_module_name=>'my.tickets');
5.16 ORDS.RENAME_MODULEFormat
ORDS.RENAME_MODULE( p_module_name IN ords_modules.name%type, p_new_name IN ords_modules.name%type DEFAULT NULL, p_new_base_path IN ords_modules.uri_prefix%type DEFAULT NULL);
Description
RENAME_MODULE lets you change the name or the base path, or both, of an OracleREST Data Services resource module.
Parameters
p_module_nameCurrent name of the RESTful service module. Case sensitive.
p_new_nameNew name to be assigned to the RESTful service module. Case sensitive. If thisparameter is null, the name is not changed.
p_new_base_pathThe base of the URI to be used to access this RESTful service. Example: hr/ meansthat all URIs starting with hr/ will be serviced by this resource module. If thisparameter is null, the base path is not changed.
Usage Notes
Both the new resource module name and the base path must be unique within theenabled schema.
Examples
The following example renames resource module my.tickets to old.tickets.
BEGIN ORDS.RENAME_MODULE(
Chapter 5ORDS.RENAME_MODULE
5-20
p_module_name =>'my.tickets', p_new_name=>'old.tickets', p_new_base_path=>'/old/tickets/');END;/
5.17 ORDS.RENAME_PRIVILEGEFormat
ORDS.RENAME_PRIVILEGE( p_name IN sec_privileges.name%type, p_new_name IN sec_privileges.name%type);
Description
RENAME_PRIVILEGE renames a privilege.
Parameters
p_nameCurrent name of the privilege.
p_new_nameNew name to be assigned to the privilege.
Usage Notes
(None.)
Examples
The following example renames the privilege tickets.privilege toold.tickets.privilege.
BEGIN ORDS.RENAME_PRIVILEGE( p_name =>'tickets.privilege', p_new_name=>'old.tickets.privilege');END;/
5.18 ORDS.RENAME_ROLEFormat
ORDS.RENAME_ROLE( p_role_name IN sec_roles.name%type, p_new_name IN sec_roles.name%type);
Description
RENAME_ROLE renames a role.
Chapter 5ORDS.RENAME_PRIVILEGE
5-21
Parameters
p_role_nameCurrent name of the role.
p_new_nameNew name to be assigned to the role.
Usage Notes
p_role_name must exist.
Examples
The following example renames an existing role.
BEGIN ORDS.RENAME_ROLE( p_role_name=>'Tickets User', p_new_name=>'Legacy Tickets User');END;/
5.19 ORDS.SET_MODULE_ORIGINS_ALLOWEDFormat
ORDS.SET_MODULE_ORIGINS_ALLOWED p_module_name IN ords_modules.name%type, p_origins_allowed IN sec_origins_allowed_modules.origins_allowed%type);
Description
SET_MODULE_ORIGINS_ALLOWED configures the allowed origins for a resourcemodule. Any existing allowed origins will be replaced.
Parameters
p_module_nameName of the resource module.
p_origins_allowedA comma-separated list of URL prefixes. If the list is empty, any existing origins areremoved.
Usage Notes
To indicate no allowed origins for a resource module (and remove any existing allowedorigins), specify an empty p_origins_allowed value.
Examples
The following restricts the resource module my.tickets to two specified origins.
BEGIN ORDS.SET_MODULE_ORIGINS_ALLOWED( p_module_name => 'my.tickets', p_origins_allowed => 'http://example.com,https://example.com');
Chapter 5ORDS.SET_MODULE_ORIGINS_ALLOWED
5-22
END;/
5.20 ORDS.SET_URL_MAPPINGFormat
ORDS.SET_URL_MAPPING p_schema IN ords_schemas.parsing_schema%type DEFAULT NULL, p_url_mapping_type IN ords_url_mappings.type%type, p_url_mapping_pattern IN ords_url_mappings.pattern%type);
Description
SET_URL_MAPPING configures how the specified schema is mapped to requestURLs.
Parameters
p_schemaName of the schema to map. The default is the schema of the current user.
p_url_mapping_typeURL Mapping type: BASE_PATH or BASE_URL.
p_url_mapping_patternURL mapping pattern.
Usage Notes
Only DBA users can update the mapping of a schema other than their own.
Examples
The following example creates a BASE_PATH mapping for the current user.
BEGIN ORDS.SET_URL_MAPPING( p_url_mapping_type => 'BASE_PATH', p_url_mapping_pattern => 'https://example.com/ords/ticketing' );END;/
Chapter 5ORDS.SET_URL_MAPPING
5-23

Chapter 5
ORDS.SET_URL_MAPPING
5-24

6OAUTH PL/SQL Package Reference
The OAUTH PL/SQL package contains procedures for implementing OAuthauthentication using Oracle REST Data Services.
Related Topics:
• Using the Oracle REST Data Services PL/SQL API (page 3-80)
6.1 OAUTH.CREATE_CLIENTFormat
OAUTH.CREATE_CLIENT( p_name VARCHAR2 IN, p_grant_type VARCHAR2 IN, p_owner VARCHAR2 IN DEFAULT NULL, p_description VARCHAR2 IN DEFAULT NULL, p_allowed_origins VARCHAR2 IN DEFAULT NULL, p_redirect_uri VARCHAR2 IN DEFAULT NULL, p_support_email VARCHAR2 IN DEFAULT NULL, p_support_uri VARCHAR2 IN DEFAULT NULL, p_privilege_names VARCHAR2 IN)
Description
Creates an OAuth client registration.
Parameters
p_nameName for the client, displayed to the end user during the approval phase of three-legged OAuth. Must be unique.
p_grant_typeMust be one of authorization_code, implicit, or client_credentials.
p_ownerName of the party that owns the client application.
p_descriptionDescription of the purpose of the client, displayed to the end user during the approvalphase of three-legged OAuth. May be null if p_grant_type is client_credentials;otherwise, must not be null.
p_allowed_originsA comma-separated list of URL prefixes. If the list is empty, any existing origins areremoved.
6-1
p_redirect_uriClient-controlled URI to which redirect containing an OAuth access token or error willbe sent. May be null if p_grant_type is client_credentials; otherwise, must not be null.
p_support_emailThe email where end users can contact the client for support.
p_support_uriThe URI where end users can contact the client for support. Example: http://www.myclientdomain.com/support/
p_privilege_namesList of comma-separated privileges that the client wants to access.
Usage Notes
To have the operation take effect, use the COMMIT statement after calling thisprocedure.
Examples
The following example creates an OAuth client registration.
BEGIN OAUTH.create_client( 'CLIENT_TEST', 'authorization_code', 'test_user', 'This is a test description.', '', 'https://example.org/my_redirect/#/', '[email protected]', 'https://example.org/help/#/', 'MyPrivilege' ); COMMIT;END;/
6.2 OAUTH.DELETE_CLIENTFormat
OAUTH.DELETE_CLIENT( p_name VARCHAR2 IN);
Description
Deletes an OAuth client registration.
Parameters
p_nameName of the client registration to be deleted.
Chapter 6OAUTH.DELETE_CLIENT
6-2

Usage Notes
To have the operation take effect, use the COMMIT statement after calling thisprocedure.
Examples
The following example deletes an OAuth client registration.
BEGIN OAUTH.delete_client( 'CLIENT_TEST' ); COMMIT;END;/
6.3 OAUTH.GRANT_CLIENT_ROLEFormat
OAUTH.GRANT_CLIENT_ROLE( p_client_name VARCHAR2 IN, p_role_name VARCHAR2 IN);
Description
Grant an OAuth client the specified role, enabling clients performing two-legged OAuthto access privileges requiring the role.
Parameters
p_client_nameName of the OAuth client.
p_role_nameName of the role to be granted.
Usage Notes
To have the operation take effect, use the COMMIT statement after calling thisprocedure.
Examples
The following example creates a role and grants that role to an OAuth client.
BEGIN ORDS.create_role(p_role_name => 'CLIENT_TEST_ROLE');
OAUTH.grant_client_role( 'CLIENT_TEST', 'CLIENT_TEST_ROLE' ); COMMIT;END;/
Chapter 6OAUTH.GRANT_CLIENT_ROLE
6-3
6.4 OAUTH.RENAME_CLIENTFormat
OAUTH.RENAME_CLIENT( p_name VARCHAR2 IN, p_new_name VARCHAR2 IN);
Description
Renames a client.
Parameters
p_nameCurrent name for the client.
p_new_nameNew name for the client.
Usage Notes
The client name is displayed to the end user during the approval phase of three-legged OAuth.
To have the operation take effect, use the COMMIT statement after calling thisprocedure.
Examples
The following example renames a client.
BEGIN OAUTH.rename_client( 'CLIENT_TEST', 'CLIENT_TEST_RENAMED' ); COMMIT;END;/
6.5 OAUTH.REVOKE_CLIENT_ROLEFormat
OAUTH.REVOKE_CLIENT_ROLE( p_client_name VARCHAR2 IN, p_role_name VARCHAR2 IN);
Description
Revokes the specified role from an OAuth client, preventing the client from accessingprivileges requiring the role through two-legged OAuth.
Chapter 6OAUTH.RENAME_CLIENT
6-4

Parameters
p_client_nameName of the OAuth client.
p_role_nameName of the role to be revoked
Usage Notes
To have the operation take effect, use the COMMIT statement after calling thisprocedure.
Examples
The following example revokes a specified role from an OAuth client.
BEGIN OAUTH.revoke_client_role( 'CLIENT_TEST_RENAMED', 'CLIENT_TEST_ROLE' ); COMMIT;END;/
6.6 OAUTH.UPDATE_CLIENTFormat
OAUTH.UPDATE_CLIENT( p_name VARCHAR2 IN, p_description VARCHAR2 IN, p_origins_allowed VARCHAR2 IN, p_redirect_uri VARCHAR2 IN, p_support_email VARCHAR2 IN, p_suppor_uri VARCHAR2 IN, p_privilege_names t_ords_vchar_tab IN);
Description
Updates the client information (except name). Any null values will not alter the existingclient property.
Parameters
p_nameName of the client that requires the owner, description, origins allowed, support e-mail, support URI, and/or privilege modification.
p_descriptionDescription of the purpose of the client, displayed to the end user during the approvalphase of three-legged OAuth.
Chapter 6OAUTH.UPDATE_CLIENT
6-5
p_redirect_uriClient-controlled URI to which a redirect containing the OAuth access token/error willbe sent. If this parameter is null, the existing p_redirect_uri value (if any) is notchanged.
p_support_emailThe email address where end users can contact the client for support.
p_support_uriThe URI where end users can contact the client for support. Example: http://www.myclientdomain.com/support/
p_privilege_namesList of names of the privileges that the client wishes to access.
Usage Notes
To have the operation take effect, use the COMMIT statement after calling thisprocedure.
If you want to rename the client, use the OAUTH.RENAME_CLIENT procedure.
Example to Updates the Description of the Specified Client
The following example updates the description of the client with the name matchingthe value for p_name.
BEGIN ORDS_METADATA.OAUTH.update_client( p_name => 'CLIENT_TEST_RENAMED', p_description => 'The description was altered', p_origins_allowed => null, p_redirect_uri => null, p_support_email => null, p_support_uri => null, p_privilege_names => null); COMMIT;END;/
Example 6-1 Example to Add Multiple Privileges
The following example adds a second privilege:
declare my_privs t_ords_vchar_tab := t_ords_vchar_tab (); begin my_privs.EXTEND (3); my_privs(1):='tst.privilege1'; my_privs(2):='tst.privilege2'; . oauth.update_client( p_name => 'Test_Client', p_owner => 'scott', p_description => 'Description', p_grant_type => 'client_credentials', p_redirect_uri => '/abc/efg/', p_privilege_names => my_privs); commit; end;
Chapter 6OAUTH.UPDATE_CLIENT
6-6

Related Topics:
• OAUTH.RENAME_CLIENT (page 6-4)
Chapter 6OAUTH.UPDATE_CLIENT
6-7

Chapter 6
OAUTH.UPDATE_CLIENT
6-8
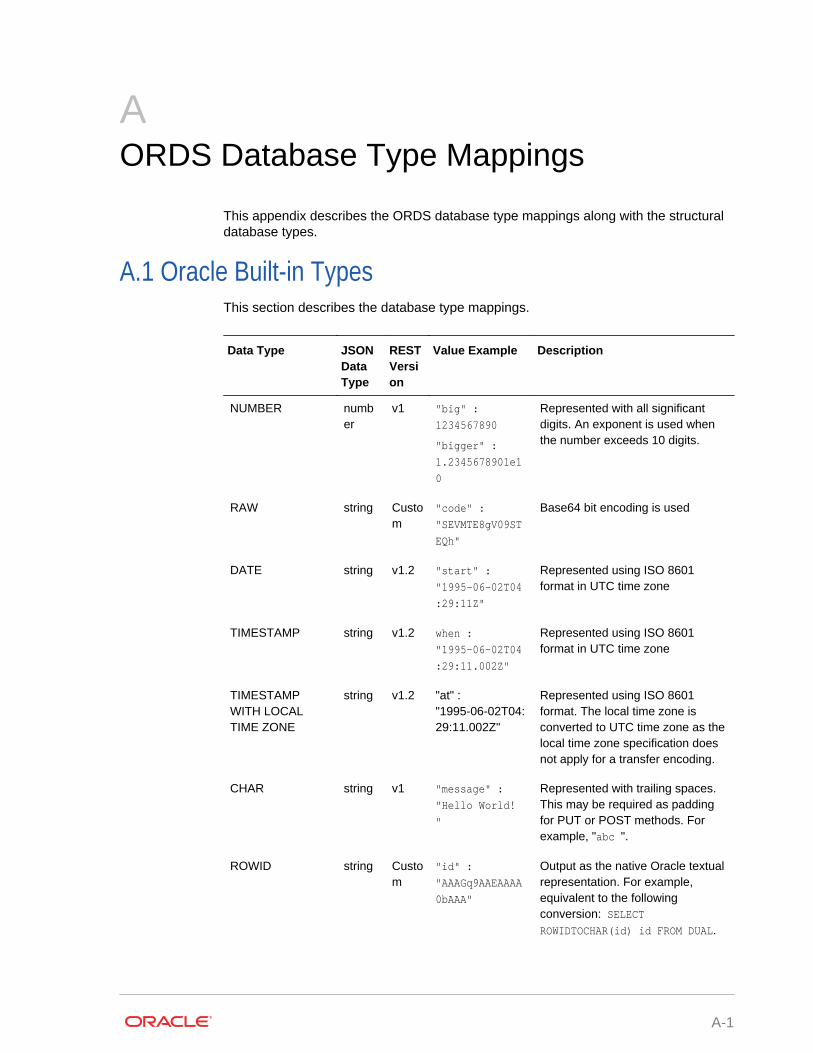
AORDS Database Type Mappings
This appendix describes the ORDS database type mappings along with the structuraldatabase types.
A.1 Oracle Built-in TypesThis section describes the database type mappings.
Data Type JSONDataType
RESTVersion
Value Example Description
NUMBER number
v1 "big" :
1234567890
"bigger" :
1.2345678901e1
0
Represented with all significantdigits. An exponent is used whenthe number exceeds 10 digits.
RAW string Custom
"code" :
"SEVMTE8gV09ST
EQh"
Base64 bit encoding is used
DATE string v1.2 "start" :
"1995-06-02T04
:29:11Z"
Represented using ISO 8601format in UTC time zone
TIMESTAMP string v1.2 when :
"1995-06-02T04
:29:11.002Z"
Represented using ISO 8601format in UTC time zone
TIMESTAMPWITH LOCALTIME ZONE
string v1.2 "at" :"1995-06-02T04:29:11.002Z"
Represented using ISO 8601format. The local time zone isconverted to UTC time zone as thelocal time zone specification doesnot apply for a transfer encoding.
CHAR string v1 "message" :
"Hello World!
"
Represented with trailing spaces.This may be required as paddingfor PUT or POST methods. Forexample, "abc ".
ROWID string Custom
"id" :
"AAAGq9AAEAAAA
0bAAA"
Output as the native Oracle textualrepresentation. For example,equivalent to the followingconversion: SELECTROWIDTOCHAR(id) id FROM DUAL.
A-1
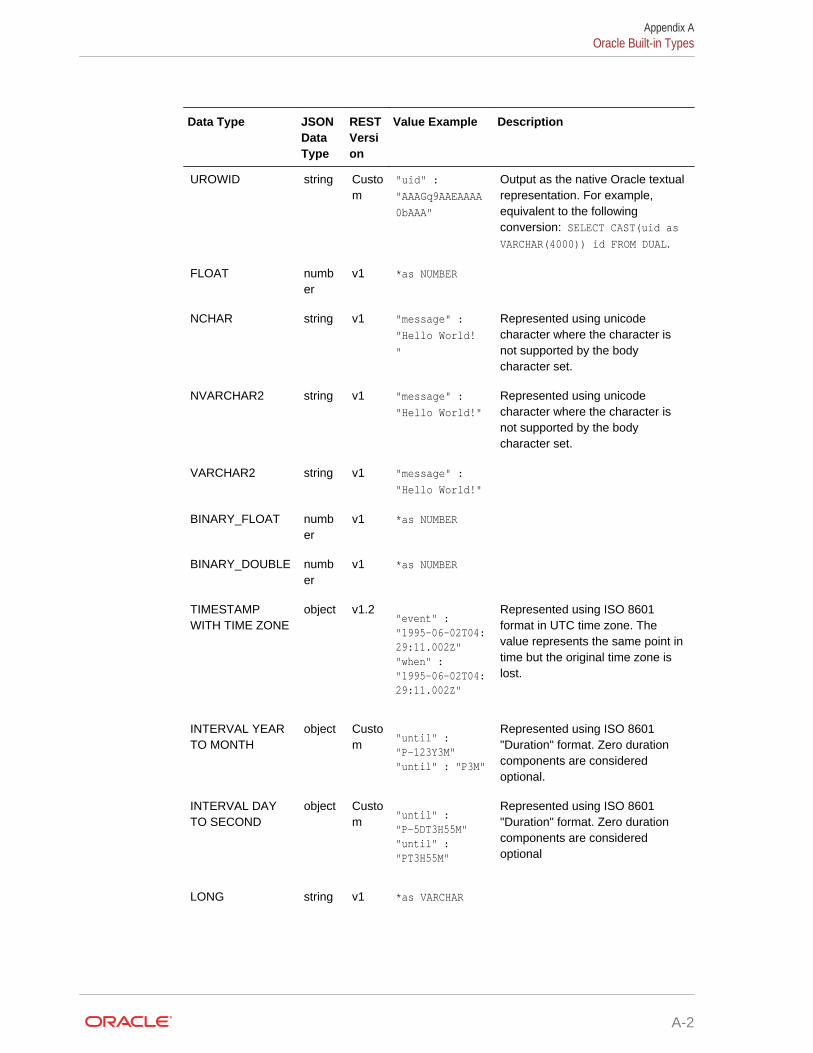
Data Type JSONDataType
RESTVersion
Value Example Description
UROWID string Custom
"uid" :
"AAAGq9AAEAAAA
0bAAA"
Output as the native Oracle textualrepresentation. For example,equivalent to the followingconversion: SELECT CAST(uid asVARCHAR(4000)) id FROM DUAL.
FLOAT number
v1 *as NUMBER
NCHAR string v1 "message" :
"Hello World!
"
Represented using unicodecharacter where the character isnot supported by the bodycharacter set.
NVARCHAR2 string v1 "message" :
"Hello World!"
Represented using unicodecharacter where the character isnot supported by the bodycharacter set.
VARCHAR2 string v1 "message" :
"Hello World!"
BINARY_FLOAT number
v1 *as NUMBER
BINARY_DOUBLE number
v1 *as NUMBER
TIMESTAMPWITH TIME ZONE
object v1.2"event" : "1995-06-02T04:29:11.002Z""when" : "1995-06-02T04:29:11.002Z"
Represented using ISO 8601format in UTC time zone. Thevalue represents the same point intime but the original time zone islost.
INTERVAL YEARTO MONTH
object Custom
"until" : "P-123Y3M""until" : "P3M"
Represented using ISO 8601"Duration" format. Zero durationcomponents are consideredoptional.
INTERVAL DAYTO SECOND
object Custom
"until" : "P-5DT3H55M""until" : "PT3H55M"
Represented using ISO 8601"Duration" format. Zero durationcomponents are consideredoptional
LONG string v1 *as VARCHAR
Appendix AOracle Built-in Types
A-2

Data Type JSONDataType
RESTVersion
Value Example Description
LONG RAW string Custom
"long_code" :
{ "SEVMTE8gV09
STEQh"
BLOB string Custom
"bin" : {"base64_value" : "bGVhc3VyZS4="}
CLOB string Custom
"text" : {"value" : "Hello World!"}
BFILE Object Custom
"file" : {"locator" : "TARGET_DIR","filename" : "myfile"}
BOOLEAN true|false
v1"right" : true"wrong" : false
A.2 Handling Structural Database TypesThis section explains how structural database types are handled.
Object Types
An exception to this is where ORDS has adopted an accepted encoding for anIndustry Standard type such as GeoJSON.
Following is a sample code snippet:
"address" : {
"number" : 42,
"street" : "Wallaby Way",
"city" : "Sydney"
}
Appendix AHandling Structural Database Types
A-3

Inheritance
Object type inheritance is not supported. For marshalling purposes, all object types aretreated as if they are left concrete types.
PL/SQL Records
PL/SQL Records are not supported.
VARRAYS
VARRAYS are mapped directly to the JSON array type.
Following is a sample code snippet:
"addresses" : [
{
"__db_type" : "MY_SCHEMA.AUS_ADDRESS",
"number" : 42,
"street" : "Wallaby Way",
"city" : "Sydney"
},
{
"__db_type" : "MY_SCHEMA.UK_ADDRESS"
"number : 1,
"street" : "Oracle Parkway"
"city" : "Reading"
"postcode" : "RG6 1RA"
}
]
Element Inheritance
If the type of a VARRAY element instance is a sub-type of the defined type, then itbecomes mandatory to add the __db_type named value, as explained in the objecttypes section.
Associative Arrays
Associative arrays (formally known as PL/SQL table or index-by table) fall intofollowing two categories:
• Indexed by an integer value: A sparsely populated indexed array. This type ofarray may not yield a value for a given index. When this type of array is convertedto and from JSON, the index is ignored, removing the indexable value gaps. Thiswill have the side-effect that a sparsely populated indexed array that is passed as
Appendix AHandling Structural Database Types
A-4
an IN/OUT parameter through a PL/SQL procedure without any changes, couldstill appear to have been changed, as the indexable value gaps would have beenremoved.
Following is a sample code snippet:
"avg_values" : [
34,
57,
86,
3235
]
:
• Not indexed by an integer value: For example, VARCHAR. This category israrely used and not supported by the Oracle JDBC API.
A.3 Oracle Geospacial EncodingOracle Geospacial types comprises of more than the predefined Oracle Object types.However, recognized JSON encoding call, GeoJSON is used to encode the instancedata.
Related Topics:
• GeoJSON standard documentation
A.4 Enabling Database Mapping SupportThis section shows how to enable the extended database mapping support.To enable the extended database mapping support, the following code snippet mustbe added to the ORDS defaults.xml file, which is located in the ORDS configurationords directory:
<entry key="misc.datatypes.enable">true</entry>
Appendix AOracle Geospacial Encoding
A-5

Appendix A
Enabling Database Mapping Support
A-6

BAbout the Oracle REST Data ServicesConfiguration Files
The section describes the Oracle REST Data Services configuration files.
Topics:
• Locating Configuration Files (page B-1)
• Setting the Location of the Configuration Files (page B-1)
• Understanding the Configuration Folder Structure (page B-1)
• Understanding the Configuration File Format (page B-2)
• Understanding Configurable Parameters (page B-3)
B.1 Locating Configuration FilesUse the configdir command to display the current location of the configuration files:
java -jar ords.war configdir
If the configuration folder has not yet been configured, the message: The config.dirsetting is not set, is displayed. If it has been configured, the current value of thesetting is displayed.
B.2 Setting the Location of the Configuration FilesTo change the location of the configuration folder use the configdir command:
java -jar ords.war configdir </path/to/config>
Where:
• </path/to/config> is the location where the configuration files are stored.
B.3 Understanding the Configuration Folder StructureThe configuration folder has the following structure:
./ | +-defaults.xml +-apex.properties* +-url-mapping.xml | +conf/ | +-apex.xml +-apex_al.xml
B-1
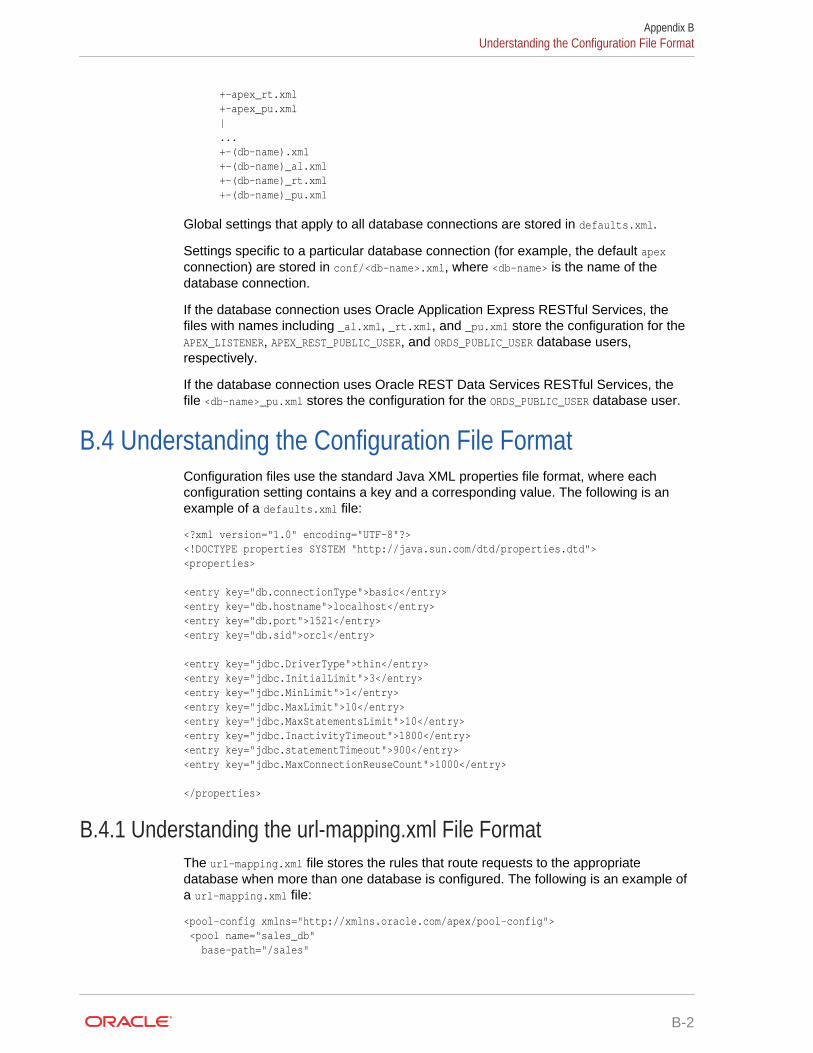
+-apex_rt.xml +-apex_pu.xml | ... +-(db-name).xml +-(db-name)_al.xml +-(db-name)_rt.xml +-(db-name)_pu.xml
Global settings that apply to all database connections are stored in defaults.xml.
Settings specific to a particular database connection (for example, the default apexconnection) are stored in conf/<db-name>.xml, where <db-name> is the name of thedatabase connection.
If the database connection uses Oracle Application Express RESTful Services, thefiles with names including _al.xml, _rt.xml, and _pu.xml store the configuration for theAPEX_LISTENER, APEX_REST_PUBLIC_USER, and ORDS_PUBLIC_USER database users,respectively.
If the database connection uses Oracle REST Data Services RESTful Services, thefile <db-name>_pu.xml stores the configuration for the ORDS_PUBLIC_USER database user.
B.4 Understanding the Configuration File FormatConfiguration files use the standard Java XML properties file format, where eachconfiguration setting contains a key and a corresponding value. The following is anexample of a defaults.xml file:
<?xml version="1.0" encoding="UTF-8"?><!DOCTYPE properties SYSTEM "http://java.sun.com/dtd/properties.dtd"><properties> <entry key="db.connectionType">basic</entry><entry key="db.hostname">localhost</entry><entry key="db.port">1521</entry><entry key="db.sid">orcl</entry> <entry key="jdbc.DriverType">thin</entry><entry key="jdbc.InitialLimit">3</entry><entry key="jdbc.MinLimit">1</entry><entry key="jdbc.MaxLimit">10</entry><entry key="jdbc.MaxStatementsLimit">10</entry><entry key="jdbc.InactivityTimeout">1800</entry><entry key="jdbc.statementTimeout">900</entry><entry key="jdbc.MaxConnectionReuseCount">1000</entry> </properties>
B.4.1 Understanding the url-mapping.xml File FormatThe url-mapping.xml file stores the rules that route requests to the appropriatedatabase when more than one database is configured. The following is an example ofa url-mapping.xml file:
<pool-config xmlns="http://xmlns.oracle.com/apex/pool-config"> <pool name="sales_db" base-path="/sales"
Appendix BUnderstanding the Configuration File Format
B-2

workspace-id="sales_rest"/></pool-config>
B.5 Understanding Configurable ParametersTable B-1 (page B-3) lists editable parameters for the defaults.xml and (db-name).xml configuration files.
Tip:
Oracle recommends users to use the Oracle REST Data Services command-line interface and Oracle SQL Developer Oracle REST Data ServicesAdministration to edit the configuration files.
Table B-1 Oracle REST Data Services Configuration Files Parameters
Key Type Description Example
apex.docTable string Name of the document table used byApplication Express.
Defaults toFLOWS_FILES.WWV_FLOW_FILE_OBJECTS$.
MYDOCTABLE
apex.excel2collection boolean Indicate whether to place your Excelfiles into an Oracle Application Expresscollection.
Supported values:
• true• false (default)If value is true, then eitherapex.excel2collection.onecollection orapex.excel2collection.useSheetName should be set to true.
false
apex.excel2collection.name string The name of the apex collection. Thename is required ifapex.excel2collection.onecollection is true.
mycollection
apex.excel2collection.onecollection
boolean Indicate whether to put all Excelworksheets into a single collection.
Supported values:
• true• false (default)
false
Appendix BUnderstanding Configurable Parameters
B-3

Table B-1 (Cont.) Oracle REST Data Services Configuration Files Parameters
Key Type Description Example
apex.excel2collection.useSheetName
boolean Indicate whether to create a collectionfor each Excel worksheet, and useseach worksheet name for thecorresponding collection name.
Supported values:
• true• false (default)
false
cache.caching boolean Supported values:
• true• false (default)For caching to be enabled, this mustbe set to true and theprocedureNameList must have aprocedure.
true
cache.directory string The directory location for the cachefiles.
C:\data\cachefiles
cache.duration string Supported values:
• days (default)• minutes• hoursRequired for expire cache type.
days
cache.expiration numeric Required for expire cache type.
Defaults to 7.
7
cache.maxEntries numeric Required for lru cache type.
Defaults to 500.
500
cache.monitorInterval numeric Interval time is specified in minutes.
If the cache type is expire, OracleREST Data Services, checks the cacheevery NN minutes for files that haveexpired. For example, if themonitorInterval is 60, then it checksthe cache every 60 minutes.
Defaults to 60.
60
cache.procedureNameList string Specify the procedure names to allowfor caching of their files.
Procedure names can contain thewildcard characters asterisk (*) orquestion mark (?). Use an asterisk (*)to substitute zero or more charactersand a question mark (?) to substitutefor any one character.
Each procedure name must beseparated by a comma.
p, download_file
Appendix BUnderstanding Configurable Parameters
B-4

Table B-1 (Cont.) Oracle REST Data Services Configuration Files Parameters
Key Type Description Example
cache.type string Supported values:
• expire• lru (default)
lru
db.connectionType string The type of connection. Supportedvalues:
• basic• tns• customurl
basic
db.customURL string The JDBC URL connection to connectto the database.
jdbc:oracle:thin:@(DESCRIPTION=(ADDRESS=(PROTOCOL=TCP) (HOST=myhost)(PORT=1521))(CONNECT_DATA=(SERVICE_NAME=ora111.example.com)))
db.hostname string The host system for the Oracledatabase.
myhostname
db.password string The password of the specifieddatabase user. Include an exclamationat the beginning of the password sothat it can be stored encrypted.
!password4user
db.port numeric The database listener port. 1521
db.servicename string The network service name of thedatabase.
ora111.example.com
db.serviceNameSuffix string Indicates that the pool points to a CDB,and that the PDBs connected to thatCDB should be made addressable byOracle REST Data Services (see Making All PDBs Addressable byOracle REST Data Services (PluggableMapping) (page E-3)).
apex_pu
db.sid string The name of the database. ora111
db.tnsAliasName string The TNS alias name that matches thename in the tnsnames.ora file.
MY_TNSALIAS
db.tnsDirectory string The directory location of yourtnsnames.ora file.
C:\ORACLE\NETWORK\ADMIN
db.username string The name of the database user for theconnection.
APEX_PUBLIC_USER
Appendix BUnderstanding Configurable Parameters
B-5
Table B-1 (Cont.) Oracle REST Data Services Configuration Files Parameters
Key Type Description Example
debug.debugger boolean Indicate whether to display debuggingmessages on the application serverconsole.
Supported values:
• true• false (default)
false
debug.printDebugToScreen boolean Indicate whether to display errormessages on the browser.
Supported values:
• true• false (default)
false
error.keepErrorMessages boolean Indicate whether to retain the errormessages.
Supported values:
• true• false (default)
true
error.maxEntries numeric Specify the total number of errormessages to retain.
Defaults to 50.
50
icap.port numeric Specify the Internet Content AdaptationProtocol (ICAP) Port to virus scan files.
The icap.port is required to have avalue.
5555
icap.server string Specify the Internet Content AdaptationProtocol (ICAP) Server name to virusscan files.
The icap.server is required to have avalue.
servername
jdbc.DriverType string The JDBC driver type. Supportedvalues:
• thin• oci8
thin
jdbc.InactivityTimeout numeric Specify how long an availableconnection can remain idle before it isclosed. The inactivity connectiontimeout is in seconds.
Defaults to 1800.
1800
jdbc.InitialLimit numeric Specify the initial size for the number ofconnections that will be created.
Defaults to 3. (The default is low, andshould probably be set higher in mostproduction environments.)
10
Appendix BUnderstanding Configurable Parameters
B-6

Table B-1 (Cont.) Oracle REST Data Services Configuration Files Parameters
Key Type Description Example
jdbc.MaxConnectionReuseCount numeric Specify the maximum number of timesto reuse a connection before it isdiscarded and replaced with a newconnection.
Defaults to 1000.
1000
jdbc.MaxLimit numeric Specify the maximum number ofconnections.
Defaults to 10. (Might be too low forsome production environments.)
20
jdbc.maxRows numeric Specify the maximum number of rowsthat will be returned from a query whenprocessing a RESTful service and thatwill be returned from a nested cursor ina result set. Affects all RESTfulservices generated through a SQLquery, regardless of whether theresource is paginated.
Defaults to 500.
300
jdbc.MaxStatementsLimit numeric Specify the maximum number ofstatements to cache for eachconnection.
Defaults to 10.
10
jdbc.MinLimit numeric Specify the minimum number ofconnections.
Defaults to 1.
1
jdbc.statementTimeout numeric Specify how long a borrowed (in use)connection can remain unused beforeit is considered as abandoned andreclaimed. The abandoned connectiontimeout is in seconds.
Defaults to 900.
900
log.logging boolean Indicate whether to retain the logmessages.
Supported values:
• true• false (default)
true
log.maxEntries numeric Specify the total number of logmessages to retain.
Defaults to 50.
50
log.procedure boolean Indicate whether procedures are to belogged.
Supported values:
• true• false (default)
false
Appendix BUnderstanding Configurable Parameters
B-7

Table B-1 (Cont.) Oracle REST Data Services Configuration Files Parameters
Key Type Description Example
misc.defaultPage string The default page to display. TheOracle REST Data Services homepage, apex, is commonly used.
apex
procedure.postProcess string Specify the procedure name(s) toexecute after executing the procedurespecified on the URL. Multipleprocedure names must be separatedby commas.
SCHEMA1.SUBMIT.REQUEST,FINISHTASK
procedure.preProcess string Specify the procedure name(s) toexecute prior to executing theprocedure specified on the URL.Multiple procedure names must beseparated by commas.
SCOTT.PREPROC1,INITIALIZE,PKG1.PROC
security.disableDefaultExclusionList
boolean Supported values:
• true• false (default)
false
security.exclusionList string Specify a pattern for procedures,packages, or schema names which areforbidden to be directly executed froma browser.
Procedure names can contain thewildcard characters asterisk (*) orquestion mark (?). Use an asterisk (*)to substitute zero or more charactersand a question mark (?) to substitutefor any one character.
Note: Separate multiple patterns usingcommas.
customer_account,bank*, employe?
security.inclusionList string Specify a pattern for procedures,packages, or schema names which areallowed to be directly executed from abrowser.
Procedure names can contain thewildcard characters asterisk (*) orquestion mark (?). Use an asterisk (*)to substitute zero or more charactersand a question mark (?) to substitutefor any one character.
Note: Separate multiple patterns usingcommas.
apex, p, v, f,wwv_*, y*, c*
security.maxEntries numeric Specify the maximum cache size.
Defaults to 2000.
2000
Appendix BUnderstanding Configurable Parameters
B-8
Table B-1 (Cont.) Oracle REST Data Services Configuration Files Parameters
Key Type Description Example
security.requestValidationFunction
string Specify a validation function todetermine if the requested procedure inthe URL should be allowed ordisallowed for processing. The functionshould return true if the procedure isallowed; otherwise, return false.
CHECK_VALID_PROCEDURE
security.verifySSL boolean Indicate whether HTTPS is available inyour environment.
Supported values:
• true (default)• falseIf you change the value to false, see Using OAuth2 in Non-HTTPSEnvironments (page 1-11).
true
soda.defaultLimit string When using the SODA REST API,specifies the default number ofdocuments returned for a GET requeston a collection when a limit is notspecified in the URL. Must be apositive integer, or "unlimited" for nolimit.
Defaults to 100.
75
soda.maxLimit string When using the SODA REST API,specifies the maximum number ofdocuments that will be returned for aGET request on a collection URL,regardless of any limit specified in theURL. Must be a positive integer, or"unlimited" for no limit.
Defaults to 1000.
700
See Also:
For more information, see Configuring and Installing Oracle REST DataServices (page 1-3) and "Oracle REST Data Services Administration" in Oracle SQL Developer User's Guide.
Appendix BUnderstanding Configurable Parameters
B-9

Appendix B
Understanding Configurable Parameters
B-10

CTroubleshooting Oracle REST DataServices
This appendix contains information on troubleshooting Oracle REST Data Services.
Topics:
• Enabling Debug Tracing (page C-1)
• Enabling Detailed Request Error Messages (page C-1)
• Configuring Application Express Static Resources with Oracle REST DataServices (page C-1)
C.1 Enabling Debug TracingTo enable debug tracing, add the following setting to the Oracle REST Data Servicesconfiguration file named: defaults.xml:
<entry key="debug.debugger">true</entry>
When this setting is present in defaults.xml, detailed logging information that may helpwith problem diagnosis is appended to the Oracle REST Data Services log output.This setting should not be enabled on production systems due to the performanceimpact of outputting large amounts of data to the log.
C.2 Enabling Detailed Request Error MessagesTo enable detailed request error messages, add the following setting to the OracleREST Data Services configuration file named: defaults.xml:
<entry key="debug.printDebugToScreen">true</entry>
When this setting is present in defaults.xml, any request that produces an errorresponse includes a detailed message, including a stack trace. This setting must notbe enabled on productions systems due to the risk of sensitive information beingrevealed to an attacker.
C.3 Configuring Application Express Static Resources withOracle REST Data Services
When using Oracle REST Data Services, a blank page might be displayed whenattempting to access an Oracle Application Express page, for example, whenattempting to display https://example/ords/. This problem is caused by an improperconfiguration of Application Express static resources, which causes the JavaScript andCSS resources required by Application Express not to be found and the ApplicationExpress page not to render correctly.
C-1

The specific cause can be any of the following:
• Forgetting to ensure that the Application Express static images are located on thesame server as the Oracle REST Data Services instance
• Forgetting to deploy i.war on WebLogic Server or GlassFish
• Specifying an incorrect path when using the java -jar ords.war static commandto generate i.war
• Configuring Application Express to use a nondefault context path for staticresources (/i) and not specifying the same context path (using the --context-pathoption) when using java -jar ords.war static
• Moving, renaming, or deleting the folder pointed to by i.war after deploying i.war
• When running in Standalone mode, entering an incorrect path (or not specifying apath) when prompted on the first run of Standalone mode
• When running in Standalone mode, entering an incorrect path with the --static-images option
• Upgrading to a new version of Application Express and forgetting to reconfigureand redeploy i.war to point to the static resources for the new Application Expressversion, or in Standalone mode forgetting to update the location by using the --apex-images option
To help in diagnosing the problem, you can try to access the apex_version.txt file. Forexample, if your Application Express deployment is located at https://example.com/ords/ and your static resources have been deployed at https://example.com/i/, use abrowser to access the following URL:
https://example.com/i/apex_version.txt
If you get a 404 Not Found error, then check the preceding list of possible specificcauses, including i.war not being deployed or not pointing to a folder containingApplication Express static resources.
If a plain text file is displayed, it should contain text like the following:
Application Express Version: 4.2.1
Check that the version number matches the version of Application Express that isdeployed on the database. If the numbers do not match, check if you have made anerror mentioned in the last item in the preceding list of possible specific causes,because Oracle REST Data Services is not configured to use the correct version of theApplication Express static resources to match the Application Express version in thedatabase.
If you need help in solving the problem, check the information in this book aboutcreating and deploying i.war for your environment, such as WebLogic Server orGlassfish.
You can also get detailed help on the static listener command by entering the followingat a command prompt:
java -jar ords.war help static
Appendix CConfiguring Application Express Static Resources with Oracle REST Data Services
C-2
DDevelopment Tutorial: Creating an ImageGallery
This appendix explains an extended example that builds an image gallery service forstoring and retrieving images. This tutorial uses Oracle Application Express.
Topics:
• Before You Begin (page D-1)
• Creating the Gallery Database Table (page D-2)
• Creating the Gallery RESTful Service Module (page D-3)
• Trying Out the Gallery RESTful Service (page D-4)
• Creating the Gallery Application (page D-5)
• Trying Out the Gallery Application (page D-8)
• Securing the Gallery RESTful Services (page D-8)
• Accessing the RESTful Services from a Third Party Application (page D-11)
See Also:
To do this tutorial, you must be familiar with the concepts and techniquescovered in Developing Oracle REST Data Services Applications (page 3-1).
D.1 Before You BeginThis section describes some common conventions used in this example as well asbest practices regarding API entry points.
Topics:
• About URIs (page D-1)
• About Browser Support (page D-2)
• Creating an Application Express Workspace (page D-2)
D.1.1 About URIsThroughout this example, URIs and URI Templates are referenced using anabbreviated form that omits the host name, context root and workspace path prefix.Consider the following example:
gallery/images/
D-1
To access this URI in your Web browser, you would use a URI in the following format:
https://<host>:<port>/ords/<workspace>/gallery/images/
where
• <host> is the host on which Oracle REST Data Services is running.
• <port> is the port on which Oracle REST Data Services is listening.
• /ords is the context root where Oracle REST Data Services is deployed.
• /<workspace>/ is the workspace path prefix of the Oracle Application Expressworkspace where the RESTful Service is defined.
D.1.2 About Browser SupportThis example uses many modern features defined in HTML5 and relatedspecifications. It has only been tested in Mozilla Firefox and Google Chrome. It has notbeen tested in Microsoft Internet Explorer or on smart-phone/tablet web browsers.Please use recent versions of either Mozilla Firefox or Google Chrome for thisexample.
D.1.3 Creating an Application Express WorkspaceTo follow the instructions for creation the Gallery example application and relatedobjects, first, create a new Oracle Application Express Workspace (in FullDevelopment mode). See the Oracle Application Express Documentation for details onhow to do this.
Call the workspace resteasy and call the administrator user of the workspaceresteasy_admin. Ensure the resteasy_admin user is a a member of the RESTful Servicesuser group.
D.2 Creating the Gallery Database TableTo create the Gallery database table, follow these steps:
1. Log into the resteasy workspace.
2. Navigate to SQL Workshop and then SQL Commands.
3. Enter or copy and paste in the following SQL:
CREATE SEQUENCE GALLERY_SEQ/CREATE TABLE GALLERY ( ID NUMBER NOT NULL ENABLE, TITLE VARCHAR2(1000) NOT NULL ENABLE, CONTENT_TYPE VARCHAR2(1000) NOT NULL ENABLE, IMAGE BLOB NOT NULL ENABLE, CONSTRAINT GALLERY_PK PRIMARY KEY (ID) ENABLE)/CREATE OR REPLACE TRIGGER BI_GALLERY before insert on GALLERY for each row begin if :NEW.ID is null then select GALLERY_SEQ.nextval into :NEW.ID from sys.dual;
Appendix DCreating the Gallery Database Table
D-2
end if; end; / ALTER TRIGGER BI_GALLERY ENABLE /
D.3 Creating the Gallery RESTful Service ModuleTo create the Gallery RESTful services module, follow these steps:
1. Navigate to SQL Workshop and then RESTful Services.
2. Click Create on the right side, and enter the following information:
• Name: gallery.example
• URI Prefix: gallery/
• URI Template: images/
• Method: POST
• Source: Enter or copy and paste in the following:
declare image_id integer;begin insert into gallery (title,content_type,image) values (:title,:content_type,:body) returning id into image_id; :status := 201; :location := image_id;end;
3. Click Create Module.
4. Click the POST handler under images/
5. For Requires Secure Access, select No.
6. Click Create Parameter, and enter the following:
• Name: Slug
• Bind Variable Name: title
7. Click Create.
8. Click Create Parameter on the bottom right, and enter the following information:
• Name: X-APEX-FORWARD
• Bind Variable Name: location
• Access Method: OUT
9. Click Create.
10. Click Create Parameter on the bottom right, and enter the following information:
• Name: X-APEX-STATUS-CODE
• Bind Variable Name: status
• Access Method: OUT
• Parameter Type: Integer
Appendix DCreating the Gallery RESTful Service Module
D-3
11. Click Create.
At this point you have created the module with a single service that can store newimages. Next, add a service to display the list of stored images:
1. Navigate to SQL Workshop and then RESTful Services.
2. Click the module named gallery.example.
3. Click Create Handler under images/, and enter the following information:
• Method: GET
• Source Type: Feed
• Requires Secure Access: No
• Source: Enter or copy and paste in the following:
select id,title,content_type from gallery order by id desc
4. Click Create.
At this point you have created the service to store and list images. Next, add a serviceto display individual images:
1. Navigate to SQL Workshop and then RESTful Services.
2. Click the module named gallery.example.
3. Click Create Template under gallery.example, and enter the following information:
• URI Template: images/{id}
4. Click Create.
5. Click Create Handler under images/{id}, and enter the following information:
• Method: GET
• Source Type: Media Resource
• Requires Secure Access: No
• Source: Enter or copy and paste in the following:
select content_type, image from gallery where id = :id
6. Click Create.
D.4 Trying Out the Gallery RESTful ServiceTo try out the Gallery RESTful Service, follow these steps:
1. Navigate to SQL Workshop and then RESTful Services.
2. Click the module named gallery.example.
3. Click the GET handler located under images/.
4. Click Test.
The following URI should be displayed in the browser:
https://<host>:<port>/ords/resteasy/gallery/images/
Content similar to the following should be displayed:
Appendix DTrying Out the Gallery RESTful Service
D-4

{"next": {"$ref": "http://localhost:8080/ords/resteasy/gallery/images/?page=1" }, "items":[]}
• The content is a JSON document that lists the location of each image in thegallery, but since you have not yet added any images, the list (the items[]element) is empty.
• The JSON has no extra white space to minimize its size, this can make itdifficult to decipher, it is recommended to add a JSON viewing plugin to yourbrowser to make viewing the JSON easier.
To create an Oracle Application Express application to enable users to add and viewimages in the gallery, see Creating the Gallery Application (page D-5).
D.5 Creating the Gallery ApplicationTo create an Oracle Application Express application that uses the gallery RESTfulServices, follow these steps:
1. Navigate to Application Builder.
2. Click Create.
3. Choose Database, then click Next.
4. Enter Image Gallery in the Name field, then click Next.
5. Click Create Application, and then Create Application again to confirm creationof the application.
6. Click page 1, Home.
7. Under Regions click the + (plus sign) icon to create a new region.
8. For Region Type, choose HTML and click Next, then click Next on the next page.
9. For Region Template, choose No Template.
10. For Title, enter Tasks, and click Next.
11. For Enter HTML Text Region Source, specify:
<a class="button" id="upload-btn">Upload Image</a>
12. Click Create Region.
13. Under Regions, click the + (plus sign) icon to create a new region.
14. For Region Type, choose HTML, and click Next, then Next again.
15. For Region Template, choose DIV Region with ID.
16. For Title, enter Images.
17. Click Create Region.
18. Click the Images region and click the Attributes tab.
19. For Static ID, enter images, and click Apply Changes.
20. Under Page, click the Edit icon, then click the JavaScript tab.
Appendix DCreating the Gallery Application
D-5
21. For Function and Global Variable Declaration, enter or copy and paste in thefollowing:
var workspace_path_prefix = 'resteasy'; var gallery_url = './' + workspace_path_prefix + '/gallery/images/'; function uploadFiles(url, fileOrBlob, onload) { var name = 'unspecified'; if ( fileOrBlob['name'] ) { name = fileOrBlob.name; } var xhr = new XMLHttpRequest(); xhr.open('POST', url, true); xhr.setRequestHeader('Slug',name); xhr.onload = onload; xhr.send(fileOrBlob); }
function createUploader() { var $upload = $('<div id="uploader" title="Image Upload"\ style="display:none">\ <form>\ <fieldset>\ <label for="file">File</label>\ <input type="file" name="file" id="file"\ class="text ui-widget-content ui-corner-all"/>\ </fieldset>\ </form>\ </div>'); $(document.body).append($upload); $upload.dialog({ autoOpen:false, modal: true, buttons: { "Upload": function() { var file = document.querySelector('input[type="file"]'); uploadFiles(gallery_url,file.files[0],function() { $('#uploader').dialog("close"); getImages(); }); }, "Cancel": function() { $('#uploader').dialog("close"); } } }); $('#upload-btn').click(function() { $('#uploader').dialog("open"); }); }
function getImages() { var xhr = new XMLHttpRequest(); xhr.open('GET', gallery_url); xhr.onload = function(e) { var data = JSON.parse(this.response); $('#image-list').remove(); var $images = $('<ol id="image-list"></ol>'); for ( i in data.items ) { var item = data.items[i]; var uri = item.uri['$ref']; var $image = $('<li></li>')
Appendix DCreating the Gallery Application
D-6
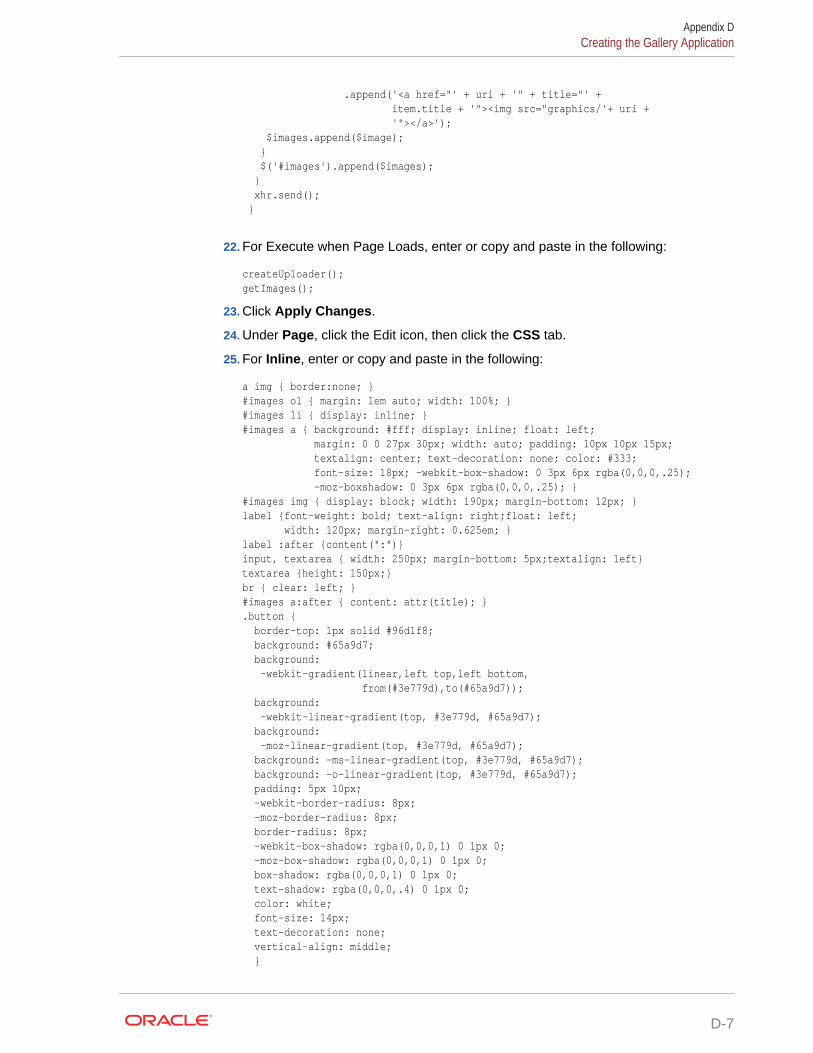
.append('<a href="' + uri + '" + title="' + item.title + '"><img src="graphics/'+ uri + '"></a>'); $images.append($image); } $('#images').append($images); } xhr.send(); }
22. For Execute when Page Loads, enter or copy and paste in the following:
createUploader();getImages();
23. Click Apply Changes.
24. Under Page, click the Edit icon, then click the CSS tab.
25. For Inline, enter or copy and paste in the following:
a img { border:none; } #images ol { margin: 1em auto; width: 100%; } #images li { display: inline; } #images a { background: #fff; display: inline; float: left; margin: 0 0 27px 30px; width: auto; padding: 10px 10px 15px; textalign: center; text-decoration: none; color: #333; font-size: 18px; -webkit-box-shadow: 0 3px 6px rgba(0,0,0,.25); -moz-boxshadow: 0 3px 6px rgba(0,0,0,.25); }#images img { display: block; width: 190px; margin-bottom: 12px; } label {font-weight: bold; text-align: right;float: left; width: 120px; margin-right: 0.625em; }label :after {content(":")} input, textarea { width: 250px; margin-bottom: 5px;textalign: left}textarea {height: 150px;}br { clear: left; }#images a:after { content: attr(title); }.button { border-top: 1px solid #96d1f8; background: #65a9d7; background: -webkit-gradient(linear,left top,left bottom, from(#3e779d),to(#65a9d7)); background: -webkit-linear-gradient(top, #3e779d, #65a9d7); background: -moz-linear-gradient(top, #3e779d, #65a9d7); background: -ms-linear-gradient(top, #3e779d, #65a9d7); background: -o-linear-gradient(top, #3e779d, #65a9d7); padding: 5px 10px; -webkit-border-radius: 8px; -moz-border-radius: 8px; border-radius: 8px; -webkit-box-shadow: rgba(0,0,0,1) 0 1px 0; -moz-box-shadow: rgba(0,0,0,1) 0 1px 0; box-shadow: rgba(0,0,0,1) 0 1px 0; text-shadow: rgba(0,0,0,.4) 0 1px 0; color: white; font-size: 14px; text-decoration: none; vertical-align: middle; }
Appendix DCreating the Gallery Application
D-7

.button:hover { border-top-color: #28597a; background: #28597a; color: #ccc; cursor: pointer; }
.button:active { border-top-color: #1b435e; background: #1b435e; }
26. Click Apply Changes.
D.6 Trying Out the Gallery ApplicationTo try out the Gallery application, follow these steps:
1. Navigate to Application Builder.
2. Click Run beside the Image Gallery application.
3. Log in as the resteasy_admin user.
4. Click Upload Image.
5. Choose an image file (a JPEG or PNG file) and click Upload.
The application displays the uploaded image.
D.7 Securing the Gallery RESTful ServicesIt is not wise to allow public access to the image uploading service, and it is probablynot ideal to allow public access to the images in the gallery either. Therefore, youshould protect access to the RESTful services.
RESTful Services support two kinds of authentication:
• First Party Authentication. This is authentication intended to be used by the partywho created the RESTful service, enabling an Application Express application toeasily consume a protected RESTful service. The application must be located withthe RESTful service, that is, it must be located in the same Oracle ApplicationExpress workspace. The application must use the standard Oracle ApplicationExpress authentication.
• Third Party Authentication. This is authentication intended to be used by third partyapplications not related to the party who created the RESTful service. Third partyauthentication relies on the OAuth 2.0 protocol.
Topics:
• Protecting the RESTful Services (page D-8)
• Modifying the Application to Use First Party Authentication (page D-9)
D.7.1 Protecting the RESTful ServicesTo protect the RESTful services, follow these steps:
Appendix DTrying Out the Gallery Application
D-8

1. Navigate to SQL Workshop and then RESTful Services.
2. Click RESTful Service Privileges in the section labeled Tasks.
3. Click Create, and enter the following:
• Name: example.gallery
• Label: Gallery Access
• Assigned Groups: RESTful Services
• Description: View and Post images in the Gallery
• Protected Modules: gallery.example
4. Click Create.
To check that access to the RESTful Service is now restricted, follow these steps:
1. Navigate to SQL Workshop and then RESTful Services.
2. Click the module named gallery.example.
3. Click the GET handler located under images/.
4. Click Test.
The URI in the following format should be displayed in the browser:
https://<host>:<port>/ords/resteasy/gallery/images
An error page should be displayed with the error message:
401 Unauthorized.
See Also:
This is the expected result, because a protected RESTful Service cannot beaccessed unless proper credentials are provided. To add the requiredcredentials to the request, see Modifying the Application to Use First PartyAuthentication (page D-9)
D.7.2 Modifying the Application to Use First Party AuthenticationFirst Party Authentication relies on the cookie and user session established by theApplication Express application, but Oracle REST Data Services needs additionalinformation to enable it to verify the cookie. It needs to know the application ID and thecurrent session ID. This information is always known to the Application Expressapplication, and must be included with the request made to the RESTful service byadding the custom Apex-Session HTTP header to each request sent to a RESTfulService. The application ID and session ID are sent as the value of the header,separated from each other by a comma delimiter. For example:
GET /ords/resteasy/gallery/images/Host: server.example.comApex-Session: 102,6028968452563
Sometimes it is not possible to include a custom header in the HTTP request. Forexample, when displaying an image in an HTML page using the <img> tag, an
Appendix DSecuring the Gallery RESTful Services
D-9
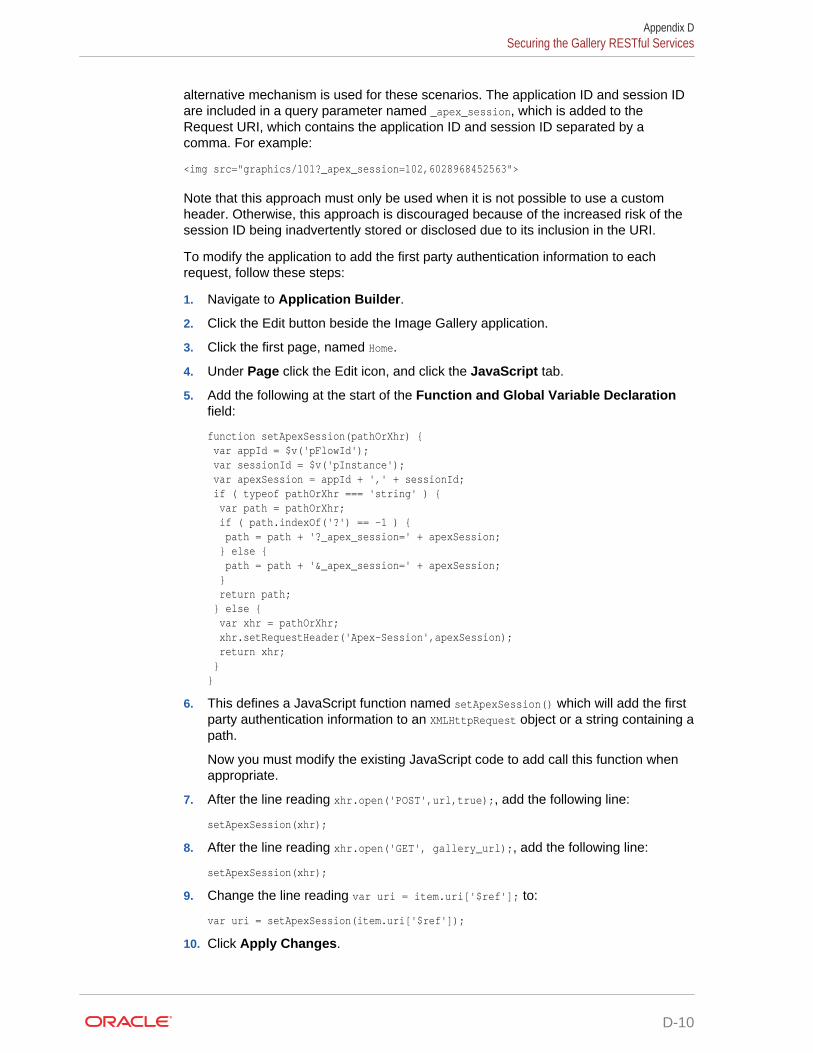
alternative mechanism is used for these scenarios. The application ID and session IDare included in a query parameter named _apex_session, which is added to theRequest URI, which contains the application ID and session ID separated by acomma. For example:
<img src="graphics/101?_apex_session=102,6028968452563">
Note that this approach must only be used when it is not possible to use a customheader. Otherwise, this approach is discouraged because of the increased risk of thesession ID being inadvertently stored or disclosed due to its inclusion in the URI.
To modify the application to add the first party authentication information to eachrequest, follow these steps:
1. Navigate to Application Builder.
2. Click the Edit button beside the Image Gallery application.
3. Click the first page, named Home.
4. Under Page click the Edit icon, and click the JavaScript tab.
5. Add the following at the start of the Function and Global Variable Declarationfield:
function setApexSession(pathOrXhr) { var appId = $v('pFlowId'); var sessionId = $v('pInstance'); var apexSession = appId + ',' + sessionId; if ( typeof pathOrXhr === 'string' ) { var path = pathOrXhr; if ( path.indexOf('?') == -1 ) { path = path + '?_apex_session=' + apexSession; } else { path = path + '&_apex_session=' + apexSession; } return path; } else { var xhr = pathOrXhr; xhr.setRequestHeader('Apex-Session',apexSession); return xhr; }}
6. This defines a JavaScript function named setApexSession() which will add the firstparty authentication information to an XMLHttpRequest object or a string containing apath.
Now you must modify the existing JavaScript code to add call this function whenappropriate.
7. After the line reading xhr.open('POST',url,true);, add the following line:
setApexSession(xhr);
8. After the line reading xhr.open('GET', gallery_url);, add the following line:
setApexSession(xhr);
9. Change the line reading var uri = item.uri['$ref']; to:
var uri = setApexSession(item.uri['$ref']);
10. Click Apply Changes.
Appendix DSecuring the Gallery RESTful Services
D-10
11. Try running the application as before. It should work, because it is now providingthe RESTful Services with the required authentication information.
D.8 Accessing the RESTful Services from a Third PartyApplication
If third parties want to consume and use the Gallery RESTful services, they mustregister the third party application in order to gain OAuth 2.0 credentials, which canthen be used to initiate an interactive process by which users can authorize the thirdparty application to access the RESTful Services on their behalf.
Once an application is registered, it can then acquire an access token. The accesstoken must be provided with each request to a protected RESTful Service. OracleREST Data Services verifies the access token before allowing access to the RESTfulservice.
OAuth 2.0 defines a number of different protocol flows that can be used byapplications to acquire an access token. Oracle REST Data Services supports two ofthese protocol flows:
• Authorization Code. This flow is used when the third party application is able tokeep its client credentials secure, for example, a third party website that is properlysecured.
• Implicit Grant. This flow is used when the third party application cannot assurethat its credentials would remain secret, for example, a JavaScript-based browserapplication or a native smartphone application.
The first step is to register the third party application. To demonstrate this, you willcreate a user representing the third party developer, and then use that user to registeran application.
The steps in the related topics create a user in the RESTEASY workspace user repositoryand perform related actions.
Note:
In addition to authenticating users defined in workspace user repositories,Oracle REST Data Services can also authenticate against any user repositoryaccessible from WebLogic Server or GlassFish. For information, see Authenticating Against WebLogic Server and GlassFish User Repositories(page 3-75).
Topics:
• Creating the Third Party Developer User (page D-12)
• Registering the Third Party Application (page D-12)
• Acquiring an Access Token (page D-12)
• Using an Access Token (page D-14)
• About Browser Origins (page D-15)
• Configuring a RESTful Service for Cross Origin Resource Sharing (page D-15)
Appendix DAccessing the RESTful Services from a Third Party Application
D-11

• Acquiring a Token Using the Authorization Code Protocol Flow (page D-15)
• About Securing the Access Token (page D-19)
D.8.1 Creating the Third Party Developer UserTo create the third party developer user (the user account for the third party developerwho wants to register an application to access the RESTful services), follow thesesteps:
1. Navigate to Administration.
2. Click Manage Users and Groups.
3. Click Create User, and enter the following information:
• Username: 3rdparty_dev
• Email Address: Email address for this developer user
• Password: Password for this user
• User Groups: OAuth 2.0 Client Developer
4. Click Create User.
D.8.2 Registering the Third Party ApplicationTo register the third party application to use the Implicit Grant OAuth 2.0 protocolflow, follow these steps:
1. Go to the following URI in your browser:
https://server:port/ords/resteasy/ui/oauth2/clients/
2. Enter the credentials of the 3rdparty_dev user created above, and click Sign In.
3. Click Register Client, and enter the following information:
• Name: 3rd Party Gallery
• Description: Demonstrates consuming the Gallery RESTful Service
• Response Type: Token
• Redirect URI: https://server:port/i/oauthdemo/gallery.html
• Support Email: Desired email address
• Required Scopes: Gallery Access
4. Click Register.
5. Click 3rd Party Gallery in the list that appears on the next page.
6. Note the values of the Client Identifier and the Authorization URI fields.
D.8.3 Acquiring an Access TokenTo acquire an access token, a user must be prompted to approve access. To initiatethe approval process, direct the user to the approval page using the following URI:
Appendix DAccessing the RESTful Services from a Third Party Application
D-12

https://server:port/ords/resteasy/oauth2/auth?response_type=token&\ client_id=CLIENT_IDENTIFIER&\ state=STATE
where:
• CLIENT_IDENTIFIER is the Client Identifier assigned to the application when it wasregistered.
• STATE is a unique value generated by the application used to prevent Cross SiteRequest Forgery (CSRF) attacks.
Note the following about the Oracle REST Data Services OAuth 2.0 implementation:
• The OAuth 2.0 specification allows two optional parameters to be supplied in theabove request:
– redirect_uri: Identifies the location where the authorization server will redirectback to after the user has approved/denied access.
– scope: Identifies the RESTful Service Privileges that the client wishes toaccess.
Oracle REST Data Services does not support either of these parameters: both ofthese values are specified when the client is registered, so it would be redundantto repeat them here. Any values supplied for these parameters will be ignored.
• The OAuth 2.0 specification recommends the use of the state parameter, butOracle REST Data Services requires the use of the parameter because of itsimportance in helping to prevent CSRF attacks.
• The response type is also specified when the application is registered, and thusthe response_type parameter is also redundant; however, the OAuth 2.0specification states the parameter is always required, so it must be included. It isan error if the response_type value differs from the registered response type.
When the preceding URI is accessed in a browser, the user is prompted to sign on,and then prompted to review the application's request for access and choose whetherto approve or deny access.
If the user approves the request, then the browser will be redirected back to theregistered redirect URI, and the access token will be encoded in the fragment portionof the URI:
https://server:port/i/oauthdemo/gallery.html#token_type=bearer&\ access_token=ACCESS_TOKEN&\ expires_in=TOKEN_LIFETIME&\ state=STATE
where:
• ACCESS_TOKEN is the unique, unguessable access token assigned to the current usersession, and which must be provided with subsequent requests to the RESTfulservice.
• TOKEN_LIFETIME is the number of seconds for which the access token is valid.
• STATE is the unique value supplied by the application at the start of theauthorization flow. If the returned state value does not match the initial statevalue, then there is an error condition, and the access token must not be used,because it is possible an attacker is attempting to subvert the authorizationprocess through a CSRF attack.
Appendix DAccessing the RESTful Services from a Third Party Application
D-13

Note:
You can modify the default OAuth access token duration (or lifetime) for all thegenerated access tokens. To achieve this, add thesecurity.oauth.tokenLifetime entry to the defaults.xml configuration file in thefollowing way, with the OAuth access token duration specified in seconds:<entry key="security.oauth.tokenLifetime”>600</entry>
If the user denies the request, or the user is not authorized to access the RESTfulService, the browser will be redirected back to the registered redirect URI, and anerror message will be encoded in the fragment portion of the URI:
https://server:port/i/oauthdemo/gallery.html#error=access_denied&state=STATE
where:
• error=access_denied informs the client that the user is not authorized to access theRESTful Service, or chose not to approve access to the application.
• STATE is the unique value supplied by the application at the start of theauthorization flow. If the returned state value does not match the initial statevalue, then there is an error condition, the client should ignore this response. It ispossible an attacker is attempting to subvert the authorization process via a CSRFattack.
D.8.4 Using an Access TokenAfter the application has acquired an access token, the access token must be includedwith each request made to the protected RESTful service. To do this, an Authorizationheader is added to the HTTP request, with the following syntax:
Authorization: Bearer ACCESS_TOKEN
where:
• ACCESS_TOKEN is the access token value.
For example, a JavaScript-based browser application might invoke the Gallery serviceas follows:
var accessToken = ... /* initialize with the value of the access token */var xhr = new XMLHttpRequest();xhr.open('GET', 'https://server:port/ords/resteasy/gallery/images/',true);/* Add the Access Token to the request */ xhr.setRequestHeader('Authorization', 'Bearer ' + accessToken); xhr.onload = function(e) { /* logic to process the returned JSON document */ ... };xhr.send();
The preceding example uses the XMLHttpRequest.setRequestHeader(name,value)function to add the Authorization header to the HTTP request. If the access token isvalid, then the server will respond with a JSON document listing the images in thegallery.
Appendix DAccessing the RESTful Services from a Third Party Application
D-14
D.8.5 About Browser OriginsOne of the key security concepts of web browsers is the Same Origin Policy, whichpermits scripts running on pages originating from the same web site (an Origin) toaccess each other's data with no restrictions, but prevents access to data originatingfrom other web sites.
An origin is defined by the protocol, host name and port of a web-site. For examplehttps://example.com is one origin and https://another.example.com is a different origin,because the host name differs. Similarly, http://example.com is a different origin thanhttps://example.com because the protocol differs. Finally, http://example.com is adifferent origin from http://example.com:8080 because the port differs.
For example, if a third party client of the Gallery RESTful service is located at:
https://thirdparty.com/gallery.html
and the Gallery RESTful service is located at:
https://example.com/ords/resteasy/gallery/images/
then the Same Origin Policy will prevent gallery.html making an XMLHttpRequest tohttps://example.com/ords/resteasy/gallery/images/, because scripts in the https://thirdparty.com origin can only access data from that same origin, and https://example.com is clearly a different origin.
This is proper if the authors of https://example.com do not trust the authors of https://thirdparty.com. However, if the authors do have reason to trust each other, then theSame Origin Policy is too restrictive. Fortunately, a protocol called Cross OriginResource Sharing (CORS), provides a means for https://example.com to inform theweb browser that it trusts https://thirdparty.com and thus to instruct the browser topermit gallery.html to make an XMLHttpRequest to https://example.com/ords/resteasy/gallery/images/.
D.8.6 Configuring a RESTful Service for Cross Origin ResourceSharing
To configure a RESTful service for Cross Origin Resource Sharing, follow these steps:
1. Navigate to SQL Workshop and then RESTful Services.
2. Click the module named gallery.example.
3. For Origins Allowed, enter the origins that are permitted to access the RESTfulservice (origins are separated by a comma).
4. Press Apply Changes
D.8.7 Acquiring a Token Using the Authorization Code Protocol FlowOther sections have explained acquiring an access token using the OAuth 2.0 Implicitprotocol flow. This section explains how to do the same using the Authorization Codeprotocol flow. The process is slightly more involved than for the Implicit protocol flow,because it requires exchanging an authorization code for an access token.
This section will mimic this exchange process using cURL.
Appendix DAccessing the RESTful Services from a Third Party Application
D-15

Topics:
• Registering the Client Application (page D-16)
• Acquiring an Authorization Code (page D-16)
• Exchanging an Authorization Code for an Access Token (page D-17)
• Extending OAuth 2.0 Session Duration (page D-18)
D.8.7.1 Registering the Client Application[To register the client, follow these steps:
1. Go to the following URI in your browser:
https://server:port/ords/resteasy/ui/oauth2/clients/
2. Enter the credentials of the 3rdparty_dev user, and click Sign In.
3. Click Register Client, and enter the following information:
• Name: Another Gallery
• Description: Demonstrates using the Authorization Code OAuth 2.0 ProtocolFlow
• Response Type: Code
• Redirect URI : https://gallery.example.demo
• Support EMail: any desired email address
• Required Scopes: Gallery Access
4. Click Register.
5. Click 3rd Party Gallery in the list that appears on the next page.
6. Note the values of the Client Identifier, Client Secret, and the Authorization URIfields.
D.8.7.2 Acquiring an Authorization CodeThe first step in the Authorization Code protocol flow is to acquire an authorizationcode. An authorization code is a short lived token that when presented along with theapplication's client identifier and secret can be exchanged for an access token.
To acquire an access token, the user must be prompted to approve access. To initiatethe approval process, direct the user to the approval page using a URI in the followingformat:
https://server:port/ords/resteasy/oauth2/auth?response_type=code&\ client_id=CLIENT_IDENTIFIER&\ state=STATE
where:
• CLIENT_IDENTIFIER is the Client Identifier assigned to the application when it wasregistered.
• STATE is a unique value generated by the application used to prevent Cross SiteRequest Forgery (CSRF) attacks.
Appendix DAccessing the RESTful Services from a Third Party Application
D-16

If the user approves the request, then the browser will be redirected back to theregistered redirect URI, and the access token will be encoded in the query stringportion of the URI:
https://gallery.example.demo?code=AUTHORIZATION_CODE&state=STATE
where:
• AUTHORIZATION_CODE is the authorization code value.
• STATE is the unique value supplied by the application at the start of theauthorization flow. If the returned state value does not match the initial statevalue, then there is an error condition, the authorization code must not be used. Itis possible an attacker is attempting to subvert the authorization process via aCSRF attack.
Because the registered https://gallery.example.demo redirect URI does not exist,the browser will report a server not found error, but for the purposes of thisexample, this does not matter, because you can still see the authorization codevalue encoded in the URI. Note the value of the code parameter, because it will beused while Exchanging an Authorization Code for an Access Token.
D.8.7.3 Exchanging an Authorization Code for an Access TokenIn this section you will use cURL to exchange the authorization code for an accesstoken. To exchange an authorization code the application must make an HTTPrequest to the Oracle REST Data Services OAuth 2.0 token endpoint, providing theauthorization code and its client identifier and secret. If the credentials are correct,Oracle REST Data Services responds with a JSON document containing the accesstoken. Note that the application makes the HTTP request from its server side (wherethe client identifier and secret are securely stored) directly to Oracle REST DataServices; the web-browser is not involved at all in this step of the protocol flow.
Use a cURL command in the following format to exchange the authorization code foran access token:
curl -i -d "grant_type=authorization_code&code=AUTHORIZATION_CODE" \ --user CLIENT_IDENTIFER:CLIENT_SECRET \ https://server:port/ords/resteasy/oauth2/token
where:
• AUTHORIZATION_CODE is the authorization code value (which was encoded in the codeparameter of the query string in the redirect URI in the previous section).
• CLIENT_IDENTIFER is the client identifier value.
• CLIENT_SECRET is the client secret value.
cURL translates the above commands into an HTTP request like the following:
POST /ords/resteasy/oauth2/token HTTP/1.1Authorization: Basic Q0xJRU5UX0lERU5USUZJRVI6Q0xJRU5UX1NFQ1JFVA== Host: server:port Accept: */* Content-Length: 59 Content-Type: application/x-www-form-urlencoded
grant_type=authorization_code&code=AUTHORIZATION_CODE
where:
Appendix DAccessing the RESTful Services from a Third Party Application
D-17
• The request is an HTTP POST to the oauth2/token OAuth 2.0 token endpoint.
• The Authorization header uses the HTTP BASIC authentication protocol to encodethe client identifier and secret to assert the application's identity.
• The Content-Type of the request is form data (application/x-www-form-urlencoded)and the content of the request is the form data asserting the OAuth 2.0 token granttype and the OAuth 2.0 authorization code value.
The preceding HTTP request will produce a response like the following:
HTTP/1.1 200 OKETag: "..."Content-Type: application/json
{ "access_token":"04tss-gM35uOeQzR_2ve4Q..", "token_type":"bearer", "expires_in":3600, "refresh_token":"UX4FVHhPFJl6GokvTXYw0A.."}
The response is a JSON document containing the access token along with a refreshtoken. After the application has acquired an access token, the access token must beincluded with each request made to the protected RESTful Service. To do this anAuthorization header is added to the HTTP request, with the following syntax:
Authorization: Bearer ACCESS_TOKEN
Related Topics:
• Extending OAuth 2.0 Session Duration (page D-18)
D.8.7.4 Extending OAuth 2.0 Session DurationTo extend the lifetime of an OAuth 2.0 session, a refresh token can be exchanged fora new access token with a new expiration time. Note that refresh tokens are onlyissued for the Authorization Code protocol flow.
The application makes a similar request to that used to exchange an authorizationcode for an access token. Use a cURL command in the following format to exchangethe refresh token for an access token:
curl -i -d "grant_type=refresh_token&refresh_token=REFRESH_TOKEN" \ --user CLIENT_IDENTIFER:CLIENT_SECRET \ https://server:port/ords/resteasy/oauth2/token
where:
• REFRESH_TOKEN is the refresh token value returned when the access token wasinitially issued.
• CLIENT_IDENTIFER is the client identifier value.
• CLIENT_SECRET is the client secret value.
cURL translates the above commands into an HTTP request like the following:
POST /ords/resteasy/oauth2/token HTTP/1.1 Authorization: Basic Q0xJRU5UX0lERU5USUZJRVI6Q0xJRU5UX1NFQ1JFVA==Host: server:portAccept: */*
Appendix DAccessing the RESTful Services from a Third Party Application
D-18
Content-Length: 53 Content-Type: application/x-www-form-urlencoded
grant_type=refresh_token&refresh_token=REFRESH_TOKEN
where:
• The request is an HTTP POST to the oauth2/token OAuth 2.0 token endpoint.
• The Authorization header uses the HTTP BASIC authentication protocol to encodethe client identifier and secret to assert the application's identity.
• The Content-Type of the request is form data (application/x-www-form-urlencoded)and the content of the request is the form data asserting the OAuth 2.0 token granttype and the refresh token value.
The preceding HTTP request will produce a response like the following:
HTTP/1.1 200 OKETag: "..."Content-Type: application/json
{ "access_token":"hECH_Fc7os2KtXT4pDfkzw..", "token_type":"bearer", "expires_in":3600, "refresh_token":"-7OBQKc_gUQG93ZHCi08Hg.."}
The response is a JSON document containing the new access token along with a newrefresh token. The existing access token and refresh token are invalidated, and anyattempt to access a service using the old access token will fail.
D.8.8 About Securing the Access TokenIn OAuth 2.0 the access token is the sole credential required to provide access to aprotected service. It is, therefore, essential to keep the access token secure. Followthese guidelines to help keep the token secure:
• It is strongly recommended to use HTTPS for all protected RESTful Services. Thisprevents snooping attacks where an attacker may be able to steal access tokensby eavesdropping on insecure channels. It also prevents attackers from viewingthe sensitive data that may be present in the payload of the requests.
• Ensure that the client application is not located in a browser origin with otherapplications or scripts that cannot be trusted. For example assume that user Alicehas a client application hosted at the following location:
https://sharedhosting.com/alice/application
If another user (such as Fred) is also able to host his application in the sameorigin, for example, at:
https://sharedhosting.com/fred/trouble
then it will be easy for /fred/trouble to steal any access token acquired by /alice/application, because they share the same origin https://sharedhost.com, and thusthe browser will not prevent either application from accessing the other's data.
To protect against this scenario, Alice's application must be deployed in its ownorigin, for example:
Appendix DAccessing the RESTful Services from a Third Party Application
D-19

https://alice.sharedhosting.com/application
or:
https://application.alice.sharedhosting.com
or:
https://aliceapp.com
Appendix DAccessing the RESTful Services from a Third Party Application
D-20
EUsing the Multitenant Architecture withOracle REST Data Services
This section outlines the installation choices and different scenarios associated withcopying and moving pluggable databases introduced by the Oracle Database 12cmultitenant architecture with respect to Oracle REST Data Services.
• Understanding the Installation Choices (page E-1)
• Installing Oracle REST Data Services into a CDB (page E-2)
• Upgrading Oracle REST Data Services in a CDB Environment (page E-3)
• Making All PDBs Addressable by Oracle REST Data Services (PluggableMapping) (page E-3)
• Uninstalling Oracle REST Data Services in a CDB Environment (page E-5)
E.1 Understanding the Installation ChoicesOracle Database 12c Release 1 (12.1) introduces the multitenant architecture. Thisdatabase architecture has a multitenant container database (CDB) that includes a rootcontainer, CDB$ROOT, a seed database, PDB$SEED, and multiple pluggable databases(PDBs). A PDB appears to users and applications as if it were a non-CDB. Each PDBis equivalent to a separate database instance in Oracle Database Release 11g.
The root container, CDB$ROOT, holds common objects that are accessible to every PDButilizing metadata links or object links. The seed database, PDB$SEED, is used whencreating a new PDB to seed the new pluggable database. The key benefit of theOracle Database 12c multitenant architecture is that the database resources, such asCPU and memory, can be shared across all of the PDBs. This architecture alsoenables many databases to be treated as one for tasks such as upgrades or patches,and backups.
You can install Oracle REST Data Services into one or more pluggable databasesPDBs in a multitenant database or into the container database (CDB). The installationchoices are as follows:
• If you want the same version of Oracle REST Data Services available in all thePDBs, then install it into the CDB. The rest of the instructions in this topic refer toinstalling into the CDB.
• If you want only some PDBs to be able to use Oracle REST Data Services, or ifyou want different PDBs to use different versions of Oracle REST Data Services,then install into the desired PDBs. (Use the same procedure as for a non-CDB.)
When Oracle REST Data Services is installed into a CDB, it is installed in the rootcontainer, the seed container, and any existing PDBs. The root container (CDB$ROOT)includes the ORDS_METADATA schema to store the common database objects forOracle REST Data Services packages, functions, procedures, and views. It alsoincludes the Oracle REST Data Services public user (ORDS_PUBLIC_USER).
E-1

The seed container (PDB$SEED) includes the ORDS_METADATA schema and theORDS public user. You can create a new PDB by copying PDB$SEED and creatingmetadata links back to the common database objects in the ORDS_METADATAschema within the CDB$ROOT. As a result, there are multiple copies of the Oracle RESTData Services tables and only single copies of the Oracle REST Data Servicespackages, functions, procedures, and views. Thus, each PDB has theORDS_METADATA schema and its own copy of the Oracle REST Data Servicestables, so that it can hold the metadata for the Oracle REST Data Services applicationwithin that PDB. Each PDB also has its own ORDS public user.
See also "Creating a PDB using the Seed" in Oracle Database Administrator's Guide.)
E.2 Installing Oracle REST Data Services into a CDBIf you want to have all PDBs in a multitenant environment to use the same OracleREST Data Services release and patch set, install into the CDB. (This option will notallow you to have different releases of Oracle REST Data Services in different PDBs.)
Before installing into the a CDB:
• Ensure that the PDBs are open (not mounted/closed) in read/write mode (exceptfor PDB$SEED, which remains in read-only mode). See "Modifying the Open Mode ofPDBs" in Oracle Database Administrator's Guide.
• Ensure that the default and temporary tablespaces to be used by theORDS_METADATA schema and the ORDS_PUBLIC_USER user exist and thatyou know the tablespace names. The installation procedure creates those users,but it does not create the tablespaces.
Note that ORDS_METADATA and ORDS_PUBLIC_USER are also installed in theseed container, and that the default and temporary tables will have to exist in PDB$SEED. If these tablespace do not already exist there, then you will have to createthe tablespaces in PDB$SEED; see "Running Oracle-Supplied SQL Scripts in a CDB"in Oracle Database Administrator's Guide.
To install Oracle REST Data Services into a CDB, follow these steps.
1. Go to the folder into which you unzipped the Oracle REST Data Servicesinstallation kit.
2. Enter the following command:
java -jar ords.war install advanced
Note:
To use the pluggable mapping feature, see Making All PDBs Addressable byOracle REST Data Services (Pluggable Mapping) (page E-3).
3. When prompted, enter the database connection information for your CDB:
Enter the name of the database server [localhost]:Enter the database listen port [1521]:Enter 1 to specify the database service name, or 2 to specify the database SID [1]:Enter the database service name: (for example, cdb.example.com)
4. Verify the Oracle REST Data Services installation:
Appendix EInstalling Oracle REST Data Services into a CDB
E-2

Enter 1 if you want to verify/install Oracle REST Data Services schema or 2 to skip this step [1]:
Accept or enter 1 (the default) to install Oracle REST Data Services into the CDBand all of its PDBs.
5. Enter and confirm the ORDS_PUBLIC_USER password:
Enter the database password for ORDS_PUBLIC_USER:Confirm password:
6. When prompted, enter additional information as needed. (See AdvancedInstallation Using Command-Line Prompts (page 1-8).)
Related Topics:
• Advanced Installation Using Command-Line Prompts (page 1-8)
E.3 Upgrading Oracle REST Data Services in a CDBEnvironment
When you use a new release of Oracle REST Data Services, upgrading ORDSschema in the CDB and its pluggable databases (PDBs) will occur automatically whenyou perform a simple or advanced installation.
For example:
java -jar ords.war
If Oracle REST Data Services is already installed or upgraded, a message displaysthe Oracle REST Data Services schema version, and you will not be prompted forinformation.
If an error occurred, view the log files.
Related Topics:
• Simple Installation Using a Parameters File (page 1-7)
• Advanced Installation Using Command-Line Prompts (page 1-8)
E.4 Making All PDBs Addressable by Oracle REST DataServices (Pluggable Mapping)
Pluggable mapping refers to the ability to make all PDBs in a CDB addressable byOracle REST Data Services. To use this feature, follow the instructions in this topic.
If the Oracle REST Data Services configuration file includes the db.serviceNameSuffixparameter, this indicates that the Oracle REST Data Services pool points to a CDB,and that the PDBs connected to that CDB should be made addressable by OracleREST Data Services.
The value of the db.serviceNameSuffix parameter must match the value of theDB_DOMAIN database initialization parameter, and it must start with a period (.). To setthe value of the db.serviceNameSuffix parameter:
1. In SQL*Plus, connect to the root as a user with SYSDBA privileges.
Appendix EUpgrading Oracle REST Data Services in a CDB Environment
E-3

2. Check the value of the DB_DOMAIN database initialization parameter.
SQL> show parameter DB_DOMAIN
3. Exit SQL*Plus.
SQL> exit
4. If the DB_DOMAIN value was not empty, then on the command line enter thecommand to create the key and value for the db.serviceNameSuffix parameter andits DB_DOMAIN. This will be used to add this entry to the ORDS configuration file.
echo db.serviceNameSuffix=.value-of-DB_DOMAIN > snsuffix.properties
For example, if DB_DOMAIN is set to example.com, enter the following:
echo db.serviceNameSuffix=.example.com > snsuffix.properties
5. If the db.serviceNameSuffix parameter value is not defined, enter a command in thefollowing format to add an entry to the configuration file:
java -jar ords.war set-properties --conf pool-name snsuffix.properties
Where pool-name is one of the following:
• poolName for a PL/SQL Gateway configuration
• poolName_pu for an Oracle REST Data Services RESTful Services configuration
• poolName_rt for an Application Express RESTful Services configuration
Example 1: You want to make PDBs in a CDB addressable globally. Specifydefaults by entering the following command:
java -jar ords.war set-properties --conf defaults snsuffix.properties
Note:
The approach shown in Example 1 (setting the property for all pools throughthe defaults.xml file) is best for most use cases.
Example 2: You want to make PDBs in a CDB addressable for your PL/SQLGateway, and your pool name is apex. Enter the following command:
java -jar ords.war set-properties --conf apex snsuffix.properties
For example, if the database pointed to by apex has a DB_DOMAIN value ofexample.com and contains the two PDBs pdb1.example.com and pdb2.example.com,the first PDB will be mapped to URLs whose path starts with /ords/pdb1/, and thesecond PDB will be mapped to URLs whose path starts with /ords/pdb2/.
Example 3: You want to make PDBs in a CDB addressable for your Oracle RESTData Services RESTful Services, and your pool name is apex_pu. Enter thefollowing command:
java -jar ords.war set-properties --conf apex_pu snsuffix.properties
Example 4: You want to make PDBs in a CDB addressable for your ApplicationExpress RESTful Services and your pool name is apex_rt. Enter the followingcommand:
Appendix EMaking All PDBs Addressable by Oracle REST Data Services (Pluggable Mapping)
E-4
java -jar ords.war set-properties --conf apex_rt snsuffix.properties
Related Topics:
• About the Oracle REST Data Services Configuration Files (page B-1)
E.5 Uninstalling Oracle REST Data Services in a CDBEnvironment
To uninstall Oracle REST Data Services from a CDB, use the uninstall command.
For example:
java -jar ords.war uninstall
Oracle REST Data Services will be removed from the CDB and its pluggabledatabases (PDBs).
Related Topics:
• If You Want to Reinstall or Uninstall (Remove) Oracle REST Data Services(page 1-10)
Appendix EUninstalling Oracle REST Data Services in a CDB Environment
E-5

Appendix E
Uninstalling Oracle REST Data Services in a CDB Environment
E-6

FGetting Started with RESTful Services
This tutorial is based on the following document that is included in the Oracle RESTData Services installation kit: <install-directory>\examples\getting-started\index.html. That document is among several resources supplied to help you becomeproductive quickly.
Before you perform the actions in this tutorial, note the following prerequisites andrecommendations:
• Ensure that you have installed Oracle REST Data Services and configured it toconnect to an Oracle database.
• Ensure that you have installed Oracle SQL Developer 4.1 or later in order to beable to edit RESTful services.
• It is strongly recommended that you install a browser extension that enables youto view JSON in the web browser. Recommended extensions:
– For Google Chrome: JSON Formatter (https://chrome.google.com/webstore/detail/json-formatter/bcjindcccaagfpapjjmafapmmgkkhgoa)
– For Mozilla Firefox: JSON View (https://addons.mozilla.org/en-US/firefox/addon/jsonview/)
The examples in this tutorial assume the following:
• Oracle REST Data Services has been installed and configured, and is running instandalone mode on the following server, port, and context path: localhost:8080/ords/
• Oracle REST Data Services is configured to connect as its default connection toan Oracle database listening on localhost:1521, and the database has a servicename of orcl.
This "getting started" tutorial has the following major steps:
1. REST-Enable a Database Table (page F-1)
2. Create a RESTful Service from a SQL Query (page F-5)
3. Protect Resources (page F-11)
4. Register an OAuth Client Application (page F-20)
F.1 REST-Enable a Database TableTo enable a table for REST access, follow these steps.
F-1

Tip:
It is recommended that you follow the steps as closely as possible, includingusing the specified names for schemas and database objects. After you havesuccessfully completed the tutorial using this approach, feel free to try it againusing other values if you wish.
1. Create a database schema named ordstest for use in trying out RESTful services.In SQL Developer, connect to the database as sys and enter the following in theSQL Worksheet:
CREATE USER ordstest IDENTIFIED BY <password>;GRANT "CONNECT" TO ordstest;GRANT "RESOURCE" TO ordstest;GRANT UNLIMITED TABLESPACE TO ordstest
2. Connect to the ordstest schema. In SQL Developer create a connection to theordstest schema, connect to it, and open a SQL worksheet.
3. Create a database table. For example, enter the following in the SQL Worksheetto create an example table named EMP:
CREATE TABLE EMP ( EMPNO NUMBER(4,0), ENAME VARCHAR2(10 BYTE), JOB VARCHAR2(9 BYTE), MGR NUMBER(4,0), HIREDATE DATE, SAL NUMBER(7,2), COMM NUMBER(7,2), DEPTNO NUMBER(2,0), CONSTRAINT PK_EMP PRIMARY KEY (EMPNO) );
4. Insert some sample data into the table. For example:
Insert into EMP (EMPNO,ENAME,JOB,MGR,HIREDATE,SAL,COMM,DEPTNO) values (7369,'SMITH','CLERK',7902,to_date('17-DEC-80','DD-MON-RR'),800,null,20);Insert into EMP (EMPNO,ENAME,JOB,MGR,HIREDATE,SAL,COMM,DEPTNO) values (7499,'ALLEN','SALESMAN',7698,to_date('20-FEB-81','DD-MON-RR'),1600,300,30);Insert into EMP (EMPNO,ENAME,JOB,MGR,HIREDATE,SAL,COMM,DEPTNO) values (7521,'WARD','SALESMAN',7698,to_date('22-FEB-81','DD-MON-RR'),1250,500,30);Insert into EMP (EMPNO,ENAME,JOB,MGR,HIREDATE,SAL,COMM,DEPTNO) values (7566,'JONES','MANAGER',7839,to_date('02-APR-81','DD-MON-RR'),2975,null,20);Insert into EMP (EMPNO,ENAME,JOB,MGR,HIREDATE,SAL,COMM,DEPTNO) values (7654,'MARTIN','SALESMAN',7698,to_date('28-SEP-81','DD-MON-RR'),1250,1400,30);Insert into EMP (EMPNO,ENAME,JOB,MGR,HIREDATE,SAL,COMM,DEPTNO) values (7698,'BLAKE','MANAGER',7839,to_date('01-MAY-81','DD-MON-RR'),2850,null,30);Insert into EMP (EMPNO,ENAME,JOB,MGR,HIREDATE,SAL,COMM,DEPTNO) values (7782,'CLARK','MANAGER',7839,to_date('09-JUN-81','DD-MON-RR'),2450,null,10);Insert into EMP (EMPNO,ENAME,JOB,MGR,HIREDATE,SAL,COMM,DEPTNO) values (7788,'SCOTT','ANALYST',7566,to_date('19-APR-87','DD-MON-RR'),3000,null,20);Insert into EMP (EMPNO,ENAME,JOB,MGR,HIREDATE,SAL,COMM,DEPTNO) values (7839,'KING','PRESIDENT',null,to_date('17-NOV-81','DD-MON-RR'),5000,null,10);Insert into EMP (EMPNO,ENAME,JOB,MGR,HIREDATE,SAL,COMM,DEPTNO) values (7844,'TURNER','SALESMAN',7698,to_date('08-SEP-81','DD-MON-RR'),1500,0,30);Insert into EMP (EMPNO,ENAME,JOB,MGR,HIREDATE,SAL,COMM,DEPTNO) values (7876,'ADAMS','CLERK',7788,to_date('23-MAY-87','DD-MON-RR'),1100,null,20);Insert into EMP (EMPNO,ENAME,JOB,MGR,HIREDATE,SAL,COMM,DEPTNO) values
Appendix FREST-Enable a Database Table
F-2
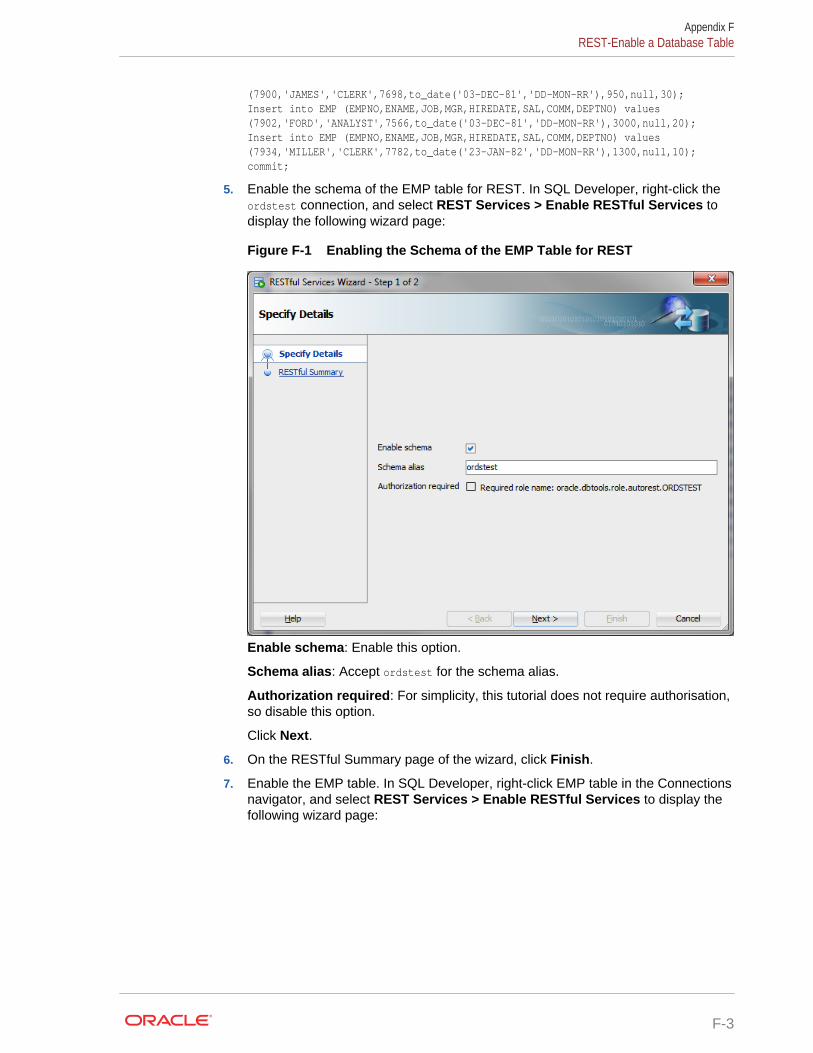
(7900,'JAMES','CLERK',7698,to_date('03-DEC-81','DD-MON-RR'),950,null,30);Insert into EMP (EMPNO,ENAME,JOB,MGR,HIREDATE,SAL,COMM,DEPTNO) values (7902,'FORD','ANALYST',7566,to_date('03-DEC-81','DD-MON-RR'),3000,null,20);Insert into EMP (EMPNO,ENAME,JOB,MGR,HIREDATE,SAL,COMM,DEPTNO) values (7934,'MILLER','CLERK',7782,to_date('23-JAN-82','DD-MON-RR'),1300,null,10);commit;
5. Enable the schema of the EMP table for REST. In SQL Developer, right-click theordstest connection, and select REST Services > Enable RESTful Services todisplay the following wizard page:
Figure F-1 Enabling the Schema of the EMP Table for REST
Enable schema: Enable this option.
Schema alias: Accept ordstest for the schema alias.
Authorization required: For simplicity, this tutorial does not require authorisation,so disable this option.
Click Next.
6. On the RESTful Summary page of the wizard, click Finish.
7. Enable the EMP table. In SQL Developer, right-click EMP table in the Connectionsnavigator, and select REST Services > Enable RESTful Services to display thefollowing wizard page:
Appendix FREST-Enable a Database Table
F-3
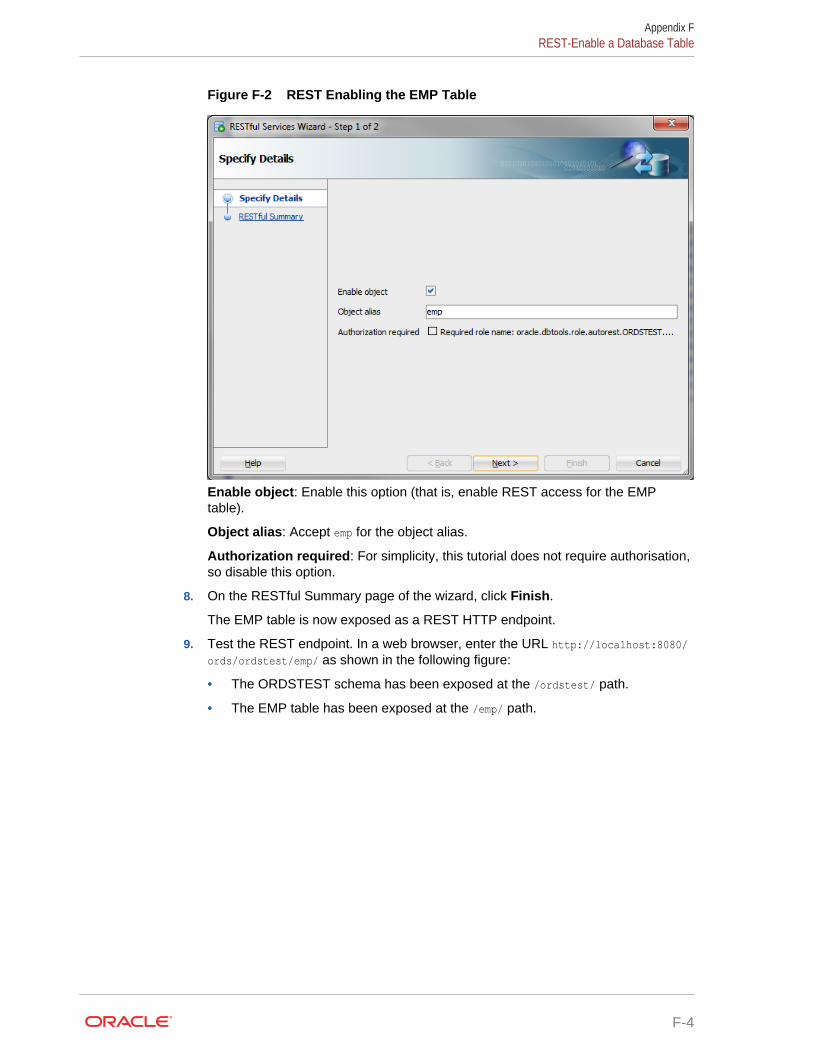
Figure F-2 REST Enabling the EMP Table
Enable object: Enable this option (that is, enable REST access for the EMPtable).
Object alias: Accept emp for the object alias.
Authorization required: For simplicity, this tutorial does not require authorisation,so disable this option.
8. On the RESTful Summary page of the wizard, click Finish.
The EMP table is now exposed as a REST HTTP endpoint.
9. Test the REST endpoint. In a web browser, enter the URL http://localhost:8080/ords/ordstest/emp/ as shown in the following figure:
• The ORDSTEST schema has been exposed at the /ordstest/ path.
• The EMP table has been exposed at the /emp/ path.
Appendix FREST-Enable a Database Table
F-4
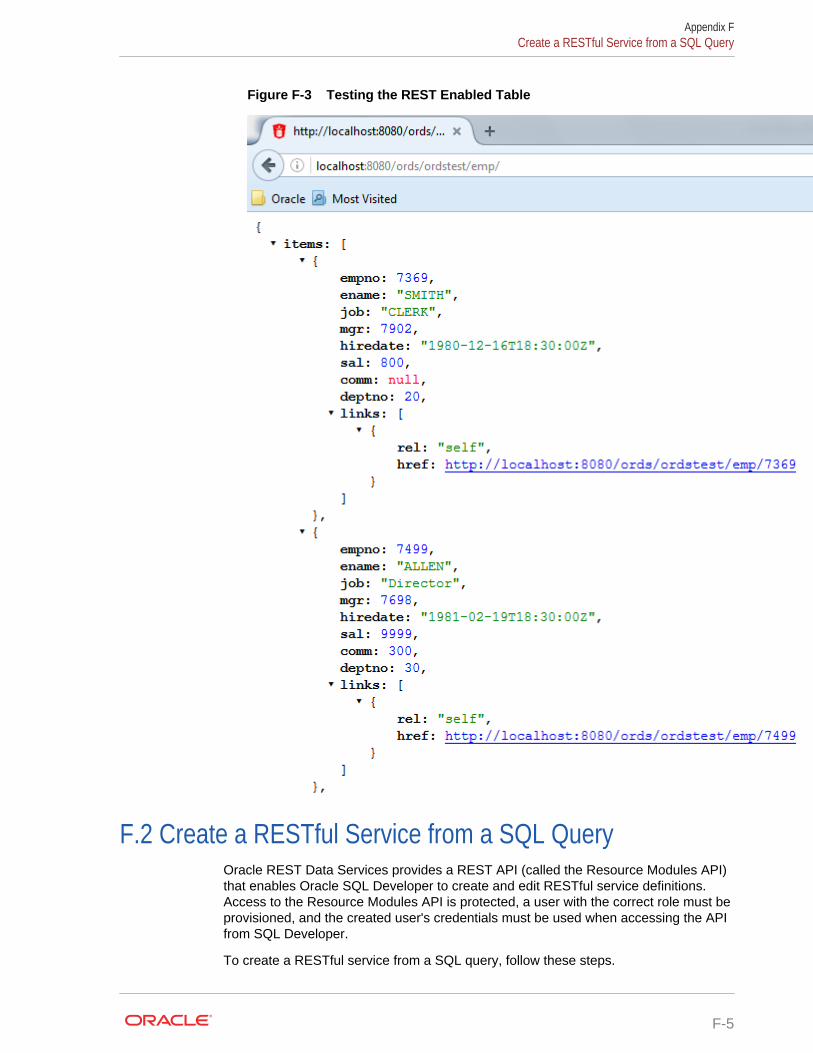
Figure F-3 Testing the REST Enabled Table
F.2 Create a RESTful Service from a SQL QueryOracle REST Data Services provides a REST API (called the Resource Modules API)that enables Oracle SQL Developer to create and edit RESTful service definitions.Access to the Resource Modules API is protected, a user with the correct role must beprovisioned, and the created user's credentials must be used when accessing the APIfrom SQL Developer.
To create a RESTful service from a SQL query, follow these steps.
Appendix FCreate a RESTful Service from a SQL Query
F-5
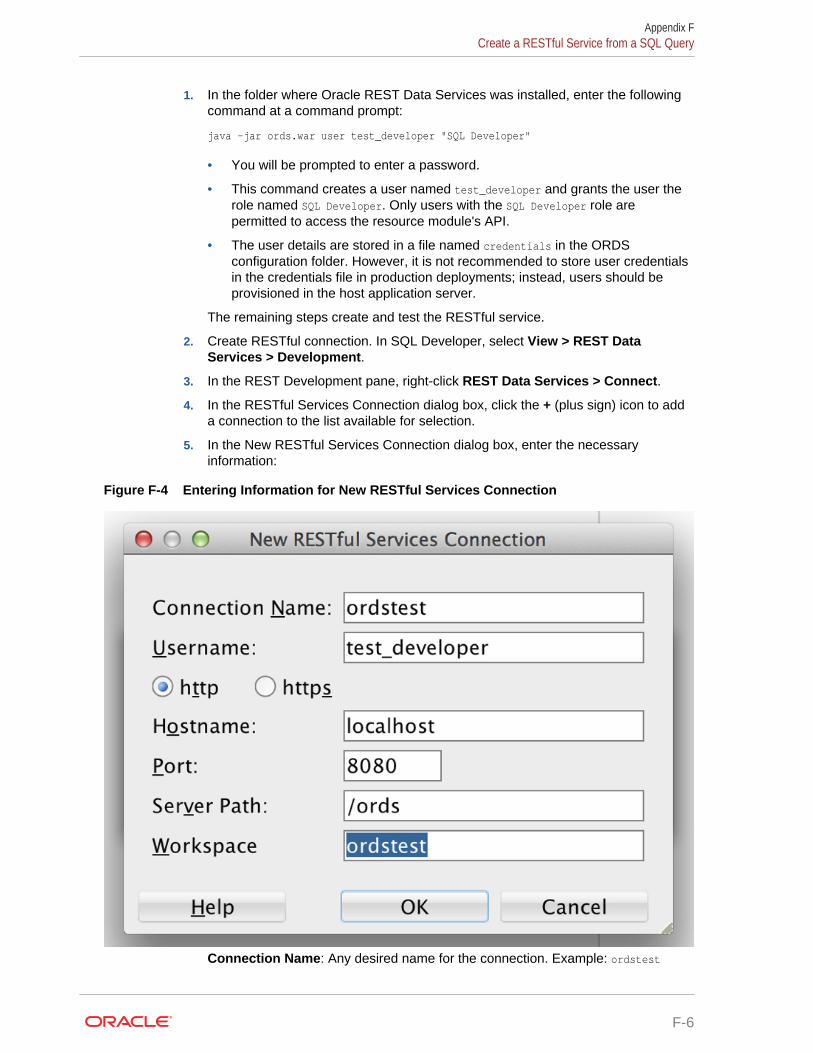
1. In the folder where Oracle REST Data Services was installed, enter the followingcommand at a command prompt:
java -jar ords.war user test_developer "SQL Developer"
• You will be prompted to enter a password.
• This command creates a user named test_developer and grants the user therole named SQL Developer. Only users with the SQL Developer role arepermitted to access the resource module's API.
• The user details are stored in a file named credentials in the ORDSconfiguration folder. However, it is not recommended to store user credentialsin the credentials file in production deployments; instead, users should beprovisioned in the host application server.
The remaining steps create and test the RESTful service.
2. Create RESTful connection. In SQL Developer, select View > REST DataServices > Development.
3. In the REST Development pane, right-click REST Data Services > Connect.
4. In the RESTful Services Connection dialog box, click the + (plus sign) icon to adda connection to the list available for selection.
5. In the New RESTful Services Connection dialog box, enter the necessaryinformation:
Figure F-4 Entering Information for New RESTful Services Connection
Connection Name: Any desired name for the connection. Example: ordstest
Appendix FCreate a RESTful Service from a SQL Query
F-6
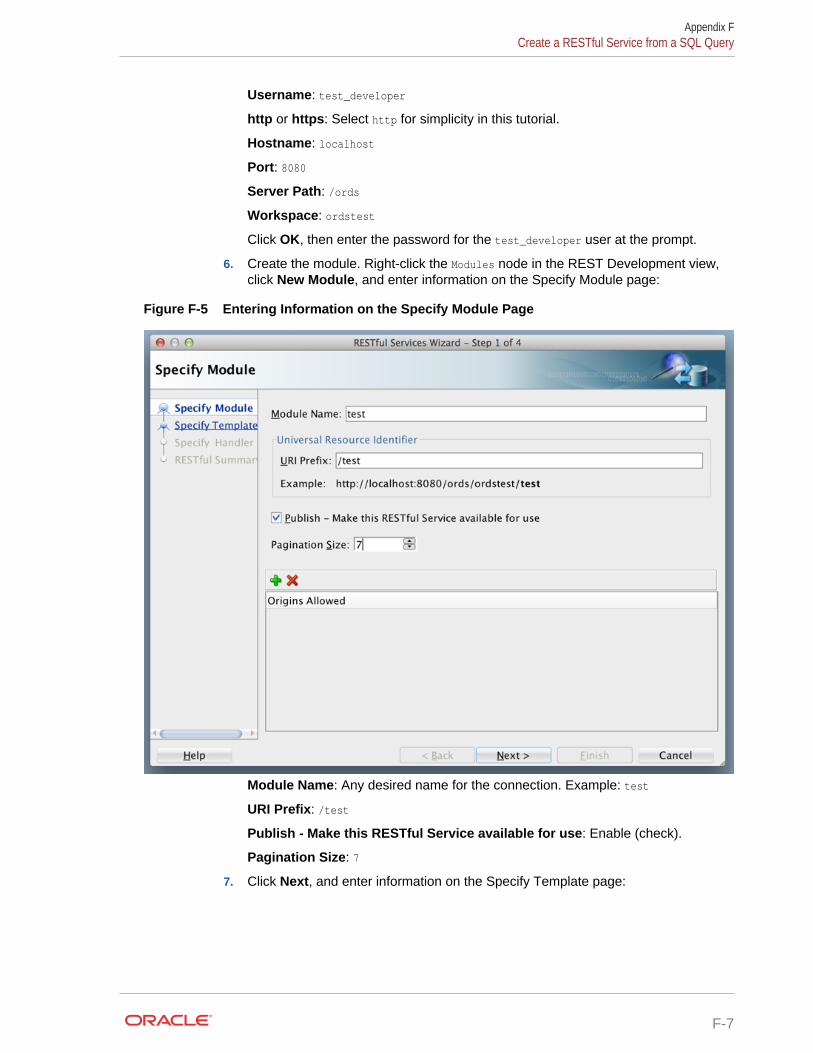
Username: test_developer
http or https: Select http for simplicity in this tutorial.
Hostname: localhost
Port: 8080
Server Path: /ords
Workspace: ordstest
Click OK, then enter the password for the test_developer user at the prompt.
6. Create the module. Right-click the Modules node in the REST Development view,click New Module, and enter information on the Specify Module page:
Figure F-5 Entering Information on the Specify Module Page
Module Name: Any desired name for the connection. Example: test
URI Prefix: /test
Publish - Make this RESTful Service available for use: Enable (check).
Pagination Size: 7
7. Click Next, and enter information on the Specify Template page:
Appendix FCreate a RESTful Service from a SQL Query
F-7

Figure F-6 Entering Information on the Specify Template Page
URI Template: /emp/
Accept the defaults for the remaining options.
8. Click Next, and enter information on the Specify Handler page:
Figure F-7 Entering Information on the Specify Handler Page:
Appendix FCreate a RESTful Service from a SQL Query
F-8

Method: GET
Requires Secure Access: Disable (uncheck) for this tutorial.
Source Type: Collection Query
Pagination Size: 7
9. Click Next to go to the RESTful Summary page of the wizard, then click Finish.
The resource module is now created, the next step is to define the query for theGET resource handler.
10. Define the query for the GET resource handler.
a. Expand the test node under the Modules node in the REST Development view.
b. Expand the /emp/ node, right-click the GET node, and select Open.
c. In the SQL Worksheet that opens for GET /emp/, enter the following SQL query:
select * from emp
d. Right-click on the test node under the 'Modules' node in the 'RESTDevelopment' view
e. Click 'Upload...'. A confirmation dialog will appear confirming the module hasbeen uploaded.
11. Test the RESTful service. In a web browser enter the URL http://localhost:8080/ords/ordstest/test/emp/ as shown in the following figure:
• The ORDSTEST schema has been exposed at the /ordstest/ path.
• The EMP table has been exposed at the /test/emp/ path.
Appendix FCreate a RESTful Service from a SQL Query
F-9
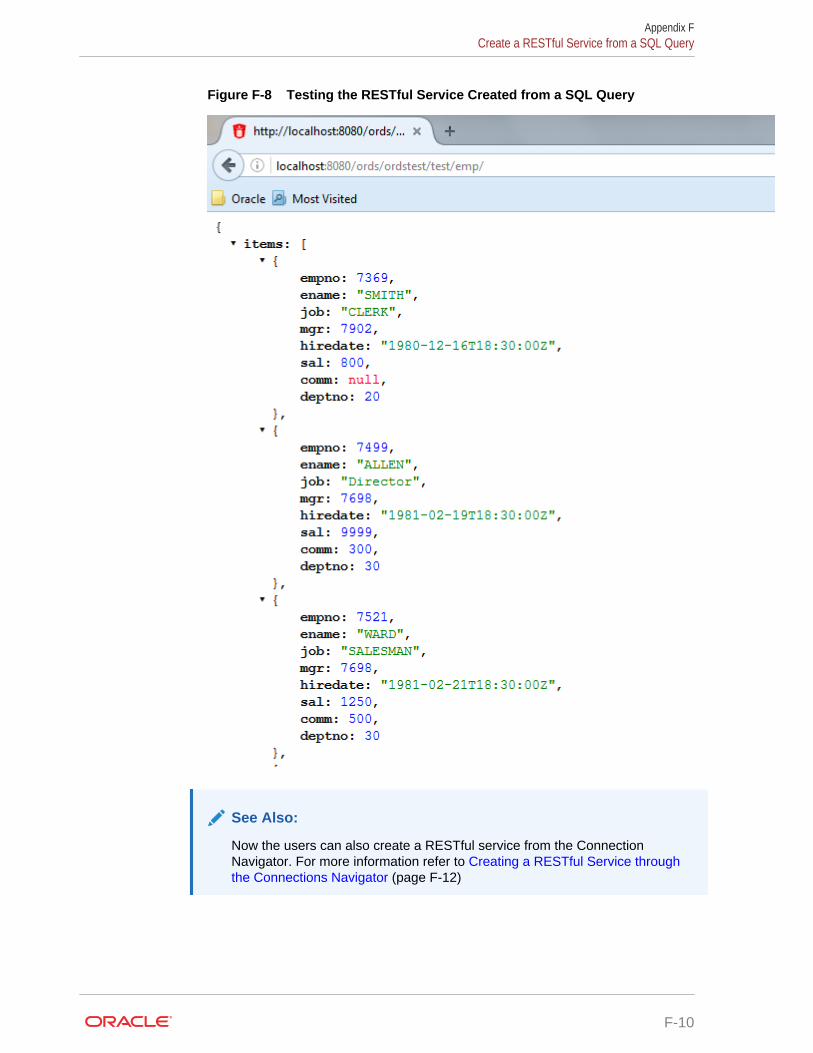
Figure F-8 Testing the RESTful Service Created from a SQL Query
See Also:
Now the users can also create a RESTful service from the ConnectionNavigator. For more information refer to Creating a RESTful Service throughthe Connections Navigator (page F-12)
Appendix FCreate a RESTful Service from a SQL Query
F-10
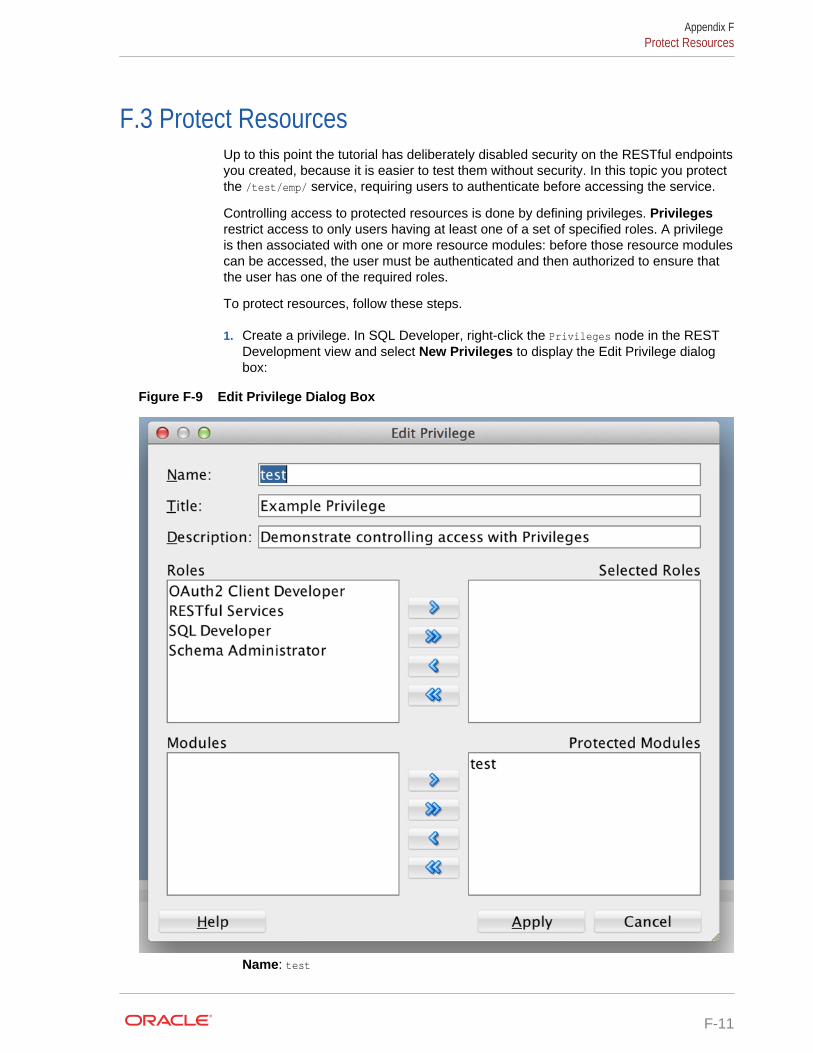
F.3 Protect ResourcesUp to this point the tutorial has deliberately disabled security on the RESTful endpointsyou created, because it is easier to test them without security. In this topic you protectthe /test/emp/ service, requiring users to authenticate before accessing the service.
Controlling access to protected resources is done by defining privileges. Privilegesrestrict access to only users having at least one of a set of specified roles. A privilegeis then associated with one or more resource modules: before those resource modulescan be accessed, the user must be authenticated and then authorized to ensure thatthe user has one of the required roles.
To protect resources, follow these steps.
1. Create a privilege. In SQL Developer, right-click the Privileges node in the RESTDevelopment view and select New Privileges to display the Edit Privilege dialogbox:
Figure F-9 Edit Privilege Dialog Box
Name: test
Appendix FProtect Resources
F-11
Title: Example Privilege
Description: Demonstrate controlling access with privileges
Protected Modules: Ensure that the list includes the test module. Use the arrowbutton to move it if necessary.
Click Apply.
2. Right click the test privilege and click Upload.
A dialog box confirms that the privilege has been uploaded.
You have now created a privilege that protects the test module. However, you havenot restricted the privilege to any particular role; this will just require that the userbe authenticated before accessing the test module (the next step).
3. Test the RESTful service. In a web browser enter the following URL:
http://localhost:8080/ords/ordstest/test/emp/
4. Click the link to sign in, and enter the test_developer credentials.
The contents of the JSON document are displayed.
F.4 Creating a RESTful Service through the ConnectionsNavigator
This section explains how to create a RESTful service by using REST Data Servicesnode in the Connections navigator. Oracle REST Data Services provides an optionthrough the Connections navigator that enables you to create and edit RESTful servicedefinitions.
To create and test a RESTful service by using REST Data Services node in theConnections navigator, follow these steps:
1. Under ordstest schema, select REST Data Services.
Appendix FCreating a RESTful Service through the Connections Navigator
F-12

Figure F-10 REST Data Services option under Connections Navigator
The following steps create and test the RESTful service.
2. Under REST Data Services node, right-click the Modules node, click New Module,and enter information on the Specify Module page:
Appendix FCreating a RESTful Service through the Connections Navigator
F-13

Figure F-11 Entering Information on the Specify Module Page
Module Name: Any desired name for the connection. For example, demo
URI Prefix: /demo/
Publish - Make this RESTful Service available for use: Enable (check).
Pagination Size: 25
3. Click Next, and enter information on the Specify Template page:
Appendix FCreating a RESTful Service through the Connections Navigator
F-14
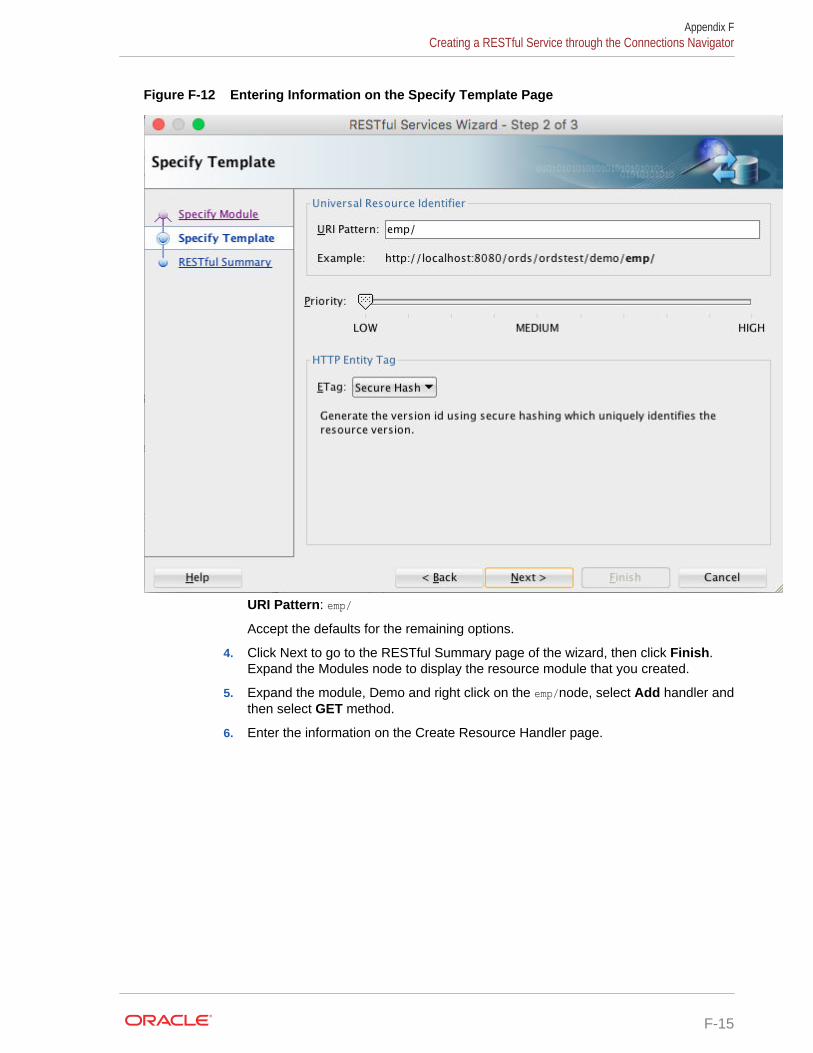
Figure F-12 Entering Information on the Specify Template Page
URI Pattern: emp/
Accept the defaults for the remaining options.
4. Click Next to go to the RESTful Summary page of the wizard, then click Finish.Expand the Modules node to display the resource module that you created.
5. Expand the module, Demo and right click on the emp/node, select Add handler andthen select GET method.
6. Enter the information on the Create Resource Handler page.
Appendix FCreating a RESTful Service through the Connections Navigator
F-15
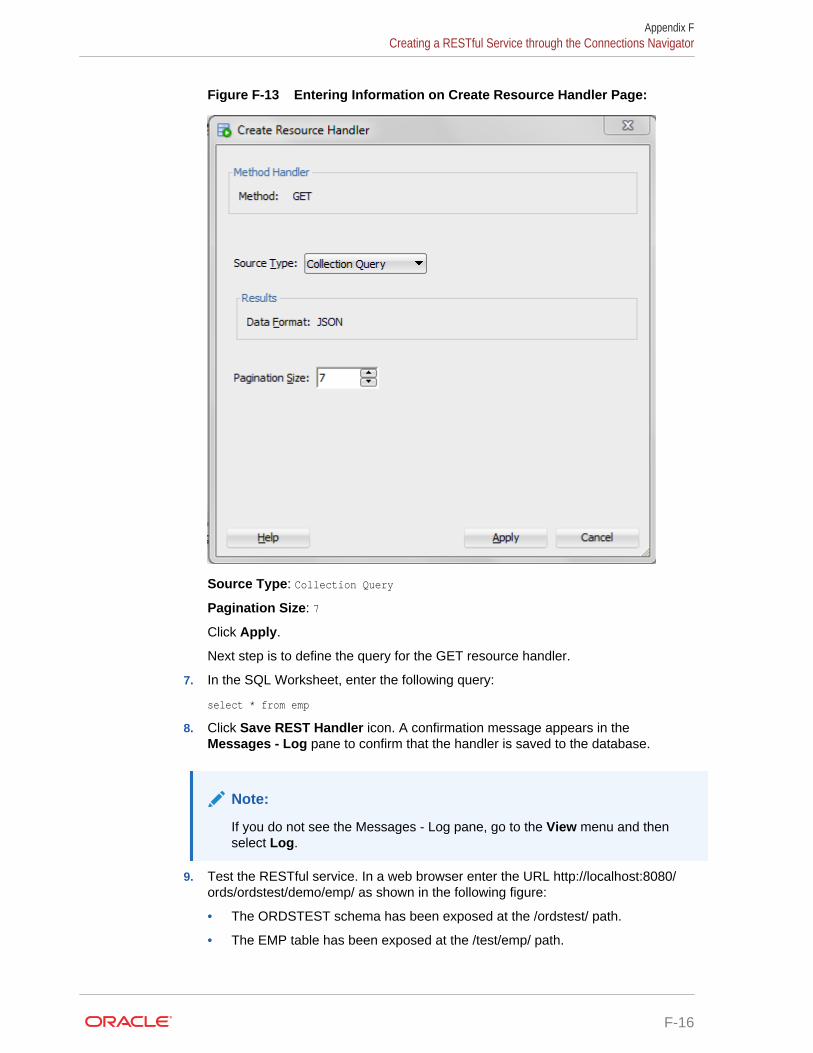
Figure F-13 Entering Information on Create Resource Handler Page:
Source Type: Collection Query
Pagination Size: 7
Click Apply.
Next step is to define the query for the GET resource handler.
7. In the SQL Worksheet, enter the following query:
select * from emp
8. Click Save REST Handler icon. A confirmation message appears in theMessages - Log pane to confirm that the handler is saved to the database.
Note:
If you do not see the Messages - Log pane, go to the View menu and thenselect Log.
9. Test the RESTful service. In a web browser enter the URL http://localhost:8080/ords/ordstest/demo/emp/ as shown in the following figure:
• The ORDSTEST schema has been exposed at the /ordstest/ path.
• The EMP table has been exposed at the /test/emp/ path.
Appendix FCreating a RESTful Service through the Connections Navigator
F-16
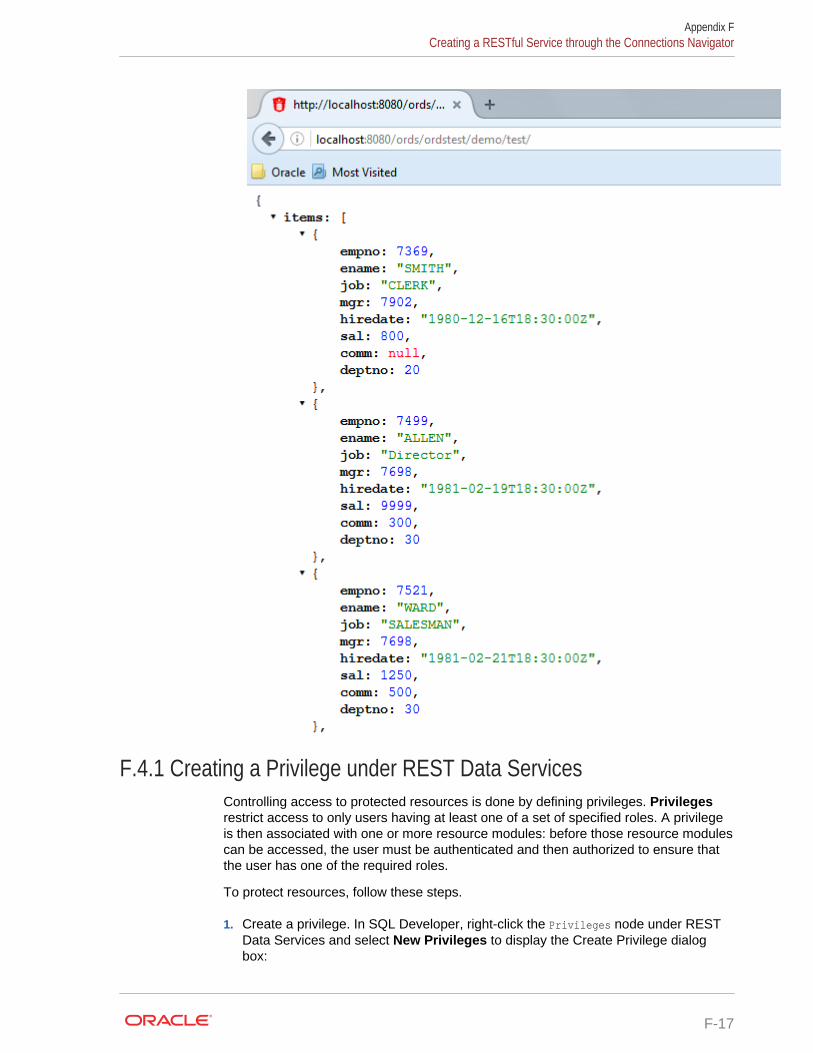
F.4.1 Creating a Privilege under REST Data ServicesControlling access to protected resources is done by defining privileges. Privilegesrestrict access to only users having at least one of a set of specified roles. A privilegeis then associated with one or more resource modules: before those resource modulescan be accessed, the user must be authenticated and then authorized to ensure thatthe user has one of the required roles.
To protect resources, follow these steps.
1. Create a privilege. In SQL Developer, right-click the Privileges node under RESTData Services and select New Privileges to display the Create Privilege dialogbox:
Appendix FCreating a RESTful Service through the Connections Navigator
F-17

Figure F-14 Create Privilege Dialog Box
Name: Demo
Title: Example Privilege
Description: Demonstrate controlling access with privileges
Protected Modules: Ensure that the list includes the Demo module. Use the arrowbutton to move it if necessary.
Click Apply.
You have now created a privilege that protects the test module. However, you havenot restricted the privilege to any particular role; this will just require that the userbe authenticated before accessing the test module (the next step).
2. Test the RESTful service. In a web browser enter the following URL:
http://localhost:port/ords/ordstest/demo/emp/
Appendix FCreating a RESTful Service through the Connections Navigator
F-18

3. Click the link to sign in, and enter the test_developer credentials.
Note:
To create a test_developer user refer to Create a RESTful Service from aSQL Query section.
A JSON document similar to the following is displayed:
Related Topics:
• Create a RESTful Service from a SQL Query (page F-5)
Appendix FCreating a RESTful Service through the Connections Navigator
F-19
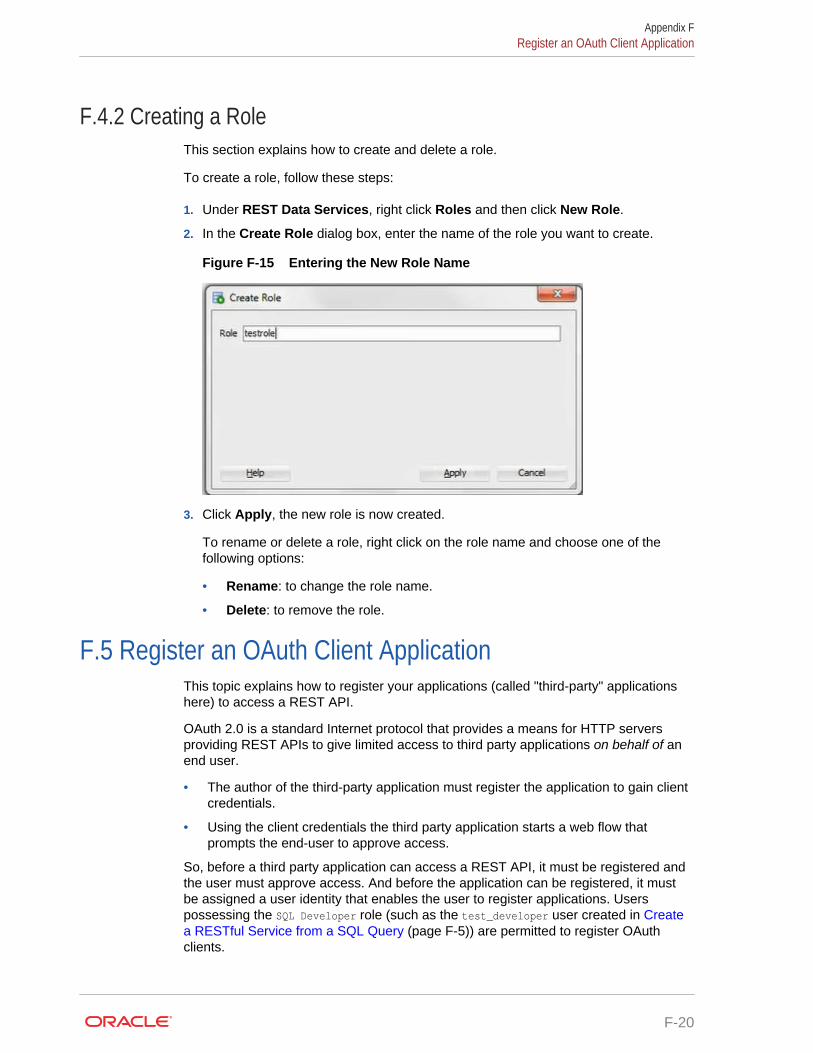
F.4.2 Creating a RoleThis section explains how to create and delete a role.
To create a role, follow these steps:
1. Under REST Data Services, right click Roles and then click New Role.
2. In the Create Role dialog box, enter the name of the role you want to create.
Figure F-15 Entering the New Role Name
3. Click Apply, the new role is now created.
To rename or delete a role, right click on the role name and choose one of thefollowing options:
• Rename: to change the role name.
• Delete: to remove the role.
F.5 Register an OAuth Client ApplicationThis topic explains how to register your applications (called "third-party" applicationshere) to access a REST API.
OAuth 2.0 is a standard Internet protocol that provides a means for HTTP serversproviding REST APIs to give limited access to third party applications on behalf of anend user.
• The author of the third-party application must register the application to gain clientcredentials.
• Using the client credentials the third party application starts a web flow thatprompts the end-user to approve access.
So, before a third party application can access a REST API, it must be registered andthe user must approve access. And before the application can be registered, it mustbe assigned a user identity that enables the user to register applications. Userspossessing the SQL Developer role (such as the test_developer user created in Createa RESTful Service from a SQL Query (page F-5)) are permitted to register OAuthclients.
Appendix FRegister an OAuth Client Application
F-20

Tip:
In a real application, you may want to provision specific users that can registerOAuth clients; these users should be granted the OAuth Client Developer role.
This topic outlines how to complete these actions. It is not a full-featureddemonstration of how to create and integrate a third party application; it just outlinesthe concepts involved.
1. Register the client application.
a. In a web browser enter the following URL:
http://localhost:8080/ords/ordstest/oauth/clients/
b. At the prompt, click the link to sign in and enter the credentials for thetest_developer user.
c. Click New Client and enter the following information:
Name: Test Client
Description: An example OAuth Client
Redirect URI: http://example.org/redirect
Support e-mail: [email protected]
Support URI: http://example.org/support
Required Privileges: Example Privilege
d. Click Create.
The client registration is created, and the Authorization URI for the client isdisplayed. You have created a client that will use the Implicit Grantauthorization flow (explained at https://tools.ietf.org/html/rfc6749#section-4.2).
Note the Client Identifier assigned to the client and the Authorization URIvalue. These values are used to start the authorization flow (next major step).
2. Approve the client application.
In a real third-party client application, the client will initiate the approval flow bydirecting a web browser to the Authorization URI. The end user will be prompted tosign in and approve access to the client application. The browser will be redirectedback to the client's registered Redirect URI with a URI fragment containing theaccess_token for the approval. To simulate this process:
a. In a web browser, enter the Authorization URI that you noted in the previousstep. The URL should look like the following (though you should not copy andpaste in this example value):
http://localhost:8080/ords/ordstest/oauth/auth?response_type=token&client_id=5B77A34A266EFB0056BE3497ED7099.&state=d5b7944-d27d-8e2c-4d5c-fb80e1114490&_auth_=force
The client_id value must be the value of the client identifier assigned to theapplication. Be sure you are using the correct client_id value. Do not use thevalue in the preceding example; replace it with the client identifier assigned toyour application.
Appendix FRegister an OAuth Client Application
F-21
The state value should be a unique, unguessable value that the clientremembers, and can use later to confirm that the redirect received from OracleREST Data Services is in response to this authorisation request. This value isused to prevent Cross Site Request Forgery attacks; it is very important,cannot be omitted, and must not be guessable or discoverable by an attacker.
b. At the prompt, click the link to sign in and enter the credentials for thetest_developer user.
c. Review the access being requested, and click Approve.
The browser is redirected to a URL similar to the following:
http://example.org/redirect#token_type=bearer&access_token=-i_Ows8j7JYu0p07jOFMEA..&expires_in=3600
When registering the OAuth client, you specified http://example.org/redirectas the Redirect URI. On completion of the approval request, the browser isredirected to this registered redirect URI. Appended to the URI is theinformation about the access token that was generated for the approval.
In a real application, the third party application would respond to the redirect tothe redirect URI by caching the access token, redirecting to another page toshow the user that they are now authorized to access the REST API, andincluding the access token in every subsequent request to the REST API.However, in this tutorial you just make note of the access token value andmanually create a HTTP request with the access token included, as explainedin the next major step.
The value of the access token (which in the preceding example is -i_Ows8j7JYu0p07jOFMEA..) will change on every approval.
Note that the access token expires. In the preceding example it expires after3600 seconds (&expires_in=3600), that is, one hour.
3. Issue an authorized request.
After an access token has been acquired, the client application must rememberthe access token and include it with every request to the protected resource. Theaccess token must be included in the HTTP Authorization request header(explained at http://tools.ietf.org/html/rfc2616#section-14.8) as in the followingexample:
Host: localhost:8080GET /ords/ordstest/test/emp/Authorization: Bearer -i_Ows8j7JYu0p07jOFMEA..
To emulate creating a valid HTTP request, use the cURL command line tool (ifnecessary, install cURL). In a real application this request would be performed bythe client making an HTTP request, such as an XMLHttpRequest. For example:
curl -i -H'Authorization: Bearer -i_Ows8j7JYu0p07jOFMEA..' http://localhost:8080/ords/ordstest/test/emp/
However, in this example replace -i_Ows8j7JYu0p07jOFMEA.. with the access tokenvalue that you previously noted.
Output similar to the following JSON document should be displayed:
HTTP/1.1 200 OKContent-Type: application/jsonTransfer-Encoding: chunked
Appendix FRegister an OAuth Client Application
F-22
{ "items":[ {"empno":7369,"ename":"SMITH","job":"CLERK","mgr":7902,"hiredate":"1980-12-17T00:00:00Z","sal":800,"comm":null,"deptno":20}, {"empno":7499,"ename":"ALLEN","job":"SALESMAN","mgr":7698,"hiredate":"1981-02-20T00:00:00Z","sal":1600,"comm":300,"deptno":30}, {"empno":7521,"ename":"WARD","job":"SALESMAN","mgr":7698,"hiredate":"1981-02-22T00:00:00Z","sal":1250,"comm":500,"deptno":30}, {"empno":7566,"ename":"JONES","job":"MANAGER","mgr":7839,"hiredate":"1981-04-01T23:00:00Z","sal":2975,"comm":null,"deptno":20}, {"empno":7654,"ename":"MARTIN","job":"SALESMAN","mgr":7698,"hiredate":"1981-09-27T23:00:00Z","sal":1250,"comm":1400,"deptno":30}, {"empno":7698,"ename":"BLAKE","job":"MANAGER","mgr":7839,"hiredate":"1981-04-30T23:00:00Z","sal":2850,"comm":null,"deptno":30}, {"empno":7782,"ename":"CLARK","job":"MANAGER","mgr":7839,"hiredate":"1981-06-08T23:00:00Z","sal":2450,"comm":null,"deptno":10} ], "hasMore":true, "limit":7, "offset":0, "count":7, "links":[ {"rel":"self","href":"http://localhost:8080/ords/ordstest/test/emp/"}, {"rel":"describedby","href":"http://localhost:8080/metadata-catalog/test/emp/"}, {"rel":"first","href":"http://localhost:8080/ords/ordstest/test/emp/"}, {"rel":"next","href":"http://localhost:8080/ords/ordstest/test/emp/?offset=7"} ]}
However, if the Authorization header is omitted, then the status 401 Unauthorizedis returned instead.
See Also:
http://curl.haxx.se/
Appendix FRegister an OAuth Client Application
F-23

Appendix F
Register an OAuth Client Application
F-24
Index
Aaccess token
acquiring, D-12securing, D-19using, D-14
Apache Tomcatabout, 1-23configuring Oracle REST Data Services
images, 1-23deploying to, 1-22downloading, 1-23
authenticationagainst WebLogic and GlassFish user
repositories, 3-75
Bbequeath connection, 1-25browser origins, D-15
Ccommand-line interface, 1-4configdir command
locating configuration files, B-1locating configuration folder, B-1
configuration file editable parametersapex.excel2collection, B-3apex.excel2collection.onecollection, B-3jdbc.MaxConnectionReuseCount, B-7jdbc.MinLimit, B-7security.requestValidationFunction, B-9security.verifySSL, B-9soda.defaultLimit, B-9soda.maxLimit, B-9
configuration filesformat of, B-2locating using configdir command, B-1
configuration foldersetting location, B-1structure of, B-1
CORS (Cross Origin Resource Sharing), D-15CREATE_CLIENT procedure, 6-1CREATE_ROLE procedure, 5-1
CREATE_SERVICE procedure (deprecated), 5-1Cross Origin Resource Sharing (CORS), D-15Cross Site Request Forgery (CSRF) attacks,
D-13CSRF (Cross Site Request Forgery) attacks,
D-13cURL, 3-5
Ddatabase users, 1-4defaults.xml
configuration fileOracle REST Data Services, C-1
enabling debug tracing, C-1enabling detailed request error messages,
C-1defaults.xmll, file format, B-2DEFINE_HANDLER procedure, 5-4DEFINE_MODULE procedure, 5-6DEFINE_PARAMETER procedure, 5-7DEFINE_PRIVILEGE procedure, 5-9DEFINE_SERVICE procedure, 5-11DEFINE_TEMPLATE procedure, 5-14DELETE_CLIENT procedure, 6-2DELETE_MODULE procedure, 5-15DELETE_PRIVILEGE procedure, 5-16DELETE_ROLE procedure, 5-16deploy options
Apache Tomcat, 1-22deployment options
GlassFish Server, 1-19Oracle WebLogic Server, 1-15
DERconverting private key to DER, 1-13
downloadingApache Tomcat, 1-23GlassFish Server, 1-20Oracle WebLogic Server, 1-15
DROP_REST_FOR_SCHEMA procedure, 5-17
EENABLE_OBJECT procedure, 5-17ENABLE_SCHEMA procedure, 5-18
Index-1
GGlassFish Server
about, 1-20creating a WAR file for images, 1-20deploy to, 1-19downloading, 1-20installing the deployment, 1-21, 1-24
GRANT_CLIENT_ROLE procedure, 6-3graphical user interface administration, 1-10
Iimage gallery example, D-1installation options
standalone mode, 1-12installation overview, 1-3
JJava EE application servers
about supported, 1-2JSON
using to pass parameters, 3-32
Mmultiple database configuration
about the request URL, 2-1configuring additional databases, 2-2routing request rules, 2-3routing requests based on URL prefix, 2-4
NNoSQL
and Oracle REST Data Services, 4-1
OOAUTH package
CREATE_CLIENT, 6-1DELETE_CLIENT, 6-2GRANT_CLIENT_ROLE, 6-3RENAME_CLIENT, 6-4REVOKE_CLIENT_ROLE, 6-4UPDATE_CLIENT, 6-5
OAuth2, default behavior, 1-11Oracle GlassFish Server
launching Administration Console, 1-21Oracle REST Data Services
about, 1-1about upgrading, 1-24
Oracle REST Data Services (continued)administering with graphical user interface,
1-10bequeath connection, 1-25caching, 2-5configuration file
defaults.xml, C-1configuration files, B-1configuring, 1-3, 1-6, 2-1configuring multiple databases, 2-1configuring with command-line interface, 1-4,
1-6database users, 1-4developing RESTful services, 2-5downloading, 1-3environment, 2-5Excel settings, 2-5installation overview, 1-3installing, 1-3PL/SQL API
PL/SQL API for Oracle REST DataServices, 3-80
pre- and post- processing, 2-5running in standalone mode, 1-12security, 2-5system requirements, 1-2using with NoSQL, 4-1
Oracle REST Data Services configuration fileenabling debug tracing, C-1enabling detailed request error messages,
C-1Oracle WebLogic Server
about, 1-15deploy to, 1-15downloading, 1-15installing, 1-15installing the deployment, 1-17
ORDS packageCREATE_ROLE, 5-1CREATE_SERVICE (deprecated), 5-1DEFINE_HANDLER, 5-4DEFINE_MODULE, 5-6DEFINE_PARAMETER, 5-7DEFINE_PRIVILEGE, 5-9DEFINE_SERVICE, 5-11DEFINE_TEMPLATE, 5-14DELETE_MODULE, 5-15DELETE_PRIVILEGE, 5-16DELETE_ROLE, 5-16DROP_REST_FOR_SCHEMA, 5-17ENABLE_OBJECT, 5-17ENABLE_SCHEMA, 5-18PUBLISH_MODULE, 5-19RENAME_MODULE, 5-20RENAME_PRIVILEGE, 5-21
Index
Index-2
ORDS package (continued)RENAME_ROLE, 5-21SET_MODULE_ORIGINS_ALLOWED, 5-22SET_URL_MAPPING, 5-23
Ppassing parameters
using JSON, 3-32using query strings, 3-40using route patterns, 3-36
private keyconverting to DER, 1-13
PUBLISH_MODULE procedure, 5-19
RRENAME_CLIENT procedure, 6-4RENAME_MODULE procedure, 5-20RENAME_PRIVILEGE procedure, 5-21RENAME_ROLE procedure, 5-21resource handler, 3-3resource module, 3-3resource template, 3-3RESTful services
about, 3-2accessing from third-party application, D-11configuring for cross-origin resource sharing,
D-15developing, 2-5getting started with, 3-2image gallery example, D-1integrating with existing group/role models,
3-78sample services, 3-53securing, D-8terminology, 3-3user roles, 3-72using cURL, 3-5
REVOKE_CLIENT_ROLE procedure, 6-4role-mapping.xml file, 3-78
route pattern, 3-3
SSame Origin Policy, D-15SET_MODULE_ORIGINS_ALLOWED
procedure, 5-22SET_URL_MAPPING procedure, 5-23SQL Developer Oracle REST Data Services
Administration, 1-10standalone mode
starting, 1-12stopping the server, 1-14
standalone mode, running in, 1-12structure of configuration folder, B-1supported Java EE application servers, 1-2system requirements, 1-2
Ttroubleshooting
enabling debug tracing, C-1enabling detailed request error messages,
C-1
UUPDATE_CLIENT procedure, 6-5upsert operation, 3-15URI pattern, 3-3URI template, 3-3url-mapping.xml
file format, B-2request rules routing, B-2
user roles for RESTful services, 3-72using query strings
to pass optional parameters, 3-40using route patterns
for passing required parameters, 3-36
Index
3

Index
Index-4