installation guide · 1170.1-2002; ‘structural design actions: part 1 permanent, imposed and...
TRANSCRIPT

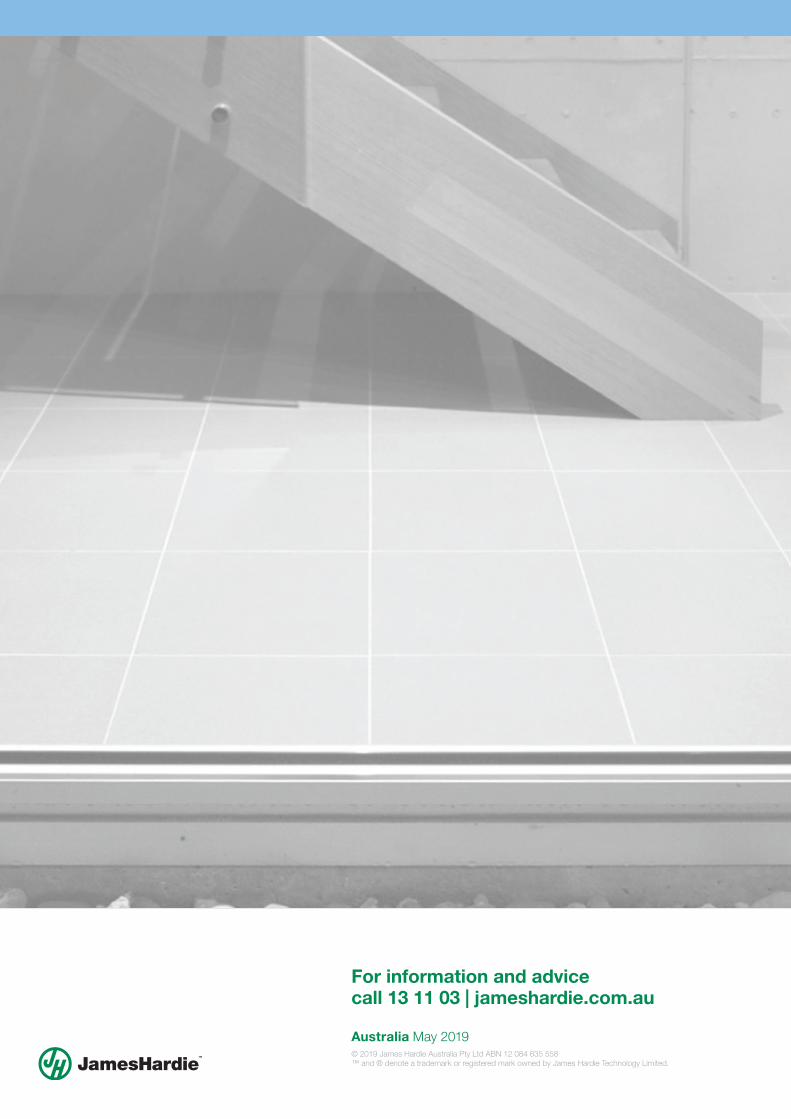
INTERIOR
Australia May 2019
Make sure your information is up to date. When specifying or installing James Hardie™ products, ensure that you have the current technical information and guides. If in doubt, or you need more information, visit www.jameshardie.com.au or Ask James Hardie™ on 13 11 03.
HardiePanel™ Compressed Sheet
Installation Guide
2 HARDIEPANEL™ COMPRESSED SHEET INTERIORS INSTALLATION GUIDE
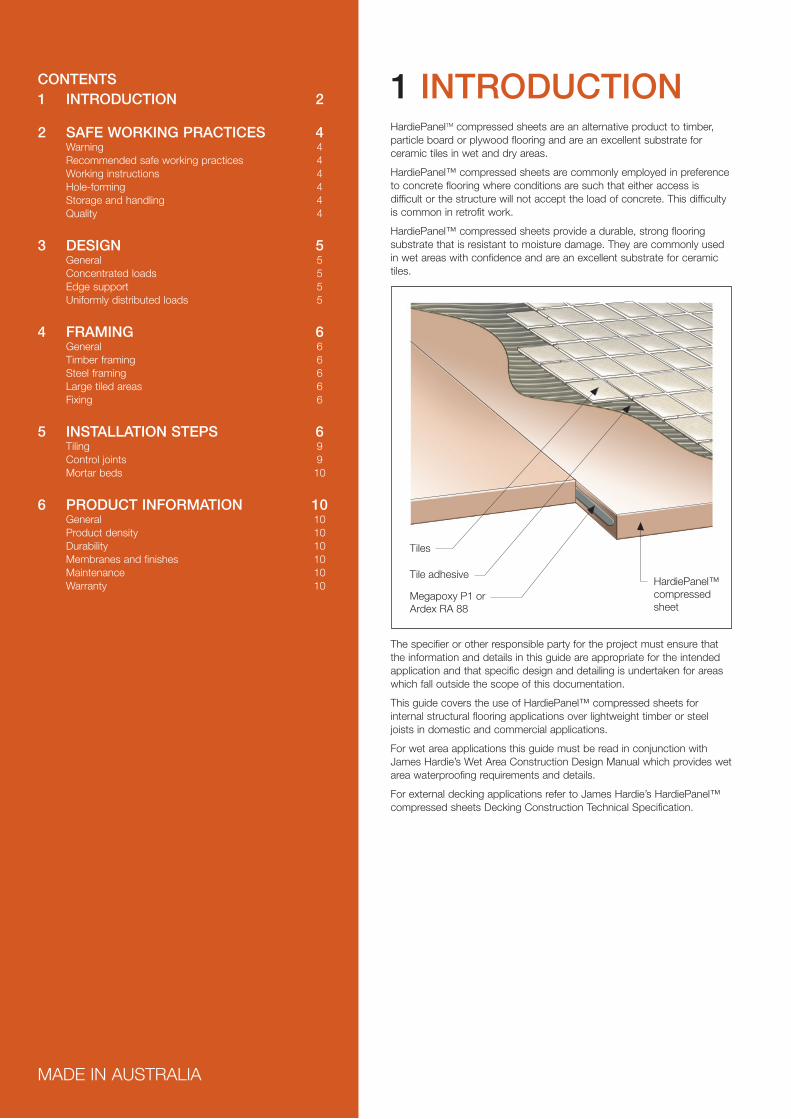
HardiePanelTM compressed sheets are an alternative product to timber, particle board or plywood flooring and are an excellent substrate for ceramic tiles in wet and dry areas.
HardiePanel™ compressed sheets are commonly employed in preference to concrete flooring where conditions are such that either access is difficult or the structure will not accept the load of concrete. This difficulty is common in retrofit work.
HardiePanel™ compressed sheets provide a durable, strong flooring substrate that is resistant to moisture damage. They are commonly used in wet areas with confidence and are an excellent substrate for ceramic tiles.
1 INTRODUCTIONCONTENTS1 INTRODUCTION 2
2 SAFE WORKING PRACTICES 4 Warning 4 Recommended safe working practices 4 Working instructions 4 Hole-forming 4 Storage and handling 4 Quality 4
3 DESIGN 5 General 5 Concentrated loads 5 Edge support 5 Uniformly distributed loads 5
4 FRAMING 6 General 6 Timber framing 6 Steel framing 6 Large tiled areas 6 Fixing 6
5 INSTALLATION STEPS 6 Tiling 9 Control joints 9 Mortar beds 10
6 PRODUCT INFORMATION 10 General 10 Product density 10 Durability 10 Membranes and finishes 10 Maintenance 10 Warranty 10
MADE IN AUSTRALIA
The specifier or other responsible party for the project must ensure that the information and details in this guide are appropriate for the intended application and that specific design and detailing is undertaken for areas which fall outside the scope of this documentation.
This guide covers the use of HardiePanel™ compressed sheets for internal structural flooring applications over lightweight timber or steel joists in domestic and commercial applications.
For wet area applications this guide must be read in conjunction with James Hardie’s Wet Area Construction Design Manual which provides wet area waterproofing requirements and details.
For external decking applications refer to James Hardie’s HardiePanel™ compressed sheets Decking Construction Technical Specification.
Megapoxy P1 orArdex RA 88
Tile adhesive HardiePanel™compressedsheet
Tiles
HARDIEPANEL™ COMPRESSED SHEET INTERIORS INSTALLATION GUIDE 3
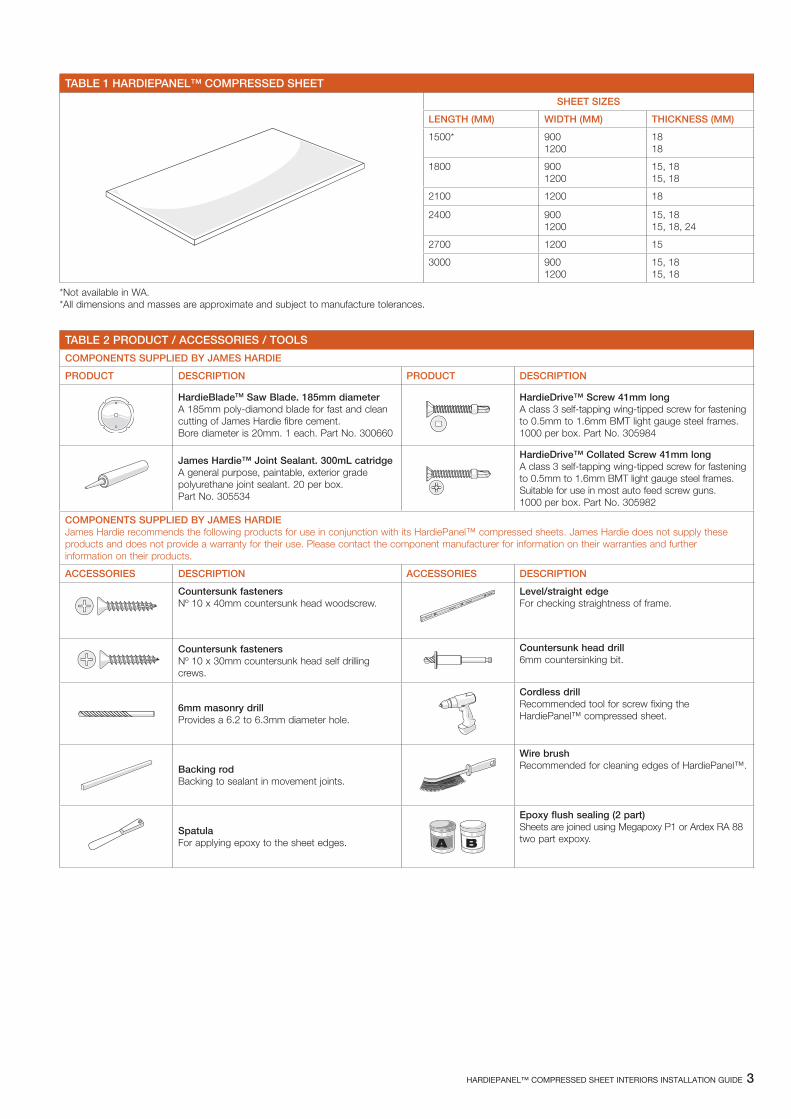
*Not available in WA. *All dimensions and masses are approximate and subject to manufacture tolerances.
TABLE 1 HARDIEPANEL™ COMPRESSED SHEET
SHEET SIZES
LENGTH (MM) WIDTH (MM) THICKNESS (MM)
1500* 9001200
1818
1800 9001200
15, 1815, 18
2100 1200 18
2400 9001200
15, 1815, 18, 24
2700 1200 15
3000 9001200
15, 1815, 18
TABLE 2 PRODUCT / ACCESSORIES / TOOLS
COMPONENTS SUPPLIED BY JAMES HARDIE
PRODUCT DESCRIPTION PRODUCT DESCRIPTION
HardieBladeTM Saw Blade. 185mm diameter A 185mm poly-diamond blade for fast and clean cutting of James Hardie fibre cement. Bore diameter is 20mm. 1 each. Part No. 300660
HardieDrive™ Screw 41mm longA class 3 self-tapping wing-tipped screw for fastening to 0.5mm to 1.6mm BMT light gauge steel frames. 1000 per box. Part No. 305984
James Hardie™ Joint Sealant. 300mL catridgeA general purpose, paintable, exterior grade polyurethane joint sealant. 20 per box. Part No. 305534
HardieDrive™ Collated Screw 41mm longA class 3 self-tapping wing-tipped screw for fastening to 0.5mm to 1.6mm BMT light gauge steel frames. Suitable for use in most auto feed screw guns. 1000 per box. Part No. 305982
COMPONENTS SUPPLIED BY JAMES HARDIE James Hardie recommends the following products for use in conjunction with its HardiePanel™ compressed sheets. James Hardie does not supply these products and does not provide a warranty for their use. Please contact the component manufacturer for information on their warranties and further information on their products.
ACCESSORIES DESCRIPTION ACCESSORIES DESCRIPTION
Countersunk fasteners Nº 10 x 40mm countersunk head woodscrew.
Level/straight edgeFor checking straightness of frame.
Countersunk fastenersNº 10 x 30mm countersunk head self drilling crews.
Countersunk head drill6mm countersinking bit.
6mm masonry drill Provides a 6.2 to 6.3mm diameter hole.
Cordless drillRecommended tool for screw fixing the HardiePanel™ compressed sheet.
Backing rod Backing to sealant in movement joints.
Wire brushRecommended for cleaning edges of HardiePanel™.
SpatulaFor applying epoxy to the sheet edges.
Epoxy flush sealing (2 part)Sheets are joined using Megapoxy P1 or Ardex RA 88 two part expoxy.
4 HARDIEPANEL™ COMPRESSED SHEET INTERIORS INSTALLATION GUIDE
2 SAFE WORKING PRACTICES
WORKING INSTRUCTIONS Refer to recommended safe working practices before starting any cutting or machining of product.
HardieBladeTM Saw Blade The HardieBlade™ Saw Blade used with a dust-reducing saw and HEPA vacuum extraction allows for fast, clean cutting of James Hardie™ fibre cement products. A dust-reducing saw uses a dust deflector or a dust collector which can be connected to a vacuum system. When sawing, clamp a straight-edge to the sheet as a guide and run the saw base plate along the straight edge when making the cut.
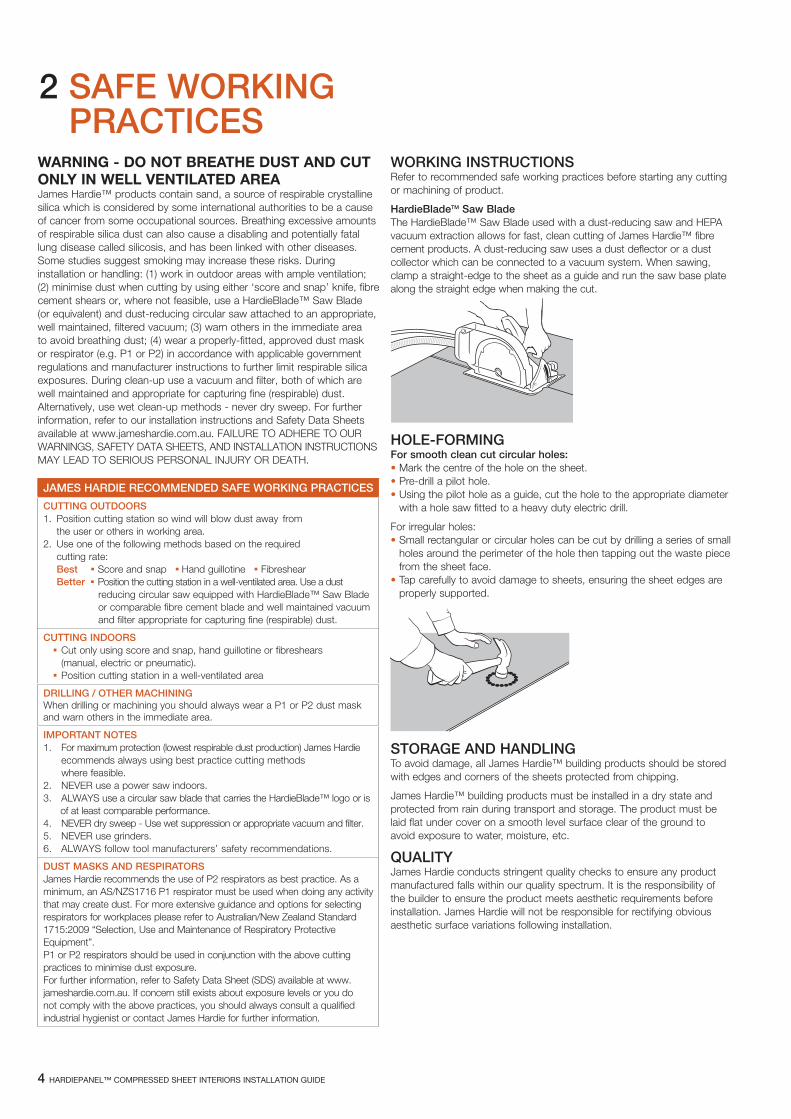
HOLE-FORMINGFor smooth clean cut circular holes:• Mark the centre of the hole on the sheet.• Pre-drill a pilot hole.• Using the pilot hole as a guide, cut the hole to the appropriate diameter
with a hole saw fitted to a heavy duty electric drill.
For irregular holes:• Small rectangular or circular holes can be cut by drilling a series of small
holes around the perimeter of the hole then tapping out the waste piece from the sheet face.
• Tap carefully to avoid damage to sheets, ensuring the sheet edges are properly supported.
STORAGE AND HANDLING To avoid damage, all James Hardie™ building products should be stored with edges and corners of the sheets protected from chipping.
James Hardie™ building products must be installed in a dry state and protected from rain during transport and storage. The product must be laid flat under cover on a smooth level surface clear of the ground to avoid exposure to water, moisture, etc.
QUALITY James Hardie conducts stringent quality checks to ensure any product manufactured falls within our quality spectrum. It is the responsibility of the builder to ensure the product meets aesthetic requirements before installation. James Hardie will not be responsible for rectifying obvious aesthetic surface variations following installation.
WARNING - DO NOT BREATHE DUST AND CUT ONLY IN WELL VENTILATED AREAJames Hardie™ products contain sand, a source of respirable crystalline silica which is considered by some international authorities to be a cause of cancer from some occupational sources. Breathing excessive amounts of respirable silica dust can also cause a disabling and potentially fatal lung disease called silicosis, and has been linked with other diseases. Some studies suggest smoking may increase these risks. During installation or handling: (1) work in outdoor areas with ample ventilation;(2) minimise dust when cutting by using either ‘score and snap’ knife, fibre cement shears or, where not feasible, use a HardieBlade™ Saw Blade (or equivalent) and dust-reducing circular saw attached to an appropriate, well maintained, filtered vacuum; (3) warn others in the immediate area to avoid breathing dust; (4) wear a properly-fitted, approved dust mask or respirator (e.g. P1 or P2) in accordance with applicable government regulations and manufacturer instructions to further limit respirable silica exposures. During clean-up use a vacuum and filter, both of which are well maintained and appropriate for capturing fine (respirable) dust. Alternatively, use wet clean-up methods - never dry sweep. For further information, refer to our installation instructions and Safety Data Sheets available at www.jameshardie.com.au. FAILURE TO ADHERE TO OUR WARNINGS, SAFETY DATA SHEETS, AND INSTALLATION INSTRUCTIONS MAY LEAD TO SERIOUS PERSONAL INJURY OR DEATH.
JAMES HARDIE RECOMMENDED SAFE WORKING PRACTICES
CUTTING OUTDOORS1. Position cutting station so wind will blow dust away from the user or others in working area.2. Use one of the following methods based on the required cutting rate: Best n Score and snap n Hand guillotine n Fibreshear Better n Position the cutting station in a well-ventilated area. Use a dust reducing circular saw equipped with HardieBlade™ Saw Blade or comparable fibre cement blade and well maintained vacuum and filter appropriate for capturing fine (respirable) dust.
CUTTING INDOORS n Cut only using score and snap, hand guillotine or fibreshears (manual, electric or pneumatic). n Position cutting station in a well-ventilated area
DRILLING / OTHER MACHININGWhen drilling or machining you should always wear a P1 or P2 dust mask and warn others in the immediate area.
IMPORTANT NOTES1. For maximum protection (lowest respirable dust production) James Hardie ecommends always using best practice cutting methods where feasible.2. NEVER use a power saw indoors.3. ALWAYS use a circular saw blade that carries the HardieBlade™ logo or is of at least comparable performance.4. NEVER dry sweep - Use wet suppression or appropriate vacuum and filter.5. NEVER use grinders.6. ALWAYS follow tool manufacturers’ safety recommendations.
DUST MASKS AND RESPIRATORS James Hardie recommends the use of P2 respirators as best practice. As a minimum, an AS/NZS1716 P1 respirator must be used when doing any activity that may create dust. For more extensive guidance and options for selecting respirators for workplaces please refer to Australian/New Zealand Standard 1715:2009 “Selection, Use and Maintenance of Respiratory Protective Equipment”. P1 or P2 respirators should be used in conjunction with the above cutting practices to minimise dust exposure. For further information, refer to Safety Data Sheet (SDS) available at www.jameshardie.com.au. If concern still exists about exposure levels or you do not comply with the above practices, you should always consult a qualified industrial hygienist or contact James Hardie for further information.
HARDIEPANEL™ COMPRESSED SHEET INTERIORS INSTALLATION GUIDE 5
UNIFORMLY DISTRIBUTED LOADS Table 2 sets out the maximum distributed load for joist spacing between 300mm and 600mm.
3 DESIGN
GENERAL National Construction Code (NCC) requires that floor structures be designed to meet the load requirements of Australian Standard AS 1170.1-2002; ‘Structural design actions: Part 1 Permanent, imposed and other actions’. The combinations of dead and live loads are given by Part 0 of that standard.
In residential construction the normal practice is to use 15mm thick sheets supported on joists at 450mm centres, or else 18mm or 24mm sheets supported at 600mm centres. The sheets are fixed so that the lengthwise direction spans across the joists, and in this case there is no need to have trimmers between the joists to support the sheet ends or edges, see page 8.
CONCENTRATED LOADS For residential applications, Table 3.1 of AS/NZS 1170.1 specifies a concentrated load of 1.8kN on a 350mm2 area, which is equivalent to a 21.1mm diameter round or 18.7mm square applicator. As seen in Table 1 below, all HardiePanel™ compressed sheets are able to sustain this load.
For other residential and commercial indoor applications, the concentrated loads of 2.7kN, 3.5kN and 4.5kN and greater are applied over an area of 0.01m2, namely a 100mm square applicator. The selection of the floor sheet thickness therefore depends on the magnitude of the concentrated load.
See section ‘Notes to Table 1 and Table 2’ for further information.
TABLE 1 MAXIMUM ALLOWABLE CONCENTRATED LOAD (kN)
Thickness (mm)
Joist Spacing (mm)
Dry Load Applicator Size 100 x 100mm or 0.01m2
Load Applicator Size 350mm2
15
300 4.7
2.3400 4.5
450 3.6
600 3.1
18 300 6.1 3.3
400 6.1
450 5.6
600 5.0
24 300 14.2 5.1
400 10.0
450 10.0
600 7.4
TABLE 2 MAXIMUM UNIFORMLY DISTRIBUTED LIVE LOAD (KPa)
Thickness (mm)
Span / Joist Spacing (mm)
300 350 400 450 500 600
15 26.4 19.1 14.4 11.2 8.8 5.8*
18 38.4 27.9 21.1 16.5 13.2 8.8
24 69.1 50.4 39.2 30.1 24.1 16.4
The National Construction Code (NCC) specifies higher loads in areas subject to crowd loading, storage of materials and heavy wheel loads. Any additional imposed loads must be considered. In this regard, it is necessary to determine if loads from machinery or other imposed concentrated loads are directly over supporting joists or whether these extraneous loads must also be supported by the flooring sheet.
EDGE SUPPORT1. 18mm thick HardiePanel™ compressed sheets may be installed
without edge support in domestic applications where the maximum unfactored concentrated load is limited to 1.8 kN provided that there are no circumstances where the flooring sheet will become saturated. 18mm HardiePanel™ compressed sheets however shall not be installed without edge support in commercial applications (where the concentrated load is 2.7 kN or greater) under any circumstances.
2. 24mm thick HardiePanel™ compressed sheets may be installed without edge support in domestic applications where the maximum unfactored concentrated load is limited to 1.8 kN.
3. 24mm thick HardiePanel™ compressed sheets may be installed without edge support in commercial applications where the maximum unfactored concentrated load is limited to 4.5 kN.
4. James Hardie recommends that all edges of the sheets be supported in all other non-residential applications.
NOTES TO TABLE 1 AND TABLE 21. In all cases the deflection limit of span/200 under Serviceability Limit
State loading has not been exceeded, except for the figure marked with * where the deflection is 3.8mm (span/160). If the span/200 limit is required (i.e. 3mm deflection), then the load must not exceed 4.6kPa.
2. The above capacities are working loads that need to be factored in accordance with Section 4 of AS 1170.0 to get to Ultimate Limit State (ULS) loading. The worst case partial factor has been assumed in these designs, namely ψs = 1.0 (short term loading in storage areas).
3. A working load of 1kPa has been allowed for partitioning and floor coverings in the establishment of the uniformly distributed loading capacities, noting that all figures are governed by bending strength (not deflection) except for the figure described in Note 1.
4. The concentrated load capacities for the 350mm2 applicator are independent of the joist spacing because the failure mode will be punching shear.
5. James Hardie’s approach to managing potential saturation of its FC flooring systems is that the material will provide – in the air-dry condition – no less than the AS/NZS 1170.1 code-stipulated capacity for concentrated load and then for a temporary period only during saturation, experience a reduction in the safety factors inherent in the design, but without leading to failure.
6. The customer is required as far as possible to keep the floor in a relatively dry state. Building codes require that habitable floors in flood-prone areas of the country be some height above the peak flood level. However, should the floor boards become wet, or even fully saturated (which would require several hours of complete water submersion), some proportion of the point load capacity will be shed, but the capacity would remain above the unfactored design load such that failure will not occur. The capacity of the floor is then fully recovered, as research has confirmed, once the boards dry out.

6 HARDIEPANEL™ COMPRESSED SHEET INTERIORS INSTALLATION GUIDE
5 INSTALLATION STEPS
Step 1 Measure floor joist centres and ensure that correct sheet thickness is used, see page 5.
Floor joistsmust be level
4 FRAMING
GENERAL HardiePanel™ compressed sheet flooring may be fixed to timber or steel joists. The type, size and spacing of the joists should be determined by a structural engineer. The thickness of the timber joist or the flange width of the steel joists should be sufficient (45mm minimum) to allow correct fixing of the HardiePanel™ compressed sheet.
Standard timber or steel joist framing systems are suitable for use with HardiePanel™ compressed sheets.
Joists should be spaced at maximum 450mm centres for 15mm sheets and maximum 600mm centres for 18mm and 24mm sheets.
Joists and trimmers must be 45mm minimum width to allow correct fixing of the HardiePanel™ compressed sheets.
It is preferred to lay the sheets with the long edges across the joists because trimmers are not required between joists to support the long edges of sheets. In this case ends must be supported on the center line of joists. When the sheets are laid along the joists, both the long and short edges of the sheets require continuous support, i.e. trimmers are required at sheet ends. Sheet edges must be supported on the center line of joists and trimmers.
Trimmers may also be provide where higher than normal > 1.8kN concentrated loads may be anticipated. Such loads may be caused by antique baths (i.e. claw and ball), heavy machinery with legs, or where there will be the use of trolleys.
NOTE HardiePanel™ compressed sheet flooring should not be used where steel or hard resin type wheels are employed on materials handling equipment i.e. pallet jacks.
TIMBER FRAMING Use of timber framing must be in accordance with AS 1684 ‘Residential timber-framed construction’ and the framing manufacturer’s specifications. Use only seasoned timber. Unseasoned timber must not be used because it is prone to shrinkage and can cause sheets and frames to move.
“Timber used for house construction must have the level of durability appropriate for the relevant climate and expected service life and conditions including exposure to insect attacks or to moisture, which could cause decay.”
Reference AS 1684.2.
STEEL FRAMING Use of steel framing must be in accordance with AS 3623 ‘Domestic metal framing’ and the framing manufacturers’ specifications. Framing members must be in the range 0.75mm to 1.6mm BMT (base metal thickness).
The steel framing must have the appropriate level of durability required to prevent corrosion.
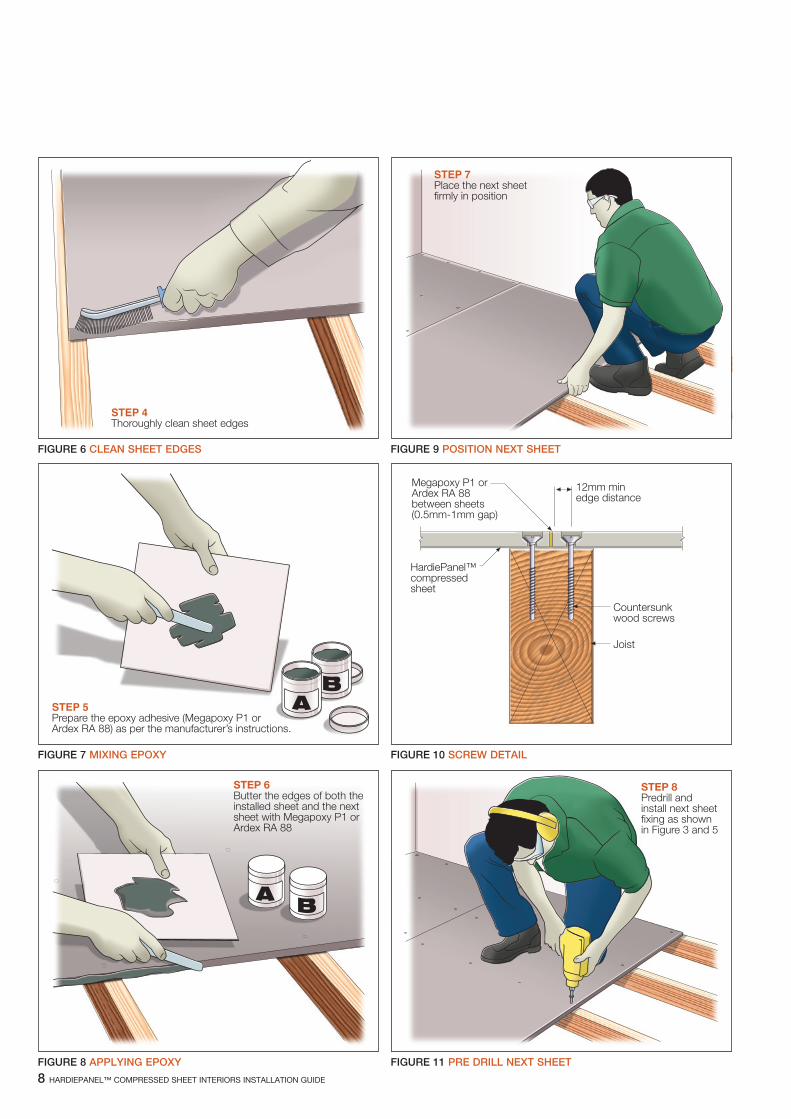
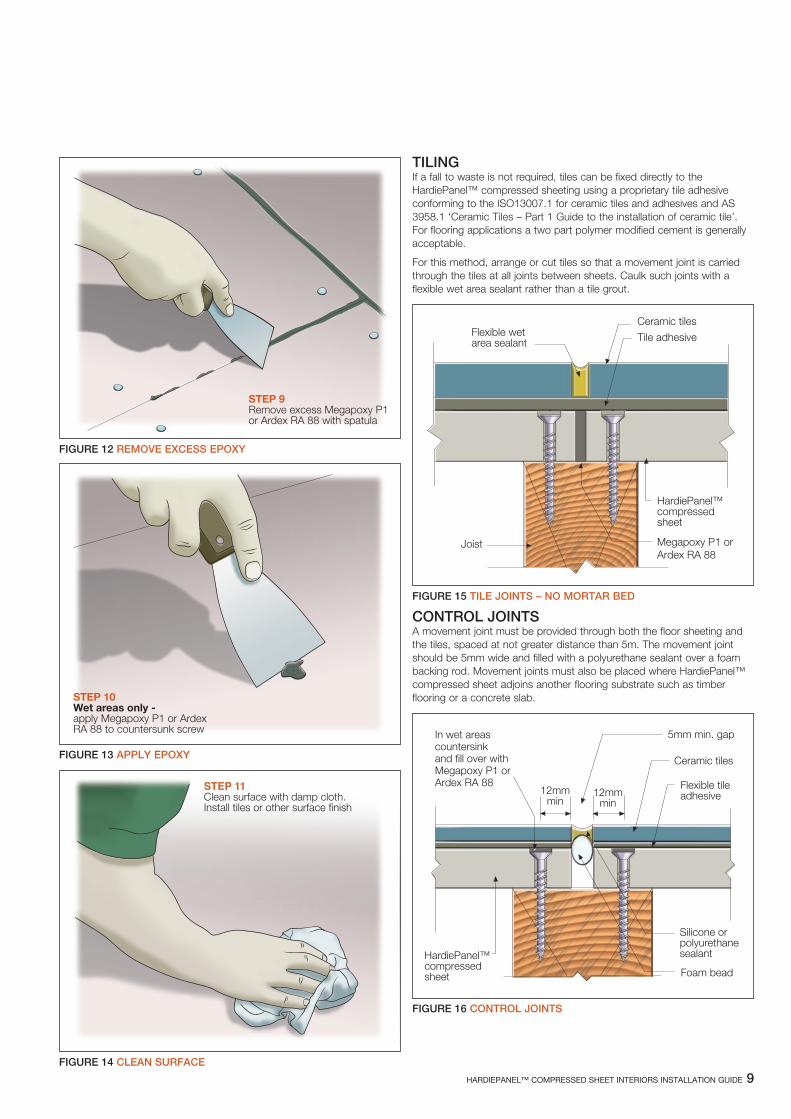
LARGE TILED AREAS A movement joint must be provided through both the floor sheeting and the tiles, spaced at not greater distance than 5m. The movement joint should be 5mm wide and filled with a polyurethane sealant over a foam backing rod.
FIXING Space fixings at a maximum of 450mm along the joists, minimum of 12mm in from the sheet edges, and 50mm minimum from sheet corners, refer to Figure 2.
FIGURE 1 JOIST LAYOUT
FIGURE 2 FIXING REQUIREMENTS
HardiePanel™ compressed sheets may be installed along or across framing. Laying sheets across framing is preferred, as fewer trimmers are needed. Install trimmers where required to support the short ends of the sheets. See ‘Notes to Table 1 and Table 2’.
HARDIEPANEL™ COMPRESSED SHEET INTERIORS INSTALLATION GUIDE 7
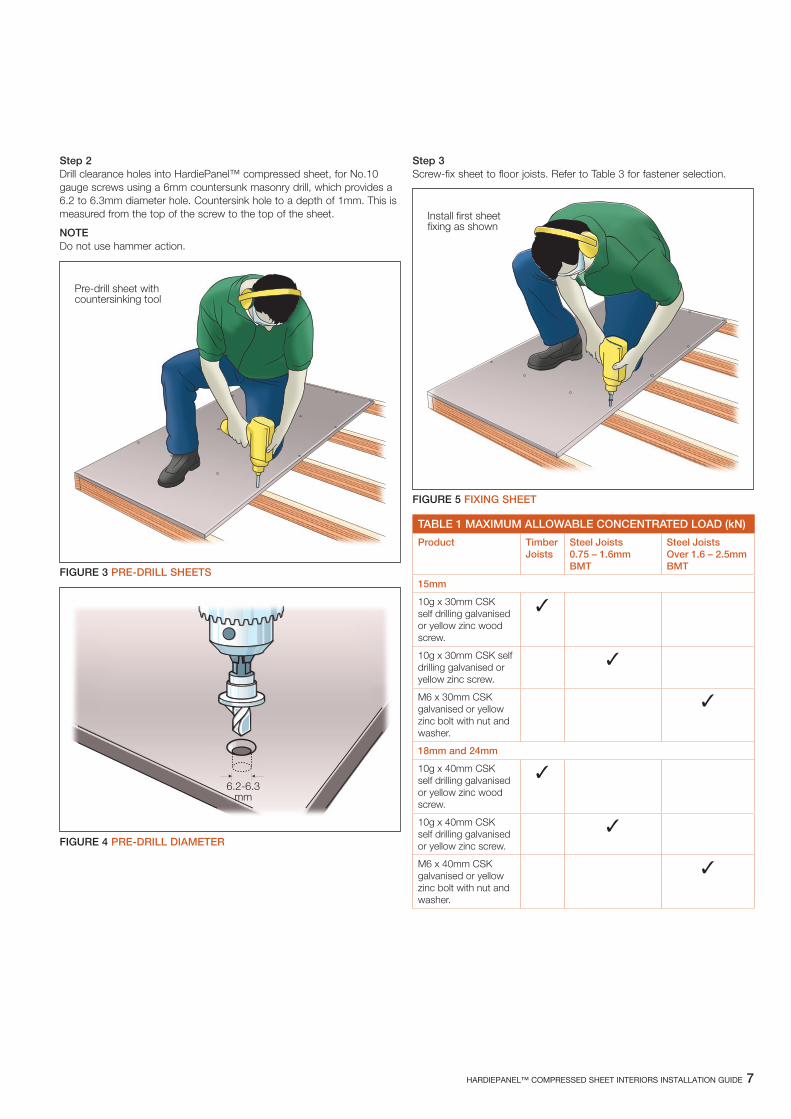
Step 2 Drill clearance holes into HardiePanel™ compressed sheet, for No.10 gauge screws using a 6mm countersunk masonry drill, which provides a 6.2 to 6.3mm diameter hole. Countersink hole to a depth of 1mm. This is measured from the top of the screw to the top of the sheet.
NOTE Do not use hammer action.
FIGURE 3 PRE-DRILL SHEETS
FIGURE 4 PRE-DRILL DIAMETER
Step 3 Screw-fix sheet to floor joists. Refer to Table 3 for fastener selection.
FIGURE 5 FIXING SHEET
TABLE 1 MAXIMUM ALLOWABLE CONCENTRATED LOAD (kN)
Product Timber Joists
Steel Joists 0.75 – 1.6mm BMT
Steel Joists Over 1.6 – 2.5mm BMT
15mm
10g x 30mm CSK self drilling galvanised or yellow zinc wood screw.
3
10g x 30mm CSK self drilling galvanised or yellow zinc screw.
3
M6 x 30mm CSK galvanised or yellow zinc bolt with nut and washer.
3
18mm and 24mm
10g x 40mm CSK self drilling galvanised or yellow zinc wood screw.
3
10g x 40mm CSKself drilling galvanised or yellow zinc screw.
3
M6 x 40mm CSK galvanised or yellow zinc bolt with nut and washer.
3
8 HARDIEPANEL™ COMPRESSED SHEET INTERIORS INSTALLATION GUIDE
Megapoxy P1 orArdex RA 88between sheets(0.5mm-1mm gap)
Countersunkwood screws
Joist
12mm minedge distance
HardiePanel™compressed sheet
FIGURE 6 CLEAN SHEET EDGES
FIGURE 7 MIXING EPOXY
FIGURE 8 APPLYING EPOXY
FIGURE 9 POSITION NEXT SHEET
FIGURE 10 SCREW DETAIL
FIGURE 11 PRE DRILL NEXT SHEET
HARDIEPANEL™ COMPRESSED SHEET INTERIORS INSTALLATION GUIDE 9
FIGURE 12 REMOVE EXCESS EPOXY
FIGURE 13 APPLY EPOXY
FIGURE 14 CLEAN SURFACE
CONTROL JOINTS A movement joint must be provided through both the floor sheeting and the tiles, spaced at not greater distance than 5m. The movement joint should be 5mm wide and filled with a polyurethane sealant over a foam backing rod. Movement joints must also be placed where HardiePanel™ compressed sheet adjoins another flooring substrate such as timber flooring or a concrete slab.
FIGURE 15 TILE JOINTS – NO MORTAR BED
FIGURE 16 CONTROL JOINTS
TILING If a fall to waste is not required, tiles can be fixed directly to the HardiePanel™ compressed sheeting using a proprietary tile adhesive conforming to the ISO13007.1 for ceramic tiles and adhesives and AS 3958.1 ‘Ceramic Tiles – Part 1 Guide to the installation of ceramic tile’. For flooring applications a two part polymer modified cement is generally acceptable.
For this method, arrange or cut tiles so that a movement joint is carried through the tiles at all joints between sheets. Caulk such joints with a flexible wet area sealant rather than a tile grout.
10 HARDIEPANEL™ COMPRESSED SHEET INTERIORS INSTALLATION GUIDE
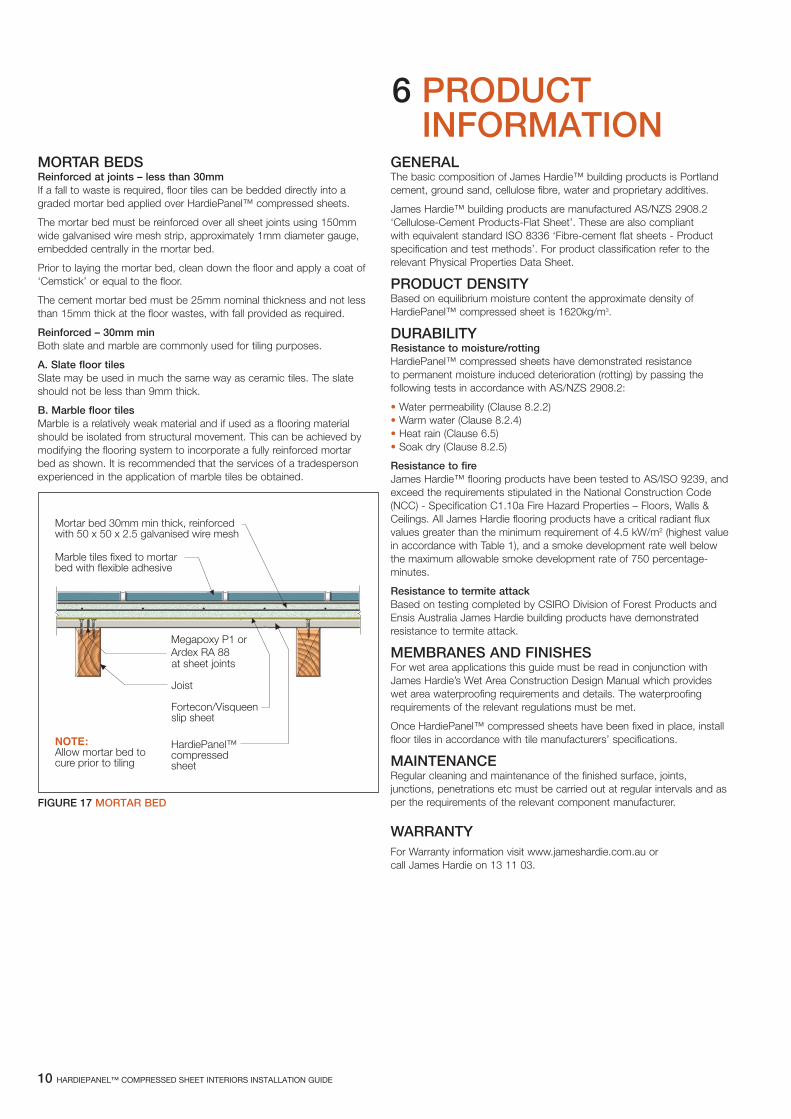
MORTAR BEDS Reinforced at joints – less than 30mm If a fall to waste is required, floor tiles can be bedded directly into a graded mortar bed applied over HardiePanel™ compressed sheets.
The mortar bed must be reinforced over all sheet joints using 150mm wide galvanised wire mesh strip, approximately 1mm diameter gauge, embedded centrally in the mortar bed.
Prior to laying the mortar bed, clean down the floor and apply a coat of ‘Cemstick’ or equal to the floor.
The cement mortar bed must be 25mm nominal thickness and not less than 15mm thick at the floor wastes, with fall provided as required.
Reinforced – 30mm min Both slate and marble are commonly used for tiling purposes.
A. Slate floor tiles Slate may be used in much the same way as ceramic tiles. The slate should not be less than 9mm thick.
B. Marble floor tiles Marble is a relatively weak material and if used as a flooring material should be isolated from structural movement. This can be achieved by modifying the flooring system to incorporate a fully reinforced mortar bed as shown. It is recommended that the services of a tradesperson experienced in the application of marble tiles be obtained.
FIGURE 17 MORTAR BED
6 PRODUCT INFORMATION
GENERAL The basic composition of James Hardie™ building products is Portland cement, ground sand, cellulose fibre, water and proprietary additives.
James Hardie™ building products are manufactured AS/NZS 2908.2 ‘Cellulose-Cement Products-Flat Sheet’. These are also compliant with equivalent standard ISO 8336 ‘Fibre-cement flat sheets - Product specification and test methods’. For product classification refer to the relevant Physical Properties Data Sheet.
PRODUCT DENSITY Based on equilibrium moisture content the approximate density of HardiePanel™ compressed sheet is 1620kg/m3.
DURABILITY Resistance to moisture/rotting HardiePanel™ compressed sheets have demonstrated resistance to permanent moisture induced deterioration (rotting) by passing the following tests in accordance with AS/NZS 2908.2:
• Water permeability (Clause 8.2.2)• Warm water (Clause 8.2.4)• Heat rain (Clause 6.5)• Soak dry (Clause 8.2.5)
Resistance to fire James Hardie™ flooring products have been tested to AS/ISO 9239, and exceed the requirements stipulated in the National Construction Code (NCC) - Specification C1.10a Fire Hazard Properties – Floors, Walls & Ceilings. All James Hardie flooring products have a critical radiant flux values greater than the minimum requirement of 4.5 kW/m2 (highest value in accordance with Table 1), and a smoke development rate well below the maximum allowable smoke development rate of 750 percentage-minutes.
Resistance to termite attack Based on testing completed by CSIRO Division of Forest Products and Ensis Australia James Hardie building products have demonstrated resistance to termite attack.
MEMBRANES AND FINISHES For wet area applications this guide must be read in conjunction with James Hardie’s Wet Area Construction Design Manual which provides wet area waterproofing requirements and details. The waterproofing requirements of the relevant regulations must be met.
Once HardiePanel™ compressed sheets have been fixed in place, install floor tiles in accordance with tile manufacturers’ specifications.
MAINTENANCE Regular cleaning and maintenance of the finished surface, joints, junctions, penetrations etc must be carried out at regular intervals and as per the requirements of the relevant component manufacturer.
WARRANTYFor Warranty information visit www.jameshardie.com.au or call James Hardie on 13 11 03.

HARDIEPANEL™ COMPRESSED SHEET INTERIORS INSTALLATION GUIDE 11
6 PRODUCT INFORMATION
For information and advice call 13 11 03 | jameshardie.com.au
© 2019 James Hardie Australia Pty Ltd ABN 12 084 635 558 ™ and ® denote a trademark or registered mark owned by James Hardie Technology Limited.
Australia May 2019