installation guide - sector fencing...to insert 3 sheets of coloured steel panels into each 2300mm...
TRANSCRIPT
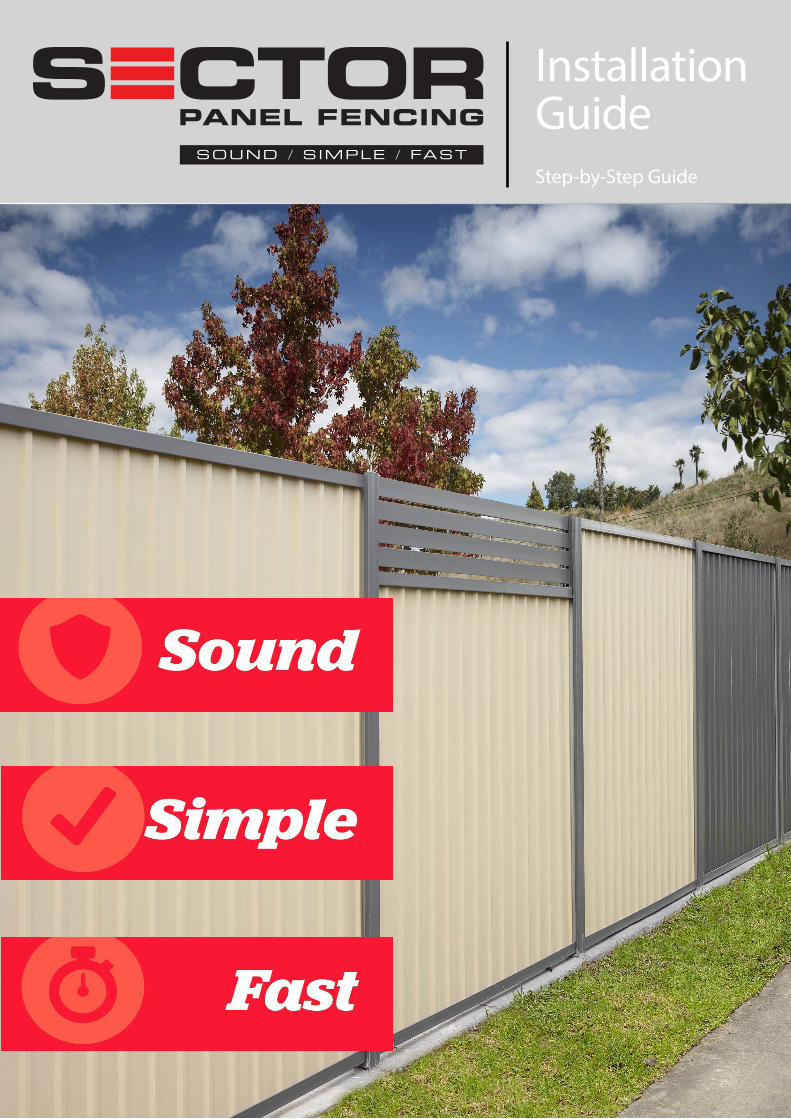
Installation Guide Step-by-Step Guide
2
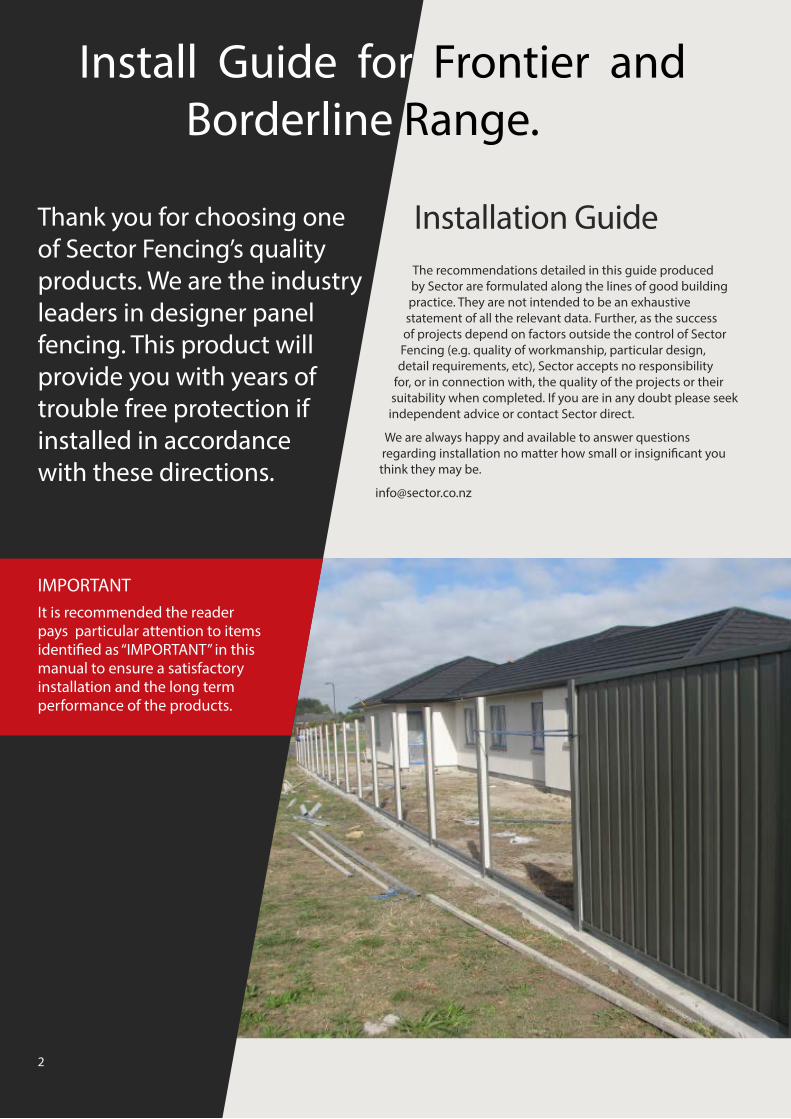
Installation GuideThank you for choosing one of Sector Fencing’s quality products. We are the industry leaders in designer panel fencing. This product will provide you with years of trouble free protection if installed in accordance with these directions.
The recommendations detailed in this guide produced by Sector are formulated along the lines of good building practice. They are not intended to be an exhaustive statement of all the relevant data. Further, as the success of projects depend on factors outside the control of Sector Fencing (e.g. quality of workmanship, particular design, detail requirements, etc), Sector accepts no responsibility
for, or in connection with, the quality of the projects or their suitability when completed. If you are in any doubt please seek independent advice or contact Sector direct.
We are always happy and available to answer questions regarding installation no matter how small or insignificant you think they may be.
IMPORTANTIt is recommended the reader pays particular attention to items identified as “IMPORTANT” in this manual to ensure a satisfactory installation and the long term performance of the products.
2
Install Guide for Frontier and Borderline Range.

3
Components List
Square Spirit Level
5/16” Hex Bit
Drill/Driver
Post Hole Digger
Caulking Gun
Tape Measure
Shovel
Angle Grinder
Circular SawLine Marking Paint
String Line
Tools NeededIt is recommended that you read through this guide before beginning the installation.
5. Post Infill6. Bottom Channel
2. Complete Post
7. Double Post Top
3. Support Bracket 4. Top Channel1. Post Half
3
8. Fence Sheeting
Laser Level (if you can get hold of one.)

4 Sector Installation Guide sectorfencing.co.nz
Installation guide
Determine Boundary line, Posthole Depths and Centres
Please read the wind region and post hole depth charts carefully prior to starting your installation.
We recommend you plan your wall set out/post position on a piece of paper first to save unnecessary digging. Where installation is to take place on uneven or sloped ground, you should also consider the instructions listed under “Additional Information” towards the end of this guide.
Accurately determine the boundary line to where the fence will be installed & mark this with a string line as per the diagram below. In cases where the boundary line is unknown or unclear, a surveyor will need to be engaged.
Note The diagram below is for reference purposes only & shows the wall splitting the boundary line equally; this is may not always be the case depending on your individual circumstances.
Standard Post Centre-to-Centre measurement when using a 2280mm panel will be 2300mm minimum (Plus 5mm extra is an allowable tolerance). This will give you the required clearance when installing the wall panels.
Note: Fence panels may be trimmed with a Angle Grinder if necessary to fit in within an exact measurement (panel cutting procedure is detailed later in this guide).
Postholes can be dug by hand or with a mechanical auger. Use the Footing depth table to determine your posthole depth and diameter.
IMPORTANT Recommended footing depths listed here are for terrain categories 2.5 & 3, within wind regions A & B. If you are building your wall in a Cyclonic wind area, on the top of a hill, adjacent to an escarpment, on a ridge, or in terrain category 1, you will need engineering advice beyond the scope of this publication.
Please contact Sector directly for this information.
Installation guide
Step 1
Installation guide
POST CENTRES2300mm – 2305mm
POST CENTRES2300mm – 2305mm
BOUNDARY LINE
STRING LINEPosition o� the boundary linehalf the depth of the post

5sectorfencing.co.nz Sector Installation Guide
Innovative, Cost Effective, Designer Boundary FencesInnovative, Cost Effective, Designer Boundary FencesInnovative, Cost Effective, Designer Boundary Fences
Footing depth table
Wall Height
Hole depth into firm earth or clay
Hole depth into sand, soft clay or loose earth
Hole Diameter
Wind regions A&B Terrain Categories 2.5 & 3
Approx. concrete required (20 kg bags)
Wind regions A&B Terrain Categories 2.5 & 3
Approx. concrete required (20 kg bags)
Wind regions A&B Terrain Categories 2.5 & 3
900
450mm
1.5 per hole
550mm
1.5 per hole
200mm
1200
550mm
2 per hole
650mm
2 per hole
200mm
1500
600mm
2 per hole
700mm
2.5 per hole
200mm
1800
650mm
2 per hole
800mm
3 per hole
200mm
6 Sector Installation Guide sectorfencing.co.nz
Installation guide
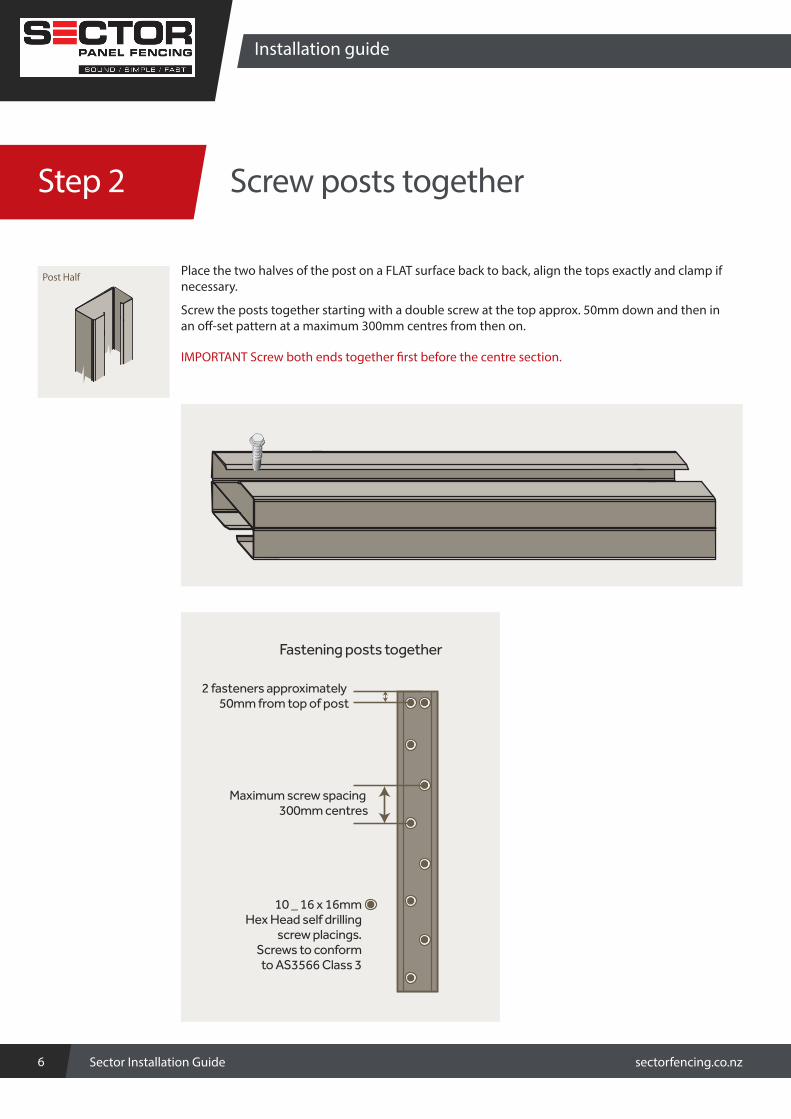
Screw posts together
6 Sector Installation Guide sectorfencing.co.nz
Place the two halves of the post on a FLAT surface back to back, align the tops exactly and clamp if necessary.
Screw the posts together starting with a double screw at the top approx. 50mm down and then in an off-set pattern at a maximum 300mm centres from then on.
IMPORTANT Screw both ends together first before the centre section.
Post Half
Fastening posts together
Maximum screw spacing 300mm centres
10 _ 16 x 16mmHex Head self drilling
screw placings.Screws to conformto AS3566 Class 3
2 fasteners approximately 50mm from top of post
Installation guide
Step 2

7sectorfencing.co.nz Sector Installation Guide
Innovative, Cost Effective, Designer Boundary Fences
Fixing the base brackets to the post
Attach the panel support bracket into the post with the hex head screws supplied.
The measurement the the bracket should be screwed on at should be 6mm more than the length of the sheeting provided.
Example if you have ordered a Frontier fence @1800 high the sheets supplied will be 1805mm long so you screw your brackets on at 1811mm.
7sectorfencing.co.nz Sector Installation Guide
Support Bracket
1803mm
Support bracket
1800mm wall height
Innovative, Cost Effective, Designer Boundary Fences
Step 3
11
8 Sector Installation Guide sectorfencing.co.nz
Installation guide
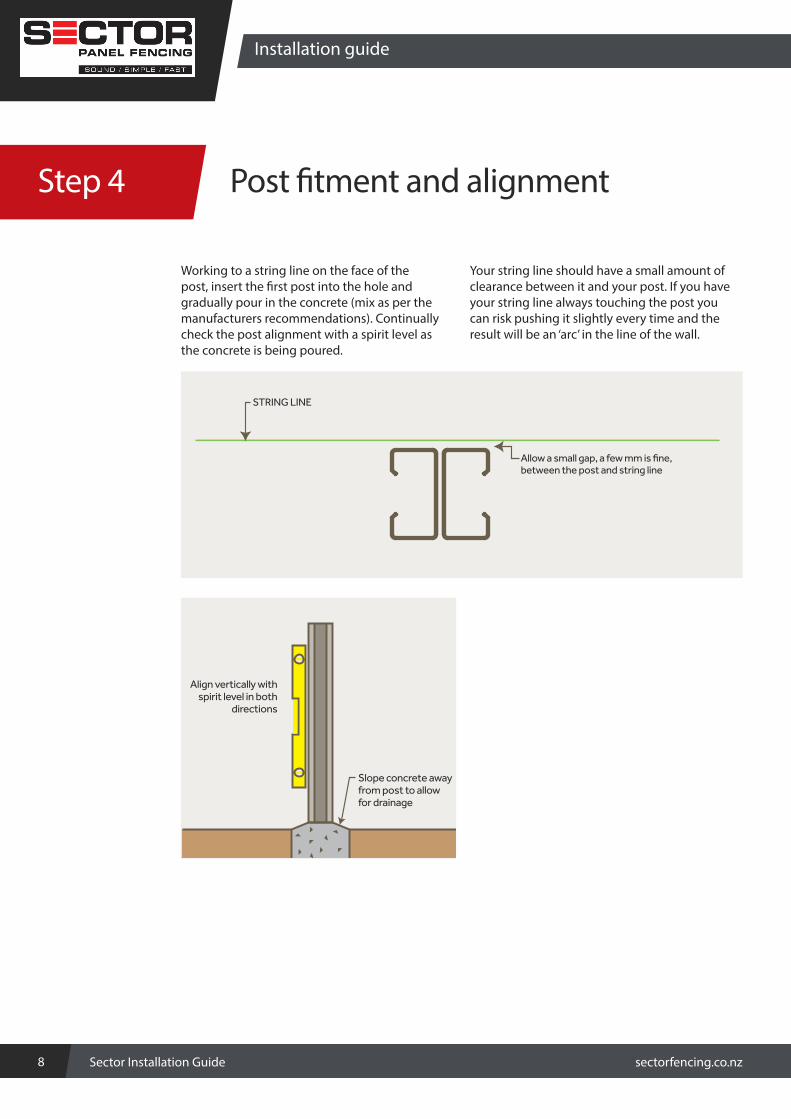
Working to a string line on the face of the post, insert the first post into the hole and gradually pour in the concrete (mix as per the manufacturers recommendations). Continually check the post alignment with a spirit level as the concrete is being poured.
Your string line should have a small amount of clearance between it and your post. If you have your string line always touching the post you can risk pushing it slightly every time and the result will be an ‘arc’ in the line of the wall.
STRING LINE
Allow a small gap, a few mm is fine,between the post and string line
Slope concrete awayfrom post to allowfor drainage
Align vertically withspirit level in both
directions
Post fitment and alignment
Installation guide
Step 4

9sectorfencing.co.nz Sector Installation Guide
Innovative, Cost Effective, Designer Boundary Fences
Spacing consecutive posts
The centre to centre measurement of 2300mm is to allow 10mm per side clearance for the panel. We recommend that you use the bottom channel to act as a spacer between posts
2300mm spacer resting on the brackets (see picture below)
2300mm Post Centres
This example is based on a 2280mm panel being installed
House 1 House 2
IMPORTANT: Allow concrete to cure completely before further assembly. See manufacturers data for concrete curing times.
Corner post by fixing the post halves together
45 degree angle trim
(custom Order Only)3 way T post configurations
Corner using 90x90x2.5 Galvanised SHS
Innovative, Cost Effective, Designer Boundary Fences
Step 5
3 Way corner post configuration
10 Sector Installation Guide sectorfencing.co.nz
Installation guide
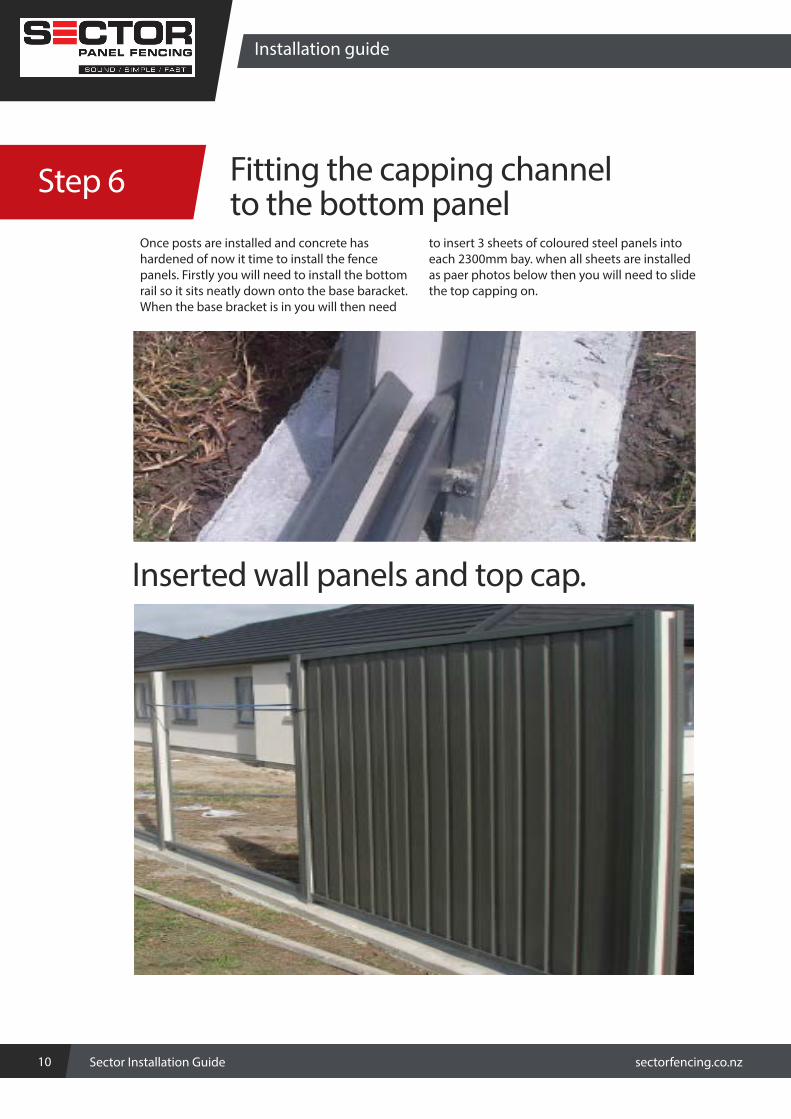
Inserted wall panels and top cap.
Fitting the capping channel to the bottom panel
Installation guide
Step 6
Once posts are installed and concrete has hardened of now it time to install the fence panels. Firstly you will need to install the bottom rail so it sits neatly down onto the base baracket. When the base bracket is in you will then need
to insert 3 sheets of coloured steel panels into each 2300mm bay. when all sheets are installed as paer photos below then you will need to slide the top capping on.
11sectorfencing.co.nz Sector Installation Guide
Innovative, Cost Effective, Designer Boundary FencesInnovative, Cost Effective, Designer Boundary Fences
Step 7 Step in the fence line.
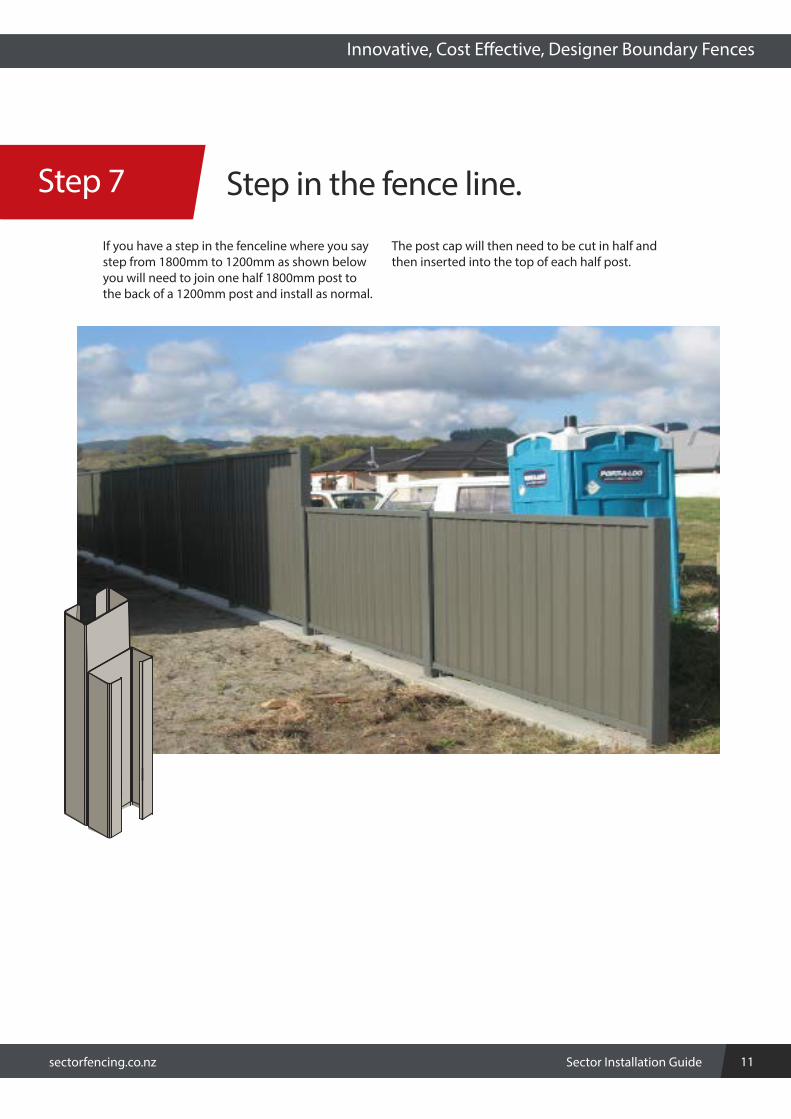
If you have a step in the fenceline where you say step from 1800mm to 1200mm as shown below you will need to join one half 1800mm post to the back of a 1200mm post and install as normal.
The post cap will then need to be cut in half and then inserted into the top of each half post.
12 Sector Installation Guide sectorfencing.co.nz
Step 10
Installation guide
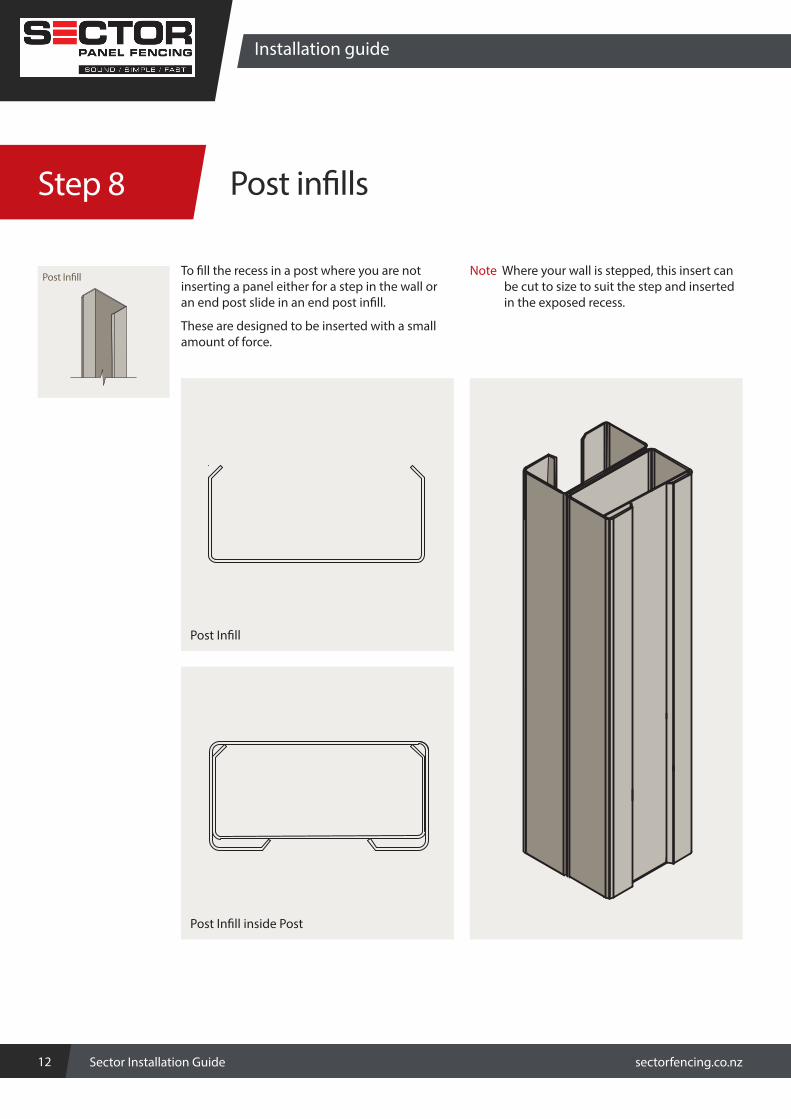
To fill the recess in a post where you are not inserting a panel either for a step in the wall or an end post slide in an end post infill.
These are designed to be inserted with a small amount of force.
Note Where your wall is stepped, this insert can be cut to size to suit the step and inserted in the exposed recess.
Post Infill
Post Infill
Post Infill inside Post
Post infills
Installation guide
Step 8
13sectorfencing.co.nz Sector Installation Guide
Innovative, Cost Effective, Designer Boundary Fences
Fitting the Post Tops
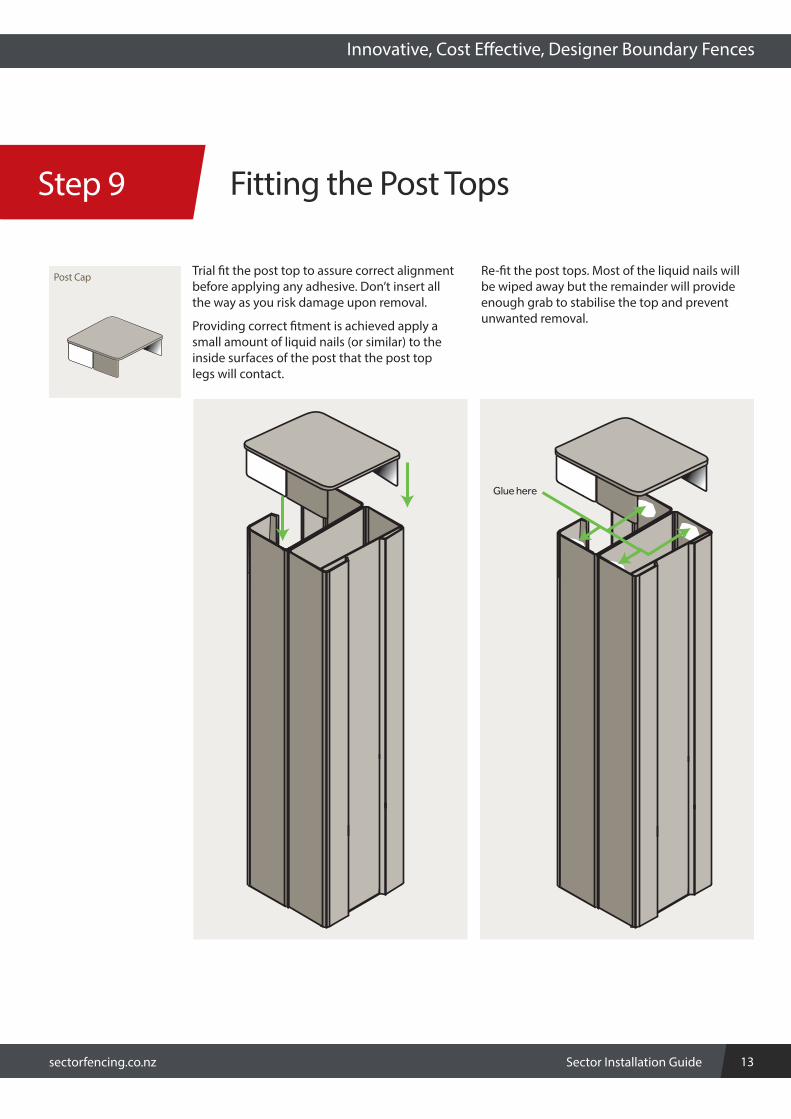
Trial fit the post top to assure correct alignment before applying any adhesive. Don’t insert all the way as you risk damage upon removal.
Providing correct fitment is achieved apply a small amount of liquid nails (or similar) to the inside surfaces of the post that the post top legs will contact.
Re-fit the post tops. Most of the liquid nails will be wiped away but the remainder will provide enough grab to stabilise the top and prevent unwanted removal.
Post Cap
Glue here
Innovative, Cost Effective, Designer Boundary Fences
Step 9
14 Sector Installation Guide sectorfencing.co.nz
Determine Boundary line, Posthole depths & Centres Step 10
Installation guide
Installation guide
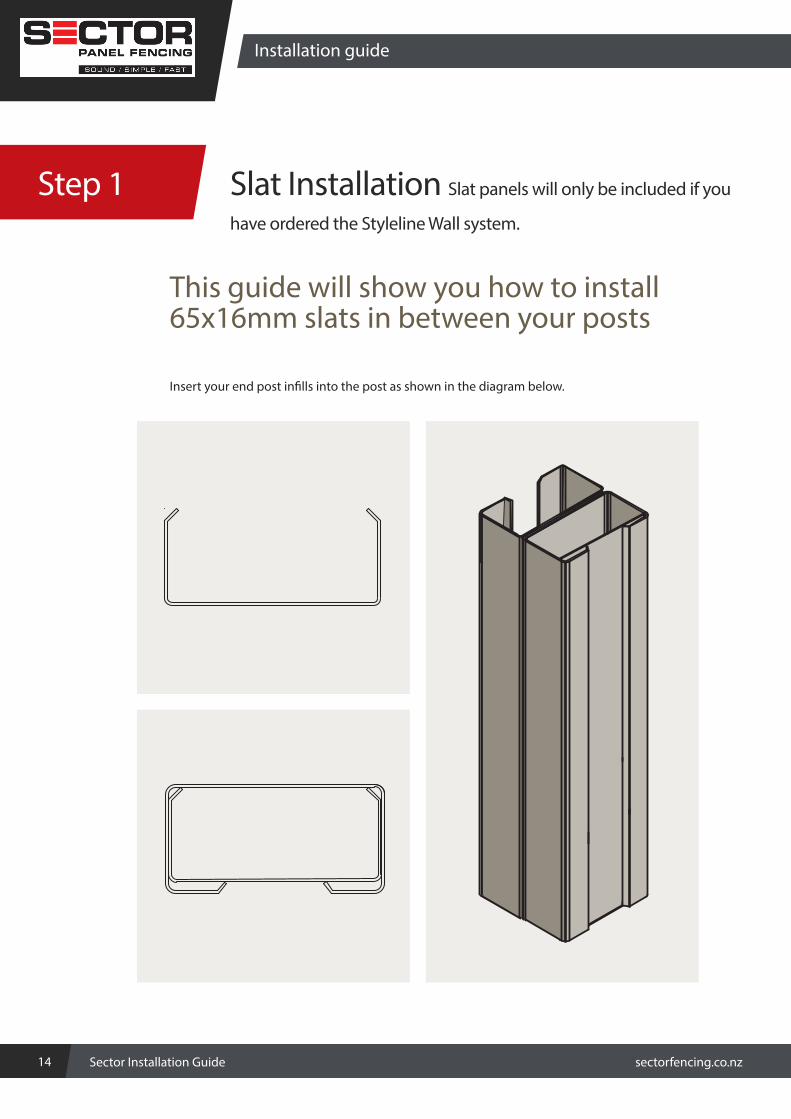
Step 1 Slat Installation Slat panels will only be included if you
have ordered the Styleline Wall system.
This guide will show you how to install 65x16mm slats in between your posts
Insert your end post infills into the post as shown in the diagram below.
15sectorfencing.co.nz Sector Installation Guide
Determine Boundary line, Posthole depths & Centres Step 10
Innovative, Cost Effective, Designer Boundary Fences
Innovative, Cost Effective, Designer Boundary Fences
Step 2
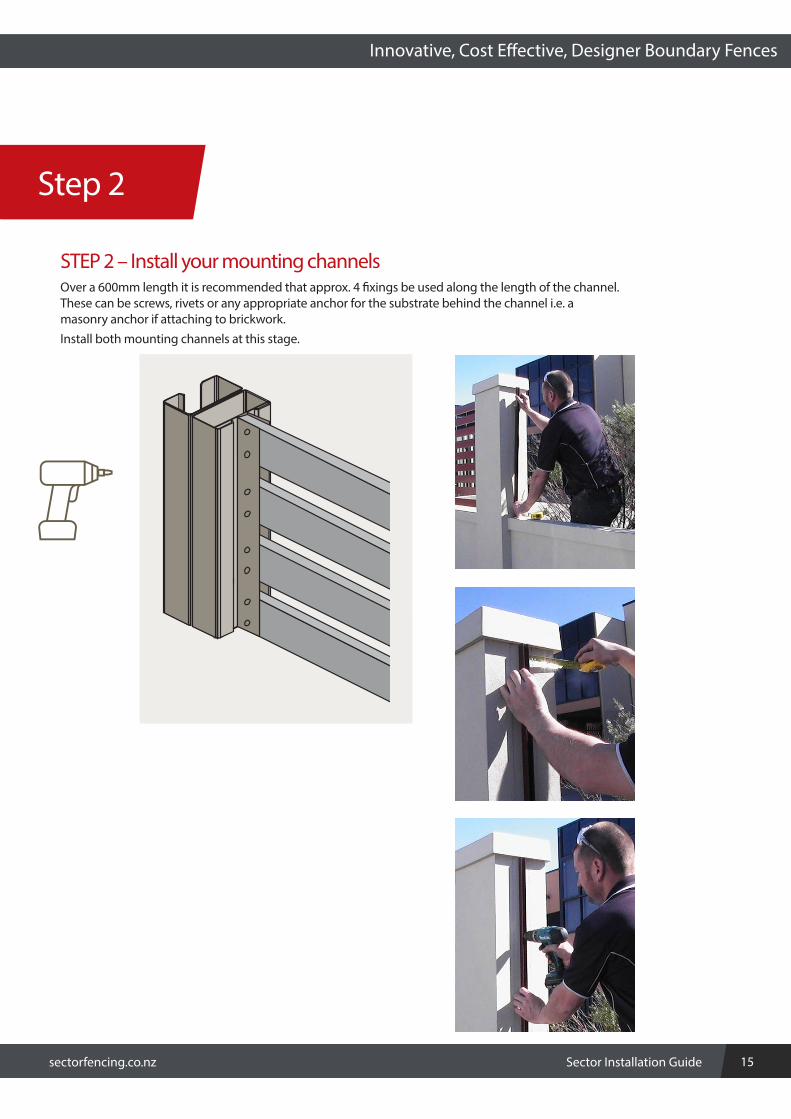
STEP 2 – Install your mounting channelsOver a 600mm length it is recommended that approx. 4 fixings be used along the length of the channel. These can be screws, rivets or any appropriate anchor for the substrate behind the channel i.e. a masonry anchor if attaching to brickwork.Install both mounting channels at this stage.
16 Sector Installation Guide sectorfencing.co.nz
Determine Boundary line, Posthole depths & Centres Step 10
Installation guide
Installation guide
Step 3
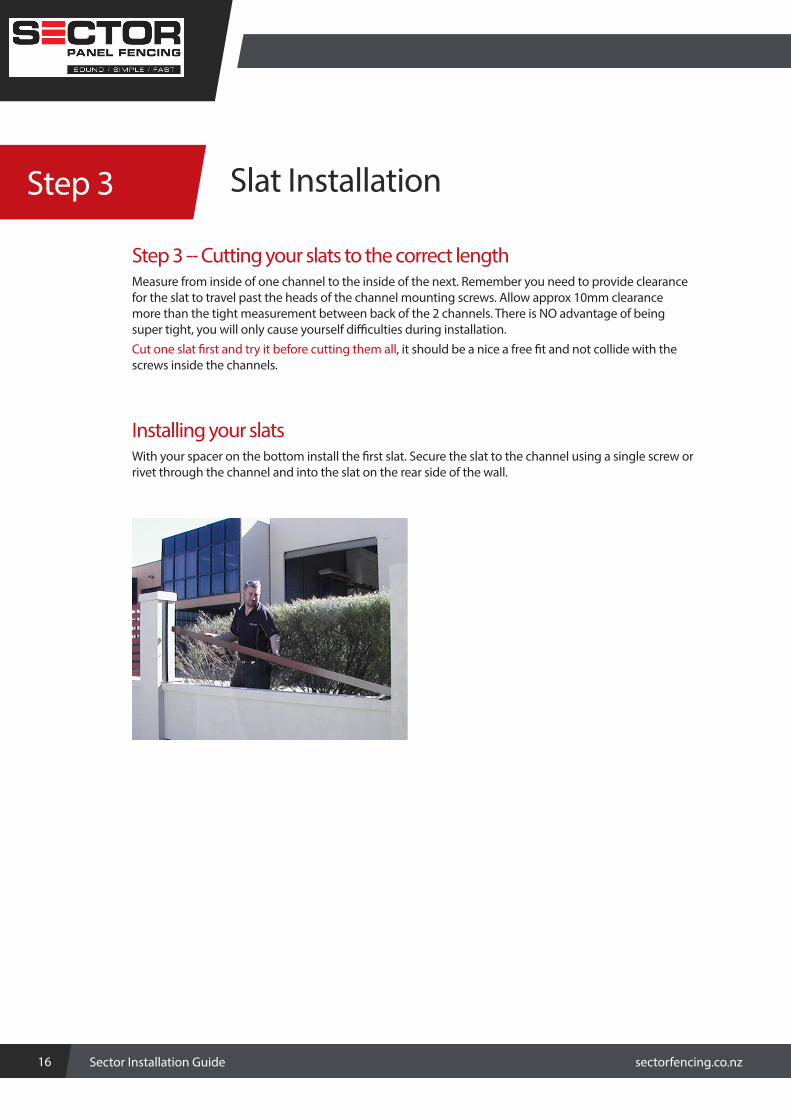
Step 3 -- Cutting your slats to the correct lengthMeasure from inside of one channel to the inside of the next. Remember you need to provide clearance for the slat to travel past the heads of the channel mounting screws. Allow approx 10mm clearance more than the tight measurement between back of the 2 channels. There is NO advantage of being super tight, you will only cause yourself difficulties during installation.Cut one slat first and try it before cutting them all, it should be a nice a free fit and not collide with the screws inside the channels.
Installing your slatsWith your spacer on the bottom install the first slat. Secure the slat to the channel using a single screw or rivet through the channel and into the slat on the rear side of the wall.
Slat Installation

17sectorfencing.co.nz Sector Installation Guide
Determine Boundary line, Posthole depths & Centres Step 10
Innovative, Cost Effective, Designer Boundary Fences
Step 3
Innovative, Cost Effective, Designer Boundary Fences
STEP 4 – Slat spacingBe sure that the spacer you use wont mark the finished surface of the slat. Plastic spacers/shims in the correct size as pictured below can be purchased from most hardware stores. Drill and rivet only one side (normally the inside of the fence as you put the slats in.NOTE – gaps always ‘grow’ so if you determine that you need a 10mm gap a spacer/packer closer to 9 - 9.5mm would probably be more suitable. This is just something to be aware and cautious of.
Continue this for all slats until installed. Secure one slat at a time and keep moving your spacer up as you go.
Slat InstallationStep 4

18 Sector Installation Guide sectorfencing.co.nz
Installation guide – Additional Information
This will generally be the most complex part of any installation. Please take the time to draw it out on a piece of paper before setting any posts in the ground. Having to remove posts that are concreted in can be very disheartening! And remember we are always here to help you get it right so if you are unsure please ask.
There are three methods for dealing with sloping ground. The examples below are based around an 1800mm high wall.
Method 1 Stepping the bottom of your panels & maintaining a minimum 1800mm wall height.Note This will leave a void/gap under one end of your wall panels.
Method 2 Raking/cutting the base panel & maintaining a maximum 1800mm wall height.Note This will leave no void/gap under your wall panels but will reduce your wall height at one end.
Method 3 Raking/cutting the base & maintaining a minimum 1800mm wall height at one end and a taller wall height at the low end of the slope. (please note if you are trying to acheive this method you would need some longer sheets to suit the extra height. This need to be taken into consideration at time of ordering.)Note This will leave no void/gap under your wall panels but will increase your wall height at the lower
end of the slope above 1800mm.
Cutting the panels:
STOP – Wear the appropriate safety equipment for performing the task. Eye wear, hearing protection & a dust mask.
The panels can be cut using a with an angle grinder with a 1mm cutting blade to cut through the sheeting.
Cutting the posts:
STOP – Wear the appropriate safety equipment for performing the task such as, eye wear, hearing protection & a dust mask.
Mark the post and use an angle grinder with a 1mm cutting blade to cut through the post.
Note All cut edges that will remain exposed to the elements will require treating with a zinc rich paint such as ‘cold gal’ or similar.
Cut edges should be put down into the footing wherever possible.
Additional Information Stepping or Raking your wall
Installation guide
Additional

19sectorfencing.co.nz Sector Installation Guide
Innovative, Cost Effective, Designer Boundary Fences
Stepping Method 1 – Maintaining a minimum 1800mm wall heightAs pictured below it should be noted that you will be left with a void at the low end of the slope but you will maintain a minimum 1800mm wall height. In most cases on gradual slopes this void won’t be large and can either be left as is or planted in front of.
1800mm high wall shown
insert end postin�ll here
insert end postin�ll here
Support bracket height= Normal placement for a 1800mm wall
Support bracket height= Normal placement for a 1800mm wall + 100mm for step in wall
1900
1800
example of a 100mm fall over this distance
100
void
void
void
POST CENTRES2300mm – 2305mm
1800
1900
Innovative, Cost Effective, Designer Boundary Fences

20 Sector Installation Guide sectorfencing.co.nz
Stepping Method 2 – Rake/Cut your bottom panel to the slope using 1800mm worth of wall panels You will maintain a maximum height of 1800mm wall height – As pictured below it should be noted that your wall height at the high side of the slope will be reduced by the amount of the rake – in this situation 100mm.
1800mm high wall shown
Support bracket height= Normal placement for a 1800mm wall on both sides of the post
Cut
Cut panel to suit the slope of the ground
1800
1700
1700
1800
Cutting of a panel to suit a 100m rake/slope
N.B. On a larger rake/slope a longer base channel may be required
insert end postin�ll here
insert end postin�ll here
100
1800
1700
1800
example of a 100mm fall over this distance
Installation guide – Additional InformationInstallation guide
Additional

21sectorfencing.co.nz Sector Installation Guide
Innovative, Cost Effective, Designer Boundary Fences
Stepping Method 3 – Rake/Cut your bottom panel to the slope using 1900mm worth of fence panel to
maintain a minimum 1800mm wall height. You will maintain a maximum height of 1800mm wall height – As pictured below it should be noted that your wall height at the high side of the slope will be increased by the amount of the rake – in this situation 100mm.
Depending on the additional height gained by doing this you may require deeper footings and longer posts. Please contact us for specific advice before installation.
1800mm high wall shown
Support bracket height= Normal placement for a 1800mm wall on both sides of the post
Cut
Cut panel to suit the slope of the ground
1800
1700
1800
1900
Cutting of a panel to suit a 100m rake/slope
N.B. On a larger rake/slope a longer base channel may be required
insert end postin�ll here
insert end postin�ll here
100
1900
1800
1900
example of a 100mm fall over this distance
Innovative, Cost Effective, Designer Boundary Fences

22 Sector Installation Guide sectorfencing.co.nz
Installation guide – Additional InformationInstallation guide
Finished Fences
23sectorfencing.co.nz Sector Installation Guide
Innovative, Cost Effective, Designer Boundary Fences
Thank you for Choosing
0800 235 2473 sectorfencing.co.nz