installation guidelines for audi-vw 6-speed …...installation guidelines for audi-vw 6-speed...
TRANSCRIPT
Must Read: At the beginning of transmission fluid and filter service, confirm the ATF temperature is below 30°C. If necessary let the ATF cool to below 30°C. Their are several variations of the Aisin 6-speed transmissions, depending on application. These variations will allow for slight differences in the transmission oil pan shape, filter, and drain / fill plug location. The instructional image references still apply. The Normal transmission fluid filling procedures is by gravity fill. To allow for a quicker flow of ATF into the transmission you may purchase and use ATF pump tool number J91001.
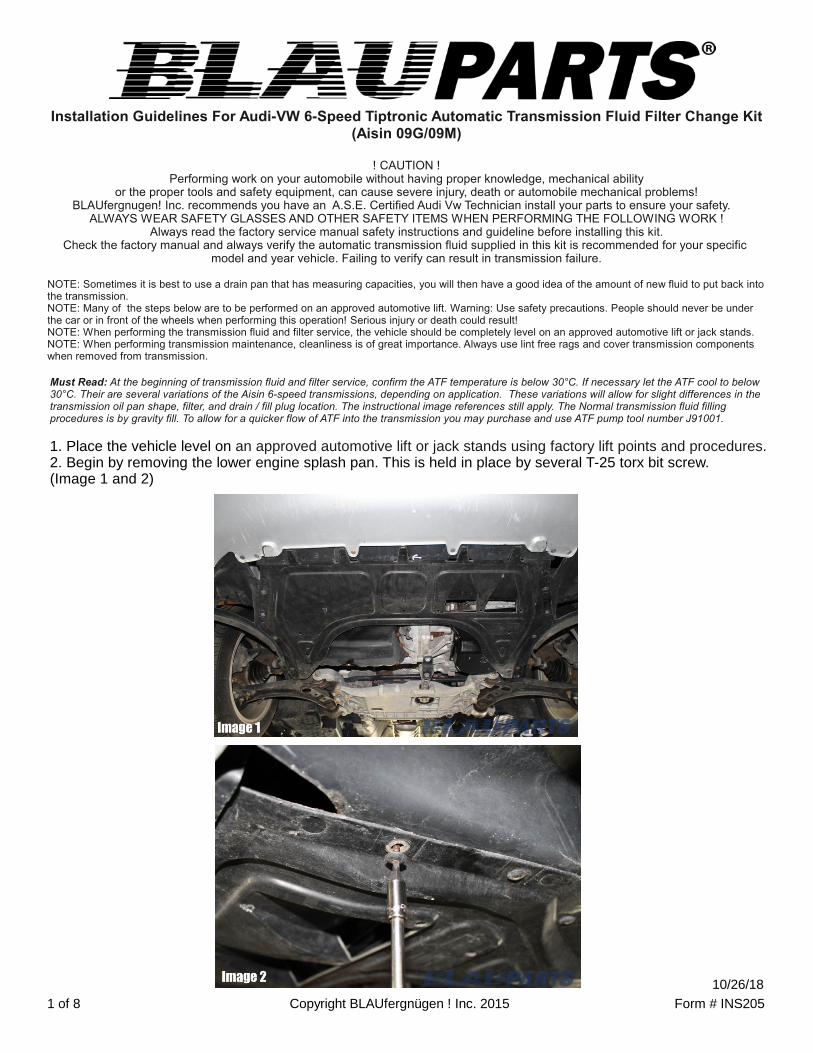
1. Place the vehicle level on an approved automotive lift or jack stands using factory lift points and procedures.2. Begin by removing the lower engine splash pan. This is held in place by several T-25 torx bit screw. (Image 1 and 2)
Installation Guidelines For Audi-VW 6-Speed Tiptronic Automatic Transmission Fluid Filter Change Kit (Aisin 09G/09M)
! CAUTION !Performing work on your automobile without having proper knowledge, mechanical ability
or the proper tools and safety equipment, can cause severe injury, death or automobile mechanical problems!BLAUfergnugen! Inc. recommends you have an A.S.E. Certified Audi Vw Technician install your parts to ensure your safety.
ALWAYS WEAR SAFETY GLASSES AND OTHER SAFETY ITEMS WHEN PERFORMING THE FOLLOWING WORK !Always read the factory service manual safety instructions and guideline before installing this kit.
Check the factory manual and always verify the automatic transmission fluid supplied in this kit is recommended for your specific model and year vehicle. Failing to verify can result in transmission failure.
NOTE: Sometimes it is best to use a drain pan that has measuring capacities, you will then have a good idea of the amount of new fluid to put back into the transmission.NOTE: Many of the steps below are to be performed on an approved automotive lift. Warning: Use safety precautions. People should never be under the car or in front of the wheels when performing this operation! Serious injury or death could result!NOTE: When performing the transmission fluid and filter service, the vehicle should be completely level on an approved automotive lift or jack stands.NOTE: When performing transmission maintenance, cleanliness is of great importance. Always use lint free rags and cover transmission components when removed from transmission.
1 of 8 Copyright BLAUfergnügen ! Inc. 2015 Form # INS205
10/26/18
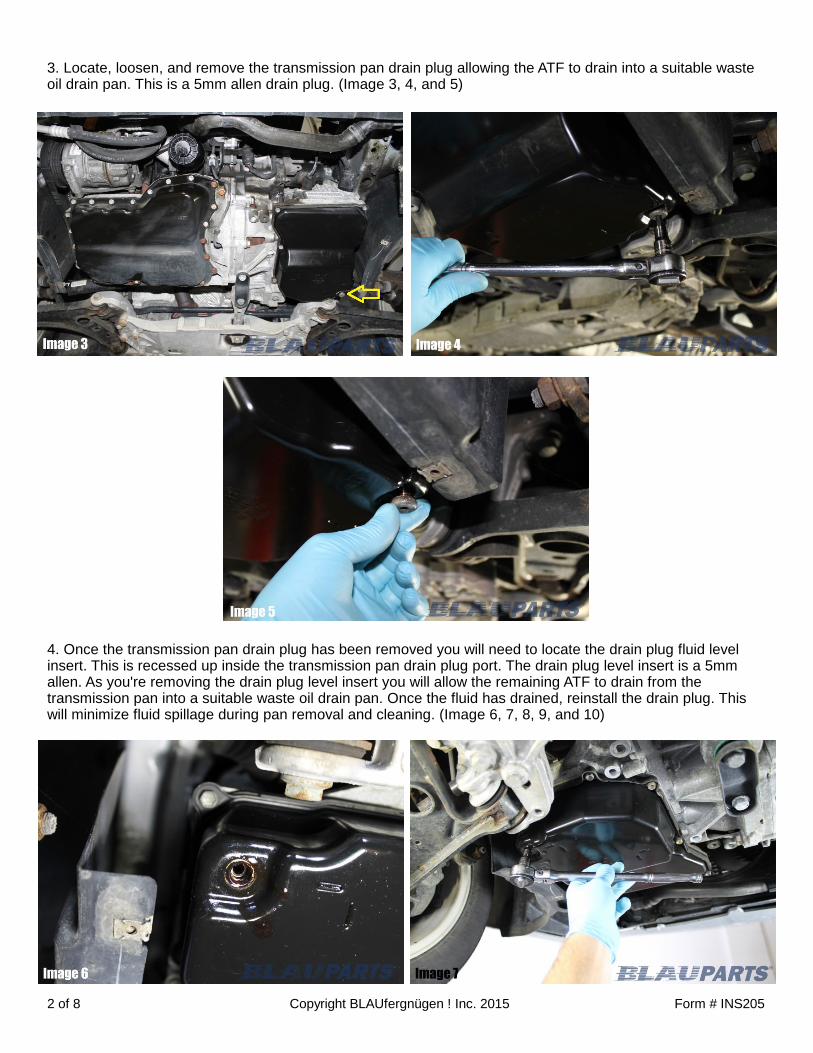
3. Locate, loosen, and remove the transmission pan drain plug allowing the ATF to drain into a suitable waste oil drain pan. This is a 5mm allen drain plug. (Image 3, 4, and 5)
4. Once the transmission pan drain plug has been removed you will need to locate the drain plug fluid level insert. This is recessed up inside the transmission pan drain plug port. The drain plug level insert is a 5mm allen. As you're removing the drain plug level insert you will allow the remaining ATF to drain from the transmission pan into a suitable waste oil drain pan. Once the fluid has drained, reinstall the drain plug. This will minimize fluid spillage during pan removal and cleaning. (Image 6, 7, 8, 9, and 10)
2 of 8 Copyright BLAUfergnügen ! Inc. 2015 Form # INS205

5. Remove the transmission pan. This is held in place by 10mm bolts. Begin by loosening all the transmission pan bolts. Once all the bolts are loose, remove all of the bolts except two at opposite ends of the transmission pan. Lastly, remove the two bolts left well supporting the pan. In most cases there will be a small amount of ATF still in the pan.
(09G style trans pan has 8 bolts total)(09M style trans pan has 9 bolts total)
(Image 11, 12, and 13)
3 of 8 Copyright BLAUfergnügen ! Inc. 2015 Form # INS205
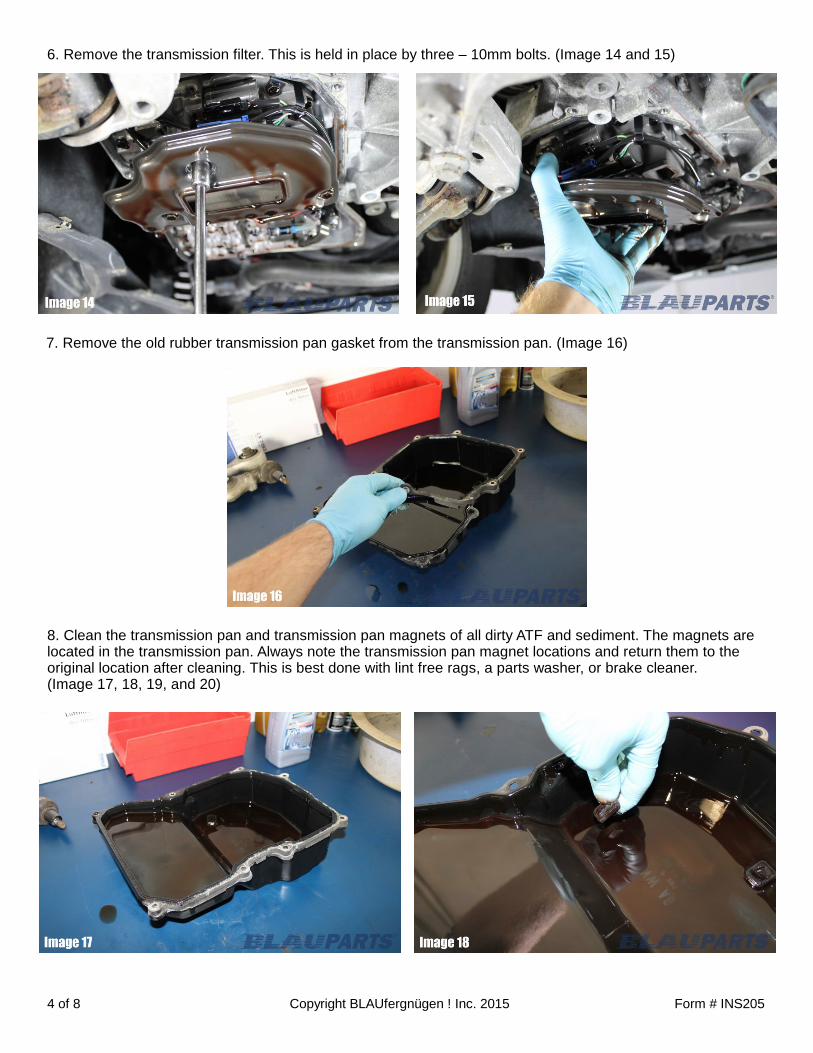
6. Remove the transmission filter. This is held in place by three – 10mm bolts. (Image 14 and 15)
7. Remove the old rubber transmission pan gasket from the transmission pan. (Image 16)
8. Clean the transmission pan and transmission pan magnets of all dirty ATF and sediment. The magnets are located in the transmission pan. Always note the transmission pan magnet locations and return them to the original location after cleaning. This is best done with lint free rags, a parts washer, or brake cleaner.(Image 17, 18, 19, and 20)
4 of 8 Copyright BLAUfergnügen ! Inc. 2015 Form # INS205

9. Clean the transmission pan gasket mating surfaces on both the transmission side and the pan side. Make sure to remove all old gasket material and corrosive buildup. Be careful not to dirty any of the transmission internals and only use lint free rags.10. The 09G/09M transmission filter seals to the transmission by a rubber or cork material which could leave buildup. It is good to check for this build up and clean these gasket mating surfaces to allow for a proper seal of the new transmission filter. If a good seal is not made, this could cause transmission reliability and longevity problems. Be careful not to dirty any of the transmission internals and use lint free rags.11. Install the new transmission filter and evenly torque the three – 10mm mounting bolts to 7 ft. lbs. (Image 21)
12. On a clean bench top insert the transmission pan gasket spacers into the gasket. (Image 22)
5 of 8 Copyright BLAUfergnügen ! Inc. 2015 Form # INS205

13. Install the transmission pan gasket onto the transmission pan, closely aligning the mounting holes. (Image 23)14. Reinstall the transmission pan with gasket onto the transmission. Align the transmission pan mounting holes and install the 10mm mount bolts. First tighten the mounting bolts evenly to a hand tight torque. Next evenly tighten the transmission pan from one side of the transmission pan to the other, torquing the bolts to 7 ft. lbs. (Image 24)
15. Reinstall the transmission fluid level insert, using a 5mm allen into the drain plug port. Leave insert snug and do not over tighten as this is made of plastic. (Image 25)16. Hand tighten the fill adapter onto the transmission pan. Once the fill adapter is installed, slide the fill hose on as pictured. (Image 26)
17. Slide the loose end of the fill hose up in front of the transmission and connect it to the fluid bottles as described in the supplied instructions. Connect the hose to the ATF bottle as described in the supplied instructions. (Image 27)
6 of 8 Copyright BLAUfergnügen ! Inc. 2015 Form # INS205
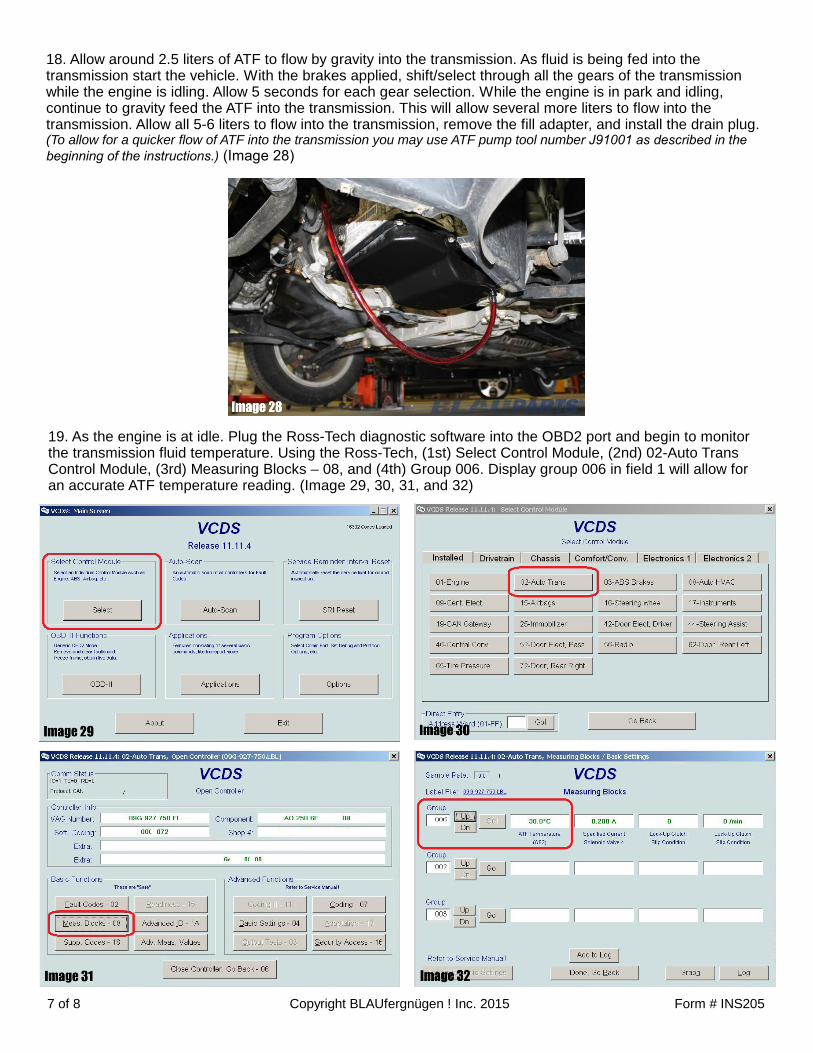
18. Allow around 2.5 liters of ATF to flow by gravity into the transmission. As fluid is being fed into the transmission start the vehicle. With the brakes applied, shift/select through all the gears of the transmission while the engine is idling. Allow 5 seconds for each gear selection. While the engine is in park and idling, continue to gravity feed the ATF into the transmission. This will allow several more liters to flow into the transmission. Allow all 5-6 liters to flow into the transmission, remove the fill adapter, and install the drain plug. (To allow for a quicker flow of ATF into the transmission you may use ATF pump tool number J91001 as described in the beginning of the instructions.) (Image 28)
19. As the engine is at idle. Plug the Ross-Tech diagnostic software into the OBD2 port and begin to monitor the transmission fluid temperature. Using the Ross-Tech, (1st) Select Control Module, (2nd) 02-Auto Trans Control Module, (3rd) Measuring Blocks – 08, and (4th) Group 006. Display group 006 in field 1 will allow for an accurate ATF temperature reading. (Image 29, 30, 31, and 32)
7 of 8 Copyright BLAUfergnügen ! Inc. 2015 Form # INS205
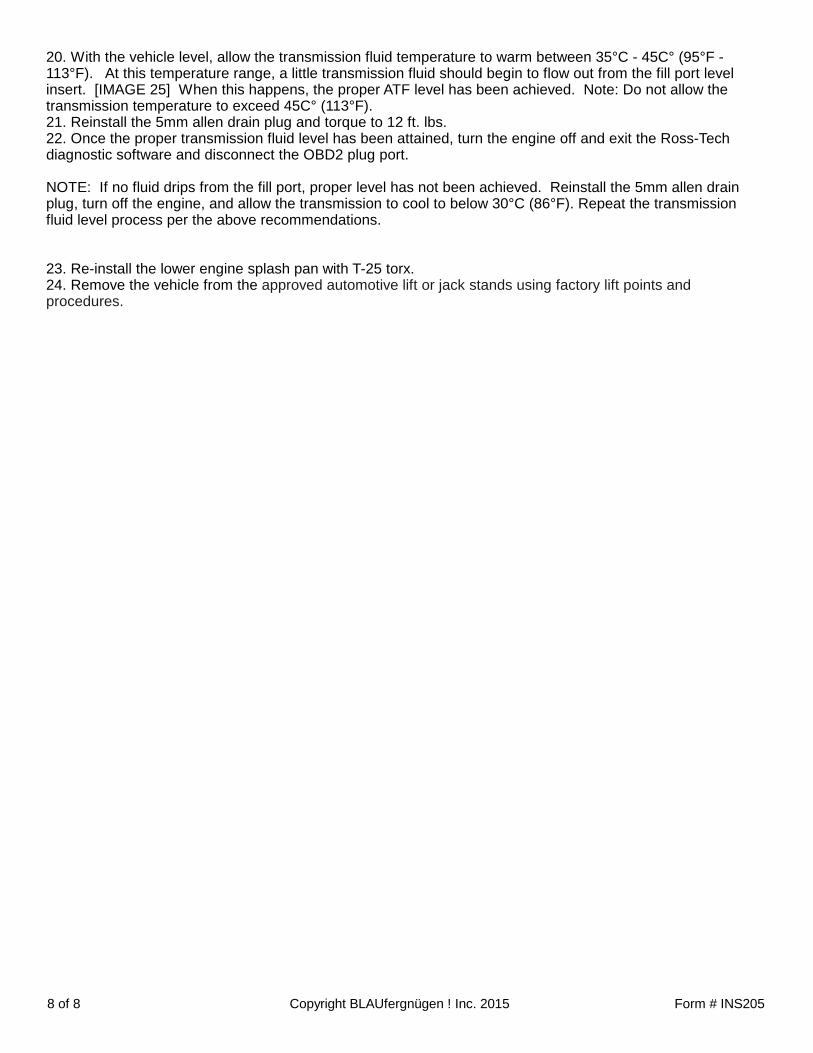
20. With the vehicle level, allow the transmission fluid temperature to warm between 35°C - 45C° (95°F - 113°F). At this temperature range, a little transmission fluid should begin to flow out from the fill port level insert. [IMAGE 25] When this happens, the proper ATF level has been achieved. Note: Do not allow the transmission temperature to exceed 45C° (113°F).21. Reinstall the 5mm allen drain plug and torque to 12 ft. lbs.22. Once the proper transmission fluid level has been attained, turn the engine off and exit the Ross-Tech diagnostic software and disconnect the OBD2 plug port.
NOTE: If no fluid drips from the fill port, proper level has not been achieved. Reinstall the 5mm allen drain plug, turn off the engine, and allow the transmission to cool to below 30°C (86°F). Repeat the transmission fluid level process per the above recommendations.
23. Re-install the lower engine splash pan with T-25 torx.24. Remove the vehicle from the approved automotive lift or jack stands using factory lift points and procedures.
8 of 8 Copyright BLAUfergnügen ! Inc. 2015 Form # INS205