installation instructions and system manager ... - sas support · ii installation instructions and...
TRANSCRIPT

i 26 March 2004
Installation Instructions and System Manager’s Guide for Release 8.2 (TS2M0) of the SAS® System under OS/390®
Table of Contents
Using This Book....................................................................................................................... 1 Contents of this Document ................................................................................................... 1 Terminology ......................................................................................................................... 2 Reference Material ............................................................................................................... 2 Contacting SAS .................................................................................................................... 2
Section I: Installation Instructions ........................................................................................ 3
Part 1, Pre-Installation Checklist........................................................................................... 5 Introduction .......................................................................................................................... 5 Checking System Requirements........................................................................................... 5 Checking Available Disk Space ........................................................................................... 5 Choosing Installation Actions .............................................................................................. 5 Choosing Installation Modes................................................................................................ 6
Part 2, Installing the SAS System .......................................................................................... 9
Introduction .......................................................................................................................... 9 Unloading the Installation Jobs — Run IEBUPDTE............................................................ 9 Enabling minimal cartridge mounts from a Multi 3480 cart media.................................... 10 Specifying Installation Parameters ..................................................................................... 11 Performing Installation Actions.......................................................................................... 16
Action A – Install a new SAS System............................................................................. 16 Action B – Install new products directly to existing SAS libraries. ................................ 17 Action C – Install new products to staging SAS libraries. .............................................. 18 Action D – Copy new products from staging SAS libraries to existing SAS libraries.... 21 Action E – Delete SAS libraries...................................................................................... 22 Action G - Apply renewal SETINIT information to an existing SAS System. ............... 23 Verifying the System Installation.................................................................................... 23 Performing Site-Specific Product Implementation.......................................................... 24
Part 3, Installing SAS System Maintenance and Supplemental Keyword Maintenance 25
Identifying the Contents of Your Media............................................................................. 25 Installing SAS System Maintenance and Supplemental Keyword Maintenance................ 26
Copying Staged Libraries to Production ......................................................................... 26

ii Installation Instructions and System Manager's Guide for the SAS System under OS/390
Part 4, Installation Instructions for SAS Software Translations ...................................... 29 Determine the Two-Character Media and Data Set Code for Your Location and EBCDIC Encoding............................................................................................................................. 30
Languages, Encodings, and Installation Codes ............................................................... 30 Determine User Prefix and Encoding of the Untranslated SAS System to Receive Translations ..................................................................................................................... 30 Determine if NLS Maintenance has been Applied .......................................................... 31 Install NLS Maintenance and/or Translations ................................................................. 32 Copying Staged Libraries to Production ......................................................................... 34
Section II: System Manager’s Guide ................................................................................... 37
Part 1, Setting Up the SAS System....................................................................................... 39 Implementing SAS TSO support ........................................................................................ 39 Customizing Default Options and System Configuration Files.......................................... 41 Selecting a Bundled Configuration..................................................................................... 50
OS/390 non-LPA (ENTRY=SASXA1)........................................................................... 50 OS/390 LPA (ENTRY=SASXAL).................................................................................. 51
Installing the SAS System into the LPA............................................................................. 51 System Configuration for Using SAS with TCP/IP............................................................ 54
Recommended Procedures .............................................................................................. 54 Overview and Software Requirements ............................................................................ 54 Locating the TCPIP.DATA File...................................................................................... 55 Host Name Resolution..................................................................................................... 57 Locating Other TCP/IP Data Sets.................................................................................... 58 UNIX System Services (USS) - Open Edition ................................................................ 59 Diagnosing Configuration Problems ............................................................................... 60 Using SOLVE:TCPaccess ............................................................................................... 60 SAS/C Transient Library................................................................................................. 62 Customized Configuration............................................................................................... 62
Customizing Your SAS CLIST and Cataloged Procedure ................................................. 64 Customizing Your NEWS File ........................................................................................... 68 Installing the SAS SVC Routine......................................................................................... 68 Installing the SAS SMF Exit .............................................................................................. 71
Part 2, Maintaining the SAS System.................................................................................... 75 Renewing Your License ..................................................................................................... 75 Viewing the SAS Notes Library on the World Wide Web. ................................................ 75 Applying Zaps to the SAS System ..................................................................................... 75
Appendix A, Implementing the SAS/ACCESS Interface to ADABAS ............................. 77 Customizing the SAS CLIST and Cataloged Procedure..................................................... 77 Using the NATURAL Security Interface ........................................................................... 78 Using the Samples .............................................................................................................. 78 SAS System Options for this Interface............................................................................... 79 NATURAL Date and Time Support................................................................................... 79 Reentrancy.......................................................................................................................... 80
Appendix B, Implementing SAS/ACCESS Interface to CA-DATACOM/DB Software . 81 Customizing the SAS CLIST and Cataloged Procedure..................................................... 81 Using the Samples .............................................................................................................. 81 SAS System Options for this Interface............................................................................... 82

iii Installation Instructions and System Manager's Guide for the SAS System under OS/390
Appendix C, Implementing the SAS/ACCESS Interface to CA-IDMS............................ 83 Customizing the SAS CLIST and Cataloged Procedure .................................................... 83 SAS/ACCESS DATA Step Interface Enhancement........................................................... 84
Appendix D, Implementing the SAS/ACCESS Interface to DB2...................................... 85 Defining the Interface to DB2 and DB2 Users................................................................... 85 Customizing the SAS CLIST and Cataloged Procedure .................................................... 86
Verifying Installation of the SAS/ACCESS Interface to DB2 ........................................ 87 Creating and Loading the Sample Tables........................................................................... 88 SAS System Options for this Interface............................................................................... 88 Special Consideration for Using the RRS Attachment Facility.......................................... 89
Appendix E, Implementing the SAS/ACCESS Interface to IMS-DL/I............................. 91 Customizing the SAS CLIST and Cataloged Procedure .................................................... 91 Verifying Installation of the SAS/ACCESS Interface to IMS............................................ 93 SAS System Options for this Interface............................................................................... 93
Appendix F, Implementing the SAS/ACCESS Interface to ORACLE............................. 95 Renaming the ORACLE RDBMS Interface Subroutines (required) .................................. 95 Customizing the SAS CLIST and Cataloged Procedure (required).................................... 95 Verifying Installation of the SAS/ACCESS Interface to ORACLE (required) .................. 97 Creating and Loading the Sample Tables (optional) .......................................................... 98
Appendix G, Implementing the SAS/ACCESS Interface to SYSTEM 2000 Data Management Software .......................................................................................................... 99
Customizing the SASS2K CLIST and Cataloged Procedure ............................................. 99 Executing the SASS2K CLIST to Access the SAS System ............................................. 100 Executing the Cataloged Procedure to Access the SAS System....................................... 100 Testing with Sample Data ................................................................................................ 101 Verifying the SAS/ACCESS Interface to SYSTEM 2000 Software ................................ 101
Appendix H, Implementing the SAS/ACCESS Interface to Teradata ........................... 103 Defining the Interface to Teradata................................................................................. 103
Customizing the SAS CLIST and Cataloged Procedure .................................................. 103 Verifying the installation of the SAS/ACCESS Interface to Teradata ............................. 104
Example 1: Verifying with tdpid=explicitly specified .................................................. 104 Example 2: Verifying without tdpid= specified ............................................................ 105
Appendix I, Post-Installation Setup for SAS/ASSIST Software ..................................... 107 Adding a Master Profile ................................................................................................... 107 Installing Sample DB2 Tables and a Sample Query Manager ......................................... 109
Appendix J, Installing the BMDP Interface...................................................................... 113 Introduction ...................................................................................................................... 113 Installation of the BMDP Interface .................................................................................. 113
iv Installation Instructions and System Manager's Guide for the SAS System under OS/390
Appendix K, Post-Installation Setup for SAS/CONNECT Software.............................. 115 Storing and Locating SAS/CONNECT Script Files ......................................................... 115 Setting SAS System Options ............................................................................................ 116 System Configuration for the TCP Access Method.......................................................... 116
Software Requirements ................................................................................................. 116 System Configuration for the APPC Access Method ....................................................... 116
Software Requirements ................................................................................................. 116 System Configuration for APPC ................................................................................... 117 Setting APPC-Related SAS System Options................................................................. 118
Implementing SAS/CONNECT APPC/MVS Subsystem Exploitation ............................ 121 References ..................................................................................................................... 123
Multi-Process (MP) CONNECT....................................................................................... 124 System Configuration for MP CONNECT....................................................................... 124
Considerations for Using XMS with MP CONNECT................................................... 124 Implementing the OS/390 Spawner.................................................................................. 125 Spawner Security.............................................................................................................. 125
RACF Security .............................................................................................................. 126 ACF2 Security............................................................................................................... 127 Top Secret ..................................................................................................................... 127 Examples of Starting and Connecting to the OS/390 Spawner Program....................... 132
Ending the OS/390 Spawner Program.............................................................................. 133 Appendix L, Post-Installation Setup of Enterprise Miner Server Software ............... 135
Installing Enterprise Miner Server software..................................................................... 135 Configuring Enterprise Miner Server Software................................................................ 135
Default Data Library Setup ........................................................................................... 135 Information Needed to Configure Enterprise Miner Client Software ........................... 136
Appendix M, SAS/GIS Census Tract Maps ...................................................................... 137 Unloading the SAS/GIS Census Tract Maps.................................................................... 137 Customizing the SAS CLIST and Cataloged Procedure................................................... 137
Appendix N, Implementing SAS/GRAPH Software......................................................... 139 Understanding the Organization of this Appendix ........................................................... 139 Part 1, Accessing the SAS/GRAPH Maps Data Sets........................................................ 139 Part 2, Customizing Devices ............................................................................................ 140
Setting up a SAS/GRAPH Translate Table ................................................................... 140 Using SAS/GRAPH Software with ASCII Terminals and ASCII Terminal Emulators 140 Using SAS/GRAPH Software with ASCII Printers ...................................................... 140 Installing the Linkable Driver ....................................................................................... 141 Using SAS/GRAPH Software with IBM 3270-Type Terminals and 3270 Emulators .. 141 Using SAS/GRAPH Software with IBM 3287, 3268, and 4224 Printers...................... 142 Using SAS/GRAPH Software with GDDM.................................................................. 142
Part 3, Setting Up and Modifying Device Catalogs.......................................................... 143 How Device Catalogs Are Used.................................................................................... 143 How and When to Modify Catalog Entries ................................................................... 144

v Installation Instructions and System Manager's Guide for the SAS System under OS/390
Part 4, Device HELP Screens........................................................................................... 146 Part 5, Client-Side Components ....................................................................................... 147
ContourApplet (ctrapp.jar) ................................................................................... 147 GraphApplet (graphapp.jar).................................................................................. 147 MapApplet (mapapp.jar and related map data jar files) .......................................... 147 MetaViewApplet (metafile.zip)........................................................................... 147 RangeViewApplet (rvapplet.jar)......................................................................... 147 SAS/GRAPH Control for ActiveX................................................................................ 148
Installing the Client-Side Components............................................................................. 148 Appendix O, Post-Installation Setup for SAS Integration Technologies Software........ 149
Integration Technologies Documentation ..................................................................... 149 Java Client Development and Runtime Component...................................................... 149 Windows Client Development and Runtime Component ............................................. 149 Integration Technologies Administrator........................................................................ 150 SAS Package Reader..................................................................................................... 150 Subscription Manager ................................................................................................... 150
Appendix P, Installing SAS/IntrNet Software .................................................................. 151 Introduction ...................................................................................................................... 151
Components of SAS/IntrNet Software .......................................................................... 151 Steps for Installing SAS/IntrNet.................................................................................... 151
1. Install the SAS System (which includes SAS/IntrNet)................................................. 152 2. TCP/IP Customization.................................................................................................. 152 3. Installing CGI Components .......................................................................................... 152 4. Configuring the Application Dispatcher....................................................................... 153
Component Overview of the Application Dispatcher ................................................... 153 Setup of the Application Server .................................................................................... 154 Creating an Application Dispatcher Service on OS/390 ............................................... 154 Editing INETEDTP and INETCFG .............................................................................. 154 Setup of the Application Broker.................................................................................... 158
5. Starting, Stopping and Removing A Service ................................................................ 159 Starting the Application Server ..................................................................................... 159 Stopping the Service...................................................................................................... 159 Removing the Service ................................................................................................... 160
Testing and Debugging each Component......................................................................... 160 Testing the Application Broker ..................................................................................... 160 Testing the Application Server...................................................................................... 160
Additional and Alternate Documentation......................................................................... 161 Load Manager ............................................................................................................... 162 Using htmSQL .............................................................................................................. 162
Appendix Q, Installing SAS IT Resource Management Solution Software, Release 2.6............................................................................................................................................... 163
SAS IT Resource Management Functionality .................................................................. 163 Installing SAS IT Resource Management ........................................................................ 164
Installation Considerations ............................................................................................ 164 Migration Considerations.............................................................................................. 164 Installation Customizations ........................................................................................... 165 Installation Checklist..................................................................................................... 165
Installing or Upgrading MXG .......................................................................................... 165

vi Installation Instructions and System Manager's Guide for the SAS System under OS/390
Customization of SAS IT Resource Management Server................................................. 168 Site Library Considerations .............................................................................................. 168
Modifying the pointer to the default SITELIB library .................................................. 169 Starting SAS IT Resource Management........................................................................... 170 Considerations for Staged Installations (Action C) .......................................................... 171
Appendix R, Installing SAS IT Security Management Solution Software, Release 2.6 (Pre-Production).................................................................................................................. 173
Appendix S, Installing SAS IT Service Level Management Solution Software 1.0 ....... 175
Appendix T, Post-Installation Setup for SAS/MDDB Server Software.......................... 177
Appendix U, Post-Installation Setup for the Metabase Facility ...................................... 179 Setting Up the System Repository Manager Files ............................................................ 179 Registering the SASHELP Repository in the Repository Manager.................................. 180
Appendix V, Post-Installation Instructions for Setting up National Language Support (NLS) .................................................................................................................................... 181
Asian Language Support (ALS) ....................................................................................... 181 DBCS System Option.................................................................................................... 181 DBCSLANG System Option......................................................................................... 182 DBCSTYPE System Option.......................................................................................... 182 Changing the Default DBCSLANG and DBCSTYPE Option Settings ........................ 182
Asian Font Catalogs ......................................................................................................... 183 Specifying the Font Data Set in the Configuration File................................................. 183 Specifying the Font Data Set in a SAS Session............................................................. 183
European Language Support (ELS).................................................................................. 183 Shipping Map for Countries based on Encodings ......................................................... 185 Background ................................................................................................................... 186 NLS-Related System Options........................................................................................ 186 LOCALE System Option .............................................................................................. 186 ENCODING System Option ......................................................................................... 187
Locale Setup Window ...................................................................................................... 188 Configuring Your System for Locale ............................................................................... 188
Running SAS in a Different Locale............................................................................... 188 Configuring Your System with the Locale Setup Window ........................................... 189 Running SAS with Special Locale Settings................................................................... 190
Additional Information ..................................................................................................... 190 New-Line Character and Line-Feed .............................................................................. 190 Locale Setup on the Remote Server .............................................................................. 191 Devmaps and Keymaps for SAS/GRAPH® Software .................................................. 191 Additional Documentation ............................................................................................ 193
Appendix W, Post-Installation Setup for SAS OLAP Server Software.......................... 195 Setting up Access Control without SAS/EIS Software on Your Server ........................... 195
Starting the Access Control Setup Dialog Window ...................................................... 195 Setting Your Access Control Key and Environment Programmatically........................ 195 Doing Your Access Control Definitions (Users, Groups, ACL) Programmatically...... 198 Write Access to SASHELP.AC and SASHELP.MB..................................................... 207
Specifying OLAP Classes ................................................................................................ 207

vii Installation Instructions and System Manager's Guide for the SAS System under OS/390
Appendix X, Post-Installation Setup for SAS/SECURE Software.................................. 209
SAS/SECURE Client for Windows.................................................................................. 209 SAS/SECURE Client for Java.......................................................................................... 209 Client Components ........................................................................................................... 209
Appendix Y, Implementing SAS/SESSION Software...................................................... 211 Introduction ...................................................................................................................... 211 Defining SAS/SESSION to the VTAM System............................................................... 212
Define the VTAM Applications .................................................................................... 212 Define the VTAM Logon Mode.................................................................................... 212
Defining SAS/SESSION to APPC/MVS ......................................................................... 213 Security Considerations................................................................................................. 214
Defining SAS/SESSION to CICS .................................................................................... 215 Activating the Interface .................................................................................................... 218 Executing the SAS System............................................................................................... 219
Appendix Z, Implementing SAS/SHARE Software ......................................................... 221 Special Files for Use with SAS/SHARE Software........................................................... 221
Customizing the Started Task JCL Procedure for a Server ........................................... 221 Configuration File for a Server ..................................................................................... 221
Customizing the SAS/SHARE Autocall Macros.............................................................. 222 Selecting Communications Access Methods to Use......................................................... 222 System Configuration for the Cross-Memory Access Method......................................... 224
Installing the SASVXMS Load Module........................................................................ 224 Defining an Anchor Point ............................................................................................. 225
System Configuration for the VTAM LU 6.2 Access Method......................................... 226 Software Requirements ................................................................................................. 226 Configuration for a Server............................................................................................. 226 Configuration for Users................................................................................................. 227
System Configuration for TCP/IP .................................................................................... 229 Client-Side Components................................................................................................... 229
SAS/SHARE Data Provider .......................................................................................... 230 SAS ODBC Driver ........................................................................................................ 230 SAS/SHARE Driver for JDBC...................................................................................... 230 SAS/SHARE SQL Library for C................................................................................... 230
Appendix AA, Customizing SAS System Forms .............................................................. 231 Customizing the Printer Selection List ............................................................................. 231
Appendix BB, Licensing the SAS System.......................................................................... 233 Introduction ...................................................................................................................... 233 Processing Renewal of the SAS System........................................................................... 233 SETINIT Troubleshooting................................................................................................ 234 OPTIONAL - Creating SASIRENW SETINIT Renewal Utility (Action G) ................... 235
Optional Processing Renewal of the SAS System......................................................... 235 Appendix CC, Logging Directly on to the SAS System.................................................... 239
Installing the Direct Logon Procedure.............................................................................. 239 Example Logon Procedure ............................................................................................ 240
Using Direct Logon .......................................................................................................... 241 Logging onto the SAS Display Manager System.......................................................... 241 Logging onto a Windowing Application....................................................................... 241
Restrictions....................................................................................................................... 241 Accounting Considerations ........................................................................................... 242

viii Installation Instructions and System Manager's Guide for the SAS System under OS/390
Appendix DD, Implementing SAS/TOOLKIT Software ................................................. 243
Appendix EE, Unloading the Installation Instructions from Tape ................................. 245 Obtaining the Instructions ................................................................................................ 245
U.S. Government Rights Notice ......................................................................................... 247 Reviewing the U.S. Government Rights Notice ............................................................... 247 Processing the U.S. Government Rights Notice ............................................................... 247

Page 1
Using This Book
Contents of this Document
This document is divided into two sections with a total of five parts, plus a set of appendices. The following describes the contents of each section of this document.
Section I, Installation Instructions, details all the steps required for installing the SAS System. Complete this section before continuing with any other section.
Section I, Part 1, “Pre-Installation Checklist”
Gives you an overview of installation requirements and defines the installation parameters you need to supply for the install process. It also describes the installation actions and options from which you can choose.
Section I, Part 2, “Installing the SAS System”
Describes the common installation process you use for all actions and identifies the steps that are necessary for you to complete the different post-installation processing for each action.
Section I, Part 3, “System Maintenance and Supplemental Keyword Maintenance”
Provides information in case you perform a supplemental keyword installation of certain types of maintenance.
Section II, System Manager's Guide, contains information on setting up and maintaining your SAS System. Keep this document as a reference after you complete the installation.
Section II, Part 1, “Setting up the SAS System”
Describes how you can customize SAS System invocation at your site. It also addresses issues that pertain to running the SAS System effectively at any site. You should carefully review all of this information.
Section II, Part 2, “Maintaining the SAS System”
Provides information about viewing SAS Notes on the World Wide Web, and the application of ZAPS to the SAS System.
The Appendices supply information for specialized concerns, including notes on special implementation processing for individual products. Review the sections that are relevant to the products you received. In most cases, you need to perform the steps described to run the products successfully at your site.

2 Installation Instructions and System Manager's Guide for the SAS System under OS/390
Terminology
Although several media types are used for distributing SAS software products, these instructions refer to all media as tape.
In some of the sections that describe product customization, there are references to software products that are shipped separately on CD media.
During the first step of the installation process, you are instructed to allocate a data set into which all SAS System installation jobs will be loaded. The name of this data set is completely arbitrary and is referred to throughout this document as the CNTL data set.
CAUTION! If the CNTL data set is deleted, you will have to restart the installation process from the beginning to recreate the data set. Therefore, keep this data set on disk.
Other installation libraries are referenced in this document using the names specified in the LIBSEL member of the CNTL data set.
Reference Material
The SAS Companion for the OS/390 Environment, Version 8 is available in both hard copy and online formats. The documentation can assist users with this release of the SAS System, and may provide helpful information for completing your system set up and product implementation.
Contacting SAS
If you have questions about this document or any of the procedures described in it, contact the SAS Technical Support Division at (919) 677-8008.

Page 3
Section I: Installation Instructions

4 Installation Instructions and System Manager's Guide for the SAS System under OS/390

Page 5
Part 1, Pre-Installation Checklist
Introduction
This section provides an overview of the complete installation process. Review the task descriptions in this section before starting your installation.
Checking System Requirements
The system requirements information is shipped as part of your installation package. Refer to the System Requirements document for the software and hardware requirements for the Base SAS System and any other products you intend to install.
Checking Available Disk Space
The System Requirements document shipped as part of your installation package provides the disk space requirements for each SAS product. The “Space Requirements Information” section also details the additional space needed for the installation process itself. Before you proceed, insure that you have adequate space available on one disk volume.
If you are installing add-on products (the Base SAS product is not on your tape), verify that your existing SAS System libraries contain enough additional space to accommodate each product on your installation tape.
Choosing Installation Actions
Choose one, and only one, primary action to process a SAS System installation tape:
Note: If this installation is an upgrade of an existing product/solution, a Supplemental Keyword Maintenance install is required instead of the choices listed below. Refer to the section "Installing SAS System Maintenance and Supplemental Keyword Maintenance" on page 25 and the associated appendix for this product/solution for installation instructions.
A. INSTALL-NEW (Action A): Installs a new SAS System. Select Action A when you receive a tape with a new release of the SAS System, including the Base SAS product. This installation procedure allocates new SAS System libraries on disk for unloading the libraries on your tape.
B. INSTALL-DIRECT (Action B): Installs additional products directly to existing SAS System libraries. Select Action B when you receive a tape with additional SAS products for the current release of the SAS System, and you want to install the files directly into your current SAS System libraries.

6 Installation Instructions and System Manager's Guide for the SAS System under OS/390
If you select this option, be aware that current load modules may be overwritten. You will also need to insure that existing load libraries have adequate space and that they are not in use.
C. INSTALL-TO-STAGE (Action C): Installs additional products to new SAS System staging libraries. Select Action C when you receive a tape with additional SAS products and you want to unload the new products to separate staging libraries without affecting your current SAS System libraries. You can choose other actions to perform further operations on your installed SAS System.
After completing a primary action, you may find it necessary to perform one or more of the following secondary actions. However, you may only perform one secondary action at a time.
D. STAGE-TO-FINAL (Action D): Copies staged SAS product libraries into your production SAS System libraries
E. DELETE-ENTIRE (Action E): Deletes an entire set of installed SAS libraries
F. STANDALONE-RENEW (Action G): Optional step for creating Renewal Utility
Choosing Installation Modes
When you install the SAS System, you must install in one of two possible modes:
Default Mode
All SAS libraries on your media are unloaded into the specified SAS System libraries on disk. This is the recommended method of installing the SAS System for USA customers and any other customer whose media is specially cut to match the customer’s licensed products.
The PRODSEL member of the control data set is left as is (default). The necessary SETINIT licensing text is provided on media in the control data set member RENEWPRM and only need be replaced if the installation occurs after the licensing expiration date(s).
Selective Mode
If your media contain more products than you have licensed, you must specify which products are to be unloaded from the media. This usually happens when a customer outside the USA installs from an “agent” media containing all products available for the OS/390 or equivalent platform.
When performing a selective installation, use the CNTL data set member PRODSEL to turn off (uncomment) unwanted products, so they will not be unloaded. In this situation it will almost always be necessary to copy the SETINIT licensing text provided on paper by the SAS agent issuing the media.

Installation Instructions and System Manager's Guide for the SAS System under OS/390 7
This text will be included with the transmittal material and must be copied into the control data set member RENEWPRM in order for the installation to complete.

8 Installation Instructions and System Manager's Guide for the SAS System under OS/390

Page 9
Part 2, Installing the SAS® System
Introduction
This section describes how to tailor your SAS System installation to suit your particular site configuration. The following topics are discussed in this section:
Unloading the Installation Jobs – Run IEBUPDTE
Specifying Installation Parameters
Performing Installation Actions
Verifying the System Installation
Performing Site-Specific Product Implementation
Unloading the Installation Jobs — Run IEBUPDTE
STEP 1: Allocate and unload the CNTL data set. The CNTL data set contains the installation jobs. This data set is hereafter referred to as the CNTL data set. Use the example IEBUPDTE job below to allocate and unload the CNTL data set.
Note: A new CNTL data set must be allocated. Do not use the same CNTL data set used for previous installations of SAS products.
The example IEBUPDTE job follows:
//IEBUPDTE JOB (account information),'programmer', // TIME=(m,s),MSGCLASS=a //* //ALLOC EXEC PGM=IEFBR14 //OUTCNTL DD DSN=your.cntl.dataset,DISP=(NEW,CATLG,DELETE), // UNIT=disk,VOL=SER=dddddd, // DCB=(BLKSIZE=6160,LRECL=80,DSORG=PO,RECFM=FB), // SPACE=(6160,(450,45,35)) //* //UPDTE EXEC PGM=IEBUPDTE,PARM='NEW' //SYSIN DD DSN=SAS.SASROOT,DISP=OLD,VOL=SER=vvvvvv, // LABEL=(1,SL),UNIT=uuuu //SYSPRINT DD SYSOUT=* //SYSUT2 DD DSN=your.cntl.dataset,DISP=OLD //*

10 Installation Instructions and System Manager's Guide for the SAS System under OS/390
a. Modify the first lines of the IEBUPDTE job to contain jobcard information for your site.
b. Change your.cntl.dataset to specify the data set name for your CNTL data set. (This text appears twice in the example. Be sure to replace it both times.)
c. Replace disk with the unit type you are using for the CNTL data set.
d. Replace dddddd with the volume serial of the disk pack on which the CNTL data set will be created, if you must specify volume serial at your site.
e. Replace vvvvvv with the volser of the first tape in the series of tapes that you are installing.
f. Replace uuuu with the unit type for a tape drive at your site.
g. If your site has tape data set protection, ensure that you have read access to SAS.SASROOT.
STEP 2: Execute the IEBUPDTE job.
STEP 3: Check the ##README file for any special installation instructions for your tape and also the #CONTENT file to verify the list of products.
These members were unloaded into the CNTL data set by the IEBUPDTE job you just ran. It contains any special instructions that may be needed to complete the installation of the tape you received.
Enabling minimal cartridge mounts from a Multi 3480 cart media
If tape drive resources are limited, follow the steps below so only two tape drives will be required simultaneously during the installation process.
Before running SASINEW or SASIHOLD, replace &cntldsn($$SDXMAC) with &cntldsn($$AFFMAC). This change may be undone by replacing &cntldsn($$SDXMAC) with &cntldsn($MSDXMAC), which is a copy of the shipped $$SDXMAC, and rerunning SASINEW or SASIHOLD.
Note: When this procedure is followed, the operating system can choose any available drive for any mount request, and no more than two drives will be in use at any one time. However, mount requests cannot be restricted to specific cartridge drives for the duration of the installation process. This is a function of the operating system.
If the first cartridge has not been physically removed by the operator, and another mount is already available, the system will call for the second cartridge in the

Installation Instructions and System Manager's Guide for the SAS System under OS/390 11
available mount. However, the install is not holding the first mount; it is available as soon as the operator removes the dismounted cartridge.
Interruptions by Other Processes
By disallowing the RETAIN or “keep-for-my-use-only” option in the tape unload JCL, the single-mount-enabled install can be interrupted by other processes which can take over the cart mount. This will be determined by site-specific OS/390 priority settings and is not a function of the install.
GIS Maps
This process does not work for the installation of the GIS Census maps. In order to install the GIS maps, the enabling of this action will need to be reversed, thereby replacing the &cntldsn($$SDXMAC) with &cntldsn($MSDXMAC).
Specifying Installation Parameters
The SASEDITP member of the CNTL data set contains parameters for which you must specify installation-specific values. A backup copy of this member exists in the CNTL data set as @SASEDTP.
STEP 1: Supply SASEDITP parameter values.
Two types of parameters appear in this installation process: selectable and keyword=value. Selectable parameters help reduce the amount of data you need to type and are activated by removing comment characters. When making a selection, be sure to blank out the comment symbol, *NO*, associated with the parameter. Likewise, if there is an alternate selection that you do not want, be sure that the parameter is commented out. With keyword=value parameters, you specify your site value after keyword=. Do not leave any spaces between the equal sign and your value.
Note: Although comments in this member use lower case for readability, all parameter values you enter should be in upper case. Set CAPS ON in your edit session before entering your values.
Provide job header information:
Use JOBCARD1= through JOBCARD5= to create JOB statements for the generated job(s). The default JOBCARD1 value contains a jobname value of SYSNAME, which resolves so that the jobname is the same as that of the member name that contains the JCL for the job. Do not change the //%SYSNAME. symbol in the existing JOBCARD1 value. Update the remainder of the JOBCARDx parameters with the appropriate values (/*JOBPARM, /*ROUTE, //*MAIN, or //*FORMAT statements) for your installation. You may, for example, want to add a /*JOBPARM FETCH statement for online retrieval of your jobs.

12 Installation Instructions and System Manager's Guide for the SAS System under OS/390
Be sure to leave the JOB statement values enclosed in quotes ("). Do not increase the number of characters (50) contained between the quotes in JOBCARD1.
Choose your install action:
Select a single SAS install action and supply the corresponding library prefix values. The maximum prefix length is 23 characters.
Select the action you want by blanking out the *NO* that precedes the action name. Verify that you have only one action value active. If more than one action is selected, a return code of 12 is set, and error messages specifying the duplicate selections are posted to SYSPRINT and SYSTERM.
Specify library prefixes as follows:
• If you are using Action A: INSTALL-NEW
Use NEW-SAS-PREFIX= to specify the high-level prefix that you want to use for the SAS product libraries. The default is SAS.SAS8.
• If you are using Action B: INSTALL-DIRECT
Use EXISTING-SAS-PFX= to specify the high-level prefix of the current SAS System libraries at your site into which you want to unload the tape libraries. The default is SAS.SAS8.
If you cannot use exclusive access to the existing SAS Libraries (DISP=OLD), blank out the *NO* before BUDSP=SHR.
• If you are using Action C: INSTALL-TO-STAGE
Use STAGED-LIBR-PFX= to specify the high-level prefix of the SAS System staging libraries into which you want to unload the tape libraries. The default is SAS.SAS8.NEW. These libraries are created as part of the SAS install process for this action.
Use FINAL-SASLIB-PFX= to specify the high-level prefix of the current set of complete SAS System libraries. These libraries cannot be staging libraries from a previous install. The CLIST and cataloged procedure unloaded from the tape with the INSTALL-TO-STAGE action concatenate the staging libraries in front of the production libraries for executing the SAS System.
To concatenate your production Config files into the generated staging PROC and CLIST, blank out the *NO* on these lines and provide fully qualified data set names.

Installation Instructions and System Manager's Guide for the SAS System under OS/390 13
PROD-BATCH-CFG= specifies the name of a production batch SAS Config file.
PROD-TSO-CONFIG= specifies the name of a production TSO SAS Config file.
• If you are using Action D: STAGE-TO-FINAL
Use STAGED-LIBR-PREFIX= to specify the high-level prefix of the SAS System staging libraries. The default is SAS.SAS8.NEW but may have been changed during the ACTION-C INSTALL-TO-STAGE install.
Use FINAL-SAS-PREFIX= to specify the high-level prefix of the current set of complete SAS System libraries. The default is SAS.SAS8, but may have been changed during the initial ACTION-A INSTALL-NEW install.
• If you are using Action E: DELETE-ENTIRE
Use DEL-STAGELIB-PFX= to specify the high-level prefix of the SAS System libraries you want to delete.
• If you are using Action G: STANDALONE-RENEW
Use RENEW-PREFIX= to specify the high level prefix of the complete SAS System libraries for which you want to generate a SETINIT job stream.
Use RNW-BASE-PFX= to specify the high level prefix of the staging SAS System libraries for which you want to generate a SETINIT job stream.
Provide site-specific parameter values for the following:
• CNTLDSN= specifies the CNTL data set you created by running the IEBUPDTE job.
• TAPEUNIT= specifies the JCL unit name or unit address for the tape drive on which the installation tape is mounted.
• EXPDATE= specifies the expiration date value used in accessing the installation tape. Some tape management systems require you to set this parameter to 98000 to indicate that you are using an external unmanaged tape.
• DISKUNIT= specifies the JCL unit name or unit address for the volume for the SAS installation libraries.

14 Installation Instructions and System Manager's Guide for the SAS System under OS/390
• WORKSPC= specifies the size, in 6144-byte blocks, for the SAS WORK library allocation for CLISTs, cataloged procedures, and in-stream procedures used throughout installation. The first value is the primary allocation, followed by a comma, and the second value is the secondary allocation.
• INTREADR= specifies the syntax for program submission to the JES internal reader. Optionally disables use of the internal reader if not available or allowed at your site.
To REVISE the syntax to invoke your internal reader, modify the data between the quotes as shown in the following example:
INTREADR='DD ALTERNATE,SYNTAX'
Do not remove the surrounding quotes. If your syntax contains single quotes, change the surrounding quotes to double quotes as shown in the following example:
INTREADR="DD 'ALTERNATE',SYNTAX"
To DISABLE use of the internal reader, blank out the *NO* before the INTREADR. To complete the install you must individually submit each generated job in sequence following the successful completion of the prior step.
• ENTRY= specifies the entry point for the SAS System that is used in in-stream procedures during installation, in the cataloged procedures, and the CLISTs. The default is SASHOST, which runs the unbundled version of the SAS System. The “System Manager’s Guide” in Section II of this document contains information on the different bundling configurations you can choose in customizing Release 8.2 of the SAS System for your site.
• SYSOUT= specifies the SYSOUT class you want to use for jobs.
• TMPUNI= specifies the value your site uses as the system-assigned name for temporary disk storage.
• VOLDISK= specifies the volume serial of the disk pack for installing SAS product libraries. This parameter is ignored if you specify the use of SMS.
• SMS-ALLOC specifies whether you intend to use IBM’s SMS to help manage your installation data set allocations. By default, this parameter is commented out. If you want to use SMS, blank out the *NO* to invoke your site’s installed SMS allocation features. VOLDISK will be ignored. Your site default SMS values will be used unless you delete the *NO* on each appropriate SMS

Installation Instructions and System Manager's Guide for the SAS System under OS/390 15
parameter and supply the parameter combinations required by your installation. Consult your SMS documentation and system support personnel for further information and appropriate values.
SMS-STORCLAS SMS "STORCLAS=" value
SMS-MGMTCLAS SMS "MGMTCLAS=" value
SMS-DATACLAS SMS "DATACLAS=" value
• JES3SYS= Blank out the *NO* on this line if you are running on a JES3 system. This will cause certain dynamic data set allocations for Actions B, C, or D to be performed in a separate job
• COPYMOD= specifies the IEBCOPY command name to use when unloading your SAS installation load libraries from tape. Using the COPYMOD command causes the load libraries to be reblocked to the blocksize specified by the LOADBLK= parameter. The default is COPYMOD. If you use COPY, your load library blocksize will be 6144.
• LOADBLK= when you use COPYMOD, specifies the blocksize you want to use for your SAS load library. The default is 32760. If you are performing an INSTALL-DIRECT, use this parameter when your target library blocksize is not 6144.
• PROC-DSN-SFX= specifies the final node of the data set name of the cataloged procedure library to which cataloged procedures (PROCs) are copied. It is appended to the installation library prefix that you specify with the action you select. If you do not want to use this name, you can comment-out this parameter, uncomment the PROC-DSN parameter, and specify the entire data set name. The default is PROCLIB. The PROC-DSN-SFX and PROC-DSN parameters are used only when installing the SAS System with Action A.
• SASPNM= specifies the name you want to use for the SAS cataloged procedure. The default is SAS8.
• CLST-DSN-SFX= specifies the final qualifier of the data set name of the command procedure library to which command procedures (CLISTs) are copied. It is appended to the installation library prefix that you specify. If you do not want to use this name, you can comment-out this parameter, uncomment the CLST-DSN parameter, and specify the entire data set name. The default is CLIST. The CLIST-DSN-SFX and CLIST-DSN parameters are used only when installing the SAS System with Action A.

16 Installation Instructions and System Manager's Guide for the SAS System under OS/390
• SASCNM= specifies the name you want to use for the SAS command procedure (CLIST). The default is SAS8.
STEP 2: Choose SAS System products to install.
By default, all products on your tape are installed. If you want to install all products from your tape, skip to STEP 3. Installing all products is recommended.
If you want to install by individual product, edit the PRODSEL member of the CNTL data set and follow the instructions for selecting and deselecting products in the comments of the PRODSEL member.
STEP 3: Verify SETINIT status.
In many cases, the installation tape you receive includes pre-applied licensing, or SETINIT, information. Each SAS System product must be licensed for you to run it.
If the Cover Letter in your installation package indicates that your tape contains an expired SETINIT, then your package should also include customized SETINIT data for you to enter at installation. If your SETINIT has expired since the tape was cut, contact SAS for the current SETINIT data. Enter this data into the RENEWPRM member of the CNTL data set exactly as it appears on paper. Check the RENEWPRM member of the CNTL data set to determine if your SETINIT has expired.
Performing Installation Actions
Action A – Install a new SAS System
Edit the SASINEW member of the CNTL data set and modify the following parameters:
CNTLDSN= specifies the name of the installation CNTL data set you allocated using the IEBUPDTE job.
SASEDTP= specifies the name of the CNTL data set member that contains the SASEDITP user site parameter values you have entered to control SAS installation tasks. The default is SASEDITP.
LIBSEL= do not modify this value.
PRODSEL= specifies the name of the CNTL data set member that contains the product selection parameter values you want to use to control SAS installation tasks. The default is PRODSEL, and selects all products.
SYSOUT= specifies the SYSOUT class you want to use for this job.

Installation Instructions and System Manager's Guide for the SAS System under OS/390 17
DISKUNI= specifies the unit name at your site for temporary storage.
Submit the SASINEW member. This job requires exclusive access to the CNTL data set. Be sure to terminate your edit session or otherwise free the CNTL data set after submitting the SASINEW job.
This job creates the SASINSTA and SASINSXA members of the CNTL data set. Submit the generated SASINSTA job. It in turn submits the SASINSXA job. It is important to verify that the SASINSXA job completes successfully. If it does not, it is usually due to an invalid jobcard. If this happens, fix the jobcard and manually submit the job.
Upon successful completion of SASINSTA/SASINSXA, your product libraries are installed. You are ready to verify the installation, using the instructions in “Verifying the System Installation.”
Base SAS System Customization
Although no further implementation is required for you to run the Base SAS product at your site, you should review the topics in Section II, Part 1 of this document. The information contained in “Setting up the SAS System” starting on page 39 can help you customize the SAS System effectively for your users. This section tells you how to select a bundled configuration and install the bundles in your Link Pack Area. It also describes how you can customize your SAS invocation procedures and your default options settings. Other topics that address use of the SAS SVC and SMF Exit may be relevant for your site as well.
If you have a prior release of the SAS System installed, you may want to make the corresponding customizations in your newly installed release.
Action B – Install new products directly to existing SAS libraries. Edit the SASIHOLD member of the CNTL data set and modify the following parameters:
CNTLDSN= specifies the name of the installation CNTL data set you allocated using the IEBUPDTE job.
SASEDTP= specifies the name of the CNTL data set member that contains the SASEDITP user site parameter values you have entered to control SAS installation tasks. The default is SASEDITP.
LIBSEL= do not modify this value.
PRODSEL= specifies the name of the CNTL data set member that contains the product selection parameter values you want to use to control SAS installation tasks. The default is PRODSEL, and selects all products.
SYSOUT= specifies the SYSOUT class you want to use for this job.
DISKUNI= specifies the unit name at your site for temporary storage.

18 Installation Instructions and System Manager's Guide for the SAS System under OS/390
Submit the SASIHOLD member. This job requires exclusive access to the CNTL data set. Be sure to terminate your edit session or otherwise free the CNTL data set after submitting the SASIHOLD job.
If you are running JES3, submit the generated SASIALOB JES3 conditional data set new allocation job. This submits the SASINSTB job, which in turn submits the SASINSXB job.
If you are not running JES3, submit the generated SASINSTB job. It in turn submits the SASINSXB job. It is important to verify that the SASINSXB job completes successfully. If it does not, it is usually due to an invalid jobcard. If this happens, fix the jobcard and manually submit the job.
Upon successful completion of SASINSTB/SASINSXB, your product libraries are installed. You are ready to verify the installation, using the instructions in “Verifying the System Installation” on page 23.
Action C – Install new products to staging SAS libraries. Edit the SASIHOLD member of the CNTL data set and modify the following parameters:
CNTLDSN= specifies the name of the installation CNTL data set you allocated using the IEBUPDTE job.
SASEDTP= specifies the name of the CNTL data set member that contains the SASEDITP user site parameter values you have entered to control SAS installation tasks. The default is SASEDITP.
PRODSEL= specifies the name of the CNTL data set member that contains the product selection parameter values you want to use to control SAS installation tasks. The default is PRODSEL, and selects all products.
LIBSEL= do not modify this value.
SYSOUT= specifies the SYSOUT class you want to use for this job.
DISKUNI= specifies the unit name at your site for temporary storage.
Submit the SASIHOLD member. This job requires exclusive access to the CNTL data set. Be sure to terminate your edit session or otherwise free the CNTL data set after submitting the SASIHOLD job.
If you are running JES3, submit the generated SASIALOC JES3 conditional data set new allocation job. This submits the SASINSTC job, which in turn submits the SASINSXC job.
If you are not running JES3, submit the generated SASINSTC job. It in turn submits the SASINSXC job. It is important to verify that the SASINSXC job completes successfully. If it does not, it is usually due to an invalid jobcard. If this happens, fix the jobcard and manually submit the job.

Installation Instructions and System Manager's Guide for the SAS System under OS/390 19
Upon successful completion of SASINSTC/SASINSXC, your product libraries are installed.
Completing the Installation for Action C
If your site has customized the default CLIST or PROC, you need to apply your site customizations to the installed staging CLIST and PROC under one of the following conditions: • you need to test the staged system with the site customizations in place • you intend to run the staged system in a production mode.
If your site customizations are small, you may simply want to add them to the install-created staging CLIST and PROC. The SASINSXC job copies the staging CLIST BACLST01 and the staging PROC BAPROC01 to the CNTL data set. Rename these and copy them to the appropriate PROC and CLIST libraries for your site.
If you made many site customizations, you may want to add the staging libraries to the appropriate DDname concatenations in your customized CLIST and PROC. Add the concatenations as follows:
The staging libraries do not contain everything required to run the SAS System. The concatenations shown below are required to correctly run SAS.
Cataloged procedure modifications
To concatenate the load library data sets, locate the JCL statements in the PROC that look like the following:
//STEPLIB DD DISP=SHR,DSN=&LOAD // DD DISP=SHR,DSN=&final-saslib-pfx.LIBRARY
Change this DD statement as follows, providing the prefix values specified in SASEDITP:
//STEPLIB DD DISP=SHR,DSN=&LOAD // DD DISP=SHR,DSN=&staged-libr-pfx.LIBRARY // DD DISP=SHR,DSN=&final-saslib-pfx.LIBRARY
To concatenate the SASMSG library data sets, locate the JCL statement in the PROC that looks like the following:
//SASMSG DD DSN=&final-saslib-pfx.SASMSG,DISP=SHR
Change this DD statement as follows, providing the prefix values specified in SASEDITP:
//SASMSG DD DSN=&staged-libr-pfx.SASMSG,DISP=SHR // DD DSN=&final-saslib-pfx.SASMSG,DISP=SHR
To concatenate the AUTOLIB library data sets, locate the JCL statement in the PROC that looks like the following:

20 Installation Instructions and System Manager's Guide for the SAS System under OS/390
//SASAUTOS DD DSN=&final-saslib-pfx.AUTOLIB,DISP=SHR
Change this DD statement as follows, providing the prefix values specified in SASEDITP:
//SASAUTOS DD DISP=(SHR,PASS),DSN=&SASAUTO // DD DISP=SHR,DSN=&staged-libr pfx.AUTOLIB // DD DISP=SHR,DSN=&final-saslib-pfx.AUTOLIB
You must run with the SASHELP library that was updated with your installation tape. The SASIxxxx jobs merge the contents of &staged-libr-pfx.SASHELP with your &final-saslib-pfx.SASHELP. The resulting, merged SAS data library is the &staged-libr-pfx.SASHELP data set.
Locate the JCL statement in the PROC that looks like the following:
//SASHELP DD DSN=&final-saslib-pfx.SASHELP,DISP=SHR
Change this DD statement as follows, providing the prefix values specified in SASEDITP:
//SASHELP DD DSN=&staged-libr-pfx.SASHELP,DISP=SHR
CLIST modifications
To concatenate the load library data sets, locate the line in the CLIST that reads:
SASLOAD('''&final-saslib-pfx.LIBRARY''')
Change this statement as follows, providing the prefix values specified in SASEDITP:
SASLOAD('''&staged-libr-pfx.LIBRARY'' + ''&final-saslib-pfx.LIBRARY''')
To concatenate the SASMSG library data sets, locate the following line in the CLIST:
SASMSG('''&final-saslib-pfx.SASMSG''')
Change this statement as follows, providing the prefix values specified in SASEDITP:
SASMSG('''&staged-libr-pfx.SASMSG'' + ''&final-saslib-pfx.SASMSG''')
To allocate the appropriate SASHELP library data sets, locate the following line in the CLIST:
SASHELP('''&final-saslib-pfx.SASHELP''')

Installation Instructions and System Manager's Guide for the SAS System under OS/390 21
Change this statement as follows, providing the prefix values specified in SASEDITP:
SASHELP('''&staged-libr-pfx.SASHELP''')
To concatenate the AUTOLIB library data sets, locate the following line in the CLIST:
MAUTS('''&final-saslib-pfx.AUTOLIB''')
Change this statement as follows, providing the prefix values specified in SASEDITP:
MAUTS('''&staged-libr-pfx.AUTOLIB''' + '''&final-saslib-pfx.AUTOLIB''')
After modifying the CLIST and PROC, you are ready to perform site-specific testing.
After completing your site-specific testing, you will want to copy the contents of the staging libraries to your production SAS System libraries. This is done using Action D, which is documented below. At many sites, it takes days, weeks, or even months, to perform site-specific testing, so reference this document on details of performing Action D when appropriate for your site.
Finally, you will want to delete your set of staging libraries using Action E, which is documented below.
Action D – Copy new products from staging SAS libraries to existing SAS libraries.
Edit the SASIHOLD member of the CNTL data set and modify the following parameters:
CNTLDSN= specifies the name of the installation CNTL data set you allocated using the IEBUPDTE job.
SASEDTP= specifies the name of the CNTL data set member that contains the SASEDITP user site parameter values you have entered to control SAS installation tasks. The default is SASEDITP.
PRODSEL= specifies the name of the CNTL data set member that contains the product selection parameter values you want to use to control SAS installation tasks. The default is PRODSEL, and selects all products.
LIBSEL= do not modify this value.
SYSOUT= specifies the SYSOUT class you want to use for this job.
DISKUNI= specifies the unit name at your site for temporary storage.

22 Installation Instructions and System Manager's Guide for the SAS System under OS/390
Submit the SASIHOLD member. This job requires exclusive access to the CNTL data set. Be sure to terminate your edit session or otherwise free the CNTL data set after submitting the SASIHOLD job.
If you are running JES3, submit the generated SASIALOD JES3 conditional data set new allocation job. This submits the SASISTFN job.
If you are not running JES3, submit the generated SASISTFN job.
Upon successful completion of SASISTFN, your existing SAS libraries are updated with new products.
Action E – Delete SAS libraries.
This section describes how to delete SAS product libraries. Although we recommend that you install all SAS product libraries when you receive an installation tape, you may decide at a later time that you no longer need certain product libraries. If you decide to delete any SAS product libraries, use the steps in this section to do so.
DELETE-ENTIRE (Action E): deletes an entire set of SAS staging libraries. Action E is intended to be used to delete staged libraries after the STAGE-TO-FINAL (Action D) action has been executed. Please note the SAS Notes library is not staged, and is likewise not deleted by this action.
The actions described in this section are optional and are included only to assist you in maintaining the SAS System in accordance with your installation needs.
Edit the SASIHOLD member of the CNTL data set and modify the following parameters:
CNTLDSN= specifies the name of the installation CNTL data set you allocated using the IEBUPDTE job.
SASEDTP= specifies the name of the CNTL data set member that contains the SASEDITP user site parameter values you have entered to control SAS installation tasks. The default is SASEDITP.
PRODSEL= specifies the name of the CNTL data set member that contains the product selection parameter values you want to use to control SAS installation tasks. The default is PRODSEL, and selects all products.
LIBSEL= do not modify this value.
SYSOUT= specifies the SYSOUT class you want to use for this job.
DISKUNI= specifies the unit name at your site for temporary storage.

Installation Instructions and System Manager's Guide for the SAS System under OS/390 23
Submit the SASIHOLD member. This job requires exclusive access to the CNTL data set. Be sure to terminate your edit session or otherwise free the CNTL data set after submitting the SASIHOLD job.
Submit the generated SASIDSTG job.
Action G - Apply renewal SETINIT information to an existing SAS System.
See the Optional Section in the appendix “Licensing the SAS System” on page 233 for instructions on completing Action G.
Verifying the System Installation
Check the job log to verify successful completion of the SASIxxxx job(s).
You should not receive any error messages, and the job should finish with completion codes of zero.
Several steps of the jobs may produce the following messages:
• +NO CONFIG File Available • NOTE: Apparent keyword reference could not be resolved.
These messages are purely informational and can be ignored.
Submit the initial verification job.
The job VALID in the CNTL data set performs basic validation of your SAS System installation. Check the SAS log to verify execution. You should not receive any error messages, and the job should finish with a completion code of zero. The VALID job should be run only if Base SAS software is included on your installation media. If Base SAS software is not included, there is no corresponding test program available for the VALID job.
Submit product verification jobs.
Separate validation jobs are included for many of the SAS software products, including Base SAS Software. Each provides a more in-depth validation test for the specified SAS software product. For some products, post-installation implementation must be completed in order to run the products at your site.
The CNTL data set contains jobs used to validate products. You can run the following jobs without performing any special implementation for the products. Submit the relevant jobs for the products on your installation tape. You can submit them all at the same time; you do not have to run them one at a time. Check the SAS log to verify execution of each job.

24 Installation Instructions and System Manager's Guide for the SAS System under OS/390
The following jobs are contained in the CNTL data set and validate the products indicated:
BAVALID verifies Base SAS product installation.
If you perform any of the customizations described in “Setting up the SAS System” in the “System Manager’s Guide” in Section II, you may want to rerun BAVALID (after modifying it to execute your customized procedure) as a regression test.
ETVALID verifies SAS/ETS product installation.
GRVALID verifies SAS/GRAPH product installation.
MLVALID verifies SAS/IML product installation.
ORVALID verifies SAS/OR product installation.
QCVALID verifies SAS/QC product installation.
STVALID verifies SAS/STAT product installation.
Note: If you receive errors while executing any of the validation jobs and cannot determine their cause, contact the Technical Support Division at SAS, as described in the introduction to this document. Validation jobs that invoke experimental status procedures may issue warning messages to alert you to the experimental status of those components.
Performing Site-Specific Product Implementation
Most SAS software products require no special implementation procedures. However, some products do have special requirements. Refer to the appropriate product appendix for any required product-specific processing and customization information. You cannot run these products at your site until you complete the implementation information described in the appropriate product appendix.

Page 25
Part 3, Installing SAS® System Maintenance and Supplemental Keyword Maintenance
Note: Release 8.2 TS2M0 is not a maintenance release. Part 3 is not intended for everyone installing Release 8.2 of the SAS System. Unless you are performing a supplemental keyword installation, please continue with the System Manager’s Guide on page 37.
This section contains instructions for installing SAS System maintenance files, and for performing a supplemental keyword installation of certain types of maintenance that are recommended by technical support.
If you are doing a supplemental keyword installation after you have successfully installed the SAS System, follow the instructions below in the section “Installing SAS System Maintenance and Supplemental Keyword Maintenance.”
At present, there are no supplemental keyword maintenance requirements for Release 8.2 TS2M0. Any maintenance or hot fixes can be found off the SAS Technical Support home page at
www.sas.com/service/techsup/intro.html
You may also go to the SAS home page at www.sas.com and select Service & Support and then Technical Support.
Identifying the Contents of Your Media
Before you can proceed with the installation process, you must identify the contents of your media. Follow these steps:
1. Unload the CNTL data set using the IEBUPDTE job as described on page 9 in “Unloading the Installation Jobs - Run IEBUPDTE,” in Part 2, “Installing the SAS System.”
2. Browse the #CONTENT member of the CNTL data set. This member contains information about your installation media, as well as instructions on unloading your software.
3. Find the following line in the #CONTENT member:
This tape contains the following products and/or maintenance files:
A list of products usually follows this line. However, if you see only MAINTENANCE FILES: to upgrade your new or existing system to TS M1
then you have maintenance-only media. In either case you will be able to apply maintenance to any Version 8 product in your SAS System.
26 Installation Instructions and System Manager's Guide for the SAS System under OS/390
Installing SAS System Maintenance and Supplemental Keyword Maintenance.
1. Unload the CNTL data set using the IEBUPDTE job as described on page 9 in “Unloading the Installation Jobs - Run IEBUPDTE,” in Part 2, “Installing the SAS System.”
2. Edit the SASEDITP member of the CNTL data set created in step 1 above.
Follow the steps for editing instructions as documented in “Specifying Installation Parameters,” on page 11 in Part 2, “Installing the SAS System.” Choose a primary action in Part 1.
Note: Only Action B or Action C is available.
3. Edit the SPKEYLST member of the CNTL data set and add the keywords listed above for the specific keyword maintenance you want to install, following the instructions in the SPKEYLST member.
4. Edit the MAKESUPL job in the CNTL data set. Modify the job card according to your site specifications, and follow the editing instructions in the comments of the MAKESUPL member.
5. Run the MAKESUPL job. Note: The MAKESUPL job needs exclusive access to the CNTL data set. You should
close your editing session of the CNTL data set after submitting MAKESUPL.
6. Upon successful completion of the MAKESUPL job, a SASISUPL member is created in the CNTL data set. This job is customized by your editing parameters in SASEDITP and the execution of MAKESUPL.
Note: The SASISUPL job needs exclusive access to the CNTL data set. You should close your editing session of the CNTL data set after submitting SASISUPL.
7. After SASISUPL completes successfully, the supplemental keyword maintenance is installed.
Copying Staged Libraries to Production
If you performed the recommended Action C above on your media, you will eventually want to move these staging libraries to production. Complete the following steps to move these libraries to production:
1. Edit the SASEDITP member of the CNTL data set. You should comment out Action C and activate Action D within the SASEDITP.
2. Edit the MAKESUPL member of the CNTL data set and submit it. No editing should be required in MAKESUPL.

Installation Instructions and System Manager's Guide for the SAS System under OS/390 27
Note: The MAKESUPL job needs exclusive access to the CNTL data set. You should back out of the CNTL data set after submitting MAKESUPL.
3. After MAKESUPL completes successfully, edit the SASISPSF member of the CNTL data set. This job was customized for submission by your editing parameters in SASEDITP and the submission of MAKESUPL. Run SASISPSF to copy the staging libraries to production.

28 Installation Instructions and System Manager's Guide for the SAS System under OS/390

Page 29
Part 4, Installation Instructions for SAS Software Translations
This section will guide you through the process of installing National Language Support translations to your SAS System.
This process creates translation files that overlay an existing Release 8.2 SAS system which has certain necessary maintenance applied. If the system was installed from the most recent tapes, the maintenance is already present and is not applied again. If the system was installed from an older version of Release 8.2, the maintenance will be applied as part of the NLS installation. The installation of the maintenance is on by default and can be turned off with a keyword.
Each V8.2 SAS System is installed in a particular encoding. An encoding of the translation must match the encoding of the installed Release 8.2 SAS System. In some cases, your site may not have installed the SAS System in an encoding that matches your desired translation. If not, you will be instructed to perform this installation.
Caution: You may have previously installed Version 8.2, and later installed an additional Version 8.2 product(s), and/or installed hot fixes, using a staged installation (Action C). If so, you must have completed that installation and promoted the new product and/or hot fixes to production libraries (Action D) before installing NLS material. The installation you are beginning now (NLS maintenance and translations) will not have knowledge of those prior staged libraries, and the SAS invocation devices created to use your translation(s) will not refer to them.
The process for installing translations and NLS maintenance is in five parts. Each section describes the process in more detail:
1. Determine the two character Media and Data set Code for your location and EBCDIC encoding.
2. Determine the User Prefix of the untranslated SAS System to receive translations.
3. Determine if NLS maintenance to the untranslated SAS System is needed.
4. Install maintenance (if needed) and translation(s) to match your language requirements and EBCDIC encoding.
5. Perform post-installation customizations.

30 Installation Instructions and System Manager's Guide for the SAS System under OS/390
Determine the Two-Character Media and Data Set Code for Your Location and EBCDIC Encoding
If you have just completed installing a SAS System from media with Setup and Support VOLSER OxxNS2 , where xx is either of the media and data set codes W0 or W3 from the table Languages, Encodings, and Installation Codes below, and your language is listed with code xx, skip to the section “Install NLS maintenance and/or translations” on page 32.
Different international locations use variations of the OS/390 and zOS EBCDIC character set known as encodings to support the language and character set in use, and use various locale-dependent conventions for notation of dates, money, etc. SAS is distributed in encoding support groupings that usually support a single encoding and a group of related locales. SAS System files containing material translated into local languages are distributed matching these specific encoding support groupings. SAS System installation media VOLSERs, and certain installed SAS System filenames contain a two-character code that identifies the encoding(s) and locale(s) supported.
The following Release 8.2 language/encoding combinations are available:
Languages, Encodings, and Installation Codes
Language Support
Language Code (yy val.)
Req. Media and Data Set Code (xx value)
Main Encoding
Typical Location
Typical Locale Value in Config File
GERMAN DE W3 EBCDIC 1141 Germany GERMAN
JAPANESE JA W0 or none EBCDIC 1047 Japan JAPANESE
Select the Media and Data Set Code (xx value) from the row in the table that matches your language and encoding. Contact your SAS sales representative for inquiries concerning other combinations.
Determine User Prefix and Encoding of the Untranslated SAS System to Receive Translations
In order to install language support, you must have installed a Release 8.2 SAS System containing the required media and data set code from the table above. SAS System data set names will begin with a common high level prefix chosen by the installer. This prefix is referred to as <USER.PREFIX>. Use ISPF or another utility to display all data set names beginning with <USER.PREFIX>. You should see the following installed data sets, where xx is a code from the table Languages, Encodings and Installation Codes above.
• <USER.PREFIX>.xx.XREG.TXT or <USER.PREFIX>.XREG.TXT for W0 only.
• <USER.PREFIX>.xx.SASHELP or <USER.PREFIX>.SASHELP for W0 only.
• <USER.PREFIX>.xx.AUTOLIB or <USER.PREFIX>.AUTOLIB for W0 only.

Installation Instructions and System Manager's Guide for the SAS System under OS/390 31
An example of such a data set would be: MISOS.CMPLX2.SASV82.W3.SASHELP.
<USER.PREFIX> is MISOS.CMPLX2.SASV82 and the encoding support is W3, EBCDIC 1141.
If you saw more than one xx in a MISOS.CMPLX2.SASV82.xx.SASHELP, or xx and MISOS.CMPLX2.SASV82.SASHELP, you have more than one encoding installed at your site; you may install any language for those encodings if you have the translation media and the Setup and Support Media OxxNS2 with matching xx. Each combination of language and encoding requires a separate installation. The maintenance is not encoded and only needs to be installed once.
For a SAS System in EBCDIC 1047 encoding, without the W0 in the names, execute a SAS CLIST using this <USER.PREFIX> to verify that the system is Release 8.2. The version number is usually contained in the first lines of the SAS System Log. If not, consult with your system personnel to ascertain the version, or SAS Technical Support can assist you in determining the SAS version.
Note: These translations can be applied to Release 8.2 systems only.
The translation media for a given language will contain a full set of translations in each of the encodings associated with the language in the table, and is the only translation media required.
The encoding of your installed Release 8.2 SAS System must match one of the listed encodings of your chosen translation. IF no xx value determined above matches your desired translation, your site has not installed the SAS System in the necessary encoding. You will need to perform this installation. Your distribution package may include the media to do this. This media will be in one of these forms:
OxxNS2, OxxN11, OxxN21, ... OxxN61 (3480)
In these examples, xx is the Required Media and Data Set Code from code from the table Languages, Encodings and Installation Codes on page 30.
If you do not have this media, you will need to contact your SAS Sales representative to obtain it.
To perform the installation, follow the steps listed at the beginning of this manual. When you have completed the installation, proceed to the section “Install NLS Maintenance and/or Translations” below.
Determine if NLS Maintenance has been Applied
Use of these translations requires application of a particular list of maintenance (termed NLS maintenance) to your SAS System. If you located the data sets above, check to see if NLS maintenance has been installed. There are two ways to verify that maintenance has been applied to your SAS System:

32 Installation Instructions and System Manager's Guide for the SAS System under OS/390
1. Locate the partitioned data set (PDS) <USER.PREFIX>.DBCS.LIBRARY. Verify that the alias SASXALF exists here. If so, maintenance has been applied.
2. Start the SAS 8.2 System that will have its maintenance verified, and execute the following SAS source. Be sure to use the actual value for <USER.PREFIX>:
data null; filename testver '<USER.PREFIX>.LIBRARY'; tslfound =tslvx('testver','SASVK'); put tslfound; run;
If SASXALF is found using the first method above, or if the second method produces a listing of 8.02 TS2M0 D012301 in the log, add the keyword NONLSMAINT to the keywords for installing NLS translations below.
Note: If you do not find these files, they may be listed under a different <USER.PREFIX>, or they may not have been installed at all. You will have to ascertain the correct <USER.PREFIX> or install the SAS System from media containing the code xx in second and third position of the SAS System cartridge VOLSERs. This media may have been included with the National Language translation media you received in the shipment from SAS. If not, you will need to contact your SAS sales representative to obtain it. If you possess the Release 8.2 media with tape VOLSERs in the following pattern, where xx is the code from the table above, install the SAS System using the steps listed at the beginning of this manual.
OxxNS2, OxxN11, OxxN21, ... OxxN61 (3480)
If you install a SAS System from these media, the system will already contain the NLS maintenance. Add the keyword NONLSMAINT to the keywords for installing NLS translations below.
Install NLS Maintenance and/or Translations
If you have just completed a SAS System installation from media containing the VOLSERs OxxNS2 or OxxNA1, reuse the control data set from that installation and skip to Step 3 below “Edit the SPKEYLST member.” The NLS installation will use the settings from the SAS System installation. Use of other prefix settings will cause the creation of non-functional invocation devices. Be sure to turn on the NONLSMAINT keyword in Step 3
1. Unload the SAS.SASROOT data set from OxxNS2 (3480) or OxxNA1 (3590) using the Control Data set (CNTLDSN) allocation and IEBUPDTE steps described on page 9 in “Unloading the Installation Jobs - Run IEBUPDTE,” in Part 2, “Installing the SAS System.”

Installation Instructions and System Manager's Guide for the SAS System under OS/390 33
2. Edit the SASEDITP member of the CNTLDSN.
Follow the steps for editing instructions as documented in “Specifying Installation Parameters,” on page 11 in Part 2, “Installing the SAS System.” Choose a primary action in Part 1.
Note: Action B and Action C are the only choices available. Action B will install NLS maintenance directly to the SAS System libraries defined by <USER.PREFIX>. Action C will install NLS maintenance to staging libraries defined by a new <USER.STAGE.PREFIX> without making any changes to production libraries. The invocation devices created by this install will concatenate the maintenance libraries with production libraries.
• If you select Action B, set EXISTING-SAS-PFX= to <USER.PREFIX> determined above.
• If you select Action C, set FINAL-SASLIB-PFX= to <USER.PREFIX> determined above and set the STAGED-LIBR-PRX= to a <USER.STAGE.PREFIX> of your choice.
You may ignore the contents of PRODSEL and LIBSEL. The NLS installation does not utilize PRODSEL or LIBSEL.
3. Edit the SPKEYLST member of the CNTLDSN.
If you have taken either of these two actions, follow the editing instructions below:
• installed the SAS System or installed and promoted SAS products to <USER.PREFIX> using the media OxxNS2 or OxxNA1, or
• verified that the SAS System at <USER.PREFIX> contains the NLS maintenance
Edit the line beginning #+ NLS-LANG-yy to begin #K NLS-LANG-yy by changing the ‘+’ to ‘K’, where yy is
DE for German requires media VOLSER ODENS1 (3480)
JA for Japanese requires media VOLSER OJANS1 (3480)
If you are installing a second or subsequent language after using these procedures to install the first language, edit the line beginning #+ NONLSMAINT to begin #K NONLSMAINT by changing the ‘+’ to ‘K’.
4. Edit the MAKESUPL member of the CNTLDSN, supplying job card data appropriate to your installation, PROC name, and CNTLDSN name in two places. Follow the instructions contained in the JCL.
34 Installation Instructions and System Manager's Guide for the SAS System under OS/390
Submit this job for execution. MAKESUPL will generate a customized SASISUPL member in the CNTLDSN.
5. Submit the SASISUPL job to install your selected language support.
6. Edit the CNTLDSN members TSOyyxx and BATyyxx , where yy and xx are as selected above. Make sure the LOCALE=value refers to the location appropriate for operation of your SAS System.
All valid values are listed for LOCALE= in the EBCDIC encoding of your installed SAS system. All values except your chosen value should be commented out. Some values of LOCALE= may not be compatible with your language.
7. There are CLIST and PROC examples created in the CNTLDSN for invoking both the translations and the encoded images you have installed. You can invoke the translated SAS System using the CNTLDSN members CLSTyyxx and PROCyyxx, or invoke the untranslated encoded SAS System using CLSTxx or PROCxx where yy and xx are from the selections above.
If you need to write additional CLISTs and PROCs for your translated system, be sure to use the concatenations found in these examples to invoke the translations. Also note the concatenation of SASHELP present in the SASHELP= option of the CONFIG files TSOyyxx and BATyyxx. If you create other CONFIG files related to running SAS with translations, you will need to duplicate this concatenation using the SASHELP= option.
If Action B was chosen in the SASEDITP member, this completes the installation of the chosen translation. Otherwise, continue with the section “Copying Staged Libraries to Production” below. Repeat the process if you intend to install more than one translation.
Copying Staged Libraries to Production
If you performed the recommended Action C above on your media, eventually you will want to move these staging libraries to production. Complete the following steps to move these libraries to production:
1. Edit the SASEDITP member of the CNTL data set. You should comment out Action C and activate Action D within the SASEDITP.
2. Submit the MAKESUPL member of the CNTL data set. No editing should be required in MAKESUPL.
Note: The MAKESUPL job needs exclusive access to the CNTL data set. You should back out of the CNTL data set after submitting MAKESUPL.

Installation Instructions and System Manager's Guide for the SAS System under OS/390 35
3. After MAKESUPL completes successfully, submit the generated SASISPSF member of the CNTL data set for execution to copy the staging libraries to production.
Note: This member has a different name than the SASISUPL member generated for other functions.
4. Edit the PROC and CLIST CNTLDSN members CLSTyyxx, PROCyyxx, CLSTxx and PROCxx where yy and xx are as selected above. Remove the allocations and concatenations referring to <USER.STAGED.PREFIX>.
5. Edit the CONFIG file CNTLDSN members TSOyyxx and BATyyxx to change the second libref in the SASHELP= option line to match the DDNAME used for <USER.PREFIX>.xx.SASHELP in the PROC and CLIST members. They may already be set to use the DDNAME for <USER.PREFIX>.xx.SASHELP, and no edit is required.
6. You will also have to perform these edits on any other PROC/CLIST/CONFIG files you have setup to run your translated system while maintenance was staged.

36 Installation Instructions and System Manager's Guide for the SAS System under OS/390

Page 37
Section II: System Manager’s Guide

38 Installation Instructions and System Manager's Guide for the SAS System under OS/390

Page 39
Part 1, Setting Up the SAS® System
Part 1 describes how to tailor your SAS System installation to suit your particular site configuration. The following topics are discussed in this section:
❏ Implementing SAS TSO Support (recommended) ❏ Customizing Default Options and System Configuration
Files (recommended)
❏ Selecting a Bundled Configuration (recommended) ❏ Installing the SAS System into the LPA (recommended) ❏ System Configuration for Using SAS with TCP/IP (recommended) ❏ Customizing Your SAS CLIST and Cataloged Procedure (recommended) ❏ Customizing Your NEWS File (recommended) ❏ Installing the SAS SVC Routine (optional) ❏ Installing the SAS SMF Exit (optional)
Note: Some of the actions may require knowledge of OS/390 operating system principles.
Implementing SAS TSO support
Note: This task is required if you are planning to run the SAS System under TSO.
If you plan to run the SAS System under TSO, you must install the SASCP TSO command processor as outlined below, even if you previously installed it in an earlier release of the SAS System. If you do not install the SASCP TSO command processor, you can run the SAS System in batch mode only. You must also use the CLIST supplied with this installation tape to run Release 8.2 of the SAS System under TSO. Do not try to use a SAS CLIST from a previous release.
SAS TSO support includes two different facilities. The SAS TSO command processor allows you to invoke the SAS System from a TSO session. The SAS TSO command support feature provides a SAS statement for executing TSO commands from a SAS session and allows SAS DATA step programs to execute TSO commands conditionally.
The SAS System supports these features through installation-modifiable modules. These modules contain all of the TSO service routine dependent functions and make no reference to SAS service routines or data areas. These modules are:
SASCP the TSO command processor for invoking the SAS System.
Note: SASCP is backward compatible and replaces the modules from previous releases. You can continue to execute previous releases of the SAS System and SASCP with the Release 8.2 SASCP installed on your system.

40 Installation Instructions and System Manager's Guide for the SAS System under OS/390
SASTSO the TSO command executor for executing TSO commands.
SASCALL the TSO CALL command processor used by SASTSO.
SASTSMAC the macros necessary to assemble these modules.
These source modules are unloaded from the tape during installation into the &prefix.BAMISC library. The default load modules SASCP, SASTSO, and SASCALL are unloaded into your &prefix.LIBRARY. These modules work correctly under all levels of TSO.
Most sites will not need to modify the modules. If you do not need to customize the modules, proceed to STEP 3. However, should your site have special needs, STEPs 1 and 2 describe how to modify and reassemble these modules.
STEP 1: Determine if the distributed TSO support modules require installation customization for your site. Perform customization if needed. (Optional)
The Assembler source code for the SASCP, SASTSO, and SASCALL modules is available in your &prefix.BAMISC library for modification. Assembly requires that the SYSLIB concatenation contain the general use system macro library SYS1.MACLIB, the product-sensitive system macro library SYS1.AMODGEN or SYS1.MODGEN, and the BAMISC library. Examine the source code for the TSO support modules for further details. Sample JCL for assembling and linking these modules is included with the comments of the modules.
If your site has modified the source code and relinked the SASCP module, you can use the TSO TEST command to test SASCP directly from the SAS library by specifying the CP option of TEST. Create a test version of the SAS8 CLIST and insert the TEST command with the CP option immediately before the SASCP invocation at the end of the CLIST.
STEP 2: Modify system tables as needed. (Optional)
This installation may also require that you modify certain system tables, such as the PCF and/or ISPF Command Authorization tables. These modifications may require the assistance of local systems or technical support personnel.
The TSO command executor, SASTSO, contains support for TSO command validation by both PCF and ACF2. The use of ACF2 command validation must be explicitly enabled either by modifying and reassembling SASTSO (following the instructions given in the program header), or by using the OS/390 service aid, AMASPZAP. Contact the Technical Support division at SAS if you have any questions concerning these procedures.
The functionality that will allow you to interface the SAS System with IBM’s ISPF is included in this release. For this reason, you should examine

Installation Instructions and System Manager's Guide for the SAS System under OS/390 41
the ISPF Command Table, ISPTCM. For more information about this functionality, refer to Chapter 8, “SAS Interfaces to ISPF and REXX” in SAS Companion for the OS/390 Environment, Version 8.
If the SAS command processor, SASCP, is defined within your installation’s ISPTCM, the flag bit to allow a function pool to be created for the command must be on x'40'. If SASCP is not in your ISPTCM, then either the default flag value must include the preceding bit, or you should do one of the following:
• change the default flag value • add SASCP to the table with the flag on
Note that the bit is ON in the default flag value in the sample ISPTCM that is distributed by IBM.
STEP 3: Copy the SASCP module to your TSO command load library.
Note: This step is required if you are running under TSO.
Installation of SAS TSO support requires that the module SASCP be copied from the &prefix.LIBRARY to a load library that contains TSO commands. This can be a STEPLIB library defined in a LOGON procedure, a system link list library, or a link pack area library. (The SASTSO and SASCALL modules should remain in &prefix.LIBRARY.)
Use job BASASCP in the CNTL data set to copy SASCP to your TSO command load library. The CMDDSN, CMDUNIT, and CMDVOL JCL procedure parameters specify the user command load library into which you copy the SASCP module. Modify these values to specify your TSO command library. If you have customized the SASCP module and are storing it in a library other than &prefix.LIBRARY, you also need to specify its new location in the //SASLIB DD statement.
Check the JCL and run the BASASCP job.
Customizing Default Options and System Configuration Files
Note: You should complete this task.
In the process of installing the SAS System under OS/390, you establish default SAS system options for all SAS invocations at your site. You can set these global defaults in any of the following places:
Default Options Table System configuration file Restricted Options Table

42 Installation Instructions and System Manager's Guide for the SAS System under OS/390
Two sample system configuration files are shipped with the SAS System. One has option settings set specifically for TSO (member TSO in the CNTL data set). The other has settings for batch execution (member BATCH). These files are discussed in more detail later in this section.
Users can also specify options in any of the following locations:
in a user configuration file, which is specified using the CONFIG operand in the CLIST and the CONFIG parameter in the cataloged procedure
on the command line when invoking the SAS System under TSO
with the OPTIONS parameter in the cataloged procedure, if invoking it under batch
from within a SAS session, either on an OPTIONS statement or from the OPTIONS window in the windowing environment
The following indicates the order in which the SAS System processes options from the various sources:
1. Options in the Default Options Table (if assembled)
2. Options in a system configuration file (if one is used)
3. Options in a user configuration file (if one is specified)
4. Options supplied on the command line in the invocation of the CLIST (TSO) or using the OPTIONS parameter in the cataloged procedure (batch)
5. Options in the Restricted Options Table (if assembled)
6. Options specified on an OPTIONS statement or in the OPTIONS window.
Note that later specification of an option overrides an earlier specification. For example, options set in a user configuration file override options set in the system configuration file. Depending upon where you set them, you can streamline system startup or restrict use of options by users.
To streamline system startup for users under TSO, for example, you can add all option defaults needed for TSO at your site to the Default Options Table. Then, since users need not allocate a system configuration file at startup time, you can remove its allocation from the CLIST. Note that in this case, you still need a system configuration file for batch jobs to override the values tailored for TSO in the Default Options Table.
To restrict use of options by users, you can set them in the Restricted Options Table. Since this table is processed last after the Default Options Table, configuration files, and command line options, values set here override all earlier specifications. As a result, options that can be specified on an OPTIONS statement cannot be restricted by

Installation Instructions and System Manager's Guide for the SAS System under OS/390 43
use of the “Restricted Options Table”; only “invocation only” options can be restricted.
STEP 1: Determine default values for SAS system options at your site.
SAS system options that can be used in any operating system environment in which the SAS System resides are described as portable and discussed in SAS Language Reference: Dictionary, Version 8. OS/390-specific system options are discussed in the SAS Companion for the OS/390 Environment, Version 8. The section “Summary Table of SAS System Options” in the OS/390 Companion contains a table that lists all options available in Version 8 both portable and OS/390-specific.
Note: The table does not include system options that were new in Versions 8.1 and 8.2.
The options are listed in alphabetical order for easy reference. This table shows the system default value for each option and includes a reference to the appropriate document for further details.
OS/390-specific options that warrant special attention at installation time are discussed in the following. These options include the SMF- and SVC-related options, and the superblocking options.
SMF and SVC Options
The following options should be set in the Restricted Options Table with values that you choose at installation time. The settings of these options are unlikely to require change. Because of the measurements that these options govern, it is prudent to remove these option settings from general user access. • SMF|NOSMF causes an SMF record to be written for every PROC or
DATA step containing resource usage statistics for CPU time, memory, and EXCP count. NOSMF disables writing of utilization statistics by the SAS System. The default is NOSMF.
Note: The SAS system option STIMER must also be on for SMF records to be written.
• SMFEXIT=name identifies the user SMF recording exit load module. This load module is loaded and given control before SMF records are written. It allows the user to modify the contents of the record to be written or to disallow the writing of the record (if SMF option is in effect). There is no default.
For information on installing the SMF exit, see “Installing the SAS SMF Exit” on page 71.
• SMFTYPE=recnum identifies the SMF record type to record and specifies the default user type for the SAS System to place in the

44 Installation Instructions and System Manager's Guide for the SAS System under OS/390
SMF records it generates when the SMF option is on. The value must be greater than 127 for the SAS SVC to write the SMF record. The default is 128.
• SVC0R15=value specifies the value to be placed in Register 15 before invoking the SAS SVC. The default is 4. For information about installing the SAS SVC, see “Installing the SAS SVC Routine” on page 68.
• SVC0SVC=number specifies the SVC number invoked for functions requiring the SAS SVC. The default is 109.
For information about installing the SAS SVC, see “Installing the SAS SVC Routine” on page 68.
Superblocking Options
To decrease memory fragmentation, the SAS System has the ability to obtain large blocks of memory from the operating system to satisfy multiple requests for smaller blocks of memory. This scheme, which is called superblocking, not only reduces fragmentation but also reduces the number of system GETMAIN calls that are issued. This facility is controlled by setting the superblocking options. When they are set to zero, no superblocking is performed.
The superblocking options warrant special attention at installation time because useful values can depend on the mode (batch or TSO) in which the SAS System runs. The default values for these options are based on early and fairly limited experience in running Release 8.2 of the SAS System. In most cases you should not need to override the default values. To see the current values of these options and other options related to memory, as well as where they were set, submit
proc options group=memory value; run;
The SAS System issues superblock overflow warning messages if secondary (OSA) superblock memory is needed. These messages can help you to tune these values for your site.
The following options can be used at SAS invocation or in a configuration file to specify the size of the superblocks. The values may be specified in bytes, kilobytes (K), or megabytes (M).
• PSUPISA=value specifies the size of the Initial Size Allocation (ISA) for the portable supervisor.
• PSUPOSA=value specifies the size of the Overflow Size Allocation (OSA) for the portable supervisor.

Installation Instructions and System Manager's Guide for the SAS System under OS/390 45
• VMCTLISA=value specifies the size of the ISA for SAS System memory management control blocks.
• VMNSISA=value specifies the initial size allocation of NOSIG pools.
• VMNSOSA=value specifies the overflow size allocation of NOSIG pools.
• VMPAISA=value specifies the size of the ISA for permanent memory above the 16 Mb line. Permanent memory is memory that is used past procedure or task termination, typically by the host and core supervisor.
• VMPAOSA=value specifies the size of the OSA for permanent memory above the 16 Mb line.
• VMPBISA=value specifies the size of the ISA for permanent memory below the 16 Mb line.
• VMPBOSA=value specifies the size of the OSA for permanent memory below the 16 Mb line.
• VMTAISA=value specifies the size of the ISA for temporary memory above the 16Mb line. Temporary memory is that memory which needs to be resident only while the task or procedure is active. This type of memory is highly transient so it is always cleaned up at the end of the task or procedure. Almost all PROC step memory, DATA step memory, and I/O buffers come from this class of memory.
• VMTAOSA=value specifies the size of the OSA for temporary memory above the 16Mb line.
• VMTBISA=value specifies the size of the ISA for temporary memory below the 16Mb line.
• VMTBOSA=value specifies the size of the OSA for temporary memory below the 16Mb line.
WTO Options
There are three options that control the way system operator messages are issued if a SETINIT failure occurs. All of these options are invocation-only so that you can restrict them at your site by including them in the Restricted Options Table. If you work with a systems programmer at your site, you can set values for these options that cause SETINIT error messages to be trapped by operating system automation software.

46 Installation Instructions and System Manager's Guide for the SAS System under OS/390
To see the values of these options, specify the following:
proc options group=install; run;
Each of the WTO options corresponds to one of the keywords that can be supplied on the WTO system macro.
• WTOSYSTEMDESC=n Use this option to specify the message descriptor code. The value of this option is passed to the WTO macro with the DESC keyword. See IBM documentation for the meaning of the various values (0 to 16) that can be supplied.
• WTOSYSTEMMCSF=(list-of-keywords) With this option you supply keywords that control the display of the message. Multiple values are permitted. If you specify more than one value, you must enclose them in parentheses; if you specify only one value, then the parentheses are optional. Here are the keywords that you can supply:
BRDCST Broadcast the message to all active consoles. HRDCPY Queue the message for hard copy only. NOTIME Do not append time to the message. BUSYEXIT Do not wait for WTO buffers.
This option corresponds to the MCSFLAG keyword on the WTO macro.
• WTOSYSTEMROUT=n Use this option to specify the message routing code. The value of this option is passed to the WTO macro with the ROUTCDE keyword.
See IBM documentation for the meaning of the various values (0 to 16) that can be supplied.
The BNDLSUFX= Option
specifies a character that is to be appended to every bundle load module name before it is searched for or loaded. The character is appended to the name of every bundle load module (these modules have a prefix of SAB). If the name of the bundle is eight characters long already, the suffix character replaces the last character. The value for the BNDLSUFX= option can be enclosed in quotes, but does not have to be. See “Selecting a Bundled Configuration” on page 50 for more information.
The BNDLSUFX= option is typically used only by system administrators, and not by the general user.

Installation Instructions and System Manager's Guide for the SAS System under OS/390 47
The SUBSYSID= Option
tells the cross memory services communication facility to use the OS/390 subsystem ID that was chosen in the installation process to anchor its resource descriptors. The default value is SAS0. This option is used in conjunction with SAS/SHARE software.
The OPRESTRICTIONS= Option
sets the name of the Restricted Options Table load module, which sets initial options and prevents the user from overriding them. The syntax is OPRESTRICTIONS=AAAAAAAA where AAAAAAAA is the name of an OS/390 load module that must be in LPA or the linklist. See “Step 5: Create a Restricted Options Table” for more information.
The DLINITDEFER Option
suppresses synchronization of VTOC entry at library creation time. If your site uses SMS management classes which specify partial release = yes immediate, or if you utilize a system exit to release space when data sets are closed, you may want to consider specifying DLINITDEFER as a default option for your site.
STEP 2: Determine where to set your option defaults.
Review the procedures for setting default option values in the next three steps. Decide which options should be set in the Default Options Table, the system configuration files, and the Restricted Options Table. Save these lists for use in later steps.
STEP 3: Customize the supplied DFLTOPTS table.
Customizing DFLTOPTS (Default Options Table) is optional. If you decide to customize it, edit the DFLTOPTS assembler source by adding the options to the table that you would like to include and removing those you do not want. For example, you can put options that have the same value in all execution modes in the Default Options Table.
The source for the DFLTOPTS table resides in the &prefix.BAMISC library member DFLTOPTS. This source represents the DFLTOPTS table that is linked into the SAS load modules on your installation tape. Instructions for modifying the DFLTOPTS table are included in comments in the source code. The JCL to assemble and link it is in member BAOPTS1 in the CNTL data set. Run the job to assemble the DFLTOPTS CSECT and link it into SASHOST individually, and into the bundles of which SASHOST is a part. Be sure that if you run a bundled configuration, you relink the bundles that you use.

48 Installation Instructions and System Manager's Guide for the SAS System under OS/390
Since the DFLTOPTS table is linked with SASHOST, it does not have to be loaded to be read. If you can put all the default options that you need in the DFLTOPTS table, you do not have to use a system configuration file.
The DFLTOPTS table can contain as many option length/value pairs as needed. An option length/value pair consists of a half word length field, followed by a character string of the form option, NOoption, or option=value. The OPT macro in the assembler source calculates the length fields given the character strings. The table must be terminated by a pair with a length field of 0.
STEP 4: Customize the system configuration files.
Set up a system configuration file to establish installation-wide default values for commonly-used options. The default SAS CLIST and cataloged procedure installed from the tape always allocate a system configuration file and allow for specification of a user configuration file using the CONFIG operand and parameter.
Customizing your system configuration files involves customizing the following default system configuration files supplied with the installation:
TSO running under TSO BATCH running in batch mode.
These default system configuration files are unloaded into the CNTL data set as samples for you to review. They contain some of the options for which you may want to establish installation-wide default values that would likely vary, depending on batch or interactive execution mode. However, not all of these options are required.
The CNTL data set, where the sample configuration files reside, is a blocked partitioned data set with fixed-length, 80-byte records. You can create a system or user configuration file as any sequential data set or member of a PDS, as long as the data set has fixed-length, 80-byte records.
The sample configuration files contain option settings separated into logical groups by comments. Records in a configuration file are either comment lines (indicated by an asterisk in column 1) or option lines. In the sample configuration files, options are listed one per line to make them easier to read and maintain. However, this is not required; more than one option can be included on a single line.
For options that require a value, the option must be specified as option=value with no blanks before or after the equal sign. Any SAS system option can be specified in the system configuration file. Those options include:

Installation Instructions and System Manager's Guide for the SAS System under OS/390 49
options that must be specified only at invocation (sometimes referred to as configuration options). These options can be specified in a configuration file, on the CLIST command line, or in the batch OPTIONS parameter.
options that can be specified any time (sometimes referred to as session options).
Once you have entered the options in the system configuration file, no further processing is necessary (unlike options specified in the Default Options Table or Restricted Options Table). However, if you move the configuration files from the installation CNTL data set, be sure to update your CLIST and cataloged procedure accordingly to reference the new data set names.
STEP 5: Create a Restricted Options Table (optional).
Since this is the last place from which invocation options are processed and a later specification of an option always overrides an earlier specification, an invocation option specified in the Restricted Options Table cannot be overridden by the user. (Note that session options can be overridden.) For options in the Restricted Options Table to be processed, the restricted options module must come from a linklist library but does not have to be APF authorized.
The format of the Restricted Options Table is the same as that for the DFLTOPTS table, except that the option length/value pairs must be preceded by the header ***SASOPTRS***. Like the Default Options Table, the Restricted Options Table is an assembler source module that must be assembled and linked.
The source for the sample Restricted Options Table is in the &prefix.BAMISC library member SASOPTRS. The JCL to assemble and link this table is in member BAOPTS2 in the CNTL data set. The Restricted Options Table is optional. If you decide to install it, edit the SASOPTRS member containing the assembler source, adding the options to the table that you would like to include and removing those that you do not want to use. Run the BAOPTS2 job to assemble the SASOP820 module and link it into a linklist library.
Be sure that the SYSLMOD DD statement in the BAOPTS2 job points to a linklist library since the SASOP820 module must come from a linklist library in order to be processed.
Note: The sample table provided with this installation restricts access to VSAM data sets. You should not run this sample “as is” unless you want to restrict the use of this feature.

50 Installation Instructions and System Manager's Guide for the SAS System under OS/390
In the SAS System, you can apply different restricted options tables in different situations. This might be useful, for example, in a scenario that required multiple releases of the SAS System Version 8 to run concurrently. Modify the JCL in the BAOPTS2 member to assemble another restricted options module. Simply change the name on the NAME statement from SASOP820 to a name of your choice. Then specify the following in the config file:
OPRESTRICTIONS=name_of_your_choice
STEP 6: Verify your default option settings.
After performing the various steps described in this section to set default option values for your site, you should run PROC OPTIONS VALUE; RUN; to verify that the desired defaults are in place. The OS/390-specific SMF and SVC options are not normally displayed by PROC OPTIONS. Specify PROC OPTIONS VALUE GROUP=INSTALL; RUN; to review these options.
Selecting a Bundled Configuration
Note: You should complete this task.
Release 8.2 of the SAS System for OS/390 is distributed in two bundled configurations that are tailored for execution in the OS/390 environment, and one unbundled configuration. The two bundled configurations differ in that one is tailored for execution with some modules installed in the Link Pack Area (LPA), while the other is tailored for execution with no modules installed in the LPA. Note that the code is identical across the three versions; the only difference is in the packaging.
The ENTRY parameter of the JCL cataloged procedure or TSO CLIST determines which configuration is used. The default entry point name is SASHOST, which runs the unbundled configuration. If you want to run a bundled configuration, which is highly recommended, edit your installed SAS CLIST and cataloged procedure to specify the appropriate entry point name for your site as described in the following section.
OS/390 non-LPA (ENTRY=SASXA1)
The bundled components of the OS/390 non-LPA configuration consist of the following modules located in your installed SAS LIBRARY data set: SASXA1, SASXA2, SABXSPL, SABXINI, SABXTRM, SABDSC, SABDSX, SABZPLM, SABZPLC, as well as others when other Institute Program Products (IPPs) are installed. SABXINI and SABXTRM are transient modules used during initialization and termination, respectively. SABDSC and SABDSX are the DATA step compilation and execution modules, respectively.

Installation Instructions and System Manager's Guide for the SAS System under OS/390 51
In Version 8 of the SAS System, OS/390 sites that wish to run with an entry point of SASXA1 and make use of the BNDLSUFX system option should follow these guidelines:
1. Specify BNDLSUFX="character" in default CONFIG files, default options table, or restricted options table.
2. Modify the SAS-supplied CLIST and cataloged procedure to specify ENTRY=SASXA"character"
3. Rename required modules as follows:
SASXA1 => SASXA"character" SASXA2 => SASXA"character"2 SABDSC => SABDSC"character" SABXSPL => SABXSPL"character" SABDSX => SABDSX"character" SABXINI => SABXINI"character" SABZPLM => SABZPLM"character" SABXTRM => SABXTRM "character" SABZPLC => SABZPLC"character"
Note: The renamed SASXA2 module does not follow the usual convention (i.e., the ‘2’ follows the BNDLSUFX character).
Failure to follow these steps may result in a U2098 abend during SAS session initialization.
The SASXA1 module resides below the 16 Mb line, while all the other modules reside above it. SASXA1 is the entry module. To execute the SAS System using this configuration, specify ENTRY=SASXA1 in your SASEDITP member before you run the SASIxxxx job(s), or directly in your SAS CLIST and PROC.
OS/390 LPA (ENTRY=SASXAL)
The bundled components of the OS/390 LPA configuration consist of the modules listed in the following section.
The SASXAL module resides below the 16 Mb line, while all the other modules reside above it. SASXAL is the entry module. To execute the SAS System using this configuration, you will need to follow the procedures outlined in the next section.
Installing the SAS System into the LPA
Note: You should complete this task.
You can install the bundled modules in the LPA/ELPA. If the bundled modules are not installed in the LPA/ELPA, they are loaded into the address space of each SAS System user. This can cause a significant increase in the working set size, placing a heavy burden on the paging subsystem. If you have many users of the SAS System, this may be an important consideration.

52 Installation Instructions and System Manager's Guide for the SAS System under OS/390
STEP 1: Decide whether to install the SAS System in the LPA/ELPA.
Contact your systems programming staff to discuss the particular considerations involved at your site. You can install just the basic supervisor bundles (SASXAL, SASXAL2, SABXSPL, SABXDML, SABDS), or the supervisor bundles and the other bundles listed below as optional. The module sizes are as follows:
OS/390 Configuration:
Bundled Module for LPA
Size
SASXAL 700K
Bundled Modules for ELPA
Size
SASXAL2 1256K (recommended) SABXSPL 3626K (recommended) SABXDML 831K (recommended; Display Manager) SABDS 577K (recommended; DATA step) SABSCLL 2644K (optional; used by SAS/ASSIST
and SCL applications) SABDBGM 276K (optional; SCL debugger) SABZPLH 58K (optional; printing routines) SABXGPH 897K (optional; part of SAS/GRAPH) Total for ELPA 10165K
STEP 2: Install the modules into the LPA/ELPA using the standard procedure at your site.
STEP 3: Ensure that modules in LPA/ELPA do not have the same names as modules in the installed SAS LIBRARY data set.
Note: STEP 3 is necessary to prevent OS/390 from loading LPA/ELPA modules into the user’s address space when a JOBLIB or STEPLIB DD statement (batch), or a LOAD or SASLOAD CLIST parameter (TSO) references the SAS System LOAD LIBRARY.
You can do this in one of three ways:
1. Delete the bundled modules from the installed SAS LIBRARY data set.
2. Rename the bundled modules in the installed SAS LIBRARY data set.
3. Rename the bundled modules in the LPA/ELPA, leaving them in the installed SAS LIBRARY data set with their original names.
This approach has two advantages. It simplifies the application of maintenance by allowing you to apply maintenance directly to the SAS LIBRARY data set. It also facilitates the concurrent running of different releases of the SAS System.

Installation Instructions and System Manager's Guide for the SAS System under OS/390 53
To rename the bundles, do the following:
Choose a single character (0-9, A, B, D-E, G, I-W, Y, Z, #, @, $) as your suffix character. This will be the value of the BNDLSUFX= SAS system option.
Note: The characters F and H are reserved for use with Fujitsu and Hitachi versions of SAS. In addition, there are modules SABDS, SABDSC, SABDSX so if the suffix C or X is used, there will be duplicate modules names.
Rename the bundles, adding the suffix character to the old name to get the new name. There is one exception to this rule. The new name for the SASXAL2 module must be the same as the new name for the SASXAL with a 2 appended to it. If the new name for SASXAL is eight characters long, the 2 must replace the last character.
For example, if you choose the character 0 as your suffix character, rename the modules listed as follows:
Original Name New Name
SASXAL SASXAL0 SASXAL2 SASXAL02 <=== exception SABXSPL SABXSPL0 SABXDML SABXDML0 SABDS SABDS0 SABSCLL SABSCLL0 SABDBGM SABDBGM0 SABZPLH SABZPLH0 SABXGPH SABXGPH0
Note: Your list of modules may not include all those in this example. Your list will depend on the SAS System products that you have licensed.
Step 4: Make sure the ENTRY parameter of the JCL cataloged procedure and TSO CLIST defaults to the appropriate name.
If you have not renamed the modules in the LPA/ELPA, use the name SASXAL.
If you have renamed the modules in the LPA/ELPA, use the new name for the SASXAL module as the ENTRY parameter for the JCL cataloged procedure and TSO CLIST.
If you plan to make further CLIST or procedure customizations, edit the SASEDITP member of the CNTL data set to specify your name for the ENTRY parameter.

54 Installation Instructions and System Manager's Guide for the SAS System under OS/390
Step 5: If you have renamed the modules in the LPA/ELPA, use the BNDLSUFX= SAS system option to tell SAS which set of bundled modules to use:
BNDLSUFX=character
If you use BNDLSUFX= for any of the bundled modules, you must rename them all, including those bundles which are added later. A mixture of bundles which have been renamed and those that have not will cause the system to fail. This applies to bundles in both the LPA/ELPA and the SAS LIBRARY data set.
System Configuration for Using SAS with TCP/IP
Recommended Procedures
The steps in this section are required if you are to take full advantage of base SAS Software’s functionality. TCP/IP must be configured if you will be using certain features of base SAS software, such as EMAIL, URL, Socket and FTP ACCESS methods. You will not be able to use these features if you fail to complete this section. If you choose not to complete the steps in this section, you should notify SAS System users that this functionality is not available.
In addition, many SAS System products may require the steps in this section to be completed. A partial list of these products would include SAS/SHARE, SAS/CONNECT, SAS/IntrNet Software, IT Service Vision, and SAS OLAP Server Software. Please refer to product-specific appendices for further details.
Overview and Software Requirements
Overview
TCP/IP is a set of layered protocols developed to allow cooperating computers to perform tasks or functions and to share resources across a network. TCP/IP is actually made up of TCP and IP, where each is a set of commands which one machine sends to another. TCP can be thought of as routines that applications can use when they need reliable network communications with another computer.
Not all applications use TCP. There are some services that every application needs to communicate successfully through the network. These services are put together into IP. IP is a set of routines that TCP calls on, but it is also available to applications that do not use TCP. The SAS System uses both TCP and IP, and requires that certain types of information be made available to the system.
People usually prefer to use host names, while TCP/IP applications refer to host computers by their IP addresses. To facilitate the use of host names in a network, the Domain Name System translates host names to IP addresses. This Domain Name System provides host-to-IP address mapping through network server hosts called domain name servers. Domain name servers are described on page 57 in the section “Host Name Resolution.” The Domain Name System also provides other information

Installation Instructions and System Manager's Guide for the SAS System under OS/390 55
about server hosts and networks such as the TCP/IP services available to the server host and the location of the domain name servers in the network.
Software Requirements
You will need the SAS/C Transient Library and one of the following two TCP/IP packages:
• IBM TCP/IP Version 3 Release 2 or later • SOLVE:TCPacess (formerly Interlink SNS/TCPacess 5.2)
Using IBM TCP/IP
If you are using IBM TCP/IP, the procedures in the following sections must be completed, and the results made available to the SAS System:
• Locating the TCPIP.DATA file – below • Host Name Resolution – page 57 • Locating other TCP/IP data sets – page 58 • UNIX System Services (USS) - Open Edition – page 59 • Diagnosing Configuration Problems – page 60
Note: If the TCPIP.DATA file is an MVS data set, it should be a fixed block (RECFM=FB) with a logical record length of 80 (LRECL=80). Also use a semi-colon(;) to designate any comments. This is the location for most of the TCP/IP information that the SAS System will use. The TCPIP.DATA data set may also be stored as a HFS file.
Locating the TCPIP.DATA File
IBM has two different resolvers; one for Native MVS sockets (the MVS Resolver) and one for USS sockets (the LE Resolver). SAS/C (and SAS) uses its own resolver (the SASC Resolver) for both Native MVS and USS sockets. Therefore, it is crucial that all three resolvers get the same information. The best way to accomplish this is to make sure that they are all reading the same TCPIP.DATA file. See the table below for more information.
Comparison of the Three Resolvers Respective TCPIP.DATA Search Orders Under OS/390
IBM’s MVS Resolver(a) IBM’s LE Resolver(a) SAS/C’s Resolver(b) ----------------------------- ----------------------------- ---------------------------
1. SYSTCPD DD-name 1. LE environmental variable, 1. SAS/C Environment RESOLVER_CONFIG var. TCPIP_DATA
2. jobname.TCPIP.DATA 2. /etc/resolv.conf 2. SYSTCPD DD-name or userid.TCPIP.DATA
3. SYS1.TCPPARMS 3. SYSTCPD DD-name 3. userid.TCPIP.DATA

56 Installation Instructions and System Manager's Guide for the SAS System under OS/390
(TCPDATA)
4. TCPIP.TCPIP.DATA 4. userid.TCPIP.DATA 4. SYS1.TCPPARMS (TCPDATA)
5. SYS1.TCPPARMS 5. tcpip_prefix.TCPIP.DATA, (TCPDATA) where "tcpip_prefix" is the value of the SAS/C environmental variable TCPIP_PREFIX or system option TCPIPPRF=
6. TCPIP.TCPIP.DATA 6. TCPIP.TCPIP.DATA
(a) From OS/390 IBM Communications Server - IP Configuration Guide. (b) From SAS/C Library Reference, Volume.
If the TCPIP.DATA file is not found using the above SAS/C resolver search order, then the recommended method is to add an allocation for SYSTCPD (#1 above) to the SAS CLIST and SAS Catalog Procedure, as well as all other methods of initializing The SAS System.
The HOMETEST command is an IBM utility for verifying the actual data set name that IBM’s MVS Resolver finds for the TCPIP.DATA. However, this may not be the same data set found by IBM’s LE Resolver or the SAS/C Resolver.
Parameters
The following is a brief description of the parameters within the TCPIP.DATA file that affect The SAS System directly:
TCPIPJOBNAME The name of the member in the cataloged procedure library that is used to start the TCPIP address space. This is how the SAS System locates the TCP/IP Started task. For example, if the Started Task name is TCPIP34, the statement would read:
TCPIPJOBNAME TCPIP34 ;Name of the TCPIP Started Task
The default is TCPIP.
HOSTNAME The HOSTNAME statement is used to specify the TCP host name of the OS/390 server. The fully qualified domain name for the host is formed by concatenating this host name with the domain origin (specified by the DOMAINORIGIN configuration statement). The SAS System will use this along with the DOMAINORIGIN to form the fully qualified domain name used in host name resolution.
DATASETPREFIX The DATASETPREFIX statement is used to set the high-level qualifier for the dynamic allocation of data sets in TCP/IP. This allows the SAS System to locate other TCP/IP files. The default is TCPIP.

Installation Instructions and System Manager's Guide for the SAS System under OS/390 57
DOMAINORIGIN The DOMAINORIGIN statement is used to specify the domain origin that is appended to the host name to form the fully qualified domain name for a host. This is how the SAS System completes host name resolution.
NSINTERADDR The NSINTERADDR specifies the Internet address of the name server. This line can be repeated as many times as needed to specify IP addresses of alternative name servers. Connections to the name servers are attempted in the order they appear in the hlq.TCPIP.DATA data set. If no NSINTERADDR are coded in the hlq.TCPIP.DATA data set, the resolver looks for all domain names in the site table, and does not attempt to use a name server. The SAS System will use this value to perform host name resolution to an IP address. If the value of the name server Internet address is not present, then the SAS System will look for other TCP/IP files to perform host name resolution.
NSPORTADDR The NSPORTADDR is used to specify the name server port number. The default is Port 53. The SAS System will use this port to locate the domain named server.
Note: This is not a complete list of parameters for the TCPIP.DATA file.
Host Name Resolution
As indicated in the Overview section on page 54, people prefer to deal with computer names rather than numbers. However, network software generally needs a 32-bit Internet address to open a connection or send information. In order to resolve the names to address numbers, a database allows the software to look up a name and find the corresponding number. In the early days of the Internet, each system would keep a file of all the other systems, listing both their name and number. This is no longer practical, so these files have been replaced by a set of name servers that keep track of host names and the corresponding Internet addresses.
Name servers are part of the Domain Name System, which requires a fully qualified domain name. A fully qualified domain name is the complete name of a host. It takes the form of a series of labels separated by dots or periods. The root domain servers store information about server hosts in the root domain and the name servers in the delegated, top-level domains, such as com (commercial), edu (education), mil (military), and gov (government).
IP address-to-host name mapping is performed by the Domain Name System if the NSINTERADDR statement(s) in the TCPIP.DATA file point to the IP address(es) of the Name Servers.
Here are the keyword/value combinations involved in resolving host names in the TCP/IP Data file:
• NSINTERADDR value ; Required

58 Installation Instructions and System Manager's Guide for the SAS System under OS/390
• NSPORTADDR value ; Optional, will use default values
• RESOLVEIA value ; Optional, will use default values
• RESOLVERTIMEOUT value ; Optional, will use default values
• RESOLVERUDPRETRIES value ; Optional, will use default values
NSINTERADDR is the only one that needs to be verified. The defaults for the others are sufficient for The SAS System to function properly.
Note: If Name Servers are not being used for Host Name Resolution, the NSINTERADDR statement(s) would be commented out. Please refer to the section “Locating Other TCP/IP Data Sets” below for more information.
Locating Other TCP/IP Data Sets
Customizing the SERVICES File
Some SAS System products (products which utilize a server) require an entry in the SERVICES file. The ETC.SERVICES data set should be a physical sequential (DSORG=PS), Fixed Block (RECFM=FB), LRECL=80 data set without sequence numbers. Entries in the ETC.SERVICES file should follow the form below:
# this is a comment in the ETC.SERVICES file # # telnet 23/telnet ftp 21/tcp sassrv1 5010/tcp # SAS/SHARE Server number 1 sassrv2 5011/tcp # SAS/SHARE Server number 2 appsrv1 5224/tcp # SAS/IntrNet Application Server number 1 appsrv2 5225/tcp # SAS/IntrNet Application Server number 2 spawner1 5227/tcp # OS/390 Spawner
Search Order for Finding the SERVICES File
1. //SERVICES DD statement
2. jobname.ETC.SERVICES or userid.ETC.SERVICES
3. hlq.ETC.SERVICES
Some environments do not implement a TCP/IP SERVICES File, but instead define the port in the TCP/IP PROFILE data set.
PROFILE Data Set
The PROFILE data set is a TCP/IP member/file containing configuration and system operation parameters.
The search order for this member/file is as follows:

Installation Instructions and System Manager's Guide for the SAS System under OS/390 59
1. //PROFILE DD statements in the TCP/IP startup procedure
2. job_name.node_name.TCPIP
3. datasetprefix.node_name.TCPIP
4. job_name.PROFILE.TCPIP
5. datsetprefix.PROFILE.TCPIP
Profile Parameters Affecting SAS
Datasetprefix: defines HLQ for dynamic allocation of data sets.
PORT: reserves ports for server tasks. Only jobnames/procnames specified are allowed access to the port specified on this statement.
RESTRICT: defines a list of user ids that are prohibited from using TCP/IP.
RESTRICTLOWPORTS: restrict use of ports 1 to 1023 to specific jobnames/procnames in the port or portrange statement.
PORTRANGE: same as PORT parameter but for a range of ports.
Note: TCP will take PROFILE information over SERVICES information if a mismatch exist.
UNIX System Services (USS) - Open Edition
Certain SAS System applications (such as the Broker for SAS/IntrNet that execute under UNIX System Services) must be customized for the local environment. The customization steps require exporting shell variables. These variables direct how the SAS System initializes and uses files under the HFS. The following information is required by the SAS System:
1. The location of the SAS/C Transient Library
2. The name of the TCP/IP configuration data set
3. The name of file used for domain nameserver processing
4. The name of the file used for host table lookup
Specifying the SAS/C Transient Library
The SAS/C Transient Library contains various modules and routines that are used by the SAS System during execution. These libraries are unloaded from tape during SAS System installation. Specify the library using the following shell environment variable command:
export ddn_CTRANS=&prefix.SASC.TRANSLIB

60 Installation Instructions and System Manager's Guide for the SAS System under OS/390
where &prefix = High-Level-Qualifier of the SAS System installation libraries.
Specifying the name of the TCP/IP Configuration Data Set
The SAS System under UNIX System Services will use the SYS1.TCPPARMS (TCPDATA) data set to obtain system configuration information. Specify the data set using the following shell environment variable command:
export TCPIP_DATA=//dsn:SYS1.TCPPARMS(TCPDATA)
Or, change the value following dsn to point to the TCP/IP configuration data set at your site.
Customizing Host Tables if a Domain Nameserver is not Available
If the site does not use a domain nameserver, then the SAS System under UNIX System Services must be customized to perform host table name lookup. Specify the name of the host table lookup file using the following environment variable:
export ETC_HOSTS=//dsn:sys2.ETC.HOSTS
where sys2.ETC.HOSTS is the ETC.HOSTS file installed under OS/390. The format of this file is described in the section “Customized Configuration” on page 62.
If your ETC.HOSTS file is located within the HFS under UNIX System Services, the export statement would look like this:
export ETC_HOSTS=//hfs:/etc/hosts
Ensure the ETC_HOSTS environment variable points to the correct path and file name.
Diagnosing Configuration Problems
The SAS System uses the DD SASCTCPE for diagnostic information related to TCP/IP processing. To obtain diagnostic information, allocate the DDname SASCTCPE to a permanent or SYSOUT data set. This will enable warnings and errors that may assist in problem determination. This data set may be allocated to DUMMY to prevent error messages from being written to the console or terminal.
Using SOLVE:TCPaccess
Solve:TCPaccess (formerly Interlink SNS TCPaccess 5.2) allows the SAS System to connect with a TCPaccess TCP/IP stack. The information in this section describes the unique configuration requirements for using TCPaccess. The SAS System interface to TCPaccess is designed to be transparent to the application. TCPaccess provides the mechanism used by the SAS System to connect with TCPaccess.

Installation Instructions and System Manager's Guide for the SAS System under OS/390 61
There are two methods of accessing the TCPaccess stack:
• The first method requires using TCPaccess components instead of the runtime components and is discussed in the section below.
• The second method requires configuring TCPaccess to emulate IBM’s TCP/IP. For this method, the mechanisms for accessing TCPaccess are the same as described in the section “Using IBM TCP/IP” on page 55.
Using TCPaccess Components Instead of the Runtime Components Provided with the SAS System
TCPaccess provides a load module LSCNCOM (and an alias L$CNCOM), which is compatible with SAS runtime modules. To enable the TCPaccess modules, these modules should be allocated before the SAS/C TRANSIENT library specification. The method for locating and loading executable modules uses normal OS/390 conventions. The TCPaccess library specification should be allocated via one of the following:
• STEPLIB, JOBLIB, or TASKLIB DD statements
• Link List Lookaside (LLA)
• Link Pack Area (LPA)
• Linklist
Configuring Name Resolution Processing
In addition to SAS System hostname resolution processing, TCPaccess implements additional mechanisms for hostname resolution. This additional capability is implemented via a TCPaccess-specific SAS system option, ICSRSLV. The following describes the use of the ICSRSLV option:
ICSRSLV=ONLY | FIRST | LAST | NEVER
The value of this option specifies the order in which the TCPaccess name revolver (DNR) and the SAS resolver are used. The value specified for the ICSRSLV option is stored in the SAS environment variable ICS_RESOLVER. Alternatively, the environment variable ICS_RESOLVER may be set in the SASCTCPV data set.
• ONLY: (default) call the TCPaccess name resolver only and return OK or error.
• FIRST: call the TCPaccess name resolver first and if there is an error, call the SAS resolver.
• LAST: call the SAS/C resolver first and if there is an error, call the TCPaccess name resolver.
• NEVER: call the SAS/C resolver only and return OK or error.
62 Installation Instructions and System Manager's Guide for the SAS System under OS/390
When using TCPaccess, and the SAS System name resolution processing is in effect, the SAS System processing is as described for IBM TCP/IP.
SAS/C Transient Library
The SAS/C Transient Library is also required for communication between the SAS System and TCP/IP and SOLVE:TCPaccess. The library is automatically unloaded from tape during the installation process into a data set name &prefix.SASC.TRANSLIB, where &prefix= High Level-Qualifier of the SAS System installation libraries.
Copy &prefix.SASC.TRANSLIB to a link-list library or to the LPA. The SAS/C Transient Library is made available to the SAS System in one of the following ways:
1. CTRANSLOC option specified in the config file. This is the default and is generated in the BATCH and TSO members of the CNTL data set during installation. For example,
CTRANSLOC=&prefix.SASC.TRANSLIB
2. Copy &prefix.SASC.TRANSLIB to a link-list library of to the LPA
3. Add &prefix.SASC.TRANSLIB to the STEPLIB or TASKLIB concatenations in the SAS cataloged procedure and the SAS CLIST, respectively.
4. Add an allocation for the CTRANS DD to the &prefix.SASC.TRANSLIB data set in the SAS cataloged procedure and SAS CLIST. An example of these allocations for BATCH and TSO would read as follows:
//CTRANS DD DISP=SHR,DSN=&prefix.SASC.TRANSLIB
or
ALLOC F(CTRANS) DA('&prefix.SASC.TRANSLIB') SHR
Note: There may be previous versions of the SAS/C Transient Library installed on your system (often in a link list library). The 7.00C version of the SAS/C Transient Library that ships with Release 8.2 is required.
In Release 8.1 and above, the CTRANSLOC options takes precedent over any other method of allocating the SAS/C Transient Library.
Customized Configuration
Using Environment Variables and SAS System Options
Environment variables and SAS system options are needed only if the default TCP/IP system configuration is not used.

Installation Instructions and System Manager's Guide for the SAS System under OS/390 63
The SAS System uses the following environment variables or SAS system options to alter default processing for TCP/IP initialization:
TCPIP_MACH=name (environment variable) TCPIPMCH=name (SAS system option)
This environment variable or option is useful to sites that run either multiple TCP/IP vendor packages or multiple instances of the same vendor’s TCP/IP simultaneously. The TCPIP_MACH environment variable can be used to specify the name of the TCP/IP started task. Setting this environment variable is the equivalent of the TCPIPJOBNAME configuration keyword within SYS1.TCPPARMS(TCPDATA). The default value for TCPIP_MACH for Solve:Netmaster TCP/IP is ACSS, and for IBM TCP/IP the default is TCPIP.
TCPIP_DATA=dsn:data.set.name
This environment variable specifies the fully qualified name of a TCP/IP configuration data set. This keyword is equivalent to the //SYSTCPD DD statement described in the section “Locating the TCPIP.DATA File” on page 55. Specifying this environment variable will override the //SYSTCPD DD definition. This is an IBM TCP/IP only specification.
ETC_HOSTS=dsn:data.set.name
This environment variable specifies the fully qualified name of the data set that contains host table name resolution information. The purpose and contents of this file are described in the section “Customizing Host Tables if a Domain Nameserver is not Available” on page 60. You must specify an ETC.HOSTS file if your site does not enable domain nameserver processing.
ETC_SERVICES=dsn:data.set.name
This environment variable specifies the fully qualified data set name that contains service names and port numbers for SAS System products requiring such services. SAS/SHARE and SAS/IntrNet software both require entries in the ETC.SERVICES file. The ETC.SERVICES file will also be found by the SAS System if the DATASETPREFIX keyword/value in the TCP/IP configuration file specifies an appropriate high level qualifier. See the TCPIP_PREFIX environment variable below for further details.
TCPIP_PREFIX=high.level.qualifier (environment variable) TCPIPPRF=high.level.qualifier (SAS system option)
This environment variable or option allows for a global specification of a “high-level-qualifier” for the various TCP/IP configuration data sets that have been described previously. The DATASETPREFIX keyword/value within the TCP/IP configuration file can also be used to specify this “high-level-qualifier.”

64 Installation Instructions and System Manager's Guide for the SAS System under OS/390
For example, the configuration data sets may be placed under a single high-level-qualifier specification of
TCPIPPRF=SYS2.TCP26
This would cause the data sets SYS2.TCP26.TCPIP.DATA, SYS2.TCP26.ETC.HOSTS and SYS2.TCP26.ETC.SERVICES to be utilized by the SAS System as the TCP/IP configuration file, the ETC.HOSTS file and the ETC.SERVICES file, respectively.
Specifying the Environment Variable Data Set
The file that contains all environment variables, hereby referred to as the SASCTCPV file, should be allocated to the SASCTCPV DD with RECFM=FB and LRECL=80. Do not turn on line numbers in the SASCTCPV data set.
If you make use of environment variables, you must allocate the SASCTCPV DD in the JCL or CLIST that executes the SAS System. For example, if the data set SAS.TCPIP.ENVIRON.DATA contained the desired environment variable information, the allocation statements for BATCH and TSO would read:
//SASCTCPV DD DISP=SHR,DSN=SAS.TCPIP.ENVIRON.DATA
or
ALLOC F(SASCTCPV) DA('SAS.TCPIP.ENVIRON.DATA') SHR
Each logical record is assumed to contain an environment variable assignment of the form:
environment_variable_name=value.
Note: If any of the SAS system options controlling configuration data sets are specified, they will override the environment variables set in the SASCTCPV data set.
Customizing Your SAS CLIST and Cataloged Procedure
Note: You should complete this task.
The SASIxxxx job(s) that you ran to complete the installation created tailored versions of the SAS8 CLIST and cataloged procedures. It placed these tailored versions in the CNTL data set and copied them to the libraries you specified. The tailored CLIST was written to the CNTL data set as member BACLST01. The SASIxxxx job(s) copied it to the command procedure library you specified in SASEDITP under the name you specified as SASCNM=. The tailored cataloged procedure was written to the CNTL data set as member BAPROC01. The SASIxxxx job(s) copied it to the procedure library you specified in SASEDITP under the name you specified as SASPNM=.
Installation Instructions and System Manager's Guide for the SAS System under OS/390 65
Note: Only Action A moves the CLIST and cataloged procedure into the specified libraries. Actions B and C require that you manually copy and rename BACLST01 and BAPROC01 to the appropriate libraries.
You can further customize these tailored versions of the CLIST and cataloged procedure. For example, the CLIST includes statements that allocate a permanent SASUSER data library for each user. If no permanent SASUSER data library exists for the user, the CLIST creates one. If you do not want each user at your site to maintain an individual permanent SASUSER data library, you can remove these statements from the CLIST. You may also want to make changes as part of selecting a bundled configuration to run or as part of installing the SAS System in the LPA/ELPA, as previously described. STEP 1 in this section describes some of the changes you may want to make.
Determine the changes you want to make as described in STEP 1 and apply the changes according to your standard procedures. Make the changes to the CLIST and cataloged procedure in the libraries to which they were copied.
STEP 1: Determine the customizations you need.
Review the following information that discusses changes you may want to make. You may also have some site-specific issues to address.
Product-specific customizations
The appendices describe product-specific customizations that may be required. Review the appendices for the products you are installing to see what customizations to the SAS CLIST and PROC you need.
SASUSER Considerations
The Release 8.2 CLIST allocates a permanent SASUSER data library for each user the first time the user invokes the SAS System. When there is no SASUSER data library allocated to a session, the system by default assigns the SASUSER libref to the temporary WORK data library. In this case, data written to SASUSER disappears when the WORK data library is deleted.
Although individual SASUSER data libraries are not required, they allow users to take advantage of many interactive features in the Release 8.2 SAS System. The SAS/ASSIST product uses the SASUSER library to store all SAS data sets created and to save all work (programs, output, catalogs) from a SAS/ASSIST session. The SAS windowing environment uses this library for storing various types of information. Users can save profiles in their SASUSER data libraries to customize window sizes, function key settings, and other aspects of the SAS full-screen environment. You can use SAS windowing environment SAVE and COPY commands to transfer data or program statements between windows and catalogs in your SASUSER

66 Installation Instructions and System Manager's Guide for the SAS System under OS/390
data library. The FORMS command stores forms entries used in printing from the windowing environment.
The default CLIST creates a permanent SASUSER data library for each user who invokes the SAS System using the CLIST statements, as shown in the following:
IF &SYSPREF EQ THEN + SET &USRPREF=&SYSUID
ELSE + SET &USRPREF=SYSPREF
IF &STR(&SASUSER) EQ THEN + SET &SASUSER = &STR('&USRPREF..SAS8.SASUSER')
SET STATE = &SYSDSN(&SASUSER) IF &STATE = OK THEN +
ALLOC F(&DDSASUSR) DA(&SASUSER) OLD &SU11 ELSE + IF &STATE = DATASET NOT FOUND THEN DO
WRITE Warning: SASUSER file does not exist, will be created.
ALLOC F(&DDSASUSR) DA(&SASUSER) NEW CATALOG + SP(30 5) ROUND DSORG(PS) RECFM(F S) + BLKSIZE(6144) &SU11
END ELSE DO
WRITE Warning: SASUSER file: &STATE WRITE SASUSER file not allocated to
this session END
You may want to determine a different naming convention for SASUSER data libraries or alter the default space allocation.
Special Cataloged Procedure Parameters
The default cataloged procedure includes two symbolic parameters that allow concatenation of user libraries before your SAS System installation libraries:
• LOAD=
The LOAD= parameter allows you to specify a user load library DSN to concatenate before the SAS load library data set.
• SASAUTO=
The SASAUTO= parameter allows you to specify a user autocall macro library DSN to concatenate before the system autocall macro library.
These parameters are intended to provide added flexibility for invoking the SAS System in batch mode. Please note that any existing JCL you use to invoke earlier releases of the SAS System may not work

Installation Instructions and System Manager's Guide for the SAS System under OS/390 67
as expected with the new default PROC. If large volumes of production JCL at your site contain DD overrides for //SASAUTOS and //STEPLIB, you may want to customize the SAS8 PROC to change the concatenation order of the data sets for these DD statements.
Entry Name Considerations
If you plan to run a bundled configuration, change the default ENTRY name in your CLIST and cataloged procedure. The default is SASHOST. Valid standard ENTRY names are as follows:
• SASHOST for OS/390 non-bundled configuration • SASXA1 for OS/390 non-LPA bundled configuration • SASXAL for OS/390 LPA bundled configuration.
See the sections “Selecting a Bundled Configuration” on page 50 and “Installing the SAS System into the LPA,” on page 51 for considerations relating to ENTRY name selection.
Running Multiple Versions of the SAS System Concurrently
If your users run multiple versions of the SAS System concurrently in the same TSO session, you may also want to customize the CLIST to avoid DDname conflicts.
To do so, determine a naming convention for the SAS file DDnames allocated, such as WORK, and specify your DDnames in the CLIST. The CLIST includes special DDname operands for you to use when specifying your SAS file DDnames. When you use these operands, the CLIST specifies the appropriate corresponding SAS system options for you. Specify alternate DDnames in this manner for any files that would cause conflicts at your site.
Further DDname Considerations
Like the Version 6 SAS System, note that the Release 8.2 SAS System no longer uses the FORTRAN-style DDnames that were used in Version 5 for the SAS log, print, and PARMS data sets. If you want to use the same DDnames in Release 8.2 as in Version 5, you need to customize your CLIST, PROC, and system default options. Customize the CLIST and PROC by changing the DDnames as follows: • change SASLOG to FT11F001 • change SASLIST to FT12F001 • change SASPARM to FT15F001.
Customize your default options by adding the following option values to your DFLTOPTS table or system configuration file.
LOG=FT11F001 PRINT=FT12F001

68 Installation Instructions and System Manager's Guide for the SAS System under OS/390
PARMCARDS=FT15F001
If you need more information about these options, page 47 of the section “Setting up the SAS System” contains details on customizing your DFLTOPTS table and system configuration file.
SORT Library Considerations
If your users run PROC SORT and your site does not provide your system sort routine in a linklist library, set the SORTLINK CLIST operand to null and specify the load library that contains your system sort routine in the SORTLDSN operand. In the cataloged procedure, concatenate your system sort load library to the STEPLIB DD statement.
STEP 2: Make the CLIST and PROC changes according to standard procedures at your site.
Customizing Your NEWS File
Note: You should complete this task.
The installation process unloads the default NEWS member into your &prefix.NEWS partitioned data set. You can update this member with information appropriate for your site.
Information contained in the NEWS data set is displayed on the SAS log at invocation time when the NEWS= SAS system option is specified. The NEWS= option specifies either a logical or a physical name for the NEWS data set. The default system configuration files loaded into your CNTL data set at installation time contain the NEWS= system option specifying the physical name of the NEWS member in the NEWS data set allocated by the SASIxxxx jobs. You can modify the NEWS member to contain any information appropriate for your site, or, if you do not want to display standard information at invocation time, you can remove the NEWS= option from your system configuration files.
Installing the SAS SVC Routine
Note: This task is optional, but recommended.
STEP 1: Decide whether to install the SAS SVC routine.
In most cases, where the function provided or supported by the SVC routine is not utilized or required, installation of the SAS SVC routine is not absolutely necessary. However, this step should be completed for the following reasons:
At a later time it may be decided to utilize the otherwise unavailable functions.

Installation Instructions and System Manager's Guide for the SAS System under OS/390 69
A SAS Institute product may be acquired which requires the SAS SVC routine.
Installation of the SAS SVC is absolutely required in any of these four situations:
1. The SMF SAS system option is used to write SAS user SMF records.
2. The Release 8.2 SAS/SHARE product is installed.
3. The SAS/IntrNet product is installed and PROC APPSRV is used with the AUTH=HOST option.
4. The MP CONNECT feature of SAS/CONNECT is to be implemented.
The Release 8.2 SAS SVC routine provides all the functions available with the SAS SVC in previous releases and can be used in place of the prior release SAS SVC routine. However, the Release 8.2 SAS System is not compatible with a prior release of the SAS SVC routine. Therefore, if the SAS SVC routine is to be used with Release 8.2 of the SAS System, the Release 8.2 SAS SVC routine must be installed. System Integrity Guidelines
The SAS SVC Routine has been designed, written and tested using IBM guidelines for system integrity. When installed properly, the SAS SVC routine cannot obtain control in an authorized state, nor bypass system security or password protection.
STEP 2: Select the type of SVC to install.
The SAS SVC routine can be installed in one of two ways:
As a Type 4 Extended Support Router SVC (ESR SVC 109) entry. It is recommended that the SAS SVC routine be installed as a Type 4 ESR SVC (SVC 109). This technique has several advantages. One is that a user SVC reserved exclusively for the SAS SVC is not required. Additionally, if the Type 4 ESR SVC routing code chosen is selected for use by another software vendor, it is relatively easy to change the routing code used by the SAS SVC.
To choose the Type 4 ESR SVC (SVC 109) routing code to use, first determine which routing codes are already installed or in use by the operating system or other software products. To do this, list the names of members beginning with IGX00 in the SYS1.LPALIB and all other libraries listed in the LPALSTxx member of SYS1.PARMLIB. Also check the IEALPAxx member of SYS1.PARMLIB for IGX00nnn modules that may be placed in MLPA. The nnn suffix is the routing code (always in decimal) by which the ESR SVC routine is invoked. For example, the ESR SVC routine IGX00219 would be invoked by loading register 15 with the decimal value 219 and then executing an

70 Installation Instructions and System Manager's Guide for the SAS System under OS/390
SVC 109 instruction. IBM has reserved routing codes between 200-255 for customer use under OS/390. SAS Institute recommends that you choose a routing code within this range. However, the default routing code is 4, for compatibility with previous releases of the SAS System. It is necessary to choose an unused routing code to ensure its integrity.
As a standard “user” SVC (SVC Routines 200-255) defined in member IEASVCxx of SYS1.PARMLIB. To install the SAS SVC as a “user” SVC routine, ensure that the selected user SVC number is currently unused. Check the IEASVCxx member in SYS1.PARMLIB. For example, to install the SAS SVC as SVC 200, code the following SVCPARM statement in IEASVCxx:
SVCPARM 200,REPLACE,TYPE(4)
Note that the SAS SVC is installed as a Type 4, preemptive, unauthorized SVC with no locks held.
The first “load” of a Type 4 SVC routine is named according to OS/390 convention. That is IGC00nnc, where nnc is the zoned EBCDIC representation of the SVC routine’s number, resulting from the unpacking of the positive, packed decimal value that is the SVC routine number. For example, the first load of a Type 4 SVC routine invoked using SVC 234 would be named IGC0023D. This is because x'234', when unpacked, yields x'F2F3C4' or C'23D'.
STEP 3: Copy and Rename the SAS SVC routine into SYS1.LPALIB or a LNKLSTxx library.
Copy and rename the SAS SVC into SYS1.LPALIB or any other LPA library pointed to by the LPALSTxx member of SYS1.PARMLIB. Optionally, the SAS SVC can be installed into a LNKLSTxx library and brought into LPA at IPL time by a specification in the IEALPAxx member of SYS1.PARMLIB and an MLPA=xx specification in the IEASYS00 member of SYS1.PARMLIB.
The load module (SVC0MVS) must be installed into SYS1.LPALIB (or other appropriate library) with a valid SVC name. A utility like IEBCOPY could be used to copy the SAS SVC routine into an appropriate LPA library. Refer to member SVC0CPYJ in your &prefix.BAMISC SAS installation library for a sample job.
Alternatively, SMP/E may be used to install the SAS SVC as an SMP/E USERMOD. Refer to member SVC0SMPJ in your &prefix.BAMISC SAS installation library for a sample job.
You must IPL after the SAS SVC routine is actually copied into an appropriate operating system library. Specify the CLPA parameter in response to the IEA101A message.

Installation Instructions and System Manager's Guide for the SAS System under OS/390 71
STEP 4: Verify and update the SAS system options for the SAS SVC.
If the default values are not used, these options need to be set in the Restricted Options Table. See “Customizing Default Options and System Configuration Files” on page 41 for details on creating a Restricted Options Table.
The following SAS system options are directly related to the SAS SVC routine and the manner in which it is installed. You must set these options as described in the following to invoke the SAS SVC routine correctly.
SVC0SVC=
The default is 109 for the ESR SVC 109. If using the “user” SVC instead of the ESR SVC, this option should be set to the SVC number that was defined in STEP 2.
SVC0R15=
This option only applies if the SAS SVC was installed as an ESR Type 4 SVC. The default is 4 for compatibility with previous releases of the SAS System. It should specify the routing code that was chosen when the SAS SVC was installed into your operating system.
Installing the SAS SMF Exit
Note: This procedure is optional.
The SMF SAS system option controls whether SMF records formatted by the SAS System are written to the SMF file at the termination of every SAS Software step. If you intend to enable the SMF option in order to write SMF records, and if you would like to tailor the SMF records that the SAS System writes, you must install the SMF exit and set the SMFEXIT= system option.
STEP 1: Decide whether you need to install the SMF exit.
You can use the SMF exit to examine the SMF record that the SAS System has formatted, modify fields within the record, write the record to a user file, and suppress the writing of the record by the SAS System.
Note: If SMF records are to be written to the SMF file, the SAS SVC must be installed. Please see “Installing the SAS SVC Routine” on page 68 for more information.
The use of the SMF exit is entirely optional. Even if it is not installed, records are written to the SMF file if the SMF and STIMER options are in effect and the SAS SVC is installed. If you install the SMF exit, you can still use the SMFEXIT= option to specify whether or not it is to be invoked. If you do not specify the SMFEXIT= option, the exit is not invoked. If the

72 Installation Instructions and System Manager's Guide for the SAS System under OS/390
value specified is the name of a load module in the search path, the exit is invoked.
STEP 2: Tailor the SMF exit source to meet the requirements of your site.
The sample SMF exit is an assembler source module that must be modified to suit your needs. The source for the sample SMF exit is in the BAMISC library member SMFEXIT.
Note: In the OS/390 environment, the exit is entered in AMODE 31. If you are writing to a user file using an access method that requires you to be in AMODE 24, change AMODE for the access method calls, then return to AMODE 31 before returning from the exit.
The exit is called at SAS System initialization, at SAS Software step termination, and at SAS System termination. At entry to the exit, R15 contains the entry point address, R14 contains the return address, R13 points to a standard register save area, and R1 contains the address of a fullword. If the fullword is 0, the call is being made after the SAS System is initialized so that the exit can perform any initialization necessary. If your exit is writing records to a user file, you probably want to open the file on this call. If the fullword is -1, the call is being made before the SAS System is terminated so that the exit can perform any termination necessary. If your exit is writing records to a user file, you probably want to close the file on this call. If the fullword contains neither 0 nor -1, it is assumed to be the address of the SMF record to be written.
If the exit returns 0 in R15, the SAS System writes the SMF record pointed to by R1. If the exit returns a non-zero value in R15, the SAS System suppresses the writing of the SMF record. The following approaches may be taken in the exit:
Zero R15 and return immediately to write the SMF record, as is.
Return immediately leaving a non-zero value in R15 to suppress the writing of the record.
Modify the record pointed to by R1, as desired, including adding data in the user area provided, or perhaps changing the record type. Note, however, that record type must be greater than 127. If it is not, the SAS SVC does not write the record to the SMF file. Note also that the record length in the standard header on input does not include the user area. If data is added in this area, the length field must be incrementally lengthened by the number of bytes added. Return a 0 in R15 to cause the SAS System to write the modified SMF record.
Modify the record pointed to by R1, as desired, and write the record to a user file. In this case, record-type checking is up to you. Return a

Installation Instructions and System Manager's Guide for the SAS System under OS/390 73
non-zero value in R15 to cause the SAS System to suppress writing of the SMF record.
The format of the record formatted by the SAS System is as follows:
Hex Offset SMFREC DSECT 00 SMFRLEN DS BL2 Record length 02 SMFSEG DS BL2 Segment descriptor 04 SMFFLG DS BL1 Header flag 05 SMFRTYP DS BL1 Record type 06 SMFTIME DS BL4 Time given to smf 0A SMFDATE DS PL4 Date given to smf 0E SMFSID DS CL4 System id 12 SMFJOBN DS CL8 Jobname 1A SMFRTME DS BL4 Reader time 1E SMFRDTE DS PL4 Reader date 22 SMFSTEP DS XL1 Step number 23 SMFRSVD DS XL1 Reserved 24 SMFPROC DS CL8 Proc name 2C SMFCPU DS F Proc CPU time in timer units 30 SMFEXCP DS F Proc excp count 34 SMFCORE DS F Proc storage used 38 SMFVUSE DS F Vector usage in .01 sec 3C SMFVAFF DS F Vector affinity time in .01 sec 40 SMFHSP DS F RSM hiperspace time in .01 sec 44 SMFUSER DS XL64 User space (Not included in SMFLEN)
STEP 3: Assemble and link the tailored source.
The JCL required to assemble and link the SMF exit is located in member BASMF in the CNTL data set. You can tailor the link step so that the name supplied on the ENTRY statement is the entry point that you want to use when invoking the exit. SMFEXIT1, which is the name on the ENTRY statement in the JCL, is the entry point in the sample SMF exit that simply zeroes R15 and returns, causing the SMF record to be written to the SMF file as formatted by the SAS System.
STEP 4: If your site requirements dictate that SMF always be ON, and that the SMFEXIT= always be set, insure that SMF, SMFTYPE=, SMFEXIT=, STIMER, SVC0SVC=, and SVC0R15= are set in the Restricted Options Table.
See “Customizing Default Options and System Configuration Files” on page 41 of this document for more information.

74 Installation Instructions and System Manager's Guide for the SAS System under OS/390

Page 75
Part 2, Maintaining the SAS® System
SAS provides several services to assist you in maintaining and using your SAS software. These include the ability to easily renew your license onsite, and to view SAS Notes on the World Wide Web, and to apply ZAPS to the SAS System. Each of these procedures is discussed in this section.
Renewing Your License
If your SETINIT has expired, and you have received renewal SETINIT text, follow the instructions in the appendix “Licensing the SAS System” on page 233 to renew your SAS System license.
Modifying the DCB attributes of the SASHELP library can produce unpredictable results. For example, reblocking the SASHELP library could give a user the impression that renewal SETINIT information applies when it does not.
Viewing the SAS Notes Library on the World Wide Web.
The most recent version of the SAS Notes library is available from the World Wide Web at http://www.sas.com/service/techsup/intro.html. Accessing Usage Notes in this way allows you to get the most up-to-date information.
Applying Zaps to the SAS System
Occasionally, you will be instructed to apply zaps to your set of installed SAS System libraries. To apply zaps, use the AMASPZAP utility provided by IBM. A sample job follows: //ZAPIT JOB your job card //* //ZAP EXEC PGM=AMASPZAP //SYSPRINT DD SYSOUT=* //SYSLIB DD DISP=SHR,DSN=&prefix.LIBRARY <=== VERIFY &PREFIX
//SYSIN DD DISP=SHR,DSN=&prefix.USAGE.ZAPS(Z801xxxx) <=== VERIFY &PREFIX

76 Installation Instructions and System Manager's Guide for the SAS System under OS/390

Page 77
Appendix A, Implementing the SAS/ACCESS® Interface to ADABAS
Customizing the SAS CLIST and Cataloged Procedure
Note: This task is required.
If the ADABAS interface is used extensively at your site, and if your ADABAS system load library is not a link list library, you may want to modify the SAS CLIST and cataloged procedure to allocate the necessary files by default. Alternatively, users must specify the SASLOAD operand shown below when invoking the CLIST and must override STEPLIB when running batch to concatenate the library that contains your site’s Software AG load modules. In either case, they may also be required to allocate DDCARD, as appropriate.
Note: The concatenation order of the SAS LOAD LIBRARY and the load library for data base access may be interchanged. Generally, if more data base access activities will occur in the SAS session or batch job, place the data base load library first in the concatenation (or ahead of the SAS LOAD LIBRARY). The opposite is true when SAS processing dominates the session or JOB.
Make the following changes to the CLIST:
• Replace the following line in the installation-supplied CLIST:
SASLOAD('''&prefix.LIBRARY''')
with the line
SASLOAD('''your.ADABAS.loadlib'' ''&prefix.LIBRARY''')
• Optionally, add an appropriate ALLOCATE statement for the fileref DDCARD, unless appropriate parameters are included in the ADARUN module.
Make the following changes to the cataloged procedure:
• Modify the STEPLIB DD statement to concatenate your Software AG load library as follows:
//STEPLIB DD DISP=SHR,DSN=&LOAD // DD DISP=SHR,DSN=&prefix.LIBRARY // DD DISP=SHR,DSN=your.ADABAS.loadlib

78 Installation Instructions and System Manager's Guide for the SAS System under OS/390
Appendix A, Implementing the SAS/ACCESS Interface to ADABAS
• Optionally, add an appropriate DDCARD DD statement, unless appropriate parameters are included in the ADARUN module. The following example illustrates the DDCARD parameters required by this interface:
ADARUN DATABASE=001 /*site-specific value*/ ADARUN DEVICE=3380 /*site-specific value*/ ADARUN MODE=MULTI /*multi (default) or single*/ ADARUN SVC=253 /*site-specific value*/ ADARUN PROGRAM=USER /*required*/
Using the NATURAL Security Interface
Note: This task is optional.
The modules NSCDDM and NSCDDM22 unloaded to your SAS LIBRARY data set are the NATURAL Security Interface modules supplied by Software AG. If you do not have the NATURAL Security Software, or do not want to use it, delete or rename the load module NSCDDM.
The module NSCDDM is necessary for support of NATURAL Release 2.3.1 or later or ADABAS Version 6 when using the NATURAL Security Interface. If you are using NATURAL Release 2.2 and you want to use the NATURAL Security Interface, delete or rename the existing NSCDDM module and then rename the module NSCDDM22 to NSCDDM.
Using the Samples
Note: This task is optional.
Three samples for the ADABAS interface are unloaded into your &prefix.SAMPLE library at install time:
ADBDOC, which is used to create sample data sets. These sample data sets are referenced in SAS/ACCESS Interface to ADABAS Software, Version 8.
ADBUTL contains input to the ADABAS Utilities that are used to create the four ADABAS files referenced in SAS/ACCESS Interface to ADABAS Software, Version 8. You may want to create NATURAL DDMs to match these files using the NATURAL software.
ADBSTMT contains line-mode statements used to create sample access and view descriptors. These access and view descriptors are referenced in SAS/ACCESS Interface to ADABAS Software, Version 8.

Installation Instructions and System Manager's Guide for the SAS System under OS/390 79
Appendix A, Implementing the SAS/ACCESS Interface to ADABAS
SAS System Options for this Interface
Note: This task is optional.
To see a list of the SAS system options for this interface, invoke SAS Release 8.2 and submit the following statements:
proc options group = adabas; run;
Appendix 1 in the SAS/ACCESS Interface to ADABAS Software manual also lists the SAS system options for this interface. You may want to review these during installation. All options have defaults.
The options applicable to this interface are all invocation options. That means you can change them when you invoke the SAS System but not during a SAS session. Some system options can be overridden by using the corresponding data set options. You can supply data set options when a data set is referenced in a SAS procedure or DATA step.
You are allowed to restrict changes to invocation options by placing them in the Restricted Options Table, SASOPTRS. This process is described in “Customizing Default Options and System Configuration Files” on page 41 of this document.
One option, ADBUPD=, is suggested as a restricted option. The ADBUPD= option determines whether the SAS/ACCESS for ADABAS engine can perform both read and update operations or is restricted to read only. The default option value, Y, specifies that both reads and updates are allowed. The option value, N, specifies that the engine can only read ADABAS data; any attempt to update an ADABAS file results in an error.
Note: The ABDUPD= option replaces the ADBENGMD= option available in earlier releases.
Other options you may want to examine first are those listed in Appendix 1 of the SAS/ACCESS Interface to ADABAS Software, Version 8, under the heading ADABAS System Options.
NATURAL Date and Time Support
The SAS/ACCESS Interface to ADABAS now supports NATURAL Date (D) and Time (T) datatypes. Such fields will have their data values translated into the equivalent SAS dates and times respectively.
When an access descriptor is created on a NATURAL or PREDICT DDM containing a date field, the default SAS format and informat is set to DATE9. As with other default formats and informats on the Access Descriptor Display window, this can be changed to another compatible SAS format/informat.

80 Installation Instructions and System Manager's Guide for the SAS System under OS/390
Appendix A, Implementing the SAS/ACCESS Interface to ADABAS
A NATURAL time field has a default SAS format and informat of TIME8. This can be changed to another SAS format/informat.
If the NATURAL time field is an extended time field, this can be interpreted as a SAS datetime value by specifying an E in the DB Content field. In this case, the default SAS format and informat is changed from TIME8. to DATETIME18. This can be changed to another compatible SAS format/informat.
While it is not possible to display these values as simple numeric values (date or time values), NATURAL date and time values are stored differently than SAS date and time values. Thus the values displayed in this manner will not be the same as if they had been displayed through a NATURAL application. It is not recommended that these values be used as other than their corresponding date or time values.
Reentrancy
Load module SASIOADB is non-reentrant because of the non-reentrant program ADAUSER provided by Software AG, which must be linked with SASIOADB in order to communicate with the ADABAS DBMS.

Page 81
Appendix B, Implementing SAS/ACCESS®
Interface to CA-DATACOM/DB Software
Customizing the SAS CLIST and Cataloged Procedure
Note: This task is required.
If the CA-DATACOM/DB interface is used extensively at your site, and your DATACOM system load library is not a link list library, you may want to modify the SAS CLIST and cataloged procedure to allocate the necessary files by default. If you do not, users will be required to specify the SASLOAD operand shown below when invoking the CLIST, and to override STEPLIB when running batch to concatenate the library that contains your site's CA-provided load modules.
Note: The concatenation order of the SAS LOAD LIBRARY and the load library for data base access may be interchanged. Generally, if more database access activities will occur in the SAS session or batch job, place the data base load library first in the concatenation (or ahead of the SAS LOAD LIBRARY). The opposite is true when SAS processing dominates the session or JOB.
Make the following change to the CLIST:
Replace the following line in the installation-supplied CLIST:
SASLOAD('''&prefix.LIBRARY''')
with the line:
SASLOAD('''your.DATACOM.loadlib'' ''&prefix.LIBRARY''')
Make the following change to the cataloged procedure:
Modify the STEPLIB DD statement to concatenate your CA-provided load module library as follows:
//STEPLIB DD DISP=SHR,DSN=&LOAD // DD DISP=SHR,DSN=&prefix.LIBRARY // DD DISP=SHR,DSN=your.DATACOM.loadlib
Using the Samples
Note: This task is optional.
Three samples for the CA-DATACOM/DB interface are unloaded into your &prefix.SAMPLE library at install time:
82 Installation Instructions and System Manager's Guide for the SAS System under OS/390
Appendix B, Implementing SAS/ACCESS Interface to CA-DATACOM/DB Software
DDBDOC is used to create sample data sets referred to in SAS/ACCESS Interface to CA-DATACOM/DB: Reference, Version 8, First Edition.
DDBUTL contains input to the CA-DATADICTIONARY Batch Utility that creates the database referred to in SAS/ACCESS Interface to CA-DATACOM/DB: Reference, Version 8, First Edition. DDBUTL creates a new CA-DATACOM/DB database with four tables.
DDBDESC contains code to create the access and view descriptors to be used in recreating the examples in SAS/ACCESS Interface to CA-DATACOM/DB: Reference, Version 8, First Edition.
SAS System Options for this Interface
Note: This task is optional.
To see a list of the SAS system options for this interface, invoke V8 SAS and submit the following statements:
proc options group=datacom; run;
You can also refer to Appendix 1 in SAS/ACCESS Interface to CA-DATACOM/DB: Reference, Version 8, First Edition for a list of the SAS system options for this interface. You may want to review this information during installation. All options have defaults.
The options applicable to this interface are invocation options. That means you can change them when you invoke the SAS System, but not during a SAS session. Some system options have corresponding data set options; these can be set during a SAS procedure or DATA Step. Refer to Appendix 2 in SAS/ACCESS Interface to CA-DATACOM/DB: Reference, Version 8, First Edition for information on these data set options.
One invocation option, DDBMISS=, specifies a value to be used for representing null values when the SAS/ACCESS engine for CA-DATACOM/DB inserts or updates records in a database table. Valid values for the DDBMISS= option are blank (0X40) which is the default, and 0X00.
You are allowed to restrict changes to invocation options by placing them in the Restricted Options Table, SASOPTRS. This process is described in “Customizing Default Options and System Configuration Files,” on page 41 of this document.
One option, DDBUPD=, is suggested as a restricted option. The DDBUPD= system option determines whether the SAS/ACCESS for CA-DATACOM/DB engine can perform both read and update operations, or is restricted to read only. The default option value, Y, specifies that both reads and updates are allowed. The option value, N, specifies that the engine can only read CA-DATACOM/DB tables; any attempt to update a CA-DATACOM/DB table results in an error.

Page 83
Appendix C, Implementing the SAS/ACCESS® Interface to CA-IDMS
Customizing the SAS CLIST and Cataloged Procedure
Note: This task is required.
If the CA-IDMS interface is used extensively at your site, and your IDMS system load library is not a link list library, you may want to modify the SAS CLIST and cataloged procedure to allocate the necessary files by default. Refer to Steps 1 and 2 below for instructions on making these changes.
If you do not make the changes described in Steps 1 and 2, you are required to specify the LOAD operand shown below when invoking the CLIST and/or the LOAD= parameter when executing the cataloged procedure to concatenate the library that contains your site’s CA-IDMS load modules.
If you are accessing the IDMS databases using central version, you may also be required to allocate the SYSCTL file. If you are accessing the IDMS databases using local mode, you may also be required to allocate the database files.
Enter the following command under TSO to start a SAS session in which you will execute the IDMS interface:
SASname LOAD(’’’your.IDMS.loadlib’’’)
Where your.IDMS.loadlib is the IDMS system load library and the SASname is the name of the CLIST you use to invoke the SAS System.
To use the IDMS interface with the SAS cataloged procedure, use the LOAD= parameter of the PROC to specify your site’s load library. For example, you can use the following code in your JCL:
//SASIDM EXEC SASname,LOAD=’your.IDMS.loadlib’
Note: The name the user supplies must consist of all capital letters.
Step 1: Update your SAS CLIST (optional)
If the IDMS interface is used extensively at your site, you may want to alter the CLIST so that your IDMS load library is allocated and concatenated before the SAS load library in the TASKLIB symbol. Replace the following line in the installation-supplied CLIST (where SASLOAD is the replacement parameter in the CLIST).

84 Installation Instructions and System Manager's Guide for the SAS System under OS/390
Appendix C, Implementing the SAS/ACCESS Interface to CA-IDMS
Replace the following line in the installation-supplied CLIST:
SASLOAD('''&prefix.LIBRARY''')
with the line:
SASLOAD('''your.IDMS.loadlib'' ''&prefix.LIBRARY''')
Add an appropriate ALLOCATE statement for the fileref SYSCTL, if you are accessing your IDMS databases using central version. Add the appropriate ALLOCATE statements for the IDMS databases and dictionary you have the authority to access, if you are accessing your IDMS databases using local mode.
Step 2: Update your SAS cataloged procedure (optional)
If the IDMS interface is used extensively at your site with the SAS cataloged procedure, you may want to make the STEPLIB DD statement change permanent to your cataloged procedure. To always execute the SAS System using the IDMS interface, modify the STEPLID DD statement in your cataloged procedure to reflect the following lines:
//STEPLIB DD DISP=SHR,DSN=&LOAD // DD DISP=SHR,DSN=&prefix.LIBRARY // DD DISP=SHR,DSN=your.IDMS.loadlib
• Add the appropriate DD statements for the fileref SYSCTL, if you are accessing your IDMS databases using central version.
• Add the appropriate DD statements for the IDMS databases and dictionary you have authority to access, if you are accessing your IDMS databases using local mode.
SAS/ACCESS DATA Step Interface Enhancement
The DATA step component of the SAS/ACCESS Interface to CA-IDMS is the only component available with this release. This component allows you to directly access network data using special SAS system extensions for the standard SAS INFILE statement, along with DATA step programming statements. The INFILE statement extensions, along with the DATA step programming statements, allow you to generate DML calls to the database.

Page 85
Appendix D, Implementing the SAS/ACCESS® Interface to DB2
Defining the Interface to DB2 and DB2 Users
Note: This task is required.
The DB2 data base administrator at your site must perform the following steps.
Even if you installed and implemented any previous release of the SAS System, and SAS/ACCESS Interface to DB2, and completed the BIND and GRANT steps at that time, you will need to repeat them for this installation.
STEP 1: Bind the DBRMs into an application plan (required).
You can bind the application plan by using the BIND option from the DB2I panels under ISPF. Alternatively, you can issue the BIND command from TSO through the DSN command processor running in either foreground or background. A new plan will be created. If a plan with this name already exists on your system, it will be replaced.
The syntax of the BIND command is:
BIND PLAN(SAS82) ACTION(REPLACE) ISOLATION(CS) DEGREE(ANY) VALIDATE(RUN) RELEASE(COMMIT) ACQUIRE(USE) KEEPDYNAMIC(NO) NODEFER(PREPARE) NOREOPT(VAR) CURRENTDATA(YES) SQLRULES(DB2) DISCONNECT(EXPLICIT) PKLIST(*.COLLID.SAS82, DB2V6R1.DSNUTILS.*)
If you plan to use DRDA support, you must regenerate plan SAS82 to include the following:
1. Bind packages for each server you plan to access 2. Bind for the plan which must include all bind packages 3. Some statements in this plan that will use a DB2 stored procedure (to invoke the
LOAD UTILITY), which do not exist on other DBMSs, or in earlier releases of DB2. If you encounter errors regarding unknown SQL statements when binding a package against a particular server, you might want to use the SQLERROR(CONTINUE) option to allow the package to be bound without those statements. These statements are not required, since the optional LOAD UTILITY will not exist on that DBMS.
The syntax for binding packages and the plan is as follows:
Note: These are the suggested option values that have been run and tested. Other values can cause different behaviors. Please consult the DB2 manuals for more information about bind options.

86 Installation Instructions and System Manager's Guide for the SAS System under OS/390
Appendix D, Implementing the SAS/ACCESS Interface to DB2
BIND PACKAGE(DB2V6R1.COLLID) OWNER(USERID) QUALIFIER(USERID) MEMBER(SAS82) ACTION(REPLACE) ISOLATION(CS) DEGREE(ANY) VALIDATE(RUN) RELEASE(COMMIT) KEEPDYNAMIC(NO) NODEFER(PREPARE) NOREOPT(VAR) CURRENTDATA(YES) SQLERROR(NOPACKAGE) LIBRARY('DB2V6R1.DBRM.DATA')
BIND PACKAGE(DB2V5R1.COLLID) OWNER(USERID) QUALIFIER(USERID) MEMBER(SAS82) ACTION(REPLACE) ISOLATION(CS) DEGREE(ANY) VALIDATE(RUN) RELEASE(COMMIT) KEEPDYNAMIC(NO) NODEFER(PREPARE) NOREOPT(VAR) CURRENTDATA(YES) SQLERROR(NOPACKAGE) LIBRARY('DB2V6R1.DBRM.DATA')
BIND PACKAGE(DB2V4R1.COLLID) OWNER(USERID) QUALIFIER(USERID) MEMBER(SAS82) ACTION(REPLACE) ISOLATION(CS) DEGREE(ANY) VALIDATE(RUN) RELEASE(COMMIT) CURRENTDATA(YES) SQLERROR(CONTINUE) LIBRARY('DB2V6R1.DBRM.DATA')
BIND PLAN(SAS82) ACTION(REPLACE) ISOLATION(CS) DEGREE(ANY) VALIDATE(RUN) RELEASE(COMMIT) ACQUIRE(USE) KEEPDYNAMIC(NO) NODEFER(PREPARE) NOREOPT(VAR) CURRENTDATA(YES) SQLRULES(DB2) DISCONNECT(EXPLICIT) PKLIST(*.COLLID.SAS82, DB2V6R1.DSNUTILS.*)
STEP 2: Grant EXECUTE authority to users (required).
Grant EXECUTE authority for the plan created by the BIND command to all users of the plan or to PUBLIC for general use. Issue the GRANT command as follows:
GRANT EXECUTE ON PLAN SAS82 TO userid
Customizing the SAS CLIST and Cataloged Procedure
Note: This task is required.
If the DB2 interface is used extensively at your site, and if your DB2 system load library is not a link list library, you may want to modify the SAS CLIST and cataloged procedure to allocate your DB2 system load library by default. See Steps 1 and 2, which follow, for the changes to make.
If you do not make the changes described in Steps 1 and 2, users must specify the LOAD operand shown in the following example when invoking the CLIST. The user must also specify the LOAD= parameter when executing the cataloged procedure to concatenate your DB2 system load library.
Note: The concatenation order of the SAS LOAD LIBRARY and the load library for data base access may be interchanged. Generally, if more data base access activities will occur in the SAS session or batch job, place the data base load library first in the concatenation (or ahead of the SAS LOAD LIBRARY). The opposite is true when SAS processing dominates the session or JOB.

Installation Instructions and System Manager's Guide for the SAS System under OS/390 87
Appendix D, Implementing the SAS/ACCESS Interface to DB2
Enter the following command under TSO to start a SAS session in which you will execute the DB2 interface:
SASname LOAD('''your.db2.loadlib''')
where your.db2.loadlib is the DB2 system load library and SASname is the name of the CLIST you use to invoke the SAS System.
To use the DB2 interface with the SAS cataloged procedure, use the LOAD= parameter of the PROC to specify your site’s DB2 load library. For example, you can use the following code in your JCL:
//SASDB2 EXEC SASname,LOAD='your.DB2.loadlib'
STEP 1: Update your SAS CLIST (optional).
If the DB2 interface is used extensively at your site, you may want to alter the CLIST so that your DB2 load library is allocated and concatenated before the SAS load library in the TASKLIB symbol. Replace the following line in the installation-supplied CLIST (where SASLOAD is a replacement parameter in the CLIST):
SASLOAD('''&prefix.LIBRARY''')+
with this line:
SASLOAD('''your.db2.loadlib'' ''&prefix.LIBRARY''') +
STEP 2: Update your SAS cataloged procedure (optional).
If the DB2 interface is used extensively at your site with the SAS cataloged procedure, you may want to permanently change the STEPLIB DD statement in your cataloged procedure. To always execute the SAS System using the DB2 interface, modify the STEPLIB DD statement in your cataloged procedure to reflect the following lines.
//STEPLIB DD DISP=SHR,DSN=&LOAD // DD DISP=SHR,DSN=&prefix.LIBRARY // DD DISP=SHR,DSN=your.db2.loadlib
where &prefix.LIBRARY is the SAS System load library and your.db2.loadlib is the DB2 System load library.
Verifying Installation of the SAS/ACCESS Interface to DB2
Note: This task is required.
STEP 1: Set up JCL to invoke the cataloged procedure you updated as described in the preceding STEP 2. Include a SYSIN DD statement like the following to run the installation verification program for this product:
//SYSIN DD DISP=SHR,DSN=&prefix.TESTS(TESTDB2)

88 Installation Instructions and System Manager's Guide for the SAS System under OS/390
Appendix D, Implementing the SAS/ACCESS Interface to DB2
STEP 2: Submit the job and verify the results.
This job should complete with return code 0.
Creating and Loading the Sample Tables
Note: This task is optional.
Refer to SAS/ACCESS Software for Relational Databases: Reference, Version 8 (DB2 under OS/390 Chapter) for a number of coding examples based on sample DB2 tables that can be created at your site. Creating these tables will assist the users at your site in learning how to use the SAS/ACCESS Interface to DB2 product.
The program to create these sample tables is in the SAMPLE library member GENDBL. Before running the GENDBL job, you must first adapt the DBMACS and DBPTMACS macro file for your DB2. To execute this program, use the JCL as previously described, with the SYSIN DD card referring to the GENDBL member in the SAMPLE library as follows:
//SYSIN DD DISP=SHR,DSN=&prefix.SAMPLE(GENDBL)
SAS System Options for this Interface
Note: This task is optional.
To see a list of the SAS system options for this interface, invoke Release 8.2 SAS and submit the following statements:
proc options group = db2; run;
Alternatively, you can refer to online help for the current information. You may want to review these system options during installation. All options have defaults.
Most of the options applicable to this interface are invocation options. That means you can change them when you invoke the SAS System, but not during a SAS session. Some system options have corresponding data set options; these can be set during a SAS procedure or DATA step.
Other system options such as DB2SSID= can be set at invocation time or within a SAS session. You are allowed to restrict changes to invocation options by placing them in the Restricted Options Table. This process is described in “Customizing Default Options and System Configuration Files,” on page 41 of this document.
One option, DB2UPD=, is suggested as a restricted option. The DB2UPD= option determines if, in certain circumstances, the SAS/ACCESS for DB2 engine can perform both read and update operations, or is restricted to read only. The default option value, Y, specifies that both reads and updates are allowed. The option value, N, specifies that the engine can only read DB2 data; users who are using access views or libname engine and attempt to update a DB2 file will receive an error message.

Installation Instructions and System Manager's Guide for the SAS System under OS/390 89
Appendix D, Implementing the SAS/ACCESS Interface to DB2
Note: Even with the DB2UPD= set to N, DB2 Tables can be updated by users with PROC SQL Pass-Through Facility, PROC DBLOAD and the Version 5 Compatibility procs.
Special Consideration for Using the RRS Attachment Facility.
The V8 DB2 Access Product supports both RRSAF and CAF as the attachment facility. For usage details, please see the sections “SAS System Options and Settings for DB2” and “Information for the Database Administrator” in “DB2 under OS/390 Chapter, First Edition” of “Part 5, SAS/ACCESS Software: DBMS-Specific Information” in the OnlineDoc SAS/ACCESS Software for Relational Databases: Reference.
There are three installation requirements that must be met before RRSAF can be used as the attachment facility:
1. The SAS SVC Routine must be installed, and must be at Level 7 or greater. See “Installing the SAS SVC Routine” on page 68 for details on the SAS SVC.
Note: The SVC routine shipped with V8 SAS is Level 7.
2. The load module named DSNRLI is part DB2 and should be found in DB2’s SDSNLOAD load library. DSNRLI must be in an APF authorized load library that is included in the LINKLIST.
3. The load module named SASD2RUB is part of the SAS DB2 Access Product and should be found in your SAS load library. SASD2RUB must be in an APF authorized load library, which is recommended to be included in the LINKLIST.
With these requirements met, the full functionality of the RRSAF will be supported.
Note: If these requirements are not met, RRSAF can still be used by a non-server SAS System session, but the Authorized Signon support will not work. Since Authorized Signon support is the main reason for having the SAS System use this facility, these requirements are not considered optional.

90 Installation Instructions and System Manager's Guide for the SAS System under OS/390
Appendix D, Implementing the SAS/ACCESS Interface to DB2

Page 91
Appendix E, Implementing the SAS/ACCESS® Interface to
IMS-DL/I
Customizing the SAS CLIST and Cataloged Procedure
Note: This task is required.
If the IMS interface is used extensively at your site, you may want to alter the CLIST and cataloged procedure so that your IMS libraries are allocated and concatenated.
Note: The concatenation order of the SAS LOAD LIBRARY and the load library for data base access may be interchanged. Generally, if more data base access activities will occur in the SAS session or batch job, place the data base load library first in the concatenation (or ahead of the SAS LOAD LIBRARY). The opposite is true when SAS processing dominates the session or JOB.
STEP 1: Determine the IMS library data set names and identify the IMS libraries you need to allocate at your site.
In order to access your IMS data bases, you need to add allocations for the following IMS data sets to your SAS CLIST and cataloged procedure: DFSRESLB DFSVSAMP (only required for VSAM and OSAM access methods, as defined in the DBD) IEFRDER IMS DD statements for your IMS data bases if using DLI or DBB region.
Depending on how your site runs IMS, you may also want to add allocations for these additional data sets: • IMSACB • IMSERR • RECON1 • RECON2.
STEP 2: Add allocations to your SAS CLIST, specifying your IMS library data set names as determined in STEP 1.
Replace the following line in the installation-supplied CLIST (where SASLOAD is a replacement parameter in the CLIST) so that your IMS RESLIB is concatenated before the SAS Load library in the TASKLIB symbol.
Replace the following:
SASLOAD('''&prefix.LIBRARY''')
with the following:

92 Installation Instructions and System Manager's Guide for the SAS System under OS/390
Appendix E, Implementing the SAS/ACCESS Interface to IMS-DL/I
SASLOAD('''your.ims.reslib'' ''&prefix.LIBRARY''')
Add the following parameter at the top of the default CLIST to allow optional user input of the IMS LOG IEFRDER data set name:
/* --------Allow IMS LOG DSN input ------------------- */ + IMSLOG(NULLFILE) /* IMS LOG DSN */ +
Add lines like the following in the default SAS CLIST to allocate required IMS libraries:
ALLOC F(DFSRESLB) DA('your.ims.reslib') SHR &SU11 ALLOC F(IMS) DA('your.ims.psblib' 'your.ims.dbdlib') SHR &SU11 IF &STR(IMSLOG) NE THEN ALLOC F(IEFRDER) DA('&IMSLOG.') OLD ALLOC F(DFSVSAMP) DA('your.parmlib(DFSVSAMP)') SHR &SU11 ALLOC F(database) DA('your.ims.database') OLD
Note: You only need to allocate your data base data sets with disposition OLD if you will be writing to them with the SAS/ACCESS software. Data base data set allocations are not required for a region type of BMP.
If needed, add lines like the following immediately after the statements you added for required IMS libraries:
ALLOC F(IMSACB) DA('your.ims.acblib') SHR &SU11 ALLOC F(RECON1) DA('your.recon1') SHR &SU11 ALLOC F(RECON2) DA('your.recon2') SHR &SU11 ALLOC F(IMSERR) DA('your.dump.data set') SHR &SU11
STEP 3: Add allocations to your SAS cataloged procedure, specifying your IMS library data set names as determined in STEP 1.
Concatenate your IMS RESLIB to your STEPLIB statement in your default SAS cataloged procedure as follows:
//STEPLIB DD DISP=SHR,DSN=&LOAD // DD DISP=SHR,DSN=&prefix.LIBRARY // DD DISP=SHR,DSN=your.ims.reslib
where &prefix.LIBRARY is the SAS System load library and your.ims.reslib is the IMS RESLIB library.
Add lines like the following in your default SAS cataloged procedure. If you want to use the IMS LOG facility, be sure to include appropriate DD specifications for your site in the IEFRDER DD statement.
//DFSRESLB DD DISP=SHR,DSN=your.ims.reslib //IMS DD DISP=SHR,DSN=your.ims.psblib // DD DISP=SHR,DSN=your.ims.dbdlib //IEFRDER DD DSN=NULLFILE,DISP=(,KEEP), // UNIT=(TAPE,,DEFER),VOLSER=xxxxxx, // DCB=(RECFM=VB,BLKSIZE=1920,LRECL=1916,BUFNO=2) //database DD DISP=OLD,DSN=your.ims.database
Note: You only need to allocate your data base data sets with disposition OLD if you will be writing to them with the SAS/ACCESS software. Data base data set allocations are not required for a region type of BMP.

Installation Instructions and System Manager's Guide for the SAS System under OS/390 93
Appendix E, Implementing the SAS/ACCESS Interface to IMS-DL/I
If needed at your site, also add lines like the following in your default SAS cataloged procedure:
//IMSACB DD DISP=SHR,DSN=your.ims.acblib //RECON1 DD DISP=SHR,DSN=your.recon1 //RECON2 DD DISP=SHR,DSN=your.recon2 //IMSERR DD DISP=SHR,DSN=your.dump.dataset
Verifying Installation of the SAS/ACCESS Interface to IMS
Note: This task is required.
STEP 1: Set up JCL to invoke the standard SAS cataloged procedure at your site The additional allocations described in the preceding STEP 3 are not required because TESTIMS does not attach to the IMS DBMS.
Include a SYSIN DD statement like the following to run the installation verification program for this product:
//SYSIN DD DISP=SHR,DSN=&prefix.TESTS(TESTIMS)
STEP 2: Submit the job and verify the results.
This job should complete with return code 0.
When this job completes successfully, you have verified the ability to create descriptors in SAS/ACCESS. Since this job does not attach to the DBMS, it does not test the actual interface.
SAS System Options for this Interface
Note: This task is required.
To see a list of the SAS system options for this interface, invoke V8 SAS and submit the following statements:
proc options group=ims; run;
You can also refer to Appendix 1 in SAS/ACCESS Interface to IMS-DL/I Software, Version 8, First Edition for a list of the SAS system options for this interface. You may want to review the default option settings during installation, as they determine whether the interface can attach successfully to the IMS DBMS.
The BMPREAD=, DLIREAD=, IMSBPUPD=, IMSDLUPD=, IMSID=, IMSREGTP=, and IMSWHST= options for this interface are invocation options. That means you can change them when you invoke the SAS System, but not during a SAS session. All other options are classified as session options.
You are allowed to restrict changes to invocation options by placing them in the Restricted Options Table. This process is described in “Customizing Default Options and System Configuration Files” on page 41 of this document.

94 Installation Instructions and System Manager's Guide for the SAS System under OS/390
Appendix E, Implementing the SAS/ACCESS Interface to IMS-DL/I
BMPREAD=, DLIREAD=, IMSBPUPD=, and IMSDLUPD= are suggested as restricted options. The BMPREAD= and DLIREAD= options determine whether the SAS/ACCESS Interface to IMS DATA step can perform both read and update operations, or is restricted to read only. The default value, N, allows update processing. The option value, Y, causes the SAS System to return a status code of SE and set _ERROR_=1 if a DL/I update call is issued. The IMSBPUPD= and IMSDLUPD= options determine whether the SAS/ACCESS for IMS engine can perform both read and update operations, or is restricted to read only. The default option value, Y, specifies that both reads and updates are allowed. The option value, N, specifies that the engine can only read IMS data; any attempt to update an IMS file results in an error. For more information about these options, refer to SAS/ACCESS Interface to IMS-DL/I Software, Version 8.

Page 95
Appendix F, Implementing the SAS/ACCESS® Interface to ORACLE
Renaming the ORACLE RDBMS Interface Subroutines (required)
Note: This task is required.
The SAS/ACCESS interface to Oracle software comes with a choice of modules that provide interface support for the Oracle application. The Oracle software release your site is running will determine which module to use:
• ORACLE 7.3.3, use the ORMVS733 module. • ORACLE 8.04, use the ORMVS8 module.
After choosing a module, rename the module to SASORA.
Customizing the SAS CLIST and Cataloged Procedure (required)
If the ORACLE interface is used extensively at your site, and if your ORACLE system load library is not a link list library, you may want to modify the SAS CLIST and cataloged procedure to allocate your ORACLE system load library by default. See Steps 1 and 2 below for the changes to make.
If you do not make the changes described in Steps 1 and 2, users must specify the LOAD operand shown below when invoking the CLIST and the LOAD= parameter when executing the cataloged procedure to concatenate your ORACLE system load library.
Enter the following command under TSO to start a SAS session in which you will execute the ORACLE interface:
SASname LOAD(’’’your.ORACLE.cmdload’’’)
where your.ORACLE.cmdload is the ORACLE system load library and SASname is the name of the CLIST you use to invoke the SAS System.
To use the ORACLE interface with the SAS cataloged procedure, use the LOAD= parameter of the PROC to specify your site’s load library. For example, you can use the following code in your JCL:
//SASORA EXEC SASname,LOAD=’your.ORACLE.cmdload’

96 Installation Instructions and System Manager's Guide for the SAS System under OS/390
Appendix F, Implementing the SAS/ACCESS Interface to ORACLE
If you are running SQL*Net Version 2 or above and you will be accessing the ORACLE server as an OS/390 client, you may also need to allocate the TNSNAMES file to your current SAS session. Check with your DBA to see if the TNSNAMES file is centrally maintained. If it is not, get the correct data set name for your site’s TNSNAMES file.
If you do not have the TNSNAMES file allocated, you will receive the following error from ORACLE:
ORACLE connection error: ORA-12154 TNSNAMES: could not resolve service name.
Optionally, you may want to allocate the data set that contains the default pathname for connecting to the ORACLE database server. This is especially convenient if you are always connecting to the same server. Check with your DBA for the correct DDname to the data set name.
STEP 1: Update your SAS CLIST (Optional)
If the ORACLE interface is used extensively at your site, you may want to alter the CLIST so that your ORACLE load library is allocated and concatenated before the SAS load library in the TASKLIB symbol. Replace the following line in the installation-supplied CLIST (where SASLOAD is a replacement parameter in the CLIST):
SASLOAD(’’’&prefix.LIBRARY’’’)+
with this line:
SASLOAD(’’’your.ORACLE.cmdload’’ ’’&prefix.LIBRARY’’’)+
If you are running SQL*Net Version 2 or above and you will be accessing the ORACLE server as an OS/390 client, you may also need to allocate the TNSNAMES file to your current SAS session. Check with your DBA to see if the TNSNAMES file is centrally maintained. If it is not, get the correct data set name for your site’s TNSNAMES file:
ALLOC F(TNSNAMES) DA('Your.TNSNAMES.dataset') SHR
If you do not have the TNSNAMES file allocated, you will receive the following error from ORACLE:
ORACLE connection error: ORA-12154: TNSNAMES: could not resolve service name.
Optionally, you may want to allocate the data set that contains the default pathname for connecting to the ORACLE database server. This is especially convenient if you are always connecting to the same server. Check with your DBA for the correct DDname to the data set name.
ALLOC F(Your site's DDname) DA(‘Your.data.setname’) SHR

Installation Instructions and System Manager's Guide for the SAS System under OS/390 97
Appendix F, Implementing the SAS/ACCESS Interface to ORACLE
STEP 2: Update your SAS cataloged procedure (optional)
If the ORACLE interface is used extensively at your site with the SAS cataloged procedure, you may want to make the STEPLIB DD statement change permanent to your cataloged procedure. To always execute the SAS System using the ORACLE interface, modify the STEPLIB DD statement in your cataloged procedure to reflect the following lines.
//STEPLIB DD DISP=SHR,DSN=&LOAD // DD DISP=SHR,DSN=&prefix.LIBRARY // DD DISP=SHR,DSN=your.ORACLE.cmdload where &prefix.LIBRARY is the SAS System load library and your.ORACLE.cmdload is the ORACLE System load library.
If you are running SQL*Net Version 2 or above and you will be accessing the ORACLE server as an OS/390 client, you may also need to allocate the TNSNAMES file to your current SAS session. Check with your DBA to see if the TNSNAMES file is centrally maintained. If it is not, get the correct data set name for your site’s TNSNAMES file.
//TNSNAMES DD DISP=SHR,DSN=your.TNSNAMES.dataset
If you do not have the TNSNAMES file allocated, you will receive the following error from ORACLE:
ORACLE connection error: ORA-12154: TNSNAMES:could not resolve service name.
Optionally, you may want to allocate the data set that contains the default pathname for connecting to the ORACLE database server. This is especially convenient if you are always connecting to the same server. Check with your DBA for the correct DDname to the data set name.
//yourDDname DD DISP=SHR,DSN=your.dataset.name
Verifying Installation of the SAS/ACCESS Interface to ORACLE (required)
STEP 1: Set up JCL to invoke the cataloged procedure you updated as described in STEP 2 above. Include a SYSIN DD statement like the following to run the installation verification program for this product:
//SYSIN DD DISP=SHR,DSN=&prefix.TESTS(TESTORL)
STEP 2: Run the job and verify the results.
This job should complete with return code 0.

98 Installation Instructions and System Manager's Guide for the SAS System under OS/390
Appendix F, Implementing the SAS/ACCESS Interface to ORACLE
Creating and Loading the Sample Tables (optional)
Refer to SAS/ACCESS Software for Relational Databases: Reference, Version 8, (SAS/ACCESS Software: Appendices, Sample Data) for coding examples based on sample ORACLE tables that can be created at your site. Creating these tables will assist the users at your site in learning how to use the SAS/ACCESS Interface to ORACLE product.
The program to create these sample tables is in the SAMPLE library member GENDBL. Before running GENDBL, you must first adapt the DBMACS and DBPTMACS macro files for your ORACLE set-up. To execute this program, use the JCL as previously described, with the SYSIN DD card referring to the GENDBL member in the SAMPLE library as follows:
//SYSIN DD DISP=SHR,DSN=&prefix.SAMPLE(GENDBL)
Note: Some customization of this job will be required.

Page 99
Appendix G, Implementing the SAS/ACCESS® Interface to SYSTEM 2000® Data Management Software
Customizing the SASS2K CLIST and Cataloged Procedure
Note: This task is required.
STEP 1: Edit the S2EDITP member of the CNTL data set and specify the parameter values as described in the following.
S2KLOAD= your SYSTEM 2000 LOAD library where SYSTEM 2000 is installed
S2KTEST= the name of the test library where SYSTEM 2000 is installed at your site
S2KCNM= the name of the CLIST to be installed to invoke the SAS System and the SYSTEM 2000 Interface, referred to in this appendix as the SASS2K CLIST
S2KPNM= the name of the cataloged procedure to be installed to invoke the SAS System and the SYSTEM 2000 Interface, referred to in this appendix as the SASS2K cataloged procedure
TS2K= the name of the CLIST you previously installed with SYSTEM 2000 to invoke SYSTEM 2000
TS2KFREE= the name of the CLIST previously installed with SYSTEM 2000 to free all SYSTEM 2000 files.
STEP 2: Submit the S2KPOST job.
This job modifies the SASS2K CLIST and cataloged procedure with the S2EDITP parameter values, and copies them to &prefix.CLIST and &prefix.PROCLIB, respectively.

100 Installation Instructions and System Manager's Guide for the SAS System under OS/390
Appendix G, Implementing the SAS/ACCESS Interface to SYSTEM 2000 Data Management Software
Executing the SASS2K CLIST to Access the SAS System
Note: This task is required.
STEP 1: Verify the S2KLLIB parameter in the SASS2K CLIST.
The SASS2K CLIST is located in &prefix.CLIST under the name that you supplied in S2EDITP. The SASS2K CLIST has two functions. The first function is to allocate all the files that are necessary to access SYSTEM 2000 databases, while the second function is to execute the SAS System.
All the SYSTEM 2000 file allocations are isolated in a CLIST called S2K that is delivered with the base SYSTEM 2000 product. The SASS2K CLIST calls the S2K CLIST to allocate the files, but not to execute SYSTEM 2000. The SASS2K parameters that do not apply to the SAS System are there to pass options to the S2K CLIST. Refer to the SYSTEM 2000 installation instructions for an explanation of these parameters.
The S2KLLIB parameter is modified by the S2KPOST job to reflect the value you specified for the S2KLOAD= parameter in the S2EDITP member of the CNTL data set; however, you should verify that the S2KLLIB parameter in the SASS2K CLIST refers to your site’s SYSTEM 2000 load library as follows:
S2KLLIB('''your.S2K.loadlib''') +
STEP 2: If you have not received the Base SAS product on your installation tape, verify that the SASS2K CLIST’s default values match those in your site’s SAS and S2K CLISTs.
If you have received the Base SAS product, these default values were already modified by S2KPOST job.
Move the SASS2K CLIST to the standard location for CLISTs at your site.
STEP 3: Execute the SASS2K CLIST to access SYSTEM 2000 database via the SAS System.
Executing the Cataloged Procedure to Access the SAS System
Note: This task is required.
The SASS2K cataloged procedure performs the same function for the batch environment as the SASS2K CLIST provides for the TSO environment. The procedure allocates the necessary files to access SYSTEM 2000 databases and executes the SAS System.
STEP 1: Verify that your site’s SYSTEM 2000 libraries are allocated as desired.

Installation Instructions and System Manager's Guide for the SAS System under OS/390 101
Appendix G, Implementing the SAS/ACCESS Interface to SYSTEM 2000 Data Management Software
STEP 2: Run a batch job to invoke the cataloged procedure to access SYSTEM 2000.
Testing with Sample Data
Note: This task is optional.
Refer to SAS/ACCESS Interface to SYSTEM 2000 Data Management Software: Reference, Version 8, for coding examples based on the EMPLOYEE data base that is delivered with the SYSTEM 2000 product. These examples can help the users at your site learn how to use the SAS/ACCESS Interface to SYSTEM 2000 software. The SAS sample files contain SAS programs for creating additional files used in the documentation. The sample files also contain SAS programs, catalogs, and data files used in the document.
STEP 1: Refer to the SYSTEM 2000 installation instructions for information on restoring the EMPLOYEE data base.
STEP 2: Refer to the (optional) SAMPLE library unloaded at installation time for the sample programs used as examples in the Reference guide and in the SYSTEM 2000 Software Sampler.
Note: The (optional) SAMPSIO SAS data library for the SAS/ACCESS Interface to SYSTEM 2000 unloaded at installation time contains sample SAS data files and SAS catalogs that correspond to the examples found in the SYSTEM 2000 Software Sampler.
Verifying the SAS/ACCESS Interface to SYSTEM 2000 Software
Note: This task is required.
The job S2VALID included in the CNTL data set validates your SAS/ACCESS Interface to SYSTEM 2000 software installation. Run this job only after the SAS/ACCESS Interface to SYSTEM 2000 software has been installed.
STEP 1: Submit the S2VALID job (member S2VALID of the CNTL data set).
This job verifies the correct installation and customization of the SAS/ACCESS Interface to SYSTEM 2000 software. Although the VALID job is run during installation of the SAS System, the S2VALID job provides a more in-depth validation test specifically written for the SAS/ACCESS Interface to SYSTEM 2000 software.
STEP 2: Check the SAS log to verify that the S2VALID job has completed successfully.
You should not receive any errors, and the job should finish with a completion code of zero.

102 Installation Instructions and System Manager's Guide for the SAS System under OS/390
Appendix G, Implementing the SAS/ACCESS Interface to SYSTEM 2000 Data Management Software
Note: If you receive errors while executing the S2VALID job, and you cannot determine their cause, contact the Technical Support Division at SAS, using the method described in the introduction to this document.

Page 103
Appendix H, Implementing the SAS/ACCESS® Interface to Teradata
Defining the Interface to Teradata
Customers will need to have installed Teradata client software for OS/390 before attempting to use the SAS/ACCESS to Teradata interface. The procedure to install this software is described in the Teradata Client for MVS Installation Guide supplied by NCR. Once the Teradata software is installed, it must be verified. A suggested last step to verify your Teradata installation is a successful login to the Teradata DBS from a BTEQ session on OS/390.
Along with the customer’s installation of Teradata client software, the System Administrator must have started and initialized the Teradata Director Program (TDP). This communication task must be running before the SAS/ACCESS Interface to Teradata product can communicate with the Teradata server. Names of the TDPs must be communicated to the SAS user community if a default TDP (see below) is not established.
Note: A typical installation may include two TDPs; one named “TDP0 - production TDP” and another “TDP1 - test TDP.” The test TDP could be used for the testing of new versions of Teradata, new applications, etc. The production TDP’s role would be to communicate with the production database server.
The System Administrator can set up a default TDP to be used by Teradata client applications, including SAS sessions. To do this, the System Parameter Block (HSISPB and HSHSPB) must be modified to indicate the default name.
Note: This is a Teradata parameter block and not a SAS parameter block.
Once the default TDP is defined, then SAS software will use this TDP by default when connecting to the Teradata server.
Customizing the SAS CLIST and Cataloged Procedure
After the Teradata components are in place, tested and defined, the System Administrator needs to configure the SAS System to use the Teradata load libraries. SAS/ACCESS to Teradata under OS/390 uses the APPLOAD load library supplied by Teradata. This library must be accessible to the SAS System in order for SAS/ACCESS to Teradata to function. There are several methods that can be used to accomplish this task:
Enter the following command under TSO to start a SAS session in which you will execute the SAS/ACCESS to Teradata under OS/390 interface:

104 Installation Instructions and System Manager's Guide for the SAS System under OS/390
Appendix H, Implementing the SAS/ACCESS Interface to Teradata
SASname LOAD('''your.ncr.appload''')
where your.ncr.appload is the Teradata system load library and SASname is the name of the CLIST you use to invoke the SAS System.
To use the Teradata interface with the SAS cataloged procedure, use the LOAD= parameter of the PROC to specify your site’s Teradata load libraries. For example, you can use the following code in your JCL:
//SASTRA EXEC SASname,LOAD='your.ncr.appload'
where your.ncr.appload is the Teradata system load library and SASname is the name of the cataloged procedure you use to invoke the SAS System.
You can modify your SAS CLIST to make the necessary Teradata libraries accessible when you invoke the SAS System. Follow these steps to do this:
1. Edit your SAS CLIST.
2. Replace SASLOAD('''&prefix.LIBRARY''')+ with this line: SASLOAD('''your.ncr.appload'' ''&prefix.LIBRARY''')+
You can modify your SAS cataloged procedure by changing the STEPLIB DD statement as shown below.
//STEPLIB DD DISP=SHR,DSN=&LOAD
// DD DISP=SHR,DSN=&prefix.LIBRARY
// DD DISP=SHR,DSN=your.ncr.appload
Verifying the installation of the SAS/ACCESS Interface to Teradata
When you have the components installed and configured, test SAS/ACCESS to Teradata by submitting one or more of the following code examples to the SAS System:
Note: You will need to supply a valid Teradata username/password pair.
Example 1: Verifying with tdpid=explicitly specified
libname tera teradata user=SYSTEMFE pw=PASSWORD tdpid=TDP1;
If the code is successful you will see the following in the log:
NOTE: Libref tera was successfully assigned as follows: Engine: Teradata Physical Name: tdp1

Installation Instructions and System Manager's Guide for the SAS System under OS/390 105
Appendix H, Implementing the SAS/ACCESS Interface to Teradata
If you receive an error message, use the following information to correct the connection:
ERROR: Teradata connection: CLI0151 CLI2/OS/390: NOTDP SUBSYSTEM DEFINED
Explanation: The tdpid= value specified is incorrect. In the LIBNAME statement above, this indicates that TDP1 is not an active Teradata Director Program. Check the TDP definition and that the director program is active.
ERROR: Teradata connection:. Explanation: Two problems can cause this message. First, the SAS System is not
recognizing the required Teradata APPLOAD load library (see “Customizing the SAS CLIST and Cataloged Procedure” above).
The alternative is that no TDP is active. This could mean your site has skipped the required step, “Verifying the Teradata Software.” Make sure you perform this required step and then retry your SAS connection to Teradata.
ERROR: Teradata connection: User identification is not authorized.
Explanation: The user= value specified in the LIBNAME statement, SYSTEMFE is not a valid Teradata userid.
ERROR: Teradata connection: Invalid Password
Explanation: The pw= value specified in the LIBNAME statement, PASSWORD, is not a valid Teradata password for the given userid.
Example 2: Verifying without tdpid= specified
libname tera teradata user=SYSTEMFE pw=PASSWORD;
If you receive an error message, refer to the explanations listed above under Example 1. However, the following SAS System response has a different meaning if Example 1 was executed successfully, but Example 2 fails:
ERROR: Teradata connection: CLI0151 CLI2/OS/390: NO TDP SUBSYSTEM DEFINED Explanation: The default TDP name in the System Parameter Block (HSISPB and
HSHSPB) is not defined or working correctly.

106 Installation Instructions and System Manager's Guide for the SAS System under OS/390
Appendix H, Implementing the SAS/ACCESS Interface to Teradata

Page 107
Appendix I, Post-Installation Setup for SAS/ASSIST® Software
This appendix describes how to add an optional master profile to SAS/ASSIST software. You can use a master profile to override the default settings as sent by SAS Institute. This allows you to provide a customized setup for SAS/ASSIST software. With the master profile you can control the profile options of all SAS/ASSIST users from one central place. For more information on the profile options, refer to SAS/ASSIST Software: Changes and Enhancements.
Adding a Master Profile
Complete the following steps to add a master profile to SAS/ASSIST software:
1. Specify the location of the master profile by creating a new SAS library that all users of SAS/ASSIST Software will have read-access to. The following definitions are needed:
Data Set Name prefix.ASSIST.MASTER Space units CYLINDER Primary quantity 1 Secondary quantity 1 Directory blocks 0 Record format FS Record length 6144 Block size 6144
Example: prefix.ASSIST.MASTER
All users with write-access to this library will automatically also have write-access to the master profile in SAS/ASSIST software. Select a name that conforms to the naming conventions at your installation. The name of this new library must be stored in an entry in the SASHELP library. This requires that you have write access to the SASHELP library.
Modify the CLIST provided with installation to change the disposition of the SASHELP library to OLD.
Invoke the SAS System. Only one user at a time will be able to run SAS using the modified CLIST.
On line 1 of the Program Editor type the physical pathname to be used as the SAS data library to store the master profile. Execute the Save command to save the entry as shown in the following example:

108 Installation Instructions and System Manager's Guide for the SAS System under OS/390
Appendix I, Post-Installation Setup for SAS/ASSIST Software
SAVE SASHELP.QASSIST.PARMS.SOURCE 00001 prefix.ASSIST.MASTER 00002
Note: The entry must be saved with the name SASHELP.QASSIST.PARMS.SOURCE.
The location of the master profile is now known by SAS/ASSIST software.
Exit the SAS System.
Free the SASHELP data set to release the exclusive lock:
FREE DS('&prefix.SASHELP')
Modify the CLIST provided with installation to change the disposition of the SASHELP library back to SHR. Now other users are able to run SAS concurrently.
2. Create the master profile.
The first time SAS/ASSIST software is started a master profile is created if the SASHELP.QASSIST.PARMS.SOURCE contains the name of an existing library, and the person who starts SAS/ASSIST software has write-access to this library.
3. Customize the master profile by starting SAS/ASSIST and typing the command ASSIST on the SAS command line. Then select
Setup ... Profiles ... Master/group ...
If you have write-access to the SAS data library containing the master profile you can specify default values for your installation. These values will be used by new users as they start SAS/ASSIST software.
Note: If you restrict values by typing R in Status, users will not be allowed to change the values you define.
You can run SAS/ASSIST software in two different styles – workplace or block menu. The block menu can be new style or old style. You can control this using the profile options below.
Run workplace: SAS/Assist style: Workplace
Run new style with block menu:
SAS/Assist style: Block Menu Menu style: New

Installation Instructions and System Manager's Guide for the SAS System under OS/390 109
Appendix I, Post-Installation Setup for SAS/ASSIST Software
Run old style:
SAS/Assist style: Block Menu Menu Style: Old
4. Create Group profiles.
From the master profile it is possible to create group profiles to allow groups of users to have different setups. The master profile controls group profiles and user profiles when a user is not a member of any group. All users are indirectly controlled by the master profile when option values are set to a restricted ( R ) status.
From Setup … Profile … Master/Group … select Tools … Create Group Profile. To add users to a group profile, select Tools … Update User Group. By default, the userid is found in the macro variable &SYSJOBID. The value is set in the option Userid in the master profile (option type System Administration). Change the value if your site uses another variable to keep the userid.
Installing Sample DB2 Tables and a Sample Query Manager
This section describes how to customize SAS/ASSIST software to run queries against DB2 sample data. It is recommended that you do this in order to get acquainted with the software before you start working with your own DB2 data. This example sets up a personal query manager. See Chapter 9, “Setting Up Query Managers,” in SAS/ASSIST Software: Changes and Enhancements for more information.
Complete the following steps:
1. Create DB2 Sample Tables.
Query and Reporting contains its own sample DB2 tables. These tables are used in the documentation and in the SAS training courses. Complete the following steps to create DB2 sample tables:
a. Invoke SAS and enter the following on the command line in the Program Editor:
COPY SASHELP.QASSIST.SAMPLTAB.SOURCE
b. Specify the DB2 subsystem id, creator, and database name (lines 54-59):
See documentation in the program for further information.
c. Execute this SAS program and the DB2 sample data will be created.
2. Create Query Manager Tables on the DB2 Sample Data

110 Installation Instructions and System Manager's Guide for the SAS System under OS/390
Appendix I, Post-Installation Setup for SAS/ASSIST Software
Complete the following steps to create query manager tables for installation verification purposes:
a. In the Program Editor, use the COPY command to copy the sample source from SASHELP.QASSIST.DB2METAU.SOURCE. This program will generate a set of Query Manager tables, which contain information on DB2 tables available to specific creators.
b. Specify the creators you want to use in line 21 as shown in the following example:
%let creators=('SASQR','DSN8230',USER);
Note: In this example SASQR and DSN8230 are two specific creators which contain sample data from SAS and IBM. Add USER if you want access to a DB2 table, which has a creator equal to your userid.
c. Specify the location of the Query Manager tables on line 25.
%let saslib=SASUSER; *<--User QM library;
d. Execute this SAS program and the Query Manager tables will be created. The following SAS tables will be created:
SASUSER_DB2TAB DB2 table information SASUSER_DB2COLS DB2 column information SASUSER_DB2RELS Relations for joining tables SASUSER_DB2INDX Defined indexes in DB2.
3. Create the Query Manager Definitions
The Query Manager contains information that indicates the database to be used, as well as the location of the SAS Query Manager tables created in the last step. You can also specify the name of the program to be used to recreate (refresh) the SAS Query Manager tables. See Chapter 9 in SAS/ASSIST Software: Changes and Enhancements for more information.
a. Select the following from the SAS/ASSIST Primary menu to get to the Query Manager Administration window:
DATA MGMT... QUERY... Query and Reporting... SETUP... Administration
b. Enter the following information to identify the location of the Query Manager tables as shown below:
For Database, enter DB2
For Program to Generate Query Manager tables, select No

Installation Instructions and System Manager's Guide for the SAS System under OS/390 111
Appendix I, Post-Installation Setup for SAS/ASSIST Software
For Location of the Query Manager tables, enter SASUSER
Note: The remaining parameters are selected by default.
c. Save the Query Manager definition.
Select Save As from the File menu.
d. Enter name and description as shown in the following example (the Type and Catalog are already specified):
Type: MANAGER Name: db2samp Description: Sample DB2 data Catalog: SASUSER.MANAGER
e. Select OK to save it.
4. Using the Query Manager
a. Select the following from the SAS/ASSIST Primary menu to get to the Query window:
DATA MGMT... QUERY... Query and Reporting... QUERY...
The Query window may attempt to load a Query Manager other than the one you defined (in Step 3 above), or you might be notified that one or more Query Manager tables are not found. You will be asked if you want to generate them. Select No.
b. To use the Query Manager that you defined (see Steps 2 and 3 above), select Select Query Manager... from the Tools menu.
A pop-up menu is displayed. Select the Query Manager you just defined DB2SAMP (in Step 3 above).
c. Select the Select button to get a list of DB2 data.

112 Installation Instructions and System Manager's Guide for the SAS System under OS/390
Appendix I, Post-Installation Setup for SAS/ASSIST Software
Page 113
Appendix J, Installing the BMDP Interface
Introduction
The BMDP procedure (PROC BMDP) converts an input SAS data set into a BMDP save file and loads user-provided BMDP control statements for processing the file. It then calls a BMDP program (for example, BMDP1D) to execute the control statements. PROC BMDP then prints the output of the BMDP program, interspersing by-line information if a BY statement is given.
The SAS BMDP interface is not necessary if your site does not have BMDP, or if you are only accessing BMDP data through the BMDP engine (via the LIBNAME statement or PROC CONVERT). You may want to survey your SAS software users to determine if and how the BMDP interface will be used.
Installation of the BMDP Interface
Note: This task is optional.
If your users plan to run PROC BMDP, you need to customize the SASBMDP CLIST and cataloged procedure (PROC) and install them in the appropriate libraries for user access at your site.
STEP 1: Edit the BMDPEDTP member of the CNTL data set to specify the desired values for the BMDP parameters.
The BMDP parameters are defined as follows:
BMDPPNM= specifies the name of the PROC to execute the SAS BMDP interface at your site.
BMDPCNM= specifies the name of the CLIST to invoke the SAS BMDP interface at your site.
BMDPLOD= specifies the name of the load library that contains the BMDP programs. This item is required.
BMDPNWS= specifies the BMDP news file name. This is optional, and displays as part of the BMDP program’s output. Use NULLFILE if you do not want to view the BMDP news file name in your log.
BMDPMAC= specifies the name of the BMDP macro file. This is only used by the BMDP program and is optional. Use NULLFILE if it is not wanted.

114 Installation Instructions and System Manager's Guide for the SAS System under OS/390
Appendix J, Installing the BMDP Interface
STEP 2: Review and submit the BMDPPOST job in the CNTL data set.
Submit the BMDPPOST job to tailor the CLIST and PROC, as well as the BABMDP job.
STEP 3: Review the SASBMDP CLIST and PROC located in your CNTL data set.
Member BACLST02 contains the CLIST. BAPROC02 contains the PROC. The cataloged procedure and CLIST contain file allocations for three sets of files. These files are required for the Release 8.2 of the SAS System, PROC BMDP, and the BMDP program.
If you have customized your SAS CLIST and cataloged procedure as described in the section “Customizing your SAS CLIST and Cataloged Procedure” on page 64, you may want to apply the same customizations here as well.
The files required for PROC BMDP are identified by the DDnames FT05F001, FT06F001, and FT03F001, which are defined as follows:
FT05F001 identifies the file into which PROC BMDP writes the BMDP control statements.
FT06F001 identifies the file into which PROC BMDP directs the BMDP program output listing for post-processing.
FT03F001 identifies the file into which PROC BMDP writes the converted BMDP save file. While the user can have PROC BMDP write to any unit number, FT03F001 is the default. The user must supply the additional JCL if another DDname is used.
STEP 4: Review and then submit the BABMDP job in the CNTL data set that was tailored by the BMDPPOST job submitted in Step 2.
This job copies the tailored SASBMDP CLIST and PROC to the libraries that you specified earlier in SASEDITP and executes the TESTBMDP validation program to verify the installation of the BMDP interface.

Page 115
Appendix K, Post-Installation Setup for SAS/CONNECT® Software
Note: For further information on implementing and using SAS/SHARE software, refer to Communications Access Methods for SAS/CONNECT and SAS/SHARE Software and the SAS/CONNECT User’s Guide which are both in the SAS OnlineDoc.
The first section in this appendix, “Storing and Locating SAS/CONNECT Script Files,” describes the use of the sample script files shipped with the product. The next sections in this appendix list supported software for access methods available on OS/390 and outline configuration procedures for those access methods that require additional configuration. The final section documents installing and configuring the OS/390 Spawner Program.
The access methods supported for OS/390 are TCP/IP, APPC and XMS. They are described in the order listed. Refer to the appropriate sections for the access methods that you will be using at your site for requirement information. Remote capability for the PCLINK access method supported in previous releases is available in this release as well. There is no change in the requirements for these access methods, so they will not be discussed in this appendix. Refer to Communications Access Methods for SAS/CONNECT and SAS/SHARE Software, Version 8 for complete details on the access methods supported by other systems.
Storing and Locating SAS/CONNECT Script Files
Several sample script files are shipped with SAS/CONNECT software. SAS/CONNECT software uses these script files to establish a connection to a remote SAS session. The install process places the script files into your &prefix.CTMISC data set.
The SAS system option, SASSCRIPT, points to the location of the SAS/CONNECT script files. The SASSCRIPT option is used by SAS/ASSIST and could be used by user-written SCL applications.
The value of the SASSCRIPT option can be one or more concatenated PDS names.
The simplest way for you to give your users automatic access to the installed sample script files is to place the following option in your configuration file:
SASSCRIPT=("&prefix.CTMISC")
where &prefix.CTMISC specifies your installation CTMISC data set name. See the “System Manager’s Guide” in Section II of this document for details on updating the configuration files.

116 Installation Instructions and System Manager's Guide for the SAS System under OS/390
Appendix K, Post-Installation Setup for SAS/CONNECT Software
You can also specify other PDS names to concatenate after your &prefix.CTMISC data set:
SASSCRIPT=(‘&prefix.CTMISC’ ‘userid.CTMISC’)
Setting SAS System Options
The following options are required by SAS/CONNECT software:
DMR
invokes a remote version of the windowing environment for use with SAS/CONNECT software.
REMOTE=remote_sessionid
specifies the logical unit of the remote host that you are connecting to.
System Configuration for the TCP Access Method
Software Requirements
With the TCP/IP access method, SAS/CONNECT software requires one of the following TCP/IP packages:
• Interlink’s SNSTCP, Version 5.2 or later • IBM TCP/IP, Release 3.2 or later or OS/390 UNIX System Services
For details on configuring either of these products for use with SAS/CONNECT Software, refer to the section “System Configuration for Using SAS with TCP/IP” on page 54.
System Configuration for the APPC Access Method
Note: This task is required in order to use the APPC access method.
Software Requirements
SAS/CONNECT software requires the following levels of system software to support the APPC access method:
VTAM Version 3, Release 2 or later
MVS/ESA Version 5 or later with APPC/MVS configured.
NCP Version 4 Release 3 or later for 3725 communications controllers, or Version 5 Release 2 or later for 3745 communications controllers, is recommended for peripheral node attachment.

Installation Instructions and System Manager's Guide for the SAS System under OS/390 117
Appendix K, Post-Installation Setup for SAS/CONNECT Software
System Configuration for APPC
System configuration tasks, in the form of resource definitions, must be performed prior to using the APPC access method with SAS/CONNECT software. The steps for defining SNA end nodes and their logical units for OS/390 environments are described in this section.
The following VTAM definitions are required to allow OS/390 to function as either a local or a remote host in a SAS/CONNECT conversation.
STEP 1: Define application nodes.
Define local-domain VTAM application minor node identifiers for the collection of host logical units. This is done by VTAM systems personnel through the specification of APPL definition statements to define a pool of APPLs for SAS/CONNECT users. A sample APPL definition follows:
N02SVnnn APPL APPC=YES,AUTOSES=1,MODETAB=modetab, DLOGMOD=modeent,DDRAINL=NALLOW, DMINWNL=16384,DMINWNR=0,DSESLIM=32767, DRESPL=NALLOW,EAS=3,SECACPT=CONV, VPACING=n
❏ APPC=YES allows the application to exploit the APPCCMD
interface. ❏ MODETAB=modetab defines the session parameter mode table. ❏ DLOGMOD=modeent defines the default session parameter mode table
entry. ❏ DDRAINL=NALLOW disallows conversation allocation quiescence
during shutdown. ❏ DMINWNL=16384 specifies the initial negotiation value for local
contention manner sessions. ❏ DMINWNR=0 specifies to use the remote partner’s contention
winner sessions request. ❏ DSESLIM=32767 defines maximum session limits. ❏ DRESPL=NALLOW requires the remote partner to deactivate sessions. ❏ EAS=3 specifies that a user has one session at a time. ❏ SECACPT=CONV indicates that FMH5 security subfield information
is accepted. ❏ VPACING=n sets per site network requirements.
Refer to VTAM Installation and Resource Definition (SC23-0111) for further information.
STEP 2: Define session mode entries.
Session mode entries, which define protocol and performance parameters, are required to support session binding to a secondary logical unit residing within the local VTAM domain. Examples are provided below. Refer to appropriate IBM documentation for further details on BIND RU and MODEENT.

118 Installation Instructions and System Manager's Guide for the SAS System under OS/390
Appendix K, Post-Installation Setup for SAS/CONNECT Software
Note that the SNASVCMG entry is required to support SNA services sessions initiated through a boundary NCP. The MAPPCIND entry specifies parallel session and CNOS support for independent LUs, while the MAPPCDEP entry, for dependent LUs, does not. Both examples specify access security field acceptance. The RUSIZES and COS settings are site- specific.
SNASVCMG MODEENT LOGMODE=SNASVCMG, FMPROF=X'13', TSPROF=X'07', PRIPROT=X'B0', SECPROT=X'B0', COMPROT=X'50B1', RUSIZES=X'xxxx', PSERVIC=X'060200000000000000000300', TYPE=0
MAPPCIND MODEENT LOGMODE=MAPPCIND, FMPROF=X'13', TSPROF=X'07', PRIPROT=X'B0', SECPROT=X'B0', COMPROT=X'50B1', RUSIZES=X'xxxx', PSERVIC=X'060200000000000000102F00', COS=n, TYPE=0
MAPPCDEP MODEENT LOGMODE=MAPPCDEP, FMPROF=X'13', TSPROF=X'07', PRIPROT=X'B0', SECPROT=X'B0', COMPROT=X'50B1', RUSIZES=X'xxxx', PSERVIC=X'060200000000000000102C00', COS=n, TYPE=0
Setting APPC-Related SAS System Options
Note: This task is required.
The following SAS system options are required by SAS/CONNECT software for APPC access method support.
LUNAME=name
defines the explicit VTAM LU name (eight characters maximum) to use for the session. This name is used to define a user-dedicated LU rather than making use of pooled acquisition and can be used for both local and remote sessions on OS/390.

Installation Instructions and System Manager's Guide for the SAS System under OS/390 119
Appendix K, Post-Installation Setup for SAS/CONNECT Software
APPCSEC=userid.password
specifies a userid.password string, _PROMPT_, or _NONE_. You can specify this as an option in an OPTIONS statement, or in the configuration file on the local host. The default is _NONE_. Both the userid and password can contain any characters. If the remote host is case-sensitive for the userid and password, specify the value in the appropriate case and enclose it in quotation marks.
Security information can now be specified using the USERID and PASSWORD options on the SIGNON command or statement. This is the recommended method for specifying security information. Please refer to the SAS/CONNECT Software User’s Guide in the SAS OnlineDoc for complete details about these options. APPC_SECURE is still supported as well.
Keep in mind that specifying this value in the configuration file undermines security by putting the userid and password as readable values in the SAS configuration file. If you specify _PROMPT_, the user is prompted for a userid and password for the remote host.
You must specify either the userid.password string or _PROMPT_ to sign on to OS/390, CMS, or VSE. The userid is optional and is usually omitted when both the OS/390 and CMS hosts have the same userid. In this case, the OS/390 session derives the userid from the appropriate Accessor Environment Element (ACEE).
If you are connecting to an OS/2 session, you can omit this parameter (which causes the value to default to _NONE_) unless you have established a user profile on the OS/2 host with Communications Manager or with User Profile Management.
If you are connecting to a Windows session, the parameter can also be omitted unless security has been explicitly defined.
Unlike most other SAS system options for APPC, this option will probably be specified by the end user.
You should include the following common SAS options in a globally available system configuration file so that your end users do not need to be aware of them.
COMAMID=APPC
specifies that the APPC access method should be used for communication between SAS/CONNECT local and remote sessions.
LUPOOL=USER|ALL
specifies when an LU should be acquired from a pool. Setting this option to USER enables pool use for local OS/390 SAS sessions; this is the default value.

120 Installation Instructions and System Manager's Guide for the SAS System under OS/390
Appendix K, Post-Installation Setup for SAS/CONNECT Software
Setting this option to ALL enables pool use for both local and remote OS/390 SAS sessions.
LU62MODE=name
specifies the communications mode to use. The mode name must be defined in both the local and the remote environments; for OS/390, this is done with a MODEENT macro as shown previously.
The following options are used together to produce an LU name. The LU name is what you specify for the REMOTE= option prior to establishing a SAS/CONNECT conversation. The LUPREFIX, LUFIRST, and LULAST options describe the pool of LUs from which an LU is dynamically selected. These options are used only when pool use is enabled. (Setting LUPOOL=USER enables LU pool use only for local sessions on OS/390; setting LUPOOL=ALL enables pool use for both local and remote sessions on OS/390.) These options can be used to specify an actual LU name or an ACBNAME chosen by you to eliminate dependency between the SAS configuration and naming changes in your network.
LUFIRST=suffix
specifies the numeric LU (ACBNAME) suffix of the first LU in the pool.
LULAST=suffix
specifies the numeric LU (ACBNAME) suffix of the last LU in the pool. The size of a pool is determined as follows:
pool-depth = LULAST - LUFIRST + 1
If an LU is not acquired after cycling through the pool, the signon fails.
LUPREFIX=prefix
specifies the LU (ACBNAME) prefix to use to create a pool of LUs. SAS takes the value of the LUPREFIX= option and concatenates it with a numeric suffix to get the ACBNAME associated with this LU. The number of digits in the numeric suffix depends on the number of digits in the value of the LULAST= option.
The zero filling done to produce an ACBNAME (as defined in the user application pool) using the LUPREFIX system option is dynamic based on the magnitude of the LULAST. For example, a 5-byte LUPREFIX value combined with LULAST=9 is not zero-filled to produce a 6-byte ACBNAME; combined with LULAST=99 it is zero filled with a single zero to produce a 7-byte ACBNAME and so on.
Sites that have defined 8-byte ACBNAMEs in the user application pool should ensure that LUPREFIX and LULAST values are specified that generate 8-byte ACBNAMEs (LUPREFIX=SASIUO LULAST=10 for example). Although this parameter is not required, it is recommended to insulate your SAS/SHARE

Installation Instructions and System Manager's Guide for the SAS System under OS/390 121
Appendix K, Post-Installation Setup for SAS/CONNECT Software
configuration from changes in LU naming conventions and to allow the same configuration to be shared by more than one OS/390 system in the SNA network (since ACBNAMEs must be unique only within a single domain).
The prefix used should be specified to the SAS System via the SAS system option LUPREFIX=. The lower and upper bounds of the suffix range used should be specified via the system options LUFIRST= and LULAST=, respectively. If the ACBNAME= parameter is omitted it defaults to lu-name, which should then be constructed as a name prefix and numeric suffix.
Note: LU Pool naming assumes a zero leading suffix; that is, if LUFIRST is 1, LULAST is 99, and LUPREFIX is N02SV, the first LU in the pool should be named N02SV01, not N02SV1.
Implementing SAS/CONNECT APPC/MVS Subsystem Exploitation
Note: This task is optional.
You need to perform the additional steps described in this section to enable OS/390 to be a remote session of a SAS/CONNECT conversation initiated from another OS/390, OS/2 (without a TSO logon), or CMS environment. These types of connections depend on SAS/CONNECT APPC/MVS subsystem capabilities. Refer to MVS/ESA Planning: APPC Management (GC28-1110) for a detailed discussion of these tasks.
STEP 1: Define the VSAM transaction program profile data set to be run when an inbound connection is requested.
Run IDCAMS using the following example to create a KSDS VSAM cluster to contain the transaction program profile that defines the SAS/CONNECT transaction program.
DEFINE CLUSTER ( NAME ( vsam.profile.dataset ) - VOLUME ( volser ) - KEYS ( 112 0 ) - RECORDSIZE ( 248 4000 ) - RECORDS ( 100 100 ) - SHAREOPTIONS ( 3 3 ) - INDEXED REUSE ) -
DATA ( NAME ( vsam.profile.data ) ) - INDEX ( NAME ( vsam.profile.index ) )
The member ATBTPVSM in the SYS1.SAMPLIB data set contains other examples for creating this type of data set.
STEP 2: Run the ATBSDFMU utility to define the transaction program profile.
Run the APPC/MVS administrative utility ATBSDFMU using the following example to define the transaction program profile.

122 Installation Instructions and System Manager's Guide for the SAS System under OS/390
Appendix K, Post-Installation Setup for SAS/CONNECT Software
//UPDTTPSI EXEC PGM=ATBSDFMU //SYSPRINT DD SYSOUT=* //SYSSDLIB DD DSN=vsam.profile.dataset,DISP=SHR //SYSSDOUT DD SYSOUT=* //SYSIN DD DATA,DLM=$$ TPADD
TPNAME(SASRMT) SYSTEM ACTIVE(YES) TPSCHED_DELIMITER(SCHEND) TAILOR_SYSOUT(YES) TAILOR_ACCOUNT(YES) CLASS(xxx) JCL_DELIMITER(JCLEND)
//SASRMT JOB 'REMOTE SAS',MSGLEVEL=(1,1) // JCLLIB ORDER=(your.proc.library) // EXEC COPYSAS JCLEND
KEEP_MESSAGE_LOG(ALWAYS) SCHEND $$
Note that the utility SYSIN input includes embedded JCL. The APPC/MVS transaction scheduler uses this JCL to invoke the transaction program SASRMT, which starts a remote SAS application on OS/390 by executing a SAS cataloged procedure. You need to specify the DSN of the cataloged procedure library where your SAS procedure resides in the JCLLIB statement of this JCL.
If users do not need to specify SAS system options for the remote SAS invocation, then you can specify your standard SAS cataloged procedure on the preceding EXEC statement in the SASRMT JCL. However, if users do need to customize option settings for the remote SAS invocation, then you need to set up a separate cataloged procedure like the following sample APPCSAS procedure. This procedure specifies a user-specific configuration file using the system symbolic parameter &SYSUID.
//APPCSAS PROC USER=&SYSUID //SAS EXEC PGM=SASHOST,REGION=4096K //STEPLIB DD DISP=SHR,DSN=prefix.LIBRARY //CONFIG DD DISP=SHR,DSN=&USER..SASRMT.CONFIG // DD DISP=SHR,DSN=prefix.CNTL(BATCH) //SASHELP DD DISP=SHR,DSN=prefix.SASHELP //SASMSG DD DISP=SHR,DSN=prefix.SASMSG //WORK DD UNIT=3380,SPACE=(CYL,(1,1)), // DCB=(RECFM=FS,LRECL=6144,BLKSIZE=6144,DSORG=PS) //SASLOG DD SYSOUT=A,DCB=(BLKSIZE=141,LRECL=137,RECFM=VBA) //SASLIST DD SYSOUT=A,DCB=(BLKSIZE=141,LRECL=137,RECFM=VBA) //SYSIN DD DUMMY
STEP 3: Define and activate a target logical unit name.
Create an APPCPMxx member in SYS1.PARMLIB, where xx is a two-character identifier for distinguishing the member that defines the target LU name to service inbound remote session requests. This LU name is the value given to the REMOTE= option in both the local and remote SAS sessions. Use a statement like the following to specify the target LU name:
LUADD ACBNAME(N01APL00) TPDATA(vsam.profile.dataset)

Installation Instructions and System Manager's Guide for the SAS System under OS/390 123
Appendix K, Post-Installation Setup for SAS/CONNECT Software
TPLEVEL(SYSTEM)
You also need to define a VTAM application node for this LU dedicated to APPC/MVS. This LU is in addition to the LU pool you defined in STEP 1 of “System Configuration for APPC” previously. See STEP 1 on page 117 for a sample VTAM APPL definition. Then activate the logical unit to APPC/MVS through a START or SET APPC command, specifying the xx identifier.
References
Establishing communications within an SNA network, especially for a host subarea peripheral node, can be extremely trying until the configuration is properly specified. The APPC communications access method reflects failures as they are reported by the operating system components with which it interfaces. Often this information will be in the form of operation codes, return codes, and sense data. No attempt is made to interpret these failures. Rather, given the numerous possibilities for failure that are a function of your particular environment, it is expected that you will work with network systems and SAS support personnel at your site to attain resolution. Refer to the following IBM publications for additional information:
SNA Technical Overview (GC30-3073)
SNA Formats (GA27-3136)
VTAM Programming for LU6.2 (SC30-3400)
Extended Services for OS/2 Communications Manager User’s Guide (S04G-1015)
Extended Services for OS/2 Communications Manager Configuration Guide (S04G-1002)
Extended Services for OS/2 Problem Determination Guide for the Service Coordinator (S04G-1006)
Extended Services for OS/2 Programming Services and Advanced Problem Determination for Communications (S04G-1007)
Extended Services for OS/2 Communications Manager System Management Programming Reference (S04G-1116)
Extended Services for OS/2 APPC Programming Reference (S04G-1025).
If you cannot resolve your connectivity problem, call SAS Technical Support for assistance. You will probably be asked to generate traces to assist in documenting the problem, so ensure that you or your site support personnel are familiar with the tracing services available through VTAM and OS/2 Extended Services.

124 Installation Instructions and System Manager's Guide for the SAS System under OS/390
Appendix K, Post-Installation Setup for SAS/CONNECT Software
Multi-Process (MP) CONNECT
A new feature called “Multi-Process (MP) CONNECT” was added to the SAS/CONNECT product in Version 8.0. This facility exploits a local host’s multi-processor capability, as well as multi-processors across a network, by allowing parallel processing of self-contained tasks and the coordination of all the results into the original SAS session. SAS/CONNECT accomplishes multi-processing by means of asynchronous rsubmits.
When MP CONNECT processing needs to be done on the same host as the local host, a SASCMD signon may be used to initiate one or more “remote” SAS sessions. For OS/390 hosts, the SASCMD signon uses the cross-memory (XMS) access method. The SASCMD= option is used for specifying options and values that are passed to a dynamically created DMR session.
System Configuration for MP CONNECT
To implement the SAS System’s MP CONNECT features, complete the following steps, which are described in detail elsewhere in this manual:
STEP 1: Install the SASVXMS Load Module.
This procedure is described on page 224 of the appendix “Implementing SAS/SHARE Software.”
STEP 2: Define an Anchor Point.
This procedure is described on page 225 of the appendix “Implementing SAS/SHARE Software.”
STEP 3: Install the SAS SVC Routine.
This procedure is described on page 68 of Part I “Setting Up the SAS System” in Section II, “System Manager’s Guide.”
Considerations for Using XMS with MP CONNECT
System administrators should note that the remote (DMR) SAS sessions spawned by MP CONNECT will be connected to their local client OS/390 session exclusively with the cross-memory access method.
Like XMS SHARE servers, these DMR server sessions will have their OS/390 ASID marked “temporarily non-reusable” by the operating system when their address space terminates. The DMR address space will be terminated in response to the signoff command. The ASID will remain non-reusable until the client address space is terminated -- when the client TSO session logs off, started task ends or batch initiator is drained. Customers should therefore follow IBM recommendations by not spawning DMR sessions from long running address spaces.

Installation Instructions and System Manager's Guide for the SAS System under OS/390 125
Appendix K, Post-Installation Setup for SAS/CONNECT Software
In addition, customers should guard against spawning excessive numbers of DMR sessions from a single client session. A complete discussion of how OS/390 manages cross memory ASIDs can be found in section 3.9 of OS/390 MVS Programming: Extended Addressability Guide (GC28-1769). SAS XMS servers, both SHARE and DMR, create non-system LXs for purposes of that discussion.
Note also that the spawning of XMS DMR session utilizes OS/390 UNIX System Services, including the BPX1FRK interface (UNIX fork support). If these services are not present in the host OS/390 system and usable by the client session, the DMR server creation will fail.
This feature may be disabled with the following zap:
NAME SASVQM VQAMSPR@ VER 029C 5020,D070,5080,D074,5070,D078 REP 029C 58F0,B284,47F0,B292,8000,080B
Implementing the OS/390 Spawner
Note: The OS/390 spawner requires that you configure the SAS System for communication with TCP/IP. For this reason, please ensure that you have reviewed and completed the steps in the section “System Configuration for Using SAS with TCP/IP” on page 54.
As an alternative method to signing on to a remote session by using a TSO sign-on script, the OS/390 spawner program initiates SAS/CONNECT sessions on OS/390 systems without requiring that username and password pairs be passed over the network in clear text mode.
If the local SAS session is running Release 6.09E or a subsequent release or Release 6.11 TS040 or a subsequent release, all data that flows from the local host to the spawner program during sign on is encrypted by default.
The OS/390 spawner program supports encrypted sign ons, by default, to an OS/390 system with or without scripts.
The OS/390 spawner runs as an OS/390 started task. It uses OS/390 UNIX System Services, and you must be running OS/390 Version 2 Release 6 or later. The spawner uses fork to start each user’s SAS/CONNECT session. Each session runs in a BPXAS address space, executing the TSO batch terminal monitor program to run the SAS CLIST. Note that since this is not a TSO LOGON session, the user may sign on several times concurrently.
Spawner Security
The Spawner module is SASTCPD, in the SAS load module library. The Spawner uses the SAS/C transient library. This library may be installed in LPA, LINKLIST, or allocated to the STEPLIB or to CTRANS DD in the Spawner Started Task JCL

126 Installation Instructions and System Manager's Guide for the SAS System under OS/390
Appendix K, Post-Installation Setup for SAS/CONNECT Software
The Spawner runs as a daemon process, so correct daemon security may need to be implemented based on the security software running on your machine (i.e., RACF, ACF2, or TOP Secret). IBM defines two levels of security for daemon processes, traditional UNIX security and OS/390 Unix System Services security. Under traditional security any daemon process that changes the user ID of a spawned or forked process must run with a UID of ‘0’. BPXROOT is usually the default userid defined with a UID of ‘0’. For OS/390 UNIX System Services security, these daemon processes do not require UID of ‘0’ but should be loaded from a program-controlled library. Depending on which level your shop is running you need to make the appropriate security changes.
The Spawner validates userids and passwords using the __passwd service. It then starts an address space for the SAS/CONNECT session, using the USS spawn service.
Below are some examples of security definitions for RACF, ACF2 and TOP Secret.
RACF Security
If the BPX.DAEMON profile of the RACF FACILITY class is active, the userid of the Spawner may require read access to this profile. To assign a userid to the started task, either add the started task to the RACF Started Procedures Table ICHRIN03, or define a profile for the started task in the RACF started class.
The BPX.DAEMON authority requires that all modules loaded into the Spawner address space come from RACF program controlled libraries. This applies to the Spawner and SAS/C libraries. If this is not set up correctly, the spawned SAS session will either incur a RACF violation in attempting to read the BPX.DAEMON profile, or will receive a JREnvDirty on the __passwd or spawn call. To diagnose a dirty address space, look at informational APAR II08176.
For RACF Program Control to be enabled, two things must be implemented. First, RACF facility class BPX.DEAMON must be defined. Next Program Control must be enabled, use the following command:
SETROPTS WHEN(PROGRAM) REFRESH
When Program Control is enabled, all modules loaded into the daemons address space must come from a RACF Program Controlled Library. The command to make a library program controlled is:
RDEFINE PROGRAM * UACC(READ) ADDMEM (‘SAS9.SAS.LOAD’//NOPADCHK + ‘SAS9.SASC.TRANSLIB’//NOPADCHK)
Use RALTER command instead of REDEFINE if * or ** already exists from a previous definition.
The next command must be done on the machine to refresh these changes. It does not matter if the RACF databases are shared or not.

Installation Instructions and System Manager's Guide for the SAS System under OS/390 127
Appendix K, Post-Installation Setup for SAS/CONNECT Software
SETROPTS WHEN(PROGRAM) REFRESH
For more information, please refer to your OS/390 Security Server (RACF) Command Language Reference.
ACF2 Security For ACF2 Security, you must first give daemon authority to the OMVS kernel, the command to do so is:
SET RESOURCE(FAC) COMPILE $KEY(BPX) TYPE(FAC) DAEMON UID(omvs) SERVICE(READ) ALLOW STORE
If the BPX rule already exists, add the rule line to it for the OMVS logonid. Use the following commands to define the BPXROOT logonid:
SET LID INSERT BPXROOT GROUP (OMVSGRP) SET PROFILE(USER) DIV(OMVS) INSERT BPXROOT UID(0) HOME(/) PROGRAM(/BIN/SH)
For more information, please refer to your ACF2 Security Manuals.
Top Secret For Top Secret, the Superuser ACID must be defined with a UID(0) and must not have BPX.DAEMON authorization. Create this ACID by issuing the following TSS commands:
TSS CREATE (BPXROOT) TYPE(USER) NAME(‘BPXROOT ACID’) PASSWORD(password,0) DEPARTMENT(OOS/390DEPT) FACILITY (APPC) TSS ADDTO (BPXROOT) GROUP(OOS/390GRP) DFLTPGRP (OOS/390GRP) UID(0)
For more information, please refer to your Top Secret Security Manuals.
To start the OS/390 spawner, enter the following operator console command: START SPAWNER
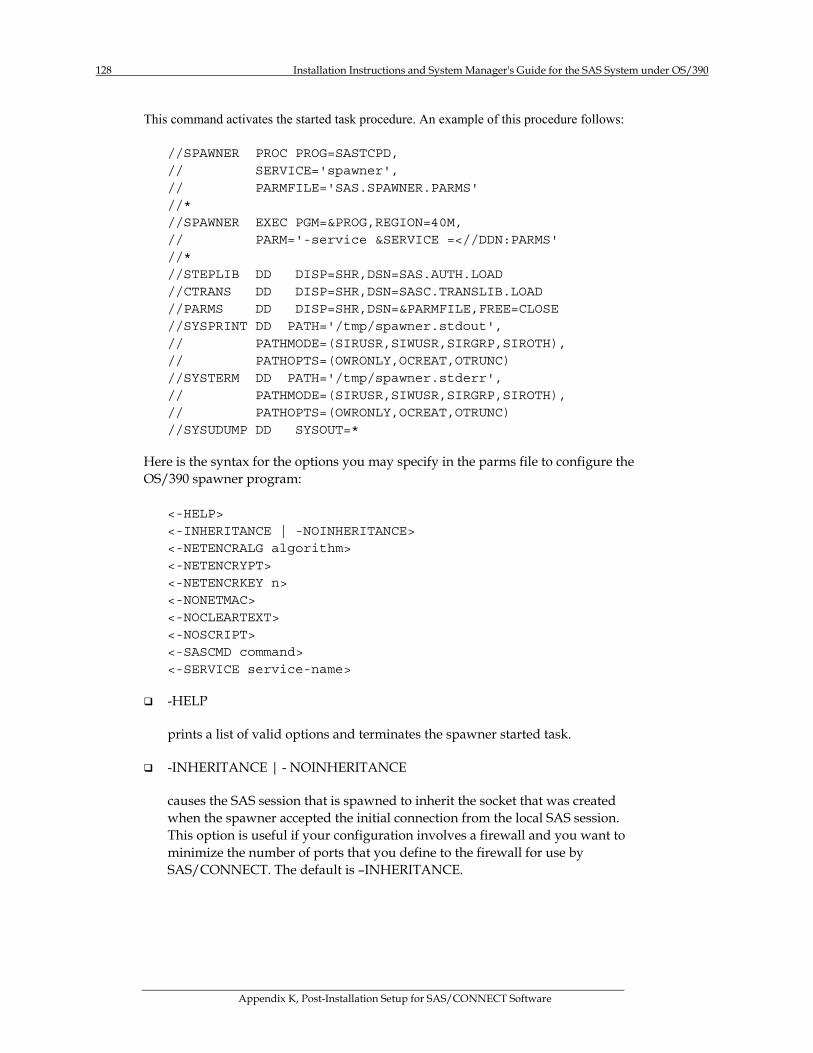
128 Installation Instructions and System Manager's Guide for the SAS System under OS/390
Appendix K, Post-Installation Setup for SAS/CONNECT Software
This command activates the started task procedure. An example of this procedure follows:
//SPAWNER PROC PROG=SASTCPD, // SERVICE='spawner', // PARMFILE='SAS.SPAWNER.PARMS' //* //SPAWNER EXEC PGM=&PROG,REGION=40M, // PARM='-service &SERVICE =<//DDN:PARMS' //* //STEPLIB DD DISP=SHR,DSN=SAS.AUTH.LOAD //CTRANS DD DISP=SHR,DSN=SASC.TRANSLIB.LOAD //PARMS DD DISP=SHR,DSN=&PARMFILE,FREE=CLOSE //SYSPRINT DD PATH='/tmp/spawner.stdout', // PATHMODE=(SIRUSR,SIWUSR,SIRGRP,SIROTH), // PATHOPTS=(OWRONLY,OCREAT,OTRUNC) //SYSTERM DD PATH='/tmp/spawner.stderr', // PATHMODE=(SIRUSR,SIWUSR,SIRGRP,SIROTH), // PATHOPTS=(OWRONLY,OCREAT,OTRUNC) //SYSUDUMP DD SYSOUT=*
Here is the syntax for the options you may specify in the parms file to configure the OS/390 spawner program:
<-HELP> <-INHERITANCE | -NOINHERITANCE> <-NETENCRALG algorithm> <-NETENCRYPT> <-NETENCRKEY n> <-NONETMAC> <-NOCLEARTEXT> <-NOSCRIPT> <-SASCMD command> <-SERVICE service-name>
-HELP
prints a list of valid options and terminates the spawner started task.
-INHERITANCE | - NOINHERITANCE
causes the SAS session that is spawned to inherit the socket that was created when the spawner accepted the initial connection from the local SAS session. This option is useful if your configuration involves a firewall and you want to minimize the number of ports that you define to the firewall for use by SAS/CONNECT. The default is –INHERITANCE.

Installation Instructions and System Manager's Guide for the SAS System under OS/390 129
Appendix K, Post-Installation Setup for SAS/CONNECT Software
If you start a spawner with the -INHERITANCE option, you then define the port that the spawner is listening on to the firewall and map it to the server machine’s port. This will enable any number of SAS/CONNECT clients to connect through this single port and SIGNON to a remote host on the inside of the firewall. Each client just opens a unique socket on the defined port. This eliminates the need to define an individual port for each client that may need to come in through the firewall. In this configuration you set your REMOTE= value to a two-level name where the first level is the name of the host running the firewall and the second level is the well-known service name of the port that you have enabled for connections.
-NETENCRALG algorithm
To specify more than one algorithm, simply repeat this option.
Set this option at the remote host and, optionally, at the local host to specify one or more encryption algorithms to use in a SAS/CONNECT session. However, the local host and the remote host must share an encryption algorithm in common. If you specify the option in the remote host session only, the local host attempts to select an algorithm that was specified at the remote host. If you also set the option at the local host and specify an algorithm that is not specified at the remote host, the local host’s attempt to connect to that remote host fails when the local host assigns a library.
The following are valid values for this option:
• RC2 • RC4 • DES • TripleDES • SASPROPRIETARY
See the SAS/CONNECT User’s Guide or the SAS/SHARE User’s Guide for more information about the NETENCRALG option.
-NETENCRYPT
Set this option at both the local host and the remote host. At the remote host, this option specifies that encryption is required for each connection from a local host SAS session. At the local host, this option specifies that the local host must connect only to a remote host that supports encryption.
The default for this option is that encryption is used if the NETENCRALG option is set and if both the local host and the remote host are capable of encryption. If encryption algorithms were specified but either the local host or the remote host is incapable of encryption, then encryption will not be performed.

130 Installation Instructions and System Manager's Guide for the SAS System under OS/390
Appendix K, Post-Installation Setup for SAS/CONNECT Software
Encryption may not be supported at the local host or the remote host for the following reasons:
• You are running a release of SAS (prior to Version 7) that does not support encryption.
• Your site has not purchased a SAS/SECURE license for a specific platform.
• You specified encryption algorithms in the local host and the remote host SAS sessions that are incompatible.
See the SAS/CONNECT User’s Guide or the SAS/SHARE User’s Guide for more information about the -NETENCRYPT option.
-NETENCRKEY n
Set this option in either the local host or the remote host SAS session. It specifies the key length to be used by the encryption algorithm.
Valid values for this option are as follows:
• 128 specifies 1024-bit RSA and 128-bit RC2 and RC4 key algorithms. • 40 specifies 512-bit RSA and 40-bit RC2 and RC4 key algorithms. Note that
specifying 40 is incompatible with DES and TRIPLEDES, and will not allow negotiation of these algorithms.
• 0 no value is set. This is the default.
If extra security is needed, set the -NETENCRKEY option to 128. If you prefer to save CPU cycles, then set the -NETENCRKEY option to 40.
By default, if you try to connect a host that is capable of only a 40-bit key length with a host that is capable of both a 40-bit and a 128-bit key length, then the connection is made using the lesser key length. If both hosts are capable of 128-bit key lengths, then a 128-bit key length is used.
See the SAS/CONNECT User’s Guide or the SAS/SHARE User’s Guide for more information about the -NETENCRKEY option.
-NONETMAC
Set this option to disable the use of Message Authentication Codes (MACs) on network communications. A Message Authentication Code is the equivalent of a checksum that is used to ensure that the original message has not been modified.
This option may be set at either the local host or the remote host. The default is -NETMAC.
See the SAS/CONNECT User’s Guide or the SAS/SHARE User’s Guide for more information about the -NETMAC option.

Installation Instructions and System Manager's Guide for the SAS System under OS/390 131
Appendix K, Post-Installation Setup for SAS/CONNECT Software
-NOCLEARTEXT
prevents a sign on from a local host that does not support username and password encryption. This option prevents local hosts in a SAS session that are running releases prior to 6.09E and 6.11 TS040 from signing on to the spawner program. The default is to accept both encrypted and clear-text userids and passwords. This allows local hosts in a SAS session that are running releases prior to 6.09E and 6.11 TS040 to sign on to the OS/390 spawner program.
-NOSCRIPT
prevents sign ons from local hosts that use scripts, and allows sign ons only from local hosts that do not use scripts.
For the TCP/IP access method, the spawner program requires a script file, or it will verify the supplied userid and the password. This option requires that the user set security in the local SAS session prior to sign on. For details about setting security (for example, by means of the USER= and PASSWORD= options in an appropriate statement), refer to “Setting Security for SAS/CONNECT and SAS/SHARE” in Communications Access Methods for SAS/CONNECT and SAS/SHARE Software, Version 8.
If you use the -NOSCRIPT option, you must also use the -SASCMD option.
-SASCMD command
specifies the SAS command that starts a SAS session when you sign on without a script. If the RLINK fileref is not defined in the local host SAS session, then the user is signing on without a script. In this case, the -SASCMD option must be specified.
The command is a TSO CLIST or REXX exec that invokes a SAS session. The command must be specified using the explicit form, using the EXEC TSO command with the fully qualified name of the CLIST or REXX exec library and member. This is because there is no SYSPROC or SYSEXEC allocated in the spawned child address space. Please see Example 2 below.
-SERVICE service-name
specifies the name of the service that the OS/390 spawner program uses to listen for incoming requests. This value is identical to the service value in the REMOTE= option that the user specifies at the local host prior to sign on. Because there is no default, you must specify this value. For details, refer to “Specifying the Remote Node Name” in Communications Access Methods for SAS/CONNECT and SAS/SHARE Software, Version 8.
The service name must be defined identically in the SERVICES file on both the local and remote hosts. For more information, please see “Configuring the

132 Installation Instructions and System Manager's Guide for the SAS System under OS/390
Appendix K, Post-Installation Setup for SAS/CONNECT Software
Services File” in Communications Access Methods for SAS/CONNECT and SAS/SHARE Software, Version 8.
Examples of Starting and Connecting to the OS/390 Spawner Program
The following examples illustrate how to start the spawner program and how to connect to it.
Example 1
The following OS/390 command starts the spawner program at the remote OS/390 host with the service-name spawner and disallows clear-text sign ons from local hosts that use a script.
START SPAWNER
It uses the following PARMS file:
-service spawner –nocleartext
At a local host, the following statements specify a script file named tcpmvs.scr that makes a connection to the spawner program on the system RMTHOST, which is listening on the port that is named spawner. The value for REMOTE= is the host name of the OS/390 node, or it can be a macro variable that contains that host name, where the spawner program is running.
options comamid=tcp; filename rlink '!sasroot\connect\saslink\tcpmvs.scr'; signon rmthost.spawner;
Note: Do not use the return key to break the line that specifies the filename; continue typing the statement on a single line.
The command is a TSO CLIST or REXX exec that invokes a SAS session. The command must be specified using the explicit form, using the EXEC TSO command with the fully qualified name of the CLIST or REXX exec library and member. This is because there is no SYSPROC or SYSEXEC allocated in the spawned child address space. See Example 2 below.

Installation Instructions and System Manager's Guide for the SAS System under OS/390 133
Appendix K, Post-Installation Setup for SAS/CONNECT Software
Example 2
The following OS/390 command starts the spawner program at the remote OS/390 host.
START SPAWNER
It uses the following PARMS file:
-service spawner –inheritance –noscript -netencralg rc2 -netencralg des -sascmd "EX '&prefix.CNTL (SPWNSAS8)' 'OPT(''DMR,NOTERMINAL,COMAMID=TCP'')"
Note: There is no closing single quote for the CLIST parameter string, because the spawner adds parameters to the end of the string. Replace 'PREFIX.CLIST' with the name of your installation’s CLIST library. SPWNSAS8 is an example CLIST that ships with the SAS System for OS/390. The SPWNSAS8 CLIST includes the following additional PROC statement parameters:
• INHERIT(0) • SASCLIENTPORT() • SASDAEMONPORT() • NETENCRALG() • NOSASUSER
At a local host, the TCP/IP access method is used to connect to the remote host named RMTHOST. This must be either the host name of the OS/390 node, or a macro variable that contains that host name, where the spawner program is running. The USER= option in the SIGNON statement prompts the user for a userid and password when connecting to RMTHOST, on which the OS/390 spawner program named spawner runs.
options comamid=tcp; signon rmthost.spawner user=_prompt_ ;
Ending the OS/390 Spawner Program
To stop the spawner, enter the following system command:
STOP SPAWNER

134 Installation Instructions and System Manager's Guide for the SAS System under OS/390
Appendix K, Post-Installation Setup for SAS/CONNECT Software

Page 135
Appendix L, Post-Installation Setup of Enterprise Miner Server Software
Enterprise Miner uses a client/server architecture that provides the following advantages:
• distributes data-intensive processing to the most appropriate machine • minimizes network traffic by processing the data on the server machine • minimizes data redundancy by maintaining one central data source • distributes server profiles to multiple clients • regulates access to data sources • toggles between remote and local processing
Enterprise Miner Server runs on OS/390, Microsoft Windows NT Server and selected Unix operating systems.
Enterprise Miner Client runs on Microsoft Windows platforms supported by Release 8.2 of the SAS System.
Installing Enterprise Miner Server software
If you licensed Enterprise Miner Solution software and have completed the installation instructions described earlier in this document, you have installed the server components of Enterprise Miner software (referred to as the Enterprise Miner server). Enterprise Miner Server software is invoked from the Enterprise Miner Client via SAS/CONNECT. For more information on running Enterprise Miner, refer to Getting Started with the Enterprise Miner Software, Release 4.1, and Enterprise Miner Software: Changes and Enhancements, Release 4.1.
Note: Enterprise Miner requires that you configure the SAS System for SAS/CONNECT. For this reason, please ensure that you have reviewed and completed the steps in the appendix “Post-Installation Setup for SAS/CONNECT Software” on page 115.
Configuring Enterprise Miner Server Software
Default Data Library Setup
Make sure that the server has a library to which Enterprise Miner Client Software users have read/write access. This requires a separate library for each user. If you need to create a library, do it now.
136 Installation Instructions and System Manager's Guide for the SAS System under OS/390
Appendix L, Post-Installation Setup of Enterprise Miner Server Software
A SAS Data Library requires the following DCB attributes:
• DSORG=PS • RECFM=FS • BLKSIZE=value* • LRECL=same value as BLKSIZE
* where value can be from 4096 to 27648 in increments of 512. The default is 6144.
The amount of space to allocate is dependent on the size of the data to be analyzed. Typically the amount of space required is 3-6 times the amount of the data file to be analyzed per project.
Information Needed to Configure Enterprise Miner Client Software
Provide the following information to users of Enterprise Miner Client Software so they can complete the steps outlined in the section “Configuring Enterprise Miner Client Software for Remote Projects”:
• machine name and IP address • how to invoke Release 8.2 of the SAS System with SAS/CONNECT • how to access the default data library

Page 137
Appendix M, SAS/GIS® Census Tract Maps
Unloading the SAS/GIS Census Tract Maps
To access the GIS Census Tract Maps you must first unload them from tape. To unload the maps, complete the following steps:
Step 1: Edit the CMAPSEL member of the CNTL data set to select the census maps to unload. Follow the instructions in the CMAPSEL member to select all states or individual states.
Step 2: Edit and then submit the CMAPINST job in the CNTL data set. This job creates a utility job named GISMAPUL to unload the maps specified in the CMAPSEL member.
Note: Please be aware of any special instructions for modifying SASEDITP values that affect tape and disk device allocations.
Step 3: Submit the GISMAPUL job to unload selected maps.
Customizing the SAS CLIST and Cataloged Procedure
If GIS Census Tract Maps will be used extensively at your site, you may want to modify the SAS CLIST and cataloged procedure to allocate the necessary file.
To enable your users to access the GIS Census Tract Maps data sets when operating under TSO, modify your installed SAS CLIST to include the following ALLOCATE statement for the GISMAPS library. Include it after the allocation of the SAMPSIO library.
ALLOC F(GISMAPS) DA(’&prefix.GIS.CTRKMAPS’) SHR REU
To access the GIS Census Tract Maps data sets when running in batch, modify your installed SAS cataloged procedure to include the following DD statements for the GISMAPS library.
//GISMAPS DD DSN=&prefix.GIS.CTRKMAPS,DISP=SHR

138 Installation Instructions and System Manager's Guide for the SAS System under OS/390
Appendix M, SAS/GIS Census Tract Maps

Page 139
Appendix N, Implementing SAS/GRAPH® Software
Understanding the Organization of this Appendix
This appendix is divided into four parts. Each part describes a set of the post-installation tasks that may be necessary to use SAS/GRAPH software at your site. The list is an overview of each part. Use this overview to help locate the information you require.
Part 1, Accessing the SAS/GRAPH Maps Data Sets
describes how to allocate the MAPS library in your installed CLIST or cataloged procedure. You must perform this task if users at your site need to access maps.
Part 2, Customizing Devices
provides the information necessary to customize device drivers for your graphic devices.
Part 3, Setting up and Modifying Device Catalogs
describes how to create or modify device catalog entries in order to customize device driver output to the needs of your site.
Part 4, Device Help Screens
describes how to use SAS/GRAPH device drivers and to set up system parameters that are required to use certain drivers.
Part 5, Client-Side Components
describes the new SAS/GRAPH Control for ActiveX and Java applets available with SAS/GRAPH Software.
Part 1, Accessing the SAS/GRAPH Maps Data Sets
All installed SAS/GRAPH maps data sets are merged into the common MAPS library by the SASIxxxx jobs. To enable your users to access the maps data sets when operating under TSO, modify your installed SAS CLIST to include the following allocate statement for the MAPS library. Include it after the allocation of the SAMPSIO library.
ALLOC F(MAPS) DA('&prefix.MAPS') SHR REU

140 Installation Instructions and System Manager's Guide for the SAS System under OS/390
Appendix N, Implementing SAS/GRAPH Software
To access the maps data sets when running under batch, modify your installed SAS cataloged procedure to include the following DD statement for the MAPS library.
//MAPS DD DSN=&prefix.MAPS,DISP=SHR
Part 2, Customizing Devices
Setting up a SAS/GRAPH Translate Table
A translate table is only needed if you are using ASCII terminals or attached plotters interactively on ASCII lines. You do not have to worry about translate tables if all of your asynchronous devices are used with 3270-type or 3287-type protocol converters.
If you encounter problems when using SAS/GRAPH software with ASCII terminals or attached plotters interactively on ASCII lines, contact SAS Technical Support.
Using SAS/GRAPH Software with ASCII Terminals and ASCII Terminal Emulators
If you encounter problems when using SAS/GRAPH software with ASCII terminals and PCs running ASCII terminal emulation software, contact SAS Technical Support.
Using SAS/GRAPH Software with ASCII Printers
When using SAS/GRAPH software with ASCII printers, the typical GOPTIONS statement that you need to specify in your SAS/GRAPH program is as follows:
GOPTIONS DEVICE = driver-name GPROTOCOL = protocol-module GSFNAME = GSASFILE GSFMODE = REPLACE GSFLEN = 80;
These GOPTIONS tell the device driver to direct the graphics output to the fileref (or DDname) of GSASFILE. To use a FILENAME statement to assign the fileref of GSASFILE to a permanent data set, specify the following:
FILENAME GSASFILE ‘your-host-file’ LRECL=132 RECFM=VB;
To use a FILENAME statement to assign the fileref of GSASFILE to a SYSOUT class, specify the following:
FILENAME GSASFILE SYSOUT=sysout-class DEST=printer-dest;

Installation Instructions and System Manager's Guide for the SAS System under OS/390 141
Appendix N, Implementing SAS/GRAPH Software
The following are valid values for the ‘protocol-module’ value shown above: SASGPASC formats the graphics data stream as straight ASCII. SASGPSTD formats the graphics data stream as straight EBCDIC. SASGPAGL use with an AGILE protocol converter. SASGPISI use with an ISI 87 converter (as well as some AGILE converters).
SASGPLCL Use with converters from Andrew Corporation (as well as older
converters from KMW and Local Data). SASGPAXI Use with converters from AXIS Corporation. SASGPVAT Use with converters from Avatar. SASGPIDX Use with converters from IDEX Corporation. SASGPNET Use with converters from NetCommander, I-Data, and several others. SASGPDCA Use with IRMAprint, IRMAprint2, TEK 4512, and QMS AFPlink
converters. SASGPCAB Use with converters from Cablenet. SASGPCHK Use with a Cherokee protocol converter. SASGPIOC Use with converters from I/O Corporation.
For more information about using SAS/GRAPH software with ASCII printers, consult the on-line help for SAS/GRAPH device drivers. If you encounter problems using SAS/GRAPH software with ASCII printers, contact SAS Technical Support.
Installing the Linkable Driver
The Linkable device driver is a special SAS/GRAPH device driver that makes calls to vendor-supplied “CalComp compatible” plotting routines. Before you can use the Linkable driver, parts of it must be compiled and link-edited with your plotting routines.
Devices that typically require the use of the Linkable driver include Xerox 9700, 9790, and 8700 printers. If your site does not have a device that uses vendor-supplied subroutines, you do not have to worry about building a Linkable driver. If you do have devices that use vendor-supplied subroutines, contact SAS Technical Support for more information.
Using SAS/GRAPH Software with IBM 3270-Type Terminals and 3270 Emulators
If you are using a display device that supports mainframe graphics and you are running the SAS System in the windowing environment, output is automatically displayed on your screen when you run a SAS/GRAPH procedure and it is not necessary to specify a SAS/GRAPH device driver. Note that you must be running your SAS session interactively under TSO to display SAS/GRAPH output on your screen.
If you encounter problems displaying SAS/GRAPH output on the screen of your 3270 display device, the problem is usually that your 3270 display device is not properly configured to support mainframe graphics. To determine the graphics capability of your 3270 display device, invoke the windowing environment and issue

142 Installation Instructions and System Manager's Guide for the SAS System under OS/390
Appendix N, Implementing SAS/GRAPH Software
the TERMSTAT command from any windowing environment command line. The TERMSTAT command writes device configuration information to the log window. In the SAS log, check that the following two lines appear under the DEVICE FEATURES section:
• Extended Data Stream • Vector Graphics
If the two lines above do not appear under the DEVICE FEATURES section of the TERMSTAT information, check the following:
If you have a real IBM graphics terminal, check to be sure that it supports mainframe graphics.
If you have a PC running 3270 emulation software, make sure that your 3270 emulation software supports host graphics and also that your 3270 host session has been configured to support host graphics.
Make sure that your 3270 display device is defined to VTAM as a device which supports extended data streams.
Make sure that the control unit that your 3270 display device is attached to supports (or is configured to support) 3270 graphic data streams.
For more information, consult the on-line help for SAS/GRAPH device drivers. If you encounter problems when using SAS/GRAPH with 3270 display devices, contact SAS Technical Support.
Using SAS/GRAPH Software with IBM 3287, 3268, and 4224 Printers
SAS/GRAPH software supports IBM graphics printers using either native (non-GDDM) device drivers or GDDM device drivers. For detailed information about using SAS/GRAPH software with IBM printers, consult the on-line help for SAS/GRAPH device drivers. If you encounter problems using SAS/GRAPH software with IBM graphics printers, contact SAS Technical Support.
Using SAS/GRAPH Software with GDDM
SAS provides a set of drivers that interface with IBM’s GDDM base product and can be used to direct output to any device supported by GDDM. The set of GDDM drivers comes standard with SAS/GRAPH software. You do not need to do anything extra to install the GDDM device drivers. Some of the GDDM device drivers are provided as an alternative to the SAS/GRAPH device drivers. For example, both the GDDMPCG and IBM3179 drivers produce graphics on an IBM 3179 Model G graphics terminal. The advantages of one over the other vary and depend on a particular site’s requirements. On the other hand, some graphics devices require the use of a GDDM driver. These devices include IEEE-attached plotters (IBM 7372, IBM 6180, etc.) and IBM 3800-type laser printers (IBM 3800, 3812, 3820, etc.).

Installation Instructions and System Manager's Guide for the SAS System under OS/390 143
Appendix N, Implementing SAS/GRAPH Software
To use any of the GDDM drivers, the GDDM base product (IBM Program Number 5748-XXH) must be installed on your system. The GDDM load library is commonly installed in a system link list library so that the SAS/GRAPH GDDM drivers can load the module ADMASPT. ADMASPT is GDDM’s System Programmer Interface routine. If the GDDM load library is not installed in a system link list library, concatenate it to the STEPLIB DD statement (if batch) or use the LOAD parameter in the SAS CLIST (if running interactively under TSO).
For more information about using SAS/GRAPH software with GDDM, consult the on-line help for SAS/GRAPH device drivers. If you encounter problems using SAS/GRAPH software with GDDM, contact SAS Technical Support.
Part 3, Setting Up and Modifying Device Catalogs
Note: The tasks described in this section are optional.
After installing SAS/GRAPH software, you may need to create or modify device catalog entries in order to customize device driver output to your site’s needs. This section gives a brief explanation of device catalogs, and how to handle situations where catalog entries may need to be modified. For complete details on managing device catalogs, refer to “The GDEVICE Procedure,” in the on-line help screens for SAS/Graph Software.
How Device Catalogs Are Used
In Release 8.2 SAS/GRAPH software, when you specify the name of a graphics device driver with the DEVICE= or TARGET= options, or when prompted, the name you specify corresponds to an entry in a device catalog. Device catalog entries contain default characteristics used by the driver. For example, the parameters can determine details such as graph size, picture orientation, default colors, and whether to send the graphics output directly to a device or store it in a file. A device catalog entry can also be set up to control the attributes of a graphics stream file or to execute the necessary host commands to send graphics output directly to the device. This feature enables you to develop applications that do not require the end user to specify special GOPTIONS or issue host commands to produce hardcopy output. You can change the characteristics used by a driver either by modifying its entry in the device catalog, or by specifying GOPTIONS that override settings in the catalog.
For example, if you specify DEVICE=HP7550, the SAS/GRAPH procedure attempts to find an entry named HP7550 in available device catalogs. The parameters found in the entry (such as the default graph size, graph orientation, or where output is sent) are used in generating the graph. If you want to change the way the driver produces output, you can use the GDEVICE procedure to modify parameters in the catalog entry, or you can override them with a GOPTIONS statement. In general, if you want to change defaults for a single session or job, you can use a GOPTIONS statement. If you want to permanently change the default parameters used by a driver, you can create a new device entry or modify an existing one.

144 Installation Instructions and System Manager's Guide for the SAS System under OS/390
Appendix N, Implementing SAS/GRAPH Software
A device catalog supplied by SAS, SASHELP.DEVICES, is installed and made available as part of the overall SAS/GRAPH installation process. This catalog contains over 300 entries, covering each graphics device and model that SAS/GRAPH software supports. Individual users or groups can also create their own device catalogs. These are given the names GDEVICE0.DEVICES, GDEVICE1.DEVICES and so on, through GDEVICE9.DEVICES. When a driver name is specified in a SAS program, the SAS System looks for the corresponding entry in GDEVICE0.DEVICES, GDEVICE1.DEVICES, etc. If the entry is not found in any of the user catalogs (or the catalogs do not exist), the supplied catalog, SASHELP.DEVICES, is searched.
How and When to Modify Catalog Entries
If you need to make changes to a device entry, how you do so depends on whether the changes affect an individual user or most or all users at a site. If the change affects only one user, that user should create his or her own device catalog (GDEVICE0.DEVICES), copy the device entry from SASHELP.DEVICES, and make the changes to the entry in GDEVICE0.DEVICES. Note that GDEVICE0.DEVICES, being a “personal” catalog, is usually a different catalog for each user. If the modification affects a large number of users, the SAS Installation Representative or SAS Software Representative can make modifications to an entry in SASHELP.DEVICES.
The following guidelines should be used when creating or modifying device entries:
Only the SAS Installation Representative or SAS Software Representative should add or modify entries in SASHELP.DEVICES. End users should not have update access to SASHELP.DEVICES. If individual users need to make modifications, they should create their own GDEVICE0.DEVICES catalog.
If a catalog entry needs to be modified, create a new entry (with a different name) and modify the new entry. By renaming modified entries, users are ensured that the original entries supplied in the SASHELP.DEVICES catalog use default settings.
Any options specified in a GOPTIONS statement override equivalent parameters in device catalogs. If a parameter needs to be changed only for a single session, it is probably easier to use a GOPTIONS statement than to create a new device entry.
Examples
The following examples illustrate how to use device catalog parameters to create graphics stream files or to spool output directly to a hardcopy device. The examples first illustrate GOPTIONS and FILENAME or host statements that can be used to produce output, and then show how equivalent parameters can be specified in device entries, eliminating the need for the statements in the end users’ programs. For complete details on managing device catalogs, refer to Chapter 25, “The GDEVICE Procedure,” in the SAS/GRAPH Software: Reference, Version 8.
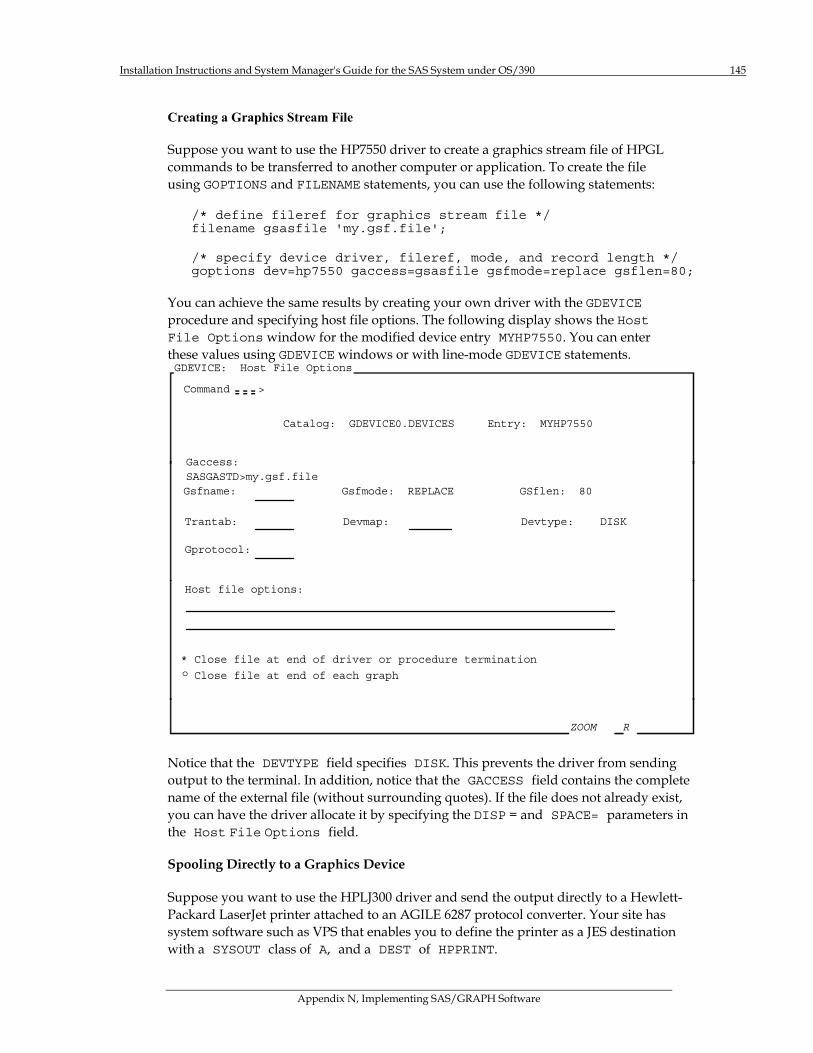
Installation Instructions and System Manager's Guide for the SAS System under OS/390 145
Appendix N, Implementing SAS/GRAPH Software
Creating a Graphics Stream File
Suppose you want to use the HP7550 driver to create a graphics stream file of HPGL commands to be transferred to another computer or application. To create the file using GOPTIONS and FILENAME statements, you can use the following statements:
/* define fileref for graphics stream file */ filename gsasfile 'my.gsf.file';
/* specify device driver, fileref, mode, and record length */ goptions dev=hp7550 gaccess=gsasfile gsfmode=replace gsflen=80;
You can achieve the same results by creating your own driver with the GDEVICE procedure and specifying host file options. The following display shows the Host File Options window for the modified device entry MYHP7550. You can enter these values using GDEVICE windows or with line-mode GDEVICE statements. GDEVICE: Host File Options
Command >
Catalog: GDEVICE0.DEVICES Entry: MYHP7550
Gaccess:SASGASTD>my.gsf.fileGsfname: Gsfmode: REPLACE GSflen: 80
Trantab: Devmap: Devtype: DISK
Gprotocol:
Host file options:
* Close file at end of driver or procedure termination
ZOOM R
Close file at end of each grapho
Notice that the DEVTYPE field specifies DISK. This prevents the driver from sending output to the terminal. In addition, notice that the GACCESS field contains the complete name of the external file (without surrounding quotes). If the file does not already exist, you can have the driver allocate it by specifying the DISP = and SPACE= parameters in the Host File Options field.
Spooling Directly to a Graphics Device
Suppose you want to use the HPLJ300 driver and send the output directly to a Hewlett-Packard LaserJet printer attached to an AGILE 6287 protocol converter. Your site has system software such as VPS that enables you to define the printer as a JES destination with a SYSOUT class of A, and a DEST of HPPRINT.

146 Installation Instructions and System Manager's Guide for the SAS System under OS/390
Appendix N, Implementing SAS/GRAPH Software
The following GOPTIONS and FILENAME statements are used to send graphics output to the LaserJet printer.
/* define fileref and JES parameters for graphics stream file */ filename gsasfile sysout=a dest=hpprint;
/* specify device driver, fileref for GSF, */ /* protocol converter, and record length */ goptions dev=hplj300 gaccess=gsasfile gprotocol=sasgpagl gsflen=128;
You can achieve the same results by creating your own driver with the GDEVICE procedure and specifying host file options. The following display shows the Host File Options window for the modified device entry MYHP300. You can enter these values using GDEVICE windows or with line-mode GDEVICE statements. GDEVICE: Host File Options
Command >
Catalog: GDEVICE0.DEVICES Entry: MYHP300
Gaccess:
Gsfname: Gsfmode: REPLACE GSflen: 0
Trantab: Devmap: Devtype: PRINTER
Gprotocol: SASGPAGL
Host file options: SYSOUT=A DEST=HPPRINT
* Close file at end of driver or procedure termination
ZOOM R
Close file at end of each grapho
When the preceding parameters are specified, SAS/GRAPH software dynamically allocates a SYSOUT file with a SYSOUT class of A and a destination of HPPRINT, and directs the driver output to that file.
Note: Because a temporary spool file is dynamically allocated, it is not necessary to specify GACCESS=GSASFILE.
Part 4, Device HELP Screens
The device HELP screens for Release 8.2 contain information on setting up system parameters required to use certain drivers and how to use SAS/Graph device drivers. If you are using the SAS System interactively on a full-screen terminal, you

Installation Instructions and System Manager's Guide for the SAS System under OS/390 147
Appendix N, Implementing SAS/GRAPH Software
can also obtain details on using graphics devices by first making sure that you have enabled PMENUs, and then selecting Help from the pulldown menu. Then, select SAS System Help, then Help on SAS Software Products, and then SAS/GRAPH. On the “About SAS/GRAPH” screen, select Using SAS/GRAPH Software and then Using Graphics Devices.
Part 5, Client-Side Components
Using SAS/GRAPH Software, Release 8.2, you can produce interactive charts and plots for Web publishing. The GCHART, GCONTOUR, GMAP, GPLOT, and G3D procedures can produce scripted ActiveX Controls or Java Applets in HTML pages using the SAS/GRAPH Java or ActiveX drivers and the Output Delivery System (ODS). The DS2GRAF, DS2CSF, and META2HTM macros can also be used to generate HTML output with embedded ActiveX Controls or Java Applets. The following controls and applets are available:
ContourApplet (ctrapp.jar)
A scriptable Java applet for visualization of Contour and Surface plots in a Web browser. The applet supports outline and filled modes and interactive exploration of the data. ContourApplet is supported by the SAS/GRAPH Java driver with ODS.
GraphApplet (graphapp.jar)
A scriptable Java applet for visualization of 2D and 3D charts in a Web browser. The applet supports Bar charts, Pie charts and Scatter Plots, and interactive exploration of the data. GraphApplet is supported by the SAS/GRAPH Java driver with ODS, and also by the DS2GRAF macro.
MapApplet (mapapp.jar and related map data jar files)
The Java Map Applet is a scriptable Java graphics control that allows the user to embed interactive spatial data in a Java 1.1 compliant Web page. The Web page is created with PROC GMAP and uses the map jar files that correspond to the SAS Map Data Sets. MapApplet is supported by the SAS/GRAPH Java driver with ODS.
MetaViewApplet (metafile.zip)
A Java applet for displaying SAS/GRAPH metagraphics data. MetaViewApplet is supported by the SAS/GRAPH metagraphics driver and the META2HTM macro.
RangeViewApplet (rvapplet.jar)
A Java applet for displaying a Critical Success Factor (CSF). A CSF is a graphic that visually represents the position of some value in a range of data. RangeViewApplet is supported by the DS2CSF macro.

148 Installation Instructions and System Manager's Guide for the SAS System under OS/390
Appendix N, Implementing SAS/GRAPH Software
SAS/GRAPH Control for ActiveX
This ActiveX control enables you to embed interactive graphs in Web pages and OLE documents (in Microsoft Office products), as well as in applications written in Visual Basic, C++, HTML, and JavaScript. When the graph is displayed, you can point-and-click to rotate, change, or further investigate the graph.
In Release 8.2 of SAS software, the SAS/GRAPH Control for ActiveX supports the following graph types: • Area plots • Bar charts • Box-and-Whisker plots • Bubble plots • Contour plots • High-Low plots • Line plots • Maps • Pie charts • Regression plots • Scatter plots • Standard Deviation plots • Surface plots
Supported by the SAS/GRAPH ActiveX driver with ODS, and also by the DS2GRAF macro
Installing the Client-Side Components
Documentation for the SAS/GRAPH Client Components can be found on the SAS Web site at http://www.sas.com/rnd/webgraphs. Documentation for the HTML Formatting Tools (including the DS2GRAF, DS2CSF, and META2HTM macros) can be found at http://www.sas.com/rnd/web/intrnet/format.
If you wish to publish SAS/GRAPH output on a Web server or create SAS/IntrNet applications using SAS/GRAPH, you may need to install these SAS/GRAPH clients on your Web server. The clients can be installed from the SAS Client-Side Components CD included with your SAS Software distribution. See the installation instructions on the SAS Client-Side Components CD for more information on installing SAS/GRAPH clients on a Web server.

Page 149
Appendix O, Post-Installation Setup for SAS Integration Technologies Software
SAS Integration Technologies includes client components that are used outside of your SAS installation. These components must be installed in the client environment before they can be used.
Note: SAS Integration Technologies Software requires that you configure the SAS System for communication with TCP/IP. For this reason, please ensure that you have reviewed and completed the steps in the section “System Configuration for Using SAS with TCP/IP” on page 54.
SAS Integration Technologies client components are delivered with SAS Integration Technologies Software and can be installed from the SAS Client-Side Components CD included with your SAS Software distribution. For updated components and documentation, please visit the following Web site:
http://www.sas.com/rnd/itech/updates
The following component packages are available:
Integration Technologies Documentation
The documentation package provides complete documentation for SAS Integration Technologies. You can install the documentation on a Web server for common access, or you can install it for each developer and end-user. The Integration Technologies documentation will be updated and provided on the SAS Web site.
Java Client Development and Runtime Component
Install this package for each developer who will be creating applications that run in a Java environment and communicate with a SAS session.
Windows Client Development and Runtime Component
Install this package for each developer who will be creating applications that run in a Windows environment and communicate with a SAS session. You must also install this package on each client machine that will access the COM interfaces that are provided by the SAS server.

150 Installation Instructions and System Manager's Guide for the SAS System under OS/390
Appendix O, Post-Installation Setup for SAS Integration Technologies Software
Integration Technologies Administrator
Install this Java application where you plan to manage your Object Servers and Spawners and your publishing framework. To use this application, you must also have an LDAP server installed.
SAS Package Reader
Install this application for every user who will access an SPK file that was created using the publishing framework.
Subscription Manager
Install this applet on a Web server for all users to access. Note that subscriptions can also be managed using the Administrator application.

Page 151
Appendix P, Installing SAS/IntrNet® Software
Introduction
If SAS/IntrNet software is licensed and the installation instructions described earlier in this document have been completed, then the SAS server components of SAS/IntrNet software (referred to as the SAS/IntrNet Application server) have been installed. The media included with your SAS software package (SAS Client-Side Component) also contains the complete documentation for SAS/IntrNet software in addition to this document.
Note: SAS/IntrNet requires that the SAS System be configured for communication with TCP/IP. Please ensure that the steps in the section “System Configuration for Using SAS with TCP/IP” on page 54 have been reviewed and completed. A Web Browser must be installed independent of SAS/IntrNet.
Components of SAS/IntrNet Software
The SAS Client-Side Component CD contains SAS/IntrNet CGI-based components and samples to be installed on a Web server. The following components are included:
• Application Dispatcher • Application Broker (CGI program) • Application Server (SAS server) • Load Manager • Samples • Xplore Sample Application • MDDB Report Viewer • htmSQL • Java Graphics components
Steps for Installing SAS/IntrNet
Here are the steps for installing SAS/IntrNet. The remainder of this appendix describes these procedures in detail.
1. Install the SAS System (which includes SAS/IntrNet)
2. TCP/IP Customization
3. Install the CGI Components (optional if Web Server & Application Broker are not installed on OS/390)
4. Configure the Application Dispatcher
A. Setup Application Server

152 Installation Instructions and System Manager's Guide for the SAS System under OS/390
Appendix P, Installing SAS/IntrNet Software
B. Setup Application Broker (required, but does not have to be on OS/390)
5. Starting, Stopping, and Removing a Service
6. Testing and Debugging each component of the Application Dispatcher
Note: Both the SAS/IntrNet server and the Web server components require additional configuration before you can use them in your Web-enabled environment. The Application Broker must reside on the same operating system as the Web Server. Configuration information is also provided as part of the documentation contained on the SAS Client-Side Components CD.
1. Install the SAS System (which includes SAS/IntrNet)
Follow the instructions for installing the SAS System (which includes SAS/IntrNet) or the instructions for installing new products in the section “Installing the SAS System” starting on page 9.
2. TCP/IP Customization
Please refer to the section “System Configuration for Using SAS with TCP/IP,” starting on page 54.
3. Installing CGI Components
Note: This step is optional if the Application Broker is not installed on the OS/390.
This version of SAS/IntrNet software for OS/390 contains the Application Broker that runs under an OS/390 Web server on UNIX System Services. UNIX System Services is a UNIX-like operating environment that runs on top of the OS/390 operating system, enabling your mainframe to (among other things) run a Web server.
SAS has developed a version of the Application Broker CGI program that will run in this environment in conjunction with a Web server. Because development work was done using the IBM Internet Connection Server (ICSS) Release 2.1 under OS/390 Version 2, with the PTF for APAR PQ07788 applied, this PTF is required for correct operation of the Application Broker under Release 2.1 of the ICSS.
If you have Release 2.2 of ICSS, you do not need to apply this PTF. The data set (&prefix.WEB.TAR) was unloaded during the install process. This data set contains a tar archive. You will need to copy the member to the hierarchical file system so it can be unpacked with UNIX System Services.
To transfer the archive files to the hierarchical file system, use the OPUT command from a TSO prompt as shown in the following example:
OPUT '&prefix.WEB.TAR(WEBSRV)' '/u/local/tmp/websrv.tar.z' BINARY

Installation Instructions and System Manager's Guide for the SAS System under OS/390 153
Appendix P, Installing SAS/IntrNet Software
Note: A different destination path may be chosen in place of the user defined directory /u/local/tmp/, but the directory path that is chosen should already exist.
Complete the following steps from the UNIX System Services environment:
1. Use the following command to extract the files and directories. It should be issued from the target installation directory:
tar -xvof /u/local/tmp/websrv.tar.z <enter filename used in the OPUT command>
2. The CGI Component files will now be located in the directory /websrv/sasweb/IntrNet8/ under your target installation directory.
Note: The file /u/local/tmp/websrv.tar.z may be deleted after Step 1. A link/directive to /websrc/sasweb/cgi-bin/ may be needed, please contact your Web Administrator.
4. Configuring the Application Dispatcher
Component Overview of the Application Dispatcher
The Application Dispatcher is the gateway between the Web browser and the SAS System. Here are some descriptions of its components:
The input component can be any of the following:
• an HTML form • a Hyperlink • an image • a Java applet
The Application Broker is a CGI program residing on the Web Server. The Application Broker identifies the Application Server (-service) using the broker configuration file, and passes the program component to the Application Server.
The Application Server is a SAS session. It is created using the SAS/IntrNet Configuration Utility (inetcfg). The Application Server executes the program component (_program).
The program component is a SAS program (_program) that is executed by the Application Server. The program component must reside in a program library defined using the APPSRV procedure using the PROGLIBS statement. The program component can only access data that is accessible to the APPSRV procedure using the DATALIBS statement.

154 Installation Instructions and System Manager's Guide for the SAS System under OS/390
Appendix P, Installing SAS/IntrNet Software
Setup of the Application Server
Note: This section mentions two different types of services; a TCP/IP service and an Application Dispatcher service. Please note when each of these services are referenced.
There are three types of Application Dispatcher Services:
1. Socket: runs continuously waiting to process a request
2. Pool: provides a pool of servers that are started as needed (requires Load Manager and OS/390 Spawner be installed)
3. Load Manager: enhances distribution of the Application Dispatcher resources
Creating an Application Dispatcher Service on OS/390
A TCP/IP service/port number must be reserved for your Application Dispatcher service before the Application Dispatcher service is created. Consult your System Administrator or check your TCP/IP services definition file (ETC.SERVICES) to find an available port number.
A socket service with the name of default must be created to run any of the sample programs supplied with SAS/IntrNet.
The SAS/IntrNet Service Configuration Utility provided for OS/390 is a batch job. It is installed in the &prefix.CNTL(INETCFG) data set that was created during the first step of your SAS software installation. To use the utility, follow these two steps, which are described in more detail below:
1. Edit the parameter file, member INETEDTP in the &prefix.CNTL data set, as described below. The INETEDTP member contains the parameters necessary for creating a service. Editing instructions are provided in the comments in INETEDTP, and the default values should be changed to the values required for the service being created.
2. Edit and submit the INETCFG job, as described on page 156. You will run this job for each service you create.
Editing INETEDTP and INETCFG
INETEDTP
1. Specify the name of the Application Dispatcher service that you are creating. The service name can be a maximum of eight characters. Locate the line containing ISVC= and replace the default value with the name of the Application Dispatcher service you are creating .

Installation Instructions and System Manager's Guide for the SAS System under OS/390 155
Appendix P, Installing SAS/IntrNet Software
2. Specify the type of service being defined. Uncomment the appropriate line containing ISVCTYP=. If a socket service is being created, uncomment %SOCKETTYP. If a pool service is being created, uncomment %POOLTYP. Make sure the line containing the other service type is commented out by placing an asterisk in the first column.
3. Port numbers or names are not used for pool services. For socket services, specify the TCP/IP port number or network service name for each server in the service. At least one port must be specified, but up to 10 ports can be specified. Change the value 5001 to the correct port number or network service name for the first server in your service. If more than one server is wanted for this service, remove *NO* from the desired number of IS-PORT entries and change the value to the appropriate value for each server in the service.
4. If a pool service is being created, the Application Load Manager and the OS/390 Spawner must be installed. The Load Manager may also be wanted, if a socket service is created with more than one server. For more information, see “Using the Load Manager” on the SAS Client-Side Components CD.
To use the Load Manager on your OS/390 system, the SAS/IntrNet CGI Tools for Web Server package must be installed (CGI Components). Verify the settings for the Load Manager in INETEDTP:
A. Choose a TCP port number or network service name for the Load Manager. Supply this value on the line containing I$LDMPORT=.
B. Supply the entire UNIX System Services file path to the Load Manager executable on the line containing I$LDMPROG=. The Load Manager is named loadmgr and is installed in the directory corresponding to the URL http://your_web_server/websrv/sasweb/IntrNet8/tools/.
C. Determine where the Load Manager should write its log file. Supply the entire UNIX System Services file path for the log file on the line containing I$LDMSOUT.
Please refer to the appendix “Post-Installation Setup for SAS/CONNECT Software” on page 115 for installation instructions for the SAS OS/390 Spawner.
5. Review and update any other remaining parameters if necessary.
ADMINPW=YOURPASSWORD Uncomment and supply password to enable administrator password for this service. Do not leave a blank between ADMINPW= and the supplied password.
I$LDMPROG=/usr/bin/loadmgr Verify full HFS path to Load Manager executable (50-character maximum)

156 Installation Instructions and System Manager's Guide for the SAS System under OS/390
Appendix P, Installing SAS/IntrNet Software
I$LDMSOUT=/tmp/loadmgr.stdout Verify STDOUT log file name (45-character maximum)
INET-LDMPMSTR1="SIRUSR,SIWUSR" Value not normally changed; change only by instruction from SAS Technical Support.
INET-LDMPMSTR2="SIRGRP,SIWGRP,SIROTH,SIWOTH" Value not normally changed; change only by instruction from SAS Technical Support.
I$LDMPOPTS="OWRONLY,OCREAT,OTRUNC" Value not normally changed; change only by instruction from SAS Technical Support.
I$SAMPLE=&prefix.SAMPLE Normal Location of SAS/IntrNet sample program PDS.
I$SAMPSIO=&prefix.SAMPSIO Normal Location of SAS/IntrNet sample SAS Library.
INETENTRY=SASHOST Set to installation default entry.
INETWORK=500,200 Primary and secondary allocations for the PROC WORK Data set.
INETCFG
1. Edit INETCFG to verify the job header information and the name of the service you are defining. The service name in the JCL should match the value you supplied for ISVC in INETEDTP.
2. Submit the INETCFG JCL job for processing.
The INETCFG job will submit another job (INETCFGA). Verify that both jobs complete with a return code of 0. If the jobs complete successfully, the data sets and members necessary for running the SAS/IntrNet Application Dispatcher service will exist.
If the INETCFG job fails, examine the messages and sysprint output for error messages. If the following message is received:
ERROR: THIS REPLACEMENT CAUSES RESULT TO EXCEED OUTPUT LRECL
The supplied pathname in one of the INETEDTP parameters may be too long. Try shortening this pathname and rerun INETCFG.
Note: Before running INETCFG again, any data sets created by the previous failure of INETCFG must be deleted. To find these data sets, look at the
Installation Instructions and System Manager's Guide for the SAS System under OS/390 157
Appendix P, Installing SAS/IntrNet Software
&prefix determined by the original SAS installation. For example, if the SAS software was installed with the &prefix name SYS.SAS and the failed INETCFG was trying to create the default service, then delete all data sets beginning with the name &prefix SYS.SAS.WEB.DEFAULT before running INETCFG again.
3. The configuration utility creates a server root in a partitioned data set (PDS) named &prefix.WEB.servicename, where &prefix is the data set &prefix that was supplied during the SAS installation. The PDS contains any JCL procedures and server start-up code required for starting the service.
Verify that the following members have been created:
APSTRTn contains the JCL necessary to run the corresponding @APSTXn member as a started task. These members exist only for socket services and should be moved to a started task library and enable it as started tasks.
@APSTXn contains the SAS code that invokes the server. The JCL calls this file in the corresponding APSTRTn member for socket services and by the OS/390 Spawner for pool services. These SAS programs must remain in the PDS where they were created.
LOADMGR Contains the JCL necessary to run the Load Manager. This member should be moved to a started task library and enabled as a started task.
In addition to the server root PDS, the configuration utility creates an empty PDS named &prefix.WEB.servicename.TDIR, where &prefix is the data set &prefix supplied during the SAS installation, and servicename is the name of the service just created. All of the servers in the service use this PDS as a scratch location. Each server also has its own scratch SAS data library. These libraries are named TBLIB1 through TBLIBn.
4. The permissions for the data sets created above must be modified so the server can write to them as necessary. To modify the permissions, create a special security profile that applies to all the data sets in this service (&prefix.WEB.DEFAULT.*). The security system profile should also grant write access to the userid of the Application Server.

158 Installation Instructions and System Manager's Guide for the SAS System under OS/390
Appendix P, Installing SAS/IntrNet Software
Setup of the Application Broker
Application Broker on Operating System Other than OS/390
If the Broker resides on an operating system other than OS/390, refer to the section “Customizing the Application Broker” on the SAS Client-Side Components CD for setup information.
Application Broker residing on OS/390
To access the Application Dispatcher services created, the Application Broker must know about them. Its configuration file controls the Application Broker. The configuration file is normally named broker.cfg and resides in the same directory as the broker executable. Other names or directories can be used. A template Broker configuration file named broker.cfg is installed with the SAS/IntrNet CGI Components. The template contains example directives to help configure the Broker and is located in /websrv/sasweb/cgi-bin/broker/.
Open the Broker configuration file on the Web server in an editor and add a service definition block for each Application Dispatcher service. Example service definitions are found in the template configuration file installed with the Application Broker. Several examples are shown below. Values that may need to be changed for your site are shown italicized. For more information on Broker configurations, refer to “Customizing the Application Broker” on the SAS Client-Side Components CD.
The definition block for a socket service might look like this:
# This service contains one server (port 5801) on yourserv.yyy.com. SocketService service-name "brief-text-desc" ServiceDescription "text-desc" ServiceAdmin "administrator-name" ServiceAdminMail "administrator-email-address_host" Server yourserv.yyy.com Port 5801
A pool service is defined by:
# Start up to 5 servers on node yourserv.yyy.com using the # spawner started at port 7777. All servers will be started # with the specified username/password. At least 1 server # will not timeout and be kept running. PoolService service-name ServiceDescription "text-desc" ServiceAdmin "administrator-name" ServiceAdminMail "administrator-email-address" ServiceLoadManager load-manager-host:port # Change &prefix in command to the SAS install &prefix name. # There is no closing single quote for the CLIST parameter # because the spawner adds parameters to the end of the # shown in the example command is important. SasCommand "EXEC 'your.clist.dataset(SPWNSAS8)' +

Installation Instructions and System Manager's Guide for the SAS System under OS/390 159
Appendix P, Installing SAS/IntrNet Software
'NOSASUSER OPTIONS(''NOTERMINAL SYSIN=\"&prefix.WEB. + servicename(@APSTX1)\" + SYSPARM '') " SERVER yourserv.yyy.com PORT 6000-6004 USERNAME appdemo PASSWORD xyzzy SPAWNERPORT 7777 MINRUN 1
5. Starting, Stopping and Removing A Service
Starting the Application Server
As stated above, the APSTRTn file for each Application Dispatcher service should be moved from the file &prefix.WEB.servicename to a started task library and enabled as a started task. To start the Application Server for each service, issue a START command from the system console. Pool services are started automatically by the Application Load Manager.
If the Load Manager was installed on your OS/390 system, the LOADMGR started task can be started by a START command from the system console. For more details, see “Using the Load Manager” on the SAS Client-Side Components CD.
After initialization, the Application Server will pause. This indicates the server has begun waiting for Application Dispatcher requests from the Application Broker, and everything is functioning properly.
If the Application Broker on the Web server has not yet been set up, abort or cancel the Application Server and proceed with the Application Broker setup. To install the Application Broker, refer to “Setup of the Application Broker” on page 158.
Stopping the Service
Socket services can be stopped from a Web browser. The URL will depend on the platform and path where your Application Broker is installed. For typical installs, the URL to stop a service will be one of the following:
• OS/390 & UNIX http://your_server/cgi-bin/broker?_service=service-name&_program=stop
• Windows http://your_server/scripts/broker.exe?_service=service-name&_program=stop
• CMS http://your_server/sasweb/htbin/broker.cgi?_service=servicename&_program=stop
The name of the Web server must be specified in place of your_server and the service-name in place of service-name. A different URL path may need to be chosen depending on the path chosen when the Application Broker was installed.

160 Installation Instructions and System Manager's Guide for the SAS System under OS/390
Appendix P, Installing SAS/IntrNet Software
Removing the Service
A service can be removed by deleting or renaming all data sets beginning with the same &prefix.WEB.servicename, where &prefix is the data set &prefix supplied during the SAS installation. For example, if you want to remove the SVC2 service and your SAS software was installed with the &prefix name SYS.SAS, then delete or rename all data sets beginning with the name &prefix SYS.SAS.WEB.SVC2.
Testing and Debugging each Component
At this point in the process, the Application Server should be running, and the Application Broker should be installed in your Web server CGI directory. Before trying to write applications, take a moment to verify that everything is working correctly by using the following tests.
Testing the Application Broker
To make sure that the Broker was installed correctly and can access its configuration file, point your Web browser to this URL:
• Windows http://your_server/scripts/broker.exe?_DEBUG=4
• CMS http://your_server/sasweb/htbin/broker.cgi?_DEBUG=4
• Other host http://your_server/cgi-bin/broker?_DEBUG=4
Replace your_server with the name of the Web server. The URL path may also need to be changed if you installed the Application Broker to a different directory. If the CGI program is working and the DEBUG value of 4 was not masked out, a screen with the following messages will be displayed:
List of all services SocketService default - Reuse existing session Pages reference this generic server when they don't care which service is used. Administrator: Your Name, yourname@yoursite Defined servers and ports: . host appsrv.yourcomp.com, port 5001, weight 1 ...
Testing the Application Server
Pinging the Application Server
Test the combination of the Broker and the server by pinging the Application Server. Invoke a Web browser and try a URL similar to this:

Installation Instructions and System Manager's Guide for the SAS System under OS/390 161
Appendix P, Installing SAS/IntrNet Software
http://your_server/cgi-bin/broker?_SERVICE=default&_PROGRAM=ping
Modify the URL for your installation as described earlier in this page. If this works properly, an HTML page returns to your Web browser indicating that the Application Server is functioning properly.
Running the Sample Programs
Several sample applications are provided with the Application Dispatcher (CGI Components). To complete the installation testing, try some of the samples at the following location:
http://your_server/sasweb/IntrNet8/samples.html
If the samples fail, stop the Application Server and examine the SAS log file. You can stop the Application Server by running the stop program:
http://your_server/cgi-bin/broker?_SERVICE=default&_PROGRAM=stop
Check the log file for any errors.
Service Log Files
Log files for socket services are saved as JES spool files. Log files for pool services are named &prefix.WEB.servicename.mmddyy.port-no.LOG, where &prefix is the data set &prefix supplied during your SAS installation, mmddyy is the current date (represented as a six-digit number), and port-no is the TCP/IP port number of the server.
Log files are not deleted automatically. You must delete them manually to recover the disk space.
Additional and Alternate Documentation
Additional documentation and component updates are available from our Web site:
http://www.sas.com/rnd/web/intro.html
You may want to monitor the “What’s New” page (new.html) for information about new or updated components.
More product information and alternate installation instructions can be found using the following procedure:
1. Locate the SAS Client-Side Components CD that is included in your SAS software package. Mount the CD according to the platform-specific instructions that are provided on the inside cover.

162 Installation Instructions and System Manager's Guide for the SAS System under OS/390
Appendix P, Installing SAS/IntrNet Software
2. In a browser, view the index.html page that is located in the root directory of your CD.
3. From the index page, select the Installation button and follow the instructions provided on the “Installing SAS/IntrNet Software” page.
Load Manager
The Load Manager executable can be found in the tool directory under the sasweb/IntrNet8 directory you created during the installation. See the Application Dispatcher documentation for more information on the Load Manager.
Samples
Application Dispatcher samples and the Xplore sample application can be found on the SAS/IntrNet CGI Tools samples page at the following location:
http://<your_server>/sasweb/IntrNet8/samples.html
Using htmSQL
If this is the first time you are installing htmSQL on this system, you should review the htmSQL.cfg file in the cgi-bin directory to verify that the options in the default file are suitable for your system. You must also set up a Data Source Definition file using the dsdef utility contained in the sasweb/IntrNet8/tools directory. See the htmSQL documentation for more information.
Samples
htmSQL samples can be found on the SAS/IntrNet CGI Tools samples page at the following location:
http://<your_server>/sasweb/IntrNet8/samples.html.
Page 163
Appendix Q, Installing SAS® IT Resource Management Solution Software, Release 2.6
SAS IT Resource Management Functionality
Note: SAS IT Resource Management was formerly known as IT Service Vision.
Some documentation and references may still use the former name.
SAS IT Resource Management is a data management and presentation software package for evaluating the delivery of services to your IT users. With SAS IT Resource Management, you can report on the utilization and service levels from such diverse parts of your IT operation as file servers, mainframes, telephone PBXes, Help Desks, or network links using one tool.
SAS IT Resource Management has both client and server components. The server software is required to process, reduce and/or update the data in a performance data warehouse (PDB) located on your system. The client software is required only if you want to access a performance data warehouse on a remote server system from a client PC platform.
SAS IT Resource Management Server runs on Microsoft Windows NT Server, OS/390, and selected UNIX operating systems.
SAS IT Resource Management Client runs on Microsoft Windows platforms supported by Release 8.2 of the SAS System.
The SAS IT Resource Management Client software is installed from the main SAS Solutions Disk(s). To install your SAS IT Resource Management Client software, please refer to “Solutions Powered by SAS Technology” in Installation Instructions for Release 8.2 (TS2M0) of the SAS System for Microsoft Windows.
These installation instructions and disks are in the accompanying SAS System package for Windows. If you did not receive the installation instructions you need, please refer to page 2 for information about contacting SAS Technical Support.
For the latest installation information on SAS IT Resource Management, download the Installation Instructions from the Library section of the SAS IT Resource Management home page, http://support.sas.com/documentation/onlinedoc/itsv.

164 Installation Instructions and System Manager's Guide for the SAS System under OS/390
Appendix Q, Installing SAS IT Resource Management Solution Software
Installing SAS IT Resource Management
Installation Considerations
The CNTL PDS member #CONTENT will help you determine if SAS IT Resource Management 2.6 is in the list of products that will install with the tape you received. If you are installing SAS 8.2 for the first time, Action A (INSTALL-NEW) should be used.
Note: SAS IT Resource Management 2.6 will be installed by default if the product is not de-selected from PRODSEL member in the CNTL PDS.
If SAS 8.2 is already installed but IT Service Vision 2.4 or 2.5 is not, Action B (INSTALL-DIRECT) should be used. However, if SAS 8.2 is installed with either IT Service Vision 2.4 or 2.5, follow the steps below to upgrade IT Service Vision from 2.4 or 2.5 to SAS IT Resource Management 2.6:
1. Select Action B (INSTALL-DIRECT) in the CNTL PDS SASEDITP member and supply SASEDITP parameter values. Modify the CNTL PDS SPKEYLST member to select the ITRMSRV26UPG keyword. Follow the instructions at the top of the SPKEYLST member for details. Do NOT run the ACTION B install jobs SASIHOLD, SASINSTB, and SASINSXB.
2. Edit the CNTL PDS MAKESUPL member according to the instructions within it, submit it and exit out of the PDS since the job needs exclusive access to the PDS. It will create another member in the CNTL PDS called SASISUPL.
3. Run SASISUPL to upgrade IT Service Vision from 2.4 or 2.5 to SAS IT Resource Management 2.6.
Note: Action C (INSTALL-TO-STAGE) is not supported for SAS IT Resource Management installations. Refer to the section “Considerations for Staged Installations (Action C)” on page 171 for more information.
Migration Considerations
If you have an existing IT Service Vision installation and want to migrate from SAS Version 6 to SAS Version 8, refer to the conversion information in the directory !SASROOT\cpe\itsvdocs\convert.htm in your IT Service Vision Client installation and at www.sas.com/itsvconv.
If you have modified your SITELIB library, you will need to save a copy of it so that you can merge it into the new SITELIB library. Please see the instructions relating to “Site Library Considerations” on page 168.

Installation Instructions and System Manager's Guide for the SAS System under OS/390 165
Appendix Q, Installing SAS IT Resource Management Solution Software
Installation Customizations
Action C (INSTALL-TO-STAGE) is not supported for SAS IT Resource Management installations. This is because “Action D” (STAGE-TO-FINAL) will not copy all of the components of the staged libraries to the existing production libraries.
SAS IT Resource Management will be installed into a set of libraries prefixed hlq.ITSV, where hlq is the high-level qualifier described by the NEW-PREFIX, FINAL-PREFIX or STAGED-PREFIX, depending on the INSTALL ACTION chosen to install the SAS system.
Installation Checklist
The following steps must be reviewed in sequence:
1. Installing or upgrading MXG (optional).
2. Customization of SAS IT Resource Management Server (required).
3. Site Library Considerations (review required).
4. Starting SAS IT Resource Management.
5. If you use IBM's WebSphere to view galleries produced by SAS IT Resource Management, ensure that the WebSphere httpd.config file contains the following directive: AddType .js application/x-javascript ebcdic 1.0 # Javascript
6. Considerations for staged installs (Action C).
Installing or Upgrading MXG
If you do not already have MXG installed you should install it now:
1. Locate the ITSV.CPMISC PDS member CMXGINST. 2. Copy it to a location suitable for editing and submission. 3. Edit it according to the comments within the member. 4. Add a jobcard and submit it.
A copy of the JCL is included below.
If you have MXG installed but it is older than the supplied version, we recommend that you install the supplied version. The newer version solves all reported problems, and could provide support for new data records. Installing it now will protect you from APARs and new versions of data records. Follow the instructions in the ITSV.CPMISC PDS member CMXGINST.
Enter the location of the MXG installation data set names into the ITSVEDTP job, as detailed below. This action tells SAS IT Resource Management where to get the latest MXG definitions.

166 Installation Instructions and System Manager's Guide for the SAS System under OS/390
Appendix Q, Installing SAS IT Resource Management Solution Software
If you update your MXG installation in the future without applying any SAS IT Resource Management maintenance, you should update all your %CPSTART macros to reflect the latest version of MXG installed. Typically, they are referenced in batch jobs that you have created to collect and process SMF-type data. They are also referenced in the ITSV.MXGEXITS PDS member CMAUTOEX and any customized autoexecs you may have written based on the CMAUTOEX member.
Here is the skeleton JCL that can be found in the OS/390 ITSV.CPMISC PDS member CMXGINST. Verify the following:
• The correct VOLSER for the supplied MXG cartridge (normally of the form OSISnn)
• The names for the newly created data sets are correct (most customers prefer to install MXG into data set names that reflect the MXG version).
• Their corresponding UNIT and VOLSER specifications, and that the correct SAS procedure for your site is executed in the FORMATS jobstep.

Installation Instructions and System Manager's Guide for the SAS System under OS/390 167
Appendix Q, Installing SAS IT Resource Management Solution Software
//STEP1 EXEC PGM=IEBUPDTE,PARM=NEW //SYSPRINT DD DUMMY /* IF POINTED TO SYSOUT, PLAN FOR LOTS OF OUTPUT. //* /* ** VERIFY VOLSER OF SUPPLIED MXG TAPE BELOW ** //SYSIN DD DSN=TAPE.MXG.SOURCLIB,DISP=SHR,VOL=SER=OSISnn, <==VERIFY // UNIT=TAPE,DCB=(RECFM=FB,LRECL=80,BLKSIZE=32720), // LABEL=(,NL,EXPDT=98000) //* //*** change the DSN= and VOL=SER= below to an appropriate value for //*** your installation. Also, verify them in step FORMATS below. //SYSUT2 DD DSN=MXG.MXG.SOURCLIB,VOL=SER=XXXXXX, <==VERIFY // DISP=(NEW,CATLG), // UNIT=3380,DCB=(RECFM=FB,LRECL=80,BLKSIZE=23440), // SPACE=(CYL,(205,5,499)) //*** or, if using 3390 disks, comment out the above two lines //*** and uncomment the two below //* UNIT=3390,DCB=(RECFM=FB,LRECL=80,BLKSIZE=27920), //* SPACE=(CYL,(180,5,499)) //* //**************************************************************** //*** ALLOCATE AND LOAD MXG FORMAT LIBRARY - check the CONFIG=, //*** the SOURCLIB DSN=, and the LIBRARY DSN= and VOL=SER= parms. //**************************************************************** //* //FORMATS EXEC SAS,ENTRY=SASHOST, // CONFIG='MXG.MXG.SOURCLIB(CONFIG)' <==VERIFY //SASLOG DD SYSOUT=* //SASLIST DD SYSOUT=* //SOURCLIB DD DSN=MXG.MXG.SOURCLIB,DISP=SHR <==VERIFY //* //*** change the DSN= and VOL=SER= below to an appropriate value for //*** your installation //* //LIBRARY DD DSN=MXG.MXG.FORMATS,VOL=SER=XXXXXX, <==VERIFY // DISP=(NEW,CATLG),SPACE=(CYL,(4,2)), // UNIT=3380,DCB=(DSORG=PS,RECFM=FS,LRECL=23040,BLKSIZE=23040) //*** or if using 3390 disks, comment out the above line //*** and uncomment the line below //* UNIT=3390,DCB=(DSORG=PS,RECFM=FS,LRECL=27648,BLKSIZE=27648) //SYSIN DD * %INCLUDE SOURCLIB(FORMATS); //

168 Installation Instructions and System Manager's Guide for the SAS System under OS/390
Appendix Q, Installing SAS IT Resource Management Solution Software
If this is your first MXG installation, you must also create a data set for storing copies of MXG source code that you modify. Allocate a PDS similar in structure (but smaller) to the SOURCLIB allocation above. This PDS is referred to as MXG.USERID.SOURCLIB in both the MXG and the SAS IT Resource Management documentation. Detailed MXG information can be found in members CHANGES and INSTALL of the MXG SOURCLIB PDS created in the first job step above.
For existing MXG installations, user modifications should be reviewed against the newly installed version. In a few cases, the base MXG member may have changed, requiring the user modification to be re-engineered on to a copy of the newly installed base member.
Customization of SAS IT Resource Management Server
These are the steps that are required to complete an installation (not an upgrade) of SAS IT Resource Management.
1. ITSVEDTP
Edit the CNTL PDS member ITSVEDTP member to supply the name of the MXG.SOURCLIB and MXG.USERID.SOURCLIB PDSs, the name of the MXG format library, and other information according to the instructions in that member.
2. ITSVPOST
Submit the CNTL PDS member ITSVPOST. This customizes the SAS IT Resource Management Server with the parameters specified in ITSVEDTP.
You may receive the following message:
WARNING: Since library hlq.ITSV.PDBDEMO.DETAIL was already allocated, any options specified on the LIBNAME statement were not able to be processed.
As a result, the ITSVPOST job may end with a Condition Code 4. Disregard this message.
Site Library Considerations
If this is your first installation of SAS IT Resource Management, the following step is not relevant and can be skipped.
If this is not your first installation of SAS IT Resource Management, you must consider the maintenance of the SITELIB library. In the ITSV.CPMISC PDS just installed, locate a member called CPSITEUP. This code will merge your old, production SITELIB library with your newly installed version. Details about running this code follow.

Installation Instructions and System Manager's Guide for the SAS System under OS/390 169
Appendix Q, Installing SAS IT Resource Management Solution Software
When a new version or release of SAS IT Resource Management is installed, a new SITELIB library is created. This ensures that you are able to access any SITELIB updates that may have been made in the product. An example of this would be new options on the OS/390 interactive menuing system. If you didn’t access the new SITELIB.TSKINFO data set you would never see the new menus or options.
If you have an existing production SITELIB library that contains site-wide options or data sets that you want to make available to the new release of SAS IT Resource Management, locate the CPSITEUP member and review its contents.
The CPSITEUP code refers to three SITELIB libraries:
1. The newly installed SITELIB, referred to as NEWSITE.
2. The current, production/default SITELIB (whether it is the previously installed SITELIB or a subsequently re-located version), referred to as OLDSITE.
3. PRODSITE, which is used in referring to your chosen location for the production SITELIB for the newly installed release of SAS IT Resource Management.
So, before running CPSITEUP, ensure that the following updates have been made:
• NEWSITE points to your newly installed SITELIB.
• OLDSITE points to your current production/default SITELIB.
• PRODSITE points to a directory or library from which you want to run SAS IT Resource Management. This could be the same location as OLDSITE or NEWSITE, in which case those libraries will be overwritten, or it could be somewhere new.
Run the CPSITEUP code, following the instructions at the top of the code.
If you have decided to use a SITELIB library whose location is not that of the newly installed SITELIB, CPSITEUP will also update the pointer held in PGMLIB so that your chosen SITELIB becomes the new default SITELIB. You will not need to perform the task described in the following section, “Modifying the Pointer to the Default SITELIB library.”
Other tools that are available for modifying site-wide options are the macros CPPDBOPT and CPHDAY, both of which are documented in the SAS IT Resource Management Macro Reference.
Modifying the pointer to the default SITELIB library
A SITELIB library (OS/390) or directory and its files (PC or UNIX) must be write-able by the SAS IT Resource Management administrator and readable by all other SAS IT Resource Management software users.

170 Installation Instructions and System Manager's Guide for the SAS System under OS/390
Appendix Q, Installing SAS IT Resource Management Solution Software
When SAS IT Resource Management is started (using the %CPSTART macro), you have the option of specifying the SITELIB= parameter. This is not required and is usually not specified. If it is specified, the SITELIB= value is used as the SITELIB library for (only) that invocation. Otherwise, the default SITELIB library will be used. This default library’s name is stored in the PGMLIB library and is set at installation to be the name of the newly installed SITELIB library. If you need to change that default, submit the following program.
Note: Update-access to the PGMLIB library and its components is required.
LIBNAME PGMLIB 'hlq.ITSV.PGMLIB' DISP=OLD; DATA PGMLIB.CPSITE; CPSITE="name.of.new-or-updated.SITELIB"; RUN;
Starting SAS IT Resource Management
From TSO READY Prompt
To start SAS and SAS IT Resource Management from the TSO READY prompt, follow these steps:
1. Use the CMCPE CLIST found in the ITSV.CPMICS PDS created for you by the SAS installation.
2. This will run the autoexec (CMAUTOEX, stored in the ITSV.MXGEXITS PDS) which will allocate the correct libraries and demo PDB.
3. If you leave the SAS IT Resource Management application and remain in SAS, enter either the ITSV or CPE command to restart it.
From Within SAS System
To start SAS IT Resource Management from within the SAS System, follow one of these methods:
• Use the ITSV or CPE command or submit a %CPSTART() macro from the Program Editor. You will then be prompted to enter the location of the SAS IT Resource Management root. This will be the prefix of your PGMLIB library.
• Use the autoexec that the SAS installation created for you in your ITSV.MXGEXITS PDS called CMAUTOEX. It contains a %CPSTART macro invocation to allocate the correct root and activate the sample PDB that was created at install time.

Installation Instructions and System Manager's Guide for the SAS System under OS/390 171
Appendix Q, Installing SAS IT Resource Management Solution Software
Considerations for Staged Installations (Action C)
Installation
“Action C” (INSTALL-TO-STAGE) is not supported for SAS IT Resource Management installations, because “Action D” (STAGE-TO-FINAL) will not copy all of the components of the staged libraries to the existing production libraries.
This section is an attempt to help your site use the libraries that this unsupported Action C creates.
If you have Release 8.2, but you did not have IT Service Vision 2.4 or 2.5 already installed, you will need to run SASIHOLD and SASINSTC/SASINSXC using Action C, then go to the section “Customization of SAS IT Resource Management Server” on page 168.
If you have Release 8.2 with IT Service Vision 2.4 or 2.5 already installed, and you want to upgrade to SAS IT Resource Management 2.6 by running MAKESUPL and SASISUPL using Action C, you need to follow the steps below. This ensures that your stagedhlq.CNTL(BACLST01) CLIST and SAS IT Resource Management 2.6 will work with your staged libraries.
1. Select Action C (INSTALL-TO-STAGE) and modify the CNTL PDS SPKEYLST member to select the ITRMSRV26UPG keyword. Follow the instructions at the top of the SPKEYLST member for details.
2. Edit the CNTL PDS MAKESUPL member according to the instructions within it, submit it and exit out of the PDS since the job needs exclusive access to the PDS. It will create another member in the CNTL PDS called SASISUPL.
3. Run SASISUPL to upgrade IT Service Vision from 2.4 or 2.5 to SAS IT Resource Management 2.6.
4. Edit the stagedhlq.CNTL PDS BACLST01 member as follows:
a. Rename stagedhlq.sampsio to prodhlq.SAMPSIO
b. Rename stagedhlq.sashelp to prodhlq.sashelp
c. Comment out or delete the stagedhlq.sasc.translib allocation. Your TSO config file should have the SAS System option CTRANSLOC= pointing to your existing SASC transient library.
5. Create a CMCPE CLIST and CMAUTOEX autoexec member to point to the staged libraries.

172 Installation Instructions and System Manager's Guide for the SAS System under OS/390
Appendix Q, Installing SAS IT Resource Management Solution Software
Merging Staging Libraries to Production
If a site selects Action C, then Action D (STAGE-TO-FINAL) is required after site-specific testing is completed. In addition, the site-specific, manual actions described below must be followed:
1. Make sure that a copy of your CMAUTOEX member (found in stagedhlq.ITSV.MXGEXITS) exists in your prodhlq.ITSV.MXGEXITS. If necessary, copy that PDS member.
2. Edit the CMAUTOEX member (found in prodhlq.ITSV.MXGEXITS) or CMCPE member (found in prodhlq.ITSV.CPMISC), or any other clist or cataloged procedure that invokes ITSV or the base SAS System, so that any references to staged libraries are updated to point to the production libraries.
3. Run the following program to copy your stagedhlq.ITSV.PGMLIB to prodhlq.ITSV.PGMLIB:
LIBNAME SPGMLIB 'stagedhlq.ITSV.PGMLIB' DISP=SHR; LIBNAME PGMLIB 'prodhlq.ITSV.PGMLIB' DISP=OLD; PROC COPY IN=SPGMLIB OUT=PGMLIB; RUN;
Note that the prodhlq.ITSV.PGMLIB library stores the default location of the SITELIB library, which is currently set to the stagedhlq.ITSV.SITELIB library. Append the program below to the SAS code mentioned above to replace the name of the stagedhlq.ITSV.SITELIB library with the one used in production (prodhlq.ITSV.SITELIB).
DATA PGMLIB.CPSITE; CPSITE='prodhlq.ITSV.SITELIB'; RUN;
4. If you have Release 8.2, but you did not have SAS IT Resource Management already installed, run the following program to copy your stagedhlq.ITSV.SITELIB to prodhlq.ITSV.SITELIB:
LIBNAME SSITELIB 'stagedhlq.ITSV.SITELIB' DISP=SHR; LIBNAME SITELIB 'prodhlq.ITSV.SITELIB' DISP=OLD; PROC COPY IN=SSITELIB OUT=SITELIB; RUN;

Page 173
Appendix R, Installing SAS® IT Security Management Solution Software, Release 2.6 (Pre-Production)
SAS IT Security Management is a new product that combines new functionality with SAS IT Resource Management. While SAS is confident in the quality of SAS IT Resource Management, we are delivering the new functionality as pre-production. Therefore, for installation instructions specific to installing and running SAS IT Security Management, please use the installation instructions for SAS IT Resource Management above.

174 Installation Instructions and System Manager's Guide for the SAS System under OS/390
Appendix R, Installing IT Security Management Solution Software, Release 2.6 (Pre-Production)

Page 175
Appendix S, Installing SAS® IT Service Level Management Solution Software 1.0
The instructions for installing and configuring your IT Service Level Management Server are included in the SAS IT Service Level Management 1.0 Installation Instructions found in the SAS IT Service Level Management folder in your software package.

176 Installation Instructions and System Manager's Guide for the SAS System under OS/390
Appendix S, Installing IT Service Level Management Solution Software, Version 1.0

Page 177
Appendix T, Post-Installation Setup for SAS/MDDB Server® Software
SAS/MDDB Server Software includes an OLE DB provider, Open OLAP Server Software. The Open OLAP Server allows you to access, update, and manipulate MDDB data on your SAS System from OLE DB and ADO compliant applications on Windows platforms.
The Open OLAP Server is packaged as a self-installing program for Windows platforms and is available on the SAS Client-Side Components CD included with your SAS Software distribution. Please see the SAS Client-Side Components CD for installation instructions.
Note: The Open OLAP Server requires that you configure the SAS System for communication with TCP/IP. For this reason, please ensure that you have reviewed and completed the steps in the section “System Configuration for Using SAS with TCP/IP” on page 54.

178 Installation Instructions and System Manager's Guide for the SAS System under OS/390
Appendix T, Post-Installation Setup for SAS/MDDB Server Software

Page 179
Appendix U, Post-Installation Setup for the Metabase Facility
Starting with Version 7 of the SAS System, the SAS/EIS Metabase facility has been converted to the new Common Metadata Repository. The Common Metadata Repository is a general-purpose metadata management facility that provides common metadata services to various metadata-driven applications. The Common Metadata Repository enables applications to share metadata between SAS System products.
Using the Common Metadata Repository requires a one-time setup. If the repository manager was set up in a previous release, it may not need to be set up again. The steps in the following sections should be completed before you attempt to use the Metabase Facility. For Metabase Facility users who were using a release prior to Version 7, using the Common Metadata Repository requires a conversion.
Setting Up the System Repository Manager Files
Complete the following steps to set up the necessary system repository manager files. You must have write access to SASHELP (allocate with disp=old) in order to specify the system repository manager.
1. Create a SAS library that will be dedicated exclusively to the storage of repository manager files. This SAS library should not be used to store other SAS files. You can use the following DCB and SPACE attributes but other are possible: DSORG=PS, RECFM=FS, LRECL=6144, SPACE=(TRK,(1,1)
2. At a SAS command line, type REPOSMGR and then select Setup Repository Manager.
3. In the Repository Manager Setup window, Library will default to RPOSMGR. For Path, specify the fully qualified OS/390 data set name (without quotes) created in Step 1 above, and then select the Write values to system registry check box. Then select OK.
4. In the resulting dialog window, select Yes to generate the necessary repository manager files.
This completes the setup for the System Repository Manager. You can create additional repository managers (a user repository manager, for example) by repeating the steps above and by using a different path.

180 Installation Instructions and System Manager's Guide for the SAS System under OS/390
Appendix U, Post-Installation Setup for the Metabase Facility
Note: This step sets the default location for the repository manager for your site. Individual users may specify their own repository manager location by following the steps above and not selecting the Write values to system registry check box.
Registering the SASHELP Repository in the Repository Manager
The SASHELP repository is used in various samples. Before beginning the steps below a repository manager must be created (see previous section). Complete the following steps to register the SASHELP repository in the Repository Manager:
1. At a SAS command line, type REPOSMGR and then select Repository Registration.
2. In the Repository Registration window, select New.
3. In the Register Repository (New) window, type SASHELP (in uppercase) in the Repository field, and then type the fully qualified data set name without quotes where the CORE catalog is located in the Path field.
4. In the Description field, you can type any character string (for example, SASHELP Repository). Select OK to close the Register Repository (New) window. Select Close to exit the Repository Registration window.
Note: Repositories cannot span multiple directories because the path cannot contain concatenated directories. If you have existing metabases in concatenated directories, you should copy the metabases to a single path that will be referenced as a repository.

Page 181
Appendix V, Post-Installation Instructions for Setting up National Language Support (NLS)
This release for NLS contains a variety of new and powerful features. Depending on which version of the SAS System you have installed, there may be additional settings that must be configured. This appendix will guide you through the configuration of these options.
For localized languages, all of the options described in this appendix are set to the default by the system. These settings can be changed in the configuration file, if necessary. Since there are differences between the European and Asian versions of the SAS System, these versions are discussed in separate sections to help clarify the applicable options and settings.
Note: The DBCS, DBCSLANG, and DBCSTYPE system options, described in the section “Asian Language Support (ALS)” below, should be used to set locale for Asian languages only. The LOCALE and ENCODING system options, described in “European Language Support (ELS)” on page 183 are for setting locale for European languages.
Asian Language Support (ALS)
This section describes the three SAS System options you should use to set locale for Asian languages or for English with DBCS extensions:
• DBCS • DBCSLANG • DBCSTYPE
In addition, this section also provides information about Asian font catalogs.
DBCS System Option
The DBCS system option indicates that all text, input, output, and data should be processed as if encoded in a double-byte character set. This option is used for various reasons, including converting lowercase data that are input into the SAS System into uppercase, and supporting Asian languages such as Chinese, Japanese, Korean, and Taiwanese.
DBCS is a toggle option whose values are either DBCS or NODBCS.
• DBCS (specifies that the SAS System process double-byte character sets)
• NODBCS (specifies that the SAS System not process double-byte character sets)
The default value set by the SAS System is NODBCS.

182 Installation Instructions and System Manager's Guide for the SAS System under OS/390
Appendix V, Post-Installation Instructions for Setting up NLS
DBCSLANG System Option
The DBCSLANG= system option shows which double-byte character set (DBCS) language is in use.
Note: This option does not accept abbreviations for the language value.
The following table provides valid DBCSLANG values for each language:
Language DBCSLANG Value
Chinese Simplified CHINESE
An alias for CHINESE HANZI
Chinese Traditional TAIWANESE
Korean KOREAN
Japanese JAPANESE
Japanese language with Katakana characters.
KATAKANA
English JAPANESE
When DBCS extensions are in effect, Japanese is the default value.
Note: All values of DBCSLANG require that you specify a value of IBM for the DBCSTYPE system option.
DBCSTYPE System Option
The DBCSTYPE= system option specifies the type of double-byte character set (DBCS) encoding method. Valid values for DBCSTYPE are as follows:
• FACOM - specifies the Fujitsu encoding method (JEF code).
• HITAC - specifies the Hitachi encoding method (KEIS code).
• IBM - specifies the IBM encoding method.
Changing the Default DBCSLANG and DBCSTYPE Option Settings
When you install the SAS System and choose to load NLS language translations, the installation automatically sets default values for the DBCSLANG and DBCSTYPE system options based on the language selection and platform. If you need to change the default settings, edit the configuration file.

Installation Instructions and System Manager's Guide for the SAS System under OS/390 183
Appendix V, Post-Installation Instructions for Setting up NLS
Asian Font Catalogs
Asian font catalogs reside in separate, installed data sets. You can make font catalogs available to the SAS System in either the configuration file or in your SAS session by using the GFONTx command.
Specifying the Font Data Set in the Configuration File
To specify a cataloged font data set in the configuration file, use the following command:
gfontx='FULLY.QUALIFIED.FONT.DATA.SET.NAME'
In this command,
• x represents an integer value from 0-9
• FULLY.QUALIFIED.FONT.DATA.SET.NAME is the catalogued name of the data set in which the font set that you want to use is stored.
Specifying the Font Data Set in a SAS Session
To specify the font data set in a SAS session, submit the following LIBNAME statement:
libname gfontx 'FULLY.QUALIFIED.FONT.DATA.SET.NAME';
In this statement,
• x represents an integer value from 0-9
• FULLY.QUALIFIED.FONT.DATA.SET.NAME is the catalogued name of the data set in which the font set that you want to use is stored.
European Language Support (ELS)
Starting with this release, SAS expands and simplifies its support for national languages. This applies to data as well as to code, and is especially important for international customers who are running applications in client/server, cross-platform environments. In an effort to simplify the user interface, many features have been consolidated into the LOCALE option.
Using the LOCALE option, you can set the locale and encoding SAS assumes for external data, catalogs, and data sets. (For details on the LOCALE and ENCODING system options, refer to the section “NLS-Related System Options” on page 186.) However, for the software to work correctly, you must have installed the particular SAS System image that supports the encoding that you want to use.

184 Installation Instructions and System Manager's Guide for the SAS System under OS/390
Appendix V, Post-Installation Instructions for Setting up NLS
For Release 8.2, OS/390 customers receive media in the defined encoding for their location. OS/390 was shipped in the following encodings for Release 8.2:
• 838 (Thai)
• 870 (Central Europe)
• 1047 (United States) - the default
• 1141 (Austria and Germany)
• 1142 (Denmark and Norway)
• 1143/1122 (Finland and Sweden)
• 1144 (Italy)
• 1145 (Spain)
• 1146 (United Kingdom)
• 1147 (France)
• 1148/1130 (International)
When you install an OS/390 SAS System for a given encoding, the installation-generated configuration files set the LOCALE system option to the default value for the encoding installed.
A given SAS System installation will support one encoding, and sometimes two encodings, along with a specific list of locales that are compatible with those encodings.
If more than one encoding is supported, the second encoding will be present, but commented out, in the configuration file. Specification of any locale and encoding combination that does not appear in the installed configuration file is unsupported, and it will produce unpredictable results.
To verify the EBCDIC code page for the media you received, refer to the following table, which maps countries to appropriate encodings.

Installation Instructions and System Manager's Guide for the SAS System under OS/390 185
Appendix V, Post-Installation Instructions for Setting up NLS
Shipping Map for Countries based on Encodings
Country Code Page Number
Required Media and Data Set Code
Country Code Page Number
Required Media and Data Set Code
Austria cp1141 W3 Poland cp870 C0
Croatia cp870 C0 Romania cp870 C0
Czech Republic
cp870 C0 Slovakia cp870 C0
Denmark cp1142 W5 Slovenia cp870 C0
Finland cp1142/ cp1122
W6 Spain cp1145 W8
France cp1147 WA Sweden cp1143/ cp1122
W6
Germany cp1141 W3 Switzerland cp1148/ cp1130
WB
Hungary cp870 C0 Thailand cp838 F0
Italy cp1144 W7 United Kingdom
cp1146 W9
North and South America
cp1047 W0 United States
cp1047 W0
Norway cp1142 W5
Vietnam cp1148/ cp1130
WB
Note: If you are running on an EBCDIC platform and you set the LOCALE system option, you will need to use the SASHELP catalogs that have been prepared for the encoding you select.
The section, “Configuring Your System For Locale” on page 188 provides some specific instructions for installing and setting up your system to run in a locale other than the default.
If you do plan to select a locale other than the default, you may also benefit from the section “Additional Information” on page 190. If you will be running SAS as a server on your platform serving a SAS client on an EBCDIC platform, please see the section “Locale Setup on the Remote Server” on page 191. Following this, SAS/GRAPH users will find instructions for setting up the correct devmaps and keymaps in the section “Devmaps and Keymaps for SAS/GRAPH Software” on page 191.

186 Installation Instructions and System Manager's Guide for the SAS System under OS/390
Appendix V, Post-Installation Instructions for Setting up NLS
More detailed instructions are provided in the following sections, with specific information about how the options and Locale Setup Window (LSW) influence the SAS System.
Background
A locale reflects the local conventions, language, and culture for a particular geographical region. A locale’s conventions may include the formatting of dates, times, and numbers. Locale is not the same as language; a language may be spoken in many countries where conventions are very different. It is also worth noting that a country may have more than one official language. For example, Canada has two languages: English and French.
An encoding is a set of characters, with each character having been assigned a unique number. The SAS System uses the encoding to process data.
In Release 8.1, you could run the LSW to select a locale and encoding for the SAS session. Locale information was stored in the SAS Registry and was queried by applications that needed to be aware of the locale name, encoding, Euro character, and translation tables. For example, the SAS session used the trantab information stored in the CORE\LSW\INIT registry to set the TRANTAB system option at startup.
Starting in this release, three new system options are provided to give you more flexibility in setting up the locale and session encoding for your SAS session. The LSW has been redesigned to allow you to enhance the environment set by these new options.
NLS-Related System Options
NLS-related system options were added to this release. The LOCALE option allows you to set the locale for your SAS session and sets the ENCODING, DFLANG, and TRANTAB system options. The ENCODING option sets the encoding that SAS uses for processing external data. ENCODING also sets the TRANTAB system option.
These options are valid in the configuration file and at session startup. They are documented in the SAS Companion for the OS/390 Environment, Version 8.
LOCALE System Option
The LOCALE option specifies a locale setting for your SAS session. When LOCALE is set, the DFLANG, TRANTAB, and ENCODING options are also updated to match the locale you selected.
LOCALE option values contain the language name. For some locales, you can also specify a country name or region to provide more specific locale information. For example, valid locales for France are French and French_France. See the SAS Companion for the host environment where you run the SAS System for values that can be specified for LOCALE.

Installation Instructions and System Manager's Guide for the SAS System under OS/390 187
Appendix V, Post-Installation Instructions for Setting up NLS
When LOCALE is set, the DFLANG system option is set to a value that corresponds to the chosen locale or English if no corresponding value is available. For more information about the DFLANG option, please refer to SAS Language Reference: Dictionary, Version 8.
The locale you set also has a common encoding that is used most often on the platform where the SAS system is running. When the LOCALE option is set, the ENCODING option is set to match this common locale encoding and also sets the TRANTAB option to support the encoding. However, if the ENCODING option is also specified on the SAS command line or in the configuration file, the ENCODING option will set the SAS session encoding.
Unlike the LSW, the LOCALE option does not store values in the SAS Registry. Run PROC OPTIONS to display the value of the LOCALE option.
ENCODING System Option
The ENCODING option sets the encoding that SAS uses for in-memory strings and external files. The ENCODING option can be set by specifying ENCODING at startup or, more commonly, by specifying a value in the LOCALE option that uses an encoding other than the default compiler encoding. Compiler encoding is the encoding used to compile the SAS System. Valid values for ENCODING are listed in the SAS Companion for the host environment where you run the SAS System.
Note: ENCODING values on one platform are not necessarily supported on another platform.
When ENCODING is set, the TRANTAB option is also set. On most platforms, all of the first five slots are filled:
• local to transport • transport to local • upper case • lower case • character classification trantabs
On EBCDIC platforms, a scanner trantab is also set in the sixth slot of the TRANTAB option. The scanner trantab maps variant characters from the specified encoding to the compiler encoding for SAS syntax characters. The mapping does not occur for characters that are in quoted strings or data lines.
Note: This trantab allows you to use the characters from your keyboard for SAS syntax instead of making the character substitutions you were required to make in Version 6 and in Release 8.1.
However, the character substitutions are supported, so your existing applications will still run. For example, if a Danish user running SAS on OS/390 selects a locale of Danish, that user can use either the ‘$’ or the A-ring where SAS syntax calls for a ‘$’.

188 Installation Instructions and System Manager's Guide for the SAS System under OS/390
Appendix V, Post-Installation Instructions for Setting up NLS
For more information about the TRANTAB option, please refer to the SAS Language Reference.
SAS will assume that external data is in the specified encoding. If your files are in a different encoding, use the ENCODING option in the FILENAME, INFILE, or FILE statement to indicate the correct encoding. If you use the SAS Display Manager to manage your files, you will also need to specify ENCODING in the INCLUDE or FILE commands to indicate an encoding other than the current encoding.
Locale Setup Window
In this release, the Locale Setup Window (LSW) has been redesigned to work in conjunction with the new system options described in earlier sections. Unless you are in Administrator Mode, the LSW will only list the languages that are supported by the current encoding. This allows you to set additional options or safely change to a locale that is supported for that session.
When a new locale is set, the DFLANG system option is set to a value that corresponds to the chosen locale or English if no corresponding value is available. The hex value of the Euro character is also set for the locale. The DFLANG and Euro values are stored in the SAS Registry.
The TRANTAB option string is stored in the registry with the new setting. As in Release 8.1, the LSW does copy the trantabs from the LOCALE catalog into the SASUSER.PROFILE and SASCFG.HOST catalogs if you have the proper permissions. The LSW will also create trantabs using the TRABASE naming convention at your request. As noted in the previous section, the scanner trantab is set in the sixth slot of the TRANTAB option. The TRANTAB option is set when the window is closed. The LSW does not set the encoding for the SAS session.
For more details about why you must use the Locale Setup Window when setting the LOCALE option, refer to the section “Configuring Your System with the Locale Setup Window” on page 189. For complete information on the Locale Setup Window, refer to the Locale Setup Window section in the SAS System Help.
Configuring Your System for Locale
If you would like to configure your SAS session for a locale other than the default, you have a few options. This section explains how to use the options described in the previous sections to get the results that you want from the SAS System.
Running SAS in a Different Locale
To set the locale for the SAS system at your site, add the LOCALE system option to your configuration file. You should add LOCALE to the configuration file when you install the product. You can find a list of locale values in the SAS Companion for the OS/390 Environment.

Installation Instructions and System Manager's Guide for the SAS System under OS/390 189
Appendix V, Post-Installation Instructions for Setting up NLS
When you read or write a file, the SAS System expects the data in the external files to be in the compiler encoding. The compiler encoding is the encoding used to compile the SAS System on the platform where you run SAS. To specify a different encoding, see the documentation for the ENCODING option in the FILENAME, INFILE, or FILE statement in the SAS Companion for the OS/390 Environment.
When LOCALE is set, the ENCODING system option will be set to an encoding that supports the language for the locale. The SAS System expects user data to be in the encoding that matches the ENCODING option. If you prefer an encoding other than the most common encoding for the locale, you can also set the ENCODING system option in the configuration file.
If you are running on an EBCDIC platform, the encoding will be an EBCDIC encoding rather than the corresponding Open Edition encoding. EBCDIC and Open Edition encodings are based on the same encoding. However, EBCDIC encodings use a different new-line character.
The encoding set by the ENCODING system option will also be used by applications that create output in or that establish communications with applications whose syntax or protocols are not determined by SAS. For example, when ODS generates HTML, RTF, or JavaScript, the output will use, by default, the encoding set by the ENCODING system option. If you would like your output created using a different encoding, please refer to the documentation for the Output Delivery System.
When the ENCODING option is set, the TRANTAB option will always be set to match the ENCODING system option. The transport format trantabs, set by the TRANTAB option, are used by the CPORT and CIMPORT procedures to transfer SAS data files. These trantabs are also used by the UPLOAD and DOWNLOAD procedures for transferring files and catalogs, for remotely submitting code to the server, and for returning logs and listings to the client. However, the transport format trantabs are not used for SAS data set transfer. Please see the next section for a description of the host-to-host trantabs that are set up by the LSW.
For more information, please see the SAS Procedures Guide, Version 8 in the base SAS software for documentation about PROC CPORT and PROC CIMPORT. Please see the SAS/CONNECT User’s Guide, Version 8 for documentation on PROC UPLOAD and PROC DOWNLOAD.
Configuring Your System with the Locale Setup Window
The Locale Setup Window extends the support of the NLS options. To access the Locale Setup window, select Solutions -> Accessories -> Locale Setup from the SAS Explorer window menu.
You will need to run the LSW and select the locale if one of the following three conditions is true:
• You are using PROC UPLOAD and PROC DOWNLOAD to transfer a SAS data set, and both your client and server sessions are Version 7 or later.

190 Installation Instructions and System Manager's Guide for the SAS System under OS/390
Appendix V, Post-Installation Instructions for Setting up NLS
• Applications at your site reference trantabs created using the TRABASE application.
• You use Remote Library Services or Cross Environment Data Access to access SAS files, views, or external data sets.
Note: You will need to run LSW in Administrator mode if you want to make the trantabs that are created generally available or if you want to select additional encodings.
For more information, please refer to the Locale Setup Window documentation in SAS System Help.
Running SAS with Special Locale Settings
The Locale Setup Window sets the Euro character that matches the encoding and copies the host-to-host trantabs into place. The host-to-host trantabs have a different purpose than the transport trantabs that are set by the LOCALE and ENCODING system options in the TRANTAB system option.
The host-to-host trantabs that the LSW sets up are used by PROC UPLOAD and PROC DOWNLOAD for SAS data set transfer, Cross Environment Data Access (or CEDA), and Remote Library Services (RLS). Please see the SAS/CONNECT User’s Guide for information on the procedures. Also, refer to the SAS/CONNECT User’s Guide and SAS/SHARE User’s Guide for documentation on RLS.
If users at your site need to use trantabs that were created by the Version 6 TRABASE sample program, the LSW can be used to copy those trantabs into place as well.
The LSW will select the Traditional EBCDIC mode by default. LSW also sets the scanner trantab in the sixth slot of the TRANTAB option, as mentioned previously. No other trantab slots will be set, so this setting will not override the transport and character classification trantabs set by the ENCODING option.
Additional Information
This section contains information that you may need for general understanding and set up of your system so that it can run with alternate locales.
New-Line Character and Line-Feed
Both the line-feed character and the new-line character appear in EBCDIC encodings, but only the line-feed character appears in ASCII encodings. Much of the SAS System uses the new-line character on EBCDIC to indicate the end of the line.
Because ASCII encodings do not support the new-line character, software running on ASCII platforms always expects the line-feed character to indicate the end of the line. When data is transferred from OS/390 to a machine that supports ASCII encodings,

Installation Instructions and System Manager's Guide for the SAS System under OS/390 191
Appendix V, Post-Installation Instructions for Setting up NLS
formatting problems can occur (particularly in HTML output) because the EBCDIC line-feed is not written in the data stream as an end-of-line character.
SAS supports two sets of EBCDIC-based encodings for OS/390. The encodings that have EBCDIC in their names use the traditional mapping of the EBCDIC line-feed character to the ASCII line-feed character. This mapping can cause data to appear as one stream.
The encodings that use Open Edition in their names use the line-feed character as the end-of-line character. When the data is transferred to an ASCII platform, the EBCDIC new-line character maps to an ASCII line-feed character. This mapping enables ASCII applications to interpret the end-of-line correctly, resulting in better formatting.
Locale Setup on the Remote Server
The LSW also sets up the remote SAS environment for data transfer. If you are running this release of SAS in a locale other than the default, you can set up the locale on the remote SAS environment by running the LSW or submitting the %lswbatch() macro. Either of these can be run after you sign on to the remote session.
If you are using SAS/CONNECT to connect to a remote SAS server, you will need to set up the server session for the locale used by SAS. You must do this after signing on to the remote session.
To set up the locale on the remote session, you can either run the LSW or use the %lswbatch() macro. In the LSW, select your language and set the Remote Submit option before closing the window.
You can also achieve remote locale setup by running the %lswbatch() macro after you sign on to the remote session. To set up the locale on the remote session, run %lswbatch with the LOCALE= and REMOTE= parameters. Set the LOCALE= parameter to match the LOCALE option you set for your client session. For example, if you are running MVS with LOCALE=Danish, use the following %lswbatch() macro after your sign on to the remote session:
%lswbatch(locale=Danish, remote=on);
Devmaps and Keymaps for SAS/GRAPH® Software
If you are running SAS/GRAPH and your SAS session locale is not the default, you will need to use the devmaps and keymaps for the locale. The devmap and keymap entries you need are in the SASHELP.LOCALE catalog. You will need to copy those that match the locale to your GFONT0.FONTS catalog.
Change the name of the entry to 'default' so they will be loaded for you. For example, a Danish user on an EBCDIC platform would need to use the devmap and keymap named E142.

192 Installation Instructions and System Manager's Guide for the SAS System under OS/390
Appendix V, Post-Installation Instructions for Setting up NLS
libname gfont0 'your-font-library'; %lswgraph(e142);
Here is a list of the devmaps and keymaps that match the locales on your platform:
Locale Devmap and Keymap Name
Locale Devmap and Keymap Name
Arabic e425 German_Switzerland e148
Bulgarian ecyr Greek e875
Byelorussian ecyr Hebrew e424
Croatian e870 Hungarian e870
Czech e870 Icelandic elat
Danish e142 Italian e144
Dutch elat Italian_Italy e144
English elat Italian_Switzerland e148
English_Australia elat Latvian ebal
English_Britain e146 Lithuanian ebal
English_Canada elat Norwegian e142
English_Caribbean elat Polish e870
English_Ireland e146 Portuguese elat
English_Jamaica elat Portuguese_Brazil e275
English_NewZealand elat Portuguese_Portugal elat
English_SouthAfrica elat Romanian e870
English_UnitedStates elat Russian ecyr
Estonian eest Serbian ecyr
Finnish e143 Slovakian e870
French e147 Slovenian e870
French_Belgium e148 Spanish e145
French_Canada elat Spanish_Spain e145
French_France e147 Spanish_LatinAmerica elat
French_Switzerland e148 Swedish e143
German e141
Turkish etur

Installation Instructions and System Manager's Guide for the SAS System under OS/390 193
Appendix V, Post-Installation Instructions for Setting up NLS
German_Austria e141 Ukrainian ecyr
German_Germany e141
Additional Documentation
This section lists documentation referenced throughout the appendix. Please refer to these documents for more detailed information.
• “Locale Setup Window” and “Locale Setup Window Item Descriptions” in the SAS System Help
• SAS Companion for the OS/390 Environment, Version 8
• SAS/CONNECT User’s Guide, Version 8
• SAS Language Reference: Dictionary, Version 8
• SAS Procedures Guide, Version 8, Volumes 1 & 2
• SAS/SHARE User’s Guide, Version 8

194 Installation Instructions and System Manager's Guide for the SAS System under OS/390
Appendix V, Post-Installation Instructions for Setting up NLS

Page 195
Appendix W, Post-Installation Setup for SAS® OLAP Server Software
Setting up Access Control without SAS/EIS Software on Your Server
Please keep in mind that Access Control Setup consists of three steps:
1. Set your Access Control Key - modifies SASHELP.MB 2. Set your Access Control environment (aclroot, ac_active flag, etc.) -
modifies SASHELP.AC 3. Create your Access Control definitions (users, groups, the actual ACL) – data sets
PASSWD, GROUPS, and ACL in aclroot
Each of these steps can be performed interactively in a set of windows (where available), or programmatically.
Starting the Access Control Setup Dialog Window
Use the command AF C=SASHELP.EISSRV.STARTAC.SCL <USER=uid PASSWD=password>
Follow the instructions in Help or the description in SAS/EIS Software: Administrator’s Guide - Access Control Tasks to assist you through the setup process. On 3270 platforms, where the Access Control Setup GUI is not very comfortable to use, you may prefer to do your AC setup programmatically. Please see the following section for more information on that.
Setting Your Access Control Key and Environment Programmatically
Setting the Access Control Key
The Access Control Key is stored in the entry SASHELP.MB.ACLAPWM.SCL. You need write access to this entry in order to change the Access Control Key. Please refer to How to set up write access to SASHELP.AC and SASHELP.MB for more information on that.
Using a command
Use the following command to set the Access Control Key (for setting the Access Control Key to ADMIN):
AF C=SASHELP.EISSRV.SETAPW.SCL PW=ADMIN

196 Installation Instructions and System Manager's Guide for the SAS System under OS/390
Appendix W, Post-Installation Setup for SAS OLAP Server Software
• To reset the Access Control Key to its initial status (no key set), pass in an empty string ("").
• Use the special value "0" to use no Access Control Key. • Use the option ECHO=Y to dump the settings in the log.
Using a statement
Use the following command to submit the command as a SAS statement:
DM 'AF C=SASHELP.EISSRV.SETAPW.SCL PW=ADMIN';
Using SCL
Within SCL code, you can use the following method call to set the Access Control Key:
CALL METHOD ('SASHELP.MBEISSRV.APWUTIL','CREAAPWM', flag, pw-value, rc);
where
• flag is 0 or 1. 0 indicates to not use a control key; 1 indicates to use a control key. • pw-value is the value of the new control key. If flag is 0, this value is ignored • rc is 0 if the update was successful; 1 if it was not successful
Setting the Access Control Environment
The Access Control Environment information is stored in the entry SASHELP.AC.ACLINIT.SCL. You need write access to this entry in order to change the Access Control Environment settings. Please refer to How to set up write access to SASHELP.AC and SASHELP.MB for more information.
Using a command
Use the following command to set the Access Control Environment:
AF C=SASHELP.EISSRV.SETAC.SCL APW=access control key ACTIVE=Y/N ACLROOT=access control root path ACLSERV=server LOGIN=login application AUTOUSER=Y/N LIBSEC=Y/N PW_ENCRYPT=Y/N DISP_CLASS=access control start class QUERY_CLASS=access control query class SERVER_CLASS=access control server class ADMIN_CLASS=access control administration class ECHO=Y

Installation Instructions and System Manager's Guide for the SAS System under OS/390 197
Appendix W, Post-Installation Setup for SAS OLAP Server Software
Using a statement
submit the previous command using a DM statement, e.g.,
DM 'AF C=SASHELP.EISSRV.SETAC.SCL APW=ADMIN ACTIVE=Y ACLROOT="path"';
Using SCL
Within SCL code, you can use the following method call to set the Access Control Environment:
CALL METHOD ('SASHELP.EISSRV.ACLUTIL', 'CREAACLI', rc, flag active, aclroot, aclserv, login_window, autouser_enabled, libsec, pw_encrypt, disp_class, query_class, server_class, admin_class);
Key Description
APW The Access Control Key (required for setac)
ACTIVE Y/N to switch access control on or off
ACLROOT The path of a directory that holds the ACL files
ACLSERV The name of the remote session or share server for ACLROOT. If the session is local, this parameter should be blank.
LOGIN
The four-level name of the AF application or APPLSCR to use as a login dialog. The default is SASHELP.EISSRV.GATE_KPR.FRAME - a dialog with entry for User ID and Password, and OK and Cancel buttons. There is one other login dialog provided with the system, SASHELP.EISSRV.GATE_KP2.FRAME, which has an additional Change Password button.
AUTOUSER
Y/N to indicate whether to allow the use of the USER= and PASSWD= options on the EIS, RUNEIS, and METABASE commands. If these options are given, no login dialog appears (Default=Y)
LIBSEC
Y/N to indicate when the temporary library to access access control files is to be allocated ‘Y’ (default): the ACLTMP library is allocated before and deallocated after each access to the ACL files. Use this setting to assure that the ACL files don't show up in the SAS Explorer. ‘N’: the ACLTMP library is allocated once at access control server initialization and deallocated at access control server termination.

198 Installation Instructions and System Manager's Guide for the SAS System under OS/390
Appendix W, Post-Installation Setup for SAS OLAP Server Software
PW_ENCRYPT Y/N indicates whether to encrypt the user password stored in the PASSWD file. (Default=Y).
DISP_CLASS The class used to start the access control subsystem and optionally display a login dialog. The default is SASHELP.EISSRV.ACLDISP.CLASS
QUERY_CLASS The class used to satisfy queries on the current access control permissions. The default is SASHELP.MB.ACLMAIN.CLASS.
SERVER_CLASS The class used for loading and persisting acl information. The default is SASHELP.EISSRV.ACLSERV.CLASS.
ADMIN_CLASS The class used managing user and group information and for updating the ACL. The default is SASHELP.MB.ACLADMIN.CLASS.
ECHO=Y Dump the current and updated settings in the LOG.
RC (creaacli only) a flag that indicates if the update was successful, where ‘0’ indicates that the update was successful and ‘1’ indicates that it was not.
Doing Your Access Control Definitions (Users, Groups, ACL) Programmatically
To do your Access Control definitions programmatically, you need to know some basics about the storage of User and Group information and the actual Access Control List.
The Access Control definitions are stored in three data sets in the Access Control Root Path. The data sets are password-protected and encrypted using the Access Control Key.
User definitions are stored in the PASSWD data set. Group definitions are stored in the GROUPS data set. The Access Control List is stored in the ACL data set.
To do your definitions, proceed using the following steps:
1. Set up the Access Control Key and Environment page 199 2. Set a libname ACL on your aclroot path page 199 3. Define the groups page 199 4. Define the users page 200 5. Create your metabase registrations page 202 6. Create your ACL page 202 7. Initialize partial ACL data sets page 202 8. Edit the partial ACL data sets page 203 9. Merge the partial ACL data sets page 206

Installation Instructions and System Manager's Guide for the SAS System under OS/390 199
Appendix W, Post-Installation Setup for SAS OLAP Server Software
1. Set up the Access Control Environment
Here is a simple example of how to Set up the Access Control Environment. Choose an Access Control Key, and create a location where you want to store your AC definitions. Then submit:
DM 'AF C=SASHELP.EISSRV.SETAPW.SCL PW=access control key'; DM 'AF C=SASHELP.EISSRV.SETAC.SCL APW=access control key ACLROOT=”access control root path” PW_ENCRYPT=N’;
Note: By default, user passwords stored in the PASSWD data set are encrypted using the _encryptPassword method of the ACLSERV class. This adds an additional layer of protection to the information stored in the PASSWD data set. To be able to store plain text passwords in the PASSWD data set when managing the user setup outside of the Access Control definition dialogs, use PW_ENCRYPT=N option when setting up the access control environment.
2. Set a libname ACL on your aclroot path
LIBNAME ACL “access control root path”;
3. Define the groups
The GROUPS data set holds the names and descriptions of the access control groups. The data set has one record for each group defined to the system. When the GROUPS data set is initially created, two additional records are also added, one for the SYSTEM (Administrator) and another for the USERS (Users) group.
A Group name can have from three to eight characters. Group names begin with a letter, and are followed by letters, numbers, or underscores. Letters must be in upper case. The GROUPS data set has the following structure:
GROUP $8 Group Name (needs to be upper case!)
DESC $32 Group Description
You can edit the acl.groups data set by using an interactive facility, like FSEDIT, or FSVIEW, or data management tools like the data step.
Example for using a data step:
data work.groups; infile datalines; length group $8 desc $32; input group / desc &;

200 Installation Instructions and System Manager's Guide for the SAS System under OS/390
Appendix W, Post-Installation Setup for SAS OLAP Server Software
datalines; SALES Sales Staff MKT Marketing MGMT Management ; proc sort data=work.groups; by group; proc sort data=acl.groups(pw=access control key); by group); data acl.groups(pw=access control key); merge acl.groups(pw=access control key) work.groups; by group; run;
Group names must be upper case valid SAS names, of three to eight characters length.
Please note that when you first activate Access Control (using either the Access Control Setup window, or the SETAC facility) a GROUPS data set is created in your aclroot path, with the two groups SYSTEM and USERS already defined. That is why the previous data step merges your new definitions with the already existing ones.
4. Define the users
The PASSWD holds the definitions for the access control users. The following information is stored for each user:
User id A 32-character string that must start with a character, followed by characters, numbers, or underscores. The userid is stored in upper case.
Description Mixed case, free format descriptive string.
Groups Names of the groups a user belongs to, in upper case, separated by commas.
Password
A 16-character string that must start with a character, followed by characters, numbers, or underscores. By default, this password is stored encrypted using the _encryptPassword method of the ACLSERV class. Use PW_ENCRYPT=N when setting up the access control environment to use unencrypted passwords. Unencrypted passwords are stored in upper case.
Creation date/time A SAS datetime value indicating the creation time of the

Installation Instructions and System Manager's Guide for the SAS System under OS/390 201
Appendix W, Post-Installation Setup for SAS OLAP Server Software
user’s record.
The data set holds one record for each user of the system. When the PASSWD data set is initially created, one record for the ADMIN user (password ADMIN) is added. The PASSWD data set has the following structure:
USERID $32 User ID (upper case)
FULLNAME $32 User Description
GROUP $198 User Groups
PASSWORD $16 User Password
C_DATET $8 DateTime
You can edit the acl.passwd data set by using an interactive facility, such as FSEDIT, or FSVIEW, or a data management tool such as the DATA step.
Example for using the data step:
data work.passwd; infile datalines dsd; length userid fullname $32 group $198 password $16 c_datet 8; format c_datet datetime16.; c_datet=time(); input userid / fullname & / group / password ; datalines; MJONES Markus Jones SALES MJONES1 OFIELDS Oscar Fields MKT OFIELDS1 ABEAN Abraham Bean SALES,MKT,MGMT ABEAN1 ; proc sort data=work.passwd; by userid; proc sort data=acl.passwd(pw=admin); by userid; data acl.passwd(pw=admin);

202 Installation Instructions and System Manager's Guide for the SAS System under OS/390
Appendix W, Post-Installation Setup for SAS OLAP Server Software
merge acl.passwd(pw=admin) work.passwd; by userid; run;
Userids must be upper case valid SAS names, of 3 to 32 characters length. Passwords must be upper case valid SAS names, of 3 to 16 characters length.
Please note that when you first activate Access Control (using either the Access Control Setup window, or the SETAC facility) a PASSWD data set is created in your aclroot path, with the user ADMIN (password ADMIN) already defined. That is why the previous DATA step merges your new definitions with the already existing ones.
5. Create your metabase registrations
If you have not already done so, create your metabase registrations now. An Access Control definition is always linked to an existing metabase registration.
Use the METABASE command to invoke the Metabase GUI.
6. Create your ACL
Now, for each group/metabase registration combination, fill a data set with the structural information from the metabase registration, and, if needed and available, with the class column value combinations. There is a utility, FILLACL, that does that for you. Then edit those partial data sets to set your access control tags. And finally, merge the partial ACL data sets back into ACL.ACL.
A. Initialize partial ACL data sets
Note: The FILLACL utility uses the SAS OLAP Server classes to access the data. If you do not have SAS/EIS software, you might have to run the following utility first, to make sure the correct data model classes are being used:
DM 'AF C=SASHELP.EISSRV.SET_OLAP_CLASSES.SCL MODMGR=SASHELP.EISSRV.MODMGR.CLASS MODMGRE=SASHELP.EISSRV.MODMGRE.CLASS EMDDB_C=SASHELP.EISSRV.EMDDB_C.CLASS';
Use the FILLACL utility to create a data set with the same structure as the ACL data set, and initialize it with information from the registration and the data.
DM 'AF C=SASHELP.EISSRV.FILLACL.SCL APW=access control key OUTDS=partial ACL data set name GROUP=groupname REP="repository name” REG="registration name” LEVEL=ALL/DIMSONLY';

Installation Instructions and System Manager's Guide for the SAS System under OS/390 203
Appendix W, Post-Installation Setup for SAS OLAP Server Software
using a different OUTDS= value each time , and setting the other options accordingly. FILLACL accepts the following named parameters:
Key Description
APW The access control key. This is required.
OUTDS The data set where the partial ACL file should be written. If the data set exists, it will be overwritten.
GROUP Name of the user group for initializing the GROUP column (upper case!)
REP The name of the repository in which the registration is stored. Use quotes if the repository name contains blanks or special characters.
REG
The name of the metabase registration to use. Please note that the typical registration name has the form LIB.MEM, e.g., SASHELP.PRDMDDB. By default, a metabase registration has the name of the SAS file (data set or MDDB) that was registered.
LEVEL ALL/DIMSONLY. ALL is the default. DIMSONLY only reads out the structural information, no data values.
B. Edit the partial ACL data sets
Edit each data set created by FILLACL, using an interactive facility like FSEDIT or FSVIEW. Usually, you would only edit the TAG column. Use TYPE, VALUE, and ITEM to identify the element for which a tag will be set.
For example, to drop the COUNTRY variable, find the record with TYPE=CL, VALUE=COUNTRY, and set a ‘D’ in the TAG column.
Do not set any values for TAG in those records that you do not want to restrict. These records will be removed when merging the partial ACL data sets in the next step.
Please refer to SAS/EIS Software: Administrator's Guide - Using Access Control for information on how to use Access Control tags.

204 Installation Instructions and System Manager's Guide for the SAS System under OS/390
Appendix W, Post-Installation Setup for SAS OLAP Server Software
Each partial ACL has the following structure:
GROUP $8 Group Identifier
TARGET $17 Target Identifier
TYPE $2 Information Type
ITEM $42 Information Item
VALUE $200 Information Value
TAG $1 Access Control Tag
The columns hold the following information: Column name Description - values
GROUP Name of the group to which the access control definitions in the current record apply (upper case!)
TARGET The ID of the metabase registration to which the access control definitions in the current record apply, or #A, for applications/application databases, or #F, for application functions.
Record type: If TARGET is a metabase registration ID:
T Table
H Hierarchy
HL Hierarchy Level
A Analysis variable (ANALYSIS, COMPUTED)
S Statistic
C Category variable (CATEGORY)
CL Category variable level (data value)
If target is #A:
AP for application
AD for application database
TYPE
If target is #F: Always F

Installation Instructions and System Manager's Guide for the SAS System under OS/390 205
Appendix W, Post-Installation Setup for SAS OLAP Server Software
Depending on TYPE, value can be:
Type Value
T TABLE (dummy value when the whole table is being dropped)
H Hierarchy name
HL Hierarchy level name
A Analysis variable name
S Statistic keyword
C Category variable name
CL Category variable value. Special value #T for _Total_
AP Application name (2-level)
AD Application Database name (4-level)
VALUE
F Function id.
Additional identifier, set to identify what the VALUE refers to for
HL to identify the hierarchy
CL to identify the Category variable ITEM
S to identify the Analysis variable

206 Installation Instructions and System Manager's Guide for the SAS System under OS/390
Appendix W, Post-Installation Setup for SAS OLAP Server Software
Access Tag. This is the only column you would typically edit. Valid tags are as follows:
D Drop
K Keep
I Initial
H Hide
S Show
Valid TAGs by TYPE:
T D
A D, K, H
S D, K
H D, K
C D, K
CL D, K, I, H, S
HL D, K, I
AP D, K
AD D, K
TAG
F D, K
C. Merge the partial ACL data sets
The result is a collection of data sets. To merge them and remove the unneeded observations (the ones with TAG=''), submit:
data acl.acl(pw=access control key encrypt=yes); set work.one work.two . . ; if tag = '' then delete; run;

Installation Instructions and System Manager's Guide for the SAS System under OS/390 207
Appendix W, Post-Installation Setup for SAS OLAP Server Software
Write Access to SASHELP.AC and SASHELP.MB
1. Choose an empty library or path for use as a playpen. Later you can either merge it into your SASHELP library, or concatenate it in front of your SASHELP path.
libname playpen 'path'; proc catalog; copy in=sashelp.ac out=playpen.ac; copy in=sashelp.mb out=playpen.mb; select aclapwm.scl; run;quit; catname sashelp.ac (playpen.ac); catname sashelp.mb (playpen.mb sashelp.mb);
2. Set up your Access Control Key and Environment. When setting up your SAS application server, or distributing the application to your users, make sure the modified catalogs are concatenated in front of your SASHELP path by modifying the SAS CONFIG file, or the SAS CLIST accordingly.
Specifying OLAP Classes
The following utility program can be used to override the default OLAP Server classes and specify your custom OLAP Server classes. DM ‘AF C=SASHELP.EISSRV.SET_OLAP_CLASSES.SCL
MODMGR= MODMGRE= EMDDB_C= DP= MDVIEWER= MDMODEL= ‘;
SET_OLAP_CLASSES accepts the following named parameters:
Key Description
MODMGR The 4-level name of the model manager class.
MODMGRE The 4-level name of the model manager engine class.
EMDDB_C The 4-level name of the model coordinator class.
DP The 4-level name of the data provider class.
MDVIEWER The 4-level name of the OLAP metadata viewer class.
MDMODEL The 4-level name of the OLAP metadata model class.

208 Installation Instructions and System Manager's Guide for the SAS System under OS/390
Appendix W, Post-Installation Setup for SAS OLAP Server Software

Page 209
Appendix X, Post-Installation Setup for SAS/SECURE Software
SAS/SECURE software includes client components that you can use to create non-SAS System client applications which communicate with a SAS server in a secure environment. To use encryption between a non-SAS System client and a SAS Server with SAS/SECURE software licensed, you must install the SAS/SECURE client components on the client machine.
SAS/SECURE Client for Windows
The secwin.exe executable installs the files necessary for the IOM Bridge for COM to use the CryptoAPI algorithms. It also contains a TAR and ZIP file that is used to develop Java clients that utilize the encryption support.
SAS/SECURE Client for Java
The SAS/SECURE client for Java provides encryption support for Java applications. You can incorporate this support into applications that are written using the following components:
• SAS/SHARE driver for JDBC • SAS/CONNECT driver for Java • IOM Bridge for Java
Client Components
The SAS/SECURE client components are available on the SAS Client-Side Components CD included with your SAS Software distribution.

210 Installation Instructions and System Manager's Guide for the SAS System under OS/390
Appendix X, Post-Installation Setup for SAS/Secure Software

Page 211
Appendix Y, Implementing SAS/SESSION® Software
Introduction
SAS/SESSION software enables terminal users connected to the Customer Information Control System (CICS) to communicate with the SAS System in an OS/390 environment. In reality, the user communicates with the SAS System running in an APPC/MVS initiator. The SAS System uses VTAM as the communication access method. Figure 1 illustrates the relationship among the various components.
CICS/ESA
APPC/MVS
VTAM LU2 (3270)
VTAM LU6.2 (CPI-C)
user A user B user C user D
user A user B user C user DSASSASSASSAS
Figure 1
Installing the SAS/SESSION interface to the SAS System consists of the following: defining the interface to VTAM defining the interface to APPC/MVS defining the interface to CICS.
These topics are covered in the next three sections. The discussions assume that Base SAS software, CICS, and APPC/MVS have already been installed.

212 Installation Instructions and System Manager's Guide for the SAS System under OS/390
Appendix Y, Implementing SAS/SESSION Software
Program names and argument values shown throughout this document serve as examples only. You may modify them to fit your naming conventions.
For more information on defining the interface, consult the following manuals: CICS Intercommunication Guide CICS Resource Definition Guide MVS Planning: APPC/MVS Management
Defining SAS/SESSION to the VTAM System
To define SAS/SESSION to VTAM requires two steps: Define the two VTAM applications needed by the interface Define an LU Type 6.2 entry in the VTAM logon mode table.
Define the VTAM Applications
Two VTAM applications need to be defined (or modified): SASSESS, to access the SAS System through APPC/MVS MVSCICS, the CICS system application.
Note: The application names SASSESS and MVSCICS are examples for the purpose of discussion only. Contact your systems programmer to identify the correct names for your installation.
Use the VTAM APPL macro to define the applications. The VTAM application definition table contains an APPL macro expansion for each application to be used in a VTAM environment. You will need to add (or change) some parameters for the SASSESS and the MVSCICS applications:
SASSESS APPL APPC=YES,SRBEXIT=YES,SECACPT=ALREADYV,VERIFY=NONE, * DMINWNL=0,DMINWNR=10,DSESLIM=10
MVSCICS APPL AUTH=(ACQ),EAS=10,APPC=NO,PARSESS=YES, * ACBNAME=MVSCICS
Examples of these APPL definitions are in member SESSAPPL of the &prefix.SEMISC data set.
Define the VTAM Logon Mode
The VTAM logon mode table contains various protocol definitions for use by applications within the VTAM system. SAS/SESSION uses an Advanced Program to Program Communication (APPC) logmode entry. If this type of entry already exists, the interface can use it.
Otherwise, use the following MODEENT macro. You can include the MODEENT macro in the existing VTAM logon mode table.
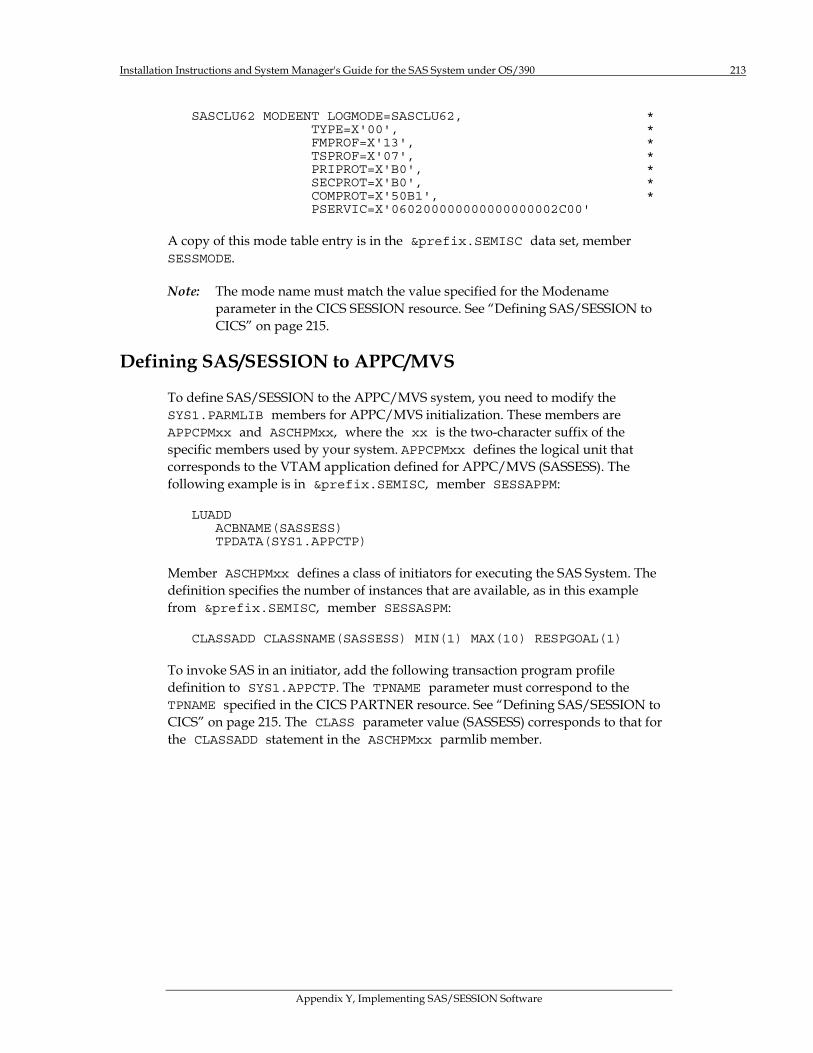
Installation Instructions and System Manager's Guide for the SAS System under OS/390 213
Appendix Y, Implementing SAS/SESSION Software
SASCLU62 MODEENT LOGMODE=SASCLU62, * TYPE=X'00', * FMPROF=X'13', * TSPROF=X'07', * PRIPROT=X'B0', * SECPROT=X'B0', * COMPROT=X'50B1', * PSERVIC=X'060200000000000000002C00'
A copy of this mode table entry is in the &prefix.SEMISC data set, member SESSMODE.
Note: The mode name must match the value specified for the Modename parameter in the CICS SESSION resource. See “Defining SAS/SESSION to CICS” on page 215.
Defining SAS/SESSION to APPC/MVS
To define SAS/SESSION to the APPC/MVS system, you need to modify the SYS1.PARMLIB members for APPC/MVS initialization. These members are APPCPMxx and ASCHPMxx, where the xx is the two-character suffix of the specific members used by your system. APPCPMxx defines the logical unit that corresponds to the VTAM application defined for APPC/MVS (SASSESS). The following example is in &prefix.SEMISC, member SESSAPPM:
LUADD ACBNAME(SASSESS) TPDATA(SYS1.APPCTP)
Member ASCHPMxx defines a class of initiators for executing the SAS System. The definition specifies the number of instances that are available, as in this example from &prefix.SEMISC, member SESSASPM:
CLASSADD CLASSNAME(SASSESS) MIN(1) MAX(10) RESPGOAL(1)
To invoke SAS in an initiator, add the following transaction program profile definition to SYS1.APPCTP. The TPNAME parameter must correspond to the TPNAME specified in the CICS PARTNER resource. See “Defining SAS/SESSION to CICS” on page 215. The CLASS parameter value (SASSESS) corresponds to that for the CLASSADD statement in the ASCHPMxx parmlib member.

214 Installation Instructions and System Manager's Guide for the SAS System under OS/390
Appendix Y, Implementing SAS/SESSION Software
TPADD TPNAME(SAS_SESSION) TPSCHED_DELIMITER(DLM1) CLASS(SASSESS) KEEP_MESSAGE_LOG(ERROR) JCL_DELIMITER(DLM2)
//SASSESS JOB (),'SAS/SESSION(TM)' //CRTESUSR EXEC PGM=IEFBR14 //SASUSER DD DISP=(MOD,CATLG),DSN=&SYSUID..SASSESS.SASUSER, // UNIT=DISK,SPACE=(CYL,(2,1)) //SASAUTOS DD DISP=(MOD,CATLG),DSN=&SYSUID..SASSESS.SASAUTOS, // UNIT=DISK,SPACE=(CYL,(2,1)) //CONFIG DD DISP=(MOD,CATLG),DSN=&SYSUID..SASSESS.CONFIG, // UNIT=DISK,SPACE=(TRK,(0,1)), // DCB=(DSORG=PS,RECFM=FB,LRECL=80,BLKSIZE=3120) //SASEXEC DD DISP=(MOD,CATLG),DSN=&SYSUID..SASSESS.SASEXEC, // UNIT=DISK,SPACE=(TRK,(0,1)), // DCB=(DSORG=PS,RECFM=FB,LRECL=80,BLKSIZE=3120) //SAS EXEC PGM=SASXAL,PARM=’SESSION’ //STEPLIB DD DISP=SHR,DSN=YOUR.SAS.LOAD //CONFIG DD DISP=SHR,DSN=YOUR.SAS.CONFIG(TSO) // DD DISP=SHR,DSN=&SYSUID..SASSESS.CONFIG //SASAUTOS DD DISP=SHR,DSN=YOUR.SAS.SASAUTOS // DD DISP=SHR,DSN=&SASUID..SASSESS.SASAUTOS //SASHELP DD DISP=SHR,DSN=YOUR.SAS.SASHELP //SASMSG DD DISP=SHR,DSN=YOUR.SAS.SASMSG //SASPARM DD UNIT=SYSDA,SPACE=(400,(100,300)), // DCB=(RECFM=FB,LRECL=80,BLKSIZE=400,BUFNO=1) //WORK DD UNIT=SYSDA,SPACE=(6144,(500,200),,, ROUND), // DCB=(RECFM=FS,DSORG=PS,LRECL=6144,BLKSIZE=6144) //SASUSER DD DISP=OLD,DSN=&SYSUID..SASSESS.SASUSER //SASEXEC DD DISP=SHR,DSN=&SYSUID..SASSESS.SASEXEC DLM2 DLM1
Note: Setting KEEP_MESSAGE_LOG(ERROR) generates a message data set when a non-zero return code is returned to CICS. Refer to the appropriate IBM documentation for more information on the MESSAGE_DATA_SET and the KEEP_MESSAGE_LOG parameters.
An example job to update your TP profile data set with this profile is in the &prefix.SEMISC data set, member SESSPROF.
Security Considerations
Since the SAS System executes in an APPC/MVS address space rather than under CICS, it acquires its own security environment. APPC/MVS defines this environment when CICS requests allocation of the transaction program. To create the environment, APPC/MVS uses the userid that CICS passes. By default, CICS passes no userid, so in this case, all input data sets used by APPC/MVS must have a universal access of read, and all output data sets must have a universal access of write.
In order for CICS to pass a userid to APPC/MVS, you must establish a conversation security level of already verified. You can specify this using the SECACPT=ALREADYV parameter of the VTAM APPL definition for the APPC/MVS logical unit (SASSESS).

Installation Instructions and System Manager's Guide for the SAS System under OS/390 215
Appendix Y, Implementing SAS/SESSION Software
Alternatively, if you define RACF session security between the CICS and APPC/MVS logical units, you can specify CONVSEC(ALREADYV) on the RACF APPCLU definition for the APPC/MVS LU.
If the security level is already verified and users do not sign on to CICS using the CESN transaction, CICS passes its default user id on TP allocate requests. In this case, the SAS System running under APPC/MVS has the same security as the CICS system and can access the same data sets.
Defining the security level to already verified and having users sign on to CICS allows users to customize their SAS software environment. In order for users to use the CESN signon transaction, CICS external security must be active. The example TP profile defines four user-specific data sets: SASUSER, SASAUTOS, CONFIG, and SASEXEC. If you choose to retain these user-specific data sets in the TP profile, note that the &SYSUID system variable identifies them. This variable resolves to the user id that CICS passes when issuing a TP allocation request. Therefore, if users do not sign on, or several users sign on with the same id, the potential exists for multiple users to attempt to access the same data sets for update. This could result in lockouts of users or in corrupted data.
In order to allow some users to access the SAS System without first signing on to CICS (for example, those who do not desire any special customization), you can define a second TP profile with a key that specifies the CICS default user id. This profile would not specify any output data sets with the &SYSUID system variable. For example, if the default user for your CICS system is CICS1, specify the following key on the TPADD:
TPADD TPNAME(SAS_SESSION) USERID(CICS1) ...
Note that to support user id qualified TP profiles, the LU definition in your APPCPMxx member of 'SYS1.PARMLIB' must specify a TPLEVEL of USER:
LUADD ACBNAME(SASSESS) TPDATA(SYS1.APPCTP) TPLEVEL(USER)
Defining SAS/SESSION to CICS
To enable communication with APPC/MVS, be sure ISC=YES is specified in the system initialization parameters. To define the CICS resources required for SAS/SESSION, use the CEDA transaction of the Resource Definition Online (RDO) facility of CICS. For details on any of the parameters used, refer to the appropriate IBM documentation.
All of the resources for SAS/SESSION are contained in a single GROUP in the CICS System Definition (CSD) file. You can choose any name that is acceptable for groups (for example, SASSESS). The following are basic components of the SASSESS group.

216 Installation Instructions and System Manager's Guide for the SAS System under OS/390
Appendix Y, Implementing SAS/SESSION Software
Use the DEFINE function of the CEDA transaction for these definitions.
CONNECTION
defines the actual VTAM connection (SASC) between CICS and the APPC/MVS System. Note that the value of the Netname parameter (SASSESS) matches the ACBNAME for the SASSESS VTAM APPL definition.
Connection parameters required are as follows: Connection - SASC Group - SASSESS Netname - SASSESS Accessmethod - VTAM Protocol - APPC Singlesess - No Datastream - User Recordformat - U Autoconnect - All Inservice - Yes Attachsec - Local
SESSION
defines the session (SASSESS) on which the conversations will take place between CICS and the SAS System. Note that the value of the Connection parameter (SASC) matches the name of the Connection in the preceding list. The SASC connection supports multiple sessions. Session parameters required are as follows:
Session - SASSESS Group - SASSESS Connection - SASC Modename - SASCLU62 Protocol - APPC Maximum - 00010,00010 Receivecount - No Sendcount - No Sendsize - 3840 Receivesize - 3840 Autoconnect - All Buildchain - Yes Discreq - Yes
The Modename SASCLU62 refers to the VTAM logon mode table entry name for APPC (LUTYPE6.2). You can specify an existing entry in the VTAM logon mode table here. See “Define the VTAM Logon Mode” on page 212 for more information.
PROGRAM
defines the transaction program delivered with SAS/SESSION to CICS. The library that the program resides on must be concatenated with the CICS Relocatable Program Library (RPL), or the load member must be copied into the existing RPL. The required parameters for the SASSESS program are as follows:

Installation Instructions and System Manager's Guide for the SAS System under OS/390 217
Appendix Y, Implementing SAS/SESSION Software
Program - SASSESS Group - SASSESS Language - ASSEMBLER Reload - No Resident - No Status - Enabled DataLocation - Any
TRANSACTION
defines the transaction (SASC), which invokes the program SASSESS, as indicated by the parameters. Note that the transaction name (SASC) matches the value of the Transaction parameter under the SESSION component. Transaction parameters required are as follows:
Transaction - SASC Group - SASSESS Program - SASSESS Profile - SASSESS Status - Enabled TaskDataLoc - Any
PROFILE
defines the SASSESS profile. This profile makes the SASC transaction use the terminal’s alternate display size (as the SAS System does) in all communications with the terminal. The profile also defines the modename used for APPC communication with the SAS System. Profile parameters required are as follows:
Profile - SASSESS Group - SASSESS Scrnsize - ALTERNATE Modename - SASCLU62
If the user already has a profile defined that meets these requirements, that profile name can be used in the transaction component instead of SASSESS.
PARTNER
defines the SASCSESS partner. This partner defines the network LU name and the APPC/MVS transaction program name used to communicate with the SAS System. It also specifies a profile that defines the modename for APPC communication. Partner parameters required are as follows:
Partner - SASCSESS Group - SASSESS Netname - SASSESS Profile - SASSESS Tpname - SAS_SESSION
The partner name must be the concatenation of the transaction name (SASC), and the suffix (SESS). This allows the installation to define different APPC/MVS transaction program profiles for different SAS System configurations.

218 Installation Instructions and System Manager's Guide for the SAS System under OS/390
Appendix Y, Implementing SAS/SESSION Software
Activating the Interface
SAS/SESSION on APPC/MVS
To activate SAS/SESSION on APPC/MVS, complete the following steps:
1. Start APPC/MVS and its transaction scheduler under the control of the Master Scheduler, as shown in the following:
START APPC,APPC=xx,SUB=MSTR START ASCH,ASCH=xx,SUB=MSTR
where xx is the suffix of your APPCPMxx and ASCHPMxx members in 'SYS1.PARMLIB'.
If APPC/MVS and its transaction scheduler are already started, activate your members using the SET command, as shown in the following:
SET APPC=xx SET ASCH=xx
where xx is the suffix of your APPCPMxx and ASCHPMxx members in 'SYS1.PARMLIB'.
2. Verify that the SASSESS LU is active. You can display its status by issuing the following command:
DISPLAY APPC,LU,ALL,LLUN=SASSESS
After activating the CICS interface, the LU display should show the following:
PARTNERS=00001
3. After the CICS interface is active and users begin using SAS/SESSION, periodically display the status of the transaction programs. You can display its status by issuing the following command:
DISPLAY APPC,TP,ALL,LLUN=SASSESS
For more information on managing APPC/MVS resources, refer to the appropriate IBM documentation.
SAS/SESSION on CICS
To activate SAS/SESSION on CICS, complete the following steps:
1. Install the group SASSESS by issuing the CEDA command:
CEDA INSTALL GROUP(SASSESS)

Installation Instructions and System Manager's Guide for the SAS System under OS/390 219
Appendix Y, Implementing SAS/SESSION Software
A message on the CEDA output display should say Install Successful. If it does not, check the parameters you supplied to determine the problem and reissue the command.
2. Press PF15 to terminate CEDA processing.
Note: If the auto install list includes the group SASSESS, you do not need to issue the CEDA command.
3. Issue the following command to verify the connection to APPC/MVS:
CEMT I CONN
The status of the SASC connection appears on the screen. After the group SASSESS is installed, the status shown should be Ins Acq (inservice and acquired).
Once the connection has been acquired, the sessions associated with that connection are allocated automatically.
4. Press PF15 to terminate CEMT processing.
5. Clear the display.
Executing the SAS System
To execute the SAS System, first sign on to CICS to enter your userid and password if required by your SAS administrator:
CESN
Then, use the SASC transaction to execute the SAS System:
SASC <options>
where options are any valid SAS system options.
Note: SASC refers to the CICS transaction name as defined in the Transaction component. Please see “Defining SAS/SESSION to CICS” on page 215 for more information.
The session proceeds as if you had entered the SAS command from a TSO terminal. Refer to the SAS Companion for the OS/390 Environment, Version 8 for more information.
At the end of the session, the following message indicates that all resources associated with this transaction have been released in the CICS region:
SAS/SESSION complete, return code is 0
220 Installation Instructions and System Manager's Guide for the SAS System under OS/390
Appendix Y, Implementing SAS/SESSION Software
Refer to MVS/ESA Application Development: Writing Transaction Programs for APPC/MVS for information on other return codes.

Page 221
Appendix Z, Implementing SAS/SHARE® Software
Note: For further information on implementing and using SAS/SHARE software, please refer to Communications Access Methods for SAS/CONNECT and SAS/SHARE Software and the SAS/SHARE User’s Guide which are both in the SAS OnlineDoc.
Special Files for Use with SAS/SHARE Software
Customizing the Started Task JCL Procedure for a Server
Note: This task is required.
STEP 1: Edit the SHREDITP member of the CNTL data set and specify the following parameter values. SASSNM= specifies the JCL procedure name and member name in the started
task procedure library for the started task JCL SERVERID= specifies the default server id
STEP 2: Edit and submit the SHRPOST job.
This job modifies the SAS/SHARE started task JCL procedure, member SHPROC01 in the CNTL data set, with the SHREDITP parameter values and copies the procedure to the library specified with PROCDSN.
PROCDSN= specifies the data set name of the cataloged procedure library to which the started task procedure is copied. The default is the procedure library specified for the SAS System.
STEP 3: Notify the server administrator that this file has been provided.
STEP 4: Please refer to The SAS/Share Users Guide Appendix 2, “Creating the SAS/Share Server Environment,” and Appendix 3 “Tuning Tips for Applications That Use SAS/Share Software.”
Configuration File for a Server
Member SRVCNFG of the CNTL data set is provided as a default configuration file for a server’s SAS execution. This member contains recommended SAS system option settings and is included in the CONFIG concatenation in the started task JCL procedure customized according to the procedure described in the previous section.
222 Installation Instructions and System Manager's Guide for the SAS System under OS/390
Appendix Z, Implementing SAS/SHARE Software
Customizing the SAS/SHARE Autocall Macros
Note: This task is required.
The installed SASSAML data set is an APPLSYS macro library used by the SAS/SHARE autocall macros. This library contains the required members DEFAULTS and SERVERID. These members contain instructions with examples in comment headers for adding entries to the tables used by the macros. To use this library, you must specify its name in the SHRMACS autocall macro.
STEP 1: Edit the SHRMACS autocall macro (required).
Member SHRMACS in the AUTOLIB data set must contain the correct data set reference for the APPLSYS macro library. Edit this member to change the name SAS.SASSAML to the correct installed &prefix.SASSAML data set name for your installation.
STEP 2: Notify the server administrator that this file has been provided.
Selecting Communications Access Methods to Use
Note: This task is required.
STEP 1: Determine the access method to use.
Communication between a SAS/SHARE server and user is handled by a part of SAS software called a communications access method. There are three communications access methods available for use with this release of SAS/SHARE software under OS/390: cross-memory services VTAM LU 6.2 TCP/IP
To use the cross-memory services access method, a server and user must be running on the same OS/390 system.
You can choose to use one access method exclusively, or you can choose one as your primary access method and others as secondary access methods. If you choose to define primary and secondary access methods, SAS/SHARE software will attempt to establish a user-to-server connection using the primary access method first. If that attempt fails, SAS/SHARE software will then attempt to establish the connection using each of the secondary access methods in turn.
You should choose the access methods you will use based on your site’s requirements and restrictions. The cross-memory access method is the default and is faster than the other access methods. However, the cross-memory access method can only be used for within-system

Installation Instructions and System Manager's Guide for the SAS System under OS/390 223
Appendix Z, Implementing SAS/SHARE Software
communication and requires installation of a module in an authorized link list library and definition of an inactive OS/390 subsystem.
STEP 2: Set SAS system options to specify selected access methods.
The SAS system option COMAMID= specifies which access method SAS/SHARE software should use as the primary or only access method. The SAS system options COMAUX1= and COMAUX2= specify secondary access methods. These options are specified, typically in a SAS System configuration file, by the SAS/SHARE Software Consultant.
The following table shows the value of these options for each access method:
Access Method COMAMID=/COMAUX1=/COMAUX2= Value
cross-memory services XMS VTAM LU 6.2 APPC TCP/IP TCP
For a server, these three options have essentially the same meaning; each access method specified by these options will be initialized when the server is started, making the server accessible to users via any of those access methods.
For example, for a server that is to be accessible only to users who use the cross-memory services access method, specify
COMAMID=XMS COMAUX1= COMAUX2=
For a server that is to be accessible to users who use either the cross-memory services access method or the VTAM LU 6.2 access method, specify
COMAMID=XMS COMAUX1=APPC COMAUX2=
or COMAMID=APPC COMAUX1=XMS COMAUX2=
For a user session, the access method specified by the COMAMID= option is the first one used to attempt to connect to a server. If the server is not found, the access method specified by the COMAUX1= option is used. If the server still is not found, the access method specified by the COMAUX2= option is used.
Note that is not necessary to specify COMAUX1= or COMAUX2= if you do not want to specify a secondary access method.
To cause a user session to try the cross-memory services, VTAM LU 6.2, and TCP/IP access methods, in that order, specify
COMAMID=XMS COMAUX1=APPC

224 Installation Instructions and System Manager's Guide for the SAS System under OS/390
Appendix Z, Implementing SAS/SHARE Software
COMAUX2=TCP
System Configuration for the Cross-Memory Access Method
Installing the SASVXMS Load Module
Note: This task is required.
To use the cross-memory access method for communication between a SAS/SHARE server and user, you must copy the module SASVXMS0 from the SAS load library data set into an authorized library. You must then rename this module SASVXMS (removing the 0). It is very important that you perform these two tasks in that order.
When SAS/SHARE software loads the module SASVXMS, it must find that module to be marked authorized, re-entrant, and reusable, and to have been loaded from an authorized library.
The version of SASVXMS that is distributed with each release of SAS/SHARE software can be used ONLY with that release. If you have a previous version of SAS/SHARE software installed, be sure to follow the special instructions in Step 2.
STEP 1: Copy SASVXMS0 into an authorized link list library.
Copy the module SASVXMS0 into any authorized library. In a production environment, SAS Institute recommends you copy the SASVXMS0 module into an authorized link list library. Alternatively, you can install this module into the link pack area. You can use any standard utility program to copy the module SASVXMS0 from your &prefix.LIBRARY data set to your authorized library.
Note: A user abend 984 will occur if the SASVXMS module is not
installed in an authorized library or the library is in a STEPLIB concatenation where one of the libraries is not authorized.
STEP 2: Rename SASVXMS0.
After copying SASVXMS0 into the appropriate library, you must rename it. You can use any standard utility to rename the module.
If you do not have a previous version of SAS/SHARE software installed, rename SASVXMS0 to SASVXMS. Specify the SAS system option COMAMID=XMS as described earlier.
If you have a previous version of SAS/SHARE software installed, rename SASVXMS0 to SASVXMSn, where n is version of the SAS System. Specify the SAS system option COMAMID=XMSn. For example, for Release 8.2, rename SASVXMS0 to SASVXMS8 and specify COMAMID=XMS8.

Installation Instructions and System Manager's Guide for the SAS System under OS/390 225
Appendix Z, Implementing SAS/SHARE Software
Note: The XMS access method does not support communication
between a Version 6 SAS session and a Release 8.2 SAS/SHARE server, nor does it support communication between a Release 8.2 SAS session and a Version 6 SAS/SHARE server.
If you wish to run Release 8.2 SAS/SHARE and Version 6 SAS/SHARE software concurrently, you MUST rename the Release 8.2 copy of SASVXMS0 and set the COMAMID= option appropriately. Failure to do so will generate errors, the most common being ERROR: XMS Communication Failure. Unable to locate system XVT Anchor.
Defining an Anchor Point
Note: This task is required.
To use the default cross-memory access method for communication between a SAS/SHARE server and user, you must define an anchor point. The anchor point is a place in common memory that can be located by servers and users and used to store and retrieve cross-memory communication information.
Note: If you have defined an anchor point for a previous release of
SAS/SHARE software, it is not necessary to repeat this step now.
STEP 1: Define an inactive OS/390 subsystem.
The anchor point is specified by defining an inactive OS/390 subsystem. Defining an inactive subsystem causes OS/390 to create a subsystem communications vector table (SSCVT) at IPL time. The SSCVT chain is in common memory and easily accessible to the cross-memory access method routines. The SSCTSUSE field of the SSCVT is available to these routines and is used as the anchor point for their control blocks.
You should note that, although you define a subsystem to OS/390, it will never be considered active and will provide no system services because the SSCTSSVT field of the SSCVT will never be non-zero.
You can define the inactive subsystem by adding an entry to any of the following: the IEFJSSNT member of SYS1.LINKLIB an IEFSSNxx member of SYS1.PARMLIB.
Consult OS/390 system initialization and tuning documentation for the details of each alternative.
Regardless of which method you choose, you must include the subsystem name and you must not specify an initialization routine name. Use the name SAS0 unless it conflicts with standards or conventions at your site.

226 Installation Instructions and System Manager's Guide for the SAS System under OS/390
Appendix Z, Implementing SAS/SHARE Software
STEP 2: Set the SAS system option SUBSYSID= to specify the inactive subsystem you defined.
The name you specify for the inactive subsystem defined as the anchor point for the cross-memory access method must also be specified as the value of the SAS system option SUBSYSID=. This option is specified, typically in a SAS System configuration file, by the SAS/SHARE Software Consultant. This option is described in Communications Access Methods for SAS/CONNECT and SAS/SHARE Software, Version 8.
System Configuration for the VTAM LU 6.2 Access Method
Software Requirements
In order to use the VTAM LU 6.2 access method, you must have ACF/VTAM Version 3 Release 2 or higher installed.
Configuration for a Server
STEP 1: Specify the SAS system option APPCSEC=_SECURE_.
Note: This task is required.
Specify the SAS system option APPCSEC=_SECURE_ to cause the VTAM LU 6.2 access method to require users to supply a valid userid and password for the OS/390 system where the server is running in order to connect to the server.
STEP 2: Define an LU for the Server to VTAM.
Note: This task is required.
You must define a logical unit (LU) for the server to VTAM via an APPL statement. This LU must be defined in the VTAM domain in which the server will run. The APPL statement for a server should be of the form serverid APPL APPC=YES, +
MODETAB=mode-table, + DLOGMOD=default-mode, + DDRAINL=NALLOW, + DMINWNL=0, + DMINWNR=0, + DSESLIM=32767, + SECACPT=CONV
serverid specifies the name of the server.
This name will be specified as the value for the SERVER= option on the PROC SERVER, PROC OPERATE, and LIBNAME statements.

Installation Instructions and System Manager's Guide for the SAS System under OS/390 227
Appendix Z, Implementing SAS/SHARE Software
mode-table specifies the communications mode table in which to look up mode names
default-mode specifies the communications mode to use when no mode name is specified by a connecting user session
All APPL statements must follow a VBUILD TYPE=APPL statement.
STEP 3: Define the Server as a Cross-Domain Resource.
Note: This task may be required.
If the server will be communicating with users in a different VTAM domain, you must define the server as a cross-domain resource in the users’ domain via a CDRSC statement. The CDRSC statement for a server should be of the form
serverid CDRSC CDRM=cdrmname,ISTATUS=ACTIVE
serverid specifies the name of the server. This name must be the same as that in the name field of the APPL statement for the server in the controlling domain.
cdrmname specifies the name of the CDRM in the domain in which the server is defined as an APPL.
Configuration for Users
STEP 1: Define a User LU Pool to VTAM.
Note: This task is required.
You must define to VTAM a pool of logical units (LUs) for the users via a series of APPL statements. This LU pool must be defined in the VTAM domain where the users will run. The VTAM LU 6.2 access method dynamically selects an available LU for a user in order to connect to a server. The number of LUs in the pool should be equal to or greater than the maximum number of users that will be connected to servers via the VTAM LU 6.2 access method simultaneously. The APPL statement for a user should be of the form lu-name APPL ACBNAME=LUPREFIX=||suffix, +
APPC=YES, + MODETAB=mode-table, + DLOGMOD=default-mode, + DDRAINL=NALLOW, + DMINWNL=conwin, + DMINWNR=0, + DSESLIM=seslimit, + SECACPT=CONV
lu-name is the LU name.

228 Installation Instructions and System Manager's Guide for the SAS System under OS/390
Appendix Z, Implementing SAS/SHARE Software
This name must be unique across the SNA network.
LUPREFIX=||suffix specifies the ACBNAME associated with this LU.
The zero filling done to produce an ACBNAME (as defined in the user application pool) using the LUPREFIX system option is dynamic based on the magnitude of the LULAST value. For example, a 5-byte LUPREFIX value combined with LULAST=9 is not zero-filled to produce a 6-byte ACBNAME; combined with LULAST=99 it is zero filled with a single zero to produce a 7-byte ACBNAME and so on.
Sites that have defined 8-byte ACBNAMEs in the user application pool should ensure that LUPREFIX and LULAST values are specified that generate 8-byte ACBNAMEs (LUPREFIX=SASIUO LULAST=10 for example). Although this parameter is not required, it is recommended to insulate your SAS/SHARE configuration from changes in LU naming conventions and to allow the same configuration to be shared by more than one OS/390 system in the SNA network (since ACBNAMEs must be unique only within a single domain).
The prefix used should be specified to the SAS System via the SAS system option LUPREFIX=. The lower and upper bounds of the suffix range used should be specified via the system options LUFIRST= and LULAST=, respectively. If the ACBNAME= parameter is omitted it defaults to lu-name, which should then be constructed as a name prefix and numeric suffix.
mode-table specifies the communications mode table in which to look up mode names
default-mode specifies the communications mode to use when no mode name is specified by an incoming connection.
Although mode-table and default-mode are not used by a SAS/SHARE user session, you should specify these parameters if this LU pool will be used by SAS/CONNECT remote sessions on OS/390.
conwin specifies the minimum number of contention winner sessions.
This value should be roughly half of seslimit.
seslimit specifies the maximum number of concurrent sessions for this LU.
As a general rule of thumb, you should allow for two sessions for each SAS file or catalog entry accessed concurrently by user.
All APPL statements should follow a VBUILD TYPE=APPL statement. The ACBNAMEs for the APPLs in the pool should be

Installation Instructions and System Manager's Guide for the SAS System under OS/390 229
Appendix Z, Implementing SAS/SHARE Software
constructed according to the description given for the SAS system options below.
This LU pool can also be used by the VTAM LU 6.2 access method for SAS/CONNECT remote sessions on OS/390.
STEP 2: Describe Your VTAM Configuration to the SAS System.
Note: This task is required.
You must describe your VTAM configuration to the SAS System via the VTAM LU 6.2 access method system options LU62MODE=, LUPREFIX=, LUFIRST=, and LULAST=.
The LU62MODE= system option specifies the name of the communications mode for the SNA session between the user and server LUs.
The LUPREFIX= system option specifies the prefix used in constructing the LU names or ACBNAMEs for the user LU pool.
The LUFIRST= and LULAST= system options specify the first and last numeric suffix used in constructing the LU names of ACBNAMEs for the user LU pool. In dynamically selecting an LU for a user, the VTAM LU 6.2 access method constructs an ACBNAME by appending a numeric suffix between LUFIRST= and LULAST= to the value of the LUPREFIX= option.
System Configuration for TCP/IP
Note: The TCP communications access method within SAS/SHARE requires that you configure the SAS System for communication with TCP/IP. For this reason, please ensure that you have reviewed and completed the steps in the section “System Configuration for Using SAS with TCP/IP” on page 54.
Specify the SAS system option TCPSEC=_SECURE_ for the server execution
Note: This task is required.
Specify the SAS system option TCPSEC=_SECURE_ to cause the TCP/IP access method to require users to supply a valid userid and password for the OS/390 system where the server is running in order to connect to the server.
Client-Side Components
SAS/SHARE software includes client components that are used outside of your SAS installation. SAS/SHARE client components are available on the SAS Client-Side Components CD included with your SAS Software distribution. Please refer to this CD for more information.

230 Installation Instructions and System Manager's Guide for the SAS System under OS/390
Appendix Z, Implementing SAS/SHARE Software
These components are described below:
SAS/SHARE Data Provider
The SAS/SHARE data provider enables you to access, update, and manipulate SAS data using OLE DB- and ADO-compliant applications on Windows platforms.
SAS ODBC Driver
The SAS ODBC driver enables you to access, update, and manipulate SAS data from ODBC-compliant applications on Windows platforms.
SAS/SHARE Driver for JDBC
The SAS/SHARE driver for JDBC enables you to write applets, applications, and servlets that access and update SAS data. The Java Tools package that includes the SAS/SHARE driver for JDBC also includes the SAS/CONNECT driver for Java. If you are writing Java programs using these interfaces, you may also want to use the tunnel feature. This optional feature can be used with the Java applets you write to solve some common configuration problems.
SAS/SHARE SQL Library for C
The SAS SQL Library for C provides an application programming interface (API) that enables your applications to send SQL queries and statements through a SAS/SHARE server to data on remote hosts.

Page 231
Appendix AA, Customizing SAS® System Forms
As the SAS Consultant for your site, you have the ability to customize all SAS forms for your operating system. Associated with each form is a list of available printers. Review this information if users at your site require a site customized print form for use in windowing environments, SAS/FSP, SAS/AF, or SAS/ASSIST.
Note: You must have SAS/AF Software licensed to modify the site form.
Customizing the Printer Selection List
Note: This task is optional.
Whenever you create a SAS System form, a list of printers is displayed. You can modify this list to reflect only those printers available for your site. Information on changing the printer selection list has been included in a help file within the SASHELP library. To find out more about customizing this printer list, issue the following command from the windowing environment command line:
af c=sashelp.base.pdevice.cbt
This command displays a series of help screens that provide instructions for adding, deleting, and modifying entries in the PDEVICE Catalog.

232 Installation Instructions and System Manager's Guide for the SAS System under OS/390
Appendix AA, Customizing SAS System Forms

Page 233
Appendix BB, Licensing the SAS® System
Introduction
Use these instructions to renew licensing for an existing SAS System. Some sites may have been notified that the SETINIT received on the installation tape is already expired. If this is the case for your site, enter the SETINIT information you received as part of your installation package into the RENEWPRM member of the CNTL data set before you run the jobs to update your system.
Any change requests for your license parameters may either be called in or submitted in writing on your company's official stationery to our Customer Service Department. These requests include changes to the expiration date, as well as updates of the serial number or CPU model specification when you change your hardware.
Note: Only the authorized SAS representative should change the SETINIT information. Your site designated the SAS representative when you licensed the SAS System.
Processing Renewal of the SAS System
Each SAS software product you install contains a file with a list of SAS statements used to invoke the SETINIT procedure. The data supplied with the SETINIT procedure reflect your current license agreement with SAS. The SETINIT data define the following for the SAS System:
• the product(s) you have licensed • the CPU on which each product is licensed • the corresponding expiration date(s)
Expiration dates are in annual intervals of your license beginning date. When your installation renews its agreement with SAS, you will receive a new SETINIT to update this information.
The job RENEW in the installation control data set applies this new SETINIT. This job uses the RENEWPRM member of the installation control data set as input. All DD statements in the RENEW job should point to your installed production data sets. To apply the new SETINIT, enter the information from the paper SETINIT into the RENEWPRM member of installation control data set and submit the RENEW job.
Note: Every blank space and character is important. You must enter the SETINIT exactly as shown.

234 Installation Instructions and System Manager's Guide for the SAS System under OS/390
Appendix BB, Licensing of the SAS System
The message "NOTE: Siteinfo data have been updated." is printed on the SAS log of the RENEW job when the SETINIT is applied successfully.
If you encounter problems applying the SETINIT, please call our Technical Support Division at (919) 677-8008. Ask the Technical Support receptionist for an MVS consultant. Please have your site number ready when you call.
If you have questions about your SETINIT data, please call the Customer Service Department at (919) 677-8000 between 9:00 a.m. and 8:00 p.m. Eastern Time, SAS business days. Please have your site number ready when you call.
SETINIT Troubleshooting
The following is a list of common error messages and solutions that may occur when attempting to update your SETINIT information. If you still receive errors, contact the Technical Support department at SAS. (Refer to the Transmittal letter enclosed in your installation package for information on contacting the Technical Support department).
ERROR:
ERROR: INCORRECT INFORMATION WAS ENTERED FOR PROC SETINIT. ALL INFORMATION MUST BE ENTERED EXACTLY AS IT APPEARS ON THE PROC SETINIT DATA RECEIVED FROM SAS INSTITUTE.
Or
ERROR: INCORRECT INFORMATION WAS ENTERED FOR THE PASSWORD XXXXXXX
SOLUTION: The SETINIT information in the RENEWPRM member of the CNTLDSN must be entered EXACTLY as it appears on the paper SETINIT. If any text of the SETINIT is not the same, the above error occurs when you attempt to execute the RENEW job.
Note: A common mistake is typing the letter 'O' in place of the numeral zero and vice versa. Also check for any unprintable characters that might appear in the text of the SETINIT information (not '40'x)
ERROR:
THE SAS SYSTEM IS EXECUTING ON A PROCESSOR (CPU) WHOSE MODEL NAME, MODEL NUMBER, AND SERIAL NUMBER ARE NOT INCLUDED IN THE SETINIT DATA USED TO INITIALIZE THE SAS SYSTEM LIBRARY IN USE. THIS IS PERMITTED IF THIS PROCESSOR IS A DESIGNATED BACKUP PROCESSOR FOR A LICENSED CPU. FOR THIS SITE, THE SAS SYSTEM IS LICENSED FOR THE FOLLOWING CPU SERIAL NUMBERS:
MODEL IBM xxxx-xxxx SERIAL NUMBER yyyyyy

Installation Instructions and System Manager's Guide for the SAS System under OS/390 235
Appendix BB, Licensing the SAS System
SOLUTION:
When the SETINIT is executing on a processor that is not included in the SETINIT, the above error message is issued. Be sure that the SAS System is running on the processor indicated in the SETINIT. If your model name, number, or serial number is different than the one listed in the SETINIT, contact your SAS Customer Service Representative for an updated SETINIT.
ERROR:
THE SITE VALIDATION DATA CANNOT BE UPDATED. THIS IS MOST LIKELY DUE TO THE FACT THAT THE SASHELP CATALOG IS NOT AVAILABLE IN WRITE MODE, AND/OR THAT THE SETINIT OPTION HAS NOT BEEN SPECIFIED WHEN USING THE SAS COMMAND.
SOLUTION: The above error indicates that UPDATE access to the SASHELP library was denied. This is most likely due to not specifying the SETINIT option when using DISP=SHR, not having a DISP=OLD, or not having the appropriate access authority (UPDATE required) to the SASHELP library. Make the necessary changes to the RENEW job and resubmit.
OPTIONAL - Creating SASIRENW SETINIT Renewal Utility (Action G)
If your CNTL data set does not contain a RENEW member for updating the licensing information, you can follow the steps documented in Action G to create a customized batch job for updating your licensing information.
Use this procedure to renew licensing for an existing SAS System. Some sites may have been notified that the SETINIT received on the installation tape is already expired. If this is the case for your site, enter the SETINIT information you received as part of your installation package into the RENEWPRM member of the CNTL data set before you run the jobs to update your system.
You will need to run this job for each SASHELP you have in service.
Optional Processing Renewal of the SAS System
Note: This task is required if you received an expired SETINIT. It will create a new member in your CNTL data set called SASIRENW.
STEP 1: Supply SASEDITP parameter values.
Blank out the *NO* that precedes the action name STANDALONE-RENEW. Verify that you have only one action value active. If more than one action is selected, a return code of 12 is set, and error messages specifying the duplicate selections are posted to SYSPRINT and SYSTERM.

236 Installation Instructions and System Manager's Guide for the SAS System under OS/390
Appendix BB, Licensing of the SAS System
Specify the prefix of the SASHELP library to which the SETINIT will be applied. Specify this value as the RENEW-PREFIX value.
IMPORTANT: If Base SAS is not included in &RENEW-PREFIX (&RENEW-PREFIX is a staging prefix which requires license renewal), also supply the following:
RNW-BASE-PFX as the prefix to Release 8.2 of the SAS System containing at least a complete Base SAS. This prefix is not updated, and is only used for execution. Be sure to blank out the *NO* on this line to enable it.
This parameter is contained in the installation ACTION G grouping in SASEDITP.
STEP 2: Edit the RENEWPRM member of the CNTL data set to include the updated SETINIT parameters supplied at license renewal time by SAS.
The information contained in the RENEWPRM member must appear exactly as it does on the renewal text received from SAS in order for the renewal date to be properly updated.
STEP 3: Supply SASIHOLD parameter values.
First modify the jobcard information to reflect those values used by your site. Then modify the procedure parameters as described in the following:
CNTLDSN= specifies the name of the installation CNTL data set you allocated using the IEBUPDTE job in Step 1 of “Unloading the Installation Jobs - Run IEBUPDTE” on page 9 in Part 2, “Installing the SAS System.”
SASEDTP= specifies the name of the CNTL data set member that contains the SASEDITP user site parameter values you have entered to control installation jobs. The default is SASEDITP.
PRODSEL= is not significant for Action G. You may use the default, PRODSEL.
LIBSEL= is not significant for Action G. You may use the default, LIBSEL.
DISKUNI= specifies the unit name at your site for temporary storage.
SYSOUT= defaults to * and specifies the SYSOUT class you want to use for jobs.
Additional values must be updated elsewhere in the SASIHOLD job. Search for the word VERIFY to locate the following additional required changes:

Installation Instructions and System Manager's Guide for the SAS System under OS/390 237
Appendix BB, Licensing the SAS System
SAS procname= provides the name of the cataloged procedure that will invoke SAS at your site.
CNTLDSN= specifies the name of the installation CNTL data set that you allocated using the IEBUPDATE job in Step 1 of “Unloading the Installation Jobs - Run IEBUPDTE,” on page 9 in Part 2, “Installing the SAS System.”
SYSOUT= defaults to * and specifies the SYSOUT class you want to use for jobs.
DISKUNI= specifies the unit name at your site for temporary storage.
STEP 4: Submit the SASIHOLD job.
SASIHOLD will generate a renewal job in the CNTL data set called SASIRENW. Review and submit this job to process renewal of your SAS software. Be sure to check the return code of the SASIRENW job to verify that products have been renewed correctly. Also, be sure to check the SAS log, regardless of the SASIRENW job’s return code.
Note: This full process does not have to be executed every time you update your SETINIT. Once you have created the SASIRENW job, it resides in the CNTL data set. Your update process consists of updating the RENEWPRM member with the new information and resubmitting the SASIRENW job.

238 Installation Instructions and System Manager's Guide for the SAS System under OS/390
Appendix BB, Licensing of the SAS System

Page 239
Appendix CC, Logging Directly on to the SAS® System
OS/390 sites can choose to substitute the SAS System for the standard TSO terminal monitor program. Sites can insulate users from the TSO environment by automatically invoking the SAS System or a SAS application when users log on.
Because the SAS System is running as its own terminal monitor program, TSO commands are not accessible to users.
This technique is intended for OS/390 sites interested in restricting interactive user access to the TSO environment or shielding novice users from having to learn how to work in the mainframe environment. Sites that use this technique also save a little memory.
This appendix describes how to install and use the direct logon procedure, and provides an example. It also discusses the differences between logging onto the SAS System using the windowing environment, using a windowing application, as well as the possibility of using the direct logon process with SAS/CONNECT software.
In most circumstances, only system administrators need to read this appendix. If you are not a system administrator and are interested in logging directly onto the SAS System, see your SAS Software Representative.
Installing the Direct Logon Procedure
When users log onto the system, a JCL stream called a logon procedure (logon proc) is automatically executed. Normally, the logon procedure activates the TSO terminal monitor program that sends the TSO READY prompt to the display when the logon process is complete. To make the SAS System the logon environment, replace this procedure with a logon procedure that activates the SAS System as the terminal monitor program.
To use this capability you must still start TSO. Any user logging onto the SAS System must have a valid TSO userid. However, invoking the SAS System directly results in a reduction of approximately 50K in working set size for each user.
Complete the following steps to allow users to log directly onto the SAS System:
Create a logon procedure that is used by all users directly logging on to the SAS System.
Install the logon procedure into your site’s logon procedure library.
Specify the SAS logon procedure as each user’s logon procedure.

240 Installation Instructions and System Manager's Guide for the SAS System under OS/390
Appendix CC, Logging Directly on to the SAS System
The logon procedure that you create is similar to the standard SAS cataloged procedure. This procedure is in the BAPROC01 member of your site’s CNTL installation data set.
Example Logon Procedure
Example JCL for a logon procedure is shown below. This example is a simplified version of the standard SAS cataloged procedure. Important changes and omissions are summarized after the code.
//SAS8 PROC ENTRY=entry, // OPTIONS= // PRODFIX='sas8.prefix'. // WORK='500,200' //************************************************************* //* PRODUCT: MVS SAS VERSION 8 ** //* DOCUMENTATION: SAS COMPANION FOR THE OS/390 ENVIRONMENT ** //* FROM: SAS INSTITUTE INC., SAS CAMPUS DR., CARY, NC 27513 ** //************************************************************* //SAS8 EXEC PGM=&ENTRY,PARM='&OPTIONS',REGION=4096K //STEPLIB DD DISP=SHR,DSN=&PRODFIX..LIBRARY //CONFIG DD DISP=SHR,DSN=&PRODFIX..CNTL(TSO) //SASAUTOS DD DISP=SHR,DSN=&PRODFIX..AUTOLIB //SASHELP DD DISP=SHR,DSN=&PRODFIX..SASHELP //SASMSG DD DISP=SHR,DSN=&PRODFIX..SASMSG //WORK DD UNIT=SYSDA,SPACE=(6144,(&WORK),,,ROUND), // DCB=(RECFM=FS,LRECL=6144,BLKSIZE=6144,DSORG=PS) //SASPARM DD UNIT=SYSDA,SPACE=(400,(100,300)), // DCB=(RECFM=FB,LRECL=80,BLKSIZE=400,BUFNO=1) //SYSUDUMP DD SYSOUT=* //** ADD A DD STMT LIKE THIS TO CREATE A MACHINE-READABLE DUMP //*SYSMDUMP DD DSN=DUMP,UNIT=SYSDA,DISP=(NEW,CATLG), //* SPACE=(TRK,(20,5))
The following is a summary of the differences between this example logon procedure and the standard SAS cataloged procedure:
Parameters and DD statements that allow user versions of the following files have been removed:
• CONFIG • SASAUTOS (SAS autocall library) • LOAD (STEPLIB concatenation library)
The system CONFIG file is changed to the TSO CONFIG file.
The allocations for the SASLOG, SASCLOG, and SASLIST files are removed. The information written to these files is routed to the user’s windowing environment.
Note: Remember to add any additional allocations that may be needed, such as for the SAS/GRAPH library.

Installation Instructions and System Manager's Guide for the SAS System under OS/390 241
Appendix CC, Logging Directly on to the SAS System
After you have modified the cataloged procedure, install it into the site’s logon procedure library. To enable users to access the SAS direct logon facility, modify their userids to use the modified logon procedure.
Using Direct Logon
You can use the direct logon technique to log onto the windowing environment of the SAS System, or you can choose to log directly onto a windowing application. You can even use this technique in combination with SAS/CONNECT software to log directly onto the SAS System on the mainframe from your workstation.
The purpose of combining the direct logon technique with SAS/CONNECT software is to restrict users that connect to the mainframe from having access to the TSO environment. For information on using SAS/CONNECT software, refer to Communications Access Methods for SAS/CONNECT and SAS/SHARE Software, Version 8.
Logging onto the SAS Display Manager System
Use the example logon previously described. If you need to allocate special files for each user, such as individual SASUSER files, you must create a separate logon procedure for each user because of a system restriction.
Unless you are using the Amdahl Logon Pre-prompt Exit Version 2.7.5, you do not have any control over supplying customized SAS system options, configuration files, or the dynamic allocation of a user’s SASUSER data set to a single logon procedure.
Logging onto a Windowing Application
To log directly onto a windowing application, specify an autoexec file for the application. To do this, add a SASEXEC statement that supplies the data set name of the file containing the autoexec code to the example logon procedure. This SASEXEC statement has the following form:
//SASEXEC DD DISP=SHR,DSN=autoexec-file
For more information on modifying the way in which the SAS System is invoked, see Chapter 1, “Initializing and Configuring the SAS System,” in the SAS Companion for the OS/390 Environment, Version 8.
Restrictions
Using the SAS System as the logon environment implies certain restrictions. For example, because the SAS System is the terminal monitor program, users cannot execute TSO commands or access TSO facilities such as ISPF from their SAS sessions. Nor can users issue the TSO or X command from their SAS sessions to gain access to the TSO environment.

242 Installation Instructions and System Manager's Guide for the SAS System under OS/390
Appendix CC, Logging Directly on to the SAS System
However, the SAS windowing environment contains environment-dependent statements, windows, and a full-function editor that perform many of the same utilities available in ISPF. These services are available to users that log directly onto the SAS System. Users can dynamically allocate any files they are authorized to access using LIBNAME and FILENAME statements. They can also use the INCLUDE command to include external files and members of partitioned data sets into SAS editor windows. For more information on these and other operating-system-dependent language features, see the SAS Companion for the OS/390 Environment, Version 8.
If the logon procedure you have provided includes a DDname assigned to the internal reader, users are able to submit batch jobs from within their SAS sessions.
Accounting Considerations
Substituting the SAS System for the standard IBM terminal monitor program affects records produced by SMF and TSO/MON. SMF type 30, 34, and 35 records have the SAS entry name in the program name field rather than IKJEFT01 or ADFMDF03. Type 32 (TSO command) records are not produced.
If you are using LEGENT Corporation’s TSO/MON product, TSO/MON system records contain complete resource usage, transaction, and response time information, but no command information. TSO/MON command detail records are not produced.

Page 243
Appendix DD, Implementing SAS/TOOLKIT® Software
The SAS/TOOLKIT installation CNTL data set for each language contains sample JCL members that include in-stream cataloged procedures. To make it easier for your users to take advantage of the SAS/TOOLKIT product, you can customize these cataloged procedures for your site and install them in your standard cataloged procedure library.
The member APROC in the &prefix.TOOLKIT.ASM.CNTL library contains the definitions of the cataloged procedures UWASM and UWLINKA. These are needed by SAS/TOOLKIT assembler users.
The member CPROC in the &prefix.TOOLKIT.C.CNTL library contains the definitions of the cataloged procedures UWC, UWCLINK, and UWLINKC. These are needed by SAS/TOOLKIT SAS/C users.
The member PPROC in the &prefix.TOOLKIT.PLI.CNTL library contains the definitions of the cataloged procedures UWPLI and UWLINKP. These are needed by SAS/TOOLKIT PL/I users.
The member FPROC in the &prefix.TOOLKIT.FORT.CNTL library contains the definitions of the cataloged procedures UWFORT and UWLINKF. These are needed by SAS/TOOLKIT FORTRAN users.
In all cases, the procedures are defined as in-stream procedures. You must remove the PEND line as you add each member to the cataloged procedure library at your site. Also, follow the notes in the cataloged procedure text to see where you need to change data set names, entry points, etc. Any lowercase data set names should be changed to the correct data set names for your installation.

244 Installation Instructions and System Manager's Guide for the SAS System under OS/390
Appendix DD, Implementing SAS Toolkit Software

Page 245
Appendix EE, Unloading the Installation Instructions from Tape
These installation instructions for the SAS System are included on the installation tape in text-editor-readable form. A job is provided for you to offload them at your site. The text file containing these instructions does not reside in any of the SAS libraries unloaded from tape during installation. This job reads the instruction text file directly from tape, so a mount of the installation tape is required.
In addition, instructions are available via the following link:
http://www.sas.com/service/admin/mainframe/os390/admindoc.html
Obtaining the Instructions
Note: This task is optional.
STEP 1: Examine the ULINSDOC member of the CNTLDSN. You can specify a data set name other than the default, &prefix.VIEW.INS.MAN.
STEP 2: Submit the ULINSDOC job to allocate the data set and read the documentation from the tape.
STEP 3: Scan the documentation by using a text editor on the SCANTEXT member.
Note: Other members may have been included in the data set.

246 Installation Instructions and System Manager's Guide for the SAS System under OS/390
Appendix EE, Unloading the Installation Instructions from Tape

Page 247
U.S. Government Rights Notice
Reviewing the U.S. Government Rights Notice
If your installation is a United States Government site or a U.S. Government Prime Contractor site, you are responsible for the information contained in a usage rights notice that has been included during installation.
Processing the U.S. Government Rights Notice
Note: This task is required.
Review the U.S. Government Rights Notice information that is contained in the GVTNOTE member of the CNTL data set.

248 Installation Instructions and System Manager's Guide for the SAS System under OS/390