installation instructions auralast exterior door...
TRANSCRIPT

INSTALLATION INSTRUCTIONSAuraLast® Exterior Door Frame Assembly Instructions
NEEDED TOOLS & MATERIALS
pREpARINg ThE FRAME kIT FOR ASSEMbLy
TOOLS REquIRED
•TapeMeasure
•Level
•Hammer
•ScrewGun/Drillw/1/8"DrillBit
•CircularSawandHandSaw
•Router(recommended)orChiselSet
•FramingSquare
•PuttyKnife
•CaulkingGun
MATERIALS REquIRED
•Caulking-highqualityelectrometricorpolyurethane
•Woodshims
•12each#8x2"galvanizedscrews
•8each#8x2-1/2"galvanizedscrews
•Insulationmaterial
•Safetyglasses
•Woodputty
Note: read all iNstructioNs before startiNg.
RoughOpeningIllustration
Walls
Header
Subfloor
Door unit
INSTALLATION INSTRUCTIONSAuraLast® Exterior Door Frame Assembly Instructions
2
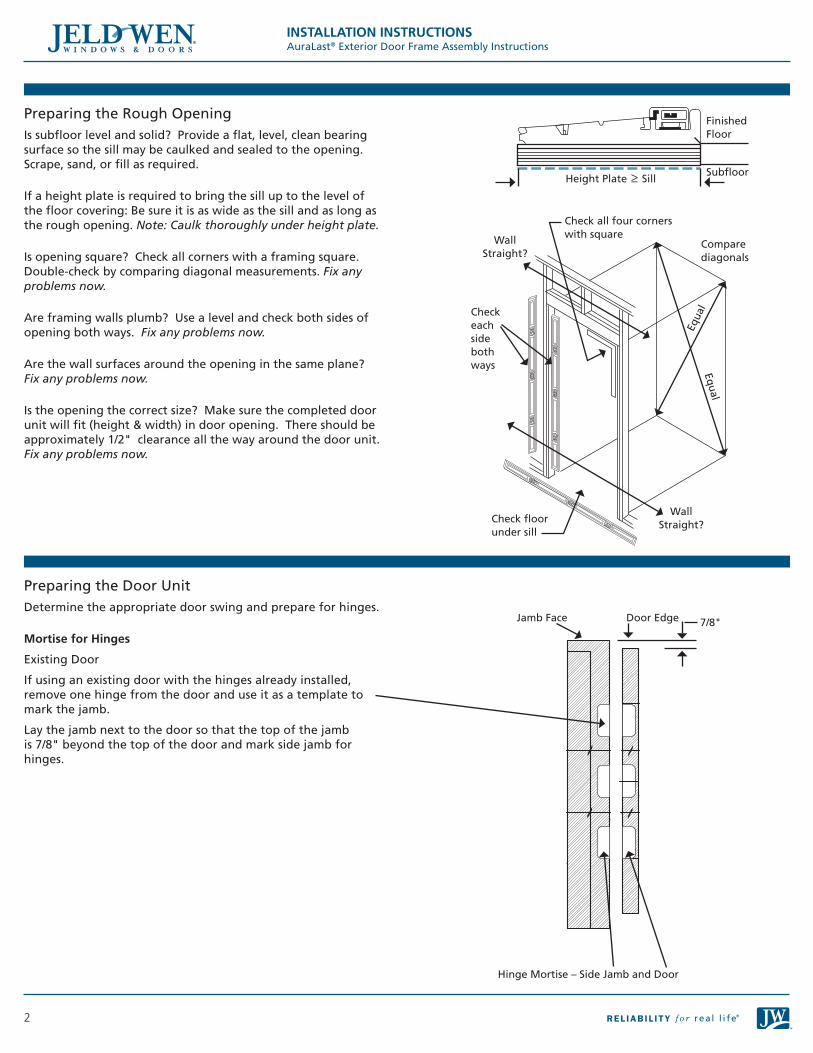
PreparingtheRoughOpeningIssubfloorlevelandsolid?Provideaflat,level,cleanbearingsurfacesothesillmaybecaulkedandsealedtotheopening.Scrape,sand,orfillasrequired.
Ifaheightplateisrequiredtobringthesilluptothelevelofthefloorcovering:Besureitisaswideasthesillandaslongastheroughopening.Note: Caulk thoroughly under height plate.
Isopeningsquare?Checkallcornerswithaframingsquare.Double-checkbycomparingdiagonalmeasurements.Fix any problems now.
Areframingwallsplumb?Usealevelandcheckbothsidesofopeningbothways.Fix any problems now.
Arethewallsurfacesaroundtheopeninginthesameplane?Fix any problems now.
Istheopeningthecorrectsize?Makesurethecompleteddoorunitwillfit(height&width)indooropening.Thereshouldbeapproximately1/2"clearanceallthewayaroundthedoorunit.Fix any problems now.
PreparingtheDoorUnitDeterminetheappropriatedoorswingandprepareforhinges.
Mortise for Hinges
ExistingDoor
Ifusinganexistingdoorwiththehingesalreadyinstalled,removeonehingefromthedooranduseitasatemplatetomarkthejamb.
Laythejambnexttothedoorsothatthetopofthejambis7/8"beyondthetopofthedoorandmarksidejambforhinges.
WallStraight?
WallStraight?
Checkeachsidebothways
Checkallfourcornerswithsquare
Checkfloorundersill
Equa
l
Equal
Comparediagonals
FinishedFloor
SubfloorHeightPlate ≥ Sill
Jamb Face
HingeMortise–SideJambandDoor
DoorEdge 7/8"

INSTALLATION INSTRUCTIONSAuraLast® Exterior Door Frame Assembly Instructions
3
Mortise for Hinges
NewDoor
Ifusinganewdoorandhinges,measurefromthetopofthejambasillustrated.
Placeahingeonthejambbetweenthemarks.Makesurethebarrelisoutfarenoughsothatthedoorcanopenwithoutinterferingwiththetrim.Markthejambattheedgeofthehinge.Measurefromthemarktotheedgeofthejamb.Usethatmeasurementtomarkfortheremaininghinges.
Usearouter-or-hammer&chisel(Note:Makesurethechiselisverysharp)tocreatedthehingemortise.
Routorchiselaroundthehingeoutline.
Routorchiselthehingemortisethesamedepthasthehingeleafthickness.
BevelofChisel
Jamb Face DoorEdge 7/8"
6-3/4"7-5/8"
36"36-7/8"
66-1/8"65-1/4"
HingeBarrel
Clearance
MarkforMeasurement
Door
RoughWall

INSTALLATION INSTRUCTIONSAuraLast® Exterior Door Frame Assembly Instructions
4
DOOR uNIT ASSEMbLy
Door unit Illustration
Frame Assembly IllustrationMostdoorsanddooropeningsarenotconsistentinheightandwidth.Thisframekitisslightlyoversizedinordertoaccommodateforthesevariations.
Theheadjambandsillshouldbecut(1/4"-noless)widerthanthedoorwidth.Theframewidthshouldallowfor(1/8"-noless)reveal.
Cutsidejambs(1/8"-noless)forrevealatthetopandmakesurethelengthallowsforthebottomdoorsweeptocompressslightlyonthesillforaweather-tightfit.
Note: Make sure the reveal is consistent all the way around the door to prevent sticking.
StrikeSideJamb
StrikePlate
HeadJamb
Sill
Reveal-betweendoor&doorframe
1/8"
Bottom-Sill&DoorSweep
Hinges
HingeSideJamb
Door Slab
Note: Hinge & Strike Jamb placement is for illustration purposes only. Depending upon the door in-swing, hinge & strike jamb placement may be reversed.
1/8"
1/8"
1/8"1/8"
1/8"
1/8"

INSTALLATION INSTRUCTIONSAuraLast® Exterior Door Frame Assembly Instructions
5
PreparingforSill&JambHeadPreparing the Sill
Note: the side jambs have been pre-cut to help assist in preparing the sill assembly. depending upon the type of sill (purchased separately - or - existing sill) being used, modifications may have to be made. cut the length of the side jambs (sill end) to properly fit the door height.
Cutthesillendofthesidejambsfortheappropriatelength.Tonotchjambforthesill,placethesillnexttothejambonaflatsurface,makingsuretheinteriorfaceofthesillandjambareinline.Usingthesillasaguide,markalineinthejamb.Removethematerialbelowthelineandflushwithwiderpartofthejambasillustrated.
PreparingtheHeadJambThesidejambshavebeenpre-cutforeasyassemblyofheadjamb.Cutheadjamb(1/4"-noless)widerthethandoorwidth.
Sill&JambHeadAssemblySill
Pre-drillthesidejambsintothesillandapplysealanttothebottomofthesidejambswherethesillistobeattached(asillustrated).
Attachthesidejambstothesillwith#8x2"galvanizedscrews(asillustrated).
HeadJamb Pre-drillanduse#8x2"galvanizedscrewstoattachthesidejambstotheheadjamb(asillustrated).
Hinges Layassembledframeunitdownonlevelsurfaceandattachthedoortotheframewiththehinges.Temporarilysecurethestrikesideofthejamb(shim)tothedoorsothatitremainsinplace.
SillBevel
SillHeight
Woodtoberemoved
Followingthesillprofile,markalineinthejamb
3fasteners
3fastenersHeadJamb
SideJambspre-cutforheadjambassembly
Shimthestrikesidetothedoorforinstallation
Hinges
Applysealantatthesilllocationofsidejambs
Endcutsquare

INSTALLATION INSTRUCTIONSAuraLast® Exterior Door Frame Assembly Instructions
6
DOOR uNIT INSTALLATION
Applythreeormorecontinuousbeadsofcaulkingtothebottomofthesillandsidejambs.
SecureDoorUnittoRoughOpeningRemovetemporarystrikejambshimssothedoorwillopenfreely.
Removethetopscrewfromeachhinge.Pre-drillandreplacewitha#8x2-1/2"screw.Thesescrewswillrunthroughhingejamb,shim,andintotheroughstud(asillustrated).
Strikejamb,pre-drillpilotholesatthetopandbottomshimlocations.Hidescrewlocationsbehindtheweatherstrip(asillustrated).
Checkthedoorunitforconsistentdimensionsbetweentheframeanddoor.Addscrewsifneedforsupportandrevealconsistency.Checkweatherstripcontacttomakesurethedoorsurfacehasequalpressurearoundthewholedoor.Makethenecessaryadjustments.
PlaceDoorUnitinRoughOpeningandShiminPlaceOnhingejamb,shimbehindeachhingeandchecktoensurethedoorunitisplumb,level,andsquare.
Onstrikejamb,shimthetopandbottomandbehindthelocksetlocation.Checktoensurethedoorunitisplumb,level,andsquare.
HingeJamb
Removeshims
#8x2-1/2"Screws
ShimShim
StrikeJamb

INSTALLATION INSTRUCTIONSAuraLast® Exterior Door Frame Assembly Instructions
7
Please visit www.jeld-wen.com/resources for warranty and care and maintenance information.
Thank you for choosing
© 2009, JELD-WEN, inc. | JELD-WEN and Reliability for Real Life are trademarks or registered trademarks of JELD-WEN, inc., Oregon, USA.
All other trademarks are the property of their respective owners.
PrepareandInstallLocksetHardwareTherearemanytypesandvarietiesoflocksethardwareavailable.Preparethestrikejambforthechosenlockset.
Drillpilotholesandsecurestrikeplatewithtwo#8x2-1/2"screwsthroughstrikejamb,shims,andintoroughstud.
Adjuststrikeinoroutforproperdooroperation.
InsulateInsulatearoundedgesofthedoorframewithlooselypackedfiberglassinsulationorlowexpansionfoam.
FinishingForaNaturalWoodFinish-applystainwithanexteriorgradeclearcoatsealant.
-or-
ForaPaintedFinish-applyanexteriorgradelatexpaint.
For Exterior Trim:Purchase our AuraLast Brickmould Kit.
#8x2-1/2"Screws
Shims
16-144 04/09