installation instructions for continuous ink systems …cisinks.com/cisinstall.pdf · installation...
TRANSCRIPT

1
Installation Instructions for Continuous Ink Systems __________________________________________________________________________________________
Table of Contents
GENERAL CISS RULES OF THUMB .....................................................................................................................3
NEW ARTISAN 800-837 CISS RULES OF THUMB ...............................................................................................4
BROTHER PRINTERS WITHOUT CHIPS LC950 LC960 LC11 LC61 LC38 LC37 LC71 LC75 ..........................5
BROTHER LC101 LC103 LC107 LC203 .................................................................................................................8
EPSON:ARTISAN 600 610 700 710 725 800 810 835 837 .................................................................................. 11
EPSON: ARTISAN 50 R260 R280 R380 RX580 RX595 RX680 R200 R220 R300 R320 R340 RX500 RX600 RX620 .................................................................................................................................................................... 14
EPSON NX125 NX127 WORKFORCE 320 WORKFORCE 325 .......................................................................... 17
EPSON NX420 NX430 NX625 ............................................................................................................................ 200
EPSON: C68 CX3810 CX7800 CX5000 CX5000V CX6000 CX7000 CX7000F CX7400 CX7450 CX8400 CX9400 CX9400F (FAX) CX9475F NX415 NX105 NX100 NX115 NX215 NX300 NX305 NX200 NX400 NX510 NX515 WORKFORCE 40 500 600 610 ............................................................................................................... 244
EPSON: 1400 1410 1390 .................................................................................................................................... 277
EPSON T125 T126 T127 CISS INSTALLATION FOR ALL WORKFORCE AND WF SERIES 545 630 633 635 645 840 845 850 3520 3540 7010 7520 WF 520 2 METHODS .......................................................................... 330
Epson T200 Cartridges XP 200 XP 300 XP 400 WF2530 WF2540 WF2630 WF2650 WF2660 XP310 XP410
AND ALL T200,T220&T252 PRINTERS ................................................... ERROR! BOOKMARK NOT DEFINED.5
Epson WF-3620 WF-3640 WF-7610 WF-7620 WF-7110……………………………………………………………38
Epson XP520 XP600 XP610 XP620 XP800 XP810 XP820 XP850 XP860 XP950………………………………………………………………………………………………..40
EPSON R1900 R2000 R2400 R1800 R2880 R3000 INSTALLATION INSTRUCTIONS ................................... 422
HP 02 PHOTOSMART: 8230 8238 8250 8253 8288 3108 3110 3210 3210V 3210XI 3308 3310 3310XI 3313 D5180 D6160 D7145 D7155 D7160 D7245 D7255 D7260 D7263 D7268 D7345 D7355 D7360 D7460 C5140 C5150 C5175 C5180 C5183 C5188 C5190 C6150 C6175 C6180 C6183 C6188 C6240 C6250 C6280 C7180 C7250 C7275 C7280 C7283 C7288 C8150 C8180 C8183 C8721 C8771 C8772 C8773 C8774 C8775 .......... 455
CANON IP4200 IP4300 IP4500 IP5200 IP5200R IP5300 MP500 MP510 MP530 MP800 MP800R MP810 MX850 MP600 MP610 ( WITHOUT CHIP ) ......................................................................................................... 477
CANON IP4200 IP4300 IP4500 IP5200 IP5200R IP5300 MP500 MP510 MP530 MP800 MP800R MP810 MX850 MP600 MP610 IP3600 MP560 MP620 MX860 IP4600 IP4680 MP630 MP640 MP638 IP4700 (WITH CHIPS) ................................................................................................................................................................. 499

2
CANON PGI-225 CLI-226 PIXMA MG5120 MG5200 MG5220 MG5220 RFB MG5320 IX6520 MX712 MX882 MX892 MG6120 MG6220 MG8120 MG8220 BOTH 5 COLOR AND 6 COLOR .................................................. 51
CANON PGI-250 CLI-251 PIXMA MG5420 MG5422 MG5520 MG5522 MG6420 MX722 MX922 IP7220 MG6320 MG7120 IP7250 BOTH 5 COLOR AND 6 COLOR ............................................................................. 533
HP 564 AND HP 920 ........................................................................................................................................... 566
HP 940 OFFICEJET PRO 8000 8500 ................................................................................................................. 588
HP 932/933XL, HP950/951. HP OFFICE JET PRO 6100, 6600. 6700. HP OFFICE JET PRO 8100 & 8600, 8610, 8620 7110 CISS INSTALLATION ................................................................................................................ 60
EPSON REFILLABLE CARTRIDGE .................................................................................................................. 622
HP REFILLABLE CARTRIDGE .......................................................................................................................... 655
CANON REFILLABLE CARTRIDGE .................................................................................................................. 699
BROTHER REFILLABLE CARTRIDGE ............................................................................................................... 71
SCIS SUB CARTRIDGES RULES OF THUMB.................................................................................................. 744
FREQUENTLY ASKED QUESTIONS ................................................................................................................ 766
Please read through the instructions before attempting to install the system into your printer
All Rights Reserved!
3
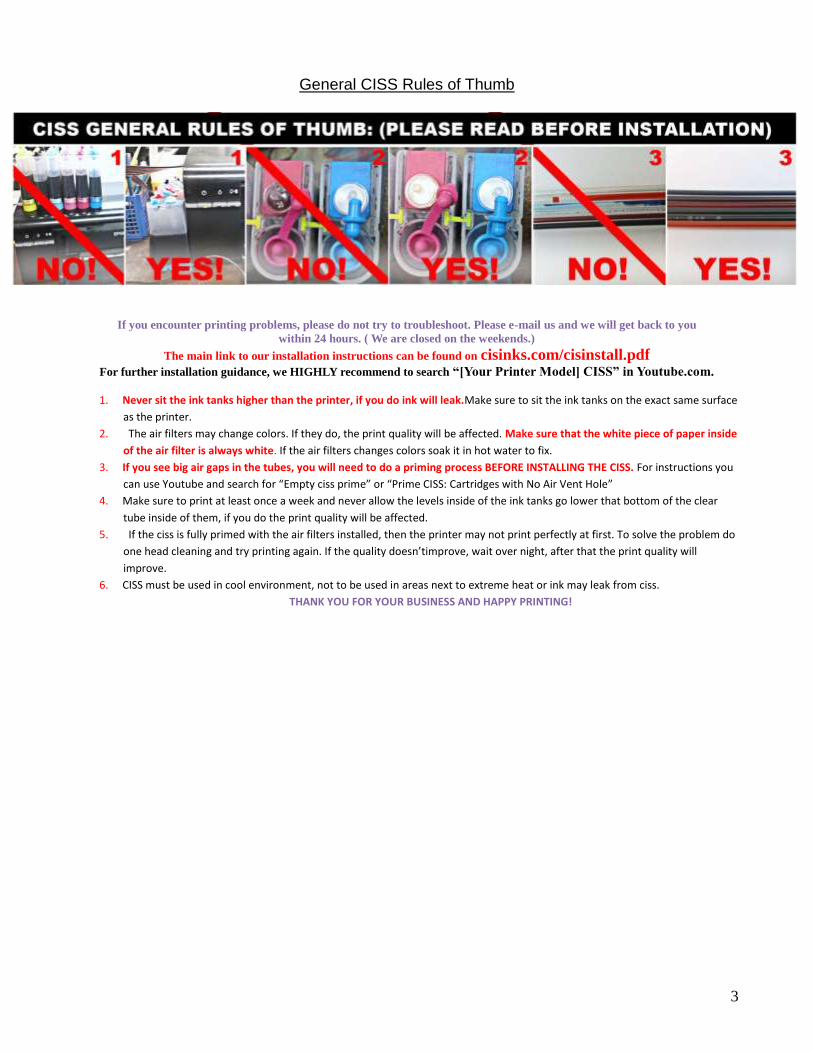
General CISS Rules of Thumb
If you encounter printing problems, please do not try to troubleshoot. Please e-mail us and we will get back to you
within 24 hours. ( We are closed on the weekends.)
The main link to our installation instructions can be found on cisinks.com/cisinstall.pdf
For further installation guidance, we HIGHLY recommend to search “[Your Printer Model] CISS” in Youtube.com.
1. Never sit the ink tanks higher than the printer, if you do ink will leak.Make sure to sit the ink tanks on the exact same surface
as the printer.
2. The air filters may change colors. If they do, the print quality will be affected. Make sure that the white piece of paper inside
of the air filter is always white. If the air filters changes colors soak it in hot water to fix.
3. If you see big air gaps in the tubes, you will need to do a priming process BEFORE INSTALLING THE CISS. For instructions you
can use Youtube and search for “Empty ciss prime” or “Prime CISS: Cartridges with No Air Vent Hole”
4. Make sure to print at least once a week and never allow the levels inside of the ink tanks go lower that bottom of the clear
tube inside of them, if you do the print quality will be affected.
5. If the ciss is fully primed with the air filters installed, then the printer may not print perfectly at first. To solve the problem do
one head cleaning and try printing again. If the quality doesn’timprove, wait over night, after that the print quality will
improve.
6. CISS must be used in cool environment, not to be used in areas next to extreme heat or ink may leak from ciss.
THANK YOU FOR YOUR BUSINESS AND HAPPY PRINTING!
4
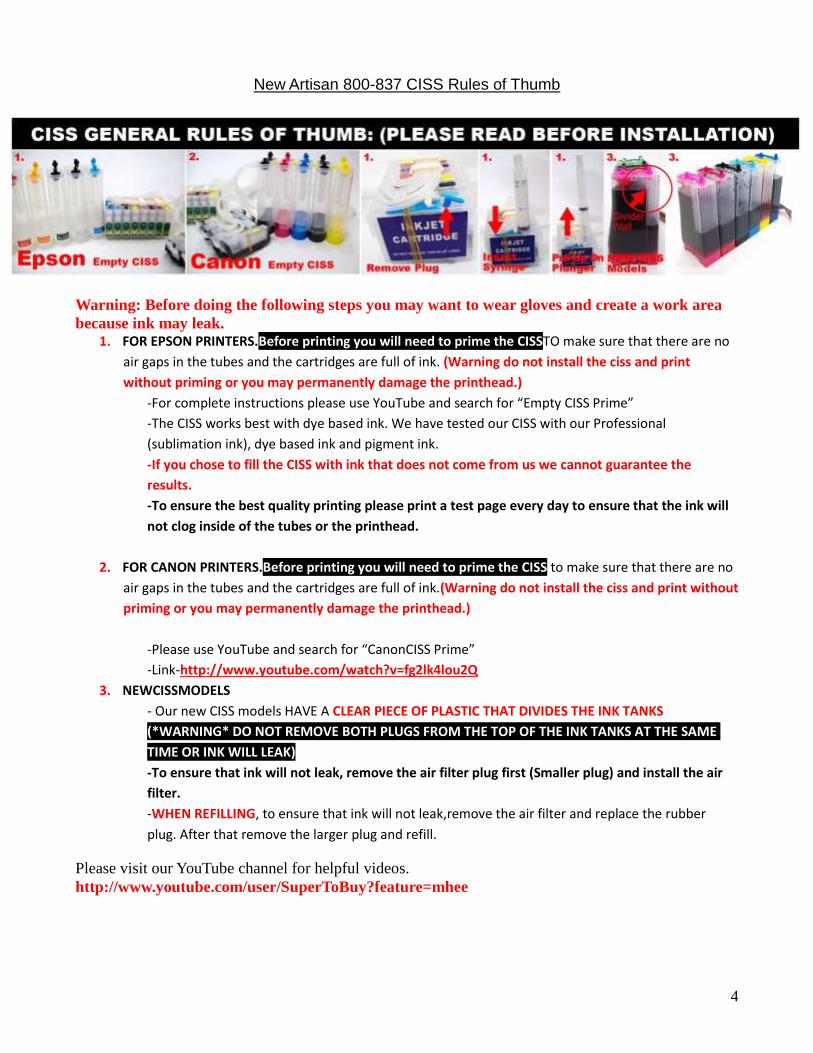
New Artisan 800-837 CISS Rules of Thumb
Warning: Before doing the following steps you may want to wear gloves and create a work area
because ink may leak. 1. FOR EPSON PRINTERS.Before printing you will need to prime the CISSTO make sure that there are no
air gaps in the tubes and the cartridges are full of ink. (Warning do not install the ciss and print
without priming or you may permanently damage the printhead.)
-For complete instructions please use YouTube and search for “Empty CISS Prime”
-The CISS works best with dye based ink. We have tested our CISS with our Professional
(sublimation ink), dye based ink and pigment ink.
-If you chose to fill the CISS with ink that does not come from us we cannot guarantee the
results.
-To ensure the best quality printing please print a test page every day to ensure that the ink will
not clog inside of the tubes or the printhead.
2. FOR CANON PRINTERS.Before printing you will need to prime the CISS to make sure that there are no
air gaps in the tubes and the cartridges are full of ink.(Warning do not install the ciss and print without
priming or you may permanently damage the printhead.)
-Please use YouTube and search for “CanonCISS Prime”
-Link-http://www.youtube.com/watch?v=fg2lk4lou2Q
3. NEWCISSMODELS
- Our new CISS models HAVE A CLEAR PIECE OF PLASTIC THAT DIVIDES THE INK TANKS.
(*WARNING* DO NOT REMOVE BOTH PLUGS FROM THE TOP OF THE INK TANKS AT THE SAME
TIME OR INK WILL LEAK)
-To ensure that ink will not leak, remove the air filter plug first (Smaller plug) and install the air
filter.
-WHEN REFILLING, to ensure that ink will not leak,remove the air filter and replace the rubber
plug. After that remove the larger plug and refill.
Please visit our YouTube channel for helpful videos.
http://www.youtube.com/user/SuperToBuy?feature=mhee

5
Brother printers Without Chips
Please read through the instructions before attempting installation.
The continuous ink supply system is designed as a cost effective and economical way of replacing ink cartridges. The system feeds ink directly into the printers cartridges, without the use of messy needles and ink bottles. After proper installation, the continuous ink system will produce high quality prints and will last up to 5 times longer than standard ink cartridges.
If your printer is brand new then you must first install the original ink cartridges prior to installing the Continuous Ink System. The reason for this is because the printer needs to initialize with the original cartridges. The Continuous Ink System is not able to do that. This will help the Continuous Ink System function a lot better. Open the package and remove all of its contents. You should have the following items: Continuous Ink System. 4 air filters. 1 mounting bracket
Continuous Ink System Brother printer
Check the Continuous Ink System for any leaks or damage. Thoroughly inspect the PVC tubes. It is normal for the tubes to have either air bubbles or ink inside of them. This will not affect the Continuous Ink System.
1. Open the printer cover and carefully remove the empty ink cartridges. Please dispose of them properly. Turn off your printer and wait a few minutes before turning it back on.
2. Before inserting the CIS's cartridges into your printer, carefully lay out all the cartridges and make sure there are no twists or knots in the tubing.
3. Each cartridge is an exact replica of the original cartridges and should fit in perfectly. Insert each cartridge into the corresponding slot. We recommend installing one cartridge at a time. Disconnecting the ink tubes to install the cartridges is NOT recommended. However, you may gently twist around the 'elbow' connector that attaches the tubing to the cartridges to get to the best possible placement.
4. Once the cartridges have all clicked into place, the sensor button within the cartridge bay that detects when the cartridge cover is closed will need to be manipulated. To do so, locate where the sensor button along the outer frame and examine how it behaves. Once found, roll a piece of paper small enough to keep the button compressed, then cut off any excess paper that is not needed.

6
5. To keep the cover closed with the paper contraption sticking out, simply use a small strip of tape to hold the cover close to the printer.
6. Once you've installed all of the cartridges, you'll need to set up the ink tanks. Carefully remove the red caps on the ink tanks and replace them with the air filters provided. Please make sure they're securely in place. The side with the 'star' design and thicker cylinder should be inserted into the ink tanks. You may need to apply a small amount of force to properly fit them in.
7. To straighten out the excess ink tubes outside of your printer, take the tape cover off the small mounting bracket and mount it along the back of the printer. Place the ink tubes inside the bracket and then snap the bracket shut.
8. Choose an convenient area to place the ink tanks. If the ink tanks ever get knocked down, it will cause all the excess ink to spill and create a large pool of ink, so choose an area where they won't be in the way. CAUTION: The ink tanks MUST be at the same level as the printer. It CANNOT be placed higher or lower. This is very important. If you place the ink tank above the printer, gravity and the extra force will cause the ink to drain into your printer. If you place it at a lower level, the ink will not properly feed into the cartridges.
9. You're all done. Close the printer cover and print a few test sheets. Do a head cleaning, nozzle check and alignment if necessary.

7
In the event that you run into certain issues during the installation process, we do have a 'Tech support & FAQ' link on the bottom-right corner of our main page under the “Information” menu. That will take you to a
list of common issues our customers encounter and a solution to each. Please consult with the information in that link for a possible solution before taking any other drastic measures.
Thank you for purchasing the Continuous Ink System.

8
Brother LC101 LC103 LC107
Youtube installation link
https://www.youtube.com/watch?v=mNj_H5M9V5E
You want to make sure that the ink tanks are placed at the same level as the base of the printer. If you
have two desks the tubes can not be hanging from one desk to the other if not excess ink would flow to
the cartridges.
You have to install the air filters onto the external ink tanks if they are not installed you will not see the
cartridges printing since that prevents air from going into the ink tanks to the cartridges.
If the air filter ever gets ink inside of it you are able to clean it by sticking it into a cup of hot water for
20 minutes.
You are not able to jam the printer lid sensor for this particular model so you would have to close the
cover. If the printer has a single paper tray you are able to route the tubes through the bottom of the
cartridge cover.

9
1
0
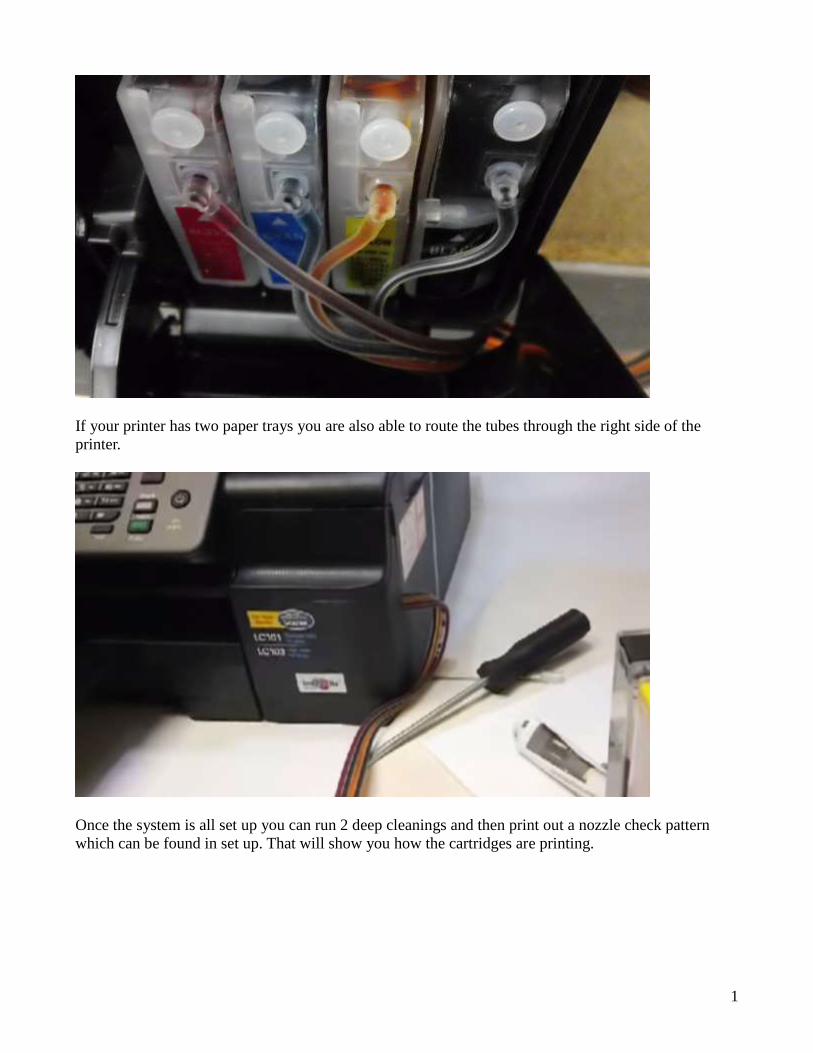
If your printer has two paper trays you are also able to route the tubes through the right side of the
printer.
Once the system is all set up you can run 2 deep cleanings and then print out a nozzle check pattern
which can be found in set up. That will show you how the cartridges are printing.

1
1
Epson:Artisan 600 610 700 710 725 800 810 835 837
The continuous ink supply system is designed as a cost effective and economical way of replacing ink cartridges. The system feeds ink directly into the printers cartridges, without the use of messy needles and ink bottles. After proper installation, the continuous ink system will produce high quality prints and will last up to 5 times longer than standard ink cartridges. PLEASE READ THROUGH THE ENTIRE INSTALLATION INSTRUCTIONS BEFORE ATTEMPTING TO INSTALL THE CONTINUOUS INK SYSTEM.
10. Before you begin, please remove the empty ink cartridges from your printer and dispose of them properly. Turn off and unplug your printer for a few minutes before restarting again. Clean off any excess ink and dust within the cartridge carriage prior to installation of the continuous ink system. 11. Open the box and carefully remove the contents from the package. You should have the following items:
Continuous Ink System.
6 air filters.
1 syringe.
2 mounting brackets (optional for installation)
If you are missing any parts, please contact us as soon as possible. 12. The PVC vinyl tubes attached to the CIS system will carry ink from the ink tanks to the cartridges. Please make sure that they’re free from clogs and knots. Occasionally you will see air bubbles inside the tubes. This is normal and will not affect the CIS system. 13. To begin the installation process, install an air filter into each individual ink reservoir. The side of the air filter with the thicker cylinder will need to be inserted directly into the smaller plug located on top of each ink reservoir. This step allows any air that had inadvertently pressurized while the product was in transit to you to be released from the ink system, thus preventing any ink from leaking.
→ 14. Open the printer lid to begin installation of the cartridges into the carriage bay. Compare the order of the cartridges to the order required by the printer to ensure the appropriate alignment. Insert the entire cartridge set together at once, pushing firmly on top of each individual cartridge to ensure proper seating (indicated by a distinct “click” sound made when each cartridge is secured in place). If the cartridges do not seat properly, push forward gently on the “arm” of each cartridge until the cartridges are secured (NOTE: the arms are delicate and will break if too much force is applied).

1
2
15. With the cartridges properly seated, close the printer cover to begin the recognition of the cartridges by your printer. Please wait a few moments while your printer adjusts to the new cartridges and recognizes the new ink levels. In the meantime, you may want to begin routing the external ink tubes using the provided mounting clip for better organization of
the larger ink reservoirs.
16. Remove the red film that is covering the sticking adhesive and attach the clip to the back corner on the right-side the printer where the ink reservoirs are placed. Run the ink tubes along the external wall of the printer and snap the clip shut, keeping everything in line.
--> 17. Arrange the large ink reservoirs to the side of the printing, making sure the tanks are resting on the same platform that the printer is on. CAUTION: The ink tanks MUST be at the same level as the printer. If the ink tanks are placed too high above the printer, ink will gradually leak out of the cartridges over time due to the gravitational pull slowly forcing the ink out. It is also important to note that ink can leak out if the reservoirs accidentally fall or are tipped over, so please choose a convenient place for the reservoirs away from any potential pitfalls.
18. Congratulations, you've completed the installation process. Close the printer cover and print a few test pages to allow the printer to pull ink out from every color cartridge. Do a nozzle check, head cleaning and alignment if necessary.

1
3
In the event that you run into certain issues during the installation process, we do have a 'Tech support & FAQ' link on the bottom-right corner of our main page under the “Information” menu. That will take you to a list of common issues our customers encounter and a solution to each. Please consult with the information on that link for a possible solution before taking any drastic measures. You may also contact any of our customer service representatives for any troubleshooting assistance either via e-mail or over the phone. All contact information is provided on the invoice included with your package.
Thank you for purchasing the Continuous Ink System.

1
4
Epson: Artisan 50 R260 R280 R380 RX580 RX595 RX680 R200 R220 R300 R320 R340 RX500
RX600 RX620
The continuous ink supply system is designed as a cost effective and economical way of replacing ink cartridges. The system feeds ink directly into the printers cartridges, without the use of messy needles and ink bottles. After proper installation, the continuous ink system will produce high quality prints and will last up to 5 times longer than standard ink cartridges. PLEASE READ THROUGH THE ENTIRE INSTALLATION INSTRUCTIONS BEFORE ATTEMPTING TO INSTALL THE CONTINUOUS INK SYSTEM.
19. Before you begin, please remove the empty ink cartridges from your printer and dispose of them properly. Turn off your printer and wait a few minutes before restarting again. Clean off any excess ink and dust around the printer head / nozzle. 20. Open the box and carefully remove the contents from the package. You should have the following items:
Continuous Ink System.
Instruction booklet.
6 air filters.
1 syringe.
1 small bag of replacement parts. If you are missing any parts, please contact us.
21. The PVC vinyl tubes attached to the CIS system will carry ink from the ink tanks to the cartridges. Please make sure that they’re free from clogs and knots. Occasionally you will see air bubbles inside the tubes. This is normal and will not affect the CIS system. 22. To begin the installation process, you must first have your printer head in the correct “ink replacement position”. Please follow your printer manufacturers instructions on how to do this. 23. Once the printer head is in the correct position, you’ll need to remove the lid of the printer head. You can do this by inserting a flathead screwdriver into the hinges and prying off a small black clip. Do this carefully to avoid any permanent damage to your printer.
24. Before inserting the cartridges into the printer head, you must place air filters onto the ink tanks. Carefully remove the red caps on the ink tanks and replace them with the air filters provided. Please double check to make sure that the air filters are securely in place.

1
5
25. With the lid of the printer head off and the air filters installed, you are now ready to insert the cartridges into the printer head. Carefully examine the printers interior before beginning. You must leave enough free space for the CIS’s tubes and the printer head to freely move back and forth. 26. Each printer model varies in design. Some models will have a small plastic bridge that will block the CIS's tubing. Some models do not. If your printer has a bridge then we suggest placing the CIS's tubes under the plastic bridge so the printer head can move efficiently, without interruption. To do this, you must first manually push the printer head to the left, then slide the cartridges and tubing underneath the plastic bridge and then manually push the printer head back to the right side. Make sure the tubing stays flat and is not twisted or tangled. If your printer does not have the plastic bridge, you may proceed to the next step.

1
6
27. Now that the tubing is in place, you may insert the cartridges into the printer head. The ink cartridges are held in place by the CIS's tubing. Each color sticker should align with the color codes on your printer head. Remove the rubber bands from the cartridges. Carefully place the ink cartridges inside the printer head. Firmly press down on each individual cartridge, making sure that they're securely in place. 28. Once you've installed the cartridges, you'll need to figure where to place the excess tubing. Remember that you MUST leave enough tubing for the printer head to move back and forth easily. The most common area to place the tubing is about 6 inches to the left of the printer head. We recommend that you manually move the printer head back and forth to see if the tubing interferes with its path.
29. Now that you've chosen a place to hold down the tubing, use the small plastic clips provided to hold the tubing down. The clips have adhesive tape on them so that you may attach them to your printer.
30. Choose an convenient area to place the ink tanks. If the ink tanks ever get knocked down, it will be a big mess, so choose an area where they won't be in the way. CAUTION: The ink tanks MUST be at the same level as the printer head. It CANNOT be placed higher or lower. This is very important. If you place the ink tank above the printer, the ink will drain into your printer. If you place it at a lower level, the ink will not feed into the cartridges.
31. Congratulations, you've completed the installation process. Close the printer cover and print a few test pages. Do a nozzle check, head cleaning and alignment if necessary.
Thank you for purchasing the Continuous Ink System.

17
Epson NX125 NX127 Workforce 320 Workforce 325 The continuous ink supply system is designed as a cost effective and economical way of replacing ink cartridges. The system feeds ink directly into the printers cartridges, without the use of messy needles and ink bottles. After proper installation, the continuous ink system will produce high quality prints and will last up to 5 times longer than standard ink cartridges.
PLEASE READ THROUGH THE ENTIRE INSTALLATION INSTRUCTIONS BEFORE ATTEMPTING TO INSTALL THE CONTINUOUS INK SYSTEM. 1. Before you begin, we recommend to watch the installation video on the original listing. This will
provide you with a better understanding on how to proceed with your installation. 2. Open your box and inspect the contents. You should have received:
Continuous Ink System w/ attached Chip Hub
Instruction booklet
USB to Mini-USB cable
4 Air Filters
Syringe(s) and Needle(s)
T-Bracket
Clamp Bracket 3. If you are missing any parts, please contact us. 4. The PVC vinyl tubes attached to the CIS system will carry ink from the ink tanks to the cartridges. Please
make sure that they’re free from clogs and knots. Occasionally you will see air bubbles inside the tubes.
This is normal and will not affect the CIS system.
5. To begin the installation process, you will have to remove your original cartridges.
6. Locate the ‘Chip Hub’ on the side of the ‘ink tank reservoirs’. There are slots on the hub where have to
install the correct color chip into them. Carefully remove the chip off of the original cartridges with a small exact-o knife ONE AT A TIME to ensure that you don’t mix up the chips. Afterward, remove the chip lid on the chip hub and insert the correct chip into the respective slots. Replace the chip lid to secure the chip into place.
These are the correct chips for the respective slots (starting from the slot closest to the bottom of the ink reservoir base.)
Slot 1 = Cyan Slot 2 = Yellow Slot 3 = Magenta
18
Slot 4 = Black
7. On top of the ink tank reservoirs, there are two plugs for each color. The smaller plug is for the ‘air vent’ and the larger plug is where you would insert more ink when you are low. Remove the ‘air vent plug’ and insert the air filters, with the thicker side going down. It fit snuggly into place.
8. To install the CISS system, you must first have your printer head in the correct “ink replacement position”. Please follow your printer manufacturers instructions on how to do this.
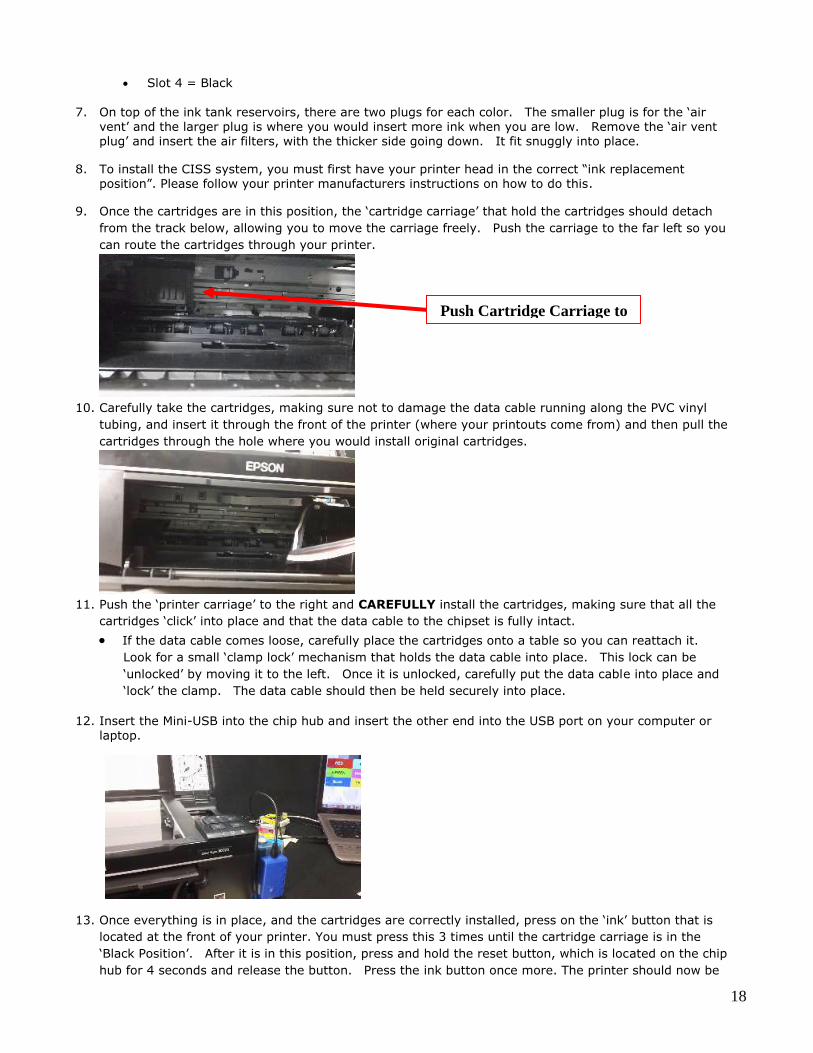
9. Once the cartridges are in this position, the ‘cartridge carriage’ that hold the cartridges should detach
from the track below, allowing you to move the carriage freely. Push the carriage to the far left so you
can route the cartridges through your printer.
10. Carefully take the cartridges, making sure not to damage the data cable running along the PVC vinyl
tubing, and insert it through the front of the printer (where your printouts come from) and then pull the
cartridges through the hole where you would install original cartridges.
11. Push the ‘printer carriage’ to the right and CAREFULLY install the cartridges, making sure that all the
cartridges ‘click’ into place and that the data cable to the chipset is fully intact.
If the data cable comes loose, carefully place the cartridges onto a table so you can reattach it.
Look for a small ‘clamp lock’ mechanism that holds the data cable into place. This lock can be
‘unlocked’ by moving it to the left. Once it is unlocked, carefully put the data cable into place and
‘lock’ the clamp. The data cable should then be held securely into place.
12. Insert the Mini-USB into the chip hub and insert the other end into the USB port on your computer or laptop.
13. Once everything is in place, and the cartridges are correctly installed, press on the ‘ink’ button that is
located at the front of your printer. You must press this 3 times until the cartridge carriage is in the
‘Black Position’. After it is in this position, press and hold the reset button, which is located on the chip
hub for 4 seconds and release the button. Press the ink button once more. The printer should now be
Push Cartridge Carriage to
left
19
charging the ink from the cartridges. This step might have to be repeated a few times before the printer
can properly recognize the cartridges. If for whatever reason the printer does not move into position,
unplug the printer and repeat this process. TIP: If for some reason your ‘cartridge carriage’ is not moving after pressing the ‘ink button’, try
moving it through the ‘Ink Cartridge Replacement’ option found in the Maintenance Tab under ‘Printing
Preferences’. 14. If you are successful with this procedure, the printer should start to ‘charge’ the ink cartridges and the
‘cartridge carriage’ will begin to move left and right. BE SURE TO PREVENT THE PVC TUBING FROM
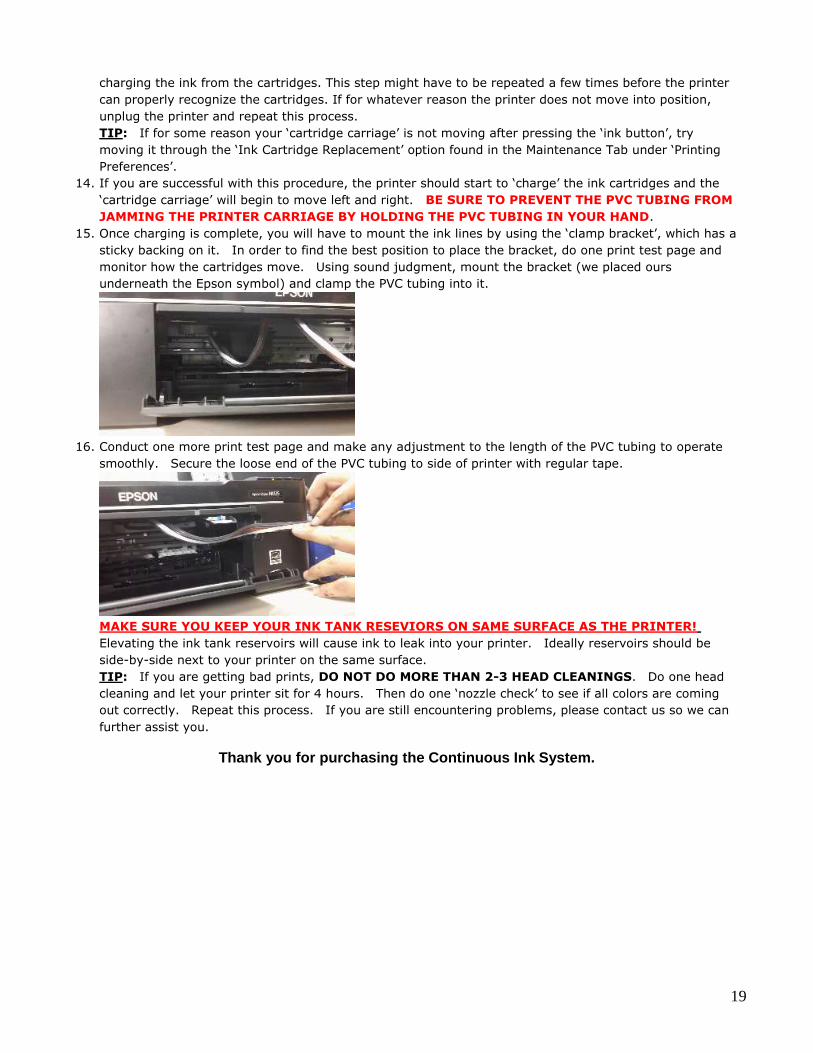
JAMMING THE PRINTER CARRIAGE BY HOLDING THE PVC TUBING IN YOUR HAND. 15. Once charging is complete, you will have to mount the ink lines by using the ‘clamp bracket’, which has a
sticky backing on it. In order to find the best position to place the bracket, do one print test page and
monitor how the cartridges move. Using sound judgment, mount the bracket (we placed ours
underneath the Epson symbol) and clamp the PVC tubing into it.
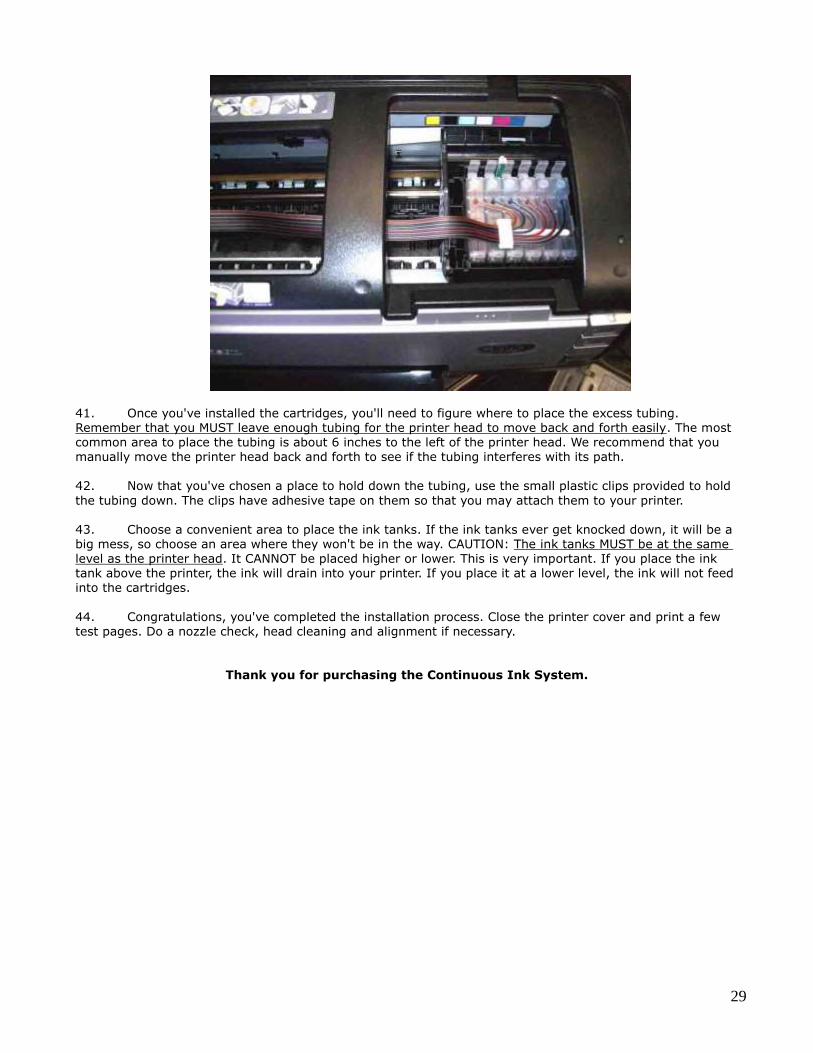
16. Conduct one more print test page and make any adjustment to the length of the PVC tubing to operate
smoothly. Secure the loose end of the PVC tubing to side of printer with regular tape.
MAKE SURE YOU KEEP YOUR INK TANK RESEVIORS ON SAME SURFACE AS THE PRINTER!
Elevating the ink tank reservoirs will cause ink to leak into your printer. Ideally reservoirs should be
side-by-side next to your printer on the same surface.
TIP: If you are getting bad prints, DO NOT DO MORE THAN 2-3 HEAD CLEANINGS. Do one head
cleaning and let your printer sit for 4 hours. Then do one ‘nozzle check’ to see if all colors are coming
out correctly. Repeat this process. If you are still encountering problems, please contact us so we can
further assist you.
Thank you for purchasing the Continuous Ink System.

20
Epson NX420 NX430 NX625
The continuous ink supply system is designed as a cost effective and economical way of replacing ink cartridges. The system feeds ink directly into the printers cartridges, without the use of messy needles and ink bottles. After proper installation, the continuous ink system will produce high quality prints and will last up to 5 times longer than standard ink cartridges.
THIS SYSTEM WILL REQUIRE MODIFICATIONS THAT WILL VOID YOUR PRINTER MANUFACTUER WARRANTY. PLEASE DO NOT PROCEED WITH
INSTALLATION IF YOU ARE UNWILLING TO MODIFY YOUR PRINTER. PLEASE READ THROUGH THE ENTIRE INSTALLATION INSTRUCTIONS BEFORE ATTEMPTING TO INSTALL THE CONTINUOUS INK SYSTEM.
17. Before you begin, we recommend to watch the installation video on the original listing. This will
provide you with a better understanding on how to proceed with your installation. 18. INSPECT ITEMS: Open your box and inspect the contents. You should have received:
Continuous Ink System w/ attached Chip Hub
Instruction booklet
USB to Mini-USB cable
4 Air Filters
Syringe(s) and Needle(s)
T-Bracket
Clamp Bracket 19. If you are missing any parts, please contact us. 20. The PVC vinyl tubes attached to the CIS system will carry ink from the ink tanks to the cartridges. Please
make sure that they’re free from clogs and knots. Occasionally you will see air bubbles inside the tubes.
This is normal and will not affect the CIS system.
21. To begin the installation process, you will have to remove your original cartridges.
22. INSTALL ORGINAL CHIPS INTO CHIP HUB: Locate the ‘Chip Hub’ on the side of the ‘ink tank
reservoirs’. There are slots on the hub where have to install the correct color chip into them. Carefully remove the chip off of the original cartridges with a small exact-o knife ONE AT A TIME to ensure that you don’t mix up the chips. Afterward, remove the chip lid on the chip hub and insert the correct chip into the respective slots. Replace the chip lid to secure the chip into place.
These are the correct chips for the respective slots (starting from the slot closest to the bottom of the
ink reservoir base.)
Slot 1 = BLACK Slot 2 = YELLOW
Slot 3 = MAGENTA
Slot 4 = CYAN
23. To install the CISS system, you must first have your printer head in the correct “ink replacement
position”. Please follow your printer manufacturers instructions on how to do this.
24. REMOVE CARTRDIGE COVER LID: Locate the left-hinge that holds the lid down. Use a needle-nose pliers to hold this hinge down, while using your free hand to push on the right-side of the cartridge to the left while stabilizing the pliers with the thumb of the free hand. Most likely the hinge will break right off.

21
25. MODIFY CARTRIDGE CARRIAGE: The printer is designed to prevent the PVC tubing from moving
freely, so you would have to cut into the ‘left-side’ of the cartridge carriage wall to prevent the tubing from kinking when the carriage moves to the left as it prints. There are various ways you can do this. Ideally, using a dremel tool will allow you to make clean cuts. You can also use needle-nose pliers to stabilize the back-side of the wall and use regular pliers to ‘snap’ and ‘bend’ the front-end of the wall off.
In either method, be sure to catch any shavings for broken pieces by placing a napkin inside of the
printer. Be sure to cut away enough so that the PVC tubing won’t have to ‘climb’ up the side of the carriage and that there are no sharp edges.
We are not responsible for improperly handling this part of the procedure.
26. REINFORCE DATA CABLE TO PVC TUBING: It is important to not damage the data cable or the
system will no longer work. Straighten the data cable and use regular tape to reinforce it to the PVC
tubing.

22
27. INSTALL CISS SYSTEM: Once the cartridges are in this position, the ‘cartridge carriage’ that hold the
cartridges should detach from the track below, allowing you to move the carriage freely. Push the
carriage to the far left so you can route the cartridges through your printer.
Install cartridges into ‘cartridge carriage’.
28. MODIFY T-BRACKET – Remove the sticking backing on the T-Bracket and cut off the end of the long T-
bracket (you can use a needle-nose pliers and the regular pliers to bend it off) so that that it is flush with
the bottom part of the bracket. Then reattach the T-bracket back on with the same sticking backing.
Place the T-bracket in position shown in picture below.
29. ROUTE PVC TUBING: Push the ‘cartridge carriage’ to the far left (your cartridges should already be
installed) and Route the PVC Tubing AND the data cable (being sure to not damage it) through the T-
Bracket as shown below.
If the data cable comes loose, carefully place the cartridges onto a table so you can reattach it.
Look for a small ‘clamp lock’ mechanism that holds the data cable into place. This lock can be

23
‘unlocked’ by moving it to the left. Once it is unlocked, carefully put the data cable into place and
‘lock’ the clamp. The data cable should then be held securely into place.
30. TEST AND ADJUST LENGTH OF PVC TUBING: Move the ‘cartridge carriage’ Left and Right multiple
times and readjust the length of the tubing isn’t too long to cause the carriage to jam or too short to pull on the cartridges. Make adjustment to length of tubing if necessary. Use your ‘clamp bracket’ to secure the PVC tubing to the side of the printer.
31. INSTALL AIR FILTERS: On top of the ink tank reservoirs, there are two plugs for each color. The
smaller plug is for the ‘air vent’ and the larger plug is where you would insert more ink when you are low. Remove the ‘air vent plug’ and insert the air filters, with the thicker side going down. It will fit snuggly into place. BEFORE DOING SO, TILT THE RESEVIOR SO THAT THE ‘AIR POCKET’ IS UDNERNEATH THE PLUG WHERE THE AIR FILTER GOES TO PREVENT INK FROM LEAKING.
32. INSTALL POWER SUPPLY TO CHIP-HUB: Insert the Mini-USB into the chip hub and insert the other end into the USB port on your computer or laptop.
33. FINALIZE INSTALLATION PROCEDURE: Now you can finalize your cartridge replacement procedure.
If you are successful with this procedure, the printer should start to ‘charge’ the ink cartridges and the
‘cartridge carriage’ will begin to move left and right.
34. FINAL ADJUSTMENTS: Conduct a print test page and make any adjustment to the length of the PVC
tubing to operate smoothly. MAKE SURE YOU KEEP YOUR INK TANK RESEVIORS ON SAME SURFACE AS THE PRINTER!
Elevating the ink tank reservoirs will cause ink to leak into your printer. Ideally reservoirs should be
side-by-side next to your printer on the same surface.
TIP: If you are getting bad prints, DO NOT DO MORE THAN 2-3 HEAD CLEANINGS. Do one head
cleaning and let your printer sit for 4 hours. Then do one ‘nozzle check’ to see if all colors are coming
out correctly. Repeat this process. If you are still encountering problems, please contact us so we can
further assist you.
Thank you for purchasing the Continuous Ink System.

24
Epson: C68 CX3810 CX7800 CX5000 CX5000V CX6000 CX7000 CX7000F CX7400 CX7450 CX8400 CX9400 CX9400F (fax) CX9475F NX415 NX105 NX100
NX115 NX215 NX300 NX305 NX200 NX400 NX510 NX515 Workforce 40 500 600 610
The continuous ink supply system is designed as a cost effective and economical way of replacing ink cartridges. The system feeds ink directly into the printers cartridges, without the use of messy needles and ink bottles. After proper installation, the continuous ink system will produce high quality prints and will last up to 5 times longer than standard ink cartridges. PLEASE READ THROUGH THE ENTIRE INSTALLATION INSTRUCTIONS BEFORE ATTEMPTING TO INSTALL THE CONTINUOUS INK SYSTEM.
1. Before you begin, please remove the empty ink cartridges from your printer and dispose of them properly. Turn off your printer and wait a few minutes before restarting again. Clean off any excess ink and dust around the printer head / nozzle.
2. Open the box and carefully remove the contents from the package. You should have the following items:
Continuous Ink System.
Instruction booklet.
6 air filters.
1 syringe.
1 small bag of replacement parts. If you are missing any parts, please contact us.
3. The PVC vinyl tubes attached to the CIS system will carry ink from the ink tanks to the cartridges. Please make sure that they’re free from clogs and knots. Occasionally you will see air bubbles inside the tubes. This is normal and will not affect the CIS system.
4. To begin the installation process, you must first have your printer head in the correct “ink replacement position”. Please follow your printer manufacturers instructions on how to do this.
5. Once the printer head is in the correct position, you’ll need to remove the lid of the printer head. You can do this by inserting a flathead screwdriver into the hinges and prying off a small black clip. Do this carefully to avoid any permanent damage to your printer. Please see pictures below.
6. Before inserting the cartridges into the printer head, you must place air filters onto the ink tanks. Carefully remove the red caps on the ink tanks and replace them with the air filters provided. Please double check to make sure that the air filters are securely in place.

25
7. With the lid of the printer head off and the air filters installed, you are now ready to insert the cartridges into the printer head. Carefully examine the printers interior before beginning. You must leave enough free space for the CIS’s tubes and the printer head to freely move back and forth.
8. Each printer model varies in design. Some models will have a small piece of plastic that will block the CIS's tubing. Some models do not. We suggest placing the CIS's tubes under the piece of plastic for the printer head to move efficiently, without interruption. To do this, you must first manually push the printer head to the left, then slide the cartridges and tubing underneath the plastic arm and then manually push the printer head back to the right side. Make sure the tubing stays flat and is not twisted or tangled. Please see picture below.
9. Now that the tubing is in place, you may insert the cartridges into the printer head. The ink cartridges are held in place by the CIS's tubing. Each color sticker should align with the color codes on your printer head. Remove the rubber bands from the cartridges. Carefully place the ink cartridges inside the printer head. Firmly press down on each individual cartridge, making sure that they're securely in place.

26
10. Once you've installed the cartridges, you'll need to figure where to place the excess tubing. Remember that you MUST leave enough tubing for the printer head to move back and forth easily. The most common area to place the tubing is about 6 inches to the left of the printer head. We recommend that you manually move the printer head back and forth to see if the tubing interferes with its path.
11. Now that you've chosen a place to hold down the tubing, use the small plastic clips provided to hold the tubing down. The clips have adhesive tape on them so that you may attach them to your printer.
12. Choose an convenient area to place the ink tanks. If the ink tanks ever get knocked down, it will be a big mess, so choose an area where they won't be in the way. CAUTION: The ink tanks MUST be at the same level as the printer head. It CANNOT be placed higher or lower. This is very important. If you place the ink tank above the printer, the ink will drain into your printer. If you place it at a lower level, the ink will not feed into the cartridges.
13. Congratulations, you've completed the installation process. Close the printer cover and print a few test pages. Do a nozzle check, head cleaning and alignment if necessary.
Thank you for purchasing the Continuous Ink System.

27
Epson: 1400 1410 1390 The continuous ink supply system is designed as a cost effective and economical way of replacing ink cartridges. The system feeds ink directly into the printers cartridges, without the use of messy needles and ink bottles. After proper installation, the continuous ink system will produce high quality prints and will last up to 5 times longer than standard ink cartridges.
PLEASE READ THROUGH THE ENTIRE INSTALLATION INSTRUCTIONS BEFORE ATTEMPTING TO INSTALL THE CONTINUOUS INK SYSTEM.
32. Before you begin, please remove the empty ink cartridges from your printer and dispose of them properly. Turn off your printer and wait a few minutes before restarting again. Clean off any excess ink and dust around the printer head / nozzle.
33. Open the box and carefully remove the contents from the package. You should have the following
items: Continuous Ink System. Instruction booklet. 6 air filters. 1 syringe.
1 small bag of replacement parts. If you are missing any parts, please contact us.
34. The PVC vinyl tubes attached to the CIS system will carry ink from the ink tanks to the cartridges. Please make sure that they’re free from clogs and knots. Occasionally you will see air bubbles inside the
tubes. This is normal and will not affect the CIS system. 35. To begin the installation process, you must first have your printer head in the correct “ink
replacement position”. Please follow your printer manufacturers instructions on how to do this. 36. Once the printer head is in the correct position, you’ll need to remove the lid of the printer head. You can do this by inserting a flathead screwdriver into the hinges and prying off a small black clip. Do this
carefully to avoid any permanent damage to your printer.
37. Before inserting the cartridges into the printer head, you must place air filters onto the ink tanks. Carefully remove the red caps on the ink tanks and replace them with the air filters provided. Please double check to make sure that the air filters are securely in place.

28
38. With the lid of the printer head off and the air filters installed, you are now ready to insert the cartridges into the printer head. Carefully examine the printers interior before beginning. You must leave enough free space for the CIS’s tubes and the printer head to freely move back and forth. 39. We suggest placing the CIS's tubes under the plastic bridge so the printer head can move efficiently, without interruption. To do this, you must first manually push the printer head to the left, then slide the cartridges and tubing underneath the plastic bridge and then manually push the printer head back to the
right side. Make sure the tubing stays flat and is not twisted or tangled. If your printer does not have the plastic bridge, you may proceed to the next step.
40. Now that the tubing is in place, you may insert the cartridges into the printer head. The ink
cartridges are held in place by the CIS's tubing. Each color sticker should align with the color codes on your printer head. Remove the rubber bands from the cartridges. Carefully place the ink cartridges inside the printer head. Firmly press down on each individual cartridge, making sure that they're securely in place.
29
41. Once you've installed the cartridges, you'll need to figure where to place the excess tubing. Remember that you MUST leave enough tubing for the printer head to move back and forth easily. The most common area to place the tubing is about 6 inches to the left of the printer head. We recommend that you manually move the printer head back and forth to see if the tubing interferes with its path.
42. Now that you've chosen a place to hold down the tubing, use the small plastic clips provided to hold
the tubing down. The clips have adhesive tape on them so that you may attach them to your printer.
43. Choose a convenient area to place the ink tanks. If the ink tanks ever get knocked down, it will be a big mess, so choose an area where they won't be in the way. CAUTION: The ink tanks MUST be at the same
level as the printer head. It CANNOT be placed higher or lower. This is very important. If you place the ink tank above the printer, the ink will drain into your printer. If you place it at a lower level, the ink will not feed into the cartridges.
44. Congratulations, you've completed the installation process. Close the printer cover and print a few test pages. Do a nozzle check, head cleaning and alignment if necessary.
Thank you for purchasing the Continuous Ink System.

30
Workforce 60 545 630 633 635 840 845 PLEASE READ THROUGH THE ENTIRE INSTALLATION INSTRUCTIONS BEFORE ATTEMPTING TO INSTALL THE CONTINUOUS INK SYSTEM. Before you begin, please remove the empty ink cartridges from your printer and dispose of them properly. Turn off and unplug your printer for a few minutes before restarting again. Clean off any excess ink and dust within the cartridge carriage prior to installation of the continuous ink system. Open the box and carefully remove the contents from the package. You should have the following items: Continuous Ink System. 6 air filters. 1 syringe 2 mounting brackets (optional for installation) The PVC vinyl tubes attached to the CIS system will carry ink from the ink tanks to the cartridges. Please make sure that they’re free from clogs and knots. Occasionally you will see air bubbles inside the tubes. This is normal and will not affect the CIS system. To begin the installation process, install an air filter into each individual ink reservoir. The side of the air filter with the thicker cylinder will need to be inserted directly into the smaller plug located on top of each ink reservoir. This step allows any air that had inadvertently pressurized while the product was in transit to you to be released from the ink system, thus preventing any ink from leaking.
The following step requires you to break off the cartridge carriage lid in order to be able to accommodate the tubing that is attached to the continuous system. Breaking off the cartridge lid will void your warranty, so beware. Initialize the cartridge replacement procedure by pushing the “setup” button and choosing the option to replace the ink cartridges. Once the cartridge carriage moves around you are able to freely move it with your hands. In order to break the lid you will need to grab a set of needle nose pliers and bend out the hinge to the right side of the lid (see photo) and push it out until it either slides off or breaks.

31
Once the lid has been removed then the next step would be to route the tubing. For this particular installation you will not need the use of a T Bracket since there’s not enough clearance for the cartridges carriage to move around freely. You will again need to use the needle nose pliers to pry out small clamps within the printers to route the tubing like the picture shows. There are 4 clamps that need to be pried out, but don’t pull them out too far, just enough for the tubing to fit.
Once the clamps are bent outwards, it’s time to route the tubing. Carefully place the tubing inside of the clamps and adjust it as necessary. Please be aware that there are 4 clamps and all 4 must hold a piece of the tubing to avoid the carriage from getting caught while it prints. If this step is not done then the printer will more than likely give you a paper jam error message.
Now that the tubing is in place it’s time to install your cartridges.
After you seat the cartridges inside of the cartridge carriage, grab the tubing and tuck onto the

32
right of the carriage to where the hinge was removed from earlier. A zip tie or a twisty tie will also work to hold the tubing in place.
Now that the cartridges are installed it’s time for us to initialize the replacement procedure for the cartridges. In this instance hold the reset button on the cartridges for about 10 seconds and let go of the button. After just close the scanner bed and the printer should start charging ink. That’s all it takes to be able to install this system. If after trying these steps and you are encountering problems, please contact us immediately so that we can work with you to solve the issue.
Thank you for purchasing the Continuous Ink System.

33
Epson T125 T126 T127 CISS INSTALLATION For all Workforce and WF series 545 630 633 635 645 840 845 850 3520 3540 7010 7520
The printer housing for the Workforce 545 is very tight, which makes it more difficult to route the ink lines as shown in our Youtube installation video for the Workforce 630. To fix this issue, we devised another method of installation for your CISS. Step 1- Remove the cartridge carriage lid by removing the hinge on the lid located on the right hand side of the carriage lid. Use a pair of pliers to remove the hinge (please note that removing the cartridge carriage lid will void your warranty)
STEP 2 – Attach Bracket to Printer: Attach the following bracket in the location that is shown in the image below. Install the cartridges and route the tubes as shown in the picture below.
STEP 3 – Route Ink Lines through through the Bracket and Test Tension: Adjust the lines to make the lines run properly on the printer by pushing the cartridge carriage to the far left and then to the far right. Use sound judgment when finalizing this step. (Refer to the picturesabove as reference). You can tape the ink lines for a cleaner look. STEP 4 – Adjust Ink Lines and Ink Tank Reservoir: Fix any twisting in the ink lines by rotating the ink tank reservoirs in the opposite direction of the twist. Place the ink tank reservoirs ON THE SAME SURFACE AS THE PRINTER. ELAVATING THE INK TANK RESEVIORS WILL CAUSE INK TO LEAK INTO YOUR PRINTER. STEP 5 – Finalize Installation: Each color of the Ink Tank Reservoirs has two plugs. Remove the smaller plug and install the air filters, with thicker side going downward, into this hole. This should fit snuggly.

34
Your Installation is complete! Thank you for fighting the war on expensive ink with us. We appreciate your business and feel free to contact us if you need any further assistance with your CISS! SuperToBuy and CisInks Customer Service Team
Thank you for purchasing the Continuous Ink System.

35
Epson T200 & T252 Cartridges XP 200 XP 300 XP 400 WF2530 WF2540 WF2630 WF2650 WF2660
PLEASE NOTE:For alternate instructions you may also refer to the T126/T127 Workforce 630 Installation instruction included in this PDF.
Before you begin, please remove the empty ink cartridges from your printer and dispose of them properly. Turn off and unplug your printer for a few minutes before restarting again. Clean off any excess ink and dust within the cartridge carriage prior to installing the continuous ink system. Open the box and carefully remove the contents from the package. WARNING: YOU MUST USE YOUR OEM CARTRIDGES TO INITIALIZE THE PRINTER PRIOR TO THE INSTALLATION OF OUR CISS!!!!
You should have the following items: Continuous Ink System. 4 air filters. 1 syringe 2 mounting brackets (optional for installation) The PVC vinyl tubes attached to the CIS system will carry ink from the ink tanks to the cartridges. Please make sure that they’re free from clogs and knots. Occasionally you will see air bubbles inside the tubes. This is normal and will not affect the CIS system. To begin the installation process, install an air filter into each individual ink reservoir. The side of the air filter with the thicker cylinder will need to be inserted directly into the smaller plug located on top of each ink reservoir. This step allows any air that had inadvertently pressurized while the product was in transit to you to be released from the ink system. To begin the installation process, you must first have your printer head in the correct “ink Replacement position”. Please follow your printer manufacturer’s instructions on how to do this. Once the print head is in position, install the ink cartridges. Please refer to the images Below:
Once the cartridges are in the replacement position, please remove the cartridges. Go ahead and grab the rectangular shaped mounting bracket and place it at the following location. It should be located right in the middle of the bottom portion of the printer.

36
Now slide grab the cartridges and slide them into the printer from the bottom of the printer like below. You might needle to set them in at an angle to get them to go in all the day. Pull the cartridges out from the bottom and then install the cartridges onto the printer carriage. All cartridges must be locked into place in order for the printer to accept the cartridges. Please follow the images below.
Once the cartridges have been installed, clamp the hoses on the mountain bracket that we installed earlier. Move the cartridge carriage to the left first and make sure that there’s enough hose for it to freely move all the way to the left and to the right. Do not leave too much slack on the lines as this will cause issues while printing. Do not allow the ink line to touch the base of the printer.
Go ahead and install your air filters. The air filters are to be installed onto the air vent hole on the external tank. (see image)

37
Once all of these steps are done, go ahead and close your scanner lid and press “ok” to initialize the cartridge replacement procedure. During this process you will see the following messages.
If you see the messages above, do not be alarmed. Our Version of the T200 chips will still allow you to print. Go ahead and dismiss the message by press “ok” to proceed. Eventually it will as if you want to Continue using this ink, go ahead and press yes. It will detect the cartridges, but the printer will not charge the ink for you. So you will have to run a head cleaning prior to printing for optimal results. Also with these new T200 chips, the printer will not be able to display the ink levels, this will not cause a problem.
If you have any questions, feel free to contact us. Thanks!
Thank you for purchasing the Continuous Ink System.

38
CISS Installation for Epson WF-3620 WF-3640 WF-7610 WF-7620 WF-7110
Package Contents
Open the box and carefully remove the contents from the package. You should have the following items:
Continuous Ink System.
4 air filters.
1 syringe.
2 mounting brackets (optional for installation)
If you are missing any parts, please contact us as soon as possible.
To begin the installation process, you must first have your printer head in the correct “ink
Replacement position”. Please follow your printer manufacturer’s instructions on how to do this. Once the print head
is in position, install the ink cartridges. Please refer to the images Below:
1. You want to make sure that the air filters are installed onto the external ink tanks.
2.You have to remove the cartridge door cover from the printer. You are also able to use a flat head screwdriver to
push the opening of the front end of the lid to the left. Once you have removed the left side removing the right side
would be easy.

39
3. Using the Square clip inside of the package to route the tubes on the front end of the printer laying the adhesive side
near the Serial Number sticker on the front panel of the printer.
4. The last and final step would be to use a piece of paper folded into multiple haves to put into the printer lid sensor
and then place a piece of tape over the piece of paper. To keep it from moving around once it is inserted into the
printer.
(Note: You have to keep the printer lid partially open to allow the tubes to move freely left and right inside of the
printer)
5. You will see messages saying that non genuine ink cartridges are installed you are able to press ‘OK’
to dismiss that after that it will ask you if you want to proceed using the ink and you can press ‘YES’
and then ‘OK’ to proceed.
If you have any questions feel free to contact us.
Thank you for purchasing the Continuous Ink System.

40
CISS Installation for Epson XP520 XP600 XP610 XP620 XP800 XP810 XP820 XP850 XP860
Package Includes:
1X CISS Unit
Syringes and Needles
1X T Hose Clip
1X Square Clip
5 Air filters (6 Filters for 6 Color printers)
Before beginning the installation, it's best to set up a work area where you don't mind spilling ink.
Since this is a sponge type cartridge system, then there will be leaking ink. Please keep this in mind
before you proceed with the installation.
If this is a new printer setup, make sure to initialize your printer with the starter cartridges that
originally came with the printer. Our cartridges will not work if the printer has not been previously
initialized with OEM cartridges.
The first we would have to do is grab the cartridges from the CISS and flip them upside down with the
orange pedestals facing up. Remove the orange pedestals one by one, if you see pooling ink after
removing the pedestals then dab the excess ink with a paper towel. Set your cartridges in position to be
installed and lock them into place as fast as you can. Make sure to hear a good click from each
cartridge.
Once the cartridges are clicked into position you can install the air filters into the external ink tanks on

41
the smaller hole on the tanks. You are then able to route the tubes for this particular installation I prefer
the Square clip since you can paste it onto the bottom of the printer lid where the cartridges sit Idle
when needing to be replaced. (Where the red arrow is pointing)
Using the orange cap which came installed onto the cartridges you are able to insert it into the lid
sensor (tricking the printer to think that the printer lid is closed)
Once you have jammed the printer lid sensor you would then see these messages appear on the printer.
It would first recognize that the cartridges are not Genuine and you would be able to press ‘ok’ and that
would dismiss the message. After you would see a message asking if you would like to Continue to use
the ink and you would have to press ‘Yes’.
When the set up is complete you can run 1-2 deep cleanings and then print out the nozzle check and
that would show you how the cartridges are printing.
If you have any questions feel free to contact us.
Thank you for purchasing the Continuous Ink System.

42
Epson R1900 R2000 R2400 R1800 R2880 R3000 Installation Instructions The continuous ink supply system is designed as a cost effective and economical way of replacing ink cartridges. The system feeds ink directly into the printers cartridges, without the use of messy needles and ink bottles. After proper installation, the continuous ink system will produce high quality prints and will last up to 5 times longer than standard ink cartridges.
THIS SYSTEM WILL REQUIRE MODIFICATIONS THAT WILL VOID YOUR
PRINTER MANUFACTUER WARRANTY. PLEASE DO NOT PROCEED WITH INSTALLATION IF YOU ARE UNWILLING TO MODIFY YOUR PRINTER.
PLEASE READ THROUGH THE ENTIRE INSTALLATION INSTRUCTIONS BEFORE ATTEMPTING TO INSTALL THE CONTINUOUS INK SYSTEM.
If you see big air gaps in the tubes then you will need to PRIME the ciss before installation.
Video link: http://www.youtube.com/watch?v=kIq1QBWOkuw MAKE SURE YOU KEEP YOUR INK TANK RESEVIORS ON SAME SURFACE AS THE PRINTER! Elevating the ink tank reservoirs will cause ink to leak into your printer. Ideally reservoirs should
be side-by-side next to your printer on the same surface. Before you begin, we recommend to watch the installation video on the original listing. This will provide you with a better understanding on how to proceed with your installation.
1. INSPECT ITEMS: Open your box and inspect the contents. You should have received:
Continuous Ink System w/ attached Chip Hub 8 Air Filters Syringe(s) and Needle(s)
T-Bracket Square Clamp Bracket 8 Rubber in tank plugs
2. The PVC vinyl tubes attached to the CIS system will carry ink from the ink tanks to the cartridges. Please make sure that they‟re free from clogs and knots. Occasionally you will see air bubbles inside the tubes. This is normal and will not affect the CIS system. Video Link : http://www.youtube.com/watch?v=kIq1QBWOkuw
3. To begin the installation process, you will have to remove your original cartridges.
4. To install the CISS system, you must first have your printer head in the correct “ink replacement position”. Please follow your printer manufacturers instructions on how to do this. 5. REMOVE CARTRDIGE COVER LID: After the printhead is in the replacement position. Locate the plastic hinge that locks the lid in place in the bottom right hand corner. Use a needle-nose pliers to hold this hinge,
while using your free hand to pulling the cartridge holder to the left-while prying to the right with the needle nosed pliers. Most likely the hinge will break right off.
We are not responsible for improperly handling this part of the procedure.

43
6. Install cartridge, attach square clip to printer and route tubes :
Before installing the cartridges, we suggest placing the CIS's tubes under the plastic bridge so the printer head can move efficiently, without interruption. To do this, you must first manually push the cartridge holder to the left. (Replacement procedure must be activated.)
After moving the cartridge holder to the left, slide the cartridges and tubing underneath the plastic bridge and install the cartridges, make sure that they all snap in and stay firmly locked in place. Before permanently attaching the square-clip to the printer, connect the square clip to the tubes on the ciss and
hold it on the imaginary spot that you think it goes on the printer. (Right to the left of the grey control panel on R1900’s) After that, manually push the print head all the way to the right and back to the left. Make sure the tubing stays flat and is not twisted or tangled. After you feel sure that the tubes are routed correctly and there is no extra slack, remove the adhesive and connect the square clip to the printer.
After connecting the tubes to the printer, make one last adjustment to the slack in the tubes by pushing the cartridge holder all the way to the left and back to the right, make sure that there is not extra slack in the tubes when the is pushed all the way to the right. If the tubing is too long or to short it can cause the carriage to jam.

44
31. INSTALL AIR FILTERS: On top of the ink tank reservoirs, there are two plugs for each color. The smaller plug is for the „air vent‟ and the larger plug is where you would insert more ink when you are low.
Remove the „air vent plug‟ and insert the air filters, with the thicker side going down. It will fit snuggly into place. BEFORE DOING SO, TILT THE RESEVIOR SO THAT THE „AIR POCKET‟ IS UDNERNEATH THE PLUG WHERE THE AIR FILTER GOES TO PREVENT INK FROM LEAKING.
33. FINALIZE INSTALLATION PROCEDURE: Now you can finalize your cartridge replacement procedure. If you are successful with this procedure, the printer should start to „charge‟ the ink cartridges and the „cartridge carriage‟ will begin to move left and right.
34. FINAL ADJUSTMENTS: Conduct a print test page and make any adjustment to the length of the PVC
tubing to operate smoothly. MAKE SURE YOU KEEP YOUR INK TANK RESEVIORS ON SAME SURFACE AS THE PRINTER! Elevating the ink tank
reservoirs will cause ink to leak into your printer. Ideally reservoirs should be side-by-side next to your printer on the same surface. TIP:
If you are getting bad prints, DO NOT DO MORE THAN 2-3 HEAD CLEANINGS. Do one head cleaning and let your printer sit for 4
hours. Then do one „nozzle check‟ to see if all colors are coming out correctly. Repeat this process. If you are still encountering problems,
please contact us so we can further assist you.
Thank you for purchasing the Continuous Ink System.

45
HP 02 Photosmart: 8230 8238 8250 8253 8288 3108 3110 3210 3210v 3210xi 3308 3310 3310xi 3313 D5180 D6160 D7145
D7155 D7160 D7245 D7255 D7260 D7263 D7268 D7345 D7355 D7360 D7460 C5140 C5150 C5175 C5180 C5183 C5188 C5190 C6150 C6175 C6180 C6183 C6188 C6240 C6250 C6280 C7180 C7250 C7275 C7280 C7283 C7288 C8150 C8180 C8183 C8721 C8771 C8772 C8773 C8774
C8775
Please read through the instructions before attempting installation.
The continuous ink supply system is designed as a cost effective and economical way of replacing ink cartridges. The system feeds ink directly into the printers cartridges, without the use of messy needles and ink bottles. After proper installation, the continuous ink system will produce high quality prints and will last up to 5 times longer than standard ink cartridges.
If your printer is brand new then you must first install the original ink cartridges prior to installing the Continuous Ink System. The reason for this is because the printer needs to initialize with the original cartridges. The Continuous Ink System is not able to do that. This will help the Continuous Ink System function a lot better. Open the package and remove all of its contents. You should have the following items:
Continuous Ink System.
6 air filters.
1 plastic syringe.
1 small bag of replacement parts. Check the Continuous Ink System for any leaks or damage. Thoroughly inspect the PVC tubes. It is normal for the tubes to have either air bubbles or ink inside of them. This will not affect the Continuous Ink System.
Open the printer cover and carefully remove the empty ink cartridges. Please dispose of them properly. Turn off your printer and wait a few minutes before turning it back on.
Before inserting the CIS's cartridges into your printer, carefully lay out all the cartridges and make sure there are no twists or knots in the tubing.
Each cartridge is an exact replica of the original cartridges and should fit in perfectly. Insert each cartridge into the corresponding slot. We recommend installing one cartridge at a time. Make sure the tubing is not pinched by the cartridge cover. The cartridge cover should close properly with the tubing in place. Disconnecting the ink tubes to install the cartridges is NOT recommended.

46
Once you've installed all of the cartridges, you'll need to set up the ink tanks. Carefully remove the red caps on the ink tanks and replace them with the air filters provided. Please make sure they're securely in place.
Select an area to place the ink tanks. If they ever get knocked over, it'll be a big mess so choose an area where they will not be in the way. CAUTION: The ink tanks MUST be at the same height level as the printer head. It MUST NOT be higher or lower. If placed higher, all the ink from the ink tanks will over-flow into your printer. If placed lower, the ink will not feed into the cartridges. This is VERY IMPORTANT.
You're all done. Close the printer cover and print a few test sheets. Do a head cleaning, nozzle check and alignment if necessary.
Thank you for purchasing the Continuous Ink System.

47
Canon IP4200 IP4300 IP4500 IP5200 IP5200R IP5300 MP500 MP510 MP530 MP800 MP800R MP810 MX850 MP600 MP610 ( Without Chip )
Please read through the instructions before attempting installation.
The continuous ink supply system is designed as a cost effective and economical way of replacing ink cartridges. The system feeds ink directly into the printers cartridges, without the use of messy needles and ink bottles. After proper installation, the continuous ink system will produce high quality prints and will last up to 5 times longer than standard ink cartridges. If your printer is brand new then you must first install the original ink cartridges prior to installing the Continuous Ink System. The reason for this is because the printer needs to initialize with the original cartridges. The Continuous Ink System is not able to do that. This will help the Continuous Ink System function a lot better. Open the package and remove all of its contents. You should have the following items:
Continuous Ink System.
6 air filters.
1 plastic syringe.
1 small bag of replacement parts. Check the Continuous Ink System for any leaks or damage. Thoroughly inspect the PVC tubes. It is normal for the tubes to have either air bubbles or ink inside of them. This will not affect the Continuous Ink System. You will need the following items to complete the installation.
Exacto knife or razor blade.
Double-sided tape.
Disposable gloves.
Paper towels. If you do not have the above items, you may improvise with similar items to complete the installation.
Open the printer cover and have the printer head moved to the “ink replacement position”. Carefully remove your original ink cartridges. DO NOT THROW THEM AWAY YET.
Locate the chip on the empty ink cartridge. This is the small green and gold piece on the corner of the cartridge. You’ll need to remove this piece from the old cartridge and insert them into the new cartridge.
There are two tiny plastic tabs that hold the chip in place. Using an exacto knife or a razor blade, carefully cut the tabs off. BE CAREFUL NOT TO DAMAGE THE CHIP. Once you’ve broken off the plastic tabs, the chip can easily be taken off the cartridge. Slide your razor blade underneath the chip and pop it out.
To ensure that you don’t mix up the chips. PLEASE DO ONLY ONE CARTRIDGE AT A TIME. For example, the chip from your original black cartridge must only go onto the new black cartridge. This is very important.
Now that the chip is off of the original cartridge, you may now properly dispose of the empty ink cartridge. Take the chip and affix it to the corresponding ink cartridge.
The cartridges on the Continuous Ink System are replicas of the original ink cartridges. The chips should fit perfectly into the empty slots of the new cartridges. Please do a fitting test before proceeding to the next step.
Once you've confirmed that the chip fits perfectly into the cartridge, use a small piece of double sided tape and attach it to the back of the chip. Place the chip onto the ink cartridge. DO NOT USE ANY TYPE OF GLUE. It will permanently damage the chips. Another option is a soldering iron, if available.
Repeat the above steps for all the other cartridges before continuing.
With the chips properly attached, you are now ready to install the cartridges into the printer. You will need a pair of disposable gloves to do this. Some paper towels would be helpful as well. It may get messy.

48
Carefully remove the orange plugs from each of the ink cartridges. They should come right off with a simple twist. Excess ink may leak out so be careful. Have some paper towels ready when removing the plugs.
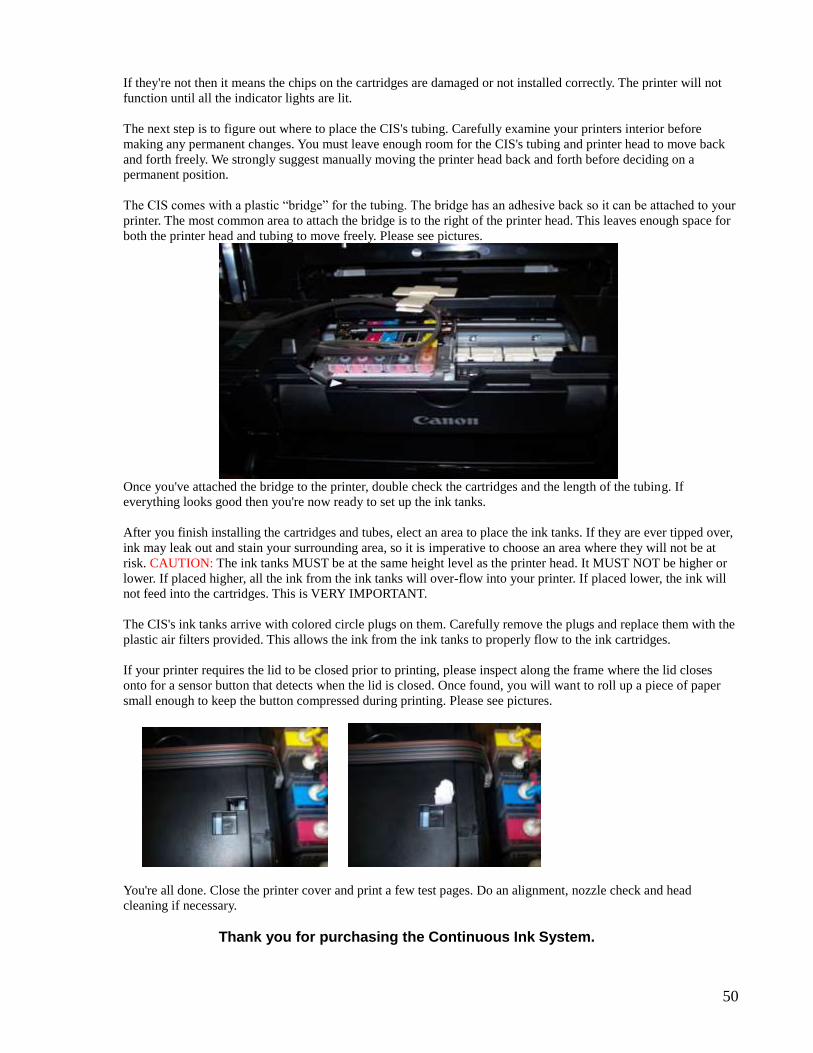
Quickly install the ink cartridges into the printer head. The tubes on the CIS hold the cartridges together. They should align with the corresponding colors on your printer head. Make sure all the cartridge indicator lights are lit. If they're not then it means the chips on the cartridges are damaged or not installed correctly. The printer will not function until all the indicator lights are lit.
The next step is to figure out where to place the CIS's tubing. Carefully examine your printers interior before making any permanent changes. You must leave enough room for the CIS's tubing and printer head to move back and forth freely. We strongly suggest manually moving the printer head back and forth before deciding on a permanent position.
The CIS comes with a plastic “bridge” for the tubing. The bridge has an adhesive back so it can be attached to your printer. The most common area to attach the bridge is to the right of the printer head. This leaves enough space for both the printer head and tubing to move freely. Please see pictures.
Once you've attached the bridge to the printer, double check the cartridges and the length of the tubing. If everything looks good then you're now ready to set up the ink tanks.
The CIS's ink tanks arrive with red plugs on them. Carefully remove the red plugs and replace them with the plastic air filters provided. This allows the ink from the ink tanks to properly flow to the ink cartridges.
Select an area to place the ink tanks. If they ever get knocked over, it'll be a big mess so choose an area where they will not be in the way. CAUTION: The ink tanks MUST be at the same height level as the printer head. It MUST NOT be higher or lower. If placed higher, all the ink from the ink tanks will over-flow into your printer. If placed lower, the ink will not feed into the cartridges. This is VERY IMPORTANT.
You're all done. Close the printer cover and print a few test pages. Do an alignment, nozzle check and head cleaning if necessary.
Thank you for purchasing the Continuous Ink System.

49
Canon IP4200 IP4300 IP4500 IP5200 IP5200R IP5300 MP500 MP510 MP530 MP800 MP800R MP810 MX850 MP600 MP610 IP3600 MP560 MP620 MX860 IP4600 IP4680
MP630 MP640 MP638 IP4700 (WITH CHIPS)
Please read through the instructions before attempting installation.
The continuous ink supply system is designed as a cost effective and economical way of replacing ink cartridges.
The system feeds ink directly into the printers cartridges, without the use of messy needles and ink bottles. After proper
installation, the continuous ink system will produce high quality prints and will last up to 5 times longer than standard ink
cartridges.
If your printer is brand new then you must first install the original ink cartridges prior to installing the Continuous
Ink System. The reason for this is because the printer needs to initialize with the original cartridges. The Continuous Ink
System is not able to do that. This will help the Continuous Ink System function a lot better.
Open the package and remove all of its contents. You should have the following items:
45. Continuous Ink System.
46. 6 air filters.
47. 1 plastic syringe.
48. 1 small bag of accessories including transparent washer seals
Check the Continuous Ink System for any leaks or damage. Thoroughly inspect the PVC tubes. It is normal for the tubes to
have either air bubbles or ink inside of them. This will not affect the Continuous Ink System.
You will need the following items to complete the installation.
Double-sided tape.
Disposable gloves.
Paper towels.
If you do not have the above items, you may improvise with similar items to complete the installation.
Open the printer cover and have the printer head moved to the “ink replacement position”. Carefully remove your
original ink cartridges. DO NOT THROW THEM AWAY YET.
Please wear a pair of disposable gloves. Some paper towels would be helpful as well. It may get messy.
Put five small parts in the small bag to the right position shown as following pictures:
Please do not replace any air filter and keep the ink tanks sealed at this moment. Put the ink tanks at lower
position than your cartridges as much as you can. Carefully remove the orange plugs from each of the ink
cartridges, the orange side have to be faced up, otherwise, excess ink may leak out, so be careful. Have some
paper towels ready when removing the plugs.
Quickly install the ink cartridges into the printer head. The tubes on the CIS hold the cartridges together. They
should align with the corresponding colors on your printer head. Make sure all the cartridge indicator lights are lit.
50
If they're not then it means the chips on the cartridges are damaged or not installed correctly. The printer will not
function until all the indicator lights are lit.
The next step is to figure out where to place the CIS's tubing. Carefully examine your printers interior before
making any permanent changes. You must leave enough room for the CIS's tubing and printer head to move back
and forth freely. We strongly suggest manually moving the printer head back and forth before deciding on a
permanent position.
The CIS comes with a plastic “bridge” for the tubing. The bridge has an adhesive back so it can be attached to your
printer. The most common area to attach the bridge is to the right of the printer head. This leaves enough space for
both the printer head and tubing to move freely. Please see pictures.
Once you've attached the bridge to the printer, double check the cartridges and the length of the tubing. If
everything looks good then you're now ready to set up the ink tanks.
After you finish installing the cartridges and tubes, elect an area to place the ink tanks. If they are ever tipped over,
ink may leak out and stain your surrounding area, so it is imperative to choose an area where they will not be at
risk. CAUTION: The ink tanks MUST be at the same height level as the printer head. It MUST NOT be higher or
lower. If placed higher, all the ink from the ink tanks will over-flow into your printer. If placed lower, the ink will
not feed into the cartridges. This is VERY IMPORTANT.
The CIS's ink tanks arrive with colored circle plugs on them. Carefully remove the plugs and replace them with the
plastic air filters provided. This allows the ink from the ink tanks to properly flow to the ink cartridges.
If your printer requires the lid to be closed prior to printing, please inspect along the frame where the lid closes
onto for a sensor button that detects when the lid is closed. Once found, you will want to roll up a piece of paper
small enough to keep the button compressed during printing. Please see pictures.
You're all done. Close the printer cover and print a few test pages. Do an alignment, nozzle check and head
cleaning if necessary.
Thank you for purchasing the Continuous Ink System.
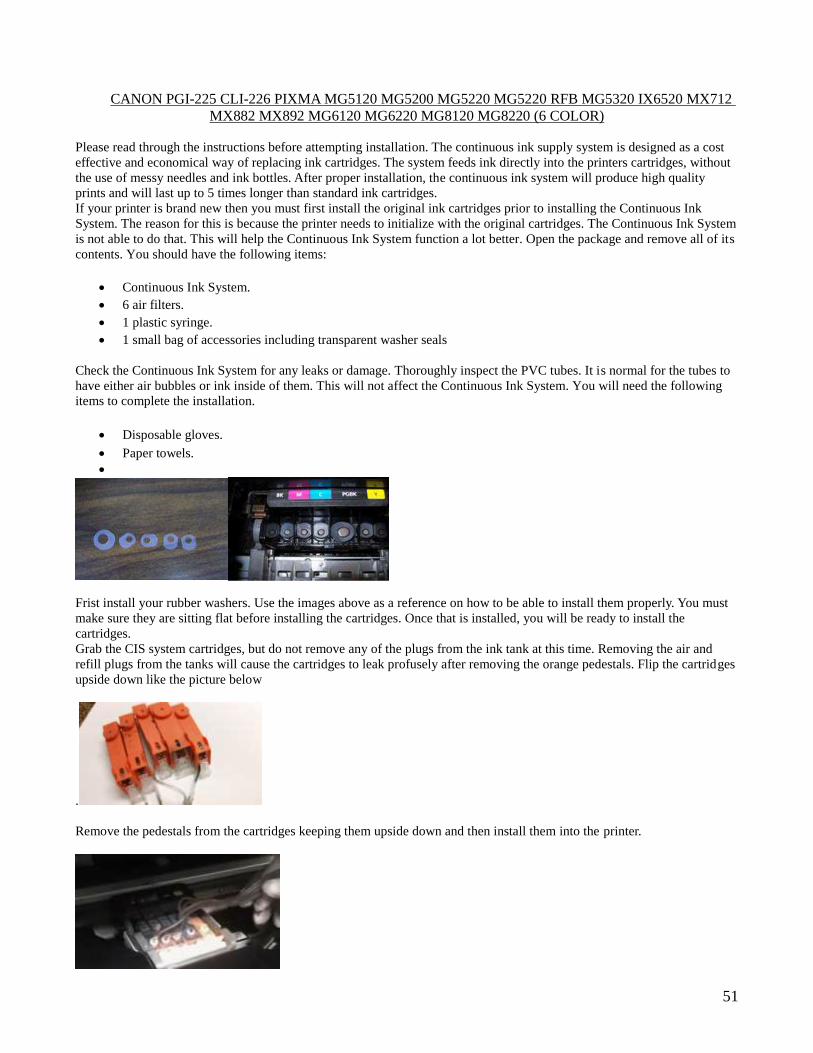
51
CANON PGI-225 CLI-226 PIXMA MG5120 MG5200 MG5220 MG5220 RFB MG5320 IX6520 MX712
MX882 MX892 MG6120 MG6220 MG8120 MG8220 (6 COLOR)
Please read through the instructions before attempting installation. The continuous ink supply system is designed as a cost
effective and economical way of replacing ink cartridges. The system feeds ink directly into the printers cartridges, without
the use of messy needles and ink bottles. After proper installation, the continuous ink system will produce high quality
prints and will last up to 5 times longer than standard ink cartridges.
If your printer is brand new then you must first install the original ink cartridges prior to installing the Continuous Ink
System. The reason for this is because the printer needs to initialize with the original cartridges. The Continuous Ink System
is not able to do that. This will help the Continuous Ink System function a lot better. Open the package and remove all of its
contents. You should have the following items:
Continuous Ink System.
6 air filters.
1 plastic syringe.
1 small bag of accessories including transparent washer seals
Check the Continuous Ink System for any leaks or damage. Thoroughly inspect the PVC tubes. It is normal for the tubes to
have either air bubbles or ink inside of them. This will not affect the Continuous Ink System. You will need the following
items to complete the installation.
Disposable gloves.
Paper towels.
Frist install your rubber washers. Use the images above as a reference on how to be able to install them properly. You must
make sure they are sitting flat before installing the cartridges. Once that is installed, you will be ready to install the
cartridges.
Grab the CIS system cartridges, but do not remove any of the plugs from the ink tank at this time. Removing the air and
refill plugs from the tanks will cause the cartridges to leak profusely after removing the orange pedestals. Flip the cartridges
upside down like the picture below
.
Remove the pedestals from the cartridges keeping them upside down and then install them into the printer.

52
Make sure you insert the cartridges as fast as you can since they can possibly leak due to the sponge.
After this step is taken, the next thing to do would be to isntall our air filters. Grab the air filters, now look at the top part of
your external ink tank, you should see a 2 pronged plug. Remove the small plug and install the air filters fat side first. Make
the air filter creates an airtight seal.
The next step would be to route the tubes. In the package you will receive 2 brackets, one long bar bracket and a small
rectangular shape bracket. You can use either one to route the tubes. We prefer the small bracket which is easier to use.
Remove the red tape from the sticky backing, before installing this in the printer I would suggest to use crazy glue on the
sticky side to make it stick better. Now with the scanner lid open, you will need to place the sticky bracket on the roof of the
scanner lid unit, you can use the following picture as a reference point. After routing the tubes, you must jam a piece of
cardboard on the scanner lid sensor, the image to the right will show you the location for it. The location of the lid sensor
will vary depending on your printer model.
Once installed, run 1 head cleaning and then run a nozzle check and you should be good to go. If there’s any more
assistance, please contact our support staff. Thanks!!!
Thank you for purchasing the Continuous Ink System.

53
Canon PGI-250 CLI-251 PIXMA MG5420 MG5422 MG5520 MG5522 MG6420 MX722 MX922 IP7220 (6 COLOR) MG6320 MG7120
Canon PGI-250 CLI-251 CISS installation
Compatible with: PIXMA MG5420 MG5422 MG5520 MG5522 MG6420 MX722 MX922 IP7220 (6 COLOR) MG6320
MG7120
Package Includes:
1X CISS Unit
5X Rubber washers ( 6 washers for 6 color systems)
Syringes and Needles
1X T Hose Clip
Before beginning the installation, it's best to set up a work area where you don't mind spilling ink. Since this is a sponge
type cartridge system, then there will be leaking ink. Please keep this in mind before you proceed with the installation.
If this is a new printer setup, make sure to initialize your printer with the starter cartridges that originally came with the
printer. Our cartridges will not work if the printer has not been previously initialized with OEM cartridges.
The first thing we will do is install the rubber washers that came inside the accessory bag included in your CISS package.
The air filters are needed in order to allow our cartridges to create an extra air tight seal with the print head to prevent any
leaking ink on the printer. When installing the rubber washers, make sure that you're installing them as flat as possible to
allow the cartridges to sit properly in place. You should grab a flat head screwdriver and flatten the washers as much as you
can.
Once the washers have been installed it's time to install the cartridges. The first we would have to do is grab the cartridges
from the CISS and flip them upside down with the orange pedestals facing up. Remove the orange pedestals one by one, if
you see pooling ink after removing the pedestals then dab the excess ink with a paper towel. Set your cartridges in position
to be installed and lock them into place as fast as you can.

54
Once the cartridges are locked into the printer, we will install the hose bracket. The hose bracket is install to the right hand
side of the printer, Please take a look at the picture below so that you can identify the positioning of the hose and bracket.
After installing the bracket, clamp the hose and make sure that the hose is able to move freely from left to right, you should
only leave enough slack for it to move all the way to the left. Since there is limited space in the printer, the lid will have to
remain open. In order for us to trick the printer into thinking that the lid is closed, then we would have to locate and jam the
cartridge lid sensor. The picture below shows the location of the sensor for our printer, the location might vary from printer
to printer. Fold a piece of cardboard or paper and jam it in the sensor.
The last thing you would need to do is to install the air filters. Once you've jammed the lid sensor, the printer should start
charging the ink. During that process, locate the ink tanks and pull out the air filters from the accessory bag. On the CISS,
you will see that there's 2 rubber plugs connected to each other for each color. A smaller plug and a larger plug. Remove the
smaller plug from the CISS tanks and install the air filters on the hole that is exposed (fat side down).

55
Once the filters have been installed and the ink has been charged, you're good to go. The hoses are routed as the images
shown below.

56
HP 564 and HP 920 CISS Installation
PLEASE READ ALL INSTRUCTIONS AND VIEW VIDEO PRIOR TO INSTALLATION!!
Package Includes:
1X CISS Unit
4X Rubber washers (5 washers for 5 color systems)
Syringes and Needles, Air filters
1X T Hose Clip
If this is a new printer setup, make sure to initialize your printer with the starter cartridges that originally came with the
printer. Our cartridges will not work if the printer has not been previously initialized with OEM cartridges.
1) Be sure to have a clear work area when you work on removing the chips from the original cartridges.
2) Place the ink tanks at a lower level than the cartridges of the CISS to prevent ink from overflowing from the cartridges
(will be explained further in detail later)
3) Flip the CISS cartridges upside down so orange trays are facing up towards the ceiling. Remove the orange trays.
4) When removed, a sponge will be exposed. Ink can overflow from this sponge. Soak up with napkins when necessary
to keep work area clean; having the ink tanks lower than the cartridges will decrease the flow of ink to the sponges.
5) Place the rubber grommets into the Cartridge Carrier before installing the CISS cartridges into the printer.
6) Install the CISS cartridges into the printer. You might have to manually 'hook' the plastic arms underneath the lip of the
cartridge carrier to make it stay into place.
7) Route the tubes as indicated in the pictures/video.
https://www.youtube.com/watch?v=QEG-vlEdpME
8) Push the cartridge carrier left and right to make sure the ink lines aren't too tight or too loose. Tight lines will cause it
to pull on the cartridges, cause the chips to be misaligned and give a message that the cartridges can't be recognized or
are damaged. Loose lines will flap around inside of your printer and might get caught/tangled inside of your printer.
9) For each color, remove the small plug off of the ink tank and insert the air filters. This allows ink to flow in the system.
10) Run a test print with your scanner bed open so you can make any final adjustments to the lines if necessary to have it
run properly.
Once you have installed the washers your print head should look like ours below. You can use the end of a pen cap to assure
that the washers are in the correct position.

57
Once you install the cartridge into the printer you want to make sure that you hear a good click from each cartridge. When
routing the tubes you have to leave the printer lid partially open that way the cartridges can move freely left and right
without the tubes getting caught.
Be sure to contact us if you have any questions or concerns with these instructions.
Thank you for purchasing the Continuous Ink System.

58
HP Officejet Pro 8000 8500
The continuous ink supply system is designed as a cost effective and economical way of replacing ink cartridges. The system feeds ink directly into the printers cartridges, without the use of messy needles and ink bottles. After proper installation, the continuous ink system will produce high quality prints and will last up to 5 times longer than standard ink cartridges.
PLEASE READ THROUGH THE ENTIRE INSTALLATION INSTRUCTIONS BEFORE ATTEMPTING TO INSTALL THE CONTINUOUS INK SYSTEM.
1) Be sure to have a clear work area when you work on removing the chips from the original cartridges.
2) Place the ink tanks at a lower level than the cartridges of the CISS to prevent ink from overflowing from the cartridges
(will be explained further in detail later). For each color, remove the smaller plug off the top of each ink tank and insert the
air filters (the side with the thicker cylinder is inserted). This allows all pressurized air to escape out of the ink system.
3) Get original cartridges and compare the chip placement to the CISS cartridges; note where you have to attach the chips
to the CISS cartridges.
4) Carefully remove one chip off of one cartridge with razor tool. Don't touch face of chips with since it may damage the
chips.

59
5) Carefully glue the chips onto the CISS chips with a couple drops of super glue. Don't put too much glue in case you
have to remove the chips later on. Using the tip of the syringe, press down on the chip for approximately 30 seconds to
allow the adhesive to full adhere the chip to the cartridge.
6) Continue to take off the rest of the chips and installing them onto the rest of the CISS cartridges.
7) Install the CISS cartridges into the printer, making sure the cartridges are seated in securely.
8) Maneuver the tubes to come out of the cartridge bay similar to how they are displayed in the video provided here:
(http://www.youtube.com/watch?v=RK_7GtiSn1s)
9) Close the main cartridge door covering the cartridge bay. If the printer will not function without that door completely
closed, examine the frame to locate the sensor button that detects when the door is closed. Rolling a small piece of paper,
insert it directly into the sensor opening to keep the button compressed, thus manipulating the printer into detecting the door
as being closed. Close the door, using some tape if necessary to secure it.
10) Run a test print with your scanner bed open so you can make any final adjustments to the lines if necessary to have it
run properly.
In the event that you run into certain issues during the installation process, we do have a 'Tech support & FAQ' link on the bottom-right corner of our main page under the “Information” menu. That will take you to a list of common issues our customers encounter and a solution to each. Please consult with the information on that link for a possible solution before taking any drastic measures. You may also contact any of our customer service representatives for any troubleshooting assistance either via e-mail or over the phone. All contact information is provided on the invoice included with your package.
Thank you for purchasing the Continuous Ink System.

60
HP 932/933XL, HP950/951.HP Office Jet Pro 6100, 6600. 6700. HP Office Jet Pro 8100 & 8600 CISS Installation
Please use this as a reference on routing the tubes, printer shown is the HP 8100. The installation will work for all printers that use 932/933 and 950/951 cartridges. Before you begin, please remove the empty ink cartridges from your printer and dispose of them properly. Turn off and unplug your printer for a few minutes before restarting again. Clean off any excess ink and dust within the cartridge carriage prior to installing the continuous ink system. Open the box and carefully remove the contents from the package. WARNING: YOU MUST USE YOUR OEM CARTRIDGES TO INITIALIZE THE PRINTER PRIOR TO THE INSTALLATION OF OUR CISS!!!!
You should have the following items: Continuous Ink System. 6 air filters. 1 syringe 2 mounting brackets (optional for installation) The PVC vinyl tubes attached to the CIS system will carry ink from the ink tanks to the cartridges. Please make sure that they’re free from clogs and knots. Occasionally you will see air bubbles inside the tubes. This is normal and will not affect the CIS system. To begin the installation process, install an air filter into each individual ink reservoir. The side of the air filter with the thicker cylinder will need to be inserted directly into the smaller plug located on top of each ink reservoir. This step allows any air that had inadvertently pressurized while the product was in transit to you to be released from the ink system. To begin the installation process, you must first have your printer head in the correct “ink Replacement position”. Please follow your printer manufacturer’s instructions on how to do this. Once the print head is in position, install the ink cartridges. Please refer to the images Below:
Once the cartridges have been installed, you will need to grab the rectangular shaped mounting bracket and place it as the picture below shows. Before clamping the tube, grab the cartridge carriage with your hands and slide the carriage all the way to the left. Make sure to only leave enough slack on the ink lines so that the print head may move to the left and right. Too much slack left on the ink line will cause a paper jam error.

61
When closing the printer lid, you must make sure that the ink line allows the lid to close all the way so that the printer can detect that the lid is closed. If you cannot route your tubes to allow the tubes to come out, then you would need to locate you lid sensor and jimmy rig it with a piece of paper to trick the printer in thinking the lid is closed. The location of the lid sensor varies.
The last step would be to install the air filters, make sure you insert the air filters the in appropriate slot on the ink tanks. They should always go in fat side first.
Once the filters are install, close the lid all the way and run a head cleaning prior to running any print jobs.
Thank you for purchasing the Continuous Ink System.

62
EPSON REFILLABLE CARTRIDGE
Epson Refillable Cartridge Instructions:
Cartridge series: T200 T069 T078 T079
These refillable cartridges function almost as if you were using an OEM cartridges with the distinction
that the cartridges are able to be refilled over and over.
Before installing the cartridges into the printer, it is required for you to remove the air vent plug from
each cartridge. The plug locations and color may vary, but the easiest way to find the air vent hole is to
look through the clear side of the cartridge and locate a small air reservoir on the side of it (Picture 1).
The refill hole is located close to the locking arm on the cartridge at the very top opposite to where the
location of the air vent plug is. This plug can sometimes be colored or clear, make sure to find the air
reservoir to know exactly which plug to remove for refilling as well.
The location of the refill plug is almost always next to the locking arm on each cartridge
Underneath each cartridge there is a piece of plastic film. It is not required for you to be able to remove
this piece of film. If you are to install the cartridges onto the printer the spikes on the print head will
puncture through that film. Once the cartridge is locked into the printer it should recognize right away
and print if the proper air vent has been exposed.
Cartridge Series: T676 T786
These cartridges while being bigger than the standard Epson cartridges. While the shape and size of
these cartridges are different, the main functions are exactly the same. The air vent location on the
cartridge is at the very top of each cartridge. It is a standard size plug and the word “air” is embedded
right next to the rubber plug that is designated for the air vent hole.

63
If you look through the clear side of each cartridge you will see a small reservoir below a rubber air
plug(Right hand picture above)
The refill hole can be found on the back of the cartridge above the cartridge label. The plug that will
need to be removed to refill the cartridge is much bigger in diameter than the other plug that is on the
cartridge. Like the air vent hole, you will see “refill hole” embedded on the cartridge.
After removing the air vent plug from the cartridge it is recommended that you run 1 head cleaning
prior to printing for optimal results.
Cartridge Series: T273 T276
These cartridges different than any other refillable cartridges that Epson currently offers. These are
sponge type cartridges like the cartridges that are found in most Canon and certain HP printers. As
with all sponge type cartridges, there is a chance that they will leak. The best way to prevent a lot of
ink from leaking out of the sponge is to flip the cartridge with the pedestal facing up and grab a paper
towel. With the paper towel, dab up some of the excess ink that is extruding from the cartridge. This
will minimize leaking, but keep in mind that the sponge may still leak.
If you look through the clear side of the cartridge, you will see that the cartridge is divided in 2
sections. The first section of the cartridge is the sponge of the cartridge while the other half of the
cartridge holds the ink .You will notice that there is either a rubber plug or a yellow piece of tape on the
cartridge. The location of this plug/tape is right above the sponge section on the cartridge, this is your
air vent hole. It would be best to remove this plug/tape with the cartridge already inside of the printer.
This will minimize any leaking ink.

64
You should always run a head cleaning before you print to maximize your results. If you install these
cartridges and do not get any ink out of one or any of the cartridges, then it could be possible that the
air vent hole might need to be expanded a bit. This can be done with a pin, needle or pointy knife.
In order to refill the cartridge you would have to pull the cartridge out of the printer and place the
cartridge back onto the original pedestal that was included with it. Since the sponges leak when
refilling, it would be best to use the pedestals to refill the cartridges to prevent any leaking messes.
Cartridge Series: T157 (r3000)
Before installing the cartridges into the printer, it is required for you to remove the air vent plug from
each cartridge. The plug locations and color may vary, but the easiest way to find the air vent hole is to
look through the clear side of the cartridge and locate a small air reservoir on the side of it. The refill
hole is located on the middle of the cartridge. The air vent plug fort his particular cartridge is found on
the front end of the cartridge opposite end of the locking tab.
After removing the air vent plug from the cartridge it is recommended that you run 1 head cleaning
prior to printing for optimal results.

65
HP REFILLABLE CARTRIDGE
HP Refillable Cartridge Instructions:
Cartridge Series: HP564 HP920
This particular series of HP cartridges are sponge type cartridges. With all sponge type cartridges, there
is leakage to be expected. This isn’t due to the cartridge design flaw or a defective cartridge, it’s mostly
due to the sponges leaking after the air vent hole has been exposed. These cartridges require a bit
more care and they tend to be messy, it’s recommended you use disposable gloves while refilling the
cartridge.
These sponges have two sections built into them. A sponge section and an ink reservoir section. The air
vent hole for all of these cartridges are located above the sponge section of the cartridges. The refill
hole is located above the reservoir section and had a colored plug. In order to refill the cartridges you
will have to put the pedestals that were included with each cartridge back in. If you attempt to refill
without this pedestal then you will see ink leaking out from the cartridge.
Prior to installing these cartridges onto the printer, you must first install the set of rubber washers that
are included in the kit. These washers create a tighter seal between the cartridges and the print head,
preventing any excess ink from leaking and preventing air from going into the print head, which can
coagulate any standing ink. The washers should always be installed with the thinner side facing you
and are installed above the washers installed from the factory.

66
With the cartridges semi-installed into the printer, remove the yellow piece of tape to prevent any big
leaks while trying to install the cartridge into the printer.
You should always run 1 head cleaning after installing the cartridges. Sometimes the cartridge might
need to sit in the printer for about 2 hours before getting optimal results. The print head will need to
soak up some of the ink and you might encounter quality issues at first.
Cartridge Series: HP10/HP11 HP84/HP85 HP88 HP940
These cartridges are fairly simple to use and install. In order to use these cartridges the only kind of
preparation needed is to remove the air vent plugs from each cartridge. The location of the air vent plug
is at the top of each cartridge. You will see a label on the cartridge showing the location of the air vent
plug.
If the label has been removed, the best way to find the air vent hole is to look at the side of the
cartridge. Below the air vent plug you will see a small air reservoir and below the refill plug you will
see that it goes straight into the ink reservoir.

67
The refill plug is usually colored for these cartridges.
Cartridge Series: HP72
This cartridge series are bigger than other HP cartridges and the reason for that is that they are designed
for plotter printers. In order to refill these cartridges you will have to find the refill hole at the very top
of each cartridge. Each hole will have a double plug on it. The bigger plug will be where you can refill
your ink from using a syringe or needle. The smaller plug is reserved for the air vent hole.
These cartridges also require you install an air filters in them. If you remove the smaller plugs on the
cartridges, it will expose a hole that will allow the air filters to slide in tightly. As with all nozzle type

68
cartridges, they will not leak. Once you have exposed the air vent hole and installed the air filters, go
ahead and install the cartridges into the printer and run a head cleaning.
Cartridge Series: HP950/HP951 HP932/HP933/HP711
This cartridge is another nozzle type version for modern printers. These cartridges come in different
shapes and sizes, which means that the location of the air vent hole and color of the plug will vary. The
2 most common cartridges that come from us will be pictured below. One cartridge set might be long
and the other cartridge set might be shorter.
The longer cartridge has 2 plugs, one on the side of the cartridge and the other at the very. The location
of the air vent hole is the side plug for this particular cartridge. The refill plug is located at the top of
the cartridge.
The 2nd cartridge that you might have received will be much shorter than the one pictured above. The
location of the refill and air vent plugs is at the back of each cartridge. The location of the air vent hole
and refill hole will vary with these cartridges. The best way to identify the air vent hole is to look at the
side of the cartridge where you can see through it. The air vent plug is right above a small rectangular
reservoir, please refer to the images below to avoid any confusions. The air vent plugs are removed
from each cartridges in order for air to flow within them. The remaining plug will be used to refill the
cartridge.
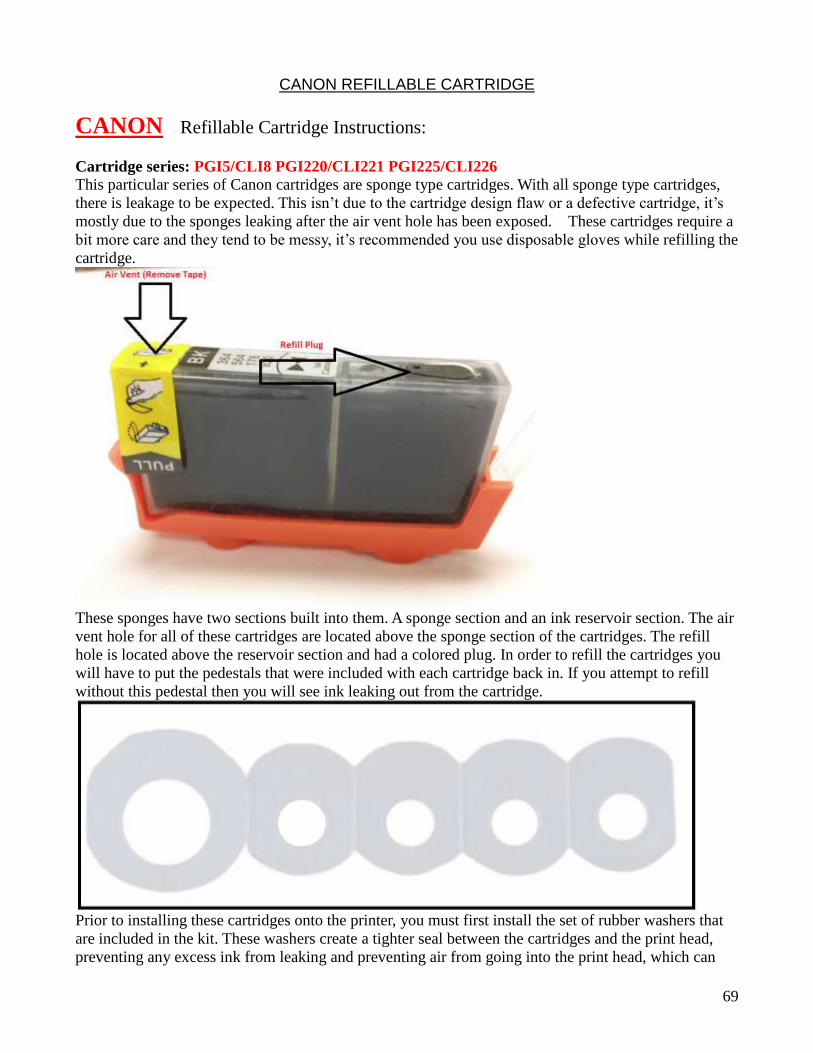
69
CANON REFILLABLE CARTRIDGE
CANON Refillable Cartridge Instructions:
Cartridge series: PGI5/CLI8 PGI220/CLI221 PGI225/CLI226
This particular series of Canon cartridges are sponge type cartridges. With all sponge type cartridges,
there is leakage to be expected. This isn’t due to the cartridge design flaw or a defective cartridge, it’s
mostly due to the sponges leaking after the air vent hole has been exposed. These cartridges require a
bit more care and they tend to be messy, it’s recommended you use disposable gloves while refilling the
cartridge.
These sponges have two sections built into them. A sponge section and an ink reservoir section. The air
vent hole for all of these cartridges are located above the sponge section of the cartridges. The refill
hole is located above the reservoir section and had a colored plug. In order to refill the cartridges you
will have to put the pedestals that were included with each cartridge back in. If you attempt to refill
without this pedestal then you will see ink leaking out from the cartridge.
Prior to installing these cartridges onto the printer, you must first install the set of rubber washers that
are included in the kit. These washers create a tighter seal between the cartridges and the print head,
preventing any excess ink from leaking and preventing air from going into the print head, which can

70
coagulate any standing ink. The washers should always be installed with the thinner side facing you
and are installed above the washers installed from the factory.
You should always run 1 head cleaning after installing the cartridges. Sometimes the cartridge might
need to sit in the printer for about 2 hours before getting optimal results. The print head will need to
soak up some of the ink and you might encounter quality issues at first.
Cartridge Series: PGI250/CLI251
With all sponge type cartridges, there is leakage to be expected. This isn’t due to the cartridge design
flaw or a defective cartridge, it’s mostly due to the sponges leaking after the air vent hole has been
exposed. These cartridges require a bit more care and they tend to be messy, it’s recommended you
use disposable gloves while refilling the cartridge.
Prior to installing these cartridges onto the printer, you must first install the set of rubber washers that
are included in the kit. These washers create a tighter seal between the cartridges and the print head,
preventing any excess ink from leaking and preventing air from going into the print head, which can
coagulate any standing ink. The washers should always be installed with the thinner side facing you
and are installed above the washers installed from the factory
These sponges have two sections built into them. A sponge section and an ink reservoir section. The air
vent hole for all of these cartridges are located above the sponge section of the cartridges. The refill
hole is located above the reservoir section and had a colored plug. In order to refill the cartridges you
will have to put the pedestals that were included with each cartridge back in. If you attempt to refill
without this pedestal then you will see ink leaking out from the cartridge
This particular cartridges will either have yellow piece of tape or a rubber plug covering the air vent

71
hole. It is best if these are removed after they have been installed onto the printer to prevent any leaking
while attempting to install the cartridges.
You should always run 1 head cleaning after installing the cartridges. Sometimes the cartridge might
need to sit in the printer for about 2 hours before getting optimal results. The print head will need to
soak up some of the ink and you might encounter quality issues at first.
Thank you for choosing us for all of your ink needs!
BROTHER REFILLABLE CARTRIDGE
Brother Refillable cartridge instructions:
Cartridge Series: LC38/LC61 LC950
This particular cartridge will have 2 rubber plugs towards the back of each cartridge. One plug is in the
air vent hole and will need to be exposed in order for the cartridges to print correctly. The location of
the air vent holes will vary with these cartridges. The best way to make sure that you’re opening up the
right hole will be to look on the clear side of the cartridge. Below the air vent hole plug, there’s a small
rectangular reservoir. This will be the plug to remove and leave off. The other plug on the cartridge is
intended to refill the cartridge.
Always run a head cleaning when installing new cartridges to allow the new ink to settle into the print
head.
Cartridge Series: LC61XL/LC38XL cartridges.

72
These larger cartridges will extrude outside of the cartridge carriage, so you will have to modify your
printer in order to allow the cartridges to work with the printer.
You will need to either leave the cartridge carriage lid open or completely remove it from the printer.
There is also a lid sensor that detects whether or not the cartridge lid is closed. The location of this
sensor will vary, but it’s fairly simple to locate. Once you locate the lid sensor, jam a piece of paper to
trick the printer into thinking that the lid is closed.
This cartridge has a double plug with one end covering the air vent slot and the other the refill hole.
The smaller plug is where the air vent hole sits and must be opened. There is also an air filter that needs
to be installed which is included in the kit. The air filter goes into the air vent hole that was exposed
with the fatter side going in first.
Run a head cleaning and the cartridges will print just fine.
Cartridge Series: LC75 LC79
This particular cartridge will have 2 rubber plugs towards the top of each cartridge. One plug is in the
air vent hole and will need to be exposed in order for the cartridges to print correctly. The location of
the air vent holes will vary with these cartridges. The best way to make sure that you’re opening up the
right hole will be to look on the clear side of the cartridge. Below the air vent plug, there’s a small
rectangular reservoir. This will be the plug to remove and leave off. The other plug on the cartridge is
intended to refill the cartridge.

73
Always run a head cleaning when installing new cartridges to allow the new ink to settle into the print
head.
Cartridge Series: LC101 LC103 LC107 LC203
This particular cartridge will have 2 rubber plugs towards the back of each cartridge. One plug is in the
air vent hole and will need to be exposed in order for the cartridges to print correctly. The location of
the air vent holes will vary with these cartridges. The best way to make sure that you’re opening up the
right hole will be to look on the clear side of the cartridge. Below the air vent hole plug, there’s a small
rectangular reservoir. This will be the plug to remove and leave off. The other plug on the cartridge is
intended to refill the cartridge.

74
The color of the plugs will vary so make sure to check the side of the cartridge to locate the appropriate
air vent hole.
Always run a head cleaning when installing new cartridges to allow the new ink to settle into the print
head.
Thank you for choosing us for all of your ink needs!
SCIS Sub Cartridges Rules of Thumb
Warning: When using the cartridges ink may leak, please create a work area and wear gloves
75
before using.
**After switching chip frame, ink levels will no longer read accurately.**
1. CARTRIDGES WITH REUSABLE CHIP FRAME. These cartridges are designed to have a detachable and
reusable chip frame.
After you use the cartridge, simply detach the chip frame and reconnect it to the new cartridge.
2. CARTRIRDGES WITHOUT REUSABLE CHIP FRAME. To use these cartridges you need to have the chip
frame, when the ink levels display as empty, just swap out the chip frame. These cartridges will not
work without the chip frame.
3. TO HELP PREVENT INK FROM LEAKING, make sure to remove the cartridge holder and the chip
frame with the cartridges turned upside down.
For more help Please visit our YouTube channel for video instructions
http://www.youtube.com/watch?v=Bap3NN6KBOI

76
Frequently Asked Questions
What is the continuous ink supply system (or CIS, CISS, continuous ink
flow system, bulk ink system)?
The continuous ink supply system is designed as a cost effective and economical way of replacing ink cartridges. The system feeds ink directly
into the printers cartridges, without the use of messy needles and ink bottles. After proper installation, the continuous ink system will produce
high quality prints and will last up to 5 times longer than standard ink cartridges.
What is a refillable cartridge?
A refillable cartridge is a printer cartridge that can be refilled once it runs out of ink. This will save you money because you will not need to constantly
buy expensive new cartridges. It's also better for the environment. You can easily refill a cartridge by directly injecting it with ink.
Why won't my printer recognize the refillable cartridges?
Refillable cartridges MUST BE USED AS A SET. They will not work if you mix
them with your original cartridges.
I received my CIS and I see air bubbles inside the tubes, is this normal?
Yes. It is perfectly normal to see air bubbles inside the CIS's tubes. This will
NOT affect the CIS's performance in any way.
My printer cannot recognize the cartridges. How can I fix this?
This is a common error. Since the CIS & refillable cartridges are not OEM, you may run into this error from time to time. This is normal. To fix this
error, please remove all the cartridges and turn off your printer. Wait about 5 minutes and then restart and re-install all the cartridges. This will reset
the printer and cartridges. Repeat if necessary.
The ink is leaking on the paper or printer.
Remove the cartridges right away. Thoroughly inspect the interior of your printer. The leak is usually caused by the nozzle of the cartridge. It may not
be securely in place.
The ink cannot flow into the cartridges.

77
Please make sure the ink tanks are placed at the same height level as the
printer. This is VERY important. If the ink tanks are placed lower then they
will not be able to feed the cartridges. You may need to prime the cartridges prior to use.
The printer is able to recognize the cartridges, but the computer cannot.
Why?
Please re-install the printers software to fix this problem.
I get an error message saying the cartridges are empty, even though they're not. How can I fix this?
A printer adjusts the ink levels based on the number of pages printed.
When the printer reads it as empty, find the printer in your computer,
simply follow the on-screen “ink cartridge replacement” guide and remove
the indicated cartridge. Wait a few seconds and re-insert the same
cartridge. This will trick the printer into thinking that you're putting in a new cartridge. It will read it as full again.
When should I refill the ink tanks?
You can refill the ink tanks whenever you please. The most common time is
when the ink tanks have only about a quarter inch of ink left in them.
My prints come out blurry and dis-colored. How can I fix this?
Do a nozzle check, head cleaning and alignment. Check to make sure the printer head is not clogged. Clean off any dust and excess build up on the
printer head.
Are the chips already installed on a Canon CIS?
No. The Canon CIS does not come with chips. You will need to remove them
from your OEM cartridges and attach them to the CIS cartridges. Please e- mail us for instructions.
I sent back an item for a refund, when will it be processed?
We generally take about 2-3 days to process refunds and exchanges, once
we receive your return. You will be notified via e-mail once it has been processed.

78
I've sent several e-mails and have not received a response. Why?
We try our best to respond to all of our e-mails. Most of the time we do respond to every single one. Please make sure to check your Spam or Junk
e-mail folder, as our responses may end up there.
Once I place an order, how long will it take to receive it?
Delivery time depends on your location and shipping method. USPS Priority takes about 3-4 days to the east coast, 2-3 days for the mid-west and 1-2
days on the west coast. UPS Ground is a little slower at 4-5 days to the east, 3-4 days in the mid-west and 1-2 days on the west coast.