installation instructions ml14xp1 split system heat …
TRANSCRIPT

Page 1
THIS MANUAL MUST BE LEFT WITH THE HOMEOWNER FOR FUTURE REFERENCE
WARNINGImproper installation, adjustment, alteration, service or maintenance can cause property damage, personal injury or loss of life. Installation and service must be performed by a licensed professional HVAC installer or equivalent, or service agency.
General This ML14XP1 outdoor heat pump with all-aluminum coil is designed for use with HFC-410A refrigerant only. This unit must be installed with an approved indoor air handler or coil. See the ML14XP1 product specifications bulletin for approved indoor component match ups. These instructions are intended as a general guide and do not supersede local codes in any way. Consult authorities having jurisdiction before installation.
NOTICE!Charging information is given on the charging procedure sticker on the unit access panel.
INSTALLATION INSTRUCTIONSML14XP1 SPLIT SYSTEM HEAT PUMP
(R410A REFRIGERANT)
IMPORTANTThe Clean Air Act of 1990 bans the intentional venting of refrigerant (CFCs, HCFCs and HFCs) as of July 1, 1992. Approved methods of recovery, recycling or reclaiming must be followed. Fines and/or incarceration may be levied for noncompliance.
CAUTIONAs with any mechanical equipment, contact with sharp sheet metal edges can result in personal injury. Take care while handling this equipment and wear gloves and protective clothing.
IMPORTANT: Special procedures are required for clean-ing the all-aluminum coil in this unit. See page 15 in this instruction for information.
NOTES -Service clearance of 30 in. (762 mm) must be maintained on one ofthe sides adjacent to the control box.
Clearance to one of the other three sides must be 36 in. (914 mm).
Clearance to one of the remaining two sides may be 12 in. (305mm) and the final side may be 6 in. (152 mm).
A clearance of 24 in. must be maintained between two units.
48 in. (1219 mm) clearance required on top of unit.
SeeNOTES
See NOTES
See NOTES
SeeNOTES
CONTROLBOX
STEP 1 – SETTING THE UNIT – Clearances

Page 2
A
BSIDEVIEW
UNIT DIMENSIONS - INCHES (MM)
Model Number A BML14XP1-036 28-1/4 (718) 37-1/4 (946)ML14XP1-042 32-1/4 (819) 37-1/4 (946)ML14XP1-048 32‐1/4 (819) 37-1/4 (946)ML14XP1-060 32‐1/4 (819) 43-1/4 (1099)
FIGURE 1. Unit Dimensions
STEP 1 – SETTING THE UNIT (Continued) – Unit Placement
NOTICE!Roof Damage!This system contains both refrigerant and oil. Some rubber roofing material may absorb oil, causing the rubber to degrade. Failure to follow this notice could result in damage to roof surface.
IMPORTANTThis unit must be matched with an indoor coil as specified in the engineering handbook. Coils previously charged with HCFC-22 must be flushed.
WARNINGTo prevent personal injury, as well as damage to panels, unit or structure, observe the following:While installing or servicing this unit, carefully stow all removed panels so that the panels will not cause injury to personnel, objects or nearby structures. Also, take care to store panels where they will not be subject to damage (e.g., being bent or scratched).While handling or stowing the panels, consider any weather conditions (especially wind) that may cause panels to be blown around and damaged.
IMPORTANTExhaust vents from dryers, water heaters and furnaces should be directed away from the outdoor unit. Prolonged exposure to exhaust gases and the chemicals contained within them may cause condensation to form on the steel cabinet and other metal components of the outdoor unit. This will diminish unit performance and longevity
INSTALL UNIT AWAYFROM WINDOWS
TWO 90º ELBOWS INSTALLED IN LINE SETWILL REDUCE LINE SET VIBRATION
PLACEMENT
FIGURE 2
Install unit level or, if on a slope, maintain slope tolerance of 2degrees (or 2 inches per 5 feet [50 mm per 1.5 m]) away frombuilding structure.
GROUND LEVEL
MOUNTING SLAB
BUILDINGSTRUCTURE DISCHARGE AIR
SLAB MOUNTING
FIGURE 3
IMPORTANTThis model is designed for use in check / expansion valve systems only. An indoor expansion valve approved for use with HFC-410A refrigerant must be ordered separately and installed prior to operating the system.
NOTE - An optional Unit Stand-Off Kit (94J45) is available for this unit. Black high-density polyethylene feet raise unit off of mounting surface away from damaging moisture. Four feet are furnished per order number.

Page 3
STEP 2 – REFRIGERANT PIPING
IMPORTANTIf this unit is being matched with an approved line set or indoor unit coil that was previously charged with mineral oil, or if it is being matched with a coil which was manufactured before January of 1999, the coil and line set must be flushed prior to installation. Take care to empty all existing traps. Polyol ester (POE) oils are used in units charged with HFC-410A refrigerant. Residual mineral oil can act as an insulator, preventing proper heat transfer. It can also clog the expansion device and reduce system performance and capacity. Failure to properly flush the system per this instruction and the detailed installation and service procedures manual will void the warranty.
Flush the existing line set per the following instructions. CAUTION - DO NOT attempt to flush and re-use existing line sets or indoor coil when the system contains contam-inants (i.e., compressor burn out).If a new line set is being installed, size the piping per table 1.
TABLE 1 REFRIGERANT LINE SET – INCHES (MM)
Model
Valve Field Connections Recommended Line Set
Liquid Line
Vapor Line
Liquid Line
Vapor Line L15 Line Sets
-0363/8 in.
(10 mm)7/8 in.
(22 mm)3/8 in.
(10 mm)7/8 in.
(22 mm)L15-65
15 ft. - 50 ft. (4.6 m - 15 m)
-042
-048
-060 3/8 in. (10 mm)
1-1/8 in. (28 mm)
3/8 in. (10 mm)
1-1/8 in. (28 mm) Field Fabricated
NOTE - Some applications may require a field-provided 7/8" to 1-1/8" adapter.
NOTE - When installing refrigerant lines longer than 50 feet, refer to the Refrigerant Piping Design and Fabrica-tion Guidelines manual.
WARNINGWhen using a high pressure gas such as nitrogen to pressurize a refrigeration or air conditioning system, use a regulator that can control the pressure down to 1 or 2 psig (6.9 to 13.8 kPa).
WARNINGRefrigerant can be harmful if it is inhaled. Refrigerant must be used and recovered responsibly.Failure to follow this warning may result in personal injury or death.
WARNINGFire, Explosion and Personal Safety hazard. Failure to follow this warning could result in damage, personal injury or death.Never use oxygen to pressurize or purge refrigeration lines. Oxygen, when exposed to a spark or open flame, can cause fire and/or an explosion, that could result in property damage, personal injury or death.
WARNINGPolyol ester (POE) oils used with HFC-410A refrigerant absorb moisture very quickly. It is very important that the refrigerant system be kept closed as much as possible. DO NOT remove line set caps or service valve stub caps until you are ready to make connections.
IMPORTANTSome scroll compressors have an internal vacuum protector that will unload scrolls when suction pressure goes below 20 psig. A hissing sound will be heard when the compressor is running unloaded. Protector will reset when low pressure in system is raised above 40 psig. DO NOT REPLACE COMPRESSOR.

Page 4
STEP 2 – REFRIGERANT PIPING – (Continued)
SENSINGLINE
TEFLON® RINGFIXED ORIFICE
BRASS NUT
LIQUID LINE ASSEMBLY(INCLUDES STRAINER)
LIQUID LINE ORIFICE HOUSING
DISTRIBUTOR TUBES
DISTRIBUTORASSEMBLY
REMOVE AND DISCARDWHITE TEFLON® SEAL
(IF PRESENT)
A - On fully cased coils, remove the coil access and plumbing panels. B -
sembly. C - Using two wrenches, disconnect liquid line from liquid line
ing. Tcess.
D - Remove and discard fixed orifice, valve stem assembly (if present)and Teflon® washer as illustrated above.
E - Use a field-provided fitting to temporarily reconnect the liquid line to theindoor unit's liquid line orifice housing.
TYPICAL EXISTING FIXED ORIFICEREMOVAL PROCEDURE (UNCASED COIL SHOWN)
TYPICAL EXISTING EXPANSION VALVE REMOVALPROCEDURE (UNCASED COIL SHOWN)
TWO-PIECE PATCH PLATE(UNCASED COIL ONLY)
VAPORLINE
DISTRIBUTORASSEMBLY
DISTRIBUTORTUBES
LIQUIDLINE
MALE EQUALIZERLINE FITTING
EQUALIZERLINE
CHECKEXPANSION
VALVE
TEFLON®RING
STUB END
TEFLON®RING
SENSING BULB
LIQUID LINEORIFICE
HOUSING
LIQUID LINEASSEMBLY WITH
BRASS NUT
A - On fully cased coils, remove the coil access and plumbing panels. B - Remove any shipping clamps from the liquid line and distributor
assembly. C - Disconnect the equalizer line from the check expansion valve
equalizer line fitting on the vapor line. D - Remove the vapor line sensing bulb. E - Disconnect the liquid line from the check expansion valve at the
liquid line assembly. F - Disconnect the check expansion valve from the liquid line orifice
housing. Take care not to twist or damage distributor tubes duringthis process.
G - Remove and discard check expansion valve and the two Teflon®
rings. H - Use a field-provided fitting to temporarily reconnect the liquid line to
the indoor unit's liquid line orifice housing.
LOW HIGH
EXISTINGINDOOR
UNIT
GAUGEMANIFOLD
CYLINDER CONTAININGCLEAN HCFC-22 TO BEUSED FOR FLUSHING(Positioned to deliver liquidrefrigerant)
LIQUID LINE SERVICEVALVE
INLET
DISCHARGE
TANKRETURN
CLOSEDOPENED
RECOVERYCYLINDER
RECOVERY MACHINE
NEWOUTDOOR
UNIT
VAPOR LINESERVICE VALVE
VAP
OR
LIQU
ID
1
A - HCFC-22 cylinder with clean refrigerant (positioned to deliver liquidrefrigerant) to the vapor service valve.
B - HCFC-22 gauge set (low side) to the liquid line valve. C - HCFC-22 gauge set center port to inlet on the recovery machine with an
empty recovery tank connected to the gauge set. D - Connect recovery tank to recovery machine per machine instructions.
CONNECT GAUGES AND EQUIPMENT FORFLUSHING PROCEDURE
A
B
CD
B
OR
FLUSHING LINE SET
A - Set the recovery machine for liquid recovery and start the recoverymachine. Open the gauge set valves to allow the recoverymachine to pull a vacuum on the existing system line set and indoorunit coil.
B - Position the cylinder of clean HCFC-22 for delivery of liquidrefrigerant and open its valve to allow liquid refrigerant to flow intothe system through the vapor line valve. Allow the refrigerant topass from the cylinder and through the line set and the indoor unitcoil before it enters the recovery machine.
C - After all of the liquid refrigerant has been recovered, switch therecovery machine to vapor recovery so that all of the HCFC-22vapor is recovered. Allow the recovery machine to pull the systemdown to 0.
D - Close the valve on the inverted HCFC-22 drum and the gauge setvalves. Pump the remaining refrigerant out of the recoverymachine and turn the machine off.
The line set and indoor unit coil must be flushed with at least the sameamount of clean refrigerant that previously charged the system. Checkthe charge in the flushing cylinder before proceeding.
1A
2
3
1B
FIGURE 4

Page 5
STEP 2 – REFRIGERANT PIPING – Brazing Procedures
ATTACH THE MANIFOLD GAUGE SET FOR BRAZING LIQUID AND VAPOR LINE SERVICE VALVES
OUTDOORUNIT
LIQUID LINE
VAPOR LINE
LIQUID LINE SERVICEVALVE
VAPOR LINESERVICE
VALVE
ATTACHGAUGES
INDOORUNIT
VAPOR SERVICE PORT MUST BE OPEN TO ALLOW EXIT POINT FOR NITROGEN
A - Connect gauge set low pressure side toliquid line service valve (service port).
B - Connect gauge set center port to bottle ofnitrogen with regulator.
C - Remove core from valve in vapor lineservice port to allow nitrogen to escape.
NITROGEN
HIGHLOW USE REGULATOR TO FLOWNITROGEN AT 1 TO 2 PSIG.
B
A
C
WHEN BRAZING LINE SET TOSERVICE VALVES, POINT FLAME
AWAY FROM SERVICE VALVE.
Flow regulated nitrogen (at 1 to 2 psig) through the low-side refrigeration gauge set into the liquid line service port valve, and out of thevapor line service port valve.
CUT AND DEBUR CAP AND CORE REMOVALCut ends of the refrigerant lines square (free from nicks or dents)and debur the ends. The pipe must remain round. Do not crimp endof the line.
Remove service cap and core fromboth the vapor and liquid line serviceports.
1 2
LIQUID LINE SERVICEVALVE
SERVICEPORTCORE
SERVICE PORTCAP
SERVICEPORTCORE
SERVICEPORT CAP
CUT AND DEBUR
LINE SET SIZE MATCHESSERVICE VALVE CONNECTION
DO NOT CRIMP SERVICE VALVECONNECTOR WHEN PIPE IS
SMALLER THAN CONNECTION
3
VAPOR LINE SERVICEVALVE
COPPER TUBESTUB
REFRIGERANT LINE
REDUCER
SERVICE VALVECONNECTION
LINE SET SIZE IS SMALLERTHAN CONNECTION
FIGURE 5
CAUTIONBrazing alloys and flux contain materials which are hazardous to your health.Avoid breathing vapors or fumes from brazing operations. Perform operations only in well-ventilated areas.Wear gloves and protective goggles or face shield to protect against burns.Wash hands with soap and water after handling brazing alloys and flux.
WARNINGDanger of fire. Bleeding the refrigerant charge from only the high side may result in pressurization of the low side shell and suction tubing. Application of a brazing torch to a pressurized system may result in ignition of the refrigerant and oil mixture. Check the high and low pressures before applying heat.

Page 6
WHEN BRAZING LINE SET TOSERVICE VALVES, POINT FLAME
AWAY FROM SERVICE VALVE.
LIQUID LINE SERVICE VALVE
LIQUID LINE
BRAZE LINE SETWrap both service valves with water-saturated cloths as illustrated here and as mentioned in step 4, before brazing to line set.Cloths must remain water-saturated throughout the brazing and cool-down process.
WATER-SATURATEDCLOTH
IMPORTANT — Allow braze joint to cool. Applyadditional water-saturated cloths to help cool brazedjoint. Do not remove water-saturated cloths untilpiping has cooled. Temperatures above 250ºF willdamage valve seals.
6
VAPOR LINE
WATER-SATURATEDCLOTH
VAPOR LINE SERVICE VALVE
After all connections have been brazed, disconnect manifold gauge set from service ports. Apply additional water-saturated cloths to bothservices valves to cool piping. Once piping is cool, remove all water-saturated cloths.
WHEN BRAZING LINE SET TOSERVICE VALVES, POINT FLAME
AWAY FROM SERVICE VALVE.
PREPARATION FOR NEXT STEP7
WRAP SERVICE VALVESTo help protect service valve seals during brazing, wrap water-saturated cloths around service valve bodies and copper tube stubs. Useadditional water-saturated cloths underneath the valve body to protect the base paint.
4FLOW NITROGENFlow regulated nitrogen (at 1 to 2 psig) through the refrigeration gauge set into the valve stem port connection on the liquid service valve andout of the vapor valve stem port. See steps 3A, 3B and 3C on manifold gauge set connections.5
WARNING
FIRE, PERSONAL INJURY, OR PROPERTY DAMAGEmay result if you do not wrap a water-saturated cloth aroundboth liquid and suction line service valve bodies and coppertube stub while brazing the line set! The braze, whencomplete, must be quenched with water to absorb anyresidual heat.
Do not open service valves until refrigerant lines andindoor coil have been leak-tested and evacuated. Referto Installation and Service Procedures manual.
FIGURE 6

Page 7
STEP 2 – REFRIGERANT PIPING – Install Indoor Expansion Valve This outdoor unit is designed for use in systems that include an expansion valve metering device (purchased separately) at the indoor coil. See the ML14XP1 specifications for approved expansion valve kit match-ups and application infor-mation. The check expansion valve unit can be installed internal or external to the indoor coil. In applications where an uncased coil is being installed in a field-provided plenum, install the check/expansion valve in a manner that will provide access for future field service of the expansion valve. Refer to below illustration for reference during installation of expan-sion valve unit.
1 - Attach the vapor line sensing bulb in the properorientation as illustrated to the right using the clamp andscrews provided.
NOTE - Though it is preferred to have the sensing bulbinstalled on a horizontal run of the vapor line, installationon a vertical run of piping is acceptable if necessary.NOTE - Confirm proper thermal contact between vaporline and check/expansion bulb before insulating thesensing bulb once installed.
2 - Connect the equalizer line from the check expansionvalve to the equalizer vapor port on the vapor line. Fingertighten the flare nut plus 1/8 turn (7 ft-lbs) as illustratedbelow.
TWO PIECEPATCH PLATE
(UNCASEDCOIL ONLY)
VAPORLINE
LIQUID LINEORIFICE
HOUSINGDISTRIBUTOR
TUBES
LIQUID LINE
MALE EQUALIZER LINEFITTING (SEE
EQUALIZER LINEINSTALLATION FORFURTHER DETAILS)
SENSINGLINE
EQUALIZERLINE
CHECKEXPANSION
VALVE
TEFLON®RING
(Uncased Coil Shown)
Sensing bulb insulation is required ifmounted external to the coil casing. sensingbulb installation for bulb positioning.
STUBEND
TEFLON®RING
LIQUID LINEASSEMBLY WITH
BRASS NUT
DISTRIBUTORASSEMBLY
3 - Install one of the provided Teflon® rings around thestubbed end of the check expansion valve and lightlylubricate the connector threads and expose surface ofthe Teflon® ring with refrigerant oil.
4 - Attach the stubbed end of the check expansion valve tothe liquid line orifice housing. Finger tighten and use anappropriately sized wrench to turn an additional 1/2 turnclockwise as illustrated in the figure above, or tighten to20 ft-lb.
5 - Place the remaining Teflon® washer around the otherend of the check expansion valve. Lightly lubricateconnector threads and expose surface of the Teflon®
ring with refrigerant oil. 6 - Attach the liquid line assembly to the check expansion
valve. Finger tighten and use an appropriately sizedwrench to turn an additional 1/2 turn clockwise asillustrated in the figure above or tighten to 20 ft-lb.
ON 7/8” AND LARGER LINES,MOUNT SENSING BULB ATEITHER THE 4 OR 8 O'CLOCKPOSITION.
12
ON LINES SMALLER THAN7/8”, MOUNT SENSINGBULB AT EITHER THE 3 OR9 O'CLOCK POSITION.
12
BULB
VAPOR LINE
VAPOR LINE
NOTE - NEVER MOUNT THE SENSING BULB ONBOTTOM OF LINE.
BULB
BULBBULB
VAPOR LINE
FLARE NUT
COPPER FLARESEAL BONNET
MALE BRASS EQUALIZERLINE FITTING
FLARE SEAL CAP
OR
1234
567891011 12
1/2 Turn
SENSING BULB INSTALLATION
EQUALIZER LINE INSTALLATION
1234
567891011 12
1/8 Turn
1 - Remove and discard either the flare seal cap or flare nutwith copper flare seal bonnet from the equalizer line porton the vapor line as illustrated in the figure below.
2 - Remove the field-provided
sembly.
INDOOR EXPANSION VALVE INSTALLATION
FIGURE 7

Page 8
STEP 3 – LEAK TEST AND EVACUATION
TO VAPORSERVICE VALVE
HFC-410A
MANIFOLD GAUGE SET
OUTDOOR UNIT
HIGHLOW
1
2
AB
NITROGEN
NOTE - Positioncanister to deliverliquid refrigerant.
A - With both manifold valves closed, connect the cylinder of HFC-410A refrigerant to the center port of themanifold gauge set. Open the valve on the HFC-410A cylinder (vapor only).
B - Open the high pressure side of the manifold to allow HFC-410A into the line set and indoor unit. Weigh ina trace amount of HFC-410A. [A trace amount is a maximum of two ounces (57 g) refrigerant or threepounds (31 kPa) pressure.] Close the valve on the HFC-410A cylinder and the valve on the highpressure side of the manifold gauge set. Disconnect the HFC-410A cylinder.
C - Connect a cylinder of nitrogen with a pressure regulating valve to the center port of the manifold gaugeset.
D - Adjust nitrogen pressure to 150 psig (1034 kPa). Open the valve on the high side of the manifold gauge setin order to pressurize the line set and the indoor unit.
E - After a few minutes, open one of the service valve ports and verify that the refrigerant added to thesystem earlier is measurable with a leak detector.
F - After leak testing, disconnect gauges from service ports.
After the line set has been connected to the indoor and outdoor units, check the line set connections andindoor unit for leaks. Use the following procedure to test for leaks:
A - Connect the high pressure hose of an HFC-410A manifold gauge set to the vapor valve service port.NOTE - Normally, the high pressure hose is connected to the liquid line port. However, connecting itto the vapor port better protects the manifold gauge set from high pressure damage.
B - With both manifold valves closed, connect the cylinder of HFC-410A refrigerant to the center port ofthe manifold gauge set.
CONNECT GAUGE SET
TEST FOR LEAKS
NOTE - Later in the procedure, the HFC-410A container will be replaced by the nitrogen container.
LEAK TEST
FIGURE 8

Page 9
A - Open both manifold valves and start the vacuum pump.B - Evacuate the line set and indoor unit to an absolute pressure of 23,000 microns (29.01 inches of mercury).
NOTE - During the early stages of evacuation, it is desirable to close the manifold gauge valve at least once. A rapid rise in pressureindicates a relatively large leak. If this occurs, repeat the leak testing procedure.
NOTE - The term absolute pressure means the total actual pressure above absolute zero within a given volume or system. Absolutepressure in a vacuum is equal to atmospheric pressure minus vacuum pressure.
C - When the absolute pressure reaches 23,000 microns (29.01 inches ofmercury), perform the following:Close manifold gauge valves.Close valve on vacuum pump.Turn off vacuum pump.Disconnect manifold gauge center port hose from vacuum pump.Attach manifold center port hose to a nitrogen cylinder with pressureregulator set to 150 psig (1034 kPa) and purge the hose.Open manifold gauge valves to break the vacuum in the line set and indoorunit.Close manifold gauge valves.
D - Shut off the nitrogen cylinder and remove the manifold gauge hose from the cylinder. Open the manifold gauge valves to release thenitrogen from the line set and indoor unit.
E - Reconnect the manifold gauge to the vacuum pump, turn the pump on, and continue to evacuate the line set and indoor unit until theabsolute pressure does not rise above 500 microns (29.9 inches of mercury) within a 20-minute period after shutting off the vacuum pumpand closing the manifold gauge valves.
F - When the absolute pressure requirement above has been met, disconnect the manifold hose from the vacuum pump and connect it to acylinder of HFC-410A positioned to deliver liquid refrigerant. Open the manifold gauge valve 1 to 2 psig in order to release the vacuum in theline set and indoor unit.
G - Perform the following:Close manifold gauge valves.Shut off HFC-410A cylinder.Reinstall service valve cores by removing manifold hose from service valve. Quickly install cores with coretool while maintaining a positive system pressure.Replace stem caps and finger tighten them, then tighten an additional one-sixth (1/6) of a turn as illustrated.
OUTDOORUNIT
TO VAPORSERVICE VALVE
TO LIQUID LINESERVICE VALVE
MICRONGAUGE
VACUUM PUMP
1/4 SAE TEE WITH SWIVELCOUPLER
500
MANIFOLDGAUGE SET
HFC-410A
RECOMMENDMINIMUM 3/8” HOSE
A - Connect low side of manifold gauge set with1/4 SAE in-line tee to vapor line service valve
B - Connect high side of manifold gauge set toliquid line service valve
C - Connect available micron gauge connectoron the 1/4 SAE in-line tee.
D - Connect the vacuum pump (with vacuumgauge) to the center port of the manifoldgauge set. The center port line will be usedlater for both the HFC-410A and nitrogencontainers.
HIGHLOW
12
34
567
891011 12
1/6 TURN
NITROGEN
3CONNECT GAUGE SET
A
B
C
D
4 EVACUATE THE SYSTEM
NOTE - Remove cores from service valves (if not already done).
Possible equipment damage.Avoid deep vacuum operation. Do not usecompressors to evacuate a system.Extremely low vacuum can cause internalarcing and compressor failure. Damagecaused by deep vacuum operation willvoid warranty.
WARNING !
NOTE -ister to deliver liquidrefrigerant.
EVACUATION
FIGURE 9

Page 10
STEP 4 – ELECTRICAL – Circuit Sizing and Wire Routing
In the U.S.A., wiring must conform with current local codes and the current National Electric Code (NEC). In Canada, wiring must conform with current local codes and the cur-rent Canadian Electrical Code (CEC).Refer to the furnace or air handler installation instructions for additional wiring application diagrams and refer to unit nameplate for minimum circuit ampacity and maximum overcurrent protection size.24VAC TRANSFORMERUse the transformer provided with the furnace or air han-dler for low-voltage control power (24VAC - 40 VA mini-mum)
WARNINGElectric Shock Hazard. Can cause injury or death. Unit must be properly grounded in accordance with national and local codes.Line voltage is present at all components when unit is not in operation on units with single-pole contactors. Disconnect all remote electric power supplies before opening access panel. Unit may have multiple power supplies.
WARNINGFire Hazard. Use of aluminum wire with this product may result in a fire, causing property damage, severe injury or death. Use copper wire only with this product.
WARNINGFailure to use properly sized wiring and circuit breaker may result in property damage. Size wiring and circuit breaker(s) per Product Specifications bulletin (EHB/Spec Sheet) and unit rating plate.
WARNING
ELECTROSTATIC DISCHARGE
(ESD)Precautions and
Procedures
Electrostatic discharge can affect electronic components. Take care during unit installation and service to protect the unit’s electronic controls. Precautions will help to avoid control exposure to electrostatic discharge by putting the unit, the control and the technician at the same electrostatic potential. Touch hand and all tools on an unpainted unit surface before performing any service procedure to neutralize electrostatic charge.
Refer to the unit nameplate for minimum circuit ampacity,and maximum fuse or circuit breaker (HACR per NEC).Install power wiring and properly sized disconnect switch.
NOTE - Units are approved for use only with copperconductors. Ground unit at disconnect switch orconnect to an earth ground.
SIZE CIRCUIT AND INSTALL SERVICEDISCONNECT SWITCH
NOTE - 24VAC, Class II circuit connections are madein the control panel.
Install room thermostat (ordered separately) on an insidewall approximately in the center of the conditioned areaand 5 feet (1.5m) from the floor. It should not be installedon an outside wall or where it can be affected by sunlightor drafts.
THERMOSTAT
5 FEET(1.5M)
INSTALL THERMOSTAT
SERVICEDISCONNECT
SWITCH
MAIN FUSE BOX/BREAKER PANEL
FIGURE 10

Page 11
STEP 4 – ELECTRICAL – (Continued) – High Voltage and Field Control Wiring The following illustration provides an example of control wiring connections when using a standard thermostat.
Any excess high voltage field wiring should be trimmed and secured away from any low voltage field wiring. To facilitate a conduit, a cutout islocated in the bottom of the control panel. Connect conduit to the control panel using a proper conduit fitting.
ROUTING HIGH VOLTAGE, GROUND AND CONTROL WIRING
WIRE RUN LENGTH AWG# INSULATION TYPE
LESS THAN 100' (30 METERS) 18 TEMPERATURE RATING
MORE THAN 100' (30 METERS) 16 35ºC MINIMUM.
Install low voltage wiring from outdoor to indoor unit and from thermostat to indoor unit as illustrated.
HIGH VOLTAGE / GROUND WIRES
A - Run 24VAC control wires through hole with grommet.
B - Make 24VAC thermostat wire connections to CMC1. NOTE - For proper voltages, select thermostat wire (control wires) gauge pertable below.
NOTE - Wire tie provides low voltage wire strain relief and maintains separation of field-installed low and high voltage circuits.
NOTE - Do not bundle any excess 24VAC control wires inside control panel.
TYPICAL CONTROL WIRING
R
C
W1
Y1
O
G
R
C
W1
W2
W3
G
REVERSING VALVE
Thermostat Indoor Unit
R
C
W1
Y1
O
Outdoor Unit
POWER
COMMON
1ST. STAGE AUX.HEAT
INDOOR BLOWER
COMPRESSOR
(SOME CONNECTIONS MAY NOT APPLY. REFERTO SPECIFIC THERMOSTAT AND INDOOR UNIT.)
POWER
COMMON
1ST. STAGE AUX.HEAT
Low Voltage Wiring
R
C
W1
Y1
O
G
R
C
W1
W2
W3
G
Thermostat Indoor Unit Outdoor Unit
E
R
C
W1
Y1
O
1ST. STAGE AUX.HEAT
EMER.HEAT
RELAY OUTDOORT'STAT
(SOME CONNECTIONS MAY NOT APPLY. REFER TOSPECIFIC THERMOSTAT AND INDOOR UNIT.)
REVERSING VALVE
POWER
COMMON
1ST. STAGE AUX.HEAT
INDOOR BLOWER
COMPRESSOR
POWER
COMMON
EMERGENCYHEAT
Low Voltage Wiring (with Auxiliary Heat)
HIGH VOLTAGEFIELD WIRING
LOW VOLTAGEFIELD WIRING
FACTORYWIRING
FIGURE 11
STEP 5 – UNIT START-UP
IMPORTANTIf unit is equipped with a crankcase heater, it should be energized 24 hours before unit start-up to prevent compressor damage as a result of slugging.
1 - Rotate fan to check for binding. 2 - Inspect all factory- and field-installed wiring for
loose connections. 3 - After evacuation is complete, open the liquid line
and vapor line service valve stems to release the refrigerant charge (contained in outdoor unit) into the system.
4 - Replace the stem caps and tighten to the value listed in table 2.
5 - Check voltage supply at the disconnect switch. The voltage must be within the range listed on the unit’s nameplate. If not, do not start the equipment until you have consulted with the power company and
the voltage condition has been corrected. 6 - Connect manifold gauge set for testing and
charging. 7 - Set the thermostat for a cooling demand. Turn
on power to the indoor indoor unit and close the outdoor unit disconnect switch to start the unit.
8 - Recheck voltage while the unit is running. Power must be within range shown on the unit nameplate.
9 - Check system for sufficient refrigerant using the procedures outlined under Checking Refrigerant Charge.
OPERATING MANIFOLD GAUGE SET AND SERVICE VALVES The liquid and vapor line service valves are used for re-moving refrigerant, flushing, leak testing, evacuating, checking charge and charging. Each valve is equipped with a service port which has a factory-installed valve stem. Figures 15 and 16 provide information on how to access and operate both angle- and ball-type service valves.

Page 12
Torque Requirements When servicing or repairing heating, ventilating and air conditioning components, ensure the fasteners are appro-priately tightened. Table 2 lists torque values for fasteners.
TABLE 2 TORQUE REQUIREMENTS
Parts Recommended TorqueService valve cap 8 ft.-lb. 11 NMSheet-metal screws 16 in.-lb. 2 NMMachine screws #10 28 in.-lb. 3 NMCompressor bolts 90 in.-lb. 10 NMGauge port seal cap 8 ft.-lb. 11 NM
IMPORTANTTo prevent stripping of the various caps used, the appropriately sized wrench should be used and fitted snugly over the cap before tightening.
Using Manifold Gauge Set When checking the system charge, only use a manifold gauge set that features low loss anti-blow back fittings. Manifold gauge set used with HFC-410A refrigerant sys-tems must be capable of handling the higher system oper-ating pressures. The gauges should be rated for use with pressures of 0 - 800 psig on the high side and a low side of 30" vacuum to 250 psig with dampened speed to 500 psi. Gauge hoses must be rated for use at up to 800 psig of pressure with a 4000 psig burst rating.
BALL (SHOWNCLOSED)
SERVICE PORTCORE
TO OPEN, ROTATE STEMCOUNTERCLOCKWISE 90°.
TO CLOSE, ROTATE STEMCLOCKWISE 90°.
SERVICE PORT
SERVICE PORTCAP
STEM CAP
VALVESTEM
1 - Remove stem cap with an appropriately sized wrench.2 - Use an appropriately sized wrench to open. To open valve, rotate
stem counterclockwise 90°. To close, rotate stem clockwise 90°.
OPERATING BALL-TYPE SERVICE VALVE
FIGURE 12
(VALVE STEM SHOWN CLOSED)INSERT HEX WRENCH HERE
SERVICE PORT CORE
SERVICE PORT CAP
ANGLE-TYPE SERVICE VALVE(FRONT-SEATED CLOSED)
STEM CAP
(VALVE STEM SHOWN OPEN)INSERT HEX WRENCH HERE
ANGLE-TYPE SERVICE VALVE(BACK-SEATED OPENED)
1 - Remove stem cap with an appropriately sized wrench.2 - Use a service wrench with a hex-head extension (3/16" for liquid
line valve sizes and 5/16" for vapor line valve sizes) to back thestem out counterclockwise as far as it will go.
When service valve is CLOSED, the service port isopen to the line set and indoor unit.
When service valve is OPEN, the service port isopen to line set, indoor and outdoor unit.
NOTE - A label with specific torque requirements may be affixed tothe stem cap. If the label is present, use the specified torque.
OPERATING ANGLE-TYPE SERVICE VALVE
FIGURE 13
1234567
891011 12
1/12 TURN
A service port cap protects the service port core from contaminationand serves as the primary leak seal.
1 - Remove service port cap with an appropriately sized wrench.2 - Connect gauge set to service port.3 - When testing is completed, replace service port cap and tighten
as follows:With torque wrench, finger tighten and torquecap per table 2.Without torque wrench, finger tighten and use an appropriately sized wrench to turn an additional 1/6 turn clockwise. 1
234567
89101112
1/6 TURN
Reinstall Stem CapStem cap protects the valve stem from damage and serves as theprimary seal. Replace the stem cap and tighten as follows:
With torque wrench, finger tighten andthen torque cap per table 2.Without torque wrench, fien and use an appropriately sizedwrench to turn an additional 1/12turn clockwise.
ACCESS SERVICE PORT
FIGURE 14

Page 13
Checking Refrigerant Charge The ML14XP1 unit is factory-charged with enough HFC-410A refrigerant to accommodate a 15-foot length of refrig-erant piping. Charge should be checked and adjusted using the tables provided on the charging procedure sticker on the unit access panel. Detailed information is given in the ML14XP1 Installation and Service Proce-dures manual.
Defrost System The defrost system includes a defrost thermostat (S6) and a defrost control (CMC1). DEFROST CONTROL (CMC1) This defrost control includes the combined functions of a time/temperature defrost control, defrost relay, time delay, diagnostic LEDs and a terminal strip for field wiring con-nections.
24V TERMINALSTRIPCONNECTIONS
DIAGNOSTICLEDS
HIGH PRESSURESWITCH
TESTPINS
DEFROST TIMINGPINS (P1)
REVERSINGVALVE
DEFROSTTHERMOSTAT (S6)
LOW PRESSURESWITCH
COMPRESSORDELAY PINS
S4
S87
SERVICE LIGHTCONNECTIONS
DEFROST CONTROL (CMC1)
FIGURE 15 The defrost control provides automatic switching from nor-mal heating operation to defrost mode and back. When the defrost thermostat is closed, the control accumulates compressor run time at 30-, 60- or 90- minute field-adjust-able intervals. When the selected compressor run time interval is reached, the defrost relay is energized and defrost begins. Defrost Control Timing Pins (P1) Each timing pin selection provides a different accumulat-ed compressor run time period for one defrost cycle. This time period must occur before a defrost cycle is initiated. The defrost interval can be adjusted to 30 (T1), 60 (T2), or 90 (T3) minutes (see figure 17). The maximum defrost period is 14 minutes and cannot be adjusted. NOTE - Defrost control part number is listed near the P1 timing pins. • Factory default is 90 minutes. • If the timing selector jumper is missing, the defrost con-
trol defaults to a 90-minute defrost interval.
Compressor Delay (P5) The defrost control has a field-selectable function to re-duce occasional sounds that may occur while the unit is cycling in and out of the defrost mode. The compressor will be cycled off for 30 seconds going in and out of the defrost mode when the compressor delay jumper is installed. (Factory default is jumper installed.)NOTE - The 30-second compressor feature is ignored when jumpering the TEST pins. Time Delay The timed-off delay is five minutes long. The delay helps to protect the compressor from short-cycling in case the power to the unit is interrupted or a pressure switch opens. The delay is bypassed by placing the timer select jumper across the TEST pins for 0.5 seconds. Test Mode The TEST mode is activated by removing the jumper on the defrost termination pins (30, 60 or 90) and placing the jumper on the TEST pins after 24VAC is applied to the control. The low pressure input is ignored in TEST mode.
IMPORTANTThe TEST pins are ignored and the TEST function is locked out: • If the jumper is applied on the TEST pin before 24VAC
is applied to the control. • If there is a jumper on the 30 or 60 minute defrost
termination pins.
Bypass Anti-Short-Cycle Delay The Y1 input must be active ON, the high pressure switch must be closed or a jumper must be installed on the high pressure terminals of the control. Initiate a Force Defrost The Y1 input must be active ON, the high pressure switch must be closed or a jumper must be installed on the high pressure terminals of the control, the defrost thermostat must be closed or a jumper must be placed across the DF terminals on the control and the O terminals must not have 24VAC (no power to reversing valve) before control will enter into a force defrost. Test Mode Sequence / Clear Pressure Switch LockoutUsing the defrost termination pin, short the TEST pins for a period of two seconds: • Clear timed lockout / or pressure switch lockout func-
tion.• Enter defrost mode. After entering force defrost, if the jumper is removed be-fore 5 seconds has elapsed, the unit will remain in forced defrost mode until defrost thermostat opens or terminated on maximum defrost time (14 minutes). If the jumper is not removed, once 5 seconds has elapsed (7 seconds total), the unit will terminate defrost and return to heat mode. The TEST mode will then be lockedout and no further TEST mode operation will be executed until the jumper on the TEST pins is removed and reapplied to the applicable de-frost termination pins.
Page 14
IMPORTANTAfter testing has been completed, properly reposition test jumper across desired timing pins
Service Light ConnectionThe defrost control includes terminal connections for a service light which provides a signal that activates the room thermostat service light during periods of inefficient operation.
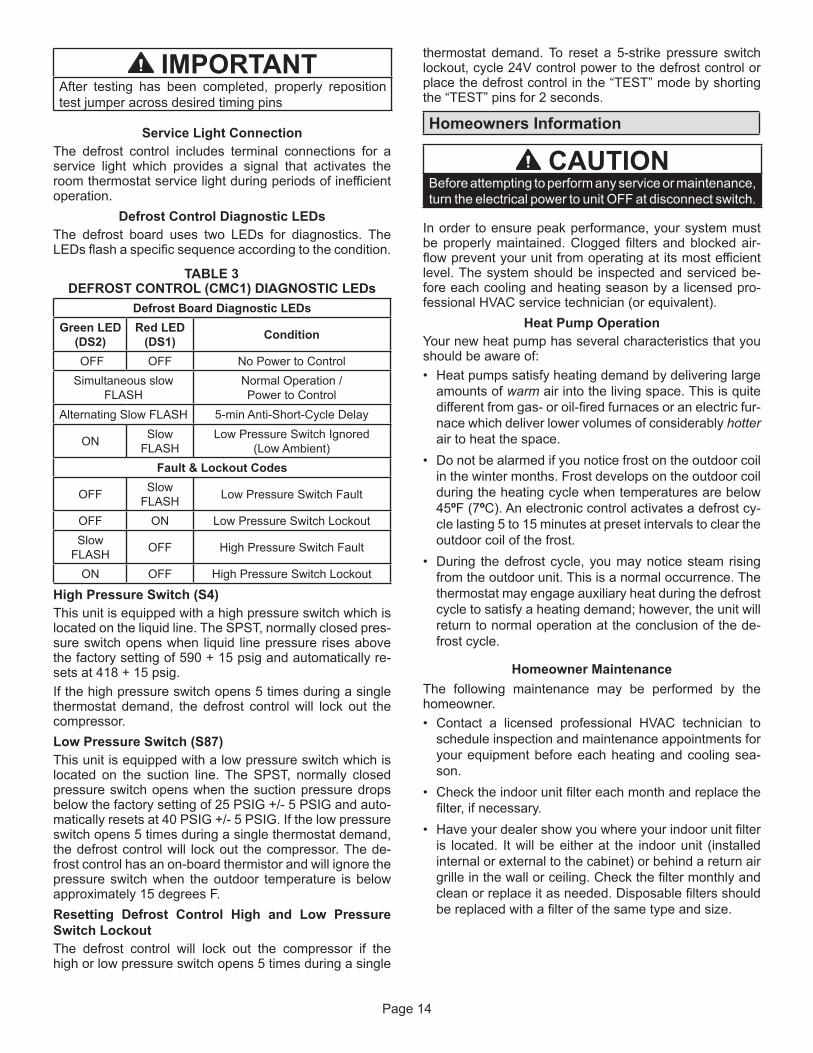
Defrost Control Diagnostic LEDsThe defrost board uses two LEDs for diagnostics. The LEDs flash a specific sequence according to the condition.
TABLE 3 DEFROST CONTROL (CMC1) DIAGNOSTIC LEDs
Defrost Board Diagnostic LEDsGreen LED
(DS2)Red LED
(DS1) Condition
OFF OFF No Power to ControlSimultaneous slow
FLASHNormal Operation / Power to Control
Alternating Slow FLASH 5-min Anti-Short-Cycle Delay
ON Slow FLASH
Low Pressure Switch Ignored (Low Ambient)
Fault & Lockout Codes
OFF Slow FLASH Low Pressure Switch Fault
OFF ON Low Pressure Switch LockoutSlow
FLASH OFF High Pressure Switch Fault
ON OFF High Pressure Switch Lockout
High Pressure Switch (S4)This unit is equipped with a high pressure switch which is located on the liquid line. The SPST, normally closed pres-sure switch opens when liquid line pressure rises above the factory setting of 590 + 15 psig and automatically re-sets at 418 + 15 psig. If the high pressure switch opens 5 times during a single thermostat demand, the defrost control will lock out the compressor. Low Pressure Switch (S87)This unit is equipped with a low pressure switch which is located on the suction line. The SPST, normally closed pressure switch opens when the suction pressure drops below the factory setting of 25 PSIG +/- 5 PSIG and auto-matically resets at 40 PSIG +/- 5 PSIG. If the low pressure switch opens 5 times during a single thermostat demand, the defrost control will lock out the compressor. The de-frost control has an on-board thermistor and will ignore the pressure switch when the outdoor temperature is below approximately 15 degrees F. Resetting Defrost Control High and Low Pressure Switch LockoutThe defrost control will lock out the compressor if the high or low pressure switch opens 5 times during a single
thermostat demand. To reset a 5-strike pressure switch lockout, cycle 24V control power to the defrost control or place the defrost control in the “TEST” mode by shorting the “TEST” pins for 2 seconds.
Homeowners Information
CAUTIONBefore attempting to perform any service or maintenance, turn the electrical power to unit OFF at disconnect switch.
In order to ensure peak performance, your system must be properly maintained. Clogged filters and blocked air-flow prevent your unit from operating at its most efficient level. The system should be inspected and serviced be-fore each cooling and heating season by a licensed pro-fessional HVAC service technician (or equivalent).
Heat Pump Operation Your new heat pump has several characteristics that you should be aware of: • Heat pumps satisfy heating demand by delivering large
amounts of warm air into the living space. This is quite different from gas- or oil-fired furnaces or an electric fur-nace which deliver lower volumes of considerably hotter air to heat the space.
• Do not be alarmed if you notice frost on the outdoor coil in the winter months. Frost develops on the outdoor coil during the heating cycle when temperatures are below 45ºF (7ºC). An electronic control activates a defrost cy-cle lasting 5 to 15 minutes at preset intervals to clear the outdoor coil of the frost.
• During the defrost cycle, you may notice steam rising from the outdoor unit. This is a normal occurrence. The thermostat may engage auxiliary heat during the defrost cycle to satisfy a heating demand; however, the unit will return to normal operation at the conclusion of the de-frost cycle.
Homeowner Maintenance The following maintenance may be performed by the homeowner. • Contact a licensed professional HVAC technician to
schedule inspection and maintenance appointments for your equipment before each heating and cooling sea-son.
• Check the indoor unit filter each month and replace the filter, if necessary.
• Have your dealer show you where your indoor unit filter is located. It will be either at the indoor unit (installed internal or external to the cabinet) or behind a return air grille in the wall or ceiling. Check the filter monthly and clean or replace it as needed. Disposable filters should be replaced with a filter of the same type and size.
Page 15
• Check the indoor unit drain line for obstructions month-ly. The indoor coil is equipped with a drain pan to collect condensate formed as your system removes humidity from the inside air. Have your dealer show you the loca-tion of the drain line and how to check for obstructions. (This would also apply to an auxiliary drain, if installed.)
• Check the area around the outdoor unit monthly and remove any obstructions that may restrict airflow to the outdoor unit. This would include grass clippings, leaves, or papers that may have settled around the unit.
• Trim shrubbery away from the unit and periodically check for debris which collects around the unit.
• During the winter months, keep the snow level below the louvered panels.
NOTE - The filter and all access panels must be in place any time the unit is in operation. If you are unsure about the filter required for your system, call your dealer for as-sistance.
IMPORTANTSprinklers and soaker hoses should not be installed where they could cause prolonged exposure to the outdoor unit by treated water. Prolonged exposure of the unit to treated water (i.e., sprinkler systems, soakers, waste water, etc.) will corrode the surface of the steel and aluminum parts, diminish performance and affect longevity of the unit.
Thermostat Operation See the thermostat homeowner manual for instructions on how to operate your thermostat.
Pre-Service Check If your system fails to operate, check the following before calling for service: • Verify room thermostat settings are correct. • Verify that all electrical disconnect switches are ON.• Check for any blown fuses or tripped circuit breakers. • Verify unit access panels are in place. • Verify air filter is clean. If service is needed, locate and write down the unit model number and have it handy before calling.
Extended Power Outage The heat pump is equipped with a compressor crankcase heater which protects the compressor during cold weather operation. If power to your unit has been interrupted for several hours or more, set the room thermostat selector to the EMER-GENCY HEAT setting to obtain temporary heat without the risk of serious damage to the heat pump. In EMERGENCY HEAT mode, all heating demand is sat-isfied by auxiliary heat; heat pump operation is locked out. After a six-hour compressor crankcase warm-up period, the thermostat can be switched to the HEAT setting and normal heat pump operation may resume.
Professional Maintenance
NOTICE !Failure to follow instructions will cause damage to the unit.This unit is equipped with an aluminum coil. Alumi-num coils may be damaged by exposure to solu-tions with a pH below 5 or above 9. The aluminum coil should be cleaned using potable water at a moderate pressure (less than 50psi). If the coil can-not be cleaned using water alone, the manufacturer recommends use of a coil cleaner with a pH in the range of 5 to 9. The coil must be rinsed thoroughly after cleaning.In coastal areas, the coil should be cleaned with potable water several times per year to avoid corro-sive buildup (salt).
Your heating and air conditioning system should be in-spected and maintained twice each year (before the start of the cooling and heating seasons) by a licensed profes-sional HVAC technician. You can expect the technician to check the following items. These checks may only be conducted by a licensed professional HVAC techni-cian. Outdoor Unit
1 - Inspect component wiring for loose, worn or damaged connections. Also check for any rubbing or pinching of wires. Confirm proper voltage plus amperage of outdoor unit.
2 - Check the cleanliness of outdoor fan and blade condition (cracks) and clean or replace them, if necessary.
3 - Inspect base pan drains for debris and clean as necessary.
4 - Inspect the condition of refrigerant piping and confirm that pipes are not rubbing copper-to-copper. Also, check the condition of the insulation on the refrigerant lines. Repair, correct, or replace as necessary.
5 - Test capacitor. Replace as necessary. 6 - Inspect contactor contacts for pitting or burn marks.
Replace as necessary. 7 - Check outdoor fan motor for worn bearings/
bushings. Replace as necessary. 8 - Inspect and clean outdoor coils, if necessary and
note any damage to coils or signs of leakage. Indoor Unit (Air Handler or Furnace)
1 - Inspect component wiring for loose, worn or damaged connections. Confirm proper voltage plus amperage of indoor unit.
2 - Inspect and clean or replace air filters in indoor unit. 3 - Check the cleanliness of indoor blower and clean
blower, if necessary.

Page 16
4 - Inspect the indoor coil drain pans and condensate drains for rust, debris, obstructions, leaks or cracks. Pour water in pans to confirm proper drainage from the pan through to the outlet of the pipe. Clean or replace as necessary.
5 - Inspect and clean indoor coil, if necessary. 6 - Inspect the condition of the refrigerant lines and
confirm that pipes are not rubbing copper-to-copper. Also, ensure that refrigerant pipes are not being affected by indoor air contamination. Check condition of insulation on the refrigerant lines. Repair, correct, or replace as necessary.
7 - Inspect the duct system for leaks or other problems. Repair or replace as necessary.
8 - Check for bearing/bushing wear on indoor blower motor. Replace as necessary.
9 - If your heat pump is matched with a gas- or oil-fired furnace for auxiliary heating, indoor unit service will also include inspection and cleaning of the burners, and a full inspection of the gas valve, heat exchanger and flue (exhaust) system.
General System Test with System Operating 1 - Your technician should perform a general system
test. He will turn on the air conditioner to check operating functions such as the startup and shutoff operation. He will also check for unusual noises or odors, and measure indoor/outdoor temperatures and system pressures as needed. He will check the refrigerant charge per the charging sticker information on the outdoor unit.
2 - Verify that system total static pressure and airflow settings are within specific operating parameters.
3 - Verify correct temperature drop across indoor coil.
ML14XP1 Start-Up and Performance Checklist
Customer Address
Indoor Unit Model SerialOutdoor Unit Model SerialNotes:
START UP CHECKSRefrigerant Type:
Rated Load Amps: Actual Amps Rated Volts Actual Volts
Condenser Fan Full Load Amps Actual Amps:
COOLING MODESuction Pressure: Liquid Pressure:
Supply Air Temperature: Ambient Temperature: Return Air: Temperature:
System Refrigerant Charge (Refer to manufacturer's information on unit or installation instructions for requiredsubcooling and approach temperatures.)
Subcooling: A — B = SUBCOOLING Saturated Condensing Temperature (A)
minus Liquid Line Temperature (B)
Approach: A — B = APPROACHLiquid Line Temperature (A)
minus Outdoor Air Temperature (B)
Indoor Coil Temperature Drop (18 to 22°F) A — B = COIL TEMP DROPReturn Air Temperature (A)
minus Supply Air Temperature (B)