installation manual - metroflorusa.com · installation manual 100% ... • engage genesis™ is...
TRANSCRIPT

FLOATING LUXURY VINYL FLOOR
Installation Manual
1 0 0 % WAT E R P R O O F
Revised 4/7/2016
Note: This document supersedes all printed and electronic Installation and Technical Guidespreviously distributed Engage Genesis™.

metroflorusa.com 2
• Engage Genesis™ is intended for interior use only and is suitable for above-grade, on-gradeand below-grade applications. However, Engage Genesis™ should not be installed inlocations where the substrate beneath the building structure is exposed to the elements.
• Engage Genesis™ is a floating floor and should be allowed to expand and contract freely.It must not be glued, nailed, or fastened to the substrate in any way. Install permanentcabinets, vanities, island counters and similar items first, then fit Engage Genesis™ aroundthem, leaving a space for expansion and contraction. Fill expansion spaces aroundpotentially wet areas with premium waterproof 100% silicone caulk. Always removestanding water, pet urine and other liquids promptly.
• Direct sunlight may cause Engage Genesis™ to fade or the joints to separate. ProtectEngage Genesis™ from direct sunlight using window treatments or UV tinting on windows.Engage Genesis™ is not recommended for use in sunrooms.
• Engage Genesis™ is a waterproof floating floor, but it should not be used to seal an existing floor from moisture. Engage Genesis™ cannot inhibit the growth of mold or preventstructural problems associated with, or caused by flooding, excessive moisture, alkalis in thesubfloor, or conditions arising from hydrostatic pressure. Regardless of location,always remove standing water, urine and other liquids promptly. Moistureissues should be addressed and corrected at the job site prior to installation.
Get To Know Engage Genesis™Featuring ISOCORE Technology™

metroflorusa.com 3
EVALUATE THE JOB SITEExteriorDamage caused by water and high humidity should be addressedprior to installing Engage Genesis™.
• Examine the driveway and landscaping surrounding the building.Be sure that they slope and direct water away from thefoundation.
• Inspect gutters, down spouts and drains for blockage. Removeclogs caused by leaves, dirt and debris, allowing runoff to flowfreely away from the foundation.
• Check crawl spaces for cross-ventilation air vents equaling at least1.5% per 100 square feet of floor space. Crawl spaces shouldmeasure a minimum of 18 inches high and should be insulatedaccording to the latest building code requirements. The groundshould be covered with a minimum 6-mil vapor barrier.
InteriorMoisture issues should be addressed and corrected at the job siteprior to installation.
• Examine the installation site for leaky plumbing, including leaksfrom water heaters, dishwashers, washing machines, or any otherwater-bearing fixtures or pipes.
• Inspect substrates for level. They must be sturdy, sound, and flatwithin 1⁄8" in a 6-foot radius, or 3⁄16 of an inch within a 10-footradius. The substrate should not slope more than 1 inch per 6feet in any direction.
• Metroflor® Corp. recommends testing concrete substrates forrelative humidity, moisture and pH before installing EngageGenesis™. Test results should not exceed 85% relative humidity(RH). The Calcium Chloride Test for moisture should be no morethan 8lbs per one-thousand square feet in 24 hours MVER,(Moisture Vapor Emission Rating) and pH tests for alkalinity levelsshould register between 7 and 9.
• Metroflor® Corp. recommends checking wood substrates formoisture. Obvious signs of moisture issues include warping,peaking, degradation of the integrity of the substrate, rustedfasteners, and rusted floor registers. Even if obvious signs are notpresent, the material should be tested using an invasive moisturemeter and moisture levels should not exceed 14%.
ATTENTION: Mold and mildew grow only in the presence ofmoisture. Moisture issues should be addressed and corrected at thejob site prior to installation. Please visit www.epa.gov/mold forinformation about safely preventing and removing mold, mildewand other biological pollutants.
IDENTIFY YOUR SUBSTRATEApproved SubstratesEngage Genesis™ is suitable for use over a wide variety ofsubstrates.
ConcreteEngage Genesis™ is waterproof, but moisture issues should becorrected at the jobsite before installation begins to prevent seriousdamage to the subfloor and surrounding structure, and todiscourage the growth of mold and mildew. Concrete substratesshould be prepared in accordance to the most current version ofASTM F710 (Standard Practice for Preparing Concrete Floors toReceive Resilient Flooring). Concrete substrates must be sturdy,sound, and flat within 1⁄8 of an inch within a 6-foot radius, or 3⁄16 ofan inch within a 10-foot radius. The substrate should not slope morethan 1 inch per 6 feet in any direction. Moisture and alkalinity testsshould be performed on all concrete substrates regardless of gradelevel or age of slab. Perform either ASTM F2170 In-Situ RelativeHumidity (RH) test or ASTM F1869 Calcium Chloride Moisture Test(MVER: Moisture Vapor Emission Rating). Perform pH test perASTM F710 to determine alkalinity of the slab. RH Test resultsshould not exceed 85% relative humidity. The Calcium Chloride Testfor moisture should measure no more than 8lbs per one-thousandsquare feet in 24 hours MVER, and pH tests for alkalinity levelsshould register between 7 and 9. Electronic meter testing is notconsidered a replacement for a Calcium Chloride Test or RelativeHumidity Test. All moisture tests should be conducted several daysprior to installation to be sure that moisture is at recommendedlevels. Follow current ASTM F710 guidelines. Metroflor® Corp.highly recommends that substrate moisture and pH testing isconducted by an ICRI (International Concrete Repair Institute) tier 2certified third party.
Radiant HeatRadiant heating systems must be cast ½-inch below the surface ofthe concrete slab, and should be operating at least 2 weeks beforeinstalling Engage Genesis™. Set the temperature of the radiantheating system to 68°F 48 hours before, during, and 72 hours afterinstallation. The temperature of the radiant heat floor may beincreased gradually 72 hours after installation, but the surfacetemperature should never exceed 85°F. Contact the manufacturerof your radiant heating system for further recommendations.
PRE-INSTALLATION ESSENTIALSYour job will be smooth, fast and easy when you follow the essentials every time you install Engage Genesis™.

metroflorusa.com 4
Plywood, OSB, Particleboard & ChipboardWood substrates must be A.P.A. approved with a minimum gradeof “BB” or “CC”. They must be sturdy, sound, and flat within 1⁄8 ofan inch within a 6-foot radius, or 3⁄16 of an inch within a 10-footradius. The substrate should not slope more than 1 inch per 6 feetin any direction. Metroflor® Corp. recommends performing moisturetests prior to installation to prevent serious damage to the subfloorand surrounding structure, and to discourage the growth of moldand mildew. Moisture readings should never exceed 14% forplywood, OSB, particleboard and chipboard substrates. If moisturereadings exceed 14%, it is advisable to correct moisture issues atthe jobsite before installing Engage Genesis™.
Tile, Terrazzo, Asbestos Tile, Resilient Tile, Non-Cushion Sheet Vinyl, & MetalExisting floors must be firmly attached to the structural floor. Theymust be sturdy, sound, and flat within 1⁄8 of an inch within a 6-footradius, or 3⁄16 of an inch within a 10-foot radius. The substrate shouldnot slope more than 1 inch per 6 feet in any direction. Wheninstalling Engage Genesis™ in commercial settings, fill in grout lineson ceramic tiles, terrazzo, quarry tiles and similar floors withcementitious leveling and patching compound.
UNACCEPTABLE SUBSTRATESRemove the floors noted below and remove old adhesive beforeinstalling Engage Genesis™. Encapsulate adhesive and cutbackresidue.
• Parquet Over Concrete
• Hardwood Over Concrete
• Cushion Back Sheet Vinyl
• Engineered Hardwood Over Concrete
• Carpeting/Carpet Pad
• Floating Floors
• Sleeper Substrates
NOTE: Various Federal, State and Local government agencies haveregulations governing the removal of in-place asbestos-containingmaterial. If you contemplate the removal of a resilient floorcovering structure that contains (or is presumed to contain)asbestos, you must review and comply with all applicableregulations. Do not sand, dry sweep, dry scrape, drill, saw, beadblast, or mechanically chip or pulverize existing resilient flooring,backing, lining felt, asphalt "cut-back” adhesive, or other adhesive.These products may contain asbestos fibers and/or crystallinesilica. Avoid creating dust. Inhalation of such dust is a cancer andrespiratory tract hazard. Smoking by individuals exposed toasbestos fibers greatly increases the risk of bodily harm. Unlesspositively certain that the product is a non-asbestos containingmaterial, you must presume it contains asbestos. Regulations mayrequire that the material be tested to determine asbestos content.The RFCI's Recommended Work Practices for Removal of ResilientFloor Covering are a defined set of instructions addressed to thetask of removing all resilient floor covering structures. For furtherinformation, contact the Resilient Floor Covering Institute websiteat www.rfci.com
metroflorusa.com 5
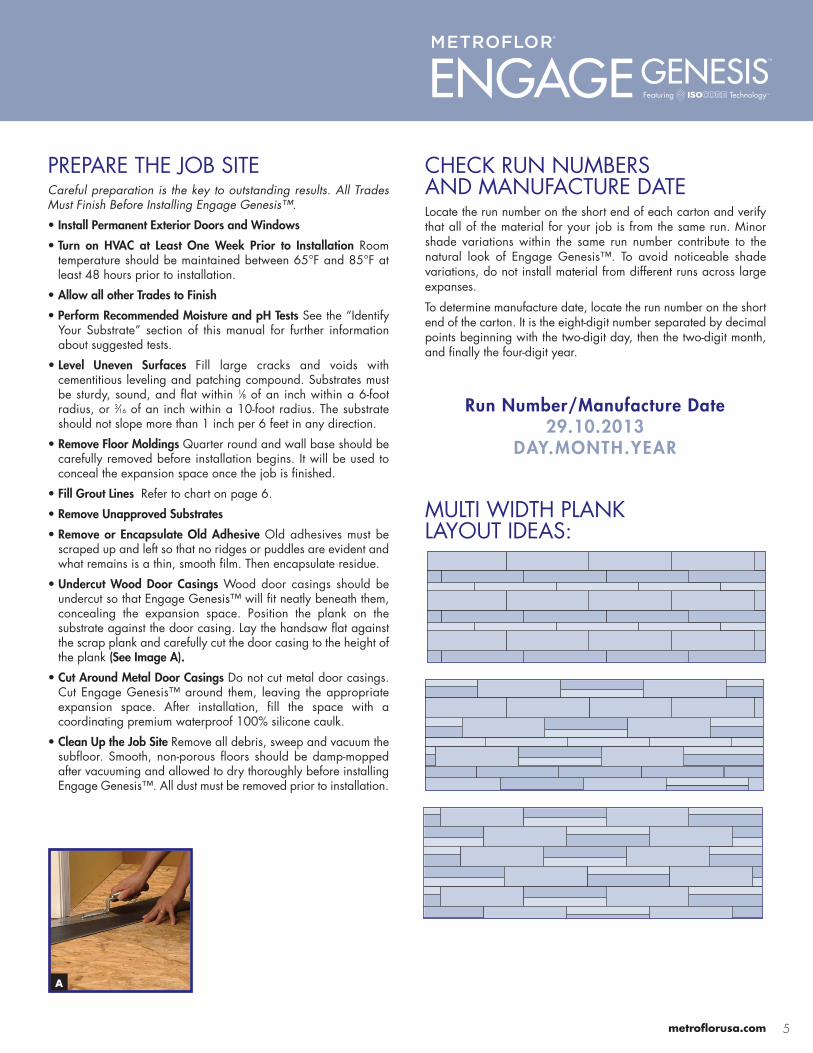
PREPARE THE JOB SITECareful preparation is the key to outstanding results. All TradesMust Finish Before Installing Engage Genesis™.
• Install Permanent Exterior Doors and Windows
• Turn on HVAC at Least One Week Prior to Installation Roomtemperature should be maintained between 65°F and 85°F atleast 48 hours prior to installation.
• Allow all other Trades to Finish
• Perform Recommended Moisture and pH Tests See the “IdentifyYour Substrate” section of this manual for further informationabout suggested tests.
• Level Uneven Surfaces Fill large cracks and voids withcementitious leveling and patching compound. Substrates mustbe sturdy, sound, and flat within 1⁄8 of an inch within a 6-footradius, or 3⁄16 of an inch within a 10-foot radius. The substrateshould not slope more than 1 inch per 6 feet in any direction.
• Remove Floor Moldings Quarter round and wall base should becarefully removed before installation begins. It will be used toconceal the expansion space once the job is finished.
• Fill Grout Lines Refer to chart on page 6.
• Remove Unapproved Substrates
• Remove or Encapsulate Old Adhesive Old adhesives must bescraped up and left so that no ridges or puddles are evident andwhat remains is a thin, smooth film. Then encapsulate residue.
• Undercut Wood Door Casings Wood door casings should beundercut so that Engage Genesis™ will fit neatly beneath them,concealing the expansion space. Position the plank on thesubstrate against the door casing. Lay the handsaw flat againstthe scrap plank and carefully cut the door casing to the height ofthe plank (See Image A).
• Cut Around Metal Door Casings Do not cut metal door casings.Cut Engage Genesis™ around them, leaving the appropriateexpansion space. After installation, fill the space with acoordinating premium waterproof 100% silicone caulk.
• Clean Up the Job Site Remove all debris, sweep and vacuum thesubfloor. Smooth, non-porous floors should be damp-moppedafter vacuuming and allowed to dry thoroughly before installingEngage Genesis™. All dust must be removed prior to installation.
CHECK RUN NUMBERS AND MANUFACTURE DATELocate the run number on the short end of each carton and verifythat all of the material for your job is from the same run. Minorshade variations within the same run number contribute to thenatural look of Engage Genesis™. To avoid noticeable shadevariations, do not install material from different runs across largeexpanses.
To determine manufacture date, locate the run number on the shortend of the carton. It is the eight-digit number separated by decimalpoints beginning with the two-digit day, then the two-digit month,and finally the four-digit year.
MULTI WIDTH PLANK LAYOUT IDEAS:
Run Number/Manufacture Date29.10.2013
DAY.MONTH.YEAR
A

metroflorusa.com 6
Subfloor Flatness Tolerances3⁄16" in 10' or 1⁄8" in 6' Slope no more than 1" in 6'
3⁄16" in 10' or 1⁄8" in 6' Slope no more than 1" in 6''
Vapor Barrier (6 mil polyfilm) Not Required Not Required
Is underlayment (pad) requiredNo – Genesis™ includes an integral pre-attached pad
No – Genesis™ includes an integral pre-attached pad
Acclimation Requirements Not Required* 48 hours
Transition Requirements (T-Mold) for Large Spaces
Not Required Required in rooms greater than 100’ in either direction
Transition Requirements (T-Mold) Doorways/Thresholds
Not Required Required
Installation over existing ceramic tile floor
Filling Grout Lines Not Required (Follow Subfloor Flatness Tolerances)
Filling Grout Lines Required
Glue Down Installation Not Required/Not Recommended Not Required/Not Recommended
Subfloor RH/MVER Recommendations
85% RH/8 lbs MVER 85% RH/8 lbs MVER
Radiant HeatApproved – Substrate surface temp. not to exceed 85° F
Approved – Substrate surface temp. not to exceed 85° F
3-Season/Non-Climate Controlled Environments
Not Recommended Not Recommended
Perimeter Expansion Requirements
1⁄4"around perimeter walls & heavy fixedobjects such as cabinetry
3⁄8"around perimeter walls & heavy fixedobjects such as cabinetry**
Optimal Interior Environmental Conditions
65°– 85°�F / 40%– 60% RH 65°– 85°�F / 40%– 60% RH
Definition of “Waterproof”Structural integrity of flooring will not degrade due to contact with moisture/water***
Structural integrity of flooring will not degrade due to contact with moisture/water***
*Engage Genesis™ flooring is more dimensionally stable than typical floating wood or vinyl based flooring products. Acclimation of Engage Genesis™ flooring forresidential applications is generally not required. However, Engage Genesis™ flooring subjected to extreme hot or cold conditions can cause the material to becometoo flexible or rigid, making the material difficult to install and potentially causing damage to the locking system. Optimum material temperature range for installationis 65°– 85°�F.
**If installing Genesis™ in an environment that has a length greater than 100', a T-Molding should be utilized to separate the floor into two (2) separate sections.
***While Engage Genesis™ is Waterproof, it is not intended for use as a moisture mitigation system.
Engage Genesis™ with ISOCORE Technology™ is a patent pending product from Metroflor Corporation.
KEY INSTALLATION CONSIDERATIONSRESIDENTIAL COMMERCIAL
ATTENTION: Only installation techniques described in this installation guide are warranted. Metroflor® Corporation does not warrant EngageGenesis™ installations involving custom cutting, such as 45-degree mitered corners and serpentine edges. Please refer to the EngageGenesis™ warranty for complete warranty details and exclusions.
metroflorusa.com 7
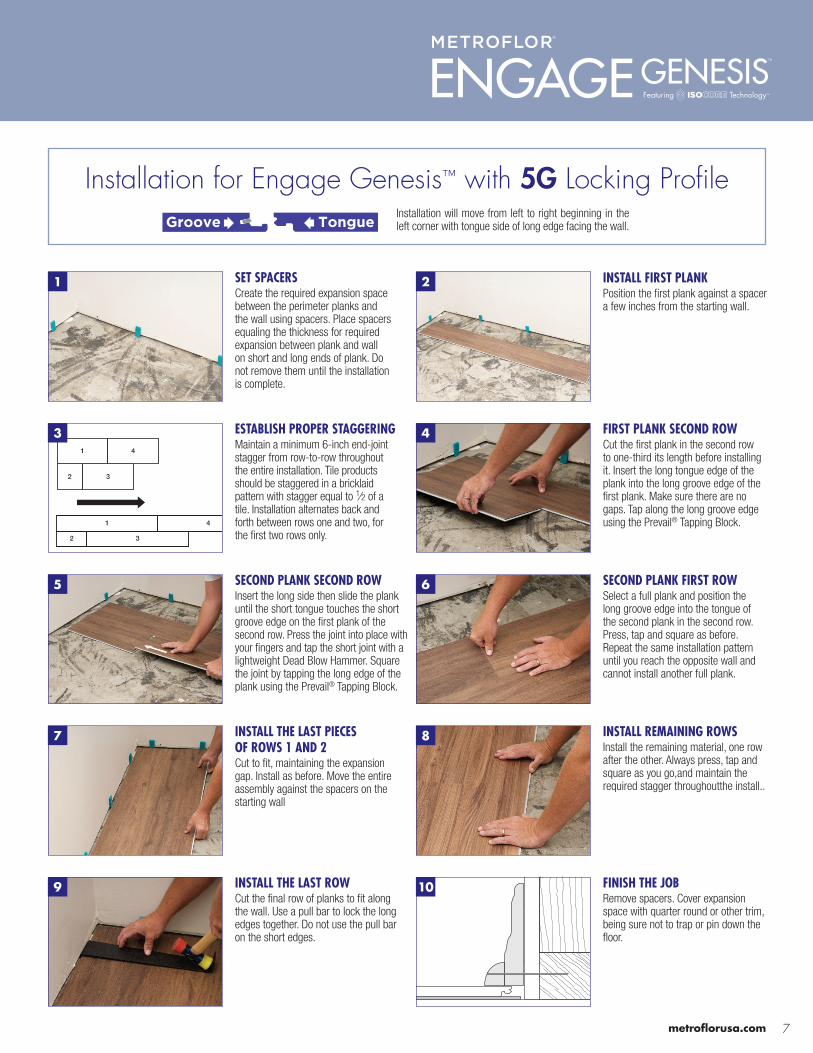
Installation for Engage Genesis™ with 5G Locking Profile
1
32
4
1
32
4
SET SPACERSCreate the required expansion spacebetween the perimeter planks andthe wall using spacers. Place spacersequaling the thickness for requiredexpansion between plank and wall on short and long ends of plank. Donot remove them until the installationis complete.
1 INSTALL FIRST PLANKPosition the first plank against a spacera few inches from the starting wall.
2
SECOND PLANK SECOND ROWInsert the long side then slide the plankuntil the short tongue touches the shortgroove edge on the first plank of thesecond row. Press the joint into place withyour fingers and tap the short joint with alightweight Dead Blow Hammer. Squarethe joint by tapping the long edge of theplank using the Prevail® Tapping Block.
5 SECOND PLANK FIRST ROWSelect a full plank and position thelong groove edge into the tongue ofthe second plank in the second row.Press, tap and square as before.Repeat the same installation patternuntil you reach the opposite wall andcannot install another full plank.
6
INSTALL THE LAST PIECES OF ROWS 1 AND 2Cut to fit, maintaining the expansiongap. Install as before. Move the entireassembly against the spacers on thestarting wall
7 INSTALL REMAINING ROWSInstall the remaining material, one rowafter the other. Always press, tap andsquare as you go,and maintain therequired stagger throughoutthe install..
8
INSTALL THE LAST ROWCut the final row of planks to fit alongthe wall. Use a pull bar to lock the longedges together. Do not use the pull baron the short edges.
9 FINISH THE JOBRemove spacers. Cover expansionspace with quarter round or other trim,being sure not to trap or pin down thefloor.
10
ESTABLISH PROPER STAGGERING Maintain a minimum 6-inch end-jointstagger from row-to-row throughoutthe entire installation. Tile productsshould be staggered in a bricklaidpattern with stagger equal to 1⁄2 of atile. Installation alternates back andforth between rows one and two, forthe first two rows only.
3 FIRST PLANK SECOND ROWCut the first plank in the second row to one-third its length before installingit. Insert the long tongue edge of theplank into the long groove edge of thefirst plank. Make sure there are nogaps. Tap along the long groove edgeusing the Prevail® Tapping Block.
4
Installation will move from left to right beginning in theleft corner with tongue side of long edge facing the wall.
metroflorusa.com 8
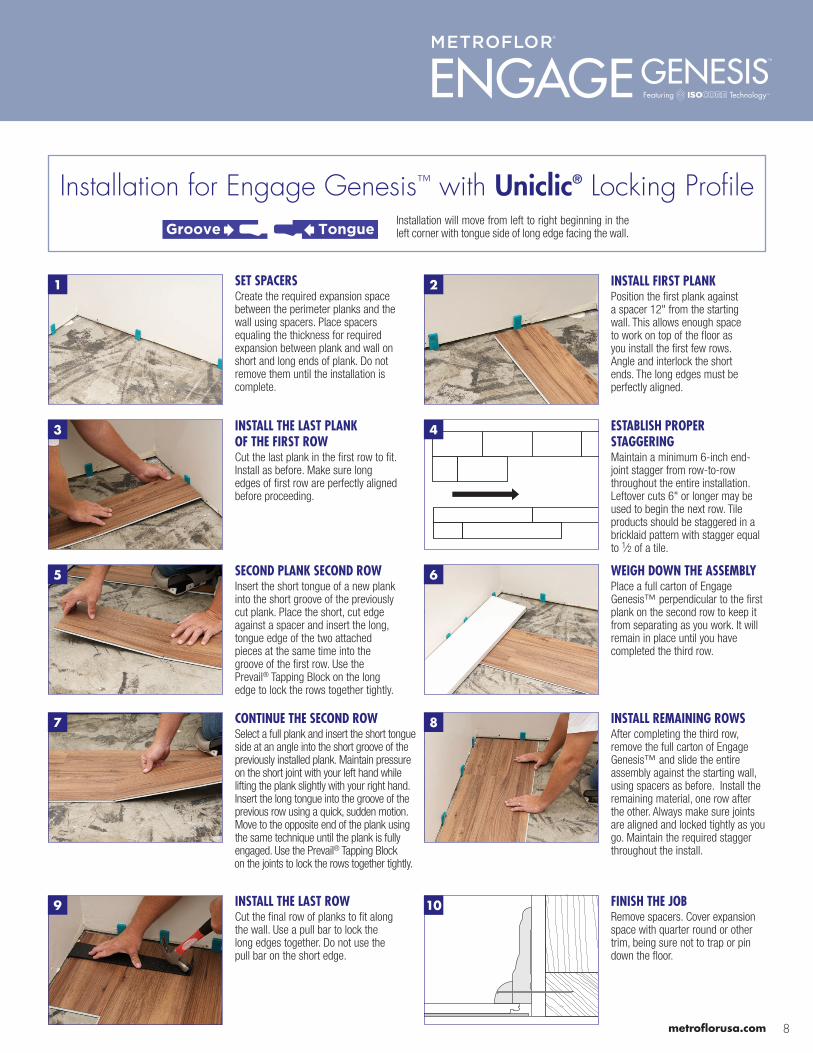
Installation for Engage Genesis™ with Uniclic® Locking Profile
SET SPACERSCreate the required expansion spacebetween the perimeter planks and thewall using spacers. Place spacersequaling the thickness for requiredexpansion between plank and wall onshort and long ends of plank. Do notremove them until the installation iscomplete.
1 INSTALL FIRST PLANKPosition the first plank againsta spacer 12" from the startingwall. This allows enough spaceto work on top of the floor asyou install the first few rows.Angle and interlock the shortends. The long edges must beperfectly aligned.
2
SECOND PLANK SECOND ROWInsert the short tongue of a new plankinto the short groove of the previouslycut plank. Place the short, cut edgeagainst a spacer and insert the long,tongue edge of the two attachedpieces at the same time into thegroove of the first row. Use thePrevail® Tapping Block on the longedge to lock the rows together tightly.
5 WEIGH DOWN THE ASSEMBLYPlace a full carton of EngageGenesis™ perpendicular to the firstplank on the second row to keep itfrom separating as you work. It willremain in place until you havecompleted the third row.
6
CONTINUE THE SECOND ROWSelect a full plank and insert the short tongueside at an angle into the short groove of thepreviously installed plank. Maintain pressureon the short joint with your left hand whilelifting the plank slightly with your right hand.Insert the long tongue into the groove of theprevious row using a quick, sudden motion.Move to the opposite end of the plank usingthe same technique until the plank is fullyengaged. Use the Prevail® Tapping Block on the joints to lock the rows together tightly.
7 INSTALL REMAINING ROWSAfter completing the third row,remove the full carton of EngageGenesis™ and slide the entireassembly against the starting wall,using spacers as before. Install theremaining material, one row afterthe other. Always make sure jointsare aligned and locked tightly as yougo. Maintain the required staggerthroughout the install.
8
INSTALL THE LAST ROWCut the final row of planks to fit alongthe wall. Use a pull bar to lock thelong edges together. Do not use thepull bar on the short edge.
9 FINISH THE JOBRemove spacers. Cover expansionspace with quarter round or othertrim, being sure not to trap or pindown the floor.
10
INSTALL THE LAST PLANK OF THE FIRST ROW Cut the last plank in the first row to fit.Install as before. Make sure longedges of first row are perfectly alignedbefore proceeding.
3 ESTABLISH PROPERSTAGGERINGMaintain a minimum 6-inch end-joint stagger from row-to-rowthroughout the entire installation.Leftover cuts 6" or longer may beused to begin the next row. Tileproducts should be staggered in abricklaid pattern with stagger equalto 1⁄2 of a tile.
4
Installation will move from left to right beginning in theleft corner with tongue side of long edge facing the wall.

metroflorusa.com 9
ROUTINE CARE & MAINTENANCE• Sweep, dust mop or vacuum daily. Do not use vacuums with any
type of beater bar assembly.
• Lightly damp mop with Prevail® Neutral Cleaner. Remove excesssoil by carefully scrubbing with a soft nylon brush or magic erasersponge and Prevail® Neutral Cleaner.
• Remove scuffs using Prevail® Neutral Cleaner and a soft nylonbrush or magic eraser sponge.
• Heavily soiled floors may require an occasional deep cleaningusing Prevail® Neutral Cleaner and a low-speed buffer notexceeding 300 RPM. Fit the buffer with a red or white scrubbingpad and work the solution over the floor. Remove the dirty residueby damp mopping with clear water.
• Remove standing water, pet urine and other liquids promptly.Follow with Prevail® 1-Step Neutral Cleaner or Prevail® Ready toUse Neutral Cleaner.
PREVENTIVE CARE• Use walk-off mats at all outside entrances.
• Use flat glides at least 2" in diameter under furniture legs to prevent indentations and scratches.
• Use broad surface non-staining casters at least 2" in diameter on rolling furniture.
• Do not use vinegar, polishes, waxes, oil soaps, abrasive cleaners,harsh detergents, “mop and shine” products or solvents.
• Use non-staining mats.
• Do not expose to direct sunlight for prolonged periods.
• Do not use steam cleaners.
• Do not flood floor or subject to standing liquids including pet urine.
GENERAL CARE & MAINTENANCE
For further information, please call Metroflor™ Technical Support Services at (888) 235-6672, or visit our website at metroflorusa.com.
To register and activate your product warranty, please visit metroflorusa.com. The registration information you provide will be used only to register your purchase and for no other purpose.
WARRANTY REGISTRATION