installation of sti-1221c strobe damage … · nec, nfpa and local codes. 3. in applications where...
TRANSCRIPT
USA - Headquarters2306 Airport Road • Waterford, Michigan 48327-1209Phone: 248-673-9898 • Fax: 248-673-1246Toll Free: 800-888-4784 • E-mail: [email protected]: www.sti-usa.com
European OfficeTaylor House • 34 Sherwood Road • BromsgroveWorcestershire • B60 3DR • England Tel: 44 (0) 1527 520 999 Fax: 44 (0) 1527 501 999 E-mail: [email protected] • Web: www.sti-emea.com
INSTALLATION OF STI-1221C STROBE DAMAGE STOPPERAll specifications and information shown were current as of publication and are subject to change without notice.
INSTALLATION NOTES1. To minimize strobe light loss, regardless of the type of strobe
appliance used, center cover over the strobe light lens. Failure to follow these instructions may lead to light loss transmission.
2. Damage Stopper must be installed to comply with applicable NEC, NFPA and local codes.
3. In applications where wash downs, rainfall or condensation occur, it is recommended that a drain or weep hole be provided. Refer to weep hole installation diagram.
4. Damage Stopper may be installed outdoors when appliance carries an outdoor rating.
Three year warranty or a one year limited warranty (from date of purchase) on most products. See website for details.Electronic warranty form at www.sti-usa.com/wc14.
1221CIS JAN2017
CLEANING INSTRUCTIONSRinse with water to remove abrasive dust and dirt. Wash with soap or mild detergent, using a soft cloth (do not scrub). Rinse once more then dry with a soft cloth or chamois. To remove grease or wet paint, rub gently with a cloth wetted with naphtha. Then wash and rinse. DO NOT USE RAZOR BLADES.
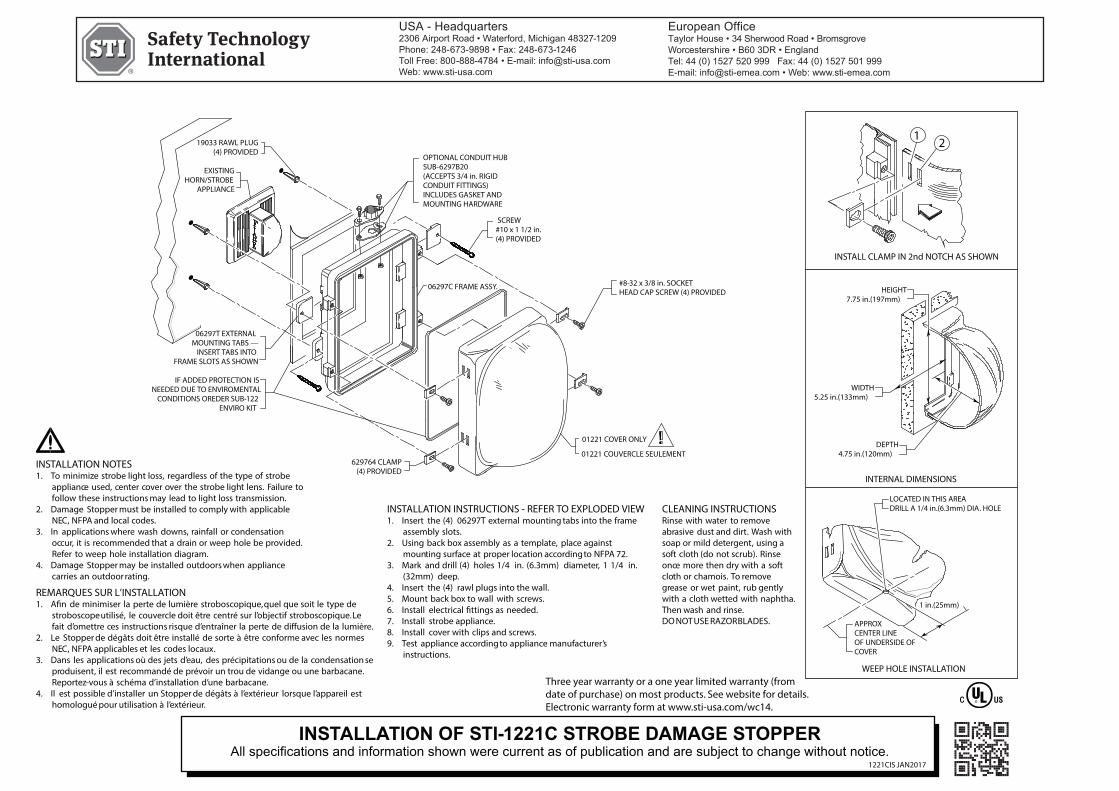
INSTALLATION INSTRUCTIONS - REFER TO EXPLODED VIEW1. Insert the (4) 06297T external mounting tabs into the frame
assembly slots.2. Using back box assembly as a template, place against
mounting surface at proper location according to NFPA 72.3. Mark and drill (4) holes 1/4 in. (6.3mm) diameter, 1 1/4 in.
(32mm) deep.4. Insert the (4) rawl plugs into the wall. 5. Mount back box to wall with screws.6. Install electrical fittings as needed.7. Install strobe appliance.8. Install cover with clips and screws.9. Test appliance according to appliance manufacturer’s
instructions.
629764 CLAMP(4) PROVIDED
APPROXCENTER LINEOF UNDERSIDE OF COVER
1 in.(25mm)
1 2
19033 RAWL PLUG(4) PROVIDED
EXISTINGHORN/STROBE
APPLIANCE
OPTIONAL CONDUIT HUBSUB-6297B20(ACCEPTS 3/4 in. RIGIDCONDUIT FITTINGS)INCLUDES GASKET ANDMOUNTING HARDWARE
LOCATED IN THIS AREADRILL A 1/4 in.(6.3mm) DIA. HOLE
IF ADDED PROTECTION ISNEEDED DUE TO ENVIROMENTAL
CONDITIONS OREDER SUB-122ENVIRO KIT
06297T EXTERNALMOUNTING TABS —
INSERT TABS INTOFRAME SLOTS AS SHOWN
SCREW#10 x 1 1/2 in.(4) PROVIDED
#8-32 x 3/8 in. SOCKETHEAD CAP SCREW (4) PROVIDED
06297C FRAME ASSY.
DEPTH4.75 in.(120mm)
WIDTH5.25 in.(133mm)
HEIGHT7.75 in.(197mm)
01221 COVER ONLY !01221 COUVERCLE SEULEMENT
INSTALL CLAMP IN 2nd NOTCH AS SHOWN
629764 CLAMP(4) PROVIDED
APPROXCENTER LINEOF UNDERSIDE OF COVER
1 in.(25mm)
1 2
19033 ANCHOR(4) PROVIDED
EXISTINGHORN/STROBE
APPLIANCE
OPTIONAL CONDUIT HUBSUB-6297B20(ACCEPTS 3/4 in. RIGIDCONDUIT FITTINGS)INCLUDES GASKET ANDMOUNTING HARDWARE
LOCATED IN THIS AREADRILL A 1/4 in.(6.3mm) DIA. HOLE
IF ADDED PROTECTION ISNEEDED DUE TO ENVIROMENTAL
CONDITIONS OREDER SUB-122ENVIRO KIT
06297T EXTERNALMOUNTING TABS —
INSERT TABS INTOFRAME SLOTS AS SHOWN
SCREW#10 x 1 1/2 in.(4) PROVIDED
#8-32 x 3/8 in. SOCKETHEAD CAP SCREW (4) PROVIDED
06297C FRAME ASSY.
DEPTH4.75 in.(120mm)
WIDTH5.25 in.(133mm)
HEIGHT7.75 in.(197mm)
01221 COVER ONLY !01221 COUVERCLE SEULEMENT INTERNAL DIMENSIONS
WEEP HOLE INSTALLATION
REMARQUES SUR L’INSTALLATION1. Afin de minimiser la perte de lumière stroboscopique, quel que soit le type de
stroboscope utilisé, le couvercle doit être centré sur l’objectif stroboscopique. Le fait d’omettre ces instructions risque d’entraîner la perte de diffusion de la lumière.
2. Le Stopper de dégâts doit être installé de sorte à être conforme avec les normes NEC, NFPA applicables et les codes locaux.
3. Dans les applications où des jets d’eau, des précipitations ou de la condensation se produisent, il est recommandé de prévoir un trou de vidange ou une barbacane. Reportez-vous à schéma d’installation d’une barbacane.
4. Il est possible d’installer un Stopper de dégâts à l’extérieur lorsque l’appareil est homologué pour utilisation à l’extérieur.
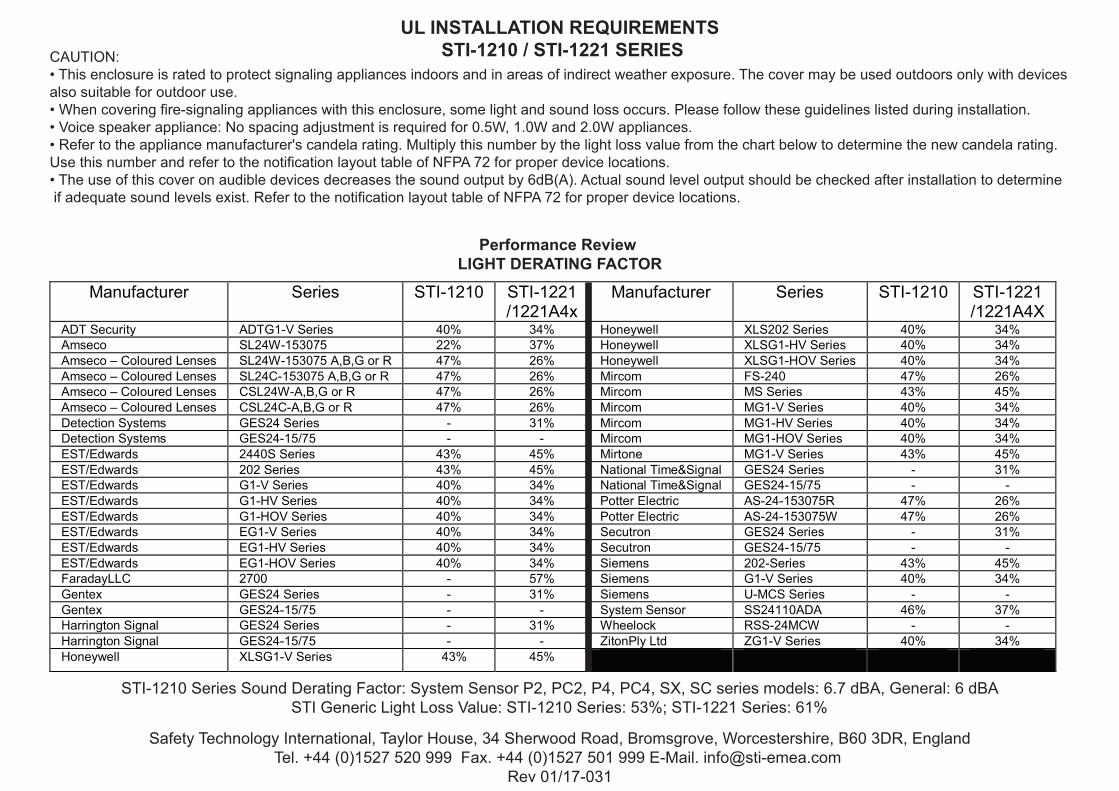
CAUTION:• This enclosure is rated to protect signaling appliances indoors and in areas of indirect weather exposure. The cover may be used outdoors only with devices also suitable for outdoor use.• When covering fire-signaling appliances with this enclosure, some light and sound loss occurs. Please follow these guidelines listed during installation.• Voice speaker appliance: No spacing adjustment is required for 0.5W, 1.0W and 2.0W appliances.• Refer to the appliance manufacturer's candela rating. Multiply this number by the light loss value from the chart below to determine the new candela rating. Use this number and refer to the notification layout table of NFPA 72 for proper device locations.• The use of this cover on audible devices decreases the sound output by 6dB(A). Actual sound level output should be checked after installation to determine if adequate sound levels exist. Refer to the notification layout table of NFPA 72 for proper device locations.
UL INSTALLATION REQUIREMENTS STI-1210 / STI-1221 SERIES
Performance Review LIGHT DERATING FACTOR
Manufacturer Series STI-1210 STI-1221 /1221A4x
Manufacturer Series STI-1210 STI-1221 /1221A4X
ADT Security ADTG1-V Series 40% 34% Honeywell XLS202 Series 40% 34% Amseco SL24W-153075 22% 37% Honeywell XLSG1-HV Series 40% 34% Amseco – Coloured Lenses SL24W-153075 A,B,G or R 47% 26% Honeywell XLSG1-HOV Series 40% 34% Amseco – Coloured Lenses SL24C-153075 A,B,G or R 47% 26% Mircom FS-240 47% 26% Amseco – Coloured Lenses CSL24W-A,B,G or R 47% 26% Mircom MS Series 43% 45% Amseco – Coloured Lenses CSL24C-A,B,G or R 47% 26% Mircom MG1-V Series 40% 34% Detection Systems GES24 Series - 31% Mircom MG1-HV Series 40% 34% Detection Systems GES24-15/75 - - Mircom MG1-HOV Series 40% 34% EST/Edwards 2440S Series 43% 45% Mirtone MG1-V Series 43% 45% EST/Edwards 202 Series 43% 45% National Time&Signal GES24 Series - 31% EST/Edwards G1-V Series 40% 34% National Time&Signal GES24-15/75 - - EST/Edwards G1-HV Series 40% 34% Potter Electric AS-24-153075R 47% 26% EST/Edwards G1-HOV Series 40% 34% Potter Electric AS-24-153075W 47% 26% EST/Edwards EG1-V Series 40% 34% Secutron GES24 Series - 31% EST/Edwards EG1-HV Series 40% 34% Secutron GES24-15/75 - - EST/Edwards EG1-HOV Series 40% 34% Siemens 202-Series 43% 45% FaradayLLC 2700 - 57% Siemens G1-V Series 40% 34% Gentex GES24 Series - 31% Siemens U-MCS Series - - Gentex GES24-15/75 - - System Sensor SS24110ADA 46% 37% Harrington Signal GES24 Series - 31% Wheelock RSS-24MCW - - Harrington Signal GES24-15/75 - - ZitonPly Ltd ZG1-V Series 40% 34% Honeywell XLSG1-V Series 43% 45%
STI-1210 Series Sound Derating Factor: System Sensor P2, PC2, P4, PC4, SX, SC series models: 6.7 dBA, General: 6 dBASTI Generic Light Loss Value: STI-1210 Series: 53%; STI-1221 Series: 61%
Safety Technology International, Taylor House, 34 Sherwood Road, Bromsgrove, Worcestershire, B60 3DR, EnglandTel. +44 (0)1527 520 999 Fax. +44 (0)1527 501 999 E-Mail. [email protected]
Rev 01/17-031
DRILL A 1/4 in.(6.3mm) DIA. HOLE