installation user manualuser manual manual
TRANSCRIPT

User ManualUser ManualInsta l lat ion Manual
Insta l lat ion Manual
T2BCBlade Server
T2BCBlade Server
™
™Sun 64-bi t 4/8-Core Ult raSPARC T2 Processor for IBM BladeCenter / 1.2 GHzUp to 500-GB HDD / Up to 32-GB FB-DIMM / Solar is 8/9/10-based appl icat ions
Network Fabr ic: 1-Gbit & 10-Gbit Ethernet / Fibre Channel
RRR

Su
n U
ltra
SP
AR
C T
2 P
ro
ce
ss
or fo
r IB
M B
lad
eC
en
te
r
T2
BC
Bla
de
Se
rve
rT
2B
C B
lad
e S
erv
er
Su
n U
ltra
SP
AR
C T
2 P
ro
ce
ss
or fo
r IB
M B
lad
eC
en
te
r
T2
BC
Bla
de
Se
rve
rT
2B
C B
lad
e S
erv
er
Su
n U
ltra
SP
AR
C T
2 P
ro
ce
ss
or fo
r IB
M B
lad
eC
en
te
r
T2
BC
Bla
de
Se
rve
rT
2B
C B
lad
e S
erv
er
Su
n U
ltra
SP
AR
C T
2 P
ro
ce
ss
or fo
r IB
M B
lad
eC
en
te
r
T2
BC
Bla
de
Se
rve
rT
2B
C B
lad
e S
erv
er
Su
n U
ltra
SP
AR
C T
2 P
ro
ce
ss
or fo
r IB
M B
lad
eC
en
te
r
T2
BC
Bla
de
Se
rve
rT
2B
C B
lad
e S
erv
er

Themis Computer—Rest of World5 Rue Irene Joliot-Curie38320 Eybens, FrancePhone +33 476 14 77 80Fax +33 476 14 77 89
Themis Computer—Americas and Pacific Rim47200 Bayside ParkwayFremont, CA 94538Phone (510) 252-0870Fax (510) 490-5529World Wide Web http://www.themis.com
T2BC Blade ServerInstallation Manual
Version 1.2— January 2009

Copyright © 2009 Themis Computer, Inc.
ALL RIGHTS RESERVED. No part of this publication may be reproduced in any form, byphotocopy, microfilm, retrieval system, or by any other means now known or hereafter invented withoutthe prior written permission of Themis Computer.
The information in this publication has been carefully checked and is believed to be accurate. However,Themis Computer assumes no responsibility for inaccuracies. Themis Computer retains the right tomake changes to this publication at any time without prior notice. Themis Computer does not assumeany liability arising from the application or use of this publication or the product(s) described herein.
RESTRICTED RIGHTS LEGEND: Use, duplication, or disclosure by the United States Governmentis subject to the restrictions set forth in DFARS 252.227-7013 (c)(1)(ii) and FAR 52.227-19.
TRADEMARKS and SERVICEMARKS
Themis® is a registered trademark of Themis Computer, Inc.
T2BC™ is a trademark of Themis Computer, Inc.
IBM® and BladeCenter® are registered trademarks of IBM Corporation
Sun® and Solaris™ are trademarks or registered trademarks of Sun Microsystems, Inc.
UltraSPARC® is a registered trademark of SPARC International
InfiniBand® is a registered trademark and servicemark of the InfiniBand® Trade Association
All other trademarks, servicemarks, or registered trademarks used in this publication are the property oftheir respective owners.
T2BC Blade ServerInstallation Manual, Version 1.2
January 2009
Part Number: 115906-024
Themis Customer Support
North America, South America, and Pacific Rim
Telephone: 510-252-0870Fax: 510-490-5529
E-mail: [email protected] Site: http://www.themis.com

iiiThemis Computer
T2BC Blade Server Installation Manual
Version Revision History
Version 1.2.......................................................................................January 2009
• Corrected the “Accessing Solaris by Remote KVM” procedure in section 3.2 ofChapter 3.
• Added Appendix D, "Installing Solaris 10 onto the T2BC".• Assorted minor edits and changes throughout the manual.
Version 1.1................................................................................... December 2008
• Modified “Instructions for the Lithium Battery” on page vi.• Added a checksum command to Step 6 on page 3-8 in Chapter 3, "Accessing
OBP and Solaris by Remote KVM". • Modified section 4.1.4, "Installing Memory Modules", in Chapter 4, "Hardware
Installation", to include increased memory configurations.• Added new section 4.2, "Rack-Mount Safety Instructions". • Assorted minor edits and changes throughout the manual.
Version 1.0....................................................................................... October 2008

ivThemis Computer
T2BC Blade Server Installation Manual
Safety InstructionsTo maximize user safety and ensure correct device operation, all instructions con-tained in this section should be read carefully.
• The device must be used in accordance with the instructions for use.
• Electrical installations in the room must correspond to the requirements ofrespective regulations.
• Take care that there are no cables, particularly mains cables, in areas wherepersons can trip over them.
• Do not use a mains connection in sockets shared by a number of other powerconsumers. Do not use an extension cable.
• The unit is completely disconnected from the power source only when thepower cord is disconnected from the power source. Therefore the power cordand its connectors must always remain easily accessible.
• Do not set up the device in the proximity of heat sources or in a damp location.Make sure the device has adequate ventilation.
• The device is no longer safe to operate when:
— the device has visible damage or
— the device no longer functions.
• In these cases, the device must be shut down and secured against unintentionaloperation.
• Repairs may only be carried out by a person authorized by Themis Computer.
Caution: It is important that the user observe all warnings and instructions that areon the device and contained in this manual.

vThemis Computer
T2BC Blade Server Installation Manual
Safety Instructions
• The device may only be opened for the installation and removal of memorymodules, expansion card, hard-disk or solid-state drive, and lithium battery—all in accordance with instructions given in this manual.
• If extensions are made to the device, the legal stipulations and the device spec-ifications must be observed.
Electrostatic Discharge (ESD)A sudden discharge of electrostatic electricity can destroy static-sensitive devicesor micro-circuitry. Proper packaging and grounding techniques are necessary pre-cautions to prevent damage. Always take the following precautions:
1. Transport boards in static-safe containers such as boxes or bags.
2. Keep electrostatic-sensitive parts in their containers until they arrive at static-free stations.
3. Always be properly grounded when touching a sensitive board, component, orassembly.
4. Store electrostatic-sensitive boards in protective packaging or on conductivefoam.
Grounding MethodsGuard against electrostatic damage at workstations by following these steps:
1. Cover workstations with approved anti-static material. Provide a wrist strapconnected to a work surface and properly grounded tools and equipment.
2. Use anti-static mats, heel straps, or air ionizers to give added protection.
3. Handle electrostatic-sensitive components, boards, and assemblies by the caseor the PCB edge.
4. Avoid contact with pins, leads, or circuitry.
Note: The T2BC Blade Server does not support the addition of PCI I/O or storageexpansion units at this time.

viThemis Computer
T2BC Blade Server Installation Manual
5. Turn off power and input signals before inserting and removing connectors ortest equipment.
6. Keep the work area free of non-conductive materials such as ordinary plastic as-sembly aids and Styrofoam.
7. Use field service tools, such as cutters, screwdrivers, and vacuums that are con-ductive.
8. Always place drives and boards PCB-assembly-side down on the foam.
Instructions for the Lithium BatteryThemis systems are equipped with a lithium battery installed on the motherboard.To replace this battery, please observe the instructions that are described in thismanual.
Warning: There is a danger of explosion if the battery is replaced by an incorrecttype. Dispose of used batteries according to the instructions.

viiThemis Computer
Table of ContentsSafety Instructions ................................................................................................................ iv
Preface ....................................................................................................................................xv
Website Information xvi
Your Comments are Welcome ............................................................................................ xvi
Notes, Cautions, Warnings, and Sidebars xvii
1. Overview and Specifications ........................................................................................ 1-1
1.1 Overview ................................................................................................................ 1-11.2 System Management .............................................................................................. 1-41.3 Specifications ......................................................................................................... 1-6
1.3.1 General ....................................................................................................... 1-61.3.2 Power ......................................................................................................... 1-61.3.3 Midplane Electrical Interface ..................................................................... 1-71.3.4 Environmental ............................................................................................ 1-8
1.3.4.1 Electrostatic Discharge ............................................................... 1-81.3.5 Agency Compliance ................................................................................... 1-8
1.3.5.1 Safety Certifications ................................................................... 1-81.3.5.2 EMC/EMI Certifications ............................................................. 1-91.3.5.3 Mil-Spec Requirements .............................................................. 1-9
1.4 Packaging and Shipping ....................................................................................... 1-10
2. Basic Operation, Controls, and Indicators ................................................................. 2-1
2.1 Installing the T2BC in a BladeCenter .................................................................... 2-12.2 Accessing the Service Processor and Baseboard Serial Console .......................... 2-4
2.2.1 Serial Over LAN (SOL) ............................................................................. 2-42.2.2 Front-Panel Micro-DB9 ............................................................................. 2-52.2.3 Midplane Serial Interface ........................................................................... 2-6
2.3 Turning On the T2BC Blade Server ...................................................................... 2-72.3.1 Turning On Directly ................................................................................... 2-8

viiiThemis Computer
T2BC Blade Server Installation Manual
2.3.2 Turning On Remotely ................................................................................ 2-92.3.2.1 Integrated Lights Out Manager (ILOM) ..................................... 2-92.3.2.2 BladeCenter T-R Advanced Management Module (AMM) ..... 2-112.3.2.3 Sun Service Processor Command-Line Interface (CLI) ........... 2-122.3.2.4 Log into the Service Processor using SSH or Telnet ................ 2-12
2.3.3 Sun Service Processor Command-Line Interface (CLI) .......................... 2-132.4 Turning Off the T2BC Blade Server .................................................................... 2-14
2.4.1 Turning Off Directly ................................................................................ 2-142.4.2 Turning Off Remotely ............................................................................. 2-15
2.4.2.1 Turning Off from the Sun ILOM GUI Interface ....................... 2-152.4.2.2 Turning Off from the Sun CLI .................................................. 2-172.4.2.3 Turning Off from the IBM AMM GUI Interface
(Soft and Hard) ......................................................................... 2-17
2.5 Removing the T2BC from a BladeCenter ............................................................ 2-192.6 Control Buttons and LED Indicators ................................................................... 2-20
2.6.1 Control Buttons ........................................................................................ 2-202.6.1.1 Power (ON/OFF) Button .......................................................... 2-202.6.1.2 KVM Select Button .................................................................. 2-212.6.1.3 Media Tray (CD/FDD) Select Button ....................................... 2-21
2.6.2 LED Indicators ......................................................................................... 2-212.6.2.1 Power-On LED ......................................................................... 2-212.6.2.2 Activity LED ............................................................................. 2-222.6.2.3 Location LED ........................................................................... 2-222.6.2.4 Information LED ....................................................................... 2-222.6.2.5 Blade Server Error (Fault) LED ................................................ 2-222.6.2.6 KVM LED (Button Illumination) ............................................. 2-222.6.2.7 Media Tray (CD/FDD) Select LED (Button Illumination) ...... 2-22
3. Accessing OBP and Solaris by Remote KVM ............................................................ 3-1
3.1 Accessing OBP by Remote KVM ......................................................................... 3-13.2 Accessing Solaris by Remote KVM ...................................................................... 3-6
4. Hardware Installation .................................................................................................. 4-1
4.1 Installation Procedures ........................................................................................... 4-14.1.1 Opening the T2BC Blade Server Cover .................................................... 4-14.1.2 Installing an SAS/SATA Mass Storage Drive ........................................... 4-34.1.3 Removing an SAS/SATA Mass Storage Drive ......................................... 4-54.1.4 Installing Memory Modules ....................................................................... 4-5

ixThemis Computer
Table of Contents
4.1.4.1 Installation .................................................................................. 4-74.1.5 Installing an I/O Expansion Card ............................................................. 4-10
4.1.5.1 Small-Form-Factor Expansion Card ......................................... 4-114.1.5.2 High-Speed Expansion Card ..................................................... 4-12
4.1.6 Replacing the Lithium Battery ................................................................. 4-124.1.6.1 Removing the Lithium Battery ................................................. 4-124.1.6.2 Installing the Lithium Battery ................................................... 4-13
4.2 Rack-Mount Safety Instructions .......................................................................... 4-14
Appendix A. Connector Pinouts ...................................................................................... A-1
A.1 USB Port ............................................................................................................... A-2
A.2 Serial Port ............................................................................................................. A-3
Appendix B. T2BC Blade Server Quick-Start Reference Notes ...................................B-1
B.1 Setup Service Processor (SP) .................................................................................B-1B.1.1 SOL Connection Example: ........................................................................B-1
B.2 Setup Solaris Network Connection ........................................................................B-4B.2.1 Power on CPU from SP .............................................................................B-4B.2.2 dhcp Connection Example .........................................................................B-6
Appendix C. T2BC Service Processor & BMC Firmware Upgrade .............................C-1
C.1 Service Processor (SP) Firmware Upgrade ...........................................................C-1
C.2 Baseboard Management Controller (BMC) Firmware Upgrade ...........................C-6
Appendix D. Installing Solaris 10 onto the T2BC ......................................................... D-1
Index ................................................................................................................ Index-1
Reader Comment Card

xThemis Computer
T2BC Blade Server Installation Manual

xiThemis Computer
Table of Contents
List of Figures
Preface Themis T2BC Blade Server ............................................................................... xv
Figure 1-1 Themis T2BC Blade Server ............................................................................. 1-1
Figure 1-2 Basic Components of the T2BC Blade Server (Top View, Cover Off) .......... 1-3
Figure 1-3 T2BC Blade Server System Management ....................................................... 1-4
Figure 1-4 T2BC Blade Server Block Diagram ................................................................ 1-5
Figure 1-5 T2BC Blade Server Midplane Connectors ...................................................... 1-7
Figure 2-1 Before installation, open the release handles of the T2BC Blade Server ........ 2-2
Figure 2-2 Installing the T2BC Blade Server into a BladeCenter—First Handle ............. 2-2
Figure 2-3 Installing the T2BC Blade Server into a BladeCenter—Second Handle......... 2-3
Figure 2-4 Location of the DIP Switches on the T2BC Blade Server............................... 2-5
Figure 2-5 Large-Scale View of the DIP Switch Location on the T2BC.......................... 2-6
Figure 2-6 T2BC Blade Server Power Zones .................................................................... 2-7
Figure 2-7 T2BC Blade Server Control Panel................................................................... 2-8
Figure 2-8 Integrated Lights Out Manager Main Screen ................................................ 2-10
Figure 2-9 Integrated Lights Out Manager Remote Control Screen ............................... 2-10
Figure 2-10 BladeCenter Advanced Management Module Main Screen.......................... 2-11
Figure 2-11 BladeCenter Advanced Management Module Blades Screen ....................... 2-11
Figure 2-12 BladeCenter Advanced Management Module Restart Screen....................... 2-12
Figure 2-13 Turning the T2BC Blade Server on at the Command Line ........................... 2-13
Figure 2-14 Integrated Lights Out Manager Main Screen ................................................ 2-16
Figure 2-15 Integrated Lights Out Manager Remote Control Screen ............................... 2-16
Figure 2-16 Location of the T2BC Control Panel and Protective Door ............................ 2-20
Figure 3-1 Open a Web Browser to begin Remote KVM Access..................................... 3-2
Figure 3-2 Start New Session ............................................................................................ 3-2
Figure 3-3 Select Remote Control under the Blades/Tasks Menu .................................... 3-3
Figure 3-4 Select a Blade Server from the Pull-Down Menu on the Remote KVM......... 3-3

xiiThemis Computer
T2BC Blade Server Installation Manual
Figure 3-5 OBP Screen...................................................................................................... 3-5
Figure 3-6 Restart the Advanced Management Module.................................................... 3-5
Figure 3-7 Open a Web Browser to begin Remote KVM Access..................................... 3-6
Figure 3-9 Select Remote Control under the Blades/Tasks Menu .................................... 3-7
Figure 3-8 Start New Session ............................................................................................ 3-7
Figure 3-10 Select a Blade Server from the Pull-Down Menu on the Remote KVM......... 3-8
Figure 3-11 Solaris Login Screen........................................................................................ 3-8
Figure 3-12 Restart the Advanced Management Module.................................................... 3-9
Figure 4-1 Remove the T2BC Protective Access Cover ................................................... 4-2
Figure 4-2 Location of the T2BC Mass Storage Drive Holder ......................................... 4-3
Figure 4-3 Installing the T2BC Hard-Disk Storage Drive ................................................ 4-4
Figure 4-4 Identification of the T2BC Blade Server DIMM Slots.................................... 4-8
Figure 4-5 Memory Module Removal and Installation ..................................................... 4-9
Figure 4-6 Surface I/O Connectors Supported by the T2BC Blade Server..................... 4-10
Figure 4-7 Removing the T2BC Lithium Battery ........................................................... 4-13
Figure 4-8 Installing a New T2BC Lithium Battery........................................................ 4-13
Figure A-1 Location of the I/O Connectors on the T2BC Front Panel ............................. A-1
Figure A-2 USB Port A Connector Pinout ........................................................................ A-2
Figure A-3 COM 1 Serial Port Connector Pinout ............................................................. A-3
Figure C-1 ILOM Web GUI Login Screen ........................................................................ C-2
Figure C-2 Initial ILOM Screen......................................................................................... C-2
Figure C-3 Firmware Upgrade Select Screen .................................................................... C-2
Figure C-4 Firmware Upgrade Screen .............................................................................. C-3
Figure C-5 Browse Screen ................................................................................................ C-3
Figure C-6 Choose File Screen ......................................................................................... C-4
Figure C-7 Upload File Screen.......................................................................................... C-4
Figure C-8 Start Upgrade Screen ...................................................................................... C-4
Figure C-9 Warning Before Starting Upgrade .................................................................. C-5

xiiiThemis Computer
Table of Contents
Figure C-10 Upgrade Progression Screen........................................................................... C-5
Figure C-11 Upgrade Completed Screen ............................................................................ C-5
Figure C-12 AMM Web GUI Login Window .................................................................... C-6
Figure C-13 Start New Session Window ............................................................................ C-7
Figure C-14 System Status Window ................................................................................... C-8
Figure C-15 Update Blade Firmware Window ................................................................... C-9
Figure C-16 Choose Firmware File Window...................................................................... C-9
Figure C-17 Selecting the Target Blade and Firmware File .............................................. C-10
Figure C-18 Confirm the Firmware Update Information.................................................. C-10
Figure C-19 Firmware Update Progress Window............................................................. C-11
Figure C-20 Choose Firmware File Window.................................................................... C-11
List of Tables
Table 1-1 Primary Features of the T2BC Blade Server .................................................. 1-2
Table 1-2 T2BC Blade Server General Specifications.................................................... 1-6
Table 1-3 T2BC Blade Server Environmental Specifications ........................................ 1-8
Table 2-1 T2BC Serial Console DIP Switch Settings..................................................... 2-5
Table 4-1 T2BC Blade Server Memory Module Configurations.................................... 4-5
Table 4-2 Qualified T2BC Blade Server Memory Modules ........................................... 4-6
Table 4-3 Minimum and Maximum DIMM Slot Configurations ................................... 4-7
Table 4-4 I/O Expansion Cards Supported by the T2BC Blade Server ......................... 4-10
Table A-1 USB Port A Pinout Signal Descriptions ........................................................ A-2
Table A-2 COM 1 Serial Port Pinout Signal Descriptions ............................................. A-3

xivThemis Computer
T2BC Blade Server Installation Manual

xvThemis Computer
Preface
The Themis T2BCTM Blade Server (see photo below) is designed to operate withinthe IBM® BladeCenter® chassis, and is based on the SunTM UltraSPARC® T2 ChipMulti-Threading (CMT) 8-core processor (also known as Niagara 2). The T2BC iscapable of running 64 threads simultaneously and enables SPARC Solaris applica-tions to run in native mode.
Themis T2BC Blade Server

T2BC Blade Server Installation Manual
xviThemis Computer
The T2BC Blade Server has an internal memory of up to 32 GB of fully bufferedDDR2 SDRAM, a single 2.5-inch 500-GB hard-disk drive (SATA or SAS; solidstate is optional), and a network fabric that includes:
• Two integrated 1-Gbit Ethernet ports
• Two additional (optional) 1-Gbit Ethernet or Fibre Channel port [or InfiniBandport —optional future product]
• Two 10-Gbit Ethernet ports (optional future product)
To facilitate systems management, the T2BC includes two management processors,
• One for IBM environment management
• One for Sun environment management
Software management entails Sun Integrated Lights Out Manager (ILOM) tools,which allow the T2BC Blade Server to be integrated into a network of servers. Inaddition to T2BC access via the ILOM Web GUI, users can access the T2BC or anyBlade Server in the BladeCenter chassis through the IBM AMM (Advanced Man-agement Module) Web GUI.
The T2BC Blade Server is installed with the Solaris 10 operating system, and sup-ports unmodified Solaris 10 applications, as well as Solaris 8 and Solaris 9 applica-tions using Sun Solaris Containers.
This document—the T2BC Blade Server Installation Manual—provides instructionson how to install, configure, power up, boot, and perform diagnostics on the T2BCBlade Server, and is intended for an experienced system administrator with a knowl-edge of both networking and high-speed server systems.
Website InformationThemis Computer corporate and product information may be accessed on the WorldWide Web by browsing the website http://www.themis.com.
Your Comments are WelcomeWe are interested in improving our documentation and welcome your comments andsuggestions. You can email your comments to us at [email protected] include the document part number in the subject line of your email.
xviiThemis Computer
Table of Contents
Notes, Cautions, Warnings, and SidebarsThe following icons and formatted text are included in this document for the reasonsdescribed:
Note: A note provides additional information concerning the procedure or actionbeing described.
Caution: A caution describes a procedure or action that may result in injury to the op-erator or equipment. This may involve—but is not restricted to—heavy equipment orsharp objects. To reduce the risk, follow the instructions accompanying this symbol.
Warning: A warning describes a procedure or action that may cause injury to theoperator or equipment as a result of hazardous voltages. To reduce the risk of elec-trical shock and danger, follow the instructions accompanying this symbol.
Sidebar: A “sidebar” adds detail to the section within which it is placed,but is not absolutely vital to the description or procedure of the section.

xviiiThemis Computer
T2BC Blade Server Installation Manual

1-1Themis Computer
1T2BC Blade Server
Overview and Specifications
1.1 OverviewThe Themis T2BC Blade Server (see Figure 1-1) is designed specifically for theIBM® BladeCenter® chassis. The T2BC supports a single SunTM UltraSPARC® T2Chip Multi-Threading (CMT) multicore processor, and enables SPARC Solaris 10to run natively in the BladeCenter environment, with support for Solaris 8 andSolaris 9 applications via Solaris Containers. Operating at a speed of 1.2 GHz, theUltraSPARC T2 processor supports up to 8 cores, with each core capable of 8threads, for a total of 64 threads per socket. [Each core has two execution units, witheach execution unit supporting four threads.] In addition, each core has an integratedfloating-point and cryptographic unit.
Figure 1-1. Themis T2BC Blade Server
General Section
Chapter

1-2Themis Computer
T2BC Blade Server Installation Manual
Primary features of the T2BC are described in Table 1-1. Major internal componentscan be seen in the open top view (cover removed) of Figure 1-2 on page 1-3.
Table 1-1. Primary Features of the T2BC Blade Server
Feature Details
Processor
One UltraSPARC T2 operating at 1.2 GHz—8 coresa, each with two execution units, an integrated floating point and a cryptographic unit—Each execution unit supports 4 threads
CacheEach core has an 8-Kbyte 4-way set associative L1 instruction cache and a 16-Kbyte 8-way set associative L1 data cacheA 4 Mbyte 16-way set associative L2 cache is shared by all cores
MemoryDIMM module size = 1, 2, or 4 Gbytes Up to 32 Gbytes fully buffered DDR2 SDRAM
Internal storage One 2.5-inch hard-disk or solid-state drive (SATA or SAS) 500 Gbytes maximumNote: As 2.5” disk-drive capacity increases, so will the T2BC maximum storage.
Network fabric Two integrated 1-Gbit Ethernet ports are standardTwo additional 1-Gbit Ethernet, Fibre Channel, or InfiniBand ports are available with optional daughter card Two 10-Gbit Ethernet ports are available with second optional daughter card
I/O upgrade One PCI-X expansion connector (IBM-specific)
Systems management hardware
Two integrated management processors:—One for IBM environment management—One for Sun environment management
Software management Sun Integrated Lights Out Manager (ILOM) tools—Enables management of T2 blade servers via standard Sun tools—Allows T2 blade servers to be integrated into a network of servers
Operating system Solaris 10
Applications software support
Solaris 10 applications unmodifiedSolaris 8 and Solaris 9 applications using Sun Solaris Containers
Front-panel I/O One 9-pin serial portOne USB 2.0 port
a—A 4-core UltraSPARC T2 is also available to users.

Overview and Specifications
Overview
1-3Themis Computer
Figure 1-2. Basic Components of the T2BC Blade Server (Top View, Cover Off)
2.5-inch SAS or SATA
DDR2 SDRAMFully-Buffered DIMM Memory
Hard-Disk Storage Drive
3V Lithium Battery
= Blade Signal Connector (60 Pin)
= Blade Power Connector
A
A
XAUI Connector
Multicore UltraSPARC T2CPU Heat Sink
(8 DIMMs total, up to 32 GB)
Up to 1.2 GHz
B A B
Solid-State drivealso available
SerDes = Serializer/Deserializer
Legend:
Future Product: Dual Copper10-Gbit Ethernet (CFFk)
CFFv = Compact Form Factor Vertical
Branch2
Branch3
Branch1
Branch0
Lower Midplane Connectors Upper Midplane Connectors
(Aluminum or Copper
CFFv Ethernet Expansion
XAUI = Attachment Unit Interface
Validated with:
Card 115995-L01 (IBM 39Y9310)CFFv Fibre Channel ExpansionCard 115996-L01 (IBM 41Y8527)
with Vapor Chamber)
CFFk = Compact Form Factor KatanaB
CFFk Expansion Card
CFFv Expansion Card
CFFv Expansion Card
PCI-X Connector
SerDes Connector
DIMM Slot 8 (Channel 0)Slot 7 (Channel 1)Slot 6 (Channel 0)Slot 5 (Channel 1)
Slot 1 (Channel 0)Slot 2 (Channel 1)Slot 3 (Channel 0)Slot 4 (Channel 1)
T2BC Blade Server Installation Manual
1-4Themis Computer
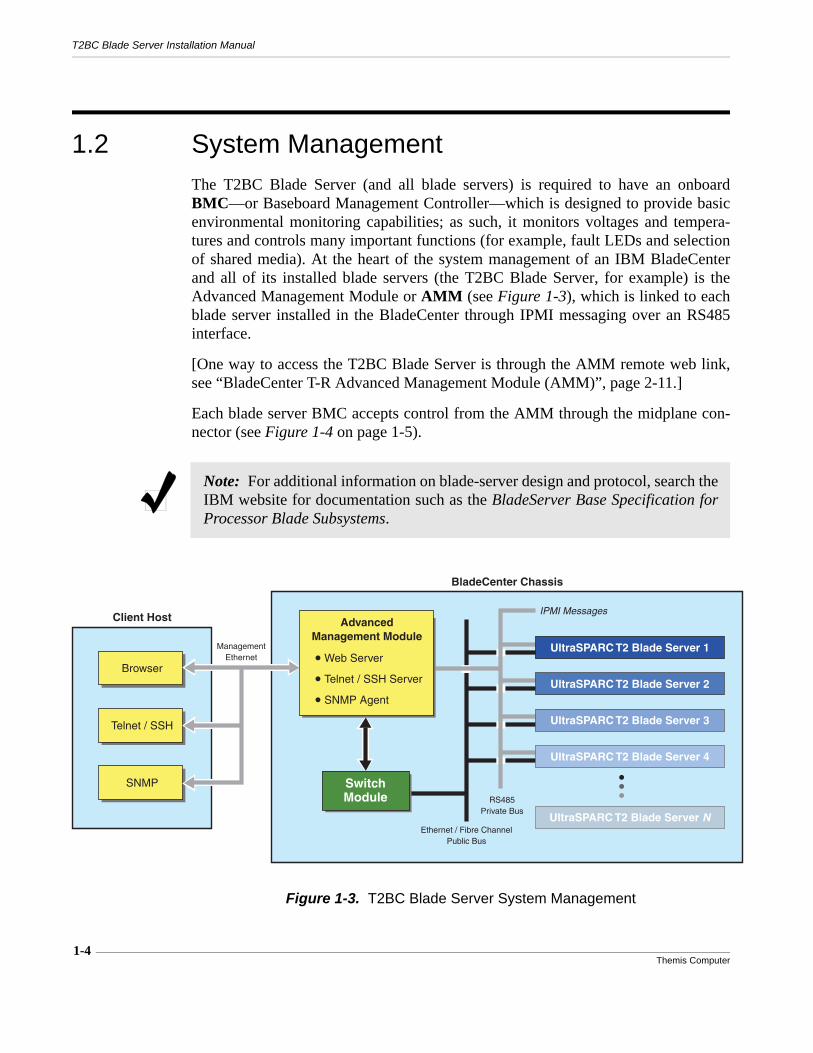
1.2 System ManagementThe T2BC Blade Server (and all blade servers) is required to have an onboardBMC—or Baseboard Management Controller—which is designed to provide basicenvironmental monitoring capabilities; as such, it monitors voltages and tempera-tures and controls many important functions (for example, fault LEDs and selectionof shared media). At the heart of the system management of an IBM BladeCenterand all of its installed blade servers (the T2BC Blade Server, for example) is theAdvanced Management Module or AMM (see Figure 1-3), which is linked to eachblade server installed in the BladeCenter through IPMI messaging over an RS485interface.
[One way to access the T2BC Blade Server is through the AMM remote web link,see “BladeCenter T-R Advanced Management Module (AMM)”, page 2-11.]
Each blade server BMC accepts control from the AMM through the midplane con-nector (see Figure 1-4 on page 1-5).
Note: For additional information on blade-server design and protocol, search theIBM website for documentation such as the BladeServer Base Specification forProcessor Blade Subsystems.
Figure 1-3. T2BC Blade Server System Management
Client Host
BladeCenter Chassis
Browser
ManagementEthernet
Telnet / SSH
SNMPRS485
Private Bus
Ethernet / Fibre ChannelPublic Bus
IPMI Messages
UltraSPARC T2 Blade Server 1
UltraSPARC T2 Blade Server 2
UltraSPARC T2 Blade Server 3
UltraSPARC T2 Blade Server 4
UltraSPARC T2 Blade Server N
AdvancedManagement Module
Web Server
Telnet / SSH Server
SNMP Agent
SwitchModule

Overview and Specifications
System Management
1-5Themis Computer
Figure 1-4. T2BC Blade Server Block Diagram
XPCI ExpressSwitch
RepeaterDaughter
Card
PCI-Expressto PCI Bridge
PCI-Expressto PCI-X Bridge
1-GbitEthernet
USB
10-Gbit Ethernet
1-Gbit Ethernet
10/100-Mbit Ethernet
DaughterConnector
Top
Top
Top
Top
Bottom
Bottom
Top
Bottom
Bottom
Bottom
Top
SOL
I C2
PCI-Express
PCI-Express PCI-Express
8 Lane
SharedSerial
Console
SP SerialConsole
TTY OBPSolaris Console
A
B
A
B
12V
SSI Bus
SOL
Midplane
(BCHT only)
DB9
Front Panel
MUX
10-Gbit Ethernet
1-Gbit Ethernet
GraphicsSATA / SAS
Legend:
SOL = Serial Over LAN
SSI = Synchronous Serial Interface Bottom = Connected to Bottom Midplane Connector
Top = Connected to Top Midplane ConnectorBCHT = IBM BladeCenter, Model HT BMC = Baseboard Management Controller
SATA = Serial ATA (Advanced Technology Attachment) SAS = Serial-Attached SCSI
SP = Service Processor
RS485
RS485
Bottom
Top
Bottom
UltraSPARC T2Processor[4 / 8 Core]
1.2 GHz
Mid
pla
ne
Co
nn
ecto
r
0Channel
Branch01
FBD DIMM 8
FBD DIMM 7
0
1
FBD DIMM 6
FBD DIMM 5
Branch1
0Channel
Branch2 1
FBD DIMM 1
FBD DIMM 2
0
1
FBD DIMM 3
FBD DIMM 4
Branch3
PowerController
IBMBMC
T2 Service Processor
USB 2.0
Front Panel
FET Switch
FET Switch
SATA/ SAS
FPGA

1-6Themis Computer
T2BC Blade Server Installation Manual
1.3 Specifications
1.3.1 GeneralTable 1-2 lists general specifications for the T2BC Blade Server.
1.3.2 Power T2BC Blade Server input power is delivered from the backplane through two redun-dant 12-volt power domains (12V_A and 12V_B). Standby power is used by boththe BMC and the UltraSPARC T2 service processor (SP) for offline functions. TheBMC controls the main power to the remainder of the system. The backplane poweris converted to the requisite voltage levels required by the major circuit functions.
Total power consumption of the T2BC Blade Server is 230 watts or less.
Table 1-2. T2BC Blade Server General Specifications
Parameter Description
Dimensions 1.14” (2.9 cm) high 9.65” (24.5 cm) wide17.72” (45 cm) deep
Weight Approximately 8.5 pounds (3.9 kg), includes 1 hard-disk drive and 8 DIMMsAdd 8.0 pounds (3.6 kg) for the shipping containerThe manual and associated shipping paperwork weighs approxi-mately 1 lb (0.5 kg)
MechanicalEnclosure, internal support structures, cooling methods, and back-plane interface are compatible with IBM BladeCenter specifications for plug-compatible blade systemsBladeCenter-type release handles (lockable)Enclosure components are RoHS-compliantStainless steel enclosure for humidity and salt spray resistance(MIL-A-8625)

1-7Themis Computer
Overview and Specifications
Specifications
1.3.3 Midplane Electrical InterfaceThe T2BC Blade Server is modeled after the IBM Base Specification For ProcessorBlade Subsystems. As defined, two sets of signal (VHDM) and power connectorsconnect the T2BC with the dual (upper and lower) midplane interface of the Blade-Center chassis backplane (see Figure 1-5).
The following functions are supported by the specification:
• Four sets of 4-wire SERDES interfaces, one for each “legacy” switch bay
— Bay 1 and Bay 3 connections are through the upper VHDM connector
— Bay 2 and Bay 4 connections are through the lower VHDM connector
— Bay 7, Bay 8, Bay 9, and Bay 10 connections are through the high-speeddaughter card (CFFk, 10-Gbit Ethernet)
• Two sets of RS485 busses, one for each AMM
• Two sets of +12V power/ground connections, one for each redundantly pow-ered +12V domain in the BladeCenter midplane (+12V_A, +12V_B)
• Two sets of analog (RGH+HV) video signals, one for each AMM
• Two sets of USB 2.0 signals for keyboard/mouse functionality
• Two sets of USB 2.0 signals for the interface to the media-tray storage devices
• One set of RS232 signals through the lower VHDM connector (which arerouted through the rear high-density connector of the BladeCenter H and HT)
• Miscellaneous signals (Presence bits and Early Power-Off Warning–EPOW,for example)
Figure 1-5. T2BC Blade Server Midplane Connectors
VHDM Signal ConnectorVHDM Signal ConnectorPower Connector (+12V)
Lower Midplane Upper Midplane
Power Connector (+12V)

1-8Themis Computer
T2BC Blade Server Installation Manual
1.3.4 Environmental Table 1-3 lists the environmental specifications for the T2BC Blade Server
1.3.4.1 Electrostatic Discharge
The T2BC is designed to tolerate electrostatic pulses up to 15 kilovolts (KV) with noimpact on system operation.
1.3.5 Agency Compliance
1.3.5.1 Safety Certifications
• US: UL 60950-1 Listed Accessory Report
• Canada: CAN/CSA C22.2 No. 60950-1-03
• Germany: TUV/VDE IEC 60950-1/EN 60950-1 (TUV component report & I IEC60950-1 CB Report and Certificate)
Table 1-3. T2BC Blade Server Environmental Specifications
Parameter Operating Non-Operating
Temperature 0°C to +40°C (55°C for 96 hours) –40°C to +70°C
Relative Humidity 10% to 95%, non-condensing 10% to 95%, non-condensing
Altitude 0 to 13,000 feet above sea level 0 to 13,000 feet above sea level
Shock, 3 axis(MIL-SPEC-901D) 20G @ 20 msec 20G @ 20 msec
Vibration (MIL-STD-810F) 0.25 Grms, 5 Hz to 500 HZ 1 Grms, 5 Hz to 500 HZ
Airflow (inlet) 28 CFMa @ 40°C, 38 CFM @ 55°C
a—CFM = cubic feet per minute.
Note: Certifications and Mil-Spec requirements have yet to be completed. Com-pliance testing is scheduled for a future date.

1-9Themis Computer
Overview and Specifications
Specifications
1.3.5.2 EMC/EMI Certifications
The T2BC Blade Server meets all applicable worldwide Class A EMC requirements.
• FCC - Title 47 CFR Part 15 Subpart B
• Canada - ICES-003
• Australia/New Zealand - C-Tick - AS/NZS CISPR 22:2002
• CE Mark-EN55022: 1998+A2: 2003 and EN55024: 1998+A1: 2001+A2: 2003
• VCCI - Japan VCCI April 2003
• GOST 29216-91 (Russia)
• CISPR 22 Class A
1.3.5.3 Mil-Spec Requirements
The equipment meets the surface craft requirements identified within the AN-FOSENVIRONMENTAL REQUIREMENTS V 1.0 (CMPro Doc# AN-FOS-ENV-REQS-0203).
The following are specific clarifications and deviations to the above specification:
a. Airborne Noise—This system requires A3.
b. Human Machine Interface—MIL-STD-1472F HMI, Para 5.7.2. Allow a+/- 1RU height deviation for standing in front of enclosure (Standing Op-erations).
c. Humidity—Perform analysis based on vendor data, if analysis warrantstesting, then perform testing or request waiver.
d. Shock—Testing is required at 8 Hz +/- 1 Hz and 14 Hz +/- 2 Hz deck fre-quencies. Vendor shall monitor for grade A shock acceptance.
e. Vibration—This system meets MIL-STD-167-1A table I, para 5.1.2.4.6. [Presently scheduled for testing.]
f. [Correction] Fiber Optic—MIL-STD-20425B to MIL-STD-2042-5B.
g. [Clarification] Ship Motion—Ship Motion Test (DOD-STD-1399-301A)shall be conducted with all equipment racked in.

1-10Themis Computer
T2BC Blade Server Installation Manual
1.4 Packaging and ShippingThe T2BC Blade Server is packaged in a reusable shipping container. Approximateweight of an empty container is 8.0 pounds (3.6 kg).
The approximate weight of a T2BC (loaded with one hard-disk drive and 8 DIMMs)is 8.5 pounds (3.9 kg).
The approximate weight of a manual and associated shipping paperwork is onepound (0.5 kg).
Therefore, both the shipping container and a fully installed T2BC—including a man-ual and associated paperwork—weigh under 18 pounds (8.2 kg).

2-1Themis Computer
2T2BC
2
Basic Operation, Controls, and Indicators
This chapter describes: • How to install and remove a T2BC Blade Server into and from a BladeCenter • How to turn the T2BC Blade Server on and off• What controls are available directly from the front Control Panel• The meaning of the LED indicators on the front Control Panel
2.1 Installing the T2BC in a BladeCenterBefore installing the T2BC Blade Server, make sure that all upgrades (disk drives ormemory, for example) have been installed (see Chapter 4, "Hardware Installation").
1. Select the BladeCenter bay (server slot) into which the T2BC will be installed.
Consult the Installation and User’s Guide for the BladeCenter orBladeCenter T to ensure that there are an adequate number of pow-er supplies installed in the power bays of the BladeCenter.
Operation Section
Chapter

T2BC Blade Server Installation Manual
2-2Themis Computer
2. Pull out the two release handles of the T2BC Blade Server so that they are inthe open position (perpendicular to the front of the T2BC front bezel (see Fig-ure 2-1).
3. Carefully insert the T2BC into the available blade bay and slide the unit to-ward the rear until it stops.
4. Lock the T2BC into the BladeCenter by rotating the release handles to theirclosed positions (see Figure 2-2 below and Figure 2-3 on page 2-3).
Figure 2-1. Before installation, open the release handles of the T2BC Blade Server
Figure 2-2. Installing the T2BC Blade Server into a BladeCenter—First Handle
Release HandleRelease Handle
Front BezelControl Panel Door
Closed (Locked) Position Open (Removal) Position
First (Upper) Release Handle

Basic Operation, Controls, and Indicators
Installing the T2BC in a BladeCenter
2-3Themis Computer
5. Turn on the T2BC (see “Turning On the T2BC Blade Server”, page 2-7).
6. The T2BC is turned on (receiving power) when the Power-On LED stays lit.
7. Install any other blade servers at this time.
8. BladeCenter T only: Reinstall the front bezel assembly.
Note: The use of “Upper” and “Lower” to describe the release handles in Figure2-2 and Figure 2-3 is appropriate only if the T2BC Blade Server is installed ver-tically into a BladeCenter.
Figure 2-3. Installing the T2BC Blade Server into a BladeCenter—Second Handle
Closed (Locked) Position Open (Removal) Position
Second (Lower) Release Handle
Caution: Proper cooling of the T2BC Blade Server and other components installedin the BladeCenter requires that all bays be filled to prevent diversion of air flowaway from installed components. To prevent possible overheating, do not operatethe BladeCenter if it does not have a blade server, expansion unit, or blade filler in-stalled in every bay.
Note: Reinstallation of a T2BC Blade Server into a bay different from the origi-nal installation bay may result in unintended results. Because configuration andupdate information is based on the bay number, using a different bay to reinstallthe T2BC may require reconfiguration of the server through the Configura-tion/Setup Utility program.

T2BC Blade Server Installation Manual
2-4Themis Computer
2.2 Accessing the Service Processor and Baseboard Serial ConsoleBoth the Sun Service Processor (SP) console and Baseboard console share the samephysical serial interface. To switch from SP console to Baseboard console, enter theconsole command:
sc> console <enter>
The Baseboard console may display the OBP ok prompt or a Solaris login prompt,depending on whether or not the T2BC has been configured to automatically boot.To switch back to the SP console, enter #.(pound sign with period) at any time:
{0}ok #. [If already in Solaris, “x console login:” will appear.]
or T2BC console login: #.
The default login for the Service Processor is:• User Name = admin• Password = changeme
The default login for Solaris is:• User Name = root• Password = root12
There are three ways to access the shared serial console:• Serial Over LAN (SOL)........................................................... // Default setting• Front-Panel Micro-DB9• Midplane Serial Interface (for BladeCenter H and HT only)
2.2.1 Serial Over LAN (SOL)To use Serial Over LAN (SOL) to access the SP serial console, the default DIP-switch settings (see Table 2-1 on page 2-5) must be set. The baud rate of the consolemust be set to 19200 (the default setting).
Consult IBM documentation for details on the SOL setup procedure.
Caution: When using DOS to Telnet SOL access and asked to enter a pass-word, if the password is not successful (perhaps indicated by a double linereturn), enter the password again and press <Ctrl><Enter>.

Basic Operation, Controls, and Indicators
Accessing the Service Processor and Baseboard Serial Console
2-5Themis Computer
2.2.2 Front-Panel Micro-DB9To use Front-Panel Micro-DB9 to access the SP serial console, connect the serialcable (P/N 113057-001) shipped with your T2BC Blade Server order—one end tothe micro-DB9 port on the T2BC front panel, the other end to a COM port on a lap-top or desktop computer. COM port settings should be 19200-8-N-1 (19200 baudrate, 8 data bits, no parity, and 1 stop bit); for flow control, start with None andchange if necessary.
Important: To direct the SP console port to the T2BC front panel, DIP switchesmust be configured as shown in Table 2-1. See Figure 2-4 for the DIP-switch loca-tion on the motherboard; a large-scale view is given in Figure 2-5, page 2-6.
Table 2-1. T2BC Serial Console DIP Switch Settings
Function DPSW1 DPSW2 DPSW3 DPSW4
Default settings Open (OFF)
Open (OFF)
Open (OFF)
Closed (ON)
Direct the SP console to the Front Panel Micro-DB9 connector
Closed (ON)
Closed (ON)
Open (OFF)
Closed (ON)
Figure 2-4. Location of the DIP Switches on the T2BC Blade Server
Close-up of DIP Switch (Default Settings) Default Settings
NO
1 2 3 4
Closed (ON)
Open (OFF)Front-Panel DB9 Settings
NO
1 2 3 4
OFF OFF OFFON ON ON
OFFON
Push direction:

T2BC Blade Server Installation Manual
2-6Themis Computer
2.2.3 Midplane Serial Interface
When the T2BC Blade Server is installed in a BladeCenter H or HT chassis, the SPconsole can be directed to the Midplane by carrying out the following steps:
1. Make sure that all DIP switches are in the default position (see Table 2-1, page2-5, and Figure 2-4, page 2-5).
2. Disable SOL for the T2BC Blade Server from the IBM Advanced Manage-ment Module (AMM) GUI.
3. A rear I/O connector and cable option on the IBM BladeCenter H or HT pro-vides the external serial port connection from the chassis. Refer to IBM doc-umentation on these chassis for additional details.
Figure 2-5. Large-Scale View of the DIP Switch Location on the T2BC
Location of DIP Switch
Front
Note: The Midplane Serial Interface is not supported by the BladeCenter T.

2-7Themis Computer
Basic Operation, Controls, and Indicators
Turning On the T2BC Blade Server
2.3 Turning On the T2BC Blade Server There are two management controllers on the T2BC Blade Server:
• IBM Baseboard Management Controller (BMC) • Sun Service Processor (SP)
The T2BC has two power zones (see Figure 2-6); the BMC and SP belong to PowerZone 1, and the baseboard belongs to Power Zone 2. As soon as the T2BC is insertedinto a BladeCenter chassis, both controllers are powered on by Standby power, andthe BMC starts to boot immediately. As the BMC starts to boot, the Power-On LEDon the front control panel blinks.
As soon as a T2BC Blade Server is inserted into a slot, the BMC will start booting. Ittakes about 15 seconds for the BMC to finish the boot process. The SP starts to bootafter the BMC finishes booting and requires about 2 minutes for the SP to completebooting. Before the Service Processor finishes booting, the power LED at the frontblinks approximately 3-to-4 times per second. After the SP finishes booting, thePower-On LED will blink once per second until the T2BC Blade Server is turned on.After the blade is power on, the Power-On LED will be lit continuously.
Figure 2-6. T2BC Blade Server Power Zones
T2 CPU
FB DIMM Branch 0, Channel 0
FB DIMM Branch 0, Channel 1
FB DIMM Branch 1, Channel 0
FB DIMM Branch 1, Channel 1
FB DIMM Branch 3, Channel 1
FB DIMM Branch 3, Channel 0
FB DIMM Branch 2, Channel 1
FB DIMM Branch 2, Channel 0
Sun T2Service
ProcessorThemis
Baseboard
Power Zone 2Baseboard Power
Power Zone 1Standby Power
IBMBaseboard
ManagementController
SP BMC

2-8Themis Computer
T2BC Blade Server Installation Manual
There are three primary methods of turning on the T2BC:• Directly at the T2BC Blade Server• Remotely through a network interface• Through the Sun Service Processor command-line interface (CLI)
2.3.1 Turning On Directly1. Swing the protective Control Panel door out of the way (see Figure 2-7 on
page 2-8), then press the Power (ON/OFF) button (refer to “Power (ON/OFF)Button”, page 2-20).
2. When the T2BC is fully turned on, the Power-On LED will be lit continuously(green).
Note: The Power (ON/OFF) button will not respond before theService Processor finishes booting. A blade is ready to be poweredon if the power LED at the front is blinking slowly. It requires about2 minutes from the time a blade is inserted to the time when theblade is ready to be powered on.
Figure 2-7. T2BC Blade Server Control Panel
i !
i !
KVM Select Button & LED Media Tray Select Button & LED
Unused
Activity LED
Power (ON/OFF) ButtonPower-On LED
Blade Server Error LED
Active LED Color Assignments
Information LED
Not Used
Location LED
Amber
BlueGreen Green
M T

Basic Operation, Controls, and Indicators
Turning On the T2BC Blade Server
2-9Themis Computer
2.3.2 Turning On RemotelyTurning the T2BC Blade Server on remotely through a network is accomplishedthrough one of four different ways:
• Integrated Lights Out Manager or ILOM (Sun)• BladeCenter Advanced Management Module or AMM (IBM)• Sun Service Processor command-line interface (CLI)• SSH (Secure Shell) or Telnet
2.3.2.1 Integrated Lights Out Manager (ILOM)
To access Integrated Lights Out Manager (ILOM) remotely, an I/O Ethernet SwitchModule must be installed in switch-module bay #1 on the BladeCenter chassis.
As a manufacture default, the Service Processor is configured to use DHCP toacquire an IP address. To determine the IP address of the Service Processor, type
sc> showsc
at the SP serial console (see “Accessing the Service Processor and Baseboard SerialConsole” on page 2-4). Once the Service Processor IP address is known, use it to login to the ILOM using a web browser from another computer on the network (forexample, if the IP is 192.168.44.252, then enter https://192.168.44.252into the web browser’s address field, then enter the following user name and pass-word into the resulting prompts:
• User Name = root• Password = changeme
The following steps show how to turn on the T2BC remotely through ILOM.
Note: The ILOM management tool only allows a connection to the T2BC withthe specific IP address used for login, whereas the AMM management tool ad-dresses the entire BladeCenter along with each blade server installed within.
Note: Detailed information on ILOM is given in the ILOM AdministrationGuide, located at http://dlc.sun.com/pdf/819-1160-13/819-1160-13.pdf.
Note: The ILOM is normally accessed from the root account, while the ServiceProcessor command prompt is accessed from the admin account, using admin asthe User Name and changeme as the Password.

T2BC Blade Server Installation Manual
2-10Themis Computer
1. If your login is successful, the following Sun Integrated Lights Out ManagerWeb screen will appear:
2. At the main Web screen, choose the Remote Control tab, which will result in:
3. At the pull-down menu, select Power Up Server. After the T2BC BladeServer is powered on, it is ready to boot from Solaris.
Figure 2-8. Integrated Lights Out Manager Main Screen
Figure 2-9. Integrated Lights Out Manager Remote Control Screen

2-11Themis Computer
Basic Operation, Controls, and Indicators
Turning On the T2BC Blade Server
2.3.2.2 BladeCenter T-R Advanced Management Module (AMM)
1. Connect to the BladeCenter that contains the T2BC Blade Server to be turnedon by logging onto the local network attached to the BladeCenter using the IPaddress, user ID, and password assigned by your system administrator. If yourlogin is successful, the following IBM BladeCenter T-R AMM Web screenwill appear:
2. At the main BladeCenter AMM Web screen, scroll down to the Blades sec-tion, which will display a list of all Blade Servers that are installed:
Figure 2-10. BladeCenter Advanced Management Module Main Screen
Figure 2-11. BladeCenter Advanced Management Module Blades Screen

T2BC Blade Server Installation Manual
2-12Themis Computer
3. To turn a specific Blade Server on, scroll down to the Blade Power / Re-start section, click a checkbox in the first column to select one or moreblades, then click on a link below the table to restart (turn on) the specifiedBlade Server(s).
2.3.2.3 Sun Service Processor Command-Line Interface (CLI)
For details, refer to Section 2.3.3, “Sun Service Processor Command-Line Interface(CLI),” on page 2-13
2.3.2.4 Log into the Service Processor using SSH or Telnet
As long as there is a network connection to the Service Processor, a user can beginan SSH (Secure Shell) or Telnet session to control the Service Processor. Once con-nected to the Service Processor, refer to the commands described in Section 2.3.3,“Sun Service Processor Command-Line Interface (CLI),” on page 2-13
Figure 2-12. BladeCenter Advanced Management Module Restart Screen
Note: Wake-on-LAN is not supported on the T2BC Blade Server.
Note: Detailed information on using SSH is given in the Sun Integrated LightsOut Manager (ILOM) Administration Guide.

2-13Themis Computer
Basic Operation, Controls, and Indicators
Turning On the T2BC Blade Server
2.3.3 Sun Service Processor Command-Line Interface (CLI)To turn the T2BC Blade Server on through the command-line interface (CLI) of theService Processor, a connection must first be made to the SP serial console, asdescribed in the section “Accessing the Service Processor and Baseboard SerialConsole” on page 2-4.
After logging onto the Service Processor, the user can turn the T2BC on by entering
sc> poweron <enter>
at the sc (serial console) prompt of the terminal (see Figure 2-13 on page 2-13).
The command
sc> poweron -c <enter>
not only powers on the T2BC, but switches control to the Baseboard console fromthe SP console with one command, which is equivalent to the following two com-mands:
sc> poweron <enter>
sc> console <enter>
After the T2BC boots to the OBP “ok” prompt, entering
{0} ok boot <enter>
will boot Solaris from the SAS (or SATA) disk installed in the T2BC Blade Server.
Figure 2-13. Turning the T2BC Blade Server on at the Command Line

2-14Themis Computer
T2BC Blade Server Installation Manual
2.4 Turning Off the T2BC Blade ServerWhile the T2BC Blade Server is installed in the BladeCenter, both the IBM BMCand Sun SP are always powered on, hence can respond to requests from theAdvanced Management Module service processor (to turn the system on, for exam-ple). The T2BC must be totally removed from the BladeCenter to turn off powercompletely.
[Unplugging the BladeCenter chassis main power lines will also turn off T2BCpower completely.]
Before turning off the T2BC Blade Server, be sure to shut down the operating sys-tem. There are several ways to turn off the T2BC Blade Server:
• Directly at the T2BC Blade Server• From the Sun ILOM GUI• From the Service Processor CLI• From the AMM GUI
2.4.1 Turning Off Directly1. Swing the protective Control Panel door out of the way, then press the Power
(ON/OFF) button (refer to “Power (ON/OFF) Button”, page 2-20) to send aPower-Down Blade request to the AMM. After receiving the power-down re-quest, the AMM will interrupt the BMC to power down the T2BC Blade Serv-er in an orderly manner. The power-down process will require approximately one minute (includingexiting the OS and turning off baseboard power), and can be visually verifiedas completed when the front-panel Power-On LED blinks slowly (refer toSection 2.6.2.1, “Power-On LED,” on page 2-21).
2. In the event the operating system is not functioning, the T2BC can be turnedoff by pressing the Power (ON/OFF) button for 8 or more seconds.
Note: If the T2BC is turned off in this way, the operator will haveto wait for approximately one minute before the T2BC is ready tobe powered on again.

2-15Themis Computer
Basic Operation, Controls, and Indicators
Turning Off the T2BC Blade Server
2.4.2 Turning Off Remotely
2.4.2.1 Turning Off from the Sun ILOM GUI Interface
Start an ILOM Web GUI by entering https://IP_Address_of_the_SP// See Note below.
on a web browser, then enter the following default user name and password:• User Name = root• Password = changeme
Note: If the IP_Address_of_the_SP is unknown, log in to the serial console ofthe Service Processor, then use the command
sc>showsc
to display the IP address.
The MAC address for a Service Processor looks like
00:80:b6:??:??:0A
where ??:?? is board-dependent.
The MAC addresses for the on-board NICs have a fixed relationship with theMAC address of the Service Processor, and appear as
00:80:b6:??:??:04and 00:80:b6:??:??:05
where only the last character is different.

T2BC Blade Server Installation Manual
2-16Themis Computer
1. If your login is successful, the following Sun Integrated Lights Out ManagerWeb screen will appear:
2. At the main Web screen, choose the Remote Control tab, which will result in:
3. At the pull-down menu, select Power Down Server.
Figure 2-14. Integrated Lights Out Manager Main Screen
Figure 2-15. Integrated Lights Out Manager Remote Control Screen

Basic Operation, Controls, and Indicators
Turning Off the T2BC Blade Server
2-17Themis Computer
2.4.2.2 Turning Off from the Sun CLI
Before turning the T2BC Blade Server off through the command-line interface (CLI)of the Service Processor, a connection must be made to the SP serial console(described in “Accessing the Service Processor and Baseboard Serial Console” onpage 2-4) using the following user name and password:
• User Name = admin
• Password = changeme
1. If Solaris is running, login to Solaris first as follows:sc> console <enter> // Switch from SP console to Baseboard console.#> root <enter> #> root12 <enter>
2. Carry out one of the following two commands to turn off the T2BC: #> halt <enter> // Exit the Solaris operating system.Note: The halt command will turn off the T2BC immediately without awarning to users. For a shutdown that will gracefully turn off all system ser-vices before bringing down the OS, issue the init 0 command:
#> init 0 <enter>
The following three choices will appear after a brief wait:
r) eboot // Reboot the system.o) k prompt // Return to the OBP prompt.h) alt // Shut down baseboard power.
3. After selecting “halt”, the message “Host has been powered off” willbe displayed. To return to the Service Processor console, type “#.”.
4. If Solaris is not running, simply power down the T2BC Blade Server by en-tering the following command to the service processor console:sc> poweroff -fy <enter> // Shut down the system immediately.
2.4.2.3 Turning Off from the IBM AMM GUI Interface (Soft and Hard)
The BladeCenter Advanced Management Module offers an alternative method ofturning off the T2BC Blade Server.
1. Connect to the BladeCenter that contains the T2BC Blade Server to be turnedoff by logging onto the local network attached to the BladeCenter using the IPaddress, user ID, and password assigned by your system administrator. If yourlogin is successful, the IBM BladeCenter AMM GUI interface similar to thatshown in Figure 2-10 on page 2-11 will appear.

2-18Themis Computer
T2BC Blade Server Installation Manual
2. At the main BladeCenter AMM Web screen, scroll down to the Blades sec-tion, then click the soft button Power/Restart under Blade Task,which will display the following three soft buttons:
•Power On Blade•Power Off Blade•Shut Down OS and Power Off Blade
[Screens may appear different depending on the AMM firmware revision.]
Hard Shut Down
3. Selecting the second soft button “Power Off Blade” will quickly cut offpower to the T2BC Blade Server, not allowing the operating system (OS) toexecute an orderly exit. Hence, this button should be used to power down aT2BC Blade Server only if
• An emergency shutdown is required• The T2BC booted to OBP but not Solaris• It doesn’t matter if the installed Solaris disk crashes or not
Orderly Shut Down
4. Clicking the third soft button “Shut Down OS and Power Off Blade”will initiate an orderly shutdown. After this request, the Service Processor willinform the Baseboard to exit the OS and power down the Baseboard, a processthat should require about one minute.
When the T2BC is actually powered down, the Power-On LED on the frontpanel will start blinking.
Note: Wait one full minute before attempting to turn the T2BC Blade Serverback on.
Caution: It is recommended that the T2BC Blade Server be shut down in an order-ly manner to avoid crashing the OS.

2-19Themis Computer
Basic Operation, Controls, and Indicators
Removing the T2BC from a BladeCenter
2.5 Removing the T2BC from a BladeCenter
1. BladeCenter T only: Remove the front bezel assembly.
2. If the T2BC Blade Server is turned on, shut down the operating system, thenturn off the T2BC by pressing the Power (ON/OFF) button (see Figure 2-7on page 2-8) under the Control Panel door (see “Turning Off the T2BC BladeServer” on page 2-14 for several ways on turning off the system).
3. Open the two release handles of the T2BC Blade Server (see Figure 2-1, page2-2). This will cause the T2BC to move out of the blade bay by approximatelya quarter inch.
4. Carefully pull the T2BC Blade Server from the BladeCenter.
5. To prevent an imbalance of air flow through the BladeCenter chassis, replacethe empty bay with another blade server or blade filler within a few minutes.
Note: When a T2BC Blade Server is removed from the BladeCenter, alwaysmake a note of the bay number. Reinstallation of a T2BC Blade Server into a baydifferent from the original installation bay may require reconfiguration of theserver.
Caution: After the T2BC Blade Server has powered off, wait at least 30seconds before proceeding to the next step in order for the T2BC hard-disk drive to stop spinning.
Caution: To prevent overheating and possible damage to installed components,make sure that a blade server, expansion unit, or blade filler is installed in every bayof an operational BladeCenter.

T2BC Blade Server Installation Manual
2-20Themis Computer
2.6 Control Buttons and LED IndicatorsAll of the control buttons and LED indicators of the T2BC Blade Server are locatedon the Control Panel at one end of the front bezel (see Figure 2-16). As a precaution
against accidental pressing of the Power button, the Control Panel is protected by ahinged door, which allows two control buttons—KVM Select and Media-TraySelect—to protrude so that they can be activated while the door is closed.
2.6.1 Control Buttons
2.6.1.1 Power (ON/OFF) Button
Press the Power (ON/OFF) button to turn the T2BC Blade Server on or off.
Figure 2-16. Location of the T2BC Control Panel and Protective Door
Control Panel Door
Note: Some T2BC controls also serve as LED indicators.
Note: Refer to Figure 2-7 on page 2-8 for a pictorial and callouts of the T2BCBlade Server Control Panel.
Note: Local power control must be enabled for the T2BC Blade Server in orderfor the Power (ON/OFF) button to be effective. Local power control is enabledand disabled through the Advanced Management Module (AMM) Web interface.

Basic Operation, Controls, and Indicators
Control Buttons and LED Indicators
2-21Themis Computer
2.6.1.2 KVM Select Button
Press the KVM Select button to request access to the KVM Module of the Blade-Center. This button also serves as an LED, which—when lit—”owns” the KVMModule. The user can then control the T2BC Blade Server either locally through theKVM Module or remotely over a network connection.
2.6.1.3 Media Tray (CD/FDD) Select Button
The Media Tray (CD/FDD) Select button must be pressed to associate the T2BCBlade Server with the BladeCenter Media Tray (containing a removable-mediadrive—such as a CDROM—and USB ports), hence removing control of thesedevices and ports from other installed blade servers.
As the Media Tray Select button request is being processed by the system, itsembedded LED will blink, then light continually when control of the Media Trayports is transferred to the T2BC Blade Server. This request requires up to 20 secondsto complete.
2.6.2 LED Indicators
2.6.2.1 Power-On LED
The green Power-On LED indicates the power status of the T2BC Blade Server:• Rapid blinking
— The service processor (BMC) firmware is being flashed
— The Advanced Management Module is not giving the BMC power-onpermission
— The Advanced Management Module is in the process of trying to identifythe server bay (slot)
• Slow blinking
— The T2BC Blade Server has power-on permission but is not turned on• Continuous
— The T2BC Blade Server has power-on permission and is turned on
Note: When there is no response after pressing the Media Tray Select button, theAdvanced Management Module Web interface can be used to determine if localcontrol has been disabled on the T2BC Blade Server.

2-22Themis Computer
T2BC Blade Server Installation Manual
2.6.2.2 Activity LED
A green light from the Activity LED indicates traffic activity on the hard-disk driveor the network.
2.6.2.3 Location LED
A blue light from the Location LED aids the system administrator to visually locatethe selected T2BC Blade Server. In addition, the Location LED on the BladeCenterwill also be lit.
The Location LED can be turned off through the Advanced Management ModuleWeb interface or the IBM Director Console.
2.6.2.4 Information LED
An amber light from the Information LED indicates that system-error informationfor the T2BC Blade Server has been placed in the Advanced Management Moduleevent log. The Information LED can be turned off through the Advanced Manage-ment Module Web interface or the IBM Director Console.
2.6.2.5 Blade Server Error (Fault) LED
A system error in the T2BC Blade Server will cause the Blade Server Error LED tolight amber. This LED will turn off only after the error has been corrected.
2.6.2.6 KVM LED (Button Illumination)
[See “KVM Select Button” on page 2-21.]
2.6.2.7 Media Tray (CD/FDD) Select LED (Button Illumination)
[See “Media Tray (CD/FDD) Select Button” on page 2-21.]

3-1Themis Computer
3T2BC
3
Accessing OBP and Solaris by Remote KVM
This chapter describes how to access OBP and Solaris on the T2BC Blade Server byremote KVM.
3.1 Accessing OBP by Remote KVM
1. Open a web browser with the IBM BladeCenter containing the T2BC BladeServer of interest, using a valid IP address, User Name, and Password (seeFigure 3-1 on page 3-2):
• IP Address = Get from System Administrator
• User Name = USERID
• Password = PASSW0RD // Note use of zero character.
2. When the web browser opens, press the Start New Session button on theright-hand side of the screen (see Figure 3-2 on page 3-2).
Caution: To obtain KVM access, the KVM has to be assigned to the spe-cific T2BC Blade Server of interest before rebooting the system.
Operation Section
Chapter

T2BC Blade Server Installation Manual
3-2Themis Computer
Figure 3-1. Open a Web Browser to begin Remote KVM Access
Figure 3-2. Start New Session

3-3Themis Computer
Accessing OBP and Solaris by Remote KVM
Accessing OBP by Remote KVM
3. Select Remote Control under the Blades/Tasks menu on the left sideof the screen (see Figure 3-3), then press Start Remote Control.
4. Under the KVM pull-down menu, select a blade server of interest that is in-stalled in an IBM BladeCenter slot (see Figure 3-4).
Figure 3-3. Select Remote Control under the Blades/Tasks Menu
Figure 3-4. Select a Blade Server from the Pull-Down Menu on the Remote KVM

3-4Themis Computer
T2BC Blade Server Installation Manual
5. Login to the T2BC Blade Server using SSH (Secure Shell)—consult Chapter2, "Basic Operation, Controls, and Indicators" for details.
6. The environment variables can be set either from the OBP prompt or fromthe Service Processor prompt.
From OBP
From the OBP prompt, enter the following:
{0}ok setenv output-device screen:r800x600x60{0}ok setenv input-device keyboard{0}ok setenv auto-boot? false{0}ok reset-all
{0}ok
From the Service Processor
From the Service Processor prompt, enter the following:
sc> poweroff -fy
sc> poweron
sc> bootmode bootscript=”setenv output-devicescreen:r800x600x60”
sc> reset
sc> poweroff -fy
sc> poweron
sc> bootmode bootscript=”setenv input-device keyboard”
sc> reset
sc> poweroff -fy
sc> poweron
sc> bootmode bootscript=”setenv auto-boot? false”
sc> reset
sc> poweron -c
{0}ok
Note: Use either the OBP prompt or the Service Processorprompt to set environment variables, not both.
Accessing OBP and Solaris by Remote KVM
Accessing OBP by Remote KVM
3-5Themis Computer
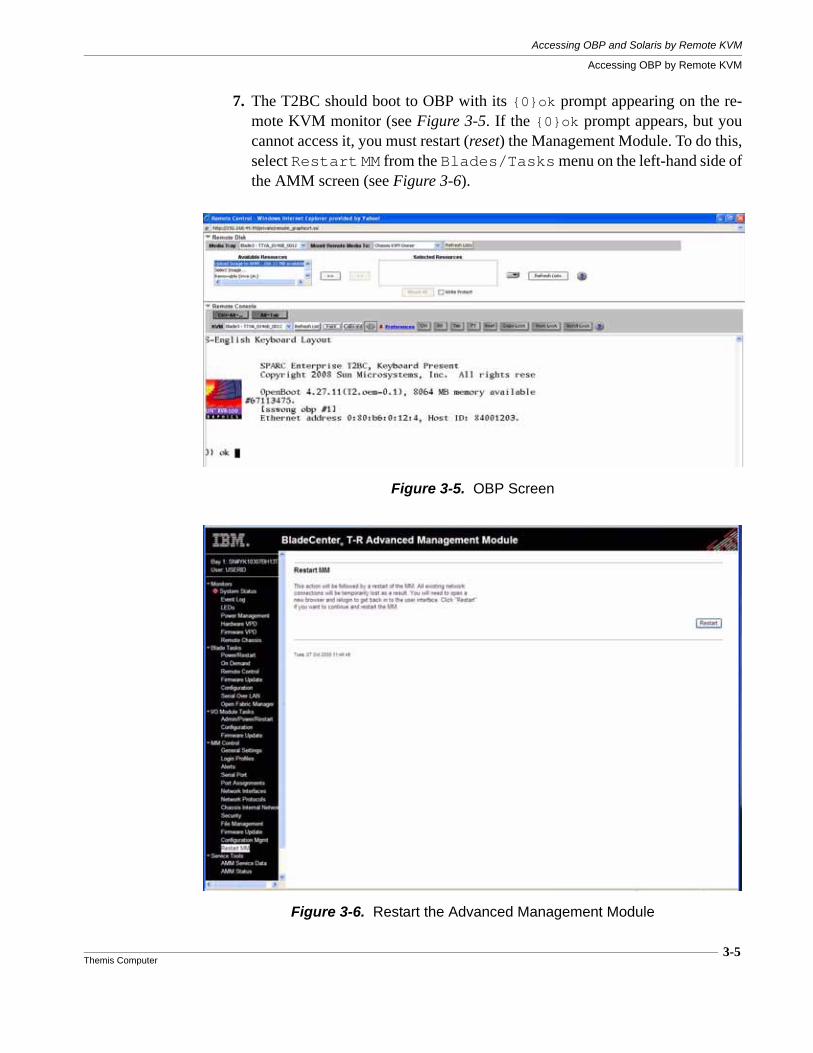
7. The T2BC should boot to OBP with its {0}ok prompt appearing on the re-mote KVM monitor (see Figure 3-5. If the {0}ok prompt appears, but youcannot access it, you must restart (reset) the Management Module. To do this,select Restart MM from the Blades/Tasks menu on the left-hand side ofthe AMM screen (see Figure 3-6).
Figure 3-5. OBP Screen
Figure 3-6. Restart the Advanced Management Module

T2BC Blade Server Installation Manual
3-6Themis Computer
3.2 Accessing Solaris by Remote KVM
1. Open a web browser with the IBM BladeCenter containing the T2BC BladeServer of interest, using a valid IP address, User Name, and Password (seeFigure 3-7):
• IP Address = Get from System Administrator
• User Name = USERID
• Password = PASSW0RD // Note use of zero character.
2. When the web browser opens, press the Start New Session button on theright-hand side of the screen. When the web browser opens, press the StartNew Session button on the right-hand side of the screen (see Figure 3-8 onpage 3-7).
Caution: To obtain KVM access, the KVM has to be assigned to the spe-cific T2BC Blade Server of interest before rebooting the system.
Figure 3-7. Open a Web Browser to begin Remote KVM Access

Accessing OBP and Solaris by Remote KVM
Accessing Solaris by Remote KVM
3-7Themis Computer
3. Select Remote Control under the Blades/Tasks menu on the left sideof the screen (see Figure 3-9), then press Start Remote Control.
Figure 3-8. Start New Session
Figure 3-9. Select Remote Control under the Blades/Tasks Menu

T2BC Blade Server Installation Manual
3-8Themis Computer
4. Under the KVM pull-down menu, select a blade server of interest that is in-stalled in an IBM BladeCenter slot (see Figure 3-10).
5. The Remote KVM should show the Solaris login screen (see Figure 3-11). Ifthe Solaris login screen appears, but you cannot access it, you must restart (re-set) the Management Module from the AMM window. To do this, select Re-start MM from the Blades/Tasks menu on the left-hand side of theAMM window (see Figure 3-12 on page 3-9).
Figure 3-10. Select a Blade Server from the Pull-Down Menu on the Remote KVM
Figure 3-11. Solaris Login Screen

3-9Themis Computer
Accessing OBP and Solaris by Remote KVM
Accessing Solaris by Remote KVM
Figure 3-12. Restart the Advanced Management Module

3-10Themis Computer
T2BC Blade Server Installation Manual

4-1Themis Computer
4T2BC
4
Hardware Installation
This chapter describes how to install the following hardware:
• a memory module (DIMM)
• an SAS or SATA hard-disk drive
• an I/O expansion card
• a lithium battery
4.1 Installation Procedures Replacement of T2BC components requires removal of the protective chassis cover.
4.1.1 Opening the T2BC Blade Server CoverThe following steps describe how to open the T2BC Blade Server cover:
Caution: Read the “Safety Instructions” on page iv of this manual before continu-ing with T2BC installation procedures. Use industry-standard ESD grounding tech-niques when handling all components. Wear an antistatic wrist strap and use anESD-protected mat. Store ESD-sensitive components in antistatic bags before plac-ing them on any surface.Handle all IC cards by the front panel or edges only.
Installation Section
Chapter

4-2Themis Computer
T2BC Blade Server Installation Manual
1. Remove the T2BC Blade Server if it is installed in a BladeCenter (see “Re-moving the T2BC from a BladeCenter” on page 2-19).
2. Lay the T2BC carefully on a flat, antistatic surface with its cover side up.
3. Press the cover release on each side of the chassis (see A, Figure 4-1), lift thecover slowly (see B) until it is fully open (see C), then remove it from thechassis.
4. Store the cover in a safe place until it is replaced.
Figure 4-1. Remove the T2BC Protective Access Cover
Cover Release
A Press the cover release on eachside of the T2BC Blade Server, . . .
Cover Release
B . . . lift the cover slowly,
C . . . and remove the cover.

Hardware Installation
Installation Procedures
4-3Themis Computer
4.1.2 Installing an SAS/SATA Mass Storage DriveThe T2BC Blade Server supports a single, high-capacity (up to 500 GB), 2.5-inchmass-storage drive (either rotating hard-disk or solid-state) through a SAS (Serial-Attached SCSI) or SATA (Serial ATA) controller operating at a maximum transferrate of 3 gigabits per second (Gbps). In SAS mode, the controller supports the fullSCSI protocol.
If your T2BC does not contain a hard-disk or solid-state drive, use the followingsteps to install one:
1. If the T2BC is installed in a BladeCenter, remove it (see “Removing the T2BCfrom a BladeCenter” on page 2-19).
2. Open the T2BC according to the instructions given in the section “Openingthe T2BC Blade Server Cover” on page 4-1.
3. Locate the drive tray at the rear of the T2BC (see Figure 4-2).
4. Place the drive into the tray (see Figure 4-3 on page 4-4), making sure that itsconnector pins face the rear of the tray and the circuit board is facing down.
Figure 4-2. Location of the T2BC Mass Storage Drive Holder
Drive Tray
Drive Connector
Drive Drive Tray Screws (1 of 4)
Front
Release/LockingLever

T2BC Blade Server Installation Manual
4-4Themis Computer
5. Push the drive (see Figure 4-3) toward the rear of the drive tray directly intothe drive connector on the motherboard until the appropriate drive mountingscrew enters the hole in the locking lever. At this point, the drive will be fullyinstalled and connected.
Figure 4-3. Installing the T2BC Hard-Disk Storage Drive
A Insert drive into the tray so that the mounting screws (4) on each side
Drive Tray
of the drive align with the holding channels (3) of the tray.
B When the drive is flush with the bottom of the tray, push it toward therear of the tray until the locking lever snaps over the fourth screw.
Rear of Tray
Rear
Drive Release/Locking Lever
C A fully installed hard-disk storage drive.
Mounting Screw (1 of 4)
Holding Channel (1 of 3)Locking Lever
Push toward Rear of Tray

4-5Themis Computer
Hardware Installation
Installation Procedures
4.1.3 Removing an SAS/SATA Mass Storage DriveTo remove a hard-disk or solid-state drive, perform the following steps:
1. If the T2BC is installed in a BladeCenter, remove it (see “Removing the T2BCfrom a BladeCenter” on page 2-19).
2. Open the T2BC according to the instructions given in the section “Openingthe T2BC Blade Server Cover” on page 4-1.
3. Locate the drive to be removed (see Figure 4-2, page 4-3).
4. While holding the drive release lever to the side far enough to clear the drivemounting screw (see Figure 4-3, page 4-4), slide the drive forward to disen-gage it from the rear connector.
5. When the drive mounting screws have cleared the holding channels on thetray, carefully lift the drive out of the tray.
4.1.4 Installing Memory Modules The T2BC Blade Server supports up to eight fully buffered double-data-rate dual-channel (FB-DDR2) registered SDRAM with ECC dual in-line memory modules(DIMMs)—see Table 4-1—at up to a total memory capacity of 64 GB.
[See Table 4-2 on page 4-6, for a list of qualified memory modules.]
Table 4-1. T2BC Blade Server Memory Module Configurations
T2BC Blade ServerFully Buffered ECC DIMM Memory (FB-DDR2)
DIMMType
DIMMSize
Total Capacity (Channel 0 only)
Total Capacity (Channels 0 and 1)
Eight 240-pin DIMM Sockets
DDR2-667;PC2-5300
1 GB 4 GB 8 GB
2 GB 8 GB 16 GB
4 GB 16 GB 32 GB
8 GB 32 GB 64 GB

4-6Themis Computer
T2BC Blade Server Installation Manual
The dual-channel memory bus can support full-duplex memory bandwidth transfers.When installing memory, follow these rules:
• Four DIMMs must be installed at a time, with a minimum configuration fillingDIMM slots 1, 3, 6, and 8. Installing additional DIMMs into slots 2, 4, 5, and 7completes the maximum configuration (see Table 4-3).
Caution: Exercise extreme caution when installing or removing DIMMs to preventany possible damage. Note that memory is interleaved to improve performance.
Table 4-2. Qualified T2BC Blade Server Memory Modules
DIMM Slot (Socket) Number
See Figure 4-4, page 4-8
Themis Memory Module Part Number
Configuration:8
1-GB DIMMs
82-GB
DIMMs
44-GB
DIMMs
48-GB
DIMMs
88-GB
DIMMs
Slot Description 8-GB Total 16-GB Total 16-GB Total 32-GB Total 64-GB Total
1 Branch 0,Channel 0 115818-L03 115818-L01 115818-L02 115818-L04 115818-L04
2 Branch 0,Channel 1 115818-L03 115818-L01 Empty Empty 115818-L04
3 Branch 1,Channel 0 115818-L03 115818-L01 115818-L02 115818-L04 115818-L04
4 Branch 1,Channel 1 115818-L03 115818-L01 Empty Empty 115818-L04
5 Branch 3,Channel 1 115818-L03 115818-L01 Empty Empty 115818-L04
6 Branch 3,Channel 0 115818-L03 115818-L01 115818-L02 115818-L04 115818-L04
7 Branch 2,Channel 1 115818-L03 115818-L01 Empty Empty 115818-L04
8 Branch 2,Channel 0 115818-L03 115818-L01 115818-L02 115818-L04 115818-L04

4-7Themis Computer
Hardware Installation
Installation Procedures
• All DIMMs must have the same speed rating. It is strongly recommended thatyou do not mix memory modules of different speeds and sizes; DIMMs fromdifferent manufacturers may be mixed, however.
4.1.4.1 Installation
The following steps explain how to install new DIMMs.
1. Read any documentation shipped with the DIMMs.
2. If the T2BC is installed in a BladeCenter, remove it (see “Removing the T2BCfrom a BladeCenter” on page 2-19).
3. Open the T2BC according to the instructions given in the section “Openingthe T2BC Blade Server Cover” on page 4-1.
4. Determine the location of the slots into which the DIMMs will be installed(see Figure 4-4 on page 4-8).
Table 4-3. Minimum and Maximum DIMM Slot Configurations
DIMM Installation DIMM Slots
Minimum Slots 1, 3, 6, and 8
Maximum Slots 1 through 8
Caution: A Memory Module shipped by Themis is qualified to operatewith T2BC UltraSPARC T2 processors. Third-party Memory Modulesare not supported by Themis and, therefore, are not recommended foruse with the T2BC Blade Server. Call Themis Technical Support ifthere is a question concerning qualified Memory Modules.
Caution: Before opening the static-protective package containing a DIMM, touchit to an unpainted metal surface of the BladeCenter for at least 2 seconds.
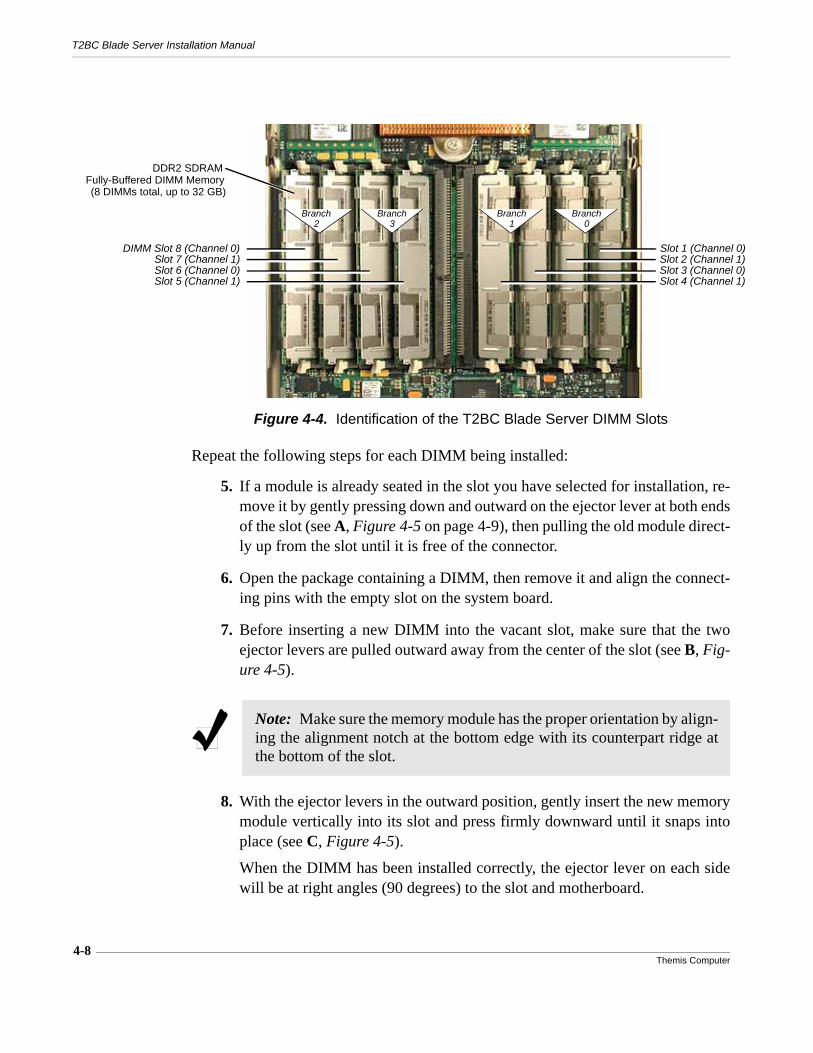
4-8Themis Computer
T2BC Blade Server Installation Manual
Repeat the following steps for each DIMM being installed:
5. If a module is already seated in the slot you have selected for installation, re-move it by gently pressing down and outward on the ejector lever at both endsof the slot (see A, Figure 4-5 on page 4-9), then pulling the old module direct-ly up from the slot until it is free of the connector.
6. Open the package containing a DIMM, then remove it and align the connect-ing pins with the empty slot on the system board.
7. Before inserting a new DIMM into the vacant slot, make sure that the twoejector levers are pulled outward away from the center of the slot (see B, Fig-ure 4-5).
8. With the ejector levers in the outward position, gently insert the new memorymodule vertically into its slot and press firmly downward until it snaps intoplace (see C, Figure 4-5).
When the DIMM has been installed correctly, the ejector lever on each sidewill be at right angles (90 degrees) to the slot and motherboard.
Figure 4-4. Identification of the T2BC Blade Server DIMM Slots
DDR2 SDRAMFully-Buffered DIMM Memory(8 DIMMs total, up to 32 GB)
DIMM Slot 8 (Channel 0)Slot 7 (Channel 1)Slot 6 (Channel 0)Slot 5 (Channel 1)
Slot 1 (Channel 0)Slot 2 (Channel 1)Slot 3 (Channel 0)Slot 4 (Channel 1)
Branch2
Branch3
Branch1
Branch0
Note: Make sure the memory module has the proper orientation by align-ing the alignment notch at the bottom edge with its counterpart ridge atthe bottom of the slot.

Hardware Installation
Installation Procedures
4-9Themis Computer
Figure 4-5. Memory Module Removal and Installation
DIMM slot
DIMM
Ejector
lever (2)
Release and remove the existing DIMM from its slot, . . . A
. . . and press down on the DIMM until locked. CDIMM notchDIMM connector key
. . . align the new DIMM with the slot, . . . B
Photograph of actual DIMM

T2BC Blade Server Installation Manual
4-10Themis Computer
4.1.5 Installing an I/O Expansion Card The T2BC supports the installation of the I/O expansion (“daughter”) cardsdescribed in Table 4-3. The location of card connectors is shown in Figure 4-6.
Table 4-4. I/O Expansion Cards Supported by the T2BC Blade Server
Type of Expansion CardSupported
byT2BC?
InstallationConnector
Used
Typical CardSupported
Small-Form-Factor Expansion Card(CFFv) YES Combined PCI-X
and SerDes 1-Gigabit Ethernet (copper) Fibre Channel a
High-Speed Expansion Card YES XAUI 10-Gigabit Ethernet (copper) b
Standard-Form-Factor Expansion Card NO
a—At present, the 4Gb QLogic I/O expansion card 41Y8527 is supported.
b—This card is presently under development.
Note: At the present time, the T2BC Blade Server does not support the additionof an expansion unit to the system.
Figure 4-6. Surface I/O Connectors Supported by the T2BC Blade Server
* This connector is protected by a cover.
CFFv Expansion Card
CFFv Expansion Card
Expansion Card Connector (XAUI) *Future Product: Dual Copper
10-Gbit Ethernet
PCI-X Connector
SerDes Connector
CFFv Ethernet ExpansionValidated with:
Card 39Y9310CFFv Fibre Channel ExpansionCard 41Y8527
Mounting Holes for Standoff and Hold-Down Screw
A
B

4-11Themis Computer
Hardware Installation
Installation Procedures
The next two sections outline how to install an I/O expansion card in the T2BC.
Before proceeding,
1. Read any documentation shipped with the expansion card.
2. If the T2BC is installed in a BladeCenter, remove it (see “Removing the T2BCfrom a BladeCenter” on page 2-19).
3. Open the T2BC according to the instructions given in the section “Openingthe T2BC Blade Server Cover” on page 4-1.
4. Before opening the static-protective package containing an expansion card,touch it to an unpainted metal surface of the BladeCenter.
4.1.5.1 Small-Form-Factor Expansion Card
1. Remove the installed high-speed expansion card (if installed) before attempt-ing to install the small-form-factor expansion card.
2. Before installing the expansion card, remove the appropriate hold-downscrew from its standoff (indicated by A in Figure 4-6, page 4-10)
3. Remove the expansion card from its package and align it with the two connec-tors (PCI-X and SerDes; see Figure 4-6) on the motherboard.
4. Carefully press the expansion card connectors into the motherboard connec-tors until they are firmly joined.
5. Pass the hold-down screw removed in Step 2 through the expansion cardmounting hole and screw it firmly to its standoff.
Caution: If a high-speed expansion card is installed in the XAUI con-nector, the card must be removed before a small-form-factor expansioncard can be installed.
Note: To complete the installation, consult the documentation shippedwith the expansion card for device-driver and configuration details.

T2BC Blade Server Installation Manual
4-12Themis Computer
4.1.5.2 High-Speed Expansion Card
1. If installed, remove the XAUI connector cover (see Figure 4-6, page 4-10).
2. Before installing the expansion card, remove the appropriate hold-downscrew from its standoff (indicated by B in Figure 4-6, page 4-10)
3. Remove the expansion card from its package and align it with the XAUI con-nector on the motherboard.
4. Carefully press the XAUI connector into the motherboard connector until theyare firmly joined.
5. Pass the hold-down screw removed in Step 2 through the expansion cardmounting hole and screw it firmly to its standoff.
4.1.6 Replacing the Lithium Battery
4.1.6.1 Removing the Lithium Battery
Perform the following steps to remove the lithium battery:
1. Make sure the system is powered off.
2. Locate the lithium battery (see A, Figure 4-7 on page 4-13), then pry the bat-tery up from either side with a small slothead jewel screwdriver (see B, Figure4-7) until the battery lifts out of its holder. [Note: Nearby connectors mayhave to be unplugged to allow access to the battery.]
Note: To complete the installation, consult the documentation shippedwith the expansion card for device-driver and configuration details.
Note: While a CR2032 lithium battery may have a shelf life of 10 years, it is rec-ommended that it be replaced by an authorized Themis service representative ev-ery two to three years.
Caution: Since the battery holder is surface mounted, it is recommended that re-moval of a battery be performed very carefully so as not to pop the holder awayfrom the surface of the motherboard. Pressing down on the battery holder while pry-ing the battery upward may alleviate the breaking force.

Hardware Installation
Installation Procedures
4-13Themis Computer
3. Remove the old battery and replace it with a new battery (see next section).
4.1.6.2 Installing the Lithium Battery
Perform the following steps to install a new lithium battery:
1. With the plus (+) side facing up, tilt the replacement battery into the emptyholder so that it is angled under the top pressure contacts of the battery holder(see Figure 4-8).
2. Carefully press down on the battery until it clicks firmly into place.
Figure 4-7. Removing the T2BC Lithium Battery
Locate the lithium battery on the surface (top) of the motherboard, . . .
Battery
A
. . . slowly pry the battery upward from its holder from either side*,B
C . . . and carefully remove the battery from its holder
Pry here
... or here
Battery Holder
Top Pressure Contacts
while carefully avoiding bending the 2 top pressure contacts, . . .
* A small slothead jewel screwdriver may be used.
Surface-Mount Pad Surface-Mount Pad
Figure 4-8. Installing a New T2BC Lithium Battery
Insert battery underneath
Battery Holder
Top Pressure Contacts
Surface-Mount Pad Surface-Mount Pad

4-14Themis Computer
T2BC Blade Server Installation Manual
4.2 Rack-Mount Safety InstructionsIt is important that the operator installing the T2BC Blade Server into a standard 19”rack within an IBM BladeCenter adhere to the following safety standards:
A. Elevated Operating Ambient—If the equipment is installed in a closed or multi-unit rack assembly, the operating ambient temperature of the rack environmentmay be greater than room ambient. Therefore, consideration should be given toinstalling the equipment in an environment that is compatible with the maximumambient temperature (Tma) specified by the manufacturer.
B. Reduced Air Flow—Installation of the equipment in a rack should be such thatthe amount of air flow required for safe operation of the equipment is not com-promised.
C. Mechanical Loading—Mounting of the equipment in the rack should be suchthat a hazardous condition is not achieved due to uneven mechanical loading.
D. Circuit Overloading—Consideration should be given to the connection of theequipment to the supply circuit and the effect that overloading of the circuitsmight have on overcurrent protection and supply wiring. Appropriate consider-ation of equipment nameplate ratings should be used when addressing this con-cern.
E. Reliable Earthing—Reliable earthing of rack-mounted equipment should bemaintained. Particular attention should be given to supply connections other thandirect connections to the branch circuit (e.g., the use of power strips).

A-1Themis Computer
A
Connector Pinouts
This appendix provides connector pinouts and signal descriptions for the user I/Oconnectors that are installed on the T2BC Blade Server front panel (see Figure A-1).
Figure A-1. Location of the I/O Connectors on the T2BC Front Panel
USB 2.0 Port
Serial Port (DB9)
Appendix
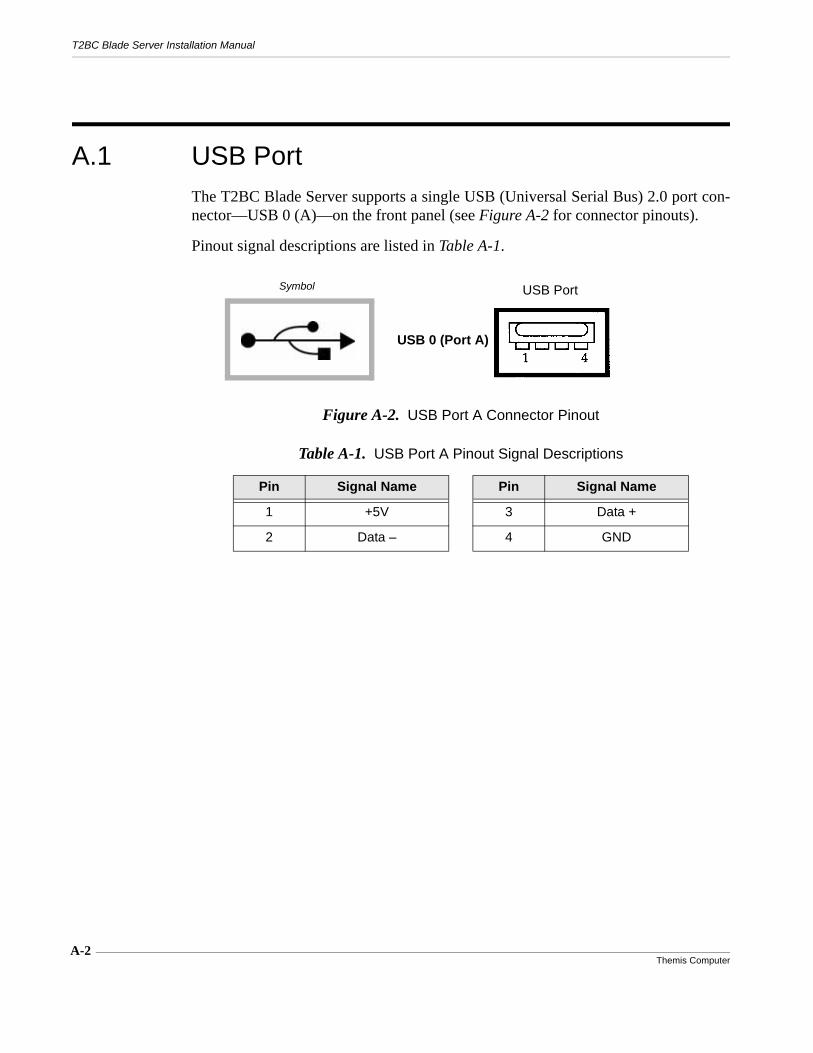
A-2Themis Computer
T2BC Blade Server Installation Manual
A.1 USB PortThe T2BC Blade Server supports a single USB (Universal Serial Bus) 2.0 port con-nector—USB 0 (A)—on the front panel (see Figure A-2 for connector pinouts).
Pinout signal descriptions are listed in Table A-1.
Figure A-2. USB Port A Connector Pinout
Table A-1. USB Port A Pinout Signal Descriptions
Pin Signal Name Pin Signal Name
1 +5V 3 Data +
2 Data – 4 GND
USB PortSymbol
USB 0 (Port A)

A-3Themis Computer
Connector Pinouts
Serial Port
A.2 Serial PortThe T2BC Blade Server supports one male micro-DB9 serial port connector on thefront panel (see Figure A-3)—COM 1 (TTYA). Connection to this serial port can bemade through an available Themis cable (P/N 113057-001)
COM 1 connector-pin signals are described in Table A-2.
Figure A-3. COM 1 Serial Port Connector Pinout
Symbol
COM 1
Table A-2. COM 1 Serial Port Pinout Signal Descriptions
Pin Signal Name Signal Definition Signal Definition
1 DCD Data Carrier Detect Modem is connected
2 RXD Receive Data Receive bytes into T2BC Blade Server
3 TXD Transmit Data Transmit bytes out of T2BC Blade Server
4 DTR Data Terminal Ready Ready to communicate
5 GND Signal Ground Return signal to ground
6 DSR Data Set Ready Ready to communicate
7 RTS Request To Send RTS/CTS flow control
8 CTS Clear To Send RTS/CTS flow control
9 RI Ring Indicator Telephone line is ringing

A-4Themis Computer
T2BC Blade Server Installation Manual

B-1Themis Computer
B
T2BC Blade ServerQuick-Start Reference Notes
B.1 Setup Service Processor (SP)Connect the SP console through SOL (Serial Over LAN) from the IBM AdvancedManagement Module. If you have a problem connecting to the SOL, open the topcover and flip the first two dip switches down, which will route the SP serial consoleto the front panel micro-DB9 connector (at 19200,n,8).
B.1.1 SOL Connection Example: Telnet and login to AMM first:
username: USERIDpassword: PASSW0RD
Hostname: MM00145E3B2F54Static IP address: 192.168.44.99Burned-in MAC address: 00:14:5E:3B:2F:54DHCP: Disabled - Use static IP configuration.Last login: Thursday July 17 2008 22:27 from 192.168.44.239 (Web)system> console -T system:blade[2]
SP login prompt:
SUNSP0080B600170A login:SUNSP0080B600170A login:SUNSP0080B600170A login: adminPassword:changeme
Appendix

T2BC Blade Server Installation Manual
B-2Themis Computer
Waiting for daemons to initialize...
Daemons readySun(TM) Integrated Lights Out Manager
Version 2.0.4.x_T2oem
Copyright 2007 Sun Microsystems, Inc. All rights reserved.Use is subject to license terms.Third-party software, including font technology, is copyrighted and licensedfrom Sun suppliers.Portions may be derived from Berkeley BSD systems, licensed from U. of CA.Sun, Sun Microsystems, and the Sun Logo are trademarks or registered trademarksof Sun Microsystems, Inc. in the U.S. and other countries.
Federal Acquisitions: Commercial Software -- Government Users Subject toStandard License Terms and Conditions.
Copyright 2007 Sun Microsystems, Inc. Tous droits réservés.Distribué par des licences qui en restreignent l'utilisation.Le logiciel détenu par des tiers, et qui comprend la technologie relativeaux polices de caractères, est protégé par un copyright et licencié pardes fournisseurs de Sun.Des parties de ce produit pourront être dérivées des systèmes Berkeley BSDlicenciés par l'Université de Californie.Sun, Sun Microsystems, et le logo Sun sont des marques de fabrique ou desmarques déposées de Sun Microsystems, Inc. aux Etats-Unis et dans d'autres pays.
sc> showscSP firmware version: 2.0.4.x_T2oem
Parameter Value--------- -----if_network trueif_connection sshif_emailalerts truenetsc_dhcp truenetsc_ipaddr 192.168.44.218netsc_ipnetmask 255.255.255.0netsc_ipgateway 192.168.44.254mgt_mailhost 0.0.0.0mgt_mailalertsc_customerinfosc_escapechars #.sc_powerondelay falsesc_powerstatememory falsesc_clipasswdecho truesc_cliprompt scsc_clitimeout 0sc_clieventlevel 2sc_backupuserdata truediag_trigger power-on-reset error-resetdiag_verbosity normal

T2BC Blade Server Quick-Start Reference Notes
Setup Service Processor (SP)
B-3Themis Computer
diag_level maxdiag_mode offsys_autorunonerror falsesys_autorestart resetser_baudrate 9600ser_commit (Cannot show property)netsc_enetaddr 00:80:B6:00:17:0Anetsc_commit (Cannot show property)sys_enetaddr 00:80:b6:00:17:04sc>
The default IP is from the dhcp server, but the user can change it to static IP by copy-ing the following example:
sc> setsc netsc_dhcp falsesc> setsc netsc_ipaddr 192.168.44.88sc> setsc netsc_ipnetmask 255.255.255.0sc> setsc netsc_ipgateway 192.168.44.254sc> setsc netsc_commit truesc> shownetworkSC network configuration is: IP Address: 192.168.44.88Gateway address: 192.168.44.254Netmask: 255.255.255.0Ethernet Address: 00:80:B6:00:17:0A
After the IP is assigned and known to the SP, the user can use ssh to connect to theSP, or use web gui (https://<ipaddress>) to configure and manage the SP:
$ ssh 192.168.44.88 -l adminThe authenticity of host '192.168.44.88 (192.168.44.88)' can't be established.RSA key fingerprint is fc:97:64:a3:92:87:c4:55:15:9f:79:92:f3:6b:a9:2b.Are you sure you want to continue connecting (yes/no)? yesWarning: Permanently added '192.168.44.88' (RSA) to the list of known hosts.Password:changemeWaiting for daemons to initialize...
Daemons ready
Sun(TM) Integrated Lights Out Manager
Version 2.0.4.x_T2oem
Copyright 2007 Sun Microsystems, Inc. All rights reserved.Use is subject to license terms.sc>

B-4Themis Computer
T2BC Blade Server Installation Manual
B.2 Setup Solaris Network Connection
B.2.1 Power on CPU from SPsc> poweron -cEnter #. to return to ALOM.Chassis | major: Host has been powered onFault | critical: SP detected fault at time Thu Jul 17 18:34:13 2008. Unable to read env data from NVRAMChassis | major: Host is running/
SPARC Enterprise T2BC, No KeyboardCopyright 2008 Sun Microsystems, Inc. All rights reserved.OpenBoot 4.27.11(T2.oem-0.1), 8064 MB memory available, Serial #67114755.[sswong obp #1]Ethernet address 0:80:b6:0:17:4, Host ID: 84001703.
{0} ok{0} ok devalias screen /pci@0/pci@0/pci@1/pci@0/SUNW,XVR-100@1ttya /ebus@c0/serial@0,ca0000nvram /virtual-devices/nvram@3net3 /pci@0/pci@0/pci@a/pci@0/ethernet@4,1net2 /pci@0/pci@0/pci@a/pci@0/ethernet@4net1 /pci@0/pci@0/pci@9/network@0,1net0 /pci@0/pci@0/pci@9/network@0net /pci@0/pci@0/pci@9/network@0cdrom /pci@0/pci@0/pci@1/pci@0/usb@0/hub@1/storage@3/disk@0:fdisk3 /pci@0/pci@0/pci@2/scsi@0/disk@3disk2 /pci@0/pci@0/pci@2/scsi@0/disk@2disk1 /pci@0/pci@0/pci@2/scsi@0/disk@1disk0 /pci@0/pci@0/pci@2/scsi@0/disk@0disk /pci@0/pci@0/pci@2/scsi@0/disk@0scsi /pci@0/pci@0/pci@2/scsi@0virtual-console /virtual-devices/console@1name aliases{0} ok printenvVariable Name Value Default Value
ttya-rts-dtr-off false falsettya-ignore-cd true truekeyboard-layout US-English reboot-command security-mode none No defaultsecurity-password No defaultsecurity-#badlogins 0 No defaultverbosity min min
T2BC Blade Server Quick-Start Reference Notes
Setup Solaris Network Connection
B-5Themis Computer
pci-mem64? true truediag-switch? false falselocal-mac-address? true truefcode-debug? false falsescsi-initiator-id 7 7oem-logo No defaultoem-logo? false falseoem-banner No defaultoem-banner? false falseansi-terminal? true truescreen-#columns 80 80screen-#rows 34 34ttya-mode 9600,8,n,1,- 9600,8,n,1,-output-device virtual-console virtual-consoleinput-device virtual-console virtual-consoleauto-boot-on-error? false falseload-base 16384 16384auto-boot? false truenetwork-boot-arguments boot-command boot bootboot-file boot-device disk net disk netmultipath-boot? false falseboot-device-index 0 0use-nvramrc? false falsenvramrc
error-reset-recovery boot boot
{0} ok boot
SPARC Enterprise T2BC, No Keyboard Copyright 2008 Sun Microsystems, Inc. All rights reserved. OpenBoot 4.27.11(T2.oem-0.1), 8064 MB memory available, Serial #67114755. [sswong obp #1] Ethernet address 0:80:b6:0:17:4, Host ID: 84001703.
Note: Using “sc> bootmode reset_nvram” from ALOM to reset all of the param-eters in host the system.
Don’t forget to set it back to normal next time “sc> bootmode normal”
Note: User must configure the system the first time. In the following example,we setup the entire network with dhcp.

B-6Themis Computer
T2BC Blade Server Installation Manual
B.2.2 dhcp Connection ExampleBoot device: disk File and args: SunOS Release 5.10 Version Generic_127127-11 64-bit Copyright 1983-2008 Sun Microsystems, Inc. All rights reserved. Use is subject to license terms. WARNING: consconfig: cannot find driver for screen device Hostname: unknown Configuring devices. /dev/rdsk/c1t0d0s7 is clean
Select a Language
0. English 1. es 2. fr
Please make a choice (0 - 2), or press h or ? for help: 0
What type of terminal are you using? 1) ANSI Standard CRT 2) DEC VT52 3) DEC VT100 4) Heathkit 19 5) Lear Siegler ADM31 6) PC Console 7) Sun Command Tool 8) Sun Workstation 9) Televideo 910 10) Televideo 925 11) Wyse Model 50 12) X Terminal Emulator (xterms) 13) CDE Terminal Emulator (dtterm) 14) Other Type the number of your choice and press Return: 3 Configure Keyboard Layout
Please specify the keyboard layout from the list below.
> To make a selection, use the arrow keys to highlight the option and press Return to mark it [X].
Keyboard Layout
^ [ ] Slovenian x [ ] Slovakian x [ ] Spanish x [ ] Swedish x [ ] Swiss-French x [ ] Swiss-German

B-7Themis Computer
T2BC Blade Server Quick-Start Reference Notes
Setup Solaris Network Connection
x [ ] Taiwanese x [ ] TurkishQ x [ ] TurkishF x [ ] UK-English - [X] US-English
Creating new rsa public/private host key pairCreating new dsa public/private host key pairConfiguring network interface addresses: bge0 bge1 e1000g0 e1000g1. in.rdisc: No interfaces up Network Connectivity
Specify Yes if the system is connected to the network by one of the Solaris or vendor network/communication Ethernet cards that are supported on the Solaris CD. See your hardware documentation for the current list of supported cards. Specify No if the system is connected to a network/communication card that is not supported on the Solaris CD, and follow the instructions listed under Help.
Networked
[X] Yes [ ] No
Esc-2_Continue Esc-6_Help Configure Multiple Network Interfaces
Multiple network interfaces have been detected on this system. Specify all of the network interfaces you want to configure.
Note: You must choose at least one interface to configure.
Network interfaces
[x] e1000g0 [x] e1000g1 [x] bge0 [x] bge1
Esc-2_Continue Esc-6_Help
Primary Network Interface On this screen you must specify which of the following network adapters is the system's primary network interface. Usually the correct choice is the lowest number. However, do not guess; ask your system administrator if you're not sure.
> To make a selection, use the arrow keys to highlight the option and press Return to mark it [X].

T2BC Blade Server Installation Manual
B-8Themis Computer
Primary network interface [X] e1000g0 [ ] e1000g1 [ ] bge0 [ ] bge1 Esc-2_Continue Esc-6_Help
DHCP for e1000g0
Specify whether or not this network interface should use DHCP to configure itself. Choose Yes if DHCP is to be used, or No if the network interface is to be configured manually.
NOTE: DHCP support will not be enabled, if selected, until after the system reboots.
Use DHCP for e1000g0
[X] Yes [ ] No
Esc-2_Continue Esc-6_Help
IPv6 for e1000g0
Specify whether or not you want to enable IPv6, the next generation Internet Protocol, on this network interface. Enabling IPv6 will have no effect if this machine is not on a network that provides IPv6 service. IPv4 service will not be affected if IPv6 is enabled.
> To make a selection, use the arrow keys to highlight the option and press Return to mark it [X].
Enable IPv6 for e1000g0
[ ] Yes [X] No
Esc-2_Continue Esc-6_Help
Confirm Information for e1000g0
> Confirm the following information. If it is correct, press F2; to change any information, press F4.
Networked: Yes Primary network interface: e1000g0 Secondary network interfaces: e1000g1, bge0, bge1 Use DHCP: Yes Enable IPv6: No Esc-2_Continue Esc-4_Change Esc-6_Help

B-9Themis Computer
T2BC Blade Server Quick-Start Reference Notes
Setup Solaris Network Connection
DHCP for e1000g1
Specify whether or not this network interface should use DHCP to configure itself. Choose Yes if DHCP is to be used, or No if the network interface is to be configured manually.
NOTE: DHCP support will not be enabled, if selected, until after the system reboots.
Use DHCP for e1000g1
[X] Yes [ ] No
Esc-2_Continue Esc-6_Help
IPv6 for e1000g1
Specify whether or not you want to enable IPv6, the next generation Internet Protocol, on this network interface. Enabling IPv6 will have no effect if this machine is not on a network that provides IPv6 service. IPv4 service will not be affected if IPv6 is enabled.
> To make a selection, use the arrow keys to highlight the option and press Return to mark it [X].
Enable IPv6 for e1000g1
[ ] Yes [X] No
Esc-2_Continue Esc-6_Help
Confirm Information for e1000g1
> Confirm the following information. If it is correct, press F2; to change any information, press F4.
Use DHCP: Yes Enable IPv6: No
Esc-2_Continue Esc-4_Change Esc-6_Help
DHCP for bge0
Specify whether or not this network interface should use DHCP to configure itself. Choose Yes if DHCP is to be used, or No if the network interface is to be configured manually.

T2BC Blade Server Installation Manual
B-10Themis Computer
NOTE: DHCP support will not be enabled, if selected, until after the system reboots.
Use DHCP for bge0
[X] Yes [ ] No
Esc-2_Continue Esc-6_Help
IPv6 for bge0
Specify whether or not you want to enable IPv6, the next generation Internet Protocol, on this network interface. Enabling IPv6 will have no effect if this machine is not on a network that provides IPv6 service. IPv4 service will not be affected if IPv6 is enabled.
> To make a selection, use the arrow keys to highlight the option and press Return to mark it [X].
Enable IPv6 for bge0
[ ] Yes [X] No
Esc-2_Continue Esc-6_Help
Confirm Information for bge0
> Confirm the following information. If it is correct, press F2; to change any information, press F4.
Use DHCP: Yes Enable IPv6: No
Esc-2_Continue Esc-4_Change Esc-6_Help
DHCP for bge1
Specify whether or not this network interface should use DHCP to configure itself. Choose Yes if DHCP is to be used, or No if the network interface is to be configured manually.
NOTE: DHCP support will not be enabled, if selected, until after the system reboots.
Use DHCP for bge1
[X] Yes [ ] No
Esc-2_Continue Esc-6_Help

B-11Themis Computer
T2BC Blade Server Quick-Start Reference Notes
Setup Solaris Network Connection
IPv6 for bge1
Specify whether or not you want to enable IPv6, the next generation Internet Protocol, on this network interface. Enabling IPv6 will have no effect if this machine is not on a network that provides IPv6 service. IPv4 service will not be affected if IPv6 is enabled.
> To make a selection, use the arrow keys to highlight the option and press Return to mark it [X].
Enable IPv6 for bge1
[ ] Yes [X] No
Esc-2_Continue Esc-6_Help
Confirm Information for bge1
> Confirm the following information. If it is correct, press F2; to change any information, press F4.
Use DHCP: Yes Enable IPv6: No
Configure Security Policy:
Specify Yes if the system will use the Kerberos security mechanism. Specify No if this system will use standard UNIX security.
Configure Kerberos Security
[ ] Yes [X] No
Esc-2_Continue Esc-6_Help
Confirm Information
> Confirm the following information. If it is correct, press F2; to change any information, press F4. Configure Kerberos Security: No
Name Service
On this screen you must provide name service information. Select the name service that will be used by this system, or None if your system will either not use a name service at all, or if it will use a name service not listed here.

B-12Themis Computer
T2BC Blade Server Installation Manual
> To make a selection, use the arrow keys to highlight the option and press Return to mark it [X].
Name service
[ ] NIS+ [ ] NIS [X] DNS [ ] LDAP [ ] None
Esc-2_Continue Esc-6_Help
Domain Name
On this screen you must specify the domain where this system resides. Make sure you enter the name correctly including capitalization and punctuation.
Domain name: themis.com
Esc-2_Continue Esc-6_Help
DNS Server Addresses
On this screen you must enter the IP address of your DNS server(s). You must enter at least one address. IP addresses must contain four sets of numbers separated by periods (for example 129.200.9.1).
Server's IP address: 10.10.1.3 Server's IP address: Server's IP address:
Esc-2_Continue Esc-6_Help
DNS Search List
On this screen you can enter a list of domains that will be searched when a DNS query is made. If you do not enter any domains, DNS will only search the DNS domain chosen for this system. The domains entered, when concatenated, may not be longer than 250 characters.
Search domain: Search domain: Search domain: Search domain: Search domain: Search domain:
Esc-2_Continue Esc-6_Help

B-13Themis Computer
T2BC Blade Server Quick-Start Reference Notes
Setup Solaris Network Connection
Confirm Information
> Confirm the following information. If it is correct, press F2; to change any information, press F4.
Name service: DNS Domain name: themis.com Server address(es): 10.10.1.3
Esc-2_Continue Esc-4_Change Esc-6_Help
Name Service Error
Unable to find an address entry for unknown with the specified DNS configuration.
Enter new name service information?
[ ] Yes [X] No NFSv4 Domain Name
NFS version 4 uses a domain name that is automatically derived from the system's naming services. The derived domain name is sufficient for most configurations. In a few cases, mounts that cross domain boundaries might cause files to appear to be owned by "nobody" due to the lack of a common domain name.
The current NFSv4 default domain is: "themis.com"
NFSv4 Domain Configuration
[X] Use the NFSv4 domain derived by the system [ ] Specify a different NFSv4 domain
Esc-2_Continue Esc-6_Help
Confirm Information for NFSv4 Domain > Confirm the following information. If it is correct, press F2; to change any information, press F4.
NFSv4 Domain Name: << Value to be derived dynamically >> Time Zone
On this screen you must specify your default time zone. You can specify a time zone in three ways: select one of the continents or oceans from the list, select other - offset from GMT, or other - specify time zone file.

B-14Themis Computer
T2BC Blade Server Installation Manual
> To make a selection, use the arrow keys to highlight the option and press Return to mark it [X].
Continents and Oceans
- [ ] Africa x [X] Americas x [ ] Antarctica x [ ] Arctic Ocean x [ ] Asia x [ ] Atlantic Ocean x [ ] Australia x [ ] Europe v [ ] Indian Ocean
Esc-2_Continue Esc-6_Help
Country or Region
> To make a selection, use the arrow keys to highlight the option and press Return to mark it [X].
Countries and Regions
- [X] United States x [ ] Anguilla x [ ] Antigua & Barbuda x [ ] Argentina x [ ] Aruba x [ ] Bahamas x [ ] Barbados x [ ] Belize x [ ] Bolivia x [ ] Brazil x [ ] Canada x [ ] Cayman Islands v [ ] Chile
Esc-2_Continue Esc-6_Help
Time Zone
> To make a selection, use the arrow keys to highlight the option and press Return to mark it [X].
Time zones
- [ ] Eastern Time x [ ] Eastern Time - Michigan - most locations x [ ] Eastern Time - Kentucky - Louisville area x [ ] Eastern Time - Kentucky - Wayne County

B-15Themis Computer
T2BC Blade Server Quick-Start Reference Notes
Setup Solaris Network Connection
x [ ] Eastern Time - Indiana - most locations x [ ] Eastern Time - Indiana - Daviess, Dubois, Knox & Martin Counties x [ ] Eastern Time - Indiana - Starke County x [ ] Eastern Time - Indiana - Pulaski County x [ ] Eastern Time - Indiana - Crawford County x [ ] Eastern Time - Indiana - Switzerland County x [ ] Central Time x [ ] Central Time - Indiana - Perry County v [ ] Central Time - Indiana - Pike County
Esc-2_Continue Esc-6_Help
Date and Time
> Accept the default date and time or enter new values.
Date and time: 2008-07-17 11:38
Year (4 digits) : 2008 Month (1-12) : 07 Day (1-31) : 17 Hour (0-23) : 11 Minute (0-59) : 38
Esc-2_Continue Esc-6_Help
Confirm Information
> Confirm the following information. If it is correct, press F2; to change any information, press F4.
Time zone: Pacific Time (US/Pacific) Date and time: 2008-07-17 11:38:00 Root Password
Please enter the root password for this system.
The root password may contain alphanumeric and special characters. For security, the password will not be displayed on the screen as you type it.
> If you do not want a root password, leave both entries blank.
Root password: Root password:

B-16Themis Computer
T2BC Blade Server Installation Manual
System identification is completed.
rebooting system due to change(s) in /etc/default/init
syncing file systems... donerebooting... Resetting...
SPARC Enterprise T2BC, No Keyboard Copyright 2008 Sun Microsystems, Inc. All rights reserved. OpenBoot 4.27.11(T2.oem-0.1), 8064 MB memory available, Serial #67114755. [sswong obp #1] Ethernet address 0:80:b6:0:17:4, Host ID: 84001703.
Boot device: disk File and args: SunOS Release 5.10 Version Generic_127127-11 64-bit Copyright 1983-2008 Sun Microsystems, Inc. All rights reserved. Use is subject to license terms.
WARNING: consconfig: cannot find driver for screen device Hostname: unknown
/dev/rdsk/c1t0d0s7 is clean
unknown console login: Jul 17 11:40:21 unknown sendmail[546]: My unqualified host name (unknown) unknown; sleeping for retry Jul 17 11:40:21 unknown sendmail[545]: My unqualified host name (unknown) unknown; sleeping for retry Jul 17 11:40:25 unknown picld[170]: PICL snmpplugin: sunPlatSensorClass 0 unsupported (row=127) Jul 17 11:40:25 unknown picld[170]: PICL snmpplugin: sunPlatSensorClass 0 unsupported (row=128) Jul 17 11:40:26 unknown picld[170]: PICL snmpplugin: sunPlatSensorClass 0 unsupported (row=138) Jul 17 11:40:26 unknown picld[170]: PICL snmpplugin: sunPlatSensorClass 0 unsupported (row=139)
SUNW-MSG-ID: SUN4-8000-4P, TYPE: Fault, VER: 1, SEVERITY: Critical EVENT-TIME: Tue Jul 15 15:16:45 PDT 2008 PLATFORM: sun4v, CSN: -, HOSTNAME: unknown SOURCE: eft, REV: 1.16 EVENT-ID: 63031910-41c9-e592-e6c9-ba24a290834f DESC: A problem was detected in the PCI-Express subsystem. Refer to http://sun.com/msg/SUN4-8000-4P for more information. AUTO-RESPONSE: This fault does not have an automated response agent and thus requires interaction from the user and/or Sun Services. IMPACT: Loss of services provided by the device instances associated with this fault REC-ACTION:
B-17Themis Computer
T2BC Blade Server Quick-Start Reference Notes
Setup Solaris Network Connection
Schedule a repair procedure to replace the affected device. Use fmdump -v -u EVENT_ID to identify the device or contact Sun for support.
If this message occurs on a Sun Fire T2000 also refer to the NOTE at the end of the Details section below. Jul 17 11:41:00 unknown picld[170]: PICL snmpplugin: sunPlatSensorClass 0 unsupported (row=263) Jul 17 11:41:21 unknown sendmail[546]: unable to qualify my own domain name (unknown) -- using short name Jul 17 11:41:21 unknown sendmail[545]: unable to qualify my own domain name (unknown) -- using short name
unknown console login: root Password:
Replace the bge driver with the Themis driver at the following location beforeinstalling a CFFv card:
bash-3.00# pwd/platform/sun4v/kernel/drv/sparcv9bash-3.00# ls -ltotal 10250-rwxr-xr-x 1 root sys 217744 Jul 18 11:09 bge
Note: Some warning messages do not indicate the true failure; Themis softwareengineering is working to clean up these messages.
If the configuration is not satisfactory, then use the “sys-unconfig” commandin Solaris to reconfigure the system again.
Caution: CFFv network card problem / bge driver issue
Currently (2008 July), the bge driver in Solaris 10 Update 5 DVD will cause the ker-nel to panic during driver loading. Sun has fixed this problem in Solaris 11, but ithas not yet been released. Themis Computer provides a work-around driver.
[See following page.]

B-18Themis Computer
T2BC Blade Server Installation Manual
Verify the Themis driver:
bash-3.00# digest -v -a md5 bgemd5 (bge) = 30ce5b2f18489a350137bfa390aba050
Install the CFFv card, then use “boot -r” from OBP, and finally check the networksetup in Solaris:
bash-3.00#bash-3.00# ifconfig -alo0: flags=2001000849<UP,LOOPBACK,RUNNING,MULTICAST,IPv4,VIRTUAL> mtu 8232 index 1 inet 127.0.0.1 netmask ff000000 bge0: flags=1004843<UP,BROADCAST,RUNNING,MULTICAST,DHCP,IPv4> mtu 1500 index 2 inet 192.168.3.102 netmask ffffff00 broadcast 192.168.3.255 ether 0:80:b6:0:17:6bge1: flags=1004843<UP,BROADCAST,RUNNING,MULTICAST,DHCP,IPv4> mtu 1500 index 3 inet 192.168.4.101 netmask ffffff00 broadcast 192.168.4.255 ether 0:80:b6:0:17:7e1000g0: flags=1004843<UP,BROADCAST,RUNNING,MULTI-CAST,DHCP,IPv4> mtu 1500 index 4 inet 192.168.44.208 netmask ffffff00 broadcast 192.168.44.255 ether 0:80:b6:0:17:4 e1000g1: flags=1004843<UP,BROADCAST,RUNNING,MULTICAST,DHCP,IPv4> mtu 1500 index 5 inet 192.168.2.100 netmask ffffff00 broadcast 192.168.2.255 ether 0:80:b6:0:17:5

C-1Themis Computer
C
T2BC Service Processor& BMC Firmware Upgrade
C.1 Service Processor (SP) Firmware UpgradeSun Service Processor (SP) firmware is embedded in an onboard flash memory ofthe T2BC Blade Server. To upgrade this firmware, the code must first be uploaded toSP memory from a binary firmware image file that is provided by Themis, then pro-grammed to the internal flash. [Call Themis Technical Support for additional infor-mation.]
Follow these steps to upgrade SP firmware:
1. Place the T2BC Blade Server SP firmware CD-ROM into an appropriatedrive.
2. Through the ILOM (Integrated Lights Out Manager) Web GUI, establish aLAN connection with the IBM BladeCenter that contains the installed T2BCBlade Server receiving the SP firmware upgrade. When the ILOM connectionis made (see Figure C-1 on page C-2), enter the following:
User Name: root
Password: changeme
then press the Log In button.
3. When the initial ILOM screen appears (see Figure C-2, page C-2), select theMaintenance tab, followed by the Firmware Upgrade sub-tab (seeFigure C-3, page C-2).
Appendix

T2BC Blade Server Installation Manual
C-2Themis Computer
Figure C-1. ILOM Web GUI Login Screen
Figure C-2. Initial ILOM Screen
Figure C-3. Firmware Upgrade Select Screen

C-3Themis Computer
T2BC Service Processor & BMC Firmware Upgrade
Service Processor (SP) Firmware Upgrade
4. After the Enter Upgrade Mode button is pressed, the Firmware Up-grade screen will appear:
5. Pressing the Browse button to select the proper firmware-upgrade file willproduce a list of files:
Figure C-4. Firmware Upgrade Screen
Figure C-5. Browse Screen

T2BC Blade Server Installation Manual
C-4Themis Computer
6. Select the <filename>.pkg file with the most recent date, then press theOpen button, which will result in the screen shown in Figure C-6:
7. After making sure the proper file is selected, press the Upload button. Whilethe SP firmware file is uploading, the following screen will warn you to wait:
8. After the SP firmware file has completed uploading, the following screen willappear, asking if you want to start the upgrade or cancel (remember that youcan also preserve the present configuration by clicking the small box):
Figure C-6. Choose File Screen
Figure C-7. Upload File Screen
Figure C-8. Start Upgrade Screen

T2BC Service Processor & BMC Firmware Upgrade
Service Processor (SP) Firmware Upgrade
C-5Themis Computer
9. Press the Start Upgrade button to begin programming the new SP firm-ware. As a precaution before starting, a warning will ask you to click the OKbutton to begin the upgrade:
10. As the upgrade progresses, a running count of the firmware blocks being writ-ten will appear on the screen (see Figure C-10)—wait until the download iscompleted:
11. When the upgrade is completed, the Service Processor will reboot using thenew firmware, after which you will need to reconnect to the ILOM (see Fig-ure C-11):
Figure C-9. Warning Before Starting Upgrade
Figure C-10. Upgrade Progression Screen
Figure C-11. Upgrade Completed Screen

C-6Themis Computer
T2BC Blade Server Installation Manual
C.2 Baseboard Management Controller (BMC) Firmware UpgradeIBM Baseboard Management Controller (BMC) firmware is embedded in anonboard flash memory of the T2BC Blade Server. To upgrade this firmware, thecode must first be uploaded to BMC memory from a binary firmware image file thatis provided by Themis, then downloaded to the internal flash. [Call Themis Techni-cal Support for additional information.]
Follow these steps to upgrade BMC firmware:
1. Place the T2BC Blade Server BMC firmware CD-ROM into an appropriatedrive.
2. Through the AMM (Advanced Management Module) Web GUI, establish aLAN connection with the IBM BladeCenter that contains the installed T2BCBlade Server receiving the BMC firmware upgrade (contact your local net-work manager; the IP address is based on the AMM configuration). When theAMM connection is made (see Figure C-12), enter the following:
User Name: USERID
Password: PASSWØRD ........Note use of zero
then press the OK button.
Figure C-12. AMM Web GUI Login Window

C-7Themis Computer
T2BC Service Processor & BMC Firmware Upgrade
Baseboard Management Controller (BMC) Firmware Upgrade
3. When the initial AMM window appears (see Figure C-13), select the StartNew Session button, which will be followed by the System Statuswindow (see Figure C-14 on page C-8).
Figure C-13. Start New Session Window

C-8Themis Computer
T2BC Blade Server Installation Manual
4. The System Status window (Figure C-14) allows the user to scroll through alist of all Blade Servers installed within the BladeCenter. To begin download-ing BMC firmware, you must first select the Blade Server to be upgraded. Todo this, select Firmware Update under Blade Tasks on the left side ofthe window...
Figure C-14. System Status Window

T2BC Service Processor & BMC Firmware Upgrade
Baseboard Management Controller (BMC) Firmware Upgrade
C-9Themis Computer
5. . . .which brings up the Update Blade Firmware window, from which the“target” Blade Server and firmware file must be selected (see Figure C-15).
• To select a Target, click the drop-down list box and select the BladeServer to be upgraded.
• To select the Firmware file, press the Browse button, which resultsin the window shown in Figure C-16.
Figure C-15. Update Blade Firmware Window
Figure C-16. Choose Firmware File Window

T2BC Blade Server Installation Manual
C-10Themis Computer
6. After selecting (highlighting) the most recent <filename>.pkt file, press theOpen button, which will produce the window shown in Figure C-17.
At this point, you can upgrade the BMC firmware file by pressing theUpdate button, after which a Confirm Firmware Update window (seeFigure C-18) will appear before the upgrade continues. Click the Con-tinue button to finish the upgrade.
Figure C-17. Selecting the Target Blade and Firmware File
Figure C-18. Confirm the Firmware Update Information

C-11Themis Computer
T2BC Service Processor & BMC Firmware Upgrade
Baseboard Management Controller (BMC) Firmware Upgrade
7. As the upgrade progresses, a window (Figure C-19) shows the progress of theupdate . . .
8. . . . and a message indicating that the update was successful (Figure C-20).
Figure C-19. Firmware Update Progress Window
Figure C-20. Choose Firmware File Window

C-12Themis Computer
T2BC Blade Server Installation Manual

D-1Themis Computer
D
Installing Solaris 10 onto the T2BC
Use the following procedure to install Solaris 10 onto your T2BC Blade Server. It is assumed that the T2BC is already set up and can be accessed via an ip address.
1. Open up a PuTTY/SSH session, issue the ip address of the IBM BladeCenterAdvanced Management Module, and select open (see following window):
Appendix

T2BC Blade Server Installation Manual
D-2Themis Computer
2. Next, enter the following login and password:
login = USERID
password = PASSW0RD // Notice use of zero
which will be followed by:
Hostname: MM00145E3B3BB6
Static IP address: 192.168.45.5
Burned-in MAC address: 00:14:5E:3B:3B:B6
DHCP: Disabled - Use static IP configuration
Last login: Tuesday January 20 2009 4:28 from 192.168.45.118 (Web)
system>
3. Connect to the T2BC by entering the following command at the systemprompt:
system> console -T system:blade[5]// [5] is the slot ID on the IBM Blade Center
4. After establishing a connection with the T2BC Blade Server, the user shouldlog into the Service Processor and power-on the T2BC:
SUNSP0080B6000408 login: admin
Password: changeme
SC> poweron -c
5. After the T2BC is powered on, the following message will appear, followedby the OBP prompt:
SPARC Enterprise t2BC, Keyboard Present
Copyright 2008 Sun Microsystems, Inc. All rights reserved.
OpenBoot T2oem(4.27.11), 8064 MB memory available, Serial #67111427.
[sswong obp #20]
Note: The PuTTY session is given as an example for convenience—not as theonly possible connection method. Any type of connection to the T2BC serial portwill work, either Front-Panel Micro-DB9 or Serial Over LAN.

Installing Solaris 10 onto the T2BC
D-3Themis Computer
Ethernet address 0:80:b6:0:a:4, Host ID: 84000a03.
{0} ok
6. To display a list of devices from which to load Solaris 10, enter:
{0} ok show-devs
/ebus@c0
/pci-performance-counters@0
/pci@0
/niu@80
/cpu@3
/cpu@2
/cpu@1
/cpu@0
/virtual-devices@100
/virtual-memory
/memory@m0,8000000
/aliases
/options
/openprom
/chosen
/packages
/ebus@c0/serial@0,ca0000
/pci@0/pci@0
/pci@0/pci@0/pci@a
/pci@0/pci@0/pci@9
/pci@0/pci@0/pci@8
/pci@0/pci@0/pci@2
/pci@0/pci@0/pci@1
/pci@0/pci@0/pci@a/pci@0
/pci@0/pci@0/pci@9/network@0,1
/pci@0/pci@0/pci@9/network@0
/pci@0/pci@0/pci@2/scsi@0
/pci@0/pci@0/pci@2/scsi@0/disk
/pci@0/pci@0/pci@2/scsi@0/tape
/pci@0/pci@0/pci@1/pci@0
/pci@0/pci@0/pci@1/pci@0/SUNW,XVR-100@1
/pci@0/pci@0/pci@1/pci@0/usb@0,2
/pci@0/pci@0/pci@1/pci@0/usb@0,1

T2BC Blade Server Installation Manual
D-4Themis Computer
/pci@0/pci@0/pci@1/pci@0/usb@0
/pci@0/pci@0/pci@1/pci@0/usb@0,2/storage@5/disk@0:f
/virtual-devices@100/channel-devices@200
/virtual-devices@100/console@1
/virtual-devices@100/random-number-generator@e
/virtual-devices@100/ncp@6
/virtual-devices@100/n2cp@7
/virtual-devices@100/flashprom@0
/virtual-devices@100/channel-devices@200/virtual-network-switch@0
/virtual-devices@100/channel-devices@200/virtual-console-concentrator@0
/virtual-devices@100/channel-devices@200/virtual-disk-server@0
/virtual-devices@100/channel-devices@200/virtual-channel@3
/virtual-devices@100/channel-devices@200/virtual-channel@0
/virtual-devices@100/channel-devices@200/virtual-channel-client@1
/virtual-devices@100/channel-devices@200/virtual-channel-client@2
/openprom/client-services
/packages/obp-tftp
/packages/kbd-translator
/packages/SUNW,asr
/packages/dropins
/packages/terminal-emulator
/packages/disk-label
/packages/deblocker
/packages/SUNW,builtin-drivers
{0} ok
7. From the listed devices, if the user chooses to install from a USB flash drive,issue the following command:
{0} ok boot /pci@0/pci@0/pci@1/pci@0/usb@0,2/storage@5/disk@0:f
after which, the system will start to boot from the USB flash driver.
Note: Devices other than a USB flash drive might show up differently, depend-ing on how they are enumerated during OBP firmware boot. For example, an ex-ternal USB DVD drive may require a boot command, where storage@5 isreplaced with storage@2, for example:
/pci@0/pci@0/pci@1/pci@0/usb@0,2/storage@2/disk@0:f

D-5Themis Computer
Installing Solaris 10 onto the T2BC
8. After the system has booted from the USB flash driver, you are asked a num-ber of configuration questions before Solaris 10 is installed:
Select a Language
0. English
1. French
2. German
3. Italian
4. Japanese
5. Korean
6. Simplified Chinese
7. Spanish
8. Swedish
9. Traditional Chinese
Please make a choice (0 - 9), or press h or ? for help:0// Select English
What type of terminal are you using?
1) ANSI Standard CRT
2) DEC VT52
3) DEC VT100
4) Heathkit 19
5) Lear Siegler ADM31
6) PC Console
7) Sun Command Tool
8) Sun Workstation
9) Televideo 910
10) Televideo 925
11) Wyse Model 50
12) X Terminal Emulator (xterms)
13) CDE Terminal Emulator (dtterm)
14) Other
Type the number of your choice and press Return:12// Select X-terminal Emulator
Note: Selecting choice 3 might work better than choice 12 for some terminal pro-grams.
D-6Themis Computer
T2BC Blade Server Installation Manual
- The Solaris Installation Program ------------------------The Solaris installation program is divided into a series of short sections where you'll be prompted to provide information for the installation. At the end of each section, you'll be able to change the selections you've made before continuing.
About navigation...
- The mouse cannot be used
- If your keyboard does not have function keys, or they do not respond, press ESC; the legend at the bottom of the screen will change to show the ESC keys to use for navigation.
----------------------------------------------------------
F2_Continue F6_Help
9. From this point, the Solaris installation proceeds normally. For guidance onthe ensuing choices, please refer to the Sun documentation on the topic of So-laris installation.
Following the standard Solaris 10 installation, several minor fixes must bemade in order for the T2BC Blade Server to function properly in the Blade-Center. Refer to the T2BC Release Notes for additional details.

Index-1Themis Computer
Numerics10-Gbit Ethernet ports xvi1-Gbit Ethernet ports xvi2.5-inch 500-GB hard-disk drive xvi64 threads xv8-core processor xv
AAccessing OBP by Remote KVM 3-1Accessing Solaris by Remote KVM 3-6Activity LED 2-22Advanced Management Module xvi, 2-9
Blades Screen 2-11Main Screen 2-11Restart Screen 2-12
Agency Compliance 1-8AMM. See Advanced Management Module.antistatic bags 4-1antistatic wrist strap 4-1
BBaseboard console 2-4Baseboard Management Controller (BMC) 1-4Baseboard Management Controller (BMC) Firm-
wareUpgrade C-6
Baseboard Management Controller (BMC)firmware C-6
Basic Operation, Controls, and Indicators 2-1baud rate 2-4Blade Server Error (Fault) LED 2-22BladeCenter 1-4BladeCenter Advanced Management Module or
AMM (IBM) 2-9BladeCenter H and HT 1-7BladeServer Base Specification for Processor
Blade Subsystems 1-4
blade-server design and protocol 1-4Block Diagram, T2BC 1-5BMC 1-4, 1-6
CCautions xviiChip Multi-Threading (CMT) xvCOM 1 Serial Port
Connector Pinout A-3Pinout Signal Descriptions A-3
COM baud rate 2-5COM port 2-5command-line interface (CLI) 2-9Comments xvicomponents, major 1-2Connector Pinouts A-1Control Buttons 2-20Control Buttons and LED Indicators 2-20Control Panel, T2BC 2-7, 2-8cryptographic unit 1-1
DDB9 port 2-5DDR2 4-5DDR2 SDRAM 1-2DDR2 SDRAM, fully buffered xvidesktop 2-5dhcp Connection Example B-6DIP Switch Location 2-6DIP Switch Settings 2-5DIP switches 2-5DIP-switch settings 2-4
EEarly Power-Off Warning–EPOW 1-7ECC SDRAM
memory modules 4-5, 4-7
Index

T2BC Blade Server Installation Manual
Index-2Themis Computer
Electrostatic Discharge 1-8EMC/EMI Certifications 1-9environment variables 3-4
setting from OBP 3-4setting from the Service Processor 3-4
Environmental Specifications 1-8ESD
grounding techniques 4-1protected mat 4-1
Ethernet xvi, 1-2
FFibre Channel xvi, 1-2Firmware Upgrade C-1front panel 2-5Front-Panel Micro-DB9 2-5full-duplex memory bandwidth 4-6Fully-buffered DIMM (FBD) 4-5
GGeneral Specifications 1-6
Hhard-disk drive xviHigh-Speed Expansion Card 4-12high-speed server systems xvi
II/O Connectors A-1I/O connectors
XAUI 4-12I/O Connectors, location of 4-10I/O expansion card 4-1IBM Baseboard Management Controller
(BMC) 2-7IBM BladeCenter xv, 1-1IBM environment management xvi, 1-2ILOM. See Integrated Lights Out Manager.InfiniBand 1-2infiniband port xviInformation LED 2-22
InstallationI/O expansion cards 4-10Memory Modules 4-5Remove the T2BC Protective Access
Cover 4-2SAS/SATA Mass Storage Drive 4-3T2BC Hard-Disk Storage Drive 4-4
Installation procedures 4-1memory modules 4-7
Installing Solaris 10 onto the T2BC D-1installing the T2BC Blade Server 2-1integrated floating-point 1-1Integrated Lights Out Manager 2-9
Main Screen 2-10, 2-16Remote Control Screen 2-10, 2-16
Integrated Lights Out Manager or ILOM(Sun) 2-9
IPMI messaging 1-4
KKVM LED 2-22KVM Select Button 2-21
LL1 data cache 1-2L1 instruction cache 1-2laptop 2-5LED Indicators 2-21LEDs
Activity LED 2-22Blade Server Error (Fault) LED 2-22Information LED 2-22KVM LED 2-22Location LED 2-22Media Tray (CD/FDD) Select LED 2-22Power-On LED 2-21
lithium battery 4-1installation 4-13lithium battery and socket, illustration of
4-13removal 4-12
Location LED 2-22

Index
Index-3Themis Computer
Location of the T2BC Mass Storage DriveHolder 4-3
Location, DIP Switches 2-5Logging into the Service Processor using SSH or
Telnet 2-12
Mmanagement processors xviMedia Tray (CD/FDD) Select Button 2-21Media Tray (CD/FDD) Select LED 2-22memory module (DIMM) 4-1memory modules, ECC SDRAM 4-5, 4-7memory of up to 32 GB xvimicro-DB9 port 2-5micro-DB9 serial connector A-3midplane connector 1-4Midplane Connectors 1-7Midplane Electrical Interface 1-7midplane interface 1-7Midplane Serial Interface 2-6Mil-spec Requirements 1-9
Nnetworking xviNiagara 2 xvNotes xvii
OOBP 3-1
PPackaging and Shipping 1-10PCI-X expansion connector 1-2pinouts
serial port A-3USB port A-2
Power 1-6Power (ON/OFF) Button 2-20power connectors 1-7power consumption, T2BC 1-6Power on CPU from SP B-4Power-On LED 2-21
Presence bits 1-7Primary Features
Applications software support 1-2Cache 1-2Front-panel I/O 1-2I/O upgrade 1-2Internal storage 1-2Memory 1-2Network fabric 1-2Operating system 1-2Processor 1-2Software management 1-2Systems management hardware 1-2
QQuick-Start Reference Notes B-1
RRemoving the T2BC from a BladeCenter 2-19Removing the T2BC Protective Access Cover
4-2Revision History iiiRS232 signals 1-7RS485 busses 1-7RS485 interface 1-4
SSafety Certifications 1-8Safety Instructions iv
Electrostatic Discharge (ESD) vGrounding Methods vInstructions for the Lithium Battery vi
SAS xviSAS or SATA hard-disk drive 4-1SATA xviSERDES interfaces 1-7serial cable 2-5Serial Console 2-5Serial Over LAN (SOL) 2-4serial port 1-2, A-3Service Processor 2-9Service Processor (SP) 2-4

T2BC Blade Server Installation Manual
Index-4Themis Computer
Service Processor (SP) FirmwareUpgrade C-1
Service Processor (SP) firmware C-1Setup Solaris Network Connection B-4Sidebars xviiSmall-Form-Factor Expansion Card 4-11SOL Connection Example B-1Solaris xv, 3-6Solaris 10 xvi, 1-2Solaris 10, Installation D-1Solaris 8 xvi, 1-1, 1-2Solaris 9 xvi, 1-1, 1-2Solaris Containers xvi, 1-1, 1-2solid state xviSP console port 2-5SP serial console 2-4, 2-5Specifications
Airflow (inlet) 1-8Altitude 1-8Dimensions 1-6Electrostatic Discharge 1-8Mechanical 1-6Relative Humidity 1-8Shock, 3 axis 1-8Temperature 1-8Vibration 1-8Weight 1-6
SSH (Secure Shell) 2-9Sun environment management xvi, 1-2Sun Integrated Lights Out Manager (ILOM) xviSun Integrated Lights Out Manager (ILOM)
tools 1-2Sun Service Processor 2-4Sun Service Processor (SP) 2-7Sun Service Processor command-line interface
(CLI) 2-9Sun Solaris Containers xvi, 1-1, 1-2Sun UltraSPARC T2 processor xv, 1-1system administrator xviSystem Management 1-4systems management xvi
TT2BC
Basic Components 1-3Block Diagram 1-5Control Buttons 2-20Control Buttons and LED Indicators 2-20Control Panel 2-1I/O Connectors A-1installation 2-1KVM Select Button 2-21Large-Scale View 2-6LED Indicators 2-21LED indicators 2-1Media Tray (CD/FDD) Select Button 2-21Power (ON/OFF) Button 2-20power consumption 1-6Quick-Start Reference Notes B-1
dhcp Connection Example B-6Power on CPU from SP B-4Setup Service Processor (SP B-1, C-6Setup Solaris Network B-4SOL Connection Example B-1
Removal from a BladeCenter 2-19Turning Off 2-14
Turning Off Directly 2-14Turning Off from the IBM AMM GUI In-
terfaceHard Shut Down 2-18Orderly Shut Down 2-18
Turning Off from the IBM AMM GUI In-terface (Soft and Hard) 2-17
Turning Off from the Sun CLI 2-17Turning Off from the Sun ILOM GUI
Interface 2-15Turning Off Remotely 2-15
turning off 2-1Turning On
Directly at the T2BC Blade Server 2-14From the AMM GUI 2-14From the Service Processor CLI 2-14From the Sun ILOM GUI 2-14
turning on 2-7

Index
Index-5Themis Computer
Turning On Directly 2-8Turning On Remotely 2-9
T2BC Blade Server 1-1T2BC Blade Server Control Panel 2-7, 2-8T2BC System Management 1-4Themis T2BC Blade Server 1-1TTYA (COM 1) A-3Turning Off the T2BC Blade Server 2-14Turning On
Directly at the T2BC Blade Server 2-8Remotely through a network interface 2-8Through the Sun Service Processor com-
mand-line interface (CLI) 2-8Turning On Directly 2-8Turning On Remotely 2-9
BladeCenter T-R Advanced ManagementModule (AMM) 2-11
Command Line 2-13Integrated Lights Out Manager (ILOM) 2-9Sun Service Processor Command-Line Inter-
face (CLI) 2-12Turning On the T2BC Blade Server 2-7
UUltraSPARC T2 1-2UltraSPARC T2 service processor 1-6USB 2.0 signals 1-7USB port 1-2, A-2USB Port A
Connector Pinout A-2Pinout Signal Descriptions A-2
VVHDM 1-7video signals
analog (RGH+HV) 1-7
WWarnings xviiWebsite Information xvi
XXAUI connector 4-12

T2BC Blade Server Installation Manual
Index-6Themis Computer

Themis Computer47200 Bayside ParkwayFremont, CA 94538Attn: Publications Department
PlaceStampHere
Fold here; tape at top to seal

Reader Comment CardWe welcome your comments and suggestions to help improve the T2BC Blade Server Installation Manual. Please take time to let us know what you think about this manual.
• Information provided in the manual was complete.
Agree___ Disagree___ Not Applicable___
• Information was well documented and easy to follow.
Agree___ Disagree___ Not Applicable___
• Information was easily accessible.
Agree___ Disagree___ Not Applicable___
• The manual was useful.
Agree___ Disagree___ Not Applicable___
• Please write down any comments you may have about this manual, including how it can be improved:
___________________________________________________________
___________________________________________________________
___________________________________________________________
___________________________________________________________
___________________________________________________________
___________________________________________________________
___________________________________________________________
___________________________________________________________
___________________________________________________________
Name: _____________________________________________________
Title: _____________________________________________________
Company: _____________________________________________________
Address: _____________________________________________________