installing and updating hp-ux 9.0
TRANSCRIPT
Installing and Updating HP-UX 9.0
HP 9000 Series 300/400 Computers
Installing and Updating HP-UX 9.0
HP 9000 Series 300/400
Flin- HEWLETT a:~ PACKARD
HP Part No. 81864-90019 Printed in USA August, 1992
E0892
Legal Notices The information contained in this document is subject to change without notice.
Hewlett-Packard makes no warranty of any kind with regard to this manual, including, but not limited to, the implied warranties of merchantability and fitness for a particular purpose. Hewlett-Packard shall not be liable for errors contained herein or direct, indirect, special, incidental or consequential damages in connection with the furnishing, performance, or use of this material.
A copy of the specific warranty terms applicable to your Hewlett-Packard product and replacement parts can be obtained from your local Sales and Service Office.
Copyright Information
Copyright © Hewlett-Packard Company 1991 Copyright © AT&T, Inc. 1980, 1984 Copyright © The Regents of the University of California 1979, 1980, 1983
This document contains information which is protected by copyright. All rights are reserved. Reproduction, adaptation, or translation without prior written permission is prohibited, except as allowed under the copyright laws.
Restricted Rights Legend
Use, duplication or disclosure by the U.S. Government Department of Defense is subject to restrictions as set forth in paragraph (b )(3)(ii) of the Rights in Technical Data and Software clause in FAR 52.227-7013.
Use of this manual and flexible disc(s) or tape cartridge(s) supplied for this pack is restricted to this product only. Additional copies of the programs can be made for security and back-up purposes only. Resale of the programs in their present form or with alterations, is expressly prohibited.
Printing History New editions of this manual will incorporate all material updated since the previous edition.
The manual printing date and part number indicate its current edition. The printing date changes when a new edition is printed. (Minor corrections and updates which are incorporated at reprint do not cause the date to change.) The manual part number changes when extensive technical changes are incorporated.
August 1992 ... Edition 1.
iii

Contents
1. Introduction to HP- UX 9.0 Install/Update You Must Function as a System Administrator You Can Get Additional Information Identify Your Install or Update Situation
2. Planning an Installation or Update
1-2 1-3 1-4
Step 1: Check Your Product (or Products) and Your Media 2-2 Step 2: Read Related Information Before You Begin . 2-3 Step 3: Back up Your Existing System as Appropriate 2-4
Files You Might Want to Back Up .... 2-5 Step 4: Minimal System Requirements. . . . . . 2-6 Step 5: You May Need to Obtain a Codeword 2-8 Step 6: Decide on Having Long or Short Filenames 2-10 Step 7: Obtain Information for Time and Networking 2-10 Step 8: An Installation Via a Network. 2-11
Have Information About the Servers. . 2-11 A Local Boot Server. . . . . . . . . Restricting Access To The Boot Server System Requirements . . . . . . . . Setting Up a Local Boot Server . . . . If the Local Boot Server is not an HP Cluster Server ... If the Local Boot Server is an HP Cluster Server ... Some Tips ................ .
Step 9: Continue When Your Planning is Complete .
2-11 2-12 2-14 2-15 2-16 2-16 2-16 2-17
Contents-1
3. Installing HP-UX Step1: Have All Devices are Turned OFF 3-1
If you Have a Running System. . . 3-1 Step 2: Prepare Your Installation Media 3-2 Step 3: Turn on Mass Storage Devices 3-3 Step 4: Start Up the System . . . . . 3-4 Step 5: Observe the Startup Process 3-6 Step 6: Account for Your Type of Terminal? 3-7 Step 7: Use the Main Install Screen . . . . 3-8 Possible Step 8: If You do a Network Installation. .. 3-9
Step 8, Substep A: Possible Site-specific Message/Screen 3-10 Step 8, Substep B: Specify the Network Parameters . . 3-10 Step 8, Substep C: Note Message and Take Any Necessary
Actions . . . . . . . . . . . . . . . . . . . 3-11 Step 8, Substep D: Select the Root Destination Disk. 3-12 Step 8, Substep E: Verify That the Disk is Desired 3-13
Step 9: Choose the Type of Filenames for File Systems 3-13 Step 10: Use the Main Menu to Continue the Installation 3-14 Step 10, Substep X: Change Root Filesystem Parameters 3-16
Step 10: Substep Y: Add a non-Root Disk/Filesystem 3-17 Step 10, Substep Y-A: Specify a Mount Point. . . . 3-18 Step 10, Substep Y-B: Specify Type of Filesystem. . 3-18 Step 10, Substep Y-C: Set Parameters for the Additional
Disk . . . . . . . . . . . . . . . . 3-19 Step 11: Verify the Swap Space . . . . . . . . . . . . 3-20 Step 12: A Final Opportunity to Change Values . . . . 3-21 Step 13: Initial Loading of Partitions Containing Filesets 3-22
Initial Messages. . . . . . . . . . . . . 3-22 System Reboot . . . . . . . . . . . . . . . . 3-23
Step 14: Select Filesets to Load (Main Menu) 3-24 Read This Before You Choose a Main Menu Option 3-24 Is Your Media on a CD-ROM? . . . . . . . . . 3-26 Continue Here Whether You Enter a Codeword or Not 3-27 Option 1: Select All Filesets on the Source Media -> 3-27 Option 2: Select Filesets for a Minimum System-> 3-28 Option 3: View/Select Partitions and Filesets-> 3-29
Step 14: Complete Post-installation Tasks . . . . . 3-30
Contents-2

4. Updating HP-UX Step 1: Determine Your Type of Update Before You Begin 4-2
An Interactive Update. . . . . . . . . . . . 4-2 A Non-interactive Update . . . . . . . . . . . 4-3 If Problems Occur During an Interactive Update 4-3 If Problems Occur During a Non-interactive Update 4-3
Step 2: Get Everything Ready to Perform the Update 4-4 Step 3: Clean Up File Systems As Necessary . 4-5 Step 4: Read Associated Documentation . . . 4-6 Step 5: Reconfirm Having Enough Disk Space 4-7
Minimum Free Space Requirements 4-7 Insufficient Disk Space. . . 4-8 How to Free Disk Space . . . . . 4-8
Option 1: Deselect Filesets . . . 4-8 Option 2: Remove Unnecessary Files 4-9 Option 3: Mount Another File System . 4-9 Option 4: Create Symbolic Links . . . 4-10
Step 6: Gather Information About Media and Devices 4-11 Update from a Netdist Server? . . . . . 4-11 Need to Mount or Unmount File Systems? . 4-11 Updating the Operating System? . . . . . 4-12 Updating from CD-ROM after a Shutdown? 4-13
Step 7: Some Final Tips for Performing an Update 4-14 Step 8: Load the TOOL Fileset . . . . . . . . . 4-15
If You Have DDS or HP 9144 Cartridge Tape... 4-15 If You Have CD-ROM... 4-15 If You Use a Netdist Server... 4-16
Step 9: Load the Filesets 4-17 Read This Before You Load Filesets 4-18 Checklist Item: Is Your Media on a CD-ROM? 4-19 Continue Here Whether You Enter a Codeword or Not 4-20 Option 1: Select All Filesets on the Source Media -> 4-21 Option 2: Select Only Filesets Currently on Your System -> 4-21 Option 3: View/Select Partitions and Filesets- > ... .. 4-22
Contents-3
5. Post Install or Update Tasks Typical Post-installation System Administration Tasks 5-1 Suggested Tasks ............ 5-2 Remove Unwanted Software Using rmfn(IM) 5-3
Use rmfn with Caution ........ 5-3 Important Points About Using rmfn(IM) 5-3 How to Use rmfn . . . . . . . . . . . 5-4
A. Product and Fileset Information Order of Loading Products . . . . . . . . . A-I Filesets and Sizes . . . . . . . . . . . . . A-2 SE Core Only Functionality Filesets and Sizes A-4 B1861A: HP-UX Run-Time, 1-2 User Filesets and Sizes A-5 B1862A: HP-UX Run-Time, 1-32 User Filesets and Sizes A-8 B1865A: Developer's Toolkit . A-ll B2379A: General Programming . . . . . . . . . . . A-ll BI012B: NS . . . . . . . . . . . . . . . . . . . A-12 B2386A Japanese HP-UX Run-Time, 1-2 User = Japanese NLIO
+ Japanese LION . . . . . . . . . . . . . . . . . .. A-12 B2388A: Korean HP-UX Run-Time, 1-2 User = Korean NLIO +
Korean LION . . . . . . . . . . . . . . . . . . .. A-13 B2389A: T-Chinese HP- UX Run-Time, 1-2 User = T-Chinese
NLIO + T-Chinese LION . . . . . . . . . . . . . . A-13 B2390A: S-Chinese HP-UX Run-Time, 1-2 User = S-Chinese
NLIO + S-Chinese LION . . . . . . . . . . . . . . A-14 B2391A: German HP-UX Run-Time, 1-2 User = German LION A-14 B2392A: French HP-UX Run-Time, 1-2 User = French LION A-15
B. Creating, Using, and Managing a Netdist Server Overview of a Network Distribution Server . . . B-2 Requirements for a Network Distribution Server B-3
Hardware and Disk Space Requirements . . B-3 Software Requirements ......... B-4
Create and Use a Network Distribution Server B-5 Step 1: Create the N etdist Server . . . . . B-6 Step 2: Make /etc/update Available to Clients B-8 Step 3: Set Appropriate Permissions B-I0 If You Need More Information... ..... B-ll
Contents-4
Isolate Processes on a Server Before Updating It Isolating the Server . . . . . . . . . . . .
Add Filesets to a Netdist Server as Appropriate. Use the netdist.log File to Get Information . . . Manage Fileset Availability on a Server as Necessary
Examining the MAIN .pkg File Restricting Access to Filesets
c. Troubleshooting an Update
Index
B-12 B-12 B-14 B-16 B-18 B-18 B-18
Contents-5

Introduction to HP-UX 9.0 Install/Update
This document explains how to perform three tasks:
• Install the 9.0 release of HP-UX on a Series 300/400 computer.
• Update your HP- UX system from an S.x release to the 9.0 release.
• Update an existing 9.0 HP- UX system by adding software products to it.
The remainder of this chapter discusses the tasks.
1
Introduction to HP-UX 9.0 Install/Update 1-1
You Must Function as a System Administrator
Checklist Item
Installation
Post Installation
Update
Post Update
Information and Tasks
The hardware/software system is totally shutdown when you begin an installation. You will be asked to perform tasks such as: connect and test devices, boot the system from install media, execute HP -UX commands, manage device files, interpret install screens, and edit customization files.
Immediately following an installation, you utilize various tools, utilities, daemons, and scripts that set up windowing, networking, printing, and so on.
The hardware/software system is running when you begin an update, and you must be logged in as a system administrator.
Immediately following an update, you should examine various files to make sure the updated system provides the new functionality you obtained while accommodating the functionality you had. You might also need to restore back-up copies of files.
1-2 Introduction to HP-UX 9.0 Install/Update
You Can Get Additional Information The following items describe documents you might want to use during or right after an installation or update:
System Administration Tasks You get information about such tasks as creating device files, using shell escapes, mounting file systems, shutting down the system, and editing customization files.
How HP- UX Works: Concepts for Explains concepts related to system the System Administrator administration.
Installing Peripherals
HP- UX Reference
Solving HP- UX Problems
Finding HP- UX Information
Special Documents
Contains information about configuring peripherals. This includes port numbers, device information, select codes, minor numbers, and device files.
A set of volumes that explain HP- UX commands. For example, you get information about commands such as update(lM), mknod(lM), and rmfn(lM).
Provides general information about how to recover from error conditions.
This document is online only. After an installation or update, you can use the document to get information about other HP-UX documents.
For example, some products have readme first documents or release notes that you should read before performing an installation or update.
Introduction to HP-UX 9.0 Install/Update 1-3

Identify Your Install or Update Situation Your situation determines whether you perform an installation, perform an update from a previous release to the 9.0 release, or perform an update of the 9.0 release by adding non-core software products to it.
Checklist Item
Installation
Update
Software
Information and Tasks
Installing HP- UX places the 9.0 release on a root disk (or disks), overwriting files that exist on that disk (or disks). If you have no existing operating system, you simply perform an installation. You can have an existing system and need to perform an installation instead of an update (for example, your system crashed or you are running a release that predates an 8.x release).
Updating HP- UX from an 8.x release to the 9.0 release modifies files as necessary and loads new files as necessary. The process does not destroy or alter your customized files.
Adding non-core software to your existing 9.0 system does not destroy that system, but the update might alter some files and might configure a new kernel. You should note any special instructions in the documentation for your software.
1-4 Introduction to HP-UX 9.0 Install/Update
The chart shows your alternatives for performing an installation or update. It also shows the chapters to read. If you cannot perform your update or installation, see your HP representative.
I Irev System ?
(0 Nev System, Pre installed 9.0 HP-UX "Instant Ignition" Skip this Document. See documents for pre installed product.
(2) Nev System put 9.0 root on physical disk
See Chapters: 2, 3, and 5. Then, use SAM for system administration
OR Existing System? I
(0 Running S.x, update to 9.0, root on physical disk
A normal update.
See Chapters: 2, 4, and 5. Then, use SAH for system administration.
(2) Running 9.0, vill add a nev product to system
See Chapters: 4 and 5. Then, use SAH as necessary for system administration.
Introduction to HP-UX 9.0 Install/Update 1-5

2 Planning an Installation or Update
If you have already installed the 9.0 release or updated to the 9.0 release and you want only to add a product to that release, go to Chapter 4. Otherwise, plan your installation or update. The checklists in the steps will help you.
Planning an Installation or Update 2·1
Step 1: Check Your Product (or Products) and Your Media
Checklist Item Information and Tasks
Correct Product? Examine your core HP- UX product. Be sure it is accommodates the correct number of users.
Multiple Products?
Your installation or update media might consist of several products. For example, you might have a core HP- UX 9.0 product such as the 8-User product and several application products such as ME-I0 or SoftBench. If this is the case, you will need to install or update your core HP-UX system. Then, you will update the HP- UX 9.0 system to add each application.
If you have more than one media unit (a cartridge, for example), use the documentation for your product (or products) to get the units into the correct order.
Media and Source HP- UX 9.0 media resides on a DDS tape cartridge, an Device Match? HP cartridge tape (for example, 9144A), or a CD-ROM
disc. Make sure your hardware system has a corresponding source device. For an update, the existing kernel must
Netdist Server?
have a device driver for the source device. The Installing Peripherals document and the System Administration Tasks document have information about devices and device drivers.
Your system might have access to a netdist server, which is a system that can deliver install or update media. To use this source of media, see Appendix B, which describes the creation, use, and maintenance of a netdist server.
2·2 Planning an Installation or Update
Step 2: Read Related Information Before You Begin
Checklist Item
Release Notes
README FIRST
Hardware Documents
Information and Tasks
Mention new, changed, or removed features in the 9.0 release. If you received a 9.0 Release Notes document, you can examine the new, changed, and removed functionality before performing an installation or update.
Contains special information about the installation or update processes. You might also have README FIRST documents for other products. This information usually supplements the information you find in this document.
If an installation includes assembling a complete hardware system or if you add devices to an existing system, each device will have some type of documentation. Account for information in those documents before beginning an installation or update. Failing to install and test your devices can result in getting an error condition during an installation or update.
Planning an Installation or Update 2·3
Step 3: Back up Your Existing System as Appropriate This document does not explain back-up procedures. You decide if a backup is necessary. The System Administration Tasks document explains system backup.
Checklist Item
If you have no operating system
If you have a system and must do an installation
If you do an update that modifies the kernel
If you do an update that adds files
Information and Tasks
A backup does not apply. You perform an installation. Later, you set up a back-up procedure.
Backup all user files and data files. Also, for all your applications, make backup copies of files according to the documentation for the application. Later, after the installation, you can restore the backed up files.
Some updates add files that require building a new kernel. Such updates accommodate most configuration files, placing new versions of them in I etc/newconfig. HP suggests you take one of the following actions:
1. Make printouts of customized files and refer to them after an update. The following sections names the most common ones.
2. Collect customized files in a directory (for example, laId). Use tar(l) to make a tape archive of the files in laId. After the update, restore the files, editing them as desired.
No backup is required unless the documentation for a product says the update will build a new kernel. You must read to documentation that came with your product to determine this.
2-4 Planning an Installation or Update
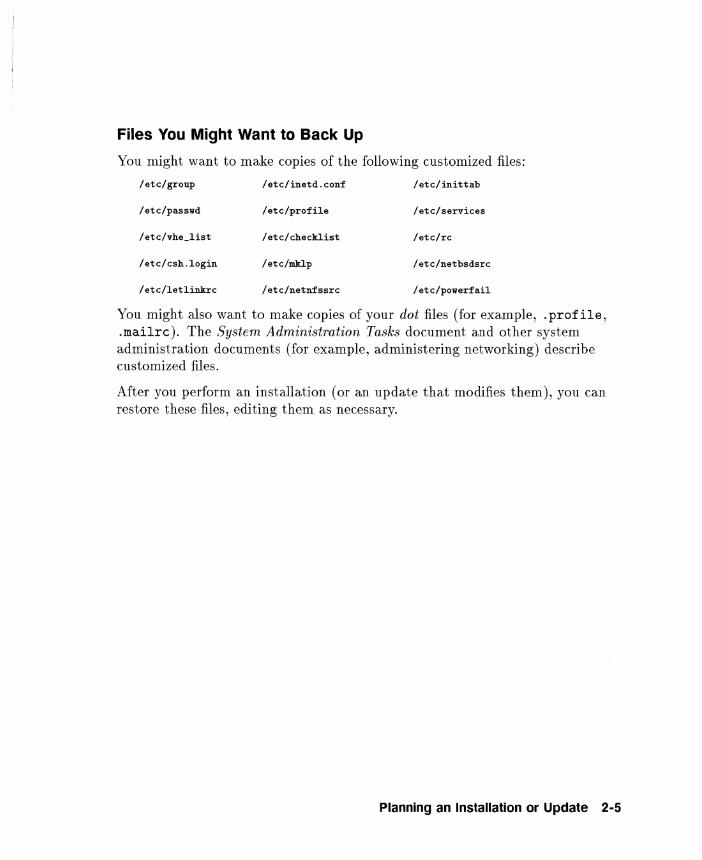
Files You Might Want to Back Up
You might want to make copies of the following customized files:
/ete/group /ete/inetd.eon:f /ete/inittab
/ete/passlld /ete/pro:file /ete/serviees
/ete/vhe_list /ete/ehecklist /ete/rc
/ete/esh.login /ete/mklp /etc/netbsdsrc
/ete/letlinkre /ete/netn:fssrc /ete/poller:fail
You might also want to make copies of your dot files (for example, . profile, .mailrc). The System Administration Tasks document and other system administration documents (for example, administering networking) describe customized files.
After you perform an installation (or an update that modifies them), you can restore these files, editing them as necessary.
Planning an Installation or Update 2-5
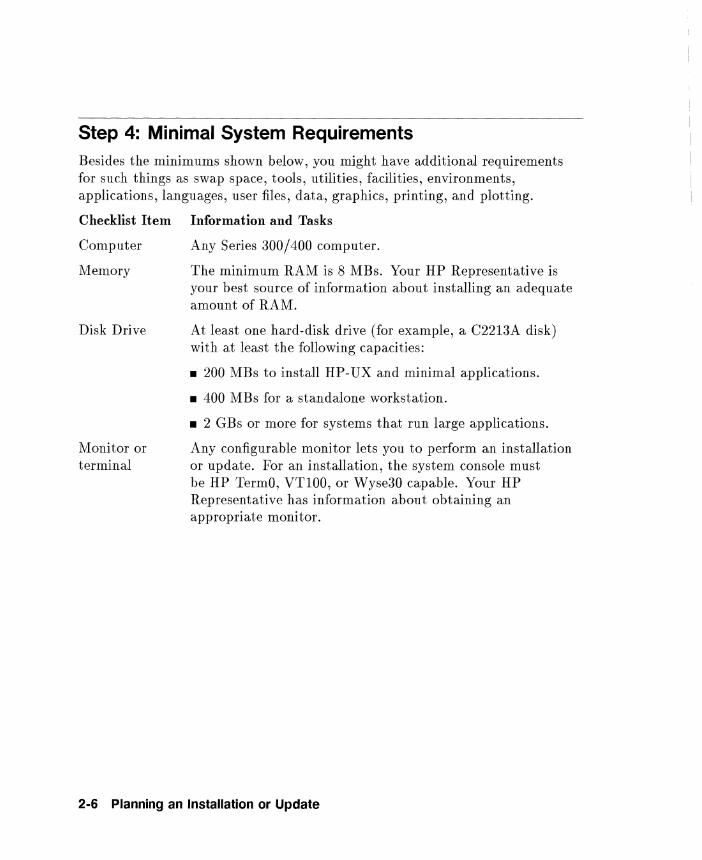
Step 4: Minimal System Requirements Besides the minimums shown below, you might have additional requirements for such things as swap space, tools, utilities, facilities, environments, applications, languages, user files, data, graphics, printing, and plotting.
Checklist Item Information and Tasks
Computer Any Series 300/400 computer.
Memory The minimum RAM is 8 MBs. Your HP Representative is your best source of information about installing an adequate amount of RAM.
Disk Drive At least one hard-disk drive (for example, a C2213A disk) with at least the following capacities:
Monitor or terminal
• 200 MBs to install HP- UX and minimal applications.
• 400 MBs for a standalone workstation.
• 2 GBs or more for systems that run large applications.
Any configurable monitor lets you to perform an installation or update. For an installation, the system console must be HP TermO, VT100, or Wyse30 capable. Your HP Representative has information about obtaining an appropriate monitor.
2·6 Planning an Installation or Update
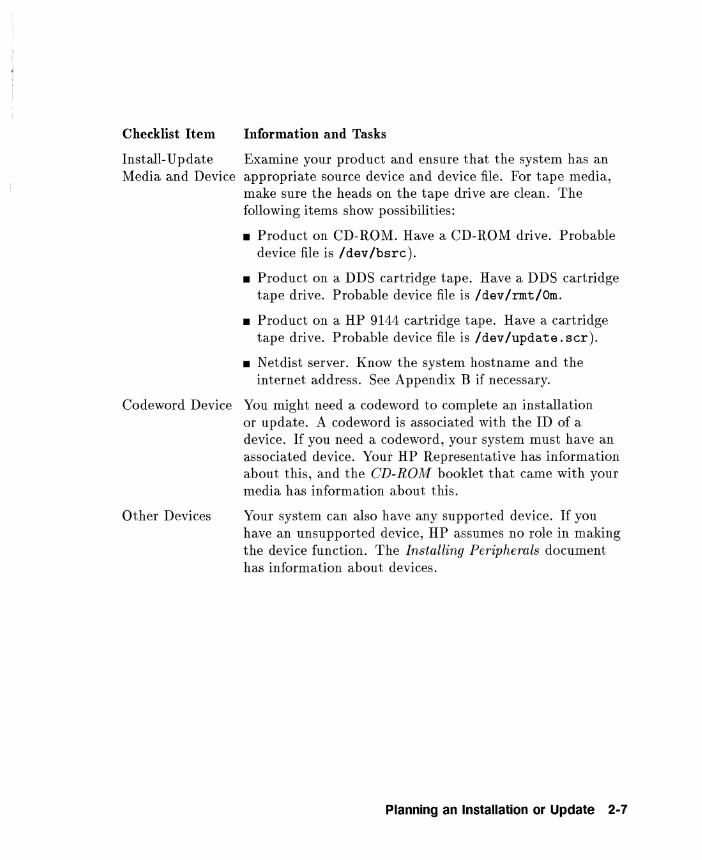
Checklist Item
Install-Update Media and Device
Information and Tasks
Examine your product and ensure that the system has an appropriate source device and device file. For tape media, make sure the heads on the tape drive are clean. The following items show possibilities:
• Product on CD-ROM. Have a CD-ROM drive. Probable device file is / dev /bsrc ).
• Product on a DDS cartridge tape. Have a DDS cartridge tape drive. Probable device file is / dev /rmt/Orn.
• Product on a HP 9144 cartridge tape. Have a cartridge tape drive. Probable device file is / dev /update. scr).
• Netdist server. Know the system host name and the internet address. See Appendix B if necessary.
Codeword Device You might need a codeword to complete an installation or update. A codeword is associated with the ID of a device. If you need a codeword, your system must have an associated device. Your HP Representative has information about this, and the CD-ROM booklet that came with your media has information about this.
Other Devices Your system can also have any supported device. If you have an unsupported device, HP assumes no role in making the device function. The Installing Peripherals document has information about devices.
Planning an Installation or Update 2-7
Step 5: You May Need to Obtain a Codeword If your installation/update media is a CD-ROM disk having an ISO 9660 format and containing files intended to be copied onto an HP- UX file system by the update(lM) command, you have what is called a Core or Application disk. To use this type of disk for anything other than a 2-user runtime system, you must obtain a codeword that you enter during the installation/update process. You cannot use this type of disk as a boot disk, and you should not expect to execute commands from such a disk.
The following items provide information about obtaining a codeword, allowing that you should also consult a CD-ROM booklet.
• It is possible for one (or more) required codewords to appear on the CD-ROM Certificate you received with your product. Be sure you examine ALL the contents of the packages that contain your product, and take time to study the certificate. Keep the certificate handy because you will need to refer to the codeword (or codewords).
• Your certificate might not include a codeword. In this case, you need to obtain a codeword from Hewlett-Packard Company. The CD-ROM booklet that came with your CD-ROM disk has directions for obtaining the codeword. The process involves filling out a form, using a FAX machine to transmit the form to your HP Sales Office, and getting a returned FAX that has the codeword. If you do not have access to a FAX machine, you can make other arrangements with your HP Sales Office, but the procedure takes more time.
• If, for any reason, your CD-ROM does not have a certificate, contact your HP Representative to obtain one.
• Take the time to resolve questions you have regarding CD-ROMs, certificates, and codewords before you begin an installation or update. Not completing this prerequisite step might cause a delay in completing the installation or update.
2-8 Planning an Installation or Update

Besides just getting a codeword, there are requirements for associating the codeword with hardware IDs.
• Your codeword is tied to the ID for a specific device in your hardware system. For example, your codeword might be tied to your SPU (System Processing Unit) or, perhaps, your HP-HIL ID module.
• The ID might not be the serial number. The CD-ROM booklet contains explanations, according to devices, for what you can use as the IDs for codewords.
• The device ID that is tied to your codeword might impact your use of a system. Consider the following situations:
D If the codeword is tied to the ID of a SPU, the codeword will allow you to extract software only from a CD-ROM drive connected to that system (SPU).
D If the codeword is tied to the ID of an HP-HIL module, you could move the module among systems, using the codeword to extract software on those systems.
Planning an Installation or Update 2·9
Step 6: Decide on Having Long or Short Filenames During an installation, you decide to have long or short filenames.
Checklist Item Information and Tasks
Long Filenames Copying files from a long-filename system to a
Short Filenames
Preinstalled HP-UX
short-filename system can result in a loss of data for filenames that become identical due to truncation. Otherwise, you get to use more descriptive filenames.
Most previous releases were restricted to short filenames. You might have a situation that favors deciding to have short filenames.
If you have a pre installed HP- UX and, for some reason, you need to reinstall that system, you must choose long filenames.
Recommendation If you have sufficient disk space, you should specify long filenames.
Step 7: Obtain Information for Time and Networking
Checklist Item
Time Zone
Time and Date
Hostname and Internet Protocol Address
Information and Tasks
An installation prompts you to enter a time zone. The Using HP- UX with HP VUE document has information.
An installation prompts you to enter the current time and data. See same document as above item.
For a networked system, you enter the system hostname and internet address during an installation. For this information, see your network administrator, or see the Installing and Administering LAN/9000 document.
2-10 Planning an Installation or Update
Step 8: An Installation Via a Network If you do not plan to do an installation over a network, skip this step.
Have Information About the Servers
Checklist Item
A netdist server
You must have addresses
Local boot server
A Local Boot Server
Information and Tasks
Ensure you can access a netdist server from your system (the client system). Your system will obtain media from the netdist server during an installation or update as if you had physical media, provided there is a network connection.
Obtain the internet protocol address and port number of the netdist server. The System Administration Tasks document explains this. As well, your documentation about networking has information.
Ensure that your local LAN has a local boot server that can be used by the client system during the start-up process. The next section explains this.
A cold network install differs from updating a system over the network. A cold network install allows a system to:
1. boot a client system from LAN via a local boot server,
2. construct a new filesystem on a new root disk, and
3. load software without the use of physical media.
Except for providing information about the networked systems, performing a cold network install is similar to performing an installation from physical media.
Planning an Installation or Update 2-11

Restricting Access To The Boot Server
Checklist Item
The install boot server
Restricting access
Information and Tasks
By default, the server responds to any boot requests. It may be desirable to either temporarily disable the install boot server or to restrict access to a select few clients.
This is useful primarily for Series 300/400 clients. Because the default boot process for the Series 300/400 is to boot from the first available respondent, a Series 300/400 computer can accidentally boot from the install boot server instead of its normal device (server). This happens most often when a cluster server is shut down and its clients are allowed to boot from a different host that is configured as an install boot server (other than itself).
Disabling the install boot You edit edit the / etc/boottab file on the boot server server and insert a # (comment character) in front
Restricting host access
of the line that begins inst all: HPS300. It should then read #install :HPS300, allowing that the entire line is not shown here. To enable the boot server at a later time, remove the comment character (#).
If the file does not contain the line, but the line is preceded by a comment character, #, then delete that comment character. The default / etc/boottab file has the HPS300 line commented out, and this line should be un commented to enable install boot services for Series 300/400 clients.
This occurs in steps, which are shown next.
2-12 Planning an Installation or Update
1. Determine the LLA (Link Level Address) of all potential install clients and modify (or add) lines in the / etc/boottab file to contain their addresses.
The LLA of a Series 300/400 client can be determined by observing the boot messages that appear during the start-up process. The LLA is a 12 digit hexadecimal number that usually has 080009 as the first 6 digits. Make a list of the addresses.
2. When the LLA's of the install clients are known, edit the /etc/boottab file and modify the appropriate line (assuming that only Series 300/400 clients are to be restricted). The following line shows an example:
install:HPS300: :SYSINSTALL:/usr/lib/uxinstkern.300,/usr/lib/uxinstrs.300
3. Modify the first field to contain a unique name other than install. It can be almost anything (for example, inst1).
4. Then insert one of the LLA's between double-colons. Replicate the line for each potential client using its LLA and a unique first field. When this is done, the lines should look something like the following ones:
i nst1: HPS300: 080009008966: SYS INSTALL: Ius r/I i b/ ux in stke rn .300, Ius r II i b/ uxi nstfs. 300
In st2: HPS300: 080009094dbO: SYS INSTALL: Ius r II i bl ux i nstke rn. 300.1 u s r II i b/ux i nstis. 300
Do not leave an entry with install as the first field or the boot services will not be restricted. The install keyword is special in this respect.
Planning an Installation or Update 2-13

System Requirements
Checklist Item
Related information
NET-INSTL-300 fileset
All desired filesets
Information and Tasks
Every local LAN that supports cold network installs must have a local boot server. The local boot server cannot be a client on an HP cluster, but it can be the internet gateway, an HP cluster server, or a networked system. The local boot server should be already running the 9.0 release of HP- UX and have about 4 MBs of free disk space on the same disk that has the /usr/lib directory. It also needs to run the /etc/rbootd daemon and have an /etc/boottab file, which is provided by the RBOOTD fileset. The kernel needs the lan01 driver.
A local (install) boot server on the local LAN must have loaded the NET-INSTL-300 fileset. This works for Series 300 and 400 systems.
A netdist server anywhere on the network must be available to distribute Series 300/400 HP -UX filesets (including the NET-INSTL-AUX fileset). (This can be the local boot server.)
2-14 Planning an Installation or Update
Setting Up a Local Boot Server
One system on a local LAN needs to act as an install boot server if cold network installs are to be provided to Series 300/400 systems on that local LAN. The requirement is that any Series 300/400 system doing network install must be able to reach a local boot server via Ethernet/IEEE802.3 packets. Bridges are acceptable, and gateways or routers are not acceptable.
Checklist Item
Build server
Edit /etc/boottab
Information and Tasks
Use /etc/update to load the NET-INSTL-300 fileset from the media to the local boot server. Load the RBOOTD fileset as well.
The / etc/boottab file should contain:
install:HPS300:
If it does not contain the line, copy / etc/newconfig/boottab over the new /etc/boottab, merging any changes you had made to your existing /etc/boottab file.
Run required daemons If the rbootd(lM) daemon is not already running, start it before using this system as a local boot server. You can find two examples of starting /etc/rbootd in the
Have the correct device file
/ etc/newconfig/rc file. Follow the example in which a LAN device file argument is provided.
/usr/bin/rtprio 64 /etc/rbootd $RBOOTD_DEVICES
For $RBOOTD_DEVICES, substitute a LAN device file such as / dey llano
Depending on which LAN card the install clients are connected to, RBOOTD_DEVICES should be set to the appropriate device file. For example, RBOOTD_DEVICES=" /dev/lan".
Planning an Installation or Update 2-15
If the Local Boot Server is not an HP Cluster Server ...
The rbootd process is not normally started at boot time by / etc/rc when the local boot server is not also an HP cluster server. If you want / etc/rbootd to be started each time you start up the server, copy the 9.0 version of /etc/newconfig/rc to /etc/rc, preserving your customizations as necessary and editing the line:
RBOOTD_DEVICES=1I11
so it reads:
RBOOTD_DEVICES=II/dev/lan ll
If the Local Boot Server is an HP Cluster Server ...
The above setup does not interfere with the auto-booting of HP cluster cnodes. The / etc/rbootd does not serve install requests to any HP cluster cnodes that are configured on the boot server. If an install client appears in the boot server's / etc/ clusterconf, the server refuses to act as a local boot server for that client. If an old HP cluster cnode wishes to do a network install, it must be removed from the HP cluster server's /etc/clusterconf file (Use SAM to remove the client completely).
Some Tips
You can make things easier for other people who perform network installs by setting up some default networking values. Use the instLadm(lM) script. The HP-UX Reference document has information about using the script.
2-16 Planning an Installation or Update
Step 9: Continue When Your Planning is Complete When you have completed the planning steps that apply to your situation, continue by working through the chapters you identified in Chapter 1. Be aware that, in no situation, do you work sequentially through the remaining chapters.
Planning an Installation or Update 2·17

3 Installing HP-UX
Please work through Chapters 1 and 2 to plan an installation before you use this chapter to perform one.
Step 1: Have All Devices are Turned OFF While it might not be mandatory to turn all devices OFF, doing so helps you install the 9.0 release without having problems.
If you Have a Running System ...
If you have a running system and you want to install the 9.0 release on that system, be sure you have done the following tasks:
Checklist Item
Be a system administrator
Shutdown the system.
Make the system quiet
Information and Tasks
Log in as root.
The System Administration Tasks document explains this.
Turn all devices 0 FF.
Installing HP-UX 3-1

Step 2: Prepare Your Installation Media You must set up your media so the install process can NOT write to the media.
Checklist Item
DDS cartridge tape
HP 9144 cartridge tape
Information and Tasks
Have the write protect slidebar positioned so you can see white in the hole in the bottom of the cartridge. The documentation that came with the cartridge tape explains this.
Have the write protect screw point to SAFE. The documentation that came with the cartridge tape explains this.
CD-ROM Know the codeword if you need one.
Cartridge tape autochanger Load the install tape in magazine slot 1 and load any update tapes in sequential order, starting in slot 2. Set the sequential/selective switch on the back of the tape drive to sequential. The documentation that came with the autochanger explains this.
N etdist server Know the name and address of the local boot server and the netdist server.
When the media is ready, go on to the next step.
3-2 Installing HP-UX
Step 3: Turn on Mass Storage Devices
Checklist Item
1) Source device ON
2) System disks ON
3) Load the media
4) Problems?
Information and Tasks
You will insert the 9.0 installation media into this drive. It must be ON. If the source device happens to be in a disk drive, turning on the disk drive also turns on the source device. Wait until the source drive is ready according to its documentation.
Turn on all the disks you plan to use in the installation. Wait until these disks are ready according to their documentation. If the disk is internal, turning the computer ON in a later step turns the disk on.
When the source disk is running, load your install media (as opposed to any update media you might also have).
If any drive is not ready, stop the installation and solve any problems related to it according to the documentation for the drive.
When the disks are running and the media is loaded, go on to the next step.
Installing HP-UX 3-3
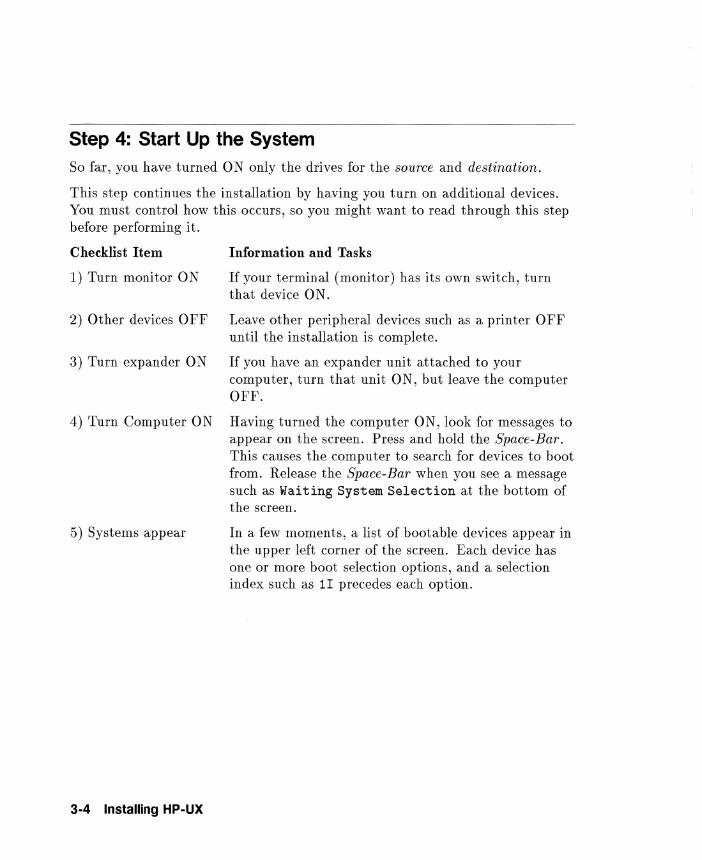
Step 4: Start Up the System So far, you have turned ON only the drives for the source and destination.
This step continues the installation by having you turn on additional devices. You must control how this occurs, so you might want to read through this step before performing it.
Checklist Item Information and Tasks
1) Turn monitor ON If your terminal (monitor) has its own switch, turn that device ON.
2) Other devices OFF Leave other peripheral devices such as a printer OFF until the installation is complete.
3) Turn expander ON If you have an expander unit attached to your computer, turn that unit ON, but leave the computer OFF.
4) Turn Computer ON Having turned the computer ON, look for messages to appear on the screen. Press and hold the Space-Bar. This causes the computer to search for devices to boot from. Release the Space-Bar when you see a message such as Waiting System Selection at the bottom of the screen.
5) Systems appear In a few moments, a list of bootable devices appear in the upper left corner of the screen. Each device has one or more boot selection options, and a selection index such as 11 precedes each option.
3-4 Installing HP-UX

Checklist Item Information and Tasks
6) Select a boot option The installation device should eventually respond with a boot selection option that contains the word SYSINSTALL. The selection index will be 1I. It might be 2I if:
lf nothing happens
1. there is another installation device on the system, or
2. there is a network boot server.
Begin the boot process by typing in the selection index followed by (Return ).
lf the installation media does not respond, ensure that the installation media is inserted (as opposed to any update media). Also check ensure that the device is installed correctly and is turned on.
lf a network install boot server is expected to respond and does not do so after 30-40 seconds, then ensure that the server is running the / etc/rbootd process and that / etc/boottab is configured properly. Also, ensure that no gateway is separating the client from the boot server (See Chapter 2).
When the boot process has occurred) go on to the next step.
Installing HP-UX 3-5
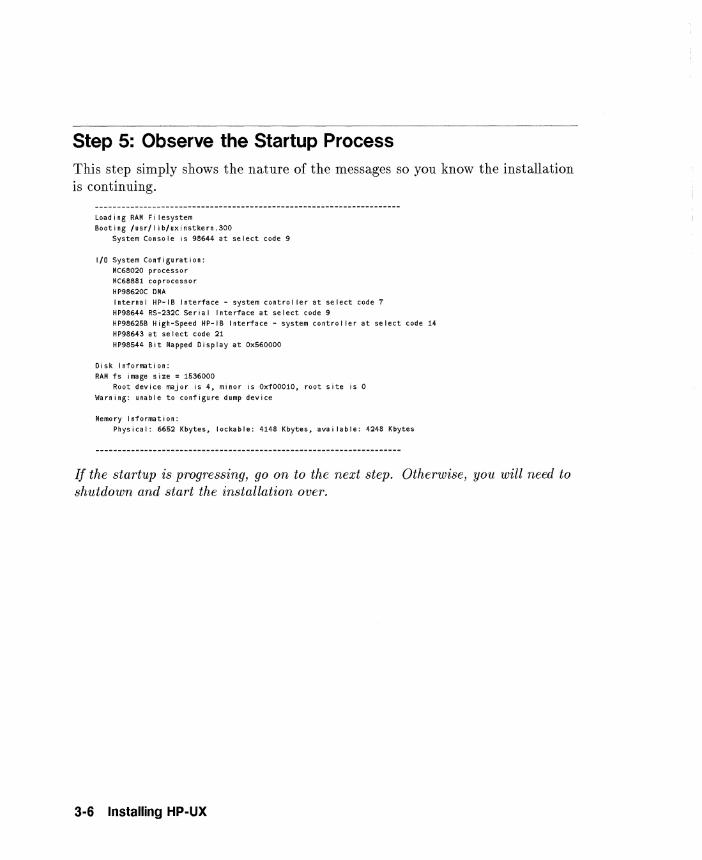
Step 5: Observe the Startup Process This step simply shows the nature of the messages so you know the installation IS continuing.
Loading RAM Fi lesystem Booting /usr/I ib/uxinstkern.300
System Console is 98644 at select code 9
I/O System Conf iguration: MC68020 processor 1'1(68881 coprocessor H P98620C DMA Internal HP-IB Interface - system controller at select code 7
HP98644 RS-232C Serial Interface at select code 9 HP98625B High-Speed HP-IB Interface - system controller at select code 14
HP98643 at select code 21 HP98544 Bit I~apped Display at Ox560000
Disk Information: RAful fs image size = 1536000
Root device major is 4, minor is Oxf00010, root site is 0
Warning: unable to configure dump device
,ulemory Information: Physical: 6652 Kbytes, lockable: 4148 Kbytes, available: 4248 Kbytes
If the startup is progressing, go on to the next step. Otherwise, you will need to shutdown and start the installation over.
3-6 Installing HP-UX
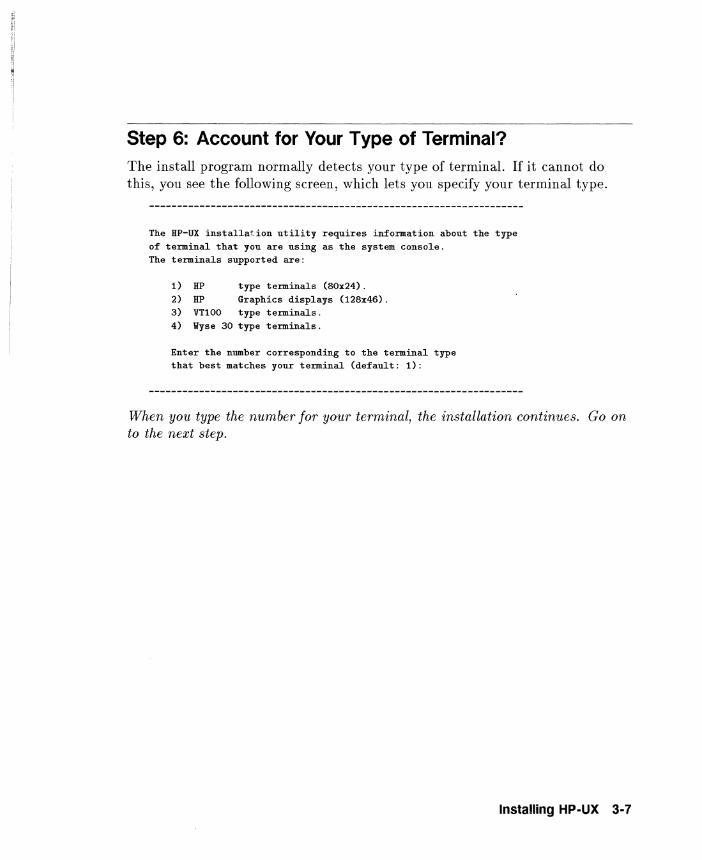
Step 6: Account for Your Type of Terminal? The install program normally detects your type of terminal. If it cannot do this, you see the following screen, which lets you specify your terminal type.
The HP-UX installation utility requires in:fonnation about the type o:f tenninal that you are using as the system console. The tenninals supported are:
1) HP type tenninals (SOx24) . 2) HP Graphics displays (i2Sx46) . 3) VT100 type tenninals. 4) Wyse 30 type tenninals.
Enter the number corresponding to the tenninal type that best matches your tenninal (de:fault: 1):
When you type the number for your terminal, the installation continues. Go on to the next step.
Installing HP-UX 3-7

Step 7: Use the Main Install Screen At this point, you should see the following screen.
@(#) $Revision: 68.24 install $
Welcome to HP-UX install. There are basically 4 steps to installing HP-UX, which this and another utility will lead you through.
Step 1) Select the root "destination disk" and its characteristics.
Step 2) Optionally modify the file system parameters pre-set for your chosen destination disk.
Step 3) Optionally choose any other disks to be added to the system. This may be useful if root disk space is insufficient.
Step 4) Choose the filesets (functional groups of files) which you want loaded onto the destination disk.
A menu driven interface will guide you through the above steps.
Press any key when you're ready to proceed to Step 1 >
Examine the screen and then type a key to go on to the next step.
3-8 Installing HP-UX
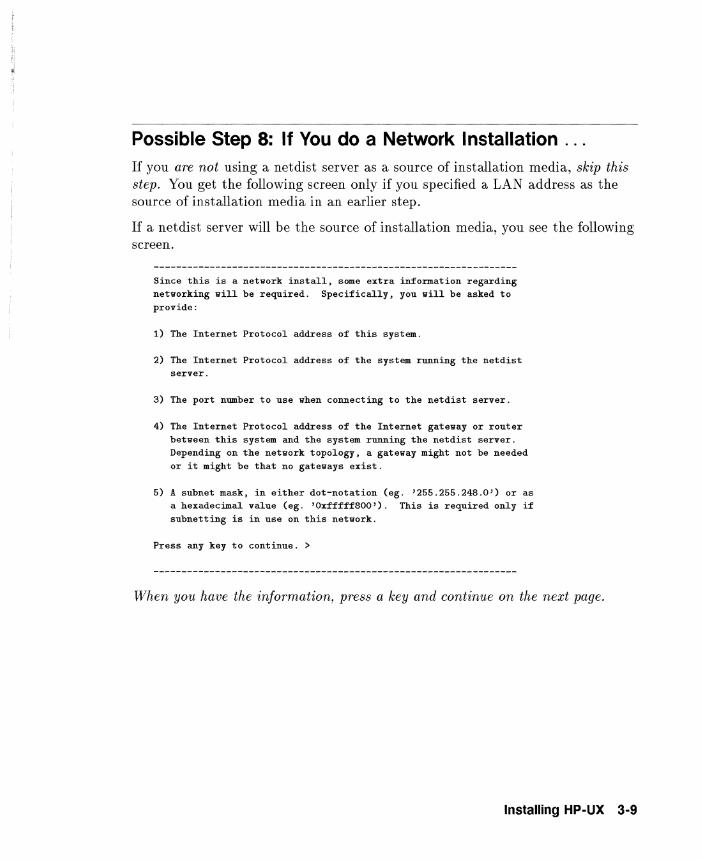
Possible Step 8: If You do a Network Installation . ..
If you are not using a netdist server as a source of installation media, skip this step. You get the following screen only if you specified a LAN address as the source of installation media in an earlier step.
If a netdist server will be the source of installation media, you see the following screen.
Since this is a network install, some extra information regarding networking will be required. Specifically, you will be asked to provide:
1) The Internet Protocol address of this system.
2) The Internet Protocol address of the system running the netdist server.
3) The port number to use when connecting to the netdist server.
4) The Internet Protocol address of the Internet gateway or router between this system and the system running the netdist server. Depending on the network topology, a gateway might not be needed or it might be that no gateways exist.
5) A subnet mask, in either dot-notation (eg. '255.255.248.0') or as a hexadecimal value (eg. 'Oxfffff800'). This is required only if subnetting is in use on this network.
Press any key to continue. >
When you have the information, press a key and continue on the next page.
Installing HP-UX 3-9
Step 8, Substep A: Possible Site-specific Message/Screen
Depending on the configuration of your instLadm(lM) utility, you might get a message related to a network install. If you get a message, note the information and continue.
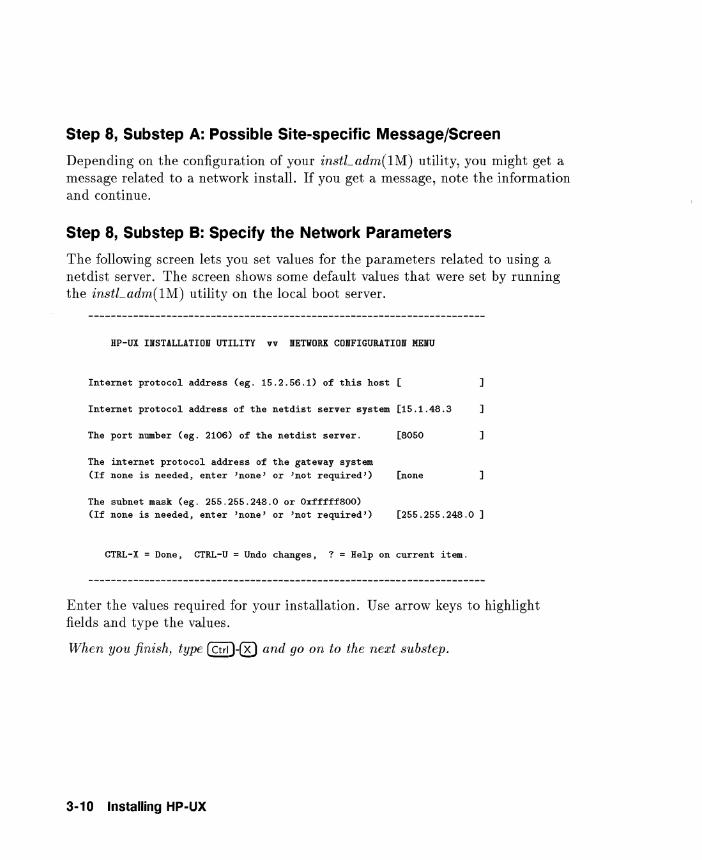
Step 8, Substep B: Specify the Network Parameters
The following screen lets you set values for the parameters related to using a netdist server. The screen shows some default values that were set by running the instLadm(lM) utility on the local boot server.
HP-UX INSTALLATION UTILITY vv NETWORK CONFIGURATION MENU
Internet protocol address (eg. 15.2.56.1) of this host
Internet protocol address of the netdist server system [15.1.48.3
The port number (eg. 2106) of the netdist server.
The internet protocol address of the gateway system (If none is needed, enter 'none' or 'not required')
The subnet mask (eg. 255.255.248.0 or Oxfffff800) (If none is needed, enter 'none' or 'not required')
[8050
[none
[255.255.248.0 ]
CTRL-X = Done, CTRL-U = Undo changes, ? = Help on current item.
Enter the values required for your installation. Use arrow keys to highlight fields and type the values.
When you finish, type @}0 and go on to the next substep.
3-10 Installing HP-UX
Step 8, Substep C: Note Message and Take Any Necessary Actions
After you specify the values, you see several messages. Note them and, if necessary, take the suggested actions. The following items examine what happens:
• A brief message (network installs only) appears that looks like this:
Bringing up network, and verifying netdist server connection.
• If the network connection cannot be made, you see:
Network did not initialize correctly, would you like to change the network parameters?
If you answer Y, the installation program takes you back to the screen in which you provided values for networking parameters.
If you answer N, the installation assumes you cannot supply the information and aborts, letting you stop the installation.
• The system searches for disks connected to the system. You can select the root-disk, being aware that the types of disks can vary. The next substep deals with this.
Go on to Substep D.
Installing HP-UX 3-11
Step 8, Subslep D: Select the Root Destination Disk
The following screen appears to let you select the disk that will subsequently contain the root file system.
HP-UX INSTALLATIOn UTILITY vv ROOT DESTINATION MENU
Select one of the folloving disks (name and system location) connected to your system to be the ROOT destination device for this installation. Enter the item number, or highlight the item using the arrov keys and press Return. If the desired ROOT disk is not listed, make sure it is connected properly and turned on, then select the "Search Again" item. If your disk is STILL not recognized, you can use the "Other disk" item to manually enter the Disk address.
Disk Slot Bus Unit
Number Addr Rum
1. QUANTUM PD210S at 0 6 0 2. QUANTUM PD210S at 0 5 0 3. Search Again 4. Other disk 5. Exit Install
Enter selection [1]
Select the disk for the root device, or use another option as suggested by the option name. If you select Other disk, you get a screen that lets you specify the disk according to its address.
Except for exiting, you must eventually select a disk and move to Step 8, Substep E.
3-12 Installing HP-UX
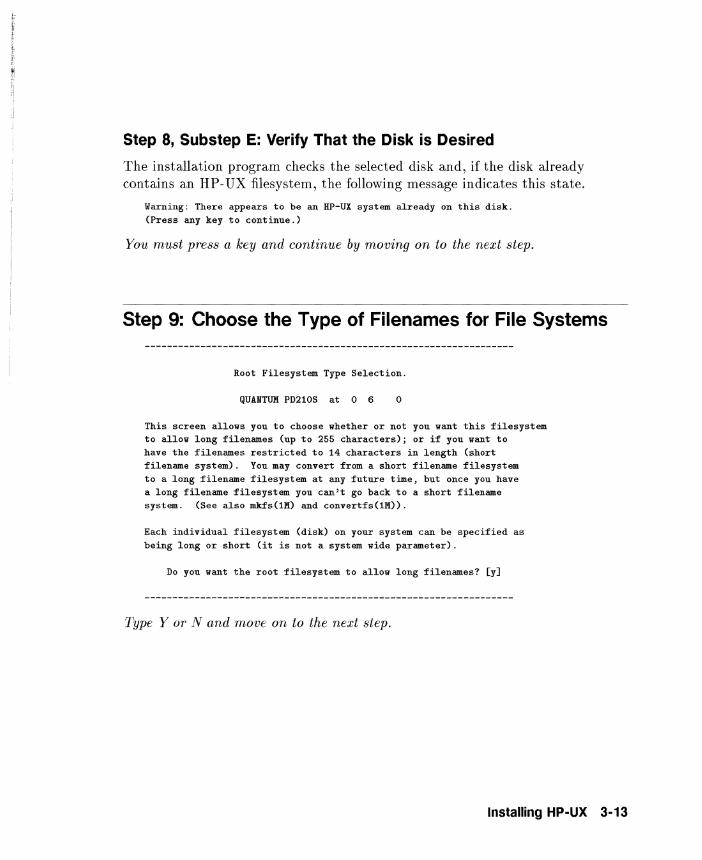
Step 8, Substep E: Verify That the Disk is Desired
The installation program checks the selected disk and, if the disk already contains an HP- UX filesystem, the following message indicates this state.
Warning: There appears to be an HP-UX system already on this disk. (Press any key to continue.)
You must press a key and continue by moving on to the next step.
Step 9: Choose the Type of Filenames for File Systems
Root Filesystem Type Selection.
QUANTUM PD210S at 0 6 0
This screen allows you to choose whether or not you want this filesystem to allow long filenames (up to 255 characters); or if you want to have the filenames restricted to 14 characters in length (short filename system). You may convert from a short filename filesystem to a long filename filesystem at any future time, but once you have a long filename filesystem you can't go back to a short filename system. (See also mkfs(1K) and convertfs(1K».
Each individual file system (disk) on your system Can be specified as being long or short (it is not a system wide parameter).
Do you want the root filesystem to allow long filenames? [y]
Type Y or N and move on to the next step.
Installing HP-UX 3-13
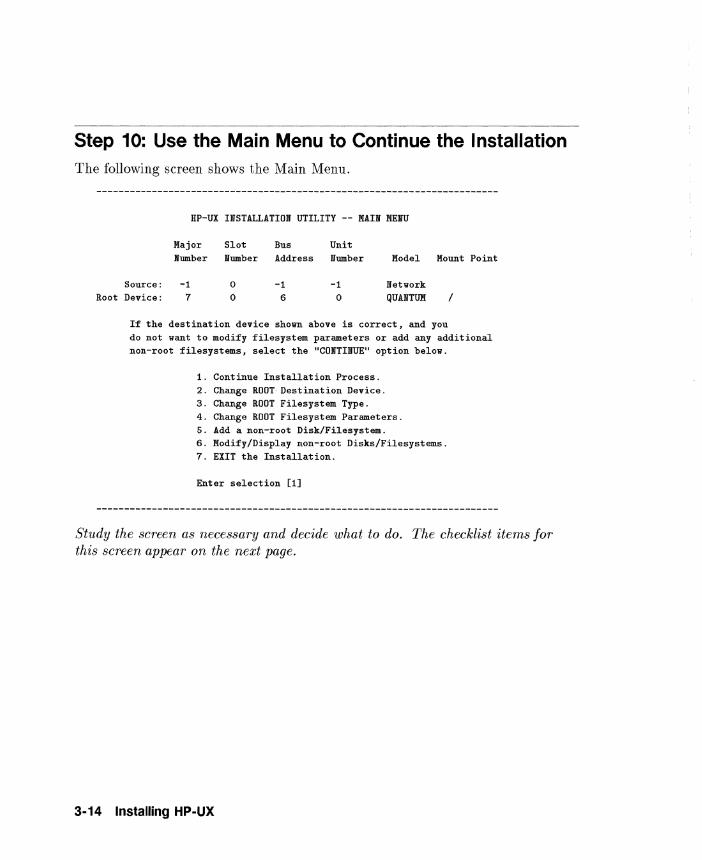
Step 10: Use the Main Menu to Continue the Installation The following screen shows the Main Menu.
Root
HP-UX INSTALLATIOn UTILITY -- NAIl MENU
JIIajor Slot Bus Unit Number Number Address lIIumber Model Mount Point
Source: -1 0 -1 -1 Network Device: 7 0 6 0 QUANTUM /
If the destination device shown above is correct, and you do not want to modify filesystem parameters or add any additional non-root filesystems, select the "CONTINUE" option below.
1. Continue Installation Process. 2. Change ROOT- Destination Device. 3. Change ROOT Filesystem Type. 4. Change ROOT Filesystem Parameters. 6. Add a non-root Disk/Filesystem. 6. Modify/Display non-root Disks/Filesystems. 7. EXIT the Installation.
Enter selection [1]
Study the screen as necessary and decide what to do. The checklist items for this screen appear on the next page.
3-14 Installing HP-UX
Checklist Item
Recommendation
Continuing
Changing
What if You Exit
Decision
Information and Tasks
HP highly recommends that you set up your system during planning and the previous install steps so you can continue at this point.
Selecting 1 continues the installation. If you select other options, you will work through one or more additional screens. You must eventually continue or exit the installation.
If you do not continue (option 1), the following sub steps indicate what appears or happens. No attempt is made to completely explain them. Use Help as required to work through the screens.
Deciding to exit from the above screen aborts the entire installation.
Select one of the options from the screen and go on to the appropriate step or substep. You must eventually decide to continue, or exit.
Installing HP-UX 3-15
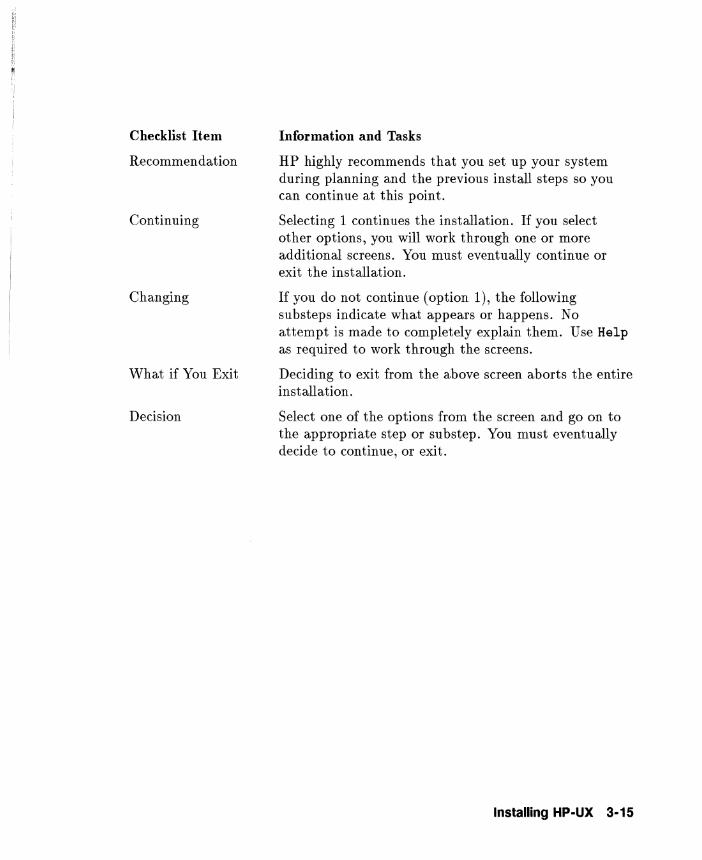
Step 10, Substep X: Change Root Filesystem Parameters While this menu lets you change the values of parameters, you should not change them unless you have expert knowledge. Appropriate defaults are offered, and you can change the swap size after you complete the installation.
The menu looks like this.
HP-UX INSTALLATION UTILITY -- ROOT FILESYSTEM PARAMETERS MENU 204287 Kb Disk: QUANTUM D210S at 0 6 0
The only parameter below that you may want to change is "Swap Size". All others should be correct.
Swap space (in 1024 byte blocks): [36987
Block size: [8192 ]\ Fragment size: [1024 ] \ Rotational Delay (millisec): [dynamic ] } File System Free Space Threshold (%): [10 ] } Parameters Density - bytes per inode: [2048 ] / Cylinders per group: [16 ]/ 1024 byte sectors per track: [25 ]\ Tracks per cylinder: [7 ] } Hard Disk's RPMs or the disk: [3600 ] } Parameters Interleave Factor: [0 ]/ Run mediainit(l) on disk? en]
CTRL-X = Done, CTRL-U = Undo changes, ? = Help on current item.
When you are ready, go on to the next substep, or go on to Step 11.
3-16 Installing HP-UX
.: 11
II fr , ;.,
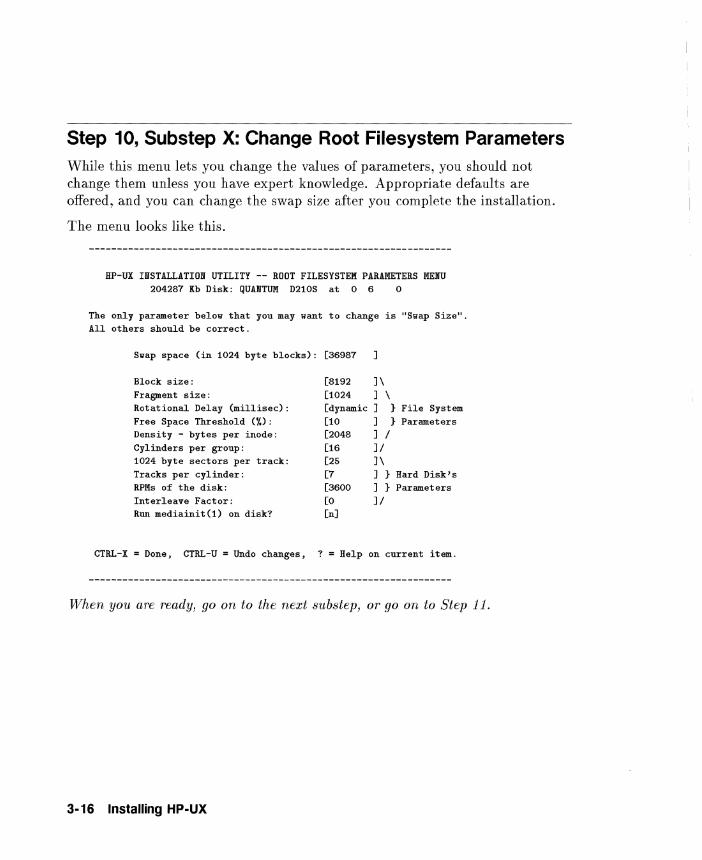
Step 10: Substep V: Add a non-Root Disk/Filesystem
If you decide to specify an additional, non-root disk/filesystem, you use the following menu, and if you use the menu, you work through a series of menus that are much like the menus you have already seen. This substep shows the additional menus you will see, but it assumes you know how to specify values and make decisions. Use Help as required.
HP-UX INSTALLATION UTILITY -- ADDITIONAL FILESYSTEM DESTINATION MENU
Current Root Destination: QUANTUN D210S at 0 6 o
If the disk shown below (name and system location) is the desired destination device, press Return. If the desired mON-ROOT disk is not listed, make sure it is connected properly and turned on, then select the "Search Again" item. If your disk is STILL not recognized, you can use the "Other disk" item to manually enter the Disk address.
Disk
1. QUANTUM PD210S 2. Search Again 3. Other disk 4. Exit Install 5. Previous Menu
Slot Bus Unit Number Addr Num
at 0 5 o
Enter selection [1]'
If you add a non-root disk, work through Substeps Y-A, Y-B, and Y-G.
Installing HP-UX 3-17
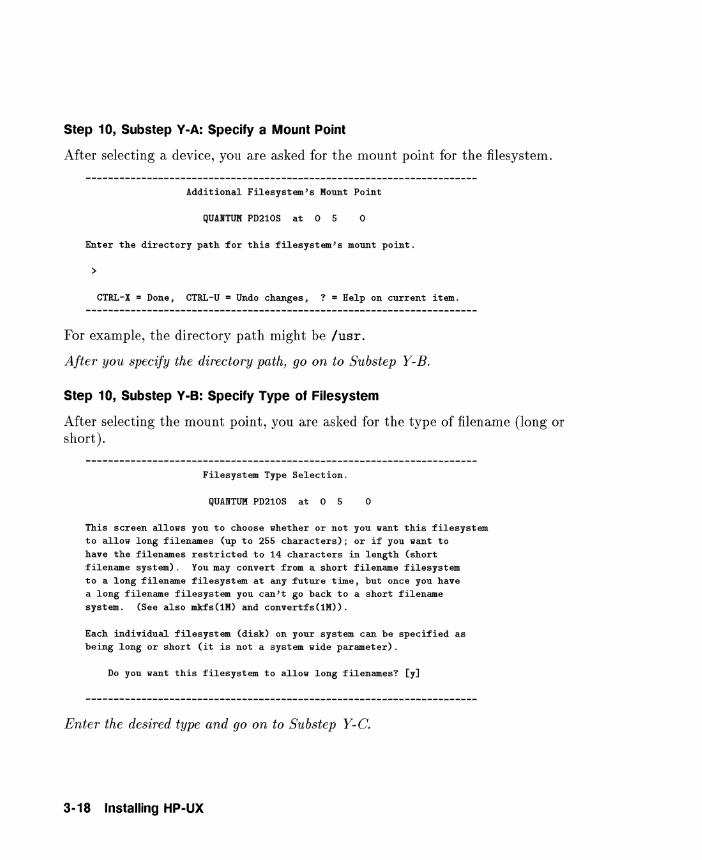
Step 10, Substep V-A: Specify a Mount Point
After selecting a device, you are asked for the mount point for the filesystem.
Additional Filesystem's Mount Point
QUANTUM PD210S at 0 5 0
Enter the directory path for this filesystem's mount point.
>
CTRL-X = Done, CTRL-U = Undo changes, ? = Help on current item.
For example, the directory path might be /usr.
After you specify the directory path, go on to Substep Y-B.
Step 10, Substep Y-B: Specify Type of Filesystem
After selecting the mount point, you are asked for the type of filename (long or short).
Filesystem Type Selection.
QUANTUM PD210S at 0 5 0
This screen allows you to choose whether or not you want this filesystem to allow long filenames (up to 255 characters); or if you want to have the filenames restricted to 14 characters in length (short filename system). You may convert from a short filename filesystem to a long filename filesystem at any future time, but once you have a long filename filesystem you can't go back to a short filename system. (See also mkfs(lM) and convertfs(lN».
Each individual filesystem (disk) on your system can be specified as being long or short (it is not a system wide parameter).
Do you want this filesystem to allow long filenames? [y]
Enter the desired type and go on to Substep Y-C.
3-18 Installing HP-UX
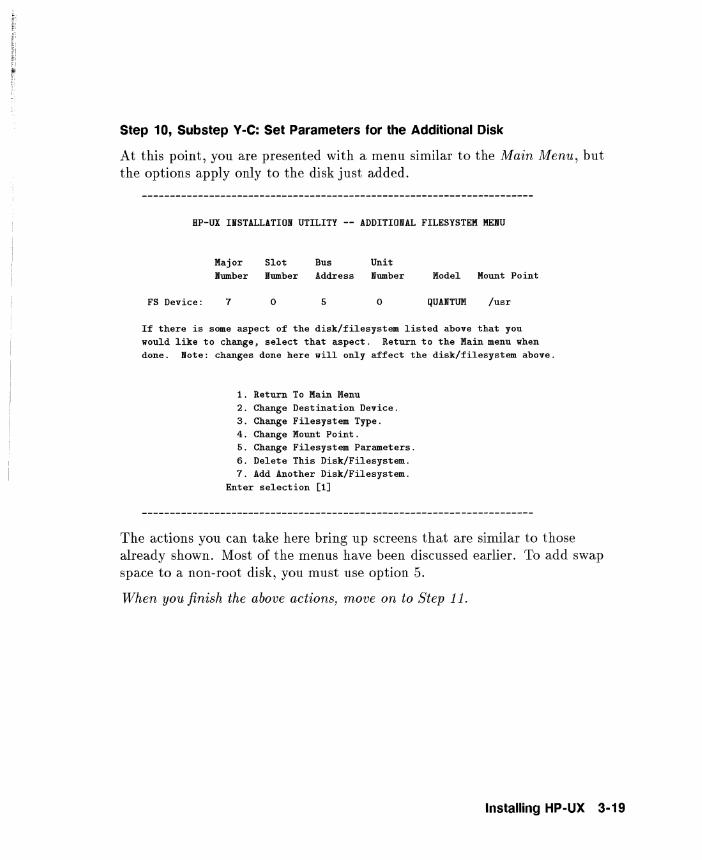
Step 10, Substep Y-C: Set Parameters for the Additional Disk
At this point, you are presented with a menu similar to the Main Menu, but the options apply only to the disk just added.
HP-UX INSTALLATION UTILITY -- ADDITIONAL FILESYSTEM KENU
Maj or Slot Bus Unit lumber Number Address Number Model Mount Point
FS Device: 7 o 5 o QUANTUM /usr
If there is some aspect of the disk/filesystem listed above that you vould like to change, select that aspect. Return to the Main menu vhen done. Note: changes done here viII only affect the disk/filesystem above.
1. Return To Main Nenu 2. Change Destination Device. 3. Change Filesystem Type. 4. Change Hount Point. 5. Change Filesystem Parameters. 6. Delete This Disk/Filesystem. 7. Add Another Disk/Filesystem.
Enter selection [1]
The actions you can take here bring up screens that are similar to those already shown. Most of the menus have been discussed earlier. To add swap space to a non-root disk, you must use option 5.
When you finish the above actions, move on to Step 11.
Installing HP-UX 3-19
Step 11: Verify the Swap Space The installation process sets up enough swap space to install and start up your HP-UX system. The screen shows the default value.
Swap space verification
Verify that the root disk swap space is sufficient and change if necessary.
Root Disk Swap space (in 1024 byte blocks): [36987
CTRL-X = Done, CTRL-U = Undo changes, ? = Help on current item.
Checklist Item Information and Tasks
System swap space In most cases, the default swap space is sufficient to install the system.
Additional swap space For servers and applications that need large amounts of swap space, you can provide additional space after the installation is completed or after you subsequently update your system to add an application.
Information about The System Administration Tasks manual explains how swap space to alter swap space, should you need to do so after
an installation. The Managing Clusters of HP 9000 Computers Using the HP- UX File System manual has information about swap space for cluster servers. The documentation for many applications explains the required swap space.
? Explains how to alter the swap space.
@}@) Restores the original default if you change it.
@}0 Continues the installation.
3-20 Installing HP-UX
li
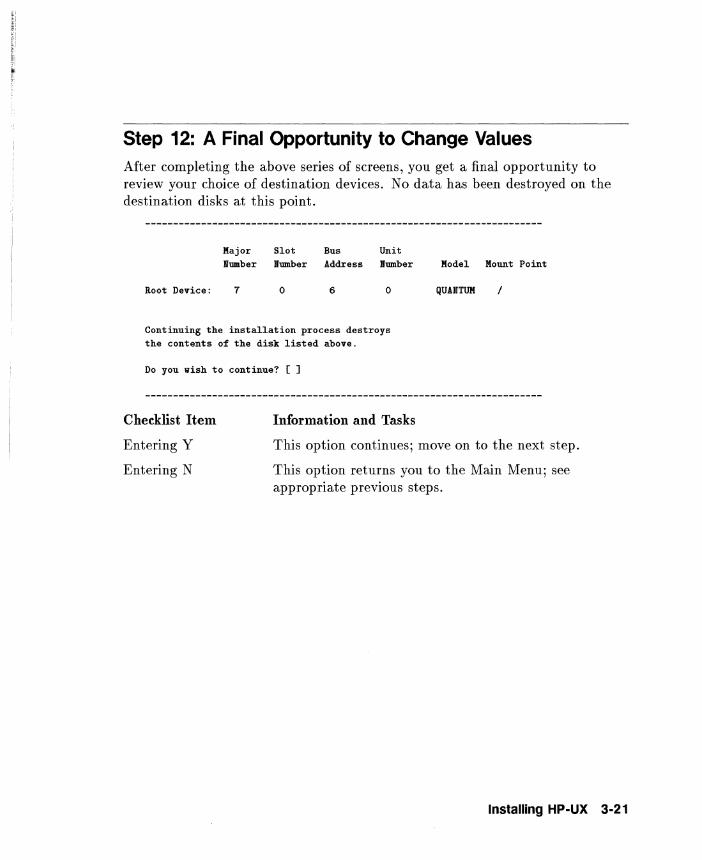
Step 12: A Final Opportunity to Change Values After completing the above series of screens, you get a final opportunity to review your choice of destination devices. No data has been destroyed on the destination disks at this point.
Major Slot Bus Unit Number Number Address Number
Root Device: 7 o 6 o
Continuing the installation process destroys the contents of the disk listed above.
Do you wish to continue? [ ]
Information and Tasks
Model Mount Point
QUANTUM /
Checklist Item
Entering Y
Entering N
This option continues; move on to the next step.
This option returns you to the Main Menu; see appropriate previous steps.
Installing HP-UX 3-21
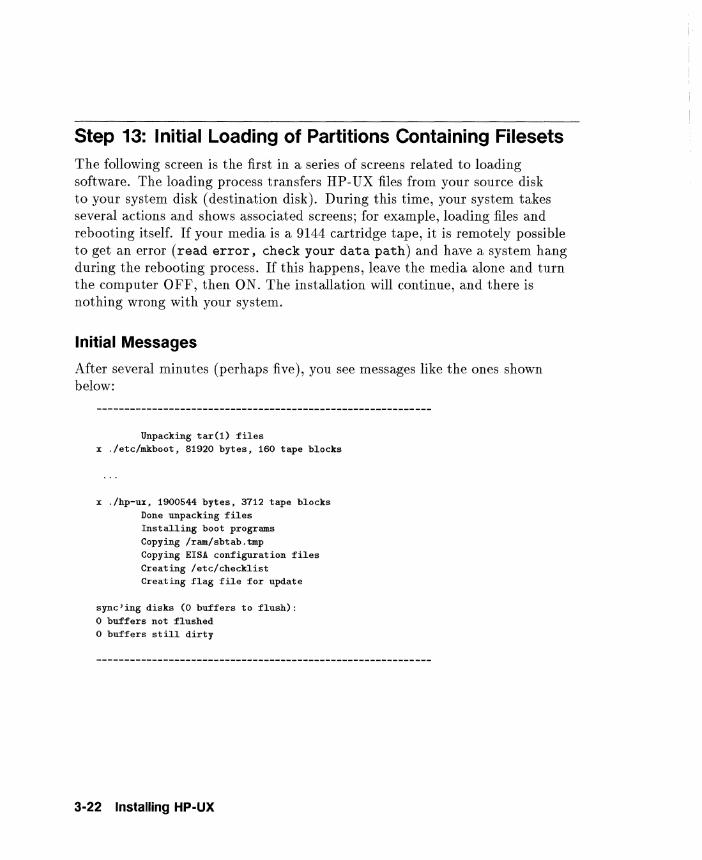
Step 13: Initial Loading of Partitions Containing Filesets The following screen is the first in a series of screens related to loading software. The loading process transfers HP- UX files from your source disk to your system disk (destination disk). During this time, your system takes several actions and shows associated screens; for example, loading files and rebooting itself. If your media is a 9144 cartridge tape, it is remotely possible to get an error (read error, check your data path) and have a system hang during the rebooting process. If this happens, leave the media alone and turn the computer OFF, then ON. The installation will continue, and there is nothing wrong with your system.
Initial Messages
After several minutes (perhaps five), you see messages like the ones shown below:
Unpacking tar(l) files x ./etc/rnkboot, 81920 bytes, 160 tape blocks
x ./hp-ux, 1900544 bytes, 3712 tape blocks Done unpacking files Installing boot programs Copying /ram/sbtab.tmp Copying EISA configuration files Creating /etc/checklist Creating flag file for update
sync'ing disks (0 buffers to flush): o buffers not flushed o buffers still dirty
3-22 Installing HP-UX
~, , [";;1
~i
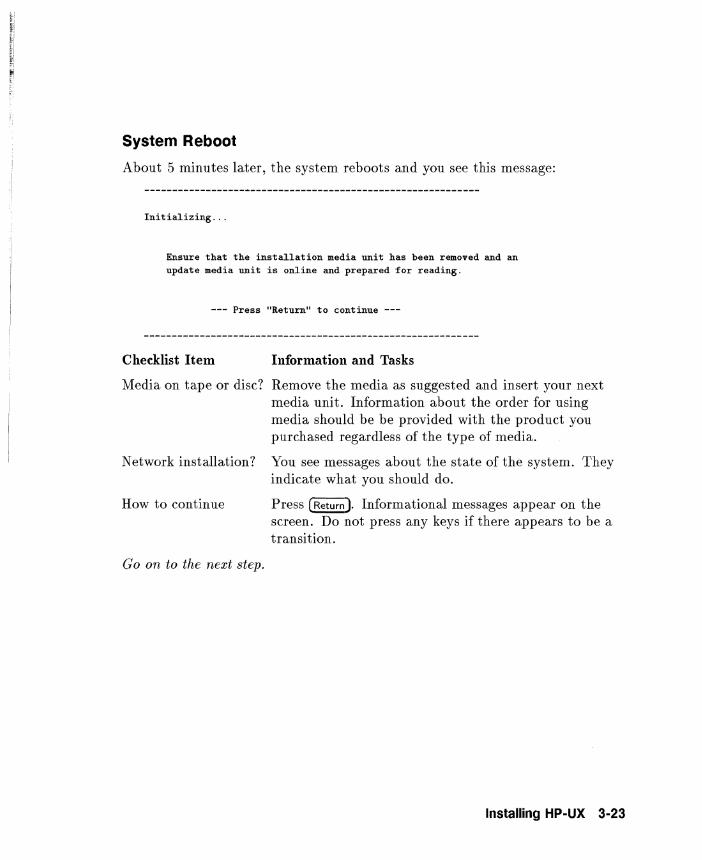
System Reboot
About 5 minutes later, the system reboots and you see this message:
Ini t ializ ing ...
Ensure that the installation media unit has been removed and an update media unit is online and prepared Tor reading.
--- Press "Return" to continue ---
Checklist Item Information and Tasks
Media on tape or disc? Remove the media as suggested and insert your next media unit. Information about the order for using media should be be provided with the product you purchased regardless of the type of media.
Network installation? You see messages about the state of the system. They indicate what you should do.
How to continue Press (Return). Informational messages appear on the screen. Do not press any keys if there appears to be a transition.
Go on to the next step.
Installing HP-UX 3-23
Step 14: Select Filesets to Load (Main Menu) The following screen shows the main menu. Your screen might vary, depending on your source device. The menu might contain Enter Codeword -».
INSTALL Main Menu
Highlight an item and then press "Return" or "Select Item". To refresh the screen press CTRL-L.
Source: Tape Device your_device
Destination: Local System
/
Select All Filesets on the Source Media -> Select Filesets for a Minimum System -> Select/View Partitions and Filesets ->
How to Use Install
Read This Before You Choose a Main Menu Option
The following checklist items discuss what happens in relation to the options in the main menu and the installation process.
Checklist Item
You must eventually load filesets
Do not interrupt the loading
3-24 Installing HP-UX
Information and Tasks
Regardless of which()ptionsyou lIse, you must eventually activatep:#art;:#OaqJ.±l.g.{ to load your selected filesets.
Once you choose an option for loading filesets, the system will begin loading. Messages will appear on the screen, and the messages will be recorded in /tmp/update .log so you can review them after the installation. The loading takes one to several hours.
Checklist Item
Im;tall runs customization scripts
A new kernel is built
Install prompts for time zone, time, and date
Install prompts about networ king
End of an installation
Information and Tasks
After the filesets are loaded, the install program runs customization scripts for individual filesets and builds a new kernel. Again, you should not interrupt the system during this time.
An installation results in getting a totally new kernel.
When the loading of filesets completes, install prompts you to enter a time zone and time/ date. For example, MST7MDT for Mountain Standard Time, which is 7 hours off the Prime Meridian) and 0412093292 for April 12 at 9:32 in the morning in 1992.
Optionally, you can specify a hostname and an internet protocol address. If you get to this point in the installation and do not know your hostname and internet protocol address, you should probably continue and set your system up for networking later. The System Administration Tasks manual explains how to do this.
Getting a login prompt indicates the installation is complete. Remove the media and store it in a safe place. Then, go on to Chapter 5 to perform post-installation tasks.
Having noted this information, read on and choose an option.
Installing HP-UX 3-25
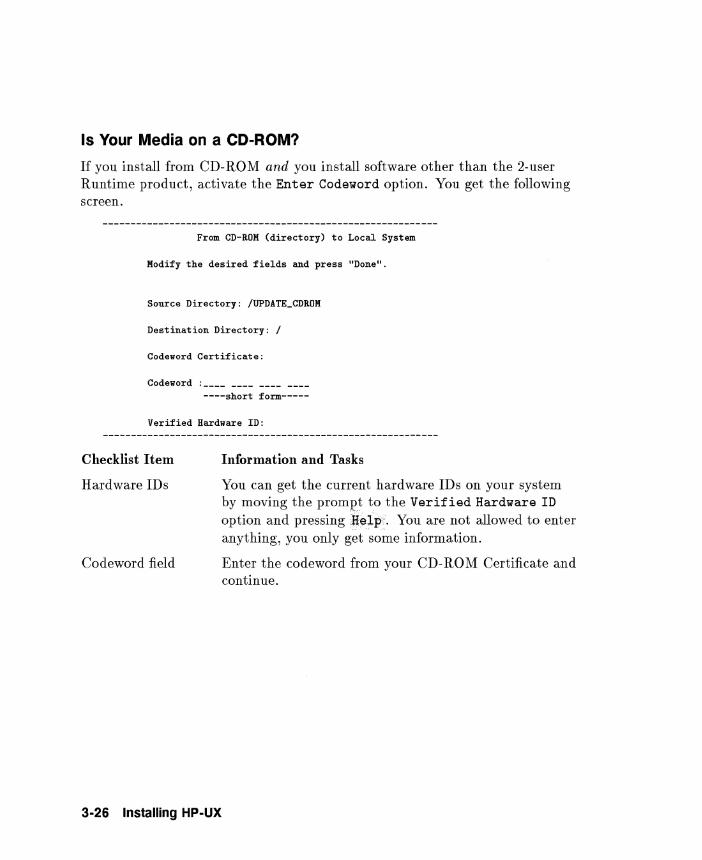
Is Your Media on a CD-ROM?
If you install from CD-ROM and you install software other than the 2-user Runtime product, activate the Enter Codeword option. You get the following screen.
From CD-RON (directory) to Local System
NodiIY the desired Iields and press "Done".
Source Directory: /UPDATE_CDRON
Destination Directory: /
Codeword CertiIicate:
Codeword ----short Iorm-----
VeriIied Hardware ID:
Checklist Item
Hardware IDs
Codeword field
3·26 Installing HP·UX
Information and Tasks
You can get the current hardware IDs on your system by moving the prompt to the Verified Hardware ID
option and pressingljelp. You are not allowed to enter anything, you only get some information.
Enter the codeword from your CD-ROM Certificate and continue.
Continue Here Whether You Enter a Codeword or Not
The following checklist items have some information you might want to consider.
Checklist Item Information and Tasks
Help and Escapes You can get help about how to use the Main Menu. Also, while using the Main Menu, you can escape to a .. shell to execute HP-UX commands by activating She:J..:J.L (This document assumes that, if you want to escape to a shell, you know what to do and how to do it.)
You must select an The Main Menu has three major options (besides option entering a codeword or getting help). To continue,
you must highlight and activate an option. HP highly recommends that you activate Select ALL Filesets on the Source Media ->. If you activate another options, you should know what you want to accomplish. The following sections describe the options.
Option 1: Select All Filesets on the Source Media -> Checklist Item Information and Tasks
What this option does Automatically loads every file set on the source media.
What happens The Select All . .. screen appears, which has options you can use.
Start the loading From the~elect All . .. screen, activate Start ,Loading. When it completes, go to Chapter 5.
The options continue on the next page.
Installing HP-UX 3-27
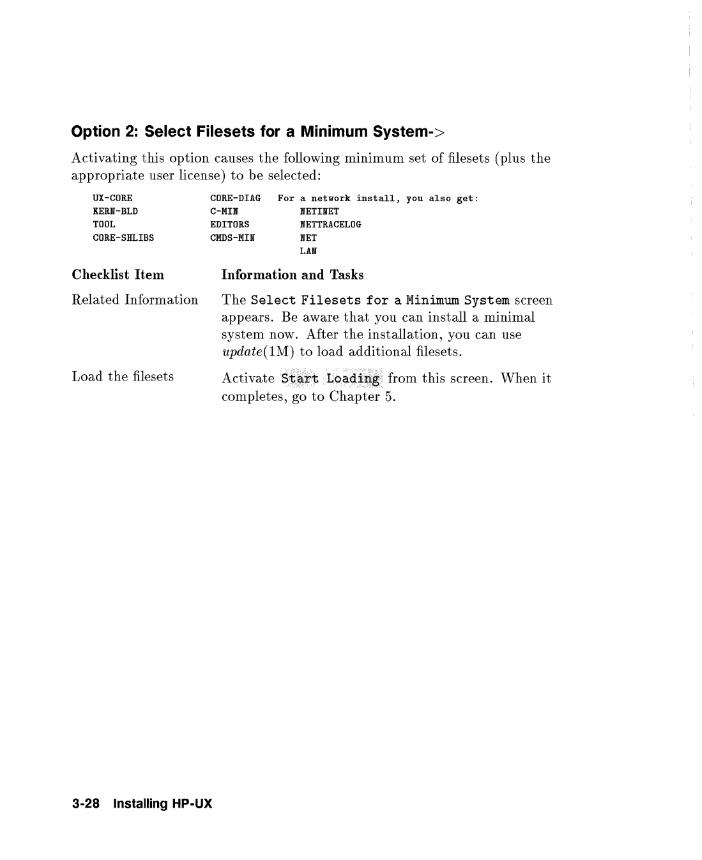
Option 2: Select Filesets for a Minimum System->
Activating this option causes the following minimum set of filesets (plus the appropriate user license) to be selected:
UX-CORE KERli-BLD TOOL CORE-SHLIBS
Checklist Item
Related Information
Load the filesets
CORE-DIAG For a network install, you also get: C-l'IIIII IIIETnTET EDITORS IIIETTRACELOG CKDS-l'IIN IIIET
LAlli
Information and Tasks
The Select Filesets for a Minimum System screen appears. Be aware that you can install a minimal system now. After the installation, you can use update(lM) to load additional filesets.
ActivateS~~i6tLb~4~~g from this screen. When it completes, go to Chapter 5.
3-28 Installing HP-UX
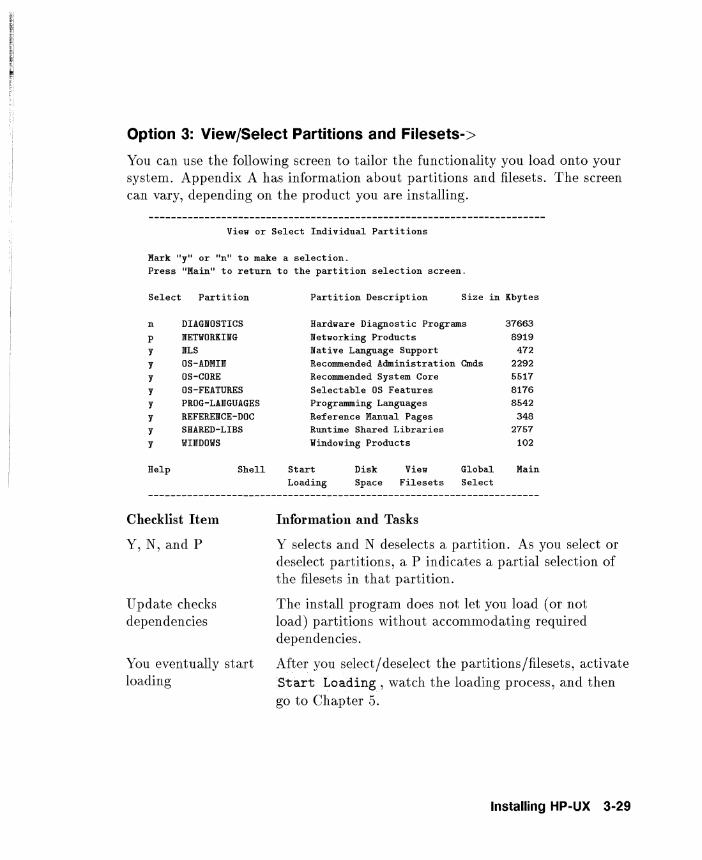
Option 3: View/Select Partitions and Filesets-> You can use the following screen to tailor the functionality you load onto your system. Appendix A has information about partitions and filesets. The screen can vary, depending on the product you are installing.
View or Select Individual Partitions
Mark "y" or "n" to make a selection. Press "Main" to return to the partition selection screen.
Select Partition
n DIAGllOSTICS p IIIETIlORKIllG y IIILS y OS-ADMIN y OS-CORE y OS-FEATURES y PROG-LAIIIGUAGES y REFERENCE-DOC y SHARED-LIBS y IHIIIDOVS
Help Shell
Checklist Item
Y, N, and P
Update checks dependencies
You eventually start loading
Partition Description Size in Kbytes
Hardware Diagnostic Programs 37663
lIIetworking Products 8919 Native Language Support 472 Recommended Administration Cmds 2292 Recommended System Core 5517
Selectable OS Features 8176
Programming Languages 8542
Reference Manual Pages 348 Runtime Shared Libraries 2757
Windowing Products 102
Start Disk View Global Main Loading Space Filesets Select
Information and Tasks
Y selects and N deselects a partition. As you select or deselect partitions, a P indicates a partial selection of the filesets in that partition.
The install program does not let you load (or not load) partitions without accommodating required dependencies.
After you select/deselect the partitions/filesets, activate Start Loading, watch the loading process, and then go to Chapter 5.
Installing HP-UX 3-29
Step 14: Complete Post-installation Tasks After the filesets are loaded, the update program runs customization scripts for individual filesets and builds a new kernel. Move on to Chapter 5 to complete the installation.
3-30 Installing HP-UX
4 Updating HP-UX
This chapter assumes you worked through Chapter 1 and, if necessary, Chapter 2. If you need to perform an installation instead of an update, see Chapter 3.
An update provides new functionality without destroying the existing system. You must have a running HP- UX system to perform an update. You update HP-UX (as opposed to install HP-UX) when you have any of the following situations.
• You are running the S.x release and want to move to the 9.0 release, keeping your root file system on a physical disk as it is now.
• You are running the 9.0 release and you want to add software to that release (for example, Starbase Graphics or ARPA Services).
• You want to convert an existing system to a network distribution server (a netdist server). Appendix B has information about creating, managing, and maintaining a netdist server.
Updating HP·UX 4·1
Step 1: Determine Your Type of Update Before You Begin
An Interactive Update
This chapter describes an interactive update mode in which menus, prompts, and help screens guide you through the procedure. You perform an interactive update by executing update(lM) with no arguments.
Your existing system must meet the minimal requirements discussed in Chapter 2. If you reconfigure your system before you begin an update, you should accommodate all the requirements for using the reconfigured system.
Besides using a supported HP terminal or monitor, you can use a VT-IOO or Wyse 30 compatible terminal while performing an update. This includes Xterm windows because they run as VT-IOO compatible terminals. If you use such a terminal and the screen does not behave correctly, examine the value of your TERM variable. The following items show appropriate, values:
VT-l00 Compatible Terminals
TERM=vtl00 TERM=vtl00-am TERM=vtl00 TERM=vtl02 TERM=xterm TERM=ansi
Wsye 30 Compatible Terminals
TERM=30 TERM=wy30 TERM=400-41
If you have a VT-lOO or Wsye 30 compatible terminal, and the value is not in the above list, set the value of the TERM variable to one of the above values. If your terminal does not display screens correctly, reset the value of TERM to another value from the table. For an update to work in the interactive mode, your terminal must display the screens appropriately.
4-2 Updating HP-UX
A Non-interactive Update
You perform a non-interactive update by executing update(1M) as a shell command, specifying the options that control the update. The interface is less friendly than that of the interactive update, and you need to know which options to specify.
You might want to use a non-interactive update under the following conditions:
• You have a non-HP terminal other than a Vt100 or Wyse30 compatible terminal, and the terminal does not function in the interactive update mode .
• You are very familiar with update(1M), and you want to bypass the interaction.
This chapter does not discuss the non-interactive update. To get information, see the update(1M) entry in the HP-UX Reference manual.
If Problems Occur During an Interactive Update
An error message appears on the display when an interactive update encounters an error condition. The message is also recorded in /tmp/update .log. Typically, you can return to a previous step, correct the error condition, and continue. After the update, you should examine the log file.
If Problems Occur During a Non-interactive Update
Error messages are sent to /tmp/update .log and to standard error. If an error condition occurs before update(1M) begins to load filesets, the program aborts. Otherwise, the program completes the update and you can examine the log file to see what happened. To get more information, see update(1M) in the HP-UX Reference.
Updating HP-UX 4-3
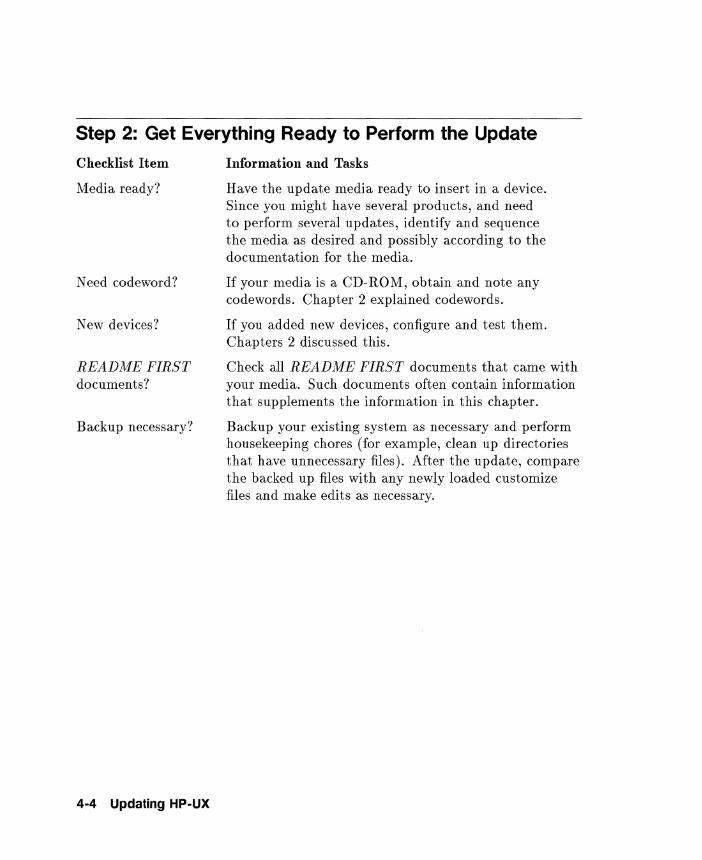
Step 2: Get Everything Ready to Perform the Update
Checklist Item
Media ready?
Need codeword?
New devices?
README FIRST documents?
Backup necessary?
4-4 Updating HP-UX
Information and Tasks
Have the update media ready to insert in a device. Since you might have several products, and need to perform several updates, identify and sequence the media as desired and possibly according to the documentation for the media.
If your media is a CD-ROM, obtain and note any codewords. Chapter 2 explained codewords.
If you added new devices, configure and test them. Chapters 2 discussed this.
Check all README FIRST documents that came with your media. Such documents often contain information that supplements the information in this chapter.
Backup your existing system as necessary and perform housekeeping chores (for example, clean up directories that have unnecessary files). After the update, compare the backed up files with any newly loaded customize files and make edits as necessary.
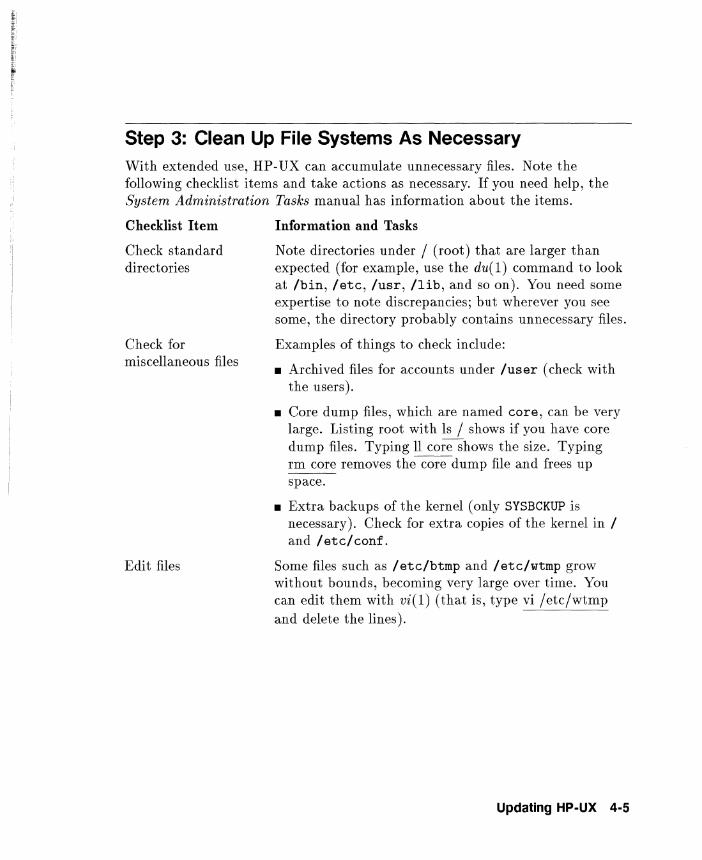
Step 3: Clean Up File Systems As Necessary With extended use, HP -UX can accumulate unnecessary files. Note the following checklist items and take actions as necessary. If you need help, the System Administration Tasks manual has information about the items.
Checklist Item
Check standard directories
Check for miscellaneous files
Edit files
Information and Tasks
Note directories under / (root) that are larger than expected (for example, use the du(l) command to look at Ibin, letc, lusr, /lib, and so on). You need some expertise to note discrepancies; but wherever you see some, the directory probably contains unnecessary files.
Examples of things to check include:
• Archived files for accounts under luser (check with the users).
• Core dump files, which are named core, can be very large. Listing root with Is / shows if you have core dump files. Typing 11 core shows the size. Typing rm core removes the core dump file and frees up space.
• Extra backups of the kernel (only SYSBCKUP is necessary). Check for extra copies of the kernel in I and I etcl conf.
Some files such as I etc/btmp and I etc/wtmp grow without bounds, becoming very large over time. You can edit them with vi(1) (that is, type vi /etc/wtmp and delete the lines).
Updating HP-UX 4-5
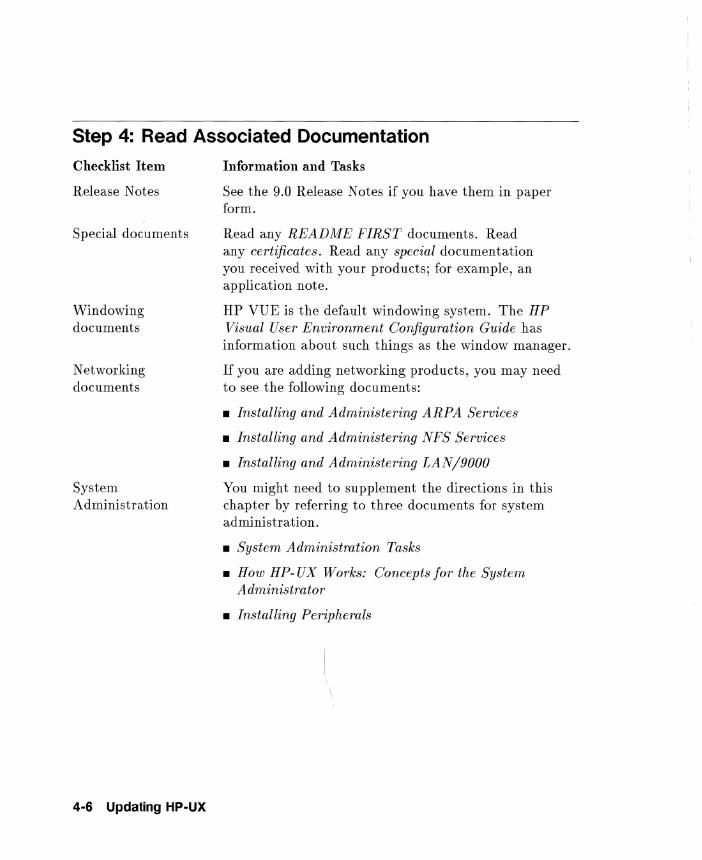
Step 4: Read Associated Documentation
Checklist Item
Release Notes
Special documents
Windowing documents
Networking documents
System Administration
4-6 Updating HP-UX
Information and Tasks
See the 9.0 Release Notes if you have them in paper form.
Read any README FIRST documents. Read any certificates. Read any special documentation you received with your products; for example, an application note.
HP VUE is the default windowing system. The HP Visual User Environment Configuration Guide has information about such things as the window manager.
If you are adding networking products, you may need to see the following documents:
• Installing and Administering ARPA Services
• Installing and Administering NFS Services
• Installing and Administering LAN/gOOD
You might need to supplement the directions in this chapter by referring to three documents for system administration.
• System Administration Tasks
• How HP - UX Works: Concepts for the System Administrator
• Installing Peripherals
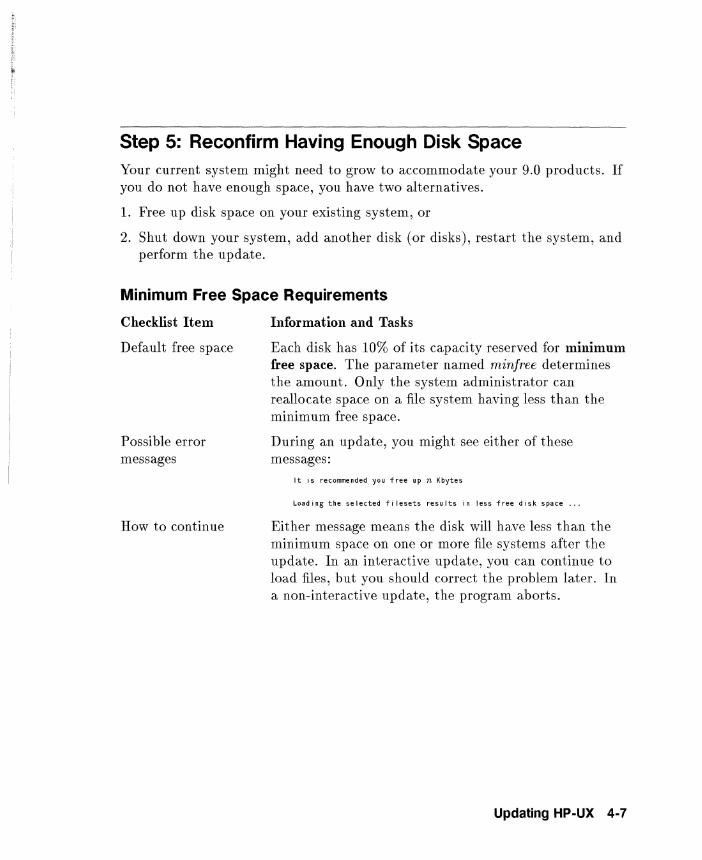
Step 5: Reconfirm Having Enough Disk Space Your current system might need to grow to accommodate your 9.0 products. If you do not have enough space, you have two alternatives.
1. Free up disk space on your existing system, or
2. Shutdown your system, add another disk (or disks), restart the system, and perform the update.
Minimum Free Space Requirements
Checklist Item
Default free space
Possible error messages
How to continue
Information and Tasks
Each disk has 10% of its capacity reserved for minimum free space. The parameter named minfree determines the amount. Only the system administrator can reallocate space on a file system having less than the minimum free space.
During an update, you might see either of these messages:
It is recommended you free up n Kbytes
Loading the selected fi lesets results in less free dIsk space ...
Either message means the disk will have less than the minimum space on one or more file systems after the update. In an interactive update, you can continue to load files, but you should correct the problem later. In a non-interactive update, the program aborts.
Updating HP-UX 4-7
Insufficient Disk Space
Checklist Item
Error messages
To continue
Information and Tasks
During an update, you might see either of the following messages:
You MUST free up n Kbytes
Loading the selected filesets is impossible due to insufficient space on one or more file systems ....
You must free up disk space to load filesets.
How to Free Disk Space
Option 1
Option 2
Option 3
Option 4
Option 5
Deselect filesets to load during an update.
Remove some existing files on the system.
Mount another file system.
Create symbolic links.
Use a combination of the above methods.
Option 1: Deselect Filesets
Checklist Item
Appropriate screens
What to do
You can add filesets later
Information and Tasks
The Partition Selection, Fileset Selection, and Disk Space Analysis screens let you deselect filesets.
In any of the above screens, examine the options for deselecting filesets and deselect those you do not want. Update does not let you deselect a required fileset.
After an update completes, you can add more disk space and then update your system again, adding the desired filesets.
Options continue on the next page.
4-8 Updating HP-UX
Option 2: Remove Unnecessary Files
Checklist Item Information and Tasks
1) Escape to a shell
2) Remove unnecessary files
3) Remove unnecessary filesets
Leave the update program so you can remove files. The System Administration Tasks document has information about shell escapes.
The update program might have placed some files in /tmp that you cannot remove. They include: /tmp/INDEX, /tmp/INFO, /tmp/CDFinfo, and /tmp/update .log. However, you can check the following directories for unnecessary files: /tmp, /etc/*tmp* (you might remove wtmp or btmp), /usr/adm, /usr/local,/usr/contrib, /usr/tmp, /users.
You can remove unnecessary filesets in the existing system by using rmfn(lM). Do not remove files or directories under / system.
Option 3: Mount Another File System
Checklist Item Information and Tasks
1) Escape to a shell Leave the update program so you can mount another file system. The System Administration Tasks document has information about shell escapes.
2) Mount a file system Using information from the System Administration Tasks manual, mount a file system, which should add another physical disk.
Options continue on the next page.
Updating HP-UX 4-9
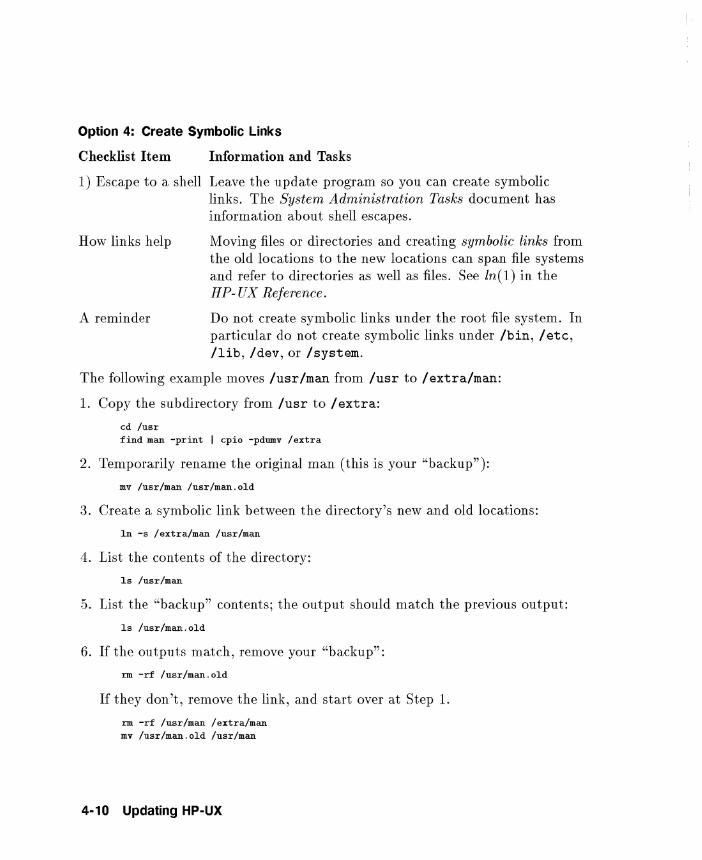
Option 4: Create Symbolic Links
Checklist Item Information and Tasks
1) Escape to a shell Leave the update program so you can create symbolic links. The System Administration Tasks document has information about shell escapes.
How links help Moving files or directories and creating symbolic links from the old locations to the new locations can span file systems and refer to directories as well as files. See In(1) in the HP- UX Reference.
A reminder Do not create symbolic links under the root file system. In particular do not create symbolic links under Ibin, I etc, llib, Idev, or Isystem.
The following example moves lusr/man from lusr to lextra/man:
1. Copy the subdirectory from lusr to I extra:
cd /usr find man -print I cpio -pdumv /extra
2. Temporarily rename the original man (this is your "backup"):
mv /usr/man /usr/man.old
3. Create a symbolic link between the directory's new and old locations:
In -s /extra/man /usr/man
4. List the contents of the directory:
Is /usr/man
5. List the "backup" contents; the output should match the previous output:
Is /usr/man. old
6. If the outputs match, remove your "backup":
rm -rf /usr/man.old
If they don't, remove the link, and start over at Step 1.
rm -rf /usr/man /extra/man mv /usr/man.old /usr/man
4-10 Updating HP-UX
Step 6: Gather I nformation About Media and Devices Examine the checklist questions posed by the following sections, performing the tasks that relate to your update.
Update from Tape?
You need to know the device file name for your tape drive. The System Administration Tasks manual and the Installing Peripherals manual have information about device files for tape drives.
Update from a Netdist Server?
If you plan to update from a netdist server and need information about using a netdist server, see Appendix B.
Need to Mount or Unmount File Systems?
If you do not want a file system to be mounted (for example, /users), comment out the line in /etc/checklist before you start the update program. Leave NFS file systems (if any) in the checklist file so the update program does not load files under them locally.
Updating HP-UX 4-11
Updating the Operating System?
If you are updating the operating system to release 9.0, accommodate the following items:
Checklist Item Information and Tasks
Have users log off Updating the system while users are logged on and accessing files can have undesirable consequences.
Use the normal kernel If you are not running on /hp-ux (the normal kernel), you might want to reboot the system on /hp-ux.
Some updates require single-user state
You might want to run /etc/fsck
4-12 Updating HP-UX
If you load filesets that cause HP- UX to reboot, put the system being updated into the single-user state. The System Administration Tasks manual and the shutdown(lM) entry in the HP- UX Reference manual explain this.
After you shut down the system, and before you begin an update, it is a good practice to run fsck(lM) if you suspect you have any file-system corruption. The System Administration Tasks manual and the fsck(lM) entry in the HP- UX Reference manual explain this. The HP- UX Error Message Catalog explains errors related to fsck.
Updating from CD-ROM after a Shutdown?
Perform this step if you run letc/shutdown because the shutdown process unmounts the CD-ROM drive.
Checklist Item Information and Tasks
The CD-ROM needs a Make a directory where the CD-ROM will be mounted directory by executing:
Insert the CD-RO M disc
Mount the CD-ROM drive
mkdir /UPDATE_CDROK
The documentation for the CD-ROM drive explains this.
Execute a command similar to: letc/mount Idev/dsk/bsrc IUPDATE_CDRDM -t cdfs
The command mounts the CD-ROM drive at IUPDATE_CDROM. The -t cdfs indicates the file system type on the CD-ROM disc. If an appropriate device file does not exist (for example, the I dey I dsk/bsrc ), use the mknod(lM) command to create one.
Updating HP-UX 4-13
Step 7: Some Final Tips for Performing an Update
Checklist Item
You can refresh a blank screen
Check status of console
Information and Tasks
Some terminals might get a blank screen if the keyboard is not used frequently (for example, while you take time to read another document). If the screen goes blank, press (Shift). The Shift key is not interpreted as input. Do not use use any other key.
Do not run console processes in the background. Unexpected output to the terminal can produce unreadable screens. Except when the update program is loading filesets, use (CTRL}(jJ to refresh the screen. If the program is loading filesets, do not press any key until the loading completes.
Move on to the next step to start the update.
4-14 Updating HP-UX

Step 8: Load the TOOL Fileset
If You Have DDS or HP 9144 Cartridge Tape ...
1. Write protect the tape according to its documentation.
2. Insert the tape in its drive. Wait until the drive is ready according to the drive's documentation.
3. If you are not in the root directory, change to it (cd I).
4. Execute the following command, which assumes a device file named update. src. Use the appropriate device file name. Wait for the extraction to complete before you type anything. After no files are extracted for a minute or so, stop the command by typing the interrupt character (probably (Break) or @}CS)). It takes a long time for the command to read the entire tape.
tar -xvf /dev/update.src TOOL
If You Have CD-ROM ...
1. If you are not in the root directory, change to it (cd I).
2. Execute the following command. The update program expects to find the CD-ROM drive mounted under the directory named /UPDATE_CDROM. Specify the directory where the CD-ROM drive is mounted. You get an error message if you do not insert the CD-ROM disc or mount the CD-ROM drive. Wait for the extraction to complete, which can take several minutes.
tar -xvf /UPDATE_CDROM/TOOL
Options for media continue on the next page.
Updating HP-UX 4-15
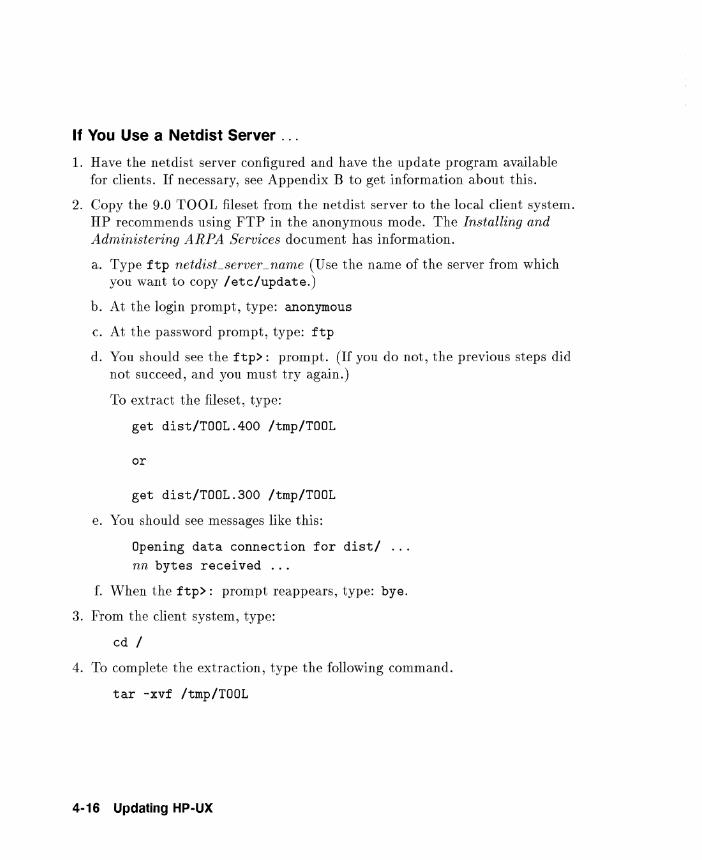
If You Use a Netdist Server ...
1. Have the netdist server configured and have the update program available for clients. If necessary, see Appendix B to get information about this.
2. Copy the 9.0 TOOL fileset from the netdist server to the local client system. HP recommends using FTP in the anonymous mode. The Installing and Administering ARPA Services document has information.
a. Type ftp netdisLserver _name (Use the name of the server from which you want to copy / etc/update.)
b. At the login prompt, type: anonymous
c. At the password prompt, type: ftp
d. You should see the ftp>: prompt. (If you do not, the previous steps did not succeed, and you must try again.)
To extract the fileset, type:
get dist/TOOL.400 /tmp/TOOL
or
get dist/TOOL.300 /tmp/TOOL
e. You should see messages like this:
Opening data connection for dist/ ... nn bytes received ...
f. When the ftp>: prompt reappears, type: bye.
3. From the client system, type:
cd /
4. To complete the extraction, type the following command.
tar -xvf /tmp/TOOL
4-16 Updating HP-UX
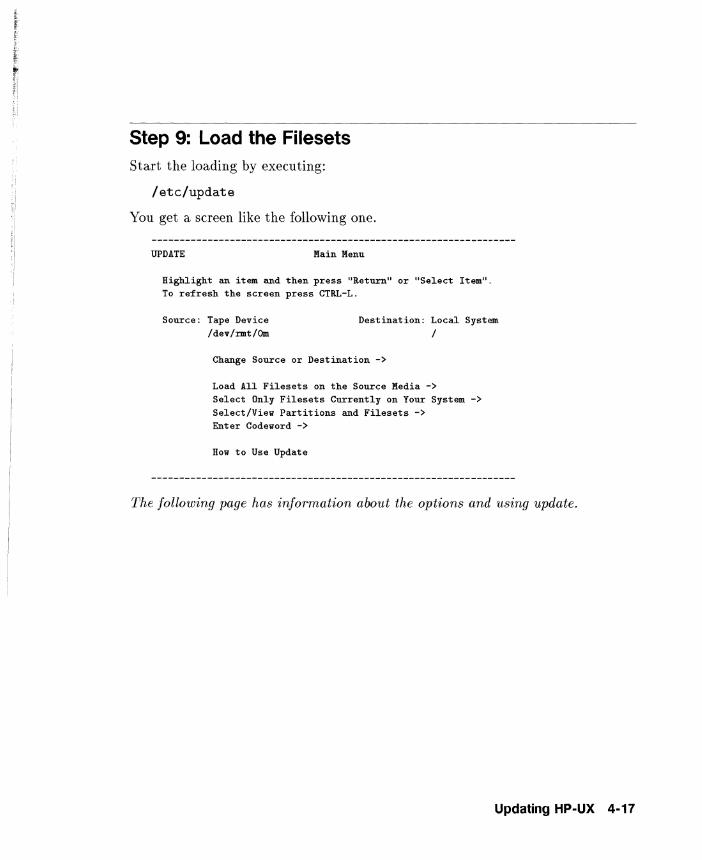
~,
~' I
Step 9: Load the Filesets Start the loading by executing:
/etc/update
You get a screen like the following one.
UPDATE Main Menu
Highlight an item and then press "Return" or "Select Item". To rerresh the screen press CTRL-L.
Source: Tape Device /dev/rmt/Om
Destination: Local System
/
Change Source or Destination ->
Load All Filesets on the Source Media -> Select Only Filesets Currently on Your System -> Select/View Partitions and Filesets -> Enter Codeword ->
How to Use Update
The following page has information about the options and using update.
Updating HP-UX 4-17
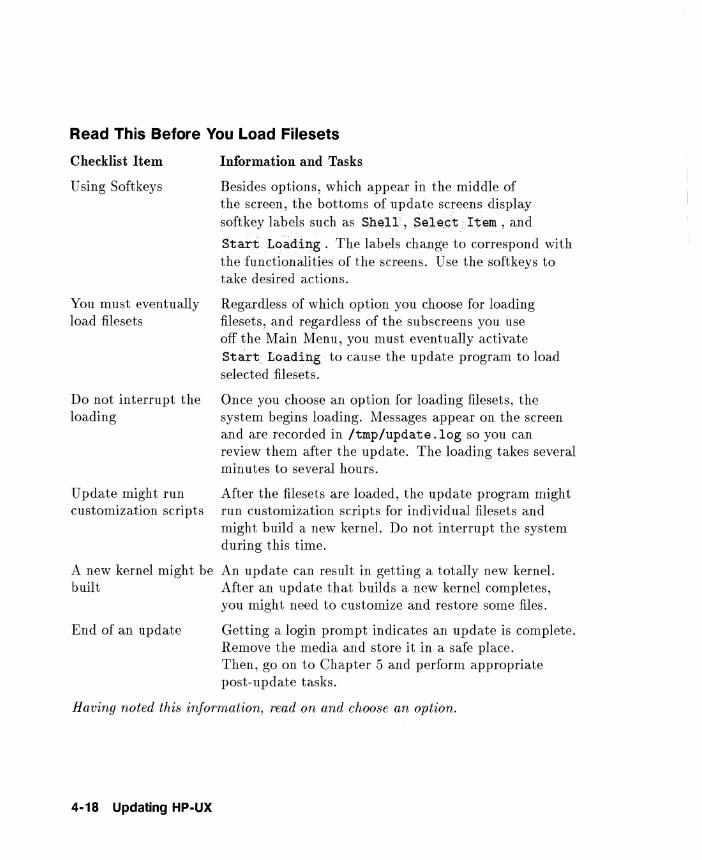
Read This Before You Load Filesets
Checklist Item
Using Softkeys
You must eventually load filesets
Do not interrupt the loading
Update might run customization scripts
A new kernel might be built
End of an update
Information and Tasks
Besides options, which appear in the middle of the screen, the bottoms of update screens display softkey labels such as Shell, Select Item, and
Start Loading. The labels change to correspond with the functionalities of the screens. Use the softkeys to take desired actions.
Regardless of which option you choose for loading filesets, and regardless of the sub screens you use off the Main Menu, you must eventually activate Start Loading to cause the update program to load selected filesets.
Once you choose an option for loading filesets, the system begins loading. Messages appear on the screen and are recorded in /tmp/update .log so you can review them after the update. The loading takes several minutes to several hours.
After the filesets are loaded, the update program might run customization scripts for individual filesets and might build a new kernel. Do not interrupt the system during this time.
An update can result in getting a totally new kernel. After an update that builds a new kernel completes, you might need to customize and restore some files.
Getting a login prompt indicates an update is complete. Remove the media and store it in a safe place. Then, go on to Chapter 5 and perform appropriate post-update tasks.
Having noted this information, read on and choose an option.
4-18 Updating HP-UX
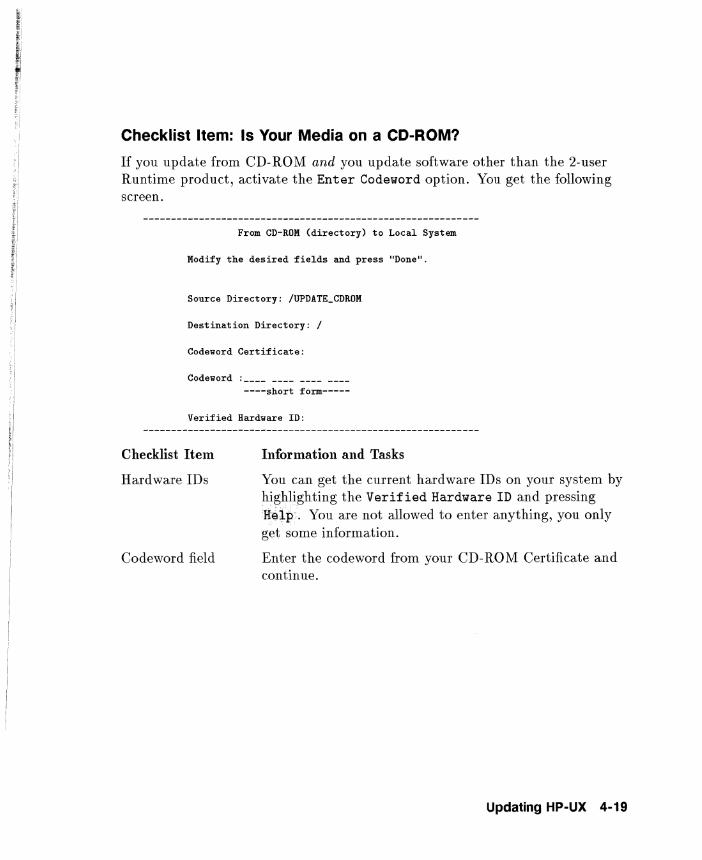
Checklist Item: Is Your Media on a CD-ROM?
If you update from CD-ROM and you update software other than the 2-user Runtime product, activate the Enter Codeword option. You get the following screen.
From CD-RON (directory) to Local System
JIIodi:fy the desired :fields and press "Done".
Source Directory: /UPDATE_CDROJII
Destination Directory: /
Codeword Certi:ficate:
Codeword ----short :form-----
Veri:fied Hardware ID:
Checklist Item
Hardware IDs
Codeword field
Information and Tasks
You can get the current hardware IDs on your system by highlighting the Verified Hardware ID and pressing Help. You are not allowed to enter anything, you only get some information.
Enter the codeword from your CD-ROM Certificate and continue.
Updating HP-UX 4-19
Continue Here Whether You Enter a Codeword or Not
The following checklist items have information you might need to consider.
Checklist Item Information and Tasks
Help and Escapes
You can change the destination
You must select an option for loading
4-20 Updating HP-UX
You can get help about how to use the Main Menu. Also, while using the Main Menu, you can escape to a shell to execute HP-UX commands by activating :poIi:,lt. You can still, at this point, change the source or destination device before you choose an option for loading filesets. You get a secondary screen.
• To change the source for a cartridge tape drive, specify its device file.
• To change the source for a CD-ROM, specify a mounted directory.
• To change the destination, specify the destination directory (for example, lapps).
The Main Menu has three options for loading filesets. The following sections describe the options.
I I,!
I !
Option 1: Select All Filesets on the Source Media ->
Selecting Select All Filesets on the Source Media -> automatically loads every fileset on the source media. Unless you know why you should NOT load all the filesets, you should activate this option. If you activate it, the Select All . .. screen appears. At this point, if you wish to examine the filesets selected for loading, activate Modify/View Partitions and Filesets, which gives you another opportunity to load or deselect filesets. When you are ready, activate Start Loading. When it completes, go to Chapter 5.
Option 2: Select Only Filesets Currently on Your System ->
Activating this option selects filesets from the source media that match the existing functionality on your system.
Checklist Item Information and Tasks
Related Information The update program surveys the /etc/filesets directory on the destination system, selecting the filesets on the source media that match. If any fileset names have changed for the 9.0 release, the update program maps old file set names in /etc/filesets to any new filesets names on the source media.
Load the filesets Activate Start.Loading from this screen. When the loading completes, go to Chapter 5.
Updating HP-UX 4·21
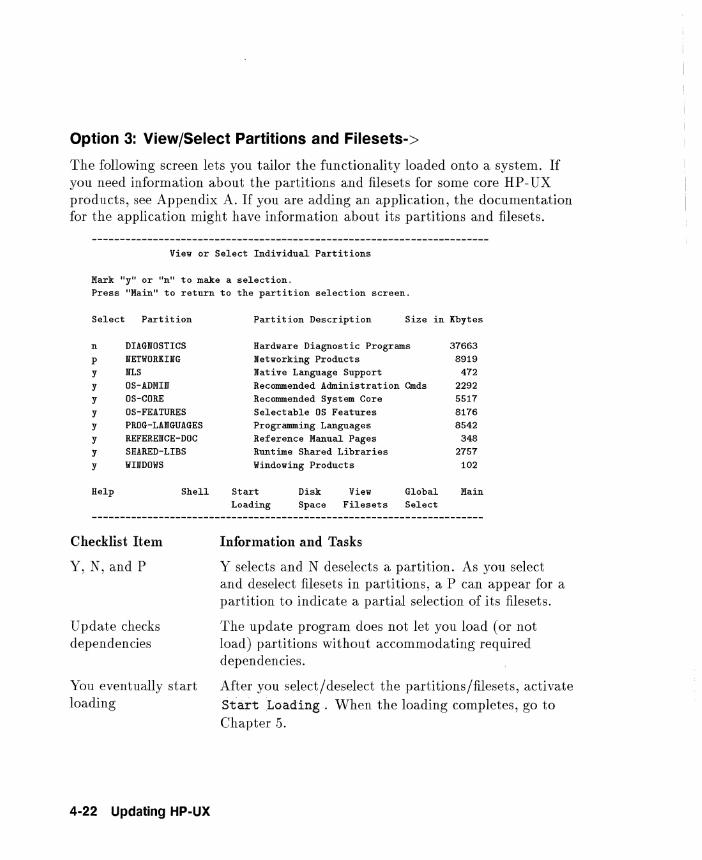
Option 3: View/Select Partitions and Filesets->
The following screen lets you tailor the functionality loaded onto a system. If you need information about the partitions and filesets for some core HP- UX products, see Appendix A. If you are adding an application, the documentation for the application might have information about its partitions and filesets.
View or Select Individual Partitions
Nark "y " or "n" to make a selection.
Press "Main" to return to the partition selection screen.
Select Partition
n DIAGNOSTICS p NETWORK IlliG y fILS y OS-ADMIN y OS-CORE y OS-FEATURES y PROG-LAJIGUAGES y REFERENCE-DOC y SHARED-LIBS y llUDOWS
Help Shell
Checklist Item
Y, N, and P
Update checks dependencies
You eventually start loading
4-22 Updating HP-UX
Partition Description Size in Kbytes
Hardware Diagnostic Programs 37663 Networking Products 8919 lIIative Language Support 472 Recommended Administration Cmds 2292 Recommended System Core 5517 Selectable OS Features 8176 Programming Languages 8542 Reference Manual Pages 348 Runtime Shared Libraries 2757 Windowing Products 102
Start Disk View Global Main Loading Space Filesets Select
Information and Tasks
Y selects and N deselects a partition. As you select and deselect filesets in partitions, a P can appear for a partition to indicate a partial selection of its filesets.
The update program does not let you load (or not load) partitions without accommodating required dependencies.
After you select/deselect the partitions/filesets, activate Start Loading. When the loading completes, go to Chapter 5.
5 Post Install or Update Tasks
Typical Post-installation System Administration Tasks
Checklist Item
Superuser password.
Information across documentation.
Update log file
Information about new functionality.
System security
Add software
Information and Tasks
See the System Administration Tasks manual.
See the Master Index document. It has indexes for all the HP-UX documents.
Check for problems in /tmp/update .log. Follow any instructions you find in this file.
See the release notes file, which is named hpuxsystem and which is stored in /etc/newconfig/90RelNotes.
See the HP- UX System Security document.
If you have additional software products, now is a good time to use the update program to add them to your system. If you do this, note any README documents.
Post Install or Update Tasks 5·1
Suggested Tasks The following checklist items mention things you might need to do. The System Administration Tasks manual has information about most of the tasks. You might want to see special documents (for example, the UUCP User's Guide to set up UUCP).
Checklist Item
Add users
Add groups
Mount file systems
Information and Tasks
See the System Administration Tasks document.
Same document as above.
Same document as above.
Set up the LP Spooler Same document as above.
Set up UUCP
Manage the windowing system
Create system run levels
Create an accounting system
Remove extraneous software
Back up your system
See the section about UUCP in the Remote Access User's Guide.
This can require reading several documents. See the Finding HP-UX Information document. Look for the documents about windows that relate to your release and desired functionality.
See the System Administration Tasks document.
This can require reading several documents. See the Finding HP- UX Information document. Look for the documents about accounting and system security that relate to your release and desired functionality.
Use the / etc/rmfn command. See a later section in this chapter. Also, see the rmfn(lM) entry in the HP- UX Reference document.
See the System Administration Tasks document.
5·2 Post Install or Update Tasks
Remove Unwanted Software Using rmfn( 1 M) After you finish installing HP-UX, you might have software you do not need. The rmfn(lM) (remove functionality) utility lets you remove unnecessary system software. The HP- UX Reference manual has complete information for this command.
Use rmfn with Caution
Although rmfn(lM) checks dependencies to prevent you from inadvertently removing functionality, you still need to be cautious. The command is designed to help you quickly remove major pieces of software. It is important to avoid making mistakes.
Important Points About Using rmfn(1M)
Checklist Item Information and Tasks
Filescts and partitions The filesets and partitions that the rmfn command displays depend on the contents of the directories named /etc/filesets and /system. Do not change the contents of these directories or the command will display an inaccurate list of filesets.
Dependencies The rmfn( 1M) command only lets you remove filesets that will not subsequently harm the integrity of your system. The rmfn(lM) command does not allow you to remove a minimum set of filesets needed by the system. For example, you cannot remove UX-CORE.
Remote systems The rmfn(lM) command does not remove files on a remote, mounted system (NFS).
Symbolic links As the rmfn(lM) command removes a symbolic link contained in a fileset, it does not remove a symbolic link's target file. A target file remains intact until rmfn(lM) removes the fileset containing the target file.
Post Install or Update Tasks 5-3

How to Use rmfn
To use the remove file set command, log in as the system administrator and execute:
/etc/rmfn
The example below shows a typical main screen.
rInrn Partitions
Press "y" to select an entire partition ror deletion. Press "n" to undo a selection. Press the "Select Filesets" key to viell the rilesets llithin a partition. Press the "Start Removing" key llhen selection is complete.
Mark Partition Arch. Partition Description Size in Kbytes
p DIAGNOSTICS 400 Hardllare Diagnostic Programs 37663
n IIET'IIORKING 400 Netllorking Products 8919
n IIfLS 400 Native Language Support 472
n OS-ADMIN 400 Recommended Administration Cmds 2292
n OS-CORE 400 Recommended System Core 5517
n OS-FEATURES 400 Selectable OS Features 8176
y PROG-LANGUAGES 400 Programming Languages 8542
n REFERENCE-DOC 400 Rererence Manual Pages 348
n SHARED-LIBS 400 Runtime Shared Libraries 2757
n WINDOWS 400 Windolling Products 102
[Help] [Shell] [Start Rem]
5-4 Post Install or Update Tasks
Checklist Item
Arrow keys
Help
Shell
Exit mfn
Select Filesets
View ·Seleeted
Start Removing
Information and Tasks
Move the highlight among the items in a screen as implied by the key.
This key selects a highlighted item for deletion. The letter y appears on the screen under Mark.
This key undoes the effects of a selection. For example, if you select a partition with 0, pressing @) deselects the partition. The letter n appears on the screen under Mark.
Pressing this soft key explains how to use the rmfn command.
Pressing this soft key lets you escape to a shell to execute HP-UX commands. Type exit on a shell command line to return to the rmfn screen.
Pressing this softkey terminates the removal process and exits the rmfn command.
For a highlighted partition, pressing this softkey lets you select individual filesets in that partition for deletion. If you do this, a p appears on the screen under Mark to indicate a partial selection of filesets.
Pressing this soft key lists the names and sizes of the partitions and filesets selected for removal.
Pressing this soft key removes the selected partitions and filesets from your system.
Post Install or Update Tasks 5-5

A Product and Fileset Information
A feature of the install and update programs is that you can decide to load or not load certain filesets. The programs do not let you deselect a fileset that is required for other filesets you decide to load.
The following sections contain information about certain, core HP- UX products. You might want to consider the information while making decisions about loading partitions and filesets for certain, core HP- UX products. For applications you purchased to add to your system, the documentation for those applications might have information about partitions and filesets.
Order of Loading Products The order in which you load products can depend on which products you obtain and whether you perform an installation or update of the operating system. In general, you should load products as follows:
1. Load any product that will install or update the core operating system. For example, a installing the operating system on a new hardware system or updating the operating system to a newer release.
2. Load any products that interact with the core system. This includes, for example, languages, tools, and utilities.
3. Load special-purpose applications that run on top of HP- UX. This includes, for example, a word processor or an inventory program.
4. Load entire software environments that run on top of HP -UX and consist of applications that work together. This includes, for example, SoftBench.
Product and Fileset Information A-1
Filesets and Sizes This section lists filesets and their sizes (in KBs) without regard to products. Seeing a fileset in the section provides information but does not imply that the product you obtained contains the fileset.
Subsequent sections have information about filesets for certain products. Be aware that product bundling and other considerations can cause products to change. This appendix does not generally contain information about non-core products.
Fileset Size Fileset Size
02-USER 26 ACCOUllTlIG-I'lAlI 72 ACCOUllTlIG 202 AGRK 102 ALl.BASE-I'lAN 36 AMERICAI 52 ARABIC 52 ARABICV 40 ARPA-AUI-KAI 60 ARPA-AUI 124 ARPA-IllC 40 ARPA-KAI 284 ARPA-RUI 1122 AUDIO-HAll 254 AUDIT-HAll 54 AUDIT 164 BIF-CIIDS-KAlI 60 BIF-CI'IDS 238 BKS 390 BSDIPC-SOCKET 298 BULGARIAI 36 C-AUX 208 C-I1C 1924 C-KAI 124 C-KIII 1482 C-TOOLS 892 C 1266 CE-UTIL 834 CFREICH-CAT 544 CFREIICH-Il1 442 CFREICH 52 CHIlIESES-CAT 390 CHIlIESES-Il1 484 CHIIIESES 38 CHIlIESET-CAT 394 CHIIIESET-Il1 402 CHIlIESET 48 CI'IDS-AUX-MAlI 264 CKDS-AUX 946 CNDS-KIII-IUlI 294 CKDS-HIlI 900 CORE-DIAG 664 CORE-SHLIBS 1244 CZECH 36 DEBUGGERS-KAI 62 DEBUGGERS 1446 DISKLESS-BLD 11158 DISKLESS-MAli 42 DISKLESS 82 DOS-UTILS-MAN 42 DOS-UTILS 58 DQUOTA-KAlI 50 DQUOTA 78 DRIVERS 270 DUTCH 52 ECC-TOOLS-HAII 28 ECC-TOOLS 34 EDITORS-KAll 68 EDITORS 268 EIIGLISH 52 FAFK-IIAN 92 FAFI'I-PRG 130 FAFK-RUlI 270 FAFI'I-SHLIBS 82 FDDI-IIAI 40 FIlIlIIISH 52 FORTRAII-DOC 46 FORTRAlI-KAlI 128
A·2 Product and Fileset Information
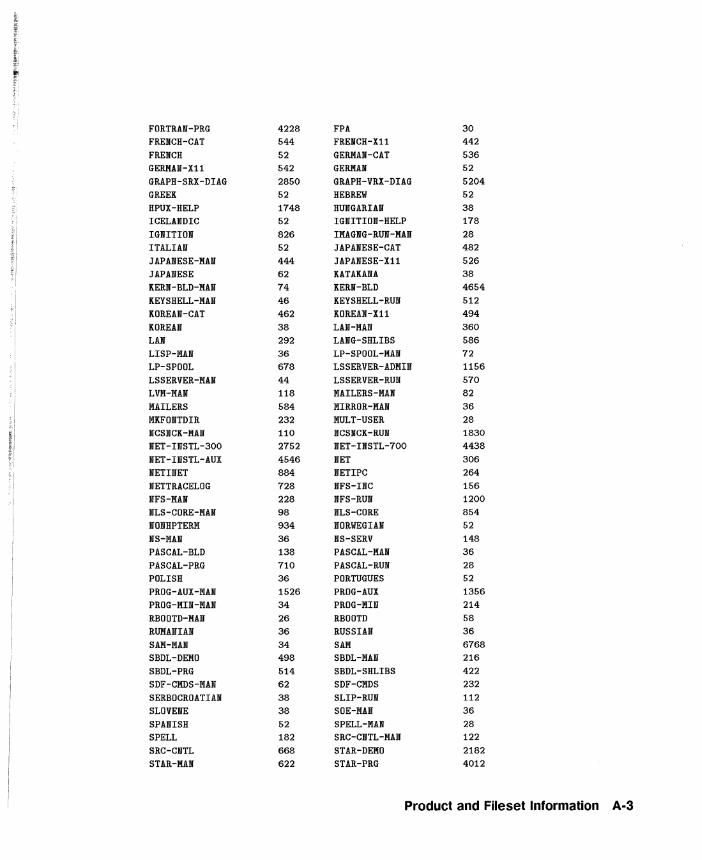
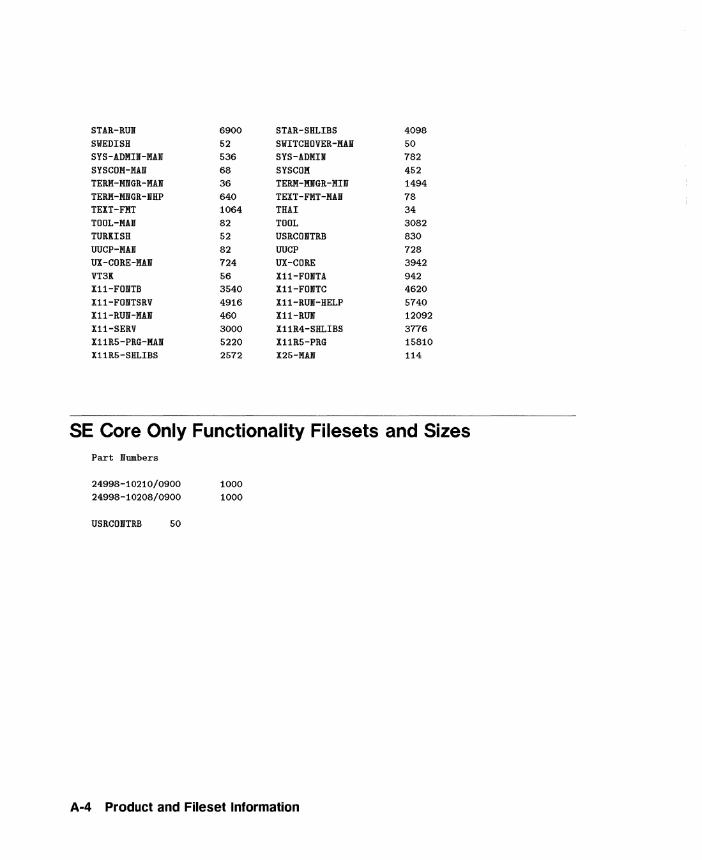
STAR-RUI 6900 STAR-SHLIBS 4098 SWEDISH 52 SWITCHOVER-MAll 50 SYS-ADMIR-MAll 536 SYS-ADMIN 782 SYSCOM-MAll 68 SYSCOM 452 TERM-MNGR-MAll 36 TERM-MIIGR-JilIN 1494 TERM-MllGR-llHP 640 TEXT-FMT-MAII 78 TEXT-FliT 1064 THAI 34 TOOL-MAlI 82 TOOL 3082 TURKISH 52 USRCONTRB 830 UUCP-MAll 82 UUCP 728 OX-CORE-IIAll 724 UX-CORE 3942 VT3K 56 Xll-FOllTA 942 Xll-FONTB 3540 Xll-FONTC 4620 Xll-FONTSRV 4916 Xll-RUII-HELP 5740 Xll-RUII-MAll 460 Xll-RUII 12092 Xll-SERV 3000 X11R4-SHLIBS 3776 X11R5-PRG-MAII 5220 XllR5-PRG 15810 X11R5-SHLIBS 2572 X25-MAIII 114
SE Core Only Functionality Filesets and Sizes Part llumbers
24998-10210/0900 1000 24998-10208/0900 1000
USRCOllTRB 50
A-4 Product and Fileset Information
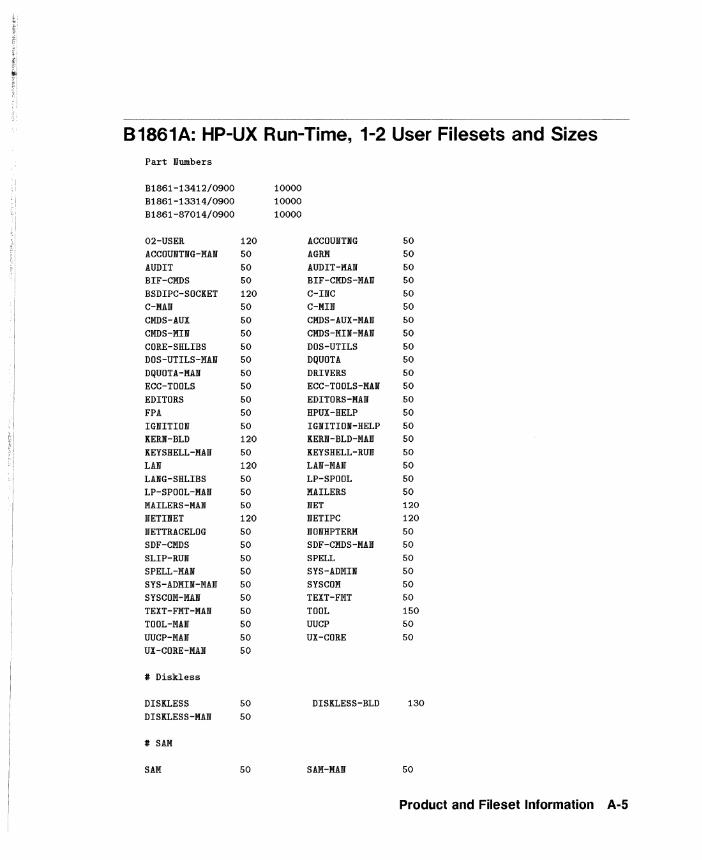
,;: :1'
B1861A: HP-UX Run-Time, 1-2 User Filesets and Sizes Part Numbers
B1861-13412/0900 10000 B1861-13314/0900 10000 B1861-87014/0900 10000
02-USER 120 ACCOUllTlfG 50 ACCOUllTIfG-MAli 50 AGRM 50 AUDIT 50 AUDIT-MAN 50 BIF-CMOS 50 BIF-CMDS-MAli 50 BSDIPC-SOCKET 120 C-IlIJC 50 C-MAli 50 C-Mili 50 CMDS-AUX 50 Cl'IDS-AUX-MAli 50 CMDS-Mili 50 CNDS-MIlI-MAli 50 CORE-SHLIBS 50 DOS-UTILS 50 DOS-UTILS-MAN 50 DQUOTA 50 DQUOTA-l'IA1I 50 DRIVERS 50 ECC-TOOLS 50 ECC-TOOLS-MAlII 50 EDITORS 50 EDITORS-MAli 50 FPA 50 HPUX-HELP 50 IGIIITION 50 IGlHTIOll-HELP 50 KERlI-BLD 120 KERlI-BLD-MAlIJ 50 KEYS HELL-MAN 50 KEYSHELL-RUII 50 LAN 120 LAlI-MAN 50 LAIfG-SHLIBS 50 LP-SPOOL 50 LP-SPOOL-MAN 50 MAILERS 50 MAILERS-MAli 50 IfET 120 lIETiliET 120 IfETIPC 120 lIETTRACELOG 50 I'lOIfHPTERM 50 SDF-CMDS 50 SDF-CMDS-MAli 50 SLIP-RUli 50 SPELL 50 SPELL-MU 50 SYS-ADMIIf 50 SYS-ADMIlIJ-MAN 50 SYSCOM 50 SYSCOM-KAli 50 TEXT-FMT 50 TEXT-FMT-MAli 50 TOOL 150 TOOL-MAN 50 UUCP 50 UUCP-MAlIJ 50 UX-CORE 50 UX-CORE-MAII 50
# Diskless
DISKLESS 50 DISKLESS-BLD 130 DISKLESS-MAN 50
# SAM
SAM 50 SAM-MAli 50
Product and Fileset Information A-5
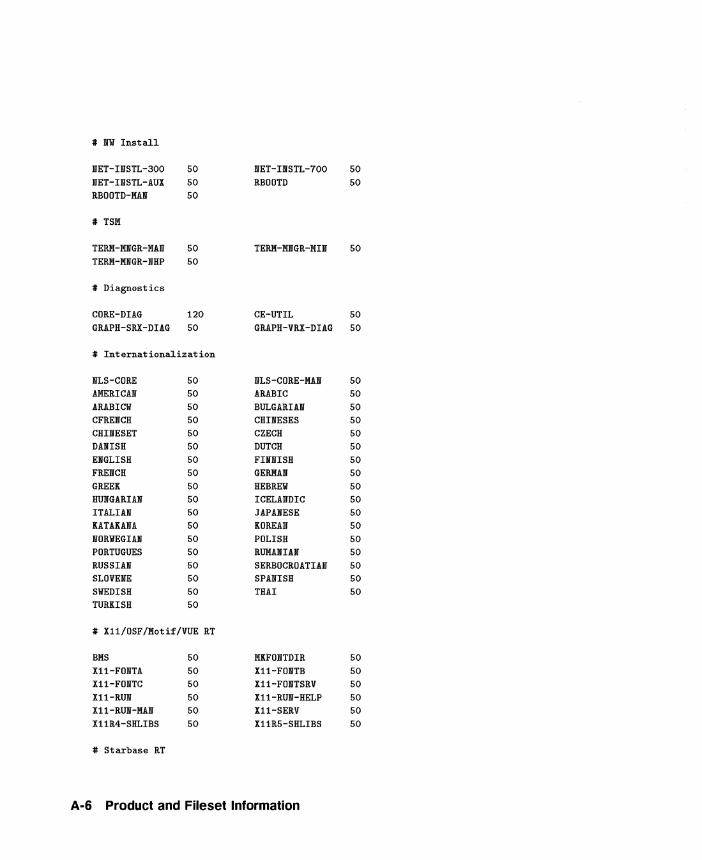
# II'W Install
llET-III'STL-300 50 llET-IllSTL-700 50 llET-nJSTL-AUX 50 RBOOTD 50 RBOOTD-MAll 50
# TSK
TERK-KllGR-KAll 50 TERK-KllGR-KIlI' 50 TERK-KllGR-llHP 50
# Diagnostics
CORE-DIAG 120 CE-UTIL 50 GRAPH-SRI-DIAG 50 GRAPH-VRX-DIAG 50
# Internationalization
ilLS-CORE 50 llLS-CORE-IIAll 50 AKERICAli 50 ARABIC 50 ARABICV 50 BULGARIAll 50 CFREllCH 50 CHIllESES 50 CHIlIIESET 50 CZECH 50 DAllISH 50 DUTCH 50 EllGLISH 50 FIllllISH 50 FREII'CH 50 GERKAll 50 GREEK 50 HEBREW 50 HUllGARIAN 50 ICELAIIIDIC 50 lTALIAli 50 JAPAIJESE 50 KATAKANA 50 KOREAII' 50 llORlfEGIAIl 50 POLISH 50 PORTUGUES 50 RUMAII'IAN 50 RUSSIAll 50 SERBOCROATIAIII 50 SLOVENE 50 SPAll'ISH 50 SllEDISH 50 THAI 50 TURKISH 50
# Xll/0SF/Kotif/VUE RT
BKS 50 KKFOllTDIR 50 Xl1-FOll!! 50 Xl1-FOllTB 50 Xl1-FOllTC 50 Xl1-FOllTSRV 50 Xl1-ROll 50 Xl1-ROll-HELP 50 Xll-RUll-MAll 50 Xl1-SERV 50 Xl1R4-SHLIBS 50 XllR5-SHLIBS 50
# Starbase RT
A-6 Product and Fileset Information
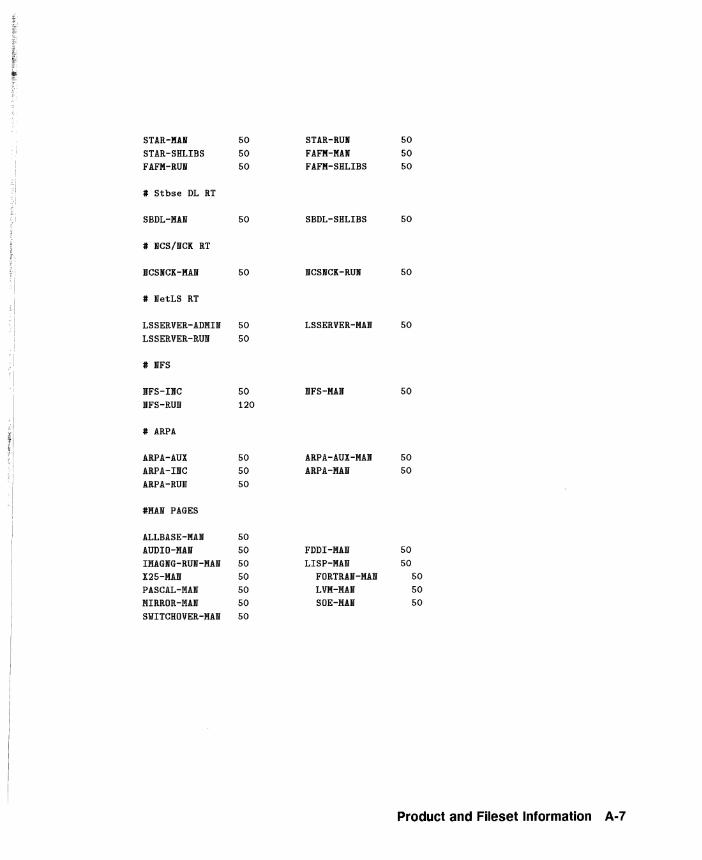
f ~t :~. i
" f;i ii:!
~ j.: ~, I
STAR-KAll 50 STAR-RUll 50 STAR-SHLlBS 50 FAFM-KAll 50 FAFM-RUll 50 FAFM-SHLIBS 50
# Stbse DL RT >i I
SBDL-MA!II 50 SBDL-SHLlBS 50
, # llCS/llCK RT " L
," \~, i llCSllCK-MAlI "
50 llCSllCK-RUll 50
# lletLS RT
LSSERVER-ADMIll 50 LSSERVER-MAll 50 LSSERVER-ROO 50
'I # NFS ,
I llFS-BlC 50 JlFS-KAll 50 llFS-RUll 120
# ARPA
ARPA-AUX 50 ARPA-AUX-MAll 50 ARPA-INC 50 ARPA-MAll 50 ARPA-Rill! 50
#KAll PAGES
ALLBASE-MAll 50 AUDIO-MAll 50 FDDI-KAJI 50 HIAGllG-ROll-MAll 50 LISP-KAlil 50 X25-HAll 50 FORTRAll-KAll 50 PASCAL-MAll 50 LVM-MAll 50 MIRROR-MAll 50 SOE-MAll 50 SWITCHOVER-MAll 50
Product and Fileset Information A-7
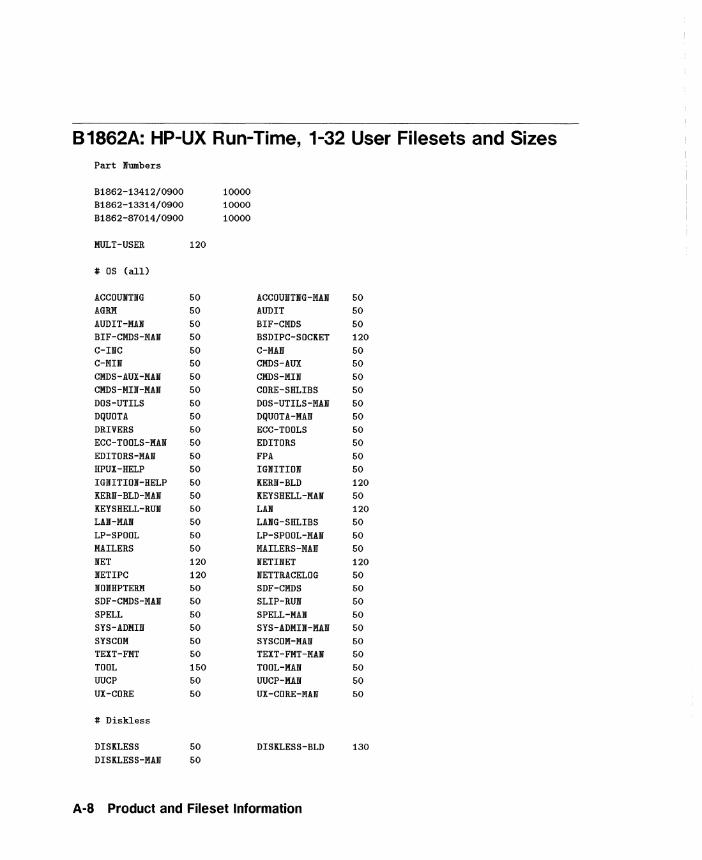
B 1862A: HP-UX Run-Time, 1-32 User Filesets and Sizes Part Numbers
B1862-13412/0900 10000 B1862-13314/0900 10000 B1862-87014/0900 10000
MULT-USER 120
# OS (all)
ACCOUBTllG 50 ACCOUllTllG-MAll 50 AGRI'l 50 AUDIT 50 AUDIT-MAN 50 BIF-CMOS 50 BIF-CMDS-]UII 50 BSDIPC-SOCKET 120 C-IllC 50 C-MAN 50 C-MIII 50 CMOS-AUX 50 CMOS-AUX-HAll 50 CMOS-MIN 50 CMOS-MIll-MAll 50 CORE-SHLIBS 50 DOS-UTILS 50 DOS-UTILS-MAII 50 DQUOTA 50 DQUOTA-MAll 50 DRIVERS 50 ECC-TOOLS 50 ECC-TOOLS-MAN 50 EDITORS 50 EDITORS-MAll 50 FPA 50 HPUX-HELP 50 IGNITION 50 IGNITIOII-HELP 50 KERll-BLD 120 KERN-BLD-MAN 50 KEYSHELL-MAN 50 KEYSHELL-RUN 50 LAll 120 LAll-MAII 50 LAllG-SHLIBS 50 LP-SPOOL 50 LP-SPOOL-MAll 50 MAILERS 50 MAILERS-MAIII 50 IIIET 120 NETIlfET 120 llETIPC 120 llETTRACELOG 50 1l0llHPTERI'I 50 SDF-CMOS 50 SDF-CMDS-MAll 50 SLIP-RUll 50 SPELL 50 SPELL-MAll 50 SYS-ADMIN 50 SYS-ADMIN-MAll 50 SYSCOH 50 SYSCOM-MAll 50 TEXT-FMT 50 TEXT-FMT-MAll 50 TOOL 150 TOOL-MAN 50 UUCP 50 UUCP-MAN 50 UX-CORE 50 UX-CORE-MAll 50
# Diskless
DISKLESS 50 DISKLESS-BLD 130 DISKLESS-MAll 50
A-a Product and Fileset Information
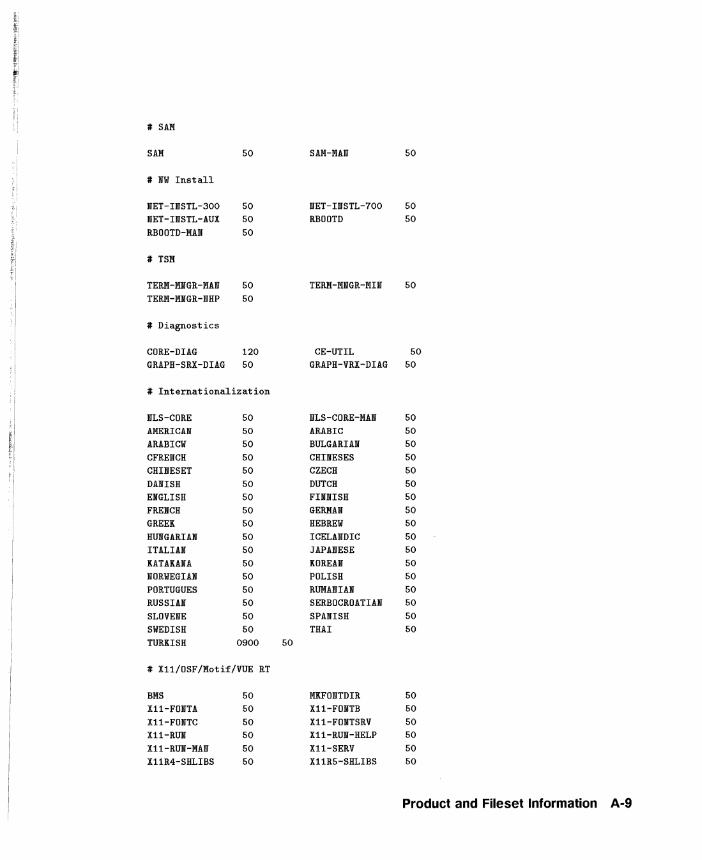
t,i l] i;! it il f'
~ .1 t,1 ~', ~, I
# SAM
SAM 50 SAM-MAN 50
# NW Install
NET-nISTL-300 50 lIIET-INSTL-700 50 NET-INSTL-AUX 50 RBOOTD 50 RBOOTD-MAl'I 50
# TSM
TERM-MJlGR-I'lAlII 50 TERI'l-I'll'IGR-I'IIN 50 TERM-MJlGR-lIIHP 50
# Diagnostics
CORE-DIAG 120 CE-UTIL 50 GRAPH-SRX-DrAG 50 GRAPH-VRX-DrAG 50
# Internationalization
l'ILS-CORE 50 lIILS-CORE-HAN 50 AMERICAN 50 ARABIC 50 ARABICW 50 BULGARIAN 50 CFREHCH 50 CHIl'IESES 50 CHIl'IESET 50 CZECH 50 DAl'IISH 50 DUTCH 50 EIIIGLISH 50 FIIIIHISH 50 FRENCH 50 GERKAN 50 GREEK 50 HEBREW 50 HUNGARIAN 50 ICELANDIC 50 ITALIAN 50 JAPAlfESE 50 KATAKAIU 50 KOREAN 50 NORWEGIAN 50 POLISH 50 PORTUGUES 50 RUMAIIIAII 50 RUSSIAN 50 SERBOCROATIAN 50 SLOVENE 50 SPAUSH 50 SWEDISH 50 THAI 50 TURKISH 0900 50
# X11/0SF/Motif/VUE RT
BI!:S 50 MKFONTDIR 50 X11-FONTA 50 X11-FONTB 50 X11-FONTC 50 X11-FOllTTSRV 50 X11-RUII 50 X11-RUN-HELP 50 X11-RUN-MAN 50 X11-SERV 50 X11R4-SHLIBS 50 X11R5-SHLIBS 50
Product and Fileset Information A-9

# Starbase RT
STAR-MAli 50 STAR-RUIIT 50 STAR-SHLIBS 50 FAFIHUII 50 FAFI'I-RUIi 50 FAFI'I-SHLIBS 50
# Stbse DL RT
SBDL-MAII 50 SBDL-SHLIBS 50
# IITCS/liCK RT
IICSIICK-JIIAIi 50 IICSIlCK-RUII 50
# lIetLS RT
LSSERVER-ADI'IIIl 50 LSSERVER-MAII' 50 LSSERVER-RUII 50
# IIFS
IITFS-IIIC 50 IIFS-I'IAIIT 50 IIFS-RUII 120
# ARPA
ARPA-AUX 50 ARPA-AUX-MAII 50 ARPA-IIIC 50 ARPA-MAli 50 ARPA-RUN 50
#I'IAII PAGES ALLBASE-I'IAII 50 AUDIO-KAII 50 FDDI-MAlII 50 II'IAGIIG-RUII-MAIl 50 LISP-MAlI 50 X25-KAli 50 FORTRAII-MAII 50 PASCAL-I'IAIl 50 LVI'I-I'IAII 50 KIRROR-MAli 50 SOE-I'IAII 50 SIHTCHOVER-KAli 50
A-10 Product and Fileset Information
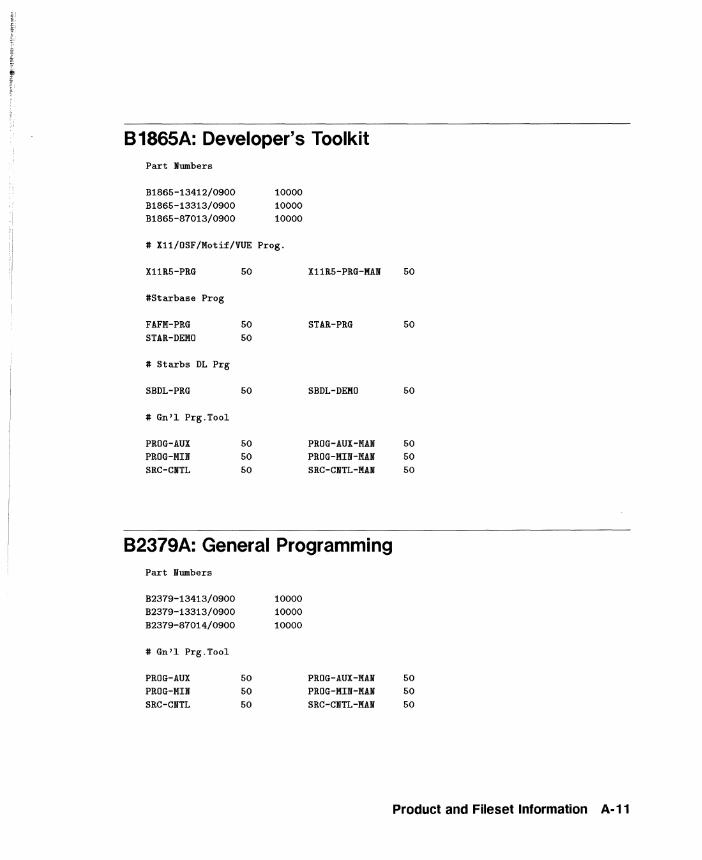
81865A: Developer's Toolkit Part Numbers
B1865-13412/0900 10000 B1865-13313/0900 10000 B1865-87013/0900 10000
# X11/0SF/Motif/VUE Prog.
Xl1R5-PRG 50 X11R5-PRG-KAN 50
#Starbase Prog
FAFM-PRG 50 STAR-PRG 50 STAR-DEMO 50
# Starbs DL Prg
SBDL-PRG 50 SBDL-DEKO 50
# Gn'l Prg.Tool
PROG-AUX 50 PROG-AUX-JIlAN 50 PROG-Milil 50 PROG-MIN-MAN 50 SRC-CIITL 50 SRC-CNTL-MAN 50
82379A: General Programming Part Numbers
B2379-13413/0900 10000 B2379-13313/0900 10000 B2379-87014/0900 10000
# Gn'l Prg.Tool
PROG-AUX PROG-IIJIN SRC-CNTL
50 50 50
PROG-AUX-MAN PROG-MIN-JilAN SRC-CNTL-MAN
50 50 50
Product and Fileset Information A-11
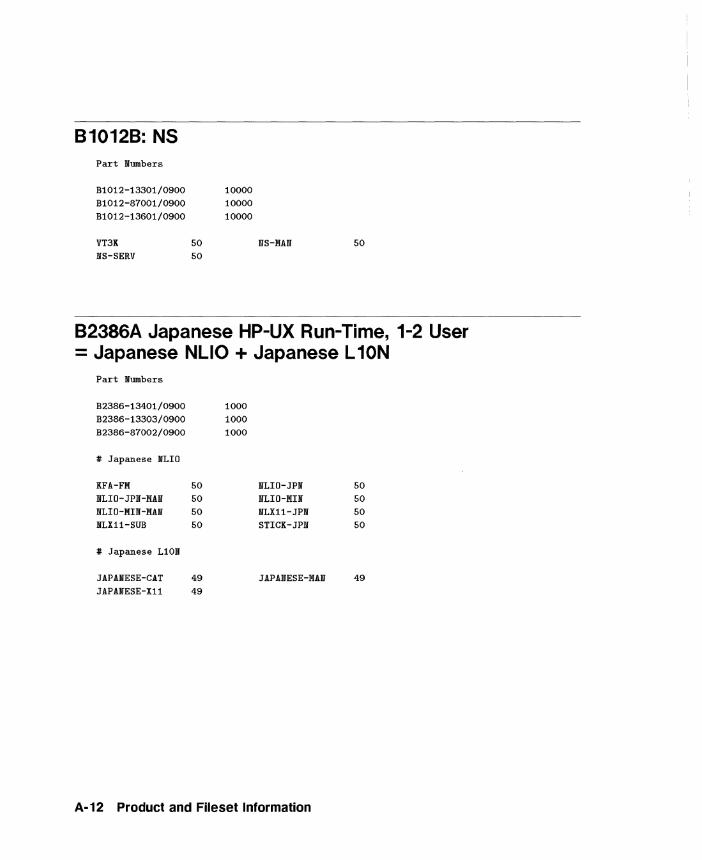
810128: NS Part Numbers
B1012-13301/0900 10000 B1012-87001/0900 10000 B1012-13601/0900 10000
VT3K NS-SERV
50 50
NS-MAN 50
82386A Japanese HP-UX Run-Time, 1-2 User Japanese NLiO + Japanese L 10N Part Numbers
B2386-13401/0900 1000 B2386-13303/0900 1000 B2386-87002/0900 1000
# Japanese NLIo
KFA-FM 50 IIlLID-JPN 50 NLIo-JPN-MAN 50 NLIo-MIN 50 NLIo-MIN-MAli 50 NLX11-JPN 50 nX11-SUB 50 STICK-JPN 50
# Japanese L10N
JAPAlI'ESE-CAT 49 JAPANESE-MAN 49 JAPANESE-X1l 49
A-12 Product and Fileset Information
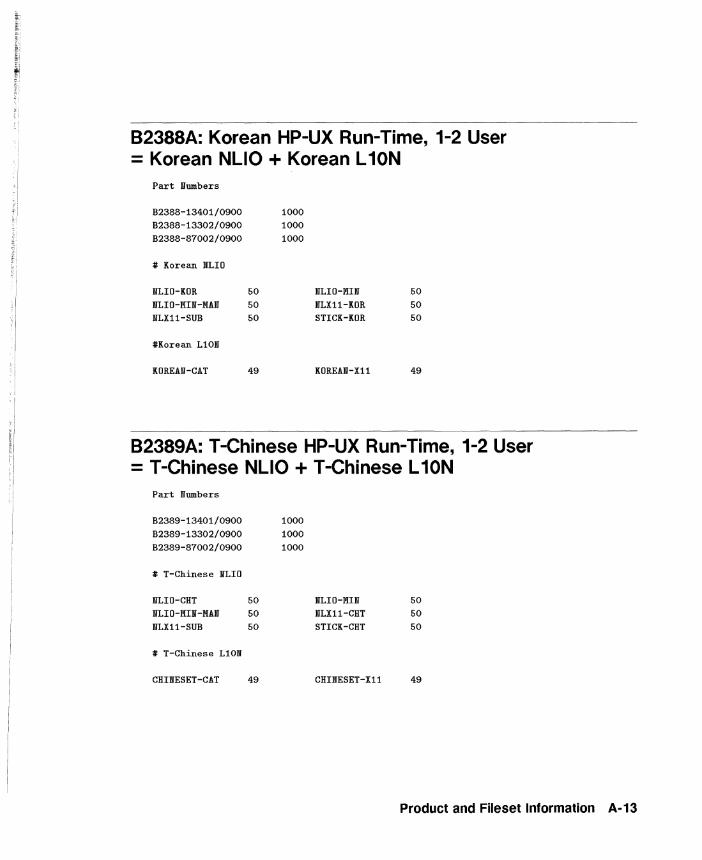
B2388A: Korean HP-UX Run-Time, 1-2 User Korean NLiO + Korean L 10N Part Numbers
B2388-13401/0900 1000 B2388-13302/0900 1000 B2388-87002/0900 1000
# Korean NLIO
NLIO-KOR 50 NLIO-MIN 50 IlLIO-MIN-MAN 50 llILX11-KOR 50 NLX11-SUB 50 STICK-KOR 50
#Korean LiON
KOREAN-CAI 49 KOREAN-X11 49
B2389A: T -Chinese HP-UX Run-Time, 1-2 User = T -Chinese NLIO + T -Chinese L 10N
Part Numbers
B2389-13401/0900 1000 B2389-13302/0900 1000 B2389-87002/0900 1000
# I-Chinese NLIO
NLIO-CHI 50 NLIO-MIN 50 NLIO-MIN-MAII 50 NLX11-CHI 50 NLX11-SUB 50 STICK-CHI 50
# I-Chinese LiON
CHINESEI-CAI 49 CHINESEI-Xi1 49
Product and Fileset Information A-13

B2390A: S-Chinese HP-UX Run-Time, 1-2 User = S-Chinese NLIO + S-Chinese L 10N
Part lumbers
B2390-13401/0900 1000 B2390-13302/0900 1000 B2390-87002/0900 1000
# S-Chinese ILIO
llLIO-CBS 50 ILIO-IUI 50 lILIO-MIll-KAll 50 lUll-CBS 50 ILX11-SUB 50 STICK-CBS 50
#S-Chinese Ll011
CBIllESES-CAT 49 CBIllESES-Xll 49
B2391A: German HP-UX Run-Time, 1-2 User = German L 10N
Part lumbers
B2391-13401/0900 1000 B2391-13302/0900 1000 B2391-87002/0900 1000
# German Ll01
GERMAI-CAT 49 GERMAN-Xll 49
A·14 Product and Fileset Information
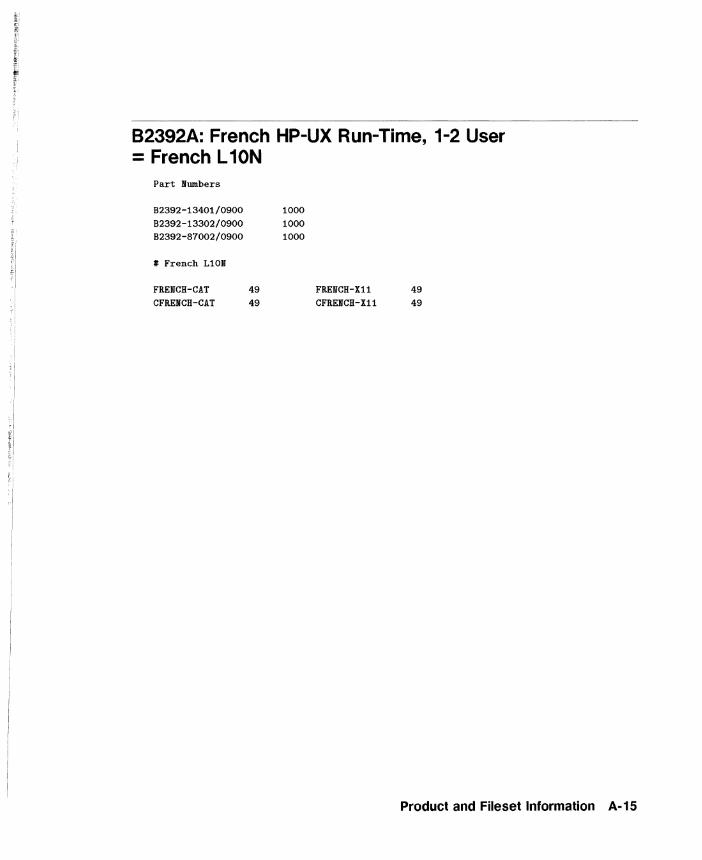
~ i I
,I
82392A: French HP-UX Run-Time, 1-2 User = French L 10N
Part Numbers
B2392-13401/0900 1000 B2392-13302/0900 1000 B2392-87002/0900 1000
# French LiON
FRENCH-CAT CFRENCH-CAT
49 49
FREMCH-Xl1 CFRENCH-Xl1
49 49
Product and Fileset Information A·15

Creating, Using, and Managing a Netdist Server
B
This appendix explains how to use a network distribution server (called a netdist server). A netdist server has the capability to be a source of update media for update(lM). The media is distributed to a remote system (called a client system or a local system) over a network.
The netdistd(lM) entry in the HP-UX Reference document supplements the information in this appendix.
To use a netdist server during an update, run the / etc/update program on the client system as usual and specify a netdist server as the source of media (filesets) instead of specifying a tape or CD-ROM disk. You need to know the networking address or hostname for the netdist server. Otherwise, you use the update program according to the steps described in Chapter 4: Updating HP-UX.
This appendix does not explain how to use a netdist server. Instead, it describes server requirements and how to perform the following tasks:
• Create (set up) a network distribution server (netdist server).
• Add filesets to the netdist server. This includes isolating a netdist server from processes related to ongoing updates. Isolating the server lets you add new or modified filesets to it without affecting the filesets being distributed by the server to client (remote) systems.
• Identify the filesets that are available for a network installation or update.
• Examine the log file created during an installation or update to identify possible problems.
Creating, USing, and Managing a Netdist Server B-1
Overview of a Network Distribution Server The following items indicate why you might want to use a netdist server to obtain filesets for an update:
• You have a group of networked systems, and you want to update all of them to a new release of HP- UX. '
• You have a group of networked systems, and you must add software to all of them.
• You need to perform an update across architectures, making a Series 300/400,700, or 600/800 computer into a netdist server.
You cannot use a netdist server to perform an update until the server exists on a network that client systems can access. You create a server, if necessary, by running /ete/updist (a variant of fete/update) on the desired system.
When you create a netdist server, the /etc/updist program transfers filesets from conventional media (tapes or CD-ROM disks) to a directory that is typically named /netdist. These filesets subsequently become the ones a client system can use as the source media for its update.
After you create the netdist server (that is, the / etc/updist program adds the distribution filesets to the server and completes its work), you start up a netdistd daemon on the server. Client systems on the network can then obtain filesets during their update from the /netdist directory on the server because the netdistd daemon delivers the filesets as if they were on conventional media.
B·2 Creating, Using, and Managing a Netdist Server
Requirements for a Network Distribution Server The system you make into a netdist server must meet the following requirements. If your system does not meet the requirements, take time to configure it so it does. Then, return to this section and continue.
Hardware and Disk Space Requirements
• Have the necessary networking hardware installed and configured.
See the LAN Interface Controller (LANIC) Installation and Reference Manual and the LAN Cable and Accessories Manual if you need information.
• Ensure that the server has adequate disk space. The following items offer guidelines for minimum amounts of space:
D 100 MBs for the Series 300 runtime product.
D 120 MBs for the Series 700 runtime product.
D 140 MBs for Series 800 multi-user runtime product.
D 200 MBs for the Series 800 server runtime product.
• Also, you might need additional space for applications. You might want to mount a separate disk on the /netdist directory and let the netdist server distribute files from that disk (directory). The System Administration Tasks manual has information about mounting disks on file systems.
For example, to distribute software for Series 300, 400, 700, and 800 systems, you might mount a disk of 660 MBs (or more) on the /netdist directory.
Creating, Using, and Managing a Netdist Server 8-3
Software Requirements
• To distribute the 9.0 release to client systems, the netdist server must be running an appropriate release (at least 8.05, unless the 8.05/9.0 versions of updist/netdistd are obtained from an 8.0 system). Regardless of the release, the netdist server should have the LANLINK and ARPA filesets.
• If necessary, configure the LAN LINK software according to directions given in the following documents:
Installing and Administering ARPA Services. Installing and Administering LAN/9000 Series 800.
• To transfer the TOOL Fileset Archive files between the netdist server and client systems, set up FTP (File Transfer Protocol) in the anonymous mode on the netdist server. FTP is not the only facility for transferring files, but it does provide an effective one for transferring files among networked systems. In the past, the use of FTP was optional. For the 9.0 release, the netdist server must have anonymous jtp. You can use sam(1M) to set up anonymous jtp, or you can use the document named Installing and Administering ARPA Services to set it up manually.
8-4 Creating, USing, and Managing a Netdist Server
Create and Use a Network Distribution Server This section attempts to be complete. If you need additional information, the final section (in this appendix) named "If You Need More Information ... " contains pointers to other documentation.
You cannot perform an update over a network to a client system unless some system on the network is a netdist server.
If your network does not already have a netdist server, create one by working through the steps in this section. If your network does have an accessible netdist server, you can ignore this section.
Working through the following steps assumes the system you make into a netdist server is not already one. (In a later section, you will see the need to isolate a netdist server before you add filesets that the server can subsequently distribute to client systems. The procedure for isolating and then updating an existing netdist server is separate from the one for creating a server.)
Creating, USing, and Managing a Netdist Server 8-5

Step 1: Create the Netdist Server
1. Be sure the system you make into a netdist server meets the minimal hardware and software requirements described in the previous section.
2. The system that will become the server must be running at least an 8.05 release of HP-UX, and you must be logged in as the superuser.
3. On the system that will become the server, make a directory named /netdist (if it does not already exist). You can specify a different path if you do not like /netdist. If you use a different path, know why using a different path is important and account for it when you perform other tasks.
4. Examine the file named /etc/services to see if it contains an entry for the netdist server. The entry should look something like this:
netdist 2106/tcp # network file distribution
The 2106 is the default port number on the server.
If the entry does not exist, edit /etc/services, adding the line as shown above. Enter the appropriate port number if you do not use the default.
5. Insert the media for the 9.0 release in the drive you intend to specify as the source device (for example, a DDS cartridge tape drive or CD-ROM disk drive). You can, when you run the /etc/updist program, specify another netdist server as the source device. If you intend to do this, you must know the network name of the server before you run updist.
6. Run the /etc/updist program to load filesets from the source-device media to a hierarchical structure beneath the /netdist directory.
The filesets you load during this step are the only ones the netdist server can subsequently distribute to a client system when that system requests filesets during an update.
8-6 Creating, USing, and Managing a Netdist Server
:1
~ i :1
II II
To distribute software for Series 300,400, 700, and 800 systems, run the updist program for each set of update media. The filesets are loaded into separate directories under the /netdist directory according to the series.
7. When the filesets have been loaded and the updist program completes its work, you should start up the system as a netdist server by executing:
/etc/netdistd -1 The option is a lowercase L
You may need to specify other options if you do not use the defaults or if you specified a directory other than /netdist.
When you execute the command shown in the example, the netdist server functions as follows:
a. The netdistd program is a daemon that monitors the network for distribution requests.
b. The -1 option causes the netdistd daemon to log activity and error information, saving the information in a file named /usr/adm/netdist .log. (A later section in this appendix describes the netdist log entries.)
If you need information about other options to the / etc/netdistd program, see netdistd(lM) in the HP-UX Reference.
Creating, Using, and Managing a Netdist Server 8-7
Step 2: Make fete/update Available to Clients
The / etc/update program on the netdist server must be available for network distribution of filesets requested by client systems.
1. On the newly created netdist server, build the TOOL archive from the /netdist directory by executing the following commands as appropriate.
Series 300/400 Execute the following commands to distribute software to Series 300/400 clients:
Series 700
Series 800
cd /netdist/300/TOOL/product tar -cvf /tmp/TOOL.300 etc system
Execute the following commands to distribute software to Series 700 clients:
cd /netdist/700/TOOL/product tar -cvf /tmp/TOOL.700 etc system
Execute the following commands to set up the server distribute software to Series 800 clients:
cd /netdist/800/TOOL/product tar -cvf /tmp/TOOL.800 etc system
2. This step assumes you set up anonymous jtp on the netdist server. (The need to do this was discussed in a previous section named "Requirements for a Network Distribution Server".)
8·8 Creating, Using, and Managing a Netdist Server

fj ii !I I'
tl 'I
Make the TOOL archive available to client systems by putting the archives in a directory where other systems can get them. Execute the following commands as appropriate.
Series 300/400 mkdir /users/ftp/dist mv /tmp/TOOL. 300 /users/ftp/ dist/TOOL. 300 chmod 444 /users/ftp/ dist/TOOL. 300
Series 100 mkdir /users/ftp/dist
Series 800
mv /tmp/TOOL. 700 /users/ftp/ dist/TOOL. 700 chmod 444 /users/ftp/dist/TOOL. 700
mkdir /users/ftp/dist mv /tmp/TOOL. 800 /users/ftp/ dist/TOOL. 800 chmod 444 /users/ftp/ dist/TOOL. 800
Creating, USing, and Managing a Netdist Server 8-9
Step 3: Set Appropriate Permissions
The client systems must have permission to access the netdist server. You set permissions in the lusr I adml inetd. sec file on the netdist server. It is not possible to anticipate every situation, but the following two examples show some entries.
The following example denies host 192.23.4.3 access to the NFS server named rpc .mountd.
mountd deny 192.23.4.3
The example following the list allows the use of rlogin to:
• Hosts in subnets 3 through 5 in network 10. • The host with internet address of 192.34.56.5. • The host with the name ahost. • All the hosts in the network named anetwork.
login allow 10.3-5 192.34.56.5 ahost anetwork
At this point, set the permissions for your netdist server. If you need some help, the inetd.sec( 5) entry in the HP- UX Reference has information about creating permissions. When you complete this step, the netdist server should be ready to accept requests from client systems for distribution of filesets.
B-10 Creating, USing, and Managing a Netdist Server
If You Need More Information ...
If working through the above steps causes you to need more information about creating and using a netdist server, read the following documents as appropriate:
• For information on the netdistd daemon, see the netdistd(lM) entry in the HP-UX Reference.
• For information on creating or using anonymous ftp, see the Installing and Maintaining NS-ARPA Services document or the sam(lM) entry in the HP- UX Reference manual.
• For information on disk space, see the How HP- UX Works: Concepts for the System Administrator manual.
• For information on networking hardware, see available hardware configuration manuals and data sheets (for example, the HP9000 Series 300 Hardware Configuration Guide).
Creating, Using, and Managing a Netdist Server 8-11
Isolate Processes on a Server Before Updating It After you create a netdist server, you will probably update the server's /netdist tree periodically to make new or updated filesets available to clients.
Before you update a netdist server so it can distribute new software, you need to isolate the server from any child processes that are accommodating current updates of clients via the server's parent process for the netdistd daemon. Isolating a netdist server relates to killing certain processes and not killing other processes. As well, it relates to letting some processes terminate.
You need to isolate the netdist server before you update it.
This section explains how to isolate the server. The next section explains how to add filesets to an existing server (this includes updating the server to a new release of HP-UX). Be sure to coordinate your actions across the two sections.
Isolating the Server
1. The daemon named netdistd spawns child processes to handle incoming requests for updates, one child process for each request. For example, if three requests are being serviced, four copies of the netdistd daemon are running (one parent process and three child processes).
2. Before you isolate the server so as to not disturb any updates being performed by clients, you need to identify the parent process for the server's netdistd daemon. To do this, examine the log file named /usr / adm/netdist .log. The line showing the parent process in the log file should look something like this:
netdistd.560 14:59:46 ... Started on port 2106
8-12 Creating, USing, and Managing a Netdist Server
A line in the log file that begins with netdistd indicates a parent daemon. The process ID (PID) immediately follows the period after netdistd (which is 560 in the line above). Lines for child processes begin with a digit (for example, 1 or 2).
3. Having determined the PID of the parent process of the netdistd daemon, kill the process. Do not kill any of the child processes, wait for them to terminate normally. In reference to the above example, you could execute:
kill 560
If you need more information about killing a process, see the kill(l) entry in the HP- UX Reference).
Having isolated the netdist server from updates it is providing for client systems, you can update the server without disturbing the updates of clients. You need to wait for the server to drain itself. In the state you just created for the server, no new distributions are allowed. The server waits for existing distributions to finish.
Creating, Using, and Managing a Netdist Server 8-13

Add Filesets to a Netdist Server as Appropriate This section explains how to update an existing server, adding filesets to the server or updating the server to a new release.
Do not update an existing server unless you have isolated it from updates it might be providing for client systems. Not isolating the server might cause a core dump or cause the filesets being distributed to a client system to become corrupted. The previous section explained how to isolate the server. Once you have isolated the server, work through the following steps to update it:
1. Insert the media for the filesets to be added in the device you intend to specify as the source device (probably a tape drive or CD-ROM disk drive). You can, when you run the /etc/updist program, specify another, existing netdist server as the source device. If you intend to do this, you must know the name and port number of the server before you run updist.
2. Run the updist program to load filesets from a tape, CD-ROM disk, or another netdist server to a hierarchical structure beneath the /netdist directory.
The filesets you load during this step (plus the filesets that are already on the server) are the only ones the netdist server can subsequently deliver to a client system when the client system requests filesets during its update.
To distribute software for Series 300, 400, 700, and 800 systems, run the updist program for each set of update media. The filesets are loaded into separate directories under the /netdist directory according to the series.
8·14 Creating, Using, and Managing a Netdist Server
3. When the filesets have been loaded and the updist program completes its work, start up the system as a netdist server by executing:
/etc/netdistd -1 Option is a lowercase L
You may need to specify other options if you do not use the defaults or if you specified a directory other than /netdist.
When you execute the command shown in the example, the netdist server functions as follows:
a. The netdistd program is a daemon that monitors the network for network distribution requests.
b. The -1 option causes the netdistd daemon to log activity and error information, saving the information in a file named /usr / adm/netdist .log. The next section in this appendix describes the netdist log entries.
If you need information about other options to the / etc/netdistd program, see the netdistd(lM) entry in the HP- UX Reference.
Creating, Using, and Managing a Netdist Server 8-15
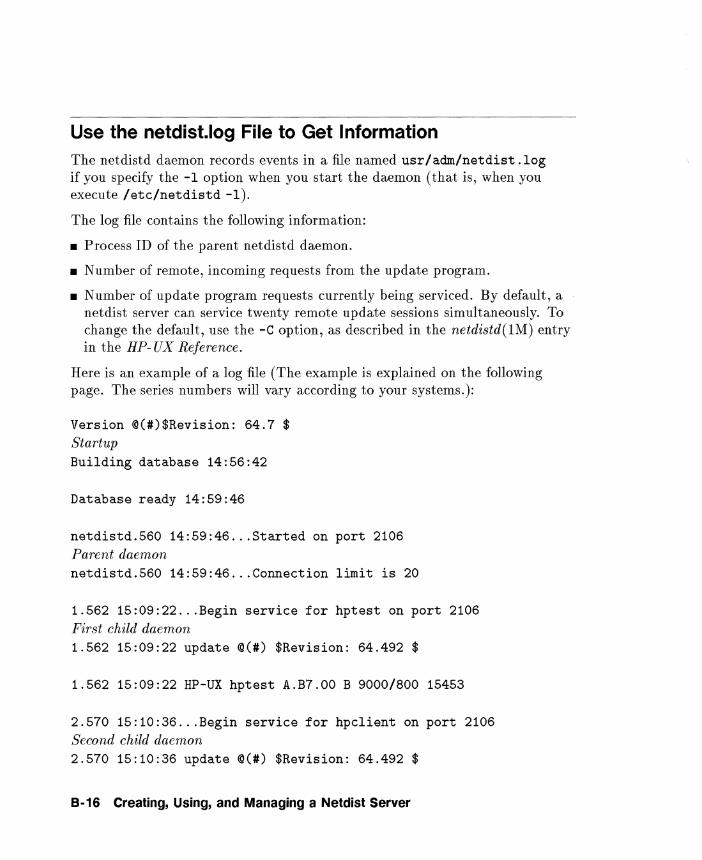
Use the netdist.log File to Get Information The netdistd daemon records events in a file named usr 1 adm/netdist .log if you specify the -1 option when you start the daemon (that is, when you execute letc/netdistd -1).
The log file contains the following information:
• Process ID of the parent netdistd daemon.
• Number of remote, incoming requests from the update program.
• Number of update program requests currently being serviced. By default, a netdist server can service twenty remote update sessions simultaneously. To change the default, use the -C option, as described in the netdistd(lM) entry in the HP- UX Reference.
Here is an example of a log file (The example is explained on the following page. The series numbers will vary according to your systems.):
Version @(#)$Revision: 64.7 $ Startup Building database 14:56:42
Database ready 14:59:46
netdistd.560 14:59:46 ... Started on port 2106 Parent daemon netdistd.560 14:59:46 ... Connection limit is 20
1.562 15:09:22 ... Begin service for hptest on port 2106 First child daemon 1.562 15:09:22 update @(#) $Revision: 64.492 $
1.562 15:09:22 HP-UX hptest A.B7.00 B 90001800 15453
2.570 15:10:36 ... Begin service for hpclient on port 2106 Second child daemon 2.570 15:10:36 update @(#) $Revision: 64.492 $
8·16 Creating, Using, and Managing a Netdist Server
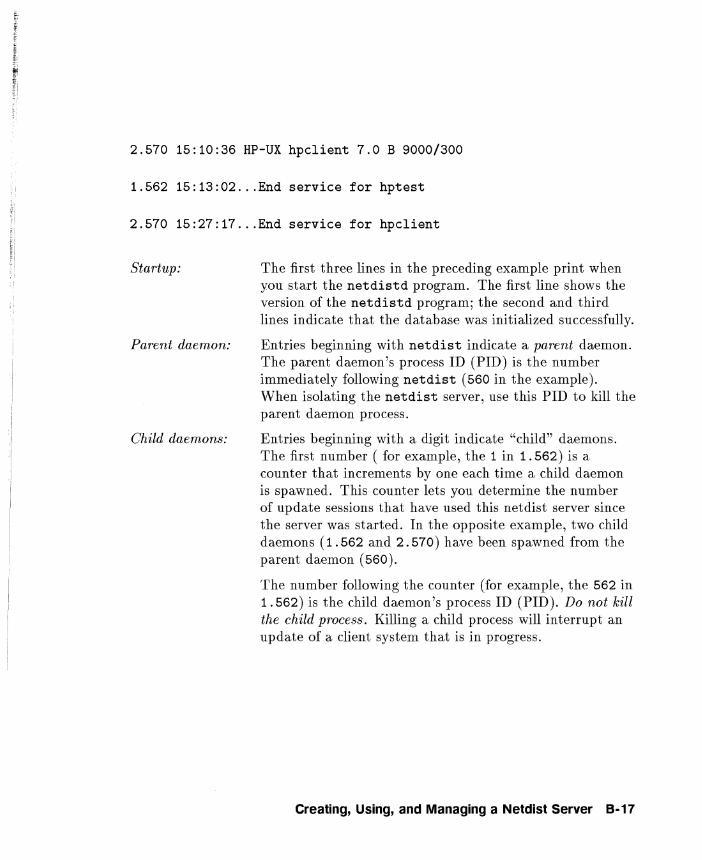
2.570 15:10:36 HP-UX hpclient 7.0 B 9000/300
1.562 15:13:02 ... End service for hptest
2.570 15:27:17 ... End service for hpclient
Startup:
Parent daemon:
Child daemons:
The first three lines in the preceding example print when you start the netdistd program. The first line shows the version of the netdistd program; the second and third lines indicate that the database was initialized successfully.
Entries beginning with netdist indicate a parent daemon. The parent daemon's process ID (PID) is the number immediately following netdist (560 in the example). When isolating the netdist server, use this PID to kill the parent daemon process.
Entries beginning with a digit indicate "child" daemons. The first number ( for example, the 1 in 1. 562) is a counter that increments by one each time a child daemon is spawned. This counter lets you determine the number of update sessions that have used this netdist server since the server was started. In the opposite example, two child daemons (1.562 and 2.570) have been spawned from the parent daemon (560).
The number following the counter (for example, the 562 in 1.562) is the child daemon's process ID (PID). Do not kill the child process. Killing a child process will interrupt an update of a client system that is in progress.
Creating, USing, and Managing a Netdist Server 8-17
Manage Fileset Availability on a Server as Necessary The purpose of a netdist server is to make filesets available to client systems for an update. This means you might, at times, want to know which filesets are available and control the access to those filesets.
Examining the MAIN.pkg File
The updist program automatically creates a file named /netdist/MAIN . pkg. The lines in the file look something like this:
source II /netdist/300/ ACCDUNTING/netdist. pkg" ; source "/netdist/300/ALLBASE1/netdist.pkg";
Statements that begin with source identify filesets that are available for network distribution.
Restricting Access to Filesets
You can make a fileset unavailable for distribution to clients by editing MAIN. pkg in either of the following ways, noting that the file is in /netdist (the default) or the directory you specified when you created the netdist server:
1. insert a pound sign (#) at the beginning of each line naming a fileset you do not want to distribute, or
2. delete each statement having a fileset you do not want to distribute.
Exercise care in restricting access to a fileset because some filesets have dependencies on other filesets. Looking at lines in MAIN. pkg, you will see comments under lines that begin with source. The comments indicate dependencies on other filesets. The following lines show examples:
source "/netdist/800/NS-SERV/netdist.pkg"; #NDTE: NS-SERV depends on LANLINK
source "/netdist/800/NFS-RUN/netdist.pkg"; #NDTE: NFS-RUN depends on LANLINK
source 11 /netdist/800/LANLINK/netdist . pkg" ;
8-18 Creating, Using, and Managing a Netdist Server
Looking at the example, you see that the NS-SERV and NFS-RUN filesets depend on the LANLINK fileset. Therefore, do not comment out the source statement for a file set (LANLINK) that contains files required by other filesets (NS-SERV and NFS-RUN unless you also comment out those filesets.
To restrict access by editing MAIN. pkg, work through the following procedure:
1. Isolate the netdist server according the directions given earlier in the section named "Isolate Processes on a Server Before Updating It".
2. Determine which filesets you do not want to distribute over the network. Do this by inspecting MAIN. pkg and any other documents you may have that relate to network distribution of HP products.
3. Edit the MAIN. pkg file as explained above (comment out or delete lines). This does not remove the filesets from the netdist server. You are only making them unavailable to client systems. If you update an existing netdist server, it is possible to have duplicate entries in the MAIN .pkg file. You must comment out or delete all related entries to make filesets unavailable to clients.
4. If you need to remove any filesets from the server, you can use the following command, which removes the specified directory.
rm -rf /netdist/300/ACCOUNTING Specify a series number and fileset name as appropriate.
5. Restart the netdist server by executing the following command:
/etc/netdistd -1 The option is a lowercase L
Creating, USing, and Managing a Netdist Server B·19

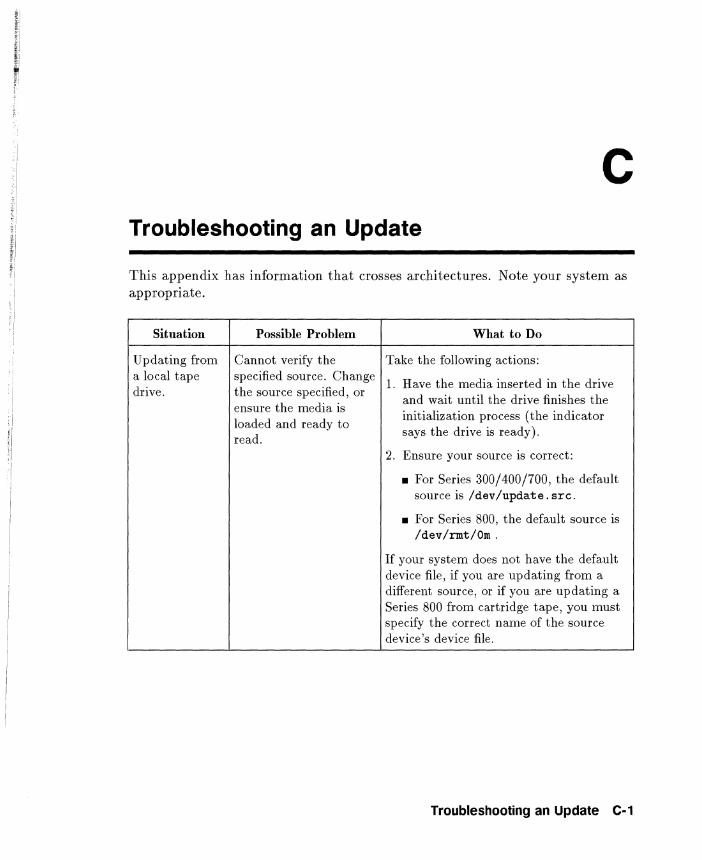
jj "·1 , ~ I !.I
c Troubleshooting an Update
This appendix has information that crosses architectures. Note your system as appropriate.
Situation Possible Problem What to Do
Updating from Cannot verify the Take the following actions: a local tape specified source. Change
1. Have the media inserted in the drive drive. the source specified, or
and wait until the drive finishes the ensure the media is
initialization process (the indicator loaded and ready to read.
says the drive is ready).
2 . Ensure your source is correct:
• For Series 300/400/700, the default source is /dev/update.src .
• For Series 800, the default source is /dev/rmt/Om.
If your system does not have the default device file, if you are updating from a different source, or if you are updating a Series 800 from cartridge tape, you must specify the correct name of the source device's device file.
Troubleshooting an Update C-1
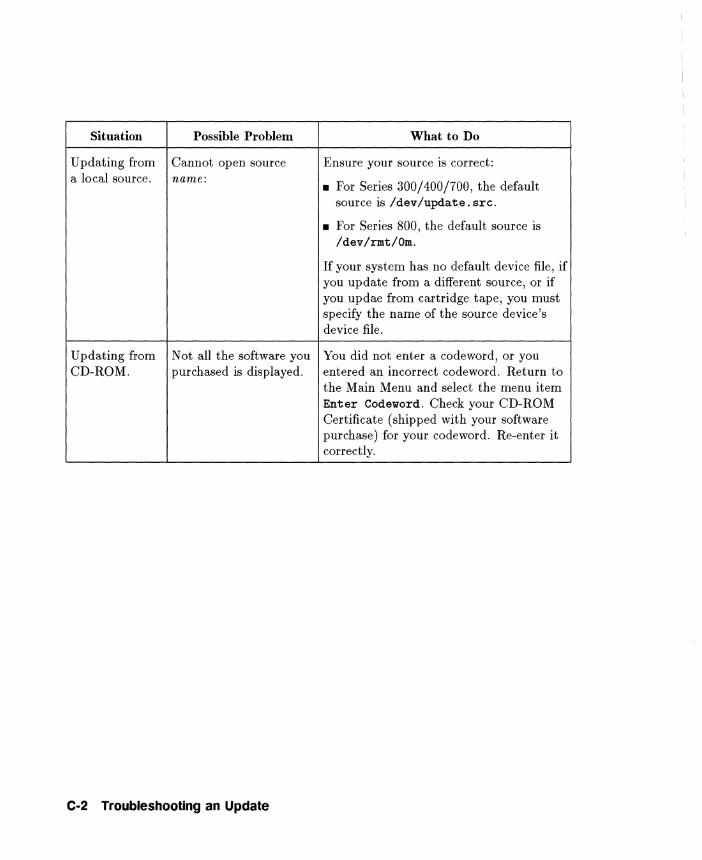
Situation Possible Problem What to Do
Updating from Cannot open source Ensure your source is correct: a local source. name:
• For Series 300/400/700, the default source is /dev/update.src .
• For Series 800, the default source is /dev/rmt/Om.
If your system has no default device file, if you update from a different source, or if you updae from cartridge tape, you must specify the name of the source device's device file.
Updating from N at all the software you You did not enter a codeword, or you CD-ROM. purchased is displayed. entered an incorrect codeword. Return to
the Main Menu and select the menu item Enter Codeword. Check your CD-ROM Certificate (shipped with your software purchase) for your codeword. Re-enter it correctly.
C-2 Troubleshooting an Update
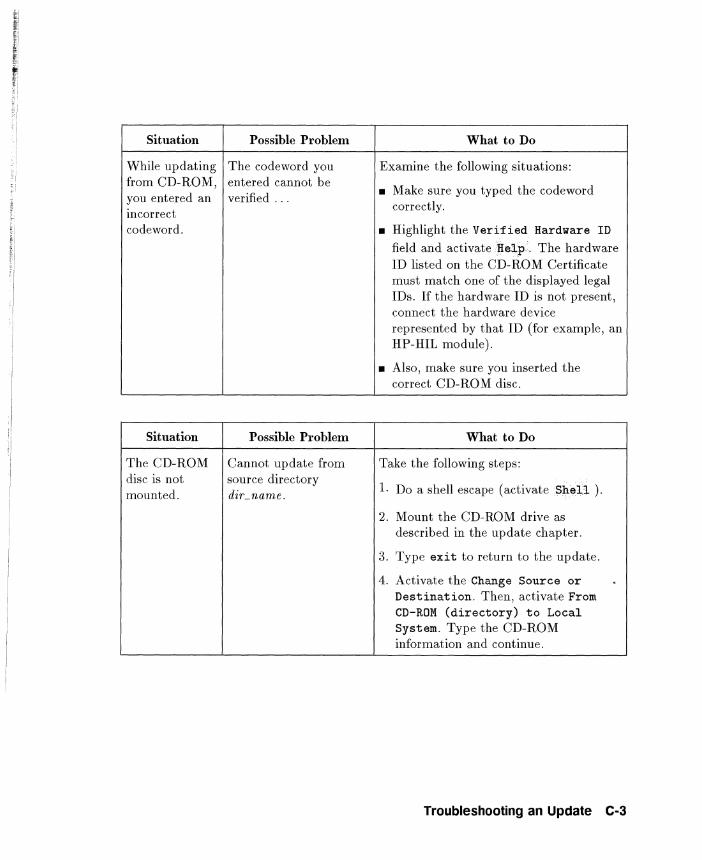
~i ~.
[I 21 i'
~.I ~,
~ ~!
~ I
Situation
While updating from CD-RO M, you entered an incorrect codeword.
Situation
The CD-ROM disc is not mounted.
Possible Problem
The codeword you entered cannot be verified ...
Possible Problem
Cannot update from source directory diLname.
What to Do
Examine the following situations:
• Make sure you typed the codeword correctly.
• Highlight the Verified Hardware ID
field and activate Help. The hardware ID listed on the CD-ROM Certificate must match one of the displayed legal IDs. If the hardware ID is not present, connect the hardware device represented by that ID (for example, an HP-HIL module).
• Also, make sure you inserted the correct CD-ROM disc.
What to Do
Take the following steps:
l. Do a shell escape (activate Shell ).
2. Mount the CD-ROM drive as described in the update chapter.
3. Type exit to return to the update.
4. Activate the Change Source or Destination. Then, activate From CD-ROM (directory) to Local System. Type the CD-ROM information and continue.
Troubleshooting an Update C-3
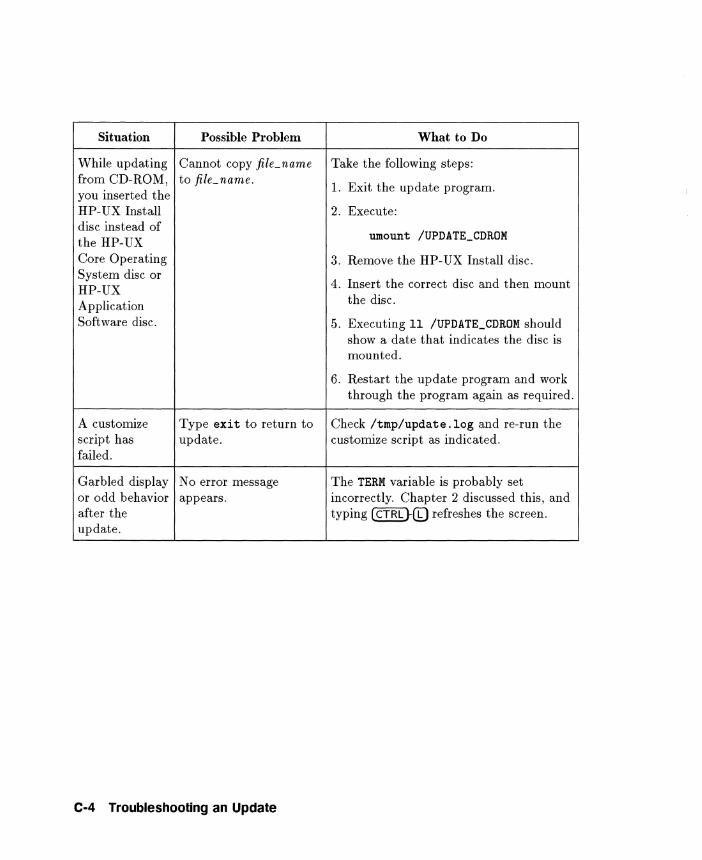
Situation Possible Problem What to Do
While updating Cannot copy file- name Take the following steps: from CD-ROM, to file_name.
l. Exit the update program. you inserted the HP-UX Install 2. Execute: disc instead of
/UPDATE_CDROM the HP-UX umount
Core Operating 3. Remove the HP-UX Install disc. System disc or
4. Insert the correct disc and then mount HP-UX Application the disc.
Software disc. 5. Executing 11 /UPDATE_CDROM should show a date that indicates the disc is mounted.
6. Restart the update program and work through the program again as required.
A customize Type exit to return to Check /tmp/update .log and re-run the script has update. customize script as indicated. failed.
Garbled display No error message The TERM variable is probably set or odd behavior appears. incorrectly. Chapter 2 discussed this, and after the typing (CTRL}-(g refreshes the screen. update.
C-4 Troubleshooting an Update
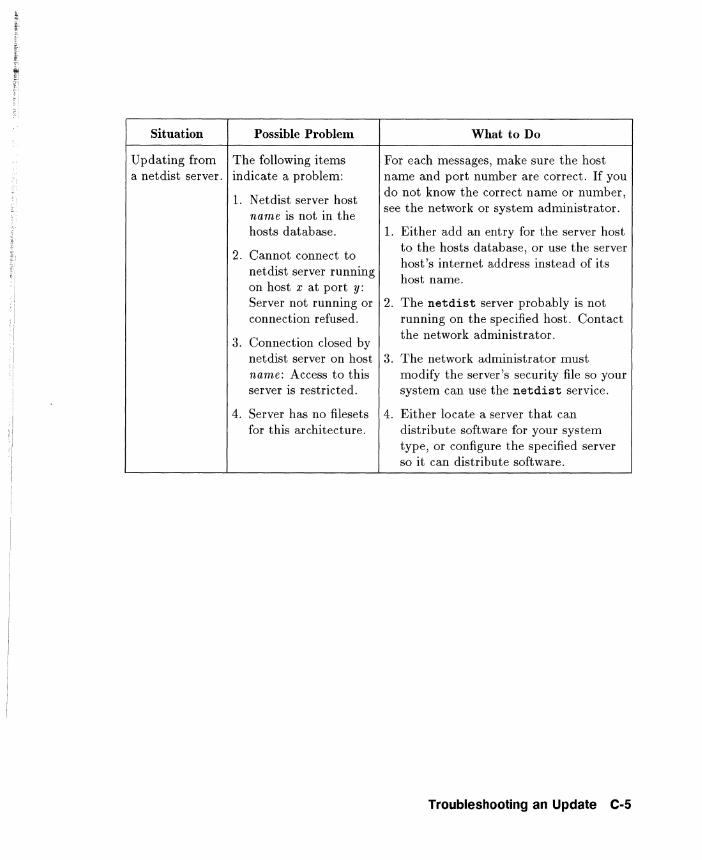
Situation Possible Problem What to Do
Updating from The following items For each messages, make sure the host a netdist server. indicate a problem: name and port number are correct. If you
1. N etdist server host do not know the correct name or number,
name is not in the see the network or system administrator.
hosts database. 1. Either add an entry for the server host
2. Cannot connect to to the hosts database, or use the server
netdist server running host's internet address instead of its
on host x at port y: host name.
Server not running or 2. The netdist server probably is not connection refused. running on the specified host. Contact
3. Connection closed by the network administrator.
netdist server on host 3. The network administrator must name: Access to this modify the server's security file so your server is restricted. system can use the netdist service.
4. Server has no filesets 4. Either locate a server that can for this architecture. distribute software for your system
type, or configure the specified server so it can distribute software.
Troubleshooting an Update C-5

Situation Possible Problem What to Do
Updating a The following items Take the following actions: cluster. indicate a problem:
l. On a Series 700 cluster, update l. The Series 300 requires CDF information that does
software on this not exist on pre-S.O media. Obtain a update media cannot 9.0 version of this software. be loaded correctly
2. If you want to convert this system into on a Series 700 clustered system due
a cluster server, you need a 9.0 version of this software. If you do not intend
to missing CDF to convert the system into a cluster
information. server, you can ignore this message.
2. The software on this update media might not function correctly on a clustered system due to missing CDF information.
Configuring a The software on this Network distribution requires CDF netdist server update media cannot be information that does not exist on pre-S.O (running distributed by a media. Obtain a 9.0 version of this updist). netdist server due to software.
missing CDF information.
The netdistd The following items Take the following actions: program does indicate the problem:
l. Either add an entry to letc/services, not start up.
l. Network service name or specify a port number using the is not in the services -Pport option (see netdistd(lM) in the database. HP- UX Reference and services( 4) in
2. Address already in the Networking Reference).
use. 2. Another netdist server program is running on the specified (or default) port. Specify a different port using the -Pport option.
C-G Troubleshooting an Update
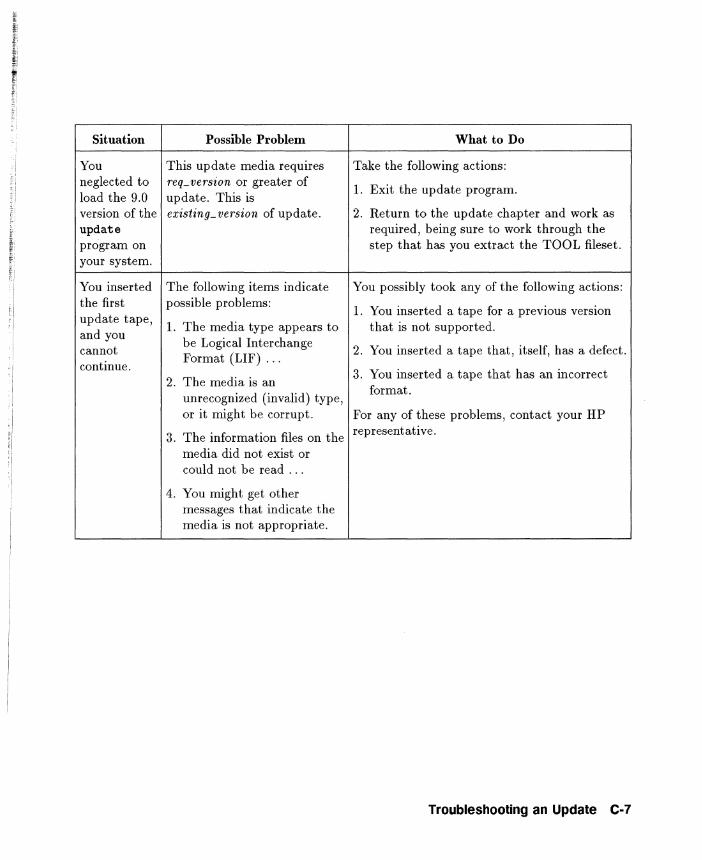
Situation Possible Problem What to Do
You This update media requires Take the following actions: neglected to req_ version or greater of
l. Exit the update program. load the 9.0 update. This is version of the existing_ version of update. 2. Return to the update chapter and work as update required, being sure to work through the program on step that has you extract the TOOL fileset. your system.
You inserted The following items indicate You possibly took any of the following actions: the first possible problems:
l. You inserted a tape for a previous version update tape,
l. The media type appears to that is not supported. and you
be Logical Interchange cannot
Format (LIF) ... 2. You inserted a tape that, itself, has a defect.
continue. 2. The media is an
3. You inserted a tape that has an incorrect
unrecognized (invalid) type, format.
or it might be corrupt. For any of these problems, contact your HP
3. The information files on the representative.
media did not exist or could not be read ...
4. You might get other messages that indicate the media is not appropriate.
Troubleshooting an Update C-7
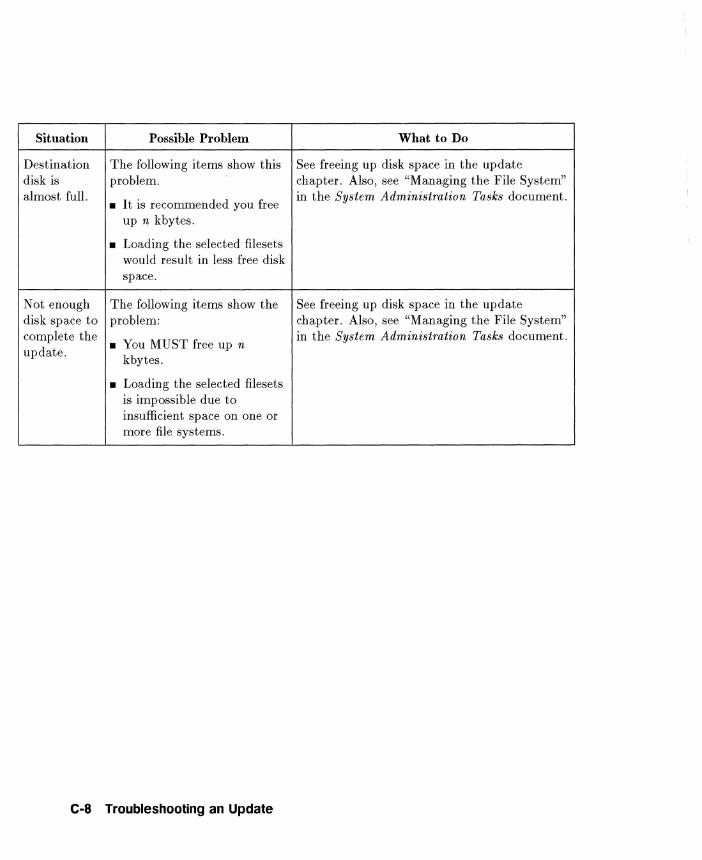
Situation Possible Problem What to Do
Destination The following items show this See freeing up disk space in the update disk is problem. chapter. Also, see "Managing the File System" almost full.
• It is recommended you free in the System Administration Tasks document.
up n kbytes.
• Loading the selected filesets would result in less free disk space.
Not enough The following items show the See freeing up disk space in the update disk space to problem: chapter. Also, see "Managing the File System" complete the
• You MUST free up n in the System Administration Tasks document.
update. kbytes.
• Loading the selected filesets is impossible due to insufficient space on one or more file systems.
c-s Troubleshooting an Update
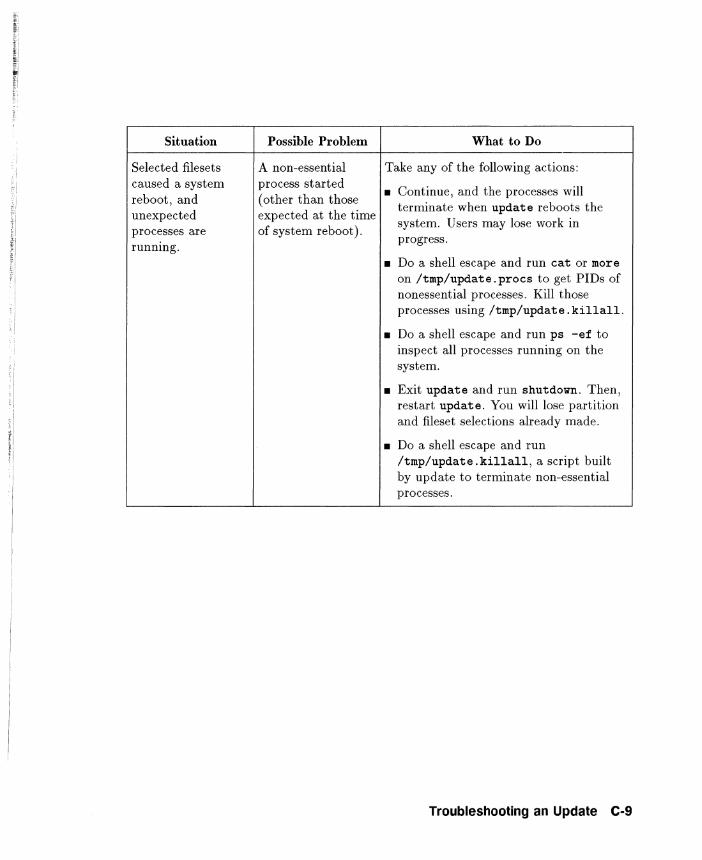
Situation Possible Problem What to Do
Selected filesets A non-essential Take any of the following actions: caused a system process started
• Continue, and the processes will reboot, and (other than those
terminate when update reboots the unexpected expected at the time
system. Users may lose work in processes are of system reboot). running.
progress.
• Do a shell escape and run cat or more on /tmp/update.procs to get PIDs of nonessential processes. Kill those processes using /tmp/update .killall.
• Do a shell escape and run ps -ef to inspect all processes running on the system.
• Exit update and run shutdown. Then, restart update. You will lose partition and fileset selections already made.
• Do a shell escape and run /tmp/update . killall , a script built by update to terminate non-essential processes.
Troubleshooting an Update e-9
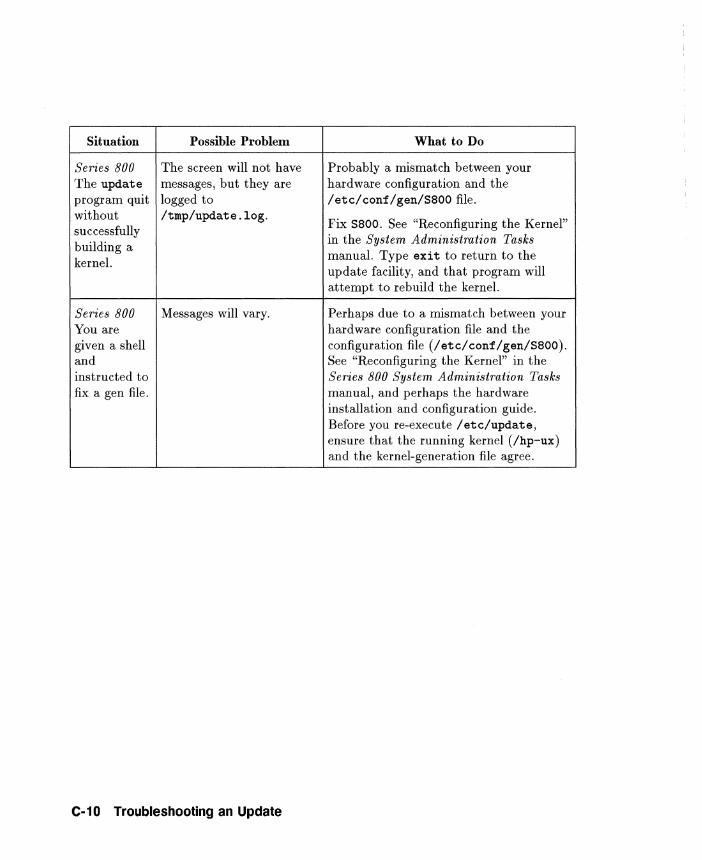
Situation Possible Problem What to Do
Series 800 The screen will not have Probably a mismatch between your The update messages, but they are hardware configuration and the program quit logged to /etc/conf/gen/5800 file. without /tmp/update .log.
Fix 5800. See "Reconfiguring the Kernel" successfully building a
in the System Administration Tasks
kernel. manual. Type exit to return to the update facility, and that program will attempt to rebuild the kernel.
Series 800 Messages will vary. Perhaps due to a mismatch between your You are hardware configuration file and the given a shell configuration file (/ etc/ conf/ gen/5800). and See "Reconfiguring the Kernel" in the instructed to Series 800 System Administration Tasks fix a gen file. manual, and perhaps the hardware
installation and configuration guide. Before you re-execute / etc/update, ensure that the running kernel (/hp-ux) and the kernel-generation file agree.
C-10 Troubleshooting an Update
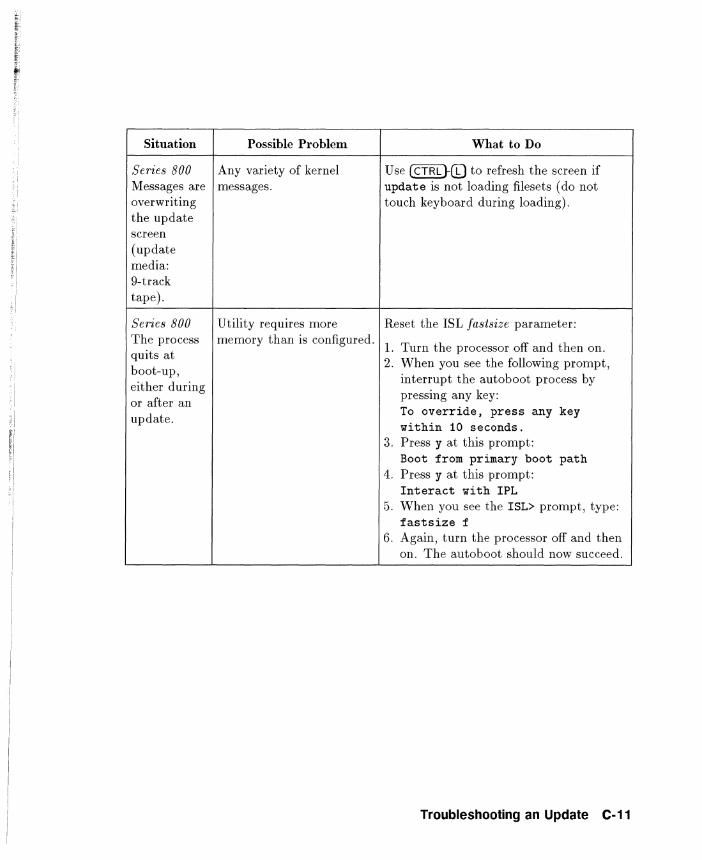
£-
Situation Possible Problem What to Do
Series 800 Any variety of kernel Use (CTRL }-eg to refresh the screen if Messages are messages. update is not loading filesets (do not overwriting touch keyboard during loading). the update screen (update media: 9-track tape).
Series 800 Utility requires more Reset the ISL Jasisize parameter: The process memory than is configured.
1. Turn the processor off and then on. quits at
2. When you see the following prompt, boot-up, either during
interrupt the autoboot process by
or after an pressing any key:
update. To override, press any key within 10 seconds.
3. Press y at this prompt: Boot from primary boot path
4. Press y at this prompt: Interact with IPL
5. When you see the ISL> prompt, type: fast size f
6. Again, turn the processor off and then on. The autoboot should now succeed.
Troubleshooting an Update C-11


Index
A
adding software, 4-1
B
backup customizations , 2-4 need for , 2-4 software , 2-4
boot server, 2-11
C
CD-ROM codeword , 2-8
cluster update, 4-1 codeword for CD-ROM, 2-8 cold network install, 2-11 command line update, 4-3 commands
netdistd, B-7
D
definition destination device, 3-3 source device, 3-3 system disk, 3-3
destination device definition, 3-3 disk space
errors, C-7 freeing it, 4-8 insufficient, 4-8
distribution creating a server, B-5
isolating a server, B-12 server log file, B-16 server overview, B-2 updating a server, B-14
distribution, server requirements, B-3
E
error messages during update, 4-3
F
filesets HP-UX products, A-I information, A-I list and size, A-2 order of loading them, A-I
H
HP-UX order of loading products, A-I
installation codeword , 2-8 cold network install, 2-11 introduction, 1-1 local boot server, 2-11 minimal system requirements , 2-6 networking ,2-10 planning, 2-1 procedure, 3-1 time and date, 2-10
install server, 2-11
Index-1
interactive update, 4-2 introduction to install/update, 1-1 isolating a netdist server, B-12
L
load TOOL fileset, 4-15 local boot server, 2-11
M
minimal system requirements , 2-6
N
netdist adding filesets to a server, B-14 creating a server, B-5 isolating a server, B-12 isolating the server, B-12 restricting access, B-18 server log file, B-16
netdist daemon starting, C-6
netdist server configuring, C-6 updating, C-5
netdist server overview, B-2 netdist, server requirements, B-3 network
definition of server, B-2 server overview, B-2
network, server requirements, B-3 non-interactive update, 4-3
o order of loading products, A-I
p
planning backup ,2-4 codeword , 2-8 installation , 2-1 minimal system requirements , 2-6
Index-2
networking, 2-10 time and date, 2-10 update, 2-1
prerequisites update, 4-4
procedure for installation, 3-1 products
order of loading them, A-I products and filesets, A-I
R
removing system files, 5-3 restricting fileset access, B-18 rmfn(IM)
removing system files, 5-3
s sequencing the loading of products, A-I server
adding filesets to one, B-14 creating one, B-5 isolating one, B-12 local boot, 2-11 log file, B-16 overview, B-2 restricting access, B-18
server, requirements, B-3 source device definition, 3-3 system disk definition, 3-3 system files
removing them, 5-3 system requirements , 2-6
T
TOOL fileset loading, 4-15
U
update adding software, 4-1 cartridge tape, updating, C-4 cluster, 4-1
cluster updates, C-6 codeword , 2-8 command line, 4-1, 4-3 deselecting filesets, 4-8 device files, 4-11 error information, 4-7 error messages, 4-3 interactive, 4-2 introduction, 1-1 load TOOL fileset, 4-15 local source, updating, C-4 log file, C-lO min/ree requirements, 4-7
mounting file systems, 4-8, 4-11 nine-track tape, updating, C-4 non-interactive, 4-3 planning , 2-1 prerequisites, 4-4 removing files, 4-8 source device, 4-11 symbolic links, creating, 4-8 the operating system, 4-12 to a new release, 4-1 unmounting file systems, 4-11 updist program, C-6
updating HP-UX, 4-1
Index-3
Reorder No. or Manual Part No. B1864-90019
rli~ HEWLETT .:~ PACKARD
Copyright © 1992 Hewlett-Packard Company Printed in USA E0892
Manufacturing Part No. B1864-90019
Bl864-90019