installing mwtm on solaris - cisco - global home page cisco mobile wireless transport manager...
TRANSCRIPT
C H A P T E R
2-1Cisco Mobile Wireless Transport Manager Installation Guide
OL-7636-01
2Installing MWTM on Solaris
This chapter describes how to install the MWTM server and client software on a Sun Solaris system. It also provides information about verifying the installation and uninstalling and reinstalling MWTM on Solaris.
This chapter includes the following sections:
• Overview of Installing MWTM, page 2-2
• Prerequisites for Installing MWTM, page 2-2
• Becoming the Root User, page 2-3
• Installing the MWTM Server and/or Client, page 2-3
• Installing MWTM to a Different Directory, page 2-13
• Specifying Alternate Ports, page 2-13
• Installing the MWTM Client for Solaris Using the Web Server, page 2-14
• Verifying MWTM Installation, page 2-16
• Starting MWTM, page 2-19
• Uninstalling MWTM, page 2-20

2-2Cisco Mobile Wireless Transport Manager Installation Guide
OL-7636-01
Chapter 2 Installing MWTM on Solaris Overview of Installing MWTM
Overview of Installing MWTMYou can install both the MWTM server software and MWTM client software on a Solaris system using the following installation menu options:
• Install MWTM Server and Client—Use when you want the MWTM server and client software to reside on the same Solaris system.
• Install MWTM Server Only—Use when you want to install only the MWTM server software on this system.
• Install MWTM Client Only—Use when you want to install only the MWTM client software on this system, or if you must install the MWTM client software separately from the server software.
The MWTM software consists of the following Solaris packages:
• MWTM server (CSCOsgm-s)
• MWTM client (CSCOsgm-c)
When you install both the MWTM server and client software on the same system, both of the listed packages must be installed successfully. When you install only the MWTM server or client, only the respective package (CSCOmwtm-s or CSCOmwtm-c) must be installed successfully.
When the MWTM installation program prompts you for a response, it displays the default value for each prompt in square brackets [ ]. To accept the default value, press Return. (When in doubt, accept the default.)
MWTM also verifies the availability of all values, such as port numbers, before accepting them.
To stop the MWTM installation program at any time, press Ctrl-C.
If you attempt to install MWTM in one window while installing another product (such as HP OpenView) in another window, the MWTM installation fails. If this situation occurs, wait until all other product installations are complete, then enter the following command from the top of the MWTM DVD Image:
./uninstall.sh -n
This command removes all MWTM components and restores your system to a clean state. Then reinstall MWTM.
Prerequisites for Installing MWTMBefore you run the MWTM installation program:
• Make sure your Solaris system meets the requirements listed in the “System Requirements” section on page 1-2.
• Determine whether you want MWTM to receive SNMP traps:
– If you want MWTM to receive traps natively, determine whether MWTM is to receive traps on the standard UDP port number 162 or on another port. For example, if your RAN-O device has been configured to send traps to a different port, or if trap multiplexing devices and NMS applications in your network have been configured to send traps to a different port, you need to specify that port number when prompted by the MWTM installation program.
– If you want MWTM to receive traps using HP OpenView, determine the location of the HP OpenView home directory. The default location is /opt/OV.

2-3Cisco Mobile Wireless Transport Manager Installation Guide
OL-7636-01
Chapter 2 Installing MWTM on Solaris Becoming the Root User
• Determine whether you want to configure MWTM Security Services, and whether you want local-based or Solaris-based authentication. For more information, see the “Configuring MWTM User-Based Access” section in the Cisco Mobile Wireless Transport Manager User Guide.
• Determine whether CiscoWorks is installed on your system, whether you want to integrate MWTM with CiscoWorks, and the name and port number for the CiscoWorks Web server. The default port number is 1741.
• Determine whether you want the MWTM server to automatically discover your network the first time the server starts after installation. If so, determine the name or IP address of the node you want to use as a seed node. For more information about the Discovery process and how to use seed nodes, see the “Discovering the Network” section of the Cisco Mobile Wireless Transport Manager User Guide.
Becoming the Root UserTo install and configure MWTM, you must be logged in as the root user on the system where you want to install MWTM.
Caution As the root user, you can adversely affect your operating environment if you are unaware of the effects of the commands you use. If you are a relatively inexperienced UNIX user, limit your activities as the root user to the tasks described in this manual.
If you are not logged in, log in as the root user:
> login: root> Password: root-password
If you are already logged in, but not as the root user, use the su command to change your login to root:
# su# Password: root-password
Installing the MWTM Server and/or ClientThis procedure assumes that you have not already installed the MWTM server or client on this workstation. If you have already installed the MWTM server or client on this workstation, some steps might be added, some might be different, and some might be unnecessary and ignored by MWTM.
During client installation, the MWTM installation program prompts you for the full path to the Netscape Communicator or Mozilla executable file. Verify the location of the file before installing the MWTM client. You can run MWTM without Netscape or Mozilla, but Netscape or Mozilla is required to access the online help, to install the MWTM client using the Web Server, to access the MWTM server home page, and to launch CiscoView and CiscoWorks. You can also change the path at any time after installation using the mwtm browserpath command. For more information, see the “MWTM Command Reference” appendix in the Cisco Mobile Wireless Transport Manager User Guide.

2-4Cisco Mobile Wireless Transport Manager Installation Guide
OL-7636-01
Chapter 2 Installing MWTM on Solaris Installing the MWTM Server and/or Client
To install the MWTM server and/or client, complete the following steps:
Step 1 Log in as the root user, as described in the “Becoming the Root User” section on page 2-3.
Step 2 Mount the DVD-ROM drive, as described in Appendix A, “Mounting and Unmounting the DVD-ROM Drive on Solaris/Linux.”
Step 3 Change to the mounted directory using the cd command:
# cd /cdrom/mwtm50/mwtm-sol
or
# cd /cdrom/cdrom0/mwtm-sol
Step 4 Start the installation script by entering the following command:
# ./setup.sh
Note If you are installing MWTM using an NFS-exported DVD-ROM drive, image checking might take several hours to complete. To avoid this problem, enter ./setup.sh -i, which disables image checking.
Step 5 The MWTM installation program displays the installation menu:
1) Review README File First (Recommended)2) Install MWTM Server and Client3) Install MWTM Server Only4) Install MWTM Client Only5) Exit Setup
Please choose an option ->
Choose one of the following installation options:
• To read the latest information about MWTM in the README file, type 1 and press Return. The README file contains late-breaking information about MWTM that might not be found in the other product documentation.
• To install both the MWTM server and client software on the system, type 2, press Return. (This is the recommended option.)
• To install the MWTM server only, type 3, press Return. Skip Step 19 through Step 23.
• To install the MWTM client only, type 4, press Return. Proceed to Step 19 through Step 25.
Note MWTM uses separate server and client installation scripts. If you choose to install both the server and client, the server script runs first, followed immediately by the client script.

2-5Cisco Mobile Wireless Transport Manager Installation Guide
OL-7636-01
Chapter 2 Installing MWTM on Solaris Installing the MWTM Server and/or Client
Step 6 The MWTM Server Install Tool starts. A system requirements check is performed to ensure all required patches are installed, and memory requirements are met.
The MWTM installation program then displays the following messages and prompt:
=========================================================================- MWTM Server Summary -=========================================================================
INFO: The following parameters will be used:
INFO: [1] Server Name : your_mwtm_serverINFO: [2] Web Server : 1774/tcpINFO: [3] JSP Server : 1775/tcpINFO: [4] Naming Server : 44742/tcpINFO: [5] Browser Path : /opt/netscape/netscape
Press Return to continue ->
where your_mwtm_server is the name of the MWTM Server.
Press Return.
Step 7 The MWTM installation program attempts to determine whether there is adequate space in the default installation directory, /opt, to install the MWTM server.
• If there is adequate space, installation continues.
• If there is not adequate space, the MWTM installation program asks you to specify a different directory. See the “Installing MWTM to a Different Directory” section on page 2-13 for more information. After you specify a different directory, installation continues.
The MWTM installation program also checks the following directories to determine whether there is adequate space: /var/sadm, /var/tmp, and /tmp. If there is not adequate space on any of these directories, the following message appears:
There is insufficient space in <directory> for installation to proceed.
The installation process stops and exits.
Step 8 If your system does not meet the requirements for Express Install, installation continues with Step 9.
If your system does meet the requirements, the MWTM installation program displays the following prompt:
Do you want the Express Install (y/n)? [Y]
The Express Install option uses default settings, minimizing system prompts.
• To choose the Express Install, press Return, and skip to Step 14.
• To choose the standard installation, which prompts you for additional information, type n, press Return, and continue with Step 9.
Step 9 The MWTM installation program displays the following prompt:
Where should the product be installed? [/opt]
To accept the default value, press Return; or type a different location and press Return.

2-6Cisco Mobile Wireless Transport Manager Installation Guide
OL-7636-01
Chapter 2 Installing MWTM on Solaris Installing the MWTM Server and/or Client
Step 10 The MWTM installation program displays the following prompt:
Which tcp port should Web Server use? [1774]
To accept the default value (recommended), press Return; or type a different, numeric port number and press Return.
(MWTM works on standard Web port 80, but software installed in the future that requires port 80 might conflict with MWTM.)
Do not enter a non-numeric port number. If you do, you are prompted to enter a numeric port number.
Step 11 The MWTM installation program displays the following prompt:
Which tcp port should JSP Server use? [1775]
To accept the default value, press Return; or type a different, numeric port number and press Return.
Do not enter a non-numeric port number. If you do, you are prompted to enter a numeric port number.
Step 12 The MWTM installation program displays the following prompt:
Which tcp port should Naming Server use? [44742]
To accept the default value, press Return; or type a different, numeric port number and press Return.
Do not enter a non-numeric port number. If you do, you are prompted to enter a numeric port number.
Step 13 The MWTM installation program displays the following messages and prompt:
=========================================================================- MWTM Server Summary -=========================================================================
INFO: The following parameters will be used:
INFO: [1] Server Name : your_mwtm_serverINFO: [2] Web Server : your_web_server_port/tcpINFO: [3] JSP Server : your_JSP_server_port/tcpINFO: [4] Naming Server : your_naming_server_port/tcpINFO: [5] Browser Path : your_browser_path
If necessary, you can change these settings after installing MWTM by using the following commands:
• To change the Server Name, use the mwtm servername command. The MWTM client name changes to match the new server name.
• To change the Browser Path, use the mwtm browserpath command.
• To change the Web Server TCP port number, use the mwtm webport command.
• To change the JSP Server TCP port number, use the mwtm jspport command.
• To verify the new settings, use the mwtm props command.
The MWTM installation program then displays the following prompt:
Press Return to continue ->
Press Return.

2-7Cisco Mobile Wireless Transport Manager Installation Guide
OL-7636-01
Chapter 2 Installing MWTM on Solaris Installing the MWTM Server and/or Client
Step 14 If CiscoWorks is not installed on your system, installation continues with Step 15.
If CiscoWorks is installed on your system, the MWTM installation program automatically integrates the MWTM server with CiscoWorks and displays output similar to the following:
Registering MWTM Server with CiscoWorks Application Registry...Integrating MWTM Server with CiscoWorks Common Services...
[Fri Aug 12 16:37:58 EDT 2005] INFO [CMICLogger : info] : com.cisco.nm.cmf.cmic.CMICApplicationRegistry Registering mwtm with ems-svr278 1741 http[Fri Aug 12 16:37:59 EDT 2005] INFO [CMICLogger : info] : com.cisco.nm.cmf.cmic.registry.OperateRecords Processing template /opt/CSCOpx/objects/data/cmf/cmic/mst-templates/sgm.xml[Fri Aug 12 16:37:59 EDT 2005] INFO [CMICLogger : info] : com.cisco.nm.cmf.cmic.registry.OperateRecords The number of records to be added : 44[Fri Aug 12 16:38:00 EDT 2005] INFO [CMICLogger : info] : com.cisco.nm.cmf.cmic.registry.RegistryInteractor Successfully added record to the registry :44[Fri Aug 12 16:38:00 EDT 2005] INFO [CMICLogger : info] : com.cisco.nm.cmf.cmic.registry.OperateRecords Writing registered template at /opt/CSCOpx/objects/data/cmf/cmic/registered-templates/mobilewirelesstransportmanager.5.0.ems-svr278.1741.http.xml[Fri Aug 12 16:38:00 EDT 2005] INFO [CMICLogger : info] : com.cisco.nm.cmf.cmic.registry.OperateRecords Setting permissions to casuser:casusers for registered template.[Fri Aug 12 16:38:00 EDT 2005] INFO [CMICLogger : info] : com.cisco.nm.cmf.cmic.CMICApplicationRegistry Registering in UNRESTERDBsgmwith display Preference asself[Fri Aug 12 16:38:00 EDT 2005] INFO [CMICLogger : info] : com.cisco.nm.cmf.cmic.registry.CMICApplicationRegistry Retrieving the last registered application name[Fri Aug 12 16:38:00 EDT 2005] INFO [CMICLogger : info] : com.cisco.nm.cmf.cmic.UnRegisterApplicationList Setting UNREGISTERDB[Fri Aug 12 16:38:00 EDT 2005] INFO [CMICLogger : info] : com.cisco.nm.cmf.cmic.UnRegisterApplicationList retriving from UNREGISTERDBEnd of UnregiseterApplicaionList[Fri Aug 12 16:38:00 EDT 2005] INFO [CMICLogger : info] : com.cisco.nm.cmf.cmic.UnRegisterApplicationList storing in UNREGISTERDB [Fri Aug 12 16:38:00 EDT 2005] INFO [CMICLogger : info] : com.cisco.nm.cmf.cmic.UnRegisterApplicationList Added appname:Mobile Wireless Transport Managerpreferenceself
CiscoWorks must be restarted to register MWTM menus:
/etc/init.d/dmgtd stop/etc/init.d/dmgtd start
Integration of MWTM Server with CiscoWorks Complete.
Note This step does not start the CiscoWorks server automatically. If the CiscoWorks server was not running when you began installing MWTM, you must start it manually.

2-8Cisco Mobile Wireless Transport Manager Installation Guide
OL-7636-01
Chapter 2 Installing MWTM on Solaris Installing the MWTM Server and/or Client
Step 15 The MWTM installation program displays the following prompt:
Would you like to configure MWTM to receive SNMP traps? [y]
• If you do not want to configure MWTM to receive SNMP traps, type n and press Return.
• If you want to configure MWTM to receive SNMP traps, press Return. The MWTM installation program displays the following message and prompt:
MWTM can receive traps natively on a UDP port or receive traps via integration with HP OpenView.
Enter SNMP trap integration type: native or hpov? [native]
– If you want MWTM to receive traps natively, press Return. The MWTM installation program attempts to determine the best configuration for the server, then displays the following messages and prompt:
MWTM can receive traps natively on the standard UDP port number 162 or on any other UDP port chosen. If another application is already bound to the SNMP standard trap reception port of 162, an alternate port number for MWTM to receive traps must be specified.
UDP port number 44750 is the default alternate port.
Enter trap port number? [162]
By default, RAN-O devices send traps to port 162. To accept the default value, press Return.
If your RAN-O devices have been configured to send traps to a different port, type that port number and press Return.
By default, MWTM listens for traps from trap multiplexing devices and NMS applications on port 44750. If you want MWTM to monitor that port, and port 162 is not available on the MWTM server device, type 44750 and press Return.
If trap multiplexing devices and NMS applications in your network have been configured to send traps to a different port, type that port number and press Return.
Do not enter a non-numeric port number. If you do, you are prompted to enter a numeric port number.
When you select an SNMP trap port number for the MWTM server, make sure your RAN-O devices use the same SNMP trap port number. See the description of the snmp-server host command in the “RAN-O Requirements” section on page 1-3 for more information.
– If you want MWTM to receive traps using HP OpenView, type hpov and press Return. The MWTM installation program displays the following prompt:
Please enter location of HP OpenView home directory: [/opt/OV]
To accept the default value, press Return; or type a different location and press Return.

2-9Cisco Mobile Wireless Transport Manager Installation Guide
OL-7636-01
Chapter 2 Installing MWTM on Solaris Installing the MWTM Server and/or Client
Step 16 The MWTM installation program displays the following prompt:
Would you like to configure MWTM Security Services? [y]
• If you do not want to configure MWTM Security Services, type n and press Return.
• If you want to configure MWTM Security Services, press Return. The MWTM installation program displays the following messages and prompt:
MWTM provides two types of security authentication, Solaris and local.
Local authentication allows creation of user accounts and passwords local to the MWTM system. When using this method, usernames, passwords, and access levels are managed using MWTM commands.
Solaris authentication uses the standard Solaris-based user accounts and passwords as specified in the /etc/nsswitch.conf file. Using this method, authentication can be provided by the local /etc/passwd file or from a distributed NIS or Kerberos system. When using this method, access levels are assigned to user accounts using MWTM commands, but all usernames and passwords are managed using Solaris commands.
The valid choices for authentication type are solaris and local.
Please choose the type of authentication to use: [local]
– If you want MWTM to use local-based authentication, press Return. The MWTM installation program displays the following message:
Authentication type set to: local.
– If you want MWTM to use Solaris-based authentication, type solaris and press Return. The MWTM installation program displays the following message:
Authentication type set to: solaris.
The MWTM installation program then displays the following messages:
User-Based Access Protection Is Enabled.Use the “mwtm adduser” command to add users.Log in with usernames and passwords for access to MWTM features.
Step 17 The MWTM installation program displays the following prompt:
Would you like MWTM to discover your network after startup? [n]
• If you want the MWTM server to automatically discover your network the first time the server starts after installation, type y and press Return.
The MWTM installation program displays the following prompt:
Enter name of device to use to seed discovery:
Type the name or IP address of a seed node and press Return.
Note MWTM does not verify that the node name you enter is a valid node name.
For more information about the Discovery process and how to use seed nodes, see the “Discovering the Network” section of the Cisco Mobile Wireless Transport Manager User Guide.
• If you do not want the MWTM server to automatically discover your network the first time the server starts after installation, press Return.

2-10Cisco Mobile Wireless Transport Manager Installation Guide
OL-7636-01
Chapter 2 Installing MWTM on Solaris Installing the MWTM Server and/or Client
Step 18 Server installation completes, and the MWTM installation program displays the following message:
To use this product, set your path to:/opt/CSCOsgm/bin:$PATH
To access the MWTM Web Server use the URL:http://your_mwtm_server:your_web_server_port
in your web browser.
Check the documentation for supported browsers and versions.
where:
• your_mwtm_server is the name of the MWTM Web Server
• your_web_server_port is the TCP port number used by the Web Server
This URL is required if you want to install the MWTM client software using the Web interface on the MWTM server. See the “Installing the MWTM Client for Solaris Using the Web Server” section on page 2-14 for more information.
Tip You can also use the Web interface on the MWTM server to access server logs, system information, and MWTM documentation.
The MWTM installation program then displays the following messages and prompt:
No Errors were encountered during installation.Please review /var/tmp/cisco_sgmsvr_install.log for detailed results.Would you like to view the log? [n]
• If you do not want to view the log, press Return.
• If you want to view the log, type y and press Return. The server installation log is displayed, followed by the prompt:
Press Return to continue ->
Press Return.
Step 19 Client installation begins. A system requirements check is performed to ensure all required patches are installed, and memory requirements are met. If the required patches are not installed, a warning appears:
WARNING: Some of the required OS patches are not installedWARNING: on this system.
Do you want to continue to install the MWTM - Server ? (y/n)? [N]
If you receive this warning, it is not recommended to continue the installation. Press Return to accept the default and discontinue the installation. Update your system with the required patches.
MWTM performs a disk space usage check to determine whether there is adequate space in the default installation directory, /opt, to install the MWTM client.
• If there is adequate space, installation continues.
• If there is not adequate space, the MWTM installation program asks you to specify a different directory. See the “Installing MWTM to a Different Directory” section on page 2-13 for more information. After you specify a different directory, installation continues.

2-11Cisco Mobile Wireless Transport Manager Installation Guide
OL-7636-01
Chapter 2 Installing MWTM on Solaris Installing the MWTM Server and/or Client
The MWTM installation program also checks the following directories to determine whether there is adequate space: /var/sadm, /var/tmp, and /tmp. If there is not adequate space on any of these directories, the following message appears:
There is insufficient space in <directory> for installation to proceed.
The installation process then stops and exits.
The MWTM installation program uses the TCP/IP and UDP ports and the browser executable path specified in Step 6.
Step 20 If your system does not meet the requirements for Express Install, installation continues with Step 21.
If your system does meet the requirements, the MWTM installation program displays the following prompt:
Do you want the Express Install (y/n)? [Y]
The Express Install option uses default settings, minimizing system prompts.
• To choose the Express Install, press Return, and skip to Step 22.
• To choose the standard installation, which prompts you for additional information, type n, press Return, and continue with Step 21.
Step 21 The MWTM installation program displays the following prompt:
Where should the product be installed? [/opt]
To accept the default value, press Return; or type a different location and press Return.
Step 22 The MWTM installation program displays the following prompt:
Integrate MWTM client with a CiscoWorks Server? [n]
• If you do not want to integrate the MWTM client with a CiscoWorks server, press Return. The MWTM installation program displays the following message and prompt:
Integration with a CiscoWorks Server was not chosen.Press Return to continue ->
Press Return.
• If you want to integrate the MWTM client with a CiscoWorks server, type y and press Return. The MWTM installation program displays the following prompt:
Enter server name for CiscoWorks Server. [your_cw_server]
where your_cw_server is the host name of the CiscoWorks server. The CiscoWorks server can be the same as the MWTM server, or it can be a different server.
To accept the default value, press Return; or type a different server name and press Return.
The MWTM installation program displays the following prompt:
Enter port number for CiscoWorks Web Server on cw_server. [1741]
where cw_server is the name of the CiscoWorks server. To accept the default port number, press Return; or type a different, numeric port number and press Return.
Do not enter a non-numeric port number. If you do, you are prompted to enter a numeric port number.

2-12Cisco Mobile Wireless Transport Manager Installation Guide
OL-7636-01
Chapter 2 Installing MWTM on Solaris Installing the MWTM Server and/or Client
The MWTM installation program displays the following prompt:
Enter secure port number for CiscoWorks Web Server on cw_server. [443]
where cw_server is the name of the CiscoWorks server. To accept the default port number, press Return; or type a different, numeric port number and press Return.
Do not enter a non-numeric port number. If you do, you are prompted to enter a numeric port number.
The MWTM installation program displays the following message and prompt:
Integration of MWTM Client with CiscoWorks Server {cw_server} complete.
Step 23 The MWTM installation program displays the following message and prompt:
To start the MWTM Client type:/opt/CSCOsgmClient/bin/mwtm clientor include /opt/CSCOsgmClient/bin in your path and type ‘mwtm client’
No Errors were encountered during installation.Please review /var/tmp/cisco_sgmcli_install.log for detailed results.Would you like to view the log? [n]
• If you do not want to view the log, installation is complete. Press Return.
• If you want to view the log, type y and press Return. The client installation log is displayed, followed by the prompt:
Press Return to continue ->
Press Return.
Step 24 To verify that the installation was successful, see the procedures in the “Verifying MWTM Installation” section on page 2-16.
Step 25 The MWTM installation program displays the following MWTM start menu:
1) Start MWTM Server and Client2) Start MWTM Server Only3) Exit Setup
Please choose an option ->
To start MWTM at this time, type one of the options and press Return. To start MWTM at a later time, see the “Starting MWTM” section on page 2-19.
Note Launching the client on Solaris requires the variable DISPLAY to be set to your display in your unix shell environment. If you used telnet to get to the server, you will not have access to your display and will not have the DISPLAY variable set automatically for you.

2-13Cisco Mobile Wireless Transport Manager Installation Guide
OL-7636-01
Chapter 2 Installing MWTM on Solaris Installing MWTM to a Different Directory
Installing MWTM to a Different DirectoryTo install the MWTM software in a directory other than the /opt default directory, use the standard installation and specify a new location to install the MWTM software.
In the following example, the MWTM installation program detects insufficient space in the /opt default directory and recommends an alternate directory, /usr2, which has enough available space:
============================================================================- Disk Space Usage check -==============================================================================INFO: For this product the default disk space requirements are: /opt 300 MB /var/sadm 1 MB /var/tmp 1 MB /tmp 1 MBINFO: Checking default disk space requirements... INFO: /opt has insufficient space for installation.INFO: Express Install has been disabled.============================================================INFO: Local disks on this machine with enough space to install:Filesystem kbytes used avail capacity Mounted on/dev/dsk/c0t4d0s6 1925720 288623 1444527 17% /usr2Where should the product be installed? [/usr2]
To accept the recommended directory, press Return. Otherwise, specify another directory and press Return.
Specifying Alternate PortsThe MWTM client and server software must be set up to communicate on the same port. If you are installing the MWTM client on the same machine as the MWTM server, the installation program handles this automatically. If you are installing the MWTM client on a separate system from the server, you must make sure the ports specified during the client installation match those installed for the MWTM server. In most installation situations the default ports should be available for the MWTM client and server.
The MWTM server software uses the following default ports:
• Web Server—1774/tcp
• JSP Server—1775/tcp
• Naming Server—44742/tcp
The MWTM client software must know which ports the MWTM server is using. By default, the client uses the following ports:
• Web Server—1774/tcp
• JSP Server—1775/tcp
• Naming Server—44742/tcp

2-14Cisco Mobile Wireless Transport Manager Installation Guide
OL-7636-01
Chapter 2 Installing MWTM on Solaris Installing the MWTM Client for Solaris Using the Web Server
When you install the MWTM server, or the MWTM server and client, the MWTM installation program determines whether or not these ports are available. (This is not done when you install only the MWTM client.) If there are conflicts with the ports, the software provides you with the option to specify an alternate port number.
To determine the ports that are currently in use on your system, use the netstat command for Solaris, which includes the corresponding port type (TCP).
# netstat -a -n -f inet -P tcp
Note If you are specifying an alternate port, remember that ports 1 through 1023 are reserved for system processes.
Installing the MWTM Client for Solaris Using the Web ServerYou can access the MWTM client installation software from the MWTM Web Server. This is useful if you do not have the DVD-ROM, or if you prefer to download the software from the MWTM server. Once you have downloaded the MWTM client installation software to your system, you must install the software on your local system by entering the setup.sh command.
The following procedure explains how to download, unzip, and install the MWTM client software on a Solaris system.
To install the MWTM client using the Web interface:
Step 1 Create a temporary directory in a disk partition that contains at least 60 MB of space on the system where you want to install the MWTM client software.
Step 2 From your browser, go to the URL for the MWTM Web Server:
http://mwtm_web_server:1774
where mwtm_web_server is the name or IP address of the MWTM Web Server and 1774 is the Web port being using by MWTM. (1774 is the default port number.) If you do not know the name or Web port of the MWTM Web Server, contact the system administrator who installed the MWTM server software.
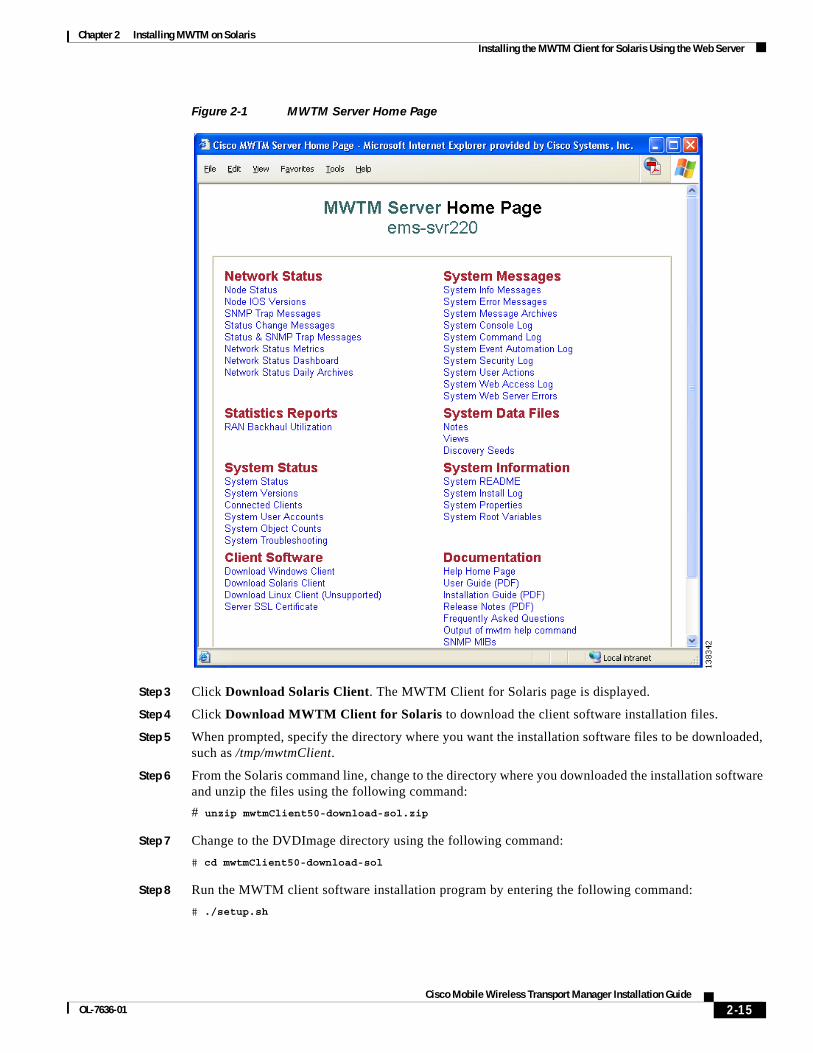
MWTM displays the MWTM Server Home Page (Figure 2-1).
2-15Cisco Mobile Wireless Transport Manager Installation Guide
OL-7636-01
Chapter 2 Installing MWTM on Solaris Installing the MWTM Client for Solaris Using the Web Server
Figure 2-1 MWTM Server Home Page
Step 3 Click Download Solaris Client. The MWTM Client for Solaris page is displayed.
Step 4 Click Download MWTM Client for Solaris to download the client software installation files.
Step 5 When prompted, specify the directory where you want the installation software files to be downloaded, such as /tmp/mwtmClient.
Step 6 From the Solaris command line, change to the directory where you downloaded the installation software and unzip the files using the following command:
# unzip mwtmClient50-download-sol.zip
Step 7 Change to the DVDImage directory using the following command:
# cd mwtmClient50-download-sol
Step 8 Run the MWTM client software installation program by entering the following command:
# ./setup.sh

2-16Cisco Mobile Wireless Transport Manager Installation Guide
OL-7636-01
Chapter 2 Installing MWTM on Solaris Verifying MWTM Installation
Note If you are installing MWTM using an NFS-exported DVD-ROM drive, image checking might take several hours to complete. To avoid this problem, enter ./setup.sh -i, which disables image checking.
The MWTM installation program displays the installation menu:
1) Review README File First (Recommended)4) Install MWTM Client Only5) Exit Setup
Please choose an option ->
Choose one of the following installation options:
• To read the latest information about MWTM in the README file, type 1 and press Return. The README file contains late-breaking information about MWTM that might not be found in the other product documentation.
• To install only the MWTM client on the system, type 4 and press Return.
The rest of the MWTM client installation is identical to Step 19 through Step 25 of the “Installing the MWTM Server and/or Client” section on page 2-3.
Step 9 After verifying that the MWTM client software installed successfully, remove all installation files in the temporary directory using the following command:
# rm -rf tmp/mwtmClient
Where tmp/mwtmClient50-download-sol is the directory containing the downloaded files.
Verifying MWTM InstallationYou can verify successful installation of the MWTM server and client software by performing the following tasks:
• Checking for Error Messages, page 2-17
• Viewing Packaging Information for the MWTM Server and Client, page 2-18
• Verifying the Installation Directories, page 2-18

2-17Cisco Mobile Wireless Transport Manager Installation Guide
OL-7636-01
Chapter 2 Installing MWTM on Solaris Verifying MWTM Installation
Checking for Error MessagesDuring installation, messages are recorded in a log file to provide diagnostic information about problems that might arise. The location of the installation log file is provided in a message at the end of the MWTM installation script.
To check for installation error messages:
Step 1 Log in as the root user as described in the “Becoming the Root User” section on page 2-3.
Step 2 Use the following command to examine the MWTM server installation log:
# more install_directory/install/cisco_sgmsvr_install.log
Where install_directory is the directory in which MWTM was installed. The default installation directory for MWTM is /opt/CSCOsgm.
Step 3 Use the following command to examine the MWTM client installation log:
# more install_directory/install/cisco_sgmcli_install.log
Step 4 Press the Space bar to scroll through the display one screen at a time.
You can also display the MWTM server and client installation logs using the mwtm installlog command. For more information, see the “MWTM Command Reference” appendix in the Cisco Mobile Wireless Transport Manager User Guide.

2-18Cisco Mobile Wireless Transport Manager Installation Guide
OL-7636-01
Chapter 2 Installing MWTM on Solaris Verifying MWTM Installation
Viewing Packaging Information for the MWTM Server and ClientYou can use the pkginfo command to verify that the MWTM server (CSCOsgm-s) and MWTM client (CSCOsgm-c) software packages are installed on your system.
To view packaging information for the MWTM server and client:
Step 1 Enter one of the following pkginfo commands:
# pkginfo -l CSCOsgm-s# pkginfo -l CSCOsgm-c
Step 2 Verify that you receive output similar to the following display for each package you query with the pkginfo command:
PKGINST: CSCOsgm-s NAME: Cisco MWTM Server
CATEGORY: application ARCH: sparc VERSION: 5.0 BASEDIR: /opt/CSCOsgm VENDOR: Cisco Systems, Inc DESC: Cisco MWTM Server PSTAMP: mwtm-sun320040213143816
INSTDATE: Feb 13 2005 18:13 HOTLINE: 1-800-553-2447 EMAIL: [email protected] STATUS: completely installed FILES: 2532 installed pathnames 1 linked files 176 directories 2342 executables 1 setuid/setgid executables 233768 blocks used (approx)
If the package was not found, the following message is displayed:
ERROR: information for "CSCOsgm-s" was not found
The MWTM software package was not installed. Install MWTM again.
Verifying the Installation DirectoriesAfter you install MWTM, use the ls command to verify that you have a new directory structure containing the MWTM software.
• For the MWTM server, the default directory is /opt/CSCOsgm.
• For the MWTM client, the default directory is /opt/CSCOsgmClient.
• If you installed MWTM in a directory other than /opt, then the CSCOsgm and CSCOsgmClient directories are located in that directory.

2-19Cisco Mobile Wireless Transport Manager Installation Guide
OL-7636-01
Chapter 2 Installing MWTM on Solaris Starting MWTM
Starting MWTMAfter you install the MWTM server and client software, verify that you can start the MWTM software. You can start the MWTM software by selecting the corresponding option on the start-up menu after the installation program is complete.
You can also start the MWTM server and client from the command line.
There is no harm in attempting to start an MWTM server or client if it is already running.
Note The following procedures assume that you installed MWTM in the default directory, /opt. If you installed MWTM in a different directory, change to that directory instead of /opt.
To start just the MWTM server from the command line, log in as the root user and use the following commands:
# cd /opt/CSCOsgm/bin# ./mwtm start
To start just the MWTM client from the command line, use the following commands:
# cd /opt/CSCOsgm/bin# ./mwtm client server_name
For a complete list of all of the MWTM commands, see the “MWTM Command Reference” appendix in the Cisco Mobile Wireless Transport Manager User Guide.
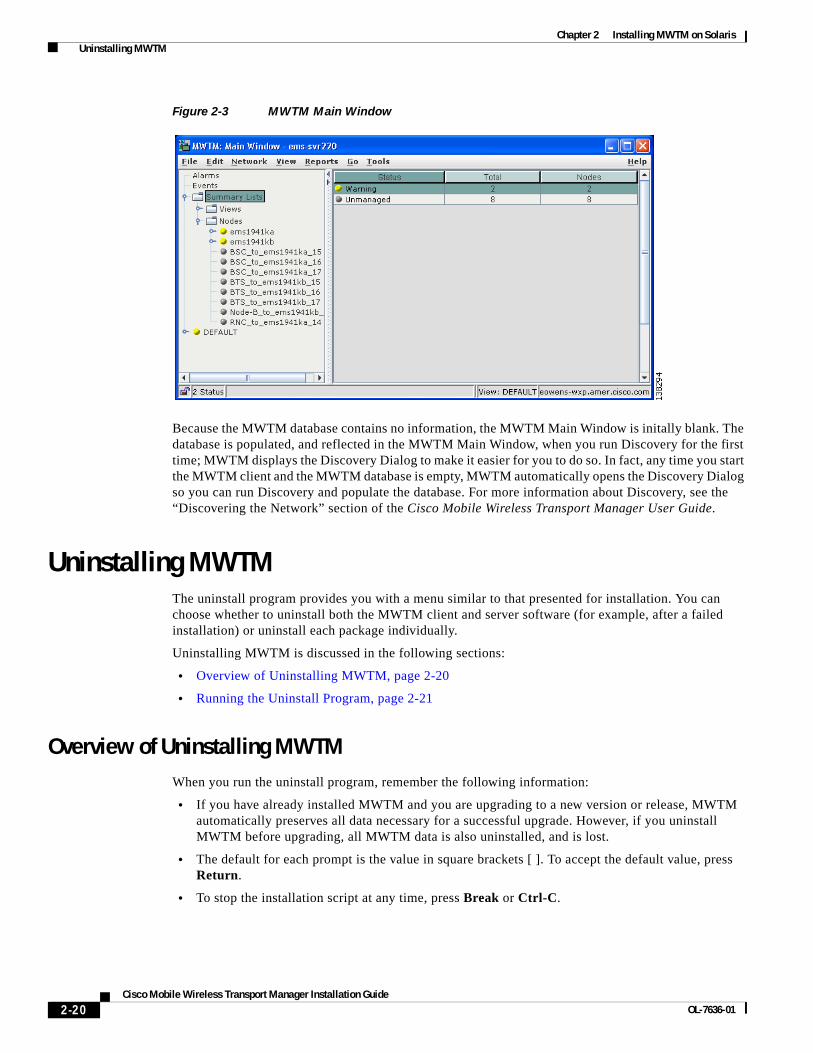
If the MWTM server and client installation was successful, and if you did not configure the MWTM server to automatically discover your network the first time the server starts after installation, MWTM displays the Discovery Dialog (Figure 2-2) and the MWTM Main Window (Figure 2-3).
Figure 2-2 Discovery Dialog
2-20Cisco Mobile Wireless Transport Manager Installation Guide
OL-7636-01
Chapter 2 Installing MWTM on Solaris Uninstalling MWTM
Figure 2-3 MWTM Main Window
Because the MWTM database contains no information, the MWTM Main Window is initally blank. The database is populated, and reflected in the MWTM Main Window, when you run Discovery for the first time; MWTM displays the Discovery Dialog to make it easier for you to do so. In fact, any time you start the MWTM client and the MWTM database is empty, MWTM automatically opens the Discovery Dialog so you can run Discovery and populate the database. For more information about Discovery, see the “Discovering the Network” section of the Cisco Mobile Wireless Transport Manager User Guide.
Uninstalling MWTMThe uninstall program provides you with a menu similar to that presented for installation. You can choose whether to uninstall both the MWTM client and server software (for example, after a failed installation) or uninstall each package individually.
Uninstalling MWTM is discussed in the following sections:
• Overview of Uninstalling MWTM, page 2-20
• Running the Uninstall Program, page 2-21
Overview of Uninstalling MWTMWhen you run the uninstall program, remember the following information:
• If you have already installed MWTM and you are upgrading to a new version or release, MWTM automatically preserves all data necessary for a successful upgrade. However, if you uninstall MWTM before upgrading, all MWTM data is also uninstalled, and is lost.
• The default for each prompt is the value in square brackets [ ]. To accept the default value, press Return.
• To stop the installation script at any time, press Break or Ctrl-C.

2-21Cisco Mobile Wireless Transport Manager Installation Guide
OL-7636-01
Chapter 2 Installing MWTM on Solaris Uninstalling MWTM
Uninstall both the MWTM server software and client software on a Solaris system, either at the same time or separately, using the following menu options provided by the uninstall program.
1. Uninstall MWTM Server and Client—Use when the MWTM server and client software reside on the same Solaris system and you want to remove all of the MWTM software on that system. This option removes all of the MWTM packages from the system: the MWTM server package (CSCOsgm-s) and MWTM client package (CSCOsgm-c).
2. Uninstall MWTM Server Only—Use when you want to remove only the MWTM server software on this system. This option removes the MWTM server package (CSCOsgm-s).
Note Uninstalling the MWTM server also disables the MWTM client. If you want to uninstall the MWTM server, we strongly recommend that you uninstall both the MWTM server and the MWTM client.
3. Uninstall MWTM Client Only—Use when you want to remove only the MWTM client software on this system. This option removes the MWTM client package (CSCOsgm-c).
Running the Uninstall ProgramTo uninstall the MWTM software:
Step 1 Log in as the root user as described in the “Becoming the Root User” section on page 2-3.
Step 2 If you are running an MWTM client locally, exit all open MWTM windows.
Tip To display a list of all MWTM clients that are connected to the MWTM server, use the mwtm who command. To notify all MWTM clients that you are uninstalling MWTM, use the mwtm wall command.
You do not need to stop the MWTM server; the MWTM uninstall program stops the server automatically.
Step 3 To start the uninstall script, enter the following command:
# /opt/CSCOsgm/bin/mwtm uninstall
If you installed the MWTM client only, enter the following command:
# /opt/CSCOsgmClient/bin/mwtm uninstall
For more details on the mwtm uninstall command, see the “MWTM Command Reference” appendix in the Cisco Mobile Wireless Transport Manager User Guide.
Step 4 The MWTM uninstall program displays the uninstall menu. The options displayed depend on what you have installed. For example, if you have installed only the MWTM server, then your only option is to uninstall the MWTM server.
Choose one of the following actions:
• To uninstall both the MWTM server and client software, type 1 and press Return. The MWTM client is uninstalled, followed by the MWTM server.
• To uninstall only the MWTM server, type 2 and press Return.
• To uninstall only the MWTM client, type 3 and press Return.
Step 5 The MWTM uninstall program asks you to verify that you want to uninstall the MWTM client, server, or both. When prompted, type y and press Return.
2-22Cisco Mobile Wireless Transport Manager Installation Guide
OL-7636-01
Chapter 2 Installing MWTM on Solaris Uninstalling MWTM
Step 6 When uninstall is complete, the MWTM uninstall program displays messages indicating that the packages were deleted successfully.
For example, the following example shows the message received when uninstalling the MWTM server:
INFO: The following Cisco MWTM packagesINFO: have been successfully deleted from the system: CSCOsgm-sPlease review /var/tmp/cisco_sgmsvr_uninstall.log for detailed results
Step 7 To verify that the MWTM server and its associated services are uninstalled, enter the following pkginfo commands:
# pkginfo -l CSCOsgm-sERROR: information for "CSCOsgm-s" was not found
# pkginfo -l CSCOsgm-cERROR: information for "CSCOsgm-c" was not found