installing scanbizcards through appexchange · procedure to get started. attach contacts to new or...
TRANSCRIPT

Installing ScanBizCards ThroughAppExchange
1© ScanBiz Mobile Solutions LLC. - All rights reserved.

ScanBizCards improves the productivity of sales and executive teams by allowing them to quickly snap photos of business cards using their phone and export contacts directly into Salesforce.
More than 82000 businesses use ScanBizCards to get new contacts into their sales funnel faster, boosting sales productivity by at least 40%.
Here’s what you can do with ScanBizCards Enterprise edition:
This guide will help you set up your ScanBizCards managed package. Follow the step-by-step procedure to get started.
Attach contacts to new or existing customer accountsAssign lead owners before exporting to SalesforceCustomize any �eldCapture additional contacts from email signatures, and much more
2
Overview
ScanBizCards Enterprise: An Overview
© ScanBiz Mobile Solutions LLC. - All rights reserved.

Contents
3
77
55
5
9
10
13
15
15
1720
23
28
28
29
29
30
30
3032
33
3334
37
37
37
35
13
Signing-up
Signing up from the website
Installing ScanBizCards Managed PackageChoose the environment
Installation Options
Prerequisites to install Managed Package
Creating Pro�les
How to Create a User Pro�le
Managing Settings
General Settings
Lead
Contact
Account
Org Data Assignment
Section A: Installing ScanBizCards Through AppExchange
Assign: Accounts
Assign: Campaigns
Assign: Lead Owners
Installation OptionsInstall for Admins Only
Install for All Users
For Admins
Assigning Roles & Licenses
Revoking User Licenses
Business Cards
Email Signature Capture
User Activity
How to Manage Licenses
Reports
© ScanBiz Mobile Solutions LLC. - All rights reserved.
4
Integration to ScanBizCards
Steps for integration
ScanBizCards Interaction with Accounts Layout
Overview
Section B: Integrating ScanBizCards With the Salesforce1 App
Help and Support
Technical Support
38
38
39
39
41
42
42
© ScanBiz Mobile Solutions LLC. - All rights reserved.

Section A
5
Signing-up
Go to https://www.scanbizcards.com/ and click on the Free 14-Day Trial link.
You will land up on the Salesforce Appexchange page for ScanBizCards: Conference Badge & Business Card Scanner App for Salesforce: https://appexchange.salesforce.com/listingDetail?list-ingId=a0N3000000B4XwXEAV
Click on Get it Now tab.
Installing ScanBizCards Through AppExchange
Signing up from the website
1
2
3
© ScanBiz Mobile Solutions LLC. - All rights reserved.
6
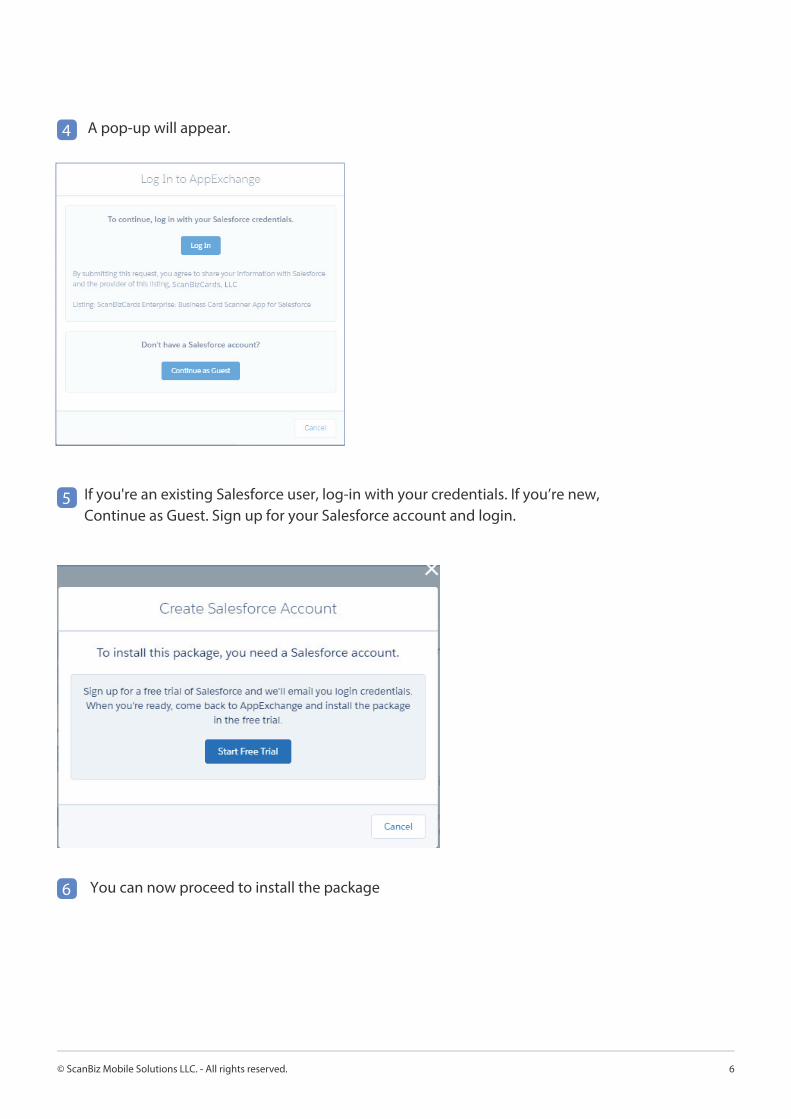
4 A pop-up will appear.
If you're an existing Salesforce user, log-in with your credentials. If you’re new, Continue as Guest. Sign up for your Salesforce account and login.
You can now proceed to install the package
5
6
© ScanBiz Mobile Solutions LLC. - All rights reserved.

Choose an environment
7
Choose an environment (i.e. Production or Sandbox) where you would like to install your ScanBizCards package.
[We recommend you to �rst install the package in your sandbox, and use it for few days before you’re ready to install the package in your production environment]
1
You will see the Con�rm Installation Details page.2
Installing ScanBizCards Managed Package
© ScanBiz Mobile Solutions LLC. - All rights reserved.

8
Click on ‘Con�rm and Install’3
You will see your Salesforce Login prompt. Proceed with the login using your Salesforce login creden-tials.
The next step is to choose the option you’d like to choose for installing your ScanBizCards Enterprise package.
Please Note: USERS WILL STILL NEED TO DOWNLOAD THE MOBILE APP ONTO THEIR RESPECTIVE
DEVICES.
© ScanBiz Mobile Solutions LLC. - All rights reserved.
August 2019 7

Congratulations! Your ScanBizCards Package is now installed.
9
Installation Options
There are three options:
To Manage your Free/Paid licenses. Please click on ‘Manage Licenses’
Install for Admin(s) Only-- Your SBCE Salesforce package will be installed only for users with Admin roles. We prefer that user select “Install for Admins only”Install for All Users-- -- Your SBCE Salesforce package will be installed for all the users within the organization.Install for Speci�c pro�les-- Your SBCE Salesforce package will be installed only for speci�c user pro�les.
1
2 Click Install
2 Click Done
© ScanBiz Mobile Solutions LLC. - All rights reserved.
7August 2019ScanBiz Mobile Solutions LLC

10© ScanBiz Mobile Solutions LLC. - All rights reserved.
1
Make sure that the domain for your Salesforce organization is registered. If not, follow the given steps:
Go to Set up
2 Search for ‘My Domain’ in Quick Setup
3 View ‘My Domain’ screen.
4 Now, choose a domain name.
5 Check availability of domain.
Please follow the steps below if you are installing ScanBizCards Enterprise Managed Package in your Salesforce organization on the Lightning platform.
Prerequisites to install Managed Package
11
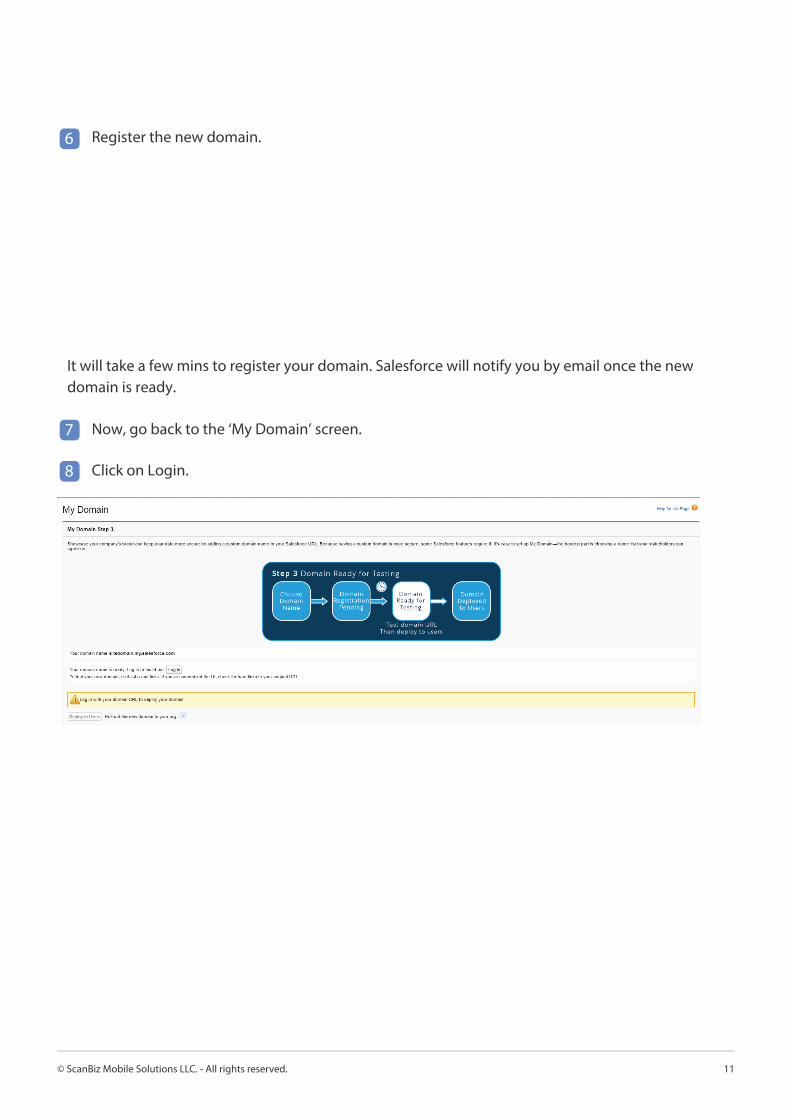
6 Register the new domain.
It will take a few mins to register your domain. Salesforce will notify you by email once the new domain is ready.
Now, go back to the ‘My Domain’ screen.
Click on Login.
7
8
8
© ScanBiz Mobile Solutions LLC. - All rights reserved.

12
9 Now, deploy domain for all users.
88
© ScanBiz Mobile Solutions LLC. - All rights reserved.

13
Creating Pro�lesHow to Create a User Pro�le
Let’s go to the ScanBizCards Managed package. For this, go to the tabs section in Salesforce environment and click on nine dots icon to view all options.
A list of all tabs will appear.
Click on the ‘ScanBizCards’ option. The ScanBizCards package page will load. The Settings page for the Managed package will open.
1
2
This page shows the list of all pro�les that the Admin user has created.3
By default, the ‘Default’ pro�le is displayed. If an admin user wants to add a new pro�le for select users, admin user can click on ‘Add’.
4
© ScanBiz Mobile Solutions LLC. - All rights reserved.

14
When user adds a new pro�le then a pop-up will be displayed informing that ScanBizCards has enabled some default settings for the user to allow changes in these settings. The user can also set everything back to default using the ‘Restore to defaults’ tab.
5
A blank pro�le page will appear. Enter your pro�le name.6
At this point, if users want to change any settings, they can. After this, they can click on the Publish button.
The user pro�les are now saved.
7
© ScanBiz Mobile Solutions LLC. - All rights reserved.

15
General Settings
Managing Settings
YES / NO
YES / NO
YES / NO
YES / NO
YES / NO
YES / NO
Lead/Contact
YES / NO
YES / NO
YES / NO
YES / NO
YES / NO
Whether scanned data exports as a Lead Or Contact.
For any addresses detected on the card, attempt to export using a 2 letter state code instead of full state name. If you have State & Country picklists enabled, turn this setting o�.
Whether to attach the image of the busi-ness card to the Contact or Lead record that is created.
When enabled, the default actionshown to users after scanning isExport to Salesforce, rather than Addto Address Book.
Whether the user should beprompted if they want to exportimmediately or export later (for
Export as
Use 2 letter country code
Use 2 letter state code
Attach image to export
Export after scan
Prompt to export later
Value User Canmodify *
DescriptionOption
situations where they do not have connec-tivity, for example).
1 General settings covers basic settings available in the app with yes/no options.
© ScanBiz Mobile Solutions LLC. - All rights reserved.

Set criteria on which you want duplicates to be detected while exporting to Sales-Force.
If a duplicate record is detected should the scanned data be added to the existing Contact or Lead?
Whether the user can search only the current exported object type or across all.
Allow duplicate search across objects
Opt in to Smart OCR
Hide 'Store as default'
User can modifycampaigns
User can modify lead owners
BCC to Salesforce
16
YES / NO
YES / NO
YES / NO
YES / NO
YES / NO
YES / NO
First NameLast NameCompanyEmailPhone
Smart OCR improves user experienceby automatically making correctionsto your scan using recent scans of thecard generated by our user base. Byparticipating in Smart OCR, accuracyas well as account name associationare greatly improved.
Whether the option is shown during an export to save the data the user enters for custom �elds as the default value (within the app only) for that �eld.
Whether the user is able to overridethe Campaign settings.
Whether the user is able to overridethe Lead Owner settings speci�edbelow.
Whether the user auto populates their BCC to Salesforce email when using Quick Intro Email within the app.
Duplicate Criteria
YES / NO YES / NOUpdate duplicates
When enabled, the application will then follow the assignment rules during the creation of the new record.
Whether the user is able to choosebetween Lead/Contact or not duringan export.
Use Assignment Rule
Prompt For Lead/Contact Selection
YES / NO
YES / NO
© ScanBiz Mobile Solutions LLC. - All rights reserved.

*User can modify: Speci�es whether the user can override this property within the app.
Use Assignment Rule
Prompt For Lead/Contact Selection
Lead
Click Lead - Lead settings will be displayed1
Choose if app user can or cannot modify standard or custom �elds while exporting.2
If you allow the user to modify �elds, the app user can modify lead standard or custom �elds during export.
3
Standard �elds are default �elds supplied by Salesforce for each lead.
Map from Scanned Field: Whether the app should attempt to automatically populate this �eld based on a speci�ed scanned item.Default for Value: Speci�es the default value for this �eld during the export.
4
The Column Values display the following:5
17© ScanBiz Mobile Solutions LLC. - All rights reserved.
When enabled, Task/Activity will be create under exported Lead/Contact
YES / NOAdd Task to Lead/Contact
When enabled, Notes will be create under exported Lead/Contact
YES / NO YES / NOAdd Notes to Lead/Contact
YES / NO
Map from Scanned Field: Whether the app should attempt to automatically populate this �eld based on a speci�ed scanned item.Default for Value: Speci�es the default value for this �eld during the export.
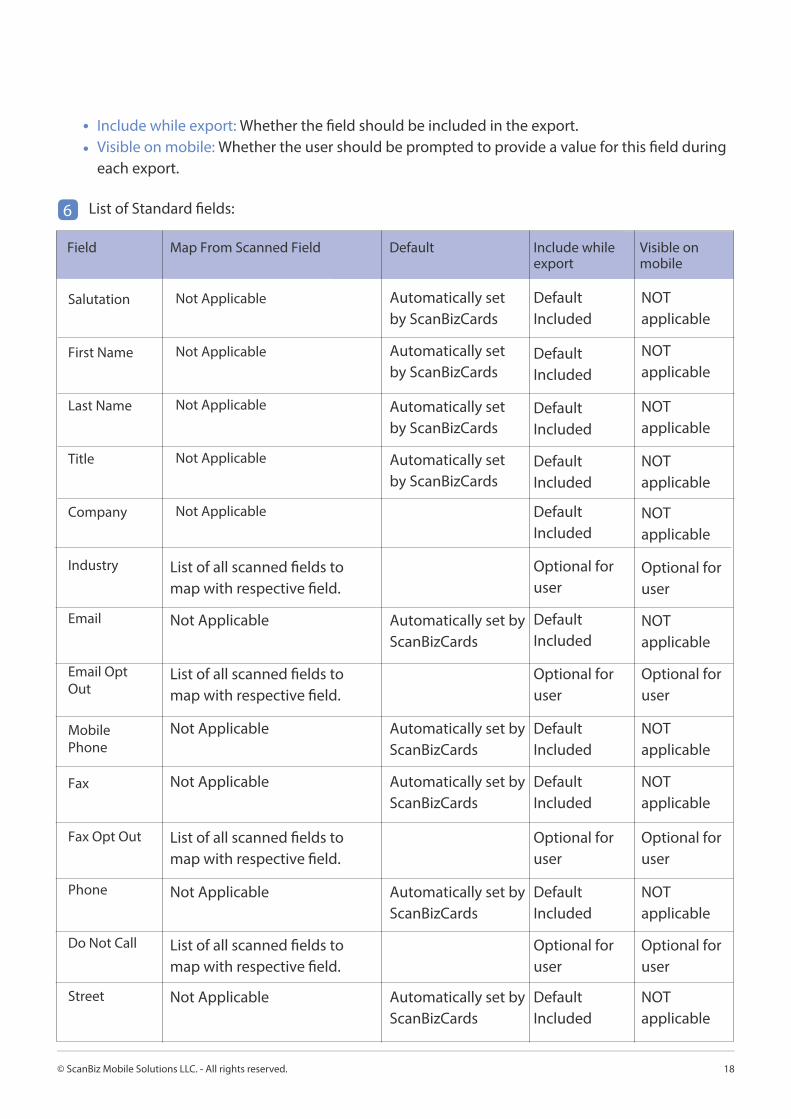
Include while export: Whether the �eld should be included in the export.Visible on mobile: Whether the user should be prompted to provide a value for this �eld during each export.
List of Standard �elds:6
Not Applicable
Not Applicable
Not Applicable
Not Applicable
Not Applicable
List of all scanned �elds to map with respective �eld.
List of all scanned �elds to map with respective �eld.
Automatically setby ScanBizCards
Automatically setby ScanBizCards
Automatically setby ScanBizCards
Automatically setby ScanBizCards
Automatically set by ScanBizCards
Default Included
Default Included
Default Included
Default Included
Default Included
NOTapplicable
NOTapplicable
Optional for user
Optional for user
Optional for user
Not Applicable
Automatically set by ScanBizCards
Not Applicable
Default Included
Default Included
NOT applicable
Optional for user
List of all scanned �elds to map with respective �eld.
Optional for user
Optional for user
List of all scanned �elds to map with respective �eld.
Optional for user
Optional for user
NOT applicable
Automatically set by ScanBizCards
Not Applicable Default Included
NOT applicable
Automatically set by ScanBizCards
Not Applicable Default Included
NOT applicable
Automatically set by ScanBizCards
Not Applicable Default Included
NOT applicable
NOTapplicable
NOTapplicable
NOTapplicable
Salutation
First Name
Last Name
Title
Company
Industry
Email Opt Out
MobilePhone
Fax
Fax Opt Out
Phone
Do Not Call
Street
Map From Scanned Field Default Include whileexport
Visible onmobile
Field
18© ScanBiz Mobile Solutions LLC. - All rights reserved.

Not Applicable
Not Applicable
Not Applicable
Not Applicable
Not Applicable
List of all scanned �elds to map with respective �eld.
List of all scanned �elds to map with respective �eld.
Automatically setby ScanBizCards
Automatically setby ScanBizCards
Automatically setby ScanBizCards
Automatically setby ScanBizCards
Automatically setby ScanBizCards
Automatically set by ScanBizCards
Default Included
Default Included
Default Included
Default Included
Default Included
NOTapplicable
NOTapplicable
Optional for user
Optional for user
Optional for user
Not Applicable
List of all scanned �elds to map with respective �eld.
Default Included
Optional for user
NOT applicable
Optional for user
List of all scanned �elds to map with respective �eld.
Optional for user
Optional for user
List of all scanned �elds to map with respective �eld.
Optional for user
Optional for user
Optional for user
List of all scanned �elds to map with respective �eld.
Default Included
Optional for user
List of all scanned �elds to map with respective �eld.
Default Included
Optional for user
List of all scanned �elds to map with respective �eld.
Default Included
Optional for user
NOTapplicable
NOTapplicable
NOTapplicable
City
State/Province
Zip/Postal Code
Country
Website
Employees
Description
Annual Revenue
Rating
Lead Source
Status
Data.com Key
Clean Status
Company D-U-N-S Server
D&B Company ID
Latitude
List of all scanned �elds to map with respective �eld.
Default Included
Optional for user
List of all scanned �elds to map with respective �eld.
Default Included
Optional for user
19© ScanBiz Mobile Solutions LLC. - All rights reserved.
List of all scanned �elds to map with respective �eld.
Default Included
Optional for user
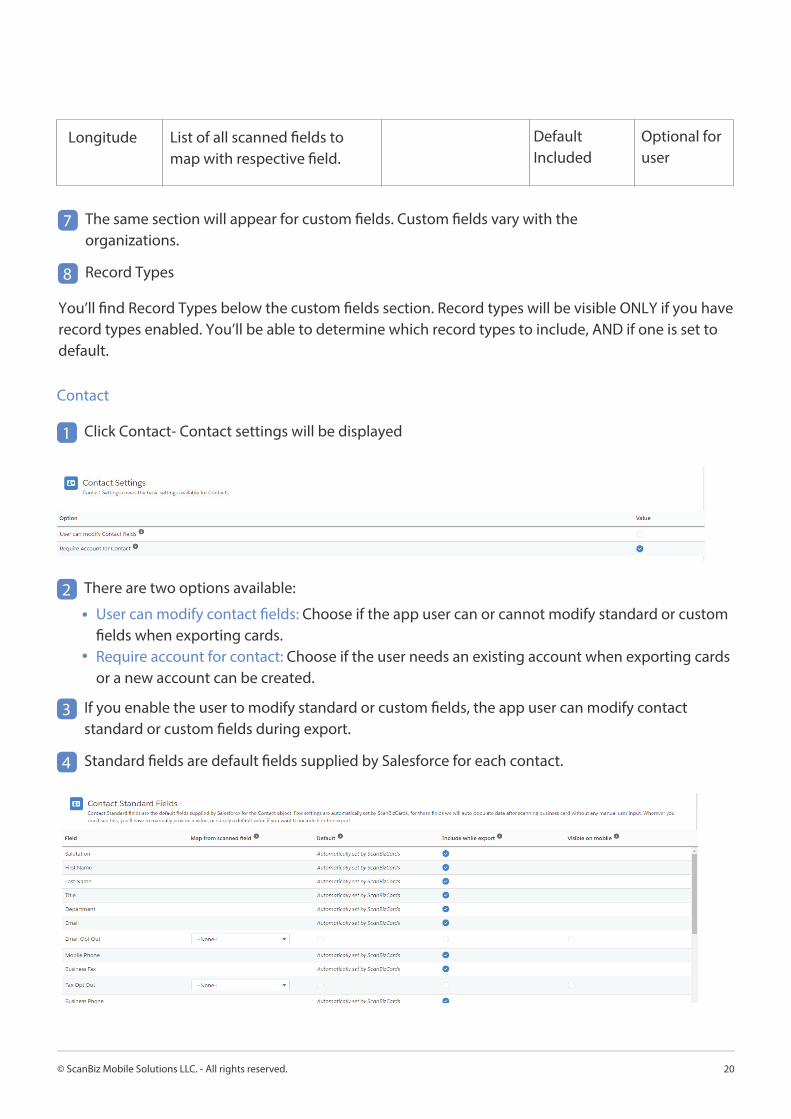
The same section will appear for custom �elds. Custom �elds vary with theorganizations.
You’ll �nd Record Types below the custom �elds section. Record types will be visible ONLY if you have record types enabled. You’ll be able to determine which record types to include, AND if one is set to default.
7
Record Types8
20
Longitude
Contact
Click Contact- Contact settings will be displayed1
User can modify contact �elds: Choose if the app user can or cannot modify standard or custom �elds when exporting cards.Require account for contact: Choose if the user needs an existing account when exporting cards or a new account can be created.
There are two options available:2
If you enable the user to modify standard or custom �elds, the app user can modify contact standard or custom �elds during export.
3
Standard �elds are default �elds supplied by Salesforce for each contact.4
© ScanBiz Mobile Solutions LLC. - All rights reserved.

21
The column values display the following:5
List of Standard �elds:6
Map from Scanned Field: Whether the app should attempt to automatically populate this �eld based on a speci�ed scanned item.Default: Speci�es the default value for this �eld during the export.Include while export: Whether the �eld should be included in the export.Visible on mobile: Whether the user should be prompted to provide a value for this �eld during each export.
Not Applicable
Not Applicable
Not Applicable
Not Applicable
Not Applicable
Not Applicable
Automatically setby ScanBizCards
Automatically setby ScanBizCards
Automatically setby ScanBizCards
Automatically setby ScanBizCards
Automatically setby ScanBizCards
Automatically setby ScanBizCards
List of all scanned �elds to map with respective �eld.
Default Included
Default Included
Default Included
Default Included
NOTapplicable
NOTapplicable
NOTapplicable
NOTapplicable
Default Included
Default Included
NOTapplicable
NOTapplicable
Automatically setby ScanBizCards
Default Included
NOTapplicable
Optional for use
Not Applicable
Automatically setby ScanBizCards
Default Included
NOTapplicable
Not Applicable
Automatically setby ScanBizCards
Default Included
NOTapplicable
Not Applicable
Optional for use
List of all scanned �elds to map with respective �eld.
Optional for use
Optional for use
List of all scanned �elds to map with respective �eld.
Optional for use
Optional for use
Salutation
First Name
Last Name
Title
Department
Email Opt Out
MobilePhone
Business Fax
Fax Opt Out
BusinessPhone
Do Not Call
Map From Scanned Field Default Include whileexport
Visible onmobile
Field
© ScanBiz Mobile Solutions LLC. - All rights reserved.
Not Applicable
Not Applicable
Automatically setby ScanBizCards
Default Included
NOTapplicable
Automatically setby ScanBizCards
Default Included
NOTapplicable
Not Applicable
Automatically setby ScanBizCards
Default Included
NOTapplicable
Not Applicable
Automatically setby ScanBizCards
Default Included
NOTapplicable
Not Applicable
Automatically setby ScanBizCards
Default Included
NOTapplicable
Not Applicable
Automatically setby ScanBizCards
Default Included
NOTapplicable
Not Applicable
Automatically setby ScanBizCards
Default Included
NOTapplicable
Not Applicable
Automatically setby ScanBizCards
Default Included
NOTapplicable
Not Applicable
Automatically setby ScanBizCards
Default Included
NOTapplicable
Not Applicable
List of all scanned �elds to map with respective �eld.
Optional for use
Optional for use
List of all scanned �elds to map with respective �eld.
Optional for use
Optional for use
List of all scanned �elds to map with respective �eld.
Optional for use
Optional for use
List of all scanned �elds to map with respective �eld.
Optional for use
Optional for use
List of all scanned �elds to map with respective �eld.
Optional for use
Optional for use
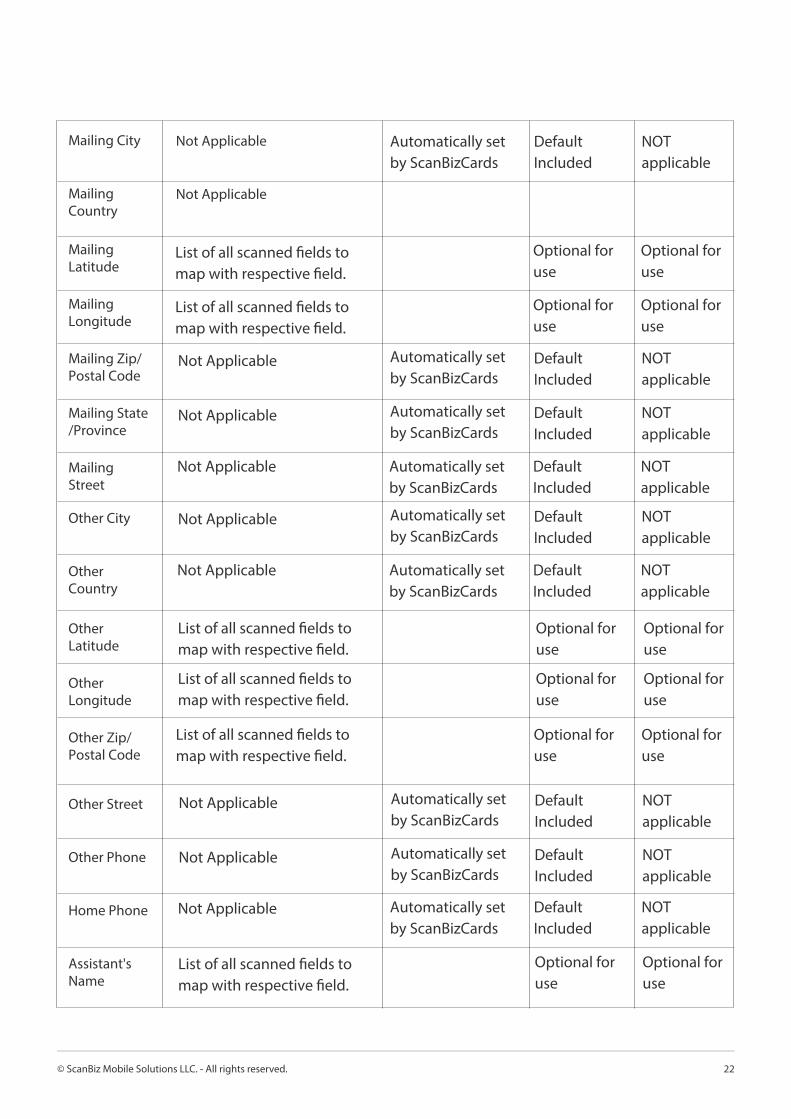
Mailing City
Mailing Country
Mailing Latitude
Mailing Longitude
Mailing Zip/Postal Code
Mailing State/Province
Mailing Street
Other City
Other Country
Other Latitude
Other Longitude
Other Zip/Postal Code
Other Street
Other Phone
Home Phone
Assistant'sName
List of all scanned �elds to map with respective �eld.
Optional for use
Optional for use
22© ScanBiz Mobile Solutions LLC. - All rights reserved.
Automatically setby ScanBizCards
Default Included
NOTapplicable
Not Applicable
List of all scanned �elds to map with respective �eld.
Optional for use
Optional for use
List of all scanned �elds to map with respective �eld.
Optional for use
Optional for use
List of all scanned �elds to map with respective �eld.
Optional for use
Optional for use
List of all scanned �elds to map with respective �eld.
Optional for use
Optional for use
List of all scanned �elds to map with respective �eld.
Optional for use
Optional for use
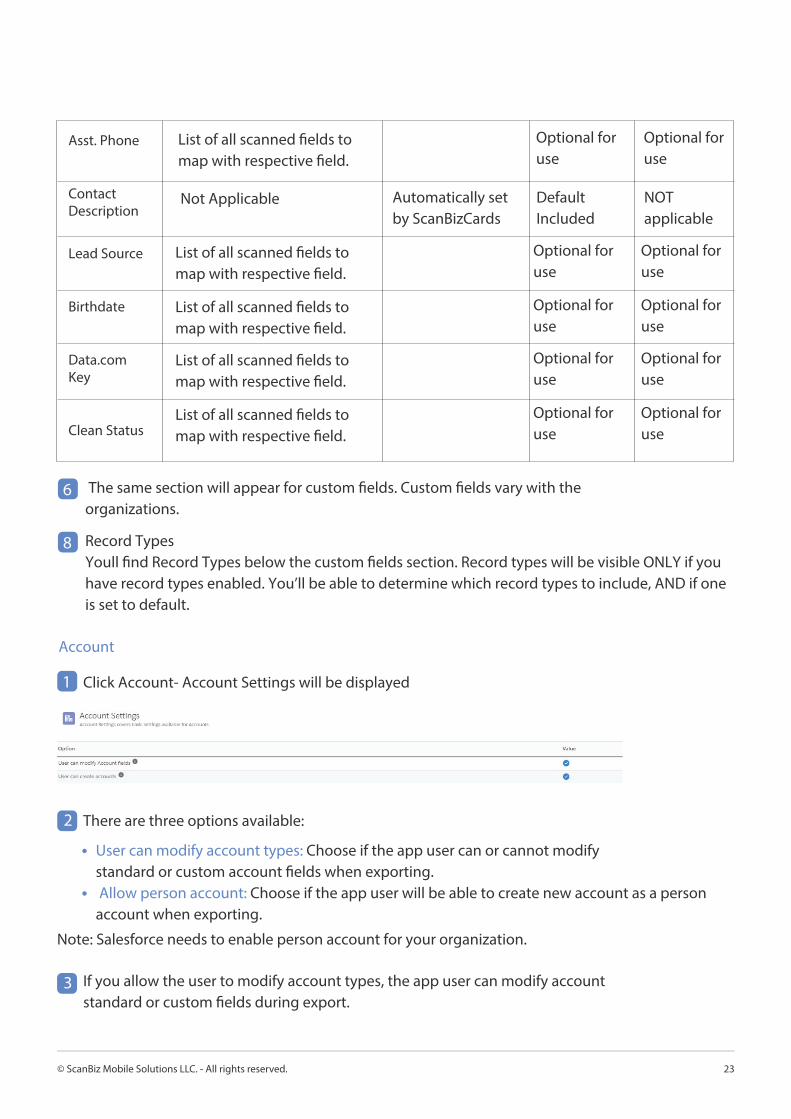
Asst. Phone
Contact Description
Lead Source
Birthdate
Data.com Key
Clean Status
The same section will appear for custom �elds. Custom �elds vary with theorganizations.
6
Record TypesYoull �nd Record Types below the custom �elds section. Record types will be visible ONLY if you have record types enabled. You’ll be able to determine which record types to include, AND if one is set to default.
8
Account
Click Account- Account Settings will be displayed1
There are three options available:2
If you allow the user to modify account types, the app user can modify accountstandard or custom �elds during export.
3
23
User can modify account types: Choose if the app user can or cannot modifystandard or custom account �elds when exporting. Allow person account: Choose if the app user will be able to create new account as a person account when exporting.
Note: Salesforce needs to enable person account for your organization.
© ScanBiz Mobile Solutions LLC. - All rights reserved.

Not Applicable
List of all scanned �elds to map with respective �eld.
List of all scanned �elds to map with respective �eld.
List of all scanned �elds to map with respective �eld.
List of all scanned �elds to map with respective �eld.
List of all scanned �elds to map with respective �eld.
Automatically setby ScanBizCards
Default Included
Optional for user
Optional for user
Optional for user
Optional for user
NOTapplicable
NOTapplicable
Optional for user
Optional for user
Optional for user
Optional for user
Optional for user
AccountName
Account Number
Annual Revenue
Account Source
Account Site
AccountDescription
Map From Scanned Field Default Include whileexport
Visible onmobile
Field
Standard �elds are default �elds supplied by Salesforce for each contact4
The column values display the following:5
List of Standard �elds:6
Map from Scanned Field: Whether the app should attempt to automatically populate this �eld based on a speci�ed scanned item.Default: Speci�es the default value for this �eld during the export.Include while export: Whether the �eld should be included in the export.Visible on mobile: Whether the user should be prompted to provide a value for this �eld during each export.
24© ScanBiz Mobile Solutions LLC. - All rights reserved.

List of all scanned �elds to map with respective �eld.
List of all scanned �elds to map with respective �eld.
List of all scanned �elds to map with respective �eld.
List of all scanned �elds to map with respective �eld.
List of all scanned �elds to map with respective �eld.
Automatically set by ScanBizCards
Optional for user
Not Applicable
List of all scanned �elds to map with respective �eld.
Default Included
NOT applicable
Automatically set by ScanBizCards
Not Applicable Default Included
NOT applicable
Automatically set by ScanBizCards
Not Applicable Default Included
NOT applicable
Automatically set by ScanBizCards
Not Applicable Default Included
NOT applicable
Automatically set by ScanBizCards
Not Applicable Default Included
NOT applicable
Automatically set by ScanBizCards
Not Applicable Default Included
NOT applicable
Automatically set by ScanBizCards
Not Applicable Default Included
NOT applicable
Optional for user
Optional for user
Optional for user
Optional for user
Optional for user
Optional for user
Optional for user
List of all scanned �elds to map with respective �eld.
Optional for user
Optional for user
List of all scanned �elds to map with respective �eld.
Optional for user
Optional for user
List of all scanned �elds to map with respective �eld.
Optional for user
Optional for user
List of all scanned �elds to map with respective �eld.
Optional for user
Optional for user
Optional for user
Optional for user
Optional for user
Optional for user
Industry
Ownership
Employees
AccountRating
Account Type
AccountPhone
Account Fax
Shipping City
ShippingCountry
ShippingLatitude
ShippingLongitude
Shipping Zip/Postal Code
Shipping State/Province
ShippingStreet
Website
Data.com Key
SIC Code
25© ScanBiz Mobile Solutions LLC. - All rights reserved.

List of all scanned �elds to map with respective �eld.
List of all scanned �elds to map with respective �eld.
List of all scanned �elds to map with respective �eld.
List of all scanned �elds to map with respective �eld.
List of all scanned �elds to map with respective �eld.
Optional for user
List of all scanned �elds to map with respective �eld.
Optional for user
Optional for user
Optional for user
Optional for user
Optional for user
Optional for user
Optional for user
List of all scanned �elds to map with respective �eld.
Optional for user
Optional for user
List of all scanned �elds to map with respective �eld.
Optional for user
Optional for user
List of all scanned �elds to map with respective �eld.
Optional for user
Optional for user
List of all scanned �elds to map with respective �eld.
Optional for user
Optional for user
Optional for user
Optional for user
Optional for user
Optional for user
List of all scanned �elds to map with respective �eld.
List of all scanned �elds to map with respective �eld.
List of all scanned �elds to map with respective �eld.
List of all scanned �elds to map with respective �eld.
Optional for user
Optional for user
Optional for user
Optional for user
Optional for user
Optional for user
Optional for user
Optional for user
List of all scanned �elds to map with respective �eld.
Optional for user
Optional for user
List of all scanned �elds to map with respective �eld.
Optional for user
Optional for user
List of all scanned �elds to map with respective �eld.
Optional for user
Optional for user
SICDescription
Ticker Symbol
Clean Status
D&B Company ID
D-U-N-S Number
First Name
Last Name
NAICS Code
NAICS Description
Parent Account ID
Assistant
Asst. Phone
Birthdate
Department
EmailBounced Date
Email BouncedReason
26© ScanBiz Mobile Solutions LLC. - All rights reserved.

List of all scanned �elds to map with respective �eld.
List of all scanned �elds to map with respective �eld.
List of all scanned �elds to map with respective �eld.
List of all scanned �elds to map with respective �eld.
List of all scanned �elds to map with respective �eld.
Optional for user
List of all scanned �elds to map with respective �eld.
Optional for user
Optional for user
Optional for user
Optional for user
Optional for user
Optional for user
Optional for user
List of all scanned �elds to map with respective �eld.
Optional for user
Optional for user
List of all scanned �elds to map with respective �eld.
Optional for user
Optional for user
List of all scanned �elds to map with respective �eld.
Optional for user
Optional for user
List of all scanned �elds to map with respective �eld.
Optional for user
Optional for user
Optional for user
Optional for user
Optional for user
Optional for user
List of all scanned �elds to map with respective �eld.
List of all scanned �elds to map with respective �eld.
List of all scanned �elds to map with respective �eld.
List of all scanned �elds to map with respective �eld.
Optional for user
Optional for user
Optional for user
Optional for user
Optional for user
Optional for user
Optional for user
Optional for user
List of all scanned �elds to map with respective �eld.
Optional for user
Optional for user
List of all scanned �elds to map with respective �eld.
Optional for user
Optional for user
List of all scanned �elds to map with respective �eld.
Optional for user
Optional for user
Home Phone
Lead Source
Mailing City
MailingCountry
MailingLatitude
MailingLongitude
Mailing Zip/Postal Code
Mailing State/Province
Mailing Street
Mobile
Other City
Other Country
Other Latitude
OtherLongitude
Other Phone
Other Zip/Postal Code
Other State/Province
27© ScanBiz Mobile Solutions LLC. - All rights reserved.

List of all scanned �elds to map with respective �eld.
List of all scanned �elds to map with respective �eld.
List of all scanned �elds to map with respective �eld.
List of all scanned �elds to map with respective �eld.
List of all scanned �elds to map with respective �eld.
Optional for user
Optional for user
Optional for user
Optional for user
Optional for user
Optional for user
Optional for user
Optional for user
Optional for user
Optional for user
Other Street
Title
Salutation
Tradestyle
Year Started
28
The same section will appear for Custom �elds. Custom �elds vary with the organizations.
7
Record TypesYou’ll �nd Record Types below the custom �elds section. Record types will be visible ONLY if you have record types enabled. You’ll be able to determine which record types to include, AND if one is set to default.
8
Org Data Assignment
Assign Accounts - This section displays all Accounts available in your Salesforce instance. Account name and geographic location (if available) is displayed.
Assign: Accounts:
1
You will have the ability to turn o� speci�c Accounts that you do not wish your users to be able to assign Contacts to during exports.
(Note: This has no e�ect on Lead exports — and this will NOT give users access to accounts that they would otherwise not have access to).
2
© ScanBiz Mobile Solutions LLC. - All rights reserved.
Now you can �lter the Accounts on the basis of created Account Record types.3

Default: Speci�es whether exported Leads or Contacts are added to this Campaign automatical-ly (will not be shown to the user as a choice during the export).Visible on mobile: Speci�es whether the user can add exported Leads or Contacts to this Cam-paign during an export.Description: Speci�es the text the user sees next to the checkbox to add the exported Lead or Contact to this Campaign.
Name : Name of the user or queue that CAN be assigned as the object ownerEmail : The email for the user that CAN be assigned the objectType : This identi�es the row as either a speci�c User or a QueueVisible on mobile : By checking this box, the User or Queue is available to the app user during export to select as the owner of the Lead
29
This section displays all the campaigns available in your salesforce instance.
Assign: Campaigns:
1
This section allows you to control which Users or Queues, if any, the end user will be able to specify as the owner of the Lead record they are exporting. The columns in the section and their function are as follows:
Lead Owner Columns:
Assign: Lead Owners:
It allows you to control to which campaigns, if any, end users will be able to assign to a Lead or Contact during an export.
Note: In addition to this functionality, you can customize “Description” text which displays along-side the campaign during an export.”
2
Campaign Columns3
© ScanBiz Mobile Solutions LLC. - All rights reserved.
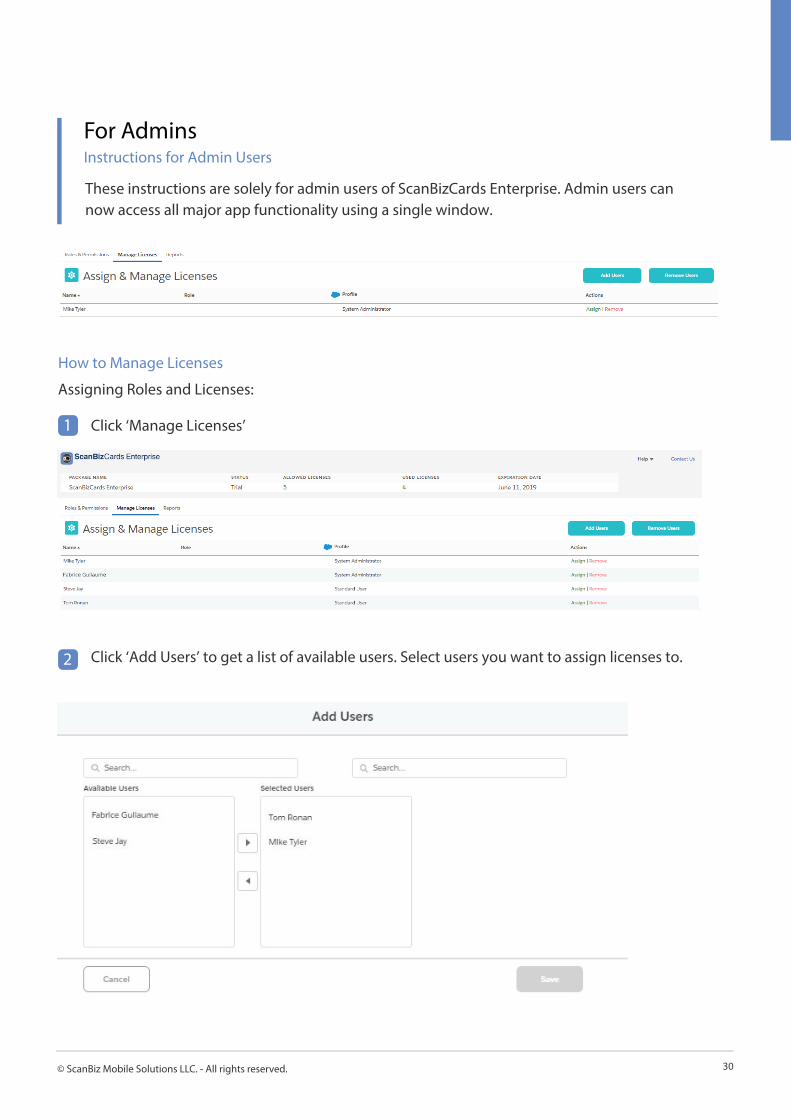
How to Manage Licenses
30
Instructions for Admin Users
For Admins
1 Click ‘Manage Licenses’
Assigning Roles and Licenses:
2 Click ‘Add Users’ to get a list of available users. Select users you want to assign licenses to.
These instructions are solely for admin users of ScanBizCards Enterprise. Admin users can now access all major app functionality using a single window.
© ScanBiz Mobile Solutions LLC. - All rights reserved.

31
3 Click Save.
4 The selected users will now be available on the ‘Assign and Manage Licenses’ page.
5 Click ‘Assign’ to assign ScanBizCards roles to individual users. The list of available ScanBizCards roles will be displayed.
© ScanBiz Mobile Solutions LLC. - All rights reserved.

32
6 Assign a ScanBizCards role to the user and click ‘Save’
7 Go to ‘SBC Roles & Permissions’ tab. Click the number of users corresponding to the role you assigned to the user. The list of users under that role will be displayed.
1 Go to the Manage Licenses tab.
2 For revoking individual licenses:
The role has been assigned successfully.
Revoking User Licenses:
Under the Actions title, click Remove corresponding to the individual’s name. A pop up will be displayed.
Click Remove. The user license will be removed.
© ScanBiz Mobile Solutions LLC. - All rights reserved.
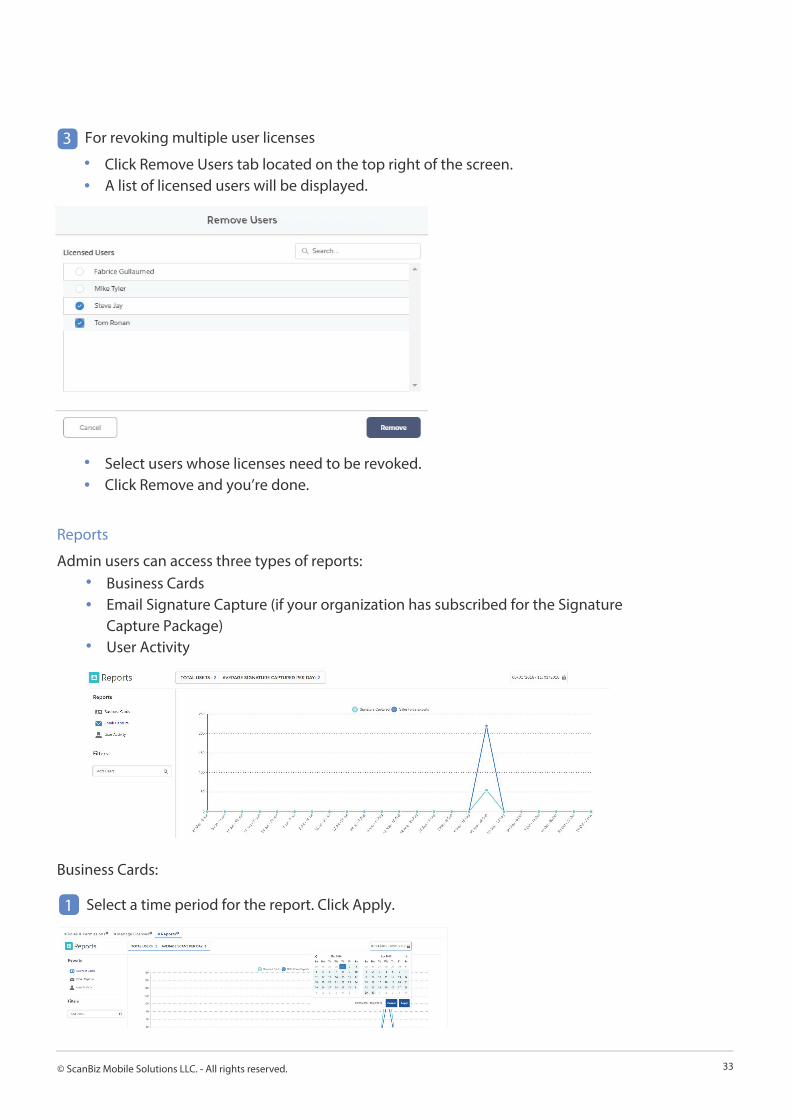
Click Remove Users tab located on the top right of the screen.A list of licensed users will be displayed.
Select users whose licenses need to be revoked.Click Remove and you’re done.
Business CardsEmail Signature Capture (if your organization has subscribed for the SignatureCapture Package) User Activity
33
3 For revoking multiple user licenses
1 Select a time period for the report. Click Apply.
Reports
Admin users can access three types of reports:
Business Cards:
@ ScanBizCards LLC. All rights reserved.@ ScanBizCards LLC. All rights reserved.
© ScanBiz Mobile Solutions LLC. - All rights reserved.

Email Signature Capture:
34
2 At the top, the total number of users along with the average number of cards scanned per day during the selected time period will be displayed.
3 In addition, the report will also graphically display the number of business cards scanned versus the number of cards exported to Salesforce during the chosen time period.
4 Admin user can also choose to view the graph selectively for scanned cards orsalesforce exports by clicking on the other tab to cancel its view.
5 Using �lters, Admin user can also view the above statistics for each individual user.
1 The report will only be displayed if you have subscribed for the Email Signature Capture Package. Else, you’ll see the following screen.
© ScanBiz Mobile Solutions LLC. - All rights reserved.

Select a time period for the report. Click Apply.
At the top, the total number of users along with the average number of emailsignatures captured per day during the selected time period will be displayed.
In addition, the report will also graphically display the number of email signatures captured versus the number of email signatures exported to Salesforce during the chosen time period.
Admin user can also choose to view the graph selectively for signatures captured or salesforce exports by clicking on the other tab to cancel its view.
Using �lters, Admin user can also view the above statistics for each individual user.
35
2 If you have subscribed for the package:
User Activity:
1 Select a time period for the report. Click Apply.
© ScanBiz Mobile Solutions LLC. - All rights reserved.

User NameCards exported Captures exportedTotalLast logged in
2 At the top, the total number of users along with the average number of cards exported per day during the selected time period will be displayed.
3 The report will also graphically display the number of business cards exported by all users com-bined during the chosen time period.
4 In addition, a table with following user details will be displayed for the selected time period. The table will display users in descending order based on total number of cards and signatures (combined) exported within the selected time period.
5 Using �lters, Admin user can also view the above statistics for each individual user.
36© ScanBiz Mobile Solutions LLC. - All rights reserved.

If you have chosen the installation option as “ Install for Admins only “, then only admin user will be able to access ScanBizCards manage package when log in to Salesforce account through the web. Now you can assign ScanBizCards Enterprise license to your non-admin users.
Install for Admins Only
Installation Options
37
The settings that the admin will choose for these users in the ScanBizCards managed package will be downloaded on their respective mobile devices whenever they log in. However, if these users log in to their Salesforce account through the web, they won’t be able to access ScanBizCards manage package as it’s only visible for admins.
If you have chosen the installation option as “ Install for All Users” then the ScanBizCards manage package will be installed for all users. You can assign ScanBizCards Enterprise license to the non-admin users.
The settings that the admin will choose for these users in the ScanBizCards managed package will be downloaded on their respective mobile devices whenever they log in. If these users log in to their Salesforce account through the web, they will be able to access ScanBizCards manage pack-age as it’s visible for all licensed users.
Install for All Users
© ScanBiz Mobile Solutions LLC. - All rights reserved.
38
Salesforce mobile application enables the building of applications in the Salesforce Customer Success Platform, in conjunction with the Lightning development platform. The combi-nation also allows for third-party applications to be built on top of Salesforce apps for smart-phones, tablets and wearables.
With Lightning, admins can create applications quickly and easily without having to code from scratch, because many items can draw on prebuilt Lightning Components. Salesforce mobile application also enables developers to use alternatives to Force.com, including the Heroku plat-form, through capabilities like Salesforce Connect, which make it easier to build customer-facing apps. Force.com has traditionally been used for creating internal employee-facing apps built on the Salesforce platform.
Open APIs also enable multiple applications built on di�erent code bases to interact without con�ict and share data. Salesforce involves the mobile app, which delivers the Salesforce platform as mobile apps, such as the Sales, Service, Community and Wave Analytics clouds. The Salesforce App Exchange also features third-party applications that have been built on top of the Salesforce platform.
Overview
Salesforce Mobile Application Integration To ScanBizCards
Section B Integrating ScanBizCards With the Salesforce1 App
© ScanBiz Mobile Solutions LLC. - All rights reserved.
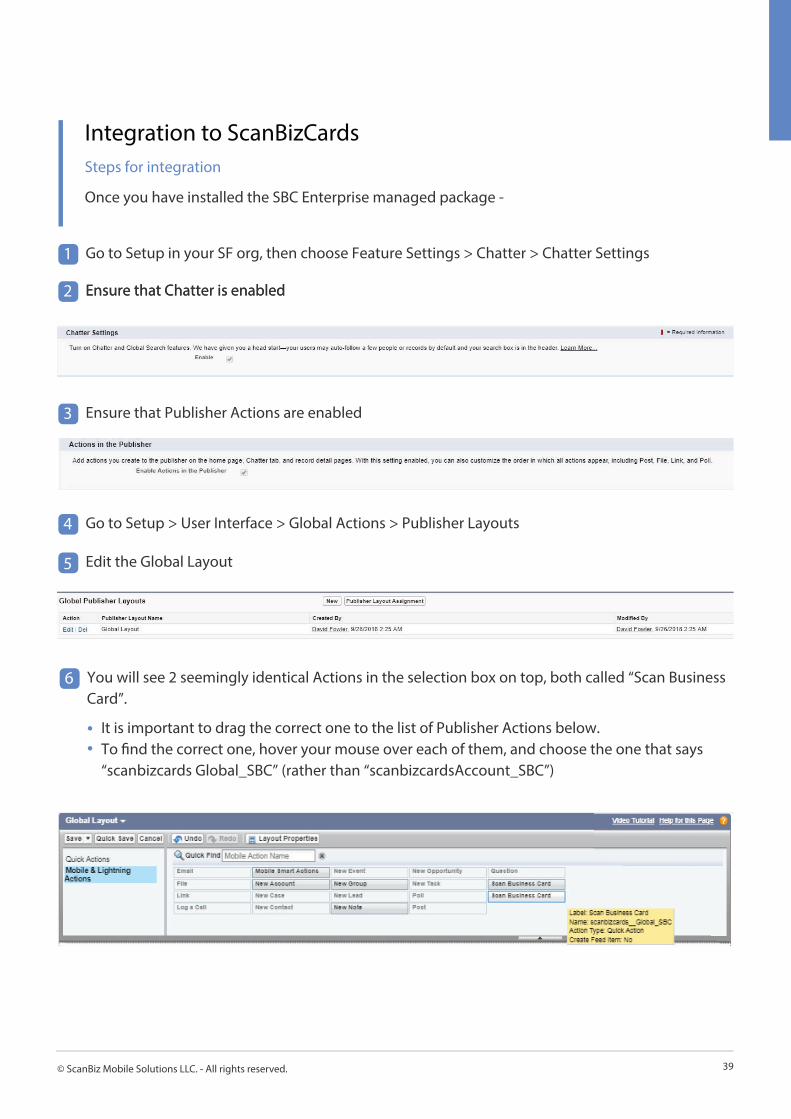
Ensure that Chatter is enabled2
39
Integration to ScanBizCards
Go to Setup in your SF org, then choose Feature Settings > Chatter > Chatter Settings
Once you have installed the SBC Enterprise managed package -
Steps for integration
1
Ensure that Chatter is enabled2
2
Ensure that Publisher Actions are enabled3
4 Go to Setup > User Interface > Global Actions > Publisher Layouts
25 Edit the Global Layout
26 You will see 2 seemingly identical Actions in the selection box on top, both called “Scan Business Card”.
It is important to drag the correct one to the list of Publisher Actions below.To �nd the correct one, hover your mouse over each of them, and choose the one that says “scanbizcards Global_SBC” (rather than “scanbizcardsAccount_SBC”)
© ScanBiz Mobile Solutions LLC. - All rights reserved.

40
Drag this action into the list of publisher actions in the position you prefer.There are 2 considerations to bear in mind when selecting a position:
7
Click the “Save” button located on top left
Using these steps, Scan Business Card action will be available from the Main Menu
Follow these steps only if you want the Scan Business Card action to also be available from the actions menu when looking at a particular account within Salesforce1: AssigningLicenses
[ Please Note: Steps 9—13 are Optional ]
8
Go to Setup > Customize > Accounts > Page Layouts9
Edit the default layout10
You will see a similar screen to what you saw earlier, but this time you have to choose the “Mobile & Lightning Actions” list from the left hand menu
This time, hover your mouse over the “Scan Business Card” actions and choose the one that shows “scanbizcards Account_SBC”, and drag this to your desired position below in the list of Publisher Actions. The same position considerations as above apply.
12
11
You probably should not put it in the �rst position, since this is the action that will be open by default in the SFDC web interface when you open the Chatter tab
This action is inapplicable to the web interface
The Salesforce mobile application actions menu can only show 6 tiles at a time, so if you put this action later than the 6th position, you will have to scroll to the next screen before you see it within this menu.
© ScanBiz Mobile Solutions LLC. - All rights reserved.

41
Click the “Save” button on top13
Now Navigate to: Setup > Develop > Visualforce Pages14
Click “Security” to the left of SBC FeedLink and SBC AccountLink15
Add pro�les of those who will be using SBC to the list of enabled pro�les.166
Fire up the Salesforce1 app on your mobile device17
ScanBizCards Interaction with Accounts Layout
1
If You Have Added Scan Business Card Action to the Accounts Layout
If the action is not present, force quit and restart the app.
Open the main menu on the top left of the screen
2 Choose Accounts and then click into a particular account
3 Touch the Actions menu from the bottom right and verify that the Scan Business Card action is present.
© ScanBiz Mobile Solutions LLC. - All rights reserved.

42
If you have any questions, please contact us.
Technical SupportHelp and Support
Email: [email protected]
© ScanBiz Mobile Solutions LLC. - All rights reserved.