instrucciones de instalación t ... - tractor supply co. · reinicialice el sistema eléctrico del...
TRANSCRIPT
5. Repeat step 3 for the passenger’s side usingthe T-Connector containing the green wire.
6. Locate a suitable grounding point near theconnector. Clean dirt and rustproofing fromthe area. Drill a 3/32" hole and secure thewhite wire using the eyelet and screw provided. (Do not drill into vehicle floor orbed. Do not drill into any exposed surfaces.)
CAUTIONVerify what is behind any surface prior to drilling to avoid damage to the vehicle and/or personal injury. Do not drill into any exposed surfaces.
WARNINGAll connections must be complete for the T-Connector to function properly.For initial test, reset vehicle electrical system by temporarily removing the key from the ignition. Test and verify installationwith a test light or trailer once installed.
7. On the Driver’s side, mount the T-ConnectorBlack Box using the double-sided tape provided. Secure the remainder of the T-connector harness with the cable ties provided, to prevent damage or rattling and being careful to avoid any areas thatwould cut or pinch the wire e.
8. Reinstall the taillight housing assemblies,positioning the vehicle wiring harnessbetween the housing and the vehicle body.
9. Mount the 4-Flat end in an accessible location with a bracket or electrical box (not included).
WARNINGOverloading circuit can cause fires.DO NOT exceed lower of towing manufacturer rating or:• Max. stop/turn light: 1 per side (2.1 amps)• Max. tail lights: (5 amps)Read vehicle's owners manual & instructionsheet for additional information.
118431-037 Rev. A 01/29/07
ENGLISH
TOOLS REQUIRED:Drill (3/32” Drill Bit), Philips Head Screwdriver
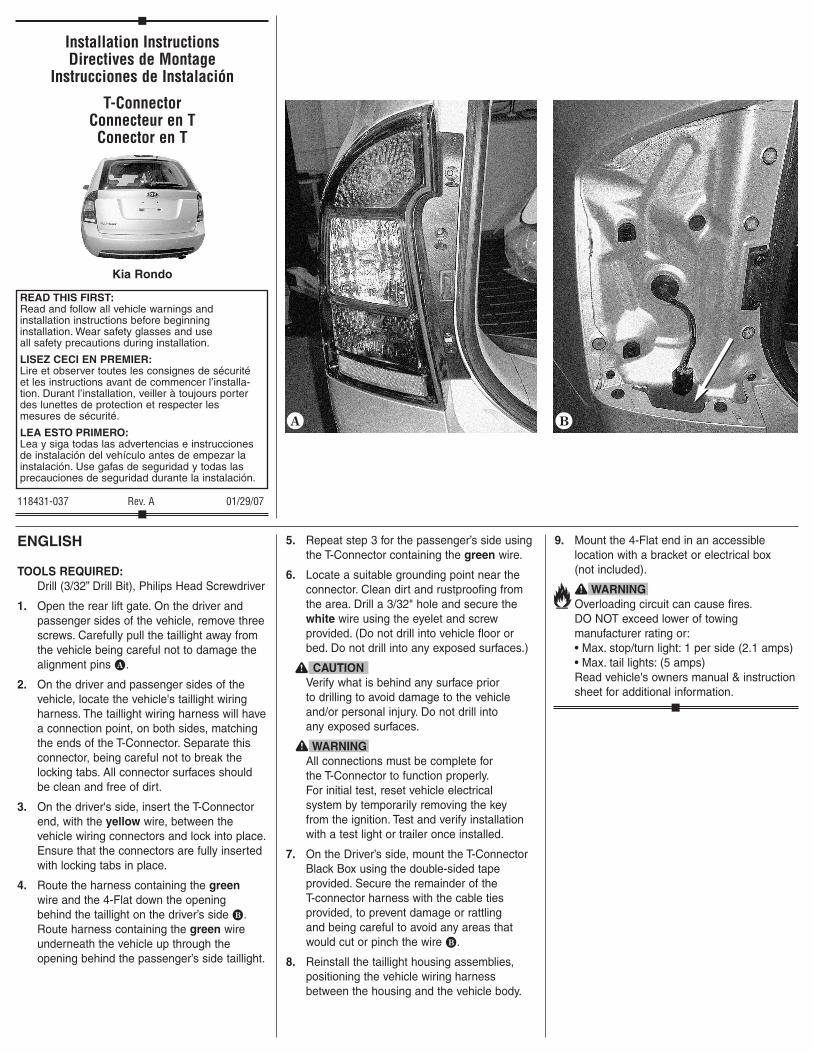
1. Open the rear lift gate. On the driver andpassenger sides of the vehicle, remove threescrews. Carefully pull the taillight away fromthe vehicle being careful not to damage thealignment pins d.
2. On the driver and passenger sides of thevehicle, locate the vehicle's taillight wiringharness. The taillight wiring harness will havea connection point, on both sides, matchingthe ends of the T-Connector. Separate thisconnector, being careful not to break thelocking tabs. All connector surfaces shouldbe clean and free of dirt.
3. On the driver's side, insert the T-Connectorend, with the yellow wire, between the vehicle wiring connectors and lock into place.Ensure that the connectors are fully insertedwith locking tabs in place.
4. Route the harness containing the greenwire and the 4-Flat down the opening behind the taillight on the driver’s side e.Route harness containing the green wireunderneath the vehicle up through the opening behind the passenger’s side taillight.
•d •e
READ THIS FIRST:Read and follow all vehicle warnings and installation instructions before beginning installation. Wear safety glasses and use all safety precautions during installation.
LISEZ CECI EN PREMIER:Lire et observer toutes les consignes de sécurité et les instructions avant de commencer l’installa-tion. Durant l’installation, veiller à toujours porterdes lunettes de protection et respecter les mesures de sécurité.
LEA ESTO PRIMERO:Lea y siga todas las advertencias e instruccionesde instalación del vehículo antes de empezar lainstalación. Use gafas de seguridad y todas las precauciones de seguridad durante la instalación.
Installation InstructionsDirectives de Montage
Instrucciones de Instalación
T-ConnectorConnecteur en TConector en T
Kia Rondo

ESPAÑOL
HERRAMIENTAS NECESARIAS:Taladro (broca de 3/32"), Destornillador de estrella
1. Abra la puerta de levantar en la partetrasera. En los lados del conductor ypasajero del vehículo, quite tres tornillos.Hale cuidadosamente la luz trasera lejos del vehículo con cuidado de no dañar lospasadores de alineación d.
2. En el costado del conductor y del pasajerodel vehículo, localice el arnés de cables de la luz trasera del vehículo. El arnés delcableado de la luz trasera tendrá un puntode conexión en ambos lados, que combinalos extremos del conector en T. Separe esteconector, con cuidado de no romper las pestañas de bloqueo. Todas las superficiesdel conector deben estar limpias y libres de suciedad.
3. En el costado del conductor, inserte elextremo del conector en T, con el cableamarillo, entre los conectores del cableadodel vehículo y asegure en su lugar. Verifiqueque los conectores estén completamenteinsertados con las lengüetas de bloqueo en su lugar.
4. Dirija el arnés que contiene el cable verde yel conector plano de 4 cables por la aberturadetrás de la luz trasera del costado del con-ductor e. Dirija el arnés del conector planode 4 cables hacia el centro del vehículo.Dirija el arnés que contiene el cable verdepor debajo del vehículo y a través de la abertura detrás de la luz trasera del costadodel pasajero.
5. Repita el paso 3 en el costado del pasajerousando el conector en T que contiene elcable verde.
6. Localice un punto adecuado de conexión a tierra cerca del conector. Limpie lasuciedad y el óxido del área. Perfore un orificio de 3/32" y asegúrelo con el cableblanco usando el ojete y tornillo provistos.(No perfore en el piso o base del vehículo.No perfore ninguna superficie expuesta.)
ATENCIÓN Revise qué hay detrás de cualquier superficie antes de perforar para evitardaños al vehículo y/o lesiones personales.No perfore ninguna superficie expuesta.
ADVERTENCIASe deben completar todas las conexionespara que el conector en T funcione correctamente. Para la prueba inicial, reinicialice el sistema eléctrico del vehículoal quitar temporalmente la llave de la ignición. Ensaye y verifique la instalacióncon una luz de prueba o remolque una vez se instale.
7. En el costado del conductor, instale la caja negra conectora en T utilizando lacinta adhesiva por ambos lados que sesuministra. Fije el resto del arnés delconector en T con los amarres de cableque se suministran, para evitar daños ovibración y con cuidado de evitar áreas que podrían cortar o pellizcar el cable e.
8. Vuela a instalar las ensambladuras de losreceptáculos de las luces traseras, colo-cando el arnés de cableado del vehículoentre el receptáculo y la carrocería.
9. Instale el extremo plano de 4 vías en un punto accesible con un soporte o cajaeléctrica (no se incluye).
ADVERTENCIALa sobrecarga del circuito puede ocasionarincendios. NO exceda la calificación de remolque más baja indicada por el fabricante o:• Máx. luz de estacionamiento/ direccional:1 por costado (2.1 amperios)• Máx. luz trasera: (5 amperios)Lea el manual del propietario y la hoja de instrucciones del vehículo para información adicional.
FRANÇAIS
OUTILS REQUIS:Perceuse (mèche de 3/32 po), Tournevis à pointe cruciforme
1. Ouvrir le hayon arrière. Des côtés conducteur et passager du véhicule, enlever trois vis. Éloigner délicatement les feux du véhicule, en veillant à ne pas briser les tiges d’alignement d.
2. Des deux côtés, conducteur et passager,repérer le faisceau de fils des feux arrière du véhicule. Le faisceau de fils des feuxarrière comportera, des deux côtés, un point de branchement correspondant auxextrémités du connecteur en T. Débrancherce connecteur, en veillant à ne pas briser les pattes de verrouillage. Toutes les surfacesde contact des connecteurs doivent être propres et dépourvues de saleté.
3. Du côté conducteur, insérer l'extrémité duconnecteur en T munie du fil jaune entre les connecteurs du câblage du véhicule, puis verrouiller en place. S’assurer que lesconnecteurs sont insérés à fond, avec lespattes de verrouillage en place.
4. Faire passer, de haut en bas, le faisceaucomprenant le fil vert et le connecteur plat à 4 voies dans l’ouverture derrière le feuarrière du côté conducteur e. Faire passer le connecteur plat à 4 voies au centre du véhicule. Faire passer le faisceau comprenant le fil vert sous le véhicule, puis vers le haut dans l’ouverture derrière le feu arrière du côté passager.
5. Répéter l’étape 3 du côté passager avec le connecteur en T comprenant le fil vert.
6. Repérer un endroit approprié à proximité du connecteur pour effectuer la mise à lamasse. Nettoyer la surface pour y enlevertoute trace de saleté ou de traitementantirouille. Percer un trou de 3/32 po et fixer le fil blanc à l’aide de l’oeillet et de la vis fournis. (Ne pas percer le plancher ou la plateforme du véhicule. Ne pas percer de surfaces exposées.)
ATTENTION Avant de percer, vérifier ce qui se trouvesous la surface pour prévenir tout dommageau véhicule ou toute lésion corporelle.Ne pas percer de surfaces exposées.
AVERTISSEMENTTous les branchements doivent être terminéspour que le connecteur en T fonctionne correctement. Comme test initial, réinitialiserle système électrique du véhicule en retiranttemporairement la clé du contact. Tester etvérifier l’installation à l’aide d’une lampetémoin ou sur une remorque.
7. Du côté conducteur, monter la boîte noire duconnecteur en T à l’aide du ruban adhésif àdeux faces qui est fourni. Afin de prévenir lesdommages ou les bruits de cliquetis, fixer lereste du harnais du connecteur en T à l’aidedes attaches de câble fournies, en prenantsoin d’éviter les endroits susceptibles decouper ou coincer les fils e.
8. Remettre en place les logements des feuxarrière, en plaçant le faisceau de fils duvéhicule entre le logement et la carosserie.
9. Monter l’extrémité du connecteur plat 4 voiesdans un endroit accessible avec un supportou un coffret de branchement (non inclus).
AVERTISSEMENTUn circuit surchargé peut occasionner desincendies. NE DÉPASSEZ JAMAIS la valeurla plus basse indiquée par le fabricant deremorquage, ou:• Max. lumière arrêt/tournant: 1 par côté (2,1 amps)• Max. lumières arrières: (5 amps)Consultez le manuel du propriétaire et lafeuille d’instructions du véhicule pour de plus amples informations.
© 2007 Cequent™ Electrical Products