instruction book - janome · important safety instructions this appliance is not intended for use...
TRANSCRIPT

INSTRUCTION BOOK

IMPORTANT SAFETY INSTRUCTIONSThis appliance is not intended for use by persons (including children) with reduced physical, sensory or mental capabilities,
or lack of experience and knowledge, unless they have been given supervision or instruction concerning use of the
appliance by a person responsible for their safety.
Children should be supervised to ensure that they do not play with the appliance.
When using an electrical appliance, basic safety precautions should always be followed, including the
following:
This sewing machine is designed and manufactured for household use only.
Read all instructions before using this sewing machine.
Please note that on disposal, this product must be safely recycled in accordance with relevant National legislation relating toelectrical/electronic products. If in doubt please contact your retailer for guidance. (European Union only)
DANGER— To reduce the risk of electric shock:An appliance should never be left unattended when plugged in. Always unplug this sewing machine from theelectric outlet immediately after using and before cleaning.
WARNING— To reduce the risk of burns, fire, electric shock, or injury to persons:1. Do not allow to be used as a toy. Close attention is necessary when this sewing machine is used by or near
children.
2. Use this appliance only for its intended use as described in this owner’s manual.
Use only attachments recommended by the manufacturer as contained in this owner’s manual.
3. Never operate this sewing machine if it has a damaged cord or plug, if it is not working properly, if it has been
dropped or damaged, or dropped into water.
Return this sewing machine to the nearest authorized dealer or service center for examination, repair, electrical or
mechanical adjustment.
4. Never operate the appliance with any air opening blocked. Keep ventilation openings of this sewing machine and
foot controller free from accumulation of lint, dust and loose cloth.
5. Never drop or insert any object into any opening.
6. Do not use outdoors.
7. Do not operate where aerosol (spray) products are being used or where oxygen is being administered.
8. To disconnect, turn all controls to the off (“O”) position, then remove plug from outlet.
9. Do not unplug by pulling on cord. To unplug, grasp the plug, not the cord.
10. Keep fingers away from all moving parts. Special care is required around the sewing machine needle.
11. Always use the proper needle plate. The wrong plate can cause the needle to break.
12. Do not use bent needles.
13. Do not pull or push fabric while stitching. It may deflect the needle causing it to break.
14. Switch this sewing machine off (“O”) when making any adjustment in the needle area, such as threading the
needle, changing the needle, threading the bobbin or changing the presser foot, and the like.
15. Always unplug this sewing machine from the electrical outlet when removing covers, lubricating, or
when making any other adjustments mentioned in this owner’s manual.
SAVE THESE INSTRUCTIONS

1
SECTION I. NAMES OF PARTSNames of Parts ............................................................. 2Standard Accessories ................................................... 3Extension Table ............................................................. 3
SECTION II. GETTING READY TO SEWConnecting the Power Supply ....................................... 4Before Using Your Sewing Machine .............................. 4Speed Control Slider ..................................................... 5Controlling Sewing Speed ............................................ 5Machine Operating Buttons........................................ 6-7Removing and Attaching the Foot Holder ..................... 8Changing the Presser Foot ........................................... 8Presser Foot Lifter ........................................................ 8Dropping or Raising the Feed Dog ............................... 9Changing the Needle .................................................... 9Selecting Thread and Needles ..................................... 9Bobbin Winding ...................................................... 10-12Threading the Machine ............................................... 13Needle Threader ......................................................... 14Drawing up the Bobbin Thread ................................... 15LCD Display ................................................................ 16Stitch Patterns ............................................................. 16Adjusting the Needle Thread Tension for a Straight Stitch .................................................... 17Adjusting the Needle Thread Tension for a Zigzag Stitch ...................................................... 18
SECTION III. BASIC SEWINGStraight Stitch Sewing ................................................. 19Needle Plate ............................................................... 20Straight Stitch.............................................................. 21Lock-a-Matic Stitch ..................................................... 21Locking Stitch .............................................................. 21Stretch Stitch............................................................... 21Triple Stretch Stitch ..................................................... 22Sculpture Stitch ........................................................... 22Saddle Stitch ............................................................... 22Zigzag Stitch ............................................................... 23Overcasting with Zigzag Stitch ................................... 24Multiple Zigzag ............................................................ 24Knit Stitch .................................................................... 24Overedge Stitch .......................................................... 25Various Kinds of Buttonholes and Their Uses ............. 25Square Buttonhole ................................................. 26-27Adjusting the Stitch Width and Density for Buttonholes ................................................................ 28Round-End Buttonhole ............................................... 28Keyhole Buttonhole ..................................................... 28Corded Buttonhole ...................................................... 29Darning Stitch ............................................................. 30Tacking ........................................................................ 31Eyelet .......................................................................... 31Zipper Sewing ........................................................ 32-33Blind Hemming............................................................ 34Button Sewing ............................................................. 35Shelltuck Stitch ........................................................... 35Applique ...................................................................... 36
SECTION IV. DECORATIVE STITCHINGScallop Stitch .............................................................. 36Smocking .................................................................... 37Patchwork Piecing ...................................................... 37Fagoting ...................................................................... 38Satin Stitches .............................................................. 38Cross Stitch................................................................. 39Decorative Stitches ..................................................... 39Decorative Stitch Combinations.................................. 40Correcting Distorted Stitch Patterns ........................... 40
SECTION V. CARE OF YOUR MACHINECleaning the Hook Race and Feed Dog ..................... 41Installing the Bobbin Holder ........................................ 41Problems and Warning Signs ..................................... 42Troubleshooting ........................................................... 43
TABLE OF INSTRUCTION
2
q
w
e
r
t
y
u i o !0
!1
!2
!3
!4
!6
!7
!8
!9
!5
@0
@1
@2
@3
@4
@5
@6
@7
@8
@9
#0
#1
#3
#4
#5
#6
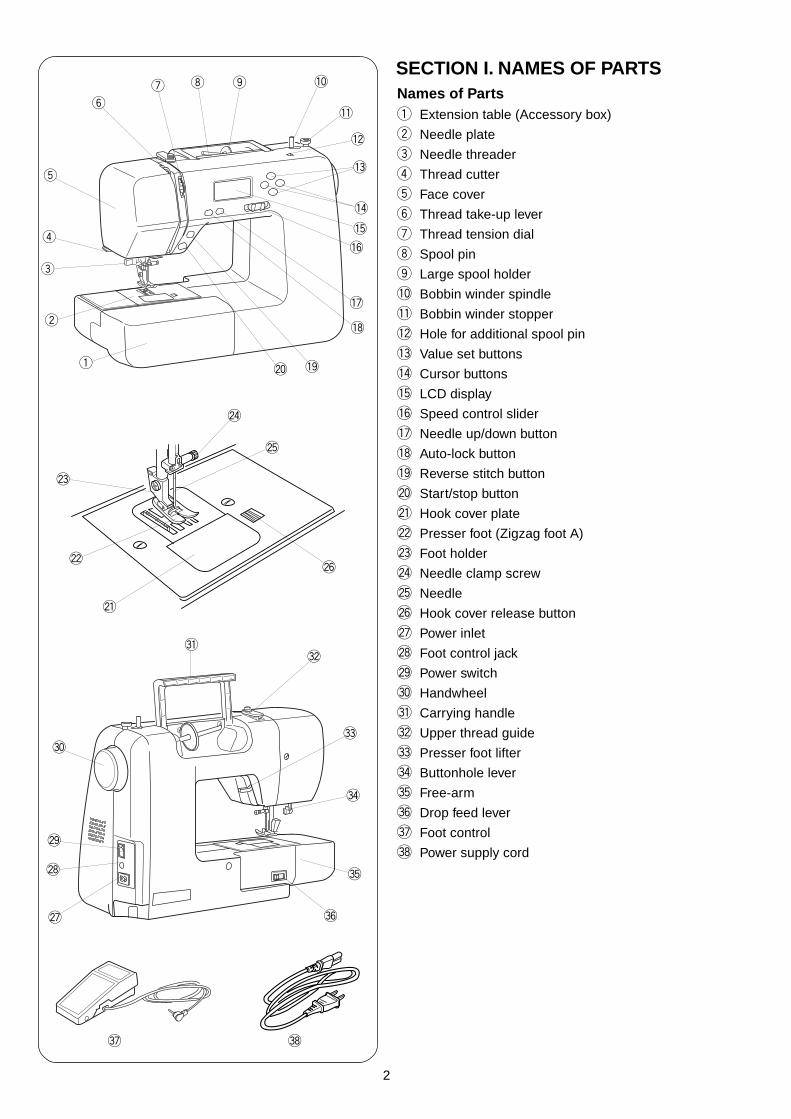
Names of Partsq Extension table (Accessory box)
w Needle plate
e Needle threader
r Thread cutter
t Face cover
y Thread take-up lever
u Thread tension dial
i Spool pin
o Large spool holder
!0 Bobbin winder spindle
!1 Bobbin winder stopper
!2 Hole for additional spool pin
!3 Value set buttons
!4 Cursor buttons
!5 LCD display
!6 Speed control slider
!7 Needle up/down button
!8 Auto-lock button
!9 Reverse stitch button
@0 Start/stop button
@1 Hook cover plate
@2 Presser foot (Zigzag foot A)
@3 Foot holder
@4 Needle clamp screw
@5 Needle
@6 Hook cover release button
@7 Power inlet
@8 Foot control jack
@9 Power switch
#0 Handwheel
#1 Carrying handle
#2 Upper thread guide
#3 Presser foot lifter
#4 Buttonhole lever
#5 Free-arm
#6 Drop feed lever
#7 Foot control
#8 Power supply cord
SECTION I. NAMES OF PARTS
#2
#7 #8

3
q w e r t
y u i o !0
!1 !2 !3
Standard Accessoriesq Bobbin
w Spool pin felt
e Needle set
r Additional spool pin
t Satin stitch foot F
y Zipper foot E
u Automatic buttonhole foot R
i Seam ripper (Buttonhole opener)
o Screwdriver key
!0 Lint brush
!1 Small spool holder
!2 Large spool holder
!333 Spool stand
Extension TableThe extension table q provides an extended sewing areaand can be easily removed for free arm sewing.
q Extension tablew Tabe Slot
• Detaching the tablePull the table away from the machine, as illustrated.
• Attaching the tablePush the extension table, inserting the tab w into the slote until the table snaps into the machine.
• Free-arm sewingFree-arm sewing is useful for darning socks or mendingknees, cuffs or areas of wear in children’s clothes.
q w e

4
SECTION II. GETTING READY TO SEWConnecting the Power Supply• Using the foot control
Turn off the power switch q.Insert the foot control plug w into the foot control jack e.Insert the machine plug r into the power inlet t.Insert the power supply plug y into the wall outlet u.Turn on the power switch q.The foot control sign i will be displayed when thefoot control is connected to the machine.q Power switchw Foot control pluge Foot control jackr Machine plugt Power inlety Power supply plugu Wall outleti Foot control sign
q
e
w
r
u
t
q
w
t
e
r
• Using the start/stop buttonTurn off the power switch q.Insert the machine plug w into the power inlet e.Insert the power supply plug r into the wall outlet t.Turn on the power switch q.q Power switchw Machine pluge Power inletr Power supply plugt Wall outlet
NOTE:The start/stop button does not work when the footcontrol is connected.
i
WARNING:While in operation, always keep your eyes on the sewingarea, and do not touch any moving parts such as thethread take-up lever, handwheel or needle.Always turn off the power switch and unplug from thepower supply:
- when leaving the machine unattended.- when attaching or removing parts.- when cleaning the machine.
Do not place anything on the foot control, otherwise themachine will run inadvertently.
Before Using Your Sewing MachineBefore using your sewing machine for the first time,place a scrap of fabric under the presser foot and runthe machine without thread for a few minutes. Wipe awayany oil which may appear.
Operating Instructions:The symbol “O” on a switch indicates the “off” position ofa switch.For appliances with a polarized plug (one blade widerthan the other): To reduce the risk of electric shock, thisplug is intended to fit in a polarized outlet only one way.If it still does not fit, contact a qualified electrician toinstall the proper outlet. Do not modify the plug in anyway (U.S.A. and Canada only).* Foot control model YC-485EC-1 is used with this
sewing machine.
y

5
Speed Control SliderSewing speed can be varied by the speed control slideraccording to your sewing needs.To increase sewing speed, slide the slider to the right.To decrease sewing speed, slide the slider to the left.
Controlling Sewing SpeedDepress the foot control to start the machine.The further down you press on the foot control, the fasterthe machine runs.The maximum sewing speed can be varied by the speedcontrol slider.

6
qqqqq Start/Stop Button
Lower the presser foot lifter.Press the start/stop button q to start the machine.The machine starts running slowly for the first fewstitches; it then runs at the speed set by the speed controlslider.Press the start/stop button q again to stop the machine.
NOTES: •The machine runs slowly as long as you press and hold
the start/stop button q. •The start/stop button q cannot be used when the foot
control is connected to the machine.
w
e r
t
y
w
e
r
wwwww Reverse Stitch Button
When stitches (00, 01, 10, 11) are selected, themachine will sew in reverse while the reverse stitch buttonis pressed.
If you press the reverse stitch button when sewing anyother stitches, the machine will immediately sew lockingstitches and automatically stop.
If you press the reverse stitch button when stitch pattern00, 01, 10 or 11 is selected and the foot control is notconnected, the machine will sew in reverse as long as thebutton is pressed, and the machine will stop when thebutton is released.
eeeee Auto-lock Button
When stitches (00, 01, 10, 11) are selected, themachine will immediately sew locking stitches andautomatically stop when the auto-lock button is pressed.
If you press the auto-lock button when sewing any otherstitches, the machine will sew locking stitches at the endof the current pattern and automatically stop.
rrrrr Up/down Needle Position Button
Press this button to bring the needle up or down.The machine will stop with the needle up or downdepending on the needle position determined by thisbutton.
Machine Operating Buttons
q
q

7
ttttt Cursor Buttons
Use these buttons to move the cursor u.
Press button to move the cursor to right.
Press button to move the cursor to left.
yyyyy Value Set Buttons
Use these buttons to change the set value.
Move the cursor under the digit you would like to change.
Press button to increase the value.
Press button to decrease the value.
u
t
y

8
Presser Foot LifterThe presser foot lifter q raises and lowers the presserfoot.You can raise the foot about 1/4˝ (0.6 cm) higher than thenormal up position w for easy removal of the presserfoot, or to help you place thick material under the foot.
q Presser foot lifterw Normal up positione Highest position
q
w
ewe
Removing and Attaching the Foot Holder
q
w
e
w
q
Changing the Presser Foot
• Removing the foot holderRemove the setscrew q by turning it counterclockwisewith a screwdriver.
• Attaching the foot holderMatch the hole in the foot holder w with the threadedhole in the presser bar e. Fit the setscrew q intothe hole. Tighten the setscrew q by turning it clockwisewith a screwdriver.
q Setscreww Foot holdere Presser bar
CAUTION:Turn OFF the power switch before changing the foot .Always use the proper foot for the selected pattern.The wrong foot can cause the needle to break.
• Attaching the presser footInsert the presser foot pin q into the slit w of thepresser holder and push the presser foot to lock it inplace.
q Pinw Slit
• Removing the presser footPull the foot in the direction of arrow to remove thepresser foot.
CAUTION:Turn OFF the power switch before detaching orattaching foot holder.
w
q

9
Changing the Needlez x
c
Selecting Thread and NeedlesFor general sewing, use needle size 11/75 or 14/90. Afine thread and needle should be used for sewinglightweight fabrics, so the fabric will not be marred.Heavy fabrics require a needle large enough to piercethe fabric without fraying the needle thread.Always test the needle size on a small scrap of thefabric, which will be used for actual sewing.In general, use the same thread for the needle andbobbin. When sewing stretch fabrics, very fine fabricsand synthetics, use a BLUE TIPPED needle. The bluetipped needle effectively prevents skipped stitches.
Fabric
Light
Thread Needle
Medium
Heavy
Lawn
GeorgetteTricotWool,
Polyester
Cotton,PolyesterFine jersey
Wool
DenimJerseyCoating
Quilting
Silk #80-100
Cotton #80-100Synthetic #80-100
Silk #50Cotton #60-80Synthetic #50-80
Cotton #50
Silk #50Cotton #40-50Synthetic #40-50
Silk #30Cotton #50
#9/65–11/75
#11/75–14/90
#14/90
#14/90–16/100
#16/100
Dropping or Raising the Feed DogThe drop feed lever is located underneath the free armbed on the back of the machine.
q To drop the feed dog, push the lever in the directionof the arrow q.
w To raise the feed dog, push the lever in the directionof the arrow w, as illustrated, and turn the handwheele toward you. The feed dog must be up for normalsewing.
qw
e
q
w
z Turn off the power switch.Raise the needle to its highest position by turning thehandwheel counterclockwise, and lower the presserfoot. Loosen the needle clamp screw q by turning itcounterclockwise. Remove the needle from theneedle clamp w.
x Insert a new needle into the needle clamp w with theflat side to the rear. When inserting the needle intothe needle clamp w, push it up as far as it goes.Tighten the needle clamp screw q firmly by turning itclockwise.
c To see if the needle is good, place the flat side of theneedle onto something flat (needle plate, glass, etc.).The gap between the needle and the flat surfaceshould be consistent. Never use a bent or bluntneedle.A damaged needle can cause permanent snags orruns in knits, fine silks and silk-like fabrics.
q Needle clamp screww Needle clamp
CAUTION:Turn OFF the power switch before changing theneedle.
wq

10
Bobbin Winding• Removing the bobbin
Gently slide the hook cover release button q to theright and remove the hook cover plate w.Lift out the bobbin.
q Hook cover release buttonw Hook cover plate
• Horizontal spool pin
Lift up the spool pin q. Place a spool of thread on thespool pin with the thread coming off the spool as shown.Attach the large spool holder w, and press it firmlyagainst the spool of thread.The small spool holder e is used with narrow or smallspools of thread.
q Spool pinw Large spool holdere Small spool holder
w
q
q
w
e
• Additional spool pin
The additional spool pin w is for winding bobbins,without unthreading the machine.Set the spool stand q under the additional spool pin w.Insert the additional spool pin w into the hole e.Place the felt r and a spool on the pin.
q Spool standw Additional spool pine Hole for additional spool pinr Spool pin felt
q
w
r
e

11
z
x c
• Winding the bobbin
NOTE:Set the speed control slider at its fastest position forbobbin winding.
x
c v
b
q
m
z Draw the thread from the spool.
x Guide the thread around the thread guide.
NOTE:For safety purposes, the machine will stop automatically2 minutes after the start of bobbin winding.
c Thread through the hole in the bobbin from the insideto the outside.
v Put the bobbin on the bobbin winder spindle.
b Push the bobbin to the right.The bobbin sign q appears on the LCD display.
n With the free end of the thread held in your hand,start the machine. Stop the machine when it haswound a few layers, and then cut the thread close tothe hole in the bobbin.
n
m Start the machine again. When the bobbin is fullywound, it will stop automatically. Return the bobbinwinder to its original position by moving the spindle tothe left, and cut the thread as shown.

12
• Inserting the bobbin
z Place a bobbin in the bobbin holder with the threadrunning off counterclockwise.q End of thread
z
x
c
v
b
x Guide the thread into the first notch w on the frontside of the bobbin holder.w Notch
c Draw the thread to the left, sliding it between thetension spring blades.
v Continue to draw the thread lightly until the threadslips into the second notch e. Pull out about 6˝(15 cm) of thread.e Notch
b Attach the hook cover plate. Check the threading byreferring to the diagram r shown on the hook coverplate.r Threading diagram
q
w
e
r

13
z
x
c
v b
wz
c
v
b x
z Draw the end of the thread around the upper threadguide.
Threading the Machine
• Threading the machine
CAUTION:Turn OFF the power switch before threading themachine.
x While holding the thread near the spool w, draw theend of the thread down around the check springholder.w Spool
c Firmly draw the thread up from right to left over thetake-up lever, and down into the take-up lever eye.
v Pass the thread through the lower thread guide. Slidethe thread behind the needle bar thread guide on theleft.
b Thread the needle from front to back, or use theneedle threader.
w
Raise the presser foot. Press theneedle up/down button q to raisethe thread take-up lever to itshighest position.q Needle up/down button
q

14
q
z
x
NOTE:The needle threader can be used with a #11 to #16needle or a blue tipped needle. Thread sizes 50 to 90are recommended.
Needle Threader
CAUTION:Turn OFF the power switch when using the needlethreader.
c v
z Lower the presser foot. Raise the needle to its highestposition. Pull down the needle threader knob q as faras it will go.q Knob
x Turn the knob away from you so the hook comes outthrough the needle eye.Draw the thread around the guide w and under thehook e.w Guidee Hook
e
c Turn the knob toward you to pull the thread throughthe needle eye.Raise the knob in the direction of the arrow, drawingthe thread loop through the needle.
v Pull the thread through the needle eye.
w

15
Drawing up the Bobbin Threadz Raise the presser foot. Hold the needle thread lightly
with your left hand.
x Press the needle up/down button q twice tolower and raise the needle to pick up the bobbin thread.q Needle up/down button
c Pull both threads 4˝ to 6˝ (10 to 15 cm) under andbehind the presser foot.
q
z
x
c

16
LCD DisplayThe LCD display shows the following information whenthe machine is turned on.
q Stitch pattern numberw Cursorse Stitch widthr Stitch length
q
w e r
z
x
c
z Press the cursor keys to move the cursor
under the stitch pattern number.
The cursors appear under both digits when turning
the power on.
x Press the value set keys to change the stitch
pattern number until the pattern number of the
desired stitch is indicated.
The number will increase or decrease by 1 each time
you press the value set key.
c Press the key to move the cursor under the tens
digit of the stitch pattern number.
The number will increase or decrease by 10 each
time you press the value set key.
Stitch Patterns
* The alphabet under the stitch pattern indicates thesuitable presser foot type for the selected stitchpattern.

17
Adjusting the Needle Thread Tension for aStraight Stitch• Correct tensionq Needle thread (top thread)w Bobbin thread (bottom thread)e To loosenr To tighten
The ideal straight stitch has threads locked between twolayers of fabric, as illustrated (magnified to show detail).If you look at the top and bottom of the seam, notice thatthe stitches are evenly balanced.When adjusting the needle thread tension, the higher thenumber, the tighter the top thread tension.Results depend on:- stiffness and thickness of the fabric- number of fabric layers- type of stitch
q
w
e
r
r
q
w
t
e
• Tension is too looseq Needle thread (top thread)w Bobbin thread (bottom thread)e To tighten tensionr Right side (top side) of fabrict Wrong side (bottom side) of fabric
The needle thread shows through on the wrong sideof the fabric, and the stitch feels bumpy. Turn the dial to ahigher tension setting number to tighten the needlethread tension.
r
q
w
t
e
• Tension is too tightq Needle thread (top thread)w Bobbin thread (bottom thread)e To loosen tensionr Right side (top side) of fabrict Wrong side (bottom side) of fabric
The bobbin thread shows through on the right side ofthe fabric, and the stitch feels bumpy. Turn the dial to alower tension setting number to loosen the needle threadtension.

18
Adjusting the Needle Thread Tension for aZigzag StitchFor an ideal zigzag stitch, the bobbin thread does notshow on the right side (Top side) of the fabric, and theneedle thread shows slightly on the wrong side (Bottomside) of the fabric.See the illustrations for the correct appearance.To match this appearance, adjust the needle tension asnecessary.
• Correct tensionq Right side (Top side) of fabricw Wrong side (Bottom side) of fabric
Minimize the amount of needle thread visible on thewrong side (Bottom side) of the fabric without causingexcessive puckering, or causing the bobbin thread toshow on the right side (Top side) of the fabric.Results vary with fabric, thread and sewing conditions.
q w
q w
q w
• Tension is too tightq Right side (Top side) of fabricw Wrong side (Bottom side) of fabric
The corner of each zigzag pulls together on the rightside of the fabric
• Tension is too loose
q Right side (Top side) of fabric
w Wrong side (Bottom side) of fabric
The corner of each zigzag point pulls together on the
wrong side of the fabric.

19
q ewStraight Stitch Sewingq Stitch pattern: 00 or 01w Needle thread tension: 2 to 6e Presser foot: Zigzag foot A
• Starting to sewRaise presser foot and position the fabric next to a seamguide line on the needle plate (5/8˝ (1.6 cm) is mostcommon). Lower the needle to the point where you wantto start. Lower the presser foot and pull the threadstoward the back. Start the machine. Gently guide thefabric along a seam guide line letting the fabric feednaturally.
• Changing sewing directionStop the machine and bring the needle down into thefabric by pressing the needle up/down button q.Raise the presser foot.Pivot the fabric around the needle to change the sewingdirection as desired. Lower the presser foot.
q Needle up/down button
SECTION III. BASIC SEWING
w
• Finishing sewingTo fasten the ends of a seam, press the reverse stitchbutton w and sew several reverse stitches. Raise thepresser foot. Remove the fabric, draw the threads to theback and cut them with the thread cutter e. Thethreads are cut a proper length to begin sewing thenext seam.
w Reverse stitch buttone Thread cutter
e
• Turning square cornersWhen sewing with fabric edge at 5/8˝ seam guide, to turna square corner so that sewing continues at samedistance from edge.Stop the machine when front edge of fabric reaches thecornering guide lines q.Lower the needle by pressing needle up/down button w.Raise the presser foot and turn the fabric counterclock-wise 90°.Lower the presser foot, and begin stitching in the newdirection.
q Cornering guidew Needle up/down button
w
q
q

20
Needle PlateThe seam guides on the needle plate and the hook coverhelp you to measure seam allowance. The numbers onthe needle plate indicate the distance between thecenter needle position q and the edge of the fabric w.
q Center needle positionw Edge of the fabric
qw
Number
Distance(cm)
Distance(inch)
10 15 30 40 3/8 1/2 5/8 1 1 1/2
1.0 1.5 3.0 4.0
3/8 1/2 5/8 1 1 1/2— — — —
— — — — —
q e
[1.0] [2.2] [5.0]
q
w e r
• Adjusting the stitch lengthPress the cursor buttons to move the cursor qunder the stitch length value “2.2” w (default setting).Press the button to decrease stitch length.Press the button to increase stitch length.The stitch length can be varied from 0.0 to 5.0.
q Cursorw Stitch length (2.2)
NOTE:Reverse stitch length cannot be set longer than 4.0.
w
q
• Adjusting the needle drop positionThe needle drop position can be adjusted for straightstitch patterns 00–03, and 17–19.
Press the cursor buttons to move the cursor qunder the stitch width value “3.5” (default setting).Press the button to move the needle to the right r.Press the button to move the needle to the left w.
w Left (0.0)e Middle (3.5)r Right (7.0)
The front seam guides e are marked at 1/4˝, 3/8˝ and5/8˝ from the center needle position q.
e Front seam guides

21
q ew
q ew
q ew
Lock-a-Matic Stitchq Stitch pattern: 02w Needle thread tension: 2 to 6e Presser foot: Zigzag foot Ar Reverse button
Use this stitch to secure the beginning and the end of aseam with backstitching.When you reach the end of the seam, press the reversestitch button r once. The machine will sew four reversestitches, four forward stitches, and then stop sewingautomatically.
Locking Stitchq Stitch pattern: 03w Needle thread tension: 2 to 6e Presser foot: Zigzag foot Ar Reverse button
This unique stitch is used where an invisible lockingstitch is needed.Lower the needle close to the front edge of the fabric.The machine will sew several locking stitches in placeand continue sewing forward.When you press the reverse stitch button r at the end ofthe seam, the machine will sew several locking stitchesin place, then stop sewing automatically.
r
r
Straight Stitchq Stitch pattern: 00 or 01w Needle thread tension: 2 to 6e Presser foot: Zigzag foot A
For seaming garments, zipper application and more.Pattern 01 is used for seaming fine fabrics.
q ewStretch Stitchq Stitch pattern: 04w Needle thread tension: 3 to 6e Presser foot: Zigzag foot A
This stitch is a narrow stretch stitch designed toeliminate puckering on knit fabrics and bias seams, whilepermitting the seam to be pressed completely open flat.

22
q ew
q ewSaddle Stitchq Stitch pattern: 19w Needle thread tension: 3 to 6e Presser foot: Zigzag foot A
Sculpture Stitchq Stitch pattern: 18w Needle thread tension: 3 to 6e Presser foot: Satin stitch F
For top stitching and outlining designs.Sew slowly at the corners.
This saddle stitch is formed with one stitch forward, twostitches backward, and a fourth stitch forward.You can achieve a lovely hand-worked look whentopstitching suits, blazers, jumpers, and denim outfitswith the saddle stitch.
q ewTriple Stretch Stitchq Stitch pattern: 17w Needle thread tension: 2 to 6e Presser foot: Zigzag foot A
This strong, durable stitch is recommended when bothelasticity and strength are necessary in order to insurecomfort and durability. Use it to reinforce areas such ascrotch and armhole seams. Also use for extrareinforcement when constructing items such asbackpacks.

23
The zigzag stitch is one of the most useful and versatilestitches.It is used for overcasting, mending, appliqué, and alsoused as a decorative stitch.
NOTE:Use an interfacing when sewing on stretch fabrics suchas knit, jersey or tricot.
q ew
r
u
Zigzag Stitchq Stitch pattern: 10w Needle thread tension: 2 to 6e Presser foot: Zigzag foot A
• Adjusting the stitch widthPress the cursor buttons to move the cursor wunder the stitch width value “5.0” q (default setting).Press the button to decrease stitch width e.Press the button to increase stitch width r.The stitch width can be varied from 0.0 to 7.0.
e
• Adjusting the stitch lengthPress the cursor buttons to move the cursor wunder the stitch length value “1.5” t (default setting).Press the button to decrease stitch length y.Press the button to increase stitch length u.The stitch length can be varied from 0.2 to 5.0.
t
w
y
q
w

24
q ewOvercasting with Zigzag Stitchq Stitch pattern: 10w Needle thread tension: 3 to 7e Presser foot: Zigzag foot A
q ewMultiple Zigzagq Stitch pattern: 11w Needle thread tension: 3 to 6e Presser foot: Zigzag foot A
This stitch is used to finish seams on synthetics andother fabrics that tend to pucker. The stitch is alsoexcellent for darning and mending tears.Place your fabric to allow a 5/8˝ (1.5 cm) seam. Trimexcess close to stitching. Be careful not to cut thestitches.
q ewKnit Stitchq Stitch pattern: 13w Needle thread tension: 3 to 6e Presser foot: Zigzag foot A
Place your fabric to allow a 5/8˝ (1.5 cm) seam. Trimexcess close to stitching. Be careful not to cut thestitches.
This stitch is useful in garment construction, and infinishing raw edges of any sewing project.
Carefully guide the fabric so the needle falls off the edgewhen it swings to the right.

25
NOTES:• To sew the buttonholes 05 to 07, follow the same
procedure as Square BH (See page 26 to 27.).• The size of a buttonhole is automatically set by placing
a button in the rear of automatic buttonhole foot R.• The button holder of the foot takes a button size of up
to 1˝ (2.5 cm) in diameter.• It is sometimes necessary to change buttonhole size
to match certain heavy or specific materials andthreads.
• Make a test buttonhole on an extra piece of the fabricto check your setting.
• Place the button on the fabric and mark the top andbutton to determine the position of the buttonhole onthe fabric.
• Use interfacing on stretch fabrics.
Various Kinds of Buttonholes and Their Uses
q Square ButtonholeThis square buttonhole is widely used on medium toheavy fabrics. The buttonhole size is automaticallydetermined by placing a button in the foot.
w Round-end ButtonholeThis buttonhole is used on fine to medium weightfabrics, especially for blouses and children’s clothes.
e Keyhole ButtonholeThe keyhole buttonhole is widely used on medium toheavy fabrics. It is also suitable for larger and thickerbuttons.
q
w
e
Overedge StitchMachine settingq Stitch pattern: 12 or 14w Needle thread tension: 3 to 6e Presser foot: Zigzag foot: A
Satin Stitch foot: F
Carefully guide the fabric so the needle falls off the edgewhen it swings to the right.
q ew

26
q ew Square Buttonholeq Stitch pattern: 05w Thread tension dial: 1 to 5e Presser foot: Automatic buttonhole foot Rr Buttonhole lever sign
t
y u
i
!0
o
z
x
e
r
c
v
• To sewz Press the needle up/down button to raise the needle.
Attach the automatic buttonhole foot R snappingthe pin w into the slit q of the foot holder.
q Slitw Pin
c Pull the buttonhole lever t down as far as it will go.t Buttonhole Lever
x Pull the button holder e to the back, and place thebutton in it. Push it together tightly to the button.
NOTE:If the button is extremely thick, make a test buttonholeon an extra piece of the fabric.If it is difficult to fit the button through the testbuttonhole, you can lengthen the buttonhole by pullingthe button holder back a little. The length of thebuttonhole will be increased.
e Button holderr Extra gap
r
!1u
v Insert the corner of the fabric under the foot.Press the needle up/down button twice.Remove the fabric to the left to draw the needlethread through the hole of the foot.Place the fabric under the foot, and lower theneedle at the starting point of the buttonhole mark y.Then lower the automatic buttonhole foot R.
y Buttonhole marku Starting point
NOTE:Make sure there is no gap !0 between the slider andstopper, otherwise the buttonhole will not be sewn inthe required position.
i Slidero Stopper!0 No gap!1 Sewing gap
w
q

27
b b Start the machine to sew the buttonhole.The buttonhole will be automatically sewn.The machine will sew the left row first.
n
m
n The machine will sew the back bartack and the rightrow.
m The machine will sew the front bartack, then it stopsautomatically.
NOTE:If you start sewing the buttonhole without lowering thebuttonhole lever, the LCD display will show “bL”message and the buttonhole lever sign !2 will blink.Lower the buttonhole lever, then restart the machine.
, Remove the fabric and place a pin !3 just below thebartack at each end to prevent accidentally cuttingstitches. Cut the opening with the seam ripper !4.
!3 Pin!4 Seam ripper
. When buttonhole sewing is finished, push thebuttonhole lever !5 upward as far as it will go.
!5 Buttonhole lever
!3
!4
!5
!2
,
.

28
Adjusting the Stitch Width and Density forButtonholes
• Adjusting the stitch widthPress the cursor buttons to move the cursor underthe stitch width value “5.0” q (default setting).Press the button to decrease buttonhole width w.Press the button to increase buttonhole width e.The stitch width can be varied from 2.5 to 7.0 dependingon the selected buttonhole.
• Adjusting the stitch densityPress the cursor buttons to move the cursor underthe stitch density value “0.4” q (default setting).Press the button to make the buttonhole stitchdenser w.Press the button to make the buttonhole stitch lessdense e.The stitch density can be varied from 0.3 to 0.8depending on the selected buttonhole.
w e
q
q
w e
Round-End Buttonholeq Stitch pattern: 06w Thread tension dial: 1 to 4e Presser foot: Automatic buttonhole foot R
q ew
Sewing procedure is the same as square buttonhole.The stitch width can be varied from 2.5 to 5.5.To change the sitch width or stitch density, refer to the“Adjusting the stitch density” section above.
q ewKeyhole Buttonholeq Stitch pattern: 07w Thread tension dial: 1 to 5e Presser foot: Automatic buttonhole foot Rr Eyelet punch
Sewing procedure is the same as square buttonhole.Use the seam ripper and an eyelet punch r to open thebuttonhole.
The stitch width can be varied from 5.5 to 7.0.To change the stitch width or density, “Adjusting the stitchdensity” section above.* An eyelet punch is an optional item.
r

29
q ew Corded Buttonholeq Stitch pattern: 05w Thread tension dial: 1 to 5e Presser foot: Automatic buttonhole foot R
z Use the same procedure as the square buttonholeprocedure.Set the stitch width to match the thickness of thecord used.With the buttonhole foot raised, hook the filler cord onthe spur q at the back of the buttonhole foot.Bring the ends toward you under the buttonhole foot,clearing the front end.Hook the filler cord into the forks w on the front of theautomatic buttonhole foot to hold them tight.Lower the needle into the garment where thebuttonhole will start, and lower the foot.
q Spurw Forks
z
x
c
q
w
e
r
x Start the machine and sew the buttonhole.Each side of the buttonhole and the bartacks will besewn over the cord.Remove the fabric from the machine, and cut thesewing threads only.
e Needle thread (top thread)r Bobbin thread (bottom thread)
c Pull the loose ends of the filler cord to tighten it.Thread the end of the cord through a hand-sewingneedle. Then draw them to the wrong side of thefabric and knot.
NOTE:Cut the filler cord at both ends, if the filler cord isstitched on the fabric and cannot be pulled.

30
q ewDarning Stitchq Stitch pattern: 08w Thread tension dial: 3 to 6e Presser foot: Automatic buttonhole foot R
• Starting to sewz Pull the button holder q to the back.x Place the garment under the foot. Press the needle
up/down button twice. Move the fabric to theleft to draw both threads under the foot.
c Lower the foot and start the machine.The machine will lock stitch, sew 16 rows of darning,lock stitch again and stop automatically.
v Turn the fabric and repeat sewing.q Button holderw Holee Starting pointr 3/4˝ (2 cm)t 9/32˝ (0.7 cm)
q
w
e
r
te• Sewing a shorter darningTo sew a darning shorter than 3/4˝ (2 cm), first stop themachine after sewing the required length u, then pressthe reverse stitch button y.The required length u has been determined.Start the machine again and continue sewing until themachine stops automatically.
y Reverse stitch buttonu Required lengthi Starting point
• Sewing a same-sized darningSimply start the machine to sew another darning at thesame size.
y
u
i
z x c v
o • Adjusting the evenness of the darningCorrect the evenness of the darning as follows:Press the cursor buttons to move the cursorunder the value “d5” o (default setting).When the right side of the darn is lower than the left side,press the button to set the value to “d6” – “d9”, andmake the darn even.When the left side of the darn is lower than the right side,press the button to set the value to “d1” – “d4”, andmake the darn even.

31
q ew
q
r
t
w
re
Tackingq Stitch pattern: 09w Thread tension dial: 3 to 6e Presser foot: Satin stitch foot F
Tacking is used to reinforce pockets, crotches and beltcarriers where extra strength is needed.
• Start sewingStart the machine and sew until the machine stopsautomatically. The machine will sew a tacking 1.5 cm(5/8˝) long.q 1.5 cm (5/8˝)
• Sewing a shorter tack* Set the speed control slider at low speed setting.
To sew a tack shorter than 1.5 cm (5/8˝), first stop themachine after sewing the required length w, then pressthe reverse stitch button e.The tack length r has been determined.Start the machine again and continue sewing until themachine stops automatically.
w Required lengthe Reverse stitch buttonr Tack lengtht Starting point
• Sewing a same-size darningSimply start the machine to sew another tack at thesame size.
q ew Eyeletq Stitch pattern: 49w Needle thread tension: 1 to 4e Presser foot: Satin stitch foot FThe eyelet is used for belt holes etc.
• Starting to sewAttach the satin stitch foot F.Start the machine. The machine will stop automaticallywhen completed.Open the eyelet with an awl, eyelet punch or pointedscissors.
w
e
q
• Adjusting the shape of an eyeletCorrect the shape of the eyelet as follows:Press the cursor buttons to move the cursorunder the value “L3” (default setting) q.If the eylet gap opens w, press the button to makethe darn even. (L1~L2)If the eylet overlaps e, press the button to make thedarn even. (L4~L5)
NOTE:The shape can be adjusted within L1 to L5 (defaultsetting is L3).

32
q ew Zipper Sewingq Stitch pattern: 00
w Needle thread tension: 1 to 4
e Presser foot: Zigzag foot A
Zipper foot E
w
e r
• Attaching the zipper footFit the pin on the zipper foot into the slit of the footholder.
• To sew the left side of the zipper, attach zipper foot with the right-hand side of pin.
• To sew the right-side of zipper, attach zipper foot with the left-hand side of pin.
q Slitw Pine To sew left sider To sew right side
• Fabric preparationAdd 3/8˝ (1 cm) to the zipper length. This is the overallopening size.
q Right side of the fabricw 3/8˝ (1 cm)e Opening sizer Zipper lengtht Slidery Zipper teethu Zipper tapei Wrong side of the fabrico End of the opening
Place the right sides of the fabric together and sew upto the end of the zipper opening, with a 13/16˝ (2 cm)seam allowance. Reverse the stitch to fasten theseam. Attach the zigzag foot. Baste along the zipperopening with the stitch length 4.5.
!0 13/16˝ (2 cm)!1 Zipper opening (Basting)!22 Reverse stitches!3 End of the opening!4 Seam
NOTE:Loosen the thread tension to one (1) for basting.
w
e r
t
y
u
o!0
q
!1
!3!2
!4
z • Start sewingz Fold up the upper seam allowance. Fold back the
bottom seam allowance to form a 1/8˝ (0.3 cm)fold. Place the zipper teeth next to the fold and pinit in place.q Bottom fabricw End of the zipper openinge Zipper teethr 1/8˝ (0.3 cm)t Wrong side of the upper fabricy Opening sizeu Fold
q
we
r
yt
u
q
i
q

33
x
c
i
o
v!0
!1
b n
!2
m
Zipper Sewing (continued)x Attach the zipper foot with the pin on the right. Sew
through all the layers from the end of the zipperopening, guiding the zipper teeth along the edge ofthe foot.
c Stop the machine 2˝ (5 cm) before the foot reachesthe slider on the zipper tape. Lower the needle intothe fabric, and raise the foot. Open the zipper, thenlower the foot and stitch the remainder of theseam.i Slidero 2˝ (5 cm)
v Close the zipper and open the upper fabric flat overthe zipper. Baste the upper fabric and zipper tapetogether.!0 Basting stitch
b Detach the foot and attach it with the pin on theleft. Backstitch across the end of opening 3/8˝(1 cm).Turn the fabric 90 degrees and stitch through thegarment and zipper tape.!1 Backstitch
n Stop the machine 2˝(5 cm) before the foot reachesthe slider on the zipper tape. Lower the needle intothe fabric, and raise the foot. Remove the bastingstitches.!2 Basting stitches
m Open the zipper, then lower the foot and stitch theremainder of the seam.After finished sewing, remove the basting stitches onthe upper fabric.

34
q ewBlind Hemmingq Stitch pattern: 15w Thread tension dial: 1 to 4e Presser foot: Zigzag foot A
z Fold a hem with the wrong side of the fabric up toform a 1/4˝ – 7/16˝ (0.4 – 0.7 cm) allowance.
q Wrong side of fabricw 1/4˝ – 7/16˝ (0.4 – 0.7 cm)
(1) On heavyweight fabrics that tend to ravel, the rawedge should be overcast first.
(2) Fold the hem under the fabric for lightweightfabrics.
q
w
(2)z
q
w(1)
x
c
x Position the fabric, so that the needle at its leftmostposition just pierces the edge of the fold.
e When the needle comes to the leftr When the needle comes to the right
c Open the fabric after sewing is finished.
NOTE:If the needle pierces too far left, the stitch will showthrough on the right side of the fabric.
e r

35
q ew
r
Button Sewingq Stitch pattern: 10w Needle thread tension: 3 to 7e Presser foot: Satin stitch foot Fr Feed dog: Dropped
z Lower the feed dog.x Match the holes of button to the horizontal slot on the
presser foot.c Lower the foot to hold the button in place.v Adjust the stitch width so the needle will enter the left
hole of the button.b Turn the handwheel so that the needle will enter the
right hole of the button. Readjust the stitch width ifnecessary.
n Stitch several times.
z x c v b n
m , m After you finish sewing, cut the thread but leave3˝ to 4˝ of thread at the button.
, With a hand sewing needle, draw the top thread tothe reverse side of the fabric and knot the threads.
* After the button sewing is completed, raise the feeddogs for normal sewing.
q ewShelltuck Stitchq Stitch pattern: 16w Needle thread tension: 6 to 8e Presser foot: Satin stitch foot F
Use a lightweight fabric (tricot, for example). Fold thefabric as shown and stitch on the fold. Allow the needleto just clear the folded edge to create a shelled edge.You may need to increase the needle thread tensionslightly.If you sew rows of shell stitches, space the rows at least5/8˝ (1.5 cm) apart. You can also sew shell stitches onknits or soft silky woven fabrics, in any direction.

36
q ew
Scallop Stitchq Stitch pattern: 23w Thread tension dial: 3 to 6e Presser foot: Zigzag foot A
Sew the stitches approximately 3/8˝ (1 cm) inside theedge of the fabric.Trim the outside of the stitches as shown. Make sureyou don’t cut the thread.
q ew Appliqueq Stitch pattern: 31, 32 or 33w Needle thread tension: 1 to 4e Presser foot: Satin stitch foot F
SECTION IV. DECORATIVE STITCHING
w
* The stitch width of pattern 31 – 33 can be changedwithout changing its center needle position.
Place an applique on the fabric and baste or pin it inplace.Reduce the foot pressure.Sew while guiding the fabric so the needle falls along theouter edge of the applique.
q Appliquew Outer edge
q
e
r
t
y
• To adjust the stitch widthSelect pattern 31.Press the cursor buttons to move the cursor underthe stitch width value “3.5” e (default setting).Press the button to decrease the stitch width r.Press the button to increase the stitch width t.The stitch width will be varied based on the centeredneedle drop position y.
e Stitch width (3.5)r Stitch pattern 31 (stitch width decreased)t Stitch pattern 31 (stitch width increased)y Center needle drop position

37
q ewPatchwork Piecingq Stitch pattern: 00 and 21w Thread tension dial: 3 to 6e Presser foot: Zigzag foot A
w
z Place the patchwork pieces right sides together.Select stitch pattern 00. Sew a precise 1/4˝ seamallowance.
q Wrong side of fabricw Right side of fabric
x Select stitch pattern 21.
c Press the seam allowance to open.Sew stitch pattern 21 on the right side of thegarment centering over the seam line.
* Stitch patterns 22, 25, 30 can also be used.
q
w w
z
x c
q ewSmockingq Stitch pattern: 00 and 26w Thread tension dial: 3 to 6e Presser foot: Satin stitch foot F
q
w
Smocking is a delicate decorative treatment used onchildren’s clothes or women’s blouses.Choose a soft and lightweight fabric such as batiste,gingham or challis. Cut the fabric three times wider thanthe projected width. Set stitch length at “5.0” and sewrows of straight stitches 3/8˝ (1.0 cm) apart across thearea to be smocked.
Knot the threads along one edge q. From the otheredge, pull the bobbin threads (bottom threads) todistribute the gathers w evenly.Sew the smocking stitches between the gathered rows.Remove the straight stitches by pulling them out.
q Knotted edgew Gathers
NOTE:Pull up the bobbin thread and draw a 4˝–6˝ thread tail tothe back before start sewing.

38
q ewFagotingq Stitch pattern: 34w Thread tension dial: 3 to 6e Presser foot: Satin stitch foot F
Use this stitch to join two pieces of fabric to create anopen work appearance and add design interest.Fold under each fabric edge 5/8˝ (1.5 cm) and press. Pinthe two edges to paper or tear backing 1/8˝ apart. Sewslowly, guiding the fabric so the needle catches thefolded edge on each side.After finishing the sewing, take off the paper.
q 1/8˝ (0.3~0.4 cm)w Paper
q w
q ewSatin Stitchesq Stitch pattern: 45w Thread tension dial: 3 to 6e Presser foot: Satin stitch foot F* Stitch patterns 42–47 can be used for satin stitches.
For better sewing results, interfacing should be used onthe wrong side of the fabric when you use stretch orelastic fabrics.Press the auto-lock button to finish the end of thepattern.

39
Cross Stitchq Stitch Pattern: 36w Thread tension dial: 3 to 6e Presser foot: Satin stitch foot F
q ew
You can make cross stitch designs with these patterns,in half the time it would take if embroidered by hand.
* If you press the auto-lock button before sewing, themachine will sew one unit of the cross stitch and stopautomatically.
Decorative Stitchesq Stitch Pattern: 20, 27–29, 37–41 or 48w Thread tension dial: 3 to 6e Presser foot: Zigzag foot A
Satin stitch foot F
q ew
For the best sewing results, carefully align and guide thefabric when you sew with decorative stitches.Use a tear-way backing if necessary.

40
q ewDecorative Stitch Combinationsq Stitch Pattern: 41 and 43w Thread tension dial: 3 to 6e Presser foot: Satin stitch foot F
q
Correcting Distorted Stitch Patterns
The sewing results of the stretch patterns may varydepending upon the sewing conditions, such as sewingspeed, type of the fabric, number of layers etc.Always test sew on a scrap piece of the fabric that youwish to use.If stretch patterns are distorted, correct it with the feedbalancing dial.
q Feed balancing dial
q
Stretch stitch pattern
If the pattern is compressed, turn the feed balancing dialin the direction of “+”.
If the pattern is drawn out, turn the feed balancing dial inthe direction of “–”.
Evenness of tacking
If the stitch does not meet start position, turn the feedbalancing dial in the direction of “+”.
If the stitch does not meet return position, turn the feedbalancing dial in the direction of “–”.
z
x
c
To combine two units of pattern 43 and 41.z Sew pattern 43 and press the auto-lock button while
sewing the second unit. The machine will stopautomatically when the second unit is completed.q Auto-lock button
x Select stitch pattern 41. Press the auto-lock buttonand start sewing.
c Machine will sew one unit of pattern 41 and stopautomatically.
v Repeat the procedure above.

41
SECTION V. CARE OF YOUR MACHINECleaning the Hook Race and Feed Dog
WARNING: • Turn the power switch off and unplug the machine
before cleaning. • Do not dismantle the machine other than as explained
in this section.
CAUTION:Do not store the machine in a high-humidity area, neara heat radiator, or in direct sunlight.
Installing the Bobbin Holderz Insert the bobbin holder q so that the knob e fits
next to the stopper w in the hook race.x Insert the bobbin.c Attach the needle plate with the setscrews t.
After cleaning the machine, make sure the needleand presser foot are attached.
q Bobbin holderw Stoppere Knobr Screwdriver keyt Setscrews
Press the needle up/down button to raise the needle,then unplug the sewing machine.Remove the needle and presser foot.Remove the cover plate by sliding the cover platerelease button to the right. Take out the bobbin. Brushout dust and lint. (You may also use a vacuum cleaner.)
z Remove the setscrews w on the needle plate e withthe screwdriver key q supplied with the machine.Remove the needle plate e.
x Lift up the bobbin holder t and remove it.c Clean the bobbin holder r with a lint brush.v Clean the feed dog y and hook race u with the lint
brush.b Clean the center of the hook race with a dry cloth.
q Screwdriver keyw Setscrewse Needle plater Lint brusht Bobbin holdery Feed dogu Hook race
* You may also use a vacuum cleaner.* The machine does not require oiling.
NOTE:Clean the outside of the machine with a soft cloth andneutral soap.After cleaning the machine, make sure the needle andpresser foot are attached.
w
e
t
r
t
z
x
c
v
b
z x
c
r
q
q
r
y
t
u
e
w

42
Audible signal
Pip
Pip-pip-pip
Pip-pip-peep
Peep
The buzzer sounds when:
Normal operation
Invalid operation
Buttonhole sewing completed
Malfunction
Problems and Warning Signs
Cause Try this
The machine will not sew with the start/stop button
because the foot control is connected.
Disconnect the foot control
and start the machine.
Warning sign
Lower the buttonhole leverand restart the machine.
A buttonhole is sewn without lowering thebuttonhole lever.
The bobbin winder spindle is moved to the right. Move the bobbin winderspindle to the left.
The machine is restarted too soon after it has
halted due to the overload.
Wait for at least 15 seconds to
restart. If threads are
jamming, remove the
jammed threads.

43
Troubleshooting
Condition
The needle thread
breaks.
The bobbin thread
breaks.
The needle breaks.
Skipped stitches
Seam puckering
The cloth is not
feeding smoothly.
Stitches form loops
below the works.
The machine does not
work.
Buttonhole sewing is
not sewn properly.
The machine does not
run smoothly and is
noisy.
1. The needle thread is not threaded properly.
2. The needle thread tension is too tight.
3. The needle is bent or blunt.
4. The needle is incorrectly inserted.
5. The needle thread and the bobbin thread are not set under the
presser foot when start sewing.
6. The threads were not drawn to the rear after sewing.
7. The thread is either too heavy or too fine for the needle.
1. The bobbin thread is not threaded properly in the bobbin holder.
2. Lint has collected in the bobbin holder.
3. The bobbin is damaged and doesn’t turn smoothly.
4. The thread is wound loosely on a bobbin.
1. The needle is incorrectly inserted.
2. The needle clamp screw is loose.
3. The threads were not drawn to the rear after sewing.
4. The needle is too fine for the fabric being used.
5. The presser foot is not appropriate for the stitch pattern being sewn.
1. The needle is incorrectly inserted, bent or blunt.
2. The needle and/or threads are not suitable for the work being sewn.
3. A Blue Tip needle is not being used for sewing stretch, very fine
fabrics and synthetics.
4. The needle thread is not threaded properly.
5. A poor quality needle is used.
1. The needle thread tension is too tight.
2. The needle thread is not threaded properly.
3. The needle is too heavy for the fabric being sewn.
4. The stitch length is too long for the fabric.
1. The feed dog is packed with lint.
2. The stitches are too fine.
3. The feed dog is not raised after “drop feed” sewing.
1. The needle thread tension is too loose.
2. The needle is either too heavy or too fine for the thread.
1. The machine is not plugged in.
2. Thread has been caught in the hook race.
3. The bobbin winder spindle is not returned to the left after bobbin
winding.
1. The stitch density is not suitable for the fabric being sewn.
2. Suitable interface material has not been used for the stretch or
synthetic fabric.
1. Thread has been caught in the hook race.
2. Lint has built up in the hook race or bobbin holder.
ReferenceSee page 13, 14
See page 17, 18
See page 9
See page 9
See page 19
See page 19
See page 9
See page 12
See page 41
Replace the bobbin.
See page 11
See page 9
See page 9
See page 19
See page 9
Change the presser foot.
See page 9
See page 9
See page 9
See page 13, 14
Change the needle.
See page 17, 18
See page 13
See page 9
Make the stitches shorter.
See page 41
Make the stitches longer.
See page 9
See page 17, 18
See page 9
See page 4
See page 41
See page 11
See page 28
Use an interfacing.
See page 41
See page 41
Cause


808-800-361(Eng)Printed in Taiwan