instruction book manual de instrucciones - …manuals.husqvarnaviking.com/vsm/husqvarna...
TRANSCRIPT
K E E P I N G T H E W O R L D S E W I N G
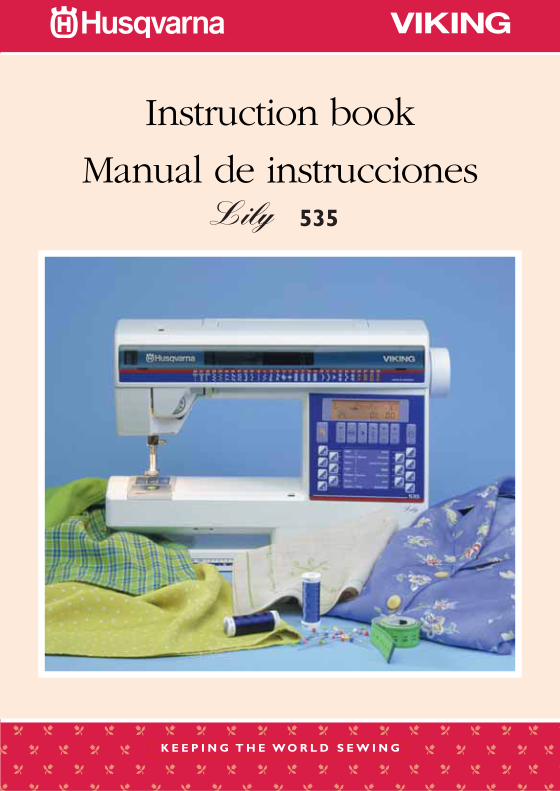
Instruction book
Manual de instrucciones 535

Instruction book/Manual de instrucciones Lily 5352
Instruction book/Manual de instrucciones Lily 535 3
List of contentsSafety instructions 4Machine parts 6Procedures 7-17Unpacking, Packing away 7Connecting the foot control 8Connecting to the power supply 8Accessory box, Sewing surface 9Spool pin 10Threading the upper thread 11Threading for twin needles 12Bobbin winding, Direct winding 13Threading lower thread 14Thread tension, Correct andincorrect thread tension 14Presser foot pressure, Presser foot lever,Changing the presser foot 16Changing the needle, Loweringfeed teeth 17Functions 18-21Infodisplay 18-20Sewing Advisor 21Stitch selection 21Sewing 22-41Buttonholes 22-25Buttonhole sensor foot 22-23Buttonhole knife 25Sewing buttons 26Straight stitch 27Needle positions 27Zipper 28-29Reinforced straight stitches,Stretch stitch 29Gathering with straight stitches 30Applique 31Zigzag 32Lace edging 32Three-step zigzag 33Sewing terry cloth 33Mending and darning 33Flatlock 34Hemming 35Bridging stitch 36Seam and Overcast 36Darning stitch, Automatic taper stitch 37Decorative Stitches 38Sewing hints 39Stitch table 40-41Maintenance 44-45Fault-finding 46-47Accessories, Needles 48Index 49
IndiceInstrucciones de seguridad 5La máquina y sus partes 6Manejo 7-17Desembalaje, Embalaje 7Conexión del pedal, Conexión a la red 8Caja de accesorios, Superficie de trabajo 9Porta-carrete 10Enhebrado del hilo superior 11Enhebrado de la aguja gemela 12Devanado de la canilla, directo 13Enhebrado del hilo inferior 14Tensión del hilo 15Tensión, correcta et incorrecta 15Presión del prensatelas,Palanca de elevación del prensatelas,Cambio del prensatelas 16Cambio de la aguja, Bajada deltransporte de dientes 17Funciones 18-21Pantalla de información 18-20Panel de costura 21Selección de costura 21Costura 22-43Ojales 22-25Sensor prensatelas-Ojales automáticos 22-23Abridor de ojales 25Costura botones 26Costura recta 27Posicionamiento de la aguja 27Cremallera 28-29Costura recta reforzada, Puntada elástica 29Fruncido con pespunte recto 30Aplicacion 31Zig-zag 32Encajes 32Zig-zag de tres puntadas 33Tejidos esponjosos 33Remendar y zurcir 33Puntada overlock triple 34Dobladillo 35Puntada ”fagoting” 36Unión y sobrehilado 36Remendar para costura especiale 37Monogramas 37Costuras decorativas 38Ideas de costura 39Presentación de las puntadas 42-43Mantenimiento 44-45Posibles averías y remedios 46-47Accesorios especiales, Agujas 48Indice alfabético 50

Instruction book/Manual de instrucciones Lily 5354
IMPORTANT SAFETY INSTRUCTIONSWhen using an electrical appliance, basic safety precautions should always befollowed, including the following:Read all instructions before using this household sewing machine.
DANGER - To reduce the risk of electric shock:
• A sewing machine should never be left unattended when plugged in. Alwaysunplug this sewing machine from the electric outlet immediately after using andbefore cleaning.
• Always unplug before relamping. Replace bulb with same type rated 5 Watt.
WARNING- To reduce the risk of burns, fire, electric shock, or injury to persons:
• Do not allow to be used as a toy. Close attention is necessary when this sewingmachine is used by or near children and infirm persons.
• Use this sewing machine only for its intended use as described in this manual.Use only attachments recommended by the manufacturer as contained in thismanual.
• Never operate this sewing machine if it has a damaged cord or plug, if it is notworking properly, if it has been dropped or damaged, or dropped into water.Return the sewing machine to the nearest authorized dealer or service center forexamination, repair, electrical or mechanical adjustment.
• Never operate the sewing machine with any air openings blocked. Keepventilation openings of the sewing machine and foot controller free from theaccumulation of lint, dust, and loose cloth.
• Keep fingers away from all moving parts. Special care is required around thesewing machine needle.
• Always use the proper needle plate. The wrong plate can cause the needle to break.• Do not use bent needles.• Do not pull or push fabric while stitching. It may deflect the needle causing it to break.• Switch the sewing machine off (“0”) when making any adjustment in the needle
area, such as threading needle, changing needle, threading bobbin, or changingpresser foot, etc.
• Always unplug sewing machine from the electrical outlet when removingcovers, lubricating, or when making any other user servicing adjustmentsmentioned in the instruction manual.
• Never drop or insert any object into any opening.• Do not use outdoors.• Do not operate where aerosol (spray) products are being used or where
oxygen is being administrated.• To disconnect, turn all controls to the off (“0”) position, then remove plug from outlet.• Do not unplug by pulling on cord. To unplug, grasp the plug, not the cord.
SAVE THESE INSTRUCTIONS

Instruction book/Manual de instrucciones Lily 535 5
Instrucciones de seguridad
Esta máquina de coser de familia ha sido construida según las instrucciones de seguridad paraaparatos eléctricos.
Conexión eléctricaControle que la máquina esté enchufada a la red y lea las indicaciones en la placa de tipo de lamáquina antes de enchurfarla por primera vez
Seguridad• Mantener los dedos lejos de las piezas en movimiento, especialmente en la zona cercana a la
aguja• Cuando no se utilice la máquina o durante el mantenimiento o modificaciones mecánicas, se
recomienda dejar la máquina desconectada. Esto se efectue tirando el cable de alimentaciónde la toma de corriente.
• No utilizar la máquina como juguete. Ponga atención especialmente cuando la máquina seautilizada por niños.
• Esta máquina tiene un cable especial del pedal. Si el cable estuviera dañado cambielo porotro cable del mismo tipo. Este cable se vende por los revendedores de Husqvarna Viking.El montaje del cable debe efectuarse por un especialista.
• La máquina de coser debe utilizarse según las instrucciones en este manual.• Utilizar las bombillas adecuadas de 12 V (tensión) y 5 W (potencia).

Instruction book/Manual de instrucciones Lily 5356
Summary Nomenclatura
29.
20.21.22.23.24.25.
26.
27.
18.17.16.
12.
11.10.
9.8.7.6.5.
2.3.
1.
28.
14.15.
13.
4.
1. Door 2. Thread take-up lever 3. Presser foot pressure dial 4. Thread guide 5. Buttonhole sensor socket 6. Light 7. Needle bar 8. Presser foot 9. Free arm10. Bobbin cover11. Base plate12. Drop feed dial13. Needle plate14. Presser bar and Presser foot ankle15. Needle clamp screw16. Presser foot lifter17. Thread tension18. Thread guide for bobbin winding19. Spool pin with Spool holders20. Recess for additional spool pin21. Thread cutter for bobbin winding22. Handwheel23. Bobbin spindle, Bobbin stop24. Infodisplay25. Function selectors26. Sewing Advisor27. Main power switch, Connection to power supply28. Stitch panel29. Handle
1. Tapa 2. Palanca tira-hilo 3. Regulador de la presión del prensatelas 4. Guía-hilo 5. Conexión del sensor prensatelas 6. Luz 7. Soporte agujas 8. Pie prensatelas 9. Brazo libre10. Tapa de protección cápsula11. Zócalo12. Descenso del transportador13. Placa de aguja14. Barra del prensatelas con cuerpo del prensatelas15. Tornillo de sujeción de la aguja16. Palanca de elevación del prensatelas17. Tensión del hilo18. Guía-hilo del devanador19. Porta-carretes, Discos para bobina20. Entalladura/Agujero para porta-carrete extra21. Cortador de hilos devanado22. Volante23. Eje del canillero24. Pantalla de información25. Selector de funciones26. Panel de costura27. Conexión eléctrica28. Costuras29. Asa abatible
19.
Instruction book/Manual de instrucciones Lily 535 7
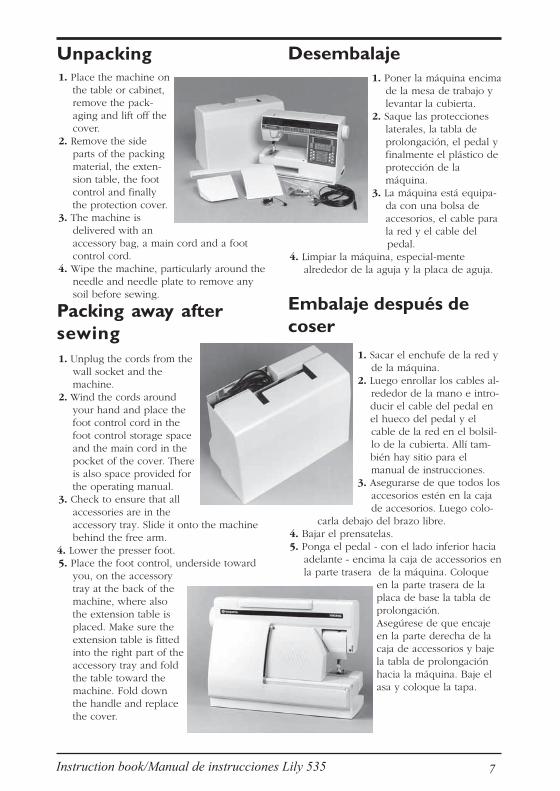
Unpacking1. Place the machine on
the table or cabinet,remove the pack-aging and lift off thecover.
2. Remove the sideparts of the packingmaterial, the exten-sion table, the footcontrol and finallythe protection cover.
3. The machine isdelivered with anaccessory bag, a main cord and a footcontrol cord.
4. Wipe the machine, particularly around theneedle and needle plate to remove anysoil before sewing.
1. Poner la máquina encima de la mesa de trabajo y levantar la cubierta.2. Saque las protecciones laterales, la tabla de prolongación, el pedal y finalmente el plástico de protección de la máquina.3. La máquina está equipa- da con una bolsa de accesorios, el cable para la red y el cable del
pedal.4. Limpiar la máquina, especial-mente
alrededor de la aguja y la placa de aguja.
Desembalaje
Embalaje después decoser
1. Unplug the cords from thewall socket and themachine.
2. Wind the cords aroundyour hand and place thefoot control cord in thefoot control storage spaceand the main cord in thepocket of the cover. Thereis also space provided forthe operating manual.
3. Check to ensure that allaccessories are in theaccessory tray. Slide it onto the machinebehind the free arm.
4. Lower the presser foot.5. Place the foot control, underside toward
you, on the accessorytray at the back of themachine, where alsothe extension table isplaced. Make sure theextension table is fittedinto the right part of theaccessory tray and foldthe table toward themachine. Fold downthe handle and replacethe cover.
Packing away aftersewing
1. Sacar el enchufe de la red y de la máquina.2. Luego enrollar los cables al- rededor de la mano e intro- ducir el cable del pedal en el hueco del pedal y el
cable de la red en el bolsil- lo de la cubierta. Allí tam- bién hay sitio para el
manual de instrucciones.3. Asegurarse de que todos los accesorios estén en la caja de accesorios. Luego colo-
carla debajo del brazo libre.4. Bajar el prensatelas.5. Ponga el pedal - con el lado inferior hacia
adelante - encima la caja de accessorios enla parte trasera de la máquina. Coloque
en la parte trasera de laplaca de base la tabla deprolongación.Asegúrese de que encajeen la parte derecha de lacaja de accessorios y bajela tabla de prolongaciónhacia la máquina. Baje elasa y coloque la tapa.

Instruction book/Manual de instrucciones Lily 5358
3 1 2
Connecting the footcontrol
Among the accessories you will find the footcontrol cord and the main cord.1. Place the foot control on its narrow side. Fit the
plug into the socket inside the foot controlcompartment.
2. Push it firmly to make sure it is properly con-nected. This operation is only necessary thevery first time you are going to use themachine.
3. To correctly turn away the cord, place it intothe slot, see picture.
Note: Before plugging in, check to ensure thatthe foot control is of "type FR2".
Connecting to thepower supplyOn the underside of the machine you will findinformation about the power supply (V) and thefrequency (Hz). Check the power supply setting inthe machine to ensure that this agrees with themain supply before youconnect the machine.1. Connect the foot control
cord to the first socket onthe bottom right side ofthe machine.
2. Connect the main cord tothe back socket on thebottom right side of themachine.
3. When you press the powerswitch, both the machineand the light are switched on.
For the USA and CanadaThis Sewing Machine has a polarized plug (oneblade wider than the other). To reduce the risk ofelectric shock, this plug is intended to fit in a pola-rized outlet only one way. If the plug does not fitfully in the outlet, reverse the plug. If it still doesnot fit, contact a qualified electrician to install theproper outlet. Do not modify the plug in any way.
Conexión del pedal
El cable del pedal está entre los accessorios. Estecable ha de conectarse al mando de pie.1. Ponga de canto el pedal. Introducir la clavija
pequeña en el zócalo dentro del mando depie.
2. Controlar que la clavija de contacto está bienfija. Esto solo ha de hacerse la primera vez,cuando se desembala la máquina.
3. Para poder desenrollar correctamente el cable,colóquelo en la ranura según la figura.
1. Conectar el cable del pedal en la entalladura de delante abajo en el lado derecho de la máquina.2. Conectar el cable de la red en el enchufe trasero, debajo del lado derecho de la máquina.3. Al pulsar el interruptor principal, se conecta la máquina y la ilumina-
ción.Para los Estados Unidos y el Canada:Esta máquina de coser tiene un enchufe polarizado(tripolar). Para reducir el riesgo de choque eléctrico esteenchufe encaja a un enchufe de pared polariza-do de unasola manera. Si el enchufe no encajara bien en el enchufede pared, de la vuelta al enchu-fe. Si todavía no encajabien, contacte a un electri-cista calificado para instalar unenchufe apropriado. No modifique de ninguna manera elenchufe.
!Atención! Controlar que el pedal tiene lamarca "type FR2".
Conexión eléctricaDebajo del zócalo están indicadas la tensión(voltaje) y la frecuencia (Hz). Antes de conectar lamáquina a red, asegurarse de que los valoresindicados coincidan con los de la red.
Instruction book/Manual de instrucciones Lily 535 9
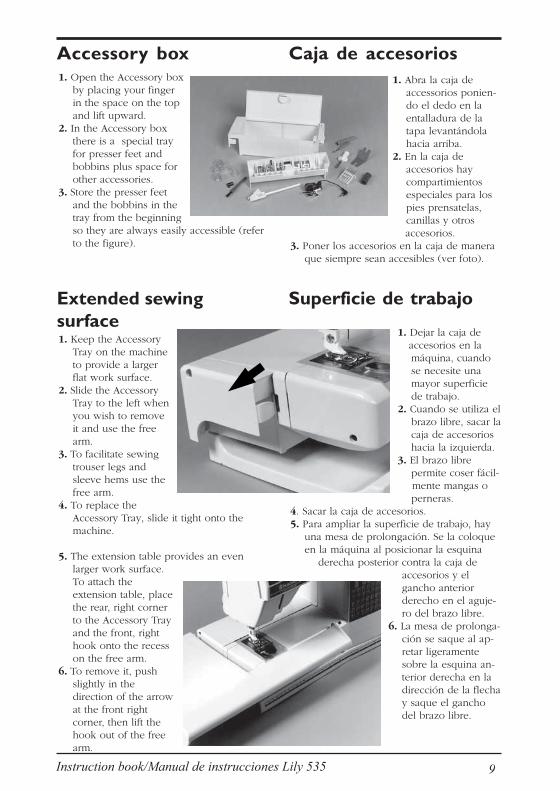
Accessory box1. Open the Accessory box
by placing your fingerin the space on the topand lift upward.
2. In the Accessory boxthere is a special trayfor presser feet andbobbins plus space forother accessories.
3. Store the presser feetand the bobbins in thetray from the beginningso they are always easily accessible (referto the figure).
Extended sewingsurface1. Keep the Accessory
Tray on the machineto provide a largerflat work surface.
2. Slide the AccessoryTray to the left whenyou wish to removeit and use the freearm.
3. To facilitate sewingtrouser legs andsleeve hems use thefree arm.
4. To replace theAccessory Tray, slide it tight onto themachine.
5. The extension table provides an evenlarger work surface.To attach theextension table, placethe rear, right cornerto the Accessory Trayand the front, righthook onto the recesson the free arm.
6. To remove it, pushslightly in thedirection of the arrowat the front rightcorner, then lift thehook out of the freearm.
Caja de accesorios1. Abra la caja de accessorios ponien- do el dedo en la entalladura de la tapa levantándola hacia arriba.2. En la caja de accesorios hay compartimientos especiales para los pies prensatelas, canillas y otros
accesorios.3. Poner los accesorios en la caja de manera
que siempre sean accesibles (ver foto).
Superficie de trabajo
1. Dejar la caja de accesorios en la
máquina, cuando se necesite una mayor superficie de trabajo.2. Cuando se utiliza el brazo libre, sacar la caja de accesorios hacia la izquierda.3. El brazo libre permite coser fácil- mente mangas o
perneras.4. Sacar la caja de accesorios.5. Para ampliar la superficie de trabajo, hay
una mesa de prolongación. Se la coloqueen la máquina al posicionar la esquina derecha posterior contra la caja de
accesorios y elgancho anteriorderecho en el aguje-ro del brazo libre.
6. La mesa de prolonga-ción se saque al ap-retar ligeramentesobre la esquina an-terior derecha en ladirección de la flechay saque el ganchodel brazo libre.

Instruction book/Manual de instrucciones Lily 53510
b cd
c
a
d
Spool pinThe machine has spool pinssuitable for all types ofthread. The main spool pin(a) is horizontal - the threadreels off the stationary spool.Place the spool so that thethread reels counter-clockwise.There are two spool holderson the spool pin. Withnarrow thread spools, thesmall holder (b) is placed in front of thethread. If you use large thread spools, thelarge holder (c) is placed in front of thethread.Slide the correct size spool holder in place sothe flat side is pressed firmly against thespool. No space between spool holder andspool.
There is also a separate spoolpin (d) to be attached ontothe machine. The fingers onthe extra spool pin fit intothe two holes to the right ofthe fixed spool pin. Pushdownward to snap in place.The large spool holder (c) isplaced under the thread. Thisspool pin is used whenwinding a bobbin from a second spool ofthread or for a second spool when sewingwith a twin needle.
Porta-carreteLa máquina tiene los porta-carretes que se adapta atodo tipo de bobinas. Sepuede utilizar en posicióndiferentes - el hilo sedesenrolla y la bobina estáparada (a).El porta-carrete estáequipado con dos discosguía-hilo.Si se tienen bobinas
pequeñas se debe poner el disco pequeño(b) delante de la bobina. Si se tienen bobinasgrandes, se debe poner el disco grande (c)delante de la bobina.
Ponga el disco de manera que sus parte planaesté contra la bobina. No debe haber juegoentre el disco y la bobina.
La máquina también tiene unporta-carrete suelto (d) que semonta en la máquina. Elgancho del porta-carrete seintroduce en los dos agujerosa la derecha del porta-carretefijo empujándolo hacia abajo.El disco grande (c) se coloquecomo zócalo. Este porta-carrete se utiliza al bobinarseparadamente o al coser conuna aguja gemela.

Instruction book/Manual de instrucciones Lily 535 11
Make sure the presser foot is raised and theneedle is in the up position
1. Pull the spool pin out. Place the threadon the spool pin and the spool holder onthe spool pin as described. Push thespool pin back in.
2. Bring the thread in the direction of thearrow under the thread guide (a) andover the thread guide (b).
3. Bring the thread down between thethread tension discs.
4. Continue threading by drawing the threadfrom the right into the slot on the take-uplever.
5. Thread last guide just above needle.6. The needle is threaded from front to back.
The white on the presser foot anklemakes it easy to see the eye of theneedle.
7. Place thread underthe presser foot andinto the thread knifewhere it is cut.
Threading the upperthread
Enhebrado del hilosuperior
Asegurarse de que el prensatelas y la aguja seencuentran levantados.1. Poner el carrete del hilo sobre el porta-
carrete y poner el disco sobre el porta-carrete como está indicado arriba.Devuelva el porta-bobina.
2. Pasar el hilo debajo el guía-hilo (a) yencima el guía-hilo (b).
3. Luego pasar el hilo hacia abajo entre losdos discos de tensión.
4. Pasar el hilo desde la derecha en la ranuradel tira-hilo.
5. Continuar pasando el hilo hacia abajo porel guía-hilo.
6. Enhebrar la aguja de adelante hacia atrás.Gracias a la superficie blanca de contrastedel cuerpo del prensatelas, se observafácilmente el agujero de la aguja.
7. Finalmente tirar el hilo hacia atrás por debajo del prensatelas y
luego hacia arriba através del corta-hilo,donde el hilo escortado.

Instruction book/Manual de instrucciones Lily 53512
1. Ponga una aguja gemela.
2. Bobine un carrete de hilo inferior con elhilo que quiera utilizar como hilo superiorsegundo.
3. Enhebre la máquina según el esquema deenhebrado. Asegúrese de que el hilo pasapor los discos interiores de la tensión delhilo, feura del último guía-hilo y enhebrela aguja izquierda.
4. Monte el porta-carrete movible en lamáquina. Ponga un disco como soporte.
5. Ponga el carrete enhebrado en el porta-carrete.
6. Enhebre la máquina como antes, peroasegúrese de que el hilo pasa entre losdiscos exteriore de la tensión del hilo,guera del guía-hilo inferior. Enhebre laaguja derecha.
Enhebrado de la agujagemela
Threading for twinneedle
1. Insert a twin needle.
2. Wind a bobbin with the thread you aregoing to use as the second upper thread
3. Thread the machine as described andcheck to ensure that the thread liesbetween the inner thread tension discs,outside the lowest thread guide. Threadleft needle.
4. Attach the extra spool pin onto themachine. Place a spool holder under thethread.
5. Place the bobbin with the second threadon the spool pin.
6. Thread the machine as before but thisthread should lie between the outer threadtension discs, outside the lowest threadguide. Thread right needle.

Instruction book/Manual de instrucciones Lily 535 13
Bobbin winding withthe machine threaded
Make sure that the presser foot is up and theneedle is in the highest position.Note! Do not use a plastic presser foot whenbobbin winding.1. Place your empty bobbin with the small mark
outwards on the bobbin spindle on the
front of the machine.2. Pull the thread from the needle under the
presser foot and to the right over the threadguide (c).
3. Start from above and wind a few turns of threadaround the bobbin. Cut off the thread on thethread knife (d).
4. Bring the bobbin spindle down. Press the footcontrol. When the bobbin winding is finished,the bobbin will stop automatically. Remove thebobbin, cut off the thread and bring thebobbin spindle up.
Note! We do not recommend winding specialtythreads such as clear nylon or other stretchythreads through the needle. Instead see "Bobbinwinding - vertical spool pin".
Bobbin winding -vertical spool pin1. Place an empty bobbin with the mark out-
wards on thebobbin spindle onthe front of themachine.
2. Place the large spoolholder under thethread on the spoolpin.
3. Bring the threadunder the thread guide (a) and overthread guide (b), then around threadguide (c) as illustrated.
4. From above wind a few turns ofthread around the bobbin andinto the knife.
5. As "4." above.
Asegúrese que el prensatelas esté elevado y que laaguja esté en su posición superior.N.B! No utilice un prensatelas de plástico albobinaje.1. Colocar la canilla vacía en el eje del canillero,
en el frente de la máquina con la marca
circular hacia fuera.
2. Pasar el hilo de la aguja, por debajo del pieprensatelas y hacia la derecha haciéndolopasar por encima del guía-hilo (c).
3. Después, comenzar por arriba y dar unascuantas vueltas al hilo en la canilla.Cortar elhilo con el cortador (d).
4. Conduzca el eje del canillero hacia abajo.Presionar sobre el pedal. La máquina se paraautomáticamente, cuando la canilla está llena.Pasar el hilo por el cortador y conduzca el ejedel canillero hacia arriba.
N.B! No se debe bobinar a través de la aguja unhilo de nylon u otro tipo de hilo muy elástico. Ver”Devanado - porta-carrete vertical”.
Devanado de la canilla
Devanado - porta-carrete vertical1. Poner una canilla vacía con la marca hacia
fuera sobre el eje del canillero en el frente de la máquina.2. El disco grande se coloque como zócalo. Ponga una bobina sobre el porta-carrete.3. Pasar el hilo debajo el guía-hilo (a) y encima el guía-hilo (b)
después debajo el guía-hilo (c).4. Dar unas cuantas vueltas al hilo sobre la canilla. Pasar el hilo por el corta-hilos y cortarlo.
5. Como "4., Devanado de la canilla".
Instruction book/Manual de instrucciones Lily 53514
b
a
c
21
3 4
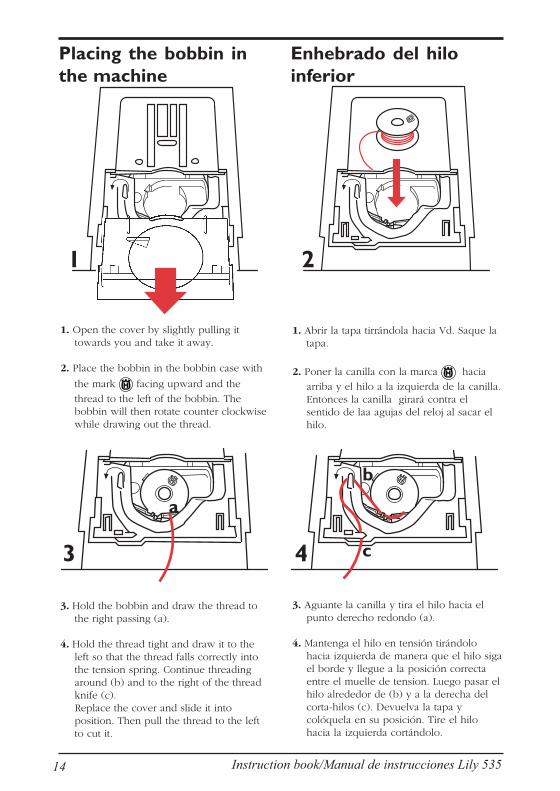
Placing the bobbin inthe machine
1. Open the cover by slightly pulling ittowards you and take it away.
2. Place the bobbin in the bobbin case with
the mark facing upward and the
thread to the left of the bobbin. Thebobbin will then rotate counter clockwisewhile drawing out the thread.
3. Hold the bobbin and draw the thread tothe right passing (a).
4. Hold the thread tight and draw it to theleft so that the thread falls correctly intothe tension spring. Continue threadingaround (b) and to the right of the threadknife (c).Replace the cover and slide it intoposition. Then pull the thread to the leftto cut it.
1. Abrir la tapa tirrándola hacia Vd. Saque latapa.
2. Poner la canilla con la marca hacia
arriba y el hilo a la izquierda de la canilla.Entonces la canilla girará contra elsentido de laa agujas del reloj al sacar elhilo.
3. Aguante la canilla y tira el hilo hacia elpunto derecho redondo (a).
4. Mantenga el hilo en tensión tirándolohacia izquierda de manera que el hilo sigael borde y llegue a la posición correctaentre el muelle de tension. Luego pasar elhilo alrededor de (b) y a la derecha delcorta-hilos (c). Devuelva la tapa ycolóquela en su posición. Tire el hilohacia la izquierda cortándolo.
Enhebrado del hiloinferior

Instruction book/Manual de instrucciones Lily 535 15
1 2 3
Always use the recommended setting givenon the Info-display to start with.You can adjust the thread tension by turningthe dial which is numbered. The higher thenumber the tighter the tension. Normal threadtension is number 4.When sewing buttonholes and decorativestitches set thread tension to number 3.When topstitching with a coarse thread inthick fabric, increase the tension to 7-9.
Thread tension
Correct and incorrectthread tension
To understand the correct thread tension, sewa few sample stitches at different settings.1. Begin with a tension that is too loose, i.e.
set at "1". The lower thread will lie straightand the upper thread will be drawn downon the underside.
2. If you set the tension at the highestnumber, the opposite will occur, and theseam may pucker.
3. The correct thread tension is providedwhen the threads interlock in the middleof both layers of material or, in the case ofdecorative stitches, on the underside.
Make a few tests on a scrap piece of thematerial you are going to sew and check thetension.
Siga primero las recomendaciones dadas en lapantalla de información (pág. 20). También sepuede modificar la tensión del hilo girando elmando de regulación de la tensión . La ten-sión normal del hilo es 4.Para ojales y otros puntos decorativas seobtiene una buena tensión del hilo en la cifra3. Si quiera pespuntear con un hilo grueso entelas gruesas, aumente la tensión del hilosuperior hasta la posición 7-9.
Tensión del hilo
Tensión de los hiloscorrecta e incorrecta
Para comprobar cual debe ser la tensióncorrecta del hilo, realizar varias costuras,modificando en cada una la tensión.1. Comenzar con una tensión muy floja, o
sea, ajusta la tensión a ”1”. El hilo inferiorestá tenso mientras el hilo superior arrugael tejido en la parte inferior.
2. Si se ajusta la tensión en el número másalto se obtendrá un efecto contrario, esdecir, el tejido se arrugará.
3. La tensión correcta se obtiene cuando launión se produce en la mitad de las doscapas de tejido; o bien en la parte inferioral coser costuras decorativas.
Siempre hacer una prueba en un trozo delgénero igual al que se desee coser y controlarla tensión de los hilos.

Instruction book/Manual de instrucciones Lily 53516
?????
Presser foot pressure
1. Make sure that the needleis in the highest position.Pull the presser foot downand towards you.
2. Line up the cross pin on thefoot between the spring andthe presser foot ankle. Pressback until the foot snaps intoplace.
Palanca de elevación delprensatelas
Presión del pie delprensatelas
La presión del pie del prensatelas seefectúa mediante una rueda graduada,de ajuste situada en el frento de lamáquina. La posición normal es 4.Cuanto mayor sea el número deregulación, mayor será la presión en elprensatelas. Las telas mullidos se cosenen posición baja.
The presser foot pressure is adjustedwith the dial on the front of themachine. Normal setting is 4. Thehigher the number the more pressureon the fabric. Knit and Soft fabricsshould be sewn at low pressure.
Por medio de la palancase sube o se baja elprensatelas. Al coser elprensatelas debe estaren su posición inferior.Se escucha una señal yel símbolo del prensate-las parpadea en la pan-talla de información.Elevando el prensatelaslo más alto posible ymanteniéndolo así sepuede incrementar laaltura de elevación en
algunos mm. más.
The presser foot is raisedand lowered with thepresser foot lever. Thepresser foot must belowered when sewing.By raising the presser footlever as far as it goes andholding it there, the liftheight of the presser footcan be increased byseveral millimeters.
Presser foot lever
1. Poner primero la aguja en suposición más alta. Empujar elprensatelas ligeramente haciaadelante.
2. Introducir el pasador transver-sal del prensatelas entre el cuerpode éste y el meulle. Empujaroblicuamente hacia atrás hastaque el pie encaje.
Cambio del prensatelasChanging the presserfoot

Instruction book/Manual de instrucciones Lily 535 17
The feed teeth are lowered when you turnthe dial to the left to . Turn the dial tothe right to if you wish to raise the feedteeth. The feed teeth will not come up untilyou begin to sew.
The feed teeth are lowered when sewingbuttons and for free-hand work.
By lowering the feed teeth it is easier to getthick garments under the presser foot. Do notforget to raise the feed teeth before starting tosew.
Cambio de la agujaChanging the needle
1. Loosen the screw in the needleclamp.
2. Remove the needle.3. Push up the new needle with the
flat side away from you until it willgo no further.
4. Tighten the screw properly.
Always use needles of system 130/705H.
1. Aflojar el tornillo del soporte-agujascon el destornillador.2. Sacar la aguja.3. Introducir la aguja de abajo a arriba(la superficie redondeada haciaadelante) empujándola hasta su tope.4. Apretar fuertemente el tornillo.
Siempre utlice agujas del sistema130/705H.
Bajada del transportede dientes
Lowering the feed teeth
Se baja el transporte de dientes, girando elregulador desde la izquierda en y sesube giran el regulador desde la derecha
. Los dientes del transporte se alzanautomáticamente al empezar a coser.
La bajada del transporte de dientes serequiere para coser botones y paraoperaciones de remendar.
Igualmente, con los dientes del transportebajados, se colocarán más fácilmente lostejidos gruesos debajo del prensatelas.

Instruction book/Manual de instrucciones Lily 53518
ReverseYour machine sews backwards when thisbutton is pressed. The machine sews forwardwhen the button is released. The longeststitch length when reverse feeding is 3 mm.
For permanent reverse, press the button twice inquick succession before starting to sew. An arrow
to the top left on the display indicates reversesewing. To sew forward again, press the buttononce more.
Marcha atrásLa máquina cose hacia atrás cuando se pre-siona la tecla. La máquina cose hacia ade-lante al soltar de nuevo la tecla. La longitudde puntada máxima al coser hacia atrás es 3
mm. La máquina también se puede bloquear en laposición marcha atrás. Para hacer esto, presionar latecla rápidamente dos veces cuando la máquinaestá parada. Cuando se quiera coser de nuevo ha-cia adelante, presionar la tecla una sola vez. Una
flecha en el izquierda de la pantalla indica quese ha seleccionado la marcha hacia atrás.
Indica el final costuraEsta tecla STOP sirve para terminar unmotivo y rematar las últimas puntadas. Alpulsar esta tecla la máquina cose hasta seha terminado lo programado, y ataca las
últimas puntadas. El símbolo en la pantallaindica que se ha seleccionado STOP. La funciónSTOP se anula al pulsar otra vez la tecla; o bienal seleccionar un motivo nuevo.
STOPThe STOP button is used to finish astitch. i.e. the machine fastens the threadand stops automatically when the stitch
has been completed. The symbol onthe display indicates that STOP is selected.STOP is cancelled when you press the buttonagain or by selecting a new stitch.
Longitud de puntada seleccionadaAl seleccionar un motivo la máquina ajustaautomáticamente la longitud adecuada depuntada que está indicada en la pantalla deinformación. También se puede cambiar la
longitud de puntada al pulsar la tecla (+) o latecla (-). Se puede aumentar o disminuir laspuntadas desde 0 hasta 6 mm. Ciertos motivostienen una longitud de puntadas limitada.
Stitch lengthWhen you select a stitch, the machinewill automatically set the best stitchlength which will be indicated bynumbers on the Infodisplay. You can
change the stitch length by pressing either the(+) or (-) button. Certain stitches have alimited stitch length.
Functions / Infodisplay Funciones / Pantalla deinformación
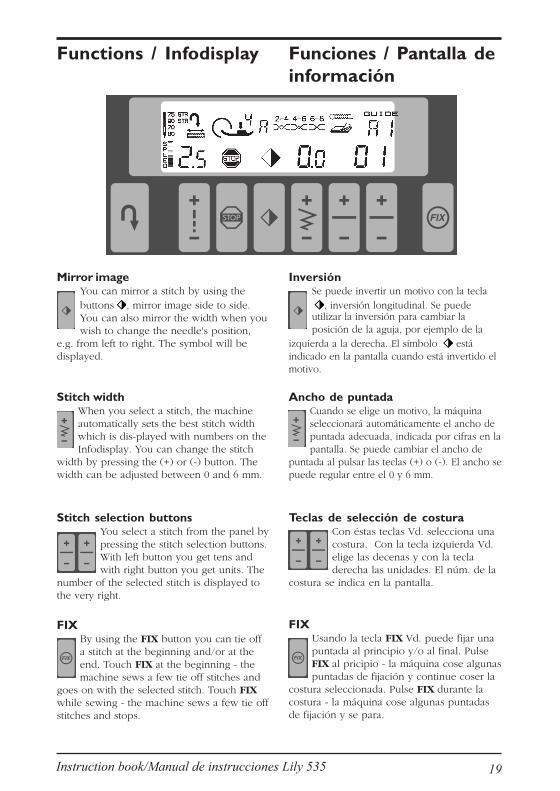
Instruction book/Manual de instrucciones Lily 535 19
Functions / Infodisplay Funciones / Pantalla deinformación
Mirror imageYou can mirror a stitch by using thebuttons , mirror image side to side.You can also mirror the width when youwish to change the needle's position,
e.g. from left to right. The symbol will bedisplayed.
InversiónSe puede invertir un motivo con la tecla
, inversión longitudinal. Se puedeutilizar la inversión para cambiar laposición de la aguja, por ejemplo de la
izquierda a la derecha. El símbolo estáindicado en la pantalla cuando está invertido elmotivo.
Ancho de puntadaCuando se elige un motivo, la máquinaseleccionará automáticamente el ancho depuntada adecuada, indicada por cifras en lapantalla. Se puede cambiar el ancho de
puntada al pulsar las teclas (+) o (-). El ancho sepuede regular entre el 0 y 6 mm.
Stitch widthWhen you select a stitch, the machineautomatically sets the best stitch widthwhich is dis-played with numbers on theInfodisplay. You can change the stitch
width by pressing the (+) or (-) button. Thewidth can be adjusted between 0 and 6 mm.
Stitch selection buttonsYou select a stitch from the panel bypressing the stitch selection buttons.With left button you get tens andwith right button you get units. The
number of the selected stitch is displayed tothe very right.
Teclas de selección de costuraCon éstas teclas Vd. selecciona unacostura. Con la tecla izquierda Vd.elige las decenas y con la tecladerecha las unidades. El núm. de la
costura se indica en la pantalla.
FIXBy using the FIX button you can tie offa stitch at the beginning and/or at theend. Touch FIX at the beginning - themachine sews a few tie off stitches and
goes on with the selected stitch. Touch FIXwhile sewing - the machine sews a few tie offstitches and stops.
FIXUsando la tecla FIX Vd. puede fijar unapuntada al principio y/o al final. PulseFIX al pricipio - la máquina cose algunaspuntadas de fijación y continue coser la
costura seleccionada. Pulse FIX durante lacostura - la máquina cose algunas puntadasde fijación y se para.
Instruction book/Manual de instrucciones Lily 53520
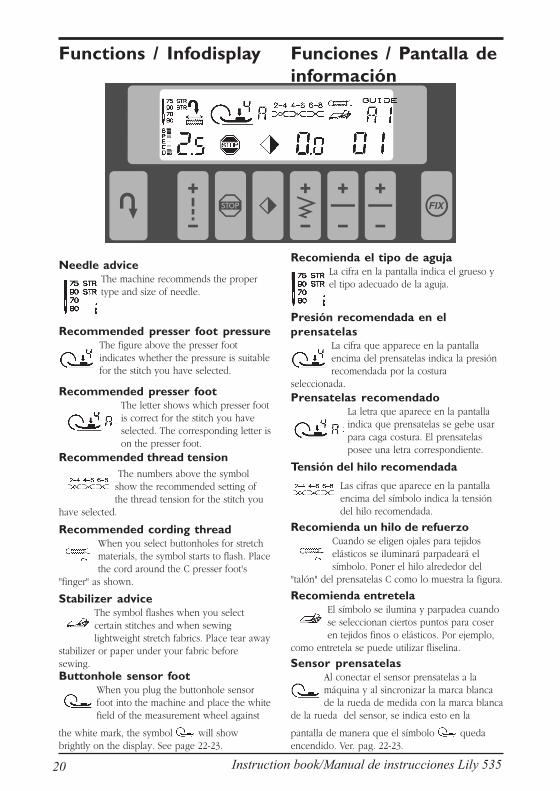
Functions / Infodisplay Funciones / Pantalla deinformación
Buttonhole sensor footWhen you plug the buttonhole sensorfoot into the machine and place the whitefield of the measurement wheel against
the white mark, the symbol will showbrightly on the display. See page 22-23.
Stabilizer adviceThe symbol flashes when you selectcertain stitches and when sewinglightweight stretch fabrics. Place tear away
stabilizer or paper under your fabric beforesewing.
Recommended cording threadWhen you select buttonholes for stretchmaterials, the symbol starts to flash. Placethe cord around the C presser foot's
"finger" as shown.
The numbers above the symbolshow the recommended setting ofthe thread tension for the stitch you
have selected.
Recommended thread tension
Recommended presser footThe letter shows which presser footis correct for the stitch you haveselected. The corresponding letter ison the presser foot.
Recommended presser foot pressureThe figure above the presser footindicates whether the pressure is suitablefor the stitch you have selected.
Needle adviceThe machine recommends the propertype and size of needle.
Sensor prensatelasAl conectar el sensor prensatelas a lamáquina y al sincronizar la marca blancade la rueda de medida con la marca blanca
de la rueda del sensor, se indica esto en la
pantalla de manera que el símbolo quedaencendido. Ver. pag. 22-23.
Recomienda entretelaEl símbolo se ilumina y parpadea cuandose seleccionan ciertos puntos para coseren tejidos finos o elásticos. Por ejemplo,
como entretela se puede utilizar fliselina.
Recomienda un hilo de refuerzoCuando se eligen ojales para tejidoselásticos se iluminará parpadeará elsímbolo. Poner el hilo alrededor del
"talón" del prensatelas C como lo muestra la figura.
Recomienda el tipo de agujaLa cifra en la pantalla indica el grueso yel tipo adecuado de la aguja.
Las cifras que aparece en la pantallaencima del símbolo indica la tensióndel hilo recomendada.
Tensión del hilo recomendada
Prensatelas recomendadoLa letra que aparece en la pantallaindica que prensatelas se gebe usarpara caga costura. El prensatelasposee una letra correspondiente.
Presión recomendada en elprensatelas
La cifra que apparece en la pantallaencima del prensatelas indica la presiónrecomendada por la costura
seleccionada.

Instruction book/Manual de instrucciones Lily 535 21
Panel de costura
The Sewing Advisor™ selects from 7 differentfabrics and 7 different sewing techniques.You can select the material first and then thesewing technique or vice versa. Themachine selects the best stitch. Fabric andsewing technique, e.g. B2 for "Medium -Overcast", is indicated in the display. Followthe advice shown in the display. If youchange setting of the stitch, the number goesout. The fabric selection still remains.
Some sewing techniques are not suitable forall materials, e.g. blind hem in lightweightmaterial. The machine indicates this via thenumber for the sewing technique flashing inthe display and then goes out.
Este panel permite seleccionar entre 7 tiposdiferentes de material y entre 7 trabajosdiferentes de costura. La máquina seleccionaentonces una costura adecuada. El tipo de telay de la costura, por ejemplo B2 para"Sobrehilado medio", se indican en la pantalla.Siga los consejos indicados en la pantalla. SiVd. cambia el ajuste de una puntada, se apagael número. La selección de la tela permance.
Algunos trabajos de costura no se puedenefectuar de manera satisfactoria en todos losmateriales. El número del tipo de costurareluce en la pantalla y se apaga despues.
Selección de costuraCuando se conecta la máquina, ésta siemprese pondrá en costura recta. La cifra 00 yencima de 00 la letra por material medianoaparece en la pantalla. Se elige una costurapulsando una de las teclas de selección decostura. Con la tecla izquierda Vd. elige lasdecenas y con la tecla derecha las unidades.El núm. de la costura se indica en la pantalla.En la derecha de la pantalla se indican elnúmero de la costura.Ver "Tabla de costura", en la pág. 42-43.
Sewing Advisor™
When you turn on the machine it alwaysselects straight stitch and the number 00 andover 00 the letter for medium fabric isdisplayed. You select a stitch by pressing thestitch selection buttons. With left button youget tens and with right button you get units.The number of the selected stitch is dis-played to the very right.See Stitch table, page 40-41.
Stitch selection
Introduire el panel de costura1. Saque el plástico de protección en la parte
trasera.2. Ponaer el panel de costura sobre el panel
con el texto inglés.3. Controlar que el panel está bien fija.
Instruction book/Manual de instrucciones Lily 53522
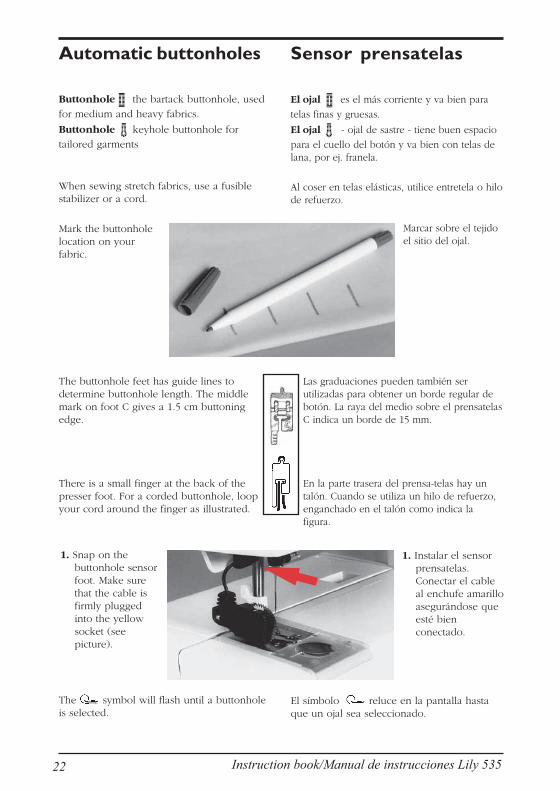
When sewing stretch fabrics, use a fusiblestabilizer or a cord.
The buttonhole feet has guide lines todetermine buttonhole length. The middlemark on foot C gives a 1.5 cm buttoningedge.
There is a small finger at the back of thepresser foot. For a corded buttonhole, loopyour cord around the finger as illustrated.
Automatic buttonholes
Buttonhole the bartack buttonhole, used
for medium and heavy fabrics.
Buttonhole keyhole buttonhole for
tailored garments
Mark the buttonholelocation on yourfabric.
1. Snap on thebuttonhole sensorfoot. Make surethat the cable isfirmly pluggedinto the yellowsocket (seepicture).
The symbol will flash until a buttonholeis selected.
El ojal es el más corriente y va bien para
telas finas y gruesas.
El ojal - ojal de sastre - tiene buen espacio
para el cuello del botón y va bien con telas delana, por ej. franela.
Al coser en telas elásticas, utilice entretela o hilode refuerzo.
Las graduaciones pueden también serutilizadas para obtener un borde regular debotón. La raya del medio sobre el prensatelasC indica un borde de 15 mm.
En la parte trasera del prensa-telas hay untalón. Cuando se utiliza un hilo de refuerzo,enganchado en el talón como indica lafigura.
1. Instalar el sensor prensatelas. Conectar el cable al enchufe amarillo asegurándose que esté bien conectado.
El símbolo reluce en la pantalla hastaque un ojal sea seleccionado.
Sensor prensatelas
Marcar sobre el tejidoel sitio del ojal.

Instruction book/Manual de instrucciones Lily 535 23
8 12 16 20 24 28 32 36 40 44 48
0 6 10 14 18 22 26 30 34 38 42 46 50
Automatic buttonholes2. Select a buttonhole on the stitch panel.
The buttonhole will be pre-set for a 16mm button when the machine is turnedon. The number 16 is therefore shown onthe display in place of the stitch length
together with the symbol .
3. If you are using a different size button,measure the button on the buttonhole rulebelow and set the correct size with thestitch length buttons (+) or (-). The sizewill change by 2 mm at a time.
4. Turn the measurement wheel so that thewhite area is lined up with the whitemark. When the measurement wheel is
correctly set, the circle in the symbolwill stop flashing.
If the circle or the whole symbol isflashing the machine can not be started.
For better visibility the machine sewsbuttonholes away from you.
Buttonhole size5. The machine will sew the correct size
buttonhole for the button size you haveselected. The buttonhole will be sewn inone step, and when the button-hole iscompleted the machine will stopautomatically.
NOTE: Always stitch a sample buttonhole onscraps of the garment fabric to check sizebefore sewing buttonholes on the garment.
Changing the density/stitch lengthTo change the stitch density of the buttonholecolumns, adjust the length setting of thestitch. Unplug the buttonhole sensor. Thestitch length will then be shown on theInfodisplay again and you will be able toadjust the density of thebuttonhole. When youplug in the buttonholesensor foot, the displaygoes back to showingthe size of thebuttonhole, butremembers the new stitch length setting.Place the button as shown on the circles onthe picture and you can easily see the sizeneeded for your buttonhole.
Sensor prensatelas2. Seleccionar un ojal del menú. El número
del ojal seleccionado aparecerá en lapantalla. El ojal será pre-ajustado a unbotón de 16 mm. Por eso la cifra 16aparecerá en la pantalla en lugar de laindicación de la longitud de puntada y
señalará con el símbolo .
3. Si su botón tiene otro tamaño, se tendráque medir el botón con las teclas de lalongitud de puntada (+) o (-). El temañocambiará 2 mm cada vez que Vd. pulsa.
4. Controlar que la referencia blanca de larueda de medición esté en línea con lamarca blanca de referencia. Si la rueda demedición está bien ajustada, relucerá en la
pantalla el símbolo constantemente.
Si el círculo o todo el símbolo parpadea, la máquina no puede ponerseen marcha.
¡Atención! La máquina comienza a coser losojales en marcha atrás.
Tamaño del ojal5. La máquina coserá el ojal con el tamaño
correcto para el tamaño de botón que sehaya elegido.Todo el ojal se coserá de una vez, y alterminar el ojal la máquina se pararáautomaticamente.
Siempre es prudente hacer un ojal de prueba.
Cambiar la densidad y la longitud depuntadaSi desea cambiar la longitud de puntadas delojal, desconecte el sensor prensatelas. Lalongitud de puntada se indicará de nuevo enla pantalla y se podrá ajustar la densidad delojal. Al instalar el sensor prensatelas la
pantalla vuelve a indicardel ojal.
Si coloca el botón como muestran los anillosen el dibujo, podrá leer con facilidad lalongitud el ojal que debe regular.

Instruction book/Manual de instrucciones Lily 53524
When sewing stretch fabrics, use a fusiblestabilizer or a cord.
The buttonhole feet has guide lines todetermine buttonhole length. Themiddle mark on foot C gives a 1.5 cmbuttoning edge.Place the button on the presser footagainst the needle and you will be ableto see which mark on the footcorresponds to the button. You will sewuntil the first buttonhole column reachesthis mark.There is a small finger at the back of thepresser foot. For a corded buttonhole,loop your cord around the finger asillustrated.
For better visibility the machine sewsbuttonholes away from you.
NOTE: Always stitch a sample buttonhole onscraps of the garment fabric and, if needed,adjust the stitch setting. Use the stitch widthand length buttons. In heavy fabric, increasethe stitch length to 0.5. Loosen the threadtension to position 2-4.
Buttonholes
Buttonhole the bartack buttonhole, used
for medium and heavy fabrics.
Buttonhole keyhole buttonhole for
tailored garments
1. Select a buttonhole.2. Use the presser foot
C.3. Mark the buttonhole
location on yourfabric.
Las graduaciones pueden también serutilizadas para obtener un borde regular debotón. La raya del medio sobre elprensatelas C indica un borde de 15 mm.El botón se coloca después sobre elprensatelas contra la aguja y se puede verde esa manera qué raya del prensa-telascorresponde al botón.
En la parte trasera del prensa-telas hay untalón. Cuando se utiliza un hilo derefuerzo, enganchado en el talón comoindica la figura.
Ojales
El ojal es el más corriente y va bien para
telas finas y gruesas.
El ojal - ojal de sastre - tiene buen espacio
para el cuello del botón y va bien con telas delana, por ej. franela.
1. Elegir un ojal.2. Seleccione el prensatelas para ojales C .3. Marcar sobre el tejido el sitio del ojal.
Al coser en telas elásticas, utilice entretela o hilode refuerzo.
¡Atención! La máquina comienza a coser losojales en marcha atrás.
Siempre es prudente hacer un ojal de prueba,regulando las puntadas a fin de llegar al ajusteideal. Utilice las teclas de la longitud y delancho de puntada. Para telas grueses, aumentarla longitud de puntada hasta 0.5. Tensión delhilo: 2-4.
Instruction book/Manual de instrucciones Lily 535 25
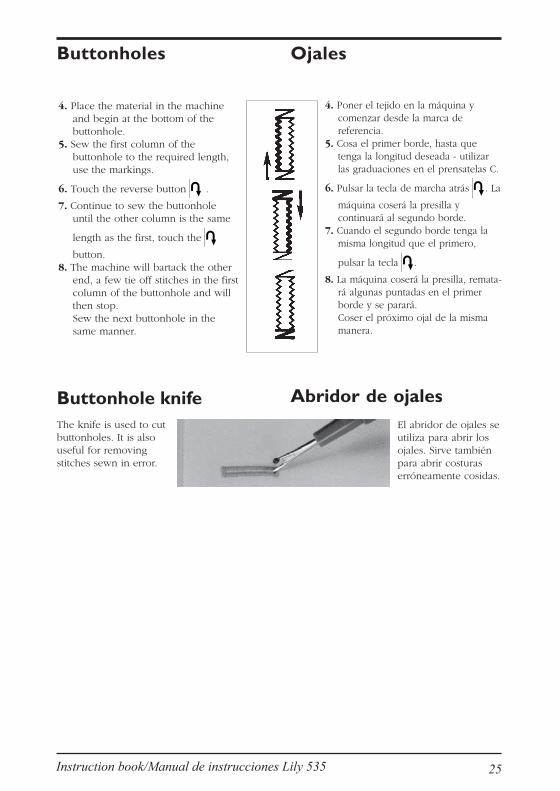
Buttonholes
4. Place the material in the machineand begin at the bottom of thebuttonhole.
5. Sew the first column of thebuttonhole to the required length,use the markings.
6. Touch the reverse button .
7. Continue to sew the buttonholeuntil the other column is the same
length as the first, touch the
button.8. The machine will bartack the other
end, a few tie off stitches in the firstcolumn of the buttonhole and willthen stop.Sew the next buttonhole in thesame manner.
Buttonhole knifeThe knife is used to cutbuttonholes. It is alsouseful for removingstitches sewn in error.
Ojales
4. Poner el tejido en la máquina y comenzar desde la marca de referencia.5. Cosa el primer borde, hasta que tenga la longitud deseada - utilizar las graduaciones en el prensatelas C.
6. Pulsar la tecla de marcha atrás . La
máquina coserá la presilla y continuará al segundo borde.7. Cuando el segundo borde tenga la misma longitud que el primero,
pulsar la tecla .
8. La máquina coserá la presilla, remata- rá algunas puntadas en el primer borde y se parará. Coser el próximo ojal de la misma
manera.
Abridor de ojalesEl abridor de ojales seutiliza para abrir losojales. Sirve tambiénpara abrir costuraserróneamente cosidas.

Instruction book/Manual de instrucciones Lily 53526
1. Mark the fabric where the button is to belocated.
2. Select zigzag .
3. Lower the feed teeth with thedial. See page 17.
4. Snap off the presser foot.5. Place the material under the
presser foot ankle.6. Place the button on marking and
lower the presser bar so that thepresser foot ankle is between theholes of the button (see picture).
7. Hold the thread ends to one side.Turn the handwheel and checkto be sure that the needle goes into theleft hole of the button.
8. Touch the mirroring button to checkthat the needle also goes into the righthole.
9. Sew as many stitches as you considernecessary.
10. Touch STOP. The machine will then tieoff in one of the holes and stop.
11.Touch STOP to cancel it. Move to the nextpair of holes or the next button.
If you have a button with a different holespacing, you can adjust this by presssing oneof the stitch width buttons (+) or (-).
Button with a shank
Use the clearance plate for thispurpose. Use the thin end whensewing buttons on light fabrics,the thick end for heavier fabrics.
Push in the plate between thebutton and the fabric. Lower thepresser bar and sew on thebutton. Pull the threads betweenthe button and the fabric. Windthe threads a few times aroundthe shank and tie the ends.
Sewing buttons
1. Hacer una marca en el tejido para laposición del botón.
2. Elegir zigzag .
3. Bajar el transporte, ver pag. 17.4. Sacar el prensatelas.5. Poner el tejido en la máquina.6. Colocar el botón en la tela y bajar la barra prensatelas, de manera que el cuerpo del prensatelas esté perfectamente centrado entre los agujeros del botón (ver figura).7. Poner los extremos de los hilos hacia un lado. Girar el volante manual y asegurarse de que la
aguja coincida con el agujero izquierdodel botón.
8. Pulsar la tecla de inversión y controlarde que la aguja coincida con el agujeroderecho del botón.
9. Entonces, coser tantas puntadas como seanprecisas.
10. Pulsar STOP. Ahora la máquina rematará unas puntadas en uno de los agujeros y se parará.
11. Pulsar STOP. Continuar con el próximo botón.
Cuando se tiene un botón con otra distanciaentre los agujeros, se puede cambiarpulsando una de las teclas del ancho depuntada (+) o (-).
Costura de botones
Botón con cuello
A menudo se necesita coser un bo-tón con ”cuello”. Para ello, se emp-lea el suplemento para botones. Laparte delgada para tela mediana yla parte más gruesa, para génerospesados.Colocar el suplemento entre el bo-tón y el género y coser el botón.Re-tirar el suplemento, meter loshilos entre el botón y el género,dándoles unas cuantas vueltasalrededor del ”cuello” .

Instruction book/Manual de instrucciones Lily 535 27
Straight stitching, No 00 is used to join
fabric which does not stretch and for seamswhich will not be subjected to great strain.When you select straight stitch the machinewill automatically set the average stitchlength.Experiment until you arrive at the exactsetting for the actual work you will be doing.Example: Increase the stitch length whenbasting and when topstitching.
Straight stitch
Needle PositionsWhen topstitching using straight stitch andreinforced straight stitch, the needle positioncan be adjusted in steps. Use the stitch widthbutton (+), 0 is the center position, width 6 isleft needle position, width 6 mirror imaged
is right needle position. To return tocenter position, use the stitch width button (-)and step back to 0. Adjust the width between0-6 for additional positions.
To edge stitch, youshould takeadvantage of thepossibility to set theneedle to the left orthe right position.
To sew about 2 mmfrom the edge, snapon presser foot Awhen sewing lightfabrics and presserfoot D for otherfabrics.Place the fabric and sew so thatthe edge follows the inside rightedge of the presser foot D or thefirst mark of the left edge of thepresser foot A.If you wish to sew about 5 mmfrom the edge or sew a narrowhem, use presser foot A and setthe needle to the right position.
Place the edge of the fabric so thatit follows the outside right edge ofthe presser foot and sew the hem.
Costura rectaCostura recta, núm. 00 se utiliza para unir
parted de tela no extensibles y para costurasque no están expuestas a mayores esfuerzos.Al seleccionar la costura recta, la máquina eligeautomaticamente la longitud de puntada 2.5mm. Se pueden también cambiar la longitudhasta obtenir la mejor posición para su trabajo.Aumentar la longitud de puntada al hilvanar y alrealizar pespuntes decorativos.
Posiciónes de laagujaA fin de realizar pespuntes bonitos en costurarecta y en costura recta resfor-zada Vd. puedecambiar la posición de la aguja gradualmente.Esto se efectúa con la tecla del ancho depuntada (+), 0=posición central, 6= a laizquierda. Para llegar al extremo derecho,utilizar la tecla de inversión . Para volver a laposición central, retroceder con la tecla del
ancho de puntada (-)hasta 0.Cuando quiera coser unpespunte cerca de unborde exterior, es másfácil coser con la agujaen posición de izquierdao derecha. Para génerosmuy ligeros se emplea elprensatelas A y para losdemás el prensatelas D.Ponga el género con suborde exterior contra ellado interior del ”dedo”
derecho delprensatelas D o contra la primeraentalladura del ”dedo” izquierdo delprensatelas A y coser el pespunte.Cuando quiera pespuntear ca. 5mmdel borde o hacer un dobladilloestrecho, se hace con la aguja enposición derecha. Utilizar elprensatelas A.
Poner el borde del tejido debajo delborde exterior derecho del prensatelasy coser un pespunte o un dobladillo.

Instruction book/Manual de instrucciones Lily 53528
2
3
Sewing zippers
The zipper foot E can be snapped on so thatit is located either to the right or to the left ofthe needle, making it easy to sew both sidesof the zipper. To sew the other side of thezipper, reposition the zipper foot.
1. Sew the seam together to thebottom of the zipper placket.Baste the rest of the seam.Leave about 2 cm open at thetop. Press seam open. Setthe needle to the rightposition.
2. Place presser foot E to the leftof the needle. From thewrong side fold the fabric toone side so both seamallowances are free. Fold andpress the left allowanceunder approximately 0.5 cm from thebasted seam.
3. Place the zipper under the folded seamallowance with the teeth as near to thefold as possible and stitch zipper to fabricclose to fold. Begin sewing at the bottomof the zipper. Before reaching the zipperpull, lift the presser foot and slide thezipper pull down past the zipper foot.Lower the foot and sew to the top of thezipper.
Cosido decremallerasAplique el prensatelas E de tal manera que elmismo quede a la derecha o a la izquierda de laaguja, y de esta forma re-sulte fácil coser amboslados de la cre-mallera. Para coser el otro lado dela cremallera retirar el prensatelas y colo-carlo denuevo, de manera que éste quede al otro lado.
Cremallera ocultaLapped zipper1. Una las costuras hasta la marca- ción. Hilvanar la abertura. Dejar aprox. 2 cm abiertos al comienzo de la abertura. Planchar la costura abierta. Emplear la posición derecha de la aguja.
2. Colocar el prensatelas E a la izquierda de la aguja. Dar la vuel- ta a la prenda de tal forma que el revés quede por encima y doblar la prenda al lado hasta que se vean las dos costuras. Doblar el
aumento de la costura del lado izquierdo, comoun pliegue, a unos 5 mm del hilvanado.
3. Colocar la cremallera con alfileres debajo de lacostura doblada con los dientes lo más cercaposible del doblado y coser el lado izquierdo.Empezar a coser desde abajo. Unos centímetrosantes de llegar al final de la costura, levantar elprensatelas y abrir la cremallera, deslizando elcier-re de la misma por detrás del prensatelas.Bajar el prensatelas y terminar la costura.
Instruction book/Manual de instrucciones Lily 535 29
4
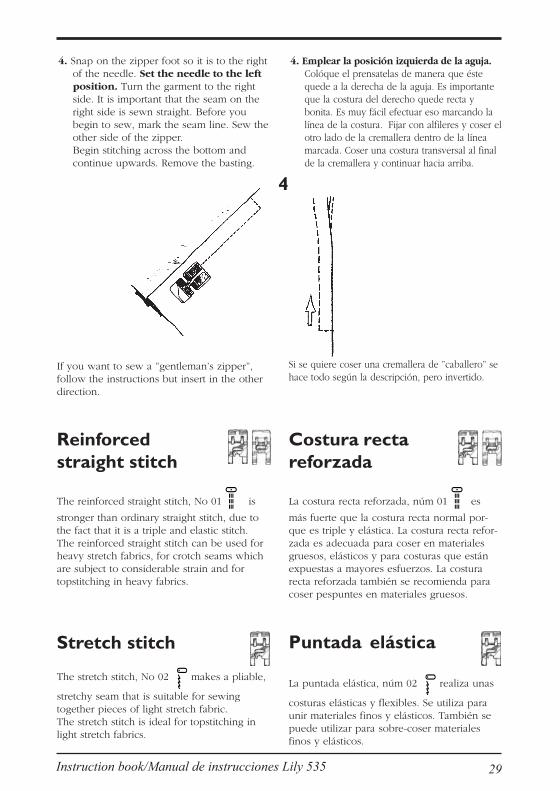
4. Snap on the zipper foot so it is to the rightof the needle. Set the needle to the leftposition. Turn the garment to the rightside. It is important that the seam on theright side is sewn straight. Before youbegin to sew, mark the seam line. Sew theother side of the zipper.Begin stitching across the bottom andcontinue upwards. Remove the basting.
If you want to sew a ”gentleman’s zipper”,follow the instructions but insert in the otherdirection.
Reinforcedstraight stitch
The reinforced straight stitch, No 01 is
stronger than ordinary straight stitch, due tothe fact that it is a triple and elastic stitch.The reinforced straight stitch can be used forheavy stretch fabrics, for crotch seams whichare subject to considerable strain and fortopstitching in heavy fabrics.
Stretch stitch
The stretch stitch, No 02 makes a pliable,
stretchy seam that is suitable for sewingtogether pieces of light stretch fabric.The stretch stitch is ideal for topstitching inlight stretch fabrics.
Si se quiere coser una cremallera de ”caballero” sehace todo según la descripción, pero invertido.
4. Emplear la posición izquierda de la aguja.Colóque el prensatelas de manera que éstequede a la derecha de la aguja. Es importanteque la costura del derecho quede recta ybonita. Es muy fácil efectuar eso marcando lalínea de la costura. Fijar con alfileres y coser elotro lado de la cremallera dentro de la líneamarcada. Coser una costura transversal al finalde la cremallera y continuar hacia arriba.
Costura rectareforzada
La costura recta reforzada, núm 01 es
más fuerte que la costura recta normal por-que es triple y elástica. La costura recta refor-zada es adecuada para coser en materialesgruesos, elásticos y para costuras que estánexpuestas a mayores esfuerzos. La costurarecta reforzada también se recomienda paracoser pespuntes en materiales gruesos.
La puntada elástica, núm 02 realiza unas
costuras elásticas y flexibles. Se utiliza paraunir materiales finos y elásticos. También sepuede utilizar para sobre-coser materialesfinos y elásticos.
Puntada elástica
Instruction book/Manual de instrucciones Lily 53530
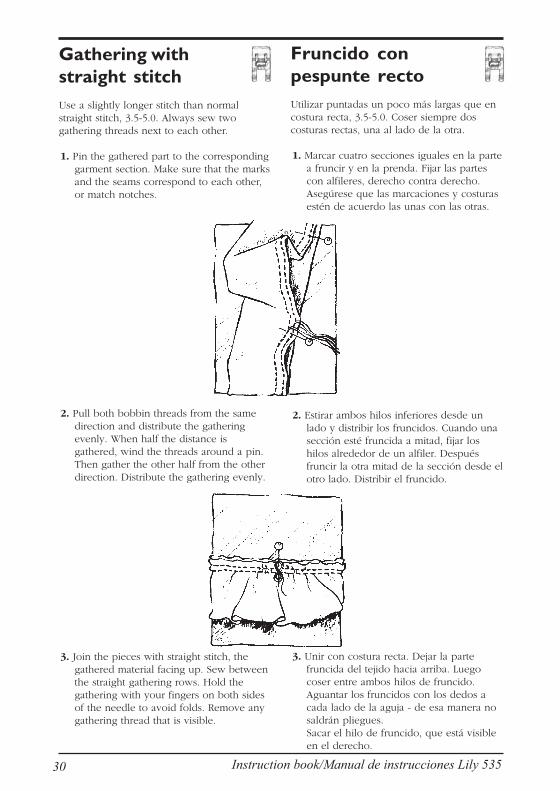
2. Pull both bobbin threads from the samedirection and distribute the gatheringevenly. When half the distance isgathered, wind the threads around a pin.Then gather the other half from the otherdirection. Distribute the gathering evenly.
Gathering withstraight stitchUse a slightly longer stitch than normalstraight stitch, 3.5-5.0. Always sew twogathering threads next to each other.
1. Pin the gathered part to the correspondinggarment section. Make sure that the marksand the seams correspond to each other,or match notches.
2. Estirar ambos hilos inferiores desde unlado y distribir los fruncidos. Cuando unasección esté fruncida a mitad, fijar loshilos alrededor de un alfiler. Despuésfruncir la otra mitad de la sección desde elotro lado. Distribir el fruncido.
Fruncido conpespunte rectoUtilizar puntadas un poco más largas que encostura recta, 3.5-5.0. Coser siempre doscosturas rectas, una al lado de la otra.
1. Marcar cuatro secciones iguales en la partea fruncir y en la prenda. Fijar las partescon alfileres, derecho contra derecho.Asegúrese que las marcaciones y costurasestén de acuerdo las unas con las otras.
3. Unir con costura recta. Dejar la partefruncida del tejido hacia arriba. Luegocoser entre ambos hilos de fruncido.Aguantar los fruncidos con los dedos acada lado de la aguja - de esa manera nosaldrán pliegues.Sacar el hilo de fruncido, que está visibleen el derecho.
3. Join the pieces with straight stitch, thegathered material facing up. Sew betweenthe straight gathering rows. Hold thegathering with your fingers on both sidesof the needle to avoid folds. Remove anygathering thread that is visible.

Instruction book/Manual de instrucciones Lily 535 31
2. Iron the fusible web sothat it sticks to the wrongside of the appliquématerial.
Alternative:Cut the design 5 mm larger thanthe final size (seam allowance).
Sew the appliqué stitch, No 10 ,
over the folded edge.
4. Satin stitch, No 19 , stitch
width 2.0, around the edges. Sewall design lines using the samesatin stitches.
3. Cut out the appliqué.Remove the paper layerfrom the fusible web. Fusethe appliqué to the back-ground material. Placestabilizer under backgroundfabric.
Aplicación
1. Dibujar el motivo al revés en el lado de papel de la entretela doble adhesiva.
2. Una la entretela con el revés de la tela de aplicación planchandola.
3. Cortar la aplicación. Sacar el papel de la entretela. Una la aplicación con la tela de fondo planchan- dola.
4. Coser los bordes con un zig-zag muy tupido, núm
19 , ancho de puntada
2 mm. También coser todos losdetalles interiores con estacostura.
Alternativa:Corte el motivo 5 mm másgrande que el tamaño final(borde de la tela). Cosa lapuntada de applicación, núm 10
, sobre el borde doblado.
Applique
1. Draw a mirror image of yourdesign on the paper side ofthe fusible web.
Instruction book/Manual de instrucciones Lily 53532
Zigzag
The zigzag, No 03 is utilized for sewing on
lace, bound edging and appliqués.When you select the zigzag the machine willautomatically set stitch length 2 and width 3.The zigzag is utilized for sewing on lace,bound edging and appliqués.When you select the zigzag the machine willautomatically set stitch length 2 and width 3.You can change this setting by pressing eitherthe (+) or (-) button. Experiment until youreach the best setting for your actual work.
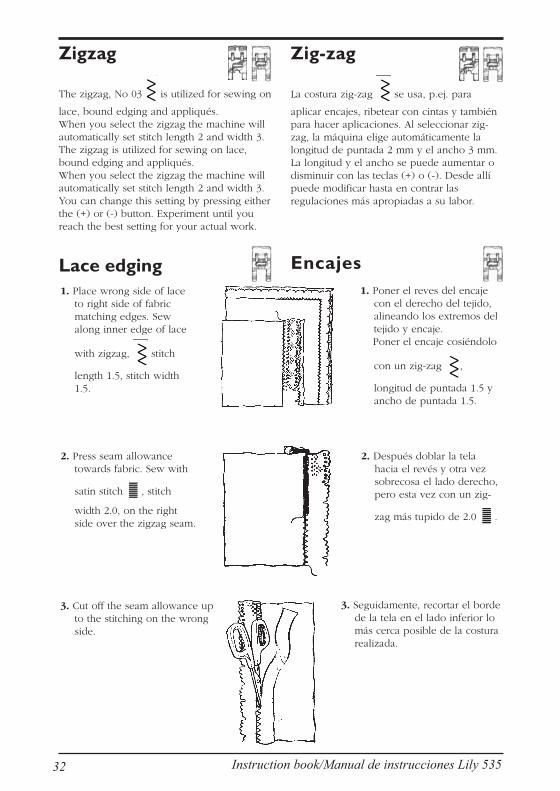
Lace edging1. Place wrong side of lace
to right side of fabricmatching edges. Sewalong inner edge of lace
with zigzag, stitch
length 1.5, stitch width1.5.
2. Press seam allowancetowards fabric. Sew with
satin stitch , stitch
width 2.0, on the rightside over the zigzag seam.
3. Cut off the seam allowance upto the stitching on the wrongside.
Zig-zag
La costura zig-zag se usa, p.ej. para
aplicar encajes, ribetear con cintas y tambiénpara hacer aplicaciones. Al seleccionar zig-zag, la máquina elige automáticamente lalongitud de puntada 2 mm y el ancho 3 mm.La longitud y el ancho se puede aumentar odisminuir con las teclas (+) o (-). Desde allípuede modificar hasta en contrar lasregulaciones más apropiadas a su labor.
Encajes1. Poner el reves del encaje con el derecho del tejido, alineando los extremos del tejido y encaje. Poner el encaje cosiéndolo
con un zig-zag ,
longitud de puntada 1.5 y ancho de puntada 1.5.
2. Después doblar la tela hacia el revés y otra vez sobrecosa el lado derecho, pero esta vez con un zig-
zag más tupido de 2.0 .
3. Seguidamente, recortar el borde de la tela en el lado inferior lo más cerca posible de la costura realizada.
Instruction book/Manual de instrucciones Lily 535 33
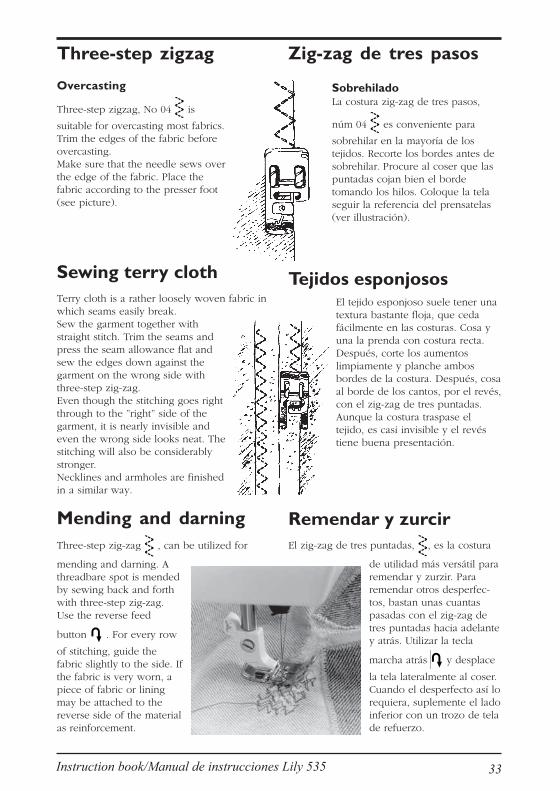
Three-step zigzag
Overcasting
Three-step zigzag, No 04 is
suitable for overcasting most fabrics.Trim the edges of the fabric beforeovercasting.Make sure that the needle sews overthe edge of the fabric. Place thefabric according to the presser foot(see picture).
Sewing terry clothTerry cloth is a rather loosely woven fabric inwhich seams easily break.Sew the garment together withstraight stitch. Trim the seams andpress the seam allowance flat andsew the edges down against thegarment on the wrong side withthree-step zig-zag.Even though the stitching goes rightthrough to the ”right” side of thegarment, it is nearly invisible andeven the wrong side looks neat. Thestitching will also be considerablystronger.Necklines and armholes are finishedin a similar way.
Mending and darningThree-step zig-zag , can be utilized for
mending and darning. Athreadbare spot is mendedby sewing back and forthwith three-step zig-zag.Use the reverse feed
button . For every row
of stitching, guide thefabric slightly to the side. Ifthe fabric is very worn, apiece of fabric or liningmay be attached to thereverse side of the materialas reinforcement.
El tejido esponjoso suele tener unatextura bastante floja, que cedafácilmente en las costuras. Cosa yuna la prenda con costura recta.Después, corte los aumentoslimpiamente y planche ambosbordes de la costura. Después, cosaal borde de los cantos, por el revés,con el zig-zag de tres puntadas.Aunque la costura traspase eltejido, es casi invisible y el revéstiene buena presentación.
El zig-zag de tres puntadas, , es la costura
de utilidad más versátil pararemendar y zurzir. Pararemendar otros desperfec-tos, bastan unas cuantaspasadas con el zig-zag detres puntadas hacia adelantey atrás. Utilizar la tecla
marcha atrás y desplace
la tela lateralmente al coser.Cuando el desperfecto así lorequiera, suplemente el ladoinferior con un trozo de telade refuerzo.
Zig-zag de tres pasos
SobrehiladoLa costura zig-zag de tres pasos,
núm 04 es conveniente para
sobrehilar en la mayoría de lostejidos. Recorte los bordes antes desobrehilar. Procure al coser que laspuntadas cojan bien el bordetomando los hilos. Coloque la telaseguir la referencia del prensatelas(ver illustración).
Tejidos esponjosos
Remendar y zurcir

Instruction book/Manual de instrucciones Lily 53534
Flatlock
The flatlock, No 07 , is suitable for sewing
overlapped seams and decorative hems.Loosen the presser foot pressure to 2 whensewing stretch fabric.
You can produce a decorative hem by foldinga single hem to the wrong side and sewingthe flatlock from the right side.
Trim excess hem to stitching from the wrongside.
To sew an overlapped seam, lap one piece offabric over the other piece and sew flatlockstitch over the fabric edge on the right side.
Trim from the wrong side or sew anotherseam from the right side.
Narrow belts and bandsFold the fabric in thirds and sew in the center.Trim excess material from underneath.
Puntada overlocktriplePuntada overlock triple, núm 07 , es una
costura que se emplea para costurasmontadas y bastillas. En telas elásticas,disminuir la presión del prensatelas hasta 2.
Para obtener una bastilla decorativa, doble latela sobre su revés, formando así una bastilla,y cosa con overlock triple sobre el ladoderecho.
Para confeccionar una costura montada,coloque una parte del género sobre la otra ycosa con overlock triple sobre el ladoderecho del borde del género y recorte elsobrante de la costura en el revés del género.
Cintas estrechas y ribetesDoble el género tres veces y cosa por elcentro del lado derecho. Recorte el materialsobrante en el lado inferior.

Instruction book/Manual de instrucciones Lily 535 35
2. If the stitch catches too much of the fold,decrease the stitch width (-).
Blind hemSnap on presser foot D for the elastic blind
hem, No 08 .
Fold the material as shown. Make sure thatthe fold line of the fabric rides in the grooveunder the right side of the presser foot.
Practice using a scrap of material and com-pare with the illustrations.
1. If the stitch does not catch the foldededge, increase the stitch width (+).
1. Cuando las puntadas no alcanzan el bordedoblado del género, ajustar con la tecladel ancho de puntada (+).
3. Un dobladillo a puntada invisible correcta:la aguja debe caer de forma tangencialsobre el borde de la doblez del género.
DobladilloEl prensatelas D se utiliza para el dobladillo a
puntada invisible, núm 08 .
Doblar el género como muestra la figura.
Hacer una prueba y comparar con las figuras.
3. For an invisible hem the needle catches asingle thread of the folded edge.
2. Cuando las puntadas sobrepasandemasiado el borde doblado, ajustar conla tecla del ancho de puntadas (-).

Instruction book/Manual de instrucciones Lily 53536
Bridging stitchThe bridging stitch, No 09 is suitable
for joining two pieces of fabric with foldededges. Leather and vinyl are joined bybutting the edges close to each other usingthe bridging stitch. Also use to join lace andribbon.
Presser foot J is also used to overlockand overcast many different fabrics withthe exception of heavy, firm fabrics. Thepin on the presser foot should follow theedge of the fabric and will prevent thefabric from puckering. Stitch width 5-6mm. When using stitch width 4.5 or lower,use presser foot A.
Overlock, No 06, is chiefly used forsewing heavy stretch fabric. Snap onpresser foot B.Overcast stitch, No 05, may be used tosew light and medium non-stretch fabricand light stretch fabric. Snap on presserfoot J.
Some stitches can be used for seaming andovercasting directly on the edge where a 5mm (1/4") seam is allowed. Place the fabricso that the inside right ”toe” of the presserfoot follows the edge of the fabric.
Seam and overcast
Elastic shirringThe bridging stitch isalso useful for gatheredelastic shirring. Use thebuttonhole foot C, tigh-ten the upper threadtension. On the wrongside of your fabricdraw lines to sew thestitched rows straight.Remember that the elastic will always bestitched double, so take this into accountwhen calculating how much you willneed. Place the shirring elastic (elasticthread) around the finger of the presserfoot C. Sew from the wrong side overboth lengths of the elastic following markedlines. Gather the shirring by pulling the elasticthreads.
Puntada ”fagoting”Puntada ”fagoting”, núm 09 e emplea
para unir por sus bordes dos tejidos plegados,poniendo los bordes los unos contra losotros, preferentemente con un trozo de telapor debajo, y se cose con puntada ”fagoting”.
Nido de abejaelásticoAdemás, la puntada”fagoting” se empleapara un ”nido de abejaelástico”. Utilizar elprensatelas C y aumen-tar la tensión del hilosuperior. Para obtenercosturas de nido de
abeja rectas, primero dibujar líneas rectasen el revés de la tela. Mida una gomaelástica de cordoncillo el doble de largoque la tela. Doblela por la mitad.Enganche el bucle en el talón del prensa-telas. Empezar cosiendo del revés sobrelas dos gomas de cordoncillo. Coser sobre
las líneas dibujadas. Coser todas las filas denidos de abeja. Después, hacer un nido deabeja tirando los hilos de goma.
Unión y sobrehiladoCiertas costuras se utilizan para unir y sobre-hilar directamente sobre el borde en una ope-ración con 5-6 mm de costura. Ponga el géne-ro de manera que el borde interior del ”dedo”derecho del prensatelas guíe el canto deltejido.
Puntada de overlock, núm 06, se empleapara telas gruesas y elásticas. Utilizar elprensatelas B.Puntada semi-overlock, núm 05, seemplea para telas finas y corrientes, paragéneros no elásticos y para telas finaselásticas. Utilizar el prensatelas J.El prensatelas J se utiliza para elsobrehilado y para costuras al canto entodos tipos de tela, con excepción de telasmuy gruesas y duras. La punta del piedebe estar canto a canto con la tela eimpedir así que se contraiga el borde de latela. Ancho de puntada 5-6 mm. Al cosercon el ancho 4.5 o menor, utilice elprensatelas A.

Instruction book/Manual de instrucciones Lily 535 37
Stitches 26-27
Darning stitch
No 27, is a perfect stitch for mending and
darning. Use presser foot A.
1. Sew the first row ofstitches as long as youneed to cover your tearor worn spot.
2. Touch the reverse button
and the machine
continues sewing theremaining stitches at thesame length and fastensthe thread.
3. Touch STOP. Move thefabric so that the needleis right over the last stitch. Repeat as manytimes as you need to cover the hole.
Automatic taperstitchThe tapered satin
stitch, No 26 , is a
tapered zigzag whichmakes it suitable forsewing monogramsand other embellish-ments. Use presserfoot B.
1. Trace the monogram on the fabric and sewover the lines.
2. Select .
3. Sew until the desired length is reached.
4. Touch the reverse button to taper the
end.5. Touch STOP and sew. The stitch will be
repeated in succession and the machinestops automatically when the stitch isfinished.
Costuras 26-27
Zurcir
Núm 27, es una costura especial para
zurzir. Utilice elprensatelas A.1. Cosa la primera costura con la longitud necesa- ria para cubrir el aguje- ro o la parte desperfec- ta.2. Pulse la tecla marcha
atrás . La máquina
sigue cosiendo las costuras restantes con la misma longitud y rematará el hilo.3. Pulse STOP. Repita eso
hasta que la parte desperfecta estécubierta.
Monogramas
La costura de monogra-
mas, núm 26 tiene
un principio y un fincuneiforme. Pose esoes muy adecuada paracoser monogramas yotras decoraciones.Utilice el prensatelas B.
1. Calque el monograma directamente sobrela tela y sobrecosa.
2. Elija .
3. Cosa la longitud deseada.
4. Pulse la tecla marcha atrás . La costura
se termina en forma de cuña.5. Pulse la tecla STOP. Ahora la costura sigue
repetitiéndose y la máquina se pararáautomáticamente al terminar la costura.

Instruction book/Manual de instrucciones Lily 53538
These stitches are combined to form a border.Stitch no 22 and stitch no 15.
Las dos cosutras puoi combinare para realizarun ribete. Costuras núm 22 y núm 15.
An effective edging can be produced withthese stitches. Sew a bit from the edge andtrim close to the stitching.Upper, stitch 21, lower, stitch 20.
Decorative stitchesThese stitches are mainly used as decorativestitches.
Examples:
These stitches produce Point du Parishemstitch together with a wing needle(option).
Estas costuras forman buenas terminacionesde canto al cortar a lo largo del borde de lapunta.Superior, puntada 21, inferior, puntada 20.
Costuras decorativasLas costuras se emplean sobre todo comocosturas decorativas.
Algunos ejemplos de trabajos de costura:
Estas costuras hacen buenas vainicasjunto con una aguja de punta de lanza(alada) que hay como accesorio especial.
Instruction book/Manual de instrucciones Lily 535 39
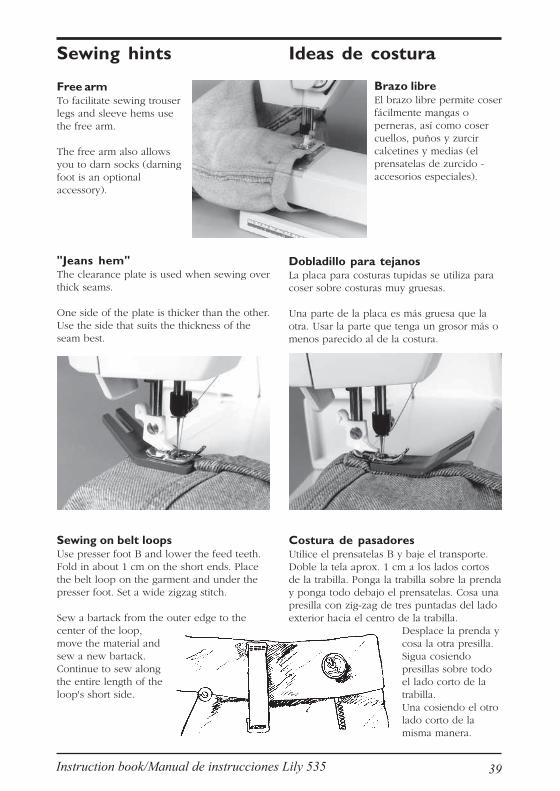
Sewing on belt loopsUse presser foot B and lower the feed teeth.Fold in about 1 cm on the short ends. Placethe belt loop on the garment and under thepresser foot. Set a wide zigzag stitch.
Sew a bartack from the outer edge to thecenter of the loop,move the material andsew a new bartack.Continue to sew alongthe entire length of theloop's short side.
Sewing hints
Free armTo facilitate sewing trouserlegs and sleeve hems usethe free arm.
The free arm also allowsyou to darn socks (darningfoot is an optionalaccessory).
"Jeans hem"The clearance plate is used when sewing overthick seams.
One side of the plate is thicker than the other.Use the side that suits the thickness of theseam best.
Ideas de costura
Brazo libreEl brazo libre permite coserfácilmente mangas operneras, así como cosercuellos, puños y zurcircalcetines y medias (elprensatelas de zurcido -accesorios especiales).
Dobladillo para tejanosLa placa para costuras tupidas se utiliza paracoser sobre costuras muy gruesas.
Una parte de la placa es más gruesa que laotra. Usar la parte que tenga un grosor más omenos parecido al de la costura.
Costura de pasadoresUtilice el prensatelas B y baje el transporte.Doble la tela aprox. 1 cm a los lados cortosde la trabilla. Ponga la trabilla sobre la prenday ponga todo debajo el prensatelas. Cosa unapresilla con zig-zag de tres puntadas del ladoexterior hacia el centro de la trabilla.
Desplace la prenda ycosa la otra presilla.Sigua cosiendopresillas sobre todoel lado corto de latrabilla.Una cosiendo el otrolado corto de lamisma manera.
Instruction book/Manual de instrucciones Lily 53540
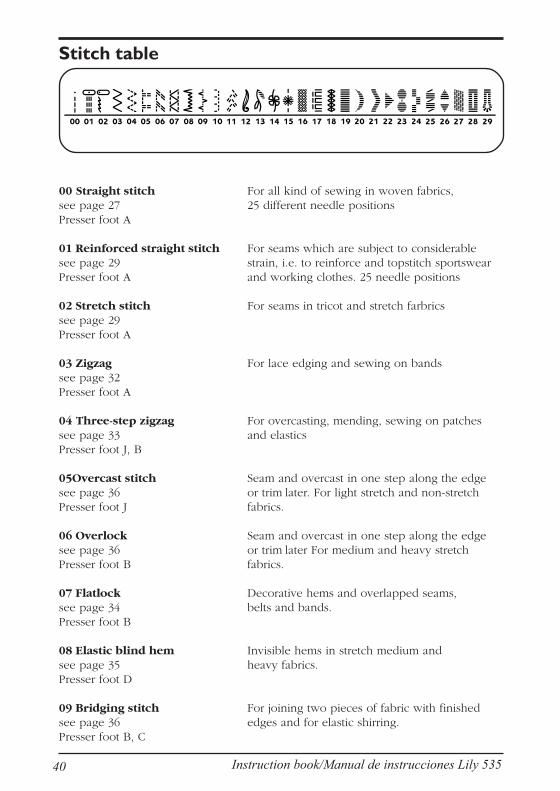
Stitch table
00 Straight stitch For all kind of sewing in woven fabrics,see page 27 25 different needle positionsPresser foot A
01 Reinforced straight stitch For seams which are subject to considerablesee page 29 strain, i.e. to reinforce and topstitch sportswearPresser foot A and working clothes. 25 needle positions
02 Stretch stitch For seams in tricot and stretch farbricssee page 29Presser foot A
03 Zigzag For lace edging and sewing on bandssee page 32Presser foot A
04 Three-step zigzag For overcasting, mending, sewing on patchessee page 33 and elasticsPresser foot J, B
05Overcast stitch Seam and overcast in one step along the edgesee page 36 or trim later. For light stretch and non-stretchPresser foot J fabrics.
06 Overlock Seam and overcast in one step along the edgesee page 36 or trim later For medium and heavy stretchPresser foot B fabrics.
07 Flatlock Decorative hems and overlapped seams,see page 34 belts and bands.Presser foot B
08 Elastic blind hem Invisible hems in stretch medium andsee page 35 heavy fabrics.Presser foot D
09 Bridging stitch For joining two pieces of fabric with finishedsee page 36 edges and for elastic shirring.Presser foot B, C

Instruction book/Manual de instrucciones Lily 535 41
Stitch table
10-15 Decorative stitches For decorating clothes, tablecloths and curtainssee page 38Presser foot B
16-18 Hemstitches For hemstitching, use a wing needle(optional)see page 38Presser foot B, A
19 Satin stitch For appliqués, rounded edge, sewing on lacessee page 31, 33 and bands.Presser foot B
20-21 Decorative edging For decorative edges. Sew 15 mm from the edgesee page 38 and trim close to the stitchingPresser foot B
22-25 Decorative stitches For decorating clothes, tablecloths and curtainssee page 38Presser foot B
26 Tapered satin stitch Automatic tapering for sewing monogramssee page 37 and other decorationsPresser foot B
27 Darning stitch Darn and mend work clothes, jeans, table-see page 37 cloths and linen towels.Presser foot A
28 Bartack Buttonhole Suitable in medium and heavy fabrics.see page 22-25Presser foot C
29 Keyhole buttonhole For tailored garments suitable in compact wool-see page 22-25 len cloth.Presser foot C

Instruction book/Manual de instrucciones Lily 53542
00 Costura recta Para todo tipo de trabajos en tejidos no elásticos. 25 posicionesVéa pág. 27 posibles de la aguja.Prensatelas A
01 Costura recta reforzada Para todo tipo de costura expuesto a grandes esfuerzos, por ejemploVéa pág. 29 prendas de deporte o de trabajo. 25 posiciones posibles de la aguja.Prensatelas A
02 Puntada elástica Para todo tipo de trabajo en tejidos elásticos.Véa pág. 29Prensatelas A
03 Zig-zag Para fijar encajes y cintas.Véa pág. 32Prensatelas A
04 Zig-zag de tres puntadas Para sobrehilar bordes, remendar rasgones, zurcir o coser cintasVéa pág. 33 elásticas.Prensatelas J, B
05 Sobrehilado Para unir y sobrehilar a la vez. Para tejidos finos, no elásticos.Véa pág. 36Prensatelas J
06 Overlock Para unir y sobrehilar a la vez. Para tejidos gruesos y muy elásticos.Véa pág. 36Prensatelas B
07 Overlock triple Para dobladillos visibles, costuras montadas, cinturillas y cintas.Véa pág. 34Prensatelas B
08 Dobladillo invisible Para dobladillos invisibles en tejidos elásticos y tejidos normales, no-Véa pág. 35 elástico y grueso.Prensatelas D
09 Puntada Fagoting Para unir dos bordes doblados y coser dos filas de hilo elástico.Véa pág. 36Prensatelas B, C
Tabla de costuras
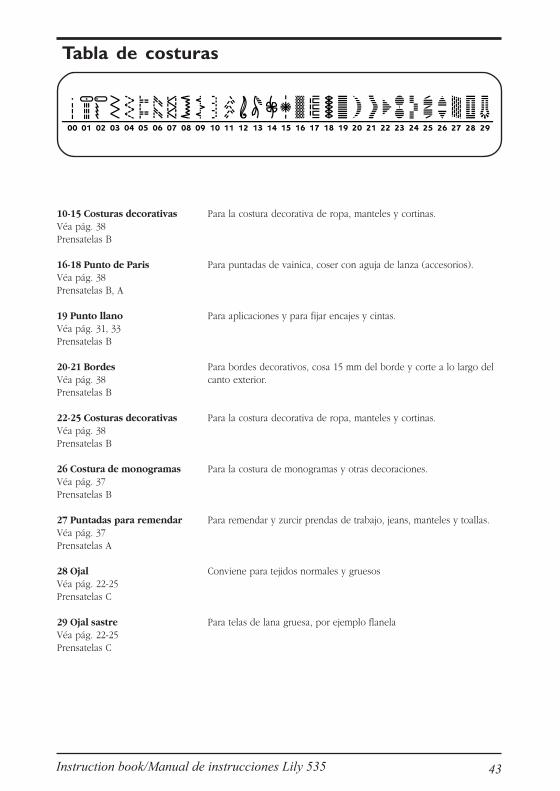
Instruction book/Manual de instrucciones Lily 535 43
Tabla de costuras
10-15 Costuras decorativas Para la costura decorativa de ropa, manteles y cortinas.Véa pág. 38Prensatelas B
16-18 Punto de Paris Para puntadas de vainica, coser con aguja de lanza (accesorios).Véa pág. 38Prensatelas B, A
19 Punto llano Para aplicaciones y para fijar encajes y cintas.Véa pág. 31, 33Prensatelas B
20-21 Bordes Para bordes decorativos, cosa 15 mm del borde y corte a lo largo delVéa pág. 38 canto exterior.Prensatelas B
22-25 Costuras decorativas Para la costura decorativa de ropa, manteles y cortinas.Véa pág. 38Prensatelas B
26 Costura de monogramas Para la costura de monogramas y otras decoraciones.Véa pág. 37Prensatelas B
27 Puntadas para remendar Para remendar y zurcir prendas de trabajo, jeans, manteles y toallas.Véa pág. 37Prensatelas A
28 Ojal Conviene para tejidos normales y gruesosVéa pág. 22-25Prensatelas C
29 Ojal sastre Para telas de lana gruesa, por ejemplo flanelaVéa pág. 22-25Prensatelas C

Instruction book/Manual de instrucciones Lily 53544
Maintenance
Changing the light bulbThe light bulb is placed to the left of theneedle. Place the rubber sheath found in theaccessory box with its deep hole around thebulb. Do not turn the bulb, just pull it downto remove the bulb.
When inserting, place the rubber sheath withits shallow hole around the new bulb, insertthe bulb by pushing it up.Use light bulb designed as indicated on thefront of the machine.
Care of the machineTo keep your sewing machine operatingsatisfactorily, it requires, like other precisionmachines, regular cleaning. No lubrication(oiling) is needed.
Mantenimiento
Cambio de la bombillaLa bombilla está situada a la izquierda de laaguja. Empuje el soporte de goma con suagujero profundo hacia arriba alrededor de lalámpara. No gire la lámpara, bájela solo haciaabajo.
Al ponerlo coloque el soporte de goma consu agujero llano alrededor de la lámpara ycoloque la lámpara en su soporte yempújerlo. La potencia de la bombilla estáindicada en vatios en la parte delantera de lamáquina.
Mantenimiento de la máquinaPara que su máquina siempre trabaje a suplena satisfacción, necesita una limpieza yregulación adecuada como cualquier máquinade precisión. Sin embargo, no se debelubrificar nunca.

Instruction book/Manual de instrucciones Lily 535 45
Removing the stitch plateRemove the presser foot and the bobbincover. Lower the feed teeth. Place the stitchplate opener on the brush. There is a recessat the rear of the stitch plate. Insert the stitchplate opener at the recess and turn.
CleaningWhen necessary, the feed teeth and thebottom of the bobbin area must be cleanedwith the brush, which you will find with theaccessories.
Replacing the stitch plateReplace the stitch plate about 5 mm in frontof the rear edge and push it backward.Replace the bobbin cover.
Maintenance Mantenimiento
Sacar la placa de agujaRetirar el prensatelas y la tapa de bobina,bajar el transporte de dientes.Coloque el abridor de la placa de aguja en elestillo de la brocha. En la parte de atrás de laplaca de aguja, hay una etalladura. Ponga elabridor en la entalladura y gire.
Limpiar debajo del cesto de bobinaA veces es neccesario limpiar también debajodel cesto de bobina. Se limpian mediante elpincel de la caja de accesorios.
Colocar la placa de agujaColoque en su sitio la placa de aguja aprox. 5mm delante del borde posterior empujandolahacia atrás. Coloque la tapa de bobina.

Instruction book/Manual de instrucciones Lily 53546
Fault-findingAlways start by checking the needleAlways start with a new needle as soon asyou discover that a stitch is not what youexpected. Test sew on a scrap of the fabricyou are sewing. Check that you have chosenthe correct needle and see that it is correctlyinserted. See page 17.
Unattractive stitchesThe thread tension is not correct. See page14.Make sure that the thread is not catching. Cer-tain thread spools are unsuitable for spoolingfrom the horizontal spool pin. Try insteadwith the vertical spool pin. The machine maybe incorrectly threaded. Be sure to placespool holders correctly.The correct threading is shown on page 11.Wrong bobbin thread. It should be of thesame thickness as the upper thread.
The needle breaksThe needle can strike against stitch plate andbreak. Change the needle. See page 17.
The upper thread breaksCheck the thread spool to see that it has notcaught in any way.The needle eye may have sharp edges whichcut the thread. If so, change the needle. Seepage 17.The upper thread is incorrectly threaded. Seepage 11. The upper thread may have toomuch tension. Refer to page 15.The hole in the stitch plate may be chippedand have sharp edges. We recommend thatyou replace it.
The bobbin thread breaksThe bobbin thread may be incorrectlythreaded. See page 14.The stitch plate hole is damaged. See "Upperthread breaks".
Irregular thread tensionThis may be due to poor quality thread.When sewing with cotton thread, increase thethread tension.
The bobbin thread breaksThe bobbin thread may be incorrectlythreaded. See page 14. The stitch plate hole isdamaged. See "Upper thread breaks".
Irregular thread tensionThis may be due to poor quality thread.When sewing with cotton thread, increase thethread tension.
Posibles averíasControlar la agujaCuando alguna vez una costura no sea satis-factoria, comprobar con una aguja nueva enun trozo de tela. Controlar que se haya elegi-do la aguja correcta y asegurarse de que laaguja sea introducida hasta su tope y que eltornillo está apretado correctamente, véa pág.17.
Puntadas falsasLa tensión del hilo no es correcta, véa pág.15. Asegúrarse que el hilo no está bloquea-do. Ciertos porta-carretes no son adecuadospara el devanado desde porta-carretes hori-zontales. Por lo tanto, comprobar con un por-ta-carrete vertical. El enhebrado no es correc-to, verificar según la pág. 11. Hilo inferior in-adecuado. Este debe ser igual que el superior.
Rotura de la agujaLa aguja se puede romper al tropezar contrala placa de aguja. Cambiar la aguja, véa pág.17.
Rotura del hilo superiorExaminar el carrete del hilo y verificar si elhilo se ha enganchado en alguna parte. Pod-ría ser que el agujero de la aguja no estuvieralo suficiemente bien pulido. Cambiar la aguja,véa pág. 17.El hilo superior está mal enhebrado, véa pág.11. La tensión del hilo superior es demasiadofuerte. Ver la ”Tensión del hilo”, pág. 15.El agujero de la placa de la aguja se hadañado por los continuos pinchazos de laaguja. Lo mejor es cambiar la placa de aguja.
Rotura del hilo inferiorEl hilo inferior está mal enhebrado, véa pág.14. Se ha dañado el agujero de la placa deaguja, ver arriba.
Tensión irregular del hiloPuede ser a causa de la deficiente calidad delhilo. Al coser con un hilo de algodón, aumen-ar la tensión del hilo. El hilo inferior está malenhebrado, véa pag. 13.
Bobinado irregular del hiloLa máquina no está correctamente enhebradapara el bobinado, ver la pág. 14.
La tela se frunceLa tensión del hilo superior es demasiadofuerte. Tensión correcta del hilo, véa pág. 15.Utilice el prensatelas indicado en la pantalla.

Instruction book/Manual de instrucciones Lily 535 47
The machine does not feed the fabricThe stitch length is too short. Increase stitchlength.The feed teeth may be lowered. Raise themby turning the dial to . See page 17.The feed teeth are full of dust and dirt. Cleanwith the brush. See page 45.
The stitch is too loose - fabric layersnot held togetherThe thread tension is far too loose. Page 15shows how to adjust the thread tension.
Incorrect stitchIf the machine does not sew the stitch indica-ted by the display, it is possible that the elec-tronics have been disturbed in some way,perhaps by a short power cut or electricaldisturbance. Shut off the main switch, wait afew seconds and try again. If the faultremains, contact your dealer.
Machine runs sluggishlyDirt or lint has built up under the stitch plate.Loosen the plate and brush clean betweenthe feed teeth and in the bottom area. Seepage 45.
Main motor does not workThe electronic overload protector may haveswitched off. Shut off the main switch, waitabout a minute. Then swith on the machine.
Expert assistanceHave your machine "tuned up" regularly byyour dealer. If you have followed thepreceding points and still do not getsatisfactory results, you should contact thedealer where you bought the machine. Whenthe machine is being checked, it is a greathelp if it can be test sewn under as similarconditions as possible as when you used it.Remember to take a sewing sample alongwith you, preferably of the fabric and withthe thread you intend to use.A sewing sample will often give much betterinformation than words.
Non-original Parts and AccessoriesThe warranty does not cover any defect ordamage caused by use of non-originalaccessories or parts.
Fault-finding Posibles averíasNo hay avance del tejidoLa longitud de la puntada es demasiado corta.Pulsar la tecla (+). Puede ser que el transpor-te esté bajado, véa pág. 17. El transporte estálleno de pelusilla y apresto. Limpiarlo con unpincel, ver la pág. 45.
La costura resulta demasiado floja -las capas del tejido no estánfuertemente unidasLa tensión del hilo es demasiado floja.Tensión correcta del hilo, véa pág. 15.
Costura decorativa erróneaCuando la máquina no reproduce el motivoseleccionado, puede ser que el sistema elec-trónico se haya visto influido por una pertur-bación eléctrica o cualquier fallo eléctrico.Entonces desconectar el interruptor principaly volver a coser la misma costura. Si se vol-viese a producir el mismo fallo, llamar a unexperto.
La máquina marcha con dificultadSe haya acumulado demasiada pelusilla y ap-resto por debajo de la placa de aguja. Quitarla placa de aguja y limpiar el dentado deltransporte y en el canillero, ver la pág. 45.
Asistencia técnicaCuando se hayan seguido todas las instruccio-nes mencionadas y no se consigan resultadossatisfactorios, ponerse en contacto con el es-tablecimiento que le vendió la máquina. Allí,le atenderán gustosamente con los consejos einstrucciones correspondientes. También leaconsejerán donde puede mandar la máquinapara un servicio. Sería de mucha utilidad yayuda para el personal técnico acompañar ala máquina unas muestras del tejido e hilosutilizados, como, asimismo, una muestra delcosido defectuoso. Muchas veces una muestradel cosido da mejor información que uninforme oral.
Accesorios y repuestos no originalesLa garantía no cubre ningún desperfecto oavería causado por la utilización deaccesorios o repuestos que no sean origina-les.
La máquina no funcionaLa protección electrónica de sobrecarga sepuede haber disparado. Desconectar lamáquina y volver a coser.
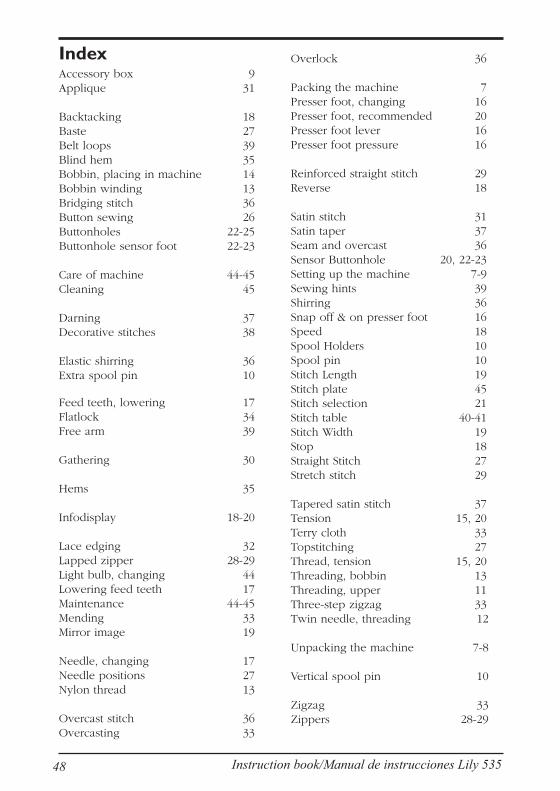
Instruction book/Manual de instrucciones Lily 53548
IndexAccessory box 9Applique 31
Backtacking 18Baste 27Belt loops 39Blind hem 35Bobbin, placing in machine 14Bobbin winding 13Bridging stitch 36Button sewing 26Buttonholes 22-25Buttonhole sensor foot 22-23
Care of machine 44-45Cleaning 45
Darning 37Decorative stitches 38
Elastic shirring 36Extra spool pin 10
Feed teeth, lowering 17Flatlock 34Free arm 39
Gathering 30
Hems 35
Infodisplay 18-20
Lace edging 32Lapped zipper 28-29Light bulb, changing 44Lowering feed teeth 17Maintenance 44-45Mending 33Mirror image 19
Needle, changing 17Needle positions 27Nylon thread 13
Overcast stitch 36Overcasting 33
Overlock 36
Packing the machine 7Presser foot, changing 16Presser foot, recommended 20Presser foot lever 16Presser foot pressure 16
Reinforced straight stitch 29Reverse 18
Satin stitch 31Satin taper 37Seam and overcast 36Sensor Buttonhole 20, 22-23Setting up the machine 7-9Sewing hints 39Shirring 36Snap off & on presser foot 16Speed 18Spool Holders 10Spool pin 10Stitch Length 19Stitch plate 45Stitch selection 21Stitch table 40-41Stitch Width 19Stop 18Straight Stitch 27Stretch stitch 29
Tapered satin stitch 37Tension 15, 20Terry cloth 33Topstitching 27Thread, tension 15, 20Threading, bobbin 13Threading, upper 11Three-step zigzag 33Twin needle, threading 12
Unpacking the machine 7-8
Vertical spool pin 10
Zigzag 33Zippers 28-29

Instruction book/Manual de instrucciones Lily 535 49
Indice alfabéticoAbridor de ojales 25Accesorios especiales - Agujas 48Alumbrado 44Ancho de puntada 19Aplicaciones 31
Bajada del transporte 17Bombillas 44Botones con ”cuello” 26Brazo libre 39Broches de cinturón 39
Cable 8Caja de accesorios 9Cambio de bombillas 44Cambio de la aguja 17Cambio del prensatelas 16Canilla, hilo inferior 14Cintas estrechas y ribetes 34Conexión de la máquina 8Conexión del pedal 8Cortador de hilos 11, 13Coser pasadores 39Cosido de cremalleras 28-29Costura de botones 26Costura elástica 29Costura recta 27Costura recta reforzada 29Costuras 26-27 37Costuras decorativas 38Costuras gruesas 39Costuras para remendar 33, 37Desembalaje de la máquina 7Devanado de la canilla 13Discos guía-hilo 10Dobladillo puntada invisible 35
Embalaje de la máquina 7Encajes 32Enhebrado, agujas dobles 12Enhebrado del hilo inferior 14Enhebrado del hilo superior 11
Indice 3Instrucciones de seguridad 5Interruptor principal 8Inversión 19
Limpieza 45Longitud de la puntada 19
Mantenimiento 44-45Marcha atrás 18
Monogramas 48
Nido de abeja elástico 36
Ojales 22-25Ojales automáticos 22-23Ojales con hilo de refuerzo 20, 22-25Overlock 36Overlock chiuso 34Overlock doble 36
Panel de costura 21Palanca de elevación 39Palanca de elevación del prensatelas 16Pantalla de información 18-20Pedal 8Placa de aguja 45Porta-carrete 10Posibles averías 46-47Posición de la aguja 27Posición de las funciones 18-21Prensatelas, cambio 16Prensatelas especial, ojales 22-23Presentación de la máquina 6Presión del prensatelas 16Puntada elástica 29Puntada ”fagoting” 36Puntada zig-zag 32
Recomendaciones 20Regulación de la velocidad 18Regulación del ancho de la puntada 19Regulación de la longitud de la puntada 19Remendar y zurcir 33, 37
Selección de puntadas 21STOP 19Sumario 6Superficie de trabajo 9Tabla de costuras 42-43Tecla de marcha atrás 18Tejido esponjosos 33Tensión del hilo 15Tensión correcta o falsa del hilo 15
Unión y sobrehilar 36
Zig-zag 32Zig-zag de tres puntadas 33Zurcido 37

Instruction book/Manual de instrucciones Lily 53550
Declaration of ConformityHerewith we confirm that this Sewing Machine in itsessential parts, fulfils the Low Voltage Directive 73/23/EEC, EMC directive 89/336/EEC and the CE MarkingDirective 93/68/EEC.This confirmation is based upon Certificate or TechnicalConstruction Files, performed by SEMKO.The complete archive file is drawn up and maintainedby:VSM Group ABSE-561 84 HuskvarnaSweden
Husqvarna Viking reserves the right to changethe machine equipment and the assortment ofaccessories without prior notice, or makemodifications to the performance or design.Such modifications, however, will always beto the benefit of the user and the product.
Nos reservamos el derecho a modificar lamáquina, el equipo ó los accessorios extrassin previo aviso. Tales modificaciones seránsiempre en abeneficio del consumidor y elproducto.

Instruction book/Manual de instrucciones Lily 535 51

World Firsts From Husqvarna VikingHusqvarna Viking, the world leader in home sewing,
continues to add to its list of firsts to ensure your sewing is as fast,fun, and easy as it can be.
VSM Group AB • SE-561 84 Huskvarna, Swedenwww.husqvarnav ik ing .com
1953 First floating jam-proof hook
1961 First color-coded stitch selection
1965 First snap-on presser foot system
1971 First to eliminate the need for oiling
1980 First programmable lettering – A writing sewing machineFirst programmable stitching
1981 First with dual lights
1982 First Sewing Advisor® – A thinking sewing machine
1983 First thinking and writing sewing machine
1989 First LCD Infodisplay® – A built-in instruction bookFirst LCD Programdisplay® – See before you sewFirst truly automatic self-adjusting tension
1994 First embroidery software for home computers
1998 First Sensor Foot LiftFirst Sensor Foot PressureFirst Selective Thread CuttersFirst Color Touch ScreenFirst Built-in Disk Drive
41
2 6
0 82
-45B
•
Pri
nted
in
Swed
en
• ©
200
0-20
03 V
SM G
roup
AB
•
All
rig h
ts r
eser
v ed
•
Prin
ted
on e
nvir
onm
enta
lly fr
iend
ly p
aper