instruction booklet - amazon simple storage servicean… · instruction booklet f. contents 01...
TRANSCRIPT

Instruction Booklet
F

Contents
01
Introduction
Features
Setup Guide
Installation
Operation Guide
Braking
Battery
Safety
Troubleshooting
Safety Symbols
Warranty
T ab le of Contents
2
3
4
7
9
12
13
17
22
24
25
26

Introduction
02
T hank you for choosing the Foldalite T rekker, your effortless trav el companion. T he Foldalite T rekker is an ultra- compact, lig ht- weig ht and portab le power wheelchair allowing for comfortab le trav el, compact storag e and increasing accessib ility in your daily life. T he Foldalite T rekker is desig ned to fold in j ust seconds thus increasing trav el opportunities and allowing for compact storag e. T he Foldalite T rekker will allow you to g o wherev er you choose and whenev er you choose!
Y our safety is our utmost priority. P lease read and follow all instructions in this owner’ s manual carefully b efore operating your Foldalite T rekker for your first time. For your own safety, it is crucial that you completely understand the instructions g iv en in this owner’ s manual. A s a result of improper use of this power wheelchair or failing to follow the instructions in this owner’ s manual.
I f you hav e a prob lem in comprehending the warning s and instructions contained in this manual, please contact your distrib utor, or your prov ider or the manufacturer. We, at Motion H ealthcare, striv e to enrich your life!
Motion H ealthcare

!
!
Features
03
Backrest Jo int
Lithium Battery
Footrest
Storage Basket
Safety Belt
Armrest
Jo ystick
Leg Guard
Folding Release Lever
Control P anel Cable Clip
K ick Stand
Anti-Tip Wheels
Control P anel Connector
Electromagnetic Brake Levers

Setup Guide
04
Q uick S etup G uide:
• P ull out the chair by holding the position as shown.
• Unfold the footrest.
• Rotate the two armrests into position.
• P ull the backrest to the rear edge of the seat cushion until the two folding levers reach the red line, as shown. When a click sound is heard, the chair is unfolded.

Setup Guide
05
• P ress the backrest adj usting button (yellow/orange button on either side of the backrest) and turn the back rest in until a click sound is heard.
• P ress the anti-tip wheel extension button and pull out the anti-tip wheels.
• Mount the j oystick on the req uired side (can be set up on left or right hand side) and plug in the 4– pin control cable. (For further details please see page 8).
• Fully set up Foldalite Trekker.

Setup Guide
06
Folding :
• Remove the control panel. (Reverse actions shown on page 8)
• P ress the anti-tip wheel extension button and retract the anti-tip wheels.
• P ress the backrest adj usting button and turn the back rest.
• Rotate the armrest as shown. Then, loosen the knob and turn the leg guard down.
• Hold the folding lever and push the backrest forward. Then press the chair tightly as shown, until it is fully closed.

Installation Guide
07
K ick S tand:
The kick stand is located at the bottom of the rear frame.
N o t e : O n l y a f t e r f o l d i n g t h e w h e e l c h a i r c a n t h e k i c k s t a n d b e s e t u p r i g h t . B e f o r e u n f o l d i n g
CA U T I O N : Do not adj ust kick stand leng th.
S afety Belt:
The safety belt is for holding your hip properly against the back of the seat and must be strapped 45° over your hip to prevent the user from falling off the chair. P lease wear the safety belt at all times while seated.
CA U T I O N : P lease b e aware that the waist b elt is not intended for use as an auto style seat b elt. T he Foldalite T rekker is not desig ned for b eing used as a seat in any forms of transportation. Y ou are at your own risk and are not recommended to use the chair as a seat when taking any forms of transportation such as cars, buses, trains, planes or ships. CA U T I O N :
• Always ensure the waist belt is appropriately installed onto the chair and adj usted securely
breathing.
• Always check the waist belt for any loose parts or wear and tear. If any problem is found, contact your provider for maintenance or repair.

Installation Guide
08
Mounting the Joystick:
The control panel can be mounted on the right or left armrest. P ut the q uick release clamp of the j oystick control panel onto the metal grab bar and lock the q uick release handle tightly and securely.
• As shown, route the control panel cable through the cable clip.
• As shown, plug the four – pin control plug from the j oystick control panel into the socket at either side.
• There is a connector for the control panel on the left and right side of the chair. P lease keep the

Operation Guide
Joystick Controller
The j oystick controller comprises the following:
1
2 3
5
7
8
4
6
09
Number
1
2
3
4
5
6
7
8
Function
Horn
Speed Button
Power-On Button
Speed Indicator
Battery Life Indicator
Decrease the speed of the chair.
Indicates the battery level.
P ressing this button will power off the chair.
P ress horn to sound.
Increase the speed of the chair.
P ressing this button will power on the chair.
With 5 LED lights on, the chair is at its max. speed. 1 LED light on, the chair is at its lowest speed.
With 5 LED lights on, the chair is at its max. speed. With 1 LED light on, the chair is at its lowest speed. As well direction control.
Speed Button
Power-Off Button
Control Joystick
Description

Operation Guide
O perating the Joystick:
gently and gradually pushing the control j oystick forward. Familiarise yourself with controlling the speed and start and stop of the chair.
Do not make sharp turns at high speeds. The chair will lose its balance and tip over causing serious bodily inj ury and damage.
The control j oystick provides 360 degrees of manoeuvrability comfortably and effortlessly. A spring is eq uipped inside the j oystick which automatically returns to its original position when let go.
P ush the j oystick towards the target direction. The j oystick can control the drive proportionally the harder the push, the faster it goes. The max traveling speed is 6km/hr.
Release the control j oystick slowly and gradually for the chair to slow down safely. Sudden release of the control j oystick may cause the chair to lose balance and tip over causing bodily inj ury.
L ED Warning L ig hts:
guide on page 22.
10

Operation Guide
11
Movement
Forward
Backward
Right
Left
Stop
Control Lever Operation
P ull the control lever backward.
P ush the control lever to the right.
P ush the control lever to the left.
Release the control lever gradually. (The chair will slow down to stop safely)
P ush the control lever forward.
Braking
12
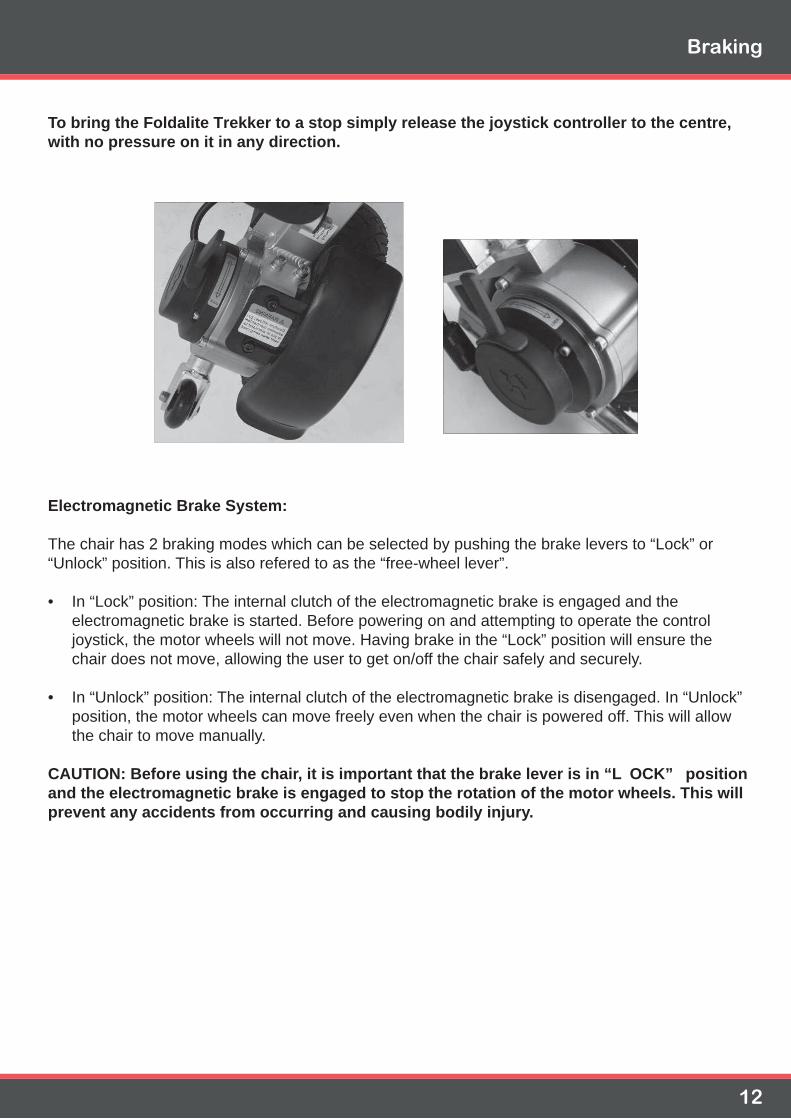
T o b ring the Foldalite T rekker to a stop simply release the j oystick controller to the centre, with no pressure on it in any direction.
Electromag netic Brake S ystem:
The chair has 2 braking modes which can be selected by pushing the brake levers to “ Lock” or “ Unlock” position. This is also refered to as the “ free-wheel lever” .
• In “ Lock” position: The internal clutch of the electromagnetic brake is engaged and the electromagnetic brake is started. Before powering on and attempting to operate the control j oystick, the motor wheels will not move. Having brake in the “ Lock” position will ensure the chair does not move, allowing the user to get on/off the chair safely and securely.
• In “ Unlock” position: The internal clutch of the electromagnetic brake is disengaged. In “ Unlock” position, the motor wheels can move freely even when the chair is powered off. This will allow the chair to move manually.
CA U T I O N : Before using the chair, it is important that the b rake lev er is in “L O CK ” position and the electromag netic b rake is eng ag ed to stop the rotation of the motor wheels. T his will prev ent any accidents from occurring and causing b odily inj ury.

Battery
13
Battery S afety:
Do not use batteries with different amp-hour (Ah) capacities. Do not mix old and new batteries. Always replace both batteries at the same time.
K eep tools and other metal obj ects away from battery terminals. If contacted, short-circuit or electric shock may occur and cause inj ury.
Corrosive substance contained in the battery. Do not disassemble the battery.
Danger of explosion. When charging the batteries, place the chair and the battery charger
Warning
• Do not attempt to connect the battery terminal directly using pliers or metal cables to charge the battery.
• Do not use the chair when the battery is being charged. An electronic drive locking device will be activated that prevents the chair from operating when the battery is being charged.
• Do not use a non-standard power supply (eg. generator or inverter).
• Do not sq ueeze, bend, j erk or tie the power cord.
• Do not smoke or ignite anything around the battery.
• When pulling the power cord, grab the plug to pull it out.
• K eep the power cord away from children or pets.
• If there is any issue with the circuit breaker, pull out the charger immediately and contact your provider.
• The operating temperature of the battery is -5º C (23º F) to 40º C (104º F).

Battery
14
Battery Maintenance: The battery’s life and performance may be affected by temperature, condition of the battery, and
can reduce the battery’s service life. It is recommended that you do not charge the battery for the
fully activate the battery.
Always check if the battery is fully charged before use. The regular charging time is about 5 hours, but if the power is fully run out it may take 10-12 hours to charge fully until the red LED on the charger turns green. Thus the recommended charging time for the battery is 8-12 hrs.
When not using the chair for a long duration, charge the battery fully every month. If the battery is left uncharged for a long period of time, it will damage the battery permanently.
Mounting / R emov ing Battery: Ensure the chair is powered off before mounting or removing the battery. Taking out the battery:
• Near the edge of the seat base, the batteries are located at the sides of the chair.
• P ress the button, hold the battery grip and pull the battery out of the battery holder, as seen below.

Battery
15
Mounting the Battery:
• Hold the battery grip and plug in the battery with the battery bottom aligned to the mouth of the battery holder. When a click sound is heard, the battery has been mounted correctly.
Charg ing the Battery: The battery can be charged with normal AC power (AC 110-220 V, 50-60 Hz). The charging port is located under the front part of the control panel. Before charging, ensure the chair is powered off.
• P lug the charger 3 – pin cable into the charging port under the front part of the j oystick controller (as seen below).
• P lug the charger into a power outlet. When the red LED is on, it is charging.
• When the LED on the charger changes from red to green, keep charging for an additional 30 minutes to allow the battery to be fully charged.
• Unplug the charger from the power outlet before unplugging from the charging port of the j oystick controller.
Battery
16
O v er- Discharg e P rotector. The lithium battery will be permanently damaged, if the battery’s capacity has been completely discharged. Therefore, the Foldalite Trekker is eq uipped with an over-discharge protector. When the lithium battery is running out, the protector will cut off the circuit automatically and the controller will stop working.
batteries need to be charged.
When there is no red LED light on battery level indicator, it means that the batteries must be charged within 2 hours immediately. If not, the battery may not be activated permanently.The charging time after over-discharge takes 10-12 hours.
O v er- Current P rotector: The Foldalite Trekker is also eq uipped with an over-current protector. If the current supplied to the motor is too high, the over-current protector will cut off the supply. If ascending over a slope over 12º, or the load is over 330lbs, or the motor rotation is j ammed, the over-current protector will be activated and the chair’s control will cut off the circuit to prevent overcurrent and overheating of the motor.
Battery S ocket Cleaning :
• Check the battery pack and the positive and negative poles for any corrosion. If there is any, clean with battery cleaning tools, steel brush or medium sand paper.
• When cleaning, keep tools and other metal obj ects away from battery terminals. If contacted, short-circuit or electric shock may occur and cause bodily inj ury.
CA U T I O N : Do not allow the acidic sub stance inside the b attery to come into contact with your skin, clothes or other items. T he sub stance is extremely haza rdous and may cause serious b urn. I f contact is made, immediately wash your skin with cold water and seek medical attention.

Safety
17
U sag e S afety G uidelines:
• .
• Check battery levels regularly and ensure the battery is charged periodically when not in use.
• K eep tools and any metal obj ects away from the negative and positive poles of the battery. Short-circuits or electric shock may occur when the two poles are accidentally contacted.
• Familiarise yourself with the Foldalite Trekker and its capabilities.
•
• Always be aware of any potential hazards while using the Foldalite Trekker.
• When the power wheelchair is not in use, turn off the power, charge the battery and store in a clean and dry place.
• The Foldalite Trekker is not waterproof. K eep away from water sources.
Joystick Control P anel: To ensure your safety while operating your powerchair, the control panel must be securely mounted. If any buttons on the control panel fail or are not responding, you must stop using the chair immediately and contact your authorised dealer for repair or replacement. S tationary P osition: When the chair is inactive, the power must be off. This will:
• P revent the control panel from being activated by accidental touch which may cause the chair to move unintentionally.
• P revent the chair from electromagnetic interference sources which may activate the chair’s operation system and cause damage to the chair and user.
Do not allow anyone but the user operating the control j oystick.

Safety
18
Weather P recautions:
This power wheelchair cannot be used or stored in environments of rain, snow, ice or slippery surfaces. These conditions may adversely affect the functions of the chair. Always keep your chair in a clean and dry area.
Warranty does not cover water damage. Do not expose the chair to any extremely hot or cold conditions. If you are ever caught in any of these conditions, please proceed to shelter immediately.
N o t e : I f t h e c h a i r g e t s w e t , i m m e d i a t e l y p u l l o u t t h e b a t t e r y a n d a l l o w i t t o d r y n a t u r a l l y . P u t t h e b a t t e r y b a c k a f t e r t h e c h a i r i s c o m p l e t e l y d r i e d . When operating on wet or frictionless ground surfaces, please move at a slow speed.
R oad S urfaces: The Foldalite Trekker is designed optimally for dry level surfaces, such as concrete and indoor ground
Do not use the Foldalite Trekker on sand, uneven or loose surfaces, tall grass or rough road surfaces to prevent the wheels, bearings, axis, motor and other parts from being damaged or loosened.
on public roads.
. It is highly recommended that you wear hi-vis clothing while driving at night.
V ehicle T ransport:
CA U T I O N : P lease b e aware that it is at your own risk and is not adv isab le to sit in the Foldalite T rekker when taking any forms of transportation such as cars, b uses, trains, planes or ships. If you must take such forms of transportation while remaining in the chair, it is extremely important that you secure your safety belt, power off the chair and push the brake lever to “ Lock” position, make sure there is no movement in the motor wheels and have the chair securely tied down. However, as this chair is ultra-compact, taking any transportation is made possible as you can fold the chair conveniently and it can be stored away in tight storage areas such as a car boot. P lease ensure the chair is stored securely.
If you need to be transferred on or off a vehicle manually without getting off the chair, never allow
the front and rear edges of the seat cushion frame.

Safety
19
Weig ht Distrib ution:
To avoid tipping over while driving, the balance and stability of the power wheelchair must not be neglected. The following factors may affect the weight distribution of the chair:
• Height and angle of the chair.
• Seating position, or weight loading position of the user’s body.
• The gradient of the ramp or slope.
• Load carried in storage basket or by the user, may have adverse effects to the weight distribution of the chair.
G etting O n/ O ff:
CA U T I O N : Do not modify or adj ust the Foldalite T rekker’ s config uration yourself.
Whenever transferring to or from the Foldalite Trekker, it is recommended to have a supporting point that is higher than the seat cushion. To reduce the chance of falling, please be aware of the following:
• Ensure that you lift up the armrest and lower the leg guard.
• Ensure that the power is off and the brake is in “ Lock” position. Check that there is no movement in the motor wheels.
• Move the chair as close as possible to the target position to minimise the risk of falling during transfer.
• Consult your GP about the safest way to move your body in and out of the chair.
1. Do not stand on the footrest!2. Make sure your feet are not tangled or j ammed in the gap between the footrest while
getting on/off the chair.

Safety
20
L eaning or R eaching while S eated:
Reaching out your hands or leaning your body in the chair may adversely affect the chair’s balance. If you do not position yourself correctly, you may fall off or tip over the chair.
• Do not lean your body out of the range of the seat cushion. Y our hip must be always in contact with the seat cushion.
• Under no circumstance should you try to pick up anything through the space between your knees or in front of your body.
• Do not exert force on the footrest to avoid the chair from tipping over, this may result in serious inj ury.
CA U T I O N : Failing to follow these g uidelines may result in serious inj ury. I f you do any of these actions, it is at your own risk. N ev er reach, b end, or lean in the chair. Doing so will chang e your centre of g rav ity and the weig ht distrib ution of the chair.
S tationary O b stacles: Exercise extreme caution when negotiating ramps, slopes and raised curbs etc. to avoid tipping the chair over.
It is important to climb or descend an obstacle slowly, cautiously and perpendicularly. Failing to do so may result in damage to the chair or causing bodily harm.
’ s manual.
• Lean your upper body slowly and slightly forward, when going over an obstacle with an ascending slope.
• Lean your upper body gently against the backrest, when going over an obstacle with a descending slope.
• Avoid any sudden stops and starts.
• Always navigate perpendicularly towards the obstacle.

Safety
21
R ev erse Driv ing : CA U T I O N : When driv ing in rev erse, please exercise extreme caution. T he motor wheels may run into an ob structiv e ob j ect which may lead to losing control of your chair may cause your chair to tip ov er.
• All obstructive obj ects should be cleared and approach cautiously and slowly while driving in reverse.
• Never drive in reverse on inclined slopes.
L oad L imit:
• Max Load of the chair: 330lbs (150kg).
• Overloading the chair may cause damage to the chair’s frame, fastened parts and folding device.
• Damage caused by overloading will void the warranty of the chair.
G etting U p/ Down S tairs and Escalators:
The Foldalite Trekker is not designed for long j ourneys or getting up and down stairs, and escalators. CA U T I O N : I t is prohib ited to mov e or use the Foldalite T rekker on stairs and escalators. S erious b odily inj ury may result.
Electromag netic I nterference Warning : The power wheelchair may be affected by electromagnetic interference (EMI), which may cause damage or interruption to the operation of the chair.
Sources of electromagnetic waves come from broadcasting stations, TV stations, radio transmitters, two-way radios (such as walkie-talkies), mobile phones and computers. Interference from these electromagnetic waves may cause malfunction or permanent damage to the chair’s braking and control system.
The power wheelchair has passed the 30 V/m EMI test and has a certain degree of immunity to most common electromagnetic energy sources.
• If interference does occur and causes unintended movement to the chair in an uncontrolled manner, cut off the power immediately.
• any parts.

Troubleshooting
22
The j oystick control panel will display a number of possible fault conditions by means of the LED light. When the LED light is green, the chair is trouble-free. When a problem occurs, the LED light
causes and solutions. If you cannot determine the cause of the trouble condition, please contact your provider or distributor for assistance.
P ower:
Number
Number
Possible Cause
Possible Cause
Solution
Solution
1
1
2
3
4
5
2
3
Faulty connection of the control panel and the
motor connector
The lowest level LED light
req uired
The second level LED light
panel failing to deliver control signals
The third level LED light
being charged.
The fourth level LED light
failed.
the electromagnetic brake is in “ Unlock” position and
the chair will not move
Re-plug the 4-pin plug into the battery connector at the side of the chair; refer to instructions on page 15.
If the power is off automatically, the batteries must be recharged within 2 hours, and charged for 10-12 hours,
refer to instructions on page 22-23.
P ull out the battery and check the contact for any fault and re-insert the battery. Refer to instructions on page 21-22.
Recharge the batteries immediately.
Reconnect the plugs of the two ends of the control panel cable, or replace the control panel.
Do not use the chair, an electronic drive locking device preventing the chair from operating when batteries are
being charged.
Re-plug and tighten the motor connector.
P ush the electromagnetic brake lever to “ Lock” position, please refer to instructions on page 19.
Low power supply, the power cuts off automatically
Fault of the 3-pin plug connecting to the battery

Troubleshooting
23
Electromag netic b rake:
Motor Wheels:
Distance per charg e decreased:
Charg ing :
Fail to start when the power is on:
Number
Number
Number
Number
Number
Possible Cause
Possible Cause
Possible Cause
Possible Cause
Possible Cause
Solution
Solution
Solution
Solution
Solution
1
1
1234
2
2
3
1
1
When the power is off, and the electromagnetic brake lever is in “ Lock” position, the motor wheels
cannot move.
Low temperature enviroment below 0.
Noise and vibration occurs in the course of motor run.
After not using for a period or after charging.
Contact the authorised dealer to replace the electromagnetic brake.
Turn the power on and off to reactivate.
Contact the authorised dealer to replace the electromagnetic brake.
It is normal as this is the characteristics of lithium batteries.
Contact authorised dealer to replace the battery.
Contact authorised dealer to replace the battery.
Contact authorised dealer to replace the battery.
Contact the authorised dealer to replace the electromagnetic brake.
Contact the authorised dealer to replace the electromagnetic brake.
When the power is on, and the electromagnetic brake lever is in “ Lock” position, the motor wheels
cannot move.
Faulty connection of the j oystick controller and the battery connector.
Jo ystick controller damage.
Charger plug damaged.
Charger plug loosened.
Reconnect the 4-pin plug into the battery connector at the side of the chair.
Battery use has exceeded its service life.
When the power is off, and the electromagnetic brake lever is in
“ Unlock” position, the motor wheels cannot move.

Product Safety Symbols
24
The following symbols are used to identify warnings, mandatory actions and prohibited actions. It is essential that you fully understand and completely familiarise yourself with these symbols before operating the Foldalite Trekker for the first time.
Read and follow the instructions provided in this manual.
Safety warning sign or an indication of a dangerous operation that may endanger your safety or the safety of others.
Do not use any mobile phones, walkie talkies, electronic devices or any other radio transmitters while operating.
Finger crush / pinch point.
Store in a clean and dry condition; away from rain, snow, ice, salt and water.
Test of EMI/RFI at an immunity level of 30 V/m has been passed.
Corrosive substance contained in the battery.
Danger of explosion.
Do not use batteries with different amp-hour (Ah) capacities. Do not mix and new batteries. Always replace both batteries at the same time.
K eep tools and other metal obj ects away from battery terminals. If contacted, short-circuit or electric shock may occur and cause inj ury.
Flammable material, avoid exposure
Disposal and recycle.

Technical Specifications
25
General
Motor
Battery
Controller
Front Castor
Rear Wheel
41.33x 27.1x 38.97in / 1050 x 690 x 990 mm
Brushless DC Motor
Li-ion battery
Brushless dual-drive rocker controller
8in
8in
7.32 x 27.1 x 35.03 in / 440x 690x 840 mm
250 W
20Ah
250W x 2
Solid tyre
Solid tyre
Max: 330lbs (150kg)
DC 24V
DC 24V
DC 24V / 12A x 2
72.75b (33kg) with battery / 63.93lb (29kg) without battery
At max speed: 0.5m
Up to 12º (depending on user weight / safe climbing angle)
Intelligent Electromagnetic Brake
6km/h (3.75mph)
39.3 in / 1000 mm
23km (vary with user’s weight, terrain, ground condition, battery condition, temperature and driving habit)
Dimensions (Unfolded): L x W x H
Type
Type
Type
Size
Size
Dimensions (Folded): L x W x H
Rated power
Norminal capacity
Input power
Type
Type
Maximum user weight
Input voltage
Output voltage
Input voltage/current
GW / NW
Maximum climbing angle
Brake system
Maximum speed
Turning radius
Full charge mileage
Braking distance

Warranty
26
Invoice and warranty card are req uired for service within the warranty period, otherwise all repair costs will be charged. Motion Healthcare will repair or replace after to the original purchaser, free of charge, any of the warranty included items being examined by an authorised representative of Motion Healthcare and found defective in material and/or workmanship. For repair beyond the warranty period, material and transport costs will be charged.
Main Frame (5 years warranty from purchase date):
Motor (1 years warranty from purchase date):
Damaged due to overloading or tampering by the user will void the warranty.
Battery (1 years warranty from purchase date):
Damaged due to incorrect charging or tampering by the user will void the warranty. We are not responsible for accidents caused thereof after.
Joystick Controller and Control Box (1 years warranty from purchase date):
. Repair costs will be charged.
Warranty Exclusions:
• The warranty exclusions extend to the following items:
1. Upholstery and seating, armrest, leg guard, footrest, brake pads, motor brushes and tyres req uire replacement due to normal wear and tear.
2. Damaged components due to negligence, accident, misuse, abuse, overload commercial use, improper operation, maintenance or storage.
3. Circumstances beyond the control of Motion Healthcare.4.
• the serial number on the warranty card is altered, warranty will be voided.
• The warranty is non-transferable and is for the original purchaser of the chair only.
As a manufacturer, our responsibility is to repair or replace damaged parts.To the extent permitted by law, this warranty instruction supersedes any other warranties; such as writing, oral, expressive or implicit warranties, including warranties of any merchantability or applicability of special purpose, for any
Disclaimer
Thank you for purchasing the Foldalite Trekker. Motion Healthcare disclaims all responsibility for any personal inj ury or property damage as a result of improper or unsafe use of this chair.
If you have any q uestions about the Foldalite Trekker and its safe operation, please feel free to contact your authorised provider.
