instruction manual chr1000w ceiling hood
TRANSCRIPT
INSTRUCTION MANUAL INSTRUCTION MANUAL CHR1000W CEILING HOODCHR1000W CEILING HOOD
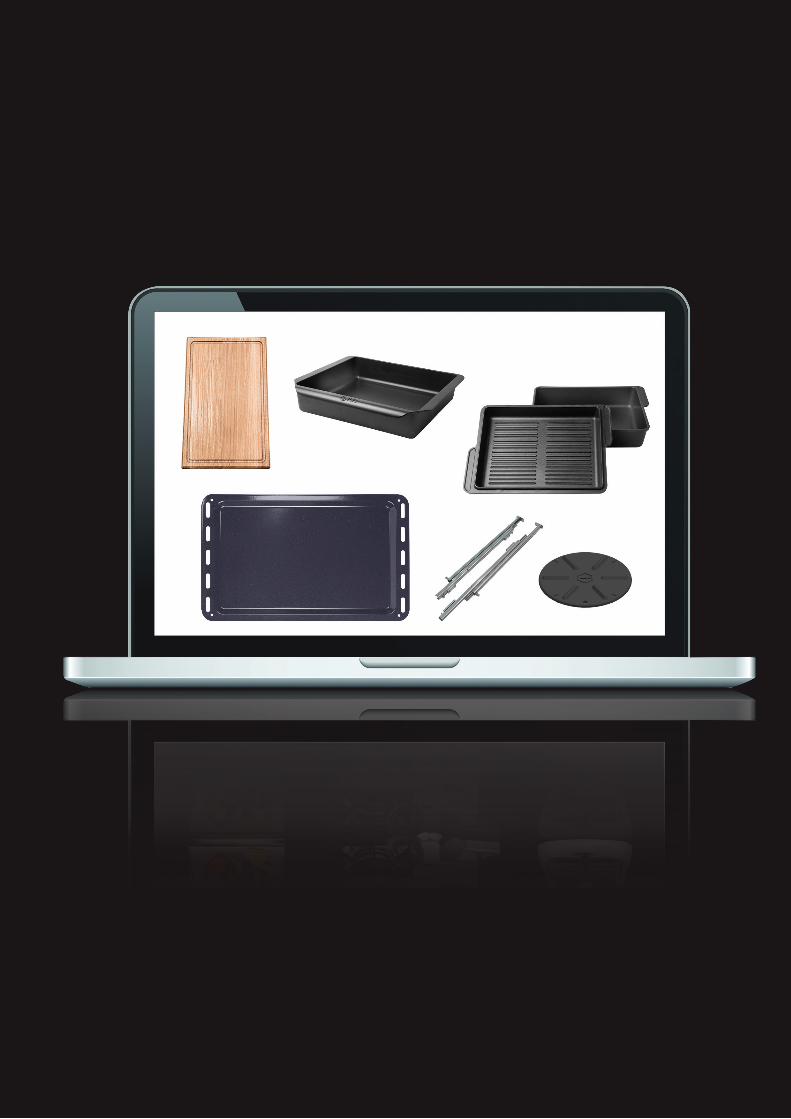

OPEN 24/7ILVE ACCESSORIES ONLINE SHOP
For a wide range of Genuine ILVE accessories at the click of a button shop.ilve.com.au

11
Exhausting cooker hood The equipment is constructed in accordance with European Standards and the requirements included in the following Directives: 73/23 EEC (electric-low tensionsafety), 89/336 EEC (electromagnetic compatibility), 93/68 EEC (EC marking regulations).Before installing and/or using the hood:• read all the instructions thoroughly;• be sure that the ceiling structure is suitable for the installation of this heavy equipment• make sure that the voltage (V) and frequency (Hz) ratings indicated on the plate inside the hood unit correspond to the ones available in the installation place. • At least two people are needed for the installation procedure, which it is advisable to entrust to competent technicians.
USEThis cooker hood can be employed as exhausting or filtering. Exhausting (external evacuation). Kitchen smokes are driven outside through a flue (not provided with the hood) joined to the exhaust pipe flue connector. This pipe must not under any circumstances be connected to cooker, boiler or burner exhaust pipes, etc.The use of pipes and holes on the wall with a smaller diameter than the output of the motor will cause a decrease in suction performance and an increased of the noise level.Use as short as possible tubes and with few curves.Use pipes with smooth internal surfaces.Filtering (inside recycling). The fumes pass through activated carbon filters (supplied with the hood) to be purified and recycled into the kitchen.
1. INSTALLATION
Read the instruction manual before installing and/or using the hood. The minimum distance between the supporting surface of the cooking hob and the lowest part of the range hood must be not less than 65cm with a gas hob. If the mounting instructions of the gas hob indicate a wider distance, respect it.
The unit must not be mounted above cookers fitted with top radiant plate.
For proper operation, it is recommended to install the product at a distance of 200 – 210 cm from the floor.Respect all the air discharge regulations.
The air must not be discharged in a pipe used to discharge exhaust fumes produced by gas-fed equipments or fuel-fed equipments (this does not apply to filtering hoods).The room must be adequately ventilated when the hoods is used together with other gas or fuel
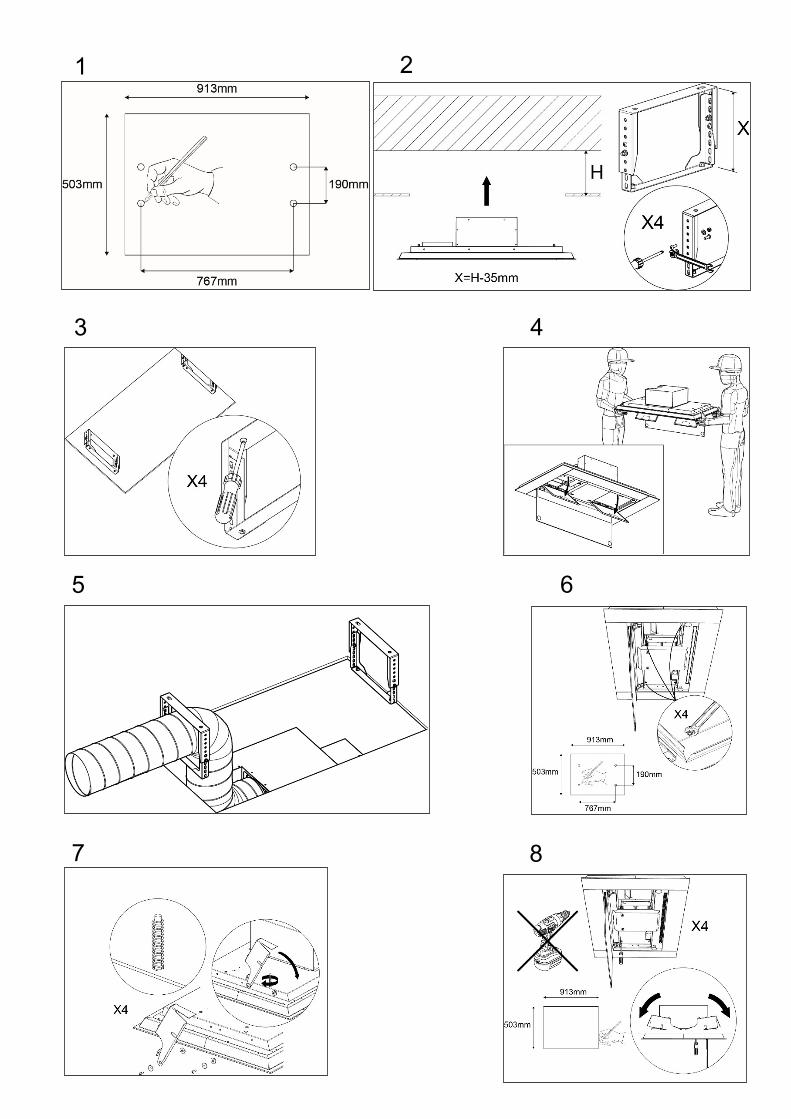
equipments.For an easy access, it is advisable to move possible furniture under the installation area.Installation of the hoodThe hood is equipped with all the necessary fastenings for its installation, which are suitable for most surfaces. Verify that the installation surface is strong.Installation must be carried out by qualified installers according to present regulations.EXHAUSTING:The hood can be installed in two different ways:• Fixed with the motor directly on the ceiling (possible
only when the distance between the ceiling and the false ceiling is between 210 and 270mm). Follow the visual instructions Fig. 1-2-3-4-5-6.
• Fixed with the motor directly on the false ceiling. Follow the visual instructions Fig. 7-8.
FILTERING:Assemble the box combining the four inox walls and fixing them manually folding the inox tabs. Fig. 9Fix the box to the hood with the provided screws. Fig. 10Adjust the height of the two mounting brackets at 162mm. Fig. 11 Install the hood to the ceiling following the visual instructions Fig. 12-13- 14-15The motor can also be positioned away from the hood at a distance not longer than 7m. In this case the hood can only be used in the exhausting version. If the motor is installed on the wall it is prohibited to have the air outlet on the side. Fig. 16For the electrical connection of the motor away from the hood always use the supplied extension cord and make the earthing connection using the yellow-green wire.
2. ELECTRICAL CONNECTIONS
This equipment must be connected to a grounding plant. Two types of electrical connection can be used:1. Using a standard plug to be connected to the power cable and inserted in a mains socket which must be accessible (so that the plug can be disconnected when servicing is carried out). Make sure that the plug is accessible also after the complete installation of the equipment.2. By means of a fixed mains connection, fitting a bipolar switch, which ensures the disconnection, with an opening distance of the contacts allowing a complete disconnection on the conditions of the over voltage III category, according to installation regulations. The ground connection (yellow-green wire) must not be interrupted.Refer to the plate inside the hood for the mains voltage and frequency ratings.If the power cable is damaged, it must be replaced by the manufacturer or by its service agent or a qualified person in order to avoid any risk.
For stationary appliances permanently connected to the fixed wiring, compliance with this requirement is considered to be met if the instruction concerning
INSTALLATION, OPERATING AND MAINTENANCE INSTRUCTIONS FOR RANGE HOODS DESIGNED FOR WALL FITTING 230 Vac • 50 Hz

INSTALLATION
2
disconnection incorporated in the fixed wiring is in accordance with AS/NZS 3000
Refer to the plate inside the hood for the mains voltage and frequency ratings.
3. OPERATION
The hood is supplied with a multi speed motor.The hood should be run at low speed under normal conditions and at higher speeds only when there is a heavy build-up of fumes or odour. Ideally, the hood should be switched on as soon as cooking is started and then kept on until all odour have been eliminated.
REMOTE CONTROL FUNCTIONS
When turned on, the engine is positioned at the second speed. The motor speed is indicated by the lighting of the respective green LED (ref. pos. 1-2-3-4). At the fourth speed (intensive, ref. pos. 4), the LED flashes and after 5 minutes the motor returns to the third speed automatically.
REMOTE CONTROL ENCODINGThe supplied remote control is already encoded and can be used from the beginning for the total control of the hood.To encode another remote control, hold the button “P” on the hood for 4 seconds until the programming red LED lights up, at this point press immediately after the On / Off aspirator.When the red LED turns off, the programming is closed and you cannot no longer program the remote control.
SAFETY SWITCHIn case the remote control is lost or out of batteries, the appliance shall be switched off pushing the “P” button.
RESTORING FACTORY CONDITIONS (RESET)Hold down the “P” button until the red LED lights up and continue to press the button without releasing until the LED turns off by itself. At this point no remote control will be coupled and it will be necessary to pair one again.
GREASE FILTER MAINTENANCE WARNINGThe electronic control report, after 100 hours of operation, with the flashing of the LEDs, for 30 seconds at shutdown of the hood, the need for cleaning of the grease filters. To reset the counter, after cleaning the filters, while the flashing warning press the “+” on the remote control until shutdown.
5. MAINTENANCE AND REMINDERS
Always disconnect the hood from the mains before carrying out any maintenance or cleaning operation.Particular attention should be paid to the metallic anti-grease filters that are designed to trap particles of fat contained in the fumes. The metallic anti-grease filters must be washed at least once a month with detergent in hot water (or in the dish-washer). The filters may dis-colour after a few washes. This is normal and does not mean they have to be replaced. To remove the metallic anti-grease filters, open the bottom panel of the hood and then remove the filter by the handle. Fig. 17.
ATTENTION: • the grease collected in the filter can easily catch fire and it is therefore extremely important to clean the metallic filter on a regular basis as per instructions. Grease filters are removed as illustrated (Fig. 5).• Do not flambé under the range hood• Caution; accessible parts may become hot when used with cooking appliances.• Never leave the hob unattended when frying, as oil or fat can catch fire.
The activated charcoal filters, if present, are designed to collect unpleasant odour in the cooking fumes. The air is then released purified in the environment. The charcoal filters must not be washed, but replaced 2 or 3 times a year, depending on how much the hood is used. New filters are to be requested directly to the manufacturer.To replace the charcoal filters, just remove the motor protection panel, centrally positioned between the metal filters: locking is performed with magnetic closures; simply exert a modest manual force, without the use of tools. At this point you can remove the active charcoal filter through rotation of about 90 ° with respect to their position to unhook from the locking lugs, accompanying then the filter downward, without the aid of tools. Fig. 18-19-20-21.To reinstall the new activated carbon filters, reverse operations.In order to remove the remaining glue or any impurity, the cooker hood must be cleaned immediately after installation and after having removed the protective film.The cooker hood must be cleaned frequently both internally and externally (at least once a month).Do not let dirt gather on the inner and outer surfaces of the hood.To clean the exterior of the hood do not use either acid or basic products, or abrasive sponges.Clean the hood with a sponge dampen in warm water and a little quantity of neutral detergent (for example dishwasher detergent), in order to remove possible particles of grease.Rinse with a damp cloth, removing all the detergent

33
carefully, following the satin finish direction on the steel surface.Drying is very important, especially in areas where water is particularly hard and leaves limestone.The hood features a LED light that, in addition to offering a good lighting and a significant energy savings, are guaranteed to last on average 10 times more than traditional lights.All the ordinary and extraordinary maintenance can be performed without having to remove the hood.
1 2
3 4
5 6
7 8

9 10 11
12 13
14 15
16

19 20
21
17 18

INSTALLATION
4

55
Eurolinx Pty Limited A.B.N. 50 001 473 347 trading as ILVE (“ILVE”)Office:48-50 Moore Street, Leichhardt N.S.W 2040 Post:Locked Bag 3000, Annandale, N.S.W 2038 P: 1300 856 411
WARRANTY REGISTRATIONYour ongoing satisfaction with your ILVE product is important to us. We ask that you complete the enclosed Warranty Registration Card and return it to us so that we have a record of the ILVE product purchased by you, Alternitivley, you can now register your warranty online at http://support.eurolinx.com.au/
PRIVACYILVE respects your privacy and is committed to handling your personal information in accordance with the National Privacy Principles and the Privacy Act 1988 (Cth). A copy of the ILVE Privacy Policy is available at www.ilve.com.au. ILVE will not disclose any personal information set out in the Warranty Registration Card (“Personal Information”) without your consent unless required by:1. law;2. any ILVE related company;3. any service provider which provide services to ILVE or assist ILVE in providing services (including repair and warranty services) to customers. Our purpose in collecting the Personal Information is to keep a record of the ILVE product purchased by you, in order to provide a better warranty service to you in the unlikely event that there is a problem with your ILVE product. ILVE may contact you at any one or more of the addresses, email addresses or telephone numbers set out in the Warranty Registration Card. Please contact ILVE on 1300 694 583 should you not wish to be contacted by ILVE.
WARRANTY1. WarrantyILVE warrants that each ILVE product will remain, for a period of twenty four (24) months computed from the date of purchase of the ILVE product, free from defects arising in the manufacture of the ILVE product (“Warranty”). Except for consumer guarantees setout in the Competition and Consumer Act 2010 (Cth) (“Act”), ILVE does not make any further warranties or representations in relation to ILVE products.
2. What is not Covered by the Warranty.The Warranty does not apply if an ILVE product is defective by a factor other than a defect
arising in the manufacture of the ILVE product, including but not limited to:(a) damage through misuse (including failure to maintain, service or use with proper care), neglect, accident or ordinary wear and tear (including deterioration of parts and accessories and glass breakage);(b) use for purpose for which the ILVE product was not sold or designed;(c) use or installation which is not in accordance with any specified instructions for use or installation;(d) use or operation after a defect has occurred or been discovered;(e) damage through freight, transportation or handling in transit (other than when ILVE is responsible);(f) damage through exposure to chemicals, dusts, residues, excessive voltage, heat, atmospheric conditions or other forces or environmental factors outside the control or ILVE;(g) repair, modification or tampering by the purchaser or any person other than ILVE, an employee of ILVE or an authorised ILVE service contractor*;(h) use of parts, components or accessories which have not been supplied or specifically approved by ILVE.(i) damage to surface coatings caused by cleaning or maintenance using products not recommended in the ILVE product handbook provided to the purchaser upon purchase of the ILVE product;(j) damage to the base of an electric oven due to items having been placed on the base of the oven cavity or covering the base, such as aluminium foil (this impedes the transfer of heat from the element to the oven cavity and can result in irreparable damage); or(k) damages, dents or other cosmetic imperfections not affecting the performance of the ILVE in respect of an ILVE product purchased as a “factory second” or from displayThe Warranty does not extend to light globes used in ILVE products.3. Domestic UseEach ILVE product is made for domestic use. This Warranty may not extend to ILVE products used for commercial purposes.4. Time for Claim under the WarrantyYou must make any claim under this Warranty within twenty eight (28) days after the occurrence of an event which gives rise to a claim pursuant to the Warranty, by booking a service call on the telephone number below.
Continued over...
WARRANTY

INSTALLATION
66
5. Proof of PurchaseCustomers must retain proof of purchase in order to be eligible to make a warranty claim in respect of an ILVE product.
6. Claiming under the WarrantyCustomers will bear the cost of claiming under this Warranty unless ILVE determines the expenses are reasonable, in which case the customer must claim those expenses by providing written evidence of each expense to ILVE at the address on the Warranty Registration Card.
7. Statutory Rights(a) These terms and conditions do not affect your statutory rights.(b) The limitations on the Warranty set out in this document do not exclude or limit the application of the consumer guarantees set out in the Act or any other equivalent or corresponding legislation in the relevant jurisdiction where to do so would:(i) contravene the law of the relevant jurisdiction; or (ii) cause any part of the Warranty to be void.(c) ILVE excludes indirect or consequential loss of any kind (including, without limitation, loss of use of the ILVE product) and (other than expressly provided for in these terms and conditions) subject to all terms,conditions and warranties implied by custom, the general law, the Act or other statute.(d) The liability of ILVE to you for a breach of any express or non-excludable implied term, condition or warranty is limited at the option of ILVE to:
(i) replacing or repairing the defective part of the ILVE product;(ii) paying the cost of replacing or repairing the defective part of the ILVE product;(iii) replacing the ILVE product; or(iv) paying the cost of replacing the ILVE product.(e) Our goods come with guarantees that cannot be excluded under the Australian Consumer Law. You are entitled to a replacement or refund for a major failure and for compensation for any other reasonably foreseeable loss or damage. You are also entitled to have the goods repaired or replaced if the goods fail to be of acceptable quality and the failure does not amount to a major failure.
8. DefectsAny part of an ILVE product deemed to be defective and replaced by ILVE is the property of ILVE. ILVE reserves the right to inspect and test ILVE products in order to determine the extent of any defect and the validity of a claim under the Warranty.
*For your closest ILVE authorised service agent go to https://support.eurolinx.com.au/#/map/retailers
All warranty service calls must be booked through ILVE’s Customer Care Centre on [email protected] or 1300 85 64 11 option 1
01072021
6ILVE Operating Manual
Please complete and send to ILVE at: REPLY PAID 83617 LEICHHARDT NSW 2040
Last Name: First Name:
Address:
State: Postcode: Email:
Home Phone: Mobile:
Purchase Date: / / (Please attach proof of purchase to validate warranty)
MODEL NUMBER SERIAL NUMBER (if you cannot locate the serial number please call ILVE on 1300 85 64 11)
1
2
3
4
WARRANTY REGISTRATION CARD01072021
01072021
Warranty Card tear off
WARRANTY

P: 1300 694 583 E: [email protected] W: eurolinx.com.au
NATIONAL SERVICE CENTRE
Our high quality appliances are designed and manufactured to give you many years of cooking pleasure.
Should you have any questions or issues with your appliance please email our national service centre
[email protected] or phone us on 1300 85 64 11.
Our experienced staff are on hand to log your service request and ensure any matter is attended to promptly.
For after sales enquiries please contact us at [email protected] or 1.300 85 64 11 option 1
For spare parts contact us at [email protected] or 1.300 85 64 11 option 2
Technical support is available to authorised and licensed service providers only by contacting us at
[email protected] Allother technical enquiories should be directed to [email protected]
10/55 Howe StOsborne Park, WA
1/42 Cavendish Rd Coorparoo, QLD
48-50 Moore St Leichhardt, NSW
LUXURY KITCHEN APPLIANCES
