instruction manual dvd-5100 dvd playercncms.com.au/sanyo-ims/consumer-electronics/dvd5100_im.pdf ·...
TRANSCRIPT

INSTRUCTION MANUAL DVD-5100
DVD Player
TM
# ~coxll ~ryi
[DIGITAL VIDEOI DIGITAL AUDIO
VIDEOCD
m.4 IXIIEEI
DIGITALUUT’” DIGITAL
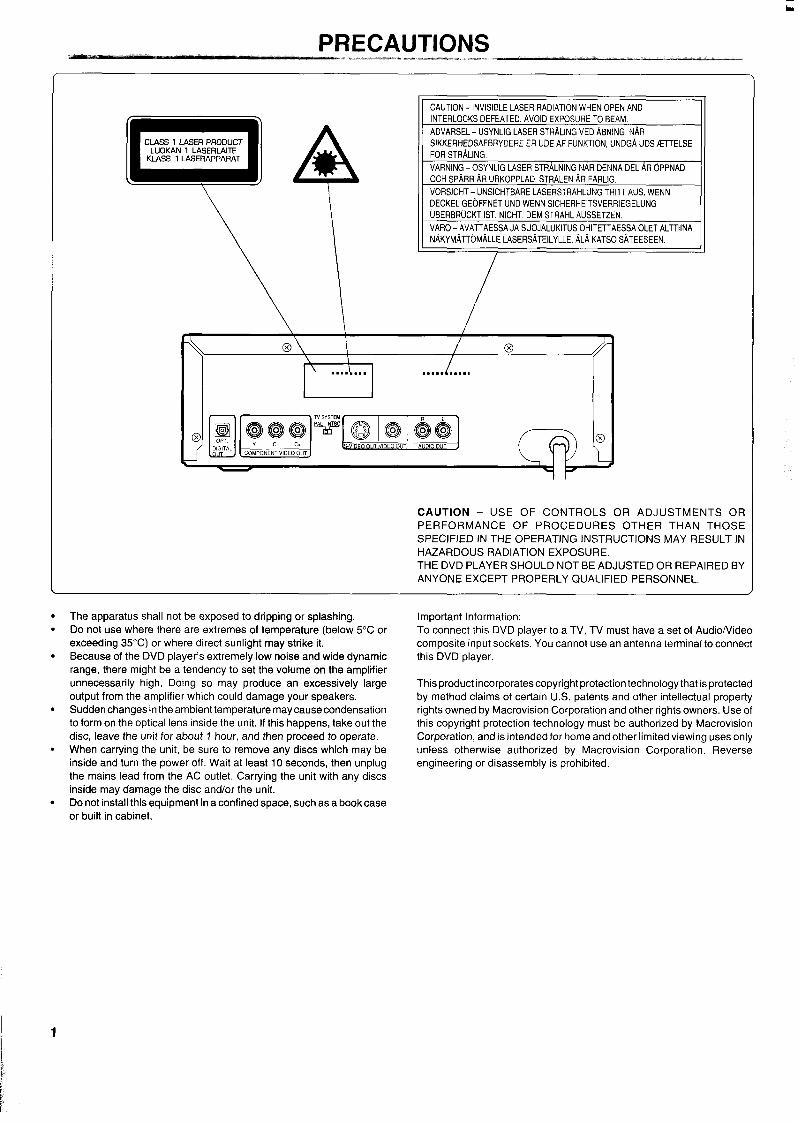
PRECAUTIONS— .,s.,”..-..—.,—,——.—...
I CAUTION- INVISIBLELASERRADIATIONWHENOPENAND
~
INTERLOCKSDEFEATED,AVOIDEXPOSURETOBEAM,ADVARSEL- USYNLIGLASERSTR~LINGVED~BNING,N~RSIKKERHEDSAFBRYDEREERUDEAFFUNKTIONUNDG~UDSKITELSE
VARNING- OSYNLIGLASERSTR~LNINGNARDENNADELAROPPNAD
-
OCHSPARRARURKOPPLAD.STR~LENARFARLIG,VORSICHT- UNSICHTBARELASERSTRAHLUNGTRITTAUS,WENNDECKELGEOFFNETUNDWENNSICHERHEITSVERRIEGELUNGUBERBRUCKT1ST.NICHT,DEMSTRAHLAUSSETZEN,VARO- AVATTAESSAJASUOJALUKITUSOHITETTAESSAOLETALTTIINANAKYMATTOMALLELASERSATEILYLLE.ALAKATSOSATEESEEN.
\\”/1[
b
@ I / @\ ....... ..........
CAUTION - USE OF CONTROLS OR ADJUSTMENTS ORPERFORMANCE OF PROCEDURES OTHER THAN THOSE
SPECIFIED IN THE OPERATING INSTRUCTIONS MAY RESULT INHAZARDOUS RADIATION EXPOSURE,THEDVDPLAYER SHOULDNOTBE ADJUSTEDOR REPAIRED BY
ANYONE EXCEPT PROPERLY QUALIFIED PERSONNEL,
● Theapparatus shall not beexposed todtipping orsplashing, Important Information:. Do not use where there are extremes of temperature (below 50C or To connect this DVD plaver to a TV, TV must have a set of Audio/Video
exceeding 35”C) or where direct sunlight may strike it.’● Because of the DVDplayer's extremely lownoise andwide dynamic
range, there might be a tendency to set the volume on the amplifier
unnecessarily high. Doing so may produce an excessively large
output from the amplifier which could damage your speakers.● Sudden changes intheambienttemperature maycausecondensation
to form on the optical lens inside the unit, If this happens, take out the
disc, leave theunitforaboutl hour, andthen proceed cooperate,● When carying theunit, besureto remove anydiscs which maybe
inside and turn the power off. Wait at least 10 seconds, then unplug
themains lead from the AC outlet. Carry ingtheunit with any discsinside may damage the disc and/or the unit.
● Donotinstall thisequipment inaconfined space, suchasabookcase
or built in cabinet.
.composite input sockets. You cannot use an antenna terminal to connectthis DVD player.
This product incorporates copyright protection technology that is protected
by method claims of certain U.S. patents and other intellectual propertyrights owned by Macrovision Corporation and other rights owners. Use of
this copyright protection technology must be authorized by Macrovision
Corporation, and is intended for home and other limited viewing uses onlyunless otherwise authorized by Macrovision Corporation. Reverse
engineering or disassembly is prohibited.
1

CONTROLS
Front panel
2 34
1
5
6
10 9 8 7
1. Power button/Standby indicator (WON, STANDBY) 6. Skip/NextlPrevious buttons (!4+ ➤N)2. Disc tray 7. Open/Close button (OPEN/CLOSE)
3. Play button/indicator (PLAY) 8. Display4. Pause/Step button (PAUSE/STEP) 9. Headphones volume control (PHONE LEVEL)
5. Stop button (STOP) 10. Headphones socket (PHONES)
Display
1.2.
3.4.
5.
6.7.
8.
14 13
Last memory indicator (LAST MEMO)Playback control indicator for Video CD (PBC)
Programme indicator (PROGRAM)
Title indicator (TITLE)
Chapter~rack indicator (CHP~RK)Angle indicator (ANGLE)
Dolbv Diaital indicator (DOLBY DIGITAL)DTS”indi;ator (DTS)
12 1“1 10
Rear panel
1 2 3456
9. PCM 96kHz sampling frequency indicator (96kHz)10. Elapsed and Remaining playing time indicator
11. Chapter and Track number indicator12. Title number indicator
13. Pause indicator (II)
14. Play indicator (F)
15. Repeat mode indicators (REPEAT, ALL,l, A-B)
1. Optical digital output socket (DIGITAL OUT) 4. S-Video output socket (S-VIDEO OUT)
2. Component video output sockets (COMPONENT VIDEO OUT) 5. Video output socket (VIDEO OUT)
3. TV system select switch (TV SYSTEM) 6. Audio output sockets (AUDIO OUT)
2
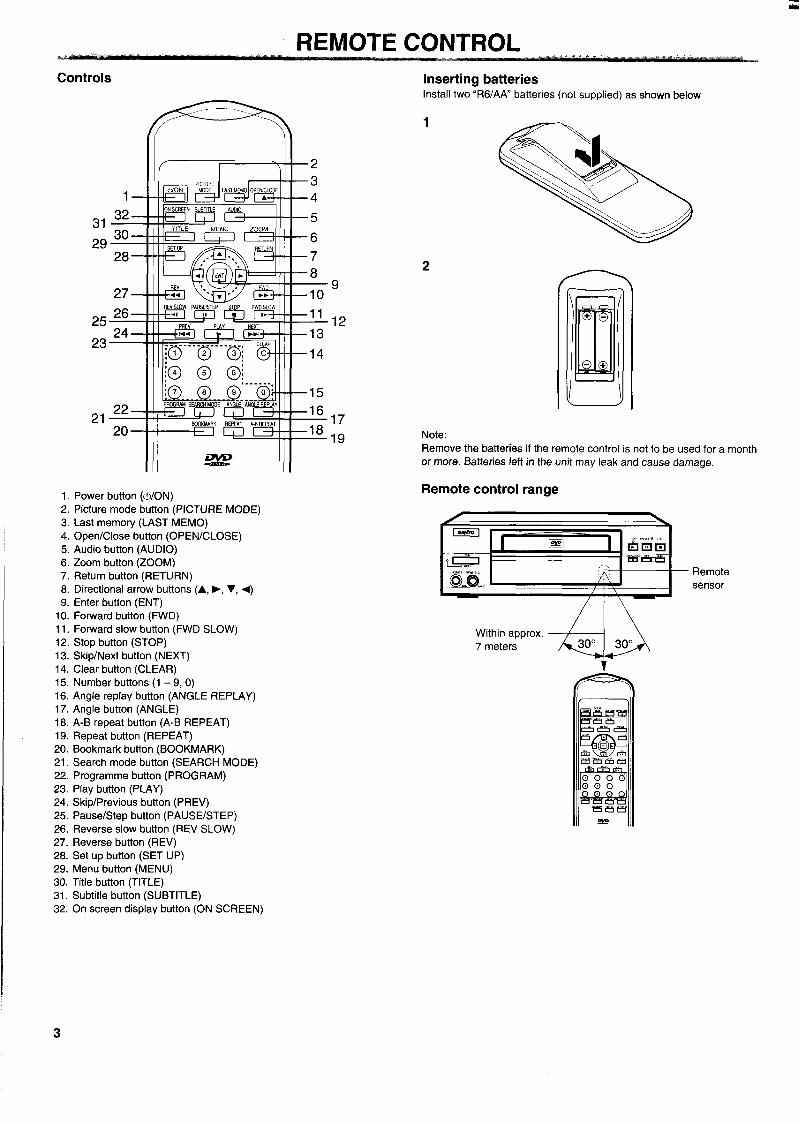
REMOTE CONTROL..Controls
31
29
25
23
21
34
5
6
7
+% ‘;‘i.......
:7 8 9 o’ 15
22P W SEARCHM C+ Al LE ANGLEREFi4Y
16,7
20WOKKARK REPE4T A.SREPEAT
18 ,9
Ill Ill1. Power button (dYON)
2. Picture mode button (PICTURE MODE)3. Last memory (LAST MEMO)4. Open/Close button (OPEN/CLOSE)
5. Audio button (AUDIO)
6. Zoom button (ZOOM)7. Return button (RETURN)
8. Directional arrow buttons (A, F, Y, +9. Enter button (ENT)
10. Forward button (FWD)
11. Fotward slow button (FWD SLOW)12, Stop button (STOP)
13. Skip/Next button (NEXT)
14. Clear button (CLEAR)
15. Number buttons (1 – 9, O)
16. Angle replay button (ANGLE REPLAY)17. Angle butlon (ANGLE)
18, A-B repeat button (A-B REPEAT)
19. Repeat button (REPEAT)
20. Bookmark button (BOOKMARK)21. Search mode button (SEARCH MODE)
22, Programme button (PROGRAM)
23. Play button (PLAY)24. Skip/Previous button (PREV)
25. Pause/Step button (PAUSE/STEP)
26. Reverse slow button (REV SLOW)
27. Reverse button (REV)
28. Set up button (SET UP)29. Menu button (MENU)
30. Title button (TITLE)
31. Subtitle button (SUBTITLE)
32. On screen display button (ON SCREEN)
Inserting batteriesInstall two “R6/AA batteries (not supplied) as shown below
1
2
Note:
Remove the batteries if the remote control is not to be used for a month
or more. Batteries left in the unit may leak and cause damage,
Remote control range
Within approx.
7 meters
3
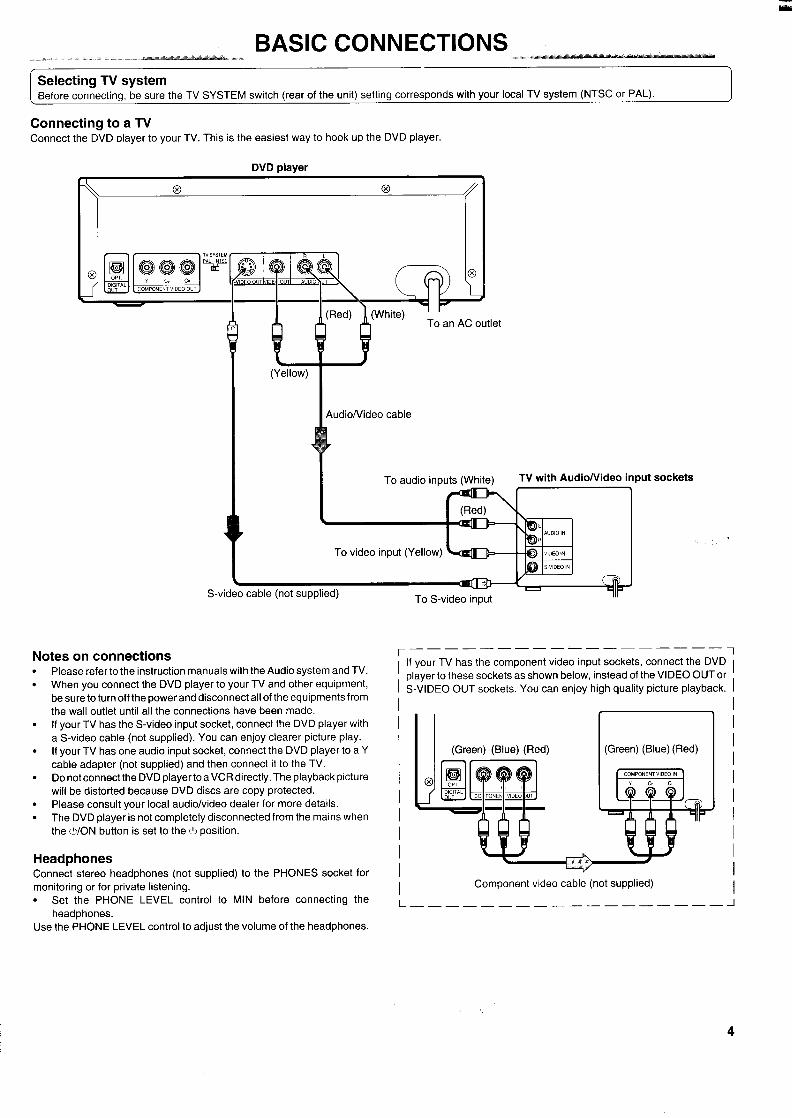
BASIC CONNECTIONS.,.,...Selecting TV systemBefore connecting, be sure the TV SYSTEM switch (rear of the unit) setting corresponds with your local TV system (NTSC or PAL). )
Connecting to a TVConnect the DVD cdayer to your TV. This is the easiest way to hook LIDthe DVD player.
DVD player
@ @
: QQNsysTEMQ\ ~ [•@@@~f3m@
-1’1” -
—.
(Red) (White)n To an AC outlet
(Yellow)
Audio/Video cable
To audio irmuts (White) TV with AudioNideo input sockets,.,
Notes on connections. Please refer to the instruction manuals with the Audio system and TV.
● When you connect the DVD player to your TV and other equipment,
be sure to turn off the power and disconnect all of the equipments from
the wall outlet until all the connections have been made.. If your TV has the S-video input socket, connect the DVD player with
a S-video cable (not supplied). You can enjoy clearer picture play.. If your TV has one audio input socket, connect the DVD player to a Y
cable adapter (not supplied) and then connect it to the TV.
● Do not connect the DVD player to aVCR directly. The playback picturewill be distorted because DVD discs are copy protected.
● Please consult your local audio/video dealer for more details.
● The DVD player is not completely disconnected from the mains when
the WON button is set to the u position.
HeadphonesConnect stereo headphones (not supplied) to the PHONES socket formonitoring or for private listening.
● Set the PHONE LEVEL control to MIN before connecting theheadphones.
Use the PHONE LEVEL control to adjust the volume of the headphones.
~——————————— –1 If your TV has the component video input sockets, connect the DVD
player to these sockets as shown below, instead of the VIDEO OUT orI S-VIDEO OUT sockets. You can enjoy high quality picture playback.
L—
(
(Green) (Blue) (Red) (Green) (Blue) (Red)
‘@L-Component video cable (not supplied) I
— — — — — — — —— —— —— —— —— -1
/,
4
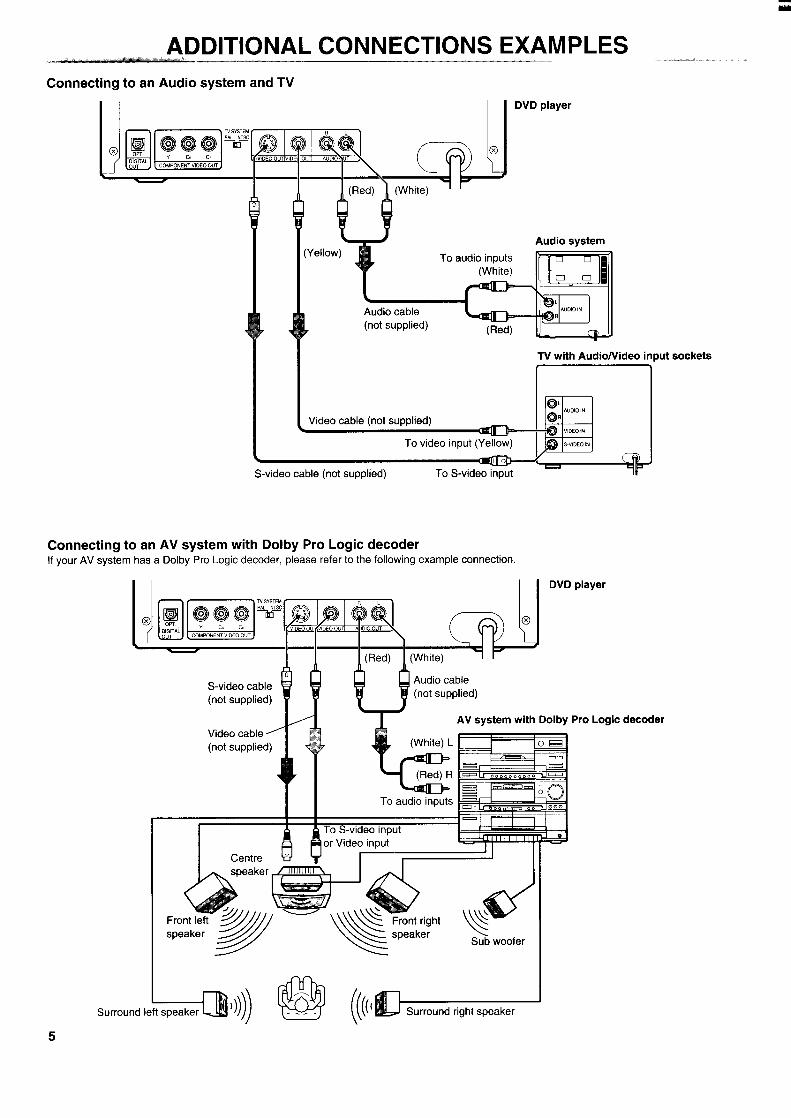
ADDITIONAL CONNECTIONS EXAMPLES ....“..,.,AConnecting to an Audio system and TV
lJ!-‘mm”II
vi’
DVD player
Audio system‘ellow) To audio inputs > u
7
(White)On : II
\
Audio cable
(not supplied) (Red)
TV with Audio/Video i!
I
—H@,,UDIO,N
Video cable (not supplied)
To video input (Yellow) I izz;N
S-video cable (not supplied) To S-video input~~
Connecting to an AV system with Dolby Pro Logic decoderIf your AV system has a Dolby Pro Logic decoder, please refer to the following example connection.
S-video cable(not supplied)
Video cable -’
(not supplied)
I Centre
Surroundleft-~)))))
DVD player
put sockets
H) Audio cable
(not supplied)
T AV system with Dolby Pro Logic decoder
k &~(White) L OR
m.—
(Red) R ‘== . . .. 0...0 =
~!:To audio inputs ~ooo” X
ro S-video input1[ 1- 0
)r Video input I~“’’’”
r
@ ((((-5
bw
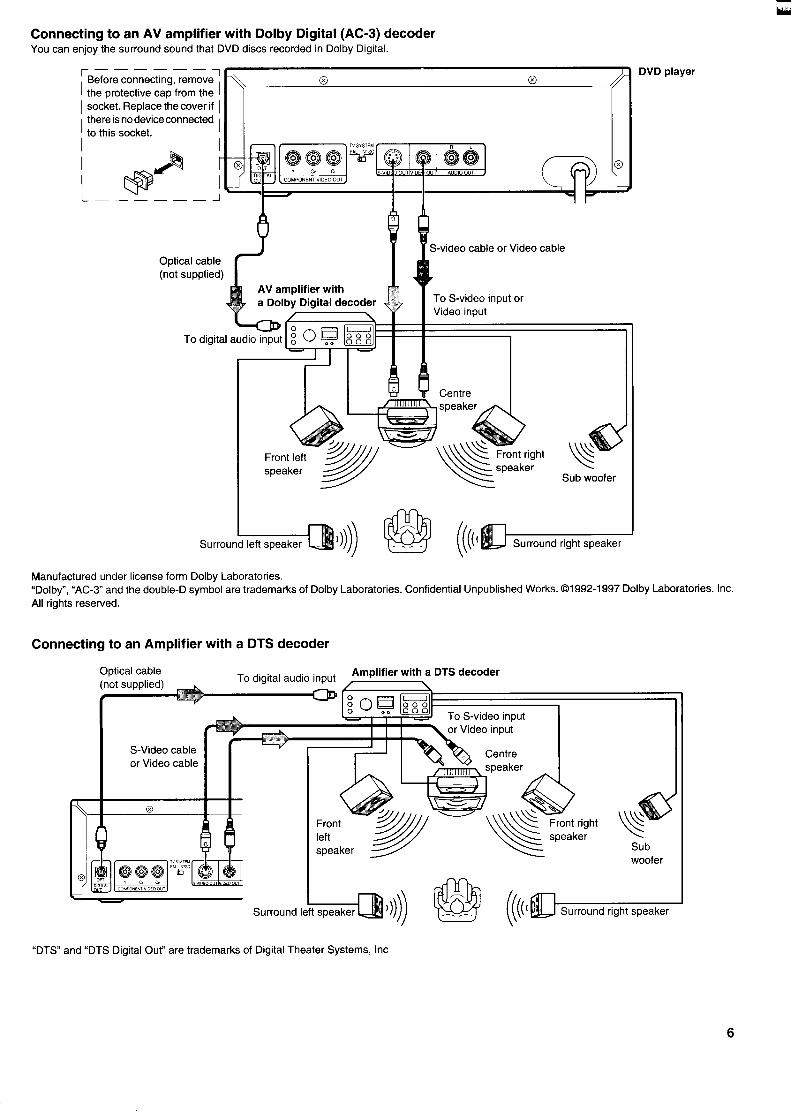
Connecting to an AV amplifier with Dolby Digital (AC-3) decoderYou can enjoy the surround sound that DVD discs recorded in Dolby Digital.
~————_Before connecting, rem;vel @
DVD player
I the protective cap from the I ~@
I socket. Replace thecoverif I
! ;y::::c~pconnected I
L_
#h@—————
Optical ca(not suppl
To di
s
Manufactured under license form Dolby Laboratories.“Dolby”, “AC-3 and the double-D symbol are trademarks of Dolby Laboratories. Confidential Unpublished Works. 01992-1997 Dolby Laboratories. Inc.
All rights reserved.
Connecting to an Amplifier with a DTS decoder
To digital audio inputAmplifier with a DTS decoderOptical cable
9~–\—
or Video input-,,:,.,.,, I I---%”
1A
h’JjyZ’FF]”m
Surround II
auDwoofer
-D1’)))) @ (((dDSurround right speaker
“DTS” and “DTS Digital Out” are trademarks of Digital Theater Systems, Inc
6

Connecting to a Digital amplifierYou can enjoy 2 Channel Digital stereo sound
AmDlifier with an o~tical diaital input
Optical cable
(not supplied)
❑ 00
To digital audio input =3--:000:==0
=:===:=== ❑==:==
To S-video input
S-Video cable
or Video cable
Front left
speaker
u,,,?!!!3!!?——
7

PLAYABLE DISCS . ..-.. .The following types of discs can be played on this unit.
Disc type and logo markRecorded
Disc size Maximum playing timecontent
12cmApprox, 4 hours (Single sided disc)
=
Audio Approx. 8 hours (Double sided disc)
DVD Video +
,. Video8 cm
Approx. 80 minutes (Single sided disc)
Approx. 160 minutes (Double sided disc)
~~~fi @,Audio 12cm 74 minutes
Video CD
[DIGITALVIDEOI VIDEOCD Video(Version 2.0)
8 cm 20 minutes
~THfi 12cm 74 minutes
Music CD Audio
DIGITAL AUDIO 8 cm 20 minutes
Region number DVD disc
Region number (Regional restriction code) is built-in to the DVD player DVD discs are divided into titles, and the titles are sub-divided into
and DVD discs. chapters.
There is a region number on the rear of the unit.
The same region number or region number “ALL” of DVD discs can beDVD disc
used on this unit. 0 Title 1 Title 2 -
DVD disc Chapter 1 Chapter 2 Chapter 1 Chapter 2 Chapter 3There are the marks on some DVD disc package.
Examples:
0))
m
B
m
@
Note:
Video CD/Music CD disc
Multiple Languages Video CD and Music CD discs are divided into tracks.
Multi-language subtitles Video CD/Music CD disc
Multi-Angle Track 1 Track 2 Track 3 Track 4 Track 5
Multi-Aspect
Notes on handling discsRegion number ● Do not expose the disc to direct sunlight, high humidity or high
temperatures for extended periods of time.
● Only the above types of discs can be played on this unit.● Discs should be returned to their cases after use.. Do not apply paper or write anything on the disc surface.
DVD-ROM, CD-ROM, CD-R, SVCD, CVD, etc. cannot be played. . Handle the disc by its edge. Do not touch the playing surface (glossy● This unit is to be used exclusively with the NTSC or PAL colour side).
system. SECAM system discs cannot be used with this unit. . Fingerprints and dust should be carefully wiped off the playing surface
of the disc with a soft cloth.Wipe in a straight motion from the centre to the outside of the disc.
● Never use chemicals such as record cleaning sprays, antistatic
sprays or fluids, benzene or thinner to clean discs.
8
BASIC OPERATION
Important note:● This instruction manual explains the basic instruction of this
DVD playar using the remote control unit.
● Some DVD or Video CD discs have different functions that may not
be explained in this instruction manual. You maybe needed extra
instructions. In this case, please follow the instructions displayed
on the TV screen or jacket or case of the disc.. “@” r-my appear on the TV screen during operation. This icon
means that the function is not available on the disc now.
Before starting. Turn on the power (TV, Audio system, AV amplifier, etc.).
● Select the video input source.● Select the olayback picture size according to the aspect ratio of the
TV.
● Select the audio input source.
Basic playNote:. Do not touch the disc tray while it is moving.
● Never place anything except a disc on the disc try. Foreign objects can
damage the unit.
● Do not apply excessive force to the disc tray.. Discs must be placed on the disc tray one at a time.
When operation buttons are pressed, that operation is displayed on the TV
screen. The display turns off after several seconds.
1.
2.
3.
4.
Press the WON button.● The STANDBY indicator turns off.. “SANYO logo appears on the TV screen.. “READING” appears on the display, then “READING” is replaced
by “NO DISC.Press the OPEN/CLOSE button.. “OPEN” appears and the disc tray opens.Note:
To open or close the disc tray, be sure to use the OPEN/CLOSE
button. Do not press the disc tray with your hand.
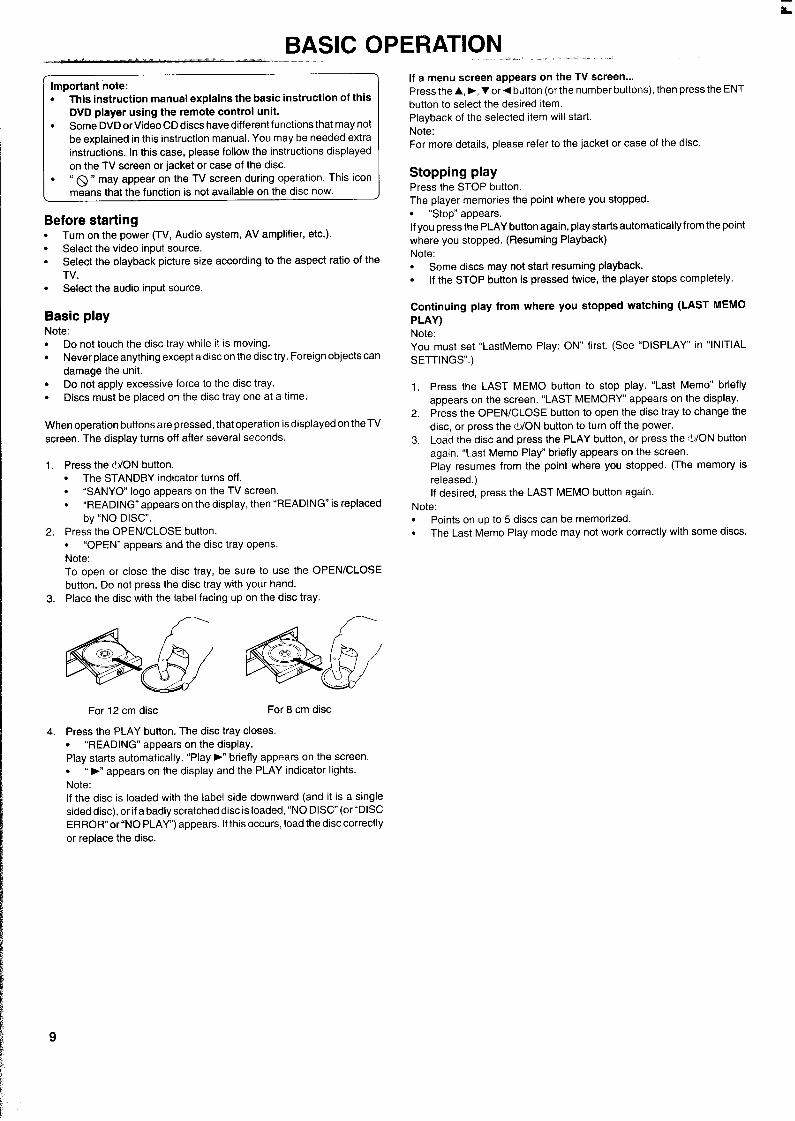
Place the disc with the label facing upon the disc tray.
~
/-
For 12 cm disc For 8 cm disc
Press the PLAY button. The disc tray closes.● “READING” appears on the display.Play starts automatically. “Play ➤“ briefly appears on the screen. ‘rF’ appears on the display and the PLAY indicator lights.
Note:
If the disc is loaded with the label side downward (and it is a single
sided disc), or if a badly scratched disc is loaded, “NO DISC (or’’DlSCERROR” or”NO PLAY”) appears. If this occurs, load the disc correctly
or replace the disc.
.. .... .. . .-.. ,.- . -
If a menu screen appears on the TV screen...Press the A, ➤ ,T or 4 button (or the number buttons), then press the ENT
button to select the desired item.
Playback of the selected item will start.Note:
For more details, please refer to the jacket or case of the disc.
Stopping playPress the STOP button.The player memories the point where you stopped.. “Stop” appears.
If you press the PLAY button again, play starfs automatically from the pointwhere you stopped. (Resuming Playback)Note:● Some discs may not start resuming playback.. If the STOP button is pressed twice, the player stops completely.
Continuing play from whera you stopped watching (LAST MEMOPLAY)Note:
You must set “LastMemo Play: ON” first. (See “DISPLAY” in “INITIAL
SETTINGS.)
1,
2.
3.
Press the LAST MEMO button to stop play. “Last Memo” briefly
appears on the screen. “LAST MEMORY” appears on the display.Press the OPEN/CLOSE button to open the disc tray to change the
disc, or press the ti/ON button to turn off the power.Load the disc and press the PLAY button, or press the WON button
again. “Last Memo Play” briefly appears on the screen.Play resumes from the point where you stopped. (The memory is
released. )If desired, press the LAST MEMO button again.
Note:. Points on up to 5 discs can be memorized.. The Last Memo Play mode may not work correctly with some discs.
9
VARIOUS PLAYING FUNCTIONS..”
Chapter (Track) skip
Skipping forward
Press the NEXT button (or the F>I button on the front panel) during playto skip to the next chapter (or track), “Search” appears on the screen. A
chapter (or track) is skipped each time the button is pressed.
Skipping backPress the PREV button (or the 14+ button on the front panel) during play
to skip back to the beginning of the chapter (or track) currently play.
‘rSearch appears on the screen. Press the button again immediately toskip back to the beginning of the previous chapter (or track).
Title/Chapter (Track) search1.
2.
3.4.
5.
Press the SEARCH M-ODE button once during play or in the stop
mode. “TITLE/CHAPTER SEARCH” or ‘(TRACK SEARCH” screen
appears.Press the number buttons to enter the title (or track) number.
Press the T button.
Press the number buttons to enter the chapter number.
(For Video CD and Music CD, skip this step.)Note:. If you made a mistake, press the CLEAR button.● If you want to exit the “TITLE/CHAPTER SEARCH” or “TRACK
SEARCH” screen, press the SEARCH MODE button twice.Press the ENT button. The selected title and chapter (or track) play
starts.
Time search1. Press the SEARCH MODE button twice during play or in the stop
mode. “TIME SEARCH” screen appears.
2. Press the number buttons to enter the time.
Example:
20 minutes 5 seconds Press 2, 0, 0 and 5.
42 minutes 39 seconds Press 4, 2, 3 and 9.
1 hour 4 minutes 35 seconds Press 1, 0, 4, 3 and 5.
Note:. If you made a mistake, press the CLEAR button.
● If you want to exit the “TIME SEARCH” screen, press the SEARCHMODE button.
3. Press the ENT button. Play starts from the searched time.
Fast playFast forward playPress the FWD button repeatedly to select the fast speed forward play
DVDiVideo CD: “FF1”, ‘rFF2 and “FF3Music CD: ‘(FF1” and “FF2
Press the PLAY button to return to normal play.
Fast reverse play
Press the REV button repeatedly to select the fast speed reverse play.DVD/Video CD: “FR1”, “FR2” and “FR3
Music CD: “FR1” and “FR2
Press the PLAY button to return to normal play.
Slow-motion playForward slow play [DVD], [Video CD]
Press the FWD SLOW button repeatedly to select the forward slow speedplay (3 steps: “SF1”, “SF2 and “SF3).
Press the PLAY button to return to normal play.
Reverse slow play [DVD]
Press the REV SLOW button repeatedly to select the reverse slow speedplay (3 steps: “SR1”, “SR2 and “SR3).
Press the PLAY button to return to normal play.
Note:
The sound is muted during fast play or slow-motion play.
Still picture (Pause)[DVD], [Video CD]: Still picture mode, [CD]: Pause mode
Press the PAUSE/STEP button during play. “ II” appears and the PLAY
indicator blinks. “Pause II” appears on the TV screen.Press the PLAY button to return to normal play.
Note: The sound is muted.
Frame by frame advance play [DVDI, [Video CDI
Press the PAUSE/STEP button during still play. “StepllW’ appears on the
screen.
Each time the button is pressed, the picture advances one frame.Press the PLAY button to return to normal play.
Note:● The sound is muted.. Frame play is operated forward only.
Zoom feature [Dvq
m“biz!!ii1. Press the ZOOM button during normal play or still play.
The player magnifies the image (2 times) in the centre of the picture.
2. Press the A, T, <or ➤ button to change the zoom point.
3. To return to normal play or still play, press the ZOOM button again.Note:
Some discs may not work Zoom feature.
Viewing from a desired camera angle (Multi-Angle)Some DVD discs may contain scenes which have been shot simultaneously
from a number of different camera angles.
The jacket or case of discs that are recorded with angles will be marked.
Example:
& 3Note:The recorded angles differ depending on the disc used.
1. Play the disc that is recorded with angles.
2, Press the ANGLE button repeatedly until the desired angle smears.Example:
Angle
03
10

Angle replayDuring Multi-angle play screen, press the ANGLE REPLAY button.
The player skips back to last approximately 10 seconds, changes it to the
next camera angle and plays it, and continues play.
If desired, press the button again.
Normal repeat playPress the REPEAT button during play (or programmed play) of the title or
chapter (or track) you want to repeat.Each time the button is pressed. the reoeat mode will be changed asfollows.
[DVD]
All Repeat: Repeat all titlesTitle Repeat: Repeat of title being played
Chapter Repeat: Repeat of chapter being played(Program Repeat: Repeat programmed play)
Clear Normal play mode
[Video CD], [CD]
All Repeat: Repeat all tracks
Repeat 1: Repeat of track being played
(Program Repeat: Repeat programmed play)
Clea~ Normal play mode
Note:
When “All Repeat” appears on the TV screen, “REPEAT ALL” appears on
the display. But, “REPEAT 1” appears on the display in all other repeatmodes.
Designated range repeat play (A-B Repeat)
, , 1 [ 1
1.
2.
3.
Press the A-B REPEAT button during play at the beginning of the
section you want to repeat (Point A). “Repeat A-” briefly appears on
the screen. “REPEAT A-B” blinks on the display.Press the A-B REPEAT button during play at the end of the section you
want to repeat (Point B). “Repeat A-B briefly appears on the screen.
“REPEAT A-B remains lit.
The section between points A and B is played repeatedly.Note:
For Video CD, wait 2 seconds at least before pressing the button.
To return to normal play, press the A-B REPEAT button again, “Clea~
briefly appears on the screen.
Note:
Normal repeat play or A-B repeat play mode may not work correctly with
some discs.
Return button (RETURN) for Video CDNormally, it returns to the previous menu during play when the RE-
button is pressed.Note:
The operation differs according to the content of the Video CD.
Programmed playUp to 32 selections can be programmed
Programming procedure1. Press the PROGRAM button during play or stop mode. “PROGRAM”
2,
3.4.
5.
screen appears. “PROGRAM” blinks and “Pr 1“ appears on the
display.Press the A, 7, <or ➤ button to select the title, chapter or track.
Press the ENT button.
Repeat steps 2-3 above to select another title, chapter or track
Example:
ALL CLEAR
No. : T, C
B
TITLE
i
CHAPTER
1: 2, 9 >- ALL
2: 1 1
3: 2 2
4: 3 3
5: 4 4
6: 5
7: 6
8: 7
9: 8
1,0 : 9
Programme number
Note:. If you made a mistake, press the CLEAR button.. If you want to exit the “PROGRAM screen, press the PROGRAM
button.Press the PLAY button to start play. “PROGRAM” remains lit.
When all programmed selections have been played, the player stops
automatically.● The programme contents are retained in memory.
To clear the programme one by one
Press the A, Y, <or ➤ button to select the programme number. Then
press the CLEAR button.
To clear all the programmed
Press the A, Y, 4 or> button to select “ALL CLEAR”. Then press the ENT
button.
Storing bookmarks in memory to be viewed (listenedto) againStoring a Bookmark in the player’s memory is similar to marking your pagein a book. You can quickly return to any point on the disc.
Note:
Some discs may not work Bookmark function.
Storing a bookmark in the mamory
Up to 5 points can be memorized for each 5 discs.
1. Press the BOOKMARK button during play. “BOOKMARK screen
URN appears.
Example:No: T. C
1:NONE
2:NONE
3:NONE4:NONE
5:NONE
2. Press the A or 7 button to select the bookmark number.
11

3. Press the ENT button at the starting point to be viewed (listened to)again.
Example:
No: T, C
l: ENTRY 1,6
2: NONE
3: NONE4:NONE
5: NONE
Note:
● If you made a mistake, press the CLEAR button.● If you want to exit the “BOOKMARK screen, press the BOOKMARK
button.
Recalling a bookmark1. Press the BOOKMARK button during play.
2. Press the A or~ button to select the bookmark number to be recalled.
3. Press the PLAY button. Play resumes from the point corresponding tothe selected bookmark,
Clearing a bookmark1. Press the BOOKMARK button,
2. Press the A or T button to select the bookmark number to be cleared
3. Press the CLEAR button.
Selecting a title menu
1. Press the TITLE button. A list of the titles on the disc appears.
Note:
Press the TITLE button again to resume play from the scene when theTITLE button was first pressed.
2. Press the A, T, <or ➤ button (or the number buttons) to select the
desired title.
3. Press the ENT button. The selected title play starts.
Selecting a DVD menu1.
2.
3.
Press t;e MENU button. The main menu screen appears.
Note:
Press the MENU button again to resume play.Press the A, V, <or ➤ button (or the number buttons) to select the
desired menu.
Press the ENT button. The selected menu play starts.
Note:● The selecting a title or DVD menu operation may differ depending on
the disc used.
● Selecting a title or DVD may not be possible on some discs.
Selecting subtitle languageThis operation works only with discs on which multiple subtitle languages
are recorded.
1. Press the SUBTITLE button during play. “SUBTITLE MODE screenappears.
2. Press the A, T, < or> button to select the desired subtitle language
3. Press the ENT button.
Note:. In some cases, the subtitle language is not changed to the selected
one.● When a disc supporting the closed caption is played, the subtitle and
the closed caption may overlap each other on the TV screen. In this
case, turn the subtitle off.● When the desired language is not selected even if the button is
pressed, the language is not available on the disc.● When the power is turned on or the player is stopped completely or the
disc is replaced, select the subtitle language again.. If “OTHERS is selected, enter the language code. (See ‘(LANGUAGE
CODE LIST”.). If the subtitle language is not necessary, select “NO.
Selecting audio soundtrack language (Multi-Language)This operation works only with discs on which multiple audio soundtrack
languages are recorded.
o 00
1.
2.
Hello! Hola! iHola!
Press the AUDIO button during play.
Press the AUDIO button repeatedly until the desired language appears
on the screen.
Example:Language Change
02 French
Note:
● When the desired language is not selected even if the button ispressed, the language is not available on the disc.
● When the power is turned on or the player is stopped completely or the
disc is replaced, select the language again.. If the language is not recorded on the disc, only the available language
on the disc will be heard.● If “OTHERS is selected, enter the language code. (See “LANGUAGE
CODE LIST”.)
Selecting picture modePress the PICTURE MODE button. “PICTURE MODE briefly appears.
Each time the button is pressed, the picture mode is changed as shown:
PICTURE MODE
Cinema — Animation — Sports — Black and White — Standard— Cinema — .,.
Selecting display modePress the ON SCREEN button to show the disc information (Title,
Chapter, Title pass time, Language, etc.).
Example:DVD
TITLE: 01 Title pass time
CHAPTER: 04 Chapter pass time
AUDIO: English
Dolby Digital 5.1 ch
SUBTITLE: EnglishANGLE: 1
Play ➤
00:05:4500:00:51
DVD Play E
TITLE: 01 Title remain time 00:56:07
CHAPTER: 14 Chapter remain time 00:00:37
AUDIO: English
Dolby Digital 5.1 ch
SUBTITLE: OthersANGLE: 1
12

I
INITIAL SETTINGS.,.-.Once the initial settings have been completed, the player can always be operated under the same conditions.The settings will be retained in the memory until they are changed, even if the power is turned off.
Common procedures of initial settings1. Press the SETUP button in the stop mode. “SETUP MENU (LANGUAGE, DISPLAY, AUDIO and PARENTAL)” screen appears on the TV screen.
2. Press the A, Y, 4 or ➤ button, then press the ENT button to select the menu. Please follow these on the screen
3, Press the SET UP button
Example: Note:- You cannot switch audio sound track Ianguaaes if there is onlY one
LANGUAGE OSD: ENGLISH ENGLISH
(Note: The language on OSD is “ENGLISH” only.)
AUDIO: ENGLISH ORIGINAL
language recorded on the disc.. When you play a DVD disc, the player automatically displays the pre-
selected subtitle language if it is included on the disc.. If “OTHERS’ is selected, enter the language code. (See “LANGUAGE
SUBTITLE: ENGLISH
DVD MENU: ORIGINAL
ENGLISH CODE LIST”.)
JAPANESECHINESE
GERMANFRENCH
ITALIAN
SPANISHDUTCH
OTHERS
ORIGINALENGLISH
JAPANESECHINESE
GERMANFRENCH
ITALIAN
SPANISHDUTCH
OTHERS
ORIGINALENGLISH
JAPANESE
CHINESEGERMAN
FRENCHITALIAN
SPANISHDUTCHOTHERS
13

DISPLAY TV TYPE: 4:3 LT 4:3 LT Select the appropriate your TV screen size.
4:3 Ps16:9 4:3 LT (Letterbox):
Select when a conventional TV set is connected.
SCREEN SAVER: ON ON When the wide screen disc is played back, the
OFF black bands appear at the top and bottom ofscreen.
LastMemo Play: ON ON
OFF 4:3 PS (Panscan):
Select when a conventional TV set is connected.When the wide screen disc is played back, it
displays pictures cropped to fill to yourTV screen.The left and right edges are cut off.
16:9:
Select when a wide screen TV set is connectedPlayed in “FULL” size. (Setting the wide screen
TV to “FULL” mode is also necessary.)
Note:The screen size may differ depending on the
DVD discs.
AUDIO DIGITAL OUT ON ON
(Note: It is “ON only.)
Dolby Digital: 2ch 5.lch2ch
MPEG: PCM MPEG
PCM
DTS: OFF ON
OFF
cut off cut off
Select Dolby Digital “2ch” or “5.1 ch”.
Select PCM or MPEG signal.
Select DTS signal “ON” or “OFF.Note:When using a Digital Amplifier without a DTS decoder, set DTS to “OFF
PARENTAL
Enter password. Enter a number in 4 digits, then
press ENTER.
LEVEL: 5 87
65
4
32
1
OFF
STANDARD: USA USA
CHANGE PASSWORD
Change password. Enter a number in 4 digits, thenpress ENTER.
Parental control
MPAA (Motion Picture Association of America) Guideline is rating system that
provide advance cautionary information to parent about the content of movieprogrammed.
The parental lock level is equivalent to the following MPAA Rating System.
Level 7: NC-17 (No one 17 and under admitted)
Level 6: R (Restricted)
Level 4: PG13 (Parental guidance cautioned)Level 3: PG (Parental guidance suggested)
Level 1: G (General audiences)
Some DVD discs contain a restriction level which enables parents to preventplayback of discs by children. This DVD player is equipped with a ~assword
designed to prevent children changing the level.
You cannot play DVD discs rated higher than the level you selected unless you
cancel the parental lock function.For example, when you select level “5”, the DVD player will not play discs with
ratings of “6, “7” or “8. The information will appear on the TV screen.
If you forget the password . . .Enter “788444 to clear the current password.
Enter a new password and set the parental lock level again.
Note:DVD discs mayor may not respond to the parental lock settings. Make sure this
function works with your DVD discs.
CLEANING THE UNITClean the outside of the unit with a clean soft cloth, moistened with lukewarm water. Do not use benzene, thinner or alcohol since they will mar the finish
of the surfaces.
14
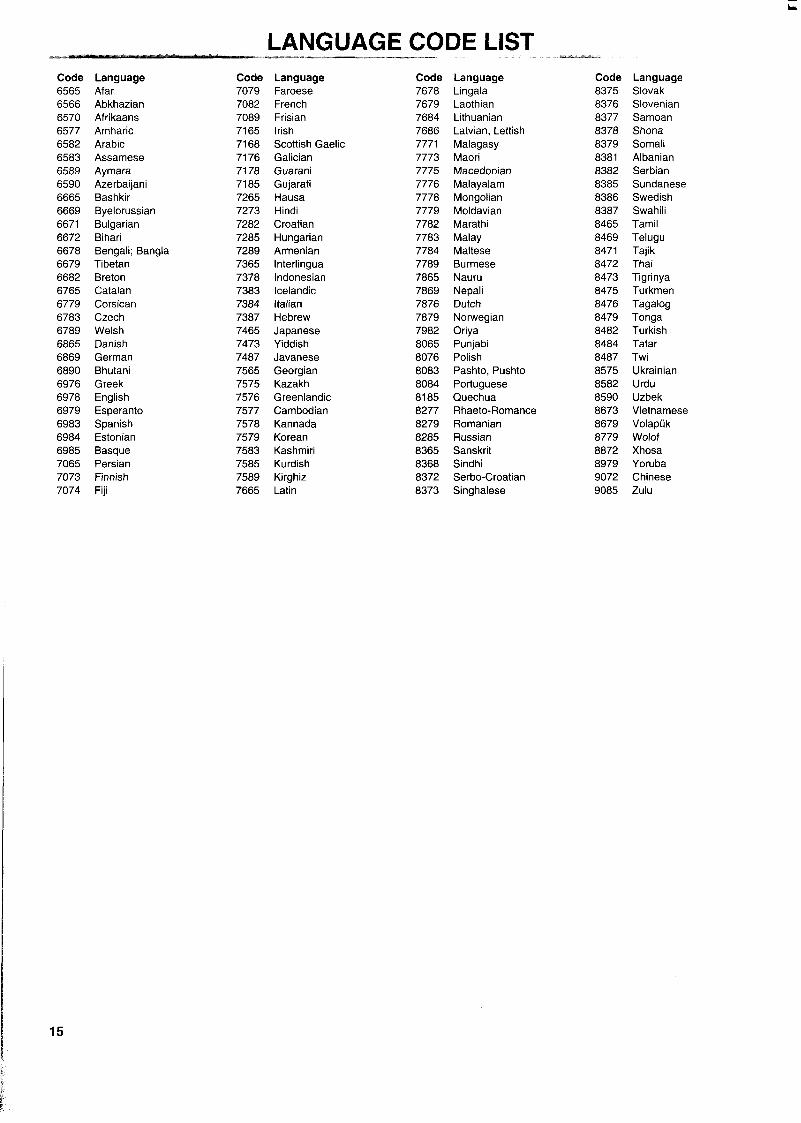
LANGUAGE CODE LIST..—. ..—.Code6565
6566
65706577
6582
6583
65896590
6665
6669
6671
66726678
66796682
6765
6779
67836789
6865
6869
68906976
6978
6979
69836984
69857065
70737074
LanguageAfarAbkhazian
Afrikaans
Amharic
Arabic
Assamese
AymaraAzerbaijaniBashkir
Belorussian
BulgarianBihati
Bengali; BanglaTibetan
Breton
Catalan
Corsican
CzechWelsh
Danish
GermanBhutani
GreekEnglish
Esperanto
SpanishEstonian
BasquePersian
Finnish
Fiji
Code70797082
7089
7165
7168
7176
717871857265
7273
7282
7285
72897365
7378
73837384
7387
74657473
7487
7565
7575
75767577
7578
75797583
7585
7589
7665
LanguageFaroeseFrench
Frisian
Irish
Scottish GaelicGalician
Guarani
GujaratiHausaHindi
CroatianHungarian
ArmenianInterlingua
Indonesian
IcelandicItalian
Hebrew
JapaneseYiddish
Javanese
GeorgianKazakh
Greenlandic
CambodianKannada
Korean
KashmitiKurdish
KirghizLatin
Code76787679
7684
76867771
7773
7775
77767778
7779
7782
7783
77847789
7865
78697876
7879
7982
8065
8076
80838084
8185
82778279
8285
8365
83688372
8373
Language
LingalaLaothian
Lithuanian
Latvian, Lettish
Malagasy
MaoriMacedonia
Malayalam
MongolianMoldavian
Marathi
Malay
MalteseBurmese
Nauru
Nepali
DutchNorwegian
Oriya
PunjabiPolish
Pashto, Pushto
Portuguese
QuechuaRhaeto-Romance
Romanian
Russian
SanskritSindhi
Serbo-CroatianSinghalese
Code
83758376
8377
8378
8379
83818382
8385
83868387
8465
8469
84718472
8473
84758476
8479
8482
84848487
8575
8582
8590
86738679
8779
88728979
9072
Language
SlovakSlovenian
Samoan
Shona
SomaliAlbanian
Serbian
SundaneseSwedishSwahili
Tamil
TeluguTajik
ThaiTlgrinya
TurkmenTagalog
TongaTurkish
Tatar
Twi
Ukrainian
Urdu
UzbekVietnamese
Volapuk
WolofXhosa
YorubaChinese
Zulu
15
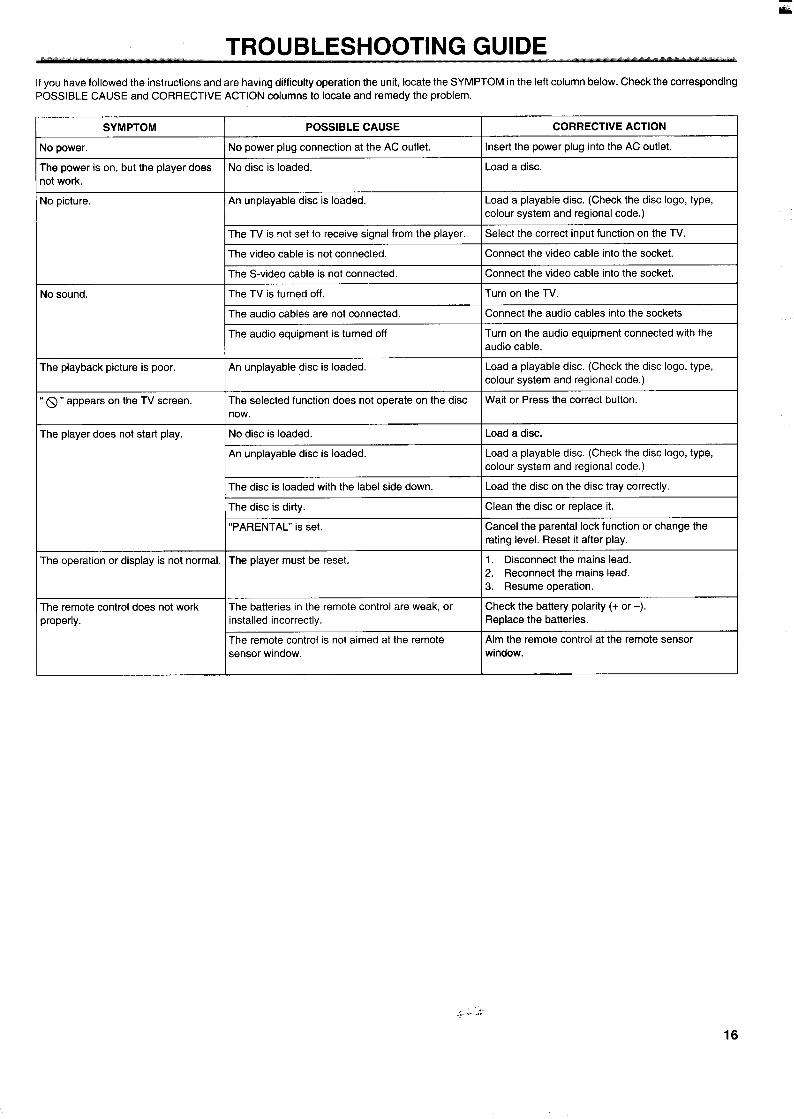
TROUBLESHOOTING GUIDEIf you have followed the instructions and are having difficulty operation the unit, locate the SYMPTOM in the left column below. Check the correspondingPOSSIBLE CAUSE and CORRECTIVE ACTION columns to locate and remedy the problem.
SYMPTOM POSSIBLE CAUSE CORRECTIVE ACTION
No power. No power plug connection at the AC outlet. Insert the power plug into the AC outlet.
The power is on, but the player does No disc is loaded. Load a disc.not work.
No picture. An unplayable disc is loaded. Load a playable disc. (Check the disc logo, type,
colour system and regional code.)
The TV is not set to receive signal from the player. Select the correct input function on the TV.
The video cable is not connected. Connect the video cable into the socket.
The S-video cable is not connected. Connect the video cable into the socket.
No sound. The TV is turned off. Turn on the TV.
The audio cables are not connected. Connect the audio cables into the sockets
The audio equipment is turned off Turn on the audio equipment connected with the
audio cable.
The playback picture is poor. An unplayable disc is loaded. Load a playable disc. (Check the disc logo, type,
colour system and regional code.)
“@” appears on the TV screen. The selected function does not operate on the disc Wait or Press the correct button.
now.
The player does not start play. No disc is loaded. Load a disc.
An unplayable disc is loaded. Load a playable disc. (Check the disc logo, type,colour system and regional code. )
The disc is loaded with the label side down. Load the disc on the disc tray correctly.
The disc is dirty. Clean the disc or replace it.
“PARENTAL” is set. Cancel the parental lock function or change therating level. Reset it after play.
The operation or display is not normal. The player must be reset. 1. Disconnect the mains lead.
2. Reconnect the mains lead.
3. Resume operation.
The remote control does not work The batteries in the remote control are weak, or Check the battery polarity (+ or –).properly. installed incorrectly. Replace the batteries.
The remote control is not aimed at the remote Aim the remote control at the remote sensor
sensor window. window.
I
..fl“. .,”=
16
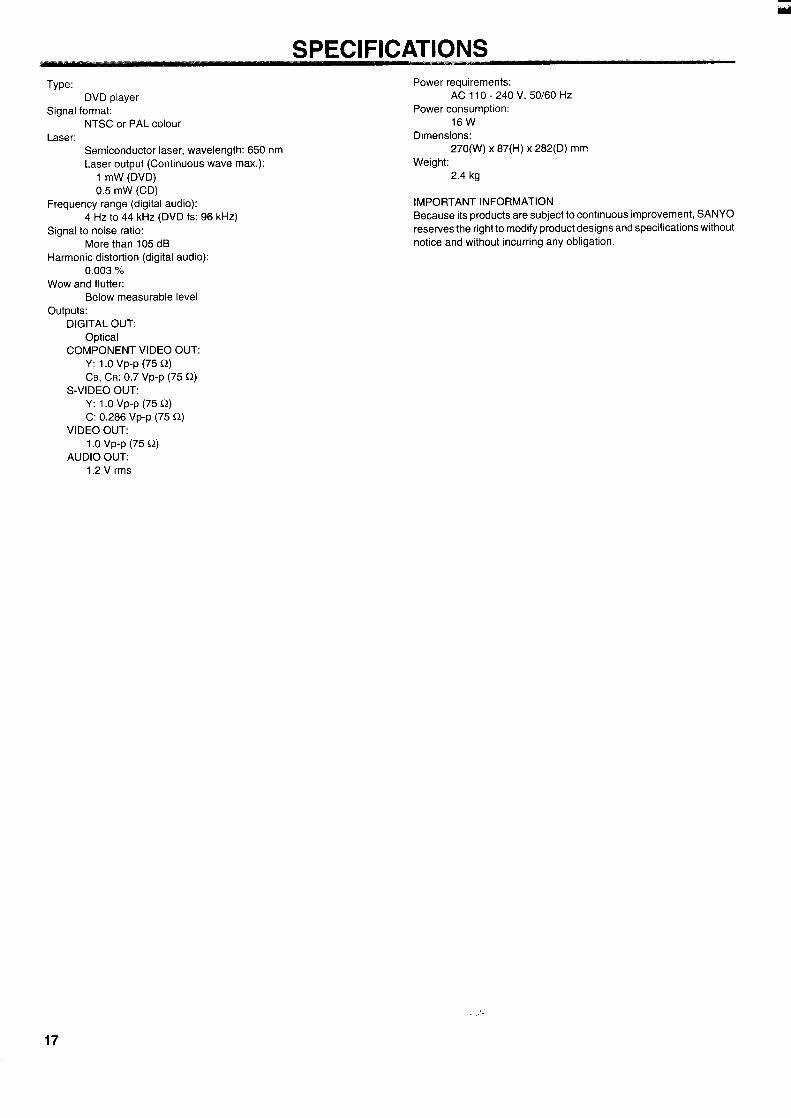
SPECIFICATIONSType:
DVD player
Signal format:NTSC or PAL colour
Laser:Semiconductor laser, wavelength: 650 nm
Laser output (Continuous wave max.):1 mW (DVD)
0.5 mW (CD)Frequency range (digital audio):
4 HZ to 44 kHz (DVD fs: 96 kHz)
Signal to noise ratio:
More than 105 dB
Harmonic distortion (digital audio):0.003 O/o
Wow and flutter:Below measurable level
outputs:DIGITAL OUT:
Optical
COMPONENT VIDEO OUT:Y: 1.0 Vp-p (75 Q)
CS, CR: 0.7 VP-P (75 Q)
S-VIDEO OUT:Y: 1.0 Vp-p (75 Q)
C: 0.286 Vp-p (75 Q)
VIDEO OUT:1.0 Vp-p (75 Q)
AUDIO OUT:1.2 V rms
Power requirements:AC 110-240 V, 50/60 HZ
Power consumption:16W
Dimensions:
270(W) x 87(H) x 282(D) mm
Weight:
2.4 kg
IMPORTANT INFORMATION
Because its products are subject to continuous improvement, SANYO
reserves the right to modify product designs and specifications without
notice and without incurring any obligation.
,..-
17


ii
(AU) 1AD6P1 P0998-DSANYO Electric Co., Ltd.Printed in China