instruction manual easy install diy alarm system · instruction manual easy install diy alarm ......
TRANSCRIPT

GSM INTRUSION ALARM SYSTEM
INSTRUCTION MANUAL
Easy Install DIY Alarm System

Printed in ShenzhenRE: G10-GSM-January-2014
SECURE YOUR HOME AND BUSINESS

Key Features• Easy install wireless alarm system• Quad-band GSM communication, works with SIM card• Four personal emergency phone numbers• One central monitoring station phone number• Alarm notification via phone call or SMS• Zone SMS is editable by user• One installer (admin) code• Three different user codes• Arm/Disarm via SMS/Phone Call• Entry/Exit delay setting• 15 wireless zones• Maximum 8 pieces remote controller or LED/LCD keypads• Maximum 52 pieces wireless sensor• Perimter zone, Interior zone, Fire/Emergency zones• Working with wireless socket and lamp holder• Using remote control to turn on/off remote alarm lamp or socket• Built-in 85dB internal sounder• Equipped with recharegable backup battery• Working with wireless indoor/outdoor sirens• Working with sperate wireless LED/LCD keypad
3

Technical Information• Power supply: AC=100 ~ 230V 50Hz/60Hz• Working voltage: DC12V 1A• Static current: < 30mA (when not in charging) • Alarm current: < 120mA• Backup Battery: 3.7V 800mA• Standby time: Around 24 hours• Charging time: 8 hours• GSM frequency: 850/900/1800/1900MHz• GSM Transmission power: 2W• Receiving and emitting frequency: 433MHz • Wireless transmission distance: ≤100 m (Open space)• Working condition:Temperature: -10ºC ~ 50ºC Humidity:5% ~ 80%
4

Alarm panel View
q Alarm/Arm LED w Reset Button e SIM Card Slotr GSM Signal LED t DC12V Input y Power ON/OFF
5
q w
e
r
t
y
LED Indicationq Alarm/Arm LED: Flashing quickly when alarm is triggered, Flashing in slow speed when system is Armed. Turn off when system is Disarmed.r GSM Signal LED: The LED will blink quickly when system without signal or haven't inserted with SIM card; blink in slow speed (blinking one time per second), when GSM is working.

Sensor Enrollment
6
Enroll Remote ControllersRegister first remote controller into alarm panel, you need send the text message with commands: "1234" + "J" + "00" + "0" to the SIM number of alarm panel. The panel will make "Di" sound, and pressing disarm button in remote controller for two times, you will hear five di sound for successful enrollment.
1234J000
This alarm system allows user to enroll wireless remote controllers and sensors into the alarm panel. Using the SMS commands you can enroll any sensors into specific zones.
Sensor EnrollmentSending the SMS with commands: "1234" + "J" + "00" + "0/1/2/3" to the SIM card number of alarm panel. The alarm panel will make "Di" sound, now you can enroll the new wireless remote controllers or sensor by triggering the sensor or pressing buttons on remote control.
When system make "Di, Di, Di, Di, Di" sound, that indicates enrollment is successful.
Notice: "1234" is the default admin code, "00" is the zone number (00-01 is for remote controler or keypads, 02-15 is for wireless sensors). "0/1/2/3" is the serial number for first sensor, second sensor, third sensor, and forth sensor.
>>>>
Register second remote controller into alarm panel, you need send the text message with commands: "1234" + "J" + "00" + "1" to the SIM number of alarm panel. The panel will make "Di" sound, and pressing disarm button in remote controller for two times, you will hear five di sound for successful enrollment.
1234J001 >>>>

Sensor Enrollment
After system make "Di" sound, if without receiving wireless signal within 30 second, the system will exit programming method automatically.
Delete SensorSending the SMS with commands: "1234" + "J" + "00-15" to the SIM card number of alarm panel. The alarm panel will make "Di, Di" sound for deleteting all sensors in this zone.
For example: Delete remote keyfob from zone 00, you need to send the below SMS:
1234J00 >>>>
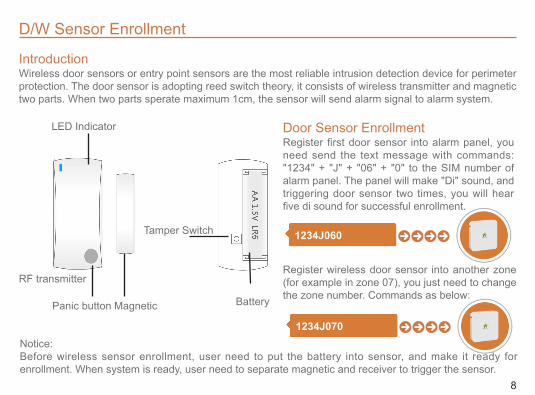
D/W Sensor Enrollment
Door Sensor EnrollmentRegister first door sensor into alarm panel, you need send the text message with commands: "1234" + "J" + "06" + "0" to the SIM number of alarm panel. The panel will make "Di" sound, and triggering door sensor two times, you will hear five di sound for successful enrollment.
8
IntroductionWireless door sensors or entry point sensors are the most reliable intrusion detection device for perimeter protection. The door sensor is adopting reed switch theory, it consists of wireless transmitter and magnetic two parts. When two parts sperate maximum 1cm, the sensor will send alarm signal to alarm system.
LED Indicator
RF transmitter
Panic button Magnetic
Tamper Switch
Battery
1234J060 >>>>
Register wireless door sensor into another zone (for example in zone 07), you just need to change the zone number. Commands as below:
1234J070 >>>>Notice: Before wireless sensor enrollment, user need to put the battery into sensor, and make it ready for enrollment. When system is ready, user need to separate magnetic and receiver to trigger the sensor.

9
How to Install Door Sensor
Installation• Remove the insulating protect on battery.• Mount the transmitter on the door frame and the magnet on the door• Make sure that the magnet is always on the right side of the transmitter.• Make sure that the magnet will not be more than 1 cm from the transmitter.• Attach the transmitter and the magnet with double-sided tape or the screw.• Avoid placing the detector in areas with large-metallic structures or electrical installations such as boiler area or counters
Technical Information• Working voltage: 1.5V LR6• Static current: ≤30 μA• Alarm current: ≤40mA• Emitting frequency: 433MHz • Transmission distance:≤100 m (Open space)• Lifespan of battery: ≤ 12 months
Notice: The door sensor in the package is included with battery. The extra bought wireless door/window sensor may not include with battery.

PIR Sensor Enrollment
10
IntroductionPIR motion sensor is one of common intrusion sensor for intrusion detection. It with advantages of large space protection, lowest energy consumption. It detects infrared energy changes which is caused by movement of human.
q
w
e
1. Wide angle fresnel lens2. Alarm LED Indicator3. Swivel Bracket
Door Sensor EnrollmentRegister first door sensor into alarm panel, you need send the text message with commands: "1234" + "J" + "11" + "0" to the SIM number of alarm panel. The panel will make "Di" sound, and triggering door sensor two times, you will hear five di sound for successful enrollment.
1234J110 >>>>
Register wireless door sensor into another zone (for example in zone12), you just need to change the zone number. Commands as below:
1234J120 >>>>
Notice: Before wireless sensor enrollment, user need to put the battery into sensor, and make it ready for enrollment. When system is ready, user need to press "test" button on the motion sensor.

11
How to Install PIR Sensor
InstallationDue to the wide coverage angle and the swivel bracket, the motion sensor can easily be installed:• Indoor environment only!• Wall mounted on the wall and sensor points to entry point of doors• Wall mounted on corridor to detect movement
Technical Information• Working voltage: 2x1.5V LR6• Static current: ≤50 μA• Alarm current: ≤9.5mA• Detection angle: ≤ 110°• Detection distance: ≤ 12 m• Emitting frequency: 433MHz• Transmission distance:≤100 m (Open space)• Lifespan of battery: ≤ 12 months
Notice: The PIR sensor is indoor usage only, don't install the sensor outside. To avoid false alarm, install it with recommended height and should not view toward windows and other moving objects.

Smoke Sensor Enrollment
Introduction"There's no smoke without fire", Smoke detection is imporant fire detection method. Smoke sensor is widely used fire sensor for fire detection. It allows the security system not only can protect your home from intrusion, but also secure your property with fire detection.
q
w
Door Sensor EnrollmentRegister first door sensor into alarm panel, you need send the text message with commands: "1234" + "J" + "04" + "0" to the SIM number of alarm panel. The panel will make "Di" sound, and press the "Test" button on smoke sensor, you will hear five di sound for successful enrollment.
1234J040 >>>>
Register second smoke sensor into zone (for example in zone 04), you just need to change the group number. Commands as below:
1234J041 >>>>
1. Alarm Indicator2. "Test" button

13
Zone Plan TableItem Zone Name CID Code Partial/Defence line00 Remote Controllers N/A N/A01 Separate Keypads N/A N/A02 Emergency Button E120 24/Emergency03 Gas Sensor E112 24/Emergency04 Smoke/Fire Sensor E111 24/Emergency05 Other Sensor E110 24/Emergency06 Door/Window Sensor E134 Perimeter07 Door/Window Sensor E134 Perimeter08 Door/Window Sensor E134 Perimeter09 Other Sensor E134 Perimeter10 Other Sensor E134 Perimeter11 Motion Sensor E134 Interior12 Motion Sensor E134 Interior13 Motion Sensor E134 Interior14 Other Sensor E134 Interior15 Other Sensor E134 InteriorNotice:24 hours Zone: Panic, duress, and fire sensors should be programmed into these zones. Sensors are working in 24 hours, it's not controllable.Perimeter Zone: Perimeter sensor such as door sensor should be programmed into these zones. They will be active when system is Away Armed and Home Armed.Interior Zone: Interior senosor such as PIR motion sensor should be programmed into these zones. Theywill be active when system is Away Armed, and de-activated when system is Home Armed.
14
Basic Alarm Setting
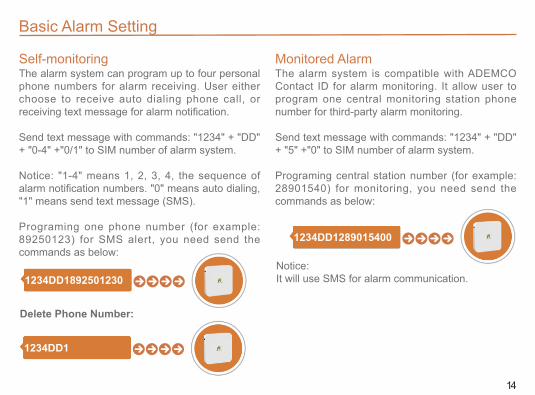
Self-monitoringThe alarm system can program up to four personal phone numbers for alarm receiving. User either choose to receive auto dialing phone call, or receiving text message for alarm notification.
Send text message with commands: "1234" + "DD" + "0-4" +"0/1" to SIM number of alarm system.
Notice: "1-4" means 1, 2, 3, 4, the sequence of alarm notification numbers. "0" means auto dialing, "1" means send text message (SMS).
Programing one phone number (for example: 89250123) for SMS alert, you need send the commands as below:
1234DD1892501230 >>>>
Monitored AlarmThe alarm system is compatible with ADEMCO Contact ID for alarm monitoring. It allow user to program one central monitoring station phone number for third-party alarm monitoring.
Send text message with commands: "1234" + "DD" + "5" +"0" to SIM number of alarm system.
Programing central station number (for example: 28901540) for monitoring, you need send the commands as below:
1234DD1289015400 >>>>
Notice:It will use SMS for alarm communication.
Delete Phone Number:
1234DD1 >>>>

15
OperationRemotely Arm/Disarm via SMSAway Arm: Send text message with commands: "user code" + "1" to SIM number of alarm system.Activate the "Away Arm" remotely via SMS with 1111 user code, you need send commands:
Disarm
Stay Arm
Away Arm
SOS
Working LED
Arm/Disarm/SOSAway Arm the system by press:
Stay Arm the system by press:
Disarm the system by press:
Trigger SOS alarm by press:
11111 >>>>
Home Arm: Send text message with commands: "user code" + "2" to SIM number of alarm system.Activate the "Away Arm" remotely via SMS with 1111 user code, you need send commands:
11112 >>>>
Disarm: Send text message with commands: "user code" + "0" to SIM number of alarm system.Disarm via SMS with 1111 user code, you need send commands:
11110 >>>>

16
Alarm Handle for User
Receiving SMS AlertOnce an alarm occurs, the system will send SMS as long as user choose for alarm SMS notification. The system will send SMS with below content:Alarm System: 11 Zone Door Sensor Alarming
Receiving Alarm Phone CallOnce an alarm occurs, the system will make phone call as long as user choose for alarm call notification. Pick up phone call, you will hear "Di, Di, Di, Di" sound, then you can:Press "8" on phone to stop siren yelling, the alarm will not dial this phone number.Press "*" for alarm receiving confirmation, the alarm will stop dial all phone number.

17
Simple Home Automation
IntroductionThis alarm model can work with wireless home automation device including remote control socket and lamp holder. The socket/lamp holder can allow user to turn on/off the appliances or equipment remotely. The socket has manual turn on/off button design, and included one wireless remote controller for turn on/off the socket. The lamp holder adopted standard E27 screw for plug-n-play installation, also included one wireless remote controller for turn on/off the socket. The included remote controller can control more than one socket/lamp holder individually.
Key Features• Working with wireless alarm system• Manual turn on/off design• Power on indicator design• Comes with one wireless remote controller• Power rating 10 amps, 230 volts (Socket)• Maximum load 2300 watts (Socket)• 60 watts maximum load (Lamp holder)• Can be safely used with existing E27 lamp (Lamp holder)• CR2032 3V lithium battery in transmitter (included)• Multi channel assignment for each socket• Working frequency: 433MHz, learning code
(Please note this remote control socket is only for indoor usage, the total power consumption should not exceed the maximum watt of remote socket)

Working with Remote Socket
18
IntroductionThe system can work with wireless remote control socket for simple home automation system. The socket can allow user to achieve below function:1. When alarm is triggered, the socket automatically turn on.2. When system is Diarmed, the socket will turn off..3. Remotely turn on/off socket with APP/SMS
q
w
e
1. On/Off Indicator2. Manual On/Off Switch/Enroll3. Power Socket
Device EnrollmentRegister alarm panel into this socket: plug the socket into power, and press "Manual On/Off" button for 2s. The indicator will start flashing. Now triggering the panic alarm via pressing the panic button on remote controller.
Notice: This is an advanced socket, and some informaiton (function and features, technical info) haven't provided in here, please read the separate manual for socket of usage.
Remotely ControlUser can use the separate remote control to turn on/off this remote socket, and also you can turn on/off the socket by sending SMS commands:
1111H >>>>

19
Working with Lamp Holder
IntroductionThe system can work with wireless remote control lamp holder for simple home automation system. The remote lamp holder can allow user to achieve below function:1. When alarm is triggered, the lamp holder automatically turn on.2. When system is Diarmed, the lamp holder will turn off..3. Remotely turn on/off lamp holder with APP/SMS
q
w
e
1. E27 Screw (male)2. On/Off Indicator3. E26 Screw (female)
Device EnrollmentRegister alarm panel into lamp holder: screw it into E27 female holder, and press "Study" button. The indicator will start flashing. Now using the "Slot eject pin tool" to press "Reset" button on alarm panel. The siren will start to flash three times, that indicates the enrollment is successful.
Notice: This is an advanced lamp holder, and some informaiton (function and features, technical info) haven't provided in here, please read the separate manual for lamp hodler of usage.
Remotely ControlUser can use the separate remote control to turn on/off this remote holder, and also you can turn on/off the holder by sending SMS commands:
1111H >>>>

Working with WIreless Siren
IntroductionThe alarm system can work with wireless indoor/outdoor siren (sounder). A very loud powerful strobe siren can not only alert people, but also scare/deter the intruders from entering the property or leaving the house without proceeding illegal actions.
20
Device EnrollmentRegister alarm panel into the siren: plug the siren into power, and press "Enroll/Study" button. The light will turn on. Now using the "Slot eject pin tool" to press "Reset" button on alarm panel. The siren will start to flash three times, that indicates the enrollment is successful.
When program the alarm panel to siren, Ensuring other sensors and accessories are turned off without signal transmitting.
The siren can maximum programmed with up to 10 pieces wireless alarm panels.
qw
e
1. Enroll/Study Button2. Plug (American, EU, British 3PIN)3. Lens (Default Red, Blue optional)

21
Working with WIreless Keypad
IntroductionThe alarm panel can work with maximum 8 pieces separate wireless LED/LCD keypad. User can use the extra user code to disarm and arm the alarm system remotely. You can install these keypads in your bedroom or any door entrance.
qwe
r
1. "Arm Indicator": Red color, Turn on when system is Armed, then turn off automatically after 8 seconds2. "Disarm Indicator": Green color, Turn on when system is Disarmed, then turn off after 8 seconds3. "Low-Power Indicator": Orange color. Turn on when battery runs out, then turn off after 8 seconds4. Digital Keypad for entering password and perform Arm/Disarm.
Enroll Remote ControllersRegister first remote keypad into alarm panel, you need send the text message with commands: "1234" + "J" + "01" + "0" to the SIM number of alarm panel. The panel will make "Di" sound, and diarm or arm the wireless keypad for two times you will hear five di sound for successful enrollment.
1234J010 >>>>
For second keypad, you just need to change the group number "0" to "1", and command is:1234J011

Change Password
22
Change User CodeThe alarm system can support three user codes. The default user codes are 0000, 1111, 2222.
Sending below SMS commands, you can change the user code.1st Group: "Old user code" + "DD" + "7" + "New user code"2nd Group: "Old user code" + "DD" + "8" + "New user code"3rd Group: "Old user code" + "DD" + "9" + "New user code"
For example: Change 1st user code from 0000 to 5678, SMS commands should be:
0000DD75678 >>>>
Change Admin CodeThe defaut admin code: 1234. User can change the admin code by composing SMS content: "Old admin code" + "DD" + "6" + "New admin code"
For example: Change admin code from 1234 to 4321, SMS commands should be:
Notice: The user code and digital code must be 4 digitals
1234DD64321 >>>>
Reset If you forget the admin code or user code, you still can perform hardware reset.
Using slot eject pin tool to press "Reset" button on the alarm panel for more than 5 seconds, the system will perform reset and make long "Di" sound for confirmation.

23
Advanced Function
Change Zone NameThe alarm system can allow user to change the zone name. Composing your own SMS content and send to alarm panel, it will send out user-friendly SMS content, when alarm is triggered.
Commands: "1234" + "DM" + "02-15" + "New Zone Name" + "#"
Notice: "02-15" is zone number, and "New Zone Name" should be 1-12 bits in ASCII standard.
For example: Change zone 6 to "Bedroom Alarm", you need send below commands to SIM number of alarm panel:
1234DM06Bedroom Alarm# >>>>
Exit Delay/Arm DelayThe system support exit delay function, and the system will delay preset time before Arm the system. The delay time from 00-59 seconds. "00" means without delay. Default delay time: 15s
Change the exit delay time to 30s, you need to send below SMS:
1234E30 >>>>
Entry Delay/Alarm DelayThe system support entry delay function, and the system will delay preset time before alarm is triggered. The delay time from 00-59 seconds. "00" means without delay. Default delay time: 00s
Change the entry delay time to 15s, you need to send below SMS:
1234F15 >>>>

24
Maintenance and Care
This alarm system is a Hi-Tech product with outstanding design and sophisticated technology, and shall be carefully.To make the alarm to operate for a long term stably and to prolong the service life, it's recommended that:• Try to put the alarm panel in a dry and well-ventilated location• Do not put the alarm panel and any wireless sensors in too cold, too hot or dusty places to prevent it • from curtailing the service lives of electric parts and preventing the plastic shell from distorting.• Do not put the alarm panel and any wireless sensors in low and too exposed places to prevent children from touching them or the thieves from finding them• Reglarly testing is necessary for finding and resolving probles in time.• Regularly check the batteries in all wireless sensors. To ensure normal operations of the system, replace with new batteries whenever you feel a sensor is not detecting properly.

System Note: