instruction manual vacuum cleaner...7 note: the inlet hepa should be fully dried before...
TRANSCRIPT
Instruction Manual Vacuum Cleaner
JV51

2
Products Installation
Unpacking
Parts Name
Open the package, take out the foam pad , all accessories and machine from the package, take off the plastic bag and save them for the purpose of future maintenance and repair.
1. Electric Floor Head
4. Metal Tube Release Button
7. Speed Control Button
10. Adaptor
13.2-in-1 Crevice Tool
16. Screws
11. Electric Mattress Head
14. Wall Storage Base
12. 2-in-1 Upholstery Tool
15. Wall Anchors
2. Floor Head Release Button
5. Dust Cup Release Button
8. On/off Button
3.Metal Tube
6. HEPA
9. Battery Pack
2
1
3
4
5
6
7
98
12
13
11
10
14
15
16
3
Main-body Assembly
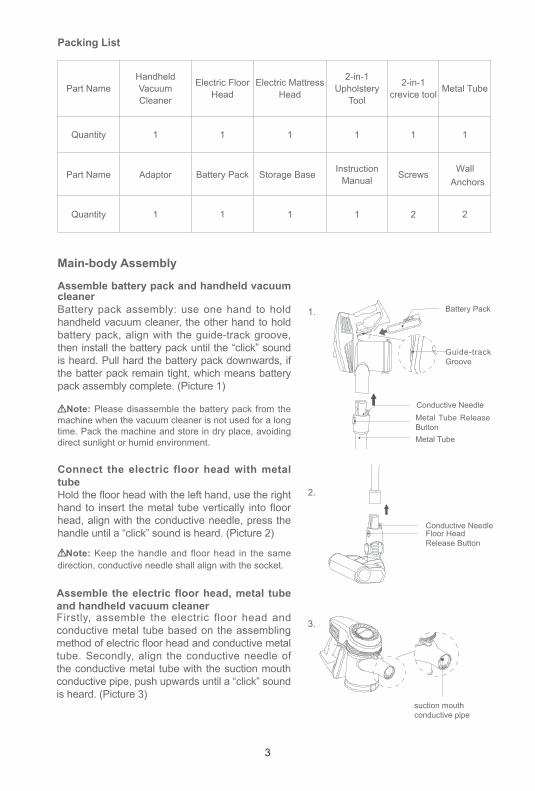
Packing List
Battery pack assembly: use one hand to hold handheld vacuum cleaner, the other hand to hold battery pack, align with the guide-track groove, then install the battery pack until the “click” sound is heard. Pull hard the battery pack downwards, if the batter pack remain tight, which means battery pack assembly complete. (Picture 1)
Hold the floor head with the left hand, use the right hand to insert the metal tube vertically into floor head, align with the conductive needle, press the handle until a “click” sound is heard. (Picture 2)
Firstly, assemble the electric floor head and conductive metal tube based on the assembling method of electric floor head and conductive metal tube. Secondly, align the conductive needle of the conductive metal tube with the suction mouth conductive pipe, push upwards until a “click” sound is heard. (Picture 3)
Assemble battery pack and handheld vacuum cleaner
Connect the electric floor head with metal tube
Assemble the electric floor head, metal tube and handheld vacuum cleaner
Part NameHandheld Vacuum Cleaner
Electric Floor Head
Electric Mattress Head
2-in-1 Upholstery
Tool
2-in-1 crevice tool Metal Tube
Quantity 1 1 1 1 1 1
Part Name Adaptor Battery Pack Storage Base Instruction Manual Screws Wall
Anchors
Quantity 1 1 1 1 2 2
Note: Please disassemble the battery pack from the machine when the vacuum cleaner is not used for a long time. Pack the machine and store in dry place, avoiding direct sunlight or humid environment.
Note: Keep the handle and floor head in the same direction, conductive needle shall align with the socket.
Battery Pack
Guide-track Groove
Conductive NeedleMetal Tube Release ButtonMetal Tube
Conductive NeedleFloor Head Release Button
suction mouth conductive pipe
1.
2.
3.

4
Please drill a hole with a diameter of 6mm and a depth of about 30mm on the wall. Then put the wall anchors into the hole. After positioning the storage base, fx it on the wall with screws. (Picture 4)
Installation of storage base 4.
5.
6.
7.
Accessories AssemblyFor ease of use, this product is specially equipped with accessories for the handheld vacuum cleaner. The handheld vacuum can be connected to different tools for different cleaning purposes.
Please fx the storage base on a clean wall, do not fix on the wet wall like in the kitchen. (Picture 6)
After the task has been completed, place them on the storage base. (Picture 7)
Screw Hole
Screw
Install the storage baseDrill holes on the walls
Insert wall anchors into the hole
Insert 2-in-1 upholstery tool connector into the handheld vacuum’s air inlet until it is tightly fitted. (Picture 5)
Connect handheld vacuum cleaner with 2-in-1 upholstery tool
Connecting accessories with storage base
Note: The handheld vacuum can also connect other accessories: 2-in-1 crevice tool and electric mattress head, the connecting method is the same as 2-in-1 upholstery tool.
Handheld Vacuum
2-in-1 Upholstery Tool
Clean Wall
2-in-1 Crevice Tool
2-in-1 Upholstery Tool
Storage Base
Wet Wall
(√) (×)

5
9.
8.
Charge the vacuum cleaner in time when battery power is insufficient; When the voltage is too low, to protect the battery, the vacuum will automatically turn off. At this time, the vacuum must be charged. During charging, the battery pack can be taken off, charge it through adaptor, or place the machine onto the storage base, and the charging indicator turns red, the vacuum cleaner is charging.
JV51’s Charging time is about 5 hours. When the charging indicator on the vacuum batteryturns from red to green, it means the vacuum cleaner is fully charged. We recommend continue charging for half an hour to one hour, so that the charging effect is better. After charging, unplug the charger to stop charging.
Note: When using the machine for the first time, the battery capacity is not full, need to put the machine on the charging base or take out the battery to charge. The machine is able to be used after the battery is charged fully when the indicate light turns from red to green. (Picture 8)
Indicate Light
Charging Socket
Adaptor
speed control
On/off Button
Indicate Light: “Red ” means charging “Green”means fully charged
Use of Vacuum Cleaner
Charging
Use of Handheld Vacuum Cleaner
Note:When using the vacuum cleaner for the first time, fully charge the battery and fully discharge the battery before second charge to increase the battery life.
Take the handheld vacuum from the storage base, press the on/off button to turn on and turn off the vacuum. When green indicator lights up, it is normal mode, press the speed control button to max mode. The speed control button can switch between max mode and normal mode easily. (Picture 9)
Note:When the electric floorhead is running, if brushroll stops running due to big foreign object blockage or excessive fiber entangle, or the child accidentally putting hand into brushroll, the floorhead will stop working to protect personal safety and avoid damage to floorhead motor.
Use of Electric Floor HeadElectric floorhead can clean short-hair carpet, hardfloor or tile floor. (Picture 10)
10-1. 10-2.

6
11.
12.
14.
13.
15.
Use of Accessories2-in-1 Upholstery Tool: Suitable for dust mites cleaning on bed, sofa and other kinds of fabric furniture. (Picture 11)
2-in-1 Crevice Tool: Suitable to clear narrow seam, blind angle of doors and windows and other narrow places. (Picture 12)
Electric mattress head: Especially designed for sofa and mattress, it can beat up and remove the dust mites and bacteria which hide in the sofa and mattress by flapping of the brushroll. (Picture 13)
Note: 1. HEPA filter is available for sale from local vacuum cleaner distributors.2. It is recommended to clean the dust cup after each use; When the dust cup is full or the HEPA filter is clogged, it needs to be cleaned and replaced if necessary. Floorhead brushroll might be entangled with hair after long time use, it needs to be cleaned in time to keep the vacuum working more efficiently.
Cleaning and Replacing Parts
Cleaning Dust Cup and Filtration System
Pull out downwards the dust cup on/ off button to dump dust in dust cup. (Picture 14)Press hard the dust cup release button, hold steady the main body with right hand, rotate the dust cup in the direction shown in the picture, remove the dust cup from main body to further clean the dust cup. (Picture 15)
Hold the main body, take the HEPA upwards as shown in the picture, take out the HEPA, then take out the dual-cyclonic system components, clean them. (Picture 16)
Fix inlet HEPA, rotate the HEPA cover in the direction as shown in the picture, separate the HEPA cover from inlet HEPA, which will be easily cleaned. (Picture 17)
Clean dust cup
Clean filter system Dust Cup on / off Button
Dust Cup ComponentsDust Cup Release Button

7
Note: The inlet HEPA should be fully dried before installation.
Cleaning Electric Floor Head
Cleaning Electric Mattress Head
1.Use finger to release the brushroll button, take out the side cover of the brushroll.2.Take out one side of the brushroll in the same direction as shown in the picture, then brushroll can be taken out to clean. (Picture 18)3.After cleaning and replacing,reassemble them in the opposite order of the disassembly.
Turn the knob according to the unlocking direction indicated on the knob of the electric mattress head. After hearing the sound of "click", the brushroll of the electric mattress head can be pulled out for cleaning. After cleaning, it can be assembled in the reverse order of disassembly. (Picture 19)
After cleaning and drying(if necessary, please replace HEPA) , reassemble them in the opposite order of the disassembly.
16.
17.
18.
19.
HEPA Filter
HEPA Cover
B r u s h r o l l R e l e a s e Button
Brus
Brushroll
Brushroll Cover
Inlet HEPA
Dual-cyclonic System Components
Knob
Brushroll

8
Storage of Vacuum Cleaner
Disassemble the Handheld Vacuum Cleaner and Metal Tube
Guide-track Groove
Battery Pack
Battery Pack Release Button
Conductive NeedleMetal Tube Release Button
Metal Tube
Conductive Needle
Electric Floor Head Release Button
Unpack the Battery Pack
Machine Storage
Disassembly of Electric Floor Head and Metal Tube
Fix the handheld first, press the release button of metal tube, pull out it. (Picture 20)
Press the battery release button, take out the battery pack.Put the battery pack into a plastic bag, then place it in a dry place.
Take out the battery pack if the machine is not used for a long time.Store the machine in cool and dry place, avoiding direct sunlight or humid environment.
When store or clean the vacuum cleaner, if you need to disassemble the electric floor head, press the electric floor head release button, pull upwards the metal tube. (Picture 21)
20.
21.

9
Safety NotesWhen using an electrical appliance, basic precautions should always be followed, including the following.
READ ALL INSTRUCTIONSBEFORE USINGFOR HOUSEHOLD USE ONLY
WARNING-To reduce the risk of fire, electric shock, or injury: Do not leave appliance when plugged in. Unplug from outlet when not in use and before servicing.
Do not allow to be used as a toy. Close attention is necessary when used by or near children.
Use only as described in this manual. Use only manufacturer's recommended attachments.
Do not use with damaged cord or plug. If appliance is not working as it should, has been dropped, damaged, left outdoors, or dropped into water, return it to a service center.
Do not pull or carry by cord, use cord as a handle, close a door on cord, or pull cord around sharp edges or corners. Do not run appliance over cord, Keep cord away from heated surfaces.
Do not unplug by pulling on cord. To unplug, grasp the plug, not the cord.
Do not handle plug or appliance with wet hands.
Do not put any object into openings. Do not use with any opening blocked; keep free of dust,lint, hair, and anything that may reduce air flow.
Keep hair, loose clothing, fingers, and all parts of body away from Openings and moving parts.
Turn off all controls before unplugging.
Use extra care when cleaning on stairs.
Do not use to pick up flammable or combustible liquids, such as gasoline, or use in areas where they may be present.
CAUTION - Risk Of Injury. Brush May Start Unexpectedly.
Disconnect Battery Pack Before Cleaning or Servicing
WARNING-To Reduce The Risk Of Electric Shock-Do not use outdoors or on wet surfaces.
Always turn off this appliance before connecting or disconnecting motorized nozzle.
Do not pick up anything that is burning or smoking, such as cigarettes. matches. orhot ashes.
WARNING: Read all safety warnings and instructions. Failure to follow the warnings and instructions may result in electric shock fire and / or serious injury.

10
Prevent unintentional starting. Ensure the switch is in the off-position before connecting to battery pack, picking up or carrying the appliance. Carrying the appliance with your finger on the switch or energizing appliance that have the switch on invites accidents.
Disconnect the battery pack from the appliance before making any adjustments, changing accessories, or storing appliance.Such preventive safety measures reduce the risk of starting the appliance accidentally.
Recharge only with the charger E-TEK charger type ZD12D250060US specified by the manufacturer. A charger that is suitable for one type of battery pack may create a risk of fire when used with another battery pack.
Use appliances only with specifically designated Kingclean battery pack type T-DC38M.
Use of any other battery packs may create a risk of injury and fire.
When battery pack is not in use, keep it away from other metal objects, like paper clips,coins, keys, nails, screws or other small metal objects, that can make a connection from one terminal to another. Shorting the battery terminals together may cause burns or a fire.
Under abusive conditions, liquid may be ejected from the battery;avoid contact. If contact accidentally occurs, flush with water.If liquid contacts eyes, additionally seek medical help. Liquid ejected from the battery may cause irritation or burns.
Do not use a battery pack or appliance that is damaged or modified. Damaged or modified batteries may exhibit unpredictable behavior resulting in fire, explosion or risk of injury.
Do not expose a battery pack or appliance to fire or excessive temperature. Exposure to fire or temperature above 130 °C(265 E) may cause explosion.
Follow all charging instructions and do not charge the battery pack or appliance outside of the temperature range specified in the instructions. Charging improperly or at temperatures outside of the specified range may damage the battery and increase the risk of fire.
Have servicing performed by a qualified repair person using only identical replacement parts.
This will ensure that the safety of the product is maintained.
Do not modify or attempt to repair the appliance or the battery pack except as indicated in the instructions for use and care.Do not put the vacuum close to fire or other high temperature facility.
Do not use or store the machine under extreme bad conditions, for example, extreme temperature. It is recommended to use it indoors between the temperature of 5 °C to 40 °C. Store the machine in dry place and avoid direct sunlight.
Fully charge the battery before first use or after long storage.
Before using the vacuum, make sure brushroll is assembled, otherwise, it may lead to motor fan blockage, causing motor burn out.
Please do not use the vacuum to pick up detergent, oil, glass slag, needle, cigarette ash, wet dust, water, matches, etc.

11
Please do not use the vacuum to pick up tiny particles such as cement,gypsum powder, wall powder, or large objects such as paper balls, otherwise it will cause malfunctions such as blockage and motor burnout.
Avoid blockage to air inlet or brushroll, it may cause motor failure.
Do not pour or splash water or other liquids into the machine to avoid short circuit to burn out the machine.
If the brushroll is not working, please check whether the brushroll is entangled with hair or other long fiber, clean it in time.
When storing the machine for a long time, ensure that the battery is fully charged before storage and charge the machine at least every three months.
Unplug the charger to clean or repair the machine. Hold the charger when plugging or unplugging it, and do not pull the charging cord.
Use a dry cloth to clean the machine. Liquids like gasoline, alcohol, lacquer thinner will cause crack or colour fading and cannot be used.
If the machine is not working after fully charged, it must be checked and repaired in our designated office, please do not dismantle the machine on your own.
When discard the machine, please press the button to release the battery pack, take out the battery pack, make sure the machine is disconnected with power and handled properly. Do not throw into fire,water or soil.
If the battery liquid leakage touches your skin or clothes, wash it with water, if there is any discomfort, please go to hospital immediately.
Do not use non-original battery pack, avoiding machine damage and safety problems.
Avoid to use the vacuum cleaner to pick up easily blockable things such as: plastic bags, candy paper, big scrap of paper, which might affect the function, even cause failure of working. Please clean the foreign matter on the floor head in time, then it will work normally. The discarded battery pack shall be recycled safely, do not throw away casually.
PRECAUTIONS
The vacuum cleaner is specially used for household purpose, and please do not use it for commercial or other purposes.
Please don't use the vacuum cleaner to suck detergent, kerosene, glass waste, needles, cigarette ash, moisturized dust, sewage, matches and similar articles.
Please don't use the vacuum cleaner to suck cement, gypsum powder, wall power and similar small particles, or toy, paper filler and other larger objects, which can cause vacuum cleaner clogging, motor burnout and other fault.
Please don't use the vacuum cleaner near fire source and other high temperature places.
Before using the vacuum, please make sure the Hepa filter and ground brush roller are installed properly, otherwise it may clog motor cooling fan, which will result motor burned-out.

12
Note:If the soft wire of the power supply is damaged, it must be replaced by professional personnel from manufacturer, maintenance department or similar department in order to prevent risk.
Risk of Injury. Brush may start unexpectedly. Disconnect battery pack be ore cleaning or servicing.
To reduce the risk of fire, electric shock or injury.
Do not use outdoors on wet surfaces. Do not expose to rain, store indoors.
To reduce the risk of injury from moving parts-disconnect battery pack before cleaning or servicing.
SAVE THESE INSTRUCTIONS
Trouble ShootingPlease check the following issues before sending to designated repair offices.
Symptoms Possible Causes Solutions
Motor is not working
Battery has no power Charge the vacuum cleanerMetal tube, electric floor had, battery pack is not assembled correctly to the mainbody
Check the accessories are assembled correctly to the mainbody
Low suction
Dust cup is full Empty dust cupFilter is blocked by dust Clean or replace HEPAFloor head hose or brushroll blocked Clean the floorhead
Short run time after charging
Battery not fully charged Follow instruction manual to fully charge the battery
Battery old aging Replace new battery
When charging, indicate light doesn’t turn red(“Red”means charging)
Battery pack is not installed correctly
Check whether the battery pack has been installed correctly
Note: If any other failures occurred, which need professional tools, in order to avoid danger, the machine must be repaired or replaced by manufacturer, other maintenance offices or professionals from similar offices.
13
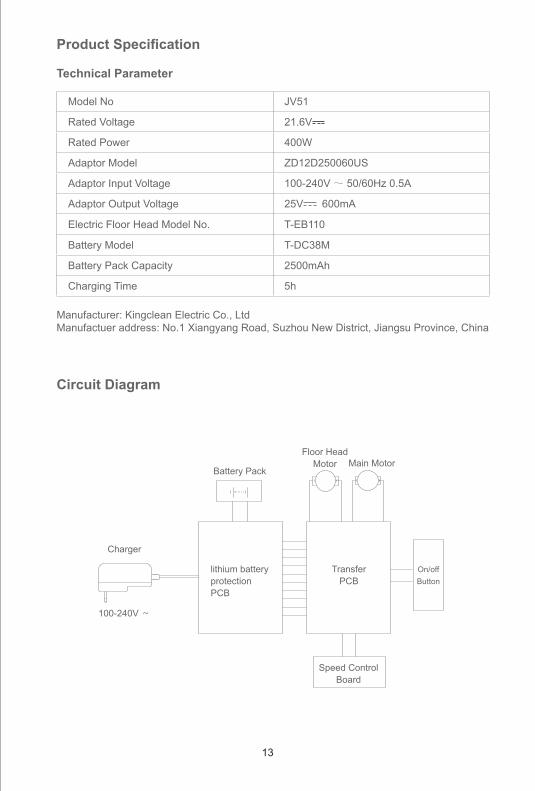
Product Specification
Technical Parameter
Model No JV51
Rated Voltage 21.6V
Rated Power 400W
Adaptor Model ZD12D250060US
Adaptor Input Voltage 100-240V ~ 50/60Hz 0.5A
Adaptor Output Voltage 25V 600mA
Electric Floor Head Model No. T-EB110
Battery Model T-DC38M
Battery Pack Capacity 2500mAh
Charging Time 5h
Manufacturer: Kingclean Electric Co., Ltd Manufactuer address: No.1 Xiangyang Road, Suzhou New District, Jiangsu Province, China
Circuit Diagram
lithium batteryprotection PCB
Charger
Transfer PCB
Battery Pack
Floor Head Motor Main Motor
100-240V ~
Speed Control Board
On/off Button

14
Warranty Information
Your JIMMY machine enjoys one year warranty from the date of purchase.
Excluded from the guarantee is normal wear, commercial use, alterations to the appliance as purchased, cleaning activities, consequences of improper use or damage by the purchaser or a third person, damage, that can be attributed to external circumstances or caused by the batteries.
This limited warranty is subject to the follows terms:
WHAT IS NOT COVERED?1.Normal wear and tear of the vacuum and vacuum parts that require replacement under normal use such as disposable dust bags,filters,drive belts,light bulbs,brush-roll,bristles, impellers and cleaning.2.Damages or malfunctions resulting from: improper or unreasonable use or maintenance, abuse, negligence, failure to follow instructions contained in any written materials that accompany the product, deterioration by reason of excess moisture, corrosive atmosphere, lightning, power surges, connections to improper voltage supply, unauthorized alteration, or other external causes, such as extremes in temperature or humidity, accidents, misuse, or acts of God. This warranty also does not cover damage resulting from repair or attempted repair by anyone other than JIMMY.3.This warranty is not applicable to any product that has been altered or on which the serial number has been defaced,modified pr removed. Altering,erasing, or forging any proof-of-purchase documents voids any applicable product warranty.
OBTAINING WARRANTY SERVICE:To obtain warranty service you can contact the JIMMY Service Team, email [email protected], to discuss the warranty claim and procedures to be followed. All warranty claims must include submission of proof-of-purchase documentation. For additional information, you may also visit www.jimmyglobal.com
SHIPPING CHARGES:You will be responsible for any initial shipping and insurance charges if the defective product(s) must be shipped for warranty service or warranty evaluation; however, JIMMY will pay the return warranty. When returning parts for repair, you must include the model, type and serial number located on the rating plate. If any product submitted for warranty service is found to be ineligible, an estimate of repair cost will be furnished and the repair performed only if requested by the owner and upon receipt of payment or acceptable arrangements for payment.
FUETHER LIMITITATIONS AND EXCLUSIONS:Any warranty that may be implied in connection with your purchase or use of the vacuum, including any warranty of Merchantability or any warranty of Fitness For A Particular Purpose is limited to the duration of this limited warranty. Some states do not allow limitations on how long an implied warranty lasts, so the above limitations may not apply to you.This warranty for the breach of this warranty is limited to the relief expressly provided above. In no event shall the manufacturer be liable for any consequential or incidental damages you may incur in connection with your purchase or use of the vacuum. Some states do not allow the exclusion or limitation of incidental or consequential damages, so the above limitation or exclusion may not apply to you.This warranty gives you specific legal rights. You may also have other rights, which may vary by state.