instructions for completing the covid-19 vaccine provider
TRANSCRIPT

1 Revised 5/14/2021
COVID-19 Provider Agreement
Instructions for completing the Covid-19 Vaccine Provider Agreement
Do not print the Agreement to fill out
Must complete and submit electronically
Download to computer before entering information. Do not complete in browser “Open with” Acrobat Reader DC
Download Adobe Reader DC - free - latest version (softonic.com)
Section A Pages 1 – 3:
Organization Identification:This is the provider organization (or owner of group of clinics/facilities).Example: Health Homes Hospital owns 3 clinics/facilities (or vaccination locations). Healthy HomesHospital is the “organization” (A).
Important: The email under the Organization Identification Section will be used for CDC’s Vaccine FinderWebsite contact. The contact will be responsible for reporting daily COVID-19 vaccine inventory to theVaccine Finder website throughout the response.
Sections A and B must be completed for each location that will be receiving and administering Covid-19vaccine. If the organization will also be administering Covid-19 vaccine, section B should also becompleted for the organization.
Section A must be completed, signed, and dated by the Chief Medical Officer or equivalent and the ChiefExecutive Officer/Fiduciary Officer.
If you do not already have a digital ID-Please see “ How to set up signature” included on page 4
Do not complete the sections labeled “For official use only”
Section B (Section A and B must be submitted for every clinic/facility location that will be storing and administering Covid-19 Vaccines for two or more consecutive days)
Page 4:
Specify the clinic/facility name in the Organization Location Name field.
If you answer “Yes” to the question “Will another location order Covid-19 vaccine for this site?” Youmust specify the name of the other location.
Complete contact information for the primary Covid-19 vaccine coordinator.
Complete contact information for backup Covid-19 vaccine coordinator.
Important: The Primary and Back-up vaccine coordinators will be required to take specific trainingfor vaccine ordering and accountability.
Complete address fields for vaccine shipments. If applicable, specify the alternate location for Covid-19 vaccine administration.
Specify the format for days and times shipment can be accepted as follows: 99:99-99:99
o If open all day from 9 to 5 - AM: 09:00-12:00PM: 12:00-17:00
Do not complete the section labeled “For official use only”
2 Revised 5/14/2021
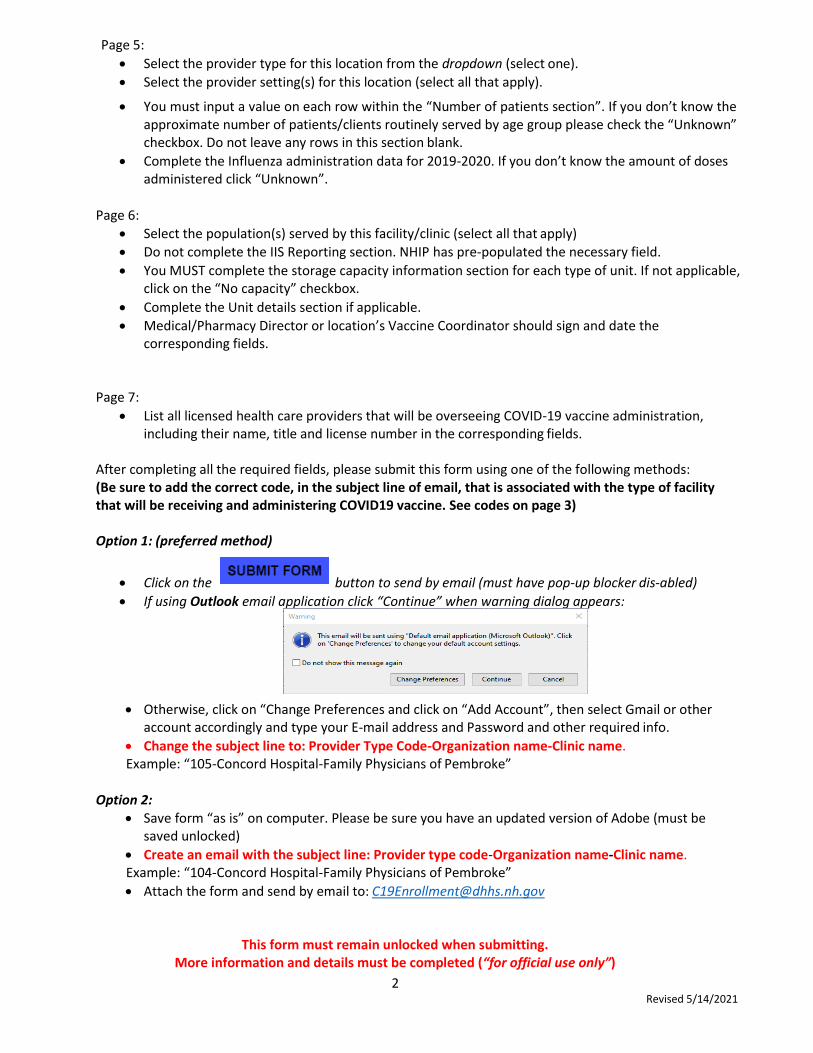
Page 5:
Select the provider type for this location from the dropdown (select one).
Select the provider setting(s) for this location (select all that apply).
You must input a value on each row within the “Number of patients section”. If you don’t know theapproximate number of patients/clients routinely served by age group please check the “Unknown”checkbox. Do not leave any rows in this section blank.
Complete the Influenza administration data for 2019-2020. If you don’t know the amount of dosesadministered click “Unknown”.
Page 6: Select the population(s) served by this facility/clinic (select all that apply) Do not complete the IIS Reporting section. NHIP has pre-populated the necessary field. You MUST complete the storage capacity information section for each type of unit. If not applicable,
click on the “No capacity” checkbox.
Complete the Unit details section if applicable.
Medical/Pharmacy Director or location’s Vaccine Coordinator should sign and date the corresponding fields.
Page 7:
List all licensed health care providers that will be overseeing COVID-19 vaccine administration,including their name, title and license number in the corresponding fields.
After completing all the required fields, please submit this form using one of the following methods: (Be sure to add the correct code, in the subject line of email, that is associated with the type of facility that will be receiving and administering COVID19 vaccine. See codes on page 3)
Option 1: (preferred method)
Click on the button to send by email (must have pop-up blocker dis-abled)
If using Outlook email application click “Continue” when warning dialog appears:
Otherwise, click on “Change Preferences and click on “Add Account”, then select Gmail or otheraccount accordingly and type your E-mail address and Password and other required info.
Change the subject line to: Provider Type Code-Organization name-Clinic name.Example: “105-Concord Hospital-Family Physicians of Pembroke”
Option 2: Save form “as is” on computer. Please be sure you have an updated version of Adobe (must be
saved unlocked)
Create an email with the subject line: Provider type code-Organization name-Clinic name.Example: “104-Concord Hospital-Family Physicians of Pembroke”
Attach the form and send by email to: [email protected]
This form must remain unlocked when submitting. More information and details must be completed (“for official use only”)
Revised 5/14/2021
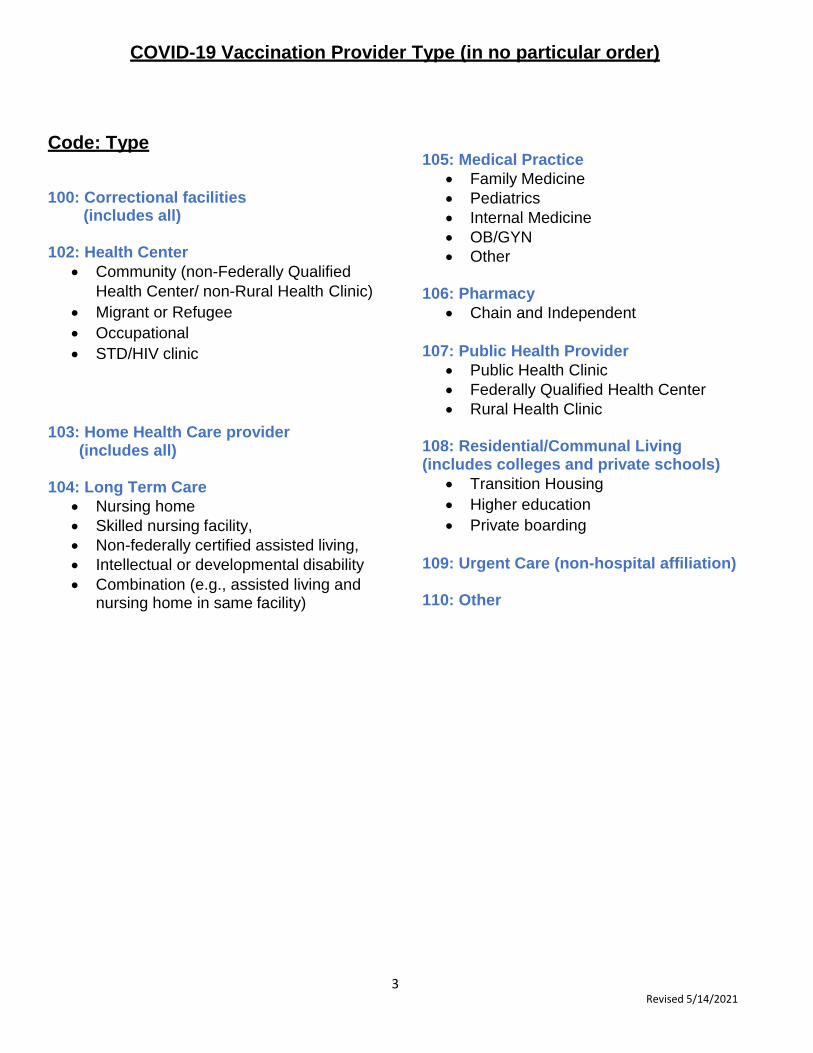
COVID-19 Vaccination Provider Type (in no particular order)
Code: Type
100: Correctional facilities (includes all)
102: Health Center
Community (non-Federally Qualified Health Center/ non-Rural Health Clinic)
Migrant or Refugee
Occupational
STD/HIV clinic
103: Home Health Care provider (includes all)
104: Long Term Care
Nursing home
Skilled nursing facility,
Non-federally certified assisted living,
Intellectual or developmental disability
Combination (e.g., assisted living andnursing home in same facility)
105: Medical Practice
Family Medicine
Pediatrics
Internal Medicine
OB/GYN
Other
106: Pharmacy
Chain and Independent
107: Public Health Provider
Public Health Clinic
Federally Qualified Health Center
Rural Health Clinic
108: Residential/Communal Living (includes colleges and private schools)
Transition Housing
Higher education
Private boarding
109: Urgent Care (non-hospital affiliation)
110: Other
3

Revised 5/14/2021
4
How to Create a Digital Signature in Adobe Reader To create a digital signature that can be applied to PDF forms, please follow the instructions below:
1. Click on the signature field.2. You will be presented with a window labeled “Digital ID Configuration required”, click on “ConfigureDigital ID”.
3. Select “Create a new digital ID, Create your self-signed Digital ID and click “Continue”
4. When prompted to select the destination of the new Digital Select: “Save to File” and click “Continue”

5 Revised 5/14/2021
5. Fill out the required information in the provided fields and click “Continue”
6. Select the location on your computer where you would like your “Digital ID saved” and create apassword then click “Save:”

6 Revised 5/14/2021
7. Choose the Digital ID that you created and click “Continue”.
8. Your Digital Signature will be displayed with date and time stamp, click “Sign”:
9. You will then see yourdigital signature on thePDF form.Example: