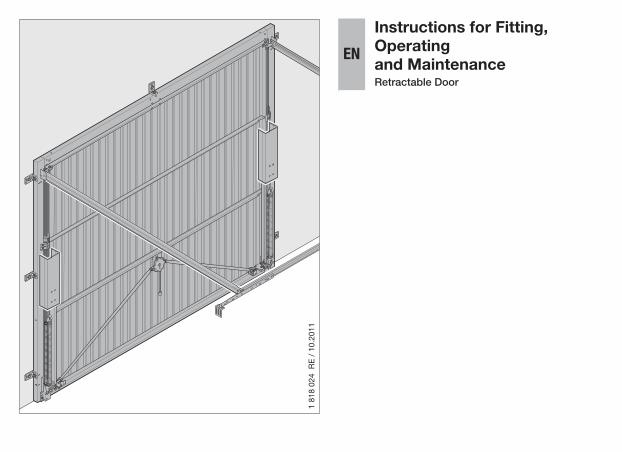
instructions for fitting, en operating and maintenance for fitting, operating and maintenance...
TRANSCRIPT
EN
Instructions for Fitting, Operating and MaintenanceRetractable Door
1 81
8 02
4 R
E / 1
0.20
11

2 1 818 024 RE / 10.2011
Contents
1 Safety Instructions ............................... 31.1 Qualified persons ........................................... 31.2 Symbols and signal words used .................... 31.3 Intended use .................................................. 41.4 General safety instructions ............................ 42 Fitting and Initial Start-Up ........................... 52.1 Safety instructions ......................................... 52.2 Fitting ............................................................. 52.2.1 Doors with centre profile/
horizontal ribbing ........................................... 72.2.2 Fitting the handle ........................................... 72.2.3 Fitting to the ceiling ....................................... 72.2.4 Checking the door action and door stop ....... 72.3 Initial start-up ................................................. 72.3.1 Checking the door spring
tension (Figure 8.3) ........................................ 73 Operation ...................................................... 83.1 Safety instructions ......................................... 83.2 Opening the door with the handle ................. 83.3 Locking and unlocking the door .................... 84 Inspection and Maintenance ...................... 94.1 Safety instructions ......................................... 94.2 Checking the condition of the door ............... 94.3 Checking the door spring tension ................. 94.4 Replacing the door tension springs ............... 94.5 Checking the track rollers and tracks .......... 10
4.6 Checking the lock and locking mechanism ............................... 10
4.6.1 Adjusting the latching (Figure 9.1) ............... 104.7 Accessories ................................................. 105 Surface Protection ..................................... 105.1 Door with steel infill ..................................... 105.2 Door with timber or GRP infill ...................... 116 Cleaning and Care ..................................... 116.1 Door surfaces made of steel ....................... 116.2 Synthetic panes ........................................... 116.3 Data plate .................................................... 117 Assistance with Malfunctions................... 118 Dismantling ................................................ 11
.................................................................................. 12
Dissemination as well as duplication of this document and the use and communication of its content are prohibited unless explicitly permitted. Noncompliance will result in damage compensation obligations. All rights reserved in the event of patent, utility model or design model registration. Subject to changes.
ENGLISH
1 818 024 RE / 10.2011 3
Make sure that these instructions remain with the door operator!Read and follow these instructions carefully!They provide you with important information on safe fitting and operation, as well as proper care and maintenance of your garage door.Keep these instructions and the warranty booklet with the declaration of conformity in a safe place.Enter the serial number (see the data plate) here.Serial no.: .............................................................
1 Safety Instructions
The manufacturer is not liable for damage resulting from non-compliance with these instructions and the safety instructions.
Qualified persons1.1 Have a qualified person (competent persons in acc. with EN 12635) fit, start-up and maintain the door following these instructions. While doing so, the requirements listed in the standards EN 12604 and EN 12635 must be observed.
Symbols and signal words used1.2 Special safety information is provided at respective important points in these instructions. They are identified by the following symbols and signal words.
The general warning symbol indicates a danger that can lead to injury or death.
WARNINGIndicates a danger that can lead to death or serious injuries.
CAUTIONIndicates a danger that can lead to minor or moderate injuries.
ATTENTIONIndicates a danger that can lead to damage or destruction of the product.
Important note for avoiding damage to property
Permissible arrangement or activity
Non-permissible arrangement or activity
ENGLISH
4 1 818 024 RE / 10.2011
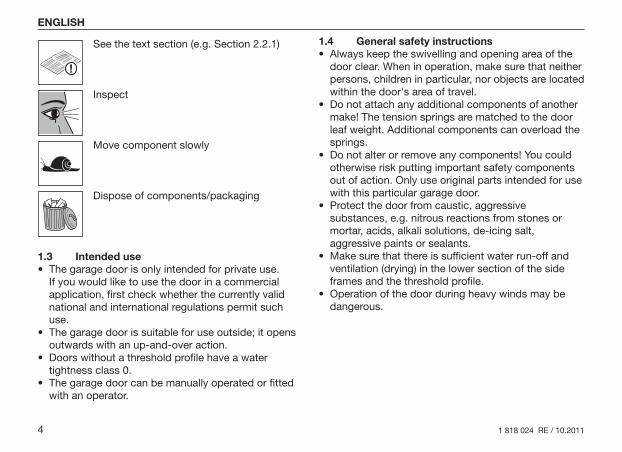
See the text section (e.g. Section 2.2.1)
Inspect
Move component slowly
Dispose of components/packaging
Intended use1.3 The garage door is only intended for private use. •If you would like to use the door in a commercial application, first check whether the currently valid national and international regulations permit such use.The garage door is suitable for use outside; it opens •outwards with an up-and-over action.Doors without a threshold profile have a water •tightness class 0.The garage door can be manually operated or fitted •with an operator.
General safety instructions1.4 Always keep the swivelling and opening area of the •door clear. When in operation, make sure that neither persons, children in particular, nor objects are located within the door's area of travel.Do not attach any additional components of another •make! The tension springs are matched to the door leaf weight. Additional components can overload the springs.Do not alter or remove any components! You could •otherwise risk putting important safety components out of action. Only use original parts intended for use with this particular garage door.Protect the door from caustic, aggressive •substances, e.g. nitrous reactions from stones or mortar, acids, alkali solutions, de-icing salt, aggressive paints or sealants.Make sure that there is sufficient water run-off and •ventilation (drying) in the lower section of the side frames and the threshold profile.Operation of the door during heavy winds may be •dangerous.
ENGLISH

1 818 024 RE / 10.2011 5
2 Fitting and Initial Start-Up
Safety instructions2.1
WARNINGDanger of injuryThere is a danger of injury during fitting. Observe the following instructions:
Wear safety glasses and protective gloves.▶
There is a danger of injury during fitting. Observe the following instructions:
Check that the fixing materials supplied are ▶ suitable for the given structural condition. Only use suittable fixing material. Only fasten the door system to supporting structures with permission from the structural engineer.Secure the door from falling.▶
Support the tracks properly.▶
Secure the door leaf from crashing to the ▶ floor.Fit all delivered fastenings according to the ▶ fitting instructions.
ATTENTION
Damage to the productObserve the following instructions:
Protect the door frame along with the ball-bearing ▶ bracket and door leaf against drilling dust during fitting.Install a door with timber infill only in dry garages.▶
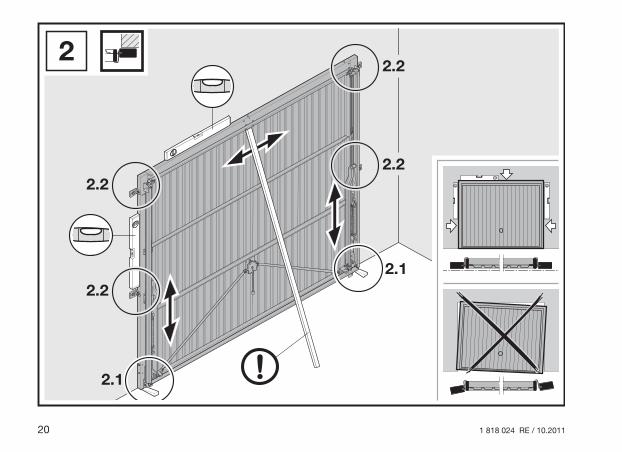
Fitting2.2
Fitting to stell frameThe garage door can be fitted from the inside behind the opening or in the opening
Fitting to timber frame
ATTENTION
Damage of injuryCheck carefully the opening size and squareness of ▶ the timber frame (the door is manufactured slighty smaller to give the corect clearance between door leaf and timber frame.The timber frame should be of the „Goalpost“ type, ▶ with a minimum nominal size of 70 mm x 70 mm (2 2/3“ x 2 2/3“) once erected it should provide an inside frame dimension as detailed.
ENGLISH

6 1 818 024 RE / 10.2011
Door size Inside frame dimension in
Imperial
Inside frame dimension in
Metric6’6” x 6’6” 6’6” x 6’6” 1981 x 19816’6” x 7’0” 6’6” x 7’0” 1981 x 21346’10” x 6’4” 6’10” x 6’4” 2083 x 19317’0” x 6’4” 7’0” x 6’4” 2134 x 19317’0” x 6’6” 7’0” x 6’6” 2134 x 19817’0” x 7’0” 7’0” x 7’0” 2134 x 21347’3” x 6’4” 7’3” x 6’4” 2210 x 19317’5” x 6’6” 7’5” x 6’6” 2261 x 19817’5” x 7’0” 7’5” x 7’0” 2261 x 21347’6” x 6’4” 7’6” x 6’4” 2286 x 19317’6” x 6’6” 7’6” x 6’6” 2286 x 19817’6” x 7’0” 7’6” x 7’0” 2286 x 21347’8” x 6’4” 7’8” x 6’4” 2337 x 19318’0” x 6’4” 8’0” x 6’4” 2438 x 19318’0” x 6’6” 8’0” x 6’6” 2438 x 19818’0” x 7’0” 8’0” x 7’0” 2438 x 21349’0” x 6’6” 9’0” x 6’6” 2743 x 19819’0” x 7’0” 9’0” x 7’0” 2743 x 2134
All the dimensions stated in the illustrated section are in mm.
Door for on-site infill
CAUTIONTransport locking device / max. infill weightObserve the following instructions to avoid any injuries:
First install the infill and then remove the transport ▶ locking device so that the door does not bounce up.Observe the maximum infill weight of 7 kg/m▶ 2 for doors with an integrated wicket door so that the springs are not overloaded.
Maximum permissible infill weight for on-site infill:
BR
hei
ght
BR width
ENGLISH

1 818 024 RE / 10.2011 7
Infill in the frame Infill overlapping the frameFor on-site infill see also supplement to instructions.
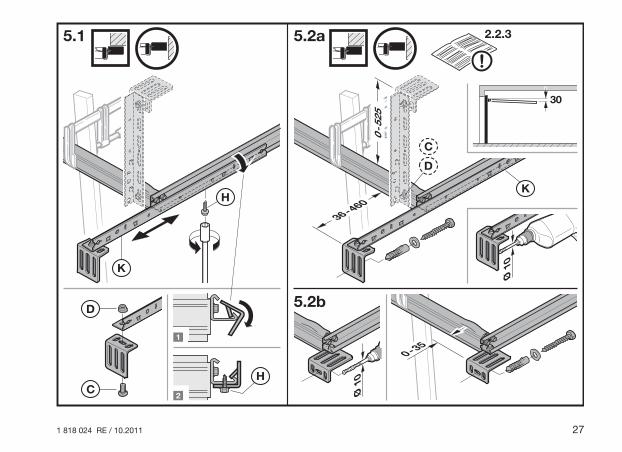
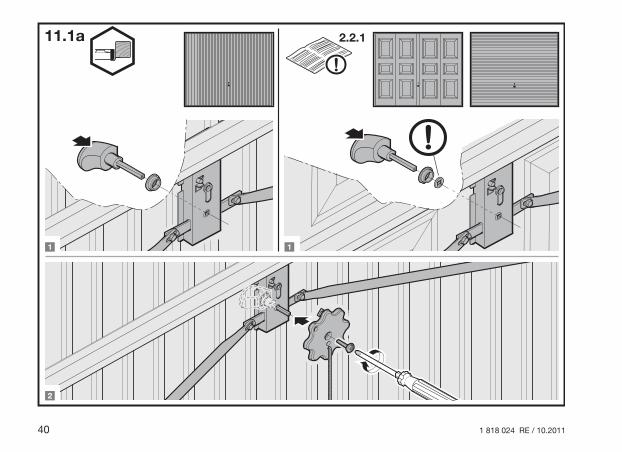
Doors with centre profile/horizontal ribbing2.2.1 The spacer bush with a square hole is only used in doors with centre profile or horizontal ribbing.
Fitting the handle2.2.2 Always choose the pin setting (• a, b or c) with the largest possible guidance for the interior handle.Shorten the pin of part • O if dimension A is less than 36 mm.
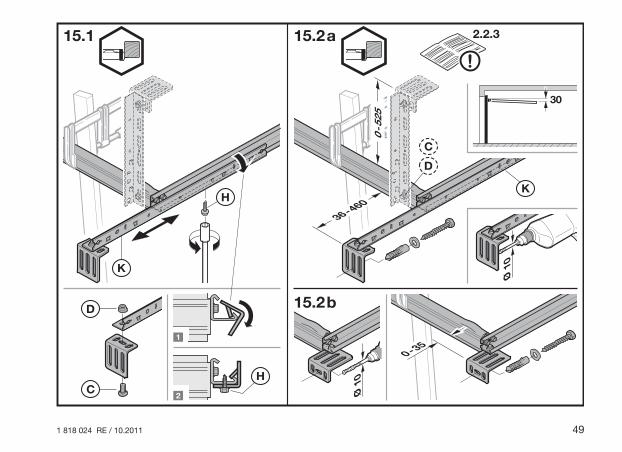
Fitting to the ceiling2.2.3
CAUTIONProtruding anchorThere is a risk of injury when fitting to the ceiling without sufficient headroom.
Shorten the anchor flush with the lower edge of the ▶ track.
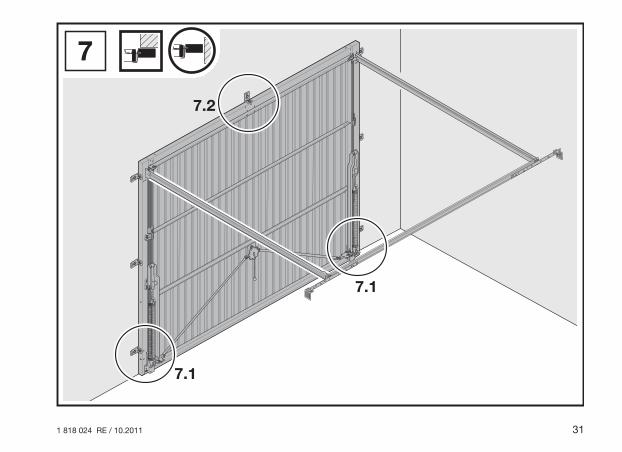
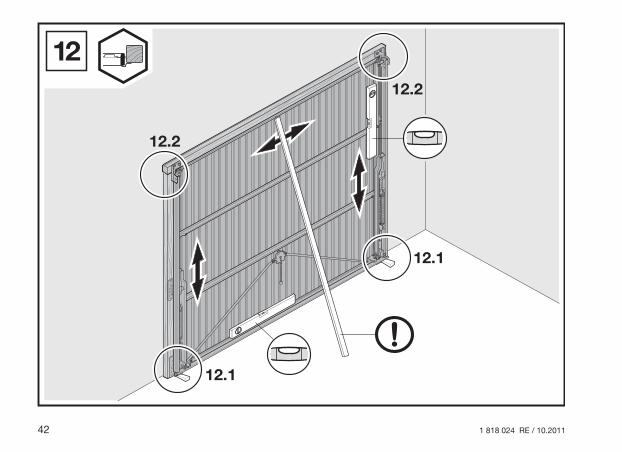
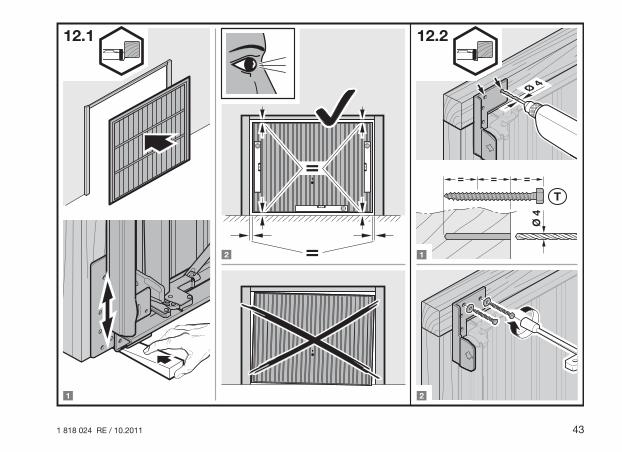
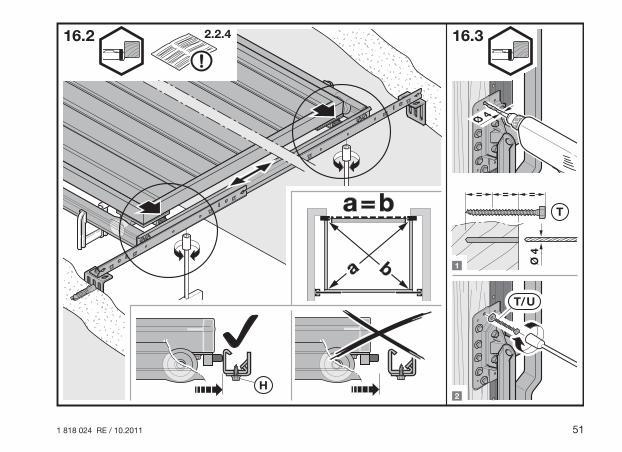
Checking the door action and door stop2.2.4 Check the door action and door stop.▶
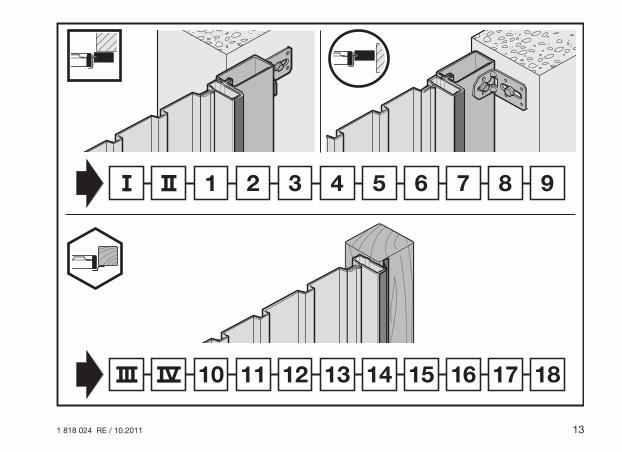
In order for the door to travel freely, the diagonal dimensions a and b must be equal and the rubber buffers in the end-of-travel position must contact the rear spacer on both sides.To ensure simple and safe fitting, carefully go through the work steps illustrated in Figures 1 to 9.3!
Initial start-up2.3
Checking the door spring tension (Figure 8.3)2.3.1 Open the door halfway.▶ The door should hold this position.
WARNINGDoor spring tensionImproper adjustment of the door spring tension may result in injuries.
Only have a specialist adjust the door spring ▶ tension in accordance with Figure 8.3 (1-4) when the door is open and secured.After adjusting the door spring tension, secure the ▶ spring holders with the spring securing pins.
If the door moves substantially downwards:Increase the spring tension.▶
If the door moves substantially upwards:Decrease the spring tension.▶
ENGLISH

8 1 818 024 RE / 10.2011
Perform a test run and check the door in accordance with Chapter 4, Inspection and Maintenance.When properly fitted and inspected, the garage door can be easily moved, is functionally safe and easy to operate.
Operation3
Safety instructions3.1
WARNINGDoor travelThere is a risk of injury in the door's swivelling and opening area.
When in operation, make sure that neither persons, ▶ children in particular, nor objects are located within the door's area of travel.Keep a safe distance of 1350 mm away from the ▶ door.
Opening and closingThere is a risk of injury when opening or closing the door improperly.
Manually opening:Only open the door with the exterior handle or ▶ interior handle, never with the lever arm or the cord knob.Always slide the door fully into the end-of-travel ▶ position and wait until the door has come to a stop.
Manually closing:Only close the door with the exterior handle, interior ▶ handle or the cord knob, never with the lever arm.Make sure that the locking engages correctly.▶
Opening the door with the handle3.2 Opening from the outside:
Turn the handle a quarter turn clockwise.▶ Opening from the inside:
Turn the handle a quarter turn anti-clockwise.▶ The door is not locked when closed with the grip handle. Use the key or locking pin to lock the door.
Locking and unlocking the door3.3 From outside with the key and from inside with the locking pin.Unlocking from the outside:
Turn the key one whole turn clockwise and remove ▶ the key.
ENGLISH

1 818 024 RE / 10.2011 9
Locking from the outside:Turn the key one whole turn anti-clockwise and ▶ remove the key.
Unlocking from the outside - self-locking:Turn the key half a turn clockwise and slightly open 1. the door.Turn the key back to the original position and 2. remove it.
When the door is closed, the lock is locked again.Unlocking from inside:
Push the locking pin to the left.▶ By unlocking in this way, you can then open the door without a key.Locking from inside:
Push the locking pin to the right.▶
NOTE:Follow the operator manufacturer's instructions for •doors with operator.Ribbed steel doors with ventilation slots are locked •horizontally with non-resilient rods. The locking pin is concealed to prevent burglary.
4 Inspection and Maintenance
Safety instructions4.1 Have a specialist perform inspection and ▶ maintenance work on the door at least once a year in accordance with these instructions.
WARNINGDoor travelThere is a risk of injury in the door's swivelling and opening area.
When in operation, make sure that neither persons, ▶ children in particular, nor objects are located within the door's area of travel.Functional parts, particularly safety components, ▶ may only be exchanged by a specialist.
Checking the condition of the door4.2 Visually inspect the general condition of the door, all ▶ components, and safety devices for completeness, proper condition, and effectiveness.Check that all of the fixing points are tight. Tighten ▶ the screws if necessary.Lubricate all pivot points with a standard penetrating ▶ or lube oil. Do not use grease (see Figure 8.1).
Checking the door spring tension4.3 See Chapter 2, Fitting and Initial Start-Up.
Replacing the door tension springs4.4 Have the door tension springs replaced by a ▶ specialist after approx. 25,000 door cycles.
ENGLISH

10 1 818 024 RE / 10.2011
This is required at the following approximate time:
Door cycles per day PeriodUp to 5 Every 15 years
6 – 10 Every 8 years11 – 20 Every 4 years21 – 40 Every 2 yearsOver 40 yearly
CAUTIONElongated door tension springDanger of injury due to elongated door tension spring – the coil spacing is irregular.
Call in a qualified specialist to replace the door ▶ tension spring immediately.
Checking the track rollers and tracks4.5 Clean the tracks. Do not apply grease.▶ Check the track rollers for wear. Have the track rollers ▶ replaced by a specialist if they are greatly worn or damaged.
Checking the lock and locking mechanism4.6
ATTENTIONCare productsUnsuitable care products may cause damage.
Only use specialised care products for the profile ▶ cylinder. Do not use oil or graphite.
Lubricate the locking rotary catch with a standard ▶ penetrating or lube oil. Do not use grease.
Check the locking as shown in Figure 1.2 and adjust ▶ it if necessary.
Adjusting the latching (Figure 9.1)4.6.1 The latching has already been adjusted for normal use. In case of building structure imprecision:
Loosen the nuts, slide the latching in the direction of ▶ the arrow and tighten the nuts again.
Accessories4.7 To ensure a high level of quality, safety, reliability, as •well as a long service life, only use original parts intended for this particular garage door.Only use an operator approved for the garage door •according to EN 13241-1. Follow the separate instructions for fitting and operation provided by the operator manufacturer. Immobilise both rotary catches.Use the latching kit for up-and-over doors if you want •the rotary catches to function when operating a garage door operator.
Surface Protection5
Door with steel infill5.1 The door leaf is made of galvanized material and has a polyester-primer coating. Scratches or minor damage are no reason for complaints. For long-lasting surface
ENGLISH
1 818 024 RE / 10.2011 11
protection, we recommend applying a final coat within three months of delivery. For this, follow the steps below:
Lightly sand the door surface with a fine sand paper 1. (at least 180 grain size).Clean the door surface with water and then dry it.2. Apply a 2K-EPOXY-etch primer to the door surface 3. and paint it with a conventional synthetic resin paint for outdoor applications. Coordinate both coatings with each other. When doing so, follow the instructions provided by the paint manufacturer.
Renew the final coat when necessary, depending on the local weather conditions.
Door with timber or GRP infill5.2 See seperate instructionlabel on inside face of door.
Cleaning and Care6
Door surfaces made of steel6.1 Clean the door surfaces with clear water and a soft ▶ sponge or with conventional paint cleaners.
Synthetic panes6.2
ATTENTION
Cleaning productsUnsuitable cleaning products can cause stress cracks and damage the panes.
Do not use any abrasive cleaners, sharp tools or ▶ alcohol-based glass cleaners.
Clean the synthetic panes with clear water and a ▶ soft sponge or cloth.Use a mild, acrylic-compatible plastics cleaner if ▶ more heavily soiled. Follow the instructions for use provided by the manufacturer.
Data plate6.3 Clean the data plate.▶
It must always be easy to read.
Assistance with Malfunctions7
If the door is difficult to move or exhibits other malfunctions:
Check all the functional parts. To do this, please ▶ follow the instructions in Chapter 4, Inspection and Maintenance.In the case of uncertainty, contact a specialist for ▶ assistance.
Dismantling8
Have the door dismantled and disposed of by a specialist.
ENGLISH

12 1 818 024 RE / 10.2011
1 818 024 RE / 10.2011 13

14 1 818 024 RE / 10.2011

1 818 024 RE / 10.2011 15

16 1 818 024 RE / 10.2011

1 818 024 RE / 10.2011 17

18 1 818 024 RE / 10.2011

1 818 024 RE / 10.2011 19
20 1 818 024 RE / 10.2011

1 818 024 RE / 10.2011 21

22 1 818 024 RE / 10.2011

1 818 024 RE / 10.2011 23

24 1 818 024 RE / 10.2011

1 818 024 RE / 10.2011 25

26 1 818 024 RE / 10.2011
1 818 024 RE / 10.2011 27

28 1 818 024 RE / 10.2011

1 818 024 RE / 10.2011 29

30 1 818 024 RE / 10.2011
1 818 024 RE / 10.2011 31

32 1 818 024 RE / 10.2011

1 818 024 RE / 10.2011 33

34 1 818 024 RE / 10.2011

1 818 024 RE / 10.2011 35

36 1 818 024 RE / 10.2011

1 818 024 RE / 10.2011 37

38 1 818 024 RE / 10.2011

1 818 024 RE / 10.2011 39
40 1 818 024 RE / 10.2011

1 818 024 RE / 10.2011 41
42 1 818 024 RE / 10.2011
1 818 024 RE / 10.2011 43

44 1 818 024 RE / 10.2011

1 818 024 RE / 10.2011 45

46 1 818 024 RE / 10.2011

1 818 024 RE / 10.2011 47

48 1 818 024 RE / 10.2011
1 818 024 RE / 10.2011 49

50 1 818 024 RE / 10.2011
1 818 024 RE / 10.2011 51

52 1 818 024 RE / 10.2011
1 818 024 RE / 10.2011 53

54 1 818 024 RE / 10.2011

1 818 024 RE / 10.2011 55
