instructions for maintenance
TRANSCRIPT

In the U.S.A.: BOBRICK WASHROOM EQUIPMENT, INC.200 Commerce Drive, Clifton Park, New York 12065-1350; Telephone: 518-877-7444 • FAX: 518-877-502911611 Hart Street, North Hollywood, California 91605-5882; Telephone: 818-982-9070 • FAX: 818-503-9287or email [email protected]
In Canada: BOBRICK WASHROOM EQUIPMENT COMPANY45 Rolark Drive, Scarborough, Ontario M1R 3B1 • FAX: 877-423-8555
© 2013 Bobrick Washroom Equipment, Inc.Form No. 4706-79 r4/12/13 Printed in U.S.A.
Product protected under U.S. Patent No's. 7,469,779 & 7,950,513; Other U.S. and foreign Patents Pending
Cabinet Assembly
3706-344
I K
4706-1914706-1934706-288
B
4706-1924706-1944706-289
J L
4706-15647063-15747063-158
C D
4706-240F
4706-2064706-2164706-295
P R
4706-2054706-2154706-294
O Q
4706-60A
Plastite Screws (10)
Machine Screws (4)
Hex Nuts (4)
ST
4706-2224706-175
47064-17Skirt for Semi-Recessed
Models Only
U
Or
47069-18Skirt for Surface-Mounted
Models Only
V
Or
E
H
G
M
N
Coin Box
Coin Box Feet (2)Coin Box Bracket
Product TrayCoin BoxBracket
Coin BoxMounting Slots
Coin Box
Coin Box Lock
Fig. AFig. B
INSTRUCTIONS FOR MAINTENANCEBOBRICK SANITARY NAPKIN/TAMPON VENDORS – MODELS B-4706, B-47064, and B-47069
IMPORTANT NOTE:Ensure coin box round feet are engaged in coin box bracket.
MAINTENANCE
To load Dispensers:Insert 20 napkin packages, measuring between 2-7/8" x 3/4" x 4-1/8" to 3-1/8" x 1-1/8" x 4-3/8" (73 x 19 x 105mm to 80 x 29 x 111mm) in the napkin magazine (see Advisory Bulletin TB-25). Then insert 30 tampons, measuring between 4-5/8" long x 9/16" diameter minimum to 5-1/8" long x 3/4" diameter maximum (118 x 14mm to 130 x 19mm) in the tampon magazine.
To empty Coin Box: (25¢ and 50¢ only)Unlock coin box lock with key provided and pull forward to remove. Empty coin box then reinsert coin box ensuring rectangular feet are fully inserted into coin box bracket mounting slots (see Fig. A). Lock coin box into place.
To dispense Napkin or Tampon:Insert coin(s) in coin slot (25¢ and 50¢ only), push button as far as it will go and release. When one napkin or tampon is left, the napkin or tampon red empty indicator blocks the coin slot to prevent another coin from being inserted and indicates time to refill.
If Vendor fails to work properly, ensure that:1. Machine is loaded with correct size napkins and tampons.2. Damaged napkins or tampons are not jamming mechanism.3. Coin box is seated properly on coin box bracket. (25¢ and 50¢ only)4. Coin box is not full. (25¢ and 50¢ only)
To replace individual Magazine Assembly:Order applicable Free, 25¢ or 50¢ Napkin and/or Tampon Magazine Assembly Kit. Remove napkins and/or tampons from vendor. Remove existing magazine by unscrewing two (2) hex nuts from each magazine assembly as indicated in figure B; install new magazine assembly using same hex nuts.
To convert coin denomination:Order Part No. 4706-240 Coin Conversion Kit which includes two (2) Bezels, Label Sheet with Free, 25¢, and 50¢ labels, and lever assembly for each coin denomination. For complete set of instructions for conversion in the field, refer to Form No. 3706-261.
Note: If converting from Free to a coin operated vendor, a coin box kit, Part No. 3706-344 must be ordered separately.
To replace Bezel Assembly:Remove existing bezels from the door by removing three (3) plastite screws from each bezel assembly on the door. Install new bezels ensuring that the locating pins are properly engaged and reinstall existing screws. Refer to replacement parts for correct Bezel assembly.
To replace Product Tray Kit:Order Part No. 4706-60. Remove four (4) plastite screws from bottom of cabinet and remove tray. Install new tray using same screws. If unit is recessed, unit must be removed from wall to access screws for product tray replacement.
To replace Door Locks:Order 2 each Part No. 47706-222 or 4706-175. Remove lock nut from inside of door. Install new locks, securing them with new lock nut.
To replace Door:Order Part No. 4706-157 for Free operation, 4706-158 for 25¢ or 37063-158 for 50¢. Unlock and open door. Use nail or similar object to push hinge pin out of hinge knuckle and use pliers to pull hinge pin out. Remove door. Using same hinge pin, align hinge knuckles of new door with the cabinet and insert pin from top. Ensure hinge pin is aligned flush at top or bottom of hinge barrel and filed smooth.
REPLACEMENT PARTS (refer to Fig. B)A Product Tray Kit 4706-60B Coin Box Kit 3706-344C Door Assembly Kit, Free (includes Bezel Assemblies) 4706-156D Door Assembly Kit, 25¢ (includes Bezel Assemblies) 4706-157E Door Assembly Kit, 50¢ (includes Bezel Assemblies) 4706-158F Coin Conversion Kit, Free, 25¢, 50¢ (includes Bezel Assemblies) 4706-240G Tampon Bezel Assemby Kit Free 4706-288H Napkin Bezel Assemby Kit Free 4706-289 I Tampon Bezel Assemby Kit 25¢ 4706-191J Napkin Bezel Assemby Kit 25¢ 4706-192K Tampon Bezel Assemby Kit 50¢ 4706-193L Napkin Bezel Assemby Kit 50¢ 4706-194M Tampon Magazine Assemby Kit Free 4706-294N Napkin Magazine Assemby Kit Free 4706-295O Tampon Magazine Assemby Kit 25¢ 4706-205P Napkin Magazine Assemby Kit 25¢ 4706-206Q Tampon Magazine Assemby Kit 50¢ 4706-215R Napkin Magazine Assemby Kit 50¢ 4706-216S Door Lock & Key (keyed to Cat 74) 43500-24T Door Lock & Key (keyed to Cat 118 for added security) 4706-175U 2" Skirt for Semi-Recessing 47064-17V 6" Skirt for Surface-Mounting 47069-18
In the U.S.A.: BOBRICK WASHROOM EQUIPMENT, INC.200 Commerce Drive, Clifton Park, New York 12065-1350 • Tel: 518/877-7444 • FAX: 518-877-502911611 Hart Street, North Hollywood, California 91605-5882 • Tel: 818/982-9600 • FAX: 818-503-1102
In Canada: BOBRICK WASHROOM EQUIPMENT COMPANY45 Rolark Drive, Scarborough, Ontario M1R 3B1 • Ontario East: Tel: (877) 423-6555 • FAX: (877) 423-8555• Manitoba West: Tel: (877) 423-6444 • FAX: (877) 423-8444
© 2011 Bobrick Washroom Equipment, Inc.Form No. 3706-189 r4/22/11 Printed in U.S.A.
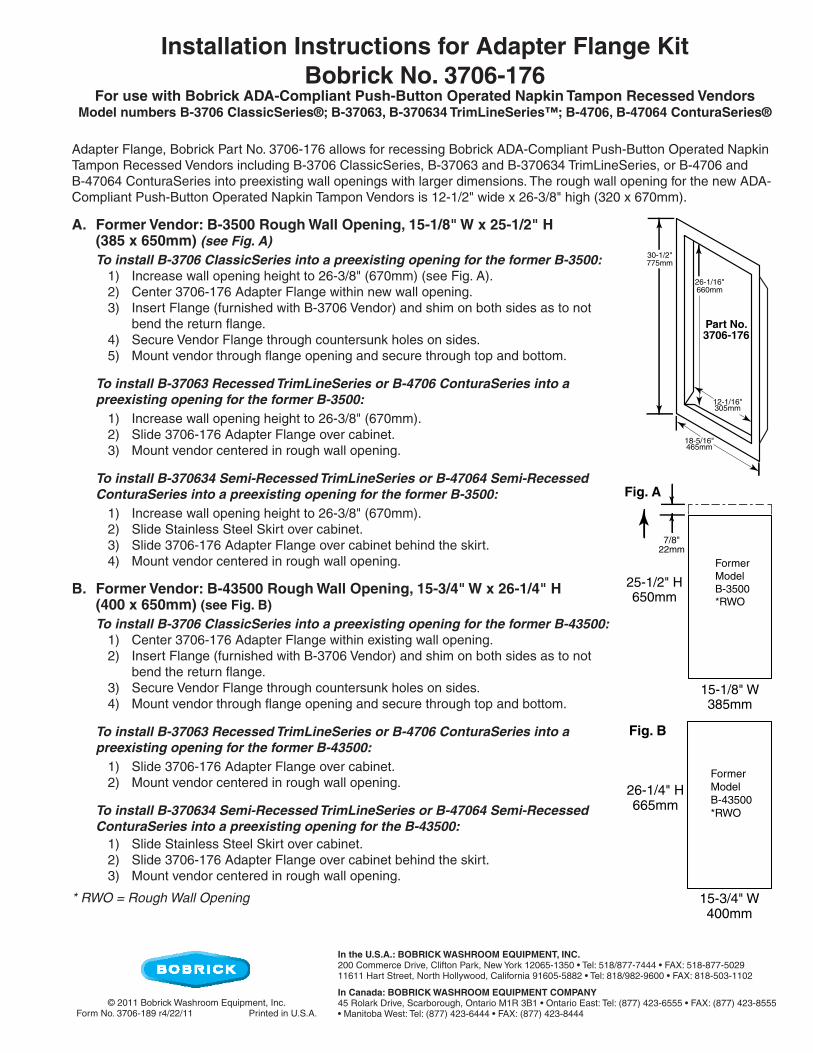
Installation Instructions for Adapter Flange KitBobrick No. 3706-176
For use with Bobrick ADA-Compliant Push-Button Operated Napkin Tampon Recessed VendorsModel numbers B-3706 ClassicSeries®; B-37063, B-370634 TrimLineSeries™; B-4706, B-47064 ConturaSeries®
Part No.3706-176
26-1/16"660mm
12-1/16"305mm
30-1/2"775mm
18-5/16"465mm
25-1/2" H650mm
15-1/8" W385mm
FormerModelB-3500*RWO
Fig. A
7/8"22mm
26-1/4" H665mm
15-3/4" W400mm
FormerModelB-43500*RWO
Fig. B
Adapter Flange, Bobrick Part No. 3706-176 allows for recessing Bobrick ADA-Compliant Push-Button Operated Napkin Tampon Recessed Vendors including B-3706 ClassicSeries, B-37063 and B-370634 TrimLineSeries, or B-4706 and B-47064 ConturaSeries into preexisting wall openings with larger dimensions. The rough wall opening for the new ADA-Compliant Push-Button Operated Napkin Tampon Vendors is 12-1/2" wide x 26-3/8" high (320 x 670mm).
A. Former Vendor: B-3500 Rough Wall Opening, 15-1/8" W x 25-1/2" H (385 x 650mm) (see Fig. A) To install B-3706 ClassicSeries into a preexisting opening for the former B-3500: 1) Increase wall opening height to 26-3/8" (670mm) (see Fig. A). 2) Center 3706-176 Adapter Flange within new wall opening. 3) Insert Flange (furnished with B-3706 Vendor) and shim on both sides as to not bend the return flange. 4) Secure Vendor Flange through countersunk holes on sides. 5) Mount vendor through flange opening and secure through top and bottom.
To install B-37063 Recessed TrimLineSeries or B-4706 ConturaSeries into a preexisting opening for the former B-3500: 1) Increase wall opening height to 26-3/8" (670mm). 2) Slide 3706-176 Adapter Flange over cabinet. 3) Mount vendor centered in rough wall opening.
To install B-370634 Semi-Recessed TrimLineSeries or B-47064 Semi-Recessed ConturaSeries into a preexisting opening for the former B-3500: 1) Increase wall opening height to 26-3/8" (670mm). 2) Slide Stainless Steel Skirt over cabinet. 3) Slide 3706-176 Adapter Flange over cabinet behind the skirt. 4) Mount vendor centered in rough wall opening.
B. Former Vendor: B-43500 Rough Wall Opening, 15-3/4" W x 26-1/4" H (400 x 650mm) (see Fig. B) To install B-3706 ClassicSeries into a preexisting opening for the former B-43500: 1) Center 3706-176 Adapter Flange within existing wall opening. 2) Insert Flange (furnished with B-3706 Vendor) and shim on both sides as to not bend the return flange. 3) Secure Vendor Flange through countersunk holes on sides. 4) Mount vendor through flange opening and secure through top and bottom.
To install B-37063 Recessed TrimLineSeries or B-4706 ConturaSeries into a preexisting opening for the former B-43500: 1) Slide 3706-176 Adapter Flange over cabinet. 2) Mount vendor centered in rough wall opening.
To install B-370634 Semi-Recessed TrimLineSeries or B-47064 Semi-Recessed ConturaSeries into a preexisting opening for the B-43500: 1) Slide Stainless Steel Skirt over cabinet. 2) Slide 3706-176 Adapter Flange over cabinet behind the skirt. 3) Mount vendor centered in rough wall opening.
* RWO = Rough Wall Opening
In the U.S.A.: BOBRICK WASHROOM EQUIPMENT, INC.200 Commerce Drive, Clifton Park, New York 12065-1350 • Tel: 518/877-7444 • FAX: 518-877-502911611 Hart Street, North Hollywood, California 91605-5882 • Tel: 818/982-9600 • FAX: 818-503-1102
In Canada: BOBRICK WASHROOM EQUIPMENT COMPANY45 Rolark Drive, Scarborough, Ontario M1R 3B1 • Ontario East: Tel: (877) 423-6555 • FAX: (877) 423-8555 • Manitoba West: Tel: (877) 423-6444 • FAX: (877) 423-8444
© 2012 Bobrick Washroom Equipment, Inc.Form No. 3706-261 r2/10/12 Printed in U.S.A.
Coin Return LeverAssembly
Machine Screws(T15 Torx)
Machine Screws(T15 Torx)
Fig. A2
Fig. A1
Fig. A
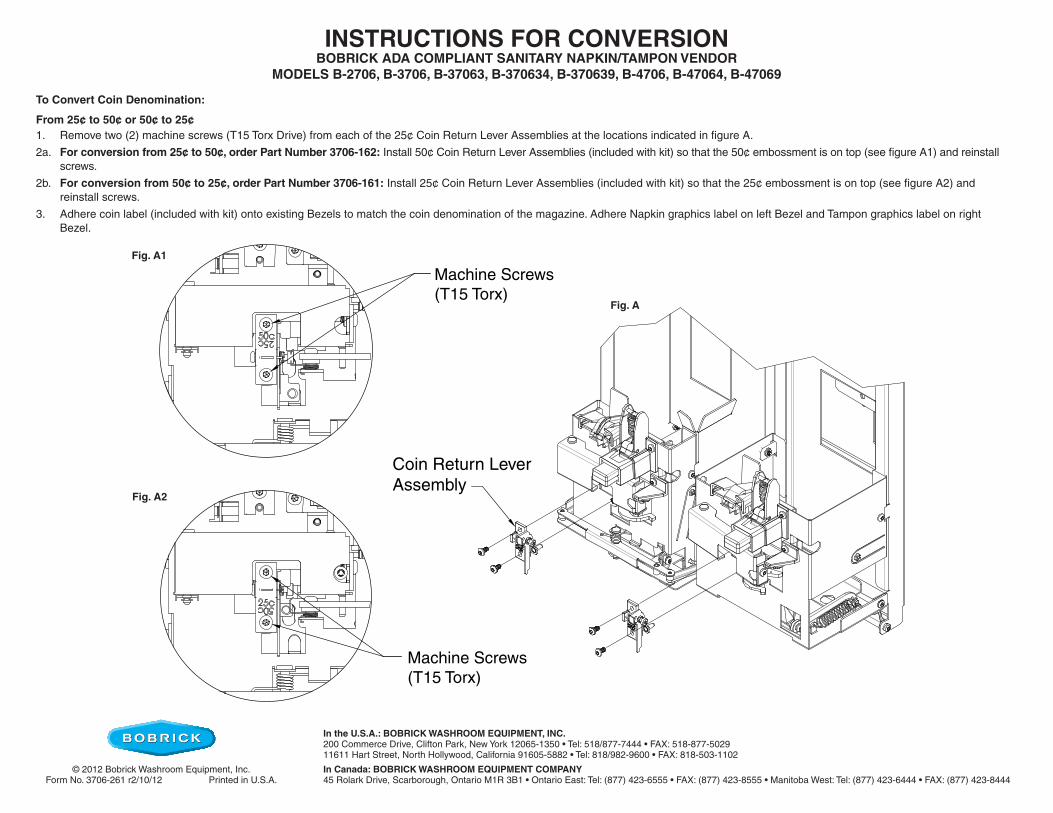
INSTRUCTIONS FOR CONVERSIONBOBRICK ADA COMPLIANT SANITARY NAPKIN/TAMPON VENDOR
MODELS B-2706, B-3706, B-37063, B-370634, B-370639, B-4706, B-47064, B-47069
To Convert Coin Denomination:
From 25¢ to 50¢ or 50¢ to 25¢1. Remove two (2) machine screws (T15 Torx Drive) from each of the 25¢ Coin Return Lever Assemblies at the locations indicated in figure A.
2a. For conversion from 25¢ to 50¢, order Part Number 3706-162: Install 50¢ Coin Return Lever Assemblies (included with kit) so that the 50¢ embossment is on top (see figure A1) and reinstall screws.
2b. For conversion from 50¢ to 25¢, order Part Number 3706-161: Install 25¢ Coin Return Lever Assemblies (included with kit) so that the 25¢ embossment is on top (see figure A2) and reinstall screws.
3. Adhere coin label (included with kit) onto existing Bezels to match the coin denomination of the magazine. Adhere Napkin graphics label on left Bezel and Tampon graphics label on right Bezel.
In the U.S.A.: BOBRICK WASHROOM EQUIPMENT, INC.200 Commerce Drive, Clifton Park, New York 12065-1350 • Tel: 518/877-7444 • FAX: 518-877-502911611 Hart Street, North Hollywood, California 91605-5882 • Tel: 818/982-9600 • FAX: 818-503-9287
In Canada: BOBRICK WASHROOM EQUIPMENT COMPANY45 Rolark Drive, Scarborough, Ontario M1R 3B1 • FAX: (877) 423-8555
© 2012 Bobrick Washroom Equipment, Inc.Form No. 3706-263 r04/23/12 Printed in U.S.A.
B
Ratchet PawlExtinsion Spring (A2)
Damper Gear Rack (B2)
Machine Screws (B1)(T15 Torx)
Ratchet Pawl (A1)
Machine Screws(T15 Torx)
Free Vend Lever (C)
Fig. 1
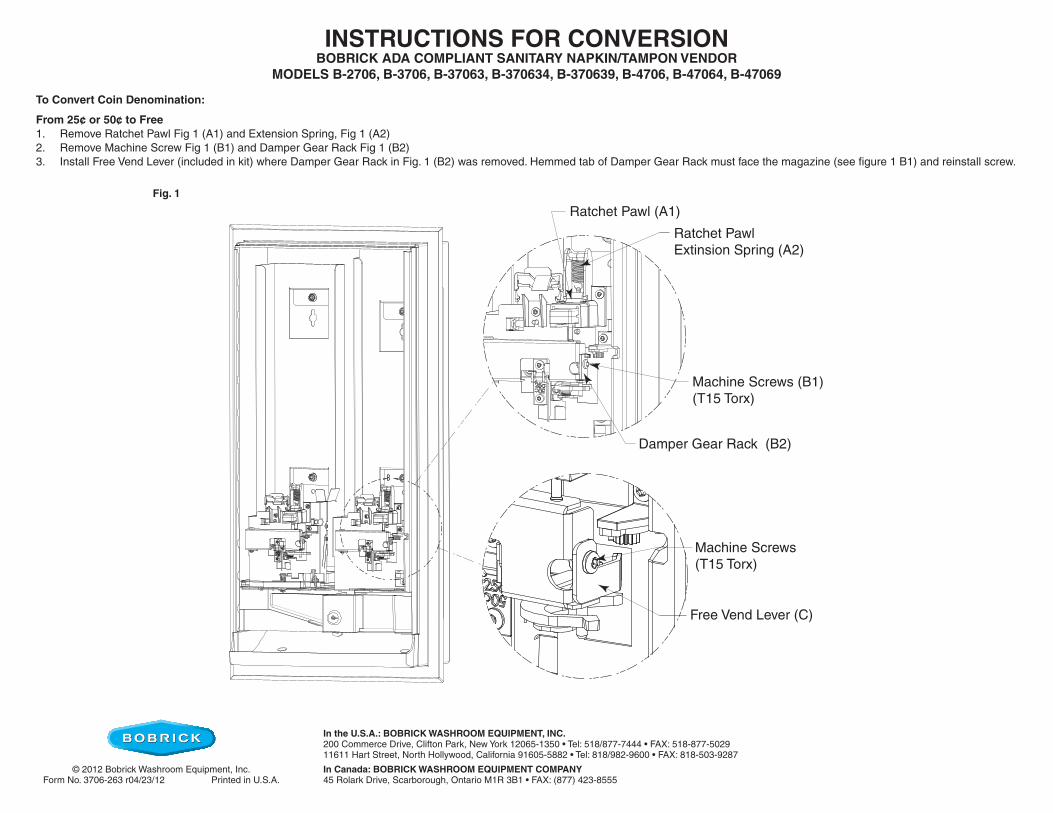
INSTRUCTIONS FOR CONVERSIONBOBRICK ADA COMPLIANT SANITARY NAPKIN/TAMPON VENDOR
MODELS B-2706, B-3706, B-37063, B-370634, B-370639, B-4706, B-47064, B-47069
To Convert Coin Denomination:
From 25¢ or 50¢ to Free1. Remove Ratchet Pawl Fig 1 (A1) and Extension Spring, Fig 1 (A2)2. Remove Machine Screw Fig 1 (B1) and Damper Gear Rack Fig 1 (B2)3. Install Free Vend Lever (included in kit) where Damper Gear Rack in Fig. 1 (B2) was removed. Hemmed tab of Damper Gear Rack must face the magazine (see figure 1 B1) and reinstall screw.
In the U.S.A.: BOBRICK WASHROOM EQUIPMENT, INC.200 Commerce Drive, Clifton Park, New York 12065-1350 • Tel: 518/877-7444 • FAX: 518-877-502911611 Hart Street, North Hollywood, California 91605-5882 • Tel: 818/982-9600 • FAX: 818-503-1102
In Canada: BOBRICK WASHROOM EQUIPMENT COMPANY45 Rolark Drive, Scarborough, Ontario M1R 3B1 • Ontario East: Tel: (877) 423-6555 • FAX: (877) 423-8555• Manitoba West: Tel: (877) 423-6444 • FAX: (877) 423-8444
© 2011 Bobrick Washroom Equipment, Inc.Form No. 3706-270 r5/12/11 Printed in U.S.A.
Plastite Screw(T15 Torx)
Product Tray
Plastite Screw(T15 Torx)
Product Tray
Cabinet
Cabinet
Bottom View of Cabinet
Tampon CoinMechanism
Coin Box
Napkin CoinMechanism
#10-32Hex Nut
CabinetFlange
Wall
Mounting Holes Top
Mounting Holes Bottom
Fig. C
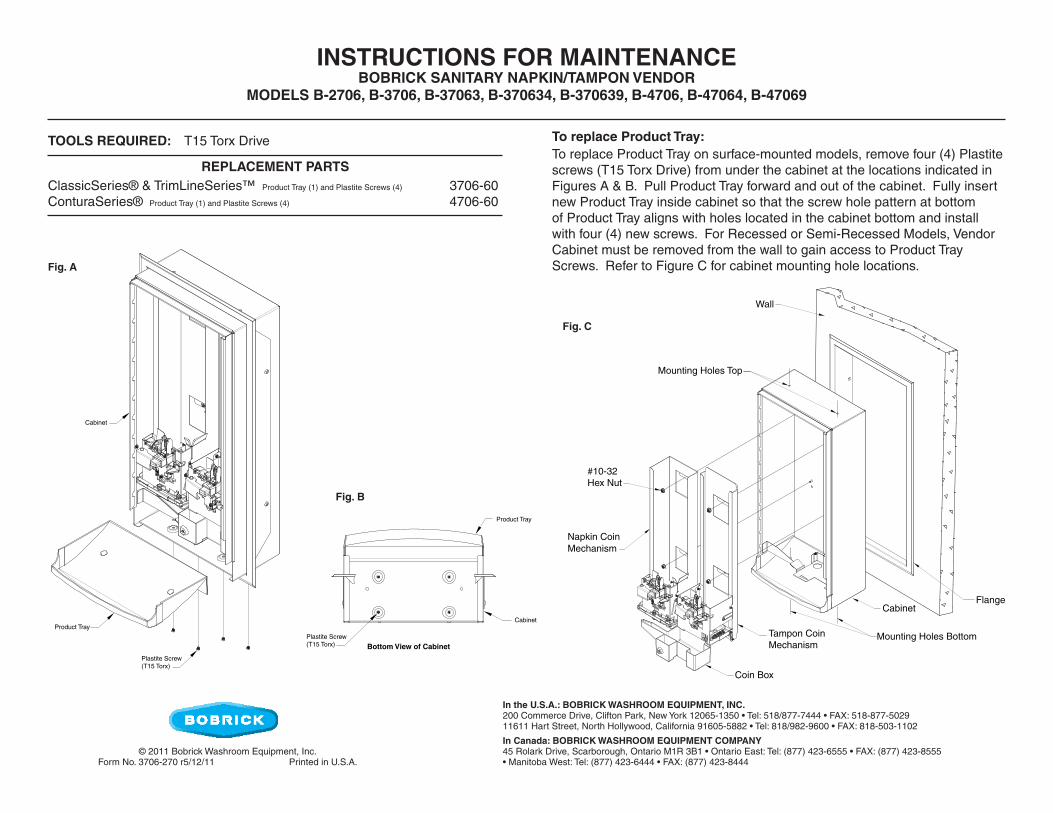
To replace Product Tray:To replace Product Tray on surface-mounted models, remove four (4) Plastite screws (T15 Torx Drive) from under the cabinet at the locations indicated in Figures A & B. Pull Product Tray forward and out of the cabinet. Fully insert new Product Tray inside cabinet so that the screw hole pattern at bottom of Product Tray aligns with holes located in the cabinet bottom and install with four (4) new screws. For Recessed or Semi-Recessed Models, Vendor Cabinet must be removed from the wall to gain access to Product Tray Screws. Refer to Figure C for cabinet mounting hole locations.
Fig. B
REPLACEMENT PARTSClassicSeries® & TrimLineSeries™ Product Tray (1) and Plastite Screws (4) 3706-60ConturaSeries® Product Tray (1) and Plastite Screws (4) 4706-60
INSTRUCTIONS FOR MAINTENANCEBOBRICK SANITARY NAPKIN/TAMPON VENDOR
MODELS B-2706, B-3706, B-37063, B-370634, B-370639, B-4706, B-47064, B-47069
TOOLS REQUIRED: T15 Torx Drive
Fig. A
In the U.S.A.: BOBRICK WASHROOM EQUIPMENT, INC.200 Commerce Drive, Clifton Park, New York 12065-1350 • Tel: 518/877-7444 • FAX: 518-877-502911611 Hart Street, North Hollywood, California 91605-5882 • Tel: 818/982-9600 • FAX: 818-503-1102
In Canada: BOBRICK WASHROOM EQUIPMENT COMPANY45 Rolark Drive, Scarborough, Ontario M1R 3B1 • Ontario East: Tel: (877) 423-6555 • FAX: (877) 423-8555• Manitoba West: Tel: (877) 423-6444 • FAX: (877) 423-8444
© 2012 Bobrick Washroom Equipment, Inc.Form No. 3706-275 r2/10/12 Printed in U.S.A.
CabinetCoin Box
#10-32Hex Nut (4)
NapkinMagazineAssembly
TamponMagazineAssembly
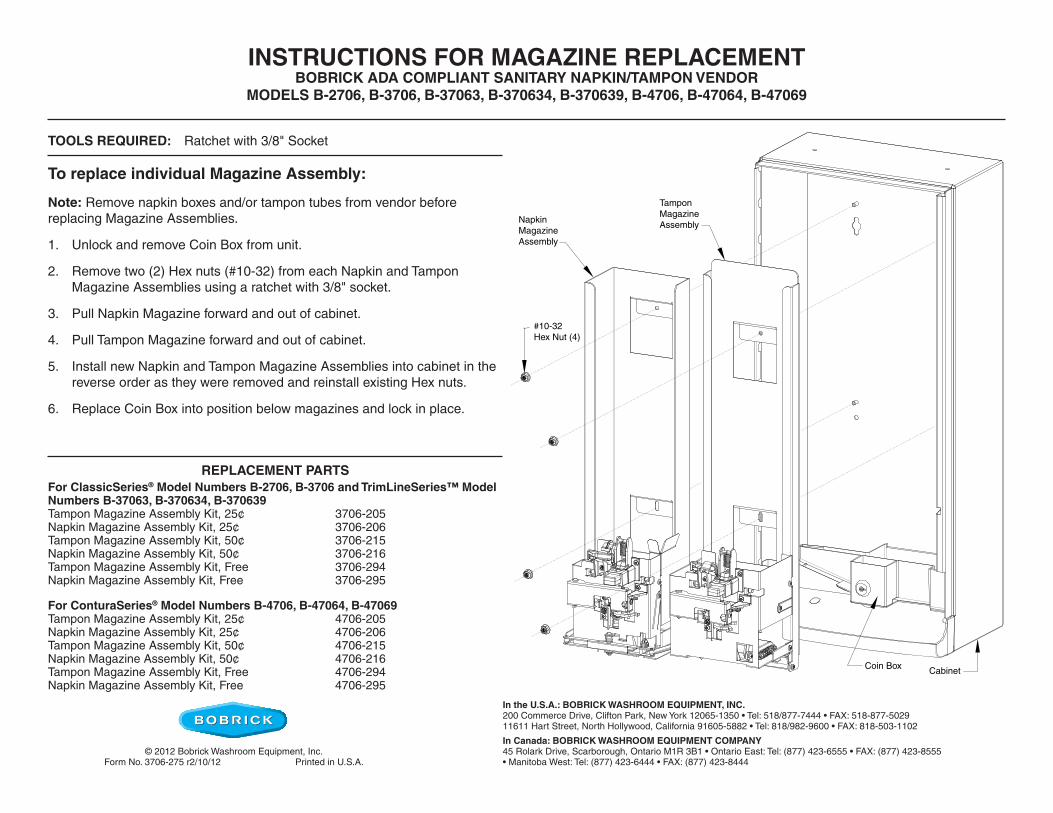
To replace individual Magazine Assembly:
Note: Remove napkin boxes and/or tampon tubes from vendor before replacing Magazine Assemblies.
1. Unlock and remove Coin Box from unit.
2. Remove two (2) Hex nuts (#10-32) from each Napkin and Tampon Magazine Assemblies using a ratchet with 3/8" socket.
3. Pull Napkin Magazine forward and out of cabinet.
4. Pull Tampon Magazine forward and out of cabinet.
5. Install new Napkin and Tampon Magazine Assemblies into cabinet in the reverse order as they were removed and reinstall existing Hex nuts.
6. Replace Coin Box into position below magazines and lock in place.
REPLACEMENT PARTSFor ClassicSeries® Model Numbers B-2706, B-3706 and TrimLineSeries™ Model Numbers B-37063, B-370634, B-370639Tampon Magazine Assembly Kit, 25¢ 3706-205Napkin Magazine Assembly Kit, 25¢ 3706-206Tampon Magazine Assembly Kit, 50¢ 3706-215Napkin Magazine Assembly Kit, 50¢ 3706-216Tampon Magazine Assembly Kit, Free 3706-294Napkin Magazine Assembly Kit, Free 3706-295
For ConturaSeries® Model Numbers B-4706, B-47064, B-47069 Tampon Magazine Assembly Kit, 25¢ 4706-205Napkin Magazine Assembly Kit, 25¢ 4706-206Tampon Magazine Assembly Kit, 50¢ 4706-215Napkin Magazine Assembly Kit, 50¢ 4706-216Tampon Magazine Assembly Kit, Free 4706-294Napkin Magazine Assembly Kit, Free 4706-295
INSTRUCTIONS FOR MAGAZINE REPLACEMENTBOBRICK ADA COMPLIANT SANITARY NAPKIN/TAMPON VENDOR
MODELS B-2706, B-3706, B-37063, B-370634, B-370639, B-4706, B-47064, B-47069
TOOLS REQUIRED: Ratchet with 3/8" Socket
In the U.S.A.: BOBRICK WASHROOM EQUIPMENT, INC.200 Commerce Drive, Clifton Park, New York 12065-1350 • Tel: 518/877-7444 • FAX: 518-877-502911611 Hart Street, North Hollywood, California 91605-5882 • Tel: 818/982-9600 • FAX: 818-503-1102
In Canada: BOBRICK WASHROOM EQUIPMENT COMPANY45 Rolark Drive, Scarborough, Ontario M1R 3B1 • Ontario East: Tel: (877) 423-6555 • FAX: (877) 423-8555 • Manitoba West: Tel: (877) 423-6444 • FAX: (877) 423-8444
© 2012 Bobrick Washroom Equipment, Inc.Form No. 3706-271 r2/9/12 Printed in U.S.A.
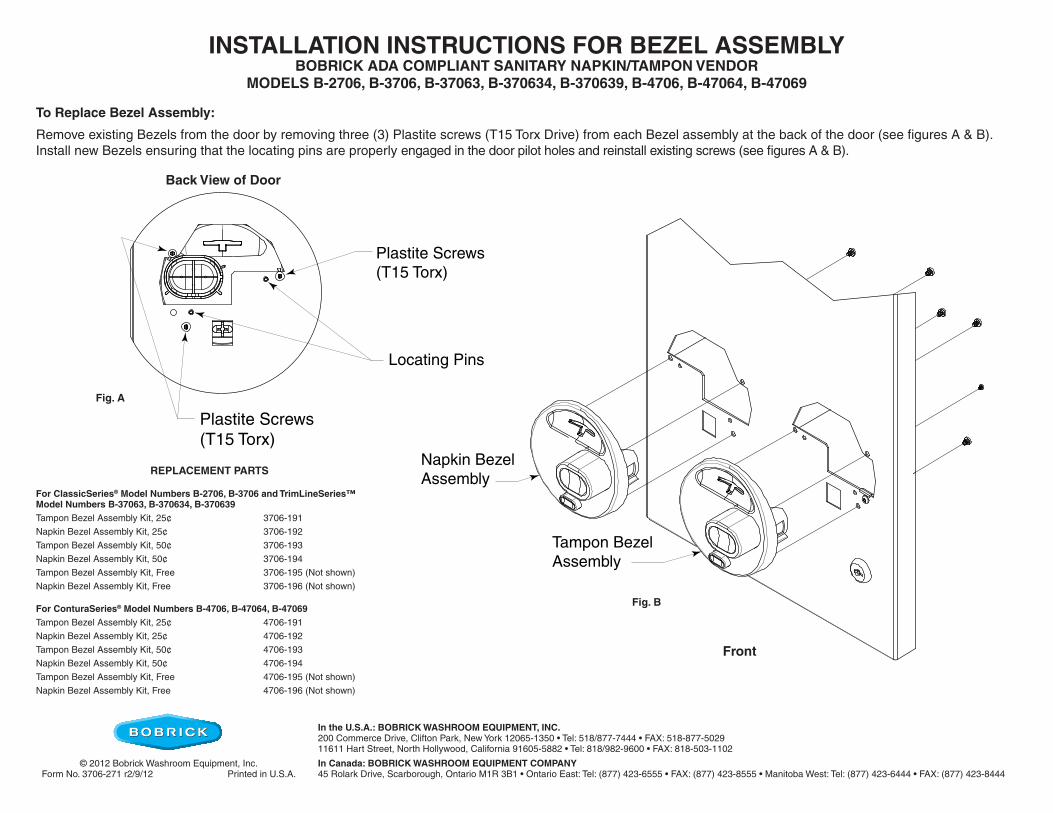
Locating Pins
Napkin BezelAssembly
Plastite Screws(T15 Torx)
Tampon BezelAssembly
Plastite Screws(T15 Torx)
INSTALLATION INSTRUCTIONS FOR BEZEL ASSEMBLYBOBRICK ADA COMPLIANT SANITARY NAPKIN/TAMPON VENDOR
MODELS B-2706, B-3706, B-37063, B-370634, B-370639, B-4706, B-47064, B-47069
To Replace Bezel Assembly:
Remove existing Bezels from the door by removing three (3) Plastite screws (T15 Torx Drive) from each Bezel assembly at the back of the door (see figures A & B). Install new Bezels ensuring that the locating pins are properly engaged in the door pilot holes and reinstall existing screws (see figures A & B).
Fig. A
Fig. B
REPLACEMENT PARTS
For ClassicSeries® Model Numbers B-2706, B-3706 and TrimLineSeries™ Model Numbers B-37063, B-370634, B-370639Tampon Bezel Assembly Kit, 25¢ 3706-191
Napkin Bezel Assembly Kit, 25¢ 3706-192
Tampon Bezel Assembly Kit, 50¢ 3706-193
Napkin Bezel Assembly Kit, 50¢ 3706-194
Tampon Bezel Assembly Kit, Free 3706-195 (Not shown)
Napkin Bezel Assembly Kit, Free 3706-196 (Not shown)
For ConturaSeries® Model Numbers B-4706, B-47064, B-47069 Tampon Bezel Assembly Kit, 25¢ 4706-191
Napkin Bezel Assembly Kit, 25¢ 4706-192
Tampon Bezel Assembly Kit, 50¢ 4706-193
Napkin Bezel Assembly Kit, 50¢ 4706-194
Tampon Bezel Assembly Kit, Free 4706-195 (Not shown)
Napkin Bezel Assembly Kit, Free 4706-196 (Not shown)
Back View of Door
Front