instructions for use - wh.com€¦ · foot switchfoot switch ((((wired pedalwired pedalwired...
TRANSCRIPT

ENGLISH FB-618/EN – Rev. A-01 - 2017.03.30 1/46
PROPHYLAXIS MASTER
® 1. BEFORE USE........................................................ 2
1.1. INTENDED USE .................................................... 3 1.2. APPLICATION FIELDS ............................................. 3 1.3. INTENDED USER .................................................. 4 1.4. PATIENT POPULATION .......................................... 4 1.5. CONTRAINDICATIONS ........................................... 5
1.6. COMPATIBILITY ................................................... 5 1.7. GENERAL PRECAUTIONS ........................................ 6
2. INSTALLATION .................................................... 7
2.1. EQUIPMENT INCLUDED IN THE BOX .......................... 7 2.2. STEP-BY-STEP INSTALLATION .................................. 9 2.3. POWDER CHAMBERS .......................................... 13
2.4. WATER SUPPLY AND PIEZON® BOTTLE .................. 14
2.5. AIRFLOW® AND PERIOFLOW
® HANDPIECES ........ 15
2.6. PIEZON® HANDPIECE AND INSTRUMENTS .............. 16
3. DEVICE USE ...................................................... 17
3.1. INTERFACES ...................................................... 17
3.2. TREATMENT SEQUENCE ....................................... 21
4. OPTIONAL EQUIPMENT ..................................... 22
4.1. PERIOFLOW® NOZZLES..................................... 22
4.2. ENDOCHUCK & PI INSTRUMENT ........................... 22 4.3. MIRROR SUCTION CANNULA ................................ 22
5. CLEANING & REPROCESSING ............................. 23
5.1. WATER LINE CLEANING & DISINFECTION ................ 23
5.2. SAFETY INFORMATION ON NIGHT CLEANER® ........ 25
5.3. REPROCESSING OF EMS PARTS ............................. 26 5.4. REPROCESSING OF CLASENUNO CANNULA ............. 32
6. MAINTENANCE & TROUBLESHOOTING ............... 33
6.1. AIRFLOW® HANDPIECE POWDER UNCLOGGING ....... 33
6.2. AIRFLOW® HANDPIECE LEAKAGE .......................... 33
6.3. PIEZON® LIGHT GUIDE CHECK & REPLACE ............... 33
6.4. HANDPIECE CORD REPLACEMENT ........................... 34 6.5. MONTHLY CHECK ............................................... 34 6.6. YEARLY MAINTENANCE & REPAIR ........................... 35
6.7. PAIRING A NEW PEDAL ......................................... 35 6.8. TROUBLESHOOTING ............................................ 36 6.9. TO CONTACT EMS SERVICE SUPPORT ..................... 39
7. SUSTAINABILITY ................................................ 40
7.1. DISPOSAL OF WASTE PARTS .................................. 40
7.2. SUSTAINABLE DESIGN .......................................... 40
8. WARRANTY....................................................... 40
9. TECHNICAL DESCRIPTION ................................... 41
9.1. SYMBOLS .......................................................... 42
9.2. ELECTROMAGNETIC COMPATIBILITY ....................... 43
10. ALPHABETICAL INDEX ........................................ 45
INSTRUCTIONS FOR USE
Table of contents �

ENGLISH FB-618/EN – Rev. A-01 - 2017.03.30 2/46
1. BEFORE USE
TO AVOID the risk of electric shock, this equipment must only be connected to a mains supply with protective earth/grounding. This device uses a Class-I insulating system that requires protective earth. FOR USA AND CANADAFOR USA AND CANADAFOR USA AND CANADAFOR USA AND CANADA: GROUNDING RELIABILITY CAN ONLY BE ACHIEVED WHEN EQUIPMENT IS CONNECTED TO AN EQUIVALENT RECEPTACLE MARKED “HOSPITAL ONLY” OR “HOSPITAL GRADE”.
DO NOT modify this equipment and/or any of its accessories. No modification of any part of this medical device is allowed.
DO NOT open the device. There are no serviceable parts inside.
If any serious incident occurs that is directly or indirectly related to the device, report it immediately to the manufacturer and to the competent authority of your country and of where the patient is established (if different).
Disconnect the mains plug from electrical outlet for the purposes of maintenance, in the case of malfunction or when the device is left unattended.
Turn off the water inlet when not in use. The device is not equipped with Aquastop and the EG-110 water hose may disconnect or leak: risk of flooding.
• The instructions for use of the device are provided in electronic format. However, if you want a
hard copy, you can request one free of charge on our website, by telephone or in writing, and receive it within 7 days.
• The instructions for use are available for download in PDF format at http://www.myems.dental using the Product/Key Code FT-229. A PDF reader is required and, in case of need, it can be downloaded from the same web site.
• It is essential to first read and understand all the instructions for use before operating the device and using the related accessories.
• We recommend that you visit our website regularly to consult and/or download the latest version of the instructions for use of your device at http://www.myems.dental
• Please contact EMS technical support or your local EMS representative for further information and support.
• Always keep this documentation close at hand.
CONGRATULATIONS! You are now the owner of this new EMS device!
Please read the instructions carefully before use �
ENGLISH FB-618/EN – Rev. A-01 - 2017.03.30 3/46
1.1. Intended Use
The device is a fixed table top unit combining: - PIEZON®: : : : ultrasound scaler
- AIRFLOW®: air polishing technology
Intended for use in
PREVENTION, MAINTENANCE AND TREATMENT
during dental prophylaxis to remove biofilm and calculus from natural teeth, restorations and implants
1.2. Application Fields
Natural teeth include smooth surfaces, pits, fissures, interproximal areas and around restorations.
AIRFLOWAIRFLOWAIRFLOWAIRFLOW® applications include:applications include:applications include:applications include: • Plaque removal for the placement of sealants • Surface preparation prior to the bonding/cementation of inlays, onlays, crowns and veneers • Surface preparation prior to placing composite restorations • Effective plaque and stain removal for orthodontic patients • Cleaning prior to the bonding of orthodontic brackets • Cleaning the implant fixture prior to loading • Stain removal for shade determination • Plaque removal prior to a fluoride treatment • Plaque and stain removal prior to a whitening procedure
PERIOPERIOPERIOPERIOFLOWFLOWFLOWFLOW® applications include:applications include:applications include:applications include: • Maintenance of periodontal deep pockets up to 10mm following initial treatment • Removal of periodontal biofilm • Cleaning of implants
PIEZONPIEZONPIEZONPIEZON® applications include:applications include:applications include:applications include: • Removal of supragingival calculus • Removal of subgingival calculus • Periodontal treatment • Preparation of approximal cavities • Luting tooth-shaded inlays and onlays with highly thixotropic, dual-curing cements • Removal of crowns, bridges, inlays and posts as well as condensing gutta-percha • Endo preparation, cleaning and irrigation of root canals • Endo retrograde preparation of root canals • Endo condensing gutta-percha • Endo removal of crowns, bridges and restorations • Restorative: Preparation of cavities • Restorative: Cementation of restorations • Restorative: Condensing of amalgams

ENGLISH FB-618/EN – Rev. A-01 - 2017.03.30 4/46
1.3. Intended User
Only qualified qualified qualified qualified dentistdentistdentistdentistssss and dental hygienistsdental hygienistsdental hygienistsdental hygienists must use this device by fully complying with their respective country’s regulations, accident prevention measures, and strictly follow these instructions for use.
The device must be prepared and maintained only by persons who have been instructed in infection control, personal protection and patient safety.
Improper use (e.g. due to lack of hygiene or routine maintenance), non-compliance with our instructions, or the use of accessories and spare parts that are not approved by
EMS invalidates all claims under warranty and any other claims.
No specific training other than initial professional training is required to use this medical device. The practitioner is responsible for performing the clinical treatments and for any dangers that may arise due to a lack of skill and/or training. For optimal patient comfort, safety and efficiency, we suggest that you regularly follow our:
SWISS DENTAL ACADEMY Training Program
Do you know the Guided Biofilm therapy? If not:
GET TRAINED NOW Please contact your local EMS representative for further information.
Professional product installation and product introduction by EMS certified person is highly recommended for optimal setup and reliability.
1.4. Patient Population
PIEZON® devices are intended for use on patients requiring dental treatment, including scaling (e.g. subgingival and supragingival calculus, stains), endo (e.g. root canal treatment), restorative (e.g. cavities, amalgams), periodontics and dental prophylaxis, regardless of age or gender. AIRFLOW® devices are intended for use on patients requiring dental treatment, including cleaning and polishing of teeth (natural or implant) by the projection of water, air and dental powders onto the tooth surface, regardless of age or gender.
This medical device is not intended for use on newborn (neonate) and infant patient populations.

ENGLISH FB-618/EN – Rev. A-01 - 2017.03.30 5/46
1.5. Contraindications
Treatments contraindications:Treatments contraindications:Treatments contraindications:Treatments contraindications: Suggestion for alternativeSuggestion for alternativeSuggestion for alternativeSuggestion for alternativessss::::
® and ® are contraindicated with
Patients with upper respiratory tract infections, chronic bronchitis/asthma1.
PIEZON®
® subgingivalsubgingivalsubgingivalsubgingival + ®
are contraindicated with Pregnant and breastfeeding patients2
AIRFLOW® Supragingival
and PIEZON® PS
® is contraindicated with
Patients taking bisphosphonate therapy, with severe inflammation and/or osteonecrosis.
AIRFLOW® PLUS and PIEZON® PS
® is contraindicated with
Patients with a cardiac pacemaker, defibrillators and any implantable electronic device.
AIRFLOW® PLUS
The decision to use AIRFLOW® and/or PERIOFLOW® on contagious patients or on patients with risk of infection, has to be taken by the dentist/medical doctor on an individual basis following practitioner protection level, patient risk assessement and specific country regulations.
AIRFLOWAIRFLOWAIRFLOWAIRFLOW®®®® powders contraindicationpowders contraindicationpowders contraindicationpowders contraindicationssss:::: Suggestion for alternativeSuggestion for alternativeSuggestion for alternativeSuggestion for alternativessss::::
CLASSIC CLASSIC CLASSIC CLASSIC powder is contraindicated with Low-salt diet patients. AIRFLOW® PLUS
Flavored CLASSIC Flavored CLASSIC Flavored CLASSIC Flavored CLASSIC powder is contraindicated with Patients allergic to flavor aroma.
AIRFLOW® PLUS Or CLASSIS NEUTRAL
PLUS PLUS PLUS PLUS powder is contraindicated with Patients allergic to Chlorhexidine.
AIRFLOW® PERIO
PERIO PERIO PERIO PERIO & SOFT SOFT SOFT SOFT powder is contraindicated with Patients allergic to Glycine (Glycocoll).
AIRFLOW® PLUS
1.6. Compatibility
This device is compatible with the following accessories: ® Powders PLUS powders: DV-082, DV-086 series
CLASSIC powders: DV-048 series PERIO and SOFT powders: DV-070, DV-071 series
® Handpiece EL-308 ® Handpiece EL-354
® Handpieces EN-060, EN-061 ® Scaling and Periodontal instruments PS, A, B, C, P, PL1, PL2, PL3, PL4, PL5, HPL3, DPL3, PI ® Endodontics instruments RT1, RT2, D, H, ESI, Files ISO 15, 20, 25, 30, 35,
Endochuck 180°, 120° and 90°, RT3, RE2, BERUTTI ® Conservative measures instruments E, F, G, SP ® Cavity preparation instruments SM, PF, SD, VE, SB, SBD, SBM
1 Related to possible powder inhalation during AIRFLOW® treatment. 2 Related to the use of antibiotics in case of emphysema.

ENGLISH FB-618/EN – Rev. A-01 - 2017.03.30 6/46
Applied Parts
The following items are Medical Device Applied Parts: • AIRFLOW® (EL-308) handpiece
• PERIOFLOW ® (EL-354) handpiece
• PIEZON® (EN-060 and EN-061)handpieces
Applied Parts, under certain operating conditions, may exceed 41°C of temperature and reach a maximum temperature of 51°C.
1.7. General Precautions
USE EMS ACCESSORIES ONLY!
DO NOT use this device in the presence of flammable anesthetics or oxidizing gases (such as
nitrous oxide (N2O) and oxygen) or in close proximity to volatile solvents (such as ether or alcohol),
as explosion may occur.
DO NOT store the powder near acids or heat sources.
TAKE the following precautions to prevent any adverse events to the patient and/or to the user
in case of electromagnetic disturbances:
• Always refer to the information listed in the chapter “Electromagnetic Compatibility”. • In case of a wireless pedal malfunction, presumably caused by electromagnetic
disturbances, use the wired pedal instead.
• In case of a device malfunction, presumably caused by electromagnetic disturbances, first
verify the cabling, and then move any portable RF communications equipment and mobile
devices placed nearby as far away as possible to rule out interference.
• Stop using the device if the electromagnetic disturbances persist and contact EMS
technical support for assistance.
The use of any other accessories could lead to patient injury, malfunction or damage to the device
PS Instrument

ENGLISH FB-618/EN – Rev. A-01 - 2017.03.30 7/46
2. INSTALLATION
2.1. Equipment included in the box
Check contents for any damage that may have occurred during transportation.
AIRFLOW AIRFLOW AIRFLOW AIRFLOW Prophylaxis Prophylaxis Prophylaxis Prophylaxis MasterMasterMasterMaster® UnitUnitUnitUnit with Master Screw, water & air filters installed FT-229/A
Quick GuideQuick GuideQuick GuideQuick Guide providing links to eIFU download and product registration
Power Power Power Power cordcordcordcord Plug type depends on country
AIRFLOWAIRFLOWAIRFLOWAIRFLOW® PLUSPLUSPLUSPLUS Prophylaxis Prophylaxis Prophylaxis Prophylaxis PowderPowderPowderPowder DV-082 or DV-086
Powder Powder Powder Powder CCCChamberhamberhamberhamberssss PLUSPLUSPLUSPLUS :::: EL-607 CLASSICCLASSICCLASSICCLASSIC:::: EL-606
Water Water Water Water hosehosehosehose EG-110
Air hoseAir hoseAir hoseAir hose EH-142
AIRFLOWAIRFLOWAIRFLOWAIRFLOW® CLASSIC CLASSIC CLASSIC CLASSIC Prophylaxis Prophylaxis Prophylaxis Prophylaxis PowderPowderPowderPowder DV-048
NIGHT NIGHT NIGHT NIGHT CLEANERCLEANERCLEANERCLEANER®
DV-146 (800 ml)
CLIP+CLEANCLIP+CLEANCLIP+CLEANCLIP+CLEAN 2x AB-613 (Package EL-655)
PIEZONPIEZONPIEZONPIEZON® bottlebottlebottlebottle EG-111
AIRFLOWAIRFLOWAIRFLOWAIRFLOW® handpiece handpiece handpiece handpiece cordcordcordcord EM-145
One of the following pOne of the following pOne of the following pOne of the following pedaledaledaledalssss::::
Boost wBoost wBoost wBoost wireless ireless ireless ireless pedalpedalpedalpedal EK-404A with 2x AA 1.5V type lithium batteries
NIGHT CLEANERNIGHT CLEANERNIGHT CLEANERNIGHT CLEANER®
bottlebottlebottlebottle EG-120
PIEZONPIEZONPIEZONPIEZON® handpiece handpiece handpiece handpiece cordcordcordcord EM-146
Foot switchFoot switchFoot switchFoot switch ((((Wired pedalWired pedalWired pedalWired pedal)))) EK-410

ENGLISH FB-618/EN – Rev. A-01 - 2017.03.30 8/46
FS-442 / FS-447 (See below)3
FS-441
Optional: FS-443
1 EL-308: AIRFLOW® handpiece 1 EN-060 : PIEZON® handpiece 1 EL-354: PERIOFLOW® handpiece
2 AB-470A/A: Easy Clean 2 DS-001A: Instrument A AB-358/A Nozzle extractor (under)
3 Ultra FS ClasenUNO Cannula1 3 DS-016A : Instrument PS 2 10x AB-327A/A: PERIOFLOW® nozzle
4 EL-651: Cord gaskets 4 DS-011A: Instrument P 3 6x DT-064: Instrument PI
5 El-600: Water filter 5 4x AB-340: Light guide 4 DT-018: Flat wrench (on top)
6 EL-599: Air filter 5 DS-010: Endochuck 120°
3 AIRFLOW® application box FS-442 integrates ClasenUNO Cannula in the European Union. In the rest of the world, the reference is FS-447.
ENGLISH FB-618/EN – Rev. A-01 - 2017.03.30 9/46
2.2. Step-by-step installation
Find an appropriate area to place the device.
Place the medical device (control unit) within the dental cabinet in a suitable position for your activity and leave enough free space to allow easy handling and proper aeration.
Keep 10cm of clearance around at all times and do not stack over other devices. The medical device must be placed on a secure and flat surface (with a maximum slope of 5 degrees). Check for proper water and air supply lines.
Verify that your dental cabinet has a filtered tap water source and a compressed air source using air and water hoses EG-110 and EH-142, respectively.
In case your cabinet water and air lines are not provided with the required hoses EG-110 and EH-142, a proper installation by qualified personnel is required. Call EMS Service for support.
In order to prevent retro contamination, connect the cable to EN-1717 or DVGW4 compliant fluid sources. Check for a proper and safe power grid.
This device uses a Class-I insulating system that requires protective earth.
Plug the unit only into an FI protected mains supply (FI = Residual current protection). For USA and Canada: connect only to a hospital-grade outlet.
Check that the rated voltage of the device is suited for the local line voltage to prevent damaging the unit, risk of fire and electric shock.
The mains plug of the unit must be accessible at all times.
DO NOT INSTALL the device in case your dental cabinet does NOT have protective earth. If you have any concerns about this, call EMS Service for on-site support by qualified personnel. Be aware
The use of cables and accessories other than those supplied by EMS may negatively affect EMC performance. Use only parts supplied by EMS.
The device uses a low power radio, 1 dBm EIRP max, Bluetooth® 2.4 GHz, to communicate
with the wireless pedal. Interference may occur in the vicinity of this equipment.
The Bluetooth® radio is automatically disabled (powered off) when a wired pedal is connected.
Portable RF communications equipment (including peripherals such as antenna cables and external
antennas) should be used no closer than 30 cm (12 inches) to any part of the device, including
cables. Otherwise, degradation of the performance of this equipment could result.
4 German Technical and Scientific Association for Gas and Water

ENGLISH FB-618/EN – Rev. A-01 - 2017.03.30 10/46
Connect air and water hoses
Turn the device over and place it upside down.
Connect the air hose EH-142 to the cabinet/dental unit. PPPPushushushush the hose connector the hose connector the hose connector the hose connector iiiinto the air nto the air nto the air nto the air jackjackjackjack firmly (it may be hard).firmly (it may be hard).firmly (it may be hard).firmly (it may be hard).
Pressure: 4.5 to 7 bar Dry air. Max. humidity: 1.032 g/m3 Filtration: max. 1 μm
Connect the water hose EG-110 to the cabinet/dental unit.
To prevent retro contamination, connect the cable to an EN-1717 or DVGW compliant fluids source.
DO NOT install the PIEZON® or NIGHT CLEANER® bottle before connecting the air and water lines.
Drinking water Pressure: 2 to 5 bar Salinity: max. 0.2% Temperature: 10°C to 30°C
Install accessories
Continue to keep the device upside down and disconnected from the power grid!
EHEHEHEH----142142142142 Air hose – filter pre-installed PUSH PUSH PUSH PUSH VERYVERYVERYVERY HARDHARDHARDHARD
EGEGEGEG----110110110110 Water hose – filter pre-installed
Power cord into socket (Fuse holder in the socket)
EKEKEKEK----410410410410 Wired pedal ONLY IF APLICABLEONLY IF APLICABLEONLY IF APLICABLEONLY IF APLICABLE
EMEMEMEM----145145145145 AIRFLOW® handpiece cord + lock actuator PUSH HARDPUSH HARDPUSH HARDPUSH HARD
EMEMEMEM----146146146146 (push hard) PIEZON® handpiece cord + lock actuator PUSH HARDPUSH HARDPUSH HARDPUSH HARD
1
2
1 2
3 4
1
2
3
4
5
5 6
6 4 3
5 6
ENGLISH FB-618/EN – Rev. A-01 - 2017.03.30 11/46
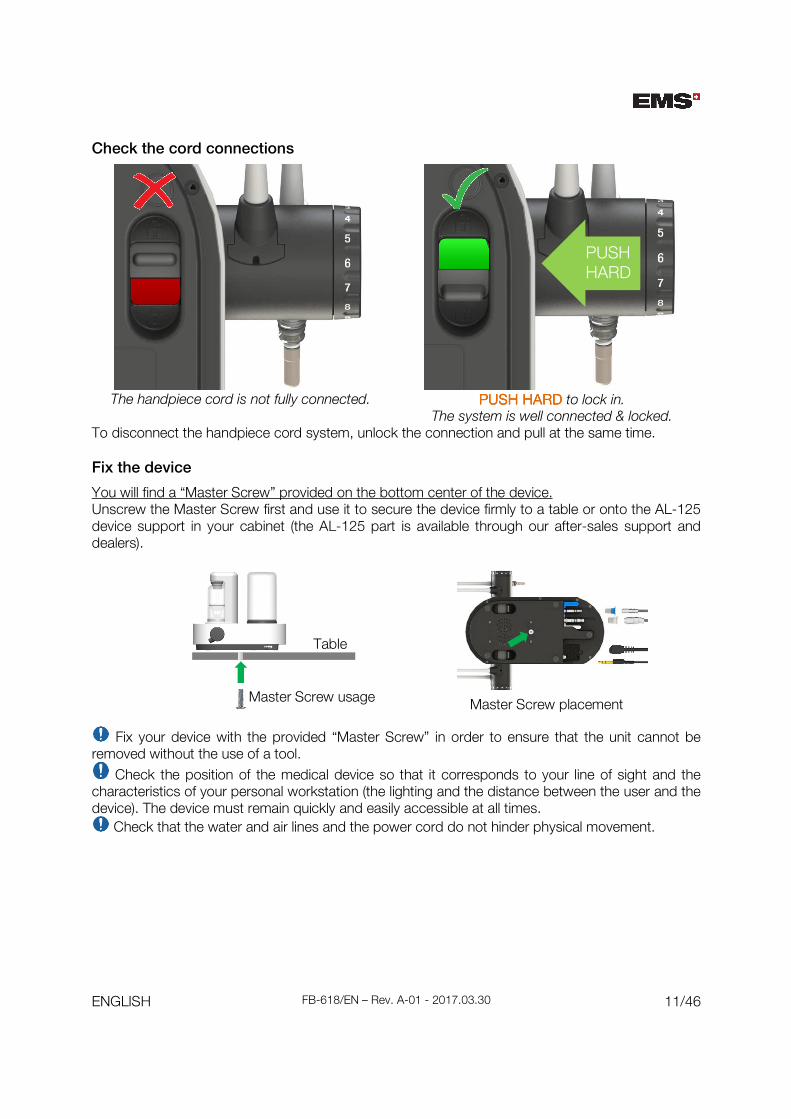
Check the cord connections
The handpiece cord is not fully connected. PUSH HARDPUSH HARDPUSH HARDPUSH HARD to lock in.
The system is well connected & locked.
To disconnect the handpiece cord system, unlock the connection and pull at the same time. Fix the device
You will find a “Master Screw” provided on the bottom center of the device. Unscrew the Master Screw first and use it to secure the device firmly to a table or onto the AL-125 device support in your cabinet (the AL-125 part is available through our after-sales support and dealers).
Fix your device with the provided “Master Screw” in order to ensure that the unit cannot be removed without the use of a tool.
Check the position of the medical device so that it corresponds to your line of sight and the characteristics of your personal workstation (the lighting and the distance between the user and the device). The device must remain quickly and easily accessible at all times.
Check that the water and air lines and the power cord do not hinder physical movement.
Master Screw usage
Table
Master Screw placement
PUSH HARD

ENGLISH FB-618/EN – Rev. A-01 - 2017.03.30 12/46
Power your device
YYYYou canou canou canou can nownownownow connect the power cord to the mains gridconnect the power cord to the mains gridconnect the power cord to the mains gridconnect the power cord to the mains grid.
Protective earth is required! Be sure your power grid has an efficient protective earth.
Voltage: 100-240 Vac Frequency: 50 to 60 Hz. Operating current: 4 A max.
Installation of the wireless pedal
Insert two (2) AA 1.5V lithium batteries into the wireless pedal. Close the cover and operate your device.
Risk of fire: use only batteries that have current limiter/short-circuit and over-temperature protection (compliant to IEC 60086-4:2014 Safety of lithium batteries).
The optional wireless pedal supplied with your device is already paired and ready to use (Note: A pedal can only command one single device at a time. Pairing is maintained even if the batteries are removed). When you receive your new machine, all you need to do is insert the two (2) AA lithium batteries into the wireless pedal and your device is ready to work. In case you replace your pedal, you will need to pair it with your device. For instructions, please read the specific Maintenance & Troubleshooting chapter. The Bluetooth® radio is automatically disabled (powered off) when a wired pedal connected.
The wireless pedal uses a low power, 1 dBm EIRP max, Bluetooth® 2.4 GHz radio, to communicate with the control
unit. Interference may occur in the vicinity of this equipment.
Portable RF communications equipment (including peripherals such as antenna cables and external antennas) should be used no closer than 30 cm (12 inches) to any part of the device, including cables. Otherwise, degradation of the performance of this equipment could result.

ENGLISH FB-618/EN – Rev. A-01 - 2017.03.30 13/46
2.3. Powder Chambers
Clinical risk: Only use PLUS or PERIO powder with the PLUS powder chamber.
Clinical risk: Only use PLUS powder chamber (red) for subgingival treatments.
PLUSPLUSPLUSPLUS
The PLUSThe PLUSThe PLUSThe PLUS powderpowderpowderpowder chamberchamberchamberchamber isisisis designed fordesigned fordesigned fordesigned for thethethethe PLUSPLUSPLUSPLUS powderpowderpowderpowder. It. It. It. It can be usedcan be usedcan be usedcan be used for for for for supra and supra and supra and supra and subsubsubsubgingival gingival gingival gingival treatments.treatments.treatments.treatments. Pressure is automatically reduced for compatibility with subgingival treatments, including Perioflow treatments (Supra applications also possible). Compatible EMS powders: PLUS and PERIO (refer to paragraph “Compatibility” for details).
CLASSICCLASSICCLASSICCLASSIC
The CLASSICThe CLASSICThe CLASSICThe CLASSIC powderpowderpowderpowder chamberchamberchamberchamber is designed foris designed foris designed foris designed for the CLASSICthe CLASSICthe CLASSICthe CLASSIC powderpowderpowderpowder andandandand can only can only can only can only be used forbe used forbe used forbe used for suprasuprasuprasupragingival gingival gingival gingival treatments.treatments.treatments.treatments. Sodium Bicarbonate: Use only this powder and chamber for supragingival applications. Compatible EMS powders: CLASSIC and SOFT (refer to paragraph “Compatibility” for details).
Check bottle and powder chamber integrity: There should be no crack on the body.
The powder chamber is pressurized during use. Replace faulty parts immediately.
Make sure that the powder chambers are dry.
Use only PLUS or PERIO powders for restorations, crowns, bridgework, implants and orthodontics.
Do not sterilize the powder chambers and their caps/parts by steaming or dry thermal reprocessing. Use only ambient temperature active disinfectant and cleaning agents.
By hand only: remove the powder chamber cap to refill powder up to the indicated MAX level, then insert the cap back fully onto the bottle. Pour the powder in freely. The central tube can be fully filled without problem.
Do not fill the chamber higher than the indicated MAX level. The powder level will go down slightly a few minutes after the filling (powder compaction).
Before pressurizing, position the powder chamber into the device. Magnetic attraction will position it correctly.
Do not insert upside-down.

ENGLISH FB-618/EN – Rev. A-01 - 2017.03.30 14/46
2.4. Water supply and PIEZON® bottle
Without Without Without Without BBBBottle:ottle:ottle:ottle: PIEZON® & AIRFLOW® use external water supply.
With With With With BBBBottleottleottleottle connectedconnectedconnectedconnected:::: AIRFLOW® uses external water supply. PIEZON® uses bottle liquid supply.
The CLIP+CLEAN shall be
previously cleaned and disinfected before use. Non-disinfected CLIP+CLEAN may contaminate the device.
Place the CLIP+CLEAN into the
device’s bottle receptacle for dust
protection.
Connect the PIEZON® bottle
Only use the PIEZON® bottle EG-111 (transparent) for disinfectant solutions.
Compatible disinfecting solutionsCompatible disinfecting solutionsCompatible disinfecting solutionsCompatible disinfecting solutions for for for for PIEZONPIEZONPIEZONPIEZON®®®® bottlebottlebottlebottle::::
Please refer to the standards applicable in your country regarding the purchase and use of these products. Different solutions can be used during treatment. Chemical reactions might occur between these solutions and damage the unit. Wash the liquid circuit with distilled (or demineralized) water before using a different solution.
Disinfectant solutionDisinfectant solutionDisinfectant solutionDisinfectant solution ConcentrationConcentrationConcentrationConcentration
Sodium Hypochlorite ≤ 5% Chlorexidine ≤ 1% Carbanilides ≤0.05% Povidone iodine ≤12% Quaternary ammonium compound ≤0.7% Cetylpyridin chloride ≤1% Citric acid ≤5% Physiological water ≤0.9% Ethanol 90% Isopropanol 90%
Do not sterilize the PIEZON® bottle and its nozzle cap by steaming or dry thermal reprocessing. Use only ambient temperature active disinfectant and cleaning agents.
1 2

ENGLISH FB-618/EN – Rev. A-01 - 2017.03.30 15/46
2.5. AIRFLOW® and PERIOFLOW® handpieces
AIRFLOW® and PERIOFLOW® handpieces are reusable, but they shall have been previously reprocessed: cleaned, disinfected and sterilized. Non-sterile handpieces and accessories may cause bacterial or viral infections.
Connect the
AIRFLOW® or PERIOFLOW® handpiece.
Follow the “Reprocessing of EMS parts” instructions and the present-day regulations on reprocessing enforced in your country. In case the AIRFLOW® handpiece gets clogged, refer to the “Maintenance & Troubleshooting” section for instruction.

ENGLISH FB-618/EN – Rev. A-01 - 2017.03.30 16/46
2.6. PIEZON® Handpiece and Instruments
PIEZON® instruments and handpieces are reusable, but they shall be reprocessed before use: cleaned, disinfected and sterilized. Non-sterile handpieces and accessories may cause bacterial or viral infections.
Follow the “Reprocessing of EMS parts” instructions and the present-day regulations on reprocessing enforced in your country.
Check tip length and tip thread through the cover right folder of your Quick Guide.
If tip extremity is in the red area, it can have excessive and uncontrolled vibration. Replace the tip.
Accessories are available from EMS and authorized dealers.
Mount the tip / insert using the
EMS CombiTorque tool Connect the PIEZON®
handpiece Nose cap and light guide
Once the instrument is screwed all the way in, give an extra quarter of a turn to obtain the required torque and remove the CombiTorque.
Use only the CombiTorque to tighten the EMS instrument on the handpiece to the correct torque to avoid tip unscrewing or breaking.
Blow-dry the connections to remove any presence of liquid and to ensure a proper electrical contact.
Never blow compressed air in the irrigation connections, as this will irremediably damage internal parts.
Always use the handpiece with
the light guide and the nose cap
installed and correctly tightened.
For replacing the light guide, refer to the “PIEZON® light guide check & replace” section.
1 2 3
ENGLISH FB-618/EN – Rev. A-01 - 2017.03.30 17/46
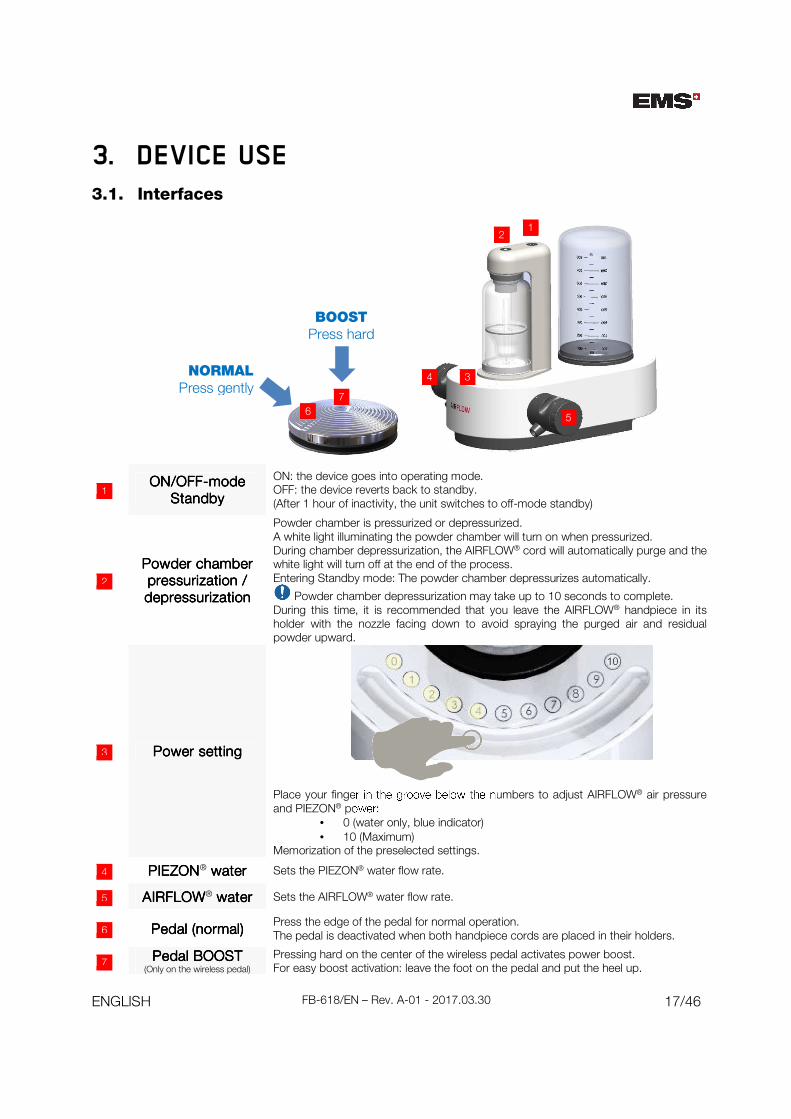
3. DEVICE USE 3.1. Interfaces
ONONONON////OFFOFFOFFOFF----mode mode mode mode
StandbyStandbyStandbyStandby
ON: the device goes into operating mode. OFF: the device reverts back to standby. (After 1 hour of inactivity, the unit switches to off-mode standby)
Powder chamber Powder chamber Powder chamber Powder chamber pressurizationpressurizationpressurizationpressurization / / / / depressurizationdepressurizationdepressurizationdepressurization
Powder chamber is pressurized or depressurized. A white light illuminating the powder chamber will turn on when pressurized. During chamber depressurization, the AIRFLOW® cord will automatically purge and the white light will turn off at the end of the process. Entering Standby mode: The powder chamber depressurizes automatically.
Powder chamber depressurization may take up to 10 seconds to complete. During this time, it is recommended that you leave the AIRFLOW® handpiece in its holder with the nozzle facing down to avoid spraying the purged air and residual powder upward.
Power settingPower settingPower settingPower setting Place your finger in the groove below the numbers to adjust AIRFLOW® air pressure and PIEZON® power:
• 0 (water only, blue indicator) • 10 (Maximum)
Memorization of the preselected settings.
PIEZONPIEZONPIEZONPIEZON® waterwaterwaterwater Sets the PIEZON® water flow rate.
AIRFLOWAIRFLOWAIRFLOWAIRFLOW® waterwaterwaterwater Sets the AIRFLOW® water flow rate.
PedalPedalPedalPedal (normal)(normal)(normal)(normal) Press the edge of the pedal for normal operation. The pedal is deactivated when both handpiece cords are placed in their holders.
PedalPedalPedalPedal BOOSTBOOSTBOOSTBOOST
(Only on the wireless pedal) Pressing hard on the center of the wireless pedal activates power boost. For easy boost activation: leave the foot on the pedal and put the heel up.
1
2
3
4
5
6
7
1 2
4
5
3
7
6
BOOST
Press hard
NORMAL
Press gently

ENGLISH FB-618/EN – Rev. A-01 - 2017.03.30 18/46
PIEZON® power setting
The unit is equipped with NO PAIN® technology which provides an adaptive response in function
according to the load applied to the instrument.
The following table shows the maximum output power as per user power setting:
PIEZON® Power
Power Power Power Power SettingSettingSettingSetting 0000 1111 2222 3333 4444 5555 6666 7777 8888 9999 10101010
Max Output Power [W] 0 0.4 1.2 2.1 3.0 3.9 4.8 5.6 6.4 7.2 8.0
Risk of tip breakage: with ENDOENDOENDOENDO filesfilesfilesfiles, do not exceed 2.5W (power setting “3” maxpower setting “3” maxpower setting “3” maxpower setting “3” max....) AIRFLOW® pressure setting
Both the PLUS and CLASSIC powder chambers have an integrated dynamic pressure regulator
that automatically set the optimal pressure range for the selected powder chamber and related
powder type as detailed in chapter “Powder Chambers”.
The following table shows the static and approximate dynamic pressures5 as per selected powder
chamber and user power setting:
AIRFLOW® Pressure
PressurePressurePressurePressure SettingSettingSettingSetting 0000 1111 2222 3333 4444 5555 6666 7777 8888 9999 10101010
Static [Bar] / 2.5 2.7 3.0 3.2 3.5 3.7 4.0 4.2 4.5 4.7
CLASSIC dynamic [Bar] / 1.9 2.1 2.3 2.6 2.8 3.0 3.2 3.5 3.7 3.9
PLUS dynamic [Bar] / 1.5 1.7 1.9 2.0 2.2 2.4 2.6 2.7 2.9 3.1
5 Dynamic pressures depend on handpiece and powder type too. The listed pressures are for information purpose and referring to the commonly used EL-308 AIRFLOW® handpiece with DV-082 and DV-048 powders.

ENGLISH FB-618/EN – Rev. A-01 - 2017.03.30 19/46
PIEZON® and AIRFLOW® BOOST
Pressing hard on the center of the wireless pedal activates the BOOST mode and results in an
increase of power, as the following table shows:
AIRFLOW® Boost
Power Power Power Power SettingSettingSettingSetting 0000 1111 2222 3333 4444 5555 6666 7777 8888 9999 10101010
Corresponding Boost Level 0000 6666 7777 8888 8888 8888 9999 10101010 10101010 10101010 10101010
PIEZON® Boost
Power Power Power Power SettingSettingSettingSetting 0000 1111 2222 3333 4444 5555 6666 7777 8888 9999 10101010
Corresponding Boost Level 0000 6666 7777 8888 9999 10101010 10101010 10101010 10101010 10101010 10101010
Risk of tip breakage: use BOOST only with a tip suited for high power usage.
DO NOT use BOOST with ENDO files.
Wireless pedal battery saving
Each time the wireless pedal is released, it enters into a low power mode. Even if unused for long, it
is not required to remove the batteries.
To avoid an involuntary depletion of the wireless pedal batteries, in the case the pedal stays
uninterruptedly pressed for 10 minutes, it will automatically enter into switch-off mode.
To resume from the switch-off mode, it is required to first release the wireless pedal and then
power cycle the device (switch off for 30s and then power on again).
BOOST effect
ENGLISH FB-618/EN – Rev. A-01 - 2017.03.30 20/46
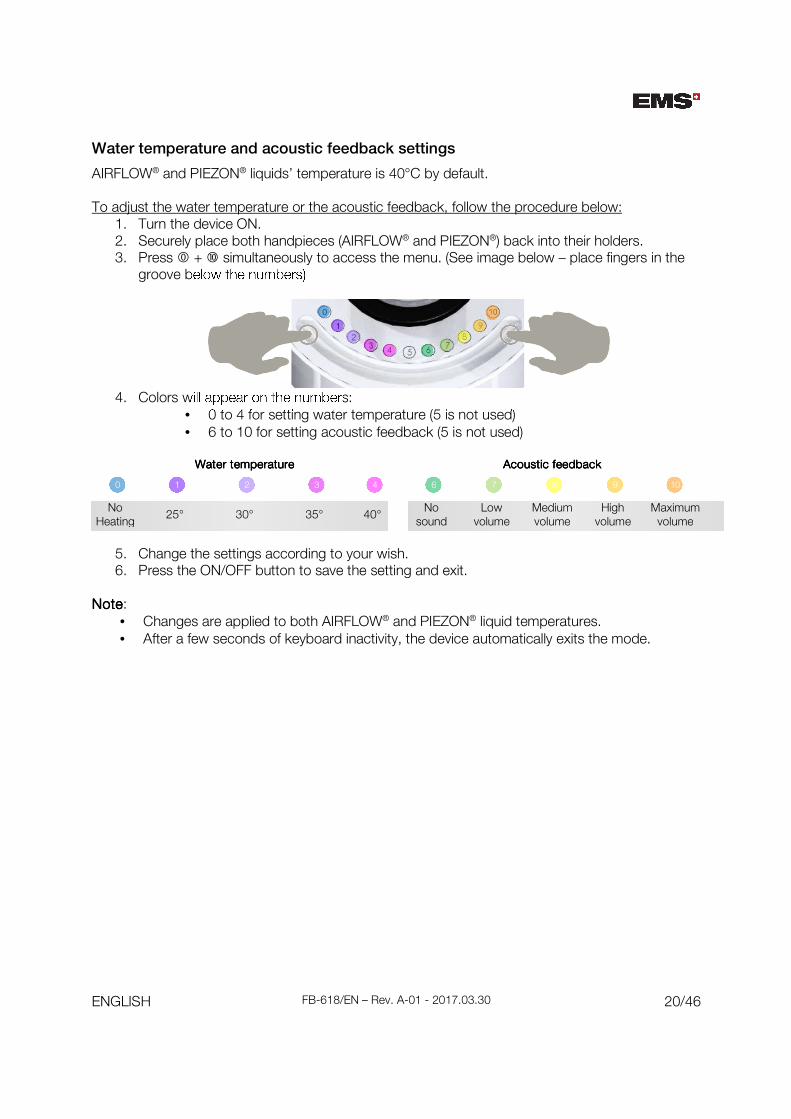
Water temperature and acoustic feedback settings
AIRFLOW® and PIEZON® liquids’ temperature is 40°C by default. To adjust the water temperature or the acoustic feedback, follow the procedure below:
1. Turn the device ON. 2. Securely place both handpieces (AIRFLOW® and PIEZON®) back into their holders. 3. Press � + � simultaneously to access the menu. (See image below – place fingers in the
groove below the numbers)
4. Colors will appear on the numbers:
• 0 to 4 for setting water temperature (5 is not used) • 6 to 10 for setting acoustic feedback (5 is not used)
Water temperatureWater temperatureWater temperatureWater temperature Acoustic feedbackAcoustic feedbackAcoustic feedbackAcoustic feedback
No
Heating 25° 30° 35° 40°
No sound
Low volume
Medium volume
High volume
Maximum volume
5. Change the settings according to your wish. 6. Press the ON/OFF button to save the setting and exit.
NoteNoteNoteNote:
• Changes are applied to both AIRFLOW® and PIEZON® liquid temperatures. • After a few seconds of keyboard inactivity, the device automatically exits the mode.
0 1 2 3 4 6 7 8 9 10

ENGLISH FB-618/EN – Rev. A-01 - 2017.03.30 21/46
3.2. Treatment sequence
AIRFLOW®
1 Position the powder chamber. 2 Pressurize the chamber. 3 Set the AIRFLOW® power. 4 Set the water flow. 5 Take the AIRFLOW® handpiece. 6 Press the pedal to start treatment. 7 [Step hard on the center of the BT pedal for
BOOST.] 8 Release the pedal to stop treatment. 9 Put the handpiece back into its holder.
PIEZON®
1 Set the PIEZON® power. 2 Set the water flow. 3 Connect the PIEZON® bottle (if required). 4 Take the PIEZON® handpiece. 5 Press the pedal to start treatment. 6 [Step hard on the center of the BT pedal for
BOOST.] 7 Release the pedal to stop treatment. 8 Put the handpiece back into its holder.
Treatment does not stop immediately. Beware there is a small delay between the release of the pedal and the effective stop of the treatment (approximately 0.2 second).
Risk of patient injury. If you are not trained on a specific treatment, do not execute it. Always get trained before executing new treatments.
1
2
4
2
3
5
6 7
8
1
3
4
5 6
7

ENGLISH FB-618/EN – Rev. A-01 - 2017.03.30 22/46
4. OPTIONAL EQUIPMENT 4.1. PERIOFLOW® Nozzles
Single-use nozzle. Cannot be reprocessed.
Do not use the nozzle if the package is damaged or open.
Connect the nozzle. Make sure the nozzle is correctly attached = fully inserted.
4.2. Endochuck & PI Instrument
The Endochuck file holders are available in 90°, 120° or 180° orientations to adapt to particular configurations.
Do not tighten the chuck nut when no file or instrument is installed as this may damage it.
Verify that the plastic coating is not worn or damaged before use.
4.3. Mirror Suction Cannula
Ultra FS ClasenUNO Mirror Suction Cannula is only available in the
European Union.
Cannula is reusable, but shall be previously reprocessed before use: cleaned, disinfected and sterilized. A non-sterile cannula may cause bacterial or viral infections.
Follow the ClasenUNO Reprocessing instructions and the present-day regulations on reprocessing enforced in your country. Connect it to the high-speed suction hose of your dental unit and check for
compatibility before use (It may not be compatible with your dental unit
suction hoses).

ENGLISH FB-618/EN – Rev. A-01 - 2017.03.30 23/46
5. CLEANING & REPROCESSING
5.1. Water Line Cleaning & Disinfection
Keeping the device’s water lines clean and disinfected is mandatory to prevent patient infection. A regular daily cleaning using the EMS NIGHT CLEANER®
agent cleans and disinfects the device’s water lines, and helps to prevent the growth of biofilm and calcification in the long term.
The water supply hose and related device connection will not be cleaned by this procedure.
Each morning before the first patient: Rinsing
PPPPlacelacelacelace a fully filleda fully filleda fully filleda fully filled waterwaterwaterwater bottle onto the devicebottle onto the devicebottle onto the devicebottle onto the device
Set waterSet waterSet waterSet water to 10to 10to 10to 10 Turn the Turn the Turn the Turn the device ONdevice ONdevice ONdevice ON
HHHHold old old old bothbothbothboth cordscordscordscords over a over a over a over a sink sink sink sink withwithwithwith CLIP+CLEANCLIP+CLEANCLIP+CLEANCLIP+CLEAN
Press the pedal once, Press the pedal once, Press the pedal once, Press the pedal once, release, and then wait release, and then wait release, and then wait release, and then wait 1 1 1 1
minuteminuteminuteminute
To reduce the risk of ingestion of the cleaning
agent by the patient, always use a fully filled 800ml water
bottle.
Set both water regulators to 10 to ensure
optimal rinsing.
Contamination prevention:
Do not make any contact between the sink
and the cords.
The white and blue countdown indicates
remaining time.
Cleaning can be paused and reset by pressing the
pedal again.
Risk of ingestion of the cleaning agent. Check that no more blue residue is flushing out of the cord. Otherwise, repeat the rinsing procedure.
Always empty out and wash the water bottle used for rinsing before any new use.
Risk of ingestion of residue of cleaning agent. During rinsing, a small quantity of cleaning agent flows back into the water bottle.
1 2 3 4
NIGHT
CLEANER
WATER SUPPLY BY HOSE EG-110

ENGLISH FB-618/EN – Rev. A-01 - 2017.03.30 24/46
Between each patient
Overall cleaning and disinfection
Clean Clean Clean Clean the externalthe externalthe externalthe external surface of surface of surface of surface of the the the the device device device device
with a cloth and alcoholwith a cloth and alcoholwith a cloth and alcoholwith a cloth and alcohol Reprocess handpieces and instrumentsReprocess handpieces and instrumentsReprocess handpieces and instrumentsReprocess handpieces and instruments
See the specific following chapters.
Clean the unit only with an alcohol-based (ethanol, isopropanol), colorless disinfectant.
Never use scouring powder or an abrasive sponge. It will damage its surface.
Risk of contamination. Always disinfect the bottom and top areas of device air connections.
End of day: Overnight cleaning
Use only EMS NIGHT CLEANER®6 as a cleaning agent.
Other products may damage or not clean the unit, and cause patient intoxication.
Place Place Place Place the the the the NIGHTNIGHTNIGHTNIGHT CLEANERCLEANERCLEANERCLEANER®®®® bottle onto bottle onto bottle onto bottle onto
the devicethe devicethe devicethe device
Set waterSet waterSet waterSet water to 10to 10to 10to 10 Turn the Turn the Turn the Turn the device ONdevice ONdevice ONdevice ON
HHHHold old old old bothbothbothboth cordscordscordscords over a over a over a over a sink sink sink sink withwithwithwith CLIP+CLEANCLIP+CLEANCLIP+CLEANCLIP+CLEAN
Press the pedal once, Press the pedal once, Press the pedal once, Press the pedal once, release, and then wait release, and then wait release, and then wait release, and then wait 1 1 1 1
minuteminuteminuteminute
Before placing, remove CLIP+CLEAN from the device.
Each cleaning consumes 30ml
of NIGHT CLEANER®.
Before cleaning, check that the liquid level is above the external black line of the
bottle’s neck.
Set both water regulators to 10 to ensure the flow of the
cleaning agent.
Contamination prevention:
Do not make any contact between the sink and the
cords.
CLIP+CLEAN shall be reprocessed after each use.
(Do not exceed 135°C).
The white and blue countdown indicates remaining time.
Cleaning can be paused and
resumed by pressing the pedal again.
Once completed, leave the
NIGHT CLEANER® bottle on the device overnight.
The NIGHT CLEANER® agent can remain active in the device’s water lines for up to 1 week.
6 Alternative long-term disinfection liquid, Alpro Bilpron, can be used.
1 2 3 4

ENGLISH FB-618/EN – Rev. A-01 - 2017.03.30 25/46
Refill the blue NIGHT CLEANER® bottle with NIGHT CLEANER® agent only
NIGHT CLEANER® has the following properties: • Long-term disinfection • Remains stable in the NIGHT CLEANER® bottle • Blue color increases user awareness of the
cleaning procedure
Do not sterilize the NIGHT CLEANER® bottle and its nozzle cap by steaming or dry thermal reprocessing. Use only ambient temperature active disinfectant and cleaning agents.
Do not use Hydrogen Peroxide as EMS Ultra Clean. It deactivates after some time in the device’s bottle.
5.2. Safety Information on NIGHT CLEANER®
DO NOT mix NIGHT CLEANER® with other cleaning solutions.
NIGHT CLEANER® should not be swallowed. Take this product protected from child. In case of ingestion, rinse the mouth with water. Do not induce vomiting. In case of discomfort, ask advice to a medical doctor.
Avoid contact with eyes. In case of contact, rinse the eyes intensively during few minutes with water. In case of contact lenses, remove these lenses as soon as possible and continue to rinse.
Manipulate the product with gloves. In case of skin contact, wash it with water and soap. In case of soiled clothes, take off these immediately. If you have any contamination concern, promptly ask advice to a medical doctor.
For further information refer to the specific NIGHT CLEANER® instructions for use provided with
the product
Manufacturer information and point of contact
For any information and/or complaints, you can also contact the legal manufacturer: Dr. Wittmann GmbH & Co KGDr. Wittmann GmbH & Co KGDr. Wittmann GmbH & Co KGDr. Wittmann GmbH & Co KG Rieslingstraße 8 D-64673 Zwingenberg, Germany Phone: +49 6251 770 76 90 Email: [email protected]
ENGLISH FB-618/EN – Rev. A-01 - 2017.03.30 26/46
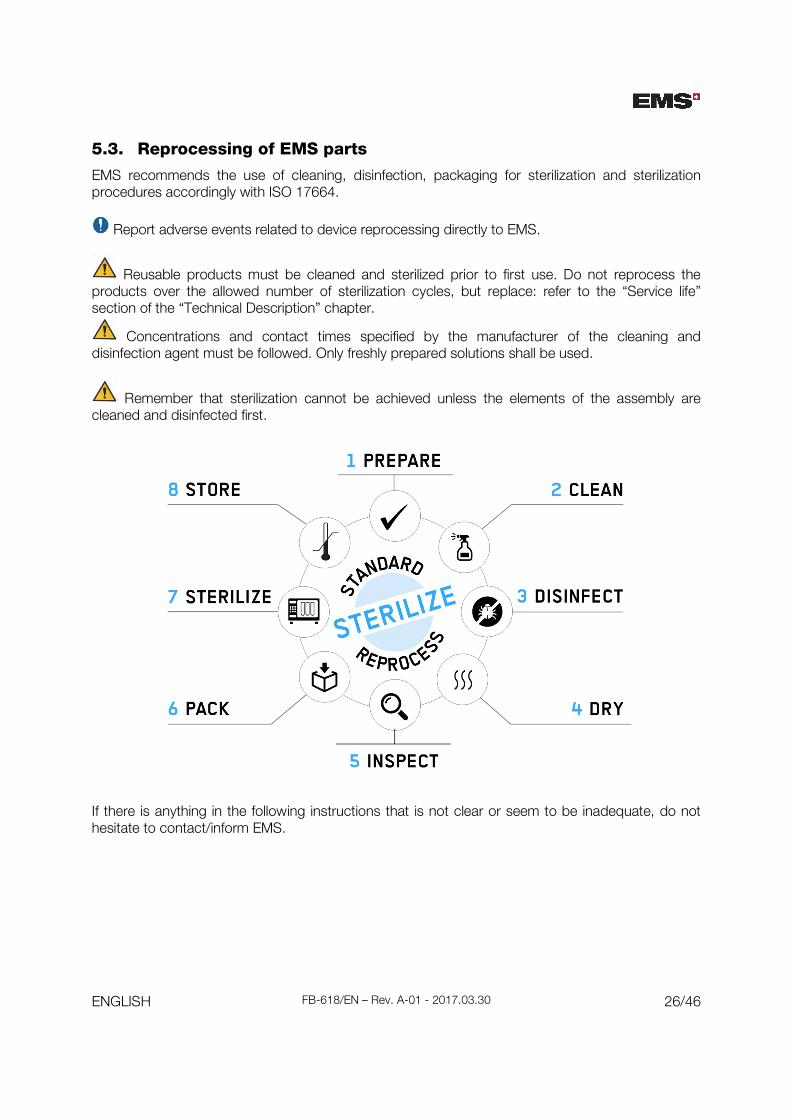
5.3. Reprocessing of EMS parts
EMS recommends the use of cleaning, disinfection, packaging for sterilization and sterilization procedures accordingly with ISO 17664.
Report adverse events related to device reprocessing directly to EMS.
Reusable products must be cleaned and sterilized prior to first use. Do not reprocess the products over the allowed number of sterilization cycles, but replace: refer to the “Service life” section of the “Technical Description” chapter.
Concentrations and contact times specified by the manufacturer of the cleaning and disinfection agent must be followed. Only freshly prepared solutions shall be used.
Remember that sterilization cannot be achieved unless the elements of the assembly are cleaned and disinfected first.
If there is anything in the following instructions that is not clear or seem to be inadequate, do not hesitate to contact/inform EMS.

ENGLISH FB-618/EN – Rev. A-01 - 2017.03.30 27/46
Preparation
Immediately after use, rinse the lumen(s) line of the part (device / instrument) and remove gross soiling by wiping the instrument.
For AIRFLOW® and PERIOFLOW®: always carry out handpiece powder unclogging and check for both lumens (water and powder) clearage before proceeding.
For PIEZON®: • Remove any installed instrument. • Remove the nose cap and separate aside the light guide and the red gasket.
For Endochuck file holder: • Remove any installed file. • Remove the screw and separate aside the small O-ring (gasket).
Safely transport to the reprocessing area to avoid any damage to the parts and contamination to the environment and to the people involved in the reprocessing process.
Cleaning shall need to be performed within 1 hour from the use.

ENGLISH FB-618/EN – Rev. A-01 - 2017.03.30 28/46
Cleaning
Any part can be cleaned manually or automatically by washer or disinfector. EMS recommends the use of automatic washer-disinfector (WD) for an optimal effectiveness and part service life.
DO NOT use any Ultra Sound Bath cleaning procedure with the PIEZON®, AIRFLOW® and PERIOFLOW® handpieces: it may destroy the products. Manual CleaningManual CleaningManual CleaningManual Cleaning Automated CleaningAutomated CleaningAutomated CleaningAutomated Cleaning
The following validated process can be used: • Remove away any surface soiling (gross
contamination) on the product with a wetted cloth and drinking water.
• For part having a lumen, flush the lumen 3 times for 5 seconds each using a water jet pistol.
• Immerse in cold tap water for 5 min. • Brush all accessible parts with a soft
bristled nylon brush. • Immerse in 0.5% cleaning solution of
Neodisher MediClean (Dr. Weigert, Hamburg) at 40°C for 5 min. All surfaces must be moistened.
• Rinse for 60 seconds with a water jet pistol and rinse thoroughly afterwards under running tap water.
• Fully dry with an air pistol for at least 20 seconds.
Washer-disinfector must have suitable baskets to hold small fragile products and has rinsing connections for the attachment to product lumen. Manual pre-cleaning is required and the following validated process can be used: • Immerse in cold tap water for 5 minutes. • With a syringe, flush 3 times the lumen of
the part with 50 ml deionized water. Place the instrument to a suitable rack and start the automated cleaning. The following validated (on Miele G 7735 CD) automated cleaning process can be used: • 2 min pre-washing with cold water. • Drain. • 5 min cleaning with deionized water with
0.5% detergent of Neodisher MediClean (Dr. Weigert, Hamburg) at 55°C.
• Drain. • 3 min rinsing and neutralization with
deionized water. • Drain • 2 min final rinse with deionized water.
Also instructions of the manufacturer of the washer disinfector shall be followed.
Disinfection
Any part can be disinfected manually or automatically by a disinfector. EMS recommends the use of automatic washer-disinfector (WD) for an optimal effectiveness and part service life.
DO NOT use any Ultra Sound Bath disinfecting procedure with the PIEZON®, AIRFLOW® and PERIOFLOW® handpieces: it may destroy the products. Manual Manual Manual Manual DisinfectionDisinfectionDisinfectionDisinfection Automated Automated Automated Automated DisinfectionDisinfectionDisinfectionDisinfection
• ASP CIDEX OPA® 0.55% disinfectant solution shall be used not diluted and within its Use-Life and Shelf-Life,
Automated Thermal Disinfection in a disinfector under consideration of national requirements in regards to A0-Value accordingly to ISO 15883.

ENGLISH FB-618/EN – Rev. A-01 - 2017.03.30 29/46
respecting the manufacturer’s Warnings and precisely following its Instruction for Use.
• Disinfectant shall be poured into a proper tray having secure lid. Tray size shall have to allow the complete submersion of the device and to facilitate the evacuation of air from the inside.
• Warm up the disinfectant to at least 20°C.
• Immerse the product completely, and if applicable, fill all lumens and eliminate air pockets by means of a syringe fulfilled of disinfectant (to guaranty full internal lumen contact with the disinfectant).
• Close the tray with the secure lid. • Wait for at least 5 minutes and be sure
that the temperature of the disinfectant solution doesn’t drop below 20°C.
• The ASP CIDEX OPA disinfectant requires a total of three (3) rinses, with large volumes of fresh water to properly remove its residues. Sterile water shall be poured into proper rinsing trays. Tray size shall have to allow the complete submersion of the device and to facilitate the evacuation of air from the inside.
For each of the 3 rinses do: - Flush all lumens with large volumes (not less than 100 ml) of rinse water. Use a syringe or a water jet pistol to correctly accomplish this task. - Keep the device totally immersed for a minimum of 1 minute in duration. - Remove the device from the rinsing tray and discard the rinse water.
• Finally, fully dry it internally and externally.
Always use fresh volumes of water for each rinse. Do not reuse the water for rinsing or any other purpose. Residues of disinfectant may cause serious side effects.
The following validated (on Miele G 7735 CD using program “DESIN 93° C-3’”) process can be used to achieve an A0 Level of 3000: • Holding time: 3 minutes • Min temperature: 93°C • Final automated drying cycle executed in full Special instructions and warnings of the manufacturer of the washer disinfector have to be followed.
Follow carefully the instructions provided by the disinfection solution manufacturer.

ENGLISH FB-618/EN – Rev. A-01 - 2017.03.30 30/46
Drying
Any part can be dried manually or automatically by washer-disinfector. EMS recommends the use of automatic dryer for an optimal effectiveness and part service life. Manual Manual Manual Manual DryingDryingDryingDrying Automated Automated Automated Automated DryingDryingDryingDrying
Dry the outside of the parts with a lint free towel. Dry the lumen of the products with filtered sterile compressed air (max. 3 bars) for 20 seconds.
Dry the part through the automated drying cycle of washer/disinfector within the disinfection program or just immediately after. Never heat up over 138°C. If needed, additional manual drying can be performed using air pistol and sterile air.
Sterilization shall be performed immediately after cleaning-disinfection. Inspection before sterilization
If stains are still visible on the product after cleaning/disinfection, the entire cleaning/ disinfection procedure must be repeated. Products with visible damage, chip/flake loss, corrosion or are bent out of shape must be disposed of (no further use is permissible). Packaging for sterilization
Only previously cleaned and disinfected products can be sterilized. Prior to sterilization, the products need to be placed in a suitable sterilization packaging:
• Use Single or Double Pouches ISO 11607 compliant • Resistant to 138°C, with adequate steam permeability
Sterilization
Sterilization must be performed immediately after cleaning-disinfection.
DO NOT exceed the maximum number of sterilization cycles allowed.
DO NOT exceed a sterilization temperature of 138°C and a holding time of 20 minutes.
DO NOT use hot-air sterilization and radio-sterilization procedures: they destroy the products. Moist heat sterilization of parts shall be performed according to ISO 17665 and under consideration of the respective country requirements.

ENGLISH FB-618/EN – Rev. A-01 - 2017.03.30 31/46
The following validated Pre-vacuum Moist Heat (steam) process can be used:
Parameters for the Parameters for the Parameters for the Parameters for the PPPPrererere----vacuumvacuumvacuumvacuum Moist HeatMoist HeatMoist HeatMoist Heat cycle:cycle:cycle:cycle:
• 3 pre-vacuum phases • Sterilization temperature of 132°C • Pressure of 3 bar • Humidity of 100% • Holding time of 4 minutes minimum (full cycle) • Drying time of 20 minutes
It is the duty of the user to ensure that the reprocessing processes, including resources, materials and personnel, are capable to reach the required results and maintained over the time: keeping actual the validation of the reprocessing processes is under the responsibility of the user. Storage
Store the sterilized instruments in a dry, clean and dust free environment at a temperature of 5°C to 40°C. Service life
Refer to the section “Service life” of the “Technical Description” chapter for details. The products have been designed for a large number of sterilization cycles. The materials used in their manufacture were selected accordingly. However, with every renewed preparation for use, thermal and chemical stresses will result in the ageing of the products.
If the number of permissible re-sterilization cycles is restricted, this will be stated in the product’s specific instructions (if any) and/or in the “Service life” section of the “Technical Description” chapter.
Always replace products that present sign of worn-out or of early degradation, regardless of the number of sterilization cycles left unused.
DO NOT expose the products to temperature exceeding the 138°C.

ENGLISH FB-618/EN – Rev. A-01 - 2017.03.30 32/46
5.4. Reprocessing of ClasenUNO Cannula
The Ultra FS ClasenUNO Mirror Suction Cannula requires an EN ISO 17664 compliant reprocessing. Check the cannula regularly before use and replace it as signs of wear are detected. Cleaning and disinfection
Only disinfectants that are suitable for polypropylene (PP) and used according to the guidelines may be employed for cleaning and disinfection. To avoid the risk of scratching the mirror and cannula, do not use hard brushes (wire brushes) for cleaning. The requirements stated in EN ISO 17664 must be observed. Firstly, Firstly, remove the coarse dirt, and then rinse the ClasenUNO under running water. For the ClasenUNO with Ultra mirror, use distilled water for rinsing. Place the contaminated ClasenUNO in a suitable disinfectant solution. Follow the recommendations of the solution manufacturer regarding the concentration levels of the disinfectant and the duration of disinfection. Rinse it well with water after disinfection and dry carefully. Next, disinfect/sterilize using one of the methods below.
Ultrasonic disinfection
Make sure that the surface of the mirror is completely dry, particularly with the Ultra version, as lime residue could be burnt in otherwise. Place the ClasenUNO in an ultrasonic bath (e.g. Bandelin Sonorex Super RK 514). Add a cleaning and disinfection agent suitable for polypropylene (PP) (e.g. 0.55% Cidex OPA) and set the washing cycle as per the manufacturer's instructions. Keep it in the ultrasonic bath for 12 minutes and ensure that the temperature does not drop below 18°C. Then, rinse with sterile water until all cleaning agent residue has been removed. Check to ensure that the ClasenUNO is thoroughly clean and, if necessary, repeat the cleaning cycle. Finally, dry the ClasenUNO carefully.
Disinfection with a thermal disinfector
To clean and disinfect with a thermal disinfector, use a device that corresponds to EN ISO 15883 (e.g. Belimed WD 100) and observe the manufacturer's instructions when choosing the cleaning and disinfection cycle and cleaning agent. Position the ClasenUNO in the thermal disinfector in such a way that the inside surfaces are rinsed and the water can flow off. 0.5% (V/V) deconex 24 LIQ has proven suitable as the cleaning solution and 0.2% (V/V) deconex 26 Plus as the neutralizing solution. Disinfection is performed at 90°C for a hold time of 5 minutes. At the end of the cleaning and disinfection cycle, ensure that the ClasenUNO is thoroughly clean and, if necessary, repeat the cleaning cycle.
Sterilization
Steam sterilization must be performed using a device that complies with EN 13060 or EN 285 (e.g. autoclave with fractionated pre-vacuum, W&H, type LISA 517), observing the sterilization procedure as per EN ISO 17665-1. The cycle must be conducted at a sterilization temperature of 134°C with a hold time of 5 minutes, or at a sterilization temperature of 121°C with a hold time of 12 minutes. Manufacturer information and point of contact
For any information and/or complaints, you can also contact the legal manufacturer: CleverdentCleverdentCleverdentCleverdent Ltd.Ltd.Ltd.Ltd., Theresiengrund 31, DE - 48149 Münster, Germany. Tel: +49 (0) 251 98292828 Website: www.clasen.uno Email: [email protected]

ENGLISH FB-618/EN – Rev. A-01 - 2017.03.30 33/46
6. MAINTENANCE & TROUBLESHOOTING
6.1. AIRFLOW® handpiece powder unclogging
In case of a clogged handpiece and before the reprocessing of AIRFLOW® and PERIOFLOW® handpieces.
Easy Clean FV-083
Provided in your ® Application box
Rinse through central lumina in the normal direction of flow (no back
rinsing) using Easy Clean with a disposable syringe filled with more
than 2 ml of drinking water
Blow air to dry.
The Easy Clean tool can be thermally disinfected and also sterilized at up to 135°C in the autoclave.
6.2. AIRFLOW® handpiece leakage
In case of leakage at the AIRFLOW® handpiece
connection with the AIRFLOW® cord, replace the o-rings
of the cord with the spare provided in the EL-651 Kit
located in the ® application box.
6.3. PIEZON® light guide check & replace
The light guide loses its transparence after undergoing repeated sterilization and reprocessing
cycles. Check the transparency of the light guide every month and do the following:
1. Remove the tip and unscrew the handpiece nose cap by hand. 2. Take off the light guide and inspect it. 3. Place in a new light guide AB-340 (provided in the ® application). 4. Screw the nose cap on again, by hand only.

ENGLISH FB-618/EN – Rev. A-01 - 2017.03.30 34/46
6.4. Handpiece cord replacement
Disconnect the mains plug for purposes of maintenance and in case of malfunction.
Depressurize the powder chamber before disconnecting the AIRFLOW® cord. In case of persistent malfunction or damage to the PIEZON® or AIRFLOW® handpiece cord system, the part can be easily replaced by the user. Follow the directions for replacement provided with the spare part supply.
Handpiece cord disconnecting procedureHandpiece cord disconnecting procedureHandpiece cord disconnecting procedureHandpiece cord disconnecting procedure:
1. Unlock the cord system by pushing the lock switch to the front (Switch located under the device).
2. The cord system is now unlocked and can be removed by pulling it.
6.5. Monthly check
Each month check both air and water filters for cleanliness.
Disconnect the mains plug for purposes of maintenance and in case of malfunction.
No maintenance is allowed while in use with a patient.
Check water and air filter cleanliness.
Filter color has to be white without significant visible impurities. If not, replace the filter. If the water filter needs to be changed more than 3 times a year, please check the quality of your water line. Air filters usually remain cleaner for longer periods of time. Replace once a year. (The yearly maintenance service includes the replacement of both filters.)
Good Worn-out
1. Disconnect Disconnect Disconnect Disconnect the the the the power cord from the grid firstpower cord from the grid firstpower cord from the grid firstpower cord from the grid first.... 2. Disconnect the water hose by pulling it off the connector. 3. Pull the filter off by hand or by using a small flat screwdriver. 4. Replace with a new filter and reconnect the hose.
1
2
ENGLISH FB-618/EN – Rev. A-01 - 2017.03.30 35/46
6.6. Yearly maintenance & repair
This device must only be maintained and/or repaired by EMS and by
authorized EMS repair centers.
A yearly preventive maintenance or 2000 hours usage maintenance,
whichever comes first, is required as means of safety and performance
guarantee for both the patient and the user. Qualified service repair may also be required anytime persistent malfunctioning is detected
by the user and/or reported by the device diagnostic.
When returning the device for service, it is recommended that you ship the
device with its pedal, powder chamber, bottle and cords in its original
packaging for optimal protection against damage during transportation. Provide the contact details of your EMS dealer for a quicker service process.
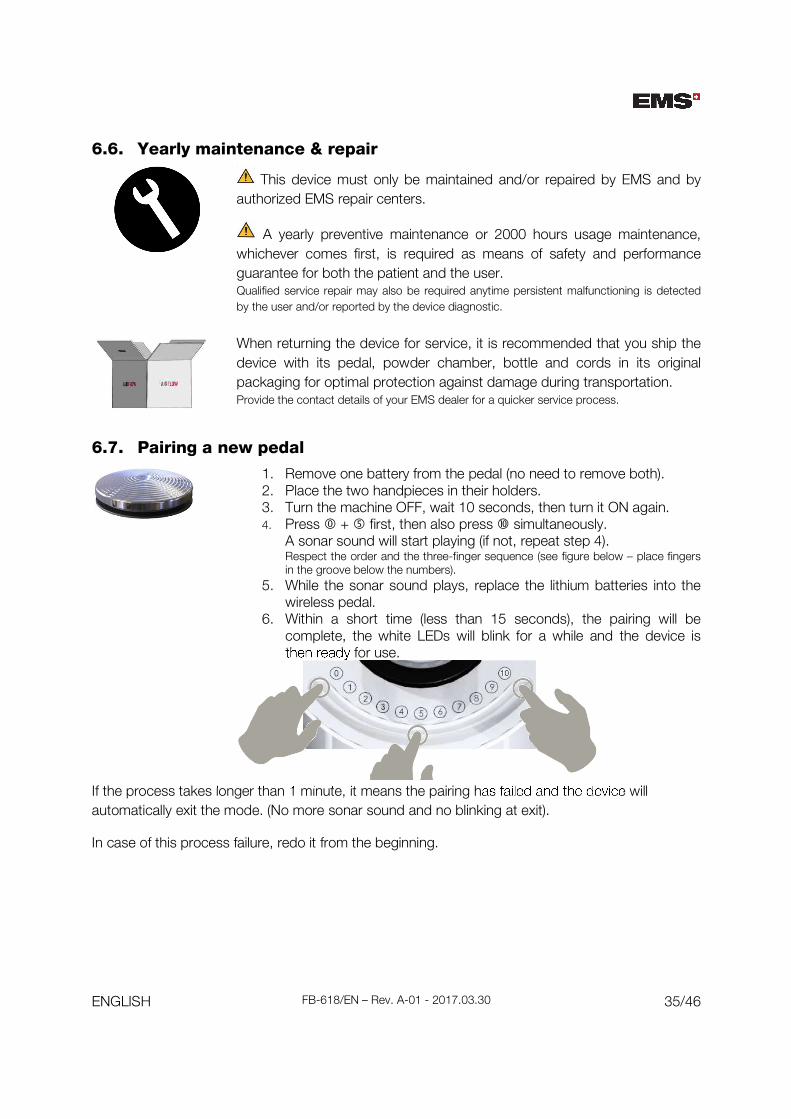
6.7. Pairing a new pedal
1. Remove one battery from the pedal (no need to remove both). 2. Place the two handpieces in their holders. 3. Turn the machine OFF, wait 10 seconds, then turn it ON again. 4. Press � + � first, then also press � simultaneously.
A sonar sound will start playing (if not, repeat step 4). Respect the order and the three-finger sequence (see figure below – place fingers in the groove below the numbers).
5. While the sonar sound plays, replace the lithium batteries into the wireless pedal.
6. Within a short time (less than 15 seconds), the pairing will be complete, the white LEDs will blink for a while and the device is then ready for use.
-
If the process takes longer than 1 minute, it means the pairing has failed and the device will
automatically exit the mode. (No more sonar sound and no blinking at exit).
In case of this process failure, redo it from the beginning.

ENGLISH FB-618/EN – Rev. A-01 - 2017.03.30 36/46
6.8. Troubleshooting
The device is whistling or making strange noisesThe device is whistling or making strange noisesThe device is whistling or making strange noisesThe device is whistling or making strange noises
Risk of bottle explosion.
First disconnect the mains plug. This symptom is generally caused by a problem to the pressure regulator (fault or low temperature) or by a crack in the water bottle. 1° Stop using your device immediately and disconnect it from the grid. 2° Check the bottle in use for crack or any damage and, if the case, replace it with a new one. 3° If the device temperature is below 10°C (device too cold), wait for it to warm-up at ambient temperature and then reconnect to the power grid and switch it on again. 4° If the device temperature is over 10°C, or the problem reoccurs, definitively stop to use it and contact EMS aftersales service.
The device is making smoke (and fire)The device is making smoke (and fire)The device is making smoke (and fire)The device is making smoke (and fire)
Risk of fire and electric shock.
First disconnect the mains plug. Stop using your device immediately, disconnect it and contact EMS aftersales service.
Cord or device Cord or device Cord or device Cord or device leakageleakageleakageleakage
Risk of fire and electric shock.
First disconnect the mains plug. 1° If the leak is from the AIRFLOW® handpiece, replace the o-rings. 2° If the leak is from the device (handpiece support and water regulator), replace the complete handpiece cord. 3° If still not solved, contact EMS aftersales service.
�
LED 1 is SOLID LED 1 is SOLID LED 1 is SOLID LED 1 is SOLID orangeorangeorangeorange
Safety Warning: You can still operate the device to terminate the ongoing treatments. The device requires the yearly maintenance. Promptly contact EMS aftersales service.
LED 1LED 1LED 1LED 1 BLINKINGBLINKINGBLINKINGBLINKING orangeorangeorangeorange
Safety Warning: Permanent or transitory hardware fault condition detected.
1° Unplug the device power cord, wait for 30 seconds, then plug it back again and restart the device (to
check for effective permanent fault condition).
2° If the error is still present, contact EMS aftersales service for repair.
�
LED 2 LED 2 LED 2 LED 2 SOLID SOLID SOLID SOLID orangeorangeorangeorange The wireless pedal’s 2x AA lithium batteries are depleted. Replace both with new AA high-quality lithium
batteries having current limiter protection.
�
LED 3 LED 3 LED 3 LED 3 SOLID SOLID SOLID SOLID orangeorangeorangeorange The problem may have multiple causes. A step-by-step multiple checks are required. 1° No pedal detected (at least one pedal must be connected to operate the device):
• Wired pedal may be disconnected. Check if the jack is fully inserted. Restart the device. • Wireless pedal is not paired. Execute the procedure “Pairing of new pedal”
2° If the error is still present, contact EMS aftersales service for repair.
LED 3 BLINLED 3 BLINLED 3 BLINLED 3 BLINKING KING KING KING orangeorangeorangeorange Both the AIRFLOW® and PIEZON® cord systems are not detected or missing. At least one cord system is required to operate the device. 1° First, switch OFF the device, then disconnect both AIRFLOW® and PIEZON® handpiece cords and clean the electric contacts (jacks) present on the cord system connections. Also blow air to clean the device connection receptacles. 2° Reinstall both handpiece cords and start the device again. 3° If error is still present, contact EMS aftersales service.

ENGLISH FB-618/EN – Rev. A-01 - 2017.03.30 37/46
� LED 4 LED 4 LED 4 LED 4 BLINKING BLINKING BLINKING BLINKING orangeorangeorangeorange
Risk of fire and electric shock.
First disconnect the mains plug. 1° Your device is too hot. Unplug it, wait for 1 hour and start the device again. 2° If error is still present, contact EMS aftersales service.
Note: This error also shows up when the device is operating below the minimum temperature.
In this case, just wait for the device to warm up to ambient temperature.
Water filter leakageWater filter leakageWater filter leakageWater filter leakage
First disconnect the mains plug. 1° Replace the water filter (blue cartridge). 2° If still not solved, contact EMS aftersales service.
Bottle or bottle connectionBottle or bottle connectionBottle or bottle connectionBottle or bottle connection leakageleakageleakageleakage 1° Ensure the bottle cap has been correctly closed. 2° Clean the connection: cap and device sides. 3° Replace the bottle. 4° If still not solved, contact EMS aftersales service.
AIRFLOWAIRFLOWAIRFLOWAIRFLOW®®®® connectionconnectionconnectionconnection leakageleakageleakageleakage 1° Ensure the handpiece has been correctly connected to the cord. 2° Clean the interior of the handpiece and the cord terminating end. 3° Replace the AIRFLOW® cord gasket as described in paragraph “AIRFLOW® handpiece leakage”. 4° If still not solved, contact EMS aftersales service.
IIIInsufficiensufficiensufficiensufficient or no waternt or no waternt or no waternt or no water from handpiece from handpiece from handpiece from handpiece 1° Make sure you have set your water regulators to 10 (maximum flow on the cord) and verify that the handpiece is not clogged by removing it and checking the water flow without handpiece. 2° Check your water filter cleanliness and replace it if necessary.
Disconnect the mains plug before servicing any filter. 2° Make sure you have well-connected and sufficient pressure from your water supply. 3° If still not solved, contact EMS aftersales service.
Night CleanerNight CleanerNight CleanerNight Cleaner
Still some blue liqStill some blue liqStill some blue liqStill some blue liquid remaining after rinsinguid remaining after rinsinguid remaining after rinsinguid remaining after rinsing 1° Make sure you have set your water regulators to 10: maximum flow on the cords. 2° Make sure you have well-connected and sufficient pressure from your water supply. 3° Perform a second rinsing phase before treatment. 4° If still not solved, contact EMS aftersales service.
The unit does not startThe unit does not startThe unit does not startThe unit does not start 1° Check the electrical connection and power socket. 2° Check the fuses at the back of the unit:
First disconnect the mains plug. Fuses are housed within the power cord socket. 1° Remove the power cord from the device. 2° With the help of a small flat screwdriver, open the fuse-holder cover. 3° Replace fuses only with the exact type required (refer to the “Technical Description” section). 4° If still not solved, contact EMS aftersales service.
Wireless pedal does not workWireless pedal does not workWireless pedal does not workWireless pedal does not work In the case is evident that the pedal remained pressed for longer than 10min, simply release the pedal and power cycle the device. If not this case, the problem may have multiple causes. A step-by-step multiple checks are required: 1° Switch-off the device and disconnect and reconnect both the PIEZON® and AIRFLOW® cord systems. Try again. 2° Perform a new pairing. This procedure is explained in the paragraph “Pairing a new pedal”. Try again. 3° Change the 2x AA lithium batteries and try again. 4° If still not solved, contact EMS aftersales service.

ENGLISH FB-618/EN – Rev. A-01 - 2017.03.30 38/46
Wired pedal does not workWired pedal does not workWired pedal does not workWired pedal does not work 1° Disconnect and reconnect the pedal. Check the cable for damage. Restart the device. 2° If still not solved, contact EMS aftersales service.
No No No No pressurizationpressurizationpressurizationpressurization of the powder chamberof the powder chamberof the powder chamberof the powder chamber 1° Check that your device is ON: at least 1 LED light should be ON. 2° Check that the AIRFLOW® cord system is well connected (full green mark on the lock actuator).
2° If still not solved, contact EMS aftersales service.
Powder chamber white light is Powder chamber white light is Powder chamber white light is Powder chamber white light is BLINKING at pressurizationBLINKING at pressurizationBLINKING at pressurizationBLINKING at pressurization attemptattemptattemptattempt Either the air line is not connected or there is not enough air pressure. 1° Check the air line for no kinking and check the air compressor unit.
2° Check air filter for cleanliness and replace if dirty.
3° If still not solved, contact EMS aftersales service.
Powder chamberPowder chamberPowder chamberPowder chamber white lightwhite lightwhite lightwhite light is BLINKING at depressurizationis BLINKING at depressurizationis BLINKING at depressurizationis BLINKING at depressurization 1° The handpiece could be clogged. Unclog with Easy Clean (see paragraph below). 2° AIRFLOW® cord could be clogged. Dismount and clean the airflow cord extremity. 3° If still not solved, contact EMS aftersales service.
Powder Powder Powder Powder spraysprayspraysprays out of s out of s out of s out of chamberchamberchamberchamber at depressurizationat depressurizationat depressurizationat depressurization 1° Powder chamber is filled beyond the maximum level marked. 2° Remove the powder exceeding the MAX sign on the bottle.
Powder leaks under Powder leaks under Powder leaks under Powder leaks under the the the the AIRFLOWAIRFLOWAIRFLOWAIRFLOW®®®® handpiece cord handpiece cord handpiece cord handpiece cord systemsystemsystemsystem The AIRFLOW® pinching element might be worn out or the air interface is dirty and is leaking powder. 1° Disconnect the cord, clean the air jack and connect again. If problem persists, go to Step 2. 2° Replace your AIRFLOW® handpiece cord with a new one. 3° If still not solved, contact EMS aftersales service.
Powder chamber is leakingPowder chamber is leakingPowder chamber is leakingPowder chamber is leaking 1° Clean the chamber with a wet cloth, in particular the cap and the bottom o-rings. Also clean the connecting elements on the device. 2° If still not solved, replace the powder chamber with a new one.
White LED White LED White LED White LED PIEZONPIEZONPIEZONPIEZON®®®® is not workingis not workingis not workingis not working 1° Clean and dry the handpiece connection and try again.
2° Your PIEZON® handpiece might be too hot and has entered automatic LED shut off mode.
Wait 1 min for the handpiece to cool and try again.
3° If still not solved, contact EMS aftersales service.
Insufficient lightingInsufficient lightingInsufficient lightingInsufficient lighting 1° Check the light guide and replace if necessary. 2° If the light is still weak, replace the handpiece.
Damaged light guideDamaged light guideDamaged light guideDamaged light guide Replace the light guide.
Low or no Low or no Low or no Low or no mechanical power delivered by PIEZONmechanical power delivered by PIEZONmechanical power delivered by PIEZONmechanical power delivered by PIEZON®®®® or vibration perceivedor vibration perceivedor vibration perceivedor vibration perceived 1° Make sure that the PIEZON® instrument (tip) is correctly screwed on (use CombiTorque tool). 2° Check the wear of the instrument (tip) and replace it if necessary. 3° Clean and dry the handpiece and the cord system electric connections. 4° Replace the PIEZON® handpiece first. 5° Replace the PIEZON® handpiece cord. 6° If still not solved, contact EMS aftersales service.

ENGLISH FB-618/EN – Rev. A-01 - 2017.03.30 39/46
6.9. To contact EMS Service support
E.M.S. Electro Medical Systems S.AE.M.S. Electro Medical Systems S.AE.M.S. Electro Medical Systems S.AE.M.S. Electro Medical Systems S.A.... Ch. de la Vuarpillière 31 1260 Nyon – Switzerland
Phone: +41 (0) 22 99 44 700 Email: [email protected]
ENGLISH FB-618/EN – Rev. A-01 - 2017.03.30 40/46
7. SUSTAINABILITY 7.1. Disposal of waste parts
The device must not be discarded in domestic household waste. Should you wish to definitively dispose of the device, please comply with the regulations that apply in your country. Other parts of this device, including tips/inserts, and chemicals must be disposed of according to your country’s regulations. Waste Electrical and Electronic Equipment belonging to customers located in the European Union may be shipped to EMS for recycling in accordance to the WEEE regulations. The costs of recycling, exclusive of shipping fees, are covered by EMS.
Keep the original packaging until the device is to be disposed of permanently. It can be used for shipping or storing.
7.2. Sustainable design
The device, on a voluntary basis, respects the latest Eco design low energy standby and off mode consumption regulation7. Packaging cardboards are recycled and recyclable.
Printed instructions respect the highest standards in sustainable development as My Climate neutral Imprimerie and FSC certification.
8. WARRANTY Warranty is void if the device has been used with non-original EMS powder, instruments and handpieces. Warranty is void if the device has been opened. EMS and the distributor of this device accept no liability for direct or consequential injury or damage resulting from improper use, arising in particular through non-observance of the instructions for use, or improper preparation and maintenance. EMS declines the responsibility for the safety of the device and declares the warranty null and void if service or repair is carried out by an unauthorized third party or if non-genuine spare parts are used.
7 European Commission Regulation N°1275/2008 of 17 December 2008 regarding the Eco design requirements for standby and off mode electric power consumption of electronic household and office equipment.

ENGLISH FB-618/EN – Rev. A-01 - 2017.03.30 41/46
9. TECHNICAL DESCRIPTION Manufacturer EMS ELECTRO MEDICAL SYSTEMS SA, CH-1260 Nyon, Switzerland Models AIRFLOW Prophylaxis Master, product code FT-229 Classification EM 60601-1 Electrical Insulation Class-I
Applied part Type B IP20 Control unit IP21 Foot pedal
Classification EU MDD 93/42/EEC
Medical Device Class IIa
Essential Performance This medical device, in the meaning of the EU MDD 93/42 has no Essential Performance Operating mode Continuous operation Power supply 100-240VAC, 50-60Hz, 4A max. Power consumption OFF-mode / Stand-by: 0.5W max.
Max: 700VA Ultrasonic module Max Output Power: 8W under fully-loaded mechanical condition
Frequency: 24-32kHz Fuse 5A, T (slow), 250VAC, H type (=T5H250V) Wireless communication module
Max 1dBm EIRP, 2.4 GHz band, Bluetooth® radio module
Weight Control Unit 5kg max. (full operating condition) Foot pedal: 0.35kg max. (wireless pedal)
Dimensions Control Unit: Height: 245 mm, Width: 260 mm, Length: 290 mm Wireless pedal: Diameter 135 mm, Height 35 mm
Operating conditions Temperature: 10°C to 35°C Humidity: 30% to 75% Altitude: Max 2000m
Storage conditions Temperature: -10°C to 30°C, no water inside Humidity: 95% not condensed
Transport conditions Temperature: -29°C to 38°C, no water inside Humidity: 95% not condensed
Input fluids Water: pressure 2-5 Bar, temperature 10-30 °C, salinity 0.2% max., RECTUS 20KA connector type. EN-1717 compliant water network/inlet is required. Air: pressure 4.5-7 Bar, dry-only (humidity 1.032g/mq max.), oil filtered 0.1 mg/mq max., RECTUS 21KA connector type
Output fluids Water: max. 90ml/min. for Airflow, max 70ml/min. for Piezon, with pressure 1.3 bar max. Air: max pressure 5 bar for Airflow
Service life Device: 7 years, having regular yearly preventive maintenance PIEZON® and NIGHT CLEANER® bottles: 3 years Handpieces: 1000 sterilization cycles CombiTorque: 1000 sterilization cycles

ENGLISH FB-618/EN – Rev. A-01 - 2017.03.30 42/46
9.1. Symbols
General Warning
Warning Electricity
Non-ionizing radiation (radio communication)
Read the operation instructions
Device requiring protective earth
Disconnect the mains plug for purposes of maintenance and in case of malfunction
Electronic instructions for use
Mandatory action
Expiration date
Single use. Do not re-use.
Do not do.
Protection against water permeability
Applied part, type B
Disposal of old electronic equipment (European Union & other countries with separate collection systems)
Manufacturer
Manufacturing date
Serial number
Catalog number / Product reference
Sterilizable at up to 135°C in the autoclave
Thermal disinfection
Input
Output
Fuse
Wired foot pedal connection

ENGLISH FB-618/EN – Rev. A-01 - 2017.03.30 43/46
9.2. Electromagnetic Compatibility The use of parts other than those supplied or listed as accessory may negatively affect EMC performance. The device has embedded a low power, 1 dBm EIRP max, Bluetooth 2.4 GHz module, for communication with the wireless pedal. This radio module is disabled when a wired pedal is connected (device reboot required). The product is intended for use and Basic Safety is maintained in the electromagnetic environment specified below. The customer or the user of this product should assure that it is used in such an environment.
Electromagnetic emissions compliance
Emissions testEmissions testEmissions testEmissions test ComplianceComplianceComplianceCompliance Electromagnetic environment Electromagnetic environment Electromagnetic environment Electromagnetic environment ---- guidanceguidanceguidanceguidance
RF emissions CISPR 11RF emissions CISPR 11RF emissions CISPR 11RF emissions CISPR 11 Group 1 The product uses RF energy only for its internal function. Therefore, its RF emissions
are very low and are not likely to cause any interference in nearby electronic equipment.
RF emissions CISPR 11RF emissions CISPR 11RF emissions CISPR 11RF emissions CISPR 11 Class B The product is suitable for use in all establishments, including domestic establishments and those directly connected to the public low-voltage power supply network that supplies buildings used for domestic purposes.
Harmonic emissions IEC 61000Harmonic emissions IEC 61000Harmonic emissions IEC 61000Harmonic emissions IEC 61000----3333----2222 Class A Voltage fluctuations / flicker emissions IEC Voltage fluctuations / flicker emissions IEC Voltage fluctuations / flicker emissions IEC Voltage fluctuations / flicker emissions IEC 61000610006100061000----3333----3333 Complies
Electromagnetic immunity compliance
Immunity testImmunity testImmunity testImmunity test IECIECIECIEC 60601 test level60601 test level60601 test level60601 test level Compliance levelCompliance levelCompliance levelCompliance level Electromagnetic environment Electromagnetic environment Electromagnetic environment Electromagnetic environment ---- guidanceguidanceguidanceguidance Electrostatic discharge (ESD)Electrostatic discharge (ESD)Electrostatic discharge (ESD)Electrostatic discharge (ESD) IEC 61000-4-2
± 8 kV contact ± 15 kV air
Floors should be wood, concrete or ceramic tile. If floors are covered with synthetic material, relative humidity should be > 30%.
Electrical fast transient/burstElectrical fast transient/burstElectrical fast transient/burstElectrical fast transient/burst IEC 61000-4-4
± 2 kV for power supply lines 100 kHz repetition frequency
± 1 kV for input/output lines 100 kHz repetition frequency
Mains power quality should be that of a typical commercial or hospital environment.
SurgeSurgeSurgeSurge IEC 61000-4-5
± 1 kV line(s) to line(s) ± 2 kV line(s) to earth
Mains power quality should be that of a typical commercial or hospital environment.
Voltage dipsVoltage dipsVoltage dipsVoltage dips IEC 61000-4-11 Voltage interruptions Voltage interruptions Voltage interruptions Voltage interruptions IEC 61000-4-11
<5 % UT (>95 % dip in UT) for 0,5 cycle 40 % UT (60 % dip in UT) for 5 cycles
70 % UT (30 % dip in UT) for 25 cycles 0 % UT for 0,5 cycle at 0°, 45°, 90°, 135°, 180°,
225°, 270° and 315° 0 % UT for 1 cycle single phase
<5 % UT (>95 % dip in UT) for 5 s 0% UT for 250 cycles
Mains power quality should be that of a typical commercial or hospital environment. If the user of the product requires continued operation during power mains interruptions, it is recommended that the product be powered from an uninterruptible power supply or a battery.
Power frequency (50/60 Hz)Power frequency (50/60 Hz)Power frequency (50/60 Hz)Power frequency (50/60 Hz) magnetic fieldmagnetic fieldmagnetic fieldmagnetic field IEC 61000-4-8
30 A/m 30 A/m (50 Hz or 60 Hz)
Power frequency magnetic fields should be at levels characteristic of a typical location in a typical commercial or hospital environment.
Conducted RFConducted RFConducted RFConducted RF IEC 61000-4-6 Radiated RFRadiated RFRadiated RFRadiated RF IEC 61000-4-3 Proximity fields from RF Proximity fields from RF Proximity fields from RF Proximity fields from RF wireless communications wireless communications wireless communications wireless communications equipmentequipmentequipmentequipment IEC 61000-4-3
3 V 150 kHz to 80 MHz
6V in ISM bands 150kHz and 80 MHz 80 % AM at 1 kHz
3 V/m 80 MHz to 2.7 GHz 80% AM at 1 kHz
See Table below
3 V
3 V/m
Portable and mobile RF communications equipment should be used no closer to any part of the product, including cables, than the recommended separation distance calculated from the equation applicable to the frequency of the transmitter. Recommended separation distance d = 1.17 √P, d = 1.17 √P 80 MHz to 800 MHz, d = 2.4 √P 800 MHz to 2.7 GHz where P is the maximum output power rating of the transmitter in watts (W) according to the transmitter manufacturer and d is the recommended separation distance in meters (m). Field strengths from fixed RF transmitters, as determined by an electromagnetic site survey8, should be less than the compliance level in each frequency range9. Interference may occur in the vicinity of equipment marked with the
following symbol: or
8 Field strengths from fixed transmitters, such as base stations for radio (cellular/cordless) telephones and land mobile radios, amateur radio, AM and FM radio broadcast and TV broadcast cannot be predicted theoretically with accuracy. To assess the electromagnetic environment due to fixed RF transmitters, an electromagnetic site survey should be considered. If the measured field strength in the location in which the product is used exceeds the applicable RF compliance level above, the product should be observed to verify normal operation. If abnormal performance is observed, additional measures may be necessary, such as re-orienting or relocating the product. 9Over the frequency range 150 kHz to 80 MHz, field strengths should be less than 3 V/m.

ENGLISH FB-618/EN – Rev. A-01 - 2017.03.30 44/46
Notes: - UT is the a. c. mains voltage prior to application of the test level. - At 80 MHz and 800 MHz, the higher frequency range applies. - These guidelines may not apply in all situations. Electromagnetic propagation is affected by absorption and reflection from
structures, objects and people. Proximity fields from RF wireless communications equipmentProximity fields from RF wireless communications equipmentProximity fields from RF wireless communications equipmentProximity fields from RF wireless communications equipment IEC 61000-4-3
TestTestTestTest FrequencyFrequencyFrequencyFrequency
(MHz)
BandBandBandBand
(MHz)
ServiceServiceServiceService
ModulationModulationModulationModulation
Maximum powerMaximum powerMaximum powerMaximum power
(W)
DistanceDistanceDistanceDistance
(m)
ImmunityImmunityImmunityImmunity test leveltest leveltest leveltest level
(V/m)
385 380-390 TETRA 400 Pulse Modulation
18Hz 1,8 0,3 27
450 430-470 GMRS 460,
FRS 460
FM ±5 kHz deviation
1 kHz sine 2 0,3 28
710 704-787 LTE Band 13, 17
Pulse Modulation
217 Hz 0,2 0,3 9 745
780
810
800-960
GSM 800/900, TETRA 800,
iDEN 820, CDMA 850, LTE Band 5
Pulse Modulation
18 Hz 2 0,3 28 870
930 1720
1700-1990
GSM 1800, CDMA 1900,
GSM 1900, DECT, LTE Band 1, 3, 4,
25, UMTS
Pulse Modulation
217 Hz 2 0,3 28
1845
1970
2450 2400 -2570
Bluetooth, WLAN, 802.11b/g/n, RFID
2450, LTE Band 7
Pulse Modulation
217 Hz 2 0,3 28
5240 5100 – 5800 WLAN 802.11a/n
Pulse Modulation
217 Hz 0,2 0,3 9 5500
5785
Recommended separation distances
The product is intended for use in an electromagnetic environment in which radiated RF disturbances are controlled. The customer or the user of the product can help prevent electromagnetic interference by maintaining a minimum distance between portable and mobile RF communications equipment (transmitters) and the product as recommended below, according to the maximum output power of the communications equipment.
Rated maximum Rated maximum Rated maximum Rated maximum output power of output power of output power of output power of transmitter transmitter transmitter transmitter W
Separation distance according to frequency of transmitter Separation distance according to frequency of transmitter Separation distance according to frequency of transmitter Separation distance according to frequency of transmitter (m)(m)(m)(m)
150 kHz to 80 MHz 150 kHz to 80 MHz 150 kHz to 80 MHz 150 kHz to 80 MHz
d = �.�
� √P with V=3V
80 MHz to 800 MHz 80 MHz to 800 MHz 80 MHz to 800 MHz 80 MHz to 800 MHz
d = �.�
� √P with E=3V/m
800 MHz to 2,5 GHz 800 MHz to 2,5 GHz 800 MHz to 2,5 GHz 800 MHz to 2,5 GHz
d = �
� √P with E=3V/m
0.01 0.12 0.12 0.24 0.1 0.37 0.37 0.74 1 1.17 1.17 2.34 10 3.69 3.69 7.4 100 11.67 11.67 23.4 For transmitters rated at a maximum output power not listed above, the recommended separation distance d in metres (m) can be estimated using the equation applicable to the frequency of the transmitter, where P is the maximum output power rating of the transmitter in watts (W) according to the transmitter manufacturer.
NOTE: This equipment has been tested and found to comply with the limits for a Class B digital device, pursuant to part 15 of the FCC Rules. These limits are designed to provide reasonable protection against harmful interference in a residential installation. This equipment generates, uses and can radiate radio frequency energy and, if not installed and used in accordance with the instruction, may cause harmful interference to radio communications. However, there is no guarantee that interference will not occur in a particular installation. If this equipment does cause harmful interference to radio or television reception which can be determined by turning the equipment off and on, the user is encouraged to try to correct interference by one or more of the following measures: - Reorient or relocate the receiving antenna. - Increase the separation between the equipment and receiver. - Connect the equipment into an outlet on a circuit different from that to which the receiver is connected. - Consult the dealer or an experienced radio/TV technician for help.

ENGLISH FB-618/EN – Rev. A-01 - 2017.03.30 45/46
10. ALPHABETICAL INDEX
A
ACOUSTIC FEEDBACK, 20
AIR, 3, 4, 7, 9, 10, 11, 16, 17, 30, 33,
34, 38, 43
AIRFLOW, 3, 4, 6, 7, 8, 10, 14, 15,
17, 18, 19, 20, 21, 33, 34, 37, 38,
41
APPLICATION, 3, 33
APPLIED PARTS, 6
B
BATTERIES, 7, 12, 35, 36, 37
BETWEEN EACH PATIENT, 24
BLUETOOTH, 9, 12, 41, 43, 44
BOOST, 17, 19
C
CHECK FOR, 7, 9
CHECK TIP LENGTH, 16
CLASENUNO, 8, 22, 32
CLASSIC POWDER, 13
CLEANING, 3, 23, 24, 32
CLEVERDENT, 32
CLINICAL RISK, 13
CLIP+CLEAN, 7, 14, 23, 24
CLOGGED HANDPIECE, 33
CLOGGING, 15
COMBITORQUE, 16
COMPATIBILITY, 5
CONTACT EMS SERVICE SUPPORT,
39
CONTAMINATION, 9, 10, 24
CONTRAINDICATIONS, 5
CORD REPLACEMENT, 34
CORDS, 11, 17, 23, 24, 35, 36
D
DEPRESSURIZATION, 17, 38
DISCONNECT THE MAINS PLUG, 2,
34, 42
DISINFECTING SOLUTIONS, 14
DISINFECTION, 24, 25, 26, 30, 32
DISINFECTION, 32
DISPOSAL OF WASTE PARTS, 40
E
E.M.S. ELECTRO MEDICAL SYSTEMS
S.A, 39, 46
EACH MORNING, 23
ELECTROMAGNETIC
COMPATIBILITY, 43
ELECTROMAGNETIC
DISTURBANCES, 6
END OF DAY, 24
ENDO, 18, 19
ENDOCHUCK, 5, 8, 22
EQUIPMENT SUPPLIED, 7
F
FIX THE DEVICE, 11
I
INCIDENT, 2
INSTRUCTIONS FOR USE, 2, 4
INSTRUMENTS, 5, 16, 24, 40
INTENDED USER, 4
INTERFACES, 17
L
LIGHT GUIDE, 16, 33, 38
M
MALFUNCTION, 2, 6, 34
MANUFACTURER INFORMATION,
25, 32
MASTER SCREW, 7, 11
MIRROR, 22, 32
MONTHLY MAINTENANCE, 34
N
NEWBORN (NEONATE), 4
NIGHT CLEANER, 7, 10, 23, 24, 25
NIGHT CLEANER BOTTLE, 41
O
ON/OFF, 17
OVERALL CLEANING AND
DISINFECTION, 24
OVERNIGHT CLEANING, 24
P
PAIRING A NEW PEDAL, 35
PATIENT POPULATION, 4
PEDAL, 17
PERIOFLOW, 8, 13
PERIOFLOW, 3, 6, 8, 15, 22, 33
PI INSTRUMENT, 22
PIEZON, 3, 4, 6, 7, 8, 10, 14, 16, 17,
18, 19, 20, 21, 33, 34, 37, 38
PIEZON BOTTLE, 41
PLUS POWDER, 13
POINT OF CONTACT, 25, 32
POWDER, 5, 13, 17, 21, 24, 33, 34,
35, 38, 40
POWDER CHAMBERS, 7, 13
POWER SETTING, 17
PRECAUTIONS, 6
PRESSURIZATION, 17, 38
PREVENTIVE MAINTENANCE, 35, 41
PROTECTIVE EARTH, 2, 9, 12
R
REPAIR, 35, 36, 40
REPROCESSING, 15, 16, 22, 26, 32
REUSABLE PRODUCTS, 26
RINSING, 23
RISK OF ELECTRIC SHOCK, 2
RISK OF FIRE, 12, 36, 37
RISK OF INGESTION, 23
RISK OF PATIENT HARM, 21
RISK OF TIP BREAKAGE, 18, 19
S
STERILIZATION, 26, 30, 31
STERILIZATION, 30, 31
SUCTION CANNULA, 22, 32
SYMBOLS, 42
T
TIP, 16, 18, 19
TRAINING, 4
TROUBLESHOOTING, 12, 15, 36
W
WATER, 4, 7, 9, 10, 11, 14, 17, 21,
23, 24, 32, 33, 34, 36, 37, 41, 42
WATER TEMPERATURE, 20
WATERLINE CLEANING &
DISINFECTION, 23
WIRELESS PEDAL, 6, 9, 12, 17, 35,
36, 41, 43
Y
YEARLY MAINTENANCE, 35

ENGLISH FB-618/EN – Rev. A-01 - 2017.03.30 46/46
E.M.S. Electro Medical Systems S.AE.M.S. Electro Medical Systems S.AE.M.S. Electro Medical Systems S.AE.M.S. Electro Medical Systems S.A.... Ch. de la Vuarpillière 31Ch. de la Vuarpillière 31Ch. de la Vuarpillière 31Ch. de la Vuarpillière 31 CHCHCHCH----1260 Nyon1260 Nyon1260 Nyon1260 Nyon SWITZERLANDSWITZERLANDSWITZERLANDSWITZERLAND
Tel. +41 22 99 44 700Tel. +41 22 99 44 700Tel. +41 22 99 44 700Tel. +41 22 99 44 700 Fax +41 22 99 44 701Fax +41 22 99 44 701Fax +41 22 99 44 701Fax +41 22 99 44 701
eeee----mailmailmailmail: : : : welcome@emswelcome@emswelcome@[email protected]
GERMANYGERMANYGERMANYGERMANY EMS Electro Medical Systems GmbH
Schatzbogen, 86 D-81829 München
Tel. +49 89 42 71 61 0 Fax +49 89 42 71 61 60 e-mail: [email protected]
SPAINSPAINSPAINSPAIN EMS Electro Medical Systems España SLU
c/ Tomás Bretón, 50-52, 2ª planta E-28045 Madrid
Tel. +34 91 528 99 89 e-mail: [email protected]
FRANCEFRANCEFRANCEFRANCE EMS France Sarl
23, Av. Louis Bréguet Immeuble Santos Dumont, Bâtiment D F-78140 Vélizy Villacoublay
Tél. +33 1 34 58 03 80 Fax +33 1 34 58 03 90
e-mail: [email protected]
ITALYITALYITALYITALY EMS Italia S.p.A.
Via Faravelli, 5 I-20149 Milano
Tel. +39 02 3453 8111 Fax +39 02 3453 2778
e-mail: [email protected]
USAUSAUSAUSA EMS Electro Medical Systems Corporation
11886 Greenville Avenue, #120 Dallas, TX 75243
Tel. +1 972 690 83 82 Fax +1 972 690 89 81
e-mail: [email protected]
CHINACHINACHINACHINA 医迈斯电子医疗系统统易(上海)有限公司
E.M.S. Electro Medical Systems Trading (Shanghai) Co., Ltd. 24A, No 379, Jin Sui Mansion Pudong Nan Road Shanghai 200120
Tel. +862133632323 e-mail: [email protected]