instructions late 2015 - 2016 all -...
TRANSCRIPT
A
DETAIL A
Link
Strut
Lever craddle
Spring
Cable bolt(hidden)
Left axle
Left arm
Right arm
Right axleAxlenut
Thin Axlewasher
Cable adjust screw
Cable adjust nut
Cable adjust padLever
2
Thin steel washer
Mounting bolt
Nut
frame/Fork
E E T I G T E LE T A LE E E T E CA LE
LT T E A LE T I G T E LE T A LE E CA LE LT IS I STALLED A CA SEDA AGE
GreaseThreads
1
General Safety Information: Warning: Improper use of your bike’s brakes may result in loss of control and an accident, resulting in serious injury. Learn to control and use •
your brakes safely by practicing riding and braking techniques in a safe place. Read and follow these instructions. Keep these instructions for later use.Tighten brake nuts and bolts to the specified tightening torque. Over-tightening bolts may result in brake failure.•Use grease as specified to protect parts against galling, wear and corrosion. •Plastic bushings are designed to be used dry. Light oil lubricant is optional to facilitate smooth movement and is suggested when riding in wet •
conditions.Brake mounting bolts and nuts must be long enough to provide at least 5 full turns of engagement when mounting the brakes to the bike. •
Insufficient bolt engagement may result in brake failure, an accident and serious injury.Always check your brakes to make sure the quick release is closed before riding your bike.•Routinely check your brakes insuring they are in good working condition, checking the bolts for tightness and the cables for rust and fraying. •
Replace cables immediately if problems are found. Never ride your bike with loose, worn or damaged brakes including the pads. This may result in an accident and serious injury.
Do not allow oil or grease to get on the brake pads as this may result in an accident and serious injury.•Use caution when riding in wet weather as tire traction is reduced and stopping distances are increased in these conditions. •
Ride at reduced speeds, apply the brakes gently and allow greater distances to stop.
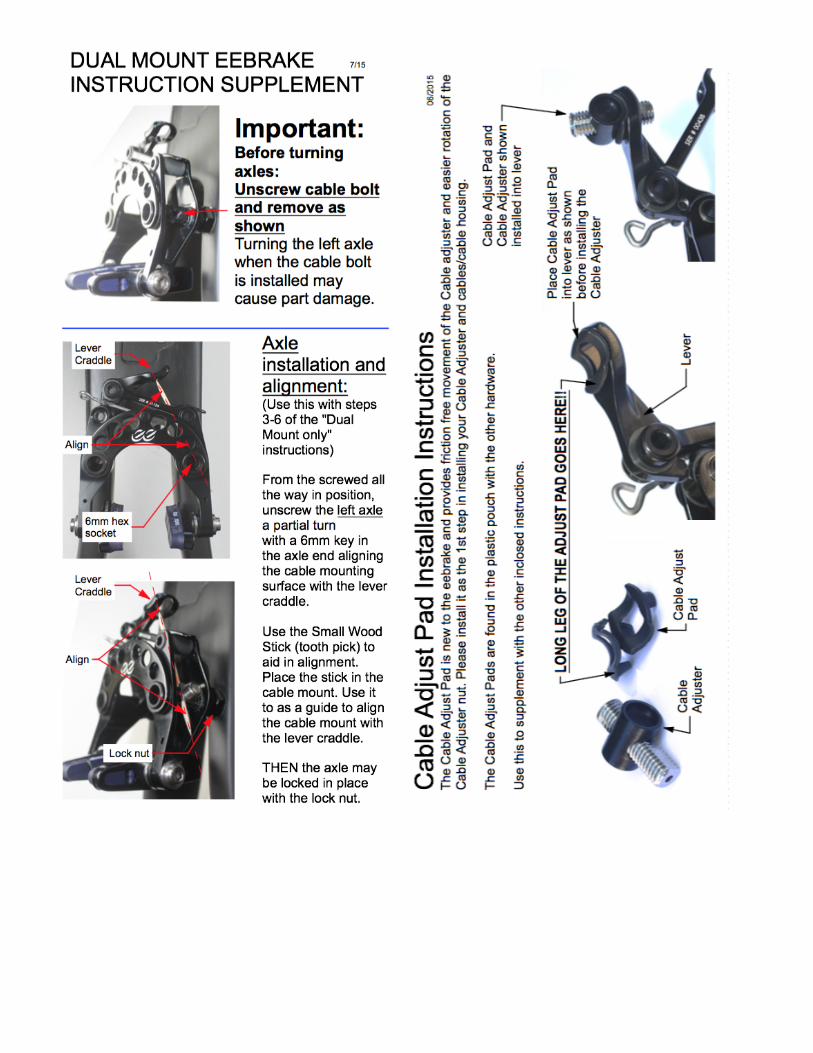
ounting the eebrake to the fork/frame.U L U T BR S L
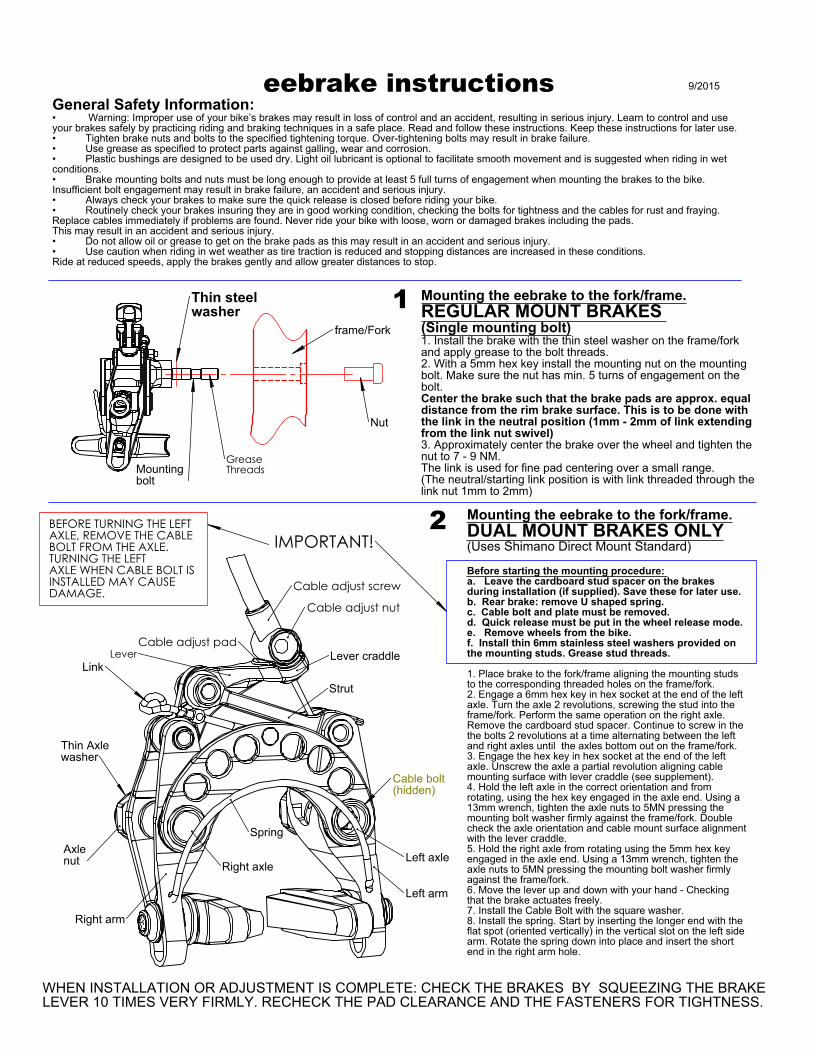
(Uses Shimano Direct Mount Standard) Before starting the mounting procedure: a. Leave the cardboard stud spacer on the brakes during installation (if supplied). Save these for later use.b. Rear brake: remove U shaped spring.c. Cable bolt and plate must be removed.d. Quick release must be put in the wheel release mode. e. Remove wheels from the bike.f. Install thin 6mm stainless steel washers provided on the mounting studs. Grease stud threads.
1. Place brake to the fork/frame aligning the mounting studs to the corresponding threaded holes on the frame/fork.2. Engage a 6mm hex key in hex socket at the end of the left axle. Turn the axle 2 revolutions, screwing the stud into the frame/fork. Perform the same operation on the right axle. Remove the cardboard stud spacer. Continue to screw in the the bolts 2 revolutions at a time alternating between the left and right axles until the axles bottom out on the frame/fork.3. Engage the hex key in hex socket at the end of the left axle. Unscrew the axle a partial revolution aligning cable mounting surface with lever craddle (see supplement).4. Hold the left axle in the correct orientation and from rotating, using the hex key engaged in the axle end. Using a 13mm wrench, tighten the axle nuts to 5MN pressing the mounting bolt washer firmly against the frame/fork. Double check the axle orientation and cable mount surface alignment with the lever craddle.5. Hold the right axle from rotating using the 5mm hex key engaged in the axle end. Using a 13mm wrench, tighten the axle nuts to 5MN pressing the mounting bolt washer firmly against the frame/fork.6. Move the lever up and down with your hand - Checking that the brake actuates freely. 7. Install the Cable Bolt with the square washer.8. Install the spring. Start by inserting the longer end with the flat spot (oriented vertically) in the vertical slot on the left side arm. Rotate the spring down into place and insert the short end in the right arm hole.
Cable housing and cable installationRemove the lever retention wire tie.Measure and cut the cable and housing to the correct length. Cable housing length keys:The housing must be long enough to allow for free movement as the brake is operated (As the eebrake is operated, the cable housing moves toward the brake). Too short of housing will pull against the brake when operated and/or may not allow the brake to fully open when released.. Then housing alignment / length is to allow the cable adjuster to naturally seat in the lever cradle. Improper alignment / length will ‘rack’ the cable adjuster in the lever. This hinders smooth brake operation.Note: When replacing other brakes with eebrakes, the correct length varies. As a guide, the length is often 1/4” longer than the existing housing.
Insert the brake cable into the cable groove under square cable plate and bolt.
While holding the brake arms / pads in the relaxed brake position, tighten the cable bolt to 4NM.
WHEN INSTALLATION OR ADJUSTMENT IS COMPLETE: CHECK THE BRAKES BY SQUEEZING THE BRAKE LEVER 10 TIMES VERY FIRMLY. RECHECK THE PAD CLEARANCE AND THE FASTENERS FOR TIGHTNESS.
eebrake instructions 9/2015
I TA T
ounting the eebrake to the fork/frame.R GUL R U T BR S (Single mounting bolt)1. Install the brake with the thin steel washer on the frame/fork and apply grease to the bolt threads.2. With a 5mm hex key install the mounting nut on the mounting bolt. Make sure the nut has min. 5 turns of engagement on the bolt.Center the brake such that the brake pads are approx. equal distance from the rim brake surface. This is to be done with the link in the neutral position (1mm - 2mm of link extendingfrom the link nut swivel)3. Approximately center the brake over the wheel and tighten the nut to 7 - 9 NM.The link is used for fine pad centering over a small range.(The neutral/starting link position is with link threaded through the link nut 1mm to 2mm)
Step 1Step 2
Cable housing
Cable adjust screw
Cable adjust nutLever
CableStrut
Link
Left arm
Right arm
Left axleRight axle
ShoePad
Spherical washerSpacer
Shoe bolt
Cable bolt(hidden)
QuickreleaseStep 1
QuickreleaseStep 2
Spring
Cable adjust pad(with long leg on this side)
Lever craddle
Pad retention boss
WHEN INSTALLATION OR ADJUSTMENT IS COMPLETE: CHECK THE BRAKES BY SQUEEZING THE BRAKE LEVER 10 TIMES VERY FIRMLY. RECHECK THE PAD CLEARANCE AND THE FASTENERS FOR TIGHTNESS.
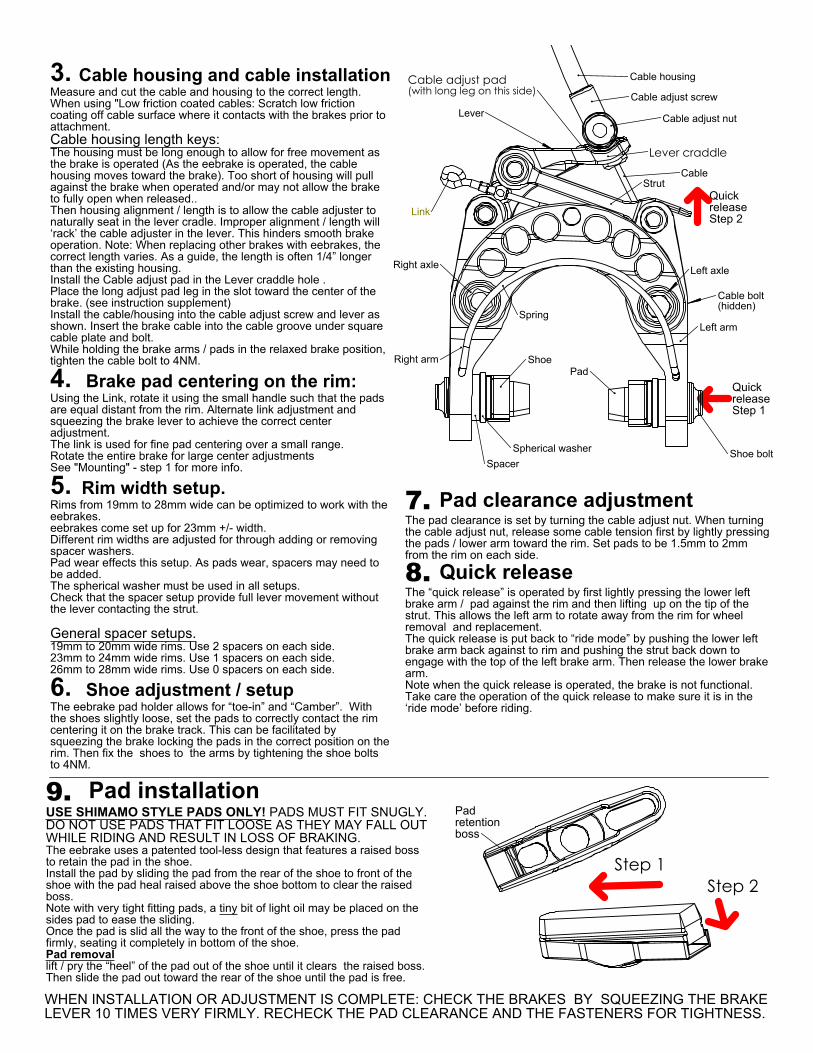
3. Cable housing and cable installationMeasure and cut the cable and housing to the correct length. When using "Low friction coated cables: Scratch low friction coating off cable surface where it contacts with the brakes prior to attachment.Cable housing length keys:The housing must be long enough to allow for free movement as the brake is operated (As the eebrake is operated, the cable housing moves toward the brake). Too short of housing will pull against the brake when operated and/or may not allow the brake to fully open when released.. Then housing alignment / length is to allow the cable adjuster to naturally seat in the lever cradle. Improper alignment / length will ‘rack’ the cable adjuster in the lever. This hinders smooth brake operation. Note: When replacing other brakes with eebrakes, the correct length varies. As a guide, the length is often 1/4” longer than the existing housing. Install the Cable adjust pad in the Lever craddle hole .Place the long adjust pad leg in the slot toward the center of the brake. (see instruction supplement)Install the cable/housing into the cable adjust screw and lever as shown. Insert the brake cable into the cable groove under square cable plate and bolt.While holding the brake arms / pads in the relaxed brake position, tighten the cable bolt to 4NM.
4. Brake pad centering on the rim:Using the Link, rotate it using the small handle such that the pads are equal distant from the rim. Alternate link adjustment and squeezing the brake lever to achieve the correct center adjustment.The link is used for fine pad centering over a small range.Rotate the entire brake for large center adjustmentsSee "Mounting" - step 1 for more info.
5. Rim width setup.Rims from 19mm to 28mm wide can be optimized to work with the eebrakes.eebrakes come set up for 23mm +/- width.Different rim widths are adjusted for through adding or removing spacer washers. Pad wear effects this setup. As pads wear, spacers may need to be added.The spherical washer must be used in all setups.Check that the spacer setup provide full lever movement without the lever contacting the strut.
General spacer setups.19mm to 20mm wide rims. Use 2 spacers on each side.23mm to 24mm wide rims. Use 1 spacers on each side.26mm to 28mm wide rims. Use 0 spacers on each side.
6. Shoe adjustment / setupThe eebrake pad holder allows for “toe-in” and “Camber”. With the shoes slightly loose, set the pads to correctly contact the rim centering it on the brake track. This can be facilitated by squeezing the brake locking the pads in the correct position on the rim. Then fix the shoes to the arms by tightening the shoe bolts to 4NM.
ad installationUS S I ST L S L PADS MUST FIT SNUGLY.DO NOT USE PADS THAT FIT LOOSE AS THEY MAY FALL OUT WHILE RIDING AND RESULT IN LOSS OF BRAKING.The eebrake uses a patented tool-less design that features a raised boss to retain the pad in the shoe.Install the pad by sliding the pad from the rear of the shoe to front of the shoe with the pad heal raised above the shoe bottom to clear the raised boss.Note with very tight fitting pads, a tiny bit of light oil may be placed on the sides pad to ease the sliding.Once the pad is slid all the way to the front of the shoe, press the pad firmly, seating it completely in bottom of the shoe.
ad removallift / pry the “heel” of the pad out of the shoe until it clears the raised boss. Then slide the pad out toward the rear of the shoe until the pad is free.
ad clearance adjustment The pad clearance is set by turning the cable adjust nut. When turning the cable adjust nut, release some cable tension first by lightly pressing the pads / lower arm toward the rim. Set pads to be 1.5mm to 2mm from the rim on each side.
Quick releaseThe “quick release” is operated by first lightly pressing the lower left brake arm / pad against the rim and then lifting up on the tip of the strut. This allows the left arm to rotate away from the rim for wheel removal and replacement. The quick release is put back to “ride mode” by pushing the lower left brake arm back against to rim and pushing the strut back down to engage with the top of the left brake arm. Then release the lower brake arm. Note when the quick release is operated, the brake is not functional. Take care the operation of the quick release to make sure it is in the ‘ride mode’ before riding.