instrukcja obsługi ideal ap 60 pro - loveair.pl · oczyszczacz powietrza pl instrukcja obsługi...
TRANSCRIPT

LuftreinigerAir PurifiersPurificateur
IDEAL AP60 Pro
www.ideal.de
DE Betriebsanleitung
EN Operating Instructions
FR Mode d´emploi
Oczyszczacz powietrza PL Instrukcja obsługi
IDEAL AP60 PROIDEAL AP80 PRO

23
EN Operating Instructions (23 – 43)
Intended use 24 Safety instructions 24 Product features 26 Included in the box 26 Unpacking and setting up 27 Overview and description of parts 29 Control panel 30
Fan speeds 31 Timer function 31 Quiet function 32 Air quality indicator 32 Filter replacement indicator 32 Daylight sensor 32 IR receiver 32 Air quality sensor 32 Remote control (when using for the first time) 33 Remote control (replacing the battery) 34 Remote control (function) 35
Changing the filter 36 Cleaning and maintenance 37 Troubleshooting 38 Technical data 40
PL Instrukcja obsługi (1-22)
Wprowadzenie 3Zasady bezpieczeństwa 3Cechy produktu 5Rozpakowywanie i montaż 6Przegląd i opis części 8Panel sterowania 9Prędkości wentylatora 10Wyłącznik czasowy 10Tryb pracy cichej 11Wskaźnik jakości powietrza 11Wskaźnik wymiany filtra 11Czujnik światła dziennego 11Odbiornik IR 11Czujnik jakości powietrza 11Pilot zdalnego sterowania 12Pilot zdalnego sterowania (wymiana baterii) 13Pilot zdalnego sterowania (funkcje) 14Wymiana filtra 15Czyszczenie i konserwacja 16Rozwiązywanie problemów 17Dane techniczne 19
2

24
IntroductionThank you for choosing a device from IDEAL.
Intended use• The device is used exclusively for cleaning the ambient air indoors.• Please read these operating instructions before starting to use the device
and please follow the safety instructions. The operating instructions must be kept available with the device at all times.
Safety instructions• Keep packing material, such as plastic wrapping, away from children!
(Risk of suffocation)• Please follow the safety instructions to prevent fire or electric shock.
Only use the device indoors.• Only use a wall socket that supplies the correct voltage (see rating plate)• Do not modify or repair the device. • Do not use the device if the power cable or mains plug is damaged or if
the connection at the wall socket is not stable.• Make sure that the power cable does not get crushed while you are using
the device and that it cannot be damaged in any other way. Place the cable so that no one will trip over it. Do not place the power cable under strain, i.e. do not pull it tight.
• Disconnect the plug from the wall socket for cleaning purposes and whenever the device is not in use for a significant period of time.
• Do not touch the plug or the device if you have wet hands.• Do not spray any insect repellent.• Do not use in rooms where the device may come into contact with fuel
vapour or metal dust.• Do not use any volatile liquids, petroleum, kerosene, paint thinner or
polishing paste to clean the device. Such liquids may damage the surface of the device.
• Do not expose the device to rain, water, moisture or high humidity, and do not set it up in a bathroom or kitchen next to a sink.
• Make sure that no foreign objects get into the outlet grilles.• Do not use near an open fire or sparks. The device is not suitable for
removing harmful gases (carbon monoxide, e.g. from heating appliances).
Wprowadzenie
Dziękujemy za wybór oczyszczacza powietrza firmy Ideal.
Przeznaczenie urządzenia:• Urządzenie służy wyłącznie do oczyszczania powietrza w pomieszczeniu zamkniętym. • Należy przeczytać instrukcję obsługi przed rozpoczęciem użytkowania urządzenia i postępować zgodnie z zasadami BHP.• Instrukcja obsługi powinna być zawsze dostępna.
Zasady bezpieczeństwa
Opakowanie, np. folię trzymać z dala od dzieci! (istnieje niebezpieczeństwo uduszenia się).• Postępuj zgodnie z instrukcjami zawartymi w niniejszej instrukcji obsługi, aby maksymalnie zmniejszyć ryzyko porażenia prądem, zwarcia i/lub powstania pożaru.• Korzystaj wyłącznie z gniazdka o napięciu 220 - 240 V.• Wtyczka urządzenia jest spolaryzowana, nie przekręcaj wtyczki, nie wkładaj na siłę. Jeśli wtyczka nie wchodzi spróbuj ją obrócić do góry nogami. Jeżeli nadal masz problemy z włożeniem wtyczki skontaktuj się z elektrykiem, aby zainstalował poprawne gniazdo.• Zwróć uwagę, aby w czasie pracy urządzenia przewód sieciowy nie był zagięty lub uszkodzony. Przewód ułóż tak, aby nikt się o niego nie potknął. Nie naciągaj przewodu.• W przypadku dłuższych przerw w używaniu urządzenia lub na okres jego czyszczenia wyjmij przewód z gniazda.• Nie wkładaj wtyczki do gniazda sieciowego mając mokre ręce.• Nie czyść urządzenia za pomocą nafty, ani rozcieńczalnika lub środka chroniącego przed owadami.• Do czyszczenia nie stosuj żadnych łatwo odparowujących cieczy, benzyny, rozcieńczalnika lub pasty polerskiej, gdyż mogą one uszkodzić powierzchnie urządzenia.• W żadnym wypadku nie narażaj urządzenia na deszcz, wodę, wilgoć lub dużą wilgotność powietrza, nie ustawiaj urządzenia w łazience lub kuchni obok zmywarki do naczyń, albo zlewu.• Nie wkładaj palców ani innych elementów do wlotu i wylotu urządzenia.• Nie włączaj urządzenia w pobliżu palących się papierosów, świec lub innych źródeł ognia i iskier. Urządzenie nie jest przeznaczone do usuwania szkodliwych gazów, np. tlenku węgla wydzielającego się z palenisk.• Nie rozpylaj w pobliżu urządzenia środków odstraszających owady.• Nie włączaj urządzania w pomieszczeniach w których mogą występować opary paliwa lub pyłki metali. • Nie blokuj wlotów i wylotów urządzenia.• Nigdy nie włączaj urządzenia bez kasety z filtrami.• Nie używaj w pobliżu otwartego ognia. • Nie modyfikowuj, ani nie naprawiaj urządzenia we własnym zakresie. Wszelkich napraw powinien dokonywać wyspecjalizowany serwis.
3

25
Safety instructions• Do not block the air intake or outlet.• Keep the device away from sources of heat such as direct sunlight or
radiators, etc.• Make sure that no water vapour comes into contact with the device.• Do not use in rooms where the device may come into contact with oil
vapour.• Do not use the air purifier without a filter.• Only use the air purifier in living spaces and within the specified technical
parameters. Improper usage may pose a threat to life and health.• Children may not recognise hazards associated with electrical equipment.
You should therefore always supervise children near and around the air purifier.
• Anyone who is not familiar with the operating instructions, any children and anyone under the influence of medication, alcohol or drugs must not use the device or may only use it under supervision.
CautionRisk of injury due to electric shock.Always disconnect the mains plug prior to• Carrying out maintenance work or cleaning• Moving the device• Changing the filter
Danger• Do not use any spray cans with flammable content near to the Air Purifier!
Danger• Do not use any flammable cleaning agents.
Instrukcje bezpieczeństwa
• Trzymaj urządzenie z dala od źródeł ciepła, takich jak: bezpośrednie działanie promieni słonecznych lub grzejnika, itp.• Nie narażaj urządzenia ma parę wodną.• Używaj wyłącznie oczyszczacza powietrza w pomieszczeniach mieszkalnych oraz wg. określonych technicznie parametrów oczyszczacza. Niewłaściwe użytkowanie może stwarzać zagrożenie dla życia i zdrowia.• Dzieci mogą nie rozpoznawać zagrożeń związanych z urządzeniami elektrycznymi. Zawsze nadzoruj dzieci w pobliżu oczyszczacza. • W urządzeniu znajduje się filtr z węglem aktywnym. Węgiel ten jest pochodzenia naturalnego i może generować charakterystyczny zapach. Jest wrażliwy na wysoką wilgotność powietrza, która może go nieodwracalnie uszkodzić, zmniejszając skuteczność jego działania oraz powodując nieprzyjemny intensywny zapach.
Osoby, które nie zapoznały się z instrukcją obsługi, dzieci, osoby pod wpływem leku czy alkoholu nie mogą korzystać z urządzenia lub powinny robić to pod nadzorem.
Uwaga
Niebezpieczeństwo obrażeń na skutek porażenia prądem.Zawsze należy odłączyć wtyczkę przed:• Przeprowadzeniem prac konserwacyjnych lub czyszczeniem• Przenoszeniem urządzenia• Wymianą filtra
Niebezpieczeństwo
• Nie używaj aerozoli z zawartością substancji palnych w pobliżu oczyszczacza powietrza!
Niebezpieczeństwo!
Nie używaj palnych substancji do czyszczenia urządzenia.
4

26
Included in the box
IDEAL AP60 Pro(including filter cartridge)
Filter cartridge• Pre-filter• HEPA filter coated
with activated carbon
Remote control • With self-adhesive
magnetic film• With 3V lithium battery
Power cable Printed operating instructions
Product features
• Filter replacement indicator: An illuminated red replacement indicator on the air purifier indicates that the filter cartridge
needs to be replaced.
• Air purification in 4 speed settings
• 3-stage air purification system: Pre-filter, HEPA filter coated with activated carbon
• Filter For easy maintenance and replacement of the filter cartridge.
TurboAuto
8h
4h
2h
1h
3
2
1
LuftreinigerAir PurifiersPurificateur
IDEAL AP60 Pro
www.ideal.de
DE Betriebsanleitung
EN Operating Instructions
FR Mode d´emploi
Cechy produktu
• Wskaźnik wymiany filtra: Podświetlany wskaźnik wskazuje kiedy wkład filtra musi zostać wymieniony.
• 5 ustawień prędkości
• 3 stopniowy system oczyszczania powietrza: Filtr wstępny, filtr HEPA wraz z węglem aktywnym.
• Filtr 360 (filtr wstępny, HEPA + węgiel aktywny): Łatwa konserwacja i wymiana filtrów.
Zawartość opakowania
Oczyszczacz powietrza(wraz z kasetą filtracyjną)
Kaseta filtracyjna:• Filtr wstępny• Filtr HEPA pokryty węglem aktywnym
Pilot bezprzewodowy:• Z samoprzylepną taśmą magnetyczną• Wraz z bateriami 3 V
Przewód zasilający Instrukcja obsługi
5

27
Unpacking and setting up
Take out the power cable (1.), operating instructions (2.) and remote control (3. with self-adhesive magnetic film).
Remove top packaging tray. Grasp the IDEAL AP60 Pro by the air intake ducts and lift it out of the box.
Installation guidelines for optimum performance:• The air intake ducts can be used as handles
(on the top, see adjacent diagram).
• Place the device at least 10 cm away from the wall.• Keep the device away from areas subjected to draft (wind). • Make sure that furniture, fabrics or other objects do not come in contact with the air intake/
outlet or block them.• Place the device on a stable, even surface and make sure there is sufficient air circulation.
4.4.
4.
6.
7.
5.
6.
1.2. 3.
Please remove and dispose the self-adhesive tape (4. Transport safety).
The front panel is hooked from below at two ends and is kept closed by totally 4 magnets.Open the front panel at the top, grip it firmly (5.) and then swing it downwards (6.).
Remove and dispose the single piece of cardboard (7. Transport safety).
Remove the front panel (8.).
Rozpakowanie i montaż
Wytyczne instalacyjne dla optymalnej wydajności:
• Kanały wlotowe powietrza mogą być stosowane jako uchwyty (rysunek po prawej)• Urządzenie należy ustawić co najmniej 10 cm od ściany.• Trzymaj urządzenie z dala od przeciągów.• Upewnij się, że wloty / wyloty urządzenia nie stykają się z meblami, tkaninami. • Urządzenie należy ustawić na stabilnej, równej powierzchni zapewniając odpowiednią cyrkulację powietrza.
Wyjmij przewód zasilający (1), instrukcję obsługi (2) oraz pilot zdalnego sterowania (3) - wraz z samoprzylepna taśmą magnetyczną).
Zdejmij górne zabezpieczenie i wyjmij urządzenie z opakowania.
Usuń taśmy transportowe (4).Panel przedni jest zamocowany na dwóch dolnych uchwytach oraz 4 magnesach. Otwórz przedni panel - mocno pociągnij od góry (5), a następnie odchyl panel w dół (6). Wyjmij i wyrzuć tekturę zabezpieczającą (7), zdejmij przedni panel (8).
6

28
Unpacking and setting up
Hook in the front panel at the bottom first (13.), then pivot upwards and press shut (14.).Connect the power cable to the device first (15.), then to the socket (16.).
Note:
Use the original packaging to store the air purifier if you are not using it all year round. Pack and store the filter cartridge airtight to protect the activated carbon.
Insert the filter cartridge with the tabs in the notches provided and lock in position by turning clockwise (12.).
Hold the filter cartridge with both hands using the recessed grips provided and turn it anti-clockwise (9.). Take out the filter cartridge (10.) and remove the protective film (11.).
7.
8.
9.
12.
11.
13.14.
10.
9.
10.
11.
12.
13.
14.
15.16.
No operation of the air purifier without thecomplete and secure attachment of the cladding and safety covers (safety grill motor, air outlet grill, front panel, etc.).
Safety information
Rozpakowanie i montaż
Chwyć oburącz kasetę filtracyjną i przekręć w lewo (9). Wyjmij kasetę filtracyjną (10) i usuń folię zabezpieczającą (11).
Włóż wkład filtra wraz z zabezpieczeniem i zablokuj przesuwając zabezpieczenie w prawo (12).
Zamocuj przedni panel w pierwszej kolejności na dole (13), a następnie zamknij dociskając panel (14).Podłącz przewód zasilający, w pierwszej kolejności do urządzenia (15), a następnie do gniazdka zasilającego (16).
Uwaga:Używaj oryginalnego opakowania do przechowywania oczyszczacza powietrza, jeżeli nie jest używany przez cały rok. Zapakuj i przechowuj kasetę filtracyjną szczelnie zamkniętą aby chronić węgiel aktywny.
Informacje bezpieczeństwa
Nie wolno użytkować oczyszczacza bez założonych osłon bezpieczeństwa w tym przedniego panelu.
7

29
Air outlet grill
Overview and description of parts
Front panel Power cable
Filter cartridge
Control panelAir intake ducts
Przegląd i opis części
Kaseta filtracyjna
Kanały wlotowe
Panel kontrolny
Wyloty powietrza
Przewód zasilającyPanel przedni
8

30
Control panel
A On/off button D Quiet buttonE Air quality indicator
F Filter replacement indicator
I Quiet indicator
K IR receiver
H Timer indicatorG Fan speed indicator
J Daylight sensor L Air quality sensor
B Fan speed button C Timer button
Note:The air quality sensor (L) is recalibrated the first time you switch it on (A) and after being disconnected from the mains power supply. During calibration, the fan speed indicator (G)
and the air quality indicator (E) flash green alternately. After a few minutes, the air purifier switches to automatic mode . Once the air quality sensor has been calibrated, the air purifier always starts in automatic mode. If the filter cartridge is missing or wrong (no original IDEAL filter cartridge), the filter replacement (F) and air quality indicators (E) flash red alternately. The air purifier can only be operated with an original IDEAL filter cartridge inserted.
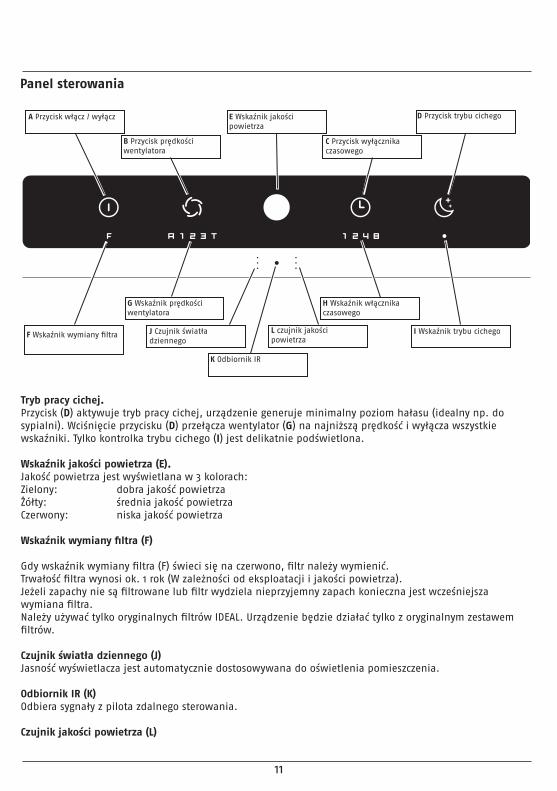
Panel sterowania
A Przycisk włącz / wyłącz
B Przycisk prędkości wentylatora
E Wskaźnik jakości powietrza
C Przycisk wyłącznika czasowego
D Przycisk trybu cichego
F Wskaźnik wymiany filtra
G Wskaźnik prędkości wentylatora
J Czujnik światła dziennego
K Odbiornik IR
L czujnik jakości powietrza
H Wskaźnik włącznika czasowego
I Wskaźnik trybu cichego
Uwaga:
Czujnik jakości powietrza (L) kalibrowany jest przy pierwszym włączeniu (A) i po wyłączeniu z zasilania. Podczas kalibracji wskaźnik prędkości wentylatora (G) oraz wskaźnik jakości powietrza (E) migają naprzemiennie na zielono. Po kilku minutach oczyszczacz przełącza się w tryb automatyczny. Po prawidłowej kalibracji oczyszczacz zawsze przełącza się w tryb automatyczny. Jeżeli wkład filtrujący nie został zamontowany lub został zamontowany nieoryginalny wkład wskaźnik wymiany filtra (F) oraz wskaźnik jakości powietrza (E) świecą naprzemiennie na czerwono. Oczyszczacz powietrza może być użytkowany wyłącznie z oryginalnym wkładem filtrującym IDEAL.
9

31
Fan speeds • Press the on/off button (A) to switch the air purifier on or off.• The air purifier runs in automatic mode . In automatic mode, the fan speed (G) automatically
adapts to the measured air quality. The worse the air quality, the higher the fan speed.• Press the fan speed button (B) to exit automatic mode. The air purifier now runs at fan speed . Press again to increase the fan speed to . Press again to increase the fan speed to , or to the turbofan speed .• The turbo speed setting for fast purification of the ambient air requires the air purifier to run at
maximum capacity. This can only be selected manually.
Timer function• Switch the air purifier on (on/off button A).• Press the timer button (C) to activate the timer. Press repeatedly to increase the timer time:
(h) . Each number lights up in turn. Press the timer button again (no number lights up) to disable the timer function.
• The timer indicator counts the respective time with ( Countdown). The remaining time is displayed.
Pressing the timer button while the air purifier is switched off activates the "switch-on timer" after the set time, the air purifier switches on.
Pressing the timer while the air purifier is switched on activates the "switch-off timer" after the set time, the air purifier switches off.
A On/off button D Quiet buttonE Air quality indicator
F Filter replacement indicator
I Quiet indicator
K IR receiver
H Timer indicatorG Fan speed indicator
J Daylight sensor L Air quality sensor
B Fan speed button C Timer button
Control panel
A Przycisk włącz / wyłącz
B Przycisk prędkości wentylatora
E Wskaźnik jakości powietrza
C Przycisk wyłącznika czasowego
D Przycisk trybu cichego
F Wskaźnik wymiany filtra
G Wskaźnik prędkości wentylatora
J Czujnik światła dziennego
K Odbiornik IR
L czujnik jakości powietrza
H Wskaźnik włącznika czasowego
I Wskaźnik trybu cichego
10
Panel sterowania
Prędkość wentylatora:
Naciśnij przycisk włącz/wyłącz (A), aby włączyć lub wyłączyć oczyszczacz powietrza.Oczyszczacz powietrza pracuje w trybie automatycznym A. Prędkość wentylatora (G) dostosowuje się w zależności od zmierzonej jakości powietrza. Im gorsza jakość powietrza, tym wyższa prędkość wentylatora.Naciśnij przycisk prędkości wentylatora (B), aby wyjść z trybu automatycznego. Oczyszczacz powietrza pracuje z prędkością 1. Naciśnij ponownie, aby zwiększyć prędkość wentylatora do 2, 3 , turbo T. Ustaw prędkość turbo dla szybkiego oczyszczania. Ten tryb może być wybrany tylko ręcznie.
Wyłącznik czasowy:
Włącz oczyszczacz powietrza (wł/wył A).Naciśnij przycisk wyłącznik czasowy (C) aby włączyć funkcje wyłącznika czasowego. Naciśnij ponownie przycisk (C) aby zwiększyć czas 1 - 2 - 4 - 8 h. Wybrane numery zostają podświetlone.Wskaźnik pokazuje odliczany, pozostały czas. Naciśnij ponownie przycisk (C) wyłącznik czasowy zostaje wyłączony (gasną podświetlenia wybranych godzin).
Wciśnięcie przycisku wyłącznika czasowego podczas gdy oczyszczacz jest wyłączony spowoduje aktywację funkcji włącznika czasowego. Po ustawieniu odpowiedniego czasu oczyszczacz włączy się automatycznie.
Wciśnięcie przycisku wyłącznika czasowego podczas gdy oczyszczacz jest włączony spowoduje aktywację funkcji wyłącznika czasowego. Po ustawieniu odpowiedniego czasu oczyszczacz wyłączy się automatycznie.
32
Quiet functionThe Quiet button (D) is provided for particularly low-noise, unobtrusive operation (e.g. bedrooms). Press the Quiet button (D) to switch the fan speed (G) to its lowest capacity and switch off all indicators. Only the Quiet indicator (I) is dimly lit.
Air quality indicator (E)The air quality is displayed in 3 colours:Green: good air qualityYellow: average air qualityRed: poor air quality
Filter replacement indicator (F)An illuminated red " " on the control panel indicates that the filter needs replacing. • The life expectancy of the filter is approx. 1 year
(depending on operation and purification activities).• If odours are no longer being filtered out, or if the filter produces unpleasant odours,
then the filter cartridge needs to be replaced sooner.• Only use original IDEAL filters. The device will only function with an original IDEAL filter
cartridge.
Daylight sensor (J)The display brightness is automatically adjusted to the ambient light.
IR receiver (K)Receives the signals from the remote control.
Air quality sensor (L)
A On/off button D Quiet buttonE Air quality indicator
F Filter replacement indicator
I Quiet indicator
K IR receiver
H Timer indicatorG Fan speed indicator
J Daylight sensor L Air quality sensor
B Fan speed button C Timer button
Control panel
A Przycisk włącz / wyłącz
B Przycisk prędkości wentylatora
E Wskaźnik jakości powietrza
C Przycisk wyłącznika czasowego
D Przycisk trybu cichego
F Wskaźnik wymiany filtra
G Wskaźnik prędkości wentylatora
J Czujnik światła dziennego
K Odbiornik IR
L czujnik jakości powietrza
H Wskaźnik włącznika czasowego
I Wskaźnik trybu cichego
Tryb pracy cichej. Przycisk (D) aktywuje tryb pracy cichej, urządzenie generuje minimalny poziom hałasu (idealny np. do sypialni). Wciśnięcie przycisku (D) przełącza wentylator (G) na najniższą prędkość i wyłącza wszystkie wskaźniki. Tylko kontrolka trybu cichego (I) jest delikatnie podświetlona.
Wskaźnik jakości powietrza (E).Jakość powietrza jest wyświetlana w 3 kolorach:Zielony: dobra jakość powietrzaŻółty: średnia jakość powietrzaCzerwony: niska jakość powietrza
Wskaźnik wymiany filtra (F)
Gdy wskaźnik wymiany filtra (F) świeci się na czerwono, filtr należy wymienić. Trwałość filtra wynosi ok. 1 rok (W zależności od eksploatacji i jakości powietrza).Jeżeli zapachy nie są filtrowane lub filtr wydziela nieprzyjemny zapach konieczna jest wcześniejsza wymiana filtra. Należy używać tylko oryginalnych filtrów IDEAL. Urządzenie będzie działać tylko z oryginalnym zestawem filtrów.
Czujnik światła dziennego (J)Jasność wyświetlacza jest automatycznie dostosowywana do oświetlenia pomieszczenia.
Odbiornik IR (K)Odbiera sygnały z pilota zdalnego sterowania.
Czujnik jakości powietrza (L)
11
Panel sterowania

33
Remote control
Battery usage• Always use 3V lithium batteries CR2025 for the remote control.• Incorrect battery usage may result in leakage of battery fluid and/or damage.• If the remote control is not going to be used for a long time, please remove the battery.
Unsuitable location• Make sure that no objects or furnishings are situated between the remote control and the
air purifier.• The air purifier should not be placed in direct sunlight. This could impair the infrared sensor.• Locations where fluorescent tubes are flickering because they are defective or old.• Do not store the remote control in direct sunlight and/or close to radiators/heaters.• When using for the first time
The device has a pre-installed lithium battery CR2025. Remove the protective flap to activate the remote control battery.
How to use correctly• Point the remote control at the air purifier (IR receiver K).
TurboAuto
8h4h
2h1h3
21
K
Pilot zdalnego sterowania
Wykorzystanie baterii:• Zawsze należy używać baterii litowych 3V CR2025 do pilota.• Niewłaściwe użytkowanie baterii może spowodować wyciek płynu z baterii i / lub uszkodzenia.• Jeśli pilot nie będzie używany przez dłuższy czas, należy wyjąć baterię.
Lokalizacja urządzenia a działanie pilota• Upewnij się, że żadne przedmioty lub meble nie są usytuowane pomiędzy pilotem a urządzeniem.• Oczyszczacz powietrza nie powinien być umieszczony w bezpośrednim świetle słonecznym. Może to pogorszyć działanie czujnika podczerwieni. • Upewnij sie, że urządzenie nie jest w pomieszczeniu gdzie funkcjonują uszkodzone lampy fluorescencyjne. Ich migotanie może zakłócić działanie pilota. • Nie przechowuj pilota w bezpośrednim działaniu promieni słonecznych i / lub w pobliżu grzejników.
Przy pierwszym użyciu:
Pilot posiada zainstalowane baterie CR 2025. Przed pierwszym użyciem usuń zabezpieczenie.
Jak używać pilota• Skieruj pilota na oczyszczacz powietrza (odbiornik IR K).
12

34
Important information about the batteries and how to dispose of themBatteries must NOT be disposed of with household waste. As the user, you are legally obligated to return used batteries for proper disposal. You can hand in your batteries at public collection points in your community or wherever the same type of batteries are sold.
• It is very important that you make sure that the polarity of the batteries is correct. Wrongly inserted batteries could destroy the device – a fire hazard.
• Do not try to open batteries and do not throw batteries into a fire. • Batteries that are leaking fluid are dangerous. Only touch these with suitable gloves. • Keep batteries out of the reach of children. • Take the batteries out of the device if you are not going to be using it for a significant
period of time.
Replacing the battery• Open the battery compartment by pressing
(A) and pulling out (B) at the same time. Take out the flat battery.
• Insert a new battery into the battery compart-ment, making sure the polarity is correct (+ / -).
• Always use 3V lithium batteries CR2025.• Slide the battery compartment back into its
seating (C).• The remote control comes with a self-
adhesive magnetic film (D). If required, this can be stuck on the back of the remote control. With the magnetic film stuck on it, the remote control can easily be attached to any ferromagnetic surface (e.g. on the back of the air purifier).
A C
B
CR20253V
D
TurboAuto
8h
4h
2h
1h
3
2
1
Wymiana baterii
• Otwórz komorę baterii, naciskając (A) i wyciągnij element (B) w tym samym czasie. Wyjmij płaską baterię.• Włóż nową baterię do komory baterii, upewniając się, że polaryzacja jest prawidłowa (+ / -).• Zawsze należy używać baterii litowych 3V CR2025.• Wsuń komorę baterii z powrotem do wnęki (C).• Pilot zdalnego sterowania wyposażony jest w samoprzylepną folię magnetyczną (D). Można ją przymocować do tylnej części pilota, a następnie pilot można zamocować na dowolnej metalowej powierzchni oczyszczacza (np. na tylnej ściance).
13

35
Remote control
M: Select the required fan speed .N: Switches the air purifier to automatic mode .O: Switches the air purifier on/off .P: Switches the air purifier to Quiet mode .Q: Select the required timer time .R: Press the locking button to lock the buttons on the control panel (air purifier).
Press the locking button again to unlock. The lock can also be removed by disconnecting the air purifier from the mains or by
pressing and holding down the on/off button (A) on the device.
Note:When you operate the remote control, the air quality indicator (E) lights up for approx. 1 second in acknowledgement. If you operate a button on the control panel (air purifier) while the locking function is activated, the air quality indicator (E) lights up briefly in red.
O On/off button
M Fan speed buttons
N Automatic button
P Quiet button
R Locking button
Q Timer buttons
Function
Turbo Auto 8h
4h
2h
1h
3
2
1
A On/off button E Air quality indicator
Funkcje:
M: wybieranie żądanej prędkości wentylatora.N: Przełączanie oczyszczania do trybu automatycznego.O: Włączanie / wyłączanie oczyszczacza.P: Przełączanie oczyszczacza powietrza w tryb cichy. Q: Wybieranie czasu automatycznego wyłączenia.R: Blokada panelu sterowania. Naciśnij przycisk blokady, aby zablokować przyciski na panelu sterowania. Ponownie nacisnąć przycisk blokujący, aby odblokować. Blokada może być również usunięta przez odłączenie oczyszczacza powietrza od sieci lub naciśnięcie i przytrzymanie przycisku włącz / wyłącz (A) na urządzeniu.
Uwaga:Podczas korzystania z pilota zdalnego sterowania, wskaźnik jakości powietrza (E) zapala się na ok. 1 sekundę. Jeśli używasz przycisków na panelu sterowania, a funkcja blokująca jest włączona, wskaźnik jakości powietrza (E) zapala się na krótko na czerwono.
O Włącznik / wyłącznik
N Tryb automatyczny
P Tryb cichy
Q Wyłącznik czasowyM Tryb pracy wentylatora
R Blokada
Pilot zdalnego sterowania:
A Włącznik / wyłącznik E Wskaźnik jakości powietrza
14

36
CAUTION: Disconnect the mains plug!
The front panel is hooked in at the bottom in two places, and kept shut with 4 magnets. Open the front panel from the top and hold (1.), pivot downwards (2.) and take off (3.).
Hold the spent filter cartridge with both hands using the recessed grips provided and turn it anti-clockwise (4.). Remove the filter cartridge (5.). Remove the protective film from the new filter cartridge (6.).
Insert the new filter cartridge with the tabs in the notches provided and lock in position by turning clockwise (7.).
Hook in the front panel at the bottom first (8.), then pivot upwards and press shut (9.). Connect the power cable to the device first (10.), then to the socket (11.).
Filter replacement (e.g. in accordance with the filter replacement indicator F, see page 32)
Note:Only original IDEAL filter cartridges (order from www.ideal.de) may be used. No tools are required to replace the filter cartridge.
Note:The air purifier automatically detects that a new IDEAL filter cartridge has been inserted and automatically resets the filter replacement indicator.
IDEAL filter cartridge Order no. 8741 100
1.
2.
3.
4.
5.
6.
7.
10.11.
9.
8.
Wymiana filtra (na przykład zgodnie ze wskaźnikiem wymiany filtra (F), patrz strona 11)
Uwaga:Należy używać wyłącznie oryginalnego wkładu filtrującego IDEAL. Do wymiany wkładu nie są potrzebne dodatkowe narzędzia.
UWAGA: Odłączyć wtyczkę z gniazdka!Panel przedni jest zaczepiony na dwóch uchwytach na dole oraz na 4 magnesach. Otwórz przedni panel od góry (1), odchyl w dół (2) i zdejmij (4).
Przytrzymaj zużyty filtr oburącz i obróć w lewo (4). Wyjmij zużyty wkład (5). Zdejmij folię z nowego wkładu filtrującego (6).
Włóż nowy wkład filtra wraz z zabezpieczeniem i zablokuj przesuwając zabezpieczenie w prawo (7).
Zamocuj przedni panel w pierwszej kolejności na dole (8) a następnie zamknij dociskając panel (9). Podłącz przewód zasilający, w pierwszej kolejności do urządzenia (10) a następnie do gniazdka zasilającego (11).
Uwaga:Oczyszczacz powietrza automatycznie wykryje nowy wkład filtrujący i automatycznie zresetuje wskaźnik wymiany filtra.
Wkład filtrujący IDEAL 8741 100
15
37
Cleaning and maintenance
CAUTION: Disconnect the mains plug prior to any cleaning or maintenance work!
• Replace the filter cartridge as soon as the filter replacement indicator (F, page 32) lights up. The average life expectancy of the filter is approx. 1 year (depending on operation and purification activities).
• Clean the air purifier housing with a lint-free cloth moistened with soapy water.• Clean the control panel with a dry, lint-free cloth.• Clean the openings for the air quality sensor (L, page 30) with a vacuum cleaner.• Clean the air intake ducts (page 29) and the interior of the air purifier with a vacuum cleaner. • Clean the filter cartridge's pre-filter with a vacuum cleaner. To do this, remove the filter
cartridge ("Changing the filter" page 36).• Do not use any solvents. These could damage the housing surface, the control panel and the
air quality sensor.• Protect the air purifier from water.• Do not use any substances containing silicone, since this could destroy the air quality sensor.• Do not test the effectiveness of the air quality sensor with high quantities of gas, or alcohol,
since this could destroy the air quality sensor.
Czyszczenie i konserwacja
UWAGA: Odłącz wtyczkę przed rozpoczęciem jakichkolwiek prac konserwacyjnych lub przed czyszczeniem!Wymień wkład filtrujący jak tylko zapali sie wskaźnik wymiany filtra (F strona 11). Średnia długość pracy wkładu filtracyjnego wynosi ok. 1 rok. (w zależności od intensywności użytkowania oraz zanieczyszczenia powierza). Obudowę oczyszczacza czyść szmatką zwilżoną wodą z mydłem. Oczyść panel sterowania suchą, niestrzępiącą się szmatką.Oczyścić otwory czujnika jakości powietrza (L, strona 11) za pomocą odkurzacza.Oczyść kanały wlotowe powietrza (strona 8) i wnętrze oczyszczacza powietrza za pomocą odkurzacza.Oczyść filtr wstępny wkładu filtracyjnego za pomocą odkurzacza. Aby to zrobić, należy wyjąć kasetę filtracyjną ( “Wymiana filtra”, strona 15).Nie używaj żadnych rozpuszczalników. Mogą one uszkodzić powierzchnię obudowy, panelu kontrolnego oraz czujnik jakości powietrza.Chroń oczyszczacz powietrza przed wodą.Nie używaj żadnych substancji zawierających silikon, gdyż może to zniszczyć czujnik jakości powietrza.Nie testuj czujnika jakości powietrza w pomieszczeniach z dużą ilością gazu, oparów alkoholu, gdyż może to zniszczyć czujnik jakości powietrza.
16
Sterowanie za pomocą aplikacji App Store
Twój oczyszczacz powietrza może być dodatkowo obsługiwany za pomocą aplikacji “IDEAL AIR PRO” poprzez smartfon z systemem (iOS / Android).
Szczegóły dostepne na stronie www.ideal-air.de
3838
Cleaning and maintenance
CAUTION: Disconnect the mains plug prior to any cleaning or maintenance work!
•Replacethefiltercartridgeassoonasthefilterreplacementindicator(F, page 33) lights up. Theaveragelifeexpectancyofthefilterisapprox.1year(dependingonoperationandpurificationactivities).
•Cleantheairpurifierhousingwithalint-freeclothmoistenedwithsoapywater.• Clean the control panel with a dry, lint-free cloth.• Clean the openings for the air quality sensor (L, page 31) with a vacuum cleaner.•Cleantheairintakeducts(page30)andtheinterioroftheairpurifierwithavacuumcleaner.•Cleanthefiltercartridge'spre-filterwithavacuumcleaner.Todothis,removethefiltercartridge("Changing the filter"page37).
• Do not use any solvents. These could damage the housing surface, the control panel and the air quality sensor.
•Protecttheairpurifierfromwater.• Do not use any substances containing silicone, since this could destroy the air quality sensor.• Do not test the effectiveness of the air quality sensor with high quantities of gas, or alcohol,
since this could destroy the air quality sensor.
App Control
Yourpurifiercanadditionallybecontrolledbythe"IDEALAIRPRO"Appviayoursmartphone(iOS /Android).
For information, please see www.ideal-air.de
38
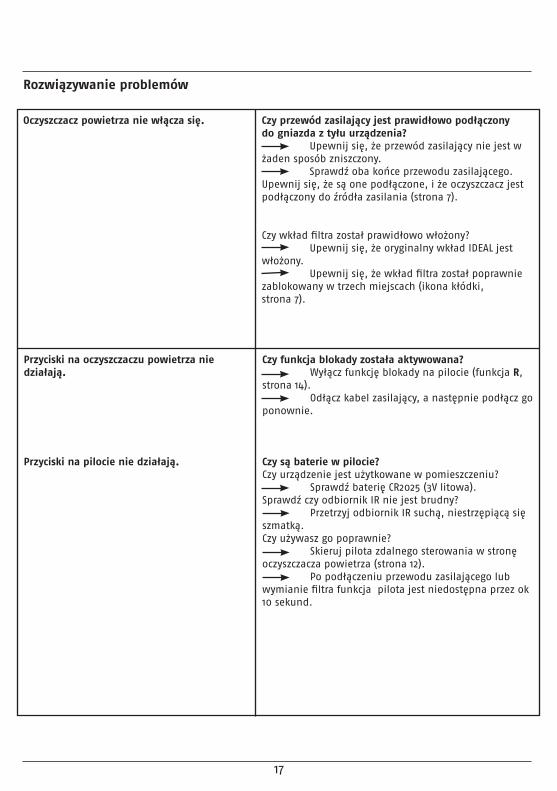
Troubleshooting
The air purifier won't switch on. Is the power cable securely connected to the back of the device?
Make sure that the power cable is not damaged in any way.
Check both ends of the power cable. Make sure that these are plugged in and that the purifier is connected to the power supply (page 28).
Has a filter cartridge been inserted? Is the filter cartridge inserted correctly?
Make sure that an original IDEAL filter cartridge is inserted.
Make sure that the filter cartridge is clicked in place with all 3 tabs and is fully locked (padlock icon, page 28).
The buttons on the air purifier do not work.
The buttons on the remote control do not work.
Has the locking function been activated?
Disable the locking function on the remote control (function R, page 35).
Unplug the power cable and then plug it back in.
Is the battery in the remote control? Or is it flat?
Check the battery (3V lithium CR2025).
Is the IR receiver dirty?
Clean the IR receiver with a dry, lint-free cloth.
Are you using it correctly?
Point the remote control at the air purifier (page 33).
Having joined the power cord or exchanged the filter, the function of the remote control is blocked for about 10 seconds
Rozwiązywanie problemów
Oczyszczacz powietrza nie włącza się. Czy przewód zasilający jest prawidłowo podłączony do gniazda z tyłu urządzenia? Upewnij się, że przewód zasilający nie jest w żaden sposób zniszczony. Sprawdź oba końce przewodu zasilającego. Upewnij się, że są one podłączone, i że oczyszczacz jest podłączony do źródła zasilania (strona 7).
Czy wkład filtra został prawidłowo włożony? Upewnij się, że oryginalny wkład IDEAL jest włożony. Upewnij się, że wkład filtra został poprawnie zablokowany w trzech miejscach (ikona kłódki, strona 7).
Przyciski na oczyszczaczu powietrza nie działają.
Przyciski na pilocie nie działają.
Czy funkcja blokady została aktywowana? Wyłącz funkcję blokady na pilocie (funkcja R, strona 14). Odłącz kabel zasilający, a następnie podłącz go ponownie.
Czy są baterie w pilocie?Czy urządzenie jest użytkowane w pomieszczeniu? Sprawdź baterię CR2025 (3V litowa). Sprawdź czy odbiornik IR nie jest brudny? Przetrzyj odbiornik IR suchą, niestrzępiącą się szmatką.Czy używasz go poprawnie? Skieruj pilota zdalnego sterowania w stronę oczyszczacza powietrza (strona 12). Po podłączeniu przewodu zasilającego lub wymianie filtra funkcja pilota jest niedostępna przez ok 10 sekund.
17

39
The indicators on the control panel do not light up at all.
Is the air purifier switched on?
Switch the air purifier on by pressing the on/off button (A, page 30).
Has the Quiet function been activated?
Disable the Quiet function by pressing the Quiet button (D, page 32).
Automatic mode is not working properly. The air purifier calibrates the air quality sensor. This happens when you first switch it on and after disconnecting it from the mains.
Wait until the calibration process (see Note, page 30) has been completed (this may take a few minutes)
The air quality sensor is dirty.
Clean the openings for the air quality sensor (L, page 30), the air intake ducts (page 29) and the interior of the air purifier (where the filter cartridge is located) with a vacuum cleaner.
The air quality sensor is not detecting the air quality reliably Calibrate the air quality sensor by briefly
disconnecting it from the mains again!
Odours are not being filtered properly. Is the activated carbon in the filter cartridge spent?
Replace the filter cartridge (page 36). If the air purifier has been continuously
exposed to strong odours, it may be that the activated carbon is spent before the filter replacement indicator (F, page 32) lights up.
Are the odours being drawn in at all?
Place the air purifier closer to the source of the odours.
Switch the air purifier manually to a higher fan speed (page 31).
TroubleshootingRozwiązywanie problemów
Wskaźniki na panelu sterowania nieświecą się.
Czy oczyszczacz powietrza jest włączony? Włącz oczyszczacz powietrza naciskając wł/wył (A, strona 9).
Czy został włączony tryb pracy cichej? Wyłącz tryb pracy cichej naciskając przycisk (D, strona 11).
Tryb automatyczny nie działa prawidłowo.
Zapachy nie są poprawnie filtrowane.
Oczyszczacz powietrza kalibruje czujnik jakości powietrza. Dzieje się tak, gdy po raz pierwszy został włączony i po odłączeniu go od sieci.
Poczekaj, aż proces kalibracji (patrz Uwaga, strona 9) został zakończony (może to potrwać kilka minut)
Czujnik jakości powietrza jest brudny. Oczyść odkurzaczem otwory czujnika jakości powietrza (L, strona 9), kanały dolotowe powietrza (strona 8) i wnętrze oczyszczacza powietrza (miejsce usytuowania wkładu filtracyjnego).
Czujnik jakości powietrza nie wykrywa jakości powietrza w wiarygodny sposób. Należy skalibrować czujnik jakości powietrza poprzez krótkie odłączenie go od zasilania!
Czy węgiel aktywny we wkładzie filtra przestał działać? Wymienić wkład filtra (strona 15).Jeżeli oczyszczacz powietrza jest stale narażony na silne zapachy, może się okazać, że węgiel aktywny przestaje działać zanim wskaźnik wymiany filtra (F, strona 11) zaświeci się.
Czy zapachy są przechwytywane przez oczyszczacz powietrza? Umieść oczyszczacz powietrza bliżej źródła zapachów. Przełącz oczyszczacz powietrza ręcznie na wyższą prędkość pracy wentylatora (strona 10).
18

40
The air purifier is making loud noises. Is the filter cartridge really dirty?
Clean the pre-filter with a vacuum cleaner.
Is the air purifier located on an even surface?
Place the device on an even surface.
Is the air purifier running at a high fanspeed?
Use the fan speed button (B, page 31) to set a lower fan speed (G, page 31).
In bright environments, the indicators on the air purifier control panel are too dark.
Is the daylight sensor dirty?
Clean the relevant section on the control panel (J, page 30)!
The display intensity automatically adapts to its surroundings.
Troubleshooting
IDEAL AP60 Pro technical data
Subject to technical changes.
Power supply 200-240V50/60Hz / 100-120V50/60Hz
Power consumption 90W (200-240V) / 70W (100-120V)
Suitable for rooms up to 60 m² *
Air flow rate (max.) 660 m³/h
Dimensions (L × W × H) 468 × 275 × 668 mm
Weight 15.7 kg
Volume at fan speed (max.) 55 dB(A)
Volume at fan speed (min.) 19 dB(A)
* For a room height of 2.50 m
None of the above mentioned methods helped to solve the problem:Contact Service Team:• www.ideal.de "Service"
Oczyszczacz powietrza generuje głośne dźwięki.
W jasnych pomieszczeniach, wskaźniki na panelu sterowania oczyszczacza powietrza są zbyt ciemne.
Czy wkład filtrujący jest brudny?Oczyścić filtr wstępny za pomocą odkurzacza.
Czy oczyszczacz powietrza znajduje się na płaskiej powierzchni?
Umieść urządzenie na równej powierzchni.Czy oczyszczacz powietrza pracuje z dużą prędkością wentylatora?
Użyj przycisku prędkość wentylatora (B, strona 10) i ustaw niższą prędkość wentylatora (G, strona 10).
Czy czujnik światła dziennego jest brudny?Wyczyść panel sterowania (J, strona 9)!
Intensywność wyświetlacza automatycznie dostosowuje się do otoczenia.
Żadna z wymienionych metod nie pomogła w rozwiązaniu problemu:Skontaktuj się z działem obsługi klienta.www.opus.pl
19
AP 60 PRO AP 80 PRO
Zasilanie 200-240 V - 50/60 Hz /100-120 V - 50/60 Hz
200-240 V - 50/60 Hz / 100-120 V - 50/60 Hz
Moc 90 W (200-240 V) / 75 W (100-120 V)
175 W (200-240 V) / 180 W (100-120 V)
Przeznaczenie od 50 do 80 m² * od 60 do 100 m² *
Przepływ powietrza (maks.) 600 m³/h 800 m³/h
Wymiary (W x S x G) 668 x 468 x 275 mm 668 x 468 x 275 mm
Waga netto 15 kg 15 kg
Poziom głośności dla trybu T Turbo (maks.) 56,6 dB (A) 63,4 dB (A)
Poziom głośności dla prędkości 1 (min.) 16,5 dB(A) 18,7 dB (A)
Z zastrzeżeniem zmian technicznych. * Dla wysokości pomieszczenia 2,50 m
41
Terms of warrantyIDEAL provides a warranty for this device from the date of purchase. The terms of warranty are defined by our local representative.• If a material or design defect occurs during the warranty period, IDEAL shall repair or replace
the device, or repay the purchase price, at its discretion.• The warranty will only be honoured if sufficient evidence is submitted, e.g. sales receipt, and
the claim under warranty is made within the warranty period.• The warranty does not cover wearing parts or parts that need to be replaced regularly.• The warranty shall be void if the device is not set up, adjusted and cleaned/maintained
correctly (in accordance with the operating instructions).• The warranty shall be void if the device is connected to a power supply that does not comply
with the rating plate data.
StorageWe recommend storing the air purifier in its original packaging in a cool, dry place. Pack and store the filter cartridge airtight to protect the activated carbon.
Spare parts and accessoriesYou can source spare parts via your dealer or at www.ideal.de. Only use the manufacturer's original parts.
RepairsRepairs must only be carried out by qualified experts or the customer service department. This also applies if you have a defective power cable. Any attempt by untrained persons to perform repairs may pose considerable risk to the user and invalidate the warranty.
DisposalThis device must not be disposed of with household waste! Please hand this device in at the collection points provided! Collecting and recycling electrical and electronic waste conserves valuable resources!The packaging material can be recycled. Dispose of the packaging in an environmentally friendly manner and take it to the recyclable waste collection. Thanks!
Przechowywanie
Zalecamy przechowywanie oczyszczacza powietrza w oryginalnym opakowaniu, w chłodnym, suchym miejscu oraz przechowywanie wkładu filtracyjnego hermetycznie zamkniętego, aby chronić węgiel aktywny.
Części zamienne i akcesoriaNależy używać wyłącznie oryginalnych części od producenta. Części zamienne można uzyskać u dystrybutorów.
NaprawyNaprawy muszą być wykonywane wyłącznie przez wykwalifikowanych specjalistów lub dział obsługi klienta.
Dotyczy to także wadliwego przewodu zasilającego. Jakakolwiek próba naprawy przesz osoby niewykwalifikowane może stwarzać zagrożenie dla użytkownika i utratę gwarancji.
Zużyty sprzęt oznakowany niniejszym symbolem nie może być umieszczany i usuwany łącznie z innymi odpadami, w tym odpadami komunalnymi. Obowiązkiem użytkownika jest przekazanie zużytego produktu do punktu zbiórki w celu recyklingu odpadów powstałych ze sprzętu elektrycznego i elektronicznego. Właściwa segregacja i selektywna zbiórka odpadów zużytego sprzętu zmniejsza negatywne oddziaływanie substancji niebezpiecznych, które mogą się w nim znajdować, na środowisko naturalne i zdrowie człowieka. W celu uzyskania bardziej szczegółowych informacji dotyczących utylizacji zużytego sprzętu prosimy skontaktować się z przedstawicielem władz lokalnych, dostawcą usług utylizacji odpadów lub punktem sprzedaży, gdzie nabyto produkt. Zapewniając prawidłową utylizację sprzętu pomagamy chronić środowisko naturalne.
20

42
The company Krug + Priester has the following certifications:• Quality management system according to DIN EN ISO 9001:2015• Environmental management system according to DIN EN ISO 14001:2009• Energy management system according to DIN EN ISO 50001:2011
Firma Krug + Priester manastępujące certyfikaty:
• System zarządzania jakością wgDIN EN ISO 9001: 2015• System zarządzania środowiskowegozgodnie z normą DIN EN ISO 14001: 2009• System zarządzania energią wgPN-EN ISO 50001: 2011
21

43
This machine is GS-tested and conforms to the following EC guidelines:• 2014/35/EU for electrical safety• 2014/30/EU for electromagnetic compatibility.• 2011/65/EU RoHS.For specific technical data, please refer to the information on the identification plate of the machine.To file a warranty claim, the device must still bear its original identification plate. Subject to technical changes.
EC-declaration of conformity
- Herewith we declare that
GS-IDENT. Nr. UL-IDENT. Nr.IDEAL AP60 Pro Made in Germany 11874101 10874101IDEAL AP60 Pro Made in Germany 11874102 10874102
- complies with the following provisons applying to it
2014/35/EU Low voltage directive
2011/65/EURoHS directive
2014/30/EGEMV Electromagnetic compatibility directive
- Applied harmonised standards in particular
IEC 61000-3-2; IEC 61000-3-3; EN 61000-3-2; EN 61000-3-3;EN 60335-2-65; EN 60335-1;EN ISO 13857; EN 55014-1; EN 55014-2
01.10.2016Datum
- Geschäftsführer -
Authorized representative for technical documentation:
Krug + Priester GmbH & Co KGSimon-Schweitzer-Str. 34D-72336 Balingen (Germany)
To urządzenie spełnia europejskie wytyczne:• 2014/35 / UE w zakresie bezpieczeństwa elektrycznego• 2014/30 / UE w zakresie kompatybilności elektromagnetycznej.• 2011/65 / EU RoHS.
W celu uzyskania szczegółowych danych technicznych, proszę odnieść się doinformacji na tabliczce znamionowej urządzenia. Aby złożyć reklamację gwarancyjną, urządzenie musi posiadać tabliczkę znamionową. Z zastrzeżeniem zmian technicznych.
Deklaracja zgodności - Niniejszym oświadczam, że:
GS-IDENT. Nr. UL-IDENT. Nr.IDEAL AP60 Pro Made in Germany 11874101 10874101IDEAL AP80 Pro Made in Germany 11874102 10874102
spełnia następujące przepisy mające zastosowanie do:
2014/35/EUDyrektywa niskiego napięcia
2011/65/EUDyrektywa RoHS
2014/30/EGKompatybilność elektromagnetyczna Dyrektywa EMV
- Zastosowania norm zharmonizowanych w szczególności:
IEC 61000-3-2; IEC 61000-3-3; EN 61000-3-2; EN 61000-3-3;EN 60335-2-65; EN 60335-1;EN ISO 13857; EN 55014-1; EN 55014-2
01.6.2017 Upoważniony przedstawiciel ds. dokumentacji technicznej:
22
