insulated highline panels gutters first element of gutter on the gutter hook and external cladding...
TRANSCRIPT

InsulatedPanels
Highline Gutters
Installation guide

2

3
Kingspan angular gutters are manufactured from galvanized metalsheet with single-side coating (polyester, Spectrum, plastisol). Their shape and dimensions ensure good drainage of rainwater from the roof surface. Gutters are delivered in 6 m lenghts, but other lengths are also available on request.
Necessary tools
To install the gutter you need following tools:
- plate shears
- riveter
- cordless screwdriver (1800-2500 obr/min)
- drill
- center punch
- measuring tape
Gutters should be stored near their subsequent installation place. Before installation, check the contents of the packages with individual components. Gutters, pipes and other gutter accessories are packed on pallets, wrapped in stretch and secured by polystyrene spacers.
Preparing of the roof panel to hang the gutter.
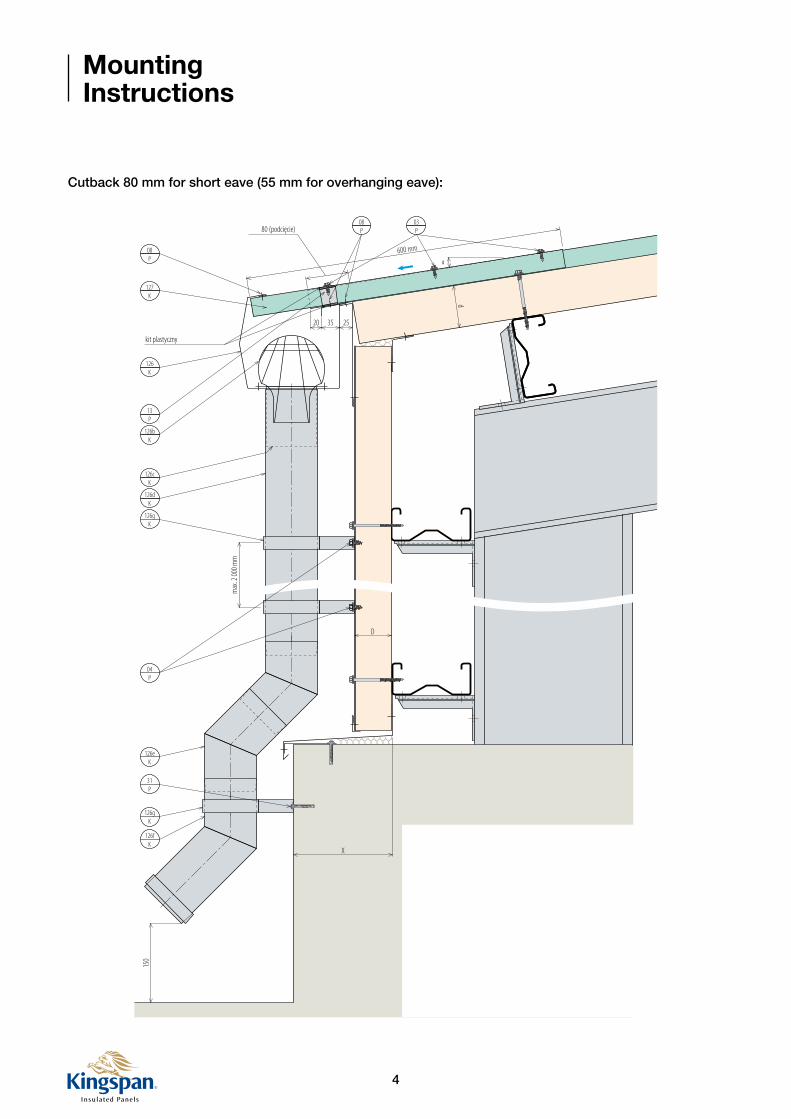
Roof panel KS1000 RW is supplied with a factory-made cutback length:- 80 mm for short eave- 55 mm for overhanging eave
Preparing for installation
4
Mounting Instructions
150
126fK
X
D
126eK
126gK
126dK
126cK
126bK
13P
126K
127K
08P
08P
03P
20 35 25d
04P
126gK
31P
α
max.
2 000
mm
80 (podcięcie)
600 mm
kit plastyczny
Cutback 80 mm for short eave (55 mm for overhanging eave):

5
Installationguide
3. While fitting the gutter „stop end” K126h install the first part of the gutter. Join gutter stop end and rim K126h using rivets and glue K+D like on the picture.
2. Install hangers K127 on every second fold of the roof panel (tongued approx. 116 mm).
1. Paste the sealing profile P13 approx. 20 mm from the edge of the panel.
P14 seal PE 9x3
P03 metal screw - 4,8x20K127 - gutter hook, elementfixing gutter at 666mm
K126a gutter connector
K126 - start gutter „A”P08 - stainless steel rivets 10-12 pcs at both ends of gutter
P13 sealing profile pasted under the upper skin of RW panel approximately 20 mm from the edge.
Roof panel KS 1000 RW with factory-made cutback
K+D glue applied over edge of the gutterK126h gutter stop end
6
Mounting Instructions
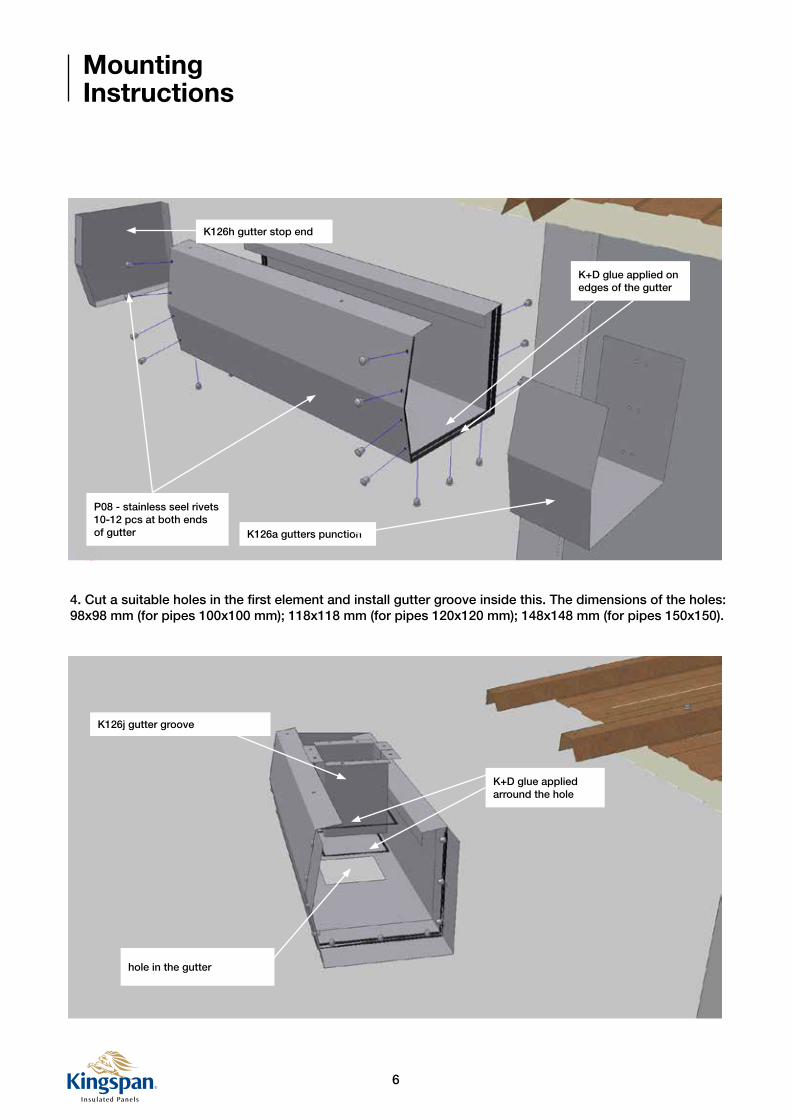
4. Cut a suitable holes in the first element and install gutter groove inside this. The dimensions of the holes: 98x98 mm (for pipes 100x100 mm); 118x118 mm (for pipes 120x120 mm); 148x148 mm (for pipes 150x150).
K126h gutter stop end
K+D glue applied on edges of the gutter
K126a gutters punction
K+D glue applied arround the hole
K126j gutter groove
hole in the gutter
P08 - stainless seel rivets 10-12 pcs at both ends of gutter

7
Installatiion guide
5. Install first element of gutter on the gutter hook and external cladding of panel (in plece where P13 seal is). Use stainless steel rivets.
Rivet P08 fixing gut-ter with gutter hook
rivet P08 fixing gutter with external cladding of RW panel (every 333 mm)
8xP08 4,8x9,5 stainless steel rivets
two lines of K+D glue

8
Mounting Instructions
6. Install additional sections of the gutter according to the scheme.
7. Install next sections to the gutter hangers and panels according to the scheme (a single rivet at intervals of 333 mm).
Gutter part „A”
K+D glue applied over edge of the gutter, part „B” gutter part „B”
K+D glue applied over edge of the gutter, part „B”
K127 - gutter hanger supporting the gutter at each 666 mm
126a gutters punction
P08 – stainless steel rivets (10-12 pcs) on the edge of the gutter
gutter part „A”
gutter part „B”
rivet P08 fixing gutter with external cladding of RW panel (every 333 mm)
126a gutters punction

9
Mounting Instructions
K+D glue for to seal gutter groove
K126j gutter groove
two lines of K+D glue
K126 - gutter part „C”
K126h gutter stop end „C” (right)
P08 rivets for instalation gutter groove (8 pcs)
P08 – stainless steel rivet 4,8x9,5 for instalation gutter stop end (10-12 pcs)
8. Install the last section of the gutter similarly to the first element.
The interior of the gutter - the connection of two gutter sections over the length: A and B.
Gutter part „B”
P08 stainless steel rivet 4,8x9,5
K126a łącznik rynny
Gutter part „A”
K127 gutter hangler
two lines of K+D glue

10
Verge component K131
9. After installing the entire section of the gutter, mount verge component K131.
Mounting Instructions
10. Install bases for downpipes K126g.
K126g – base for clamp
P03 self tapping fasteners (4,8x20) – 4 pcs for each clamp

11
Mounting Instructions
11. Install drain elbow K126e.
K126d – downpipe
K126j gutter groove
K126e double drain elbow
K126g – base for clamp
K126j gutter groove
K126g – base for clamp
Maximum spacing of clamps – 2000 mm

12
Mounting Instructions
50-100mm
Match the end of the downpipe to next sections by cutting the edge of the pipe on length of 50-100 mm
P03 self tapping fasteners (4,8x20) – 2 pcs for each clamp
K126g – base for clamp
K126d – downpipe

13
Mounting Instructions
K126d – Downpipe
sewage pipe
P03 Self Tapping Fastener mounting clamp
K126g – Base
K126g – Sleeve
K126s adapter from square to the circle
K126d downpipe
P03 self tapping fastener
K126g – base for clamp
K126g – clamp
K126f – drain elbow
13. If the gutters are combined with the storm instalation use K126s element (reduction).
12. Install drain elbow K126f by rivets.

14
Mounting Instructions
K126d – Downpipe
sewage pipeK126s adapter from square to the circle
K126e – double drain elbow
K126g – clamp
K126d – downpipe
K126g – clamp
K126g – base
K126e double drain elbow
P03 Self Tapping Fastener mounting clamp

15

Kingspan Sp. z o.o.ul. Przemysłowa 20, 27-300 Lipsko, Polskat: +48 48 378 31 00 · [email protected] · www.plyty-warstwowe.kingspan.pl
Care has been taken to ensure that the contents of this publication are accurate, but Kingspan Limited and its subsidiary companies do not accept responsibility for errors or for information that is found to be misleading. Suggestions for, or description of, the end use or application of products or methods of working are for information only and Kingspan Limited and its subsidiaries accept no liability in respect thereof.