insulin pump therapy - waterloo wellington diabetes · insulin pump therapy a guide for managing...
TRANSCRIPT
Insulin Pump Therapy A guide for managing your insulin pump This guide is to support you in managing your pump and to supplement the education you receive from your Diabetes Education Program. It is not intended to replace visits with your diabetes healthcare team or to provide medical advice. May 2013
1 | P a g e
Table of Contents
Responsibilities ........................................................................................................................... 3
Determining your basal rate ........................................................................................................ 4
Determining your bolus rate ........................................................................................................ 5
Determining your correction bolus ............................................................................................... 6
Site selection, tips and trouble-shooting……………………………………………………………….7
Diabetic Ketoacidosis .................................................................................................................. 8
What to do if your BS is > 14 ....................................................................................................... 9
Sick Day Management………………………………………………………………………………….10
Food Choices during illness……………………………………………………………………………11
Hypoglycemia……………………………………………………………………………………………13
Hypoglycemia Unawareness…………………………………………………………………………..14
Glucagon…………………………………………………………………………………………………15
Exercise………………………………………………………………………………………….……….15
Travel Guidelines………………………………………………………………………………………..17
What to do with your pump when going to the hospital………………………………….………….17
Your guidelines for pump use if you are hospitalized…………………………………….…………18
Letter for hospital staff……………………………………………………………………….…………19
References…………………………………………………………………………………….…………20
2 | P a g e
Congratulations on choosing to go on an insulin pump. For most people, an insulin pump offers more flexibility in eating and exercising, fewer injections and fewer blood sugar swings. As a result, you can often achieve improved glycemic control, as well as an improved quality of life. There is an increased risk of diabetic ketoacidosis if the insulin supply is interrupted, therefore, it is important to understand all aspects of your pump as well as overall diabetes management.
To benefit from a pump, means additional work on your part, as well as support on our part. We want to make sure that you have a successful start to pump therapy, and that it provides the benefits that you were anticipating. The following responsibilities are necessary for success on a pump.
Your responsibilities the first week:
Keep a consistent schedule for the first 2 weeks in order to set insulin doses correctly
Test every 2 hours for the first 3 days on the pump during the day and at night
Alternate your night time testing: 1 am, 3 am, 5 am, 7 am, and 2 am, 4 am, 6 am, and 8
am
Take your daytime readings before and 2 hours after meals
Miss your bedtime snack the first 3-4 nights
Keep in regular contact with the Diabetes Centre in the first week
Your ongoing responsibilities:
Have a long term commitment to insulin pump therapy
Have regular visits (every 3-4 months) with your endocrinologist/diabetes team
Maintain sick day knowledge
Monitor at least 4, preferably 6 times per day
Maintain A1C < 10%
Always carry rapid insulin (Humalog or NovoRapid) with you as a backup (either a pen
or syringe)
Always carry a new infusion set with you
Always carry spare batteries with you
3 | P a g e
Your team’s responsibilities:
Support you with teaching, and consultation
Train you in the technical use of your pump
Coach you in problem solving day to day blood sugar patterns
Calculate starting dosages of insulin for the pump (along with your physician)
Calculate and teach you on correction doses
Assess, educate and review sick day management
Review hypoglycemia and glucagon
Provide you with trouble-shooting guidelines
A word about your logbook and food records
A detailed logbook and food records will help to make changes to gain control of blood
sugars. This is really important when you first start on the pump and we are trying to adjust the
basal and bolus insulin doses. The more information we have, the easier it will be to identify
trends or work through problems.
4 | P a g e
Getting Started
You first need to determine, along with your diabetes team, how much insulin to use in
the insulin pump. To do this you need to total the average number of units of insulin you use
per day. To do this, add up all of your rapid insulin + your long acting insulin to give you your
total daily dose (TDD).
1. My Total Daily Dose (TDD) of insulin per day = ______________ a
2. Reduce your dose by 25%. TDD = ____________ x75% = ______________ b
To determine your basal dose of insulin:
3. Divide b by 2 = ______________ c
4. Divide c by 24 = _____________ d This is your basal dose of insulin
Your basal insulin provides the background insulin around the clock. Initially, many people start
with a single basal rate when they begin pump therapy. Once you have attained some blood
sugar readings overnight and during the day, you will often require minor adjustments in your
basal rates and may require several basal rates.
Fine tuning your basal rate:
When your basal rate is set correctly, you should be able to go to bed with a normal blood
sugar, eat little or no bedtime snack and wake up with a normal blood sugar in the morning. A
good target is to have your blood sugar stay level and not drop or rise more than 2 mmol/L
during your sleep. Your team will ask you to avoid your bedtime snacks and to check every 2
hours the first week or so overnight, to determine your night-time basal rate. After that, they
may ask you to skip breakfast or a meal to determine your correct basal dose during the day.
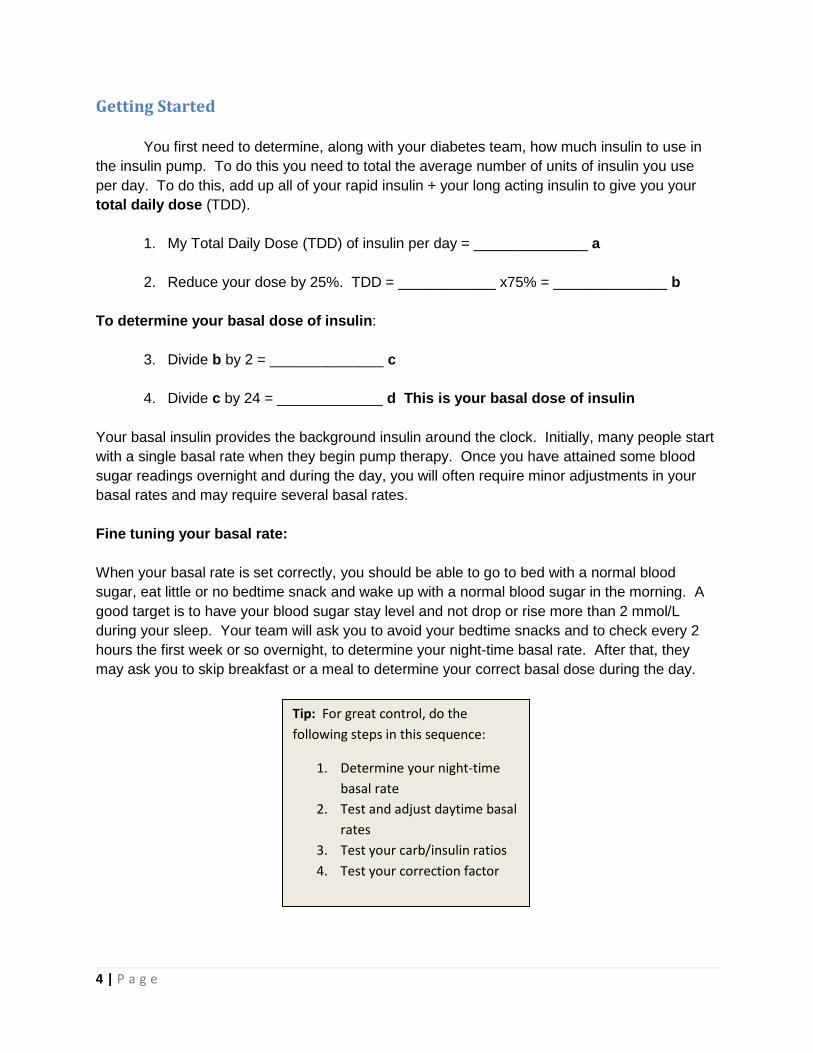
Tip: For great control, do the
following steps in this sequence:
1. Determine your night-time
basal rate
2. Test and adjust daytime basal
rates
3. Test your carb/insulin ratios
4. Test your correction factor
5 | P a g e
To determine your meal bolus dose of insulin:
From clinical experience over the years, the “500 Rule” has been developed to calculate insulin
to carbohydrate (CHO) ratio. How this works is the following, divide 500 by the total daily dose
(TDD):
500 ÷ ________ a = ________ e
Therefore 1 unit rapid acting insulin covers ______ e gms of CHO. This is your starting
“insulin to CHO ratio” for your meal bolus dose on your pump.
Fine tuning your meal bolus:
The amount of carbohydrate that will be eaten in a meal or snack determines how much bolus
insulin is needed to cover it. For this reason, your food records and log book are very important
in determining the correct bolus dose. Your team will ask you to check your blood sugar 2
hours after your meal to assess whether your bolus dose is correct. They may determine a
different insulin to CHO ratio for each meal, depending on your records.
Revised Insulin to CHO ratios:
Breakfast:__________ units/____________grams carbohydrate
Lunch: ____________units/____________grams carbohydrate
Supper: ____________units/____________grams carbohydrate
Other: ___________________units/____________grams carbohydrate
6 | P a g e
Correction Bolus:
A correction dose of insulin is sometimes required if your blood sugar goes high unexpectantly.
This correction dose is in addition to your mealtime bolus insulin.
The “100” Rule was the first tool that was developed in the early 1990’s to allow precise dosing
for high blood sugars. It provides a calculation to determine how much insulin is required to
bring down your blood sugar to target.
To determine your correction bolus of insulin:
100 ÷ Your TDD _________ = _________ mmol/L drop
Example: if your TDD = 25 then 100 ÷ 25 = 4 mmol/L drop.
This means that for every 1 unit of insulin, your blood sugar will drop 4 mmol/L.
Example: if your blood sugar is 12 mmol/L and you want to drop it to a target of 6 mmol/L: (Actual blood sugar – Target blood sugar) ÷ correction factor = amount of extra insulin needed
(12 – 6) ÷ 4 = 1.5 units
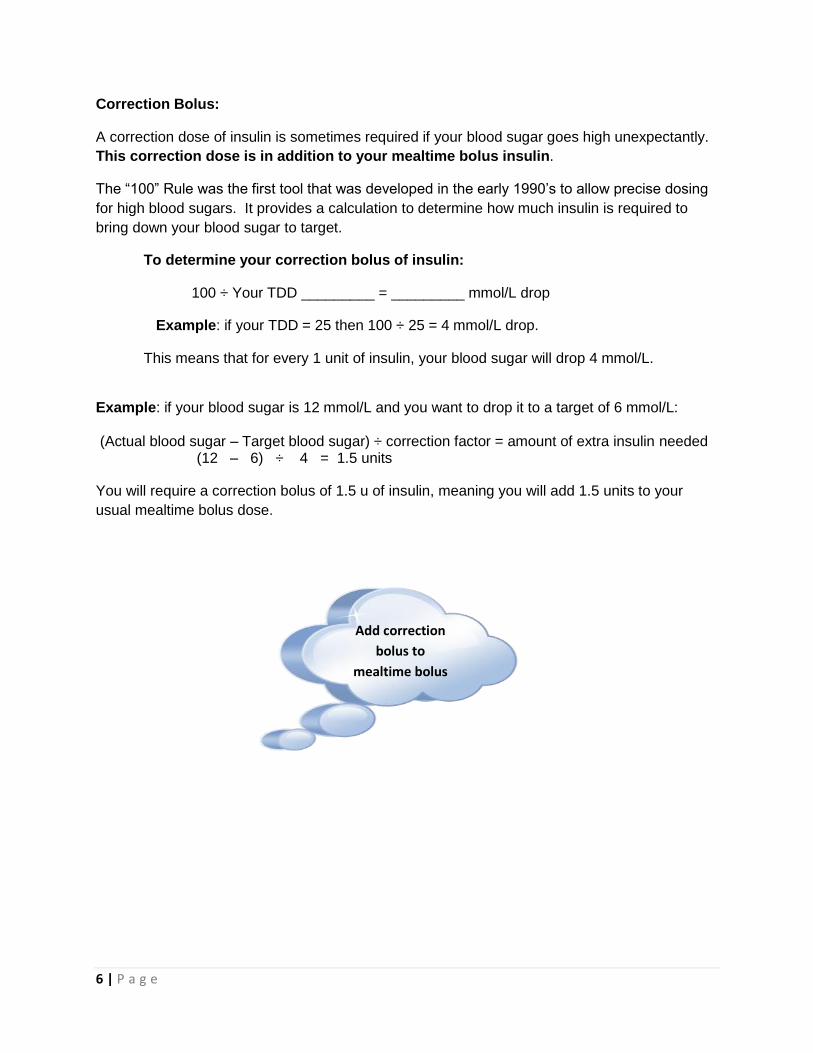
You will require a correction bolus of 1.5 u of insulin, meaning you will add 1.5 units to your
usual mealtime bolus dose.
Add correction
bolus to
mealtime bolus
dose
7 | P a g e
Site Selection
The abdominal area is used most often since insulin absorption is best from this site. The
subcutaneous area of the hip, thigh and upper buttock area may also be used. Areas to avoid
include 2 inches around the navel, any area with scars, belt area or any area where clothing
would constrict the site.
Tips for Successful management
Try to change your site during the day. Remember to check your blood sugar 1 ½ to 2
hours after your site change. If changing your site at night, set your alarm.
Rotate the site and change the set every 2 to 3 days to prevent infections and elevated
blood sugar readings.
Wash your hands with soap before starting
Use a skin protectant such as IV Prep or Skin Prep on the site. Using a circular motion
from the center moving outward, wipe the skin and allow to air dry before inserting the
set. Move the site at least 1” from the previous one.
When putting on tape, stand up straight instead of sitting or in the bent-over position.
This prevents tape from pulling.
If perspiration causes the tape to loosen, try using an unscented antiperspirant around
the edges of the tape. Other products can be applied to the skin prior to the set insertion
including Skin Tac or Tincture of Benzoin if tape adhesion is a problem.
Your pump will pick up any pressure on the tubing that might cause an blockage, but it
won’t pick up on a dislodged site, or a puncture in the tubing. Remember to inspect your
site and tubing regularly and every night before you go to bed.
Remove your pump if you are going on any rides at amusement parks, as some of the
rides are operated with magnets which can affect your pump.
Trouble-shooting
If you have any technical problems with your pump, call the 1-800 # on the back of your
pump.
If for any reason you have to come off the pump, you will need to inject your insulin
every 4 hours. Make sure you discuss with your certified pump trainer, how to replace
your insulin if this should occur.
8 | P a g e
Risks of an insulin pump
People using an insulin pump can be at higher risk for diabetic ketoacidosis because
there is a small amount of insulin in the body at any given time. If the pump is not giving you
insulin for any reason, blood sugars can start to rise within 90 minutes. This is usually caused
by a dislodged cannula or a poor site. Often you are not aware of the poor site until you see a
high blood sugar reading. This is why it is very important to test your blood sugars frequently in
order to act quickly if your blood sugar is elevated.
Diabetic Ketoacidosis
Diabetic ketoacidosis occurs when there is not enough insulin in the body. As a result,
you are unable to use glucose for energy. Without glucose available, your body breaks down
any fat stores that you have as an alternative source of energy. The process of fat breakdown
produces ketones. Ketones are acidic and a buildup of them in your body causes ketoacidosis.
Ketoacidosis is a dangerous condition and can worsen rapidly if not treated.
Signs and symptoms of Diabetic Ketoacidosis
Dry mouth and tongue, sore throat
Thirst
Frequent urination
Elevated blood sugar
Ketones in urine or blood
Fruity smell to breath
Stomach cramps
Vomiting
Leg cramps
Deep heavy breathing
Flushed appearance
Drowsiness leading in time to unconsciousness
What causes diabetic ketoacidosis?
No insulin or not enough insulin
9 | P a g e
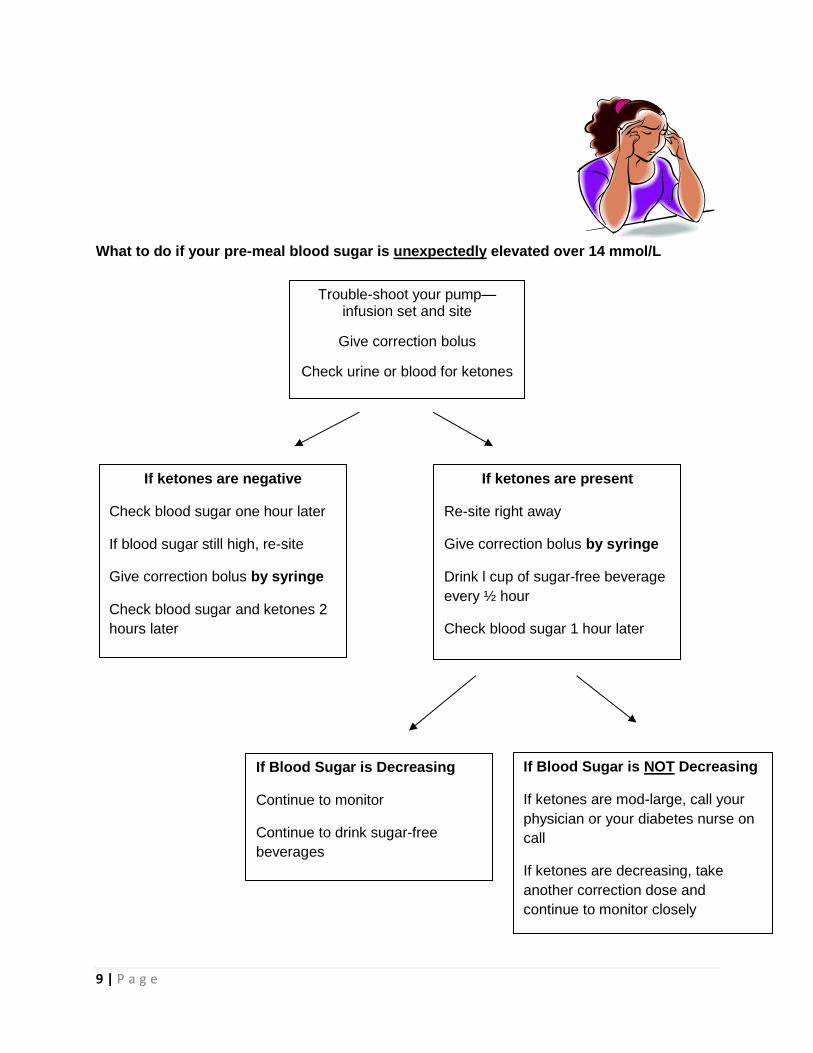
What to do if your pre-meal blood sugar is unexpectedly elevated over 14 mmol/L
Trouble-shoot your pump—infusion set and site
Give correction bolus
Check urine or blood for ketones
If ketones are negative
Check blood sugar one hour later
If blood sugar still high, re-site
Give correction bolus by syringe
Check blood sugar and ketones 2
hours later
If ketones are present
Re-site right away
Give correction bolus by syringe
Drink l cup of sugar-free beverage
every ½ hour
Check blood sugar 1 hour later
If Blood Sugar is Decreasing
Continue to monitor
Continue to drink sugar-free
beverages
If Blood Sugar is NOT Decreasing
If ketones are mod-large, call your
physician or your diabetes nurse on
call
If ketones are decreasing, take
another correction dose and
continue to monitor closely
10 | P a g e
Sick Day Management on a Pump
Sick days or acute illnesses are expected events in everyone’s life. You need to be aware that
an illness such as the flu or an infection can put your diabetes out of control. Monitoring is very
important during this time—both blood sugars and ketones. Even though you may not be
eating, your blood sugars can still run higher than expected due to the stress effect on your
body. If your ketones become large, you may require hospitalization to correct your electrolyte
imbalance.
Goals for sick-day management include the following:
Prevention of high blood sugars and diabetic ketoacidosis
Prevention of hypoglycemia
Maintenance of hydration: your body needs about 2200 mL (9 cups) of fluid daily to
prevent dehydration
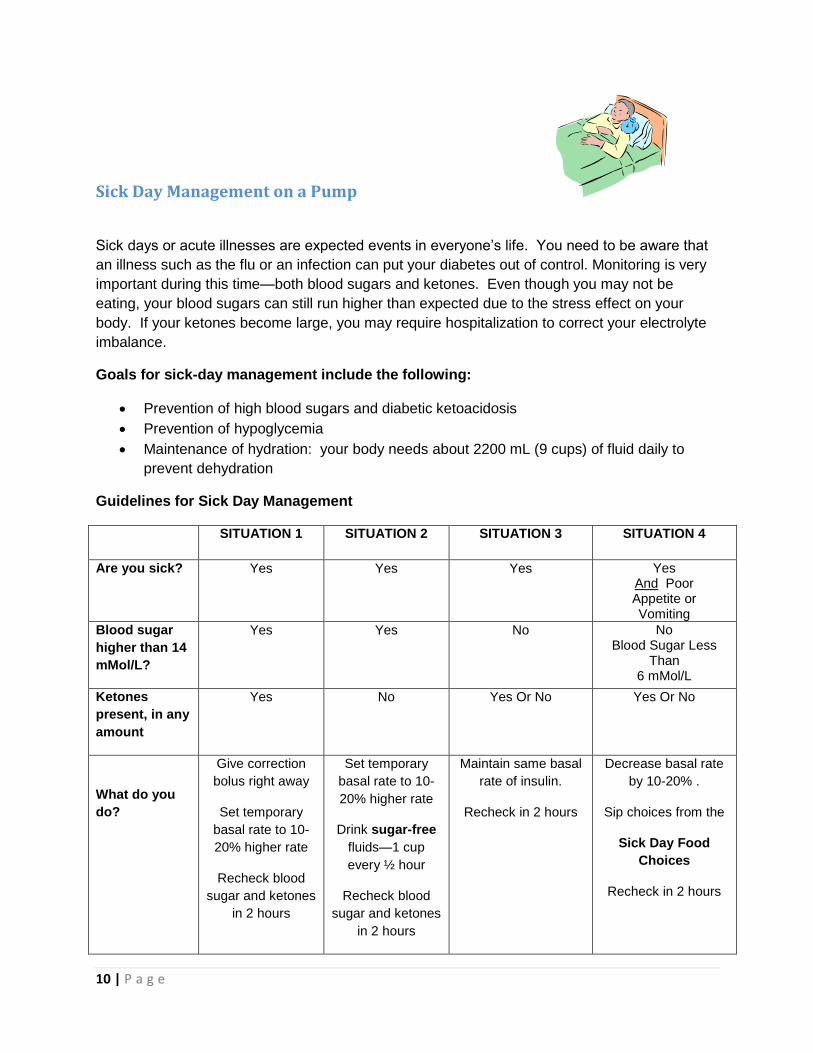
Guidelines for Sick Day Management
SITUATION 1 SITUATION 2 SITUATION 3 SITUATION 4
Are you sick? Yes Yes Yes Yes And Poor Appetite or Vomiting
Blood sugar
higher than 14
mMol/L?
Yes Yes No No Blood Sugar Less
Than 6 mMol/L
Ketones
present, in any
amount
Yes No Yes Or No Yes Or No
What do you
do?
Give correction
bolus right away
Set temporary
basal rate to 10-
20% higher rate
Recheck blood
sugar and ketones
in 2 hours
Set temporary
basal rate to 10-
20% higher rate
Drink sugar-free
fluids—1 cup
every ½ hour
Recheck blood
sugar and ketones
in 2 hours
Maintain same basal
rate of insulin.
Recheck in 2 hours
Decrease basal rate
by 10-20% .
Sip choices from the
Sick Day Food
Choices
Recheck in 2 hours
11 | P a g e
It is important to remain hydrated. Try to drink 1 cup of sugar-free drinks every ½ hour.
Sugar Free Fluid List
water * Sugar Free Kool-Aid
clear tea * Crystal Light
clear soup broth * Soda water/Club Soda
diet pop * Jello Light
If you are unable to eat, you need to try to replace solid foods with glucose-containing fluids.
You should try to sip or nibble on the sick day food choices over the 1-2 hour period. These
choices are fast acting sugars. They do not last as long as other choices and that is why you
must take them more often.
Sick Day Food Choices
Fruit
1 choice is equal to:
Juice 125 ml…………1/2 cup
Applesauce 125ml………… 1/2 cup
Starch
1 choice is equal to:
Cooked rolled oats 125ml………… ½ cup Cream of wheat 125ml………… ½ cup Rice Krispies/Corn Flakes 200ml………… ¾ cup Canned soup 250ml………… 1 cup Soda crackers 7 Melba toast 4 Toast 1 slice Arrowroot cookies 3 English muffins ½ Digestive cookies 2 Plain muffin 1 small Graham crackers 3 Ritz crackers 7
1 Carbohydrate Choice = 15 grams of carbohydrate
12 | P a g e
Other Foods
Regular Pop 125 ml ……………. ½ cup Ice cream 125 ml ……………. ½ cup Popsicle ½ Sherbet 125 ml …………….. ½ cup Regular Jello 125 ml …………….. ½ cup Pudding 125 ml …………….. ½ cup
Over the counter medications
When buying over-the-counter medications to treat an illness, you should ask for advice from a
pharmacist. Many cold remedies and cough syrup contain sugar. Sugar-free products are
available and should be selected.
13 | P a g e
Hypoglycemia
As you know, many factors can cause low blood sugar, whether you are on a pump or
injections. Most people on pumps actually report less frequent low blood sugars and less
severe ones. It is still important to always be prepared for low blood sugars. Also, keep in mind
that over time, your symptoms of low blood sugar may change.
Causes of hypoglycemia:
Too much insulin
Too little food
Following alcohol
During and after exercise (“lag effect” may last for 12 hours after exercise)
Any time when your activity level is increased or your usual schedule is different such as
vacation
No matter what the cause, you need to treat your low blood sugar immediately.
You are likely aware of your symptoms of low blood sugars, but did you know that 50% of lows
are known to occur at night and are often asymptomatic? You may experience the following
symptoms, which may be related to a low blood sugar:
Nightmares
Waking up with a headache
Damp night clothes, sheets or pillow
Restlessness
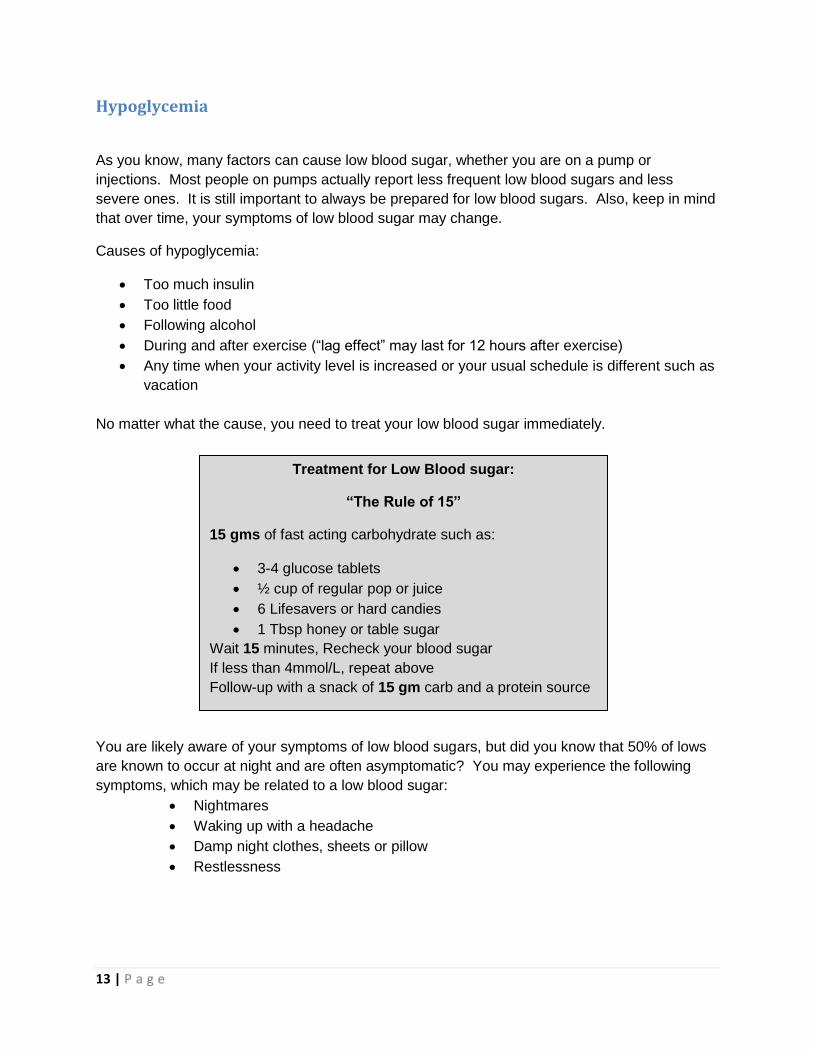
Treatment for Low Blood sugar:
“The Rule of 15”
15 gms of fast acting carbohydrate such as:
3-4 glucose tablets
½ cup of regular pop or juice
6 Lifesavers or hard candies
1 Tbsp honey or table sugar
Wait 15 minutes, Recheck your blood sugar
If less than 4mmol/L, repeat above
Follow-up with a snack of 15 gm carb and a protein source
14 | P a g e
If you do experience several lows, it is important to try to determine the cause of your low blood
sugar, and try to prevent it the next time.
Questions to ask yourself:
Is my basal rate too high? (especially if you are having frequent lows)
Are my basal rates programmed correctly?
Do I need to adjust my insulin to carb ratio or correction factor?
Are my targets too low?
Am I estimating my carbs accurately?
Am I doing the calculations correctly to determine my bolus doses?
Am I over-correcting?
Are my bolus doses overlapping?
Hypoglycemia Unawareness
If you have hypoglycemia unawareness, you are unable to recognize the early warning
symptoms of low blood sugar levels. This can occur sometimes if you have had diabetes for a
long time; if you are pregnant; or if you have had frequent recurrent low blood sugars from
running your blood sugars in tight control.
You can improve hypoglycemia unawareness by setting your targets higher for a period of time
until you can start to feel symptoms again. Speak to your physician or educator about
appropriate targets for yourself. Meanwhile, make sure your family members or friends are
familiar with glucagon administration.
Do not get frustrated if you cannot figure out the cause of an
occasional episode of low blood sugar. Sometimes with
diabetes, not every low or high can be explained
15 | P a g e
Glucagon
Glucagon is a hormone that works the opposite of insulin; it stimulates the liver to release
glucose or sugar into the bloodstream which will raises glucose in the blood stream. It is
recommended that everyone who takes insulin should have a Glucagon Emergency Kit (a
prescription item).
Things to remember about glucagon:
It has an expiry date—so check and replace as necessary
Once mixed, it is only good for 24 hours
It should be kept in an agreed upon place so everyone can find it
It is to be given in an emergency situation when you cannot give it to yourself—it must
be given by someone else
Managing Exercise on a Pump
The effect of exercise on blood sugars is variable from person to person and can be related to:
Diabetes control
Time and content of last meal
Fitness level
Type and duration of activity
When you first start on a pump, it is suggested that you refrain from doing exercise until your
basal rates are on target. If you have a consistent exercise routine, this is not as much of an
issue.
Once you are comfortable with your pump management, it is essential that you monitor your
blood sugars before and after exercise to help establish your glycemic response to a particular
activity. In general, during exercise, your blood sugar levels drop and you need less insulin.
This is because your body is working harder and uses up glucose for the extra fuel muscles
need. This can continue even after you have stopped exercising. This is called the “lag effect”.
For high-intensity exercise though, sometimes your blood sugars will go up. This is related to
the release of stress hormones. In this case, the insulin dose may not need to be decreased
during the activity, or it may be safer to correct after the exercise. For this type of exercise, it is
best to work closely with your physician or diabetes educator.
Make sure family members or friends are
familiar with administering glucagon.
16 | P a g e
In other cases, if your blood sugar is high prior to exercise (>14 mmol/L) and your insulin levels
are low, your blood sugar level can rise with the increased activity. This is a dangerous
situation, and can lead to ketoacidosis (refer to diabetic ketoacidosis section).
General Guidelines when exercising:
Check your blood sugar before, during and after activity to establish your specific
patterns.
If you are eating right after a meal, you can lower your meal-time bolus of insulin or eat
extra carbohydrate
Eat extra carbohydrate to compensate for the activity—start with 15 gm of carb for 30
minutes of activity
Program your pump to deliver a temporary basal rate reduction before, during and/or
after the activity. A general guideline is to lower the basal rate by ~50%
Drink plenty of water to stay properly hydrated
Carry carbohydrates to treat low blood sugars
If you disconnect the pump during exercise:
You may remove your pump during exercise for up to one hour.
You may need to give an insulin bolus prior to disconnecting from the pump
If you are planning to be disconnected for longer than one hour, you may need to
reconnect and give yourself a bolus
My personal plan for exercise:
Activity: ____________________________________________________
Plan:
Activity: ____________________________________________________
Plan:
17 | P a g e
Travel Guidelines:
Before you are scheduled to leave on your trip, call or visit your Diabetes Education Program to
obtain written instructions for possible adjustments while you are away.
Preparation
Obtain a letter from your health care professional indicating you have diabetes and are
wearing an insulin pump and are required to carry supplies.
Carry all medications with the pharmacy prescription label attached
Airport Screening Guidelines
Always carry all insulin, pump and BG monitoring supplies with you in your carry-on
luggage
Blood glucose meters and the pump should be carried through the security screening
area
If questioned, notify screeners that you are wearing an insulin pump. Explain that you
cannot remove it from your body, and offer to show your travel letter.
Guidelines for Pump Use if you are hospitalized:
There are situations when you may need to be hospitalized. Please remember that many health
care professionals are not familiar with insulin pumps, so it is important to remember that you
are the expert in managing your pump. As insulin pumps become more popular, hospitals are
starting to prepare policies and procedures for self-management. Meanwhile, you may need to
educate the hospital staff or be asked to demonstrate your knowledge of the pump.
The documents on the following 2 pages are useful for you to have with you and share with the
hospital staff.
Take with you to hospital:
pump supplies, including extra sets, insulin and batteries
meter, strips and lancets
“Your Guidelines for Pump use if you are Hospitalized” (Page 18)
“Letter to Hospital Staff” (Page 19)
18 | P a g e
Your Guidelines for Pump Use if You are Hospitalized
The following information should be available to the hospital staff:
1) The phone number of the pump-prescribing physician for consultation.
2) Pump description in your hospital chart
3) A piece of paper with your basal rates, insulin-to-carbohydrate and correction factor.
4) Instructions to call _______________________________________(your Diabetes
Program).
5) Instruction for calling the Help Line: ________________________ to answer any
questions regarding the insulin pump.
6) Written orders to:
a. leave the pump in place and to continue the basal rate, even if you are unable to
eat.
b. allow you and hospital staff to perform blood glucose monitoring at least before
meals and bedtime. More frequent monitoring may be necessary.
c. have an individualized bolus algorithm for meals and for correction of high blood
glucose.
d. check for ketones if blood sugar > 16 mmol/L and to have you check your pump
and site re-site if necessary.
e. allow your family to assist in site and rate changes.
7) For elective surgical and diagnostic procedures, your pump-prescribing physician
should review orders with the admitting physician, and if applicable, the
anesthesiologist.
Do not allow hospital staff to remove the insulin infusion pump unless insulin therapy is
continued by IV or injection. Due to the small amount of circulating insulin, Diabetic
Ketoacidosis (DKA) will result very quickly if the pump is discontinued.
19 | P a g e
To: Hospital Staff
This patient uses an insulin infusion pump to manage his/her diabetes. The pump delivers a steady,
measured dose of rapid-acting insulin (NovoRapid, Humalog or Apridra). The pump is not automatic, but
must be programmed by the patient to match his/her needs. The pump holds a syringe (also known as a
cartridge or a reservoir) filled with insulin and is connected to an infusion set, which is inserted
subcutaneously with a cannula. The syringe and infusion set are changed every 2-3 days.
The pump delivers a slow steady dose of insulin continuously which is called the “basal” dose and is
calculated to closely mimic the body’s normal release of insulin. Generally the rate is approximately 50%
of the total daily insulin dosage divided over 24 hours.
In addition to the basal dose of insulin, the patient must give themselves a “bolus” dose of insulin with
each meal. This dose is not pre-programmed. The patient must check his or her blood glucose with a
blood glucose meter prior to eating and then program the pump to give insulin based on his/her pre-
determined carb/insulin ratio; blood sugar reading; and anticipated exercise. The patient is very skilled
and knowledgeable about determining his/her dose.
NB. If the patient is using a Medtronic MiniMed pump, he/she may also have a glucose sensor
inserted separately from the pump insertion. This glucose sensor measures a continuous real-
time glucose reading.
Pump therapy during a hospitalization or surgery provides the best means for normalizing the patient’s
blood glucose through these times of physiological stress. The best resource for pump management
during the hospitalization is the patient. Confidence in the patient’s ability to make appropriate
management decisions will greatly enhance the outcome of the hospitalization and the interaction
between the patient and staff.
SPECIAL WARNING FOR PATIENTS AND STAFF:
Do not remove the insulin infusion pump unless insulin therapy is continued by IV or SC.
Due to the small amount of circulating insulin, Diabetic Ketoacidosis (DKA) will result
very quickly if the pump is discontinued. If the pump is discontinued, the patient will
need rapid-acting insulin immediately.
Please call ______________________ (Diabetes Education Program) if necessary or please refer to the
Waterloo Wellington Diabetes Policy and Procedure: Use of Continuous Subcutaneous Insulin Infusion
(CSII) Pumps in Hospitalized Patients (www.waterloowellingtondiabetes.ca/commonforms ).
20 | P a g e
References:
Walsh, J., Roberts, R., Pumping Insulin, (third edition), Torrey Pines Press: San Diego, ISBN 1-
884804-84-5
Bolderman, K, Putting Your Patients on the Pump, American Diabetes Association, 2002, ISBN
1-58040-148-1
BC Children’s Hospital, Endocrinology and Diabetes Unit, www.endodiab.bcchildrens.ca
Animas, My Insulin Pump Workbook, Animas Corporation, www.animascorp.com
Canadian Diabetes Association Clinical Practice Guidelines Expert Committee. Canadian
Diabetes Association 2013 Clinical Practice Guidelines for the Prevention and Management of
Diabetes in Canada. Can J Diabetes 2013;37(suppl 1): S1-S212.
Insulin Pump manuals from Credit Valley Diabetes Care Centre (2008), Grand River Hospital
Diabetes Education Centre (2006).