insurer stock prices - american economic association
TRANSCRIPT

10 Gigabit EthernetUsers Guide
Updated March 14, 2006
1

Small Tree Communications – 10 Gigabit Ethernet Users Guide
System Requirements:Xserve G4, Xserve G5 or Power Mac G5 with a free PCI or PCIX (not PCI-Express) slot .
Mac OS X revision 10.3.9 or later.
Small Tree Branded 10Gb Ethernet Adapter.
NOTE: The SmallTreeIntel82597 driver for Mac OS X only works with Small Tree branded adapters.
Supported 10Gb Ethernet Adapter Types:
Small Tree 10Gb Ethernet Adapters are customized OEM versions of Intel's PRO/10GbE Adapters, whichare based upon the Intel 82597EXASIC. There are two types of Small Tree 10GbE adapters available, tosupport different physical connection types.
10GbE SR (optical) adapter type
The Small Tree 10GbE SR adapter is based on the Intel PRO/10GbE SR adapter. Its physical interface isan 850 nm optical XPAK module with an LC-Duplex connector for connection to multi-mode optical fiberof lengths up to 300 meters, as specified in the IEEE 802.3ae 10GBase-SR standard.
2
Illustration 1 - 10 GbE SR adapter type

Small Tree Communications – 10 Gigabit Ethernet Users Guide
10GbE CX4 (copper) adapter types
The Small Tree 10GbE CX4 adapter is based on the Intel PRO/10GbE CX4 adapter. Its physical interfaceis a removable XPAK module with a CX4 connector for connection to a CX4 copper cable of lengths up to15 meters, as specified in the IEEE 892.3ak 10GBASE-CX4 standard.
The Small Tree 10GbE CX4 adapter has a removable XPAK module containing the CX4 PHY circuitryand connector. The CX4 connector portion of this module, which extends beyond the faceplate, is widerthan the opening of a standard PCIX slot. Therefore, the CX4 XPAK module must be temporarily removedwhile the adapter is being inserted into or removed from the PCIX slot.
NOTE: Power must be off while the CX4 XPAK is being inserted into or removed from the adapter.
3
Illustration 2 - 10 GbE CX4 adapter type

Small Tree Communications – 10 Gigabit Ethernet Users Guide
To remove the XPAK module, depress the latching mechanism on the adapter module and carefully pull itfree of its mount. The module may be firmly seated, but it should disengage with no more than moderateforce. After removal, temporarily place the adapter module in a safe location.
To replace the XPAK module, insert the module through the opening in the back of the computer chassis,and into the adapter mount. You should feel a click from the latch mechanism indicating that the module isproperly seated.
4
Illustration 3 - Removing CX4 XPAK module
Illustration 4 - Replacing XC4 XPAK module

Small Tree Communications – 10 Gigabit Ethernet Users Guide
Software Installation Steps:1. If necessary, download the latest version of the Small Tree 10Gb driver disk image by pointing yourweb browser to www.small-tree.com/downloads/10Gb.htm
2. Save the disk image of the Small Tree 10 Gigabit Ethernet driver (e.g. - “SmallTreeIntel82597-3.0.dmg”) to the Desktop of the machine you wish to install it on.
3. Double click on the disk image to mount it.
4. Read the README file for late breaking installation caveats, bugs and requirements.
5. Double click the installer package (e.g. - “SmallTreeIntel82597-3.0.pkg”) and follow the instruc-tions. You must install to a partition containing a valid Mac OS X volume of version 10.3.9 or later.When the install is complete, you will be asked to restart your system.
To install onto a “headless node” (i.e. - a system without a monitor), enter the following commands from aremote shell (assumes the disk image file has been downloaded to the user's home directory:
# hdiutil mount SmallTreeIntel82597_3.0.dmg# sudo installer -pkg \? /Volumes/SmallTreeIntel82597-3.0/SmallTreeIntel82597-3.0.pkg \? -target /# sudo reboot
NOTE: Your Small Tree Ethernet card will not be recognized until after the soft-ware installation process is complete and you have rebooted your system.
5

Small Tree Communications – 10 Gigabit Ethernet Users Guide
Hardware Installation steps: (G5 Power Mac)
1. Shutdown your G5 system.
2. Make sure the power to the system is turned off.
3. Touch the system chassis to discharge any static you may be carrying.
4. Remove the power cord.
5. Remove the side panel using the small lift lever on the back of the machine.
6. Temporarily remove the CX4 XPAK module from the Small Tree 10Gb Ethernet Adapter (CX4cards only).
7. Insert the Small Tree 10Gb Ethernet Adapter into the top-most PCIX slot. You may instead use oneof the other two available slots, but they will run at 100 MHz instead of the maximum PCIX speed of133 MHz.
8. Insert the small screw into the top of the bulkhead and tighten to keep the card properly seated. Other-wise, inserting and removing the cable may eventually cause the card to work loose.
9. Close the side panel of the machine. (Don’t forget the Plexiglas cover!)
10. Re-insert the CX4 XPAK module which was removed in step 6 back into the Small Tree 10Gb Ether-net Adapter (CX4 cards only).
11. Re-attach the power cable.
12. Power up the system.
6

Small Tree Communications – 10 Gigabit Ethernet Users Guide
Hardware Installation steps: (G5 and G4 Xserve)
1. Shutdown your Xserve system.
2. Make sure the power to the system is turned off.
3. Touch the system chassis to discharge any static you may be carrying.
4. Remove the power cord and unplug all cables from the back panel.
5. Temporarily remove the CX4 XPAK module from the Small Tree 10Gb Ethernet Adapter (CX4cards only).
6. On the rear panel, loosen the thumbscrew that is used to lock the PCI cards in place. After loosen-ing the screw, move the lever to the side to allow cards to be inserted or removed.
7. Loosen the two thumbscrews on the front panel. If the screws are too tight to loosen by hand, use ascrewdriver.
8. Slide the Xserve out by pulling forward. Extend the unit all the way to allow access to the PCIslots, which are in the rear.
9. Carefully insert the Small Tree 10Gb Ethernet Adapter into an empty PCIX slot. Be sure the cardis seated correctly before proceeding. Note - due to physical dimension of the CX4 optics module,CX4 cards must reside in the upper PCIX slot.
10. Push the Xserve back inside the rack and tighten the thumbscrews on the front.
11. Slide the lever that was moved in step 6 back into place to lock down the PCI cards and tighten thethumbscrew.
12. Re-insert the CX4 XPAK module which was removed in step 5 back into the Small Tree 10GbEthernet Adapter (CX4 cards only).
13. Reconnect the cables that were removed in step 4. Reconnect the power cord last.
14. Power up the system.
7

Small Tree Communications – 10 Gigabit Ethernet Users Guide
Configuring Mac OS X to use your new port:
After the hardware and software has been installed, and the system has been restarted, you may next loginand launch the Network Preferences panel to configure your new 10Gb Ethernet port. How this new port isnamed will depend on how many other network adapter cards have ever been installed onto your system(Mac OS X interface naming is persistent, so each new card ever added to your system continues to haveits unique name reserved for it even after it is removed). In general, the built-in Ethernet port and Airportnetwork ports on a Power Mac will be named en0 and en1, respectively. Likewise, the two built-in ethernetports on an XServe will also be named en0 and en1. In either case, your Small Tree Ethernet card willlikely be named en2.
To begin configuring your new network port, you will first need to start the Network Preferences panel.Select the Location -> Network Preferences option from the Apple menu to access the panel:
8
Illustration 5 - Selecting Network Preferences

Small Tree Communications – 10 Gigabit Ethernet Users Guide
Once you’ve started the Network Preferences panel, select Network Status from the Show pulldownmenu. You should see something like the following:
The Small Tree Ethernet Card should appear as a new interface with a name that begins with PCIEthernet Slot... (the above example is from a G5 XServe with the card in the top slot).
To configure the new port, select it (so it is highlighted) and then select Configure.
9
Illustration 6 - Selecting the interface in Network Preferences
Small Tree Communications – 10 Gigabit Ethernet Users Guide
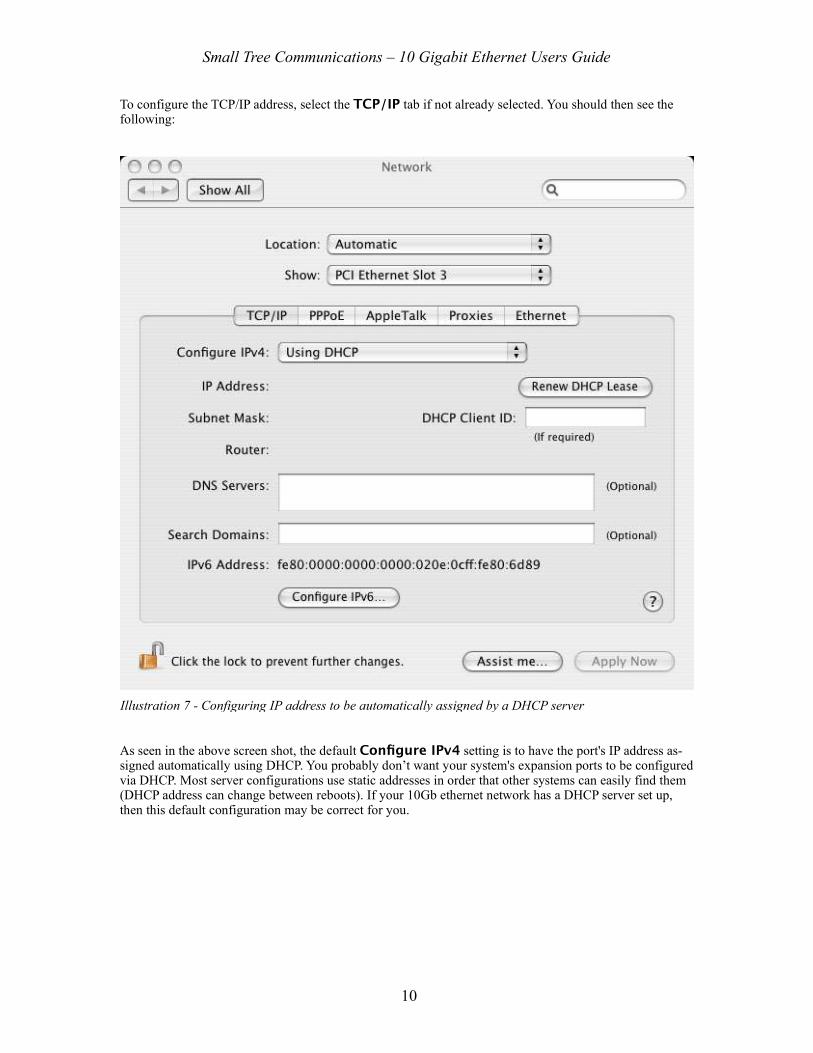
To configure the TCP/IP address, select the TCP/IP tab if not already selected. You should then see thefollowing:
As seen in the above screen shot, the default Configure IPv4 setting is to have the port's IP address as-signed automatically using DHCP. You probably don’t want your system's expansion ports to be configuredvia DHCP. Most server configurations use static addresses in order that other systems can easily find them(DHCP address can change between reboots). If your 10Gb ethernet network has a DHCP server set up,then this default configuration may be correct for you.
10
Illustration 7 - Configuring IP address to be automatically assigned by a DHCP server

Small Tree Communications – 10 Gigabit Ethernet Users Guide
Manual assignment of IPAddresses:
Most likely, you will need to manually configure the IPAddresses for the ports on your 10Gb network.Deciding which values to choose for a port's IP Address and Subnet Mask leads can be a complicated sub-ject. However, the following recipe should suffice for the typical customer wishing to set up a private 10Gbethernet Local Area Network connecting less than 255 hosts.
Choose a unique “Network ID” for the 10Gb network from a range reserved for “locally administered” net-works. A recommended choice is 192.168.X, where X is any decimal value between 0 and 254.
Determine the appropriate “Subnet Mask” value for the chosen Network ID. A Subnet Mask defines whichof the four fields of an associated IPAddress contain the Network ID and which fields contain the Host ID.The correct Subnet Mask value for all Network IDs in the recommended range of 192.168.X is255.255.255.0. This specifies that the first 3 fields of an associated IPAddress contain the Network ID, andthe last field contains the Host ID.
All hosts on the 10Gb network must configure their 10Gb ports to use the same Network ID and SubnetMask.
Choose a unique “Host ID” for each host on the 10Gb network. This host value may be any decimal valuebetween 1 and 254.
Each host on the network must configure its 10Gb port to use a unique Host ID between 1 and 254.
The IPAddress of each host on the network should be set to the concatenation of the Network ID followedby the Host ID. In the following example, a Network ID of 192.168.17 and its corresponding Subnet Maskof 255.255.255.0 were chosen for the 10Gb network, and a Host ID of 24 was chosen for the host beingconfigured. Concatenating the Network ID and Host ID together results in an IPAddress of 192.168.17.24for this host.
11

Small Tree Communications – 10 Gigabit Ethernet Users Guide
To manually configure a port's IP address, selectManually from the Configure IPv4: pulldown menu.
Set the IP Address: field to a concatenation of the port's “Network ID” and “Host ID”. In the examplebelow, the chosen Network ID was 192.168.17 and the Host ID was 24, so the port's IPAddress was set to192.168.17.24.
Set the Subnet Mask: field to 255.255.255.0. This specifies that the first 3 fields of the IPAddress con-tain the Network ID and the last field (after the last period) contains the Host ID.
Select Apply Now for your changes to take effect.
12
Illustration 8 - Manually configuring the IP Address and Subnet Mask

Small Tree Communications – 10 Gigabit Ethernet Users Guide
Configuring MTU Size:
The next step is to configure the port's Maximum Packet Size, or MTU (Maximum Transmission Unit).This is the maximum amount of data that can be sent in a single packet, or ethernet “frame”. The standardethernet frame size is 1500 bytes. In order to reduce the number of packets per second that the CPU has tohandle, high performance ethernet hardware often includes support for ethernet frame sizes larger than thestandard frame size. These are referred to as “Jumbo frames”. Although support for Jumbo frames is verycommon in high performance ethernet hardware, Jumbo frames have never been endorsed as an IEEEstandard, so the maximum size of a Jumbo frame is hardware dependent (but is generally at least 9000bytes ).
For maximum performance, configure your network to use the highest frame size which is supported by alldevices on that network.
NOTE: All switches and adapters on a local ethernet network must be configured to use the same framesize, and all devices on that network must be capable of supporting frames of at least that size.
The Small Tree 10Gb Ethernet Adapter supports Jumbo frame sizes of up to 16,384 bytes. However,most 10GbE switches available at this time do not support frame sizes that large, so your network's framesize will probably be dictated by the maximum frame size of your 10Gb switch.
Assuming that the switch supports Jumbo frames (and sending standard sized frames over 10Gb ethernet isinefficient due to excessive per-packet processing overhead), a frame size of 9000 bytes is recommended asa safe setting.
The Small Tree STX-700 10 GbE Switch supports frame sizes of up to 12,288 bytes (or 16,384 bytes ifflow control is disabled).
Note that if your 10Gb network consists of just two hosts connected “back-to-back” without a switch, thenconfiguring an MTU size of up to 16,384 is possible.
NOTE: In order to work around a hardware bug with flow control, the adapter should be configured with aMaximum Packet Size (MTU) that is “2 modulus 4”, meaning some value that is two bytes more than aneven multiple of four bytes. For example, use an MTU of 8998 bytes instead of 9000 bytes. Failure to do socould cause the adapter to drop a few packets every 1-2 minutes under heavy load.
13

Small Tree Communications – 10 Gigabit Ethernet Users Guide
For example, to configure the Small Tree 10Gb Ethernet Adapter to use a Jumbo frame size of 11998bytes:
Select the Ethernet tab within the Network Preferences panel.
SelectManually (Advanced) from the Configure: pulldown menu.
Select the Custom: radio button.
Enter 11998 into the adjacent box.
Select Apply Now for your changes to take effect.
14
Illustration 9 - Setting MTU

Small Tree Communications – 10 Gigabit Ethernet Users Guide
Modifying driver configuration parameters:The 3.0 version of the SmallTreeIntel82597 driver introduced support for persistent configuration of thedriver via a configuration file. Modifying the driver's configuration is optional and not recommended, asthe default values for all driver configuration parameters should already be optimal for most users.
The drive configuration parameters are maintained in a configuration file which is installed at:
/Library/SmallTree/Intel82597/SmallTreeIntel82597.conf
The default contents of that configuration file (shown below) consists entirely of comment lines, so that thedriver assigned default values are applied.
To set a driver configuration parameter, edit this file (while logged in with Administrator privileges) usingany editor (such as TextEdit, which is found in the Applications directory on Mac OS). As described in the
15
Illustration 10 - Default driver configuration file
Small Tree Communications – 10 Gigabit Ethernet Users Guide
comments found within, the expected syntax of lines in this file is very simple; they each consist of a driverconfiguration parameter name followed by its numerical value.
Some of the driver configuration parameters are “live” parameters, meaning they can be changed while thedriver is running, via the stexutil command line utility (see next section). Other parameters are “static”,meaning they should only be changed within the configuration file.
Many of the driver configuration parameters found in this file should only be changed under the recom-mendation of Small Tree Technical Support staff, and will therefore not be described here. The only config-uration parameters that Small Tree recommends the user consider setting are described below.
Configuring link level flow control:
The Ethernet specification defines a link level flow control mechanism by which an Ethernet device whichis receiving packets faster than it can process them can request that transmission be temporarily suspendeduntil more buffer space becomes available. The receiver requests a pause in data transmission by sendingan “XOFF” frame to the sender, and later indicates that transmission can be resumed by sending an “XON”frame. These XON and XOFF frames are collectively referred to as “Pause Frames”. In the 10Gb stand-ards, as in many gigabit standards, both the sending and receiving of Pause Frames are independently op-tional. Unlike some gigabit standards however, the 10Gb standards do NOT define any negotiation methodfor each side to arrive at a common flow control protocol; flow control characteristics must instead bemanually configured on both sides of each point-to-point link. In practice, this means that each the flowcontrol settings for each 10Gb switch port and host adapter may need to be configured manually.
The flow control settings in the SmallTreeIntel82597 driver are controlled by two “static” configurationparameters:
rxPauseEnb – This parameter defines whether the Adapter will respond to received Pause Frames.
txPauseEnb – This parameter defines whether the Adapter will send Pause Frames when it needs to tem-porarily suspend the receiving of new packets.
The SmallTreeIntel82597 driver's default configuration enables both the transmission and reception ofPause Frames, and recommends that the switch port it is connected to be similarly configured for best per-formance. Since many switches default their flow control characteristics to enable Pause Frame receptiononly, this requires that the switch be reconfigured. If that is not desirable, it is possible to instead changethe flow control characteristics of the Small Tree 10Gb Ethernet Adapter, via the rxPauseEnb and tx-PauseEnb parameters in the configuration file.
For example, to configure the adapter to match the “Rx Only” flow control characteristics of the switch, bydisabling the transmission of Pause Frames, add the following line to the configuration file:
txPauseEnb 0
Tuning Interrupt Coalescing :
As ever faster Ethernet standards have come into existence, the number of packets per second has corres-pondingly increased. Using 9000 byte Jumbo Frames instead of 1500 byte Standard Frames can reduce thepacket frequency by a factor of 6, but even Jumbo Frames can result in more than 100,000 packets persecond at 10Gb speeds. If the Ethernet Adapter generated an interrupt for each received packet, the hostCPU would be overwhelmed by the overhead involved in handling that many interrupts.
For that reason, most high performance Ethernet Adapters include hardware features which can reduce theinterrupt rate by delaying interrupts and returning multiple packets per interrupt. This practice is called In-terrupt Coalescing (or Interrupt Moderation). Delaying interrupts can reduce CPU overhead, but at theprice of increased latency (response time). The optimal trade-off between CPU overhead and latency is
16

Small Tree Communications – 10 Gigabit Ethernet Users Guide
likely to vary between applications, so tuning the interrupt coalescing algorithm is a common method ofoptimizing network performance.
The hardware on the Small Tree 10Gb Ethernet Adapter supports several independent mechanisms ofgenerating interrupts in response to received packets. The driver employs two of those mechanisms, eachof which is controlled by its own driver configuration parameter.
rxIntrKBytes – Although expressed in terms of Kilobytes, this “live” parameter really specifies the max-imum number of “Receive Buffers” that the Adapter will consume before it generates an interrupt. The sizeof those Receive Buffers varies upon the Mac OS X version – they are 2048 bytes on 10.3, and are 4096bytes starting with 10.4.
For convenience, this parameter specifies the number of Receive Buffers in terms of their total size in Kilo-bytes (of 1024 bytes). For example, the default value of 192 Kilobytes corresponds to 48 (4 KByte) bufferson OS X 10.4 or 96 (2 KByte) buffers on OS X10.3.
Each new frame starts receiving into a new buffer, even if the last buffer of the previous frame had spaceremaining - thus no buffer will contain data for more than one frame. For example, each 9000 byte JumboFrame on Mac OS X version 10.4 will be received into 3 buffers – two full buffers of 4096 bytes each, andone partially filled buffer to hold the remaining 808 bytes. Since the default setting on OS X 10.4 will gen-erate an interrupt whenever 48 buffers are consumed, this will result in one interrupt for every 16 Jumbopackets received. Increasing this parameter may lower the interrupt rate and thus reduce CPU overhead, butat the possible cost of increased latency.
For example, the following line could reduce the interrupt rate by 33% by increasing the buffer thresholdby 50%:
rxIntrKBytes 288
rxDelayUsecs – This “live” parameter specifies the maximum interval of idle time that may occur on theEthernet link before the Adapter will generate an interrupt for any previously received packets. Its purposeis to generate a prompt interrupt when the incoming packet stream pauses before the rxIntrKBytes bufferlimit has been reached. This parameter can be thought of as a “Gap Timer”. Its default value is 25 micro-seconds, which is slightly longer than the time between consecutive 9000 byte Jumbo Frames. Setting thisvalue to 0 will defeat the interrupt coalescing entirely, so that an immediate interrupt is generated for eachreceived packet, thus reducing latency. Although this would generally result in an unacceptable increase inCPU overhead, this may be a desirable trade-off for certain sparse-packet, latency-sensitive applicationssuch as message passing between the nodes of a cluster. To minimize latency, add the following line to theconfiguration file:
rxDelayUsecs 0
Since both parameters which control Interrupt Coalescing are “live” parameters, they can be changed whilethe user application is actively moving data over the link. This makes it easier for the user to tune those set-tings for that application. Once the optimal values are determined, they can be made permanent by addingthem to the SmallTreeIntel82597.conf configuration file.
Disabling Hardware Checksumming:
By default, the Small Tree 10Gb Ethernet Adapter is configured to automatically generate (when sending)and verify (when receiving) the checksum fields in all TCP and UDP packets via hardware. This relievesthe CPU of the need to manipulate those checksums via software, and thus reduces CPU overhead.
HwCksum – This “static” parameter defines whether the driver enables the hardware checksum feature onthe Adapter.
It is unlikely that a user would ever want to disable this feature, but it can be done by adding the followingline to the configuration file:
17

Small Tree Communications – 10 Gigabit Ethernet Users Guide
hwCksum 0
NOTE: Changes to the configuration file are not recognized by the driver until after the system is restarted.
The driver configuration values that are currently in effect can be displayed via the “getConfig” commandof the stexutil command line utility (see next section).
18

Small Tree Communications – 10 Gigabit Ethernet Users Guide
The stexutil command line utility:A command line utility called “stexutil” interfaces to the SmallTreeIntel82597 driver for diagnostic pur-poses. It is installed at /Library/SmallTree/Tools/stexutil and must be run as “root” (i.e. - with Administrat-or privileges). Its primary purpose is to aid Small Tree engineers in development and debugging, so muchof its capabilities are not recommended for users, may be subject to change, and will not be documented.
WARNING: Use of stexutil in any way other than that described below is NOT recommended or supportedby Small Tree, and may cause your system to run very slow, or possibly even panic.
The following capabilities of the utility are supported by Small Tree:
help – This command just outputs usage information:
banjo:/Users/hunter root# stexutil helpUSAGE:
dumpRxRing [start [end]]dumpTxRing [start [end]]getConfiggetStategetStats [-clear]helpquitreadMacRgtrs start_adrs [end_adrs]readPhyRgtrs [devID start_adrs [end_adrs]]setConfig key valuetracemask [new_value]writeMacRgtr data adrs
quit – When stexutil is called with no command line arguments, it goes into interactive mode. The quitcommand will exit stexutil:
banjo:/Users/hunter root# stexutil> quitbanjo:/Users/hunter root#
getConfig – This command displays the driver configuration parameter settings that are currently in effectby the driver. For example, the following output illustrates the driver parameter settings that would existafter the changes described in the preceding section (implausible as they are) were made to the configura-tion file and the system were restarted:
banjo 1% sudo stexutil getConfighwCksum 0latencyTimer 252mbufSpeedup 1queueRxPkts 0rxDelayUsecs 0rxIntrKBytes 288rxPauseEnb 1timerMsecs 1000tracemask 1txDelayUsecs 1000txPauseEnb 0txWatchdog 1txRingSize 256
Note that the format of this output is consistent with the expected syntax of the SmallTreeIntel82597.confconfiguration file, thus allowing the output of this command to be redirected directly into that file.
19

Small Tree Communications – 10 Gigabit Ethernet Users Guide
setConfig – Some of the driver configuration parameters are “live”, meaning that they can be changedwhile the driver is running, and the changes will have immediate effect. This command is used to modifythose live parameters.
The setting of live configuration parameters can be verified via the stexutil getConfig command:
# stexutil getConfig | grep rxIntrKBytesrxIntrKBytes 192# stexutil setConfig rxIntrKBytes 288# stexutil getConfig | grep rxIntrKBytesrxIntrKBytes 288
If a “static” configuration parameter is attempted to be changed via the setConfig command while the10Gb interface is up, the following error message will result:
# stexutil setConfig txPauseEnb 0Config property 'txPauseEnb' may only be changed while interfaceis down.
getStats – This command dumps all non-zero statistics maintained by the NIC (in hardware) or the driver(in software). These statistics are kept since the time that the system was started, but can also be clearedafter being displayed, so that the next time they are displayed, they reflect what occurred during the pre-ceding interval.
For example, the following command will capture statistics over a ten second interval of receiving iperftraffic:
# stexutil getStats -clear > /dev/null; sleep 10; stexutil get-Stats
721998 NIC Total Pkts Rcvd721997 NIC Good Pkts Rcvd721998 NIC Unicast Pkts Rcvd721993 NIC Jumbo Pkts Rcvd
6510919784 NIC Good Octets Rcvd6510919784 NIC Total Octets Rcvd
127555 NIC Total Pkts Xmit127555 NIC Good Pkts Xmit127555 NIC Unicast Pkts Xmit8928868 NIC Good Octets Xmit8928868 NIC Total Octets Xmit33947 Interrupts32925 Rx Ring Low (ICR.RXDTMO)1314 Rx Timeouts (ICR.RXTO)34155 Rx Updates
2 Tx Completions (ICR.TXDW)33885 Tx Updates
Some of the statistics displayed in the above output are worth noting:
NIC Total Pkts Rcvd – This is the number of packets received. 721998 packets in 10 seconds is about72,000 packets per second.
NIC Good Octets Rcvd – This is the total number of bytes received in all packets. 6.51 GBytes dividedinto 722,000 packets results in an average of 9016 bytes per packet . This corresponds to 9000 byte JumboFrames, plus the 18 bytes of Ethernet header and CRC included in each Frame. 6.51 GBytes divided by 10seconds and multiplied by 8 bits per Byte yields 5.21 Gigabits per second (Gbps). The actual throughputreported by iperf was about 5.14 Gbps; the difference is accounted for by the Ethernet, IP and TCP headers(iperf reports payload data bytes only).
20

Small Tree Communications – 10 Gigabit Ethernet Users Guide
Interrupts – This is the number of times the driver's interrupt handler was entered. 33947 interrupts in 10seconds is about 3400 interrupts per second. 721998 packets received during 33947 interrupts averages outto 21.2 packets received per interrupt.
Rx Ring Low (ICR.RXDTMO) – This is the number of times that the interrupt handler found theRXDTMO bit set in the Adapter's Interrupt Cause Register. That bit is set when an interrupt is due to thebuffer limit defined by rxIntrKBytes being exceeded.
Rx Timeouts (ICR.RXTO) – This is the number of times that the interrupt handler found the RXTO bit setin the Adapter's Interrupt Cause Register. That bit is set when the “Gap Timer” defined by the rxDelay-Usecs parameter has expired.
In the above example, 97% of the interrupts were due to the buffer limit being exceeded. That is why weaveraged around 21 packets per interrupt; this run was made with rxIntrKBytes set to 288 on Mac OS X10.4 using 9000 byte frames, which would generate one interrupt for every 22 packets received.
Rx Updates – This is the number of times that the interrupt handler found that at least one packet had beenreceived, regardless of the underlying reason for the interrupt. Note that this number can exceed the totalnumber of interrupts, because the interrupt handler loops until no more work is needed, and can thus detectincoming packets multiple times.
Tx Updates – This is the number of times that the interrupt handler found that at least one packet had beensent, regardless of the underlying reason for the interrupt. Note that this number can exceed the total num-ber of interrupts, because the interrupt handler loops until no more work is needed, and can thus detectcompleted outgoing packets multiple times.
21

Small Tree Communications – 10 Gigabit Ethernet Users Guide
Testing your new network ports:
There are numerous utilities for making sure your new network ports are functioning correctly. For thepurposes of these steps, we will assume you have configured your portwith network address 192.168.1.10
Many of the commands we give below in the “General connectivity”, “Performance measurements” and“Troubleshooting” sections are accessed via the Terminal Application. The Terminal can be found here:Applications->Utilities->Terminal
General connectivity:
Ping – ping is available by default on your OS X system as well as on most other OS platforms (includingWindows!)
Ping is a very simple command that was named for the action that submarines take to find other subs un-derwater. They send out a “ping” and listen for the echo. On most operating systems, the command syntaxis “ping <some hostname or IP address>”.
To run ping using our example configuration, simply bring up a “Terminal” application and type “ping192.168.1.10”. If your port is “up”, you should see something like this:
hostname:~ you$ ping 192.168.1.10PING 192.168.1.10 (192.168.1.10): 56 data bytes64 bytes from 192.168.1.10: icmp_seq=0 ttl=64 time=0.103 ms64 bytes from 192.168.1.10: icmp_seq=1 ttl=64 time=0.116 ms
Note that you’ve just pinged your own card. Packets have not gone out over the network yet.
Now try pinging someone else. A very simple way of finding other hosts is using a broadcast ping. This isaccomplished by changing the last part of your network address to “255”.
hostname:~ you$ ping 192.168.1.255PING 192.168.1.255 (192.168.1.255): 56 data bytes64 bytes from 192.168.1.10: icmp_seq=0 ttl=64 time=0.124 ms64 bytes from 192.168.1.1: icmp_seq=0 ttl=150 time=1.354 ms (DUP!)64 bytes from 192.168.1.10: icmp_seq=1 ttl=64 time=0.142 ms64 bytes from 192.168.1.1: icmp_seq=1 ttl=150 time=1.276 ms (DUP!)
In this case, I can see responses from both the Small Tree 10 Gb Ethernet port as well as my default router.This shows that I have established connectivity.
22

Small Tree Communications – 10 Gigabit Ethernet Users Guide
Troubleshooting:
The OS does not see the new port:
Try powering the system back down and repeating the installation steps. Make sure the card is seatedproperly.
When powering up again, see if the link and activity lights on the bulkhead of the card illuminate.
Check the systems message log to see if there are errors relating to the card. From the Terminal applicationyou can enter “grep SmallTreeIntel82597 /var/log/system.log”. This will search the entire system.log filefor messages relating to the card.
Check and be sure you are running OS X 10.3.9 or better.
You can run "kextstat" to see if the com.SmallTree.iokit.Intel82597 kext is loaded. If not, then run "ls /System/Library/Extensions | grep Intel82597.kext" to see if the kext is actually installed on the system.
The OS sees the new port, but you cannot ping other hosts:
Do you see link lights on the bulkhead of the card? If not, then the cables are probably not connected atthe other end. Speak with your network admin.
The easiest thing to do in these situations is to try swapping the optical cable from a working system to thenew ports. See if the port now works or if the link light now comes on. If so, then the problem is likely re-lated to how your network is configured. It’s possible the switch port is not enabled on the other side of theconnection.
Some things to check:
Does the new port have a route pointing to it? If not, they will not send or receive pings. Use “netstat –r”to check the routes. Assuming our example address of 192.168.1.10, you should see a line like this:
192.168.1 link#4 UCS 3 0 en2
It may vary slightly, but the important elements are the network (192.168.1) and the interface name (en2).This line shows that the system will send all traffic destined for the 192.168.1 network through en2.
Is the new port “up”? Try running “ifconfig –a” from the command line to see. (It’s also helpful to com-pare the output for en0 or en1 against en2)
Is the new port configured to use DHCP? Check in the network admin tool. This is normally not desirablefor server systems. However allowing DHCP to assign an address might be an easy way to see if the port isable to communicate with the network.
Is the network your ports are connected to providing DHCP? (Ask your network admin)
Is the network secured in such a way that new ports need their MAC addresses authorized before connect-ing? (Ask your network admin)
The OS sees the new port and it seems to function for some tasks, but it does notfunction for others:
First, check with your network administrator or switch manual to be sure that the port you are connected tois capable of doing what you want (forwarding appletalk for example) and that it is configured to do so.
23

Small Tree Communications – 10 Gigabit Ethernet Users Guide
Get switch configuration outputs for your switch port as well as a working switch port and see if they areconfigured the same way.
Look at the “ifconfig” output (from the terminal application) and verify that the port is configured in a waythat matches other working ports.
Try simple commands to be sure there isn’t a problem with the application you are trying to use (perhaps itwill only use en0). Try ping to see if you can send packets to other hosts on the network.
If you are still unable to get the card to function as desired, call our technical support line at 1-651-209-0290 to report the problem.
24

Small Tree Communications – 10 Gigabit Ethernet Users Guide
Performance measurement tools:Network performance should be measured using a tool meant for the purpose. Dragging files between sys-tems using the Finder or using a copy command to an NFS mount can often create very misleading results.
Small Tree Communications recommends using one of the following two tools for measuring raw networkperformance:
Iperf – This tool can be downloaded from http://dast.nlanr.net/Projects/Iperf/#downloadThere is a precompiled binary for Apple OS X systems.From this same website one can also download the JAVAGUI (Jperf)
Nttcp – This tool can be downloaded from http://www.leo.org/~elmar/nttcpNttcp does not come as a precompiled binary, so to use it you will need to download and build the sourcecode.
Both of these tools give you the ability to see how quickly your network can move data without worryingabout the additional overhead of disk drive access and extra kernel overhead involved in switchingbetween disk and network access. If you are trying to debug slow network performance, be sure to use oneof these tools first to see exactly how fast your network is capable of running prior to trying things likeFinder copies or ftp transfers.
25