integration composer: administrator guide creating effective mappings . . . . . . . . . . . . . . ....
TRANSCRIPT
Administrator Guide
Version 7, Release 1.1for IBM Tivoli Asset Management for IT 7.1, IBM Tivoli Service Request Manager 7.1,and IBM Tivoli Change and Configuration Management Database 7.1.1
Integration Composer
This edition applies to version 7, release 1, modification 1 of IBM Tivoli Integration Composer and to all subsequent releases and modifications until otherwise indicated in new editions.
© Copyright International Business Machines Corporation 2007, 2008. All rights reserved.
US Government Users Restricted Rights - Use, duplication or disclosure restricted by GSA ADP Schedule Contract with IBM Corp.
NoteBefore using this information and the product it supports, read the information in “Notices” on page 161.
© Copyright IBM Corp. 2007, 2008 iii
About This Publication. . . . . . . . . . . . . . . . . . . . . . . . . . . . . . . . . . . . . . . . . . . . . . . . . . . . . . . . . . . . . . . . . . . . . . . . . . . . viiIntended Audience . . . . . . . . . . . . . . . . . . . . . . . . . . . . . . . . . . . . . . . . . . . . . . . . . . . . . . . . . . . . . . . . . . . . . . . . . . . . vii
Chapter 1: Introduction to Integration Composer . . . . . . . . . . . . . . . . . . . . . . . . . . . . . . . . . . . . . . . . . . . . . . . . . . . . . . 1Integration Composer Overview. . . . . . . . . . . . . . . . . . . . . . . . . . . . . . . . . . . . . . . . . . . . . . . . . . . . . . . . . . . . . . . . . . 1
System Requirements. . . . . . . . . . . . . . . . . . . . . . . . . . . . . . . . . . . . . . . . . . . . . . . . . . . . . . . . . . . . . . . . . . . . . . . . 2Integration Composer Components . . . . . . . . . . . . . . . . . . . . . . . . . . . . . . . . . . . . . . . . . . . . . . . . . . . . . . . . . . . 2IBM Tivoli Integration Adapters . . . . . . . . . . . . . . . . . . . . . . . . . . . . . . . . . . . . . . . . . . . . . . . . . . . . . . . . . . . . . . 5File Structure . . . . . . . . . . . . . . . . . . . . . . . . . . . . . . . . . . . . . . . . . . . . . . . . . . . . . . . . . . . . . . . . . . . . . . . . . . . . . . . 5Mapping Process. . . . . . . . . . . . . . . . . . . . . . . . . . . . . . . . . . . . . . . . . . . . . . . . . . . . . . . . . . . . . . . . . . . . . . . . . . . . 7Error Management . . . . . . . . . . . . . . . . . . . . . . . . . . . . . . . . . . . . . . . . . . . . . . . . . . . . . . . . . . . . . . . . . . . . . . . . . . 8
Introduction to Data Schemas . . . . . . . . . . . . . . . . . . . . . . . . . . . . . . . . . . . . . . . . . . . . . . . . . . . . . . . . . . . . . . . . . . . . 9Classes, Properties, and Instances . . . . . . . . . . . . . . . . . . . . . . . . . . . . . . . . . . . . . . . . . . . . . . . . . . . . . . . . . . . . . 9
Class Hierarchy . . . . . . . . . . . . . . . . . . . . . . . . . . . . . . . . . . . . . . . . . . . . . . . . . . . . . . . . . . . . . . . . . . . . . . . . 10Key Properties and Relations . . . . . . . . . . . . . . . . . . . . . . . . . . . . . . . . . . . . . . . . . . . . . . . . . . . . . . . . . . . . . . . . 12
Chapter 2: Access and Navigation . . . . . . . . . . . . . . . . . . . . . . . . . . . . . . . . . . . . . . . . . . . . . . . . . . . . . . . . . . . . . . . . . . 15Accessing the User Interface . . . . . . . . . . . . . . . . . . . . . . . . . . . . . . . . . . . . . . . . . . . . . . . . . . . . . . . . . . . . . . . . . . . . 15Navigating the User Interface . . . . . . . . . . . . . . . . . . . . . . . . . . . . . . . . . . . . . . . . . . . . . . . . . . . . . . . . . . . . . . . . . . . 15
Chapter 3: Defining Source and Target Data Sources . . . . . . . . . . . . . . . . . . . . . . . . . . . . . . . . . . . . . . . . . . . . . . . . . 17Defining a New Data Source . . . . . . . . . . . . . . . . . . . . . . . . . . . . . . . . . . . . . . . . . . . . . . . . . . . . . . . . . . . . . . . . . . . . 17Browsing a Data Source . . . . . . . . . . . . . . . . . . . . . . . . . . . . . . . . . . . . . . . . . . . . . . . . . . . . . . . . . . . . . . . . . . . . . . . . 20
Browsing a Data Source by Structure . . . . . . . . . . . . . . . . . . . . . . . . . . . . . . . . . . . . . . . . . . . . . . . . . . . . . . . . . 20Browsing a Data Source by Data . . . . . . . . . . . . . . . . . . . . . . . . . . . . . . . . . . . . . . . . . . . . . . . . . . . . . . . . . . . . . 22
Choosing Specific Instances to View . . . . . . . . . . . . . . . . . . . . . . . . . . . . . . . . . . . . . . . . . . . . . . . . . . . . . . 23Viewing Properties of a Data Source . . . . . . . . . . . . . . . . . . . . . . . . . . . . . . . . . . . . . . . . . . . . . . . . . . . . . . . . . . 24
Searching the Tree View. . . . . . . . . . . . . . . . . . . . . . . . . . . . . . . . . . . . . . . . . . . . . . . . . . . . . . . . . . . . . . . . . 26Closing a Connection to a Data Source . . . . . . . . . . . . . . . . . . . . . . . . . . . . . . . . . . . . . . . . . . . . . . . . . . . . . . . . . . . 27Deleting a Data Source . . . . . . . . . . . . . . . . . . . . . . . . . . . . . . . . . . . . . . . . . . . . . . . . . . . . . . . . . . . . . . . . . . . . . . . . . 28
Chapter 4: Mapping Data Sources . . . . . . . . . . . . . . . . . . . . . . . . . . . . . . . . . . . . . . . . . . . . . . . . . . . . . . . . . . . . . . . . . . 29Mappings Overview . . . . . . . . . . . . . . . . . . . . . . . . . . . . . . . . . . . . . . . . . . . . . . . . . . . . . . . . . . . . . . . . . . . . . . . . . . . 29
Mapping Functions . . . . . . . . . . . . . . . . . . . . . . . . . . . . . . . . . . . . . . . . . . . . . . . . . . . . . . . . . . . . . . . . . . . . . . . . 30Mapping Execution . . . . . . . . . . . . . . . . . . . . . . . . . . . . . . . . . . . . . . . . . . . . . . . . . . . . . . . . . . . . . . . . . . . . . . . . 30Mapping Window Features . . . . . . . . . . . . . . . . . . . . . . . . . . . . . . . . . . . . . . . . . . . . . . . . . . . . . . . . . . . . . . . . . 32Mapping Window Actions . . . . . . . . . . . . . . . . . . . . . . . . . . . . . . . . . . . . . . . . . . . . . . . . . . . . . . . . . . . . . . . . . . 34Mapping Process. . . . . . . . . . . . . . . . . . . . . . . . . . . . . . . . . . . . . . . . . . . . . . . . . . . . . . . . . . . . . . . . . . . . . . . . . . . 34
Creating a New Mapping . . . . . . . . . . . . . . . . . . . . . . . . . . . . . . . . . . . . . . . . . . . . . . . . . . . . . . . . . . . . . . . . . . . . . . . 35Opening an Existing Mapping. . . . . . . . . . . . . . . . . . . . . . . . . . . . . . . . . . . . . . . . . . . . . . . . . . . . . . . . . . . . . . . . . . . 36Viewing Mapping Errors . . . . . . . . . . . . . . . . . . . . . . . . . . . . . . . . . . . . . . . . . . . . . . . . . . . . . . . . . . . . . . . . . . . . . . . 38Exporting and Importing a Mapping . . . . . . . . . . . . . . . . . . . . . . . . . . . . . . . . . . . . . . . . . . . . . . . . . . . . . . . . . . . . . 39
Exporting a Mapping . . . . . . . . . . . . . . . . . . . . . . . . . . . . . . . . . . . . . . . . . . . . . . . . . . . . . . . . . . . . . . . . . . . . . . . 39Importing a Mapping. . . . . . . . . . . . . . . . . . . . . . . . . . . . . . . . . . . . . . . . . . . . . . . . . . . . . . . . . . . . . . . . . . . . . . . 40
Deleting a Mapping. . . . . . . . . . . . . . . . . . . . . . . . . . . . . . . . . . . . . . . . . . . . . . . . . . . . . . . . . . . . . . . . . . . . . . . . . . . . 41Deleting Mapping Last Scan History . . . . . . . . . . . . . . . . . . . . . . . . . . . . . . . . . . . . . . . . . . . . . . . . . . . . . . . . . . . . . 42Executing a Mapping . . . . . . . . . . . . . . . . . . . . . . . . . . . . . . . . . . . . . . . . . . . . . . . . . . . . . . . . . . . . . . . . . . . . . . . . . . 43
Executing Mappings with an Edited File . . . . . . . . . . . . . . . . . . . . . . . . . . . . . . . . . . . . . . . . . . . . . . . . . . . . . . 44Executing Mappings from a Command LIne. . . . . . . . . . . . . . . . . . . . . . . . . . . . . . . . . . . . . . . . . . . . . . . . . . . 46
Contents
iv Integration Composer: Administrator Guide
Creating Effective Mappings . . . . . . . . . . . . . . . . . . . . . . . . . . . . . . . . . . . . . . . . . . . . . . . . . . . . . . . . . . . . . . . . . . . . 48Mapping Key Properties . . . . . . . . . . . . . . . . . . . . . . . . . . . . . . . . . . . . . . . . . . . . . . . . . . . . . . . . . . . . . . . . . . . . 48Mapping Data for Units of Measurement. . . . . . . . . . . . . . . . . . . . . . . . . . . . . . . . . . . . . . . . . . . . . . . . . . . . . . 48Mapping Data for Scan Dates . . . . . . . . . . . . . . . . . . . . . . . . . . . . . . . . . . . . . . . . . . . . . . . . . . . . . . . . . . . . . . . . 48Mapping Data for Sites and Organizations . . . . . . . . . . . . . . . . . . . . . . . . . . . . . . . . . . . . . . . . . . . . . . . . . . . . 49Mapping Data for Deployed Asset Conversion Applications . . . . . . . . . . . . . . . . . . . . . . . . . . . . . . . . . . . . . 49Mapping Data for Files . . . . . . . . . . . . . . . . . . . . . . . . . . . . . . . . . . . . . . . . . . . . . . . . . . . . . . . . . . . . . . . . . . . . . 51Configuring Level of Depth for Actual CI Data. . . . . . . . . . . . . . . . . . . . . . . . . . . . . . . . . . . . . . . . . . . . . . . . . 51
Chapter 5: Creating Data Schemas . . . . . . . . . . . . . . . . . . . . . . . . . . . . . . . . . . . . . . . . . . . . . . . . . . . . . . . . . . . . . . . . . . 53Understanding Integration Composer Data Schemas . . . . . . . . . . . . . . . . . . . . . . . . . . . . . . . . . . . . . . . . . . . . . . . 53Creating Data Schemas . . . . . . . . . . . . . . . . . . . . . . . . . . . . . . . . . . . . . . . . . . . . . . . . . . . . . . . . . . . . . . . . . . . . . . . . . 54
Define a New Data Schema Window . . . . . . . . . . . . . . . . . . . . . . . . . . . . . . . . . . . . . . . . . . . . . . . . . . . . . . . . . 54Data Schema Window . . . . . . . . . . . . . . . . . . . . . . . . . . . . . . . . . . . . . . . . . . . . . . . . . . . . . . . . . . . . . . . . . . . . . . 55
Classes Section . . . . . . . . . . . . . . . . . . . . . . . . . . . . . . . . . . . . . . . . . . . . . . . . . . . . . . . . . . . . . . . . . . . . . . . . . 55Database Tables Section . . . . . . . . . . . . . . . . . . . . . . . . . . . . . . . . . . . . . . . . . . . . . . . . . . . . . . . . . . . . . . . . . 57Tables in Class Section . . . . . . . . . . . . . . . . . . . . . . . . . . . . . . . . . . . . . . . . . . . . . . . . . . . . . . . . . . . . . . . . . . 58Select Action Menu . . . . . . . . . . . . . . . . . . . . . . . . . . . . . . . . . . . . . . . . . . . . . . . . . . . . . . . . . . . . . . . . . . . . . 58Working with Classes and Tables in the Data Schema Window . . . . . . . . . . . . . . . . . . . . . . . . . . . . . . . 59
Creating a New Data Schema . . . . . . . . . . . . . . . . . . . . . . . . . . . . . . . . . . . . . . . . . . . . . . . . . . . . . . . . . . . . . . . . . . . 60Guidelines for Creating Data Schemas . . . . . . . . . . . . . . . . . . . . . . . . . . . . . . . . . . . . . . . . . . . . . . . . . . . . . . . . 60Defining a Data Schema . . . . . . . . . . . . . . . . . . . . . . . . . . . . . . . . . . . . . . . . . . . . . . . . . . . . . . . . . . . . . . . . . . . . 60Renaming the Root Class. . . . . . . . . . . . . . . . . . . . . . . . . . . . . . . . . . . . . . . . . . . . . . . . . . . . . . . . . . . . . . . . . . . . 63Adding a Class . . . . . . . . . . . . . . . . . . . . . . . . . . . . . . . . . . . . . . . . . . . . . . . . . . . . . . . . . . . . . . . . . . . . . . . . . . . . 64Adding Properties to a Class . . . . . . . . . . . . . . . . . . . . . . . . . . . . . . . . . . . . . . . . . . . . . . . . . . . . . . . . . . . . . . . . 66Adding a Child Class . . . . . . . . . . . . . . . . . . . . . . . . . . . . . . . . . . . . . . . . . . . . . . . . . . . . . . . . . . . . . . . . . . . . . . . 69Adding a Relationship . . . . . . . . . . . . . . . . . . . . . . . . . . . . . . . . . . . . . . . . . . . . . . . . . . . . . . . . . . . . . . . . . . . . . . 70Adding a Reference Class . . . . . . . . . . . . . . . . . . . . . . . . . . . . . . . . . . . . . . . . . . . . . . . . . . . . . . . . . . . . . . . . . . . 71Designating a Primary Key . . . . . . . . . . . . . . . . . . . . . . . . . . . . . . . . . . . . . . . . . . . . . . . . . . . . . . . . . . . . . . . . . . 72Designating an Alternate Key. . . . . . . . . . . . . . . . . . . . . . . . . . . . . . . . . . . . . . . . . . . . . . . . . . . . . . . . . . . . . . . . 73Defining a Generated Value Property . . . . . . . . . . . . . . . . . . . . . . . . . . . . . . . . . . . . . . . . . . . . . . . . . . . . . . . . . 74Defining Data Schema Properties . . . . . . . . . . . . . . . . . . . . . . . . . . . . . . . . . . . . . . . . . . . . . . . . . . . . . . . . . . . . 76
Changing an Existing Data Schema . . . . . . . . . . . . . . . . . . . . . . . . . . . . . . . . . . . . . . . . . . . . . . . . . . . . . . . . . . . . . . 78Opening an Existing Data Schema. . . . . . . . . . . . . . . . . . . . . . . . . . . . . . . . . . . . . . . . . . . . . . . . . . . . . . . . . . . . 78Changing Class Attributes . . . . . . . . . . . . . . . . . . . . . . . . . . . . . . . . . . . . . . . . . . . . . . . . . . . . . . . . . . . . . . . . . . 82
Filtering Class Data . . . . . . . . . . . . . . . . . . . . . . . . . . . . . . . . . . . . . . . . . . . . . . . . . . . . . . . . . . . . . . . . . . . . . 84Changing Properties in a Class. . . . . . . . . . . . . . . . . . . . . . . . . . . . . . . . . . . . . . . . . . . . . . . . . . . . . . . . . . . . . . . 87Renaming a Class . . . . . . . . . . . . . . . . . . . . . . . . . . . . . . . . . . . . . . . . . . . . . . . . . . . . . . . . . . . . . . . . . . . . . . . . . . 88Renaming a Class Property. . . . . . . . . . . . . . . . . . . . . . . . . . . . . . . . . . . . . . . . . . . . . . . . . . . . . . . . . . . . . . . . . . 89Deleting a Class. . . . . . . . . . . . . . . . . . . . . . . . . . . . . . . . . . . . . . . . . . . . . . . . . . . . . . . . . . . . . . . . . . . . . . . . . . . . 90Deleting a Class Property . . . . . . . . . . . . . . . . . . . . . . . . . . . . . . . . . . . . . . . . . . . . . . . . . . . . . . . . . . . . . . . . . . . 91Deleting a Relationship . . . . . . . . . . . . . . . . . . . . . . . . . . . . . . . . . . . . . . . . . . . . . . . . . . . . . . . . . . . . . . . . . . . . . 92
Viewing Link Properties . . . . . . . . . . . . . . . . . . . . . . . . . . . . . . . . . . . . . . . . . . . . . . . . . . . . . . . . . . . . . . . . . . . . . . . . 93Deleting a Data Schema . . . . . . . . . . . . . . . . . . . . . . . . . . . . . . . . . . . . . . . . . . . . . . . . . . . . . . . . . . . . . . . . . . . . . . . . 94Importing a Data Schema . . . . . . . . . . . . . . . . . . . . . . . . . . . . . . . . . . . . . . . . . . . . . . . . . . . . . . . . . . . . . . . . . . . . . . . 95Exporting a Data Schema . . . . . . . . . . . . . . . . . . . . . . . . . . . . . . . . . . . . . . . . . . . . . . . . . . . . . . . . . . . . . . . . . . . . . . . 96
Chapter 6: Creating Expressions . . . . . . . . . . . . . . . . . . . . . . . . . . . . . . . . . . . . . . . . . . . . . . . . . . . . . . . . . . . . . . . . . . . . 99Understanding Expressions . . . . . . . . . . . . . . . . . . . . . . . . . . . . . . . . . . . . . . . . . . . . . . . . . . . . . . . . . . . . . . . . . . . . . 99
When Expressions Are Required . . . . . . . . . . . . . . . . . . . . . . . . . . . . . . . . . . . . . . . . . . . . . . . . . . . . . . . . . . . . . 99Syntax of Expressions . . . . . . . . . . . . . . . . . . . . . . . . . . . . . . . . . . . . . . . . . . . . . . . . . . . . . . . . . . . . . . . . . . . . . 100
Creating Expressions. . . . . . . . . . . . . . . . . . . . . . . . . . . . . . . . . . . . . . . . . . . . . . . . . . . . . . . . . . . . . . . . . . . . . . . . . . 101Drag and Drop . . . . . . . . . . . . . . . . . . . . . . . . . . . . . . . . . . . . . . . . . . . . . . . . . . . . . . . . . . . . . . . . . . . . . . . . . . . 101Typing an Expression . . . . . . . . . . . . . . . . . . . . . . . . . . . . . . . . . . . . . . . . . . . . . . . . . . . . . . . . . . . . . . . . . . . . . 101Selecting a Deciding Class. . . . . . . . . . . . . . . . . . . . . . . . . . . . . . . . . . . . . . . . . . . . . . . . . . . . . . . . . . . . . . . . . . 101Setting Up Multiple Cases. . . . . . . . . . . . . . . . . . . . . . . . . . . . . . . . . . . . . . . . . . . . . . . . . . . . . . . . . . . . . . . . . . 102Expression Builder . . . . . . . . . . . . . . . . . . . . . . . . . . . . . . . . . . . . . . . . . . . . . . . . . . . . . . . . . . . . . . . . . . . . . . . . 103Using an Arithmetic Operator . . . . . . . . . . . . . . . . . . . . . . . . . . . . . . . . . . . . . . . . . . . . . . . . . . . . . . . . . . . . . . 105

Contents v
Using a Literal . . . . . . . . . . . . . . . . . . . . . . . . . . . . . . . . . . . . . . . . . . . . . . . . . . . . . . . . . . . . . . . . . . . . . . . . . . . . 105Deleting Expressions . . . . . . . . . . . . . . . . . . . . . . . . . . . . . . . . . . . . . . . . . . . . . . . . . . . . . . . . . . . . . . . . . . . . . . . . . . 106
Appendix A: Expression Functions, Literals, and Operators . . . . . . . . . . . . . . . . . . . . . . . . . . . . . . . . . . . . . . . . . . 107Functions. . . . . . . . . . . . . . . . . . . . . . . . . . . . . . . . . . . . . . . . . . . . . . . . . . . . . . . . . . . . . . . . . . . . . . . . . . . . . . . . . . . . 107
All Functions . . . . . . . . . . . . . . . . . . . . . . . . . . . . . . . . . . . . . . . . . . . . . . . . . . . . . . . . . . . . . . . . . . . . . . . . . . . . . 107Date/Time . . . . . . . . . . . . . . . . . . . . . . . . . . . . . . . . . . . . . . . . . . . . . . . . . . . . . . . . . . . . . . . . . . . . . . . . . . . . . . . 107Logical . . . . . . . . . . . . . . . . . . . . . . . . . . . . . . . . . . . . . . . . . . . . . . . . . . . . . . . . . . . . . . . . . . . . . . . . . . . . . . . . . . 108Mapping. . . . . . . . . . . . . . . . . . . . . . . . . . . . . . . . . . . . . . . . . . . . . . . . . . . . . . . . . . . . . . . . . . . . . . . . . . . . . . . . . 108Mapping Execution Flow . . . . . . . . . . . . . . . . . . . . . . . . . . . . . . . . . . . . . . . . . . . . . . . . . . . . . . . . . . . . . . . . . . 109Math . . . . . . . . . . . . . . . . . . . . . . . . . . . . . . . . . . . . . . . . . . . . . . . . . . . . . . . . . . . . . . . . . . . . . . . . . . . . . . . . . . . . 109SQL . . . . . . . . . . . . . . . . . . . . . . . . . . . . . . . . . . . . . . . . . . . . . . . . . . . . . . . . . . . . . . . . . . . . . . . . . . . . . . . . . . . . . 110Text . . . . . . . . . . . . . . . . . . . . . . . . . . . . . . . . . . . . . . . . . . . . . . . . . . . . . . . . . . . . . . . . . . . . . . . . . . . . . . . . . . . . . 111
Literals . . . . . . . . . . . . . . . . . . . . . . . . . . . . . . . . . . . . . . . . . . . . . . . . . . . . . . . . . . . . . . . . . . . . . . . . . . . . . . . . . . . . . . 112String . . . . . . . . . . . . . . . . . . . . . . . . . . . . . . . . . . . . . . . . . . . . . . . . . . . . . . . . . . . . . . . . . . . . . . . . . . . . . . . . . . . 113Boolean. . . . . . . . . . . . . . . . . . . . . . . . . . . . . . . . . . . . . . . . . . . . . . . . . . . . . . . . . . . . . . . . . . . . . . . . . . . . . . . . . . 113Char . . . . . . . . . . . . . . . . . . . . . . . . . . . . . . . . . . . . . . . . . . . . . . . . . . . . . . . . . . . . . . . . . . . . . . . . . . . . . . . . . . . . 113Integer . . . . . . . . . . . . . . . . . . . . . . . . . . . . . . . . . . . . . . . . . . . . . . . . . . . . . . . . . . . . . . . . . . . . . . . . . . . . . . . . . . 114Floating-Point . . . . . . . . . . . . . . . . . . . . . . . . . . . . . . . . . . . . . . . . . . . . . . . . . . . . . . . . . . . . . . . . . . . . . . . . . . . . 114
Operators . . . . . . . . . . . . . . . . . . . . . . . . . . . . . . . . . . . . . . . . . . . . . . . . . . . . . . . . . . . . . . . . . . . . . . . . . . . . . . . . . . . 114Arithmetic Operators . . . . . . . . . . . . . . . . . . . . . . . . . . . . . . . . . . . . . . . . . . . . . . . . . . . . . . . . . . . . . . . . . . . . . . 114Assignment Operator. . . . . . . . . . . . . . . . . . . . . . . . . . . . . . . . . . . . . . . . . . . . . . . . . . . . . . . . . . . . . . . . . . . . . . 115Comparison Operators . . . . . . . . . . . . . . . . . . . . . . . . . . . . . . . . . . . . . . . . . . . . . . . . . . . . . . . . . . . . . . . . . . . . 115Logical Operators . . . . . . . . . . . . . . . . . . . . . . . . . . . . . . . . . . . . . . . . . . . . . . . . . . . . . . . . . . . . . . . . . . . . . . . . . 116Unary Operators . . . . . . . . . . . . . . . . . . . . . . . . . . . . . . . . . . . . . . . . . . . . . . . . . . . . . . . . . . . . . . . . . . . . . . . . . . 116Order of Calculations. . . . . . . . . . . . . . . . . . . . . . . . . . . . . . . . . . . . . . . . . . . . . . . . . . . . . . . . . . . . . . . . . . . . . . 117
Appendix B: Initialization Files . . . . . . . . . . . . . . . . . . . . . . . . . . . . . . . . . . . . . . . . . . . . . . . . . . . . . . . . . . . . . . . . . . . 119Integration Composer Properties File (fusion.properties). . . . . . . . . . . . . . . . . . . . . . . . . . . . . . . . . . . . . . . . . . . 119
IBM Tivoli Maximo Database-Related Properties . . . . . . . . . . . . . . . . . . . . . . . . . . . . . . . . . . . . . . . . . . 120IBM Tivoli Integration Composer-Related Database Properties . . . . . . . . . . . . . . . . . . . . . . . . . . . . . . 121IBM Tivoli Integration Composer Application Properties . . . . . . . . . . . . . . . . . . . . . . . . . . . . . . . . . . . 122IBM Tivoli Integration Composer Mapping Execution Properties . . . . . . . . . . . . . . . . . . . . . . . . . . . . 122
Login Properties File (predb-labels.properties) . . . . . . . . . . . . . . . . . . . . . . . . . . . . . . . . . . . . . . . . . . . . . . . . . . . 124Connection Properties File (jdbcinfo.properties) . . . . . . . . . . . . . . . . . . . . . . . . . . . . . . . . . . . . . . . . . . . . . . . . . . 124IT Asset Initialization Properties File (assetinit.properties) . . . . . . . . . . . . . . . . . . . . . . . . . . . . . . . . . . . . . . . . . 124Logging Properties File (logging.properties). . . . . . . . . . . . . . . . . . . . . . . . . . . . . . . . . . . . . . . . . . . . . . . . . . . . . . 125
Log4j Root Loggers. . . . . . . . . . . . . . . . . . . . . . . . . . . . . . . . . . . . . . . . . . . . . . . . . . . . . . . . . . . . . . . . . . . . . . . . 126Loggers Used by Integration Composer . . . . . . . . . . . . . . . . . . . . . . . . . . . . . . . . . . . . . . . . . . . . . . . . . . . . . . 127
Appendix C: IT Asset Initialization . . . . . . . . . . . . . . . . . . . . . . . . . . . . . . . . . . . . . . . . . . . . . . . . . . . . . . . . . . . . . . . . 129IT Asset Initialization Overview . . . . . . . . . . . . . . . . . . . . . . . . . . . . . . . . . . . . . . . . . . . . . . . . . . . . . . . . . . . . . . . . 129IT Asset Initialization Process Components . . . . . . . . . . . . . . . . . . . . . . . . . . . . . . . . . . . . . . . . . . . . . . . . . . . . . . 131Prerequisite Tasks Checklist . . . . . . . . . . . . . . . . . . . . . . . . . . . . . . . . . . . . . . . . . . . . . . . . . . . . . . . . . . . . . . . . . . . 132IT Asset Initialization Checklist. . . . . . . . . . . . . . . . . . . . . . . . . . . . . . . . . . . . . . . . . . . . . . . . . . . . . . . . . . . . . . . . . 133IT Asset Initialization Tasks . . . . . . . . . . . . . . . . . . . . . . . . . . . . . . . . . . . . . . . . . . . . . . . . . . . . . . . . . . . . . . . . . . . . 134
Configuring the Provider Properties File . . . . . . . . . . . . . . . . . . . . . . . . . . . . . . . . . . . . . . . . . . . . . . . . . . . . . 134Configuring the assetinit.properties File. . . . . . . . . . . . . . . . . . . . . . . . . . . . . . . . . . . . . . . . . . . . . . . . . . . . . . 137Creating Data Source Connections . . . . . . . . . . . . . . . . . . . . . . . . . . . . . . . . . . . . . . . . . . . . . . . . . . . . . . . . . . 139
Creating a Connection to the Deployed Assets Source Data Source . . . . . . . . . . . . . . . . . . . . . . . . . . . 139Creating a Connection to the Assets Target Data Source . . . . . . . . . . . . . . . . . . . . . . . . . . . . . . . . . . . . 140
Creating the Deployed Assets to IT Assets Mapping . . . . . . . . . . . . . . . . . . . . . . . . . . . . . . . . . . . . . . . . . . . 140Executing the IT Asset Initialization Mapping . . . . . . . . . . . . . . . . . . . . . . . . . . . . . . . . . . . . . . . . . . . . . . . . 151Viewing Mapping Errors. . . . . . . . . . . . . . . . . . . . . . . . . . . . . . . . . . . . . . . . . . . . . . . . . . . . . . . . . . . . . . . . . . . 151
Deployed Assets to IT Assets Mapping Tables . . . . . . . . . . . . . . . . . . . . . . . . . . . . . . . . . . . . . . . . . . . . . . . . . . . . 152Mapping Table for Software as Spare Parts . . . . . . . . . . . . . . . . . . . . . . . . . . . . . . . . . . . . . . . . . . . . . . . . . . . 152Mapping Table for Software as Items . . . . . . . . . . . . . . . . . . . . . . . . . . . . . . . . . . . . . . . . . . . . . . . . . . . . . . . . 155
vi Integration Composer: Administrator Guide
Notices . . . . . . . . . . . . . . . . . . . . . . . . . . . . . . . . . . . . . . . . . . . . . . . . . . . . . . . . . . . . . . . . . . . . . . . . . . . . . . . . . . . . . . . . . 161
Index . . . . . . . . . . . . . . . . . . . . . . . . . . . . . . . . . . . . . . . . . . . . . . . . . . . . . . . . . . . . . . . . . . . . . . . . . . . . . . . . . . . . . . . . . . . 165
© Copyright IBM Corp. 2007, 2008 vii
About This Publication
This guide explains how to use IBM® Tivoli® Integration Composer (Integration Composer) to import information technology (IT) data from an external data source into a target data source, such as the Maximo database.
The guide explains how to access and navigate Integration Composer, define new data sources, view existing data sources, create and execute mappings to import data, and create and edit new data schemas.
Intended Audience
Information technology asset managers, system administrators, and other personnel responsible for importing data from external sources into the Maximo database should read this guide.

Intended Audience
viii Integration Composer: Administrator Guide
© Copyright IBM Corp. 2007, 2008 1
n
This chapter introduces you to IBM® Tivoli® Integration Composer, an integration tool that lets you transform and import information technology (IT) data from a source into a target database.
The chapter provides the following introductory information about Integration Composer:
Overview of how Integration Composer integrates with the target database
Product versions compatible with Integration Composer
Main architectural components
Information about IBM Tivoli integration adapters
Integration Composer file structure
Description of the process used to set up mappings and import data into a target database
Overview of data schemas, including information about classes, properties, instances, class hierarchies, key properties, and relationships
Integration Composer Overview
Integration Composer is an integration tool that lets you import data from a source to a target database. With Integration Composer, an enterprise can aggregate data collected by discovery tools and integrate it into a target database, creating a central repository for enterprise IT asset management, reporting, and decision support.
To gather data, a discovery tool, such as IBM Tivoli Configuration Manager or Microsoft® SMS, scans computers, network devices, and network printers deployed in an enterprise and records information about the hardware and software installed on those assets.
Before you import data from an external data source into the target database, you use Integration Composer to create a mapping to transform data from the source format to the target format. A mapping is a set of expressions that tell Integration Composer how to create data in the target using information from a source. For each property that you want to import, you define an expression that specifies how to transform the data for that property when Integration Composer imports the data from the source into the target. When you execute a mapping, Integration Composer transforms the collected data and imports it into the target.
Introduction to Integration Composer 1
Integration Composer Overview
2 Integration Composer: Administrator Guide
Integration Composer connects to data sources using either Java™ Database Connectivity (JDBC™) technology-enabled drivers or an application programming interface (API).
System Requirements
The hardware and software requirements for Integration Composer vary according to operating system, database platform, and site configuration. For information about minimum and recommended configurations for the several components used in running Integration Composer, refer to the IBM Tivoli Integration Composer Installation Guide.
Product Version Supported
Integration Composer 7.1 works with the following products:
IBM Tivoli Asset Management for IT 7.1.0IBM Tivoli Change and Configuration Management Database 7.1.1IBM Tivoli Service Request Manager 7.1.0
Integration Composer Components
Integration Composer consists of the following components:
Integration Composer applicationIntegration Composer engineJDBC drivers or the IBM Configuration and Tracking Application Programming Interface (API)Integration Composer repository
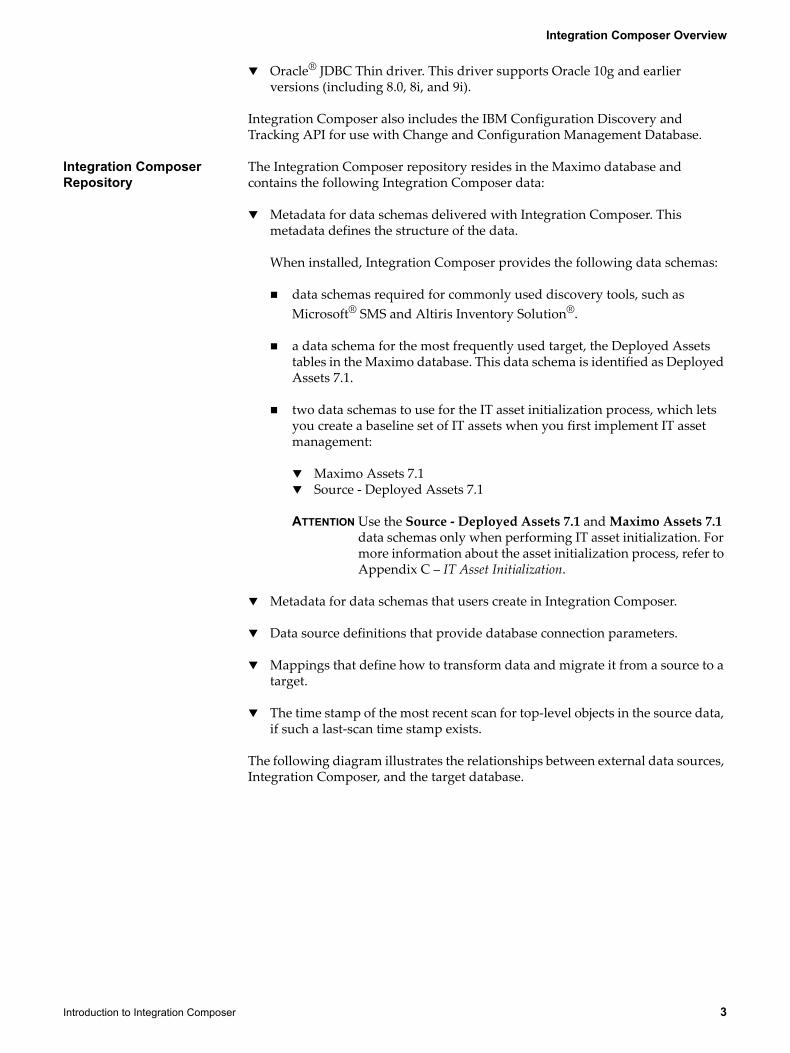
User Interface The Integration Composer user interface lets you define data sources, browse source data, define data schemas, and create mappings to transform and import data. The user interface lets you perform the following tasks:
Designate a data source and establish a connection to that data source.
Create new mappings that define how to change data and transfer it from a source data source to the target database.
Use existing mappings to migrate data into a target database.
Customize existing mappings to meet integration requirements.
Create new data schemas to use with Integration Composer.
Engine The Integration Composer engine processes mapping expressions that transform data from a source data source and integrate it into a target data source.
Connection Methods Integration Composer uses JDBC drivers or an API to establish connections to the source data and target database. Integration Composer includes the following JDBC drivers:
IBM DB2® JDBC Driver
i-net OPTA JDBC Driver for Microsoft® SQL Server 7/2000/2005
Integration Composer Overview
Introduction to Integration Composer 3
Oracle® JDBC Thin driver. This driver supports Oracle 10g and earlier versions (including 8.0, 8i, and 9i).
Integration Composer also includes the IBM Configuration Discovery and Tracking API for use with Change and Configuration Management Database.
Integration Composer Repository
The Integration Composer repository resides in the Maximo database and contains the following Integration Composer data:
Metadata for data schemas delivered with Integration Composer. This metadata defines the structure of the data.
When installed, Integration Composer provides the following data schemas:
data schemas required for commonly used discovery tools, such as Microsoft® SMS and Altiris Inventory Solution®.
a data schema for the most frequently used target, the Deployed Assets tables in the Maximo database. This data schema is identified as Deployed Assets 7.1.
two data schemas to use for the IT asset initialization process, which lets you create a baseline set of IT assets when you first implement IT asset management:
Maximo Assets 7.1Source - Deployed Assets 7.1
ATTENTION Use the Source - Deployed Assets 7.1 and Maximo Assets 7.1 data schemas only when performing IT asset initialization. For more information about the asset initialization process, refer to Appendix C – IT Asset Initialization.
Metadata for data schemas that users create in Integration Composer.
Data source definitions that provide database connection parameters.
Mappings that define how to transform data and migrate it from a source to a target.
The time stamp of the most recent scan for top-level objects in the source data, if such a last-scan time stamp exists.
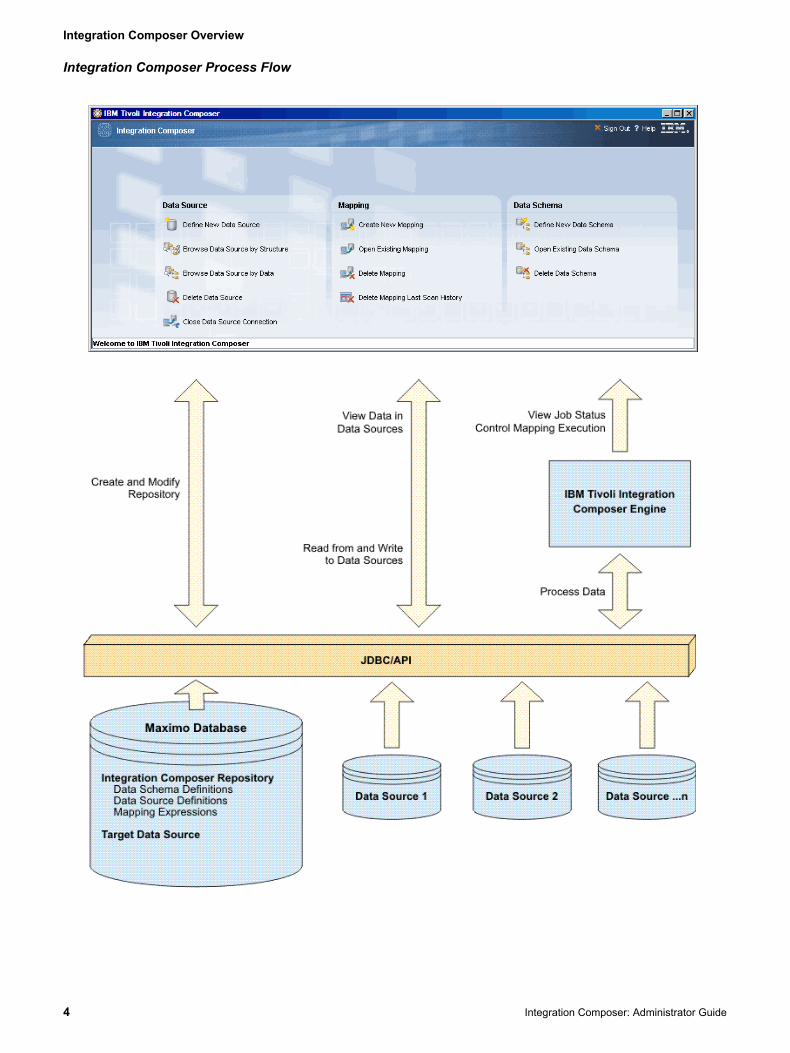
The following diagram illustrates the relationships between external data sources, Integration Composer, and the target database.
Integration Composer Overview
4 Integration Composer: Administrator Guide
Integration Composer Process Flow
Integration Composer Overview
Introduction to Integration Composer 5
IBM Tivoli Integration Adapters
To facilitate data migration, IBM offers IBM Tivoli integration adapters to transform and import data provided by commonly used asset- and system-management tools, such as Tivoli Application Dependency Discovery Manager. Each integration adapter is designed for a specific discovery tool.
Integration adapters consist of a set of files to facilitate importing data and documentation to explain how to use the files to set up the adapter. Files provided depend on the discovery tool integration requirements.
In most cases an adapter includes either a data schema file (identified with an .schm extension) that you can import into Integration Composer to create a data schema or scripts that you can run against the Maximo database to create a data schema. Some data schemas for commonly used discovery tools are installed with Integration Composer, and the additional scripts are not needed. Occasionally adapters include additional scripts or properties files that are required to integrate discovered data.
An adapter always includes one or more files (identified with an .fsn extension) that contain predefined mapping expressions for transforming data from the format of the source data to the format of the target Maximo database. You can import an adapter mapping into Integration Composer, modify it to suit your business needs, and execute the mapping to import data into the target database.
IBM Corporation provides integration adapters for the following discovery tools:
Altiris Inventory SolutionCentennial DiscoveryMaximo DiscoveryMicrosoft SMSTivoli Network Manager IP Edition (formerly Netcool/Precision for IP Networks)Tivoli Application Dependency Discovery ManagerTivoli Configuration ManagerTivoli License Compliance ManagerTivoli License Compliance Manager for z/OSTivoli Provisioning Manager
To integrate data from other discovery tools, you can use the Create Data Schema feature in Integration Composer to create a data schema for the discovery tool. After creating the data schema, you can create a mapping based on the new data schema and use the mapping to import data into the target database.
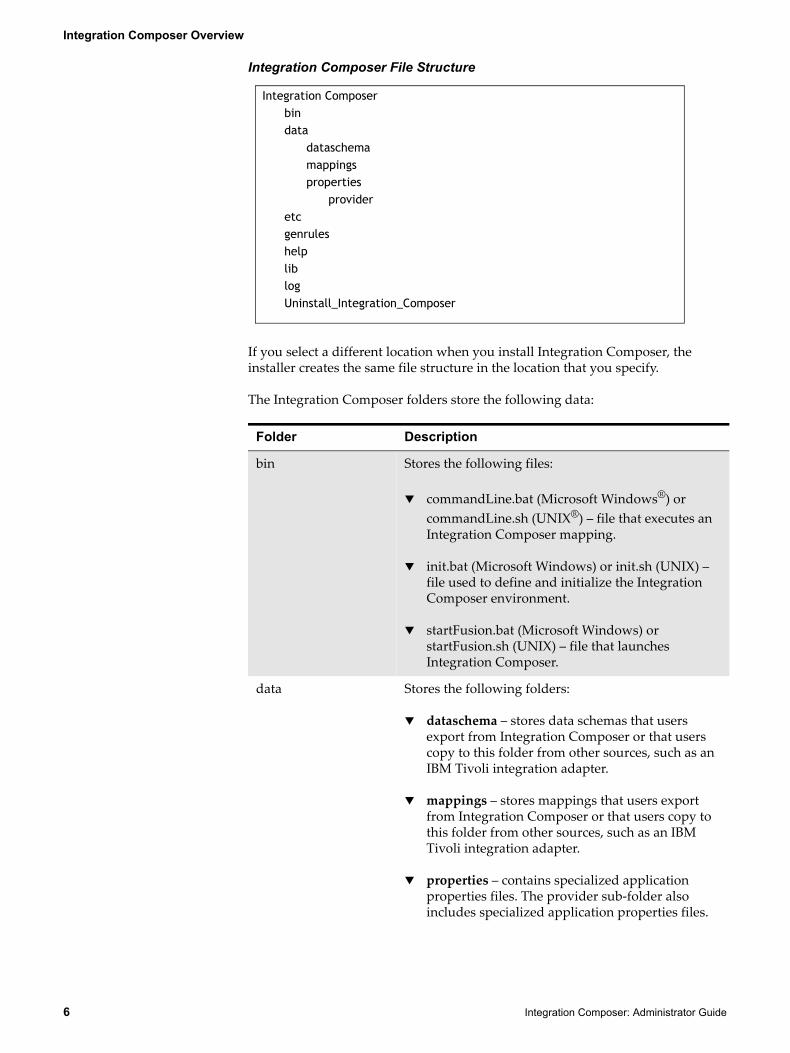
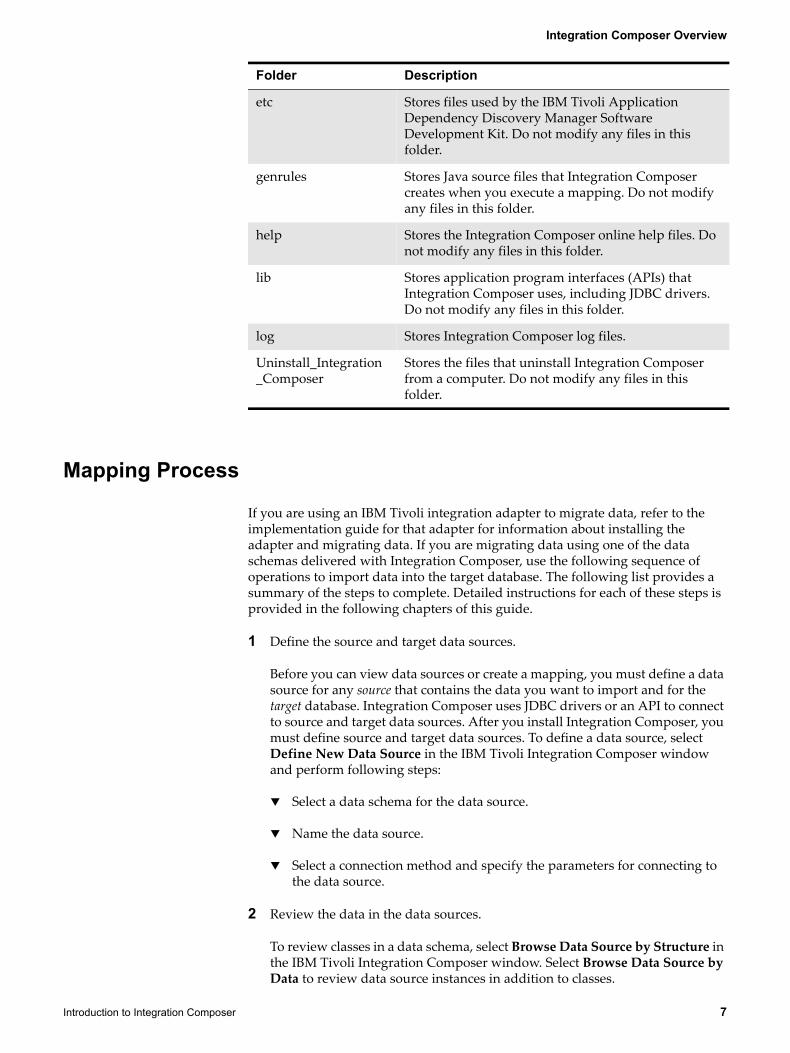
File Structure
When you install Integration Composer, if you accept the default installation path, the installer creates an Integration Composer installation directory and installs Integration Composer using the following file structure.
Integration Composer Overview
6 Integration Composer: Administrator Guide
Integration Composer File Structure
If you select a different location when you install Integration Composer, the installer creates the same file structure in the location that you specify.
The Integration Composer folders store the following data:
Folder Description
bin Stores the following files:
commandLine.bat (Microsoft Windows®) or commandLine.sh (UNIX®) – file that executes an Integration Composer mapping.
init.bat (Microsoft Windows) or init.sh (UNIX) – file used to define and initialize the Integration Composer environment.
startFusion.bat (Microsoft Windows) or startFusion.sh (UNIX) – file that launches Integration Composer.
data Stores the following folders:
dataschema – stores data schemas that users export from Integration Composer or that users copy to this folder from other sources, such as an IBM Tivoli integration adapter.
mappings – stores mappings that users export from Integration Composer or that users copy to this folder from other sources, such as an IBM Tivoli integration adapter.
properties – contains specialized application properties files. The provider sub-folder also includes specialized application properties files.
Integration Composerbindata
dataschemamappingsproperties
provideretcgenruleshelpliblogUninstall_Integration_Composer
Integration Composer Overview
Introduction to Integration Composer 7
Mapping Process
If you are using an IBM Tivoli integration adapter to migrate data, refer to the implementation guide for that adapter for information about installing the adapter and migrating data. If you are migrating data using one of the data schemas delivered with Integration Composer, use the following sequence of operations to import data into the target database. The following list provides a summary of the steps to complete. Detailed instructions for each of these steps is provided in the following chapters of this guide.
1 Define the source and target data sources.
Before you can view data sources or create a mapping, you must define a data source for any source that contains the data you want to import and for the target database. Integration Composer uses JDBC drivers or an API to connect to source and target data sources. After you install Integration Composer, you must define source and target data sources. To define a data source, select Define New Data Source in the IBM Tivoli Integration Composer window and perform following steps:
Select a data schema for the data source.
Name the data source.
Select a connection method and specify the parameters for connecting to the data source.
2 Review the data in the data sources.
To review classes in a data schema, select Browse Data Source by Structure in the IBM Tivoli Integration Composer window. Select Browse Data Source by Data to review data source instances in addition to classes.
etc Stores files used by the IBM Tivoli Application Dependency Discovery Manager Software Development Kit. Do not modify any files in this folder.
genrules Stores Java source files that Integration Composer creates when you execute a mapping. Do not modify any files in this folder.
help Stores the Integration Composer online help files. Do not modify any files in this folder.
lib Stores application program interfaces (APIs) that Integration Composer uses, including JDBC drivers. Do not modify any files in this folder.
log Stores Integration Composer log files.
Uninstall_Integration_Composer
Stores the files that uninstall Integration Composer from a computer. Do not modify any files in this folder.
Folder Description
Integration Composer Overview
8 Integration Composer: Administrator Guide
3 Create a new mapping.
To create a new mapping, you select Create New Mapping in the IBM Tivoli Integration Composer window. Integration Composer displays a New Mapping window in which you select a source data source, select a target data source, and name the mapping.
4 Add expressions to the mapping.
After you create a mapping and name it, Integration Composer displays the Mapping window. In this window, you can import the predefined mapping expressions provided in an IBM Tivoli integration adapter; or you can create mapping expressions.
5 Execute the mapping.
After you create and save a mapping, you execute a mapping from a command line. When you execute a mapping, Integration Composer transforms the data and imports it into the target database. To update data in the target database, such as importing data about new computer equipment, you can run an existing mapping as often as needed.
Error Management
When Integration Composer executes a mapping, it provides information about mapping executions and data transactions as well as errors in the fusion.log file. The fusion.log file is stored in the following location:
<installDir>\log
For information about setting up logs to provide information about mapping executions and data transactions, see “Logging Properties File (logging.properties)” on page 125.
Introduction to Data Schemas
Introduction to Integration Composer 9
Introduction to Data Schemas
A data schema is a structure for organizing and classifying data in a database. It defines both the data contents and relationships. Integration Composer interprets data and changes it to the format required for the target database based on the structures defined in the data schemas stored in Integration Composer repository.
A data source is the actual data in a database organized in the structure defined by a data schema.
Classes, Properties, and Instances
Class In Integration Composer, data schemas organize data into classes. A class is a group of data that has the same characteristics or properties. For example, you can define a class called 'Computer' because computers share many characteristics or properties.
Property A property is an attribute or feature that characterizes a class. The collection of properties assigned to a class defines the class. A class can have multiple properties. For example, objects classified as computers have the following properties: 'Hardware ID,' 'Manufacturer,' 'Model,' and 'Serial Number.'
The data schema defines the structure in which properties are stored and organizes the properties into classes. A data schema defines the formats for property data. A format might include a property name, type, and length. For example, the property 'Manufacturer' might be named Manufacturer ID. Its type is integer. Its length is 10.
In Integration Composer all properties have a name, type, and length.
The name uniquely identifies the property in a class.
The type of property indicates the format of the data. Integration Composer uses JDBC type names.
The length of a property is determined by the limit defined for the database column that corresponds to that property. You can manually change the length, but the length cannot exceed the limit set for the corresponding database column.
Some properties have specialized functions and unique characteristics that you must consider when creating mappings in Integration Composer. Key properties and reference properties have specialized functions. For more information about keys and reference relationships, see “Key Properties and Relations” on page 12.
Instance Whereas a class is a group of objects that share the same properties, an instance is a specific object that actually belongs to a class. If the class 'Computer' is characterized by the properties 'Hardware ID,' 'Manufacturer,' 'Model,' and 'Serial Number,' then a specific instance of the class, the computer HQLz2310, is characterized by the properties 0399483 ('Hardware ID'), Dell® ('Manufacturer'), Pentium® 4 ('Model'), and 938348393 ('Serial Number').
The instances of a class contain data about an object. Databases store this data in the structures defined for the properties of the class. All instances of the same
Introduction to Data Schemas
10 Integration Composer: Administrator Guide
class have the same set of properties, but each instance has different values for those properties.
Class Hierarchy
An Integration Composer data schema logically organizes classes into a hierarchy or tree. A bonding link between classes is called a relationship. Classes have two categories of relationships:
Parent-child
Reference
Parent-Child Relationship
Most relationships in a tree are parent-child relationships. A parent-child relationship is a very strong relationship between two classes. Think of it as a “has a” or “containment” relationship.
In a parent-child relationship:
Every child class has a parent class. Every instance of a child class has an instance of a parent class.
A parent can be a child in another relationship.
A parent class instance can exist without a child class instance.
Every child class has only one parent class, but a parent class can have more than one child class.
In terms of databases, a parent class has a one-to-many relationship with a child class.
Reference Relationship A reference relationship is weaker than a parent-child relationship. Think of it as a “refers to” relationship.
In a reference relationship:
A reference relationship exists between two classes when one class has complementary information about another class.
A class in a reference relationship can exist without the other class.
In terms of databases, a parent class has a many-to-one relationship to a reference class.
A class can appear only once in a parent-child relationship but many times in a reference relationship.
Tree View The Integration Composer user interface displays class relationships in a tree, as illustrated in the following figure. The tree displays classes in a hierarchical structure. At the top of the tree is the root class. A root class is a parent class. Below the root (parent) class are child classes or reference classes. If a child class has other classes below it, the child class becomes the parent class to those child or reference classes.

Introduction to Data Schemas
Introduction to Integration Composer 11
Integration Composer Classes and Properties Example
NOTE A child class is represented by the (square) symbol.A reference class is represented by the (arrow) symbol.
The preceding figure shows the following class relationships:
Deployed Asset is a Root class.
Deployed Asset is a Parent class to Computer.
Computer in turn is a Child class to Deployed Asset, but Computer is also a Parent class to Display.
Display is a Child class to Computer.
In the preceding figure, Manufacturer is a Reference class to Deployed Asset.
Introduction to Data Schemas
12 Integration Composer: Administrator Guide
Key Properties and Relations
Some properties in a class have specialized functions and unique characteristics to consider when creating mappings in Integration Composer. For example, key properties and reference properties have specialized functions.
Primary Key A primary key is a property or set of properties that uniquely identifies each instance of its class. Every Integration Composer class must have at least one property defined as a primary key; this property (or properties) uniquely identifies each instance of the class.
In a parent-child relationship, the child class must contain at least one primary key that is also a primary key of the parent class. In the “Integration Composer Classes and Properties Example” on page 11, Display is a child of Computer; the class Display has two primary keys:
DisplayidNodeid (which is a primary key of the parent Computer)
The combination of Displayid and Nodeid uniquely identifies each instance of the class Display.
Foreign Key (FK) A foreign key (FK) is a property or set of properties in a child class that Integration Composer derives from one or more primary key properties in the parent class. When Integration Composer executes a mapping, it copies the value for the foreign key from the primary key of the parent class to the child class.
In the “Integration Composer Classes and Properties Example” on page 11, the property Nodeid in the child class Display is a foreign key to the parent class Computer. When Integration Composer executes a mapping, it copies the value for the property Nodeid in the parent class Computer to the child Display.
Alternate Key An alternate key is a property or set of properties that is an equivalent way to identify an instance. The combination of the alternate key values must be unique within the class. If a primary key is a generated value, Integration Composer requires one or more alternate keys.
In the “Integration Composer Classes and Properties Example” on page 11, Displaytype, Makemodel, Manufacturer and Serialnumber are alternate keys for the class Display.
Generated Value (GV) A generated value property (GV) is a property whose value Integration Composer generates automatically when you execute a mapping for the target data source. Defining a property as a generated value is meaningful only for target data schemas. When you execute mappings, Integration Composer ignores generated value properties in the source data source.
In the “Integration Composer Classes and Properties Example” on page 11, the properties Changedate and Createdate are generated values for the class Display.
Reference Property (Ref) A reference property is a property that points to a primary key property in a reference class. When Integration Composer executes a mapping, it copies the value for a reference property from the primary key of the reference class instance.

Introduction to Data Schemas
Introduction to Integration Composer 13
In the “Integration Composer Classes and Properties Example” on page 11, the property Manufacturer in the class Display is a reference to the class Manufacturer.
When you create a mapping, Integration Composer copies the value of the primary key in the class Manufacturer, which is Manufacturervar (as shown in the following figure), to the Manufacturer property in the Display class.
Reference Property Example
Required Properties In some cases Integration Composer requires a value for a property, meaning that it cannot be null. If a property requires a value, the Integration Composer user interface displays the property with a yellow background in mappings. Because those properties must contain a value as a result of mapping execution, you must define expressions for those properties when you create mappings.
NOTE The display properties that you set for a computer might affect colors. The color displayed on the computer that you use might vary.
For numeric properties, Integration Composer does not require an expression. For Integers, Integration Composer inserts a default value of zero (0) into the target. For Double and Float, it inserts a default value of 0.0.
Introduction to Data Schemas
14 Integration Composer: Administrator Guide
© Copyright IBM Corp. 2007, 2008 15
This chapter describes how to access Integration Composer and navigate the user interface.
Accessing the User Interface
To access Integration Composer, first install the application on a server. For the hardware, software, and other requirements to run Integration Composer and for installation instructions, refer to IBM Tivoli Integration Composer Installation Guide.
To access Integration Composer, log in using the Maximo database user ID and password. You must have database administrative rights to access the user interface. Integration Composer stores the database user IDs that you enter when defining connectivity to the source and target data sources, but it does not store the passwords.
To open Integration Composer, complete the following steps:
1 From the Start menu on the desktop, select Programs>IBM Tivoli>Integration Composer>IBM Tivoli Integration Composer. The Integration Composer log-in window opens.
2 In the User Name field, type a user name.
3 In the Password field, type a password.
NOTE Use the same user ID and password that you use to log in to the Maximo database.
4 Click Log In. Integration Composer displays the IBM Tivoli Integration Composer window.
Navigating the User Interface
After you log in to the user interface, Integration Composer displays the IBM Tivoli Integration Composer window.
You can view Integration Composer best with a screen resolution of 1024x768.
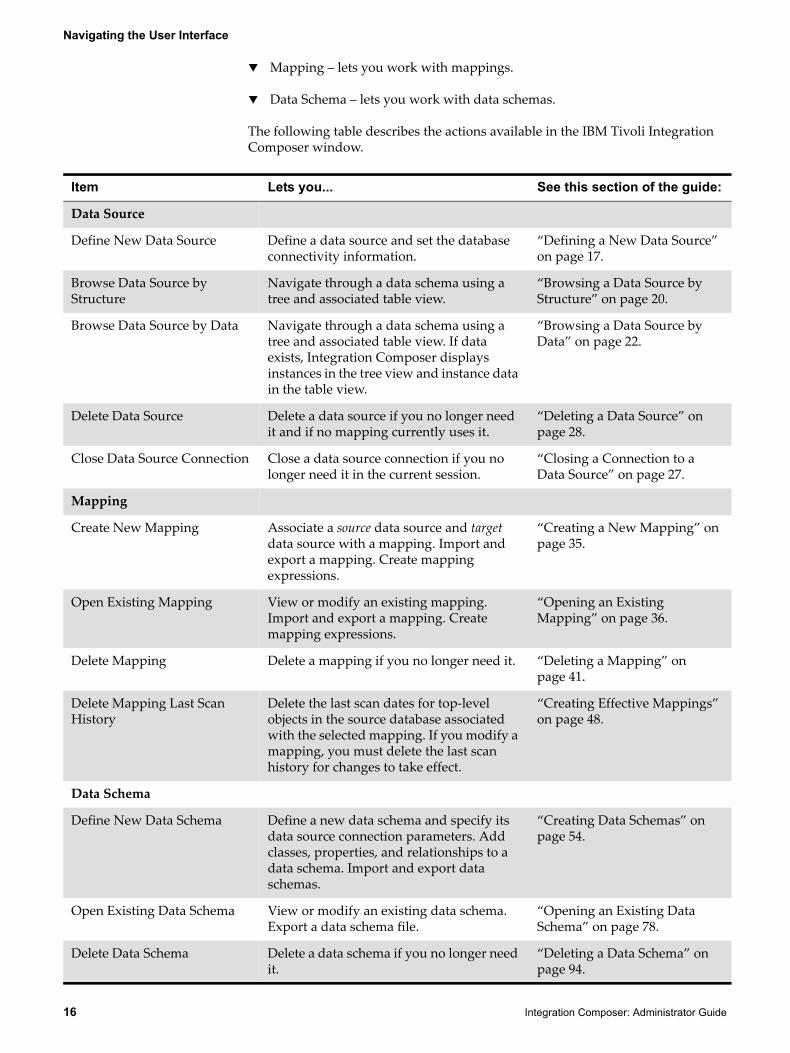
The IBM Tivoli Integration Composer window lists three menus from which you can select actions that you want to perform:
Data Source – lets you work with data sources.
Access and Navigation 2
Navigating the User Interface
16 Integration Composer: Administrator Guide
Mapping – lets you work with mappings.
Data Schema – lets you work with data schemas.
The following table describes the actions available in the IBM Tivoli Integration Composer window.
Item Lets you... See this section of the guide:
Data Source
Define New Data Source Define a data source and set the database connectivity information.
“Defining a New Data Source” on page 17.
Browse Data Source by Structure
Navigate through a data schema using a tree and associated table view.
“Browsing a Data Source by Structure” on page 20.
Browse Data Source by Data Navigate through a data schema using a tree and associated table view. If data exists, Integration Composer displays instances in the tree view and instance data in the table view.
“Browsing a Data Source by Data” on page 22.
Delete Data Source Delete a data source if you no longer need it and if no mapping currently uses it.
“Deleting a Data Source” on page 28.
Close Data Source Connection Close a data source connection if you no longer need it in the current session.
“Closing a Connection to a Data Source” on page 27.
Mapping
Create New Mapping Associate a source data source and target data source with a mapping. Import and export a mapping. Create mapping expressions.
“Creating a New Mapping” on page 35.
Open Existing Mapping View or modify an existing mapping. Import and export a mapping. Create mapping expressions.
“Opening an Existing Mapping” on page 36.
Delete Mapping Delete a mapping if you no longer need it. “Deleting a Mapping” on page 41.
Delete Mapping Last Scan History
Delete the last scan dates for top-level objects in the source database associated with the selected mapping. If you modify a mapping, you must delete the last scan history for changes to take effect.
“Creating Effective Mappings” on page 48.
Data Schema
Define New Data Schema Define a new data schema and specify its data source connection parameters. Add classes, properties, and relationships to a data schema. Import and export data schemas.
“Creating Data Schemas” on page 54.
Open Existing Data Schema View or modify an existing data schema. Export a data schema file.
“Opening an Existing Data Schema” on page 78.
Delete Data Schema Delete a data schema if you no longer need it.
“Deleting a Data Schema” on page 94.
© Copyright IBM Corp. 2007, 2008 17
Integration Composer lets you create mappings that you can use to transform data and transfer it from a source data source to a target database. Before you can work with data sources, you must establish connections between Integration Composer and the source and target databases. Integration Composer lets you create data source definitions that associate a data schema with a specific data source and specify the parameters for connecting to the data source. After you define a data source, you can use this connection information each time you want Integration Composer to connect to the database.
In Integration Composer a data source can be a source of data or a target for data. Before you can create a mapping, you must define a data source for both the source database and the target database. This chapter discusses data sources; it explains how to view data sources and their properties, define a new data source, close a connection to a data source, and delete a data source.
NOTE Throughout this chapter, the term source refers to the source data source and the term target refers to the target data source.
Defining a New Data Source
To connect Integration Composer to a data source, you define a data source connection that specifies how to connect to the data source. Integration Composer uses JDBC drivers or an application programming interface (API) to establish connection to data sources. You can specify data source connection parameters when defining a data source or when defining a data schema.
After you define data source connection parameters, Integration Composer stores the connection information and displays those parameters when you attempt to connect to the data source. The only parameter that Integration Composer requests is the password.
In an Integration Composer session, if you connect to a data source, Integration Composer keeps the data source connection open throughout the session unless you complete one of the following steps:
Close the connection using the Close Data Source Connection option in the Data Source menu in the IBM Tivoli Integration Composer window.
Delete the open data source.
Before you create a mapping, you must define a data source for both the source data and the target data.
Defining Source and Target Data Sources 3
Defining a New Data Source
18 Integration Composer: Administrator Guide
When you define a data source, you perform the following tasks:
Select a data schema to associate with the data source.
Name the data source.
Specify the parameters for connecting to the data source.
To define a data source, complete the following steps:
1 Log in to Integration Composer.
2 In the IBM Tivoli Integration Composer window, choose Define New Data Source. Integration Composer displays the Data Schema page in the Define a New Data Source window. This page displays data schemas delivered with Integration Composer as well as any data schemas that you create using the Data Schema features in the application.
NOTE In the Define a New Data Source window, you can click Back to review or change previous selections. To cancel this procedure and return to the IBM Tivoli Integration Composer window, click Cancel.
3 On the Data Schema page, select a data schema, then click Next. Integration Composer displays the Data Source page.
4 In the Data Source field, type a name for the data source (the name must have at least two characters), then click Next. Integration Composer displays the Connection Information page. Data source names are case sensitive; for example, Deployed Assets is different from DEPLOYED ASSETS.
ATTENTION If you enter an existing data source name, the specifications that you enter will replace the original data source.
5 On the Connection Information page, in the Connection Method field, select a connection method.
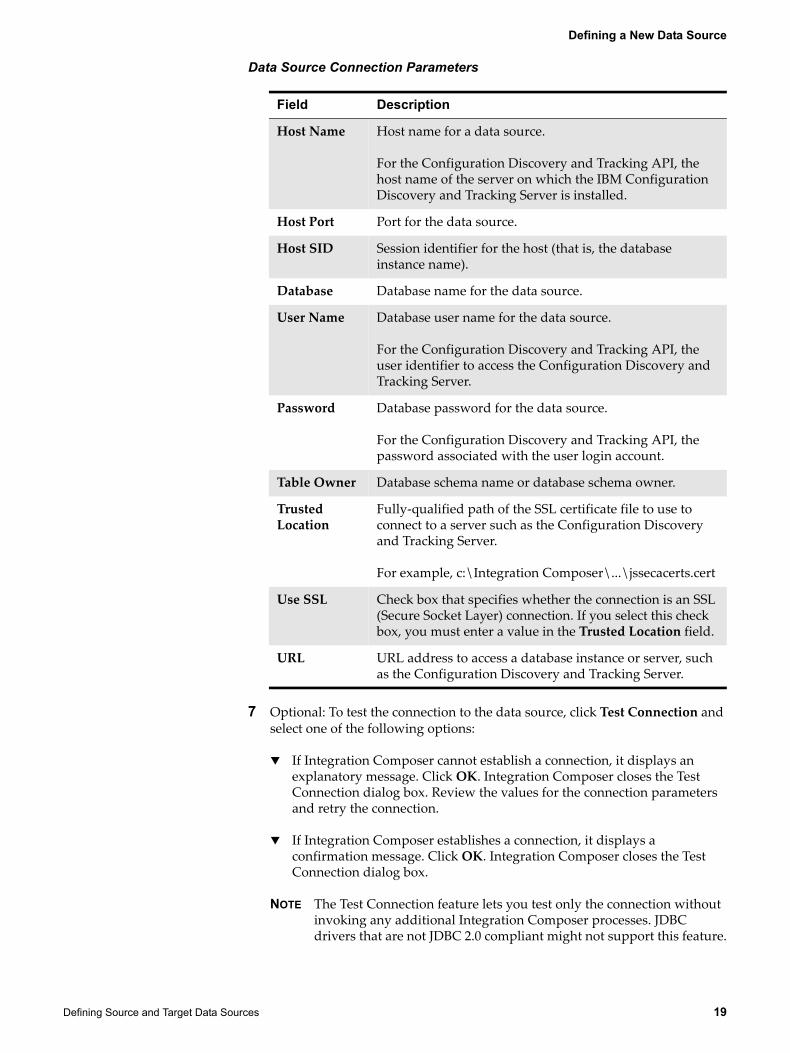
6 Enter the parameters for the connection method as required. The fields displayed depend upon the type of connection method selected. The following table lists some of the fields that Integration Composer might display.
Defining a New Data Source
Defining Source and Target Data Sources 19
Data Source Connection Parameters
7 Optional: To test the connection to the data source, click Test Connection and select one of the following options:
If Integration Composer cannot establish a connection, it displays an explanatory message. Click OK. Integration Composer closes the Test Connection dialog box. Review the values for the connection parameters and retry the connection.
If Integration Composer establishes a connection, it displays a confirmation message. Click OK. Integration Composer closes the Test Connection dialog box.
NOTE The Test Connection feature lets you test only the connection without invoking any additional Integration Composer processes. JDBC drivers that are not JDBC 2.0 compliant might not support this feature.
Field Description
Host Name Host name for a data source.
For the Configuration Discovery and Tracking API, the host name of the server on which the IBM Configuration Discovery and Tracking Server is installed.
Host Port Port for the data source.
Host SID Session identifier for the host (that is, the database instance name).
Database Database name for the data source.
User Name Database user name for the data source.
For the Configuration Discovery and Tracking API, the user identifier to access the Configuration Discovery and Tracking Server.
Password Database password for the data source.
For the Configuration Discovery and Tracking API, the password associated with the user login account.
Table Owner Database schema name or database schema owner.
Trusted Location
Fully-qualified path of the SSL certificate file to use to connect to a server such as the Configuration Discovery and Tracking Server.
For example, c:\Integration Composer\...\jssecacerts.cert
Use SSL Check box that specifies whether the connection is an SSL (Secure Socket Layer) connection. If you select this check box, you must enter a value in the Trusted Location field.
URL URL address to access a database instance or server, such as the Configuration Discovery and Tracking Server.
Browsing a Data Source
20 Integration Composer: Administrator Guide
8 On the Connection Information page, click Finish. Integration Composer saves the data source and displays a Save confirmation dialog box.
9 In the Save confirmation dialog box, click OK. Integration Composer displays the IBM Tivoli Integration Composer window.
NOTE If Integration Composer does not save the data source successfully, it displays one or more error messages. Click OK. Resolve the problem and attempt to save the data source again.
Browsing a Data Source
Before you create a mapping between two data sources, you should review the data schemas for both the source and the target to analyze the class relationships and properties. For more information about data schemas, see "Introduction to Data Schemas," on page 9.
Depending on the part of the data source that you want to review, select one of the following options:
Use Browse Data Source by Structure to review the data source’s data schema and classes.
Use Browse Data Source by Data to review both classes and data instances.
Whether you are browsing by structure or by data, the process for opening a data source that you want to view is essentially the same. Before you can view a data source, you must be connected to the database. Consequently, when you view a data source, Integration Composer prompts you to set up a data source connection.
When you open a data source, the data source remains open throughout the Integration Composer session unless you perform one of the following steps:
Close the data source using the Close Data Source option in the IBM Tivoli Integration Composer window.
Delete the open data source.
Browsing a Data Source by Structure
When you browse a data source by structure, Integration Composer displays the classes and properties defined by the data schema for the data source.
To browse a data source by structure, complete the following steps:
1 Log in to Integration Composer and, in the IBM Tivoli Integration Composer window, choose Browse Data Source by Structure. Integration Composer

Browsing a Data Source
Defining Source and Target Data Sources 21
displays the Data Schema page in the Open Data Source window. This page lists the available data schemas.
2 On the Data Schema page, select a data schema, then click Next. Integration Composer displays the Data Source page. This page lists the data sources that you defined for the selected data schema.
3 On the Data Source page, select a data source, then click Next and select one of the following options:
If the data source is already open, Integration Composer displays the Browse Data Source by Structure window. Go to step 8 on page 21.
If the data source is not open, Integration Composer displays the Connection Information page in the Open Data Source window. Go to step 4 on page 21.
4 On the Connection Information page, in the Connection Method field, accept the default connection method or select a different method from the drop-down list.
5 Enter the parameters for the connection method as required. The parameters that you enter on this page depend on the connection method that you use to connect to a database. You can accept the defaults established during the last connection to the data source, or you can update the fields. You must enter a data source password. For more information about fields displayed on this page, see step 6 on page 18.
6 Optional: To test the connection to the data source, click Test Connection and select one of the following options:
If Integration Composer cannot establish a connection, it displays an explanatory message. Click OK. Integration Composer closes the Test Connection dialog box. Review the values for the parameters and retry the connection.
If Integration Composer establishes a connection, it displays a confirmation message. Click OK. Integration Composer closes the Test Connection dialog box.
7 In the Open Data Source window, click Finish. Integration Composer opens the selected data source in the Browse Data Source by Structure window.
8 Click the + icon to expand the tree to view child and reference classes.
9 To view the properties of the class, click the class. Integration Composer displays the properties in the table view on the right side of the window.
For information on viewing property details and using the features available for this window, see “Viewing Properties of a Data Source” on page 24.
10 After you view the data source, select Close from the Select Action menu to close the data source. Integration Composer closes the Browse Data Source by Structure window and displays the IBM Tivoli Integration Composer window.

Browsing a Data Source
22 Integration Composer: Administrator Guide
Browsing a Data Source by Data
When you select Browse Data Source by Data to view instances, you use the same procedure that you used to select a data source to browse by structure. However, the tree view on the Browse Data Source by Data window includes actual data instances. When you expand the tree view, Integration Composer displays the first ten instances. When you expand an instance, Integration Composer displays the classes for that instance. When you select a class or instance, Integration Composer highlights it with a blue background and displays any associated properties and property values in the table view on the right.
To browse a data source by structure, complete the following steps:
1 Log in to Integration Composer and, in the IBM Tivoli Integration Composer window, choose Browse Data Source by Data. Integration Composer displays the Data Schema page in the Open Data Source window. This page displays data schemas delivered with Integration Composer as well as any data schemas that you created using the Data Schema functions in the application.
2 On the Data Schema page, select a data schema, then click Next. Integration Composer displays the Data Source page. This page displays the data sources that you defined for the selected data schema.
3 On the Data Source page, select a data source, then click Next and select one of the following options:
If the data source is already open, Integration Composer displays the Browse Data Source by Data window, and you can go to step 8.
If the data source is not open, Integration Composer displays the Connection Information page in the Open Data Source window, and you can go to step 4.
4 On the Connection Information page, in the Connection Method field, accept the default connection method or select a different method from the drop-down list.
5 Optional: Update the parameters for the selected connection method. The parameters that you enter on this page depend on the method that you use to connect to database. You can accept the defaults established during the last connection to the data source, or you can update the fields. You must enter a data source password.
6 Optional: To test the connection to the data source, click Test Connection and select one of the following options:
If Integration Composer cannot establish a connection, it displays an explanatory message. Click OK. Integration Composer closes the Test Connection dialog box. Review the values for the parameters and retry the connection.
If Integration Composer establishes a connection, it displays a confirmation message. Click OK. Integration Composer closes the Test Connection dialog box.
Browsing a Data Source
Defining Source and Target Data Sources 23
7 In the Open Data Source window, click Finish. Integration Composer opens the selected data source in the Browse Data Source by Data window.
8 Click the + icon to expand the tree to view child and reference classes. To view details about an instance, click it in the tree view. The details of the instance appear in the table view on the right side of the window.
Note that classes are displayed in bold type whereas instances are not.
To display the previous or next instance (if any) of the same class, click Back or Next. If these buttons are unavailable, no other instances exist in that class.
9 After you view the data source, select Close from the Select Action menu to close the data source. Integration Composer closes the Browse Data Source by Data window and displays the IBM Tivoli Integration Composer window.
Choosing Specific Instances to View
From the Browse Data Source by Data window, you can select specific instances of a class for viewing. When you select specific instances, Integration Composer displays only selected instances in the Browse Data Source by Data window. For example, you might want to view only instances of network devices, not computers or network printers.
To display specific instances of a class, complete the following steps:
1 In the Browse Data Source by Data window, select the desired class and right-click the class name. A Choose instances to show... menu opens.
2 Click Choose Instances to show.... Integration Composer displays the Select Instances to Show dialog box, listing the available instances for the selected class.
3 Choose one of the following options:
Select one or more instances to view:
To select a series of instances, use Shift+Click.To select separate instances, use Ctrl+Click.To select all instances, click Select All.
To narrow the search, complete the following steps:
a Click Search. Integration Composer displays a Search dialog box.
The Search dialog box displays the key property field or fields for the class selected. The fields displayed in the search box vary depending on the class selected.
b In this dialog box, you can search for specific instances. If you are looking at Deployed Assets, for example, you can enter Computer in the Assetclass field, and Integration Composer selects all computers in the Select Instances to Show dialog box.
Integration Composer searches using a “like” operator and not an exact search. For example, you can enter comp in the Assetclass field, and Integration Composer retrieves all values that contain the string
Browsing a Data Source
24 Integration Composer: Administrator Guide
comp, including computers, component, etc. The search is not case sensitive.
c To display the selected instances, click OK. Integration Composer displays the Select Instances to Show dialog box. Integration Composer highlights the instances selected in brown.
NOTE The display properties that you set for a computer might affect colors. The color displayed on the computer that you use might vary.
To clear the choices, click Deselect All.
To exit the Select Instances to Show dialog box and return to the Browse Data Source by Data window without making a selection, click Cancel.
4 In the Select Instances to Show dialog box, after you select the instances to show, click OK. Integration Composer displays the instances selected in the Browse Data Source by Data window.
5 Optional: To view the selected instances, expand the tree view for the class. For information on viewing property details and using the features available for the Browse Data Source by Data window, see “Viewing Properties of a Data Source” on page 24.
Viewing Properties of a Data Source
To view the properties of a class or instance, select any class or instance in the tree view; the properties of the selected class appear in the table view on the right side, as shown in the following figure.
Viewing Properties of a Data Source
Both the Browse Data Source by Structure and the Browse Data Source by Data windows are divided into two panes—a tree view on the left and a table view on the right.

Browsing a Data Source
Defining Source and Target Data Sources 25
To resize the panes, position the cursor over the bar that separates the panes until the pointer changes to a Horizontal Resize Cursor (↔); then click the mouse device and drag to the right or left to increase or decrease the size of a pane.
To close the window, select Close from the Select Action menu.
Tree View The tree view lists classes and, if you are browsing the data source by data, instances for the selected data source in a hierarchical structure that shows class relationships. Integration Composer displays class names in bold; instances are in plain text. When you select a class or instance in the tree, Integration Composer highlights it with a blue background and displays data about the class or instance in the table view. Click the + icon to expand a class or instance. Click the – icon to collapse a class or instance.
Table View The table view lists the properties of a selected class. In the preceding figure, the class Deployed Asset is selected; the table view displays properties for that class. Integration Composer displays the following information for each class property:
For more information about key properties and relationships, see “Classes, Properties, and Instances” on page 9.
Data in the table view is color coded:
Brown indicates that a row is selected.Yellow indicates the property in that row cannot have a null value.Gray indicates that you cannot edit this row when creating a mapping.
NOTE The display properties that you set for a computer might affect colors. The color displayed on the computer that you use might vary.
You can organize data in the table view in the following ways:
Resize table columns – To resize columns, position the cursor between the column headers until the pointer changes to a Horizontal Resize Cursor (↔);
Column Description
Key Indicates whether the property is a key property.
indicates that the row is a primary key.
indicates that the row is an alternate key
Relation Indicates whether the property is related to another class or instance. The following relations are possible:
FK – indicates that this is a foreign key.Ref – indicates that this is a reference relationship.GV – indicates that Integration Composer generates this value for this property.
Name Name of the selected property.
Type Java data type for the selected property.
Length Length of the selected property. For string types, this field specifies the maximum number of characters.
Value Value for the selected property.
Browsing a Data Source
26 Integration Composer: Administrator Guide
then click the mouse device and drag the column line left or right to decrease or increase the column width.
Sort rows – To sort rows in ascending or descending alphabetical order, click the column header. A triangle appears in the column header denoting the ascending alphabetical order of the records. The up and down triangles function like a toggle switch; click the column header again to sort records for that column in descending alphabetical order.
Select Action Menu In the title bar of the Browse Data Source by Structure and Browse Data Source by Data windows, there is a Select Action menu that lets you select actions that you can perform in these windows. The following table lists actions available from the Select Action menu.
Searching the Tree View
To locate a specific class or instance in the tree, complete the following steps:
1 In the tree view in the Browse Data Source by Structure or Browse Data Source by Data window, select a class or instance.
2 After selecting an item, select Tree Search from the Select Action menu to display the Find dialog box.
3 In the Find dialog box, enter the value that you want to search for.
4 Click OK. Integration Composer highlights the first value in the tree that matches the search criteria and displays the details for that class or instance in the table view.
5 Optional: You can select Search Again from the Select Action menu to find additional instances. When you select Search Again, Integration Composer finds additional instances for classes or instances that are expanded in the tree view.
Action Description
Tree Search Opens a Find dialog box to let you search for a specific item in the navigation tree.
Search Again Searches for the next item that matches the search string and highlights that item. If Integration Composer finds no matching items, it displays a message indicating that no items were found.
Close Closes the window.
Closing a Connection to a Data Source
Defining Source and Target Data Sources 27
Closing a Connection to a Data Source
Sometimes you might want to close a connection to a data source and remain in an Integration Composer session. The following instructions explain how to close a data source connection.
To close a data source but continue working in Integration Composer, complete the following steps:
1 Close any open windows that are currently using the data source that you want to close.
2 In the IBM Tivoli Integration Composer window, choose Close Data Source Connection. Integration Composer displays the Select Data Source Connection(s) to Close window.
3 In the Select Data Source Connection(s) to Close window, select one or more data source connections to close:
To select a series of data sources, use Shift+Click.
To select separate data sources, use Ctrl+Click.
To select the entire list, click Select All.
To cancel the selection of all data sources in the list, click Deselect All.
4 After you select one or more data sources that you want to close, click Close Connection. Integration Composer displays a Close Data Source Connection confirmation dialog box.
5 In the Close Data Source Connection dialog box, select one of the following options:
To close the data source connection, click Yes. Integration Composer closes the connections to the selected data sources and displays the IBM Tivoli Integration Composer window.
NOTE If the data source does not close successfully, Integration Composer displays an error message. Click OK. Resolve the problem and attempt to close the data source again.
To keep this data source connection open, click No. Integration Composer closes the Close Data Source Connection confirmation dialog box and displays the IBM Tivoli Integration Composer window.
To cancel closing the selected data source and select a different data source to close, click Cancel. Integration Composer closes the Close Data Source Connection confirmation dialog box and displays the Select Data Source Connection(s) to Close window so that you can select a different data source to close.
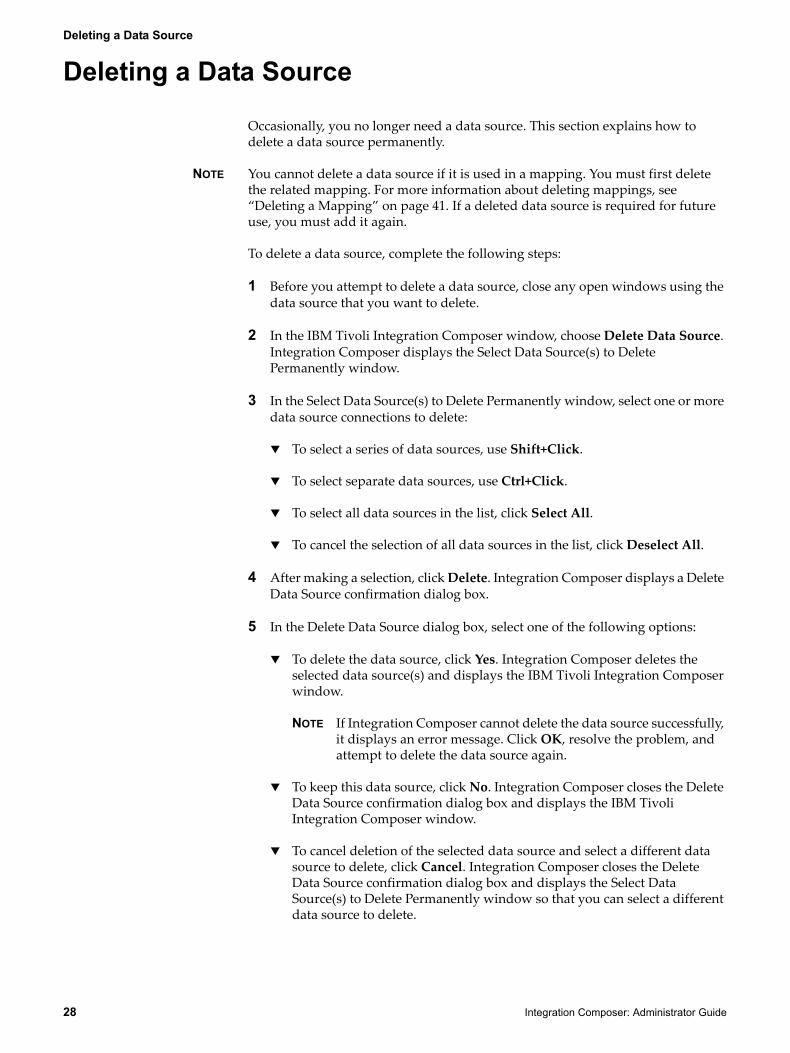
Deleting a Data Source
28 Integration Composer: Administrator Guide
Deleting a Data Source
Occasionally, you no longer need a data source. This section explains how to delete a data source permanently.
NOTE You cannot delete a data source if it is used in a mapping. You must first delete the related mapping. For more information about deleting mappings, see “Deleting a Mapping” on page 41. If a deleted data source is required for future use, you must add it again.
To delete a data source, complete the following steps:
1 Before you attempt to delete a data source, close any open windows using the data source that you want to delete.
2 In the IBM Tivoli Integration Composer window, choose Delete Data Source. Integration Composer displays the Select Data Source(s) to Delete Permanently window.
3 In the Select Data Source(s) to Delete Permanently window, select one or more data source connections to delete:
To select a series of data sources, use Shift+Click.
To select separate data sources, use Ctrl+Click.
To select all data sources in the list, click Select All.
To cancel the selection of all data sources in the list, click Deselect All.
4 After making a selection, click Delete. Integration Composer displays a Delete Data Source confirmation dialog box.
5 In the Delete Data Source dialog box, select one of the following options:
To delete the data source, click Yes. Integration Composer deletes the selected data source(s) and displays the IBM Tivoli Integration Composer window.
NOTE If Integration Composer cannot delete the data source successfully, it displays an error message. Click OK, resolve the problem, and attempt to delete the data source again.
To keep this data source, click No. Integration Composer closes the Delete Data Source confirmation dialog box and displays the IBM Tivoli Integration Composer window.
To cancel deletion of the selected data source and select a different data source to delete, click Cancel. Integration Composer closes the Delete Data Source confirmation dialog box and displays the Select Data Source(s) to Delete Permanently window so that you can select a different data source to delete.
© Copyright IBM Corp. 2007, 2008 29
To migrate data from an external data source into a target database, you create a mapping that sets up the parameters for transforming data from the source format to the target format.
This chapter provides an introduction to Integration Composer mappings and explains how to create a new mapping, open an existing mapping, execute a mapping, export a mapping, import a mapping, and set up a mapping to run unattended.
NOTE Throughout this chapter, the term source refers to the source data source and the term target refers to the target database.
Mappings Overview
To migrate data from an external data source into a target database, you create a mapping that defines how to transform data from the source format to the target format. A mapping is a set of expressions that tell Integration Composer how to create data in the target using information from a source. For each property that you want to import, you define an expression in the target data schema that specifies how to transform the data for that property when Integration Composer imports the data from the source into the target.
To facilitate data migration, IBM Corporation offers IBM Tivoli integration adapters to transform and import data provided by various asset- and systems- management tools, such as Tivoli Application Dependency Discovery Manager. The adapters provide predefined mapping expressions that let you transform data and transfer it from a database created by a discovery tool into the Maximo database. You can import an adapter mapping into Integration Composer and modify it to suit your business needs. Then you can execute the mapping to import data into the target. IBM provides an implementation guide for each integration adapter that explains how to install the adapter and use it to import data.
To create an Integration Composer mapping, you specify the following parameters:
Source data sourceTarget data sourceMapping name
After you create a mapping, you can import a mapping supplied with an IBM Tivoli integration adapter and use the predefined mapping expressions in the adapter, create new mapping expressions, or modify existing expressions using the features in the Integration Composer Mapping window. When you install Integration Composer, you should import the mappings that you want to use.
Mapping Data Sources 4
Mappings Overview
30 Integration Composer: Administrator Guide
Integration Composer also lets you export a mapping and save it as text file with an Integration Composer (.fsn) extension if you want to maintain mappings outside of the Integration Composer repository.
ATTENTION To view mapping data outside of Integration Composer, use a text editor such as Microsoft Notepad. Do not use Microsoft Wordpad to view the mapping.
Mapping Functions
The mapping features in Integration Composer let you perform the following functions:
Create a new mapping
Create a new mapping by opening an existing mapping and saving it under a different name
Delete a saved mapping
Delete last scan history
Export a mapping
Import a mapping
View and edit an existing mapping
Mapping Execution
To execute an Integration Composer mapping, you must run a script located in the bin directory of the Integration Composer installation directory. For more information about executing mappings, see “Executing a Mapping” on page 43.
As Integration Composer executes a mapping, for each object in the source and target, it creates Java source code and compiles the source code. When Integration Composer completes a top-level object, including all its children and reference classes, it commits the data for that object to the database.
If you stop and then restart mapping execution and if a last scan date exists for the source, Integration Composer begins where it left off and moves only objects that were not previously committed to the database.
Insert Only If appropriate and if your source data contains a last scan date, you can create a mapping that only inserts records for objects that were not imported in previous runs. To do this, you must select Insert Only from the Select Action menu in the Mapping window when you create the mapping. When Integration Composer imports data using a mapping with the Insert Only flag set to true, Integration Composer only creates new records in the target. It does not update existing records. This feature works only if the source data contains a last scan date.
Updates To determine which object or attribute records to update, Integration Composer uses a last scan time stamp. When Integration Composer processes a new object, it records the data for that source object in the Integration Composer repository. On subsequent mapping executions, Integration Composer compares the last scan
Mappings Overview
Mapping Data Sources 31
date in the Integration Composer repository with the scan date in the source data source and performs one of the following actions:
If the date for an object in the source is earlier than or is the same as the last scan date in the repository, Integration Composer skips the source instance.
If the date for an object in the source occurs after the last scan date in the repository, Integration Composer processes the expressions for the source instance and updates the last scan date in the repository.
By doing this, Integration Composer ensures that it processes only the objects that have changed since the last scan date.
If you modify a mapping and you want to implement the change, you might want all data processed. To accomplish this, you must delete the last scan history. If you delete the last scan history, Integration Composer imports all the source data that is mapped into the target.
Deletions For some targets, Integration Composer deletes records when importing data into the target.
CCMDB Installations
When Integration Composer imports Actual CI data into a target, it deletes relationships between Actual CI records, but it does not delete the Actual CI records themselves. Integration Composer also deletes relationships between an Actual CI and OMP, but it does not delete the Actual CI or the OMP.
Tivoli Asset Management for IT or Service Request Manager Installations
When Integration Composer imports Deployed Asset data, components of Computers, Network Printers, and Network Devices are deleted if the corresponding record no longer exists in the source. However, top-level Computer, Network Printer, and Network Device records are not deleted. Data from reference classes, such as Manufacturer and Software in Deployed Assets, is not deleted.
If a top-level object no longer exists in the source and you no longer want the data in the target, you can use the Deployed Assets module applications (Computers, Network Printers, and Network Devices) to delete computer, network device, and printer records from the Maximo database. For information about deleting records from the Maximo database, refer to online help for the Computers, Network Devices, or Network Printers applications in Tivoli Asset Management for IT or Service Request Manager.
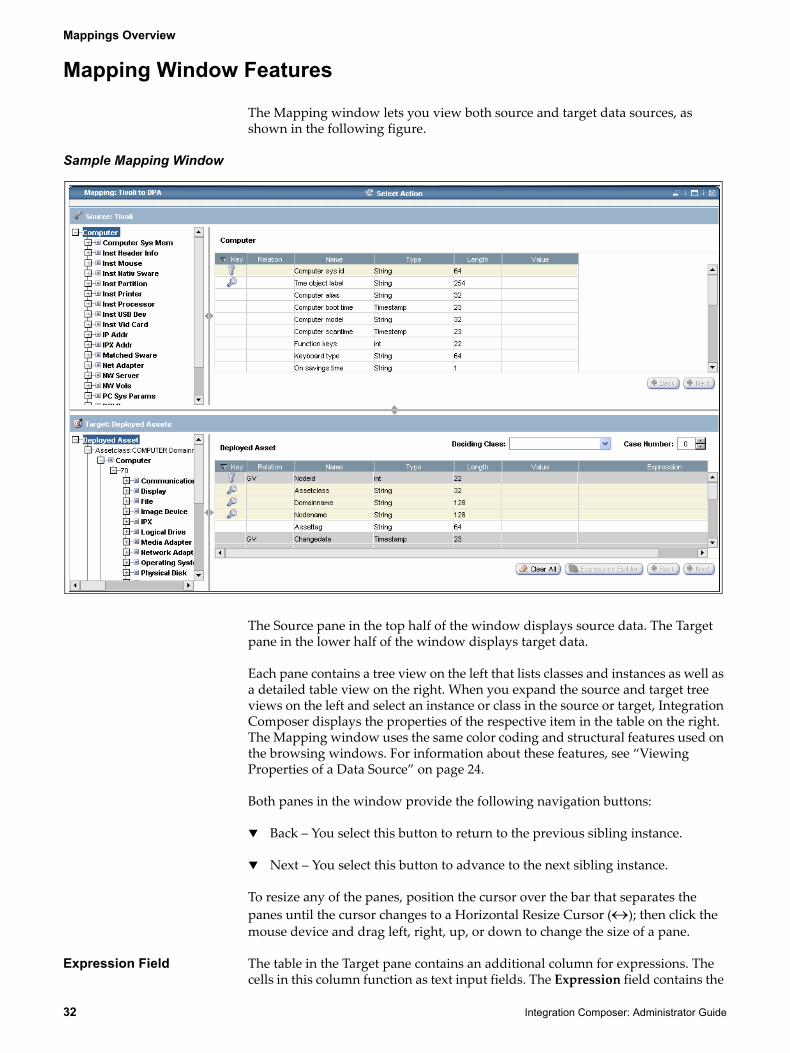
Mappings Overview
32 Integration Composer: Administrator Guide
Mapping Window Features
The Mapping window lets you view both source and target data sources, as shown in the following figure.
Sample Mapping Window
The Source pane in the top half of the window displays source data. The Target pane in the lower half of the window displays target data.
Each pane contains a tree view on the left that lists classes and instances as well as a detailed table view on the right. When you expand the source and target tree views on the left and select an instance or class in the source or target, Integration Composer displays the properties of the respective item in the table on the right. The Mapping window uses the same color coding and structural features used on the browsing windows. For information about these features, see “Viewing Properties of a Data Source” on page 24.
Both panes in the window provide the following navigation buttons:
Back – You select this button to return to the previous sibling instance.
Next – You select this button to advance to the next sibling instance.
To resize any of the panes, position the cursor over the bar that separates the panes until the cursor changes to a Horizontal Resize Cursor (↔); then click the mouse device and drag left, right, up, or down to change the size of a pane.
Expression Field The table in the Target pane contains an additional column for expressions. The cells in this column function as text input fields. The Expression field contains the
Mappings Overview
Mapping Data Sources 33
instruction that Integration Composer uses to transform data from the source format to the target format. You create a mapping by selecting a row in the table on the Source pane and entering a mapping expression into the Expression column for the corresponding property row in the table on the Target pane. In this way, you specify the class and property data in the source, associate it with a class and property in the target, and create instructions in the Expression field for transforming data from the source to the target.
Integration Composer provides the following ways to create expressions:
Drag and Drop Method – You use the drag-and-drop feature to create an expression when the source and target data have a one-to-one relationship.
Expression Builder Expression Builder – The Expression Builder button in the Target pane opens the Expression Builder dialog box, which provides access to a library of predefined functions and boolean operators that facilitate creation of complex translation expressions.
Typing an expression in the Expression field.
For more information about using each of these methods, see Chapter 6, "Creating Expressions," on page 99.
In addition to the Expression Builder and drag-and-drop features, the Target pane in the Mapping window provides the following mapping features:
Deciding Class Deciding Class Drop-down List – Sometimes you must map more than one class in a source to a single class in the target. When you map multiple source classes to a single target class, Integration Composer populates the Deciding Class drop-down list with the classes mapped. You can select a deciding class from the drop-down list to designate which class controls how many instances Integration Composer creates in the target. Integration Composer creates target instances based on the number of instances of the deciding class that exist in the source.
Case Number Case Number Field – You use the case number feature when you must migrate data from multiple classes in the source into multiple instances in a single target class. The case number feature lets you create a set of expressions that apply on a case-by-case basis to the same target class. For a more detailed discussion of this feature, see “Setting Up Multiple Cases” on page 102.
Clear All Clear All – In the Target pane, you can click Clear All to clear all expressions listed for a selected target class. If multiple cases exist for this class, Integration Composer clears expressions only for the selected case; it does not clear expressions for other cases defined for the class.
If a reference class exists for a case, clearing the expression or expressions for the case does not delete the corresponding expressions in the reference class. You must go to the reference class and delete the expressions for that case.
If a child class exists for a case, clearing the expression or expressions for the case does not delete the corresponding expressions in the child class. You must go to the child class and delete the expressions for that case.
Mappings Overview
34 Integration Composer: Administrator Guide
Mapping Window Actions
The following table lists actions available from the Select Action menu in the Mapping window.
Mapping Process
In general, use the following sequence of operations to create and execute a mapping:
1 Select the Create New Mapping function in Integration Composer and specify a source, a target, and a name for the mapping.
2 Optional: Establish connections to the source and target databases. Integration Composer requests this information if one of the data sources is not open. This step is not always required; if the source and the target databases are already open, you do not have to establish the connection.
3 Import an IBM Tivoli integration adapter mapping or use the mapping features provided in the Integration Composer user interface to define expressions for transforming data from the source to the target.
Action Description
Save Saves the mapping.
Save As Opens a Save Mapping As window to let you save the mapping with a new name.
Tree Search Opens a Find dialog box to let you search for a specific item in the navigation tree.
Search Again Searches for the next item that matches the search string and highlights that item. If Integration Composer finds no matching items, it displays a message indicating that no items were found.
Show Errors Opens an Errors dialog box that displays information about Java parsing errors detected in the current mapping.
Export Opens the Export Mapping dialog box to let you export a mapping to a text file.
Import Opens the Import Mapping dialog box to let you import a mapping into Integration Composer.
Close Opens a Close Mapping dialog box to let you close a mapping.
Insert Only Specifies that when importing data into the target data source, Integration Composer only creates new records. It does not update existing records. Select this option if you want Integration Composer only to insert data. This feature only works on sources that contain a last scan date.
Creating a New Mapping
Mapping Data Sources 35
4 Save and close the mapping.
5 Sign out of Integration Composer.
6 Execute the mapping using a command line.
Creating a New Mapping
A mapping is a set of expressions that transform data when Integration Composer imports it from an external source into a target. This section of the guide explains how to create a new mapping. If the data sources that you want to use in this mapping are not already open, as part of this procedure you must open the data sources for the source and/or target. Once you have created a mapping, you can import the mapping provided in an IBM Tivoli integration adapter or define mapping parameters by creating expressions to transform data from the source into target data. For additional information about creating expressions in a mapping, see Chapter 6, “Creating Expressions”, on page 99.
To create a new mapping, complete the following steps:
1 In the IBM Tivoli Integration Composer window, choose Create New Mapping. Integration Composer displays the New Mapping window.
2 From the Source drop-down list of existing data sources, select the desired source.
3 From the Target drop-down list of existing and available data sources, select the target.
4 In the Mapping Name field, enter a new mapping name (maximum of 255 characters). Mapping names are case sensitive; for example, IBM Tivoli Configuration Manager is different from IBM TIVOLI CONFIGURATION MANAGER.
5 Click OK. Integration Composer displays the Mapping window; or, if no data sources are open for the specified mapping, Integration Composer displays a Connection Information page in the Open Data Source window.
6 Select one of the following options:
If Integration Composer displays the Mapping window, go to step 7 on page 36.
If Integration Composer displays the Connection Information page on the Open <Source or Target> Data Source window, use the following procedure to complete the connection information:
a On the Connection Information page in the Open Source Data Source window, either accept the defaults established during the last connection to the data source or update the fields.
b Enter a data source password.
c Click Finish.
Opening an Existing Mapping
36 Integration Composer: Administrator Guide
d On the Connection Information page in the Open Target Data Source window, either accept the defaults established during the last connection to the data source or update the fields as necessary.
e Enter a data source password.
f Click Finish to establish the target’s connection. Integration Composer displays the Mapping window.
NOTE For more information about using the mapping window features, see “Mapping Window Features” on page 32.
7 In the Mapping window, set up a mapping by importing a mapping provided with an IBM Tivoli integration adapter or defining expressions to transform source data into the format required in the target.
For information about importing a mapping provided with an IBM Tivoli integration adapter, refer to the Implementation Guide provided with the adapter.
For information about how to define expressions, see Chapter 6, "Creating Expressions," on page 99.
8 After you create mapping expressions, from the Select Action menu, select Save. Integration Composer saves the mapping.
9 To close the Mapping window, from the Select Action menu, select Close. Integration Composer displays a Close Mapping dialog box.
10 In the Close Mapping dialog box, click Yes. Integration Composer closes the Mapping window and displays the IBM Tivoli Integration Composer window.
NOTE After creating the mapping, you can open it and add to it or modify it at any time (see “Opening an Existing Mapping” on page 36.). For information about how to execute a mapping after you have created it, see “Executing a Mapping” on page 43.
Opening an Existing Mapping
After creating and saving a new mapping, you can open an existing mapping to view or edit expressions in the mapping. When opening an existing mapping, keep in mind the following:
When you open a data source for the first time, you must define connection parameters on the Connection Information page of the Define a New Data Source window. When you open a data source on subsequent occasions, Integration Composer displays the previous database connection information as the default.
If a Ready check box is selected in the Open Mapping window, the mapping has no syntax errors, and you can execute the mapping.
When Integration Composer executes a mapping, it processes only the data that has changed since the last scan date. If you use the following procedure to modify
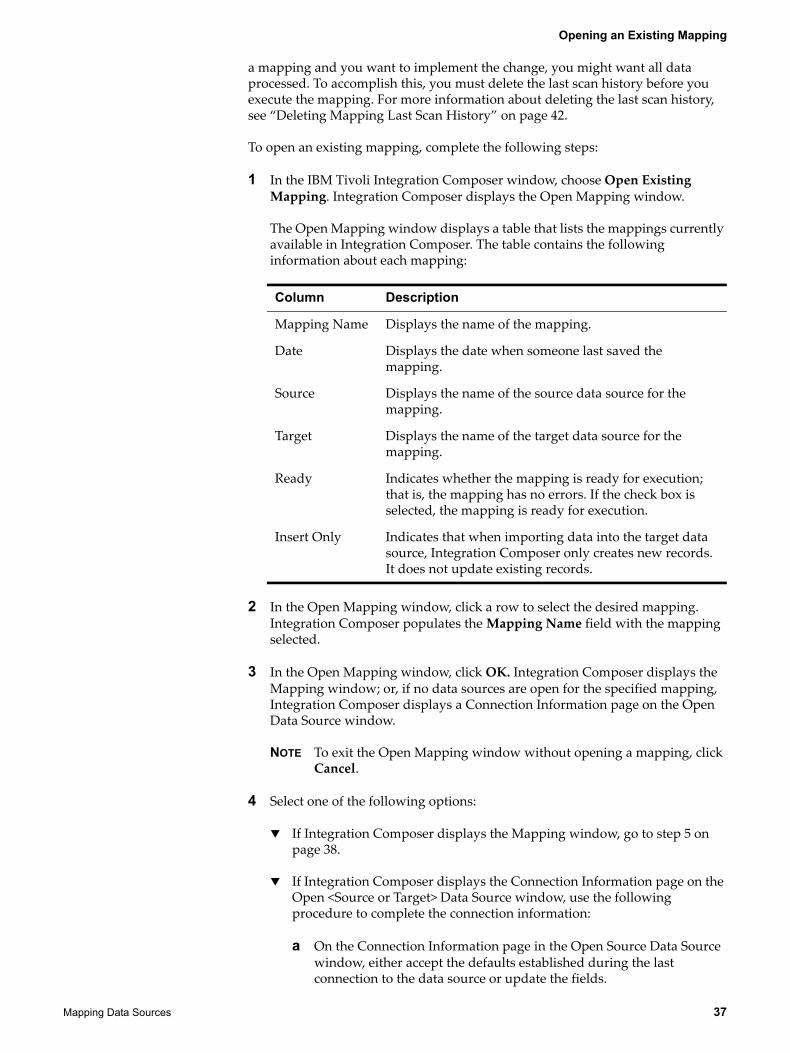
Opening an Existing Mapping
Mapping Data Sources 37
a mapping and you want to implement the change, you might want all data processed. To accomplish this, you must delete the last scan history before you execute the mapping. For more information about deleting the last scan history, see “Deleting Mapping Last Scan History” on page 42.
To open an existing mapping, complete the following steps:
1 In the IBM Tivoli Integration Composer window, choose Open Existing Mapping. Integration Composer displays the Open Mapping window.
The Open Mapping window displays a table that lists the mappings currently available in Integration Composer. The table contains the following information about each mapping:
2 In the Open Mapping window, click a row to select the desired mapping. Integration Composer populates the Mapping Name field with the mapping selected.
3 In the Open Mapping window, click OK. Integration Composer displays the Mapping window; or, if no data sources are open for the specified mapping, Integration Composer displays a Connection Information page on the Open Data Source window.
NOTE To exit the Open Mapping window without opening a mapping, click Cancel.
4 Select one of the following options:
If Integration Composer displays the Mapping window, go to step 5 on page 38.
If Integration Composer displays the Connection Information page on the Open <Source or Target> Data Source window, use the following procedure to complete the connection information:
a On the Connection Information page in the Open Source Data Source window, either accept the defaults established during the last connection to the data source or update the fields.
Column Description
Mapping Name Displays the name of the mapping.
Date Displays the date when someone last saved the mapping.
Source Displays the name of the source data source for the mapping.
Target Displays the name of the target data source for the mapping.
Ready Indicates whether the mapping is ready for execution; that is, the mapping has no errors. If the check box is selected, the mapping is ready for execution.
Insert Only Indicates that when importing data into the target data source, Integration Composer only creates new records. It does not update existing records.
Viewing Mapping Errors
38 Integration Composer: Administrator Guide
b Enter a data source password.
c Click Finish. Integration Composer displays either the Mapping window or the Connection Information page in the Open Target Data Source window. If Integration Composer displays the Mapping window, go to step 5. If Integration Composer displays the Connection Information page in the Open Target Data Source window, go to step d.
d On the Connection Information page in the Open Target Data Source window, either accept the defaults established during the last connection to the data source or update the fields as necessary.
e Enter a data source password.
f Click Finish. Integration Composer displays the Mapping window.
5 In the Mapping window, you can create new expressions or modify existing expressions. For more information about working with expressions, see Chapter 6, “Creating Expressions”, on page 99.
NOTE For an explanation of the mapping window features and various mapping methods, see “Mapping Window Features” on page 32.
6 After completing the expressions, from the Select Action menu, select Save. Integration Composer saves the mapping.
NOTE To save the changes as a new mapping, from the Select Action menu, select Save As. Integration Composer displays a Save Mapping As window. In the Mapping Name field in this window, type a new name for the mapping and click OK. Integration Composer saves the changes with the new mapping name. For instance, if you open mapping A and save it as B, Integration Composer saves the changes as mapping B and keeps mapping B open for editing. Mapping A will still exist in its original form.
7 To close the Mapping window, from the Select Action menu, select Close. Integration Composer displays a Close Mapping dialog box.
8 In the Close Mapping dialog box, click Yes. Integration Composer closes the Mapping window and displays the IBM Tivoli Integration Composer window.
NOTE For information about how to execute a mapping after you have created it, see “Executing a Mapping” on page 43.
Viewing Mapping Errors
From the Integration Composer Mapping window Select Action menu, you can select Show Errors to view any errors in the open mapping. The Show Errors function displays Java parsing errors but not compilation errors.
Integration Composer generates compilation errors only when it executes a mapping. To view compilation errors, you must view the Integration Composer
Exporting and Importing a Mapping
Mapping Data Sources 39
log files. For information about log files, see “Logging Properties File (logging.properties)” on page 125.
To view Java parsing errors in a mapping, complete the following steps:
1 From the Select Action menu in the Integration Composer Mapping window, select Show Errors. Integration Composer opens an Errors dialog box to display any errors in the mapping.
2 When you finish viewing the errors, click OK to close the dialog box.
Exporting and Importing a Mapping
After creating a mapping, you can export it from Integration Composer to a text file to use as a backup or to access it from another location. You can view the contents of the exported file using a text editor, such as Microsoft Notepad. You can also import an exported file into another instance of Integration Composer at a different location.
ATTENTION Use a text editor such as Microsoft Notepad when you want to view a mapping outside of Integration Composer. If you edit a mapping in Microsoft WordPad and then attempt to use the mapping in Integration Composer, errors occur.
By default, Integration Composer stores exported files in the following location:
<installDir>\data\mappings
Exporting a Mapping
To export a mapping, complete the following steps:
1 From the Select Action menu in the Integration Composer Mapping window, select Export. Integration Composer displays the Export Mapping dialog box.
2 In the File name field in the Export Mapping dialog box, enter a file name for the mapping.
3 From the Files of type drop-down list, select the .fsn file extension.
NOTE The .fsn extension identifies Integration Composer mapping files.
4 Click Save. Integration Composer exports the mapping to the specified location. If Integration Composer successfully exports the file, it displays a confirmation message.
5 In the confirmation message dialog box, click OK.
Exporting and Importing a Mapping
40 Integration Composer: Administrator Guide
Importing a Mapping
From the Integration Composer Mapping window, you can import a mapping into Integration Composer.
ATTENTION Importing a mapping has the following effect on the original mapping:
If an expression exists in both mappings, Integration Composer replaces the existing expression with the imported expression.Integration Composer adds any new expressions in the imported mapping to the original mapping.If an expression exists only in the original mapping, it remains unchanged; Integration Composer does not delete the existing expression.
To import a mapping into Integration Composer, complete the following steps:
1 From the Select Action menu in the Integration Composer Mapping window, select Import. Integration Composer displays the Import Mapping dialog box.
2 In the Import Mapping dialog box, double-click to select a file to import. Optional: You can use the browse features in this window to locate a file.
NOTE The .fsn extension identifies Integration Composer mapping files.
3 Click Open. Integration Composer imports the mapping.
NOTE If any errors result from importing the mapping, Integration Composer displays a dialog box listing the errors and asking if you want to continue to import the mapping. To respond, select one of the following options:To cancel the import action without importing the mapping, click No. Integration Composer closes the dialog box and does not import the mapping.To continue to import the mapping, click Yes. Integration Composer imports the mapping and displays errors in red. Resolve the errors before saving the mapping.
4 Optional: You can modify the mapping.
5 When you finish the mapping, from the Select Action menu, select Save to save the mapping. Integration Composer saves the mapping.
NOTE To save changes as a new mapping, from the Select Action menu, select Save As. Integration Composer displays a Save Mapping As window. In the Mapping Name field in this window, type a new name for the mapping and click OK. Integration Composer saves the changes with the new mapping name. For instance, if you open mapping A and save it as B, Integration Composer saves the changes as mapping B and keeps mapping B open for editing. Mapping A will still exist in its original form.
6 To close the Mapping window, from the Select Action menu, select Close. Integration Composer displays a Close Mapping dialog box.
Deleting a Mapping
Mapping Data Sources 41
7 In the Close Mapping dialog box, click Yes. Integration Composer closes the Mapping window and displays the IBM Tivoli Integration Composer window.
Deleting a Mapping
Occasionally, you no longer need a mapping. The following procedure explains how to delete a mapping permanently. If you delete a mapping, Integration Composer also deletes its last scan history.
ATTENTION After you delete a mapping, you must recreate it if you subsequently want to use it. If you think you might want to use a mapping again, but you do not want to keep it in Integration Composer, you can export the mapping to a file and then import it back into Integration Composer if necessary. For information about exporting and importing mappings, see “Exporting and Importing a Mapping” on page 39.
To delete a mapping, complete the following steps:
1 Close any open windows using the desired mapping.
2 In the IBM Tivoli Integration Composer window, select Delete Mapping. Integration Composer displays the Select Mapping(s) to Delete Permanently window.
3 In the Select Data Schema(s) to Delete Permanently window, select one or more mappings to delete by clicking the mapping.
To select a series of mappings, use Shift+Click.
To select separate mappings, use Ctrl+Click.
To select all mappings in the list, click Select All.
To cancel the selection of all mappings in the list, click Deselect All.
4 After you select one or more mappings, click Delete. Integration Composer displays a Delete Mapping confirmation dialog box.
5 On the Delete Mapping dialog box, select one of the following options:
To delete one or more mappings, click Yes. Integration Composer deletes the selected mappings and displays the IBM Tivoli Integration Composer window.
To keep this mapping, click No. Integration Composer closes the Delete Mapping confirmation dialog box and displays the IBM Tivoli Integration Composer window.
To cancel deletion of the selected mapping and select a different mapping to delete, click Cancel. Integration Composer closes the Delete Mapping confirmation dialog box and displays the Select Mapping(s) to Delete Permanently window so that you can select a different mapping to delete.
Deleting Mapping Last Scan History
42 Integration Composer: Administrator Guide
Deleting Mapping Last Scan History
When Integration Composer executes a mapping for the first time, it copies the last scan date time stamp for top-level objects in the source data source (for example, Client in Centennial and System Architecture in SMS) into the Integration Composer repository. On subsequent mapping executions, Integration Composer compares the last scan date in the Integration Composer repository with the scan date in the source data source and performs one of the following actions:
If the date for an object in the source is earlier than or is the same as the last scan date in the repository, Integration Composer skips the source instance.
If the date for an object in the source occurs after the last scan date in the repository, Integration Composer processes the expressions for the source instance and updates the last scan date in the repository.
By doing this, Integration Composer ensures that it transfers only the data that has changed since the last scan date.
If you modify a mapping and you want to implement the change, you might want all data transferred. To accomplish this, you must delete the last scan history.
To delete the last scan date, complete the following steps:
1 In the IBM Tivoli Integration Composer window, choose Delete Mapping Last Scan History. Integration Composer displays the Select Last Scan History(s) to Delete window.
2 In the Select Last Scan History(s) to Delete window, select one or more mappings for which you want to delete the last scan history by clicking the mapping.
To select a series of mappings, use Shift+Click.
To select separate mappings, use Ctrl+Click.
To select all mappings in the list, click Select All.
To cancel the selection of all mappings in the list, click Deselect All.
3 After selecting one or more mappings, click Delete. Integration Composer displays a Delete Mapping Last Scan History confirmation dialog box.
4 In the Delete Mapping Last Scan History dialog box, select one of the following options:
To delete the scan history, click Yes. Integration Composer deletes the selected scan history or histories and displays the IBM Tivoli Integration Composer window.
To keep this scan history, click No. Integration Composer closes the Delete Mapping Last Scan History confirmation dialog box and displays the IBM Tivoli Integration Composer window.
Executing a Mapping
Mapping Data Sources 43
To cancel deletion of the selected scan history and select a different scan history to delete, click Cancel. Integration Composer closes the Delete Mapping Last Scan History confirmation dialog box and displays the Select Last Scan History(s) to Delete window so that you can select a different scan history to delete.
Executing a Mapping
When you create a mapping, you define a set of expressions that specify how to transform instances of data from a source to a target. To transform the data and import it from the source into a target, you must execute the mapping. For information about how Integration Composer processes expressions during the mapping execution process, see “Mapping Execution” on page 30.
For performance reasons, you execute mappings from a command line interface. To execute a mapping, you run the script that is located in the bin subdirectory of the Integration Composer installation directory. For Microsoft Windows operating systems, the file is commandLine.bat. For UNIX-based operating systems the file is commandLine.sh.
You can provide parameter arguments directly from a command line, or you can edit the parameters in the file and then execute the file. If you have more than one mapping to execute, you can edit the file and save separate files for each mapping that you want to execute.
There are several parameters to consider when executing a mapping:
Deleting last scan history (optional)
Setting this parameter is optional. By default, when importing data, Integration Composer processes only the data that has changed since the last scan date. However, if you modify a mapping and you want to implement the change, you might want all data processed. To accomplish this, you must delete the last scan history. Set the -delete parameter only if you want all data processed when you execute the mapping.
NOTE You can also choose to delete the last scan history using the Delete Mapping Last Scan History option in the Integration Composer user interface before you execute the mapping. For more information about deleting the last scan history, see “Deleting Mapping Last Scan History” on page 42.
Mapping execution specifications
Set parameter arguments to specify mapping name, repository user name and password, source user name and password, and target user name and password for mapping execution.
Using Schedulers You can use a scheduling program, such as Windows scheduler, to execute mappings. If you use a scheduler, you must comment out the line containing the ‘pause’ command at the end of the file. To comment out a line, add REM at the beginning of the line, as shown in the following example.
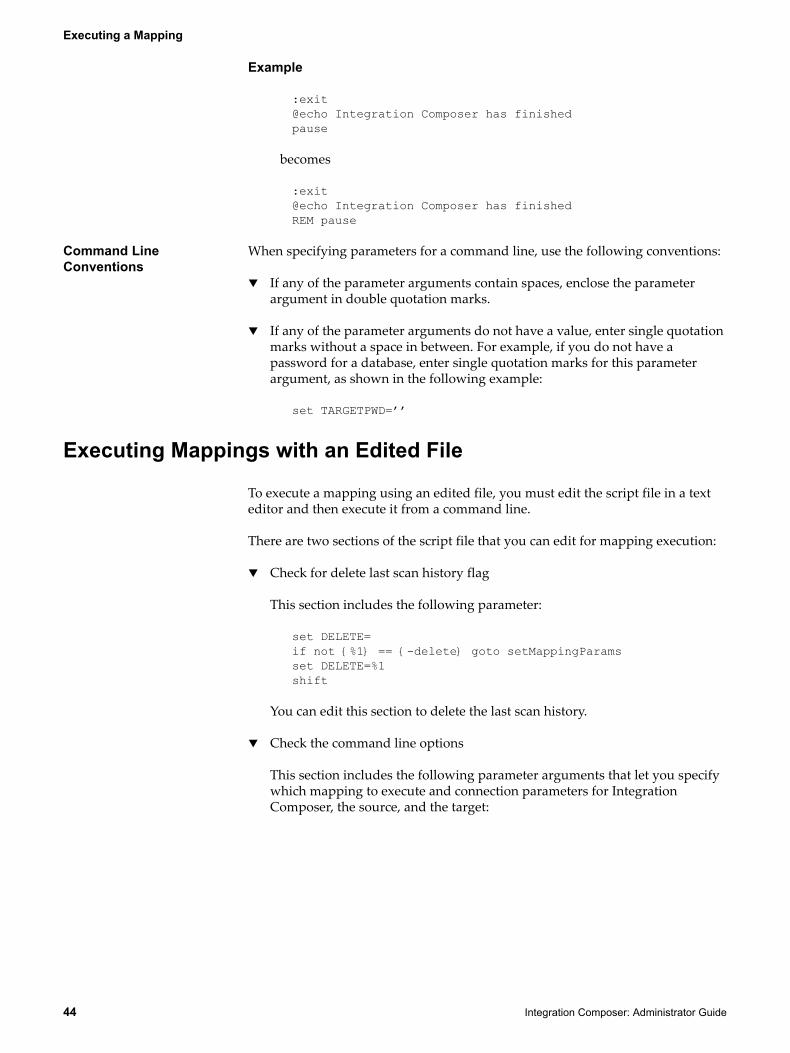
Executing a Mapping
44 Integration Composer: Administrator Guide
Example
:exit@echo Integration Composer has finishedpause
becomes
:exit@echo Integration Composer has finishedREM pause
Command Line Conventions
When specifying parameters for a command line, use the following conventions:
If any of the parameter arguments contain spaces, enclose the parameter argument in double quotation marks.
If any of the parameter arguments do not have a value, enter single quotation marks without a space in between. For example, if you do not have a password for a database, enter single quotation marks for this parameter argument, as shown in the following example:
set TARGETPWD=’’
Executing Mappings with an Edited File
To execute a mapping using an edited file, you must edit the script file in a text editor and then execute it from a command line.
There are two sections of the script file that you can edit for mapping execution:
Check for delete last scan history flag
This section includes the following parameter:
set DELETE=if not {%1} == {-delete} goto setMappingParamsset DELETE=%1shift
You can edit this section to delete the last scan history.
Check the command line options
This section includes the following parameter arguments that let you specify which mapping to execute and connection parameters for Integration Composer, the source, and the target:
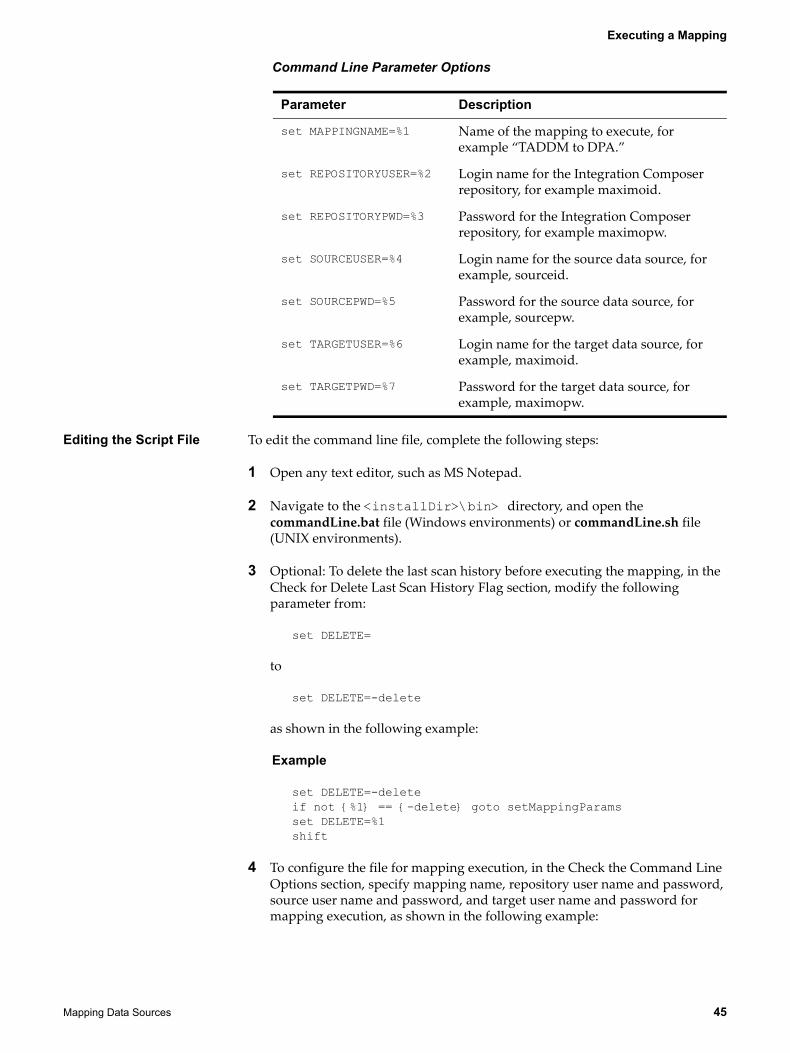
Executing a Mapping
Mapping Data Sources 45
Command Line Parameter Options
Editing the Script File To edit the command line file, complete the following steps:
1 Open any text editor, such as MS Notepad.
2 Navigate to the <installDir>\bin> directory, and open the commandLine.bat file (Windows environments) or commandLine.sh file (UNIX environments).
3 Optional: To delete the last scan history before executing the mapping, in the Check for Delete Last Scan History Flag section, modify the following parameter from:
set DELETE=
to
set DELETE=-delete
as shown in the following example:
Example
set DELETE=-deleteif not {%1} == {-delete} goto setMappingParamsset DELETE=%1shift
4 To configure the file for mapping execution, in the Check the Command Line Options section, specify mapping name, repository user name and password, source user name and password, and target user name and password for mapping execution, as shown in the following example:
Parameter Description
set MAPPINGNAME=%1 Name of the mapping to execute, for example “TADDM to DPA.”
set REPOSITORYUSER=%2 Login name for the Integration Composer repository, for example maximoid.
set REPOSITORYPWD=%3 Password for the Integration Composer repository, for example maximopw.
set SOURCEUSER=%4 Login name for the source data source, for example, sourceid.
set SOURCEPWD=%5 Password for the source data source, for example, sourcepw.
set TARGETUSER=%6 Login name for the target data source, for example, maximoid.
set TARGETPWD=%7 Password for the target data source, for example, maximopw.
Executing a Mapping
46 Integration Composer: Administrator Guide
Example
set MAPPINGNAME="TADDM to DPA"set REPOSITORYUSER=maximoidset REPOSITORYPWD=maximopwset SOURCEUSER=sourceidset SOURCEPWD=sourcepwset TARGETUSER=maximoidset TARGETPWD=maximopw
5 Save the modified file and close the editor.
Executing the Script File To execute a script file, complete the following steps:
1 If Integration Composer is open, close the application.
2 Open a command prompt.
3 Navigate to the bin subdirectory in your Integration Composer installation directory.
<installDir>\bin\
4 Type the appropriate command:
commandLine.bat (for Microsoft Windows installations)
or
./commandLine.sh (for UNIX installations)
5 Press Enter.
Executing Mappings from a Command LIne
You can delete the last scan history and execute the mapping directly from a command line.
To execute a mapping from a command line, complete the following steps:
1 If Integration Composer is open, close the application.
2 Open a command prompt.
3 Navigate to the bin subdirectory in your Integration Composer installation directory.
<installDir>\bin\
Executing a Mapping
Mapping Data Sources 47
4 Select the appropriate option for your environment:
For Microsoft Windows installations:
To delete last scan history and then execute the mapping:
commandLine.bat -delete mappingName repositoryUserName repositoryPassword sourceUserName sourcePassword targetUserName targetPassword
Example
To execute the mapping without deleting last scan history:
commandLine.bat mappingName repositoryUserName repositoryPassword sourceUserName sourcePassword targetUserName targetPassword
Example
For UNIX installations, select the appropriate option:
To delete last scan history and then execute the mapping:
./commandLine.sh -delete mappingName repositoryUserName repositoryPassword sourceUserName sourcePassword targetUserName targetPassword
Example
To execute the mapping without deleteing last scan history:
./commandLine.sh mappingName repositoryUserName repositoryPassword sourceUserName sourcePassword targetUserName targetPassword
Example
5 Press Enter.
6 When the mapping is completed, press Enter again.
commandLine.bat -delete "TADDM to DPA" maximoid maximopw sourceid sourcepw maximoid maximopw
commandLine.bat "TADDM to DPA" maximoid maximopw sourceid sourcepw maximoid maximopw
./commandLine.sh -delete "TADDM to DPA" maximoid maximopw sourceid sourcepw maximoid maximopw
./commandLine.sh "TADDM to DPA" maximoid maximopw sourceid sourcepw maximoid maximopw
Creating Effective Mappings
48 Integration Composer: Administrator Guide
Creating Effective Mappings
This section of this chapter offers useful information for special mapping expressions and suggestions for creating effective mappings in Integration Composer.
Mapping Key Properties
When creating a mapping, if a class has only a generated value or a foreign key, you must select one or more properties as alternate keys for the class.
Mapping Data for Units of Measurement
In some cases, source data uses one unit of measurement for a property and the target uses a different unit of measurement. For example, the unit of measurement in the source might be kilobytes, and the unit of measurement in the target might be megabytes. In such cases, you have to create a mapping expression to compensate for the difference.
For example, if the value for a property, such as RAM (random access memory) in the source is expressed in kilobytes and the target uses megabytes, you must define an expression in your mapping to convert from kilobytes to megabytes, as shown in the following example.
'RAM.Size(bytes)'/ 1024.
When Integration Composer imports data, it performs the appropriate calculation to compensate for the difference.
Mapping Data for Scan Dates
When Integration Composer executes a mapping for the first time, it copies the last scan date time stamp for top-level objects in the source data source (if such a scan date exists) into the Integration Composer repository. On subsequent mapping executions, Integration Composer compares the last scan date in the Integration Composer repository with the scan date from the data source and performs one of the following actions:
If the date for an object in the source is earlier than or is the same as the last scan date in the repository, Integration Composer skips the source instance.
If the date for an object in the source occurs after the last scan date in the repository, Integration Composer processes the expressions for the source instance and updates the last scan date in the repository.
By doing this, Integration Composer ensures that it transfers only the data that has changed since the last scan date.
Creating Effective Mappings
Mapping Data Sources 49
CCMDB For Configuration and Change Management Database (CCMDB) installations, Integration Composer determines scan dates based on the source-to-target mapping defined for the following property in Actual CIs:
Actual CI.LastModifiedTime
Tivoli Asset Management for IT and Service Request Manager
For Tivoli Asset Management for IT and Service Request Manager installations, Integration Composer determines scan dates based on the source-to-target mappings defined for the following properties in Deployed Assets:
Deployed Asset.Hwlastscandate
Computer.Swlastscandate
Mapping Data for Sites and Organizations
Most discovery tools do not provide scanned data about sites and organizations. If you want to differentiate data by sites and/or organizations, you must specifically set these values in the Integration Composer mapping.
If you want to include site and/or organization data, you can insert literal values for the Siteid and Orgid properties in the mapping target.
Site and organization data is not a requirement, but you can specify a value for site and organization so that the data is available in the target. Because Integration Composer does not validate this data, be sure to specify a valid value.
NOTE For Tivoli Asset Management for IT and Service Request Manager users: The Maximo Deployed Assets module applications have a Site field but not an organization field. The organization can be determined based on the site. If the Deployed Assets module applications display site information, the standard rules govern how site data is displayed.
Mapping Data for Deployed Asset Conversion Applications
NOTE This section applies only to Tivoli Asset Management for IT and Service Request Manager users who import data into Deployed Assets module applications.
Because of variable hardware and software naming conventions, data collected by discovery tools for display in the Deployed Assets module is often inconsistent. For example, operating system might sometimes be Fermion 4 and sometimes Fermion IV. In addition, sometimes discovery tools include version and release numbers in product names, such as Office 4.1 or Office 5.2. An enterprise might only want to track instances of Office without specifying a version number.
The Deployed Assets Administration module in Tivoli Asset Management for IT and Service Request Manager includes the following five conversion applications that let administrators configure the products to translate inconsistent names used by discovery tools to standard naming conventions.
Adapter Conversion – translates adapter names, both media adapters (such as video and sound cards) and network adapters.
Manufacturer Conversion – translates manufacturer names.
Creating Effective Mappings
50 Integration Composer: Administrator Guide
Operating System Conversion – translates operating system names.
Processor Conversion – translates processor (CPU) names.
Software Conversion – translates software application names.
The conversion applications in the Deployed Assets Administration module let administrators review the names assigned to imported data and, if necessary, set up conversions that translate variations in software, hardware, or manufacturer names to a standard naming convention.
Each record in a conversion application specifies a target name and a variant or a set of variants. A variant is a variation of a name that is translated to the target name each time data is displayed.
Tivoli Asset Management for IT and Service Request Manager apply deployed asset conversions each time deployed asset data for computers, network devices, and network printers is requested. The translated data is displayed in the Deployed Assets module applications and is used in the reports generated for these products.
When Integration Composer imports adapter, manufacturer, processor, operating system, and software application data, it checks the data to determine whether the name used for the deployed asset data exists as a variant on a conversion record. If Integration Composer does not find a variant, it creates a conversion record with a target name and a variant name that are identical to the name used for the deployed asset data.
To enable Integration Composer to supply a target name and variant, an Integration Composer mapping must contain expressions for both a target name and a variant name for adapters, manufacturers, processors, operating systems and software applications. The target name must be identical to the variant name.
You cannot have a null value for the target name and variant name properties. If these properties have null values, no deployed asset data is displayed for computers, network printers, network devices, adapters, manufacturers, operating systems, processors, or software.
In integration adapter mappings, the expression defined for both the target name and the variant name searches for a value and, if the value is null, returns the string “UNKNOWN” as shown in the following example:
{ String name = 'OS.ManufacturerName'; if ((name != null) && (name.length() > 0)) { if (!"<dummy text>".equalsIgnoreCase(name) && !"unknown".equalsIgnoreCase(name)) { return name; } }
return "UNKNOWN";}
Creating Effective Mappings
Mapping Data Sources 51
Mapping Data for Files
NOTE This section applies only to Tivoli Asset Management for IT and Service Request Manager users who import data into Deployed Assets module applications.
You should be aware that mapping source data about files to the Deployed Assets File class might affect Integration Composer performance if large numbers of files are present. Integration Composer adapters do not map source data about files. You can modify adapter mappings to include file data. However, you should be aware that this might negatively affect Integration Composer performance.
Configuring Level of Depth for Actual CI Data
NOTE This section applies only to CCMDB installations.
The fusion.properties initialization file contains the following property that lets you determine the number of levels of data migrated when Integration Composer imports Actual CI data:
mxe.db.queryDepthLevel=3
The default level is 3. You can edit the properties file and change the default, but be aware that using a higher number to import more levels of relationships can affect performance.
To calculate the number of relationships traversed, take the level specified in the properties file and subtract one.
Depth Level specified minus 1 = Number of relationships traversed
For example, suppose that you have the default depth level set to 3. When importing data about computer systems, Integration Composer imports the following levels:
Here you traverse two levels of relationships, one between computer system and operating system, and another between operating system and software.
If you set the Depth Level to a value of -1, all relationships are traversed for an active, top-level Actual CI.
Depth Level Class
1 Computer System
2 Operating System
3 Software

Creating Effective Mappings
52 Integration Composer: Administrator Guide
© Copyright IBM Corp. 2007, 2008 53
A data schema is a structure for organizing and classifying data in a database. Integration Composer provides default data schemas and also lets users define their own data schemas. This chapter explains how to work with user-defined data schemas. It explains how to create new data schemas, open existing data schemas, import data schemas, export data schemas, and delete schemas.
Understanding Integration Composer Data Schemas
A data schema defines both data contents and relationships. Integration Composer interprets data and transforms it to the format required for the Maximo database based on the structures defined in data schemas.
When installed, Integration Composer provides the following data schemas:
data schemas required for commonly used discovery tools, such as Microsoft® SMS and Altiris Inventory Solution®.
a data schema for the most frequently used target, the Deployed Assets tables in the Maximo database. This data schema is identified as Deployed Assets 7.1.
two data schemas to use for the IT asset initialization process, which lets you create a baseline set of IT assets when you first implement IT asset management:
Maximo Assets 7.1Source - Deployed Assets 7.1
ATTENTION Use the Source - Deployed Assets 7.1 and Maximo Assets 7.1 data schemas only when performing IT asset initialization. For more information about the asset initialization process, refer to Appendix C – IT Asset Initialization.
The Integration Composer repository contains metadata that defines the structure of the data for these data schemas. You can browse these data schemas, and you can use them to create mappings.
Integration Composer lets you define additional data schemas using the data schema definition features described in this chapter. You can use the data schema features to create data schemas, modify any data schemas you create through Integration Composer, export data schemas, import data schemas, and delete data schemas. The Integration Composer repository stores metadata for user-defined data schemas.
Creating Data Schemas 5
Creating Data Schemas
54 Integration Composer: Administrator Guide
For more information about classes and properties in Integration Composer data schemas, see "Introduction to Data Schemas," on page 9.
Creating Data Schemas
The following procedure explains how to create a new data schema. You use the following two windows to create a data schema:
Define a New Data Schema windowData Schema window
Define a New Data Schema Window
Integration Composer displays the Define a New Data Schema window when you select Define New Data Schema in the IBM Tivoli Integration Composer window.
In this window, you name the data schema, associate the data schema with a specific data source, and specify the parameters for connecting to the data source. A data schema definition includes connection parameters you define for a specific data source so that you can easily open it when you want to work with it again. After you define data source connection parameters, Integration Composer stores the connection information and displays those parameters when you attempt to connect to the data source. The only parameter that Integration Composer requests is the password.
The Define a New Data Schema window displays the following pages:
Data Schema – You use this page to specify a name for the data schema.
Data Source – You use this page to specify a data source name for the data schema.
Connection Information – You use this page to select a connection method and connection parameters for the data schema. The connection parameter fields displayed depend upon the type of driver selected.
The Define a New Data Schema window includes the following buttons:
Button Description
Back Returns to the previous page in the window.
Next Advances to the next page in the window.
Finish Completes the data schema definition.
Cancel Cancels the data schema definition.
Test Connection Lets you test the connection before you create the data schema.
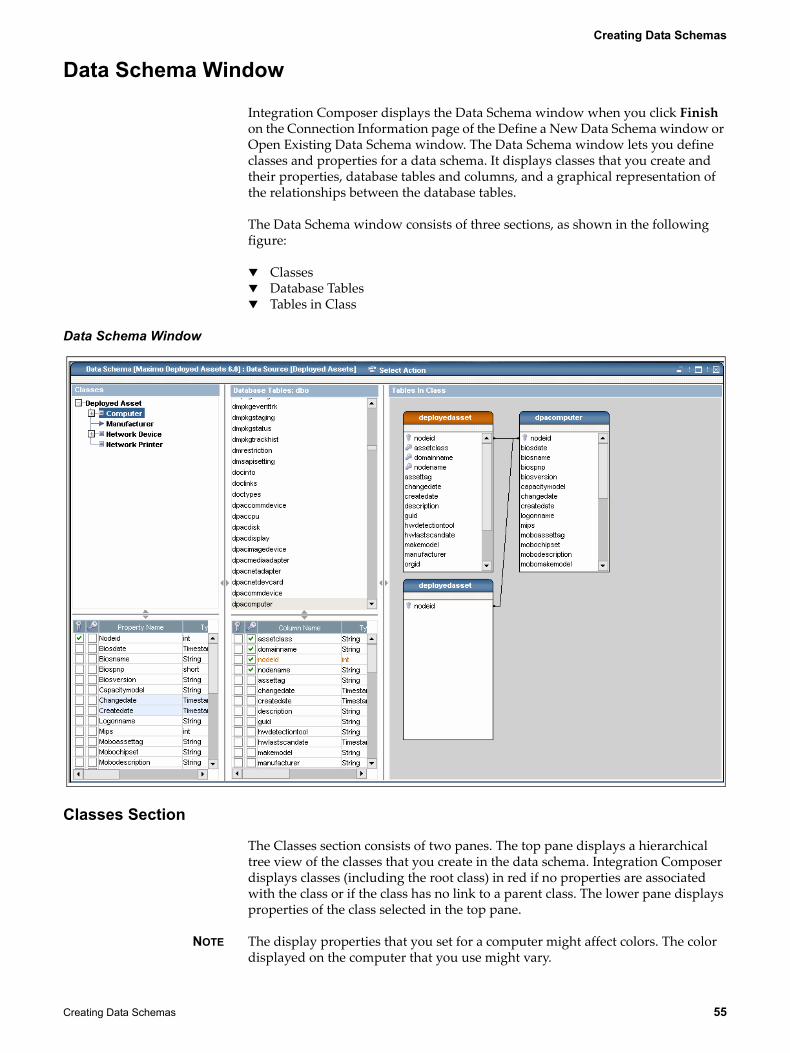
Creating Data Schemas
Creating Data Schemas 55
Data Schema Window
Integration Composer displays the Data Schema window when you click Finish on the Connection Information page of the Define a New Data Schema window or Open Existing Data Schema window. The Data Schema window lets you define classes and properties for a data schema. It displays classes that you create and their properties, database tables and columns, and a graphical representation of the relationships between the database tables.
The Data Schema window consists of three sections, as shown in the following figure:
ClassesDatabase TablesTables in Class
Data Schema Window
Classes Section
The Classes section consists of two panes. The top pane displays a hierarchical tree view of the classes that you create in the data schema. Integration Composer displays classes (including the root class) in red if no properties are associated with the class or if the class has no link to a parent class. The lower pane displays properties of the class selected in the top pane.
NOTE The display properties that you set for a computer might affect colors. The color displayed on the computer that you use might vary.
Creating Data Schemas
56 Integration Composer: Administrator Guide
Classes Tree Action Menu
The Classes tree view provides an action menu. Integration Composer displays this menu when you right-click a class in the tree view.
The following table lists the actions available in the menu.
Class Properties Table The lower pane in the Classes section displays a table, which lists the properties for the class selected in the top pane. In the Data Schema Window figure on page 55, Computer is the selected class, and the table in the lower half of the window displays the properties of that class.
The following table lists the data displayed for each class property in the class properties table.
Action Function
Add... Opens a New Class window to let you add a new class to the data schema.
Rename Opens a text field to let you rename a class in the data schema.
Delete Deletes the selected class from the data schema.
Paste Pastes tables or selected columns that you copied in the Database Tables section of the window.
Properties Opens a Class Properties window to let you view or edit attributes of a class.
Column Description
Check box to specify whether the property is a primary key. If the check box is selected, the property is a primary key. If the check box is cleared, the property is not a primary key.
Check box to specify whether the property is an alternate key. If the check box is selected, the property is an alternate key. If the check box is cleared, the property is not an alternate key.
Property Name Name of the property.
Type Java data type for the property.
Size Size of the property. If you double click this cell in the table, Integration Composer opens a spin box to let you select a value for size. The lowest value available is 1. Integration Composer determines the upper limit based on the limit specified for the associated database table column.
Null Check box to specify whether the property can be null. If the check box is selected, Integration Composer can use null values for the property. If the check box is cleared, Integration Composer requires a value for the property.
If the corresponding database table column is required (that is, it is defined as not null), then the property is also defined as not null, and you cannot change it.
Show Check box that specifies whether Integration Composer displays the property.
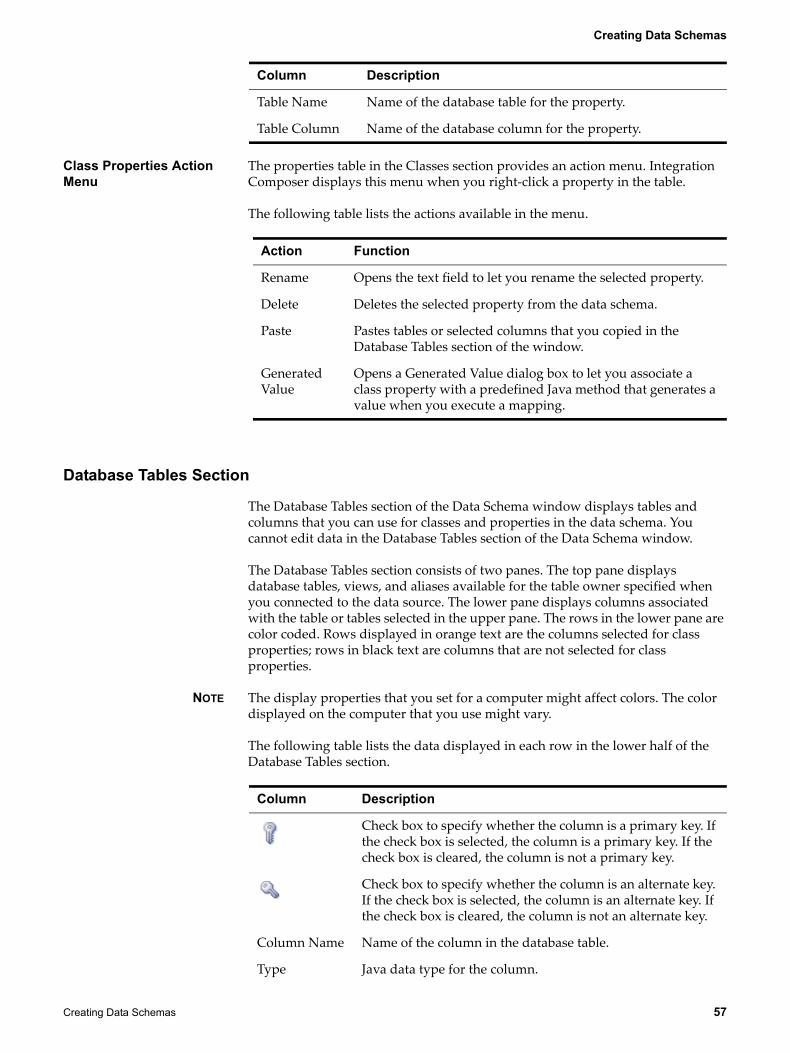
Creating Data Schemas
Creating Data Schemas 57
Class Properties Action Menu
The properties table in the Classes section provides an action menu. Integration Composer displays this menu when you right-click a property in the table.
The following table lists the actions available in the menu.
Database Tables Section
The Database Tables section of the Data Schema window displays tables and columns that you can use for classes and properties in the data schema. You cannot edit data in the Database Tables section of the Data Schema window.
The Database Tables section consists of two panes. The top pane displays database tables, views, and aliases available for the table owner specified when you connected to the data source. The lower pane displays columns associated with the table or tables selected in the upper pane. The rows in the lower pane are color coded. Rows displayed in orange text are the columns selected for class properties; rows in black text are columns that are not selected for class properties.
NOTE The display properties that you set for a computer might affect colors. The color displayed on the computer that you use might vary.
The following table lists the data displayed in each row in the lower half of the Database Tables section.
Table Name Name of the database table for the property.
Table Column Name of the database column for the property.
Column Description
Action Function
Rename Opens the text field to let you rename the selected property.
Delete Deletes the selected property from the data schema.
Paste Pastes tables or selected columns that you copied in the Database Tables section of the window.
Generated Value
Opens a Generated Value dialog box to let you associate a class property with a predefined Java method that generates a value when you execute a mapping.
Column Description
Check box to specify whether the column is a primary key. If the check box is selected, the column is a primary key. If the check box is cleared, the column is not a primary key.
Check box to specify whether the column is an alternate key. If the check box is selected, the column is an alternate key. If the check box is cleared, the column is not an alternate key.
Column Name Name of the column in the database table.
Type Java data type for the column.
Creating Data Schemas
58 Integration Composer: Administrator Guide
Tables in Class Section
The Tables in Class section of the Data Schema window consists of a single pane that displays a box for each database table associated with the class selected in the Classes tree view. The title of the box is the database table name. The title bars are color coded. Integration Composer displays tables for parent classes with an orange title bar. It displays tables for child classes with a blue title bar. Inside each box, Integration Composer lists the columns that you selected from the database table for the class properties.
Link Relationships In the Tables in Class section, you can create link relationships to join tables. You can link primary key and alternate key relationships between parent and child or sibling tables.
For each link relationship, Integration Composer displays a line connecting the columns in the tables. Lines are color coded. When you select a link, it becomes active, and Integration Composer displays it in blue. Integration Composer displays a black line for inactive links that are not selected. You can double-click the line to view the link properties. You can right-click the line to open a menu that allows you to either view link properties or delete the link, as shown in the following figure.
Integration Composer connects linked tables that belong to a parent class with an orange line. You cannot modify these links. Integration Composer displays them for information only.
NOTE You can also select the line linking two columns and press the Backspace key to delete the link or press Enter to view the link properties.
Select Action Menu
The title bar of the Data Schema window contains a Select Action menu with the following options.
Size Size of the column.
Null Check box to specify whether the column can be null. If the check box is selected, Integration Composer can use null values for the column. If the check box is cleared, Integration Composer cannot use null values for the column.
Table Name Name of the database table where the column is located.
Column Description
Menu Option Description
Close Closes the data schema. If you made any changes that you did not save, prompts you to save the changes.
Save Saves the data schema.
Export Data Schema
Opens an Export Data Schema dialog box to let you export the data schema.
Creating Data Schemas
Creating Data Schemas 59
Working with Classes and Tables in the Data Schema Window
In the Data Schema window, you can create classes for the data schema, add properties and child classes to a class, define link relationships, import data schemas, export data schemas, save and close data schemas. The Data Schema window includes several action menus and drag-and-drop features that let you define and work with the data schema.
Drag-and-Drop Features On the Data Schema window, you can use the drag-and-drop feature to perform the following actions:
Move an entire database table from the upper half of the Database Tables section to a selected class in the tree view in the Classes section. This creates a property in the class for each column in the database table.
Move selected database columns (that is, rows) from the lower half of the Database Tables section to a selected class in the tree view in the Classes section. This creates a class property for the column.
Rearrange tables displayed in the Tables in Class section.
Create a link between two columns in the tables displayed in the Tables in Class section.
When you select a class and add columns from one or more tables as properties for the class, Integration Composer performs the following actions:
In the Classes section, Integration Composer adds the property or properties to the lower half of the section.
In the Database Tables section, as you add properties to a class, Integration Composer highlights all tables selected in the top half of the section and accumulates rows for all columns in the selected tables in the lower half of the section. The rows in the lower pane are color coded. Rows displayed in orange text are the columns that you selected for class properties; rows in black text are columns you did not select for class properties.
In the Tables in Class section, Integration Composer displays a box for each table selected. In this box, Integration Composer lists columns selected for class properties.
Import Data Schema
Opens an Import Data Schema dialog box to let you import a data schema. This feature is active only when you create a new data schema in Integration Composer.
Auto-Arrange Rearranges the database tables displayed in the Tables in Class section on the Data Schema window.
Properties Opens the Data Schema Properties window to let you set properties for classes you use for caching, hardware last scan date, software last scan date, and time stamp.
Menu Option Description

Creating a New Data Schema
60 Integration Composer: Administrator Guide
Creating a New Data Schema
In general, use the following sequence of operations to create a data schema:
1 Select the Define New Data Schema function in Integration Composer to name the data schema, specify a data source, and specify connection parameters to the data source.
2 In the Data Schema window, which Integration Composer displays after you define a new data schema, select classes and properties for the data schema. Before you can save a data schema, you must add properties to each class and designate primary or alternate keys for the class.
3 Save the data schema.
After you save and close a data schema, you can use the Browse Data Source by Structure option in the IBM Tivoli Integration Composer window to open the data schema and verify that you created it properly.
Guidelines for Creating Data Schemas
Use the following guidelines for creating data schemas.
For each class that you create, you must define properties, and you must designate at least one primary key (PK) property. If appropriate, you can also create alternate keys. Integration Composer does not let you save a data schema if a class has no properties or key(s).
In some cases, you can use indexes as alternate keys.
You can add more than one table to the same class if necessary.
Defining a Data Schema
You use the following procedure to define a new data schema. You perform this action in the Define a New Data Schema window. Integration Composer displays this window when you select Define New Data Schema in the IBM Tivoli Integration Composer window.
When you define a data schema, you name the data schema, associate it with a data source, and specify connection parameters for the data source. After you define data source connection parameters, Integration Composer stores the connection information and displays those parameters when you attempt to connect to the data source. The only parameter Integration Composer requests is the password.
After you use the following procedure to define a new data schema, Integration Composer displays the Data Schema window, and you can define classes and properties for the data schema.
Creating a New Data Schema
Creating Data Schemas 61
To define a new data schema, complete the following steps:
1 In the IBM Tivoli Integration Composer window, choose Define New Data Schema. Integration Composer displays the Data Schema page of the Define a New Data Schema window.
NOTE In the Define a New Data Source window, you can click Back to review or change previous selections. To cancel this procedure and return to the IBM Tivoli Integration Composer window, click Cancel.
Naming the Data Schema 2 In the Data Schema field on the Data Schema page, enter the name of the data schema, then click Next. Integration Composer displays the Data Source page. Data Schema names are case sensitive; for example, Deployed Assets is different from DEPLOYED ASSETS.
Defining the Data Source 3 In the Data Source field, enter a name for the data source (the name must have at least two characters), then click Next. Integration Composer displays the Connection Information page. Data Source names are also case sensitive.
Setting Up Connection Parameters
4 On the Connection Information page, in the Connection Method field, select a connection method.
5 Enter the parameters for the connection method as required. The fields displayed depend upon the type of driver selected. The following table lists some of the fields that Integration Composer might display.
Field Description
Host Name Host name for a data source.
For the Configuration Discovery and Tracking API, the host name of the server on which the IBM Configuration Discovery and Tracking Server is installed.
Host Port Port for the data source.
Host SID Session identifier for the host (that is, the database instance name).
Database Database name for the data source.
User Name Database user name for the data source.
For the Configuration Discovery and Tracking API, the user identifier to access IBM Configuration Discovery and Tracking.
Password Database password for the data source.
For the Configuration Discovery and Tracking API, the password associated with the user login account.
Table Owner Database schema name or database schema owner.
Trusted Location
Fully-qualified path of the SSL certificate file to use to connect to a server such as the Configuration Discovery and Tracking server.
For example, c:\Integration Composer\...\jssecacerts.cert
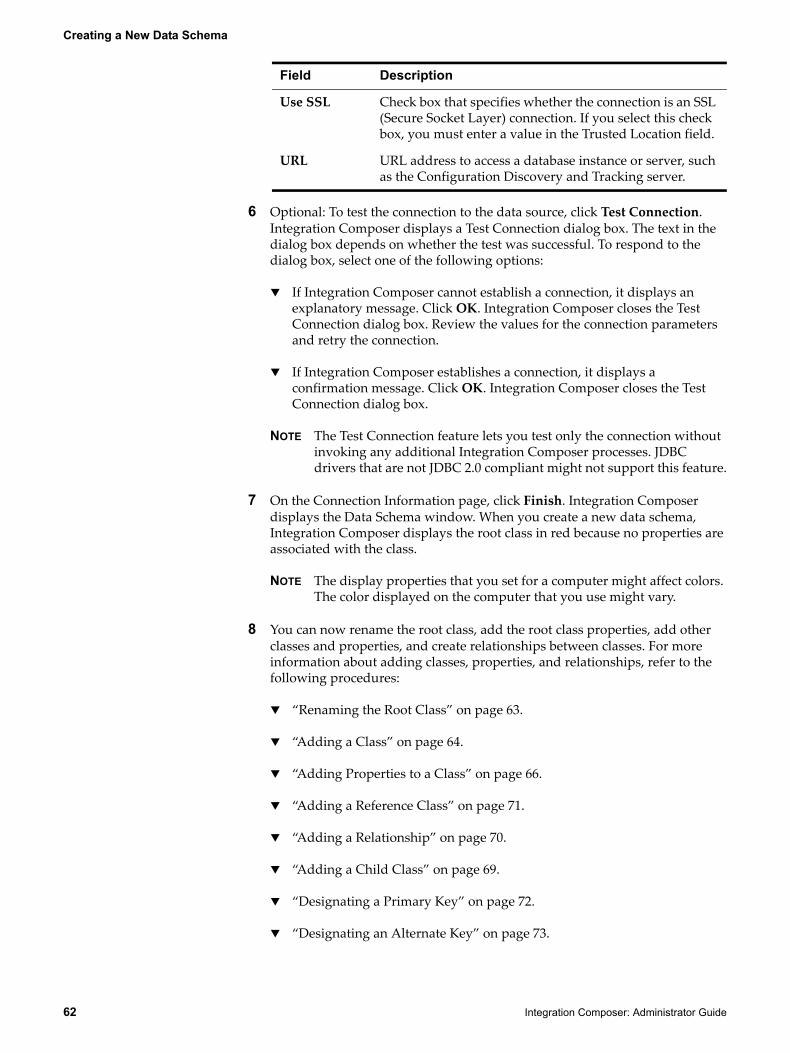
Creating a New Data Schema
62 Integration Composer: Administrator Guide
6 Optional: To test the connection to the data source, click Test Connection. Integration Composer displays a Test Connection dialog box. The text in the dialog box depends on whether the test was successful. To respond to the dialog box, select one of the following options:
If Integration Composer cannot establish a connection, it displays an explanatory message. Click OK. Integration Composer closes the Test Connection dialog box. Review the values for the connection parameters and retry the connection.
If Integration Composer establishes a connection, it displays a confirmation message. Click OK. Integration Composer closes the Test Connection dialog box.
NOTE The Test Connection feature lets you test only the connection without invoking any additional Integration Composer processes. JDBC drivers that are not JDBC 2.0 compliant might not support this feature.
7 On the Connection Information page, click Finish. Integration Composer displays the Data Schema window. When you create a new data schema, Integration Composer displays the root class in red because no properties are associated with the class.
NOTE The display properties that you set for a computer might affect colors. The color displayed on the computer that you use might vary.
8 You can now rename the root class, add the root class properties, add other classes and properties, and create relationships between classes. For more information about adding classes, properties, and relationships, refer to the following procedures:
“Renaming the Root Class” on page 63.
“Adding a Class” on page 64.
“Adding Properties to a Class” on page 66.
“Adding a Reference Class” on page 71.
“Adding a Relationship” on page 70.
“Adding a Child Class” on page 69.
“Designating a Primary Key” on page 72.
“Designating an Alternate Key” on page 73.
Use SSL Check box that specifies whether the connection is an SSL (Secure Socket Layer) connection. If you select this check box, you must enter a value in the Trusted Location field.
URL URL address to access a database instance or server, such as the Configuration Discovery and Tracking server.
Field Description
Creating a New Data Schema
Creating Data Schemas 63
9 After you finish working with the data schema, from the Select Action menu, select Save. Integration Composer saves the data schema.
NOTE If Integration Composer does not save the data schema successfully, it displays an error message. Click OK. Resolve the errors and try to save the data schema again.
10 Optional: To close the data schema, from the Select Action menu, select Close. Integration Composer closes the data schema and displays the IBM Tivoli Integration Composer window.
Renaming the Root Class
Creating the root class is the first step in setting up a new data schema. You create a root class in the Data Schema window.
After you select Define a New Data Schema in the IBM Tivoli Integration Composer window, name the data schema, associate it a data source, and specify connection information, Integration Composer displays the Data Schema window. In this window, in the Classes section, Integration Composer displays a place holder for the root class, New Root Class, in red text.
To rename the root class, complete the following steps:
1 To name the root class, in the Classes section, right click New Root Class. Integration Composer displays an action menu.
2 From the action menu, select Rename. Integration Composer displays a Class Properties dialog box for the root class.
3 In the Class Properties dialog box, rename the root class and click OK. Integration Composer renames the class and displays the new name for the root class in the Data Schema window. Integration Composer displays the new name in red because you have not added properties to the class.
NOTE The display properties that you set for a computer might affect colors. The color displayed on the computer that you use might vary.
4 Add properties and child classes to the root class as required. For more information about adding classes, properties, and relationships, refer to the following procedures:
“Adding a Class” on page 64.
“Adding Properties to a Class” on page 66.
“Adding a Reference Class” on page 71.
“Adding a Relationship” on page 70.
“Adding a Child Class” on page 69.
“Designating a Primary Key” on page 72.
“Designating an Alternate Key” on page 73.
Creating a New Data Schema
64 Integration Composer: Administrator Guide
5 Optional: You can continue to add classes, properties, keys, and links; or you can change elements of the data schema.
6 After you finish working with the data schema, from the Select Action menu, select Save. Integration Composer saves the data schema.
NOTE If Integration Composer does not save the data schema successfully, it displays an error message. Click OK. Resolve the errors and try to save the data schema again.
7 Optional: To close the data schema, from the Select Action menu, select Close. Integration Composer closes the data schema and displays the IBM Tivoli Integration Composer window.
Adding a Class
You use this procedure to add a new class to a data schema that you create in Integration Composer. You perform this action in the Data Schema window.
Before you can add classes to a data schema, you must create a new data schema or open an existing data schema. The following instructions assume that you have created or opened a data schema and that Integration Composer displays the Data Schema window.
When you add a class, you cannot save the data schema until you perform the following steps:
1 Add properties to the class.
2 Designate a primary key for the class.
3 Link the new class to its parent class with one or more primary key or alternate key properties.
To add a new class to a data schema, complete the following steps:
1 In Integration Composer, either create a new data schema or open an existing data schema.
For instructions on creating a new data schema, see “Defining a Data Schema” on page 60.
For instructions on opening an existing data schema, see “Opening an Existing Data Schema” on page 78.
2 In the Classes tree view in the upper left corner of the Data Schema window, right-click the class to which you want to add a new class (in some cases, this might be the root class). Integration Composer displays an action menu.
3 From the action menu, select Add. Integration Composer displays the New Class window.
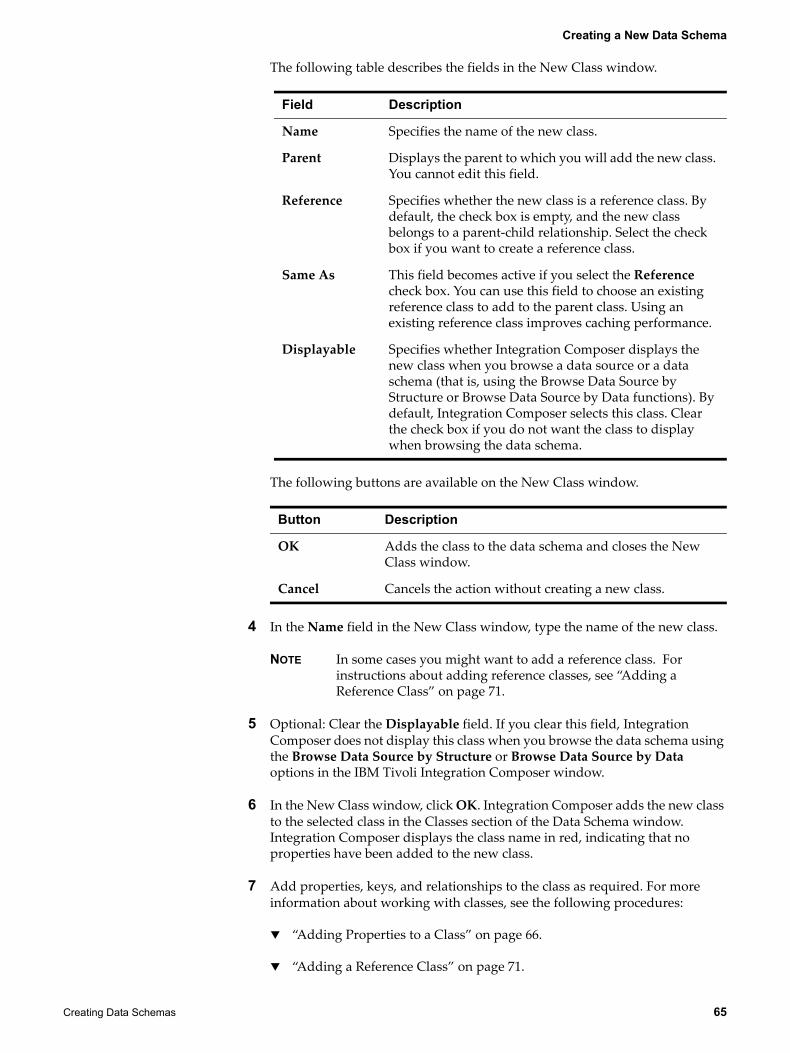
Creating a New Data Schema
Creating Data Schemas 65
The following table describes the fields in the New Class window.
The following buttons are available on the New Class window.
4 In the Name field in the New Class window, type the name of the new class.
NOTE In some cases you might want to add a reference class. For instructions about adding reference classes, see “Adding a Reference Class” on page 71.
5 Optional: Clear the Displayable field. If you clear this field, Integration Composer does not display this class when you browse the data schema using the Browse Data Source by Structure or Browse Data Source by Data options in the IBM Tivoli Integration Composer window.
6 In the New Class window, click OK. Integration Composer adds the new class to the selected class in the Classes section of the Data Schema window. Integration Composer displays the class name in red, indicating that no properties have been added to the new class.
7 Add properties, keys, and relationships to the class as required. For more information about working with classes, see the following procedures:
“Adding Properties to a Class” on page 66.
“Adding a Reference Class” on page 71.
Field Description
Name Specifies the name of the new class.
Parent Displays the parent to which you will add the new class. You cannot edit this field.
Reference Specifies whether the new class is a reference class. By default, the check box is empty, and the new class belongs to a parent-child relationship. Select the check box if you want to create a reference class.
Same As This field becomes active if you select the Reference check box. You can use this field to choose an existing reference class to add to the parent class. Using an existing reference class improves caching performance.
Displayable Specifies whether Integration Composer displays the new class when you browse a data source or a data schema (that is, using the Browse Data Source by Structure or Browse Data Source by Data functions). By default, Integration Composer selects this class. Clear the check box if you do not want the class to display when browsing the data schema.
Button Description
OK Adds the class to the data schema and closes the New Class window.
Cancel Cancels the action without creating a new class.
Creating a New Data Schema
66 Integration Composer: Administrator Guide
“Adding a Relationship” on page 70.
“Adding a Child Class” on page 69.
“Designating a Primary Key” on page 72.
“Designating an Alternate Key” on page 73.
8 After you finish adding the necessary properties, keys, and links to the class, from the Select Action menu, select Save. Integration Composer saves the data schema.
NOTE If Integration Composer does not save the data schema successfully, it displays an error message. Click OK. Resolve the errors and try to save the data schema again.
9 To close the data schema, from the Select Action menu, select Close. Integration Composer closes the data schema and displays the IBM Tivoli Integration Composer window.
Adding Properties to a Class
You use this procedure to add one or more properties to a class in a data schema that you create in Integration Composer. You perform this action in the Data Schema window.
Integration Composer offers the following two ways to add properties to a class:
You can add all columns of a selected database table as class properties.
You can select specific columns in the database table to add as properties of a class.
The following instructions assume that you have created or opened a data schema and that Integration Composer displays the Data Schema window.
After you create or open a data schema, you create properties in a class by using the cursor to drag a database table or selected columns in a table to the class where you want to add the properties.
To add a property to a class in a data schema, complete the following steps:
1 In Integration Composer, either create a new data schema or open an existing data schema.
For instructions on creating a new data schema, see “Defining a Data Schema” on page 60.
For instructions on opening an existing data schema, see “Opening an Existing Data Schema” on page 78.
2 In the Data Schema window, select the class to which you want to add properties.
3 To add properties to the class, select one of the following options:
Creating a New Data Schema
Creating Data Schemas 67
To add all columns from one or more database tables as properties of the class:
a In the upper half of the Database Tables section of the Data Schema window, click the database table you want to use for properties in the class. Integration Composer displays the columns in this database table in the lower half of the Database Tables section. If appropriate, you can select more than one table.
To select a series of tables, use Shift+Click.
To select separate tables, use Ctrl+Click.
As you select tables, Integration Composer highlights each table selected in the top half of the section and accumulates rows for all columns in the selected tables in the lower half of the section. Integration Composer displays rows in the lower pane in black text to indicate that the columns are not properties for the class.
b When you have selected all the appropriate tables, click one of the selected database tables a second time and drag the cursor to the class in the Classes tree view where you want to add the properties. When you release the mouse device, Integration Composer adds all columns for the selected table or tables as properties of the selected class and displays these properties in the lower half of the Classes section.
In the Database Tables section, in the upper pane, Integration Composer highlights all tables associated with the class in brown. In the lower pane, Integration Composer displays rows used for properties in orange text to indicate that the columns are selected as properties for the class.
In the Tables in Class section, Integration Composer displays a box for the table or tables selected. In this box, Integration Composer lists each column selected for a class property. Integration Composer displays table boxes for parent classes with an orange title bar. It displays table boxes for child classes with a blue title bar.
NOTE The display properties that you set for a computer might affect colors. The color displayed on the computer that you use might vary.
To add selected columns from one or more database tables as properties of the class:
a In the upper half of the Database Tables section of the Data Schema window, click the database table you want to use for properties in the class. If appropriate, you can select more than one table.
To select a series of tables, use Shift+Click.
To select separate tables, use Ctrl+Click.
As you select tables, Integration Composer highlights each table selected in the top half of the section and accumulates rows for all columns in the selected tables in the lower half of the section.
Creating a New Data Schema
68 Integration Composer: Administrator Guide
Integration Composer displays rows in the lower pane in black text to indicate that the columns are not properties for the class.
b In the lower half of the Database Tables section, click one or more rows to select the column or columns that you want to use for a class property.
To select a series of columns, use Shift+Click.
To select separate columns, use Ctrl+Click.
c When you have selected all the appropriate rows, click one of the selected rows, drag the cursor to the class in the Classes tree view where you want to add the properties, and release the mouse-device. Integration Composer adds the selected columns as properties of the selected class and displays the properties in the lower half of the Classes section.
In the Database Tables section, in the upper pane, Integration Composer highlights all tables associated with the class in brown. In the lower pane, Integration Composer displays rows used for properties in orange text to indicate that the columns are selected as properties for the class.
In the Tables in Class section, Integration Composer displays a box for the table or tables selected. In this box, Integration Composer lists each column selected for a class property. Integration Composer displays table boxes for parent classes with an orange title bar. It displays table boxes for child classes with a blue title bar.
NOTE The display properties that you set for a computer might affect colors. The color displayed on the computer that you use might vary.
4 Optional: To change properties listed in the properties table of the Classes section, select from the following options:
For information about adding key properties, see “Designating a Primary Key” on page 72. Also see “Designating an Alternate Key” on page 73..
For information about creating relationships, see “Adding a Relationship” on page 70.
For information about renaming a property, see “Renaming a Class Property” on page 89.
To specify whether a property can contain a null value, scroll to the Null column in the lower pane of the Classes section and select one of the following options:
To let Integration Composer use null values for this property, select the Null check box.
To prevent Integration Composer from using null values for this property, clear the Null check box.
Creating a New Data Schema
Creating Data Schemas 69
To specify whether Integration Composer displays the property when you browse a data source, scroll to the Show column in the lower pane of the Classes section and select one of the following options:
To specify that Integration Composer displays the property, select the Show check box.
To specify that Integration Composer does not display this property, clear the Show check box.
5 After you finish adding properties, from the Select Action menu on the Data Schema window, select Save. Integration Composer saves the data schema.
6 Optional: To close the data schema, from the Select Action menu, select Close. Integration Composer closes the data schema and displays the IBM Tivoli Integration Composer window.
Adding a Child Class
You use this procedure to add a child class to a parent or root class in a data schema that you create in Integration Composer. You perform this action in the Data Schema window.
Before you can add classes to a data schema, you must create a new data schema or open an existing data schema.
To add a child class to a data schema, complete the following steps:
1 In Integration Composer, either create a new data schema or open an existing data schema.
For instructions on creating a new data schema, see “Defining a Data Schema” on page 60.
For instructions on opening an existing data schema, see “Opening an Existing Data Schema” on page 78.
2 In the Classes tree view in the upper left corner of the Data Schema window, right-click the class to which you want to add a child class (in some cases, this might be the root class). Integration Composer displays a select action menu.
3 From the action menu, select Add. Integration Composer displays the New Class window.
4 In the Name field in the New Class window, type the name of the new class.
NOTE In some cases you might want to add a reference class. For instructions about adding reference classes, see “Adding a Reference Class” on page 71.
5 Optional: Clear the Displayable field. If you clear this field, Integration Composer does not display this class when you browse the data schema using the Browse Data Source by Structure or Browse Data Source by Data options in the IBM Tivoli Integration Composer window.
Creating a New Data Schema
70 Integration Composer: Administrator Guide
6 Click OK. Integration Composer adds the new class to the selected class in the Classes section. Integration Composer displays the class name in red, indicating that no properties have been added to the new class.
NOTE The display properties that you set for a computer might affect colors. The color displayed on the computer that you use might vary.
7 Add properties, keys, and links to the class as required. For more information about working with classes, see the following procedures:
“Adding Properties to a Class” on page 66.
“Adding a Reference Class” on page 71.
“Adding a Relationship” on page 70.
“Designating a Primary Key” on page 72.
“Designating an Alternate Key” on page 73.
8 After you finish adding the necessary properties, keys, and links to the class, from the Select Action menu, select Save. Integration Composer saves the data schema.
9 To close the data schema, from the Select Action menu, select Close. Integration Composer closes the data schema and displays the IBM Tivoli Integration Composer window.
Adding a Relationship
You use the following procedure to add a link relationship between two tables in a data schema that you create in Integration Composer. You perform this action in the Data Schema window.
The system translates the table joins you create with a link to a SQL inner join when retrieving instances from the database. Integration Composer does not support other types of joins, such as SQL outer joins.
Before you can create a relationship between two tables in a data schema, you must create a new data schema or open an existing data schema.
To create a link relationship between two tables in a data schema, complete the following steps:
1 In Integration Composer, either create a new data schema and add classes to it or open an existing data schema.
For instructions on creating a new data schema, see “Defining a Data Schema” on page 60.
For instructions on opening an existing data schema, see “Opening an Existing Data Schema” on page 78.
2 In the Classes tree view in the upper left corner of the Data Schema window, select the class for which you want to create a link relationship (in some cases,
Creating a New Data Schema
Creating Data Schemas 71
this might be the root class). Integration Composer displays the tables associated with the selected class in the Tables in Class section of the window.
3 In the Tables in Class section of the window, in the first of the two tables you want to link, select the column you want to link. Integration Composer highlights the selected column in brown.
NOTE The display properties that you set for a computer might affect colors. The color displayed on the computer that you use might vary.
4 Click the same column you selected in step 3 a second time, drag the cursor to the table and column you want to link to, then release the mouse device. Integration Composer creates the link and displays a line linking the two columns.
5 After you finish adding the necessary link relationships, from the Select Action menu, select Save. Integration Composer saves the data schema.
6 Optional: To close the data schema, from the Select Action menu, select Close. Integration Composer closes the data schema and displays the IBM Tivoli Integration Composer window.
Adding a Reference Class
You use this procedure to add a reference class to a parent or root class in a data schema that you create in Integration Composer. You perform this action in the Data Schema window.
Before you can add a reference class to a data schema, you must create a new data schema or open an existing data schema.
To add a reference class to a data schema, complete the following steps:
1 In Integration Composer, either create a new data schema and add classes to it or open an existing data schema.
For instructions on creating a new data schema, see “Defining a Data Schema” on page 60.
For instructions on opening an existing data schema, see “Opening an Existing Data Schema” on page 78.
2 In the Classes tree view in the upper left corner of the Data Schema window, right-click the class to which you want to add a reference class (in some cases, this might be the root class). Integration Composer displays a select action menu.
3 From the action menu, select Add. Integration Composer displays the New Class window.
4 To add a reference class, select the Reference check box and choose one of the following options:
To use an existing reference class, from the Same As drop-down list, select a reference class. Integration Composer populates the Name field with the name of the reference class selected.

Creating a New Data Schema
72 Integration Composer: Administrator Guide
To create a new reference class, complete the following steps:
a From the Same As drop-down list, select the blank item in the list.
b In the Name field, type the name of the new reference class.
5 Optional: Clear the Displayable check box. By default, Integration Composer selects the check box. If you clear this field, Integration Composer does not display this class when you browse the data schema using the Browse Data Source by Structure or Browse Data Source by Data options in the IBM Tivoli Integration Composer window.
6 Click OK. Integration Composer adds the reference class to the selected class in the Classes section. Integration Composer displays the class name in red, indicating that no properties have been added to the new class. In the Classes tree view, Integration Composer displays an arrow next to the class to indicate that this is a reference class.
7 Add properties, keys, and links to the class as required.
For more information about adding properties to the class, see “Adding Properties to a Class” on page 66.
For more information about designating a primary key for the class, see “Designating a Primary Key” on page 72.
8 After you finish adding the necessary properties, keys, and links to the class, from the Select Action menu, select Save. Integration Composer saves the data schema.
9 To close the data schema, from the Select Action menu, select Close. Integration Composer closes the data schema and displays the IBM Tivoli Integration Composer window.
Designating a Primary Key
You use this procedure to designate a property as a primary key for a class in a data schema that you create in Integration Composer. A primary key is a property or set of properties that uniquely identifies each instance of its class. You perform this action in the Data Schema window.
Before you can designate a primary key for a class in a data schema, you must create a new data schema or open an existing data schema. You must also add the class and add properties to the class.
To add a primary key to a class in a data schema, complete the following steps:
1 In Integration Composer, either create a new data schema or open an existing data schema.
For instructions on creating a new data schema, see “Defining a Data Schema” on page 60.
For instructions on opening an existing data schema, see “Opening an Existing Data Schema” on page 78.
Creating a New Data Schema
Creating Data Schemas 73
2 Optional: Add a class and add properties to the class.
For more information about adding classes, see “Adding a Class” on page 64.
For more information about adding properties to a class, see “Adding Properties to a Class” on page 66.
3 In the Classes tree view in the upper left corner of the Data Schema window, select the class for which you want to designate a primary key. Integration Composer displays the properties associated with the selected class in the lower half of the Classes section of the window.
4 To designate a primary key, in the Primary Key column in the properties table, select the check box for the property you want to be the primary key. Integration Composer highlights the selected property and designates it as a primary key.
5 You can continue to add properties, keys, and links to the class as required. For more information about creating relationships, see “Adding a Relationship” on page 70.
6 After you finish adding the necessary properties, keys, and links to the class, from the Select Action menu, select Save. Integration Composer saves the data schema.
7 To close the data schema, from the Select Action menu, select Close. Integration Composer closes the data schema and displays the IBM Tivoli Integration Composer window.
Designating an Alternate Key
You use this procedure to designate a property as an alternate key for a class in a data schema that you create in Integration Composer. An alternate key is a property or set of properties that is an equivalent way to identify an instance. The combination of the alternate key values must be unique within the class. If you use a generated value, Integration Composer requires an alternate key.
You perform this action in the Data Schema window.
Before you can designate an alternate key for a class in a data schema, you must create a new data schema or open an existing data schema. You must also add the class and add properties to the class.
You can use database table indexes for alternate keys.
To add an alternate key to a class in a data schema, complete the following steps:
1 In Integration Composer, either create a new data schema or open an existing data schema.
For instructions on creating a new data schema, see “Defining a Data Schema” on page 60.
Creating a New Data Schema
74 Integration Composer: Administrator Guide
For instructions on opening an existing data schema, see “Opening an Existing Data Schema” on page 78.
2 Optional: Add the class to which you will add the alternate key and add properties to the class.
For more information about adding classes, see “Adding a Class” on page 64.
For more information about adding properties to a class, see “Adding Properties to a Class” on page 66.
3 In the Classes tree view in the upper left corner of the Data Schema window, select the class for which you want to designate an alternate key. Integration Composer displays the properties associated with the selected class in the lower half of the Classes section of the window.
4 To designate an alternate key, in the Alternate Key column in the properties table, select the check box for the property you want to be the alternate key. Integration Composer highlights the selected property.
5 You can continue to add properties, keys, and links to the class as required.
6 After you finish adding the necessary properties, keys, and links to the class, from the Select Action menu, select Save. Integration Composer saves the data schema.
7 To close the data schema, from the Select Action menu, select Close. Integration Composer closes the data schema and displays the IBM Tivoli Integration Composer window.
Defining a Generated Value Property
A generated value property is a property whose value Integration Composer generates automatically when you execute a mapping for the target data source.
NOTE Defining a property as a generated value is meaningful only for target data schemas. When you execute mappings, Integration Composer ignores generated value properties in the source data source.
You use the following procedure to define a generated value for a property of a class in a data schema that you create in Integration Composer. Before you can define a generated value for a class property in a data schema, you must create a new data schema or open an existing data schema. You must also add the class and add properties to the class.
To define a generated value for a property in a data schema, complete the following steps:
1 In Integration Composer, either create a new data schema or open an existing data schema.
For instructions on creating a new data schema, see “Defining a Data Schema” on page 60.
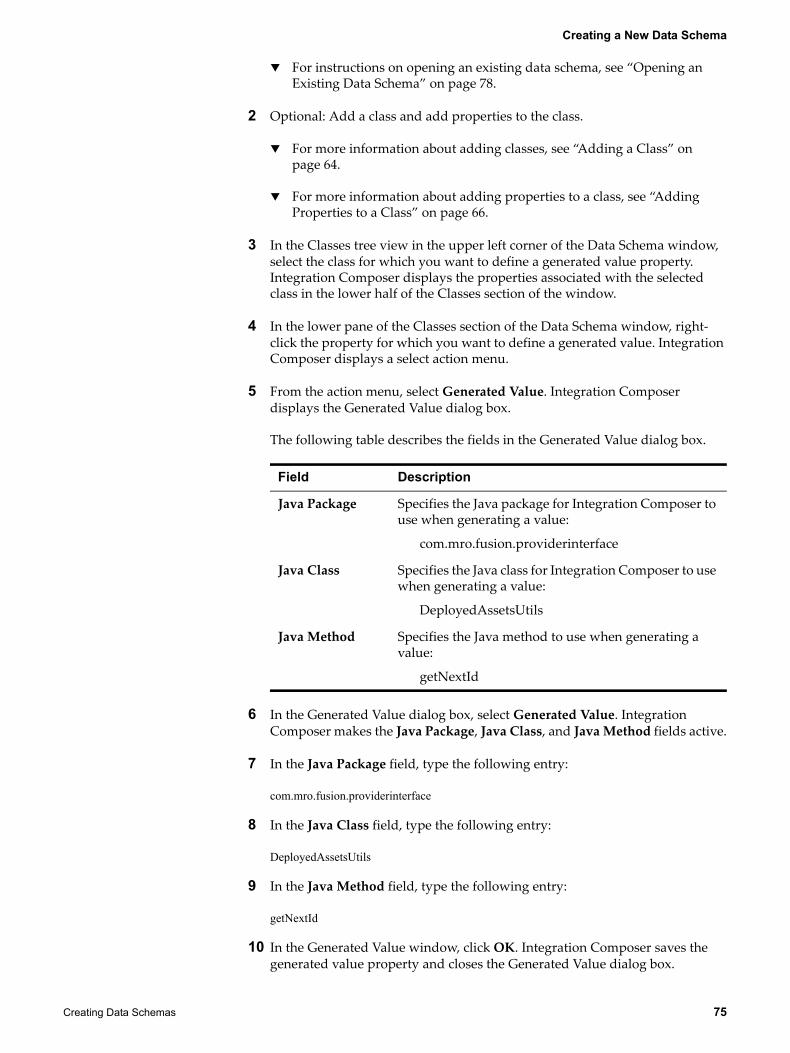
Creating a New Data Schema
Creating Data Schemas 75
For instructions on opening an existing data schema, see “Opening an Existing Data Schema” on page 78.
2 Optional: Add a class and add properties to the class.
For more information about adding classes, see “Adding a Class” on page 64.
For more information about adding properties to a class, see “Adding Properties to a Class” on page 66.
3 In the Classes tree view in the upper left corner of the Data Schema window, select the class for which you want to define a generated value property. Integration Composer displays the properties associated with the selected class in the lower half of the Classes section of the window.
4 In the lower pane of the Classes section of the Data Schema window, right-click the property for which you want to define a generated value. Integration Composer displays a select action menu.
5 From the action menu, select Generated Value. Integration Composer displays the Generated Value dialog box.
The following table describes the fields in the Generated Value dialog box.
6 In the Generated Value dialog box, select Generated Value. Integration Composer makes the Java Package, Java Class, and Java Method fields active.
7 In the Java Package field, type the following entry:
com.mro.fusion.providerinterface
8 In the Java Class field, type the following entry:
DeployedAssetsUtils
9 In the Java Method field, type the following entry:
getNextId
10 In the Generated Value window, click OK. Integration Composer saves the generated value property and closes the Generated Value dialog box.
Field Description
Java Package Specifies the Java package for Integration Composer to use when generating a value:
com.mro.fusion.providerinterface
Java Class Specifies the Java class for Integration Composer to use when generating a value:
DeployedAssetsUtils
Java Method Specifies the Java method to use when generating a value:
getNextId
Creating a New Data Schema
76 Integration Composer: Administrator Guide
Integration Composer displays the generated value property highlighted in blue.
11 Optional: You can continue to add properties, keys, and links to the class.
12 After you finish adding the necessary properties, keys, and links to the class, from the Select Action menu, select Save. Integration Composer saves the data schema.
13 To close the data schema, from the Select Action menu, select Close. Integration Composer closes the data schema and displays the IBM Tivoli Integration Composer window.
Defining Data Schema Properties
Integration Composer lets you specify a class and a property in which store the following data for a data schema: cache, hardware last scan date, software last scan date, and time stamp. You set up these properties in the Data Schema Properties window, which Integration Composer displays when you select Properties from the Data Schema window's Select Action menu.
To define data schema properties, complete the following steps:
1 In Integration Composer, either create a new data schema or open an existing data schema.
For instructions on creating a new data schema, see “Defining a Data Schema” on page 60.
For instructions on opening an existing data schema, see “Opening an Existing Data Schema” on page 78.
2 From the Select Action menu in the Data Schema window, select Properties. Integration Composer displays the Data Schema Properties window.
The window includes the following fields:
Field Description
Name Name of the data schema.
Cache:Class NameProperty Name
Specifies the cache holder class and property name. In general, the cache class is the root class, and the cache properties are the primary keys of the root class.
Hardware Last Scan:Class NameProperty Name
Specifies which class and property store the last hardware scan date.
Software Last Scan:Class NameProperty Name
Specifies which class and property store the last software scan date.
Creating a New Data Schema
Creating Data Schemas 77
The Data Schema Properties window includes the following buttons:
3 In the Class Name field in the Cache section of the window, use the drop-down list to select a value for the class name.
4 In the Property Name field in the Cache section, click Select. Integration Composer displays a Class Properties dialog box.
5 In the Class Properties dialog box, select one or more class properties. To select class properties, select one of the following options:
To select a series of properties, use Shift+Click.
To select separate items, use Ctrl+Click.
To select the entire list, click Select All.
NOTE To clear the choices, click Deselect All. To exit this function without selecting a class property, click Cancel. Integration Composer displays the Data Schema Properties window.
6 After you select one or more class properties, click OK. Integration Composer closes the Class Properties dialog box and displays the class properties selected in the Property Name field in the Data Schema Properties window.
Time Stamp:Time-Stamp Format
Specifies how to decipher the software and hardware last scan dates recorded in the database as strings rather than dates or time stamps. If time stamp data in your database is stored as a string, use this parameter to specify a format for Integration Composer to use when converting last scan date data in the database to a Java-recognizable object.
Is Target Specifies whether the data schema can be used as a target data schema.
Button Description
OK Adds the data you entered to the data schema and closes the Data Schema Properties window.
Cancel Cancels the action.
Select Opens a Class Properties dialog box to let you select one or more class properties for the data schema's cache holder class.
Legend Opens the Time Stamp Format Legend dialog box. In this dialog box, Integration Composer displays formats you can use when entering a value in the Time-Stamp Format field in the Data Schema Properties window. Click OK to close the dialog box.
Displays Help information about the selected area of the Data Schema Properties window.
Field Description
Changing an Existing Data Schema
78 Integration Composer: Administrator Guide
7 In the Hardware Last Scan section of the Data Schema Properties window, use the drop-down lists to select values for the Class Name and Property Name fields.
8 In the Software Last Scan section of the window, use the drop-down lists to select values for the Class Name and Property Name fields.
9 In the Time Stamp section of the window, enter a value or use the drop-down list to select a value for the Time-Stamp Format field.
NOTE If you want to enter a value, you can use a value listed in the Time Stamp Format Legend dialog box. To display this dialog box, click Legend.
10 After you finish defining data schema properties, click OK. Integration Composer closes the Data Schema Properties dialog box.
11 You can continue to work with the data schema. After you finish the data schema, from the Select Action menu on the Data Schema window, select Save. Integration Composer saves the data schema.
NOTE If Integration Composer does not save the data schema successfully, it displays an error message. Click OK. Resolve the errors and try to save the data schema again.
12 To close the Data Schema window, from the Select Action menu, select Close. Integration Composer closes the data schema.
Changing an Existing Data Schema
After you create and save data schemas, you can open them and change them as needed. This section of the Administrator Guide explains how to open an existing data schema and make the following changes:
Change attributes of a classChange properties in a classDelete a classDelete a class propertyDelete a relationshipRename a classRename a class property
Opening an Existing Data Schema
After creating and saving a new data schema, you can open an existing data schema to view or edit classes or properties in the data schema.
If the data source for the data schema that you select is not currently open, you must specify data source connection information before Integration Composer opens the data schema. In an Integration Composer session, when you create a data source for the first time, you must define JDBC setup information on the Connection Information page of the Open Data Schema window. When you open
Changing an Existing Data Schema
Creating Data Schemas 79
a data source on subsequent occasions, Integration Composer displays the previous database connection information as the default, and you must enter a password.
When you open an existing data schema, if discrepancies exist between the data source and the data schema, Integration Composer displays the Data Schema Analysis window. This window lists discrepancies that Integration Composer found between the data schema and the corresponding data source. You can use this window to correct the following discrepancies:
Case of a table name in the database does not match that of a table associated with a class in the data schema.
Case of a column name in the database does not match that of a table column associated with a class table in the data schema.
Length of a table column in the database does not match length of the same column in the data schema.
Data type of a table column in the database does not match that of the same column in the data schema.
If tables or columns exist in the data schema that are not in the database, and if Integration Composer can safely remove them, it will mark those errors as repairable; otherwise it will mark the errors as non-reparable.
To open an existing data schema, complete the following steps:
1 In the IBM Tivoli Integration Composer window, choose Open Existing Data Schema. Integration Composer displays the Open an Existing Data Schema window.
The page displays data schemas installed with Integration Composer and data schemas that you created using the Define a New Data Schema function.
2 On the Data Schema page in the Open an Existing Data Schema window, select the desired data schema and click Next. Integration Composer displays the Data Source page of the window, which lists data sources available for the selected data schema.
3 On the Data Source page of the Open an Existing Data Schema window, select a data source for the data schema and click Next. Integration Composer displays one of the following windows:
Data Schema Analysis window
Data Schema window
Connection Information page in the Open an Existing Data Schema window (if the data source for the specified data schema is not open)
4 Select one of the following options:
If Integration Composer displays the Data Schema Analysis window, go to step 5 on page 80.
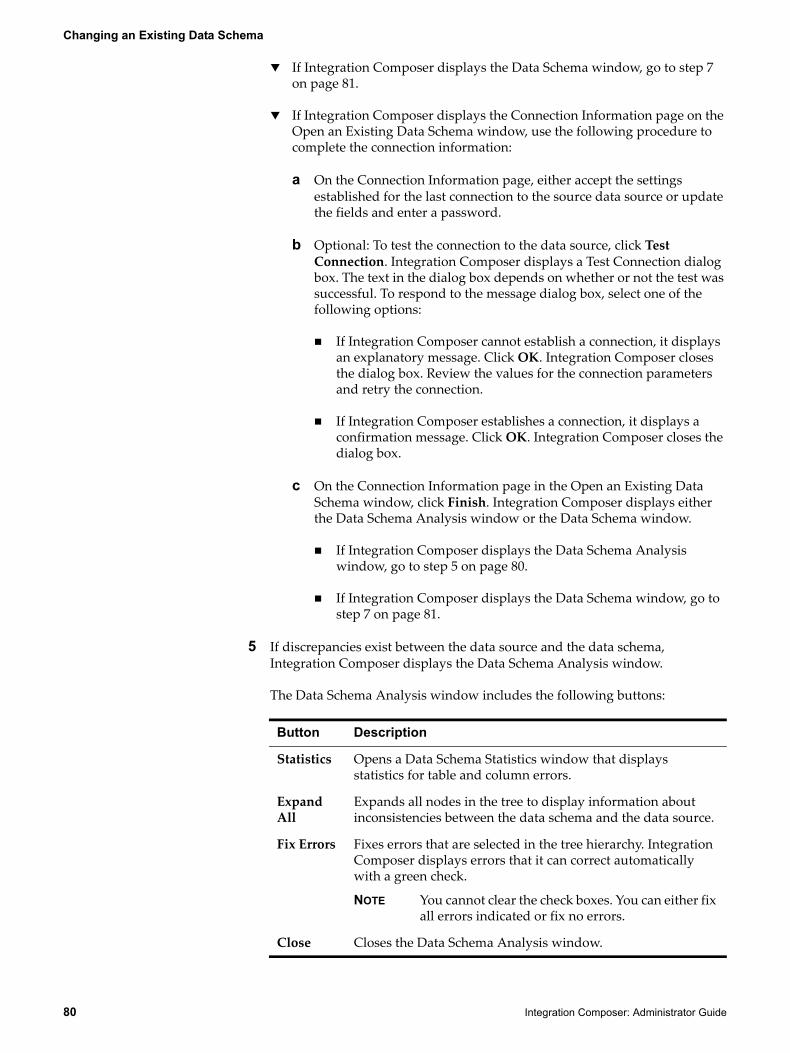
Changing an Existing Data Schema
80 Integration Composer: Administrator Guide
If Integration Composer displays the Data Schema window, go to step 7 on page 81.
If Integration Composer displays the Connection Information page on the Open an Existing Data Schema window, use the following procedure to complete the connection information:
a On the Connection Information page, either accept the settings established for the last connection to the source data source or update the fields and enter a password.
b Optional: To test the connection to the data source, click Test Connection. Integration Composer displays a Test Connection dialog box. The text in the dialog box depends on whether or not the test was successful. To respond to the message dialog box, select one of the following options:
If Integration Composer cannot establish a connection, it displays an explanatory message. Click OK. Integration Composer closes the dialog box. Review the values for the connection parameters and retry the connection.
If Integration Composer establishes a connection, it displays a confirmation message. Click OK. Integration Composer closes the dialog box.
c On the Connection Information page in the Open an Existing Data Schema window, click Finish. Integration Composer displays either the Data Schema Analysis window or the Data Schema window.
If Integration Composer displays the Data Schema Analysis window, go to step 5 on page 80.
If Integration Composer displays the Data Schema window, go to step 7 on page 81.
5 If discrepancies exist between the data source and the data schema, Integration Composer displays the Data Schema Analysis window.
The Data Schema Analysis window includes the following buttons:
Button Description
Statistics Opens a Data Schema Statistics window that displays statistics for table and column errors.
Expand All
Expands all nodes in the tree to display information about inconsistencies between the data schema and the data source.
Fix Errors Fixes errors that are selected in the tree hierarchy. Integration Composer displays errors that it can correct automatically with a green check.
NOTE You cannot clear the check boxes. You can either fix all errors indicated or fix no errors.
Close Closes the Data Schema Analysis window.
Changing an Existing Data Schema
Creating Data Schemas 81
6 Review the errors displayed in the Data Schema Analysis window and select one of the following options:
To repair the errors, click Fix Errors. Integration Composer repairs the errors that it can repair and displays the Data Schema window.
To close the dialog box without repairing the errors, click Close. Integration Composer displays a Data Schema Analysis warning window.
Select one of the following options:
To make the data schema match the source database, in the Data Schema Analysis warning window, click Yes. Integration Composer repairs the errors, closes the warning window, closes the Data Schema Analysis window, and displays the Data Schema window. Go to step 7.
To leave the data schema as is, click No. Integration Composer imports the data schema as is and displays the Data Schema window. Go to step 7.
To cancel the action, click Cancel. Integration Composer closes the warning window and displays the Data Schema Analysis window. Review the options in this window and select the appropriate action. These options are described in step 5.
7 In the Data Schema window, you can add new classes, properties, and relationships to the data schema; delete classes, properties, and relationships; or change classes, properties, and relationships. For more information about working with the data schema, see the following procedures:
“Adding a Class” on page 64.
“Adding Properties to a Class” on page 66.
“Adding a Reference Class” on page 71.
“Adding a Relationship” on page 70.
“Adding a Child Class” on page 69.
“Designating a Primary Key” on page 72.
“Designating an Alternate Key” on page 73.
“Changing Class Attributes” on page 82.
“Changing Properties in a Class” on page 87.
“Renaming a Class” on page 88.
“Renaming a Class Property” on page 89.
“Deleting a Class” on page 90.
“Deleting a Class Property” on page 91.
“Deleting a Relationship” on page 92.
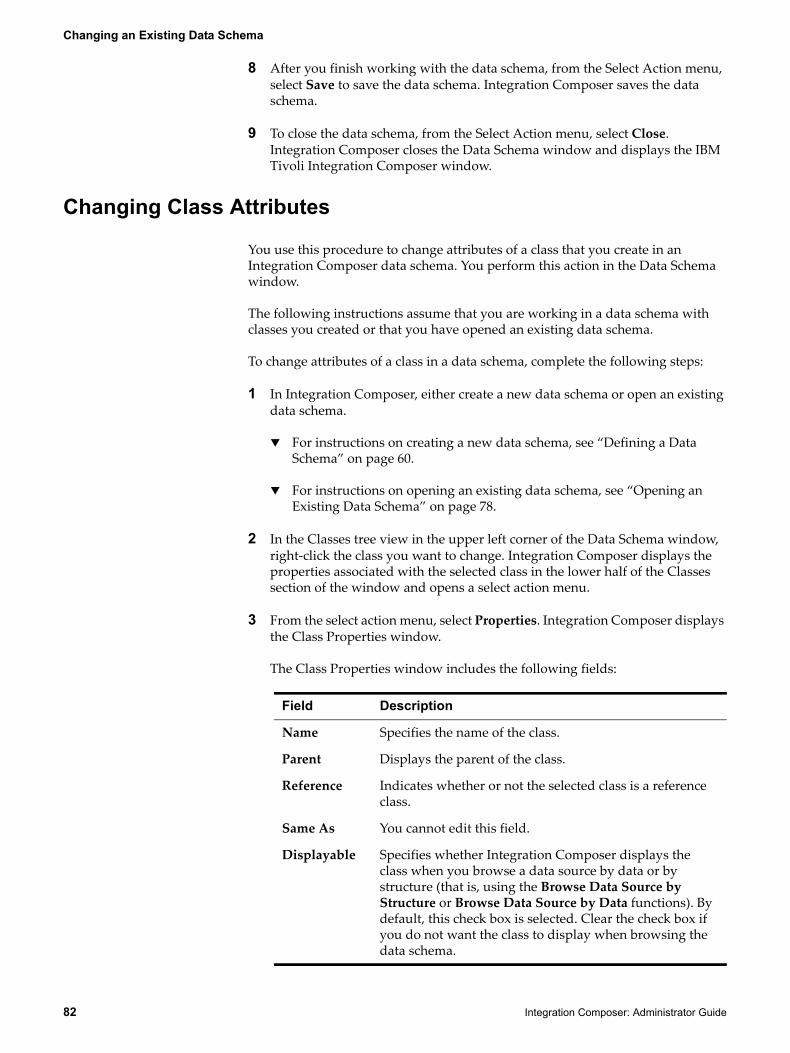
Changing an Existing Data Schema
82 Integration Composer: Administrator Guide
8 After you finish working with the data schema, from the Select Action menu, select Save to save the data schema. Integration Composer saves the data schema.
9 To close the data schema, from the Select Action menu, select Close. Integration Composer closes the Data Schema window and displays the IBM Tivoli Integration Composer window.
Changing Class Attributes
You use this procedure to change attributes of a class that you create in an Integration Composer data schema. You perform this action in the Data Schema window.
The following instructions assume that you are working in a data schema with classes you created or that you have opened an existing data schema.
To change attributes of a class in a data schema, complete the following steps:
1 In Integration Composer, either create a new data schema or open an existing data schema.
For instructions on creating a new data schema, see “Defining a Data Schema” on page 60.
For instructions on opening an existing data schema, see “Opening an Existing Data Schema” on page 78.
2 In the Classes tree view in the upper left corner of the Data Schema window, right-click the class you want to change. Integration Composer displays the properties associated with the selected class in the lower half of the Classes section of the window and opens a select action menu.
3 From the select action menu, select Properties. Integration Composer displays the Class Properties window.
The Class Properties window includes the following fields:
Field Description
Name Specifies the name of the class.
Parent Displays the parent of the class.
Reference Indicates whether or not the selected class is a reference class.
Same As You cannot edit this field.
Displayable Specifies whether Integration Composer displays the class when you browse a data source by data or by structure (that is, using the Browse Data Source by Structure or Browse Data Source by Data functions). By default, this check box is selected. Clear the check box if you do not want the class to display when browsing the data schema.
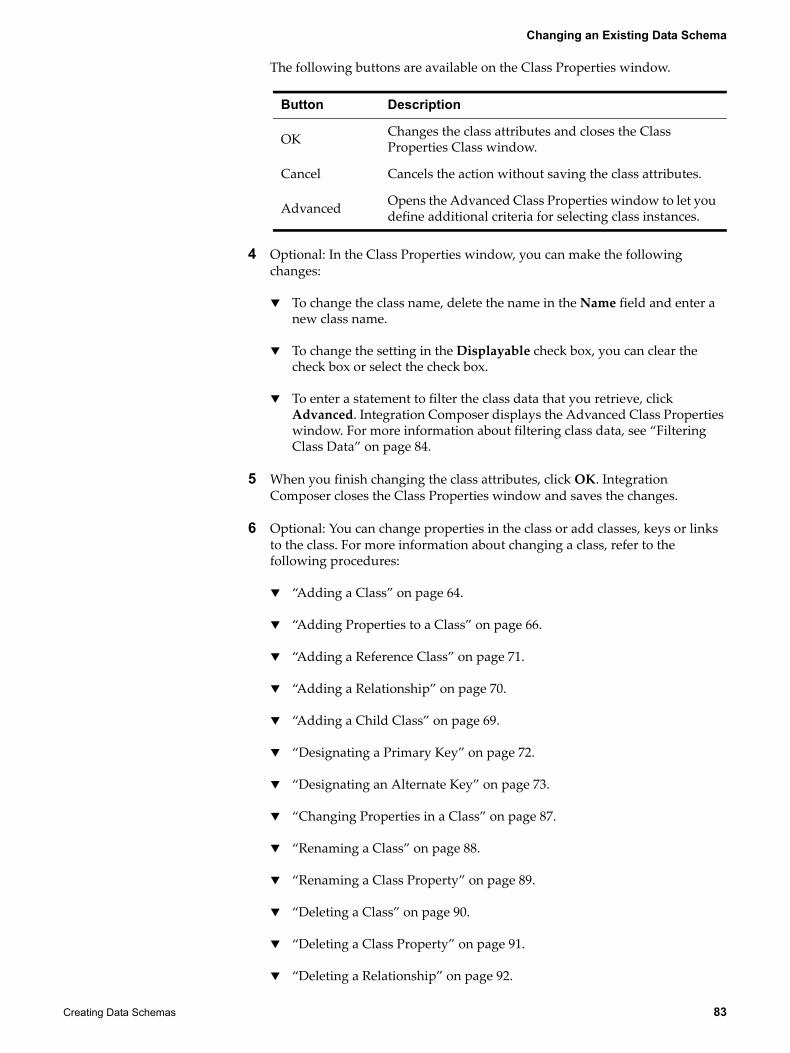
Changing an Existing Data Schema
Creating Data Schemas 83
The following buttons are available on the Class Properties window.
4 Optional: In the Class Properties window, you can make the following changes:
To change the class name, delete the name in the Name field and enter a new class name.
To change the setting in the Displayable check box, you can clear the check box or select the check box.
To enter a statement to filter the class data that you retrieve, click Advanced. Integration Composer displays the Advanced Class Properties window. For more information about filtering class data, see “Filtering Class Data” on page 84.
5 When you finish changing the class attributes, click OK. Integration Composer closes the Class Properties window and saves the changes.
6 Optional: You can change properties in the class or add classes, keys or links to the class. For more information about changing a class, refer to the following procedures:
“Adding a Class” on page 64.
“Adding Properties to a Class” on page 66.
“Adding a Reference Class” on page 71.
“Adding a Relationship” on page 70.
“Adding a Child Class” on page 69.
“Designating a Primary Key” on page 72.
“Designating an Alternate Key” on page 73.
“Changing Properties in a Class” on page 87.
“Renaming a Class” on page 88.
“Renaming a Class Property” on page 89.
“Deleting a Class” on page 90.
“Deleting a Class Property” on page 91.
“Deleting a Relationship” on page 92.
Button Description
OK Changes the class attributes and closes the Class Properties Class window.
Cancel Cancels the action without saving the class attributes.
Advanced Opens the Advanced Class Properties window to let you define additional criteria for selecting class instances.
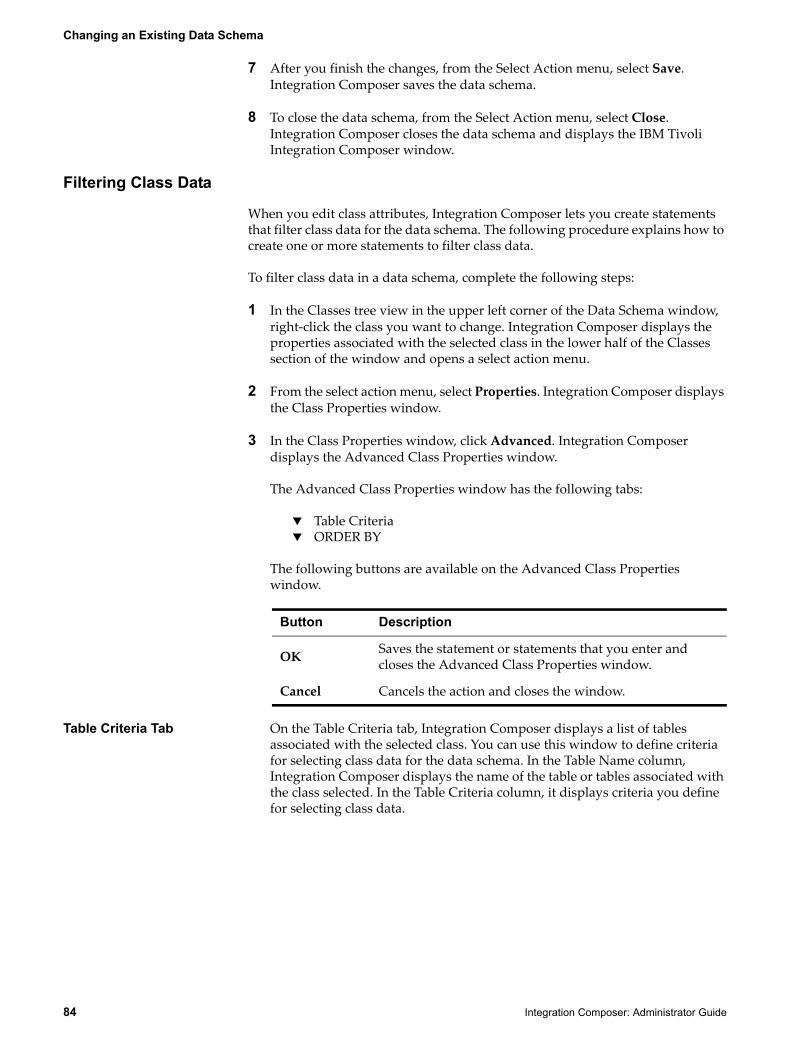
Changing an Existing Data Schema
84 Integration Composer: Administrator Guide
7 After you finish the changes, from the Select Action menu, select Save. Integration Composer saves the data schema.
8 To close the data schema, from the Select Action menu, select Close. Integration Composer closes the data schema and displays the IBM Tivoli Integration Composer window.
Filtering Class Data
When you edit class attributes, Integration Composer lets you create statements that filter class data for the data schema. The following procedure explains how to create one or more statements to filter class data.
To filter class data in a data schema, complete the following steps:
1 In the Classes tree view in the upper left corner of the Data Schema window, right-click the class you want to change. Integration Composer displays the properties associated with the selected class in the lower half of the Classes section of the window and opens a select action menu.
2 From the select action menu, select Properties. Integration Composer displays the Class Properties window.
3 In the Class Properties window, click Advanced. Integration Composer displays the Advanced Class Properties window.
The Advanced Class Properties window has the following tabs:
Table CriteriaORDER BY
The following buttons are available on the Advanced Class Properties window.
Table Criteria Tab On the Table Criteria tab, Integration Composer displays a list of tables associated with the selected class. You can use this window to define criteria for selecting class data for the data schema. In the Table Name column, Integration Composer displays the name of the table or tables associated with the class selected. In the Table Criteria column, it displays criteria you define for selecting class data.
Button Description
OK Saves the statement or statements that you enter and closes the Advanced Class Properties window.
Cancel Cancels the action and closes the window.
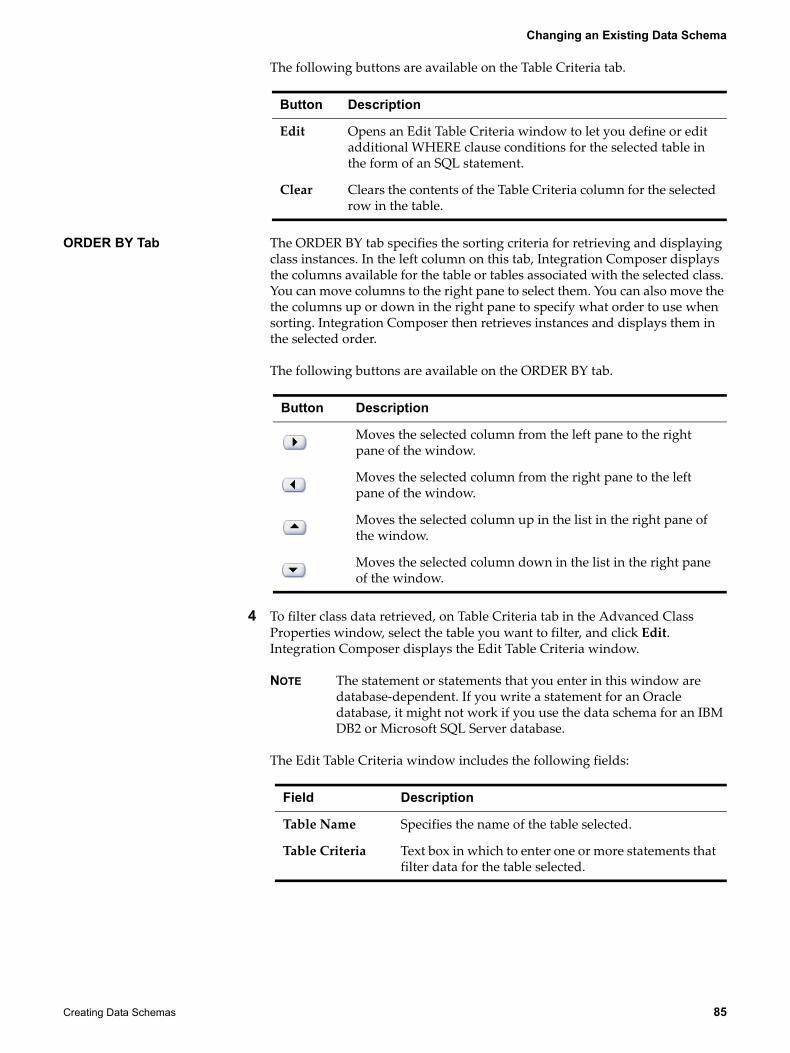
Changing an Existing Data Schema
Creating Data Schemas 85
The following buttons are available on the Table Criteria tab.
ORDER BY Tab The ORDER BY tab specifies the sorting criteria for retrieving and displaying class instances. In the left column on this tab, Integration Composer displays the columns available for the table or tables associated with the selected class. You can move columns to the right pane to select them. You can also move the the columns up or down in the right pane to specify what order to use when sorting. Integration Composer then retrieves instances and displays them in the selected order.
The following buttons are available on the ORDER BY tab.
4 To filter class data retrieved, on Table Criteria tab in the Advanced Class Properties window, select the table you want to filter, and click Edit. Integration Composer displays the Edit Table Criteria window.
NOTE The statement or statements that you enter in this window are database-dependent. If you write a statement for an Oracle database, it might not work if you use the data schema for an IBM DB2 or Microsoft SQL Server database.
The Edit Table Criteria window includes the following fields:
Button Description
Edit Opens an Edit Table Criteria window to let you define or edit additional WHERE clause conditions for the selected table in the form of an SQL statement.
Clear Clears the contents of the Table Criteria column for the selected row in the table.
Button Description
Moves the selected column from the left pane to the right pane of the window.
Moves the selected column from the right pane to the left pane of the window.
Moves the selected column up in the list in the right pane of the window.
Moves the selected column down in the list in the right pane of the window.
Field Description
Table Name Specifies the name of the table selected.
Table Criteria Text box in which to enter one or more statements that filter data for the table selected.
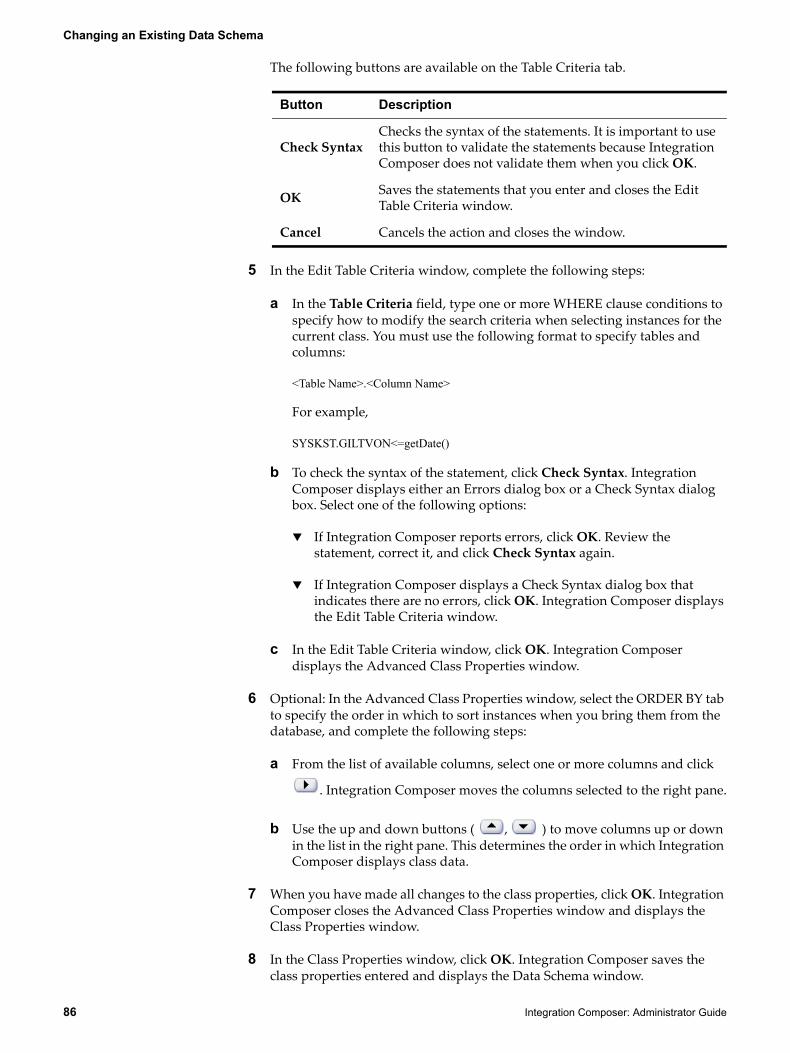
Changing an Existing Data Schema
86 Integration Composer: Administrator Guide
The following buttons are available on the Table Criteria tab.
5 In the Edit Table Criteria window, complete the following steps:
a In the Table Criteria field, type one or more WHERE clause conditions to specify how to modify the search criteria when selecting instances for the current class. You must use the following format to specify tables and columns:
<Table Name>.<Column Name>
For example,
SYSKST.GILTVON<=getDate()
b To check the syntax of the statement, click Check Syntax. Integration Composer displays either an Errors dialog box or a Check Syntax dialog box. Select one of the following options:
If Integration Composer reports errors, click OK. Review the statement, correct it, and click Check Syntax again.
If Integration Composer displays a Check Syntax dialog box that indicates there are no errors, click OK. Integration Composer displays the Edit Table Criteria window.
c In the Edit Table Criteria window, click OK. Integration Composer displays the Advanced Class Properties window.
6 Optional: In the Advanced Class Properties window, select the ORDER BY tab to specify the order in which to sort instances when you bring them from the database, and complete the following steps:
a From the list of available columns, select one or more columns and click
. Integration Composer moves the columns selected to the right pane.
b Use the up and down buttons ( , ) to move columns up or down in the list in the right pane. This determines the order in which Integration Composer displays class data.
7 When you have made all changes to the class properties, click OK. Integration Composer closes the Advanced Class Properties window and displays the Class Properties window.
8 In the Class Properties window, click OK. Integration Composer saves the class properties entered and displays the Data Schema window.
Button Description
Check SyntaxChecks the syntax of the statements. It is important to use this button to validate the statements because Integration Composer does not validate them when you click OK.
OK Saves the statements that you enter and closes the Edit Table Criteria window.
Cancel Cancels the action and closes the window.
Changing an Existing Data Schema
Creating Data Schemas 87
9 After you finish the changes, from the Select Action menu, select Save. Integration Composer saves the data schema.
10 To close the data schema, from the Select Action menu, select Close. Integration Composer closes the data schema and displays the IBM Tivoli Integration Composer window.
Changing Properties in a Class
You use this procedure to change properties in a class in a data schema that you create in Integration Composer. You perform this action in the Data Schema window.
You can change class properties in the following ways:
Change whether or not a property is a primary key.
Change whether or not a property is an alternate key.
Delete a class property. You can delete a property only if the corresponding database column is not required (that is, the Null check box for the database column is selected indicating that null values are allowed).
NOTE There is one exception to this rule. If you import a data schema and choose not to repair the data schema when importing it, then find that there is a mismatch between the data schema and the database because the data schema contains a required property that no longer exists in the database, you can delete that property from the data schema without deleting all the properties.
Rename a class property.
Clear or select the Null check box. If a column in a database table allows null values, you can select or clear the Null check box for the related property in the data schema.
Specify whether the property displays in Integration Composer when you browse a data source
To change a property in a class in a data schema, complete the following steps:
1 In Integration Composer, either create a new data schema or open an existing data schema.
For instructions on creating a new data schema, see “Defining a Data Schema” on page 60.
For instructions on opening an existing data schema, see “Opening an Existing Data Schema” on page 78.
2 In the Classes tree view in the upper left corner of the Data Schema window, select the class with the properties you want to change. Integration Composer displays the properties associated with the selected class in the lower half of the Classes section of the window.

Changing an Existing Data Schema
88 Integration Composer: Administrator Guide
3 You can modify the class properties as required. To change class properties, select from the following options:
To specify whether the property can contain a null value, in the properties table in the lower half of the Classes window, scroll to the Null column and select one of the following options:
To let Integration Composer use null values for this property, select the Null check box.
To prevent Integration Composer from using null values for this property, clear the Null check box.
To specify whether Integration Composer displays the property when you browse a data source, in the properties table in the lower half of the Classes window, scroll to the Show column and select one of the following options:
To specify that Integration Composer displays the property, select the Show check box.
To specify that Integration Composer does not display this property, clear the Show check box.
For more information about designating a primary key for a class, see “Designating a Primary Key” on page 72.
For more information about designating an alternate key for a class, see “Designating an Alternate Key” on page 73.
For more information about deleting a class property, see “Deleting a Class Property” on page 91.
For more information about renaming a class property, see “Renaming a Class Property” on page 89.
4 After you finish changing the data schema, from the Select Action menu, select Save. Integration Composer saves the data schema.
5 To close the data schema, from the Select Action menu, select Close. Integration Composer closes the data schema and displays the IBM Tivoli Integration Composer window.
Renaming a Class
You use this procedure to rename a class in a data schema that you create in Integration Composer. You perform this action in the Data Schema window.
The following instructions assume that you are working in a data schema with classes you created or that you have opened an existing data schema.
To rename a class in a data schema, complete the following steps:
1 In Integration Composer, either create a new data schema and add classes to it or open an existing data schema.
Changing an Existing Data Schema
Creating Data Schemas 89
For instructions on creating a new data schema, see “Defining a Data Schema” on page 60.
For instructions on opening an existing data schema, see “Opening an Existing Data Schema” on page 78.
2 In the Classes tree view in the upper left corner of the Data Schema window, right-click the class that you want to rename. Integration Composer displays a select action menu.
3 From the action menu, select Rename. Integration Composer displays a Class Properties dialog box for the class.
4 In the Class Properties dialog box, rename the class and click OK. Integration Composer renames the class and displays the new name for the class in the Data Schema window.
5 Optional: You can continue to add classes, properties, keys, and links; or you can change elements of the data schema.
6 After you finish working with the data schema, from the Select Action menu, select Save. Integration Composer saves the data schema.
7 To close the data schema, from the Select Action menu, select Close. Integration Composer closes the data schema and displays the IBM Tivoli Integration Composer window.
Renaming a Class Property
You use this procedure to rename a property in a data schema class. You perform this action in the Data Schema window.
The following instructions assume that you are working in a data schema with classes you created or that you have opened an existing data schema.
To rename a class property in a data schema, complete the following steps:
1 In Integration Composer, either create a new data schema or open an existing data schema.
For instructions on creating a new data schema, see “Defining a Data Schema” on page 60.
For instructions on opening an existing data schema, see “Opening an Existing Data Schema” on page 78.
2 In the Classes tree view in the upper left corner of the Data Schema window, select the class which has the property you want to rename. Integration Composer displays the properties for the selected class in the lower pane of the Classes section of the window.
3 In the lower pane of the Classes section of the window, right-click the property you want to rename. Integration Composer displays a select action menu.

Changing an Existing Data Schema
90 Integration Composer: Administrator Guide
4 From the action menu, select Rename. Integration Composer displays the selected class property name in a text box.
5 To rename the class property, select one of the following options:
Backspace to the beginning of the text box and enter a new name for the class property.
Select all the text in the text box and type a new name for the class property.
6 After you enter a new name, press Enter. Integration Composer renames the property.
7 Optional: You can continue to work with the data schema, adding classes, properties, keys, and links, or changing existing elements of the data schema.
8 After you finish working with the data schema, from the Select Action menu, select Save. Integration Composer saves the data schema.
9 To close the data schema, from the Select Action menu, select Close. Integration Composer closes the data schema and displays the IBM Tivoli Integration Composer window.
Deleting a Class
You use this procedure to delete a class from a data schema that you create in Integration Composer. You perform this action in the Data Schema window. You cannot delete a parent class associated with a child class unless you delete the child class first. If you attempt to delete a parent class that still has associated child classes, Integration Composer displays an error message.
The following instructions assume that you are working in a data schema with classes you created or that you have opened an existing data schema.
To delete a class from a data schema, complete the following steps:
1 In Integration Composer, either create a new data schema or open an existing data schema.
For instructions on creating a new data schema, see “Defining a Data Schema” on page 60.
For instructions on opening an existing data schema, see “Opening an Existing Data Schema” on page 78.
2 In the Classes tree view in the upper left corner of the Data Schema window, right-click the class that you want to delete. Integration Composer displays a select action menu.
3 From the action menu, select Delete. Integration Composer displays a Delete confirmation dialog box.
4 In the Delete confirmation dialog box, click Yes. Integration Composer deletes the selected class from the tree view.
Changing an Existing Data Schema
Creating Data Schemas 91
5 Optional: You can continue to add classes, properties, keys, and links to the data schema.
6 After you finish working with the data schema, from the Select Action menu, select Save. Integration Composer saves the data schema.
7 To close the data schema, from the Select Action menu, select Close. Integration Composer closes the data schema and displays the IBM Tivoli Integration Composer window.
Deleting a Class Property
You use this procedure to delete a class property from a data schema that you create in Integration Composer. You perform this action in the Data Schema window.
NOTE You can delete a property only if the corresponding database column is not required (that is, the Null check box for the database column is selected indicating that null values are allowed). It is possible to delete required class properties, but before you can do this, you must delete all properties in the class that are associated with the table or tables.
You can delete required class properties only if you delete all properties for the table or tables that belong to the class.
The following instructions assume that you are working in a data schema with classes you created or that you have opened an existing data schema.
To delete a class property from a data schema, complete the following steps:
1 In Integration Composer, either create a new data schema or open an existing data schema.
For instructions on creating a new data schema, see “Defining a Data Schema” on page 60.
For instructions on opening an existing data schema, see “Opening an Existing Data Schema” on page 78.
2 In the Classes tree view in the upper left corner of the Data Schema window, select the class which has the property you want to delete. Integration Composer displays the properties for the selected class in the lower pane of the Classes section of the window.
3 In the lower pane of the Classes section of the Data Schema window, right-click the property you want to delete. Integration Composer displays a select action menu.
4 From the action menu, select Delete. Integration Composer displays a Delete confirmation dialog box.
5 In the Delete confirmation dialog box, click Yes. Integration Composer deletes the selected property from the table in the lower pane of the Classes section. In the lower pane of the Database Tables section, Integration Composer displays the row for the deleted in black indicating that the database column is no longer associated with a class in the data schema.

Changing an Existing Data Schema
92 Integration Composer: Administrator Guide
6 Optional: You can continue to add classes, properties, keys, and links to the data schema.
7 After you finish working with the data schema, from the Select Action menu, select Save. Integration Composer saves the data schema.
8 To close the data schema, from the Select Action menu, select Close. Integration Composer closes the data schema and displays the IBM Tivoli Integration Composer window.
Deleting a Relationship
You use this procedure to delete a relationship between two database tables in a data schema that you create in Integration Composer. You perform this action in the Tables in Class section of the Data Schema window.
If you delete all links between a child and parent class tables, Integration Composer displays the class name in red to indicate that the selected class has no relationship to its parent.
The following instructions assume that you are working in a data schema with classes you created or that you have opened an existing data schema.
To delete a relationship between tables in a data schema, complete the following steps:
1 In Integration Composer, either create a new data schema or open an existing data schema.
For instructions on creating a new data schema, see “Defining a Data Schema” on page 60.
For instructions on opening an existing data schema, see “Opening an Existing Data Schema” on page 78.
2 In the Classes tree view in the upper left corner of the Data Schema window, select the class which has a relationship you want to delete. Integration Composer displays the database tables for the selected class in the Tables in Class section of the window. A link between tables is represented by a line connecting two columns in the tables.
3 To delete a link relationship, in the Tables in Class section of the window, select the link that you want to delete and choose one of the following options:
Click the line for the link you want to delete and press the Delete key.
Right-click the line for the link you want to delete. Integration Composer displays a select action menu. From the action menu, select Delete.
After you press the Delete key or select the Delete option, Integration Composer displays a Delete confirmation dialog box.
4 In the Delete confirmation dialog box, click Yes. Integration Composer deletes the selected link and no longer displays the line connecting the two database columns.
Viewing Link Properties
Creating Data Schemas 93
5 Optional: You can continue to add classes, properties, keys, and links or make changes to the data schema.
6 After you finish working with the data schema, from the Select Action menu, select Save. Integration Composer saves the data schema.
7 To close the data schema, from the Select Action menu, select Close. Integration Composer closes the data schema and displays the IBM Tivoli Integration Composer window.
Viewing Link Properties
You use this procedure to view properties of link relationships between two database tables in a data schema that you create in Integration Composer. You perform this action in the Data Schema window.
To view properties of a link relationship between tables in a data schema, complete the following steps:
1 In Integration Composer, either create a new data schema or open an existing data schema.
For instructions on creating a new data schema, see “Defining a Data Schema” on page 60.
For instructions on opening an existing data schema, see “Opening an Existing Data Schema” on page 78.
2 In the Classes tree view in the upper left corner of the Data Schema window, select the class that has a relationship that you want to view. Integration Composer displays the database tables for the selected class in the Tables in Class section of the window. A link between tables is represented by a line connecting two columns in the tables.
3 To view link properties, in the Tables in Class section of the window, select one of the following options:
Right-click the line for the link you want to view. Integration Composer displays a select action menu. From the action menu, select Properties.
Double-click the line for the link you want to view.
Integration Composer displays the Link Properties dialog box.
4 After you finish viewing link properties, click OK. Integration Composer closes the Link Properties dialog box.
5 You can continue to work with the data schema. After you finish working with the data schema, from the Select Action menu, select Save. Integration Composer saves the data schema.
6 Optional: To close the data schema, from the Select Action menu, select Close. Integration Composer closes the data schema and displays the IBM Tivoli Integration Composer window.
Deleting a Data Schema
94 Integration Composer: Administrator Guide
Deleting a Data Schema
If you no longer need a data schema, you can delete it from Integration Composer. You perform this action by selecting Delete Data Schema in the IBM Tivoli Integration Composer window.
After you delete a data schema, you must recreate it if you subsequently want to use it. If you think you might want to use a data schema again, but you do not want to keep it in Integration Composer, you can export the data schema to a file and then import it back into Integration Composer. For more information about exporting data schemas, see “Exporting a Data Schema” on page 96. For more information about importing data schemas, see “Importing a Data Schema” on page 95.
Before you can delete a data schema, you must delete all data sources that you defined for the data schema. For more information about deleting a data source, see “Deleting a Data Source” on page 28.
To delete a data schema from Integration Composer, complete the following steps:
1 Close any open windows using the desired data schema.
2 In the IBM Tivoli Integration Composer window, select Delete Data Schema. Integration Composer displays the Select Data Schema(s) to Delete Permanently window.
This window displays data schemas created using Integration Composer and data schemas delivered with Integration Composer.
3 In the Select Data Schema(s) to Delete Permanently window, select one one or more data schemas to delete.
To select a series of data schemas, use Shift+Click.
To select separate data schemas, use Ctrl+Click.
To select all data schemas in the list, click Select All.
To cancel the selection of all data schemas in the list, click Deselect All.
4 After you select one or more data schemas, click Delete. Integration Composer displays a Delete Data Schema confirmation dialog box.
5 In the Delete Data Schema dialog box, select one of the following options:
To delete the data schema, click Yes. Integration Composer deletes the selected data schemas and displays the IBM Tivoli Integration Composer window.
To keep this data schema, click No. Integration Composer closes the Delete Data Schema confirmation dialog box and displays the IBM Tivoli Integration Composer window.
To cancel deletion of the selected data schema, click Cancel. Integration Composer closes the Delete Data Schema confirmation dialog box and
Importing a Data Schema
Creating Data Schemas 95
displays the Select Data Schema(s) to Delete Permanently window so that you can select a different data schema to delete.
Importing a Data Schema
You can create a data schema in Integration Composer by creating a new data schema and importing an existing data schema file (<file name>.schm). You perform this action from the Select Action menu in the Data Schema window.
If discrepancies exist between the data source and the data schema that you import, Integration Composer displays the Data Schema Analysis window. This window lists discrepancies that Integration Composer found between the data schema and the corresponding data source. You can use this window to correct the following discrepancies:
Case of a table name in the database does not match that of a table associated with a class in the data schema.
Case of a column name in the database does not match that of a table column associated with a class table in the data schema.
Length of a table column in the database does not match length of the same column in the data schema.
Data type of a table column in the database does not match that of the same column in the data schema.
To import a data schema into Integration Composer, complete the following steps:
1 In Integration Composer, create a new data schema. For instructions on creating a new data schema, see “Defining a Data Schema” on page 60.
2 From the Select Action menu in the Data Schema window, select Import Data Schema. Integration Composer displays the Import Data Schema dialog box.
3 In the Import Data Schema dialog box, locate the file you want import, then select the file. Integration Composer populates the File name field with the file name.
4 Click Open. Integration Composer imports the data schema. If discrepancies exist between the data source and the data schema, Integration Composer displays the Data Schema Analysis window.
For information about the buttons in this window, see page 80.
5 Review the errors displayed in the Data Schema Analysis window and select one of the following options:
To repair the errors, click Fix Errors. Integration Composer repairs the errors and displays the Data Schema window.
To close the dialog box without repairing the errors, click Close. Integration Composer displays the Data Schema Analysis warning window:
Exporting a Data Schema
96 Integration Composer: Administrator Guide
Select one of the following options:
To make the data schema match the source database, complete the following steps:
a In the Data Schema Analysis warning window, click Yes. Integration Composer repairs the errors, closes the warning window, closes the Data Schema Analysis window, and displays an Import confirmation dialog box indicating that the import is finished.
b In the Import dialog box, click OK. Integration Composer displays the Data Schema window. Go to step 6.
To leave the data schema as is, click No. Integration Composer imports the data schema as is and displays the Data Schema window. Go to step 6.
To cancel the action, click Cancel. Integration Composer closes the warning window and displays the Data Schema Analysis window. Review the options in this window and select the appropriate action. These options are described in step 5.
6 Optional: After you import the data schema file, you can modify it.
7 After you finish working with the data schema, from the Select Action menu, select Save. Integration Composer saves the data schema.
8 To close the data schema, from the Select Action menu, select Close. Integration Composer closes the data schema and displays the IBM Tivoli Integration Composer window.
Exporting a Data Schema
After creating a data schema, you can export it from Integration Composer to a file to use as a backup or to access it from another location. You use the following procedure to export a data schema. You select this action from the Select Action menu in the Data Schema window. You can view the contents of the exported file using any text editor, such as Microsoft Notepad. You also can import the file into another instance of Integration Composer at a different location.
To export a data schema, complete the following steps:
1 In Integration Composer, either create a new data schema or open an existing data schema.
For instructions on creating a new data schema, see “Defining a Data Schema” on page 60.
For instructions on opening an existing data schema, see “Opening an Existing Data Schema” on page 78.
2 From the Select Action menu in the Data Schema window, select Export Data Schema. Integration Composer displays the Export Data Schema dialog box.
Exporting a Data Schema
Creating Data Schemas 97
3 In the File name field in the Export Data Schema dialog box, enter a file name for the data schema.
4 From the Files of type drop-down list, select the .schm file extension.
NOTE The .schm extension identifies Integration Composer data schema files.
5 Click Save. Integration Composer exports the data schema to the specified location.

Exporting a Data Schema
98 Integration Composer: Administrator Guide
© Copyright IBM Corp. 2007, 2008 99
A mapping is a set of expressions that tell Integration Composer how to transform source data when it is imported into the target database. For each data instance that you want to import from a source to a target, you define an expression that specifies how to transform the data for that property when it is migrated. Integration Composer uses Java programming language to convert data. Knowledge of this language is helpful for creating expressions, but it is not required.
NOTE Throughout this chapter, the term source refers to the source data source and the term target refers to the target data source.
Understanding Expressions
Integration Composer uses the expressions defined in a mapping to transform data instances when the data is migrated from a source to a target. Any information desired in the target must have an expression that defines how to transform the data in the source. However, expressions are not required for any class properties that will not be transferred from the source into the target.
When Expressions Are Required
Not every class and property requires an expression. Use the following guidelines when creating a mapping:
If any property of the target class contains an expression, then all primary keys of the class must also contain an expression.
If a property is a primary key for a class, the value of the primary key (or combination of the primary keys if there are more than one) must be unique.
If a primary key is a generated value, some or all of the alternate keys must have expressions.
You do not have to create an expression for every alternate key property.
Integration Composer ignores alternate key properties without expressions.
If all alternate key properties contain an expression, then the values that result from alternate key expressions must be unique.
For every child or reference class that contains an expression, all primary keys in the parent class must contain an expression to ensure that no child or reference class instance is without a parent class instance.
Creating Expressions 6
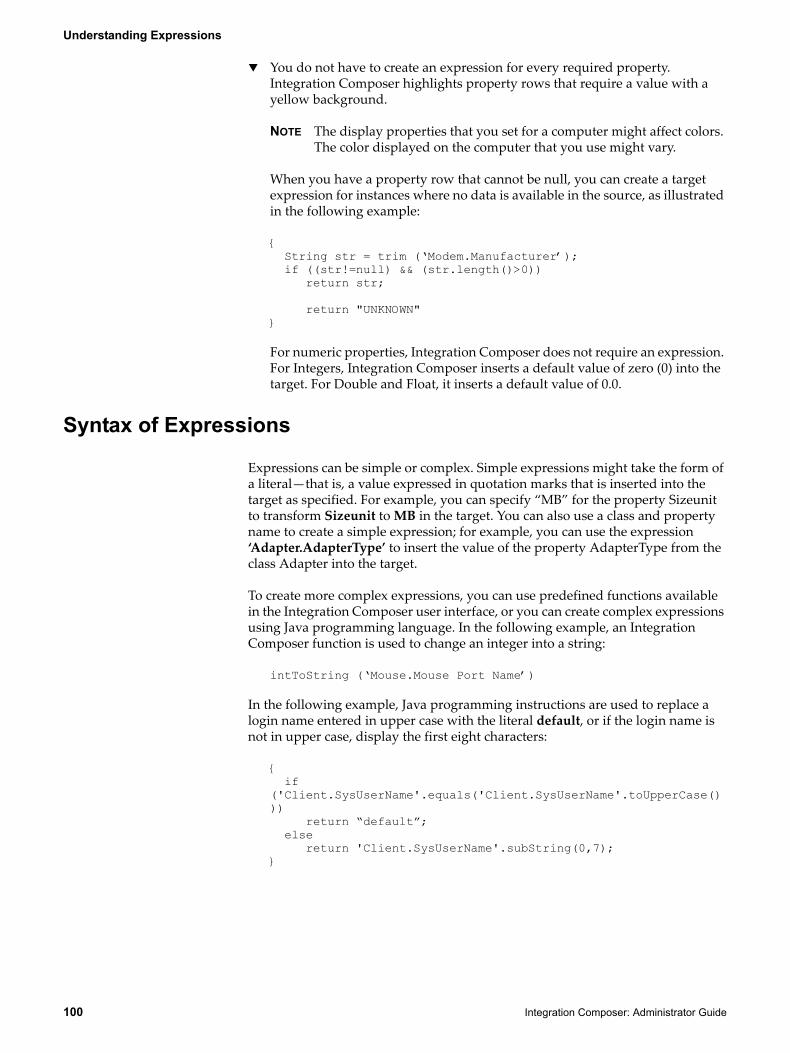
Understanding Expressions
100 Integration Composer: Administrator Guide
You do not have to create an expression for every required property. Integration Composer highlights property rows that require a value with a yellow background.
NOTE The display properties that you set for a computer might affect colors. The color displayed on the computer that you use might vary.
When you have a property row that cannot be null, you can create a target expression for instances where no data is available in the source, as illustrated in the following example:
{ String str = trim (‘Modem.Manufacturer’); if ((str!=null) && (str.length()>0)) return str; return "UNKNOWN"}
For numeric properties, Integration Composer does not require an expression. For Integers, Integration Composer inserts a default value of zero (0) into the target. For Double and Float, it inserts a default value of 0.0.
Syntax of Expressions
Expressions can be simple or complex. Simple expressions might take the form of a literal—that is, a value expressed in quotation marks that is inserted into the target as specified. For example, you can specify “MB” for the property Sizeunit to transform Sizeunit to MB in the target. You can also use a class and property name to create a simple expression; for example, you can use the expression ‘Adapter.AdapterType’ to insert the value of the property AdapterType from the class Adapter into the target.
To create more complex expressions, you can use predefined functions available in the Integration Composer user interface, or you can create complex expressions using Java programming language. In the following example, an Integration Composer function is used to change an integer into a string:
intToString (‘Mouse.Mouse Port Name’)
In the following example, Java programming instructions are used to replace a login name entered in upper case with the literal default, or if the login name is not in upper case, display the first eight characters:
{ if ('Client.SysUserName'.equals('Client.SysUserName'.toUpperCase())) return “default”; else return 'Client.SysUserName'.subString(0,7);}
Creating Expressions
Creating Expressions 101
Creating Expressions
You create expressions in the Mapping window. For more information about the features available on this window, see “Mapping Window Features” on page 32. Integration Composer provides the following ways to create expressions:
Drag and DropTyping an expression in the Expression fieldDeciding Class drop-down listCase Selection fieldExpression Builder
Drag and Drop
You use the drag-and-drop feature to create an expression when there is a one-to-one relationship between source and a target data. Select the appropriate class in the source and in the target; then click the property in the source and drag the cursor to the property in the target. When you click the source property, the cursor becomes a black circle with a crossbar and a ToolTip opens that specifies the class and property of the source. When you drag this property to the Expression cell in the target pane and release the mouse button, the class and property information populates the Expression column in the Target pane in the following form: ‘<class>.<property>’.
Typing an Expression
In the Mapping window, you can select a class and property on the Source pane. Then, on the Target pane, you can position the cursor in the Expression field for the desired property and class and double-click. Integration Composer opens a text input box in the Expression field. You can type an expression, such as a literal or a ‘<class>.<property>’, and press the Enter key. If there is an error in the expression, Integration Composer displays the expression in red text.
NOTE The display properties that you set for a computer might affect colors. The color displayed on the computer that you use might vary.
Selecting a Deciding Class
Sometimes you have to map more than one class in a source to a single class in the target. For example, suppose the target has a class Computer but the source has multiple classes for Computer, such as Client, BIOS, and RAM. When creating expressions, if you use multiple classes in the source to migrate data into a single class in the target, Integration Composer adds each class in the source to the list of values for the Deciding Class drop-down list in the Target pane.
You can select a deciding class from the drop-down list. Selecting a deciding class lets you control how many instances Integration Composer creates in a target when more than one class in a source is mapped to a target class. Integration Composer creates target instances based on the number of instances of the deciding class that exist in the source.
Creating Expressions
102 Integration Composer: Administrator Guide
For example, suppose information is mapped from the Client, BIOS, and RAM classes in the source to the Computer class in the target. Client is selected as the deciding class. When you execute the mapping, for every instance of Client that exists in the source, Integration Composer creates an instance of Computer in the target.
If you map multiple properties in a source to a single class in the target but do not designate a deciding class, Integration Composer creates one instance in the target using the first instance in the source that meets the criteria. You must select a deciding class if you want multiple instances in the target.
In the following cases, you are not dealing with multiple instances. Consequently, it is not necessary to select a deciding class:
You have mapped only one source class to a target class, or
You have used a literal value in the Expression field, and you have not mapped any source classes to the target class. In this case, Integration Composer creates only one instance in the target for each parent class.
If you map to a literal and do not select a deciding class, Integration Composer creates an instance in the target whether or not there is an instance in the source. If you map to a literal and you do not want an instance in the target when there is no instance in the source, select a deciding class. Then Integration Composer does not create an instance in the target if no instance exists in the source.
If a class is the root class and therefore has no parent, then Integration Composer creates only one instance.
Setting Up Multiple Cases
You use the case selection feature when you need to migrate data from multiple classes in the source into multiple instances in a single target class. The case selection feature lets you create a set of expressions that apply on a case-by-case basis to the same target class.
For example, suppose in the target database you have the class Adapter, which will hold data from the following classes in the source: Sound Adapter and Video Adapter. In the target, you can create two cases for the class Adapter, one for the sound adapter and one for the video adapter. This will migrate multiple instances of adapters, some of which will be video adapters and some will be sound adapters.
If an adapter in the source meets the criteria specified for case 0 (in Integration Composer, the first case is always case 0), which in this case is sound adapter, Integration Composer creates an instance in the target based on the expression defined for the sound adapter in case 0.
If an adapter in the source meets the criteria specified for case 1,which in this case is video adapter, Integration Composer creates an instance in the target based on the expression defined for the video adapter in case 1.
If you need multiple cases in the child class but not in the parent class, then create only one case (case 0) for the parent class. All instances created for the child class will be based on the parent class.
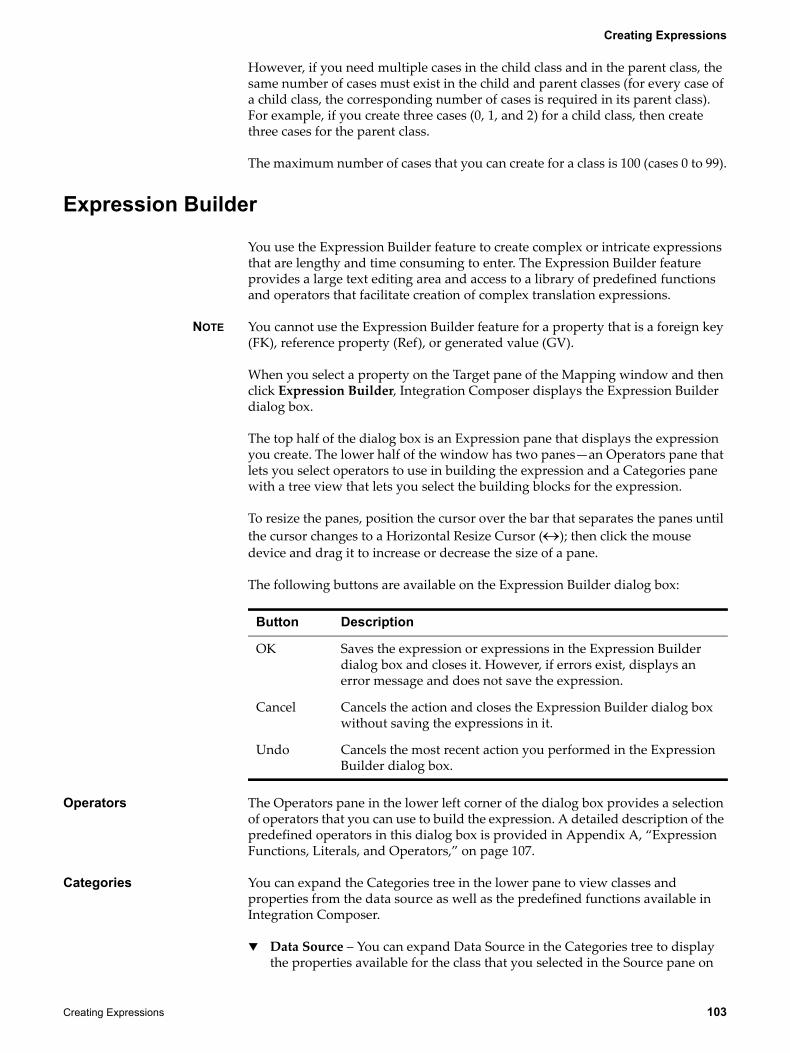
Creating Expressions
Creating Expressions 103
However, if you need multiple cases in the child class and in the parent class, the same number of cases must exist in the child and parent classes (for every case of a child class, the corresponding number of cases is required in its parent class). For example, if you create three cases (0, 1, and 2) for a child class, then create three cases for the parent class.
The maximum number of cases that you can create for a class is 100 (cases 0 to 99).
Expression Builder
You use the Expression Builder feature to create complex or intricate expressions that are lengthy and time consuming to enter. The Expression Builder feature provides a large text editing area and access to a library of predefined functions and operators that facilitate creation of complex translation expressions.
NOTE You cannot use the Expression Builder feature for a property that is a foreign key (FK), reference property (Ref), or generated value (GV).
When you select a property on the Target pane of the Mapping window and then click Expression Builder, Integration Composer displays the Expression Builder dialog box.
The top half of the dialog box is an Expression pane that displays the expression you create. The lower half of the window has two panes—an Operators pane that lets you select operators to use in building the expression and a Categories pane with a tree view that lets you select the building blocks for the expression.
To resize the panes, position the cursor over the bar that separates the panes until the cursor changes to a Horizontal Resize Cursor (↔); then click the mouse device and drag it to increase or decrease the size of a pane.
The following buttons are available on the Expression Builder dialog box:
Operators The Operators pane in the lower left corner of the dialog box provides a selection of operators that you can use to build the expression. A detailed description of the predefined operators in this dialog box is provided in Appendix A, “Expression Functions, Literals, and Operators,” on page 107.
Categories You can expand the Categories tree in the lower pane to view classes and properties from the data source as well as the predefined functions available in Integration Composer.
Data Source – You can expand Data Source in the Categories tree to display the properties available for the class that you selected in the Source pane on
Button Description
OK Saves the expression or expressions in the Expression Builder dialog box and closes it. However, if errors exist, displays an error message and does not save the expression.
Cancel Cancels the action and closes the Expression Builder dialog box without saving the expressions in it.
Undo Cancels the most recent action you performed in the Expression Builder dialog box.
Creating Expressions
104 Integration Composer: Administrator Guide
the Mapping window. You can double-click a property to select it for the expression.
NOTE Integration Composer displays only properties for the source class that you selected in the Mapping window when you clicked the Expression Builder icon.
Functions – You can expand Functions in the Categories tree to list the predefined functions that you can use to build the expression. The functions are organized into the following sub-categories: text, SQL, math, mapping execution flow, mapping, logical, and date/time. A detailed description of the predefined functions in this dialog box is provided in Appendix A, “Expression Functions, Literals, and Operators,” on page 107.
When you expand the tree, you can double click an item to select it for the expression, and Integration Composer displays the selected item in the Expression pane of the dialog box.
ATTENTION When creating expressions using the Expression Builder dialog box, do not use the tab key. You can use the space bar to add additional spaces when necessary.
Defining Function Parameters
Expression Builder provides a feature that lets you define a value or range of values for functions. When you select a specific function, a Function Definition
icon appears next to the highlighted function.
When you click this icon, Integration Composer displays the Function Parameters dialog box. This dialog box lets you select additional parameters related to the function. It also contains Help text that describes the selected function.
The Function Parameters dialog box includes the following buttons:
You can further define the function by selecting one of the parameters. When you select a parameter, Integration Composer displays a Function Parameters icon for the selected function.
Clicking this button opens a second Expression Builder dialog box that lets you create an expression for the selected parameter.
Syntax Errors Syntax errors occur if words or symbols are in the wrong order or if you omit them when you create an expression using the Expression Builder. To display syntax errors, click OK on the Expression Builder dialog box. Integration Composer displays the reason for the error in the Errors section at the bottom of the dialog box.
When you position the cursor over the error message, Integration Composer displays a ToolTip with information about the error.
Button Description
OK Saves the expression or expressions in the dialog box and closes the Function Parameters dialog box.
Cancel Cancels the action and closes the Function Parameters dialog box without saving the expressions in it.
Creating Expressions
Creating Expressions 105
Integration Composer does not let you click OK and exit without correcting the syntax error. You must correct the error before you can use the expression in the mapping.
Using an Arithmetic Operator
Many expressions are one-to-one relationships from the source to the target. Sometimes, however, the format of the data in the target is different from the format in the source. You can use an arithmetic operator to change the format of the data.
You can use the following arithmetic operators in Integration Composer.
For example, suppose that RAM memory is expressed in kilobytes in the source and megabytes in the target. The expression in the target is:
‘RAM.Size(bytes)’/1024.
When you execute the mapping, this example expression copies the value from the Size(bytes) property of the class RAM (in the source) to the Ramsize property of the class Computer (in the target). This value is then divided by 1,024 and placed into each instance created.
Using a Literal
In an expression, a literal is a value that remains unchanged when Integration Composer creates data in the target; literal values are transferred exactly as written. In Integration Composer, you can specify literals for strings and for the following primitive data types: boolean, char, integer, and floating-point. For additional information about using literals, see Appendix A, “Expression Functions, Literals, and Operators,” on page 107.
When every class instance in the target requires the same value, create an expression with a literal. For example, suppose that you are migrating adapter data from a source to a target and you want to use the words Video Adapter for the Mediatype property in the target. To use this string of words, use double quotation marks to indicate a string literal in the expression, as shown in the following example.
“Video Adapter”
When you execute the mapping, this expression copies the string literal Video Adapter into the Mediatype property of the target each time Integration Composer creates an instance of the class of Media Adapter.
+ addition
– subtraction
* multiplication
/ division
Deleting Expressions
106 Integration Composer: Administrator Guide
Deleting Expressions
Integration Composer lets you delete expressions from the Target pane. The way that you created the expression determines how to delete it.
Delete Using the Expression Field
To delete an expression created by the drag and drop method or by typing in a value, complete the following steps:
1 In the Target pane in the Mapping window, select the row that contains the expression you want to delete.
2 Double-click the cell in the Expression column. Integration Composer displays the Expression field containing the expression.
3 Highlight the expression and press Delete. Integration Composer deletes the expression.
4 Press Enter. Integration Composer closes the Expression field.
Delete Using Expression Builder
To delete a lengthy expression created with Expression Builder:
1 In the Target pane in the Mapping window, select the row that contains the expression that you want to delete and double-click the row. Integration Composer displays the selected expression in the Expression Builder dialog box.
2 In the Expression pane on the Expression Builder dialog box, highlight the text of the expression and press Delete. Integration Composer deletes the expression.
3 Click OK to close the Expression Builder dialog box. Integration Composer deletes the expression and displays the Mapping window.
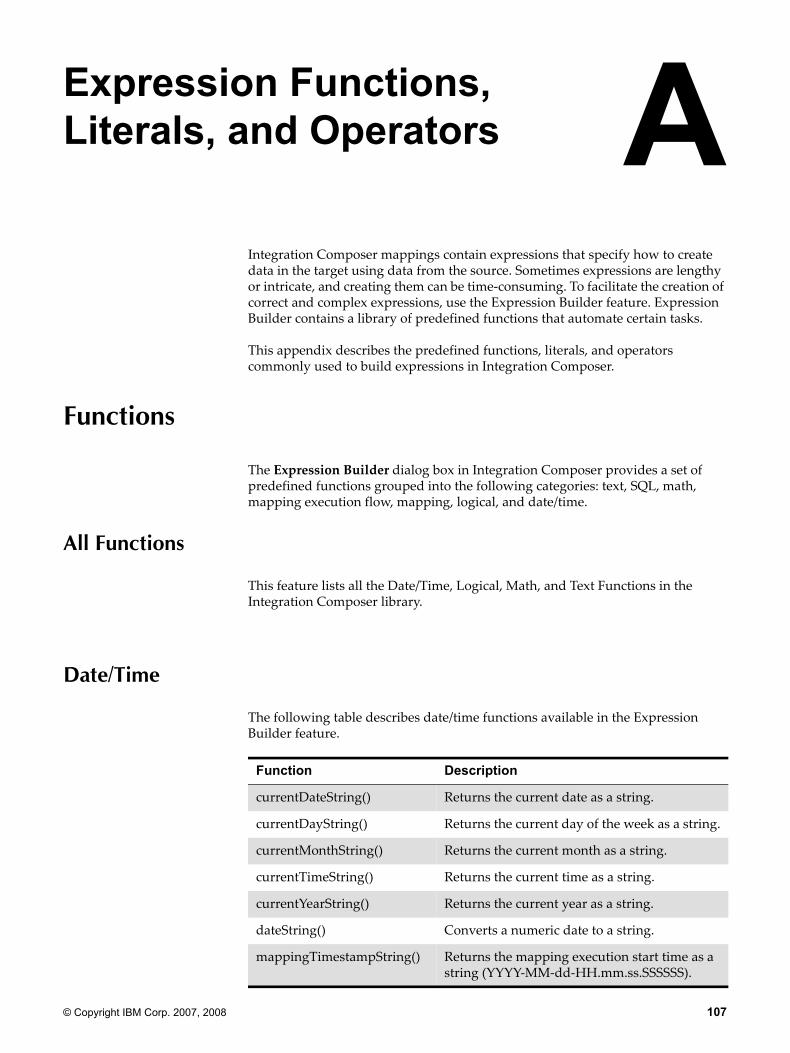
© Copyright IBM Corp. 2007, 2008 107
Integration Composer mappings contain expressions that specify how to create data in the target using data from the source. Sometimes expressions are lengthy or intricate, and creating them can be time-consuming. To facilitate the creation of correct and complex expressions, use the Expression Builder feature. Expression Builder contains a library of predefined functions that automate certain tasks.
This appendix describes the predefined functions, literals, and operators commonly used to build expressions in Integration Composer.
Functions
The Expression Builder dialog box in Integration Composer provides a set of predefined functions grouped into the following categories: text, SQL, math, mapping execution flow, mapping, logical, and date/time.
All Functions
This feature lists all the Date/Time, Logical, Math, and Text Functions in the Integration Composer library.
Date/Time
The following table describes date/time functions available in the Expression Builder feature.
Expression Functions, Literals, and Operators A
Function Description
currentDateString() Returns the current date as a string.
currentDayString() Returns the current day of the week as a string.
currentMonthString() Returns the current month as a string.
currentTimeString() Returns the current time as a string.
currentYearString() Returns the current year as a string.
dateString() Converts a numeric date to a string.
mappingTimestampString() Returns the mapping execution start time as a string (YYYY-MM-dd-HH.mm.ss.SSSSSS).
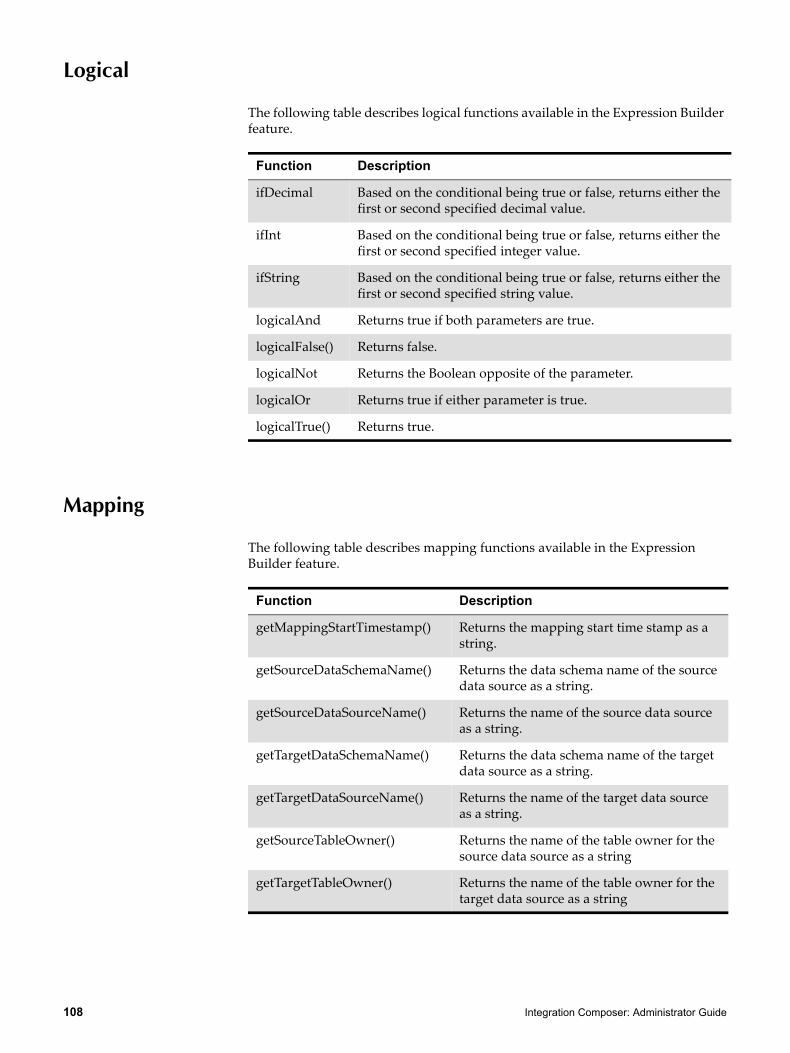
108 Integration Composer: Administrator Guide
Logical
The following table describes logical functions available in the Expression Builder feature.
Mapping
The following table describes mapping functions available in the Expression Builder feature.
Function Description
ifDecimal Based on the conditional being true or false, returns either the first or second specified decimal value.
ifInt Based on the conditional being true or false, returns either the first or second specified integer value.
ifString Based on the conditional being true or false, returns either the first or second specified string value.
logicalAnd Returns true if both parameters are true.
logicalFalse() Returns false.
logicalNot Returns the Boolean opposite of the parameter.
logicalOr Returns true if either parameter is true.
logicalTrue() Returns true.
Function Description
getMappingStartTimestamp() Returns the mapping start time stamp as a string.
getSourceDataSchemaName() Returns the data schema name of the source data source as a string.
getSourceDataSourceName() Returns the name of the source data source as a string.
getTargetDataSchemaName() Returns the data schema name of the target data source as a string.
getTargetDataSourceName() Returns the name of the target data source as a string.
getSourceTableOwner() Returns the name of the table owner for the source data source as a string
getTargetTableOwner() Returns the name of the table owner for the target data source as a string
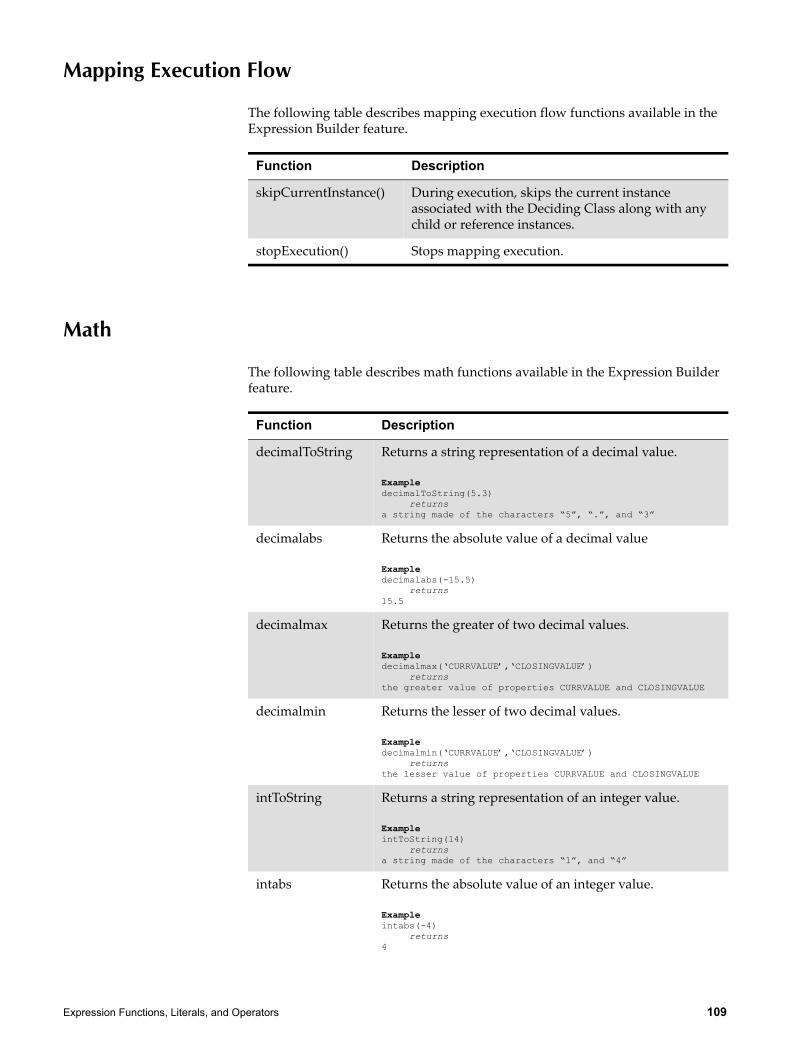
Expression Functions, Literals, and Operators 109
Mapping Execution Flow
The following table describes mapping execution flow functions available in the Expression Builder feature.
Math
The following table describes math functions available in the Expression Builder feature.
Function Description
skipCurrentInstance() During execution, skips the current instance associated with the Deciding Class along with any child or reference instances.
stopExecution() Stops mapping execution.
Function Description
decimalToString Returns a string representation of a decimal value.
ExampledecimalToString(5.3) returnsa string made of the characters “5”, “.”, and “3”
decimalabs Returns the absolute value of a decimal value
Exampledecimalabs(-15.5) returns15.5
decimalmax Returns the greater of two decimal values.
Exampledecimalmax(‘CURRVALUE’,‘CLOSINGVALUE’) returnsthe greater value of properties CURRVALUE and CLOSINGVALUE
decimalmin Returns the lesser of two decimal values.
Exampledecimalmin(‘CURRVALUE’,‘CLOSINGVALUE’) returnsthe lesser value of properties CURRVALUE and CLOSINGVALUE
intToString Returns a string representation of an integer value.
ExampleintToString(14) returnsa string made of the characters “1”, and “4”
intabs Returns the absolute value of an integer value.
Exampleintabs(-4) returns4
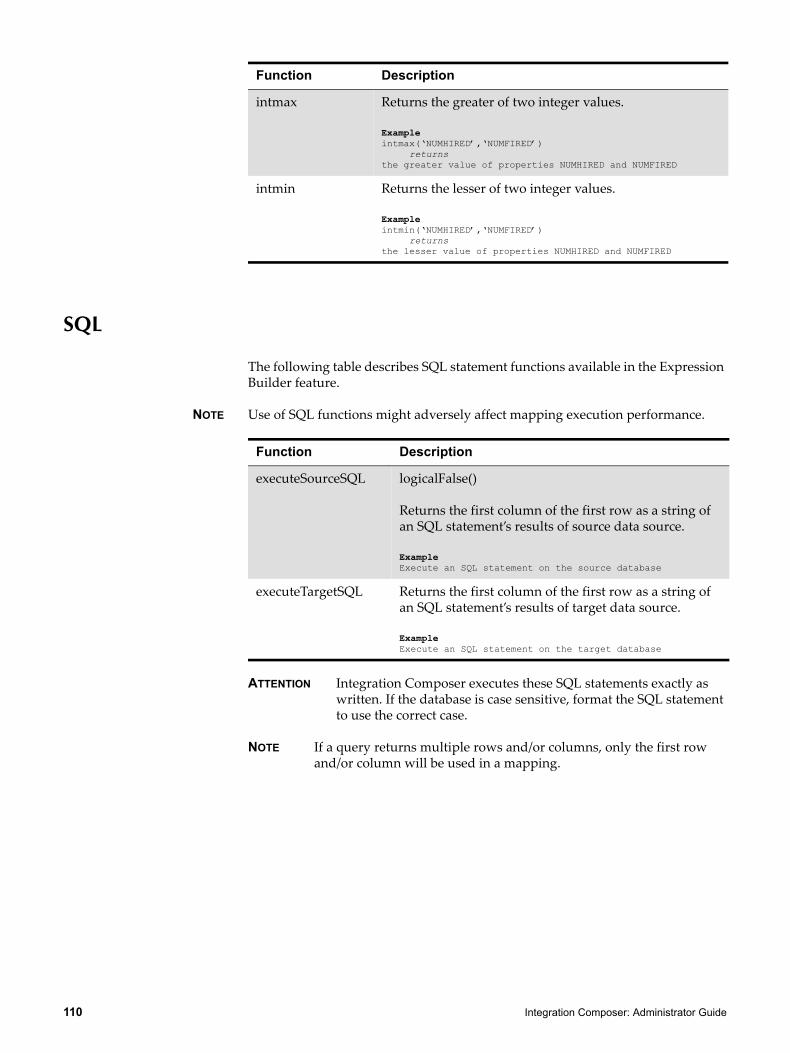
110 Integration Composer: Administrator Guide
SQL
The following table describes SQL statement functions available in the Expression Builder feature.
NOTE Use of SQL functions might adversely affect mapping execution performance.
ATTENTION Integration Composer executes these SQL statements exactly as written. If the database is case sensitive, format the SQL statement to use the correct case.
NOTE If a query returns multiple rows and/or columns, only the first row and/or column will be used in a mapping.
intmax Returns the greater of two integer values.
Exampleintmax(‘NUMHIRED’,‘NUMFIRED’) returnsthe greater value of properties NUMHIRED and NUMFIRED
intmin Returns the lesser of two integer values.
Exampleintmin(‘NUMHIRED’,‘NUMFIRED’) returnsthe lesser value of properties NUMHIRED and NUMFIRED
Function Description
Function Description
executeSourceSQL logicalFalse()
Returns the first column of the first row as a string of an SQL statement’s results of source data source.
ExampleExecute an SQL statement on the source database
executeTargetSQL Returns the first column of the first row as a string of an SQL statement’s results of target data source.
ExampleExecute an SQL statement on the target database
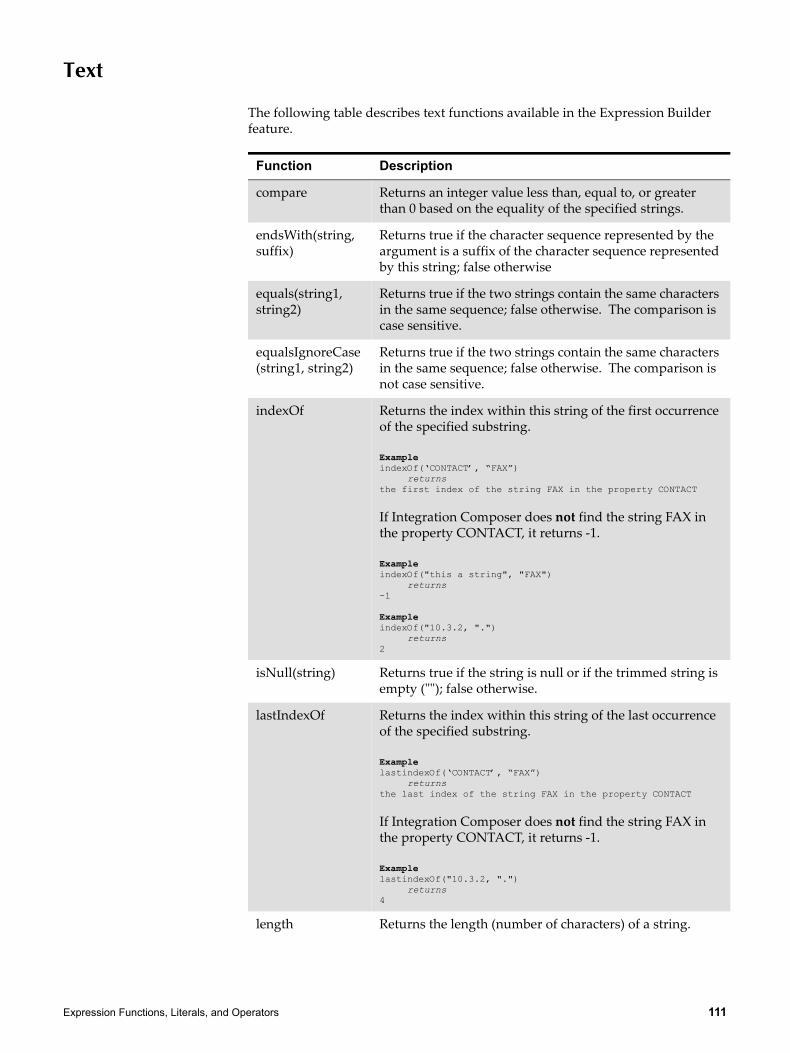
Expression Functions, Literals, and Operators 111
Text
The following table describes text functions available in the Expression Builder feature.
Function Description
compare Returns an integer value less than, equal to, or greater than 0 based on the equality of the specified strings.
endsWith(string, suffix)
Returns true if the character sequence represented by the argument is a suffix of the character sequence represented by this string; false otherwise
equals(string1, string2)
Returns true if the two strings contain the same characters in the same sequence; false otherwise. The comparison is case sensitive.
equalsIgnoreCase(string1, string2)
Returns true if the two strings contain the same characters in the same sequence; false otherwise. The comparison is not case sensitive.
indexOf Returns the index within this string of the first occurrence of the specified substring.
ExampleindexOf(‘CONTACT’, “FAX”) returnsthe first index of the string FAX in the property CONTACT
If Integration Composer does not find the string FAX in the property CONTACT, it returns -1.
ExampleindexOf("this a string", "FAX") returns-1
ExampleindexOf("10.3.2, ".") returns2
isNull(string) Returns true if the string is null or if the trimmed string is empty (""); false otherwise.
lastIndexOf Returns the index within this string of the last occurrence of the specified substring.
ExamplelastindexOf(‘CONTACT’, “FAX”) returnsthe last index of the string FAX in the property CONTACT
If Integration Composer does not find the string FAX in the property CONTACT, it returns -1.
ExamplelastindexOf("10.3.2, ".") returns4
length Returns the length (number of characters) of a string.
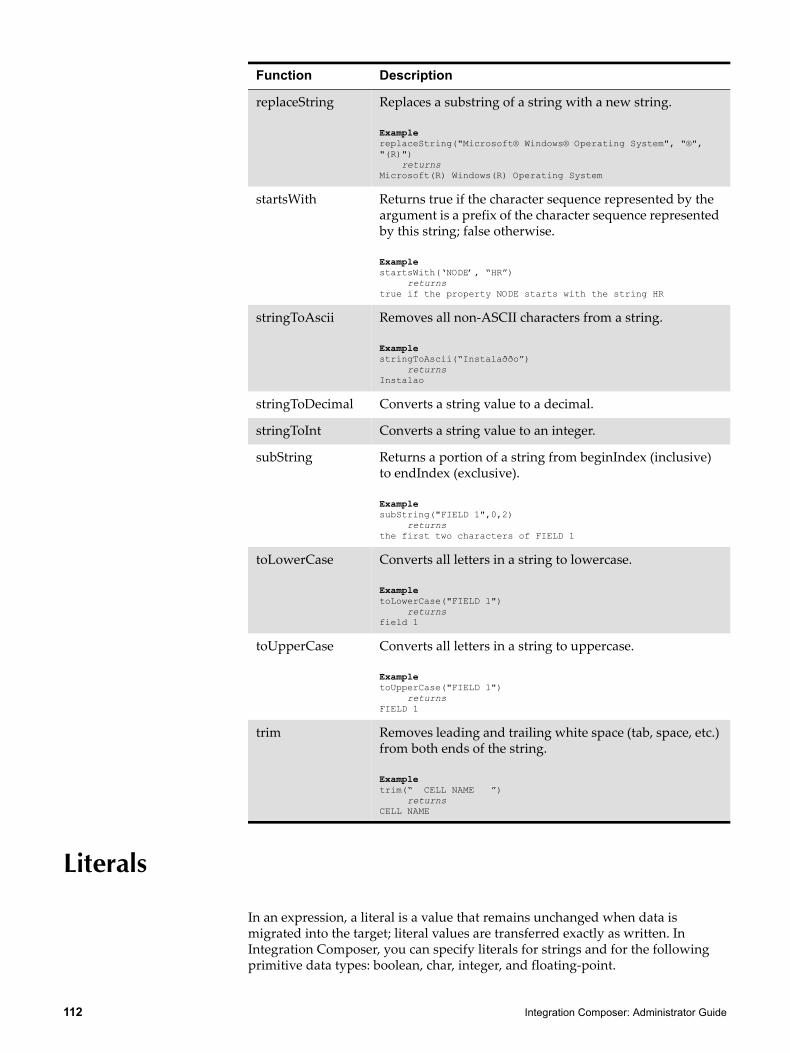
112 Integration Composer: Administrator Guide
Literals
In an expression, a literal is a value that remains unchanged when data is migrated into the target; literal values are transferred exactly as written. In Integration Composer, you can specify literals for strings and for the following primitive data types: boolean, char, integer, and floating-point.
replaceString Replaces a substring of a string with a new string.
ExamplereplaceString("Microsoft® Windows® Operating System", "®", "(R)") returnsMicrosoft(R) Windows(R) Operating System
startsWith Returns true if the character sequence represented by the argument is a prefix of the character sequence represented by this string; false otherwise.
ExamplestartsWith(‘NODE’, “HR”) returnstrue if the property NODE starts with the string HR
stringToAscii Removes all non-ASCII characters from a string.
ExamplestringToAscii(“Instalaððo”) returnsInstalao
stringToDecimal Converts a string value to a decimal.
stringToInt Converts a string value to an integer.
subString Returns a portion of a string from beginIndex (inclusive) to endIndex (exclusive).
ExamplesubString("FIELD 1",0,2) returnsthe first two characters of FIELD 1
toLowerCase Converts all letters in a string to lowercase.
ExampletoLowerCase("FIELD 1") returnsfield 1
toUpperCase Converts all letters in a string to uppercase.
ExampletoUpperCase("FIELD 1") returnsFIELD 1
trim Removes leading and trailing white space (tab, space, etc.) from both ends of the string.
Exampletrim(“ CELL NAME ”) returnsCELL NAME
Function Description
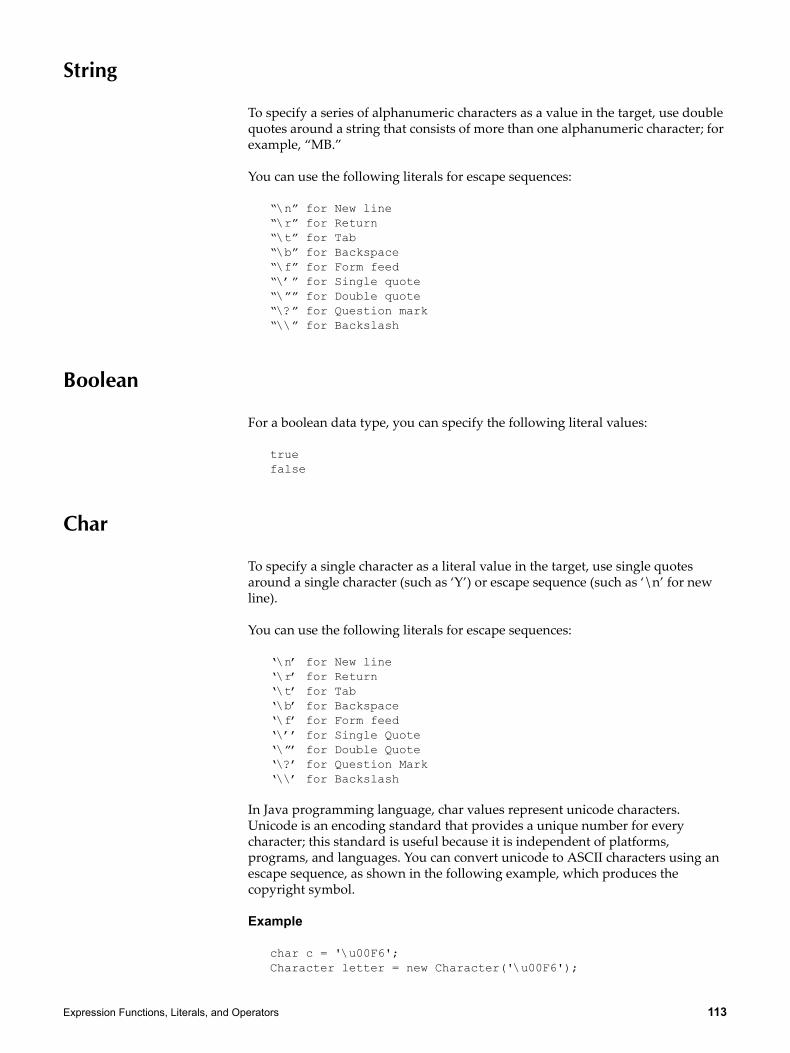
Expression Functions, Literals, and Operators 113
String
To specify a series of alphanumeric characters as a value in the target, use double quotes around a string that consists of more than one alphanumeric character; for example, “MB.”
You can use the following literals for escape sequences:
“\n” for New line“\r” for Return“\t” for Tab“\b” for Backspace“\f” for Form feed“\’” for Single quote“\”” for Double quote“\?” for Question mark“\\” for Backslash
Boolean
For a boolean data type, you can specify the following literal values:
truefalse
Char
To specify a single character as a literal value in the target, use single quotes around a single character (such as ‘Y’) or escape sequence (such as ‘\n’ for new line).
You can use the following literals for escape sequences:
‘\n’ for New line‘\r’ for Return‘\t’ for Tab‘\b’ for Backspace‘\f’ for Form feed‘\’’ for Single Quote‘\”’ for Double Quote‘\?’ for Question Mark‘\\’ for Backslash
In Java programming language, char values represent unicode characters. Unicode is an encoding standard that provides a unique number for every character; this standard is useful because it is independent of platforms, programs, and languages. You can convert unicode to ASCII characters using an escape sequence, as shown in the following example, which produces the copyright symbol.
Example
char c = '\u00F6'; Character letter = new Character('\u00F6');
114 Integration Composer: Administrator Guide
char copyright = '\u00A9';
produces character ©
Integer
You can express integer literals in decimal, octal, or hexadecimal format. For example, the value 64 may be specified in the following ways:
Floating-Point
Floating-point literals can be specified as a numeric value expressed in one of the following ways:
NOTE The default for a floating-point literal without an f or d suffix is a 64-bit double literal.
Operators
An operator is a symbol that operates on one or more arguments to produce a result. Various kinds of operators are available on the Expression Builder dialog box.
Arithmetic Operators
The following arithmetic operators are used in Integration Composer.
64 Decimal is the default 32-bit value.
0100 Octal
0X40 Hexadecimal
64L To specify the 64-bit literal, use the suffix L for long.
Literal Example
Decimal point 7.512
The letter E or e for scientific notation 6.48e+9
The suffix F or f for a 32-bit float literal 7.89f
The suffix D or d for a 64-bit double literal 456d
Operator Description
+ addition
- subtraction
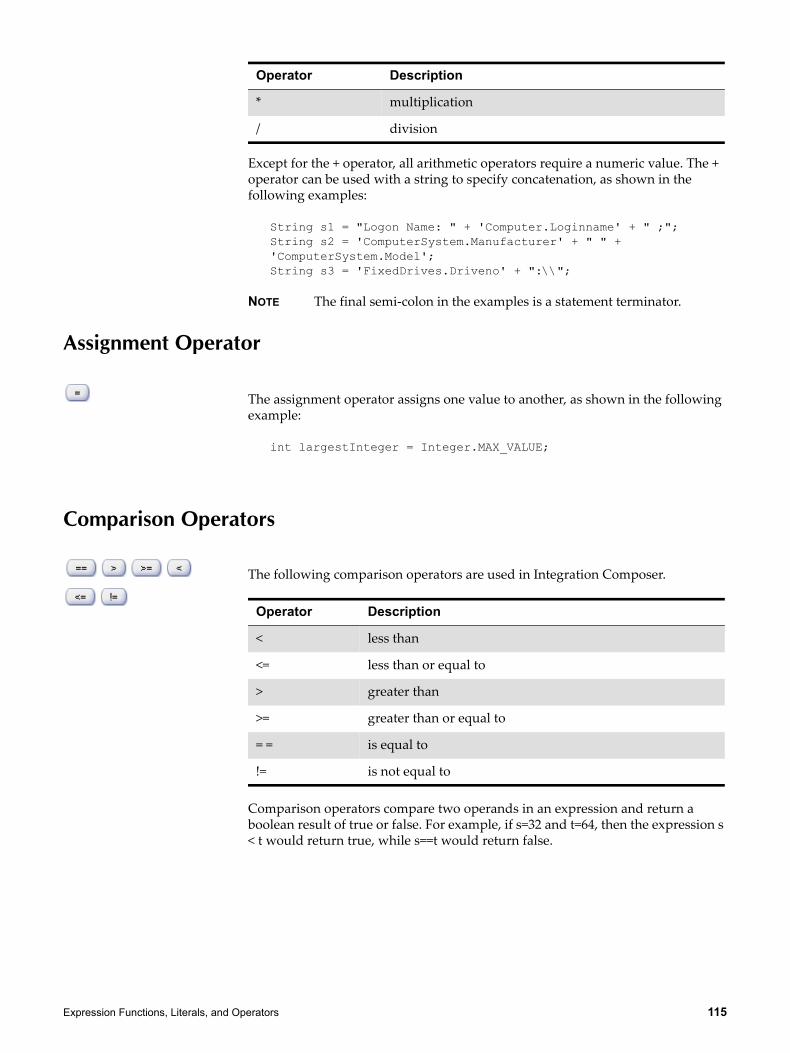
Expression Functions, Literals, and Operators 115
Except for the + operator, all arithmetic operators require a numeric value. The + operator can be used with a string to specify concatenation, as shown in the following examples:
String s1 = "Logon Name: " + 'Computer.Loginname' + " ;"; String s2 = 'ComputerSystem.Manufacturer' + " " + 'ComputerSystem.Model'; String s3 = 'FixedDrives.Driveno' + ":\\";
NOTE The final semi-colon in the examples is a statement terminator.
Assignment Operator
The assignment operator assigns one value to another, as shown in the following example:
int largestInteger = Integer.MAX_VALUE;
Comparison Operators
The following comparison operators are used in Integration Composer.
Comparison operators compare two operands in an expression and return a boolean result of true or false. For example, if s=32 and t=64, then the expression s < t would return true, while s==t would return false.
* multiplication
/ division
Operator Description
Operator Description
< less than
<= less than or equal to
> greater than
>= greater than or equal to
= = is equal to
!= is not equal to
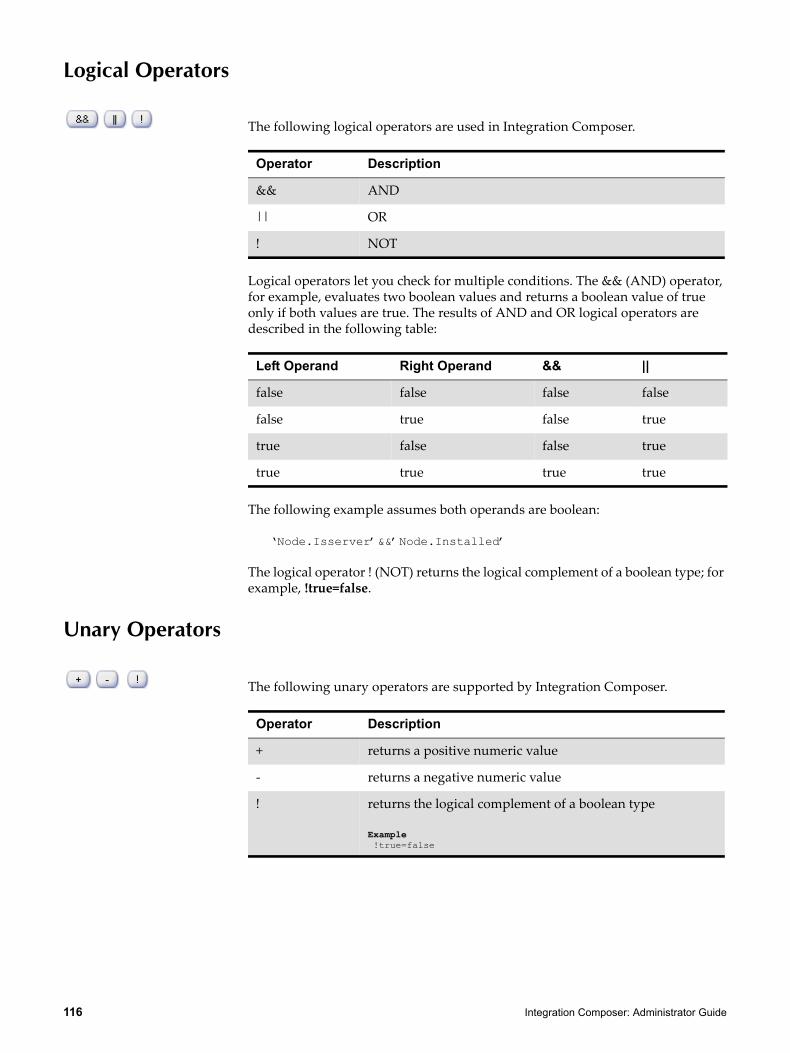
116 Integration Composer: Administrator Guide
Logical Operators
The following logical operators are used in Integration Composer.
Logical operators let you check for multiple conditions. The && (AND) operator, for example, evaluates two boolean values and returns a boolean value of true only if both values are true. The results of AND and OR logical operators are described in the following table:
The following example assumes both operands are boolean:
‘Node.Isserver’&&’Node.Installed’
The logical operator ! (NOT) returns the logical complement of a boolean type; for example, !true=false.
Unary Operators
The following unary operators are supported by Integration Composer.
Operator Description
&& AND
|| OR
! NOT
Left Operand Right Operand && ||
false false false false
false true false true
true false false true
true true true true
Operator Description
+ returns a positive numeric value
- returns a negative numeric value
! returns the logical complement of a boolean type
Example !true=false
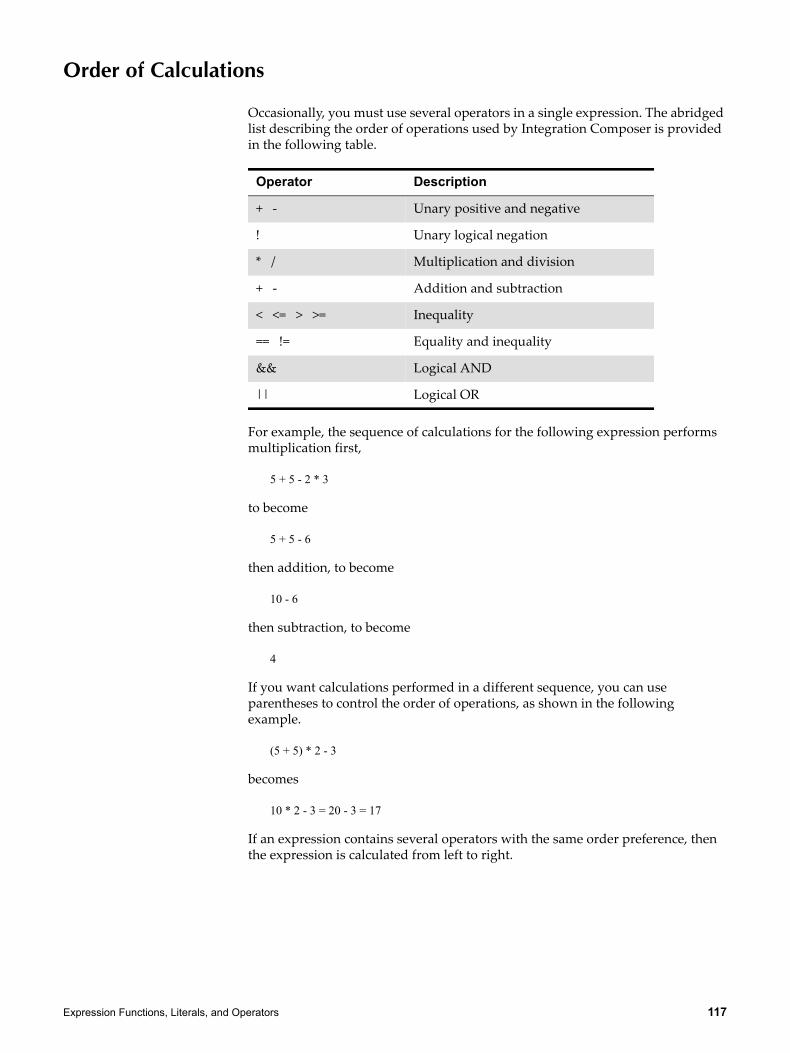
Expression Functions, Literals, and Operators 117
Order of Calculations
Occasionally, you must use several operators in a single expression. The abridged list describing the order of operations used by Integration Composer is provided in the following table.
For example, the sequence of calculations for the following expression performs multiplication first,
5 + 5 - 2 * 3
to become
5 + 5 - 6
then addition, to become
10 - 6
then subtraction, to become
4
If you want calculations performed in a different sequence, you can use parentheses to control the order of operations, as shown in the following example.
(5 + 5) * 2 - 3
becomes
10 * 2 - 3 = 20 - 3 = 17
If an expression contains several operators with the same order preference, then the expression is calculated from left to right.
Operator Description
+ - Unary positive and negative
! Unary logical negation
* / Multiplication and division
+ - Addition and subtraction
< <= > >= Inequality
== != Equality and inequality
&& Logical AND
|| Logical OR

118 Integration Composer: Administrator Guide

© Copyright IBM Corp. 2007, 2008 119
This chapter describes the initialization files that Integration Composer uses. Initialization files specify various properties of Integration Composer. The following integration Composer initialization files are located in the properties directory in the Integration Composer installation directory:
fusion.propertiesjdbcinfo.propertieslogging.propertiespredb-labels.propertiesassetinit.properties
The properties directory also contains a provider directory with the following files:
altiris6.propertiesaltiris.propertiesmaximoassets.properties
The files in the provider directory are properties files for the Altiris Inventory Solution provider and IT asset initialization. For more information about using the maximoassets.properties file, see Appendix C – IT Asset Initialization.
Integration Composer Properties File (fusion.properties)
The fusion.properties file is stored in the following location:
<installDir>\data\properties
This file is divided into sections. This appendix describes each section of the file. Properties in the fusion.properties file are defined in the following manner:
<property>=<value for the property>
NOTE To include a back slash (\) in a property value, use two back slashes (\\).
Initialization Files B

120 Integration Composer: Administrator Guide
IBM Tivoli Maximo Database-Related Properties
Property Value Comment
mxe.db.schemaowner dbo Database schema owner. “dbo” is an example; enter the appropriate schema for your database.
mxe.db.driver This varies depending on the database, for example:
DB2com.ibm.db2.jcc.DB2Driver
Oracle: Oracle JDBC Thin driveroracle.jdbc.driver.OracleDriver
SqlServer: i-net Opta drivercom.inet.tds.TdsDriver
JDBC driver specification
mxe.db.url This varies depending on the database, for example:
DB2jdbc:db2://<host_name>:<host_port>/<database_name>
Oracle: Oracle JDBC Thin driverjdbc:oracle:thin:@<host_name>:<host_port>:<host_sid>
SqlServer 7.0-: i-net Opta driver (or higher)jdbc:inetdae7:<host_name>:<host_port>?database=<database_name>
JDBC database URL
mxe.db.user Database login name.
mxe.db.systemdateformat This varies depending on the database; for example,
DB2current timestamp
SqlServergetdate()
Oraclesysdate
Specifies the database function used to retrieve the current time stamp.
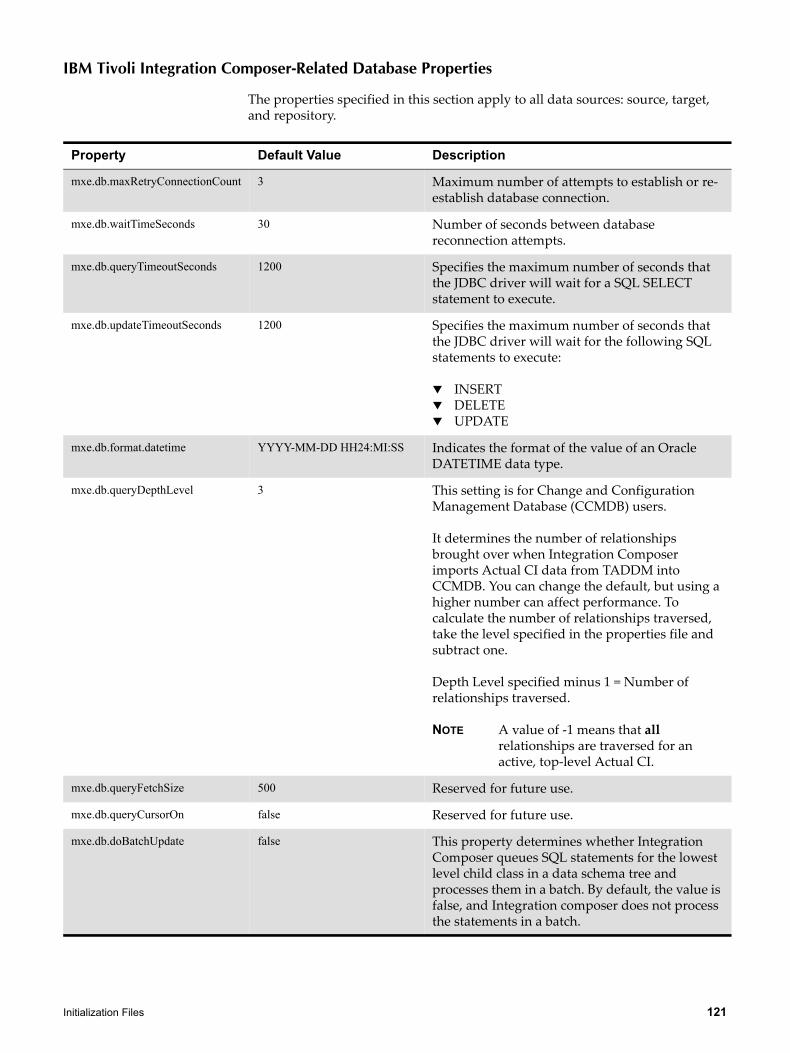
Initialization Files 121
IBM Tivoli Integration Composer-Related Database Properties
The properties specified in this section apply to all data sources: source, target, and repository.
Property Default Value Description
mxe.db.maxRetryConnectionCount 3 Maximum number of attempts to establish or re-establish database connection.
mxe.db.waitTimeSeconds 30 Number of seconds between database reconnection attempts.
mxe.db.queryTimeoutSeconds 1200 Specifies the maximum number of seconds that the JDBC driver will wait for a SQL SELECT statement to execute.
mxe.db.updateTimeoutSeconds 1200 Specifies the maximum number of seconds that the JDBC driver will wait for the following SQL statements to execute:
INSERTDELETEUPDATE
mxe.db.format.datetime YYYY-MM-DD HH24:MI:SS Indicates the format of the value of an Oracle DATETIME data type.
mxe.db.queryDepthLevel 3 This setting is for Change and Configuration Management Database (CCMDB) users.
It determines the number of relationships brought over when Integration Composer imports Actual CI data from TADDM into CCMDB. You can change the default, but using a higher number can affect performance. To calculate the number of relationships traversed, take the level specified in the properties file and subtract one.
Depth Level specified minus 1 = Number of relationships traversed.
NOTE A value of -1 means that all relationships are traversed for an active, top-level Actual CI.
mxe.db.queryFetchSize 500 Reserved for future use.
mxe.db.queryCursorOn false Reserved for future use.
mxe.db.doBatchUpdate false This property determines whether Integration Composer queues SQL statements for the lowest level child class in a data schema tree and processes them in a batch. By default, the value is false, and Integration composer does not process the statements in a batch.
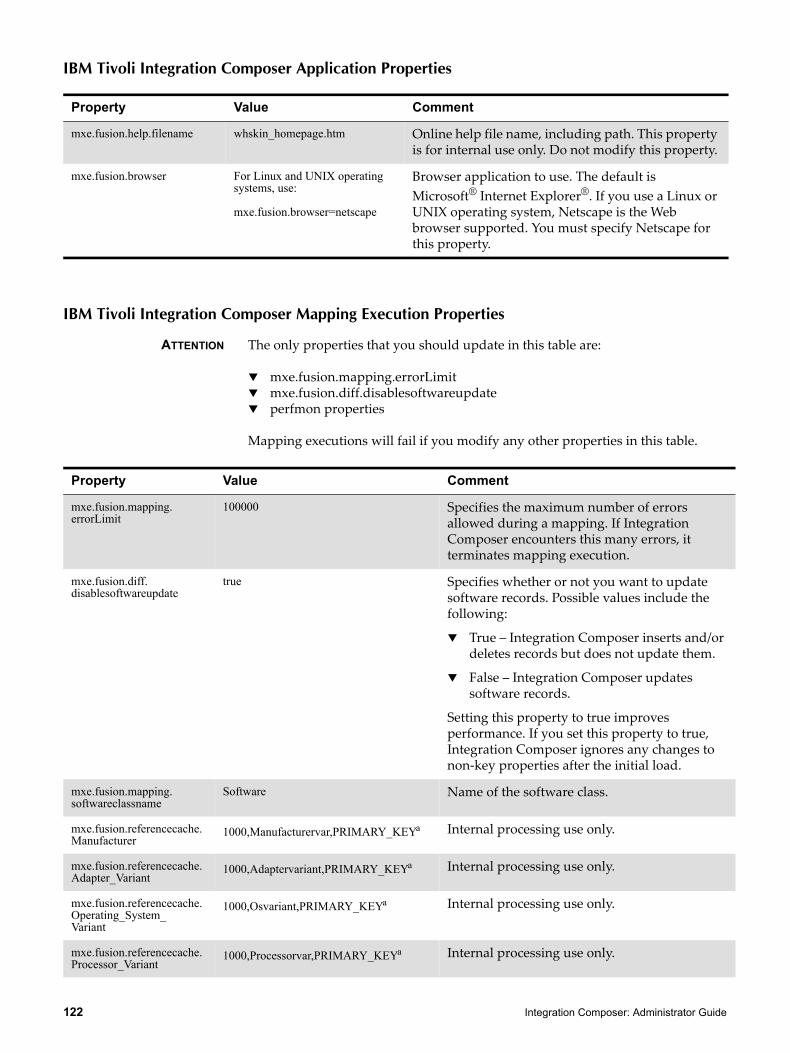
122 Integration Composer: Administrator Guide
IBM Tivoli Integration Composer Application Properties
IBM Tivoli Integration Composer Mapping Execution Properties
ATTENTION The only properties that you should update in this table are:
mxe.fusion.mapping.errorLimitmxe.fusion.diff.disablesoftwareupdateperfmon properties
Mapping executions will fail if you modify any other properties in this table.
Property Value Comment
mxe.fusion.help.filename whskin_homepage.htm Online help file name, including path. This property is for internal use only. Do not modify this property.
mxe.fusion.browser For Linux and UNIX operating systems, use:
mxe.fusion.browser=netscape
Browser application to use. The default is Microsoft® Internet Explorer®. If you use a Linux or UNIX operating system, Netscape is the Web browser supported. You must specify Netscape for this property.
Property Value Comment
mxe.fusion.mapping.errorLimit
100000 Specifies the maximum number of errors allowed during a mapping. If Integration Composer encounters this many errors, it terminates mapping execution.
mxe.fusion.diff.disablesoftwareupdate
true Specifies whether or not you want to update software records. Possible values include the following:
True – Integration Composer inserts and/or deletes records but does not update them.
False – Integration Composer updates software records.
Setting this property to true improves performance. If you set this property to true, Integration Composer ignores any changes to non-key properties after the initial load.
mxe.fusion.mapping.softwareclassname
Software Name of the software class.
mxe.fusion.referencecache.Manufacturer
1000,Manufacturervar,PRIMARY_KEYa Internal processing use only.
mxe.fusion.referencecache.Adapter_Variant
1000,Adaptervariant,PRIMARY_KEYa Internal processing use only.
mxe.fusion.referencecache.Operating_System_Variant
1000,Osvariant,PRIMARY_KEYa Internal processing use only.
mxe.fusion.referencecache.Processor_Variant
1000,Processorvar,PRIMARY_KEYa Internal processing use only.
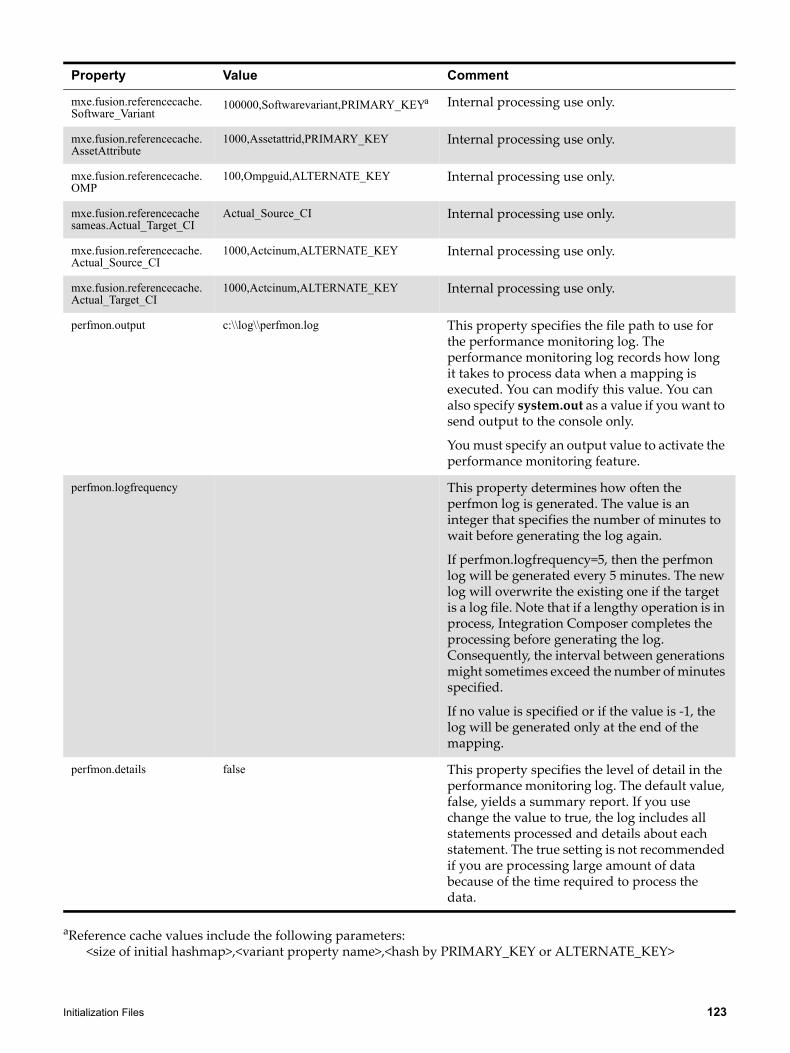
Initialization Files 123
aReference cache values include the following parameters: <size of initial hashmap>,<variant property name>,<hash by PRIMARY_KEY or ALTERNATE_KEY>
mxe.fusion.referencecache.Software_Variant
100000,Softwarevariant,PRIMARY_KEYa Internal processing use only.
mxe.fusion.referencecache.AssetAttribute
1000,Assetattrid,PRIMARY_KEY Internal processing use only.
mxe.fusion.referencecache.OMP
100,Ompguid,ALTERNATE_KEY Internal processing use only.
mxe.fusion.referencecachesameas.Actual_Target_CI
Actual_Source_CI Internal processing use only.
mxe.fusion.referencecache.Actual_Source_CI
1000,Actcinum,ALTERNATE_KEY Internal processing use only.
mxe.fusion.referencecache.Actual_Target_CI
1000,Actcinum,ALTERNATE_KEY Internal processing use only.
perfmon.output c:\\log\\perfmon.log This property specifies the file path to use for the performance monitoring log. The performance monitoring log records how long it takes to process data when a mapping is executed. You can modify this value. You can also specify system.out as a value if you want to send output to the console only.
You must specify an output value to activate the performance monitoring feature.
perfmon.logfrequency This property determines how often the perfmon log is generated. The value is an integer that specifies the number of minutes to wait before generating the log again.
If perfmon.logfrequency=5, then the perfmon log will be generated every 5 minutes. The new log will overwrite the existing one if the target is a log file. Note that if a lengthy operation is in process, Integration Composer completes the processing before generating the log. Consequently, the interval between generations might sometimes exceed the number of minutes specified.
If no value is specified or if the value is -1, the log will be generated only at the end of the mapping.
perfmon.details false This property specifies the level of detail in the performance monitoring log. The default value, false, yields a summary report. If you use change the value to true, the log includes all statements processed and details about each statement. The true setting is not recommended if you are processing large amount of data because of the time required to process the data.
Property Value Comment
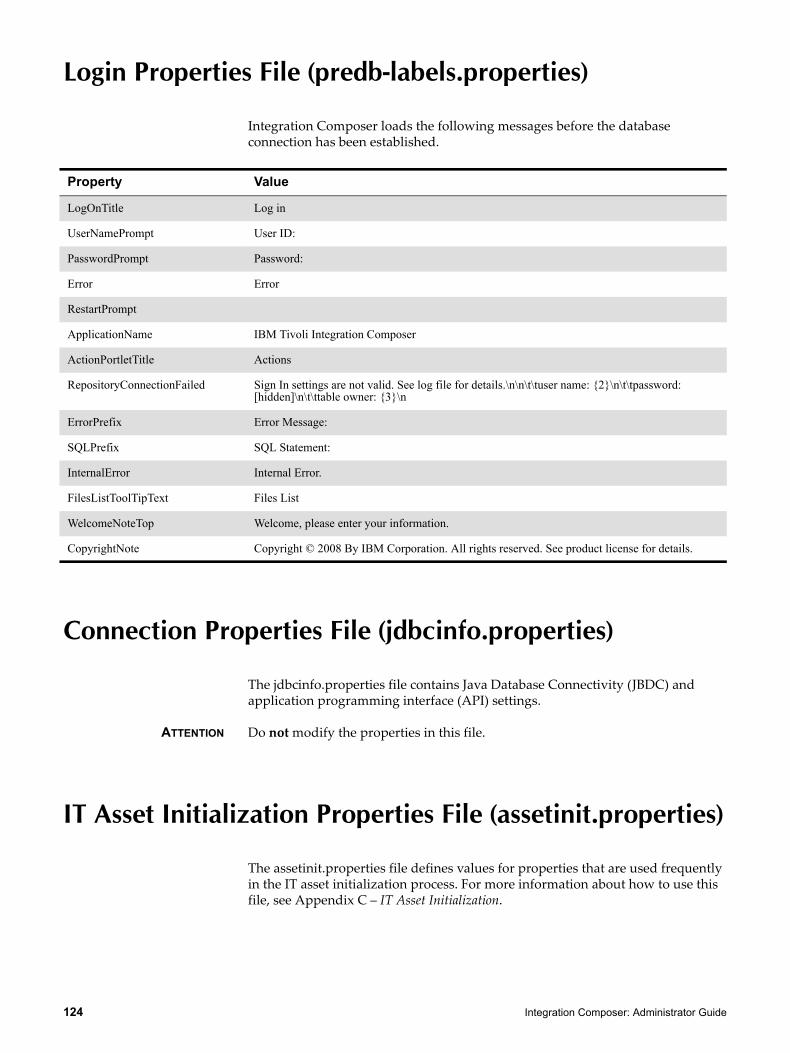
124 Integration Composer: Administrator Guide
Login Properties File (predb-labels.properties)
Integration Composer loads the following messages before the database connection has been established.
Connection Properties File (jdbcinfo.properties)
The jdbcinfo.properties file contains Java Database Connectivity (JBDC) and application programming interface (API) settings.
ATTENTION Do not modify the properties in this file.
IT Asset Initialization Properties File (assetinit.properties)
The assetinit.properties file defines values for properties that are used frequently in the IT asset initialization process. For more information about how to use this file, see Appendix C – IT Asset Initialization.
Property Value
LogOnTitle Log in
UserNamePrompt User ID:
PasswordPrompt Password:
Error Error
RestartPrompt
ApplicationName IBM Tivoli Integration Composer
ActionPortletTitle Actions
RepositoryConnectionFailed Sign In settings are not valid. See log file for details.\n\n\t\tuser name: {2}\n\t\tpassword: [hidden]\n\t\ttable owner: {3}\n
ErrorPrefix Error Message:
SQLPrefix SQL Statement:
InternalError Internal Error.
FilesListToolTipText Files List
WelcomeNoteTop Welcome, please enter your information.
CopyrightNote Copyright © 2008 By IBM Corporation. All rights reserved. See product license for details.
Initialization Files 125
Logging Properties File (logging.properties)
When Integration Composer executes a mapping, it provides information about mapping executions and data transactions as well as errors in the fusion.log file. The fusion.log file is stored in the following location:
<installDir>\log
You use the logging.properties file to set up Integration Composer logs. The logging.properties file is stored in the following location:
<installDir>\data\properties
Integration Composer logging is based on Log4j logging, which is an open source project developed by Apache Software Foundation as part of the Apache Jakarta Project. Refer to the following Web site to get more details about Log4j logging services.
http://jakarta.apache.org/log4j/docs/index.html
For more information about the general syntax of property-based configuration files, refer to the following Web site:
http://logging.apache.org/log4j/1.2/manual.html
The following table lists the error levels Integration Composer supports.
Error Description
FATAL The FATAL level logs very severe error messages that indicate application failure.
ERROR The ERROR level logs error messages that indicate errors in the application functionality that is processed.
WARN The WARN level logs warning messages that indicate harmful situations in the functionality that is processed.
INFO The INFO level logs informational messages that highlight the progress of the functionality processed.
DEBUG The DEBUG level logs extensive messages that are useful to debug.
126 Integration Composer: Administrator Guide
Log4j Root Loggers
To set up root loggers, specify the comma-separated list of appenders to the root logger. For example, to log messages to standard output as well as to a file called fusion.log, use the following setting:
log4j.rootLogger=ERROR, A1, A2
Output Destinations or Appenders
A1 is set to be a ConsoleAppender, which outputs to System.out.
log4j.appender.A1=org.apache.log4j.ConsoleAppender
log4j.appender.A1.layout=org.apache.log4j.PatternLayout
log4j.appender.A1.layout.ConversionPattern=%d{dd MMM yyyy HH:mm:ss:SSS} [%-2p] %m%n
A2 is set to be a RollingFileAppender, which outputs to the fusion.log file:
log4j.appender.A2=org.apache.log4j.RollingFileAppender
log4j.appender.A2.File=fusion.log
log4j.appender.A2.MaxFileSize=5MB
log4j.appender.A2.MaxBackupIndex=5
log4j.appender.A2.Append=false
log4j.appender.A2.layout=org.apache.log4j.PatternLayout
log4j.appender.A2.layout.ConversionPattern=%d{dd MMM yyyy HH:mm:ss:SSS} [%-2p] %m%n
NOTE The value for log4j.appender.A2.File is the name of the file only. Do not include a file path. Integration Composer ignores file paths and saves log files in <installDir>\log.
Initialization Files 127
Loggers Used by Integration Composer
Enable only the loggers that you need and use the logging information only for debugging purposes. Enabling more loggers than you need and setting the log level to DEBUG produces a large number of messages in the appenders and significantly reduces performance of the application.
log4j.logger.fusion=INFO
log4j.logger.fusion.datamanager=ERROR
log4j.logger.fusion.diff=ERROR
log4j.logger.fusion.engine=ERROR
log4j.logger.fusion.gui=ERROR
log4j.logger.fusion.om=ERROR
log4j.logger.fusion.provider=ERROR
log4j.logger.fusion.provider.actualci=ERROR
log4j.logger.fusion.provider.altiris=ERROR
log4j.logger.fusion.provider.caamo=ERROR
log4j.logger.fusion.provider.cmdbapi=ERROR
log4j.logger.fusion.provider.discovery=ERROR
log4j.logger.fusion.provider.dblayout=ERROR
log4j.logger.fusion.provider.deployedassets=ERROR
log4j.logger.fusion.provider.maximoasset60=ERROR
log4j.logger.fusion.provider.ee=ERROR
log4j.logger.fusion.provider.fusion=ERROR
log4j.logger.fusion.provider.landesk=ERROR
log4j.logger.fusion.provider.netcensus=ERROR
log4j.logger.fusion.provider.sms=ERROR
log4j.logger.fusion.provider.sms.sms20=ERROR
log4j.logger.fusion.provider.smstangram=ERROR
log4j.logger.fusion.provider.taddmcitype=ERROR
log4j.logger.fusion.provider.taddmdiscovery=ERROR
log4j.logger.fusion.provider.taddmactualci=ERROR
log4j.logger.maximo.sql=ERROR

128 Integration Composer: Administrator Guide
© Copyright IBM Corp. 2007, 2008 129
ATTENTION The information in this appendix is designed for information technology (IT) asset managers, system administrators, and other personnel responsible for creating an initial set of IT asset records in the Maximo database. The asset initialization process is designed to establish a baseline of authorized IT asset data by leveraging data collected from deployed assets.
Use the IT asset initialization process only to import IT asset data. Do not use this process if you are importing configuration items or other kinds of data.
Use the IT asset initialization process only to create new IT assets. Do not use the process to update existing assets.
IT Asset Initialization Overview
The Maximo database maintains two kinds of data about IT assets or items: authorized asset data and deployed asset data.
Authorized Assets Authorized IT asset data is data that you recorded about what you have acquired and installed. This data represents your authorized inventory, how things should be and what you have planned. In most cases, you create these records in the Assets application or when you use the Receive Rotating Items action in the Receiving application. You can view and manage authorized asset data in the Assets module applications.
Deployed Assets Deployed asset data is information that a discovery tool collects about objects actually deployed in your enterprise. To gather this data, discovery tools (such as Microsoft® SMS or IBM® Tivoli® Configuration Manager) scan computers, network devices, and network printers deployed in your enterprise and record information about the hardware and software installed on those assets. Integration Composer imports the collected data into the Maximo database. You view this data in the Deployed Assets module applications–Computers, Network Devices, and Network Printers.
NOTE In this guide, the terms authorized IT asset and authorized asset refer to information technology assets maintained in the Assets application. The term deployed asset refers to asset data maintained in the Deployed Assets module applications.
IT Asset Initialization The IT asset initialization process lets you use deployed asset data stored in the Maximo database to create IT asset records in the database. Using deployed asset data to create IT asset records is an efficient way to create a baseline set of IT asset records when you first implement IT asset management.
IT Asset Initialization C
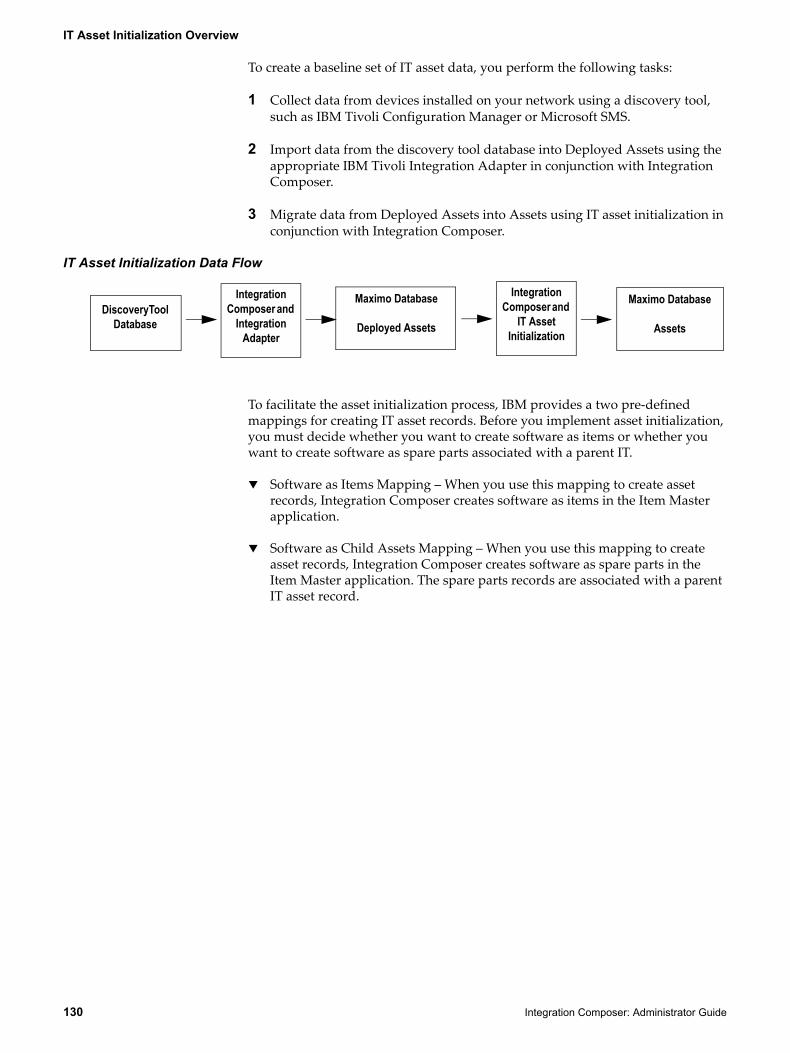
IT Asset Initialization Overview
130 Integration Composer: Administrator Guide
To create a baseline set of IT asset data, you perform the following tasks:
1 Collect data from devices installed on your network using a discovery tool, such as IBM Tivoli Configuration Manager or Microsoft SMS.
2 Import data from the discovery tool database into Deployed Assets using the appropriate IBM Tivoli Integration Adapter in conjunction with Integration Composer.
3 Migrate data from Deployed Assets into Assets using IT asset initialization in conjunction with Integration Composer.
IT Asset Initialization Data Flow
To facilitate the asset initialization process, IBM provides a two pre-defined mappings for creating IT asset records. Before you implement asset initialization, you must decide whether you want to create software as items or whether you want to create software as spare parts associated with a parent IT.
Software as Items Mapping – When you use this mapping to create asset records, Integration Composer creates software as items in the Item Master application.
Software as Child Assets Mapping – When you use this mapping to create asset records, Integration Composer creates software as spare parts in the Item Master application. The spare parts records are associated with a parent IT asset record.
DiscoveryToolDatabase
Integration Composer and
Integration Adapter
Maximo Database
Deployed Assets
Maximo Database
Assets
Integration Composer and
IT Asset Initialization
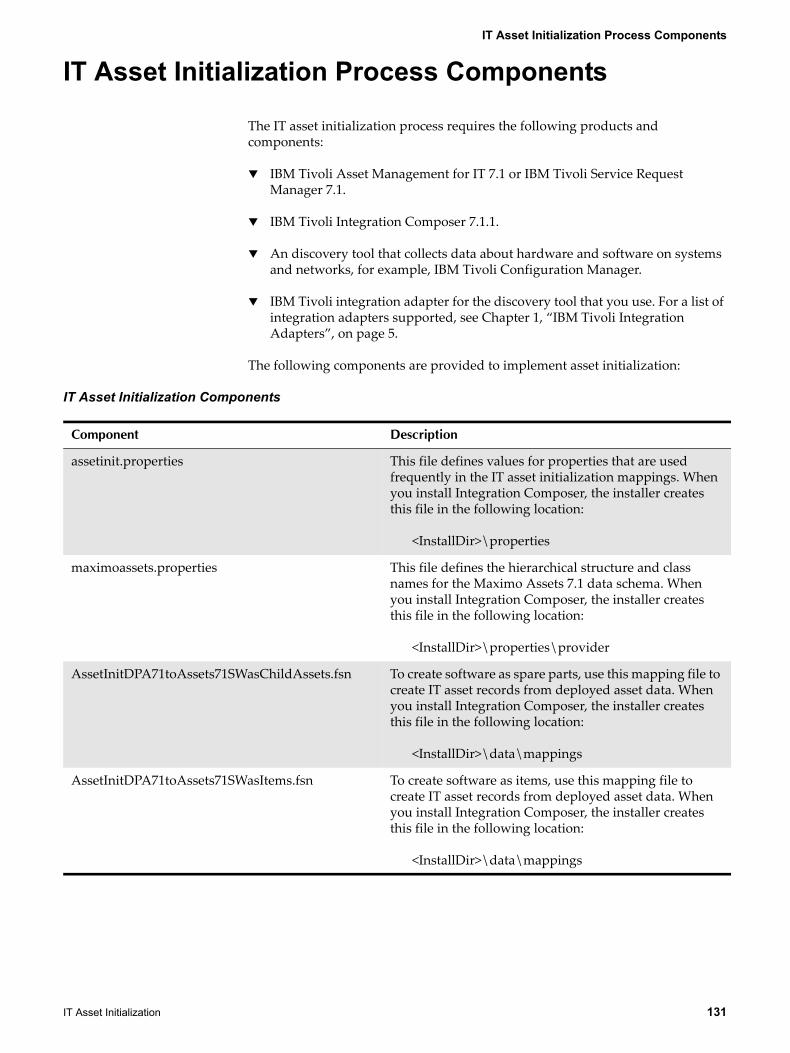
IT Asset Initialization Process Components
IT Asset Initialization 131
IT Asset Initialization Process Components
The IT asset initialization process requires the following products and components:
IBM Tivoli Asset Management for IT 7.1 or IBM Tivoli Service Request Manager 7.1.
IBM Tivoli Integration Composer 7.1.1.
An discovery tool that collects data about hardware and software on systems and networks, for example, IBM Tivoli Configuration Manager.
IBM Tivoli integration adapter for the discovery tool that you use. For a list of integration adapters supported, see Chapter 1, “IBM Tivoli Integration Adapters”, on page 5.
The following components are provided to implement asset initialization:
IT Asset Initialization Components
Component Description
assetinit.properties This file defines values for properties that are used frequently in the IT asset initialization mappings. When you install Integration Composer, the installer creates this file in the following location:
<InstallDir>\properties
maximoassets.properties This file defines the hierarchical structure and class names for the Maximo Assets 7.1 data schema. When you install Integration Composer, the installer creates this file in the following location:
<InstallDir>\properties\provider
AssetInitDPA71toAssets71SWasChildAssets.fsn To create software as spare parts, use this mapping file to create IT asset records from deployed asset data. When you install Integration Composer, the installer creates this file in the following location:
<InstallDir>\data\mappings
AssetInitDPA71toAssets71SWasItems.fsn To create software as items, use this mapping file to create IT asset records from deployed asset data. When you install Integration Composer, the installer creates this file in the following location:
<InstallDir>\data\mappings
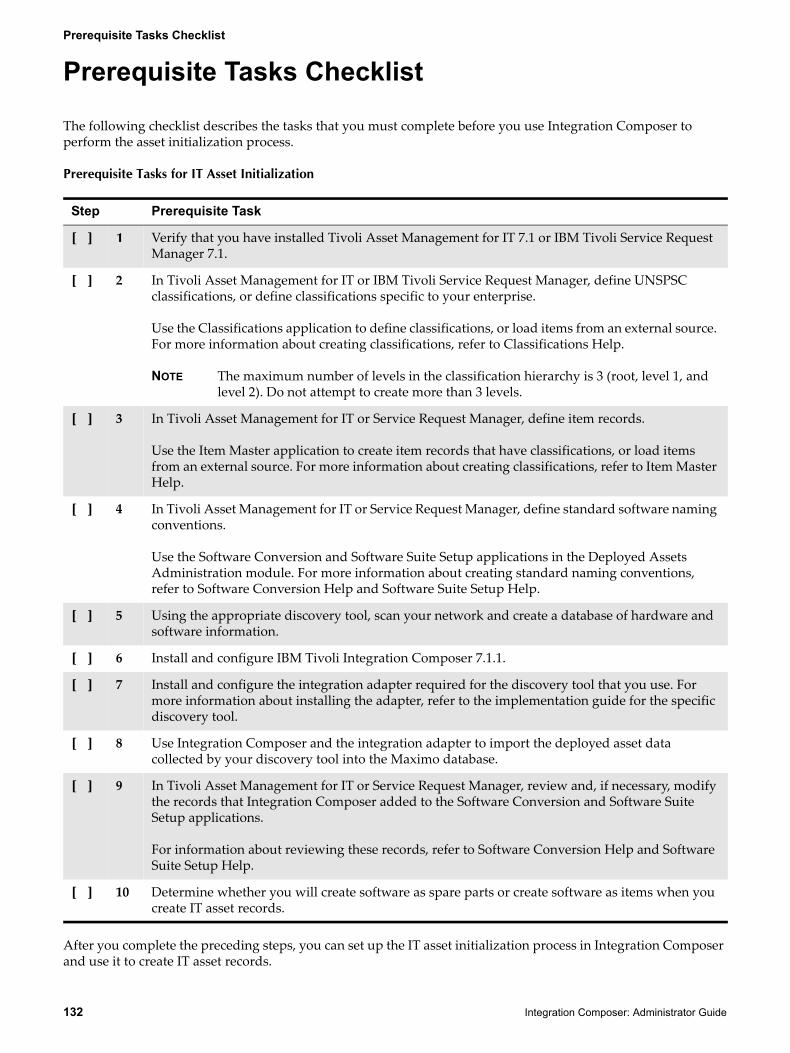
Prerequisite Tasks Checklist
132 Integration Composer: Administrator Guide
Prerequisite Tasks Checklist
The following checklist describes the tasks that you must complete before you use Integration Composer to perform the asset initialization process.
Prerequisite Tasks for IT Asset Initialization
After you complete the preceding steps, you can set up the IT asset initialization process in Integration Composer and use it to create IT asset records.
Step Prerequisite Task
[ ] 1 Verify that you have installed Tivoli Asset Management for IT 7.1 or IBM Tivoli Service Request Manager 7.1.
[ ] 2 In Tivoli Asset Management for IT or IBM Tivoli Service Request Manager, define UNSPSC classifications, or define classifications specific to your enterprise.
Use the Classifications application to define classifications, or load items from an external source. For more information about creating classifications, refer to Classifications Help.
NOTE The maximum number of levels in the classification hierarchy is 3 (root, level 1, and level 2). Do not attempt to create more than 3 levels.
[ ] 3 In Tivoli Asset Management for IT or Service Request Manager, define item records.
Use the Item Master application to create item records that have classifications, or load items from an external source. For more information about creating classifications, refer to Item Master Help.
[ ] 4 In Tivoli Asset Management for IT or Service Request Manager, define standard software naming conventions.
Use the Software Conversion and Software Suite Setup applications in the Deployed Assets Administration module. For more information about creating standard naming conventions, refer to Software Conversion Help and Software Suite Setup Help.
[ ] 5 Using the appropriate discovery tool, scan your network and create a database of hardware and software information.
[ ] 6 Install and configure IBM Tivoli Integration Composer 7.1.1.
[ ] 7 Install and configure the integration adapter required for the discovery tool that you use. For more information about installing the adapter, refer to the implementation guide for the specific discovery tool.
[ ] 8 Use Integration Composer and the integration adapter to import the deployed asset data collected by your discovery tool into the Maximo database.
[ ] 9 In Tivoli Asset Management for IT or Service Request Manager, review and, if necessary, modify the records that Integration Composer added to the Software Conversion and Software Suite Setup applications.
For information about reviewing these records, refer to Software Conversion Help and Software Suite Setup Help.
[ ] 10 Determine whether you will create software as spare parts or create software as items when you create IT asset records.
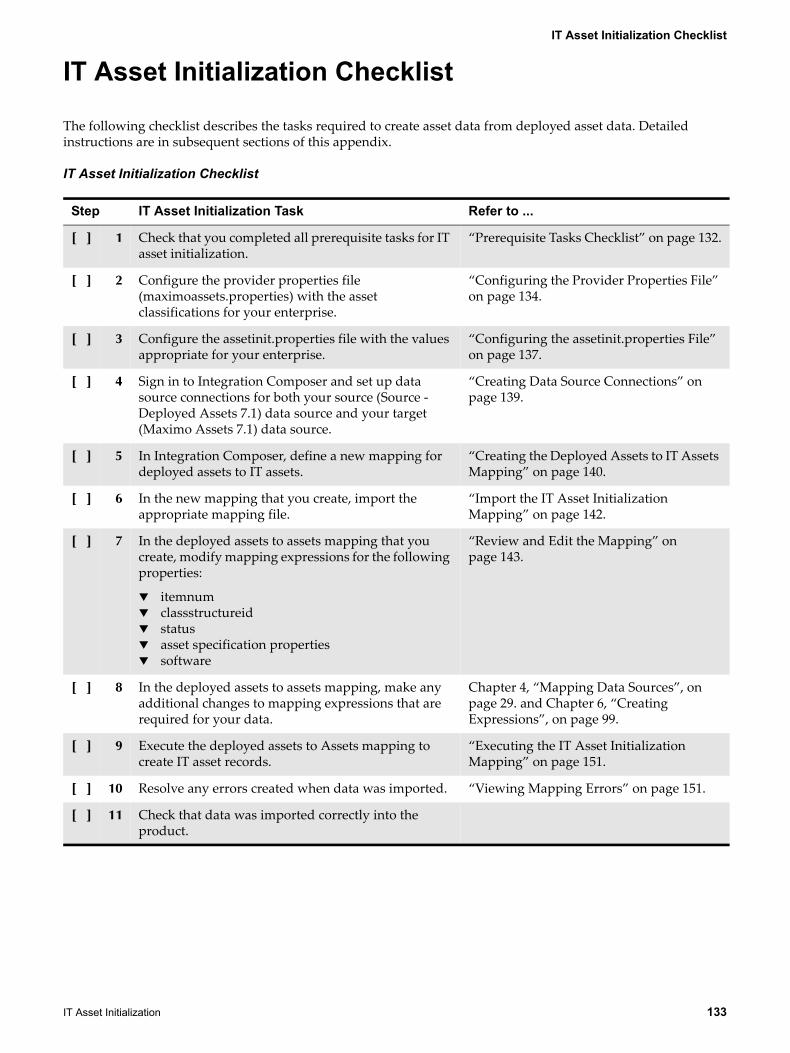
IT Asset Initialization Checklist
IT Asset Initialization 133
IT Asset Initialization Checklist
The following checklist describes the tasks required to create asset data from deployed asset data. Detailed instructions are in subsequent sections of this appendix.
IT Asset Initialization Checklist
Step IT Asset Initialization Task Refer to ...
[ ] 1 Check that you completed all prerequisite tasks for IT asset initialization.
“Prerequisite Tasks Checklist” on page 132.
[ ] 2 Configure the provider properties file (maximoassets.properties) with the asset classifications for your enterprise.
“Configuring the Provider Properties File” on page 134.
[ ] 3 Configure the assetinit.properties file with the values appropriate for your enterprise.
“Configuring the assetinit.properties File” on page 137.
[ ] 4 Sign in to Integration Composer and set up data source connections for both your source (Source - Deployed Assets 7.1) data source and your target (Maximo Assets 7.1) data source.
“Creating Data Source Connections” on page 139.
[ ] 5 In Integration Composer, define a new mapping for deployed assets to IT assets.
“Creating the Deployed Assets to IT Assets Mapping” on page 140.
[ ] 6 In the new mapping that you create, import the appropriate mapping file.
“Import the IT Asset Initialization Mapping” on page 142.
[ ] 7 In the deployed assets to assets mapping that you create, modify mapping expressions for the following properties:
itemnumclassstructureidstatusasset specification propertiessoftware
“Review and Edit the Mapping” on page 143.
[ ] 8 In the deployed assets to assets mapping, make any additional changes to mapping expressions that are required for your data.
Chapter 4, “Mapping Data Sources”, on page 29. and Chapter 6, “Creating Expressions”, on page 99.
[ ] 9 Execute the deployed assets to Assets mapping to create IT asset records.
“Executing the IT Asset Initialization Mapping” on page 151.
[ ] 10 Resolve any errors created when data was imported. “Viewing Mapping Errors” on page 151.
[ ] 11 Check that data was imported correctly into the product.
IT Asset Initialization Tasks
134 Integration Composer: Administrator Guide
IT Asset Initialization Tasks
This section summarizes the tasks required to create IT asset records from deployed asset data.
Configuring the Provider Properties File
The IT asset initialization process requires a properties file (maximoassets.properties) for assets. Integration Composer uses this file to define the hierarchical structure and class names for the target data schema, which is Maximo Assets 7.1. The properties file also associates class structure IDs to the defined classes.
When you install Integration Composer, the installer creates the maximoassets.properties file in the following location:
<installDir>\properties\provider
The maximoassets.properties file specifies a hierarchy with three levels of classes: root, level 1, and level 2. The file also specifies asset classifications (classstructureids). For each class below the root class, the file lists the class structure IDs associated with the class.
The class structure IDs listed in the file that Integration Composer installs are based on the asset structure defined for the demo data delivered with the system. For example, Computer has the following class structure IDs: 1221, 1210, 1223.These class structure IDs are meant to be used as an example, and it is not likely that the you will use the same values in your environment. Therefore, you must configure this file to correspond to the asset classifications that you use in your environment.
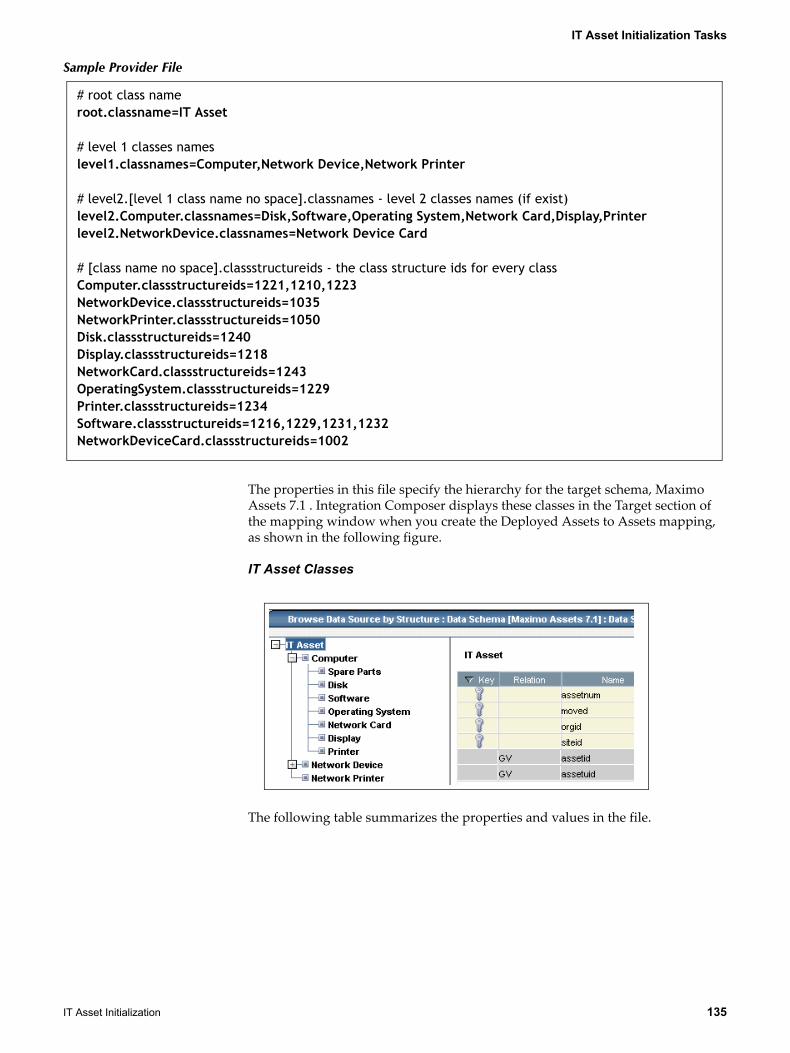
IT Asset Initialization Tasks
IT Asset Initialization 135
Sample Provider File
The properties in this file specify the hierarchy for the target schema, Maximo Assets 7.1 . Integration Composer displays these classes in the Target section of the mapping window when you create the Deployed Assets to Assets mapping, as shown in the following figure.
IT Asset Classes
The following table summarizes the properties and values in the file.
# root class nameroot.classname=IT Asset
# level 1 classes names level1.classnames=Computer,Network Device,Network Printer
# level2.[level 1 class name no space].classnames - level 2 classes names (if exist)level2.Computer.classnames=Disk,Software,Operating System,Network Card,Display,Printerlevel2.NetworkDevice.classnames=Network Device Card
# [class name no space].classstructureids - the class structure ids for every classComputer.classstructureids=1221,1210,1223NetworkDevice.classstructureids=1035NetworkPrinter.classstructureids=1050Disk.classstructureids=1240Display.classstructureids=1218NetworkCard.classstructureids=1243OperatingSystem.classstructureids=1229Printer.classstructureids=1234Software.classstructureids=1216,1229,1231,1232NetworkDeviceCard.classstructureids=1002
IT Asset Initialization Tasks
136 Integration Composer: Administrator Guide
Provider File Properties
Configuring the Provider To configure the maximoassets.properties file, complete the following steps:
1 Navigate to the following directory:
<installDir>\data\properties\provider
2 In the provider directory, open the maximoassets.properties file in a text editor, such as Notepad.
3 For each level 1 property that will contain level 2 classes, type the names of the level 2 classes that you will use, as shown in the following example:
level2.Computer.classnames=Disk,Software,Operating System,Network Card,Display,Printer
where
Disk, Software, Operating System, Network Card, Display, and Printer are class names for level 2 classes.
Class Level Class Name(s) Comment
root class IT Asset The root class is the top level of the class hierarchy.
Do not alter this class name.
level 1 class Computer, Network Device,Network Printer
Level 1 class names correspond to the three deployed asset classes that are populated by integration adapters. These classes correspond to the three Deployed Assets applications: Computers, Network Devices, and Network Printers.
Do not alter these values.
level 2 class For Computers:
Disk, Software, Operating System, Network Card, Display, Printer
For Network Devices:
Network Device Card
Level 2 classes are a sub-classification of the level 1 class. Integration Composers uses the values specified here to create child assets for each class listed.
Specify values for properties at this level only if you are tracking lower-level components as assets or spare parts. For example, if you are not tracking network cards as assets or spare parts for your Asset subassembly structure, there is no need to define a level 2 Computer.classname=Network Card.
To determine whether you must specify values for these properties, evaluate the way that you set up asset classifications. In many cases, data represented by the level 2 classes specified in this file is tracked as attributes, not as separate assets or spare parts in a subassembly.
<class name>.classstructureid
For every level 2 class name that is specified in the file, create at least one corresponding classstructureid in this section. You can include more than one classstructureid. Note that the classstructure IDs included in the mapping are based on sample demo data, and you must define values appropriate for your business needs.
IT Asset Initialization Tasks
IT Asset Initialization 137
4 Optional: Remove or comment out any level 2 class names that you will not use.
5 For each class that you added in step 3, enter a classstructureid, as shown in the following example.
Computer.classstructureids=1221,1210,1223
NetworkDevice.classstructureids=1035
NetworkPrinter.classstructureids=1050
Disk.classstructureids=1240
where 1221, 1210, 1223 etc. represent the classstructureids used in your environment.
6 Remove or comment out any classsructureids that you will not use.
7 After you enter all classes and classstructureid’s, save the properties file and close it. Configuration of the maximoassets.properties file is complete.
Configuring the assetinit.properties File
Integration Composer contains a properties file (assetinit.properties) for asset initialization, as illustrated in the following figure. Integration Composer uses this file to define values for properties that are used in many places in the mapping.
When you install Integration Composer, the installer creates the assetinit.properties file in the following location:
<installDir>\properties\provider
assetinit.properties File
The assetinit.properties file includes four properties. The following table summaries the properties and values in the file.
assetinit_orgid=EAGLENAassetinit_siteid=MCLEANassetinit_langcode=ENassetinit_itemset=SET1
IT Asset Initialization Tasks
138 Integration Composer: Administrator Guide
assetinit.properties File Properties
Configuring the assetinit.properties File
To configure the assetinit.properties file, complete the following steps:
1 Locate the assetinit.properties file in the Integration Composer installation directory:
<installDir>\data\properties
2 Open the assetinit.properties file in a text editor, such as Notepad.
Property Description
assetinit_orgid Organization for the assets target.
Tivoli Asset Management for IT and Service Request Manager maintain information by organization. Setting this property defines orgid for Integration Composer, which uses this value for mapping expressions that use the orgid property. The organization ID specified in the file must be a valid organization defined in the Organizations application.
assetinit_siteid Site for the assets target.
Tivoli Asset Management for IT and Service Request Manager maintain information by site. Setting this property defines siteid for Integration Composer, which uses this value for mapping expressions that use the siteid property. The site ID specified in the file must be a valid site defined in the Organizations application.
assetinit_langcode Language for the assets target.
The langcode property specifies which language to use. The default value for the langcode properties in the mappings for asset initialization is English (the code is EN). If you select a language other than English when you install Integration Composer, set the langcode property in the assetinit.properties file to define the langcode for mapping expressions that use that property.
The following langcode properties are valid:
Langcode LanguageDE GermanES Spanish FR FrenchIT Italian JA Japanese KO Korean PT Portuguese ZH Simplified Chinese ZHT Traditional Chinese
assetinit_itemset The itemset property specifies the set ID for the item set that administrators define for IT items when configuring Tivoli Asset Management for IT or Service Request Manager. All items imported from deployed assets belong to this item set.
Setting this property in the assetinit.properties file defines the item set for any mapping expressions that use the property. The itemset that you specify must be a valid item set that is defined in the Sets application in Tivoli Asset Management for IT or Service Request Manager.
IT Asset Initialization Tasks
IT Asset Initialization 139
3 For each property, type the appropriate value or values, as shown in the following example:
assetinit_orgid=EAGLENA
where
EAGLENA is the organization ID.
4 After you enter all values, save the file and close it. Configuration of the assetinit.properties file is complete.
Creating Data Source Connections
Integration Composer uses JDBC drivers to connect to source and to target databases. Before you can import a mapping for asset initialization into Integration Composer, you must define connections to the following locations:
Deployed assets, which is your source data sourceAssets, which is your target data source.
Use Integration Composer to define a data source for both the source and the target. Defining a data source specifies connection parameters that Integration uses to connect to the source and target. For more information about defining data sources, see Chapter 3, “Defining a New Data Source”, on page 17.
Creating a Connection to the Deployed Assets Source Data Source
To define a data source for the deployed assets source database, complete the following steps:
1 Sign in to Integration Composer.
2 In the IBM Tivoli Integration Composer window, select Define New Data Source.
3 In the Data Schema page, select Source - Deployed Assets 7.1 for the source data schema, and then click Next. Integration Composer displays the Data Source page.
4 In the Data Source field, enter Deployed Assets Source and then click Next. Integration Composer displays the Connection Information page.
ATTENTION If you enter an existing data source name, the connection parameters that you enter replace the original data source connection parameters.
5 On the Connection Information page, from the JDBC Driver drop-down list, select a driver.
6 Type the connection parameters for the driver as required. For information about the fields displayed in this window, see “Data Source Connection Parameters” on page 19
7 Optional: To test the connection to the data source, click Test Connection and when the test is completed, click OK.
IT Asset Initialization Tasks
140 Integration Composer: Administrator Guide
8 On the Connection Information page, click Finish. Integration Composer saves the data source and displays a Save dialog box.
9 In the Save dialog box, click OK. Integration Composer displays the Integration Composer window.
NOTE If Integration Composer does not save the data source, it displays one or more error messages. Click OK. Integration Composer closes the error message dialog box. Resolve the errors and try to define the data source again.
Creating a Connection to the Assets Target Data Source
To define a data source for the Assets target in the Maximo database, complete the following steps:
1 Sign in to Integration Composer.
2 In the IBM Tivoli Integration Composer window, select Define New Data Source.
3 On the Data Schema page, select Maximo Assets 7.1 for the target data schema, and then click Next. Integration Composer displays the Data Source page.
4 In the Data Source field, enter Assets Target and click Next. Integration Composer displays the Connection Information page.
5 On the Connection Information page, from the JDBC Driver drop-down list, select a driver.
6 Type the connection parameters for the driver as required. For information about the fields displayed in this window, see “Data Source Connection Parameters” on page 19
7 Optional: To test the connection to the data source, click Test Connection and when the test is completed, click OK.
8 On the Connection Information page, click Finish. Integration Composer saves the data source and displays a Save dialog box.
9 In the Save dialog box, click OK. Integration Composer displays the IBM Tivoli Integration Composer window.
NOTE If Integration Composer does not save the data source, it displays one or more error messages. Click OK. Integration Composer closes the error message dialog box. Resolve the errors and try to define the data source again.
Creating the Deployed Assets to IT Assets Mapping
Before you import deployed asset data into Assets, you use Integration Composer to create a deployed-assets-to-IT-assets mapping.
After you create the mapping, you import one of the mappings provided in this IT asset initialization process. The mapping provides expressions that specify how to
IT Asset Initialization Tasks
IT Asset Initialization 141
transform the data for a property when Integration Composer imports the data from the deployed assets tables into Assets. After you create the mapping and import the mapping file, you must modify the mapping expressions for your environment. You must modify expressions for the following properties:
itemnumclassstructureidstatusasset specificationsoftware items (spare parts)
After you complete all the required modifications, you can execute the mapping, Integration Composer transforms the deployed asset data and imports it into Assets.
To create the IT asset initialization mapping, complete the following steps:
Create a New Mapping 1 Using a valid user ID and password, sign in to Integration Composer.
2 In the IBM Tivoli Integration Composer window, select Create New Mapping. Integration Composer displays the New Mapping window.
3 From the Source drop-down list of existing and available data sources, select Deployed Assets Source.
4 From the Target drop-down list of existing and available data sources, select Assets Target.
5 In the Mapping Name field, enter Deployed Assets to Assets as the mapping name. Mapping names are case sensitive; for example, DEPLOYED ASSETS TO ASSETS is not the same as Deployed Assets to Assets.
6 Click OK.
If data sources are open for the source and target databases, Integration Composer displays the Mapping window.
If no data sources are open for the specified mapping, Integration Composer displays a Connection Information page in the Open Data Source window.
7 Select one of the following options:
If Integration Composer displays the Mapping window, go to step 8 on page 142.
If Integration Composer displays the Connection Information page in the Open <Source or Target> Data Source window, complete the following steps to complete the connection information:
a On the Connection Information page in the Open Source Data Source window, accept the defaults established during the last connection to the data source or update the fields.
b Type a password.
c Click Finish. Integration Composer displays the Connection Information page in the Open Target Data Source window.

IT Asset Initialization Tasks
142 Integration Composer: Administrator Guide
d On the Connection Information page in the Open Target Data Source window, accept the defaults established during the last connection to the data source or update the fields as necessary.
e Type a password.
f Click Finish to establish the target connection. Integration Composer displays the Deployed Assets Source and the Assets Target in the Mapping window.
Import the IT Asset Initialization Mapping
8 From the Select Action menu in the Integration Composer Mapping window, select Import. Integration Composer displays the Import Mapping dialog box.
9 In the Import Mapping dialog box, select the appropriate mapping file:
AssetInitDPA71toAssets71SWasChildAssets.fsn
or
AssetInitDPA71toAssets71SWasItems.fsn
Integration Composer displays the mapping name in the File name field.
10 Click Open. Integration Composer imports the mapping and displays it as shown in the following example.
Deployed Assets to Assets Mapping
NOTE If any errors result from importing the mapping, Integration Composer stops the import and displays a dialog box that lists the
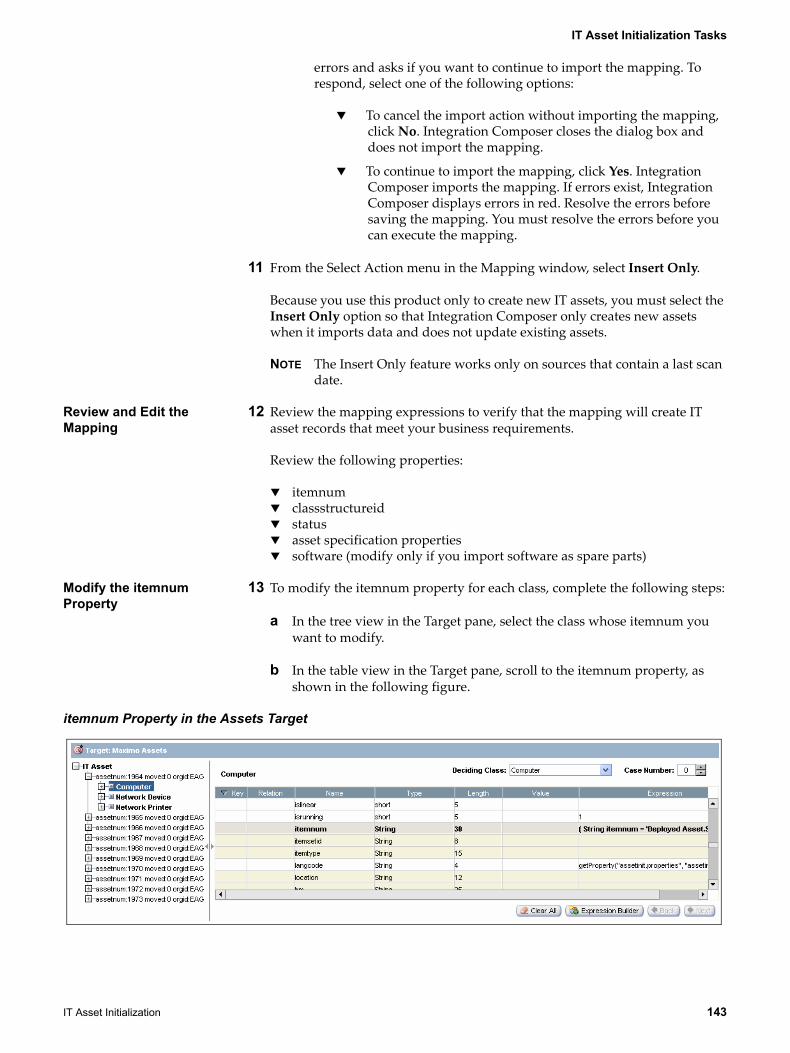
IT Asset Initialization Tasks
IT Asset Initialization 143
errors and asks if you want to continue to import the mapping. To respond, select one of the following options:
To cancel the import action without importing the mapping, click No. Integration Composer closes the dialog box and does not import the mapping.
To continue to import the mapping, click Yes. Integration Composer imports the mapping. If errors exist, Integration Composer displays errors in red. Resolve the errors before saving the mapping. You must resolve the errors before you can execute the mapping.
11 From the Select Action menu in the Mapping window, select Insert Only.
Because you use this product only to create new IT assets, you must select the Insert Only option so that Integration Composer only creates new assets when it imports data and does not update existing assets.
NOTE The Insert Only feature works only on sources that contain a last scan date.
Review and Edit the Mapping
12 Review the mapping expressions to verify that the mapping will create IT asset records that meet your business requirements.
Review the following properties:
itemnumclassstructureidstatusasset specification propertiessoftware (modify only if you import software as spare parts)
Modify the itemnum Property
13 To modify the itemnum property for each class, complete the following steps:
a In the tree view in the Target pane, select the class whose itemnum you want to modify.
b In the table view in the Target pane, scroll to the itemnum property, as shown in the following figure.
itemnum Property in the Assets Target
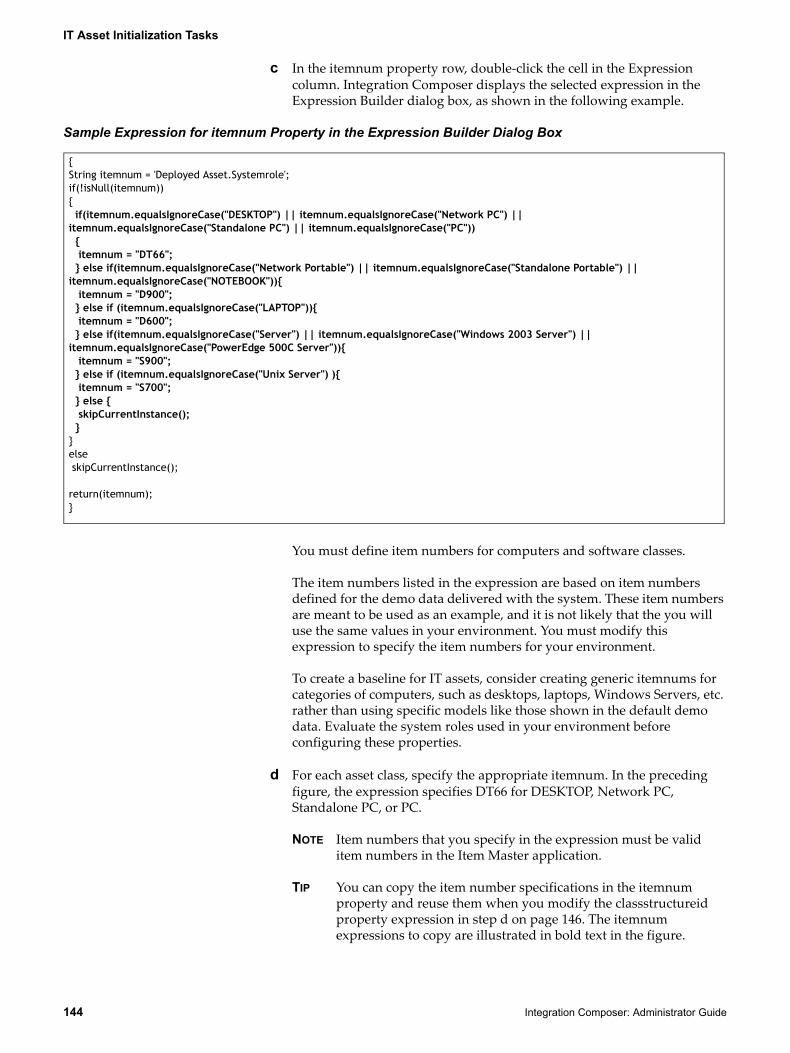
IT Asset Initialization Tasks
144 Integration Composer: Administrator Guide
c In the itemnum property row, double-click the cell in the Expression column. Integration Composer displays the selected expression in the Expression Builder dialog box, as shown in the following example.
Sample Expression for itemnum Property in the Expression Builder Dialog Box
You must define item numbers for computers and software classes.
The item numbers listed in the expression are based on item numbers defined for the demo data delivered with the system. These item numbers are meant to be used as an example, and it is not likely that the you will use the same values in your environment. You must modify this expression to specify the item numbers for your environment.
To create a baseline for IT assets, consider creating generic itemnums for categories of computers, such as desktops, laptops, Windows Servers, etc. rather than using specific models like those shown in the default demo data. Evaluate the system roles used in your environment before configuring these properties.
d For each asset class, specify the appropriate itemnum. In the preceding figure, the expression specifies DT66 for DESKTOP, Network PC, Standalone PC, or PC.
NOTE Item numbers that you specify in the expression must be valid item numbers in the Item Master application.
TIP You can copy the item number specifications in the itemnum property and reuse them when you modify the classstructureid property expression in step d on page 146. The itemnum expressions to copy are illustrated in bold text in the figure.
{String itemnum = 'Deployed Asset.Systemrole';if(!isNull(itemnum)){ if(itemnum.equalsIgnoreCase("DESKTOP") || itemnum.equalsIgnoreCase("Network PC") || itemnum.equalsIgnoreCase("Standalone PC") || itemnum.equalsIgnoreCase("PC")) { itemnum = "DT66"; } else if(itemnum.equalsIgnoreCase("Network Portable") || itemnum.equalsIgnoreCase("Standalone Portable") || itemnum.equalsIgnoreCase("NOTEBOOK")){ itemnum = "D900"; } else if (itemnum.equalsIgnoreCase("LAPTOP")){ itemnum = "D600"; } else if(itemnum.equalsIgnoreCase("Server") || itemnum.equalsIgnoreCase("Windows 2003 Server") || itemnum.equalsIgnoreCase("PowerEdge 500C Server")){ itemnum = "S900"; } else if (itemnum.equalsIgnoreCase("Unix Server") ){ itemnum = "S700"; } else { skipCurrentInstance(); }}else skipCurrentInstance();
return(itemnum);}

IT Asset Initialization Tasks
IT Asset Initialization 145
e After you modify the itemnum expression, click OK. Integration Composer saves the modified expression and closes the Expression Builder dialog box.
Modify the classstructureid Property
14 To modify the classstructureid property, complete the following steps:
a In the tree view in the Target pane, select the class whose classstructureid you want to modify.
b In the table view in the Target pane, scroll to the classstructureid property, as shown in the following example.
classstructureid Property in the Assets Target
c In the classstructureid property row, double-click the cell in the Expression column to display the selected expression in the Expression Builder dialog box, as shown in the following example.
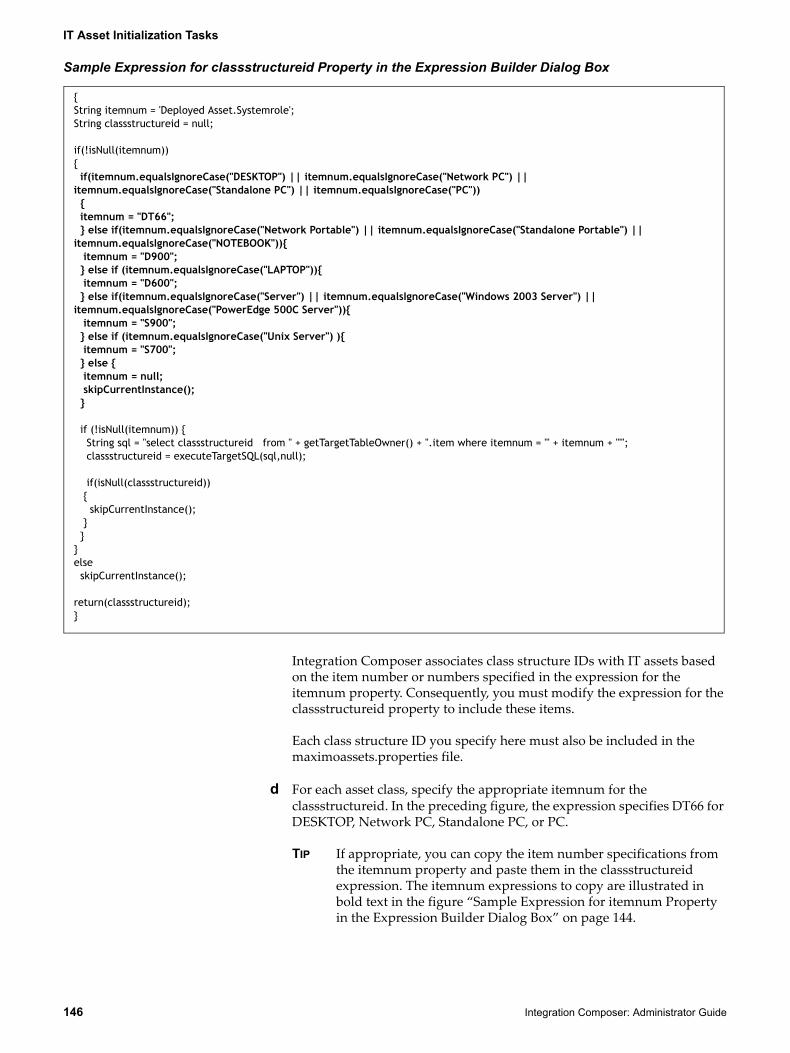
IT Asset Initialization Tasks
146 Integration Composer: Administrator Guide
Sample Expression for classstructureid Property in the Expression Builder Dialog Box
Integration Composer associates class structure IDs with IT assets based on the item number or numbers specified in the expression for the itemnum property. Consequently, you must modify the expression for the classstructureid property to include these items.
Each class structure ID you specify here must also be included in the maximoassets.properties file.
d For each asset class, specify the appropriate itemnum for the classstructureid. In the preceding figure, the expression specifies DT66 for DESKTOP, Network PC, Standalone PC, or PC.
TIP If appropriate, you can copy the item number specifications from the itemnum property and paste them in the classstructureid expression. The itemnum expressions to copy are illustrated in bold text in the figure “Sample Expression for itemnum Property in the Expression Builder Dialog Box” on page 144.
{String itemnum = 'Deployed Asset.Systemrole';String classstructureid = null;
if(!isNull(itemnum)){ if(itemnum.equalsIgnoreCase("DESKTOP") || itemnum.equalsIgnoreCase("Network PC") || itemnum.equalsIgnoreCase("Standalone PC") || itemnum.equalsIgnoreCase("PC")) { itemnum = "DT66"; } else if(itemnum.equalsIgnoreCase("Network Portable") || itemnum.equalsIgnoreCase("Standalone Portable") || itemnum.equalsIgnoreCase("NOTEBOOK")){ itemnum = "D900"; } else if (itemnum.equalsIgnoreCase("LAPTOP")){ itemnum = "D600"; } else if(itemnum.equalsIgnoreCase("Server") || itemnum.equalsIgnoreCase("Windows 2003 Server") || itemnum.equalsIgnoreCase("PowerEdge 500C Server")){ itemnum = "S900"; } else if (itemnum.equalsIgnoreCase("Unix Server") ){ itemnum = "S700"; } else { itemnum = null; skipCurrentInstance(); }
if (!isNull(itemnum)) { String sql = "select classstructureid from " + getTargetTableOwner() + ".item where itemnum = '" + itemnum + "'"; classstructureid = executeTargetSQL(sql,null);
if(isNull(classstructureid)) { skipCurrentInstance(); } }}else skipCurrentInstance();
return(classstructureid);}
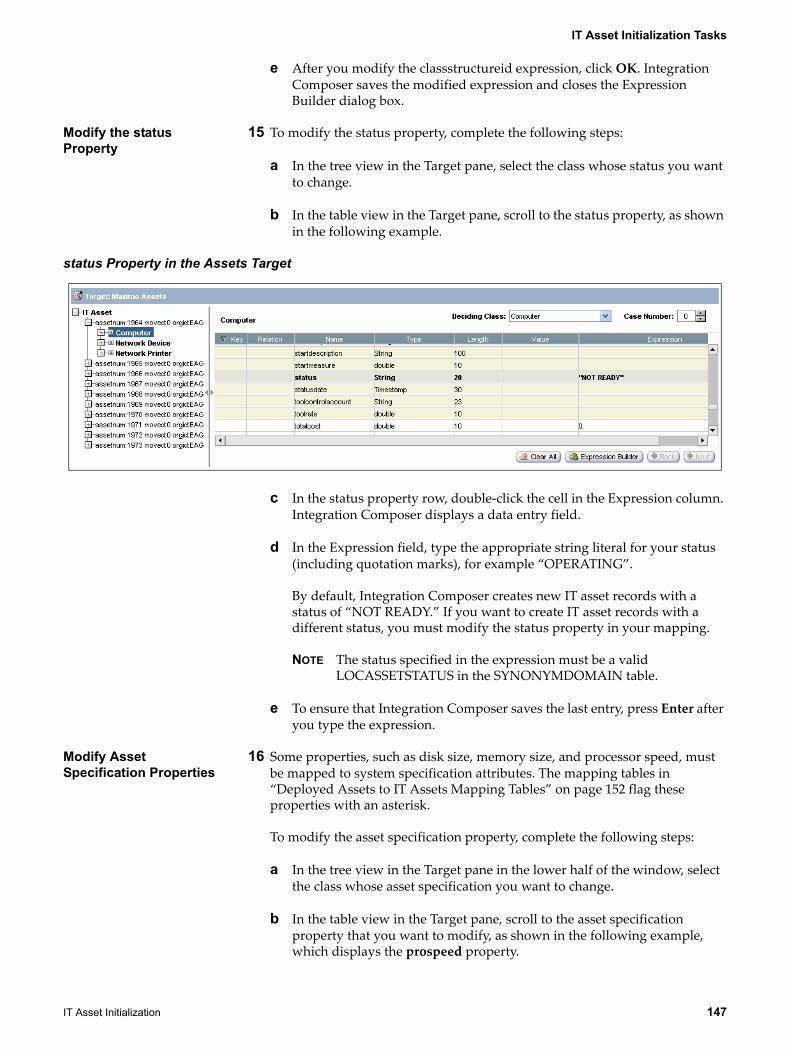
IT Asset Initialization Tasks
IT Asset Initialization 147
e After you modify the classstructureid expression, click OK. Integration Composer saves the modified expression and closes the Expression Builder dialog box.
Modify the status Property
15 To modify the status property, complete the following steps:
a In the tree view in the Target pane, select the class whose status you want to change.
b In the table view in the Target pane, scroll to the status property, as shown in the following example.
status Property in the Assets Target
c In the status property row, double-click the cell in the Expression column. Integration Composer displays a data entry field.
d In the Expression field, type the appropriate string literal for your status (including quotation marks), for example “OPERATING”.
By default, Integration Composer creates new IT asset records with a status of “NOT READY.” If you want to create IT asset records with a different status, you must modify the status property in your mapping.
NOTE The status specified in the expression must be a valid LOCASSETSTATUS in the SYNONYMDOMAIN table.
e To ensure that Integration Composer saves the last entry, press Enter after you type the expression.
Modify Asset Specification Properties
16 Some properties, such as disk size, memory size, and processor speed, must be mapped to system specification attributes. The mapping tables in “Deployed Assets to IT Assets Mapping Tables” on page 152 flag these properties with an asterisk.
To modify the asset specification property, complete the following steps:
a In the tree view in the Target pane in the lower half of the window, select the class whose asset specification you want to change.
b In the table view in the Target pane, scroll to the asset specification property that you want to modify, as shown in the following example, which displays the prospeed property.
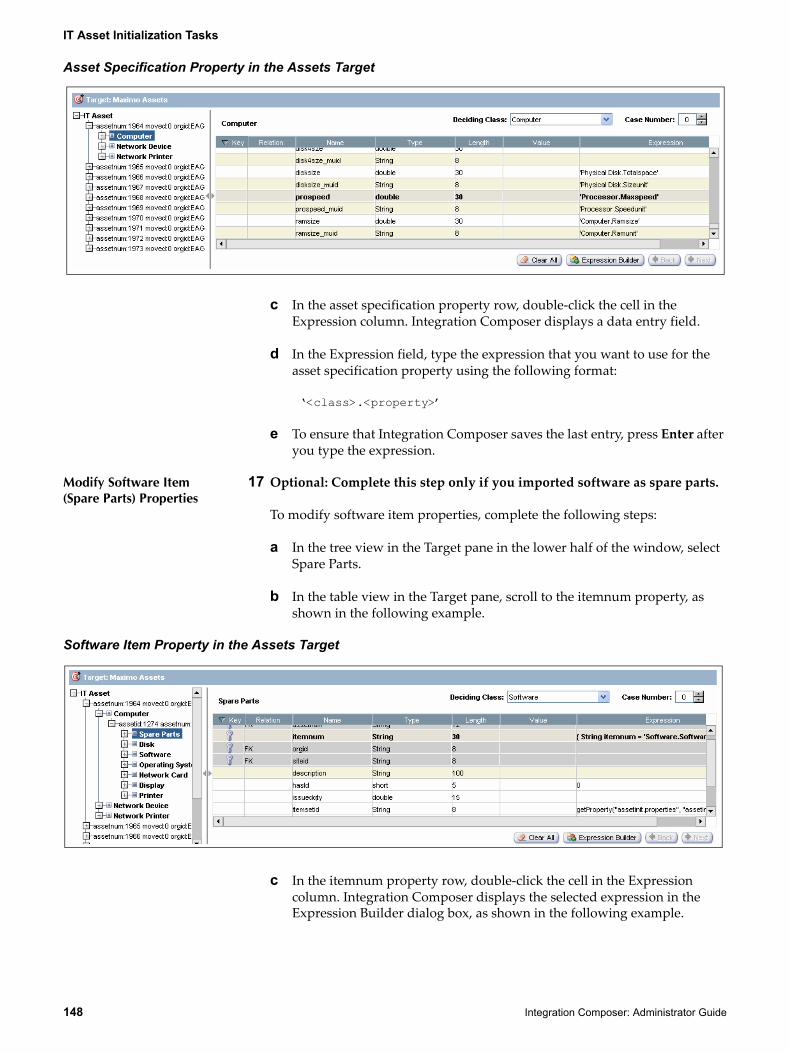
IT Asset Initialization Tasks
148 Integration Composer: Administrator Guide
Asset Specification Property in the Assets Target
c In the asset specification property row, double-click the cell in the Expression column. Integration Composer displays a data entry field.
d In the Expression field, type the expression that you want to use for the asset specification property using the following format:
‘<class>.<property>’
e To ensure that Integration Composer saves the last entry, press Enter after you type the expression.
Modify Software Item (Spare Parts) Properties
17 Optional: Complete this step only if you imported software as spare parts.
To modify software item properties, complete the following steps:
a In the tree view in the Target pane in the lower half of the window, select Spare Parts.
b In the table view in the Target pane, scroll to the itemnum property, as shown in the following example.
Software Item Property in the Assets Target
c In the itemnum property row, double-click the cell in the Expression column. Integration Composer displays the selected expression in the Expression Builder dialog box, as shown in the following example.

IT Asset Initialization Tasks
IT Asset Initialization 149
Sample Expression for Spare Parts itemnum Property in the Expression Builder Dialog Box
You must modify the itemnum property for software items to include the appropriate item numbers for your software items.
d For each software item, specify the appropriate itemnum. For example, in the preceding figure, the expression specifies WINDOWS95 and other versions of Microsoft software.
NOTE Item numbers that you specify in the expression must be valid item numbers in the Item Master application.
TIP You can copy the item number specifications in the itemnum property and reuse them when you modify the quantity expression in step h on page 150. The itemnum expressions to copy are illustrated in bold text in the preceding figure.
e After you modify the itemnum expression, click OK. Integration Composer saves the modified expression and closes the Expression Builder dialog box.
f Scroll to the quantity property in the table view and select the row.
g In the quantity property row, double-click the cell in the Expression column. Integration Composer displays the selected expression in the Expression Builder dialog box, as shown in the following example.
{String itemnum = 'Software.Softwarename';if(!isNull(itemnum)){
if((itemnum.indexOf("Windows 95") > -1)) { itemnum = "WINDOWS95"; } else if ((itemnum.indexOf("Windows 98") > -1)) { itemnum = "WINDOWS98"; } else if ((itemnum.indexOf("Windows 2000") > -1)) { itemnum = "WINDOWS2000"; } else if (itemnum.equalsIgnoreCase("Windows XP Workstation")) { itemnum = "WINDOWSXP"; } else if ((itemnum.equalsIgnoreCase("Microsoft Office 2003")) || (itemnum.equalsIgnoreCase("Microsoft Office XP")) || (itemnum.equalsIgnoreCase("Office 2000 Premium")) || (itemnum.equalsIgnoreCase("Microsoft Office 2000"))) { itemnum = "MSOFFICE"; } else { skipCurrentInstance(); }}else skipCurrentInstance();
return(itemnum);}

IT Asset Initialization Tasks
150 Integration Composer: Administrator Guide
Sample Expression for Spare Parts quantity Property in the Expression Builder Dialog Box
Because Integration Composer calculates the quantity of software items based on the item number specified in the expression for the itemnum property, you must modify the expression for the quantity property to include the same item numbers that you specified in step d on page 149.
h For each software item, specify the appropriate itemnum. For example, in the preceding figure, the expression specifies WINDOWS95 and other versions of Microsoft software. You can use the same values here that you used in step d on page 149.
i After you modify the quantity expression, click OK. Integration Composer saves the modified expression and closes the Expression Builder dialog box.
18 Optional: You can make other changes to the mapping.
19 To check for Java parsing errors in the mapping, complete the following steps:
a From the Select Action menu on the Integration Composer Mapping window, select Show Errors. Integration Composer opens an Errors dialog box that displays any errors in your mapping.
b After you view the errors, click OK to close the dialog box.
c Resolve any errors in the mapping.
20 After you finish the mapping, from the Select Action menu, select Save to save the mapping. Integration Composer saves the mapping.
{String itemnum = 'Software.Softwarename';if(!isNull(itemnum)){ if((itemnum.indexOf("Windows 95") > -1)) { itemnum = "WINDOWS95"; } else if ((itemnum.indexOf("Windows 98") > -1)) { itemnum = "WINDOWS98"; } else if ((itemnum.indexOf("Windows 2000") > -1)) { itemnum = "WINDOWS2000"; } else if (itemnum.equalsIgnoreCase("Windows XP Workstation")) { itemnum = "WINDOWSXP"; } else if ((itemnum.equalsIgnoreCase("Microsoft Office 2003")) || (itemnum.equalsIgnoreCase("Microsoft Office XP")) || (itemnum.equalsIgnoreCase("Office 2000 Premium")) || (itemnum.equalsIgnoreCase("Microsoft Office 2000"))) { itemnum = "MSOFFICE"; } else { skipCurrentInstance(); }}else skipCurrentInstance();
int quantity = 0;int j = 'Deployed Asset.Nodeid'; String assetnum = "C-" + Integer.toString(j); String orgid = getProperty("assetinit.properties", "assetinit_orgid");String siteid = getProperty("assetinit.properties", "assetinit_siteid");
...
IT Asset Initialization Tasks
IT Asset Initialization 151
21 To close the Mapping window, from the Select Action menu, select Close. Integration Composer displays a Close Mapping dialog box.
22 In the Close Mapping dialog box, click Yes. Integration Composer closes the Mapping window and displays the IBM Tivoli Integration Composer window.
Executing the IT Asset Initialization Mapping
When you create the Deployed Assets to Assets mapping, you define a set of expressions that specify how to transform deployed asset data to authorized asset data. To transform the data and create authorized asset data, you execute the mapping. For instructions about how to execute a mapping, see Chapter 4, “Executing a Mapping”, on page 43.
After Integration Composer processes a top-level asset, including its children, it commits the data for that asset to the database.
If you stop and then restart mapping execution, Integration Composer begins where it left off and moves only assets that it did not previously commit to the database.
Viewing Mapping Errors
When Integration Composer executes a mapping, the application provides information about mapping executions and data transactions as well as errors in the fusion.log file. The fusion.log file is stored in the following location:
<installDir>\log
For information about setting up logs to provide information about mapping executions and data transactions, “Logging Properties File (logging.properties)” on page 125.
Deployed Assets to IT Assets Mapping Tables
152 Integration Composer: Administrator Guide
Deployed Assets to IT Assets Mapping Tables
To create IT assets from deployed assets you can map software as spare parts or you can map software as items.
Mapping Table for Software as Spare Parts
The following table lists the mapping expressions in the mapping file that creates software as spare parts (AssetInitDPA71toAssets71SWasChildAssets.fsn).
NOTE An asterisk (*) next to a property indicates that the property is an asset specification.
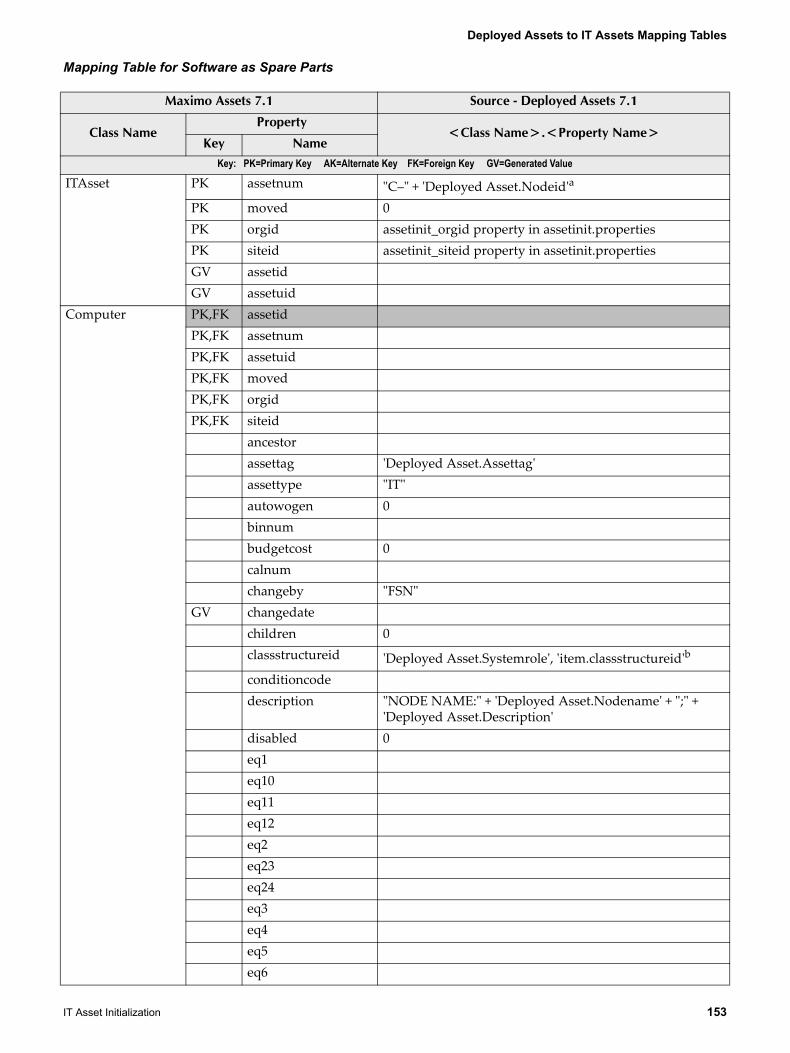
Deployed Assets to IT Assets Mapping Tables
IT Asset Initialization 153
Mapping Table for Software as Spare Parts
Maximo Assets 7.1 Source - Deployed Assets 7.1
Class NameProperty
<Class Name>.<Property Name>Key Name
Key: PK=Primary Key AK=Alternate Key FK=Foreign Key GV=Generated Value
ITAsset PK assetnum "C–" + 'Deployed Asset.Nodeid'a
PK moved 0PK orgid assetinit_orgid property in assetinit.propertiesPK siteid assetinit_siteid property in assetinit.propertiesGV assetidGV assetuid
Computer PK,FK assetidPK,FK assetnumPK,FK assetuidPK,FK movedPK,FK orgidPK,FK siteid
ancestorassettag 'Deployed Asset.Assettag'assettype "IT"autowogen 0binnumbudgetcost 0calnumchangeby "FSN"
GV changedatechildren 0classstructureid 'Deployed Asset.Systemrole', 'item.classstructureid'b
conditioncodedescription "NODE NAME:" + 'Deployed Asset.Nodename' + ";" +
'Deployed Asset.Description'disabled 0eq1eq10eq11eq12eq2eq23eq24eq3eq4eq5eq6
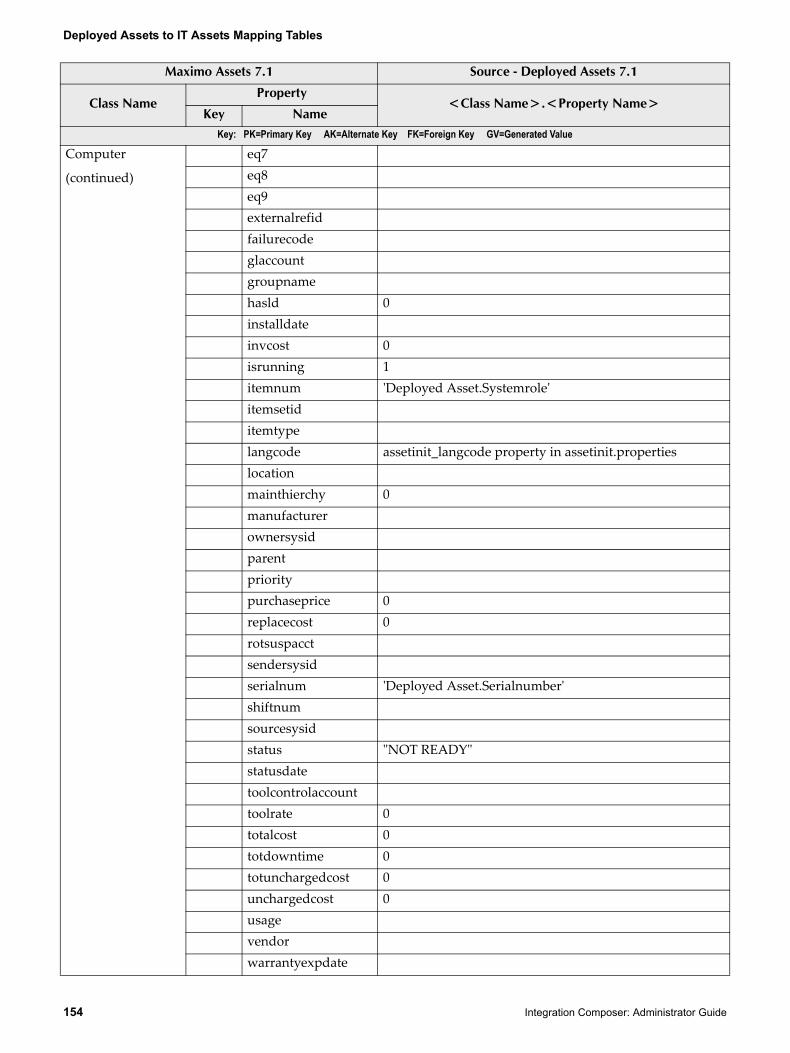
Deployed Assets to IT Assets Mapping Tables
154 Integration Composer: Administrator Guide
Computer
(continued)
eq7eq8eq9externalrefidfailurecodeglaccountgroupnamehasld 0installdateinvcost 0isrunning 1itemnum 'Deployed Asset.Systemrole'itemsetiditemtypelangcode assetinit_langcode property in assetinit.propertieslocationmainthierchy 0manufacturerownersysidparentprioritypurchaseprice 0replacecost 0rotsuspacctsendersysidserialnum 'Deployed Asset.Serialnumber'shiftnumsourcesysidstatus "NOT READY"statusdatetoolcontrolaccounttoolrate 0totalcost 0totdowntime 0totunchargedcost 0unchargedcost 0usagevendorwarrantyexpdate
Maximo Assets 7.1 Source - Deployed Assets 7.1
Class NameProperty
<Class Name>.<Property Name>Key Name
Key: PK=Primary Key AK=Alternate Key FK=Foreign Key GV=Generated Value
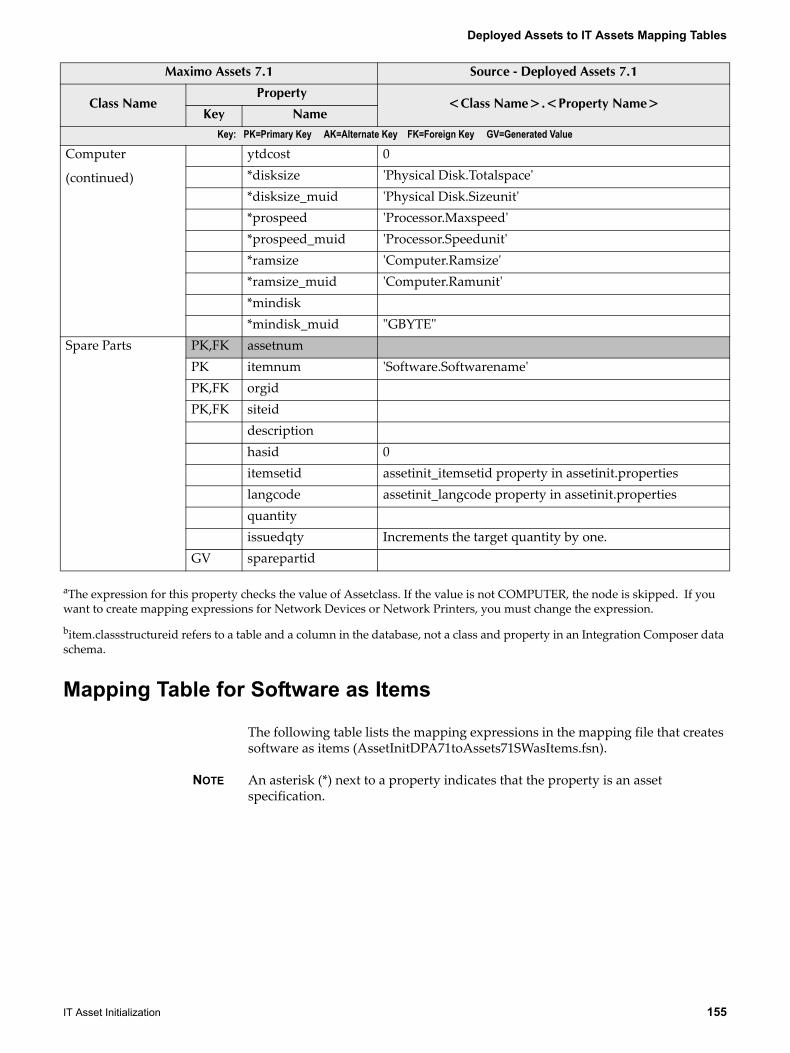
Deployed Assets to IT Assets Mapping Tables
IT Asset Initialization 155
aThe expression for this property checks the value of Assetclass. If the value is not COMPUTER, the node is skipped. If you want to create mapping expressions for Network Devices or Network Printers, you must change the expression.
bitem.classstructureid refers to a table and a column in the database, not a class and property in an Integration Composer data schema.
Mapping Table for Software as Items
The following table lists the mapping expressions in the mapping file that creates software as items (AssetInitDPA71toAssets71SWasItems.fsn).
NOTE An asterisk (*) next to a property indicates that the property is an asset specification.
Computer
(continued)
ytdcost 0*disksize 'Physical Disk.Totalspace'*disksize_muid 'Physical Disk.Sizeunit'*prospeed 'Processor.Maxspeed'*prospeed_muid 'Processor.Speedunit'*ramsize 'Computer.Ramsize'*ramsize_muid 'Computer.Ramunit'*mindisk*mindisk_muid "GBYTE"
Spare Parts PK,FK assetnumPK itemnum 'Software.Softwarename'PK,FK orgidPK,FK siteid
descriptionhasid 0itemsetid assetinit_itemsetid property in assetinit.propertieslangcode assetinit_langcode property in assetinit.propertiesquantityissuedqty Increments the target quantity by one.
GV sparepartid
Maximo Assets 7.1 Source - Deployed Assets 7.1
Class NameProperty
<Class Name>.<Property Name>Key Name
Key: PK=Primary Key AK=Alternate Key FK=Foreign Key GV=Generated Value
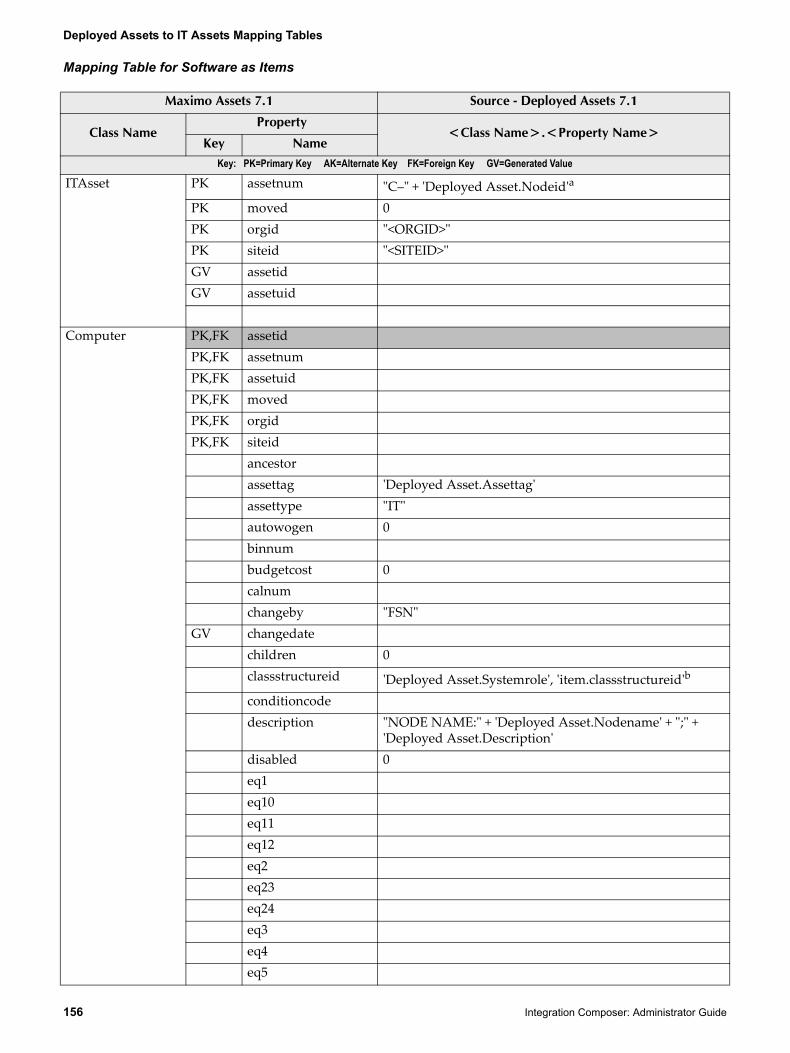
Deployed Assets to IT Assets Mapping Tables
156 Integration Composer: Administrator Guide
Mapping Table for Software as Items
Maximo Assets 7.1 Source - Deployed Assets 7.1
Class NameProperty
<Class Name>.<Property Name>Key Name
Key: PK=Primary Key AK=Alternate Key FK=Foreign Key GV=Generated Value
ITAsset PK assetnum "C–" + 'Deployed Asset.Nodeid'a
PK moved 0PK orgid "<ORGID>"PK siteid "<SITEID>"GV assetidGV assetuid
Computer PK,FK assetidPK,FK assetnumPK,FK assetuidPK,FK movedPK,FK orgidPK,FK siteid
ancestorassettag 'Deployed Asset.Assettag'assettype "IT"autowogen 0binnumbudgetcost 0calnumchangeby "FSN"
GV changedatechildren 0classstructureid 'Deployed Asset.Systemrole', 'item.classstructureid'b
conditioncodedescription "NODE NAME:" + 'Deployed Asset.Nodename' + ";" +
'Deployed Asset.Description'disabled 0eq1eq10eq11eq12eq2eq23eq24eq3eq4eq5
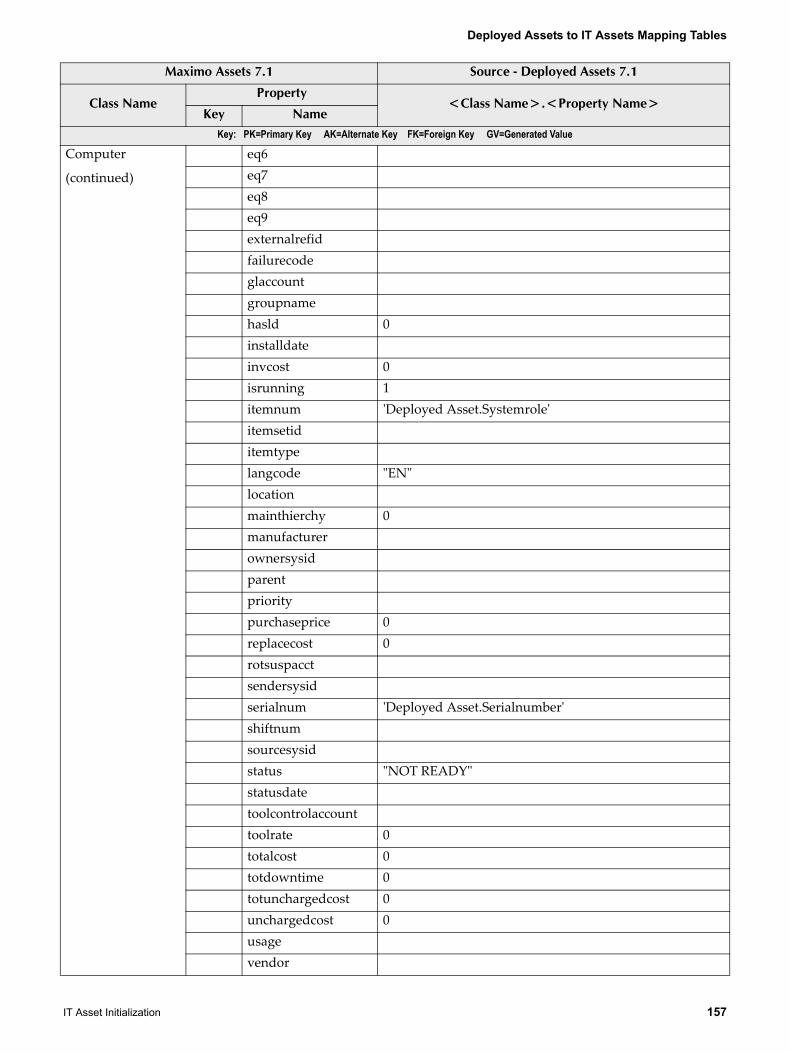
Deployed Assets to IT Assets Mapping Tables
IT Asset Initialization 157
Computer
(continued)
eq6eq7eq8eq9externalrefidfailurecodeglaccountgroupnamehasld 0installdateinvcost 0isrunning 1itemnum 'Deployed Asset.Systemrole'itemsetiditemtypelangcode "EN"locationmainthierchy 0manufacturerownersysidparentprioritypurchaseprice 0replacecost 0rotsuspacctsendersysidserialnum 'Deployed Asset.Serialnumber'shiftnumsourcesysidstatus "NOT READY"statusdatetoolcontrolaccounttoolrate 0totalcost 0totdowntime 0totunchargedcost 0unchargedcost 0usagevendor
Maximo Assets 7.1 Source - Deployed Assets 7.1
Class NameProperty
<Class Name>.<Property Name>Key Name
Key: PK=Primary Key AK=Alternate Key FK=Foreign Key GV=Generated Value
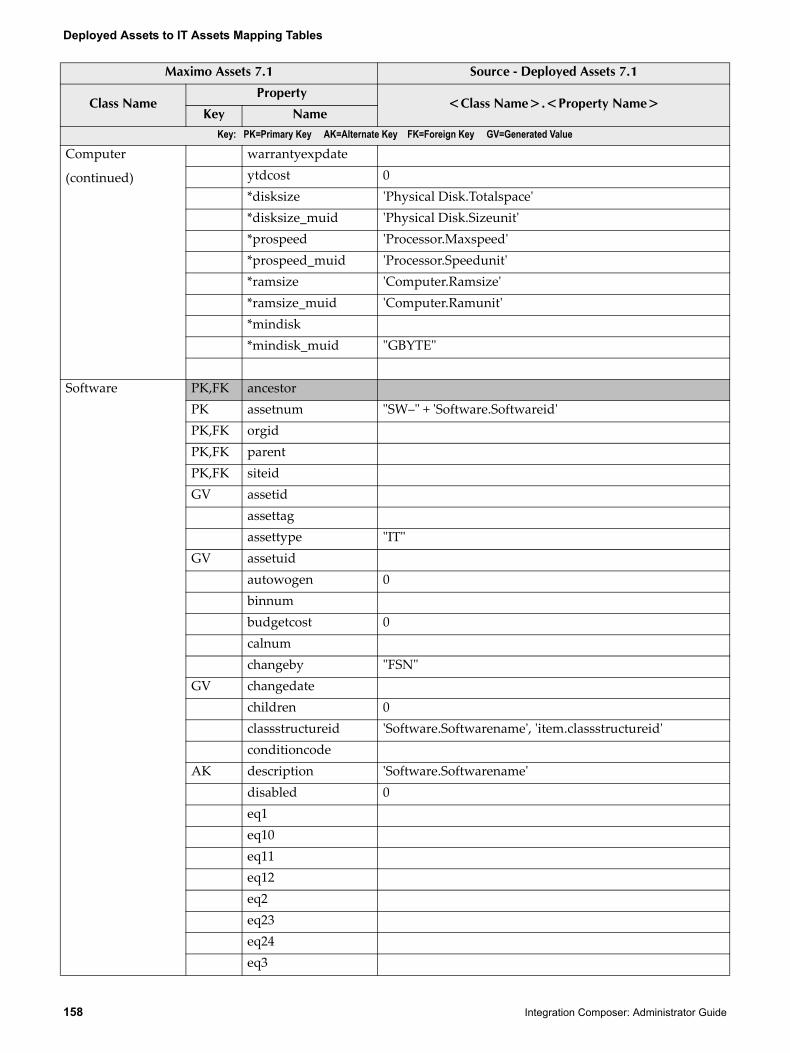
Deployed Assets to IT Assets Mapping Tables
158 Integration Composer: Administrator Guide
Computer
(continued)
warrantyexpdateytdcost 0*disksize 'Physical Disk.Totalspace'*disksize_muid 'Physical Disk.Sizeunit'*prospeed 'Processor.Maxspeed'*prospeed_muid 'Processor.Speedunit'*ramsize 'Computer.Ramsize'*ramsize_muid 'Computer.Ramunit'*mindisk*mindisk_muid "GBYTE"
Software PK,FK ancestorPK assetnum "SW–" + 'Software.Softwareid'PK,FK orgidPK,FK parentPK,FK siteidGV assetid
assettagassettype "IT"
GV assetuidautowogen 0binnumbudgetcost 0calnumchangeby "FSN"
GV changedatechildren 0classstructureid 'Software.Softwarename', 'item.classstructureid'conditioncode
AK description 'Software.Softwarename'disabled 0eq1eq10eq11eq12eq2eq23eq24eq3
Maximo Assets 7.1 Source - Deployed Assets 7.1
Class NameProperty
<Class Name>.<Property Name>Key Name
Key: PK=Primary Key AK=Alternate Key FK=Foreign Key GV=Generated Value
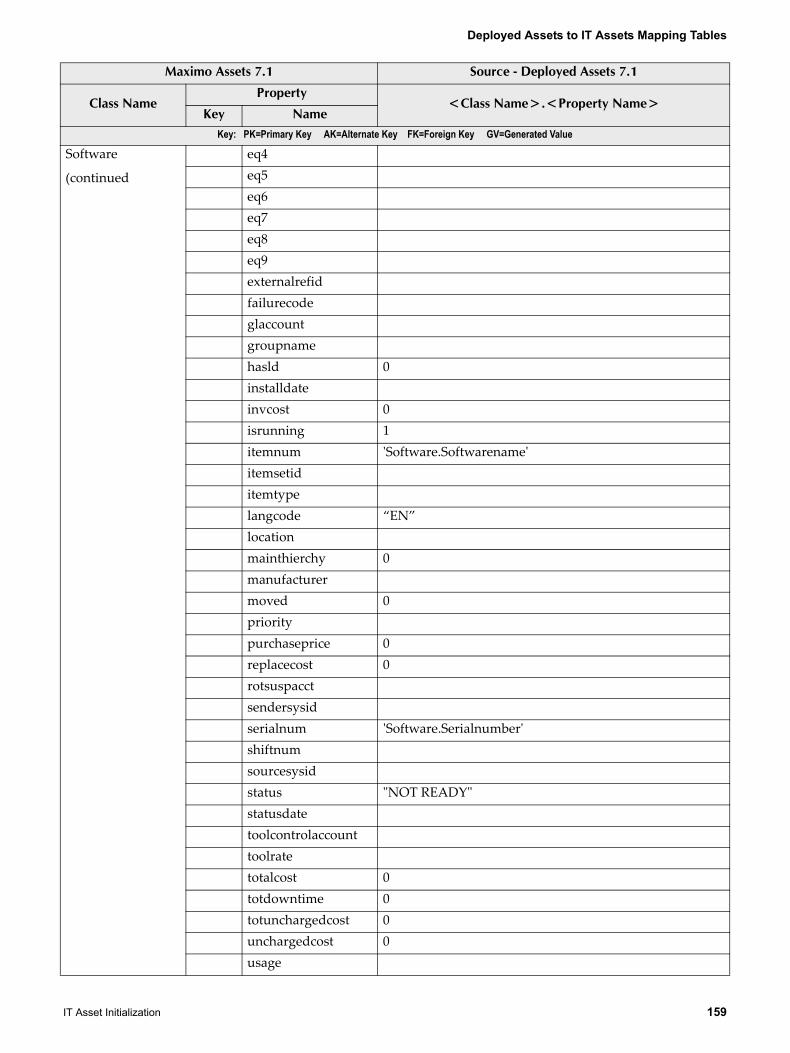
Deployed Assets to IT Assets Mapping Tables
IT Asset Initialization 159
Software
(continued
eq4eq5eq6eq7eq8eq9externalrefidfailurecodeglaccountgroupnamehasld 0installdateinvcost 0isrunning 1itemnum 'Software.Softwarename'itemsetiditemtypelangcode “EN”locationmainthierchy 0manufacturermoved 0prioritypurchaseprice 0replacecost 0rotsuspacctsendersysidserialnum 'Software.Serialnumber'shiftnumsourcesysidstatus "NOT READY"statusdatetoolcontrolaccounttoolratetotalcost 0totdowntime 0totunchargedcost 0unchargedcost 0usage
Maximo Assets 7.1 Source - Deployed Assets 7.1
Class NameProperty
<Class Name>.<Property Name>Key Name
Key: PK=Primary Key AK=Alternate Key FK=Foreign Key GV=Generated Value
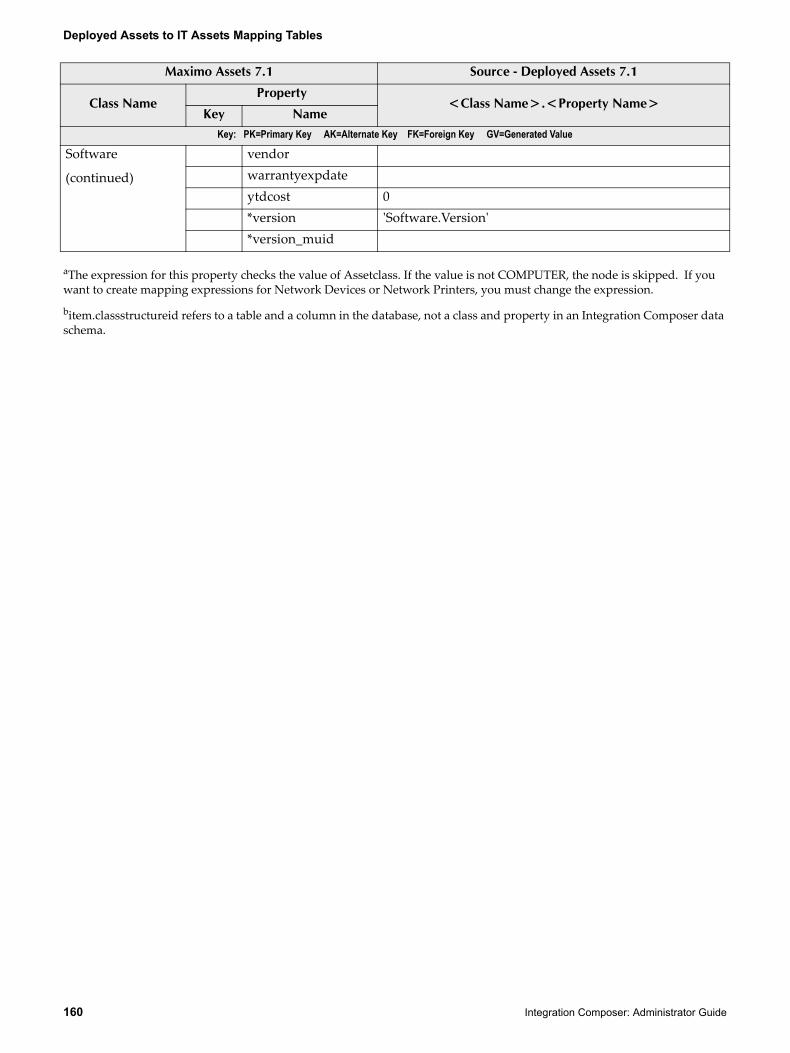
Deployed Assets to IT Assets Mapping Tables
160 Integration Composer: Administrator Guide
aThe expression for this property checks the value of Assetclass. If the value is not COMPUTER, the node is skipped. If you want to create mapping expressions for Network Devices or Network Printers, you must change the expression.
bitem.classstructureid refers to a table and a column in the database, not a class and property in an Integration Composer data schema.
Software
(continued)
vendorwarrantyexpdateytdcost 0*version 'Software.Version'*version_muid
Maximo Assets 7.1 Source - Deployed Assets 7.1
Class NameProperty
<Class Name>.<Property Name>Key Name
Key: PK=Primary Key AK=Alternate Key FK=Foreign Key GV=Generated Value

© Copyright IBM Corp. 2007, 2008 161
Notices
This information was developed for products and services offered in the U.S.A.
IBM may not offer the products, services, or features discussed in this document in other countries. Consult your local IBM representative for information on the products and services currently available in your area. Any reference to an IBM product, program, or service is not intended to state or imply that only that IBM product, program, or service may be used. Any functionally equivalent product, program, or service that does not infringe any IBM intellectual property right may be used instead. However, it is the user's responsibility to evaluate and verify the operation of any non-IBM product, program, or service.
IBM may have patents or pending patent applications covering subject matter described in this document. The furnishing of this document does not grant you any license to these patents. You can send license inquiries, in writing, to:
IBM Director of LicensingIBM CorporationNorth Castle DriveArmonk, NY 10504-1785U.S.A.
For license inquiries regarding double-byte (DBCS) information, contact the IBM Intellectual Property Department in your country or send inquiries, in writing, to:
IBM World Trade Asia CorporationLicensing2-31 Roppongi 3-chome, Minato-kuTokyo 106-0032, Japan
The following paragraph does not apply to the United Kingdom or any other country where such provisions are inconsistent with local law:
INTERNATIONAL BUSINESS MACHINES CORPORATION PROVIDES THIS PUBLICATION "AS IS" WITHOUT WARRANTY OF ANY KIND, EITHER EXPRESS OR IMPLIED, INCLUDING, BUT NOT LIMITED TO, THE IMPLIED WARRANTIES OF NON-INFRINGEMENT, MERCHANTABILITY OR FITNESS FOR A PARTICULAR PURPOSE. Some states do not allow disclaimer of express or implied warranties in certain transactions, therefore, this statement may not apply to you.
This information could include technical inaccuracies or typographical errors. Changes are periodically made to the information herein; these changes will be incorporated in new editions of the publication. IBM may make improvements and/or changes in the product(s) and/or the program(s) described in this publication at any time without notice.
Any references in this information to non-IBM Web sites are provided for convenience only and do not in any manner serve as an endorsement of those Web sites. The materials at those Web sites are not part of the materials for this IBM product and use of those Web sites is at your own risk.
162 Integration Composer: Administrator Guide
IBM may use or distribute any of the information you supply in any way it believes appropriate without incurring any obligation to you.
Licensees of this program who wish to have information about it for the purpose of enabling: (i) the exchange of information between independently created programs and other programs (including this one) and (ii) the mutual use of the information which has been exchanged, should contact:
IBM Corporation2Z4A/10111400 Burnet RoadAustin, TX 78758 U.S.A.
Such information may be available, subject to appropriate terms and conditions, including in some cases, payment of a fee.
The licensed program described in this document and all licensed material available for it are provided by IBM under terms of the IBM Customer Agreement, IBM International Program License Agreement or any equivalent agreement between us.
Information concerning non-IBM products was obtained from the suppliers of those products, their published announcements or other publicly available sources. IBM has not tested those products and cannot confirm the accuracy of performance, compatibility or any other claims related to non-IBM products. Questions on the capabilities of non-IBM products should be addressed to the suppliers of those products.
All statements regarding IBM's future direction or intent are subject to change or withdrawal without notice, and represent goals and objectives only.
This information contains examples of data and reports used in daily business operations. To illustrate them as completely as possible, the examples include the names of individuals, companies, brands, and products. All of these names are fictitious and any similarity to the names and addresses used by an actual business enterprise is entirely coincidental.
If you are viewing this information softcopy, the photographs and color illustrations may not appear.
163
Trademarks
The following terms are trademarks of International Business Machines Corporation in the United States, other countries, or both:
IBMAIXDB2developerWorksEveryplaceibm.comLotusMaximoNotesQuickPlaceTivoliWebSphere
Adobe, the Adobe logo, PostScript, and the PostScript logo are either registered trademarks or trademarks of Adobe Systems Incorporated in the United States, and/or other countries.
Java and all Java-based trademarks and logos are trademarks of Sun Microsystems, Inc. in the United States, other countries, or both.
Linux is a registered trademark of Linus Torvalds in the United States, other countries, or both.
Intel, Intel logo, Intel Inside, Intel Inside logo, Intel Centrino, Intel Centrino logo, Celeron, Intel Xeon, Intel SpeedStep, Itanium, and Pentium are trademarks or registered trademarks of Intel Corporation or its subsidiaries in the United States and other countries.
Microsoft, Windows, Windows NT, and the Windows logo are trademarks of Microsoft Corporation in the United States, other countries, or both.
UNIX is a registered trademark of The Open Group in the United States and other countries.

164 Integration Composer: Administrator Guide
© Copyright IBM Corp. 2007, 2008 165
A
actual CIconfiguring level of depth for 51
adapters 5alternate key 12, 73arithmetic operators 105assetinit.properties file 124
C
Case Selection 102Case Selection field 33class 9
filtering data for a data schema 84hierarchy 10
classesadding properties to 66adding to data schemas 64changing attributes of 82deleting 90designating alternate keys 73designating primary keys 72renaming 88
command line conventions 44connection methods 2conversion applications
mapping data for 49
D
data schemaadding relationships to 70
Data Schema Analysis window 80Data Schema window 55data schemas 9
adding a child class to 69adding classes to 64adding properties to a class 66adding reference classes to 71cache 76changing class attributes in 82changing existing 78changing properties in a class 87creating 54, 60defining generated value properties 74defining properties in 76deleting 94deleting class properties in 91deleting classes in 90
deleting relationships in 92exporting 96fixing errors in 80hardware last scan date 76importing 95link properties 93opening existing 78renaming class properties in 89renaming classes in 88software last scan date 76time stamp 77timestamp format 77
data sourcebrowsing 20browsing by data 22browsing by structure 20closing connection to 27connection information fields 18, 61defining a new 17deleting 28viewing instances in 22, 23viewing properties of 24
Deciding Class 33, 101Define a New Data Schema window 54deployed assets conversion applications
mapping data for 49
E
error management 8exporting a data schema 96exporting mappings 39Expression Builder 103
syntax errors 104expression functions 107
date/time 107logical 108mapping 108mapping execution flow 109math 109SQL 110text 111
expressions 99creating 101deleting 106functions in 107requirement for 99syntax 100using literals in 105
Index
Index
166 Integration Composer: Administrator Guide
F
file structure 5foreign key 12function parameters
defining 104fusion.properties file 119
G
generated value properties 74
I
IBM Tivoli Integration Adapters 5importing a data schema 95importing mappings 40initialization files 119
assetinit.properties file 124fusion.properties file 119jdbcinfo.properties file 124logging.properties file 125predb-labels.properties file 124
instance 9instances
viewing 23Integration Composer
accessing 15components 2engine 2navigating 15process flow 4repository 3system requirements 2user interface 2
Integration Composer application 1Integration Composer repository 3IT asset
defined 129IT asset initialization 129
assetinit properties file 137components 131configuring provider properties 134creating the mapping 140overview 129prerequisites 132provider properties file 136software as items mapping 155software as spare parts mapping 152tasks checklist 133
J
jdbcinfo.properties file 124
K
key propertiesalternate 12foreign 12primary 12
keys in data schemasalternate 73primary 72
L
literals 112boolean 113char 113floating point 114integer 114string 113
log files 8logging.properties file 125
M
mapping 29creating 35data for files 51deleting 41deleting last scan history 42executing 30, 43exporting 39importing 40insert only feature 34key properties 48opening existing 36overview 29scan date time stamp 48sequence of operations 34tips 48units of measurement 48viewing errors in 38, 151
mapping executionediting script files 44executing script files 46from command line 46using schedulers 43
mapping execution process 30deleting records 31insert only feature 30updating records 30
Mapping window 32actions in 34
O
operatorsarithmetic 105, 114assignment 115
Index
167
comparison 115logical 116unary 116
order of operations 117
P
parent-child relationship 10primary key 12, 72property
defined 9required 13
R
reference property 12relationship
parent-child 10reference 10
required property 13root class 10
renaming 63
S
scan datedeleting 42mapping data for 48
sitesmapping data for 49
T
tree view 10searching 26

Index
168 Integration Composer: Administrator Guide

Index
169