integrity owners manual - marvin - windows and doors | marvin owners manual.pdf · annual window...
TRANSCRIPT
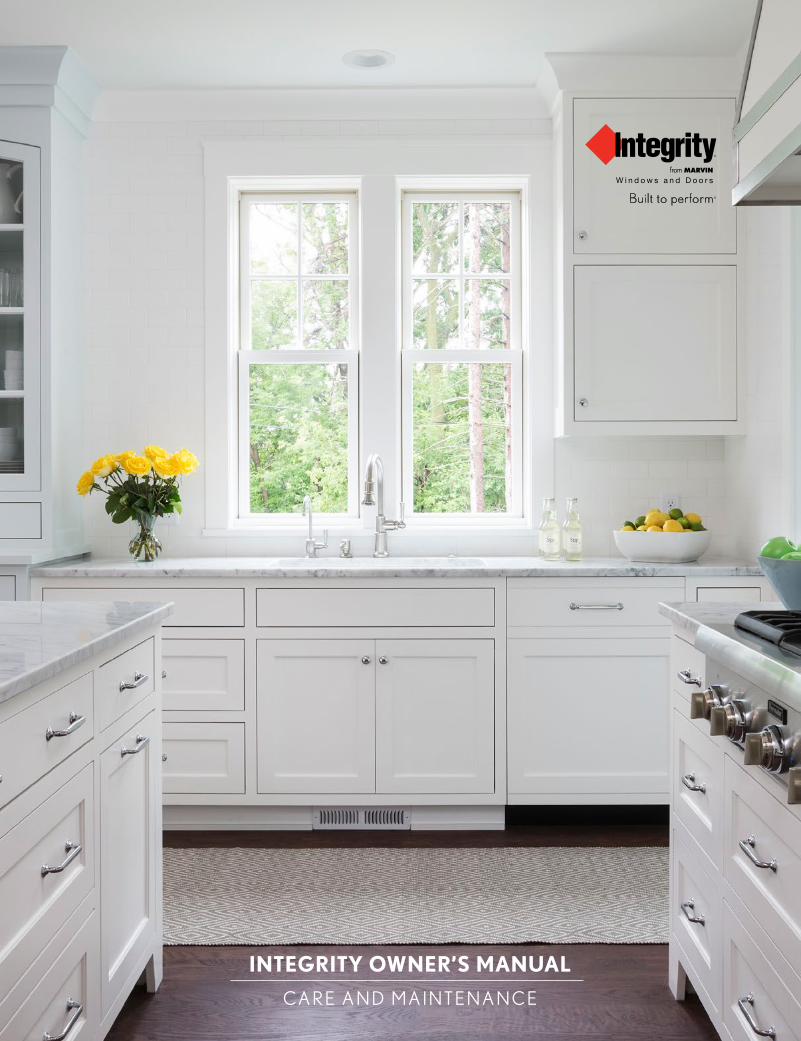
INTEGRITY OWNER’S MANUAL
CA R E A N D M A I N T E N A N C E
Table of Contents
Introduction . . . . . . . . . . . . . . . . . . . . . . . . . . . . . . . . . . . . . . . . . . . . . . . . . . . . . . . . . . . . . . . . . . . . . . . . . . . . . . . . . . . . . . 2Warranty . . . . . . . . . . . . . . . . . . . . . . . . . . . . . . . . . . . . . . . . . . . . . . . . . . . . . . . . . . . . . . . . . . . . . . . . . . . . . . . . . . . . . . . . . . . . . . . . . . . . . . . . . . . . 2
Annual Window and Door Checklist . . . . . . . . . . . . . . . . . . . . . . . . . . . . . . . . . . . . . . . . . . . . . . . . . . . . . . . . . . . . . 3Hazard Notations . . . . . . . . . . . . . . . . . . . . . . . . . . . . . . . . . . . . . . . . . . . . . . . . . . . . . . . . . . . . . . . . . . . . . . . . . . . . . . . . . . . . . . . . . . . . . . . . . . . 3
Windows . . . . . . . . . . . . . . . . . . . . . . . . . . . . . . . . . . . . . . . . . . . . . . . . . . . . . . . . . . . . . . . . . . . . . . . . . . . . . . . . . . . . . . . . . 4Window Part Identification . . . . . . . . . . . . . . . . . . . . . . . . . . . . . . . . . . . . . . . . . . . . . . . . . . . . . . . . . . . . . . . . . . . . . . . . . . . . . . . . . . . . . . . . . . . 4Window Products . . . . . . . . . . . . . . . . . . . . . . . . . . . . . . . . . . . . . . . . . . . . . . . . . . . . . . . . . . . . . . . . . . . . . . . . . . . . . . . . . . . . . . . . . . . . . . . . . . . .5Door Products . . . . . . . . . . . . . . . . . . . . . . . . . . . . . . . . . . . . . . . . . . . . . . . . . . . . . . . . . . . . . . . . . . . . . . . . . . . . . . . . . . . . . . . . . . . . . . . . . . . . . . . 6
Glass . . . . . . . . . . . . . . . . . . . . . . . . . . . . . . . . . . . . . . . . . . . . . . . . . . . . . . . . . . . . . . . . . . . . . . . . . . . . . . . . . . . . . . . . . . . . . 7Condensation . . . . . . . . . . . . . . . . . . . . . . . . . . . . . . . . . . . . . . . . . . . . . . . . . . . . . . . . . . . . . . . . . . . . . . . . . . . . . . . . . . . . . . . . . . . . . . . . . . . . . . . 7Mildew Detection and Removal . . . . . . . . . . . . . . . . . . . . . . . . . . . . . . . . . . . . . . . . . . . . . . . . . . . . . . . . . . . . . . . . . . . . . . . . . . . . . . . . . . . . . . 7Cleaning the Glass . . . . . . . . . . . . . . . . . . . . . . . . . . . . . . . . . . . . . . . . . . . . . . . . . . . . . . . . . . . . . . . . . . . . . . . . . . . . . . . . . . . . . . . . . . . . . . . . . .8
Finishing the Interior on Wood-Ultrex® Product . . . . . . . . . . . . . . . . . . . . . . . . . . . . . . . . . . . . . . . . . . . . . . . . . . 9Painting . . . . . . . . . . . . . . . . . . . . . . . . . . . . . . . . . . . . . . . . . . . . . . . . . . . . . . . . . . . . . . . . . . . . . . . . . . . . . . . . . . . . . . . . . . . . . . . . . . . . . . . . . . . . . . 9Staining . . . . . . . . . . . . . . . . . . . . . . . . . . . . . . . . . . . . . . . . . . . . . . . . . . . . . . . . . . . . . . . . . . . . . . . . . . . . . . . . . . . . . . . . . . . . . . . . . . . . . . . . . . . . . . 9
Ultrex® Care and Maintenance . . . . . . . . . . . . . . . . . . . . . . . . . . . . . . . . . . . . . . . . . . . . . . . . . . . . . . . . . . . . . . . . . . 9Cleaning Ultrex . . . . . . . . . . . . . . . . . . . . . . . . . . . . . . . . . . . . . . . . . . . . . . . . . . . . . . . . . . . . . . . . . . . . . . . . . . . . . . . . . . . . . . . . . . . . . . . . . . . . . . 9Repairing Ultrex . . . . . . . . . . . . . . . . . . . . . . . . . . . . . . . . . . . . . . . . . . . . . . . . . . . . . . . . . . . . . . . . . . . . . . . . . . . . . . . . . . . . . . . . . . . . . . . . . . . . 10Painting Ultrex . . . . . . . . . . . . . . . . . . . . . . . . . . . . . . . . . . . . . . . . . . . . . . . . . . . . . . . . . . . . . . . . . . . . . . . . . . . . . . . . . . . . . . . . . . . . . . . . . . . . . . 10
Screens Cleaning and Safety . . . . . . . . . . . . . . . . . . . . . . . . . . . . . . . . . . . . . . . . . . . . . . . . . . . . . . . . . . . . . . . . . . . . . 11
Maintenance, Operation and General Service . . . . . . . . . . . . . . . . . . . . . . . . . . . . . . . . . . . . . . . . . . . . . . . . . . . 11Casement . . . . . . . . . . . . . . . . . . . . . . . . . . . . . . . . . . . . . . . . . . . . . . . . . . . . . . . . . . . . . . . . . . . . . . . . . . . . . . . . . . . . . . . . . . . . . . . . . . . . . . . . . . 12Awning . . . . . . . . . . . . . . . . . . . . . . . . . . . . . . . . . . . . . . . . . . . . . . . . . . . . . . . . . . . . . . . . . . . . . . . . . . . . . . . . . . . . . . . . . . . . . . . . . . . . . . . . . . . . . 13All Ultrex® Casement and Awning Screen Removal . . . . . . . . . . . . . . . . . . . . . . . . . . . . . . . . . . . . . . . . . . . . . . . . . . . . . . . . . . . . . . . . . . 13Double Hung . . . . . . . . . . . . . . . . . . . . . . . . . . . . . . . . . . . . . . . . . . . . . . . . . . . . . . . . . . . . . . . . . . . . . . . . . . . . . . . . . . . . . . . . . . . . . . . . . . . . . . . 14Glider . . . . . . . . . . . . . . . . . . . . . . . . . . . . . . . . . . . . . . . . . . . . . . . . . . . . . . . . . . . . . . . . . . . . . . . . . . . . . . . . . . . . . . . . . . . . . . . . . . . . . . . . . . . . . . 15Patio and Sliding French . . . . . . . . . . . . . . . . . . . . . . . . . . . . . . . . . . . . . . . . . . . . . . . . . . . . . . . . . . . . . . . . . . . . . . . . . . . . . . . . . . . . . . . . . . . . . 16Swinging French Door . . . . . . . . . . . . . . . . . . . . . . . . . . . . . . . . . . . . . . . . . . . . . . . . . . . . . . . . . . . . . . . . . . . . . . . . . . . . . . . . . . . . . . . . . . . . . . 18
Care of PVD Finishes . . . . . . . . . . . . . . . . . . . . . . . . . . . . . . . . . . . . . . . . . . . . . . . . . . . . . . . . . . . . . . . . . . . . . . . . . . 20
2 Introduction
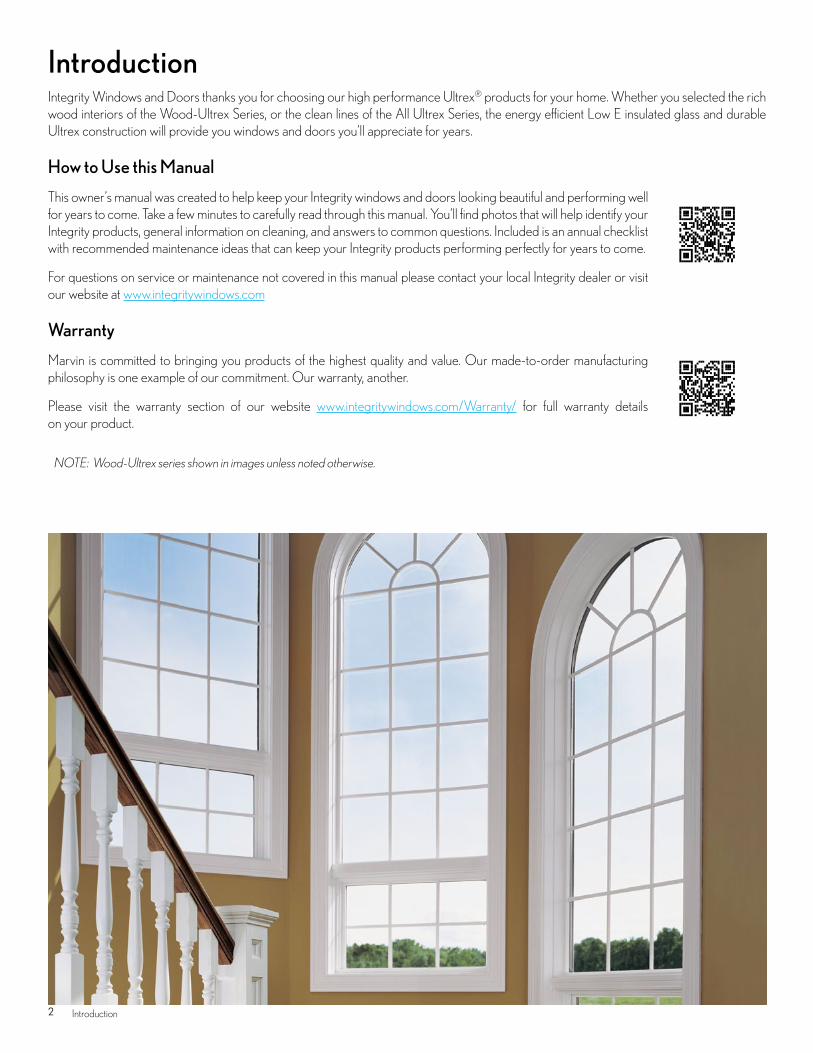
IntroductionIntegrity Windows and Doors thanks you for choosing our high performance Ultrex® products for your home . Whether you selected the rich wood interiors of the Wood-Ultrex Series, or the clean lines of the All Ultrex Series, the energy efficient Low E insulated glass and durable Ultrex construction will provide you windows and doors you'll appreciate for years .
How to Use this Manual
This owner’s manual was created to help keep your Integrity windows and doors looking beautiful and performing well for years to come . Take a few minutes to carefully read through this manual . You’ll find photos that will help identify your Integrity products, general information on cleaning, and answers to common questions . Included is an annual checklist with recommended maintenance ideas that can keep your Integrity products performing perfectly for years to come .
For questions on service or maintenance not covered in this manual please contact your local Integrity dealer or visit our website at www .integritywindows .com
Warranty
Marvin is committed to bringing you products of the highest quality and value . Our made-to-order manufacturing philosophy is one example of our commitment . Our warranty, another .
Please visit the warranty section of our website www .integritywindows .com/Warranty/ for full warranty details on your product .
NOTE: Wood-Ultrex series shown in images unless noted otherwise.
3Annual Window and Door Checklist
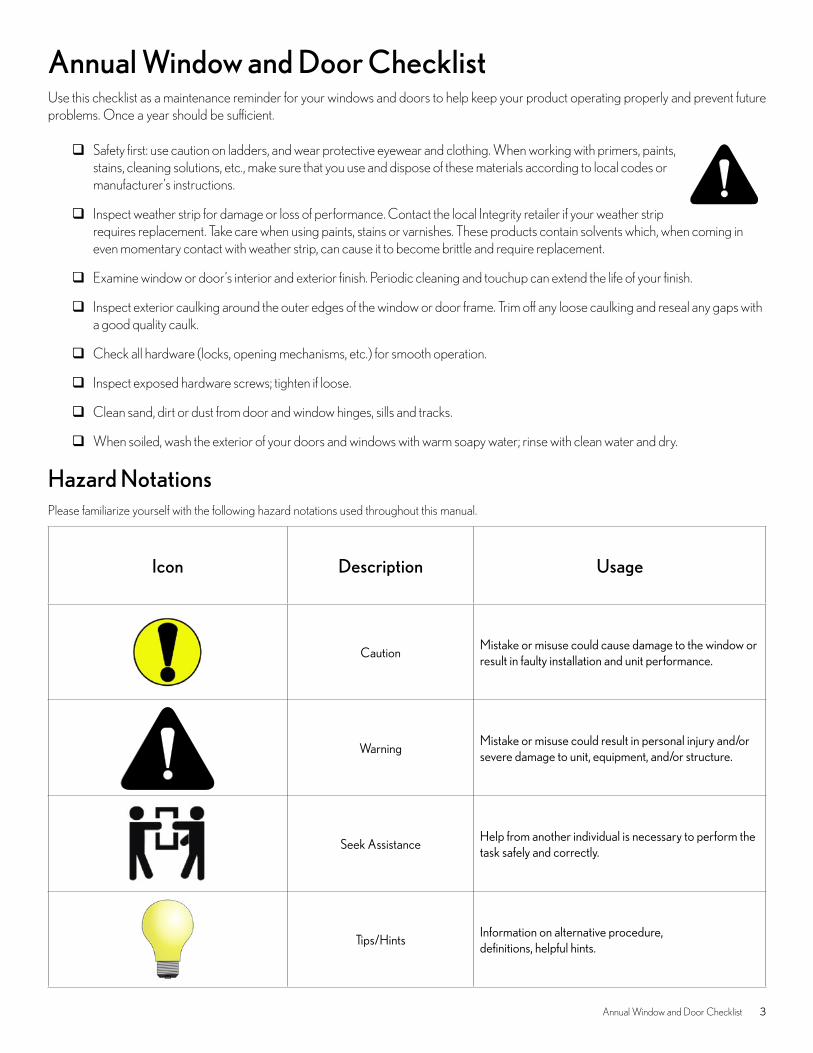
Annual Window and Door ChecklistUse this checklist as a maintenance reminder for your windows and doors to help keep your product operating properly and prevent future problems . Once a year should be sufficient .
� Safety first: use caution on ladders, and wear protective eyewear and clothing . When working with primers, paints, stains, cleaning solutions, etc ., make sure that you use and dispose of these materials according to local codes or manufacturer’s instructions .
� Inspect weather strip for damage or loss of performance . Contact the local Integrity retailer if your weather strip requires replacement . Take care when using paints, stains or varnishes . These products contain solvents which, when coming in even momentary contact with weather strip, can cause it to become brittle and require replacement .
� Examine window or door’s interior and exterior finish . Periodic cleaning and touchup can extend the life of your finish .
� Inspect exterior caulking around the outer edges of the window or door frame . Trim off any loose caulking and reseal any gaps with a good quality caulk .
� Check all hardware (locks, opening mechanisms, etc .) for smooth operation .
� Inspect exposed hardware screws; tighten if loose .
� Clean sand, dirt or dust from door and window hinges, sills and tracks .
� When soiled, wash the exterior of your doors and windows with warm soapy water; rinse with clean water and dry .
Hazard Notations Please familiarize yourself with the following hazard notations used throughout this manual .
Icon Description Usage
Caution Mistake or misuse could cause damage to the window or result in faulty installation and unit performance .
Warning Mistake or misuse could result in personal injury and/or severe damage to unit, equipment, and/or structure .
Seek Assistance Help from another individual is necessary to perform the task safely and correctly .
Tips/Hints Information on alternative procedure, definitions, helpful hints .
4 Windows
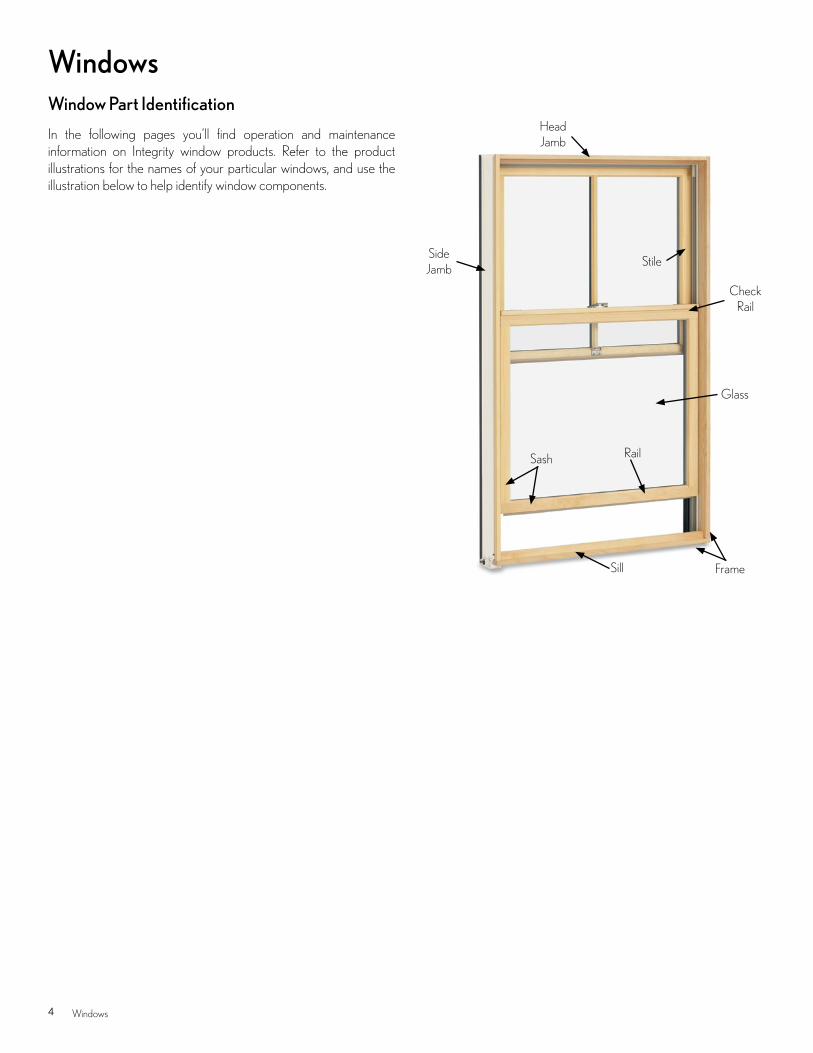
WindowsWindow Part Identification
In the following pages you’ll find operation and maintenance information on Integrity window products . Refer to the product illustrations for the names of your particular windows, and use the illustration below to help identify window components .
Head Jamb
Check Rail
Glass
Sill
Side Jamb
Frame
Sash Rail
Stile
5Windows
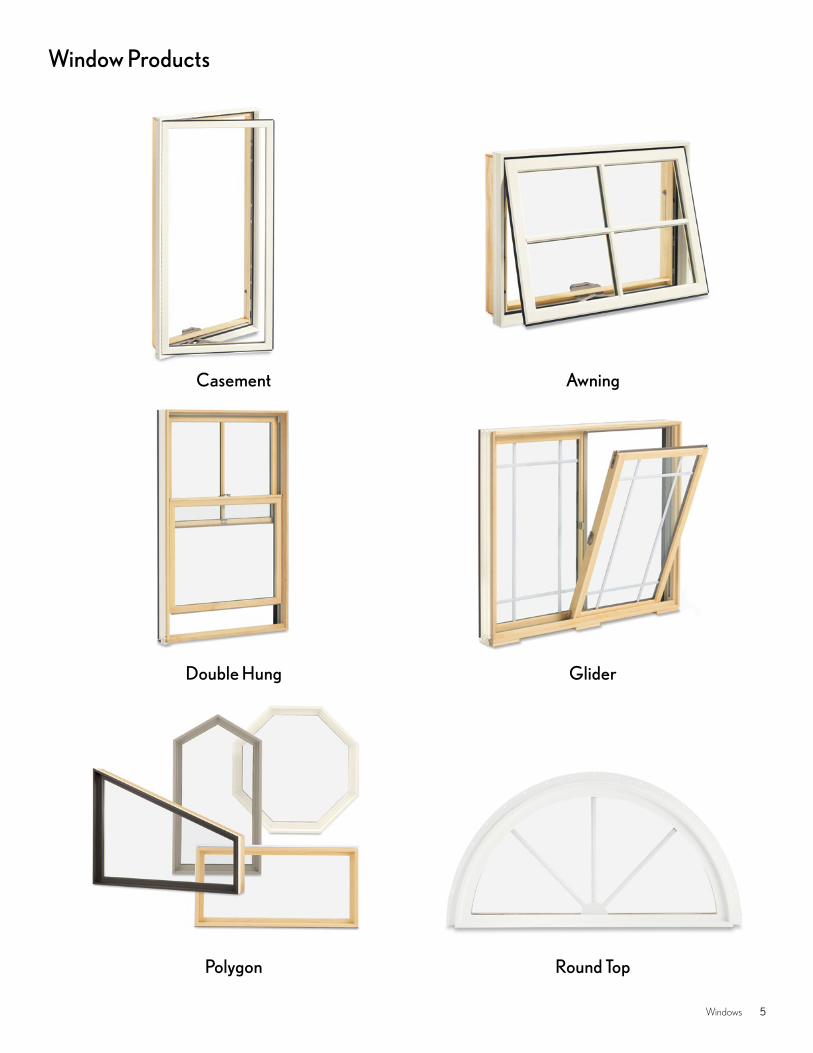
Window Products
Casement Awning
Double Hung Glider
Polygon Round Top
6 Windows
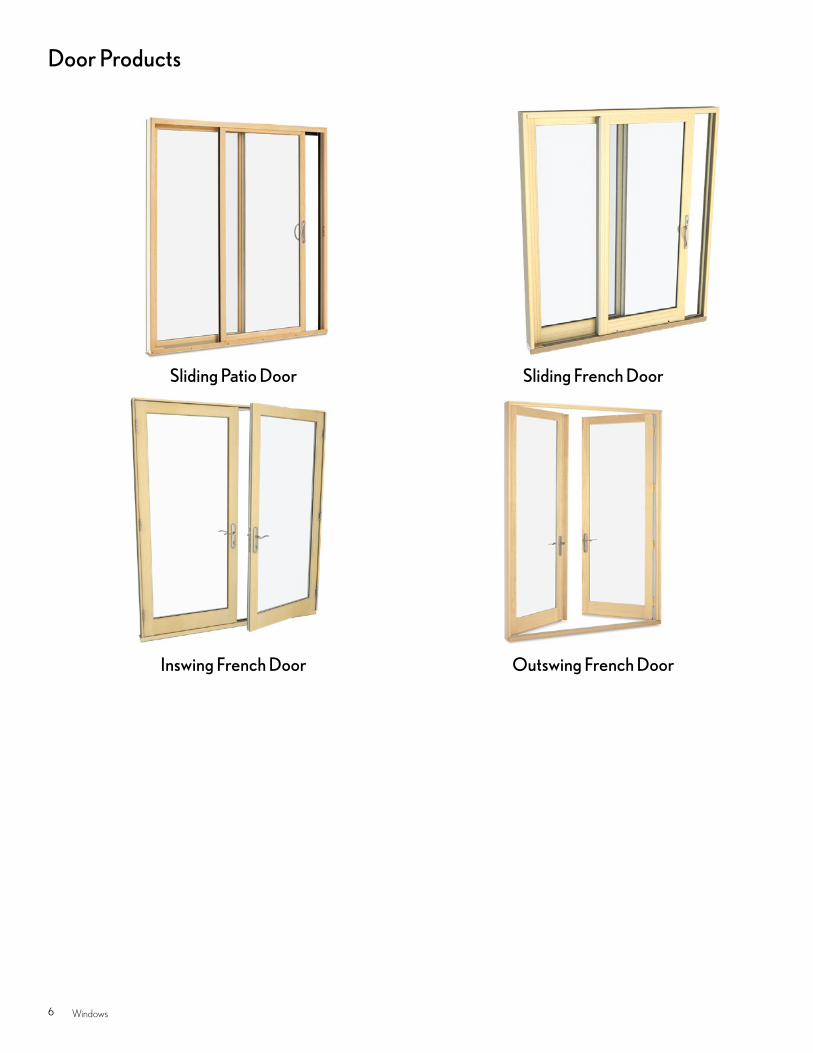
Door Products
Sliding Patio Door Sliding French Door
Inswing French Door Outswing French Door
7Glass
GlassCondensation
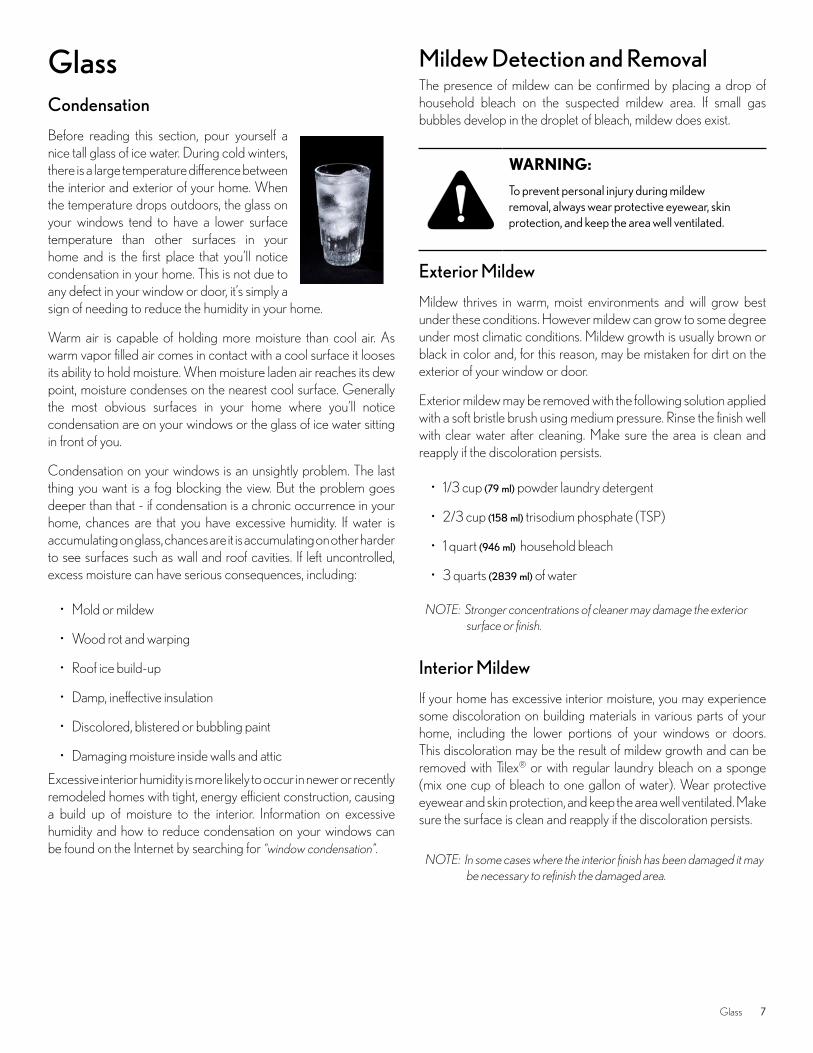
Before reading this section, pour yourself a nice tall glass of ice water . During cold winters, there is a large temperature difference between the interior and exterior of your home . When the temperature drops outdoors, the glass on your windows tend to have a lower surface temperature than other surfaces in your home and is the first place that you’ll notice condensation in your home . This is not due to any defect in your window or door, it’s simply a sign of needing to reduce the humidity in your home .
Warm air is capable of holding more moisture than cool air . As warm vapor filled air comes in contact with a cool surface it looses its ability to hold moisture . When moisture laden air reaches its dew point, moisture condenses on the nearest cool surface . Generally the most obvious surfaces in your home where you’ll notice condensation are on your windows or the glass of ice water sitting in front of you .
Condensation on your windows is an unsightly problem . The last thing you want is a fog blocking the view . But the problem goes deeper than that - if condensation is a chronic occurrence in your home, chances are that you have excessive humidity . If water is accumulating on glass, chances are it is accumulating on other harder to see surfaces such as wall and roof cavities . If left uncontrolled, excess moisture can have serious consequences, including:
• Mold or mildew
• Wood rot and warping
• Roof ice build-up
• Damp, ineffective insulation
• Discolored, blistered or bubbling paint
• Damaging moisture inside walls and attic
Excessive interior humidity is more likely to occur in newer or recently remodeled homes with tight, energy efficient construction, causing a build up of moisture to the interior . Information on excessive humidity and how to reduce condensation on your windows can be found on the Internet by searching for “window condensation”.
Mildew Detection and Removal The presence of mildew can be confirmed by placing a drop of household bleach on the suspected mildew area . If small gas bubbles develop in the droplet of bleach, mildew does exist .
WARNING:
To prevent personal injury during mildew removal, always wear protective eyewear, skin protection, and keep the area well ventilated .
Exterior Mildew
Mildew thrives in warm, moist environments and will grow best under these conditions . However mildew can grow to some degree under most climatic conditions . Mildew growth is usually brown or black in color and, for this reason, may be mistaken for dirt on the exterior of your window or door .
Exterior mildew may be removed with the following solution applied with a soft bristle brush using medium pressure . Rinse the finish well with clear water after cleaning . Make sure the area is clean and reapply if the discoloration persists .
• 1/3 cup (79 ml) powder laundry detergent
• 2/3 cup (158 ml) trisodium phosphate (TSP)
• 1 quart (946 ml) household bleach
• 3 quarts (2839 ml) of water
NOTE: Stronger concentrations of cleaner may damage the exterior surface or finish.
Interior Mildew
If your home has excessive interior moisture, you may experience some discoloration on building materials in various parts of your home, including the lower portions of your windows or doors . This discoloration may be the result of mildew growth and can be removed with Tilex® or with regular laundry bleach on a sponge (mix one cup of bleach to one gallon of water) . Wear protective eyewear and skin protection, and keep the area well ventilated . Make sure the surface is clean and reapply if the discoloration persists .
NOTE: In some cases where the interior finish has been damaged it may be necessary to refinish the damaged area.
8 Glass
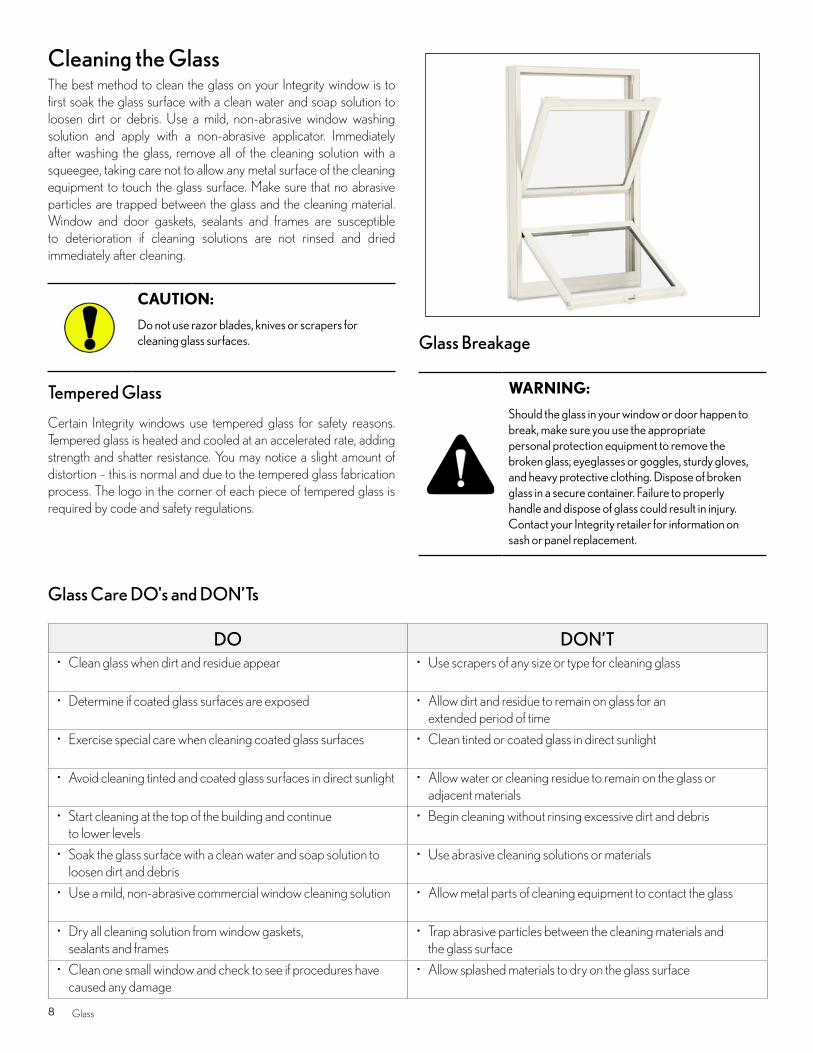
Cleaning the GlassThe best method to clean the glass on your Integrity window is to first soak the glass surface with a clean water and soap solution to loosen dirt or debris . Use a mild, non-abrasive window washing solution and apply with a non-abrasive applicator . Immediately after washing the glass, remove all of the cleaning solution with a squeegee, taking care not to allow any metal surface of the cleaning equipment to touch the glass surface . Make sure that no abrasive particles are trapped between the glass and the cleaning material . Window and door gaskets, sealants and frames are susceptible to deterioration if cleaning solutions are not rinsed and dried immediately after cleaning .
CAUTION:
Do not use razor blades, knives or scrapers for cleaning glass surfaces .
Tempered Glass
Certain Integrity windows use tempered glass for safety reasons . Tempered glass is heated and cooled at an accelerated rate, adding strength and shatter resistance . You may notice a slight amount of distortion – this is normal and due to the tempered glass fabrication process . The logo in the corner of each piece of tempered glass is required by code and safety regulations .
Glass Breakage
WARNING:
Should the glass in your window or door happen to break, make sure you use the appropriate personal protection equipment to remove the broken glass; eyeglasses or goggles, sturdy gloves, and heavy protective clothing . Dispose of broken glass in a secure container . Failure to properly handle and dispose of glass could result in injury . Contact your Integrity retailer for information on sash or panel replacement .
Glass Care DO's and DON’Ts
DO DON’T• Clean glass when dirt and residue appear • Use scrapers of any size or type for cleaning glass
• Determine if coated glass surfaces are exposed • Allow dirt and residue to remain on glass for an extended period of time
• Exercise special care when cleaning coated glass surfaces • Clean tinted or coated glass in direct sunlight
• Avoid cleaning tinted and coated glass surfaces in direct sunlight • Allow water or cleaning residue to remain on the glass or adjacent materials
• Start cleaning at the top of the building and continue to lower levels
• Begin cleaning without rinsing excessive dirt and debris
• Soak the glass surface with a clean water and soap solution to loosen dirt and debris
• Use abrasive cleaning solutions or materials
• Use a mild, non-abrasive commercial window cleaning solution • Allow metal parts of cleaning equipment to contact the glass
• Dry all cleaning solution from window gaskets, sealants and frames
• Trap abrasive particles between the cleaning materials and the glass surface
• Clean one small window and check to see if procedures have caused any damage
• Allow splashed materials to dry on the glass surface
9Finishing the Interior on Wood-Ultrex® Product
Finishing the Interior on Wood-Ultrex® ProductIf you have a brand new, bare wood Integrity Wood-Ultrex window or door, you must finish it immediately to prevent possible damage to the wood . Make sure bare wood door interior surface is clean and dry . Remove any handling marks, debris, or effects of exposure to moisture by sanding lightly with fine sandpaper and wiping clean before applying your choice of finish . Integrity uses a rubber-like material between glass panes and wood sash frames to ensure a weather tight seal . Occasionally, an excess of this silicone sealant, called “squeeze out,” appears around the edge of the glass . You can safely scrape off squeeze out with a plastic putty knife without damaging the weather tightness of your unit . It is extremely important that you do not paint locks, hardware, weather strip or jamb liners . Also, use paints, stains and varnishes with care; they contain solvents which, when coming in contact with plastics and vinyl weather strip, cause these materials to lose their flexible qualities .
CAUTION:
Do not apply paint to the Integrity factory pre-finish without first contacting your Integrity dealer for proper instructions .
PaintingWhen painting Wood-Ultrex series interiors, use only a high quality oil base or latex paint . To provide a good adhesion of paint, a compatible prime coat should be applied . Paint with panels open (or removed) and do not close until thoroughly dry . Apply one coat of primer and two coats of top quality paint according to the paint manufacturer’s instructions .
Staining
Prior to staining it may be desirable to apply a wood conditioner to obtain a more even finish . Follow the manufacturer’s recommended instructions .
When painting Wood-Ultrex series interiors, apply stain according to the manufacturer’s instructions . Apply as many coats of stain as necessary to achieve the desired color . After the stain is thoroughly dry, apply at least two coats of sealer (i .e . varnish or polyurethane) .
Ultrex® Care and MaintenanceIntegrity products feature Ultrex®, an advanced glass fiber reinforced material, with a finish coat applied during the fabrication process . This factory applied durable finish allows Integrity’s exterior to withstand extreme temperatures and atmospheric pollutants, while retaining its color and gloss . This translates into a beautiful, low maintenance exterior . Surface dirt can be removed by washing with a mild detergent and rinsing with clear water . Use a soft brush, such as a long-handled car washing brush, to remove any bugs, grime, dirt or dust . Before using more aggressive cleaners on stubborn stains, test the solution on an inconspicuous area before washing . A thorough clear water rinse should follow .
Cleaning UltrexFor regular cleaning and maintenance of Ultrex use a non-abrasive household chemical that are recommended as listed below:
• Fantastik® cleaning detergent
• Lysol®
• Murphy's® Oil Soap
• Ivory® dish soap (1% water)
• Spic and Span®
• Tide® liquid detergent (standard household strength)
• Windex® (standard household strength, 5% isopropyl alcohol content or less)
The above chemicals are not recommended for use with any abrasive materials or applicators, and are only suitable if used by placing the chemical on a non-abrasive applicator and wiping the Ultrex surface in a gentle fashion . Extreme pressure or scrubbing action is not recommended . In addition, the above materials may leave a residue on the Ultrex surface following their use .
As recommended previously, a mild detergent solution (water-based) is recommended for cleaning by applying the solution to a soft cloth and wiping the Ultrex surface .
No solvents, paint thinner or other chemicals of any type are recommended for use with Ultrex, as they may affect the integrity, functionality and appearance of the coating .
10 Ultrex® Care and Maintenance
Repairing Ultrex
You will need to supply:
• Utility knife • Quality exterior grade primer
• Putty knife • 120 - 150 Grit sandpaper
• Epoxy putty • 320 - 400 Grit sandpaper
NOTE: Consult your Integrity representative for information on locally available epoxy putty.
1 . Using a utility knife carefully cut around the damaged Ultrex area to remove any jagged edges or loose fibers .
2 . Follow manufacturer’s instructions for mixing/blending of epoxy . Fill the damaged area thoroughly by pressing epoxy in with a putty knife and remove excess .
3 . Once the epoxy has set and cured, sand the repaired area with 120 - 150 grit sandpaper until the desired profile/depth has been achieved . Finish sanding with 320 - 400 grit sandpaper .
4 . Lightly sand the surrounding area to remove the factory finish with 320 - 400 grit sandpaper . Coat the repaired and surrounding area with a quality primer per epoxy manufacturer’s instructions . When primer has dried and cured cover with a quality exterior grade acrylic latex coating (See Painting Ultrex)
Painting Ultrex
You will need to supply:
• Foam paint brush • Quality exterior grade acrylic latex paint
• Masking tape
• 320 - 400 Grit sandpaper
Spot test a small area using the following procedures . After the seven to ten day Acrylic latex paint cure time check to see if the paint has adhered to the unit . If the paint has not adhered to the surface, recheck the surface preparation procedures .
1 . Thoroughly sand the factory finish with 320 - 400 grit sandpaper .
2 . Wash the surface with water and detergent to remove contaminants, rinse with clear water and dry thoroughly .
3 . Mask any window components that will not be painted .
4 . Coat the Ultrex with a quality exterior grade acrylic latex paint .
5 . Acrylic latex products gain full adhesion after seven to ten days cure .
NOTE: If the finish is scratched, peeled or otherwise compromised down to the Ultrex substrate see "Repairing Ultrex" section.
11Screens Cleaning and Safety
Screens Cleaning and SafetyThe most effective method of cleaning the screens on your windows and doors is to remove the screens, lay them on a flat clean area (such as a sidewalk), and spray off any dust or debris with water from your garden hose . Allow the screens to completely air dry before replacing in the window or door . If you live in a cold climate, it is recommended that in the winter you remove the screen from your doors . The mesh may collect snow and ice, causing it to sag . Please see individual sections for instructions on screen removal . Contact your Integrity retailer if you require assistance with screen replacement .
NOTE: Certain size screens have a factory bow in the frame; this is to ensure a snug fit and is NOT a defect.
CAUTION:
Integrity screens are designed to stand up to everyday use . However, these screens were not intended to act as a safety device . Do not allow children to sit or play on window sills, or to push or fall against window screens, as this could result in a fall through the window or door opening .
Every screen installed on an Integrity product has a non removable label affixed to it that states:
WARNING:
Screen will not stop child from falling out window . Keep child away from open window .
Maintenance, Operation and General ServiceIn the following pages you’ll find maintenance information on individual Integrity products . Refer to the product illustrations for the names of your particular windows or doors .
Information in this section includes maintenance tips and operational tips, such as removing the window sash . Read completely through the instructions before beginning to work on your windows to make sure you have any necessary tools and parts .
Exterior finishes on doors can be cared for in the same manner as Integrity windows . See interior and exterior maintenance information . Take care with your door’s sill - make sure you prevent damage by not getting any paint, solvent or chemicals on sills . See individual door sections for any specialized sill care .
If you are having problems not explained in this manual, or if the solution seems inappropriate for your problem, contact your local Integrity retailer .
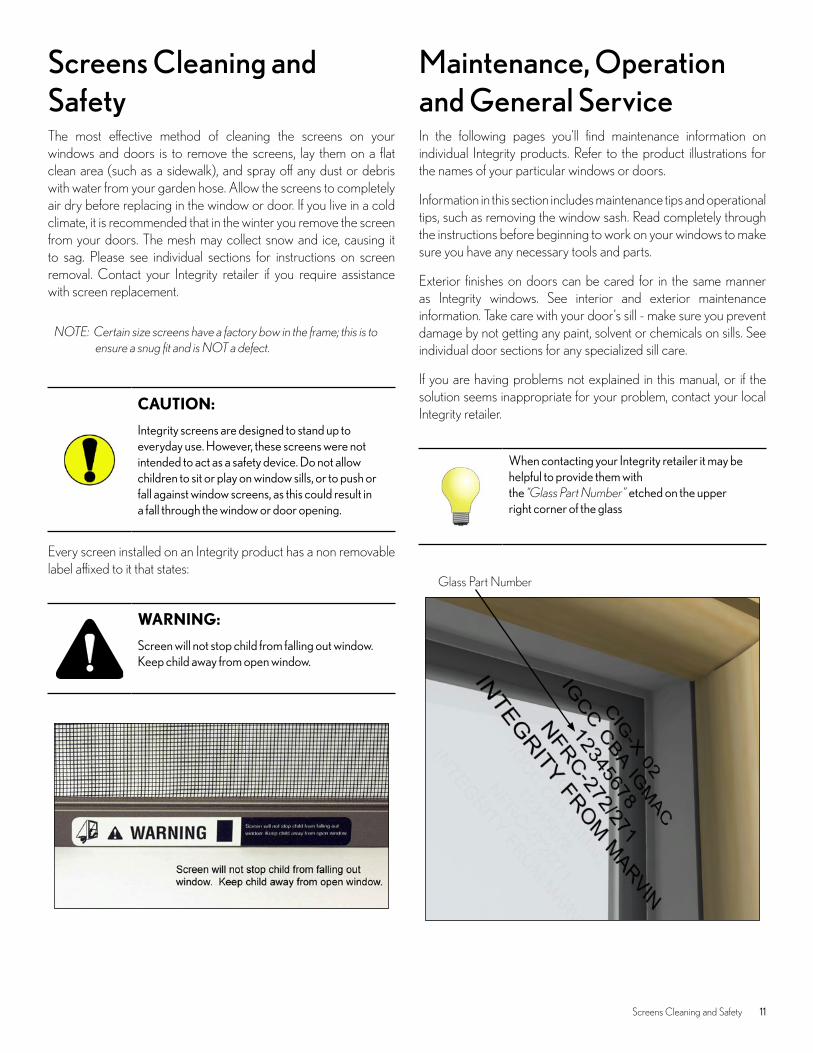
When contacting your Integrity retailer it may be helpful to provide them with the “Glass Part Number” etched on the upper right corner of the glass
Glass Part Number
12 Maintenance, Operation and General Service
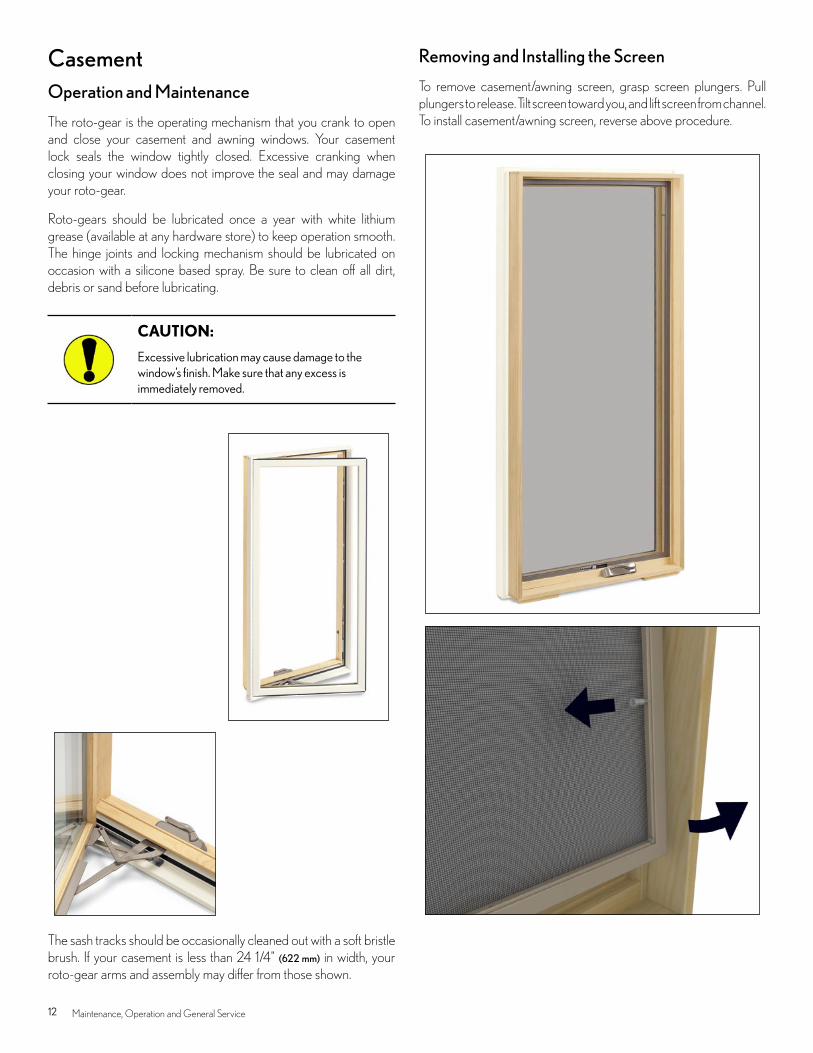
CasementOperation and Maintenance
The roto-gear is the operating mechanism that you crank to open and close your casement and awning windows . Your casement lock seals the window tightly closed . Excessive cranking when closing your window does not improve the seal and may damage your roto-gear .
Roto-gears should be lubricated once a year with white lithium grease (available at any hardware store) to keep operation smooth . The hinge joints and locking mechanism should be lubricated on occasion with a silicone based spray . Be sure to clean off all dirt, debris or sand before lubricating .
CAUTION:
Excessive lubrication may cause damage to the window’s finish . Make sure that any excess is immediately removed .
The sash tracks should be occasionally cleaned out with a soft bristle brush . If your casement is less than 24 1/4" (622 mm) in width, your roto-gear arms and assembly may differ from those shown .
Removing and Installing the Screen
To remove casement/awning screen, grasp screen plungers . Pull plungers to release . Tilt screen toward you, and lift screen from channel . To install casement/awning screen, reverse above procedure .
13Maintenance, Operation and General Service
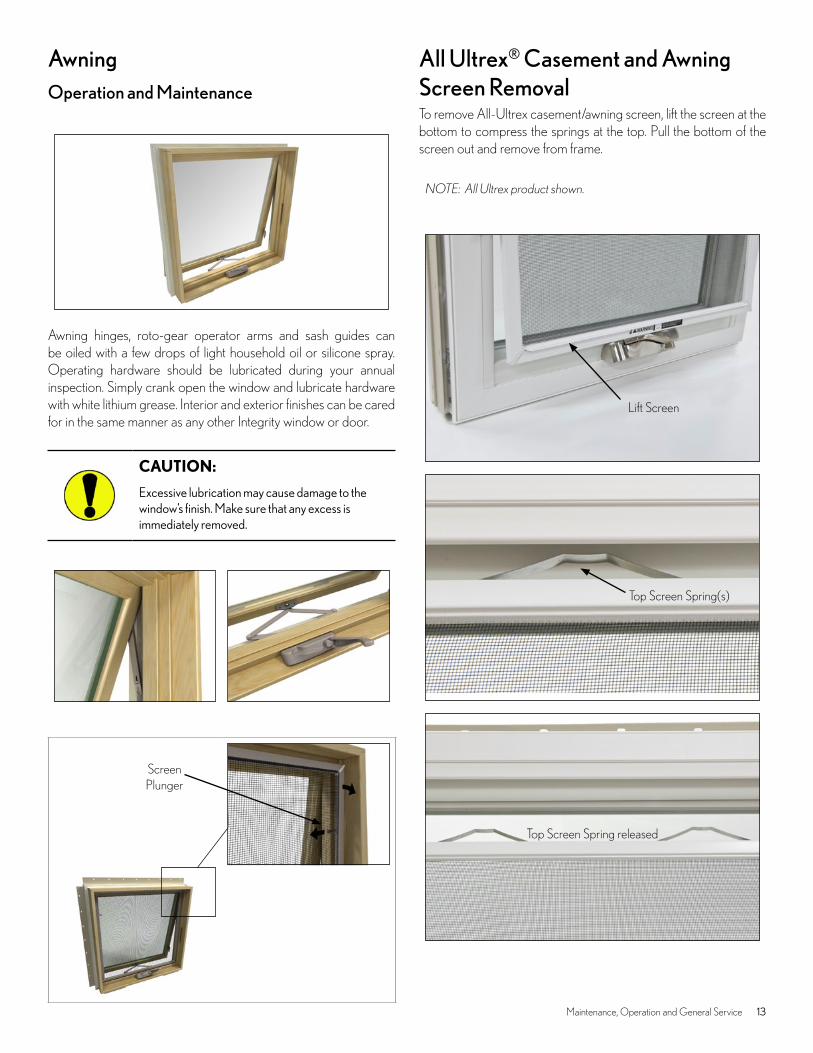
AwningOperation and Maintenance
Awning hinges, roto-gear operator arms and sash guides can be oiled with a few drops of light household oil or silicone spray . Operating hardware should be lubricated during your annual inspection . Simply crank open the window and lubricate hardware with white lithium grease . Interior and exterior finishes can be cared for in the same manner as any other Integrity window or door .
CAUTION:
Excessive lubrication may cause damage to the window’s finish . Make sure that any excess is immediately removed .
All Ultrex® Casement and Awning Screen RemovalTo remove All-Ultrex casement/awning screen, lift the screen at the bottom to compress the springs at the top . Pull the bottom of the screen out and remove from frame .
NOTE: All Ultrex product shown.
Lift Screen
Top Screen Spring(s)
Top Screen Spring released
Screen Plunger
14 Maintenance, Operation and General Service
Double HungOperation and Maintenance
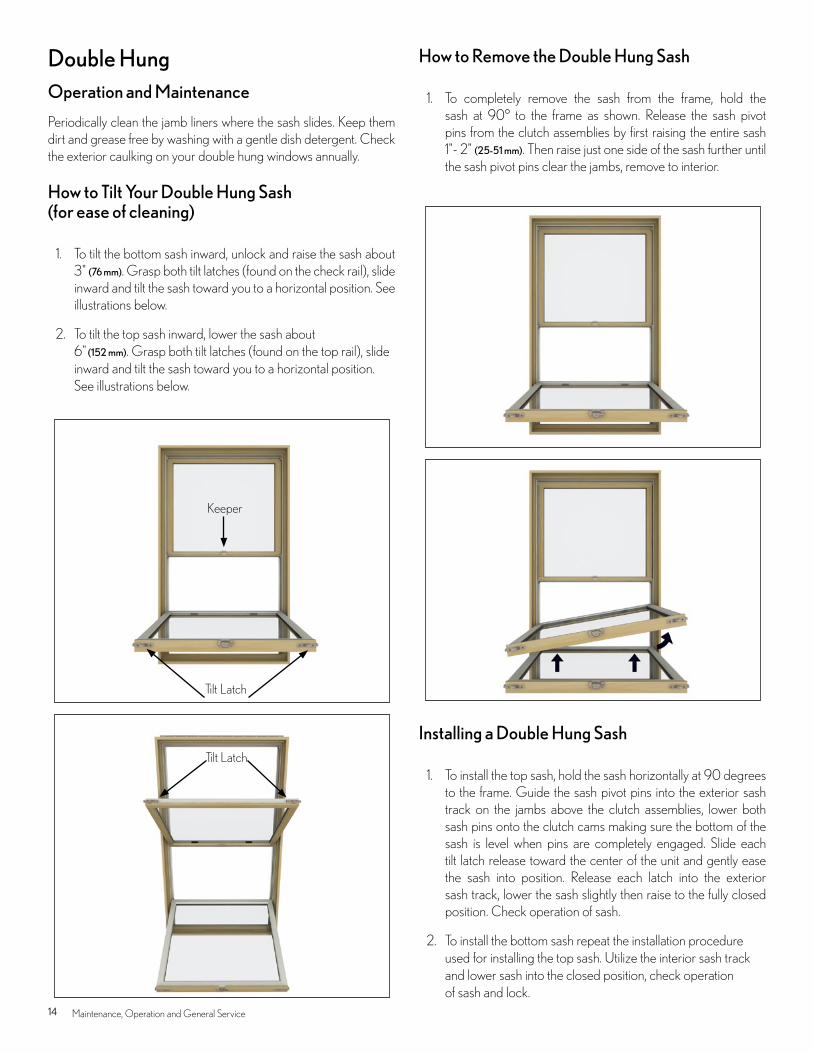
Periodically clean the jamb liners where the sash slides . Keep them dirt and grease free by washing with a gentle dish detergent . Check the exterior caulking on your double hung windows annually .
How to Tilt Your Double Hung Sash (for ease of cleaning)
1 . To tilt the bottom sash inward, unlock and raise the sash about 3" (76 mm) . Grasp both tilt latches (found on the check rail), slide inward and tilt the sash toward you to a horizontal position . See illustrations below .
2 . To tilt the top sash inward, lower the sash about 6" (152 mm) . Grasp both tilt latches (found on the top rail), slide inward and tilt the sash toward you to a horizontal position . See illustrations below .
How to Remove the Double Hung Sash
1 . To completely remove the sash from the frame, hold the sash at 90° to the frame as shown . Release the sash pivot pins from the clutch assemblies by first raising the entire sash 1"- 2" (25-51 mm) . Then raise just one side of the sash further until the sash pivot pins clear the jambs, remove to interior .
Installing a Double Hung Sash
1 . To install the top sash, hold the sash horizontally at 90 degrees to the frame . Guide the sash pivot pins into the exterior sash track on the jambs above the clutch assemblies, lower both sash pins onto the clutch cams making sure the bottom of the sash is level when pins are completely engaged . Slide each tilt latch release toward the center of the unit and gently ease the sash into position . Release each latch into the exterior sash track, lower the sash slightly then raise to the fully closed position . Check operation of sash .
2 . To install the bottom sash repeat the installation procedure used for installing the top sash . Utilize the interior sash track and lower sash into the closed position, check operation of sash and lock .
Tilt Latch
Tilt Latch
Keeper
15Maintenance, Operation and General Service
Removing the Double Hung Screen
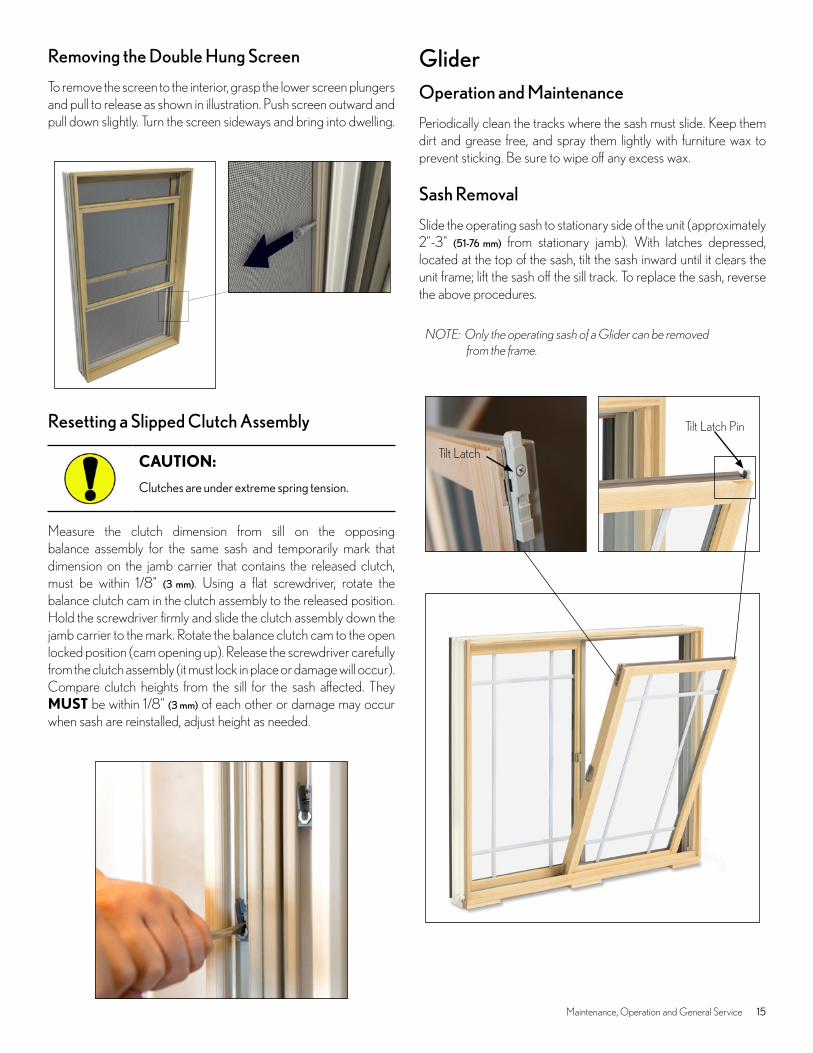
To remove the screen to the interior, grasp the lower screen plungers and pull to release as shown in illustration . Push screen outward and pull down slightly . Turn the screen sideways and bring into dwelling .
Resetting a Slipped Clutch Assembly
CAUTION:
Clutches are under extreme spring tension .
Measure the clutch dimension from sill on the opposing balance assembly for the same sash and temporarily mark that dimension on the jamb carrier that contains the released clutch, must be within 1/8" (3 mm) . Using a flat screwdriver, rotate the balance clutch cam in the clutch assembly to the released position . Hold the screwdriver firmly and slide the clutch assembly down the jamb carrier to the mark . Rotate the balance clutch cam to the open locked position (cam opening up) . Release the screwdriver carefully from the clutch assembly (it must lock in place or damage will occur) . Compare clutch heights from the sill for the sash affected . They MUST be within 1/8" (3 mm) of each other or damage may occur when sash are reinstalled, adjust height as needed .
GliderOperation and Maintenance
Periodically clean the tracks where the sash must slide . Keep them dirt and grease free, and spray them lightly with furniture wax to prevent sticking . Be sure to wipe off any excess wax .
Sash Removal
Slide the operating sash to stationary side of the unit (approximately 2"-3" (51-76 mm) from stationary jamb) . With latches depressed, located at the top of the sash, tilt the sash inward until it clears the unit frame; lift the sash off the sill track . To replace the sash, reverse the above procedures .
NOTE: Only the operating sash of a Glider can be removed from the frame.
Tilt Latch Pin
Tilt Latch
16 Maintenance, Operation and General Service
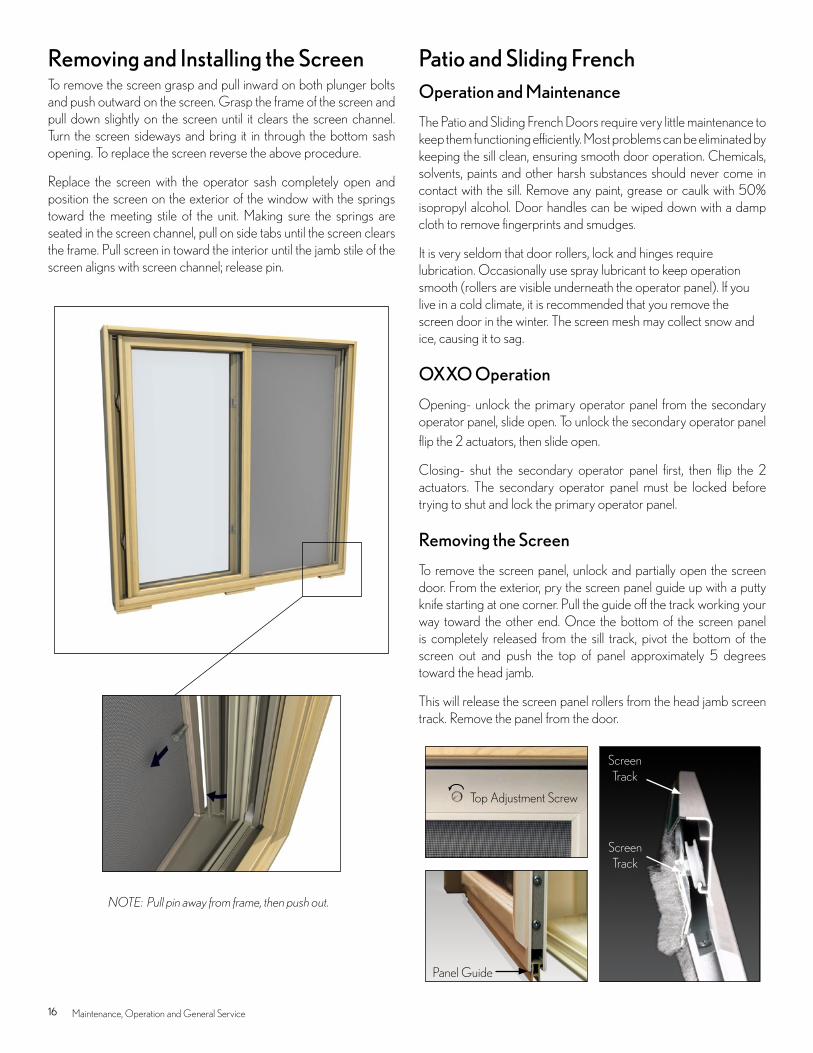
Removing and Installing the ScreenTo remove the screen grasp and pull inward on both plunger bolts and push outward on the screen . Grasp the frame of the screen and pull down slightly on the screen until it clears the screen channel . Turn the screen sideways and bring it in through the bottom sash opening . To replace the screen reverse the above procedure .
Replace the screen with the operator sash completely open and position the screen on the exterior of the window with the springs toward the meeting stile of the unit . Making sure the springs are seated in the screen channel, pull on side tabs until the screen clears the frame . Pull screen in toward the interior until the jamb stile of the screen aligns with screen channel; release pin .
NOTE: Pull pin away from frame, then push out.
Patio and Sliding FrenchOperation and Maintenance
The Patio and Sliding French Doors require very little maintenance to keep them functioning efficiently . Most problems can be eliminated by keeping the sill clean, ensuring smooth door operation . Chemicals, solvents, paints and other harsh substances should never come in contact with the sill . Remove any paint, grease or caulk with 50% isopropyl alcohol . Door handles can be wiped down with a damp cloth to remove fingerprints and smudges .
It is very seldom that door rollers, lock and hinges require lubrication . Occasionally use spray lubricant to keep operation smooth (rollers are visible underneath the operator panel) . If you live in a cold climate, it is recommended that you remove the screen door in the winter . The screen mesh may collect snow and ice, causing it to sag .
OXXO Operation
Opening- unlock the primary operator panel from the secondary operator panel, slide open . To unlock the secondary operator panel flip the 2 actuators, then slide open .
Closing- shut the secondary operator panel first, then flip the 2 actuators . The secondary operator panel must be locked before trying to shut and lock the primary operator panel .
Removing the Screen
To remove the screen panel, unlock and partially open the screen door . From the exterior, pry the screen panel guide up with a putty knife starting at one corner . Pull the guide off the track working your way toward the other end . Once the bottom of the screen panel is completely released from the sill track, pivot the bottom of the screen out and push the top of panel approximately 5 degrees toward the head jamb .
This will release the screen panel rollers from the head jamb screen track . Remove the panel from the door .
Screen Track
Screen Track
Panel Guide
Top Adjustment Screw
17Maintenance, Operation and General Service
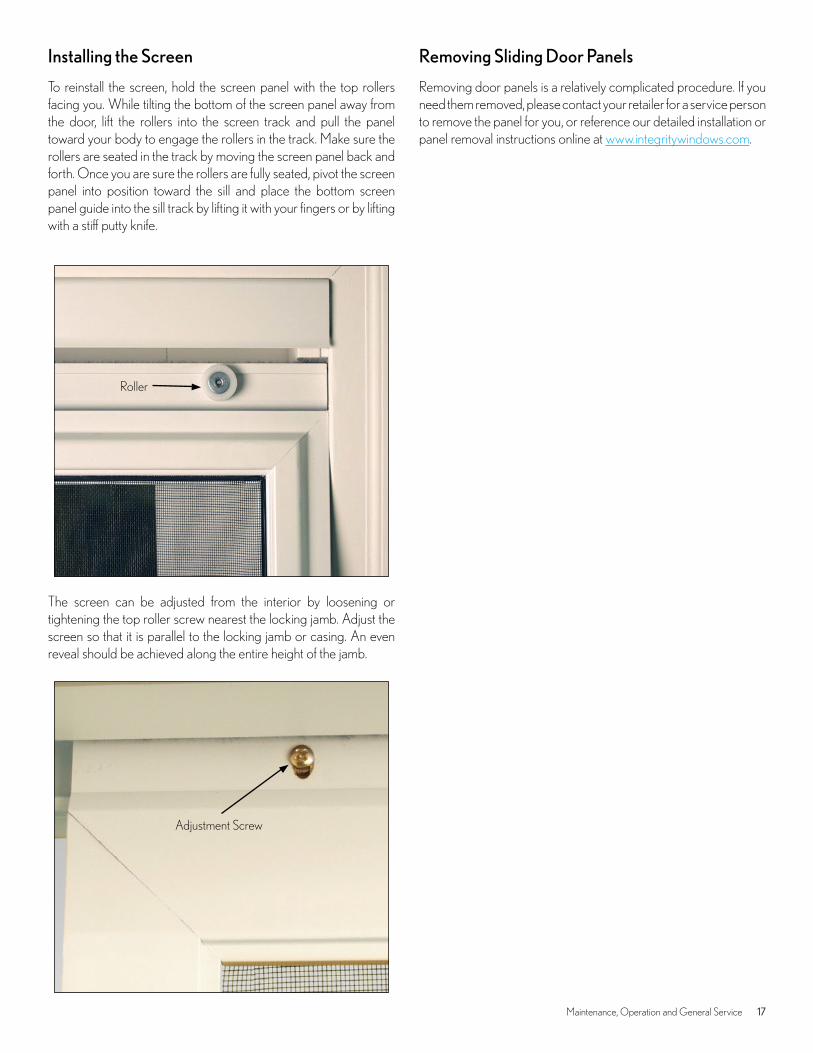
Installing the Screen
To reinstall the screen, hold the screen panel with the top rollers facing you . While tilting the bottom of the screen panel away from the door, lift the rollers into the screen track and pull the panel toward your body to engage the rollers in the track . Make sure the rollers are seated in the track by moving the screen panel back and forth . Once you are sure the rollers are fully seated, pivot the screen panel into position toward the sill and place the bottom screen panel guide into the sill track by lifting it with your fingers or by lifting with a stiff putty knife .
The screen can be adjusted from the interior by loosening or tightening the top roller screw nearest the locking jamb . Adjust the screen so that it is parallel to the locking jamb or casing . An even reveal should be achieved along the entire height of the jamb .
Removing Sliding Door Panels
Removing door panels is a relatively complicated procedure . If you need them removed, please contact your retailer for a service person to remove the panel for you, or reference our detailed installation or panel removal instructions online at www .integritywindows .com .
Roller
Adjustment Screw
18 Maintenance, Operation and General Service
Swinging French DoorOperation and Maintenance
Your French door requires very little maintenance . To maintain sill appearance, wash with a mild soap and water solution .
Remove fresh paint splashes, grease or caulk with 50% isopropyl alcohol . You may wish to remove door panels for moving or other reasons . If you need them removed, please contact your Integrity retailer for either detailed instructions or for a service person to remove the panel for you .
Keep the sill weep area clear of debris and sealants .
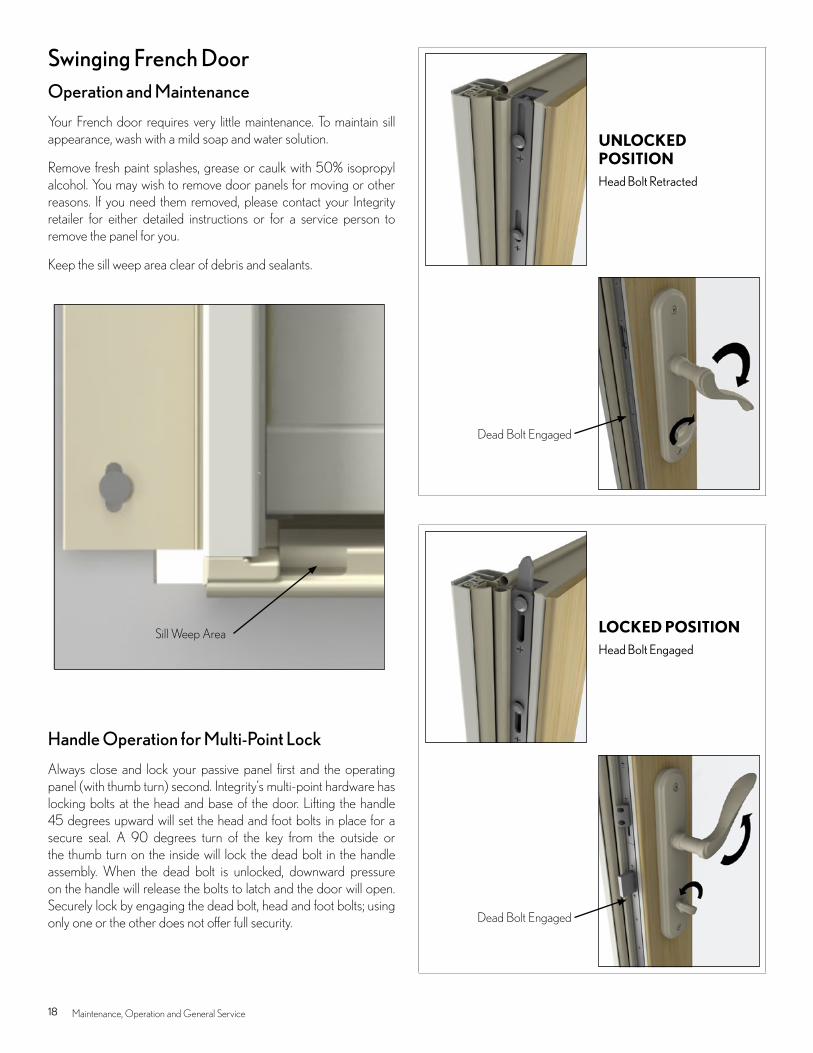
Handle Operation for Multi-Point Lock
Always close and lock your passive panel first and the operating panel (with thumb turn) second . Integrity’s multi-point hardware has locking bolts at the head and base of the door . Lifting the handle 45 degrees upward will set the head and foot bolts in place for a secure seal . A 90 degrees turn of the key from the outside or the thumb turn on the inside will lock the dead bolt in the handle assembly . When the dead bolt is unlocked, downward pressure on the handle will release the bolts to latch and the door will open . Securely lock by engaging the dead bolt, head and foot bolts; using only one or the other does not offer full security .
UNLOCKED POSITIONHead Bolt Retracted
LOCKED POSITIONHead Bolt Engaged
Dead Bolt Engaged
Dead Bolt Engaged
Sill Weep Area
19Maintenance, Operation and General Service
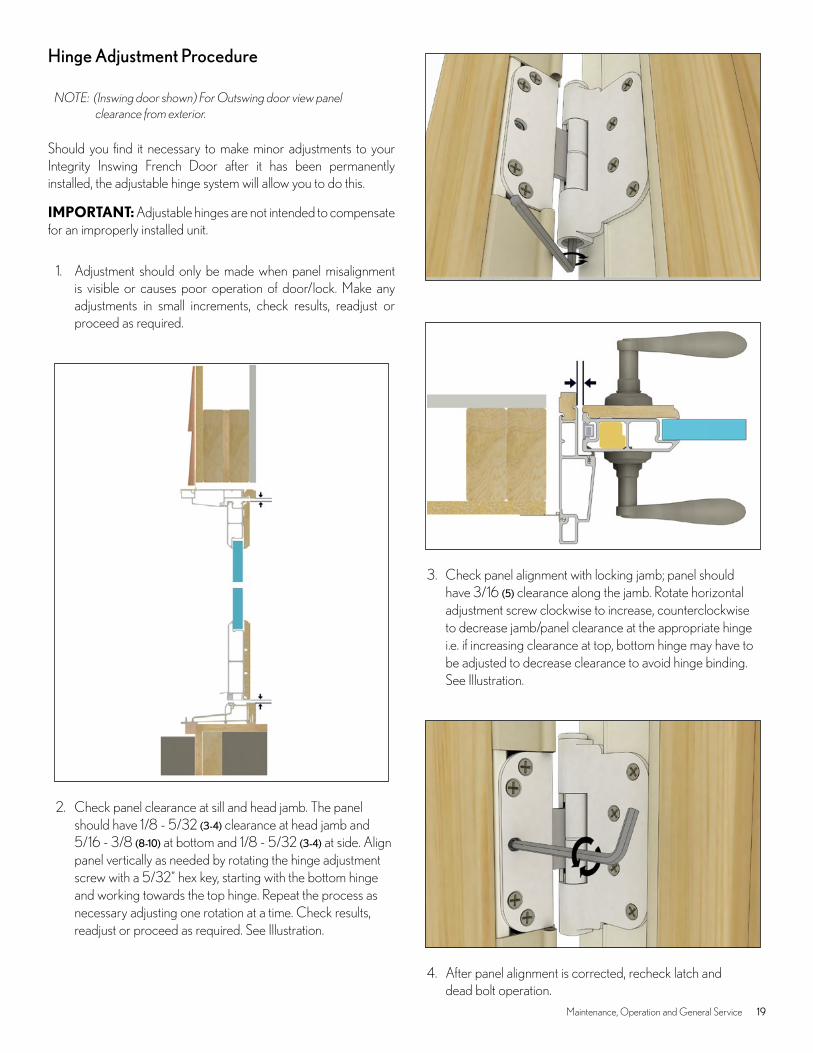
Hinge Adjustment Procedure
NOTE: (Inswing door shown) For Outswing door view panel clearance from exterior.
Should you find it necessary to make minor adjustments to your Integrity Inswing French Door after it has been permanently installed, the adjustable hinge system will allow you to do this .
IMPORTANT: Adjustable hinges are not intended to compensate for an improperly installed unit .
1 . Adjustment should only be made when panel misalignment is visible or causes poor operation of door/lock . Make any adjustments in small increments, check results, readjust or proceed as required .
2 . Check panel clearance at sill and head jamb . The panel should have 1/8 - 5/32 (3-4) clearance at head jamb and 5/16 - 3/8 (8-10) at bottom and 1/8 - 5/32 (3-4) at side . Align panel vertically as needed by rotating the hinge adjustment screw with a 5/32" hex key, starting with the bottom hinge and working towards the top hinge . Repeat the process as necessary adjusting one rotation at a time . Check results, readjust or proceed as required . See Illustration .
3 . Check panel alignment with locking jamb; panel should have 3/16 (5) clearance along the jamb . Rotate horizontal adjustment screw clockwise to increase, counterclockwise to decrease jamb/panel clearance at the appropriate hinge i .e . if increasing clearance at top, bottom hinge may have to be adjusted to decrease clearance to avoid hinge binding . See Illustration .
4 . After panel alignment is corrected, recheck latch and dead bolt operation .
20 Care of PVD Finishes
Inswing Door
Screen Removal
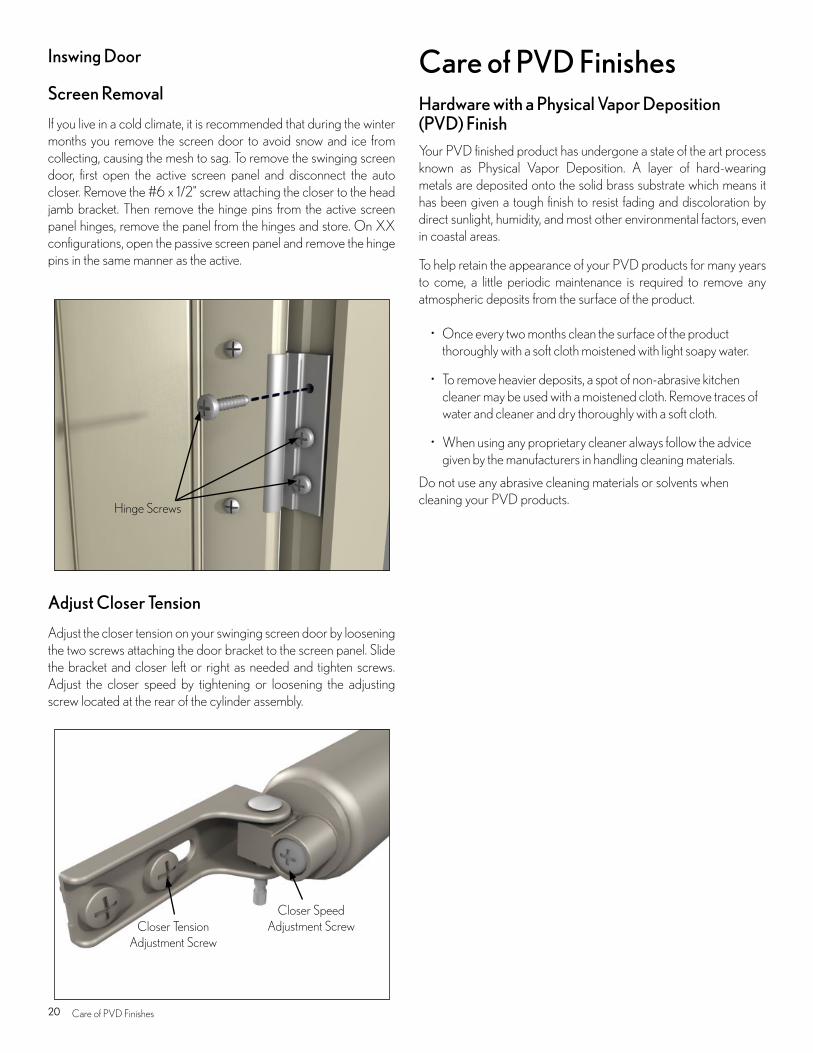
If you live in a cold climate, it is recommended that during the winter months you remove the screen door to avoid snow and ice from collecting, causing the mesh to sag . To remove the swinging screen door, first open the active screen panel and disconnect the auto closer . Remove the #6 x 1/2" screw attaching the closer to the head jamb bracket . Then remove the hinge pins from the active screen panel hinges, remove the panel from the hinges and store . On XX configurations, open the passive screen panel and remove the hinge pins in the same manner as the active .
Adjust Closer Tension
Adjust the closer tension on your swinging screen door by loosening the two screws attaching the door bracket to the screen panel . Slide the bracket and closer left or right as needed and tighten screws . Adjust the closer speed by tightening or loosening the adjusting screw located at the rear of the cylinder assembly .
Care of PVD FinishesHardware with a Physical Vapor Deposition (PVD) FinishYour PVD finished product has undergone a state of the art process known as Physical Vapor Deposition . A layer of hard-wearing metals are deposited onto the solid brass substrate which means it has been given a tough finish to resist fading and discoloration by direct sunlight, humidity, and most other environmental factors, even in coastal areas .
To help retain the appearance of your PVD products for many years to come, a little periodic maintenance is required to remove any atmospheric deposits from the surface of the product .
• Once every two months clean the surface of the product thoroughly with a soft cloth moistened with light soapy water .
• To remove heavier deposits, a spot of non-abrasive kitchen cleaner may be used with a moistened cloth . Remove traces of water and cleaner and dry thoroughly with a soft cloth .
• When using any proprietary cleaner always follow the advice given by the manufacturers in handling cleaning materials .
Do not use any abrasive cleaning materials or solvents when cleaning your PVD products .
Hinge Screws
Closer Speed Adjustment ScrewCloser Tension
Adjustment Screw

INTEGRITYWINDOWS.COM
Call 1-888-419-0076 for the Integrity dealer nearest you, or visit integritywindows.com
©2017 Marvin® Windows and Doors. All rights reserved. ®Registered trademark of Marvin Windows and Doors. ENERGY STAR® and the ENERGY STAR mark are registered U.S. marks. November 2017.PART #19970255.