intel do-it-yourself challenge lab 2: intel galileo’s … · 2014-11-22 · intel do-it-yourself...
TRANSCRIPT

Intel Do-It-Yourself Challenge
Lab 2: Intel Galileo’s Linux side
Nicolas Vaillietwww.Intel-Software-Academic-Program.com
Intel Software
2014-02-01

Prerequisites and objectives
We assume that:
- You are able to download an archive, to unzipped it and run a program under the OS you’re familiar to.
- You are able to read pieces of code and comments written in a C-like language.
Our objective are:
- Given a laptop, a Galileo board, its power supply, a micro SD card we provide, and a Wi-Fi adaptor, you’ll be able to plug all these tools together, and to connect to the board over the network to browse its file system.
- Given the previously stated tools, and demo binaries, you’re able to compile/run programs in Bash, C, C++, Node.js, Java and Python.
In general,
Our goal is to point out that Galileo Arduino support is implemented under Linux. It also explains how to use bash interpreter to perform the same actions than with an Arduino sketch.

Before you start

What do you need?
Desktop OS
We assume you’re under Microsoft Windows.Linux and Mac users should not have any problem to do the same.
Hardware
- An Intel Galileo Development Board.
- The box comes with power supply and cable.
- A Wi-Fi adaptor (N-2200 Mini-PCIe)
- A micro SD card (8GB with the full Linux image we provide)
Software
A SSH client like Putty for Windows. Mac and Linux users only need a terminal.
http://www.chiark.greenend.org.uk/~sgtatham/putty/download.html
If needed, we posted demos and Linux images on our website
http://www.intel-software-academic-program.com/pages/courses
Galileo’s Linux side

Galileo’s operating systems
By default, a simple firmware
It runs a sketch uploaded by the Arduino IDE. But you can add a microSD card with a customedLinus distribution.
A tiny Linux image
Available on Intel Galileo drivers webpage (DOC-22226 on Intel Communities). It contains all common tools from the embedded world. Compiled with uclibc.
A Linux Standard Base (LSB) image with debug tools
We created a full image with Yocto to run other x86 applications. Compiled with eglibc, it can run C++ program with libraries like OpenCV, compiled for Intel Quark (i586).
A Debian distribution
It’s possible to have a Debian distribution (i386) which is almost compatible with Pentium-4-like Quark’s set of instructions (i586).
Windows 8.1 kernel running on Galileo???
Yes, Microsoft did it! It works and it’s free!
Let’s try the LSB image with debug tools!

Plug – Boot – Connect
Preparing the board
- Insert the micro SD card into the board’s slot
- Insert the Wi-Fi adaptor into the mPCI-e slot
- Power on the board
- Wait a minute
On your computer
- Connect to “intel” Wi-Fi network
- Run putty.exe
- Host name is : [email protected]
- Click on Open
- You’re connected to your board
- Linux and Mac users run “ssh [email protected]” in their terminal.
NB: Your board’s IP address is on your Wi-Fi adaptor.
NB: Please connect to “intel” or “intel2” networks. Balance traffic between both.
Extra: WinSCP tutorial

WinSCP
Specifying connection information
- Start WinSCP
- Click on New Site
- Select SCP as file protocol
- Host name is your IP address
- Port Number is 22
- User name is root
- No password
- Click on Save and then OK
Login and security confirmation
- Click on Login
- Click on Yes to accept the host key
Your are now connected to the board. You are able to browse its file system.

WinSCP
Your computer file system Galileo board file system
Drag and drop files!
Transmitting files from/to the Galileo board Linux file system

WinSCP
Some tips
- After a ‘drag and drop’, click on OK and the file will be
transferred!
- It also works in the other way, from the board to your
computer!
- You can also perform actions like deletion and moving
files.
- If you try to open a file from Galileo, it will open a text
editor on your computer and send it back to the board
each time you modify and save it.

Linux and Mac Users
SCP command for files
To transfer files, simply use ‘scp’ command.
# scp file.txt [email protected]:~
SCP command for files and directories
Add –r to copy recursively (ie. copies directories)
# scp –r folder [email protected]:~
Moving and deleting files
You can perform other actions after connecting with sshcommand.

Going back to Galileo’s Linux side

Configuration
Setting system date and time up
(replace with the current date)
# date –s “01 APR 2014 12:00:00”
(needed to avoid compiling warnings and SSL certificates).
Installing a “more user-friendly” text editor
VI is available by default. But Nano is maybe easier to use…
No Emacs, sorry
# cd ~/tools/nano-2.2.6
# ./configure
# make install
(NB: Don’t run make, we have already done it!)
We compiled Nano sources before.
Nano is now available by running ‘nano’ in a terminal.

30 Galileo boards and up to 60 laptops on the same Wi-Fi access point?
Your Galileo will connect to “intel” Wi-Fi hotspot by default.
Half of you should connect to “intel2”, doing the following:
Finding your access point
#connmanctl
#connmanctl>scan wifi
#connmanctl>services
Copy wifi_9c4e3602d7d8_696e74656c32_managed_psk
#connmanctl>exit
Adding intel2 configuration
#nano /var/lib/connman/wifi.conf
Copy and paste the existing configuration to the end of the file.
Change service and name.
It should look like this:
//previous config +
Connect to intel2 wifi hotspot (1/2)

Adding intel2 configuration
[service_wifi_9c4e3602d7d8_696e74656c32_managed_psk]
Type = wifi
Security = wpa
Name = intel2
Passphrase = hackathon
Restart connman to load the new configuration and connect to intel2
#/etc/init.d connman restart (wait for auto reconnect)
#connmanctl
#connmanctl>connect wifi_9c4e3602d7d8_696e74656c32_managed_psk
#connmanctl>exit
You’re now connected on « intel2 », Thank you
Connect to intel2 wifi hotspot (2/2)

Compiling/Running Hello World
Try to execute some Hello World programs
Look at ~/labs/helloall files
Hello World programs are here to tell you which languages are available on this Linux distribution. Adding other language is possible. However, you need to compile compilers and tools to i586.
C and C++,
# gcc hello.c –o hello
# ./hello
(G++ and GDB are also available.)
Bash
# ./hello.sh
Node.JS 0.8.18
# node hello.js
Python 2.7.3
# python hello.py
Java SE 1.7 for embedded
# java Hello
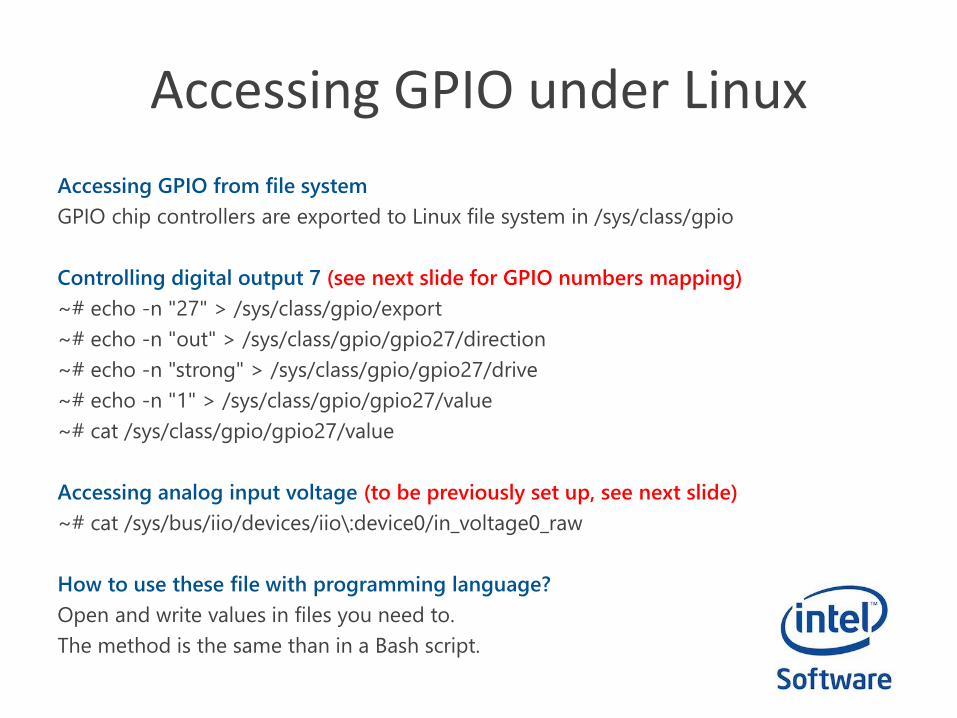
Accessing GPIO under Linux
Accessing GPIO from file system
GPIO chip controllers are exported to Linux file system in /sys/class/gpio
Controlling digital output 7 (see next slide for GPIO numbers mapping)
~# echo -n "27" > /sys/class/gpio/export
~# echo -n "out" > /sys/class/gpio/gpio27/direction
~# echo -n "strong" > /sys/class/gpio/gpio27/drive
~# echo -n "1" > /sys/class/gpio/gpio27/value
~# cat /sys/class/gpio/gpio27/value
Accessing analog input voltage (to be previously set up, see next slide)
~# cat /sys/bus/iio/devices/iio\:device0/in_voltage0_raw
How to use these file with programming language?
Open and write values in files you need to.
The method is the same than in a Bash script.
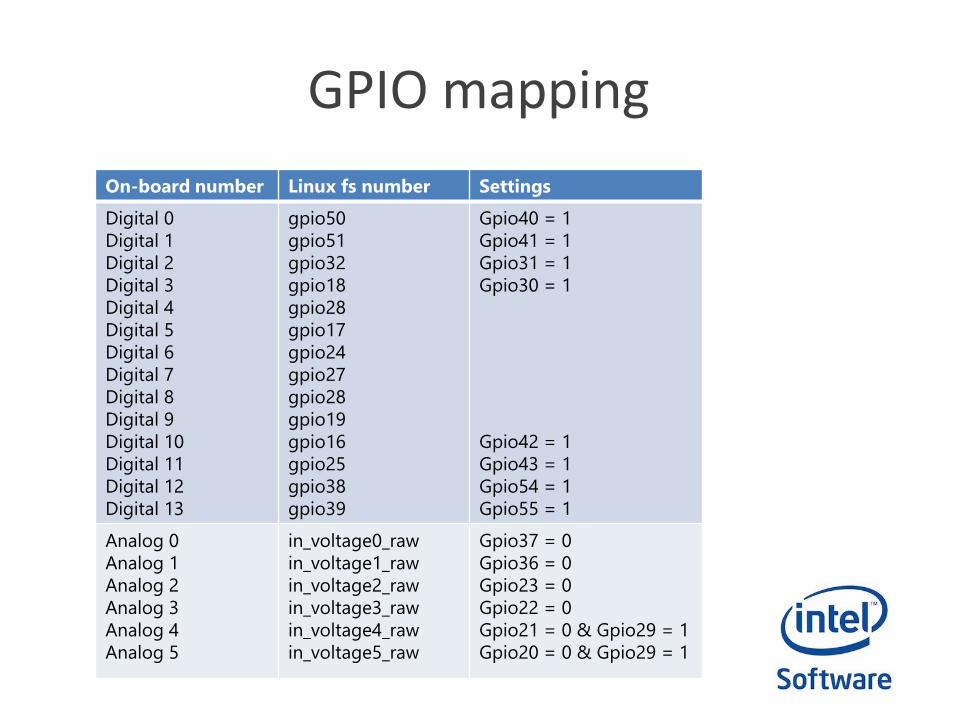
GPIO mapping
On-board number Linux fs number Settings
Digital 0
Digital 1
Digital 2
Digital 3
Digital 4
Digital 5
Digital 6
Digital 7
Digital 8
Digital 9
Digital 10
Digital 11
Digital 12
Digital 13
gpio50
gpio51
gpio32
gpio18
gpio28
gpio17
gpio24
gpio27
gpio28
gpio19
gpio16
gpio25
gpio38
gpio39
Gpio40 = 1
Gpio41 = 1
Gpio31 = 1
Gpio30 = 1
Gpio42 = 1
Gpio43 = 1
Gpio54 = 1
Gpio55 = 1
Analog 0
Analog 1
Analog 2
Analog 3
Analog 4
Analog 5
in_voltage0_raw
in_voltage1_raw
in_voltage2_raw
in_voltage3_raw
in_voltage4_raw
in_voltage5_raw
Gpio37 = 0
Gpio36 = 0
Gpio23 = 0
Gpio22 = 0
Gpio21 = 0 & Gpio29 = 1
Gpio20 = 0 & Gpio29 = 1
A simple demo with LED and sensor
We will show you that Arduino is a C program by using itslibrary, in a short demo. The same demo is implemented in bash, C, and node.js.
Web LED controller demo
Thanks to Node.JS, controlling Galileo from a web interface is easy!
Controlling servo motors
USB ports on Galileo are useful.
Let’s control servo motor!
Next steps


License Creative Commons – By 3.0
You are free:• to Share — to copy, distribute and transmit the work • to Remix — to adapt the work • to make commercial use of the work Under the following conditions:• Attribution — You must attribute the work in the manner specified by the author or licensor (but
not in any way that suggests that they endorse you or your use of the work).With the understanding that: • Waiver — Any of the above conditions can be waived if you get permission from the copyright
holder. • Public Domain — Where the work or any of its elements is in the public domain under applicable
law, that status is in no way affected by the license. • Other Rights — In no way are any of the following rights affected by the license:
– Your fair dealing or fair use rights, or other applicable copyright exceptions and limitations; – The author's moral rights; – Rights other persons may have either in the work itself or in how the work is used, such as publicity or
privacy rights.
• Notice — For any reuse or distribution, you must make clear to others the license terms of this work. The best way to do this is with a link to this web page.
http://creativecommons.org/licenses/by/3.0/