interior trim location index - ohio weather, home … · 2007 accessories & body, cab interior...
TRANSCRIPT

2007 ACCESSORIES & BODY, CAB
Interior Trim - MX-5 Miata
INTERIOR TRIM LOCATION INDEX
Fig. 1: Identifying Location Of Interior Trim Components (1 Of 3) Courtesy of MAZDA MOTORS CORP.
2007 Mazda MX-5 Miata Sport
2007 ACCESSORIES & BODY, CAB Interior Trim - MX-5 Miata
2007 Mazda MX-5 Miata Sport
2007 ACCESSORIES & BODY, CAB Interior Trim - MX-5 Miata
Microsoft
Thursday, July 09, 2009 3:29:26 PM Page 1 © 2005 Mitchell Repair Information Company, LLC.
Microsoft
Thursday, July 09, 2009 3:29:31 PM Page 1 © 2005 Mitchell Repair Information Company, LLC.

Fig. 2: Identifying Location Of Interior Trim Components (2 Of 3) Courtesy of MAZDA MOTORS CORP.
Fig. 3: Identifying Location Of Interior Trim Components (3 Of 3) Courtesy of MAZDA MOTORS CORP.
2007 Mazda MX-5 Miata Sport
2007 ACCESSORIES & BODY, CAB Interior Trim - MX-5 Miata
Microsoft
Thursday, July 09, 2009 3:29:26 PM Page 2 © 2005 Mitchell Repair Information Company, LLC.

DETACHABLE HARDTOP
Fig. 4: Identifying Location Of Detachable Hardtop Components Courtesy of MAZDA MOTORS CORP.
DASHBOARD REMOVAL/INSTALLATION
1. Remove the battery cover.
2. Disconnect the negative battery cable. (See BATTERY REMOVAL/INSTALLATION [LF] .)
3. Remove the following parts:
1. Console (See CONSOLE REMOVAL/INSTALLATION .)
2. Glove compartment (See GLOVE COMPARTMENT REMOVAL/INSTALLATION .)
3. Side wall (See SIDE WALL REMOVAL/INSTALLATION .)
4. Console panel (See CONSOLE PANEL REMOVAL/INSTALLATION .)
5. Center panel unit (See CENTER PANEL UNIT REMOVAL/INSTALLATION .)
6. Lower panel (See LOWER PANEL REMOVAL/INSTALLATION .)
7. Knee bolster (See KNEE BOLSTER REMOVAL/INSTALLATION .)
8. Column cover (See COLUMN COVER REMOVAL/INSTALLATION .)
9. Driver-side air bag module (See DRIVER-SIDE AIR BAG MODULE REMOVAL/INSTALLATION .)
10. Steering wheel (See STEERING WHEEL AND COLUMN REMOVAL/INSTALLATION .)
11. Combination switch (See COMBINATION SWITCH REMOVAL/INSTALLATION .)
12. Steering shaft (See STEERING WHEEL AND COLUMN REMOVAL/INSTALLATION .)
13. Meter hood (See METER HOOD REMOVAL/INSTALLATION .)
14. Instrument cluster (See INSTRUMENT CLUSTER REMOVAL/INSTALLATION .)
2007 Mazda MX-5 Miata Sport
2007 ACCESSORIES & BODY, CAB Interior Trim - MX-5 Miata
Microsoft
Thursday, July 09, 2009 3:29:26 PM Page 3 © 2005 Mitchell Repair Information Company, LLC.
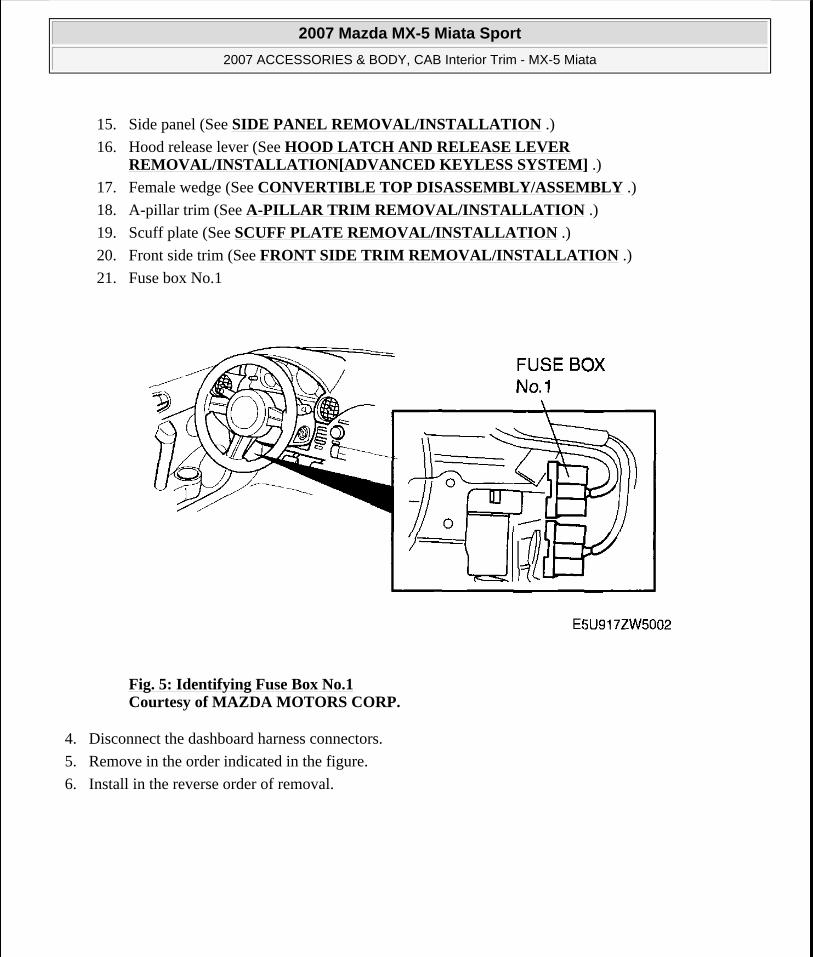
15. Side panel (See SIDE PANEL REMOVAL/INSTALLATION .)
16. Hood release lever (See HOOD LATCH AND RELEASE LEVER REMOVAL/INSTALLATION[ADVANCED KEYLESS SYSTEM] .)
17. Female wedge (See CONVERTIBLE TOP DISASSEMBLY/ASSEMBLY .)
18. A-pillar trim (See A-PILLAR TRIM REMOVAL/INSTALLATION .)
19. Scuff plate (See SCUFF PLATE REMOVAL/INSTALLATION .)
20. Front side trim (See FRONT SIDE TRIM REMOVAL/INSTALLATION .)
21. Fuse box No.1
Fig. 5: Identifying Fuse Box No.1 Courtesy of MAZDA MOTORS CORP.
4. Disconnect the dashboard harness connectors.
5. Remove in the order indicated in the figure.
6. Install in the reverse order of removal.
2007 Mazda MX-5 Miata Sport
2007 ACCESSORIES & BODY, CAB Interior Trim - MX-5 Miata
Microsoft
Thursday, July 09, 2009 3:29:26 PM Page 4 © 2005 Mitchell Repair Information Company, LLC.

Fig. 6: Identifying Dashboard (With Torque Specifications) Courtesy of MAZDA MOTORS CORP.
DASHBOARD DISASSEMBLY/ASSEMBLY
1. Remove the following parts:
1. Decoration panel (See DECORATION PANEL REMOVAL/INSTALLATION .)
2. Hazard warning switch (See HAZARD WARNING SWITCH REMOVAL/INSTALLATION .)
3. Center speaker cover (See CENTER SPEAKER REMOVAL/INSTALLATION .)
4. Center speaker (vehicles with BOSE) (See CENTER SPEAKER REMOVAL/INSTALLATION .)
5. Passenger-side air bag module (See PASSENGER-SIDE AIR BAG MODULE REMOVAL/INSTALLATION .)
2007 Mazda MX-5 Miata Sport
2007 ACCESSORIES & BODY, CAB Interior Trim - MX-5 Miata
Microsoft
Thursday, July 09, 2009 3:29:26 PM Page 5 © 2005 Mitchell Repair Information Company, LLC.

2. Disassemble in the order indicated in Fig. 7 .
3. Assemble in the reverse order of disassembly.
2007 Mazda MX-5 Miata Sport
2007 ACCESSORIES & BODY, CAB Interior Trim - MX-5 Miata
Microsoft
Thursday, July 09, 2009 3:29:26 PM Page 6 © 2005 Mitchell Repair Information Company, LLC.

Fig. 7: Exploded View Of DashboardCourtesy of MAZDA MOTORS CORP.
COLUMN COVER REMOVAL/INSTALLATION
1. Remove the tab A, then remove the upper column cover.
2. Remove the screws, then remove the lower column cover.
3. Remove the ignition key illumination. (See IGNITION KEY ILLUMINATION BULB REMOVAL/INSTALLATION .)
4. Install in the reverse order of removal.
Fig. 8: Removing Upper & Lower Column Cover Courtesy of MAZDA MOTORS CORP.
GLOVE COMPARTMENT REMOVAL/INSTALLATION
2007 Mazda MX-5 Miata Sport
2007 ACCESSORIES & BODY, CAB Interior Trim - MX-5 Miata
Microsoft
Thursday, July 09, 2009 3:29:26 PM Page 7 © 2005 Mitchell Repair Information Company, LLC.
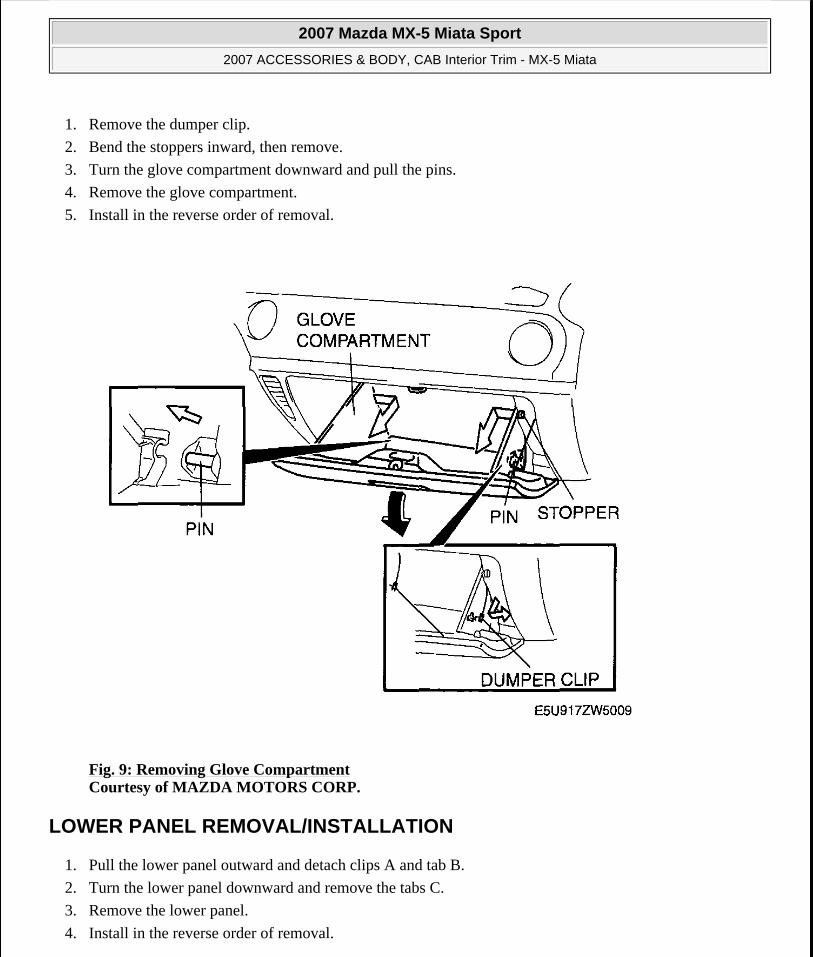
1. Remove the dumper clip.
2. Bend the stoppers inward, then remove.
3. Turn the glove compartment downward and pull the pins.
4. Remove the glove compartment.
5. Install in the reverse order of removal.
Fig. 9: Removing Glove Compartment Courtesy of MAZDA MOTORS CORP.
LOWER PANEL REMOVAL/INSTALLATION
1. Pull the lower panel outward and detach clips A and tab B.
2. Turn the lower panel downward and remove the tabs C.
3. Remove the lower panel.
4. Install in the reverse order of removal.
2007 Mazda MX-5 Miata Sport
2007 ACCESSORIES & BODY, CAB Interior Trim - MX-5 Miata
Microsoft
Thursday, July 09, 2009 3:29:26 PM Page 8 © 2005 Mitchell Repair Information Company, LLC.

Fig. 10: Removing Lower Panel Courtesy of MAZDA MOTORS CORP.
METER HOOD REMOVAL/INSTALLATION
1. Pull the meter hood upward and detach clips A.
2. Remove the meter hood.
3. Install in the reverse order of removal.
2007 Mazda MX-5 Miata Sport
2007 ACCESSORIES & BODY, CAB Interior Trim - MX-5 Miata
Microsoft
Thursday, July 09, 2009 3:29:26 PM Page 9 © 2005 Mitchell Repair Information Company, LLC.
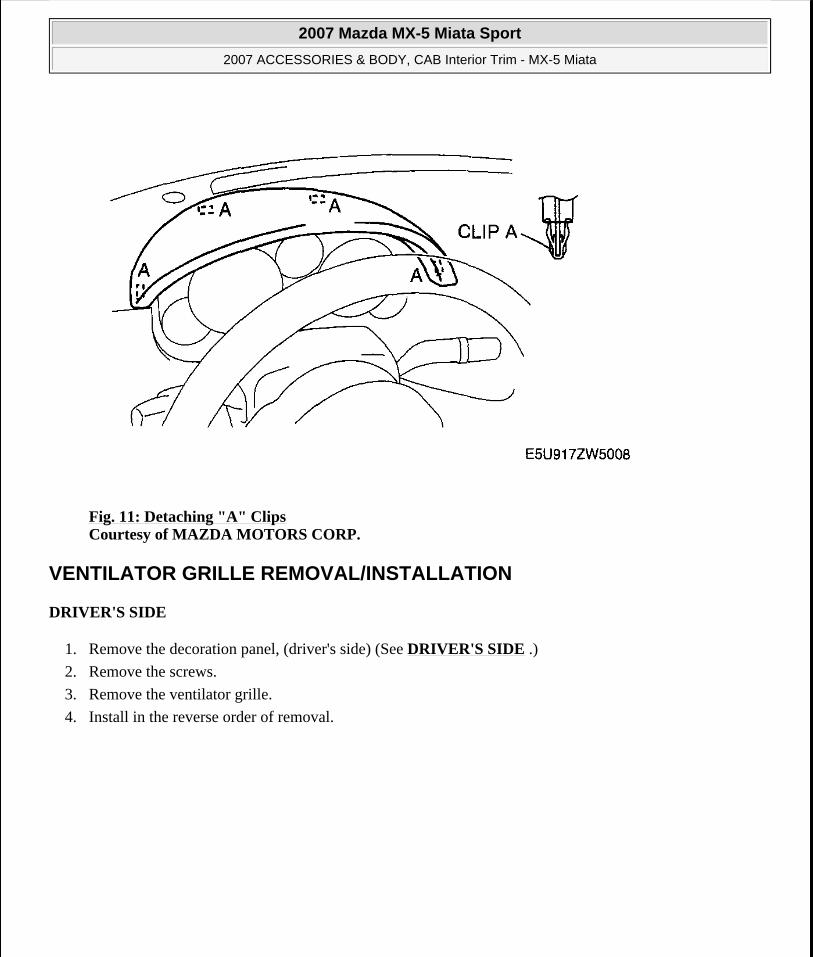
Fig. 11: Detaching "A" Clips Courtesy of MAZDA MOTORS CORP.
VENTILATOR GRILLE REMOVAL/INSTALLATION
DRIVER'S SIDE
1. Remove the decoration panel, (driver's side) (See DRIVER'S SIDE .)
2. Remove the screws.
3. Remove the ventilator grille.
4. Install in the reverse order of removal.
2007 Mazda MX-5 Miata Sport
2007 ACCESSORIES & BODY, CAB Interior Trim - MX-5 Miata
Microsoft
Thursday, July 09, 2009 3:29:26 PM Page 10 © 2005 Mitchell Repair Information Company, LLC.

Fig. 12: Removing Ventilator Grille Courtesy of MAZDA MOTORS CORP.
PASSENGER'S SIDE
1. Remove the battery cover.
2. Disconnect the negative battery cable. (See BATTERY REMOVAL/INSTALLATION [LF] .)
3. Remove the side wall. (See SIDE WALL REMOVAL/INSTALLATION .)
4. Remove the center panel unit. (See CENTER PANEL UNIT REMOVAL/INSTALLATION .)
5. Remove the glove compartment. (See GLOVE COMPARTMENT REMOVAL/INSTALLATION .)
6. Remove the decoration panel, (passenger's side) (See PASSENGER'S SIDE .)
7. Remove the screws.
8. Remove the ventilator grille.
9. Install in the reverse order of removal.
2007 Mazda MX-5 Miata Sport
2007 ACCESSORIES & BODY, CAB Interior Trim - MX-5 Miata
Microsoft
Thursday, July 09, 2009 3:29:26 PM Page 11 © 2005 Mitchell Repair Information Company, LLC.

Fig. 13: Removing Decoration Panel (Passenger's Side) Courtesy of MAZDA MOTORS CORP.
CENTER
1. Remove the battery cover.
2. Disconnect the negative battery cable. (See BATTERY REMOVAL/INSTALLATION [LF] .)
3. Remove the side wall. (See SIDE WALL REMOVAL/INSTALLATION .)
4. Remove the center panel unit. (See CENTER PANEL UNIT REMOVAL/INSTALLATION .)
5. Remove the glove compartment. (See GLOVE COMPARTMENT REMOVAL/INSTALLATION .)
6. Remove the decoration panel, (passenger's side) (See PASSENGER'S SIDE .)
7. Remove the screws.
8. Remove the ventilator grille.
9. Install in the reverse order of removal.
2007 Mazda MX-5 Miata Sport
2007 ACCESSORIES & BODY, CAB Interior Trim - MX-5 Miata
Microsoft
Thursday, July 09, 2009 3:29:26 PM Page 12 © 2005 Mitchell Repair Information Company, LLC.

Fig. 14: Removing Decoration Panel (Center) Courtesy of MAZDA MOTORS CORP.
SIDE PANEL REMOVAL/INSTALLATION
1. Pull the side panel outward and detach clips A.
2. Pull the side panel rearward and detach tab B from the dashboard.
3. Remove the side panel.
4. Install in the reverse order of removal.
2007 Mazda MX-5 Miata Sport
2007 ACCESSORIES & BODY, CAB Interior Trim - MX-5 Miata
Microsoft
Thursday, July 09, 2009 3:29:26 PM Page 13 © 2005 Mitchell Repair Information Company, LLC.

Fig. 15: Detaching Tab B From Dashboard Courtesy of MAZDA MOTORS CORP.
KNEE BOLSTER REMOVAL/INSTALLATION
1. Remove the lower panel. (See LOWER PANEL REMOVAL/INSTALLATION .)
2. Remove the screws.
3. Remove the knee bolster.
4. Install in the reverse order of removal.
2007 Mazda MX-5 Miata Sport
2007 ACCESSORIES & BODY, CAB Interior Trim - MX-5 Miata
Microsoft
Thursday, July 09, 2009 3:29:26 PM Page 14 © 2005 Mitchell Repair Information Company, LLC.
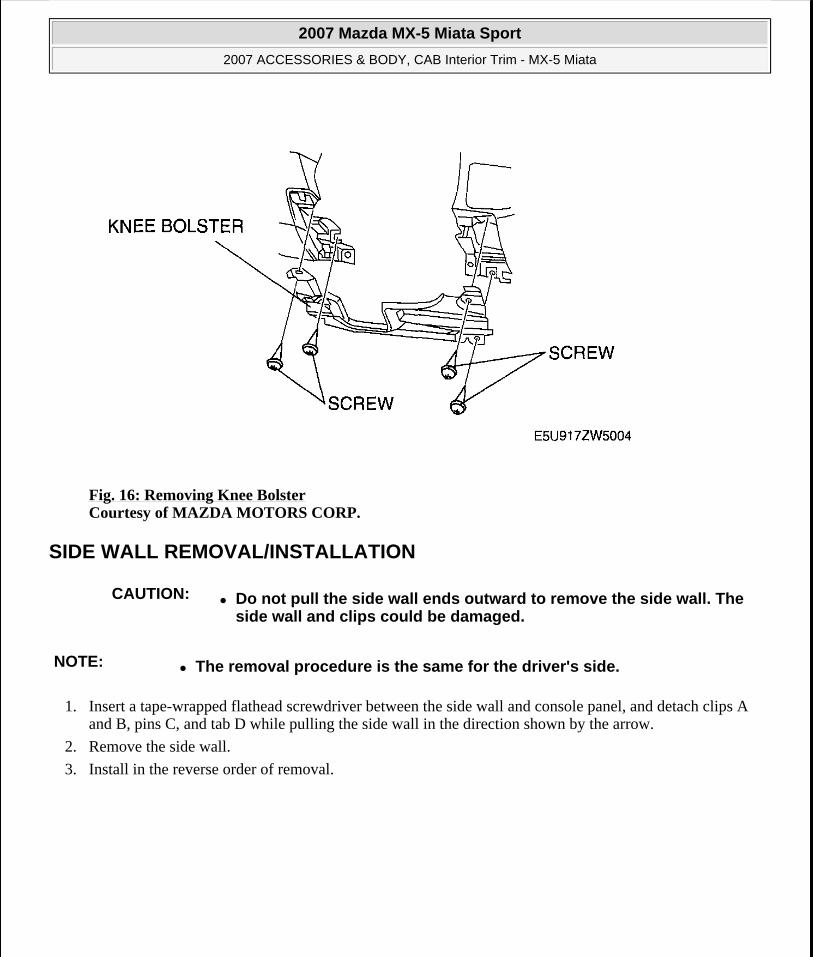
Fig. 16: Removing Knee Bolster Courtesy of MAZDA MOTORS CORP.
SIDE WALL REMOVAL/INSTALLATION
1. Insert a tape-wrapped flathead screwdriver between the side wall and console panel, and detach clips A and B, pins C, and tab D while pulling the side wall in the direction shown by the arrow.
2. Remove the side wall.
3. Install in the reverse order of removal.
CAUTION: Do not pull the side wall ends outward to remove the side wall. The side wall and clips could be damaged.
NOTE: The removal procedure is the same for the driver's side.
2007 Mazda MX-5 Miata Sport
2007 ACCESSORIES & BODY, CAB Interior Trim - MX-5 Miata
Microsoft
Thursday, July 09, 2009 3:29:26 PM Page 15 © 2005 Mitchell Repair Information Company, LLC.

Fig. 17: Removing Side Wall Courtesy of MAZDA MOTORS CORP.
CONSOLE REMOVAL/INSTALLATION
1. Remove the battery cover.
2. Disconnect the negative battery cable. (See BATTERY REMOVAL/INSTALLATION [LF] .)
3. Remove the selector lever knob (AT), shift lever knob (MT).
4. Remove in the order indicated in Fig. 18 .
2007 Mazda MX-5 Miata Sport
2007 ACCESSORIES & BODY, CAB Interior Trim - MX-5 Miata
Microsoft
Thursday, July 09, 2009 3:29:26 PM Page 16 © 2005 Mitchell Repair Information Company, LLC.

2007 Mazda MX-5 Miata Sport
2007 ACCESSORIES & BODY, CAB Interior Trim - MX-5 Miata
Microsoft
Thursday, July 09, 2009 3:29:26 PM Page 17 © 2005 Mitchell Repair Information Company, LLC.

Fig. 18: Identifying Console Courtesy of MAZDA MOTORS CORP.
5. Install in the reverse order of removal.
FRONT COVER REMOVAL NOTE
1. Adhere protective tape in the shaded area shown in the figure and remove the clips using a fastener remover inserted in the position indicated by the arrow.
Fig. 19: Identifying Front Cover Clips & Protective Tape Courtesy of MAZDA MOTORS CORP
2. Remove the front cover in the direction shown in the figure.
2007 Mazda MX-5 Miata Sport
2007 ACCESSORIES & BODY, CAB Interior Trim - MX-5 Miata
Microsoft
Thursday, July 09, 2009 3:29:26 PM Page 18 © 2005 Mitchell Repair Information Company, LLC.

Fig. 20: Removing Front Cover Courtesy of MAZDA MOTORS CORP
CONSOLE DISASSEMBLY/ASSEMBLY
1. Disassemble in the order indicated in Fig. 21 .
2007 Mazda MX-5 Miata Sport
2007 ACCESSORIES & BODY, CAB Interior Trim - MX-5 Miata
Microsoft
Thursday, July 09, 2009 3:29:26 PM Page 19 © 2005 Mitchell Repair Information Company, LLC.

Fig. 21: Disassembling/Assembling Console Courtesy of MAZDA MOTORS CORP.
2. Assemble in the reverse order of disassembly.
CONSOLE PANEL REMOVAL/INSTALLATION
1. Remove the battery cover.
2. Disconnect the negative battery cable. (See BATTERY REMOVAL/INSTALLATION [LF] .)
3. Remove the console. (See CONSOLE REMOVAL/INSTALLATION .)
4. Remove the side wall. (See SIDE WALL REMOVAL/INSTALLATION .)
5. Remove the screws.
6. Pull the console panel outward and detach tabs A and pins B.
7. Disconnect the seat warmer switch connector. (Vehicles with seat warmer)
2007 Mazda MX-5 Miata Sport
2007 ACCESSORIES & BODY, CAB Interior Trim - MX-5 Miata
Microsoft
Thursday, July 09, 2009 3:29:26 PM Page 20 © 2005 Mitchell Repair Information Company, LLC.

8. Disconnect the accessory socket connector.
9. Remove the console panel.
10. Install in the reverse order of removal.
Fig. 22: Removing Console Panel Courtesy of MAZDA MOTORS CORP.
A-PILLAR TRIM REMOVAL/INSTALLATION
1. Remove the female wedge. (See CONVERTIBLE TOP DISASSEMBLY/ASSEMBLY .)
2. Pull the A-pillar trim, then disengage clips A and B.
3. Pull the A-pillar trim upward, then disengage tabs C from the body.
4. Remove the A-pillar trim.
5. Install in the reverse order of removal.
2007 Mazda MX-5 Miata Sport
2007 ACCESSORIES & BODY, CAB Interior Trim - MX-5 Miata
Microsoft
Thursday, July 09, 2009 3:29:26 PM Page 21 © 2005 Mitchell Repair Information Company, LLC.

Fig. 23: Removing A-Pillar Trim Courtesy of MAZDA MOTORS CORP.
FRONT HEADER TRIM REMOVAL/INSTALLATION
REMOVAL
1. Remove the battery cover.
2. Disconnect the negative battery cable. (See BATTERY REMOVAL/INSTALLATION [LF] .)
3. Remove the female wedge. (See CONVERTIBLE TOP DISASSEMBLY/ASSEMBLY .)
4. Remove the map light. (See MAP LIGHT REMOVAL/INSTALLATION .)
5. Remove the A-pillar trim. (See A-PILLAR TRIM REMOVAL/INSTALLATION .)
6. Remove the screws.
7. Pull the front header trim toward you, then disengage the clips A and pin B from the body.
8. Remove the front header trim.
CAUTION: Do not twist or drop the front header trim, otherwise the vanity mirror could be damaged.
2007 Mazda MX-5 Miata Sport
2007 ACCESSORIES & BODY, CAB Interior Trim - MX-5 Miata
Microsoft
Thursday, July 09, 2009 3:29:26 PM Page 22 © 2005 Mitchell Repair Information Company, LLC.
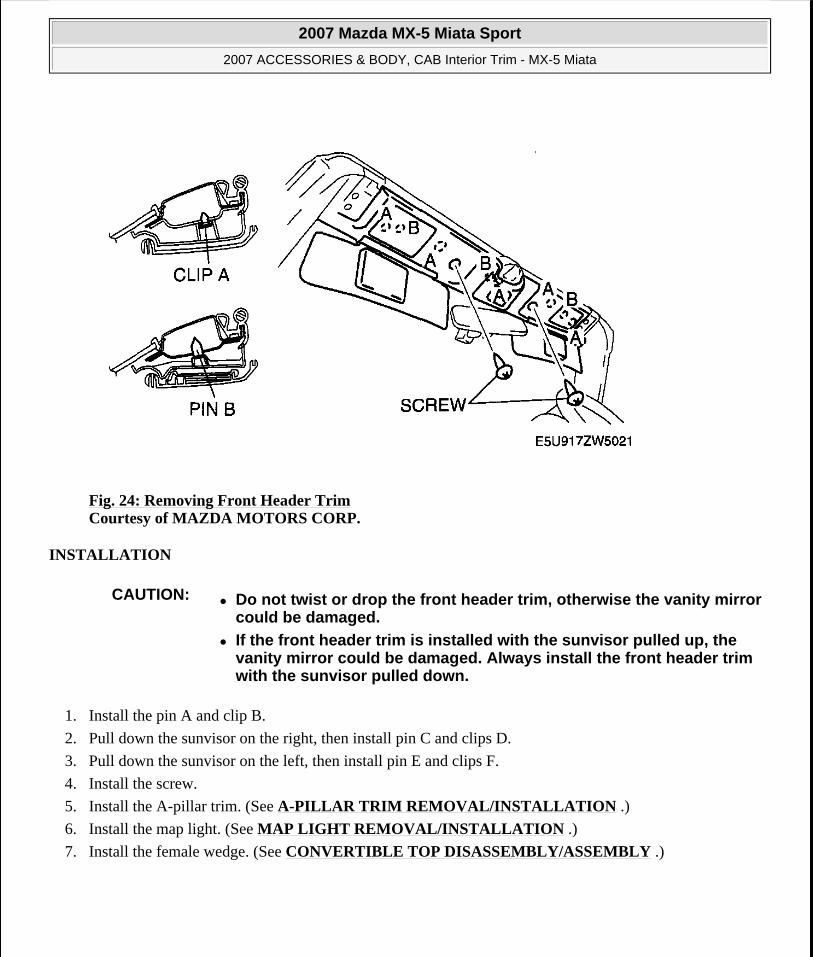
Fig. 24: Removing Front Header Trim Courtesy of MAZDA MOTORS CORP.
INSTALLATION
1. Install the pin A and clip B.
2. Pull down the sunvisor on the right, then install pin C and clips D.
3. Pull down the sunvisor on the left, then install pin E and clips F.
4. Install the screw.
5. Install the A-pillar trim. (See A-PILLAR TRIM REMOVAL/INSTALLATION .)
6. Install the map light. (See MAP LIGHT REMOVAL/INSTALLATION .)
7. Install the female wedge. (See CONVERTIBLE TOP DISASSEMBLY/ASSEMBLY .)
CAUTION: Do not twist or drop the front header trim, otherwise the vanity mirror could be damaged.
If the front header trim is installed with the sunvisor pulled up, the vanity mirror could be damaged. Always install the front header trim with the sunvisor pulled down.
2007 Mazda MX-5 Miata Sport
2007 ACCESSORIES & BODY, CAB Interior Trim - MX-5 Miata
Microsoft
Thursday, July 09, 2009 3:29:26 PM Page 23 © 2005 Mitchell Repair Information Company, LLC.

Fig. 25: Installing Front Header Trim Courtesy of MAZDA MOTORS CORP.
8. Connect the negative battery cable. (See BATTERY REMOVAL/INSTALLATION [LF] .)
9. Install the battery cover.
QUARTER TRIM REMOVAL/INSTALLATION
1. Remove the side striker (detachable bale hardtop).
2. Remove the fastener.
3. Remove the clips A.
4. Pull the quarter trim upward and detach clips B.
5. Remove the seat belt from the quarter trim through the slit in the quarter trim and remove the quarter trim.
6. Install in the reverse order of removal.
2007 Mazda MX-5 Miata Sport
2007 ACCESSORIES & BODY, CAB Interior Trim - MX-5 Miata
Microsoft
Thursday, July 09, 2009 3:29:26 PM Page 24 © 2005 Mitchell Repair Information Company, LLC.

Fig. 26: Removing Quarter Trim Courtesy of MAZDA MOTORS CORP.
DOOR TRIM REMOVAL/INSTALLATION
1. Remove the battery cover.
2. Disconnect the negative battery cable. (See BATTERY REMOVAL/INSTALLATION [LF] .)
3. Remove the covers.
4. Remove the screws.
5. Detach clips A from the door trim using fastener remover.
6. Pull the door trim upward and detach tabs B from the door.
7. Disconnect the power outer mirror switch connector, (driver's side)
2007 Mazda MX-5 Miata Sport
2007 ACCESSORIES & BODY, CAB Interior Trim - MX-5 Miata
Microsoft
Thursday, July 09, 2009 3:29:26 PM Page 25 © 2005 Mitchell Repair Information Company, LLC.

Fig. 27: Removing Door Trim Courtesy of MAZDA MOTORS CORP.
8. Remove the inner handle cover.
9. Remove the door trim.
10. Install in the reverse order of removal.
2007 Mazda MX-5 Miata Sport
2007 ACCESSORIES & BODY, CAB Interior Trim - MX-5 Miata
Microsoft
Thursday, July 09, 2009 3:29:26 PM Page 26 © 2005 Mitchell Repair Information Company, LLC.

Fig. 28: Removing Inner Handle Cover Courtesy of MAZDA MOTORS CORP.
DOOR TRIM DISASSEMBLY/ASSEMBLY
1. Disassemble in the order indicated in Fig. 29 .
2007 Mazda MX-5 Miata Sport
2007 ACCESSORIES & BODY, CAB Interior Trim - MX-5 Miata
Microsoft
Thursday, July 09, 2009 3:29:26 PM Page 27 © 2005 Mitchell Repair Information Company, LLC.

Fig. 29: Identifying Door Trim Components Courtesy of MAZDA MOTORS CORP.
2. Assemble in the reverse order of disassembly.
AEROBOARD REMOVAL/INSTALLATION
1. Insert a tape-wrapped flathead screwdriver into the service hole.
2. Twist the flathead screwdriver as indicated by the arrow to remove the clips A and tab B.
2007 Mazda MX-5 Miata Sport
2007 ACCESSORIES & BODY, CAB Interior Trim - MX-5 Miata
Microsoft
Thursday, July 09, 2009 3:29:26 PM Page 28 © 2005 Mitchell Repair Information Company, LLC.

3. Remove the aeroboard.
4. Install in the reverse order of removal.
Fig. 30: Identifying Aeroboard Courtesy of MAZDA MOTORS CORP.
SEAT BACK BAR LOWER GARNISH REMOVAL/INSTALLATION
EXCEPT POWER RETRACTABLE HARDTOP
1. Remove the following parts:
1. Console (See CONSOLE REMOVAL/INSTALLATION .)
2. Quarter trim (See QUARTER TRIM REMOVAL/INSTALLATION .)
3. Scuff plate (See SCUFF PLATE REMOVAL/INSTALLATION .)
4. Tire house trim (See TIRE HOUSE TRIM REMOVAL/INSTALLATION .)
5. Aeroboard (See AEROBOARD REMOVAL/INSTALLATION .)
2007 Mazda MX-5 Miata Sport
2007 ACCESSORIES & BODY, CAB Interior Trim - MX-5 Miata
Microsoft
Thursday, July 09, 2009 3:29:26 PM Page 29 © 2005 Mitchell Repair Information Company, LLC.

6. Seat back bar garnish (See SEAT BACK BAR GARNISH REMOVAL/INSTALLATION .)
7. Back trim (See BACK TRIM REMOVAL/INSTALLATION .)
2. Remove the fasteners.
3. Slide the seat back bar lower garnish to the vehicle rear and detach clips A and pin B.
4. Remove the seat back bar lower garnish.
5. Install in the reverse order of removal.
Fig. 31: Removing Seat Back Bar Lower Garnish Courtesy of MAZDA MOTORS CORP.
POWER RETRACTABLE HARDTOP
1. Remove the following parts:
a. Console (See CONSOLE REMOVAL/INSTALLATION.)
b. Quarter trim (See QUARTER TRIM REMOVAL/INSTALLATION.)
c. Scuff plate (SCUFF PLATE REMOVAL/INSTALLATION.)
d. Tire house trim (See TIRE HOUSE TRIM REMOVAL/INSTALLATION.)
e. Aeroboard (See AEROBOARD REMOVAL/INSTALLATION.)
f. Seat back bar garnish (See SEAT BACK BAR GARNISH REMOVAL/INSTALLATION.)
g. Back trim (See BACK TRIM REMOVAL/INSTALLATION.)
h. Roof hook. (See ROOF HOOK REMOVAL/INSTALLATION in EXTERIOR TRIM article
2007 Mazda MX-5 Miata Sport
2007 ACCESSORIES & BODY, CAB Interior Trim - MX-5 Miata
Microsoft
Thursday, July 09, 2009 3:29:26 PM Page 30 © 2005 Mitchell Repair Information Company, LLC.

2. Remove the clip A.
3. Remove the roof stopper.
Fig. 32: Identifying Clip A Of Roof Stopper Courtesy of MAZDA MOTORS CORP
4. Remove the fasteners.
5. Slide the seat back bar lower garnish to the vehicle rear and detach clips B and pin C.
2007 Mazda MX-5 Miata Sport
2007 ACCESSORIES & BODY, CAB Interior Trim - MX-5 Miata
Microsoft
Thursday, July 09, 2009 3:29:26 PM Page 31 © 2005 Mitchell Repair Information Company, LLC.

Fig. 33: Identifying Clips B & C Of Seat Back Bar Lower Garnish Courtesy of MAZDA MOTORS CORP
6. Remove the seat back bar lower garnish.
7. Install in the reverse order of removal.
BACK TRIM REMOVAL/INSTALLATION
1. Remove the following parts:
1. Console (See CONSOLE REMOVAL/INSTALLATION .)
2. Quarter trim (See QUARTER TRIM REMOVAL/INSTALLATION .)
3. Scuff plate (See SCUFF PLATE REMOVAL/INSTALLATION .)
4. Tire house trim (See TIRE HOUSE TRIM REMOVAL/INSTALLATION .)
5. Aeroboard (See AEROBOARD REMOVAL/INSTALLATION .)
6. Front seat back bar garnish (See SEAT BACK BAR GARNISH REMOVAL/INSTALLATION .)
2. Pull the open hook lever outward and remove it while pinching the tabs as shown in Fig. 34 .
2007 Mazda MX-5 Miata Sport
2007 ACCESSORIES & BODY, CAB Interior Trim - MX-5 Miata
Microsoft
Thursday, July 09, 2009 3:29:26 PM Page 32 © 2005 Mitchell Repair Information Company, LLC.

Fig. 34: Removing Rear Seat Back Bar Garnish Courtesy of MAZDA MOTORS CORP.
3. Remove the fasteners.
Fig. 35: Identifying Seat Back Trim
2007 Mazda MX-5 Miata Sport
2007 ACCESSORIES & BODY, CAB Interior Trim - MX-5 Miata
Microsoft
Thursday, July 09, 2009 3:29:26 PM Page 33 © 2005 Mitchell Repair Information Company, LLC.

Courtesy of MAZDA MOTORS CORP.
4. Pull the back trim outward and detach clips A and B.
5. Remove the back trim.
6. Install in the reverse order of removal.
SEAT BACK BAR GARNISH REMOVAL/INSTALLATION
1. Pull the front seat back bar garnish outward and detach tabs A and pins B.
2. Remove the front seat back bar garnish.
Fig. 36: Identifying Front Seat Back Bar Garnish Courtesy of MAZDA MOTORS CORP.
3. Remove the screws.
4. Pull the rear seat back bar garnish upward and detach clips A.
5. Remove the rear seat back bar garnish.
6. Install in the reverse order of removal.
2007 Mazda MX-5 Miata Sport
2007 ACCESSORIES & BODY, CAB Interior Trim - MX-5 Miata
Microsoft
Thursday, July 09, 2009 3:29:26 PM Page 34 © 2005 Mitchell Repair Information Company, LLC.

Fig. 37: Identifying Rear Seat Back Bar Garnish Courtesy of MAZDA MOTORS CORP.
SIDE SHELF REMOVAL/INSTALLATION
EXCEPT POWER RETRACTABLE HARDTOP
1. Remove the following parts:
1. Console (See CONSOLE REMOVAL/INSTALLATION .)
2. Quarter trim (See QUARTER TRIM REMOVAL/INSTALLATION .)
3. Scuff plate (See SCUFF PLATE REMOVAL/INSTALLATION .)
4. Tire house trim (See TIRE HOUSE TRIM REMOVAL/INSTALLATION .)
5. Aeroboard (See AEROBOARD REMOVAL/INSTALLATION .)
6. Front seat back bar garnish (See SEAT BACK BAR GARNISH REMOVAL/INSTALLATION .)
7. Back trim (See BACK TRIM REMOVAL/INSTALLATION .)
8. Seat belt set plate (See SEAT BELT REMOVAL/INSTALLATION .)
9. Seat back crossmember assembly (See SEAT BACK CROSSMEMBER ASSEMBLY REMOVAL/INSTALLATION .)
10. Rear side trim (See REAR SIDE TRIM REMOVAL/INSTALLATION .)
11. Rear package trim (See REAR PACKAGE TRIM REMOVAL/INSTALLATION .)
2. Remove the fasteners.
2007 Mazda MX-5 Miata Sport
2007 ACCESSORIES & BODY, CAB Interior Trim - MX-5 Miata
Microsoft
Thursday, July 09, 2009 3:29:26 PM Page 35 © 2005 Mitchell Repair Information Company, LLC.

3. Pull the side shelf outward and detach clip A.
4. Remove the side shelf.
5. Install in the reverse order of removal.
Fig. 38: Identifying Side Shelf Courtesy of MAZDA MOTORS CORP.
POWER RETRACTABLE HARDTOP
1. Fully open the deck panel.
2. Remove the following parts:
a. Console (See CONSOLE REMOVAL/INSTALLATION.)
b. Quarter trim (See QUARTER TRIM REMOVAL/INSTALLATION.)
c. Scuff plate (See SCUFF PLATE REMOVAL/INSTALLATION.)
d. Tire house trim (See TIRE HOUSE TRIM REMOVAL/INSTALLATION.)
e. Aeroboard (See AEROBOARD REMOVAL/INSTALLATION.)
f. Seat back bar garnish (See SEAT BACK BAR GARNISH REMOVAL/INSTALLATION.)
g. Back trim (See BACK TRIM REMOVAL/INSTALLATION.)
h. Rear side trim (See REAR SIDE TRIM REMOVAL/INSTALLATION.)
3. Remove the fasteners.
4. Pull the side shelf outward and detach clip A.
2007 Mazda MX-5 Miata Sport
2007 ACCESSORIES & BODY, CAB Interior Trim - MX-5 Miata
Microsoft
Thursday, July 09, 2009 3:29:26 PM Page 36 © 2005 Mitchell Repair Information Company, LLC.

5. Remove the side shelf.
6. Install in the reverse order of removal.
Fig. 39: Identifying Side Shelf & Fasteners Courtesy of MAZDA MOTORS CORP.
B-PILLAR UPPER TRIM REMOVAL [DETACHABLE HARDTOP]
1. Remove the detachable hardtop.
2. Remove the B-pillar garnish.
3. Remove the side lock.
4. Disengage the B-pillar upper trim clips A using a fastener remover.
5. While cutting the double-sided adhesive tape using a screwdriver or a razor, separate the B-pillar upper trim from the body.
WARNING: Using a razor with bare hands can cause injury. Always wear
2007 Mazda MX-5 Miata Sport
2007 ACCESSORIES & BODY, CAB Interior Trim - MX-5 Miata
Microsoft
Thursday, July 09, 2009 3:29:26 PM Page 37 © 2005 Mitchell Repair Information Company, LLC.

6. Remove the B-pillar upper trim.
Fig. 40: Removing B-Pillar Upper Trim Courtesy of MAZDA MOTORS CORP.
B-PILLAR UPPER TRIM INSTALLATION [DETACHABLE HARDTOP]
1. When installing a new B-pillar upper trim, follow the procedure below:
1. Remove the adhesive remaining on the body using razor.
2. Remove any grease or dirt from the adhesion surface of the body.
2. When reusing the B-pillar upper trim, follow the procedure below:
1. Remove the adhesive remaining on the B-pillar upper trim and the body using a razor.
2. Remove any grease or dirt from the adhesion surface of the B-pillar upper trim and the body.
3. Apply primer to the bonding area of the B-pillar upper trim.
gloves when using a razor.
NOTE: Double-sided adhesive tape has already been attached to the new rear door garnish.
WARNING: Using a razor with bare hands can cause injury. Always wear gloves when using a razor.
2007 Mazda MX-5 Miata Sport
2007 ACCESSORIES & BODY, CAB Interior Trim - MX-5 Miata
Microsoft
Thursday, July 09, 2009 3:29:26 PM Page 38 © 2005 Mitchell Repair Information Company, LLC.
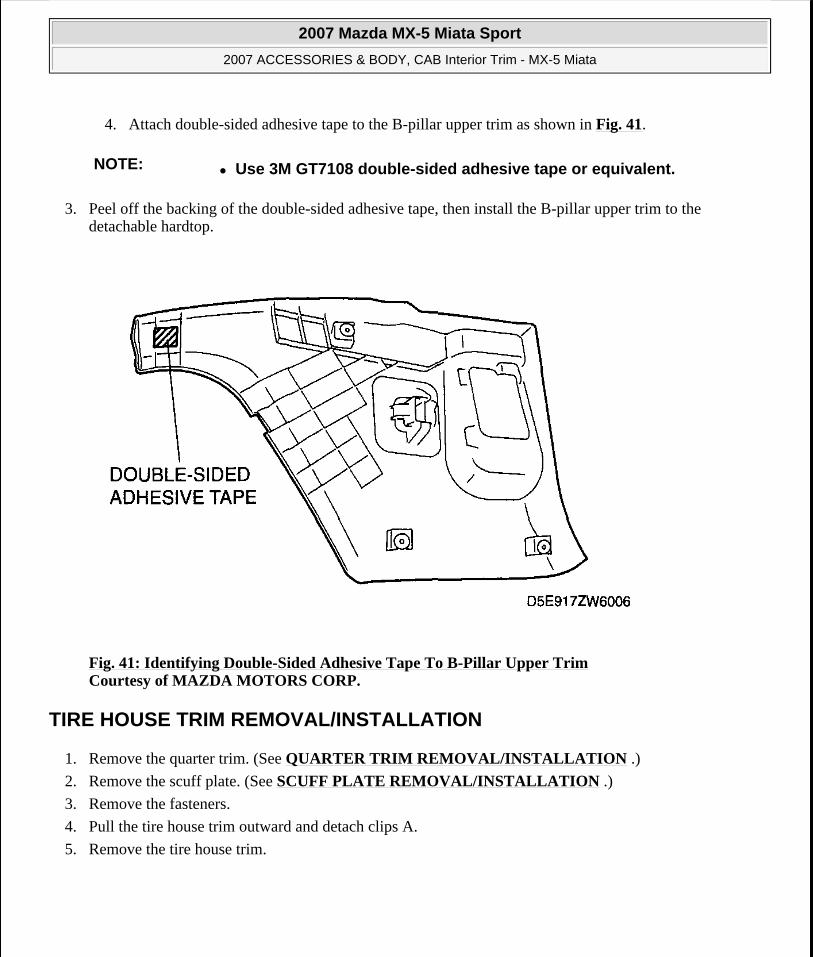
4. Attach double-sided adhesive tape to the B-pillar upper trim as shown in Fig. 41.
3. Peel off the backing of the double-sided adhesive tape, then install the B-pillar upper trim to the detachable hardtop.
Fig. 41: Identifying Double-Sided Adhesive Tape To B-Pillar Upper Trim Courtesy of MAZDA MOTORS CORP.
TIRE HOUSE TRIM REMOVAL/INSTALLATION
1. Remove the quarter trim. (See QUARTER TRIM REMOVAL/INSTALLATION .)
2. Remove the scuff plate. (See SCUFF PLATE REMOVAL/INSTALLATION .)
3. Remove the fasteners.
4. Pull the tire house trim outward and detach clips A.
5. Remove the tire house trim.
NOTE: Use 3M GT7108 double-sided adhesive tape or equivalent.
2007 Mazda MX-5 Miata Sport
2007 ACCESSORIES & BODY, CAB Interior Trim - MX-5 Miata
Microsoft
Thursday, July 09, 2009 3:29:26 PM Page 39 © 2005 Mitchell Repair Information Company, LLC.

Fig. 42: Removing Tire House Trim Courtesy of MAZDA MOTORS CORP.
6. Install in the reverse order of removal.
REAR PACKAGE TRIM REMOVAL/INSTALLATION
1. Remove the following parts:
1. Console (See CONSOLE REMOVAL/INSTALLATION .)
2. Quarter trim (See QUARTER TRIM REMOVAL/INSTALLATION .)
3. Scuff plate (See SCUFF PLATE REMOVAL/INSTALLATION .)
4. Tire house trim (See TIRE HOUSE TRIM REMOVAL/INSTALLATION .)
5. Aeroboard (See AEROBOARD REMOVAL/INSTALLATION .)
6. Front seat back bar garnish (See SEAT BACK BAR GARNISH REMOVAL/INSTALLATION .)
7. Back trim (See BACK TRIM REMOVAL/INSTALLATION .)
8. Seat belt set plate (See SEAT BELT REMOVAL/INSTALLATION .)
9. Seat back crossmember assembly (See SEAT BACK CROSSMEMBER ASSEMBLY REMOVAL/INSTALLATION .)
10. Rear side trim (See REAR SIDE TRIM REMOVAL/INSTALLATION .)
2. Remove the fasteners.
3. Remove the pins A and B.
2007 Mazda MX-5 Miata Sport
2007 ACCESSORIES & BODY, CAB Interior Trim - MX-5 Miata
Microsoft
Thursday, July 09, 2009 3:29:26 PM Page 40 © 2005 Mitchell Repair Information Company, LLC.

4. Remove the rear package trim.
5. Install in the reverse order of removal.
Fig. 43: Removing Rear Package Trim Courtesy of MAZDA MOTORS CORP.
DECORATION PANEL REMOVAL/INSTALLATION
DRIVER'S SIDE
1. Pull the decoration panel outward and detach clips A.
2. Remove the decoration panel.
3. Install in the reverse order of removal.
2007 Mazda MX-5 Miata Sport
2007 ACCESSORIES & BODY, CAB Interior Trim - MX-5 Miata
Microsoft
Thursday, July 09, 2009 3:29:26 PM Page 41 © 2005 Mitchell Repair Information Company, LLC.

Fig. 44: Pulling Decoration Panel Outward & Detach Clips A (Driver'S Side) Courtesy of MAZDA MOTORS CORP.
PASSENGER'S SIDE
1. Remove the battery cover.
2. Disconnect the negative battery cable. (See BATTERY REMOVAL/INSTALLATION [LF] .)
3. Remove the side wall. (See SIDE WALL REMOVAL/INSTALLATION .)
4. Remove the center panel unit. (See CENTER PANEL UNIT REMOVAL/INSTALLATION .)
5. Remove the glove compartment. (See GLOVE COMPARTMENT REMOVAL/INSTALLATION .)
6. Remove the three screws.
7. Pull the decoration panel outward and detach clips A and B.
8. Remove the decoration panel.
9. Install in the reverse order of removal.
2007 Mazda MX-5 Miata Sport
2007 ACCESSORIES & BODY, CAB Interior Trim - MX-5 Miata
Microsoft
Thursday, July 09, 2009 3:29:26 PM Page 42 © 2005 Mitchell Repair Information Company, LLC.

Fig. 45: Pulling Decoration Panel Outward (Passenger's Side) Courtesy of MAZDA MOTORS CORP.
FRONT SIDE TRIM REMOVAL/INSTALLATION
1. Remove the scuff plate. (See SCUFF PLATE REMOVAL/INSTALLATION .)
2. Remove the seaming welt.
3. Remove the fastener.
4. Pull the front side trim toward you, then disengage clip A and pin B from the body.
5. Remove the front side trim.
6. Install in the reverse order of removal.
2007 Mazda MX-5 Miata Sport
2007 ACCESSORIES & BODY, CAB Interior Trim - MX-5 Miata
Microsoft
Thursday, July 09, 2009 3:29:26 PM Page 43 © 2005 Mitchell Repair Information Company, LLC.
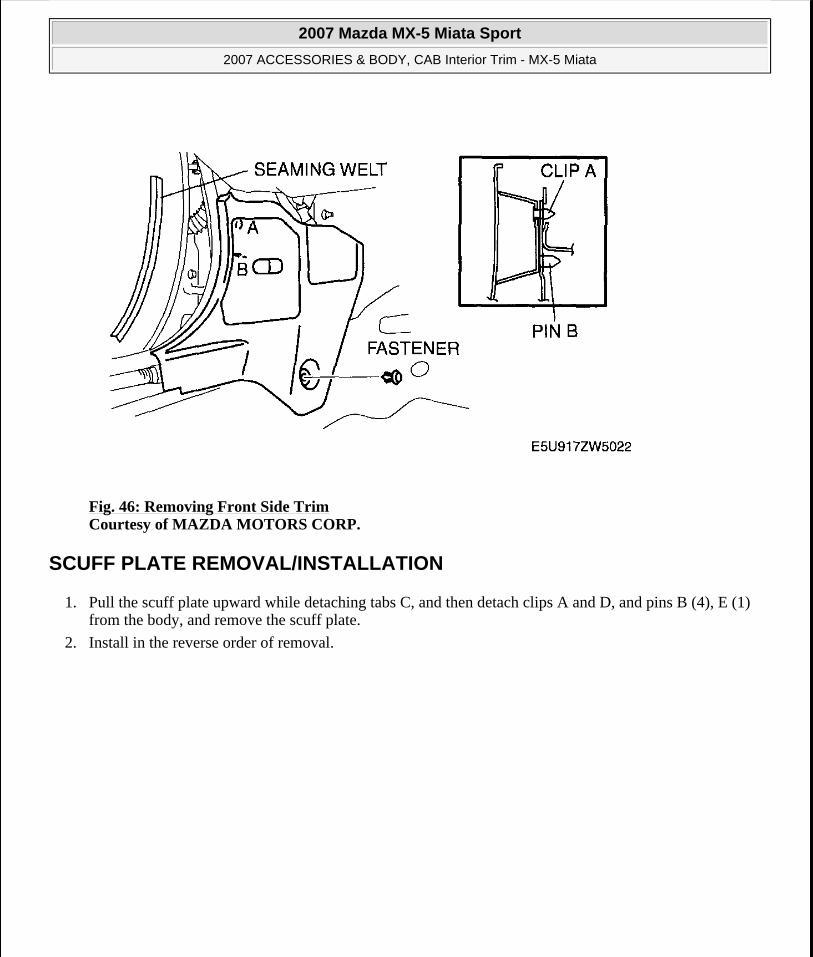
Fig. 46: Removing Front Side Trim Courtesy of MAZDA MOTORS CORP.
SCUFF PLATE REMOVAL/INSTALLATION
1. Pull the scuff plate upward while detaching tabs C, and then detach clips A and D, and pins B (4), E (1) from the body, and remove the scuff plate.
2. Install in the reverse order of removal.
2007 Mazda MX-5 Miata Sport
2007 ACCESSORIES & BODY, CAB Interior Trim - MX-5 Miata
Microsoft
Thursday, July 09, 2009 3:29:26 PM Page 44 © 2005 Mitchell Repair Information Company, LLC.

Fig. 47: Removing Scuff Plate Courtesy of MAZDA MOTORS CORP.
REAR TRIM REMOVAL [DETACHABLE HARDTOP]
1. Remove the detachable hardtop.
2. Cut the double-sided adhesive tape using a flathead screwdriver or razor.
3. Remove the rear trim.
WARNING: Using a razor with bare hands can cause injury. Always wear gloves when using a razor.
2007 Mazda MX-5 Miata Sport
2007 ACCESSORIES & BODY, CAB Interior Trim - MX-5 Miata
Microsoft
Thursday, July 09, 2009 3:29:26 PM Page 45 © 2005 Mitchell Repair Information Company, LLC.

Fig. 48: Identifying Rear Trim Courtesy of MAZDA MOTORS CORP.
REAR TRIM INSTALLATION [DETACHABLE HARDTOP]
1. When installing a new rear trim, follow the procedure below:
1. Remove the double-sided tape from the detachable hardtop.
2. Remove any grease or dirt from the adhesion surface of the detachable hardtop.
2. When reusing the rear trim, follow the procedure below:
1. Remove the double-sided adhesive tape from the rear trim and detachable hardtop.
2. Remove any grease or dirt from the adhesion surface of the rear trim and the detachable hardtop.
3. Attach double-sided adhesive tape to the rear trim as shown in Fig. 49.
3. Peel off the ends of the double-sided adhesive tape and attach the rear trim to the detachable hardtop.
4. Peel off the tape backings from double-sided adhesive tape and attach it.
NOTE: Double-sided adhesive tape has already been attached to the new rear trim.
NOTE: Use 3M GT7108 double-sided adhesive tape or equivalent.
2007 Mazda MX-5 Miata Sport
2007 ACCESSORIES & BODY, CAB Interior Trim - MX-5 Miata
Microsoft
Thursday, July 09, 2009 3:29:26 PM Page 46 © 2005 Mitchell Repair Information Company, LLC.

Fig. 49: Attaching Double-Sided Adhesive Tape To Rear Trim Courtesy of MAZDA MOTORS CORP.
REAR SIDE TRIM REMOVAL/INSTALLATION
EXCEPT POWER RETRACTABLE HARDTOP
1. Remove the following parts:
1. Console (See CONSOLE REMOVAL/INSTALLATION .)
2. Quarter trim (See QUARTER TRIM REMOVAL/INSTALLATION .)
3. Scuff plate (See SCUFF PLATE REMOVAL/INSTALLATION .)
4. Tire house trim (See TIRE HOUSE TRIM REMOVAL/INSTALLATION .)
5. Aeroboard (See AEROBOARD REMOVAL/INSTALLATION .)
6. Front seat back bar garnish (See SEAT BACK BAR GARNISH REMOVAL/INSTALLATION .)
7. Back trim (See BACK TRIM REMOVAL/INSTALLATION .)
8. Seat belt set plate (See SEAT BELT REMOVAL/INSTALLATION .)
9. Seat back crossmember assembly (See SEAT BACK CROSSMEMBER ASSEMBLY REMOVAL/INSTALLATION .)
2. Remove the fasteners.
3. Pull the rear side trim outward and detach pins A, B and tab C.
4. Remove the rear side trim.
2007 Mazda MX-5 Miata Sport
2007 ACCESSORIES & BODY, CAB Interior Trim - MX-5 Miata
Microsoft
Thursday, July 09, 2009 3:29:26 PM Page 47 © 2005 Mitchell Repair Information Company, LLC.
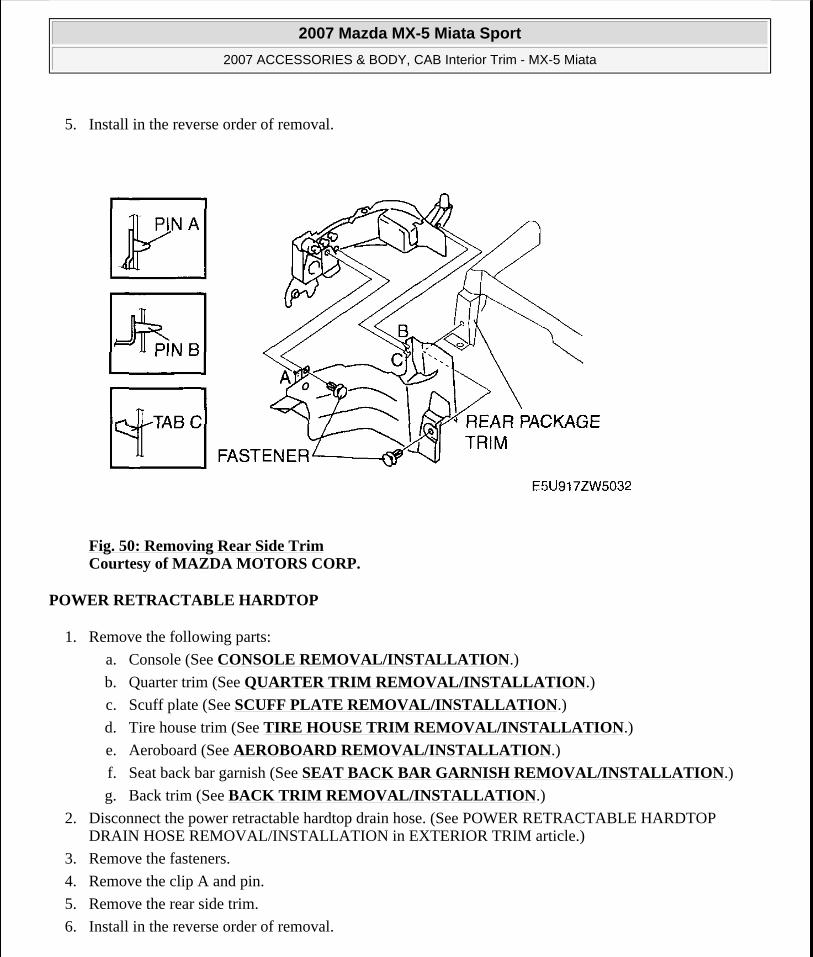
5. Install in the reverse order of removal.
Fig. 50: Removing Rear Side Trim Courtesy of MAZDA MOTORS CORP.
POWER RETRACTABLE HARDTOP
1. Remove the following parts:
a. Console (See CONSOLE REMOVAL/INSTALLATION.)
b. Quarter trim (See QUARTER TRIM REMOVAL/INSTALLATION.)
c. Scuff plate (See SCUFF PLATE REMOVAL/INSTALLATION.)
d. Tire house trim (See TIRE HOUSE TRIM REMOVAL/INSTALLATION.)
e. Aeroboard (See AEROBOARD REMOVAL/INSTALLATION.)
f. Seat back bar garnish (See SEAT BACK BAR GARNISH REMOVAL/INSTALLATION.)
g. Back trim (See BACK TRIM REMOVAL/INSTALLATION.)
2. Disconnect the power retractable hardtop drain hose. (See POWER RETRACTABLE HARDTOP DRAIN HOSE REMOVAL/INSTALLATION in EXTERIOR TRIM article.)
3. Remove the fasteners.
4. Remove the clip A and pin.
5. Remove the rear side trim.
6. Install in the reverse order of removal.
2007 Mazda MX-5 Miata Sport
2007 ACCESSORIES & BODY, CAB Interior Trim - MX-5 Miata
Microsoft
Thursday, July 09, 2009 3:29:26 PM Page 48 © 2005 Mitchell Repair Information Company, LLC.

Fig. 51: Identifying Rear Side Trim & Fasteners Courtesy of MAZDA MOTORS CORP.
TRUNK SIDE TRIM REMOVAL/INSTALLATION
1. Remove the trunk end trim. (See TRUNK END TRIM REMOVAL/INSTALLATION .)
2. Remove the partition board. (See PARTITION BOARD REMOVAL/INSTALLATION .)
3. Remove the fasteners.
4. Remove the trunk side trim.
5. Install in the reverse order of removal.
2007 Mazda MX-5 Miata Sport
2007 ACCESSORIES & BODY, CAB Interior Trim - MX-5 Miata
Microsoft
Thursday, July 09, 2009 3:29:26 PM Page 49 © 2005 Mitchell Repair Information Company, LLC.

Fig. 52: Identifying Trunk Side Trim Courtesy of MAZDA MOTORS CORP.
PARTITION BOARD REMOVAL/INSTALLATION
1. Remove the fasteners.
2. Remove the partition board.
2007 Mazda MX-5 Miata Sport
2007 ACCESSORIES & BODY, CAB Interior Trim - MX-5 Miata
Microsoft
Thursday, July 09, 2009 3:29:26 PM Page 50 © 2005 Mitchell Repair Information Company, LLC.

3. Install in the reverse order of removal.
Fig. 53: Identifying Partition Board Courtesy of MAZDA MOTORS CORP.
TRUNK END TRIM REMOVAL/INSTALLATION
1. Remove the fasteners.
2. Disconnect the trunk compartment light connector.
3. Disconnect the trunk rid cancel switch connector.
4. Remove the trunk end trim.
5. Install in the reverse order of removal.
2007 Mazda MX-5 Miata Sport
2007 ACCESSORIES & BODY, CAB Interior Trim - MX-5 Miata
Microsoft
Thursday, July 09, 2009 3:29:26 PM Page 51 © 2005 Mitchell Repair Information Company, LLC.

Fig. 54: Identifying Trunk End Trim Courtesy of MAZDA MOTORS CORP.
TRUNK MAT REMOVAL/INSTALLATION
1. Remove the fasteners.
2. Remove the trunk mat.
3. Remove the seal fasteners.
4. Install in the reverse order of removal.
2007 Mazda MX-5 Miata Sport
2007 ACCESSORIES & BODY, CAB Interior Trim - MX-5 Miata
Microsoft
Thursday, July 09, 2009 3:29:26 PM Page 52 © 2005 Mitchell Repair Information Company, LLC.

Fig. 55: Identifying Trunk Mat Courtesy of MAZDA MOTORS CORP.
SHOCK ABSORBING PAD REMOVAL/INSTALLATION [DETACHABLE HARDTOP]
1. Remove the detachable hardtop.
2. Remove the following parts:
1. B-pillar garnish
2. Side lock
3. B-pillar upper trim (See B-PILLAR UPPER TRIM REMOVAL [DETACHABLE HARDTOP] , B-PILLAR UPPER TRIM INSTALLATION [DETACHABLE HARDTOP] .)
4. Male wedge cover
5. Top lock cover
6. Headliner (See HEADLINER REMOVAL/INSTALLATION [DETACHABLE HARDTOP] .)
2007 Mazda MX-5 Miata Sport
2007 ACCESSORIES & BODY, CAB Interior Trim - MX-5 Miata
Microsoft
Thursday, July 09, 2009 3:29:26 PM Page 53 © 2005 Mitchell Repair Information Company, LLC.

3. Pull the shock absorbing pad rearward and detach clips A.
4. Remove the shock-absorbing pad.
5. Install in the reverse order of removal.
Fig. 56: Identifying Shock-Absorbing Pad Courtesy of MAZDA MOTORS CORP.
HEADLINER REMOVAL/INSTALLATION [DETACHABLE HARDTOP]
1. Remove the detachable hardtop.
2. Remove the following parts:
1. B-pillar garnish.
2. Side lock.
3. B-pillar upper trim. (See B-PILLAR UPPER TRIM REMOVAL [DETACHABLE HARDTOP] .)
4. Male wedge cover.
5. Top lock cover.
3. Remove the fasteners.
4. Pull the headliner outward and remove it.
5. Install in the reverse order of removal.
2007 Mazda MX-5 Miata Sport
2007 ACCESSORIES & BODY, CAB Interior Trim - MX-5 Miata
Microsoft
Thursday, July 09, 2009 3:29:26 PM Page 54 © 2005 Mitchell Repair Information Company, LLC.

Fig. 57: Identifying Headliner Courtesy of MAZDA MOTORS CORP.
FLOOR COVERING REMOVAL/INSTALLATION
1. Remove the battery cover.
2. Disconnect the negative battery cable. (See BATTERY REMOVAL/INSTALLATION [LF] .)
3. Remove the following parts:
1. Seat (See SEAT REMOVAL/INSTALLATION .)
2. Console (See CONSOLE REMOVAL/INSTALLATION .)
3. Side wall (See SIDE WALL REMOVAL/INSTALLATION
4. Console panel (See CONSOLE PANEL REMOVAL/INSTALLATION .)
5. Foot rest
6. Quarter trim (See QUARTER TRIM REMOVAL/INSTALLATION .)
7. Scuff plate (See SCUFF PLATE REMOVAL/INSTALLATION .)
8. Front side trim (See FRONT SIDE TRIM REMOVAL/INSTALLATION .)
9. Tire house trim (See TIRE HOUSE TRIM REMOVAL/INSTALLATION .)
10. Aeroboard (See AEROBOARD REMOVAL/INSTALLATION .)
11. Front seat back bar garnish (See SEAT BACK BAR GARNISH
2007 Mazda MX-5 Miata Sport
2007 ACCESSORIES & BODY, CAB Interior Trim - MX-5 Miata
Microsoft
Thursday, July 09, 2009 3:29:26 PM Page 55 © 2005 Mitchell Repair Information Company, LLC.

REMOVAL/INSTALLATION .)
12. Back trim (See BACK TRIM REMOVAL/INSTALLATION .)
4. Cut away the floor covering as shown in Fig. 58.
Fig. 58: Identifying Floor Covering Cutting Line Courtesy of MAZDA MOTORS CORP.
5. Remove the fasteners.
6. Remove the floor covering.
7. Install in the reverse order of removal.
NOTE: The cut part needs to match up when installing the floor covering.
2007 Mazda MX-5 Miata Sport
2007 ACCESSORIES & BODY, CAB Interior Trim - MX-5 Miata
Microsoft
Thursday, July 09, 2009 3:29:27 PM Page 56 © 2005 Mitchell Repair Information Company, LLC.

Fig. 59: Removing Floor Covering Fasteners Courtesy of MAZDA MOTORS CORP.
REAR FLOOR COVERING (POWER RETRACTABLE HARDTOP)
1. Fully open the deck panel.
2. Remove the side shelf. (See SIDE SHELF REMOVAL/INSTALLATION.)
3. Remove the stoppers.
4. Remove the fasteners.
5. Remove the rear floor covering.
6. Install in the reverse order of removal.
2007 Mazda MX-5 Miata Sport
2007 ACCESSORIES & BODY, CAB Interior Trim - MX-5 Miata
Microsoft
Thursday, July 09, 2009 3:29:27 PM Page 57 © 2005 Mitchell Repair Information Company, LLC.

Fig. 60: Identifying Rear Floor Covering Courtesy of MAZDA MOTORS CORP.
2007 Mazda MX-5 Miata Sport
2007 ACCESSORIES & BODY, CAB Interior Trim - MX-5 Miata
Microsoft
Thursday, July 09, 2009 3:29:27 PM Page 58 © 2005 Mitchell Repair Information Company, LLC.